


birth to 9kg
roomie glide™
Bedside Crib
HU CZ SK
DA
Használati utasítás Návod k obsluze Návod na použitie
Brugervejledning
AR ﺕﺎﻤﻴﻠﻌﺘﻟﺍ ﻞﻴﻟﺩ
|
IMPORTANT, RETAIN FOR FUTURE |
||
|
REFERENCE. READ CAREFULLY |
||
5 |
Bedside Sleeper Assembly |
|
|
1 - |
1 |
2 |
|
FIGURE |
|||
|
|
||
3 |
4 |
5
6 |
7 |
8
9 |
10 |
FIGURE 6 - 10
1 |
2 |

FIGURE 11 - 14
11

12
13
1 |
15 |
16 |
2
1 |
17 |
18 |
2
14 |
19 |
20 |
FIGURE 15 - 20
3 |
4 |
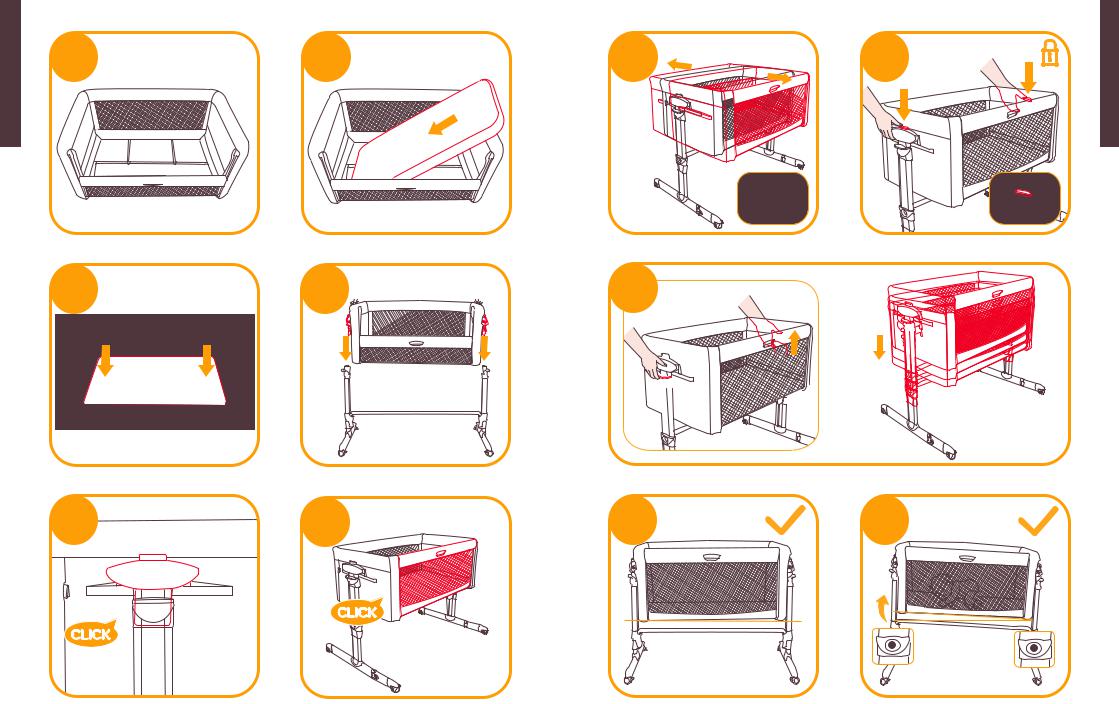
FIGURE 21 - 26
21
23
25
22
6cm
 max
max
24

26
Rocking Function Activation
27
 28
28
Height Adjustment
29
2


 1
1 

 1
1 
30 |
31 |
5 |
1 |
|
FIGURE 27 - 31
5 |
6 |
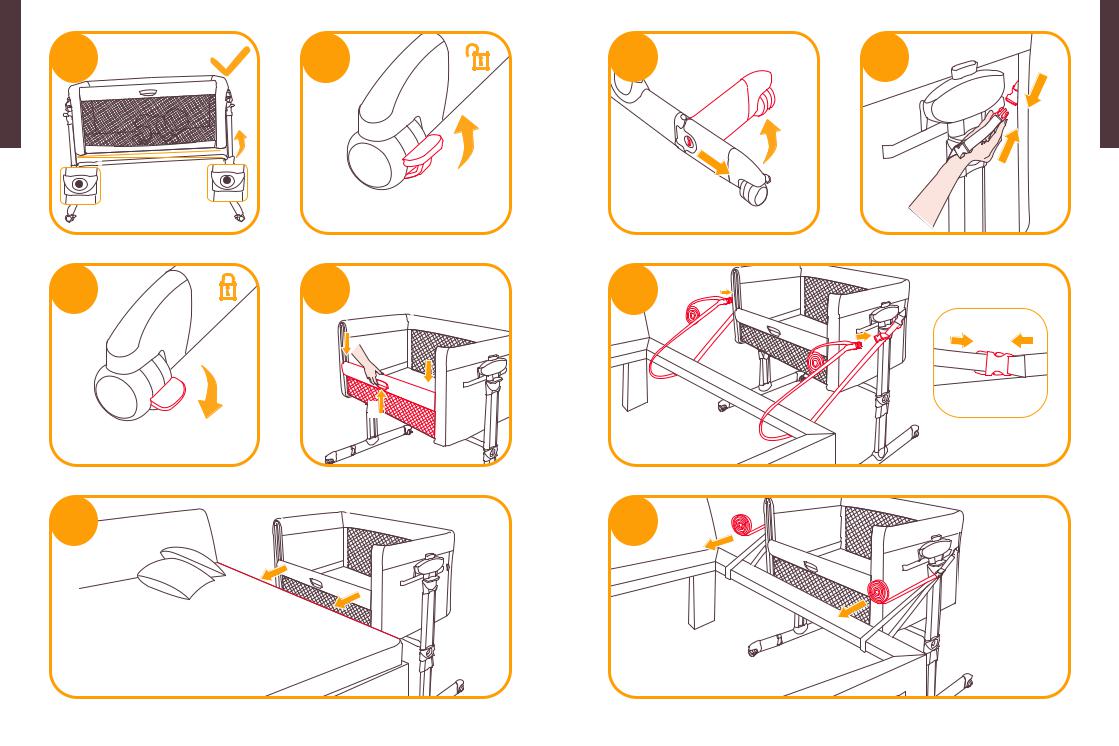
FIGURE 32 - 36
|
Use Wheels |
|
|
32 |
33 |
37 |
38 |
|
|
|
2 |
1 |
5 |
|
1 |
|
|
|
|
|
Use Bedside Sleeper |
|
|
34 |
35 |
39 |
|
|
2 |
|
|
|
2 |
|
|
|
1 |
|
|
36 |
40 |
FIGURE 37 - 40
7 |
8 |
41 - 46 |
41 |
42 |
FIGURE |
|
|


 No gap
43
|
Max. 18cm |
-Max. 64cm |
|
Max. 42cm |
Min. 49cm |
||
7cm |
|||
|
Min. |
|
Use Storage Bag
45
44
|
Max. 18cm |
|
-Max. 64cm |
42cm |
|
49cm |
|
|
|
||
Max. |
|
Max. 9.3cm |
Min. |
|
|
46
Accessories (May not be included)
Accessories may be sold separately or may not be available depending on region.
Sheet Assembly
47
Care and Maintenance |
|
48 |
49 |
50
FIGURE 47 - 50
9 |
10 |
GB Welcome to Joie™
Congratulations on becoming part of the Joie family! We are so excited to be part of your lifewith your little one. While using the Joie roomie glide™, your baby is enjoying a high quality, fully certified product, approved to European safety standards EN 1130:2019 and EN 16890:2017. This product is suitable for use with children weighing under 9kg (approximately 0-6 months).Please carefully read this manual and follow each step to ensure a comfortable sleeping and best protection for your child.
Please keep the Instruction Manual handy for future reference.
Visit us at Joiebaby.com to download manuals and see more exciting Joie products. For warranty information, please visit our website at joiebaby.com
! IMPORTANT
RETAIN FOR FUTURE REFERENCE. READ CAREFULLY.
Contents
Figures |
1- 10 |
Warning |
13 |
Bedside Sleeper Assembly |
17 |
Rocking Function Activation |
17 |
Height Adjustment |
17 |
Use Wheels |
17 |
Use Bedside Sleeper |
17 |
Use Storage Bag |
18 |
Accessories |
18 |
Care and Maintenance |
18 |
Emergency
In case of emergency or accident, it is most important to have your child taken care of with first aid and medical treatment immediately.
Product Information
Read all the instructions in this manual before using this product. If you have any further questions, please consult the retailer. Some features may vary depending on model.
Product |
Roomie Glide |
Suitable for |
Birth to 9kg (approximately 0-6 months) |
Materials |
Plastics, metal, fabrics |
Patent No. |
Patents pending |
Made in |
China |
Brand Name |
Joie |
Website |
www.joiebaby.com |
Manufacturer |
Allison Baby UK Ltd. |
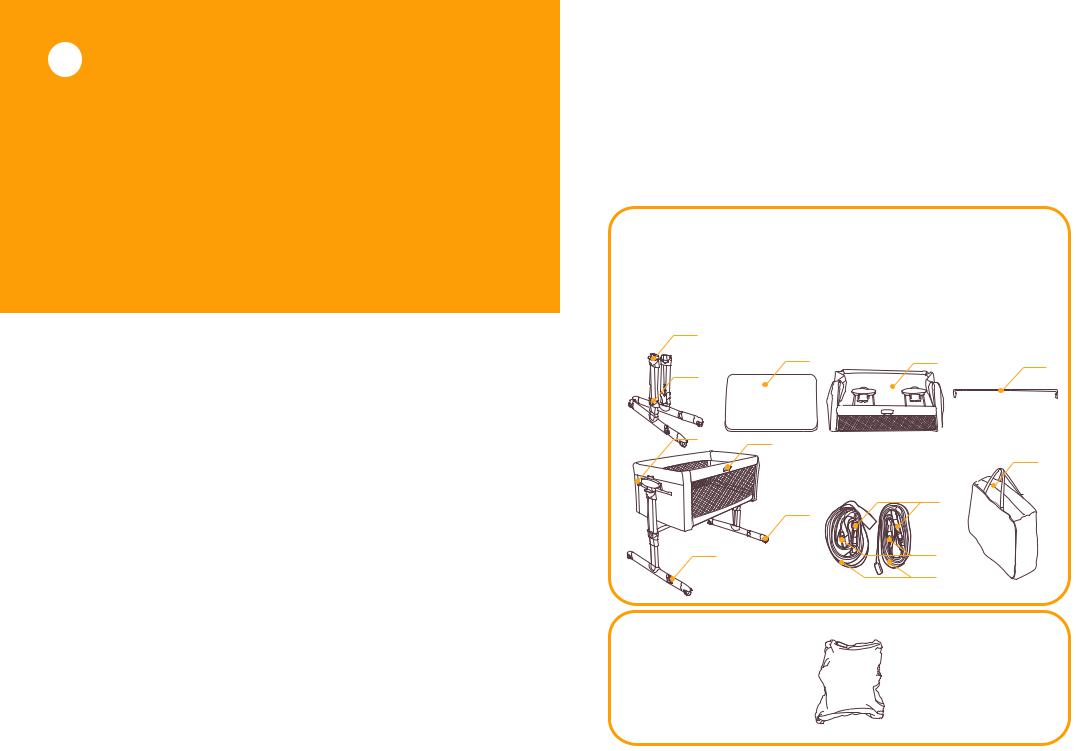
Parts List
Make sure all parts are available before assembly. If any part is missing, please contact local retailer. No tools are required for assembly.
1 |
Height Adjuster Button |
6 |
Wheel |
11 |
Storage Bag |
|
2 |
Height indicator |
7 |
Feet rotation release button |
12 |
Connecting webbing |
|
3 |
Mattress |
8 |
Support Tube |
13 |
Buckle C |
|
4 |
Support Plastic Assembly |
9 |
Buckle A |
|
|
|
5 |
Adjuster Button Rail |
10 |
Buckle B |
|
|
|
|
1 |
|
|
|
|
|
|
2 |
|
3 |
|
4 |
8 |
|
|
|
|
|
|
|
|
13 |
5 |
|
|
|
11 |
|
|
|
|
|
|
|
|
|
|
6 |
|
9 |
|
|
|
|
|
|
|
|
|
7 |
|
|
|
10 |
|
|
|
|
|
|
12 |
|
Accessories (May not be included)
Sheet
Accessories may be sold separately or may not be available depending on region.
11 |
12 |
WARNING
!Adult assembly required.
!WARNING! Do not use this product without reading the instructions for use first.
!Discontinue using product when child reaches 9kg (approximately 0-6 months) or is able to climb out.
!WARNING! Stop using the product as soon as the child can sit or kneel or pull itself up.
!Do not place additional items (e.g. toys, pillows ...) in the product.
!Do not use the product if any part is broken, torn or missing.
!DO NOT USE the product in “Crib Configuration” and/or “Bedside sleeper Configuration” if any part is missing, damaged or broken. Contact joie for spare parts and user instructions if needed. DO NOT substitute parts.
!Consult the user manual for the list of components. Examine the product regularly to make sure that there are no loose, damaged or missing parts.
!Always use all parts needed for each configuration of use.
!Be Aware of the risk of open fire and other sources of strong heat, such as electric bar fires, gas fires, etc. in the near vicinity of the cot.
!Before assembly, check that the product and all of its components have not been damaged during transportation. Should any part be damaged, keep out of reach of children and do not use.
!Make sure that the adult using the product knows exactly how it works.
!The product is ready for use only when all locking mechanisms are engaged. Make sure they are securely engaged before use.
!When your child is unattended and the product is in “Crib Configuration”, always make sure that the side is raised and locked in the closed position and aligned with the upper perimeter of the crib.
!When the product is being used, and above all in “Crib Configuration”, the wheels must always be locked.
!All operations for opening, adjusting, fastening and installing the product must be carried out by an adult.
!Before using in the “Bedside sleeper Configuration” (fastened to bed), make sure the product is fastened and installed correctly.
!Check the tightness of the attachment system before each use by pulling the bedside sleeper in a direction away from adult bed.
!The fixing straps are included in the packaging. Other fastening systems should not be used.
!To prevent danger of choking due to the child’s head being trapped, when the crib is in the “Bedside sleeper Configuration” (fastened to the bed) it should be properly fastened to the parents’ bed with the fixing straps as explained in the instruction booklet.
!Before placing the child inside the crib when the product is in the “Bedside sleeper Configuration” (fastened to the bed), be sure that the fixing straps are fastened and tightened correctly. The product must be attached to the parents’ bed frame/support and there should be no gaps between the lowest part of the Bedside sleeper crib and the parents’ mattress.
!If there are gaps between the lowest part of the Bedside sleeper crib and the parents’ mattress, DO NOT use the product.
!Do not fill any spaces or gaps between the parents’ mattress and the crib with pillows, blankets, bedsheets or any other material that may cause a choking hazard.
!DANGER!-Always completely raise the drop side when not attached to the adult’s bed.
!WARNING ! –Placing additional items in the product may cause suffocation.
!WARNING! To avoid hazards from the child’s neck being caught on the top rail on the side that is next to the adult bed, the top rail must not be higher than the adult bed mattress.
!WARNING!- To avoid the risk of your child being strangled the attachment system to the adult’s bed shall always be kept away from and out of the crib.
!A bedside sleeper shall ONLY be used once it has been securely attached to the adult’s bed or when the drop side is in the fully raised position to prevent the child falling from height.
!The product must always be placed on a horizontal surface. Never leave the product on a sloping surface with your child inside.
13 |
14 |
!Unattended children must not be left to play near the product.
!Do not use the product without the frame.
!Keep the fixing straps out of reach of children.
!Do not use more than one mattress in the cot. Only use the mattress that comes with the product.
!WARNING! Only use the mattress sold with this crib, do not add a second mattress on this one, suffocation hazards.
!When not attached to the bed, the crib can be inclined by a maximum of 4 positions between one leg support and the other.
!Infants can suffocate on soft bedding. Avoid placing pillows or similar items under newborn babies for additional comfort during sleep.
!Use the crib in the “Bedside sleeper Configuration” (fastened to the bed) only with beds of the size indicated in the reference figure at the beginning of the manual.
!Do not leave anything inside the product that might reduce its depth.
!To prevent the child from being trapped, do not place the crib close to walls or obstacles.
!Do not leave any small objects inside the product that might be swallowed.
!Only use spare parts approved by the manufacturer. Do not attach any accessories to the product that have not been supplied by the manufacturer.
!Do not make adjustments to the product when the child is in it.
!When in the “Bedside sleeper Configuration” (fastened to the bed), the crib must never be inclined.
!Do not move the product when the child is inside.
!Do not use the product with more than one child at a time.
!Do not place the product close to another product, which could present a danger of suffocation or strangulation, e.g. strings, blind/curtain cords, etc. To avoid strangulation hazards, never give children objects with strings attached, or leave these objects within their reach.
!Prolonged exposure to direct sunlight may cause the product’s colour to fade. After prolonged exposure of the product to high temperatures, wait a few minutes prior to putting your child in it.
!All assembly fittings should always be tightened properly and that care should be taken that no screws are loose, because a child could trap parts of the body or clothing (e.g., strings, necklaces, ribbons for babies´ dummies, etc), which would pose a risk of strangulation.
!Keep the product out of reach of children when it is not in use.
!Be careful when the child is in the crib, that objects or bedding items do not fall into the crib.
!The mattress of the adult´s bed shall be aligned to or above the height of the drop side in the lowest position.
!To prevent a suffocation hazard from entrapment, the bedside sleeper shall be properly secured to the adult bed using the attachment system.
15 |
16 |

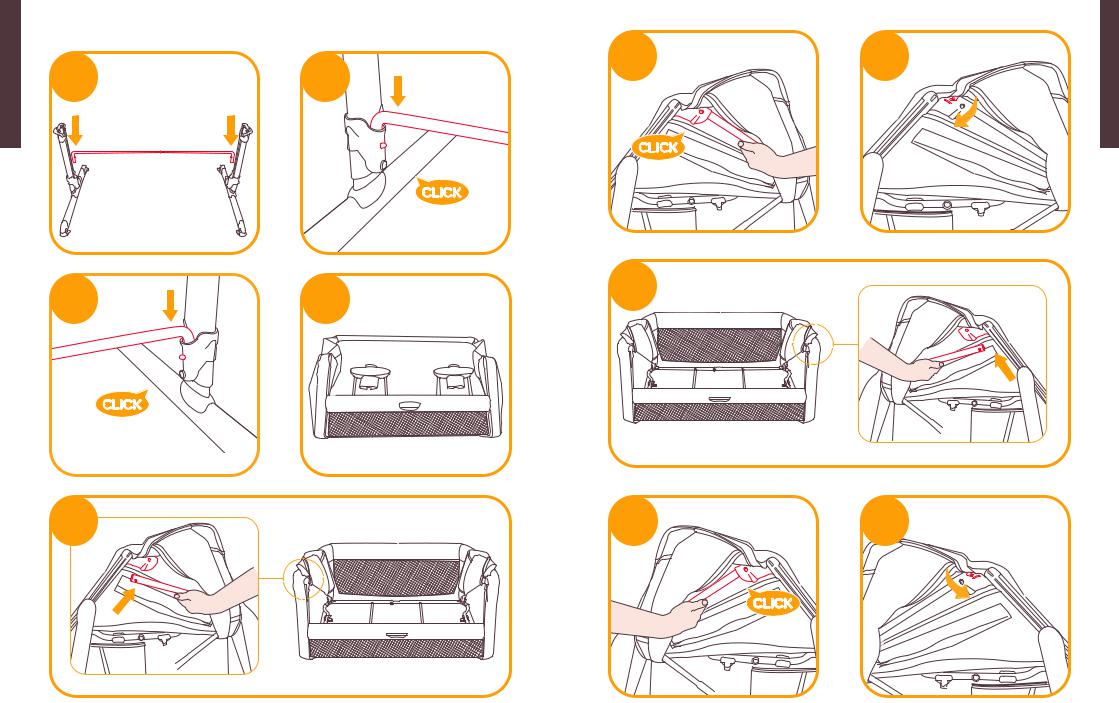
Bedside Sleeper Assembly
see images 1 - 26
Please read all the instructions in this manual before setting up and using this product.
! Please make sure that the adjustable side rail faces in the same direction with adjustable feet.
Rocking Function Activation
see images 27 - 28
! Please lock the rocking function during using the unit as bedside sleeper. 28
Height Adjustment
see images 29 - 32
!The crib can be adjusted to different height positions.
!The crib can be inclined with a maximum variance of 4 positions between one leg and the other (for example: the right leg in position 5 and the left leg in position 1, see fig. 31 32 ).
!It only be applicable to cradle state, but not to bedside sleeper state. 31 32
!The head of the child should always be positioned on the highest side. 31 32
Use Wheels
see images 33 - 34
At this point the crib is ready to be used.
!Do not use the crib with adjustable feet partially or totally rotated and unlocked. The correct position for use is illustrated in figure 26 . In the case of accidental knocks against adjustable feet, return them to the correct position by lifting the crib slightly.
Use Bedside Sleeper
see images 35 - 44
1.Press the button 35 - 1 to drop the side down 35 - 2.
2.Position next to bed 36 , Connect Buckle to roomie glide 38 then loop strap around bed frame and connect to adjuster buckle 39 , then pull straps tight 40 .
!During fixing the crib to the parent’s bed, If it is not possible to slide the feet of the crib under the parent’s bed, you can rotate the adjustable feet. 37
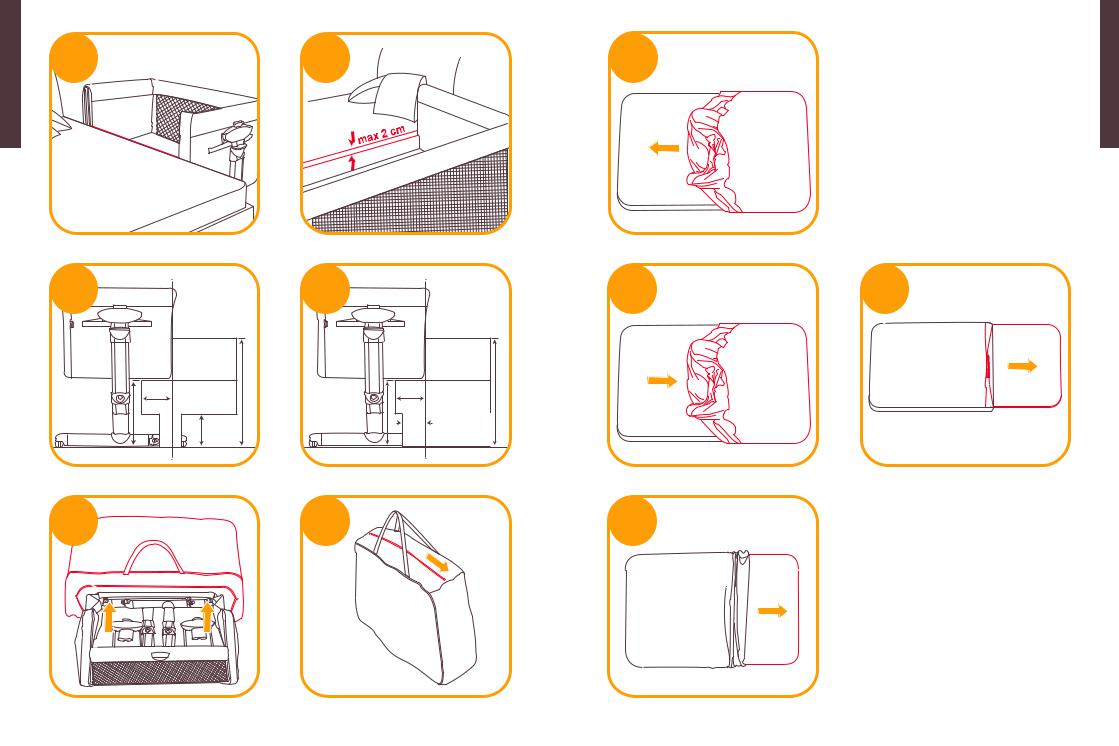
3.Ensure no gap between parent’s mattress and roomie glide 41 . The maximum height difference between the parents’ mattress and the drop side at the lowest position is 2cm 42
4.The type of adult bed which can be used with bedside sleeper is slatted bed frame and box / divan bed frame, the dimensions of adult bed shown on fig. 43 & 44
!Check to make sure that the crib in the bedside sleeper mode does not interfere with the parent’s bed.
!During use, make sure that the parents bed sheets, blankets etc. Do not enter and cover the interior of the crib.
!In the bedside sleeper mode the 2 legs of the crib should always be adjusted to the same height.
!Before every use always check to make sure that there is no space between the parent’s mattress and the side of the crib. If there is, pull the belts firmly to tighten until there’s no space and the permitted condition of use has been restored.
!Use of the product is only permitted with beds and/or mattresses with straight sides. Use of the product with round beds and/or mattresses or water beds is not permitted.
!When the product is used in the “bedside sleeper mode” (fixing to the bed, it should always be fitted to the long side of access to the bed. Do not fix the product to the head or bottom of the bed.
Use Storage Bag
see images 45 - 46
!Refer to Bedside Sleeper Assembly and perform reverse operation to fold the unit, and use the bag for convenient transportation.
Accessories (May not be included) Sheet Assembly
see images 47
!Prevent possible suffocation or entanglement. NEVER use product sheet unless it fits securely on product mattress.
!Wrap the sheet around the mattress on all four corners. MAKE SURE the sheet is securely attached to the four corners.
Care and Maintenance
see images 48 - 50
1.The fabric cover of crib is not removable.
2.Your product can be spot cleaned with a sponge and soapy water.
3.Do not use undiluted neutral detergent, gasoline or other organic solvent to wash the product. It may cause damage to the product.
4.To wash carry bag, machine wash in lukewarm water and drip-dry. Do not use bleach.
5.At the beach or in the garden, clean sand and grit off your product. Sand in the long rail locks may cause damage.
6.From time to time, check your product for worn parts, torn material or stitching. Replace or repair the parts as needed.
7.If the product is not in use for a long period of time, please put it in the shade where your child cannot access it.
17 |
18 |
DE Willkommen bei Joie™
Wir begrüßen Sie als ein weiteres Mitglied der Joie-Familie! Wir freuen uns, Sie und Ihr kleines Kind im Leben zu begleiten. Bei Verwendung des Joie roomie glide™ genießt Ihr Baby ein hochwertiges, vollständig zertifiziertes Produkt, das von EU-Sicherheitsstandards EN 1130:2019 und EN 16890:2017 zugelassen ist. Dieses Produkt eignet sich für den Einsatz mit Kindern mit einem Gewicht von weniger als 9kg (circa 0 bis 6 Monate). Bitte lesen Sie diese Anleitung aufmerksam und befolgen Sie die Schritte zur Sicherstellung eines komfortablen Schlafs und bestmöglichen Schutzes für Ihr Kind.
Bitte heben Sie diese Anleitung zur künftigen Bezugnahme auf.
Besuchen Sie uns unter Joiebaby.com, um Anleitungen herunterzuladen und weitere aufregende Joie-Produkte zu entdecken!
! WICHTIG
ZUR KÜNFTIGEN BEZUGNAHME AUFBEWAHREN. SORGFÄLTIG LESEN.
Inhalt
Abbildungen |
1-10 |
Warnhinweise |
21 |
Beistellbett montieren |
25 |
Wiegefunktion aktivieren |
25 |
Höhenanpassung |
25 |
Räder verwenden |
25 |
Beistellbett verwenden |
25 |
Aufbewahrungstasche verwenden |
26 |
Zubehör |
26 |
Pflege und Wartung |
26 |
Notfall
Bei einem Notfall oder Unfall muss Ihr Kind unverzüglich erste Hilfe bekommen und medizinisch versorgt werden.
Produktdaten
Lesen Sie alle Hinweise in dieser Anleitung, bevor Sie dieses Produkt einsetzen. Bei weiteren Fragen wenden Sie sich an Ihren Händler. Einige Bestandteile können je nach Modell variieren.
Produkt |
Roomie Glide |
Geeignet für |
Geburt bis 9 kg (circa 0 bis 6 Monate) |
Materialien |
Kunststoff, Metall, Stoff |
Patentnr. |
Patente angemeldet |
Hergestellt in |
China |
Markenname |
Joie |
Webseite |
www.joiebaby.com |
Hersteller |
Allison Baby UK Ltd. |
Teileliste
Überprüfen Sie vor der Montage, ob alle Teile vorhanden sind. Falls etwas fehlen sollte, wenden Sie sich an Ihren Händler vor Ort. Für die Montage werden keine Werkzeuge benötigt.
1 |
Höhenverstellknopf |
6 |
Rad |
10 |
Verschluss B |
|
2 |
Höhenanzeige |
7 |
Freigabeknopf für |
11 |
Aufbewahrungstasche |
|
3 |
Matratze |
|
Fußrotation |
12 |
Befestigungsgurt |
|
4 |
Stützkunststoff montieren |
8 |
Stützrohr |
13 |
Verschluss C |
|
5 |
Verstellknopfschiene |
9 |
Verschluss A |
|
|
|
|
1 |
|
|
|
|
|
|
2 |
|
3 |
4 |
8 |
|
|
|
|
|
|
|
|
|
13 |
5 |
|
|
|
11 |
|
|
|
|
|
|
|
|
|
|
6 |
|
9 |
|
|
|
|
|
|
|
|
|
7 |
|
|
10 |
|
|
|
|
|
|
12 |
|
|
Zubehör (im Kauf eventuell nicht enthalten)
Bezug
Zubehör wird möglicherweise separat verkauft oder ist je nach Region nicht verfügbar.
19 |
20 |
WARNUNG
!Das Produkt muss von einem Erwachsenen montiert werden.
!WARNUNG! Verwenden Sie das Produkt nicht, ohne zuerst die Anleitung zu lesen.
!Stellen Sie die Nutzung des Produkts ein, sobald das Kind ein Gewicht von 9 kg erreicht (ca. 0 bis 6 Monate) oder herausklettern kann.
!WARNUNG! Stellen Sie die Benutzung des Produktes ein, sobald das Kind sitzen, knien oder sich selbst nach oben ziehen kann.
!Platzieren Sie keine zusätzlichen Gegenstände (z. B. Spielzeuge, Kissen usw.) im Produkt.
!Verwenden Sie das Produkt nicht bei fehlenden, verschlissenen oder beschädigten Teilen.
!Verwenden Sie das Produkt NICHT als Babybett und/oder Beistellbett, falls etwas fehlen, beschädigt oder defekt sein sollte. Wenden Sie sich bei Bedarf für Ersatzteile und Nutzeranweisungen an joie. Verwenden Sie KEINE alternativen Teile.
!Eine Liste der Komponenten können Sie der Bedienungsanleitung entnehmen. Untersuchen Sie das Produkt regelmäßig auf fehlende, beschädigte oder lose Teile.
!Verwenden Sie immer alle für die jeweilige Konfiguration benötigten Teile.
!Beachten Sie die Gefahr von offenem Feuer und anderen Hitzequellen wie eingeschalteten Elektround Gasherden etc. in der Nähe des Bettes.
!Prüfen Sie vor der Montage, ob das Produkt und seine Komponenten Transportschäden aufweisen. Halten Sie das Produkt von Kindern fern und sehen Sie von der Benutzung ab, falls etwas beschädigt sein sollte.
!Stellen Sie sicher, dass der Erwachsene, der das Produkt verwendet, genau weiß, wie es funktioniert.
!Das Produkt ist nur einsatzbereit, wenn alle Sperrmechanismen verriegelt sind. Überzeugen Sie sich vor der Verwendung von der sicheren Verriegelung.
!Wenn sich Ihr Kind unbeaufsichtigt im Babybett befindet, müssen Sie immer sicherstellen, dass das Seitenteil angehoben festgestellt und am oberen Rand des Betts ausgerichtet ist.
!Bei Verwendung des Produkts, insbesondere im Babybett-Modus, müssen die Räder immer festgestellt sein.
!Alle Schritte zum Öffnen, Anpassen, Befestigen und Installieren des Produkts müssen von einem Erwachsenen ausgeführt werden.
!Stellen Sie vor Verwendung im Beistellbett-Modus (am Elternbett angebracht) sicher, dass das Produkt richtig befestigt und installiert ist.
!Prüfen Sie das Befestigungssystem vor jeder Verwendung, indem Sie versuchen, das Beistellbett vom Elternbett wegzudrücken.
!Die Befestigungsriemen sind im Lieferumfang enthalten. Andere Befestigungssysteme sollten nicht verwendet werden.
!Wenn das Babybett als Beistellbett (am Elternbett befestigt) verwendet wird, muss es entsprechend den Anweisungen sicher am Elternbett angebracht werden. Andernfalls könnte sich der Kopf des Kindes einklemmen, was Erstickungsgefahr birgt.
!Achten Sie darauf, dass die Befestigungsgurte richtig festgezogen und gesichert sind, bevor Sie das Kind in das als Beistellbett (am Elternbett befestigt) verwendete Babybett legen. Das Produkt muss am Rahmen des Elternbetts befestigt werden. Es dürfen keine Lücken zwischen dem untersten Teil des Beistellbetts und der Matratze des Elternbetts entstehen.
!Verwenden Sie das Produkt NICHT, falls sich Lücken zwischen dem untersten Teil des Beistellbetts und der Matratze des Elternbetts befinden.
!Füllen Sie Räume oder Lücken zwischen der Matratze des Elternbetts und dem Babybett nicht mit Kissen, Decken, Bettlaken oder anderen Materialien, die Erstickungsgefahr bergen.
!GEFAHR! Wenn das Beistellbett nicht am Elternbett angebracht ist, müssen alle Seiten angebracht und in ihrer höchsten Position sein.
!WARNUNG! Wenn Sie weitere Gegenstände im Produkt platzieren, besteht Erstickungsgefahr.
!WARNUNG! Damit der Hals des Kindes nicht an der oberen Schiene an der Seite neben dem Elternbett eingeklemmt wird, darf die obere Schiene nicht höher sein als die Matratze des Elternbetts.
21 |
22 |
!WARNUNG! Zur Vermeidung einer Strangulationsgefahr für Ihr Kind sollte das Befestigungssystem am Elternbett immer von und aus dem Bettchen ferngehalten werden.
!Das Beistellbett darf NUR verwendet werden, nachdem es sicher am Elternbett befestigt oder die Fallseite vollständig angehoben wurde. Andernfalls könnte das Kind herausfallen.
!Das Produkt muss immer auf einem horizontalen Untergrund aufgestellt werden. Lassen Sie das Produkt niemals auf einem geneigten Untergrund, wenn sich Ihr Kind darin befindet.
!Kinder dürfen nicht unbeaufsichtigt in der Nähe des Produktes spielen.
!Verwenden Sie das Produkt nicht ohne Gestell.
!Halten Sie die Befestigungsgurte von Kindern fern.
!Verwenden Sie nicht mehr als eine Matratze im Kinderbett. Verwenden Sie nur die mit dem Produkt gelieferte Matratze.
!WARNUNG! Verwenden Sie nur die mit diesem Bett verkaufte Matratze. Verwenden Sie nicht zwei Matratzen; andernfalls besteht Erstickungsgefahr.
!Wenn das Beistellbett nicht am Elternbett angebracht ist, kann es um maximal 4 Positionen zwischen einer Beinstütze und der anderen geneigt werden.
!Kleinkinder können durch weiches Bettzeug ersticken. Legen Sie während des Schlafs keine Kissen oder dergleichen unter neugeborene Babys.
!Verwenden Sie das Produkt nur dann im Beistellbett-Modus (am Elternbett angebracht), wenn die Größe des Elternbetts den Angaben in der Referenzabbildung am Anfang der Anleitung entspricht.
!Lassen Sie nichts im Produkt, das seine Tiefe verringern könnte.
!Vermeiden Sie, dass das Kind eingeklemmt wird, indem Sie das Babybett nicht in der Nähe von Wänden oder Hindernissen aufstellen.
!Lassen Sie keine kleinen Gegenstände im Produkt, die verschluckt werden könnten.
!Verwenden Sie nur vom Hersteller zugelassene Ersatzteile. Bringen Sie kein Zubehör am Produkt an, das nicht vom Hersteller geliefert wurde.
!Nehmen Sie keine Anpassungen am Produkt vor, wenn sich das Kind darin befindet.
!Bei Verwendung im Beistellbett-Modus (am Elternbett angebracht) darf das Produkt niemals geneigt werden.
!Bewegen Sie das Produkt nicht, wenn sich das Kind darin befindet.
!Verwenden Sie das Produkt nicht mit mehr als einem Kind auf einmal.
!Platzieren Sie das Produkt nicht in der Nähe eines anderen Produktes. Andernfalls bestehen Erstickungsund Strangulationsgefahr, bspw. durch Schnüre, Kordeln von Jalousien/Vorhängen usw. Vermeiden Sie Strangulationsgefahr, indem Sie Kindern keine mit Schnüren befestigten Gegenstände geben oder solche Gegenstände in ihrer Reichweite lassen.
!Durch längere Aussetzung von direktem Sonnenlicht könnte die Farbe des Produktes verblassen. Wenn das Produkt längere Zeit hohen Temperaturen ausgesetzt war, müssen Sie einige Minuten warten, bevor Sie Ihr Kind hineinlegen.
!Alle Montageteile müssen stets sicher befestigt und festgezogen werden. Achten Sie darauf, dass keine Schrauben locker sind, da sich andernfalls Körperteile oder Kleidung des Kindes darin verfangen könnten (z. B. Bänder, Halsketten, Schnullerketten, usw.), was Strangulationsgefahr birgt.
!Halten Sie das Produkt bei Nichtbenutzung von Kindern fern.
!Achten Sie darauf, dass keine Gegenstände oder Bettwaren in das Babybett fallen, während sich Ihr Kind darin befindet.
!Die Matratze des Elternbetts muss mindestens mit der Höhe des verstellbaren Seitenteils des Beistellbetts auf niedrigster Position abschließen.
!Um eine Erstickungsgefahr durch Einklemmen zu verhindern, muss das Beistellbett mit Hilfe des Befestigungssystems sachgerecht am Erwachsenenbett gesichert werden.
23 |
24 |

Beistellbett montieren
siehe Abbildungen 1 - 26
Lesen Sie bitte alle Hinweise in dieser Anleitung, bevor Sie dieses Produkt aufstellen und verwenden.
!Bitte stellen Sie sicher, dass die verstellbare seitliche Schiene in dieselbe Richtung zeigt wie die verstellbaren Füße.
Wiegefunktion aktivieren
siehe Abbildungen 27 - 28
! Bitte sperren Sie die Wiegefunktion während der Verwendung des Produktes als Beistellbett. 28
Höhenanpassung
siehe Abbildungen 29 - 32
!Das Bett kann auf verschiedene Höhenpositionen angepasst werden.
!Das Bett kann mit einer maximalen Varianz von 4 Positionen zwischen einem Bein und dem anderen geneigt werden (Beispiel: rechtes Bein in Position 5 und linkes Bein in Position 1, siehe Abb. 31 32 ).
!Der Kopf des Kindes sollte sich immer auf der höchsten Seite befinden 31 32 .
Räder verwenden
siehe Abbildungen 33 - 34
Zu diesem Zeitpunkt ist das Bett einsatzbereit.
!Verwenden Sie das Bett nicht, wenn sich die verstellbaren Füße teilweise oder vollständig drehen lassen und entsperrt sind. Die richtige Position zur Verwendung ist in Abbildung 26 dargestellt. Bringen Sie die verstellbaren Füße bei versehentlicher Verstellung wieder in die richtige Position, indem Sie das Bett leicht anheben.
Beistellbett verwenden
siehe Abbildungen 35 - 44
1.Drücken Sie die Entriegelungstaste 35 - 1 und schieben das Seitenteil nach unten 35 - 2.
2.Stellen Sie das Beistellbett neben das Elternbett 36 , Befestigen Sie das Gurtband am Roomie Glide 38 führen es um den Rahmen des Elternbetts herum und fixieren es mit dem Verschluss, um eine Schlinge zu bilden 39 Den Vorgang auf der anderen Seite des Beistellbetts wiederholen und die beiden Gurtbänder dann nacheinander festzurren 40
!Sie können die verstellbaren Füße drehen, falls Sie die Füße des Babybetts nichts unter das Elternbett schieben können, während das Babybett am Elternbett befestigt ist. 37
3. Stellen Sie sicher, dass zwischen der Matratze des Elternbetts und dem Beistellbett Roomie Glide keine Lücke entsteht 41 . Der Höhenunterschied zwischen der Matratze des Elternbetts und des verstellbaren Seitenteils des Beistellbetts auf niedrigster Position darf maximal 2 cm betragen 42
4.Zur Verwendung mit dem Beistellbett eignen sich Erwachsenenbetten mit Lattenrost, Boxspring-/ Polsterbetten in den Abmessungen aus Abb. 43 44
!Stellen Sie sicher, dass das Babybett im Beistellbett-Modus nicht das elterliche Bett stört.
!Stellen Sie während der Nutzung sicher, dass Bettlaken, Decken usw. der Eltern nicht in das Bett gelangen oder dieses bedecken.
!Bei Verwendung als Beistellbett müssen die 2 Füße des Kinderbetts immer auf dieselbe Höhe eingestellt sein.
!Stellen Sie vor jeder Verwendung sicher, dass sich keine Lücke zwischen der Elternmatratze und der Seite des Babybetts befindet. Falls doch, ziehen Sie die Gurte sicher fest, bis die Lücke verschwunden und der erlaubte Nutzungszustand wiederhergestellt ist.
!Das Produkt darf nur mit Betten und/oder Matratzen mit geraden Seiten verwendet werden. Das Produkt darf nicht mit runden Betten und/oder Matratzen oder Wasserbetten verwendet werden.
!Wenn das Produkt als Beistellbett verwendet wird (am Bett angebracht), sollte es immer an der langen Zugangsseite des Bettes angebracht werden. Befestigen Sie das Produkt nicht an der Kopfoder Fußseite des Bettes.
Aufbewahrungstasche verwenden
siehe Abbildungen 45 - 46
!Beachten Sie die Montageanweisungen des Beistellbetts und führen Sie die Schritte zum Auseinanderklappen in umgekehrter Reihenfolge aus. Verwenden Sie für einen komfortablen Transport die Aufbewahrungstaschel.
Zubehör (im Kauf eventuell nicht enthalten) Bezug anbringen
siehe Abbildungen 47
!Verhindern Sie mögliche Erstickungsoder Erdrosselungsgefahr. Verwenden Sie den Bezug NIEMALS, sofern er nicht sicher auf die Produktmatratze passt.
!Wickeln Sie den Bezug an allen vier Ecken um die Matratze. VERGEWISSERN Sie sich, dass der Bezug sicher an den vier Ecken angebracht ist.
Pflege und Wartung
siehe Abbildungen 48 - 50
1.Der Stoffbezug des Bettes kann nicht abgenommen werden.
2.Reinigen Sie Ihr Produkt mit einem Schwamm und Seifenlauge.
3.Keine unverdünnten Neutralreiniger, Benzin oder organischen Lösungsmittel zum Reinigen des Produktes verwenden. Das Produkt kann dadurch beschädigt werden.
4.Sie können die Tragetasche bei lauwarmem Wasser in der Maschine waschen und zum Trocknen aufhängen. Verwenden Sie kein Bleichmittel.
5.Befreien Sie Ihr Produkt nach Verwendung am Strand oder im Garten von Sand und Schmutz. Sand in den Verriegelungen der langen Schienen kann diese beschädigen.
6.Untersuchen Sie Ihr Produkt gelegentlich auf abgenutzte Teile, verschlissene Materialien oder aufgerissene Nähte. Ersetzen oder reparieren Sie die Teile bei Bedarf.
7.Wird das Produkt längere Zeit nicht verwendet, verstauen Sie dieses an einem Ort, wo Ihr Kind es nicht erreichen kann.
25 |
26 |

ES Bienvenido a Joie™
¡Enhorabuena por unirse a la familia Joie! Estamos encantados de formar parte de su vida con su pequeño. Cuando utilice Joie roomie glide™, su bebé disfrutará de un producto de alta calidad, totalmente certificado y aprobado por las normas de seguridad europeas EN 1130:2019 y EN 16890:2017. Este producto es adecuado para niños con un peso inferior a 9 kg (de 0 a 6 meses aproximadamente). Lea detenidamente este manual y siga cada paso para garantizar que su bebé duerma cómodamente y esté protegido de la mejor manera posible.
Tenga a mano este manual de instrucciones para futuras consultas. Visítenos en Joiebaby.com para conocer otros fantásticos productos de Joie.
Para obtener información sobre la garantía, visite nuestro sitio web en joiebaby.com.
! IMPORTANTE
GUARDE ESTE MANUAL PARA FUTURAS CONSULTAS. LEA DETENIDAMENTE ESTAS INSTRUCCIONES.
Índice
Figuras |
1-10 |
Advertencia |
29 |
Ensamblaje de la cuna |
33 |
Activación de la función de balanceo |
33 |
Ajuste de la altura |
33 |
Bloqueo de las ruedas |
33 |
Modo colecho (fijada a una cama para adulto) |
33 |
Uso de la bolsa de almacenaje |
34 |
Accesorios |
34 |
Cuidados y mantenimiento |
34 |
Emergencia
En caso de emergencia o accidente, es muy importante que su bebé reciba primeros auxilios y tratamiento médico de inmediato.
Información del producto
Lea todas las instrucciones incluidas en este manual antes de utilizar este producto. Si tiene alguna duda, póngase en contacto con su proveedor. Algunas características pueden variar según el modelo.
Producto |
Roomie Glide |
Adecuado para |
Desde el nacimiento hasta los 9 kg (de 0 a 6 meses aproximadamente) |
Materiales |
Plásticos, metal, telas |
N.º de patente |
Pendiente de patentes |
Lugar de fabricación |
China |
Nombre de la marca |
Joie |
Sitio web |
www.joiebaby.com |
Fabricante |
Allison Baby UK Ltd. |
Lista de piezas
Asegúrese de que están disponibles todas las piezas antes de montar el producto. Si falta alguna pieza, póngase en contacto con su proveedor local. No se necesita ninguna herramienta para el montaje.
1 |
Botón de ajuste de la altura |
5 |
Palanca de ajuste de la |
9 |
Hebilla A |
|
2 |
Indicador de la altura |
|
barandilla |
10 |
Hebilla B |
|
3 |
Colchón |
6 |
Rueda |
11 |
Bolsa de almacenaje |
|
4 |
Soporte de montaje de |
7 |
Botón de liberación del |
12 |
Cinta |
|
|
plástico |
|
ajuste de los pies |
13 |
Hebilla C |
|
|
1 |
8 |
Tubo de soporte |
|
|
|
|
|
|
|
|
|
|
|
2 |
|
3 |
|
4 |
8 |
|
|
|
|
|
|
|
|
13 |
5 |
|
|
|
11 |
|
|
|
|
|
|
|
|
|
|
6 |
|
9 |
|
|
|
|
|
|
|
|
|
7 |
|
|
|
10 |
|
|
|
|
|
|
12 |
|
Accesorios (es posible que no estén incluidos)
Sábana
Es posible que los accesorios se vendan por separado o no estén disponibles, dependiendo de la región.
27 |
28 |
ADVERTENCIA
!El montaje solo podrá ser realizado por personas adultas.
!ADVERTENCIA! No use este producto sin haber leído primero las instrucciones.
!Deje de utilizar el producto cuando el niño llegue a los 9 kg de peso (aproximadamente desde los 0 hasta los 6 meses) o cuando sea capaz de trepar.
!¡ADVERTENCIA! Deje de usar el producto tan pronto como el niño pueda sentarse, arrodillarse o levantarse por sí mismo.
!No coloque artículos adicionales (por ejemplo, juguetes, almohadas, etc.) en el producto.
!No utilizar el producto para niños si alguna de sus piezas está rota, partida o se ha extraviado.
!NO USE el producto en el modo cuna o el modo colecho si falta alguna pieza, está dañada o rota. Si es necesario, póngase en contacto con joie para obtener piezas de repuesto e instrucciones para el usuario. NO sustituya las piezas.
!Consulte el manual del usuario para conocer la lista de piezas. Examine el producto regularmente para asegurarse de que no haya piezas sueltas, dañadas o faltantes.
!Utilice siempre todas las piezas necesarias para cada modo de uso.
!Evite utilizar la cuna en las proximidades de chimeneas y otras fuentes de calor intenso, como calefactores eléctricos, estufas de gas, etc.
!Antes del montaje, compruebe que el producto y todos sus componentes no hayan sufrido daños durante el transporte. Si alguna pieza está dañada, manténgala fuera del alcance de los niños y no la use.
!Asegúrese de que el adulto que usa el producto sabe exactamente cómo funciona.
!El producto está listo para usarse solamente cuando todos los mecanismos de bloqueo están conectados. Asegúrese de que estén conectados de forma segura antes de usar el producto.
!Cuando su hijo esté sin supervisión y el producto se encuentre en el modo cuna, asegúrese siempre de que la barandilla esté levantada y bloqueada en la posición superior, alineada con el perímetro superior de la cuna.
!Cuando se utiliza el producto, y sobre todo en el modo cuna, las ruedas siempre deben estar bloqueadas.
!Todas las operaciones de apertura, ajuste, fijación e instalación del producto las debe realizar un adulto.
!Antes de usar el producto en el modo colecho (fijado a la cama), asegúrese de que el producto esté anclado e instalado correctamente.
!Compruebe la sujeción del sistema de fijación antes de cada uso intentando separar la cuna de la cama de los padres.
!Las correas de fijación están incluídas con el producto. No se deben utilizar otros sistemas de fijación.
!Para evitar el peligro de asfixia debido a que la cabeza del niño queda atrapada, cuando la cuna se encuentra en el modo colecho (fijado a la cama), se debe sujetar adecuadamente a la cama de los padres con las correas de fijación como se explica en las instrucciones.
!Antes de colocar al niño dentro de la cuna cuando el producto se encuentra en el modo colecho (fijado a la cama), asegúrese de que las correas de fijación estén ajustadas y apretadas correctamente. El producto debe estar unido al somier o soporte de la cama de los padres y no debe haber separaciones entre la parte más baja de la cuna a pie de cama y el colchón de los padres.
!Si en el modo colecho existe separación entre la parte más baja de la cuna y el colchón de la cama de los padres, NO use el producto.
!No rellene ningún espacio o separación entre el colchón de los padres y la cuna con almohadas, mantas, sábanas o cualquier otro material que pueda suponer un peligro de asfixia.
!PELIGRO! La cuna cuando no está unida a la cama del adulto, debe tener todos sus lados colocados en su lugar y en su posición más alta.
!¡ADVERTENCIA! Colocar elementos adicionales en el producto puede causar asfixia.
29 |
30 |
!¡ADVERTENCIA! Para evitar el peligro de estrangulamiento del nino , el borde superior de la barandilla de la cuna no debe quedar a mayor altura que la superficie superior del colchon de los padres.
!ADVERTENCIA! Para evitar el riesgo de que su hijo se estrangule, el sistema de fijación a la cama del adulto siempre debe mantenerse alejado y fuera de la cuna.
!El modo colecho SOLAMENTE debe usarse cuando se haya fijado de manera segura a la cama del adulto o cuando el lateral abatible esté en la posición completamente elevada para evitar que el niño se caiga desde una determinada altura.
!El producto siempre debe colocarse en una superficie horizontal. Nunca deje el producto en una superficie inclinada con su hijo adentro.
!No debe dejar que los niños jueguen cerca del producto.
!No use el producto sin el armazón.
!Mantenga las correas de fijación fuera del alcance de los niños.
!No utilice más de un colchón en la cuna. Use solamente el colchón incluido con el producto.
!ADVERTENCIA! Utilice únicamente el colchón que se vende con esta cuna, no añada otro colchón a este, ya que existe el riesgo de asfixia.
!Cuando no está unida a la cama, la cuna puede inclinarse un máximo de 4 posiciones entre un soporte de pata y el otro.
!Los bebés pueden asfixiarse con la ropa de cama suave. Evite colocar almohadas o artículos similares debajo de los bebés recién nacidos.
!Use la cuna en el modo colecho (fijada a la cama) solo con camas del tamaño indicado en la figura de referencia que se encuentra al comienzo del manual.
!No deje nada dentro del producto que pueda reducir su profundidad.
!Para evitar que el niño quede atrapado, no coloque la cuna cerca de paredes u obstáculos.
!No deje objetos pequeños dentro del producto susceptibles de ser tragados por el bebé.
!Utilice únicamente piezas de repuesto aprobadas por el fabricante. No acople ningún accesorio al producto que no haya sido suministrado por el fabricante.
!No haga ajustes en el producto cuando el niño esté en él.
!Cuando la cuna se encuentra en el modo colecho, nunca debe estar inclinada.
!No mueva el producto cuando el niño esté dentro.
!No use el producto con más de un niño a la vez.
!No coloque el producto cerca de otro producto que pueda presentar peligro de asfixia o estrangulamiento, por ejemplo, cuerdas, cordones de persianas o cortinas, etc. Para evitar riesgos de estrangulamiento, nunca les dé a los niños objetos con cuerdas atadas, ni deje estos objetos a su alcance.
!La exposición prolongada a la luz solar directa puede hacer que el color del producto se deteriore. Después de una exposición prolongada del producto a altas temperaturas, espere unos minutos antes de colocar a su hijo en él.
!Todos los accesorios de montaje deben ajustarse correctamente y se debe tener cuidado de que no queden tornillos sueltos, ya que alguna parte del cuerpo o de la ropa del niño podrían quedar atrapados (por ejemplo, cadenas, collares, cintas de muñecos, etc.), lo que podría representar un riesgo de estrangulamiento.
!Mantenga el producto fuera del alcance de los niños cuando no esté en uso.
!Cuando el niño esté en la cuna, tenga cuidado de que objetos u otros artículos de cama no caigan dentro de la cuna.
!El colchón de la cama debe estar alineado o por encima de la altura de la barandilla plegable de la cuna en su posición más baja.
!Para evitar el riesgo de asfixia por atrapamiento, la cuna se debe asegurar adecuadamente a la cama utilizando el sistema de fijación.
31 |
32 |

Montaje de la cuna
consulte las imágenes 1 - 26
Lea todas las instrucciones incluidas en este manual antes de montar y utilizar este producto.
! Asegúrese de que la barandilla ajustable esté orientada en la misma dirección que los pies ajustables.
Activación de la función de balanceo
consulte las imágenes 27 - 28
! Bloquee la función de balanceo cuando use la cuna en modo colecho. 28
Ajuste de la altura
consulte las imágenes 29 - 32
!La altura de la cuna se puede ajustar en diferentes posiciones.
!La cuna se puede inclinar con una variación máxima de 4 posiciones entre una pata y la otra (por ejemplo: la pata derecha en la posición 5 y la pata izquierda en la posición 1. Consulte las figuras 31 32 ).
!Solo se aplicará al uso como cuna, pero no al uso como cuna de colecho 31 32 .
!La cabeza del niño siempre debe colocarse en el lado más alto 31 32 .
Bloqueo de las ruedas
consulte las imágenes 33 - 34
Llegados a este punto, ya se puede usar la cuna.
!No use la cuna con los pies ajustables parcial o totalmente girados y desbloqueados. La posición correcta de uso se ilustra en la figura 26 . En el caso de golpes accidentales contra los pies ajustables, devuélvalos a la posición correcta levantando ligeramente la cuna.
Modo colecho (fijada a una cama para adulto)
consulte las imágenes 35 - 44
1.Presione el botón 35 - 1 para bajar el lateral 35 - 2.
2.Coloque la cuna al lado de la cama 36 , conecte la cinta a la hebilla de la Roomie Glide 38 , pase la cinta alrededor de la estructura de la cama y conecte el ajustador de longitud a la hebilla 39 . Tense la cinta 40
!Durante la fijación de la cuna a la cama de los padres, si no es posible deslizar los pies de la cuna debajo de la cama de los padres, puede girar los pies ajustables. 37
3.Asegúrese de que no hay espacio entre el colchón de la cama y la Roomie Glide 41 . La diferencia máxima de altura entre el colchón de la cama y la barandilla plegada de la cuna debe ser de 2 cm 42 .
4.El tipo de cama para adultos que se puede usar con cuna de colecho es de somier de láminas, cajón o diván, cuyas dimensiones se muestran en las figuras 43 44
!Asegúrese de que, cuando la cuna de viaje se encuentra en el modo colecho, no interfiere con la cama de los padres.
!Durante el uso, asegúrese de que las sábanas, las mantas, etc. de la cama de los padres no entran en el interior de la cuna de ni la cubren.
!En el modo colecho, las 2 patas de la cuna siempre deben ajustarse a la misma altura.
!Antes de cada uso, compruebe siempre que no haya espacio entre el colchón de los padres y el lateral de la cuna. Si lo hay, tire de los cinturones firmemente para apretarlos hasta que no haya espacio y se haya restablecido la condición de uso permitida.
!El uso del producto solo está permitido con camas y/o colchones con los laterales rectos. El uso del producto con camas y/o colchones redondos o camas de agua no está permitido.
!Cuando el producto se utiliza en modo colecho, siempre debe ajustarse al lado largo la cama. No fije el producto a la cabecera o los pies de la cama.
Uso de la bolsa de almacenaje
consulte las imágenes 45 - 46
!Consulte el montaje de la cuna y realice la operación inversa para plegar la unidad. Asimismo, use la bolsa para transportar el producto convenientemente.
Accesorios (es posible que no estén incluidos)
Instalación de la sábana
consulte las imágenes 47
!Evite los riesgos de asfixia y estrangulamiento. NUNCA use la sábana del producto a menos que se ajuste de forma segura en el colchón del producto.
!Envuelva la sábana alrededor del colchón sobre las cuatro esquinas. ASEGÚRESE de que la sábana está sujeta en las cuatro esquinas de forma segura.
Cuidados y mantenimiento
consulte las imágenes 48 - 50
1.La funda de tela de la cuna no es extraíble.
2.Si su producto se mancha, puede limpiarlo con una esponja y agua jabonosa.
3.No utilice detergentes neutros sin diluir, gasolina u otros disolventes orgánicos para limpiar el producto. Si lo hace, puede dañar el producto.
4.Para limpiar la bolsa de transporte, lávela a máquina con agua tibia y déjela escurrir. No utilice lejía.
5.En la playa o en el jardín, limpie la arena y el polvo del producto. La arena puede dañar las guías y los bloqueos de la barandilla.
6.Periódicamente, examine su producto por si tuviera piezas desgastadas, materiales dañados o descosidos. Sustituya o repare las piezas que lo requieran.
7.Si no va a utilizar el producto durante un periodo prolongado de tiempo, manténgalo alejado de la luz del sol y fuera del alcance de los niños.
33 |
34 |

FR Bienvenue dans l'univers de Joie™
Félicitations, vous faites désormais partie de la famille Joie ! Nous sommes heureux d’équiper votre bébé. En choisissant le lit roomie glide™ de Joie, vous utilisez un produit de grande qualité, certifié par un laboratoire agréé indépendant et conforme aux normes européennes de sécurité EN 1130:2019 et EN 16890:2017. Ce produit est adapté pour des enfants pesant moins de 9 kg (de la naissance à 6 mois environ). Veuillez lire attentivement et suivre chaque étape de ce mode d’emploi pour garantir le confort et la meilleure protection pour votre enfant durant son sommeil.
Rendez-vous sur notre site Joiebaby.com si vous avez besoin d’informations complémentaires ou pour télécharger les manuels d’instructions et découvrir bien d'autres produits de la marque qui pourraient vous intéresser.
Pour plus d’ informations sur la garantie, veuillez consulter notre site internet sur joiebaby.com
! IMPORTANT
A LIRE ATTENTIVEMENT ET CONSERVER POUR CONSULTATION ULTERIEURE
Sommaire
Illustrations |
1-10 |
Avertissement |
37 |
Assemblage du berceau |
41 |
Activation de la fonction de balancement |
41 |
Réglage de la hauteur |
41 |
Utilisation des roues |
41 |
Utilisation du berceau côte-côte |
41 |
Utilisation du sac de rangement |
42 |
Accessoires |
42 |
Entretien et réparations |
42 |
En cas d'urgence
En cas d'urgence ou d'accident, il est très important de prendre immédiatement soin de votre enfant en lui prodiguant les soins de premiers secours et le cas échéant, en le faisant examiner par un médecin.
Informations sur le produit
Lisez toutes les instructions de ce manuel avant d'utiliser ce produit. Pour toutes questions supplémentaires, veuillez contacter votre revendeur. Certaines fonctionnalités peuvent ne pas être présentes sur certains modèles.
Produit |
Roomie Glide |
Convient |
De la naissance à 9 kg (environ 0-6 mois) |
Matériaux |
Plastiques, métaux, tissus |
No. brevet |
Brevets en attente |
Fabriqué en |
Chine |
Nom de marque |
Joie |
Site Web |
www.joiebaby.com |
Fabricant |
Allison Baby UK Ltd. |
Liste des pièces
Assurez-vous que toutes les pièces sont présentes avant le montage. Si une pièce est manquante, contactez votre revendeur. Le montage ne nécessite aucun outil.
1 |
Bouton de réglage de la |
5 |
Bouton pour déverrouiller |
9 |
Boucle A |
|
|
|
hauteur |
|
|
le côté. |
10 |
Boucle B |
|
2 |
Indicateur de la hauteur |
6 |
Roue |
11 |
Sac de rangement |
|
|
3 |
Matelas |
|
7 |
Bouton de déverrouillage |
12 |
Sangle |
|
4 |
Assemblage en plastique de |
|
de la rotation des pieds |
13 |
Boucle C |
|
|
|
support |
1 |
8 |
Tube rigide |
|
|
|
|
|
|
|
|
|
|
|
|
|
2 |
|
3 |
|
4 |
8 |
|
|
|
|
|
|
|
|
|
|
13 |
5 |
|
|
|
11 |
|
|
|
|
|
|
|
|
|
|
|
|
6 |
|
9 |
|
|
|
|
|
|
|
|
|
|
|
7 |
|
|
|
10 |
|
|
|
|
|
|
|
12 |
|
Accessoires (peuvent ne pas être inclus lors de l’achat)
Drap-housse
Les accessoires peuvent être vendus séparément ou ne pas être disponibles selon la région.
35 |
36 |
 Loading...