

Page 1
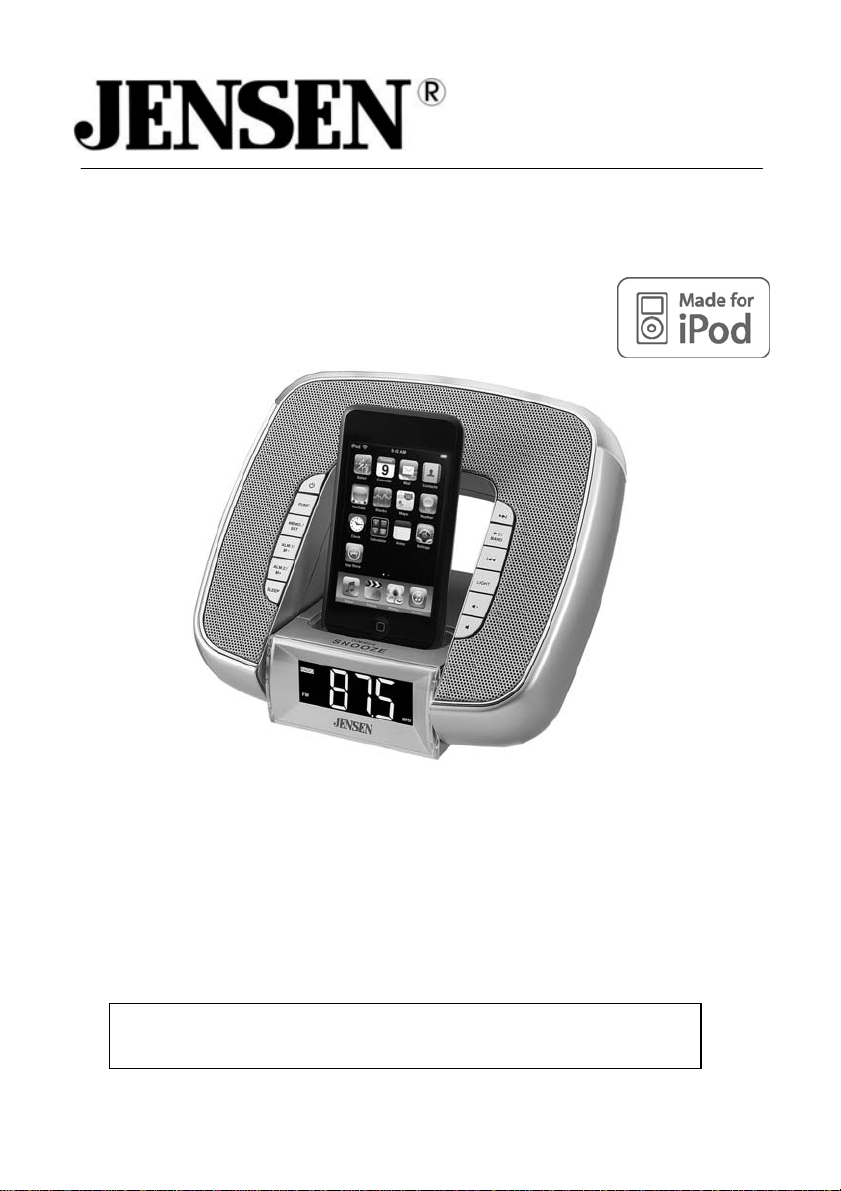
Docking Digital Clock Radio Music System For iPod®
OWNER’S MANUAL
JiMS-182
(iPod not included)
Please read this Instruction Manual carefully before using the unit and
retain it for future reference
Page 2

IMPORTANT INSTRUCTIONS
1. Do not install the system near any heat sources such as radiators, heat
registers, stoves, or other apparatus (including amplifiers) that produce heat.
2. Protect the power cord from being walked on or pinche d particularly at plugs,
convenience receptacles, and the point where they exit from the apparatus.
3. Only use attachments / accessories specified in these instructions.
4. Unplug this apparatus during lightning storms or when unused for long
periods of time.
5. Refer all servicing to qualified service personnel. Servicing is required when
the apparatus has been damaged in any way, such as power-sup ply cord or
plug is damaged, liquid has been spilled or objects have fallen into the
apparatus, the apparatus has been exposed to rain or moisture, does not
operate normally, or has been dropped.
6. This appliance shall not be exposed to dripping or splashing water and th at no
object filled with liquids such as vases shall be placed on the apparatus.
7. Do not attempt to dismantle, open or repair this product yourself. If a fault
occurs, seek advice from your local qualified service technician or contact the
distributor via the telephone number at the back of this instruction manual.
FCC NOTICE:
This equipment has been tested and found to comply with the limits for a Class B
digital device, pursuant to Part 15 of the FCC Rules. These limits are designed to
provide reasonable protection against harmful interference in a residential installation.
This equipment generates, uses and can radiate radio frequency energy and, if not
installed and used in accordance with the instructions, may cause harmful interference
to radio communications.
However, there is no guarantee that interference will not occur in a particular
installation. If this equipment does cause harmful interference to radio or television
reception, which can be determined by turning the equipment off and on, the user is
encouraged to try to correct the interference by one or more of the following measures:
– Reorient or relocate the receiving antenna.
– Increase the separation between the equipment and receiver.
– Connect the equipment into an outlet on a circuit different from that to which the
receiver is needed.
– Consult the dealer or an experienced radio/TV technician for help.
WARNING:
Changes or modifications to this unit not expressly approved by the party responsible
for compliance could void the user's authority to operate the equipment.
1
Page 3
IMPORTANT NOTES
Avoid installing the unit in locations described below:
Places exposed to direct sunlight or close to heat radiating appliances such as
electric heaters.
Dusty, humid or moist places.
Places subject to constant vibration.
PROTECT YOUR FURNITURE
This system is equipped with non-skid rubber ‘feet’ to prevent the product from
moving when you operate the controls. These ‘feet’ are made from non-migrating
rubber material specially formulated to avoid leaving any marks or stains on your
furniture. However certain types of oil based furniture polishes, wood preservatives,
or cleaning sprays may cause the rubber ‘feet’ to soften, and leave marks or a
rubber residue on the furniture.
To prevent any damage to your furniture we strongly recommend that you purchase
small self-adhesive felt pads, available at hardware stores and home improvement
centers everywhere, and apply these pads to the bottom of the rubber ‘feet’ before
you place the product on fine wooden furniture.
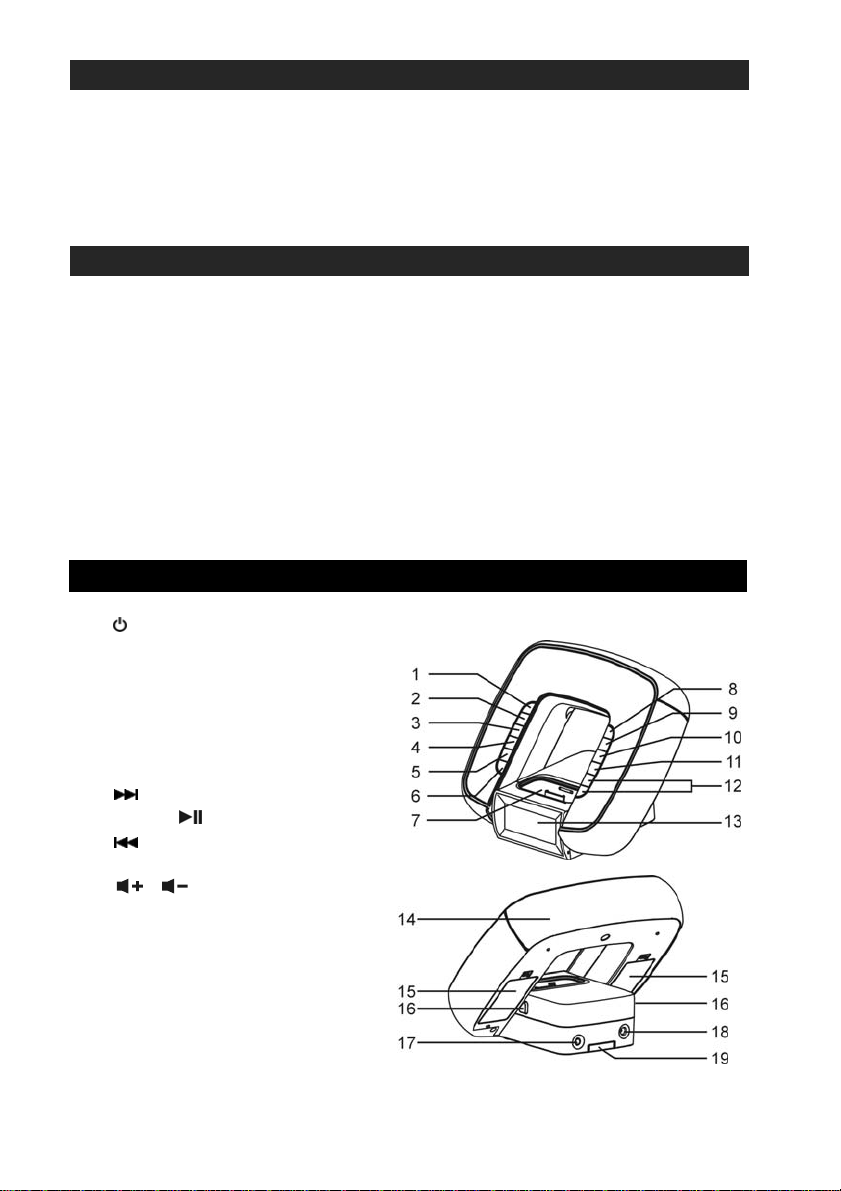
LOCATION OF CONTROLS
POWER/STA NDBY Button
1.
2. FUNCTION Button
3. MEMORY/SET Button
4. ALARM1 / M- Button
5. ALARM2/ M+ Button
6. SLEEP Button
7. iPod Connector
8.
9. BAND /
10.
11. LIGHT Button
12.
13. DISPLAY
14. LAMP
15. Battery Compartment
16. Release Button
17. AUX IN Jack
18. DC Jack
19. Lithium Battery Compartment
Button
Button
Button
/ Button
2
Page 4
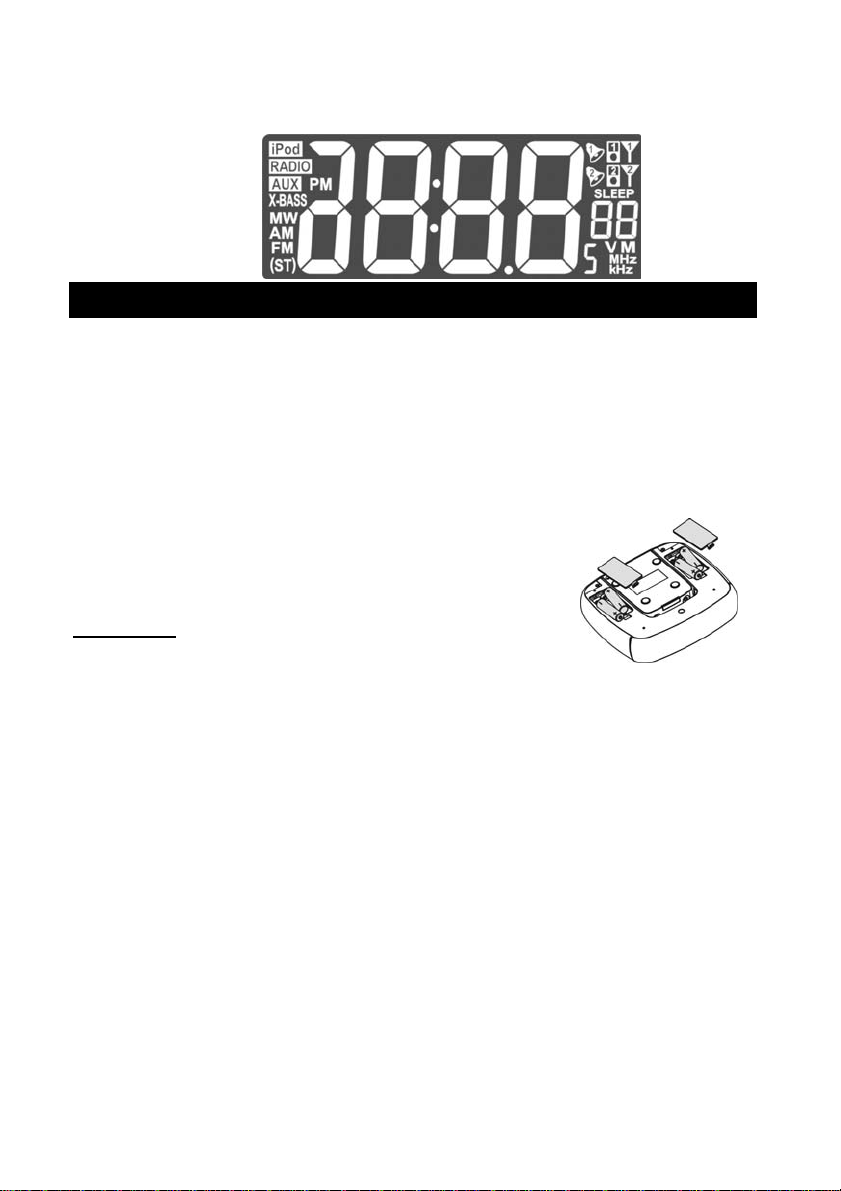
Display Segment
SETTING UP AND CONNECTING
This Portable Docking System is designed to operate on 4 x 1.5V ‘AA’ (UM-3)
batteries (Not included) or the included AC Adaptor. A Lithium battery (Included) is
also required for the backup of the clock.
A. BATTERY OPERATION
For outdoor or portable use, install 4 brand new, good quality alkaline-type batteries.
Remove the battery doors on bottom of the cabinet.
1. Check the polarities and install 4 “AA” size (UM-3)
batteries correctly.
2. Replace the battery doors.
.
IMPORTANT
i. Be sure that the batteries are installed correctly.
ii. For indoor use we recommend you remove all batteries and use the included
BATTERY CAR E
I. Do not mix old and new batteries.
II. Do not mix alkaline, standard (carbon-zinc) or rechargeable (nickel-cadmium)
III. Replac e the b attery only with the same or equivalent type.
IV. If the unit is not to be used for an extended period of time, remove the battery.
V. Do not dispose batteries in fire. Batteries may leak or explode.
:
Wrong polarity may damage the unit and void the w arran ty.
AC adaptor.
batteries.
Old or leaking battery can cause da mage to the uni t and may void the w a rranty.
BATTERY REPLACEMENT
The batteries are weak and need to be replaced when the sound becomes distorted,
the Lamp or the Display starts flashing. You need to replace all the exhausted
3
Page 5
batteries at the same time as soon as possible to avoid battery leakage.
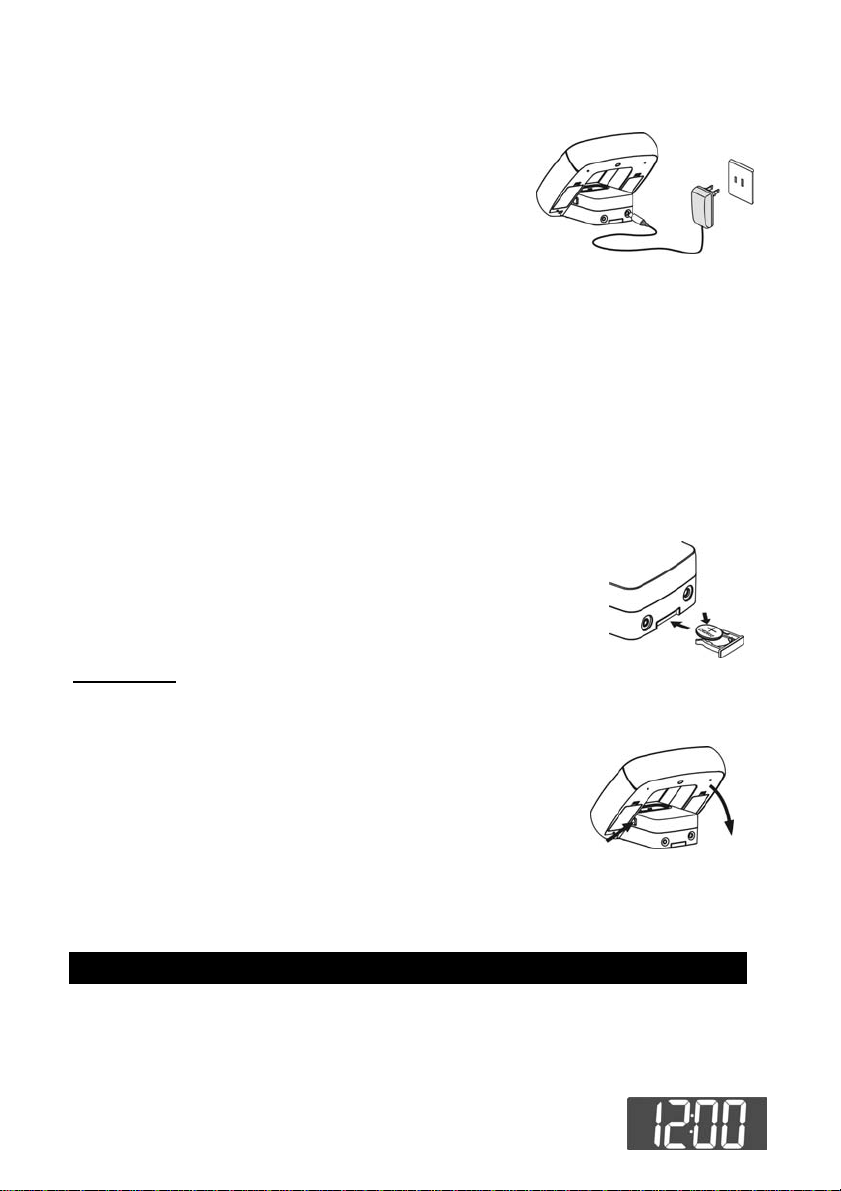
B. AC Adaptor Operation
1. Insert one end of the AC adaptor into the DC
Jack on back of JiMS-182.
2. Connect the AC plug of the AC adaptor to an
AC 120V~ 60Hz power source.
Note: The batteries will be automatically disconnected when the AC adaptor is plugged
into the DC Jack and the System w ill ope ra te on AC power.
Note: Unplug the AC adaptor and disconnect the DC Jack when the JiMS-182 is
not in use for a long period of time.
C. ACTIVATING THE BACKUP FUNCTION
To activate the backup function of the system remove the Battery Insulation Tag
from the backup battery compartment.
Replacing the Lithium Battery
1. Remove the battery tray located on the back of the unit.
2. Replace the exhausted “CR2025” 3V lithium battery with a
new one with the “+” side facing upward.
3. Slide the battery tray back into the unit.
IMPORTANT
Tilting the Speaker Body up or down
The speaker body can be lifted up to face forward at about a
45 degree angle. Press down on the two Release Buttons
located on both sides of the main body to lay the speaker
body down flat.
: Be sure that the battery is installed correctly.
Wrong polarity may damage the unit and void the w arran ty.
SETTING THE CURRENT TIME
Current Time Setting
When first plugged in the display will show “12:00” after power up. The following
example shows the procedure for setting the clock time to 8:20 AM.
1. The dock display will show “12:00” when first plugged in.
5
Page 6

Press the MEMO./SET button once. “12H” will appear and flash in the display.
2. Press
3. Press the MEMO./SET button again to save the hour format
setting. The Hour digit will blink.
4. While the Hour digit blinks, press
to set the current hour.
Note: For 12 Hour format, make sure the Hour is correctly set so
5. Press the MEMO./SET button again to save the hour setting.
The minute digit will blink.
6. While the Minute Digit blinks, press
repeatedly to set the current minutes.
7. Press the MEMO./SET button again to complete the setting.
or button once to select 24 Hour format (24 H) if desired.
or button repeatedly
that AM or PM is correctly displayed.
or button
TUNER OPERATION
1. Press the POWER/STANDBY button once. The System
will enter the FM mode.
2. Press the
TO: PRESS:
Switch between AM/FM band / BAND Button
Scan radio station manually or repeatedly
Scan radio station automatically or and h o ld for 2 seconds
Stop auto-tuning or once
Control the volume / Buttons
TO PRESET CHANNELS
This unit is equipped with 20 preset memories each for AM and FM. Once they are
preset, they can be instantly accessed by briefly pressing the ALM.1/ MEM- or
ALM.2/MEM+ Buttons.
1. Press the POWER/STANDBY button to turn the System on.
2. Press the BAND / button to switch between AM or FM band.
3. Tune to a desired station.
4. Press the MEMO./SET Button once. The Preset Channel number will appear
and the Program Indicator “M” will also appear and flash in the Display.
5. While the Program Indicator “M” is blinking, repeatedly press the ALM.2/MEM+
or ALM.1/ MEM- Button to select the desired preset channel.
6. While the Program Indicator “M” is blinking, briefly press the MEMO./SET
button again to complete.
7. Tune to another station and repeat steps 4 to 6 to store stations in other preset
locations.
TO RECEIVE PRESET STATIONS
/ BAND button once to switch to AM if desired.
6
Page 7

1. Press the POWER/STANDBY button to turn the unit on.
2. Press the / BAND button to select AM or FM band as desired.
3. Briefly press the ALM.2/MEM+ or ALM.1/ MEM- Button to select the preset
channels.
TIPS FOR BEST RECEPTION
1. Automatic tuning depends on the signal strength of the broadcasting station, so
weak stations are sometimes skipped. Tune manually to find the weak stations.
With stronger broadcast stations the tuner may stop before it reaches the
station frequency or optimum reception. Tune manually for
the best reception.
2. The receiver has a built-in bar antenna. If AM reception is
weak, slightly rotating or re-positioning the unit will usually
improve the reception. Please also remove the iPod from the
docking bay
NOTE: For best AM reception, please completely unwrap the power adaptor
as this will definitely improve the AM reception.
cord and fully extend it keeping the adaptor as far from the radio as
possible.
AUX OPERATION
You can play other music sources (iPod shuffle (1st and 2nd generation), MP3, CD or
other digital audio player) through the speakers of JiMS-182 by connecting the AUX
IN Jack to your external player’s LINE OUT jack or headphone jack.
1. Plug one end of the connection cord (Not included) into the
AUX IN jack on the back of JiMS-182. Plug the other end of the
cord into your external audio player, such as an iPod shuffle,
CD, MP3 Player etc.
2. Power on JiMS-182 and the external player.
3. Press the FUNCTION Button to select the AUX mode.
4. Start playing your iPod shuffle, MP3, CD or other digital audio player.
5. Slowly adjust both the volume on JiMS-182 and the external device.
6. Press the EQ Button repeatedly to choose the desired equalizer effect.
7. Turn off the attached player when finish listening.
8. Press the
connection cord from the AUX IN jack.
POWER/STANDBY Button to turn JiMS-182 off and unplug the
iPod ADAPTORS
There are three iPod Adaptors included in the package. One for the iPod touch (2nd
generation) and iPod nano 3
rd
generation and 4th generation.
7
Page 8

For nano 3
It is always recommended you use the adaptor that comes with your iPod first. This will
help maximize a custom fit for your iPod when docked.
To place the iPod adapter
1. Select an adaptor and gentl y place it into the dock. Insert
the hooks of the adaptor into the socket of the docking bay.
2. Carefully push forwards and press down the adaptor.
To remove/replace the iPod adapter
1. Gently remove your iPod upwards.
2. Push the iPod adapter backwards and gently pull upwards.
rd
generation For nano 4th generation For iTouch 2nd generation
DOCKING YOUR iPod
1. Press the POWER/STANDBY Button to turn on the unit.
2. Press the FUNC. Button to select iPod mode.
3. Select a suitable adaptor (included) or use the one that comes with your iPod
and insert it into the docking bay. Your iPod can now be inserted onto the
docking connector by aligning the connector on the bottom of the iPod onto the
connector in the docking bay.
Note : Please be careful when seating your iPod onto the dock to avoid
damaging the 30-pin connector in the iPod or the docking system.
4. The iPod will start playing and charging automatically.
Note: The iPod will only charge when the JiMS-182 is using the AC adaptor .
5. Adjust the sound level by pressing the
Note : The volume level cannot be adjusted using the volume control on your
iPod after being docked.
6. Press the or Buttons to skip to the previous or next song.
7. Press and hold the or Buttons to fast-backward or fast-forward during
playback.
8. To remove the iPod from JiMS-182, press and hold the Button for few
seconds to switch off the iPod and then gently remove it from the docking
connector.
9. To turn JiMS-182 off, press the
/ Buttons on the JiMS-182.
POWER/STANDBY Button again.
ALARM OPERATION
Your JiMS-182 provides two different wakeup times, ALARM1 and ALARM2. You
can choose to use them independently or simultaneously: ALARM 1, ALARM 2 or
both ALARM 1 and ALARM 2.
Alarm Time Setting
Note: Alarm time (s) can only be set in Power Off mode.
8
Page 9

1. To set the wakeup time, press and hold the ALM.1 / MEM- or ALM.2 / MEM+
Button for approximately 3 seconds until the hour digit blinks.
While the hour digit blinks, press
digit.
Note: For the 12 Hour format, Make sure the Hour is set so that AM or PM is
correctly displayed.
2. Press ALM.1 / MEM- or ALM.2 / MEM+ button to save the
hour setting, the minute digit will blink.
3. While the minute digits blink, press
your desired minute digit.
4. Press ALM.1 / MEM- or ALM.2 / MEM+ button to save the wakeup setting.
Setting Wakeup Mode
Press ALM.1 / MEM- or ALM.M2 / MEM+ Button repeatedly to select the desired
wake up mode (wake to Alarm, RADIO or iPod) for alarm 1 or alarm 2.
1. Wake to Alarm
- Repeatedly press ALM.1 / MEM- or ALM.2 / MEM+ Button to enter ALARM
mode. “
and Alarm 2 will sound when the alarm time is reached.
2. Wake to Radio
- Repeatedly press ALM.1 /MEM- or ALM.2 / MEM+ Button to enter the
RADIO mode, “
- F ollo w the proc edur e in “ TUNER OPER ATION” to select your desired radio
station.
- Press the
automatically turn on when the alarm time is reached.
” or “ ” will appear in the dis play. Two different rings for Alarm 1
” or “ ” will appear in the display.
POWER/STANDBY Button to turn off the unit. The radio will
or button to adjust your desired hour
or button to adjust
3. Wake to iPod
- Briefly press ALM.1 / MEM- or ALM.2 / MEM+ Button to select iPod m ode,
” or “ ” will appear in the display.
“
- Follow the procedure in “DOCKING YOUR iPOD” to play your iPod.
- Press
time is reached, the iPod will automatically start playing.
Note:
i. After waking to iPod or Radio alarm, the volume level of the iPod or radio
can be adjusted as needed.
ii. After the alarm is on, the LCD backlight will automatically be set to high.
4. Light
- The light located on the top of the JiMS-182 works with all “Wake to”
settings. The light will begin to light one minute before the alarm time is
reached and will increase to full brightness by the time the alarm time is
reached.
POWER/STANDBY Button to turn the unit off. When the alarm
9
Page 10

Stopping the Alarm
The alarm is programmed to continuously sound for 60 minutes. To stop the alarm,
follow the directions below.
1. SNOOZE / DIMMER Button – Press this button to stop the alarm temporarily.
The alarm will stop and automatically resume after 9 minutes.
POWER/STA NDBY Button – Press this Button to stop the alarm which will
2.
sound again 24 hours later.
3. ALM.1 / MEM- or ALM.2 / MEM+ Button – Press this Button once to stop the
alarm and the alarm will sound again 24 hours later.
DIMMER Operation (With AC Adaptor plugged in)
In power off mode, press the SNOOZE / DIMMER Button repeatedly to adjust the
LCD backlight to low, middle or high as desired.
Note:
i. W ith the AC Adaptor plugged in and with power off, press any button except
SNOOZE/DIMMER and the LCD backlight will automatically set to high and
resume to the preset brightness in approximately 5 seconds.
If using battery power, the LCD backlit is always set to the dimmest
ii.
level in order to conserve battery power. Press any button the LCD
backlight will automatically set to high and resume to the dimmest level
in approximately 5 seconds.
Turning the Lamp On/Off
1. You can press the LIGHT button to turn the Lamp on and off.
2. The Lamp will also light automatically one minute before the alarm time is
reached and increase to the full brightest level when the alarm time is reached.
3. When you stop the alarm by pressing the SNOOZE/DIMMER,
ALM.1/MEM- or ALM.2/MEM+ Button, the Lamp will be turned off at the same
time. You can also press the LIGHT Button to turn off the Lamp directly.
4. If the Lamp is on before waking to alarm, radio or iPod, when you stop the
alarm by pressing the SNOOZE/DIMMER,
or ALM.2/MEM+ Buttons, the Lamp will remain on. To turn the Lamp off press
the LIGHT Button once.
POWER,
POWER/STANDBY, ALM.1/MEM-
SLEEP OPERATION
Your JiMS-182 can be programmed to turn off according to your preset sleep time.
The sleep time can be set for 15, 30, 60, 90 or 120 minutes.
10
Page 11

Turn on the JiMS-182 on and select either iPod, Radio or AUX function.
1. Press the SLEEP Button repeatedly until the desired sleep time is shown on the
Display. For example, if it is 10:00 PM and you set the sleep time for 30 minutes,
the display will show:
Preset Sleep Time Current time
2. The JiMS-182 will play and turn off automatically after the 30 minute Sleep time
expires at 10:30 PM. If you want to cancel the sleep time before the time
expires, press
3. The Light can also be used during the Sleep mode. Press the LIGHT Button
once to turn on the Light. The light will dim and go off when the preset sleep
time expires.
Note: In AUX Mode, if the playing time of the external device is shorter than your
selected sleep time, the music will stop when the external device shuts off.
POWER/STANDBY Button once.
CARE AND MAINTENANCE
1. Clean the unit with a damp (never wet) cloth. Solvent or detergent should never
be used.
2. Avoid leaving your unit in direct sunlight or in hot, humid or dusty places.
3. Keep your unit away from heating appliances and sources of electrical noi s e such
as fluorescent lamps or motors.
4. For better Clock Display clarity, avoid operating the unit under direct sunlight or in
strong room illumination
.
TROUBLESHOOTING GUIDE
Should the system exhibit a problem, please check the following before seeking
service.
11
Page 12

Symptom Possible Cause Solution
Radio
Noise or sound distorted
on AM or FM
broadcasting.
AM or FM no sound
iPod
iPod will not play
Alarm
No Alarm
Abnormal Operation
Clock, iPod, Radio or
AUX IN not functioning
Abnormal or no display Internal micro controller needs
Station is not tuned properly
for AM or FM.
FM: The broadcast station
signal is weak
AM: The location of the built-in
antenna is not correct.
Unit is not in RADIO function
mode
Volume is at minimum Increase Volume level
Unit is not in iPod mode Press the FUNC. Button to
iPod is not inserted properly Re-insert iPod again
Alarm is not activated Check that Alarm indicator
Incorrect Alarm time Make sure AM or PM is set
Internal micro controller needs
to be reset
to be reset
SPECIFICATIONS
Fine-tune the AM or FM
broadcast station.
Find another station or
relocate the unit until the
best reception is obtained.
Remove your iPod and
rotate the unit until the best
reception is obtained.
Press the FUNC. Button
repeatedly to select the
RADIO mode.
select iPod mode.
“ ” or “ ” , “ ” or “ ”
“
” or “ ” appears in the
Display.
correctly.
Remove all the batteries
(including backup battery
CR2025), disconnect the AC
adaptor and wait a few
seconds for the built-in
micro controller to reset.
Remove all the batteries
(including backup battery
CR2025), disconnect the AC
adaptor and wait a few
seconds for the built-in
micro controller to reset.
GENERAL
Power source --------------------------------- DC 6V 2000mA AC adapter (Included)
DC 6V, “AA” size (UM-3) battery x 4 (Not
12
Page 13

included)
CR2025 x 1 (Included) for memory backup
Dimension ------------------------- ------------ 6-7/8(W) x 7-1/2(D) x 1-7/8(H) Inch/
174(W) x 190 (D) x 47(H) mm
Weight ------------------------------------------- 1.32 lb/0.6kg
TUNER SECTION
Frequency range ----------------------------- FM: 87.5- 108MHz
AM: 530-1710 KHz
AUDIO SECTION
Power Output --------------------------------- 2 x 1.5 W @10% THD per Channel
Speaker impedance ------------------------- 4 ohms
AUX input sensitivity ------------------------- 500 mV
ACCESSORIES
Instruction Manual --------------------------- 1 pc
iPod dock adapter --------------------------- 1 kit (Including nano 3
th
4
generation and iPod touch 2nd
rd
generation, nano
generation.)
You can help protect the environment! Please remember to respect
the local regulations: turn in any non-working electrical equipment to
an authorized waste disposal centre.
iPod is a trademark of Apple Inc., registered in the U.S. and other countries.
"Made for iPod" means that an electronic accessory has been desi gned to connect
specifically to iPod and has been certified by the developer to meet Apple
performance standards.
Apple is not responsible for the operation of this devise or its compliance with safet y
and regulatory standards.
90 DAY LIMITED WARRANTY AND SERVICE
VALID IN THE U.S.A ONLY
SPECTRA MERCHANDISING INTERNATIONAL, INC. warrants this unit to be free from
defective materials or factory workmanship for a period of 90 days from the date of original
customer purchase and provided the product is utilized within the U.S.A. This warranty is not
assignable or transferable. Our obligation under this warranty is the repair or replacement of
the defective unit or any part thereof, except batteries, when it is returned to the SPECTRA
Service Department, accompanied by proof of the date of original consumer purchase, such as
a duplicated copy of a sales receipt.
You must pay all shipping charges required to ship the product to SPECTRA for warranty
service. If the product is repaired or replaced under warranty, the return charges will be at
SPECTRA’s expense. There are no other express warranties other than those stated herein.
13
Page 14

This warranty is valid only in accordance with the conditions set forth below:
1. The warranty applies to the SPECTRA product only while:
a. It remains in the possession of the original purchaser and proof of purchase is demonstrated
b. It has not been subjected to accident, misuse, abuse, improper service, usage outside the
descriptions and warnings covered within the owner’s manual or non-SPECTRA approved
modifications
c. Claims are made within the warranty period
2. This warranty does not cover damage or equipment failure caused by electrical wiring not
in compliance with electrical codes or SPECTRA owner’s manual specifications, or failure to
provide reasonable care and necessary maintenance as outlined in the owner’s manual.
3. Warranty of all SPECTRA products applies to residential use only and is void when products
are used in a nonresidential environment or installed outside the United States.
This warranty gives you specific legal rights, and you may also have other rights which vary
from state to state. TO OBTAIN SERVICE please remove all batteries (if any) and pack the unit
carefully and send it prepaid by insured parcel post or UPS to SPECTRA at the address shown
below. IF THE UNIT IS RETURNED WITHIN THE WARRANTY PERIOD shown above, please
include a proof of purchase (dated cash register receipt) so that we may establish your
eligibility for warranty service and repair of the unit without cost. Also include a note with a
description explaining how the unit is defective. A customer service representative may need to
contact you regarding the status of your repair, so include your name, address, phone number
and e-mail address to speed the process.
IF THE UNIT IS OUTSIDE THE WARRANTY PERIOD, please include a check for $35.00 to
cover the cost of repair, handling and return postage. All out of warranty returns must be sent
prepaid.
It is recommended that you contact SPECTRA first at 1-800-777-5331 or by e-mail at
info@spectraintl.com for updated information on the unit requiring service. In some cases the
model you have may be discontinued and SPECTRA reserves the right to offer alternative
options for repair or replacement.
SPECTRA MERCHANDISING INTERNATIONAL, INC.
4230 North Normandy Avenue,
Chicago, IL60634, USA.
1-800-777-5331
To register your product, visit the link below on the website to enter your information.
http://www.spectraintl.com/wform.htm
Printed in China
172-G4010A1020-
JEN
14
 Loading...