

Page 1
Variolink®II
Instructions for Use
Description
Variolink II is a dual-curing (light- and self-curing) luting
composite system for the adhesive luting of ceramic, and
composite restorations.
Variolink II may also be applied in the light-curing
technique only (e.g. luting of veneers).For this purpose,
only the Variolink II Base is to be used.
Variolink II is based on the Advanced Composite Technology
of Tetric©Ceram. The special filler composition of this
technology gives Variolink II excellent physical properties,
high abrasion resistance, excellent radiopacity, very good
optical properties, as well as continuous fluoride release.
Variolink II is available in 6 base shades and 2 catalyst
shades as well as in 3 degrees of viscosity.Thus, an
appropriate version of Variolink II is available for the
various clinical requirements.
Shades
The following shades of Variolink II Base are available:
Chromascop A–D
Base
bleach XL 010 –
transparent T –
white 110 A1
white opaque – –
yellow (universal) 210 A3
brown 340 A4
Catalyst high/low viscosity:
yellow (universal) 210 A3
transparent T –
Catalyst ultra viscosity
yellow (universal) 210 A3
Working time
About 3.5 min. at 37 °C/99 °F
– Dual-curing/light-curing resin based dental luting material
– Dualhärtender/lichthärtender zahnärztlicher Befestigungskunststoff
– Matériau de restauration "Dual" de collage
– Cemento composito su base resinosa ad indurimento duale (auto-
fotoindurente)
– Cemento de fijación en base a composite de polimerización dual y
fotopolimerizable
– Compósito de cimentação fotopolimerizável / polimerização dual.
561836/0304/WE1/H
English
Instructions for Use
Gebrauchsinformation
Mode d’emploi
Istruzioni d’uso
Instrucciones de uso
Instruções de Uso
For dental use only.
Caution: U.S. Federal Law restricts this device to sale by or on
the order of a licensed dentist.
Made in Liechtenstein
Ivoclar Vivadent AG,FL-9494 Schaan/Liechtenstein
Page 2
Mixing ratio
Mix base paste and catalyst in a 1:1 ratio.
Composition
The monomer matrix is composed of Bis-GMA, urethane
dimethacrylate, and triethylene glycol dimethacrylate. The
inorganic fillers are barium glass, ytterbium trifluoride,
Ba-Al-fluorosilicate glass, and spheroid mixed oxide.
Additional contents: catalysts,stabilizers, and pigments.
The particle size is 0.04–3.0 µm.The mean particle size is
0.7 µm.
Monomer Filler Filler
%wt. %wt. %vol.
Base 26.3 73.4 46.7
Catalyst low viscosity 27.9 71.2 43.6
Catalyst high viscosity 22.0 77.2 52.0
Indication
Adhesive luting of ceramic, and composite restorations
(inlays, onlays, crowns, metal-free adhesive bridges,veneers
(Targis
®
/Vectris®, IPS Empress®2), core build-ups), made in
the laboratory or chairside.
Contraindication
The application of Variolink II is contraindicated:
– if a dry working field cannot be established, or if the
stipulated technique cannot be applied
– if the patient is known to be allergic to any of the
ingredients of the luting composite
Side effects
Systemic side effects not known to date. In individual cases,
allergic reactions have been reported. Irritation of the pulp
may occur in very deep or medium cavities, without
appropriate pulp/dentin protection or base/liner.
Interactions
Phenolic substances (e.g. eugenol) inhibit polymerization.
Consequently,application of materials containing these
substances is to be avoided.
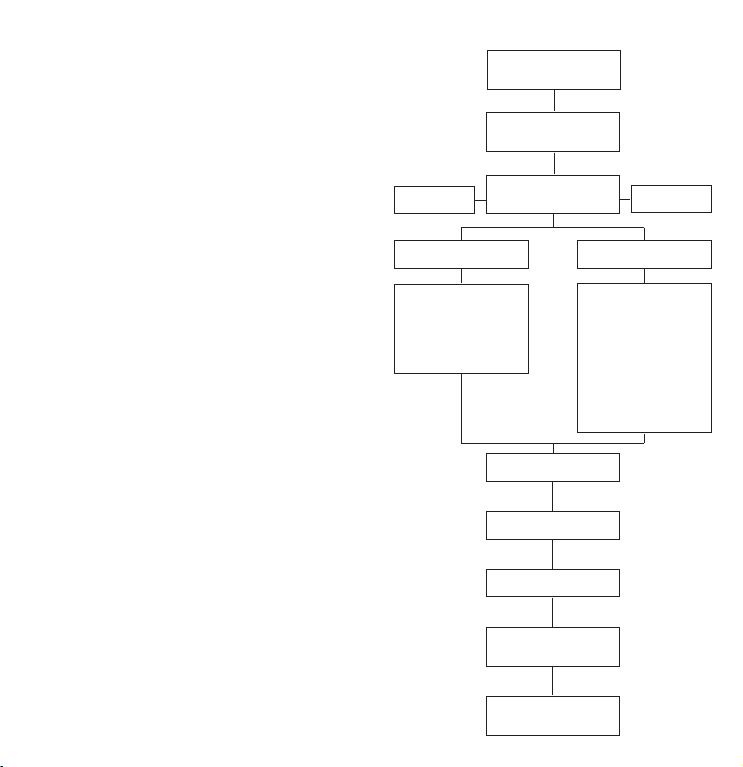
Flowchart for adhesive luting with Variolink II
Removal of
temporary restoration
Try-in of restoration
Finishing/
Polishing
Topical fluoride
application
Rinse, dry
Variolink II
Placement
Polymerization
Pre-treatment of the
restoration according
to manufacturer’s
instructions
Pre-treatment
of the cavity:
Enamel, dentin etching
(e.g.Total Etch).
Bonding agent (e.g.
Excite
®
DSC, Syntac®)
Rinse, dry
Isolation
Restoration
Cavity
Page 3

Try-in and adhesive placement of tooth-coloured
restorations
Step by Step
For detailed information also refer to the Instructions for
Use of the respective products.
1. Removal of the temporary restoration
Remove possible residue of the temporary luting composite from the cavity or the prepared die with a polishing
brush and an oil- and fluoride-free cleaning paste. Rinse
with water spray.
Note:
Use only eugenol-free temporary luting agents (e.g.
Provilink
®
), as eugenol may inhibit the polymerization of
Variolink II.When working on inlays and using
Systemp®.inlay/Systemp®.onlay as a temporary restorative
material, the application of a temporary luting composite is
generally not necessary.
2. Try-in of the restoration
To aid in achieving optimum final restoration results, try-in
of the restoration with a try-in paste (e.g.Variolink
®
II Try-In).
To avoid fracture of the restoration,do not check the
occlusion at this stage. If necessary, make corrections with a
fine diamond at medium speed and with slight pressure.
Polish ground surfaces.
3. Isolation
When applying the adhesive luting technique with
composites, isolation with a rubber dam is recommended.
Restoration – pre-treatment
Note:
The following steps “Restoration 4a and 5a”may also be
done by the dental assistant in order to relieve the dentist.
4a. Cleaning
Rinse off the glycerine gel with water and dry the
restoration with water- and oil-free air.
5a. Pre-treatment of the restoration
According to the instructions of the manufacturer.
Cavity / Preparation – pre-treatment
4b. Cleaning
Clean cavity/preparation with water spray and dry.
5b. Pre-treament of the cavity
– Apply phosphoric acid gel (37% e.g. Total Etch) to the
prepared enamel and then flow the etchant onto the
prepared dentin. Use a disposable brush or syringe tip to
push the etchant into any restricted areas of the
preparation, leave for 15–30 seconds on enamel and for
10–15 seconds on dentin.
– Remove all etchant gel with av vigorous water spray for
at least 5 seconds. Excess water is removed with either:
a) the application of 1-2 bursts of clean, dry air or
b) high-volume evacuation tip directly over the preparation
surface for 1-2 seconds, or
c) blotting with a clear applicator or lint-free absorbent
material.
– Do not overdry dentin, moist preparation surfaces
should be apparent.
– The etched enamel surface should have a chalky white
appearance. If not,or if the etched enamel surface has
been contaminated, repeat etching.
– Subsequently, apply the adhesive (see instructions for use
Excite DSC, Syntac)
Note:
Using a matrix band in the proximal regions inhibits
accidental etching of the adjacent teeth and facilitates the
subsequent removal of excess Variolink II. Hold matrix band
in place with a suitable interdental wedge.
6. Variolink II
Mix Variolink II in a 1:1 ratio on a mixing pad for 10 s (mix
carefully with a spatula). The working time of the mixed
Variolink II is about 3.5 min., at a temperature of 37 °C/99 °F.
Page 4

Attention
– Variolink II is a light-/dual-curing material and thus
sensitive to blue light (operatory light, ambient light).
Therefore,Variolink II should be mixed immediately
before application. Avoid intensive light during
application.
– The result of mixing the base pastes (bleach XL 010,
white (110/A1), white opaque,brown (340/A4) with the
catalyst pastes is a mixed colour.
– When mixing is too hard, air may be trapped in the paste.
This may delay polymerization and compromise
mechanical properties.
– Make sure to remove excess material in time, especially
in areas that are difficult to reach (proximal or gingival
margins). Given the hardness of fully polymerized luting
composites like Variolink II, the removal of excess with
rotary or oscillating instruments (finishing diamonds,
discs, Proxoshape, etc.) is extremely difficult and time
consuming.
We recommend the base with the low-viscosity catalyst
paste for the placement of crowns and partial crowns, the
base with the high-viscosity catalyst paste for inlays/onlays
and veneers.The dentist, however, is free to chose the
proper viscosity for each indication.
Should the tooth substance be discoloured, we recommend
using shade white opaque, since this opaque version of
Variolink II has better masking properties.
As veneers demonstrate only limited thickness and thus
high translucency,Variolink II can also be applied with
light-curing only. In that case,only the base paste is used
to place the restoration. The catalyst paste is unnecessary.
Consequently,a selection between different consistencies is
not possible in this case. For controlled direct placement of
Variolink II base utilize a Variolink II application tip.
7.Placement
a) Inlays/Onlays:
Apply mixed Variolink II with a brush or a spatula in the
cavity and/or,if necessary (with concave shapes or to avoid
trapping air), on the inner surface of the restoration.
b) Crowns/bridges:
Apply mixed Variolink II on the inner surface of the
restoration and/or,if necessary (to avoid trapping air), on
the preparation.
c) Veneers:
Apply mixed Variolink II with a brush or a spatula on the
preparation and/or,if necessary,on the inner surface of the
restoration. For direct placement of base alone utilizing the
Variolink II application tip.
Attention
– First, place restoration in situ with slight pressure and
remove excess with a brush or another suitable
instrument.
– When working on large restorations, make sure to
remove excess material in time, especially in areas that
are difficult to reach (proximal or gingival margins).
– Increase pressure and maintain for several seconds.
Remove the Variolink II excess thus forced out with a
brush.
– To aid in the clean-up process maintain the pressure and
tack the restoration on an isolated surface area with
light-polymerization for 10 to 20 seconds.
Important:
At this stage, do not polymerize any proximal or marginal
regions.
– After tacking the restoration in place remove any
additional marginal excess with a spatula or other
suitable instrument. Make sure that Variolink II excess is
not brushed out of the margins.
8. Polymerization
Polymerize Variolink II step by step for at least 40 s per
segment. Begin with the proximal margins (polymerize
through transparent interdental wedges).
Remarks regarding oxygen inhibition
As any other composite,Variolink II is subject to oxygen
inhibition. This means that the surface layer (approx.
50 µm) does not polymerize during light-curing, as it comes
in contact with atmospheric oxygen. This problem can be
solved in two ways:
Page 5

1)Do not remove the small amounts of excess Variolink II
before polymerization. Thus, only the excess is affected by
oxygen inhibition and may easily be removed after
polymerization during finishing of the margins.
2)Cover restoration margins with a glycerine gel (e.g. Liquid
Strip) after removal of excess, but before the polymerization. Thus, oxygen inhibition can be avoided.
9. Finishing/Polishing
– Remove polymerized excess with a finishing diamond
(grain size below 25 µm), and flexible discs.
– Apply finishing and polishing strips in the proximal
regions.
– Check occlusion and functions and make corrections if
necessary.
– Polish restoration margins with silicone polishers
(Politip-F/-P, Astropol
®
) or discs.
10. Topical fluoride application
Fluoride the tooth after completion of the restoration
(e.g. with Fluor Protector).
Warning:
Avoid contact of Variolink II with skin,mucous membrane,
and eyes. Unpolymerized Variolink II may cause slight
irritations and may lead to a sensitization against
methacrylates.
Storage
– Do not use Variolink II after expiry date.
– Cool storage (2–8 °C/36–46 °F) is indicated for the
catalyst paste.
– Note: Syringes should be closed immediately after use.
Exposure to light causes premature polymerization.
– Shelf life: see expiry date
Keep material out of the reach of children!
For use in dentistry only!
Date information prepared:
05/2003
Manufacturer:
Ivoclar Vivadent AG
FL-9494 Schaan / Liechtenstein
This material has been developed solely for use in dentistry.Processing should be
carried out strictly according to the Instructions for Use. Liability cannot be
accepted for damages resulting from failure to observe the Instructions or the
stipulated area of application. The user is responsible for testing the material for its
suitability and use for any purpose not explicitly stated in the Instructions.
Descriptions and data constitute no warranty of attributes and are not binding.
Page 6

Variolink®II
Gebrauchsinformation
Beschreibung
Variolink II ist ein dualhärtendes (licht- und selbsthärtend)
Befestigungscomposite-System zur adhäsiven Befestigung
von Keramik- und Compositerestaurationen.
Variolink II kann auch nur lichthärtend (z.B.Eingliederung
von Schalen) eingesetzt werden. Dazu wird nur die
Variolink II-Base verwendet.
Variolink II basiert auf der Advanced Composite Technology
von Tetric®Ceram. Die spezielle Füllerzusammensetzung
dieser Technologie verleiht Variolink II ausgezeichnete
physikalische Eigenschaften, hohe Abrasionsresistenz,sehr
hohe Röntgenopazität, sehr gute optische Eigenschaften
sowie eine kontinuierliche Fluoridfreisetzung.Variolink II ist
in 6 Base-, 2 Katalysatorfarben und 3 Viskositätsstufen
erhältlich. Somit steht für die unterschiedlichen klinischen
Anforderungen jeweils eine geeignete Version von
Variolink II zur Verfügung.
Farben
Variolink II-Base ist in folgenden Farben erhältlich:
Chromascop A–D
Base
Bleach XL 010 –
Transparent T –
weiss 110 A1
weiss-opak – –
gelb (universal) 210 A3
braun 340 A4
Katalysator hohe / niedrige Viskosität:
Transparent T –
gelb (universal) 210 A3
Katalysator hochvisköse (ultra) Konsistenz
gelb (universal) 210 A3
Verarbeitungszeit
ca. 3.5 Min. bei 37 °C/ 99 °F
Mischverhältnis
Basispaste und Katalysator im Verhältnis 1 :1 anmischen.
Zusammensetzung
Die Monomermatrix besteht aus Bis-GMA, Urethandimethacrylat und Triethylenglycoldimethacrylat. Die anorganischen Füllstoffe bestehen aus Bariumglas,Ytterbiumtrifluorid, Ba-Al-Fluorsilikatglas und sphäroidem Mischoxid.
Zusätzlich enthalten sind Katalysatoren, Stabilisatoren und
Pigmente. Die Partikelgrösse liegt zwischen 0.04–3.0 µm.
Die mittlere Partikelgrösse beträgt 0.7 µm.
Gew.% Gew.% Vol%
Monomer Füller Füller
Base 26.3 73.4 46.7
Katalysator dünnflüssig 27.9 71.2 43.6
Katalysator dickflüssig 22.0 77.2 52.0
Indikation
Adhäsive Befestigung von Keramik- und Compositerestaurationen (Inlays, Onlays, Kronen, metallfreie AdhäsivBrücken, Schalen (Targis
®
/Vectris®, IPS Empress®2),
Stumpfaufbauten), labor- oder chair-side gefertigt.
Kontraindikation
Die Verwendung von Variolink II ist kontraindiziert:
– wenn eine Trockenlegung oder die vorgeschriebene
Anwendungstechnik nicht möglich ist
– bei erwiesener Allergie gegen Bestandteile des
Befestigungszementes
Nebenwirkungen
Systemische Nebenwirkungen sind nicht bekannt. In Einzelfällen wurden allergische Reaktionen beschrieben. Ohne
geeigneten Pulpa-/Dentinschutz, bei fehlender Unterfüllung in tiefen oder mittleren Kavitäten, können Irritationen der Pulpa auftreten.
Wechselwirkungen
Phenolische Substanzen (z.B. Eugenol) inhibieren die Polymerisation – daher derartige Werkstoffe nicht verwenden.
Deutsch
Page 7
Übersichtsdiagramm für die adhäsive Befestigung mit
Variolink II
Einprobe und adhäsive Eingliederung der
zahnfarbenen Restaurationen
Step by Step
Für detaillierte Hinweise beachten Sie bitte auch die separaten Gebrauchsinformationen der erwähnten Produkte.
1.Entfernen des Provisoriums
Kavität oder präparierten Stumpf mit Polierbürste sowie ölund fluoridfreier Reinigungspaste von eventuellen Resten
des provisorischen Befestigungszementes reinigen und mit
Wasserspray spülen.
Hinweis:
Nur eugenolfreie provisorische Zemente verwenden (z.B.
Provilink
®
), da Eugenol die Polymerisation von Variolink II
hemmen kann. Bei Inlays kann bei Ver-wendung von
Systemp®.inlay/Systemp®.onlay als provisorisches
Füllungsmaterial auf einen provisorischen Befestigungszement meist ganz verzichtet werden.
2. Einprobe der Restauration
Um eine optimales ästhetisches Ergebnis zu erzielen kann
jetzt die Farbwirkung der Restauration überprüft werden
(z.B.Variolink
®
II Try-In). Um eine Fraktur der Restauration
zu verhindern, sollte zu diesem Zeitpunkt keine Okklusionskontrolle erfolgen. Falls erforderlich, Korrekturen mit
feinen Diamanten bei mittlerer Drehzahl und leichtem
Druck durchführen. Beschliffene Flächen nachpolieren.
3. Trockenlegung
Die Trockenlegung – mit Kofferdam – wird bei der
adhäsiven Befestigungstechnik mit Composites empfohlen.
Restauration – Vorbehandlung
Hinweis:
Die folgenden Schritte “4a. und 5a.” können zur zeitlichen
Entlastung des Behandlers von der zahnärztlichen Assistenz
durchgeführt werden.
Entfernen des
Provisoriums
Einprobe der
Restauration
Ausarbeiten
Polieren
Fluoridieren
Spülen, trocknen
Variolink II
Eingliederung
Polymerisation
Vorbehandlung der
Restauration nach
Angaben des
Herstellers
Vorbehandlung der
Kavität: Schmelzätzung
(z.B.Total Etch),
Haftvermittler (z.B.
Syntac®, Excite®DSC)
Spülen, trocknen
Trockenlegung
Restauration
Kavität
Page 8

4a. Reinigung
Abspülen des Glyceringels mit Wasser und Trocknen der
Restauration mit wasser-/ ölfreier Luft.
5a. Vorbehandlung der Restauration
Nach Angaben des Herstellers.
Kavität/Präparation – Vorbehandlung
4b. Reinigung
Kavität/Präparation mit Wasserspray reinigen und trocknen.
5b.Vorbehandlung der Kavität
– Total Etch (37 % Phosphorsäuregel) zuerst auf präpa-
rierten Schmelz, dann auf Dentin auftragen. Mit einem
Brush oder der Kanülenspitze das Gel auch in die Ecken
der Präparation verteilen. Phosphorsäure 15–30 sec. auf
Schmelz und 10–15 sec. auf Dentin einwirken lassen.
– Dann das Gel sorgfältig für mindestens 5 sec. mit
kräftigem Wasserstrahl abspülen. Überschüssige
Feuchtigkeit so trocknen,dass danach eine noch leicht
feucht schimmernde Dentinoberfläche erkennbar ist
(= wet bonding). Dies kann durchgeführt werden
a) mit dem Luftbläser oder
b) mit einem starken Suktor, der für 1–2 s über die Kavität
gehalten wird, oder
c) mit einem trockenen Pinsel, Schaumstoffpellet oder
sonstigem fusselfreiem Absorbens.Wurzelkanäle z.B. mit
Papierspitzen trocken
– Dentin nicht übertrocknen.
– Die geätzte Schmelzoberfläche hat danach ein kreidig
weisses Aussehen. Sollte dies nicht der Fall sein, oder die
geätzte Schmelzoberfläche kontaminiert werden, ist der
Ätzvorgang zu wiederholen.
– Es folgt die Applikation des Haftvermittlers (siehe
Gebrauchsinformation z.B. Excite DSC,Syntac)
Hinweis:
Durch die Verwendung von Matrizenstreifen in den
Approximalräumen wird ein versehentliches Anätzen der
Nachbarzähne verhindert und die spätere Überschussent-
fernung von Variolink II erleichtert.Die Matrizenstreifen mit
geeigneten Interdentalkeilen befestigen.
6. Variolink II
Variolink II im Verhältnis 1:1 auf einem Anmischblock
10 sec. mischen (vorsichtig durchspateln). Die Verarbeitungszeit des angemischten Variolink II beträgt
ca. 3.5 Min. bei 37 °C/99 °F.
Achtung:
– Variolink II ist ein licht-/dualhärtendes Material und
daher auch empfindlich gegenüber jeglichem Licht mit
Blauanteil (OP-Leuchte, Umgebungslicht).Aus diesem
Grund sollte Variolink II erst unmittelbar vor der Applikation angemischt werden. Während der Applikation eine
intensive Beleuchtung vermeiden.
– Das Mischen der Basispasten bleach XL 010, weiss
(110 / A1), weiss opak,und braun (340/A4) mit den
Katalysatorpasten ergibt eine Mischfarbe.
– Durch zu starkes Mischen kann zuviel Luft in die Paste
eingespatelt, dadurch der Polymerisationsprozess verlangsamt und die mechanischen Eigenschaften verschlechtert werden.
– Auf rechtzeitige Entfernung der Überschüsse v.a. in
schlecht zugänglichen Bereichen (approximal, gingivale
Ränder) achten. Die Entfernung auspolymerisierter
Befestigungscomposites wie Variolink II ist aufgrund ihrer
Härte in für rotierende oder oszillierende Instrumente
(Finierdiamanten, Disks, Proxoshape, etc.) schlecht zu
erreichenden Bereichen sehr schwierig, mühsam und
zeitaufwendig.
Wir empfehlen, die Base mit der dünnfliessenden
Katalysatorpaste für die Eingliederung von Kronen und
Teilkronen,die Base mit der viskosen Katalysatorpaste zum
Einsetzen von Inlays, Onlays und Schalen zu verwenden.Es
steht dem Behandler jedoch frei, für jede Indikation die ihm
am besten geeignet erscheinende Viskosität zu wählen. Die
Farbe weiss opak wird empfohlen bei verfärbter Zahnhartsubstanz. Diese wird durch die opake Variante von
Variolink II besser abgedeckt.
Durch die geringe Materialstärke von Schalen und die
dadurch hohe Lichtdurchlässigkeit kann Variolink II auch
Page 9

nur lichthärtend angewendet werden. In diesem Fall wird
nur die Basispaste zum Einsetzen der Restauration verwendet. Der Katalysator wird nicht benötigt. Eine Wahl
zwischen den verschiedenen Konsistenzen ist in diesem Fall
jedoch nicht möglich.
Zur kontrollierten direkten Applikation der Base empfehlen
wir die Benützung der Variolink II Kanülen.
7. Eingliederung
a) Inlays/Onlays:
Das angemischte Variolink II mit Pinsel oder Spatel in die
Kavität und/oder bei Bedarf (bei konkaven Formen,um
Lufteinschlüsse zu vermeiden) auch auf die Restaurationsinnenseite geben.
b) Kronen/Brücken:
Das angemischte Variolink II auf die Innenseiten der
Restauration und/oder bei Bedarf (um Lufteinschlüsse zu
vermeiden) auch auf den Stumpf applizieren.
c) Schalen:
Das angemischte Variolink II mit Pinsel oder Spatel und/
oder unter Zuhilfenahme der Applikationskanülen direkt auf
die Präparation und/oder bei Bedarf auf die Restaurationsinnenseite applizieren.
Achtung:
- Restauration zunächst nur mit leichtem Druck in situ
bringen und die groben Überschüsse mit einem Pinsel
oder einem anderen geeigneten Instrument entfernen.
– Auf rechtzeitige Entfernung der Überschüsse v.a. in
schlecht zugänglichen Bereichen (approximal, gingivale
Ränder) achten.
– Druck erhöhen und einige Sekunden halten. Zur ein-
facheren Überschussentfernung die Restauration kurz an
einer begrenzten Stelle punktuell 10 bis 20 sec. initial
fixieren.
Wichtig:
Zu diesem Zeitpunkt keine approximalen oder andere
schlecht zugängliche Randbereiche polymerisieren.
– Nach der ersten Fixierung die Restauration entlasten. Die
übrigen Randbereiche nun mit einem Spatel oder ande-
rem geeigneten Instrument von weiteren feinen Über-
schüssen befreien. Dabei ist zu beachten, dass Variolink II
nicht aus den Rändern herausgewischt wird.
8. Polymerisation
Variolink II nun sektionsweise mindestens 40 sec. lang pro
Segment polymerisieren, beginnend bei den approximalen
Rändern (durch die Leuchtkeile hindurch belichten).
Hinweis zur Sauerstoffinhibierung:
Variolink II unterliegt, wie alle Composites, der Sauerstoffinhibierung, d.h. die oberste Schicht (ca.50 µm), die
während der Polymerisation mit dem Luftsauerstoff in
Kontakt ist, härtet nicht aus. Diesem Problem kann auf
2 Arten begegnet werden:
1)Geringe Variolink II-Überschüsse stehen lassen. Dadurch
ist nur dieser Überschuss von der Sauerstoffinhibierung
betroffen und ist nach der Polymerisation im Rahmen der
Ausarbeitung der Ränder einfach zu entfernen.
2)Die Restaurationsränder nach der Überschussentfernung,
jedoch vor der Polymerisation, mit Liquid-Strip (Glyceringel) abdecken. Damit wird die Inhibierung mit Luftsauerstoff vermieden.
9. Ausarbeiten,Polieren
– Ausgehärtete Überschüsse mit einem Finierdiamanten
(Körnung unter 25 µm), flexiblen Disks,am besten unter
Zuhilfenahme einer Lupenbrille, entfernen.
– Approximale Bereiche mit Finier- und Polierstreifen
nacharbeiten.
– Okklusion und Funktionsbewegungen überprüfen und
nötigenfalls korrigieren.
– Restaurationsränder mit Silikongummipolierern
(Politip-F/-P, Astropol
®
) oder Disks polieren.
10. Fluoridierung
Den Zahn nach Fertigstellung der Restauration fluoridieren
(z.B mit Fluor Protector).
Warnhinweis:
Kontakt von Variolink II mit Haut/Schleimhaut und Augen
vermeiden. Variolink II kann in unausgehärtetem Zustand
leicht reizend wirken und zu einer Sensibilisierung auf
Methacrylate führen.
Page 10

Lager- und Aufbewahrungshinweise
– Variolink II nach Ablauf des Verfalldatums nicht mehr
verwenden.
– Die Katalysatorpaste muss kühl gelagert werden (2–8 °C).
– Achtung: Spritzen nach Gebrauch sofort verschliessen.
Lichtzutritt führt zu vorzeitiger Polymerisation.
– Haltbarkeit siehe Ablaufdatum
Für Kinder unzugänglich aufbewahren!
Nur für zahnärztlichen Gebrauch!
Erstellungsdatum der Gebrauchsinformation:
05/2003
Hersteller:
Ivoclar Vivadent AG
FL-9494 Schaan / Liechtenstein
Die Produkte wurden für den Einsatz im Dentalbereich entwickelt und müssen
gemäss Gebrauchsinformation angewendet werden. Für Schäden, die sich aus
anderweitiger Verwendung oder nicht sachgemässer Anwendung ergeben,
übernimmt der Hersteller keine Haftung. Darüberhinaus ist der Verwender
verpflichtet, die Produkte eigenverantwortlich vor deren Einsatz auf Eignung und
Verwendungsmöglichkeiten für die vorgesehenen Zwecke zu prüfen,vor allem
wenn diese Zwecke nicht in der Gebrauchsinformation aufgeführt sind.
Variolink®II
Mode d'emploi
Description :
Variolink II est un composite “dual”(chémo et photopolymérisable) pour le collage des restaurations en
céramique et en composite.
Variolink II peut aussi être utilisé en photopolymérisation,
par exemple : collage de facettes.Dans ce cas seule la pâte
Base Variolink II est employée.
Variolink II a été développé à partir du ceromer Tetric
®
Ceram, selon la technologie"Advanced Composite
Technology".La composition spéciale des charges de
nature céramique confère à Variolink II des propriétés
physiques excellentes, une grande résistance à l’abrasion,
une forte radio-opacité, de très bonnes propriétés optiques
ainsi qu’une diffusion constante d’ions fluorés.Variolink II
est disponible en 6 teintes de la pâte Base, 2 teintes de
Catalyseur ainsi que 3 niveaux de viscosité. Il existe
toujours une version appropriée de Variolink II pour les
différentes applications cliniques.
Teintes :
La pâte Base Variolink II existe dans les groupes de teintes
suivantes :
Chromascop A–D
Base
bleach XL 010 –
transparent T –
blanc 110 A1
blanc opaque – –
jaune (universel) 210 A3
brun 340 A4
Français
Page 11

Catalyseur haute/basse viscosité (low/high) :
jaune (universel) 210 A3
transparent T –
Catalyseur ultra viscosité (Variolink Ultra)
jaune (universel) 210 A3
Temps de mise en oeuvre :
Env.3.5 min. à 37 °C
Rapport de mélange :
Mélanger la pâte Base et le Catalyseur dans un rapport de
1 : 1
Composition :
La matrice monomère se compose de méthacrylate (BisGMA), d'uréthane diméthacrylate,de diméthacrylate
triéthylèneglycolle. Les charges anorganiques se composent
de verre de barium, de trifluorure d'Ytterbium, de BA-Alsilicate de verre fluoré, de dioxyde de silice à haute
dispersion et d'oxyde de mélange sphéroïdal. Sont aussi
contenus des catalyseurs, stabilisateurs et pigments.
La taille des particules est comprise entre 0,04 µm et
3,0 µm. La taille moyenne des particules est de 0,7 µm.
%poids %poids %Vol.
Monomère charges charges
Base 26,3 73,4 46,7
Catalyseur fluide (low) 27,9 71,2 43,6
Catalyseur épais (high)22,0 77,2 52,0
Indications :
Collage de restaurations en céramique ou en composite
sans métal (inlays, onlays, couronnes, bridges,facettes
(Targis
®
/ Vectris®, IPS Empress®2), reconstitutions de
moignons), préparées au laboratoire ou au cabinet
dentaire.
Contre-Indications :
L’utilisation de Variolink II est contre-indiquée :
– quand l’isolation du champ opératoire n’est pas possible
ou quand la technique d’utilisation préconisée n’est pas
applicable.
– en cas d’allergie connue aux composants du matériau.
Effets secondaires :
Des effets secondaires liés au matériau ne sont pas connus.
Dans des cas isolés, des réactions allergiques ont été
décrites. Sans protection dentinaire ou pulpaire, en
l’absence de fonds de cavité pour des cavités profondes,
des irritations peuvent apparaître.
Interférences :
les substances phénoliques (par ex. Eugénol) empêchent la
polymérisation. C’est pourquoi, il ne faut pas utiliser de
matériau de ce genre.
Page 12

Diagramme d’utilisation Essayage et intégration des restaurations
Etape par étape
Pour de plus amples détails,consultez aussi les modes
d’emploi respectifs des produits mentionnés.
1. Dépose de la restauration provisoire :
Nettoyer la cavité préparée des restes du ciment provisoire
avec une brosse à polir et une pâte de nettoyage exempte
de fluor et d’huile. Rincer au spray.
Remarque :
N’utiliser que des ciments provisoires sans eugénol (par ex.
Provilink
®
) car l’eugénol peut empêcher la polymérisation
du Variolink II.Dans le cas d’inlays, Systemp®.inlay/
Systemp®.onlay peut être utilisé comme matériau
d’obturation provisoire rendant l’emploi d’un ciment de
scellement provisoire superflu.
2. Essayage de la restauration :
Pour mieux apprécier l’effet de teinte de la restauration,
remplir le joint de collage avec un gel à la glycérine (par ex.
Variolink II Try-In). Pour éviter une fracture de la
restauration, il est conseillé de ne pas contrôler l’occlusion
à ce stade. Le cas échéant,effectuer des corrections des
points de contact proximaux avec un instrument diamanté
fin à vitesse moyenne et sous une légère pression. Repolir
les surfaces meulées.
3. Isolation du champ opératoire :
Pour la réussite de la technique de collage,l’isolation à
l’aide d’une digue est recommandée.
Restauration – Prétraitement
Remarque :
Afin de décharger l’emploi du temps du chirurgien-dentiste,
les points suivants 4a et 5a peuvent être confiés au
personnel auxiliaire.
4a. Nettoyage :
Enlever le gel de glycérine à l’eau et sécher la restauration
avec de l’air sec et exempt de graisse.
Dépose de la
restauration provisoire
Essayage de la
restauration définitive
Finition/
polissage
Fluoration
Rincer,sécher
Variolink II
Intégration
Polymérisation
Après prétraitement de la
restauration au laboratoire
(avec le gel IPS Ceramic),
dégraissage de la pièce
prothétique avec Total
Etch
TM
. Silanisation
(Monobond-S), puis
application de l’adhésif
(Excite
®
DSC/Syntac®).
Prétraitement
de la cavité/dent
mordançage émail /
dentine (Total Etch).
Application de l’adhésif
(Excite
®
DSC, Syntac®)
sur l’émail et sur la
dentine.
Rincer,sécher
Isolation du champ
opératoire
Restauration
Cavité/dent
Page 13

5a. Prétraitement de la restauration :
Selon les indications du fabricant.
Traitement de la cavité ou du moignon
4b. Nettoyage :
Nettoyer la cavité ou le moignon au spray puis sécher.
5b.Traitement de la cavité préparée:
– Appliquer Total Etch™ (gel d'acide phosphorique à
37 %) d'abord sur l'émail, puis sur la dentine.Utiliser un
pinceau jetable ou l'embout de la seringue pour répartir
le gel dans les zones peu accessibles. Laisser agir l'acide
phosphorique 15 à 30 secondes sur l'émail et 10 à
15 secondes sur la dentine.
– Rincer soigneusement le gel avec un spray puissant
pendant 5 secondes et sécher l'humidité résiduelle de
façon à ce que la surface dentinaire ait un aspect
légèrement brillant (= wet-bonding). Ceci peut être
réalisé au choix :
a)avec un léger coup de soufflette,
b)avec une aspiration chirurgicale maintenue pendant 1 à
2 secondes au-dessus de la cavité, ou
c) avec un pinceau sec, une boule de mousse ou tout autre
buvard ne laissant pas de résidus (peluches ou fibres)
– Ne pas dessécher la dentine.
– La surface mordancée de l’émail prend alors un aspect
blanc crayeux. Si ce n’est pas le cas ou si la surface
mordancée de l’émail est contaminée, répéter alors
l’opération.
– Applique l’adhésif, cf.mode d’emploi Excite DSC ou
Syntac
Remarque :
Pour éviter d’attaquer par mégarde les dents voisines et
pour faciliter ultérieurement l’élimination des excédents de
Variolink II, il est conseillé de mettre en place dans les
zones proximales une matrice. Fixer celle-ci avec des coins
interdentaires.
6. Variolink II :
Mélanger la pâte Base Variolink II sur un bloc de mélange
avec le catalyseur pendant 10 secondes dans un rapport de
1:1 (spatuler avec précaution). Le délai d’application du
mélange Variolink II est d'env. 3.5 min. à une température
de 37 °C.
Attention :
– Variolink II est un matériau dual, photopolymérisable et,
de ce fait, sensible à la lumière bleue (lumière
environnante et scialytique). Ainsi,il doit être mélangé
juste avant l'application. Pendant l'application,une
lumière intensive est à éviter.
– Le mélange des pâtes Base bleach XL 010, blanc
(110/A1), blanc opaque et brun (340/A4) avec la pâte
Catalyseur permet d’obtenir une teinte intermédiaire.
– Un mélange trop violent, augmente la quantité d’air
introduite dans la pâte, ce qui ralentit la polymérisation
et diminue les propriétés mécaniques.
– Veiller particulièrement à l'élimination des excédents en
temps voulu, notamment dans les zones difficiles d'accès
(bordures proximales et gingivales). Du fait de sa dureté,
l'élimination du composite de collage polymérisé
Variolink II à l'aide d'instruments rotatifs et oscillants
(pointes diamantées à finir,disques, etc.) dans les zones
peu accessibles, est difficile, longue et fastidieuse.
Nous recommandons d’utiliser la pâte Base avec la pâte
Catalyseur basse viscosité pour l’intégration de couronnes
et couronnes partielles et la pâte Base avec la pâte
Catalyseur haute viscosité pour les inlays, onlays et
facettes.Toutefois, l’utilisateur peut choisir librement pour
chaque indication la consistance qui lui semble adéquate.
La teinte blanche opaque peut être employée pour masquer
des dyschromies des substances dentaires.
Compte tenu de la faible épaisseur des facettes et de leur
translucidité, Variolink II peut être utilisé en photo-
polymérisation pure. Dans ce cas,seule la pâte Base est
utilisée pour le collage de la restauration. Le Catalyseur ne
sera pas nécessaire. La consistance est unique dans ce cas.
Pour contrôler l’application directe de la pâte Base,nous
recommandons l’utilisation des canules d’application
Variolink II.
Page 14

7. Intégration :
a) Inlays/Onlays :
Appliquer le mélange Variolink II avec un pinceau ou une
spatule dans la cavité et/ou, si nécessaire,sur l’intrados de
la restauration.
b) Couronnes/bridges :
Appliquer le mélange Variolink II sur l’intrados de la
restauration et/ou en cas de besoin, sur le moignon.
c) Facettes :
Appliquer le mélange Variolink II au pinceau ou à la spatule
et/ou à l’aide des canules d’application sur la dent préparée
et/ou, si nécessaire,sur l’intrados de la restauration.
Attention :
– Placer tout d’abord la restauration “in situ” avec une
légère pression et éliminer les excédents avec un pinceau
ou tout autre instrument approprié.
– Veiller particulièrement à l'élimination des excédents en
temps voulu, notamment dans les zones difficiles d'accès
(bordures proximales et gingivales).
– Pour faciliter le nettoyage des excès, maintenir la
pression et fixer la restauration en photopolymérisant 10
à 20 sec. sur une face facilement accessible.
Important :
A ce stade, ne polymériser en aucun cas les zones
proximales ou autres endroits.
– après la première fixation, relâcher la pression sur la
restauration. Dégager maintenant avec une spatule ou un
autre instrument approprié les excédents restant dans les
zones proximales.Veiller au cours de cette opération à ce
que Variolink II ne soit pas essuyé des zones périphériques.
8. Polymérisation :
Polymériser Variolink II pendant au moins 40 secondes
section par section en commençant par les zones
proximales.
Remarque concernant l’inhibition par l'oxygène :
Variolink II subit comme tous les composites les effets de
l’inhibition de la couche de surface par l’oxygène. Celle-ci,
d’une épaisseur d’environ 50 µm est en contact avec l’air
pendant la polymérisation et ne polymérise pas. On peut
remédier à ce problème de 2 façons :
1)Avant la polymérisation, laisser en place de petits
excédents. L’inhibition s’effectue alors sur l’excédent de
Variolink II. Celui-ci sera facilement éliminé après la
polymérisation, dans le cadre de la finition des bords.
2) Après l’élimination des excédents et avant la polymérisation couvrir les bords de la restauration de Liquid
Strip (gel de glycérine). On évite ainsi l’inhibition par
l’ oxygène.
9. Finition, polissage :
– Enlever les excédents durcis avec une fraise diamantée à
finir (granulométrie < 25 µm), des disques flexibles et de
préférence à l’aide d’une lunette-loupe
– Parfaire les zones proximales avec des strips à finir et à
polir.
– Contrôler à nouveau l’occlusion et les mouvements de
latéralité, les corriger le cas échéant.
– Polir les bords de la restauration avec des pointes
siliconées (Politip-F et P, Astropol
®
) ou avec des disques.
10. Fluoration :
Fluorer la dent après avoir terminé la restauration (par ex.
avec Fluor Protector).
Précautions d'emploi :
Ne pas mettre Variolink II en contact avec la peau,les
muqueuses et les yeux lorsqu'il n'est pas polymérisé,
Variolink II pouvant être à ce stade légèrement irritant et
entraîner une sensibilisation au méthacrylate.
Conditions de stockage :
– Ne pas utiliser Variolink II au-delà de la date de
péremption.
– Les pâtes Catalyseur doivent être conservées au
réfrigérateur (2–8 °C).
– Attention: refermer tout de suite les seringues après
utilisation, l’exposition à la lumière peut conduire à une
polymérisation prématurée.
– Stabilité: voir la date de péremption figurant sur
l'emballage.
Page 15

Ne pas laisser à la portée des enfants!
Réservé à l'usage exclusif du Chirurgien Dentiste!
Date d’édition :
05/2003
Fabricant :
Vivadent Ets.
FL-9494 Schaan / Liechtenstein
Ce matériau a été développé en vue d’une utilisation dans le domaine dentaire et
doit être mis en oeuvre selon le mode d’emploi. Les dommages résultant du nonrespect de ces prescriptions ou d’une utilisation à d’autres fins que celles indiquées
n’engagent pas la responsabilité du fabricant. L’utilisateur est tenu de vérifier sous
sa propre responsabilité l’appropriation du matériau à l’utilisation prévue et ce
d’autant plus si celle-ci n’est pas citée dans le mode d’emploi.
Variolink®II
Istruzioni d'uso
Descrizione del prodotto
Variolink II è un sistema di cementi compositi ad
indurimento duale (auto e fotoindurente) per il fissaggio
adesivo di restauri in ceramica e in composito.
Variolink II può anche essere utilizzato eslusivamente come
cemento fotopolimerizzabile (p.e.fissaggio di faccette). A
tale scopo si utilizza esclusivamente Variolink II Base.
Variolink II si basa sulla tecnologia ACT (Advanced
Composite Technology) di Tetric®Ceram. La speciale
composizione dei riempitivi della tecnologia ACT conferisce
a Variolink II eccellenti caratteristiche fisiche, un’elevata
resistenza all’abrasione, ottimale radiopacità,eccezionali
proprietà ottiche e un rilascio continuativo di fluoro.
Variolink II è disponibile in 6 colori base e 2 colori
catalizzatore e in 3 diverse viscosità per poter operare
miratamente a seconda delle situazioni cliniche.
Colori
La pasta base di Variolink II è disponibile nei seguenti
colori:
Chromascop A–D
Base
bleach XL 010 –
trasparente T –
bianco 110 A1
bianco opaco – –
giallo (universale) 210 A3
marrone 340 A4
Catalizzatore ad elevata/bassa viscosità:
giallo (universale) 210 A3
trasparente T -
Catalizzatore a viscosità ultra
giallo (universale) 210 A3
Italiano
Page 16

Tempo di lavorazione
Approssivatimente 3,5 min.con 37 °C.
Rapporto di dosaggio
Miscelare la pasta base e il catalizzatore in rapporto 1:1.
Composizione
La matrice monomerica è composta da Bis-GMA,
dimetacrilato di uretano e trietileneglicoldimetacrilato. I
riempitivi inorganici sono composti da vetro di bario,
trifluoruro di itterbio, vetrosilicati di bario, alluminio e
fluoro, e ossido misto sferoidale. Sono inoltre contenuti
catalizzatori, stabilizzatori e pigmenti.
La dimensione delle particelle è compresa tra 0,04 e 3,0 µm.
La dimensione media delle particelle è di 0,7 µm.
peso % peso % Vol%
Monomero riempitivi riempitivi
Base 26.3 73.4 46.7
Catal. cons.fluida 27.9 71.2 43.6
Catal. cons.densa 22.0 77.2 52.0
Indicazioni
Cementazione adesiva di restauri in ceramica e in
composito (inlay,onlay,corone, ponti privi di metallo,
faccette), ricostruzione di monconi realizzati in laboratorio
o in studio (Targis
®
/ Vectris®, IPS Empress®2).
Controindicazioni
L’utilizzo di Variolink II è controindicato:
– qualora non sia possibile assicurare un campo operatorio
asciutto qualora la metodica consigliata non possa essere
eseguita
– qualora il paziente sia allergico ad uno dei componenti
del cemento composito.
Effetti collaterali
Effetti collaterali sistemici ad oggi non noti. Sono stati
riportati casi sporadici di reazioni allergiche. In cavità medie
o profonde può insorgere un’irritazione pulpare qualora
non venga assicurata un’appropriata protezione pulpo dentinale o l’applicazione di un sottofondo.
Interazioni
Le sostanze fenoliche (p.e.eugenolo) inibiscono la
polimerizzazione. L’applicazione di materiali contenenti tali
sostanze è pertanto sconsigliata.
Page 17

Tabella riassuntiva per il fissaggio adesivo con
Variolink II
Messa in prova e cementazione dei restauri estetici
I passaggi:
Per informazioni dettagliate riferirsi anche alle Istruzioni
d’uso dei relativi prodotti.
1. Rimozione del restauro provvisorio
Rimuovere eventuali residui del cemento composito
provvisorio dalla cavità, o dal moncone preparato,
mediante uno spazzolino per lucidatura e una pasta
detergente priva d’olio e fluoro. Risciacquare con spray
d’acqua.
Avvertenza:
Utilizzare esclusivamente cementi provvisori privi di
eugenolo (p.e.Provilink
®
) in quanto l’eugenolo può inibire
la polimerizzazione di Variolink II.Nella realizzazione di
inlay utilizzando Systemp
®
.inlay / Systemp®.onlay quale
materiale da restauro provvisorio, di norma non è
necessaria l’applicazione di un cemento composito
provvisorio.
2. Messa in prova del restauro
Per ottenere risultati finali ottimali, è consigliabile provare il
restauro con un pasta try-in (p.e.Variolink II Try-In).Per
evitare una frattura del restauro, non controllare
l’occlusione in questa fase. Se necessario, apportare le
dovute correzioni con una punta diamantata a granulometria fine a media velocità ed esercitando una leggera
pressione. Lucidare le superfici ritoccate.
3. Isolamento
Nella tecnica di cementazione adesiva con composito si
raccomanda di isolare il campo con una diga in gomma.
Restauro – Pre-trattamento
Avvertenza:
I passaggi "Restauro 4a e 5a” possono anche essere
realizzati dal personale assistente.
4a. Detersione
Eliminare il gel alla glicerina con acqua e asciugare il
restauro con getto d’aria privo d’aria e olio.
Rimozione del
provvisorio
Messa in prova del
restauro
Rifinitura
Lucidatura
Applicazione topica
di fluoro
Sciacquare, asciugare
Variolink II
Cementazione
Polimerizzazione
Pretrattamento del
restauro secondo le
indicazioni del
produttore
Pre-trattamento della
cavità: mordenzatura di
smalto e dentina, (p.e.
Total Etch).
Adesivo dentinale (p.e.
Excite
®
DSC, Syntac®)
Sciacquare, asciugare
Isolamento
del campo
Restauro
Cavità
Page 18

5a. Pretrattamento del restauro
Seguire le istruzioni d’uso della Casa produttrice.
Cavità/Preparazione – Pre-trattamento
4b. Detersione
Detergere la cavità/preparazione con spray d’acqua e
asciugare.
5b. Pre-trattamento della cavità
– Applicare acido ortofosforico in gel (al 37% p.e. Total
Etch) dapprima su smalto poi su dentina preparati.
Utilizzare un pennellino monouso o una cannula
d'applicazione per applicare il mordenzante anche nelle
zone di difficile accesso della preparazione. Lasciare agire
per 15–30 secondi su smalto e per 10–15 secondi su
dentina.
– Rimuovere tutto il gel mordenzante con potente getto
d'acqua spray per almeno 5 secondi.
– Asciugare l’eccessiva umidità mediante:
a) Getto d'aria priva d'acqua e olio, 1–2 applicazioni
b) Mediante cannula aspiratrice ad elevata potenza tenuta
direttamente sulla cavità preparata per 1–2 secondi o
c) Tecnica tampone con un pennellino asciutto, o un
batuffolino di spugna assorbente.
– Non asciugare eccessivamente la dentina.Le
superfici della preparazione debbono mantenersi
leggermente umide.
– Le superfici debbono restare leggermente umide. La
superficie mordenzata dovrebbe avere un aspetto bianco
gessoso. In caso contrario, o qualora la superficie
dentinale fosse stata contaminata, ripetere la
mordenzatura.
– Successivamente, applicare l'adesivo (vedere istruzioni
d'uso di Excite DSC, Syntac).
Nota:
Utilizzando una matrice a banda nelle aree interprossimali
si evita la mordenzatura accidentale dei denti adiacenti e si
facilita la successiva rimozione delle eccedenze di
Variolink II. Mantenere posizionata la matrice a banda
servendosi di un apposito cuneo interdentale.
6. Variolink II
Su un blocchetto d’impasto miscelare Variolink II in
rapporto 1:1 per 10 sec. (miscelare con cura servendosi di
una spatola). Il tempo di lavorazione di Variolink II
miscelato è di circa 3 minuti e 30 sec. a 37 °C.
Attenzione:
– Variolink II è un materiale ad indurimento duale (auto e
fotoindurente), pertanto sensibile alla luce blu (luce
scialitica, luce ambientale). Per questa ragione Variolink II
andrebbe impastato immediatamente prima dell’applicazione. Evitare un’illuminazione intensa durante
l’applicazione.
– Miscelando le paste base bleach (XL 010), bianco
(110/A1), bianco opaco,marrone (340/A4) con le paste
catalizzatrici si ottiene un colore intermedio.
– Impastando eccessivamente è possibile intrappolare bolle
d’aria neIl’impasto. Ciò può ritardare la polimerizzazione
e compromettere le proprietà meccaniche.
– Assicurarsi di rimuovere le eccedenze tempestivamente,
in special modo nelle zone difficili da raggiungere
(margini prossimali o gengivali). Data la durezza dei
cementi compositi quali Variolink II una volta polimerizzati, è estremamente difficile e dispendioso in
termini di tempo rimuovere le eccedenze dalle aree
difficili da raggiungere con strumenti rotanti o oscillanti
(punte di rifinitura diamantate, dischi,Proxoshape, ecc.).
Nella cementazione di corone e corone parziali si
raccomanda di utilizzare la base con pasta catalizzatrice a
bassa viscosità; mentre per il posizionamento di inlay/onlay
e faccette la base con pasta catalizzatrice ad elevata
viscosità. L’operatore può comunque scegliere liberamente
la viscosità più adatta a seconda dell’indicazione.
In caso di discromia della sostanza dura del dente, si
raccomanda l’utilizzo del colore bianco opaco, in quanto
questa versione di Variolink II possiede migliori proprietà
coprenti.
Dato lo spessore ridotto delle faccette e la loro elevata
traslucenza, Variolink II può essere indurito anche con la
sola fotopolimerizzazione. In tal caso, per cementare il
restauro si utilizza escusivamente la pasta base.
Page 19

La pasta catalizzatrice non è necessaria. Di conseguenza,
non è possibile scegliere tra le diverse viscosità. Per una
applicazione diretta controllata di Variolink II base utilizzare
una cannula d’applicazione.
7. Cementazione
a) Inlays/onlays:
Applicare Variolink II miscelato con un pennellino o una
spatola in cavità e/o, se necessario (in caso di forme
concave o per evitare l’intrappolamento di bolle d’aria),
sulla superficie interna del restauro.
b) Corone/ponti:
Applicare Variolink II miscelato sulla superficie interna del
restauro e/o, se necessario (per evitare di intrappolare bolle
d’aria), sulla preparazione.
c) Faccette:
Applicare Variolink II miscelato con un pennellino o una
spatola sulla preparazione e/o, se necessario, sulla
superficie interna del restauro. Per una applicazione diretta
della sola base utilizzare la cannula d’applicazione
Variolink II.
Attenzione:
– Inizialmente posizionare il restauro in situ esercitando
una leggera pressione e rimuovere le eccedenze con un
pennellino o altro strumento idoneo.
– Nel caso di restauri estesi, assicurarsi di rimuovere le
eccedenze tempestivamente, specialmente nelle zone
difficili da raggiungere (margini prossimali o gengivali).
– Aumentare la pressione mantenendola per alcuni
secondi. Rimuovere le eccedenze di Variolink II con un
pennellino.
– Per facilitare la fase di rimozione delle eccedenze,
mantenere la pressione e fissare il restauro dapprima
limitatamente ad un punto, fotopolimerizzando dai 10 ai
20 secondi.
Importante:
Giunti a questo punto, non polimerizzare alcuna zona
prossimale o marginale.
– Dopo la fase di fissaggio rimuovere le eccedenze
marginali con una spatola o altro strumento idoneo.
Assicurarsi che Variolink II non venga rimosso dai margini.
8. Polimerizzazione
Polimerizzare Variolink II ad ogni passaggio per almeno
40 sec. per ogni segmento.Iniziare dai margini prossimali
(polimerizzare attraverso cunei interdentali trasparenti).
Osservazioni relative all’inibizione da ossigeno:
Come qualunque altro composito,Variolink II è soggetto
all’inibizione da parte dell’ossigeno. Ciò significa che lo
strato superficiale (circa. 50 µm) non polimerizza durante la
fotopolimerizzazione, perché entra in contatto con
l’ossigeno dell’aria. Il problema può essere risolto in due
modi:
1.Non rimuovendo le piccole eccedenze di Variolink II prima
della polimerizzazione. In tal modo, solo le eccedenze
subiscono l’inibizione da ossigeno e possono essere
facilmente rimosse dopo la polimerizzazione nella fase di
rifinitura dei margini.
2.Ricoprire i margini del restauro con gel alla glicerina (p.e.
Liquid Strip) dopo aver rimosso le eccedenze, ma prima
della polimerizzazione. In tal modo si può evitare
l’inibizione dovuta all’ossigeno.
9. Rifinitura, lucidatura
– Rimuovere le eccedenze polimerizzate con una punta
diamantata (granulometria inferiore a 25 µm) e dischi
flessibili.
– Rifinirele regioni prossimali con strisce per rifinitura e per
lucidatura.
– Controlare l’occlusione e la funzionalità e apportare le
necessarie correzioni.
– Lucidare i margini del restauro con gommini siliconici per
lucidatura (Astropol
®
, Politip F e P) o con dei dischi.
10. Applicazione topica di fluoro
Procedere con l’applicazione topica di fluoro a restauro
ultimato (p.e.con Fluor Protector).
Avvertenze:
Evitare il contatto di Variolink II non polimerizzato con cute,
mucose o occhi. Il prodotto non polimerizzato può avere un
leggero effetto irritante e può indurre a sensibilizzazione
nei confronti dei metacrilati.
Page 20

Conservazione
– Non utilizzare Variolink II dopo la data di scadenza.
– Conservare le confezioni della pasta catalizzatrice in
ambiente fresco (2–8°C).
– Avvertenza: richiudere le siringhe immediatamente dopo
l’uso. L’esposizione alla luce provoca la polimerizzazione
precoce del prodotto.
– Durata di immagazzinamento: riferirsi alla data di
scadenza.
Ad esclusivo uso odontoiatrico.
Tenere il prodotto fuori della portata dei bambini.
Realizzazione delle istruzioni d’uso:
05/2003
Produttore:
Ivoclar Vivadent AG
FL-9494 Schaan / Liechtenstein
Questi materiali sono stati sviluppati unicamente per un utilizzo in campo
odontoiatrico. Il loro impiego deve avvenire esclusivamente secondo le specifiche
istruzioni d’uso. Il produttore non si assume alcuna responsabilità per danni
risultanti dalla mancata osservanza delle istruzioni d’uso o da utilizzi diversi dal
campo d’applicazione previsto per il prodotto. L’utilizzatore è responsabile per la
sperimentazione dei materiali per un impiego non esplicitamente indicato nelle
istruzioni d’uso. Le descrizioni e i dati non costituiscono alcuna garanzia degli
attributi e non sono vincolanti.
Variolink®II
Instrucciones de uso
Descripción
Variolink II es un cemento de fijación en base a composite
de polimerización Dual (auto y fotopolimerizable), para la
cementación adhesiva de restauraciones de cerámica y
composite.
Variolink II también puede utilizarse solo con el sistema de
fotopolimerización (por ej. cementado de carillas). En este
caso, se utiliza solamente Variolink II base.
Variolink II está basado en "Advanced Composite
Technology” de Tetric®Ceram. Gracias a esta especial
composición y tecnología, Variolink II posee extraordinarios
valores físicos junto con una elevada resistencia a la
abrasión, elevada radiopacidad, buenas propiedades
ópticas además de una continua liberación de fluor.
Variolink II se suministra en 6 colores de base así como en
3 grados de viscosidad. De esta forma,Variolink II está
disponible en la versión adecuada para las diferentes
necesidades clínicas.
Colores
Variolink II Base está disponible en los siguientes colores:
Chromascop A–D
Base
Bleach XL 010 –
Transparente T –
Blanco 110 A1
Blanco Opaco – –
Amarillo (Universal) 210 A3
Marrón 340 A4
Catalizadores Alta/Baja Viscosidad:
Amarillo (Universal) 210 A3
Transparente T –
Español
Page 21

Catalizador Ultra
Amarillo (Universal) 210 A3
Tiempo de trabajo
Aprox. 3,5 minutos a 37 ºC/ 99 ºF
Proporción de mezcla
Mezclar pasta base y catalizador en proporción 1:1
Composición
La matriz de monómero se compone de Bis-GMA,
dimetacrilato de uretano y trietilenglicoldimetacrilato. El
material de relleno inorgánico se compone de vidrio de
Bario, trifluoruro de Iterbio, vidrio de fluorsilicato de Ba-Al y
óxidos mixtos esferoidales.Además contiene catalizadores,
estabilizadores y pigmentos.
El tamaño de partícula oscila entre 0.04–3.0 µm. El tamaño
medio de las partículas es de 0.7 µm.
% Monómero % Relleno % Relleno
Peso Peso Vol
Base 26.3 73.4 46.7
Catalizador fluido 27.9 71.2 43.6
Catalizador denso 22.0 77.2 52.0
Indicaciones
Fijación adhesiva de restauraciones de cerámica y
composite, (inlays, onlays, coronas,puentes adhesivos sin
metal, carillas (Targis
®
/Vectris®, IPS Empress®2, muñones)
realizadas en clínica o laboratorio.
Contraindicaciones
La utilización de Variolink II está contraindicada:
– Cuando no sea posible el aislamiento del campo
operatorio o la técnica de aplicación descrita
– Cuando el paciente tenga alergia conocida a alguno de
los componentes del cemento de fijación
Efectos secundarios
No se conocen efectos secundarios sistemáticos. En casos
individuales pueden existir reacciones alérgicas. En
cavidades muy profundas o medianas, sin la protección
dentino/pulpar adecuada (base/liner), puede producirse
irritación de pulpa.
Efectos colaterales
Las sustancias fenólicas (ej: Eugenol), inhiben la
polimerización. Consecuentemente,los preparados que
contengan estas sustancias no deben utilizarse.
Page 22

Esquema de utilización de Variolink II Prueba y cementación adhesiva de restauraciones
estéticas
Descripción paso a paso
Para indicaciones más detalladas ver instrucciones de uso
de los productos mencionados
1. Retirada de la restauración provisional
Eliminar los posibles restos de cemento provisional de la
cavidad utilizando cepillo de pulir y pasta de limpieza libre
de aceite o fluor.Lavar con agua en spray.
Nota:
Utilizar unicamente cementos provisionales libres de
eugenol (ej. Provilink
®
) debido a que el eugenol inhibe la
polimerización de Variolink II.En el caso de la realización
de inlays y utilizando como material provisional
Systemp®.inlay/Systemp®.onlay,la utilización de cemento
provisional no es necesaria.
2. Prueba de la restauración
Para conseguir un óptimo resultado final, es necesaria la
prueba de la restauración con una pasta de prueba (ej:
Variolink II Try-In). Para evitar la fractura de la restauración,
no controle la oclusión en este paso. En el caso de ser
necesario, realice las posibles correcciones con diamante
fino a velocidad media y poca presión. Pulir de nuevo las
superficies.
3. Aislamiento total
En la técnica de cementación adhesiva con composite, se
recomienda el aislamiento con dique de goma.
Restauración – Tratamiento preliminar
Nota:
Los pasos 4a y 5a que figuran a continuación, pueden
realizarse por el auxiliar de clínica.
4a) Limpieza
Lavar el gel de glicerina con agua y secar la restauración
con aire libre de agua y aceite.
Eliminación del
provisional
Prueba de la
restauración
Acabado y
pulido
Aplicación tópica
de fluor
Lavado y secado
Variolink II
Colocación
Polimerización
Pretatamiento de la
restauración según
instrucciones del
fabricante
Pretratamiento de la
cavidad: Grabado
esmalte y dentina (ej
Total Etch).Adhesivo
(Ej: Excite
®
DSC,
Syntac®)
Lavado y secado
Aislamiento
Restauración
Cavidad
Page 23

5a) Tratamiento preliminar de la restauración
Seguir instrucciones del fabricante.
Cavidad/Preparación Tratamiento preliminar
4b) Limpieza
Lavar la cavidad preparada con agua en spray y secar.
5b) Tratamiento preliminar de la cavidad
– Aplicar gel de ácido fosfórico (Total Etch 37%) primero
sobre el esmalte preparado y seguidamente sobre
dentina. Extender el gel de grabado con un pincel
desechable o extremo de una cánula también en todas
las zonas de la preparación. Dejar actuar el gel de
grabado durante
15–30 segundos sobre el esmalte y de 10 a 15 segundos
sobre dentina.
– Aclarar abundantemente y durante al menos 5 segundos
con un fuerte chorro de agua. Secar la humedad sobrante
de forma que después sea visible una superficie
dentinaria algo húmeda y brillante (= wet bonding). Ello
se puede realizar con:
a)Pistola de aire durante 1 o 2 seg. o
b)con un fuerte succionador, que se mantiene durante
1–2 segundos sobre la cavidad o
c) con un pincel, pellet sintético o cualquier otro absorbente
sin pelusas
– No resecar la dentina. La superficie preparada debe
presentar una humedad aparente.
– La superficie de esmalte grabada tiene que presentar un
aspecto blanco tizoso. En caso contrario o si la superficie
de esmalte se contamina, repetir el grabado.
– A continuación, aplicar el adhesivo (ver instrucciones de
uso Excite DSC, Syntac)
Nota:
La colocación de matrices en la zona proximal evita el
grabado accidental del diente adyacente y facilita
posteriormente la eliminación de sobrantes de Variolink II.
Colocar matrices y sujetar con cuñas interdentales.
6. Variolink II
Mezclar Variolink II en proporción 1:1 en un block de
mezcla durante 10 seg (espatular minuciosamente) El
tiempo de trabajo de Variolink II mezclado es de alrededor
de 3,5 minutos a temperatura 37ºC/ 99ºF.
Atención:
– Variolink II es un cemento de polimerización dual y
fotopolimerizable y por esta razón sensible a la luz azul
(luz operatoria/luz ambiente). Por ello, Variolink II debe
mezclarse inmediatamente antes de su aplicación. Evitar
luces intensas durante su aplicación.
– El resultado de mezclar las pastas bases (bleach XL 010,
blanco (110/A1), blanco opaco,marrón (340/A4) con las
pastas catalizadoras da como resultado un color mezcla.
– Si el mezclado se realiza demasiado fuerte, puede
penetrar aire en la pasta. En este caso puede retrasarse la
polimerización y comprometer las propiedades
mecánicas.
– Asegúrese de eliminar los excesos de material en tiempo,
especialmente en zonas de difícil acceso (zonas
proximales o margen gingival). Debido a la dureza de los
cementos de fijación completamente polimerizados,
como Variolink II,retirar los excesos con instrumentos
rotatorios u oscilatorios (diamantes de acabado, discos,
proxoshape ect) es extremadamente difícil y exige mucho
tiempo.
Recomendamos el uso de pasta base con el catalizador de
baja viscosidad para la colocación de coronas y coronas
parciales. Pasta base y catalizador de alta viscosidad para
inlays/onlays y carillas. Sin embargo el profesional puede
elegir la adecuada viscosidad para cada indicación.
En el caso que la sustancia dental esté decolorada,
recomendamos la utilización del color blanco opaco, debido
a las mejores propiedades de enmascaramiento que
presenta esta versión de Variolink II.
En carillas que presenten escaso grosor y alta translucidez
puede utilizarse Variolink II sólo fotopolimerizable. En este
caso, solo se utiliza Variolink II base para la cementación. El
catalizador no es necesario. En este caso por lo tanto no es
posible la selección de diferentes consistencias.
Page 24

Para controlar la aplicación directa de Variolink II base,
utilizar los Tips de aplicación (cánulas)
7. Colocación
a) Inlays/Onlays:
Aplicar Variolink II mezclado con un pincel o espátula en la
cavidad y/o si es necesario (angulos cóncavos o para evitar
atrapamiento de aire) en el interior de la superficie de la
restauración.
b) Coronas/puentes:
Aplicar Variolink II mezclado en el interior de la superficie
de la restauración y/o, si es necesario (evitar atrapamiento
de aire) en la preparación.
c) Carillas:
Aplicar Variolink II mezclado con un pincel o espátula en la
preparación y/o, si es necesario, en el interior de la
superficie de la restauración. Para la aplicación directa de
Variolink II base solo,utilizar los Tips de aplicación.
Atención:
– Primero, colocar la restauración en su posición con una
ligera presión y eliminar los excesos con un pincel o
instrumento adecuado.
– En el caso de grandes restauraciones, asegurarse de
eliminar los excesos en tiempo, especialmente en zonas
de difícil acceso (proximal y zona gingival)
– Incrementar la presión y mantener durante algunos
segundos. Eliminar los excesos de Variolink II ayudándose
con un pincel.
– Para facilitar el proceso de retirada de sobrantes
posterior,manteniendo la presión fotopolimerizar
10–20 segundos en un punto.
Importante:
En este paso, no polimerizar ninguna zona proximal o
marginal.
– Después de la colocación de la restauración en su
posición, eliminar los excesos adicionales con espátula o
instrumento apropiado.Asegurarse no eliminar excesos
de Variolink II de los margenes
8. Polimerización
Polimerizar Variolink II paso a paso como mínimo
40 segundos por cada sección. Comenzar por los márgenes
proximales (polimerice a través de cuñas interdentales
transparentes).
Nota sobre la inhibición del Oxígeno:
Como todos los composites,Variolink II se ve afectado por
la acción del Oxígeno. Es decir, durante la polimerización la
capa superior de Variolink II (aprox.50 µm) que está en
contacto con el oxígeno atmosférico no polimeriza durante
la fotopolimerización. Este problema puede resolverse de
dos formas:
1)No eliminar una pequeña cantidad de exceso de
Variolink II antes de la polimerización. De esta forma,
solo este exceso de Variolink II se ve afectado por la
inhibición del oxígeno y puede eliminarse fácilmente
después de la polimerización, durante el acabado de los
márgenes.
2)Cubrir los márgenes de la restauración con un gel de
glicerina (ej: Liquid Strip) después de eliminar los excesos,
pero antes de la polimerización. De esta forma, se evita
la capa inhibida por el oxígeno.
9. Acabado y pulido
– Eliminar los sobrantes polimerizados con diamantes de
acabado (tamaño de grano menor 25 µm) y discos
flexibles.
– Utilizar tiras de acabado y pulido en las zonas
proximales.
– Controlar la oclusión y la función realizando las
correcciones necesarias.
– Pulir los márgenes de la restauración con pulidores de
silicona (Astropol, Politip F y P) o discos.
10. Aplicación de fluor tópico
Fluorizar los dientes después de finalizada la restauración
(ej: con Fluor Protector)
Advertencia:
Evitar el contacto de Variolink II con piel,mucosas y ojos.
Variolink II no polimerizado puede causar ligeras irritaciones y producir una sensibilización a los metacrilatos.
Page 25

Almacenamiento
– No utilizar Variolink II una vez caducado
– La pasta catalizadora debe almacenarse en frigorífico
(2–8 ºC)
– Nota: Cerrar las jeringas inmediatamente después de su
uso. La exposición del material a la luz,puede ocasionar
polimerizaciones prematuras.
– Caducidad: ver fecha caducidad en envase
Mantener fuera del alcance de los niños!
Solo para uso odontoestomatológico!
Fecha realizada información:
05/2003
Fabricant:
Ivoclar Vivadent AG
FL-9494 Schaan / Liechtenstein
Estos productos han sido desarrollados para su aplicación en el campo dental y
deben aplicarse de acuerdo con las instrucciones de uso. El fabricante no se
responsabiliza de los daños que puedan producirse por una utilización inadecuada
de los mismos. Es más,el usuario está obligado a cerciorarse de las indicaciones de
los mismos, siempre que los fines para los que los quiera utilizar no consten en las
instrucciones de uso.
Variolink®II
Instruções de Uso
Descrição
Variolink II é um sistema composto de cimentação,com
polimerização dual (auto e fotopolimerizável), para a
fixação adesiva de restaurações de cerâmica e restaurações
de compósito.
Variolink II pode ser aplicado apenas com a técnica de
fotopolimerização (p.ex., cimentação de facetas).Para este
propósito, somente a pasta Base de Variolink II deve ser
usada.
Variolink II está baseado na "Advanced Composite
Technology” do Tetric®Ceram. A especial composição de
partículas inorgânicas desta tecnologia promove extraordinárias propriedades físicas, alta resistência à abrasão,
elevada radiopacidade, excelentes propriedades ópticas e
contínua liberação de flúor.Variolink II Base é apresentado
em 6 cores e Variolink II Catalisador é apresentado em
2 cores e 3 níveis de viscosidade. Deste modo, Variolink II
é compatível com as várias e diferentes exigências clínicas.
Cores
Variolink II Pasta Base está disponível nas seguintes cores :
Chromascop A–D
Bleach
bleach XL 010 –
transparente T –
branco 110 A1
branco opaco – –
amarelo (universal) 210 A3
marrom 340 A4
Catalisador de alta/baixa viscosidade:
amarelo (universal) 210 A3
transparente T –
Português
Page 26

Catalisador de ultra viscosidade:
amarelo (universal) 210 A3
Tempo útil de trabalho
Aprox. 3,5 minutos,na temperatura de 37º C (99 ºF).
Proporção de mistura
Misturar as pastas Base e Catalisadora na proporção de 1:1.
Composição
A matriz de monômero é composta de Bis-GMA,
dimetacrilato de uretano e trietilenoglicoldimetacrilato.A
carga inorgânica é constituída por vidro de bário, trifluoreto
de itérbio, vidro de fluorsilicato de bário e alumínio e
óxidos mistos esferoidais.Além disto, contém catalisadores,
estabilizadores e pigmentos.
O tamanho das partículas situa-se entre 0.04 e 3.0 µm.
O tamanho médio das partículas é de 0.7 µm.
Monômero Carga Carga
(% peso) (% peso) (% vol.)
Base 26.3 73.4 46.7
Catalisador fluido 27.9 71.2 43.6
Catalisador denso 22.0 77.2 52.0
Indicação
Cimentação adesiva de restaurações de cerâmica e
restaurações de compósito (inlays, onlays, coroas, facetas,
pontes adesivas sem metal,Targis
®
/Vectris®, IPS Empress®2,
reconstruções coronárias), feitas em laboratório de prótese.
Contra-indicação
A aplicação de Variolink II está contra-indicada :
– Quando não é possível estabelecer um campo operatório
seco ou quando não é possível seguir a técnica prescrita.
– Quando existir comprovada alergia a qualquer um dos
ingredientes do compósito de cimentação Variolink II.
Efeitos colaterais
Até o momento, nenhum efeito sistêmico colateral é
conhecido. Em casos isolados, reações alérgicas foram
relatadas. Nos casos de cavidades profundas, sem
adequada proteção, podem ocorrer irritações pulpares.
Interações
Substâncias fenólicas (p.ex., eugenol) inibem a polimerização.Deste modo,evitar o uso conjunto destas
substâncias com Variolink II.
Page 27

Fluxograma da cimentação adesiva com Variolink II Prova e fixação adesiva de restaurações estéticas
”Passo a passo”
Para maiores detalhes,consultar as correspondentes
Instruções de Uso dos produtos mencionados.
1. Remoção da restauração provisória
Eliminar totalmente o cimento de fixação da restauração
provisória. Limpar a cavidade (ou preparo) com escova e
pasta profilática isenta de óleo e flúor.A seguir, lavar com
spray de água.
Nota:
Utilizar apenas cimentos temporários livres de eugenol
(p.ex., Provilink
®
), porque o eugenol pode inibir a
polimerização do Variolink II. Para provisórios confeccionados com Systemp©.inlay/Systemp®.onlay,o emprego de um
cimento temporário geralmente não é necessário.
2. Prova da restauração
Com o objetivo de alcançar ótimos resultados finais, provar
a restauração com o auxílio de uma pasta de prova (p.ex.,
Variolink II Try-In). Para evitar a fratura da restauração, não
checar a oclusão neste estágio. Se necessário, assinalar as
correções com uma ponta diamantada, usando leve pressão
e média velocidade. Polir as superfícies desgastadas.
3. Isolamento absoluto
Para a técnica de cimentação adesiva de restaurações com
compósitos, é recomendado o isolamento do campo
operatório com dique de borracha.
Tratamento preliminar da restauração
Nota:
Os passos seguintes (4a, 5a) podem ser efetuados pela
assistente dental, no sentido de auxiliar o dentista.
4a. Limpeza da restauração
Remover o gel de glicerina, lavar com água e secar com
jato de ar isento de água e óleo.
Remoção
do provisório
Prova da
restauração
Acabamento e
polimento
Aplicação tópica de flúor
Lavar e secar
Variolink II
Posicionamento
Polimerização
Condicionamento da
restauração de acordo
com as instruções
Tratamento preliminar
da cavidade:
– Ataque ácido de
esmalte e dentina
(p.ex.,Total Etch).
– Agente adesivo
(p.ex., Excite
®
DSC,
Syntac®)
Lavar e secar
Isolamento
Restauração
Cavidade
Page 28

5a. Tratamento preliminar da restauração
De acordo com as instruções do respectivo fabricante.
Tratamento preliminar da cavidade (ou preparo)
4b. Limpeza
Lavar a cavidade (ou preparo) com spray de água e secar
com jato de ar isento de água e óleo.
5b.Tratamento preliminar da cavidade (ou preparo)
– Aplicar gel de ácido fosfórico a 37 % (p.ex., Total Etch) no
esmalte preparado e, a seguir, deixar escoar sobre a
dentina preparada. Usar um pincel descartável ou a
extremidade da seringa para aplicar o ácido em todas as
áreas mais restritas do preparo cavitário. O ácido
fosfórico deve permanecer em contato com o esmalte,
durante 15 a 30 segundos, e ficar em contato com a
dentina, durante 10 a 15 segundos.
– Retirar o gel de ácido fosfórico à custa de forte spray de
água, durante 5 segundos,no mínimo. O excesso de água
pode ser removido com:
a)aplicação de 1 a 2 jatos de ar seco e limpo; ou
b)uso de ponta de aspiração (sucção) de alto volume,
agindo sobre a superfície do preparo, durante 1 a
2 segundos; ou
c) secagem (tipo mata-borrão), utilizando um aplicador
limpo ou material absorvente livre de fibras e fiapos.
– Não desidratar a dentina. As superfícies do preparo
devem permanecer ligeiramente úmidas.
– A superfície atacada deve apresentar aspecto branco
leitoso. Caso isto não ocorra ou caso haja contaminação
da superfície do esmalte, repetir a técnica do ataque
ácido.
– Aplicar agente adesivo (ver Instruções de Uso Excite DSC,
Syntac)
Nota:
O uso de matriz nas regiões proximais evita a possibilidade
do ataque ácido acidental em dentes adjacentes e facilita a
posterior remoção dos excessos de Variolink II.A matriz
pode ser mantida em posição à custa de adequada cunha
interdental.
6. Variolink II
Sobre o bloco de mistura, manipular Variolink II, na
proporção 1:1, durante 10 segundos (misturar cuidadosamente com uma espátula). O tempo útil de trabalho do
Variolink II manipulado é cerca de 3,5 minutos,na
temperatura de 37º C (99 ºF).
Atenção:
– Variolink II é um material sensível à luz azul (luz
operatória, luz ambiente). Deste modo, Variolink II
sempre deve ser manipulado imediatamente antes do
uso. Evitar iluminação intensa durante os procedimentos
de aplicação do cimento Variolink II.
– A mistura das pastas Bases bleach XL (010/–), branco
(110/A1), branco-opaco e marrom (340/A4) com as
pastas Catalisadoras promove as respectivas cores
intermediárias.
– Se a mistura é realizada com muita força, a pasta pode
incorporar muito ar.Isto pode retardar a polimerização e
comprometer as propriedades mecânicas do material.
– Deve haver cuidadosa atenção para a remoção, em
tempo hábil, dos excessos de Variolink II das zonas
proximais e das margens gengivais. Devido à dureza do
cimento totalmente polimerizado, fica muito difícil e
demorada a remoção de excessos das áreas que não
podem ser alcançadas por instrumentos oscilatórios ou
rotatórios (pontas diamantadas, discos, Proxoshape, etc).
A Base e o Catalisador de baixa viscosidade são
recomendados para a fixação de coroas e pontes.A Base
e o Catalisador de alta viscosidade são recomendados para
a cimentação de inlays, onlays e facetas. Entretanto, cada
operador pode escolher a viscosidade apropriada para
cada indicação.
A cor branco-opaco é recomendada para dentes
manchados, porque esta versão opaca de Variolink II
apresenta ótimas propriedades para mascarar superfícies
descoloridas.
Para facetas de limitada espessura e com alta translucidez,
pode ser usada somente a técnica de fotopolimerização do
Variolink II, utilizando apenas a pasta Base para fixar a
restauração.A pasta Catalisadora não é necessária. Neste
caso, não é possível selecionar entre as diferentes
Page 29

consistências. Para controlar a colocação direta da Base
Variolink II, empregar a ponta de aplicação Variolink II.
7. Posicionamento da restauração
a) Inlays / Onlays:
Variolink II misturado é aplicado,com pincel ou espátula,
na cavidade e, se necessário, na parte interna da
restauração, evitando a inclusão de ar.
b) Coroas/pontes:
Variolink II misturado é aplicado na parte interna da coroa
e, se necessário, sobre o preparo, evitando a inclusão de ar.
c) Facetas:
Variolink II misturado é aplicado,com pincel ou espátula,
no preparo e, se necessário, também na parte interna da
restauração. Para posicionamento direto e somente da
pasta Base, utilizar a ponta de aplicação Variolink II.
Atenção:
– Colocar a restauração em posição e, mantendo ligeira
pressão, eliminar os excessos com um pincel ou
instrumento adequado.
– Quando trabalhar com restaurações extensas, remover os
excessos em tempo hábil, especialmente em áreas de
difícil acesso (proximais e margens gengivais).
– Aumentar a pressão sobre a restauração e manter
durante alguns segundos. Com um pincel,remover os
excessos de Variolink II.
– Para facilitar o processo de eliminação dos excessos,
manter a pressão e fixar a restauração a partir de uma
área superficial pequena e isolada, fotopolimerizando
durante 10 a 20 segundos.
Importante:
Neste momento, não fotopolimerizar qualquer área
proximal ou marginal.
– Após a fixação da restauração em sua posição, eliminar
os excessos das margens gengivais com espátula ou
outros instrumentos adequados. O cimento Variolink II,
situado na interface restauração/cavidade, não deve ser
removido.
8. Polimerização
Polimerizar Variolink II em vários segmentos da zona
marginal da restauração. Em cada segmento, fotopolimerizar,no mínimo, durante 40 segundos. Iniciar pelas
margens proximais (se possível, fotopolimerizar através das
cunhas interdentais transparentes).
Observações sobre a inibição do oxigênio
Como todos os compósitos,Variolink II é afetado pela ação
do oxigênio. Isto é,durante a polimerização, a camada
superficial (aprox. 50 µm) de Variolink II, que está em
contato com o oxigênio do ar,não polimeriza. Este
problema pode ser evitado de duas maneiras:
1)Conservar pequenos excessos de Variolink II, antes da
polimerização.A camada inibida de oxigênio será
eliminada durante o acabamento final das margens.
2)Cobrir as margens da restauração com glicerina (p.ex.,
Liquid Strip) depois da remoção dos excessos, mas antes
de polimerizar.Assim, a inibição pelo oxigênio pode ser
evitada.
9. Acabamento e polimento
– Eliminar os excessos polimerizados com pontas de
acabamento diamantadas (granulação em torno de
25 µm) e discos flexíveis.
– Retocar as zonas proximais com tiras de acabamento e
de polimento.
– Revisar a oclusão e corrigir, se necessário.
– Polir as margens da restauração com pontas montadas
de silicone (Astropol
®
, Politip-P e Politip-F) ou discos de
polimento.
10. Aplicação tópica de flúor
Terminada a cimentação, aplicar flúor (p.ex., Fluor
Protector).
Advertência
Evitar o contato de Variolink II com pele ,mucosa e olhos.
Variolink II não polimerizado pode causar ligeira irritação e
pode promover sensibilização aos metacrilatos.
Page 30

Armazenamento
– Não usar o Variolink II com prazo de validade vencido.
– O Catalisador deve ser armazenado em geladeira, entre
as temperaturas de 2 e 8 ºC (36 e 46 ºF).
– Atenção: Após o uso, fechar imediatamente as seringas.
Exposição à luz pode provocar polimerização prematura.
– Vida útil: ver prazo de validade.
Manter fora do alcance das crianças.
Somente para uso odontológico.
Data de elaboração destas Instruções de Uso:
05/2003
Fabricante:
Ivoclar Vivadent AG
FL-9494 Schaan / Liechtenstein
Este material foi fabricado somente para uso dental e deve ser manipulado de
acordo com as Instruções de Uso. O fabricante não é responsável pelos danos
causados por outros usos ou por manipulação incorreta. Além disto,o usuário está
obrigado a comprovar,antes do uso e sob sua responsabilidade, se o material é
compatível com a utilização desejada, principalmente quando esta utilização não
está indicada nestas Instruções de Uso. Descrições e dados não constituem nenhum
tipo de garantia e, por isto,não possuem qualquer vinculação.
Page 31

Ivoclar Vivadent AG
Bendererstrasse 2
FL-9494 Schaan
Liechtenstein
Tel.+423 235 35 35
Fax +423 235 33 60
www.ivoclarvivadent.com
Ivoclar Vivadent Pty. Ltd.
1 – 5 Overseas Drive
P.O. Box 367
Noble Park,Vic. 3174
Australia
Tel.+61 3 979 595 99
Fax +61 3 979 596 45
Ivoclar Vivadent Ltda.
Rua Maestro João Gomes de
Araújo 50; Salas 92/94
Sao Paulo,CEP 02332-020
Brasil
Tel.+55 11 69 59 89 77
Fax +55 11 69 71 17 50
Ivoclar Vivadent Inc.
2785 Skymark Avenue,Unit 1
Mississauga
Ontario L4W 4Y3
Canada
Tel.+1-905 238 57 00
Fax +1-905 238 57 11
Ivoclar Vivadent Marketing Ltd.
Calle 134 No. 13-83,Of. 520
Bogotá
Colombia
Tel.+57 1 627 33 99
Fax +57 1 633 16 63
Ivoclar Vivadent SAS
B.P. 118
F-74410 Saint-Jorioz
France
Tel.+33 450 88 64 00
Fax +33 450 68 91 52
Ivoclar Vivadent GmbH
Dr.Adolf-Schneider-Str.2
D-73479 Ellwangen, Jagst
Germany
Tel.+49 (0) 79 61 / 8 89-0
Fax +49 (0) 79 61 / 63 26
Ivoclar Vivadent UK Limited
Meridian South
Leicester
LE19 1WY
Great Britain
Tel.+44 116 265 40 55
Fax +44 116 265 40 57
Ivoclar Vivadent s.r.l.
Via dell’Industria 16
I-39025 Naturno (BZ)
Italy
Tel.+39 0473 67 01 11
Fax +39 0473 66 77 80
Ivoclar Vivadent S.A. de C.V.
Av.Mazatlán No. 61,Piso 2
Col. Condesa
06170 México, D.F.
Mexico
Tel.+52 (55) 55 53 00 38
Fax +52 (55) 55 53 14 26
Ivoclar Vivadent Ltd
12 Omega St, Albany
PO Box 5243 Wellesley St
Auckland, New Zealand
Tel.+64 9 914 9999
Fax +64 9 914 9990
Ivoclar Vivadent Polska Sp. z.o.o.
ul. Jana Pawla II 78
PL-01-501 Warszawa
Poland
Tel.+48 22 635 54 96
Fax +48 22 635 54 69
Ivoclar Vivadent S.A.
c/Emilio Muñoz, 15
Esquina c/Albarracín
E-28037 Madrid
Spain
Tel.+ 34 91 375 78 20
Fax + 34 91 375 78 38
Ivoclar Vivadent AB
Dalvägen 16
S-169 56 Solna
Sweden
Tel.+46 8 514 93 930
Fax +46 8 514 93 940
Ivoclar Vivadent, Inc.
175 Pineview Drive
Amherst, N.Y. 14228
USA
Tel.+1 800 533 6825
Fax +1 716 691 2285
Ivoclar Vivadent – worldwide
 Loading...