


 Loading...
Iriver H320 and H340
The RockboxVERSIONManual
for
DRAFT rockbox.org
June 6, 2008

2
Rockbox |
|
http://www.rockbox.org/ |
|
Open Source Jukebox Firmware |
|
Rockbox and this manual is the collaborative effort of the Rockbox team and |
|
DRAFT |
|
its contributors. See the appendixVERSIONfor a complete list of contributors. |
|
c |
c |
2003-2008 The Rockbox Team and its contributors, 2004 Christi Alice
Scarborough, c 2003 Jose´ Maria Garcia-Valdecasas Bernal & Peter Schlenker.
Version r17694-080606. Built using pdfLATEX.
Permission is granted to copy, distribute and/or modify this document under the terms of the GNU Free Documentation License, Version 1.2 or any later version published by the Free Software Foundation; with no Invariant Sections, no Front-Cover Texts, and no Back-Cover Texts. A copy of the license is included in the section entitled “GNU Free Documentation License”.
THE ROCKBOX MANUAL |
IRIVER H3XX |

CONTENTS |
3 |
Contents
1 |
Getting started |
VERSION |
|||
|
9 |
||||
|
1.1 |
Welcome . . . . . . . . . . . . . . . . . . . . . . . . . . . . . . . . . . . . . |
9 |
||
|
1.2 |
Getting more help . . . . . . . . . . . . . . . . . . . . . . . . . . . . . . . . |
9 |
||
|
1.3 |
Naming conventions and marks . . . . . . . . . . . . . . . . . . . . . . . |
10 |
||
2 |
Installation |
|
|
11 |
|
|
2.1 |
Overview . . . . . . . . . . . . . . . . . . . . . . . . . . . . . . . . . . . . . |
11 |
||
|
2.2 |
Prerequisites . . . . . . . . . . . . . . . . . . . . . . . . . . . . . . . . . . . |
11 |
||
|
2.3 |
Installing Rockbox . . . . . . . . . . . . . . . . . . . . . . . . . . . . . . . |
12 |
||
|
|
2.3.1 |
Automated Installation . . . . . . . . . . . . . . . . . . . . . . . . |
12 |
|
|
|
2.3.2 Manual Installation . . . . . . . . . . . . . . . . . . . . . . . . . . . |
13 |
||
|
|
2.3.3 |
Enabling Speech Support (optional) . . . . . . . . . . . . . . . . . |
16 |
|
|
2.4 |
Running Rockbox . . . . . . . . . . . . . . . . . . . . . . . . . . . . . . . . |
16 |
||
|
2.5 |
Updating Rockbox . . . . . . . . . . . . . . . . . . . . . . . . . . . . . . . |
16 |
||
|
2.6 |
Uninstalling Rockbox . . . . . . . . . . . . . . . . . . . . . . . . . . . . . . |
16 |
||
|
|
2.6.1 |
Automatic Uninstallation . . . . . . . . . . . . . . . . . . . . . . . |
16 |
|
|
|
2.6.2 Manual Uninstallation . . . . . . . . . . . . . . . . . . . . . . . . . |
17 |
||
3 |
Quick Start |
|
|
18 |
|
DRAFT |
|
18 |
|||
|
3.1 |
Basic overview . . . . . . . . . . . . . . . . . . . . . . . . . . . . . . . . . . |
|||
|
|
3.1.1 The player’s controls . . . . . . . . . . . . . . . . . . . . . . . . . . |
18 |
||
|
|
3.1.2 Turning the player on and off . . . . . . . . . . . . . . . . . . . . . |
19 |
||
|
|
3.1.3 Starting the original firmware . . . . . . . . . . . . . . . . . . . . . |
19 |
||
|
|
3.1.4 The first contact . . . . . . . . . . . . . . . . . . . . . . . . . . . . . |
19 |
||
|
|
3.1.5 |
Basic controls . . . . . . . . . . . . . . . . . . . . . . . . . . . . . . |
19 |
|
|
|
3.1.6 Basic concepts . . . . . . . . . . . . . . . . . . . . . . . . . . . . . . |
20 |
||
|
3.2 |
Customising Rockbox . . . . . . . . . . . . . . . . . . . . . . . . . . . . . |
20 |
||
|
3.3 |
Menu overview . . . . . . . . . . . . . . . . . . . . . . . . . . . . . . . . . |
20 |
||
|
3.4 |
Charging . . . . . . . . . . . . . . . . . . . . . . . . . . . . . . . . . . . . . |
21 |
||
4 |
Browsing and playing |
|
22 |
||
|
4.1 |
File Browser . . . . . . . . . . . . . . . . . . . . . . . . . . . . . . . . . . . |
22 |
||
|
|
4.1.1 |
File Browser Controls . . . . . . . . . . . . . . . . . . . . . . . . . |
23 |
|
|
|
4.1.2 Context Menu . . . . . . . . . . . . . . . . . . . . . . . . . . . . . . |
23 |
||
|
|
4.1.3 |
Virtual Keyboard . . . . . . . . . . . . . . . . . . . . . . . . . . . . |
25 |
|
|
4.2 |
Database . . . . . . . . . . . . . . . . . . . . . . . . . . . . . . . . . . . . . |
26 |
||
4.2.1Introduction . . . . . . . . . . . . . . . . . . . . . . . . . . . . . . . 26
THE ROCKBOX MANUAL |
IRIVER H3XX |

|
CONTENTS |
|
4 |
|
||
|
|
|
4.2.2 |
Initializing the database . . . . . . . . . . . . . . . . . . . . . . . . |
26 |
|
|
|
|
4.2.3 |
The Database Menu . . . . . . . . . . . . . . . . . . . . . . . . . . |
26 |
|
|
|
|
4.2.4 |
Using the database . . . . . . . . . . . . . . . . . . . . . . . . . . . |
27 |
|
|
|
4.3 |
While Playing Screen . . . . . . . . . . . . . . . . . . . . . . . . . . . . . . |
28 |
||
|
|
|
4.3.1 |
WPS Key Controls . . . . . . . . . . . . . . . . . . . . . . . . . . . |
29 |
|
|
|
|
4.3.2 |
Peak Meter . . . . . . . . . . . . . . . . . . . . . . . . . . . . . . . |
29 |
|
|
|
|
4.3.3 |
The WPS Context Menu . . . . . . . . . . . . . . . . . . . . . . . . |
30 |
|
|
|
4.4 |
5.7.4 |
Theme Settings . . .VERSION. . . . . . . . . . . . . . . . . . . . . . . . . . 39 |
||
|
|
Working with Playlists . . . . . . . . . . . . . . . . . . . . . . . . . . . . . |
32 |
|||
|
|
|
4.4.1 |
Playlist terminology . . . . . . . . . . . . . . . . . . . . . . . . . . |
32 |
|
|
|
|
4.4.2 Creating playlists . . . . . . . . . . . . . . . . . . . . . . . . . . . . |
33 |
||
|
|
|
4.4.3 |
Adding music to playlists . . . . . . . . . . . . . . . . . . . . . . . |
34 |
|
|
|
|
4.4.4 Modifying playlists . . . . . . . . . . . . . . . . . . . . . . . . . . . |
35 |
||
|
|
|
4.4.5 Saving playlists . . . . . . . . . . . . . . . . . . . . . . . . . . . . . |
35 |
||
|
|
|
4.4.6 |
Loading saved playlists . . . . . . . . . . . . . . . . . . . . . . . . |
36 |
|
|
|
|
4.4.7 |
Helpful Hints . . . . . . . . . . . . . . . . . . . . . . . . . . . . . . |
36 |
|
5 |
The Main Menu |
37 |
||||
|
|
5.1 |
Introducing the Main Menu . . . . . . . . . . . . . . . . . . . . . . . . . . |
37 |
||
|
|
5.2 |
Navigating the Main Menu . . . . . . . . . . . . . . . . . . . . . . . . . . |
38 |
||
|
|
5.3 |
Recent Bookmarks . . . . . . . . . . . . . . . . . . . . . . . . . . . . . . . |
38 |
||
|
|
5.4 |
Files . . . . . . . . . . . . . . . . . . . . . . . . . . . . . . . . . . . . . . . . |
38 |
||
|
|
5.5 |
Database . . . . . . . . . . . . . . . . . . . . . . . . . . . . . . . . . . . . . |
39 |
||
|
|
5.6 |
Now Playing/Resume Playback . . . . . . . . . . . . . . . . . . . . . . . |
39 |
||
|
|
5.7 |
Settings . . . . . . . . . . . . . . . . . . . . . . . . . . . . . . . . . . . . . . |
39 |
||
|
|
|
5.7.1 |
Sound Settings . . . . . . . . . . . . . . . . . . . . . . . . . . . . . |
39 |
|
|
|
|
5.7.2 General Settings . . . . . . . . . . . . . . . . . . . . . . . . . . . . . |
39 |
||
DRAFT6.5 Channels . . . . . . . . . . . . . . . . . . . . . . . . . . . . . . . . . . . . . 46 |
||||||
|
|
|
5.7.3 |
Manage Settings . . . . . . . . . . . . . . . . . . . . . . . . . . . . |
39 |
|
|
|
|
5.7.5 |
Recording Settings . . . . . . . . . . . . . . . . . . . . . . . . . . . |
40 |
|
|
|
5.8 |
Recording . . . . . . . . . . . . . . . . . . . . . . . . . . . . . . . . . . . . |
40 |
||
|
|
|
5.8.1 |
While Recording Screen . . . . . . . . . . . . . . . . . . . . . . . . |
40 |
|
|
|
5.9 |
FM Radio . . . . . . . . . . . . . . . . . . . . . . . . . . . . . . . . . . . . . |
41 |
||
|
|
5.10 |
Playlist . . . . . . . . . . . . . . . . . . . . . . . . . . . . . . . . . . . . . . |
42 |
||
|
|
5.11 |
Plugins . . . . . . . . . . . . . . . . . . . . . . . . . . . . . . . . . . . . . . |
43 |
||
|
|
5.12 |
System . . . . . . . . . . . . . . . . . . . . . . . . . . . . . . . . . . . . . . |
43 |
||
|
|
5.13 |
Quick Screen . . . . . . . . . . . . . . . . . . . . . . . . . . . . . . . . . . . |
44 |
||
6 |
Sound Settings |
45 |
||||
|
|
6.1 |
Volume . . . . . . . . . . . . . . . . . . . . . . . . . . . . . . . . . . . . . . |
45 |
||
|
|
6.2 |
Bass . . . . . . . . . . . . . . . . . . . . . . . . . . . . . . . . . . . . . . . . |
45 |
||
|
|
6.3 |
Treble . . . . . . . . . . . . . . . . . . . . . . . . . . . . . . . . . . . . . . . |
46 |
||
|
|
6.4 |
Balance . . . . . . . . . . . . . . . . . . . . . . . . . . . . . . . . . . . . . . |
46 |
||
|
|
6.6 |
Stereo Width . . . . . . . . . . . . . . . . . . . . . . . . . . . . . . . . . . . |
46 |
||
THE ROCKBOX MANUAL |
IRIVER H3XX |

|
CONTENTS |
|
|
5 |
|
||
|
|
6.7 |
Crossfeed . . . . . . . . . . |
. . . . . . . . . . . . . . . . . . . . . . . . . . . |
47 |
||
|
|
6.8 |
Equalizer . . . . . . . . . . |
. . . . . . . . . . . . . . . . . . . . . . . . . . . |
48 |
||
|
|
6.9 |
Dithering . . . . . . . . . . |
. . . . . . . . . . . . . . . . . . . . . . . . . . . |
50 |
||
7 |
General Settings |
|
51 |
||||
|
|
7.1 |
Playback . . . . . . . . . . |
. . . . . . . . . . . . . . . . . . . . . . . . . . . |
51 |
||
|
|
7.2 |
Playlist . . . . . . . . . . . |
. . . . . . . . . . . . . . . . . . . . . . . . . . . |
54 |
||
|
|
7.3 |
File View . . . . . . . . . . |
VERSION |
|||
|
|
. . . . . . . . . . . . . . . . . . . . . . . . . . . |
54 |
||||
|
|
7.4 |
Database . . . . . . . . . . |
. . . . . . . . . . . . . . . . . . . . . . . . . . . |
56 |
||
|
|
7.5 |
Display . . . . . . . . . . . |
. . . . . . . . . . . . . . . . . . . . . . . . . . . |
56 |
||
|
|
7.6 |
System . . . . . . . . . . . |
. . . . . . . . . . . . . . . . . . . . . . . . . . . |
59 |
||
|
|
|
7.6.1 |
Start Screen . . . . |
. . . . . . . . . . . . . . . . . . . . . . . . . . . |
59 |
|
|
|
|
7.6.2 |
Battery . . . . . . . |
. . . . . . . . . . . . . . . . . . . . . . . . . . . |
59 |
|
|
|
|
7.6.3 |
Disk . . . . . . . . |
. . . . . . . . . . . . . . . . . . . . . . . . . . . |
59 |
|
|
|
|
7.6.4 |
Time and Date . . . |
. . . . . . . . . . . . . . . . . . . . . . . . . . . |
60 |
|
|
|
|
7.6.5 |
Idle Poweroff . . . |
. . . . . . . . . . . . . . . . . . . . . . . . . . . |
60 |
|
|
|
|
7.6.6 |
Limits . . . . . . . |
. . . . . . . . . . . . . . . . . . . . . . . . . . . |
60 |
|
|
|
|
7.6.7 |
Car Adapter Mode |
. . . . . . . . . . . . . . . . . . . . . . . . . . . |
60 |
|
|
|
7.7 |
Bookmarking . . . . . . . |
. . . . . . . . . . . . . . . . . . . . . . . . . . . |
61 |
||
|
|
7.8 |
Language . . . . . . . . . . |
. . . . . . . . . . . . . . . . . . . . . . . . . . . |
62 |
||
|
|
7.9 |
Voice . . . . . . . . . . . . |
. . . . . . . . . . . . . . . . . . . . . . . . . . . |
62 |
||
8 |
Theme Settings |
|
64 |
||||
9 |
Recording Settings |
|
66 |
||||
|
|
9.1 |
Format . . . . . . . . . . . |
. . . . . . . . . . . . . . . . . . . . . . . . . . . |
66 |
||
|
|
9.2 |
Encoder Settings . . . . . . |
. . . . . . . . . . . . . . . . . . . . . . . . . . . |
66 |
||
DRAFT |
. . . . . . . . . . . . . . . . . . . . . . . . . . . |
66 |
|||||
|
|
9.3 |
Frequency . . . . . . . . . |
||||
|
|
9.4 |
Source . . . . . . . . . . . |
. . . . . . . . . . . . . . . . . . . . . . . . . . . |
67 |
||
|
|
9.5 |
Channels . . . . . . . . . . |
. . . . . . . . . . . . . . . . . . . . . . . . . . . |
67 |
||
|
|
9.6 |
File Split Options . . . . . |
. . . . . . . . . . . . . . . . . . . . . . . . . . . |
67 |
||
|
|
9.7 |
Prerecord Time . . . . . . |
. . . . . . . . . . . . . . . . . . . . . . . . . . . |
67 |
||
|
|
9.8 |
Clear Recording Directory |
. . . . . . . . . . . . . . . . . . . . . . . . . . . |
67 |
||
|
|
9.9 |
Clipping Light . . . . . . . |
. . . . . . . . . . . . . . . . . . . . . . . . . . . |
68 |
||
|
|
9.10 |
Trigger . . . . . . . . . . . |
. . . . . . . . . . . . . . . . . . . . . . . . . . . |
68 |
||
|
|
9.11 |
Automatic Gain Control . |
. . . . . . . . . . . . . . . . . . . . . . . . . . . |
68 |
||
|
|
9.12 |
AGC clip time . . . . . . . |
. . . . . . . . . . . . . . . . . . . . . . . . . . . |
68 |
||
10 |
Plugins |
|
|
69 |
|||
|
|
10.1 |
Games . . . . . . . . . . . |
. . . . . . . . . . . . . . . . . . . . . . . . . . . |
69 |
||
|
|
|
10.1.1 |
Blackjack . . . . . . |
. . . . . . . . . . . . . . . . . . . . . . . . . . . |
69 |
|
|
|
|
10.1.2 |
BrickMania . . . . |
. . . . . . . . . . . . . . . . . . . . . . . . . . . |
70 |
|
|
|
|
10.1.3 |
Bubbles . . . . . . |
. . . . . . . . . . . . . . . . . . . . . . . . . . . |
71 |
|
|
|
|
10.1.4 |
Chessbox . . . . . . |
. . . . . . . . . . . . . . . . . . . . . . . . . . . |
72 |
|
THE ROCKBOX MANUAL |
IRIVER H3XX |

CONTENTS |
|
6 |
|
10.1.5 |
Doom . . . . . . . . . . . . . . . . . . . . . . . . . . . . . . . . . . . |
73 |
|
10.1.6 |
Flipit . . . . . . . . . . . . . . . . . . . . . . . . . . . . . . . . . . . |
75 |
|
10.1.7 |
Jewels . . . . . . . . . . . . . . . . . . . . . . . . . . . . . . . . . . |
76 |
|
10.1.8 |
MazezaM . . . . . . . . . . . . . . . . . . . . . . . . . . . . . . . . |
77 |
|
10.1.9 |
Minesweeper . . . . . . . . . . . . . . . . . . . . . . . . . . . . . . |
78 |
|
10.1.10 |
Pacbox . . . . . . . . . . . . . . . . . . . . . . . . . . . . . . . . . . |
79 |
|
10.1.11 |
Pegbox . . . . . . . . . . . . . . . . . . . . . . . . . . . . . . . . . . |
80 |
|
10.2.7 |
Mandelbrot . . . . .VERSION. . . . . . . . . . . . . . . . . . . . . . . . . . 97 |
||
10.1.12 |
Pong . . . . . . . . . . . . . . . . . . . . . . . . . . . . . . . . . . . |
81 |
|
10.1.13 |
Robotfindskitten . . . . . . . . . . . . . . . . . . . . . . . . . . . . |
81 |
|
10.1.14 |
Rockblox . . . . . . . . . . . . . . . . . . . . . . . . . . . . . . . . . |
82 |
|
10.1.15 |
Sliding Puzzle . . . . . . . . . . . . . . . . . . . . . . . . . . . . . . |
83 |
|
10.1.16 |
Snake . . . . . . . . . . . . . . . . . . . . . . . . . . . . . . . . . . . |
84 |
|
10.1.17 |
Snake 2 . . . . . . . . . . . . . . . . . . . . . . . . . . . . . . . . . . |
84 |
|
10.1.18 |
Sokoban . . . . . . . . . . . . . . . . . . . . . . . . . . . . . . . . . |
85 |
|
10.1.19 |
Solitaire . . . . . . . . . . . . . . . . . . . . . . . . . . . . . . . . . |
86 |
|
10.1.20 |
Spacerocks . . . . . . . . . . . . . . . . . . . . . . . . . . . . . . . . |
87 |
|
10.1.21 |
Star . . . . . . . . . . . . . . . . . . . . . . . . . . . . . . . . . . . . |
88 |
|
10.1.22 |
Sudoku . . . . . . . . . . . . . . . . . . . . . . . . . . . . . . . . . . |
89 |
|
10.1.23 |
Wormlet . . . . . . . . . . . . . . . . . . . . . . . . . . . . . . . . . |
90 |
|
10.1.24 |
Xobox . . . . . . . . . . . . . . . . . . . . . . . . . . . . . . . . . . |
93 |
|
10.2 Demos |
. . . . . . . . . . . . . . . . . . . . . . . . . . . . . . . . . . . . . . |
94 |
|
10.2.1 |
Bounce . . . . . . . . . . . . . . . . . . . . . . . . . . . . . . . . . . |
94 |
|
10.2.2 |
Credits . . . . . . . . . . . . . . . . . . . . . . . . . . . . . . . . . . |
94 |
|
10.2.3 |
Cube . . . . . . . . . . . . . . . . . . . . . . . . . . . . . . . . . . . |
95 |
|
10.2.4 |
Demystify . . . . . . . . . . . . . . . . . . . . . . . . . . . . . . . . |
96 |
|
10.2.5 |
Fire . . . . . . . . . . . . . . . . . . . . . . . . . . . . . . . . . . . . |
96 |
|
10.2.6 |
Logo . . . . . . . . . . . . . . . . . . . . . . . . . . . . . . . . . . . |
97 |
|
10.2.8 |
Mosaique . . . . . . . . . . . . . . . . . . . . . . . . . . . . . . . . |
98 |
|
10.2.9Oscilloscope . . . . . . . . . . . . . . . . . . . . . . . . . . . . . . . 99
10.2.10Plasma . . . . . . . . . . . . . . . . . . . . . . . . . . . . . . . . . . 100
10.2.11Snow . . . . . . . . . . . . . . . . . . . . . . . . . . . . . . . . . . . 100
10.2.12 |
Starfield . . . . . . . . . . . . . . . . . . . . . . . . . . . . . . . . . |
101 |
10.2.13 |
VU meter . . . . . . . . . . . . . . . . . . . . . . . . . . . . . . . . |
101 |
10.3Viewers . . . . . . . . . . . . . . . . . . . . . . . . . . . . . . . . . . . . . . 102 10.3.1 Shortcuts . . . . . . . . . . . . . . . . . . . . . . . . . . . . . . . . . 102
DRAFT |
103 |
|
10.3.2 |
Chip-8 Emulator . . . . . . . . . . . . . . . . . . . . . . . . . . . . |
|
10.3.3 |
JPEG viewer . . . . . . . . . . . . . . . . . . . . . . . . . . . . . . . |
104 |
10.3.4 |
MPEG Player . . . . . . . . . . . . . . . . . . . . . . . . . . . . . . |
105 |
10.3.5 |
Rockboy . . . . . . . . . . . . . . . . . . . . . . . . . . . . . . . . . |
106 |
10.3.6 |
Search . . . . . . . . . . . . . . . . . . . . . . . . . . . . . . . . . . |
107 |
10.3.7 |
Sort . . . . . . . . . . . . . . . . . . . . . . . . . . . . . . . . . . . . |
107 |
10.3.8 |
Text Viewer . . . . . . . . . . . . . . . . . . . . . . . . . . . . . . . |
108 |
10.3.9 |
VBRfix . . . . . . . . . . . . . . . . . . . . . . . . . . . . . . . . . . |
109 |
THE ROCKBOX MANUAL |
IRIVER H3XX |

CONTENTS |
7 |
10.3.10 ZXBox . . . . . . . . . . . . . . . . . . . . . . . . . . . . . . . . . . |
110 |
10.4Applications . . . . . . . . . . . . . . . . . . . . . . . . . . . . . . . . . . . 111
10.4.1Battery Benchmark . . . . . . . . . . . . . . . . . . . . . . . . . . . 111
10.4.2Calculator . . . . . . . . . . . . . . . . . . . . . . . . . . . . . . . . 113
10.4.3Chess Clock . . . . . . . . . . . . . . . . . . . . . . . . . . . . . . . 114
10.4.4Clock . . . . . . . . . . . . . . . . . . . . . . . . . . . . . . . . . . . 115
10.4.5Dice . . . . . . . . . . . . . . . . . . . . . . . . . . . . . . . . . . . . 117
10.4.6 |
Disk Tidy . . . . . . . . . . . . . . . . . . . . . . . . . . . . . . . . |
118 |
10.4.7 |
Lamp . . . . . . . . . . . . . . . . . . . . . . . . . . . . . . . . . . . |
118 |
10.4.8 |
Metronome . . . . . . . . . . . . . . . . . . . . . . . . . . . . . . . |
118 |
10.4.9 |
Stats . . . . . . . . . . . . . . . . . . . . . . . . . . . . . . . . . . . |
119 |
10.4.10Stopwatch . . . . . . . . . . . . . . . . . . . . . . . . . . . . . . . . 119
10.4.11Text Editor . . . . . . . . . . . . . . . . . . . . . . . . . . . . . . . . 120
11 Advanced Topics |
121 |
11.1Customising the userinterface . . . . . . . . . . . . . . . . . . . . . . . . . 121
11.1.1Getting Extras . . . . . . . . . . . . . . . . . . . . . . . . . . . . . . 121
11.1.2Loading Fonts . . . . . . . . . . . . . . . . . . . . . . . . . . . . . . 121
11.1.3 |
Loading Languages . . . . . . . . . . . . . . . . . . . . . . . . . . |
121 |
11.1.4 |
Changing Colours . . . . . . . . . . . . . . . . . . . . . . . . . . . |
121 |
11.1.5Loading Backdrops . . . . . . . . . . . . . . . . . . . . . . . . . . . 122
11.2Configuring the WPS . . . . . . . . . . . . . . . . . . . . . . . . . . . . . . 122
11.2.1WPS – General Info . . . . . . . . . . . . . . . . . . . . . . . . . . . 122
11.2.2 WPS – Build Your Own . . . . . . . . . . . . . . . . . . . . . . . . |
122 |
11.3 Managing Rockbox settings . . . . . . . . . . . . . . . . . . . . . . . . . . |
125 |
11.3.1Introduction to .cfg files. . . . . . . . . . . . . . . . . . . . . . . . 125
11.3.2Specifications for .cfg files. . . . . . . . . . . . . . . . . . . . . . 126
11.3.3The MANAGE SETTINGS menu . . . . . . . . . . . . . . . . . . . . 126VERSION
DRAFTB.8 Hold Switches . . . . . . . . . . . . . . . . . . . . . . . . . . . . . . . . . . 132 |
|||
|
11.4 |
Firmware Loading . . . . . . . . . . . . . . . . . . . . . . . . . . . . . . . |
127 |
|
|
11.4.1 Using ROLO (Rockbox loader) . . . . . . . . . . . . . . . . . . . . |
127 |
A |
File formats |
128 |
|
|
A.1 |
Supported file formats . . . . . . . . . . . . . . . . . . . . . . . . . . . . . |
128 |
B |
WPS Tags |
129 |
|
|
B.1 |
Status Bar . . . . . . . . . . . . . . . . . . . . . . . . . . . . . . . . . . . . |
129 |
|
B.2 |
ID3 Info . . . . . . . . . . . . . . . . . . . . . . . . . . . . . . . . . . . . . . |
129 |
|
B.3 |
Power Related Information . . . . . . . . . . . . . . . . . . . . . . . . . . |
130 |
|
B.4 |
File Info . . . . . . . . . . . . . . . . . . . . . . . . . . . . . . . . . . . . . . |
130 |
|
B.5 |
Playlist/Song Info . . . . . . . . . . . . . . . . . . . . . . . . . . . . . . . . |
131 |
|
B.6 |
Runtime Database . . . . . . . . . . . . . . . . . . . . . . . . . . . . . . . . |
131 |
|
B.7 |
Sound (DSP) settings . . . . . . . . . . . . . . . . . . . . . . . . . . . . . . |
131 |
|
B.9 |
Virtual LED . . . . . . . . . . . . . . . . . . . . . . . . . . . . . . . . . . . |
132 |
THE ROCKBOX MANUAL |
IRIVER H3XX |

CONTENTS |
8 |
|
B.10 |
Repeat Mode . . . . . . . . . . . . . . . . . . . . . . . . . . . . . . . . . . . |
132 |
B.11 |
Playback Mode Tags . . . . . . . . . . . . . . . . . . . . . . . . . . . . . . |
132 |
B.12 |
Images . . . . . . . . . . . . . . . . . . . . . . . . . . . . . . . . . . . . . . |
133 |
B.13 |
Alignment . . . . . . . . . . . . . . . . . . . . . . . . . . . . . . . . . . . . |
134 |
B.14 |
Conditional Tags . . . . . . . . . . . . . . . . . . . . . . . . . . . . . . . . |
134 |
B.15 |
Real Time Clock . . . . . . . . . . . . . . . . . . . . . . . . . . . . . . . . . |
135 |
B.16 |
Other Tags . . . . . . . . . . . . . . . . . . . . . . . . . . . . . . . . . . . . |
135 |
C |
Config file options |
VERSION |
|||
|
136 |
||||
D |
User feedback |
|
140 |
||
|
D.1 |
Bug reports . . . . . . . . . . . . . . . . . . . . . . . . . . . . . . . . . . . . |
140 |
||
|
|
D.1.1 |
Rules for submitting new bug reports . . . . . . . . . . . . . . . . |
140 |
|
|
D.2 |
Feature requests . . . . . . . . . . . . . . . . . . . . . . . . . . . . . . . . . |
140 |
||
|
|
D.2.1 |
Rules for submitting a new feature request . . . . . . . . . . . . . |
140 |
|
|
|
D.2.2 |
Features we will not implement . . . . . . . . . . . . . . . . . . . |
141 |
|
E |
Changelog |
|
|
142 |
|
|
E.1 |
What is new since v2.5? . . . . . . . . . . . . . . . . . . . . . . . . . . . . |
142 |
||
F |
Credits |
|
|
143 |
|
G |
Licenses |
|
|
146 |
|
|
G.1 |
GNU Free Documentation License . . . . . . . . . . . . . . . . . . . . . . |
146 |
||
|
G.2 |
The GNU General Public License . . . . . . . . . . . . . . . . . . . . . . . |
154 |
||
DRAFT |
|
|
|||
THE ROCKBOX MANUAL |
IRIVER H3XX |


CHAPTER 1. GETTING STARTED |
10 |
for Rockbox is #rockbox on irc://irc.freenode.net. A bunch of helpful developers and users are usually around. Just join and ask – if someone knows the answer you’ll usually get an answer pretty quickly. More information including IRC logs can be found at http://www.rockbox.org/irc/. We also have a web client for joining the rockbox IRC channel so there is no need for you to install additional software to your computer.
If you think you found a bug please make sure it actually is a bug and is still present in the most recent version of rockbox. You should try to confirm that by using the above
mentioned support channels first. AfterVERSIONthat you can submit that issue to our tracker. Refer to section D (page 140) for details on how to use the tracker.
1.3 Naming conventions and marks
We have some conventions especially on naming that are intended to be consistent throughout this manual.
Manufacturer and product names are formatted in accordance with the standard rules of English grammar, e.g. “Iriver playback is currently unsupported”. Manufacturer and model names are proper nouns, and thus are written beginning with a capital letter.
This manual has some parts that are marked with icons on the margin to help you finding important parts or parts you could skip. The following icons are used:
Note: This indicates a note. A note starts always with the text “Note”. For easier finding of notes we have put this an icon in the margin like here. Notes are used to mark information that could help you or indicate a possible “weirdness” in rockbox that would be explained.
Warning: This is a warning. In contrast to notes mentioned above, a warning should be taken more seriously. While ignoring notes will not cause any serious damage ignoring DRAFTwarnings could cause serious damage. If you are new to rockbox you should really read
the warnings before doing anything that is warned about.
This icon marks a section that are intended especially for the blind and visually impaired. As they cannot read the manual in the same way sighted people can do we have added some additional descriptions. If you are not blind or visually impaired you most likely can completely skip these blocks. To make this easier, there is an icon shown in the margin on the right.
Links to the wiki are abbreviated by the name of the wiki page. Those names are still linked so you can simply follow them like any other link in this manual. If you want to access a wiki page manually go to http://www.rockbox.org/wiki/ and type the page name in the “Go” box at the top of the page. Links to wiki pages are also indicated by the symbol Zin front of the page name.
b
!
¸
THE ROCKBOX MANUAL |
IRIVER H3XX |
11
There are two ways of installing Rockbox:VERSIONautomated and manual. While the manual way is older, more tested and proven to work correctly, the automated installation is
based on a nice graphical application that does almost everything that is needed for you. It is still important that you have an overview of the installation process to be able to select the correct installation options.
There are two separate components of Rockbox that need to be installed in order to run Rockbox.
The Rockbox bootloader. The bootloader is the program that tells your player how to boot and load other components of Rockbox. This is the component of Rockbox that is installed to the flash memory of your Iriver.
The Rockbox firmware. Unlike the Iriver firmware, which runs entirely from flash memory, most of the Rockbox code is contained in a “build” that resides on your player’s drive. This makes it easy to update Rockbox. The build consists of a directory called .rockbox containing all of Rockbox’ files, which is located in the root of your player’s drive.
DRAFTApart from the required parts there are some addons you might be interested in installing too.
Fonts. Rockbox can load custom fonts. The fonts itself are distributed as separate package and thus needs to be installed separately. The fonts are not required to run Rockbox itself but a lot of themes require the fonts package to be installed.
Themes. The view of Rockbox can be customized by themes. Depending on your taste you might want to install additional themes to change the look of Rockbox.
2.2 Prerequisites
Before installing Rockbox you should make sure you meet the prerequisites. Also you may need some tools for installation. In most cases these will be already available on your computer but if not you need to get some additional software.
USB connection. To transfer Rockbox to your player you need to connect it to your computer. To proceed you need to know where to access the player. On Windows
THE ROCKBOX MANUAL |
IRIVER H3XX |

|
CHAPTER 2. INSTALLATION |
|
12 |
|
|
|
this means you need to figure out the drive letter associated with the device. On |
|
|||
|
Linux you need to know the mount point of your player. |
|
|||
For manual installation and customization additional software is required. |
|
||||
ZIP utility. Rockbox is distributed as an archive using the .zip format. Thus you need |
|
||||
|
a tool to handle that compressed format. Usually your computer should have |
|
|||
|
a tool installed that can handle the .zip file format. Windows XP has built-in |
|
|||
|
support for .zip files and presents them to you as directories unless you have |
|
|||
|
installed a third party program that handles compressed files. For other oper- |
|
|||
|
ating systems this may vary. If the .zip file format is not recognised on your |
|
|||
|
computer you can find a program to handle them at http://www.info-zip.org/ or |
|
|||
|
http://sevenzip.sf.net/ which can be downloaded and used free of charge. |
|
|||
Text editor. As you will see in the following chapters, Rockbox is highly configurable. |
|
||||
|
In addition to saving configurations within Rockbox, Rockbox also allows you to |
|
|||
|
create customised configuration files. If you would like to edit custom configura- |
|
|||
|
tion files on your computer, you will need a text editor like Windows’ “Wordpad”. |
|
|||
2.3 Installing Rockbox |
|
|
|
|
|
2.3.1 Automated Installation |
|
|
|
|
|
To automatically install Rockbox download the official installer and housekeeping tool |
|
||||
|
ROCKBOX UTILITY. It allows you to |
|
|
|
|
|
Automatically install all needed components for using Rockbox (“Small Installa- |
|
|||
|
tion”) |
VERSION |
|
||
|
|
|
|||
|
Automatically install all suggested components (“Full Installation”) |
|
|||
|
Selectively install any of all available parts of Rockbox |
|
|||
|
Install additional themes interactively |
|
|
|
|
|
Install voice files and generate talk clips |
|
|
|
|
|
Uninstall all components you installed using Rockbox Utility |
|
|||
Prebuilt binaries for Windows, Linux and MacOS X are available from http://download. |
|
||||
rockbox.org/rbutil/. As Rockbox Utility is still under development more information |
|
||||
including up-to-date download links can be found at ZRockboxUtility. |
! |
||||
Warning: Upon the first start of Rockbox Utility you need to set at least the correct |
|||||
player and mountpoint in the configuration dialog. |
Autodetection can detect most |
||||
DRAFT |
|
|
|
|
|
player types. If autodetection failed or was unable to detect the mountpoint make sure to enter the correct values. The mountpoint indicates the location of the player
THE ROCKBOX MANUAL |
IRIVER H3XX |

CHAPTER 2. INSTALLATION |
13 |
b
install and get the version for your player.
There are three different types of firmwareVERSIONbinaries from the Rockbox website: Release version, current build and daily build. You need to decide which one you want to
Release. There has not yet been a stable release for the Iriver H320 and H340. Until there is a stable release for Iriver H320 and H340, use a current build.
Current Build. The current build is built at each source code change to the Rockbox SVN repository, and represent the current state of Rockbox development. This means that the build could contain bugs, but is most of the time safe to use. You can download the current build from http://build.rockbox.org/.
Archived Build. In addition to the release version and the current build, there is also an archive of daily builds available for download. These are built once a day from the latest source code in the SVN repository. You can download archived builds from http://www.rockbox.org/daily.shtml.
Because current builds and daily builds are development versions which change frequently, they may behave differently than described in this manual, or they may intro-
duce new (and maybe annoying) bugs. If you do not want to get undefined behaviour DRAFTfrom your player you should really stick to the current stable release, if there is one for your player. If you want to help the project development, you can try development
builds and help by reporting bugs. Just be aware that these are development builds that are highly functional, but not perfect!
Installing the firmware
1. Download your chosen version of Rockbox from the links in the previous section.
2. Connect your player to the computer via USB as described in the manual that came with your player.
3. Take the file that you downloaded above, and use the “Extract all” command of your unzip program to extract the files in the .zip file onto your player.
Note that the entire contents of the .zip file should be extracted directly to the root of your player’s drive. Do not try to create a separate directory on your player for the Rockbox files! The .zip file already contains the internal structure that Rockbox needs.
THE ROCKBOX MANUAL |
IRIVER H3XX |

CHAPTER 2. INSTALLATION |
14 |
|
|
Note: If the contents of the .zip file are extracted correctly, you will have a directory |
b |
||
called /.rockbox, which contains all the files needed by Rockbox, in the main direc- |
|||
tory of your player’s drive. If you receive a “-1” error when you start Rockbox, you have not extracted the contents of the .zip file to the proper location.
Installing the fonts package
Rockbox has a fonts package that is VERSIONavailable at http://www.rockbox.org/daily.shtml or
from the extras link in the menu on the Rockbox website. While the current builds and daily builds change frequently, the fonts package rarely changes. Thus, the fonts package is not included in these builds. (The release version, on the other hand, does not change, so fonts are included when you download a release). When installing Rockbox for the first time, you should install the fonts package.
1. Download the fonts package from the link above.
2. Take the file that you downloaded above, and use the “Extract all” command of your unzip program to extract the files in the .zip file onto your player. As with the firmware installation, the entire contents of the fonts .zip should be extracted directly to the root of your player’s drive. Do not try to create a separate directory on your player for the fonts! The .zip already contains the correct internal structure.
Installing the bootloader is the trickiest part of the installation. The Rockbox bootloader allows users to boot into either the Rockbox firmware or the Iriver firmware. For legal reasons, we cannot distribute the bootloader. Instead, we have developed a program that will patch the Iriver firmware with the Rockbox bootloader. These instructions will explain how to download and patch the Iriver firmware with the Rockbox bootloader and install it on your jukebox.
1.Download a supported version of the Iriver firmware for your Iriver H320 and H340 from the Iriver website, links can be found on ZIriverBoot. Supported Iriver firmware versions currently include 1.28K, 1.28EU, 1.28J, 1.29K, 1.29J and 1.30EU.
DRAFTNote: The US Iriver H320 and H340 firmware is not supported and cannot be patched to be used with the bootloader. If you wish to install Rockbox on a
US Iriver H320 and H340, you must first install a non-US version of the original firmware and then install one of the supported versions patched with the Rockbox bootloader.
Warning: Installing non-US firmware on a US Iriver H320 and H340 will permanently remove DRM support from the player.
b
!
THE ROCKBOX MANUAL |
IRIVER H3XX |

CHAPTER 2. INSTALLATION |
15 |
If the file that you downloaded is a .zip file, use an unzip utility like mentioned in the prerequisites section to extract the .hex from the .zip file to your desktop. Likewise, if the file that you downloaded is an .exe file, double-click on the .exe file to extract the .hex file to your desktop. When running Linux you should be able extracting .exe files using unzip.
2.Download the firmware patcher fwpatcher.exe from http://download.rockbox. org/bootloader/iriver/ and save it to your desktop.
Warning: The firmware patcher contains Unicode support, which is not supported by all versions of Windows. If you have difficulty with the firmware patcher, try downloading the alternate firmware patcher fwpatchernu.exe, which is built without Unicode support.
3.Go to your desktop and double-click on whichever version of the firmware patcher you downloaded in the prior step.
4.In the firmware patcher dialog box, click on the BROWSE button and navigate to the .hex file that you previously downloaded to your desktop.
5.Click PATCH. The firmware patcher will patch the original firmware to include the Rockbox bootloader. The .hex file on your desktop is now a modified version of the original .hex file.
6.Turn on your Iriver and connect it to your computer via USB.
7.Copy or move the modified .hex file directly to the root of your player’s drive. Do not put it inside a directory on your player.
8.Disconnect the jukebox from USB. (Be sure to use Windows’ “safely remove hardware” option.) VERSION
Warning: Before proceeding further, make sure that your player has a full charge or that it is connected to the power adaptor. Interrupting the next step due to a power failure most likely will brick your player.
9.Update your player’s firmware with the patched bootloader. To do this, turn the jukebox on. Press and hold the Navi button to enter the main menu, and navigate to GENERAL ! FIRMWARE UPGRADE. Select YES when asked to confirm if you want to upgrade the firmware. The Iriver will display a message indicating that the firmware update is in progress. Do not interrupt this process. When the firmware update is complete the player will turn itself off. (The update firmware
process usually takes a minute or so.) You have now installed the Rockbox bootloader.DRAFT
!
!
Note: If you install the Rockbox bootloader but do not install the Rockbox firmware the |
b |
Rockbox bootloader will load the Iriver firmware when the jukebox is turned on. To |
THE ROCKBOX MANUAL |
IRIVER H3XX |

CHAPTER 2. INSTALLATION |
16 |
load the Iriver firmware press and hold Rec before powering up the player until the Iriver logo appears.
Note: The bootloader has a built-in “bootloader USB mode”. This function switches to USB mode when the player is connected to a computer upon power-up. This way you can access the player’s hard disk without the need to boot any firmware (which is also useful when your hard disk is damaged). The screen will simply display the text “bootloader USB mode”. After you disconnect the player from USB the bootloader
2.5 Updating Rockbox VERSION
will continue booting Rockbox. As in bootloader USB mode the firmware itself has not
been loaded this is also a simple way of updating Rockbox. After the disconnect the bootloader will load the updated version of Rockbox.
2.3.3 Enabling Speech Support (optional)
If you wish to use speech support you will also need a voice file, english ones are available from http://www.rockbox.org/daily.shtml. Download the “voice” package for your player and unzip it directly to the root of your player. You should now find an english.voice in the /.rockbox/langs directory on your player. Voice menus are enabled by default and will come into effect after a reboot. See section 7.9 (page 62) for details on voice settings.
Remove your player from the computer’s USB port. Unplug any connected power supply and turn the unit off. When you next turn the unit on, Rockbox should load. When you see the Rockbox splash screen, Rockbox is loaded and ready for use.
DRAFTUpdating Rockbox is easy even if you do not use the Rockbox Utility. Download a Rockbox build. (The latest release of the Rockbox software will always be available
from http://www.rockbox.org/download/). Unzip the build to the root directory of your player like you did in the installation step before. If your unzip program asks you whether to overwrite files, choose the “Yes to all” option. The new build will be installed over your current build.
Note: If you use Rockbox Utility be aware that it can not detect manually installed components.
2.6 Uninstalling Rockbox
2.6.1 Automatic Uninstallation
You can uninstall Rockbox automatically by using Rockbox Utility. If you installed Rockbox manually you can still use Rockbox Utility for uninstallation but will not be
b
b
THE ROCKBOX MANUAL |
IRIVER H3XX |

CHAPTER 2. INSTALLATION |
17 |
able to do this selectively.
Note: Rockbox Utility cannot uninstall the bootloader due to the fact that it requires a flashing procedure. To uninstall the bootloader completely follow the manual uninstallation instructions below.
2.6.2 Manual Uninstallation
Note: If you want to remove the Rockbox bootloader, simply flash an unpatched Iriver firmware. Be aware that doing so will also remove the bootloader USB mode. As that
Note: The Rockbox bootloader can startVERSIONthe original firmware on your player. (See section 3.1.3 (page 19) for more information.)
mode can come in quite handy (especially when having disk errors) it is recommended to keep the bootloader. It also gives you the possibility of trying Rockbox anytime later by simply installing the distribution files. Although if you retain the Rockbox bootloader, you will need to hold the Rec button each time you want to start the original firmware.
If you wish to clean up your disk, you may also wish to delete the .rockbox directory and its contents. Turn the Iriver off. Turn the player back on and the original Iriver software will load.
DRAFT
b
b b
THE ROCKBOX MANUAL |
IRIVER H3XX |

CHAPTER 3. QUICK START |
18 |
3 Quick Start
3.1 Basic overview |
VERSION |
|
|
|
|
3.1.1 The player’s controls |
|
|
DRAFTpower jack and two USB ports. The USB port on the right is used to connect your |
|
|
Throughout this manual, the buttons on the player are labelled according to the pic- |
|
|
ture above. When a table of button actions says “Long” before the button it means that |
|
|
you should make a long press on that button, in other words, press it for approximately |
|
|
1 second. In detail the buttons are described in the following paragraph. |
¸ |
|
Additional information is available for blind users on the Rockbox website at ZBlindFAQ. |
||
Hold or lay the player so that the side with the button pad and LCD is facing towards |
||
you. The buttons on the button pad are as follows: top left corner: Play, bottom left corner: Stop, top right corner: Rec, bottom right corner: A-B. In the center of the button pad is a button labelled Navi. Surrounding the Navi button are four directional buttons used to navigate up, down, left and right.
On the top panel of the player, from left to right, you can find the following: headphone mini jack plug, remote port, Line-in, Line-out.
On the bottom panel of the player, from left to right, you can find the following: player to your computer. The USB port on the left is not used in Rockbox.
THE ROCKBOX MANUAL |
IRIVER H3XX |

CHAPTER 3. QUICK START |
19 |
3.1.2 Turning the player on and off
To turn on and off your Rockbox enabled player use the following keys:
Key |
Action |
Play |
Start Rockbox |
Long Stop |
Shutdown Rockbox |
On shutdown, Rockbox automaticallyVERSIONsaves its settings.
3.1.3 Starting the original firmware
Rockbox has a dual-boot feature. To boot into the original firmware, when the player is turned off, press and hold the Rec button, and then press the Play button.
After you have first started the player you’ll be presented by the MAIN MENU. From this menu you can reach every function of Rockbox, for more information (see section 5.1 (page 37)). To browse the files on you player select FILES (see section 4.1 (page 22)), and to browse in a view that is based on the meta-data1 of your audio files, select DATABASE (see section 4.2 (page 26)).
DRAFTWhen browsing files and moving through menus you usually get a list view presented. The navigation in these lists are usually the same and should be pretty intuitive. In
the tree view use Down and Up to move around the selection. Use Navi or Right to select an item. When browsing the file system selecting an audio file plays it. The view switches to the “While playing screen”, usually abbreviated as “WPS” (see section 4.3 (page 28). The dynamic playlist gets replaced with the contents of the current directory. This way you can easily treat directories as playlists. The created dynamic playlist can be extended or modified while playing. This is also known as “on-the-fly playlist”. To go back to the FILE BROWSER stop the playback with the Stop button or return to the file browser while keeping playback running using Navi. In list views you can go back one step with Left.
1ID3 Tags, Vorbis comments, etc.
THE ROCKBOX MANUAL |
IRIVER H3XX |

CHAPTER 3. QUICK START |
20 |
3.1.6 Basic concepts
Playlists
Rockbox is playlist oriented. This means that every time you play an audio file, a socalled “dynamic playlist” is generated, unless you play a saved playlist. You can modify the dynamic playlist while playing and also save it to a file. If you do not want to use playlists you can simply play your files directory based. Playlists are covered in detail in section 4.4 (page 32).
Menu
From the menu you can customise Rockbox. Rockbox itself is very customisable. Also there are some special menus for quick access to frequently used functions.
Context Menu
Some views, especially the file browser and the WPS have a context menu. From the file browser this can be accessed with Long Navi. The contents of the context menu vary, depending on the situation it gets called. The context menu itself presents you with some operations you can perform with the currently highlighted file. In the file browser this is the file (or directory) that is highlighted by the cursor. From the WPS this is the currently playing file. Also there are some actions that do not apply to the current file but refer to the screen from which the context menu gets called. One example is the playback menu, which can be called using the context menu from within the WPS.
3.2 Customising Rockbox |
|
|
|
VERSION |
|
Rockbox’ User Interface can be customised using “Themes”. Themes usually only affect |
|
|
the visual appearance, but an advanced user can create a theme that also changes vari- |
|
|
ous other settings like file view, LCD settings and all other settings that can be modified |
|
|
using .cfg files. This topic is discussed in more detail in section 11.3 (page 125). The |
|
|
Rockbox distribution comes with some themes that should look nice on your player. |
b |
|
Note: Some of the themes shipped with Rockbox need additional fonts from the fonts |
||
package, so make sure you installed them. Also, if you downloaded additional themes |
||
DRAFT |
|
|
from the Internet make sure you have the needed fonts installed as otherwise the theme may get displayed garbled.
3.3 Menu overview
include an overview of the menu structure here
THE ROCKBOX MANUAL |
IRIVER H3XX |
CHAPTER 3. QUICK START |
21 |
3.4 Charging
The player can be powered over USB without connecting to your computer by holding Rec while plugging in. This allows you to continue using the player normally.
DRAFT |
VERSION |
|
THE ROCKBOX MANUAL |
IRIVER H3XX |

CHAPTER 4. BROWSING AND PLAYING |
22 |
4 Browsing and playing
displayed with an icon. |
|
VERSION |
|
4.1 File Browser |
|
|
|
|
Figure 4.1: The file browser |
|
|
Rockbox lets you browse your music in either of two ways. The FILE BROWSER lets |
|
||
you navigate through the files and directories on your player, entering directories and |
|
||
DRAFT |
|
|
|
executing the default action on each file. To help differentiate files, each file format is |
|
||
The DATABASE BROWSER, on the other hand, allows you to navigate through the |
|
||
music on your player using categories like album, artist, genre, etc. |
|
||
You can select whether to browse using the FILE BROWSER or the DATABASE BROWSER |
|
||
by selecting either FILES or DATABASE in the MAIN MENU. If you choose the FILE |
|
||
BROWSER, the SHOW FILES setting lets you select what types of files you wish to view. |
|
||
See section 7.3 (page 55) for more information on the SHOW FILES setting. |
b |
||
Note: The FILE BROWSER allows you to manipulate your files in ways that are not |
|||
available within the DATABASE BROWSER. Read more about DATABASE in section 4.2 |
|||
(page 26). The remainder of this section deals with the FILE BROWSER.
THE ROCKBOX MANUAL |
IRIVER H3XX |
CHAPTER 4. BROWSING AND PLAYING |
23 |
4.1.1 File Browser Controls
|
Key |
Action |
|
|
|
Up/Down |
Go to previous/next item in list. If you |
|
|
|
|
are on the first/last entry, the cursor will |
|
|
|
|
wrap to the last/first entry. |
|
|
|
Play+Up/ Down |
VERSION |
|
|
|
Move one page up/down in the list. |
|
||
|
Left |
Go to the parent directory. |
|
|
|
Navi or Right |
Executes the default action on the se- |
|
|
|
|
lected file or enters a directory. |
|
|
|
Play |
If there is an audio file playing, returns |
|
|
|
|
to the WHILE PLAYING SCREEN (WPS) |
|
|
|
|
without stopping playback. |
|
|
|
Stop |
Stops audio playback. |
|
|
|
Long Navi |
Enter the CONTEXT MENU |
|
|
|
A-B |
Enter the MAIN MENU |
|
|
4.1.2 Context Menu |
|
|
|
|
|
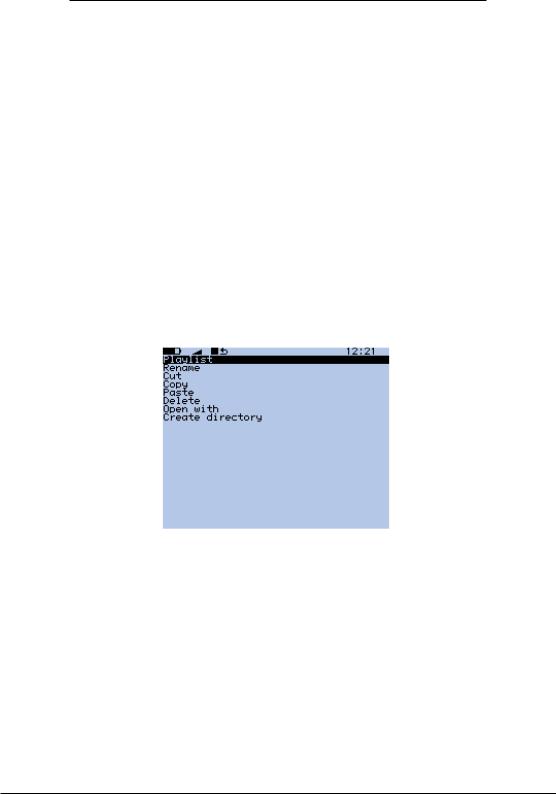
Figure 4.2: The Context Menu |
|
||
The CONTEXT MENU allows you to perform certain operations on files or directories. |
|
|||
To access the CONTEXT MENU, position the selector over a file or directory and access |
|
|||
the context menu with Long Navi. |
b |
|||
Note: The CONTEXT MENU is a context sensitive menu. If the CONTEXT MENU is in- |
||||
voked on a file, it will display options available for files. If the CONTEXT MENU is |
||||
invoked on a directory, it will display options for directories. |
|
|||
DRAFTThe CONTEXT MENU contains the following options (unless otherwise noted, each |
|
|||
option pertains both to files and directories):
THE ROCKBOX MANUAL |
IRIVER H3XX |

CHAPTER 4. BROWSING AND PLAYING |
24 |
Playlist. Enters the PLAYLIST SUBMENU (see section 4.4.3 (page 34)).
Playlist Catalog. Enters the PLAYLIST CATALOG SUBMENU (see section 4.4.2 (page 33)).
Rename. This function lets the user modify the name of a file or directory.
Cut. Copies the name of the currently selected file or directory to the clipboard and marks it to be ‘cut’.
Paste. Only visible if a file or directory name is on the clipboard. When selected it will move or copy the clipboard to the current directory.
Copy. Copies the name of the currentlyVERSIONselected file or directory to the clipboard and marks it to be ‘copied’.
Delete. Deletes the currently selected file. This option applies only to files, and not to directories. Rockbox will ask for confirmation before deleting a file. Press Navi to confirm deletion or any other key to cancel.
Delete Directory. Deletes the currently selected directory and all of the files and subdirectories it may contain. Deleted directories cannot be recovered. Use this feature with caution!
Open with. Runs a viewer plugin on the file. Normally, when a file is selected in Rockbox, Rockbox automatically detects the file type and runs the appropriate plugin. The OPEN WITH function can be used to override the default action and select a viewer by hand. For example, this function can be used to view a text file even if the file has a non-standard extension (i.e., the file has an extension of something other than .txt). See section 10.3 (page 102) for more details on viewers.
DRAFTCreate Directory. Create a new directory in the current directory on the disk.
Properties. Shows properties such as size and the time and date of the last modification for the selected file. If used on a directory, the number of files and subdirectories will be shown, as well as the total size.
Set As Recording Directory. Save recordings in the selected directory.
Add to Shortcuts. Adds a link to the selected item in the shortcuts.link file. If the file does not already exist it will be created in the root directory. Note that if you create a shortcut to a file, Rockbox will not open it upon selecting, but simply bring you to it’s location in the FILE BROWSER.
THE ROCKBOX MANUAL |
IRIVER H3XX |

CHAPTER 4. BROWSING AND PLAYING |
25 |
4.1.3 Virtual Keyboard
Figure 4.3: The virtual keyboard
This is the virtual keyboard that is used when entering text in Rockbox, for example when renaming a file or creating a new directory.
|
Key |
Action |
|
|
|
Left / Right / |
Move about the virtual keyboard (moves |
||
|
Up / Down |
the solid cursor) |
||
|
Play + Left or Play Move the line cursor within the text line |
|||
|
+ Right |
|
|
|
|
Navi |
Inserts the selected keyboard letter at the |
||
|
|
current cursor position |
||
|
Stop |
|
VERSION |
|
|
Exits the virtual keyboard without sav- |
|||
|
|
ing any changes |
||
|
Play |
Exits the virtual keyboard and saves any |
||
|
|
changes |
||
|
Rec |
Deletes the character before the line cur- |
||
|
|
sor |
|
|
|
Play + A-B |
Enters Morse input mode |
||
|
Navi |
Tap to select a character in Morse input |
||
|
|
mode |
||
DRAFT |
|
|
||
THE ROCKBOX MANUAL |
IRIVER H3XX |

CHAPTER 4. BROWSING AND PLAYING |
26 |
4.2 Database
4.2.1 Introduction
This chapter describes the Rockbox music database system. Using the information contained in the tags (ID3v1, ID3v2, Vorbis Comments, Apev2, etc.) in your audio files, Rockbox builds and maintains a database of the music files on your player and allows
you to browse them by Artist, Album and Genre.
The first time you use the database, RockboxVERSIONwill scan your disk for audio files. This can
take quite a while depending on the number of files on your player. This scan happens in the background, so you can choose to return to the Main Menu and continue to listen to music. If you shut down your player, the scan will continue next time you turn it on. After the scan is finished you may be prompted to restart your player before you can use the database.
Ignoring directories during database initialization
You may have directories on your player whose contents should not be added to the database. Placing a file named database.ignore in a directory will exclude the files in that directory and all its subdirectories from scanning their tags and adding them to the database. This will speed up the database initialization.
If a subdirectory of an ’ignored’ directory should still be scanned, place a file named database.unignore in it. The files in that directory and its subdirectories will be
scanned and added to the database.
DRAFT4.2.3 The Database Menu
Load To Ram. The database can either be kept on disk (to save memory), or loaded into RAM (for fast browsing). Setting this to YES loads the database to RAM, allowing faster browsing and searching. Setting this option to NO keeps the database on the disk, meaning slower browsing but it does not use extra RAM and saves some battery on boot up.
Note: If you browse your music frequently using the database, you should load to RAM, as this will reduce the overall battery consumption because the disk will not need to spin on each search.
Auto Update. If AUTO UPDATE is set to ON, each time the player boots, the database will automatically be updated.
Note: The AUTO UPDATE will only check for deleted files if the DIRECTORY CACHE
(SETTINGS ! GENERAL SETTINGS ! SYSTEM ! DISK ! DIRECTORY CACHE) is
enabled. UPDATE NOW includes that check whether dircache has been enabled or not.
b
b
THE ROCKBOX MANUAL |
IRIVER H3XX |

CHAPTER 4. BROWSING AND PLAYING |
27 |
Initialize Now. You can force Rockbox to rescan your disk for tagged files by using the
INITIALIZE NOW function in the DATABASE MENU.
Warning: INITIALIZE NOW removes all database files (removing runtimedb data also) and rebuilds the database from scratch.
Update Now. UPDATE NOW causes the database to detect new and deleted files
Note: Unlike the AUTO UPDATE function, UPDATE NOW will update the database |
|
4.2.4 Using the database |
VERSION |
regardless of whether the DIRECTORY CACHE is enabled. Thus, an update using UPDATE NOW may take a long time.
Unlike INITIALIZE NOW, the UPDATE NOW function does not remove runtime database information.
Gather Runtime Data. When enabled, rockbox will record how often and how long a track is being played, when it was last played and its rating. This information can be displayed in the WPS and is used in the database browser to, for example, show the most played, unplayed and most recently played tracks.
Export Modifications. This allows for the runtime data to be exported to the file
/.rockbox/database changelog.txt, which backs up the runtime data in ASCII format. This is needed when database structures change, because new code cannot read old database code. But, all modifications exported to ASCII format should be readable by all database versions.
Import Modifications. Allows the /.rockbox/database changelog.txt backup to be conveniently loaded into the database. If AUTO UPDATE is enabled this is performed automatically when the database is initialized.
DRAFTOnce the database has been initialized, you can browse your music by Artist, Album, Genre and Song Name. To use the database, go to the MAIN MENU and select DATABASE.
Note: You may need to increase the value of the MAX FILES IN DIR BROWSER setting (SETTINGS ! GENERAL SETTINGS ! SYSTEM ! LIMITS) in order to view long lists of tracks in the ID3 database browser.
There is no option to turn off database completely. If you do not want to use it just do not do the initial build of the database and do not load it to RAM.
!
b
b
THE ROCKBOX MANUAL |
IRIVER H3XX |

CHAPTER 4. BROWSING AND PLAYING |
28 |
|
||||||
|
|
|
|
|
|
|
|
|
|
Tag |
|
|
|
Type |
Origin |
||
|
|
|
|
|
|
|
||
|
filename |
|
|
string |
system |
|||
|
album |
|
|
string |
id tag |
|||
|
albumartist |
|
|
string |
id tag |
|||
|
artist |
|
|
|
string |
id tag |
||
|
comment |
|
|
string |
id tag |
|||
|
composer |
|
|
string |
id tag |
|||
|
genre |
|
|
VERSION |
||||
|
|
|
string |
id tag |
||||
|
grouping |
|
|
string |
id tag |
|||
|
title |
|
|
|
string |
id tag |
||
|
bitrate |
|
|
numeric |
id tag |
|||
|
discnum |
|
|
numeric |
id tag |
|||
|
year |
|
|
|
numeric |
id tag |
||
|
tracknum |
|
|
numeric |
id tag/filename |
|||
|
autoscore |
|
|
numeric |
runtime db |
|||
|
lastplayed |
|
|
numeric |
runtime db |
|||
|
playcount |
|
|
numeric |
runtime db |
|||
|
Pm |
(play |
time |
- |
numeric |
runtime db |
||
|
min) |
|
|
|
|
|
|
|
|
Ps (play time - sec) |
numeric |
runtime db |
|||||
|
rating |
|
|
numeric |
runtime db |
|||
|
commitid |
|
|
numeric |
system |
|||
|
entryage |
|
|
numeric |
system |
|||
|
length |
|
|
numeric |
system |
|||
|
Lm |
(track |
len |
- |
numeric |
system |
||
|
min) |
|
|
|
|
|
|
|
|
Ls (track len - sec) |
|
numeric |
system |
||||
DRAFT4.3 While Playing Screen
The While Playing Screen (WPS) displays various pieces of information about the currently playing audio file. The appearance of the WPS can be configured using WPS configuration files. The items shown depend on your configuration – all item can be turned on or off independently. Refer to section B (page 129) for details on how to change the display of the WPS.
Status bar: The Status bar shows Battery level, charger status, volume, play mode, repeat mode, shuffle mode and clock. In contrast to all other items, the status bar is always at the top of the screen.
(Scrolling) path and filename of the current song.
The ID3 track name.
THE ROCKBOX MANUAL |
IRIVER H3XX |

CHAPTER 4. BROWSING AND PLAYING |
29 |
The ID3 album name.
The ID3 artist name.
Bit rate. VBR files display average bitrate and “(avg)”
Elapsed and total time.
A slidebar progress meter representing where in the song you are.
Peak meter.
See section 11.2 (page 122) for details of customising your WPS (While Playing Screen).
4.3.1 WPS Key Controls
|
Key |
Action |
|
|
|
Up / Down |
Volume up/down. |
||
|
Left |
Go to beginning of track, or if pressed |
||
|
|
while in the first seconds of a track, go |
||
|
|
to previous track. |
||
|
Long Left |
Rewind in track. |
||
|
Right |
Go to next track. |
||
|
Long Right |
Fast forward in track. |
||
|
Play |
Toggle play/pause. |
||
|
Stop |
Stop playback. |
||
|
Navi |
Return to the FILE BROWSER. |
||
|
Long Navi |
Enter WPS CONTEXT MENU. |
||
|
Play + Up/Down |
|
VERSION |
|
|
Show PITCH SCREEN (see section 4.3.3 |
|||
|
|
(page 32)). |
||
|
A-B |
Enter MAIN MENU. |
||
|
Long A-B |
Enter QUICK SCREEN. |
||
|
Play + A-B |
Enter ID3 VIEWER. |
||
|
Play + Right |
Skip to the next directory. |
||
|
Play + Left |
Skip to the previous directory. |
||
DRAFT |
|
|
||
4.3.2 Peak Meter
The peak meter can be displayed on the While Playing Screen and consists of several indicators. For a picture of the peak meter, please see the While Recording Screen in section 5.8.1 (page 40).
The bar: This is the wide horizontal bar. It represents the current volume value.
THE ROCKBOX MANUAL |
IRIVER H3XX |

CHAPTER 4. BROWSING AND PLAYING |
30 |
|
|
The peak indicator: This is a little vertical line at the right end of the bar. It indicates |
|
||
the peak volume value that occurred recently. |
|
|
|
The clip indicator: This is a little black block that is displayed at the very right of |
|
||
the scale when an overflow occurs. It usually does not show up during normal |
|
||
playback unless you play an audio file that is distorted heavily. If you encounter |
|
||
clipping while recording, your recording will sound distorted. You should lower |
|
||
the gain. |
|
|
b |
Note: Note that the clip detection is not very precise. Clipping might occur with- |
|||
out being indicated. |
|
|
|
The scale: Between the indicators of the right and left channel there are little dots. |
|
||
These dots represent important volume values. In linear mode each dot is a 10% |
|
||
mark. In dbfs mode the dots represent the following values (from right to left): |
|
||
0db, -3db, -6db, -9db, -12db, -18db, -24db, -30db, -40db, -50db, -60db. |
|
|
|
4.3.3 The WPS Context Menu |
|
|
|
Like the context menu for the FILE BROWSER, the WPS CONTEXT MENU allows you |
|
||
quick access to some often used functions: |
|
|
|
Playlist |
|
|
|
The PLAYLIST submenu allows you to view, save, search and reshuffle the current |
|
||
playlist. To change settings for the PLAYLIST VIEWER press A-B while viewing the |
|
||
playlist to bring up the PLAYLIST VIEWER MENU.
Playlist catalog |
VERSION |
DRAFT |
View catalog. This lists all playlists that are part of the Playlist catalog. You can load a new playlist directly from this list.
Add to playlist. Adds the currently playing file to a playlist. Select the playlist you want the file to be added to and it will get appended to that playlist.
Add to new playlist. Similar to the previous entry this will add the currently playing track to a playlist. You need to enter a name for the new playlist first.
Sound Settings
This is a shortcut to the SOUND SETTINGS MENU, where you can configure volume, bass, treble, and other settings affecting the sound of your music. See section 6 (page 45) for more information.
THE ROCKBOX MANUAL |
IRIVER H3XX |
Loading...