

Page 1

DOCS2GO
QUICKSTART GUIDE
ENGLISH ( 3 – 6 )
GUÍA DE INICIO RÁPIDO
ESPAÑOL ( 7 – 10 )
GUIDE D'UTILISATION RAPIDE
FRANÇAIS ( 11 – 14 )
GUIDA RAPIDA
ITALIANO ( 15 – 18 )
KURZANLEITUNG
DEUTSCH ( 19 – 22 )
SNELSTARTGIDS
NEDERLANDS ( 23 – 26 )
Page 2

Page 3
QUICKSTART GUIDE (ENGLISH)
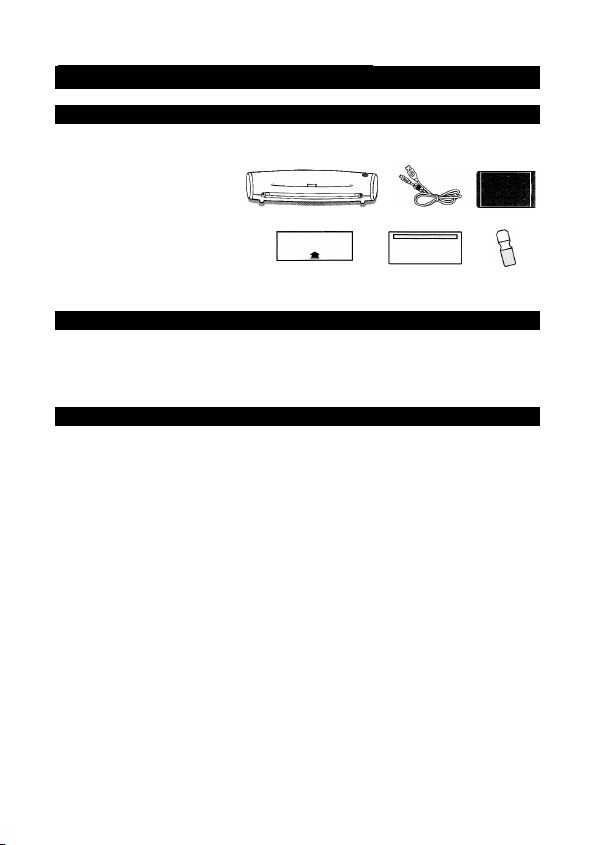
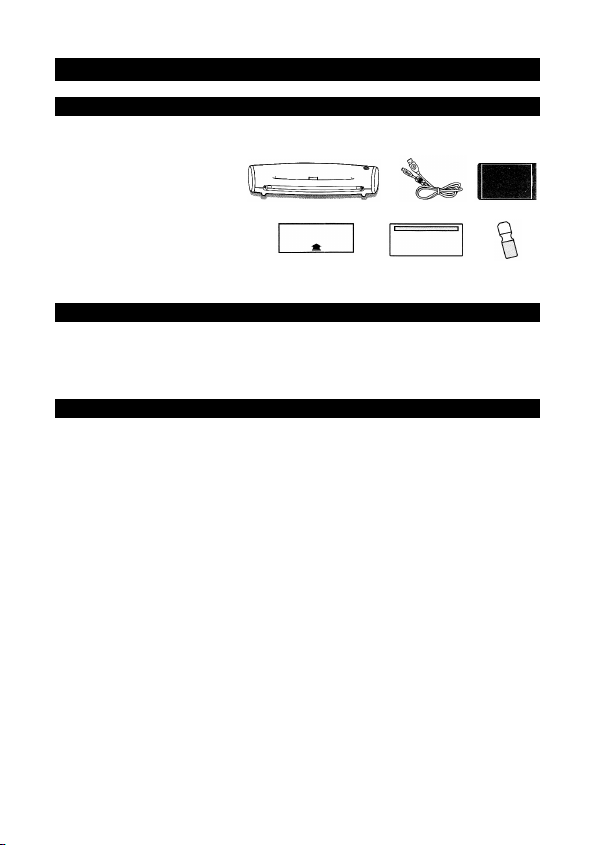
BOX CONTENTS
Check to ensure the following items are included in your packaging:
• DOCS2GO
• Mini-USB cable
• Protective photo sleeve
• Calibration paper
• Cleaning paper
• Cleaning strip
• Quickstart Guide
• Safety & Warranty Information Booklet
MINIMUM SYSTEM REQUIREMENTS
• iPad or iPad 2 with iOS 4.3.5 or later
• An iTunes Store account (for DOCS2GO App download)
• Internet access (for DOCS2GO App download)
SAFETY INFORMATION
• Keep scanner away from water or moisture and dusty areas.
• Never store scanner in hot and very cold areas.
• Only use attachments/accessories specified by the manufacturer.
• No objects filled with liquids, such as vases, should be placed on the scanner.
• Avoid dust contamination when the scanner is not in use.
• When left unused for a long period of time, disconnect the scanner from its
power source (power outlet).
• Avoid environments where the scanner would be exposed to direct sunlight (or
any other source of excessive heat) for long periods of time.
• Protect the scanner from potential liquid spills such as soda, coffee, tea, etc.
• Do not drop the scanner.
• Operate the scanner on a level, stable work surface, free of excessive vibration.
• Do not open the scanner case without consulting a qualified technician. Doing
so risks electrical shock.
• Position the scanner near its power source where it can be easily accessed
when plugged in.
3
Page 4
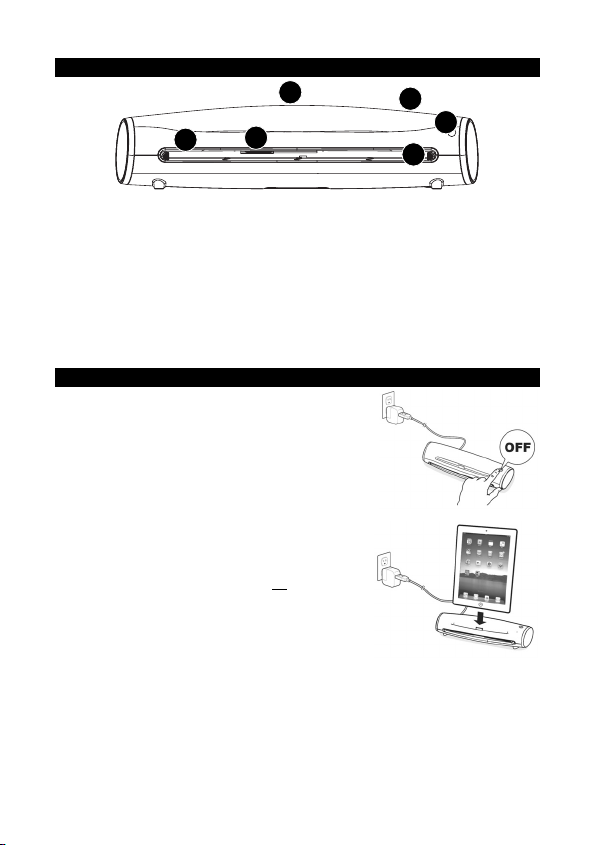
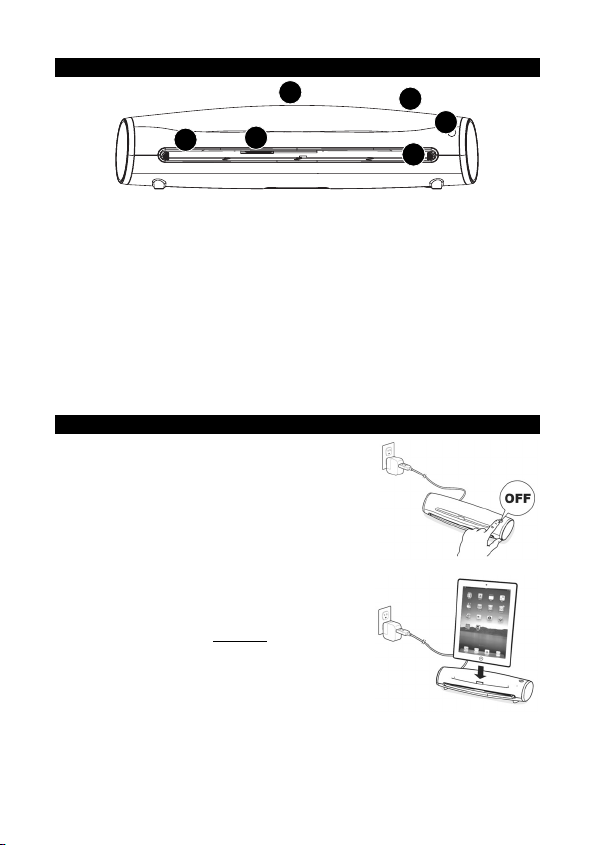
FEATURES
1. PAPER GUIDE – This piece adjusts to help guide the paper into the scanner.
2. FEED SLOT – Insert your paper or photo into this slot when scanning.
3. POWER– Press and hold this button for 3-5 seconds to turn the scanner on/off.
4. MINI-USB PORT (rear panel) – Use the included mini-USB cable to connect
this port to a 10W USB power adapter (sold separately)
5. iPad* DOCK – Connect your iPad to this dock to scan your photos or
documents.
6. PAPER EXIT SLOT (rear panel) – Outputs the paper or photo after scanning.
* iPad is a trademark of Apple Inc., registered in the U.S. and other countries.
CHARGING YOUR iPad
1. Connect one end of the mini-USB cable to the
scanner’s USB port, and the other end to the AC
adapter (that came with your iPad) which
connects to the power outlet.
2. Connect iPad to the scanner’s 30-pin port. Your
iPad will now begin charging.
Notes:
•
To properly charge your iPad, you must connect it to
the dock when the scanner is turned off.
• If your iPad does not appear to be charging, make
sure the scanner is off, then disconnect and
reconnect your iPad.
• In case of insufficient battery power, charge your
iPad when the battery level drops to 20% or
less.
2
6
5
4
3
1
4
Page 5
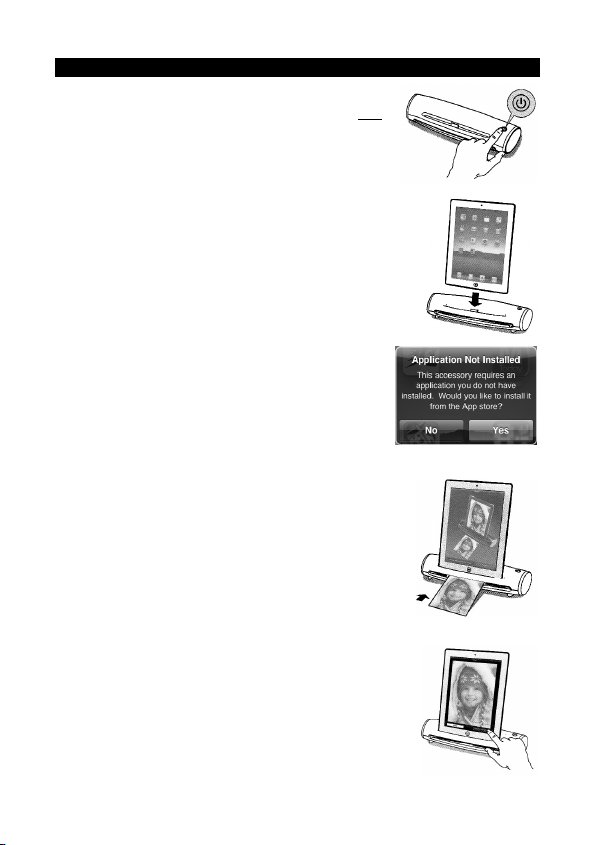
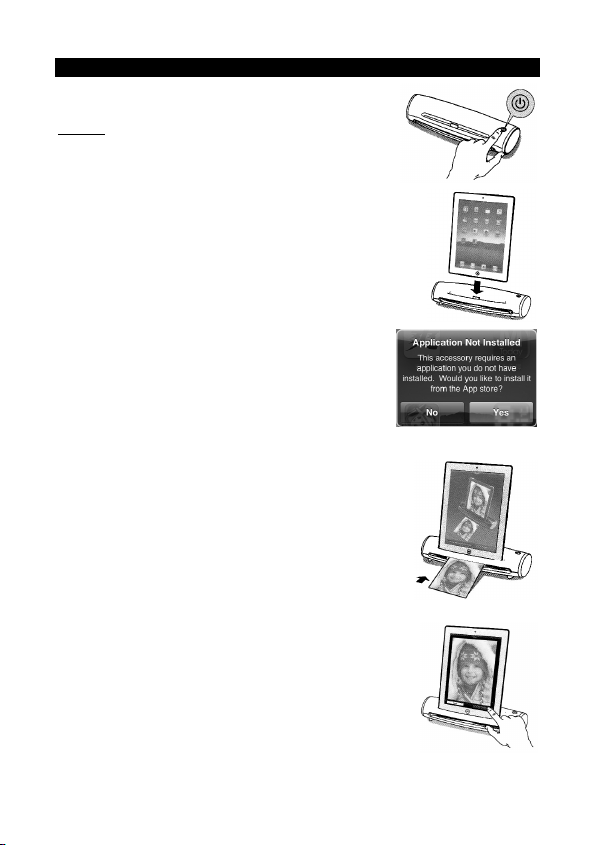
APP INSTALLATION AND SCANNING
Before you can begin using the DOCS2GO hardware
with your iPad, you must first install the free
DOCS2GO app from the App Store.
1. Power on the DOCS2GO hardware.
2. Connect iPad to the 30-pin port on DOCS2GO hardware.
3. For the dialog box that appears on the iPad, click
‘Yes’ to go to the App Store to download the
DOCS2GO app.
4. Tap 'Install' or 'Install App'.
5. Open DOCS2GO App on iPad.
6. Prepare your image or document for scanning:
• Paper: Place the paper into the FEED SLOT with
the surface to be scanned facing up. Adjust the
PAPER GUIDE so it rests against the edge of the
paper.
• Photo: Place the photo inside the included
protective photo sleeve. Place the photo sleeve
into the FEED SLOT with the sealed end first and
with the surface to be scanned facing up. Adjust
the PAPER GUIDE so it is at the edge of the
sleeve.
7. Press the SCAN button in the app. The photo or
document will be pulled through the scanner. Preview
your scan in the app and then press SAVE to save your
results to your photo library or press CANCEL to rescan.
5
Page 6
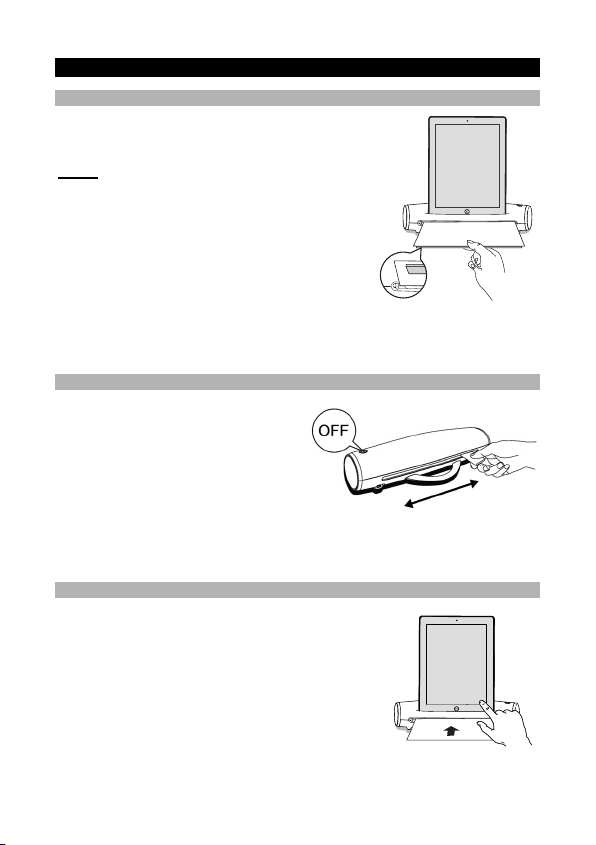
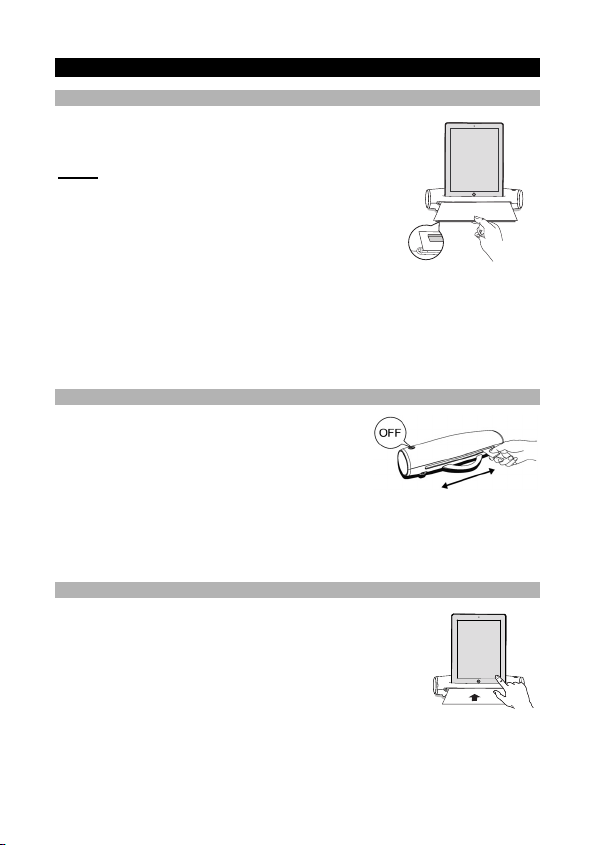
CARE INSTRUCTIONS
CLEANING
For the best scanning quality, please follow these
steps to clean the scanner.
Notes:
• Make sure there is no dust or dirt on the cleaning
paper or cleaning strip.
• Do not use any solvent to clean the sensor.
1. Click the top right corner in the DOCS2GO app
to reveal the “cogwheel” (Settings menu).
2. Tap the cogwheel to go into the Settings menu.
3. Insert the supplied cleaning paper into the
scanner's FEED SLOT with the sponge side
facing DOWN and toward you as if you were going to scan it.
4. Press the Clean menu button in the app. On the next screen that appears, press
the Clean button to begin cleaning.
USING THE CLEANING STRIP
1. Power off the scanner.
2. Hold the grip handle of the cleaning
strip with the sponge side facing
DOWN.
3. Insert the cleaning strip firmly into the
exit slot with the fabric side facing
UP.
4. Push the cleaning strip all the way to
the end of the exit slot.
5. Move the cleaning strip from one side to the other slightly a few times, then
remove it.
CALIBRATION
1. Click the top right corner in the DOCS2GO app to
reveal the cogwheel. (Settings menu)
2. Tap the cogwheel to go into the Settings menu.
3. Remove thin plastic layer on both sides the
calibration paper. Insert the calibration paper (with
the printing side facing UP) into the FEED SLOT.
4. Press the Calibrate menu button in the app.
5. Press the Calibrate button to begin the calibration
process.
6
Page 7
GUÍA DE INICIO RÁPIDO (ESPAÑOL)
CONTENIDO DE LA CAJA
Compruebe si están incluidos en el embalaje los siguientes artículos:
• DOCS2GO
• Cable mini-USB
• Funda protectora de fotos
• Calibración Papel
• Limpieza papel
• Tira de limpieza
• Guía de inicio rápido
• Folleto de información sobre la seguridad y la garantía
REQUISITOS MÍNIMOS DE SISTEMA
• iPad o iPad 2 con iOS 4.3.5 o posterior
• Una cuenta de iTunes Store (para descarga de la aplicación de DOCS2GO)
• Acceso a Internet (para descarga de la aplicación de DOCS2GO)
INFORMACIÓN SOBRE LA SEGURIDAD
• Mantenga el escáner alejado del agua, la humedad y las áreas polvorientas.
• Nunca guarde el escáner en áreas cálidas ni muy frías.
• Use sólo agregados y accesorios especificados por el fabricante.
• No coloque sobre el escáner objetos llenos de líquido, tales como vasos.
• Evite la contaminación con polvo cuando el escáner no se usa.
• Cuando se deje sin usar por un período prolongado, desconecte el escáner de
su fuente de alimentación eléctrica (puerto USB de computadora o
tomacorriente).
• Evite los ambientes donde el escáner quede expuesto a la luz solar directa (o a
cualquier otra fuente de calor excesivo) por períodos prolongados.
• Proteja el escáner de los derrames potenciales de líquidos, tales como bebidas
gaseosas, café, té, etc.
• No deje caer el escáner.
• Haga funcionar el escáner sobre una superficie de trabajo nivelada y estable,
libre de vibraciones excesivas.
• No abra la carcasa del escáner sin consultar a un técnico calificado. Si lo hace,
se arriesga a una descarga eléctrica.
• Posicione el escáner cerca de su fuente de alimentación de modo que se
pueda acceder fácilmente cuando está enchufado.
7
Page 8
CARACTERÍSTICAS
1. GUÍA DEL PAPEL – Esta pieza se ajusta para ayudar a guiar el papel hacia
dentro del escáner.
2. RANURA DE ALIMENTACIÓN – Inserte en esta ranura el papel o la foto
cuando va a escanear.
3. ENCENDIDO– Pulse y retenga este botón durante 3 a 5 segundos para
encender y apagar el escáner.
4. PUERTO MINI-USB (panel trasero) – Use el cable mini-USB incluido para
conectar este a un USB 10W adaptador de alimentación. (se vende por
separado)
5. ESTACIÓN DE ACOPLAMIENTO DE iPad – Conecte su iPad a esta
estación de acoplamiento para escanear sus fotos o documentos.
6. RANURA DE SALIDA DEL PAPEL (panel trasero) – Lugar de salida del
papel o la foto después del escaneo.
CÓMO CARGAR SU iPad
1. Conecte un extremo del cable mini-USB al
puerto USB del escáner y el otro extremo al
adaptador de CA (que viene con su iPad) que
se conecta al tomacorriente.
2. Conecte el iPad al puerto de 30 pines del
escáner. De esta forma, el iPad comienza a
cargarse.
Notas:
• Para cargar correctamente el iPad, debe
conectarlo a la estación de acoplamiento
cuando el escáner está apagado
• Si parece que el iPad no se está cargando,
asegúrese de que el escáner esté apagado,
desconecte y vuelva a conectar el iPad.
• En caso de que la energía de la batería sea
insuficiente, cargue su iPad cuando el nivel de la
batería caiga al 20% o menos.
2
6
5
4
3
1
.
8
Page 9
INSTALACIÓN DE LA APLICACIÓN Y ESCANEO
Para poder usar el equipo DOCS2GO con su iPad,
debe instalar primero la aplicación de DOCS2GO
gratuita
disponible en App Store (Tienda de
aplicaciones).
1. Encienda el equipo DOCS2GO.
2. Conecte el iPad al puerto de 30 pines del equipo
DOCS2GO.
3. En el cuadro de diálogo que aparece en el iPad,
haga clic en ‘Yes’ para ir a la App Store (Tienda de
aplicaciones) y bajar la aplicación de DOCS2GO.
4. Toque 'Install' (Instalar) o 'Install App' (Instalar
aplicación).
5. Abra la aplicación de DOCS2GO en el iPad.
6. Prepare su imagen o documento para escanearlo:
• Papel: Coloque el papel en la RANURA DE
ALIMENTACIÓN con la superficie a escanear hacia
arriba. Ajuste la GUÍA DEL PAPEL de modo que se
apoye contra el borde del papel.
• Fotografía: Coloque la foto dentro de la funda
protectora incluida. Coloque la funda con la foto en
la RANURA DE ALIMENTACIÓN, con el extremo
sellado primero y la superficie a escanear mirando
para arriba. Ajuste la GUÍA DEL PAPEL de modo
que se apoye contra el borde de la funda.
7. Pulse el botón SCAN (Escanear) de la aplicación. La
foto o el documento serán impulsados a través del
escáner. Realice una vista preliminar de su escaneo en
la aplicación y luego pulse SAVE (Guardar) para
guardar sus resultados en su biblioteca de fotografías o
CANCEL (Cancelar) para repetir el escaneo.
9
Page 10
INSTRUCCIONES PARA EL CUIDADO
LIMPIEZA
Para lograr un escaneo de la mejor calidad, siga estos
pasos para limpiar el escáner.
Notas:
• Asegúrese de que no haya polvo ni suciedad en el
papel para limpieza o en la tira papel para.
• No utilice ningún solvente para limpiar el sensor.
1. Haga clic en la esquina superior derecha de la
aplicación de DOCS2GO para revelar la “rueda
dentada” (Menú Settings (de configuración)).
2. Toque la rueda dentada para entrar al menú Settings.
3. Inserte el papel para limpieza provisto en la RANURA DE ALIMENTACIÓN del
escáner con el lado de la esponja hacia ABAJO y hacia usted, como si fuera a
escanearlo.
4. Pulse el botón Clean (Limpiar) de la aplicación. En la siguiente pantalla que
aparece, pulse el botón Clean para comenzar la limpieza.
CÓMO USAR LA TIRA DE LIMPIEZA
1. Apague el escáner.
2. Sostenga la agarradera de la tira de limpieza
con el lado de la esponja mirando hacia ABAJO.
3. Inserte la tira de limpieza firmemente en la
ranura de salida con el lado de tela mirando
hacia ARRIBA.
4. Empuje la tira de limpieza por todo el recorrido hasta el extremo de la ranura de
salida.
5. Mueva ligeramente la tira de limpieza de un lado a otro unas cuantas veces y
retírelo.
CALIBRACIÓN
1. Haga clic en la esquina superior derecha de la aplicación
de DOCS2GO para revelar la rueda dentada. (Menú
Settings)
2. Toque la rueda dentada para entrar al menú Settings.
3. Retire la capa plástica delgada de ambos lados del papel
para calibración. Inserte el papel para calibración (con el
lado de impresión mirando hacia ARRIBA) en la
RANURA DE ALIMENTACIÓN.
4. Pulse el botón Calibrate (Calibrar) de la aplicación.
5. Pulse el botón Calibrate (Calibrar) para comenzar el proceso de calibración.
10
Page 11

GUIDE D’UTILISATION RAPIDE (FRANÇAIS)
CONTENU DE LA BOÎTE
Assurez-vous que les articles suivants sont inclus dans la boîte:
• DOCS2GO
• Câble Mini-USB
• Enveloppe de protection
pour photo
• D’étalonnage papier
• Nettoyage papier
• Bande nettoyante
• Guide d’utilisation simplifié
• Livret des consignes de sécurité et des informations concernant la garantie
CONFIGURATION REQUISE
• iPad ou iPad 2 avec iOS 4.3.5 ou ultérieur
• Compte iTunes Store (pour télécharger l’application DOCS2GO)
• Accès Internet (pour télécharger l’application DOCS2GO)
CONSIGNES DE SÉCURITÉ
• Évitez de placer le numériseur près d’une source d’eau, d’humidité et de
poussière.
• Évitez d’entreposer le numériseur dans des endroits très chauds ou très froids.
• N’utilisez que des accessoires recommandés par le fabricant.
• Ne placez aucun objet rempli de liquide, tel qu'un vase, à proximité du
numériseur.
• Protégez le numériseur de l'accumulation de poussière lorsqu’il n’est pas utilisé.
• Lorsque le numériseur ne doit pas être utilisé pendant un certain temps,
débranchez l’alimentation (câble d’alimentation d’une prise secteur).
• Évitez de placer le numériseur dans un endroit où il pourrait être en contact
direct avec les rayons du soleil ou à des températures élevées pendant une
période prolongée.
• Protégez le numériseur des déversements de boissons gazeuses, de café, thé,
etc.
• Évitez que le numériseur ne tombe.
• Faites fonctionner le numériseur sur une surface plane et au niveau et sans
vibrations excessives.
• N’ouvrez pas le boîtier du numériseur sans la présence d’un technicien
spécialisé afin d’éviter les risques de décharges électriques.
• Placez le numériseur près d’une prise d'alimentation facilement accessible.
11
Page 12

FEATURES
1. GUIDE-PAPIER – Dispositif permettant de guider le papier dans le
numériseur.
2. FENTE D’INSERTION – Emplacement où insérer le papier ou la photo à
numériser.
3. TOUCHE D’ALIMENTATION – Maintenez cette touche enfoncée pendant 3
à 5 secondes afin de mettre le numériseur sous et hors tension.
4. PORT MINI-USB – Utilisez le câble mini-USB inclus pour relier ce d’un
10W USB d’alimentation un adaptateur. (vendu séparément).
5. iPad DOCK – Branchez un iPad à ce socle afin de numériser des photos ou
des documents.
6. FENTE DE SORTIE (panneau arrière) – Sortie du papier ou de la photo
après la numérisation.
RECHARGEMENT DE LA PILE DU iPad
1. Branchez une des extrémités du câble mini-
USB au port USB du numériseur et l'autre
extrémité à l'adaptateur CA (fourni avec votre
iPad) et branchez-le ensuite à la prise de
courant.
2. Branchez le iPad au connecteur 30 broches
du numériseur. Le rechargement de la pile du
iPad commencera aussitôt.
Remarques :
• Afin de recharger correctement votre iPad,
vous devez le brancher à la station d’accueil
lorsque le numériseur est hors tension
• Si votre iPad semble ne pas se recharger,
assurez-vous que le numériseur est bien hors
tension, puis débranchez et rebranchez le
iPad.
• En cas de charge insuffisante, rechargez le
iPad lorsque le niveau de la pile est à moins
de 20 %.
2
6
5
4
3
1
(off).
12
Page 13

INSTALLATION DE L'APPLICATION ET NUMÉRISATION
Avant de pouvoir utiliser le DOCS2GO avec votre iPad,
vous devez d'abord installer l’application gratuite
DOCS2GO que vous pouvez télécharger du App Store.
1. Mettez le DOCS2GO en marche.
2. Branchez le iPad au connecteur 30 broches du
DOCS2GO.
3. Lorsque la boîte de dialogue s'affiche sur le
iPad, cliquez sur « Oui » pour visiter le App
Store et télécharger l'application DOCS2GO.
4. Tapez sur « Installer » ou « Installer App ».
5. Lancez l’application DOCS2GO sur le iPad.
6. Préparez l’image ou le document à numériser:
• Papier: Placez le papier dans la fente d’insertion en
plaçant la surface à numériser vers le haut. Ajustez le
guide-papier de manière à ce qu’il repose sur le
rebord du papier.
• Photo: Placez la photo dans l’enveloppe de
protection fournie. Placez l’enveloppe de protection
dans la fente d’insertion en prenant soin de mettre le
côté scellé d’abord et la surface à numériser vers le
haut. Ajustez le guide-papier de manière à ce qu’il
repose sur le rebord de l’enveloppe de protection.
7. Tapez sur le bouton SCAN dans l’application. La photo ou
le document devrait être entraîné à travers le numériseur.
Prévisionnez la numérisation depuis l'application, puis
tapez sur SAVE pour enregistrer l’image dans votre
photothèque ou sur CANCEL pour numériser de nouveau.
13
Page 14

ENTRETIEN
NETTOYAGE
Pour une qualité de numérisation optimale, veuillez
suivre les étapes ci-dessous pour nettoyer le numériseur.
Remarques:
• Assurez-vous qu'il n'y a aucune poussière ou saleté
sur le nettoyage papier ou bande nettoyante.
• N’utilisez pas de solvant pour nettoyer le capteur.
1. Tapez dans le coin supérieur droit de l'application
DOCS2GO pour afficher la roue dentée (menu de
configuration).
2. Tapez la roue dentée pour accéder au menu de configuration.
3. Insérez le papier de nettoyage dans la fente d’insertion du numériseur de
manière à ce que le côté éponge soit vers le bas et vers vous, comme si vous
alliez le numériser.
4. Tapez sur le bouton Clean menu dans l’application. Sur la fenêtre qui s'affiche,
tapez sur le bouton Clean pour commencer le nettoyage.
UTILISATION DE LA BANDE NETTOYANTE
1. Veuillez mettre le numériseur hors tension.
2. Tenez la bande nettoyante de manière à ce
que le côté éponge soit vers le BAS.
3. Insérez la bande nettoyante dans la fente
avec le côté tissu vers le haut.
4. Poussez la bande nettoyante complètement
jusqu'à la fin de la fente de sortie.
5. Déplacez la bande nettoyante d’un côté à l’autre à quelques reprises puis
retirez-la.
ÉTALONNAGE
1. Tapez dans le coin supérieur droit de l'application
DOCS2GO pour afficher la roue dentée (menu de
configuration).
2. Tapez la roue dentée pour accéder au menu de
configuration.
3. Retirez la pellicule de plastique sur les deux côtés du
papier d'étalonnage. Placez le papier d’étalonnage dans
la fente d’insertion côté écriture vers le HAUT.
4. Tapez sur le bouton Calibrate menu dans l’application.
5. Tapes sur le bouton Calibrate afin de lancer le processus d’étalonnage.
14
Page 15

GUIDA RAPIDA (ITALIANO)
CONTENUTI DELLA CONFEZIONE
Assicurarsi che i seguenti articoli siano contenuti nella confezione:
• DOCS2GO
• Cavo mini-USB
• Guaina di protezione
fotografica
• Calibrazione carta
• Pulizia carta
• Striscia di pulizia
• Guida rapida
• Libretto di istruzioni di sicurezza e garanzia
REQUISITI MINIMI DI SISTEMA
• iPad o iPad 2 con iOS 4.3.5 o successivo
• Un account iTunes Store (per scaricare l'app DOCS2GO)
• Accesso a Internet (per scaricare l'app DOCS2GO)
INDICAZIONI DI SICUREZZA
• Conservare lo scanner lontano dall'acqua, dall'umidità e da zone polverose.
• Non riporre lo scanner in aree molto calde o molto fredde.
• Servirsi unicamente degli accessori indicati dal produttore.
• Non collocare oggetti riempiti d'acqua quali ad esempio bicchieri sullo scanner.
• Evitare che lo scanner si impolveri quando non è in uso.
• Quando lasciato inutilizzato per un lungo periodo di tempo, scollegare lo
scanner dalla sua fonte di alimentazione (presa elettrica).
• Evitare ambienti nei quali lo scanner sia esposto alla luce diretta del sole (o a
qualsiasi altra fonte di calore eccessivo) per lunghi periodi di tempo.
• Proteggere lo scanner da potenziali schizzi di liquidi quali bevande analcoliche,
caffè, tè, ecc.
• Non lasciar cadere lo scanner.
• Utilizzare lo scanner su una superficie uniforme e stabile, priva di eccessive
vibrazioni.
• Non aprire l'alloggiamento dello scanner senza consultare un tecnico
qualificato. Così facendo si rischiano scosse elettriche.
• Posizionare lo scanner nei pressi di una presa elettrica facilmente raggiungibile
quando l'apparecchio è collegato.
15
Page 16

CARATTERISTICHE
1. GUIDA PER LA CARTA – Questa parte offre una regolazione che aiuta a
guidare la carta nello scanner.
2. SLOT DI INSERIMENTO – Inserire il foglio o la fotografia in questo slot al
momento di effettuare la scansione.
3. POWER (accensione/spegnimento) – Tenere premuto questo tasto per 3-5
secondi per accendere/spegnere lo scanner.
4. PORTA MINI-USB (pannello posteriore) – Servirsi del cavo mini-USB in
dotazione per collegare questa porta ad una 10W adattatore di
alimentazione USB da (venduto separatamente)
5. DOCK iPad – Collegare l'iPad a questo dock per effettuare la scansione di
foto o documenti.
6. SLOT DI USCITA DELLA CARTA (pannello posteriore) – Espelle la carta
o la foto dopo aver effettuato la scansione.
RECHARGEMENT DE LA PILE DU iPad
1. Branchez une des extrémités du câble mini-
USB au port USB du numériseur et l'autre
extrémité à l'adaptateur CA (fourni avec votre
iPad) et branchez-le ensuite à la prise de
courant.
2. Branchez le iPad au connecteur 30 broches
du numériseur. Le rechargement de la pile du
iPad commencera aussitôt.
Remarques :
• Afin de recharger correctement votre iPad,
vous devez le brancher à la station d’accueil
lorsque le numériseur est hors tension
• Si votre iPad semble ne pas se recharger,
assurez-vous que le numériseur est bien hors
tension, puis débranchez et rebranchez le
iPad.
• En cas de charge insuffisante, rechargez le iPad lorsque le niveau de la pile est
à moins de 20 %.
2
6
5
4
3
1
(off).
16
Page 17

INSTALLAZIONE DELL'APP E SCANSIONE
Prima di iniziare a utilizzare l'hardware del DOCS2GO con l'iPad, occorre
prima installare l'app gratuito
1. Alimentare l'hardware DOCS2GO.
2. Collegare l'iPad alla porta a 30 poli presente
sull'hardware del DOCS2GO.
3. Nella casella di dialogo che compare sull'iPad,
cliccare su "Sì" per recarsi all'App Store e
scaricare l'app DOCS2GO.
4. Schiacciare 'Install' o 'Install App'.
5. Aprire l'app DOCS2GO sull'iPad.
6. Preparare l'immagine o il documento per la scansione:
• Carta: collocare la carta nello SLOT di INSERIMENTO
con la superficie da scannerizzare rivolta verso il su.
Regolare la GUIDA DELLA CARTA in modo che si
trovi contro il bordo del foglio.
• Foto: collocare la foto all'interno della guaina di
protezione in dotazione. Collocare la guaina portafoto
nello SLOT DI INSERIMENTO con il capo chiuso per
primo e con la superficie da scannerizzare rivolta verso
il su. Regolare la GUIDA DELLA CARTA in modo che
si trovi contro il bordo della guaina.
7. Premere il pulsante SCAN (scansione) nell'app. La foto o il
documento verranno trascinati all'interno dello scanner.
Effettuare un'anteprima della scansione nell'app e
premere SAVE per salvare i risultati nella propria libreria
fotografica o premere CANCEL (annulla) per effettuare
una nuova scansione.
DOCS2GO scaricato dall'App Store.
17
Page 18

ISTRUZIONI PER LA CURA E LA MANUTENZIONE
PULIZIA
Per ottenere la migliore qualità di scansione, procedere
come segue per pulire lo scanner.
Note:
• Assicurarsi che non vi sia polvere o sporcizia pulizia
nella fascetta o di pulizia carta.
• Non servirsi di alcun solvente per pulire il sensore.
1. Cliccare a livello dell'angolo superiore destro dell'app
DOCS2GO per far comparire la “ruota dentata” (menu
configurazioni).
2. Premere la ruota dentata per entrare nel menu configurazioni (Settings).
3. Inserire la carta di pulizia in dotazione nello SLOT DI INSERIMENTO con il lato
spugnoso rivolto verso il BASSO e verso di voi, come se doveste sottoporlo a
scansione.
4. Premere il pulsante del menu Clean (pulisci) nell'app. Nella schermata
successiva, premere il pulsante Clean (pulisci) per iniziare la pulizia.
UTILIZZO DELLA FASCETTA DI PULIZIA
1. Spegnere lo scanner.
2. Reggere la fascetta di pulizia della lente
con il lato spugnoso rivolto verso il
BASSO.
3. Inserire la fascetta di pulizia della lente
con decisione nella apertura di uscita
con il lato di tessuto rivolto verso
l'ALTO.
4. Spingere la fascetta di pulizia fino in fondo, all'altro capo dell'apertura di uscita.
5. Passare la fascetta di pulizia da un lato all'altro con delicatezza alcune volte e
quindi rimuoverla.
CALIBRAZIONE
1. Cliccare a livello dell'angolo superiore destro dell'app
DOCS2GO per far comparire la “ruota dentata” (menu
configurazioni).
2. Premere la ruota dentata per entrare nel menu
configurazioni (Settings).
3. Rimuovere il sottile strato di plastica da entrambi i lati della
carta di calibrazione. Inserire la carta di calibrazione (con il
lato di stampa rivolto verso l'ALTO) nello SLOT DI INSERIMENTO.
4. Premere il pulsante del menu Calibrate (calibra) nell'app.
5. Premere il tasto Calibrate (calibra) per avviare il procedimento di calibrazione.
18
Page 19

KURZANLEITUNG (DEUTSCH)
LIEFERUMFANG
Vergewissern Sie sich, dass die folgenden Teile in der Packung enthalten sind:
• DOCS2GO
• Mini-USB-Kabel
• Foto-Schutzhülle
• Kalibrierungs papier
• Reinigungs papier
• Reinigungsstreifen
• Schnellstart-Anleitung
• Sicherheitshinweise und Garantieinformationen
MINDESTSYSTEMANFORDERUNGEN
• iPad oder iPad 2 mit iOS 4.3.5 oder höher
• Benutzerkonto für den iTunes Store (für den Download der DOCS2GO-App)
• Internet-Zugang (für den Download der DOCS2GO-App)
SICHERHEITSHINWEISE
• Halten Sie den Scanner von Wasser, Feuchtigkeit und Staub fern.
• Bewahren Sie den Scanner niemals in heißen oder sehr kalten Bereichen auf.
• Verwenden Sie ausschließlich vom Hersteller angegebene
Zusatzgeräte/Zubehörteile.
• Stellen Sie keine mit Flüssigkeit gefüllten Behälter, wie Vasen, auf den Scanner.
• Halten Sie Staub vom Scanner fern, wenn dieser nicht in Betrieb ist.
• Wenn Sie das Gerät längere Zeit nicht verwenden, trennen Sie den Scanner
von der Stromversorgung (Steckdose).
• Vermeiden Sie Umgebungen, in denen der Scanner längere Zeit direktem
Sonnenlicht (oder anderen Wärmequellen) ausgesetzt wäre.
• Schützen Sie den Scanner vor verschütteten Flüssigkeiten wie Limonaden,
Kaffee, Tee etc.
• Lassen Sie den Scanner nicht herunterfallen.
• Betreiben Sie den Scanner auf einer ebenen, stabilen Arbeitsfläche, die keinen
Vibrationen ausgesetzt ist.
• Öffnen Sie das Gehäuse des Scanners nie ohne Rücksprache mit einem
qualifizierten Techniker. Andernfalls riskieren Sie einen elektrischen Schlag.
19
Page 20

FUNKTIONEN
1. PAPIERFÜHRUNG – Dieses Teil hilft Ihnen dabei das Papier in den
Scanner zu führen.
2. EINZUG – Führen Sie beim Scannen Ihr Papier oder Foto in diesen Einzug.
3. EIN-/AUSSCHALTER– Halten Sie diese Taste 3-5 Sekunden lang gedrückt,
um den Scanner ein- oder auszuschalten.
4. MINI-USB-ANSCHLUSS (Rückseite) – Verwenden Sie das mitgelieferte
Mini-USB-Kabel, um diesen Anschluss mit einem einem 10W USB-Netzteil
(separat erhältlich) zu verbinden.
5. iPad DOCK – Verbinden Sie Ihr iPad mit diesem Dock, um Ihre Fotos oder
Dokumente zu scannen.
6. PAPIERAUSGABE (Rückseite) – Gibt das Papier oder Foto nach dem
Scannen aus.
AUFLADEN IHRES iPad
1. Verbinden Sie das eine Ende des Mini-USB-
Kabels mit dem USB-Port des Scanners und
das andere Ende mit dem Netzteil, das an
eine Steckdose angeschlossen wird (das
Netzteil ist im Lieferumfang des iPad
enthalten).
2. Verbinden Sie das iPad mit dem 30-Pin-
Anschluss des Scanners. Ihr iPad wird nun
aufgeladen.
Hinweise:
• Um Ihr iPad ordnungsgemäß aufzuladen,
müssen Sie es mit dem Dock verbinden, wenn
der Scanner ausgeschaltet ist.
• Wenn Ihr iPad scheinbar nicht aufgeladen wird,
vergewissern Sie sich, dass der Scanner
ausgeschaltet ist, trennen die Geräte und
verbinden das iPad anschließend erneut.
• Bei unzureichender Batterieleistung laden Sie Ihr iPad bitte auf, wenn der
Batteriestand auf 20% oder weniger gesunken ist.
2
6
5
4
3
1
20
Page 21

APP-INSTALLATION UND SCANNEN
Bevor Sie die DOCS2GO-Hardware mit Ihrem iPad verwenden können,
müssen Sie zuerst die gratis
App Store herunterladen.
1. Schalten Sie die DOCS2GO-Hardware ein.
2. Verbinden Sie Ihr iPad mit dem 30-poligen Anschluss der
DOCS2GO-Hardware.
3. Tippen Sie im Dialogfenster des iPad auf "Ja", um
zum App Store zu navigieren und die DOCS2GOApp herunterzuladen.
4. Tippen Sie auf “Installieren” oder “App installieren”.
5. Starten Sie die DOCS2GO-App auf Ihrem iPad.
Bereiten Sie Ihr Bild oder Ihr Dokument vor:
• Papier: Legen Sie das Papier mit der einzuscannenden
Seite nach unten in den oben. Richten Sie die
PAPIERFÜHRUNG so aus, dass sie mit der Kante des
Papiers abschließt.
• Foto: Legen Sie das Foto in die mitgelieferte Foto-
Schutzhülle. Legen Sie die Foto-Schutzhülle mit dem
versiegelten Ende voran und mit der zu scannenden
Seite nach unten in den oben. Richten Sie die
PAPIERFÜHRUNG so aus, dass sie mit der
Schutzhülle abschließt.
6. Drücken Sie die SCAN-Taste in der App. Das Foto oder
Dokument wird durch den Scanner gezogen. Sehen Sie
sich die Vorschau Ihres Scans in der App an und drücken
Sie SPEICHERN, um Ihre Scans in Ihrer Foto-Bibliothek
zu speichern, oder ABBRECHEN, um erneut zu scannen.
DOCS2GO-App aus dem
21
Page 22

PFLEGEHINWEISE
REINIGUNG
Um eine ideale Scan-Qualität zu erreichen, gehen Sie
bitte folgendermaßen vor, um den Scanner zu reinigen.
Hinweise:
• Stellen Sie sicher, dass das Reinigungspapier und der
• Verwenden Sie keine Lösungsmittel, um den Sensor zu
1. Klicken Sie auf die rechte obere Ecke in der
2. Tippen Sie auf das Zahnrad, um in das Menü Einstellungen zu gelangen.
3. Legen Sie das mitgelieferte Reinigungspapier in den Scanner-EINZUG. Die
4. Drücken Sie in der App die Menütaste Reinigung. Im nächsten Bildschirm
VERWENDUNG DES REINIGUNGSSTREIFENS
1. Schalten Sie den Scanner aus.
2. Halten Sie den Griff des Reinigungsstreifens
3. Legen Sie den Reinigungsstreifens mit der
4. Schieben Sie den Reinigungsstreifens bis zum Ausgabeschlitz durch.
5. Bewegen Sie den Reinigungsstreifens ein paar Mal von einer Seite zur anderen
KALIBRIERUNG
1. Klicken Sie auf die rechte obere Ecke in der
2. Tippen Sie auf das Zahnrad, um in das Menü
3. Entfernen Sie die dünne Kunststoffschicht auf beiden
4. Drücken Sie in der App die Menütaste Kalibrierung.
5. Drücken Sie die Taste Kalibrierung, um die Kalibrierung zu starten.
Reinigungsstreifen frei von Staub oder Schmutz sind.
reinigen.
DOCS2GO-App, um das "Zahnrad" (Menü Einstellungen) anzuzeigen.
Schwammseite muss dabei nach unten zeigen und Ihnen zugewandt sein, so
als ob Sie das Reinigungspapier einscannen wollten.
drücken Sie die Taste REINIGUNG, um mit der Reinigung zu beginnen.
so, dass die Schwammseite nach UNTEN
zeigt.
Stoffseite nach OBEN in den Ausgabeschlitz.
und entfernen ihn anschließend.
DOCS2GO-App, um das Zahnrad anzuzeigen. (Menü
Einstellungen)
Einstellungen zu gelangen.
Seiten des Kalibrierungspapiers. Legen Sie das
Kalibrierungspapier (mit der beschrifteten Seite nach
OBEN) in den EINZUG.
22
Page 23

SNELSTARTGIDS (NEDERLANDS)
INHOUD VAN DE DOOS
Controleer of de volgende items zijn opgenomen in de verpakking:
• DOCS2GO
• Mini-USB-kabel
• Beschermende fotohoes
• Kalibratie papier
• Reini papier
• Reinigingsband
• Snelstartgids
• Informatieboekje over Veiligheid en Garantie
MINIMALE SYSTEEMVEREISTEN
• iPad of iPad 2 met iOS 4.3.5 of later
• Een iTunes Store-account (voor het downloaden van de DOCS2GO-app)
• Internettoegang (voor het downloaden van de DOCS2GO-app)
VEILIGHEIDSINFORMATIE
• Houd de scanner uit de buurt van water of vocht en stof.
• Bewaar de scanner niet op hete en zeer koude plekken.
• Gebruik alleen hulpstukken/accessoires die door de fabrikant zijn opgegeven.
• Op de scanner mogen geen voorwerpen met vloeistoffen, zoals vazen, worden
geplaatst.
• Voorkom vervuiling door stof wanneer de scanner niet in gebruik is.
• Koppel de scanner los van de voeding (stopcontact) wanneer u hem voor een
lange periode niet gebruikt.
• Vermijd omgevingen waar de scanner voor lange tijdsperiodes kan worden
blootgesteld aan direct zonlicht (of een andere bron van overmatige warmte).
• Bescherm de scanner tegen mogelijke vloeistoflekken, zoals frisdrank, koffie,
thee, enz.
• Laat de scanner niet vallen.
• Gebruik de scanner op een vlakke en stabiele ondergrond, zonder overbodige
trillingen.
• Open in geen geval de behuizing van de scanner zonder raadpleging van een
gekwalificeerde technicus. Hierdoor riskeert u een elektrische schok.
• Plaats de scanner in de buurt van de voeding, op een plek waar hij gemakkelijk
toegankelijk is wanneer hij aanstaat.
23
Page 24

KENMERKEN
1. PAPIERGELEIDER: dit hulpstuk is aanpasbaar en helpt het papier te
begeleiden in de scanner.
2. INVOERSLEUF: plaats uw papier of foto bij het scannen in deze sleuf.
3. AAN/UIT-KNOP: druk en houd deze knop ingedrukt gedurende 3-5
seconden om de scanner aan of uit te zetten.
4. MINI-USB-POORT (achterpaneel): gebruik de meegeleverde mini-USB-
kabel om deze poort aan een USB-stroomadapter van 10 W (afzonderlijk
verkocht).
5. iPad DOCK: sluit uw iPad aan op dit dock om uw foto's of documenten te
scannen.
6. PAPIERUITVOERSLEUF (achterpaneel): voert na het scannen het papier
of de foto uit.
UW iPad OPLADEN
1. Sluit het ene uiteinde van de mini-USB-kabel
aan op de USB-poort van de scanner, en het
andere uiteinde op de netadapter
(meegeleverd bij uw iPad), die wordt
aangesloten op het stopcontact.
2. Sluit de iPad aan op de 30-pins-poort van de
scanner. Uw iPad begint zich nu op te laden.
Opmerkingen:
• Om uw iPad naar behoren op te laden, moet u
hem op het dock aansluiten wanneer de scanner
is uitgeschakeld
• Als uw iPad niet lijkt op te laden, zorg er dan
voor dat de scanner uit staat. Verbreek daarna
de verbinding en sluit de iPad opnieuw aan.
• Herlaad uw iPad bij een lage batterij, wanneer
het batterijniveau daalt tot 20% of minder.
2
.
6
5
4
3
1
24
Page 25

INSTALLATIE VAN DE APP EN SCANNEN
Voordat u de DOCS2GO-hardware met uw iPad kunt
beginnen gebruiken, moet u eerst de gratis
DOCS2GO-app van de App Store installeren.
1. De DOCS2GO-hardware inschakelen.
2. Sluit de iPad aan op de 30-pins poort van de
DOCS2GO-hardware.
3. Klik op 'Ja' in het dialoogvenster dat op de iPad
verschijnt om naar de App Store te gaan en de
DOCS2GO-app te downloaden.
4. Tik op "Installeren" of "App Installeren".
5. De DOCS2GO-app op de iPad openen.
6. Bereid uw afbeelding of document voor om te scannen:
• Papier: Plaats het papier in de INVOERSLEUF met
het te scannen oppervlak naar omhoog. Stel de
PAPIERGELEIDER zo in, dat hij tegen de rand van
het papier rust.
• Foto: Plaats de foto in de meegeleverde
beschermende fotohoes. Plaats de fotohoes in de
INVOERSLEUF met het gesloten uiteinde eerst en
met het te scannen oppervlak naar omhoog. Stel de
PAPIERGELEIDER zo in, dat hij tegen de rand van
de hoes rust.
7. Druk op de SCAN-knop in de app. De foto of het
document zal door de scanner worden getrokken. Bekijk
uw scan in de app en druk op OPSLAAN om uw
resultaten op te slaan in uw fotobibliotheek of druk op
ANNULEREN om opnieuw te scannen.
25
Page 26

VEILIGHEIDSVOORSCHRIFTEN
REINIGING
Volg deze stappen om uw scanner te reinigen, voor de
beste scankwaliteit.
Opmerkingen:
• Zorg dat er geen stof of vuil op het reinigen van
papier of het reinigen van strip.
• Gebruik geen oplosmiddelen om de sensor schoon
te maken.
1. Klik in de rechterbovenhoek van de DOCS2GO-app
om het "tandwiel" (menu Instellingen) te doen
verschijnen.
2. Tik op het tandwiel om naar het menu Instellingen te gaan.
3. Plaats het meegeleverde reinigingspapier in de INVOERSLEUF van de scanner
met de sponsachtige kant naar BENEDEN en naar u toe, alsof u het gaat
scannen.
4. Druk op de knop Reinigen in het menu van de app. Druk op het volgende
scherm dat verschijnt u op de knop Reinigen om met het reinigen te beginnen.
DE REINIGINGSBAND GEBRUIKEN
1. Zet de scanner uit.
2. Houd de handgreep van de reinigingsband
vast met de sponskant naar beneden.
3. Plaats de reinigingsband stevig in de
uitvoersleuf met de stofkant naar BOVEN.
4. Druk de reinigingsband helemaal naar het
einde van de uitvoersleuf.
5. Beweeg de reinigingsband een paar keer lichtjes van de ene naar de andere
kant en verwijder hem.
KALIBRATIE
1. Klik in de rechterbovenhoek van de DOCS2GO-app
om het tandwiel te doen verschijnen. (Menu
Instellingen)
2. Tik op het tandwiel om naar het menu Instellingen te
gaan.
3. Verwijder de dunnen plastic film aan beide kanten van
het kalibratiepapier. Plaats het kalibratiepapier (met de
afdrukzijde naar BOVEN) in de INVOERSLEUF.
4. Druk in de app op de knop Kalibreren.
5. Druk op de knop Kalibreren om de kalibratie te starten.
26
Page 27

SPECIFICATIONS
Minimum System Requirements:
• iPad or iPad 2 with iOS 4.3.5 or later
• An iTunes Store account (for DOCS2GO App download)
• Internet access (for DOCS2GO App download)
Max Scan Size: 8.5” x 14”
Max Scan Resolution: 300 dpi
Sensor Type: Contact Image Sensor
Light Source: LED (R, G, B)
File Type: JPEG
Power: AC: 100-240V~ 0.45A (.45A) 50-60 Hz
DC: 5.1V, 2.1A from the Apple USB
Power Consumption: 10.5W (Maximum); 5V, 2.1A
Dimensions (W x H x D): 12.1" x 4.4" x 2.8"
Weight: 1.44Ibs (0.65kg)
Power Adapter (Not Supplied)
(308mm x 111mm x 72mm)
27
Page 28

Page 29

Page 30

Page 31

Page 32

www.ionaudio.com
MANUAL VERSION 1.7
82-352-10150
 Loading...