

Page 1

DJ LIVE
Quickstart Guide
English ( 3 – 4 )
Guía de inicio rápido
Español ( 5 – 7 )
Guide d’utilisation simplifié
Français ( 8 – 10 )
Guida rapida
Italiano ( 11 – 12 )
Kurzanleitung
Deutsch ( 13 – 15 )
Snelstartgids
Nederlands ( 16 – 18 )
Appendix
English ( 19 )
Page 2

Page 3
Quickstart Guide (English)
Introduction
Box Contents
• DJ LIVE
• USB Cable
• Software Download Instructions
• Quickstart Guide
• Safety & Warranty Manual
Product Registration and Support
Take a minute to register your DJ LIVE at ionaudio.com. Registering it ensures that we can
keep you updated with any new product developments and provide you with world-class
technical support if you have any issues.
Also, visit ionaudio.com/dj-live for the latest information about this product.
For additional product support, visit ionaudio.com/support.
Key Features
• 2-deck controller with crossfader, EQ controls, and capacitive touch-activated platters
• Works with Mac and PC laptops
• Includes VirtualDJ LE Lite for Mac OS X and Windows PC
• Standard MIDI-compatible
Compatible Apps
DJ LIVE can be used with the following apps:
• VirtualDJ LE Lite for Mac and PC (included)
• Any MIDI-capable software application for Windows and Mac OS X
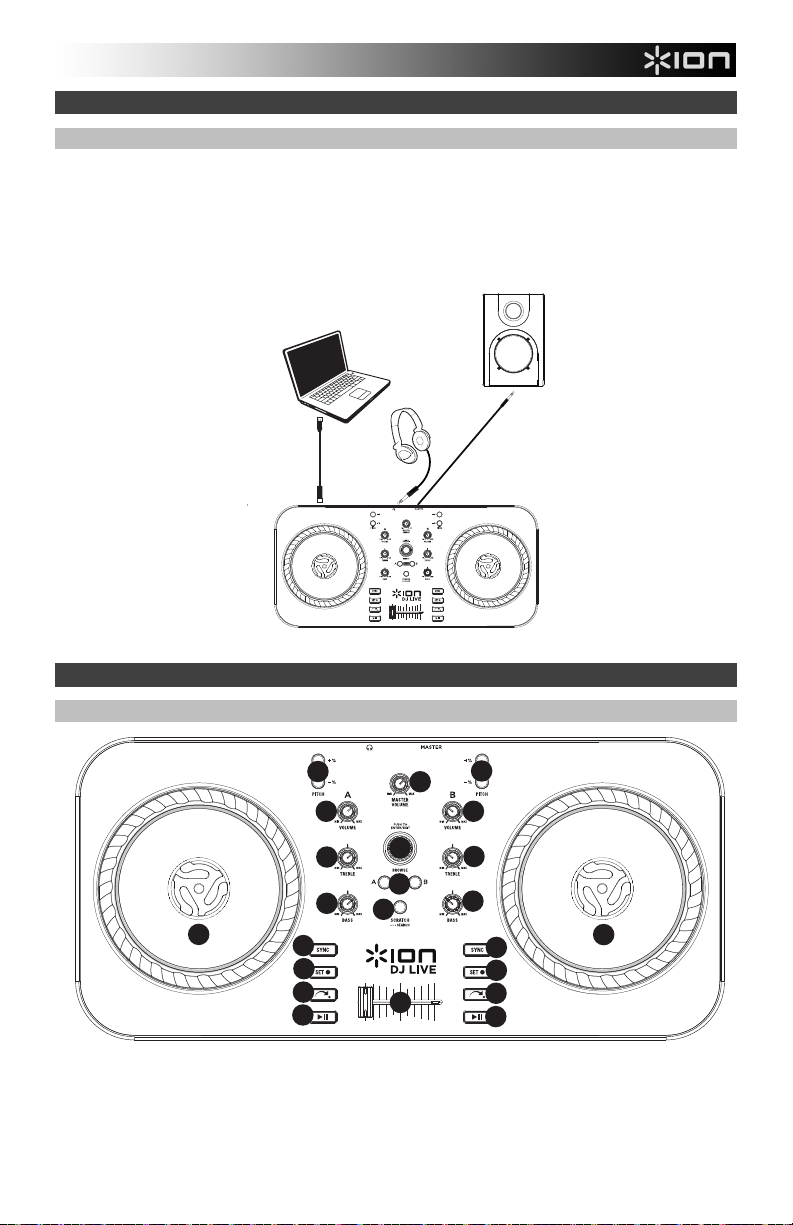
Connection Diagram
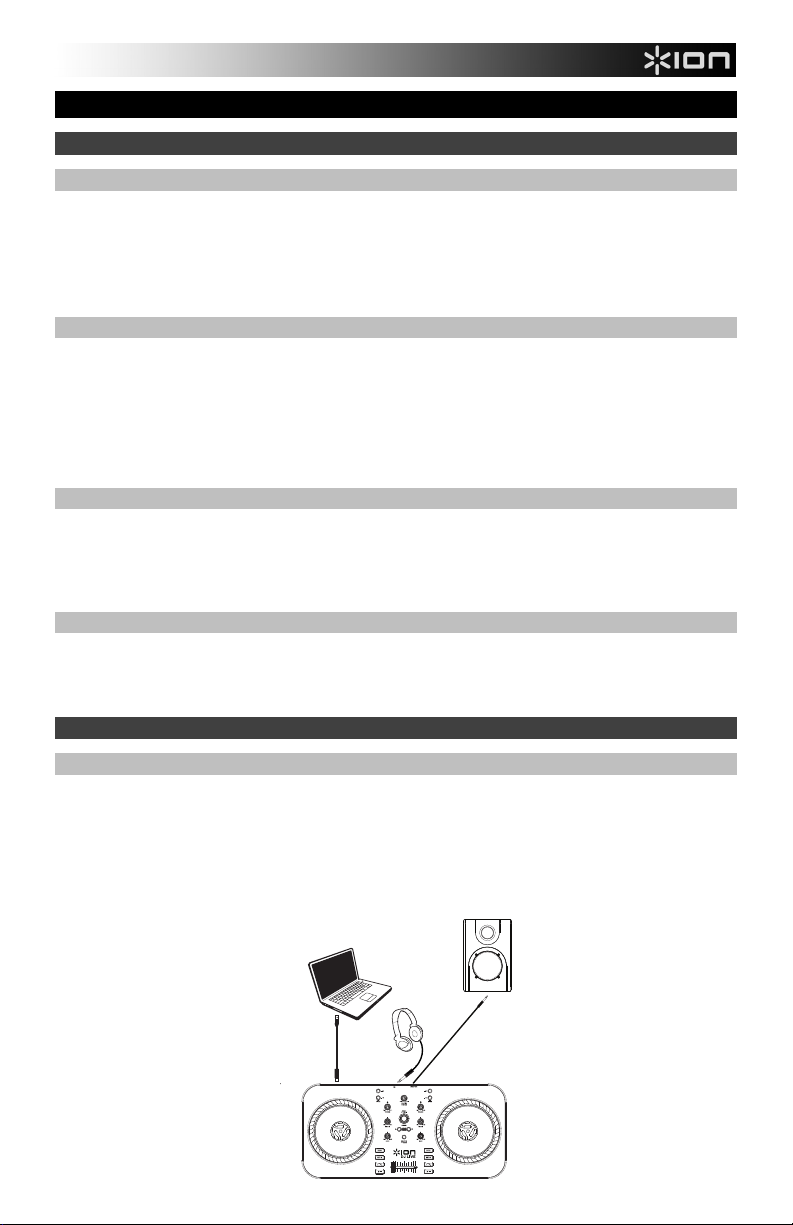
With Computer
To start using DJ LIVE:
1. Connect DJ LIVE's Mini-USB port to the USB cable.
2. Connect the USB cable to an available USB port on your computer.
3. Visit ionaudio.com/dj-live to view a list of compatible apps.
4. Once the app is downloaded, open it.
Computer*
Headphones*
3
Speaker*
*not included
Page 4
Features
Top Panel
9
13
10
11
1
9
10
11
8
12
2
7
3
6
5
4
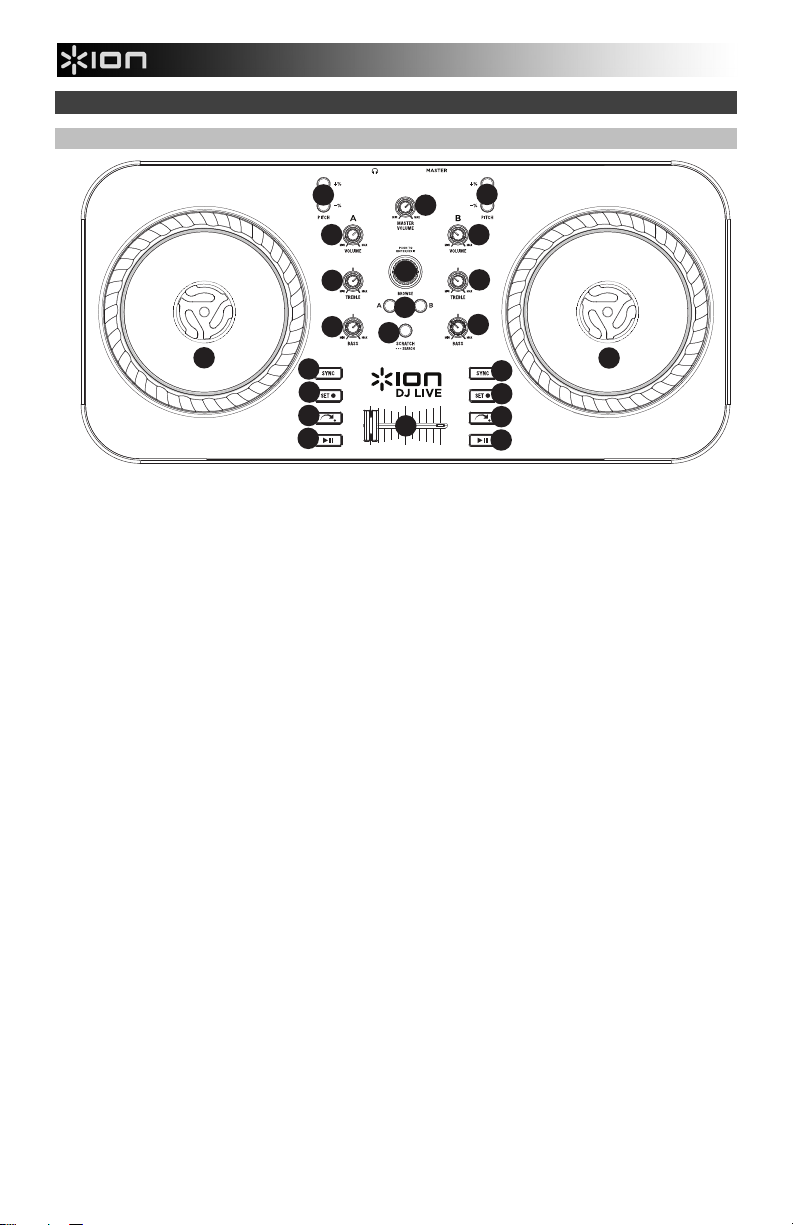
1. BROWSE KNOB – Turn this knob to scroll through your music tracks in the software. Press this knob to enter
the song library.
2. JOG WHEEL – Scratches, pitch bends or searches through the track on that deck, depending on the JOG
WHEELS' current mode (as set by the SCRATCH / SEARCH button).
a. Scratch Mode: When the SCRATCH LED is lit, move the JOG WHEEL to "scratch" when paused or
during playback on that deck – an effect similar to moving the platter on a turntable.
b. Pitch Mode: When the SCRATCH LED is off, move the JOG WHEEL to temporarily adjust the pitch up
or down for the track on that deck during playback (but not when paused).
c. Search Mode: Press and hold the SCRATCH/SEARCH button for 2 seconds when paused or during
playback and the Scratch LED will flash indicating you’re in Search Mode. Move the JOG WHEEL to rapidly
scan forward or backward in a track. When paused, no audible scrubbing will be heard when searching
through a song.
3. SCRATCH / SEARCH – Press this button to put the JOG WHEELS in Scratch Mode or Pitch Bend Mode, or
press and hold the button for 2 seconds to put the JOG WHEELS in Search Mode. When this LED is lit, the
JOG WHEELS are in Scratch Mode. When the LED is not lit, the JOG WHEELS are in Pitch Mode. When the
LED is flashing, the JOG WHEELS are in Search mode.
4. PLAY / PAUSE – Starts or resumes playback if the deck is paused. Pauses playback if the deck is playing.
5. RETURN TO CUE – Press Return to CUE to return the track to the Cue point.
6. SET CUE – Assigns a Cue point during playback or when paused.
7. SYNC – Press this button to automatically match the tempo and align the beats of the track on that deck with
the track on the opposite deck. Press while Sync is engaged to jump to the next beat in the song. Press and
hold while Sync is engaged to turn Sync off.
8. LOAD – Press this button to load the selected track to that particular deck.
9. PITCH -/+ – Press one of these buttons to bend the pitch of the track on that deck, slightly decreasing or
increasing its speed. Release the button for the track to return to its normal pitch. (This is an important feature
when manually aligning the beats of two tracks.)
10. VOLUME – Adjusts the volume level of the music on that deck.
11. TREBLE – Adjusts the high-end frequencies of the music on that deck. The Treble knob on DJ LIVE controls
both Treble and MID controls in VirtualDJ LE software.
12. BASS – Adjusts the low-end frequencies of the music on that deck.
13. MASTER VOLUME – Adjusts the volume of the entire mix (the music on both decks heard together). To adjust
the volumes of each deck separately, use the VOLUME knobs.
14. CROSSFADER – Slide the CROSSFADER towards a deck to cause that deck's track to be heard in the mix.
This is an important DJ tool for blending the tracks together, moving from one track to the next, and creating a
good overall mix.
14
12
7
2
6
5
4
4
Page 5
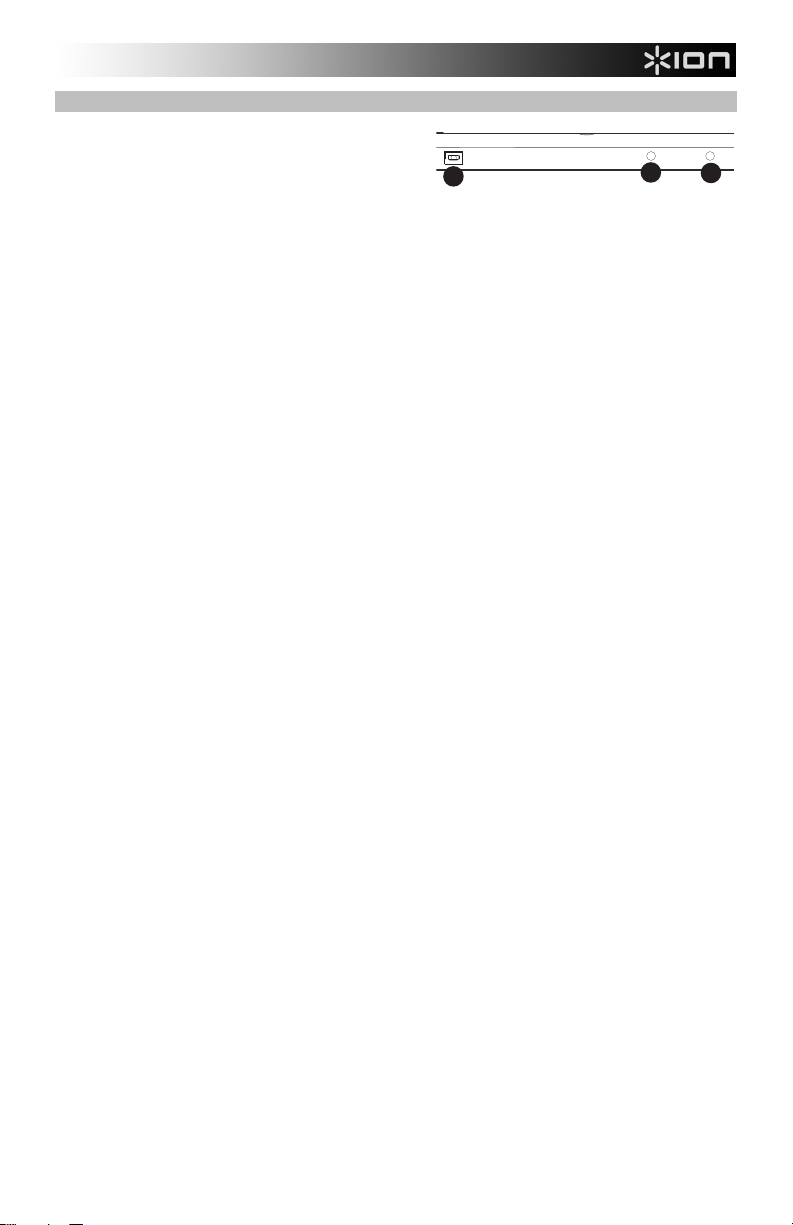
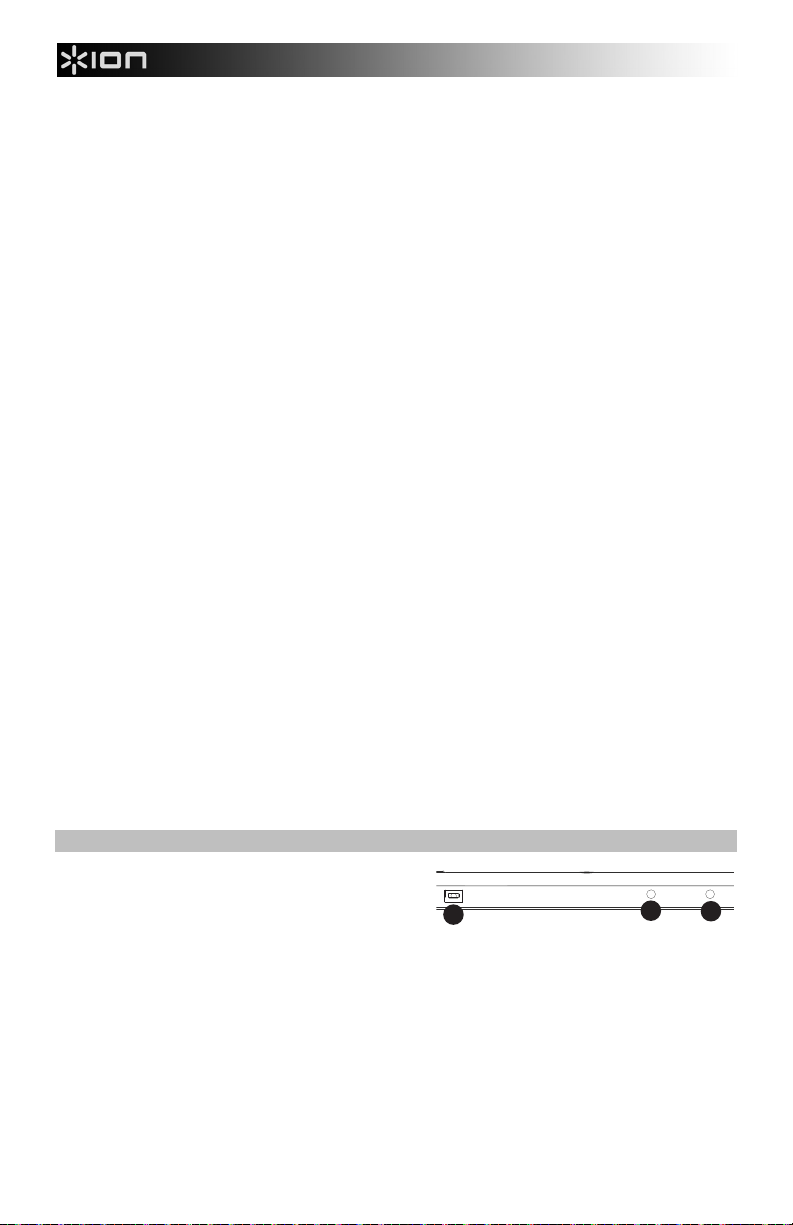
Rear Panel
1. Mini-USB – Connect the included Mini USB cable from
this Mini-USB port to a computer to power DJ LIVE and
control software.
2. Master Output – Use a standard 1/8” (3.5mm) cable to
connect this output to a powered speaker.
3. Headphones/Cue – Connect headphones to this stereo 3.5mm output.
• CUE LEVEL (software control) - Controls the level sent to the headphones.
• CUE-MIX (software control) - Controls the level of the master to cue volume on the headphones to mix
by monitoring with headphones.
1
2
3
5
Page 6
Guía de inicio rápido (Español)
Introducción
Contenido de la caja
• DJ LIVE
• Cable USB
• Instrucciones de descarga del software
Guía de inicio rápido
•
• Manual sobre la seguridad y garantía
Registro y Soporte del Producto
Tómese un minuto para registrar su DJ LIVE en ionaudio.com. Al registrarse, se asegura de que
podamos mantenerle actualizado con todos los nuevos desarrollos de productos y brindarle un
soporte técnico de categoría mundial si tiene algún problema.
Para obtener información completa sobre requisitos del sistema y compatibilidad visite
ionaudio.com/dj-live.
Para soporte adicional del producto, visite ionaudio.com/support.
Características principales
• Controlador de 2 bandejas con crossfader, controles de ecualización y platos capacitivos
activados al tacto
• Funciona con laptops PC y Mac
• Incluye VirtualDJ LE Lite para Mac OS X y Windows PC
• Compatible con MIDI estándar
Aplicaciones compatibles
El DJ LIVE se puede usar con las siguientes aplicaciones:
• VirtualDJ LE Lite para Mac y PC (incluido)
• Cualquier aplicación de software con capacidad MIDI para Windows y Mac OS X
6
Page 7
Conexión Diagrama
Con computadora
Para comenzar a usar DJ LIVE:
1. Conecte el puerto mini USB del DJ LIVE a un cable USB.
2. Conecte el cable USB a un puerto USB disponible de su computadora.
3. Para ver una lista de las aplicaciones compatibles, visite ionaudio.com/dj-live.
4. Una vez descargada la aplicación, ábrala.
Computadora*
Altavoz*
Auriculares*
*no incluido
Características
Panel superior
10
11
12
9
7
6
5
4
2
9
10
11
12
2
7
6
5
4
13
1
8
3
14
1. PERILLA DE NAVEGACIÓN – Gire esta perilla para recorrer las pistas musicales en el software.
Presione la perilla para entrar a la biblioteca de temas.
7
Page 8
2. RUEDA DE AVANCE POR PASOS – Raya, inflexiona el pitch o busca a lo largo de la pista de esa
bandeja, dependiendo del modo en que se encuentra la RUEDA (establecido por el botón SCRATCH /
SEARCH).
a. Modo de rayado: Cuando el LED SCRATCH está encendido, mueva la RUEDA DE AVANCE
POR PASOS para "rayar" la pistade esa bandeja —un efecto similar al de mover el plato en un
giradiscos.
b. Modo de pitch: Cuando el LED SCRATCH está apagado, mueva la RUEDA DE AVANCE POR
PASOS para ajustar temporalmente el pitch, subiéndolo o bajándolo en la pista de esa bandeja.
c. Modo de búsqueda: Pulse y mantenga pulsado el botón SCRATCH/SEARCH durante 2
segundos. El LED SCRATCH destellará indicando que está en modo de búsqueda. Mueva la
3. RAYAR / BUSCAR – Pulse este botón para poner las RUEDAS DE AVANCE POR PASOS en modo
4. REPRODUCIR / PAUSA – Inicia o reanuda la reproducción si la bandeja está en pausa. Pone la
5. VUELVE AL PUNTO DE CUE (Return to Cue) – Pulse Return to CUE (Volver al cue) para regresar la
6. ASIGNAR AL PUNTO DE CUE (Set Cue) – Asigna un punto de cue durante la reproducción o cuando
7. SINCRONISMO – Pulse este botón para automáticamente igualar el tempo y alinear los beats de la
8. CARGAR – Pulse este botón para cargar la pista seleccionada en esa bandeja particular.
9. PITCH -/+ – Pulse uno de estos botones para inflexionar el pitch de la pista de esa bandeja,
10. VOLUMEN – Ajusta el nivel de volumen de la música que se reproduce en esa bandeja.
11. AGUDOS – Ajusta las altas frecuencias de la música que se reproduce en esa bandeja.
12. BAJOS – Ajusta las bajas frecuencias de la música que se reproduce en esa bandeja.
13. VOLUMEN MAESTRO – Ajusta el volumen de la mezcla entera (la música en ambas bandejas
14. CROSSFADER – Deslice el CROSSFADER hacia una bandeja para hacer que se oiga la pista de esa
PANEL TRASERO
1. Mini-USB – Conecte uno de los cables incluidos
2. Master Output – Use standard RCA cables to
3. PHONES OUT – Connect headphones to this stereo 1/4” output.
RUEDA DE AVANCE POR PASOS para avanzar o retroceder rápidamente en una pista.
de rayado o de inflexión de pitch, o pulse y mantenga pulsado el botón durante 2 segundos para poner
las RUEDAS en modo de búsqueda. Cuando este LED está encendido, las RUEDAS DE AVANCE
POR PASOS están en modo de rayado. Cuando no está encendido, las RUEDAS DE AVANCE POR
PASOS están en modo de inflexión de pitch. Cuando este LED está destellando, las RUEDAS DE
AVANCE POR PASOS están en modo de búsqueda.
reproducción en pausa si la bandeja está reproduciendo.
pista al punto de cue.
está en pausa.
pista de esa bandeja con la de la bandeja opuesta. Púlselo cuando Sync (Sincronismo) está activado
para saltar al siguiente beat del tema. Púlselo y manténgalo pulsado cuando Sync está activado para
desactivarlo.
aumentando o disminuyendo levemente su velocidad. Suelte el botón para que la pista vuelva a su
pitch normal. (Ésta es una característica importante cuando se alinean manualmente los beats de dos
pistas.)
escuchada conjuntamente). Para ajustar los volúmenes de cada bandeja por separado, use las perillas
VOLUME.
bandeja en la mezcla. Ésta es una herramienta importante para que el DJ pueda combinar las pistas,
moverse de una pista a la siguiente y crear una buena mezcla general.
desde este puerto mini USB a una computadora
para alimentar el DJ LIVE y controlar el software.
connect this output to a speaker or amplifier system.
1
2
3
8
Page 9

Guide d’utilisation simplifié (Français)
Présentation
Contenu de la boîte
• DJ LIVE
• Câble USB
• Instructions de téléchargement du logiciel
• Guide d’utilisation simplifié
• Consignes de sécurité et informations concernant la garantie
Enregistrement du produit et soutien technique
Veuillez prendre le temps de visiter le site ionaudio.com afin d’enregistrer votre DJ LIVE. L'enregistrement
des produits vous permet d'être informé sur les toutes dernières nouveautés concernant les produits et de
vous offrir un soutien technique de qualité, si vous en aviez besoin.
Pour tous les renseignements concernant la configuration système requise et la compatibilité veuillez visiter
ionaudio.com/dj-live.
Pour de plus amples informations, veuillez visiter le site ionaudio.com/support.
Caractéristiques principales
• Contrôleur à deux modules avec crossfader, commandes d'égalisation et plateaux capacitifs tactiles
• Fonctionne avec ordinateurs Mac et PC
• Comprend le logiciel VirtualDJ LE Lite pour Mac OS X et Windows PC
• Compatible avec MIDI standard
Applications compatibles
DJ LIVE peut être utilisé avec les applications suivantes :
• Logiciel VirtualDJ LE Lite pour Mac et PC (inclus)
• Toute application prenant en charge la norme MIDI pour Windows et Mac OS X
9
Page 10

Schéma de Connexion
Avec ordinateur
Pour utiliser DJ LIVE :
1. Branchez le câble USB au port mini-USB du DJ LIVE.
2. Branchez ensuite le câble USB à un port USB disponible sur votre ordinateur.
3. Veuillez visiter le site ionaudio.com/dj-live pour consulter la liste des applications et
logiciels compatibles.
4. Une fois l’application téléchargée, cliquez dessus pour l’ouvrir.
Ordinateur*
Haut-parleur*
Casque
d'écoute*
*non inclus
Caractéristiques
Panneau supérieur
10
11
12
9
7
6
5
4
2
9
10
11
12
2
7
6
5
4
13
1
8
3
14
1. BOUTON DE NAVIGATION – Ce bouton permet de parcourir vos pistes dans le logiciel. Appuyez sur
ce bouton pour entrer dans la bibliothèque musicale.
10
Page 11

2. MOLETTE – Cette molette permet d’utiliser la fonction Scratch ou d’effectuer une recherche parmi la
piste sur le module correspondant, selon le mode de la molette (tel que réglé par la touche
SCRATCH/SEARCH).
a. Modo de rayado: Cuando se encienda el LED SCRATCH, mueva la RUEDA DE AVANCE POR
PASOS para “rayar” estando en pausa o reproduciendo esa bandeja —un efecto similar al de
mover el plato en un giradiscos.
b. Modo de pitch: Cuando el LED SCRATCH está apagado, mueva la RUEDA DE AVANCE POR
PASOS para ajustar temporalmente el pitch, subiéndolo o bajándolo en la pista de esa bandeja
durante la reproducción (pero no mientras está en pausa).
c. Modo de búsqueda: Mantenga pulsado el botón SCRATCH/SEARCH durante 2 segundos
estando en pausa o durante la reproducción y el LED SCRATCH destellará indicando que está
en modo de búsqueda. Mueva la RUEDA DE AVANCE POR PASOS para avanzar o retroceder
rápidamente en una pista. Estando en pausa, no oirá sonido de restriegue al adelantar o
3. SCRATCH / SEARCH – Appuyez sur cette touche pour mettre les molettes en mode Scratch ou Pitch
4. PLAY / PAUSE – Cette touche permet de lancer ou de relancer la lecture du module. Permet de faire
5. RETURN TO CUE – Appuyez sur Return to CUE pour retourner au point de repère de la piste.
6. SET CUE – Assignez un point de repère pendant la lecture ou en pause.
7. SYNC – Cette touche permet d’automatiquement synchroniser le tempo et le rythme de la piste sur ce
8. LOAD – Appuyez sur cette touche afin de charger la piste sélectionnée sur le module correspondant.
9. PITCH -/+ – Appuyez sur une de ces touches afin de modifier la vitesse de lecture de la piste du
10. VOLUME – Cette touche permet d'ajuster le niveau du volume du module correspondant.
11. TREBLE – La perilla de agudos del DJ LIVE maneja los controles tanto de los agudos como de los
12. BASS – Cette touche permet d'ajuster le niveau des basses fréquences du module correspondant.
13. MASTER VOLUME – Cette touche permet d'ajuster le niveau du volume du mix (la musique provenant
14. CROSSFADER – Afin d'ajouter la musique d'un des modules au mix, déplacez le crossfader du côté
PANNEAU ARRIÈRE
1. Mini-USB – Conecte a un ordenador el cable mini
2. Salida maestra – Utilice un cable estándar de 3,5
3. Auriculares/Cue – Conecte sus auriculares a esta salida estéreo de 3,5 mm.
retroceder un tema.
Bend, ou maintenez la touche pendant 2 secondes pour mettre les molettes en mode search. Lorsque
cette DEL est allumée, les molettes sont en mode Scratch. Lorsque cette DEL est éteinte, les molettes
sont en mode Pitch. Lorsque cette DEL clignote, les molettes sont en mode Search.
un arrêt si le module est en cours de lecture.
module à celle de l’autre module. Appuyez lorsque Sync est activé afin de sauter au prochain
battement de la chanson. Maintenez cette touche enfoncée lorsque Sync est activé pour désactiver la
synchronisation.
module correspondant, augmentant ou diminuant légèrement la vitesse. Lorsque la touche est
relâchée, la piste retourne à sa vitesse de lecture normale. (Ceci est un outil très utile lors de la
synchronisation manuelle du tempo de pistes.)
medios en el software VirtualDJ LE.
sur deux modules). Afin d’ajuster le niveau du volume de chacun des modules séparément, utilisez les
boutons VOLUME.
de ce module. Ceci est un outil très important lors du mixage des pistes, l’enchaînement d’une piste à
l’autre, et pour créer un bon mix.
USB incluido desde este puerto mini USB para
alimentar el DJ LIVE y controlar el software.
mm (1/8 pulg.) para conectar esta salida a un
altavoz amplificado.
• NIVEL DE CUE (control de software) - Controla el nivel enviado a los auriculares.
• CUE-MEZCLA (control de software) - Controla el nivel del volumen maestro a cue en los
auriculares a mezclar mediante la monitorización con auriculares.
1
2
3
11
Page 12

Guida rapida (Italiano)
Introduzione
Contenuti della confezione
• DJ LIVE
• Cavo USB
• Istruzioni per il download del Software
Guida rapida
•
• Istruzioni di sicurezza e garanzia
Registrazione del prodotto e assistenza
Dedicate un minuto alla registrazione di DJ LIVE all'indirizzo ionaudio.com. Registrando il
prodotto ci consentirete di mantenervi sempre aggiornati con tutti i nuovi sviluppi e di fornirvi
un'assistenza tecnica di prima classe in caso di problemi.
Per conoscere i requisiti di sistema completi e ottenere informazioni in merito alla compatibilità
del prodotto, recarsi ionaudio.com/dj-live.
Per ulteriore assistenza, recarsi alla pagina ionaudio.com/support.
Funzioni principali
• Controller a 2 deck con crossfader, comandi EQ e piatti capacitivi attivati col tocco
• Funziona con Mac e PC
• Comprende il software VirtualDJ LE Lite per Mac OS X e Windows PC
• Compatibile con MIDI standard
App compatibili
L'DJ LIVE può essere utilizzato con le seguenti app:
• VirtualDJ LE Lite per Mac e PC (in dotazione)
• Qualsiasi software MIDI per Windows e Mac OS X
Schema dei Collegamenti
Con computer
Per iniziare a utilizzare l'DJ LIVE:
1. Collegare la porta mini-USB dell'DJ LIVE al cavo USB.
2. Collegare il cavo USB ad una porta USB disponibile sul computer.
3. Recarsi alla pagina ionaudio.com/dj-live per visualizzare un elenco di app compatibili.
4. Una volta scaricata l'app, aprirla.
Computer*
Cuffie*
Altoparlant*
*non sono inclusi
12
Page 13

Caratteristiche
Pannello superiore
9
13
10
11
1
9
10
11
8
12
2
7
3
6
5
4
1. MANOPOLA BROWSE – Girare questa manopola per scorrere lungo le tracce musicali presenti nel software.
Premere la manopola per entrare nella libreria canzoni.
2. ROTELLA JOG WHEEL – Effettua lo scratch, il bend del pitch o la ricerca lungo la traccia presente su quel
deck, a seconda della modalità in cui si trova la rotella (impostata dal tasto SCRATCH / SEARCH).
a. Modalità scratch: quando il LED SCRATCH è acceso, spostare la JOG WHEEL per "scratchare"
durante la pausa o la riproduzione su quel deck – un effetto simile a quello ottenuto muovendo il piatto
sul giradischi.
b. Modalità pitch: quando il LED SCRATCH è spento, muovere la rotella JOG WHEEL per regolare
temporaneamente il pitch alzandolo o abbassandolo per la traccia su tale deck durante la riproduzione
(non quando è in pausa).
c. Modalità di ricerca (serch): tenere premuto il tasto SCRATCH/SEARCH per 2 secondi in pausa o
durante la riproduzione: il LED Scratch lampeggia a indicare che ci si trova in modalità di ricerca.
Muovere la rotella per scorrere rapidamente in avanti o indietro lungo la traccia. In pausa, non si udranno
3. SCRATCH / SEARCH – Premere questo tasto per configurare la rotella Jog in modalità Scratch o di Bend del
4. PLAY / PAUSE – Avvia la riproduzione o la riprende se il deck è in pausa. Interrompe momentaneamente la
5. RETURN TO CUE – Premere "Return to CUE" per far tornare la traccia al punto Cue.
6. SET CUE – Assegna un punto Cue durante la riproduzione o quando è in pausa.
7. SYNC – Premere questo tasto per automaticamente abbinare il tempo e allineare i beat della traccia su quel
8. LOAD – Premere questo tasto per caricare la traccia selezionata su quel particolare deck.
9. PITCH -/+ – Premere uno di questi tasti per attivare il bend del pitch della traccia presente su quel deck,
10. VOLUME – Regola il volume della musica riprodotta sul deck.
11. TREBLE – La manopola Treble sul DJ LIVE controlla i comandi Treble e MID nel software VirtualDJ LE.
12. BASS – Regola le frequenze basse della musica riprodotta sul deck.
13. VOLUME MASTER – Regola il volume dell’intero mix (la musica su entrambi i deck contemporaneamente).
14. CROSSFADER – Far scorrere il CROSSFADER verso un deck per fare in modo che la traccia di quel deck si
rumori durante la ricerca lungo una canzone.
pitch, oppure tenere premuto il tasto per 2 secondi per collocare le rotelle Jog wheel in modalità di ricerca.
Quando questo LED è acceso, le rotelle JOG WHEEL sono in modalità di Scratch. Quando questo LED è
spento, le rotelle JOG WHEEL sono in modalità di ricerca, Search. Quando questo LED lampeggia, le rotelle
JOG WHEEL sono in modalità di ricerca Search.
riproduzione sul deck se questo sta suonando.
deck con la traccia del deck opposto. Premere questo tasto quando Sync è attivo per saltare al beat
successivo della canzone. Tenere premuto il tasto quando Sync è attivo per disattivarlo.
aumentandone o diminuendone leggermente la velocità. Lasciare la pressione dal tasto per far tornare la
traccia al suo pitch normale. (Questa è una funzione importante al momento di allineare manualmente i beat di
due tracce.)
Per regolare il volume di ciascun deck separatamente, servirsi delle manopole VOLUME.
senta nel mix. Questo è un importante strumento da DJ per miscelare le tracce, passando da una traccia a
quella successiva e creando un buon mix complessivo.
14
12
7
2
6
5
4
13
Page 14

PANNELLO POSTERIORE
1. Mini-USB – Collegare il cavo Mini USB in dotazione da
questa porta Mini-USB al computer per alimentare il DJ
LIVE e controllare il software.
2. Uscita Master – Servirsi di un cavo standard da 1/8”
(3,5mm) per collegare questa uscita ad un altoparlante.
3. Cuffie/Cue – Collegare cuffie a questa uscita stereo da 3,5 mm.
• CUE LEVEL (controllo software) - Controlla il livello inviato alle cuffie.
• CUE-MIX (controllo software) - Controlla il livello del volume da master a cue sulle cuffie per mixare
monitorando con le cuffie.
1
2
3
14
Page 15

Kurzanleitung (Deutsch)
Einführung
Lieferumfang
• DJ LIVE
• USB Kabel
• Anweisungen zum laden der Software
• Kurzanleitung
• Sicherheitshinweise und Garantieinformationen
Produktregistrierung und Support
Nehmen Sie sich eine Minute Zeit, um Ihr DJ LIVE bei ionaudio.com zu registrieren. Die
Registrierung sorgt dafür, dass wir Sie über alle Neuentwicklungen informieren und erstklassigen
technischen Support bieten können, sollten Sie irgendwelche Fragen haben.
Für die vollständigen Systemanforderungen und Kompatibilitätsdetails besuchen Sie bitte
ionaudio.com/dj-live.
Für zusätzlichen Produkt-Support besuchen Sie ionaudio.com/support.
Wichtige Features
• 2-Deck-Controller mit Crossfader, EQ-Regler und kapazitive, berührungsempfindliche
Plattenteller
• Kompatibel mit Mac und PC Laptops
• Inklusive VirtualDJ LE Lite für Mac OS X und Windows PC
• Standard-MIDI-kompatibel
Kompatible Apps
DJ LIVE kann mit den folgenden Apps verwendet werden:
• VirtualDJ LE Lite für Mac und PC (im Lieferumfang enthalten)
• Jede MIDI-fähige Software-Anwendung für Windows und Mac OS X
15
Page 16

Anschlussdiagramm
Mit Computer
So starten Sie DJ LIVE:
1. Verbinden Sie das USB-Kabel mit dem Mini-USB-Anschluss von DJ LIVE.
2. Verbinden Sie das USB-Kabel mit einem freien USB-Port Ihres Computers.
3. Besuchen Sie ionaudio.com/dj-live, um eine Liste der kompatiblen Apps zu erhalten.
4. Wenn die App heruntergeladen worden ist, tippen Sie auf die App, um sie zu öffnen.
Computer*
Kopfhörer*
Funktionen
Oberseite
Lautsprecher*
*nicht enhalten
9
13
10
11
1
9
10
11
8
12
2
7
3
6
5
4
1. BROWSE KNOB – Drehen Sie diesen Regler, um durch Ihre Musiktitel in der Software zu blättern.
Drücken Sie diesen Regler, um die Song-Bibliothek aufzurufen.
14
12
7
2
6
5
4
16
Page 17

2. JOG WHEEL – Je nach aktuellem Modus des JOG WHEELS (Einstellung über die Taste
SCRATCHEN/SUCHEN) können Sie das Rad zum Scratchen, als Pitch Bend oder zum Durchsuchen
des Tracks am betreffenden Deck verwenden.
a. Scratch-Modus: Wenn die SCRATCH-LED leuchtet, können Sie das JOGWHEEL
während der Wiedergabe oder einer Pause auf diesem Deck bewegen, um zu "scratchen" ein ähnlicher Effekt wie beim Bewegen der Platte auf einem Plattenteller.
b. Pitch-Modus: Wenn die SCRATCH-LED nicht leuchtet, können Sie das JOGWHEEL
während der Wiedergabe bewegen (aber nicht, wenn die Wiedergabe pausiert wurde), um
für diesen Track vorübergehend die Tonhöhe nach oben oder unten zu korrigieren.
c. Suchmodus: Halten Sie die Taste SCRATCHEN/SUCHEN während der Wiedergabe oder
einer Pause 2 Sekunden lang gedrückt bis die Scratch-LED zu blinken beginnt und anzeigt,
dass Sie sich im Suchmodus befinden. Bewegen Sie das JOGWHEEL, um den Track
schnell zu durchsuchen. Wird die Wiedergabe pausiert, wird kein akustisches Scrubbing bei
3. SCRATCH /SEARCH – Drücken Sie diese Taste, um die JOG WHEELS in den Scratch-Modus bzw.
den Pitch Bend-Modus zu versetzen oder halten Sie die Taste 2 Sekunden lang gedrückt, um die JOG
WHEELS in den Suchmodus zu versetzen. Wenn diese LED leuchtet, befinden sich die JOG WHEELS
im Scratch-Modus. Wenn die LED nicht leuchtet, befinden sich die JOG WHEELS im Pitch-Modus.
Wenn die LED blinkt, befinden sich die JOG WHEELS im Suchmodus.
4. PLAY / PAUSE – Start oder Wiederaufnahme des Abspielens, falls das Deck im Pausenbetrieb war.
Hält die Wiedergabe vorläufig an, falls sich das Deck im Abspielbetrieb befindet.
5. RETURN TO CUE – Drücken Sie Zum CUE-Punkt zurückkehren, damit der Track zum Cue-Punkt
zurückspringt.
6. SET CUE – Weist einen Cue-Punkt während der Wiedergabe oder während einer Pause zu.
7. SYNC – Drücken Sie diesen Button, um das Tempo und die Beats des Tracks auf diesem Deck
automatisch mit dem gegenüberliegenden Deck anzugleichen. Drücken Sie diese Taste während Sync
aktiviert ist, um zum nächsten Takt im Song zu springen. Halten Sie diese Taste gedrückt während
Sync aktiviert ist, um Sync auszuschalten.
8. LOAD – Drücken Sie diese Taste, um den ausgewählten Track in das jeweilige Deck zu laden.
9. PITCH -/+ – Drücken Sie eine dieser Tasten, um die Tonhöhe des Tracks auf diesem Deck zu
verändern und die Geschwindigkeit etwas zu erhöhen bzw. zu verringern. Wenn Sie die Taste
loslassen, wird der Track wieder in seiner ursprünglichen Tonhöhe abgespielt. (Dies ist ein wichtiges
Feature für das manuelle Angleichen der Beats der beiden Tracks.)
10. VOLUME – Regelt die Lautstärke der Musik dieses Decks.
11. TREBLE – Der Höhenregler der DJ LIVE Controls steuert sowohl Höhen- als auch Mittenregler in der
VirtualDJ LE Software.
12. BASS – Regelt die tiefen Frequenzen der Musik dieses Decks.
13. MASTER VOLUME – Regelt die Lautstärke des gesamten Mix (die Musik beider auf Decks
gemeinsam). Verwenden Sie den VOLUME-Regler, um die Lautstärken für jedes Deck einzeln
einzustellen.
14. CROSSFADER – Schieben Sie den CROSSFADER zu einem Deck hin, um den Track dieses Decks
im Mix hören zu können. Dies ist ein wichtiges DJ-Tool, um die Tracks ineinander übergehen zu
lassen, während von einem Track zum nächsten gewechselt wird und ein guter Mix zustande kommt.
der Suche durch einen Song zu hören sein.
Rückseite
1. Mini-USB - Verbinden Sie den Mini-USB-Anschluss
mit einem Computer über das mitgelieferte MiniUSB-Kabel, um DJ LIVE und die SteuerungsSoftware mit Strom zu versorgen.
2. Master-Ausgang - Verwenden Sie ein
handelsübliches 1/8" (3,5 mm) Kabel, um diesen Ausgang mit einem Aktivlautsprecher zu verbinden.
3. Kopfhörer/Cue - Schließen Sie Ihre Kopfhörer an diesen 3,5mm-Stereoausgang an.
• CUE-PEGEL (Software-Steuerung) - Steuert den Pegel, der an die Kopfhörer gesendet wird.
• CUE-MIX (Software-Steuerung) - Steuert die Master- und Cue-Lautstärke am Kopfhörer, um
über die Kopfhörer mixen zu können.
1
2
3
17
Page 18

Snelstartgids (Nederlands)
Inleiding
Inhoud van de doos
• DJ LIVE
• USB-kabel
• Downloadinstructies voor de software
• Snelstartgids
• Handleiding veiligheid en garantie
Productregistratie en ondersteuning
Neem een ogenblik de tijd om uw DJ LIVE op ionaudio.com te registreren. Als u uw product
registreert, kunnen wij u op de hoogte houden van nieuwe productontwikkelingen en u in het
geval van problemen de best mogelijke technische ondersteuning aanbieden.
Surf ook naar ionaudio.com/dj-live voor het laatste nieuws over dit product.
Bezoek voor bijkomende productondersteuning ionaudio.com/support.
Belangrijkste eigenschappen
• Controller met 2 decks, crossfader, EQ-bedieningsknoppen en capacitieve
aanraakgevoelige draaitafels
• Werkt met laptops van Apple of pc-laptops
• Bevat VirtualDJ LE Lite voor Mac OS X en Windows pc
• Standaard MIDI-compatibel
Compatibele apps
DJ LIVE kan met de volgende apps worden gebruikt:
• VirtualDJ LE Lite voor Mac en pc (meegeleverd)
• Elk programma met MIDI-mogelijkheden op Windows en Mac OS X
Aansluitschema
Met computer
DJ LIVE opstarten:
1. De Mini-USB-poort van DJ LIVE aansluiten op de USB-kabel.
2. De USB-kabel aansluiten op een beschikbare USB-poort op uw computer.
3. Bezoek ionaudio.com/dj-live voor een lijst met compatibele apps.
4. Open de app nadat u hem heeft gedownload.
Computer*
Luidspreker*
Koptelefoon*
*niet meegeleverd
18
Page 19

Kenmerken
Bovenpaneel
9
13
10
11
1
9
10
11
8
12
2
7
3
6
5
4
1. BLADERKNOP: draai deze knop om in het programma door uw nummers te bladeren. Druk op deze knop om
de muziekbibliotheek te openen.
2. DRAAIWIEL: Scratcht, verandert de toonhoogte of doorzoekt het nummer op het deck naargelang de modus
waarin het DRAAIWIEL zich bevindt (instelbaar met de knop SCRATCHEN/ZOEKEN).
a. Scratchmodus: Wanneer de SCRATCH-LED brandt en het nummer op het deck is gepauzeerd of wordt
afgespeeld, moet u om te “scratchen” het DRAAIWIEL heen en weer bewegen: dit effect is vergelijkbaar
met het heen en weer bewegen van een vinylplaat op een draaitafel.
b. Pitchmodus: Beweeg het DRAAIWIEL wanneer de SCRATCH-LED niet brandt om tijdens het afspelen
(niet tijdens het pauzeren) tijdelijk de toonhoogte van het nummer op het deck te verhogen of te
verlagen.
c. Zoekmodus: Druk wanneer een nummer gepauzeerd is of afgespeeld wordt 2 seconden lang op de
knop SCRATCHEN/ZOEKEN. De Scratch-LED begint te knipperen om aan te geven dat u zich in
zoekmodus bevindt. Beweeg snel met het DRAAIWIEL om voorwaarts of achterwaarts te zoeken in een
nummer. Bij een gepauzeerd nummer is tijdens het doorzoeken van een nummer geen versneld geluid
3. SCRATCHEN/ZOEKEN: Druk op deze knop om de DRAAIWIELEN in scratch- of pitchmodus te zetten of
4. AFSPELEN / PAUZEREN: Het afspelen starten of hernemen wanneer het deck is gepauzeerd. Het afspelen
5. TERUGKEREN NAAR CUE: Druk op Terugkeren naar cue om het nummer terug op het cue-punt te zetten.
6. CUE INSTELLEN: Wijst tijdens het afspelen of tijdens een gepauzeerd nummer een cue-punt toe.
7. SYNC: Druk op deze knop om automatisch het tempo aan te passen en de beats van het nummer op het ene
8. LADEN: Druk op deze knop om het geselecteerde nummer naar het deck te laden.
9. PITCH -/+ – Druk op één van deze knoppen om de toonhoogte van het nummer te veranderen, door lichtjes de
10. VOLUME: Past het volumeniveau aan van de muziek op het deck.
11. TREBLE: De Treble-knop op DJ LIVE regelt in de VirtualDJ LE-software zowel de Treble- als MID-
12. BASS: Regelt de lage frequenties van de muziek op het deck in kwestie.
13. MASTER VOLUME: Regelt het volume van de hele geluidsmix (de muziek op beide decks samen). Gebruik de
14. CROSSFADER: Schuif de CROSSFADER in de richting van een deck om het nummer op dat deck in de mix
hoorbaar.
houdt deze knop 2 seconden lang ingedrukt om de DRAAIWIELEN in zoekmodus te zetten. Wanneer deze
LED verlicht is, bevinden de DRAAIWIELEN zich in scratchmodus. Wanneer deze LED niet brandt, bevinden
de DRAAIWIELEN zich in pitchmodus. Wanneer deze LED knippert, bevinden de DRAAIWIELEN zich in
zoekmodus.
pauzeren wanneer het deck speelt.
deck af te stemmen op die van het nummer op het andere deck. Wanneer Sync is geactiveerd, kunt u deze
knop indrukken om naar de volgende beat in het nummer te springen. Houd deze knop ingedrukt om Sync uit
te zetten.
snelheid te verlagen of te verhogen. Laat deze knop los om terug te keren naar de normale toonhoogte van het
nummer. (Deze functie is nuttig wanneer u manueel de beats van twee nummers op elkaar wilt afstemmen.)
bedieningsknoppen.
VOLUME-knoppen om het volume van elk deck afzonderlijk te regelen.
hoorbaar te maken. Dit belangrijk hulpmiddel voor dj's doet nummers in elkaar overlopen. Een naadloze
overgang van het ene nummer in het andere zorgt voor een goede mix.
14
12
7
2
6
5
4
19
Page 20

Achterpaneel
1. Mini-USB: Verbind met de meegeleverde mini-USBkabel de mini-USB-poort met een computer om DJ LIVE
te voeden en de software te bedienen.
2. Masteruitgang: Gebruik een standaard 1/8"- (3,5 mm)
kabel om deze uitgang met een actieve luidspreker te
verbinden.
3. Koptelefoon/Cue: Sluit op deze stereo 3,5 mm-uitgang een koptelefoon aan.
• CUE-NIVEAU (softwarebediening): Regelt het volumeniveau dat naar de koptelefoon wordt gestuurd.
• CUE-MIX (softwarebediening): Regelt het volumeniveau van de master naar de cue op de koptelefoon,
om te mixen tijdens monitoring met koptelefoon.
1
2
3
20
Page 21

Appendix (English)
Technical Specifications
Power: USB
Product Dimensions (W x D x H): 7.7” x 1.9” x 16.6”; 196 mm x 49 mm x 422 mm
Product Net Weight: 2.0 lbs.; 0.9 kg
VirtualDJ LE Lite 7 Minimum System Requirements:
PC:
• Microsoft® Windows XP SP3 or newer : Intel® Pentium® 4 or AMD Athlon
• 512MB RAM
• 1024x768 display resolution
• DirectX compatible sound card
• 50MB free on the hard drive
• Additional requirements for video mixing: ATI or NVIDIA® video card w/256MB of
MAC:
Specifications are subject to change without notice.
dedicated DDR3 RAM. Video card must support dual-screen output.
• Mac OS X v10.5 Leopard on Intel® processor platform
• 1024 MB RAM
• 1024x768 display resolution
• CoreAudio compatible sound card
• 50MB free on the hard drive
• Additional requirements for video mixing: ATI or NVIDIA® video chipset w/256MB
of dedicated DDR3 RAM. Video must support dual-screen output
Trademarks and Licenses
Virtual DJ is a registered trademark of Atomix Productions.
Mac, and OS X are trademarks or service marks of Apple Inc., registered in the U.S. and other
countries.
Windows is a registered trademark of Microsoft Corporation in the United States and other
countries.
All other product or company names are trademarks or registered trademarks of their
respective owners.
2GB RAM
21
Page 22

Page 23

Manual Version 1.0
Page 24

ionaudio.com
Manual Version 1.1
 Loading...