

Page 1

DJ GO
QUICKSTART GUIDE
GUIDE D’UTILISATION SIMPLIFIÉ
ENGLISH ( 3 – 4 )
GUÍA DE INICIO RÁPIDO
ESPAÑOL ( 5 – 6 )
FRANÇAIS ( 7 – 8 )
GUIDA RAPIDA
ITALIANO ( 9 – 10 )
KURZANLEITUNG
DEUTSCH ( 11 – 12 )
SNELSTARTGIDS
NEDERLANDS ( 13 – 14 )
Page 2

Page 3

BOX CONTENTS
DJ2GO
USB cable
Software CD
REGISTRATION
Please go to http://www.ionaudio.com to register your DJ2GO. Registering your product ensures that we
can keep you up-to-date with any new product developments and provide you with world-class technical
support, should you run into any problems.
SETUP
PC
Before you can begin using DJ
Lite software:
1. Please insert the included installation disc into your computer's CD-ROM drive.
2. Open the CD to view its contents.
3. Open the folder titled "PC."
4. Double-click the ".Msi" file.
5. Follow the on-screen instructions.
6. Once the installation is complete, click "Finish."
To start using DJ
1. Connect DJ
panel of your computer.)
2. Open Virtual DJ LE Lite by double-clicking the icon on your computer's Desktop (if you created a
Desktop shortcut) or by going to Start All Programs Virtual DJ LE Lite.
3. Once the software opens, go to the left File System / Folder structure panel.
4. Navigate to your music, video, and/or karaoke collection stored on your computer.
5. Once a supported file is found, left click + drag the file to one of the decks.
6. Repeat the process to assign a file to the other deck.
For more information on how to use Virtual DJ LE Lite, see the software manual on the CD, located in
the "Manual" folder.
2GO:
2GO to an available USB port on your computer. (If possible, use a USB port on the rear
MAC
Before you can begin using DJ2GO with your computer, you must install the included Virtual DJ LE
Lite software:
1. Please insert the included installation disc into your computer's CD-ROM drive.
2. Open the CD to view its contents.
3. Open the folder titled "Mac."
4. Double-click the "pkg" file.
5. Follow the on-screen instructions.
6. Once the installation is complete, click "Close."
To start using DJ
1. Connect DJ
panel of your computer.)
2. Open Virtual DJ LE Lite by going to Applications Virtual DJ LE Lite.
3. Once the software opens, go to the left File System / Folder structure panel.
4. Navigate to your music, video, and/or karaoke collection stored on your computer.
5. Once a supported file is found, left click + drag the file to one of the decks.
6. Repeat the process to assign a file to the other deck.
For more information on how to use Virtual DJ LE Lite, see the manual on the CD, located in the
"Manual" folder.
2GO:
2GO to an available USB port on your computer. (If possible, use a USB port on the rear
2GO with your computer, you must install the included Virtual DJ LE
3
Page 4
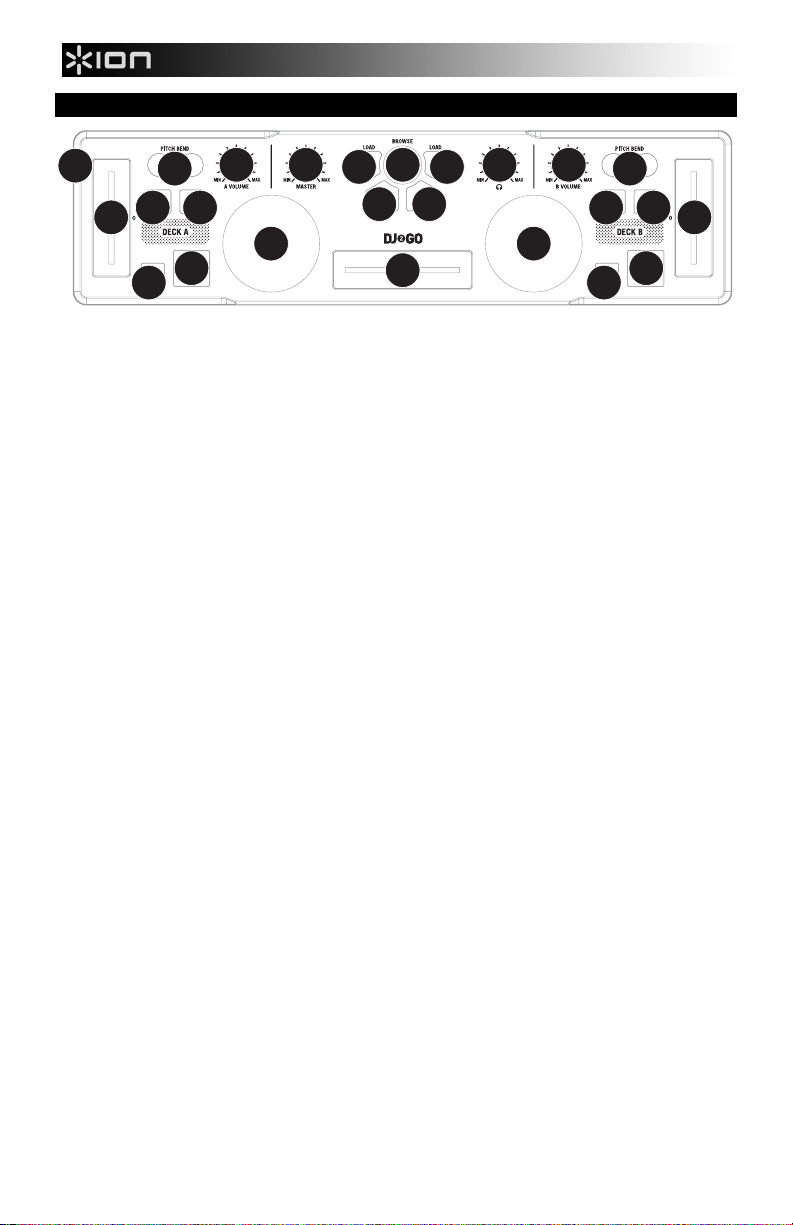
FEATURES
1
15
16 16
14
99
2
4
5
88
67
11
12 12
1. Mini-USB PORT – Plug a standard mini-USB cable into this port and into the USB port of your
computer. The computer's USB port will provide power to DJ
"plug-and-play" – no separate driver installation is necessary.
2. PFL – Sends pre-fader audio to the Cue Channel for monitoring.
3. CUE GAIN – Adjusts the audio level of the Cue channel.
4. MASTER VOLUME – Adjusts the output volume of the Program mix.
5. BROWSE KNOB – Turn this knob to scroll through lists of tracks and directories in the software.
6. BACK – This button will take you back to the previous level (folder).
7. ENTER – When a directory is selected, press the knob to enter it. (Press BACK to move up to the
previous level.)
8. LOAD A / LOAD B – Press one of these buttons while a track is selected to assign it to Deck A or Deck
B, respectively.
9. CHANNEL VOLUME – Adjusts the audio level on the corresponding channel.
10. CROSSFADER – Blends audio playing between Decks A and B. Sliding this to the left plays Deck A
and sliding to the right plays Deck B.
11. JOG WHEEL – Moving the JOG WHEEL "scratches" on the track on that deck – an effect similar to
moving the platter on a turntable.
To engage Pitch Bend Mode, hold the LOAD A / LOAD B button for two seconds; when the deck is
playing, the JOG WHEEL will bend the track's pitch.
12. PLAY / PAUSE – Starts or resumes playback if the Deck is paused. Pauses playback if the Deck is
playing.
13. CUE – The CUE button will return and pause the track at the last set cue point. For temporary play of
the cue point, you can hold down the CUE button. The track will play for as long as the button is held
down and will return to the cue point once it has been released. You can hold down CUE and PLAY /
PAUSE simultaneously to start playback from the cue point. Release both buttons to allow playback to
continue.
14. SYNC – Automatically matches the corresponding Deck's tempo with the other Deck's tempo.
15. PITCH FADER – Controls the track's playback speed.
16. PITCH BEND ( + / - ) – Press or hold down either of these buttons to temporarily adjust the track's
playback speed. When released, the track playback will return to the speed designated by the PITCH
FADER.
10
3
2
14
15
11
1313
2GO. DJ2GO is class-compliant, so it is
4
Page 5

CONTENIDO DE LA CAJA
DJ2GO
Cable USB
CD de software
REGISTRO
Visite http://www.ionaudio.com y registre su DJ2GO. El registro de su producto asegura que podamos
mantenerle actualizado con los nuevos desarrollos de productos y brindarle apoyo técnico de categoría
mundial en caso de que tenga algún problema.
SETUP
PC
Para poder usar el DJ2GO con la computadora, debe instalar el software Virtual DJ LE Lite incluido:
1. Inserte el disco de instalación provisto en la lectora de CD-ROM de su computadora.
2. Abra el CD para ver su contenido.
3. Abra la carpeta titulada "PC."
4. Haga doble clic en ".Msi" file.
5. Siga las instrucciones de la pantalla.
6. Una vez terminada la instalación, haga clic en “Finish” (Terminar).
Para comenzar a usar DJ2GO:
1. Conecte el DJ2GO a un puerto USB disponible de la computadora. (Si es posible, use un puerto USB
del panel trasero de la computadora.)
2. Abra Virtual DJ LE Lite haciendo doble clic en el icono del escritorio de la computadora (si creó un
acceso directo desde el escritorio) o yendo a Start All Programs Virtual DJ LE Lite (Inicio >
Todos los Programas > Virtual DJ LE Lite).
3. Una vez que se abra el software, vaya al panel de estructura izquierdo File System / Folder (Sistema
de archivos / carpeta.
4. Navegue hasta su colección de música, video o karaoke guardada en su computadora.
5. Una vez encontrado un archivo compatible, haga clic izquierdo y arrastre el archivo a una de las
bandejas.
6. Repita el proceso para asignar un archivo a la otra bandeja.
Para más información acerca de cómo usar Virtual DJ LE Lite, consulte el manual ubicado en la
carpeta “Manual” del CD.
MAC
Para poder usar el DJ2GO con la computadora, debe instalar el software Virtual DJ LE Lite incluido:
1. Inserte el disco de instalación provisto en la lectora de CD-ROM de su computadora.
2. Abra el CD para ver su contenido.
3. Abra la carpeta titulada "Mac".
4. Haga doble clic en ".pkg" file.
5. Siga las instrucciones de la pantalla.
6. Una vez terminada la instalación, haga clic en “Close” (Cerrar).
Para comenzar a usar DJ2GO:
1. Conecte el DJ2GO a un puerto USB disponible de la computadora. (Si es posible, use un puerto USB
del panel trasero de la computadora.)
2. Abra Virtual DJ LE Lite yendo a Applications Virtual DJ LE Lite (Aplicaciones > Virtual DJ LE Lite).
3. Una vez que se abra el software, vaya al panel de estructura izquierdo File System / Folder (Sistema
de archivos / carpeta.
4. Navegue hasta su colección de música, video o karaoke guardada en su computadora.
5. Una vez encontrado un archivo compatible, haga clic izquierdo y arrastre el archivo a una de las
bandejas.
6. Repita el proceso para asignar un archivo a la otra bandeja.
Para más información acerca de cómo usar Virtual DJ LE Lite, consulte el manual ubicado en la
carpeta “Manual” del CD.
5
Page 6

VISTA DEL PANEL SUPERIOR
1
15
16 16
14
99
2
4
5
88
67
11
12 12
1. PUERTO Mini-USB – Enchufe a este puerto un cable mini-USB estándar y luego enchúfelo al puerto
USB de la computadora. Este puerto de la computadora suministra alimentación al DJ2GO. DJ2GO
cumple la clase 25, de modo que es "plug-and-play" —no es necesario instalar ningún driver por
separado.
2. PFL – Envía el audio pre-fader al canal de Cue para monitoreo.
3. GANANCIA DE CUE – Ajusta el nivel del audio del canal de cue.
4. VOLUMEN MAESTRO – Ajusta el volumen de salida de la mezcla de programa.
5. PERILLA DE NAVEGACIÓN – Gire esta perilla para recorrer y seleccionar las listas de pistas y
directorios existentes en el software.
6. ATRÁS – Este botón lo lleva de regreso al nivel anterior (carpeta).
7. ENTRAR – Cuando seleccione un directorio, pulse la perilla para entrar al mismo. (Pulse BACK para
subir al nivel anterior.)
8. CARGAR A / CARGAR B – Pulse uno de estos botones mientras está seleccionada una pista para
asignarla a la bandeja A o B respectivamente.
9. VOLUMEN DE CANAL – Ajusta el nivel de audio en el canal correspondiente.
10. CROSSFADER – Combina el audio entre las bandejas A y B. Si se desliza a la izquierda se reproduce
el bandeja A. Si se desliza a la derecha se reproduce el bandeja B.
11. RUEDA DE AVANCE LENTO – Al mover la RUEDA DE AVANCE POR PASOS se “raya” la pista de
esa bandeja —un efecto similar al de mover el plato en un giradiscos.
Para activar el modo inflexión de pitch, mantenga pulsado el botón CARGAR A / CARGAR B dos
segundos; cuando la bandeja está reproduciendo, con la rueda se inflexiona el pitch de la pista.
12. REPRODUCIR / PAUSA – Inicia o reanuda la reproducción si la bandeja está en pausa. Pone la
reproducción en pausa si la bandeja está reproduciendo.
13. CUE – El botón CUE regresa y detiene la pista en el último punto de cue establecido. Para reproducir
temporalmente el punto de cue, puede mantener presionado el botón CUE. La pista se reproduce
mientras el botón se mantiene presionado y retorna al punto de cue cuando se suelta.
Puede mantener pulsado CUE y REPRODUCIR / PAUSA simultáneamente para comenzar la
reproducción desde el punto de cue temporal. Suelte ambos botones para permitir que continúe la
reproducción.
14. SINCRONIZACIÓN – Iguala automáticamente el tempo de la bandeja correspondiente con el de la otra
bandeja.
15. FADER DE PITCH – Controla la velocidad de reproducción de la cinta.
16. INFLEXIÓN DE PITCH ( + / – ) – Pulse o retenga pulsados cualquiera de estos botones para ajustar
temporalmente la velocidad de reproducción de la cinta. Cuando se suelta, la reproducción de la cinta
vuelve a la velocidad designada por el FADER DE PITCH.
10
3
11
14
1313
2
15
6
Page 7

CONTENU DE LA BOÎTE
DJ2GO
Câble USB
CD d'installation du logiciel
ENREGISTREMENT DU PRODUIT
Veuillez visiter le site internet http://www.ionaudio.com pour enregistrer votre DJ2GO. L'enregistrement des
produits vous permet d'être informé sur les toutes dernières nouveautés concernant les produits et de vous
offrir un soutien technique de qualité, si vous en aviez besoin.
SETUP
PC
Avant de commencer à utiliser DJ2GO sur votre ordinateur, vous devez installer le logiciel Virtual DJ
LE Lite fourni :
1. Veuillez insérer le CD d’installation fourni dans le lecteur de CD-ROM de votre ordinateur.
2. Ouvrez le disque pour visualiser son contenu.
3. Ouvrez le dossier intitulé « PC ».
4. Double-cliquez sur « .Msi » file.
5. Suivez les instructions affichées sur l’écran.
6. Une fois l’installation terminée, cliquez sur « Finish » (Terminer).
Pour commencer à utiliser DJ2GO :
1. Branchez DJ2GO à un port USB disponible sur votre ordinateur. (Si possible, utilisez un port USB situé
sur la partie arrière de votre ordinateur.)
2. Ouvrez Virtual DJ LE Lite en double-cliquant sur l’icône affichée sur le Bureau (si vous avez créé un
raccourci sur votre Bureau) ou en cliquant sur Start All Programs Virtual DJ LE Lite (Démarrer
Tous les programmes Virtual DJ LE Lite).
3. Une fois le logiciel ouvert, aller dans la fenêtre gauche Système de fichiers/arborescence des dossiers.
4. Parcourez votre collection de fichiers musique, vidéo et karaoké sauvegardée sur votre ordinateur.
5. Une fois qu'un fichier supporté est trouvé, faites un clic gauche et glissez le fichier dans l'un des
modules.
6. Répétez le processus pour attribuer un fichier à l'autre module.
Pour plus de renseignements concernant l’utilisation de Virtual DJ LE Lite, reportez-vous à la notice
située dans le dossier « Manual » (Notice) du CD.
MAC
Avant de commencer à utiliser DJ2GO sur votre ordinateur, vous devez installer le logiciel Virtual DJ
LE Lite fourni :
1. Veuillez insérer le disque d’installation fourni dans le lecteur de CD-ROM de votre ordinateur.
2. Ouvrez le disque pour visualiser son contenu.
3. Ouvrez le dossier intitulé « Mac ».
4. Double-cliquez sur « .pkg » file.
5. Suivez les instructions affichées sur l’écran.
6. Une fois l’installation terminée, cliquez sur « Close » (Fermer).
Pour commencer à utiliser DJ2GO :
1. Branchez DJ2GO à un port USB disponible sur votre ordinateur. (Si possible, utilisez un port USB situé
sur la partie arrière de votre ordinateur.)
2. Ouvrez Virtual DJ LE Lite en cliquant sur Applications Virtual DJ LE Lite.
3. Une fois le logiciel ouvert, aller dans la fenêtre gauche Système de fichiers/arborescence des dossiers.
4. Parcourez votre collection de fichiers musique, vidéo et karaoké sauvegardée sur votre ordinateur.
5. Une fois qu'un fichier supporté est trouvé, faites un clic gauche et glissez le fichier dans l'un des
modules.
6. Répétez le processus pour attribuer un fichier à l'autre module.
Pour plus de renseignements concernant l’utilisation de Virtual DJ LE Lite, reportez-vous à la notice
située dans le dossier « Manual » (Notice) du CD.
7
Page 8

CARACTÉRISTIQUES DU PANNEAU SUPÉRIEUR
1
15
16 16
14
99
2
4
5
88
67
11
12 12
1. PORT Mini-USB – Branchez un câble mini-USB standard dans cette entrée et l'autre extrémité dans
le port USB d'un ordinateur. Le port USB de l'ordinateur permet d’alimenter le DJ2GO. Le DJ2GO est
doté d’une connexion USB prête à l’utilisation et ne requiert donc pas l’installation de pilotes.
2. PFL – Achemine le signal du canal correspondant, avant atténuation et égalisation, au canal de préécoute.
3. CUE GAIN – Permet d'ajuster les niveaux du canal de pré-écoute.
4. MASTER VOLUME – Ajuste les niveaux de la sortie du Program mix.
5. BOUTON DE NAVIGATION – Ce bouton permet de parcourir et de sélectionner les pistes et les
répertoires dans le logiciel.
6. BACK – Cette touche vous permet de retourner au répertoire précédent.
7. ENTER – Lorsqu’un répertoire est sélectionné, vous n’avez qu’à tourner le bouton pour y accéder.
Vous pouvez revenir au niveau précédent à l’aide de la touche BACK.
8. LOAD A / LOAD B – Cette touche permet d'assigner la piste sélectionnée au module A ou B.
9. CHANNEL VOLUME – Utilisez cet atténuateur pour ajuster le niveau de l'audio du canal
correspondant.
10. CROSSFADER – Effectue un fondu entre les modules A et B. Lorsqu'il est déplacé vers la gauche, le
module A joue. Lorsqu'il est déplacé vers la droite, le module B joue.
11. MOLETTE – Déplacer la molette permet de scratcher la piste sur le module – effet similaire à celui du
plateau d’une table tournante classique.
Pour activer le mode pitch bend, appuyez sur la touche LOAD A / LOAD B pendant deux secondes;
lorsque le module est en ce mode lecture, tourner la molette permet de modifier temporairement la
vitesse de lecture de la piste.
12. PLAY / PAUSE – Cette touche permet de lancer ou de relancer la lecture du module. Permet de faire
un arrêt si le module est en cours de lecture.
13. CUE – La touche CUE permet de pauser la piste et de retourner au dernier point de repère
programmé. Pour faire la lecture temporaire du point de repère, maintenez la touche CUE enfoncée.
La piste joue aussi longtemps que la touche est enfoncée et revient au point de repère lorsqu'elle est
relâchée.
Vous pouvez maintenir les touches CUE et PLAY / PAUSE enfoncées simultanément afin de relancer
la lecture à partir du point de repère temporaire. Relâchez les deux touches afin de continuer la lecture.
14. SYNC – Cette touche permet de synchroniser automatiquement le tempo du module au tempo de
l'autre module.
15. POTENTIOMÈTRE – Ce potentiomètre permet de modifier la vitesse de lecture de la piste.
16. PITCH BEND ( + / – ) – Appuyer ou maintenir ces touches enfoncées permet de modifier
temporairement la vitesse de lecture de la piste. Lorsqu'elles sont relâchées, la vitesse de lecture de la
piste revient à la vitesse réglée par le PITCH FADER.
10
3
11
14
1313
2
15
8
Page 9

CONTENUTI DELLA CONFEZIONE
DJ2GO
Cavo USB
CD recante i software
REGISTRAZIONE
Recarsi alla pagina http://www.ionaudio.com per registrare il DJ2GO. La registrazione del prodotto ci
consente di tenervi aggiornati con tutti gli ultimissimi sviluppi del prodotto e di offrirvi assistenza tecnica di
livello mondiale, in caso di eventuali problemi.
SETUP
PC
Prima di iniziare a utilizzare il DJ2GO con il computer, occorre installare il software Virtual DJ LE Lite
in dotazione:
1. Inserire il CD di installazione in dotazione nel lettore CD-ROM del computer.
2. Aprire il CD per visualizzarne i contenuti.
3. Aprire la cartella denominata "PC."
4. Fare doppio clic su ".Msi" file.
5. Seguire le istruzioni su schermo.
6. Una volta completata l’installazione, cliccare su "Finish" (fine).
Per iniziare a utilizzare il DJ2GO:
1. Collegare il DJ2GO ad una porta USB disponibile sul computer (se possibile, servirsi di una porta USB
sul pannello posteriore del computer).
2. Aprire il Virtual DJ LE Lite facendo doppio clic sull’icona presente sul Desktop del computer (se è stata
creata un’icona di scelta rapida sul Desktop) oppure recandosi su Start Tutti i programmi Virtual
DJ LE Lite.
3. Una volta che il software si apre, recarsi al pannello di sinistra File System / struttura cartelle.
4. Navigare fino alla musica, video, e/o collezione di karaoke memorizzata sul computer.
5. Una volta trovato un file supportato, fare clic con plusante sinistro del mouse e trascinare il file ad uno
dei deck.
6. Ripetere il procedimento di assegnazione del file all'altro deck.
Per maggiori informazioni su come utilizzare il Virtual DJ LE Lite, fare riferimento al manuale
contenuto nel CD, nella cartella "Manual" (manuale).
MAC
Prima di iniziare a utilizzare il DJ2GO con il computer, occorre installare il software Virtual DJ LE Lite
in dotazione:
1. Inserire il CD di installazione in dotazione nel lettore CD-ROM del computer.
2. Aprire il CD per visualizzarne i contenuti.
3. Aprire la cartella denominata "Mac".
4. Fare doppio clic su ".pkg" file.
5. Seguire le istruzioni su schermo.
6. Una volta completata l’installazione, cliccare su "Close" (fine).
Per iniziare a utilizzare il DJ2GO:
1. Collegare il DJ2GO ad una porta USB disponibile sul computer (se possibile, servirsi di una porta USB
sul pannello posteriore del computer).
2. Aprire il Virtual DJ LE Lite recandosi su Applicazioni Virtual DJ LE Lite.
3. Una volta che il software si apre, recarsi al pannello di sinistra File System / struttura cartelle.
4. Navigare fino alla musica, video, e/o collezione di karaoke memorizzata sul computer.
5. Una volta trovato un file supportato, fare clic con plusante sinistro del mouse e trascinare il file ad uno
dei deck.
6. Ripetere il procedimento di assegnazione del file all'altro deck.
Per maggiori informazioni su come utilizzare il Virtual DJ LE Lite, fare riferimento al manuale
contenuto nel CD, nella cartella "Manual" (manuale).
9
Page 10

PANORAMICA PANNELLO SUPERIORE
1
15
16 16
14
99
2
4
5
88
67
11
12 12
1. PORTA Mini-USB – Collegare un cavo standard mini-USB a questa porta e a livello della porta USB
del computer. La porta USB del computer garantisce l’alimentazione del DJ2GO. DJ2GO è un
dispositivo compatibile, quindi è "plug-and-play": non richiede l’installazione di driver a parte.
2. PFL – Invia audio pre-fader, pre-EQ del canale corrispondente al canale Cue per il monitoraggio.
3. CUE GAIN (guadagno Cue) – Regola il livello dell'audio del canale Cue.
4. MASTER VOLUME – Regola il volume di uscita del mix di Programma.
5. MANOPOLA BROWSE – Girare questa manopola per scorrere lungo gli elenchi di tracce e cartelle
presenti nel software.
6. BACK – Questo tasto porta al livello precedente (cartella).
7. ENTER – Quando viene selezionata una cartella, premere la manopola per entrarvi (premere BACK
per tornare al livello precedente).
8. LOAD A / LOAD B (caricamento A / B) – Premere uno di questi tasti dopo aver selezionato una
traccia per assegnarla rispettivamente al deck A o al deck B.
9. VOLUME CANALE – Regola il livello audio del canale corrispondente.
10. CROSSFADER – Miscela l'audio tra i deck A e B. Facendolo scorrere verso sinistra, viene riprodotto il
deck A. Facendolo scorrere verso destra viene riprodotto il deck B.
11. JOG WHEEL (rotella jog wheel) – Spostando la JOG WHEEL si "scratcha" sulla traccia presente su
quel deck – un effetto simile a quello ottenuto muovendo il piatto sul giradischi. Per attivare la modalità
pitch bend (bend del pitch), tenere premuto il tasto LOAD A / LOAD B (caricamento A / B) per due
secondi; durante la riproduzione del deck, la rotella JOG WHEEL effettuerà il bendino del pitch della
traccia.
12. PLAY / PAUSE – Avvia la riproduzione o la riprende se il Deck è in pausa. Interrompe
momentaneamente la riproduzione sul deck se questo sta suonando.
13. CUE – La pressione del tasto CUE farà tornare e interrompere la traccia all'ultimo punto cue impostato.
Per la riproduzione temporanea del punto cue, si può tenere premuto il tasto CUE. La traccia verrà
riprodotta per il tempo in cui il pulsante viene tenuto premuto e tornerà al punto cue quando questo
viene rilasciato.
Per avviare la riproduzione dal punto cue temporaneo, è possibile tenere premuti
contemporaneamente CUE e PLAY / PAUSE. Lasciare la pressione di entrambi i pulsanti per
consentire che la riproduzione prosegua.
14. SYNC – Abbina automaticamente il tempo del deck corrispondente a quello dell'altro deck.
15. PITCH FADER (fader del pitch) – Regola la velocità di riproduzione della traccia.
16. PITCH BEND (bend del pitch) ( + / – ) - Premere o tenere premuto uno di questi tasti per regolare
temporaneamente la velocità di riproduzione della traccia. Una volta rilasciato, la riproduzione della
traccia tornerà alla velocità designata dal FADER del PITCH.
10
3
11
14
1313
2
15
10
Page 11

SCHACHTELINHALT
DJ2GO
USB-Kabel
Software-CD
REGISTRIERUNG
Bitte besuchen Sie die Webseite http://www.ionaudio.com, um Ihr DJ2GO zu registrieren. Durch die
Registration Ihres Produkts können wir Sie über neue Produktentwicklungen auf dem Laufenden halten und
bei etwaigen Problemen durch unseren erstklassigen technischen Kundendienst betreuen.
SETUP
PC
Bevor Sie DJ2GO auf Ihrem Computer verwenden können, müssen Sie die mitgelieferte Virtual DJ LE
Lite-Software installieren:
1. Bitte legen Sie die mitgelieferte Installations-CD in Ihr CD-ROM-Laufwerk ein.
2. Öffnen Sie den CD-Ordner, um den Inhalt anzuzeigen.
3. Öffnen Sie den Ordner mit dem Namen "PC."
4. Doppelklicken Sie auf ".Msi" file.
5. Befolgen Sie die Anweisungen auf dem Bildschirm.
6. Sobald die Installation abgeschlossen ist, klicken Sie auf "Fertigstellen".
So verwenden Sie DJ2GO:
1. Schließen Sie DJ2GO an einen freien USB-Anschluss Ihres Computers an. (Wenn möglich, verwenden
Sie einen USB-Anschluss an der Rückseite Ihres Computers.)
2. Öffnen Sie Virtual DJ LE Lite mittels Doppelklick auf das entsprechende Symbol auf Ihrem Desktop
(falls Sie eine Desktop-Verknüpfung erstellt haben) oder indem Sie Start Alle Programme
Virtual DJ LE Lite wählen.
3. Sobald sich die Software öffnet, gehen Sie zum linken Feld Dateisystem / Ordnerstruktur.
4. Navigieren Sie zu Ihrer Musik-, Video- und/oder Karaoke-Sammlung, die auf Ihrem Computer
gespeichert ist.
5. Sobald eine unterstützte Datei gefunden wird, klicken Sie mit der linken Maustaste auf diese Datei und
ziehen sie auf ein Deck.
6. Wiederholen Sie den Vorgang, um auch dem anderen Deck eine Datei zuzuweisen.
Weitere Informationen zur Verwendung des Virtual DJ LE Lite finden Sie in der Anleitung auf der CD
im Ordner "Manual".
MAC
Bevor Sie DJ2GO auf Ihrem Computer verwenden können, müssen Sie die mitgelieferte Virtual DJ LE
Lite-Software installieren:
1. Bitte legen Sie die mitgelieferte Installations-CD in Ihr CD-ROM-Laufwerk ein.
2. Öffnen Sie den CD-Ordner, um den Inhalt anzuzeigen.
3. Öffnen Sie den Ordner mit dem Namen "Mac."
4. Doppelklicken Sie auf ".pkg" file.
5. Befolgen Sie die Anweisungen auf dem Bildschirm.
6. Sobald die Installation abgeschlossen ist, klicken Sie auf "Schließen".
So verwenden Sie DJ2GO:
1. Schließen Sie DJ2GO an einen freien USB-Anschluss Ihres Computers an. (Wenn möglich,
verwenden Sie einen USB-Anschluss an der Rückseite Ihres Computers.)
2. Öffnen Sie Virtual DJ LE Lite, indem Sie Applikationen Virtual DJ LE Lite wählen.
3. Sobald sich die Software öffnet, gehen Sie zum linken Feld Dateisystem / Ordnerstruktur.
4. Navigieren Sie zu Ihrer Musik-, Video- und/oder Karaoke-Sammlung, die auf Ihrem Computer
gespeichert ist.
5. Sobald eine unterstützte Datei gefunden wird, klicken Sie mit der linken Maustaste auf diese Datei und
ziehen sie auf ein Deck.
6. Wiederholen Sie den Vorgang, um auch dem anderen Deck eine Datei zuzuweisen.
Weitere Informationen zur Verwendung des Virtual DJ LE Lite finden Sie in der Anleitung auf der CD
im Ordner "Manual".
11
Page 12

FUNKTIONSELEMENTE OBERSEITE
1
15
16 16
14
99
2
4
5
88
67
11
12 12
1. Mini-USB ANSCHLUSS – Stecken Sie ein Standard-Mini-USB-Kabel in diese Buchse und in den USBAnschluss Ihres Computers. Der USB-Anschluss Ihres Computers versorgt die DJ2GO mit Strom.
Die DJ2GO ist klassenkonform und kann ohne separate Treiberinstallation verwendet werden.
2. PFL – Sendet Pre-Fader, Pre-Eqalizer des entsprechenden Kanals an den Cue-Kanal zum Abhören.
3. CUE-LAUTSTÄRKE – Zur Einstellung der Lautstärke des Cue-Kanals.
4. MASTER-LAUTSTÄRKE – Steuert die Ausgangslautstärke des Program Mixes.
5. BROWSE KNOB – Mit diesem Drehregler können die Musikdateien und deren Verzeichnisse im
Programm durchlaufen werden.
6. BACK – Bringt Sie dieser Taster zurück auf die nächst höhere Ebene (Ordner).
7. ENTER – Um in ein ausgewähltes Verzeichnis zu gelangen, den Regler drücken. (Mit BACK kann auf
die vorherige Ebene zurückgeschaltet werden.)
8. LOAD A / LOAD B – Eine dieser Tasten drücken während ein Musikstück gewählt ist, um dieses
jeweils Deck A oder Deck B zuzuordnen.
9. KANAL-LAUTSTÄRKE – Bestimmt den Audiopegel, der zum Program Mix gesendet wird.
10. CROSSFADER – Audioüberblendung zwischen den Decks A und B. Wird der Crossfader nach links
geschoben, wird Deck A abgespielt. Bewegt man den Crossfader nach rechts, hört man Deck B.
11. JOG WHEEL – Dass der Track „gescratcht“ wird – ein ähnlicher Effekt wie beim Bewegen des
Plattentellers eines Plattenspielers.
Um den Pitch Bend Modus zu aktivieren, halten Sie den LOAD A / LOAD B Taster 2 Sekunden
gedrückt; wenn das Deck läuft, verändert das JOG WHEEL die Tonhöhe des Tracks.
12. PLAY / PAUSE – Start oder Wiederaufnahme des Abspielens, falls das Deck im Pausenbetrieb war.
Hält die Wiedergabe vorläufig an, falls sich das Deck im Abspielbetrieb befindet.
13. CUE – Unterbricht die Wiedergabe und kehrt an den ursprünglichen Cue Punkt zurück. Die
Wiedergabe startet zeitweilig von diesem Punkt, wenn Sie die Taste gedrückt halten. Der Track spielt
so lange, wie Sie die Taste gedrückt halten und kehrt an den Cue Punkt zurück, wenn Sie die Taste
loslassen.
Werden die Tasten CUE und PLAY / PAUSE gleichzeitig gedrückt, wird das Abspielen vom temporären
Cue-Punkt begonnen. Läßt man beide Tasten los, wird das Abspielen forgesetzt.
14. SYNC – Automatische Angleichung des Tempos zwischen beiden Decks.
15. PITCH FADER – Zur Einstellung der Wiedergabegeschwindigkeit des Musikstücks.
16. PITCH BEND ( + / – ) - Einen der beiden Tasten drücken oder gedrückt halten, um die
Wiedergabegeschwindigkeit des Musikstücks zeitweise zu verändern. Wird die Taste losgelassen,
kehrt die Geschwindigkeit des Musikstücks zu dem durch den PITCH FADER eingestellten Wert
zurück.
10
12
3
11
14
1313
2
15
Page 13

INHOUD VAN DE DOOS
DJ2GO
USB-kabel
Software-cd
REGISTRATIE
Surf naar http://www.ionaudio.com om uw DJ2GO te registreren. Als u uw product registreert, wordt u op
de hoogte gehouden van alle nieuwe producten en kunt u rekenen op hoogstaande technische
productondersteuning, indien u ooit een probleem mocht hebben.
OPSTELLING
PC
Voordat u DJ2GO op uw computer kunt beginnen gebruiken, moet u de meegeleverde Virtual DJ LE
Lite-software installeren:
1. Plaats de meegeleverde installatie-cd in de cd-romspeler van uw computer.
2. Open de cd om de inhoud ervan te bekijken.
3. Open de map met de titel “PC”.
4. Dubbelklik op “.Msi” file.
5. Volg de instructies op het scherm.
6. Klik zodra de installatie is voltooid op “Beëindigen”.
Om DJ2GO te beginnen gebruiken:
1. Sluit DJ
2. Dubbelklik op het pictogram op het bureaublad van uw computer om Virtual DJ LE Lite te openen (als u
3. Navigeer naar het linkerpaneel Bestandensysteem/Mappenstructuur van zodra de software opent.
4. Navigeer naar uw muziek, video en/of karaokecollectie, opgeslagen op uw computer.
5. Wanneer een ondersteund bestand gevonden is, kunt u erop klikken met de linkermuisknop en het
6. Herhaal deze procedure om een bestand aan het andere deck toe te wijzen.
Raadpleeg voor meer informatie over het gebruik van Virtual DJ LE Lite de handleiding op de cd,
beschikbaar in de map “Manual” (Handleiding).
MAC
Voordat u DJ2GO op uw computer kunt beginnen gebruiken, moet u de meegeleverde Virtual DJ LE
Lite-software installeren:
1. Plaats de meegeleverde installatie-cd in de cd-romspeler van uw computer.
2. Open de cd om de inhoud ervan te bekijken.
3. Open de map met de naam “Mac”.
4. Dubbelklik op “.pkg” file.
5. Volg de instructies op het scherm.
6. Klik zodra de installatie is voltooid op “Afsluiten”.
Om DJ2GO te beginnen gebruiken:
1. Sluit DJ
2. Open Virtual DJ LE Lite door te gaan naar Toepassingen Virtual DJ LE Lite.
3. Navigeer naar het linkerpaneel Bestandensysteem/Mappenstructuur van zodra de software opent.
4. Navigeer naar uw muziek, video en/of karaokecollectie, opgeslagen op uw computer.
5. Wanneer een ondersteund bestand gevonden is, kunt u erop klikken met de linkermuisknop en het
6. Herhaal deze procedure om een bestand aan het andere deck toe te wijzen.
Raadpleeg voor meer informatie over het gebruik van Virtual DJ LE Lite de handleiding op de cd,
beschikbaar in de map “Manual” (Handleiding).
2GO aan op een beschikbare USB-poort op uw computer. (Gebruik indien mogelijk een USB-
poort op het achterpaneel van uw computer.)
een snelkoppeling hebt aangemaakt) of ga naar Start Alle programma's Virtual DJ LE Lite.
slepen naar één van de decks.
2GO aan op een beschikbare USB-poort op uw computer. (Gebruik indien mogelijk een USB-
poort op het achterpaneel van uw computer.)
slepen naar één van de decks.
13
Page 14

KENMERKEN
1
15
16 16
14
99
2
4
5
88
67
11
12 12
1. Mini-USB-poort: sluit een standaard mini-USB-kabel aan op deze poort en de USB-poort van uw
computer. De USB-poort van de computer zal de DJ
compliant en dus “plug-and-play”: er moeten geen aparte stuurprogramma's worden geïnstalleerd.
2. PREFADERNIVEAU: stuurt een prefader-geluidsbron naar het Cue-kanaal voor monitoring.
3. CUE GAIN: past het geluidsniveau van het Cue-kanaal aan.
4. MASTER VOLUME: past het uitgangsvolume van de Programmamix aan.
5. BLADERKNOP: draai deze knop om te bladeren door tracklijsten en programmamappen.
6. TERUG: met deze knop keert u terug naar het vorige niveau (map).
7. ENTER: druk op deze knop om een geselecteerde map te openen. (Druk op TERUG om terug te gaan
naar het vorige niveau.)
8. A LADEN / B LADEN: druk op één van deze knoppen terwijl een nummer is geselecteerd om het toe
te wijzen aan respectievelijk Deck A of Deck B.
9. KANAALVOLUME: past het geluidsniveau van het kanaal aan.
10. CROSSFADER: vermengt het geluid dat speelt op Decks A en B. Als u deze knop naar links schuift,
hoort u Deck A; als u hem naar rechts schuift, hoort u Deck B.
11. JOG-WIEL: het JOG-WIEL bewegen “scratcht” het nummer op dat deck. Dit effect is vergelijkbaar met
het bewegen van een vinylplaat op een platenspeler.
Om de modus Pitch Bend in te schakelen, drukt u twee seconden lang op de knop A LADEN / B
LADEN; wanneer het deck begint af te spelen, verandert het JOG-WIEL de toonhoogte van het
nummer.
12. AFSPELEN / PAUSE: start of hervat het afspelen als het deck gepauseerd werd. Pauseert het
afspelen als het deck speelt.
13. CUE: de CUE-toets zet de track terug en pauzeert deze op het laatst ingestelde cue point. Om het cue
point tijdelijk af te spelen, kunt u de CUE-toets ingedrukt houden. Het nummer blijft spelen zolang de
toets ingedrukt wordt en keert terug naar het cue point van zodra hij wordt losgelaten. U kunt CUE en
AFSPELEN / PAUSE gelijktijdig indrukken om het afspelen vanaf het cue point te starten. Laat beide
knoppen los om het afspelen verder te zetten.
14. SYNC: synchroniseert automatisch het ritme van het overeenkomstige deck met dat van het andere
deck.
15. PITCH FADER: regelt de afspeelsnelheid van het nummer.
16. PITCH BEND (+ / -): druk op één van deze toetsen of houdt ze ingedrukt om tijdelijk de afspeelsnelheid
van de track aan te passen. Van zodra de toets wordt losgelaten, keert de afspeelsnelheid terug naar
de snelheid die werd ingesteld door de PITCH FADER.
10
14
3
2
14
15
11
1313
2GO van stroom voorzien. DJ2GO is class-
Page 15

SPECIFICATIONS
WEIGHT: 0.8 lbs. / 0.36 kg
DIMENSIONS (W x D x H): 12" x 3.2" x 1.3" / 305 mm x 81mm x 33mm
THIS DEVICE COMPLIES WITH PART 15 OF THE FCC RULES. OPERATION IS SUBJECT TO THE
FOLLOWING TWO CONDITIONS: (1) THIS DEVICE MAY NOT CAUSE HARMFUL INTERFERENCE,
AND (2) THIS DEVICE MUST ACCEPT ANY INTERFERENCE RECEIVED, INCLUDING
INTERFERENCE THAT MAY CAUSE UNDESIRED OPERATION.
15
Page 16

www.ionaudio.com
MANUAL VERSION 1.2
MANUAL VERSION 1.0
 Loading...