


‘07FX
Quick Reference
Guide
QUICK REFERENCE GUIDE
Introduction
This easy-to-use Quick Reference Guide is intended to provide you with a user-friendly learning experience to quickly acquaint you with your new Infiniti.
■The Quick Reference Guide will help you to more fully appreciate your vehicle’s superior features, unique functions and advanced technology.
■Refer to the Quick Reference Guide to learn how to personalize your vehicle’s controls and equipment to maximize your driving comfort and convenience.
However, this guide is not intended as a substitute for your vehicle’s Owner’s Manual. For comprehensive product and vehicle safety information, please refer to your Owner’s Manual. It will help you to better understand the operation and proper maintenance of your new Infiniti vehicle.
Both Infiniti and your Infiniti dealer are dedicated to serving all your automotive needs. Your complete satisfaction is our primary concern. It is suggested that you read this Quick Reference Guide and your vehicle’s Owner’s Manual thoroughly before contacting your Infiniti dealer with related questions.
co n t e n t s |
|
Getting Started |
Page |
Remote Keyless Entry System (Keyfob) |
...................1 |
Intelligent Key System ................... |
1 |
KeyFob and Intelligent Key ................... |
1 |
Locks, Child Safety Rear Door ................... |
3 |
Seats, Front Power Adjustment ................... |
3 |
Door, Fuel-Filler – Opening ................... |
4 |
Memory System, Driver’s Seat/Steering/Outside Mirrors ................... |
4 |
Vehicle Control Center ................... |
5 |
Infiniti Controller ................... |
5 |
Screen, Dash-Mounted Center Display ................... |
6 |
Buttons Surrounding Infiniti Controller ................... |
6 |
Controls, Steering Wheel – Bluetooth®/Audio ................... |
8 |
Controls, Steering Wheel – Audio ................... |
9 |
HomeLink® Universal Transceiver ................. |
10 |
Mirror, Inside (Rear View) – Anti-Glare/Compass ................. |
10 |
Mirror, Outside (Side View) – Adjust ................. |
10 |
Instrument Panel Layout ................. |
11 |
Light, Air Bag Status – Front-Passenger ................. |
12 |
Driving Controls |
|
Cruise Control ................. |
13 |
Cruise Control, Intelligent (ICC) ................. |
13 |
Headlights ................. |
15 |
Wipers, Front and Rear ................. |
16 |
All Wheel Drive, ATTESA E-TS™ ................. |
17 |
Switch, Snow Mode ON/OFF ................. |
17 |
Lane Departure Warning (LDW) ................. |
17 |
Monitor, Rear View ................. |
18 |
Comfort |
|
Heater and Air Conditioner (Dual-Zone Automatic Temperature Control) ................. |
19 |
Defroster, Front and Rear ................. |
20 |
Media Center |
|
Audio System, Bose ® ................. |
21 |
Radio Presets, How to Customize ................. |
23 |
Tone Settings, How to Customize ................. |
23 |
Special Features ................. |
23 |
Entertainment System, Infiniti CD/DVD Mobile ................. |
24 |
Phone System, Bluetooth® Hands-Free ................. |
25 |
Navigation |
|
Infiniti Navigation System ................. |
27 |
Address Book, Storing Deleting Addresses ................. |
28 |
Voice Guidance ON/OFF ................. |
28 |
Map Views, Switching ................. |
29 |
Where Am I? ................. |
29 |
Store Current Location ................. |
29 |
Programming A Destination: Street Address ................. |
29 |
Programming A Destination: Points of Interest ................. |
30 |
Programming A Destination: Nearby Places ................. |
30 |
Deleting a Route ................. |
30 |
Convenience |
|
Armrest/Center Console, Front ................. |
31 |
12-Volt Power Outlets ................. |
31 |
Lift Gate, Open/Close ................. |
31 |
Cover, Spare Tire ................. |
32 |
Seat Belt, Rear, Center – Selecting ................. |
32 |
Seat Belt, Rear, Center – Storage ................. |
32 |
Seat, Rear – Adjustment ................. |
32 |
Seats, Rear – Fold Down ................. |
32 |
REMOTE KEYLESS ENTRY SYSTEM (Keyfob)
(if so equipped)
Refer to section 3 in your Owner’s Manual for more details about this feature.
The Remote Keyless Entry system (Keyfob) allows you to lock and unlock all doors (including the lift gate), open and close the front windows, and activate a panic alarm—all from outside the vehicle.
Intelligent Key System
(if so equipped)
Refer to section 3 in your Owner’s Manual for more details about this feature.
Similar to the Remote Keyless Entry system, the Intelligent Key system also lets you lock and unlock all doors (including the lift gate), open and close the front windows, and activate a panic alarm from outside your vehicle. What makes these systems differ is the ability to perform some of these functions – as well as start and stop the engine – without having to remove the Intelligent Key from your pocket or bag.
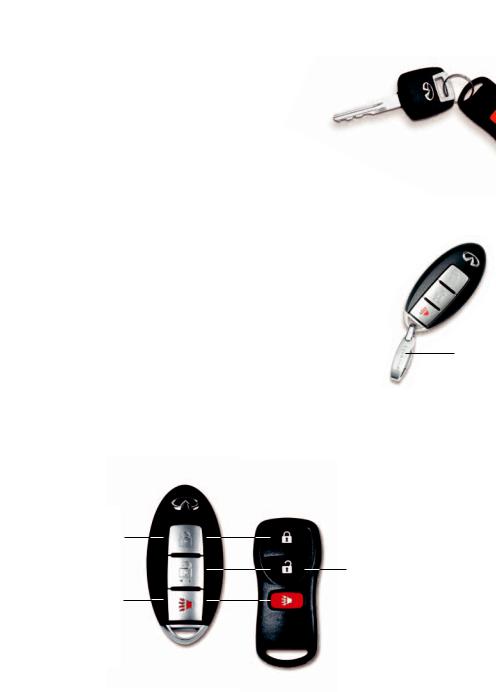
Key
Ring
Clip
Several vehicle features can be tied to a specific Intelligent Key. Attached to your Intelligent Keys are color-coded key ring clips which conveniently distinguish one driver’s Intelligent Key from another.
Keyfob and Intelligent Key
The Keyfob and Intelligent Key will operate up to approximately 33 feet from the vehicle.
LOCK Button
Press once to lock all doors (including the lift gate) and fuel-filler door.
PANIC ALARM Button
Press and hold down for more than 1 second to sound the horn and flash the headlights. Press any button on the Keyfob or Intelligent Key to stop the panic alarm.
UNLOCK Button
Press once to unlock the driver’s door and fuel-filler door.
Press again within 5 seconds to unlock all other doors (including the lift gate). Press and hold down to open the front windows
Remote Keyless Entry System (Keyfob) Features
Auto Unlock Function
This feature helps to prevent accidentally locking the key in the car. It will not allow the doors to lock if the key is still in the ignition switch, OFF position.
1

getting star ted
Intelligent Key System Features
Starting the Engine
Push IN the ignition switch/knob, and confirm the Intelligent Key Warning Light (located in the top center area of the Instrument Cluster) is illuminated green  . Then, turn the ignition switch/knob to start the engine.
Lock/Unlock Operation – Driver and
Front-Passenger Door Handle Request Switches
■Locking Doors – Push any door handle Request Switch once.
■Unlocking Doors – Push any door handle Request Switch once. The corresponding door will unlock. Push the door handle Request Switch again within 5 seconds to unlock all other doors (including the fuel-filler door and lift gate).
Note: When the driver’s door handle Request Switch is pressed once to unlock the door, the fuel-filler door will also unlock.
Outside Buzzer and Lockout Protection
If you attempt to exit the vehicle and lock the doors with either front door handle Request Switch while the Intelligent Key is inside the vehicle, a rapid beep tone will sound and the doors will not lock.
Remote Keyless Entry System (Keyfob) & Intelligent Key System Shared Features
Opening Front Windows with the Keyfob/Intelligent Key
Press and hold down the UNLOCK button for more than 3 seconds, and continue pressing until the windows are completely open.
Activating/Deactivating the Horn Beep Feature
You may program your Keyfob/Intelligent Key to sound the horn when locking the vehicle.
To Activate: Press and hold down the LOCK and UNLOCK buttons together for at least 2 seconds. The hazard indicators will flash once and the horn will chirp once to confirm the operation is complete.
To Deactivate: Again, press and hold down the LOCK and UNLOCK buttons together for at least 2 seconds. The hazard indicators will flash three times to confirm the operation is complete.
2
Auto Re-Lock Function
When the doors are unlocked with the door handle Request Switch or the UNLOCK button on the Keyfob/Intelligent Key, for security, after one minute all doors will automatically relock unless the following occurs:
■Any door is opened.
■The ignition switch/knob is turned to the ON position.
Notes:
■The time for the Auto Re-Lock function can be modified or turned OFF. To adjust the setting: Press the SETTING button and highlight Vehicle Electronic Systems on the center Display Screen, then press ENTER. Highlight Auto Re-Lock Time, then press ENTER. Use the Infiniti Controller to adjust the time to your preference. Press ENTER to set the new Auto Re-Lock Time. Refer to section 4 in your Owner’s Manual for more details about this feature.
■Close proximity of a cell phone to the Intelligent Key may interfere with the Lock/Unlock logic.
Opening/Closing Front Windows and
Locking/Unlocking Doors with Emergency or Wallet Keys
Refer to section 3 in your Owner’s Manual for more details about this feature.
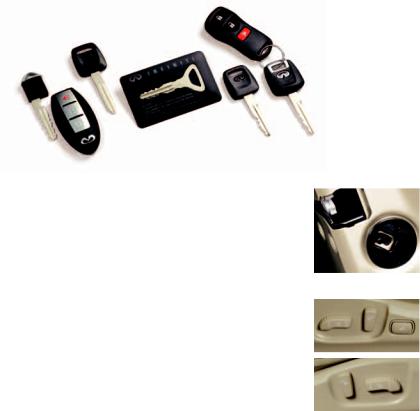
Turn the driver’s door key lock with the following keys to lock and unlock the doors and open and close the front windows while you are outside of the vehicle.
For Intelligent Key System: |
|
|
For Remote Keyless |
||||||||
Wallet Key |
|
|
|
|
Entry System (Keyfob): |
||||||
|
|
|
|||||||||
Valet Key |
|
|
|
|
|
|
Wallet Key |
|
|
||
|
|
|
|
|
|
||||||
Mechanical Key(s) |
|
|
|
|
Valet Key |
|
|
||||
|
|
|
|
|
|
|
Master Key(s) |
|
|||
|
|
|
|
|
|
|
|
|
|
|
|
|
|
|
|
|
|
|
|
|
|
|
|
|
|
|
|
|
|
|
|
|
|
|
|
|
|
|
|
|
|
|
|
|
|
|
|
|
|
|
|
|
|
|
|
|
|
|
|
Child Safety Rear Door Lock
Refer to section 1 in your Owner’s Manual for more details about this feature.
■The safety lock levers are located on the inside edge of the rear doors.
■When the lever is in LOCK position, the door can be opened only from the outside. If you cannot open a rear door from the inside, check the child safety lock lever.
Seat Switches, Front Power Adjustment
Refer to section 1 in your Owner’s Manual for more details about this feature.
10-way Power Driver’s Seat including Power Lumbar Adjustment
8-way Power Front-Passenger’s Seat
3
getting star ted
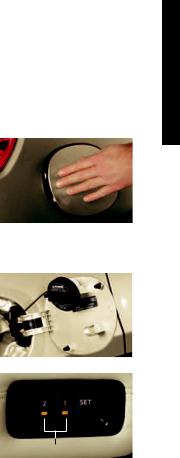
Opening Fuel-Filler Door
Refer to section 3 in your Owner’s Manual for more details about this feature.
To Open the Fuel-Filler Door:
1Unlock the doors with the Keyfob/Intelligent Key or power door lock switch.
2Then, push in on the left-hand side (9 o’clock position) of the fuel-filler door.
Note: YOU MUST use the Keyfob/Intelligent Key or power door lock switch to unlock the fuel-filler door. If the driver or front-passenger uses the inside door lock knob to unlock and exit the vehicle, the
fuel-filler door will remain LOCKED and will not open as noted above.
Fuel-Filler Cap Holder
When you are refueling, place the fuel-filler cap in the fuel-filler cap holder.
Memory System – Driver’s Seat, Steering &
Outside Mirrors (Automatic Drive Positioner)
Refer to section 3 in your Owner’s Manual for more details about this feature.
With the transmission in P (PARK), the Memory system can be programmed to automatically:
■Move the driver’s seat BACKWARD and the steering wheel UP to ease entering and exiting the vehicle (Entry/Exit Assist feature).
■Adjust the driver’s seat, steering column, and outside mirrors to two separate memorized positions.
Memory Buttons
Located on Driver’s Door
These features can be turned ON or OFF. To adjust the settings: Press the SETTING button and highlight Vehicle Electronic Systems on the center Display Screen, then press ENTER. Highlight Adjust Driver Seat When Exiting Vehicle and/or Lift Steering Wheel When Exiting Vehicle, and press ENTER to turn features ON or OFF.
To Set Customized Seat, Steering, and Mirror Position Memory:
1Turn the ignition switch/knob to ON. Keep the transmission in P (PARK).
2Adjust the seat, steering wheel, and outside mirrors to the desired positions.
3Press the SET button. The indicator lights on both Memory button 1 and 2 will illuminate.
4Within 5 seconds, press Memory button 1 or 2 and hold down for at least 1 second. The indicator light on the Memory button you select will blink ON and OFF one time and then illuminate solid amber for approximately 5 seconds. Seat/steering/mirror memory is now set to your preference.
5Link the seat/steering/mirror memory to your Keyfob/Intelligent Key.
While the indicator light on the Memory button is illuminated (see step 4, above) press the UNLOCK button on your Keyfob/Intelligent Key. The indicator light on the Memory button chosen will blink ON and OFF approximately 10 times. The memory positions are now matched to the Keyfob/Intelligent Key. You may set the second seat/steering/ mirror memory positions to your other Keyfob/Intelligent Key by repeating the steps above.
Note: Always perform step 5 when setting seat, steering and mirror memory. If you DO NOT link memory to your Keyfob/Intelligent Key, whenever you unlock the vehicle with your Keyfob/Intelligent Key, the seat, steering column, and mirrors will move to the last position set.
4
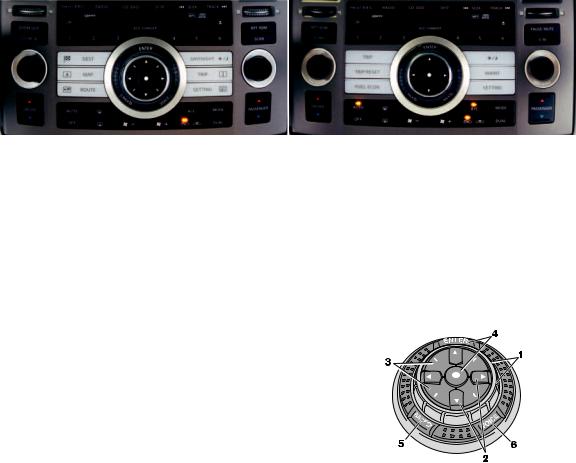
Infiniti Controller equipped with Navigation System contols shown. |
Infiniti Controller without Navigation system controls shown. |
Vehicle Control Center
Refer to section 4 in your Owner’s Manual for more details about this feature.
The following buttons and controls are used together to operate most functions displayed on your vehicle’s center Display Screen:
■Infiniti Controller
■Buttons and controls surrounding the Infiniti Controller
Heater and Air Conditioner Controls – see page 19
Audio System Controls – see page 21
Infiniti Controller
Refer to section 4 in your Owner’s Manual for more details about this feature.
Buttons located on the Infiniti Controller serve various purposes for navigating around the center Display Screen and making selections. As you use the vehicle controls, you will find the control combination that best suits your needs.
1 Center Dial
Turn the Center Dial to navigate UP, DOWN, and ACROSS the center Display Screen, highlight items for additional information, and to make changes to settings.
2Main Directional Buttons
Four Main Directional buttons (marked with arrows) on the face of the Infiniti Controller can also be used to perform the same functions as the Center Dial, above.
3Additional Directional Buttons (for vehicles with the Infiniti Navigation system)
Four additional buttons, marked with small “dashes” are located between the Main Directional buttons. When using the Navigation system, for instance, these buttons can be used in different ways to make “fine-tuned” movements around the Navigation Map screen.
4ENTER Buttons
When you use the Center Dial or Main Directional buttons to highlight a menu item, the text will display in yellow. Press either of the ENTER buttons to select the highlighted item.
5BACK (Previous) Button
Press to return to the previous function shown on the center Display Screen, and to delete characters when using the on-screen keyboard.
6VOICE Button (for vehicles with the Infiniti Navigation system)
Press to hear the next Navigation instruction. See the Navigation section of this guide (beginning on page 27) for more detailed Navigation system information.
5
getting star ted
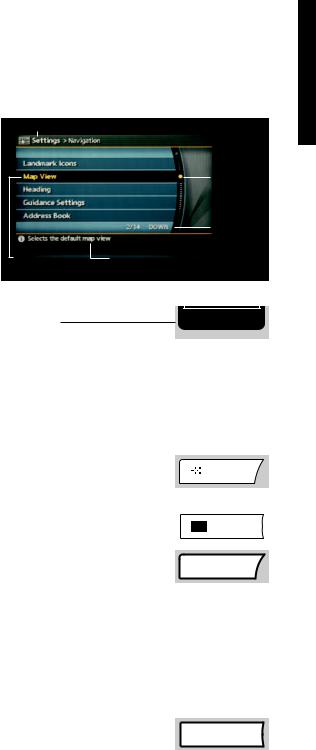
Header
Dash-Mounted Center |
|
|
Display Screen |
|
|
Refer to sections 4 in your Owner’s Manual and the |
|
|
separate 2007 Infiniti Navigation System Owner’s |
|
|
Manual for more details about this feature. |
|
|
Several vehicle functions are viewed on |
|
|
the center Display Screen in menus. As |
|
|
menu items are highlighted/selected, |
|
|
additional information may display on |
Highlighted |
|
the screen. |
||
Menu Item |
Buttons Surrounding the Infiniti Controller
E/M Button (for vehicles without the Infiniti Navigation system)
UP/DOWN
Movement
Indicator
Menu Item
Count
Footer/Information Line
Display screen from Infiniti Navigation System shown.
E/M
Press to change the center Display Screen readouts (e.g. Heater and Air
Conditioner temperature, Fuel Economy, Trip 1 and 2, etc.) from English/US to Metric (e.g. English/US = Mile, ˚Fahrenheit, MPG; Metric = km, ˚Celsius, L/100 km).
Notes:
■The center Display Screen readouts can also be changed as follows: Press the SETTING button and highlight System Settings on the center Display Screen, then press ENTER. Highlight Language/Unit, then press ENTER. Highlight Unit, and press ENTER to choose between English/US or Metric. For vehicles equipped with the Navigation system, this is the ONLY way that readouts can be changed.
■If Return All Settings to Default is chosen, the Unit setting does not default to either English/US or Metric. Therefore, in order to switch the Unit setting, you must again perform the procedure described above.
DEST Button (for vehicles with the Infiniti Navigation system) |
|
DEST |
|
Press to set a destination in the Navigation system. See the Navigation
section of this guide (beginning on page 27) for more detailed Navigation system information.
MAP Button (for vehicles with the Infiniti Navigation system) |
|
|
MAP |
|
|
||||
Press to display the Map screen. |
|
|||
TRIP Button |
|
|
TRIP |
|
|
||||
Press and quickly release to view Trip Computer information (Elapsed
Time, Driving Distance, and Average Speed) for two distinct vehicle trip logs (Trip 1 and Trip 2), and additional information, if available (see “Notes” below).
Notes:
■For vehicles with the Infiniti Navigation system, pressing this button multiple times will display: Warning Message (if any exists), Trip 1, Trip 2, Fuel Economy, Maintenance (including Tire Pressure Monitor system).
■For vehicles without the Infiniti Navigation system, pressing this button multiple times will display: Trip 1, Trip 2, Trip OFF.
Press and hold down the TRIP button for approximately 2 seconds to quickly reset the information currently shown on the center Display Screen.
TRIP RESET Button (for vehicles without the Infiniti Navigation system) |
|
TRIP RESET |
|
In addition to pressing and holding the TRIP button, you can press and
hold down the TRIP RESET button for approximately 2 seconds to quickly reset a trip log’s Elapsed Time, Driving Distance, and Average Speed to zero.
6
ROUTE Button (for vehicles with the Infiniti Navigation system) |
|
ROUTE |
|
Press to display Route related information and settings.
See the Navigation section of this guide (beginning on page 27) for more detailed Navigation system information.
FUEL ECON Button (for vehicles without the Infiniti Navigation system) |
|
FUEL ECON |
|
Provides Average Fuel Economy, a Fuel Economy visual gauge, and
Distance to Empty. To quickly reset the fuel economy data back to zero, press and hold down the TRIP RESET button for approximately 2 seconds.
DAY/NIGHT Button
■Quickly press twice to switch the center Display Screen between day
view and night view. Or, within approximately 10 seconds of pressing, you can adjust the center Display Screen brightness UP or DOWN by turning the Infiniti Controller Center Dial or pressing the LEFT/RIGHT Main Directional buttons.
■Press and hold down to turn the display OFF entirely.
■To resume display, press the SETTING button and highlight Display, then press ENTER. Highlight Display Off, then press ENTER. The indicator light will go out.
■Press the BACK button two times to return to the main display screen.
MAINT (Maintenance) Button (for vehicles without the Infiniti Navigation system) |
|
|
MAINT |
|
|
||||
Press to display and set vehicle maintenance information (e.g. Engine Oil, |
|
|||
|
||||
Tire Rotation, Tire Pressure, etc.). |
|
|||
SETTING Button |
|
|
||
|
|
SETTING |
||
|
||||
Press to display the Settings Menu. |
|
|||
|
||||
7
getting star ted
Steering Wheel Controls |
1 |
Bluetooth® Hands-Free Phone System/Audio Controls |
(if so equipped)
Refer to section 4 in your Owner’s Manual for more details about this feature.
1VOL (Volume) Control Switch
2 PHONE/SEND Button |
2 |
3 |
|
If a Bluetooth® -enabled cellular phone has been paired to |
|||
|
|
the vehicle, press this button to:
■initiate a Bluetooth® Voice Recognition session
■answer an incoming call
■ skip through system feedback |
4 |
■enter commands during a call.
Refer to section 4, List of Voice Commands and During a call in your Owner’s
Manual and visit www.infiniti.com/bluetooth for more details about this feature.
3PHONE/END Button 
■Press at any time during a Bluetooth® Voice Recognition session to cancel the session and/or end a call.
MODE Button 
■Press to change between radio preset banks A, B, and C; and CD.
4

 (Tuning) Switch For Radio:
■Push the switch UP or DOWN for less than 1.5 seconds to page through the radio preset stations on the bank (A, B, or C) currently selected.
■Push the switch UP or DOWN for more than 1.5 seconds to seek the next or previous radio station on the band currently selected (AM, FM) or the music category (SAT, if Satellite Radio is installed and activated).
For Audio CDs and CDs with MP3/WMA:
■Push the switch UP or DOWN for less than 1.5 seconds to return to the beginning of the current track/folder/file or skip to the next track/folder/file. Push several times to skip BACKWARD or FORWARD through multiple tracks/folders/files.
■Push the switch UP or DOWN for more than 1.5 seconds to change to the next CD in the CD Changer (audio CD) or next folder on the CD (CD with MP3/WMA).
8
 Loading...