


For your safety, read carefully and keep in this vehicle.
2013 Infiniti JX Owner’s Manual

FOREWORD |
READ FIRST—THEN DRIVE SAFELY |
Your INFINITI represents a new way of thinking about vehicle design. It integrates advanced engineering and superior craftsmanship with a simple, refined aesthetic sensitivity associated with traditional Japanese culture.
The result is a different notion of luxury and beauty. The car itself is important, but so is the sense of harmony that the vehicle evokes in its driver, and the sense of satisfaction you feel with the INFINITI — from the way it looks and drives to the high level of retailer service.
To ensure that you enjoy your INFINITI to the fullest, we encourage you to read this Owner’s Manual immediately. It explains all of the features, controls and performance characteristics of your INFINITI; it also provides important instructions and safety information.
A separate Warranty Information Booklet is included in your Owner’s literature portfolio. The INFINITI Service and Maintenance Guide explains details about maintaining and servicing your vehicle. Always carry it with you when you take your vehicle to an INFINITI retailer. The Warranty Information Booklet contents provide complete information about all warranties covering this vehicle, the requirements to keep the warranties in effect as well as the INFINITI Roadside Assistance program.
Additionally, a separate Customer Care and Lemon Law Information Booklet will explain how to resolve any concerns you may have with your vehicle, as well as clarify your rights under your state’s lemon law.
In addition to factory installed options, your vehicle may also be equipped with additional accessories installed by INFINITI or by your INFINITI retailer prior to delivery. It is important that you familiarize yourself with all disclosures, warnings, cautions and instructions concerning proper use of such accessories prior to operating the vehicle and/or accessory. See an INFINITI retailer for details concerning the particular accessories with which your vehicle is equipped.
Before driving your vehicle, please read this Owner’s Manual carefully. This will ensure familiarity with controls and maintenance requirements, assisting you in the safe operation of your vehicle.
WARNING
IMPORTANT SAFETY INFORMATION REMINDERS FOR SAFETY!
Follow these important driving rules to help ensure a safe and comfortable trip for you and your passengers!
●NEVER drive under the influence of alcohol or drugs.
●ALWAYS observe posted speed limits and never drive too fast for conditions.
●ALWAYS give your full attention to driving and avoid using vehicle features or taking other actions that could distract you.
●ALWAYS use your seat belts and appropriate child restraint systems. Preteen children should be seated in the rear seat.
●ALWAYS provide information about the proper use of vehicle safety features to all occupants of the vehicle.
●ALWAYS review this Owner’s Manual for important safety information.

ON-PAVEMENT AND OFF-ROAD DRIVING
This vehicle will handle and maneuver differently from an ordinary passenger car because it has a higher center of gravity for off-road use. As with other vehicles with features of this type, failure to operate this vehicle correctly may result in loss of control or an accident.
Be sure to read “On-pavement and offroad driving precautions”, and “Avoiding collision and rollover”, and “Driving safety precautions”, in the “Starting and driving” section of this manual.
MODIFICATION OF YOUR VEHICLE
This vehicle should not be modified. Modification could affect its performance, safety or durability, and may even violate governmental regulations. In addition, damage or performance problems resulting from modifications may not be covered under INFINITI warranties.
WHEN READING THE MANUAL
This manual includes information for all options available on this model. Therefore, you may find some information that does not apply to your vehicle.
All information, specifications and illustrations in this manual are those in effect at the time of printing. INFINITI reserves the right to change specifications or design at any time without notice.
IMPORTANT INFORMATION ABOUT THIS MANUAL
You will see various symbols in this manual. They are used in the following ways:
WARNING
This is used to indicate the presence of a hazard that could cause death or serious personal injury. To avoid or reduce the risk, the procedures must be followed precisely.
CAUTION
This is used to indicate the presence of a hazard that could cause minor or moderate personal injury or damage to your vehicle. To avoid or reduce the risk, the procedures
APD1005
If you see this symbol, it means “Do not do this” or “Do not let this happen.”
If you see a symbol similar to these in an illustration, it means the arrow points to the front of the vehicle.
Arrows in an illustration that are similar to these indicate movement or action.
Arrows in an illustration that are similar to these call attention to an item in the illustration.

CALIFORNIA PROPOSITION 65 WARNING
WARNING
Engine exhaust, some of its constituents, and certain vehicle components contain or emit chemicals known to the State of California to cause cancer and birth defects or other reproductive harm. In addition, certain fluids contained in vehicles and certain products of component wear contain or emit chemicals known to the State of California to cause cancer and birth defects or other reproductive harm.
CALIFORNIA PERCHLORATE ADVISORY
Some vehicle parts, such as lithium batteries, may contain perchlorate material. The following advisory is provided: “Perchlorate Material – special handling may apply, See www.dtsc.ca.gov/hazardouswaste/perchlorate/”.
BLUETOOTH® is a trademark owned by Bluetooth SIG, Inc. and licensed to Clarion.
SiriusXM Satellite Radio requires subscription, sold separately. Not available in Alaska, Hawaii or Guam. For more information, visit www.siriusxm.com.
© 2012 NISSAN NORTH AMERICA, INC.
All rights reserved. No part of this Owner’s Manual may be reproduced or stored in a retrieval system, or transmitted in any form, or by any means, electronic, mechanical, photocopying, recording or otherwise, without the prior written permission of Nissan Motor Co., Ltd.

INFINITI CUSTOMER CARE PROGRAM
INFINITI CARES . . .
Both INFINITI and your INFINITI retailer are dedicated to serving all your automotive needs. Your satisfaction with your vehicle and your INFINITI retailer are our primary concerns. Your INFINITI retailer is always available to assist you with all your automobile sales and service needs.
However, if there is something that your INFINITI retailer cannot assist you with or you would like to provide INFINITI directly with comments or questions, please contact our (INFINITI’s) Consumer Affairs Department using our toll-free number:
For U.S. customers 1-800-662-6200
For Canadian customers 1-800-361-4792
The Consumer Affairs Department will ask for the following information:
–Your name, address, and telephone number
–Vehicle identification number (on dash panel)
–Date of purchase
–Current odometer reading
–Your INFINITI retailer’s name
–Your comments or questions
OR
You can write to INFINITI with the information on the left at:
For U.S. customers INFINITI Division
Nissan North America, Inc. Consumer Affairs Department P.O. Box 685003
Franklin, TN 37068-5003 or via e-mail at:
nnaconsumeraffairs@nissan-usa.com
For Canadian customers INFINITI Division Nissan Canada Inc. 5290 Orbitor Drive
Mississauga, Ontario L4W 4Z5 or via e-mail at:
information.centre@nissancanada. com
If you prefer, visit us at:
www.infinitiUSA.com (for U.S. customers)
or
www.infiniti.ca (for Canadian customers)
We appreciate your interest in |
a quality INFINITI vehicle. |

Table of
Contents
Illustrated table of contents |
|
0 |
|
|
|
|
|
|
Safety—Seats, seat belts and supplemental restraint system |
|
1 |
|
|
|
|
2 |
|
Instruments and controls |
|
|
|
|
|
|
|
|
Pre-driving checks and adjustments |
|
3 |
|
|
|
|
|
|
Monitor, climate, audio, phone and voice recognition systems |
|
4 |
|
|
|
|
|
|
Starting and driving |
|
5 |
|
|
|
|
|
|
In case of emergency |
|
6 |
|
|
|
|
|
|
Appearance and care |
|
7 |
|
|
|
|
|
|
Maintenance and do-it-yourself |
|
8 |
|
|
|
|
|
|
Technical and consumer information |
|
9 |
|
|
|
Index |
|
10 |


0 Illustrated table of contents
Air bags, seat belts and child restraints . . . . . . . . . . . . . . 0-2 Exterior front . . . . . . . . . . . . . . . . . . . . . . . . . . . . . . . . . . . . . . 0-3 Exterior rear. . . . . . . . . . . . . . . . . . . . . . . . . . . . . . . . . . . . . . . 0-4 Passenger compartment . . . . . . . . . . . . . . . . . . . . . . . . . . . 0-5
Instrument panel. . . . . . . . . . . . . . . . . . . . . . . . . . . . . . . . . . . 0-6 Engine compartment check locations . . . . . . . . . . . . . . . . 0-8 Warning/indicator lights . . . . . . . . . . . . . . . . . . . . . . . . . . . . 0-9

AIR BAGS, SEAT BELTS AND CHILD
RESTRAINTS
1. Folding 3rd row bench (P. 1-19)
2. Folding 2nd row bench (P. 1-18)
3. Roof-mounted curtain side-impact and rollover supplemental air bag (P. 1-49)
4. Seat belts (P. 1-20)
5. Head Restraints (P.1-8)
6. Supplemental front-impact air bags
(P.1-49)
7. Seats (1st row) (P. 1-2)
8. Occupant classification sensor (weight sensor) (P.1-57)
9. Seat belt with pretensioners (P. 1-63)
10. Front seat-mounted side-impact supplemental air bag (P. 1-49)
11. LATCH (Lower Anchors and Tethers for CHildren) (P. 1-31)
12. 2nd row seat top tether strap anchor (located on bottom of seatback)
(P. 1-44)
13. 3rd row bench seat top tether strap anchor (located on bottom of seatback) (P. 1-45)
See the page number indicated in parentheses for operating details.
LII2032
0-2 Illustrated table of contents

EXTERIOR FRONT
1. Front camera (if so equipped) (P. 4-36) 2. Engine hood (P. 3-20)
3. Windshield wiper and washer switch, wiper blades (P. 2-26, 8-18)
4. Windshield-washer fluid (P. 8-18)
5. Power windows (P. 2-50)
6. Door locks, INFINITI Intelligent Key, Remote Engine Start (if so equipped), keys (P. 3-4, 3-7, 3-18,3-2)
7. Mirrors, side camera (if so equipped) (P. 3-29, 4-36)
8. Tire pressure (P. 9-11)
9. Flat tire (P. 6-3)
10. Tire chains (P. 8-38)
11. Replacing bulbs (P. 8-26)
12. Headlight and turn signal switch (P. 2-30)
13. Fog light switch (P. 2-35)
14. Corner sensors (if so equipped) (P. 4-40)
See the page number indicated in parentheses for operating details.
LII2043
Illustrated table of contents 0-3
EXTERIOR REAR
1. Moonroof, Panoramic sunshade (if so equipped) (P. 2-52, 2-54)
2. Antenna (P.4-102)
3. Rear window wiper and washer switch (P. 2-29)
4. Corner sensors (if so equipped) (P. 4-40)
5. Liftgate release (P. 3-23)
6. Rear camera: Rearview monitor, AVM rear camera (P.4-30, 4-36 )
7. Replacing bulbs (P. 8-26)
8. Fuel-filler cap, fuel recommendation (P. 3-25, P. 9-3)
9. Fuel-filler door (P. 3-24)
10. Child safety rear door lock (P. 3-7)
See the page number indicated in parentheses for operating details.
LII2044
0-4 Illustrated table of contents

PASSENGER COMPARTMENT
1. Moonroof, Panoramic sunshade (if so equipped) (P. 2-52, 2-54)
2. Storage (P. 2-43)
3. Map lights (P. 2-56)
4. Sun visors (P. 3-28)
5. Glove box, Console box (P. 2-46) 6. Seats (P. 1-2, 1-5, 1-7)
7. Cup holders (P. 2-45)
8. Luggage hooks (P. 2-48)
See the page number indicated in parentheses for operating details.
LII2033
Illustrated table of contents 0-5

INSTRUMENT PANEL
LIC2290
1.Vent (P. 4-53)
2.Headlight/fog light/turn signal switch (P. 2-30)
3.Instrument brightness control (P. 2-34)
4.Meters, gauges, warning/indicator lights and Vehicle Information Display (P. 2-4, 2-7, 2-14)
5.Driver supplemental air bag/Horn (P.1
0-6 Illustrated table of contents
6.Back-up Collision Intervention (BCI) system switch (if so equipped) (P.5-30)
7.Twin trip odometer reset switch (P. 2-5)
8.Windshield wiper/washer switch and rear window wiper/washer switch (P. 2-26, P. 2-29)
9.Vent (P. 4-53)
10.Rear window and outside mirror defroster switch (P. 2-30)
11.Center display (P. 4-14, 4-4)/Navigation system* (if so equipped)
12.Automatic heater and air conditioning controls (P. 4-54)
13.Vent (P. 4-53)
14.Front passenger supplemental air bag (P. 1-49)
15.Vent (P. 4-53)
16.Glove box (P. 2-46)
17.Center multi-function control buttons (P. 4-14, 4-4)
18.Power outlet (P.2-41)
19.Audio system controls (P. 4-61)
20.Shift selector (P.5-15)
21.Front passenger air bag status light (P. 1-59)
22.Hazard light switch (P. 6-2)

23.Ignition switch (P. 5-10)
24.Cruise control main/set switches (if so equipped) and Intelligent cruise control main/set switches (if so equipped)
(P. 5-47, P.5-49)
25.Distance Control Assist (DCA) system switch (if so equipped) (P. 5-68)
26.Tilt steering wheel control (P. 3-26)
27.Bluetooth® Hands-Free Phone System (P. 4-115, 4-129)
28.Steering wheel switch for audio control (P.4-101)
29.Hood release (P. 3-20)
30.Vehicle dynamic control (VDC) OFF switch (P. 2-41)
Heated steering wheel switch (if so equipped) (P.2-39)
Headlight aiming control (P. 2-33) Warning System switch
(if so equipped) (P. 2-40)
Power inverter switch (if so equipped) (P. 2-41)
Liftgate release switch (P.3-20) Power liftgate main switch (P. 3-23)
31.Control panel and Vehicle Information Display switches (P.4-17, 2-14)
*: Refer to the separate Navigation System Owner’s Manual (if so equipped).
See the page number indicated in parentheses for operating details.
Illustrated table of contents 0-7

ENGINE COMPARTMENT CHECK
LOCATIONS
VQ35DE engine
1. Power steering fluid reservoir (P. 8-12)
2. Engine coolant reservoir (P. 8-7)
3. Drive belt location (P. 8-16)
4. Fuse box (P. 8-21 )
5. Engine oil filler cap (P. 8-9)
6. Brake fluid reservoir (P. 8-12)
7. Air cleaner (P. 8-18)
8. Fuse box (P. 8-21)
9. Fuse box/Fusible links (P. 8-21)
10. Battery (P. 8-14)
11. Engine oil dipstick (P. 8-9)
12. Radiator cap (P. 8-7)
13. Windshield-washer fluid reservoir (P. 8-13)
See the page number indicated in parentheses for operating details.
LDI2148
0-8 Illustrated table of contents

WARNING/INDICATOR LIGHTS
Warning |
Name |
Page |
light |
|
|
|
|
|
|
Anti-lock Braking |
2-7 |
|
System (ABS) warn- |
|
|
ing light |
|
|
|
|
|
Brake warning light |
2-8 |
or |
|
|
|
|
|
|
Charge warning |
2-8 |
|
light |
|
|
|
|
|
Low tire pressure |
2-8 |
|
warning light |
|
|
|
|
|
Master warning light |
2-10 |
|
|
|
|
Power steering |
2-10 |
|
warning light |
|
|
|
|
|
Seat belt warning |
2-11 |
|
light and chime |
|
|
|
|
Warning |
Name |
Page |
light |
|
|
|
|
|
|
Supplemental air |
2-11 |
|
bag warning light |
|
|
|
|
|
|
|
Indicator |
Name |
Page |
light |
|
|
|
|
|
|
Fog light indicator |
2-11 |
|
light |
|
|
|
|
|
Front passenger air |
2-11 |
|
bag status light |
|
|
|
|
|
High beam indicator |
2-11 |
|
light (blue) |
|
|
|
|
|
Intelligent Brake |
2-12 |
|
Assist (IBA) off indi- |
|
|
cator light (if so |
|
|
equipped) |
|
|
|
|
|
Malfunction indica- |
2-12 |
|
tor light (MIL) |
|
|
|
|
|
Security indicator |
2-13 |
|
|
|
Indicator |
Name |
Page |
light |
|
|
|
|
|
|
Side light and head- |
2-13 |
|
light indicator light |
|
|
(green) |
|
|
|
|
|
Slip indicator light |
2-13 |
|
|
|
|
Turn signal/hazard |
2-13 |
|
indicator lights |
|
|
|
|
|
Vehicle Dynamic |
2-13 |
|
Control (VDC) off |
|
|
indicator light |
|
|
|
|
Illustrated table of contents 0-9

MEMO
0-10 Illustrated table of contents

1 Safety—Seats, seat belts and supplemental restraint system
Seats . . . . . . . . . . . . . . . . . . . . . . . . . . . . . . . . . . . . . . . . . . . . 1-2 Front power seat adjustment. . . . . . . . . . . . . . . . . . . . . 1-3 2nd row bench seat adjustment . . . . . . . . . . . . . . . . . . 1-5 3rd row bench seat adjustment . . . . . . . . . . . . . . . . . . 1-7 Head restraints (1st row only). . . . . . . . . . . . . . . . . . . . 1-8 Head restraints (2nd row) . . . . . . . . . . . . . . . . . . . . . . 1-10 Adjustable headrest . . . . . . . . . . . . . . . . . . . . . . . . . . . 1-13 Head restraints (3rd row). . . . . . . . . . . . . . . . . . . . . . . 1-16 Flexible seating. . . . . . . . . . . . . . . . . . . . . . . . . . . . . . . . 1-17
Seat belts . . . . . . . . . . . . . . . . . . . . . . . . . . . . . . . . . . . . . . . 1-20 Precautions on seat belt usage. . . . . . . . . . . . . . . . . . 1-20 Pregnant women . . . . . . . . . . . . . . . . . . . . . . . . . . . . . . 1-23 Injured persons. . . . . . . . . . . . . . . . . . . . . . . . . . . . . . . . 1-23 Pre-crash seat belts with comfort function
(front seats) (if so equipped) . . . . . . . . . . . . . . . . . . . . 1-23 Three-point type seat belt with retractor . . . . . . . . . . 1-23 Seat belt extenders . . . . . . . . . . . . . . . . . . . . . . . . . . . . 1-27 Seat belt maintenance . . . . . . . . . . . . . . . . . . . . . . . . . 1-27 Child safety . . . . . . . . . . . . . . . . . . . . . . . . . . . . . . . . . . . . . . 1-28 Infants. . . . . . . . . . . . . . . . . . . . . . . . . . . . . . . . . . . . . . . . 1-28
Small children . . . . . . . . . . . . . . . . . . . . . . . . . . . . . . . .
Larger children . . . . . . . . . . . . . . . . . . . . . . . . . . . . . .
Child restraints . . . . . . . . . . . . . . . . . . . . . . . . . . . . . . . . . . . 1-29 Precautions on child restraints . . . . . . . . . . . . . . . . . . 1-29 LATCH (Lower Anchors and Tethers for
CHildren) System . . . . . . . . . . . . . . . . . . . . . . . . . . . . . 1-31 Rear-facing child restraint installation using
LATCH . . . . . . . . . . . . . . . . . . . . . . . . . . . . . . . . . . . . . . . 1-34 Rear-facing child restraint installation using
the seat belts . . . . . . . . . . . . . . . . . . . . . . . . . . . . . . . . . 1-36 Forward-facing child restraint installation
using LATCH. . . . . . . . . . . . . . . . . . . . . . . . . . . . . . . . . . 1-39 Forward-facing child restraint installation
using the seat belts . . . . . . . . . . . . . . . . . . . . . . . . . . . . 1-41 Installing top tether strap
(2nd row bench seat) . . . . . . . . . . . . . . . . . . . . . . . . . . 1-44 Installing top tether strap
(3rd row bench seat). . . . . . . . . . . . . . . . . . . . . . . . . . . 1-45 Booster seats . . . . . . . . . . . . . . . . . . . . . . . . . . . . . . . . . 1-45 Supplemental restraint system . . . . . . . . . . . . . . . . . . . . . 1-49
Precautions on supplemental restraint
system . . . . . . . . . . . . . . . . . . . . . . . . . . . . . . . . . . . . . . . 1-49 air bag warning labels . . . . . . . . . . . . . 1-64 bag warning light . . . . . . . . . . . . . . 1-64

SEATS
ARS1152
WARNING
●Do not ride in a moving vehicle when the seatback is reclined. This can be dangerous. The shoulder belt will not be against your body. In an accident, you could be thrown into it and receive neck or other serious injuries. You could also slide under the lap belt and receive serious internal injuries.
●For the most effective protection when the vehicle is in motion, the seat should be upright. Always sit well back in the seat with both feet on the floor and adjust the seat properly. See “Precautions on seat belt usage” later in this section.
●After adjustment, gently rock in the seat to make sure it is securely locked.
●Do not leave children unattended inside the vehicle. They could unknowingly ac-
tivate switches or controls. Unattended children serious
1-2 Safety—Seats, seat belts and supplemental
●The seatback should not be reclined any more than needed for comfort. Seat belts are most effective when the passenger sits well back and straight up in the seat. If the seatback is reclined, the risk of sliding under the lap belt and being injured is increased.
CAUTION
When adjusting the seat positions, be sure not to contact any moving parts to avoid possible injuries and/or damage.

LRS2130
FRONT POWER SEAT ADJUSTMENT Forward and backward
Operating tips
●The power seat motor has an auto-reset overload protection circuit. If the motor stops during operation, wait 30 seconds, then reactivate the switch.
●Do not operate the power seat switch for a long period of time when the engine is off. This will discharge the battery.
See “Automatic drive positioner” in “Pre-driving checks and adjustments” for automatic drive positioner operation.
Moving the switch forward or backward will slide the seat forward or backward to the desired position.
Reclining
Move the recline switch backward until the desired angle is obtained. To bring the seatback forward again, move the switch forward and move your body forward. The seatback will move forward.
The reclining feature allows adjustment of the seatback for occupants of different sizes for added comfort and to help obtain proper seat belt fit. See “Precautions on seat belt usage” later in this section. Also, the seatback can be reclined to allow occupants to rest when the vehicle is stopped and the shift selector is in P (Park).
belts and supplemental restraint system 1-3
LRS2131
Seat lifter
Push the switch up or push down to adjust the angle and height of the seat cushion.
LRS2132 |
|
LRS2133 |
Manual (if so equipped) |
|
Power (if so equipped) |
Lumbar support (driver’s seat)
The lumbar support feature provides lower back support to the driver. Move the lever up or down (manual) or move the switch forward or backward (power) to adjust the seat lumbar area.
1-4 Safety—Seats, seat belts and supplemental

LRS2143
Outboard seats
2ND ROW BENCH SEAT ADJUSTMENT
Forward and backward
Pull the center of the bar 1 up and hold it while you slide the seat forward or backward to the desired position. Release the bar to lock the seat in position.
Reclining
To recline the seatback, pull up on the lever 2 and lean back. To bring the seatback forward, pull the lever 2 up and lean your body forward. Release the lever to lock the seatback in position.
The recline feature allows adjustment of the seatback for occupants of different sizes for added comfort and to help obtain proper seat belt fit (see “Precautions on seat belt usage” later in this section). Also, the seatback can be reclined to allow occupants to rest when the vehicle is stopped and the shift selector is in P (Park).
WARNING
●After adjustment, gently rock in the seat to make sure it is securely locked.
●Do not ride in a moving vehicle when the seatback is reclined. This can be dangerous. The shoulder belt will not be against your body. In an accident, you could be thrown into it and receive neck or other serious injuries. You could also slide under the lap belt and receive serious internal injuries.
●For the most effective protection when the vehicle is in motion, the seat should be upright. Always sit well back in the seat and adjust the seat belt properly. See “Precautions on seat belt usage” later in this section.
LRS2142
One touch walk-in function
The 3rd row can be accessed from outside the vehicle by using the seatback release lever located on the 2nd row seatback. If a child safety seat is installed on the passenger’s side of the 2nd row seat, the 3rd row can be accessed without removing the child safety seat.
Multi-mode
To enter the 3rd row from outside the vehicle, lift up on the seatback lever located on the upper outboard side of the seatback on the 2nd row bench seat. This will release the back of the seat and fold up the seat cushion. This will also re-
belts and supplemental restraint system 1-5

lease the seat tracks so you will be able to slide the seat forward or backward.
Slide the entire seat forward for access to the rear seat.
To return the seat to a locked position, push the upper seatback rearward until the seatback and tracks are locked. Push the seat cushion down.
CAUTION
●When returning the seat to its original position, confirm that the seat and seatback are locked properly.
●Be careful not to pinch your hand or foot or bump your head when operating the walk-in seat.
●Do not drive with the 2nd row seat tipped up.
●Be careful not to allow the 2nd row seat to pinch, hit any part of your body or other people when operating the 2nd row seat. Make sure the seat path is clear of all objects before moving the seat.
Child seat access mode
WARNING
Do not leave a child in the child safety seat when operating the Child seat access mode.
The passenger’s side of the 2nd row seat can be slid forward for easy entry or exit from the 3rd row bench seat without a child safety seat being removed.
To enter the 3rd row from outside the vehicle, lift up on the seatback lever located on the upper outboard side of the seatback on the 2nd row bench seat. This will release the seatback, tilt the seat, and then release the tracks so you will be able to slide the seat forward or backward.
Slide the entire seat forward for access to the rear seat.
To return the seat to a locked position, push the upper seatback rearward until the seatback and track are locked.
CAUTION
●When returning the seat to its original position, confirm that the seat and seatback are locked properly.
●Be careful not to pinch your hand or foot or bump your head when operating the walk-in seat.
●Do not drive with the 2nd row seat tipped up.
●Be careful not to allow the 2nd row seat to pinch, hit any part of your body or other people when operating the 2nd row seat. Make sure the seat path is clear of all objects before moving the seat.
Exiting the 3rd row
To exit the 3rd row from either seating position, lift the upper seatback release lever to the uppermost position. This will release the back of the seat, fold the seat cushion up and release the tracks.
Slide the entire seat forward.
To return the seat to a locked position, push the upper seatback rearward until the seatback and track are locked.
1-6 Safety—Seats, seat belts and supplemental

CAUTION
●When returning the seat to its original position, confirm that the seat and seatback are locked properly.
●Be careful not to pinch your hand or foot or bump your head when operating the walk-in seat.
LRS2147
Outboard seats
3RD ROW BENCH SEAT ADJUSTMENT
Reclining
To recline the seatback, pull up on the latch located on the outside corner of each seatback. Lean back until the desired angle is obtained.
To bring the seatback forward again, pull up on the latch and pull the seatback upright until the desired angle is obtained.
The recline feature allows adjustment of the seatback for occupants of different sizes for added comfort and to help obtain proper seat belt fit. See “Precautions on seat belt usage” later in this section. Also, the seatback can be reclined to allow occupants to rest when the vehicle is stopped and the transmission is in P (Park).
WARNING
●After adjustment, gently rock in the seat to make sure it is securely locked.
●Do not ride in a moving vehicle when the seatback is reclined. This can be dangerous. The shoulder belt will not be against your body. In an accident, you could be thrown into it and receive neck or other serious injuries. You could also slide under the lap belt and receive serious internal injuries.
●For the most effective protection when the vehicle is in motion, the seat should be upright. Always sit well back in the seat and adjust the seat belt properly. See “Precautions on seat belt usage” later in this section.
belts and supplemental restraint system 1-7

HEAD RESTRAINTS (1st row only)
WARNING
Head restraints supplement the other vehicle safety systems. They may provide additional protection against injury in certain rear end collisions. Adjust the head restraints properly, as specified in this section. Check the adjustment after someone else uses the seat. Do not attach anything to the head restraint stalks or remove the head restraint. Do not use the seat if the head restraint has been removed. If the head restraint was removed, reinstall and properly adjust the head restraint before an occupant uses the seating position. Failure to follow these instructions can reduce the effectiveness of the head restraints. This may increase the risk of serious injury or death in a collision.
LRS2134
The illustration shows the seating positions equipped with head restraints. The first row head restraints are adjustable.
Indicates the seating position is equipped with a head restraint.
LRS0887
Components
1.Head restraint
2.Adjustment notches
3.Lock knob
4.Stalks
1-8 Safety—Seats, seat belts and supplemental
WRS0134 |
|
LRS0888 |
|
LRS0889 |
Adjustment |
To raise the head restraint, pull it up. |
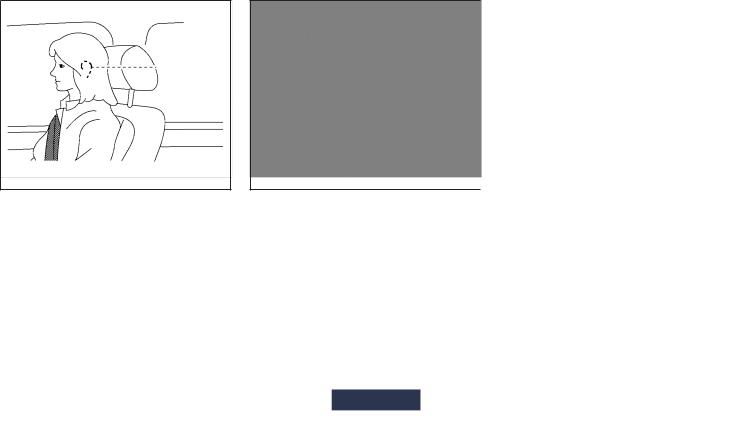
Adjust the head restraint so the center is level with the center of the seat occupant’s ears.
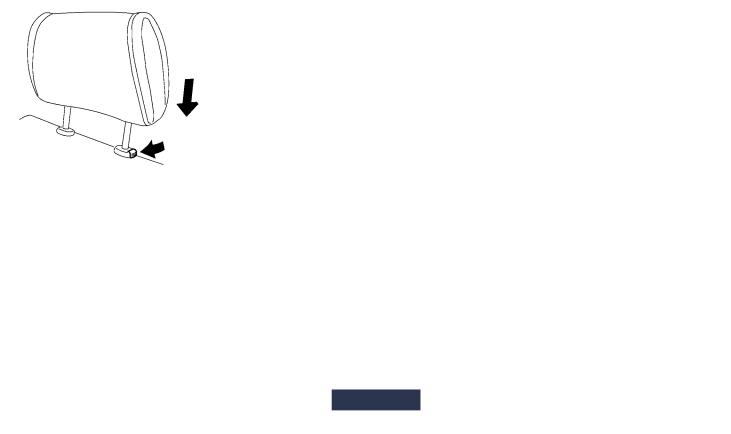
To lower, push and hold the lock knob and push the head restraint down.
belts and supplemental restraint system 1-9
LRS0890 |
|
LRS0891 |
Removal (head restraints without Dual head restraint DVD system only)
Use the following procedure to remove the adjustable head restraints.
1.Pull the head restraint up to the highest position.
2.Push and hold the lock knob.
3.Remove the head restraint from the seat.
4.Store the head restraint properly so it is not loose in the vehicle.
5.Reinstall and properly adjust the head restraint before an occupant uses the seating position.
Install
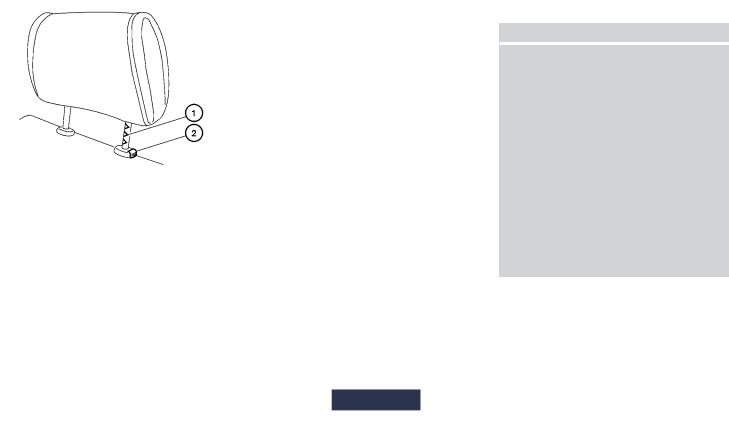
1.Align the head restraint stalks with the holes in the seat. Make sure the head restraint is
facing the correct direction. The stalk with
the adjustment notches 1 must be installed in the hole with the lock knob 2 .
2.Push and hold the lock knob and push the head restraint down.
3.Properly adjust the head restraint before an occupant uses the seating position.
1-10 Safety—Seats, seat belts and supplemental
HEAD RESTRAINTS (2nd row)
WARNING
Head restraints supplement the other vehicle safety systems. They may provide additional protection against injury in certain rear end collisions. Adjust the head restraints properly, as specified in this section. Check the adjustment after someone else uses the seat. Do not attach anything to the head restraint stalks or remove the head restraint. Do not use the seat if the head restraint has been removed. If the head restraint was removed, reinstall and properly adjust the head restraint before an occupant uses the seating position. Failure to follow these instructions can reduce the effectiveness of the head restraints. This may increase the risk of serious injury or death in a collision.
LRS2135
The illustration shows the seating positions equipped with head restraints. The second row head restraints are removable and adjustable.
Indicates the seating position is equipped with an adjustable head restraint.
Indicates the seating position is equipped with an adjustable headrest.
Components
1.Head restraint
2.Lock knob
3.Stalks
LRS2079 |
|
WRS0134 |
Adjustment
Adjust the head restraint so the center is level with the center of the seat occupant’s ears.
belts and supplemental restraint system 1-11

LRS0888 |
|
LRS0889 |
To raise the head restraint, pull it up. |
To lower, push and hold the lock knob and push |
|
|
the head restraint down. |
|
1-12 Safety—Seats, seat belts and supplemental
LRS2080
Removal
Use the following procedure to remove the head restraints.
1.Adjust the seat or seatback as necessary.
2.Push and hold the lock knob(s).
3.Pull the head restraint up until it is removed from the seat.
4.Store the head restraint properly so it is not loose in the vehicle.
5.Reinstall the head restraint and properly adjust the seat or seatback before an occupant uses the seating position.

LRS2081
Install
1.Align the head restraint stalks with the holes in the seat. Make sure the head restraint is facing the correct direction.
2.Push the head restraint down until it locks in place.
ADJUSTABLE HEADREST
WARNING
The adjustable headrests supplement the other vehicle safety systems. They may provide additional protection against injury in certain rear end collisions. Adjust the headrests properly, as specified in this section. Check the adjustment after someone else uses the seat. Do not attach anything to the adjustable headrest stalks or remove the adjustable headrests. Do not use the seat if the adjustable headrests have been removed. If the headrest was removed, reinstall and properly adjust the headrest before an occupant uses the seating position. Failure to follow these instructions can reduce the effectiveness of the adjustable headrests. This may increase the risk of serious injury or death in a collision.
LRS2135
The illustration shows the seating positions equipped with adjustable headrests. All of the headrests are adjustable.
Indicates the seating position is equipped with an adjustable headrest.
belts and supplemental restraint system 1-13
 Loading...