


FOREWORD
Your INFINITI represents a new way of thinking about car design. It integrates advanced engineering and superior craftsmanship with a simple, refined aesthetic sensitivity associated with traditional Japanese culture.
The result is a different notion of luxury and beauty. The car itself is important, but so also is the sense of harmony that the car evokes in its driver, and the sense of satisfaction you feel with the INFINITI Ðfrom the way it looks and drives to the high level of dealer service.
To ensure that you enjoy your INFINITI to the fullest, we encourage you to read this Owner's Manual immediately. It explains all of the features, controls and performance characteristics of your INFINITI; it also provides important instructions and safety information.
A separate Warranty booklet is to be found in your Owner's Literature Portfolio. Always carry it with you when you take your INFINITI to an authorized dealer. The portfolio contents provide complete information about all warranties covering this vehicle, the periodic maintenance required to keep the warranties in effect as well as the INFINITI roadside assistance program.
INFINITI is dedicated to providing a satisfying ownership experience for as long as you own your
car. Should you have any questions regarding your INFINITI or your INFINITI dealer, please contact our Consumer Affairs department at 1-800-662-6200. In Hawaii 808-531-0231. Thank you.
WHEN READING THE
MANUAL
This manual includes information for all options available on this model. Therefore, you may find some information that does not apply to your vehicle.
MODIFICATION OF YOUR VEHICLE
This vehicle should not be modified. Modification could affect its performance, safety or durability, and may even violate governmental regulations. In addition, damage or performance problems resulting from modification may not be covered under INFINITI warranties.
All information, specifications and illustrations in this manual are those in effect at the time of printing. INFINITI reserves the right to change specifications or design at any time without notice.
READ FIRST Ð THEN DRIVE SAFELY
Before driving your vehicle, please read your Owner's Manual carefully. This will ensure familiarity with controls and maintenance requirements, assisting you in the safe operation of your vehicle.
Throughout this manual we have used the word WARNING. This is used to indicate the presence of a hazard which may cause the possibility of a personal injury or other damage and must be followed precisely.
CAUTION. This is also used throughout the manual to indicate the presence of a hazard that could cause possible minor injury to yourself or components and the procedures must be followed carefully.
© 1995 NISSAN MOTOR CO., LTD.
TOKYO, JAPAN
TABLE OF CONTENTS
INSTRUMENTS AND CONTROLS..................................................................... |
1-1 |
PRE-DRIVING CHECKS AND ADJUSTMENTS................................................. |
2-1 |
HEATER/AIR CONDITIONER/AUDIO SYSTEM ................................................. |
3-1 |
STARTING AND DRIVING................................................................................. |
4-1 |
IN CASE OF EMERGENCY ............................................................................... |
5-1 |
APPEARANCE AND CARE................................................................................ |
6-1 |
DO-IT-YOURSELF.............................................................................................. |
7-1 |
MAINTENANCE ................................................................................................. |
8-1 |
TECHNICAL AND CONSUMER INFORMATION............................................... |
9-1 |
INDEX .............................................................................................................. |
10-1 |

IMPORTANT SAFETY INFORMATION
REMINDERS FOR SAFETY!
Follow these five important driving rules to help ensure a safe and comfortable trip for you and your passengers!
ONEVER drive under the influence of alcohol or drugs.
OALWAYS observe posted speed limits and never drive too fast for conditions.
OALWAYS use your seat belts and appropriate child restraint systems.
OALWAYS provide information about the proper use of vehicle safety features to all occupants of the vehicle.
OALWAYS review this Owner's Manual for important safety information.
WARNING:
This is used to indicate the presence of a hazard which may cause the possibility of a personal injury or other damage. The procedures must be followed precisely.
CAUTION:
This is used throughout the manual to indicate the presence of a hazard that could cause possible minor injury to yourself or your vehicle. The procedures must be followed carefully.
1 INSTRUMENTS AND CONTROLS
Meters and gauges...................................... |
1-3 |
Cup and card holders................................ |
1-17 |
Warning/indicator light and buzzer ............. |
1-6 |
Cargo net................................................... |
1-17 |
Theft warning .............................................. |
1-9 |
Power window........................................... |
1-18 |
Windshield wiper and washer switch........ |
1-11 |
Sun roof .................................................... |
1-19 |
Rear window and outside mirror |
|
Clock.......................................................... |
1-20 |
defogger switch......................................... |
1-12 |
Interior light............................................... |
1-20 |
Headlight and turn signal switch .............. |
1-12 |
Front personal light ................................... |
1-21 |
Cornering light........................................... |
1-13 |
Vanity mirror light ..................................... |
1-22 |
Instrument brightness control................... |
1-14 |
Trunk light ................................................. |
1-22 |
Front fog light switch ................................ |
1-14 |
Integrated HomelinkTM transmitter |
|
Hazard warning flasher switch .................. |
1-14 |
(If so equipped)......................................... |
1-22 |
Heated seat................................................ |
1-15 |
|
|
Cigarette lighter and ash trays .................. |
1-16 |
|
|
Storage tray............................................... |
1-16 |
|
|

INSTRUMENTS AND CONTROLS
See the page indicated in parentheses for operating details.
SII0029
1-2

INSTRUMENTS AND CONTROLS
METERS AND GAUGES
F |
E
SII0030
1-3
INSTRUMENTS AND CONTROLS
SPEEDOMETER
The speedometer indicates vehicle speed in miles per hour.
TACHOMETER
The tachometer indicates engine speed in revolutions per minute (r/min).
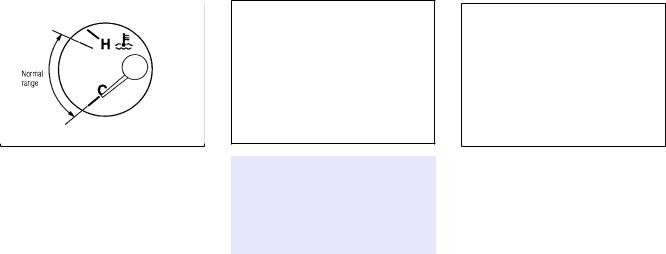
ENGINE COOLANT TEMPERATURE GAUGE
The gauge indicates the coolant temperature.
SII0031
ODOMETER
The odometer records the total distance the vehicle has been driven.
TRIP ODOMETER
The trip odometer records the distance of individual trips. Before each trip, set the trip odometer to zero by pushing the RESET button.
SII0032
CAUTION:
When engine speed approaches the red zone, shift to a higher gear. Engine speed in the red zone may cause serious engine damage.
SII0033
The coolant temperature will vary with the outside air temperature and driving conditions.
1-4

INSTRUMENTS AND CONTROLS
CAUTION:
If the gauge indicates over the normal range, stop the vehicle as soon as safely possible. If the engine is overheated, continued operation of the vehicle may seriously damage the engine. See ``In case of emergency'' section for immediate action required.
FUEL GAUGE
The gauge indicates the APPROXIMATE fuel level in the tank.
SII0034
The gauge may move slightly during braking, turning, acceleration, or going up or down hill.
The gauge needle is designed to remain in approximately the same position, even when the ignition key is turned ``OFF''.
Refill the fuel tank before the gauge registers Empty.
The indicator light comes on when the fuel tank is getting low. Refuel as soon as it is convenient, preferably before the gauge reaches ``E''. There should be a small reserve of fuel in the tank when the fuel gauge needle reaches ``E''.
1-5

INSTRUMENTS AND CONTROLS
WARNING/INDICATOR LIGHT AND BUZZER
|
|
or |
|
warning light |
|
|
Seat belt warning light |
|
Engine oil pressure warning light |
|
|
|
|
|
|
|
|||||
|
|
|
|
|
|
|
|
|
|
|
|
|
|
Turn signal/hazard indicator light |
|
|
Low washer fluid warning light |
|
CRUISE indicator light |
||
|
|
|
|
|
|
|||||
|
|
|
High beam indicator light (blue) |
|
or |
|
Anti-lock brake warning |
|
Air bag warning light |
|
|
|
|
|
|
|
|||||
|
|
|
|
|
|
|||||
|
|
|
|
|
||||||
|
|
|
|
|
light |
|
||||
|
|
|
|
|
|
|
|
|
|
|
|
|
|
Charge warning light |
|
|
Overdrive off indicator light |
|
|
||
|
|
|
|
|
|
|
||||
|
|
|
Door open warning light |
|
|
Malfunction indicator light |
|
|
||
|
|
|
|
|
|
|
||||
|
|
|
|
|
|
|
||||
|
|
|
|
|
|
|
|
|
|
|
|
|
|
|
|
|
|
|
|
|
|
Checking bulbs
Apply the parking brake and turn the ignition key to ``ON'' without starting the engine. The following lights will come on:
 ,
, or
or  ,
, ,
,
The following lights come on briefly and then go off:
 or
or  ,
, ,
,
If any light fails to come on, it may indicate a burned-out bulb or an open circuit in the electrical system. Have the system repaired promptly.


 Engine oil pressure warning light
This light warns of low engine oil pressure. If the light flickers or comes on during normal
driving, pull off the road in a safe area, stop the engine immediately and call an INFINITI dealer or other authorized repair shop. Running the engine with the oil pressure warning light on could cause serious damage to the engine.
The oil pressure warning light is not designed to indicate a low oil level. Use the dipstick to check the oil level. See
1-6

INSTRUMENTS AND CONTROLS
``Engine oil'' in the ``Do-it-yourself'' section.


 Charge warning light
If the light comes on while the engine is running, it may indicate that there is something wrong with the charging system. Turn the engine off and check the alternator belt. If the belt is loose, broken, missing or if the light remains on, see your INFINITI dealer immediately.
CAUTION:
Do not continue driving if the belt is loose, broken or missing.


 Door open warning light
This light comes on when any of the doors are not closed securely while the ignition key is ``ON''.
Seat belt warning light and buzzer
The light and buzzer remind you to fasten seat belts. The light illuminates whenever the ignition key is turned to ``ON'', and will remain illuminated until the driver's seat belt is fastened. At the same time, the buzzer will sound for about six seconds unless the driver's seat belt is securely fastened.
Refer to ``Seat belts'' in the ``Pre-driving checks and adjustments'' section for precautions on seat belt usage.


 Air bag warning light
When the ignition key is in the ``ON'' or ``START'' position, the air bag light will illuminate for about 7 seconds and then turn off. This means the system is operational.
If any of the following conditions occur, the air bag needs servicing and your vehicle must be taken to your nearest authorized INFINITI dealer.
1.The air bag light does not come on for 7 seconds and then go off as described above.
2.The air bag light flashes intermittently or remains on.
3.The air bag light does not come on at all.
Unless checked and repaired, the Supplemental Restraint System may not function properly. For additional details on the Air Bag System, see Section 2.


 Low washer fluid warning light
This light comes on when the washer tank fluid is at a low level. Add washer fluid as necessary. See the ``Do-it-yourself'' section.


 or
or 

 Brake warning light
This light functions for both the parking brake and the foot brake systems.
1-7
INSTRUMENTS AND CONTROLS
Parking brake indicator
The light comes on when the parking brake is applied.
Low brake fluid warning
The light warns of a low brake fluid level. If the light comes on while the engine is running with the parking brake not applied, stop the vehicle and perform the following:
1.Check the brake fluid level. Add brake fluid as necessary. See ``Brake and clutch fluid'' in the ``Do-it-yourself'' section.
2.If the brake fluid level is correct, check the warning system.
WARNING:
OIf you judge it to be safe, drive carefully to the nearest service station for repairs. Otherwise, have your vehicle towed because driving it could be dangerous.
OPressing the brake pedal when the engine stops and/or low brake fluid level may increase your stopping distance and require greater pedal effort as well as greater pedal travel.


 or
or 

 Anti-lock brake warning light
If the light comes on while the engine is running, it may indicate there is something wrong with the anti-lock portion of the brake system. Have the system checked by your INFINITI dealer. However if the light illuminates while starting the engine, it does not indicate a system malfunction.
If an abnormality occurs in the system, the anti-lock function will cease but the ordinary brakes will continue to operate normally.
If the light comes on while you are
driving, contact your INFINITI dealer for repair.
Overdrive off indicator light
This light comes on when the overdrive switch is pushed to the ``OFF  '' position.
However when the ignition key is in the ``ON'' or ``START'' position and the overdrive switch is not in the ``OFF  '' position, the light will illuminate for about 2 seconds and then turn off. This means the system is operational.
Turn signal/hazard indicator lights
The light flashes when the turn signal switch lever or hazard switch is turned on.
High beam indicator light (Blue)
This light comes on when the headlight high beam is on and goes out when the low beam is selected.
1-8

INSTRUMENTS AND CONTROLS


 Cruise indicator light
The light comes on while the vehicle speed is controlled by the cruise control system. If the light flickers while the engine is running, it may indicate there is something wrong with the cruise control system. Have the system checked by your INFINITI dealer.
Key reminder buzzer
The buzzer will sound if the driver side door is opened while the key is left in the ignition switch (ignition switch is turned off). Remove the key and take it with you when leaving the vehicle.
Light reminder buzzer
A buzzer will sound when the driver side door is opened if the light switch is turned on (ignition switch is turned off).
Turn the light switch off when you leave the vehicle.
Brake pad wear warning
The disc brake pads have audible wear warnings. When a brake pad requires replacement, it will make a high pitched scraping sound when the vehicle is in motion whether or not the brake pedal is depressed. Have the brakes checked as soon as possible if the warning sound is heard.
Malfunction indicator light (MIL)
If the MIL comes on or blinks while the engine is running, it may indicate a potential emission control problem.
CAUTION:
OContinued operation without having the emission control system checked and repaired as necessary could lead to poor driveability, reduced fuel economy, and possible damage to the emission control
system which may affect your warranty coverage.
OAlthough the vehicle is still driveable, see your nearest INFINITI dealer as soon as possible. To avoid system damage, do not drive at speeds above 45 MPH (72 km/h). If possible, avoid hard acceleration or deceleration.
If the fuel filler cap is not tightened properly, the MIL may come on. Check and securely tighten the fuel filler cap, and have your vehicle checked as noted above.
THEFT WARNING
The theft warning system provides visual and audio alarm signals if parts of the vehicle are disturbed.
1-9

INSTRUMENTS AND CONTROLS
How to activate the theft warning system
SII0035
1. Close all windows.
The system can be activated even if the windows are open.
2.Remove the key from the ignition switch.
3.Close and lock all doors, hood and trunk lid. The doors can be locked either with or without the key.
4.Confirm that the indicator light comes on.
The light will glow for about 30 seconds and then blink. The system is now activated. If, during this 30 second time period, the door is unlocked by the key or multi-remote controller, or the ignition key is turned to ``ACC'', the system will not activate.
CAUTION:
OIf the key is turned quickly when locking the door, the system may not activate. Furthermore, if the key is turned excessively to the unlock position, the system may be deactivated when the key is removed. If the indicator light fails to glow for 30 seconds, unlock the door once and lock it again.
OEven when the driver and/or passengers are in the vehicle, the system will activate with all doors,
hood, trunk lid and back door locked and ignition key off. Turn the ignition key to ``ACC'' to turn the system off.
Theft warning system operation
The warning system will give the following alarm:
OThe headlights blink and the horn sounds intermittently. In addition, the starter motor will not operate.
OThe alarm automatically turns off after 2 to 3 minutes; however, the alarm will reactivate if the vehicle is tampered with again. The alarm can be shut off by unlocking a door or trunk lid with the key.
The alarm is activated by:
OUnlocking the door or trunk lid without using the key or multi-remote controller
1-10

INSTRUMENTS AND CONTROLS
(even if the door is opened by releasing the door inside lock knob) or opening the trunk lid by operating the opener release button.
OOpening the hood.
OPushing in or pulling out of the key cylinder on the door or trunk lid.
How to stop alarm
The alarm will stop only by unlocking a door or trunk lid with the key or multi-remote controller. The alarm will not stop if the ignition switch is turned to ``ACC'' or ``ON''.
If the system does not operate as described above, have it checked by your INFINITI dealer.
WINDSHIELD WIPER AND WASHER SWITCH
The windshield wiper and washer operates when the ignition key is in the ``ACC'' or ``ON'' position.
SII0036
Push the lever down to operate the wiper.
Intermittent operation can be adjusted from 3 to 21 seconds by turning the knob.
Pull the lever toward you to operate the washer. Then the wiper will also operate several times.
CAUTION:
ODo not operate the washer continuously for more than 30 seconds.
ODo not operate the washer if the reservoir tank is dry.
WARNING:
In freezing temperatures the washer solution may freeze on the windshield and obscure your vision. Warm windshield with the defroster before you wash the windshield.
1-11

INSTRUMENTS AND CONTROLS
REAR WINDOW AND OUTSIDE MIRROR DEFOGGER SWITCH
SII0037
To defog the rear window glass and outside mirrors, start the engine and push the switch on. (The indicator light will come on.) Push the switch again to turn the defogger off.
It will automatically turn off in approximately 15 minutes.
CAUTION:
When cleaning the inner side of the window, be careful not to scratch or damage the electrical conductors.
HEADLIGHT AND TURN SIGNAL SWITCH
Lighting
SII0038
Turn the switch to the `` '' position:
The front clearance, side marker, tail, license plate and instrument lights will come on.
Turn the switch to the `` '' position:
Headlights will come on and all the other lights remain on.
To select the high beam, push the lever forward. Pull it back to select the low beam.
SII0039
Daytime light system (For Canada)
Even if the headlight control switch is off, the
1-12

INSTRUMENTS AND CONTROLS
headlights' high beams will illuminate after starting the engine. The headlights will be a little dimmer than they are with the headlight switch in the `` '' position.
If the parking brake is applied before the engine is started, the daytime lights will not be illuminated. The daytime lights will illuminate once the parking brake is released. Thereafter, the daytime lights will not turn off when using the parking brake at stop signals, etc.
WARNING:
When the daytime light system is active, tail lights on your vehicle will not be on. It is necessary at dusk to turn on your headlights. Failure to do so could cause an accident injuring yourself and others.
Passing signal
Pulling the lever toward you will turn on the headlight high beam.
Turn signal
SII0040
Move the lever up or down to signal the turning direction. When the turn is completed, the turn signals cancel automatically.
Lane change signal
To indicate a lane change, move the lever up or down to the point where lights begin flashing.
CORNERING LIGHT
SII0041
The cornering light provides additional illumination toward the turning direction. The light will come on when the turn signal lever is moved to the right or left with the headlights on.
1-13
INSTRUMENTS AND CONTROLS
INSTRUMENT BRIGHTNESS CONTROL
SII0042
The instrument brightness control operates when the light switch is in the `` '' or ``
 '' position.
Turn the control to adjust the brightness of instrument panel lights (except clock) and power window switch lights.
When the control is turned to the right until a click sound is heard, the light intensity will be at maximum. When the control is turned to the
left until a click sound is heard, the light will be turned off.
FRONT FOG LIGHT
SWITCH
SII0043
To turn the fog lights on, turn the headlight switch to the `` '' position, then turn the switch to the ``
 '' position. To turn them off, turn the switch to the ``OFF'' position.
The headlights must be on for the fog lights to operate.
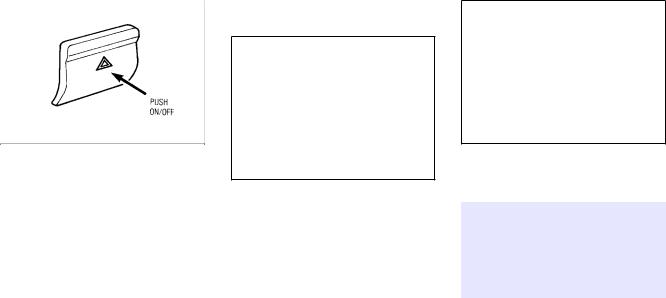
HAZARD WARNING
FLASHER SWITCH
SII0044
Push the switch on to warn other drivers when you must stop or park under emergency conditions. All turn signal lights will flash.
WARNING:
OWhen stalled or stopped on the roadway under emergency conditions, move the vehicle well off the road.
1-14
INSTRUMENTS AND CONTROLS
ODo not use the switch while moving on the highway unless unusual circumstances force you to drive so slowly that your vehicle might become a hazard to other traffic.
OSome state laws may prohibit the use of the hazard warning flasher switch while driving.
OTurn signals do not work when the switch is operating.
The flasher can be actuated with the ignition switch either off or on.
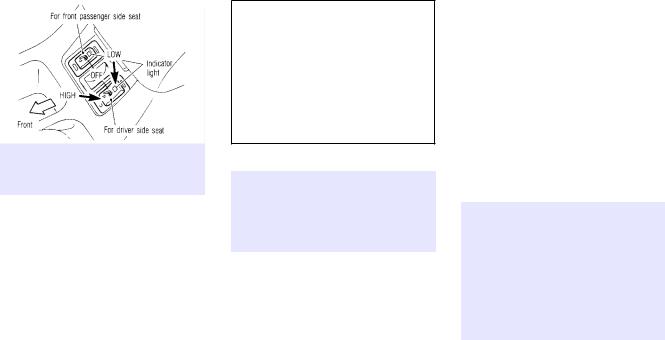
HEATED SEAT
The front seats are warmed by built-in heaters. The switches located on the center console can be operated independently of each other.
SII0045
1. Start the engine.
CAUTION:
The battery could run down if the seat heater is operated while the engine is not running.
2.Selecting heat range.
O For Low heat, press the top of the switch.
O For High heat, press the bottom of the switch.
OFor No heat, the switch has a center ``OFF'' position between Low and High.
The indicator light in the switch will illuminate when Low or High is selected.
The heater is controlled by a thermostat, automatically turning the heater on and off. The indicator light will remain on as long as the switch is on.
3.When the vehicle's interior is warmed, or before you leave the vehicle, be sure to turn the switch off.
CAUTION:
Do not use the seat heater for extended periods, or when the seat is not occupied.
ODo not put anything on the seat which insulates heat, such as ablanket, cushion, seat cover, etc. Otherwise, the seat may become overheated.
1-15

INSTRUMENTS AND CONTROLS
ODo not place anything hard or heavy on the seat or pierce it with a pin or similar object. This may result in damage to the heater.
OAny liquid spilled on the heated seat should be removed immediately with a dry cloth.
OWhen cleaning the seat, never use benzine, thinner, or any similar materials.
OIf any abnormalities are found or the heated seat does not operate, turn the switch OFF and have the system checked by your INFINITI dealer.
CIGARETTE LIGHTER AND ASH TRAYS
The cigarette lighter operates when the ignition switch is in the ``ACC'' or ``ON'' position.
SII0046
Push the lighter in all the way. When the lighter is heated, it will spring out.
Return the lighter to its original position after use.
WARNING:
The cigarette lighter should not be used while driving in order that full attention may be given to the driving operation.
STORAGE TRAY
SII0047
To open the storage tray, push and release. The storage tray will automatically move to the open position.
WARNING:
The storage tray should not be used while driving in order that full attention may be given to the driving operation.
1-16

INSTRUMENTS AND CONTROLS
CUP AND CARD HOLDERS
SII0048
WARNING:
The cup and card holders should not be used while driving in order that full attention may be given to the driving operation.
CARGO NET
CAUTION:
Avoid abrupt starting and braking when the cup holder is being used to prevent splashing the drink.
SII0059
This cargo net can hold packages or objects in place in a wide variety of layouts using
1-17
INSTRUMENTS AND CONTROLS
various attaching hooks.
ODo not put heavy objects in the cargo net. The net is designed only to hold light packages or objects in place while driving.
POWER WINDOW
The power window only operates when the ignition key is in the ``ON'' position.
SII0049
To open or close the window, push down or pull up the switch and hold it. The main
switch (driver side switches) will open or close all the windows.
Locking passenger's window
When the lock button is pushed in, only the driver side window can be opened or closed. Push it in again to cancel.
SII0050
The passenger side switch will open or close only the corresponding window. To open or close the window, hold the switch down or up.
WARNING:
OMake sure that all passengers have their hands, etc. inside the vehicle before closing the windows.
ODo not leave children unattended inside the vehicle. They could unknowingly activate switches.
Power window automatic switch
SII0051
To fully open the driver side window, com-
1-18
INSTRUMENTS AND CONTROLS
pletely push down the switch and release it; it need not be held. The window will automatically open all the way. To stop the window, just pull up the switch toward the ``CLOSE'' side.
SUNROOF
The sunroof will only operate when the ignition key is in the ``ON'' position.
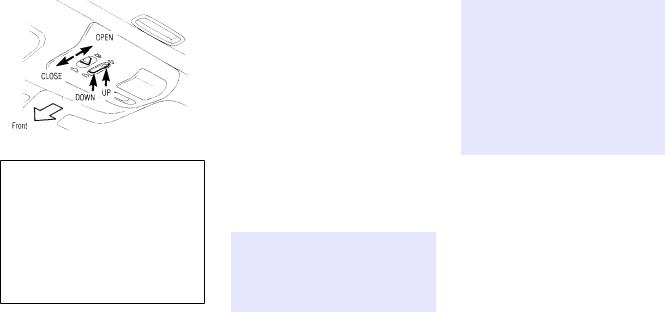
Sliding the sunroof
SII0052
To open the roof, keep pressing the switch to the `` '' side.
To close the roof, keep pressing the switch to the `` '' side.
Tilting the sunroof
To tilt up, first close the sun roof, then keep pushing the `` '' side of the tilt switch. To tilt down the sun roof, keep pushing the ``
 '' side.
Sun shade
Open/close the sun shade by sliding it backward/forward.
The shade will open automatically when the sunroof is opened. However, it must be closed manually.
WARNING:
OBe extremely careful not to have any part of your body in the sun roof opening while it is closing.
ODo not stand up or extend any portion of your body out of the opening while driving.
ORemove water drops, snow, ice or sand from the sun roof before opening.
ODo not place any heavy object on the sun roof or surrounding area.
1-19
INSTRUMENTS AND CONTROLS
If the sunroof does not close
SII0053
CAUTION:
Turn the ignition key to the ``OFF'' position.
1.Remove the cover as illustrated. The shaft end of the sunroof motor will be visible.
2.Using the wrench supplied in the tool bag, turn the shaft clockwise to close the sunroof.
If the sunroof does not tilt down, turn the shaft counterclockwise to tilt the sunroof down.
Have the sunroof system checked and repaired by your INFINITI dealer.
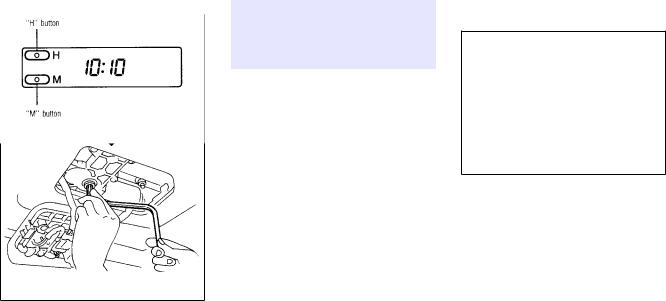
CLOCK
The digital clock displays time when the ignition key is in ``ACC'' or ``ON''.
If the power supply is disconnected, the clock
will not indicate the correct time. Readjust the time.
SII0054
Adjusting the time
Push the H button to adjust the hour.
Push the M button to adjust the minute.
INTERIOR LIGHT
The interior light has a three-position switch.
When the switch is in the center ``j'' position, the light will illuminate when a door is opened.
1-20
INSTRUMENTS AND CONTROLS
IIC038M
Interior light timer
The interior light will stay on for about 30 seconds when:
OThe driver's door is unlocked while the key is removed from the ignition switch.
OThe key is removed from the ignition switch while the driver's door is closed.
OThe key is removed from the ignition switch and the driver's door is opened and then closed.
The timer is cancelled, and the interior light will turn off when:
OThe driver's door is locked.
OThe ignition switch is turned ``ON''.
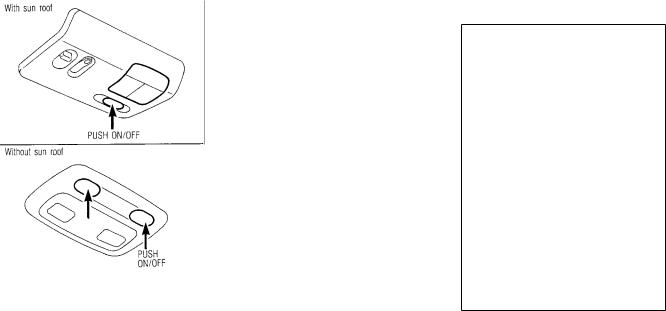
FRONT PERSONAL LIGHT
IIC036
1-21

INSTRUMENTS AND CONTROLS
VANITY MIRROR LIGHT
SII0055
The light on the vanity mirror will turn on when the cover on the vanity mirror is opened.
TRUNK LIGHT
The light illuminates when the trunk lid is opened. When the trunk lid is closed, the light will go off.
INTEGRATED HomeLinkTM TRANSMITTER
(If so equipped)
The Integrated HomeLinkTM Transmitter provides a convenient way to consolidate the functions of up to three individual hand-held transmitters into one built-in device.
THE INTEGRATED
HomeLinkTM TRANSMITTER:
Owill operate garage doors, gates, home/office lighting systems and security systems by storing and transmitting the programming information of your current hand-held transmitters.
Ois built-in and powered by your vehicle's battery and charging system. No separate batteries are necessary.
WARNING:
Do not use this Integrated HomeLinkTM Transmitter with any garage door opener that lacks safety stop and reverse features as required by federal safety standards (these standards became effective for models manufactured on April 1, 1982). A garage door opener which cannot ``detect'' an object in the path of a closing garage door and then automatically stop and reverse the door, does not meet current federal safety standards. Using a garage door opener without these features increases the risk of serious injury or death.
1-22
INSTRUMENTS AND CONTROLS
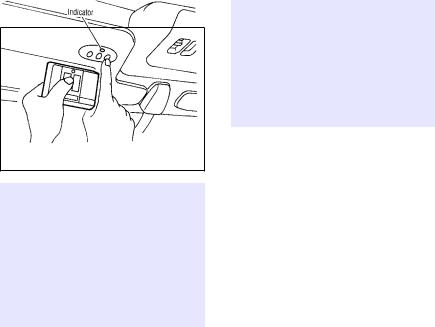
PROGRAMMING THE
HomeLinkTM TRANSMITTER
SII0056
WARNING:
During the programming procedure your garage door or security gate will open and close (if the transmitter is within range). Make sure that people or objects are clear of the garage door, gate, etc. that you are programming.
Your vehicle's engine should be turned off while programming your transmitter. The Integrated HomeLinkTM Transmitter may not work with older garage door openers that do not meet current Federal Consumer Safety Standards.
1.Test the Integrated HomeLinkTM Transmitter by pressing any button. The red indicator light should come on. If you have previously programmed a button proceed to step 3.
2.Clear all channels on the Integrated HomeLinkTM Transmitter by holding down both outside buttons (#1 & #3) until the red light begins to flash rapidly (approximately 20 seconds). Then release both buttons.
3.Select which of the three Integrated
HomeLinkTM Transmitter buttons you want to program.
4.Hold the end of your hand-held transmitter against the bottom surface of the Integrated HomeLinkTM Transmitter so that you can still see the red indicator light.
5.Press the desired button until the red indicator light flashes slowly. Do not release the button. Continue holding and press the hand-held transmitter button through step 6.
6.Hold down both buttons until the red indicator light on the Integrated HomeLinkTM Transmitter flashes rapidly (This may take 10-90 seconds). Then release both buttons. The rapid flashing means that the transmitter has been successfully programmed to match your hand-held transmitter. You can now use the Integrated HomeLinkTM Transmitter instead of your hand-held transmitter.
1-23
INSTRUMENTS AND CONTROLS
Note to Canadian users:
Prior to 1992, D.O.C. regulations required many hand-held transmitters to stop transmitting after one or two seconds, even though you continue to hold down the button. If you think you have one of these hand-held transmitters, you should press and re-press the transmitter button every 2 seconds without ever releasing the integrated HomeLinkTM Transmitter button. The indicator light on the Integrated HomeLinkTM Transmitter should blink rapidly indicating a successful programming procedure. If it returns to the slow blink of program mode, continue to periodically reactivate your hand-held transmitter until a successful programming procedure is indicated by the rapidly flashing indicator light.
OPERATING THE TRANSMITTER
To operate, simply press the appropriate button on the Integrated HomeLinkTM Trans-
mitter. The red indicator light illuminates while the signal is being transmitted. The effective transmission range of the Integrated HomeLinkTM Transmitter may differ from your hand-held transmitter.
PROGRAMMING PROBLEM DIAGNOSIS
Be sure to keep your original hand-held transmitter for possible reprogramming if necessary.
OMake sure batteries in the hand-held transmitter are fully charged.
OHold the hand-held transmitter against the
bottom surface of the Integrated HomeLinkTM Transmitter so that you can still see the red indicator light.
OHold buttons for duration of the programming without interruption.
ORotate your hand-held transmitter end- over-end and program again. For best
results, place the end opposite the battery compartment against the Integrated HomeLinkTM Transmitter when programming.
CLEARING THE PROGRAMMING INFORMATION
To clear the Integrated HomeLinkTM Transmitter of all previous programming information, simultaneously hold down the outside two buttons (#1 & #3) until the red indicator light begins to flash rapidly (approximately 20 seconds). This will clear all three buttons. Individual buttons cannot be cleared, but can be reprogrammed at any time by following the programming procedures described above.
IF YOUR VEHICLE IS EVER STOLEN
If your vehicle has been stolen, you should change the codes of any device that was programmed into the Integrated HomeLinkTM Transmitter as soon as possible. Consult the
1-24

INSTRUMENTS AND CONTROLS
owners manual of each device, or call the manufacturer or dealer of those devices.
When your vehicle is recovered, you will have to reprogram the Integrated HomeLinkTM Transmitter with your new transmitter information.
FCC Notice:
This device complies with FCC rules part 15. Operation is subject to the following two conditions: (1) This device may not cause harmful interference and (2) this device must accept any interference that may be received, including interference that may cause undesired operation.
The transmitter has been tested and complies with FCC and DOC/MDC rules. Changes or modifications not expressly approved by the party responsible for compliance could void
the user's authority to operate the device.
DOC: ISTC 1763K1313
FCC I.D.: CB2V67690
1-25
2 PRE-DRIVING CHECKS AND ADJUSTMENTS
Key............................................................... |
2-2 |
Door locks ................................................... |
2-2 |
Multi-remote control system....................... |
2-4 |
Hood release................................................ |
2-8 |
Glove box lock............................................. |
2-8 |
Trunk lid lock .............................................. |
2-9 |
Fuel filler lid lock....................................... |
2-10 |
Seats.......................................................... |
2-11 |
Supplemental restraint system |
|
(Air bag system)........................................ |
2-15 |
Warning and caution labels....................... |
2-19 |
Air bag warning light................................. |
2-19 |
Seat belts................................................... |
2-21 |
Child restraints for infants and |
|
small children ............................................ |
2-27 |
Tilting steering wheel ................................ |
2-34 |
Outside mirror remote control .................. |
2-35 |
Foldable outside mirrors ........................... |
2-35 |
Inside mirror ............................................. |
2-36 |
Automatic anti-dazzling inside mirror ....... |
2-36 |
 Loading...