


2015 Infiniti Q50 Quick Reference Guide

|
2 |
1 |
steeringBehind |
|
|
15 |
|
3 |
|
4 |
|
|
|
||
|
wheel |
|
|
|
|||
5 |
|
5 |
6 |
|
|
|
|
|
|
|
|
|
|
||
|
|
7 |
|
|
|
|
|
9 |
|
8 |
|
|
|
|
|
|
|
|
|
|
17 |
16 |
|
Behind |
|
10 |
|
|
|
||
|
16 |
|
|
||||
|
|
|
|
||||
steering wheel |
11 |
|
|
|
|
||
|
|
|
|
|
|
||
|
|
|
|
|
|
|
|
|
|
|
|
|
|
|
18 |
14 |
|
|
|
|
|
19 |
|
|
|
|
|
20 |
|
20 |
|
|
|
|
|
|
|
||
|
|
|
|
|
|
|
|
12 13
21
22
1 |
VEHICLE INFORMATION DISPLAY |
12 |
VEHICLE DYNAMIC CONTROL (VDC) |
2 |
LOW TIRE PRESSURE WARNING LIGHT |
|
OFF SWITCH* |
|
|
||
3 |
HEADLIGHT AND TURN SIGNAL SWITCH |
13 |
TRUNK RELEASE SWITCH |
|
|
||
4 |
PUSH BUTTON IGNITION SWITCH |
14 |
HOOD RELEASE* |
|
|
||
5 |
PADDLE SHIFTERS* |
15 |
UPPER DISPLAY |
|
|
||
6 |
WINDSHIELD WIPER AND WASHER SWITCH |
16 |
CLIMATE CONTROL SWITCHES |
|
|
||
7 |
INTELLIGENT CRUISE/CRUISE CONTROL/ |
17 |
LOWER DISPLAY |
|
|
||
|
DRIVER’S ASSISTANCE SWITCHES |
18 |
AUDIO SYSTEM |
8 |
STEERING WHEEL SWITCHES FOR |
19 |
FRONT PASSENGER AIR BAG |
|
AUDIO*/BLUETOOTH® |
|
STATUS LIGHT* |
9 |
INSTRUMENT BRIGHTNESS CONTROL*/ |
20 |
HEATED SEAT SWITCHES |
|
TRIP RESET SWITCH |
21 |
INFINITI CONTROLLER |
|
|
||
10 |
VEHICLE INFORMATION DISPLAY SWITCHES |
22 |
DRIVE MODE SWITCH* |
|
|
||
11 |
TILT AND TELESCOPIC STEERING COLUMN* |
|
|
*See your Owner’s Manual for information.

table of contents
new system features
INFINITI Connection™ (if so equipped) . . . . . . . . . . . . |
. |
. |
.2 |
Main Interface Switches Overview . . . . . . . . . . . . . . |
. |
. |
.3 |
User Registration . . . . . . . . . . . . . . . . . . . . . |
. |
. |
.4 |
Upper Display . . . . . . . . . . . . . . . . . . . . . . . . .4 |
|||
Around View® Monitor (AVM) with Moving Object Detection (MOD) |
|
|
|
(if so equipped) . . . . . . . . . . . . . . . . . . . . . . . . 5 SiriusXM Travel Link and SiriusXM Traffic (if so equipped) . . . . . . . 6
essential information
Tire Pressure Monitoring System (TPMS) with Tire Inflation Indicator . |
. |
7 |
Loose Fuel Cap . . . . . . . . . . . . . . . . . . . . . . . |
. |
.8 |
Fuel-filler Door . . . . . . . . . . . . . . . . . . . . . . . |
. |
.8 |
Lower Display Maintenance . . . . . . . . . . . . . . . . . . . 8 |
||
Driving Aids (if so equipped) . . . . . . . . . . . . . . . . . |
. |
.8 |
Active Lane Control (if so equipped) . . . . . . . . . . . . . . |
. |
.9 |
Heated Steering Wheel (if so equipped) . . . . . . . . . . . . . |
. |
9 |
Clock Set/Adjustment . . . . . . . . . . . . . . . . . . . . |
. |
10 |
first drive features
INFINITI Intelligent Key System . . . . . . . . . . . . |
. . . . . 11 |
|
Trunk Lid Release . . . . . . . . . . . . . . . . . . |
. . . . . 12 |
|
Seat Adjustments . . . . . . . . . . . . . . . . . . . |
. . . .12 |
|
Heated Seats (if so equipped) . . . . . . . . . . . . . |
. |
. . . .13 |
Automatic Drive Positioner (if so equipped) . . . . . . . |
. . . . . 13 |
|
Outside Mirror Control Switch . . . . . . . . . . . . . |
. . . . . 14 |
|
Starting/Stopping the Engine . . . . . . . . . . . . . |
. . . . . 14 |
|
Headlight Control Switch . . . . . . . . . . . . . . . . . . . . . . . . . . . . . . |
. . . . . . . . . .15 |
|
Windshield Wiper and Washer Switch . . . . . . . . . . |
. . . . .16 |
|
Climate Controls . . . . . . . . . . . . . . . . . . |
. . . . . 17 |
|
FM/AM/HD Radio®/SiriusXM® Satellite Radio (if so equipped) . |
. . . .19 |
|
USB (Universal Serial Bus) Connection Port /iPod® Interface |
. . . . . 20 |
|
Conventional (Fixed Speed) Cruise Control . . . . . . . . |
. . . . .20 |
|
Intelligent Cruise Control (ICC) (if so equipped) . . . . . |
. . |
. . . 21 |
system guide
Vehicle Information Display . . . . . . . . . . . . . . . . . . .22 Bluetooth® Hands-free Phone System . . . . . . . . . . . . . . .22 System Operating Tips . . . . . . . . . . . . . . . . . . . .22 Navigation System (if so equipped) . . . . . . . . . . . . . . . .25 HomeLink® Universal Transceiver (if so equipped) . . . . . . . . . .26
Please see your Owner’s Manual for important safety information and system operation limitations.
•A cellular telephone should not be used for any purpose while driving so full attention may be given to vehicle operation.
•Always wear your seat belt.
•Supplemental air bags do not replace proper seat belt usage.
•Children 12 and under should always ride in the rear seat properly secured in child restraints or seat belts according to their age and weight.
•Do not drink and drive.
For more information, refer to your InTouch™ Owner’s Manual, the “Safety –– Seats, seat belts and supplemental restraint system (section 1)” and the “Starting and driving (section 5)” of your Owner’s Manual.
|
To view detailed |
|
|
Additional information about your vehicle is also available |
instructional videos, go to |
in your Owner’s Manual, Navigation System Owner’s Manual |
www.infinitiownersinfo.mobi/2015/q50 |
and at www.InfinitiUSA.com. |
or snap this barcode with an |
|
appropriate barcode reader. |
new system features
INFINITI Connection™* (if so equipped)
INFINITI Connection™ combines personalized convenience, concierge settings and personal security features to compliment the Total Ownership Experience. For more details on INFINITI Connection or to enroll your vehicle, please visit www.Infiniticonnection.com
or call 855-444-7244. Available services include:
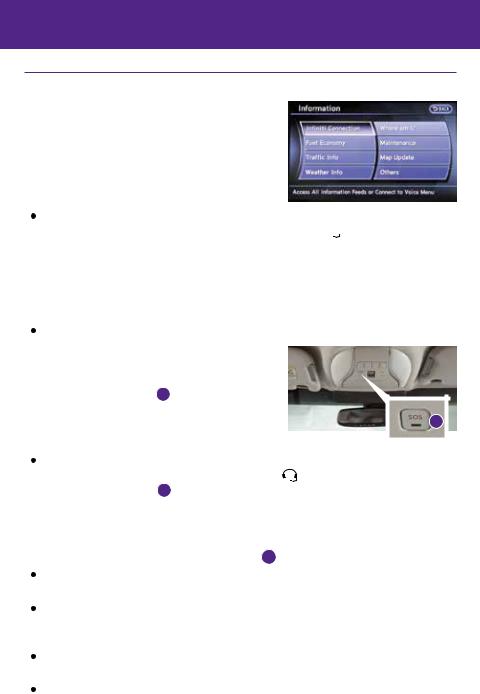
INFINITI Personal Assistant – To access INFINITI Personal Assistant, select “Connect to Voice Menu” from the INFINITI Connection menu or touch the 
 key on the map screen. At the voice prompt, say “INFINITI Personal Assistant” to be connected.
•Your INFINITI Personal Assistant can send destination information directly to your vehicle.
•Automatic Collision Notification – In case of air bag deployment, a signal is sent containing the vehicle location and customer information to a Response Specialist who notifies the proper authorities.
Emergency Call – This service provides emergency assistance by connecting the subscriber to an INFINITI Connection Specialist.
• In case of an emergency, press the in-vehicle telematics SOS button 1 .
• A Response Specialist will provide assistance based
on the situation described by the 1 vehicle’s occupant.
Enhanced Roadside Assistance – Roadside Assistance can be accessed by touching
the INFINITI Connection key on the Info menu or the |
key on the map screen or by |
pressing the SOS button 1 . |
|
•This service allows subscribers to receive assistance for a non-emergency incident, such as towing, or a third party response.
•If warranted, Roadside Assistance may also be used in conjunction with the Emergency Assistance service by pressing the SOS button 1 .
My Schedule – Access your personal online Google Calendar™, hear details read via text-to- speech** and select a location as a destination via the Navigation System.
Report Stolen Vehicle – A Response Specialist will attempt to obtain location information from a reported stolen vehicle and provide that information to local law enforcement agencies to assist in the recovery of your stolen vehicle.
Remote Door Lock/Unlock – Remotely access your vehicle via an INFINITI Connection Response Specialist or designated website to remotely lock or unlock your vehicle.
Alarm Notification – This system will notify you when the factory-installed vehicle alarm system has been activated.
*INFINITI Connection™ is only available on vehicles equipped with an optional INFINITI Connection™ subscription service. **Laws in some communities may restrict the use of text-to-speech. Check local regulations before using this feature.
2

Scheduled Maintenance Notification – Receive scheduled maintenance notifications based on mileage data provided by your vehicle.
Maintenance Alert – Receive notification of a vehicle system malfunction that triggers instrument panel warning lights.
Destination Assistance – Receive point-of-interest assistance via a guided IVR (Interactive Voice Response) or a Response Specialist by pressing the  key on the map screen or the INFINITI Connection™ web portal.
Destination Send-to-Vehicle – Find and download point-of-interest information from Google Maps™. To access, go to the INFINITI Connection menu and select “Sync All Information Feeds”. Then go to the feeds menu page and download the desired destination information.
Connected Search – Select “Connected Search” from the Destination menu on the vehicle’s Navigation System to conduct a point-of-interest search within a certain distance of the vehicle’s location.
Drive Zone – Monitor the movement of your vehicle within a specified region. Set up boundaries in the Monitoring section of the INFINITI Connection web portal.
Max Speed Alert – Set up a maximum speed on the INFINITI Connection web portal. You will receive notifications if your vehicle exceeds the maximum speed setting.
Mobile Information Service – Receive the latest news headlines, stock quotes and sports scores by setting up preferences on the Mobile Information Service page in the INFINITI Connection web portal.
Valet Alert – Use Valet Alert to set up a 0.2-mile radius around your vehicle.
•Activate alerts by pressing the “Connect to Voice Menu” button on the INFINITI Connection screen or by pressing the 
 key on the map screen.
•At the prompt, say “Valet Alert” and then “Activate” or “Deactivate”.
For more information, refer to the “Viewing technical information (section 7)” of your Navigation System Owner’s Manual.
Main Interface Switches Overview
1AUDIO – Press to navigate to the main audio screen. From here, all of the audio functions can be accessed.
2 MENU – Press to navigate to the main menu screen. |
1 |
2 |
3 |
From here, there is access to the navigation functions
and all the applications, including the settings application.
3CLIMATE – Press to navigate to the CLIMATE controls screen. From here, you have access to climate control, heated steering wheel and heated seat functions.
For more information, refer to the “Getting Started (section 2)” of your InTouch Owner’s Manual.
3
new system features
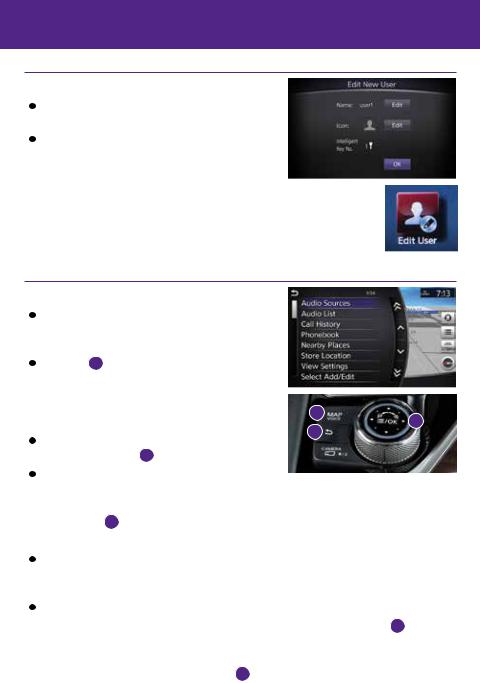
User Registration
Driving positions, navigation, climate controls, etc., can be memorized for each user.
To register a new user:
1.Press the MENU button. The menu screen will appear.
2.Touch the right arrow key until Edit User is displayed. Then touch Edit User.
3.Touch User List.
4.Touch Add New. From here, you can edit Name and Picture.
5.Touch OK when finished.
For more information, refer to the “Information and settings (section 8)” of your InTouch Owner’s Manual.
Upper Display
The upper display is controlled by the touch-screen, the INFINITI controller and the switch on the steering wheel.
Press OK 1 on the INFINITI controller or OK on the steering wheel switch to display the menu screen. From here, you are able to choose from audio sources, map settings, hands-free phonebook and adding new options.
Use the dial on the INFINITI controller to move the cursor and press OK 1 to select an item.
3
1
2
While on the map screen, use the INFINITI
controller to navigate to another location on the map by sliding the controller in the direction you would like to go.
 Press the
  2 button to return to the previous page. MAP AND DISPLAY VIEW (with Navigation)
There are different variations of split-screen views that can be displayed on the upper display. The map is always displayed on the right-hand side of the screen. Some of the left-hand side options are turn list, intersection and turn-by-turn.
To customize the split-screen views on the upper display:
1.When the current location map screen is displayed, press the MAP/VOICE 3 button on the INFINITI controller and the display view bar will appear at the bottom of the screen.
2.Touch an icon on the display view bar or use the dial on the INFINITI controller to scroll through the possible options. Press OK 1 to select one.
For more information, refer to the “Getting Started (section 2)” of your InTouch Owner’s Manual.
4
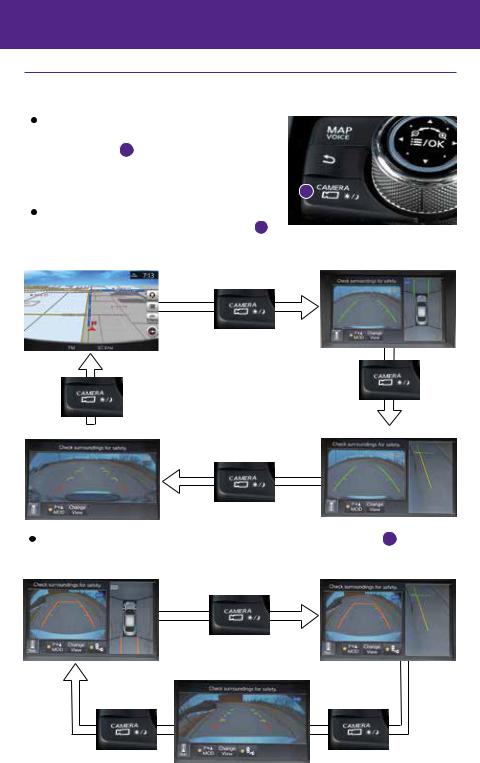
Around View® Monitor (AVM) with Moving Object Detection (MOD) (if so equipped)
With the ignition switch in the ON position, the Around View Monitor is activated by pressing the CAMERA button 1 , located on the control panel, or by moving the shift lever to the R (REVERSE) position.
The control panel displays various views of the |
|
position of the vehicle. |
1 |
When the shift lever is in the P (PARK), N (NEUTRAL) |
|
or D (DRIVE) position and the CAMERA button 1 |
is |
pressed, the following views will display in order: |
|
Start from any Control Panel screen |
Front view and bird’s-eye view |
Press |
|
Press
Press
Front wide view |
Front view and front-side view |
Press
When the shift lever is in the R (REVERSE) position and the CAMERA button 1 is pressed, the following views will display in order:
Rear view and bird’s-eye view |
Rear view and front-side view |
|
Press |
Rear wide view
Press |
Press |
5
new system features
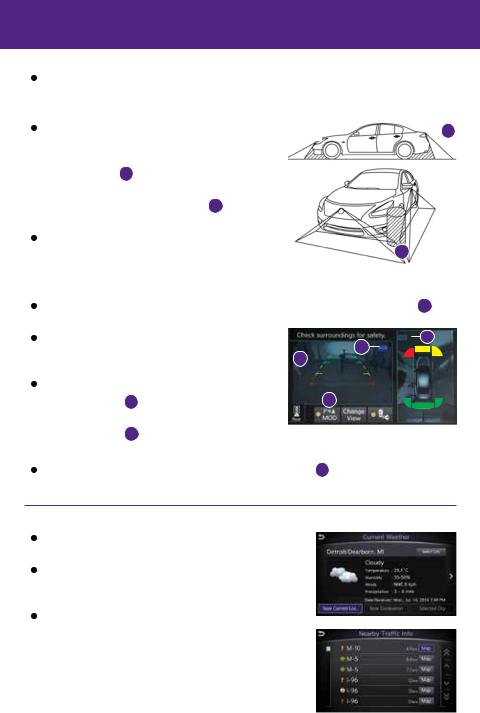
The colored guide lines on the display screen indicate vehicle width and approximate |
|
|||
distances to objects with reference to the vehicle body line. |
|
|||
• Red 1.5 ft (0.5 m); Yellow 3 ft (1 m); Green 7 ft (2 m) |
|
|
|
|
and 10 ft (3 m). |
|
|||
There are some areas where the system will not show |
objects. |
|
2 |
|
|
|
|
|
|
• When in the front or the rear view display, an |
|
|
|
|
object below the bumper or on the ground may |
|
|
|
|
not be viewed 2 . |
|
|
|
|
|
|
|||
|
|
|
|
|
• When in the bird’s-eye view, a tall object near the
seam of the camera viewing areas 3 |
will not appear |
in the monitor. |
|
The distance between objects viewed on the AVM |
|
differs from the actual distance. |
3 |
 Objects in the bird’s-eye view will appear further than the actual distance. MOVING OBJECT DETECTION (MOD)
If the MOD system detects moving objects surrounding the vehicle, a yellow frame 4 will be displayed on the camera image and a chime will sound.
In the bird’s-eye view, a yellow frame is displayed |
|
|
6 |
|
on those camera images (front, rear, right, left) |
|
5 |
|
|
4 |
|
|
||
where moving objects are detected. |
|
|
||
|
|
|
||
When the following are displayed: |
|
|
|
|
• Blue MOD icon |
5 ; the system is operative in |
|
7 |
|
this view. |
|
|
|
|
• Gray MOD icon |
6 ; the system is not operative in this view. |
|||
• No MOD icon; the system is off. |
|
|
|
|
To temporarily turn the system on or off, touch the MOD key |
7 . |
|
||
For more information, refer to the “Monitor system (section 7)” of your InTouch Owner’s Manual.
SiriusXM Travel Link* and SiriusXM Traffic* (if so equipped)
Your vehicle’s Navigation System is equipped with SiriusXM Travel Link and SiriusXM Traffic capabilities.
SiriusXM Travel Link provides access to real-time weather information and forecasts, nearby fuel prices, movie listings and stock quotes.
SiriusXM Traffic provides information that may
help to avoid delays due to traffic incidents. Traffic jams, roadwork, road closures around your current location, etc., are represented graphically on the map by icons depicting the nature of the event. Incidents on the route are automatically displayed when they are approached.
*These features, SiriusXM® Satellite Radio, Travel Link and Traffic, require
an active subscription. Multiple subscriptions may be necessary to activate the various features.
For more information, refer to “Navigation (section 4)” and “General system information (section 6)” of your Navigation System Owner’s Manual.
6
essential information
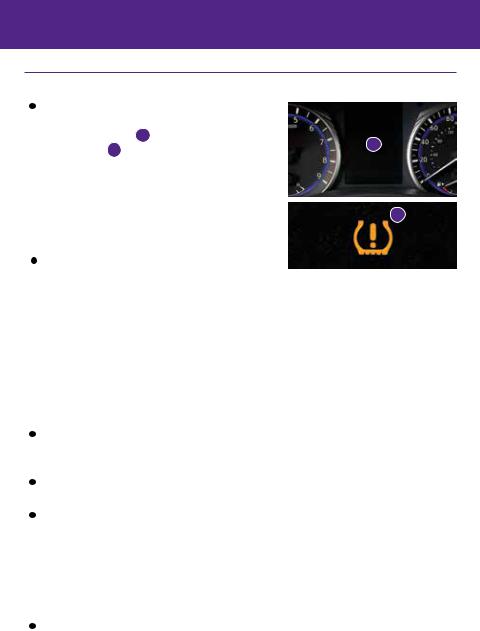
Tire Pressure Monitoring System (TPMS) with Tire Inflation Indicator
A Flat Tire Visit Dealer or Tire Pressure Low —
Add Air warning message will appear in the vehicle information display 1 and the low tire pressure warning light 2 will illuminate when one or more tires are low in pressure and air is needed.
•The tire pressures should be checked when the tires are cold. The tires are considered cold after the vehicle has been parked for 3 hours or more or driven less than 1 mi (1.6 km) at moderate speeds.
1
2
When adding air to an under-inflated tire, the TPMS with Tire Inflation Indicator provides visual and
audible signals to help you inflate the tire to the recommended COLD tire pressure. To use the tire inflation indicator:
1.Move the shift lever to the P (PARK) position and apply the parking brake.
2.Place the ignition switch in the ON position. Do not start the engine.
3.Add air to the under-inflated tire, and within a few seconds, the hazard warning lights will start flashing.
4.When the designated tire pressure is reached, the horn will beep once and the hazard warning flashers will stop flashing.
5.Repeat this procedure for any additional under-inflated tires.
After tire pressures are adjusted, drive the vehicle at speeds above 16 mph (25 km/h). The
Flat Tire Visit Dealer or Tire Pressure Low — Add Air warning message and low tire pressure warning light will extinguish.
When the low tire pressure warning light flashes for 1 minute and then remains on, the TPMS is not functioning properly. Have the system checked by an INFINITI retailer.
Tire pressure rises and falls depending on the heat caused by the vehicle’s operation and the outside temperature. Low outside temperature can lower the temperature of the air inside the tire, which can cause a lower tire inflation pressure. This may cause the low tire pressure warning light to illuminate. If the warning light illuminates, check the tire pressure in your tires.
•Check the tire pressure (including the spare tire) often and always prior to long distance trips.
The Tire and Loading Information label contains valuable information. Please refer to the “Technical and consumer information (section 9)” in your Owner’s Manual for the location of the Tire and Loading Information label.
For more information, refer to the “Instruments and controls (section 2)”, the “Starting and driving (section 5)” and the “Maintenance and do-it-yourself (section 8)” of your Owner’s Manual.
7
essential information
Loose Fuel Cap
A LOOSE FUEL CAP warning message will appear in the vehicle information display 1 when the fuelfiller cap is not tightened correctly.
To tighten, turn the cap clockwise until a single click is heard.
The warning message will extinguish when the vehicle detects the fuel-filler cap is properly tightened and the
 or
or
 button 2
is pressed.
If the cap is not properly tightened, the Malfunction Indicator Light  may illuminate.
For more information, refer to the “Instruments and controls (section 2)”
and the “Pre-driving checks and adjustments (section 3)” of your Owner’s Manual.
1
2
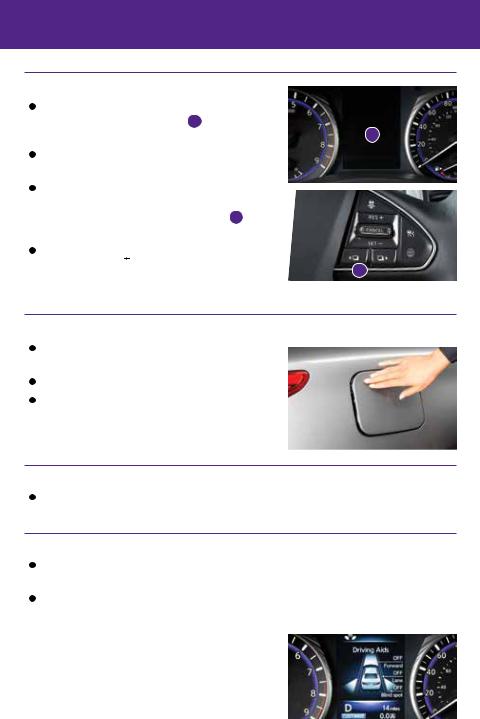
Fuel-filler Door
The fuel-filler door is located on the passenger’s, rear side of the vehicle.
Make sure that at least the driver’s door is unlocked.
Push and release the left side of the fuel-filler door to open.
For more information, refer to the “Pre-driving checks and adjustments (section 3)” of your Owner’s Manual.
Lower Display Maintenance
Only use a microfiber cloth to clean the lower display.
For more information, refer to the “Appearance and care (section 7)” of your Owner’s Manual.
Driving Aids (if so equipped)
The trip computer displays different driving aids, including Forward Emergency Braking, Lane Departure Prevention and Blind Spot Intervention if they are currently activated.
To disable driving aids or warnings:
1.Press the MENU button just below the lower display.
2.Touch the right arrow key until you see Driver Assistance. Touch the Driver Assistance key.
3.Touch the key that corresponds with the driving aid or warning you would like to turn off (Forward Assist, Lane Assist or Blind Spot Assist).
4.Select the driving aid line key to disable.
For more information, refer to the “Starting and driving (section 5)” of your Owner’s Manual.
8
 Loading...