IMG STAGE LINE STA-750 User Manual [fr]

PA-STEREO-VERSTÄRKER
PA STEREO AMPLIFIER AMPLIFICATEUR STEREO PA AMPLIFICATORE STEREO PA
STA-750 Best.-Nr. 25.1950
BEDIENUNGSANLEITUNG • INSTRUCTION MANUAL • MODE D’EMPLOI • ISTRUZIONI PER L’USO MANUAL DE INSTRUCCIONES • INSTRUKCJA OBSŁUGI • VEILIGHEIDSVOORSCHRIFTEN SIKKERHEDSOPLYSNINGER • SÄKERHETSFÖRESKRIFTER • TURVALLISUUDESTA

D
A
CH
F
B
CH
E
|
GB |
Wir wünschen Ihnen viel Spaß mit Ihrem neuen Gerät |
We wish you much pleasure with your new “img Stage |
von „img Stage Line“. Bitte lesen Sie diese Bedienungs- |
Line” unit. Please read these operating instructions |
anleitung vor dem Betrieb gründlich durch. Nur so lernen |
carefully prior to operating the unit. Thus, you will get to |
Sie alle Funktionsmöglichkeiten kennen, vermeiden |
know all functions of the unit, operating errors will be |
Fehlbedienungen und schützen sich und Ihr Gerät vor |
prevented, and yourself and the unit will be protected |
eventuellen Schäden durch unsachgemäßen Gebrauch. |
against any damage caused by improper use. Please |
Heben Sie die Anleitung für ein späteres Nachlesen auf. |
keep the operating instructions for later use. |
Der deutsche Text beginnt auf der Seite 4. |
The English text starts on page 4. |
|
I |
Nous vous souhaitons beaucoup de plaisir à utiliser cet |
Vi auguriamo buon divertimento con il vostro nuovo |
appareil “img Stage Line”. Lisez ce mode d'emploi entière- |
apparecchio di “img Stage Line”. Leggete attentamente |
ment avant toute utilisation. Uniquement ainsi, vous pour- |
le istruzioni prima di mettere in funzione l'apparecchio. |
rez apprendre l’ensemble des possibilités de fonctionne- |
Solo così potete conoscere tutte le funzionalità, evitare |
ment de l’appareil, éviter toute manipulation erronée et |
comandi sbagliati e proteggere voi stessi e l'apparecchio |
vous protéger, ainsi que l’appareil, de dommages éven- |
da eventuali danni in seguito ad un uso improprio. Con- |
tuels engendrés par une utilisation inadaptée. Conservez |
servate le istruzioni per poterle consultare anche in |
la notice pour pouvoir vous y reporter ultérieurement. |
futuro. |
La version française se trouve page 6. |
Il testo italiano inizia a pagina 6. |
Le deseamos una buena utilización para su nuevo apa- |
|
Życzymy zadowolenia z nowego produktu “img Stage |
rato “img Stage Line”. Por favor, lea estas instrucciones |
|
Line”. Dzięki tej instrukcji obsługi będą państwo w |
de uso atentamente antes de hacer funcionar el aparato. |
|
stanie poznać wszystkie funkcje tego urządzenia. |
De esta manera conocerá todas las funciones de la |
|
Stosując się do instrukcji unikną państwo błędów i |
unidad, se prevendrán errores de operación, usted y el |
|
ewentualnego uszkodzenia urządzenia na skutek nie- |
aparato estarán protegidos en contra de todo daño |
|
prawidłowego użytkowania. Prosimy zachować |
causado por un uso inadecuado. Por favor, guarde las |
|
instrukcję. |
instrucciones para una futura utilización. |
|
Tekst polski zaczyna się na stronie 8. |
|
|
|
El texto en español empieza en la página 8. |
|
|
|
|
|
|
DK |
Inden De tænder for apparatet ... |
|
|
|
God fornøjelse med dit nye “img Stage Line” produkt. |
|
“img Stage Line”. Lees de veiligheidsvoorschriften gron- |
|
Læs venligst sikkerhedsanvisningen nøje, før du tager |
|
dig door, alvorens het apparaat in gebruik te nemen. Zo |
|
produktet i brug. Dette hjælper dig med at beskytte pro- |
|
behoedt u zichzelf en het apparaat voor eventuele |
|
duktet mod ukorrekt ibrugtagning. Gem venligst denne |
|
schade door ondeskundig gebruik. Bewaar de handlei- |
|
betjeningsvejledning til senere brug. |
|
ding voor latere raadpleging. |
|
Du finder sikkerhedsanvisningen på side 10. |
|
|
|
|
|
De veiligheidsvoorschriften vindt u op pagina 10. |
|
|
|
|
|
|
|
S |
FIN Ennen virran kytkemistä ... |
Vi önskar dig mycket glädje med din nya “img Stage Line” produkt. Läs igenom säkerhetsföreskrifterna noga innan enheten tas i bruk. Detta kan förhindra att problem eller fara för dig eller enheten uppstår vid användning. Spara instruktionerna för framtida användning.
Säkerhetsföreskrifterna återfinns på sidan 10.
Toivomme Sinulle paljon miellyttäviä hetkiä uuden “img Stage Line” laitteen kanssa. Ennen laitteen käyttöä pyydämme Sinua huolellisesti tutustumaan turvallisuusohjeisiin. Näin vältyt vahingoilta, joita virheellinen laitteen käyttö saattaa aiheuttaa. Ole hyvä ja säilytä käyttöohjeet myöhempää tarvetta varten.
Turvallisuusohjeet löytyvät sivulta 11.
www.imgstageline.com
2

STA-750 |
CLIP |
CLIP |
|
PROTECT |
1000W
PRO POWER AMPLIFIER
|
|
|
|
|
– ∞ |
L - CH |
0 |
POWER |
|
– ∞ |
R - CH |
0 |
|
POWER |
|
|
|
|
|
|
|
|
|
|
|
|
|
|
|||
|
|
|
|
|
|
|
|
|
|
|
|
|
|
|
|
|
|
|
|
1 |
|
2 |
|
3 |
4 |
|
5 |
6 |
7 |
|
|
|
|
|
|
8 |
|
|
|
|
|
|
|
|
|
|
|
|
|
|
|
OUTPUTS (4 Ω |
min.) |
|
|
|
|
|
|
|
|
|
|
|
|
|
|
2– |
|
|
|
|
|
|
|
|
|
|
|
|
|
|
|
1+ |
2+ |
|
|
|
|
|
|
|
|
|
|
|
|
|
|
1– |
|
|
|
|
|
|
|
|
|
|
|
|
INPUTS |
|
RIGHT |
|
|
|
|
|
LEFT |
|
|
|
|
|
|
|
|
|
|
|
|
|
|
|
|
|
|
|
|
|
|
RIGHT |
L |
LEFT |
|
|
|
|
|
|
|
|
|
|
|
MAINS |
|
|
|
|
|
|
|
|
|
|
|
|
STA-750 |
|
|
|
|
|
|
LIFT GND |
|
|
|
|
|
|
|
|
|
|
|
|
|
|
R |
|
|
|
|
|
|
|
|
|
|
1000 W |
|
|
|
|
|
GND |
|
|
|
|
|
|
|
|
|
PRO POWER AMP |
|
|
|
|
|
|
|
|
|
|
|
|
|
|
|
|
|
|
|
|
|
SIGNAL |
|
|
|
|
|
|
|
|
|
|
|
|
|
9 |
10 |
11 |
12 |
13 |
|
|
|
|
|
|
|
14 |
15 |
|
|
2+
1-
2-
1+
|
|
|
|
|
|
|
+ |
4 Ω |
, 350 WRMS |
+ |
8 Ω |
+ |
8 Ω |
- |
8 Ω |
, 270 WRMS |
- |
175 WRMS |
- |
175 WRMS |
|
|
|
|
+ |
- |
+ |
- |
4 Ω , 135 WRMS
4 Ω , 135 WRMS
|
|
|
|
+ |
4 Ω |
+ |
4 Ω |
- |
88 WRMS |
- |
88 WRMS |
|
|
||
+ |
4 Ω |
+ |
4 Ω |
- |
88 WRMS |
- |
88 WRMS |
|
|
|
|
|
|
+ |
8 Ω |
+ |
8 Ω |
- |
68 WRMS |
- |
68 WRMS |
|
|
||
+ |
8 Ω |
+ |
8 Ω |
- |
68 WRMS |
- |
68 WRMS |
|
|
3

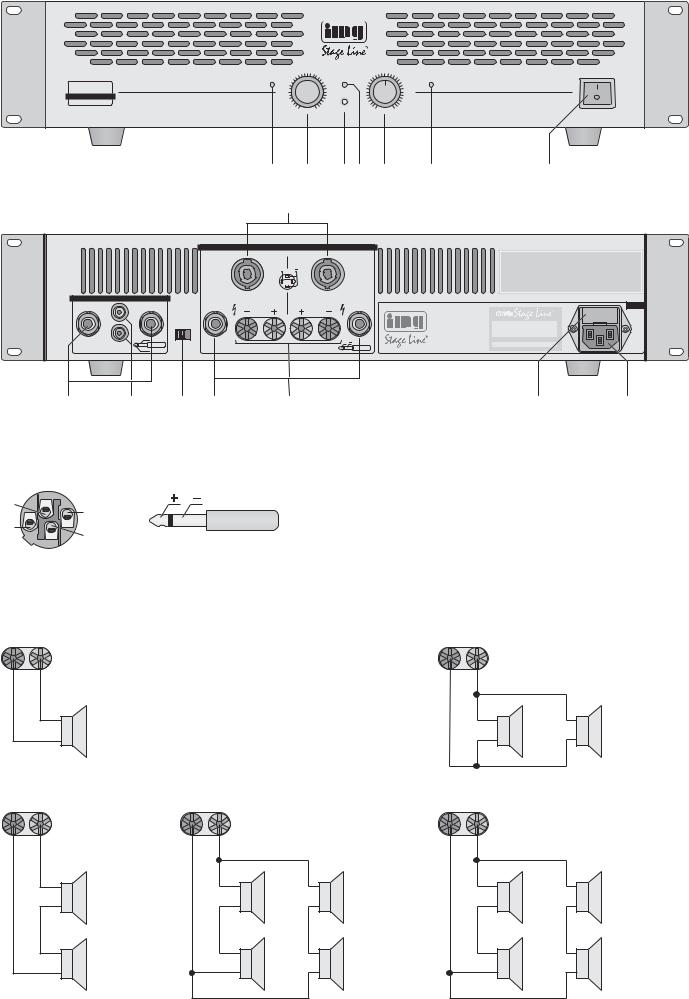
DBitte klappen Sie die Seite 3 heraus. Sie sehen dann immer die beschriebenen Bedienelemente
A |
und Anschlüsse. |
CH
1Übersicht der Bedienelemente und Anschlüsse
1.1 Frontseite
1LED CLIP leuchtet bei Übersteuerung des linken Kanals und bei Kurzschluss des linken Ausgangs
2Lautstärkeregler für den linken Kanal
3Betriebsanzeige POWER
4LED PROTECT leuchtet bei aktivierter Schutzschaltung: ca. 4 Sekunden lang nach dem Einschalten bis zur Freischaltung der Lautsprecherausgänge und wenn der Verstärker überhitzt ist
5Lautstärkeregler für den rechten Kanal
6LED CLIP leuchtet bei Übersteuerung des rechten Kanals und bei Kurzschluss des rechten Ausgangs
7Ein-/Ausschalter POWER
1.2 Rückseite
8 Lautsprecheranschlüsse OUTPUTS als „SPEA- KER“-Buchsen
9 Eingangsbuchsen INPUTS als 6,3-mm-Klinken- buchsen für Geräte mit Line-Pegel (z. B. Mischpult, Vorverstärker)
10Eingangsbuchsen INPUTS als Cinchbuchsen für Geräte mit Line-Pegel
11Groundlift-Schalter
Position GND: Signalmasse und Gehäusemasse sind verbunden
Position LIFT: Signalmasse und Gehäusemasse sind getrennt
12Lautsprecheranschlüsse OUTPUTS als 6,3-mm- Klinkenbuchsen
13Lautsprecheranschlüsse OUTPUTS als Schraubklemmen
14 Sicherungshalter; eine durchgebrannte Sicherung nur durch eine gleichen Typs ersetzen
15 Netzbuchse zur Stromversorgung an 230 V~/
50 Hz
2 Hinweise für den sicheren Gebrauch
Dieses Gerät entspricht allen erforderlichen Richtlinien der EU und ist deshalb mit 
 gekennzeichnet.
WARNUNG Das Gerät wird mit lebensgefährlicher Netzspannung (230 V~) versorgt. Nehmen Sie deshalb niemals selbst Eingriffe am Gerät vor und stecken Sie nichts durch die Lüftungsöffnungen! Es besteht die Gefahr eines elektrischen Schlages.
Im Betrieb liegt an den Lautsprecheranschlüssen berührungsgefährliche Spannung an. Alle Anschlüsse nur bei ausgeschaltetem Gerät vornehmen bzw. verändern.
Beachten Sie auch unbedingt die folgenden Punkte:
●Das Gerät ist nur zur Verwendung im Innenbereich geeignet. Schützen Sie es vor Tropfund Spritzwasser, hoher Luftfeuchtigkeit und Hitze (zulässiger Einsatztemperaturbereich 0 – 40 °C).
●Stellen Sie keine mit Flüssigkeit gefüllten Gefäße, z. B. Trinkgläser, auf das Gerät.
●Die in dem Gerät entstehende Wärme muss durch Luftzirkulation abgegeben werden. Decken sie darum die Lüftungsschlitze des Gehäuses nicht ab.
●Nehmen Sie das Gerät nicht in Betrieb oder ziehen Sie sofort den Netzstecker aus der Steckdose:
1. wenn sichtbare Schäden am Gerät oder an der Netzanschlussleitung vorhanden sind,
2. wenn nach einem Sturz oder Ähnlichem der Verdacht auf einen Defekt besteht,
3. wenn Funktionsstörungen auftreten.
Lassen Sie das Gerät in jedem Fall in einer Fachwerkstatt reparieren.
●Ziehen Sie den Netzstecker nie am Kabel aus der Steckdose, fassen Sie immer am Stecker an.
●Verwenden Sie für die Reinigung nur ein trockenes, weiches Tuch, niemals Wasser oder Chemikalien.
●Wird das Gerät zweckentfremdet, nicht richtig angeschlossen, falsch bedient oder nicht fachgerecht repariert, kann keine Haftung für daraus resultierende Sachoder Personenschäden und keine Garantie für das Gerät übernommen werden.
Soll das Gerät endgültig aus dem Betrieb genommen werden, übergeben Sie es zur umweltgerechten Entsorgung einem örtlichen Recyclingbetrieb.
3 Einsatzmöglichkeiten
Dieser PA-Stereo-Verstärker ist speziell für den Einsatz auf der Bühne und in der Disco konzipiert. Umfangreiche Schutzschaltungen schützen den Verstärker und die angeschlossenen Lautsprecher.
4 Aufstellmöglichkeiten
Der Verstärker ist für den Einschub in ein Rack (482 mm/19") vorgesehen, kann aber auch als Tischgerät verwendet werden. In jedem Fall muss Luft ungehindert durch alle Lüftungsschlitze strömen können, damit eine ausreichende Kühlung gewährleistet ist.
4.1 Rackeinbau
Für die Rackmontage werden 2 HE (Höheneinheiten) = 89 mm benötigt. Dabei sollte jedoch oberund unterhalb des Verstärkers zusätzlich Platz frei bleiben, damit eine ausreichende Belüftung sichergestellt ist.
Damit das Rack nicht kopflastig wird, muss der Verstärker im unteren Bereich des Racks eingeschoben werden. Für eine sichere Befestigung reicht die Frontplatte allein nicht aus. Zusätzlich müssen Seitenschienen oder eine Bodenplatte das Gerät halten.
Please unfold page 3. Then you can always see the operating elements described.
1 Operating Elements and Connections
1.1 Front panel
1LED CLIP lights up if the left channel is overloaded and in case of short circuit of the left output
2Volume control for the left channel
3LED POWER
4LED PROTECT lights up with activated protective circuit: approx. 4 seconds after switching-on until the speaker outputs are ready for operation and if the amplifier is overheated
5Volume control for the right channel
6LED CLIP lights up with overload of the right channel and in case of short circuit of the right output
7POWER switch
1.2 Rear panel
8Speaker connections OUTPUTS as “SPEAKER” jacks
9Jacks INPUTS as 6.3 mm jacks for units with line level (e. g. mixer, preamplifier)
10Jacks INPUTS as phono jacks for units with line level
11Ground lift switch
position GND: signal ground and housing ground are connected
position LIFT: signal ground and housing ground are separated
12Speaker connections OUTPUTS as 6.3 mm jacks
13Speaker connections OUTPUTS as screw terminals
14Fuse holder; only replace a blown fuse by one of the same type
15Mains jack for power supply for connection to 230 V~/50 Hz
2 Safety Notes
This unit corresponds to all required directives of the EU and is therefore marked with 
 .
.
WARNING The unit is supplied with hazardous mains voltage (230 V~). Never make any modifications on the unit and do not insert anything through the air vents! This may cause an electric shock.
There is a hazard of contact at the speaker connections with a dangerous voltage during operation. All connections must only be made or changed with the unit switched off.
It is essential to observe the following items:
●The unit is suitable for indoor use only. Protect it against dripping water and splash water, high humidity, and heat (admissible ambient temperature range 0 – 40 °C).
●Do not place any vessel filled with liquid, e. g. a drinking glass, on the unit.
●The heat generated in the unit has to be dissipated by air circulation. Therefore, the air vents of the cabinet must not be covered.
●Do not set the unit into operation, and immediately disconnect the mains plug from the mains socket if
1.there is visible damage to the unit or to the mains cable,
2.a defect might have occurred after a drop or similar accident,
3.there are malfunctions.
The unit must in any case be repaired by skilled personnel.
●Never pull the mains cable to disconnect the mains plug from the mains socket, always seize the plug.
●For cleaning only use a dry, soft cloth, by no means chemicals or water.
●No guarantee claims for the unit and no liability for any resulting personal damage or material damage will be accepted if the unit is used for purposes other than originally intended, if it is not correctly connected or operated, or not repaired in an
expert way.
●Important for U. K. Customers!
The wires in the mains lead are coloured in accordance with the following code:
green/yellow = earth blue = neutral brown = live
As the colours of the wires in the mains lead of this appliance may not correspond with the coloured markings identifying the terminals in your plug, proceed as follows:
1.The wire which is coloured green and yellow must be connected to the terminal in the plug which is marked with the letter E or by the earth symbol  , or coloured green or green and yellow.
2.The wire which is coloured blue must be connected to the terminal which is marked with the letter N or coloured black.
3.The wire which is coloured brown must be connected to the terminal which is marked with the letter L or coloured red.
Warning - This appliance must be earthed.
If the unit is to be put out of operation definitively, take it to a local recycling plant for a disposal which is not harmful to the environment.
3 Applications
This PA stereo amplifier is especially designed for the use on stage and in the discothèque. Extensive protective circuits protect the amplifier and the connected speakers.
4 Installation
The amplifier is designed to be mounted into a rack (482 mm/19"), but it may also be used as a table top unit. In any case air has to move freely through all air vents so that a sufficient cooling is ensured.
 Loading...