


MP3-RECORDER
MP3 RECORDER
ENREGISTREUR MP3
REGISTRATORE MP3
DPR-110 Best.-Nr. 21.2320
BEDIENUNGSANLEITUNG • INSTRUCTION MANUAL • MODE D’EMPLOI • ISTRUZIONI PER L’USO GEBRUIKSAANWIJZING • MANUAL DE INSTRUCCIONES • INSTRUKCJA OBSŁUGI • BRUGSANVISNING SÄKERHETSFÖRESKRIFTER • TURVALLISUUDESTA

DBevor Sie einschalten …
AWir wünschen Ihnen viel Spaß mit Ihrem neuen Gerät von „img Stage Line”. Bitte lesen Sie diese Bedienungs-
CH |
anleitung vor dem Betrieb gründlich durch. Nur so lernen |
|
|
|
Sie alle Funktionsmöglichkeiten kennen, vermeiden |
|
Fehlbedienungen und schützen sich und Ihr Gerät vor |
|
eventuellen Schäden durch unsachgemäßen Gebrauch. |
|
Heben Sie die Anleitung für ein späteres Nachlesen auf. |
|
Der deutsche Text beginnt auf der Seite 4. |
FAvant toute installation …
BNous vous souhaitons beaucoup de plaisir à utiliser cet appareil “img Stage Line”. Lisez ce mode dʼemploi entiè-
CH |
rement avant toute utilisation. Uniquement ainsi, vous |
|
|
|
pourrez apprendre lʼensemble des possibilités de fonc- |
|
tionnement de lʼappareil, éviter toute manipulation erronée |
|
et vous protéger, ainsi que lʼappareil, de dommages éven- |
|
tuels engendrés par une utilisation inadaptée. Conservez |
|
la notice pour pouvoir vous y reporter ultérieurement. |
|
La version française se trouve page 9. |
NL Voor u inschakelt …
BWij wensen u veel plezier met uw nieuwe apparaat van “img Stage Line”. Lees deze gebruikershandleiding grondig door, alvorens het apparaat in gebruik te nemen. Alleen zo leert u alle functies kennen, vermijdt u foutieve bediening en behoedt u zichzelf en het apparaat voor eventuele schade door ondeskundig gebruik. Bewaar de handleiding voor latere raadpleging.
De Nederlandstalige tekst vindt u op pagina 14.
PL Przed uruchomieniem …
Życzymy zadowolenia z nowego produktu “img Stage Line”. Dzięki tej instrukcji obsługi będą państwo w stanie poznać wszystkie funkcje tego urządzenia. Stosując się do instrukcji unikną państwo błędów i ewentualnego uszkodzenia urządzenia na skutek nieprawidłowego użytkowania. Prosimy zachować instrukcję.
Tekst polski zaczyna się na stronie 19.
SInnan du slår på enheten …
Vi önskar dig mycket glädje med din nya “img Stage
Line” produkt. Läs igenom säkerhetsföreskrifterna noga innan enheten tas i bruk. Detta kan förhindra att problem eller fara för dig eller enheten uppstår vid användning. Spara instruktionerna för framtida användning.
Säkerhetsföreskrifterna återfinns på sidan 24.
GB Before you switch on …
We wish you much pleasure with your new “img Stage Line” unit. Please read these operating instructions carefully prior to operating the unit. Thus, you will get to know all functions of the unit, operating errors will be prevented, and yourself and the unit will be protected against any damage caused by improper use. Please keep the operating instructions for later use.
The English text starts on page 4.
IPrima di accendere …
Vi auguriamo buon divertimento con il vostro nuovo apparecchio di “img Stage Line”. Leggete attentamente le istruzioni prima di mettere in funzione lʼapparecchio. Solo così potete conoscere tutte le funzionalità, evitare comandi sbagliati e proteggere voi stessi e lʼapparecchio da eventuali danni in seguito ad un uso improprio. Conservate le istruzioni per poterle consultare anche in futuro.
Il testo italiano inizia a pagina 9.
EAntes de la utilización …
Le deseamos una buena utilización para su nuevo aparato “img Stage Line”. Por favor, lea estas instrucciones de uso atentamente antes de hacer funcionar el aparato. De esta manera conocerá todas las funciones de la unidad, se prevendrán errores de operación, usted y el aparato estarán protegidos en contra de todo daño causado por un uso inadecuado. Por favor, guarde las instrucciones para una futura utilización.
La versión española comienza en la página 14.
DK Før du tænder …
Vi håber, du bliver glad for dit nye “img Stage Line” produkt. Læs venligst betjeningsmanualen grundigt igennem, inden du tager produktet i brug. På denne måde lærer du alle funktioner at kende, og undgår betjeningsfejl, der kan skade produktet. Gem venligst betjeningsmanualen til senere brug.
Den danske vejledning finder du på side 19.
FIN Ennen kytkemistä …
Toivomme Sinulle paljon miellyttäviä hetkiä uuden “img
Stage Line” laitteen kanssa. Ennen laitteen käyttöä pyydämme Sinua huolellisesti tutustumaan turvallisuusohjeisiin. Näin vältyt vahingoilta, joita virheellinen laitteen käyttö saattaa aiheuttaa. Ole hyvä ja säilytä käyttöohjeet myöhempää tarvetta varten.
Turvallisuusohjeet löytyvät sivulta 24.
www.imgstageline.com
2

|
|
|
|
|
|
|
IR |
|
|
|
|
|
|
|
|
|
|
|
DPR-110 MP3 RECORDER |
|
|
|
|
|
|
1 |
2 |
3 |
4 |
5 |
INTRO |
SD MMC CARD |
FOLDER SKIP |
DOWN/REV |
UP/CUE |
STOP |
PLAY/PAUSE |
|
|
|
|
|
|
|
REPEAT |
|
|
|
|
|
|
6 |
7 |
8 |
9 |
0 |
RANDOM |
|
PROG |
REPEAT |
FIND |
RECORD |
DELETE |
FUNC |
POWER
1 |
|
|
|
|
2 |
3 |
|
4 |
|
|
|
|
|
|
|
5 |
6 |
7 |
8 |
9 |
10 |
|
|
|
|
|
|
IR |
|
|
|
|
1 |
2 |
3 |
4 |
5 |
INTRO |
FOLDER SKIP |
DOWN/REV UP/CUE |
STOP |
PLAY/PAUSE |
|
6 |
7 |
8 |
9 |
0 |
RANDOM |
PROG |
REPEAT |
FIND RECORD |
DELETE |
FUNC |
11 |
12 |
13 |
14 |
15 |
16 |
17 |
18 |
|
DPR-110 |
LINE |
|
REC |
|
|
|
|
230V~/50Hz |
|
MP3 RECORDER |
|
|
|
|
|
|
|
T630mAL |
|
R |
L |
R |
|
L |
WWW.IMGSTAGELINE.COM |
OUTPUT |
|
INPUT |
USE ONLY WITH A 250V FUSE |
|
|
19 20 |
21 22 |
|
17
16
18
11
15
14
10
FUNC REC DEL PLAY/PAUSE MUTE
23
1 |
2 |
3 |
STOP |
|
|
|
9 |
4 |
5 |
6 |
PROG |
|
|
|
13 |
7 |
8 |
9 |
RANDOM |
|
|
|
12 |
|
0 |
|
INTRO |
|
|
|
5 |
FIND REPEAT DOWN/REV UP/CUE
8
FOLDER SKIP
7
3
D |
Bitte klappen Sie die Seite 3 heraus. Sie sehen |
|
A |
dann immer die beschriebenen Bedienelemente |
|
und Anschlüsse. |
||
|
||
CH |
|
1 |
Übersicht der Bedienelemente |
|
und Anschlüsse |
1.1 |
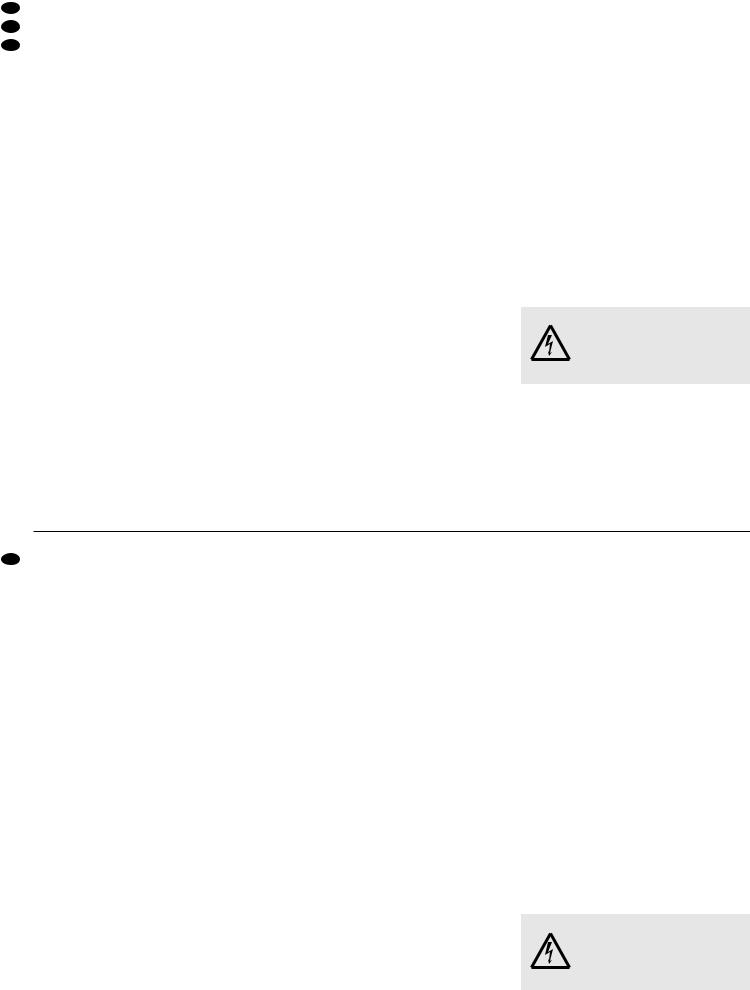
Frontseite |
1 |
Ein-/Ausschalter |
2 |
Display |
3 |
Schlitz zum Einstecken einer SD/MMC-Karte |
4 |
USB-Schnittstelle zum Einstecken eines USB- |
|
Sticks oder zum Anschluss einer Festplatte |
5Taste INTRO zum Anspielen der Titel für jeweils 10 Sek. (Anzeige INTRO)
6 Infrarotsensor für die Fernbedienungssignale
7 Tasten FOLDER SKIP zur Anwahl des ersten Titels in einem anderen Ordner:
Mit der linken Taste wird auf den ersten Titel des vorherigen Ordners gesprungen und mit der rechten Taste auf den ersten Titel des nächsten Ordners.
8Tasten DOWN/REV und UP/CUE für die Titelanwahl sowie den schnellen Vorund Rücklauf
Titelanwahl
Mit jedem Drücken der Taste UP/CUE wird ein Titel vorgesprungen; durch Drücken der Taste DOWN/REV wird an den Titelanfang gesprungen und mit jedem weiteren Drücken ein Titel zurück.
schneller Vor-/Rücklauf
Für den Vorlauf die Taste UP/CUE gedrückt halten, für den Rücklauf die Taste DOWN/REV.
9 Taste STOP zum Beenden des Abspielens
10 Taste PLAY/PAUSE zum Umschalten zwischen Wiedergabe und Pause
11Zifferntasten zur Direktanwahl eines Titels, z. B.: Titelnr. Tasten
4 4, PLAY/PAUSE
27 2, 7, PLAY/PAUSE
1351, 3, 5, PLAY/PAUSE
12Taste RANDOM zum Abspielen der Titel in zufälliger Reihenfolge (Anzeige RANDOM)
13Taste PROG, um zum Zusammenstellen einer
eigenen Titelfolge in den Programmiermodus zu schalten ( Kap. 5.10)
14Taste REPEAT für die Wiederholfunktionen
1.Tastendruck (Anzeige REPEAT)
Der momentane Titel wird ständig wiederholt.
2.Tastendruck (Anzeige REPEAT ALL)
Alle Titel auf dem Speichermedium werden ständig wiederholt.
3.Tastendruck (Anzeige REPEAT ALBUM)
Alle Titel im angewählten Ordner werden ständig wiederholt.
4.Tastendruck (Anzeige REPEAT erlischt) Die Wiederholfunktion ist ausgeschaltet.
15Taste FIND
– 1. Mal kurz drücken: alphabetische Suche eines Titels ( Kap. 5.4.3)
– 2. Mal kurz drücken: Ordnersuchfunktion ( Kap. 5.4.4)
– 3. Mal kurz drücken: Suchfunktion aus
– 1 Sek. gedrückt halten: Umschalten des Displays zwischen der Anzeige von Titelinformationen (File, Title, Artist, Album) und der Laufzeit (Titel-Nr., Min. : Sek.)
16Taste RECORD für die Aufnahmeund Kopierfunktion ( Kap. 5.11 und Kap. 5.12)
17Taste DELETE zum Löschen einzelner Titel ( Kap. 5.13)
18Taste FUNC zum Umschalten der Signalquelle;
Anzeige im Display:
USB |
= USB-Anschluss (4) |
CARD = Kartensteckplatz (3) |
|
AUX |
= Eingang REC (20) |
1.2Rückseite
19Audioausgang mit Line-Pegel (linker und rechter Kanal)
20Aufnahmeeingang REC zum Anschluss einer Signalquelle mit Line-Ausgang (z. B. CD-Spieler, Radio)
21Netzbuchse zum Anschluss an eine Steckdose (230 V~/50 Hz) über das beiliegende Netzkabel
22Netzsicherung
Eine geschmolzene Sicherung nur durch eine gleichen Typs ersetzen.
1.3Fernbedienung
5 und 7 – 18
Diese Tasten haben die gleichen Funktionen wie die Tasten am Gerät
23 Taste MUTE zum Stummschalten
2Hinweise für den sicheren Gebrauch
Das Gerät entspricht allen erforderlichen Richtlinien der EU und ist deshalb mit 
 gekennzeichnet.
WARNUNG Das Gerät wird mit lebensgefährlicher Netzspannung (230 V~) versorgt. Nehmen Sie deshalb nie selbst Eingriffe am Gerät vor. Durch unsachgemäßes Vorgehen besteht die Gefahr eines elektrischen Schlages.
Beachten Sie auch unbedingt die folgenden Punkte:
●Das Gerät ist nur zur Verwendung im Innenbereich geeignet. Schützen Sie es vor Tropfund Spritzwasser, hoher Luftfeuchtigkeit und Hitze (zulässiger Einsatztemperaturbereich 0 – 40 °C).
●Stellen Sie keine mit Flüssigkeit gefüllten Gefäße, z. B. Trinkgläser, auf das Gerät.
●Nehmen Sie das Gerät nicht in Betrieb und ziehen Sie sofort den Netzstecker aus der Steckdose:
GB Please unfold page 3. Then you can always see the operating elements and connections described.
1Operating Elements and Connections
1.1Front side
1 POWER switch
2 Display
3 Slot for inserting an SD/MMC card
4 USB interface for inserting a USB stick or for connecting a hard disk
5 Button INTRO for playing the beginning of each title for 10 sec. (indication INTRO)
6 Infrared sensor for the remote control signals
7Buttons FOLDER SKIP for selecting the first title in another folder:
With the left button the unit goes to the first title of the previous folder and with the right button to the first title of the next folder.
8 Buttons DOWN/REV and UP/CUE for the title selection and the fast forward and reverse
Title selection
Each time the button UP/CUE is pressed, the unit advances one title; by pressing the button DOWN/REV, the unit goes to the title beginning and with each further pressing, the unit goes back one more title.
Fast forward/reverse
For the fast forward, keep the button UP/CUE pressed, for the reverse the button DOWN/ REV.
9 Button STOP to stop the playing
10 Button PLAY/PAUSE to switch between replay and pause
11Numerical keys for direct selection of a title, e. g. Title No. Buttons
4 4, PLAY/PAUSE
27 2, 7, PLAY/PAUSE
135 1, 3, 5, PLAY/PAUSE
12Button RANDOM for playing the titles in a random sequence (indication RANDOM)
13Button PROG for switching to the programming
mode to compile an individual title sequence ( chapter 5.10)
14Button REPEAT for the repeat functions
1st pressing of button (indication REPEAT) The present title is continuously repeated.
2nd pressing of button (indication REPEAT ALL) All titles on the storage medium are continuously repeated.
3rd pressing of button (indication REPEAT ALBUM)
All titles in the selected folder are continuously repeated.
4th pressing of button
(indication REPEAT is extinguished) The repeat function is switched off.
15Button FIND
–Press shortly for the first time: alphabetic search of a title ( chapter 5.4.3)
–Press shortly for the second time: folder search function ( chapter 5.4.4)
–Press shortly for the third time: search function off
–Keep it pressed for 1 sec.: the display is switched between the indication of title information (file, title, artist, album) and playing time (title No., min. : sec.)
16Button RECORD for the recording and copying functions ( chapters 5.11 and 5.12)
17Button DELETE for deleting individual titles ( chapter 5.13)
18Button FUNC for switching the signal source; indication in the display:
USB = USB connection (4)
CARD = slot for inserting the card (3)
AUX = input REC (20)
1.2Rear panel
19Audio output with line level (left and right channels)
20Recording input REC for connecting a signal source with line output (e. g. CD player, radio)
21 Mains jack for connection to a socket (230 V~/ 50 Hz) via the supplied mains cable
22Mains fuse
Only replace a blown fuse by one of the same type.
1.3Remote control
5 and 7 – 18
These buttons have the same functions as the buttons on the unit
23 Button MUTE for muting
2Safety Notes
The unit corresponds to all required directives of the EU and is therefore marked with 
 .
.
WARNING The unit is supplied with hazardous mains voltage (230 V~). Leave servicing to skilled personnel only. Inexpert handling or modification of the unit may cause an electric shock hazard.
It is essential to observe the following items:
●The unit is suitable for indoor use only. Protect it against dripping water and splash water, high air humidity, and heat (admissible ambient temperature range 0 – 40 °C).
4

1.wenn sichtbare Schäden am Gerät oder an der Netzanschlussleitung vorhanden sind,
2.wenn nach einem Sturz oder Ähnlichem der Verdacht auf einen Defekt besteht,
3.wenn Funktionsstörungen auftreten.
Lassen Sie das Gerät in jedem Fall in einer Fachwerkstatt reparieren.
●Ziehen Sie den Netzstecker nie am Kabel aus der Steckdose, fassen Sie immer am Stecker an.
●Verwenden Sie zum Reinigen nur ein trockenes, weiches Tuch, niemals Wasser oder Chemikalien.
●Wird das Gerät zweckentfremdet, nicht richtig angeschlossen, falsch bedient oder nicht fachgerecht repariert, kann keine Garantie für das Gerät und keine Haftung für daraus resultierende Sachoder Personenschäden übernommen werden.
Soll das Gerät endgültig aus dem Betrieb genommen werden, übergeben Sie es zur umweltgerechten Entsorgung einem örtlichen Recyclingbetrieb.
3Einsatzmöglichkeiten
Mit dem MP3-Recorder DPR-110 lassen sich MP3und WMA-Dateien (Datenrate max. 256 kb/s) von USB-Speichermedien (z. B. USB-Festplatte, USBStick) und SD/MMC-Karten (bis 4 GB, FAT 32) abspielen. Für Aufnahmen im MP3-Format kann ein Audiogerät (Radio, CD-Player, Tape-Deck usw.) angeschlossen werden. Außerdem lassen sich Titel von einer SD/MMC-Karte auf ein USB-Speicher- medium kopieren und umgekehrt.
Der DPR-110 ist somit für vielfältige Beschallungsaufgaben geeignet (z. B. im Theater, in Gaststätten, in Warteräumen) und bietet zahlreiche Funktionen, wie z. B. Endloswiederholung, Zufallswiedergabe, Anspielen aller Titel und Programmierung einer eigenen Titelfolge.
4Gerät aufstellen und anschließen
Das Gerät ist für die Montage in ein Rack (482 mm/ 19") vorgesehen, kann aber auch als frei stehendes Tischgerät verwendet werden. Für den Einbau in ein Rack wird 1 HE benötigt (HE = Höheneinheit = 44,45 mm).
Vor dem Anschluss bzw. vor dem Verändern von Anschlüssen den DPR-110 und die anzuschließenden Geräte ausschalten.
1)Die Buchsen LINE (19) über ein Cinch-Kabel mit einem Line-Eingang z. B. an einem Mischpult oder an einem Verstärker verbinden (L = linker Kanal, R = rechter Kanal).
2)Sollen Aufnahmen auf eine SD/MMC-Karte oder auf ein USB-Speichermedium gemacht werden, ein Audiogerät mit Line-Ausgang (z. B. Radio, CD-Player, Tape-Deck) an die Buchsen REC (20) anschließen.
3)Zum Schluss das beiliegende Netzkabel zuerst in die Netzbuchse (21) und dann in eine Steckdose (230 V~/50 Hz) stecken.
5Bedienung
Das Gerät mit dem Netzschalter (1) einschalten. Auf dem Display (2) erscheint die Anzeige NO USB, wenn der USB-Anschluss  (4) nicht mit einem Speichermedium verbunden ist.
5.1Fernbedienung
1)Zum Einsetzen der Batterien (2 × 1,5 V, Größe AAA = Mikro) auf der Rückseite der Fernbedienung auf den Pfeil des Deckels drücken und den Deckel nach unten schieben. Die Batterien, wie im Batteriefach angegeben, einsetzen. Das Fach mit dem Deckel wieder schließen.
Bei längerem Nichtgebrauch die Batterien herausnehmen, damit die Fernbedienung bei einem eventuellen Auslaufen der Batterien nicht beschädigt wird.
2)Die Fernbedienung beim Betätigen einer Taste immer in Richtung des Sensors IR (6) halten. Dabei muss Sichtverbindung zwischen der Fernbedienung und dem Sensor bestehen.
3)Lässt die Reichweite der Fernbedienung nach, sind die Batterien fast verbraucht und müssen ausgewechselt werden.
Werfen Sie verbrauchte Batterien nicht in den Hausmüll, sondern geben Sie sie nur in den Sondermüll (z. B. Sammelbehälter bei Ihrem Elektrofachhändler).
5.2Speichermedium anschließen und anwählen
1)Zum Abspielen von Audio-Dateien auf einer SD/ MMC-Karte diese in den Schlitz SD MMC CARD
(3)stecken. Dabei muss die abgeschrägte Ecke der Karte nach rechts und zum Gerät zeigen.
2)Zum Abspielen von Audio-Dateien auf einem USB-Speichermedium z. B. einen USB-Stick in den USB-Anschluss  (4) stecken oder eine USB-Festplatte mit dem Anschluss
  verbinden.
3)Nach dem Einschalten wählt das Gerät immer den USB-Anschluss an. Dabei blinkt im Display
(2)die Anzeige USB. Ist kein Speichermedium angeschlossen, erscheint die Anzeige NO USB.
Bei angeschlossenem USB-Speicher erscheint nach dem Einlesen im Display die Anzahl der Titel (große Zahl) und die Anzahl der Ordner (kleine, obere Zahl). Zusätzlich wird STOP angezeigt, d. h. das Gerät steht auf Stopp.
4)Zum Umschalten zwischen Speicherkarte und USB-Speicher die Taste FUNC (18) drücken. Mit dieser Taste wird auch der Eingang REC (20) für
MP3-Aufnahmen angewählt ( Kap. 5.11). Das Display zeigt (kurz) die Auswahl an:
USB |
= USB-Anschluss |
CARD = SD/MMC-Karte |
|
AUX |
= Eingang REC |
D
A
CH
●Do not place any vessels filled with liquid, e. g. drinking glasses, on the unit.
●Do not set the unit into operation, or immediately disconnect the mains plug from the mains socket if
1.there is visible damage to the unit or to the mains cable,
2.a defect might have occurred after a drop or similar accident,
3.malfunctions occur.
The unit must in any case be repaired by skilled personnel.
●Never pull the mains cable to disconnect the mains plug from the mains socket, always seize the plug.
●For cleaning only use a dry, soft cloth, never use chemicals or water.
●No guarantee claims for the unit and no liability for any resulting personal damage or material damage will be accepted if the unit is used for other purposes than originally intended, if it is not correctly connected or operated, or not repaired in an expert way.
●Important for U. K. Customers!
The wires in this mains lead are coloured in accordance with the following code:
green/yellow = earth blue = neutral brown = live
As the colours of the wires in the mains lead of this appliance may not correspond with the coloured markings identifying the terminals in your plug, proceed as follows:
1.The wire which is coloured green and yellow must be connected to the terminal in the plug which is marked with the letter E or by the earth symbol  , or coloured green or green and yellow.
2.The wire which is coloured blue must be connected to the terminal which is marked with the letter N or coloured black.
3.The wire which is coloured brown must be connected to the terminal which is marked with the letter L or coloured red.
Warning – This appliance must be earthed.
If the unit is to be put out of operation definitively, take it to a local recycling plant for a disposal which is not harmful to the environment.
3Applications
The MP3 recorder DPR-110 allows to replay MP3 and WMA files (data rate 256 kb/s max.) of USB storage media (e.g. USB hard disk, USB stick) and SD/MMC cards (up to 4 GB, FAT 32). For recordings in the MP3 format an audio unit (radio, CD player, tape deck etc.) may be connected. In addition, it is possible to copy titles from an SD/MMC card to a USB storage medium and vice versa.
The DPR-110 is thus suitable for versatile PA applications (e. g. in the theatre, in pubs, waiting rooms) and offers numerous functions, e. g. continuous repeat, random replay, short playing of all title beginnings, and programming of an individual title sequence.
4Setting up and Connecting the Unit
The unit is provided for mounting into a rack (482 mm/19") but it can also be used as a tabletop unit. For the installation into a rack 1 rack space is required (1 rack space = 44.45 mm).
Prior to the connection or changing the connections switch off the DPR-110 and the units to be connected.
1)Connect the jacks LINE (19) via a cable with phono connectors to a line input e. g. at a mixer or amplifier (L = left channel, R = right channel).
2) For recordings on an SD/MMC card or USB stor- GB age medium, connect an audio unit with line out-
put (e. g. radio, CD player, tape deck) to the jacks REC (20).
3)Finally connect the supplied mains cable to the mains jack (21) first and then to a socket (230 V~/ 50 Hz).
5Operation
Switch on the unit with the mains switch (1). The display (2) shows NO USB if the USB connection  (4) is not connected to a storage medium.
5.1Remote control
1)To insert the batteries (2 × 1.5 V, size AAA), press the arrow of the cover on the rear side of the remote control and slide the cover downwards. Insert the batteries as indicated in the battery compartment. Close the compartment with the cover.
Remove the batteries if the remote control will not be used for a longer period of time so that it will not be damaged in case the batteries should leak.
2)Always hold the remote control in the direction of the sensor IR (6) when pressing a button. There must be no obstacles between the remote control and the sensor.
3)If the range of the remote control decreases, the batteries are almost exhausted and have to be replaced.
Do not put exhausted batteries into the household rubbish. Always take them to a special waste disposal (e. g. collecting container at your retailer).
5

D
A
CH
5.3Abspielen der Titel
1)Mit der Taste PLAY/PAUSE (10) die Wiedergabe des ersten Titels starten. Zum Anwählen eines anderen Titels siehe Kapitel 5.4.
Während des Abspielens zeigt das Display (2) die Titelnummer an und die bereits gespielte Zeit des Titels (Min. : Sek.). Die kleine, obere Zahl gibt die Nummer des Ordners an, in dem sich der Titel befindet. Titel ohne Ordner befinden sich im Hauptverzeichnis ROOT, das mit der Nummer 1 gekennzeichnet ist.
2)Zum Unterbrechen der Wiedergabe mit der Taste PLAY/PAUSE auf Pause schalten. Die Zeitanzeige blinkt. Zum Fortsetzen der Wiedergabe die Taste PLAY/PAUSE erneut drücken.
3)Sollen anstelle der Zeitanzeige Informationen zum Titel angezeigt werden, während der Wiedergabe eines Titels die Taste FIND (15) 1 Sek. gedrückt halten. Im Display laufen folgende Informationen durch (falls vorhanden):
FILE* |
= Dateiname |
TITLE |
= Titelname |
ARTIST = Name des Künstlers
ALBUM = Name des Albums
*Wird nur beim Starten der Wiedergabe angezeigt.
Hinweis: Im Pausenmodus zeigt das Display stets blinkend die bereits gespielte Zeit an.
Genauso kann mit der Taste FIND zurück auf die Anzeige der Zeit geschaltet werden.
4)Zum Beenden des Abspielens die Taste STOP
(9)drücken. Der Player schaltet auf Stopp und das Display zeigt STOP an.
5.4Titelanwahl
5.4.1 Direktwahl der Titelnummer
Mit den Zifferntasten (11) lässt sich ein Titel durch Eingabe seiner Nummer direkt anwählen. Zum Starten des Titels anschließend die Taste PLAY/PAUSE (10) drücken. Beispiele:
Titelnr. |
Tasten |
4 |
4, PLAY/PAUSE |
27 |
2, 7, PLAY/PAUSE |
135 |
1, 3, 5, PLAY/PAUSE |
Hinweis: Die Titel werden vom Gerät wie folgt durchnummeriert:
1.alle Titel ohne Ordner im Hauptverzeichnis ROOT
2.alle Titel in Ordnern auf dem Hauptverzeichnis
3.alle Titel in Unterordnern usw.
Die Nummerierung der Ordner erfolgt nicht in alphabetischer Reihenfolge, lässt sich jedoch mit der Ordnersuchfunktion ( Kap. 5.4.4) schnell feststellen. Die Titelnummern werden auch bei der alphabetischen Suche von Titeln im Display angezeigt ( Kap. 5.4.3).
5.4.2 Titel voroder zurückspringen
Um einen oder mehrere Titel voroder zurückzuspringen, die Taste UP/CUE bzw. DOWN/REV (8) kurz drücken.
Taste UP/CUE: zum nächsten Titel springen
Taste DOWN/REV: an den Anfang des gerade laufenden Titels springen. Durch weiteres Drücken der Taste DOWN/REV wird immer ein Titel weiter zurückgesprungen.
Hinweis: Die Tasten DOWN/REV und UP/CUE nur kurz drücken, sonst erfolgt ein schneller Rückbzw. Vorlauf.
5.4.3 Alphabetische Suche von Titeln
1)Die Taste FIND (15) kurz drücken. Im Display erscheint blinkend die Lupe  . Die untere Displayzeile zeigt „A–“ und den ersten Titel, der mit dem Buchstaben A beginnt.
2)Mit der Taste UP/CUE [vorwärts laufend] oder DOWN/REV (8) [rückwärts laufend] den Buchstaben wählen, mit dem der gesuchte Titel beginnt. Dabei können auch die Ziffern 0 – 9 gewählt werden. Bei Buchstaben und Ziffern, mit denen kein Titel beginnt, wird NONE angezeigt.
3)Wenn mehrere Titel mit dem gleichen Anfangsbuchstaben vorkommen, nach dem Wählen des Buchstabens die Taste DOWN/REV oder UP/
CUE gedrückt halten, bis der Anfangsbuchstabe blinkt. Dann durch mehrfaches kurzes Drücken der Taste DOWN/REV oder UP/CUE den Titel suchen.
4)Bei der Titelsuche wird auch stets die Titelnummer vom Display angezeigt (kleine, obere Zahl). Ist der gewünschte Titel gefunden, die Wiedergabe mit der Taste PLAY/PAUSE (10) starten.
5.4.4 Ordneranwahl und Ordnersuchfunktion
Mit den Tasten FOLDER SKIP (7) kann auf den ersten Titel des nächsten Ordners (rechte Taste) und auf den ersten Titel des vorherigen Ordners (linke Taste) gesprungen werden. Ein bestimmter Ordner lässt sich aber einfacher und schneller mit der Suchfunktion finden:
1)Die Taste FIND (15) zweimal kurz drücken, sodass im Display die Anzeige  ALBUM und der Name des momentanen Ordners erscheint.
Hinweis: Wird die Taste länger als eine Sekunde ge-
drückt, schaltet das Display zwischen Zeitanzeige und Titelanzeige um ( Kap. 5.3, Bedienschritt 3).
2)Mit den Tasten UP/CUE und DOWN/REV (8) den gewünschten Ordner suchen. Das Display zeigt die ersten acht Buchstaben des Ordnernamens an. Die zugehörige Ordnernummer erscheint oben links als kleine Zahl im Display.
3)Ist der gewünschte Ordner gefunden, die Taste PLAY/PAUSE drücken. Der erste Titel in diesem Ordner wird gestartet.
4)Zum Anwählen eines anderen Titels die Taste UP/ CUE oder DOWN/REV betätigen ( Kap. 5.4.2). Vom letzten Titel in einem Ordner kann mit der
Taste UP/CUE auch auf den ersten Titel des nächsten Ordners gesprungen werden und vom ersten Titel in einem Ordner mit der Taste DOWN/REV auf den letzten Titel des vorherigen Ordners.
GB 5.2 Connecting and selecting a storage medium
1)To replay audio files on an SD/MMC card, insert this card into the slot SD MMC CARD (3). The bevelled corner of the card must show to the right and to the unit.
2)To replay audio files on a USB storage medium, connect e. g. a USB stick to the USB connection 
(4) or a USB hard disk to the connection  .
.
3)After switching-on, the unit always selects the USB connection. USB flashes in the display (2). If no storage medium has been connected, NO USB is displayed.
With the USB memory connected, the number of the titles (large number) and the number of the folders (small, upper number) are displayed after reading in. In addition, STOP is displayed, i. e. the unit is set to stop.
4)To switch between memory card and USB memory, press the button FUNC (18). With this button also the input REC (20) is selected for
MP3 recordings ( chapter 5.11). The display (shortly) shows the selection:
USB |
= USB connection |
CARD = SD/MMC card |
|
AUX |
= input REC |
5.3Playing the titles
1)With the button PLAY/PAUSE (10) start the replay of the first title. To select another title, see chapter 5.4.
While playing, the display (2) shows the title number and the time already played of the title (min. : sec.). The small, upper number shows the number of the folder containing the title. Titles without folder are in the ROOT directory marked with No. 1.
2)To interrupt the replay, set the unit to pause with the button PLAY/PAUSE. The time indication
flashes. To continue the replay, press the button PLAY/PAUSE again.
3)For displaying information about the title instead of the time indication, keep the button FIND (15) pressed for 1 second while playing a title. The display successively shows the following information (if available):
FILE* TITLE ARTIST ALBUM
*Only shown when starting the replay.
Note: In the pause mode the display always shows the time already played in a flashing way.
With the button FIND it is possible to go back to the time indication in the same way.
4)To stop the replay, press the button STOP (9). The player is set to stop and the display shows STOP.
5.4Title selection
5.4.1 Direct selection of the title number
The title can directly be selected by entering its number with the numerical keys (11). To start the title, press the button PLAY/PAUSE (10). Examples:
Title No. Buttons
4 4, PLAY/PAUSE
27 2, 7, PLAY/PAUSE
135 1, 3, 5, PLAY/PAUSE
Note: The titles are consecutively numbered by the unit as follows:
1.all titles without folder in the ROOT directory.
2.all titles in folders in the ROOT directory
3.all titles in subfolders etc.
The folders are not numbered in alphabetic order but the number of the folder can easily be found with the folder search function ( chapter 5.4.4). The title numbers are also displayed during alphabetic search of titles ( chapter 5.4.3).
5.4.2 Advancing or reversing titles
To advance or reverse one or several titles, shortly press the button UP/CUE or DOWN/REV (8).
Button UP/CUE: Advance to the next title
Button DOWN/REV: Reverse to the beginning of the present title. Each time the button DOWN/REV is pressed, the unit will go back one more title.
Note: Press the buttons DOWN/REV and UP/CUE only shortly, otherwise this will result in fast forward or reverse.
5.4.3 Alphabetic search of titles
1)Shortly press the button FIND (15). The magnifying glass  is displayed in a flashing way. The lower display line shows “A–” and the first title starting with the letter A.
2)With the button UP/CUE [search in forward direction] or DOWN/REV (8) [backward direction] select the initial letter of the title searched. The numbers 0 to 9 can be selected as well. NONE is displayed for letters and numbers not referring to a title beginning.
3)If there are several titles with the same initial letter, keep the button DOWN/REV or UP/CUE pressed after selecting the letter until the initial letter flashes. Then look for the title by repeated, short pressing of the button DOWN/REV or UP/CUE.
4)When looking for the title, always the title number (small, upper number) is displayed. If the desired title has been found, start the replay with the button PLAY/PAUSE (10).
5.4.4 Folder selection and folder search function
With the buttons FOLDER SKIP (7) it is possible to go to the first title of the next folder (right button) and to the first title of the previous folder (left button). A certain folder can be found easier and quicker with the search function:
1)Shortly press the button FIND (15) twice so that the indication  ALBUM and the name of the present folder are displayed.
Note: If the button is pressed for more than a second,
6

5.5Schneller Vor-/Rücklauf
Innerhalb eines Titels kann mit dem Vor-/Rücklauf schnell eine andere Stelle angefahren werden: Für den schnellen Vorlauf die Taste UP/CUE (8) gedrückt halten, für den schnellen Rücklauf die Taste DOWN/REV. Weil der Vor-/Rücklauf akustisch nicht verfolgt werden kann, ggf. das Display auf die Anzeige der Laufzeit umschalten. [Die Taste FIND (15) eine Sekunde gedrückt halten.]
5.6Wiederholfunktionen
Mit der Taste REPEAT (14) kann eine der drei Wiederholfunktionen ausgewählt werden:
1.Tastendruck (Anzeige REPEAT)
Der momentane Titel wird ständig wiederholt.
2.Tastendruck (Anzeige REPEAT ALL)
Alle Titel auf dem Speichermedium werden ständig wiederholt.
3.Tastendruck (Anzeige REPEAT ALBUM)
Alle Titel im angewählten Ordner werden ständig wiederholt.
4.Tastendruck (Anzeige REPEAT erlischt) Die Wiederholfunktion ist ausgeschaltet.
5.7Zufallswiedergabe
Sollen die Titel in zufälliger Reihenfolge abgespielt werden, die Taste RANDOM (12) drücken. Der Player springt auf einen zufällig ausgewählten Titel und im Display wird RANDOM angezeigt. Zum Ausschalten der Funktion die Taste erneut betätigen.
5.9 Ton stumm schalten |
6) |
Die Bedienschritte 3 – 5 für alle weiteren ge- |
Um den Ton stumm zu schalten, die Taste MUTE |
|
wünschten Titel wiederholen, bis die gesamte |
(23) auf der Fernbedienung drücken. Zum Wieder- |
|
Titelfolge programmiert ist. |
einschalten des Tons die Taste erneut drücken. |
7) |
Zum Starten der Titelfolge die Taste PLAY/ |
|
|
PAUSE (10) drücken. |
5.10 Eigene Titelfolge zusammenstellen
Soll nur eine Auswahl von Titeln in einer bestimmten Reihenfolge abgespielt werden, kann eine Folge von max. 64 Titeln programmiert werden. Zum Programmieren sollte die Nummerierung der Ordner bekannt sein, denn für jeden zu programmierenden Titel muss die zugehörige Nummer des Ordners eingegeben werden ( Kap. 5.4.4).
1)Der Player muss auf Stopp geschaltet sein (Anzeige STOP), ggf. die Taste STOP (9) drücken.
8)Mit den Tasten DOWN/REV und UP/CUE kann jeder Titel der Titelfolge angewählt oder durch Gedrückthalten der jeweiligen Taste der schnelle Vor-/Rücklauf innerhalb eines Titels aktiviert werden.
9)Nach dem Abspielen der Titelfolge oder beim Drücken der Taste STOP schaltet der Player auf Stopp und die Anzeige PROGRAM erlischt. Soll die Titelfolge erneut gestartet werden, zuerst die Taste PROG und dann die Taste PLAY/PAUSE drücken.
2) Mit der Taste PROG (13) den Programmier- |
Hinweis: Eine programmierte Titelfolge wird beim Um- |
|||
modus einschalten. Das Display zeigt „000 P-01“ |
schalten auf ein anderes Speichermedium, beim Drücken |
|||
und in der oberen Zeile erscheint die Anzeige |
der Taste STOP im Programmiermodus und beim Aus- |
|||
PROGRAM. |
schalten des Gerätes gelöscht. |
|||
3) Zuerst die Nummer des Ordners wählen, in dem |
|
|
|
|
sich der erste gewünschte Titel für die Titelfolge |
5.11 Audio-Aufnahmen |
|||
befindet. Dieses ist auch erforderlich, wenn sich |
1) Am Speichermedium darf der Schreibschutz |
|||
alle Titel im Hauptverzeichnis ROOT ohne Ord- |
||||
nicht aktiviert sein, ggf. den Schutz deaktivieren. |
||||
ner befinden. Das Hauptverzeichnis hat die |
||||
2) Wenn auf einer SD/MMC-Karte aufgenommen |
||||
Nummer 1. |
||||
werden soll, darf der USB-Anschluss |
|
(4) nicht |
||
Die Ordnernummer mit den Tasten DOWN/ |
|
|||
|
||||
mit einem Speichermedium verbunden sein. Bei |
||||
REV und UP/CUE (8) wählen oder mit den Zif- |
||||
eingesteckter SD/MMC-Karte und angeschlos- |
||||
ferntasten (11) eingeben. Zum Speichern dann |
||||
senem USB-Speicher erfolgt die Aufnahme im- |
||||
die Taste PROG drücken. Die drei Nullen vor der |
||||
mer auf dem USB-Speicher. |
||||
Anzeige „P-01“ blinken als Aufforderung, die |
||||
|
|
|
||
Titelnummer einzugeben. |
3) Die Taste FUNC (18) so oft drücken, bis das Dis- |
|||
|
play AUX anzeigt. Damit ist für die Aufnahme als |
|||
|
Signalquelle ein an den Buchsen REC (20) ange- |
|||
|
schlossenes Gerät angewählt. |
|||
5.8 Titel anspielen |
|
4) Nach dem Einschalten des DPR-110 ist für die |
Die Taste INTRO (5) drücken. Das Gerät spielt |
|
Aufnahme eine Datenrate von 192 kb/s einge- |
alle folgenden Titel für 10 Sekunden an (Anzeige: |
|
stellt. Es kann aber auch eine niedrigere Daten- |
INTRO). Nach dem Anspielen des letzten Titels |
|
rate gewählt werden, damit mehr Aufnahmen ge- |
schaltet der Player auf Stopp und die Anzeige |
5) Zum Speichern die Taste PROG drücken. Das |
speichert werden können: |
INTRO erlischt. Zum vorzeitigen Ausschalten der |
Display springt auf die nächste Speicherplatz- |
Die Taste RECORD bzw. REC (16) auf der Fern- |
Funktion die Taste INTRO erneut betätigen. |
nummer „P-02“. |
bedienung so lange gedrückt halten, bis das Dis- |
|
|
|
|
Press the button INTRO (5). The unit replays each |
||
|
|
|
|
of the following titles for 10 seconds (indication: |
||
|
|
|
|
INTRO). After shortly playing the beginning of the |
||
4) To select another title, press the button UP/CUE |
last title, the player will be switched to stop and the |
|||||
or DOWN/REV ( chapter 5.4.2). With the but- |
indication INTRO will be extinguished. To switch off |
|||||
ton UP/CUE it is possible to go from the last title |
the function before all titles have been replayed, |
|||||
in a folder to the first title of the next folder and |
press the button INTRO again. |
|||||
with the button DOWN/REV from the first title in a |
|
|
||||
folder to the last title of the previous folder. |
5.9 |
Muting the sound |
||||
|
|
|
|
|||
5.5 |
Fast forward/reverse |
|
To mute the sound, press the button MUTE (23) on |
|||
|
the remote control. To switch the sound on again, |
|||||
With the fast forward/reverse it is possible to quickly |
press the button once more. |
|||||
go to another spot within a title: For the fast forward |
|
|
||||
keep the button UP/CUE (8) pressed, for the fast |
5.10 Compiling an individual title sequence |
|||||
reverse the |
button DOWN/REV. As |
the fast for- |
||||
For |
playing only a selection of titles in a certain |
|||||
ward/reverse |
cannot be followed |
acoustically, |
||||
order, a sequence of 64 titles as a maximum can be |
||||||
switch the display to the indication of the playing |
||||||
programmed. For programming, the numbering of |
||||||
time, if required. [Keep the button FIND (15) pressed |
||||||
the folders should be known because the corre- |
||||||
for one second.] |
|
|||||
|
sponding number of the folder has to be entered for |
|||||
|
|
|
|
|||
5.6 |
Repeat functions |
|
each title to be programmed ( chapter 5.4.4). |
|||
|
1) The player has to be set to stop (indication |
|||||
One of the three repeat functions can be selected |
||||||
STOP), press the button STOP (9), if required. |
||||||
with the button REPEAT (14): |
|
|||||
|
2) Switch on the programming mode with the button |
|||||
1st |
pressing of button (indication REPEAT) |
|||||
PROG (13). The display shows “000 P-01” and |
||||||
|
The present title is repeated continuously. |
|||||
|
the indication PROGRAM is shown in the upper |
|||||
2nd pressing of button (indication REPEAT ALL) |
||||||
line. |
||||||
|
All titles on the storage medium are repeated |
3) First select the number of the folder containing the |
||||
|
continuously. |
|
||||
|
|
first desired title for the title sequence. This is also |
||||
3rd |
pressing of button (indication REPEAT ALBUM) |
|||||
required if all titles are in the ROOT directory with- |
||||||
|
All titles in the selected folder are repeated con- |
out folder. The root directory has the number 1. |
||||
|
tinuously. |
|
|
|
Select the folder number with the buttons |
|
4th |
pressing of button (indication REPEAT is extin- |
DOWN/REV and UP/CUE (8) or with the numer- |
||||
|
guished) The repeat function is switched off. |
ical keys (11). To memorize, press the button |
||||
2) Look for the desired folder with the buttons UP/ |
For playing the titles in a random order, press the |
|||||
button RANDOM (12). The player goes to a title |
||||||
CUE and DOWN/REV (8). The display shows the |
selected at random and RANDOM is displayed. To |
|||||
first eight letters of the folder name. The corre- |
switch off the function, press the button again. |
|||||
sponding folder number is shown as a small |
|
|
||||
number on the top left of the display. |
5.8 Short playing of a title beginning |
|||||
3) If the desired folder has been found, press the |
5.7 |
Random replay |
||||
button PLAY/PAUSE. The first title in this folder is |
||||||
started. |
|
|
||||
the display is switched between time indication and |
||||||
title indication ( chapter 5.3, operating step 3). |
|
|
||||
PROG. The three zeroes in front of the indication “P-01” flash as a request to enter the title number.
4)Select the number of the first title for the title sequence with the buttons DOWN/REV and UP/CUE or enter it with the numerical keys. For titles in folders please observe that not all titles are consecutively numbered on the storage medium now but that the first title in a folder has the number 1 in each case.
5)To memorize, press the button PROG. The display goes to the next memory location number “P-02”.
6)Repeat the operating steps 3 to 5 for all further desired titles until the complete title sequence will be programmed.
7)To start the title sequence, press the button PLAY/PAUSE (10).
8)With the buttons DOWN/REV and UP/CUE each title of the title sequence can be selected or, by keeping the respective button pressed, the fast forward/reverse within a title can be activated.
9)After playing the title sequence or with pressing the button STOP the player is set to stop and the indication PROGRAM will be extinguished. For starting the title sequence again, first press the button PROG and then the button PLAY/PAUSE.
Note: A programmed title sequence is deleted when switching to another storage medium, when pressing the button STOP in the programming mode, and when switching the unit off.
5.11 Audio recordings
1)The write protection of the storage medium must not be activated, deactivate the protection, if required.
2)For recording on an SD/MMC card, the USB connection  (4) must not be connected to a storage medium. With SD/MMC card inserted and USB memory connected, the recording is always made on a USB memory.
D
A
CH
GB
7

D
A
CH
play REC HIGH anzeigt. Dann durch (mehrfaches) Antippen der Taste RECORD die gewünschte Aufnahmequalität auswählen:
REC HIGH = 192 kb/s
REC LOW = 96 kb/s
REC MID = 128 kb/s
Nach einigen Sekunden springt das Display auf die Anzeige AUX zurück.
5)Zum Starten der Aufnahme die Taste RECORD drücken. Das Gerät bereitet die Aufnahme vor und im Display blinkt für ca. 3 Sekunden die Anzeige REC WAIT. Sobald die Aufnahme startet, erscheint die Anzeige rEC AUX.
Wechselt die Anzeige jedoch auf REC USB, ist eine SD/MMC-Karte eingesteckt und ein USBSpeicher angeschlossen. Die Aufnahme kann jetzt nur auf dem USB-Speicher erfolgen (siehe Bedienschritt 2) und startet erst durch erneutes Drücken der Taste RECORD.
Hinweis: Erscheint die Anzeige REC NG, wurde die Aufnahme nicht gestartet oder abgebrochen. Mögliche Ursache: Der Schreibschutz ist noch aktiviert, das Speichermedium ist voll, ein Bedienfehler wurde gemacht.
6)Während der Aufnahme sind alle Tasten gesperrt, außer RECORD und STOP. Sie dienen zum Stoppen der Aufnahme. Nach dem Beenden der Aufnahme erscheint kurz die Anzeige REC OK. Dann schaltet das Display auf die Anzeige AUX zurück.
Hinweise: Für die Aufnahmen legt das Gerät den Ordner TMAUX auf dem Speichermedium an. In diesen Ordner befinden sich alle eigenen Aufnahmen. Die aufgenommenen Dateien erhalten den Namen TMAUX mit dem Zusatz MP3 und eine fortlaufende Nummer, zum Beispiel:
TMAUX001.MP3
TMAUX002.MP3
TMAUX003.MP3
…
Das Datum und die Uhrzeit der Dateien sind jedoch nicht korrekt. Der Ordnername und die Dateinamen können mit einem Computer wie gewünscht umbenannt werden.
5.12 Titel oder komplette Ordner kopieren
Mit der Kopierfunktion lassen sich einzelne Titel oder alle Titel eines Ordners von einer SD/MMC-Karte auf ein USB-Speichermedium kopieren und umgekehrt.
1)Mit der Taste FUNC (18) den Speicher anwählen, auf dem sich die zu kopierenden Titel befinden (Anzeige CARD oder USB).
2)Wenn das Display nicht STOP anzeigt, das Gerät mit der Taste STOP (9) auf Stopp schalten.
3)Die Taste RECORD bzw. REC (16) auf der Fernbedienung drücken. Das Display zeigt kurz COPY an und springt auf die Anzeige  ALBUM ROOT um. Die Ordnersuchfunktion ist aktiviert.
4)Mit der Taste UP/CUE bzw. DOWN/REV (8) den Ordner wählen, der kopiert werden soll oder in dem sich der zu kopierende Titel befindet.
5)Soll der gewählte Ordner kopiert werden, jetzt die Taste RECORD erneut drücken oder,
wenn nur ein Titel aus dem gewählten Ordner kopiert werden soll, die Taste UP/CUE oder DOWN/REV so lange gedrückt halten, bis das Display auf den Namen des 1. Titels in diesem Ordner umspringt. Dann durch Antippen der Taste UP/CUE oder DOWN/REV den zu kopierenden Titel wählen. Das Kopieren mit der Taste RECORD starten.
6)Während des Kopiervorgangs wechselt die Anzeige zwischen COPY und dem Namen des Ordners bzw. der Datei. Alle Tasten außer der Taste STOP (zum Abbrechen des Kopierens) sind gesperrt. Ist der Vorgang beendet, zeigt das Display kurz COPY OK und wechselt dann auf STOP. Die kopierten Titel befinden sich in dem Ordner COPY, der vom Gerät angelegt wurde.
Hinweis: Der Kopiervorgang kann an jeder Stelle der Bedienfolge mit der Taste STOP abgebrochen werden.
5.13 Einzelne Titel löschen
1)Wenn das Display nicht STOP anzeigt, das Gerät mit der Taste STOP (9) auf Stopp schalten.
2)Die Taste DELETE bzw. DEL (17) auf der Fernbedienung drücken. Das Display zeigt kurz DELETE an und springt auf die Anzeige  ALBUM ROOT um. Die Ordnersuchfunktion ist aktiviert.
3)Mit der Taste UP/CUE bzw. DOWN/REV (8) den Ordner wählen, in dem sich der zu löschende Titel befindet.
4)Ist der Ordner gefunden, die Taste UP/CUE oder DOWN/REV so lange gedrückt halten, bis das Display auf den Namen des ersten Titels in diesem Ordner umspringt.
5)Durch Antippen der Taste UP/CUE oder DOWN/ REV den zu löschenden Titel wählen.
6)Zum Löschen die Taste DELETE drücken. Das Display zeigt kurz DELETE an und springt auf die Anzeige STOP zurück.
7)Zum Löschen weiterer Titel die Schritte 2) bis 6) wiederholen.
Hinweis: Der Löschvorgang kann an jeder Stelle der Bedienfolge mit der Taste STOP abgebrochen werden.
6Technische Daten
Frequenzgang:. . . . . . . . . . . 20 – 20 000 Hz Klirrfaktor: . . . . . . . . . . . . . . < 0,3 % Kanaltrennung: . . . . . . . . . . > 60 dB Dynamikumfang: . . . . . . . . . > 96 dB Störabstand: . . . . . . . . . . . . > 60 dB Audioausgang:. . . . . . . . . . . 1,2 V Stromversorgung: . . . . . . . . 230 V~/50 Hz/50 VA Abmessungen (B × H × T): . 482 × 44 × 265 mm,
1 HE (Höheneinheit)
Änderungen vorbehalten.
Diese Bedienungsanleitung ist urheberrechtlich für MONACOR ® INTERNATIONAL GmbH & Co. KG geschützt. Eine Reproduktion für eigene kommerzielle Zwecke – auch auszugsweise – ist untersagt.
GB 3) Press the button FUNC (18) so many times until AUX is displayed. Thus, a unit connected to the jacks REC (20) is selected as a signal source for the recording.
4)After switching on the DPR-110, a data rate of 192 kb/s is adjusted for the recording. However, a lower data rate can also be selected so that more recordings can be stored:
Keep the button RECORD or REC (16) on the remote control pressed until REC HIGH is displayed. Then select the desired recording quality by shortly pressing the button RECORD (repeatedly):
REC HIGH = 192 kb/s
REC LOW = |
96 kb/s |
REC MID = |
128 kb/s |
After a few seconds the display returns to the indication AUX.
5)To start the recording, press the button RECORD. The unit prepares the recording and REC WAIT flashes in the display for approx. 3 seconds. As soon as the recording starts, rEC AUX is displayed.
However, if the display changes to REC USB, an SD/MMC card has been inserted and a USB memory has been connected. The recording can now only be made on the USB memory (see operating step 2) and only starts when pressing the button RECORD again.
Note: If the indication REC NG is displayed, the recording was not started or was stopped. Possible cause: The write protection is still activated, the storage medium is full, an operating error has been made.
6)While recording, all buttons are locked, except RECORD and STOP. They serve to stop the recording. After terminating the recording, the indication REC OK is shortly displayed. Then the display is switched back to the indication AUX.
Notes: For the recordings the unit creates the folder TMAUX on the storage medium. This folder contains all individual recordings. The recorded files receive the name TMAUX with the extension MP3 and a consecutive number, for example:
TMAUX001.MP3
TMAUX002.MP3
TMAUX003.MP3
…
The date and the time of the files are, however, not correct. The folder name and the file names can be renamed with a computer as desired.
5.12 Copying titles or complete folders
With the copying function individual titles or all titles of a folder can be copied from an SD/MMC card to a USB storage medium and vice versa.
1)Select the memory containing the titles to be copied with the button FUNC (18) [indication CARD or USB].
2)If the display does not show STOP, set the unit to stop with the button STOP (9).
3Press the button RECORD or REC (16) on the remote control. The display shortly shows COPY and then the indication  ALBUM / ROOT. The folder search function is activated.
4)With the button UP/CUE or DOWN/REV (8) select the folder to be copied or the folder containing the title to be copied.
5)For copying the selected folder, press the button RECORD again or,
for only copying one title from the selected folder, keep the button UP/CUE or DOWN/REV pressed until the display goes to the name of the first title in this folder. Select the title to be copied by shortly pressing the button UP/CUE or DOWN/ REV. Start to copy with the button RECORD.
6)While copying, the indication changes between COPY and the name of the folder or file. All buttons except the button STOP (to stop copying) are locked. If the procedure is terminated, the display shortly shows COPY OK and then changes to STOP. The titles which have been copied are in the folder COPY created by the unit.
Note: Copying can be stopped at any step of the operating sequence with the button STOP.
5.13 Deleting individual titles
1)If the display does not show STOP, set the unit to stop with the button STOP (9).
2)Press the button DELETE or DEL (17) on the remote control. The display shortly shows DELETE and goes to the indication  ALBUM ROOT. The folder search function is activated.
3)With the button UP/CUE or DOWN/REV (8) select the folder containing the title to be deleted.
4)When the folder has been found, keep the button UP/CUE or DOWN/REV pressed until the display shows the name of the first title in this folder.
5)By shortly pressing the button UP/CUE or DOWN/REV select the title to be deleted.
6)To delete, press the button DELETE. The display shortly shows DELETE and returns to the indication STOP.
7)To delete further titles, repeat the steps 2) to 6).
Note: Deleting can be stopped at any step of the operating sequence with the button STOP.
6Specifications
Frequency response:. . . . . . 20 – 20 000 Hz THD: . . . . . . . . . . . . . . . . . . < 0.3 % Channel separation:. . . . . . . > 60 dB Dynamic range: . . . . . . . . . . > 96 dB
S/N ratio: . . . . . . . . . . . . . . . > 60 dB Audio output: . . . . . . . . . . . . 1.2 V
Power supply: . . . . . . . . . . . 230 V~/50 Hz/50 VA Dimensions (W × H × D):. . . 482 × 44 × 265 mm,
1 rack space
Subject to technical modifications.
All rights reserved by MONACOR ® INTERNATIONAL GmbH & Co. KG. No part of this instruction manual may be reproduced in any form or by any means for any commercial use.
8
 Loading...