


 Loading...
EN |
Operator's manual |
10-23 |
DE |
Bedienungsanweisung |
24-39 |
FR |
Manuel d'utilisation |
40-54 |
ES |
Manual de usuario |
55-69 |
IT |
Manuale dell'operatore |
70-84 |
NL |
Gebruiksaanwijzing |
85-99 |
SV |
Bruksanvisning |
100-112 |
NO |
Bruksanvisning |
113-125 |
DA |
Brugsanvisning |
126-139 |
FI |
Käyttöohje |
140-153 |
PT |
Manual do utilizador |
154-168 |
EL |
Οδηγίες χρήσης |
169-184 |
CS |
Návod k použití |
185-198 |
HR |
Priručnik za korištenje |
199-212 |
SL |
Navodila za uporabo |
213-226 |
PL |
Instrukcja obsługi |
227-241 |
SK |
Návod na obsluhu |
242-255 |
HU |
Használati utasítás |
256-269 |
RU |
Руководство по эксплуатации |
270-285 |
ET |
Kasutusjuhend |
286-299 |
LT |
Operatoriaus vadovas |
300-313 |
LV |
Lietošanas pamācība |
314-327 |
BG |
Ръководство за експлоатация |
328-343 |
RO |
Instrucţiuni de utilizare |
344-358 |
TR |
Kullanım kılavuzu |
359-372 |
UK |
Посібник користувача |
373-387 |
SR |
Priručnik za rukovaoca |
388-401 |
BS |
Korisnički priručnik |
402-415 |
ES-MX |
Manual del usuario |
416-430 |
PT-BR |
Manual do operador |
431-445 |
JA |
|
446-459 |
130, 135 Mark II
H13038HV
1
2
WARNING
The engine exhaust from this product contains chemicals known to the State of California to cause cancer, birth defects or other reproductive harm.
3 |
4 |
5 |
6 |
7 |
8 |
9 |
10 |
11 |
12 |
13 |
14 |
15 |
16 |
17 |
18 |
19 |
20 |
|
|
|
|
NOISE DBA |
|
21 |
22 |
23 |
|
|
|
24 |
|
|
25 |
|
|
26
28
27
29
1
3
2
1
2

30 |
31 |
32 |
33 |
34 |
35 |
36 |
37 |

38 |
39 |
40 |
41 |
42 |
43 |
44 |
45 |
46 |
47 |
48 |
49 |
50 |
51 |
52 |
53 |
54 |
55 |
56 |
57 |
58 |
59 |
60 |
61 |

62 |
63 |
C |
D |
64
66 |
A |
68 |
65 |
A |
C |
B |
67 |
A |
69
 Ø
Ø
70
72
74
76
71 |
A |
C |
B |
73 |
75

Contents
Introduction................................................................. |
10 |
Safety........................................................................... |
11 |
Assembly..................................................................... |
15 |
Operation..................................................................... |
15 |
Maintenance................................................................ |
17 |
Transportation............................................................ |
20 |
Storage........................................................................ |
20 |
Technical data............................................................. |
20 |
Accessories................................................................. |
22 |
Contents of the EC declaration of conformity......... |
22 |
Introduction
Operator's manual
The initial language of this operator's manual is English. Operator's manuals in other languages are translations from English.
Overview
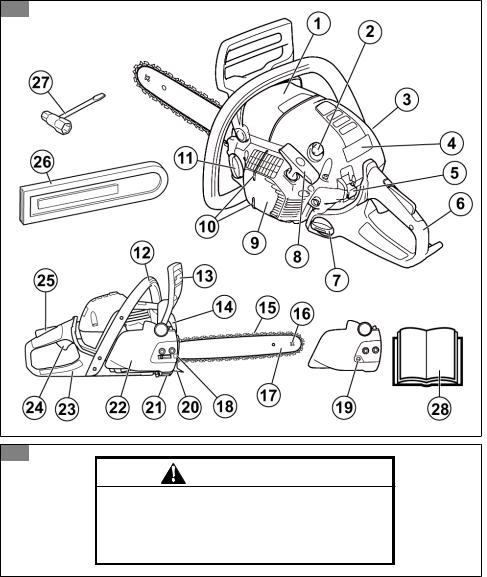
(Fig. 1)
1.Cylinder cover
2.Air purge bulb
3.Product and serial number plate
4.Information and warning decal
5.Stop switch
6.Rear handle
7.Fuel tank
8.Starter rope handle
9.Starter housing
10.Felling direction mark
11.Chain oil tank
12.Front handle
13.Chain brake and front hand guard
14.Muffler
15.Saw chain
16.Bar tip sprocket
17.Guide bar
18.Chain tensioning screw (130)
19.Chain tensioning screw (135 Mark II)
20.Spiked bumper
21.Chain catcher
22.Clutch cover
23.Right hand guard
24.Throttle trigger
25.Throttle trigger lockout
26.Transportation guard
27.Combination tool
28.Operator's manual
Symbols on the product
(Fig. 3) |
Warning |
(Fig. 4) |
Read this manual |
(Fig. 5) |
Use approved head protection, hearing |
|
protection and eye protection |
(Fig. 6) |
Use approved protective gloves |
(Fig. 7) |
The product agrees with the applicable EC |
|
Directives |
(Fig. 8) |
Sound power level |
(Fig. 9) |
Chain brake, not engaged (left). Chain |
|
brake, engaged (right) |
(Fig. 10) |
Choke control |
(Fig. 11) |
Air purge bulb |
(Fig. 12) |
Refuelling |
(Fig. 13) |
Chain oil fill |
(Fig. 14) |
This product agrees with the applicable EAC |
|
directives |
(Fig. 15) |
This product agrees with the applicable |
|
Ukraine directives |
(Fig. 16) |
This product agrees wtih the applicable |
|
Korea directives |
(Fig. 17) |
This product agrees wtih the applicable |
|
Japan directives |
(Fig. 18) |
Noise level |
(Fig. 19) |
Hold the product properly with both hands |
(Fig. 20) |
Do not use with one hand |
(Fig. 21) |
Avoid contact with nose of guide bar |
(Fig. 22) |
Beware of kickback |
10 |
862 - 002 - 03.12.2018 |
(Fig. 23) This product agrees with the applicable Australia and New Zealand electromagnetic compatibility directives.
Proposition 65
(Fig. 2)
EU V
WARNING: Tampering with the engine voids the EU type-approval of this product.
Product liability
As referred to in the product liability laws, we are not liable for damages that our product causes if:
Note: Other symbols/decals on the product refer to certification requirements for other commercial areas.
•the product is incorrectly repaired.
•the product is repaired with parts that are not from the manufacturer or not approved by the manufacturer.
•the product has an accessory that is not from the manufacturer or not approved by the manufacturer.
•the product is not repaired at an approved service center or by an approved authority.
Safety
Safety definitions
The definitions below give the level of severity for each signal word.
WARNING: Injury to persons.
CAUTION: Damage to the product.
Note: This information makes the product easier to use.
General safety instructions
•Use the product correctly. Injury or death is a possible result of incorrect use. Only use the product for the tasks found in this manual. Do not use the product for other tasks.
•Read, understand and obey the instructions in this manual. Obey the safety symbols and the safety instructions. If the operator does not obey the instructions and the symbols, injury, damage or death is a possible result.
•Do not discard this manual. Use the instructions to assemble, to operate and to keep your product in good condition. Use the instructions for correct installation of attachments and accessories. Only use approved attachments and accessories.
•Do not use a damaged product. Obey the maintenance schedule. Only do the maintenance work that you find an instruction about in this manual. An approved service center must do all other maintenance work.
•This manual cannot include all situations that can occur when you use the product. Be careful and use
your common sense. Do not operate the product or do maintenance to the product if you are not sure about the situation. Speak to a product expert, your dealer, service agent or approved service center for information.
•Disconnect the spark plug cable before you assemble the product, put the product into storage or do maintenance.
•Do not use the product if it is changed from its initial specification. Do not change a part of the product without approval from the manufacturer. Only use parts that are approved by the manufacturer. Injury or death is a possible result of incorrect maintenance.
•Do not breathe in the exhaust fumes from the engine. A health risk can occur if you breathe in exhaust fumes, chain oil fumes and sawdust for a long period.
•Do not start the product indoors or near flammable material. The exhaust fumes are hot and can contain a spark which can start a fire. Without sufficient airflow, injury or death can result from asphyxiation or carbon monoxide.
•This product makes an electromagnetic field during operation. The electromagnetic field can cause damage to medical implants. Speak to your physician and medical implant manufacturer before you operate the product.
•Do not let a child operate the product.
•Do not let a person, without knowledge of the instructions, operate the product.
•Always monitor a person, with decreased physical capacity or mental capacity, that uses the product. A responsible adult must be there at all times.
•Lock the product in an area that children and not approved persons cannot access.
862 - 002 - 03.12.2018 |
11 |

•The product can eject objects and cause injuries. Obey the safety instructions to decrease the risk of injury or death.
•Do not go away from the product when the engine is on. Stop the engine and make sure that the chain does not rotate.
•The operator of the product is responsible if an accident occurs.
•Make sure that parts are not damaged before you use the product.
•Refer to national or local laws. They can prevent or decrease the operation of the product in some conditions.
Safety instructions for operation
•Continuous or regular operation of the product can cause "white finger" or equivalent medical problems from vibrations. Examine the condition of your hands and fingers if you operate the product continuously or regularly. If your hands or fingers have discoloration, have pain, tingle, or are numb, stop work and speak to a physician immediately.
•Make sure the product is fully assembled before you use it.
•The product can cause objects to eject, which can cause damage to the eyes. Always use approved eye protection when you operate the product.
•Be careful, a child can come near the product without your knowledge during operation.
•Do not operate the product if there are persons in the work area. Stop the product if a person goes into the work area.
(Fig. 24)
•Make sure that you are always in control of the product.
•The product must be operated with two hands. Do not operate the product with one hand. Serious injury to the operator, workers, bystanders, or a combination of these persons may result from operation with only one hand.
•Hold the front handle with your left hand and the rear handle with your right hand. Hold the product on the right side of your body.
(Fig. 25)
•Do not operate the product when you are fatigued, ill or under the influence of alcohol or other drugs.
•Do not use the product if you cannot receive aid if an accident occurs. Make others aware that you will operate the product before you start the product.
•Do not turn with the product before you make sure that no persons or animals are in the safety area.
•Remove all unwanted materials from the work area before you start. If the chain hits an object, the object can eject and cause injury or damage. Unwanted material can wind around the chain and cause damage.
•Do not use the product in bad weather, such as fog, rain, strong winds, risk of lightning or other weather
conditions. Dangerous conditions, such as slippery surfaces, can occur because of bad weather.
•Make sure that you can move freely and work in a stable position.
•Make sure that you cannot fall when you use the product. Do not tilt when you operate the product.
•Always hold the product with your two hands. Hold the front handle with your left hand and the rear handle with your right hand. Hold the product on the right side of your body.
•The saw chain starts to rotate if the choke control is in the choke position when the engine starts.
•Stop the engine before you move the product.
•Do not put down the product with the engine on.
•Before you remove the unwanted materials from the product, stop the engine. Let the chain stop before you or an aid remove the cut material.
•Do not operate this product in a tree. Operation of the product while up in a tree may result in personal injury.
(Fig. 26)
•The chain brake must be engaged when the product is started to decrease the risk that the saw chain touches you during start.
(Fig. 27)
•A kickback can cause serious injury or death to the operator or others. To decrease the risk you must know the causes of kickback and how to prevent them.
•Obey all safety instructions to decrease the risk of kickback and other forces which can cause serious injury or death.
•Adjust the saw chain tension regularly to make sure that the saw chain does not slack. A slack saw chain may jump off and cause serious injury or death.
•Do not fell trees using an incorrect procedure. This can cause injury to persons, hit a utility line or cause damage to property.
•The operator should remain on the uphill side of the terrain as the tree is likely to roll or slide downhill after it is felled.
(Fig. 28)
•Plan and prepare your path of retreat before you start to cut. Your path of retreat must be approximately 135 degrees away from the felling direction.
•1. The danger zone
•2. The path of retreat
•3. The felling direction
(Fig. 29)
•Always stop the engine before you move the product.
•Make sure you firmly plant your feet on the ground and distribute your weight evenly.
(Fig. 30)
12 |
862 - 002 - 03.12.2018 |

•Only operate the product with your feet on stable ground. Without stable ground, operation can cause serious injury or death to the operator or others. Do not do operate the product on a ladder or in a tree.
(Fig. 31)
Kickbacks, skating, bouncing and dropping
Different forces can have an effect on the safe control of the product.
•Skating is when the guide bar moves quickly across the wood.
•Bouncing is when the guide bar lifts off the wood and touches it again and again.
•Dropping is when the product drops down after the cut is made. This can cause the moving chain to touch a part of the body or other objects, causing injury or damage.
•Kickback is when the end of the guide bar touches objects and moves rearward, up or suddenly forward. Kickback also occurs when the wood closes in and pinches the saw chain during the cut. Loss of control can result if the product touches an object in wood.
(Fig. 32)
•Rotational Kickback can occur when the moving chain touches an object at the top of the guide bar. This can cause the chain to bury into the object and cause the chain to stop immediately. The result is a very fast, reverse reaction that moves the guide bar up and rearward in the direction of the operator.
(Fig. 33)
•Pinch-Kickback can occur when the saw chain suddenly stops during the cut. The wood closes in and pinches the moving saw chain along the top of the guide bar. The sudden stop of the chain reverses the chain force and causes the product to move in the opposite direction of the turn of the chain. The product moves rearward in the direction of the operator.
(Fig. 34)
•Pull-In can occur when the saw chain suddenly stops when the moving chain touches an object in the wood along the bottom of the guide bar. The sudden stop pulls the product forward and away from the operator, which can easily cause the loss of control of the product by the operator. (Fig. 35)
Make sure that you understand the different forces and how to prevent them before you operate the product. See To prevent kickbacks, skating, bouncing and dropping on page 13.
To prevent kickbacks, skating, bouncing and dropping
•While the motor runs, make sure to hold the product tightly. Keep your right hand on the rear handle and
the left hand on the front handle. Tightly hold with thumbs and fingers around the handles. Do not let go.
•Keep control of the product during the cut and after the wood falls to the ground. Do not let the weight of the product drop down after the cut is made.
•Make sure that the area in which you are cutting is free from blockage. Do not let the nose of the guide bar touch a log, branch or other blockages while you operate the product. (Fig. 36)
•Cut at high motor speeds.
•Do not overreach or cut above shoulder height. (Fig. 37)
•Obey the sharpening and maintenance instructions by the manufacturer for the saw chain.
•Only use replacement guide bars and saw chains specified by the manufacturer.
•The risk of kickback is increased if the depth gauge is set too large.
Personal protective equipment
•Always use the correct personal protective equipment when you operate the product. Personal protective equipment decreases the grade of injury if an accident occurs, but does not erase it.
•Do not use loose clothing that can become caught in the saw chain.
•Use an approved protective helmet.
•Always use approved ear protection while you operate the product. Noise for a long period can cause hearing loss.
•Use protective glasses or a face visor to decrease the risk of injury from flying objects. The product can move objects with strong force, such as wood chips and small pieces of wood. This can result in serious injury, including to the eyes.
•Use gloves with chainsaw protection.
•Use pants with chainsaw protection.
•Use boots with chainsaw protection, steel toe-caps and nonslip soles.
•Make sure that you have a first aid kit near.
•Sparks can come from the muffler, the guide bar and saw chain or other sources. Always keep fire extinguishing tools and a shovel to help prevent forest fires.
Protective devices on the product
•Do not use a product with damaged protective equipment. If the product is damaged, speak to an approved service center.
To examine the stop switch
1.Start the engine. See Before you start the engine on page 16.
2.Make sure that the engine stops when you move the stop switch to the stop position.
862 - 002 - 03.12.2018 |
13 |

To examine the throttle trigger lockout
1.Make sure that the throttle trigger (B) is locked at idle speed when you release the throttle trigger lockout
(A) (Fig. 38).
2.Push the throttle trigger lockout (A) and make sure that it goes back to its initial position when you release it.
3.Push the throttle trigger (B) and make sure that it goes back to its initial position when you release it.
4.Start the engine, and then apply full throttle.
5.Release the throttle trigger and examine if the saw chain stops.
6.If the saw chain rotates at idle speed, turn the idle speed screw counterclockwise until the saw chain stops.
Guard
The guard prevents objects from being ejected in the direction of the operator. The guard also prevents accidental touch between the operator and the saw chain.
•Make sure that the guard is permitted for operation in combination with the product.
•Do not use the product without the guard.
•Make sure that the guard is not damaged. Replace the guard if it is worn or has cracks.
Fuel safety
•Do not start the product if there is fuel or engine oil on the product. Remove the unwanted fuel/oil and let the product dry. Remove unwanted fuel from the product.
•If you spill fuel on your clothing, change clothing immediately.
•Do not get fuel on your body, it can cause injury. If you get fuel on your body, use a soap and water to remove the fuel.
•Do not start the engine if you spill oil or fuel on the product or on your body.
•Do not start the product if the engine has a leak. Examine the engine for leaks regularly.
•Be careful with fuel. Fuel is flammable and the fumes are explosive and can cause injuries or death.
•Do not breathe in the fuel fumes, it can cause injury. Make sure that there is a sufficient airflow.
•Do not smoke near the fuel or the engine.
•Do not put warm objects near the fuel or the engine.
•Do not add the fuel when the engine is on.
•Make sure that the engine is cool before you refuel.
•Before you refuel, open the fuel tank cap slowly and release the pressure carefully.
•Do not add fuel to the engine in an indoor area. Not sufficient airflow can cause injury or death because of asphyxiation or carbon monoxide.
•Tighten the fuel tank cap carefully or a fire can occur.
•Move the product at a minimum of 3 m (10 ft) from the position where you filled the tank before a start.
•Do not put too much fuel in the fuel tank.
•Make sure that a leak cannot occur when you move the product or fuel container.
•Do not put the product or a fuel container where there is an open flame, spark or pilot light. Make sure that the storage area does not contain an open flame.
•Only use approved containers when you move the fuel or put the fuel into storage.
•Empty the fuel tank before long-term storage. Obey the local law on where to dispose fuel.
•Clean the product before long-term storage.
•Remove the spark plug cable before you put the product into storage to make sure that the engine does not start accidentally.
Safety instructions for maintenance
•Disconnect the spark plug before doing maintenance on the product, not including carburetor adjustments.
•Have all product servicing done by an approved dealer, not including the tasks in Maintenance on page 17.
•Make sure the saw chain stops moving when the throttle trigger is released.
•Keep the handles dry, clean, and free from oil or fuel mixture.
•Keep caps and fasteners correctly tightened.
•Replacement components that are not approved or the removal of safety devices can cause damage to the product. This can also cause possible injury to the operator or bystanders. Only use accessories and replacement parts as recommended. Do not change your product.
•Keep the saw chain sharp and clean for safe and high performance.
•Obey the instructions for lubricating and changing accessories.
•Examine the product for damaged parts. Before more use of the product, make sure the damaged guard or part operates correctly. Examine for broken or incorrectly aligned parts, and parts that do not move freely. Examine for other conditions that can have an effect on the operation of the product. Make sure the product is correctly installed. A guard or other damaged part must be repaired or replaced by an approved dealer unless written in the operator’s manual.
•When not in operation, keep the product in a dry, high or locked area away from children.
•During transportation or storage of the product, use a transportation guard or case to move the product.
•Do not use waste oil. Waste oil can be dangerous to you and can cause damage to the product and environment.
14 |
862 - 002 - 03.12.2018 |
Assembly
WARNING: Read and understand the safety chapter before you assemble the product.
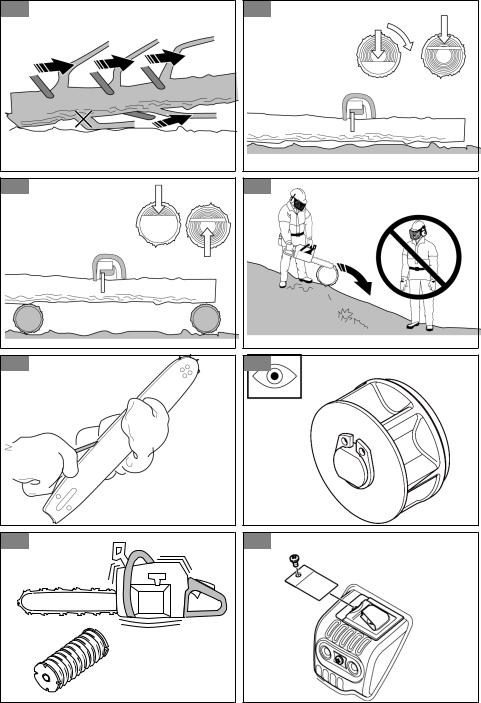
7.Make sure that the drive links of the saw chain fit correctly on the drive sprocket. Also make sure that the saw chain is correctly engaged in the groove in the guide bar.
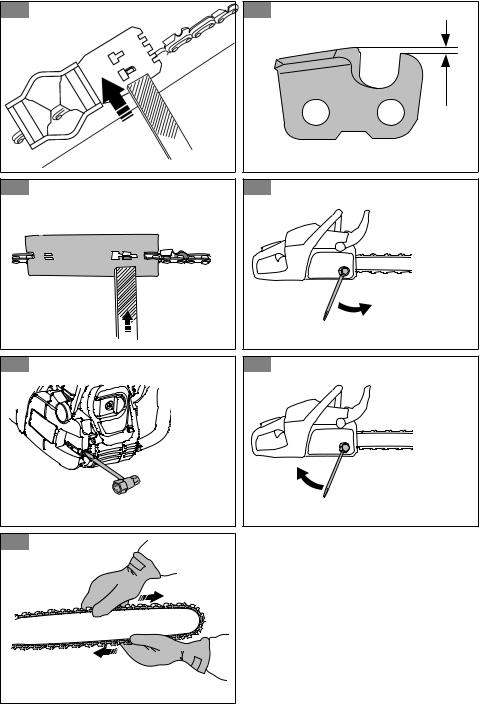
To assemble the guide bar and saw chain
1.Remove the bar nuts and the clutch cover. Remove the transportation guard (A). (Fig. 39)
2.Put the guide bar above the bar bolts. Steer the guide bar to its most rear position.
8.Tighten the guide bar nuts finger.
9.Turn the chain tensioning screw clockwise to tighten the saw chain. Tighten the saw chain until it does not hang from below the guide bar, but you can turn it easily by hand. (Fig. 41) (Fig. 42)
10.Hold up the end of the guide bar and tighten the bar nuts with the combination wrench. (Fig. 43)
3.Put on protective gloves.
4.Lift the saw chain above the drive sprocket and engage it in the groove on the guide bar. Start on the top edge of the guide bar. (Fig. 40)
5.Make sure that the edges of the cutters are turned forward on the top edge of the guide bar.
6.Assemble the clutch cover and steer the chain adjuster pin to the hole in the guide bar.
•Examine the chain tension frequently after you assemble a new saw chain and until the saw chain has been run-in.
•Examine the chain tension regularly. Correct chain tension results in good performance and a long life.
Operation
WARNING: Read and understand the safety chapter before you operate the product.
To use fuel
CAUTION: This product has a two-cycle engine. Use a mixture of gasoline and twocycle engine oil. Make sure to use the correct quantity of oil in the mixture. Incorrect ratio of gasoline and oil can cause damage to the engine.
Fuel mixture ratio
The fuel mixture ratio for the gasoline and two-cycle engine oil is 50:1 (2%)
Gasoline |
Two-cycle engine oil |
|
|
|
|
1 |
U.S. Gal. |
77 ml (2.6 oz) |
|
|
|
1 |
UK Gal. |
95 ml (3.2 oz) |
|
|
|
5 l |
100 ml (3.4 oz) |
|
|
|
|
To make the fuel mixture
1.Determine the correct quantity of gasoline and engine oil (mixture ratio 50:1). Do not make more than 30 days quantity of fuel mixture. See Fuel mixture ratio on page 15.
2.Add half of the gasoline quantity to a clean fuel container with an antispill valve.
CAUTION: Do not use gasoline with more than 10% ethanol concentration (E10). This can cause damage to the product.
CAUTION: Do not use gasoline with an octane number less than 90 RON (87 AKI). This can cause damage to the product.
Note: Use gasoline with a higher octane number if you frequently use the product at continuously high engine speed.
3.Add the full quantity of the two-cycle engine oil to the fuel container.
CAUTION: Always use air-cooled twocycled engine oil of high quality. Other oils can cause damage to the product.
4.Shake the fuel mixture to mix the contents.
5.Add the remaining gasoline quantity to the fuel container.
6.Shake the fuel mixture to mix the contents.
7.Fill the fuel tank of the product with the fuel mixture. See Fuel mixture ratio on page 15.
862 - 002 - 03.12.2018 |
15 |
To fill the fuel tank
1.Make sure that the fuel mixture is correct and that the fuel mixture is in a fuel container with an antispill valve.
2.If fuel is on the container, remove the unwanted fuel and let the container dry.
3.Make sure that the area near the fuel tank cap is clean.
4.Remove the fuel tank cap. (Fig. 44)
5.Shake the fuel container before you add the fuel mixture to the fuel tank.
6.Put back the fuel tank cap.
To lubricate the saw chain
The product has an automatic lubrication system. Make sure to only use the correct chain oil and obey the instructions.
1.Use vegetable-based saw chain oil or a standard chain oil.
2.Make sure that the area near the cap of the saw chain oil tank is clean.
3.Remove the cap of the saw chain oil tank.
4.Fill the saw chain oil tank with the recommended saw chain oil.
5.Put back the cap of the saw chain oil tank.
Before you start the engine
•Examine the product for missing, damaged, loose or worn parts.
•Examine the nuts, screws and bolts.
•Examine the air filter.
•Examine the throttle trigger lockout and the throttle control for correct operation.
•Examine the stop switch for correct operation.
•Examine the product for fuel leaks.
•Examine the saw chain sharpness and tension.
To start a cold engine
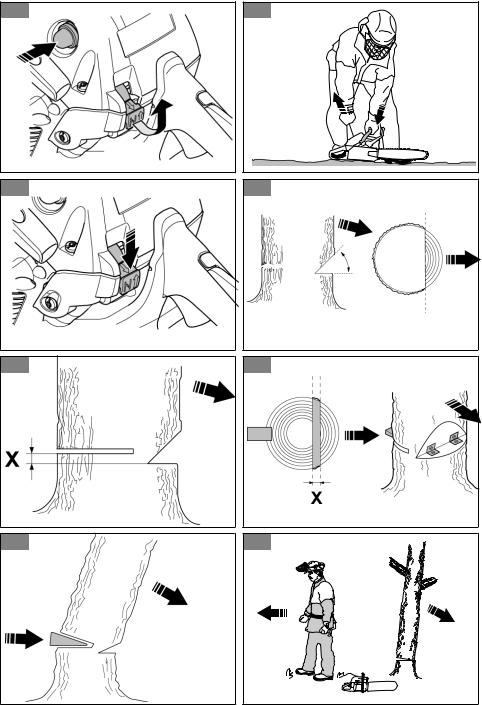
1.Move the front hand guard forward to engage the chain brake. (Fig. 45)
2.Pull the choke control out and up.
3.Push the air purge bulb 6 times. (Fig. 46)
4.Hold the body of the product on the ground with your left hand.
5.Put your right foot through the rear handle.
6.Pull the starter rope handle slowly with your right hand until you feel some resistance.
7.Pull the starter rope handle with force. (Fig. 47)
CAUTION: Do not pull the starter rope until it stops. Do not let go of the starter rope when it is fully extended. Release the starter rope slowly. If you do not
obey these instructions, it can cause damage to the engine.
Note: Do not pull the throttle trigger when you start the engine.
8.Continue to pull the starter rope handle until the engine starts or tries to start (pull max 3 times).
9.If the engine starts or tries to start, push the choke control down. (Fig. 48)
10.Continue to pull until the engine starts.
11.Hold the rear handle with your right hand and the front handle with your left hand.
12.Immediately pull the front hand guard rearward in the direction of the front handle to disengage the chain brake. (Fig. 27)
Note: The chain will move.
13.Run 20-30 seconds at elevated idle speed.
14.Pull the throttle trigger lightly to set normal idle.
15.Run 20-30 seconds at normal idle.
16.Use the product.
To start a warm engine
1.Move the front hand guard forward to engage the chain brake. (Fig. 45)
2.Pull the choke control out and up.
3.Push the air purge bulb 6 times. (Fig. 46)
4.Push the choke control down. (Fig. 48)
5.Hold the body of the product on the ground with your left hand.
6.Put your right foot through the rear handle.
7.Pull the starter rope handle slowly with your right hand until you feel some resistance.
8.Pull the starter rope handle with force. (Fig. 47)
CAUTION: Do not pull the starter rope until it stops. Do not let go of the starter rope when it is fully extended. Release the starter rope slowly. If you do not obey these instructions, it can cause damage to the engine.
Note: Do not pull the throttle trigger when you start the engine.
9.Pull the starter rope handle until the engine starts.
10.Hold the rear handle with your right hand and the front handle with your left hand.
11.Immediately pull the front hand guard rearward in the direction of the front handle to disengage the chain brake. (Fig. 27)
Note: The chain will move.
16 |
862 - 002 - 03.12.2018 |
12.Wait 10-15 seconds.
13.Pull the throttle trigger lightly to set normal idle.
14.Use the product.
To start the engine when the fuel is too hot
If the product does not start, the fuel can be too hot.
Note: Always use new fuel and decrease the operation time during warm weather.
1.Put the product in a cool area away from open sunlight.
2.Let the product cool down for 20 minutes at minimum.
3.Press the air purge bulb again and again for 10-15 seconds.
4.Obey the procedure to start a cold engine. Refer to
To start a cold engine on page 16.
To stop
•Push the stop switch to stop the engine.
Note: The stop switch automatically goes back to its initial position.
To use a spiked bumper
A spiked bumper holds the wood as you cut. The spiked bumper is a pivot between the engine body and the guide bar.
1.Put the lower end of the spiked bumper at the correct felling hinge width.
2.Push against the front handle with your left hand and lift the rear handle with your right hand.
3.Cut until you get the correct felling hinge width.
Note: The felling hinge must have an equal thickness.
4.Cut more than half of the diameter and then put the felling wedge into the saw cut.
To fell a tree
1.Remove dirt, stones, loose bark, nails, staples and wire from the tree.
2.Make a notch 1/3 the diameter of the tree, perpendicular to the direction of the fall. (Fig. 49)
3.Make the lower horizontal notch cut. This helps prevent pinching the saw chain or the guide bar when the second notch is made.
4.Make the felling back cut (X) a minimum of 50 mm (2 in) higher than the horizontal notch cut. Keep the felling back cut parallel to the horizontal notching cut so sufficient wood is left to be a hinge. Do not cut through the hinge. The hinge wood keeps the tree from twisting and falling in the incorrect direction. (Fig. 50) and (Fig. 51)
5.As the felling back cut nears the hinge, the tree starts to fall. Make sure that the tree can fall in the correct direction and not rock rearward and pinch the saw chain. Stop the cut before the felling back cut is complete to prevent this. Use wedges of wood or plastic to open the cut and let the tree fall along the necessary line of fall. (Fig. 52)
6.When the tree starts to fall, remove the product from the cut. Stop the motor, put the product down and use the planned escape path. Be careful of limbs falling from above and monitor your footing. (Fig. 53)
To limb a tree
1.Use larger limbs to hold the log off the ground.
2.Remove small limbs in one cut. (Fig. 54)
3.Cut branches that have tension from the bottom to the top to prevent pinching the saw chain or the guide bar.
To buck a log
CAUTION: Do not let the saw chain touch the ground.
•If the log has support along its full length, cut from the top of the log (known as overbucking). (Fig. 55)
•If the log has support on one end, cut 1/3 the diameter from below the log (known as underbucking).
•If the log has support on the two ends, cut 1/3 the diameter from the top. Complete the cut by underbucking the lower 2/3 of the log to touch the first cut. (Fig. 56)
•If you buck a log on a slope, always stay on the uphill side of the log. Cut through the log while you keep complete control of the product. Then release the cutting pressure near the end of the cut while tightly holding the rear handle and front handle. (Fig. 57)
Maintenance
WARNING: Read and understand the safety chapter before you clean, repair or do maintenance on the product.
Maintenance schedule
Make sure that you obey the maintenance schedule. The intervals are calculated from daily use of the product. The intervals are different if you do not use the
862 - 002 - 03.12.2018 |
17 |

product each day. Only do the maintenance work that is found in this manual. Speak to an approved service center about other maintenance work not found in this manual.
Daily maintenance
•Clean the external surfaces.
•Make sure that the throttle trigger lockout and throttle trigger work correctly.
•Clean the chain brake and make sure that it operates correctly.
•Examine the chain catcher for damage. Replace the chain catcher if it is damaged.
•Turn the guide bar daily for more equal wear.
•Make sure that the lubrication hole in the guide bar is not clogged.
•Remove saw dust and other unwanted material from below the clutch cover.
•Clean the guide bar groove. (Fig. 58)
•Make sure that the guide bar and saw chain get sufficient oil.
•Examine the saw chain for cracks and irregularly worn rivets and links. If necessary, replace the saw chain.
•Examine the saw chain for the correct tension and for burrs on the chain drive links. If necessary, replace the saw chain.
•Sharpen the saw chain. Refer to To sharpen the saw chain on page 19.
•Examine the drive sprocket for too much wear and replace if necessary.
(Fig. 59)
•Clean the air intake of the starter housing.
•Make sure that the nuts and screws are tight.
•Make sure that the controls operate correctly.
Weekly maintenance
•Make sure that the cooling system works correctly.
•Make sure that the starter, starter cord and return spring work correctly.
•Make sure that the vibration damping elements are not damaged.
(Fig. 60)
•File off any burrs from the edges of the guide bar.
•Clean or replace the spark arrester mesh on the muffler.
(Fig. 61)
•Clean the external surfaces of the carburetor and its adjacent areas.
•Clean the air filter. Install a new air filter if it is damaged or too dirty to be fully cleaned. Refer to To clean the air filter on page 19 for more information.
Monthly maintenance
•Examine the brake band on the chain brake for wear. Replace when the brake band thickness is less than 0.6 mm (0.024 in) at the most worn point.
(Fig. 62)
•Examine the clutch center, clutch drum and clutch spring for wear.
•Clean the spark plug. Make sure that the electrode gap is correct.
(Fig. 63)
•Clean the external surfaces of the carburetor and its adjacent areas.
•Examine the fuel filter and the fuel hose. Replace if necessary.
•Empty the fuel tank.
•Empty the oil tank.
•Examine all cables and connections.
Yearly maintenance
•Examine the spark plug.
•Clean the external surfaces of the carburetor and its adjacent areas.
•Clean the cooling system.
•Examine the spark arrester mesh.
•Examine the fuel filter.
•Examine the fuel hose for damage.
•Examine all cables and connections.
Intermittent maintenance
•Have an approved service center repair or replace the muffler after 50 hours of operation.
•Do maintenance on the spark plug when:
•the power level in the engine is low.
•it is hard to start the engine.
•the engine does not work correctly at idle speed.
•Do a check of the saw chain lubrication each time you refuel. See To do a check of the saw chain lubrication on page 20.
To adjust the idle speed
Make sure that the air filter is clean and the air filter cover is attached before you adjust the idle speed.
1.Turn the idle adjustment screw, which is identified with a "T" mark, clockwise until the saw chain starts to turn.
2.Turn the idle adjustment screw, which is identified with a "T" mark, counterclockwise until the saw chain stops.
3.The idle speed must be below the speed when the saw chain starts to turn. The idle speed is correct when the engine operates smoothly in all positions.
18 |
862 - 002 - 03.12.2018 |

To do maintenance on the spark arrester mesh
•Use a wire brush to clean the spark arrester mesh. (Fig. 61)
To do maintenance on the spark plug
CAUTION: Use the recommended spark plug. Make sure that the replacement is the same as the manufacturer supplied part. An incorrect spark plug can cause damage to the product.
1.If the product is hard to start or operate, examine the spark plug for unwanted materials. To decrease the risk of unwanted material on the spark plug electrodes:
a)make sure that the idle speed is correctly adjusted.
b)make sure that the fuel mixture is correct.
c)make sure that the air filter is clean.
2.Clean the spark plug if it is dirty. Make sure that the electrode gap is correct. (Fig. 63)
3.Replace the spark plug when it is necessary.
To clean the air filter
1.Remove the air filter cover and remove the air filter. (Fig. 64)
2.Clean the air filter with warm soap water. Make sure that the air filter is dry before you install it.
3.Replace the air filter if it is too dirty to fully clean it. Always replace a damaged air filter.
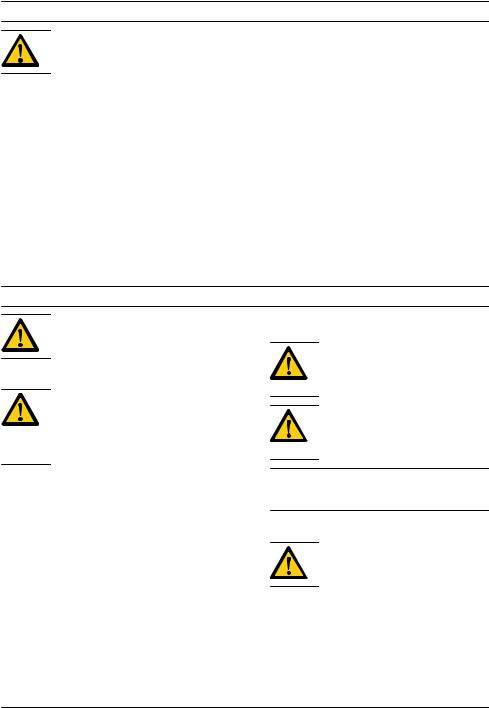
To sharpen the saw chain
The cutter
The cutting part of the saw chain is called the cutter and consists of a cutting tooth (A) and the depth gauge (B). The cutters cutting depth is determined by the difference in height between the two, the depth gauge setting (C).
(Fig. 65)
When you sharpen a cutting tooth there are four important factors to remember:
•Filing angle.
(Fig. 66)
•Cutting angle.
(Fig. 67)
•File position.
(Fig. 68)
• Round file diameter. (Fig. 69)
To sharpen the cutting teeth
Use a round file and a file gauge to sharpen the cutting teeth. See Saw chain filing and saw chain combinations on page 22 for information on the recommended dimension of the file and gauge for the saw chain installed on your product.
(Fig. 70)
1.Make sure that the saw chain has the correct tension. A chain without the correct tension moves to one side does and not sharpen correctly.
2.Use the file on all the teeth on one side. Then use the file on the cutting teeth from the inner face and decrease the pressure in the reverse direction.
3.Turn the product on the opposite side and use the file on the teeth.
4.Use the file to keep all teeth the same length. Replace a worn saw chain when the length of the cutting teeth decreases to 4 mm (5/32 in).
To adjust the depth gauge setting
Sharpen the cutting teeth before you adjust the depth gauge setting. See To sharpen the cutting teeth on page 19. When you sharpen the cutting tooth (A), the depth gauge setting (C) will decrease. To maintain optimal cutting performance, the depth gauge (B) has to be filed down to achieve the recommended depth gauge setting. See Saw chain filing and saw chain combinations on page 22 to find the correct depth gauge setting for your particular chain.
(Fig. 71) (Fig. 72)
Note: This recommendation assumes that the length of the cutting teeth is not reduced excessively.
Use a flat file and depth gauge tool to adjust the depth gauge.
1.Put the depth gauge tool above the saw chain. Detailed information regarding how to use the depth gauge tool will be found on the package of the depth gauge tool.
2.Use the flat file to file off the tip of the depth gauge that protrudes through the depth gauge tool. The depth gauge setting is correct when you no longer feel resistance as you draw the file along the depth gauge tool.
To tension the saw chain
Note: Check the tension of a new saw chain frequently during its running-in period.
1.Loosen the guide bar nuts that hold the clutch cover. Use the combination wrench. (Fig. 73)
2.Tighten the guide bar nuts by hand as tight as you can.
862 - 002 - 03.12.2018 |
19 |

3.Lift the top of the guide bar and extend the saw chain by tightening the chain tensioning screw. Use the combination wrench. Tighten the saw chain until it does not hang down from the bottom of the guide bar. (Fig. 74)
4.Tighten the guide bar nuts using the combination wrench and lift the tip of the guide bar at the same time. (Fig. 75)
5.Make sure that you can pull the saw chain round freely by hand and that it does not sag. (Fig. 76)
To lubricate the cutting equipment
To do a check of the saw chain lubrication
Do a check of the chain saw lubrication each time you refuel.
1.Start the product and let it run at 3/4 speed. Point the nose of the guide bar at a light color surface almost 20 cm (8 in) away.
2.After 1 minute of running, a line of oil shows on the light surface.
3.If you cannot see the line of oil after 1 minute, clean the oil channel in the guide bar. Clean the groove in the edge of the guide bar. Make sure the guide bar nose sprocket turns freely and that there are no blockages in the lubrication hole. Clean and lubricate the tip sprocket.
4.Start the product and let it run at 3/4 speed. Point the nose of the bar at a light color surface almost 20 cm (8 in) away.
5.After 1 minute of running, a line of oil shows on the light surface.
6.If you cannot see the line of oil after 1 minute, speak to your approved dealer.
Transportation
• Put the transportation guard on the cutting |
• Make sure that the product can not move during |
attachment during transportation to prevent injuries. |
transportation. |
Storage
•Always put the product away safely when not in operation. Leakages and fumes from the product can touch sparks, naked flames from electrical equipment, electrical mowers, relays/switches, boilers and more.
•Always save fuel in an approved container.
•Empty the fuel tank and the chain oil tank when the product is in storage for longer periods of time. Discard used fluids correctly.
•Put the transportation guard on the cutting attachment during storage to prevent injuries.
•Remove the spark plug cap from the spark plug and engage the chain brake before storage.
Technical data
|
unit |
130 (H13038HV) |
135 Mark II |
|
|
|
(H13038HV) |
|
|
|
|
Engine specifications |
|
|
|
|
|
|
|
Cylinder displacement |
cm3 |
38 |
38 |
Spark plug |
— |
NGK BPMR 7A |
NGK BPMR 7A |
|
|
|
|
Electrode gap |
mm (in) |
0.5 (0.02) |
0.5 (0.02) |
|
|
|
|
Fuel tank volume |
cm3 |
350 |
350 |
Idling speed |
min-1 |
2800-3200 |
2800-3200 |
Power output at 9000 min-1 |
kW |
1.5 |
1.6 |
Emission durability period |
h |
125 |
125 |
|
|
|
|
Noise and vibration data |
|
|
|
|
|
|
|
20 |
862 - 002 - 03.12.2018 |
|
unit |
130 (H13038HV) |
135 Mark II |
|
|
|
(H13038HV) |
|
|
|
|
Equivalent vibration level (ahv, eq) left handle1 |
m/s2 |
3.72 |
3.72 |
Equivalent vibration level (ahv, eq) right handle2 |
m/s2 |
5.5 |
5.5 |
Sound power level, guaranteed (LWA)3 |
dB(A) |
116 |
116 |
Sound power level, measured4 |
dB(A) |
114 |
114 |
Sound pressure level at operator's ear5 |
dB(A) |
102 |
102 |
Product dimensions |
|
|
|
|
|
|
|
Weight (excluding cutting equipment) |
kg |
4.68 (10.3) |
4.68 (10.3) |
|
|
|
|
Oil tank volume |
cm3 |
260 |
260 |
Fuel and lubrication system |
|
|
|
|
|
|
|
Oil pump capacity at 9000 min-1 |
ml/min |
9 |
9 |
Type of oil pump |
— |
Automatic |
Automatic |
|
|
|
|
Saw chain and guide bar |
|
|
|
|
|
|
|
Standard guide bar length |
cm (in) |
35-40 (14-16) |
35-40 (14-16) |
|
|
|
|
Recommended guide bar length |
cm (in) |
35-40 (14-16) |
35-40 (14-16) |
|
|
|
|
Usable cutting length |
cm (in) |
33-38 (13-15) |
33-38 (13-15) |
|
|
|
|
Maximum saw chain speed |
m/s |
22.3 |
22.3 |
|
|
|
|
Saw chain pitch |
mm (in) |
9.52 (3/8) |
9.52 (3/8) |
|
|
|
|
Thickness of drive links (gauge) |
mm (in) |
1.3 (0.050) |
1.3 (0.050) |
|
|
|
|
Type of drive sprocket |
— |
Spur |
Spur |
|
|
|
|
Number of drive sprocket teeth |
— |
6 |
6 |
|
|
|
|
1Equivalent vibration level is calculated as the time-weighted energy total for vibration levels under various working conditions. Reported data for equivalent vibration level has a typical statistical dispersion (standard
deviation) of 1.5 m/s2.
2Equivalent vibration level is calculated as the time-weighted energy total for vibration levels under various
working conditions. Reported data for equivalent vibration level has a typical statistical dispersion (standard deviation) of 1.5 m/s2.
3 |
Noise emissions in the environment measured as sound power (LWA). |
4 |
Noise emissions in the environment measured as sound power (LWA). |
5 |
Equivalent sound pressure level is calculated as the time-weighted energy total for different sound pressure |
levels under various working conditions. Typical statistical dispersion for equivalent sound pressure level is a standard deviation of 2.5 dB(A).
862 - 002 - 03.12.2018 |
21 |

Accessories
Guide bar and saw chain combinations
Guide bar |
|
|
|
Saw chain |
|
|
|
|
|
|
|
Length |
Pitch |
Gauge |
Max. nose radi- |
Type |
Drive link count |
|
|
|
us |
|
|
|
|
|
|
|
|
14 inch |
3/8 inch |
0.050 inch |
7T |
Husqvarna H37 |
52 |
|
|
|
|
|
|
16 inch |
|
|
|
Husqvarna S93G |
56 |
|
|
|
|
|
|
Saw chain filing and saw chain combinations
Chain type |
Round file |
Side plate |
Top plate |
File guide |
Depth |
Depth |
File gauge |
|
size |
angle |
angle |
angle |
gauge set- |
gauge part |
part no. |
|
|
|
|
|
ting |
no. |
|
H37, S93G |
5/32 in |
80° |
30° |
0° |
0.025 / 0.65 |
5056981-03 |
5052437-01 |
|
|
|
|
|
|
|
(H37) |
|
4.0 mm |
|
|
|
|
|
5878090-01 |
|
|
|
|
|
|
|
|
|
|
|
|
|
|
|
(S93G) |
|
|
|
|
|
|
|
|
Contents of the EC declaration of conformity
We, Husqvarna AB, SE 561 82 Huskvarna, SWEDEN, declare under our sole responsibility that the represented product:
Description |
Gasoline chainsaw |
|
|
Brand |
Husqvarna |
|
|
Platform / Type / Model |
Platform H13038HV, rep- |
|
resenting model 130, 135 |
|
Mark II |
|
|
Batch |
Serial number dating 2018 |
|
and onwards |
|
|
complies fully with the following EU directives and regulations:
Directive/Regulation |
Description |
|
|
2006/42/EC |
“relating to machinery” |
|
|
2014/30/EU |
“relating to electromagnet- |
|
ic compatibility” |
|
|
Directive/Regulation |
Description |
|
|
2000/14/EC |
“relating to outdoor noise” |
|
|
2011/65/EU |
“restriction of use of cer- |
|
tain hazardous substan- |
|
ces” |
|
|
Harmonized standards and/or technical specifications applied are as follows: EN ISO 12100, EN ISO 11681-1, CISPR 12, ISO 14982
In accordance with directive 2000/14/EC, Annex V, the declared sound values are stated in the technical data section of this manual and in the signed EU Declaration of Conformity.
TÜV Rheinland LGA Products GmbH, Notified Body for Machinery (notified under 0197), Tillystraße 2 - 90431 Nürnberg, Germany, carried out an EC type examination in accordance with 2006/42/EC, article 12, point 3b.
The type examination certificate, in accordance with Annex IX, as provided in the signed Declaration of Conformity, is applicable to all manufacturing locations and Countries of Origin, as stated on the product.
22 |
862 - 002 - 03.12.2018 |

This chainsaw conforms to the example that underwent EC type examination.
862 - 002 - 03.12.2018 |
23 |

Inhalt
Einleitung.................................................................... |
24 |
Sicherheit.................................................................... |
25 |
Montage....................................................................... |
30 |
Betrieb......................................................................... |
30 |
Wartung....................................................................... |
33 |
Transport..................................................................... |
36 |
Lagerung..................................................................... |
36 |
Technische Daten....................................................... |
36 |
Zubehör....................................................................... |
38 |
Inhalt der EG-Konformitätserklärung....................... |
38 |
Einleitung
Bedienungsanleitung
Die Ausgangssprache dieser Betriebsanleitung ist Englisch. Bedienungsanleitungen in anderen Sprachen sind Übersetzungen aus dem Englischen.
Übersicht
(Abb. 1)
1.Zylinderdeckel
2.Kraftstoffpumpe
3.Produktund Seriennummernschild
4.Informationsund Warnschild
5.Stoppschalter
6.Hinterer Handgriff
7.Kraftstofftank
8.Startseilhandgriff
9.Startvorrichtungsgehäuse
10.Fallrichtungsmarkierung
11.Kettenöltank
12.Vorderer Handgriff
13.Kettenbremse mit Handschutz
14.Schalldämpfer
15.Sägekette
16.Umlenkstern
17.Führungsschiene
18.Kettenspannschraube (130)
19.Kettenspannschraube (135 Mark II)
20.Rindenstütze
21.Kettenfänger
22.Kupplungsdeckel
23.Rechtshandschutz
24.Gashebel
25.Gashebelsperre
26.Transportschutz
27.Kombinationswerkzeug
28.Bedienungsanleitung
Symbole auf dem Gerät
(Abb. 3) Warnung
(Abb. 4) Lesen Sie diese Bedienungsanleitung
(Abb. 5) Tragen Sie zugelassenen Kopfschutz, Gehörschutz und Schutzbrille
(Abb. 6) Tragen Sie zugelassene Schutzhandschuhe
(Abb. 7) Dieses Gerät entspricht den geltenden CERichtlinien
(Abb. 8) Schallleistungspegel
(Abb. 9) Kettenbremse, nicht aktiviert (links). Kettenbremse, aktiviert (rechts)
(Abb. 10) Choke-Hebel
(Abb. 11) Kraftstoffpumpe (Abb. 12) Tanken
(Abb. 13) Befüllung mit Kettenöl
(Abb. 14) Dieses Gerät entspricht den geltenden EACRichtlinien
(Abb. 15) Dieses Gerät entspricht den geltenden Richtlinien der Ukraine
(Abb. 16) Dieses Gerät entspricht den geltenden Richtlinien Koreas
(Abb. 17) Dieses Gerät entspricht den geltenden Richtlinien Japans
(Abb. 18) Geräuschpegel
(Abb. 19) Halten Sie das Gerät mit beiden Händen fest
(Abb. 20) Verwenden Sie es nicht mit einer Hand
(Abb. 21) Vermeiden Sie Kontakt mit der Führungsschiene
(Abb. 22) Achten Sie auf Rückstöße
24 |
862 - 002 - 03.12.2018 |

(Abb. 23) Dieses Gerät entspricht den in Australien und Neuseeland geltenden Richtlinien zur elektromagnetischen Verträglichkeit.
Hinweis: Weitere Symbole/Aufkleber auf dem Gerät beziehen sich auf die Zertifizierungsanforderungen für andere kommerzielle Bereiche.
Proposition 65
(Abb. 1)
EU V
WARNUNG: Bei einem Eingriff in den Motor erlischt die EU-Typgenehmigung für dieses Produkt.
Produkthaftung
Im Sinne der Produkthaftungsgesetze übernehmen wir keine Haftung für Schäden, die unser Gerät verursacht, wenn...
•das Gerät nicht ordnungsgemäß repariert wurde.
•das Gerät mit Teilen repariert wurde, die nicht vom Hersteller stammen oder vom Hersteller zugelassen sind.
•ein Zubehörteil mit dem Gerät verwendet wird, das nicht vom Hersteller stammt oder vom Hersteller zugelassen ist.
•das Gerät nicht bei einem zugelassenen Service Center oder von einer zugelassenen offiziellen Stelle repariert wurde.
Sicherheit
Sicherheitsdefinitionen
Die nachstehenden Definitionen geben den Schweregrad für jedes Signalwort an.
WARNUNG: Personenschäden.
ACHTUNG: Schäden am Gerät.
Hinweis: Diese Informationen erleichtern die Verwendung des Geräts.
Allgemeine Sicherheitshinweise
•Verwenden Sie das Gerät ordnungsgemäß. Eine falsche Verwendung kann zu schweren bis tödlichen Verletzungen führen. Verwenden Sie das Gerät nur für die in dieser Betriebsanleitung aufgeführten Arbeiten. Verwenden Sie das Gerät nicht für andere Aufgaben.
•Lesen, verstehen und befolgen Sie die Anweisungen in dieser Bedienungsanleitung. Beachten Sie die Symbole und die Sicherheitshinweise. Die Nichtbeachtung der Anweisungen und Symbole kann zu Verletzungen oder zum Tod führen.
•Werfen Sie diese Bedienungsanleitung nicht weg. Verwenden Sie die Anweisungen für das Zusammensetzen und den Betrieb, und halten Sie Ihr Gerät in gutem Zustand. Befolgen Sie die Anweisungen für die korrekte Installation von Anbaugeräten und Zubehörteilen. Verwenden Sie ausschließlich zugelassene Anbaugeräte und Zubehörteile.
•Verwenden Sie das Gerät nicht, wenn es beschädigt ist. Halten Sie sich an den Wartungsplan. Führen Sie nur diejenigen Wartungsarbeiten aus, die Sie in den Anweisungen in dieser Bedienungsanleitung finden. Alle sonstigen Wartungsarbeiten müssen von einer autorisierten Servicewerkstatt durchgeführt werden.
•Diese Bedienungsanleitung kann nicht alle Situationen abdecken, die bei der Verwendung des Geräts auftreten können. Seien Sie immer vorsichtig und arbeiten Sie mit gesundem Menschenverstand. Führen Sie keine Arbeiten mit oder Wartungen am Gerät durch, wenn Sie sich in einer Situation unsicher sind. Wenden Sie sich an einen Produktfachmann, Ihren Fachhändler, Ihren Service Vertreter oder das autorisierte Service Center für weitere Informationen.
•Ziehen Sie den Zündkerzenstecker ab, bevor Sie das Gerät zusammenbauen, einlagern oder warten.
•Verwenden Sie das Gerät nicht, wenn es nicht mehr der ursprünglichen Spezifikation entspricht. Ändern Sie kein Teil des Geräts ohne Genehmigung des Herstellers. Verwenden Sie nur Teile, die vom Hersteller genehmigt wurden. Eine falsche Wartung kann zu schweren bis tödlichen Verletzungen führen.
•Atmen Sie die Abgase des Motors nicht ein. Ein Gesundheitsrisiko kann auftreten, wenn Sie Abgase, Kettenöldämpfe und Sägespäne über einen längeren Zeitraum einatmen.
•Das Gerät sollte nicht im Innenbereich oder in der Nähe von feuergefährlichen Stoffen gestartet werden. Die Abgase sind heiß und können Funken erzeugen, die einen Brand verursachen können. Wenn keine ausreichende Luftzirkulation gewährleistet ist, können Verletzungen oder Tod durch Ersticken oder Kohlenmonoxid verursacht werden.
•Dieses Gerät erzeugt beim Betrieb ein elektromagnetisches Feld. Das elektromagnetische
862 - 002 - 03.12.2018 |
25 |

Feld kann medizinische Implantate beschädigen. Sprechen Sie vor der Inbetriebnahme des Geräts mit Ihrem Arzt und dem Hersteller des medizinischen Implantats.
•Lassen Sie nicht zu, dass Kinder das Gerät verwenden.
•Erlauben Sie nicht, dass Personen ohne Kenntnis der Anweisungen das Gerät bedienen.
•Stellen Sie sicher, dass Personen mit verminderter physischer oder psychischer Leistungsfähigkeit dieses Gerät nicht unbeobachtet verwenden. Es muss immer ein verantwortlicher Erwachsener anwesend sein.
•Verschließen Sie das Gerät in einem Bereich, zum dem Kinder und nicht autorisierte Personen keinen Zugang haben.
•Das Gerät kann Objekte auswerfen und Verletzungen verursachen. Beachten Sie die Sicherheitshinweise, um das Risiko von Verletzungen oder Tod zu verringern.
•Entfernen Sie sich nicht vom Gerät, wenn der Motor eingeschaltet ist. Halten Sie den Motor an, und stellen Sie sicher, dass sich die Kette nicht dreht.
•Der Bediener des Geräts trägt bei einem Unfall die Verantwortung.
•Überprüfen Sie vor dem Gebrauch das Gerät auf schadhafte Teile.
•Halten Sie sich an nationale und lokale gesetzliche Bestimmungen. Diese können den Betrieb des Geräts unter bestimmten Bedingungen verhindern oder einschränken.
Sicherheitshinweise für den Betrieb
•Der kontinuierliche oder regelmäßige Betrieb des Geräts kann „Weißfingerkrankheit“ oder entsprechende gesundheitliche Probleme durch Vibrationen verursachen. Untersuchen Sie den Zustand Ihrer Hände und Finger, wenn Sie das Gerät dauerhaft oder in regelmäßigen Abständen bedienen. Wenn Ihre Hände oder Finger Verfärbungen aufweisen, diese sich taub anfühlen oder Sie Schmerzen oder Kribbeln spüren, unterbrechen Sie die Arbeit, und suchen Sie sofort einen Arzt auf.
•Stellen Sie sicher, dass das Gerät vollständig zusammengebaut ist, bevor Sie es verwenden.
•Das Gerät kann Objekte umherschleudern und Augenverletzungen verursachen. Tragen Sie immer einen zugelassenen Augenschutz, wenn Sie mit dem Gerät arbeiten.
•Achten Sie darauf, dass sich während der Arbeiten kein Kind unbemerkt dem Gerät nähert.
•Benutzen Sie das Gerät nicht, wenn sich Personen im Arbeitsbereich befinden. Halten Sie das Gerät an, wenn eine Person den Arbeitsbereich betritt.
(Abb. 24)
•Stellen Sie sicher, dass Sie immer die Kontrolle über das Gerät behalten.
•Das Gerät muss grundsätzlich mit beiden Händen betätigt werden. Arbeiten Sie nicht einhändig mit dem Gerät. Durch Betrieb mit nur einer Hand können schwere Verletzungen des Bedieners, anderer Arbeiter, umstehender Personen oder einer Kombination solcher Personen verursacht werden.
•Halten Sie den vorderen Handgriff mit der linken Hand und den hinteren Griff mit der rechten Hand. Halten Sie das Gerät auf der rechten Seite des Körpers.
(Abb. 25)
•Arbeiten Sie nicht mit dem Gerät, wenn Sie müde oder krank sind oder unter Einfluss von Alkohol, Drogen oder Medikamenten stehen.
•Verwenden Sie das Gerät nicht, wenn Sie bei einem Unfall keine Hilfe holen können. Machen Sie Dritte auf Ihre Arbeiten aufmerksam, bevor Sie das Gerät starten.
•Schauen Sie sich immer nach Personen und Tieren im Sicherheitsbereich um, bevor Sie sich mit dem Gerät herumdrehen.
•Entfernen Sie alle unerwünschten Materialien aus dem Arbeitsbereich, bevor Sie beginnen. Wenn die Kette gegen ein Objekt stößt, kann dieses umhergeschleudert werden und Verletzungen oder Schäden verursachen. Unerwünschtes Material kann sich um die Kette wickeln und Schäden verursachen.
•Verwenden Sie das Gerät nicht bei schlechtem Wetter wie Nebel, Regen, starkem Wind, Gewittergefahr oder sonstigen Schlechtwetterbedingungen. Bei schlechtem Wetter könnten sich gefährliche Bedingungen einstellen, z. B. rutschige Bodenflächen.
•Stellen Sie sicher, dass Sie sich beim Arbeiten frei bewegen und stabil stehen können.
•Vermeiden Sie Situationen, in denen Sie fallen könnten, wenn Sie mit dem Gerät arbeiten. Neigen Sie sich nicht bei der Arbeit mit dem Gerät.
•Halten Sie das Gerät immer mit beiden Händen fest. Halten Sie den vorderen Handgriff mit der linken Hand und den hinteren Griff mit der rechten Hand. Halten Sie das Gerät auf der rechten Seite des Körpers.
•Die Sägekette beginnt sich zu drehen, wenn sich beim Anlassen des Motors der Chokehebel in der Chokeposition befindet.
•Stellen Sie den Motor ab, bevor Sie das Gerät transportieren.
•Legen Sie das Gerät auf keinen Fall ab, solange der Motor läuft.
•Stellen Sie den Motor ab, bevor Sie unerwünschte Materialien vom Gerät entfernen. Lassen Sie die Kette zum Stillstand kommen, bevor Sie oder ein Assistent das Schnittgut entfernen.
•Verwenden Sie dieses Gerät nicht auf einem Baum. Die Verwendung des Geräts auf einem Baum kann zu Verletzungen führen.
(Abb. 26)
26 |
862 - 002 - 03.12.2018 |

•Die Kettenbremse muss beim Start des Geräts aktiviert sein, um das Risiko zu minimieren, dass die Sägekette Sie beim Start berührt.
(Abb. 27)
•Ein Rückschlag kann schwere Verletzungen des Bedieners oder anderer Personen verursachen. Um das Risiko zu mindern, müssen Sie die Ursachen für Rückschläge kennen und wissen, wie Sie sie vermeiden können.
•Beachten Sie alle Sicherheitshinweise, um das Risiko von Rückschlägen und anderen Kräften zu verringern, die zu schweren Verletzungen oder zum Tod führen können.
•Stellen Sie die Kettenspannung regelmäßig ein, um sicherzustellen, dass die Sägekette nicht durchhängt. Eine unzureichend gespannte Sägekette kann abspringen und schwere oder sogar lebensgefährliche Verletzungen verursachen.
•Bäume dürfen nicht anhand einer falschen Vorgehensweise gefällt werden. Dies kann zu Verletzungen, Beschädigungen von Versorgungsleitungen oder Sachschäden führen.
•Der Bediener sollte sich auf der Bergseite des Geländes aufhalten, da der Baum nach dem Fällen wahrscheinlich bergab rollt oder rutscht.
(Abb. 28)
•Planen und bereiten Sie Ihren Rückzugsweg vor dem Schneiden vor. Der Rückzugsweg muss ungefähr 135 Grad schräg hinter der geplanten Fällrichtung des Baumes liegen.
•1. Der Gefahrenbereich
•2. Der Rückzugsweg
•3. Die Fällrichtung
(Abb. 29)
•Stellen Sie den Motor ab, bevor Sie das Gerät transportieren.
•Sorgen Sie dafür, dass beide Füße fest auf dem Boden stehen, und verteilen Sie Ihr Gewicht gleichmäßig.
(Abb. 30)
•Bedienen Sie das Produkt nur, wenn Sie auf einem stabilen Untergrund stehen. Die Bedienung auf instabilem Untergrund kann schwere Verletzungen des Bedieners oder anderer Personen verursachen. Arbeiten Sie mit der Motorsäge nicht von einer Leiter oder einem Baum aus.
(Abb. 31)
Rückschläge, Schlittern, Prellen und Abfallen
Verschiedene Kräfte können eine sichere Kontrolle des Geräts beeinträchtigen.
•Schlittern tritt auf, wenn sich die Führungsschiene schnell über das Holz bewegt.
•Prellen tritt auf, wenn die Führungsschiene in kurzen Abständen immer wieder ruckartig vom Holz abhebt und sich darauf absenkt.
•Abfallen tritt auf, wenn das Gerät nach Ausführen des Schnitts absackt. Dies kann dazu führen, dass die umlaufende Sägekette ein Körperteil oder andere Gegenstände berührt, was Verletzungen oder Sachschäden verursachen kann.
•Rückschlag tritt auf, wenn die Spitze der Führungsschiene einen Gegenstand berührt und sich ruckartig nach hinten, oben oder vorn bewegt. Ein Rückschlag tritt auch auf, wenn das Holz die Sägekette im Schnitt einklemmt. Wenn das Gerät einen Gegenstand im Holz berührt, kann dies zu einem Verlust der Kontrolle über das Gerät führen. (Abb. 32)
•Rotierender Rückschlag kann auftreten, wenn die umlaufende Kette auf einen Gegenstand an der Oberseite der Führungsschiene trifft. Dies kann dazu führen, dass sich die Kette in den Gegenstand eingräbt und sofort zum Stillstand kommt. In einer sehr schnellen Gegenreaktion bewegt sich die Führungsschiene nach oben und hinten in Richtung des Bedieners.
(Abb. 33)
•Rückschlag durch Einklemmen kann auftreten, wenn die Sägekette im Schnitt plötzlich zum Stillstand kommt. Das Holz klemmt die umlaufende Sägekette entlang der Oberkante der Führungsschiene ein. Der abrupte Kettenhalt bewirkt ein Umkehren der Kettenkraft und führt dazu, dass sich das Gerät in der entgegengesetzten Richtung der Kettendrehung bewegt. Das Gerät bewegt sich nach hinten in Richtung des Bedieners.
(Abb. 34)
•Einziehen kann auftreten, wenn die Sägekette plötzlich zum Stillstand kommt, weil sie entlang der Unterkante der Führungsschiene einen Gegenstand im Holz berührt. Durch den abrupten Halt wird das Gerät nach vorn und vom Bediener weg gezogen, was leicht zu einem Verlust der Kontrolle über das Gerät führen kann. (Abb. 35)
Stellen Sie vor der Inbetriebnahme des Geräts sicher, dass Sie diese verschiedenen Kräfte verstehen und wissen, wie Sie ihr Auftreten verhindern können. Siehe
So vermeiden Sie Rückschläge, Schlittern, Prellen und Abfallen auf Seite 27.
So vermeiden Sie Rückschläge, Schlittern, Prellen und Abfallen
•Achten Sie bei laufendem Motor unbedingt darauf, das Gerät stets fest zu halten. Halten Sie die rechte Hand am hinteren Griff und die linke Hand am vorderen Handgriff. Ergreifen Sie die Griffe jeweils fest mit Daumen und Fingern. Lassen Sie sie während des Gerätebetriebs auf keinen Fall los.
•Sorgen Sie dafür, dass Sie sowohl während des Schnitts als auch nach Herunterfallen des
862 - 002 - 03.12.2018 |
27 |

abgesägten Holzstücks die Kontrolle über das Gerät behalten. Lassen Sie nicht zu, dass das Gerät nach dem Schnitt durch sein Gewicht ruckartig nach unten gezogen wird.
•Stellen Sie sicher, dass der Bereich, in dem Sie schneiden, nicht blockiert ist. Achten Sie beim Arbeiten mit dem Gerät darauf, dass die Spitze der Führungsschiene keinen Baumstamm, Ast oder anderen blockierenden Gegenstand berührt. (Abb. 36)
•Schneiden Sie stets bei hoher Motordrehzahl.
•Lehnen Sie sich beim Sägen nicht zu weit vor, und führen Sie keine Schnitte oberhalb der Schulterhöhe aus. (Abb. 37)
•Befolgen Sie die Anweisungen des Herstellers zum Schärfen und Warten der Sägekette.
•Verwenden Sie als Ersatzteile nur die vom Hersteller angegebenen Führungsschienen und Sägeketten.
•Ein zu großer Tiefenbegrenzerabstand erhöht die Rückschlagneigung der Sägekette!
Persönliche Schutzausrüstung
•Verwenden Sie beim Arbeiten mit dem Gerät stets die geeignete persönliche Schutzausrüstung. Bei einem Unfall kann eine persönliche Schutzausrüstung den Schweregrad von Verletzungen verringern, ohne aber die Unfallgefahr selbst zu beseitigen.
•Tragen Sie keine losen Kleidungsstücke, die sich in der Sägekette verfangen könnten.
•Verwenden Sie einen zugelassenen Schutzhelm.
•Tragen Sie immer einen zugelassenen Gehörschutz beim Arbeiten mit dem Gerät. Lärmbelastung über einen längeren Zeitraum kann zu Hörschäden führen.
•Tragen Sie stets eine Schutzbrille oder einen Gesichtsschutz, um die von weggeschleuderten Gegenständen ausgehende Gefahr zu reduzieren. Das Gerät kann Gegenstände wie Sägespäne und kleine Holzteile mit starker Kraft verschieben. Schwere Verletzungen, einschließlich an den Augen, können die Folge sein.
•Tragen Sie Handschuhe mit Schnittschutz.
•Tragen Sie Hosen mit Schnittschutz.
•Tragen Sie Stiefel mit Schnittschutz, Stahlkappen und rutschfesten Sohlen.
•Sorgen Sie dafür, dass Sie einen Erste-Hilfe-Kasten griffbereit haben.
•Von Schalldämpfer, Führungsschiene und Sägekette oder anderen Quellen können Funken erzeugt werden. Halten Sie zur Verhinderung von Waldbränden immer Feuerlöschwerkzeuge und eine Schaufel bereit.
Schutzvorrichtungen am Gerät
•Benutzen Sie kein Gerät mit defekten Schutzvorrichtungen. Wenn das Gerät beschädigt ist, wenden Sie sich an ein autorisiertes Service Center.
So überprüfen Sie den Stoppschalter
1.Starten Sie den Motor. Siehe Vor dem Starten des Motors auf Seite 31.
2.Kontrollieren Sie, dass der Motor anhält, wenn Sie den Schalter auf die Stopp-Position stellen.
Gashebelsperre überprüfen
1.Stellen Sie sicher, dass der Gashebel (B) im Leerlauf arretiert ist, wenn Sie die Gashebelsperre
(A) lösen. (Abb. 38).
2.Drücken Sie die Gashebelsperre (A) und kontrollieren Sie, ob sie beim Loslassen in die Ausgangsstellung zurückkehrt.
3.Drücken Sie den Gashebel (B) und kontrollieren Sie, ob er beim Loslassen in die Ausgangsstellung zurückkehrt.
4.Starten Sie den Motor, und geben Sie Vollgas.
5.Lassen Sie den Gashebel los, und kontrollieren Sie, ob die Sägekette stehen bleibt.
6.Wenn sich die Motorsäge im Leerlauf dreht, drehen Sie die Leerlaufeinstellschraube gegen den Uhrzeigersinn, bis die Sägekette stoppt.
Schutz
Die Schutzvorrichtung verhindert, dass der Anwender von umherfliegenden Gegenständen getroffen wird. Die Schutzvorrichtung verhindert auch ein unbeabsichtigtes Berühren zwischen dem Bediener und der Sägekette.
•Stellen Sie sicher, dass der Schutz für den Betrieb in Verbindung mit dem Gerät zugelassen ist.
•Verwenden Sie das Gerät auf keinen Fall ohne die Schutzvorrichtung.
•Vergewissern Sie sich, dass der Schutz nicht beschädigt ist. Ersetzen Sie den Schutz, wenn dieser verschlissen ist oder Risse aufweist.
Sicherer Umgang mit Kraftstoff
•Starten Sie das Gerät nicht, wenn sich Kraftstoff oder Öl darauf befindet. Entfernen Sie den unerwünschten Kraftstoff bzw. das Öl, und lassen Sie das Gerät trocknen. Entfernen Sie unerwünschten Kraftstoff aus dem Gerät.
•Wechseln Sie sofort die Kleidung, wenn Sie Kraftstoff darauf verschüttet haben.
•Lassen Sie keinen Kraftstoff auf Ihren Körper gelangen, denn dies kann zu Verletzungen führen. Wenn Kraftstoff auf Ihre Haut gelangt, waschen Sie diesen mit Wasser und Seife ab.
•Starten Sie den Motor niemals, wenn Sie Öl oder Kraftstoff auf das Gerät oder auf Ihren Körper verschüttet haben.
•Starten Sie das Gerät nicht, wenn der Motor undicht ist. Überprüfen Sie den Motor regelmäßig auf Undichtigkeiten.
28 |
862 - 002 - 03.12.2018 |

•Gehen Sie vorsichtig mit Kraftstoff um. Kraftstoff ist feuergefährlich, und die Dämpfe sind explosiv und können zu Verletzungen oder sogar zum Tod führen.
•Atmen Sie die Kraftstoffdämpfe nicht ein, denn sie sind gesundheitsschädigend. Achten Sie auf ausreichende Belüftung.
•Rauchen Sie nicht in der Nähe des Kraftstoffs oder des Motors.
•Stellen Sie keine heißen Gegenstände in der Nähe des Kraftstoffs oder Motors ab.
•Füllen Sie keinen Kraftstoff nach, während der Motor läuft.
•Vergewissern Sie sich, dass der Motor abgekühlt ist, bevor Sie Kraftstoff nachfüllen.
•Öffnen Sie vor dem Nachfüllen den Tankdeckel langsam, und lassen Sie den Druck vorsichtig entweichen.
•Füllen Sie keinen Kraftstoff in den Motor, wenn Sie sich in einem Innenraum befinden. Eine mangelhafte Luftzirkulation kann zu schweren oder tödlichen Verletzungen durch Ersticken oder eine Kohlenmonoxidvergiftung führen.
•Drehen Sie den Tankdeckel sorgfältig zu, da ansonsten Brandgefahr besteht.
•Stellen Sie das Gerät vor dem Einschalten in einem Abstand von mindestens 3 m von der Stelle auf, wo Sie den Tank befüllt haben.
•Überfüllen Sie den Kraftstofftank nicht.
•Stellen Sie sicher, dass kein Kraftstoff austreten kann, wenn Sie das Gerät oder den Kraftstoffbehälter transportieren.
•Bringen Sie weder das Gerät noch einen Kraftstoffbehälter in Bereiche mit offenem Feuer, Funkenbildung oder Zündflammen. Stellen Sie sicher, dass sich im Lagerbereich keine offene Feuerquelle befindet.
•Verwenden Sie nur zugelassene Behälter, wenn Sie den Kraftstoff transportieren oder einlagern.
•Leeren Sie den Kraftstofftank, bevor Sie das Gerät für längere Zeit einlagern. Entsorgen Sie den Kraftstoff an Orten, die durch die lokalen gesetzlichen Bestimmungen dafür vorgesehen sind.
•Reinigen Sie das Gerät, bevor Sie es für längere Zeit einlagern.
•Ziehen Sie das Zündkerzenkabel ab, bevor Sie das Gerät einlagern, um sicherzustellen, dass der Motor nicht unbeabsichtigt starten kann.
Sicherheitshinweise für die Wartung
•Ziehen Sie den Zündkerzenstecker ab, bevor Sie mit Wartungsarbeiten am Gerät beginnen, mit Ausnahme von Vergasereinstellungen.
•Lassen Sie mit Ausnahme der unter Wartung auf Seite 33 aufgeführten Aufgaben alle Wartungsarbeiten von einem autorisierten Händler durchführen.
•Stellen Sie sicher, dass die Motorsäge stoppt, wenn der Gashebel losgelassen wird.
•Halten Sie die Griffe trocken, sauber und frei von Öl und Kraftstoffgemisch.
•Halten Sie alle Kappen und Befestigungselemente korrekt angezogen.
•Die Verwendung von nicht zugelassenen Ersatzteilen oder der Ausbau von Sicherheitseinrichtungen kann zu einer Beschädigung des Geräts führen. Außerdem besteht die Gefahr von Verletzungen des Bedieners oder umstehender Personen. Verwenden Sie nur empfohlene Zubehörund Ersatzteile. Modifizieren Sie Ihr Gerät nicht.
•Um einen sicheren Betrieb mit hoher Leistung zu gewährleisten, halten Sie die Sägekette stets scharf und sauber.
•Befolgen Sie die Anweisungen für das Schmieren und Auswechseln von Zubehörteilen.
•Untersuchen Sie das Gerät auf beschädigte Teile. Vergewissern Sie sich vor Weiterverwendung des Geräts, dass der beschädigte Schutz oder das beschädigte Teil richtig funktioniert. Untersuchen Sie das Gerät auf defekte oder falsch ausgerichtete Teile sowie auf Teile, die sich nicht frei bewegen. Untersuchen Sie das Gerät auf andere Bedingungen, die den einwandfreien Betrieb beeinträchtigen könnten. Sorgen Sie dafür, dass das Gerät korrekt montiert ist. Sofern in der Bedienungsanleitung nicht anders angegeben, muss ein beschädigter Schutz oder ein anderes beschädigtes Teil von einem autorisierten Händler repariert oder ausgetauscht werden.
•Wenn es nicht in Betrieb ist, bewahren Sie das Gerät außerhalb der Reichweite von Kindern an einem trockenen, hochgelegenen oder abgeschlossenen Ort auf.
•Verwenden Sie bei Transport oder Lagerung des Geräts einen Transportschutz.
•Verwenden Sie kein Altöl. Altöl stellt eine Gefahr für den Bediener dar und kann Schäden am Gerät und in der Umwelt verursachen.
862 - 002 - 03.12.2018 |
29 |
Montage
WARNUNG: Lesen Sie vor der Montage des Geräts das Kapitel über Sicherheit, und machen Sie sich damit vertraut.
So montieren Sie Führungsschiene und Kette
1.Entfernen Sie die Schienenmuttern und den Kupplungsdeckel. Entfernen Sie den Transportschutz (A). (Abb. 39)
2.Platzieren Sie die Führungsschiene oberhalb der Schienenbolzen. Bringen Sie die Führungsschiene in ihre hinterste Stellung.
3.Ziehen Sie Schutzhandschuhe an.
4.Heben Sie die Sägekette über das Kettenantriebsrad, und passen Sie sie in die Nut in der Führungsschiene ein. Beginnen Sie an der Oberkante der Führungsschiene. (Abb. 40)
5.Achten Sie darauf, dass die Schneiden der Sägezähne auf der Oberkante der Führungsschiene nach vorn gerichtet sind.
6.Bringen Sie den Kupplungsdeckel wieder an, und platzieren Sie den Stift der Ketteneinstellung in die Öffnung der Führungsschiene.
7.Stellen Sie sicher, dass die Treibglieder der Sägekette korrekt in das Kettenantriebsrad passen. Stellen Sie auch sicher, dass die Sägekette korrekt in die Nut der Führungsschiene eingreift.
8.Ziehen Sie die Muttern der Führungsschiene mit den Fingern fest.
9.Drehen Sie die Kettenspannschraube im Uhrzeigersinn, um die Sägekette zu spannen. Ziehen Sie die Sägekette so weit an, dass sie nicht mehr unterhalb der Führungsschiene durchhängt, jedoch leicht von Hand gedreht werden kann. (Abb. 41) (Abb. 42)
10.Halten Sie die Spitze der Führungsschiene hoch, während Sie die Schienenmuttern mit dem Kombischlüssel anziehen. (Abb. 43)
• Überprüfen Sie die Kettenspannung nach der Montage einer neuen Sägekette häufig, bis sich die Sägekette eingelaufen hat.
• Kontrollieren Sie die Kettenspannung in regelmäßigen Abständen. Eine korrekte Kettenspannung führt zu guter Leistung und langer Lebensdauer.
Betrieb
WARNUNG: Lesen Sie vor der Nutzung des Geräts das Kapitel über Sicherheit, und machen Sie sich damit vertraut.
So verwenden Sie den Kraftstoff
ACHTUNG: Dieses Gerät hat einen Zweitaktmotor. Verwenden Sie eine Mischung aus Benzin und Zweitakt-Motoröl. Stellen Sie sicher, dass Sie die korrekte Menge an Öl für das Gemisch verwenden. Ein falsches Verhältnis von Benzin und Öl kann zu Schäden am Motor führen.
Kraftstoffmischungsverhältnis
Das Mischungsverhältnis von Benzin und
Zweitaktmotorenöl beträgt 50:1 (2 %).
Benzin |
Öl für Zweitaktmotoren |
|
|
1 US gal |
77 ml |
|
|
1 UK gal |
95 ml |
|
|
5 l |
100 ml |
|
|
So stellen Sie die Kraftstoffmischung her
1.Bestimmen Sie die richtige Menge an Kraftstoff und Motoröl (Mischungsverhältnis 50:1). Bereiten Sie keine größere Menge Gemisch zu, als Sie für 30 Tage benötigen. Siehe Kraftstoffmischungsverhältnis auf Seite 30.
2.Füllen Sie die halbe Benzinmenge in einen sauberen Kraftstoffbehälter ein, der mit einem AntiVerschüttventil ausgestattet ist.
ACHTUNG: Verwenden Sie kein Benzin mit einer höheren Ethanolkonzentration als 10 % (E10). Dies kann das Gerät beschädigen.
ACHTUNG: Verwenden Sie kein Benzin mit einer geringeren Oktanzahl als
90 RON (87 AKI). Dies kann das Gerät beschädigen.
Hinweis: Verwenden Sie Benzin mit einer höheren Oktanzahl, wenn Sie das Gerät häufig und bei kontinuierlich hoher Motordrehzahl verwenden.
3.Füllen Sie die gesamte Menge des Zweitaktmotoröls in den Kraftstoffbehälter ein.
30 |
862 - 002 - 03.12.2018 |
Loading...