


120 Mark II
Table of contents
 Loading...
120 Mark II
EN Operator's manual 11-24
BG Ръководство за експлоатация 25-40
BS Korisnički priručnik 41-54
CS Návod k použití 55-68
DA Brugsanvisning 69-82
DE Bedienungsanweisung 83-97
EL Οδηγίες χρήσης 98-113
ES Manual de usuario 114-128
ET Kasutusjuhend 129-142
FI Käyttöohje 143-155
FR Manuel d'utilisation 156-170
HR Priručnik za korištenje 171-184
HU Használati utasítás 185-198
IT Manuale dell'operatore 199-213
LT Operatoriaus vadovas 214-227
LV Lietošanas pamācība 228-241
NL Gebruiksaanwijzing 242-256
NO Bruksanvisning 257-269
PL Instrukcja obsługi 270-284
PT Manual do utilizador 285-299
RO Instrucţiuni de utilizare 300-314
RU Руководство по эксплуатации 315-330
SK Návod na obsluhu 331-344
SL Navodila za uporabo 345-358
SR Priručnik za rukovaoca 359-372
SV Bruksanvisning 373-386
TR Kullanım kılavuzu 387-400
UK Посібник користувача 401-415
JA 取扱説明書 416-429
KO 사용자 설명서 430-442
P02138HV
9
26
1413
12
11
2
4
3
8
10
5
29
28
25
27
24
23
22
21
20
19
15
16
17
18
1
6
7
1
2 3 4 5 6 7
8 9 10 11 12 13
14
NOISE dBA
15 16 17 18 19
20
21 22
23 24
25 26
27 28
29 30

31 32
33 34
35
A
B
36
37 38
A
39 40
41 42
43 44
45 46
47 48
49 50
51 52
X
53
Y
54
55 56
57 58
59 60
61 62

63 64
65 66
67
A
68
C
D
69 70
71
A
B
C
72
A
73
A
74
75
Ø
76
A
77
A
B
C
78
79 80
81 82
83

Contents
INTRODUCTION.......................................................... 11
SAFETY........................................................................12
ASSEMBLY.................................................................. 15
OPERATION.................................................................16
MAINTENANCE............................................................19
TRANSPORTATION.....................................................21
STORAGE.................................................................... 21
TECHNICAL DATA.......................................................22
ACCESSORIES............................................................23
CONTENTS OF THE EC DECLARATION OF
CONFORMITY..............................................................24
INTRODUCTION
Operator's manual
The initial language of this operator's manual is English.
Operator's manuals in other languages are translations
from English.
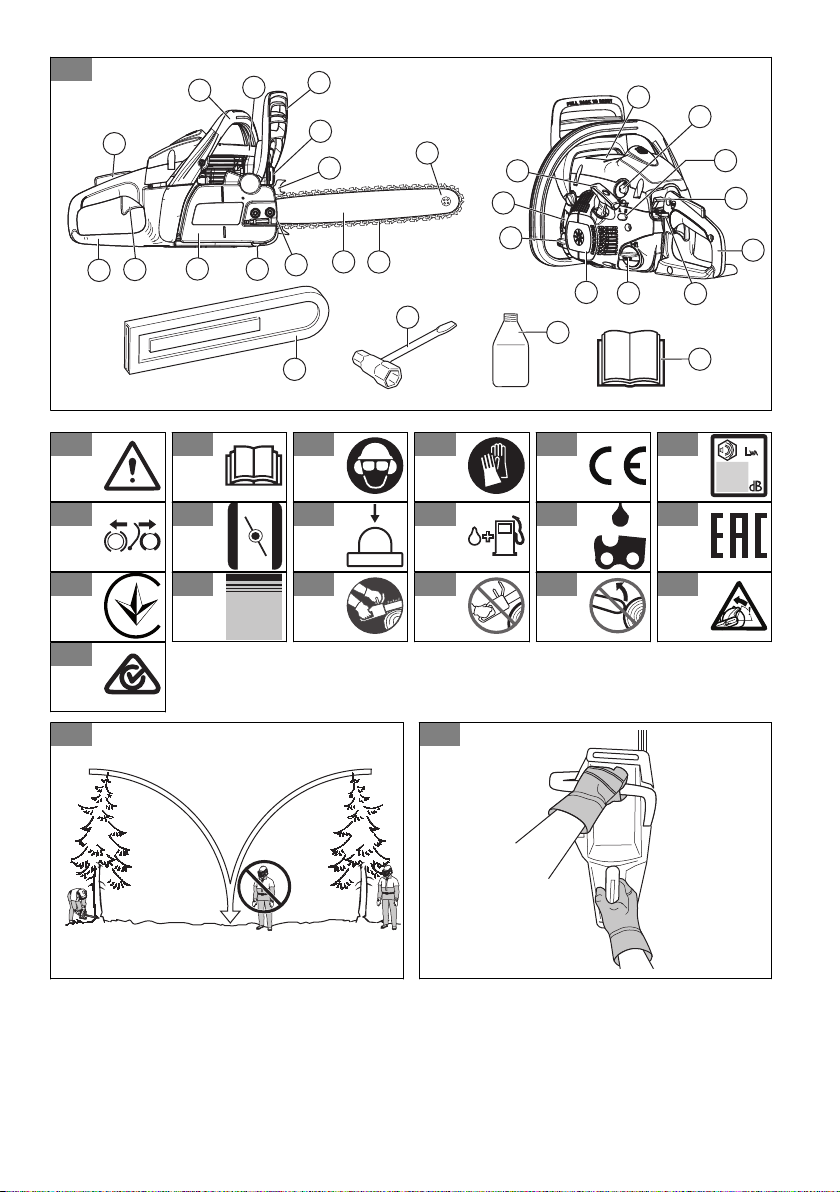
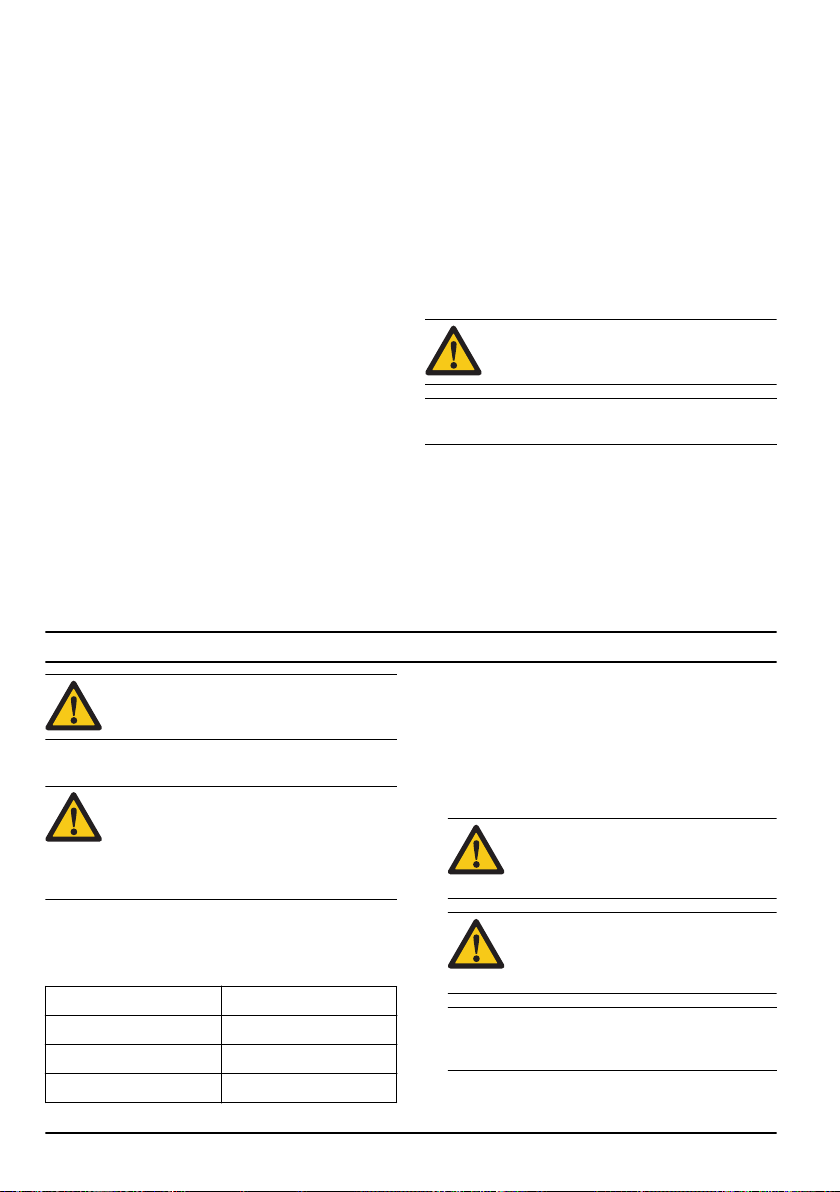
Overview
(Fig. 1 )
1. Product and serial number plate
2. Trigger lockout
3. Front handle
4. Cylinder cover
5. Chain brake and front hand guard
6. Muffler
7. Spiked bumper
8. Bar nose sprocket
9. Right hand guard
10. Trigger
11. Sprocket cover
12. Chain catcher
13. Guide bar
14. Saw chain
15. Starter handle
16. Chain oil tank
17. Starter
18. Fuel tank
19. Choke control
20. Rear handle
21. Stop switch
22. Idle adjustment screw
23. Primer bulb
24. Information and warning decal
25. Chain tensioning screw
26. Guide-bar cover
27. Combination tool
28. Two-stroke oil
29. Operator's manual (EPA)
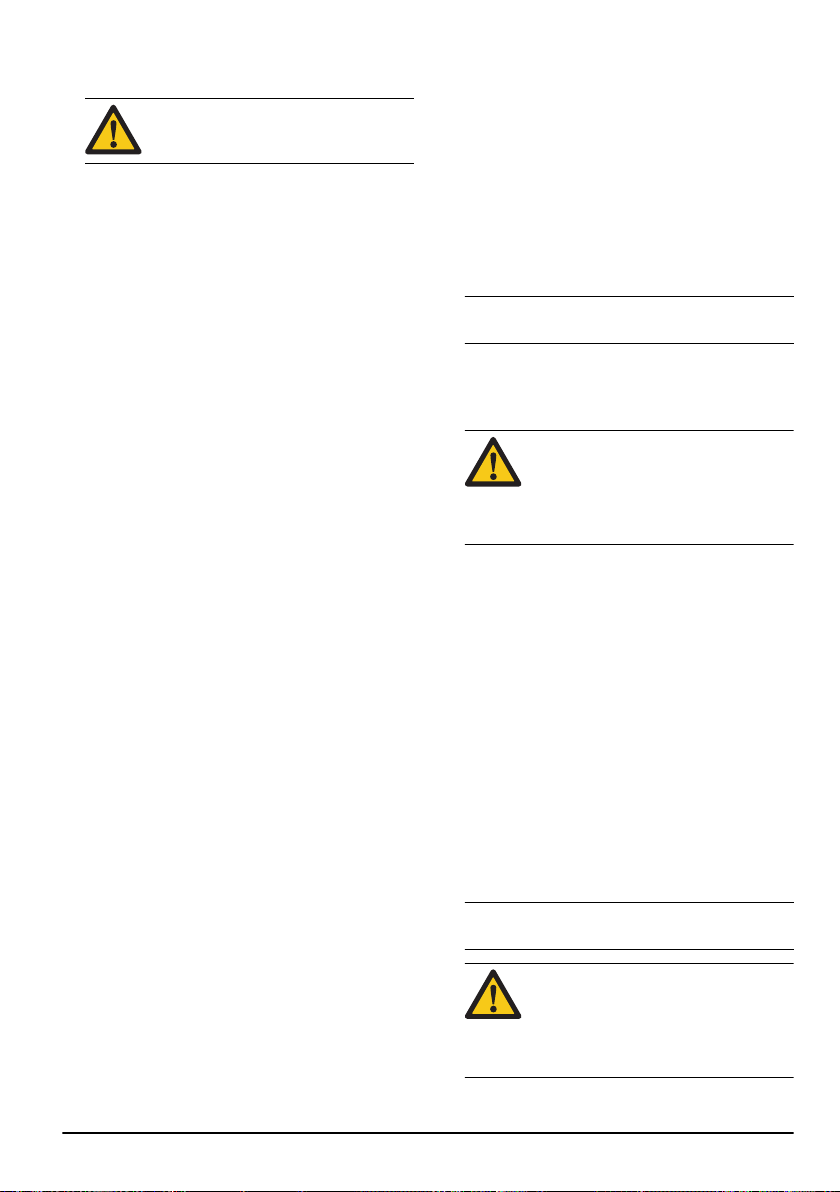
Symbols on the product
(Fig. 2 ) Warning
(Fig. 3 ) Read this manual
(Fig. 4 )
Use approved head protection, hearing
protection and eye protection
(Fig. 5 ) Use approved protective gloves
(Fig. 6 )
The product agrees with the applicable EC
Directives
(Fig. 7 ) Sound power level
(Fig. 8 )
Chain brake, not engaged (left). Chain
brake, engaged (right)
(Fig. 9 ) Choke control
(Fig. 10 ) Primer bulb
(Fig. 11 ) Refuelling
(Fig. 12 ) Chain oil fill
(Fig. 13 )
This product agrees with the applicable EAC
directives
(Fig. 14 )
This product agrees with the applicable
Ukraine directives
(Fig. 15 ) Noise level
(Fig. 16 ) Hold the product properly with both hands
(Fig. 17 ) Do not use with one hand
(Fig. 18 ) Avoid contact with nose of guide bar
(Fig. 19 ) Beware of kickback
658 - 002 - 11.04.2018 11
(Fig. 20 )
This product agrees with the applicable
Australia and New Zealand electromagnetic
compatibility directives.
Note: Other symbols/decals on the product refer to
certification requirements for other commercial areas.
Product liability
As referred to in the product liability laws, we are not
liable for damages that our product causes if:
• the product is incorrectly repaired.
• the product is repaired with parts that are not from
the manufacturer or not approved by the
manufacturer.
• the product has an accessory that is not from the
manufacturer or not approved by the manufacturer.
• the product is not repaired at an approved service
center or by an approved authority.
SAFETY
Safety definitions
The definitions below give the level of severity for each
signal word.
WARNING: Injury to persons.
CAUTION: Damage to the product.
Note: This information makes the product easier to use.
General safety instructions
• Use the product correctly. Injury or death is a
possible result of incorrect use. Only use the product
for the tasks found in this manual. Do not use the
product for other tasks.
• Read, understand and obey the instructions in this
manual. Obey the safety symbols and the safety
instructions. If the operator does not obey the
instructions and the symbols, injury, damage or
death is a possible result.
• Do not discard this manual. Use the instructions to
assemble, to operate and to keep your product in
good condition. Use the instructions for correct
installation of attachments and accessories. Only
use approved attachments and accessories.
• Do not use a damaged product. Obey the
maintenance schedule. Only do the maintenance
work that you find an instruction about in this
manual. An approved service center must do all
other maintenance work.
• This manual cannot include all situations that can
occur when you use the product. Be careful and use
your common sense. Do not operate the product or
do maintenance to the product if you are not sure
about of the situation. Speak to a product expert,
your dealer, service agent or approved service
center for information.
• Disconnect the spark plug cable before you
assemble the product, put the product into storage or
do maintenance.
• Do not use the product if it is changed from its initial
specification. Do not change a part of the product
without approval from the manufacturer. Only use
parts that are approved by the manufacturer. Injury
or death is a possible result of incorrect
maintenance.
• Do not breathe in the fumes from the engine.
Breathing in the engine's exhaust fumes, chain oil
mist and sawdust for a long period can cause a
health risk.
• Do not start the product indoors or near flammable
material. The exhaust fumes are hot and can contain
a spark which can start a fire. Without sufficient
airflow, injury or death can result from asphyxiation
or carbon monoxide.
• This product makes an electromagnetic field during
operation. The electromagnetic field can cause
damage to medical implants. Speak to your
physician and medical implant manufacturer before
you operate the product.
• Do not let a child operate the product.
• Do not let a person, without knowledge of the
instructions, operate the product.
• Always monitor a person, with decreased physical
capacity or mental capacity, that uses the product. A
responsible adult must be there at all times.
• Lock the product in an area that children and not
approved persons cannot access.
• The product can eject objects and cause injuries.
Obey the safety instructions to decrease the risk of
injury or death.
• Do not go away from the product when the engine is
on. Stop the engine and make sure that the chain
does not turn.
• The operator of the product is responsible if an
accident occurs.
• Make sure that parts are not damaged before you
use the product.
• Refer to national or local laws. They can prevent or
decrease the operation of the product in some
conditions.
12
658 - 002 - 11.04.2018

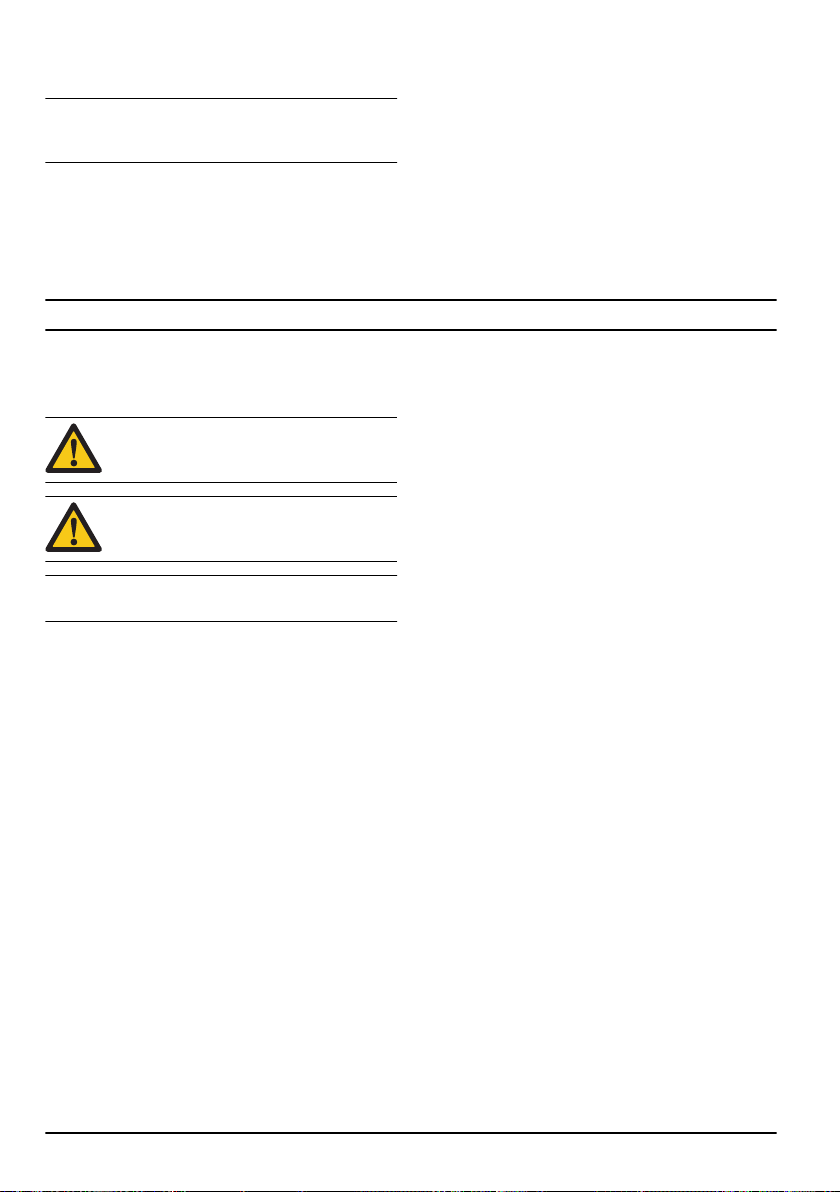
Safety instructions for operation
• Continuous or regular operation of the product can
cause "white finger" or equivalent medical problems
from vibrations. Examine the condition of your hands
and fingers if you operate the product continuously
or regularly. If your hands or fingers have
discoloration, have pain, tingle, or are numb, stop
work and speak to a physician immediately.
• Make sure the product is fully assembled before you
use it.
• The product can cause objects to eject, which can
cause damage to the eyes. Always use approved
eye protection when you operate the product.
• Be careful, a child can come near the product
without your knowledge during operation.
• Do not operate the product if there are persons in
the work area. Stop the product if a person goes into
the work area.
(Fig. 21 )
• Make sure that you are always in control of the
product.
• The product must be operated with two hands. Do
not operate the product with one hand. Serious injury
to the operator, workers, bystanders, or a
combination of these persons may result from
operation with only one hand.
• Hold the front handle with your left hand and the rear
handle with your right hand. Hold the product on the
right side of your body.
(Fig. 22 )
• Do not operate the product when you are fatigued, ill
or under the influence of alcohol or other drugs.
• Do not use the product if you cannot receive aid if an
accident occurs. Make others aware that you will
operate the product before you start the product.
• Do not turn with the product before you make sure
that no persons or animals are in the safety area.
• Remove all unwanted materials from the work area
before you start. If the chain hits an object, the object
can eject and cause injury or damage. Unwanted
material can wind around the chain and cause
damage.
• Do not use the product in bad weather, such as fog,
rain, strong winds, risk of lightning or other weather
conditions. Dangerous conditions, such as slippery
surfaces, can occur because of bad weather.
• Make sure that you can move freely and work in a
stable position.
• Make sure that you cannot fall when you use the
product. Do not tilt when you operate the product.
• Always hold the product with your two hands. Hold
the front handle with your left hand and the rear
handle with your right hand. Hold the product on the
right side of your body.
• If the choke control is in the choke position when the
engine starts, the chain starts to turn.
• Stop the engine before you move the product.
• Do not put down the product with the engine on.
• Before you remove the unwanted materials from the
product, stop the engine. Let the chain stop before
you or an aid remove the cut material.
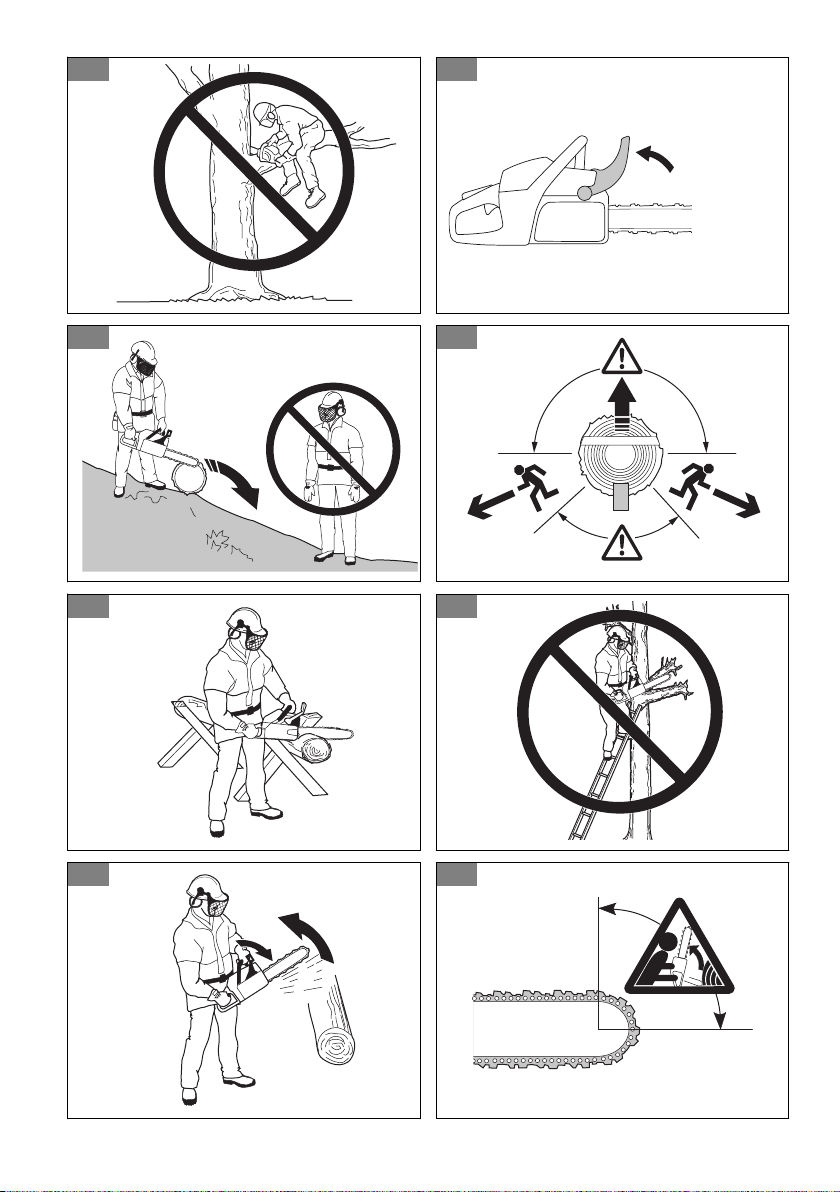
• Do not operate this product in a tree. Operation of
the product while up in a tree may result in personal
injury.
(Fig. 23 )
• The chain brake must be engaged when the product
is started to decrease the risk that the saw chain
touches you during start.
(Fig. 24 )
• Avoid kickback, skating, bouncing and dropping,
which can result in serious injury.
• Obey all safety rules to help avoid kickback and
other forces which can result in serious injury.
• Adjust the saw chain tension regularly to make sure
that the saw chain does not slack. A slack saw chain
may jump off and cause serious injury or death.
• Do not fell trees using an incorrect procedure. This
can cause injury to persons, hit a utility line or cause
damage to property.
• The operator should remain on the uphill side of the
terrain as the tree is likely to roll or slide downhill
after it is felled.
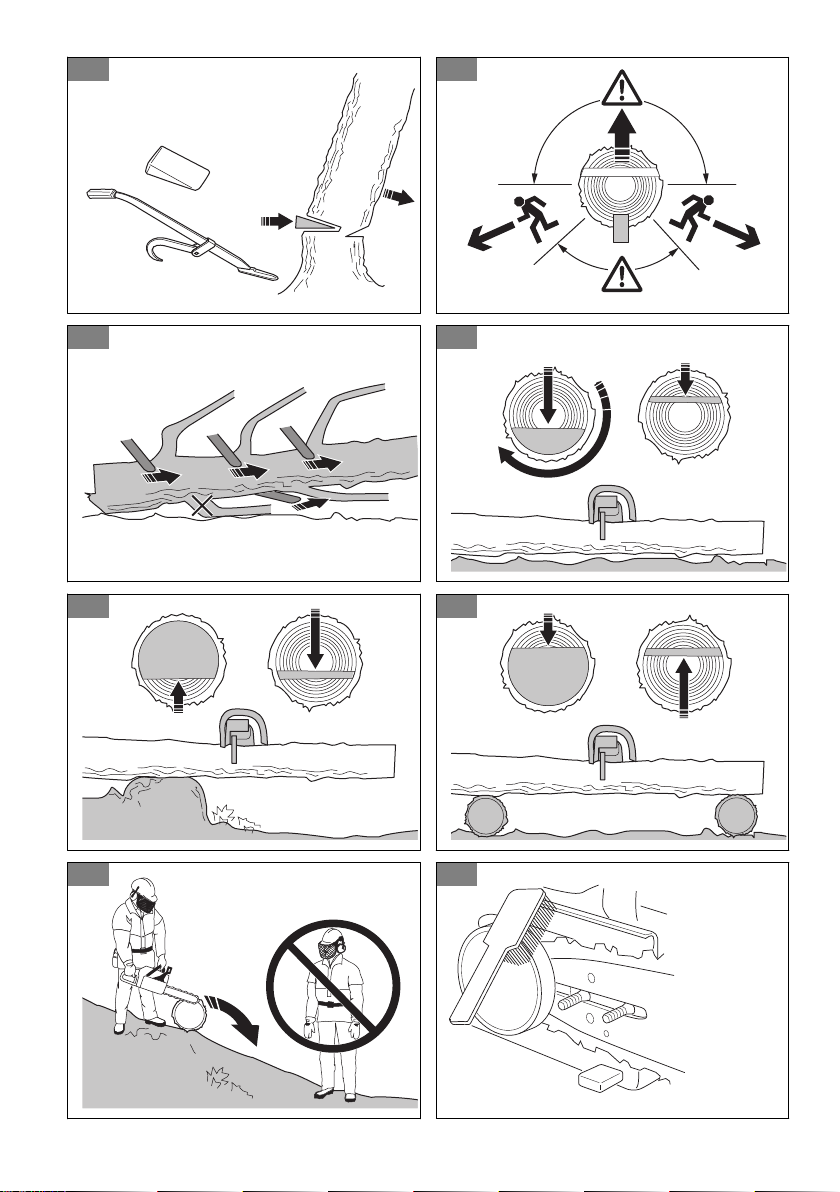
(Fig. 25 )
• Plan and clear an escape path before cuts are
started. The escape path should extend back and
diagonally to the rear of the expected line of fall.
(Fig. 26 )
• Always stop the engine before you move the product
between the trees.
• Make sure you firmly plant your feet on the ground
and distribute your weight evenly.
(Fig. 27 )
• Always keep proper footing and operate the product
only when standing on fixed, secure and level
surface. Slippery or unstable surfaces such as
ladders may cause a loss of balance or control.
(Fig. 28 )
Kickbacks, skating, bouncing and dropping
Different forces can have an effect on the safe control of
the product.
• Skating is when the guide bar glides or moves
quickly across the wood.
• Bouncing is when the guide bar lifts off the wood and
touches it again and again.
• Dropping is when the product drops down after the
cut is made. This can cause the moving chain to
touch a part of the body or other objects, causing
injury or damage.
• Kickback is when the end of the guide bar touches
objects and moves rearward, up or suddenly
forward. Kickback also occurs when the wood closes
658 - 002 - 11.04.2018
13

in and pinches the saw chain during the cut. Loss of
control can result if the product touches an object in
wood.
(Fig. 29 )
• Rotational Kickback can occur when the moving
chain touches an object at the top of the guide
bar. This can cause the chain to bury into the
object and cause the chain to stop immediately.
The result is a very fast, reverse reaction that
moves the guide bar up and rearward in the
direction of the operator.
(Fig. 30 )
(Fig. 31 )
• Pinch-Kickback can occur when the saw chain
suddenly stops during the cut. The wood closes
in and pinches the moving saw chain along the
top of the guide bar. The sudden stop of the
chain reverses the chain force and causes the
product to move in the opposite direction of the
turn of the chain. The product moves rearward in
the direction of the operator.
(Fig. 32 )
• Pull-In can occur when the saw chain suddenly
stops when the moving chain touches an object
in the wood along the bottom of the guide bar.
The sudden stop pulls the product forward and
away from the operator, which can easily cause
the loss of control of the product by the operator.
(Fig. 33 )
Make sure that you understand the different forces and
how to prevent them before you operate the product.
To prevent kickbacks, skating, bouncing and
dropping
• While the engine runs, make sure to hold the product
tightly. Keep your right hand on the rear handle and
the left hand on the front handle. Tightly hold with
thumbs and fingers around the handles. Do not let
go.
• Keep control of the product during the cut and after
the wood falls to the ground. Do not let the weight of
the product drop down after the cut is made.(Fig.
34 )
• Make sure that the area in which you are cutting is
free from blockage. Do not let the nose of the guide
bar touch a log, branch or other blockages while you
operate the product.
• Cut at high engine speeds.
• Do not overreach or cut above shoulder height.(Fig.
35 )
• Obey the manufacturer's sharpening and
maintenance instructions for the saw chain.
• Only use replacement guide bars and saw chains
specified by the manufacturer.
• The risk of kickback is increased if the depth gauge
setting is too large.
Personal protective equipment
• Always use the correct personal protective
equipment when you operate the product. The
personal protective equipment does not erase the
risk of injury. The personal protective equipment
decreases the grade of injury if an accident occurs.
• Generally, clothes should be close-fitting without
restricting your freedom of movement.
• Use an approved protective helmet.
• Always use approved ear protection while you
operate the product. Noise for a long period can
cause hearing loss.
• Use protective glasses or a face visor to reduce the
risk of injury from thrown objects. The product is
capable of throwing objects, such as wood chips,
small pieces of wood, etc., at great force. This can
result in serious injury, especially to the eyes.
• Use gloves with chainsaw protection.
• Use trousers with chainsaw protection.
• Use boots with chainsaw protection, steel toe-cap
and non-slip sole.
• Make sure that you have a first aid kit near.
• Sparks can come from the muffler, the guide bar and
saw chain or other sources. Always have fire
extinguishing tools and a shovel available to help
prevent forest fires.
Protective devices on the product
• Make sure that you regularly do the maintenance to
the product.
• The life of the product increases.
• The risk of accidents decreases.
Let an approved dealer or an approved service
center regularly examine the product to do
adjustments or repairs.
• Do not use a product with damaged protective
equipment. If the product is damaged, speak to an
approved service center.
Stop switch
Start the engine. Make sure that the engine stops when
you move the stop switch to the stop position.
To examine the throttle trigger lockout
1. Make sure that the trigger (B) is locked at idle when
you release the trigger lockout (A).(Fig. 36 )
2. Push the trigger lockout (A) and make sure that it
goes back to its initial position when you release it.
3. Push the trigger (B) and make sure that it goes back
to its initial position when you release it.
4. Start the engine, and then apply full speed.
5. Release the trigger and examine if the saw chain
stops.
6. If the saw chain turns with an idle engine, examine
the idle adjustment screw of the carburetor.
14
658 - 002 - 11.04.2018

Guard
The guard prevents objects from being ejected in the
direction of the operator. The guard also prevents
accidental touch between the operator and the saw
chain.
• Make sure that the guard is permitted for operation
in combination with the product.
• Do not use the product without the guard.
• Make sure that the guard is not damaged. Replace
the guard if it is worn or has cracks.
Fuel safety
• Do not start the product if there is fuel or engine oil
on the product. Remove the unwanted fuel/oil and let
the product dry. Remove unwanted fuel from the
product.
• If you spill fuel on your clothing, change clothing
immediately.
• Do not get fuel on your body, it can cause injury. If
you get fuel on your body, use a soap and water to
remove the fuel.
• Do not start the engine if you spill oil or fuel on the
product or on your body.
• Do not start the product if the engine has a leak.
Examine the engine for leaks regularly.
• Be careful with fuel. Fuel is flammable and the fumes
are explosive and can cause injuries or death.
• Do not breathe in the fuel fumes, it can cause injury.
Make sure that there is a sufficient airflow.
• Do not smoke near the fuel or the engine.
• Do not put warm objects near the fuel or the engine.
• Do not add the fuel when the engine is on.
• Make sure that the engine is cool before you refuel.
• Before you refuel, open the fuel tank cap slowly and
release the pressure carefully.
• Do not add fuel to the engine in an indoor area. Not
sufficient airflow can cause injury or death because
of asphyxiation or carbon monoxide.
• Tighten the fuel tank cap carefully or a fire can
occur.
• Move the product at a minimum of 3 m (10 ft) from
the position where you filled the tank before a start.
• Do not put too much fuel in the fuel tank.
• Make sure that a leak cannot occur when you move
the product or fuel container.
• Do not put the product or a fuel container where
there is an open flame, spark or pilot light. Make
sure that the storage area does not contain an open
flame.
• Only use approved containers when you move the
fuel or put the fuel into storage.
• Empty the fuel tank before long-term storage. Obey
the local law on where to dispose fuel.
• Clean the product before long-term storage.
• Remove the spark plug cable before you put the
product into storage to make sure that the engine
does not start accidentally.
Safety instructions for maintenance
• Disconnect the spark plug before doing maintenance
on the product, not including carburetor adjustments.
• Have all product servicing done by an approved
dealer, not including the tasks in
MAINTENANCE on
page 19
.
• Make sure the saw chain stops moving when the
throttle trigger is released.
• Keep the handles dry, clean, and free from oil or fuel
mixture.
• Keep caps and fasteners correctly tightened.
• Replacement components that are not approved or
the removal of safety devices can cause damage to
the product. This can also cause possible injury to
the operator or bystanders. Only use accessories
and replacement parts as recommended. Do not
change your product.
• Keep the saw chain sharp and clean for safe and
high performance.
• Obey the instructions for lubricating and changing
accessories.
• Examine the product for damaged parts. Before
more use of the product, make sure the damaged
guard or part operates correctly. Examine for broken
or incorrectly aligned parts, and parts that do not
move freely. Examine for other conditions that can
have an effect on the operation of the product. Make
sure the product is correctly installed. A guard or
other damaged part must be repaired or replaced by
an approved dealer unless written in the operator’s
manual.
• When not in operation, keep the product in a dry,
high or locked area away from children.
• During transportation or storage of the product, use
a guide bar cover or case to move the product.
• Do not use waste oil. Waste oil can be dangerous to
you and can cause damage to the product and
environment.
ASSEMBLY
WARNING: Read and understand the safety
chapter before you assemble the product.
658 - 002 - 11.04.2018 15
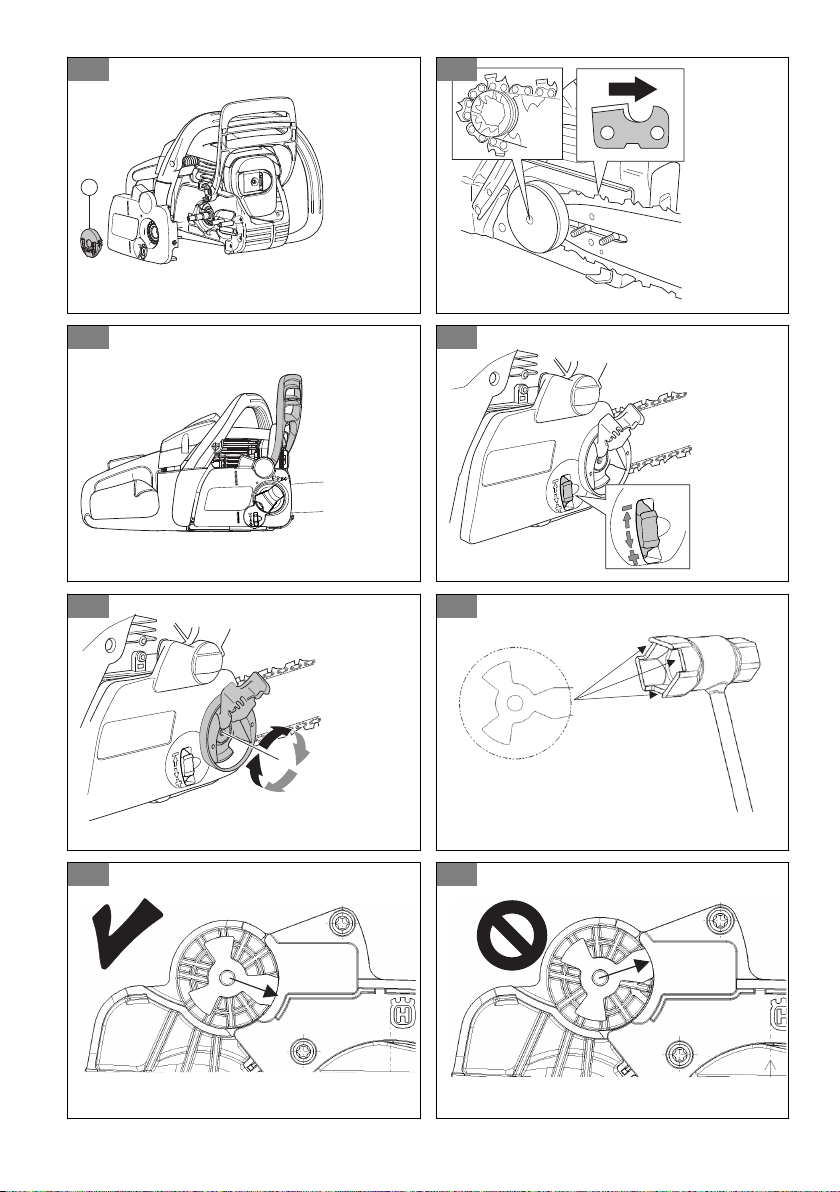
To assemble the guide bar and saw
chain
1. Move the front hand guard in the direction of the
front handle to disengage the chain brake.
2. Fold the knob out to open position. (Fig. 37 )
3. Turn the knob counterclockwise to loosen the bar
cover.(Fig. 38 )
4. Remove the knob (A) and the sprocket cover.
Remove the transportation guard, if installed. (Fig.
39 )
5. Put the guide bar over the bar bolts. Steer the guide
bar to its most rear position. Put the chain over the
drive sprocket and engage it in the groove on the
guide bar. Start on the top edge of the guide bar.
(Fig. 40 )
6. Make sure that the edges of the cutting links are
turned forward on the top edge of the guide bar.
7. Assemble the sprocket cover and steer the chain
adjuster pin to the hole in the guide bar. Make sure
that the drive links of the chain fit correctly on the
drive sprocket. Also make sure that the saw chain is
correctly engaged in the groove in the guide bar.
(Fig. 41 )
8. Tighten the saw chain by turning the wheel down (+).
Tighten the chain until it does not sag from below of
the guide bar. (Fig. 42 )
9. The saw chain is correctly tightened as it does not
sag from below the guide bar, but you can turn it
easily by hand.
10. Hold up the guide bar tip and turn the knob
clockwise to tighten it. (Fig. 43 )
• Examine the chain tension frequently after you
assemble a new saw chain and until the saw
chain has been run-in.
• Examine the chain tension regularly. Correct
chain tension results in good cutting performance
and a long life.
To reset the chain brake
If the clutch cover is removed accidentally while the
chain brake is locked, the chain brake must be unlocked
so the clutch cover can be assembled without binding to
the clutch drum.
CAUTION: The chain brake spring is under
tension. Use care when resetting the chain
brake.
Note: Do not hold the brake band while attempting to
reset it.
1. Align the notches on the bar tool so that they fit over
the brake rotating link.(Fig. 44 )
2. To reset the brake, rotate the link clockwise until it
stops. The front link will be in its downward rotated
position when the chain brake is unlocked.(Fig. 45 )
(Fig. 46 )
OPERATION
WARNING: Read and understand the safety
chapter before you operate the product.
To use fuel
CAUTION: This product has a two-cycle
engine. Use a mixture of gasoline and two-
cycle engine oil. Make sure to use the
correct quantity of oil in the mixture.
Incorrect ratio of gasoline and oil can cause
damage to the engine.
Fuel mixture ratio
The fuel mixture ratio for the gasoline and two-cycle
engine oil is 50:1 (2%)
Gasoline
Two-cycle engine oil
1 U.S. Gal. 77 ml (2.6 oz)
1 UK Gal. 95 ml (3.2 oz)
5 l 100 ml (3.4 oz)
To make the fuel mixture
1. Determine the correct quantity of gasoline and
engine oil (mixture ratio 50:1). Do not make more
than 30 days quantity of fuel mixture. See
To use
fuel on page 16
.
2. Add half of the gasoline quantity to a clean fuel
container with an antispill valve.
CAUTION: Do not use gasoline with
more than 10% ethanol concentration
(E10). This can cause damage to the
product.
CAUTION: Do not use gasoline with an
octane number less than 90 RON (87
AKI). This can cause damage to the
product.
Note: Use gasoline with a higher octane number if
you frequently use the product at continuously high
engine speed.
16 658 - 002 - 11.04.2018
3. Add the full quantity of the two-cycle engine oil to the
fuel container.
CAUTION: Always use air-cooled two-
cycled engine oil of high quality. Other
oils can cause damage to the product.
4. Shake the fuel mixture to mix the contents.
5. Add the remaining gasoline quantity to the fuel
container.
6. Shake the fuel mixture to mix the contents.
7. Fill the fuel tank of the product with the fuel mixture.
See
To use fuel on page 16
.
To fill the fuel tank
1. Make sure that the fuel mixture is correct and that
the fuel mixture is in a fuel container with an antispill
valve.
2. If fuel is on the container, remove the unwanted fuel
and let the container dry.
3. Make sure that the area near the fuel tank cap is
clean.
4. Remove the fuel tank cap.
5. Shake the fuel container before you add the fuel
mixture to the fuel tank.
6. Put back the fuel tank cap.
To lubricate the saw chain
The product has an automatic lubrication system. The
saw chain oil tank and the fuel tank are designed so that
the fuel runs out before the saw chain oil. This safety
feature requires that the correct chain oil is used and
that the instructions are obeyed.
1. Use vegetable-based saw chain oil or a standard
chain oil.
2. Make sure that the area near the cap of the saw
chain oil tank is clean.
3. Remove the cap of the saw chain oil tank.
4. Fill the saw chain oil tank with the recommended
saw chain oil.
5. Put back the cap of the saw chain oil tank.
To start and stop
Before you start the engine
• Examine the product for missing, damaged, loose or
worn parts.
• Examine the nuts, screws and bolts.
• Examine the air filter.
• Examine the trigger lockout and the trigger for
correct operation.
• Examine the stop switch for correct operation.
• Examine the product for fuel leaks.
• Examine the saw chain sharpness and tension.
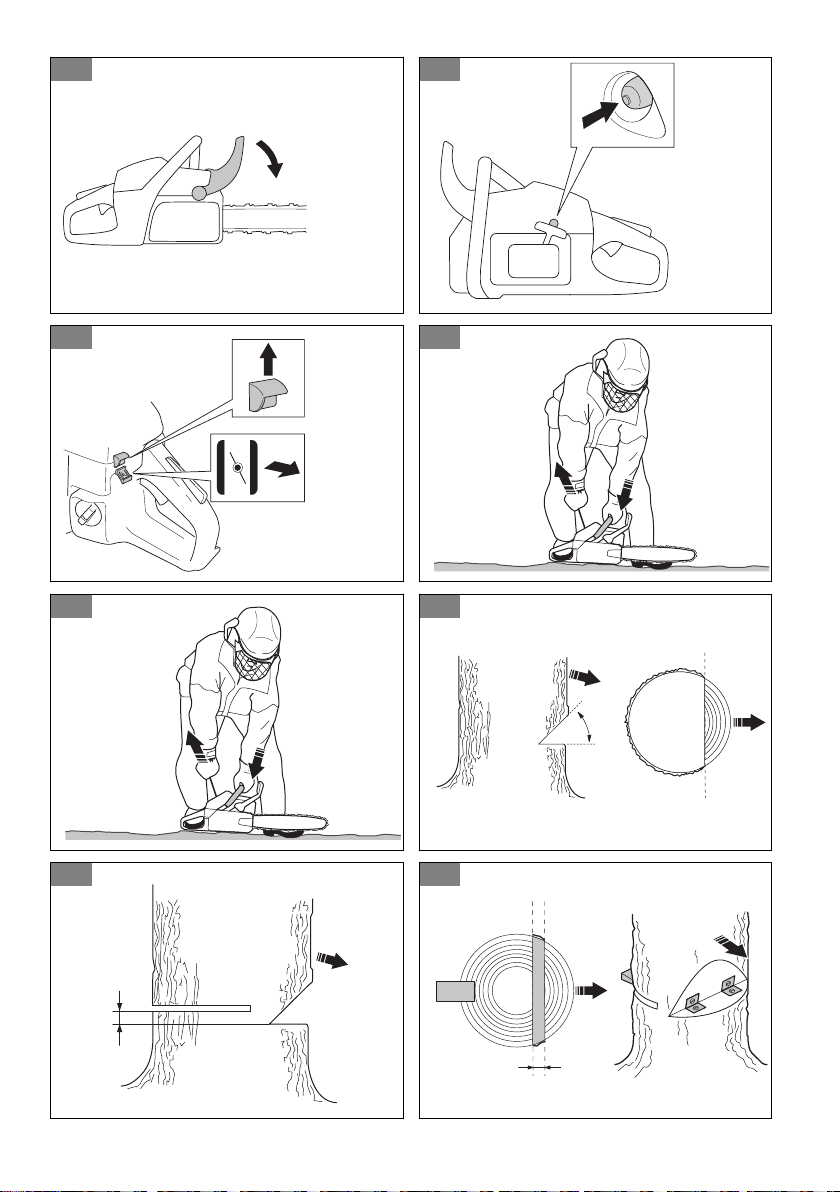
To start a cold engine
1. Move the front hand guard forward to engage the
chain brake. (Fig. 47 )
2. Push the primer bulb 6 times. (Fig. 48 )
3. Move the choke control to the full choke position.
(Fig. 49 )
4. Hold the body of the product on the ground with your
left hand. Put your right foot in the rear handle to
make the chainsaw stable. Pull the starter rope
handle slowly until you feel some resistance. Then
pull the starter rope handle with force 5 times. (Fig.
50 )
Note: Do not pull the trigger while you start the
engine.
5. Move the choke control to the no choke position.
6. Pull the starter rope handle until the engine starts.
Wait 60 seconds after a start before you pull the
trigger.
CAUTION: Do not pull the starter rope
until it stops. Do not let go of the starter
rope when it is fully extended. Release
the starter rope slowly. Obey these
instructions to prevent damage to the
engine.
7. Pull the front hand guard in the direction of the front
handle to disengage the chain brake.
8. Hold the rear handle with your right hand and the
front handle with your left hand.
9. Use the product.
To start a warm engine
1. Move the front hand guard forward to engage the
chain brake.
2. Push the primer bulb 6 times.
3. Move the choke control to the full choke position.
4. Move the choke control to the no choke position.
5. Hold the body of the product on the ground with your
left hand. Put your right foot in the rear handle to
make the chainsaw stable.. Pull the starter rope
handle slowly until you feel some resistance. Then
pull the starter rope handle with force until the
engine starts. (Fig. 51 )
Note:
Do not pull the trigger while you start the
engine.
CAUTION: Do not pull the starter rope
until it stops. Do not let go of the starter
rope when it is fully extended. Release
the starter rope slowly. Obey these
instructions to prevent damage to the
engine.
658 - 002 - 11.04.2018 17

6. Pull the front hand guard in the direction to the front
handle to disengage the chain brake.
7. Hold the rear handle with your right hand and the
front handle with your left hand.
8. Use the product.
To start the engine when the fuel is too hot
If the product does not start, the fuel can be too hot.
Note: Always use new fuel and decrease the operation
time during warm weather.
1. Put the product in a cool area away from open
sunlight.
2. Let the product cool down for 20 minutes at
minimum.
3. Press the primer bulb again and again for 10-15
seconds.
4. Obey the procedure to start a cold engine. See
To
start a cold engine on page 17
.
To stop the engine
• Push the stop switch to stop the engine.
Note: The stop switch automatically goes back to its
initial position.
To use a spike bumper
A spike bumper prevents kickbacks and holds the wood
as you cut. The spike bumper is a pivot between the
engine body and the guide bar.
1. Put the lower end of the spike bumper at the correct
hinge width.
2. Press, with your left hand, against the front handle
while you lift the rear handle with your right hand.
3. Saw until you get the correct hinge width.
Note:
The hinge must have an equal thickness.
4. Saw more than half of the diameter and then put the
felling wedge into the saw cut.
To fell a tree
1. Remove dirt, stones, loose bark, nails, staples and
wire from the tree.
2. Make a notch 1/3 the diameter of the tree,
perpendicular to the direction of the fall.(Fig. 52 )
3. Make the lower horizontal notch cut. This will prevent
either the saw chain or the guide bar from being
pinched when the second notch is made.
4. Make the felling back cut (X) at least 50 mm (2 in)
higher than the horizontal notching cut. Keep the
felling back cut parallel to the horizontal notching cut
so enough wood is left to act as a hinge. Do not cut
through the hinge. The hinge wood keeps the tree
from twisting and falling in the wrong direction.(Fig.
53 )(Fig. 54 )
5. As the felling back cut nears the hinge, the tree
starts to fall. Make sure that the tree can fall in the
correct direction and not rock rearward and pinch the
saw chain. Stop the cut before the felling back cut is
complete to prevent this. Use wedges of wood,
plastic or aluminium to open the cut and let the tree
fall along the necessary line of fall.(Fig. 55 )
6. When the tree begins to fall, remove the product
from the cut, stop the engine, put the product down,
then use the retreat path planned. Be alert for
overhead limbs falling and watch your footing.(Fig.
56 )
To limb a tree
1. Use larger limbs to hold the log off the ground.
2. Remove small limbs in one cut.(Fig. 57 )
3. Cut branches that have tension from the bottom to
the top to prevent pinching the saw chain or the
guide bar.
To buck a log
CAUTION: Do not let the saw chain touch
the ground.
• If the log is supported along its entire length, cut
from the top of the log (known as overbucking).(Fig.
58 )
• If the log is supported on one end, cut 1/3 the
diameter from the underside of the log (known as
underbucking) .(Fig. 59 )
• If the log is supported on both ends, cut 1/3 the
diameter from the top. Complete the cut by
underbucking the lower 2/3 of the log to meet the
first cut.(Fig. 60 )
• If you buck a log on a slope, always stand on the
uphill side of the log. Cut through the log while you
maintain complete control of the product, then
release the cutting pressure near the end of the cut
while firmly gripping the rear handle and front
handle.(Fig. 61 )
18
658 - 002 - 11.04.2018

MAINTENANCE
WARNING: Read and understand the safety
chapter before you clean, repair or do
maintenance on the product.
Maintenance schedule
Make sure that you obey the maintenance schedule.
The intervals are calculated from daily use of the
product. The intervals are different if you do not use the
product each day. Only do the maintenance work that is
found in this manual. Speak to an approved service
center about other maintenance work not found in this
manual.
Daily maintenance
• Clean the external surfaces.
• Make sure that the lockout and trigger work
correctly.
• Clean the chain brake and make sure that it works
correctly.
(Fig. 62 )
• Examine the chain catcher for damage. Replace the
chain catcher if it is damaged.
(Fig. 63 )
• Turn the guide bar daily for more even wear.
• Make sure that the lubrication hole in the guide bar is
not clogged.
(Fig. 64 )
• Clean the guide bar groove.
(Fig. 65 )
• Make sure that the guide bar and saw chain get
sufficient oil.
• Examine the saw chain:
• for cracks in the rivets and links.
• for abnormally worn rivets and links.
• for correct tension.
If necessary, replace the saw chain.
• Sharpen the saw chain. See
To sharpen the saw
chain on page 20
.
• Examine the drive sprocket for excessive wear and
replace if necessary.
(Fig. 66 )
• Clean the air intake of the starter unit.
• Make sure that the nuts and screws are tight.
• Make sure that the stop switch works correctly.
• Examine the engine, tank and fuel lines for fuel
leaks.
• Make sure that the saw chain does not rotate when
the engine is idling.
Weekly maintenance
• Make sure that the cooling system works correctly.
• Make sure that the starter, starter cord and return
spring work correctly.
• Make sure that the vibration damping elements are
not damaged.
(Fig. 67 )
• File off any burrs from the edges of the guide bar.
• Clean or replace the spark arrestor screen on the
muffler.
(Fig. 68 )
• Clean the external surfaces of the carburetor and its
adjacent areas.
• Clean the air filter. Install a new air filter if it is
damaged or too dirty to be fully cleaned. See
To
clean the air filter on page 20
for more information.
Monthly maintenance
• Examine the brake band on the chain brake for
wear. Replace when the brake band thickness is
less than 0.6 mm (0.024 in) at the most worn point.
(Fig. 69 )
• Examine the clutch center, clutch drum and clutch
spring for wear.
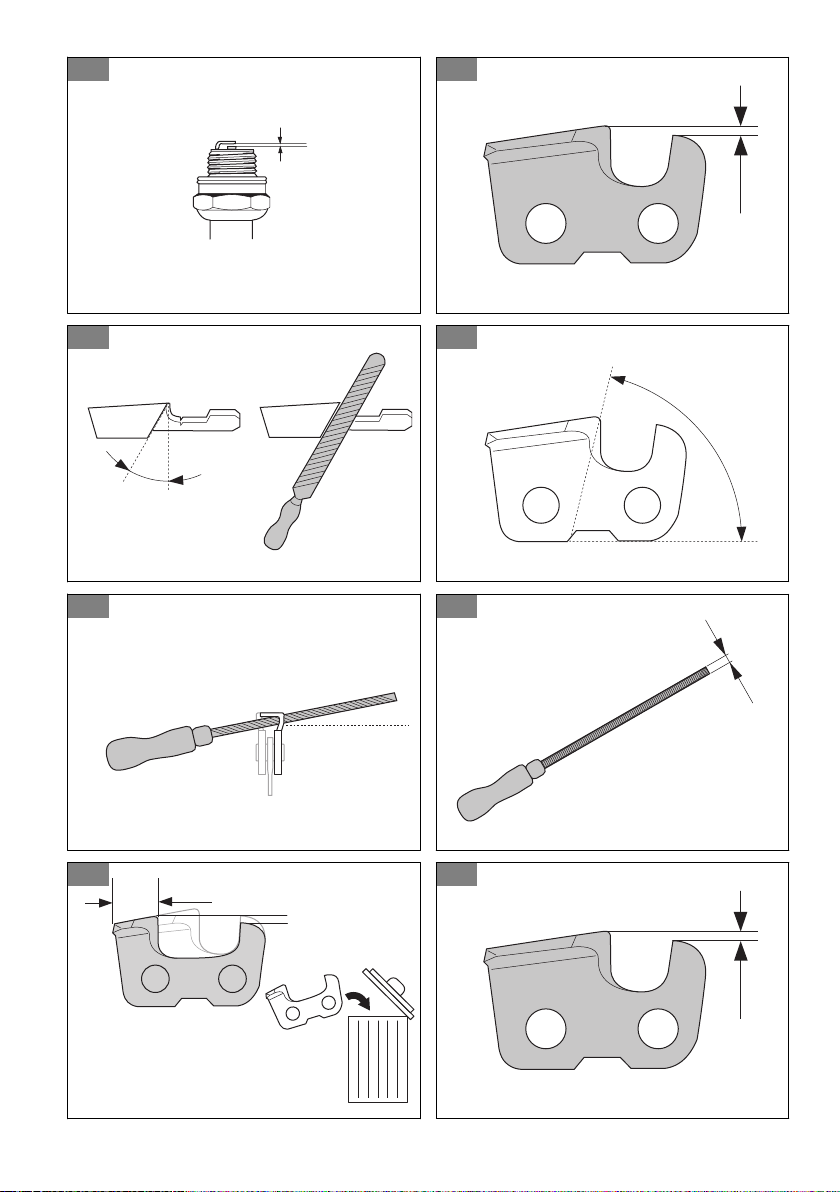
• Clean the spark plug. Make sure that the electrode
gap is correct.
(Fig. 70 )
• Clean the external surfaces of the carburetor and its
adjacent areas.
• Examine the fuel filter and the fuel hose. Replace if
necessary.
• Empty the fuel tank.
• Empty the oil tank.
• Examine all cables and connections.
Yearly maintenance
• Examine the spark plug.
• Clean the external surfaces of the carburetor and its
adjacent areas.
• Clean the cooling system.
• Examine the spark arrester screen.
• Examine the fuel filter.
• Examine the fuel hose for damage.
• Examine all cables and connections.
Intermittent maintenance
• Have an approved service center repair or replace
the muffler after 50 hours of operation.
• Do maintenance on the spark plug when:
• the power level in the engine is low.
658 - 002 - 11.04.2018
19

• it is hard to start the engine.
• the engine does not work correctly at idle speed.
• Do a check of the saw chain lubrication each time
you refuel. See
To do a check of the saw chain
lubrication on page 21
.
To adjust the idle speed
Make sure that the air filter is clean and the air filter
cover is attached before you adjust the idle speed.
1. Turn the idle adjustment screw, which is identified
with a "T" mark, clockwise until the saw chain starts
to turn.
2. Turn the idle adjustment screw, which is identified
with a "T" mark, counterclockwise until the saw chain
stops.
3. The idle speed must be below the speed when the
saw chain starts to turn. The idle speed is correct
when the engine operates smoothly in all positions.
To clean the spark arrester screen
1. Use a wire brush to clean the spark arrester screen.
To do maintenance on the spark plug
CAUTION: Use the recommended spark
plug. Make sure that the replacement is the
same as the manufacturer supplied part. An
incorrect spark plug can cause damage to
the product.
1. If the product is hard to start or operate, examine the
spark plug for unwanted materials. To decrease the
risk of unwanted material on the spark plug
electrodes:
a) make sure that the idle speed is correctly
adjusted.
b) make sure that the fuel mixture is correct.
c) make sure that the air filter is clean.
2. Clean the spark plug if it is dirty. Make sure that the
electrode gap is correct.(Fig. 71 )
3. Replace the spark plug when it is necessary.
To clean the air filter
1. Remove the air filter cover and remove the air filter.
2. Clean the air filter with warm soap water. Make sure
that the air filter is dry before you install it.
3. Replace the air filter if it is too dirty to fully clean it.
Always replace a damaged air filter.
To sharpen the saw chain
The cutter
The cutting part of the saw chain is called the cutter and
consists of a cutting tooth (A) and the depth gauge (B).
The cutters cutting depth is determined by the difference
in height between the two, the depth gauge setting (C).
(Fig. 72 )
When you sharpen a cutting tooth there are four
important factors to remember:
• Filing angle.
(Fig. 73 )
• Cutting angle.
(Fig. 74 )
• File position.
(Fig. 75 )
• Round file diameter.
(Fig. 76 )
To sharpen the cutting teeth
Use a round file and a file gauge to sharpen the cutting
teeth. See
Saw chain filing and saw chain combinations
on page 23
for information on the recommended
dimension of the file and gauge for the saw chain
installed on your product.
1. Make sure that the saw chain is correctly tensioned.
A slack chain will move sideways, making it more
difficult to sharpen correctly.
2. File all teeth on one side first. File the cutting teeth
from the inside face and reduce the pressure on the
return stroke.
3. Turn the product over and file the teeth on the other
side.
4. File all the teeth to the same length. When the length
of the cutting teeth is reduced to 4 mm (5/32") the
saw chain is worn out and must be replaced.(Fig.
77 )
To adjust the depth gauge setting
Sharpen the cutting teeth before you adjust the depth
gauge setting. See
To sharpen the cutting teeth on page
20
. When you sharpen the cutting tooth (A), the depth
gauge setting (C) will decrease. To maintain optimal
cutting performance, the depth gauge (B) has to be filed
down to achieve the recommended depth gauge setting.
See
Saw chain filing and saw chain combinations on
page 23
to find the correct depth gauge setting for your
particular chain.
(Fig. 78 )
(Fig. 79 )
Note: This recommendation assumes that the length of
the cutting teeth is not reduced excessively.
Use a flat file and depth gauge tool to adjust the depth
gauge.
1. Put the depth gauge tool above the saw chain.
Detailed information regarding how to use the depth
gauge tool will be found on the package of the depth
gauge tool.
2. Use the flat file to file off the tip of the depth gauge
that protrudes through the depth gauge tool. The
20
658 - 002 - 11.04.2018

depth gauge setting is correct when you no longer
feel resistance as you draw the file along the depth
gauge tool.
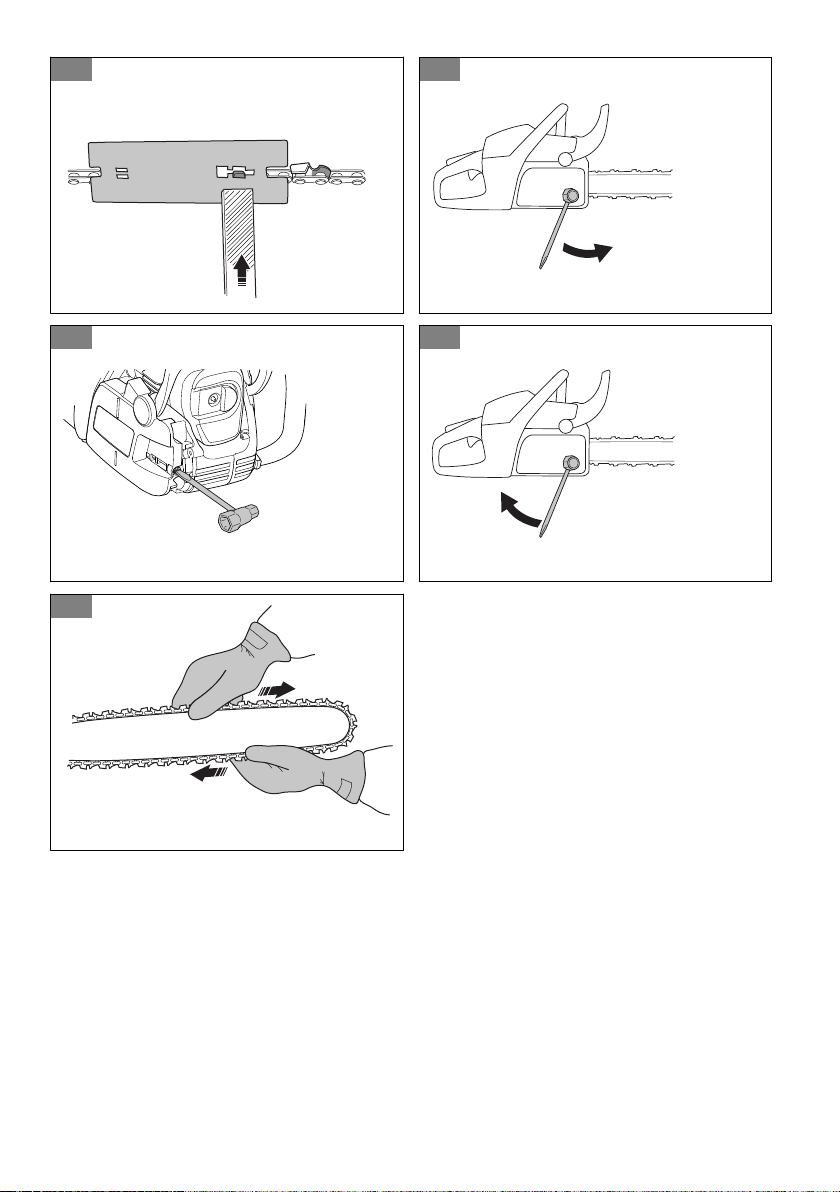
To tension the saw chain
Note: Check the tension of a new saw chain frequently
during its running-in period.
1. Loosen the guide bar nuts that hold the sprocket
cover. Use the combination wrench. (Fig. 80 )
2. Tighten the guide bar nuts by hand as tight as you
can.
3. Lift the top of the guide bar and extend the saw
chain by tightening the chain tensioning screw. Use
the combination wrench. Tighten the saw chain until
it does not hang down from the bottom of the guide
bar. (Fig. 81 )
4. Tighten the guide bar nuts using the combination
wrench and lift the tip of the guide bar at the same
time. (Fig. 82 )
5. Make sure that you can pull the saw chain round
freely by hand and that it does not sag.(Fig. 83 )
To lubricate the cutting equipment
To do a check of the saw chain lubrication
Do a check of the chain saw lubrication each time you
refuel.
1. Start the product and let it run at 3/4 speed. Point the
nose of the guide bar at a light color surface almost
20 cm (8 in) away.
2. After 1 minute of running, a line of oil shows on the
light surface.
3. If you cannot see the line of oil after 1 minute, clean
the oil channel in the guide bar. Clean the groove in
the edge of the guide bar. Make sure the guide bar
nose sprocket turns freely and that there are no
blockages in the lubrication hole. Clean and lubricate
the tip sprocket.
4. Start the product and let it run at 3/4 speed. Point the
nose of the bar at a light color surface almost 20 cm
(8 in) away.
5. After 1 minute of running, a line of oil shows on the
light surface.
6. If you cannot see the line of oil after 1 minute, speak
to your approved dealer.
TRANSPORTATION
• Empty the fuel and chain oil tanks before
transportation. Discard used fluids correctly.
• Put the guide bar cover on the cutting attachment
during transportation. This prevents persons from
touching the sharp saw chain by accident. A saw
chain not in operation can cause injury to you or
other persons that touch a sharp saw chain.
• Remove the spark plug cap from the spark plug and
engage the chain brake before transportation.
• Make sure the product cannot move during
transportation.
STORAGE
• Always put the product away safely when not in
operation. Leakages and fumes from the product can
touch sparks, naked flames from electrical
equipment, electrical mowers, relays/switches,
boilers and more.
• Always save fuel in an approved container.
• Empty the fuel and chain oil tanks when the product
is in storage for longer periods of time. Discard used
fluids correctly.
• During storage, put the guide bar cover on the guide
bar. This prevents persons from accidentally
touching the sharp saw chain. A saw chain not in
operation can cause serious injury to you or persons
who touch a sharp saw chain.
• Remove the spark plug cap from the spark plug and
engage the chain brake before storage.
658 - 002 - 11.04.2018 21

TECHNICAL DATA
unit
120 Mark II
(P02138HV)
Engine specifications
Cylinder displacement cm
3
38
Spark plug Champion RCJ7Y
Electrode gap mm (in) 0.5 (0.02)
Fuel tank volume cm
3
300
Idle speed min
-1
2800-3200
Power output at 9000 min
-1
kW 1.4
Emission durability period h 50
Noise and vibration data
Equivalent vibration levels, a
hveq
front handle
1
m/s
2
4.5
Equivalent vibration levels, a
hveq
rear handle
2
m/s
2
6.0
Sound power level, guaranteed (L
WA
)
3
dB(A) 116
Sound power level, measured
4
dB(A) 110
Sound pressure level at operator's ear
5
dB(A) 95
Product dimensions
Weight (excluding cutting equipment) kg 4,9
Oil tank volume cm
3
200
Fuel and lubrication system
Oil pump capacity at 9000 min
-1
ml/min 7
Oil tank volume cm
3
200
Type of oil pump Automatic
Saw chain and guide bar
Standard guide bar length cm (in) 35-40 (14-16)
Recommended bar lengths cm (in) 35-45 (14-18)
Usable cutting length cm (in) 34-39 (13.5 -15.5)
1
Equivalent vibration level, according to ISO 22867, is calculated as the time-weighted energy total for vibration
levels under various working conditions. Reported data for equivalent vibration level has a typical statistical
dispersion (standard deviation) of 1 m/s
2
.
2
Equivalent vibration level, according to ISO 22867, is calculated as the time-weighted energy total for vibration
levels under various working conditions. Reported data for equivalent vibration level has a typical statistical
dispersion (standard deviation) of 1 m/s
2
.
3
Noise emissions in the environment measured as sound power (L
WA
).
4
Noise emissions in the environment measured as sound power (L
WA
).
5
Equivalent sound pressure level is calculated as the time-weighted energy total for different sound pressure
levels under various working conditions. Typical statistical dispersion for equivalent sound pressure level is a
standard deviation of 1 dB(A).
22 658 - 002 - 11.04.2018

unit
120 Mark II
(P02138HV)
Maximum saw chain speed m/s 22.3
Saw chain pitch mm (in)
8,3 (0.325)
9,52 (3/8)
Thickness of drive links (gauge) mm (in) 1.3 (0.05)
Type of drive sprocket Spur
Number of drive sprocket teeth
6 (drive sprocket 3/8)
7 (drive sprocket
0,325)
ACCESSORIES
Guide bar and saw chain combinations
The cutting attachments below are approved for the
product.
Guide bar Saw chain
Length, cm (in) Pitch, mm (in) Gauge, mm (in) Max. nose radius Type Drive link count
33 (13) 8,25 (0,325) 1,3 (0,050) 10T Husqvarna H30 56
38 (15) 8,25 (0,325) 64
35 (14) 9,52 (3/8) 7T Husqvarna H37 52
40 (16) 9,52 (3/8) 56
45 (18) 9,52 (3/8) 62
Saw chain filing and saw chain combinations
Saw chain
Chain type Round file size Side plate angle Top plate angle File guide angle Depth gauge set-
ting
H30 3/16 in. / 4,8 mm 60° 30° 10° 0,025 in. / 0,65
mm
H37 5/32 in. / 4,0 mm 60° 30° 0° 0,025 in. / 0,65
mm
658 - 002 - 11.04.2018 23

CONTENTS OF THE EC DECLARATION OF CONFORMITY
We, Husqvarna AB, SE 561 82 Huskvarna, SWEDEN,
declare under our sole responsibility that the
represented product:
Description Gasoline chainsaw
Brand Husqvarna
Platform / Type / Model Platform P02138HV, rep-
resenting model 120 Mark
II
Batch Serial number dating 2018
and onwards
complies fully with the following EU directives and
regulations:
Directive/Regulation
Description
2006/42/EC “relating to machinery”
2014/30/EU “relating to electromagnet-
ic compatibility”
2000/14/EC “relating to outdoor noise”
Harmonized standards and/or technical specifications
applied are as follows: EN ISO 12100, EN ISO 11681-1,
CISPR 12, ISO 14982
In accordance with directive 2000/14/EC, Annex V, the
declared sound values are stated in the technical data
section of this manual and in the signed EC Declaration
of Conformity.
TÜV Rheinland LGA Products GmbH, Notified Body for
Machinery (notified under 0197), Tillystraße 2 - 90431
Nürnberg, Germany, carried out an EC type examination
in accordance with 2006/42/EC, article 12, point 3b.
The type examination certificate, in accordance with
Annex IX, as provided in the signed Declaration of
Conformity, is applicable to all manufacturing locations
and Countries of Origin, as stated on the product.
This chainsaw conforms to the example that underwent
EC type examination.
24
658 - 002 - 11.04.2018

Содержание
ВЪВЕДЕНИЕ............................................................... 25
БЕЗОПАСНОСТ.......................................................... 26
МОНТАЖ......................................................................30
РАБОТА....................................................................... 31
ТЕХНИЧЕСКО ОБСЛУЖВАНЕ...................................34
ТРАНСПОРТИРАНЕ................................................... 37
СЪХРАНЕНИЕ.............................................................37
ТЕХНИЧЕСКИ ХАРАКТЕРИСТИКИ........................... 37
ПРИНАДЛЕЖНОСТИ..................................................39
СЪДЪРЖАНИЕ НА ДЕКЛАРАЦИЯТА ЗА
СЪОТВЕТСТВИЕ НА ЕС............................................ 39
ВЪВЕДЕНИЕ
Инструкция за експлоатация
Оригиналната версия на настоящата инструкция за
експлоатация е на английски език. Инструкциите за
експлоатация на други езици са преведени от
английски.
Преглед
(Фиг. 1 )
1. Табелка с името на продукта и серийния номер
2. Блокировка на спусъка на газта
3. Предна дръжка
4. Капак на цилиндъра
5. Верижна спирачка и авариен лост
6. Ауспух
7. Буферен шип
8. Звездочка на шината
9. Предпазител за дясната ръка
10. Спусък на газта
11. Капак на венеца
12. Уловител на веригата
13. Водеща шина
14. Верига за моторен трион
15. Дръжка на стартера
16. Резервоар за верижно масло
17. Стартер
18. Резервоар за гориво
19. Смукач
20. Задна дръжка
21. Превключвател за спиране
22. Регулиращ винт за обороти на празен ход
23. Подкачваща помпа
24. Информационна и предупредителна лепенка
25. Винт за натягане на веригата
26. Капак на водещата шина
27. Комбиниран инструмент
28. Масло за двутактов двигател
29. Инструкция за експлоатация (EPA)
Символи върху машината
(Фиг. 2 )
Предупреждение
(Фиг. 3 ) Прочетете това ръководство
(Фиг. 4 )
Носете одобрени защитни средства за
глава, антифони и защитни средства за
очите
(Фиг. 5 ) Използвайте одобрени защитни ръкавици
(Фиг. 6 )
Продуктът е в съответствие с
приложимите директива на ЕО
(Фиг. 7 ) Сила на звука
(Фиг. 8 )
Верижна спирачка, незадействана
(вляво). Верижна спирачка, задействана
(вдясно)
(Фиг. 9 ) Смукач
(Фиг. 10 ) Подкачваща помпа
(Фиг. 11 ) Презареждане с гориво
(Фиг. 12 ) Наливане на верижно масло
(Фиг. 13 )
Продуктът е в съответствие с
приложимите директиви на EAC
(Фиг. 14 )
Продуктът е в съответствие с
приложимите директиви на Украйна
(Фиг. 15 ) Ниво на шума
(Фиг. 16 ) Дръжте продукта правилно с две ръце
(Фиг. 17 ) Не използвайте с една ръка
(Фиг. 18 )
Избягвайте контакт с върха на водещата
шина
(Фиг. 19 ) Пазете се от обратен удар
(Фиг. 20 )
Продуктът е в съответствие с
приложимите директиви на Австралия и
658 - 002 - 11.04.2018 25
Нова Зеландия относно
електромагнитната съвместимост.
Забележка: Останалите символи/стикери на
продукта се отнасят до изисквания по отношение на
сертификати за други търговски зони.
Отговорност за вреди, причинени от
стоки
Както е посочено в законите за отговорност за
вреди, причинени от стоки, ние не носим отговорност
за щети, причинени от нашия продукт, ако:
• продуктът е неправилно ремонтиран.
• продуктът е ремонтиран с части, които не са от
производителя или не са одобрени от
производителя.
• продуктът има принадлежност, която не е от
производителя или не е одобрена от
производителя.
• продуктът не е ремонтиран в одобрен сервизен
център или от одобрен орган.
БЕЗОПАСНОСТ
Дефиниции за безопасност
Дефинициите по-долу предоставят нивото на
сериозност за всяка една предупредителна дума.
ПРЕДУПРЕЖДЕНИЕ: Нараняване на
лица.
ВНИМАНИЕ: Повреда на продукта.
Забележка: Тази информация прави продукта по-
лесен за използване.
Общи инструкции за безопасност
• Използвайте правилно продукта. Неправилната
употреба може да доведе до нараняване или
смърт. Използвайте продукта само за задачите,
описани в настоящето ръководство. Не
използвайте продукта за други задачи.
• Прочетете, разберете и спазвайте инструкциите
в това ръководство. Спазвайте символите за
безопасност и инструкциите за безопасност. Ако
операторът не спазва инструкциите и символите,
резултатът може да е нараняване, повреда или
смърт.
• Не изхвърляйте това ръководство. Следвайте
инструкциите за монтиране, използване и
поддръжка на продукта в добро състояние.
Следвайте инструкциите за правилен монтаж на
приспособленията и принадлежностите.
Използвайте само одобрени приспособления и
принадлежности.
• Не използвайте повреден продукт. Спазвайте
графика за техническо обслужване. Извършвайте
само дейностите по техническо обслужване, за
които ще намерите инструкция в това
ръководство. Всички други дейности по
техническото обслужване трябва да бъдат
извършени от одобрен сервизен център.
• Това ръководство не може да включва всички
ситуации, които биха могли да възникнат при
използване на продукта. Бъдете внимателни и
действайте разумно. Не работете с продукта и не
извършвайте техническо обслужване, ако не сте
сигурни относно ситуацията. За да получите
информация, говорете с експерт по продукта,
Вашия дистрибутор, сервиз или с одобрен
сервизен център.
• Разкачете проводника на запалителната свещ
преди сглобяване, складиране или техническо
обслужване на продукта.
• Не използвайте продукта, ако е променен спрямо
първоначалните му спецификации. Не сменяйте
някоя част на продукта без одобрение от
производителя. Използвайте само части, които са
одобрени от производителя. Неправилното
техническо обслужване е възможно да доведе до
нараняване или смърт.
• Не вдишвайте изпарения от двигателя.
Продължителното вдишване на отработени
газове от двигателя, изпарения от верижното
масло и прах от дървените стърготини може да е
опасно за здравето.
• Не стартирайте продукта на закрито или близо до
запалими материали. Отработените газове са
горещи и биха могли да съдържат искри, които да
предизвикат пожар. Недостатъчният въздушен
поток може да доведе до нараняване или смърт
поради задушаване или въглероден окис.
• Този продукт създава електромагнитно поле по
време на работа. Електромагнитното поле може
да предизвика повреда на медицински импланти.
Говорете с Вашия лекар или с производителя на
медицинския имплант, преди да започнете
работа с продукта.
• Не позволявайте на деца да работят с продукта.
• Не позволявайте на лица, които не са запознати с
инструкциите, да работят с продукта.
• Винаги наблюдавайте лица с намален физически
или умствен капацитет, които използват
продукта. През цялото време трябва да
присъства отговорен възрастен.
26
658 - 002 - 11.04.2018

• Съхранявайте продукта под ключ на място,
недостъпно за деца и неупълномощени лица.
• Възможно е от продукта да изхвърчат предмети i
да причинят наранявания. Спазвайте
инструкциите за безопасност, за да намалите
опасността от нараняване или смърт.
• Не се отдалечавайте от продукта, когато
двигателят работи. Спрете двигателя и се
уверете, че веригата не се върти.
• Операторът на продукта е отговорен при
възникването на инцидент.
• Уверете се, че частите не са повредени, преди да
използвате продукта.
• Направете справка с националните или местните
закони. Те биха могли да предотвратят или
ограничат работата на продукта при определени
условия.
Инструкции за безопасност по време
на работа
• Продължителната или честата работа с продукта
може да доведе до вибрационна болест или
подобни медицински проблеми, причинени от
вибрации. Ако работите продължително или
често с продукта, проверявайте състоянието на
ръцете и пръстите си. Ако ръцете или пръстите
ви се обезцветяват, имате болка, изтръпване или
схващане, спрете работа и незабавно се
консултирайте с лекар.
• Уверете се, че продуктът е напълно сглобен,
преди да го използвате.
• Възможно е изхвърчане на предмети от
продукта, което може да доведе до увреждане на
очите. Винаги използвайте одобрени защитни
средства за очите, когато работите с продукта.
• Бъдете внимателни – без да знаете, някое дете
може да се доближи до продукта, докато той
работи.
• Не работете с продукта, ако има хора в
работната зона. Спрете продукта, ако в
работната зона влезе човек.
(Фиг. 21 )
• Уверете се, че винаги имате контрол над
продукта.
• При работа с продукта трябва да го държите с
две ръце. Не дръжте продукта с една ръка по
време на работа. Държането на продукта само с
една ръка по време на работа може да доведе до
сериозно нараняване на оператора, работниците,
странични лица или на всички тях.
• Хванете предната дръжка с лявата ръка, а
задната ръкохватка – с дясната ръка. Дръжте
продукта отдясно на тялото си.
(Фиг. 22 )
• Не работете с продукта, когато сте уморени,
болни или под въздействието на алкохол или
други опиати.
• Не използвайте продукта, ако няма възможност
да получите помощ при възникването на
инцидент. Преди да стартирате продукта,
уведомете другите, че ще работите.
• Не се обръщайте, докато държите продукта,
преди да се уверите, че в безопасната зона няма
други хора или животни.
• Отстранете всички нежелани материали от
работната зона, преди да започнете работа. Ако
веригата се удари в предмет, той може да
изхвърчи и да доведе до нараняване или
повреда. Нежеланите материали могат да се
увият около веригата и да доведат до повреда.
• Не използвайте продукта при лошо време,
например при мъгла, дъжд, силни ветрове,
опасност от светкавици или други
метеорологични условия. При лошо време може
да възникнат опасни условия от рода на хлъзгави
повърхности.
• Уверете се, че можете да се движите свободно и
да работите в стабилна позиция.
• Уверете се, че няма да паднете, когато
използвате продукта. Не накланяйте при работа с
продукта.
• Винаги дръжте продукта с двете си ръце.
Хванете предната дръжка с лявата ръка, а
задната ръкохватка – с дясната ръка. Дръжте
продукта отдясно на тялото си.
• Ако смукачът е в положение "задействан смукач",
когато запалите двигателя, веригата започва да
се върти.
• Спрете двигателя, преди да местите продукта.
• Не оставяйте продукта на земята, когато
двигателят работи.
• Спрете двигателя, преди да отстраните
нежелани материали от продукта. Изчакайте
веригата да спре, преди Вие или Ваш помощник
да отстраните изрязания материал.
• Не работете с продукта, покачени на дърво.
Работата с продукта, докато сте на дървото,
може да доведе до телесна повреда.
(Фиг. 23 )
• За да се намали опасността от контакт с веригата
за моторния трион при стартиране, верижната
спирачка трябва да бъде включена при
стартиране на продукта.
(Фиг. 24 )
• Избягвайте откат, приплъзване, подскачане и
изпускане, които могат да доведат до сериозно
нараняване.
• Спазвайте всички правила за безопасност, за да
избегне опасността от откат, приплъзване,
подскачане и изпускане, които могат да доведат
до сериозно нараняване.
• Редовно регулирайте натягането на веригата на
моторния трион, за да не се отпуска. Отпусната
верига за моторен трион може да се откачи и да
предизвика сериозно нараняване или смърт.
658 - 002 - 11.04.2018
27

• Не поваляйте дървета по неправилен начин.
Това може да предизвика нараняване и да
причини повреди на комунални линии или
имуществени щети.
• Операторът трябва да стои от горната страна на
терена, тъй като е по-вероятно, след като бъде
повалено, дървото да се изтърколи или плъзне
надолу по склона.
(Фиг. 25 )
• Преди рязане планирайте и разчистете път за
отдръпване. Пътят за отдръпване трябва да се
простира назад и диагонално към задната част
на очакваната траектория на падане.
(Фиг. 26 )
• Винаги спирайте двигателя, преди да местите
продукта между дърветата.
• Уверете се, че сте стъпили здраво и
балансирано, с равномерно разпределено тегло.
(Фиг. 27 )
• Винаги стъпвайте стабилно и работете с
продукта само когато стоите на неподвижна,
стабилна и равна повърхност. Хлъзгавите или
нестабилни повърхности, като например стълби,
могат да предизвикат загуба на баланс или
контрол.
(Фиг. 28 )
Откат, приплъзване, подскачане и
пропадане
Различни сили може да въздействат на безопасната
работа с продукта.
• Приплъзване е, когато водещата шина се
пързаля или се движи бързо по повърхността на
дървото.
• Подскачане е, когато водещата шина отскача и
се допира постоянно до повърхността на
дървото.
• Пропадане е, когато продуктът падне надолу
след среза. Вследствие на това е възможно
веригата да докосне някоя част на тялото или
друг предмет и да причини нараняване или
повреди.
• Откат е, когато краят на водещата шина се допре
до предмети и се движи назад, нагоре или
внезапно напред. Откат може да възникне и
когато дървесината се затвори по време на
рязане, приклещвайки веригата на за моторен
трион. Има възможност от загуба на контрол над
продукта при контакт с предмет в дървесината.
(Фиг. 29 )
• Въртелив откат може да възникне, когато
движещата се верига се допре до предмет в
горния край на водещата шина. В този случай
веригата може да се забие в предмета и
веднага да спре. В резултат се получава
светкавична обратна реакция, която отхвърля
водещата шина нагоре и назад по посока на
оператора.
(Фиг. 30 )
(Фиг. 31 )
• Откат при прищипване може да възникне при
внезапно спиране на веригата за моторен
трион по време на рязане. Дървесината се
затваря и прищипва движещата се верига за
моторен трион по горната част на водещата
шина. При внезапното спиране се получава
противоположно въздействие върху силата на
веригата, поради което продуктът се
задвижва в обратна посока спрямо въртенето
на веригата. Продуктът се връща назад към
оператора.
(Фиг. 32 )
• Придърпване може да възникне, когато
движещата се верига за моторен трион в
долната част на водещата шина се допре до
чуждо тяло и трионът спре внезапно. При
внезапното спиране продукта се отдалечава
от оператора в посока напред и надолу, което
лесно може да доведе до загуба на контрол
на продукта от страна на оператора.
(Фиг. 33 )
Преди работа с продукта се уверете, че сте добре
запознати с различните сили и начините за
предотвратяване на появата им.
Предотвратяване на откат, приплъзване,
подскачане и пропадане
• Докато двигателят работи, дръжте продукта
здраво. Дръжте дясната си ръка върху задната
ръкохватка, а лявата – на предната дръжка.
Палците и останалите пръсти трябва здраво да
обхващат дръжките. Не отслабвайте захвата.
• Контролирайте продукта както по време на среза,
така и след като дървеният материал падне на
земята. Не оставяйте тежестта на продукта да го
притегли надолу след среза.(Фиг. 34 )
• Уверете се, че в зоната за рязане няма
препятствия. При работа с продукта не
позволявайте върхът на водещата шина да бъде
в контакт с дънери, клони или други препятствия.
• Режете при високи обороти на двигателя.
• Не се пресягайте прекомерно и не режете над
височината на раменния пояс.(Фиг. 35 )
• Спазвайте инструкциите на производителя за
заточване и поддръжка на веригата за моторен
трион.
• Използвайте само посочените от производителя
резервни вериги за моторен трион и водещи
шини.
• Рискът от откат нараства, ако мащабът на
дълбочината се увеличи прекомерно.
28
658 - 002 - 11.04.2018

Лични предпазни средства
• Винаги използвайте правилните лични предпазни
средства, когато работите с продукта. Личните
предпазни средства не елиминират опасността
от нараняване. Личните предпазни средства
намаляват степента на нараняване при
възникването на инцидент.
• Облеклото като цяло следва да е прилепнало до
тялото, без това да ограничава движенията.
• Използвайте одобрена защитна каска.
• Винаги използвайте одобрени антифони, когато
работите с продукта. Продължителният шум
може да доведе до загуба на слуха.
• Използвайте защитни очила или лицева маска, за
да намалите опасността от нараняване от
изхвърлени предмети. Продуктът може да
изхвърля предмети като стърготини, малки
късчета дървесина и др. с голяма сила. Това
може да доведе до сериозни наранявания,
особено на очите.
• Използвайте ръкавици за защита от верижен
трион.
• Използвайте панталони за защита от верижен
трион.
• Използвайте ботуши с метални бомбета и
противоплъзгащи подметки за защита от верижен
трион.
• Уверете се, че близо до Вас има комплект за
първа помощ.
• От ауспуха, шината, веригата за моторен трион
или други източници може да изскочат искри.
Винаги дръжте наблизо пожарогасително
оборудване и лопата за предотвратяване на
горски пожари.
Устройства за безопасност на продукта
• Уверете се, че редовно извършвате техническо
обслужване на продукта.
• Срокът на експлоатация на продукта се
увеличава.
• Рискът от злополука намалява.
Позволете на одобрен дилър или одобрен
сервизен център да извършва редовна проверка
на продукта за корекции или ремонтни дейности.
• Не използвайте продукт с повредени предпазни
средства. Ако продуктът е повреден, се
консултирайте с одобрен сервизен център.
Превключвател за спиране
Стартирайте двигателя. Уверете се, че двигателят
спира, когато преместите превключвателя за
спиране в стоп позиция.
Проверка на блокировката на регулатора на газта
1. Когато освободите блокировката на спусъка (А)
проверете дали регулаторът на газта (B) е
заключен на празен ход.(Фиг. 36 )
2. Натиснете блокировката на спусъка на газта (A) и
се уверете, че се връща в първоначалната
позиция, когато я освободите.
3. Натиснете спусъка на газта (B) и се уверете, че
се връща в първоначалната позиция, когато го
освободите.
4. Включете двигателя и задайте пълни обороти.
5. Освободете спусъка и проверете дали веригата
за моторен трион спира.
6. Ако веригата за моторен трион се движи при
позиция на празен ход, проверете регулиращия
винт на скоростта на празен ход на карбуратора.
Предпазител
Предпазителят предотвратява изхвърлянето на
предмети по посока на оператора. Предпазителят
предотвратява и от неволно докосване между
оператора и веригата за моторния трион.
• Уверете се, че предпазителят е разрешен за
употреба с този продукт.
• Не използвайте продукта без предпазителя.
• Уверете се, че предпазителят не е повреден.
Заменете предпазителя, ако е износен или
напукан.
Безопасност при работа с гориво
• Не включвайте продукта, ако върху него има
гориво или моторно масло. Отстранете
нежеланото гориво/масло и оставете продукта да
изсъхне. Отстранете нежеланото гориво от
продукта.
• Ако разлеете гориво по дрехите си, сменете ги
незабавно.
• Внимавайте да не попадне гориво върху тялото
Ви, това може да доведе до телесни увреждания.
Ако гориво попадне върху тялото Ви,
използвайте сапун и вода, за да го отстраните.
• Не стартирайте двигателя, ако разлеете масло
или гориво върху продукта или тялото си.
• Не стартирайте продукта, ако от двигателя има
теч. Проверявайте редовно двигателя за течове.
• Внимавайте с горивото. Горивото е запалимо,
изпаренията са взривоопасни и могат да
причинят телесни увреждания или смърт.
• Не вдишвайте горивните изпарения, това може
да доведе до телесни увреждания. Уверете се,
че има достатъчен въздушен поток.
• Не пушете близо до горивото или двигателя.
• Не поставяйте топли предмети близо до горивото
или двигателя.
• Не добавяйте гориво, когато двигателят работи.
• Уверете се, че двигателят е изстинал преди
зареждане с гориво.
• Преди зареждане с гориво отворете бавно
капачката на резервоара за гориво и освободете
внимателно налягането.
658 - 002 - 11.04.2018
29

• Не добавяйте гориво към двигателя на закрито.
Недостатъчният въздушен поток може да доведе
до нараняване или смърт поради задушаване
или въглероден окис.
• Затегнете внимателно капачката на резервоара
за гориво или може да възникне пожар.
• Преди да включите двигателя, преместете
продукта на най-малко 3 m (10 ft) от мястото,
където сте заредили резервоара.
• Не препълвайте резервоара за гориво.
• Уверете се, че няма течове, когато местите
продукта или резервоара за гориво.
• Не поставяйте продукта или резервоара за
гориво на място, където има открит огън, искри
или постоянна малка горелка. Уверете се, че в
зоната за съхранение няма открит огън.
• При преместване или съхранение на гориво
използвайте само одобрени за целта контейнери.
• Изпразнете резервоара за гориво преди
дългосрочно съхранение. Спазвайте местните
закони за това къде да изхвърляте горивото.
• Почистете продукта преди дългосрочно
съхранение.
• Отстранете проводника на запалителната свещ,
преди да оставите продукта за съхранение, за да
се уверите, че двигателят няма случайно да се
включи.
Инструкции за безопасност при
техническо обслужване
• Разкачете запалителната свещ преди
техническото обслужване на продукта – това не
важи за настройки на карбуратора.
• Ремонтите трябва да се извършват само от
одобрен дистрибутор, това не включва задачите
в
ТЕХНИЧЕСКО ОБСЛУЖВАНЕ на страница 34
.
• Уверете се, че когато отпуснете регулатора на
газта, веригата за моторен трион спира да се
движи.
• Поддържайте дръжките сухи, чисти и незацапани
от масло или горивна смес.
• Грижете се капачките и фиксаторите да са
затегнати както трябва.
• Използването на неодобрени резервни части и
отстраняването на приспособленията за
безопасност е възможно да доведе до повреда
на продукта. Възможно е също да възникне
нараняване на оператора или странични лица.
Използвайте принадлежности и резервни части
само според препоръките. Не нанасяйте промени
по продукта.
• За безопасна и висока производителност
поддържайте веригата за моторен трион добре
заточена и чиста.
• Следвайте инструкциите за смазване и смяна на
принадлежностите.
• Проверете продукта за повредени части. Преди
повторно използване на продукта уверете се, че
повреденият предпазител или друга част работят
нормално. Проверете за счупени или неправилно
прилягащи части, както и за части, които не се
движат свободно. Проверете и за други
проблеми, които може да се отразят на работата
с продукта. Уверете се, че продуктът е правилно
монтиран. Предпазителят или друга повредена
част трябва да бъдат поправени или сменени от
одобрен дистрибутор, освен ако не е указано
друго в инструкцията за експлоатация.
• Когато продуктът не е в употреба, съхранявайте
го на сухо място, нависоко или под ключ, далече
от деца.
• При пренасяне или складиране на продукта
поставете капак на водещата шина или калъф за
пренасяне.
• Не използвайте отработено масло. Отработеното
масло може да е опасно за здравето Ви, да
повреди продукта и да навреди на околната
среда.
МОНТАЖ
ПРЕДУПРЕЖДЕНИЕ: Прочетете и
разберете главата с инструкции за
безопасност, преди да монтирате
продукта.
Монтиране на водещата шина и
веригата за моторен трион
1. Преместете аварийния лост по посока към
предната дръжка, за да изключите верижната
спирачка.
2. Сгънете регулатора навън до отворено
положение. (Фиг. 37 )
3. Завъртете регулатора обратно на часовниковата
стрелка, за да разхлабите капака на шината.(Фиг.
38 )
4. Отстранете регулатора (А) и капака на венеца.
Отстранете защитата при транспортиране, ако е
инсталирана. (Фиг. 39 )
5. Поставете водещата шина над болтовете на
шината. Придвижете водещата шина до най-
задната й позиция. Поставете веригата за
моторен трион над задвижващия венец и я
вкарайте в жлеба на водещата шина. Започнете
от горния край на водещата шина. (Фиг. 40 )
6. Уверете се, че ръбовете на режещите звена по
горния край на направляващата шина сочат
напред.
30 658 - 002 - 11.04.2018
Loading...