


 Loading...
122C, 122LK
EN |
Operator's manual |
2-19 |
SV |
Bruksanvisning |
20-38 |
DA |
Brugsanvisning |
39-57 |
NO |
Bruksanvisning |
58-76 |
FI |
Käyttöohje |
77-95 |
DE |
Bedienungsanweisung |
96-115 |
FR |
Manuel d'utilisation |
116-135 |
NL |
Gebruiksaanwijzing |
136-156 |
ES |
Manual de usuario |
157-176 |
PT |
Manual do utilizador |
177-195 |
IT |
Manuale dell'operatore |
196-217 |
ET |
Kasutusjuhend |
218-237 |
LV |
Lietošanas pamācība |
238-257 |
LT |
Operatoriaus vadovas |
258-277 |
SL |
Navodila za uporabo |
278-296 |
HU |
Használati utasítás |
297-315 |
PL |
Instrukcja obsługi |
316-335 |
CS |
Návod k použití |
336-355 |
SK |
Návod na obsluhu |
356-374 |
HR |
Priručnik za korištenje |
375-393 |
SR |
Priručnik za rukovaoca |
394-413 |
BS |
Korisnički priručnik |
414-433 |
RO |
Instrucţiuni de utilizare |
434-453 |
TR |
Kullanım kılavuzu |
454-472 |
RU |
Руководство по эксплуатации |
473-494 |
UK |
Посібник користувача |
495-515 |
BG |
Ръководство за експлоатация |
516-535 |
EL |
Οδηγίες χρήσης |
536-555 |

Contents
Introduction..................................................................... |
2 |
Troubleshooting............................................................ |
16 |
Safety.............................................................................. |
4 |
Transportation and storage........................................... |
16 |
Assembly........................................................................ |
8 |
Technical data.............................................................. |
17 |
Operation...................................................................... |
10 |
Accessories.................................................................. |
18 |
Maintenance................................................................. |
13 |
EC Declaration of Conformity....................................... |
19 |
Introduction
Product description
The product is a grass trimmer with a combustion engine.
Work is constantly in progress to increase your safety and efficiency during operation. Speak to your servicing dealer for more information.
Intended use
The product is used with a trimmer head to cut grass. Do not use the product for other tasks than grass trimming and grass clearing.
Note: National regulations can set limit to the operation of the product.
Product overview
18 |
|
|
|
|
|
|
|
|
|
|
19 |
|
|
|
|
|
15 |
|
14 |
|
|
|
|
|
|
|
|
||
1 |
122LK |
|
|
|
|
|
|
|
|
|
|
|
3 |
|
|
|
|
|
|
|
|
|
|
|
|
4 |
|
|
|
|
2 |
|
|
|
|
|
|
|
|
122C |
|
|
|
|
|
|
7 |
8 |
|
|
|
|
|
|
|
13 |
|
||
|
4 |
|
|
17 |
|
|
16 |
||
|
|
|
|
|
12 |
||||
|
|
|
|
|
|
|
|
|
|
|
|
|
|
|
|
|
6 |
|
9 |
|
|
|
|
|
|
|
|
|
|
|
|
|
7 |
|
8 |
|
|
|
|
3 |
|
|
|
13 |
|
5 |
|
|
|
|
|
|
|
16 |
|
|
|||
|
|
|
|
|
12 |
|
|
|
|
2 |
|
|
|
|
|
|
|
|
|
|
|
|
|
|
|
|
|
|
|
|
|
|
|
|
|
|
11 |
|
|
20 |
|
6 |
|
|
|
9 |
|
10 |
|
|
|
|
|
|
|
|
|
||
|
|
|
5 |
|
|
|
|
|
1 |
|
|
|
|
|
|
|
|
|
|
2 |
|
|
|
11 |
|
|
|
|
|
|
|
|
|
|
|
|
|
|
|
|
|
|
|
|
10 |
|
|
|
|
1. |
Trimmer head |
3. |
Shaft |
2. |
Cutting attachment guard |
4. |
Loop handle |
2 |
941 - 004 - 10.04.2019 |
5.Throttle trigger
6.Stop switch
7.Throttle trigger lockout
8.Spark plug cap and spark plug
9.Starter rope handle
10.Fuel tank
11.Air filter cover
12.Air purge bulb
13.Choke control
14.Operator’s manual
15.Combination wrench
16.Starter housing
17.Shaft coupling
18.Bevel gear
19.Grease filler cap, bevel gear
20.Drive disc
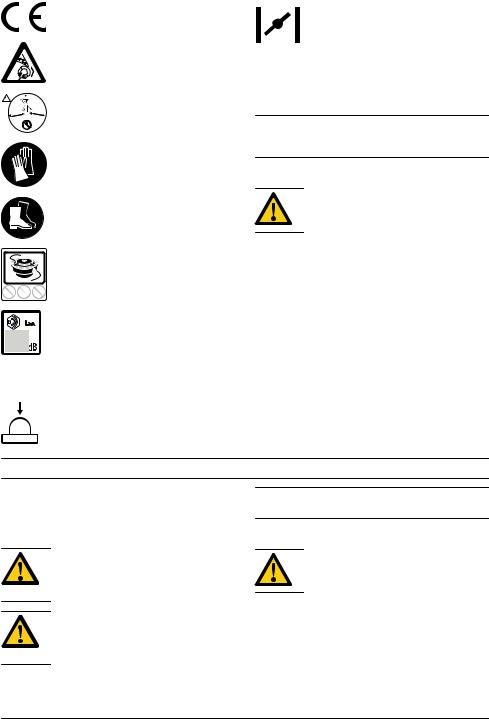
Symbols on the product
WARNING! This product is dangerous. Injury or death can occur to the operator or bystanders if the product is not used carefully and correctly. To prevent injury to the operator or bystanders, read and obey all safety instructions in the operator's manual.
Read the operator's manual carefully and make sure that you understand the instructions before use.
Use a protective helmet in locations where objects can fall on you. Use approved hearing protection. Use approved eye protection.
Maximum speed of the output shaft. |
The product agrees with the applicable EC directives.
|
|
The product can cause objects to eject, |
|
|
which can cause injury. |
|
|
Keep a minimum of 15 m distance to |
50FT |
50FT |
persons and animals during operation of the |
15 M |
15 M |
|
product.
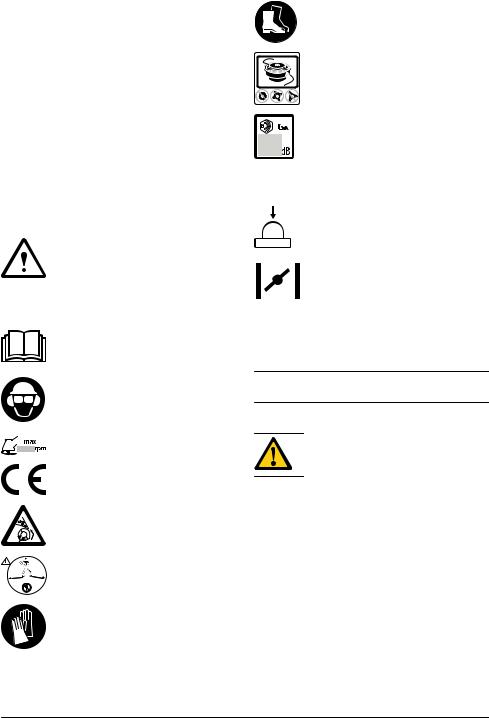
Use approved protective gloves.
Use heavy-duty slip-resistant boots.
Only use flexible cutting wire. Do not use |
metal cutting attachments. |
Noise emissions to the environment according to European Directive 2000/14/EC and New South Wales legislation "Protection of the Environment Operations (Noise Control) Regulation 2017". Noise emission data can be found on the machine label and in the Technical data chapter.
Air purge bulb.
Choke.
yyyywwxxxx
The rating plate shows the serial number. yyyy is the production year, ww is the production week.
Note: Other symbols/decals on the product refer to certification requirements for other commercial areas.
EU V
WARNING: Tampering with the engine voids the EU type-approval of this product.
Customer assistance
For customer assistance, call: 1-800-487-5951 or visit www.husqvarna.com.
Product liability
As referred to in the product liability laws, we are not liable for damages that our product causes if:
•the product is incorrectly repaired.
•the product is repaired with parts that are not from the manufacturer or not approved by the manufacturer.
•the product has an accessory that is not from the manufacturer or not approved by the manufacturer.
•the product is not repaired at an approved service center or by an approved authority.
941 - 004 - 10.04.2019 |
3 |

Safety
Safety definitions
Warnings, cautions and notes are used to point out specially important parts of the manual.
WARNING: Used if there is a risk of injury or death for the operator or bystanders if the instructions in the manual are not obeyed.
CAUTION: Used if there is a risk of damage to the product, other materials or the adjacent area if the instructions in the manual are not obeyed.
Note: Used to give more information that is necessary in a given situation.
General safety instructions
WARNING: Read the warning instructions that follow before you use the product.
•Use the product correctly. Injury or death is a possible result of incorrect use. Only use the product for the tasks found in this manual. Do not use the product for other tasks.
•Obey the instructions in this manual. Obey the safety symbols and the safety instructions. If the operator does not obey the instructions and the symbols, injury, damage or death is a possible result.
•Do not discard this manual. Use the instructions to assemble, to operate and to keep your product in good condition. Use the instructions for correct installation of attachments and accessories. Only use approved attachments and accessories.
•Do not use a damaged product. Obey the maintenance schedule. Only do the maintenance work that you find an instruction about in this manual. An approved service center must do all other maintenance work.
•This manual cannot include all situations that can occur when you use the product. Be careful and use your common sense. Do not operate the product or do maintenance on the product if you are not sure about of the situation. Speak to a product expert, your dealer, service agent or approved service center for information.
•Disconnect the spark plug cable before you assemble the product, put the product into storage or do maintenance.
•Do not use the product if it is changed from its initial specification. Do not change a part of the product without approval from the manufacturer. Only use
parts approved by the manufacturer. Injury or death is a possible result of incorrect maintenance.
•Do not breathe in the fumes from the engine. Longterm inhalation of the engine's exhaust fumes is a health risk.
•Do not start the product indoors or near flammable material. The exhaust fumes are hot and can contain a spark which can start a fire. Not sufficient airflow can cause injury or death because of asphyxiation or carbon monoxide.
•When you use this product the engine makes an electromagnetic field. The electromagnetic field can cause damage to medical implants. Speak to your physician and medical implant manufacturer before you operate the product.
•Do not let a child operate the product. Do not let a person without knowledge of the instructions operate the product.
•Make sure that you always monitor a person, with decreased physical capacity or mental capacity, that uses the product. A responsible adult must be there at all times.
•Lock the product in an area that children and unapproved persons cannot access.
•The product can eject objects and cause injuries. Obey the safety instructions to decrease the risk of injury or death.
•Do not go away from the product when the engine is on.
•The operator of the product is responsible if an accident occurs.
•Make sure that parts are not damaged before you use the product.
•Make sure that you are at minimum 15 m (50 ft) away from other persons or animals before you use the product. Make sure that persons in the adjacent area know that you will use the product.
•Refer to national or local laws. They can prevent or decrease the operation of the product in some conditions.
•Do not use the product if you are fatigued or influenced by alcohol, drugs or medicine. They can have effects on your vision, alertness, coordination or judgment.
Safety instructions for assembly
WARNING: Read the warning instructions that follow before you use the product.
•Remove the spark plug cap from the spark plug before you assemble the product.
•Use approved protective gloves.
4 |
941 - 004 - 10.04.2019 |

•Make sure that you assemble the cover and shaft correctly before you start the engine.
Safety instructions for operation
•Make sure the product is fully assembled before you use it.
•Before a start, move the product 3 m (10 ft) away from the position where you filled the fuel tank. Put the product on a flat surface. Make sure that the cutting attachment does not touch the ground or other objects.
•The product can cause objects to eject, which can cause damage to the eyes. Always use an approved eye protection when you operate the product.
•Be careful, a child can come near the product without your knowledge during operation.
•Do not operate the product if there are persons in the work area. Stop the product if a person goes into the work area.
•Make sure that you are always in control of the product.
•Do not use the product if you cannot receive aid if an accident occurs. Always make sure others know you will operate the product before you start to operate the product.
•Do not turn with the product before you make sure that no persons or animals are in the safety area.
•Remove all unwanted materials from the work area before you start. If the cutting attachment hits an object, the object can eject and cause injury or damage. Unwanted material can wind around the cutting attachment and cause damage.
•Do not use the product in bad weather (fog, rain, strong winds, risk of lightning or other weather conditions.). Dangerous conditions (such as slippery surfaces) can occur because of bad weather.
•Make sure that you can move freely and work in a stable position.
•Make sure that you cannot fall when you use the product. Do not tilt when you operate the product.
•Always hold the product with your two hands. Hold the product on the right side of your body.
•Operate the product with the cutting attachment below your waist.
•If the choke control is in the choke position when the engine starts, the cutting attachment starts to turn.
•Do not touch the bevel gear after the engine stops. The bevel gear is hot after the engine stops. Hot areas can cause injury.
•Stop the engine before you move the product.
•Do not put down the product with the engine on.
•Before you remove the unwanted materials from the product, stop the engine and wait until the cutting attachment stops. Let the cutting attachment stop before you or an aid remove the cut material.
Personal protective equipment
WARNING: Read the warning instructions that follow before you use the product.
•Always use approved personal protective equipment when you use the product. Personal protective equipment cannot fully prevent injury but it decreases the degree of injury if an accident does occur. Let your dealer help you select the right equipment.
•Use a protective helmet where there is a risk of falling objects.
•Use approved hearing protection that provides adequate noise reduction. Long-term exposure to noise can result in permanent hearing impairment.
941 - 004 - 10.04.2019 |
5 |

•Use approved eye protection. If you use a visor, you must also use approved protective goggles. Approved protective goggles must comply with the ANSI Z87.1 standard in the USAs or EN 166 in EU countries.
•Use gloves when necessary, for example when you attach, examine or clean the cutting equipment.
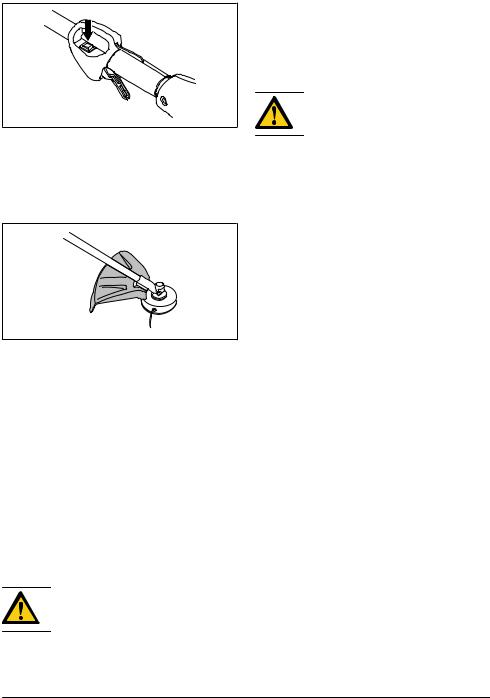
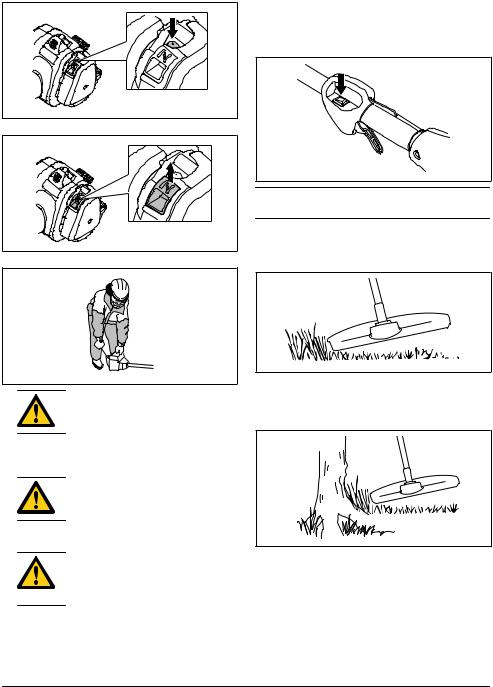
To do a check of the throttle trigger lockout
1.Make sure that the throttle trigger lockout (A) and throttle trigger (B) move freely and that the return spring works correctly.
A |
B |
2.Push down the throttle trigger lockout and make sure that it goes back to its initial position when you release it.
• Use sturdy non-slip boots.
3. Make sure that the throttle trigger is locked at the idle position when the throttle trigger lockout is released.
•Use clothing made of a strong fabric. Always use heavy, long pants and long sleeves. Do not use loose clothing that can catch on twigs and branches. Do not wear jewelry, short pants, sandals or go with bare feet. Put your hair up safely above shoulder level.
•Keep first aid equipment close at hand.
Safety devices on the product
WARNING: Read the warning instructions that follow before you use the product.
•Do not use a product with defective safety devices.
•Do a check of the safety devices regularly. Refer to
Maintenance schedule on page 13.
•If the safety devices are defective, speak to your Husqvarna servicing dealer.
4.Start the product and apply full throttle.
5.Release the throttle trigger and make sure that the blades stop and stay stationary.
WARNING: If the blades move when the throttle trigger is in the idle position, then the carburetor idle speed must be adjusted. Refer to To adjust the idle speed on page 14.
To do a check of the stop switch 1. Start the engine.
6 |
941 - 004 - 10.04.2019 |
2.Move the stop switch to the stop position and make sure that the engine stops.
To do a check of the cutting attachment guard
The cutting attachment guard stops objects that ejects in the direction of the operator. It also prevents injuries that occur if you touch the cutting attachment.
1.Stop the engine.
2.Do a visual check for damages, for example cracks.
3.Replace the cutting attachment guard if it is damaged.
Muffler
•Do not use an engine with a damaged muffler. A damaged muffler increases the noise level and the risk of fire. Keep a fire extinguisher near.
•Examine regularly that the muffler is attached to the product.
•Do not touch the engine or the muffler when then engine is on. Do not touch the engine or the muffler for a while after the engine stops. Hot surfaces can cause injuries.
•A hot muffler can cause a fire. Be careful, if you use the product near flammable liquids or fumes.
•Do not touch the parts in the muffler, if the muffler is damaged. The parts can contain some carcinogenic chemicals.
Cutting attachment
WARNING: Read the warning instructions that follow before you use the product.
•Do the regular maintenance. Let an approved service center regularly examine the cutting attachment to do adjustments or repairs.
•The performance of the cutting attachment increases.
•The life of the cutting attachment increases.
•The risk of accidents decreases.
•Only use an approved cutting attachment guard. Refer to Accessories on page 18.
•Do not use a damaged cutting attachment.
Fuel safety
WARNING: Read the warning instructions that follow before you use the product.
•Do not mix the fuel indoor or near a heat source.
•Do not start the product if there is fuel or engine oil on the product. Remove the unwanted fuel/oil and let the product dry. Remove unwanted fuel from the product.
•If you spill fuel on your clothing, change clothing immediately.
•Do not get fuel on your body, it can cause injury. If you get fuel on your body, use a soap and water to remove the fuel.
•Do not start the engine if you spill oil or fuel on the product or on your body.
•Do not start the product if the engine has a leak. Examine the engine for leaks regularly.
•Be careful with fuel. Fuel is flammable and the fumes are explosive and can cause injuries or death.
•Do not breathe in the fuel fumes, it can cause injury. Make sure that there is a sufficient airflow.
•Do not smoke near the fuel or the engine.
•Do not put warm objects near the fuel or the engine.
•Do not add the fuel when the engine is on.
•Make sure that the engine is cool before you refuel.
•Before you refuel, open the fuel tank cap slowly and release the pressure carefully.
•Do not add fuel to the engine in an indoor area. Not sufficient airflow can cause injury or death because of asphyxiation or carbon monoxide.
•Tighten the fuel tank cap carefully or a fire can occur.
•Move the product at a minimum of 3 m (10 ft) from the position where you filled the tank before a start.
•Do not put too much fuel in the fuel tank.
•Make sure that a leak cannot occur when you move the product or fuel container.
•Do not put the product or a fuel container where there is an open flame, spark or pilot light. Make sure that the storage area does not contain an open flame.
•Only use approved containers when you move the fuel or put the fuel into storage.
•Empty the fuel tank before long-term storage. Obey the local law on where to dispose fuel.
•Clean the product before long-term storage.
941 - 004 - 10.04.2019 |
7 |
•Remove the spark plug cap before you put the product into storage to make sure that the engine does not start accidentally.
Safety instructions for maintenance
WARNING: Read the warning instructions that follow before you use the product.
•Stop the engine, make sure that the cutting attachment stops and let the product cool down before you do the maintenance.
•Disconnect the spark plug cap before you do the maintenance.
•The exhaust fumes from the engine contain carbon monoxide, an odourless, poisonous and very dangerous gas that can cause death. Do not run the product indoors or in closed spaces.
•The exhaust fumes from the engine are hot and can contain sparks. Do not run the product indoors or near flammable material.
•Accessories and changes to the product that are not approved by the manufacturer, can cause serious injury or death. Do not change the product. Always use original accessories.
•If the maintenance is not done correctly and regularly, there is an increased risk of injury and damage to the product.
•Only do the maintenance as this operator's manual recommends. Let an approved Husqvarna service agent do all other servicing.
•Let an approved Husqvarna service agent do servicing on the product regularly.
•Replace damaged, worn or broken parts.
•Refer to the instructions for the cutting attachment for correct procedure to install the trimmer cord and correct cord diameter.
•Keep the teeth of the blade correctly sharpened. Obey our recommendations. Also refer to the instructions on the blade package.
Assembly
Introduction
WARNING: Before you assemble the product, you must read and understand the safety chapter.
WARNING: Remove the spark plug cable from the spark plug before you assemble the product.
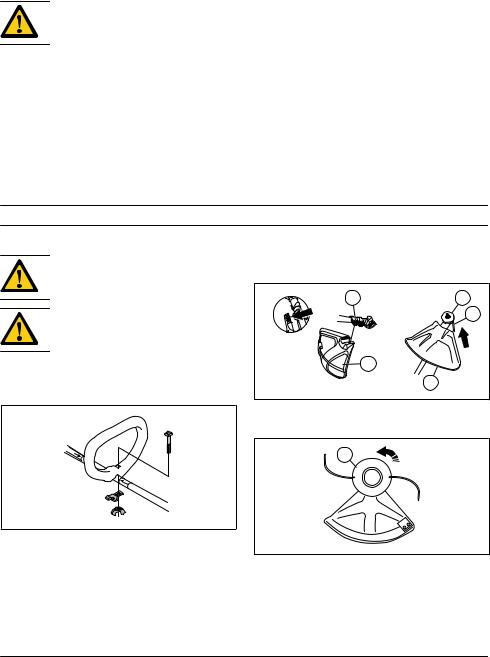
To attach the loop handle
1.Attach the loop handle to the shaft in compliance with the illustration and tighten.
2.Make sure that the loop handle attaches between the arrows on the shaft.
To attach the cutting attachment guard and the trimmer head (straight shaft)
1.Attach the cutting attachment guard (A) to the shaft with the bolt (L).
2.Attach the drive disc (B) to the output shaft.
3.Turn the output shaft until the hole in the drive disc aligns with the hole in the gear housing.
4.Put a small screwdriver (C) in the hole to lock the shaft.
L |
B |
C
A |
A |
5.Turn the trimmer head (H) counterclockwise to tighten the trimmer head to the gearbox. (Left hand threads.)
H |
8 |
941 - 004 - 10.04.2019 |

To attach the cutting attachment guard and trimmer head (curved shaft)
1. Attach the guard. Tighten the nut.
2. Attach the dust cup on the shaft.
3.Hold the dust cup with an adjustable wrench to make sure the shaft does not turn.
4.Attach the trimmer head to the shaft. Turn the trimmer head clockwise.
To assemble the two-piece shaft
1. Turn the knob to loosen the coupling.
2. Align the tab (A) with the arrow (B) on the coupling.
B |
A |
3.Push the shaft into the coupling until it clicks into position.
4. Tighten the knob fully.
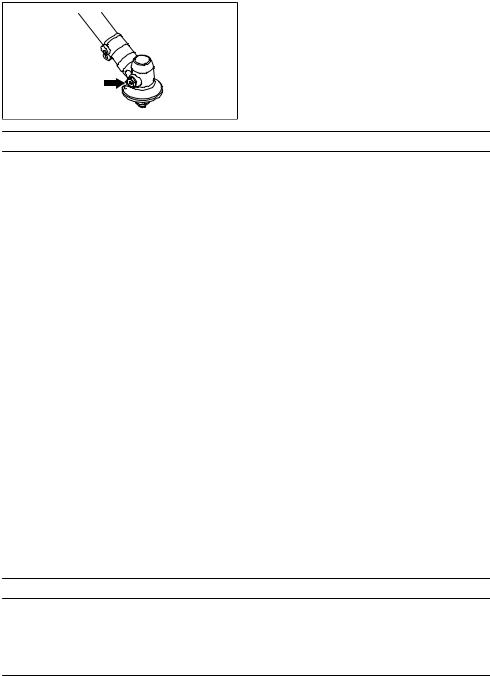
To disassemble the two-piece shaft
1.Turn the knob 3 turns or more to loosen the coupling.
941 - 004 - 10.04.2019 |
9 |

2.Push and hold the button (C).
3.Hold tight in the end of the shaft that the engine is attached to.
4. Pull the attachment straight out of the coupling.
C |
Operation
Introduction
WARNING: Before you operate the product, you must read and understand the safety chapter.
Fuel
This product has a two-stroke engine.
CAUTION: Incorrect type of fuel can result in engine damage. Use a mixture of gasoline and two-stroke oil.
Premixed fuel
•Use Husqvarna premixed alkylate fuel of a good quality, for best performance and extension of the engine life. This fuel contains less harmful chemicals compared to regular fuel, which decreases harmful exhaust fumes. The quantity of remains after combustion is lower with this fuel, which keeps the components of the engine more clean.
To mix fuel
Gasoline
•Use good quality unleaded gasoline with a maximum of 10% ethanol contents.
CAUTION: Do not use gasoline with an octane grade less than 90 RON/87 AKI. Use of a lower octane grade can cause engine knocking, which causes engine damages.
•We recommend that you use gasoline of a higher octane grade for work with continuously high rpm.
Two-stroke oil
•For best results and performance use Husqvarna two-stroke oil.
•If Husqvarna two-stroke oil is not available, use a two-stroke oil of good quality for air-cooled engines. Speak to your servicing dealer to select the correct oil.
|
|
CAUTION: Do not use two-stroke oil for |
|
|
|
water-cooled outboard engines, also |
|
|
|
referred to as outboard oil. Do not use oil |
|
|
|
for four-stroke engines. |
|
|
|
|
|
To mix gasoline and two-stroke oil |
|||
|
|
|
|
Gasoline, liter |
|
Two-stroke oil, |
|
|
|
|
liter |
|
|
|
|
|
|
|
2% (50:1) |
|
|
|
|
5 |
|
|
0.10 |
|
|
|
|
10 |
|
|
0.20 |
|
|
|
|
15 |
|
|
0.30 |
|
|
|
|
20 |
|
|
0.40 |
|
|
|
|
CAUTION: Small errors can influence the ratio of the mixture drastically when you mix small quantities of fuel. Measure the quantity of oil carefully and make sure that you get the correct mixture.
10 |
941 - 004 - 10.04.2019 |
1.Fill half the quantity of gasoline in a clean container for fuel.
2.Add the full quantity of oil.
3.Shake the fuel mixture.
4.Add the remaining quantity of gasoline to the container.
5.Carefully shake the fuel mixture.
CAUTION: Do not mix fuel for more than 1 month at a time.
To fill the fuel tank
1. Clean the area around the fuel tank cap.
2.Shake the container and make sure that the fuel is fully mixed.
3.Tighten the fuel tank cap carefully.
4.Move the product 3 m/10 ft or more away from the refueling area and fuel source before starting.
Note: To see where the fuel tank is on your product, refer to Product overview on page 2.
To examine before start
1.Make sure that the product has no missing, damaged, loose or worn parts.
2.Make sure that nuts, screws and bolts are tightened.
3.Make sure that the trimmer head is not damaged.
4.Make sure that the air filter is not clogged.
5.Make sure that the safety devices on the product are not defective.
6.Make sure that the product has no fuel leaks.
To start a cold engine
1. Push the air purge bulb 10 times.
2. Pull the choke control up.
3.Hold the body of the product on the ground with your left hand.
CAUTION: Do not step on the product.
4.Pull the starter rope handle slowly until you feel some resistance. When you feel resistance, pull the starter rope handle quickly and with force.
WARNING: Do not twist the starter rope around your hand.
5.Continue to pull the starter rope handle until the engine starts.
CAUTION: Do not pull the starter rope to full extension and do not let go of the starter rope handle. This can cause damage to the product. Release the starter rope slowly.
6.Set the choke control to the operation position and apply full throttle. The throttle trigger automatically disengages from the start position.
To start a warm engine
1.Push the air purge bulb 10 times.
2.Pull the starter rope until the engine starts.
941 - 004 - 10.04.2019 |
11 |

To stop
•Push the stop switch to stop the engine.
Note: The stop switch automatically goes back to its initial position.
To trim the grass
1.Hold the trimmer head immediately above the ground at an angle. Do not push the trimmer line into the grass.
2.Decrease the length of the trimmer line by 10-12 cm / 4-4.75 in.
3.Decrease the engine speed to decrease the risk of damage to plants.
4.Use 80 % throttle when you cut grass near objects.
4.if the blade is angled to the left when clearing grass, the grass will collect in a line, which makes it easier to collect, e.g. by raking.
5.Try to work rhythmically. Stand firmly with your feet apart. Move forward after the return stoke and stand firmly again.
6.Let the support cup rest lightly against the ground. It is used to protect the blade from hitting the ground.
7.Reduce the risk of material wrapping around the blade by always work at full throttle and avoid the previously cut material during the return stoke.
8.Stop the engine, unclip the harness and place the machine on the ground before you start to collect the cut material.
To cut the grass
1.Make sure that the trimmer line is parallel to the ground when you cut the grass.
2.Do not push the trimmer head to the ground. This can cause damage to the product.
3.Move the product from side to side when you cut grass. Use full speed.
To clear grass with a grass blade
1.Grass blades and grass cutters must not be used on woody stems.
2.A grass blade is used for all types of tall or coarse grass.
3.The grass is cut down with a sideways, swinging movement, where the movement from right-to-left is the clearing stoke and the movement from left-to- right is the return stoke. Let the left-hand side of the blade (between 8 and 12 o'clock) do the cutting.
To sweep the grass
The airflow from the rotating trimmer line can be used to remove cut grass from an area.
1.Hold the trimmer head and the trimmer line parallel to the ground and above the ground.
2.Apply full throttle.
3.Move the trimmer head from side to side and sweep the grass.
12 |
941 - 004 - 10.04.2019 |

WARNING: Clean the trimmer head cover each time you assemble new trimmer line to prevent unbalance and vibrations in the handles. Also do a check of the other parts of the trimmer head and clean it if necessary.
Grass trimmer head
•Make sure that you wind the grass trimmer line tightly and equally around the drum to decrease the vibration.
•Use only the approved grass trimmer heads and grass trimmer lines. Refer to Accessories on page 18.
•Use a correct length of the grass trimmer line. A long grass trimmer line uses more engine power than a short grass trimmer line.
•Make sure that the cutter on the cutting attachment guard is not damaged.
•Soak the grass trimmer line in water for 2 days before you attach the grass trimmer line to the product. This increases the life of the grass trimmer line.
•Refer to the instructions for the cutting attachment to use the correct procedure to load the cord and the correct cord diameter.
Maintenance
Introduction
WARNING: Before you do maintenance, you must read and understand the safety chapter.
For all servicing and repair work on the product, special training is necessary. We guarantee the availability of professional repairs and servicing. If your dealer is not a service agent, speak to them for information about the nearest service agent.
Maintenance schedule
Maintenance |
Daily |
Weekly |
Monthly |
|
|
|
|
Clean the external surface. |
X |
|
|
|
|
|
|
Clean the air filter. Replace if it is necessary. |
X |
|
|
|
|
|
|
Examine the function of the throttle trigger lock and the throttle. |
X |
|
|
|
|
|
|
Examine the stop switch. |
X |
|
|
|
|
|
|
Examine the guards. |
X |
|
|
|
|
|
|
Examine the trimmer head. |
X |
|
|
|
|
|
|
Examine the locknut. |
X |
|
|
|
|
|
|
Examine for fuel leaks. |
X |
|
|
|
|
|
|
Make sure that the grass blade is aligned with the center, that it is sharp and |
X |
|
|
does not have damages on the blade or the center hole. |
|
|
|
|
|
|
|
|
|
|
|
Make sure that the cutting attachment does not rotate at idle speed. |
X |
|
|
|
|
|
|
Apply grease to the two-piece shaft. |
|
X |
|
|
|
|
|
Examine the starter rope handle and the starter rope. |
|
X |
|
|
|
|
|
Examine the bevel gear grease. |
|
X |
|
|
|
|
|
Clean the external surface of the spark plug. Remove the spark plug and meas- |
|
X |
|
ure the electrode gap. Adjust the electrode gap or replace the spark plug. |
|
|
|
|
|
|
|
|
|
|
|
Clean the cooling system. |
|
X |
|
|
|
|
|
Clean or replace the spark arrestor screen on the muffler. |
|
X |
|
|
|
|
|
Clean the external surface of the carburetor and the area around it. |
|
X |
|
|
|
|
|
941 - 004 - 10.04.2019 |
13 |

Maintenance |
Daily |
Weekly |
Monthly |
|
|
|
|
Examine the fuel filter for contamination. |
|
|
X |
|
|
|
|
Examine the fuel hose for damage. |
|
|
X |
|
|
|
|
Examine all cables and connections. |
|
|
X |
|
|
|
|
Examine the clutch, the clutch springs and the clutch drum for wear. |
|
|
X |
|
|
|
|
Replace the spark plug. |
|
|
X |
|
|
|
|
To adjust the idle speed
Make sure that the air filter is clean and the air filter cover is attached before you adjust the idle speed.
1.Turn the idle speed screw T, which is identified with a "T" mark, clockwise until the cutting attachment starts to rotate.
2.Turn the idle speed screw T, which is identified with a "T" mark, counterclockwise until the cutting attachment stops.
3.The idle speed must be below the speed when the cutting attachment starts to rotate. The idle speed is correct when the engine operates smoothly in all positions.
To do maintenance on the spark arrester screen
•Use a wire brush to clean the spark arrester screen.
To clean the cooling system
•Clean the air intake (A) on the starter and the cooling fins (B) on the cylinder with a brush.
B |
A |
To examine the spark plug
CAUTION: Use the recommended spark plug. Make sure that the replacement is the same as the manufacturer supplied part. An incorrect spark plug can cause damage to the product. Make sure that the spark plug is installed with a supressor. Speak to your servicing dealer for more information.
1.Examine the spark plug when:
a)the engine is low on power.
b)the engine is not easy to start.
c)the engine does not operate correctly at idle speed.
2.If, the engine is not easy to start or operate, examine the spark plug for unwanted materials. To decrease the risk of unwanted material on the spark plug electrodes:
a)make sure that the idle speed is correctly adjusted.
b)make sure that the fuel mixture is correct.
c)make sure that the air filter is clean.
14 |
941 - 004 - 10.04.2019 |

3.Clean the spark plug if it is dirty. Make sure that the electrode gap is correct. Refer to Technical data on page 17.
4. Replace the spark plug when it is necessary.
To apply grease to the two-piece shaft
•Apply grease to the end of the drive shaft after each 30 hours of operation.
To clean the air filter
1. Remove the air filter cover and remove the air filter.
2.Clean the air filter with warm soap water. Make sure that the air filter is dry before you install it.
3.Replace the air filter if it is too dirty to fully clean it. Always replace a damaged air filter.
4.If your product has a foam air filter, apply air filter oil. Only apply air filter oil to a foam filter. Do not apply oil to a felt filter.
To apply air filter oil to the air filter
CAUTION: Always use special air filter oil on foam air filters. Do not use other types of oil.
WARNING: Do not get oil on your body.
1. Remove the air filter cover and remove the air filter.
2.Put the air filter in a plastic bag.
3.Put the air filter oil in the plastic bag.
4.Push the plastic bag to make sure the oil supplies equally across the air filter.
5.Push on the air filter, while in the bag, to remove the air filter oil that is not necessary. Remove the air filter from the bag.
6.Install the air filter.
941 - 004 - 10.04.2019 |
15 |
To add grease to the bevel gear
•Make sure that the bevel gear is filled ¾ full with bevel gear grease.
Troubleshooting
The engine does not start
Check |
Possible cause |
Procedure |
|
|
|
Starter pawls. |
The starter pawls cannot move freely. |
Remove the starter cover and clean around |
|
|
the starter pawls. |
|
|
|
|
|
Let an approved servicing dealer help you. |
|
|
|
Fuel tank. |
Incorrect fuel type. |
Drain the fuel tank and fill with correct fuel. |
|
|
|
Spark plug. |
The spark plug is dirty or wet. |
Make sure that the spark plug is dry and |
|
|
clean. |
|
|
|
|
The spark plug electrode gap is incorrect. |
Clean the spark plug. Make sure that the |
|
|
electrode gap is correct. Make sure that the |
|
|
spark plug has a supressor. |
|
|
|
|
|
Refer to Technical data on page 17 for cor- |
|
|
rect electrode gap. |
|
|
|
|
The spark plug is loose. |
Tighten the spark plug. |
|
|
|
The engine starts but stops again
Check |
Possible cause |
Procedure |
|
|
|
Fuel tank |
Incorrect fuel type. |
Empty the fuel tank and fill it with correct fuel. |
|
|
|
Air filter |
The air filter is clogged. |
Clean the air filter. |
|
|
|
Transportation and storage
• |
Always allow the product to cool down before |
Sparks or open flames, for example from electrical |
|
storage. |
devices or boilers, can start a fire. |
• |
For storage and transportation of the product and |
• Always use approved containers for storage and |
|
fuel, make sure that there are no leaks or fumes. |
transportation of fuel. |
16 |
941 - 004 - 10.04.2019 |

•Empty the fuel before transportation or before longterm storage. Discard the fuel at an applicable disposal location.
•Attach the transport guard during transportation and storage.
•Remove the spark plug cap from the spark plug.
•Attach the product during transportation. Make sure that it cannot move.
•Clean and do servicing on the product before longterm storage.
Technical data
Technical data
|
122C |
122LK |
|
|
|
Engine |
|
|
|
|
|
Cylinder displacement, cm3 |
21.7 |
21.7 |
Idle speed, rpm |
2900 |
2900 |
|
|
|
Recommended max. speed, rpm |
7200 |
9100 |
|
|
|
Speed of output shaft, rpm |
7200 |
6232 |
|
|
|
Power / Max. engine output, acc. to ISO 8893, kW/hp @ rpm |
0.6/0.8 @ 7800 |
0.6/0.8 @ 7800 |
|
|
|
Catalytic converter muffler |
Yes |
Yes |
|
|
|
Speed-regulated ignition system |
No |
No |
|
|
|
Ignition system |
|
|
|
|
|
Spark plug |
HQT-4 672201 |
HQT-4 672201 |
|
|
|
Electrode gap, mm |
0.5 |
0.5 |
|
|
|
Fuel system |
|
|
|
|
|
Fuel tank capacity, l/cm³ |
0.3/300 |
0.3/300 |
|
|
|
Weight |
|
|
|
|
|
Weight without fuel, cutting attachment and guard, kg |
4.4 |
4.8 |
|
|
|
Noise emissions1 |
|
|
Sound power level, measured, dB(A) |
102 |
104 |
|
|
|
Sound power level, guaranteed (LWA) , dB(A) |
104 |
108 |
Noise levels2 |
|
|
Equivalent sound pressure level at the operator’s ear, measured ac- |
88 |
90 |
cording to EN ISO 11806 and ISO 22868, dB(A): |
|
|
|
|
|
Vibration levels3 |
|
|
1Noise emissions in the environment measured as sound power (LWA) in conformity with EC directive 2000/14/ EC. Reported sound power level for the product has been measured with the original cutting attachment that
gives the highest level. The difference between guaranteed and measured sound power is that the guaranteed sound power also includes dispersion in the measurement result and the variations between different products of the same model according to Directive 2000/14/EC.
2Reported data for equivalent sound pressure level for the product has a typical statistical dispersion (standard deviation) of 1 dB (A).
3 Reported data for equivalent vibration level has a typical statistical dispersion (standard deviation) of 1 m/s2.
941 - 004 - 10.04.2019 |
17 |

|
122C |
122LK |
|
|
|
Equivalent vibration level (ahv, eq) equipped with trimmer head, left |
5.0 |
3.6 |
handle, m/s2 |
|
|
Equivalent vibration level (ahv, eq) equipped with trimmer head, right |
3.6 |
3.5 |
handle, m/s2 |
|
|
Accessories
Accessories
122C
Approved accessories |
Type |
Cutting attachment guard |
|
|
|
Threaded shaft |
3/8 R |
– |
|
|
|
Trimmer head |
T25 (Ø 2.0 - 2.7 mm cord) |
574 47 95-01 |
|
|
|
|
T25C (Ø 2.0 - 2.7 mm cord) |
574 47 95-01 |
|
|
|
122LK |
|
|
|
|
|
Approved accessories |
Type |
Cutting attachment guard |
|
|
|
Threaded shaft |
M10 |
– |
|
|
|
Trimmer head |
T25 (Ø 2.0 - 2.7 mm cord) |
574 19 87-01 |
|
|
|
The following attachments are recommended for the specified models.
Approved attachments |
Type |
Use with |
|
|
|
Clean sweep attachment |
SR600-2 |
122LK |
|
|
|
Hedge trimmer attachment |
HA110 |
122LK |
|
|
|
Hedge trimmer attachment |
HA850 |
122LK |
|
|
|
Edger attachment |
EA850 |
122LK |
|
|
|
Saw attachment |
PA1100 |
122LK |
|
|
|
Extension attachment |
EX850 |
122LK |
|
|
|
Cultivator attachment |
CA230 |
122LK |
|
|
|
Blower attachment |
BA101 |
122LK |
|
|
|
Bristle brush attachment |
BR600 |
122LK |
|
|
|
Dethatcher attachment |
DT600 |
122LK |
|
|
|
18 |
941 - 004 - 10.04.2019 |

EC Declaration of Conformity
EC Declaration of Conformity
Husqvarna AB, SE-561 82 Huskvarna, Sweden, tel: +46-36-146500, declares that the grass trimmers Husqvarna 122C, 122LK with serial numbers dating from 2016 onwards (the year is clearly stated on the rating plate, followed by the serial number), comply with the requirements of the COUNCIL’S DIRECTIVE:
•of May 17, 2006 ”relating to machinery” 2006/42/EC.
•of February 26, 2014 ”relating to electromagnetic compatibility” 2014/30/EU.
•of May 8, 2000 ”relating to the noise emissions in the environment” 2000/14/EC. Conformity assessment according to Annex V. For information relating to noise emissions, see the Technical data on page 17.
•of June 8, 2011 ”on the restriction of the use of certain hazardous substances in electrical and electronic equipment” 2011/65/EU.
The following standards have been applied:
EN ISO 12100:2010, EN ISO 11806-1:2011, ISO 14982:1998, CISPR 12:2007, EN 50581:2012
RISE SMP Svensk Maskinprovning AB, Box 7035, SE-750 07 Uppsala, Sweden, has performed voluntary type examination on behalf of Husqvarna AB.
The certificates are numbered: 122C - SEC/10/2271, 122LK - SEC/10/2272
RISE SMP Svensk Maskinprovning AB, has also verified agreement with appendix V of the council’s directive 2000/14/EG.
The certificates are numbered: 122C - 01/164/068, 122LK - 01/164/067.
Huskvarna March 30, 2016
Per Gustafsson, Development Manager (Authorized representative for Husqvarna AB and responsible for technical documentation.)
941 - 004 - 10.04.2019 |
19 |

Innehåll
Introduktion................................................................... |
20 |
Säkerhet....................................................................... |
22 |
Montering...................................................................... |
27 |
Drift............................................................................... |
28 |
Underhåll...................................................................... |
32 |
Felsökning.................................................................... |
35 |
Transport och förvaring................................................. |
35 |
Tekniska data............................................................... |
36 |
Tillbehör........................................................................ |
37 |
EG försäkran om överensstämmelse........................... |
38 |
Introduktion
Produktbeskrivning
Produkten är en grästrimmer med förbränningsmotor.
Arbetet med att öka din säkerhet och effektivitet under användning pågår ständigt. Prata med en serviceverkstad för mer information.
Avsedd användning
Produkten används med ett trimmerhuvud för att klippa gräs. Använd inte produkten till andra uppgifter än grästrimning och gräsröjning.
Notera: Nationella regler kan begränsa användningen av produkten.
20 |
941 - 004 - 10.04.2019 |
Produktöversikt |
|
|
|
|
|
|
|
|
|
18 |
|
|
|
|
|
|
|
|
|
|
19 |
|
|
|
|
|
15 |
|
14 |
|
|
|
|
|
|
|
|
||
1 |
122LK |
|
|
|
|
|
|
|
|
|
|
|
3 |
|
|
|
|
|
|
|
|
|
|
|
|
4 |
|
|
|
|
2 |
|
|
|
|
|
|
|
|
122C |
|
|
|
|
|
|
7 |
8 |
|
|
|
|
|
|
|
13 |
|
||
|
4 |
|
|
17 |
|
|
16 |
||
|
|
|
|
|
12 |
||||
|
|
|
|
|
|
|
|
|
|
|
|
|
|
|
|
|
6 |
|
9 |
|
|
|
|
|
|
|
|
|
|
|
|
|
7 |
|
8 |
|
|
|
|
3 |
|
|
|
13 |
|
5 |
|
|
|
|
|
|
|
16 |
|
|
|||
|
|
|
|
|
12 |
|
|
|
|
2 |
|
|
|
|
|
|
|
|
|
|
|
|
|
|
|
|
|
|
|
|
|
|
|
|
|
|
11 |
|
|
20 |
|
6 |
|
|
|
9 |
|
10 |
|
|
|
|
|
|
|
|
|
||
|
|
|
5 |
|
|
|
|
|
1 |
|
|
|
|
|
|
|
|
|
|
2 |
|
|
|
11 |
|
|
|
|
|
|
|
|
|
|
|
|
|
|
|
|
|
|
|
|
10 |
|
|
|
|
1.Trimmerhuvud
2.Trimmerhuvudets skydd
3.Riggrör
4.Loophandtag
5.Gasreglage
6.Stoppkontakt
7.Dödmansgrepp
8.Tändhatt och tändstift
9.Startsnörets handtag
10.Bränsletank
11.Luftfilterlock
12.Bränslepumpblåsa
13.Chokereglage
14.Bruksanvisning
15.Kombinyckel
16.Startapparathus
17.Riggrörskoppling
18.Vinkelväxel
19.Påfyllning av smörjmedel, vinkelväxel
20.Medbringare
Symboler på produkten
VARNING! Denna produkt är farlig. Skador eller dödsfall kan inträffa för användaren eller människor runt omkring om produkten inte används försiktigt och korrekt. För att förhindra att användaren eller människor runt omkring skadas ska du läsa och följa alla säkerhetsinstruktioner i bruksanvisningen.
Läs igenom bruksanvisningen noggrant och se till att du förstår instruktionerna innan användning.
Använd skyddshjälm på platser där föremål kan falla ner. Använd godkända hörselskydd. Använd godkänt ögonskydd.
Maximalt varvtal för utgående axel. |
941 - 004 - 10.04.2019 |
21 |
Produkten överensstämmer med gällande
EG-direktiv.
Produkten kan göra att föremål slungas ut, vilket kan orsaka skador.
50FT |
50FT |
Håll ett avstånd på minst 15 m till personer |
15 M |
15 M |
|
och djur vid användning av produkten.
Använd godkända skyddshandskar.
Använd kraftiga halksäkra kängor.
Använd endast flexibel skärtråd. Använd inte 


 skärutrustning av metall.
Emission av buller i miljön enligt EU-direktiv 2000/14/EC och New South
Wales ”Protection of the Environment Operations (Noise Control) Regulation 2017”. Information om bulleremission finns på maskinens etikett och i avsnittet Tekniska data.
Bränslepumpblåsa.
Choke.
Typskylten visar serie-
yyyywwxxxx numret. yyyy är produktionsåret, ww är produk-
tionsveckan.
Notera: Övriga symboler/dekaler på produkten avser specifika krav för certifieringar på andra kommersiella marknader.
EU V
VARNING: Manipulering av motorn upphäver EG-typgodkännandet för den här produkten.
Kundtjänst
Ring kundtjänst på: 1-800-487-5951 eller gå till www.husqvarna.com.
Produktansvar
Enligt lagstiftningen för produktansvar ansvarar vi inte för skador som vår produkt orsakar om:
•produkten repareras felaktigt.
•produkten repareras med delar som inte kommer från tillverkaren eller inte har godkänts av tillverkaren
•produkten har ett tillbehör som inte kommer från tillverkaren eller inte har godkänts av tillverkaren.
•produkten inte repareras vid ett godkänt servicecenter eller av en godkänd person.
Säkerhet
Säkerhetsdefinitioner
Varningar, försiktighetsåtgärder och anmärkningar används för att betona speciellt viktiga delar i bruksanvisningen.
VARNING: Används om det finns risk för skador eller dödsfall för föraren eller kringstående om anvisningarna i bruksanvisningen inte följs.
OBSERVERA: Används om det finns risk för skada på produkten, annat material eller det angränsande området om anvisningarna i bruksanvisningen inte följs.
Notera: Används för att ge mer information som är nödvändig i en viss situation.
Allmänna säkerhetsanvisningar
VARNING: Läs varningsinstruktionerna nedan innan du använder produkten.
•Använd produkten på rätt sätt. Skador eller dödsfall är ett möjligt resultat av felaktig användning. Använd endast produkten för arbetsuppgifterna som finns i denna bruksanvisning. Använd inte produkten till andra uppgifter.
•Följ instruktionerna i denna bruksanvisning. Följ säkerhetssymbolerna och säkerhetsinstruktionerna. Om användaren inte följer instruktionerna och
22 |
941 - 004 - 10.04.2019 |

symbolerna är skador eller dödsfall ett möjligt resultat.
•Spara den här bruksanvisningen. Använd instruktionerna för att sätta ihop, använda och förvara din produkt i gott skick. Använd instruktionerna för korrekt installation av tillbehör och extrautrustning. Använd endast godkända tillbehör och extrautrustning.
•Använd inte en skadad produkt. Följ underhållsschemat. Utför endast det underhållsarbete som du hittar instruktioner om i den här bruksanvisningen. Godkända servicecenter måste göra allt annat underhållsarbete.
•Den här bruksanvisningen kan inte inkludera alla situationer som kan uppstå när du använder produkten. Var försiktig och använd sunt förnuft. Använd inte produkten eller utför underhåll på produkten om du inte är trygg med situationen. Tala med en produktexpert, din återförsäljare, din serviceverkstad eller ett godkänt servicecenter för att få information.
•Koppla ur tändstiftskabeln innan du monterar produkten, ställer undan produkten för förvaring eller utför underhåll.
•Använd inte produkten om den ändras från dess första specifikation. Byt inte ut en del av produkten utan tillverkarens godkännande. Använd endast delar som är godkända av tillverkaren. Skador eller dödsfall är ett möjligt resultat av felaktigt underhåll.
•Undvik att andas in rök från motorn. Långvarig inandning av motorns avgaser utgör en hälsorisk.
•Starta inte produkten inomhus eller nära brandfarligt material. Avgaserna är heta och kan medföra gnistor som kan orsaka brand. Otillräckligt luftflöde kan orsaka skador eller dödsfall på grund av kvävning eller kolmonoxidförgiftning.
•När du använder denna produkt skapar motorn ett elektromagnetiskt fält. Det elektromagnetiska fältet kan orsaka skador på medicinska implantat. Tala med din läkare och tillverkaren av eventuella medicinska implantat innan du använder produkten.
•Låt inte barn använda produkten. Låt inte personer utan kännedom om instruktionerna använda produkten.
•Se till att du alltid övervakar en person med nedsatt fysisk eller mental kapacitet som använder produkten. En vuxen person måste vara närvarande hela tiden.
•Lås in produkten på en plats där barn och obehöriga personer inte har åtkomst.
•Produkten kan skjuta ut föremål och orsaka skador. Följ säkerhetsinstruktionerna för att minska risken för personskador eller dödsfall.
•Lämna inte produkten när motorn är på.
•Användaren av produkten är ansvarig om en olycka inträffar.
•Kontrollera att delarna inte är skadade innan du använder produkten.
•Se till att du står minst 15 m från andra personer eller djur innan du använder produkten. Se till att personer i närheten vet att du kommer att använda produkten.
•Följ nationella eller lokala lagar. De kan förhindra eller minska produktens funktion under vissa förhållanden.
•Använd inte produkten om du är trött eller om du är påverkad av alkohol, droger eller läkemedel. Din syn, ditt omdöme eller kroppskontroll kan ha påverkats.
Säkerhetsinstruktioner för montering
VARNING: Läs varningsinstruktionerna nedan innan du använder produkten.
•Avlägsna tändhatten från tändstiftet innan du monterar produkten.
•Använd godkända skyddshandskar.
•Se till att du har monterat kåpan och riggröret korrekt innan du startar motorn.
Säkerhetsinstruktioner för drift
•Kontrollera att produkten är helt monterad innan du använder den.
•Innan du startar bör du flytta produkten 3 m från den plats där du fyllde på bränsletanken. Placera produkten på en plan yta. Se till att skärutrustningen inte vidrör marken eller andra föremål.
•Produkten kan orsaka att föremål skjuts ut, vilket kan orsaka skador på ögonen. Använd alltid godkänt ögonskydd när du använder produkten.
•Var försiktig, ett barn kan närma sig produkten utan din vetskap under användningen.
•Använd inte produkten om det finns personer i arbetsområdet. Stoppa produkten om en person går in i arbetsområdet.
•Se till att du alltid har kontroll över produkten.
•Använd inte produkten om du inte kan få hjälp om en olycka inträffar. Se alltid till att andra vet att du kommer att använda produkten innan du börjar använda produkten.
•Vänd dig inte om med produkten innan du kontrollerat att inga människor eller djur finns i säkerhetsområdet.
•Ta bort allt oönskat material från arbetsområdet innan du börjar. Om skärutrustningen träffar ett objekt kan objektet skjutas ut och orsaka personskada eller skador. Oönskat material kan lindas runt skärutrustningen och orsaka skador.
•Använd inte produkten i dåligt väder (dimma, regn, hård vind, risk för blixtnedslag eller andra väderförhållanden). Farliga situationer (t.ex. hala ytor) kan uppstå på grund av dåligt väder.
941 - 004 - 10.04.2019 |
23 |

• Se till att du kan röra dig fritt och arbeta i en stabil |
• Använd skyddshjälm där det finns risk för fallande |
position. |
föremål. |
|
|
|
|
•Se till att du inte kan falla när du använder produkten. Luta dig inte när du använder produkten.
•Håll alltid produkten med båda händerna. Håll produkten på höger sida av kroppen.
•Använd godkända hörselskydd med tillräcklig dämpeffekt. Långvarig exponering för buller kan ge bestående hörselskador.
•Använd godkänt ögonskydd. Används visir måste även godkända skyddsglasögon användas. Godkända skyddsglasögon måste uppfylla standarden ANSI Z87.1 i USA eller SS-EN 166 i EUländer.
•Använda produkten med skärutrustningen under midjehöjd.
•Om chokereglaget är i chokeläge när motorn startar börjar skärutrustningen rotera.
•Rör inte vid vinkelväxeln när motorn stannat. Vinkelväxeln är varm efter det att motorn stannat. Heta ytor kan orsaka skador.
•Stanna motorn innan du flyttar produkten.
•Lägg inte ned produkten om motorn är på.
•Innan du tar bort oönskat material från produkten måste du stänga av motorn och vänta tills skärutrustningen stannar. Låt skärutrustningen stanna innan du avlägsnar skärmaterialet.
Personlig skyddsutrustning
VARNING: Läs varningsinstruktionerna nedan innan du använder produkten.
•Använd alltid godkänd personlig skyddsutrustning när du använder produkten. Personlig skyddsutrustning kan inte eliminera skaderisken helt, men den reducerar effekten av en skada vid ett eventuellt olyckstillbud. Be din återförsäljare om hjälp med att välja rätt utrustning.
•Använd handskar vid behov, till exempel när du ansluter, undersöker eller rengör skärutrustningen.
•Använd halkfria och stadiga stövlar.
•Ha på dig kläder i slitstarkt material. Bär alltid kraftiga långbyxor och överdel med långa ärmar. Använd inte löst sittande kläder som kan fastna i kvistar och grenar. Bär inte smycken, kortbyxor eller
24 |
941 - 004 - 10.04.2019 |

sandaler och gå inte barfota. Sätt upp håret ordentligt så att det inte hänger nedanför axlarna.
•Ha första förband nära till hands.
Säkerhetsanordningar på produkten
VARNING: Läs varningsinstruktionerna nedan innan du använder produkten.
•Använd inte en produkt med defekta säkerhetsanordningar.
•Kontrollera säkerhetsanordningarna regelbundet. Se
Underhållsschema på sida 32.
•Om säkerhetsanordningarna är defekta ska du prata med en Husqvarna-serviceverkstad.
Kontrollera dödmansgreppet
1.Kontrollera att dödmansgreppet (A) och gasreglaget
(B) går lätt samt att deras returfjädersystem fungerar.
A |
B |
2.Tryck ner dödmansgreppet och se till att det går tillbaka till sitt ursprungliga läge när du släpper det.
3.Se till att gasreglaget är låst i tomgångsläge när dödmansgreppet släpps.
4.Starta produkten och ge fullgas.
5.Släpp gasreglaget och se till att knivarna stannar och förblir stilla.
VARNING: Om knivarna rör sig med gasreglaget i tomgångsläge ska förgasarens tomgång justeras. Se Så justerar du tomgångsvarvtalet på sida 32.
Kontrollera stoppkontakten
1.Starta motorn.
2.Flytta stoppkontakten till stoppläget och se till att motorn stannar.
Kontrollera skärutrustningens skydd
Skärutrustningens skydd stoppar föremål som slungas ut mot användaren. Det förhindrar även skador som skulle inträffa om du vidrör skärutrustningen.
1.Stoppa motorn.
2.Kontrollera visuellt om det finns skador, till exempel sprickor.
3. Byt ut skärutrustningen om den är skadad.
941 - 004 - 10.04.2019 |
25 |

Ljuddämpare
•Använd inte en motor med defekt ljuddämpare. En defekt ljuddämpare ökar ljudnivån och brandrisken. Ha en brandsläckare i närheten.
•Kontrollera regelbundet att ljuddämparen sitter fast på produkten.
•Rör inte motorn eller ljuddämparen när motorn är på. Rör inte motorn eller ljuddämparen förrän en stund efter att motorn stannat. Heta ytor kan orsaka skador.
•En varm ljuddämpare kan orsaka brand. Var försiktig om du använder produkten nära brandfarliga vätskor eller ångor.
•Rör inte ljuddämparens delar om ljuddämparen är skadad. Delarna kan innehålla vissa cancerframkallande kemikalier.
Skärutrustning
VARNING: Läs varningsinstruktionerna nedan innan du använder produkten.
•Utför regelbundet underhåll. Låt ett godkänt servicecenter regelbundet undersöka skärutrustningen för att göra justeringar eller reparationer.
•Skärutrustningens prestanda ökar.
•Skärutrustningens livslängd ökar.
•Risken för olyckor minskar.
•Använd endast ett godkänt skydd till skärutrustningen. Se Tillbehör på sida 37.
•Använd inte en skadad skärutrustning.
Bränslesäkerhet
VARNING: Läs varningsinstruktionerna nedan innan du använder produkten.
•Blanda inte bränsle inomhus eller nära en värmekälla.
•Starta inte produkten om det finns bränsle eller motorolja på produkten. Ta bort det oönskade bränslet/oljan och låt produkten torka. Ta bort oönskat bränsle från produkten.
•Om du spillt bränsle på kläderna skall dessa bytas omedelbart.
•Se till att inte få bränsle på kroppen, det kan orsaka personskador. Om du får bränsle på kroppen använder du tvål och vatten för att ta bort bränslet.
•Starta inte motorn om du spiller olja eller bränsle på produkten eller på kroppen.
•Starta inte produkten om motorn har en läcka. Undersök regelbundet om motorn läcker.
•Var försiktig med bränsle. Bränsle är brandfarligt och ångorna är explosiva och kan orsaka skador eller dödsfall.
•Undvik att andas in bränsleångor då det kan orsaka personskador. Se till att det finns tillräckligt luftflöde.
•Rök inte i närheten av bränslet eller motorn.
•Placera inga varma föremål i närheten av bränslet eller motorn.
•Fyll inte på bränsle när motorn är på.
•Se till att motorn har svalnat innan du fyller på bränsle.
•Innan du fyller på bränsle bör du öppna bränsletanklocket långsamt och försiktigt släppa på trycket.
•Fyll inte på bränsle i motorn inomhus. Otillräckligt luftflöde kan orsaka skador eller dödsfall på grund av kvävning eller kolmonoxidförgiftning.
•Dra åt tanklocket försiktigt, annars kan brand uppstå.
•Flytta produkten minst 3 m från den plats där du fyllde på tanken innan du startar den.
•Fyll inte på med för mycket bränsle i bränsletanken.
•Kontrollera att läckage inte kan uppstå när du flyttar produkten eller bränslebehållaren.
•Placera inte produkten eller bränslebehållaren där det finns öppen eld, gnistor eller tändlågor. Se till att det inte finns någon öppen eld i förvaringsutrymmet.
•Använd endast godkända behållare när du flyttar bränslet eller ställer undan bränslet för förvaring.
•Töm bränsletanken före långtidsförvaring. Följ lokala lagar om var du kan kasta bränsle.
•Rengör produkten före långtidsförvaring.
•Ta bort tändhatten innan du ställer undan produkten för förvaring så att motorn inte oavsiktligt startar.
Säkerhetsinstruktioner för underhåll
VARNING: Läs varningsinstruktionerna nedan innan du använder produkten.
•Stäng av motorn, se till att skärutrustningen stannar och låt produkten svalna innan du utför underhåll.
•Koppla ifrån tändhatten innan du utför underhåll.
•Motorns avgaser innehåller kolmonoxid, en luktlös, giftig och mycket farlig gas som kan orsaka dödsfall. Kör inte produkten inomhus eller i slutna utrymmen.
•Motoravgaserna är heta och kan medföra gnistor. Kör inte produkten inomhus eller nära brandfarligt material.
•Tillbehör och ändringar av produkten som inte godkänts av tillverkaren kan orsaka allvarliga skador eller dödsfall. Modifiera inte produkten. Använd alltid originaltillbehör.
•Om underhåll inte utförs korrekt och regelbundet ökar risken för personskador och skador på produkten.
•Utför endast det underhåll som anges i den här bruksanvisningen. Låt en godkänd Husqvarnaserviceverkstad utföra all annan service.
•Låt en godkänd Husqvarna-serviceverkstad utföra service på produkten regelbundet.
26 |
941 - 004 - 10.04.2019 |

• |
Byt ut skadade, slitna och trasiga delar. |
• Håll klingans skärtänder väl och korrekt skärpta. Följ |
• |
Se skärutrustningens anvisningar för hur du |
våra rekommendationer. Se även instruktionerna på |
|
installerar trimmertråden och väljer rätt diameter på |
knivförpackningen. |
|
trimmertråden. |
|
Montering
Introduktion
VARNING: Innan du monterar produkten måste du läsa igenom och förstå kapitlet om säkerhet.
VARNING: Avlägsna tändstiftskabeln från tändstiftet innan du monterar produkten.
Så sätter du fast loophandtaget
1.Sätt fast loophandtaget på riggröret enligt bilden och dra åt.
2.Se till att loophandtaget fäster mellan pilarna på riggröret.
Så sätter du fast skärutrustningsskyddet och trimmerhuvudet (rakt riggrör)
1.Fäst skärutrustningens skydd (A) på riggröret med skruven (L).
2.Fäst medbringarhjulet (B) på den utgående axeln.
3.Vrid den utgående axeln tills hålet i medbringarhjulet är mitt för hålet i växelhuset.
4.Placera en liten skruvmejsel (C) i hålet för att låsa riggröret.
L |
B |
C
A |
A |
5.Vrid trimmerhuvudet (H) moturs för att dra åt trimmerhuvudet på växellådan. (Vänstergängad.)
H |
Så sätter du fast skärutrustningsskyddet och trimmerhuvudet (böjt riggrör)
1. Sätt fast skyddet. Dra åt muttern.
2. Sätt fast dammkoppen på axeln.
3.Håll fast dammkoppen med en justerbar skiftnyckel för att se till att riggröret inte vrider sig.
4.Sätt fast trimmerhuvudet på riggröret. Vrid trimmerhuvudet medurs.
941 - 004 - 10.04.2019 |
27 |

Så monterar du det tvådelade riggröret
1. Vrid vredet för att lossa kopplingen.
2. Passa in fliken (A) med pilen (B) på kopplingen.
B |
A |
3.Tryck in riggröret i kopplingen tills det klickar på plats.
4. Dra åt vredet helt.
Så demonterar du det tvådelade riggröret
1. Vrid vredet minst 3 varv för att lossa kopplingen.
2.Tryck på och håll inne knappen (C).
3.Håll hårt i änden av riggröret som motorn är ansluten till.
4.Dra tillbehöret rakt ut ur kopplingen.
C |
Drift
Introduktion
VARNING: Innan du använder produkten måste du läsa igenom och förstå kapitlet om säkerhet.
Bränsle
Denna produkt har en tvåtaktsmotor.
OBSERVERA: Motorn kan skadas om du fyller på med fel typ av bränsle. Använd en blandning av bensin och tvåtaktsolja.
28 |
941 - 004 - 10.04.2019 |

Förblandat bränsle
•Använd förblandat alkylatbränsle från Husqvarna av bra kvalitet för bästa prestanda och förlängning av motorns livslängd. Det här bränslet innehåller mindre skadliga kemikalier jämfört med vanligt bränsle, vilket minskar de skadliga avgaserna. Mängden rester som finns kvar efter förbränning är lägre med detta bränsle, vilket håller komponenterna i motorn renare.
Blanda bränsle
Bensin
•Använd blyfri bensin av bra kvalitet med högst 10 % etanolhalt.
OBSERVERA: Använd inte bensin med ett oktantal lägre än 90 RON/87 AKI. Ett lägre oktantal kan orsaka motorknackning, vilket leder till motorskador.
•Vi rekommenderar att du använder bensin med högre oktantal för arbete med kontinuerligt höga varvtal.
Tvåtaktsolja
•För bästa resultat och funktion ska du använda tvåtaktsolja från Husqvarna.
•Om tvåtaktsolja från Husqvarna inte finns tillgänglig kan du använda en annan tvåtaktsolja av hög kvalitet för luftkylda motorer. Tala med en serviceverkstad för att välja rätt olja.
|
|
OBSERVERA: Använd inte tvåtaktsolja |
|
|
|
för vattenkylda utombordsmotorer, s.k. |
|
|
|
outboardoil. Använd inte olja avsedd för |
|
|
|
fyrtaktsmotorer. |
|
|
|
|
|
Blanda bensin och tvåtaktsolja |
|||
|
|
|
|
Bensin, liter |
|
Tvåtaktsolja, li- |
|
|
|
|
ter |
|
|
|
|
|
|
|
2 % (50:1) |
|
|
|
|
5 |
|
|
0,10 |
|
|
|
|
10 |
|
|
0,20 |
|
|
|
|
15 |
|
|
0,30 |
|
|
|
|
20 |
|
|
0,40 |
|
|
|
|
OBSERVERA: Små fel kan påverka blandningsförhållandet drastiskt när du blandar små mängder bränsle. Mät noga mängden olja för att se till att du får rätt blandning.
1.Fyll halva mängden bensin i en ren behållare för bränsle.
2.Tillsätt all olja.
3.Skaka bränsleblandningen.
4.Fyll i återstående mängd bensin i behållaren.
5.Skaka omsorgsfullt bränsleblandningen.
OBSERVERA: Blanda inte bränsle för mer än en månad i taget.
Fylla på bränsletanken
1. Torka rent runt bränsletanklocket.
2.Skaka behållaren och kontrollera att bränslet är helt blandat.
3.Dra åt bränsletanklocket ordentligt.
4.Flytta produkten minst tre meter bort från tankningsplatsen och bränsledepån före start.
Notera: Information om var bränsletanken sitter på produkten finner du i Produktöversikt på sida 21.
Undersökning före start
1.Se till att produkten inte har några saknade, skadade, lösa eller slitna delar.
2.Se till att muttrar, skruvar och bultar är åtdragna.
3.Se till att trimmerhuvudet inte är skadat.
4.Se till att luftfiltret inte är igensatt.
5.Kontrollera att produktens säkerhetsanordningar inte är defekta.
6.Se till att produkten inte har något bränsleläckage.
941 - 004 - 10.04.2019 |
29 |
Starta kall motor
1. Tryck på bränslepumpblåsan 10 gånger.
2. Dra chokereglaget uppåt.
Så startar du en varm motor
1.Tryck på bränslepumpblåsan 10 gånger.
2.Dra i startsnöret tills motorn startar.
Stoppa
•Tryck ned stoppreglaget för att stoppa motorn.
3. Håll motorkroppen på marken med vänster hand.
OBSERVERA: Kliv inte på produkten.
4.Dra i startsnörets handtag långsamt tills du känner ett motstånd. När du känner motstånd drar du snabbt och hårt i starthandtaget.
VARNING: Vira inte startsnöret runt handen.
5.Fortsätt att dra i startsnörets handtag tills motorn startar.
OBSERVERA: Dra inte ut startsnöret helt och släpp inte heller startsnörets handtag. Det kan orsaka skador på produkten. Släpp startsnöret långsamt.
6.Ställ chokereglaget till arbetsposition och ge fullgas. Gasreglaget kopplas automatiskt bort från startläget.
Notera: Stoppreglaget återgår automatiskt till ursprungsläget.
Klippa gräset
1.Håll trimmerhuvudet strax ovanför marken och luta det. Tryck inte ned trimmerlinan i gräset.
2.Minska längden på trimmerlinan med 10–12 cm.
3.Minska motorns varvtal för att minska risken för skador på växter.
4.Använd 80 % gas när du klipper gräset nära föremål.
Avlägsna gräs med en gräsklinga
1.Gräsklingor och gräsknivar får ej användas till vedartade stammar.
2.För alla typer av högt eller kraftigt gräs används gräsklinga.
30 |
941 - 004 - 10.04.2019 |
Loading...