

Page 1

Installation and
User Guide
HP MediaSmart Connect x280n
Page 2

The only warranties for HP products and services are set forth in the
express warranty statements accompanying such products and
services. Nothing herein should be construed as constituting an
additional warranty. HP shall not be liable for technical or editorial
errors or omissions contained herein.
HP assumes no responsibility for the use or reliability of its software on
equipment that is not furnished by HP.
This document contains proprietary information that is protected by
copyright. No part of this document may be photocopied,
reproduced, or translated to another language without the prior
written consent of HP.
Hewlett-Packard Company
P.O . B ox 40 10
Cupertino, CA 95015-4010
USA
Copyright © 2008 Hewlett-Packard Development Company, L.P.
This product incorporates copyright protection technology that is
protected by U.S. patents and other intellectual property rights. Use of
Manufactured under license from Dolby Laboratories.
“Dolby” and the double-D symbol are trademarks of
Dolby Laboratories.
HDMI, the HDMI logo and High-Definition Multimedia Interface are
trademarks or registered trademarks of HDMI Licensing LLC.
DivX, DivX certified, and associated logos are trademarks of
DivXNetworks, Inc. and are used under license.
Microsoft, Windows Vista, and Windows XP are U.S. registered
trademarks of Microsoft Corporation.
The Windows logo and Windows Vista are trademarks or registered
trademarks of Microsoft Corporation in the United States and/or other
countries/regions.
Wi-Fi CERTIFIED 802.11n based on Draft 2.0
Draft 2.0 refers to the version of the not-yet-ratified IEEE 802.11n
standard used in Wi-Fi Alliance testing as of June 2007.
The specifications of the 802.11n WLAN (wireless local area
network) are draft specifications and not final. If the final
specifications differ from the draft specifications, it may affect the
ability of this device to communicate with other 802.11n WLAN
Page 3

HP supports lawful use of technology and does not endorse or
encourage the use of our products for purposes other than those
permitted by copyright law.
The information in this document is subject to change without notice.
n
Text set off in this manner indicates information
you need.
!
IMPORTANT: Text set off in this manner indicates
important information you need.
c
CAUTION: Text set off in this manner indicates that
failure to follow directions could result in damage to
equipment or loss of information.
w
WARNING: This symbol is intended to alert the user to
the presence of important operating and maintenance
(servicing) instructions in the literature accompanying
the appliance.
e
DANGEROUS VOLTAGE: Text set off in this manner
indicates the presence of uninsulated voltages within
the product enclosure that may be of sufficient
magnitude to constitute a risk of electrical shock to
persons.
Page 4

Regulatory and Safety Information
w
WARNING: Text set off in this manner indicates that
failure to follow directions could result in damage to
equipment, loss of information, bodily harm, or loss
of life.
e
WARNING: This symbol is intended to alert the user to
the presence of uninsulated “Dangerous Voltages”
within the product’s enclosure that may be of sufficient
magnitude to constitute a risk of electrical shock to
persons. Refer servicing to qualified service personnel.
e
WARNING: To reduce the risk of electrical shock, do not
remove cover (or back).
e
WARNING: To reduce the risk of fire or electrical shock,
do not expose this appliance to rain or moisture.
w
WARNING: Do not place this product on an unstable
cart, stand, tripod, bracket, or table. The product may
fall, causing serious personal injury and serious
damage to the product. Use only with a cart, stand,
tripod, bracket, or table recommended by the
manufacturer or sold with the product. Follow the
manufacturer’s instructions when installing the product.
A product and cart combination should be moved with
care. Quick stops, excessive force, and uneven surfaces
may cause the product and cart combination to
overturn.
Page 5

Digital Television Transition
Notice
Digital Television Transition Notice:
After February 17, 2009, a television receiver with only an
analog broadcast tuner will require a converter box to receive
full power over-the-air broadcasts with an antenna because of
the Nation’s transition to digital broadcasting. Analog-only TVs
should continue to work as before to receive low power, Class A
or translator television stations and with cable and satellite TV
services, gaming consoles, VCRs, DVD players, and similar
products.
Information about the DTV transition is available from
www.DTV.gov or 1-888-CALL-FCC, and from
www.dtv2009.gov or 1-888-DTV-2009 for information about
subsidized coupons for digital-to-analog converter boxes; and,
The DTV transition does not impact the functionality of this device
unless you use it to stream Live TV from a PC with an analog-only
tuner and an off-the-air antenna.
Interface Statement
This equipment has been tested and found to comply with the
limits for a Class B digital device, pursuant to Part 15 of the
FCC Rules. These limits are designed to provide reasonable
protection against harmful interference in a residential installation.
This equipment generates, uses, and can radiate radio frequency
energy and, if not installed and used in accordance with the
instructions, may cause harmful interference to radio
communications. However, there is no guarantee that interference
will not occur in a particular installation. If this equipment does
cause harmful interference to radio or television reception, which
can be determined by turning the equipment off and on, the user
is encouraged to try to correct the interference by one or more of
the following measures:
Reorient or relocate the receiving antenna.
Increase the separation between the equipment and receiver.
Page 6

Connect the equipment into an outlet on a circuit different
from that to which the receiver is connected.
Consult the dealer or an experienced radio/TV technician
for help.
This device complies with RSS-210 of the Industry Canada Rules.
High-power radars are allocated as primary users (meaning they
have priority) of the bands 5250-5350 MHz and 5650-5850
MHz and these radars could cause interference and/or damage
to LE-LAN devices.
This Class B digital apparatus complies with Canadian ICES-003.
Cet appareil numérique de la classe B conforme á la norme
NMB-003 du Canada.
Operation is subject to the following two conditions: (1) this
device may not cause harmful interference, and (2) this device
must accept any interference received, including interference that
may cause undesired operation.
Modifications
Pursuant to 47CFR15.21 of the FCC Rules, any changes or
modifications to this equipment not expressly approved by the
Hewlett-Packard Company may cause harmful interference and
void the FCC authorization to operate this equipment.
FCC and IC Statements
This equipment complies with FCC radiation exposure limits set
forth for an uncontrolled environment. This equipment should be
installed and operated with a minimum distance of 20 cm
between the radiator and your body.
This transmitter must not be co-located or operating in conjunction
with any other antenna or transmitter.
For products available in the USA/Canada market, only channel
1~11 can be operated. Selection of other channels is not
possible.
This device is going to be operated in 5.15~5.25 GHz frequency
Page 7

Cables
Connections to this device must be made with shielded cables
with metallic RFI/EMI connector hoods in order to maintain
compliance with FCC Rules and Regulations.
Responsible Party
Hewlett-Packard Company
Attn: Product Regulations Manager
10955 Tantau Avenue
Cupertino, CA 95014-0770 USA
Important Safety Instructions
Electricity is used to perform many useful functions, but it can also
cause personal injuries and property damage if improperly
handled. This product has been engineered and manufactured
with the highest priority on safety. However, improper use can
result in electric shock and/or fire. In order to prevent potential
danger, please observe the following instructions when installing,
operating, and cleaning the product. To ensure your safety and
prolong the service life of your product, please read the following
precautions carefully before using the product.
1 Read these instructions.
2 Keep these instructions.
3 Heed all warnings.
4 Follow all instructions.
5 Do not use this apparatus near water.
6 Clean only with a microfiber cloth. If needed, dampen cloth
with water. Never use solvents or abrasive cleaning solutions
Page 8

8 Do not install near any heat sources such as radiators, heat
registers, stoves, or other apparatus (including amplifiers)
that produce heat.
9 Do not defeat the safety purpose of the polarized or
grounding-type plug. A polarized plug has two blades with
one wider than the other. A grounding-type plug has two
blades and a third grounding prong. The wide blade or the
third prong are provided for your safety. If the provided plug
does not fit into your outlet, consult an electrician for
replacement of the obsolete outlet.
10 Protect the power cord from being walked on or pinched
particularly at plugs, convenience receptacles, and the point
where they exit from the apparatus.
11 Only use power supply/attachments/accessories specified
by the manufacturer.
12 Unplug this apparatus during lightning storms or when
unused for long periods of time.
13 Refer all servicing to qualified service personnel. Servicing is
required when the apparatus has been damaged in any way,
the power-supply, cord, or plug is damaged, liquid has been
spilled or objects have fallen into the apparatus, the
apparatus has been exposed to rain or moisture, does not
operate normally, or has been dropped.
14 Power Sources—This product should be operated only from
the type of power source indicated on the marking label. If
you are not sure of the type of power supply to your home,
consult your product dealer or local power company. For
products intended to operate from battery power, or other
sources, refer to the operating instructions.
15 Overloading—Do not overload wall outlets, extension cords,
or integral convenience receptacles as this can result in a risk
of fire or electric shock.
Page 9

16 Replacement Parts—When replacement parts are required,
be sure the service technician has used replacement parts
specified by the manufacturer or which have the same
characteristics as the original part. Unauthorized substitutions
may result in fire, electric shock, or other hazards.
17 Safety Check—Upon completion of any service or repairs to
this product, ask the service technician to perform safety
checks to determine that the product is in proper operating
condition.
18 The apparatus shall not be exposed to dripping or splashing
and no objects filled with liquids, such as vases, shall be
placed on the apparatus.
19 Plug the power supply into a power outlet where access to
the power supply connector is readily accessible in case
power disconnection is required.
20 Servicing—The user should not attempt to service the
appliance beyond that described in the operating
instructions. All other servicing should be referred to qualified
service personnel.
Water and Moisture—Do not use this product near water; for
example, near a bath tub, wash bowl, kitchen sink, or
laundry tub; in a wet basement; or near a swimming pool;
and the like.
Stand—Do not place the product on an unstable cart, stand,
tripod, or table. Placing the product on an unstable base can
cause the product to fall, resulting in serious personal injuries
as well as damage to the product. Use only a cart, stand,
tripod, bracket, or table recommended by the manufacturer
or sold with the product.
Page 10

Ventilation—The vents and other openings in the cabinet are
designed for ventilation. Do not cover or block these vents
and openings since insufficient ventilation can cause
overheating and/or shorten the life of the product. Do not
place the product on a bed, sofa, rug, or other similar
surface, since they can block ventilation openings. This
product is not designed for built-in installation; do not place
the product in an enclosed place such as a bookcase or rack,
unless proper ventilation is provided or the manufacturer’s
instructions are followed.
Heat—The product should be situated away from heat
sources such as fireplaces, chimneys, radiators, heat
registers, stoves, or other products (including amplifiers) that
produce heat.
Lightning—For added protection for this equipment during a
lightning storm, or when it is left unattended and unused for
long periods of time, unplug it from the wall outlet. This will
prevent damage to the equipment due to lightning and
power-line surges.
To prevent fire, never place any type of candle or flames on
the top or near the receiver.
To prevent fire or shock hazard, do not expose this product to
dripping or splashing. No objects filled with liquids, such as
vases, should be placed on the product.
To prevent fire or shock hazard, do not place the power cord
under heavy items.
Turn off the main power and unplug the power supply from
the wall outlet before handling.
Page 11

Important Information
The HP MediaSmart Connect must be serviced by an authorized
service technician. The HP MediaSmart Connect is not
user-serviceable.
Changes can damage your HP MediaSmart Connect and void
your warranty. Changes or modifications not expressly approved
by the manufacturer could void the user’s authority to operate the
equipment.
Recycling Information —
HP Planet Partners
For information about how to recycle this product through HP, see:
http://www.hp.com/recycle
Other recycling options may also be available in your area. If
located within the U.S. and Canada, you may also call
(1) (888) 485-1849.
Materials disposal
For disposal or recycling information, please contact your local
authorities or the Electronic Industries Alliance (EIA)
(http://www.eia.org).
Cleaning precautions
Unplug the HP MediaSmart Connect before cleaning.
Using solvents, such as alcohol, or abrasive materials, such as a
premoistened or chemically treated towel, may affect the paint.
Do not expose the product to volatile gases or fluids such as
pesticides.
Do not put the HP MediaSmart Connect in contact with vinyl or
rubber products for an extended period of time. Extended contact
may result in the removal of or degradation of the surface.
Clean only with a microfiber cloth. If needed, dampen cloth with
water. Never use solvents or abrasive cleaning solutions to clean
Page 12
Getting Started
Be sure to read all the safety information and precautions before
starting installation. See the following topics:
“Regulatory and Safety Information” on page 4
“Important Safety Instructions” on page 7
“Important Information” on page 11
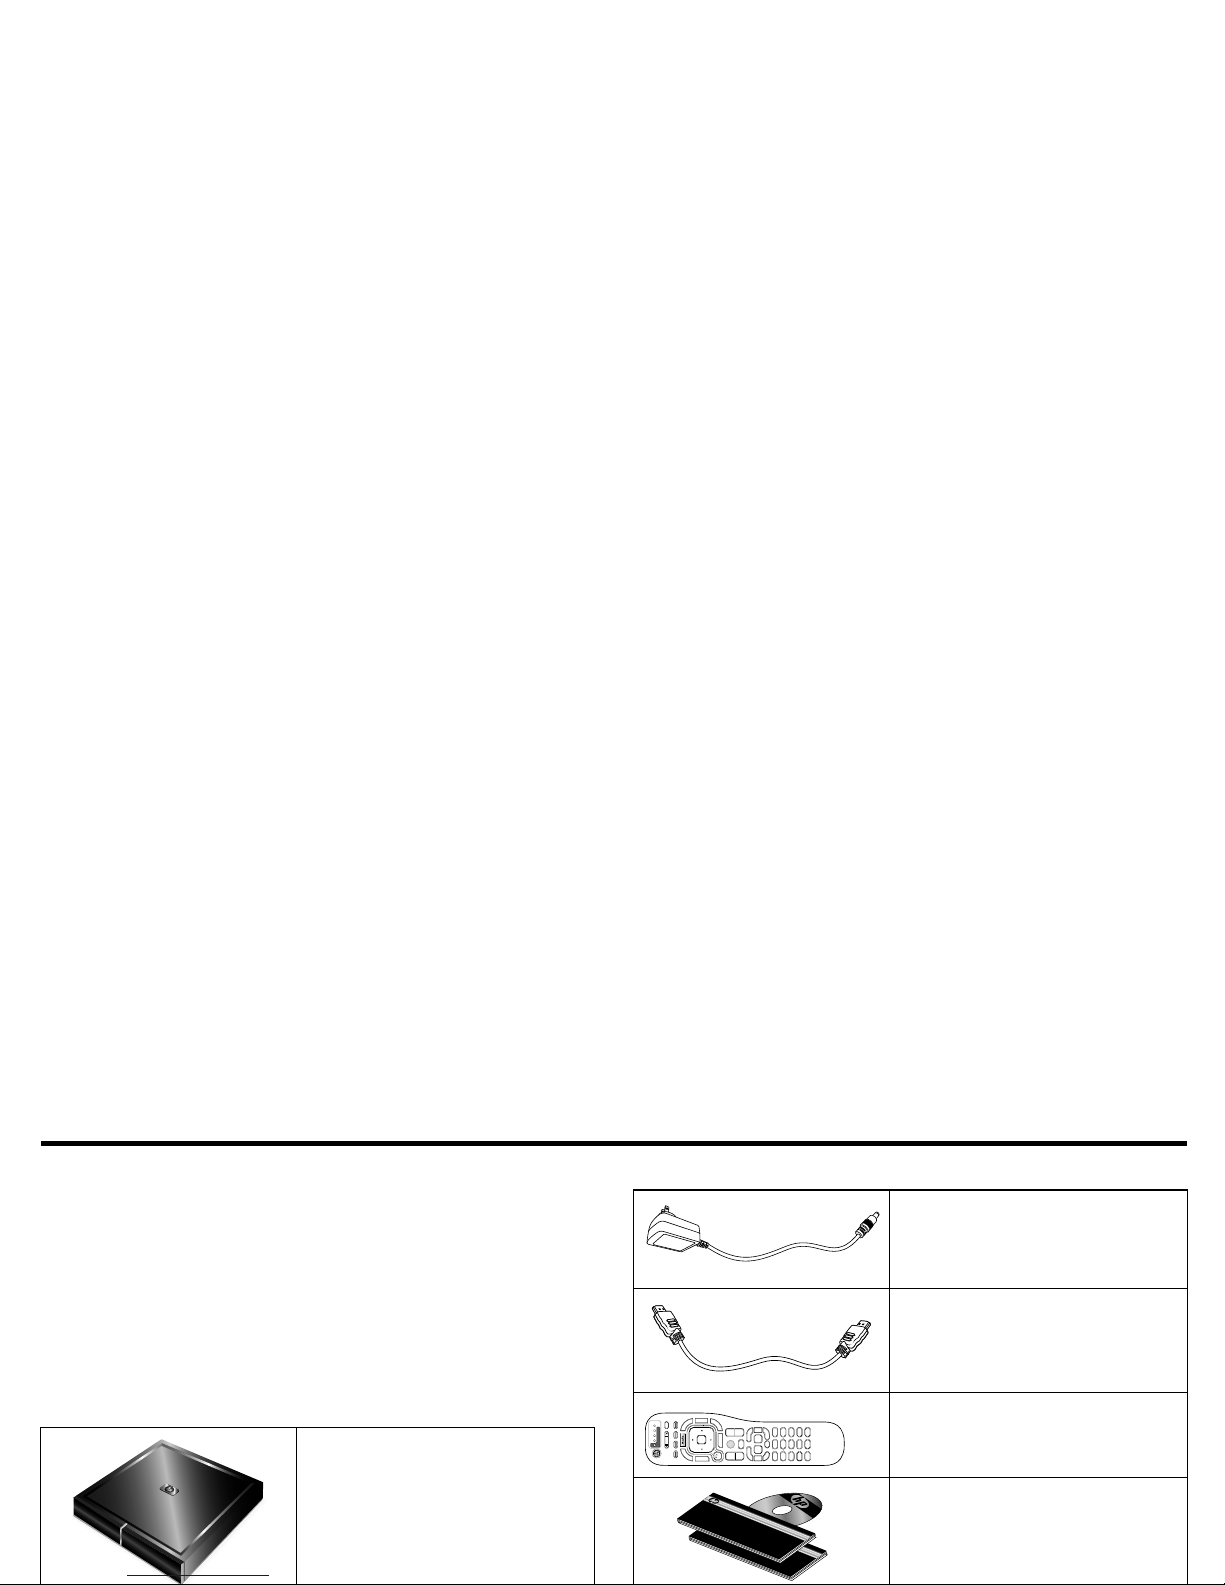
Identifying Items in the Box
HP MediaSmart Connect
AC power adaptor
HDMI (High-Definition Multimedia
Interface) cable used to connect
the HP MediaSmart Connect to
the HDTV
Remote control
Documentation and
Installation CD
Installation and User Guide
HP MediaSmart Connect x280n
Page 13

Other cables you may need
Installation Overview
This section provides the system requirements, setup time, items
you need, and an overview of the four steps to install the
System requirements
Media streaming requires a computer, or NAS (network attached
storage) with a Digital Living Network Alliance (DLNA)-compliant
media server. A home network is also required. All items are sold
separately.
The Windows
®
-based computer you use should have one of the
following:
Media Center Edition 2005 with Rollup 2 operating system
Windows XP Home operating system (32-bit only) with
Service Pack 2 (SP2) or later
Windows XP Pro operating system (32-bit only) with Service
Pack 2 or later
Windows Vista
®
Home Basic operating system
(32-bit/64-bit)
Windows Vista Home Premium operating system
(32-bit/64-bit)
Windows Vista Ultimate operating system (32-bit/64-bit)
Optional cables Use
Component Video Connect video to the HDTV instead of the
HDMI cable. (Some limitations for
protected content.)
L/R (RCA-style)
audio
Connect analog audio output to the HDTV
with the Component Video cables, or to
an optional external audio system.
Optical digital audio Connect digital audio output to an
optional external audio system.
Ethernet Connect to the network with a wired
connection instead of a wireless one.
Page 14

Some MediaSmart features may not be available on computers
with a 64-bit operating system.
Certain Windows Vista product features require advanced or
additional hardware.
For details, go to the Microsoft Web sites at
http://www.microsoft.com/windowsvista/getready/
hardwarereqs.mspx
Or
http://www.microsoft.com/windowsvista/getready/
capable.mspx
The Windows Vista Upgrade Advisor can help you determine
which features of Windows Vista can run on your computer. To
download the tool, visit the Microsoft Web site at
http://www.windowsvista.com/upgradeadvisor
Setup time
Allow at least 30 minutes to set up your HP MediaSmart Connect.
Before you begin, have on hand
Your HP MediaSmart Connect and items from the box; see
“Identifying Items in the Box” on page 12.
Your HDTV and the remote control for it.
Your existing (working) home network with a router/base
station (wired or wireless). For information about network
types, see “Chapter 2: Connecting your HP MediaSmart
Connect to your Home Network” on page 35.
NOTE: For a wireless network connection, you may need:
The name or SSID (service set identifier) of your network and
the network security information such as the Wired
Equivalent Privacy (WEP) key or the Wi-Fi Protected Access
(WPA) passphrase.
Your computer or NAS, on the home network.
For full functionality, high-speed Internet service is required
(sold separately).
Optional cables, depending on your setup. See “Other
Page 15

Installation Steps
Step 1: Connect your HDTV to your HP MediaSmart
Connect.
Select the location to place the device.
Connect the device to the HDTV, and to optional equipment.
If you are using a wired (Ethernet) connection, connect the
device to your home network.
Connect the device to power.
Install the remote control batteries.
See “Step 1: Connect Your HDTV to Your HP MediaSmart
Connect” on page 16.
Step 2: Follow the setup wizard on your HDTV.
Select the input on the TV for the HP MediaSmart Connect.
Select the TV resolution by following the onscreen instructions.
See “Step 2: Follow the Setup Wizard on Your HDTV” on
Step 3: On your computer, insert the Installation CD.
At the computer, insert the Installation CD from the box, and then
follow the wizard to:
Install the MediaSmart software (automatic).
Authorize Windows Media Player 11 to share media with the
HP MediaSmart Connect.
Register your device with HP.
Create your free HP Online Media Services account.
See “Step 3: On Your Computer, Insert the Installation CD” on
page 26.
Step 4: Return to your HDTV to complete the setup.
Finalize the set up of your network.
Set up the Extender for Windows Media Center (optional).
See “Step 4: Return to Your TV to Complete the Setup” on
page 28.
Page 16

Step 1: Connect Your HDTV to
Your HP MediaSmart Connect
Selecting a good location
When selecting the location for your HP MediaSmart Connect,
consider the following conditions:
Orientation: Position the HP MediaSmart Connect so that it is
flat (horizontal).
Power adaptor length: Choose a location with easy access to
an AC power outlet.
The type of network (wired or wireless), and the wireless
router location: For more information, see “Chapter 2:
Connecting your HP MediaSmart Connect to your Home
Network” on page 35.
Connecting to the HDTV
Your HDTV video connectors and your external sound system
usage determine how you connect them to the HP MediaSmart
Connect.
For the best video connection to the television, use the HDMI
connector and the HDMI cable from the box.
If you have a surround sound receiver connected to the HDTV,
connect the HP MediaSmart Connect to the receiver, using the
!
IMPORTANT: If you place the device in an enclosed
shelf, provide adequate air flow to keep it cool. See
“Environment” in “Chapter 9: Specifications” on
page 97.
w
WARNING: The HP MediaSmart Connect does not
support standard-definition televisions or monitors.
Page 17

If you have an external sound system:
Use an optical audio cable and the Optical Audio (digital)
connector on HP MediaSmart Connect to provide a digital
audio signal to a device such as a digital receiver or a
surround sound system.
Use an audio cable and the Analog Audio (left and right)
connectors on HP MediaSmart Connect to provide an analog
audio signal to a device such as an analog amplifier or
stereo system.
Choose the setup instructions that match your HDTV video
connector and external sound system usage.
HDMI connector
Connect the HDMI cable to the back of your device and to the TV.
Video connector Setup instructions
HDMI “HDMI connector” on page 17
“HDMI connector and external sound
system” on page 18
Component
(connector set)
“Component connector set” on page 18
w
WARNING: Before connecting the HP MediaSmart
Connect to any other electronic device, unplug each
device from the AC power outlet.
Page 18

HDMI connector and external sound
system
1 Connect the HDMI cable to the back of your device and to
the HDTV.
2 For multichannel audio output, connect an optical digital
audio cable to the back of your device and to the optional
audio/video receiver.
Component connector set
1 Connect the Component cables to the back of your device
and to the HDTV, matching the color-coded plugs to the
connectors.
2 Connect the audio L/R cable to the back of your device and
to the HDTV, matching the color-coded plugs to the
connectors.
Audio In
Digital
R L
Page 19
Component connector set and external
sound system
1 Connect the Component cables to the back of your device
and to the HDTV, matching the color-coded plugs to the
connectors.
2 Connect an optical digital audio cable or analog audio
cables to the back of your device and to the optional
audio/video receiver.
Connecting to your home network
(LAN)
Connect the HP MediaSmart Connect to the router in your
home LAN:
For a wireless connection, the HP MediaSmart Connect
is ready to use; it has internal wireless antennas and no
external antenna or other connection is necessary.
Or
For a wired connection, connect an Ethernet cable to the
network router and to the Ethernet connector on your device.
Audio In
Digital
RL
Page 20

Connecting power
Connect the AC power adaptor to the connector on your device
and to the AC power outlet. The HP MediaSmart Connect
turns on.
Installing remote control batteries
Insert two AA batteries into the remote control, ensuring that you
place them with the polarity properly aligned.
1 Press and open the cover on the rear of the remote control.
2 Insert the batteries into the remote control, and ensure that
you match polarities.
3 Close the cover.
IMPORTANT: The HP MediaSmart Connect has no Power
Page 21

Continue with “Step 2: Follow the Setup Wizard on Your HDTV”
on page 22.
Do not combine different types of batteries (for example, alkaline and
carbon-zinc), or old batteries with fresh ones.
When installing batteries, be sure to follow the correct polarity, as
indicated in the battery compartment. Reversed batteries may cause
damage to the device.
When not using the remote control for a long period of time, remove
the batteries to prevent damage or injury from possible battery
leakage.
Do not try to recharge batteries that are not intended to be recharged;
they can overheat and rupture. Follow the battery manufacturer
directions for the batteries you are using.
Always remove batteries as soon as they become weak. Weak
batteries can leak and severely damage the unit. The battery life
depends on how much the remote control is used. Replace the
batteries when remote control operation becomes erratic.
Do not take apart the batteries, heat them, or throw them into a fire.
Page 22

Step 2: Follow the Setup
Wizard on Your HDTV
This section describes how to select the HDTV resolution and start
the wizard to configure HP MediaSmart Connect at the HDTV,
and then how to install the software from the Installation CD and
proceed with the setup at the computer.
When using the remote control to operate the HP MediaSmart
Connect, point the remote control at the remote control sensor on
the front of the device, press a button on the remote control, and
then wait for the device to respond.
The Installation CD installs the Microsoft
®
Windows Media Player
(WMP) software, if it is not already installed. The WMP software
uses your home network to stream photos, videos, and music to
the HP MediaSmart Connect for viewing on your HDTV. You select
which media folders on your computer you want to share with the
HP MediaSmart Connect. Windows Media Player must be
installed, and HP MediaSmart Connect must be allowed in order
to display the media shared from your computer. These steps
occur during the software installation.
You can use any Universal Plug and Play (UPnP)-compliant server
program to stream media to HP MediaSmart Connect. HP
recommends and supports Windows Media Player 11. For
information about using Windows Media Player 11, see
“Chapter 7: Using Windows Media Player” on page 86.
!
IMPORTANT: Note that some remote control button
actions may take longer than others to complete. Be
patient, and allow sufficient time for a response before
pressing the next remote control button.
Page 23
Set up at the TV
1 If necessary, turn on the TV, and then select the input source
to view the HP MediaSmart Connect. The TV Resolution
screen displays.
NOTE: The TV Resolution screen does not display when the
resolution is automatically detected.
2 Press the Device button on the remote control one or more
times to light the HP MediaSmart Connect indicator.
Page 24
3 Point the remote control at the HP MediaSmart Connect, and
follow the onscreen instructions. If you do not see the TV
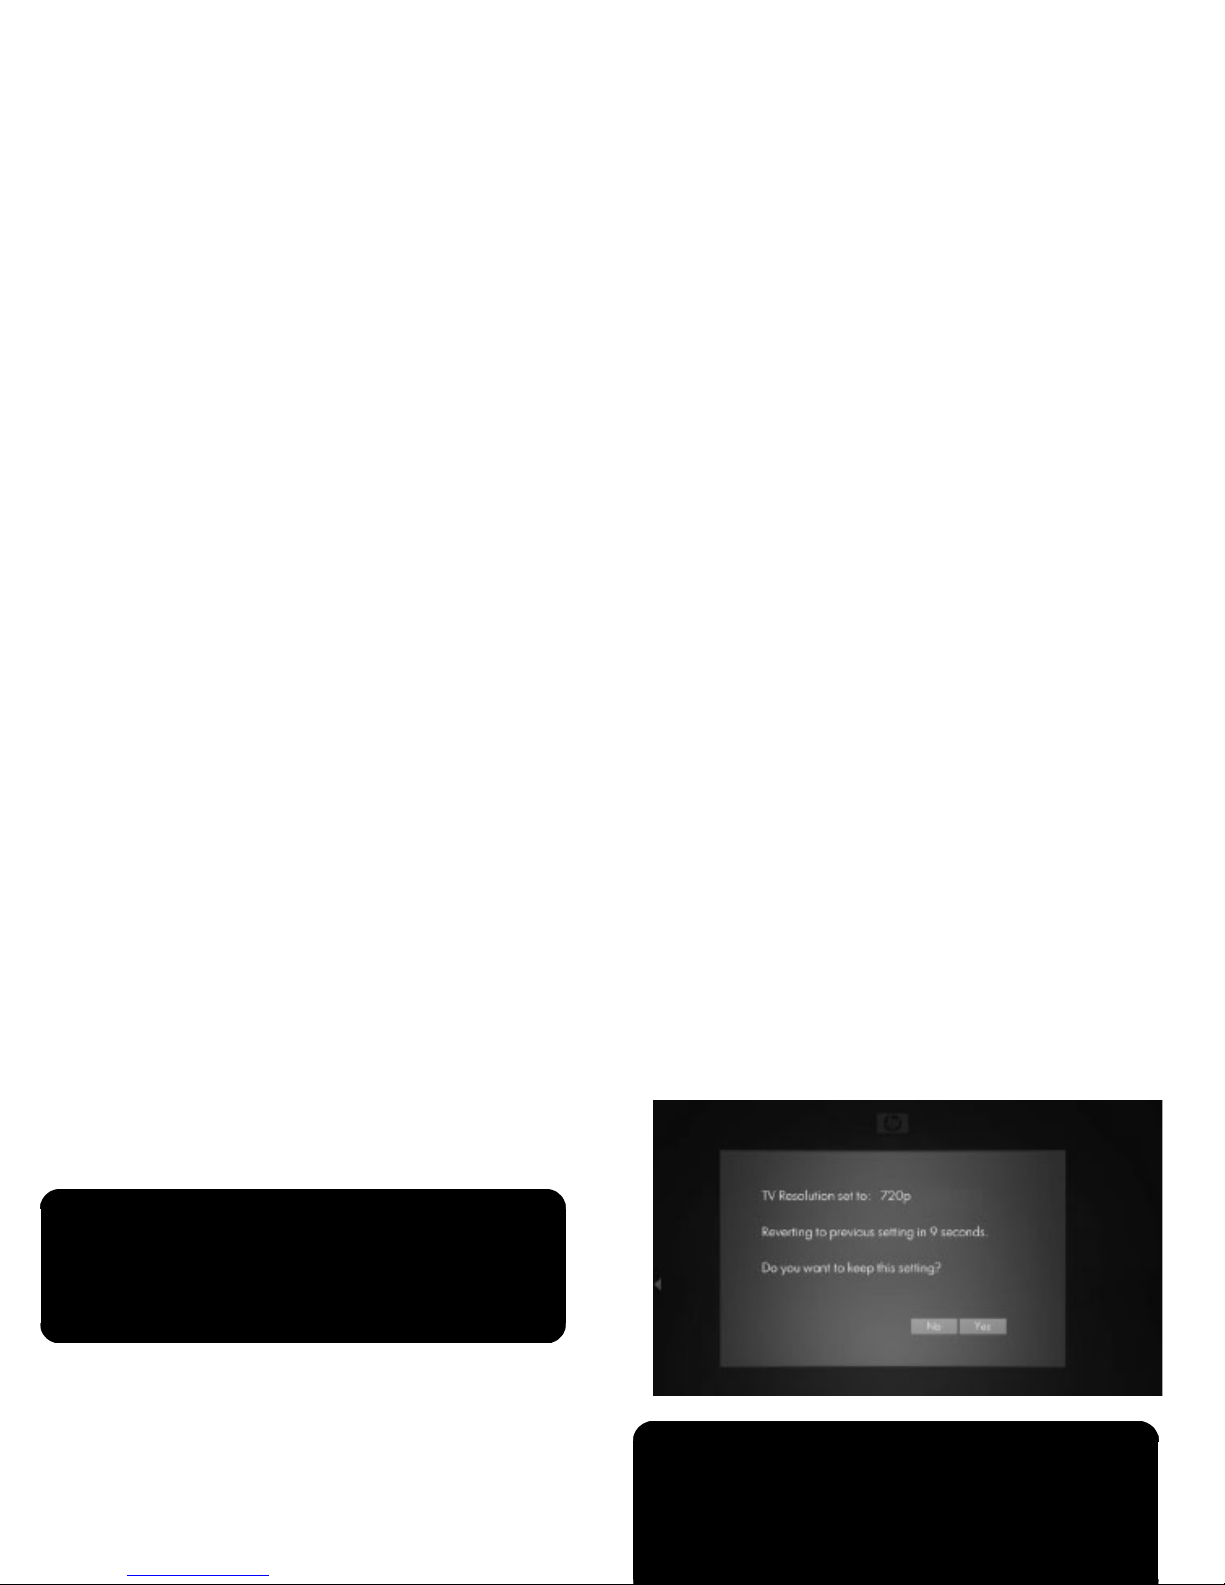
Resolution screen, skip to step 4. To select the resolution:
a Press OK, or press the Down Arrow button to select
a resolution, and then press OK. Wait for the
HP MediaSmart Connect to respond.
A confirmation window opens.
b Press the Right Arrow button to select Yes, and then
press OK
.
n
Resolution — what is better: 720p or 1080i?
Screen resolution depends on your TV, and in most
cases makes little difference. If your TV supports both
720p and 1080i, try each and select the picture that
looks best to you.
n
To change the resolution after the first time, press the
TV Resolution button on the front of the HP MediaSmart
Connect, or press the Media button on the remote
control, select Settings and press OK, select TV
Resolution and press OK, and then select the resolution
and press OK.
Page 25

4 A wizard guides you through the setup.
Follow the onscreen instructions. During the setup:
Press an Arrow button to select an item on the screen,
and then press OK. Wait for the HP MediaSmart
Connect to respond.
The wizard shows a message when it is time to install the
software on your computer.
When prompted, leave the TV as it is, and continue with
“Step 3: On Your Computer, Insert the Installation CD”
on page 26.
n
To start the wizard after the first time, press Media,
select Settings and press OK, select Network and press
OK, and then select the type of network connection and
press OK.
!
IMPORTANT: Do not turn off the TV, close the screen, or
change the input source for the TV. After ten minutes,
HP MediaSmart Connect automatically displays a
screen saver to protect your TV screen.
Page 26

Step 3: On Your Computer,
Insert the Installation CD
Use the installation CD to install the software onto your computer,
and onto each computer on your network that has media you
want to share with HP MediaSmart Connect. The HP MediaSmart
software supports playback of some files that Windows Media
Player 11 may not; see “Supported Media” on page 103.
Beginning at your computer
During setup, the Installation CD installs programs onto your
computer that enable HP MediaSmart Connect to communicate
over the network. Software firewalls installed on your computer
can block this communication and prevent the HP MediaSmart
Connect from accessing media on the computer.
If your firewall prompts you to allow the installed MediaSmart
software programs to communicate, choose Unblock. The
program names are:
HP MediaSmart Services Gateway
CinemaNow Media Manager
!
IMPORTANT: Always accept updates for the installed
HP MediaSmart software on your computer.
Page 27

Using the Installation CD
1 Insert the HP MediaSmart Installation CD from the box into a
CD drive on your computer.
2 Follow the onscreen instructions to go through the
HP MediaSmart Connect installation:
Extender for Windows Media Center host patches install
if you have the Windows Vista Home Premium or
Ultimate operating system.
The Windows Media Player 11 software installs if it is
not already installed on your computer.
The HP MediaSmart Services Gateway software and
CinemaNow Media Manager software install
automatically.
The HP MediaSmart Sharing Wizard installs.
NOTE: If it is necessary, your computer may restart
before continuing the installation.
The HP MediaSmart Sharing Wizard opens to guide you
Click to authorize Windows Media Player 11 to share
media with your HP MediaSmart Connect. For more
information about Windows Media Player, see
“Chapter 7: Using Windows Media Player” on
page 86.
Enter information to register your HP MediaSmart
Connect with HP.
Click to set up online media services. See “Setting Up
the HP Online Media Services Account” on page 67.
Click Finish when the installation is complete at your
computer.
Continue with “Step 4: Return to Your TV to Complete the
Setup” on page 28.
Page 28

Step 4: Return to Your TV to
Complete the Setup
1 Point the MediaSmart remote control at the HP MediaSmart
Connect, press the Right Arrow button to select Next, and
then press OK.
If you are using a wireless connection to the
network, select the wireless option. The wizard searches
for available wireless networks and presents a list of what it
finds. Select the wireless network you want, and be ready to
enter your SSID and security key if necessary.
2 Follow the onscreen instructions to finalize the set up of your
network. The wizard checks for the network, the IP address,
and then for access to the Internet across the network. For
information about connecting your device to your home
network, see “Chapter 2: Connecting your HP MediaSmart
Connect to your Home Network” on page 35.
3 Optional: Set up the Extender for Windows Media Center
(requires the Windows Vista Home Premium or Ultimate
operating system).
The HP MediaSmart Connect displays an eight-digit key on
your HDTV screen, along with instructions for you to enter the
key into your Media Center settings on the computer. For
more information, see “Chapter 6: Using the Extender for
Windows Media Center” on page 77.
n
Make entries by using the onscreen keyboard:
Press an Arrow button on the remote control to select an
item or key on the onscreen keyboard, and then
press OK.
Or
!
IMPORTANT: If your wireless network is not listed, select
the Advanced mode and enter it manually.
Page 29

5 Press the Media button on the remote control to display the
Media menu. To use the menu, see “Using the Media Menu”
on page 50.
Enjoying
You are now ready to enjoy digital media on your HDTV.
The HP MediaSmart Connect may seem slow to respond to a
remote control button. Some actions may take longer than others
to complete. Be patient and allow sufficient time for the
HP MediaSmart Connect to respond before pressing the next
remote control button.
For information about using the HP MediaSmart Connect, see
“Chapter 3: Using the Remote Control” on page 38.
For information about playing digital media, see “Chapter 4:
Enjoying Music, Photos, and Videos” on page 50.
For information about using the Extender for Windows Media
Center, see “Chapter 6: Using the Extender for Windows Media
Center” on page 77.
Useful URLs
Go to the following HP Web sites:
For additional help, How to documents, FAQs, and other
documentation, see:
http://www.hp.com/support/mediasmart
For additional information about the Extender for Windows
Media Center, see:
http://www.hp.com/go/extender
To register, and add and delete online media accounts, see:
!
IMPORTANT: The HP MediaSmart Connect may seem to
respond slowly to the remote control. The first time you
access a media folder or after sharing new content
folders, the discovery process may take longer than
normal.
For example, a Photos folder that has 2,000 files may
Page 30

Table of Contents
Regulatory and Safety Information ...................4
Digital Television Transition Notice .........................................5
Interface Statement ...............................................................5
Modifications.......................................................................6
FCC and IC Statements .........................................................6
Cables ................................................................................7
Responsible Party .................................................................7
Important Safety Instructions...................................................7
Important Information..........................................................11
Recycling Information — HP Planet Partners...........................11
Materials disposal ..............................................................11
Cleaning precautions..........................................................11
Getting Started ...............................................12
Identifying Items in the Box ..................................................12
Installation Overview ..........................................................13
System requirements......................................................13
Setup time....................................................................14
Before you begin, have on hand.....................................14
Installation Steps ................................................................15
Step 1: Connect Your HDTV to Your
HP MediaSmart Connect .....................................................16
Selecting a good location ..............................................16
Connecting to the HDTV.................................................16
Connecting to your home network (LAN)..........................19
Connecting power ........................................................20
Installing remote control batteries ....................................20
Step 2: Follow the Setup Wizard on Your HDTV.....................22
Set up at the TV ............................................................23
Step 3: On Your Computer, Insert the Installation CD..............26
Page 31

Step 4: Return to Your TV to Complete the Setup ....................28
Enjoying............................................................................29
Useful URLs........................................................................29
Chapter 1: Welcome .......................................33
Chapter 2: Connecting your
HP MediaSmart Connect to your
Home Network.............................................. 35
Wired network...................................................................35
Wireless network................................................................35
Improve wireless performance..............................................36
Chapter 3: Using the Remote Control...............38
Locating Controls and Connectors ........................................38
Identifying the Multifunction Remote Control Buttons................41
Selecting a Device to Control ...............................................44
Programming the remote control for a TV
(device code)................................................................44
Chapter 4: Enjoying Music, Photos,
and Videos .....................................................50
Using the Media Menu........................................................50
Using context buttons.....................................................51
Searching ....................................................................52
Using Favorites .............................................................52
Viewing Photos ..................................................................53
Playing photos or a slideshow ........................................53
Watching a slideshow while listening to music .................55
Changing slideshow options...........................................55
Watching Video Files..........................................................55
Changing video options.................................................57
Listening to Music...............................................................57
Playing music ...............................................................57
Listening to music while playing a slideshow ....................59
Viewing USB Photos, Music, and Videos ...............................59
Selecting Servers................................................................61
Changing Settings ..............................................................63
Page 32

Chapter 5: Using Online Media ...................... 65
Using the Online Media menu..............................................66
Setting Up the HP Online Media Services Account..................67
Using the HP MediaSmart Services Gateway Software............69
Using the HP Server software..........................................70
Using the HP Server Main Menu .....................................71
Using CinemaNow Media Manager.....................................73
Taskbar icon menu selections..........................................74
Using CinemaNow Media Manager ...............................75
Using CinemaNow Media Manager Options ...................76
Chapter 6: Using the Extender for Windows
Media Center ..................................................77
Using digital media: MediaSmart versus the
Extender for Windows Media Center...............................78
Setting Up for the First Time .................................................81
Using the Extender for Windows Media Center......................82
Navigating...................................................................82
Controlling live TV.........................................................82
Exiting.........................................................................83
Resetting the Extender or changing the computer ..............83
Unavailable Features ..........................................................84
Chapter 7: Using Windows Media Player ........86
Allowing and choosing folders to share ...........................86
Chapter 8: Troubleshooting.............................91
Chapter 9: Specifications.................................97
Supported Media File Types ..............................................100
Digital media formats: Codecs versus file containers........100
Supported Media .............................................................103
Manufacturer TV codes................................................106
Index ...........................................................113
Page 33

Chapter 1: Welcome
Congratulations!
Your HP MediaSmart Connect brings your digital entertainment
and your treasured photo and music libraries from your computer
and mass storage devices to your high-definition
television (HDTV).
Start using your HP MediaSmart Connect right now! To begin the
installation, see “Getting Started” on page 12.
Ethernet
Wi-Fi
HDMI
Internet
Page 34

The HP MediaSmart Connect is a digital media receiver that
enables easy browsing of all digital photos, music, and standard
and HD (high-definition) videos that you share from computers
and devices on your home network. You can browse and view this
content from a single interface on your HDTV. The HP MediaSmart
Connect also provides online access to thousands of movies
available to rent or own—and the simple HP interface enables
you to begin watching movies moments after downloading has
begun.
The HP MediaSmart Connect can also be set up to act as an
Extender for the Windows Media Center, if your computer has a
Microsoft Windows Vista Home Premium or Ultimate operating
system. In this mode, you can access content in your Media
Library, view live TV or recorded TV, and access online services
provided by through this interface. For more information about the
Extender for Windows Media Center, see “Chapter 6: Using the
Extender for Windows Media Center” on page 77.
Your HP MediaSmart Connect features integrated IEEE 802.11n
(draft 2.0) wireless networking, which enables the streaming of
HD video while providing compatibility with existing
802.11b/g/a Wi-Fi networks. For more information about
networking, see “Chapter 2: Connecting your HP MediaSmart
Connect to your Home Network” on page 35.
All specifications represent the typical specifications provided by HP
component manufacturers; actual performance may vary, either
higher or lower.
Some features may not be available on computers with a 64-bit
Page 35

Chapter 2: Connecting your HP MediaSmart Connect to your Home Network
Before you can start using your HP MediaSmart Connect you
need to connect it to your home network. You can use either an
Ethernet cable or the built in wireless antennas. For instructions to
connect the Ethernet cable for a wired connection, see
“Connecting to your home network (LAN)” on page 19.
Wired network
Using a wired network provides the best performance, because
the attached devices connect directly to the network and are not
subject to radio frequency (RF) interference. The HP MediaSmart
Connect is equipped with a full-duplex 10/100 Mbps Ethernet
(IEEE 802.3) module for wired connection to the home LAN.
Wireless network
For best wireless performance, HP recommends use of a
dual-band IEEE 802.11n Wi-Fi network (access point/router and
PC network card). IEEE 802.11a or 802.11g is the second
choice. IEEE 802.11b access points work well for audio and
picture streaming, but are not recommended for video because of
bandwidth limitations.
The quality of streaming video over wireless depends on many
factors such as the bitrate of the original video, the reception
quality, and the access point.
The 802.11b, 802.11g, and 2.4 GHz 802.11n routers operate
at radio frequencies that are also used by other household
devices, and can be affected by interference from cordless
telephones, microwave ovens, X10 wireless video cameras, ham
radios, or Bluetooth devices such as cellular telephone headsets.
The 5 GHz 802.11n or 802.11a routers operate at frequencies
that other wireless devices are less likely to use.
Page 36

Improve wireless performance
Walls dramatically reduce the range of a wireless router. It is
recommended that your router be placed in a room in the middle
of your house. For the purpose of video transmission, avoid
wireless connections that go through more than two walls or two
floors. An 802.11n router performs better in these environments,
because it uses advanced signal processing and multiple
antennas.
Turn off all unused network equipment in your local home network.
Some devices generate network traffic even when they are idle.
Most wireless routers offer multiple communication channels. Refer
to your router user manual for more information. In apartment
buildings and dense neighborhoods, if reception is poor, you may
need to switch your router wireless channel to improve reception.
The 5 GHz 802.11n* and 802.11a routers offer more channels,
and so are less subject to Wi-Fi interference. In some instances,
rotating your router antennas or placing the router at least
18 inches (457 mm) above the floor may improve your reception.
* Your 802.11n router may have a single transmitter at 2.4 GHz or a
dual transmitter at both 2.4 GHz and 5 GHz. If it is available, select
the 5 GHz mode for better coverage and performance.
Dual band 802.11n routers (2.4 GHz and 5 GHz bands) offer
the best performance option. These routers support 802.11b,
802.11g, 802.11a, and 802.11n simultaneously. Desktop
computers, notebooks, and handheld devices can use the
802.11b and 802.11g conductivity while the HP MediaSmart
Connect can use the performance of the 802.11n system at the
same time.
For more information about wireless networking, go to the
HP Web site at:
http://www.hp.com/support/mediasmart
Page 37

* Your 802.11n router may have a single transmitter at 2.4 GHz or a dual transmitter at both 2.4 GHz and 5 GHz. If it is available, select the
5 GHz mode for better coverage and performance.
Feature Wired LAN
802.11n
5 GHz*
802.11n
2.4 GHz* 802.11a 802.11g 802.11b
Streaming and viewing high-definition
video (HDTV) at the same time
(computer with wired connection to
network)
Best Excellent Works but is
subject to RF
interference
Not
recommended
Not
recommended
Not
recommended
Streaming standard-definition video
(SDTV) (computer with wired
connection to network)
Best Excellent Works but is
subject to RF
interference
Excellent Works but is
subject to RF
interference
Not
recommended
Streaming photos and music Best Excellent Very Good Excellent Very Good Good
Computer with wireless connection to
router and HP MediaSmart connect
with wireless connection to router.
Not applicable Recommended only
with a 40 MHz
Bandwidth setting
Not
recommended
Not
recommended
Not
recommended
Not
recommended
Usage in apartment building and
congested areas
Recommended Recommended
Not
recommended
Recommended Not
recommended
Not
recommended
Page 38

Chapter 3: Using the Remote Control
In this section, find the following useful information:
“Locating Controls and Connectors” on page 38.
“Identifying the Multifunction Remote Control Buttons” on
page 41.
“Selecting a Device to Control” on page 44.
Locating Controls and
Connectors
The device contains a remote control sensor, a resolution
indicator, buttons, connectors, and a drive bay for an optional
HP Pocket Media Drive (PMD). It has no Power button; press the
On/Off button on the remote control to put the device into
standby mode and awaken it, or unplug the power adaptor to
turn the device completely off.
Page 39

Front
Front Description
TV resolution
(button and
indicator)
Selects and indicates the HDTV resolution. If
you press the button and see a blank screen,
your TV may not support the selected
resolution; press the button again until you see
the HP MediaSmart Connect screen.
Remote Control
Sensor
T
V Resolution
Button, Indicator
USB
HP Pocket Media
Drive Bay
Eject
Status Indicator
Status indicator Shows the current device status:
Lights blue: Device is on.
Blinks blue: Device is in standby mode.
Lights amber: Device is turning on.
Lights red: An error occurred.
Remote control
sensor
Point the remote control at this area to operate
the device.
HP Pocket
Media
Drive bay
Insert an optional HP Pocket Media Drive
(PMD).
Eject (button) Ejects the HP PMD from the bay.
NOTE: Do not eject the drive when its
indicator is lit.
Front Description (continued)
Page 40

Back
Back Description
Reset Press this button to restart the device.
Power Connect the included AC power adaptor.
NOTE: Use only the AC power adaptor
provided.
Analog Audio
Right and Left
USB
LAN
Component
Video Y, Pb, Pr
Reset
Power
Digital audio
output (optical)
HDMI
HDMI Connect the included HDMI cable to the HDTV.
Component
Video
Y, Pb, Pr
Connect the green, blue, and red Component
Video cables (and left-right analog audio) to
the HDTV when not using HDMI.
Analog Audio
R and L
Connect left-right audio cables for stereo sound
out to an optional external (analog) audio
system or, when using the Component Video
connectors, to the HDTV.
LAN Connect an Ethernet cable to your wired home
network when not using a wireless connection.
USB Connect an optional USB-based mass storage
device.
!
IMPORTANT: Wireless local area network (LAN)
antennas are internal to the HP MediaSmart Connect
and can connect the device to your wireless home
network.
Back Description (continued)
Page 41

Identifying the Multifunction
Remote Control Buttons
This section describes each button on the remote control and its
function if the controlled device supports it.
On/Off turns the controlled device on or off.
Indicators show the device controlled by the remote control:
HP MediaSmart Connect, TV, CBL, DVD, and AUX.
Device selects the controlled device. To enjoy digital media or
use the Extender for Windows Media Center feature, the
HP MediaSmart Connect must be the controlled device.
Settings (Menu) displays the onscreen display (OSD) or settings
menu for the controlled device.
CC (Red context) selects a closed caption mode for the
controlled device or Extender mode. In the Media menu, causes
an action specific to the current menu or item.
Aspect (Green context) selects an option for the dimensions of
the TV picture in TV or DVD modes. On the Media menu, causes
an action specific to the current menu or item.
SAP (Yellow context) selects the Secondary Audio Program
(SAP) or the Multichannel Television Sound (MTS) option in TV
mode. On the Media menu, causes an action specific to the
current menu or item.
Sleep (Blue context) selects the time to turn of the TV in TV
mode. On the Media menu, causes an action specific to the
current menu or item.
Page 42

Search displays a search panel to find media.
Media displays the Media menu. In Extender mode, stops media
Favorites displays the Favorites list or adds the current selection
to the list.
Arrows move the cursor in the menu screens.
OK chooses the highlighted menu option.
Guide displays the program guide for the controlled device or in
Extender mode, if it is available on your computer.
Back goes back one level on the menu.
Info displays information about the current program.
Recorded TV displays a list of recorded television programs for
the controlled device or in Extender mode, if it is available on
your computer.
Volume increases or decreases the sound level.
Windows Media Center Green Start button displays the
Windows Media Center window from your computer in
Extender mode.
Channel (Ch+, Ch–) moves up or down one page in the media
listings. Selects the next higher or lower channel for the controlled
device (such as your computer TV tuner in Extender mode, if it is
Page 43

Device Menu displays the content or DVD menu for the
controlled device.
Rewind reverses the play of the current media for the controlled
device.
Play starts or resumes play of the current media for the controlled
device.
Pause suspends play of the current media for the controlled
device.
Fast-Forward fast-forwards play of the current media for the
controlled device.
Previous skips to the previous media for the controlled device.
Stop ends play of the current media for the controlled device.
Next skips to the next media for the controlled device.
Number keys are used to enter numbers. Or, in some menus you
select a number or character by pressing the key one or more
times to scroll to it, and then pressing Enter.
Clear backspaces and erases one character.
Last displays the previous channel in TV mode.
Enter enters a number, a character, or, in TV mode, a channel
number.
Page 44

Selecting a Device to Control
Use the remote control to operate the HP MediaSmart Connect or
another controlled device. To select the device you want to
control, press the Device button on the remote control one or more
times to light the device indicator.
To use the remote control, point the remote control at the remote
control sensor on the front of the controlled device. The
HP MediaSmart Connect sensor is in the middle of the front of the
device, in the lower section of the Status indicator. Simply point
the remote control at the front of the device.
To program the remote control for a specific device, see the next
section, “Programming the remote control for a TV (device code)”
on page 44. To use the Media menu, see “Using the Media
Menu” on page 50.
Programming the remote control
for a TV (device code)
Any device can be programmed for each remote control indictor,
except the HP MediaSmart Connect indictor: TV, CBL, DVD,
and AUX.
Each programmed device can have a second device programmed
for volume mapping, which adjusts the sound at the second
programmed device such as an external sound system. See
“Programming a second device for volume mapping” on
page 47.
Page 45

Programming steps
Follow these steps to program the remote control for the TV.
The steps are the same for the other device indicators. To find the
other device manufacturer codes, see the listing on the HP Web
site at: http://www.hp.com/support/mediasmart
1 Locate the brand of your device and the manufacturer codes.
See “Manufacturer TV codes” on page 106.
2 Turn on the TV, or the device you want to control.
3 Press the Device button on the remote control one or more
times to select the TV or device you want to program. Wait
until the device indicator light on the remote control goes out.
Selected
device
(indicator) Remote control operates
HP MediaSmart
Connect
Your HP MediaSmart Connect (only the
second device for volume mapping can be
programmed for this mode).
TV Your TV. The default code is set to HP HDTV
(manufacturer code 1000), but you can
change this to any of the supported device
codes.
CBL Your cable or satellite set-top box. The default
code is set to Comcast cable set-top box
(manufacturer code 0040), but you can
change this to any of the supported device
codes.
DVD Your DVD player. The default code is set to
Sony DVD player (manufacturer code 0003),
but you can change this to any of the
AUX There is no default code, but you can set this
to any of the supported device codes.
Selected
device
(indicator) Remote control operates (continued)
Page 46

4 Press and hold down the Device button on the remote control
for 5 seconds, until the device indicator light blinks, and then
release the Device button. The device light blinks one more
time and then remains lit, indicating the remote control is in
programming mode.
5 Enter the first four-digit code for your manufacturer from the
listing. If the code is accepted, the device indicator light
blinks twice. If the code is not accepted, the device indicator
light blinks three times.
6 Point the remote control at the device, and press the On/Off
button once. The device should turn off (or on if it is off).
If it does not, repeat steps 4 and 5, trying each code for your
brand until you find one that works. If it still does not work,
try searching for the code by using auto setup mode; see
“Programming the device code by using auto setup mode”
on page 48.
!
IMPORTANT: Enter code 9, 9, 9, 9 to reset the selected
device to the factory default manufacturer value.
Enter code 8, 8, 8, 8 to enter auto setup mode; see
“Programming the device code by using auto setup
mode” on page 48.
Pressing the 1, 3, and 0 buttons on the remote control
at the same time resets all programmable devices to
factory values.
n
If the device indicator light did not blink twice, repeat
step 4 and 5, entering either the same code or the next
code, if there is one.
n
If the device does not have a On/Off button, press Play.
Page 47

7 Repeat steps 1 through 6 for each device you want to control
with the remote control.
This completes programming a primary device. You can now
program a second device for volume mapping for each primary
device; see “Programming a second device for volume mapping”
on page 47.
Programming a second device for
volume mapping
Volume mapping defines a device instead of the TV or primary
device as producing sound. Pressing the Volume buttons or the
Mute button sends an IR remote control code to adjust the sound
level at the second device without requiring you to change the
controlled device on the remote control.
For the HP MediaSmart Connect and each device (TV, CBL, DVD,
or AUX) you program to control with the remote control, you can
program a second device for volume mapping. When you
reprogram the primary device, you must also reprogram the
1 Locate the brand of your second device and the manufacturer
codes. For device manufacturer codes, see the listing on the
HP Web site at:
http://www.hp.com/support/mediasmart
2 Turn on the device you want to program as a second device
for volume mapping.
3 Press the Device button on the remote control one or more
times to select the primary device (HP MediaSmart Connect,
TV, CBL, DVD, AUX). Wait until the device indicator light on
the remote control goes out.
4 Press and hold down the Device button on the remote control
for 5 seconds, until the device indicator light blinks, and then
release the Device button. The device indicator light blinks
one more time and then remains lit, indicating the remote
control is in programming mode.
5 Press one of the Volume buttons on the remote
control.
Page 48

6 Enter the first four-digit code for your manufacturer from the
listing. If the code is accepted, the device indicator light
blinks twice. If the code is not accepted, the device indicator
light blinks three times.
7 Point the remote control at the secondary device, and then
press the Mute button. The sound should mute. If it does not,
repeat steps 5 and 6, trying each code for your brand until
you find one that works.
8 Repeat these steps for each primary device you want to
program for volume mapping.
This completes programming a second device for volume
mapping.
Programming the device code by using
auto setup mode
If your home entertainment device does not respond to the remote
control after you try all the codes listed for your brand, try
searching for your code by using these steps for auto setup mode:
1 Turn on the device you want to program.
2 Press the Device button on the remote control one or more
times to select the device you want to program (TV, CBL,
DVD, or AUX). Wait until the device indicator light on the
remote control goes out.
3 Press and hold down the Device button on the remote control
for 5 seconds, until the device light blinks, and then release
the Device button. The device light blinks one more time and
then remains lit, indicating the remote control is in
programming mode.
4 Enter 8, 8, 8, 8. The device indicator light blinks once and
then remains lit.
n
If the device indicator light did not blink twice, repeat
steps 5 and 6, entering either the same code or the next
code, if there is one.
Page 49

5 Point the remote control at the device, and then press and
release the On/Off button on the remote control once. Wait
until the device indicator light stops blinking.
If the device turns off, continue with step 6.
If the device does not turn off, continue to press and
release the On/Off button, waiting each time for the
device indicator light to stop blinking, until the device
turns off.
6 Once the device turns off, press the OK button on the remote
control to save the code.
This completes the steps to automatically program a primary
device. After programming a primary device, you can program a
second device for volume mapping; see “Programming a second
device for volume mapping” on page 47.
n
Each time you press the On/Off button, the auto setup
tries a different code. Be sure to wait until the device
indicator light stops blinking before pressing the On/
Off button again. You may need to press the On/Off
button several times before the correct code is found.
n
If you cannot find a code that controls your device, and
your device is not listed in the manufacturer codes, your
device cannot be programmed into this remote control.
Page 50

Chapter 4: Enjoying Music, Photos, and Videos
Using the Media Menu
To operate and use the Media menu:
1 If necessary, turn on the TV, and then select the input source
to view the HP MediaSmart Connect.
2 If necessary, press the Device button on the remote control
one or more times to light the HP MediaSmart Connect
indicator. Point the remote control at the remote control
sensor in the middle of the front of the HP MediaSmart
Connect.
3 Press the Media button. The Media menu displays.
The Media menu shows these options (in a moving carousel):
Page 51

Online Media (globe icon), to access online media
services.
Servers (PC icon, not shown in illustration), to access
servers.
HP Pocket Media Drive or USB mass storage device
(USB thumb drive icon and HP PMD icon, not shown in
illustration), to access media stored on these devices.
Windows Media Center (Green Start button icon), to
access the Extender for Windows Media Center from
your Windows Vista computer.
Videos (movie reel icon), to access your digital videos.
In addition, these options are at the bottom of the screen:
What’s New? (envelope icon), to view messages such as
that your movie download is complete.
Settings (wrench icon), to change settings.
Help (question mark icon), to display a help page of
information.
5 Continue by selecting items on the displayed menu:
Press an Arrow button as needed to select an item, and
then press OK.
Or, you can:
Press the Back button to go back one menu or to stop
play.
Press the Info button to display information about a
photo, video, or music file.
Using context buttons
Pressing a remote control context button causes an action specific
to the current Media menu or item.
The button and its function display at the bottom of the screen.
Generally, the context buttons have these functions:
Page 52

Yellow (SAP) displays the search panel.
Blue (Sleep) adds the item to the Favorites list.
Searching
You can Search By these types:
Photos: Name, Date, Keyword
Videos: Title, Actor, Date
Music: Artist, Album, Song
1 In the Photos, Videos, or Music media lists, press the Yellow
context button to display a search panel.
2 Enter the search information using the onscreen keyboard for
entries. The search information you enter is not case-sensitive.
Also, the search information can be a single character or a
partial word. To change the Search By information, press the
Green context button.
To use the onscreen keyboard:
Press the Arrow buttons on the remote control to select an
item or key on the onscreen keyboard, and then press
OK to enter your selection.
Or
Press a number button on the remote control as needed
to scroll to the character you want.
3 Click the OK button to conduct the search and list the results.
4 Press the Back button to go back to the original screen.
Using Favorites
Pressing the Favorites button displays the Favorites list or adds
the current selection to the list for Photos, Music, or Videos. You
can use the Favorites list as a playlist.
On the Favorites screen, you can move or arrange the order of an
item by pressing an Arrow button to select it, and then pressing
the Yellow context button. You can remove an item from the list by
Page 53

The HP MediaSmart Connect and the Media button on the remote
control provide a simple way to connect your TV to your computer
or online services. This enables you to do the following:
View photos
Watch videos
Listen to music
Access online services for music, video, or photos
The HP MediaSmart Connect appears as a digital media receiver
in the Windows Media Player networking software program. This
program, installed on your computer, provides networking
services by streaming music, video, or picture files to the
network-connected HP MediaSmart Connect.
Viewing Photos
Use this feature to play photos, or to listen to background music
while playing a photo slideshow.
Playing photos or a slideshow
1 Press the Media button on your remote control to display the
Media menu.
2 Press an Arrow button to select Photos, and then press OK.
3 Press an Arrow button to select an option for photos listings,
and then press OK. The options are:
All Photos
Keywords
Date Taken
Online (photos available through Online Media
Services)
Playlists
Page 54

4 The screen shows your photos as thumbnail images or as
alist.
Press an Arrow button to select a photo.
Press a Channel button to show the next page of photos.
5 With a photo selected, you can:
Press the Left Arrow and Right Arrow buttons to move to
the previous or next photo.
Press the Red context button to start a slideshow from this
photo. In a slideshow:
Press Play to start or resume a slideshow, or a
slideshow and music.
Press Stop to stop music, a slideshow, or a
slideshow and music.
Press Pause to pause music, a slideshow, or a
slideshow and music.
Press Next to skip to the next photo when playing
music in a slideshow.
Press OK to view the photo as a full-screen image. Press
Back or Stop to return to the thumbnails.
In full-screen photo view:
Press the Left Arrow and Right Arrow buttons to jump
to the previous or next photo.
Press the Previous and Next buttons to jump to the
previous or next photo.
Press the Red context button to start a slideshow.
Press the Green context button to rotate the photo.
Press the Yellow context button to zoom (enlarge) the
photo. Press the Yellow button again to step through
the zoom modes. While in zoom, press an Arrow
button to pan within the photo.
Press the Blue context button to add the item to the
Favorites list.
Page 55

Watching a slideshow while
listening to music
Follow these steps to listen to your favorite music while playing a
photo slideshow:
1 Press Media, select Music, and then select and start playing
music as described in “Playing music” on page 57.
2 Press Media again, select Photos, and then select photos and
play a slideshow as described in “Viewing Photos” on
page 53.
Changing slideshow options
Slideshow options include time intervals, transitions, order, and
automatic music. Choose slideshow options on the Settings menu
for Slideshow; see “Changing Settings” on page 63.
Watching Video Files
1 Press the Media button on your remote control to display the
Media menu.
2 Press an Arrow button to select Videos, and then press OK.
3 Press an Arrow button to select an option for video listings,
and then press OK. The options are:
All Videos
Genre
Actors
Downloaded (videos you have downloaded to the
computer)
Online (movies available through Online Media
Services)
Playlists
Folders
Page 56

4 The screen shows your videos as thumbnail images or as
alist.
Press an Arrow button to select a video.
Press a Channel button to show the next page of videos.
5 With a video selected, you can:
Press OK or the Red context button to start play of this
video. Press Back or Stop to stop play and return to
the list.
Press the Left Arrow and Right Arrow buttons to move to
the previous or next video.
Press the Yellow context button to display a search panel.
Press the Green context button to display the listing as a
list or as thumbnails.
Press the Blue context button to add the item to the
Favorites list.
Press a device operation button (Pause, Previous, Stop,
or Next) to control the background music that is playing.
n
While playing a video, press Info to display a window
of information for the video file. Press Info again to
close the window.
n
Genre and actor information appears only for video
files that provide such information. For all other video
files, “Unknown” appears in these lists.
n
When playing back Digital Rights Management
(DRM)-protected content, license acquisition may delay
play for several seconds.
Page 57

6 During video play:
Press the Green context button to switch the video
between full screen and original size.
Press Stop to stop the video.
Press Pause to pause the video.
Press Fast-Forward to advance the video.
Press Rewind to rewind the video.
Press Next to go to the next video.
Press Previous to go to the previous video.
Changing video options
You can set the repeat option for videos. Choose the video option
on the Settings menu; see “Changing Settings” on page 63.
Listening to Music
Use this feature to play music, or to listen to background music
while playing a photo slideshow.
Playing music
1 Press the Media button on your remote control to display the
Media menu.
2 Press an Arrow button to select Music, and then press OK.
3 Press an Arrow button to select an option for music listings,
and then press OK. The options are:
All Music
Genre
Artist
Albums
Online (music available through Online Media Services)
Page 58

4 The screen shows your music as thumbnail images or as
alist.
Press an Arrow button to select a music file.
Press a Channel button to show the next page music.
5 In the All Music view:
Press the Red context button to select the Repeat option
for the music.
Press the Green context button to select the Shuffle
options.
Press the Yellow context button to display a search panel.
Press the Blue context button to add the item to the
Favorites list.
6 With music selected, you can press Play to start play. During
music play:
Press Pause to pause the song until you press Play.
Press Previous to play the previous song in the list.
Press Next to play the next song in the list.
Press Fast-Forward to advance music play.
Press Rewind to reverse music play.
n
While playing a song, press Info to display a window of
information for the music file. Press Info again to close
the window.
n
Album, artist, and genre information appears only for
music files that provide such information and are in a
format supported by Windows Media Player.
Page 59

Listening to music while playing a
slideshow
Follow these steps to listen to your favorite music while playing a
photo slideshow:
1 Press Media, select Music, and then select and start playing
music as described in “Playing music” on page 57.
2 Press Media again, select Photos, and then select photos
and play a slideshow as described in “Viewing Photos” on
page 53.
Viewing USB Photos, Music,
and Videos
You can view media stored on an USB mass storage device or on
an HP Pocket Media Drive (PMD).
Media can only be read from the mass storage device.
HP MediaSmart Connect cannot write to or format the mass
storage device.
The HP MediaSmart Connect supports only USB mass storage
devices with a FAT, FAT32, or NTFS file system. For example, a
printer or a Linux-based file system device is not recognized or
supported.
n
When playing back DRM-protected content, license
acquisition may delay play for several seconds.
Page 60

Playback of Digital Rights Management (DRM)-protected content
stored on a mass storage device is not supported by
HP MediaSmart Connect.
To view media stored on the USB device or
HP PMD:
1 Insert the device into a USB connector on the HP MediaSmart
Connect, or insert the HP PMD into the PMD bay on the front.
2 Press the Media button on your remote control to display the
Media menu.
3 Press an Arrow button to select USB drive (USB thumb drive
!
IMPORTANT: Downloaded movies or recorded TV files
(.dvr-ms) stored on the device are not recognized.
HP MediaSmart Connect supports play of such files
through Extender for Windows Media Center. The
media files must be accessible from your computer, and
added to your Windows Media Center Library. For more
information, see “Chapter 6: Using the Extender for
Windows Media Center” on page 77.
Page 61

5 Continue by selecting items:
Press an Arrow button as needed to select an item, and
then press OK.
Or, you can:
Press the Back button to go back one menu or to
stop play.
To remove the USB mass storage device or the
HP PMD:
1 Press the Back button to stop play.
2 Remove the USB device, or press the Eject button on the front
of the HP MediaSmart Connect to eject the PMD.
Selecting Servers
You can set the type of Media Services servers displayed, and
select and view the server media.
To set the type of servers that are displayed:
Select HP Approved Servers to show only those Media
Services servers that HP has confirmed meet requirements for use
with HP MediaSmart Connect.
1 Press the Media button on your remote control to display the
Media menu.
2 Press an Arrow button to select Settings, and then
press OK.
c
CAUTION: Do not remove a USB device when it is
streaming media, or eject the HP PMD when the activity
indicator is lit.
n
The Media menu shows the number of Media Services
servers in the lower-right corner of the screen.
Page 62

4 Press an Arrow button to select the type of servers
(All Servers or HP Approved Servers), and then
press OK.
5 Select the server, and then press OK.
6 Press the Red context button to exit Settings.
To select a server to view or play the media on it:
1 Press the Media button on your remote control to display the
Media menu.
2 Press an Arrow button to select Servers, and then press OK.
The screen lists the available servers. These include:
Windows Media Player 11
HP MediaSmart Services Gateway
HP MediaSmart Connect
3 Press an Arrow button to select a server, and then press OK.
The TV shows the available media on the server.
You can select and play the media.
You can delete a server or refresh the list.
When you delete a server, it and the contents on it are
hidden. The server is viewable again after you restart the
HP MediaSmart Connect.
n
To restart the HP MediaSmart Connect, press Settings
(Menu) on the remote control, and then select Reset
Options and choose Restart System. Or, you can also
simply press the Reset button on the back of the
HP MediaSmart Connect.
Page 63

Changing Settings
1 Press the Media button on your remote control to display the
Media menu.
2 Press an Arrow button to select Settings, and then
press OK.
Or
Press the Settings (Menu) button.
3 Press an Arrow button to select an option, and then press
OK. The options are:
Network
Demo
Language
Windows Media Center
Page 64

Reset Options (to restart HP MediaSmart Connect or
return to factory settings)
You can display this menu option by selecting Settings
from the Media menu and choosing Reset Options, or
by pressing the Settings (Menu) button on the remote
control and choosing Reset Options.
To restart HP MediaSmart Connect:
Select Restart System from the Reset
Options menu.
Simply press the Reset button on back of the
HP MediaSmart Connect.
Unplug the device from the AC power adaptor, wait
20 seconds, and then plug it in again.
Each of these actions restarts the HP MediaSmart
Connect and preserves your personal settings.
To reset the HP MediaSmart Connect, select Restore to
Factory Settings in the Reset Options menu. This
clears the current personal settings, preferences, and
Slideshow
Video
Servers
Software Update
Online Media
TV Resolution
Screen Saver
For information about the settings, see the HP Web site at:
http://www.hp.com/support/mediasmart
Page 65

Chapter 5: Using Online Media
The HP MediaSmart Connect provides online access to thousands
of movies available to rent or own, and the simple HP interface
enables you to begin watching movies moments after
downloading has begun.
To access and download online media requires these steps:
1 At your computer, create an account (user name and
password) with HP Online Media Services.
2 If needed, create your account with each of the supported
services you want to join and use such as CinemaNow or
Snapfish. (The available online media service providers may
vary in your country/region.)
3 Register your account with each of the supported services by
entering the account user name and password information
into your HP Online Media Services account.
service you want to use, enter your HP Online Media Services
account information, and then the service displays on your screen.
You can browse the service, and purchase (or rent) media and
start downloading to your computer.
The signup usually occurs during installation, but it can also be
done anytime prior to use; see “Setting Up the HP Online Media
Services Account” on page 67.
The HP MediaSmart Services Gateway software and the
CinemaNow Media Manager software, used to access online
media, automatically install on your computer from the Installation
CD. See “Using the HP MediaSmart Services Gateway Software”
on page 69, and “Using CinemaNow Media Manager” on
page 73.
Be sure to accept any updates to the software the
Page 66

Using the Online Media menu
The Online Media option on the Media menu lists the various
media service providers. Check back periodically as new services
become available.
Prior to use, the media service provider may require subscription
purchase, account setup, or other setup that is performed directly
from your computer. This is usually done during installation by
using the HP MediaSmart Connect Installation CD that came in the
box. Or, you can use your computer to access the Internet and go
to the HP Web site at:
http://www.hp.com/go/mediasmart/services
To use online media services:
1 Press the Media button on your remote control to display the
Media menu.
2 Press an Arrow button to select Online Media, and then
press OK.
The list of services displays.
3 Press an Arrow button to select a service name, and then
press OK. When prompted, enter your HP Online Media
Services user account name and password. The
HP MediaSmart Connect connects to the service. For specific
information about using the service you select, use the help
information for that service provided on the HP Web site at:
n
The available media service providers may vary in your
country/region.
n
To access the service, your HP MediaSmart Connect
must successfully connect to your home LAN and have a
broadband connection to the Internet.
Page 67

Setting Up the HP Online
Media Services Account
This section describes how to register and access online media by
using your HP MediaSmart Connect.
The signup usually occurs during installation, but it can also be
done anytime prior to use. Use your computer to access the
Internet and go to the HP Web site at:
http://www.hp.com/go/mediasmart/services
You can also access HP Online Media Services on your computer
through the HP MediaSmart Services Gateway software, see
“Using the HP Server Main Menu” on page 71.
Then, complete the three steps that follow:
Step 1: Create your user account on the HP Online
Media Services Web site. This step enables you to link the
Internet services that can be accessed from your HP MediaSmart
Connect. Create service accounts with each media provider at
your computer before registering these accounts with HP.
On the HP Online Media Services page, click the Register
button, and then follow the onscreen instructions. HP
responds with an e-mail to confirm your e-mail address.
Page 68

Step 2: Register any existing media service accounts
with HP. During this step, add your existing media service
accounts to your HP Online Media user account so that you
access them through your HP MediaSmart Connect.
a On the HP Online Media Services page, fill in your user
name/e-mail address and Password from the
confirmation e-mail, and then click the Sign-in button.
b Click Add Entertainment Services.
c Select a service to add to your HP Online Media
Step 3: At your HP MediaSmart Connect, access your online
media services. During this step, you log in to your HP Online
Media Services account and access your (registered) media
services.
a Press the Media button on your remote control to display
the Media menu.
b Press an Arrow button to select Online Media, and
then press OK.
The list of services appears.
c Press an Arrow button to select a service name, and then
press OK. When prompted, enter your HP Online Media
Services user account name and password. The
HP MediaSmart Connect connects to the service.
n
Step c assumes you created an account with the media
service provider before registering it with HP during this
step. If you do not currently have an account with the
selected service, visit the service Web site you want by
clicking in the selection. Create an account with the
media service provider before clicking the Add Service
button.
n
To access the service, your HP MediaSmart Connect
must successfully connect to your home LAN and have a
broadband connection to the Internet.
Page 69

Using the HP MediaSmart
Services Gateway Software
The HP MediaSmart Services Gateway software (also called the
HP Server) manages the downloading and storage of movies from
the Internet onto a computer, for viewing on the HP MediaSmart
Connect. The software manages the interactions between your
computer, the HP MediaSmart Connect, and the CinemaNow
Media Manager, when using CinemaNow services. It also
supports playback of some files that Windows Media Player 11
may not; see “Supported Media” on page 103.
The HP Server must be running on your PC to purchase and
download movies from your TV, as well as to view certain audio
and digital video file types not supported by Windows Media
Player 11 such as .m4a and .mp4 files.
The software is loaded onto your computer by the
HP MediaSmart Connect Installation CD. Look for the
icon on the Windows desktop.
The HP MediaSmart Services Gateway software currently does
not support computers with a 64-bit operating system; however,
Windows Media Player 11 still works well as a server.
!
IMPORTANT: The HP MediaSmart Service Gateway
software requires a Windows-based operating system;
see “System requirements” on page 13.
Page 70

Using the HP Server software
When the software is open on the computer, the
HP Server icon appears on the Windows taskbar. If the
HP Server icon is not on the taskbar, double-click the
HP Server desktop icon. The server starts, and the
HP Server icon appears on the taskbar.
You use the HP MediaSmart Services Gateway software on the
computer by right-clicking the icon on the taskbar, and then
selecting from the menu.
From the HP Server menu, you can:
View the current version of the software by selecting the
About option.
View messages, check the download progress, display the
HP Online Media Services, or run diagnostic tests by
selecting the HP Server Main Menu option.
Pause, resume, or restart the software by selecting the
specific options. The Restart Server option clears the
current activities and restarts the software.
Exit the HP Server software by selecting the Exit option. This
also removes the icon from the taskbar.
Page 71

Using the HP Server Main Menu
To display the HP Server Main Menu, on the computer, right-click
the HP Server icon on the taskbar, and then select HP Server
Main Menu.
The HP Server Main Menu displays in a browser window on your
computer. The HP Server Main Menu has these selections:
What’s New
Download Queue (present when a movie is scheduled for
download)
HP Online Media Services
Run Diagnostic Test
The following sections discuss each option.
Page 72

What’s New
This option displays messages such as a message that your movie
download is complete. Click the What’s New option to display
a window that shows current messages of these types:
Play messages such as <Movie Title...> Download Complete.
Error messages such as Error Downloading.
General message <Message Subject>.
Click a message to view it, and then click Back to return to the
message list.
Click Menu to go back to the HP Server Main Menu.
Download Queue
Click the Download Queue option to display a window that
shows the list of movies awaiting downloading to the computer.
This option is only available when a download is pending.
Click Pause All to suspend downloading.
HP Online Media Services
1 Click the HP Online Media Services option. A browser
window displays the HP Online Media Services Web site.
2 Create your user account on the HP Online Media Services
Web site and register your media service provider accounts.
(This is usually done during the software installation from the
Installation CD.)
Once you have registered your media service provider
accounts, you can access media from the sites through the TV
or the HP Server software. You must complete account
registration with a media service provider before adding the
media service provider account to HP Online Media
Services.
3 Fill in your HP Online Media Services user account name or
e-mail address, and your password, and then click the
Sign-in button.
4 Click the service you want to use.
For information about setting up your service accounts or using
Page 73

Run Diagnostic Test
Click the Run Diagnostic Test option to start a series of
diagnostic tests:
Checking Server status: Reports results as Server active,
or Server paused.
Checking Network: Reports results as Network found, or
Network not found/UPnP required ports blocked.
Checking Internet connection: Reports results as Internet
connection found, or Internet connection not found.
Checking for required software: Reports results as
Required Software found, or Required Software not found.
The test checks for the CinemaNow Media Manager
(CNMM) software.
Using CinemaNow Media
Manager
The CinemaNow Media Manager software (also called CNMM)
is installed onto your PC from the Installation CD. This software
controls the queuing, downloading, and viewing of movies and
other videos from CinemaNow.
Updates to CNMM occur automatically through HP MediaSmart
Services Gateway, which is also installed onto your computer
from the Installation CD.
CNMM is always open, and its icon can be viewed on the
Windows taskbar. If CNMM is not open on the computer, you
cannot access some CinemaNow functions from the
!
IMPORTANT: Do not update the CNMM software
directly from the CinemaNow Web site.
Page 74

To open CinemaNow Media Manager, from your
computer, right-click the CNMM icon on the taskbar, and
select Open Media Manager.
If the CNMM icon is not on the taskbar, double-click the
CinemaNow Media Manager desktop icon. CNMM
starts, and the icon appears on the taskbar.
Taskbar icon menu selections
Use the CinemaNow Media Manager software from the computer
by right-clicking the icon on the taskbar, and then selecting from
the menu.
From the CinemaNow Media Manager menu, you can:
Display the CinemaNow Media Manager main menu by
selecting the Open Media Manager option.
Define settings by selecting the Options option.
Enable or disable notifications by selecting the displayed
option.
Pause or resume downloading a movie by selecting the
displayed option.
Exit the CNMM software and remove the icon from the
taskbar by selecting the Shutdown CinemaNow Media
Manager option.
Page 75

Using CinemaNow Media Manager
The CinemaNow Media Manager displays in a window on your
computer after selecting Open Media Manager on the taskbar
icon menu. There are two main screens:
My Library shows the movies currently downloaded and
stored on the computer hard disk drive, and the current status
of each.
Rental movies that have been viewed have a status of
Expired. Movies stay on the hard disk drive until you
take action to delete them.
Delete expired movies to free space on your computer
hard disk drive. Click the X in the row for the movie title
to delete the stored file, and then click OK to approve it.
Download Queue shows those movies that are either in a
queue to be downloaded or in the process of being
downloaded.
For more help with using CinemaNow, click Help at the top of the
window, or go to the CinemaNow Web site at:
http://www.cinemanow.com/mediasmartTV
Use this site to maintain your CinemaNow account information,
including credit card information, usage of gift cards or
certificates, and personal information. If you change your
password, update your password registration information for
CinemaNow for your HP Online Media Services account on the
HP Web site at:
http://www.hp.com/go/mediasmart/services
Page 76

Using CinemaNow Media Manager
Options
To display the Options menu, select Options on either the
taskbar icon menu or from the Tools menu of the CNMM main
window.
The CinemaNow Media Manager Options menu has screens for
each type of setting:
General
Storage
Network
Some of these settings are mainly for use in the PC environment
and are not available within the HP MediaSmart Connect
environment. For optimum use, keep the default settings.
To make changes to a setting, place a check mark in the check
box, and then click Apply.
Page 77

Chapter 6: Using the Extender for Windows Media Center
Setup of the Extender for Windows Media Center, if you have the
Windows Vista Home Premium or Ultimate operating system,
occurs during installation. (The HP MediaSmart Connect displays
an eight-digit key on the TV screen, along with instructions for you
to enter the key into your Media Center settings on the computer.)
By pressing the Media Center Green Start button on the remote
control, the HP MediaSmart Connect displays the Media Center
from your computer and enables you to navigate Media Center as
if you were at the computer.
Your computer may require an active (live) connection to the
Internet while you set up your HP MediaSmart Connect as an
Extender. Each time you set up the Extender or change the
computer, the device generates a new eight-digit key.
n
A Windows Vista computer can support up to four
Extenders. The HP MediaSmart Connect can be an
Extender to only one computer at a time.
Page 78

Using digital media: MediaSmart
versus the Extender for Windows
Media Center
For MediaSmart mode: To
display the Media menu, press
the Media button on the remote
control. The Media mode
interface was designed by HP
and provides a unique and
simple way to navigate through
personal content and online
media. See “Using the Media
Menu” on page 50.
For the Extender for
Windows Media Center
mode: To display the menu
from Media Center, press the
Media Center Green Start
Extender for Windows Media Center interface was designed by
Microsoft and is similar to Microsoft Media Center interface you
see at the computer.
Some of the media experience features in Windows Media Center
are not available when using the Extender for Windows Media
MediaSmart
Extender for
Windows
Media Center
Page 79

The following table lists some features of using digital media from
your HP MediaSmart Connect for MediaSmart mode and for the
Extender for Windows Media Center mode.
Feature MediaSmart mode Extender mode
Compatibility Computer with:
Media Center Edition 2005
Windows XP (SP2) operating system or later
Or
Windows Vista operating system
Or
Any device with UPnP-compliant media server
Computer with Windows Vista
Home Premium or Ultimate
operating system
Streaming photos, music, and digital
videos to your TV
Automatically view content from multiple
devices and access multiple servers
Access online media
Page 80

Compatibility
To use the Extender for Windows Media Center mode you need a
computer running Windows Vista Home Premium or Ultimate. In
contrast, the Media mode is compatible with a wider range of
computers or other media servers. These include:
Computers running a Windows-based operating system such
as Windows XP (Service pack 2 or later) with either
Windows Media Player 11 or any other third-party media
server.
Network-attached storage (NAS) devices running Windows
Media Connect or other UPnP-compliant media servers such
as HP Media Vault and HP MediaSmart Servers.
Any device with a DLNA-compliant media server, including
non-Windows based computers or other consumer electronic
devices with media streaming capabilities such as digital
cameras or digital telephones.
Note that the HP user experience in MediaSmart mode has
been optimized for computers running Windows Media
Streaming photos, music, and digital
videos to your TV
Both MediaSmart and Extender for Windows Media Center
modes enable you to stream digital photos, music, and videos to
your TV. However, in MediaSmart mode HP software running on
your computer can stream a wider range of file formats than
Extender. These file formats include images in PNG format, MP4
video files, and unprotected iTunes.
Automatically view content from
multiple devices
It is not unusual for users to have in the home multiple computers
or other devices that can stream digital media content such as a
NAS. One of the unique features of the HP MediaSmart Connect
is that in MediaSmart mode it automatically detects all media
servers on the home network and aggregates and displays all
available content. In contrast, in the Extender for Windows Media
Center mode, only media content from the host computer is
Page 81

Access online media
Both the MediaSmart and the Extender for Windows Media
Center modes enable you to access online content directly from
your TV. Using the MediaSmart mode, you access Internet-based
services through the Online Media menu. HP Online Media
Services allow you to link all your services through a single login.
In addition, accessing certain services such as Snapfish does not
require you to have your PC on.
The Extender for Windows Media Center mode offers a rich
online experience as well. With it you can access a variety of
Internet content, including news feeds, sports clips, concerts, TV,
movie, and Internet radio services.
Controlling live TV
The Extender for Windows Media Center mode allows you to
control live TV if your computer has a TV tuner, and it is connected
to a TV signal source. For more information, see “Controlling live
TV” on page 82.
Setting Up for the First Time
If you skipped the setup during installation, follow these steps:
1 Press the Media Center Green Start button on the remote
control (or select the Windows Media Center icon on the
Media menu).
2 On the menu, select Setup Extender, and then press OK
on the remote control. Follow the onscreen instructions. The
HP MediaSmart Connect displays the eight-digit key you must
enter into the Media Center settings for the Extender at the
computer. Write down the key.
!
IMPORTANT: Do not turn off the TV, close the screen, or
change the input source for the TV.
Page 82

3 Go to the computer. The computer may automatically detect
the HP MediaSmart Connect and prompt you to connect it as
an Extender.
If it does, continue with step 4.
If it does not, open Windows Media Center on your
computer, select Tasks, select settings, and then click
add extender. Continue with step 4.
4 In the Extender Setup Welcome window, click Next.
5 Enter the eight-digit key from the HP MediaSmart Connect
screen, and then click Next. Follow the Extender steps and
when the steps are successfully completed, click Finish.
6 The Windows Media Center window (menu) appears on the
HP MediaSmart Connect TV. To navigate through it, see
“Navigating” on page 82.
Using the Extender for
Windows Media Center
After completing the Extender for Windows Media Center setup at
the computer, when you press the Media Center Green Start
button on the remote control or select the Windows Media Center
icon on the Media menu, the HP MediaSmart Connect shows the
Windows Media Center window from the computer.
Navigating
To move through the Windows Media Center menus and play
media, point the MediaSmart remote control at the
HP MediaSmart Connect and press the Arrow, OK, and Back
buttons.
Controlling live TV
If your computer has a TV tuner, and is connected to a TV signal
source, you can also control live or recorded TV with these remote
Page 83

Press a Channel button (Ch+ or Ch--) to change the channel
when watching live TV.
Press Recorded TV to display the Windows Media Center
Recorded TV menu. Use the menu to watch pre-recorded TV
programs.
Press Guide to display the Windows Media Center Program
Guide. Use the guide to browse through program listings and
mark them for recording (press Record).
Press Record to begin recording the live TV program you are
watching, or to mark for recording the program listed in the
Windows Media Center Program Guide. This function is not
available in MediaSmart mode.
Exiting
To close the Windows Media Center window, do any of the
following by using the remote control buttons:
Press Media to display the Media menu.
Press Source and select a new input source.
Resetting the Extender or changing
the computer
Use these steps to reset the Extender for Windows Media Center
or to change the host computer. After the initial setup of the
HP MediaSmart Connect as an Extender, you must remove the
current setup information from the device before setting up a new
computer.
Your computer may require an active (live) connection to the
Internet while you set up the Extender.
1 Press Media on the MediaSmart remote control.
2 Select Settings, and then press OK.
n
Each time you set up the Extender or change the
computer, HP MediaSmart Connect generates a new
eight-digit key.
Page 84

3 Select Windows Media Center, and then press OK.
To reset the Extender, select Setup Extender, and then
press OK. Follow the onscreen instructions.
Or
To change the host computer, select Remove Setup
Information, and then press OK. Follow the onscreen
instructions. Then, when the menu displays again, select
Setup Extender, and then press OK. Follow the
onscreen instructions to set up the new computer.
Unavailable Features
Some of the media experience features in Windows Media Center
are not available when using the Extender for Windows Media
Center:
Media Center
menu
Not available in the Extender for
Windows Media Center
Music
Visualization
Fast-Forward or Rewind
TV
Set Up TV Signal
Adjust Display Settings
Slow motion
Step forward or backward
CGMS/A-protected content
Videos Fast-Forward or Rewind (Not available
for video files other than Recorded TV
shows [video files with a .dvr-ms file
Page 85

CDs or DVDs Burn to CD
Burn to DVD
Watch DVDs that are inserted in a
DVD drive on the Windows Media
Center computer
Listen to audio CDs that are in the
CD-ROM drive on the Windows
Media Center computer
More Programs
Some games (for example, Hearts,
Chess, Titans, and FreeCell)
Sync to device
Media-only mode
Add Extender
Media Center
menu (continued)
Not available in the Extender for
Windows Media Center
Settings Music
DVD
Color Scheme
Automatic Download Options
Set Up TV Signal
Set Up Your Speakers
Test Digital TV antenna strength
Configure Your TV or Monitor
Run Setup Again
Remote Control Set Up
Tele te xt
Marquee Scrolling
Popups
Media Center
menu (continued)
Not available in the Extender for
Windows Media Center
Page 86

Chapter 7: Using Windows Media Player
You can use any UPnP-compliant server program to stream media
to the HP MediaSmart Connect. HP recommends and supports
Windows Media Player 11.
During installation, the Windows Media Player 11 software
installs on your computer, if it is not already installed. Windows
Media Player must be installed, and HP MediaSmart Connect
must be allowed to display the media shared from your computer.
These steps occur during the software installation. See “Using the
Installation CD” on page 27.
You can change the media shared from your computer. To do this,
you start Windows Media Player 11, and choose the media
folders you want to view by adding them to the Windows Media
Player Library. After you enable media sharing, your
HP MediaSmart Connect automatically aggregates and displays
content from your shared media servers.
Allowing and choosing folders
to share
1 At a shared computer, click the Windows Start button on
the taskbar, click All Programs, and then click Windows
Media Player.
2 Follow the onscreen instructions to complete the settings.
Page 87

3 At the top of the Windows Media Player window, click
Library, and then click Media Sharing.
If there is no Library tab in your Windows Media Player 11
window, follow these steps:
a Press the ALT key to display the File menu, click Tools,
and then click Options.
b In the window that displays, select the Library tab, and
then click Configure Sharing.
4 In the Media Sharing window, select Share my media.
Example Windows XP Media Sharing window
Page 88

Example Windows Vista Media Sharing window
For Windows Vista, your home network must be a private
network. If necessary, click the Networking button and verify
that your network is private.
5 When your HP MediaSmart Connect is connected to your
home network, it appears in the Media Sharing window.
Click the Device icon, and then click Allow. This allows the
program to stream media to the HP MediaSmart Connect.
The first time you display the Media Sharing window, the
HP MediaSmart Connect may appear as an unidentified
device. This is normal. Click the Device icon, and then click
Allow.
Page 89

6 To change the default sharing options, click the Settings
button in the window. In the Media Sharing - Default Settings
window, you can specify how your computer is listed among
the media servers (Office PC in the example figure that
follows), and you can also select the media types you want to
share and optional parental controls. Click OK.
7 Click OK to close the Media Sharing window.
8 At the top of the Windows Media Player window, click
Library, and then click Add to Library. The Add To
Library window displays.
9 Select an option under Select the folders to monitor, or
click the Advanced Options button and select specific
folders.
Page 90

Example Advanced Options window 10 Click OK. Wait while Windows Media Player automatically
adds the media files from the selected folders to your
Windows Media Player Library.
Files that are not supported by Windows Media Player 11
(such as iTunes files) do not appear in your Library; however,
if you are running the HP MediaSmart Services Gateway
software, they are still shared with your HP MediaSmart
Connect, and therefore they still appear in your listings.
At this point, your HP MediaSmart Connect automatically lists
and displays shared content from your shared computer.
n
The Windows Media Player Library does not copy the
media files, but instead creates a link to each. The
Library automatically monitors the folders you select,
and updates the information when a file is added to, or
deleted from, the monitored folders.
Page 91

Chapter 8: Troubleshooting
Refer to this section if you have startup, remote control, or media
problems.
Startup questions
Can I use an HDMI-to-DVI adaptor to connect the
HP MediaSmart Connect to my HDTV?
The HDMI connection is recommended. For HDTVs with no HDMI
connector, use a Component Video connection, see “Component
connector set” on page 18.
I do not hear sound, even though there is an image.
If you are using the Component connectors for video, did you
connect audio cables?
Is the external sound system turned off? Turn it on.
Did you program a second device for volume mapping? Turn on
the device.
I do not see an image. There is no video.
Are the connections to the TV correct? Double-check that the
cables are properly inserted into the connectors.
Is the TV turned on? Turn on the TV, and select the HP MediaSmart
Connect as the source to view.
Press the TV Resolution button on the front of the device, and wait
for the resolution to change. If the screen is still blank, press the
button again.
There is no resolution light.
Is the AC power adaptor disconnected? Make sure both ends of
the power adaptor are plugged in.
Page 92

If you are using a power strip, make sure it is turned on.
The color is strange, faded, or misaligned.
If you are using the Component connectors for video, make sure
the red, blue, and green cables are fully inserted into the proper
connectors at both HP MediaSmart Connect and the TV.
I press Media on the remote control but nothing
happens.
Is the HP MediaSmart Connect the selected device on the remote
control? Press the Device button to change the controlled device.
Remote control questions
The remote control does not work.
Make sure the batteries are inserted with the polarity properly
aligned.
Make sure the remote control batteries are fresh. If they are worn
out, replace them with new batteries.
Make sure no obstacles are between the remote control and the
sensor window on the front of the device.
Make sure the remote control is aimed at the device.
The remote control does not control other home
entertainment equipment.
Try all listed codes for the equipment brands you are trying to
set up, or try programming the remote control using the auto
setup mode.
Make sure the equipment can be operated with an infrared
remote control.
The remote control does not blink the selected device
button (HP MediaSmart Connect, TV, CBL, and so on)
when I push a button.
Replace the batteries in the remote control.
I press Media on the remote control, but nothing
happens.
Is the HP MediaSmart Connect the selected device on the remote
Page 93

Media questions
I press Media on the remote control but nothing
happens.
Is HP MediaSmart Connect the selected device on the remote
control?
The connection is not established.
Check the cable connections from your computer to the
HP MediaSmart Connect:
For a wired connection, make sure you are using the
proper cable; use an Ethernet LAN cable to connect from
the device to the computer network router.
For a wireless connection, check that the HP MediaSmart
Connect has the correct security settings.
Check your IP settings.
Make sure a firewall is not blocking the Windows Media
Player from the network. Reset the Microsoft firewall settings
in Windows Media Player, or, if you are using another
firewall program, make Windows Media Player a trusted
program, and make your whole home network a trusted
device. For additional help with firewalls, use your computer
to access the Internet, and go to the HP Web site at:
http://www.hp.com/go/mediasmart
Check your network connection by opening a browser on
your computer and viewing a Web page on the Internet. If a
Web page does not display, check your Internet connection.
Check at your PC that you accepted the HP MediaSmart
!
IMPORTANT: If you are using a firewall or antivirus
program that cannot automatically update the trusted
program list, contact the program manufacturer to find
out how to manually add programs to the list.
Page 94

Check that your home network is a private network, because
broadcast services and some UPnP programs may not work
through a virtual private network (VPN). For the steps to
change your network to private, see the remedy for “My
HP MediaSmart Connect can see my Windows Vista
computer, but I cannot stream any content.”
My HP MediaSmart Connect can see my Windows
Vista computer, but I cannot stream any content.
The Windows Vista
operating system requires that your home
network be in a secure private network before it allows any
content to stream to an allowed device. You can change your
network from public to private by using these steps:
1 At the computer, click the Windows Start Button, and
then click Network.
2 Click the Network and Sharing Center tab.
3 To change your network to private, click Customize.
4 Click Private, and then click Next.
5 Click Close.
I cannot find the media files from the HP MediaSmart
Connect that I know are in the folders I share on my
computer.
The media files do not display when they are an unsupported
format. However, the HP MediaSmart Services Gateway software
(installed on your computer from the Installation CD) adds
additional file format support that is not provided by Windows
Media Player.
Check that the HP MediaSmart Services Gateway software is
running on your computer (the icon is on the taskbar).
Or
Check that the server is visible from your device (and so,
running on your computer):
1 Press the Media button on your remote control to display
the Media menu.
2 Press an Arrow button to select Servers, and then press
OK.
Page 95

If it is necessary, restart the server from your computer, see “Using
the HP Server software” on page 70.
For more information about file formats, see “Supported Media
File Types” on page 100.
When viewing steaming video from my computer by
using a wireless LAN, the video is choppy.
The quality of streaming video over wireless depends on many
factors such as the bitrate of the original video, the reception
quality, and the access point. For best quality over wireless, HP
recommends using an access point that supports either IEEE
802.11n 5 GHz or IEEE 802.11a. For more information about
networks, see “Chapter 2: Connecting your HP MediaSmart
Connect to your Home Network” on page 35.
When viewing streaming video of a downloaded
movie, the Pause, Fast-Forward, and other device
trick-play buttons do not work.
Many video download sites do not allow or support use of the
device trick-play buttons on their pay-per-view video files.
When viewing or playing media, the screen freezes.
Unplug the HP MediaSmart Connect power adaptor, and then
plug it back in.
During high transfer rates, as when streaming videos, your
firewall may be blocking Windows Media Player from working
properly with your HP MediaSmart Connect. Reset the Microsoft
firewall settings in Windows Media Player, or, if you are using
another firewall program, make Windows Media Player a trusted
program, and make your whole home network a trusted device.
I try to watch a CinemaNow-downloaded movie but
see a Failed to play media content message.
You may see this message the first time you try to watch a
CinemaNow movie. To fix it, start to watch the movie directly on
the computer by using Windows Media Player 11 or the
CinemaNow player. A dialog window displays, asking to install a
new software component (update) on your computer. Follow the
onscreen directions to complete the installation, and then play the
movie again for a few minutes after the FBI notice finishes. After
this one-time update, you can watch the movie on your
Page 96

I try to playback a movie with Digital Rights
Management (such as a download from CinemaNow)
but see an Unsupported format message even though
I know it is a supported format.
Your Digital Rights Management keys may be corrupted. On your
remote control, press Media, select Settings from the Media
menu and choosing Reset Options. Select Restart System
and press OK. This action restarts the HP MediaSmart Connect
while preserving your personal settings.
How can I find what codec is being used in my
media file?
It may not always be possible to find this information, but you can
try this:
Play the file on your computer by using Windows Media Player.
While the file is playing, if possible, right-click the file in the
Windows Media Player Library, and then click Properties. On
the File tab, look at the Audio codec and the Video codec sections
for the information.
My USB mass storage device is not recognized.
The HP MediaSmart Connect supports only USB mass storage
devices with a FAT, FAT32, or NTFS file system. For example, a
printer or a Linux-based file system device is not recognized or
supported.
Video playback of a digital video on a USB mass
storage device is sluggish (slow).
Playback of high-definition video in a FAT32 file system may be
sluggish due to the limitations of the FAT32 system. If possible,
back up and reformat your mass storage device to use the NTFS
file system.
I downloaded or copied a movie onto my HP PMD (or
USB mass storage device) and HP MediaSmart
Connect does not play it.
Playback of Digital Rights Management content from mass storage
devices is not supported by the HP MediaSmart Connect. For
more information, see “Viewing USB Photos, Music, and Videos”
on page 59.
Page 97

Chapter 9: Specifications
Connectivity
Video output (screen
resolution)
720p, and 1080i resolution on the TV
HDMI Out HDMI connector
Component Out Y, Pb, and Pr connectors
Audio Out
Analog Audio output: 2-channel
stereo (RCA)
Optical Audio output: digital
multichannel (Dolby Digital or PCM
format)
USB 2.0 ports Two: 1 front, 1 rear
HP Pocket Media
Drive bay
1 (Drive is optional and sold separately.)
Wired LAN (RJ-45
Ethernet)
10/100 Ethernet (802.3) full-duplex
10/100 Mbps
Wireless LAN
internal antennas
Integrated IEEE 802.11n (draft 2.0)
wireless networking access, compatible
with 802.11b/g/a Wi-Fi networks.
!
IMPORTANT: Wireless LAN antennas are internal to the
HP MediaSmart Connect and can be used to connect to
your wireless home network.
The specifications of the 802.11n WLAN (wireless local
area network) are draft specifications and not final. If
the final specifications differ from the draft
specifications, it may affect the ability of this device to
Connectivity (continued)
Page 98

Chapter 9: Specifications 98
General
Dimensions in
inches (mm)
D: 8.5 in (215.9 mm),
W: 8.5 in (215.9 mm),
H: 1.8 in (45.7 mm)
Weight 3.5 lb. (1.6 kg)
Power requirement
100–220 V , 50/60 Hz
Power consumption 22 W
!
IMPORTANT: Certain Windows Vista product features require
advanced or additional hardware.
For details, go to the Microsoft Web sites at
http://www.microsoft.com/windowsvista/getready/
hardwarereqs.mspx
Or
http://www.microsoft.com/windowsvista/getready/
capable.mspx
The Windows Vista Upgrade Advisor can help you determine
which features of Windows Vista can run on your computer. To
download the tool, visit the Microsoft Web site at
http://www.windowsvista.com/upgradeadvisor
System requirements
Windows-based
computer
operating
system
Media Center Edition 2005 with Rollup 2
Windows XP Home (32-bit only) with
Service Pack 2 or later
Windows XP Pro (32-bit only) with
Service Pack 2 or later
Windows Vista Home Basic
(32-bit/64-bit)
Windows Vista Home Premium
(32-bit/64-bit)
Windows Vista Ultimate (32-bit/64-bit)
The Windows Vista Home Premium or Ultimate
edition is required for the Extender for
Windows Media Center support.
Or
Media servers UPnP and DLNA-compliant media servers such
as HP Media Vault and HP MediaSmart
Servers
Page 99

Chapter 9: Specifications 99
All specifications represent the typical specifications provided by HP
component manufacturers; actual performance may vary, either
higher or lower.
Also required A home network
Broadband service for Internet access
(optional): For full functionality,
high-speed Internet service is required
(sold separately)
Digital Media Support
Video formats
(does not play motion
JPEG)
MPEG-1, MPEG-2 MP@ML, MPEG-2
MP@HL, WMV, WMV-HD, DivX,
MPEG-4 ASP, H.264 (MP4)
Photo formats JPEG, BMP, GIF, PNG
Music formats MP2, MP3, WMA, WMA-Pro, AAC
Digital Rights
Management
Microsoft Windows Media and DivX
Extender for
Microsoft Windows
Media Center
Yes, requires a computer with Windows
Vista Home Premium or Ultimate
operating system
USB mass storage file
system
FAT, FAT32, NTFS
System requirements (continued)
Environment
Operating
temperature at
humidity
32º F to 95º F (0º C to 35º C) at 20% to
80% RH
Storage temperature
at humidity
–4º F to +122º F (–20º C to +50º C) at
10% to 90% RH
Accessories
In the box Documentation with installation disc,
remote control, HDMI cable, and AC
power adaptor
Certification and
compliance
UL, C-UL, FCC, Dolby Digital,
Wi-Fi
CERTIFIED 802.11n based on Draft 2.0
Page 100

Chapter 9: Specifications 100
Supported Media File Types
Digital media formats: Codecs
versus file containers
Despite international efforts to create standard-based audio and
video formats, many format types are incompatible.
The codec (compressor and decompressor) is the method used to
compress and decompress digital media files. Audio/video
streams usually incorporate two separate codecs: one for the
compressed video and one for the compressed audio. The MPEG
codecs include profiles and levels, which are the minimum
processing requirements for a compliant decoder. Examples of
codecs are:
JPEG: Used by almost all digital cameras to compress digital
images.
MPEG-1, MPEG-2, and MPEG-4: Audio and video codecs
developed by International Standards Technical committees.
VC-1: A video codec developed by Microsoft.
Dolby Digital: An audio codec used in DVD movies and in
high-definition broadcasting.
The file container is the type of file that the digital bit stream is
stored in, regardless of the codec used. File containers have a
specific structure, which helps decoders identify the codecs
necessary for playback. File containers may support multiple
codecs, and they may also include media metadata, DRM (digital
rights management) keys, and other stream-related parameters.
!
IMPORTANT: This device supports the codec file formats
listed herein; however, HP cannot guarantee full
compatibility or proper playback with all such codec
files, due to modifications and/or other variations that
may occur with the end user’s encoded codec files.
 Loading...