

HP StoreOnce 4900 Start Here Manual
HP StoreOnce 4900 Backup
Start here
© Copyright 2014 Hewlett-Packard Development Company, L.P.
The information contained herein is subject to change without notice. The only
warranties for HP products and services are set forth in the express warranty
statements accompanying such products and services. Nothing herein should
be construed as constituting an additional warranty. HP shall not be liable for
technical or editorial errors or omissions contained herein.
Part Number: BB903-90912
January 2014
Edition: 1
1 About your HP StoreOnce
Backup system
HP StoreOnce 4900 Backup is a disk-based storage appliance for
backing up host network servers or PCs to target devices on the
appliance. These devices are configured as NAS Share, Virtual Tape
Library or StoreOnce Catalyst Store targets for backup applications.
The base system consists of a head server unit, a disk enclosure and
a 1U supporting shelf to install below the system. It is compatible with
all HP standard racks and is scalable from 15 to 140 disks.
To find out which backup applications are compatible with HP
StoreOnce functions go to www.hp.com/go/ebs.
TIP: To find out more about configuring and using backup
target devices, see the HP StoreOnce Backup User Guide that
can be accessed from the CD supplied with your product.
HP StoreOnce 4900 Capacity Expansion
One disk enclosure must be installed at the same time as the head
server unit; it contains 44 TB of pre-configured storage and four hot
spare disks.
There are two options for further expanding storage:
• BB908A : HP StoreOnce 4900 44TB Capacity Expansion
These are packs of eleven 4 TB disks, that may be added to the
original disk enclosure until all disk bays are full. A maximum of
five of these kits may be used with each enclosure.
• BB904A : HP StoreOnce 4900 60TB Capacity Expansion
Once the original disk enclosure is full, one further disk enclosure
may be purchased and connected to the system. This disk
enclosure contains eleven 4 TB disks and four hot spare disks.
Storage in this shelf may also be expanded using up to five of the
BB908A expansion kits.
2 Retrieve your license entitlement
certificates (if purchased)
Licensing is used to enable optional product functionality, such as extra
disk capacity, Replication, Catalyst or Security features.
For extra disk capacity the appropriate License Entitlement Certificate
is supplied with the Capacity Expansion kit. This is a paper document
that contains all the information you need to obtain your unique
License To Use key. The Entitlement Certificates are shipped in clearly
marked card envelopes with your HP StoreOnce Backup system. These
are valuable items so, to prevent them becoming lost, please ensure
they are identified and put safely to one side during unpacking.
Entitlement certificates for iLO4 Advance Packs are also supplied with
the HP StoreOnce Backup system.
It is strongly recommended that all licenses are redeemed as soon as
possible. Go to the Webware site - webware.hp.com. For information
about activating licenses refer to the HP StoreOnce Installation and
Configuration Guide on the StoreOnce CD.
NOTE: There is also an Instant on license (time limited to
90 days): This allows you to try out licensable functionality
(excluding extra capacity) before paying for a full license.
NOTE: Licenses are locked to a specific appliance using
the serial number that can be found on the StoreOnce
management GUI, or printed on a label on the appliance.
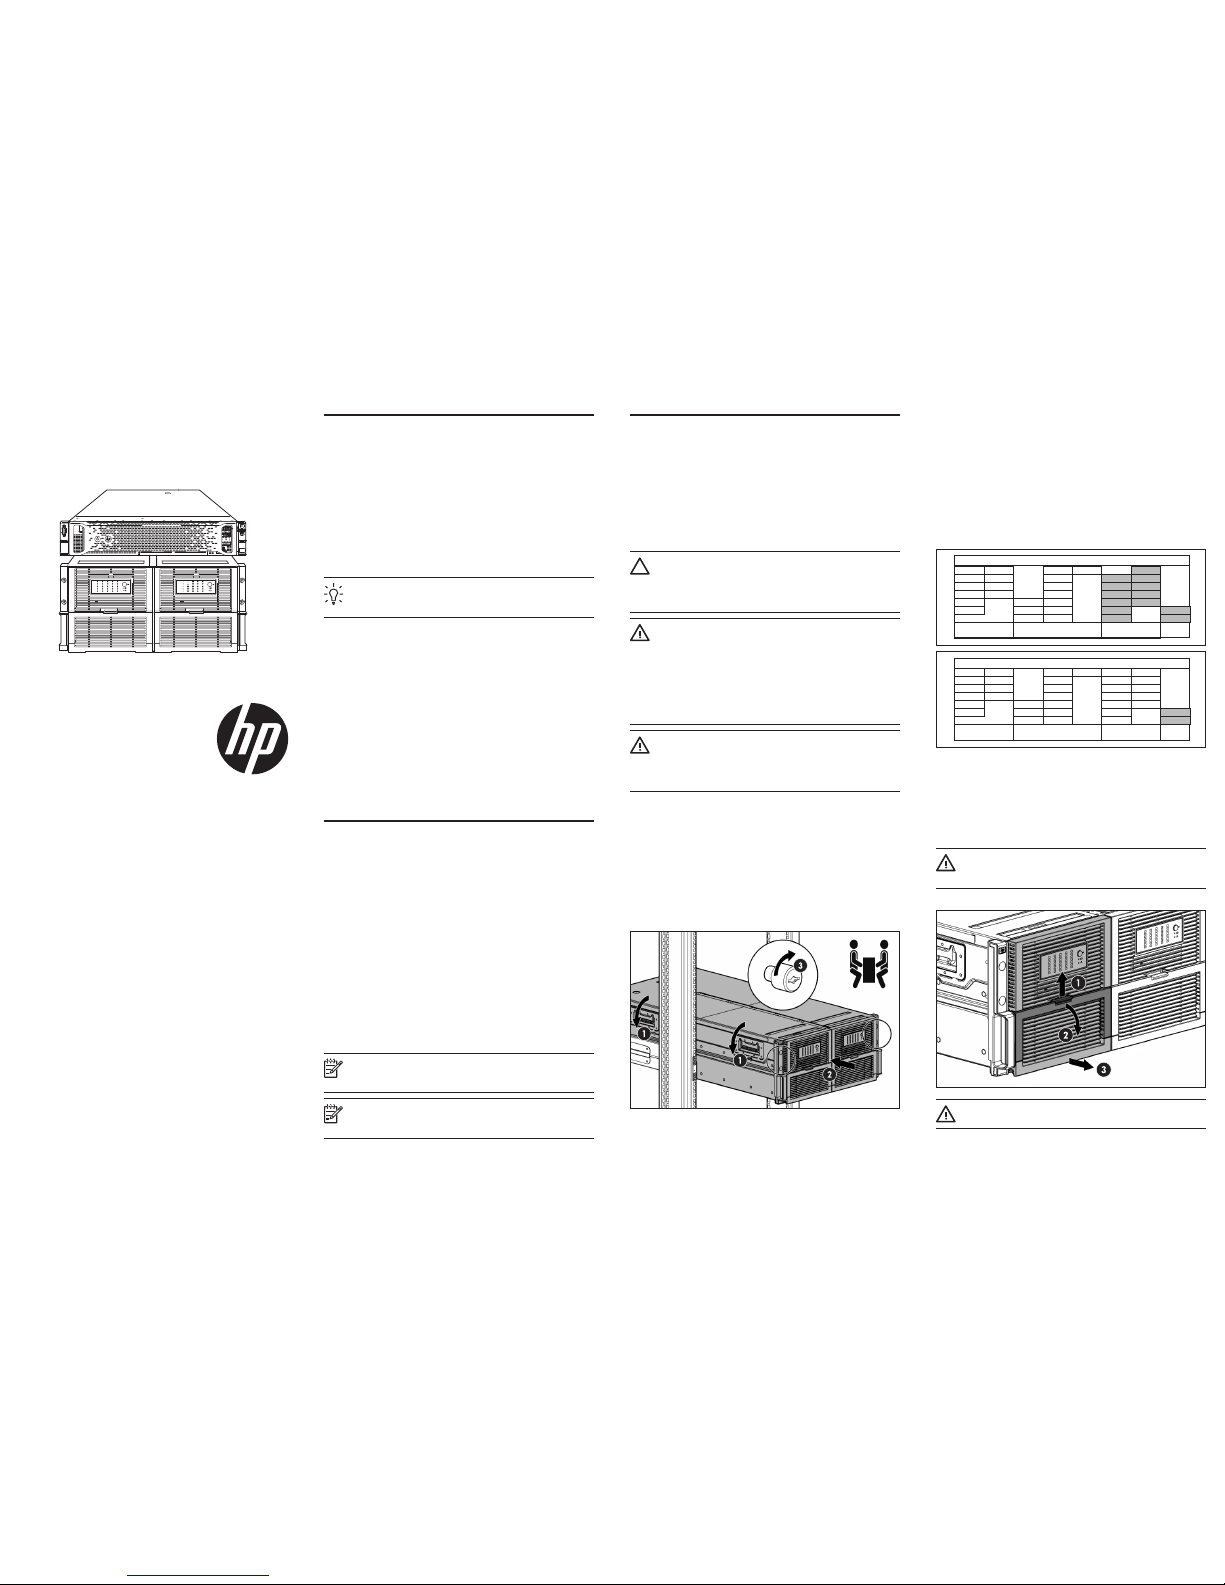
3 Install the rack rails, unit(s) and
1U support shelf
The recommendation is to install the disk enclosure below the head
server unit, and the heaviest items should be at the bottom of the
rack. Make sure there is 30 cm clearance to the right of the rack in
order to allow full access to hard drive bays in drawer 2.
Refer to your rack documentation and to the documents on the
HP StoreOnce Backup CD for detailed instructions, including safety
information, about installing units within the rack.
CAUTION: Use extreme caution when installing and pulling units
from the rack; they can slip and fall, causing damage to the
HP StoreOnce Backup system or injury. HP is not responsible for
any damage or injury caused by the mishandling of the
HP StoreOnce Backup system.
WARNING: The disk enclosure with no drives installed weighs
72.58 kg (160.00 lb). With all drives and components installed,
the enclosure can weigh up to 145.15 kg (320 lb). To reduce
the risk of personal injury or damage to the equipment:
• Observelocaloccupationalhealthandsafetyrequirements
and guidelines for manual material handling.
• Usecautionandgethelptoliftandstabilizediskenclosures
during installation or removal, especially when the disk
enclosure is not fastened to the rack.
WARNING: Always use at least two people to lift an enclosure
into the rack. If the enclosure is being loaded into the rack
above chest level, a third person must assist with aligning the
enclosure with the rails while the other two people support the
weight of the enclosure.
1. Install the rails, locking nuts and securing brackets as illustrated on
the in-box flyer.
2. Install the IU support shelf immediately below the location of the
disk enclosure.
3. Do not remove the base storage disks because this storage has
been pre-configured and expects:
Drawer one (left): Two spare hot disks in bays 34 and 35 and
eleven disks in bays 23-33
Drawer two (right): Two spare hot disks in bays 34 and 35
4. Install the disk enclosure, making sure to tighten the thumbscrews
to secure the unit to the rack.
5. Install the base server unit.
Installing additional disks in the disk enclosure
Once the disk enclosure is installed, install all additional capacity
expansion kits purchased with the product. Unlike the pre-configured
storage, this storage must be licensed, discovered and added to the
configuration before it is available for use. Refer to the printed guide
supplied with the capacity expansion kits for detailed installation
instructions.
It is very important to distribute hard disks in the correct disk bays
within each drawer, as shown on the disk enclosure labels, see
below, and to fill all bays in the first enclosure before installing a
second one.
Drawer 1 - Bay Assignment
1 8 15 22 29
2 9 16 23 30
3 10 17 24 31
4 11 18 25 32
6 12 19 26 33
7 13 20 27 34
14 21 28 35
Expansion #4 Expansion #2 Base Storage
RAID
Spares
BB897-60004
Drawer 1 - Bay Assignment
1 8 15 22 29
2 9 16 23 30
3 10 17 24 31
4 11 18 25 32
6 12 19 26 33
7 13 20 27 34
14 21 28 35
Expansion #4 Expansion #2 Base Storage
RAID
Spares
Drawer 2 - Bay Assignment
1 8 15 22 29
2 9 16 23 30
3 10 17 24 31
4 11 18 25 32
6 12 19 26 33
7 13 20 27 34
14 21 28 35
Expansion #5 Expansion #3 Expansion #1
RAID
Spares
BB897-60004
BB897-60005
When adding hard drives to the hard drive drawer, observe the
following general guidelines:
• Verify that the drives are fully seated before closing the drawer.
• The drawer should be closed with the handle in the released
position; it will click when closed securely.
• Hard drives are sensitive to excess vibration. Use care when
opening and closing the drawer.
WARNING: To reduce the risk of personal injury or damage
to the equipment, ensure that only one hard drive drawer is
extended at a time.
Drawer location
Drawer2
Drawer 1
WARNING:Pinchhazard—Keephandsoutoffrontandrearof
chassis when closing hard drive drawers.
4 Networking information
NOTE: The HP StoreOnce Backup system does not support the
IPv6 protocol.
There are four 1GbE network ports and four 10GbE network ports.
Network bonding (1GbE with 1GbE, and 10GbE with 10GbE) is
supported to provide bandwidth and failover benefits.
The physical network ports provide three network configuration modes.
• Single Port Configuration: The HP StoreOnce 4900 Backup is
connected to one network; only one network port is used.
• Multiple subnet Configuration: The HP StoreOnce 4900 Backup
is connected to different networks. Two or more network ports are
used and must be on different sub-nets.
• High Availability (Bonded) Configuration: Multiple network ports
are used, but the ports are bonded to provide port failover. The
bonded ports must be of the same speed: 1 GbE with 1 GbE,
and 10GbE with 10 GbE. Three bonding modes are available:
Mode 1 (Active/Backup), Mode 4 (IEEE 802.3ad Dynamic Link
Aggregation) and Mode 6 (Active Load Balancing). Take care to
choose the network bonding mode appropriate for your network
environment and switch capability.
One Network Port must always be connected, even if you are using
the FC ports to back up and restore data to the HP StoreOnce
4900 Backup. This is because the StoreOnce Management Console
requires an Ethernet connection to set up and manage devices.
For further information and further connectivity options please refer to
the Installation and Configuration Guide and the HP StoreOnce CLI
Reference Guide on the CD.
5 Connect the hardware
Back panel
1. RAID controller card 1
2. FC card 1
3. FC card 2
4. RAID controller card 2
5. 10GbE card 1
6. 10GbE card 2
7. Power supply 1
8. Power supply 2
9. USB connectors
10. Video/monitor connector
11. iLO4 Management port - do
NOT use for data connection
12. Serial connector
13. 1GbE network port1 (used with
Quick Install option)
14. 1GbE network ports 2, 3 and 4
Connecting to the network
1. Always use the supplied power cords to connect the HP StoreOnce
Backup system to the mains power supply. For detailed safety
information, see the Safety Guide on the CD-ROM.
2. Use any CAT-5E or CAT-6 network cable (also supplied with the
product) to connect the appropriate network Port(s) to a 1 Gigabit
or 10 Gigabit Ethernet network.
NOTE: If using the 10 GbE ports, be sure to install the SFP+ in
the port(s) first, as described on the flyer supplied with the SFP+.
3. The Quick Install option is to connect LAN Port 1 to a DHCPenabled 1GbE network, and you will be able to connect to and
manage the StoreOnce Backup system from any client attached
to the same network using the appliance’s network name. The
network name is on a label/sticker on the server. Once connected,
youcanruntheStoreOnceCLInetworkcommandstooptimize
your network configuration.
Connecting to a Fibre Channel (FC) SAN
The HP StoreOnce Backup system is supplied with two FC cards preinstalled. However, you must still connect the HP StoreOnce Backup
system to an Ethernet network in order to use the StoreOnce CLI
interface.
NOTE: If using the FC ports, be sure to install the SFP+ in the
port(s) first, as described on the flyer supplied with the SFP+.
Please note that devices created on the HP StoreOnce Backup system
canbeaccessedbyallhostsontheSANunlessyouconfigurezones
on the Fibre Channel Fabric/Switch. Please refer to the Installation
and Configuration Guide on the CD for more details.
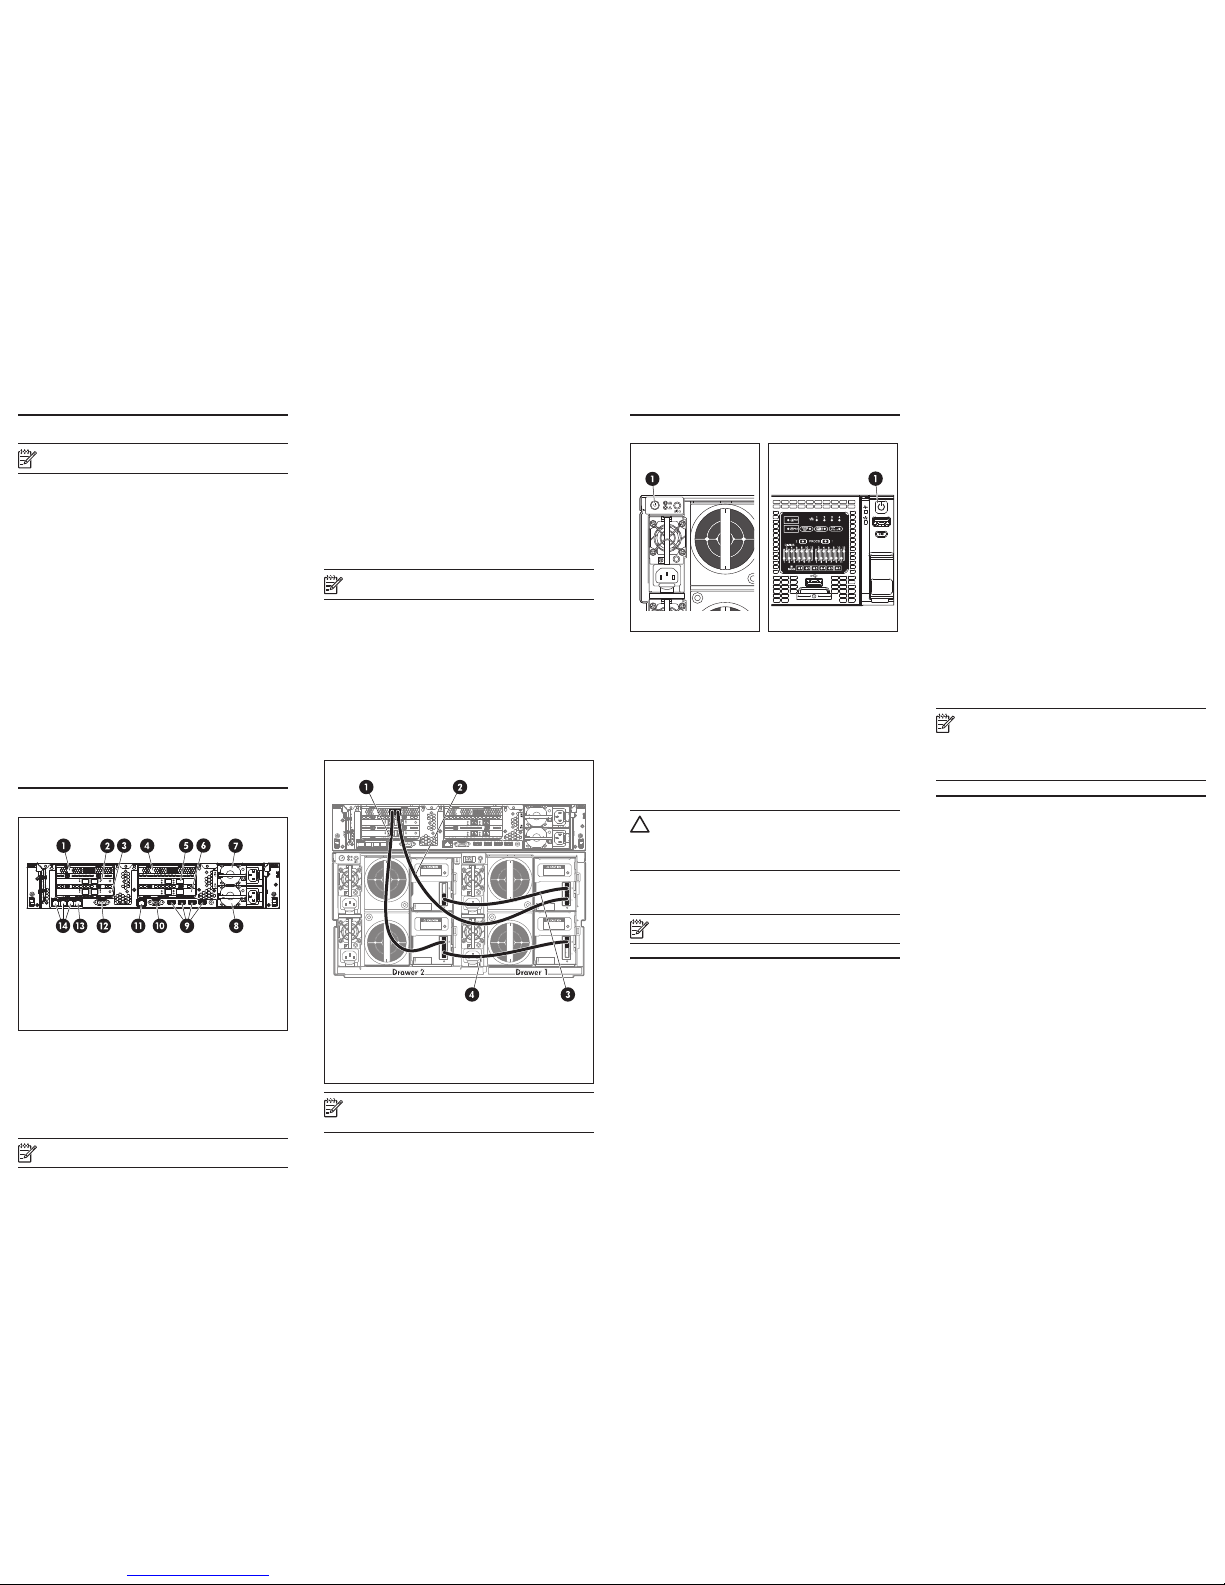
Connecting to the disk enclosure
The first disk enclosure is supplied with 11 data disks and 4 hot spare
disks pre-configured and must be installed.
If adding a second disk enclosure, the cabling layout is identical, but
it is from the second RAID card, as described in the printed guide
supplied with the expansion kit.
Connecting to the first disk enclosure
Cabling for the pre-configured disk exclosure
Connect supplied 2m SAS cables:
1. RAID port 2 to Drawer 2, I/O module B, port 2
2. RAID port 1 to Drawer 1, I/O module A, port 1
Connect supplied 0.5m SAS cables:
3. Drawer 1, I/O module A, port 2 to Drawer 2, I/O module A, port 1
4. Drawer 2, I/O module B, port 1 to Drawer 1, I/O module B, port 2
NOTE: The system will not boot if the SAS cabling is incorrect.
For more details see the HP StoreOnce 4900 Backup
Installation and Configuration Guide.
6 Power on
Disks Enclosure (rear view)
1 Power On button
HP StoreOnce 4900 Backup
(front view)
1 Power On button
1. Power on all installed disk enclosures first. You may need to hold
down the power on button (on the rear of each unit) for a few
seconds.
2. Power on the HP StoreOnce 4900 Backup (the power button is on
the front of the unit).
3. As long as DHCP is enabled on the network, the appliance should
now be accessible across the network. If it is not enabled, you
must use StoreOnce CLI commands to configure the appliance on
the network.
Power off
To power off your HP StoreOnce 4900 Backup always use the
StoreOnce CLI commands, as described in the HP StoreOnce CLI
Reference Guide on the HP StoreOnce Backup CD.
CAUTION: If you need to power down the Capacity Storage
Enclosures, make sure the HP StoreOnce 4900 Backup is
powered down first. This ensures that the system does not
erroneously mark the drives as failed when the HP StoreOnce
4900 Backup is powered up again.
To power off the Capacity Enclosures, press the Power On button (on
each unit) and wait for the system power LED to go from green to
amber.
NOTE: When installing/replacing a hot-plug device, it is not
necessary to power down the units.
7 Using the StoreOnce Backup
system
User accounts and passwords
Two types of user account are set up automatically when the system is
installed:
• Administrator:Allowsauthorizeduserstocreateandedit
management and StoreOnce functions. They can also create and
manage users. User name = Admin; password = admin.
• Operator: Provides limited access for monitoring and viewing.
User name = Operator; password = operator.
Changing the passwords for the default user accounts (Administrator,
Operator, HPresetpassword and iLO) after installation is strongly
recommended. For more information about other user accounts and
password best practices, see the HP StoreOnce Backup system User
Guide.
Accessing the StoreOnce 4900 Backup
There are two ways of accessing the StoreOnce Management
Console:
• Using the StoreOnce Command Line Interface, CLI
• Using the StoreOnce Web Management Interface, GUI
StoreOnce CLI Interface
Some tasks, such as network and storage configuration and licensing,
can be carried out only from the StoreOnce CLI.
StoreOnce CLI commands must be run from an SSH terminal
session and require an SSH client application (freely available from
the internet) running on the management console. Log on to the
StoreOnce CLI as follows:
ssh <username>@ <ip_address>
See the HP StoreOnce CLI Reference Guide for more information.
StoreOnce Web Management Interface, GUI
If DHCP is enabled on your network, or after network configuration
using the StoreOnce CLI, simply connect to the Web Management
Console or StoreOnce CLI from any machine connected to the network
using the default host name printed on the top of the appliance.
https: <ip_address> or <Fully_Qualified_Domain_Name>
Enter your user name and password
NOTE: If you will be configuring Virtual Tape Library devices as
backup targets, install all the required Tape drivers on backup
servers and ensure the backup server is running software that
supports HP Tape libraries. Tape drivers can be found on the
StoreOnce Backup CD. Drivers are not needed for NAS Share
and Catalyst Store backup targets.
8 Troubleshooting and other
sources of information
For troubleshooting information, refer to the guides on the HP
StoreOnce Backup system CD. These guides also contain reference
information about iSCSI and RAID. If you cannot resolve problems,
contact HP Support at www.hp.com/support.
For the latest information about computer, OS and software
compatibility, see www.hp.com/go/ebs.
The following documents are available:
• HP StoreOnce Backup User Guide (PDF): This guide describes
how to use the Web Management Console. It is also available as
online help.
• HP StoreOnce CLI Reference Guide (PDF): This guide describes the
StoreOnce CLI commands and how to use them.
• HP StoreOnce Backup Installation and Configuration Guide
(PDF): This guide describes how to install and carry out the initial
configuration of your HP StoreOnce Backup system.
• HP StoreOnce Linux and UNIX Configuration Guide (PDF): This
guide contains information about configuring and using HP
StoreOnce Backup systems with Linux and UNIX.
• HP StoreOnce Concepts and Configuration Guidelines: This guide
describes StoreOnce concepts and configuration best practices.
There are links to all these documents on the StoreOnce CD.
 Loading...