

Page 1

HP StorageWorks
Tape Blade
User Guide
Part Number: 625055-001
Fourth edition: September 2010
Page 2

Legal and notice information
© Copyright 2010 Hewlett-Packard Development Company, L.P.
The information contained herein is subject to change without notice. The only warranties for HP products and services are set
forth in the express warranty statements accompanying such products and services. Nothing herein should be construed as
constituting an additional warranty. HP shall not be liable for technical or editorial errors or omissions contained herein.
Linear Tape-Open LTO, the LTO Logo, Ultrium and the Ultrium Logo are registered trademarks of HP, IBM and Quantum in the
US and other countries.
Microsoft, Windows, Windows XP, and Windows NT are U.S. registered trademarks of Microsoft Corporation.
UNIX is a registered trademark of The Open Group.
Page 3

Contents
About this guide ................................................................................... 9
Intended audience ...................................................................................................................... 9
Related documentation ................................................................................................................ 9
Document conventions and symbols ............................................................................................... 9
HP technical support ................................................................................................................. 10
Product warranties .................................................................................................................... 10
Subscription service .................................................................................................................. 10
HP websites ............................................................................................................................. 11
Documentation feedback ........................................................................................................... 11
1 Before you start ................................................................................ 13
Supported Tape Blades ............................................................................................................. 13
Installation guidelines ................................................................................................................ 13
Partner server blade ........................................................................................................... 14
Onboard Administrator ............................................................................................................. 14
Your HP StorageWorks Tape Blade ............................................................................................. 14
Using the HP StorageWorks Tape CD-ROM .................................................................................. 15
2 Drivers and backup software ............................................................. 17
Install drivers ............................................................................................................................ 17
SAS controller driver ........................................................................................................... 17
HP Ultrium Tape driver ........................................................................................................ 18
Installing on Windows .................................................................................................. 18
Installing on UNIX ........................................................................................................ 19
Installing on IA64 ........................................................................................................ 19
Upgrade backup software .......................................................................................................... 19
Enabling encryption ........................................................................................................... 19
3 Installing an HP StorageWorks Tape Blade .......................................... 21
Before you start ........................................................................................................................ 21
Installation with a half-height partner server blade ......................................................................... 22
Installation with a full-height partner server blade .......................................................................... 27
Powering the Tape Blade on and off ............................................................................................ 33
Power up ........................................................................................................................... 33
Power down ...................................................................................................................... 34
4 Verify installation ............................................................................. 35
5 Understanding LEDs ......................................................................... 37
Tape Blade Chassis LEDs ........................................................................................................... 37
Troubleshooting with Tape Blade LEDs ................................................................................... 38
Tape Drive LEDs ........................................................................................................................ 38
Tape Blade 3
Page 4

Troubleshooting with Tape Drive LEDs ................................................................................... 40
Encryption LED, HP StorageWorks SB3000c Tape Blades only ................................................. 41
6 Loading and unloading cartridges and removing Tape Blade ................. 43
Inserting cartridges ................................................................................................................... 43
Removing cartridges .................................................................................................................. 44
Removing the Tape Blade .......................................................................................................... 44
7 Use the correct media ....................................................................... 47
Cartridges ............................................................................................................................... 47
Data cartridges .................................................................................................................. 47
Cleaning cartridges ............................................................................................................ 48
HP Ultrium WORM data cartridges ....................................................................................... 48
HP StorageWorks SB3000c Tape Blades and partitioning ....................................................... 49
HP StorageWorks SB3000c and SB1760c Tape Blades and encryption .................................... 49
When should I use encryption? ...................................................................................... 49
How do I enable encryption? ........................................................................................ 49
When will I be asked to enter the key? ........................................................................... 49
What happens if I don't remember the key? .................................................................... 50
Does encryption affect tape drive performance? ............................................................... 50
Does the tape drive encrypt media in an earlier Ultrium format? ......................................... 50
Where can I get more information? ................................................................................ 50
Cleaning the tape drive ............................................................................................................. 50
Write protecting cartridges ......................................................................................................... 51
Handling cartridges .................................................................................................................. 52
Operating and storage environment ............................................................................................ 52
8 Using HP OBDR ............................................................................... 55
Compatibility ........................................................................................................................... 55
What does HP OBDR do? ......................................................................................................... 55
Remote disaster recovery (ProLiant servers only) ............................................................................ 56
Testing for compatibility ............................................................................................................. 56
Running HP OBDR .................................................................................................................... 56
9 Troubleshooting ............................................................................... 59
When the Tape Blade does not power up .................................................................................... 59
Management and Diagnostic tools .............................................................................................. 60
Onboard Administrator ....................................................................................................... 60
HP TapeAssure ................................................................................................................... 60
HP Library & Tape Tools ...................................................................................................... 60
Troubleshooting with Library & Tape Tools ....................................................................... 60
Problems with cartridges ............................................................................................................ 61
The cartridge is jammed ...................................................................................................... 61
Emergency reset .......................................................................................................... 62
The drive will not accept the cartridge (or ejects it immediately) ................................................ 62
Encryption troubleshooting ......................................................................................................... 63
10 Replacing a Tape Blade chassis or tape drive .................................... 65
Before you replace a part .......................................................................................................... 65
Replacing the tape drive ............................................................................................................ 65
Remove the tape drive ......................................................................................................... 66
Install the new tape drive ..................................................................................................... 68
4
Page 5

Replacing the Tape Blade chassis ............................................................................................... 71
Remove the Tape Blade ....................................................................................................... 71
Remove the coupler plate, full-height partner servers in a c7000 enclosure only .......................... 72
Remove the tape drive ......................................................................................................... 73
Install the replacement chassis .............................................................................................. 75
Returning the faulty part ............................................................................................................. 79
Index ................................................................................................. 81
Tape Blade 5
Page 6

Figures
Front view of HP StorageWorks SB3000c Tape Blade .................................................. 151
Example Device Manager ........................................................................................ 182
Half-height device bay numbering in a c7000 enclosure .............................................. 223
Half-height device bay numbering in a c3000 enclosure .............................................. 224
Paired locations in a c7000 enclosure with a half-height partner server blade ................. 245
Paired locations in a c3000 enclosure with a half-height partner server blade ................. 256
Removing the blank ................................................................................................. 257
Removing the connector cover .................................................................................. 268
Installing the Tape Blade, partnered with a half-height server blade ............................... 279
Paired locations in a c7000 enclosure with a full-height partner server blade .................. 2910
Paired locations in a c3000 enclosure with a full-height partner server blade .................. 3011
Removing the blank ................................................................................................. 3012
Installing the coupler plate ....................................................................................... 3113
Removing the connector cover .................................................................................. 3214
Installing the Tape Blade, partnered with a full-height server blade ................................ 3315
System health LED ................................................................................................... 3416
Tape Blade chassis LEDs .......................................................................................... 3717
Tape drive LEDs in the HP StorageWorks SB3000c Tape Blade ..................................... 3818
Tape drive LEDs in all other HP StorageWorks Tape Blades ........................................... 3919
Inserting a cartridge ................................................................................................ 4320
Ejecting a cartridge ................................................................................................. 4421
Removing the Tape Blade ......................................................................................... 4522
Write protecting a cartridge ..................................................................................... 5223
Inserting cartridge for OBDR .................................................................................... 5624
Keeping eject button pressed down, power on in OBDR mode ...................................... 5725
Releasing the tape drive ........................................................................................... 6626
Disconnecting the SAS with power cable on the SB3000c Tape Blade ........................... 6727
Disconnecting the power and SAS cables on all other Tape Blades ............................... 6728
Removing the clip-on mounting rails on a faulty tape drive ............................................ 6829
Replacing the clip-on mounting rails on a new tape drive ............................................. 6830
Reconnecting the SAS with power cable to the tape drive in an SB3000c Tape Blade ...... 6931
Reconnecting the power and SAS cables to the tape drive in all other Tape Blades .......... 7032
6
Page 7

Installing the tape drive ............................................................................................ 7033
Removing the Tape Blade ......................................................................................... 7234
Disconnecting the coupler plate ................................................................................ 7335
Releasing the tape drive ........................................................................................... 7336
Disconnecting the power and SAS cables, SB3000c Tape Blades ................................. 7437
Disconnecting the power and SAS cables, all other Tape Blades ................................... 7438
Removing the Tape Blade cover ................................................................................ 7539
Removing the connector cover .................................................................................. 7540
Reconnecting the power and SAS cables to the tape drive in an SB3000c Tape
41
Blade .................................................................................................................... 76
Reconnecting the power and SAS cables to the tape drive in all other Tape Blades .......... 7642
Installing the tape drive ............................................................................................ 7743
Cabling in the replacement chassis ........................................................................... 7744
Replacing the Tape Blade cover ................................................................................ 7845
Installing the coupler plate ....................................................................................... 7846
Installing the replacement chassis .............................................................................. 7947
Tape Blade 7
Page 8

Tables
Document conventions ............................................................................................... 91
Clean, Tape, Drive and Ready LED sequences ............................................................ 402
Encryption LED, HP StorageWorks SB3000c Tape Blades only ...................................... 413
Data cartridge compatibility ..................................................................................... 474
Cleaning cartridge compatibility ............................................................................... 485
Troubleshooting Tape Blade operation ....................................................................... 596
8
Page 9

About this guide
This guide provides information about:
• Installing the HP StorageWorks Tape Blade
• Using the HP StorageWorks Tape Blade
• Troubleshooting the HP StorageWorks Tape Blade
Intended audience
This guide is intended for users who install, operate and maintain the HP StorageWorks Tape Blade.
Related documentation
The following documents provide related information:
• ‘Start here' poster for an overview of the installation information in this guide (available in English,
French, German and Japanese)
You can find this document from the Manuals page of the HP Business Support Center website:
http://www.hp.com/support/manuals
In the Storage section, click Tape Storage and Media and then select your product.
Document conventions and symbols
Table 1 Document conventions
ElementConvention
Cross-reference links and e-mail addressesBlue text: Table 1
website addressesBlue, underlined text: http://www.hp.com
• Keys that are pressed
Bold text
Monospace text
• Text typed into a GUI element, such as a box
• GUI elements that are clicked or selected, such as menu
and list items, buttons, tabs, and check boxes
Text emphasisItalic text
• File and directory names
• System output
• Code
• Commands, their arguments, and argument values
Tape Blade 9
Page 10

ElementConvention
Monospace, italic text
Monospace, bold text
CAUTION:
Indicates that failure to follow directions could result in damage to equipment or data.
IMPORTANT:
Provides clarifying information or specific instructions.
NOTE:
Provides additional information.
HP technical support
• Code variables
• Command variables
Emphasized monospace text
For worldwide technical support information, see the HP support website:
http://www.hp.com/support
Before contacting HP, collect the following information:
• Product model names and numbers
• Technical support registration number (if applicable)
• Product serial numbers
• Error messages
• Operating system type and revision level
• Detailed questions
Product warranties
For information about HP StorageWorks product warranties, see the warranty information website:
http://www.hp.com/go/storagewarranty
Subscription service
HP recommends that you register your product at the Subscriber's Choice for Business website:
http://www.hp.com/go/e-updates
After registering, you will receive e-mail notification of product enhancements, new driver versions,
firmware updates, and other product resources.
About this guide10
Page 11

After signing up, you can quickly locate your products by selecting Business support and then Storage
under Product Category.
HP websites
For additional information, see the following HP websites:
• http://www.hp.com
• http://www.hp.com/go/bladesystem/documentation
• http://www.hp.com/go/bladesystemupdates/
• http://www.hp.com/go/connect/
• http://www.hp.com/service_locator
• http://www.hp.com/support/manuals
• http://www.hp.com/support/downloads
Documentation feedback
HP welcomes your feedback.
To make comments and suggestions about product documentation, please send a message to
storagedocs.feedback@hp.com. All submissions become the property of HP.
Tape Blade 11
Page 12

About this guide12
Page 13

1 Before you start
In this chapter:
• “Supported Tape Blades” on page 13
• “Installation guidelines” on page 13
• “Onboard Administrator” on page 14
• “Your HP StorageWorks Tape Blade” on page 14
• “Using the HP StorageWorks Tape CD-ROM” on page 15
Supported Tape Blades
This guide describes how to install and operate the following Tape Blades:
• the HP StorageWorks SB3000c Tape Blade, which is an Ultrium 3000 tape drive within a Tape
Blade assembly
• the HP StorageWorks SB1760c Tape Blade, which is an Ultrium 1760 tape drive within a Tape
Blade assembly
• the HP StorageWorks SB920c Tape Blade, which is an Ultrium 920 tape drive within a Tape
Blade assembly.
• the HP StorageWorks Ultrium 448c Tape Blade, which is an Ultrium 448 tape drive within a Tape
Blade assembly
These Tape Blade assemblies may only be installed in an HP BladeSystem c-Class enclosure, which
must be running the correct firmware for it to support the Tape Blade. Firmware version 1.3 or later
is required when installing in a c7000 enclosure. In a c3000 enclosure all versions of the firmware
support the HP StorageWorks Tape Blade. For the best reliability, performance and new features
update to the most recent version of the firmware.
For the most up-to-date information about supported operating systems and configurations, refer to
http://www.hp.com/go/bladesystem/documentation.
Before performing any procedures specific to the HP StorageWorks Tape Blade, install and configure
an HP BladeSystem c-Class enclosure. The most current documentation for HP BladeSystem components
is available at the HP BladeSystem website (http://www.hp.com/go/bladesystem).
Documentation is also available in the following locations:
• Documentation CD that ships with the enclosure
• HP BladeSystem Technical Resources website (http://www.hp.com/go/bladesystem/documentation)
• HP Business Support Center website (http://www.hp.com/support)
• HP Technical Documentation website (http://www.hp.com/support/manuals)
Installation guidelines
Observe the following guidelines when installing the HP StorageWorks Ultrium Tape Blade:
• An HP StorageWorks Tape Blade supports one partner server blade, and a partner server blade
supports one HP StorageWorks Tape Blade.
Tape Blade 13
Page 14

• The server blade and the HP StorageWorks Tape Blade must be adjacent to each other in the HP
BladeSystem enclosure.
• Install the partner server blade first and ensure that it is powered down before installing the
HP StorageWorks Tape Blade.
Partner server blade
The partner server blade may be half-height or full-height. When partnering the Tape Blade with a
full-height server blade, an HP PCI Express Mezzanine Pass-Thru Card is required (option kit part
number: 431643-B21). This must be installed prior to operation with the Tape Blade.
When installing the HP StorageWorks Tape Blade with a half-height server blade:
• the Tape Blade may be installed in the upper or lower bay adjacent to the server blade. See “In-
stallation with a half-height partner server blade” on page 22.
When installing the HP StorageWorks Ultrium Tape Blade with a full-height server blade:
• In a c7000 enclosure , the Tape Blade must be installed in the lower bay adjacent to the server
blade.
• In a c3000 enclosure, the Tape Blade must be installed immediately above the partner server
blade in device bay 8. A half-height server blade can be installed in the empty bay next to the
HP StorageWorks Tape Blade, but this server blade cannot be partnered with the HP StorageWorks
Tape Blade.
• Before installing a server blade in the empty bay above the Tape Blade, c7000 enclosures require
installation of a coupler plate (supplied with the Tape Blade), and c3000 enclosures require installation of a mini divider (supplied with the enclosure). See “Installation with a full-height partner
server blade” on page 27.
Onboard Administrator
The blade enclosure must be running the correct firmware for it to support the Tape Blade. Onboard
Administrator is used to power the partner server blade on and off, update firmware for the enclosure
and configure it to function with the Tape Blade. Onboard Administrator version 1.3 or later is required
when installing in a c7000 enclosure. In a c3000 enclosure all OA versions support the HP
StorageWorks Tape Blade. For the best reliability, performance and new features update to the most
recent version of the firmware.
Your HP StorageWorks Tape Blade
For a detailed product specification, please refer to our website (http://www.hp.com/go/bladesystem/
documentation).
Before you start14
Page 15
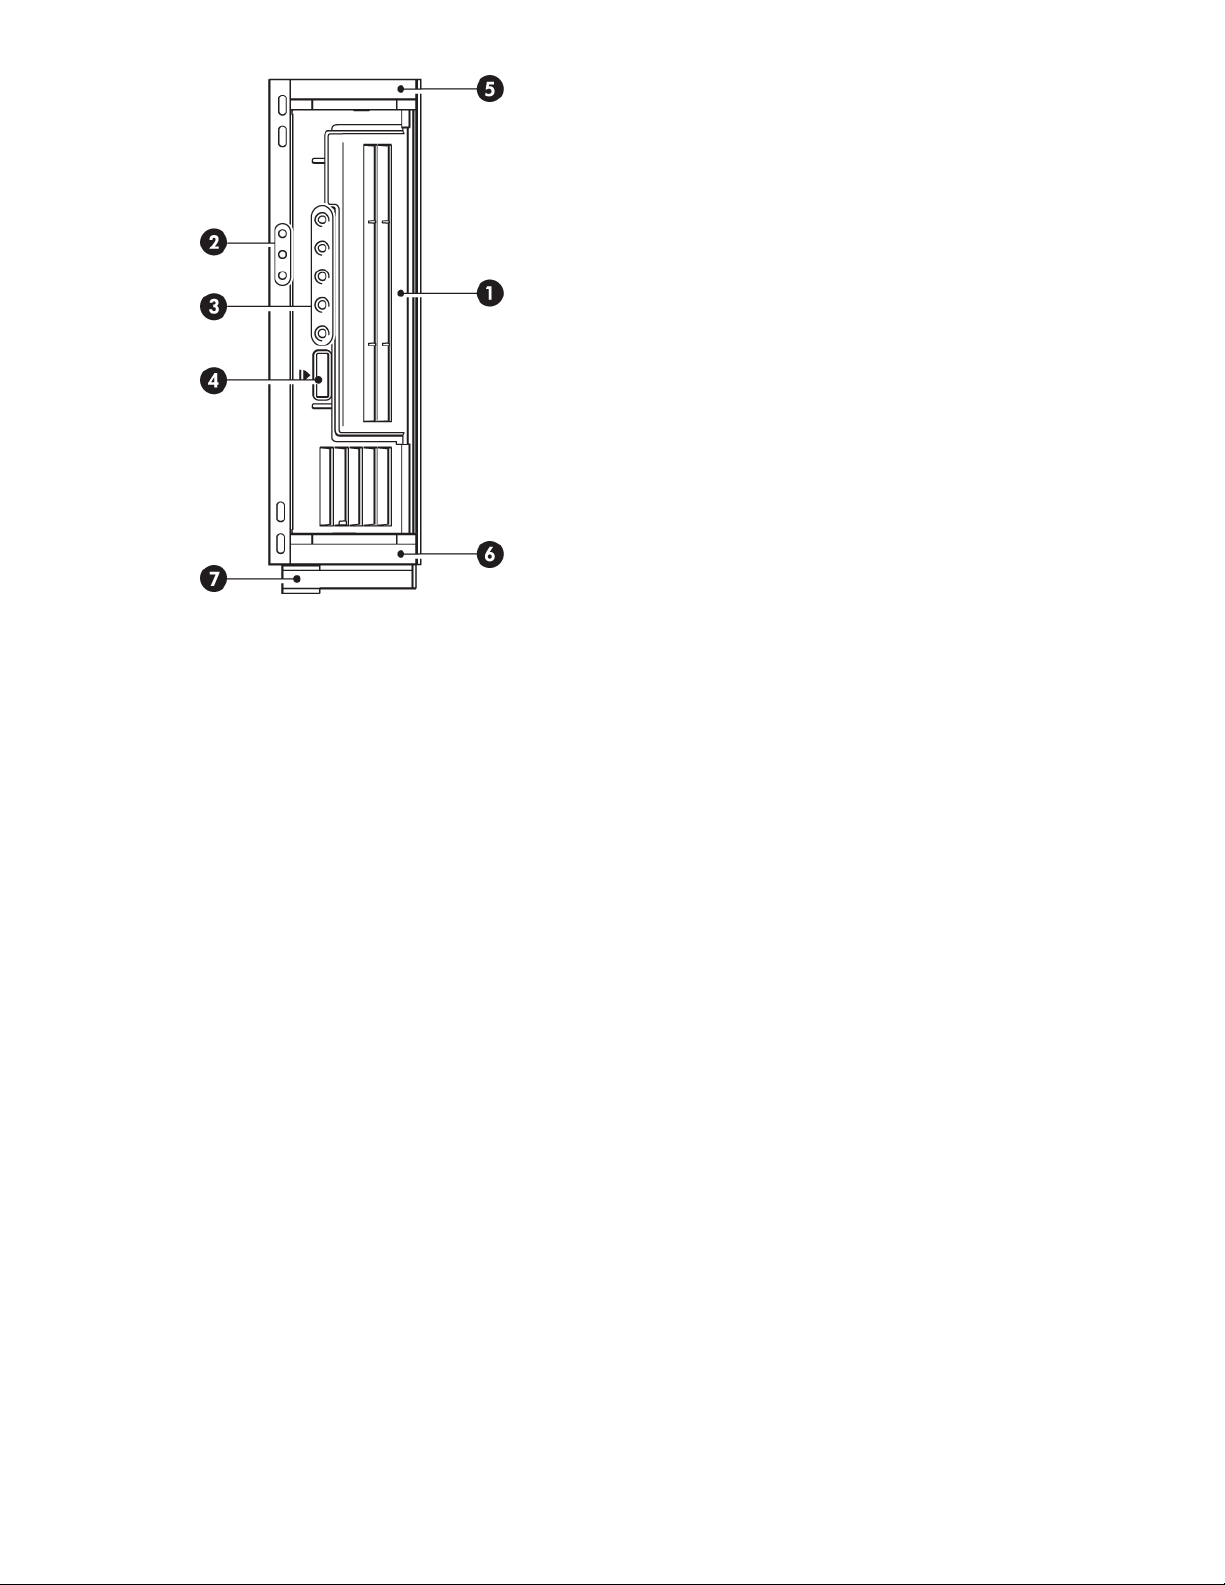
4. Cartridge eject button1. Cassette door
2. Tape blade LEDs
3. Tape drive LEDs
5 and 6. Mounting rails
7. Release latch
Figure 1 Front view of HP StorageWorks SB3000c Tape Blade
.
Using the HP StorageWorks Tape CD-ROM
The HP StorageWorks Tape CD-ROM is a central source of information about your Tape Blade with
utilities for getting the best performance from your Tape Blade.
Use the HP StorageWorks Tape CD-ROM to check installation, as described in this guide, and to
verify and troubleshoot performance after installation. It helps you to:
• Install your product, which includes access to drivers, and performance information and tools
• Learn about your product
• Register your product
• Buy media online
• Troubleshoot with HP Library & Tape Tools.
Tape Blade 15
Page 16

Before you start16
Page 17

2 Drivers and backup software
In this chapter:
• “Install drivers ” on page 17
• “Upgrade backup software” on page 19
Install drivers
Two drivers are required:
• A SAS controller driver for the Tape Blade assembly
• An HP Ultrium Tape driver for the tape drive
IMPORTANT:
The SAS controller driver must be installed first.
SAS controller driver
The SAS controller driver is only available from the HP website and must be installed before the HP
Ultrium Tape driver. It can be installed from the link on the HP StorageWorks Tape CD-ROM or directly
from the HP Support website, http://www.hp.com/#Support. Different tape blade models may require
different controller drivers.
To identify the correct SAS controller for your product:
You can identify the tape blade’s SAS controller from the POST message (slot x
<controller_name>) or from Windows Device Manager. The Tape Blade appears under the
Storage Controller section of Device Manager. In the following example, the Tape Blade has a Smart
Array P212 controller.
Tape Blade 17
Page 18
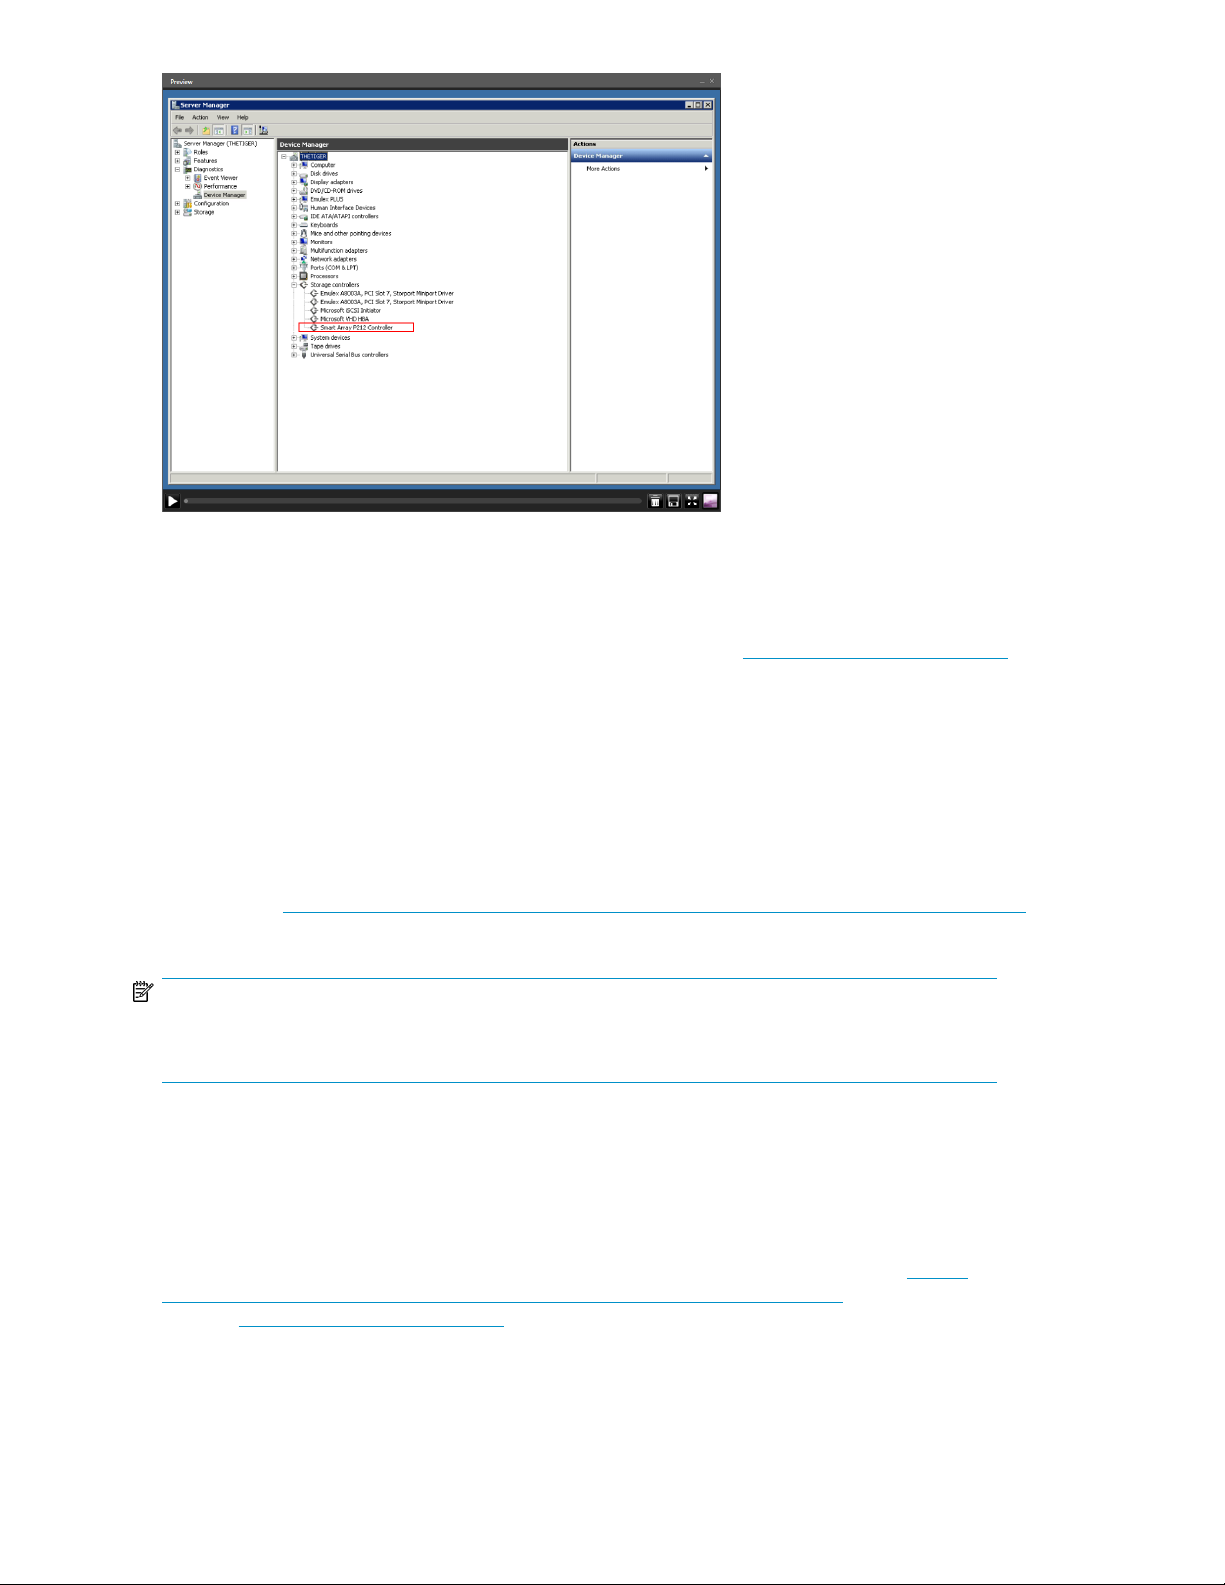
Figure 2 Example Device Manager
.
To download drivers:
Drivers may be downloaded from the web at the following location:http://www.hp.com/#Support.
1. Select Support & Drivers and select Download drivers and software (and firmware) in Step 1.
2. Enter the controller name, for example SmartArray P212 controller in Step 2 and click Go.
3. The Search results are displayed. (There are two items for the P212 controller. The Tape Blade
uses the P212/Zero Memory Controller.)
4. Select your operating system and then select the Storage Controller Driver for download.
HP Ultrium Tape driver
Please refer to http://h18004.www1.hp.com/products/blades/components/c-class-storageworks.html
for the latest information about supported operating systems.
NOTE:
Certain backup applications require you to use their own Tape driver instead of the HP Ultrium Tape
driver.
Installing on Windows
The CD-ROM contains a Tape driver install package for supported Microsoft Windows operating
systems. If you prefer to use Windows Device Manager to install the tape drivers manually, you will
find them in the drivers directory on the CD-ROM.
Updates to the drivers will be provided on the HP StorageWorks BladeSystem website (http://
h18004.www1.hp.com/products/blades/components/c-class-storageworks.html) or on the HP Support
website (http://www.hp.com/#Support).
Drivers and backup software18
Page 19

Installing on UNIX
The recommended backup applications use the operating system's standard, built-in device drivers.
To upgrade drivers we recommend that you patch to the latest version of the operating system.
Installing on IA64
If you are installing on an IA64 system, such as an HP Integrity server, check http://
h18004.www1.hp.com/products/blades/components/c-class-storageworks.html for the latest
information on the availability of backup application upgrades and drivers.
Upgrade backup software
It is important to check http://h18004.www1.hp.com/products/blades/components/
c-class-storageworks.html for software compatibility and install any recommended upgrades.
For optimum performance it is important to use a backup application that is appropriate for your
system's configuration. HP, Symantec, Legato, Yosemite and Computer Associates all provide suitable
products. Further details about these and other products that may be appropriate can be found on
the HP connectivity website.
1. Go to http://h18004.www1.hp.com/products/blades/components/c-class-storageworks.html
and select Tape Blades.
2. Select your model of Tape Blade and select Support -> Compatibility & Tools.
3. Click on the Tape Blade tab and select your combination of operating system and tape drive
model in the table.
A list of supported backup applications is displayed. This will also tell you whether your
configuration is compatible with HP One-Button Disaster Recovery, HP OBDR. (All
HP StorageWorks tape drives and Tape Blades support HP OBDR. However, you can only use
this feature if your system configuration and backup application also support it. See
“Compatibility” on page 55.)
4. Make sure you have a backup application that supports HP StorageWorks Ultrium tape drives
and download any upgrades or patches, if required.
Enabling encryption
The HP StorageWorks SB3000c and SB1760c Tape Blade includes hardware capable of performing
data encryption while writing and data decryption while reading, both at full speed. This is only
possible with Ultrium 3.0 TB or 1.6 TB media. See also “HP StorageWorks SB3000c and SB1760c
Tape Blades and encryption” on page 49.
If you wish to make use of the encryption capability, you must enable this feature via the backup
software application. Refer to http://h18004.www1.hp.com/products/blades/components/
c-class-storageworks.html to find out which applications support this advanced data protection
capability.
Tape Blade 19
Page 20

Drivers and backup software20
Page 21

3 Installing an HP StorageWorks Tape Blade
In this chapter:
• “Before you start” on page 21
• “Installation with a half-height partner server blade” on page 22
• “Installation with a full-height partner server blade” on page 27
• “Powering the Tape Blade on and off” on page 33
Before you start
These installation instructions assume you have already:
1. Installed and configured an HP BladeSystem c-Class enclosure. It must be running the correct
firmware for it to support the Tape Blade. Firmware version 1.3 or later is required when installing
in a c7000 enclosure. In a c3000 enclosure all versions of the firmware support the HP
StorageWorks Tape Blade. For the best reliability, performance and new features update to the
most recent version of the firmware.
2. Installed the partner server blade. It must be powered off before you install the Tape Blade. We
recommend that you use the Shutdown command on the partner server blade to do this.
3. Installed any device bay dividers as recommended in the documentation provided with the c-Class
enclosure.
NOTE:
The most current documentation for HP BladeSystem components is available at the HP website
(http://www.hp.com/go/bladesystem/documentation).
You need one half-height device bay in which to install the HP StorageWorks Ultrium Tape Blade.
The Tape Blade may be used with a half-height or a full-height server blade and must be installed
next to the partner server blade.
Tape Blade 21
Page 22
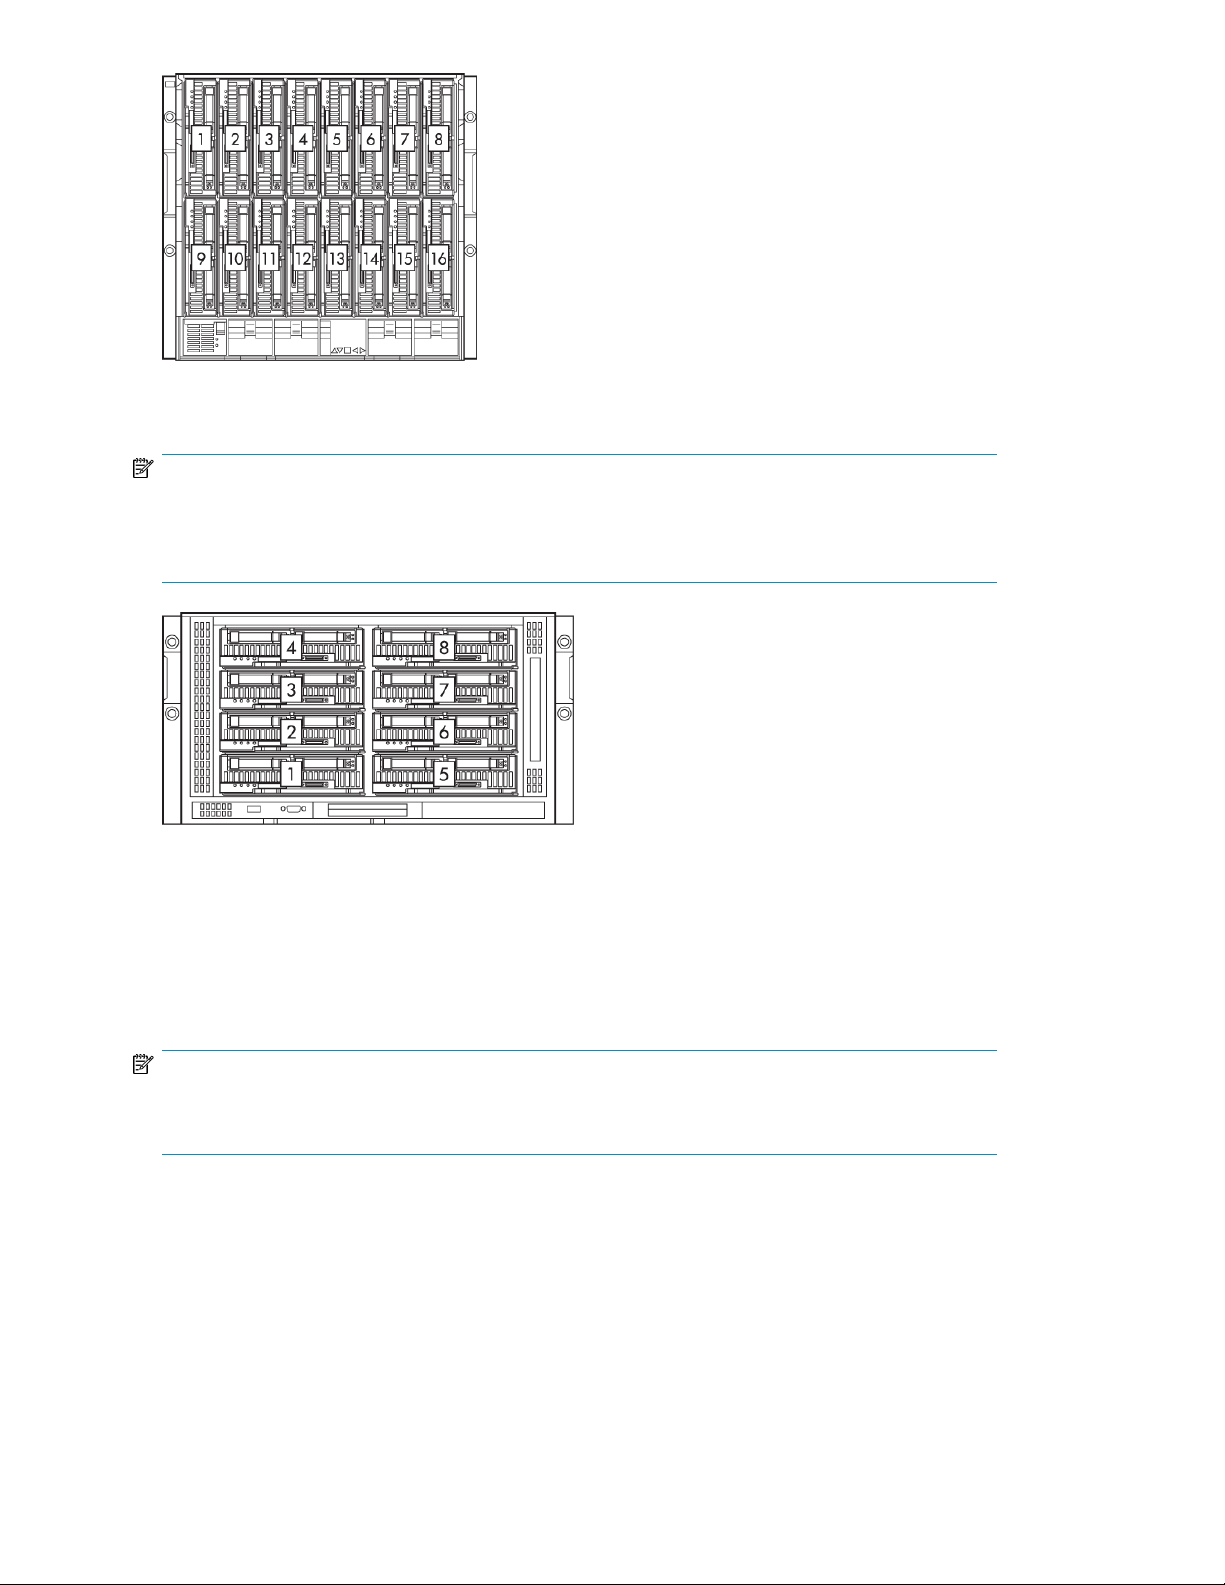
Figure 3 Half-height device bay numbering in a c7000 enclosure
.
NOTE:
In c3000 enclosures devices are seated horizontally but the same installation rules apply. The Tape
Blade resides in the adjacent device bay below or above the partner server blade. Slot combinations
are 1&2, 3&4, 5&6, 7&8.
Figure 4 Half-height device bay numbering in a c3000 enclosure
.
Installation with a half-height partner server blade
If you are installing with a full-height partner server blade, refer to “Installation with a full-height partner
server blade” on page 27.
NOTE:
The partner server blade and any device bay dividers must be installed and powered down before
you install the Tape Blade. See the documentation that ships with the server blade.
Installing an HP StorageWorks Tape Blade22
Page 23

CAUTION:
To prevent improper cooling and thermal damage, do not operate the server blade or the enclosure
unless all device bays are populated with either a component or a blank.
Tape Blade 23
Page 24
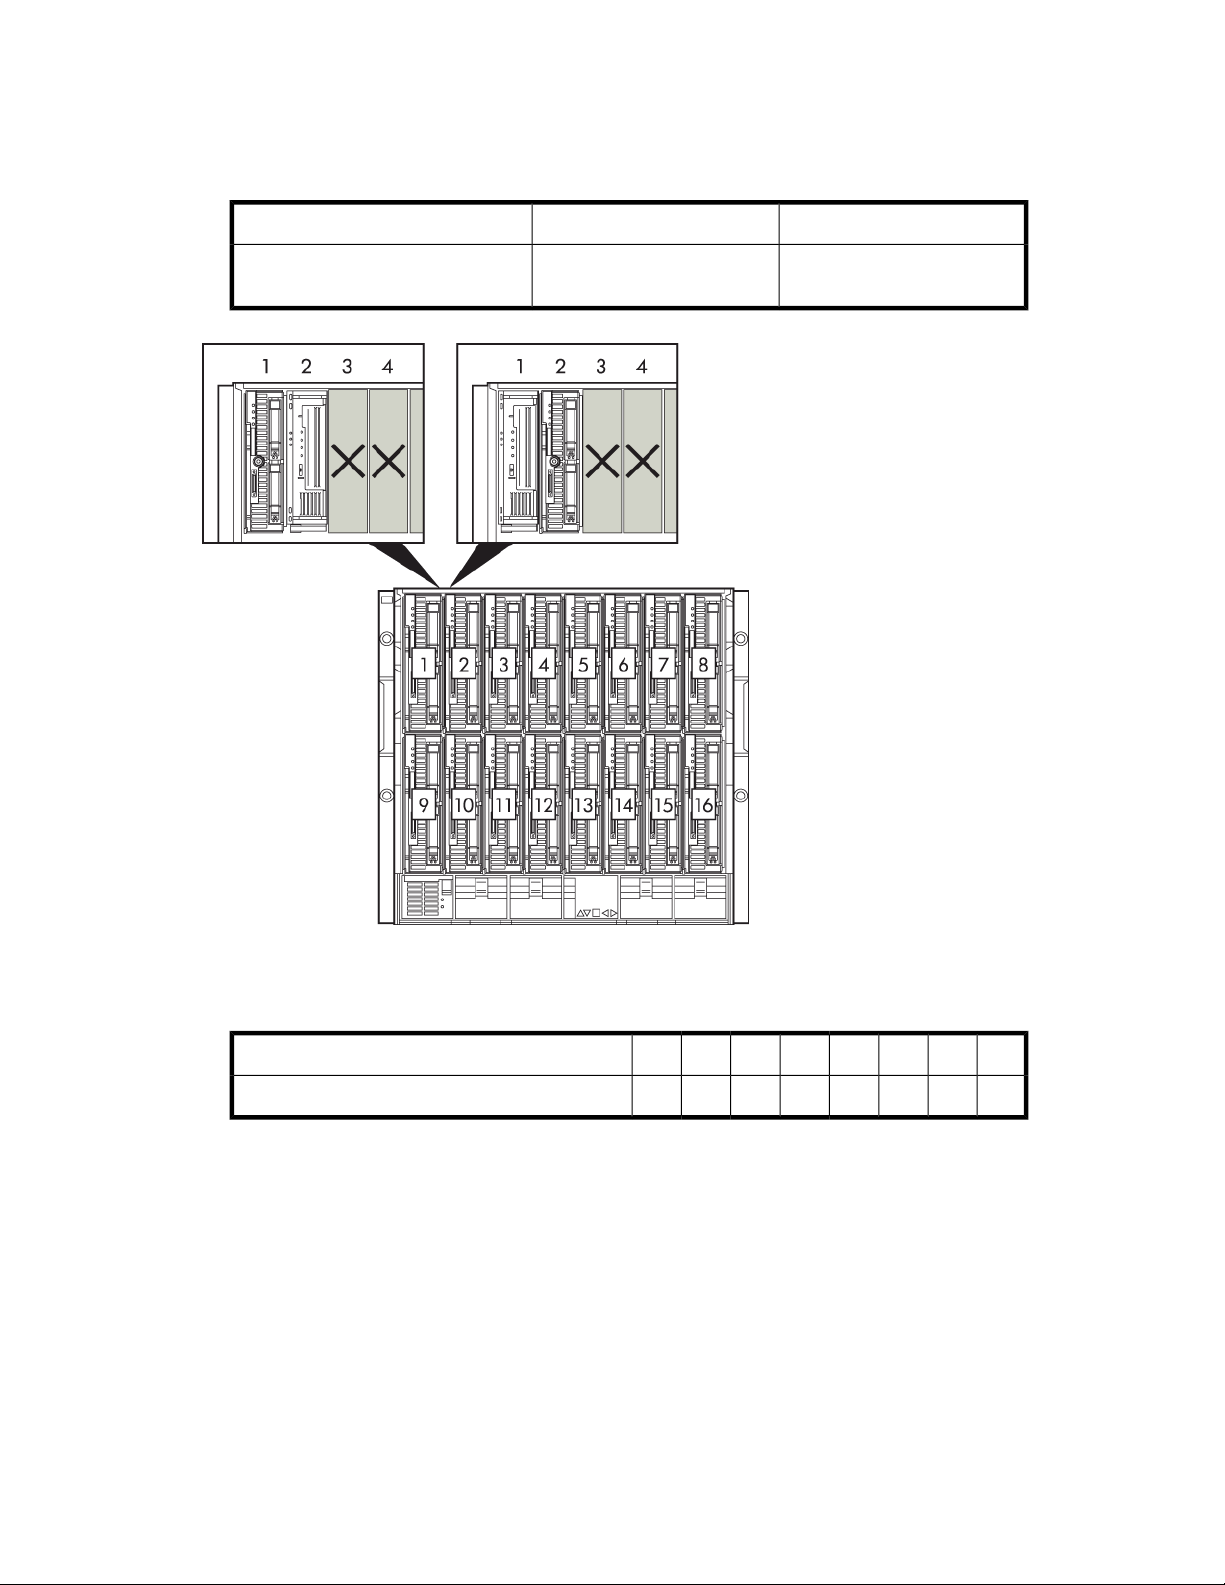
1. Identify the partner server blade to be installed with the HP StorageWorks Tape Blade. The two
blades always occupy a pair of device bays.
• c7000 enclosures: Slot combinations are: 1 & 2, 3 & 4, 5 & 6, 7 & 8, 9 & 10, 11 & 12, 13
& 14, 15 & 16.
even-numbered bayodd-numbered bayPartner server blade in bay:
HP Tape Blade in bay:
even-numbered bay to the
right
odd-numbered bay to the left
Figure 5 Paired locations in a c7000 enclosure with a half-height partner server blade
.
• c3000 enclosures: Slot combinations are: 1 & 2, 3 & 4, 5 & 6, 7 & 8.
Installing an HP StorageWorks Tape Blade24
87654321Partner server blade in bay:
78563412HP Tape Blade in bay:
Page 25
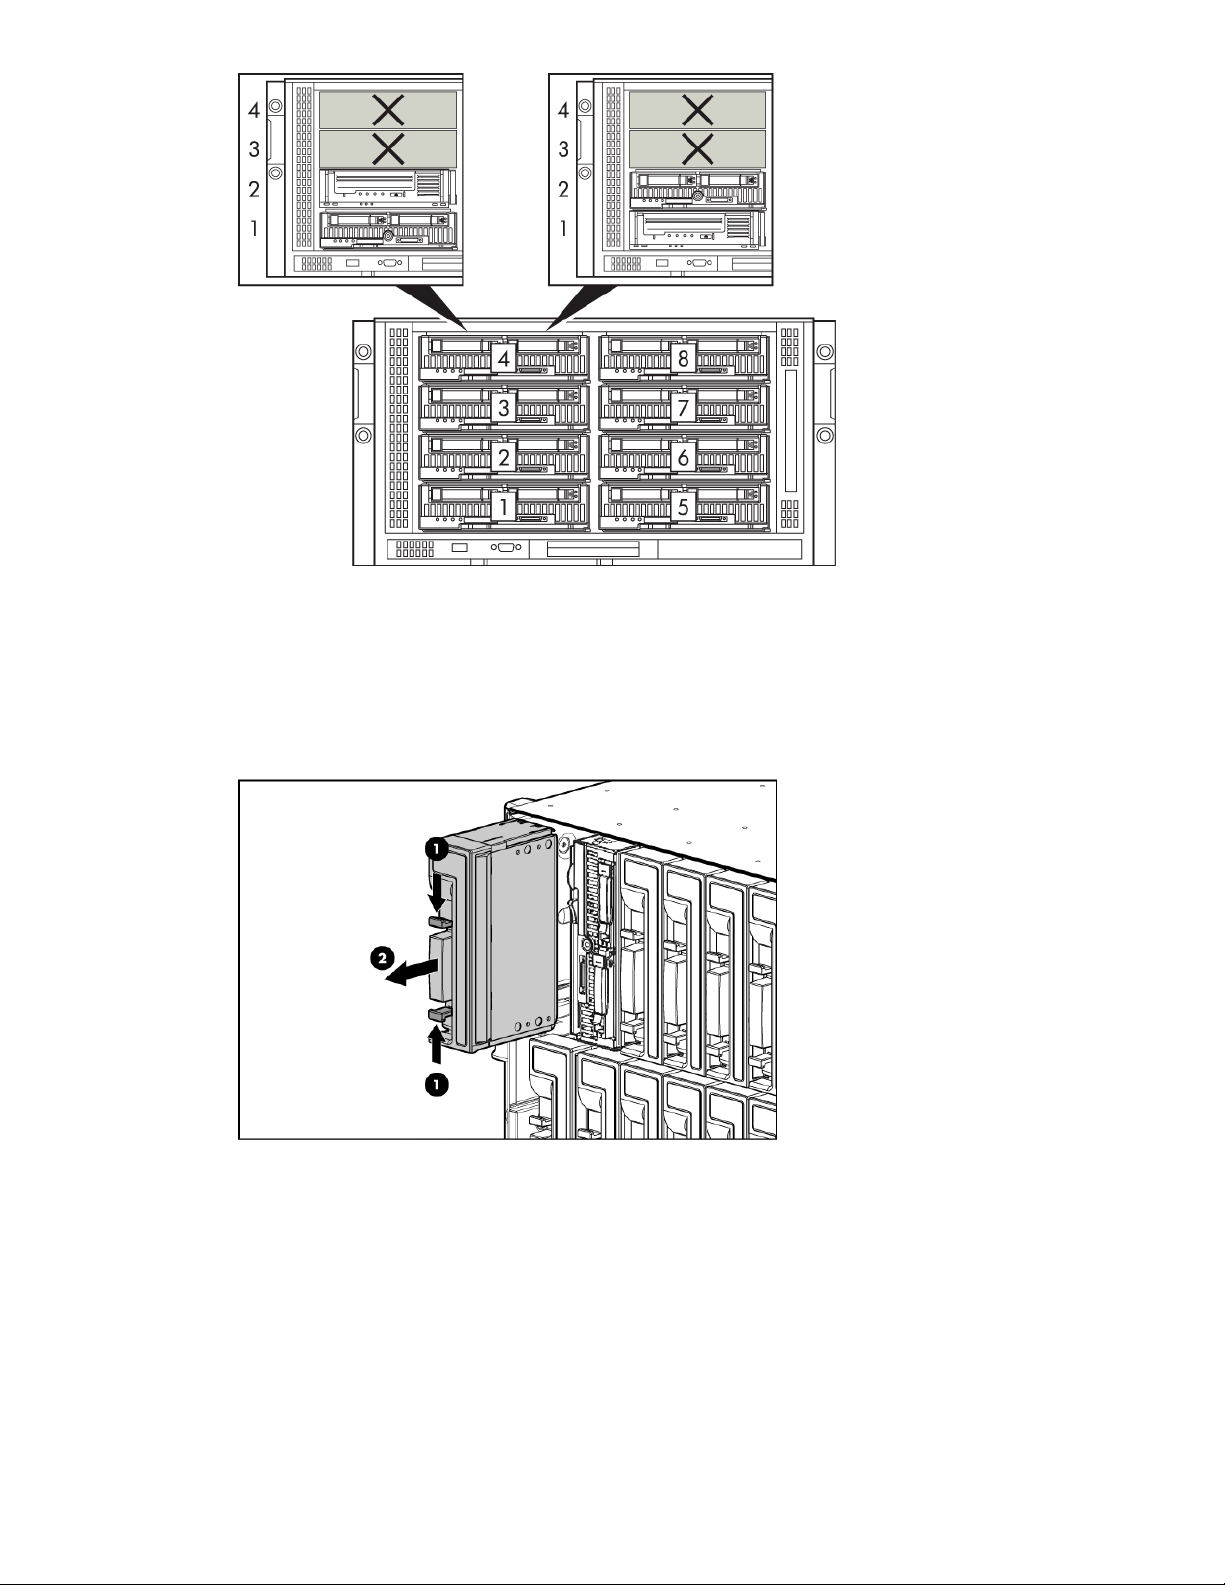
Figure 6 Paired locations in a c3000 enclosure with a half-height partner server blade
.
2. Use the Shutdown command on the partner server blade to power down the partner server blade.
3. Remove the blank from the device bay. Squeeze in the release tabs (1) and pull the blank away
from the assembly (2), as illustrated in Figure 7.
In the following figure the partner server blade is installed in device bay 2. So, the blank has
been removed from device bay 1.
Figure 7 Removing the blank
.
Tape Blade 25
Page 26
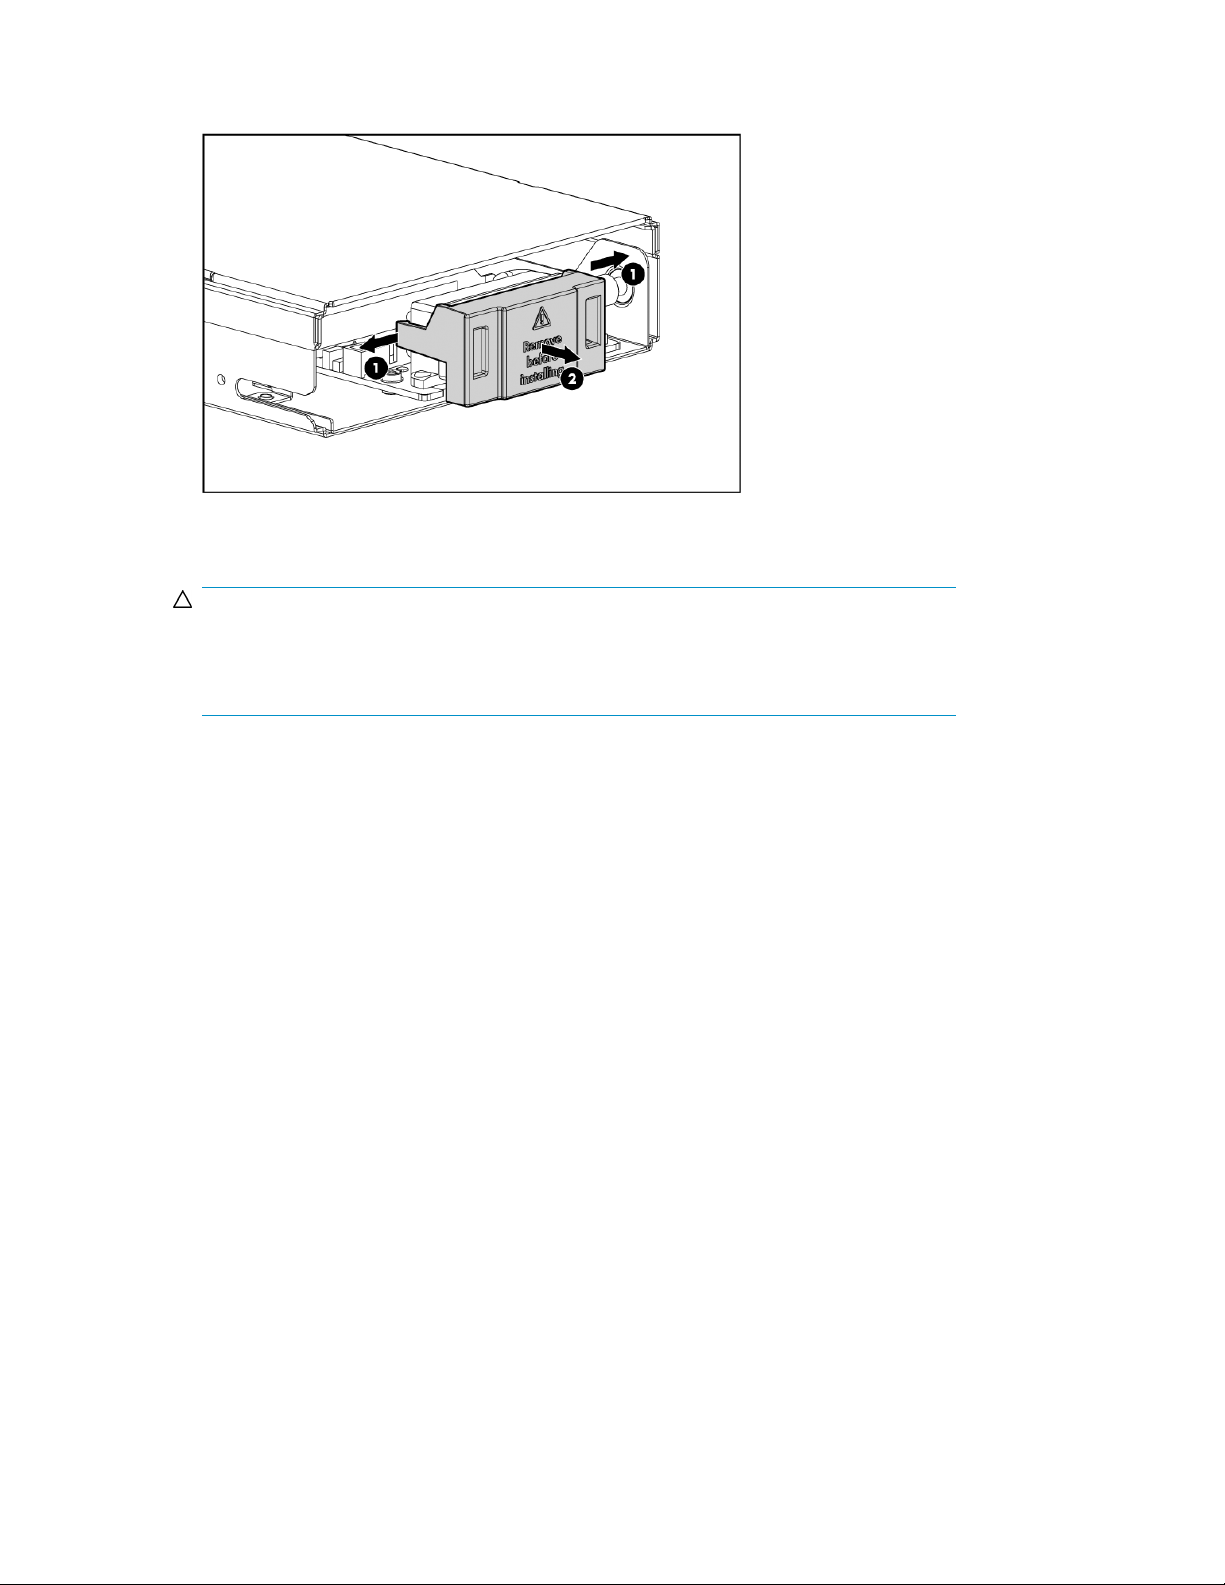
4. Remove the connector cover on the rear of the Tape Blade assembly. Release the back of the
cover (1) and pull it away from the Tape Blade (2), as illustrated in Figure 8.
Figure 8 Removing the connector cover
.
CAUTION:
To prevent damage to the backplane connector, take special care when handling the Tape
Blade assembly. If the Tape Blade is installed with a damaged connector, the enclosure
backplane may also be damaged.
Installing an HP StorageWorks Tape Blade26
Page 27

5. Install the Tape Blade, ensuring that it is in the correct orientation: in a c7000 enclosure the latch
is at the bottom of the blade assembly, as illustrated; in a horizontal orientation in a c3000
enclosure it is to the right of the Tape Blade. Carefully push the Tape Blade into the device bay
(1) and push the latch in (2) to secure the blade in position.
CAUTION:
Take care as you push the blade into position. Do not press directly on the cassette door,
because this may damage it.
Figure 9 Installing the Tape Blade, partnered with a half-height server blade
.
6. Now go to “Powering the Tape Blade on and off” on page 33.
Installation with a full-height partner server blade
If you are installing with a half-height partner server blade, refer to “Installation with a half-height
partner server blade” on page 22.
When partnering the Tape Blade with a full-height server blade, an HP PCI Express Mezzanine
Pass-Thru Card is required (option kit part number: 431643-B21). The Mezzanine Card must be
installed in mezzanine 3 connector in the server blade. The exact location of this connector varies
according to the model of server blade. Please refer to the schematic on the server blade's panel or
the server blade documentation for detailed instructions on installing the Mezzanine Card.
NOTE:
The partner server blade must be installed and powered down before you install the Tape Blade. The
general guidelines provided in this section are correct for the majority of server blades. However,
there are a few exceptions that allow different location pairings. Always refer to the documentation
that ships with the server blade or the QuickSpecs on http://www.hp.com for the most up-to-date
information.
Tape Blade 27
Page 28

CAUTION:
To prevent improper cooling and thermal damage, do not operate the server blade or the enclosure
unless all device bays are populated with either a component or a blank.
Installing an HP StorageWorks Tape Blade28
Page 29

1. Identify the partner server blade to be installed with the HP StorageWorks Tape Blade. The two
blades always occupy a pair of device bays.
• c7000 enclosures: The Tape Blade is always located on the lower row of the enclosure (bays
9 to 16).
8/167/156/145/134/123/112/101/9Partner server blade in bays:
151613141112910HP Tape Blade in bay:
Figure 10 Paired locations in a c7000 enclosure with a full-height partner server blade
.
• c3000 enclosures:The Tape Blade is always located in bay 8.
3 and 7Partner server blade in bays:
8HP Tape Blade in bay:
Tape Blade 29
Page 30

Figure 11 Paired locations in a c3000 enclosure with a full-height partner server blade
.
2. Use the Shutdown command on the partner server blade to power down the partner server blade.
If not already installed, install a HP PCI Express Mezzanine Pass-Thru Card in mezzanine 3
connector in the server blade. See the documentation that ships with the mezzanine card and
the server blade documentation for more information.
3. Remove the blank from the device bay. Squeeze in the release tabs (1) and pull the blank away
from the assembly (2).
Figure 12 Removing the blank
.
Installing an HP StorageWorks Tape Blade30
Page 31

4. c7000 enclosures only: lnstall the supplied coupler plate. (This allows you to install a separate
device in the upper bay above the Tape Blade, if required.) Align the slots, as illustrated, and
slide forward to lock into place.
Figure 13 Installing the coupler plate
.
NOTE:
If you need to return the Tape Blade for service, you must first remove the coupler plate.
See “Remove the coupler plate” on page 72 for further details.
NOTE:
c3000 enclosures require a mini divider. This is supplied with the enclosure. Refer to the
documentation provided with the enclosure for installation instructions.
Tape Blade 31
Page 32

5. Remove the connector cover on the rear of the Tape Blade assembly. Release the back of the
cover (1) and pull the cover away from the Tape Blade (2).
Figure 14 Removing the connector cover
.
CAUTION:
To prevent damage to the backplane connector, take special care when handling the Tape
Blade assembly. If the Tape Blade is installed with a damaged connector, the enclosure
backplane may also be damaged.
Installing an HP StorageWorks Tape Blade32
Page 33

6. Install the Tape Blade, ensuring that it is in the correct orientation: in a c7000 enclosure the latch
is at the bottom of the blade assembly, as illustrated; in a horizontal orientation in a c3000
enclosure it is to the right of the Tape Blade. In “Installing the tape blade, partnered with a
full-height server blade” on page 33 the partner server blade is installed in device bay 9. So,
the Tape Blade must be installed in device bay 10. Carefully push the Tape Blade into the device
bay (1) and push the latch in to secure the blade in position (2).
Figure 15 Installing the Tape Blade, partnered with a full-height server blade
.
7. Now go to “Powering the Tape Blade on and off” on page 33.
When installing the HP StorageWorks Tape Blade with a full-height server blade, a half-height
server blade can be installed in the empty bay next to the Tape Blade. (In a c7000 enclosure
this is the bay above the Tape Blade. In a c3000 enclosure this will be bay 4.) This server blade
cannot be partnered with the HP StorageWorks Tape Blade.
If the bay is left empty, a blank must be fitted to maintain proper airflow for cooling.
Powering the Tape Blade on and off
Power up
1. Install the Tape Blade, as described in the previous sections. The system health LED (item 1 in
Figure 16 on page 34) flashes red while the connection is established. (If it continues to flash
red for more than 2 minutes, there is a fault. Make sure that the partner server blade is powered
off and re-install the Tape Blade.)
2. When the Tape Blade is recognized, the system health LED (item 1 in Figure 16 on page 34)
illuminates solid green.
Tape Blade 33
Page 34

3. Power up the partner server blade. See the server blade documentation for more information.
This powers up the Tape Blade and the tape drive performs its hardware self-test.
Figure 16 System health LED
.
Power down
Use the Onboard Administrator or the Shutdown command on the partner server blade to power
down the partner server blade and Tape Blade. See the server blade and onboard administrator
documentation for more information.
Installing an HP StorageWorks Tape Blade34
Page 35

4 Verify installation
Once you have installed the Tape Blade assembly, check that drivers have been installed correctly
and you have the correct version of backup software, and verify that the Tape Blade is functioning
properly before you store your valuable data.
NOTE:
Check http://h18004.www1.hp.com/products/blades/components/c-class-storageworks.html for
the latest information on the availability of backup application upgrades and drivers.
1. Use the Onboard Administrator to power up the partner server blade, see “Powering the Tape
Blade on and off” on page 33. This also powers on the Tape Blade.
2. The system health LED flashes red while the connection is established. When the Tape Blade is
recognized, the system health LED (1) illuminates solid green.
NOTE:
If the System Health LED continues to flash red for more than 2 minutes, there is a fault. Make
sure that the partner server blade is powered off and re-install the Tape Blade.
3. The tape drive will run its hardware self-test, which takes about 5 seconds. If self-test passes, the
green Ready LED flashes and then shows steady green. If the test fails, the Drive Error and Tape
Error LEDs flash, while the Ready and Clean LEDs are off. This continues until the drive is reset.
See “Tape Drive LEDs” on page 38 for more information about front panel lights.
Tape Blade 35
Page 36

4. Make sure that the drivers are installed; two are required.
• SAS controller driver
The correct SAS controller driver must be installed first. It is only available from the HP web
site. It can be installed from the link on the HP StorageWorks Tape CD-ROM or directly from
the HP BladeSystem Technical Resources website, http://h18004.www1.hp.com/products/
blades/components/c-class-storageworks.html.
• HP Ultrium Tape driver
The CD-ROM contains a Tape driver install package for Microsoft Windows operating systems.
If you prefer to use Windows Device Manager to install the tape drivers manually, you will
find them in the drivers directory on the CD-ROM or on the HP BladeSystem Technical Resources website, http://h18004.www1.hp.com/products/blades/components/c-class-stor-
ageworks.html.
For other operating systems, the recommended backup applications use the operating system's
standard, built-in device drivers. To upgrade drivers we recommend that you patch to the
latest version of the operating system.
NOTE:
Certain backup applications require you to use their own Tape driver instead of the HP Ultrium
Tape driver.
5. Verify that the tape drive installation was successful.
HP StorageWorks Library & Tape Tools (L&TT) is the recommended diagnostic and support tool
for your HP tape drive. Use it to verify installation and confirm that your tape drive is functioning
correctly before you use it for backup. It is available free at http://www.hp.com/support/
tapetools.
NOTE:
L&TT tests tape drive operation only; use the Onboard Administrator to diagnose the Tape
Blade.
6. For all operating systems ensure that you have downloaded any upgrades necessary for your
backup application. Check for software compatibility and install any recommended upgrades.
7. Perform a backup and restore test to check that the drive can write data to tape. Use a blank
cartridge.
Windows Backup or Unix native backup applications can be used to check basic tape drive
operation, but they will not support all the advanced features of your tape drive. We recommend
that you upgrade your software application before running this test.
Verify installation36
Page 37

5 Understanding LEDs
There are two sets of LEDs; one for the Tape Blade chassis and one for the Ultrium tape drive.
In this chapter:
• “Tape Blade Chassis LEDs” on page 37
• “Tape Drive LEDs” on page 38
Tape Blade Chassis LEDs
Figure 17 Tape Blade chassis LEDs
.
UID LED1
System health LED2
Blue = Identified
Off = Not identified
Green = Normal operation
Flashing amber = Degraded condition
Flashing red = Critical condition
Not usedReserved3
Tape Blade 37
Page 38

Troubleshooting with Tape Blade LEDs
The UID LED helps you identify the location of a specific Tape Blade, if several are installed in an
enclosure. It can be toggled on and off.
The system health LED flashes red whenever the Tape Blade connection is established with the enclosure;
either immediately after installation or when the Tape Blade is removed and reinserted. If it continues
to flash for more than 2 minutes, there is a fault. Make sure that the partner server was powered down
before the Tape Blade was installed.
If the fault condition persists, other causes are:
• c7000 enclosures only: The enclosure firmware is earlier than version 1.30. (In a c3000 enclosure
all versions of the firmware support the HP StorageWorks Tape Blade.) For the best reliability,
performance and new features update to the most recent version of the firmware.
• The adjacent blade is not a server blade
• The Tape Blade is adjacent to a full-height partner server blade but a mezzanine card has not
been installed, see “Installation with a full-height partner server blade” on page 27.
See the HP BladeSystem Technical Resources website http://h18004.www1.hp.com/products/
blades/components/c-class-storageworks.html for more comprehensive troubleshooting information.
Tape Drive LEDs
HP StorageWorks SB3000c Tape Blade
Figure 18 Tape drive LEDs in the HP StorageWorks SB3000c Tape Blade
.
Understanding LEDs38
Page 39

Off: no encryption
Encryption LED1
On: encryption
Flashing: Encryption related error
Off: the drive does not require cleaning
Clean LED2
Amber: cleaning cartridge in use
Flashing: the drive needs cleaning
Off: no fault has been detected
Tape LED3
Flashing amber: the cartridge currently in the drive is faulty (damaged
or unsupported). Discard the cartridge.
Drive LED4
Flashing amber: the drive mechanism has detected a hardware error
Green: the drive is ready for use
Off: no fault has been detected
Ready LED5
Off: the drive power is off or there was a failure during self-test
Flashing: the drive is busy
All other HP StorageWorks Tape Blades
Figure 19 Tape drive LEDs in all other HP StorageWorks Tape Blades
.
Off: the drive does not require cleaning
Clean LED1
Amber: cleaning cartridge in use
Flashing: the drive needs cleaning
Tape Blade 39
Page 40

Off: no fault has been detected
Tape LED2
Flashing amber: the cartridge currently in the drive is faulty (damaged
or unsupported). Discard the cartridge.
Drive LED3
Ready LED4
Off: no fault has been detected
Flashing amber: the drive mechanism has detected a hardware error
Green: the drive is ready for use
Off: the drive power is off or there was a failure during self-test
Flashing: the drive is busy
Troubleshooting with Tape Drive LEDs
The meaning of different patterns of tape drive LEDs is as follows. See the HP BladeSystem Technical
Resources website http://h18004.www1.hp.com/products/blades/components/
c-class-storageworks.html for more comprehensive troubleshooting information.
The LED sequences in the following table relate to the Clean, Tape, Drive and Ready LEDs. The HP
StorageWorks SB3000c Tape Blade also has an Encryption LED that describes encryption status. This
is described separately in “Encryption LED” on page 41. The meaning of different patterns of LEDs,
without encryption enabled, is as follows:
Table 2 Clean, Tape, Drive and Ready LED sequences
Drive may not have power,
All LEDs OFF.
may be faulty or may have
been power cycled or reset
during a firmware upgrade.
Action requiredCauseLED Sequence
Check that the Tape Blade is installed
correctly.
Check the System Health LED is green.
Use the Onboard Administrator to check
the status of the Tape Blade.
If the tape drive LEDs are still off, call for
service.
Ready and Clean OFF. Drive
and Tape FLASH.
Ready is ON.
Ready FLASHES.
Ready sequence FLASHES- ONFLASHES.
Ready FLASHES fast.
Ready is OFF, others are ON.
Understanding LEDs40
The drive has failed to execute
power-on self test (POST).
The drive is ready for operation.
The drive is carrying out a normal activity (read, write).
The drive is in OBDR mode.
The drive is downloading firmware.
Firmware is being reprogrammed.
Power the server blade off and on again.
If the error condition reappears, call for
service.
None. This is normal.
None.
If the drive is upgrading firmware, do not
reset or power cycle it.
See “Running HP OBDR” on page 56 for
further details.
None.
Do not reset or power cycle the drive.
None.
Do not reset or power cycle the drive.
Page 41

Ready FLASHES and Clean is
ON.
Tape FLASHES.
The drive requires cleaning.Clean FLASHES.
Cleaning is in progress.
The drive believes the current
tape or the tape just ejected is
faulty.
Action requiredCauseLED Sequence
Load the Ultrium cleaning cartridge. See
“Cleaning the tape drive” on page 50 for
supported cartridges and instructions.
If the Clean LED is still flashing when you
load a new or known good data cartridge
after cleaning, call for service.
None. The cleaning cartridge will eject
on completion.
The cleaning cycle can take up to 5
minutes to complete.
Unload the tape cartridge. Make sure that
you are using the correct format cartridge;
an Ultrium data cartridge or Ultrium
universal cleaning cartridge. (See “Use
the correct media” on page 47.)
Reload the cartridge. If the Tape LED still
flashes or starts flashing during the next
backup, load a new or known good
cartridge.
If the Tape LED is now off, discard the
'suspect' tape cartridge. If it is still on, call
for service.
Write-protect the cartridge by sliding the
The tape is ejected immediately
and Tape FLASHES, or Drive
FLASHES on unloading tape.
Drive FLASHES.
Drive, Tape and Ready FLASH.
Drive and Ready ON with Tape
and Clean OFF. Alternates repeatedly.
The tape cartridge memory
(CM) may be faulty.
The drive mechanism has detected an error.
There is a firmware download
problem.
The drive has a firmware error.
switch on the tape cartridge, see “Write
protecting cartridges” on page 51. The
tape can be loaded and the data read.
Once the data is recovered, the cartridge
must be discarded.
Load a new cartridge. If the error persists,
power cycle or reset the drive.
If the Drive LED remains on, call for
service.
Insert a cartridge to clear the LED sequence. If the condition persists, call for
service.
Power cycle or reset the drive.
Upgrade the firmware. If the condition
persists, call for service.
Encryption LED, HP StorageWorks SB3000c Tape Blades only
The encryption LED may be blue or amber, as described in the following table. The state of the other
LEDs depends upon the activity, as described below.
Table 3 Encryption LED, HP StorageWorks SB3000c Tape Blades only
StateEncryption LED (Blue or Amber)
Tape Blade 41
Page 42

At power onOn
The drive is idle and there is no encryption key.Off
Off with Ready flashing green
On (solid blue)
On (solid blue) with Ready flashing
green
Alternate flashing, blue and amber
The tape drive is reading/writing unencrypted data from another host
or unloading a cartridge.
The drive is idle but the encryption key is loaded. The drive is ready to
read/write encrypted data.
The drive is reading/writing encrypted data.
There is an encryption related error. This is cleared after unload executes
or successful encryption/decryption resumes. See also “Encryption
troubleshooting” on page 63.
NOTE:
The Encryption LED only functions if you are using backup software that supports hardware encryption
and this feature is enabled in the backup application. See http://www.hp.com/go/connect for backup
application compatibility.
Understanding LEDs42
Page 43

6 Loading and unloading cartridges and removing Tape Blade
In this chapter:
• “Inserting cartridges” on page 43
• “Removing cartridges” on page 44
• “Removing the Tape Blade” on page 44
Inserting cartridges
3. Label area1. Arrow indicates leading direction
2. Cartridge door
Figure 20 Inserting a cartridge
.
1. Lift the cartridge door and insert the cartridge into the slot with the white arrow uppermost and
facing the cartridge door.
2. Apply gentle pressure until the drive takes the cartridge and loads it.
3. The Ready light flashes green while the drive performs its load sequence. When the cartridge is
loaded, the Ready light shows steady green.
Tape Blade 43
Page 44

Removing cartridges
CAUTION:
Never try to remove a cartridge before it is fully ejected.
1. Press the Eject button on the front panel.
1. Eject button
Figure 21 Ejecting a cartridge
.
2. The drive will complete its current task, rewind the tape to the beginning, and eject the cartridge.
The rewind process may take up to 10 minutes. The Ready light will flash to indicate that the
unload is still in progress.
Removing the Tape Blade
The Tape Blade is powered down from the partner server blade, see “Powering the Tape Blade on
and off” on page 33. To ensure reliable operation, do not power down the partner server blade and
remove power from the drive during read, write, fast-search, load and unload activities.
Before removing the Tape Blade:
• Unload the cartridge as described in “Removing cartridges” on page 44.
• Make sure the partner server blade is powered down. This powers down the Tape Blade. (The
Tape Blade is not a hot-plug device and should always be powered down before removal.)
To remove the Tape Blade from the enclosure:
1. Grasp the metal latch, located at the bottom of the Tape Blade in a c7000 enclosure and to the
right of the Tape Blade in a c3000 enclosure, and pull the latch forward as far as it will go to
release the locking mechanism.
Loading and unloading cartridges and removing Tape Blade44
Page 45

2. Carefully slide the Tape Blade assembly out from the enclosure.
Figure 22 Removing the Tape Blade
.
CAUTION:
Do not pull on the tape drive bezel when removing the Tape Blade.
Tape Blade 45
Page 46

Loading and unloading cartridges and removing Tape Blade46
Page 47

7 Use the correct media
For best performance we recommend HP branded media. Order online at: http://www.hp.com/go/
storagemedia.
In this chapter:
• “Cartridges” on page 47
• “Cleaning the tape drive” on page 50
• “Write protecting cartridges” on page 51
• “Handling cartridges” on page 52
• “Operating and storage environment” on page 52
Cartridges
Data cartridges
HP StorageWorks Tape Blades use Ultrium tape cartridges. These are single-reel cartridges that match
your drive's format and are optimized for high capacity, throughput and reliability. Compatible media
can be recognized by the Ultrium logo, which is the same as the logo on the front of your drive. Do
not use other format cartridges in your tape drive and do not use Ultrium cartridges in other format
tape drives.
For optimum performance always use a cartridge that matches the specification of your tape drive,
see Table 4 on page 47. A lower specification will have a lower transfer rate and may not support
write activities; a higher specification will not support read or write activities. Use:
•
Ultrium 3.0 TB1,RW and Ultrium 3.0 TB1WORM cartridges with Ultrium SB3000c Tape Blades
•
Ultrium 1.6 TB1,RW and Ultrium 1.6 TB1WORM cartridges with Ultrium SB1760c Tape Blades
•
Ultrium 800 GB1,RW and Ultrium 800 GB1WORM cartridges with Ultrium SB920c Tape Blades
•
Ultrium 400 GB1cartridges with Ultrium 448c Tape Blades
1
Table 4 Data cartridge compatibility
Ultrium 200
GB data cartridge
SB3000c Tape
Blade
1
Capacity assumes 2:1 compression.
Ultrium 400
GB data cartridge
Ultrium 800
GB data cartridge
read onlynot supportednot supported
Ultrium 1.6 TB
data cartridge
read/write and
write once/read
many
Ultrium 3 TB
data cartridge
read/write
(C7975A)and
write once/read
many (C7975W)
recommended
Tape Blade 47
Page 48

SB1760c Tape
Blade
SB920c Tape
Blade
Ultrium 200
GB data cartridge
Ultrium 400
GB data cartridge
read onlynot supported
read/writeread only
Ultrium 800
GB data cartridge
read/write and
write once/read
many
read/write
(C7973A) and
write once/read
many (C7973W)
recommended
Ultrium 1.6 TB
data cartridge
read/write
(C7974A) and
write once/read
many (C7974W)
recommended
Ultrium 3 TB
data cartridge
not supported
not supportednot supported
448c Tape
Blade
read/write
read/write
(C7972A) recommended
Cleaning cartridges
You must use Ultrium cleaning cartridges with HP StorageWorks Tape Blades, as other cleaning
cartridges will not load and run. HP recommends the HP Ultrium universal cleaning cartridge (see
Table 5). Unlike some earlier Ultrium cleaning cartridges, the orange-colored HP Ultrium universal
cleaning cartridge is designed to work with any Ultrium drive.
Table 5 Cleaning cartridge compatibility
Cleaning
HP Ultrium universal cleaning
cartridge C7978A (Orange)
HP Ultrium WORM data cartridges
The HP StorageWorks SB3000c, SB1760c and SB920c Tape Blade include support for both re-writable
and Write-Once, Read-Many, WORM, data cartridges. WORM cartridges provide for an enhanced
level of data security against accidental or malicious alteration of data on the tape cartridge. The
WORM data cartridge can be appended to maximize the full capacity of the tape cartridge, but the
user will be unable to erase or overwrite data on the cartridge. Any attempt to modify a WORM
cartridge to enable writing over existing data will result in the media becoming permanently write
protected. It should still be readable in a WORM drive, depending upon the severity of the tampering,
but no further appended backups will be possible.
not supportednot supportednot supported
Other optionsRecommended cartridgeType of cartridge
HP Ultrium cleaning cartridge
C7979A (Blue). Do not use early,
non-universal Ultrium cleaning cartridges from other manufacturers.
WORM data cartridges are clearly identified by their distinctive, two-tone cartridge color. They do
not have a write-protect slider and can only be used with Ultrium tape drives that support the WORM
feature.
To check whether your backup or archive software application supports WORM cartridges, refer to
the following web site: http://h18004.www1.hp.com/products/blades/components/
c-class-storageworks.html.
Use the correct media48
Page 49

HP StorageWorks SB3000c Tape Blades and partitioning
The HP StorageWorks SB3000c Tape Blade supports two tape partitions, when used with Ultrium 3
TB R/W cartridges. Tape partitioning is not supported with WORM cartridges or with earlier
generations of cartridge. It is not supported on earlier-generation tape drives. If you insert a partitioned
tape into a tape drive that does not support partitioning, it will be ejected.
To check for the latest information about support for partitioning and any required firmware upgrades,
go to http://www.hp.com/support/downloads. Refer to your backup application's documentation
for information about creating and using partitions on the tape drive.
HP StorageWorks SB3000c and SB1760c Tape Blades and encryption
The HP StorageWorks SB3000c and SB1760c Tape Blade includes hardware capable of performing
data encryption at full speed while writing data, and decrypting when reading.
Encryption is the process of changing data into a form that cannot be read until it is deciphered,
protecting the data from unauthorized access and use. HP StorageWorks Tape Blades use the strongest
version of the industry-standard AES encrypting algorithm to protect your data.
To make use of this feature you need:
• A backup application that supports hardware encryption
• Ultrium 3 TB media (C7975A or C7975W) or Ultrium 1.6 TB media (C7974A or C7974W); no
encryption will be performed when writing earlier generations of tape
When should I use encryption?
Your company policy will determine when you need to use encryption. For example, it may be
mandatory for company confidential and financial data, but not for personal data. Company policy
will also define how encryption keys should be generated and managed. Backup applications that
support encryption will generate a key for you or allow you to enter a key manually.
NOTE:
Encryption with keys that are generated directly from passwords or passphrases may be less secure
than encryption using truly random keys. Your application should explain the options and methods
that are available. Please refer to your application's user documentation for more information.
How do I enable encryption?
Hardware encryption is turned off by default and is switched on by settings in your backup application,
where you also generate and supply the encryption key. Your backup application must support
hardware encryption for this feature to work. The software supplied with the tape drive provides this
support. See http://h18004.www1.hp.com/products/blades/components/c-class-storageworks.html
for an up-to-date list of other suitable backup software.
When will I be asked to enter the key?
Encryption is primarily designed to protect the media once it is offline and to prevent it being accessed
from another machine. You will be able to read and append the encrypted media without being
prompted for a key as long as it is being accessed by the machine and application that first encrypted
it.
Tape Blade 49
Page 50

There are two main instances when you will need to know the key:
• If you try to import the media to another machine or another instance of the backup application
• If you are recovering your system after a disaster
What happens if I don't remember the key?
CAUTION:
You should keep a record or backup of your encryption keys and store them in a secure place separate
from the computer running the backup software. If you are unable to supply the key when requested
to do so, neither you nor HP Support will be able to access the encrypted data.
This guarantees the security of your data, but also means that you must be careful in the management
of the encryption key used to generate the tape.
Does encryption affect tape drive performance?
Hardware encryption can be used with or without compression and without speed or capacity penalties.
Does the tape drive encrypt media in an earlier Ultrium format?
No. Encryption is supported only on Ultrium 3 TB media (C7975A or C7975W) and Ultrium 1.6 TB
media (C7974A or C7974W).
Encrypted Ultrium 3 TB and 1.6 TB tapes can be read on any compatible Tape Blade that supports
hardware encryption. (SB3000c Tape Blades can read and write encrypted Ultrium 3 TB media and
Ultrium 1.6 TB media; SB1760 Tape Blades can read and write encrypted Ultrium 1.6 TB media.)
Hardware encryption is not supported on Ultrium 800 GB and Ultrium 400 GB media.
Where can I get more information?
For more information about AES encryption, encryption keys, and using hardware encryption with
your HPStorageWorks SB3000c and SB1760c Tape Blade, see http://h18006.www1.hp.com/
products/storageworks/lto4Encryp/index.html or refer to the White Papers on http://
h18006.www1.hp.com/storage/tapewhitepapers.html.
For detailed instructions about enabling encryption please refer to the documentation supplied with
your backup application. This will also highlight any default states, for example when copying tapes,
that may need changing if using encrypted tapes.
Cleaning the tape drive
HP StorageWorks Tape Blade tape drives do not require regular cleaning. An Ultrium universal
cleaning cartridge should only be used when the amber Clean LED is flashing.
1. Insert the Ultrium universal cleaning cartridge.
Use the correct media50
Page 51

2. The drive will carry out its cleaning cycle and eject the cartridge on completion (which can take
up to 5 minutes). During the cleaning cycle the amber Clean LED will be on solidly and the green
Ready LED will flash.
Each HP Ultrium universal cleaning cartridge (C7978A) can be used up to 50 times with Ultrium
tape drives. (The blue HP Ultrium cleaning cartridges, C7979A, can only be used up to 15 times
with any tape drive.) If the cleaning cartridge is ejected immediately with the Tape LED on, it has
expired.
Write protecting cartridges
If you want to protect the data on a cartridge from being altered or overwritten, you can write protect
the cartridge.
IMPORTANT:
Always remove the cartridge from the tape drive before you change the write protection.
• To write protect a cartridge, push the switch to the right to prevent any data recording on the
cartridge. Note the padlock on the tab that indicates that the cartridge is protected.
• To write enable a cartridge, push the switch to the left to allow data recording on the cartridge.
Figure 23 illustrates the location of the write-protect tab.
NOTE:
Write-protection will not protect your cartridges against magnets. Write-protection will not prevent
a cartridge being erased by bulk-erasure or degaussing. Do not bulk erase Ultrium format cartridges.
This will destroy pre-recorded servo information and make the cartridge unusable.
Tape Blade 51
Page 52

1. Write-protect tab
Figure 23 Write protecting a cartridge
.
Handling cartridges
• Do not touch the tape media.
• Do not attempt to clean the tape path or tape guides inside the cartridge.
• Do not leave cartridges in the drive. The tape loses tension in the power-off state, which can lead
to problems, particularly if the drive has been moved.
• Store cartridges in a vertical orientation.
• Do not leave cartridges in excessively dry or humid conditions.
• Do not leave cartridges in direct sunlight or in places where magnetic fields are present (for ex-
ample, under telephones, next to monitors or near transformers).
• Do not drop cartridges or handle them roughly.
• Attach labels to the label area only.
• Do not bulk erase (or degauss) Ultrium format cartridges because this will render them unusable.
Operating and storage environment
To prevent condensation and for long life, the cartridge should only be operated or stored as follows:
• Operation: 10° C to 45° C (50° F to 113° F)
• Day-to-day storage (in plastic container): 16° C to 32º C (60° F to 90° F)
• Non-condensing relative humidity: 10% to 80% (operating), 20% to 60% (non-operating)
• Wet bulb temperature should not exceed 26° C (79° F)
• Store cartridges in a vertical orientation
Use the correct media52
Page 53

Tapes intended for long-term storage should be stored in the plastic containers, at temperatures
between 5° C and 23° C (41° F and 73° F) and 20% to 60% relative humidity.
Tape Blade 53
Page 54

Use the correct media54
Page 55

8 Using HP OBDR
In this chapter:
• “Compatibility” on page 55
• “What does HP OBDR do?” on page 55
• “Remote disaster recovery (ProLiant servers only)” on page 56
• “Testing for compatibility” on page 56
• “Running HP OBDR” on page 56
Compatibility
HP One-Button Disaster Recovery, HP OBDR, is a standard feature on all HP StorageWorks Ultrium Tape
Blades. However, it can only be used with specific configurations. To use HP OBDR with the
HP StorageWorks Ultrium Tape Blade, it must be partnered with a ProLiant server blade.
To check whether your system (server blade, operating system and backup software) is
OBDR-compatible, please refer to our World Wide Web site http://www.hp.com/go/connect.
For more specific information concerning the benefits of OBDR and the latest new features please
refer to our World Wide Web site http://www.hp.com/go/obdr.
If your system does not support HP One-Button Disaster Recovery, you can still use your Tape Blade
normally to back up and restore data. However, you must remember to create a separate set of
emergency recovery disks for your operating system whenever you change your system configuration.
What does HP OBDR do?
Using just the Tape Blade and the most recent backup cartridge HP OBDR allows you to recover from
the following types of system disasters:
• Hardware failures where the server blade is replaced by an identical component
• File corruption because of an operating system error
• File corruption because of an application software error
• Viruses that prevent you from booting your system correctly
• User errors that stop you from booting your system correctly
When you run HP One-Button Disaster Recovery, your Tape Blade goes through the following sequence:
1. It goes into a special disaster recovery mode that enables it to restore your operating system and
reboot. It acts like a bootable CD-ROM. (Your system's ability to boot from CD-ROM is normally
enabled by default. If you have changed this setting, you will need to enable it again. Refer to
your system BIOS manual for further details.)
2. It returns to normal Tape Blade mode and restores the data.
Tape Blade 55
Page 56

Remote disaster recovery (ProLiant servers only)
The HP Remote Insight Lights-Out Edition (RILOE) on ProLiant servers gives the IT Administrator the
ability to completely recover a failed server at a remote location without physically traveling to where
the server resides. The on-site non-technical person need only insert the bootable cartridge into the
tape drive when asked to do so by the administrator.
Refer to the HP OBDR web site at http://www.hp.com/go/obdr for more information about using
this feature and compatibility.
Testing for compatibility
We recommend that you perform a full backup and test disaster recovery as soon as possible after
installation—if possible, onto a blank hard disk. If you do not have a blank hard disk and do not
want to overwrite your system, you can safely cancel the disaster recovery process at step 3 in the
“Running HP OBDR” procedure. Refer to our connectivity web site (http://www.hp.com/go/connect)
for more information about suitable backup applications.
Running HP OBDR
HP OBDR can only be used with backup applications that support one-button disaster recovery and
methods of operating OBDR will vary between different software companies. Check our World Wide
Web site (http://www.hp.com/go/obdr) for the latest information about software compatibility,
firmware upgrades and troubleshooting before you use HP OBDR.
1. Insert the latest bootable cartridge in the tape drive. Every full backup with overwrite creates a
bootable tape.
Figure 24 Inserting cartridge for OBDR
.
Using HP OBDR56
Page 57

2. Power on the blade server for approximately 3 seconds then power off. This will reset the Tape
Blade. Immediately hold down the eject button on the tape drive to invoke OBDR. Release the
button as soon as the Ready LED on the front panel flashes in the OBDR sequence. This is a
repeated flashing pattern. Once the Tape Blade is in OBDR mode, power on the blade server
again.
Figure 25 Keeping eject button pressed down, power on in OBDR mode
.
Keyboard shortcut for HP ProLiant servers
There is no need to press the Eject button. Just power on your server and press the [F8] function
key during the Power On Self Test (POST). This invokes OBDR to restore your system. For more
information and specific instructions please refer to our World Wide Web site at http://
www.hp.com/go/obdr.
NOTE:
The firmware for the embedded SC44Ge HBA may need to be upgraded to the latest version in
order to take advantage of this feature.
3. Follow the on-screen instructions to restore your system. Once the operating system has been
restored and rebooted, you may remove the backup cartridge.
Tape Blade 57
Page 58

Using HP OBDR58
Page 59

9 Troubleshooting
Read this chapter for information about:
• When the Tape Blade does not power up, page 59
• Management and Diagnostic tools , page 60
• Problems with cartridges, page 61
• “Encryption troubleshooting” on page 63
NOTE:
For information about troubleshooting using Tape Blade and tape drive LEDs, see “Understanding
LEDs” on page 37.
When the Tape Blade does not power up
If the Tape Blade does not start, use the following table to help resolve the problem:
Table 6 Troubleshooting Tape Blade operation
• The Tape Blade is not installed in the
correct location for the partner server
blade.
• The partner server blade was not restar-
ted after the Tape Blade was installed.
• The Tape Blade is not properly seated
in the device bay.
• No mezzanine pass-thru card installed
with a full-height server
• The c-Class enclosure firmware is at the
wrong version
• There is insufficient power or cooling
Possible solutionsPossible reasons
Verify that the Tape Blade is installed adjacent to the partner
server blade. See “Installing an HP StorageWorks Tape
Blade” on page 21.
Restart the server blade and verify that the Tape Blade front panel
system health LED changes from flashing red to solid green.
1. Power down the partner server blade.
2. Reseat the Tape Blade in the device bay.
3. Restart the server blade and verify that the Tape Blade front
panel system health LED changes from flashing red to solid
green.
Purchase and install the required card, option kit part number:
431643-B21.
Firmware version 1.3 or later is required when installing in a
c7000 enclosure. In a c3000 enclosure all versions of the firmware support the HP StorageWorks Tape Blade. For the best reliability, performance and new features update to the most recent
version of the firmware.
Use the Onboard Administrator to verify that sufficient power and
cooling are available.
Tape Blade 59
Page 60

Management and Diagnostic tools
HP BladeSystem Onboard Administrator is the management and diagnostic tool for the Tape Blade
assembly. HP TapeAssure and HP Library & Tapetools provides diagnostic and troubleshooting tools
for the tape drive.
Onboard Administrator
HP BladeSystem Onboard Administrator is the enclosure management processor, subsystem, and
firmware base used to support the HP BladeSystem c–Class enclosure and all the managed devices
contained within the enclosure.
Onboard Administrator provides a single point from which to perform basic management tasks on
server blades, Tape Blades or switches within the enclosure. Utilizing this hardwired knowledge,
Onboard Administrator performs initial configuration steps for the enclosure, allows for run-time
management and configuration of the enclosure components, and informs you of problems within the
enclosure through email, SNMP, or the Insight Display.
Please read the HP BladeSystem Onboard Administrator User Guide for more information.
HP TapeAssure
HP TapeAssure provides additional management tools for Windows users. It is a customized version
of HP's powerful Command View for Tape Libraries software that is being made available free of
charge with standalone tape drives. It provides valuable information about tape drive and media
utilization, performance and health. If system health is not good, it also advises action to take.
HP strongly recommends installation of TapeAssure. Visit http://www.hp.com/go/tapeassure for a
free download. There are two elements to the download:
• An installation and configuration package that manages the data collection from the tape drive
to the server running Command View
• The Command View for standalone tape download itself
Detailed installation and operating instructions are provided with the downloads.
HP Library & Tape Tools
HP StorageWorks Library & Tape Tools is the recommended diagnostic and support tool for your HP
tape drive product. It is available from a link on the CD shipped with your product or as a free
download from the HP web site. It is supported on nearly all major operating systems.
HP recommends installation of Library & Tape Tools, so that it can be quickly accessed at any time.
HP Support will also request that you use Library & Tape Tools should you need to contact them in
the future, so it is a good idea to have it installed.
See http://www.hp.com/support/tapetools for compatibility information, updates and the latest
version of the tool.
Troubleshooting with Library & Tape Tools
1. When Library & Tape Tools is first run, it will scan for HP tape drives and libraries on your system
and ask you to select the one to work with. At this time you can see the HBA configuration of
your server and how your devices are connected.
Troubleshooting60
Page 61

2. Once you have selected your device you have a number of choices for troubleshooting.
• Device identification: shows part number, serial number and information about any cartridge
loaded.
• Firmware upgrade: allows you to locate and upgrade to the latest firmware. To check for and
download the latest firmware from the HP web site, the server on which Library and Tape
Tools is running must have an internet connection.
• Run tests: allows you to run proactive tests on your drive, such as the drive assessment test,
which will verify the functionality of your drive in around 20 minutes. HP recommends running
this test before calling HP Support. You will need to provide a ‘trusted' cartridge that can be
written to during this test.
• Generate a support ticket: this is a full dump of the drive logs along with interpretation and
is used by HP Support to learn about the condition of your drive. Most useful is the device
analysis section which is the output from approximately 20 rules forming a comprehensive
analysis of the health of your drive. These rules may give advice such as cleaning the head
or trying a different tape if issues are found. The support ticket can be sent to HP Support for
further analysis.
• Run the performance tests: the tests to measure the write/read performance of your tape drive
and the data generation rates of your disk subsystem are also integrated into Library & Tape
Tools. Use these tests to find the performance bottleneck in your system.
Problems with cartridges
If you experience any problems using HP branded cartridges, check:
• You are using an Ultrium cartridge. Compatible media can be recognized by the Ultrium logo,
which is the same as the logo on the front of your drive.
• You are using the correct media type: Ultrium 3 TB* tape cartridges (C7975A or C7975W) for
use with HP StorageWorks SB3000c Tape Blades; Ultrium 1.6 TB* tape cartridges (C7974A or
C7974W) for use with HP StorageWorks SB1760c Tape Blades; Ultrium 800 GB* tape cartridges
(C7973A or C7973W) for use with HP StorageWorks SB920c Tape Blades; Ultrium 400 GB*
tape cartridges (C7972A) for use with HP StorageWorks Ultrium 448c Tape Blades.
• If you are using C7975W, C7974W or C7973W tape cartridges with the HP StorageWorks
SB3000c, SB1760c or SB920c Tape Blade respectively, remember that you can only write to
these cartridges once.
• The cartridge case is intact and that it contains no splits, cracks or damage.
• The cartridge has been stored at the correct temperature and humidity. This prevents condensation.
See the insert included with the tape cartridge for storage conditions.
• The write-protect switch is fully operational. It should move from side to side with a positive click.
• The World Wide Web site for more detailed troubleshooting information: http://
h18004.www1.hp.com/products/blades/components/c-class-storageworks.html.
The cartridge is jammed
If the cartridge is jammed or the backup application is unable to eject it, you can force eject the
cartridge. Once the cartridge is successfully ejected, it is good practice to run Library & Tape Tools
to diagnose the problem and to upgrade the firmware. If the failure occurs regularly, contact customer
service at http://www.hp.com/support.
1. Press and hold the Eject button on the front of the tape drive for at least 10 seconds.
Tape Blade 61
Page 62

2. Wait for the cartridge to be ejected. This process may take up to 10 minutes (the maximum
rewind time). It is important that you allow sufficient time for the drive to complete this process.
If you interrupt it, you may damage the media or the tape drive. The drive is then reset as though
you had turned the power off and then on again.
You may lose data if you force eject a cartridge. The tape may also become unreadable because
an EOD (End of Data) mark may not be properly written.
3. If the cartridge is still jammed, the tape drive has failed. Contact customer service at http://
www.hp.com/support.
Emergency reset
As a last resort, if the drive has disappeared from the system and appears to have failed, it can be
reset by holding the eject button down for 20 seconds. This will allow the drive to reset its internal
hardware and potentially make it visible to a host again.
The reset process may take up to 10 minutes (the maximum rewind time) to complete.
NOTE:
This form of reset will clear the internal buffers and, therefore, lose any data in them. If the drive was
writing at the time, data may be lost and the cartridge will not have an EOD, which means that
subsequent restores are likely to fail. Discard the cartridge.
The drive will not accept the cartridge (or ejects it immediately)
The cartridge may have been damaged, for example dropped, or the drive may have a fault. If it is
a cleaning cartridge, it has probably expired and should be discarded immediately. For data
cartridges:
1. Check that the drive has power (the power cable is properly connected and the Ready LED is
on).
2. Check that you are using the correct media. Only use Ultrium media, (see “Data
cartridges” on page 47).
3. Make sure that you have loaded the cartridge with the correct orientation (see “Inserting
cartridges” on page 43).
4. The tape cartridge memory (CM) may be faulty. Write-protect the cartridge by sliding the switch
on the tape cartridge, see “Write protecting cartridges” on page 51. If the tape can be loaded
and the data read, recover the data. Discard the faulty cartridge and save the recovered data
to a new cartridge.
5. Check for damage to your media and discard it if it is damaged.
6. Use a new or known, good piece of media and see if it loads during a backup. If it does, the
original cartridge is faulty and should be discarded.
7. Check if another Ultrium drive of the same model will accept the cartridge. If it does, the original
drive may be faulty. Before calling customer service, please check that the tape drive is responding.
See “Troubleshooting with Library & Tape Tools” on page 60.
Troubleshooting62
Page 63

Encryption troubleshooting
• Ensure that you are using an HP StorageWorks SB3000c or SB1760c Tape Blade and Ultrium 3
TB or 1.6 TB media, respectively.
• Ensure that your software supports hardware encryption. It may be necessary to update the software.
Consult http://www.hp.com/go/connect or your software vendor for more information.
• Ensure that the correct key or pass phrase has been entered.
• Ensure that your HBA supports the encryption commands. It may be necessary to update the firm-
ware. Consult http://www.hp.com/go/connect for more information.
Tape Blade 63
Page 64

Troubleshooting64
Page 65

10 Replacing a Tape Blade chassis or tape drive
In this chapter:
• Before you replace a part, page 65
• Replacing the tape drive, page 65
• Replacing the Tape Blade chassis, page 71
• Returning the faulty part, page 79
Before you replace a part
1. Unpack your replacement part and retain the packaging.
2. Remove the data cartridge from the tape drive.
There are two customer replaceable parts:
• The tape drive, see “Replacing the tape drive” on page 65.
The replacement tape drive does not include cables or mounting rails.
• The Tape Blade chassis that encloses the tape drive, see “Replacing the Tape Blade
chassis” on page 71.
The partner server blade must be powered down before you replace a Tape Blade chassis or a
tape drive. The replacement chassis is supplied with cables and all Tape Blade components, apart
from the tape drive and its mounting rails and the coupler plate.
Replacing the tape drive
There are four stages to this process:
• Power down the Tape Blade
• Remove the faulty tape drive from the Tape Blade chassis and remove its mounting rails
• Attach the mounting rails to the replacement tape drive and install it in the Tape Blade
• Power up the Tape Blade.
Tape Blade 65
Page 66

Remove the tape drive
1. Power down the partner server blade. This powers down the Tape Blade, see “Powering the
Tape Blade on and off” on page 33.
NOTE:
Do not power down the partner server blade and remove power from the drive during read,
write, fast-search, load and unload activities.
2. Press the mounting rails in towards the tape drive and slowly pull the tape drive away from the
chassis until the power and data cables become accessible. If you pull too hard on the tape
drive, you may disturb the cable routing and will not be able to install the replacement drive
without removing the chassis cover, as described in “Replacing the Tape Blade
chassis” on page 71.
Figure 26 Releasing the tape drive
.
Replacing a Tape Blade chassis or tape drive66
Page 67

3. Disconnect the power and SAS cable at the rear of the tape drive.
Figure 27 Disconnecting the SAS with power cable on the SB3000c Tape Blade
.
Figure 28 Disconnecting the power and SAS cables on all other Tape Blades
Tape Blade 67
Page 68

.
4. Remove the tape drive and then remove the clip-on mounting rails, one from each side of the
faulty tape drive, and retain the rails for use with the replacement tape drive.
Figure 29 Removing the clip-on mounting rails on a faulty tape drive
.
5. Put the faulty tape drive into the packaging that contained the replacement item.
Install the new tape drive
1. Attach the clip-on mounting rails to the new tape drive. They are marked right and left. (It is easier
to clip in the rear end of the rails first.)
Figure 30 Replacing the clip-on mounting rails on a new tape drive
.
Replacing a Tape Blade chassis or tape drive68
Page 69

2. Attach the power and SAS cable to the rear of the tape drive.
NOTE:
The tape drive in the HP StorageWorks SB3000c Tape Blade has a single socket. The power
and data connectors are on a single SAS cable.
The tape drive in all other Tape Blade models has two sockets; one for data and one for
power.
Figure 31 Reconnecting the SAS with power cable to the tape drive in an SB3000c Tape Blade
.
Tape Blade 69
Page 70

Figure 32 Reconnecting the power and SAS cables to the tape drive in all other Tape Blades
.
3. Slide the tape drive into the Tape Blade chassis and push on the mounting rail handles until the
tape drive is fully inserted into the chassis, taking care not to catch any of the cables at the rear
of the tape drive.
Figure 33 Installing the tape drive
.
Replacing a Tape Blade chassis or tape drive70
Page 71

4. Power on the partner server blade. The tape drive will run its hardware self-test, which takes
about 5 seconds. If self-test passes, the green Ready LED on the tape drive flashes and then shows
steady green.
Follow normal operating procedures to work with the Tape Blade. Follow the step-by-step
instructions in this User Guide.
Replacing the Tape Blade chassis
There are five stages to this process:
• Power down the Tape Blade and remove it from the blade enclosure
• Full-height partner server blades only: Remove the coupler plate from the faulty Tape Blade chassis
• Remove the good tape drive from the faulty Tape Blade chassis
• Insert the tape drive into the replacement chassis
• Install the replacement Tape Blade and power it up
Remove the Tape Blade
1. Power down the partner server blade. This powers down the Tape Blade, see “Powering the
Tape Blade on and off” on page 33.
NOTE:
Do not power down the partner server blade and remove power from the drive during read,
write, fast-search, load and unload activities.
NOTE:
If there is a half-height server blade in the device bay directly above the Tape Blade, please
remove it before you remove the Tape Blade. See the server blade documentation for more
details.
2. Grasp the metal release latch, at the bottom of the Tape Blade in c7000 enclosures and to the
right of the Tape Blade in c3000 enclosures, and pull forward until the locking mechanism
disengages.
Tape Blade 71
Page 72

3. Carefully pull the Tape Blade out from the enclosure.
CAUTION:
Do not pull on the tape drive bezel when removing the Tape Blade.
Figure 34 Removing the Tape Blade
.
1. Pull latch forward
2. Pull Tape Blade away from the enclosure
NOTE:
If you are not replacing the Tape Blade immediately, you should insert a half-height blank
into the empty device bay.
Remove the coupler plate, full-height partner servers in a c7000 enclosure only
If you are using the Tape Blade with a full-height partner server, you must retain the coupler plate for
use with your replacement Tape Blade. (No coupler plate is shipped with the replacement product.)
1. Press a small pin into the last flat hole of the coupler plate.
Replacing a Tape Blade chassis or tape drive72
Page 73

2. Gently start to slide the coupler plate in the opposite direction to installation
Figure 35 Disconnecting the coupler plate
.
3. Retain the coupler plate for use with the replacement chassis.
Remove the tape drive
1. Press the mounting rails in towards the tape drive and slowly pull the tape drive away from the
chassis until the power and data cable become accessible.
2. Slide back and lift coupler plate1. Location to insert release pin
Figure 36 Releasing the tape drive
.
Tape Blade 73
Page 74

2. Disconnect the power and SAS cable at the rear of the tape drive.
Figure 37 Disconnecting the power and SAS cables, SB3000c Tape Blades
.
Figure 38 Disconnecting the power and SAS cables, all other Tape Blades
Replacing a Tape Blade chassis or tape drive74
Page 75

.
3. Remove the tape drive completely and retain it for use with the replacement chassis.
4. Put the faulty Tape Blade chassis into the packaging that contained the replacement item.
Install the replacement chassis
1. Unscrew the single screw and remove the cover from the replacement Tape Blade chassis.
Figure 39 Removing the Tape Blade cover
.
2. Remove the connector cover on the rear of the replacement chassis.
Figure 40 Removing the connector cover
.
2. Pull cover away1. Release side clips
Tape Blade 75
Page 76

3. Slide the tape drive that you removed earlier into the Tape Blade assembly and attach the power
and SAS cable to the rear of the tape drive.
Figure 41 Reconnecting the power and SAS cables to the tape drive in an SB3000c Tape Blade
.
Figure 42 Reconnecting the power and SAS cables to the tape drive in all other Tape Blades
.
Replacing a Tape Blade chassis or tape drive76
Page 77

CAUTION:
Take care when routing the cables. If routed incorrectly, they may jam the tape drive or
damage components.
4. Push on the mounting rails until the tape drive is fully inserted into the chassis, taking care not to
catch any of the cables at the rear of the tape drive.
Figure 43 Installing the tape drive
.
Figure 44 Cabling in the replacement chassis
.
Tape Blade 77
Page 78

5. Replace the cover on the Tape Blade chassis and tighten the screw.
Figure 45 Replacing the Tape Blade cover
.
6. Full-height partner servers in a c7000 enclosure only: Attach the coupler plate that you removed
from the faulty chassis to the replacement unit.
Figure 46 Installing the coupler plate
.
Replacing a Tape Blade chassis or tape drive78
Page 79

7. Push the Tape Blade chassis back into the device bay until it is fully inserted and the enclosure
connectors are fully engaged. The System Health LED will briefly flash red, indicating that the
system is connected.
Figure 47 Installing the replacement chassis
.
8. Power on the partner server blade. Follow normal operating procedures to work with the Tape
Blade. Follow the step-by-step instructions in this User Guide.
Returning the faulty part
1. Put the faulty tape drive or Tape Blade chassis into the packaging that contained the replacement
part.
2. Return the faulty part to your local HP Service Center. Instructions on where to return faulty parts
will be shipped with the replacement part. You must ship the defective part back to HP within a
defined period of time, normally five (5) business days. The defective part must be returned with
the associated documentation in the provided shipping material. Failure to return the defective
part may result in HP billing you for the replacement. HP will pay all shipping and part return
costs and determine the courier/carrier to be used.
See complete hp limited warranty statement at: http://h18006.www1.hp.com/products/storageworks/
warranty.html
2. Push latch in to secure the Tape Blade1. Push Tape Blade into the bay
Tape Blade 79
Page 80

Replacing a Tape Blade chassis or tape drive80
Page 81

Index
A
audience, 9
B
backup software, 19
encryption, 19
buttons
Unload, 44
C
cabling
Tape Blade chassis, 77
cartridges
cleaning, 48, 50
compatibility, 47
drive won't accept, 62
encryption, 49
environment, 52
handling, 52
inserting, 43
jammed, 61
recommended, 47
removing, 44
troubleshooting, 61
WORM, 48
write protecting, 51
chassis
cabling, 77
installing, 75
Clean LED, 39
cleaning cartridges, 48
cleaning the tape drive, 50
conventions
document, 9
coupler plate, 31
removing, 72
diagnostic tools
TapeAssure, 60
disaster recovery
See OBDR
document
conventions, 9
related documentation, 9
documentation
HP website, 9
providing feedback, 11
drive
operating, 43
Drive LED, 39, 40
drivers, 17
SAS controller, 17
Tape driver, 18
E
ejecting cartridge, 44
emergency reset, 62
encryption, 49
backup software, 19
Encryption LED, 39
encryption LED, 41
environment
cartridges, 52
F
faulty parts
returning, 79
firmware
on tape enclosure, 13
onboard administrator, 14
firmware, upgrading
drives, 44
front view, 14
full-height partner server
installing in, 27
D
device bay numbering, 21
device bays
paired locations, 23, 28
diagnostic questions, 59
H
half-height partner server
installing in, 22
handling cartridges, 52
Tape Blade 81
Page 82

help
obtaining, 10
HP
technical support, 10
HP StorageWorks Tape CD-ROM, 15
I
inserting cartridges, 43
installation
before you start, 21
coupler plate, 31
drivers, 17
full-height partner server, 27
guidelines, 13
half-height partner server, 22
partner server blade, 14
verify, 35
installing Tape Blade chassis, 75
installing tape drive, 68
J
jammed cartridge, 61
L
L&TT, 60
LEDs
Clean, 39
Drive, 39, 40
Encryption, 39
encryption, 41
Ready, 39, 40
system health, 37
Tape, 39, 40
Tape Blade chassis, 37
tape drive, 38
UID, 37
loading cartridges, 43
M
media
See cartridges
mezzanine card, 27
N
numbering
device bays, 21
O
OBDR
compatibility, 55
remote recovery, 56
running, 56
testing for compatibility, 56
what it does, 55
onboard administrator, 60
firmware required, 14
operation
drives, 43
P
partner server blade, 14
power off, 34
power on, 33
R
Ready LED, 39, 40
recommended media, 47
related documentation, 9
remote disaster recovery, 56
removing coupler plate, 72
removing Tape Blade, 44, 71
removing tape drive, 66, 73
replacing parts, 65
returning
faulty parts, 79
S
SAS controller driver, 17
Subscriber's Choice, HP, 10
supported Tape Blades, 13
system health LED, 34, 37
T
Tape Blade
front view, 14
power off, 34
power on, 33
removing, 44, 71
supported models, 13
Tape Blade doesn't power up, 59
Tape Blade LEDs, 37
troubleshooting, 38
Tape Blade operation
troubleshooting, 59
tape drive
installing, 68
removing, 66, 73
82
Page 83

tape drive LEDs, 38
troubleshooting with, 40
Tape driver, 18
tape enclosure
firmware required, 13
Tape LED, 39, 40
TapeAssure, 60
technical support
HP, 10
service locator website, 11
tools
L&TT, 60
onboard administrator, 60
troubleshooting
cartridges, 61
drive ejects cartridge, 62
L&TT, 60
Tape Blade doesn't power up, 59
tape drive LEDs, 38, 40
tools, 60
U
UID LED, 37
Unload button, 44
upgrading firmware
drives, 44
V
verify installation, 35
W
websites
HP, 11
HP Subscriber's Choice for Business, 10
product manuals, 9
WORM cartridges, 48
write protecting cartridges, 51
Tape Blade 83
Page 84

84
 Loading...