

HP STOREEVER LTO 4, STOREEVER LTO 5, STOREEVER LTO 6 User Manual

StoreEver LTO 4/5/6
Full-Height SAS Tape Drives
User Guide
Abstract
This guide is intended for users who install, operate, and maintain Hewlett Packard Enterprise LTO-3, LTO-4, LTO-5, and LTO-6
Ultrium full-height tape drives. This guide provides information about installing, using, and troubleshooting the tape drives.
Part Number: EH964-90907
Published: June 2016
Edition: 6

© Copyright 2009, 2016 Hewlett Packard Enterprise Development LP
The information contained herein is subject to change without notice. The only warranties for Hewlett Packard Enterprise products and services
are set forth in the express warranty statements accompanying such products and services. Nothing herein should be construed as constituting
an additional warranty. Hewlett Packard Enterprise shall not be liable for technical or editorial errors or omissions contained herein.
Confidential computer software. Valid license from Hewlett Packard Enterprise required for possession, use, or copying. Consistent with FAR
12.211 and 12.212, Commercial Computer Software, Computer Software Documentation, and Technical Data for Commercial Items are licensed
to the U.S. Government under vendor's standard commercial license.
Links to third-party websites take you outside the Hewlett Packard Enterprise website. Hewlett Packard Enterprise has no control over and is not
responsible for information outside the Hewlett Packard Enterprise website.
Acknowledgments
Linear Tape-Open, LTO, LTO Logo, Ultrium and Ultrium Logo are trademarks of Quantum, Hewlett Packard Enterprise and IBM in the US, other
countries or both.
Microsoft® and Windows® are either registered trademarks or trademarks of Microsoft Corporation in the United States and/or other countries.
UNIX® is a registered trademark of The Open Group.

Contents
1 Before you start...................................................................................................5
Which operating systems are supported?............................................................................................5
Power specifications.............................................................................................................................5
How do I connect the drive to my server?............................................................................................6
Internal drives..................................................................................................................................6
External drives.................................................................................................................................7
Rackmount drives............................................................................................................................8
LTFS and HPE StoreOpen Standalone................................................................................................8
2 Drivers and backup software...............................................................................9
Install drivers.........................................................................................................................................9
Installing on Windows......................................................................................................................9
Installing on Linux and UNIX...........................................................................................................9
Installing on IA64.............................................................................................................................9
Diagnostic, management, and support tools........................................................................................9
Upgrade backup software...................................................................................................................10
Enable encryption...............................................................................................................................10
3 Installing an internal LTO Ultrium tape drive .....................................................11
Before you start..................................................................................................................................11
Mounting requirements.......................................................................................................................12
Remove server cover..........................................................................................................................12
Attach mounting hardware - some servers.........................................................................................13
HPE ProLiant servers....................................................................................................................13
Mounting rails...........................................................................................................................13
Mounting screws......................................................................................................................14
Other servers.................................................................................................................................14
Install drive..........................................................................................................................................14
Connect SAS and power cords...........................................................................................................15
Supplied SAS cable.......................................................................................................................15
Option 1: Connect to a new HBA (all servers)...............................................................................16
Option 2: Connect cable to spare port on host SAS controller......................................................18
Option 3: Connect cable to port on host SAS controller and replace existing SAS cable.............20
Secure the drive..................................................................................................................................23
Mounting hardware used...............................................................................................................23
No mounting hardware used.........................................................................................................24
Reboot the server...............................................................................................................................24
4 Installing an external LTO Ultrium tape drive ....................................................26
Before you start..................................................................................................................................26
Connecting the tape drive to an external SAS port............................................................................26
Reboot the server ..............................................................................................................................27
5 Verifying the installation.....................................................................................29
6 Operating the tape drive....................................................................................30
About the LTO tape drive....................................................................................................................30
LTO-6 and LTO-5 Ultrium tape drives............................................................................................30
Earlier generation LTO Ultrium tape drives...................................................................................30
Loading a cartridge.............................................................................................................................31
Unloading a cartridge..........................................................................................................................31
Removing power from the drive..........................................................................................................32
7 Use the correct media.......................................................................................33
Cartridges...........................................................................................................................................33
Contents 3

Cleaning cartridges........................................................................................................................33
Data cartridges..............................................................................................................................33
LTO Ultrium WORM data cartridges...................................................................................................34
LTO-6 and LTO-5 Ultrium tape drives and partitioning.......................................................................34
LTO-6, LTO-5 and LTO-4 Ultrium tape drives and encryption............................................................34
When should I use encryption?.....................................................................................................35
How do I enable encryption?.........................................................................................................35
When will I be asked to enter the key?..........................................................................................35
What happens if I do not remember the key?...............................................................................35
Does encryption affect tape drive performance?...........................................................................35
Does the tape drive encrypt media in an earlier Ultrium format?..................................................35
Where can I get more information?...............................................................................................36
Write protecting cartridges..................................................................................................................36
Cleaning the tape drive.......................................................................................................................37
Handling cartridges.............................................................................................................................37
Operating and storage environment...................................................................................................38
8 Diagnostic Tools and SMART components.......................................................39
Library & Tape Tools (L&TT) with integrated TapeAssure monitoring.................................................39
Main features available with Library & Tape Tools........................................................................39
HPE SMART components..................................................................................................................40
9 Troubleshooting.................................................................................................41
General Procedure.............................................................................................................................41
Understanding LED sequences..........................................................................................................42
Encryption LED(HPE LTO-6 and LTO-5 models only)...................................................................45
Problems with cartridges....................................................................................................................46
The cartridge is jammed................................................................................................................46
Emergency reset......................................................................................................................47
The drive will not accept the cartridge (or ejects it immediately)...................................................47
Encryption troubleshooting.................................................................................................................48
10 Replacing a tape drive.....................................................................................49
To disconnect your drive.....................................................................................................................49
To reconnect your tape drive..............................................................................................................49
11 Support and other resources...........................................................................50
Accessing Hewlett Packard Enterprise Support.................................................................................50
Accessing updates..............................................................................................................................50
Related information.............................................................................................................................51
Rack stability.......................................................................................................................................51
Websites.............................................................................................................................................51
Customer self repair...........................................................................................................................52
Registering your tape drive.................................................................................................................52
Remote support..................................................................................................................................52
Documentation feedback....................................................................................................................52
A Warranty and regulatory information.................................................................53
Warranty information...........................................................................................................................53
Regulatory information........................................................................................................................53
Belarus Kazakhstan Russia marking.............................................................................................53
Turkey RoHS material content declaration....................................................................................54
Ukraine RoHS material content declaration..................................................................................54
Index.....................................................................................................................55
4 Contents
1 Before you start
This guide describes how to install and operate the following HPE LTO Ultrium tape drives:
• HPE LTO-6 Ultrium 6650 internal and external tape drives
• HPE LTO-5 Ultrium 3280 internal and external tape drives
• HPE LTO-4 Ultrium 1840 internal and external tape drives
For a detailed product specification, see the HPE Tape Products website:
http://www.hpe.com/info/tape
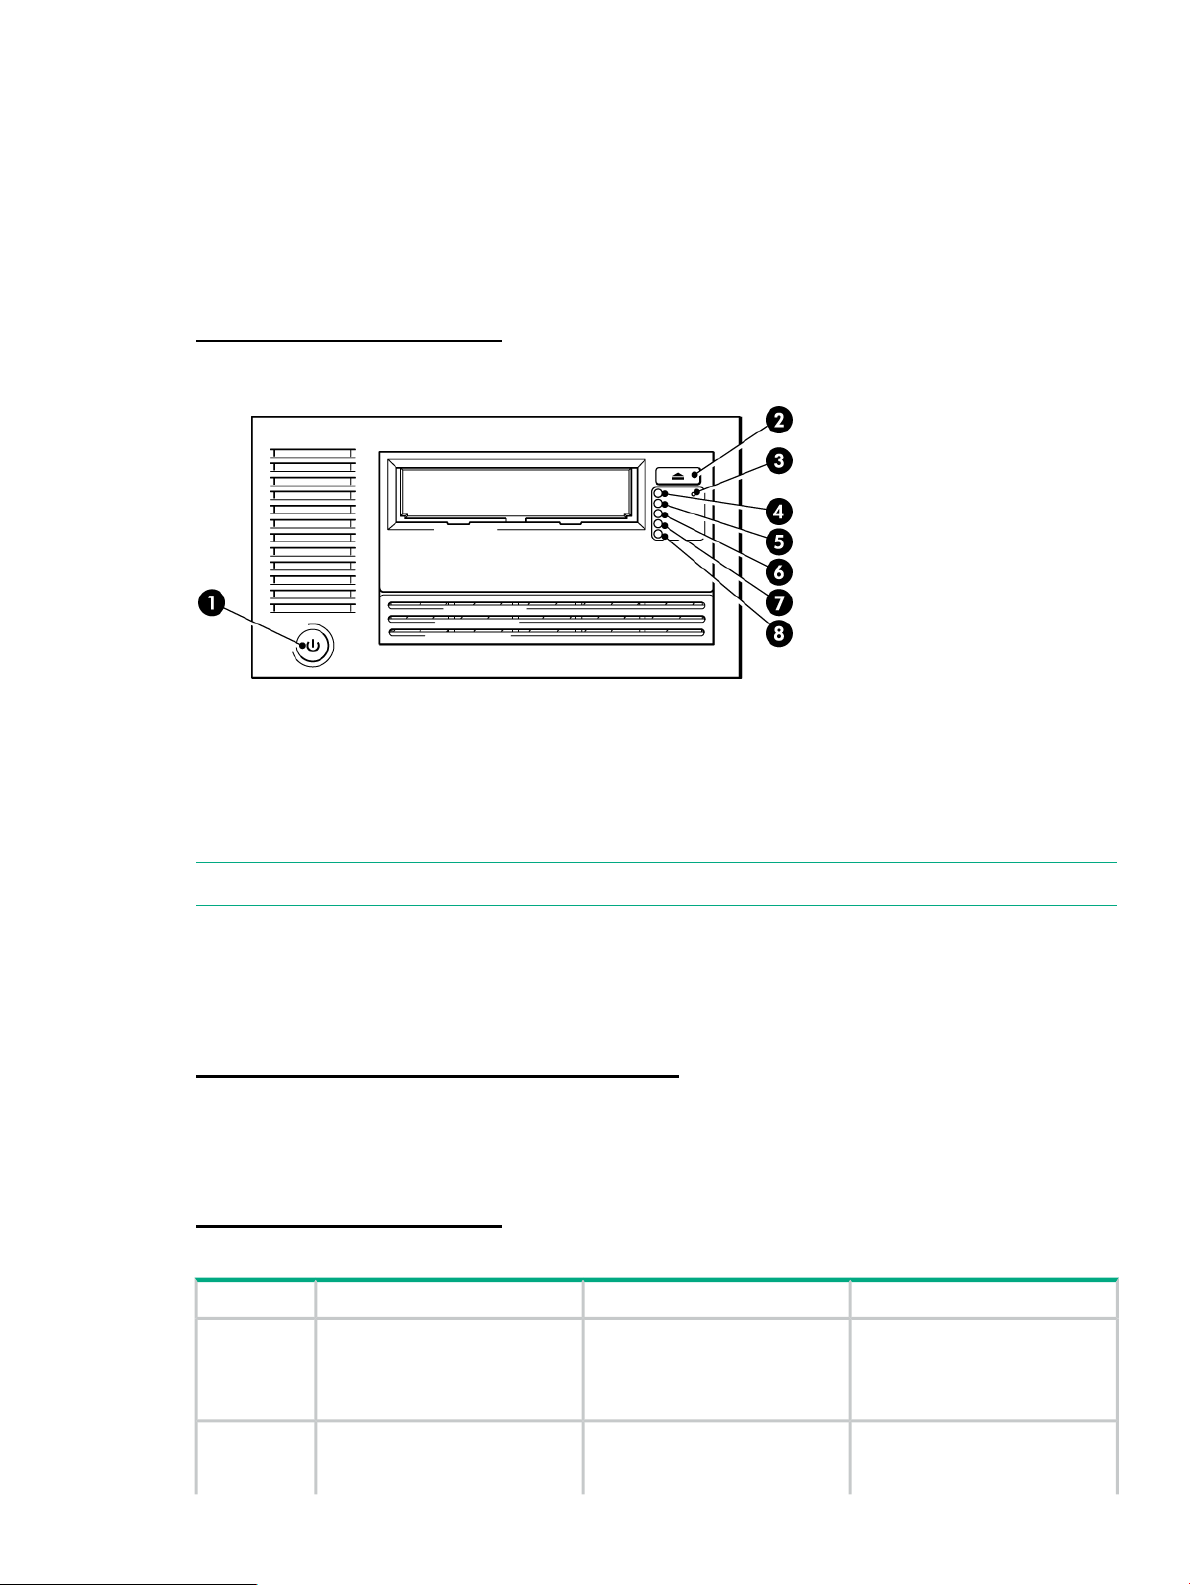
Figure 1 Front view of external tape drive
5. Drive LED1. On/Off switch (external drives only)
6. Tape LED2. Eject button
7. Clean LED3. Emergency reset button
8. Encryption LED (LTO-6 and LTO-5 only)4. Ready LED
NOTE: LTO-4 tape drives do not have an Encryption LED.
Which operating systems are supported?
LTO Ultrium drives can be connected to servers running under Windows®, Linux, UNIX, and
other major operating systems. For the most recent information about supported operating
systems, see the Data Agile BURA website:
http://www.hpe.com/storage/buracompatibility
Power specifications
For a detailed product specification, refer to the QuickSpecs available from the Tape Products
website:
http://www.hpe.com/info/tape
Table 1 Power specifications for LTO Ultrium full-height tape drives
LTO-4 Ultrium 1840LTO-5 Ultrium 3280LTO-6 Ultrium 6650
consumption
requirements
12 Watts idle,7.5 Watts idle,4.5 Watts idle (hibernate)Power
32 Watts typical,24 Watts typical,29 Watts typical (writing)
52 Watts maximum40 Watts maximum42 Watts maximum
+5V @ 4.2A typical+5V @ 4.1A typical+5V @ 3.7A typicalPower
+5V @ 4.5A maximum+5V @ 4.3A maximum+5V @ 4.2A maximum
Which operating systems are supported? 5

Table 1 Power specifications for LTO Ultrium full-height tape drives (continued)
LTO-4 Ultrium 1840LTO-5 Ultrium 3280LTO-6 Ultrium 6650
+12V @ 0.75A typical+12V @ 0.75A typical+12V @ 0.9A typical
+12V @ 2.5A maximum+12V @ 2.3A maximum+12V @ 2.3A maximum
Power
requirements,
external tape
drives
100–240 VAC, 50-60 Hz,
auto-ranging, 0.8A maximum
100–240 VAC, 50-60 Hz,
auto-ranging, 0.8A maximum
How do I connect the drive to my server?
Installation requires a SAS Smart Array controller or SAS HBA that supports tape.
NOTE: All non-Hewlett Packard Enterprise servers require an additional HBA.
The recommended way of connecting a tape drive to a SAS server, is to purchase and install
one of the supported HBAs. Always refer to the Data Agile BURA Compatibility Matrix BEFORE
you install your tape drive to ensure that you are connecting to a supported HBA running the
recommended firmware version. Be sure to check the details of the specific tape drive and server
combination that you require.
For current information about supported HBAs, see the Data Agile BURA Compatibility Matrix
at:
http://www.hpe.com/storage/buracompatibility
Internal drives
The tape drive is installed into a spare drive bay in your server and is attached to the host server
internal SAS controller or SAS host bus adapter.
You need one industry-standard, 5¼-inch, full-height bay in which to install the LTO Ultrium tape
drive. Different models of server require different mounting methods. Refer to your server
documentation for detailed information. See also “Installing an internal LTO Ultrium tape
drive” (page 11).
The cable supplied with the tape drive is suitable for connecting to a mini-SAS (SFF-8086/8087)
connector on a dedicated HBA or on the server SAS controller. If your server has a SAS 4i
connector (SFF-8484), a suitable cable is available, but must be purchased separately.
100–240 VAC, 50-60 Hz,
auto-ranging, 0.8A maximum
NOTE: Power for the LTO-6 Ultrium 6650 and LTO-5 Ultrium 3280 tape drive is supplied
through the SAS cable. For all earlier models of tape drive, a separate power cable is required,
see http://www.hpe.com/storage/spock.
6 Before you start
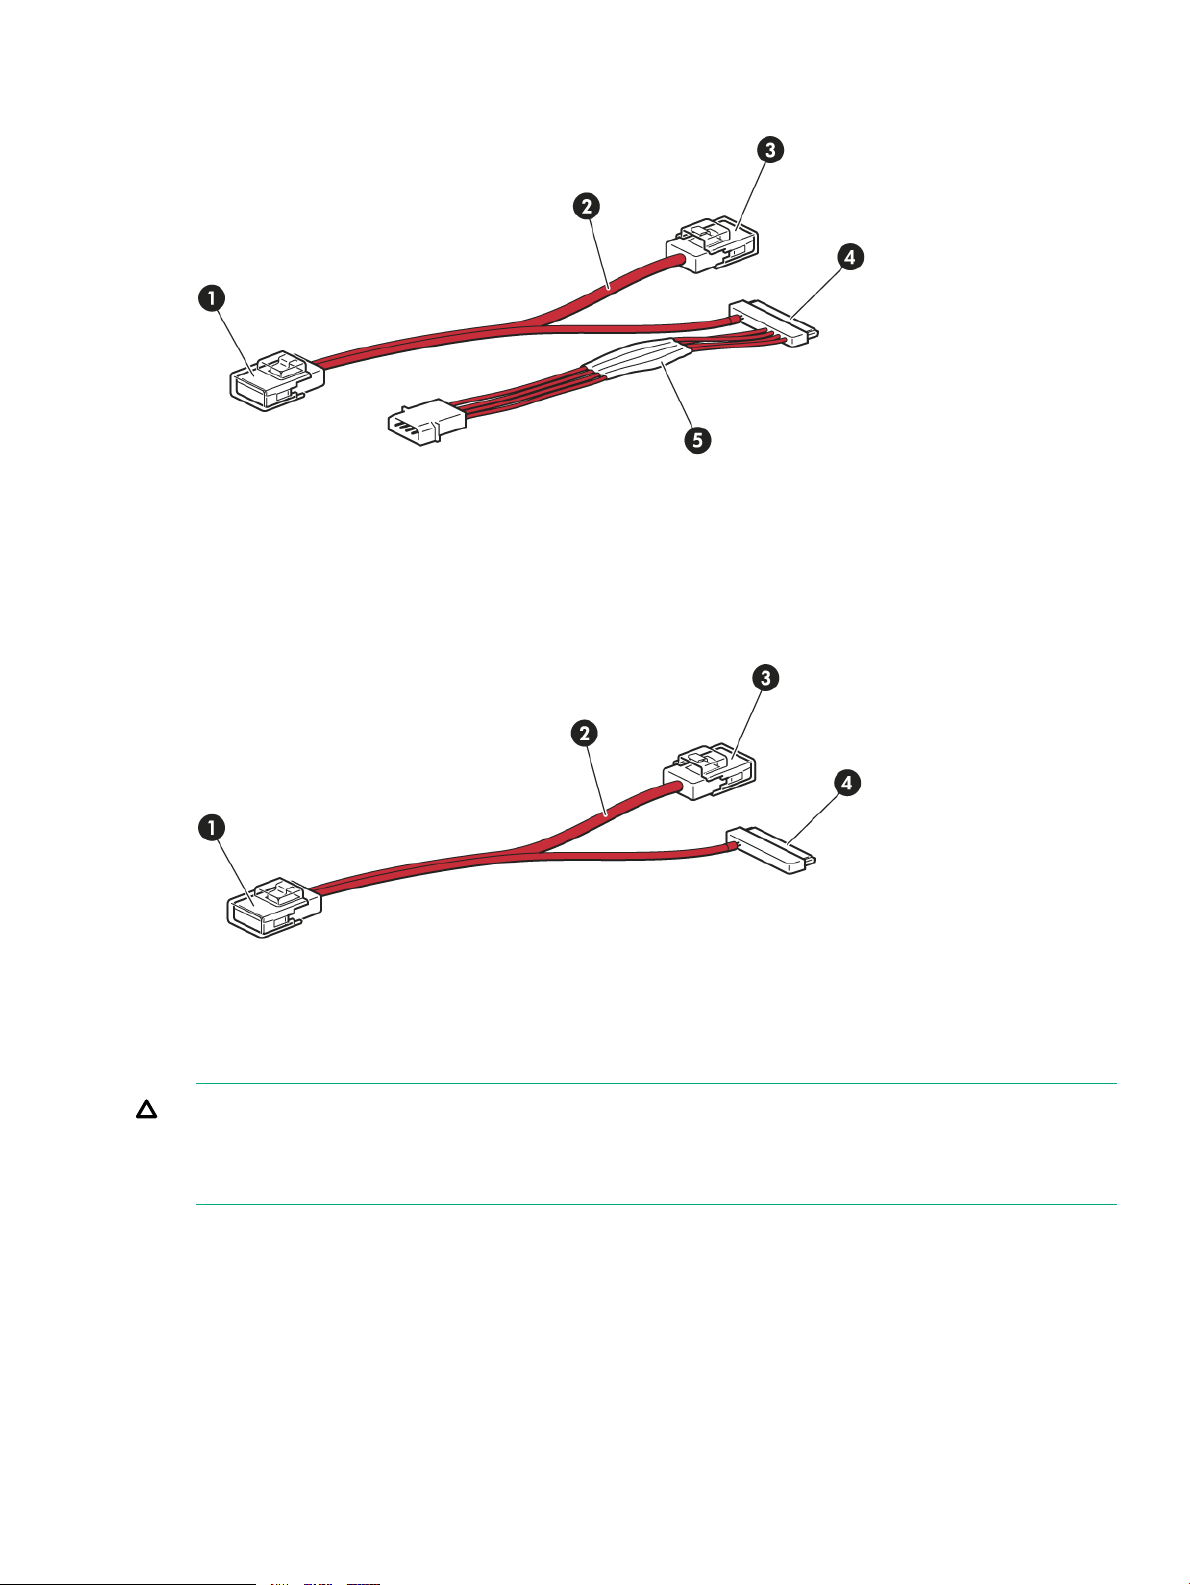
Figure 2 SAS with power cable supplied with LTO-6 Ultrium 6650 and LTO-5 Ultrium 3280
internal tape drives
2. Unused second branch on supplied cable1. Mini-SAS connector to server (remove cover)
4. SAS connector to tape drive3. Mini-SAS connector on second branch (unused, do not
remove cover)
5. Power cable and connector to server power supply
Figure 3 SAS without power cable supplied with LTO-4 Ultrium 1840 internal tape drives
remove cover)
CAUTION: With all tape drives before LTO-6 Ultrium 6650 and LTO-5 Ultrium 3280, never
use a cable where power is supplied through the SAS connector because doing so may damage
the drive. Always use a spare power cord from the server internal power supply to the conventional
power connector on the drive itself.
See Connect SAS and power cables (page 15) for detailed instructions on connecting the SAS
cable.
External drives
External tape drives must be connected to an external port. The cable supplied with the tape
drive is suitable for connecting to an External Mini SAS High Density (SFF-8644) port on a
dedicated HBA (recommended) or the host SAS controller. If your server has an external Infiniband
(SFF-8470) connector, a suitable cable is available, and must be purchased separately.
2. Unused second branch on supplied cable1. Mini-SAS connector to server (remove cover)
4. SAS connector to tape drive3. Mini-SAS connector on second branch (unused, do not
How do I connect the drive to my server? 7
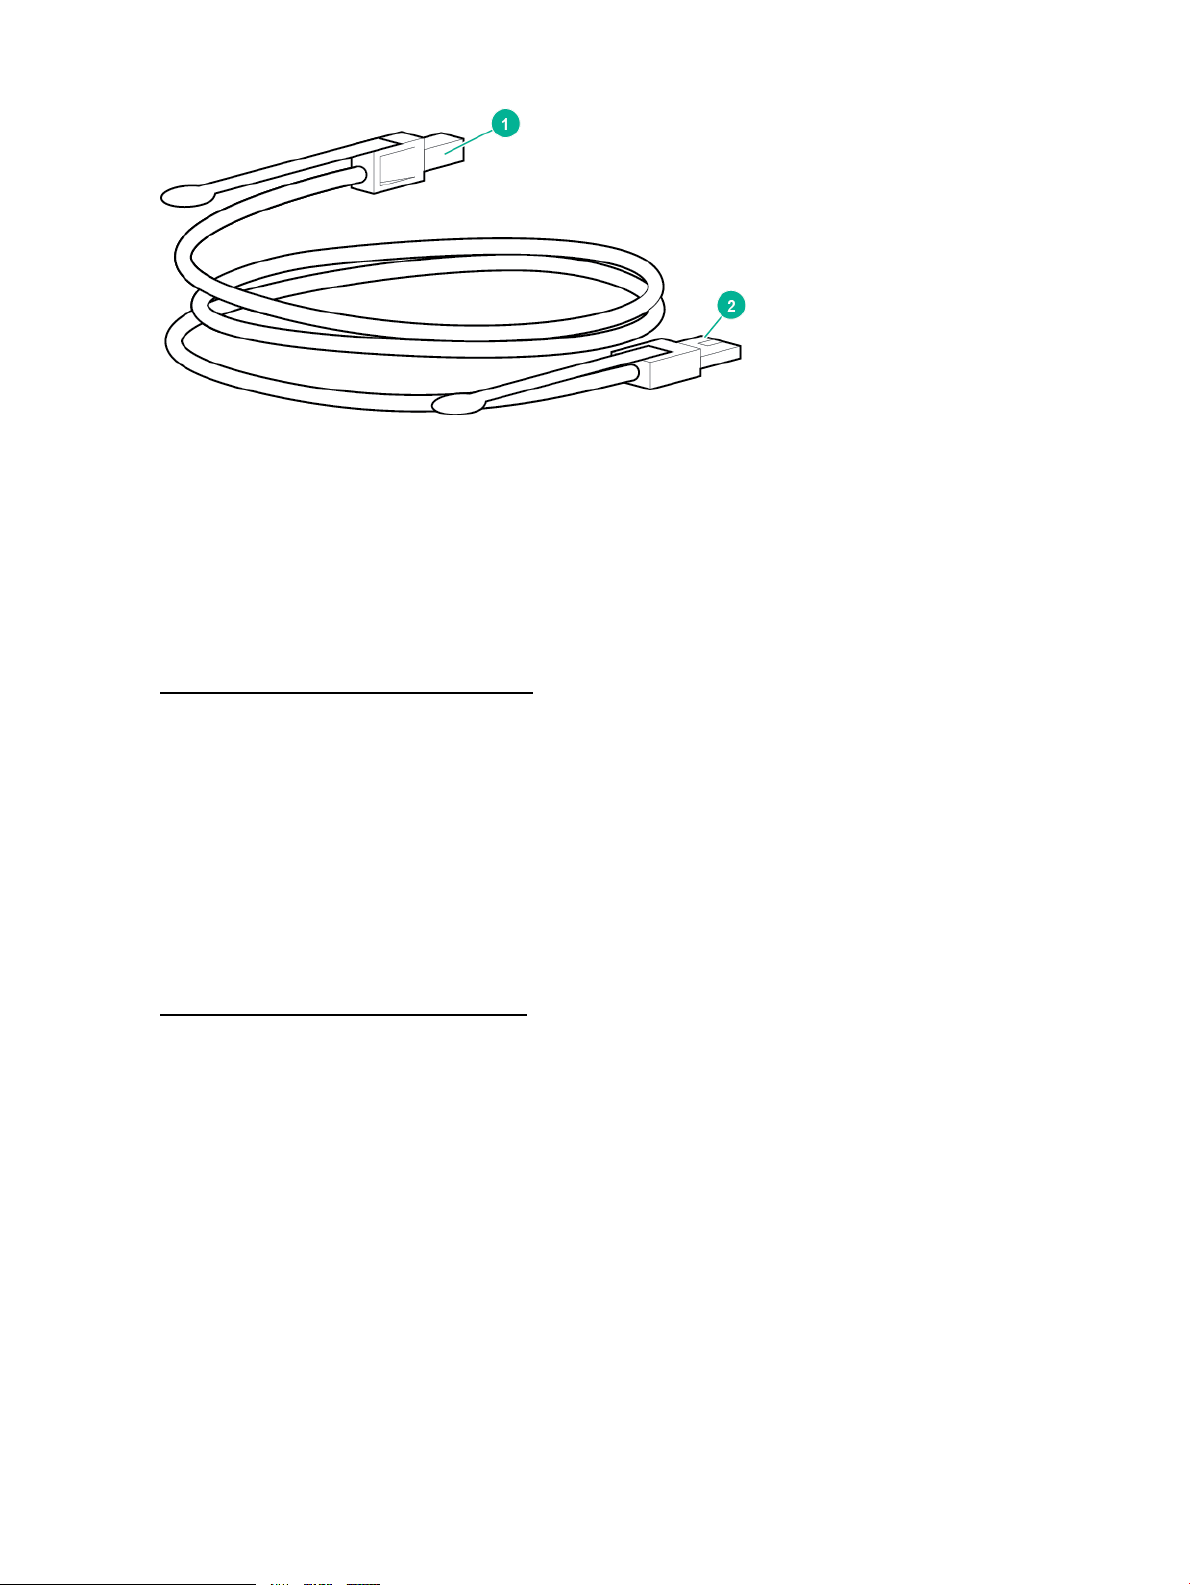
Figure 4 SAS cable supplied with the external tape drive
1. High-Density Mini SAS connector for the server
2. Mini SAS connector for the tape drive
For detailed instructions on connecting the external SAS tape drive, see Installing an external
LTO Ultrium tape drive (page 26).
Rackmount drives
Specific installation instructions for rackmount drives are not included in this guide. Refer to
http://www.hpe.com/info/rackmount for the most up-to-date information.
LTFS and HPE StoreOpen Standalone
LTO-5 and LTO-6 Ultrium Tape Drives feature HPE Linear Tape File System (LTFS) functionality.
LTFS makes tape self-describing, file-based, and easy-to-use and provides users with the ability
to use standard file operations on tape media for accessing, managing, and sharing files with an
interface that behaves just like a hard disk. In addition, with LTFS you can share data across
platforms, as you would with a USB drive or memory stick. Simply load a tape into the drive,
mount it into the file system, and it becomes visible as a disk.
HPE StoreOpen Standalone is a free application that helps LTFS users to use and manage single
tape drives. To find out more about LTFS and download StoreOpen Standalone, go to:
http://www.hpe.com/info/storeopen
8 Before you start

2 Drivers and backup software
Install drivers
NOTE:
The Hewlett Packard Enterprise Tape driver is suitable for use in most applications, but refer
also to the documentation of your software application to ensure that you are using the
recommended driver.
Installing on Windows
Hewlett Packard Enterprise recommends installing the tape drivers on the server before connecting
the tape drive. Use the Tape driver with the Windows operating systems unless the software
application requires a different driver.
For driver, firmware, and software updates, see drivers & downloads on the support website:
http://www.hpe.com/support/hpesc
Installing on Linux and UNIX
The recommended backup applications use the operating system standard, built-in device drivers.
To upgrade drivers, patch to the latest version of the operating system or configure device files,
as described in the UNIX, Linux, and OpenVMS Configuration Guide available on the
documentation website:
http://www.hpe.com/info/enterprise/docs
Installing on IA64
If you are installing on an IA64 system, such as an HPE Integrity server, check the Data Agile
BURA Compatibility Matrix at http://www.hpe.com/storage/buracompatibility for the latest
information on the availability of backup application upgrades and drivers.
Diagnostic, management, and support tools
The following utilities are available from Hewlett Packard Enterprise, free of charge, and are
highly recommended:
• Library & Tape Tools (L&TT) is the recommended diagnostic and support tool for your Hewlett
Packard Enterprise tape drive. Use it to verify installation, update to the latest firmware and
confirm that your tape drive is functioning correctly before you use it for backup. L&TT version
5.0 onwards offers integrated TapeAssure monitoring for Windows users so it is recommended
that you preinstall L&TT to monitor your tape drive and be ready to run diagnostics should
you need to contact Hewlett Packard Enterprise support. It is available free at www.hpe.com/
support/tapetools.
• Tape Smart Components provide easy to use driver and firmware updates.
HPE Storage Tape Drivers (Windows)◦
◦ HPE Storage Tape Firmware (Windows)
◦ HPE Storage Tape Firmware (Linux)
These components are available as free downloads from the support center website:
http://www.hpe.com/support/hpesc
Install drivers 9

Upgrade backup software
Check the Data Agile BURA Compatibility Matrix at http://www.hpe.com/storage/
buracompatibility for software compatibility and install any recommended upgrades. Make sure
that you have a backup application that supports LTO Ultrium tape drives and download any
upgrades or patches, if necessary.
For optimum performance, it is important to use a backup application that is appropriate for your
system configuration. In a direct attach configuration, where the tape drive is attached to a
standalone server, you can use backup software that is designed for a single-server environment.
In network configurations, you will need backup software that supports enterprise environments.
Hewlett Packard Enterprise, Veritas, EMC, Yosemite, and Computer Associates all provide
suitable products. Further details about these and other products that may be appropriate can
be found on the Data Agile BURA website.
Enable encryption
The LTO-6 Ultrium 6650, LTO-5 Ultrium 3280, and LTO-4 Ultrium 1840 tape drives include
hardware capable of performing data encryption while writing and data decryption while reading,
both at full speed. This feature is only possible with LTO Ultrium 6.25 TB, 3 TB, and 1.6 TB media.
See also LTO-6, LTO-5 and LTO-4 Ultrium tape drives and encryption (page 34).
To use the encryption capability, enable encryption via the backup software application. Refer
to http://www.hpe.com/storage/buracompatibility to find out which applications support this
advanced data protection capability.
10 Drivers and backup software

3 Installing an internal LTO Ultrium tape drive
NOTE: If you are installing an external LTO Ultrium tape drive, see “Installing an external LTO
Ultrium tape drive” (page 26).
Before you start
Always refer to the Data Agile BURA Compatibility Matrix at http://www.hpe.com/storage/
buracompatibility to find out which cabling option is appropriate for your combination of server
and tape drive.
The internal tape drive may be installed in one of three configurations, each of which is described
in more detail in Connect SAS and power cables (page 15):
• Purchase and install an additional SAS HBA and connect the tape drive to the new HBA.
This configuration is suitable for all servers and is described as Option 1.
• Use the existing SAS controller and connect the tape drive to a spare SAS port on the host
SAS controller. This cabling option is suitable for some HPE ProLiant servers only. It is
described as Option 2.
• Use the existing SAS controller, but replace one of the existing SAS cables to the hard disk
drive bays. This option requires some recabling inside the server, and may also disconnect
one of the hard disk drive bays. This configuration is suitable for some ProLiant servers only
and, if it does disconnect a hard disk drive bay, you must be sure that the bay is not required
for use. Do not move a hard disk to create an empty bay because you may damage your
server configuration. Never use this option with RAID configurations. This cabling option is
described as Option 3.
For current information about SAS host controllers and cabling options with ProLiant servers,
see the Data Agile BURA website at:
http://www.hpe.com/storage/buracompatibility
Before you start 11
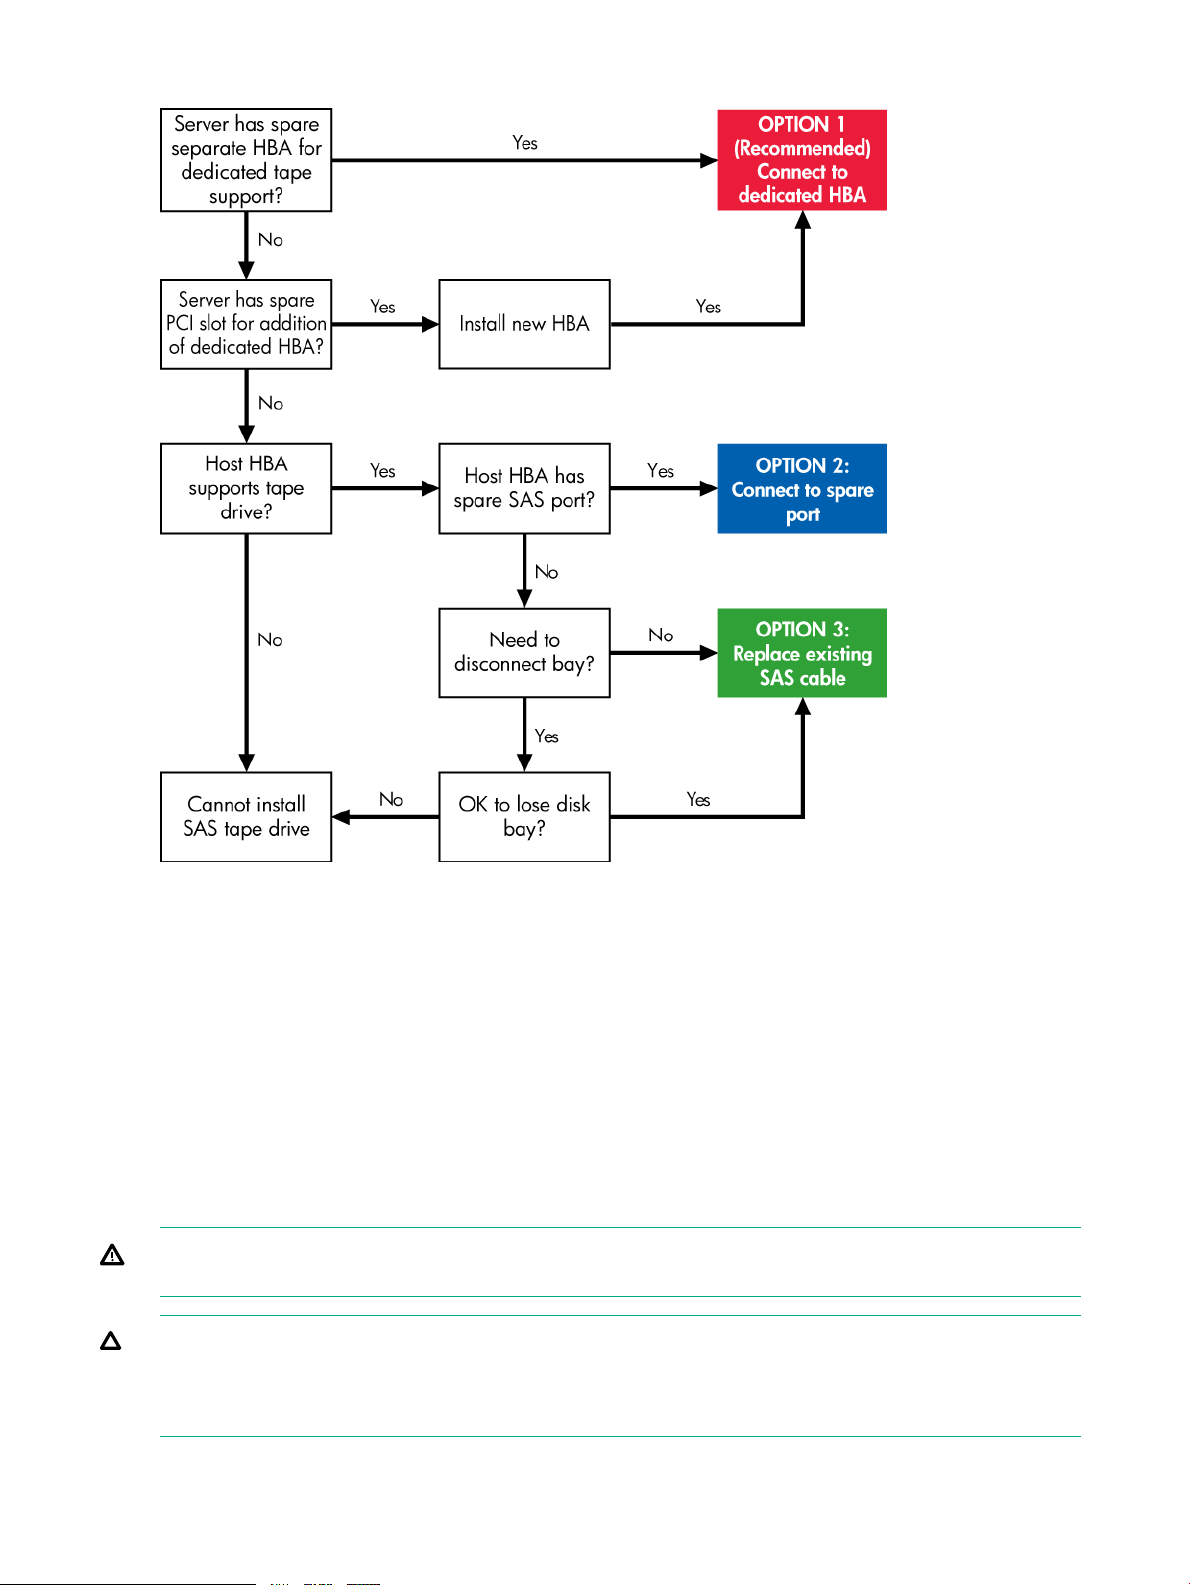
Figure 5 Decision tree for connecting an internal tape drive to an internal SAS port
Mounting requirements
You need one industry-standard, 5¼-inch, full-height bay in which to install the LTO Ultrium tape
drive.
For many servers, no mounting tray or rails are required. Devices simply slide into the server
chassis and are fixed with screws. Other servers have built-in trays or rails. Rail kits for a number
of industry-standard servers may be available.
Some servers use nonstandard mounting rails and do not include spares. If this is the case with
your system, you will have to order these accessories from the server manufacturer before you
can install the tape drive.
Remove server cover
WARNING! To avoid personal injury or damage to the server or tape drive, ensure that the
server is disconnected from the mains power supply while you install the drive.
CAUTION: Static electricity can damage electronic components. Always wear an anti-static
wriststrap if one is available. If not, after you have disconnected power from the server and
removed the cover, touch a bare metal part of the chassis. Similarly, touch a bare metal part of
the drive before installing it.
12 Installing an internal LTO Ultrium tape drive

1. Assemble the necessary tools and materials:
• PoziDrive #1 screwdriver
• Phillips screwdriver (if your server uses Phillips screws)
• Flat-bladed screwdriver (if your server uses slotted screws)
• Torx screwdriver (if your server uses Torx screws)
• Your server manuals (for reference during installation)
2. Perform a normal system shutdown and turn off the server and any connected peripherals.
Ensure that the server is disconnected from the mains power supply.
3. Remove the cover and front panel from the server, as detailed in your server documentation.
As you work inside the server, you may have to disconnect other signal cables or power
cords from other devices to maneuver the new drive into place. If you disconnect cables,
make a note of their position and connections so you can put them back correctly later.
NOTE: The server must provide forced cooling and be capable of drawing 6 CFM (0.17
m3/minute or 10.08 m3/hour) of air through the tape drive at 35° C ambient operation. This
rises to 8 CFM at 40° C ambient operation. Ensure that empty bays have the appropriate
blanking plates installed so that airflow is maintained.
4. Remove the filler panel from a spare 5¼-inch bay of your server, as described in your server
documentation. With some servers, you must also remove the half-height device divider.
Attach mounting hardware - some servers
If your server requires special rails or other hardware to install the tape drive, mount them on the
tape drive now.
If your server does not require special mounting hardware, proceed to Install drive (page 14)
now.
HPE ProLiant servers
NOTE: If mounting hardware is supplied with your tape drive, it may not be the same as shown
in the illustrations.
Different models of server require different mounting methods. The server may also incorporate
a locking mechanism to hold the tape drive in place. See Secure the drive (page 23).
Check your ProLiant server documentation to ascertain the correct method of mounting, and to
see whether mounting hardware is provided with the server.
Installing an internal LTO tape drive in an ML350 server requires a media cage kit.
• ML350 Gen8: PN 661618-B21
• ML350 Gen9: PN 726545-821
Mounting rails
Some ProLiant servers require mounting rails, which may be metal or plastic rails attached to
the server drive bay filler panel.
Use a PoziDrive #1 screwdriver to attach the appropriate rails. Use the 4mm M3 screws provided
with the tape drive, in the screw pack labeled 'General Mounting Screws', as shown below.
CAUTION: Ensure that you use the 4mm M3 screws provided. The rails may be attached to
the filler panel by screws of a different thread/size type and these screws should not be used. If
the screws are too long, they may penetrate the mechanism and void the warranty.
Attach mounting hardware - some servers 13
If the server or enclosure rails are less than 1.5 mm thick, use the washers from the GENERAL
MOUNTING SCREWS screw pack for a proper fit.
Mounting screws
Other ProLiant server models, such as ML350 and ML370, only require the use of special locating
screws with no mounting rail.
Use a T15 Torx screwdriver to attach the appropriate screws. Locate both screws lightly in position
before tightening, as shown in the following figure.
• ProLiant ML350: Use the metal shims and screw pack labeled ‘ProLiant ML350'. This screw
pack contains 3mm screws, which have a thicker head than the general mounting screws.
• ProLiant ML370: Use the metal shims and screw pack labeled ‘ProLiant ML370'. This screw
pack contains shoulder screws, which have a thick offset piece and a thicker head than the
general mounting screws.
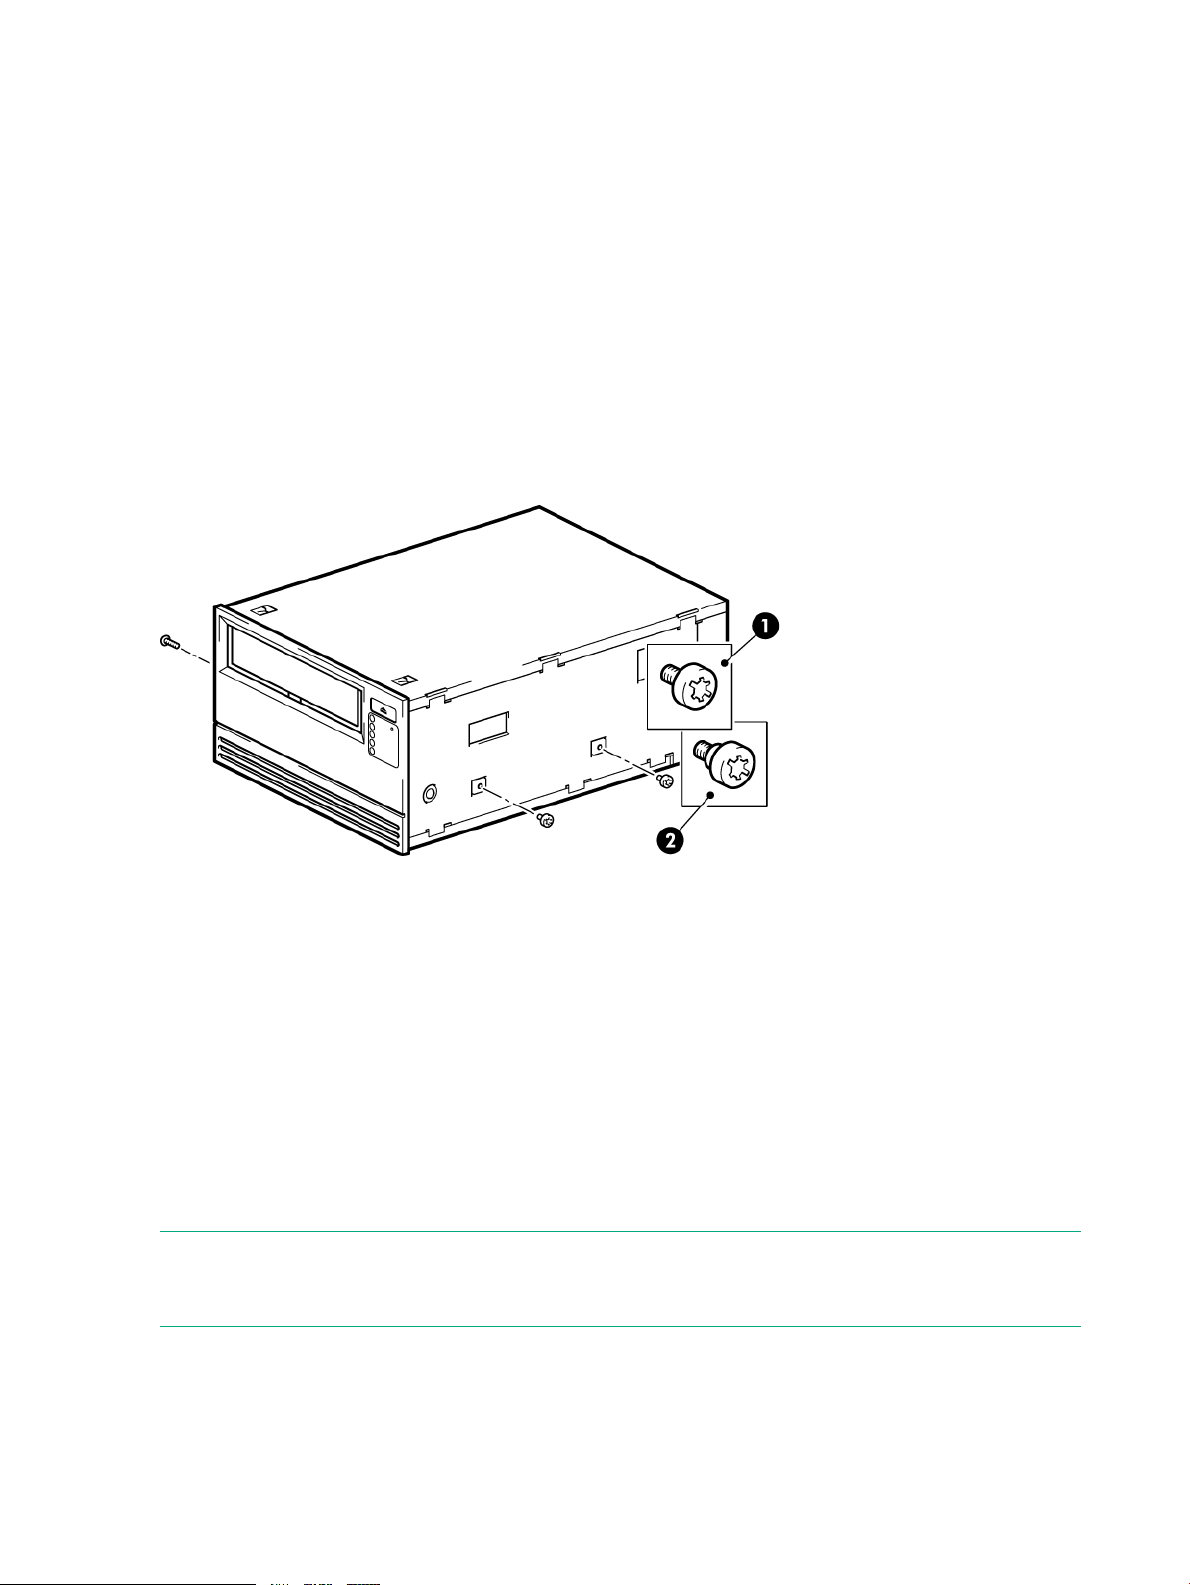
Figure 6 Attaching locating screws in a typical ProLiant ML350 or ML370
1. 3mm mounting screws ((ProLiant ML350 screw pack)
2. Shoulder mounting screws (ProLiant ML370 screw pack)
Other servers
Attach the appropriate mounting hardware. Refer to the manufacturer documentation for
instructions.
• If you are installing on a server that requires a tray, place the tape drive in the tray.
• Some servers have snap-on mounting rails attached to the filler panel, which can be removed
and attached to the tape drive with screws.
Install drive
NOTE: If cable access for the tape drive bay is awkward, it may be easier to access power
and other connections if the tape drive is installed in the top bay. You may need to move other
devices to lower bays to free the top bay. Refer also to your server documentation.
Slide the tape drive into the open bay, aligning the tray or rails with the slots in the bay. If your
server does not use mounting hardware, verify that the holes in the chassis are aligned with the
holes in the side of the tape drive.
14 Installing an internal LTO Ultrium tape drive
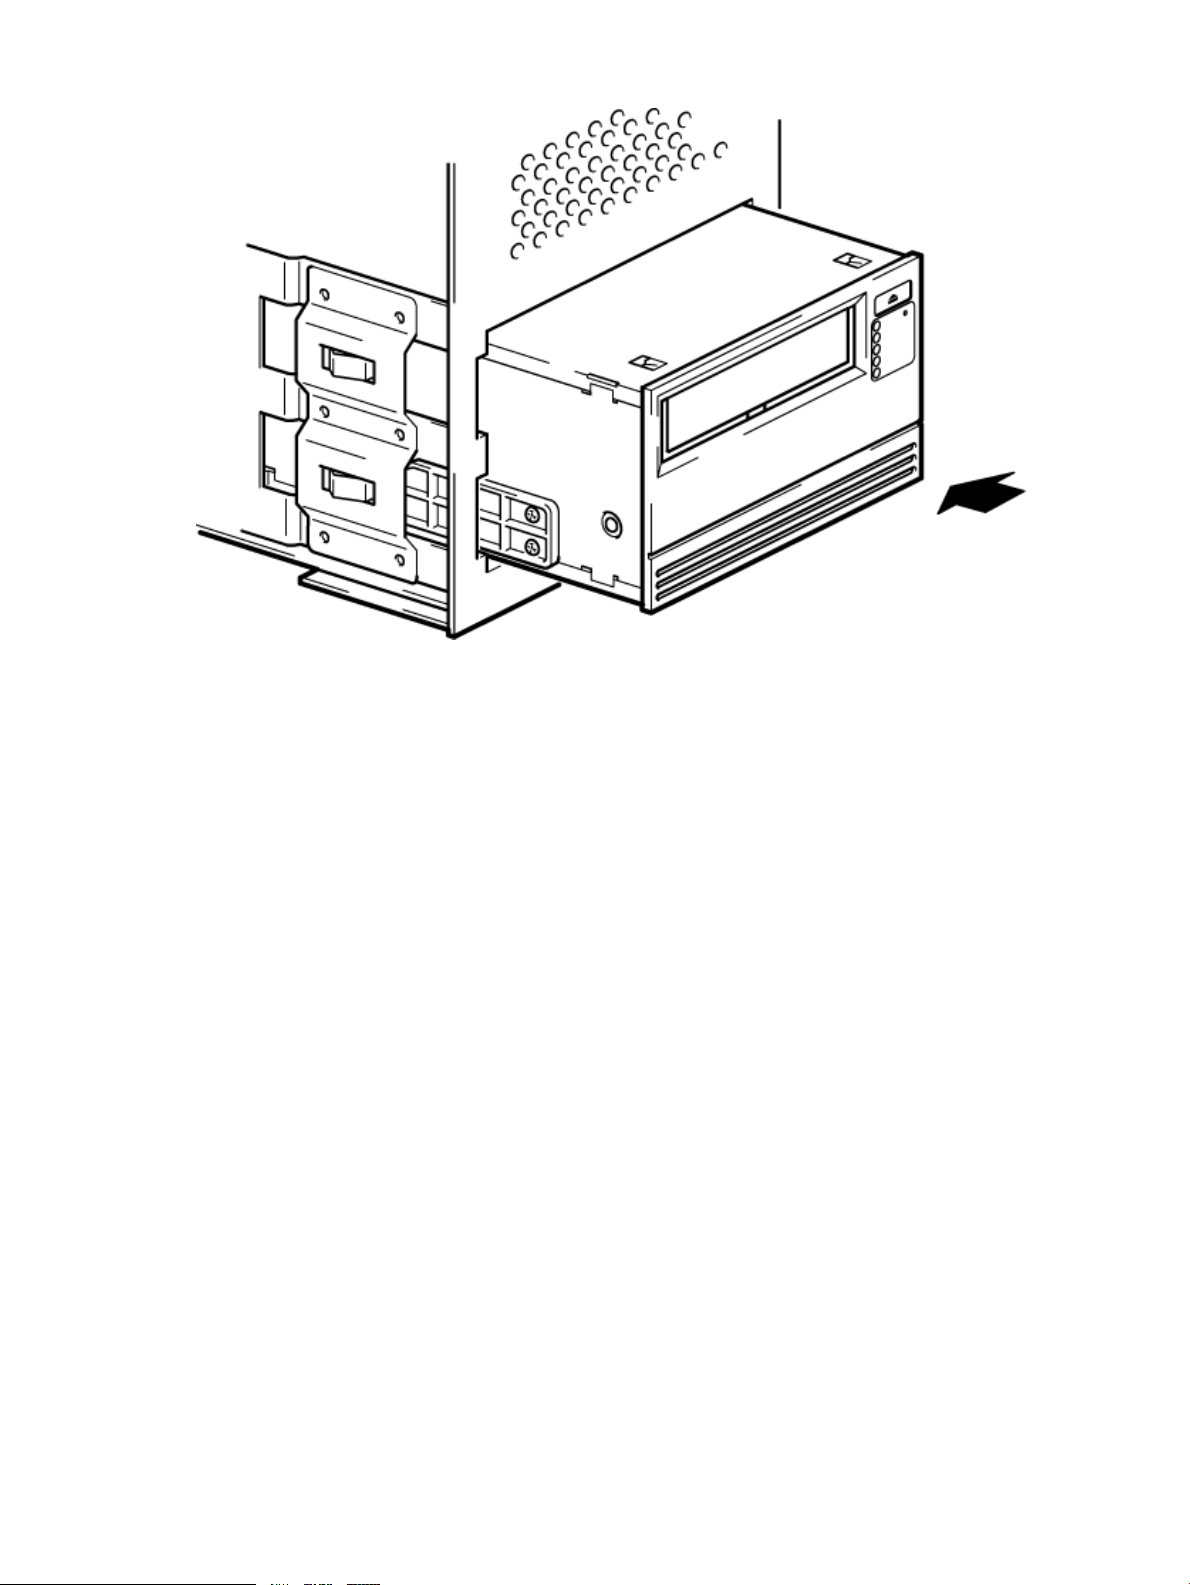
Figure 7 Installing tape drive
Do not secure the drive at this point because you may have to move the drive to get the cables
into place.
Connect SAS and power cords
There are three options for connecting the tape drive. Each is described separately in this section.
• Connect to a dedicated HBA (recommended)
• Connect to a spare port on the host controller (recommended)
• If both ports on the host controller are in use, replace one of the existing cables with the
supplied SAS cable (not recommended, use this option with care)
Supplied SAS cable
Power is supplied from the SAS connector on the SAS cable supplied with LTO-6 Ultrium 6650
and LTO-5 Ultrium 3280 tape drives.
Connect SAS and power cords 15
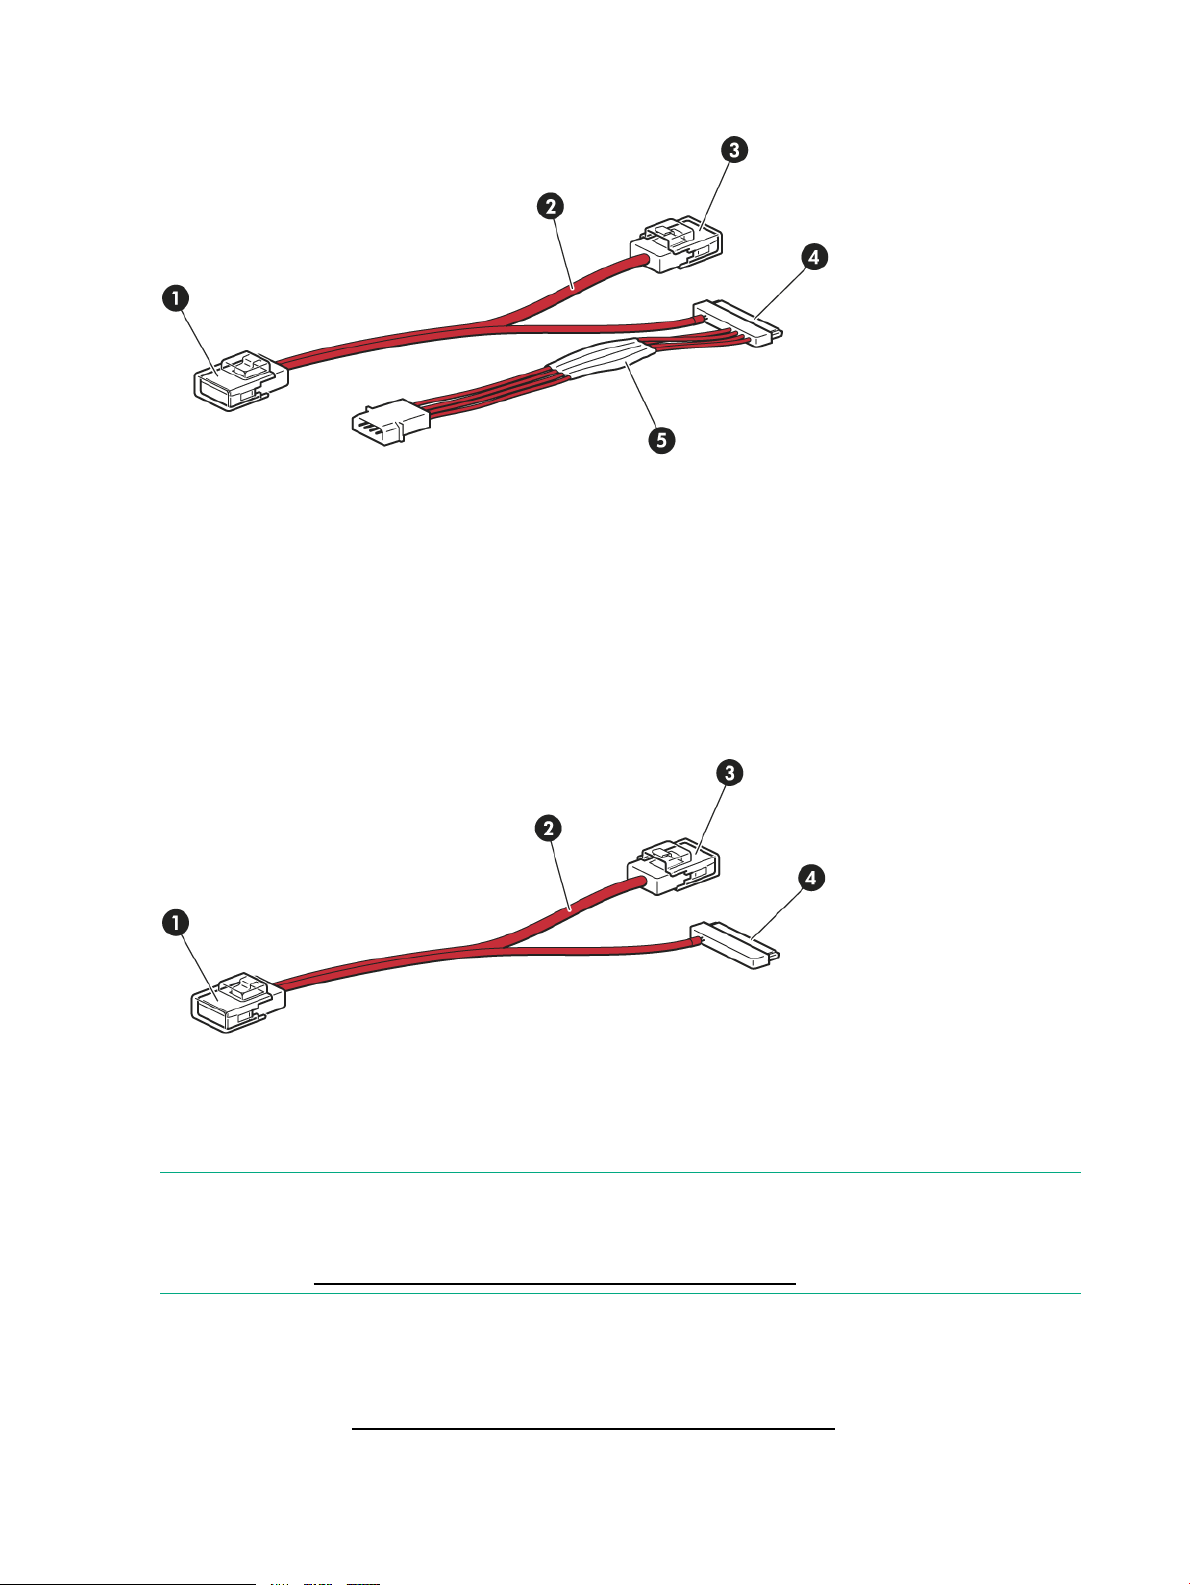
Figure 8 SAS with power cable supplied with LTO-6 Ultrium 6650 and LTO-5 Ultrium 3280
internal tape drives
Unused second branch on supplied cable2.Mini-SAS connector to server (remove cover)1.
3.
do not remove cover)
5.
Power cable and connector to server power
supply
SAS connector to tape drive4.Mini-SAS connector on second branch (unused,
The SAS connector on the cable supplied with all other LTO Ultrium tape drives does not provide
power. There is a separate power connector on the rear of the tape drive.
Figure 9 SAS without power cable supplied with LTO-4 Ultrium 1840 internal tape drives
Unused second branch on supplied cable2.Mini-SAS connector to server (remove cover)1.
3.
do not remove cover)
SAS connector to tape drive4.Mini-SAS connector on second branch (unused,
NOTE: The cable supplied with the tape drive is suitable for connecting to a mini-SAS
(SFF-8086/8087) connector on a dedicated HBA or on the server SAS controller. If your server
has a SAS 4i connector (SFF-8484), a suitable cable is available, but must be purchased
separately, see http://www.hpe.com/storage/buracompatibility.
Option 1: Connect to a new HBA (all servers)
The following instructions are valid ONLY IF you have purchased and installed an additional
HBA. See “Decision tree for connecting an internal tape drive to an internal SAS port” (page 12)
and always refer to http://www.hpe.com/storage/buracompatibility BEFORE installing your
tape drive.
16 Installing an internal LTO Ultrium tape drive
IMPORTANT: A SAS cable for connection to a dedicated HBA is supplied with the tape drive.
The cable is a split cable, but the second branch is not required. Do NOT remove the plastic
cover on the spare connector.
1. If necessary, install a new HBA. Follow the instructions supplied with the HBA to install it
and its driver.
2. Remove the plastic cover from the mini-SAS connector and connect the SAS cable supplied
with the tape drive to the new HBA.
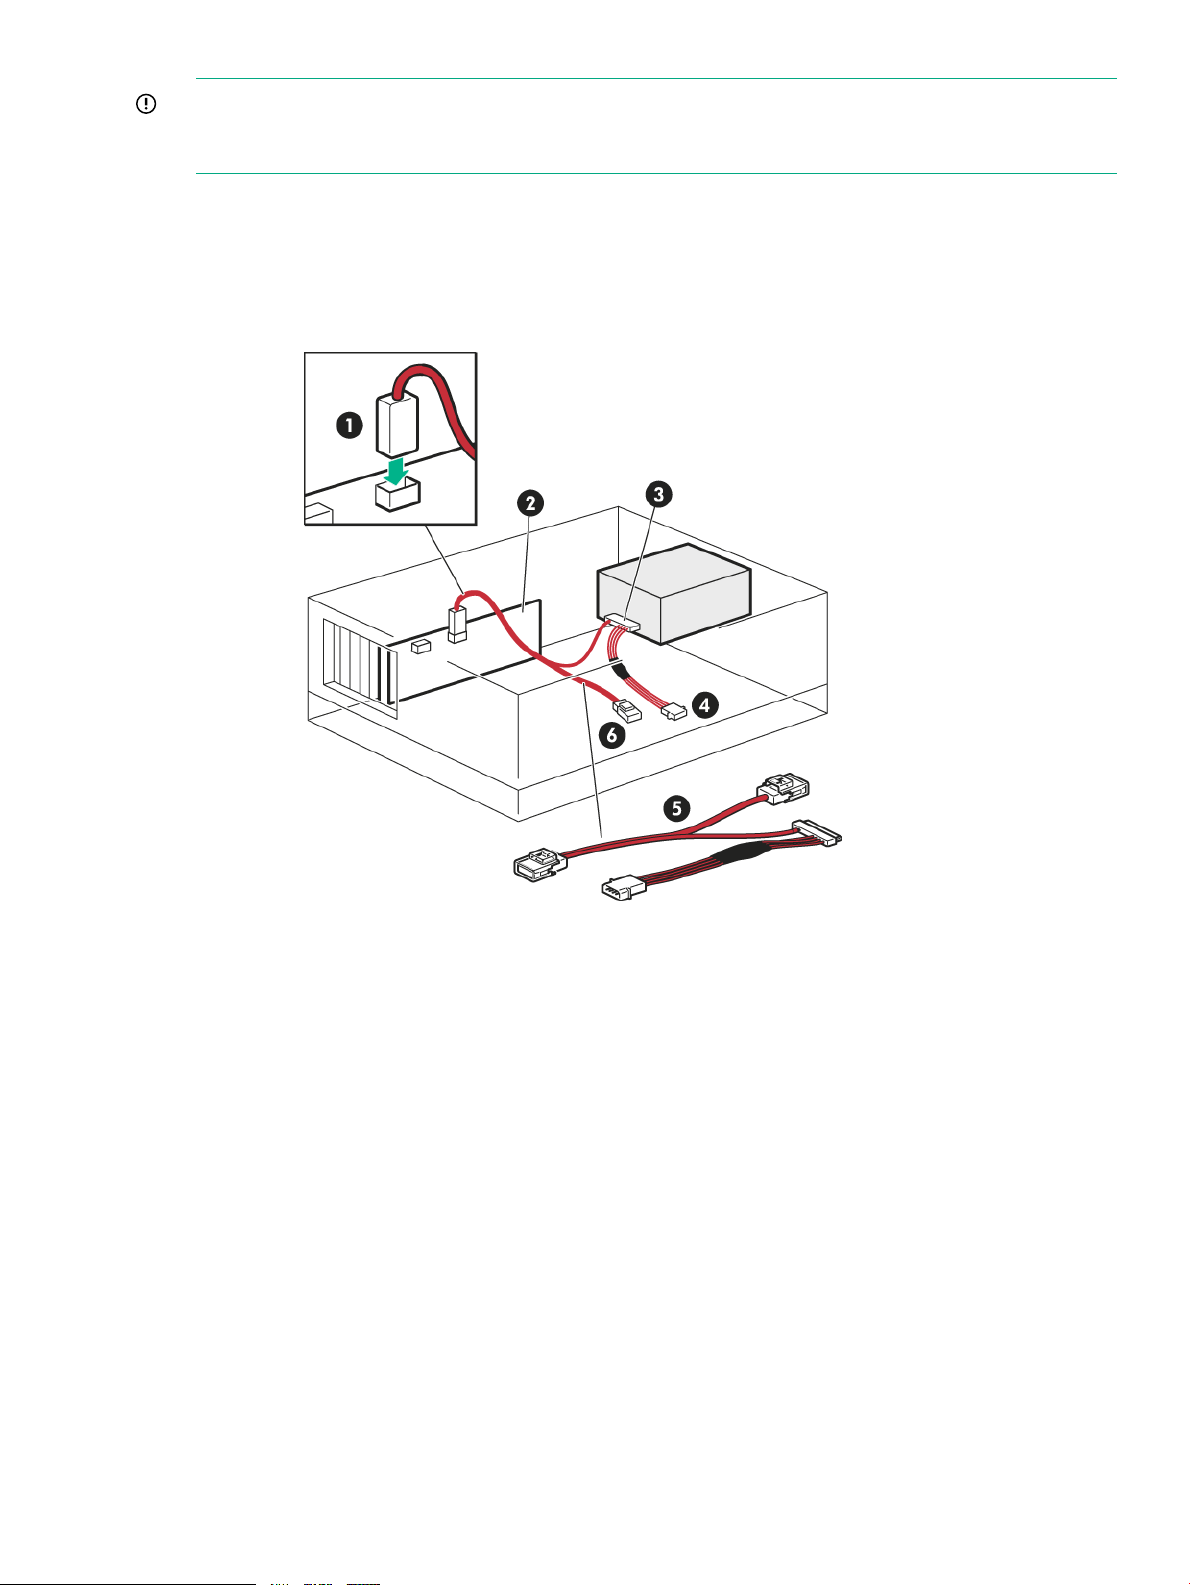
Figure 10 Cabling to a new HBA (cable for LTO-5 and LTO-6 drives shown)
1.
to new HBA
4.SAS connector to tape drive3.
6.SAS cable supplied with tape drive5.
New SAS HBA2.Remove plastic cover and connect SAS cable
Power connector to server (LTO-6 Ultrium
6650 and LTO-5 Ultrium 3280 only)
Unused connector on SAS cable (do not
remove plastic cover)
3. Connect the other end of the SAS cable to the tape drive.
LTO-6 Ultrium 6650 and LTO-5 Ultrium 3280 tape drives: Connect a spare power cable
from the server internal power supply to the power connector on the SAS data cable.
Connect SAS and power cords 17
 Loading...