

Page 1

HPE StoreEver LTO-5 and LTO-6 Failover User Guide
Part Number: 5200-2563
Published: December 2017
Edition: 8
Page 2

Contents
Overview.................................................................................................. 6
Enabling basic path failover................................................................ 16
Traditional library control path and drive connections without failover..........................................7
Basic path failover.........................................................................................................................9
Basic data path port failover details................................................................................... 9
Basic control path failover details.....................................................................................10
Technology for basic control path failover........................................................................ 11
Advanced path failover............................................................................................................... 12
Driver operation during device open................................................................................ 13
Driver operation while opening a connection to a library control path .............................13
Driver operation during normal communications..............................................................14
Path failure detection....................................................................................................... 14
Path failure recovery........................................................................................................ 14
Active and passive control path drives.............................................................................14
Library controller path failure recovery.............................................................................15
Preparing the switches and hosts for failover............................................................................. 16
Hardware-specific requirements for basic failover...................................................................... 17
Hardware-specific requirements for advanced path failover.......................................................17
Installing advanced path failover........................................................ 18
Preparing the SAN...................................................................................................................... 18
Minimize host access....................................................................................................... 18
Configure redundant connections.................................................................................... 18
Review the SAN design guidelines.................................................................................. 18
Preparing the library....................................................................................................................19
Preparing the host.......................................................................................................................19
Configuring failover for the ESL G3 Tape Libraries...........................21
Configuring data path failover..................................................................................................... 21
Library and tape drive prerequisites for basic data path failover......................................21
Library and tape drive prerequisites for advanced data path failover.............................. 21
Library configurations for mixed failover environments....................................................22
Enabling data path failover...............................................................................................22
Verifying data path failover...............................................................................................23
Diagnosing basic data path failover................................................................................. 24
Disabling data path failover..............................................................................................26
Configuring control path failover................................................................................................. 26
Library and tape drive prerequisites for basic control path failover..................................26
Library and tape drive prerequisites for advanced control path failover...........................27
Enabling control path failover for a library partition.......................................................... 27
Configuring the library after enabling control path failure.................................................28
Verifying control path failover...........................................................................................30
Disabling control path failover.......................................................................................... 30
2 Contents
Page 3

Configuring failover for the MSL3040 or MSL6480 ........................... 32
Control path failover configuration.............................................................................................. 32
Enabling control path failover...........................................................................................32
Locating the library world-wide node name after enabling basic control path failure ......33
Verifying basic control path failover..................................................................................33
Verifying advanced control path failover.......................................................................... 34
Data path failover configuration.................................................................................................. 35
Enabling data path failover...............................................................................................35
Verifying data path failover...............................................................................................36
Configuring failover for other MSL Tape Libraries ........................... 37
Configuring data path port failover..............................................................................................37
Enabling data path port failover....................................................................................... 37
Verifying data path port failover........................................................................................38
Making the standby port be the active port...................................................................... 39
Configuring basic control path failover........................................................................................39
Enabling control path port failover on the library..............................................................39
The “Enable Library Control Path Failover” setting is not selectable............................... 41
Verifying basic control path failover..................................................................................42
Locating the library world-wide node name Configuration requirements after
enabling control path failure ............................................................................................ 42
Configuring the tape drive hosting the library control path..........................................................42
Installing and using Windows advanced path failover drivers.........43
Installing the Windows advanced path failover drivers............................................................... 43
The Windows Installer reports Error 0x80070643............................................................44
Uninstalling the drivers................................................................................................................45
Verifying that the tape and changer drivers are correctly installed............................................. 45
Windows driver theory of operation............................................................................................ 46
Driver components........................................................................................................... 46
Device firmware................................................................................................................51
Installing and using Linux advanced path failover drivers...............52
Installing advanced path failover drivers.....................................................................................52
Updating the driver without rebooting......................................................................................... 53
Device files..................................................................................................................................53
Load balancing options for multiple tape drives..........................................................................53
Common characteristics of both load balancing algorithms.............................................53
Full Balancing algorithm...................................................................................................54
Less Balancing algorithm................................................................................................. 54
Setting the load balancing level....................................................................................... 54
Command line user interface...................................................................................................... 54
Viewing the current driver revision................................................................................... 55
Viewing device status.......................................................................................................55
Setting the preferred path................................................................................................ 56
Rebalancing the paths..................................................................................................... 56
Path rotation exercise function.........................................................................................57
Enabling advanced path failover on a device while the driver is running....................................57
Disabling advanced path failover on a device while the driver is running...................................57
Linux driver theory of operation.................................................................................................. 57
Contents 3
Page 4

Installing and using HP-UX advanced path failover drivers............. 59
Installing advanced path failover drivers.....................................................................................59
Commands for viewing tape and library devices connected to a system................................... 60
Finding the lockdown path.......................................................................................................... 62
Troubleshooting advanced path failover..................................................................................... 62
Enabling or disabling advanced path failover............................................................................. 62
Troubleshooting failover operation.....................................................64
Locating a failed path..................................................................................................................64
Windows debugging logs and tools............................................................................................ 65
Confirming failover operation........................................................................................... 66
Windows system log.........................................................................................................66
Diagnostic application...................................................................................................... 67
Diagnostic dumps.............................................................................................................73
Linux logs and troubleshooting tools...........................................................................................74
Dumping cached reservation information.........................................................................74
Controlling the level of debug output sent to the console................................................ 74
Reading the trace log....................................................................................................... 75
Library path failover events.........................................................................................................75
Additional tape drive sense codes.............................................................................................. 77
Advanced troubleshooting techniques...............................................79
Preparing to generate Windows driver debug dump log files..................................................... 79
Support and other resources...............................................................81
Accessing Hewlett Packard Enterprise Support......................................................................... 81
Accessing updates......................................................................................................................81
Customer self repair....................................................................................................................82
Remote support.......................................................................................................................... 82
Warranty information...................................................................................................................82
Regulatory information................................................................................................................83
Documentation feedback............................................................................................................ 83
Known issues and workarounds......................................................... 84
Path failover issues are observed on Windows Server 2012......................................................84
Device connectivity is lost after several closely spaced path failovers....................................... 85
The device driver does not connect to the preferred path.......................................................... 85
The device driver does not connect to the highest performance path........................................ 85
A host in a multi-initiator environment does not discover a path to the library controller............ 86
Tape library access commands fail with "Reservation Conflict" errors or "Medium Removal
Prevented" errors........................................................................................................................ 86
Data Protector device discovery with advanced path failover ........ 88
Troubleshooting Commvault Simpana device discovery with HP-
UX 11.31................................................................................................. 90
Commvault Simpana fails to discover devices when run on HP-UX 11.31................................. 90
4 Contents
Page 5

©
Copyright 2014, 2016 Hewlett Packard Enterprise Development LP
Acknowledgments
Intel®, Itanium®, Pentium®, Intel Inside®, and the Intel Inside logo are trademarks of Intel Corporation in
the United States and other countries.
Microsoft® and Windows® are either registered trademarks or trademarks of Microsoft Corporation in the
United States and/or other countries.
Adobe® and Acrobat® are trademarks of Adobe Systems Incorporated.
Java® and Oracle® are registered trademarks of Oracle and/or its affiliates.
UNIX® is a registered trademark of The Open Group.
Notices
The information contained herein is subject to change without notice. The only warranties for Hewlett
Packard Enterprise products and services are set forth in the express warranty statements accompanying
such products and services. Nothing herein should be construed as constituting an additional warranty.
Hewlett Packard Enterprise shall not be liable for technical or editorial errors or omissions contained
herein.
Confidential computer software. Valid license from Hewlett Packard Enterprise required for possession,
use, or copying. Consistent with FAR 12.211 and 12.212, Commercial Computer Software, Computer
Software Documentation, and Technical Data for Commercial Items are licensed to the U.S. Government
under vendor's standard commercial license.
Links to third-party websites take you outside the Hewlett Packard Enterprise website. Hewlett Packard
Enterprise has no control over and is not responsible for information outside the Hewlett Packard
Enterprise website.
Page 6

Overview
With today’s high dependency on access to business information, safe-guarded data and limited backup
windows, the reliability of the backup hardware and software is vital. Additionally, backup operations are
usually automated, often done at night, and any first pass operator intervention is done remotely. To assist
with these enterprise demands, Hewlett Packard Enterprise provides High Availability Failover features
for ESL G3 Tape Libraries and the MSL2024, MSL3040, MSL4048, MSL6480, MSL8048, and MSL8096
Tape Libraries with LTO-5 and LTO-6 Fibre Channel tape drives. Failover features are not supported on
the EML and ESL E-Series Tape Libraries.
• High Availability Data Path Failover— Both tape drive ports are connected to the SAN. Only one of the
ports is used at any one time and the second port is a standby port. When a link failure on the active
port is detected, the second port is used.
• High Availability Control Path Failover — Depending on the library and drive, one or both ports on the
control path drive are configured to present a path to the library controller and a second drive is
configured as a standby library control path drive. The library control path can be moved to a second
link on the drive hosting the control path in the event of a single path failure and in the event of a
complete control path drive connection loss, the standby library control path drive can be activated and
connection to the library control path can be moved to that drive.
With LTO-5 and LTO-6 tape drives, a driverless path failover feature uses library and drive firmware to
create a new Fibre Channel path to a drive or library if the original path is lost. Most applications
recognize the new path and some will automatically retry commands after the original path is lost. Other
applications may require user intervention to begin using the new path.
With LTO-6 tape drives, in addition to the driverless path failover feature, the libraries support a driverbased path failover feature that uses drivers in conjunction with library and drive firmware to manage
multiple paths across multiple SANs, present a single drive or library path to applications, and
automatically transfer commands to the new path if the original path is lost. This transfer is invisible to
most applications, avoiding the need for user intervention.
These failover features are presented in the library user interface as basic and advanced failover.
• Basic failover
◦ Supported on LTO-5 and LTO-6 FC tape drives. Data path failover requires a dual-ported drive.
◦ Supported by a combination of tape drive and library firmware features to create a new Fibre
Channel path to a drive or library if the original path is lost.
◦ Most applications recognize the new path and some applications will automatically retry commands
after the original path is lost. Some applications might require user intervention to begin using the
new path.
◦ Available for the MSL2024, MSL4048, MSL6480, MSL8048, MSL8096, and ESL G3 Tape Libraries.
• Advanced failover
◦ Supported on LTO-6 FC tape drives.
◦ Requires host driver support, in addition to tape drive and library firmware features, to manage
multiple paths across multiple SANs, present a single drive or library path to applications, and
automatically transfer commands to the new path if the original path is lost.
◦ The transfer to the failover path is invisible to most applications, avoiding the need for user
6 Overview
intervention.
Page 7
◦ Available for the ESL G3, MSL3040, and MSL6480 Tape Libraries.
◦ Not available for the 1/8 G2 Tape Autoloader nor the MSL2024, MSL4048, MSL8048, or MSL8096
Tape Libraries.
Traditional library control path and drive connections without failover
A typical connection for a Fibre Channel tape library using the drive to bridge commands to the library
controller in a two drive tape library is shown in
on page 7.
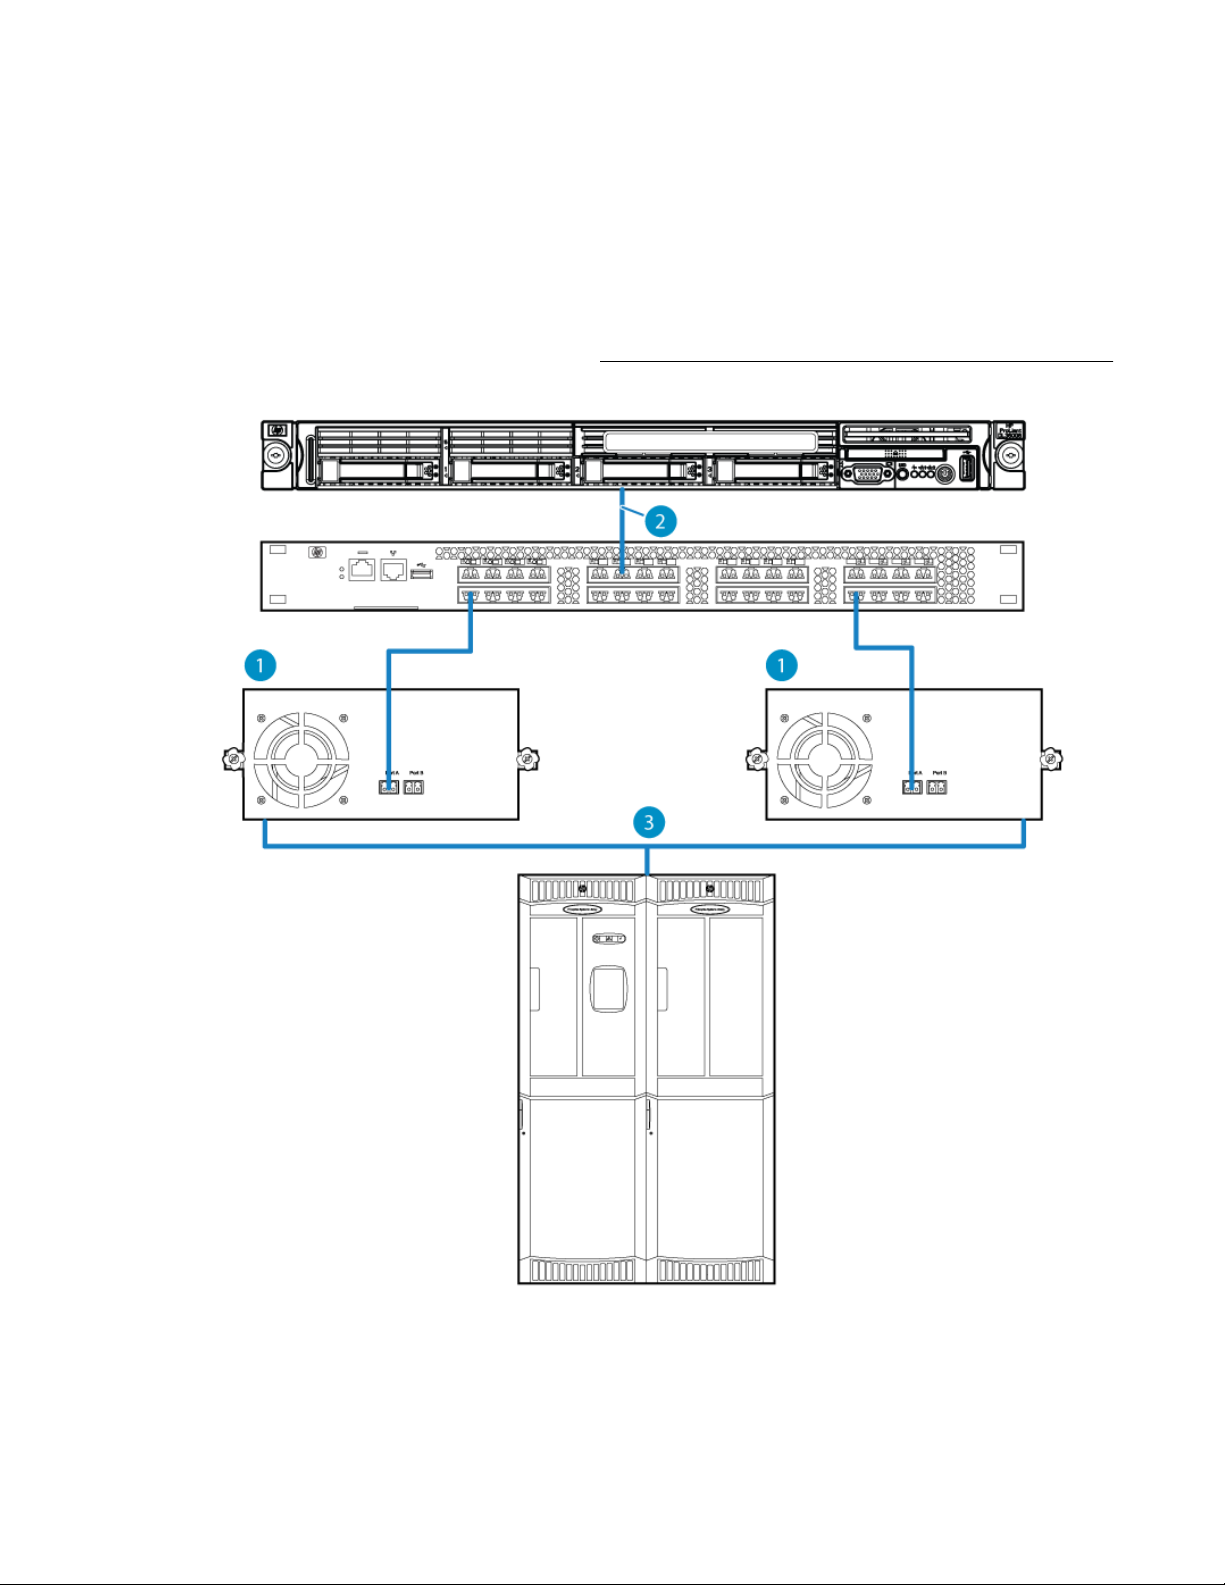
Figure 1: Typical bridged library controller connection
Figure 1: Typical bridged library controller connection
Traditional library control path and drive connections without failover 7
Page 8
1. Ultrium Dual Port Fibre Channel Tape Drives
2. Host connection
3. Internal connection
In the typical bridged library controller connection each tape drive has one physical link to the SAN switch
and connects to the SAN switch as one Fibre Channel device.
The tape drive hosting the library controller path connects as one Fibre Channel device containing two
logical units. The tape drive is logical unit number zero and the tape library is logical unit number one.
The tape library Fibre Channel device contains a tape drive logical unit and a media changer logical unit.
The logical view of the tape library is shown in Figure 2: Logical view of traditional configuration on
page 8.
Figure 2: Logical view of traditional configuration
1. Ultrium Dual Port Fibre Channel Tape Drives
2. Lun 0 at the WWPN of this drive
3. Lun 1 at the WWPN of this drive
4. Lun 0 at the WWPN of this drive
5. Host connection
8 Overview
Page 9

Basic path failover
Basic path failover uses features in the tape drive and library firmware to recover paths following a link
failure.
Basic data path port failover details
Basic data path port failover (see Figure 3: Data path port failover example configuration on page
9) can be configured on each LTO-5 or LTO-6 dual-port Fibre Channel tape drive in the library. When
basic data path port failover is configured, one link is active and is the primary data path. The second link
is a standby data path. The drive verifies that the second link is able to receive a Fibre Channel signal
and completes speed negotiation but the drive does not fully establish a connection using the standby
link. The library user interface might report the standby link as a passive connection.
The drive monitors the links for errors, and following detection of a fault, transfers the fabric identity
(world-wide names) and all settings (mode parameters, encryption settings, etc.) over to the standby link
and then activates that link. When properly configured, the change is minimally disruptive to the host and
does not require any configuration changes on the host or in the backup application.
If no drive commands are outstanding when a failure is detected, the port change happens with virtually
no disruption to the SAN. If a command is outstanding on the link when a failure is detected, the drive is
not able to recover the command so that command fails but the application is able to continue to use the
drive on the new path. Many applications are able to recover from a single command failure as long as
the communication path to the drive is not lost.
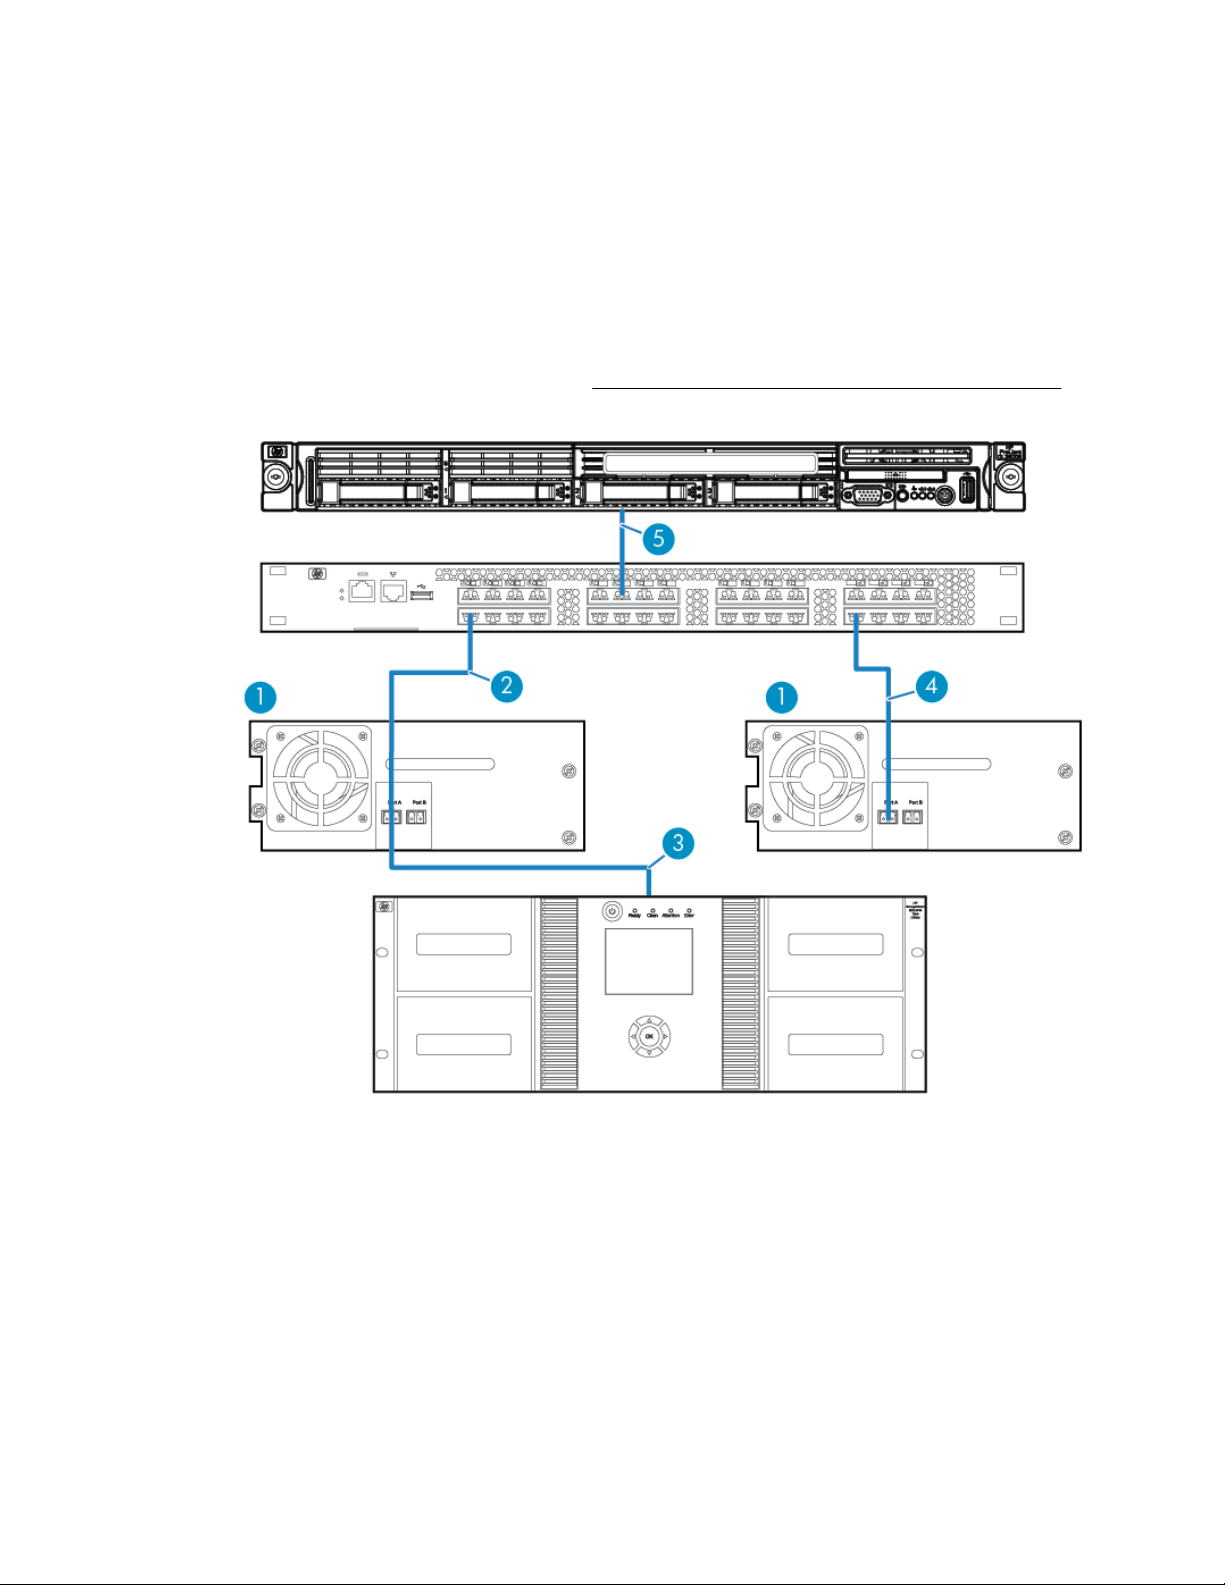
Figure 3: Data path port failover example configuration
Basic path failover 9
Page 10

1. Primary data path
2. Secondary data path
3. Host connection
4. Ultrium dual port Fibre Channel tape drive
Basic control path failover details
Library basic control path port failover (see Figure 4: Control path port failover example configuration
on page 11) is configured with one drive hosting the active logical link to the library controller and a
second drive configured as the passive logical link to the library controller. The library connections share
physical links with the drives while the library has its own identity on the SAN and will appear as a unique
device. Unlike the typical bridged library controller configuration shown in Figure 1: Typical bridged
library controller connection on page 7, basic control path failover uses a Fibre Channel technology
called NPIV, which allows the library to appear on the SAN as a new device with its own worldwide name
instead of appearing as a logical unit behind the tape drive. Connecting as an independent device makes
it possible to change the library controller SAN connection without affecting the drive connection.
If basic data path port failover is also configured, the library control path follows the data path on single
link failures.
With basic control path failover, the ESL G3 library monitors the drive that is hosting the library controller
and the ports on the drive. The library receives notification from the drive of any interface change events
and can quickly detect whether that change indicates a fault. The library also monitors the drive and can
detect when a drive has been removed or otherwise becomes inaccessible. Upon detecting a fault that
would cause loss of communication with the library controller, the library automatically moves the library
control path identity (world-wide names) and all settings (such as reservations and prevent/allow settings)
over to the alternate control path drive and activates the control path on the alternate drive. When
properly configured, the change is minimally disruptive to the host and does not require any configuration
changes on the host or in the backup application.
NOTE:
The MSL libraries monitor drive removal events and if the active control path drive is removed, the
library will automatically move the control path to the standby drive. However, if the control path
drive is not removed but SAN connectively is lost, the administrator might need to use the library
remote management interface to move the control path to the standby drive.
If no library commands are sent while the port is being reconfigured, the port change happens with
virtually no disruption to the SAN. Commands sent while the port is being reconfigured might be
completed but cannot report the command status to the application so the application will receive an
error. Applications that retry commands are able to use the library following reconfiguration of the port.
Applications that do not retry can be restarted remotely without making any hardware configuration
changes.
10 Basic control path failover details
Page 11

Figure 4: Control path port failover example configuration
1. Primary data path 2. Standby data path
3. Host connection
5. Passive logical link to switch shares physical link
on drive #2
Technology for basic control path failover
Hewlett Packard Enterprise LTO-5 and LTO-6 Fibre Channel tape drives use a technology called N-Port
Identifier Virtualization (NPIV) which is defined as part of the Fibre Channel standards maintained by the
4. Ultrium Dual Port Fibre Channel Tape Drives
6. Active logical link to switch shares physical link
on drive #1
Technology for basic control path failover 11
Page 12
INCITS/T11 working group (see clause 6) in the FC-LS-2 specification. NPIV allows a single physical port
to connect to a Fibre Channel switch multiple times using multiple node and port names.
Advanced path failover
Advanced path failover uses capabilities in the LTO-6 tape drives and the libraries in which they are
installed, combined with software drivers running on a host system to provide path failover when multiple
paths are available to a tape drive or to a library controller. Advanced path failover is a licensed feature.
An example multi-path configuration is shown in Figure 5: Example multi-path configuration on page
12.
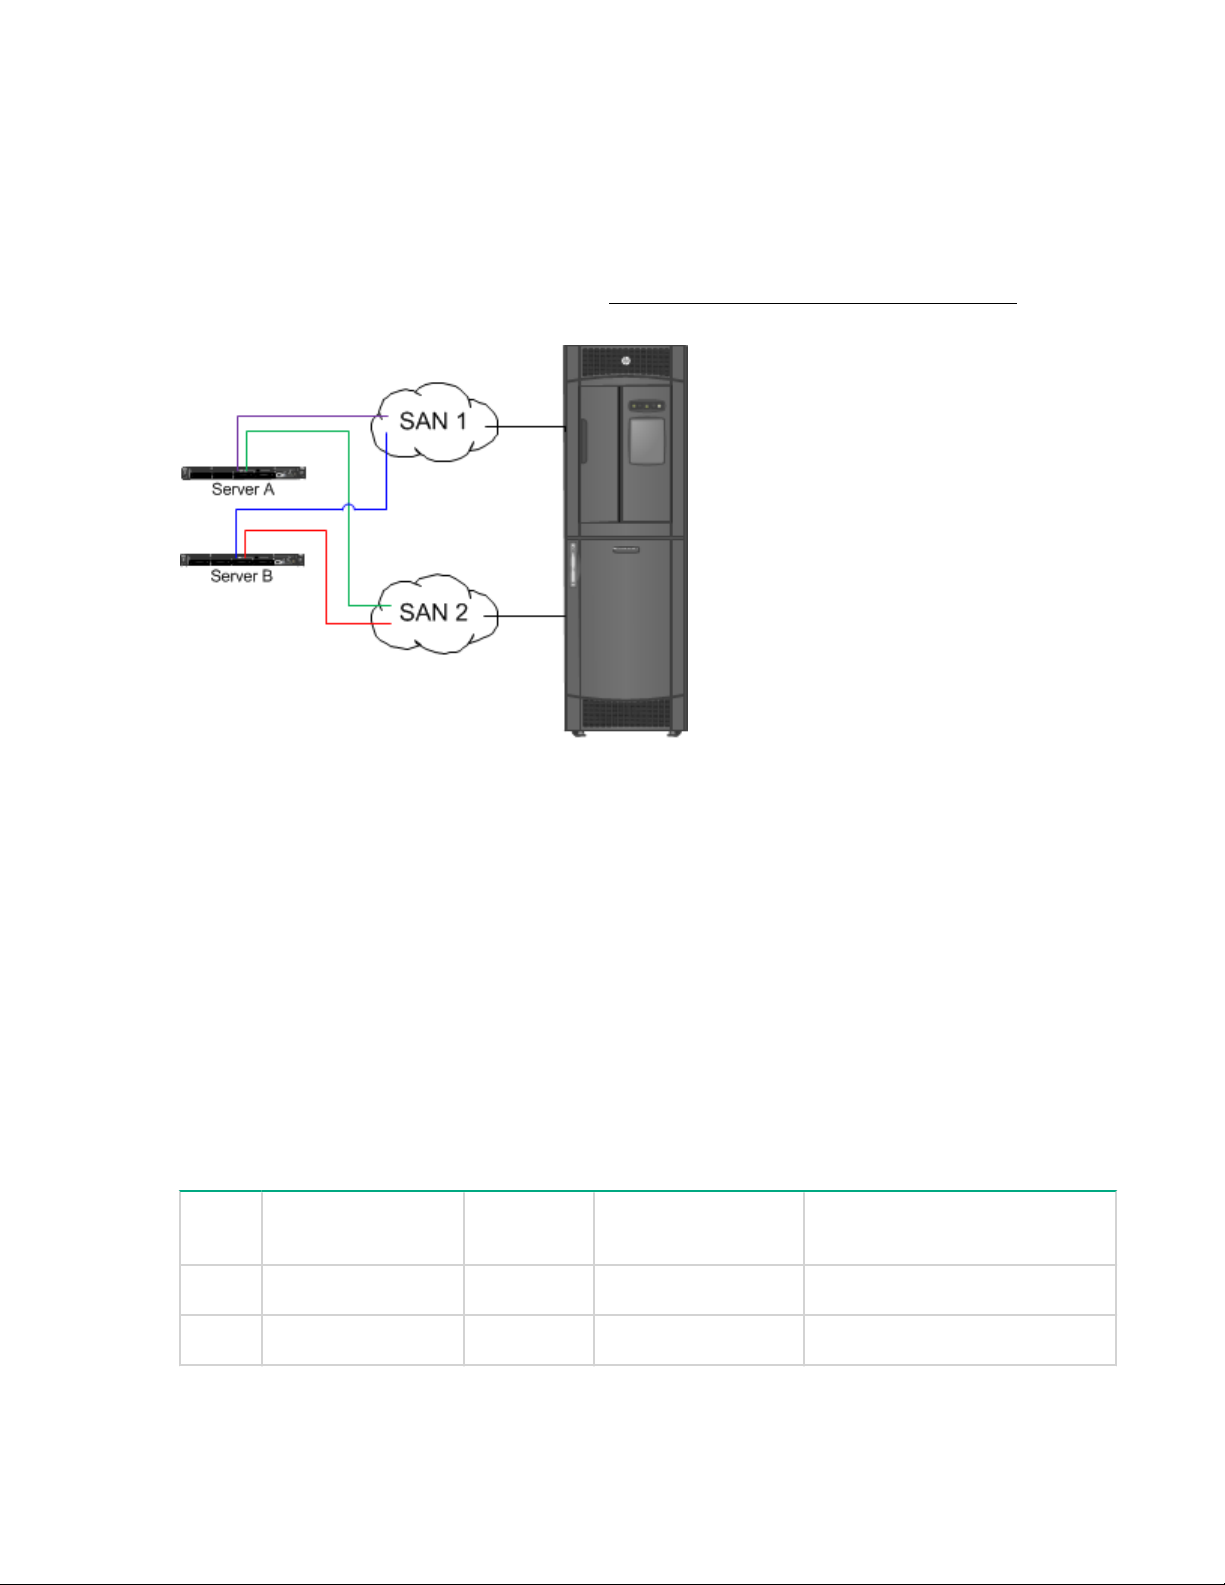
Figure 5: Example multi-path configuration
In this example configuration, two different servers designated as “Server A” and “Server B” each have
two different host interface ports that are connected to two different SANs. Each SAN is connected to the
tape library. The connection between the library and the SAN in this example is a bundle of connections
that contains a connection to one port on each drive in the library. All of the drives in the library have two
ports with one port connected into SAN 1 and the second port connected into SAN 2. The library in this
example has two different drives which are both configured to provide a library control path. Each drive
that is configured to provide a library control path will connect to the SAN as two devices, a tape drive and
a library controller, at two different SCSI logical units.
The list of paths available at one of the servers is shown in the example path list. In this table, the SAN
that contains the path is listed in the first column and the following columns show what device is being
addressed (for example, the SCSI logical unit), the port on the drive that is being accessed, an example
SCSI address, and the worldwide identifier (such as a Fibre Channel worldwide node name) of the
addressed logical unit. The unique portion of the worldwide identifier is highlighted.
Table 1: Example path list
SAN Addressed Logical
Unit
1 Tape drive 1 Port A ID 1 LUN 0 50:01:10:a0:00:00:00:01
1 Library Controller Port A ID 1 LUN 1 50:01:10:a0:00:00:00:02
Port Example SCSI
address
Example Logical Unit
Worldwide Identifier
12 Advanced path failover
Table Continued
Page 13

SAN Addressed Logical
Unit
2 Tape drive 1 Port B ID 2 LUN 0 50:01:10:a0:00:00:00:01
2 Library Controller Port B ID 2 LUN 1 50:01:10:a0:00:00:00:02
1 Tape drive 2 Port A ID 3 LUN 0 50:01:10:a0:00:00:00:03
1 Library Controller Port A ID 3 LUN 1 50:01:10:a0:00:00:00:02
2 Tape drive 2 Port B ID 4 LUN 0 50:01:10:a0:00:00:00:03
2 Library Controller Port B ID 4 LUN 1 50:01:10:a0:00:00:00:02
In this example the server is able to evaluate the worldwide identifiers to determine that there are two
paths to each of two different tape drives and four paths to a library controller.
In a typical multi-path configuration all of the paths for each device are available to the application which
must resolve redundant paths and choose a preferred path.
When advanced path failover drivers are installed on the server, the drivers will query each device for
support of advanced path failover and if the device supports advanced path failover, the drivers will select
a preferred path for each device and establish a connection using the preferred path. Only one path will
be visible to the application.
Port Example SCSI
address
Example Logical Unit
Worldwide Identifier
Driver operation during device open
When an application requests that a connection to a device be opened, the failover driver will connect to
the selected device, and if that device supports advanced path failover, will negotiate for a connection (a
nexus using INCITS/T10 standards terminology) to that device. Computers running Windows will open a
connection to each device when the server is booted. Computers running HP-UX and Linux don't open a
connection to the device until an application opens the device for reading and/or writing.
Each device supports up to 32 simultaneous failover connections. If a failover connection is available, a
connection between the host driver and the device is created. If no failover connection is available, the
connection that has been idle for the longest time is closed and then the new connection is created. The
server connected to the terminated idle session is notified that the failover connection has been
terminated and the advanced path failover driver on that system will automatically create a new
connection the next time a command is sent to the device.
NOTE:
Systems using advanced path failover should be designed with 32 or fewer active hosts per device
for optimal performance. Hosts should be configured so that they do not send unnecessary polling
commands to the device.
Driver operation while opening a connection to a library control path
In a system configured for advanced path failover at least two tape drives should be configured to provide
a path to the library controller. For additional redundancy, the ESL G3 library allows configuring more than
one standby control path drive. Some library state information is retained in the drive hosting the library
controller so each server that requests a connection to the library controller is required to create a
connection using a path through the same hosting drive. The library controller provides a method for the
administrator to select the preferred control path drive. The advanced path failover driver will query each
Driver operation during device open 13
Page 14

available control path drive to determine the preferred control path drive (called the ‘active’ control path
drive) before requesting a connection.
Driver operation during normal communications
The advanced path failover driver passes commands through without any command translation and with
minimal additional processing in normal operation to retain the maximum possible performance. During
normal communication the advanced path failover driver does not introduce additional commands that
would cause delays (for example, commands to determine position) during reading and writing.
Path failure detection
The advanced path failover driver uses notifications from the SCSI subsystem that report link failures
immediately following a path failure, which allows recovery to happen as quickly as possible so most
recoveries complete before the standard command timeout. In some operating systems the path failure
notification is received immediately after the failure and the failover drivers are able to perform path failure
recovery even if there are no outstanding commands. In other operating systems the advanced path
failover drivers are only notified of a path failure when a command is transmitted over that path.
Path failure recovery
Following detection of a path failure the advanced path failover driver queries a path verification feature in
the LTO tape drive to test paths until a valid path to the device is detected. The path verification feature
allows rapid detection of failed and valid paths without waiting for long timeouts or hardware-specific
notifications. After a new path has been identified the advanced path failover device driver will send a
command to the device using the new path to notify the device that a path has failed, indicate which
connection has failed, and to provide state information. Upon receipt of a notification that the path has
changed, the target device will automatically transfer all available settings and information from the failed
connection to the new connection and use the state information provided in that change notification to
synchronize the target state with the device driver state then will notify that device driver that it has
successfully synchronized state. Synchronization of the state includes any physical position changes
necessary to position the tape in the correct logical position for that state.
After receiving notification that the state is synchronized between the advanced path failover device driver
and the target device, the advanced path failover device driver can take the steps necessary to recover
any commands that were outstanding at the time of the failure. For most commands recovery is
accomplished by resending the original command.
Notifying the target device of the path change and performing the state synchronization in the target
device removes complex state recovery algorithms from the driver and removes the risk of incorrect tape
positioning during state recovery, resulting in a higher performance, lower complexity, and less risky path
failover method than a traditional driver where all recovery is performed by the driver.
Active and passive control path drives
The SCSI connection to libraries using advanced path failover is through the physical link in a tape drive.
Libraries that support advanced path failover will configure two different tape drives so that they present a
library control path (Medium Changer) device and forward commands addressed to the library control
path device on to the changer controller in the tape library. One of the tape drives will be configured as an
“active” control path drive, which means that the library control device presented by this tape drive will
accept commands such as MOVE MEDIUM for the changer device. One of the tape drives will be
configured as a “passive” control path drive, which means that the library control device presented by this
tape drive will accept device discovery commands such as INQUIRY, but will reject commands such as
MOVE MEDIUM. The advanced path failover drivers will automatically select an “active” path to the library
and will automatically reconfigure which drive is the active control path drive when reconfiguration is
necessary during failover. The tape library user interface will show which control path drive is the current
active control path drive.
14 Driver operation during normal communications
Page 15

Library controller path failure recovery
In most cases. the library controller path failure recovery is the same as the tape drive path failure
recovery. If all paths to the drive hosting the library controller have failed, the advanced path failover
driver can open a connection to the library controller through another tape drive.
A tape drive hosts the library control path, maintaining some state information on behalf of the library
controller. The state information maintained by the tape drive includes reservations, media removal
restrictions, and may contain special mode settings. When the library state changes, the library notifies
the advanced path failover driver that a state change occurred and then the advanced path failover driver
retrieves a cache of the state information.
When all paths to the drive that was hosting the library control path fail, the advanced path failover driver
connects to a different drive and configures the new drive as the preferred control path drive. After
activating a passive control path drive, the path failover driver downloads the state information from the
previous control path drive. The newly activated control path drive notifies the library controller that the
preferred control path drive has changed and then the library disables the previous control path drive. Any
servers still connected to the original control path drive are notified that the preferred control path drive
has changed and the advanced path failover driver on those servers will automatically change the
preferred path for future commands to the new preferred control path drive.
Library controller path failure recovery 15
Page 16

Enabling basic path failover
To successfully enable basic path failover, complete the following:
Procedure
1. Verify that the switch and host prerequisites are met. See Preparing the switches and hosts for
failover on page 16.
2. Verify that the tape drive and library prerequisites are met and then configure failover for your library:
a. Configuring failover for the ESL G3 Tape Libraries on page 21
b. Configuring failover for the MSL3040 or MSL6480 on page 32
c. Configuring failover for other MSL Tape Libraries on page 37
Preparing the switches and hosts for failover
Prerequisites for using basic data and control path failover:
• The library drive FC ports must be attached to a Fibre Channel SAN that supports NPIV and NPIV
must be enabled. LTO-5 and LTO-6 drives need an 8G connection with the fill word set to arb(ff). With
4G connections, set the fill word to idle.
• The switch is running a supported version of software. For a list of supported software, see the
compatibility matrix on the Backup, Recovery and Archive website: http://www.hpe.com/storage/
daprcompatibility
• The drive port FC topology must be in Fabric mode and the switch side must be set to F-port or Auto
Sense.
• The host Fibre Channel port must have a physical path to both the first port and secondary (passive)
port on the Fibre Channel drive.
• For basic data path failover with port zoning, the host Fibre Channel port and both ports on the drive
need to be within the same zone for failover to work.
• For basic data path failover with World Wide Port Name zoning, the host Fibre Channel World Wide
Port Name and a single first port on the drive need to be in the zone.
• For basic control path failover with port zoning the host Fibre Channel ports and the ports on both the
active and secondary drive chosen for basic control path failover will need to be in the same zone.
• For basic control path failover with World Wide Port Name zoning the host Fibre Channel World Wide
Port Name and basic control path failover World Wide Port Name assigned to the library must be in
the same zone. The Library World Wide Port Name is not the same as the World Wide Port Name of
the drive that is hosting the library.
• Hosts connecting to the library may need to be rebooted if the operating system does not support
dynamic device detection.
• Applications on hosts may need to be reconfigured to recognize the new library world wide name.
16 Enabling basic path failover
Page 17

Prerequisites for using advanced data and control path failover:
• With LTO-5 and LTO-6 drives with an 8G connection, set the fill word set to arb(ff). With 4G
connections, set the fill word to idle.
• The switch is running a supported version of software. For a list of supported software, see the
compatibility matrix on the Barkup, Recovery and Archive website: http://www.hpe.com/storage/
daprcompatibility
• For advanced data path failover, the host must have a physical path to both the first port and
secondary port on the Fibre Channel drive. For full failover capabilities, the two drive ports should be
connected to different switches and the host Fibre Channel ports should also be connected to the
same two switches.
• All drive ports must be zoned in the respective switches.
Hardware-specific requirements for basic failover
Brocade switches
Most recent firmware versions have NPIV enabled by default but it is configured per port and could have
been disabled. Verify that NPIV is enabled.
For best reliability use firmware revisions v6.2.2f, v6.3.2d, v6.4.3e, v7.1.1c or newer, depending on the
switch family. See the Design Guide for Backup and Archive for current supported revisions on the
Backup, Recovery and Archive website: http://www.hpe.com/storage/daprcompatibility
To enable NPIV on a Brocade switch, navigate to port administration and execute an advance view.
Cisco switches
Some Cisco switches that support NPIV do not have NPIV enabled by default. The Cisco MDS 9148 may
disable NPIV when power cycled.
To enable NPIV on a Cisco switch use Cisco_Device_Manager > Admin > Feature_Control or use the
Cisco CLI commands show NPIV status and NPIV enable.
Hardware-specific requirements for advanced path failover
The NPIV settings are not needed for advanced path failover. For supported switch firmware versions,
see the Design Guide for Backup and Archive on the Backup, Archive and Recovery website at: http://
www.hpe.com/storage/daprcompatibility
B-Series switches
For best reliability use revision v7.1.1c, or newer. LTO-5 and LTO-6 drives work best with 8G connections
configured with arb(ff) type 3, which is done by using the portcfgfillword command to set the ports to use
fill word type 3. The fill word for 4G connections should be set to idle.
C-Series switches
For best reliability use minimum revision 5.2(8)
H-Series switches
For best reliability use minimum revision v7.4.0.21.0.
Hardware-specific requirements for basic failover 17
Page 18

Installing advanced path failover
To successfully install advanced path failover, complete the following:
Procedure
1. Prepare the SAN. See Preparing the SAN on page 18.
2. Prepare the library. See Preparing the library on page 19.
3. Prepare the host. See Preparing the host on page 19.
Preparing the SAN
To prepare the SAN, review the following:
Procedure
1. Minimize host access on page 18.
2. Configure redundant connections on page 18.
3. Review the SAN design guidelines on page 18.
4. Verify that the switch prerequisites are met. See Preparing the switches and hosts for failover on
page 16.
Minimize host access
Advanced path failover is supported for a maximum of 32 hosts connected to each tape drive or tape
library. Each host should have two to four ports for a total of 64 to 128 connections to each tape drive or
tape library.
Connecting more than 32 hosts may cause performance degradation if extra hosts are attempting to
access the drives or library while another host is using the device.
Use switch zoning or Secure Manager to configure the SAN or library so that only hosts that need to
access the devices are able to connect.
Configure redundant connections
Each tape drive in the library has two ports. For best results the drives should be connected to two
different SANs, with all of the first ports connected to one SAN and all of the second ports connected to
another SAN. The total number of SAN switch ports required for connecting the library is twice the
number of tape drives installed in the library.
If both ports for a tape drive are connected to the same switch, fault tolerance is reduced as a single
switch failure will cause loss of connectivity. If only one switch is available, that switch must be zoned to
create two logical SANs.
Review the SAN design guidelines
The general SAN design guidelines for tape are documented at: http://www.hpe.com/storage/
daprcompatibility
18 Installing advanced path failover
Page 19

Preparing the library
Advanced path failover is a licensed feature with Control Path Failover and Data Path Failover licensed
separately. Licenses for all failover solutions are also available as a high-availability bundle. Control Path
Failover provides path fault tolerance for the robot controller and Data Path Failover provides fault
tolerance for the tape drive data path. Each feature is licensed once for each tape library and then
enabled separately for every partition and tape drive. The settings may be different for different partitions
and drives depending on the user requirements.
When advanced path failover is enabled for either the control path or the data path, the library partition
and/or tape drives with advanced path failover enabled can only be used by hosts with the advanced path
failover driver installed. If the tape drive or tape library detects that advanced path failover is enabled and
a request to access the media or move media is received from a host that is not using an advanced path
failover driver, the drive or library will reject the command with an additional sense code of 82h/93h,
FAILOVER SESSION SEQUENCE ERROR. That error code should only be reported to an application if
the advanced path failover drivers are not installed on that host.
In a mixed environment where some hosts have advanced path failover drivers installed and some hosts
do not, the library should be partitioned so that one partition is accessed by hosts that are using
advanced path failover and the second partition is accessed by hosts that are not using advanced path
failover. In some cases a mix of host operating systems might be used with a single partition. For example
a Windows host might be running the library control agent and another operating system is performing
backups. In that configuration advanced control path failover could be enabled and the advanced path
failover driver installed on the library control host but the drives may be configured without path failover.
If a single ESL G3 library needs to serve both hosts that have advanced path failover drivers installed and
hosts without advanced path failover drivers, the ESL G3 library can be configured with pools of drives
where all of the hosts with advanced path failover drivers use one pool of drives and advanced data path
failover is enabled on those drives. At the same time, a second pool of drives in the same partition either
has basic data path failover enabled or no data path failover enabled. The second pool of drives is
accessed by the hosts that do not have advanced path failover drivers. Other libraries do not support
mixing basic and advanced path failover, so the drives connected to hosts without advanced path failover
drivers must be configured without path failover enabled.
For instructions on installing advanced path failover for your library, see:
• ESL G3: Configuring failover for the ESL G3 Tape Libraries on page 21
• MSL3040 or MSL6480: Configuring failover for the MSL3040 or MSL6480 on page 32
Preparing the host
Hosts used with advanced path failover must be configured with two different data paths and should be
configured with two different HBAs. For supported HBAs see the compatibility matrix on the Backup,
Recovery and Archive Solutions website:
NOTE:
Always verify that your HBA and HBA driver are supported with path failover. For example, the
Emulux HBA driver that is included in the Red Had distribution must be upgraded.
For the highest level of fault protection, connect two different HBAs in the host to two different SANs. This
configuration provides full fault tolerance from both an HBA failure and a SAN switch failure. If a single
HBA is used, an HBA failure might result in loss of connection.
The advanced path failover driver for Windows selects the first path it discovers. If you want the driver to
select a particular SAN path, configure the host so that the HBA for your preferred path is installed in the
position with the lowest numbered bus location. Refer to your server documentation for bus location
Preparing the library 19
Page 20

information. The Linux path failover driver and the HP-UX operating system have built-in load balancing
and when a tape drive is opened the operating system selects the best path based on the current path
loading.
The Linux advanced path failover driver has a command for requesting a partition path to be preferred.
That setting will only persist until the next reboot because the hardware configuration can change when
the server reboots. The driver is unable to detect whether the hardware is the same as the previous boot
so the preferred setting is not retained across reboots. You can use a boot time script to set the preferred
path at each boot when the hardware configuration is stable. For persistent path binding, use Linux udev
rules to create persistent paths.
After the host has been configured and booted, install the drivers necessary for the host operating
system.
• Installing and using Windows advanced path failover drivers on page 43
• Installing and using Linux advanced path failover drivers on page 52
• Installing and using HP-UX advanced path failover drivers on page 59
20 Installing advanced path failover
Page 21

Configuring failover for the ESL G3 Tape Libraries
Configuring data path failover
When basic data path failover is enabled, the drive is presented on the first drive Fibre Channel port, by
default, and the second Fibre Channel port is a passive port. If the primary port goes down, the library
transfers various settings over to the passive port and then enables the failover port. When advanced
path failover is enabled, the drive is presented to the host over both SANs and the host driver determines
the active path.
For increased fault tolerance, select two drives that have less common library infrastructure for the active
and passive control path drives. For example, if you choose drive 1 as the active drive, choose a passive
drive in another cluster or library module.
Library and tape drive prerequisites for basic data path failover
• The HPE StoreEver ESL G3 LTO-5/LTO-6 Ultrium Data Path Failover license is installed on the library.
• The host has a physical path to both the primary and secondary ports on the FC drive.
• The tape drive is an LTO-5 or LTO-6 Fibre Channel tape drive.
• The library is attached to a Fibre Channel SAN that supports NPIV.
• The drive port Fibre Channel topology is configured in Fabric mode.
• All paths to the Fibre Channel drive are accessible from the same HBA and all of the devices need to
be within the same zone.
• If Secure Manager is enabled, hosts that need access to the control path have robotics device access
to the first Fibre Channel port on both the active control path drive and the standby control path drive.
Library and tape drive prerequisites for advanced data path failover
• The HPE StoreEver ESL G3 LTO-5/LTO-6 Ultrium Data Path Failover license is installed on the library.
• The host has a physical path to both the primary and secondary FC drive ports.
• The tape drive is an LTO-6 Fibre Channel tape drives.
• Host drivers are configured on all hosts.
The hosts that do not have advanced path failover drivers will see the drives but will not be able to
write, read, or send move commands.
The advanced path failover drivers also support drives configured with basic path failover or without
failover configured.
• If necessary, the library is configured for mixed failover environments.
• If Secure Manager is enabled, hosts that need access to the control path have robotics device access
to all Fibre Channel ports on both the active control path drive and the standby control path drive.
Configuring failover for the ESL G3 Tape Libraries 21
Page 22

The host will have two different worldwide names for the two different HBAs and each worldwide name
may be granted access to all ports or one name may be granted access to the first Fibre Channel port
and the second name may be granted access to the second Fibre Channel port.
Library configurations for mixed failover environments
In a mixed failover environment, hosts with advanced path failover drivers and hosts without advanced
path failover drivers all access the same tape library. Only a host using advanced path failover drivers can
access a tape drive configured for advanced path failover. The library reports an error if a host without the
advanced path failover drivers attempts to access a tape drive configured for advanced path failover.
The ESL G3 supports two methods of configuring the library to operate in mixed failover environments:
• Library partitions—The library is configured in multiple partitions such that all of the hosts accessing all
of the tape drives in the partition are either using advanced failover drivers or are not using advanced
failover drivers.
• Drive pools—The tape drives in a partition are configured into multiple pools where all of the hosts with
advanced path failover drivers use one pool of drives and advanced data path failover is enabled on
those drives. At the same time, a second pool of drives in the same partition either has basic data path
failover enabled or no data path failover enabled. The second pool of drives is accessed by the hosts
that do not have advanced path failover drivers.
Enabling data path failover
Procedure
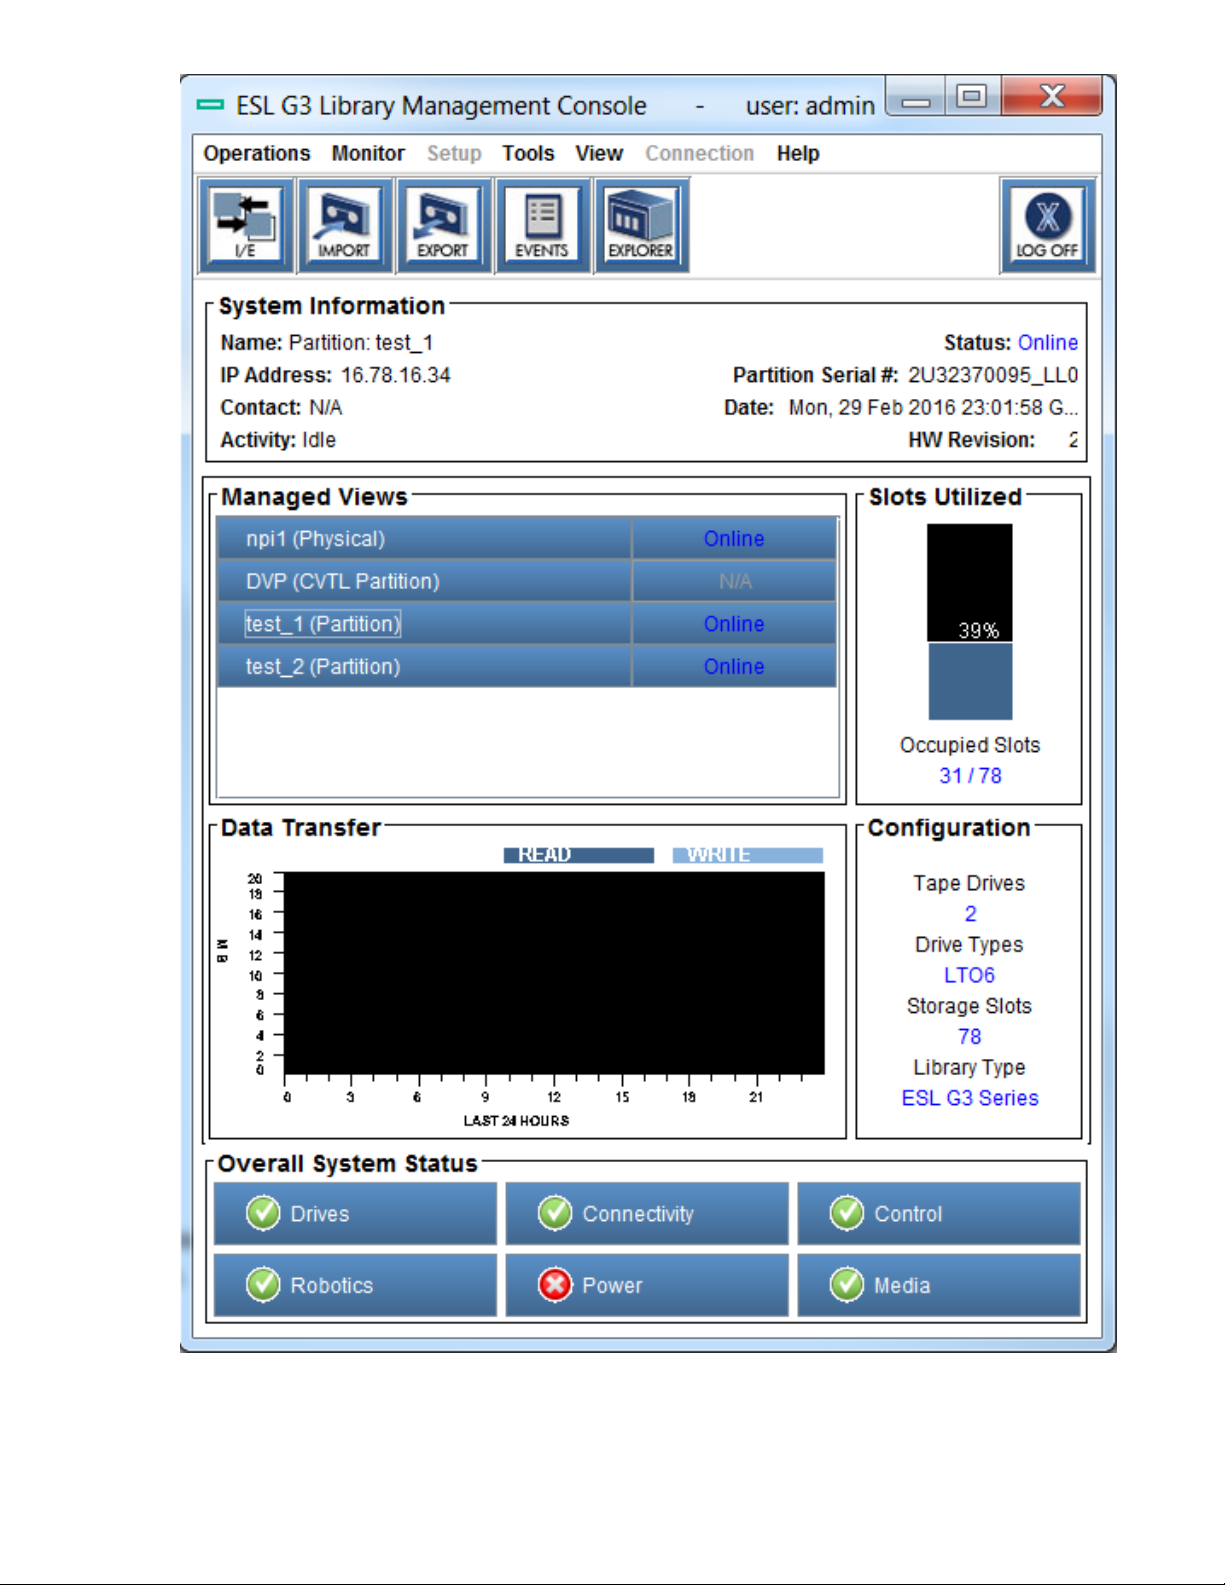
1. Log in to the Management Console as a user with Administrator privileges.
2. Select the Physical managed view.
3. Select Setup > Partitions > Data Path Failover.
4. The Data Path Failover (DPF) dialog appears and displays all LTO-5 and LTO-6 drives. You can filter
the list by partition. Select the drives for which you want to enable failover and the type of failover, and
then click OK.
a. To enable advanced path failover (ADPF), select the ADPF or Driver box for the drive.
b. To enable basic path failover (BDPF), select the BDPF box for the drive.
NOTE:
Any drives that belong to an access group and have hosts mapped to the second port are
considered to be custom mapped. BDPF cannot be enabled on these drives until the custom
mapping is removed.
Advanced Data Path Failover can only be enabled on LTO-6 drives. Basic Data Path Failover
can be enabled on both LTO-5 and LTO-6 drives.
See the StoreEver Enterprise Systems Library (ESL) G3 Tape Library User Guide for more
information on modifying partitions.
22 Library configurations for mixed failover environments
Page 23
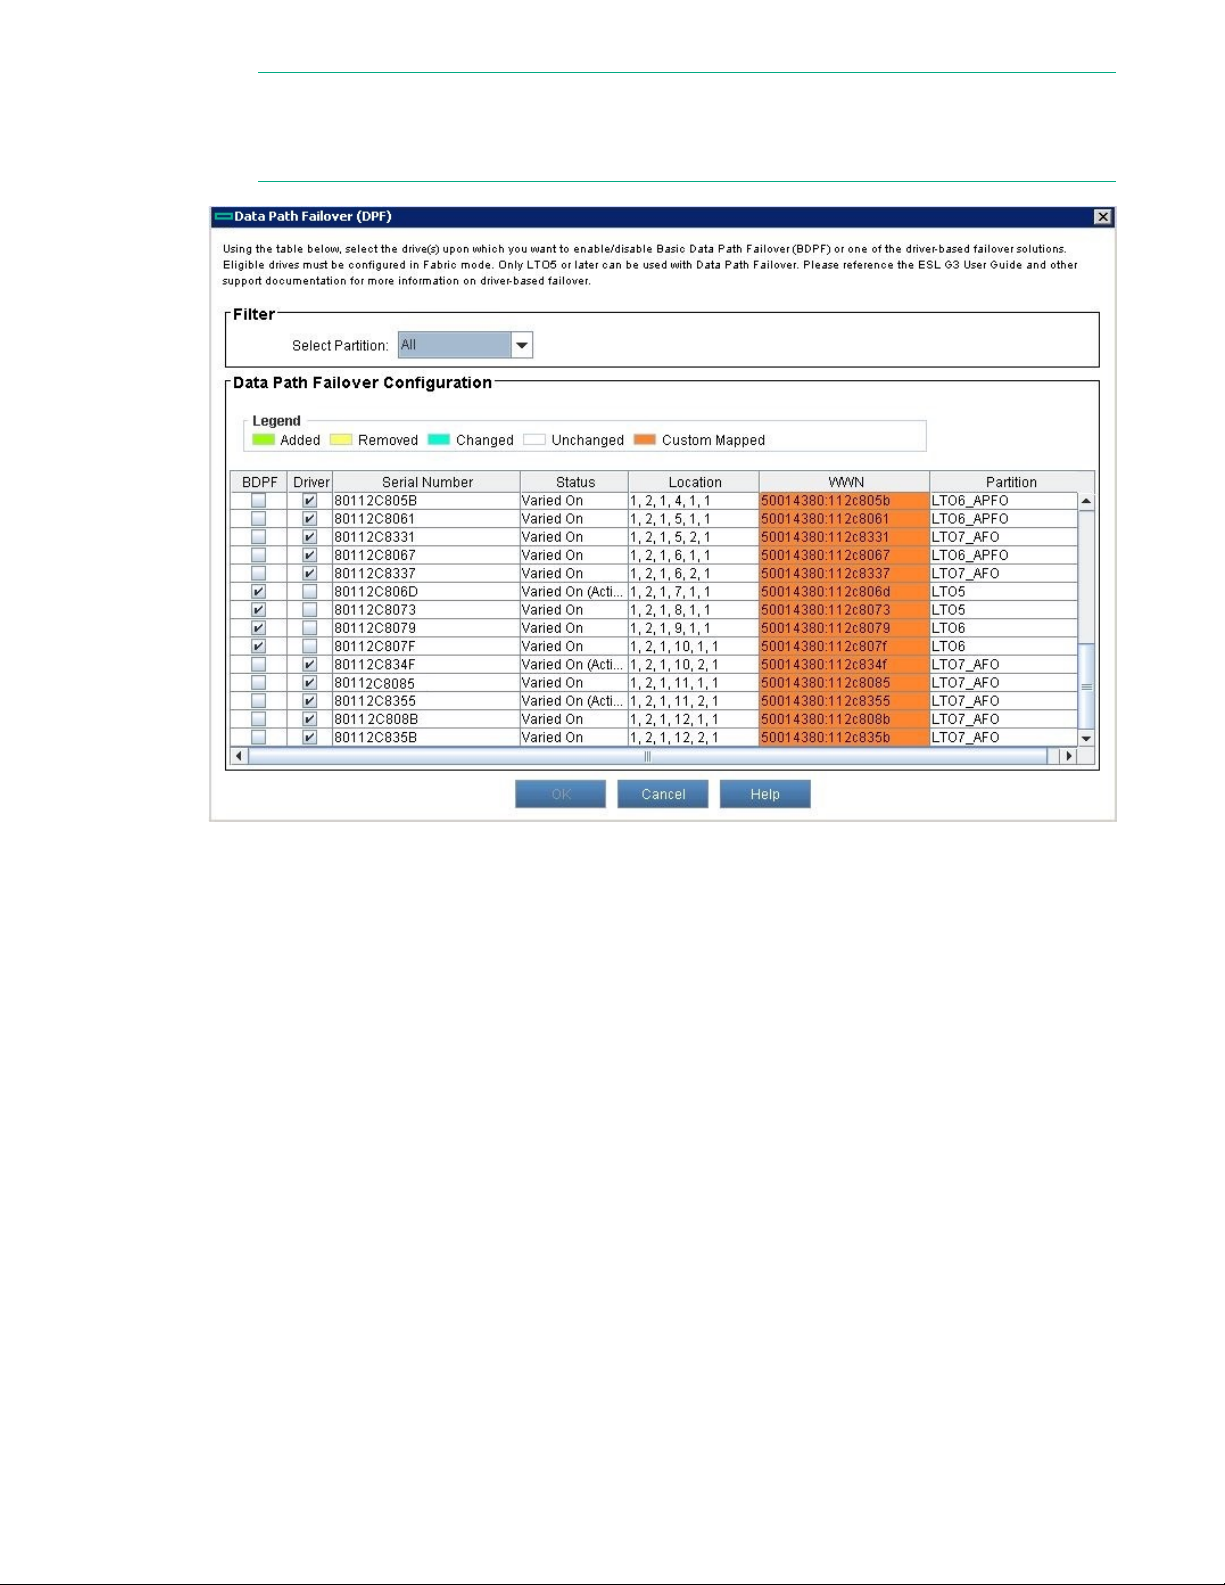
NOTE:
In the following illustration, with 720H and later firmware versions, the ADPF column is labeled
Driver.
5. Wait for the configuration change to complete.
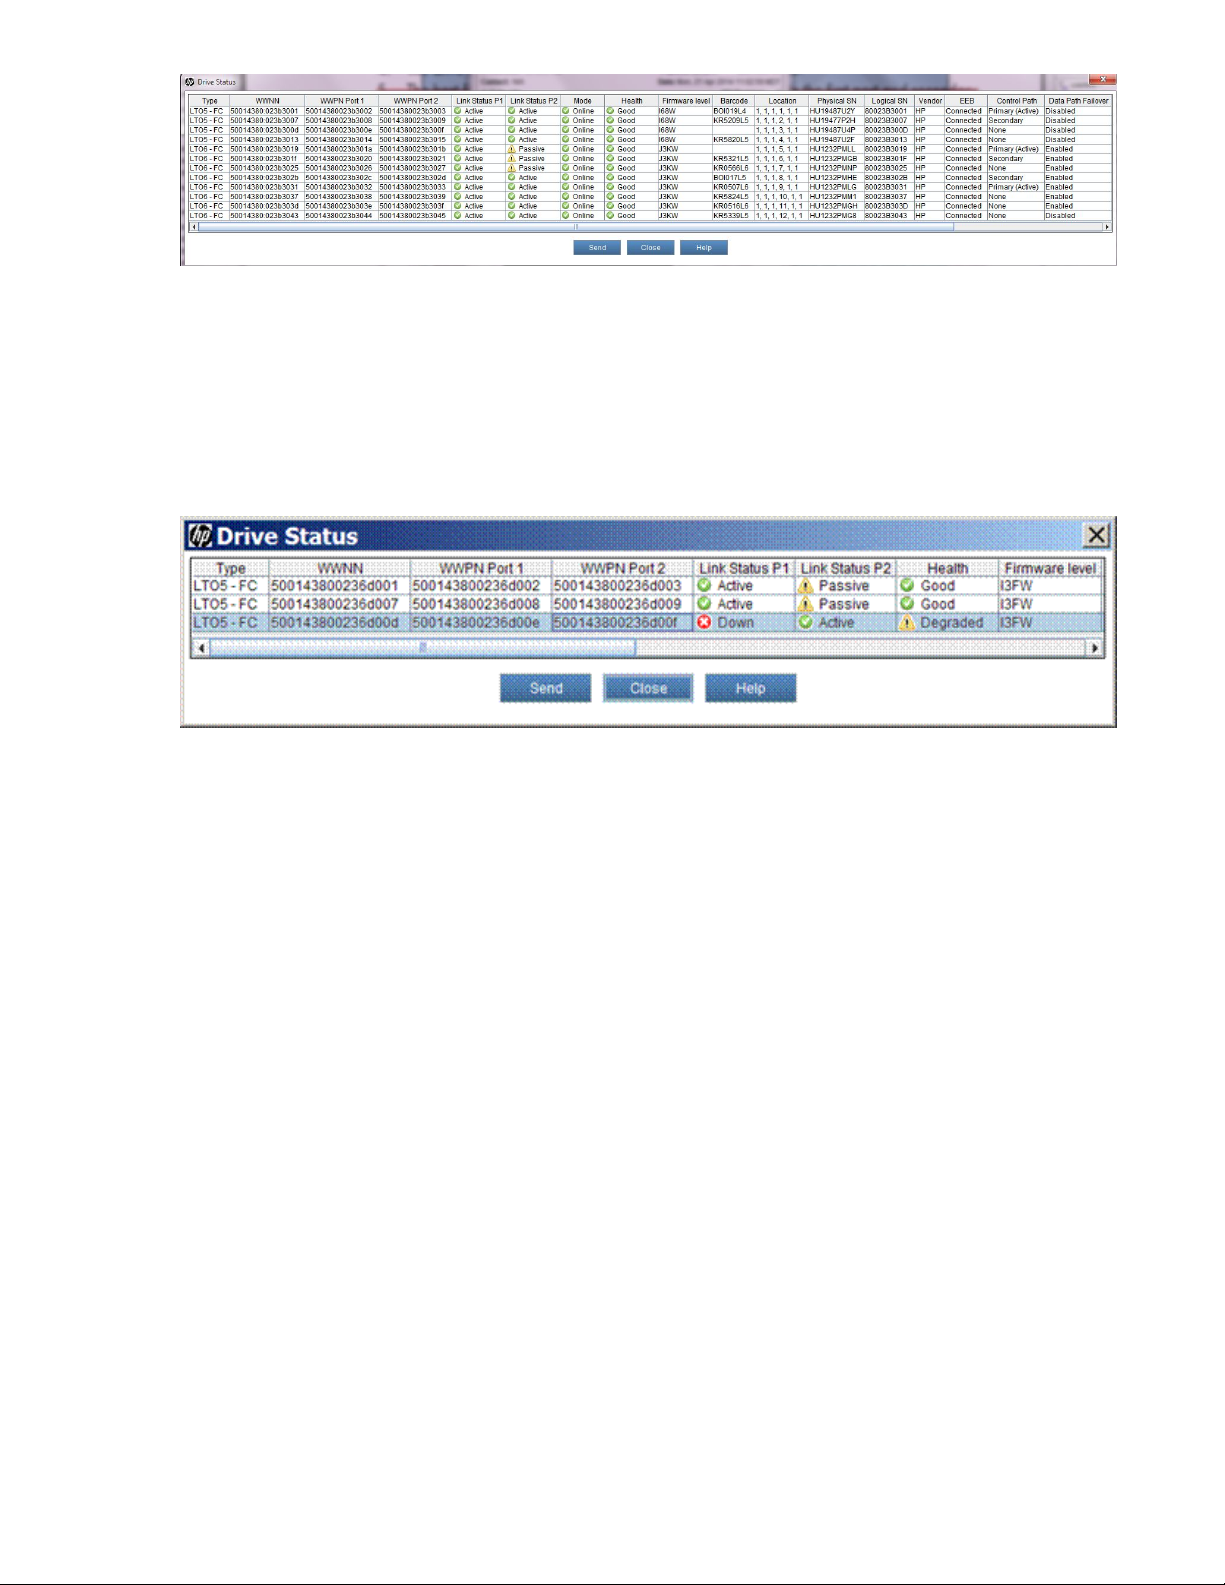
Verifying data path failover
To verify that basic data path failover is configured, navigate to Monitor > Drives to launch the Drive
Status dialog.
When basic data path failover is enabled for a drive:
Procedure
1. The Link Status for one of the ports is listed as Active.
2. The Link Status for the second drive is listed as Passive, meaning that this is the failover port.
3. The Data Path Failover column displays Enabled.
When advanced data path failover is enabled for a drive:
• The Link Status for both ports is listed as Active.
• The Data Path Failover column displays Enabled.
Verifying data path failover 23
Page 24
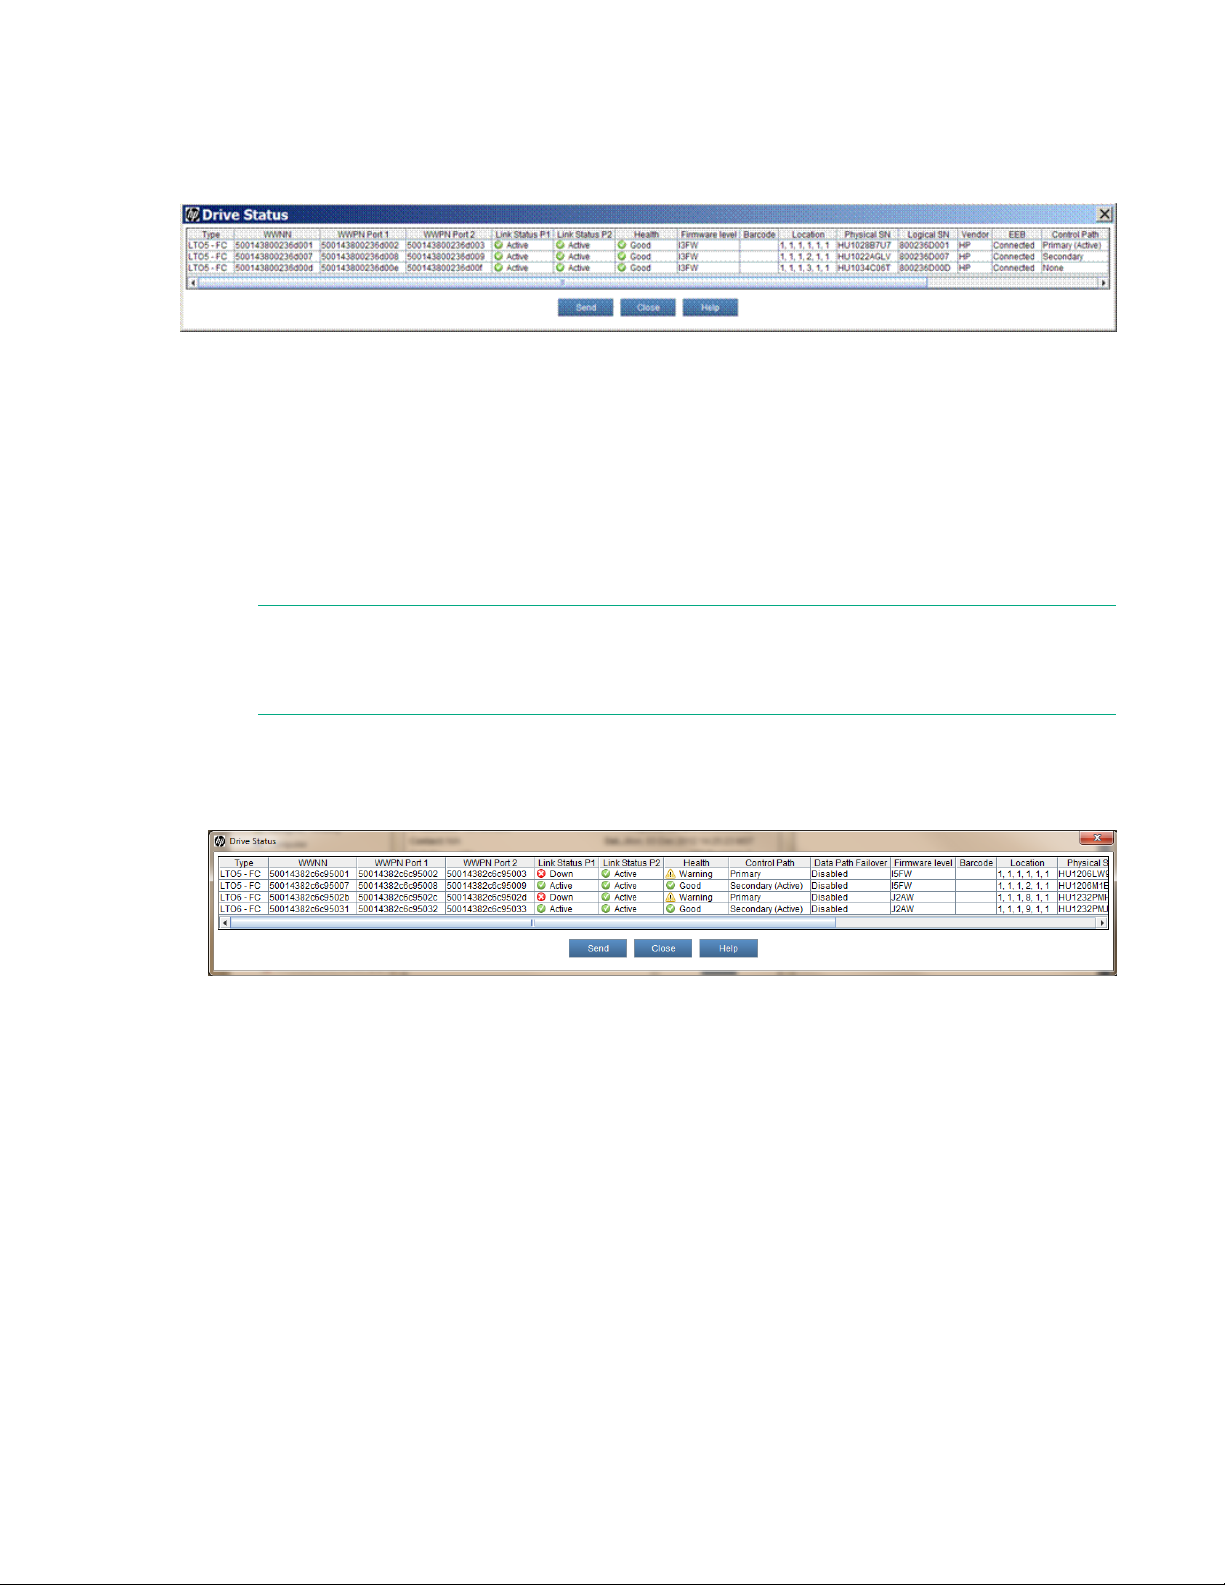
• To verify that basic or advanced data path failover is working:
• From the Fibre Channel switch's management console, down the main Fibre Channel port to a drive.
• From the host computers confirm that the drive is still accessible. After confirming that the drive is still
accessible the host logs should show a failover event.
• To verify that failover occurred, navigate to Monitor > Drives to launch the Drive Status dialog. The
link status for the first port is Down, and the link status for the second port is Active as shown below.
Diagnosing basic data path failover
When a drive failover occurs, the Drives subsystem has a Warning state, which is displayed in the
Overall System Status section of the Management Console.
24 Diagnosing basic data path failover
Page 25
Configuring failover for the ESL G3 Tape Libraries 25
Page 26

Click Drives to display the Event List, and then select the event and click Details to see more
information about the failover event. The Repair tab provides detailed instructions on how to troubleshoot
and fix the problem.
Disabling data path failover
Procedure
1. Log in to the Management Console as a user with Administrator privileges.
2. Select the Physical managed view.
3. Select Setup > Partitions > Data Path Failover.
4. Unselect the data path failover box for the drive being configured, and then click OK.
a. To disable ADPF, uncheck the ADPF or Driver box for the drive.
b. To disable BDPF, uncheck the BDPF box for the drive.
5. Wait for the configuration change to complete.
6. Verify the configuration change by selecting Monitor > Drives. Data Path Failover is shown as
Disabled.
After advanced path failover is disabled, multiple paths to each device will be presented to the host. The
advanced path failover driver supports devices with or without advanced path failover enabled so
uninstalling the advanced path failover driver is not required when advanced path failover is disabled.
Configuring control path failover
When basic control path failover (BCPF) is enabled, the library is presented on the first drive Fibre
Channel port. If basic data path failover is configured on the drive, the second Fibre Channel port will be
one of the control path failover ports.
When advanced control path failover (ACPF) is enabled, the library is presented on all the Fibre Channel
ports of all the drives configured to handle the library control path.
For both ACPF and BCPF, configure a secondary control path drive and the ports on that drive will be
standby control path failover ports that can be activated in the event of complete loss of connection to the
primary control path drive. Standby control path drive ports are still active data path ports and can be
used for tape drive access even when the drive is configured as a passive control path drive.
If the active control path port goes down, the library transfers various settings to one of the passive ports
and then either the library enables the control path failover port for basic path failover or the driver
switches the active path for advanced path failover.
Library and tape drive prerequisites for basic control path failover
Procedure
1. The HPE StoreEver ESL G3 LTO-5/LTO-6 Ultrium Control Path Failover license is installed on the
library.
2. The host has a physical path to both the primary and secondary FC drives.
3. The tape drives that will be active and standby control path drives are LTO-5 or LTO-6 FC tape drives.
4. The library is attached to a Fibre Channel SAN that supports NPIV.
26 Disabling data path failover
Page 27

5. The drive port Fibre Channel topology is configured in Fabric mode.
6. All paths to the control path Fibre Channel drive are accessible from the same HBA and all of the
devices are within the same zone.
7. If Secure Manager is enabled, hosts that need access to the control path have robotics device access
to the first Fibre Channel port on both the active control path drive and the standby control path drive.
Library and tape drive prerequisites for advanced control path failover
Procedure
1. The HPE StoreEver ESL G3 LTO-5/LTO-6 Ultrium Control Path Failover license is installed on the
library.
2. The host has a physical path to both the primary and secondary FC drives.
3. The tape drives that will be active and standby control path drives are LTO-6 FC tape drives.
4. Advanced path failover drivers are installed and configured on all hosts.
The hosts that do not have advanced path failover drivers will see the drives but will not be able to
write, read, or send move commands. The advanced path failure drivers also support drives
configured with basic path failover or without failover configured.
5. If Secure Manager is enabled, hosts that need access to the control path must be given robotics
device access to all Fibre Channel ports on both the active control path drive and the standby control
path drive. The host will have two different worldwide names for the two different HBAs and each
worldwide name may be granted access to all ports or one name may be granted access to the first
Fibre Channel port and the second name may be granted access to the second Fibre Channel port.
Enabling control path failover for a library partition
1. Log on as administrator.
2. From the main console, select Setup > Partitions > Control Path.
3. When prompted, select the partition you would like to configure. Click OK.
The Control Path dialog box appears.
4. In the Control Path (CP) Selection pane, select the primary control path drive.
5. Select the drive you wish to configure as the standby control path failover drive from the Control Path
Failover (CPF) Selection list.
NOTE:
LTO-4 drives do not support failover. LTO-5 and LTO-6 drives support Basic Path Failover, but
only LTO-6 drives are supported for advanced path failover.
6. Under CPF Mode, select the control path failover type.
• For basic control path failover, select Basic.
• For advanced control path failover, select Driver or Advanced.
Library and tape drive prerequisites for advanced control path failover 27
Page 28
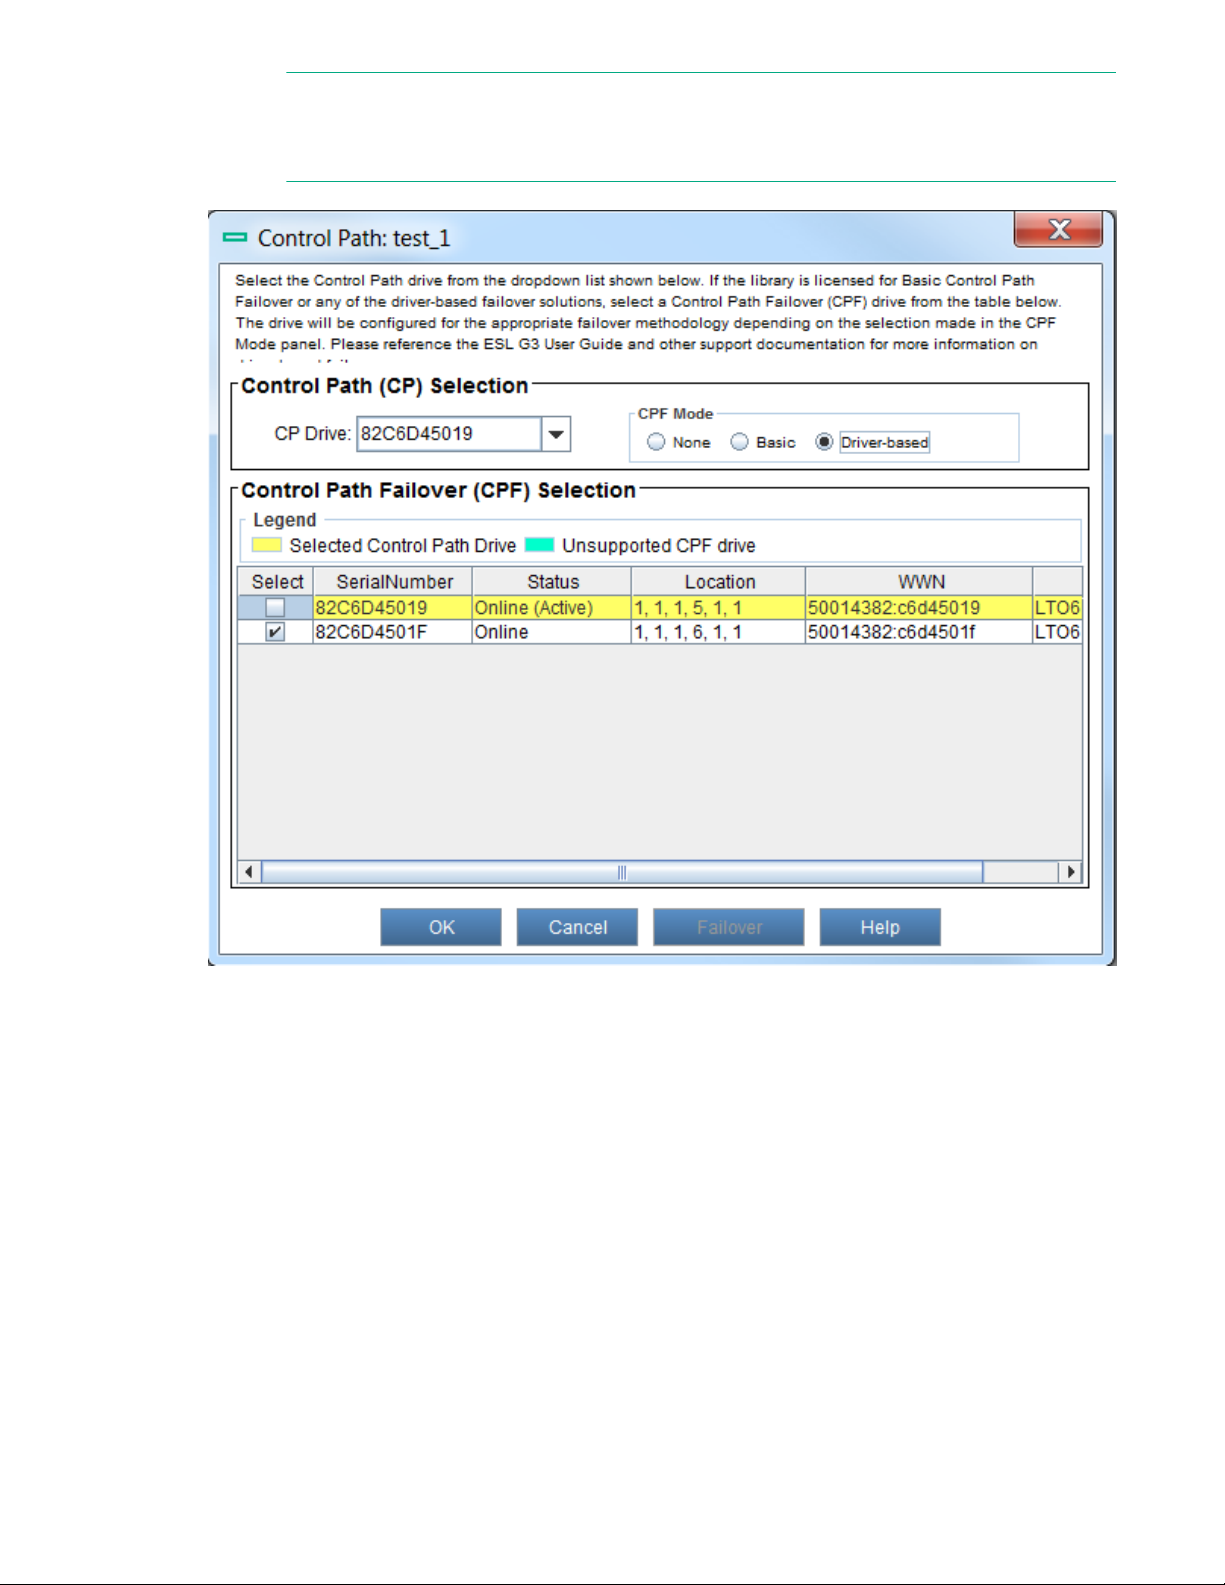
NOTE:
With firmware versions 720H and later, the Advanced button shown in this illustration is
labeled Driver.
7. Click OK.
Configuring the library after enabling control path failure
Library configuration requirements when using Secure Manager
Use the Secure Manager Configuration Wizard to map hosts that have been granted access to FC drive
ports.
Procedure
1. For basic control path failover, map hosts that have been granted access to the control path device to
the first FC drive port.
2. For advanced control path failover, map hosts that have been granted access to the control path
device to both FC ports.
28 Configuring the library after enabling control path failure
Page 29

SAN configuration requirements
When basic control path failover is enabled, the library is no longer presented as a logical unit behind the
tape drive and is assigned a new Fibre Channel node name which needs to be zoned in the same zone
as the primary and secondary control path drives. For additional SAN requirements, see Preparing the
switches and hosts for failover on page 16.
After configuring the basic control path failover parameters, you might need to make additional changes:
• To find the world-wide name assigned to the library controller, use the Monitor > Partitions menu to
see the Partitions Status dialog. The world-wide name for the library controller is shown in the LCP
WWPN column.
• Hosts connecting to the library may need to be rebooted if the operating system does not support
dynamic device detection.
• Applications on hosts may need to be reconfigured to recognize the new library world-wide name.
Configuring failover for the ESL G3 Tape Libraries 29
Page 30
Verifying control path failover
Before testing control path failover, verify that the configuration is correct in the Drive Status dialog,
which is accessed from the Monitor > Drives menu. The Control Path column identifies the primary and
secondary control path drives. The drive currently hosting control path access is marked Active.
Procedure
1. To test basic control path failover:
2. From the Physical managed view, select Monitor > Partitions > Control Path.
3. Select the partition with basic control path failover configured.
4. The Control Path dialog for the partition appears. Click Failover.
5. In the Warning dialog, click Yes.
NOTE:
Since the control path is switching from the primary drive to the secondary drive, there could be
a disruption in host traffic.
6. A progress dialog appears while the failover operation is in progress.
7. Select Monitor > Drives to launch the Drive Status dialog. The Secondary drive should now be the
Active drive.
8. From the host computers confirm that the library is still accessible. After confirming that the library is
still accessible, the host logs should show a failover event.
Disabling control path failover
Procedure
1. To disable control path failover:
2. Log in to the Management Console as a user with Administrator privileges.
3. Select the Physical managed view.
4. Select Setup > Partitions > Control Path.
5. The Secure Manager Partitions dialog appears and displays all available partitions.
6. Select the partition, and click OK.
30 Verifying control path failover
Page 31

7. The Control Path dialog appears with the command path drive highlighted in yellow and the failover
drive selected. Un-select the failover drive, and click OK.
8. Click Yes in the Warning dialog to take the partition offline. Wait for the configuration change to
complete. Once completed, the partition is automatically put online.
Configuring failover for the ESL G3 Tape Libraries 31
Page 32

Configuring failover for the MSL3040 or MSL6480
The MSL6480 supports both basic and advanced path failover, though basic and advanced path failover
cannot both be used in a partition at the same time. For example, advanced data path failover can be
used with advanced control path failover or without control path failover, but not with basic control path
failover.
Control path failover is configured for each partition with the Expert Partition Wizard. The MSL3040 does
not support Basic Path Failover.
Control path failover configuration
Control path failover is configured for each partition with the Expert Partition Wizard.
The requirements for using basic control path failover in a partition are:
• Two LTO-5 or two LTO-6 Fibre Channel drives of the same type (Ultrium 6250 half height; 3000 half
height, or Ultrium 3280 full height) are in the partition. Additional tape drives may be included in the
partition but cannot be configured for failover.
• Advanced path failover is not enabled for the partition. Advanced and basic failover may not be mixed
within a partition.
• The HPE MSL6480 LTO-5&6 Control Path (CtrlP) Failover license has been added to the library.
The requirements for using advanced control path failover are:
• Two LTO-6 Fibre Channel drives are in the partition. SAS and earlier generation tape drives can be in
the same partition, but cannot be configured for Advanced CPF.
• Basic data path failover is not enabled for the partition. Advanced and basic failover may not be mixed
within a partition.
• Only hosts that have advanced path failover drivers installed can access drives in the partition.In a
mixed environment where some hosts have advanced path failover drivers installed and some hosts
do not, partition the library so that hosts that are using advanced path failover access one partition and
hosts not running the advanced path failover driver access the second partition. In some cases, a mix
of host operating systems might be used with a single partition. For example, a Windows host might
be running the library control agent while a Linux host performs backups. In that configuration,
advanced control path failover could be enabled and the advanced path failover driver installed on the
library control host but the drives may be configured without path failover.
• The HPE MSL6480 LTO-5&6 Control Path (CtrlP) Failover license or the HPE MSL3040 Ctrl
Failover license has been added to the library.
Enabling control path failover
Use the Expert Partition Wizard to enable control path failover. For instructions on using the wizard to
configure other partition settings, see the RMI online help or library user guide.
32 Configuring failover for the MSL3040 or MSL6480
Page 33

Procedure
1. From the Configuration area, click Expert Wizard in the Partitions menu.
2. Select the partition to be configured and then click Next until the wizard displays the Select Control
Path Failover Type screen.
3. Select the type of control path failover for the partition and then click Next.
4. Select the active and passive control path drives, and then click Next.
5. In the example shown, drive 1 is set as the primary path and drive 2 is set as the secondary path.
6. Click Next until the wizard displays the final screen.
7. Verify the partition configuration and then click Finish.
8. After the wizard reconfigures the partition, the library comes on line automatically.
9. Modify switch zoning, if necessary, to enable host access to the library.
Locating the library world-wide node name after enabling basic control path failure
When basic control path failover is enabled, the library is no longer presented as a logical unit behind the
tape drive and is assigned a new Fibre Channel node name.
The new world-wide node name is displayed on the Status > Library Status screen.
Verifying basic control path failover
There is always a library logical unit number hosted by a drive so the LUN indicator does not change
when basic control path failover is enabled.
Locating the library world-wide node name after enabling basic control path failure 33
Page 34

Procedure
1. When basic control path failover is enabled, the library is presented as LUN 0 on its own world-wide
node name.
2. When basic control path failover is NOT enabled, the library is presented as LUN 1 on the drive worldwide node name.
To verify basic control path failover, force a failover from the Drives > Manual Control Path Failover
screen and then verify that the control path has moved to the passive drive.
• Navigate to the Status > Partition Map > Configuration Status screen.
• Verify that basic control path failover is enabled.
• Note the active and passive control path drives.
• Navigate to the Drives > Manual Control Path Failover screen.
• Click Failover.
• Click Submit.
• Navigate to the Status > Partition Map > Configuration Status screen.
• Verify that the active control path drive is the drive that was the passive control path drive in step 3.
Verifying advanced control path failover
To verify advanced control path failover, power off the control path drive to create a failover event. You
can find the active control path drive for a partition from the Status > Partition Map > Configuration
Status screen, shown in Figure 6: Status of the Partitions Configuration to verify basic control path
failover on page 35 .
To cause a failover event, power off the active control path drive from the Configuration > Drives >
Settings screen and then verify that the partition still has access to the host.
Procedure
1. Navigate to the Status > Partition Map > Configuration Status screen.
2. Verify that advanced control path failover is enabled.
3. Note the active and passive control path drives.
4. Verify library connectivity.
5. Navigate to the Configuration > Drives > Settings screen.
6. For the active control path drive, deselect Power On.
7. Click Submit.
8. The active control path drive is powered off and the library control path switches to the passive control
path drive.
9. Verify library connectivity.
34 Verifying advanced control path failover
Page 35

Figure 6: Status of the Partitions Configuration to verify basic control path failover
After verifying library connectivity using each of the library control paths, the library control path can be
moved back to the original drive if needed by power cycling the alternate control path drive.
Data path failover configuration
• The partition contains at least one LTO-6 dual-ported FC tape drive. SAS and other FC tape drives can
be in the same partition.
• The partition is not configured to use basic control path failover.
• Only hosts with advanced path failover drivers can access the drives in the partition. In a mixed
environment where some hosts have advanced path failover drivers installed and some hosts do not,
partition the library so that hosts that are using advanced path failover access one partition and hosts
not running the advanced path failover driver access the second partition.
• In some cases, a mix of host operating systems might be used with a single partition. For example, a
Windows host might be running the library control agent while a Linux host performs backups. In that
configuration, advanced control path failover could be enabled and the advanced path failover driver
installed on the library control host but the drives may be configured without path failover.
• The HPE MSL6480 LTO-5&6 Control Path (CtrlP) Failover license or the HPE MSL3040 Ctrl
Failover license has been added to the library.
• The partition contains at least one LTO-5 or LTO-6 dual-ported FC tape drive. SAS and other FC tape
drives can be in the same partition.
• The partition is not configured to use advanced control path failover.
Basic and advanced data path failover can be used with the drive ports configured in loop mode or fabric
mode. For best results and compatibility with basic control path failover, Hewlett Packard Enterprise
recommends that the drive ports be configured in fabric mode and connected to an FC switch.
Enabling data path failover
Data path failover is configured with the Expert Partition Wizard.
Data path failover configuration 35
Page 36

Procedure
1. From the Configuration area, click Expert Wizard in the Partitions menu.
2. Select the partition to be configured and then click Next until the wizard displays the Select Data Path
Failover Settings screen.
3. For example, Figure 7: Enabling data path failover on page 36 shows advanced data path failover
enabled for drives 1 and 2. In this case, the wizard preset LTO6 Adv. DPF because Advanced CPF is
configured for the partition. Because a partition cannot use a mixture of basic and advanced failover,
the wizard will not allow Basic DPF to be selected in this case.
Figure 7: Enabling data path failover
4. Select the type of data path failover for the each drive and then click Next.
5. Select the active and passive control path drives, and then click Next.
6. Click Next until the wizard displays the final screen.
7. Verify the partition configuration and then click Finish.
8. After the wizard reconfigures the partition, the library comes on line automatically.
Verifying data path failover
After data path failover is enabled:
Procedure
1. Navigate to the Status > Drive Status screen, expanding the section for the drive to see the details.
2. Expand the section for each drive to see the details. The Data Path Failover field will show the type of
data path failover configured.
3. Verify that the interface status for both ports is Login complete.
4. From the host, verify connectivity to the drive.
36 Verifying data path failover
Page 37

Configuring failover for other MSL Tape Libraries
The MSL2024, MSL4048, MSL8048, and MSL8096 tape libraries with dual-port LTO-5 or LTO-6 FC tape
drives support basic data path failover.
The MSL2024, MSL4048, MSL8048, and MSL8096 tape libraries with multiple LTO-5 or LTO-6 FC tape
drives support basic control path failover.
Configuring data path port failover
Enabling data path port failover
For best results and compatibility with basic control path failover, Hewlett Packard Enterprise
recommends that the drive ports be configured in fabric mode and connected to a switch.
Procedure
1. Navigate to the RMI Configuration > Drive screen.
2. Select Data Path Failover Enabled and then click Submit.
Basic data path failover is configured for each drive using the drive configuration options in the library
network management interface.
drive configuration options in the library network management interface. In this example data path port
failover is enabled for drive 1 but is not enabled for drive 2. Note that in this example control path port
failover is also enabled. When control path port failover is enabled the port type is required to be fabric so
the port type selections are disabled.
Figure 8: Enabling data path port failover on page 38 shows the
Configuring failover for other MSL Tape Libraries 37
Page 38

Figure 8: Enabling data path port failover
Verifying data path port failover
Procedure
1. Navigate to the Drive > Status screen.
2. Verify that status of one of the ports is Login complete and the other is Standby.
3. Note the status of each port.
4. Verify that the hosts with access to the tape drive can communicate with the drive.
5. Force a data path failover by one of these methods:
a. Disconnect the cable from the active port on the drive
b. Use an FC switch management interface to down the port connected to the tape drive
6. In the Drive > Status, screen verify that active port has changed.
7. Reconnect the disconnected port and verify that the status for the port is Standby.
8. Verify that each host can access the tape drive.
After data path port failover is enabled, verify the configuration in the Drive > Status screen, as shown in
Figure 9: Standby and active ports on page 39.
38 Verifying data path port failover
Page 39
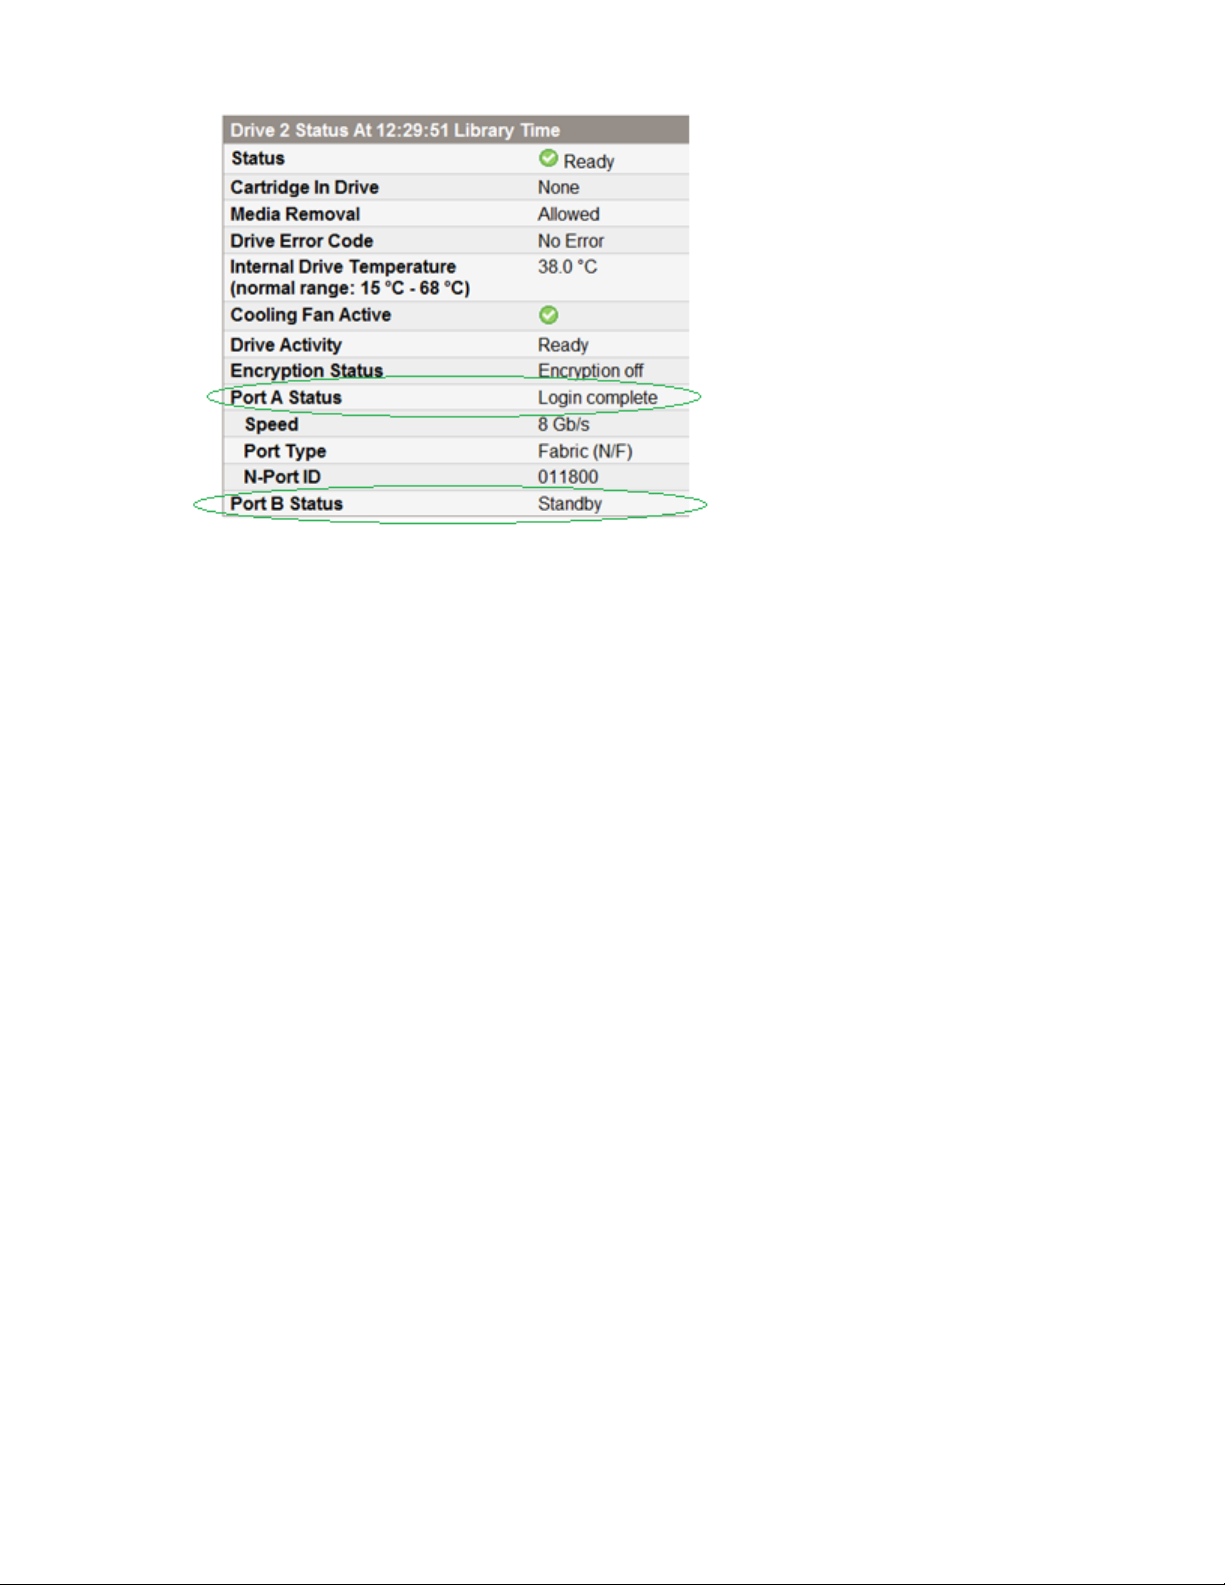
Figure 9: Standby and active ports
After verifying that the configuration change was successful, verify that the hosts with access to the tape
drive are still able to communicate with the drive.
After verifying host access via the initial path, force a data path port failover by disconnecting the cable
from the active port on the drive or using an FC switch management interface to down the port connected
to the tape drive.
The drive status display shows which drive port is active and which port is in standby. After disconnecting
the cable from the active port verify that the library network management page port status shows that the
active port has changed. Reconnect the disconnected port and verify that it shows as Standby. Verify
that each host still has access to the tape drive.
If a particular port is the preferred active port and it is configured as Standby you can force selection of a
particular port as the active port by disconnecting the cable from the other port.
Making the standby port be the active port
To make the standby port active, disconnect the FC cable from the active port. After the library control
path has failed over to the standby port, reconnect the FC cable.
Configuring basic control path failover
Enabling control path port failover on the library
Enabling control path failover
Prerequisites
• The library is used in a Fibre Channel SAN and connected as fabric devices.
• The library or logical library has two LTO-5 or two LTO-6 Fibre Channel drives of the same type
(Ultrium 6250 half height; 3000 half height, or Ultrium 3280 full height)
• All drive ports are configured to use a “Fabric N/F” connection
Making the standby port be the active port 39
Page 40

Procedure
1. Navigate to the RMI Configuration > Drive screen.
2. For each tape drive that will be configured for control path failover, configure the Port Type as Fabric
(N/F) if necessary.
3. Navigate to the RMI Configuration > System screen.
4. Select Enable Library Control Path Failover.
5. Select the Alternate Drive for Library Control Path and then click Apply.
More information
The “Enable Library Control Path Failover” setting is not selectable on page 41
The default port configuration for the libraries is Automatic and must be changed. Figure 10: Configure
library, basic control path failover configuration disabled on page 40 shows the tape library
network administration drive configuration pane for a dual-port drive. The configuration for port A is set
correctly for use with basic control path failover. The configuration for port B is still set to the default
setting of “Automatic”. A single-port drive will not have port B.
Figure 10: Configure library, basic control path failover configuration disabled
Figure 11: Configure library, basic control path failover configuration disabled on page 41 and
Figure 12: Configure library, basic control path failover configuration available on page 41 show
the System configuration pane. In Figure 11: Configure library, basic control path failover
configuration disabled on page 41 the option for Enable Library Control Path Failover is not
selectable and the option for Alternate Drive for Library Control Path Failover is set to N.A.. When the
options for enabling basic control path failover are not available the configuration requirements have not
been met. The configuration shown in Figure 10: Configure library, basic control path failover
configuration disabled on page 40 where only one drive port is configured for Fabric is an example
configuration where these options would not be available. Selecting the Help link in the note following the
option brings up a help page listing the configuration requirements.
40 Configuring failover for other MSL Tape Libraries
Page 41

Figure 11: Configure library, basic control path failover configuration disabled
In Figure 12: Configure library, basic control path failover configuration available on page 41 the
configuration requirements for enabling basic control path failover have been met and the library has
made the option for Enable Library Control Path Failover selectable as well as providing a selection for
the “Alternate Drive for Library Control Path.”
Figure 12: Configure library, basic control path failover configuration available
The “Enable Library Control Path Failover” setting is not selectable
Symptom
In the RMI Configuration > System screen, the setting Enable Library Control Path Failover cannot
be selected.
Cause
The prerequisites for control path failover have not been met.
The “Enable Library Control Path Failover” setting is not selectable 41
Page 42

Action
Verify that the library or logical library meets the prerequisites for the number, type, and configuration of
tape drives.
Verifying basic control path failover
After enabling basic control path failover, verify the configuration of both paths.
After verifying library connectivity using each of the library control paths the library control path may be
moved back to the original drive if so desired by using the
Procedure
1. Verify that the hosts configured for access to the library are able to communicate with the library.
2. If the library is not accessible to the hosts, add the library Worldwide Node Name to switch zones.
3. Using the library OCP or RMI, power off the drive marked as hosting the library logical unit number
Drive 1 (LUN) in Figure 10: Configure library, basic control path failover configuration disabled
on page 40 - Configure > Drives.
4. Verify that the LUN indicator moved to the alternate control path drive.
5. Verify that host connectivity to the library has not changed. Configure switch zoning to allow host
access if necessary.
6. If you prefer to host the library control path with the original drive, configure the tape drive hosting the
library control path.
Locating the library world-wide node name Configuration requirements after enabling control path failure
When basic control path failover is enabled, the library is no longer presented as a logical unit behind the
tape drive and is assigned a new Fibre Channel node name.
To see the library world-wide node name, navigate to the RMI Identity > Library screen.
Configuring the tape drive hosting the library control path
Procedure
1. Navigate to the RMI Configuration > System screen.
2. In the System Configuration pane, select the Library LUN Hosted By Drive.
3. A library with multiple logical libraries has a library control path for each logical library.
4. Select the Alternate Drive for Library Control Path, if necessary.
5. Click Apply.
42 Verifying basic control path failover
Page 43

Installing and using Windows advanced path failover drivers
After the host has been configured and booted, install both the Hewlett Packard Enterprise tape and
changer drivers. Both drivers must be installed before the advanced path failover drivers are installed.
The tape and changer drivers are in the StoreEver Tape Drivers for Windows driver bundle available from
http://www.hpe.com/storage/tapecompatibility.
Installing the Windows advanced path failover drivers
Prerequisites
• Windows Installer version 4.5 or later
• Windows driver for the HPE LTO-6 tape drive
• Windows driver for the tape library
Procedure
1. Locate the drivers on the Hewlett Packard Enterprise website:
a. Navigate to http://www.hpe.com/support/hpesc.
b. Enter ESL G3 (for ESL G3), MSL3040 (for MSL3040), or MSL6480 (for MSL6480), and then click
Go.
c. In the Results, select your library.
d. In the Download options tab, click Drivers, software & firmware.
e. In the Operating System drop down, select OS Independent.
f. Click Driver — Storage Tape.
g. Click Obtain software for the High Availability Failover Driver for your operating system.
h. Follow the prompts to download the driver package.
2. To install the Tape Upper Bus Storage Filter driver, run the installer file as Administrator and then
restart when requested.
3. After the system restarts, the installer will continue installing the Tape Multi-Path Intermediate Class
driver.
Installing and using Windows advanced path failover drivers 43
Page 44

NOTE:
The installation requires Windows Installer version 4.5 or later. If it is not present, the installer
reports the following errors:
• Error 0x80070643: Failed to install MSI package
• Error 0x80070643: Failed to execute MSI package.
• Error 0x80070643: Failed to configure per-machine MSI package.
• Error 0x80070643: Failed to configure per-machine MSI package.
If these errors appear, download the Windows Installer appropriate for your version of Windows
using the following link:
4. The installation process creates a directory:
C:\Program Files\Hewlett-Packard\Failover\
5. If the server does not already have the StoreEver Tape Drivers for Windows, download the driver
package from the Driver — Storage Tape page as described in Step 1 and then run the installer file
as Administrator to install the drivers.
More information
The Windows Installer reports Error 0x80070643 on page 44
http://www.microsoft.com/en-us/download/details.aspx?id=8483
The Windows Installer reports Error 0x80070643
Symptom
When installing the Tape Upper Bus Storage Filter driver, Windows Installer reports the following errors:
• Error 0x80070643: Failed to install MSI package
• Error 0x80070643: Failed to execute MSI package.
• Error 0x80070643: Failed to configure per-machine MSI package.
• Error 0x80070643: Failed to configure per-machine MSI package.
Cause
The installation requires Windows Installer version 4.5 or later.
Action
Download the Windows Installer appropriate for your version of Windows from the Microsoft website.
44 The Windows Installer reports Error 0x80070643
Page 45

http://www.microsoft.com/en-us/download/details.aspx?id=8483
Uninstalling the drivers
Procedure
1. Select Start > Programs > Control Panel.
2. Select Advanced Failover Drivers entry, and then click Uninstall/Change.
3. Follow the prompts to complete the driver removal process.
Verifying that the tape and changer drivers are correctly installed
Procedure
1. Use the Windows Device Manager to confirm that all of the configured paths are accessible to the
operating system.
2. If the expected number of paths is not available, verify the host and SAN configuration.
3. Example
In this example, there should be two paths to each tape drive and four paths to the tape library.
4. The application path list in the table below shows the device handles as presented to a Windows
application when using the advanced path failover driver for the same hardware configuration shown
in Advanced path failover. For the drives, both ports are mapped to the same device handle and one
port is active while the other is the standby port. For the library, the two ports on the first drive are the
active and standby ports and two additional ports on a second drive are passive ports that can be
activated in the event of complete connection loss to the drive hosting the control path.
Uninstalling the drivers 45
Page 46

Table 2: Application path list
Addressed
Logical Unit
Tape drive 1 TAPE0 Active 1 Port A 50:01:10:a0:00:00:00:01
Tape drive 2 TAPE1 Active 1 Port A 50:01:10:a0:00:00:00:03
Library
controller
Device
Handle
CHANGER0 Active 2 Port B 50:01:10:a0:00:00:00:02
Path SAN Port Example Logical Unit
Standby 2 Port B 50:01:10:a0:00:00:00:01
Standby 2 Port B 50:01:10:a0:00:00:00:03
Standby 1 Port A 50:01:10:a0:00:00:00:02
Passive 2 Port B 50:01:10:a0:00:00:00:02
Passive 1 Port A 50:01:10:a0:00:00:00:02
Windows driver theory of operation
The advanced path failover drivers support data path failover and control path failover on Hewlett
Packard Enterprise LTO-6 drives integrated into Hewlett Packard Enterprise tape libraries.
Worldwide Identifier
A failover device driver must identify devices accessible over the different paths available and associate
paths with devices so that it is able to mask duplicate paths and present a single path to an ISV
application.
As devices are discovered by the operating system and the DEVICE OBJECT is passed into the driver for
initialization, the driver determines if the device is a tape or changer device and is a candidate for failover.
If the device is a candidate for failover, the driver determines the serial number (SN) or worldwide name
(WWN) of the device.
If the device is capable of advanced path failover, the driver determines whether failover is enabled for
the device. If the device does support failover and failover is enabled, then the driver will mask all
duplicate paths and present a single path to application clients. If the device does not support failover, if
failover is not enabled, or if an error occurred while attempting to determine the failover-enabled state,
then the driver will not modify the presentation of paths to the device to applications.
Driver components
Windows advanced path failover drivers consists of two drivers: a storage bus filter driver and an
intermediate class driver. The storage bus filter driver processes OS device notifications (PnP
notifications) to identify available paths to tape and media changer devices capable of supporting
advanced path failover. The intermediate class driver works with the devices that have been identified as
advanced path failover capable devices and manages the active paths to the changer and tape drives.
This architecture follows the architecture of Microsoft’s MPIO. MPIO only supports disk devices and
cannot be used directly.
Figure 13: Driver and system organization on page 47 shows the organization of the Windows
drivers and the system components when an Emulex LPe12002 host bus adapter is installed. In this
example, the tape drive presents both SSC (tape) and SMC (media changer) device servers. Not all
drives in the library will present an SMC device server.
46 Windows driver theory of operation
Page 47
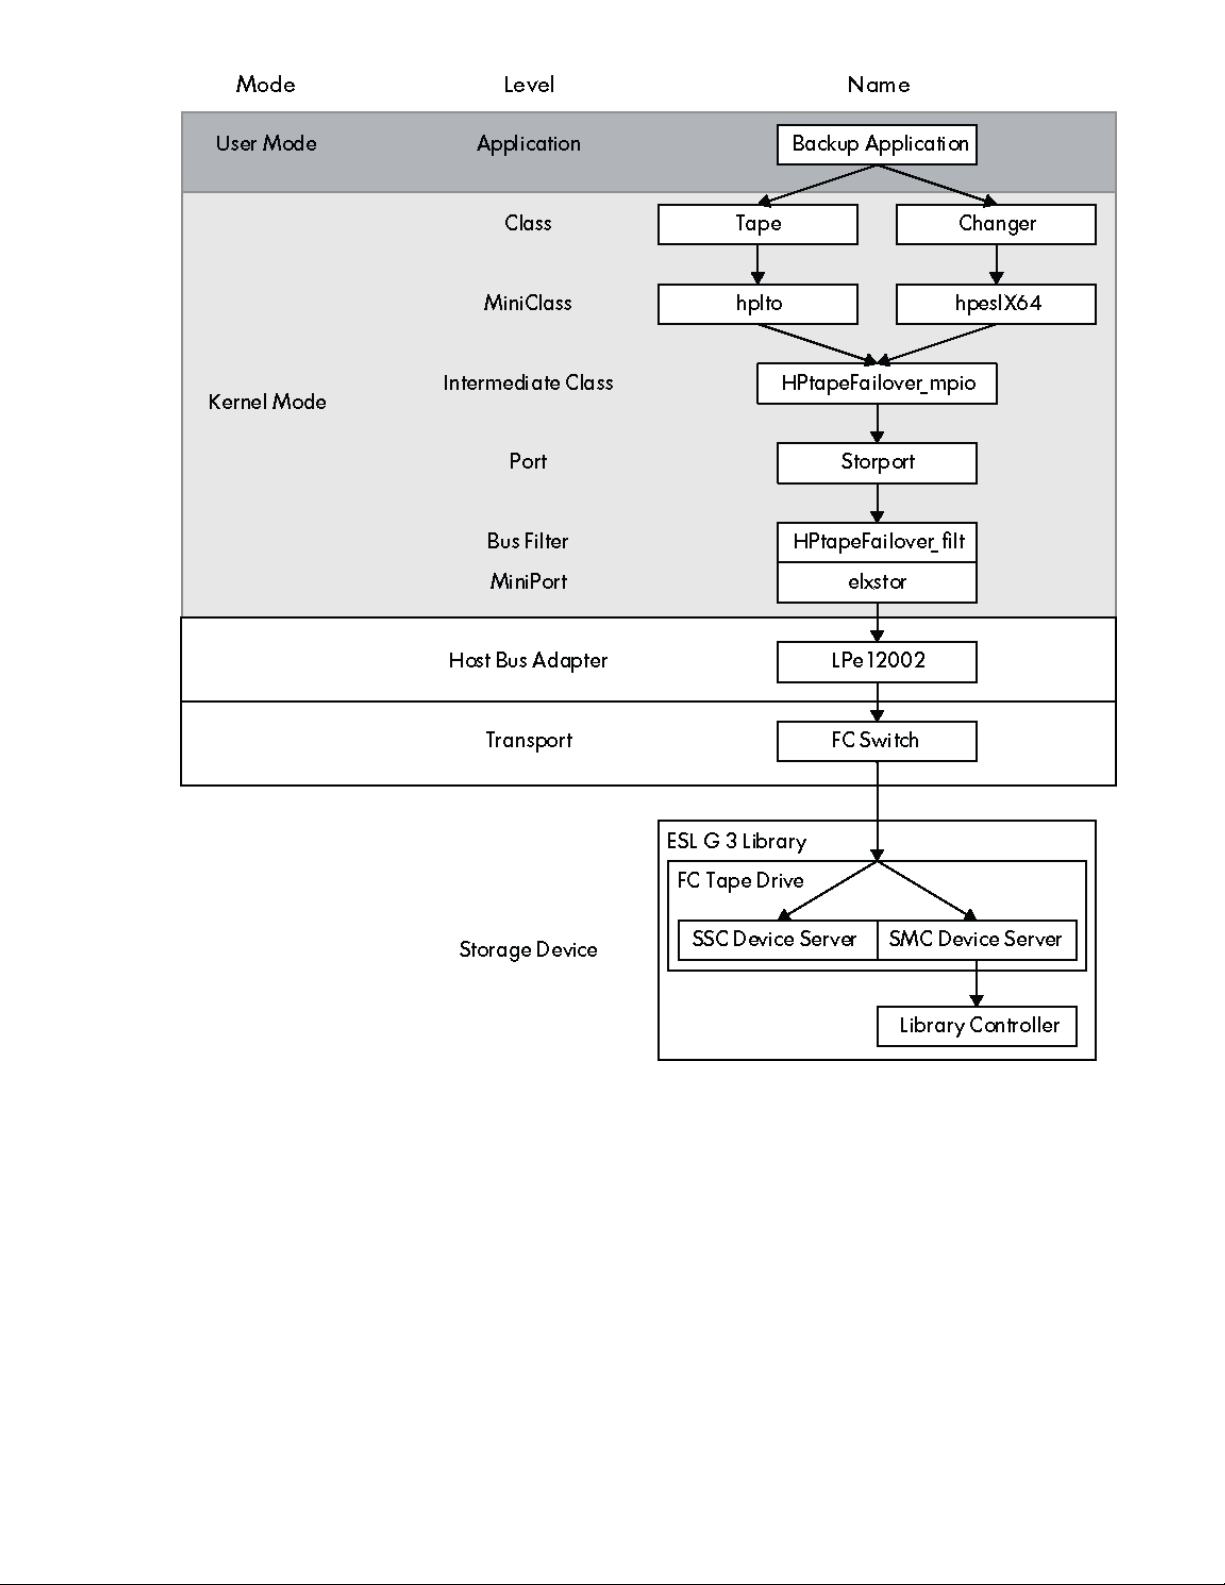
Figure 13: Driver and system organization
Storage bus filter driver
The storage bus filter driver is named HPtapeFailover_filt and manages the OS notifications
indicating that devices have been added or removed. The storage bus filter driver bus enumerator is
usually "PCI". It attaches as an upper filter to all HBA drivers. It then monitors the creation of raw devices,
looking for supported failover capable devices. Requests to all other devices are passed through
unchanged. When a supported device is recognized, the hardware ID of the device is changed to a value
that the upper device driver will recognize, but that the rest of the system will not. The special hardware
ID prevents the standard tape class driver from attaching to the raw paths.
Storage bus filter driver 47
Page 48

Multi-path intermediate class driver
The intermediate class (IC) driver, HPtapeFailover_mpio, has two halves. The upper half is a virtual
bus (VB) driver. This VB driver provides a virtual device which manages the paths to all of the devices
that support failover. The lower half is a multi-path function driver for the devices using the hardware ID
created by the lower-level filter driver. Windows calls these hardware paths physical device objects
(PDOs). The intermediate class driver creates two different types of devices in the Windows device
manager. The devices associated with the physical paths are shown as a "SCSI" bus and the device
associated with the virtual device that manages the paths is shown as a "ROOT" device.
The lower half of this driver acts like a class driver and it attaches to the devices presented by the lower
driver. The upper half acts like a virtual bus driver, presenting abstractions of devices to the layers above.
For example, a single tape device may have many paths to it, but only a single virtual tape device is
presented to the layers above, and the driver transparently manages the multiple paths to the physical
tape device.
Figure 14: Drivers and device objects on page 49 shows the various device objects presented by the
drivers. The abbreviations are:
• PDO: Physical device object
• FDO: Functional device object
• FPDO: PDO created by bus filter driver
• FFDO: FDO created by bus filter driver
• CDO: Control device object; used by diagnostic interface
48 Multi-path intermediate class driver
Page 49

Figure 14: Drivers and device objects
Installing and using Windows advanced path failover drivers 49
Page 50

Device manager view
Figure 15: Device manager window on page 50 shows the configured failover path instances in the
Windows Device Manager.
Figure 15: Device manager window
NOTE:
A number of devices have been removed from this view to improve readability.
In the system shown in Figure 16: Library configuration example on page 51, the library has two
tape drives and each tape drive has two primary ports attached to a different switch. Each drive port
presents both tape drive (SSC) and tape library (SMC) devices. One of the drives will be configured to
present the active tape library device paths and the second drive will be configured to present passive
tape library device paths. All tape drive paths are active.
50 Device manager view
Page 51

Figure 16: Library configuration example
In this example, there are two physical tape drives in the library; each of these is shown under “Tape
drives” as “Hewlett Packard Enterprise LTO Ultrium-6 drive.” At boot time, the drivers discovered eight
paths to supported SCSI devices in the system, although not all paths were in active use.
Each drive has an SSC device (i.e., tape drive) and an SMC device (i.e., media changer). Each of those
can potentially be accessed through either of the drive’s two primary ports, for a total of two paths per
drive and eight paths total (4 tape drive paths, two each on 2 drives, and 4 media changer paths to one
media changer).
The failover drivers have one path to each of the two tape drives through Switch A. The failover drivers
also have one path to each of the two tape drives through Switch B. Each of those four paths can
potentially connect to either the tape drive or the tape library. At boot time the drivers discover a total of
eight potential paths to devices.
This results in the Windows Device Manager view shown in
page 50. The failover paths appear under System devices. A virtual bus named AdvFO Tape Multi-Path
Intermediate Class Driver ROOT FDO is created to enumerate the multi-path capable devices. Each of
the eight paths appears as AdvFO Tape Multi-Path Intermediate Class Driver SCSI FDO.
The drivers make one path active to each tape drive and one path to the tape library active through the
drive hosting the active control paths. Each physical device appears once in the Device Manager. Under
Tape drives there are two instances of Hewlett Packard Enterprise LTO Ultrium 6 drive and under
Medium Changer devices there is one instance of HPE ESL G3 Tape Library.
Device firmware
These two Windows drivers work in conjunction with firmware in the library and tape devices. The special
firmware ensures that the host computer and devices stay synchronized on state and position
information. The advanced path failover device drivers hide the details of this from the rest of the system.
The objective is for the rest of the system (including all applications running on the system and all other
device drivers) to see a single changer or tape device, but not the redundant paths to the failover-enabled
devices. If a path failure occurs, it should be transparent to the rest of the system including applications. If
a path fails, the drivers work with the device to transfer communication to a new path and recover the
command that was in process when the path failed.
Figure 15: Device manager window on
Device firmware 51
Page 52

Installing and using Linux advanced path failover drivers
The advanced path failover drivers for Linux replace the normal SCSI Tape and SCSI Generic drivers.
The advanced path failover drivers for Linux pass all SCSI commands for devices that do not support
advanced path failover through the same code path that is followed when the standard drivers are loaded
and route commands for devices that do support failover through the new pfo driver. The advanced path
failover drivers for Linux perform automatic load balancing and will automatically select a path with the
fewest open tape devices.
Installing advanced path failover drivers
Procedure
1. For systems using Symantec NetBackup: Using the advanced path failover drivers with NetBackup
requires the creation of specific paths in the sys filesystem. To allow the advanced path failover
drivers to create the necessary directories when the drivers are installed:
echo "options pfo netbackup=1" > /etc/modprobe.d/pfo-netbackup.conf
2. Download the drivers for the revision of Linux running on the server. Drivers for a specific revision of
Linux will not operate properly in other revisions. See the most recent release notes to find out which
RPM file to use for the Linux operating system that is running on the server.
a. Navigate to
b. Enter ESL G3 (for ESL G3), MSL3040 (for MSL3040), or MSL6480 (for MSL6480), and then click
Go.
c. In the Results, select your library.
d. In the Download options tab, click Drivers, software & firmware.
e. For the ESL G3, select your product.
f. In the Operating System drop down, select OS Independent.
g. Click Driver — Storage Tape.
h. Click Obtain software for the High Availability Failover Driver for your operating system.
i. Click Receive for Free.
j. Follow the prompts to download the driver package.
3. To install the drivers:
rpm -ivh <filename>.rpm
The filename is version-dependent. See the release notes for filenames for the version you are
installing.
4. In some cases the server will need to be rebooted to complete the installation. Check the instructions
provided by the RPM file output and reboot the server if requested.
http://www.hpe.com/support/hpesc.
5. Hewlett Packard Enterprise highly recommends using a maximum 256K block size with the Linux path
failover drivers. Using block sizes larger than 256K can cause failures. The block size is configured in
52 Installing and using Linux advanced path failover drivers
Page 53

the application software. See the host application software user guide for instructions on configuring
the block size.
Updating the driver without rebooting
Procedure
The advanced path failover driver may be updated without rebooting the system by first removing the
existing drivers and then loading the new version. Verify that no applications have devices open that are
using the advanced path failover drivers and then use rpm -U <filename>.rpm to update the drivers.
See the release notes for specific file names.
Device files
The advanced path failover driver will resolve all paths to a device into a single ‘sg’ and ‘st’ entry in
the /dev directory for each device. Requests to open or send commands to that device path will use the
path selected by the advanced path failover driver. Alternate paths that address devices that are already
known are entered into an internal alternate path list and device files are not created for those paths.
Load balancing options for multiple tape drives
The driver balances the number of tape drives using each HBA at the same time in an attempt to improve
throughput to multiple tape drives. The level of path switching activity is adjustable.
The driver supports three levels of load balancing aggressiveness:
• Full Balancing — the most aggressive form of load balancing, which can result in frequent library path
failure alerts on a busy system when using multiple drives with multiple HBAs.
• Less Balancing — the least aggressive form of load balancing, which does some load balancing while
minimizing library path failure alerts. This is the default when the server is booted.
• No load balancing — load balancing is not a factor when assigning a drive to an HBA.
Common characteristics of both load balancing algorithms
The driver will attempt to balance the load each time a device file is opened to a tape device. The normal
on-the-fly path failover algorithms will not take other tape drive usage of an HBA into consideration. The
usage of the paths will only be evaluated at the next open of the device file.
The path will not be changed to a different path if another thread is holding the /dev file open. If multiple
threads have the /dev file open, the driver will not interfere with the path selection that has been made
by another thread.
The load balancing algorithms do not take path speed into consideration when selecting a path, they only
attempt to select a sparsely used HBA when a new /dev file to a tape drive is opened. This method does
not operate during data transfers, only at device file open.
If the load balancing algorithm is unable to select an appropriate path, the path selection algorithm reverts
to previous techniques.
If a ‘preferred’ path is set, this selection takes priority over the load balancing method. See
preferred path on page 56.
Updating the driver without rebooting 53
Setting the
Page 54

Full Balancing algorithm
When a device file is opened to a tape drive, the driver determines the number of open device files to
tape drives using the HBA of the last known good path. The driver selects a path on an HBA that is in use
by the fewest number of open tape drive device files. It will change paths even if there has not been a
path failure event.
Using the Full Balancing setting can result in frequent path changes on a busy system that has multiple
drives connected to multiple HBAs. Each path change can cause a path failover alert from the library. The
library is unable to distinguish a path change that is the result of a path failure from a path change to
optimize data throughput, so the library will issue an alert in both cases. If alerts are enabled in the library
and path change alerts are undesirable, the Less Balancing algorithm might be a better choice.
Less Balancing algorithm
When a device file is opened to a tape drive, the driver determines the number of other tape drives using
the HBA of the last known good path. The driver selects a path on an HBA that is in use by the fewest
number of other tape drives. The driver will not select a different path if there is a failover session already
established on that path to the tape drive.
If a path is lost, the driver knows that an alert will result anyway, so it will attempt to balance traffic among
the remaining paths at that time.
This algorithm will not be as effective as Full Balancing in optimizing data throughput, but will minimize
the frequency of library path failure alerts.
Setting the load balancing level
The level of load balancing aggressiveness can be set on the fly. This setting is volatile across reboot.
To set Full Balancing:
echo 2 > /sys/module/pfo/parameters/pfo_balance
To set Less Balancing:
echo 1 > /sys/module/pfo/parameters/pfo_balance
To stop load balancing:
echo 0 > /sys/module/pfo/parameters/pfo_balance
Setting the load balancing reboot option
The default load balancing algorithm is Less Balancing.
To set Full Balancing at all reboots:
echo "options pfo pfo_balance=2" > /etc/modprobe.d/pfo-balance.conf
To not use load balancing at all reboots:
echo "options pfo pfo_balance=0" > /etc/modprobe.d/pfo-balance.conf
NOTE:
For a one-time path balancing process, see Rebalancing the paths on page 56.
Command line user interface
The advanced path failover drivers support several configuration and diagnostic functions through a
command line interface. Most of the functions are accessed by directing commands to a specific path.
The following example shows the command for a specific path and the commands may be directed at any
54 Full Balancing algorithm
Page 55

path by replacing the device identifier with the identifier from the sg or st device. For example, a
command executed on pfo3 will report information for the device at sg3 and st3.
Viewing the current driver revision
The driver revision number indicates the build date of the driver and can be viewed by running:
cat /proc/scsi/sg/version
Viewing device status
You can view the status of a device that is controlled by the failover driver by reading a file in the /sys file
system. For example, to see the path status for /dev/sg3:
cat /sys/class/pfo/pfo3/paths
Terms
active_drive
A path to a tape library via an advanced path failover active drive.
down
The driver is aware of this path, but if the driver attempted to use this path at this time it would fail and
another path would need to be chosen.
last
The path that the driver was most recently able to successfully perform a SCSI command on. This is
probably the path that will be used next. There are no /dev files open to this device.
open
The path that the driver was most recently able to successfully perform a SCSI command on. This is
probably the path that will be used next. There is at least one /dev file open to this device.
prefer
The driver will attempt to send the commands on this path after the next device file open() call. This
path will override the last known good path.
session_key
The identifier number of the open session, in hexadecimal.
wwnn
World-wide node name of the device.
wwpn
World-wide port name of the Fibre Channel port on the device.
Example paths
# cat /sys/class/pfo/*/paths
sg=/dev/sg0 st=/dev/st0 wwnn=50014382c6c2f001 type=tape
0:0:3:0 up - - wwpn=50014382c6c2f003
0:0:0:0 up - - wwpn=50014382c6c2f002
1:0:0:0 up - - wwpn=50014382c6c2f002
1:0:2:0 up - - wwpn=50014382c6c2f003
sg=/dev/sg1 st=none wwnn=50014382c6c2f800 type=changer session_key=cae82d14
0:0:3:1 up - - active_drive
0:0:0:1 up last prefer active_drive
0:0:1:1 up - - 0:0:2:1 up - - -
Viewing the current driver revision 55
Page 56

1:0:0:1 up - - active_drive
1:0:1:1 up - - 1:0:2:1 up - - active_drive
1:0:3:1 up - - sg=/dev/sg2 st=/dev/st1 wwnn=50014382c6c2f007 type=tape
0:0:1:0 up - - wwpn=50014382c6c2f008
0:0:2:0 up open - wwpn=50014382c6c2f009
1:0:1:0 up - - wwpn=50014382c6c2f008
1:0:3:0 up - - wwpn=50014382c6c2f009
In this example, the tape drive at the top of the list can be accessed via either /dev/sg0 or /dev/st0. The
other tape drive is available via either /dev/sg2 or /dev/st1. An application has a device file open to the
drive at the bottom of the list; and the most recent command was sent to the drive via the path 0:0:2:0.
The library is accessed via /dev/sg1. The path most recently used to access the library was 0:0:0:1.
At some time in the past an administrator specified path 0:0:0:1 to be the “preferred” path to the library.
There are four paths to each drive. Since both drives are connected to the library there appear to be eight
paths available to the library. The drive at /dev/st0 is the “active_drive,” which means that the driver will
use that drive to access the library. The active drive can be inferred by looking at the path numbers. The
last digit (e.g. the 1 in 0:0:0:1) is the lun number of the device accessed by that path. A drive has a LUN
of 0. A library has a LUN of 1. The port names are not reported by the library because the library uses
ports on the drives so the port names are not available in the report.
All of the paths show their status as being “up”. This means that the driver believes that all of those paths
are currently available for use. The state of “down” is temporary. It is only visible while the path is being
destroyed. Once the path becomes completely unusable, the driver removes it from the list. Any path that
remains in a “down” state for more than a second should be disconnected and reconnected to reestablish
a reliable connection. The path cannot be disconnected via the Linux operating system; disconnect the
path by physically disconnecting the FC cable, disabling the port in the FC switch, or power cycling the
drive.
Setting the preferred path
Normally the driver attempts to use the path with the fewest number of open tape drive device files. You
can override the path by selecting a "preferred" path. The preferred path is the path that the driver will
attempt to use at the next open() of the device file.
The path will not switch to the preferred path if there is any other thread holding the /dev file open. If
multiple threads have the /dev file open, the driver will not interfere with the path selection that has been
made by another thread.
The path will not change to the preferred path if it is indicating a library control path using a passive drive.
In this case, the driver will select a control path hosted by an active drive instead.
You can configure the preferred path by writing to a /sys file. For example, to configure a preferred path
on /dev/sg5:
echo prefer=8:0:1:0 > /sys/class/pfo/pfo5/ctrl
You can disable the configuration of a preferred path by creating an empty prefer entry in the crtl file.
For example:
echo prefer > /sys/class/pfo/pfo5/ctrl
Rebalancing the paths
The rebalance command does a one-time path balancing process, dividing the drives evenly among all
HBA paths. This is especially useful when a path returns to service while using the Less Balancing
algorithm. This command is likely to cause library path failure events.
56 Setting the preferred path
Page 57

The balancing process starts by placing each drive on its preferred path, if one has been assigned. It will
then balance the paths for any drives that do not have a preferred path. The command will balance paths
even if there are sessions established with the tape drives.
To balance the tape drive paths:
echo rebalance > /sys/bus/scsi/drivers/pfo/ctrl
Path rotation exercise function
Path rotation is a test function that will cause the driver to change the path it uses each time the device
file is closed and reopened.
To cause the path to change with every open() of the /dev file, set rotate=1. For example:
echo rotate=1 > /sys/bus/scsi/drivers/pfo/ctrl
To stop path rotation, set rotate=0. For example:
echo rotate=0 > /sys/bus/scsi/drivers/pfo/ctrl
Enabling advanced path failover on a device while the driver is running
Procedure
If a device has any advanced path failover feature disabled when advanced path failover is enabled, the
device will reset itself, removing the old /dev file. When the device comes back up, it will be recognized
as an advanced path failover device. It will then operate normally as an advanced path failover device. It
may not have the same /dev file name as before the switch.
Disabling advanced path failover on a device while the driver is running
Procedure
Disabling advanced path failover while a device is running is not recommended because the paths will not
be cleanly removed and reassociated. If advanced path failover is disabled on any device, the Linux
server will need to be rebooted. When possible, power down the Linux server cleanly, and then disable
advanced path failover on the device, and then boot the Linux server.
Linux driver theory of operation
The Linux advanced path failover drivers support data path failover and control path failover on Hewlett
Packard Enterprise LTO-6 FC drives integrated into Hewlett Packard Enterprise libraries. The failover
functionality is provided by the pfo driver and modifications are made to the standard st and sg drivers
to call into the pfo driver if a device supports advanced path failover. The modified st and sg drivers are
called stmp and sgmp.
The failover device driver must identify devices accessible over the different paths available and
associate paths with devices so that the driver can mask duplicate paths and present a single path to an
application.
As devices are discovered by the operating system and the device information is passed into the driver
for initialization, the driver determines if the device is a tape or library device, and if so, whether it is a
Path rotation exercise function 57
Page 58

candidate for failover. If the device is a candidate for failover, the driver determines the serial number
(SN) or worldwide name (WWN) of the device. If the device is capable of advanced path failover, the
driver determines whether failover is enabled for the device. If the device supports advanced failover and
failover is enabled, the driver masks all duplicate paths and presents a single path to application clients. If
the device does not support advanced failover or if failover is not enabled, the driver will not modify the
presentation of device paths to applications.
To improve throughput for multiple tape drives, the driver attempts to balance the number of tape drives
on each HBA path. When opening a tape drive device file, the driver selects the path with the fewest
number of open tape drive device files. The load balancing algorithm does not take path speed into
account when selecting a path. If the load balancing algorithm cannot select an appropriate path, it will
select the last known good path or another available path. If a “preferred” path is configured, this path will
take precedence over the load balancing method. (See Setting the preferred path on page 56.)
Load balancing is only applied when a tape drive device file is opened by the first thread; the paths are
not reevaluated at other times. For example:
• The failover algorithms do not consider other tape drive paths when selecting a path.
• The path is not changed if another thread already has the tape drive device file open.
• The path is not changed during data transfers.
58 Installing and using Linux advanced path failover drivers
Page 59

Installing and using HP-UX advanced path failover drivers
Advanced path failover for HP-UX is implemented by updating HP-UX drivers to support advanced path
failover with the LTO-6 tape drives. The drivers function as both failover and non-failover drivers.
The updated drivers are:
• HP-UX tape driver (estape) — used for data path failover
• HP-UX media changer driver (eschgr) — used for control path failover
• HP-UX SCSI stack driver (esctl) — used for data path and control path failover
During the device open, the device driver checks to see whether the device is capable and enabled for
advanced path failover. If so, the device driver opens a failover session and continues with further device
operations. Otherwise, the driver uses the non-failover driver code. Note that until the device is opened
for the first time, the drivers do not know whether the device is capable of advanced path failover or not.
HP-UX 11i v3 performs automatic load balancing and will open new tape drive connections using the best
available path to spread the load across all available paths. In HP-UX 11i v3, the default load balance
policy for tape drives and libraries is the “Path-lockdown” policy. With this policy, the host determines a
path for sending I/O requests to the device when the device is opened for the first time and this path
remains fixed. Without the advanced path failover feature installed, if this path fails, a new path is only
chosen when the device is next opened. With the advanced path failover feature, the best path will be
chosen as the lockdown path. If this path fails, the driver will automatically fail over to the next available
best path, which becomes the new lockdown path for all further I/O requests.
For additional information see the following man pages: scsimgr(1M), ioscan(1M), mknod(2), mksf(1M),
rmsf(1M).
Installing advanced path failover drivers
HP-UX patches are available at https://h20566.www2.hp.com/portal/site/hpsc/patch/home/. To locate
the patches, search for estape, eschgr, and esctl, or the patch number and then look at the Prepby
field to see if there is a superseding patch.
To install the advanced path failover drivers, use the standard HP-UX kernel patch installation process to
install the following patches on the HP-UX host servers running HP-UX 11i v3:
Procedure
1. HP-UX Tape driver patch (estape) - PHKL_43680 or superseding patch
2. HP-UX Media changer driver patch (eschgr) - PHKL_43681 or superseding patch
3. HP-UX SCSI stack (Mass storage stack) driver patch (esctl) – PHKL_43819 or superseding patch
The server will automatically reboot as part of the installation process.
Installing and using HP-UX advanced path failover drivers 59
Page 60

Commands for viewing tape and library devices connected to a system
You can use ioscan to view the tape and library (media changer) devices connected to the HP-UX host.
The device special file (DSF) is listed as the last item in the description as shown in bold type.
Using ioscan (1M) to view tape devices
# ioscan -knNfC tape
Class I H/W Path Driver S/W State H/W Type Description
=============================================================================
tape 18 64000/0xfa00/0xd estape CLAIMED DEVICE HP Ultrium 6-SCSI
/dev/rtape/tape18_BEST /dev/rtape/tape18_BESTb /dev/rtape/tape18_BESTn /dev/rtape/tape18_BESTnb
tape 20 64000/0xfa00/0xf estape CLAIMED DEVICE HP Ultrium 6-SCSI
/dev/rtape/tape20_BEST /dev/rtape/tape20_BESTb /dev/rtape/tape20_BESTn /dev/rtape/tape20_BESTnb
Using ioscan (1M) to view library devices
# ioscan -knNfC autoch
Class I H/W Path Driver S/W State H/W Type Description
==========================================================================
autoch 18 64000/0xfa00/0x12 eschgr CLAIMED DEVICE HP ESL G3 Series /dev/rchgr/autoch18
autoch 19 64000/0xfa00/0x13 eschgr CLAIMED DEVICE HP ESL G3 Series /dev/rchgr/autoch19
autoch 20 64000/0xfa00/0x14 eschgr CLAIMED DEVICE HP ESL G3 Series /dev/rchgr/autoch20
autoch 30 64000/0xfa00/0x3e eschgr CLAIMED DEVICE HP MSL6000 Series /dev/rchgr/autoch30
Finding HP-UX paths for drives listed on the library interface
This example shows how the drive and port information displayed in the ESL G3 library web interface can
be seen from the HP-UX host.
On the Control Path (CP) Selection screen for a partition, the drive with serial number 82C6E4F007 is
the drive with the control path for the partition.
Using the control path drive’s WWN in the Drive Status screen, you can find the corresponding target
ports, which in this example are 50014382c6e4f008 and 50014382c6e4f009.
60 Commands for viewing tape and library devices connected to a system
Page 61

To find this information with HP-UX commands, use ioscan -knNfC autoch to see the list of tape
libraries, and then use ioscan -m lun -H <H/W path> for the partition. For example, if the LUN
hardware path for the library is 64000/0xfa00/0x12:
# ioscan -m lun -H 64000/0xfa00/0x12
Class I Lun H/W Path Driver S/W State H/W Type Health Description
======================================================================================
autoch 18 64000/0xfa00/0x12 eschgr CLAIMED DEVICE limited HP ESL G3 Series
0/0/0/9/0/0/1.0x50014382c6e4f002.0x1000000000000 <— Passive control path
0/0/0/9/0/0/1.0x50014382c6e4f003.0x1000000000000 <— Passive control path
0/0/0/9/0/0/1.0x50014382c6e4f009.0x1000000000000 <— Active control path
0/0/0/9/0/0/1.0x50014382c6e4f008.0x1000000000000 <— Active control path
0/0/0/9/0/0/0.0x50014382c6e4f003.0x1000000000000 <— Passive control path
0/0/0/9/0/0/0.0x50014382c6e4f009.0x1000000000000 <— Active control path
0/0/0/9/0/0/0.0x50014382c6e4f008.0x1000000000000 <— Active control path
0/0/0/9/0/0/0.0x50014382c6e4f002.0x1000000000000 <— Passive control path
/dev/rchgr/autoch18 <— Device special file for media changer
The reported LUN hardware path has three parts, separated by a period. For example, in the path
0/0/0/9/0/0/0.0x50014382c6e4f002.0x1000000000000
Part 1 . Part 2 . Part 3
• Part 1: Hardware path for the HBA. In this example, 0/0/0/9/0/0/0.
• Part 2: Target port WWN. In this example, 0x50014382c6e4f002. This is the WWN that is displayed
in the library web interface.
• Part 3: LUN identifier: In this example, 0x1000000000000.
Similarly, to find the special files for tape drives, use ioscan -knNfC tape to list the tape drives and
then use ioscan -m lun -H <H/W path> to see information for the drive. For example, if the LUN
hardware path to the tape drive is 64000/0xfa00/0x37:
# ioscan -m lun -H 64000/0xfa00/0x37
Class I Lun H/W Path Driver S/W State H/W Type Health
Description
=============================================================================
========
tape 29 64000/0xfa00/0x37 estape CLAIMED DEVICE online
HP Ultrium 6-SCSI
0/0/0/9/0/0/1.0x50014382c6e4f009.0x0 <— Tape device special file
0/0/0/9/0/0/1.0x50014382c6e4f008.0x0 <— Tape device special file
0/0/0/9/0/0/0.0x50014382c6e4f009.0x0 <— Tape device special file
0/0/0/9/0/0/0.0x50014382c6e4f008.0x0 <— Tape device special file
/dev/rtape/tape29_BEST /dev/rtape/tape29_BESTb /dev/rtape/
Installing and using HP-UX advanced path failover drivers 61
Page 62

tape29_BESTn /dev/rtape/tape29_BESTnb <— Tape device special files
Finding the lockdown path
Procedure
1. The load-balance policy used to route data on multiple paths to a tape drive or library is called the
"path-lockdown" policy. Use the scsimgr get_info command to see the current lockdown path for
a library.
For example:
># scsimgr get_info -D /dev/rchgr/autoch35
STATUS INFORMATION FOR LUN : /dev/rchgr/autoch38 ... LUN Path used when policy is
path_lockdown = 0/0/0/9/0/0/1.0x50014382c6e4f009.0x1000000000000
2. Use the scsimgr get_attr command to see the current lockdown path for a library.
For example:
# scsimgr get_attr -D /dev/rtape/tape28_BEST
SCSI ATTRIBUTES FOR LUN : /dev/rtape/tape28_BEST ... name = lpt_lockdown
current = 0/0/0/9/0/0/0.0x100000e00222a6c1.0x2000000000000 default = saved =
3. For additional information, see the HP-UX man pages:
scsimgr (1M) , ioscan (1M) , mknod (2) , mksf (1M) , rmsf (1M)
Troubleshooting advanced path failover
Cause
Advanced path failover errors are logged in the /var/adm/syslog/syslog.log file as part of the
default SCSI I/O tracing function of HP-UX. You can use standard file viewing commands, including cat,
vi, dmesg -, and tail -f, to view the syslog.log file.
Enabling or disabling advanced path failover
Advanced path failover is disabled by default. When advanced path failover is disabled, the driver
operates as if the device is not capable of using the advanced path failover feature.
When advanced failover is enabled for the library or tape drive, the device resets itself and must be
opened using the device special file before the driver will recognize it as an advanced path failover device
and use the failover features of the driver. Opening the device is generally done by the host applications.
You can enable or disable advanced path failover using the library web-based interface. For instructions,
see:
Procedure
1. Configuring failover for the ESL G3 Tape Libraries on page 21
2. Enabling data path failover on page 35
When advanced path failover is disabled, the passive control paths to the library will go into an error state
(NO_HW) in the ioscan (1M) command output. These stale entries do not affect the function of the library.
To clear these errors so the device can be accessed using its device special file:
62 Finding the lockdown path
Page 63

• On the HP-UX host, run rmsf -H on the lunpath hardware paths that are in NO_HW state. For
example:
rmsf –H 0/4/0/0/0/1.0x50014380023560d4.0x1000000000000
• Run ioscan -kfNH <HBA path>. For example:
ioscan -kfNH 0/4/0/0/0
Hewlett Packard Enterprise recommends only enabling or disabling advanced path failover when the
library is not open by any applications. If the advanced path failover is disabled while an application is
accessing the library, all of the library’s lunpaths will go offline and I/O requests to the library will fail.
Installing and using HP-UX advanced path failover drivers 63
Page 64

Troubleshooting failover operation
Cause
To find diagnostic information about the operation of basic and advanced path failover:
• Examine the library event log or RAS tickets. See
and Additional tape drive sense codes on page 77.
• Examine the Windows Device Manager view of tape drives and media changers. See Confirming
failover operation on page 66 .
• Tape drive support tickets contain more detailed information that may be required by
Hewlett Packard Enterprise support engineers.
To find additional diagnostic information for advanced path failover:
• Examine the host log files for entries from the advanced path failover drivers.
◦ Windows system log on page 66
◦ Linux or HP-UX
/var/adm/syslog/syslog.log
• Use host-specific utilities to view the status of the drivers.
◦ Diagnostic application on page 67
◦ Command line user interface on page 54
Library path failover events on page 75
◦ Commands for viewing tape and library devices connected to a system on page 60
• Optionally install Windows debug (checked build) drivers, which will save a crash dump in the event of
a system crash. See Preparing to generate Windows driver debug dump log files on page 79 .
• Use the Windows Advanced Failover Diagnostic application to clear library reservations and prevent
media removal settings if "Reservation Conflict" or "Medium Removal Prevented" errors occur.
NOTE:
For known issues and workarounds, see Known issues and workarounds on page 84 .
Locating a failed path
The system administrator should have a map of the storage area network, which will indicate how ports
on the various devices (hosts, switches, and libraries) are connected to one another.
Common causes of failed paths are:
• Loose or unplugged cables
• Loose or unplugged Fibre Channel transceivers
• Failed switch ports
64 Troubleshooting failover operation
Page 65

• Powered-off switches
• Failed host bus adapter ports
The first sign of a path failure, such as a disconnected Fibre Channel cable or a failed switch, is often an
alert or warning reported by the library in the web interface and event log. Failure of a single path to a
drive should not interfere with operation of most backup applications, and might go unnoticed. To ensure
that path failover functionality is restored for the next path failure, correct the problem as soon as
possible.
To locate and correct path failures:
Procedure
1. Examine the library event or RAS ticket that indicates that a failover has occurred and locate the serial
number of the tape drive with the failed path.
The Serial # is that of the tape drive with the failed path and the tape drive coordinates indicate the
physical location of the drive. For information about tape drive location coordinates, see the library
user guide.
2. Use host utilities to confirm the failure. On Windows, use the diagnostic application.
a. Launch the application, or if it is already running, navigate to Actions→Refresh Cached Driver
Data (F5).
b. In the Devices pane, locate the drive whose serial number matches that from the support ticket.
Select the device.
c. In the Paths pane, confirm that not all of the ports are available.
Command line user interface
Commands for viewing tape and library devices connected to a system
3. Locate the failed connection or SAN component.
a. Using the location coordinates of the drive, locate the drive and examine the two Status LEDs
labeled “Port 1” and “Port 2.” If either of those LEDs is off, the port with the unlit LED is the failed
link.
b. If the status LEDs are both lit and the library is connected to an external switch, use the Fibre
Channel switch management feature to locate ports that are not functioning.
c. Examine the Fibre Channel host bus adapters in the host. If one has a light that indicates a
malfunction, that might be the problematic link.
4. After correcting the connection problem, refresh the diagnostic application to confirm that all of the
expected failover paths are available on all devices. Launch the application, or if it is already running,
navigate to Actions > Refresh Cached Driver Data (F5).
5. In the Devices pane, locate the drive whose serial number matches that from the support ticket.
Select the device.
6. In the Paths pane, confirm that not all of the ports are available.
Windows debugging logs and tools
Windows debugging logs and tools 65
Page 66

Confirming failover operation
To confirm that the advanced path failover drivers have installed and are operating correctly, open the
system event viewer. See Driver components on page 46 for instructions on how to filter out irrelevant
events. The following events should be present; the first event in this list will be the first to occur after
system restart:
HPtapeFailover_filt Path failover driver loaded
HPtapeFailover_mpio Path failover driver loaded
Followed by one instance of the following message for each active path:
HPtapeFailover_mpio Path failover session established…
For more details on which paths are active and passive, use the diagnostic application (see Diagnostic
application on page 67).
Windows system log
The drivers create entries in the Windows system log when they are first started and whenever any
exceptional conditions occur. These log entries are summarized in the following Event Log Entries table.
The symbols beginning with ‘%’ are strings filled in by the operating system when the log entry is
generated.
Table 3: Event Log Entries
Event Severity Message
Driver loaded Informational
Driver unable to load Error
Path failure detected Error
Path removal reported by Windows Error
Device serial number for failing path Informational
Device Names for failing path Informational
Error reported for failing path Informational
Path failover driver loaded
Path failover driver unable to load
Path failure detected on SCSI Port
%s Bus %3 Target Id %4 Logical Unit
%5
Path removal reported on SCSI Port
%1 SCSI Bus %2 Target ID %3 Logical
Unit %4
Device ID: %1
Device WWNN: %1-%2 Device WWPN: %3%4 Host WWPN: %5-%6
Device error: NT status = %1. SCSI
Status = %2, Sense Key = %3, ASC/
ASCQ = %4/%5, Drive Error Code =
%6/%7
66 Confirming failover operation
Table Continued
Page 67

Event Severity Message
Failover session established Informational
Failover session establishment
error
No alternate paths available Error
Alternate path selected after a path
failure
Failure to transition a passive
control path drive to active
Failure to notify device of a failover
operation (NCN failure)
Error
Informational
Error
Error
Failover session established on SCSI
Port %2 SCSI Bus %3 Target Id %4
Logical Unit %5
Failover session establishment error
on SCSI Port %2 SCSI Bus %3 Target
Id %4 Logical Unit %5. Reason code
%6.
No alternate paths for device ID: %1
Alternate Path selected: SCSI Port
%1 SCSI Bus %2 Target Id %3 Logical
Unit %4.
License key error: NT status = %1.
SCSI Status = %2, Sense Key = %3,
ASC/ASCQ = %4/%5, Drive Error Code =
%6/%7.
Nexus change notification failure:
NT status = %1. SCSI Status = %2,
Sense Key = %3, ASC/ASCQ = %4/%5,
Drive Error Code = %6/%7.
Hardware error from device on
NCN
Unrecoverable error in failover
sequence negotiation after NCN
failure.
Sense information from a device
requires a new failover session be
established
Unable to retrieve logged in host
table from a tape drive
For simplified viewing, the Windows system Event Log may be filtered using the 'Actions' panel and
selecting just events from HPtapeFailover_filt and HPtapeFailover_mpio. Including events from
UserPnp may also provide additional helpful information.
Diagnostic application
Informational
Informational
Informational
Informational
Nexus change notification will retry
after: Sense Key = %1, ASC/ASCQ =
%2/%3.
Recovery aborted, sense data
modified: Sense Key = %1, ASC/ASCQ =
%2/%3.
A new session will be created after:
NT status = %1. SCSI Status = %2,
Sense Key = %3, ASC/ASCQ = %4/%5,
Drive Error Code = %6/%7.
Retrieve logged in host name failed:
NT status = %1. SCSI Status = %2,
Sense Key = %3, ASC/ASCQ = %4/%5,
Drive Error Code = %6/%7.
The advanced failover diagnostic application communicates with the drivers to obtain the state of failover
sessions. The diagnostic application is installed with the driver and can be found in the driver installation
directory:
Diagnostic application 67
Page 68

C:\Program Files\Hewlett-Packard\Advanced Failover Drivers\Utils or
C:\Program Files (x86)\Hewlett-Packard\Advanced Failover Drivers\HPAdvFoDgn.
The application consists of two files, HPAdvFoDgn.exe and HPtapeFailover_mpio.dll.
Operation
The diagnostic application is started by double-clicking its icon. It displays a window similar to the window
shown in Figure 17: Advanced failover diagnostic application on page 68. The window contains four
panes:
Figure 17: Advanced failover diagnostic application
The Devices pane lists the tape drives and media changers that are associated with the path failover
drivers. This panel lists all devices that are capable of supporting advanced path failover regardless of
whether they are configured to use advanced path failover. In the example above Changer0 and
Changer2 are paths to an ESL G3 library partition that is not using advanced path failover so two entries
are shown for the same changer. Changer1 has advanced path failover enabled and is only listed once.
Since LTO-5 and older drives do not support advanced path failover, only LTO-6 and newer drives will be
listed.
The Paths pane shows information about the device that is selected in the Drives pane. In
Advanced failover diagnostic application on page 68, the information is for the media changer named
“Changer1.” The capital A in the Port column of the Paths pane indicates the active control path to the
SMC device server that is currently being used, and the lower case a indicates alternate active control
68 Operation
Figure 17:
Page 69

paths to the SMC device server. All other paths are passive, i.e., they pass through a passive control path
drive (see Active and passive control path drives on page 14).
If the selected device is a tape drive, the capital A indicates the active data path, and there will be no
lower case a.
The Cached Driver Data pane shows the last state of the selected device that was reported by the
failover drivers to the diagnostic application. Because changes in the drivers’ information about a device
are not automatically sent to the diagnostic application, it is necessary to perform a refresh to get the
latest state of the drivers. For tape libraries the cached driver data will contain information about
reservations and prevent media removal as shown in
application on page 68.
For tape drives the reservation and prevent media removal information is not tracked by the driver so the
Cached Driver Data pane will not include that information for tape drives.
The Device Information pane contains data requested from the tape and changer devices when various
actions are performed.
The bottom pane shows failover session information that has been requested for the selected device.
Actions
There are several actions that can be performed by the diagnostic application.
• Refresh failover drivers state information held by the diagnostic application.
• Request current failover information from tape and changer devices.
Figure 17: Advanced failover diagnostic
• Report and clear reservations on changer devices which had been set by hosts that are now offline.
• Enable extra tracing.
Refresh
The information in the Cached Driver Data pane can be refreshed by selecting Actions > Refresh
Cached Driver Data (F5).
Figure 18: Refresh Cached Driver Data menu item
Device information
The Actions > Report Device menu has three sub-menu items (see Figure 19: Report Device menu
item on page 70) which report information on the drive or media changer selected in the Devices
Information pane. The data is displayed in the Devices Information pane.
Actions 69
Page 70

Figure 19: Report Device menu item
Table 4: Device information
Menu Item Data
Enabled Reports whether advanced path failover is enabled for the SSC device server (i.e.,
for the tape drive data path), and for the SMC device server (i.e., for the media
changer controller path)
Session Status Expected FSC: A command indicator used for management of commands that
require synchronization following a link failure.
PFSE:
1: The device server is using failover via this device server.
0: The device server is not using failover via this device server.
Failover Session Key: The key for the path (I_T_L nexus) over which the driver is
communicating with the device.
Session List Each entry in the session list contains information about one failover session:
Failover Session Key
Initiator Worldwide Name
Local SMC device server information
If a changer has been selected in the Devices pane, the Actions > Report Local SMC menu is available
and has three sub-menu items (see Device information table above) which provide an interface to read
state information from the selected library. The information is read directly from the library and should
match the information retained by the driver. The data is displayed in the Devices Information pane.
Figure 20: Report Local SMC menu items
70 Troubleshooting failover operation
Page 71

Table 5: Local SMC device server information
Menu item Data
Legacy
Reservations
Persistent
Reservation
SET: 1: An initiator has a legacy reservation established.
0: No initiator has a legacy reservation established.
NOIV: 1: The following fields are valid.
0: The following are not valid and should be
ignored.
Protocol Identifier: 0: Fibre Channel
6: Serial Attached SCSI (SAS)
Relative Target Port Identifier
Initiator Identifier: Fiber Channel Port_Name or SAS port identifier
PRgeneration A counter of persistent reservation settings
changes that have occurred.
SET: 1: A persistent reservation is established.
0: No persistent reservation is established.
PTPL A: 1: Persist through power loss capability is
activated.
Prevent Medium
Removal
0: Persist through power loss capability
Full status descriptors (see SPC-4)
SET: 1: An initiator has a prevent medium removal
established.
0: No initiator has a prevent medium removal
established.
A prevent medium removal descriptor is present for each initiator which has
established a prevent medium removal.
Prevent: 00b: Medium removal shall be allowed.
01b: Medium removal shall not be allowed.
Protocol Identifier: 0: Fibre Channel
6: Serial Attached SCSI (SAS)
Relative Target Port Identifier
Initiator Identifier: Fiber Channel Port_Name or SAS port identifier
Clear Nexus Settings
Troubleshooting failover operation 71
Page 72

The Clear Nexus Settings action is used to clear legacy and persistent reservations placed on a changer
device. This can be used to recover from the loss of a host that has placed a reservation on the changer.
If an application is reporting “Reservation Conflict” errors when it attempts to access the changer device
or “Medium Removal Prevented” errors occur when attempted to remove tapes from the changer even
after the application is no longer using the library, this function can clear those settings.
Figure 21: Clear Nexus Settings menu item
Before the action is performed, the alert shown below is displayed.
Figure 22: Clear Nexus Settings warning
Enable Logging
The Enable Logging action provides a mechanism for capturing run-time diagnostic information from the
drivers.
Figure 23: Enable Logging menu item
72 Troubleshooting failover operation
Page 73

Figure 24: Enable Logging dialog
The Enable selection immediately begins capturing driver diagnostic information after OK is clicked. The
Enable setting is not persistent across a system reboot. If the diagnostic information during a reboot is
desired, select Continue after reboot . In the Log Files Location field, enter or use the … button to
designate a local directory for log files. There will be two files created when immediately capturing the
diagnostic information:
• tapeapfousbf_YYYYMMDDhhmmss.bin
• tapeapfompic_YYYYMMDDhhmmss.bin
In these file names, YYYYMMDDhhmmss is the date and time OK was clicked. After a reboot there also
will be two files in the specified location:
• tapeapfousbf_YYYYMMDDhhmmss.bin.NNN
• tapeapfompic_YYYYMMDDhhmmss.bin.NNN
In addition to the date and time, in these file names NNNN will be a number from 1 - 16. The File Size
Limit value constrains the size of the log files and if the size limit is reached, the oldest log entries are
replaced with the new log entries. If 0 is specified as the file size, the log files can become quite large and
potentially fill up a hard drive. When Restart is selected and OK is clicked, any existing log files are
closed and new files are created with updated date and time. Each of the files created after a restart or
reboot can grow to the specified size. Before sending the log files to Hewlett Packard Enterprise, run the
application, open the enable logging dialog, deselect Enable or select Restart and then click OK to
ensure the files have been completely written to disk.
Diagnostic dumps
There are two different diagnostic dump logs, which can be saved and sent to Hewlett Packard Enterprise
for analysis.
• The standard Windows kernel dump, which can be saved when a bug check (“blue screen”) occurs.
• A Driver Debug Log generated by a debug version of the advanced path failover drivers.
The debug version of the advanced path failover drivers is designated by a ‘d’ at the end of the driver
name (for example, hpadvfox64d.exe) and will be provided by Hewlett Packard Enterprise support if
drive debug logs are required. Debug logs can provide information on failover operations and whether or
not a bug check has occurred.
Diagnostic dumps 73
Page 74

Memory dump setup
To configure Windows to produce a memory dump, see http://support.microsoft.com/kb/254649.
The configuration process includes specifying the name and location for the dump file, as well as the type
of the dump. The type should be a kernel memory dump, although the larger complete memory dump is
acceptable. Do not select the small memory dump. If a bug check occurs, then after a reboot the file can
be retrieved and sent for diagnosis.
Driver debug dump setup
Generating a driver debug dump log file requires installing checked drivers and the DebugView
application. This is an advanced technique. For instructions, see Preparing to generate Windows driver
debug dump log files on page 79.
Bug checks
Following a bug check, restart the system and retrieve the kernel dump for transmission to Hewlett
Packard Enterprise. If driver debug dumps were enabled, retrieve the driver debug log file for
transmission to Hewlett Packard Enterprise.
Hangs
If the system hangs, the system can be configured to allow forcing a system crash from the keyboard.
This is explained in
If the system hangs after configuring, force the crash and reboot. Retrieve the kernel dump for
transmission to Hewlett Packard Enterprise.
http://msdn.microsoft.com/en-us/library/ff545499(v=VS.85).aspx.
Linux logs and troubleshooting tools
Dumping cached reservation information
The Linux advanced path failover driver tracks reservation information for tape libraries to enable
rebuilding the reservations if a failure requires changing the drive that is hosting the library control path.
These commands dump the reservation information cache buffers to the /var/log/messages file and
the console.
Procedure
1. To dump legacy reservations:
echo legacy > /sys/class/pfo/pfo4/ctrl
2. To dump persistent reservations:
echo persistent > /sys/class/pfo/pfo4/ctrl
3. To dump prevent allow medium removal conditions:
echo prevent > /sys/class/pfo/pfo4/ctrl
Controlling the level of debug output sent to the console
This procedure controls the level of debug messages being sent to the console.
The default output level is minimum.
74 Memory dump setup
Page 75

Procedure
1. To minimize the level of debug messages:
echo 0x0000 > /sys/bus/scsi/drivers/pfo/debug_flag
2. To maximize the level of debug messages:
echo 0xffff > /sys/bus/scsi/drivers/pfo/debug_flag
Increased debug logging will affect performance.
3. To set the default level of debug messages:
echo minimum > /sys/bus/scsi/drivers/pfo/debug_flag
The definition of all of the bits in the value is beyond the scope of this document.
Reading the trace log
The failover driver maintains an internal buffer of the most recent significant events.
To read the trace log, cat the ‘trace’ file. For example:
cat /sys/bus/scsi/drivers/pfo/trace
Library path failover events
When the library detects a path failover, it generates an appropriate event. Path failover events do not
always occur immediately following a path break. The device driver will wait until a command is sent, and
if the path is still failed, the device driver will perform the failover actions and then the library will report the
event immediately after the failover. See the library user guide for accessing and interpreting support
tickets and log files.
• See ESL G3 events related to advanced path failover table below
• See MSL6480 events related to path failover table below
• See MSL library events related to path failover table below
Table 6: ESL G3 events related to advanced path failover
Event Description
Library Control Path Failover A library control path failed and a failover operation to a
redundant control path drive succeeded.
Library Control Path Failover Failure A library control path failed and a failover operation to a
redundant control path did not succeed. The library control path is
not operational.
Drive Data Path Failover A drive data path connection failed and a failover operation to the
redundant drive port succeeded.
Drive Data Path Failover Failure A drive data path connection failed and a failover operation to the
redundant data port failed. The drive data path is not operational.
Drive Control/Communication
Failure
A drive communication failure occurred which prevents drive
control and library control path operations.
Reading the trace log 75
Page 76

Table 7: MSL3040 or MSL6480 events related to path failover
Event
code
4037 Loss of redundant data path. Verify that both FC ports are correctly
4038 The drive configuration failed because of
4039 The drive configuration failed because of
4040 Data path failover occurred. Check the cabling and all network
4043 Control path failover occurred. This event
Message and description Details and solution
cabled to the SAN.
Advanced path failover, ADPF and ACPF,
unsupported ADPF features selected.
unsupported ACPF features selected.
applies to Advanced CPF.
are only supported on LTO-6 tape drives.
Disable advanced path failover for this drive
or replace it with a drive supporting this
feature.
components between the affected drive and
host computer.
If the failover was unplanned or unexpected,
verify that the host still sees both the active
and passive drives. If necessary, reconfigure
a different passive drive for the partition.
Check the cabling and all network
components between the affected drive and
host computer.
4046 The drive configuration failed because of
missing DPF license.
4047 The drive configuration failed because of
missing CPF license.
4048 The drive configuration failed because of
unsupported BDPF feature selected.
4049 The drive configuration failed because of
unsupported BCPF feature selected.
4050 Basic data path failover occurred. Check cabling and all network components
4053 Manual control path failover from active to
passive drive failed; partition may be
disconnected from host.
4056 Failed to copy settings from active to
passive drive in basic control path failover.
Disable path failover or install the necessary
failover license.
Disable basic path failover for this drive or
replace the drive with one supporting this
feature.
between the affected drive and host
computer.
Check cabling and all network components
between the affected drive and host
computer.
The partition no longer has a passive drive
that is available for control path failover.
Reconfigure the partition so that at least one
drive in the partition is available for control
path failover.
76 Troubleshooting failover operation
Table Continued
Page 77

Event
code
Message and description Details and solution
4057 Passive control path drive not available for
control path failover.
4058 Disabling active control path drive caused
failover to passive one. This event applies to
Basic CPF.
4066 Automatic control path failover by disabling
LUN drive failed; partition may be
disconnected from host.
9040 Control path switched over from active to
passive drive.
Verify that the configured control path
failover drive is present, powered on, and
ready to accept the control path.
If the failover is unplanned or unexpected,
verify that the host still sees both the active
and passive drives. If necessary, reconfigure
a different passive drive for the partition.
Check cabling and all network components
between the affected drive and host
computer.
This event code is used when the user
initiates the failover from the library web
interface. This is an informational event.
Table 8: MSL library events related to path failover
Event code Description Details and Solution
EC Unable to negotiate for NPIV. Library
control path failover has been disabled.
The port of the FC switch connected to the
library master drive must be in NPIV
mode. Verify the FC switch configuration.
ED Common control or data path failover
issue. Failover has been disabled.
EF A data path failover-related error has
occurred.
FF The master drive was removed without
being powered off. Library path failover
cannot be performed.
0x33 Control path failover reported. A control path failover event occurred. The
0x34 Data path failover reported A data path failover event occurred. The
Additional tape drive sense codes
Tape drives that support advanced path failover use vendor-specific SCSI additional sense codes (ASCs)
to report certain conditions to the failover drivers. These additional sense codes are handled by the
device driver in normal operation and should not be visible to the applications.
The master drive must be powered off
from the library web interface or front
panel to activate control path failover.
master drive was successfully switched to
the alternate master drive. This is an
informational event.
active port was successfully changed to
the previous standby port. This is an
informational event.
Additional tape drive sense codes 77
Page 78

Because these ASCs may be visible in device logs and diagnostic tools, they are listed in the table below.
Table 9: Advanced failover vendor specific additional sense codes
ASC ASCQ Description Meaning
1
82h
82h
2
93h FAILOVER
SESSION
SEQUENCE
ERROR
94h FAILOVER
COMMAND
SEQUENCE
ERROR
Failover is enabled but the device driver has not
opened a failover capable connection to the device.
Check that the failover driver is installed and
attempt to reopen the device.
The advanced path failover system is unable to
ensure that the command will be executed in the
proper sequence. Close all connections to the
device and then restart application services.
82h 95h DUPLICATE
FAILOVER
SESSION KEY
82h 96h INVALID
FAILOVER KEY
82h 97h FAILOVER
SESSION
RELEASED
82h 98h SMC STATE
CHANGED
82h 99h FAILOVER SMC
DEVICE SERVER
MOVED
The failover driver attempted to use a failover
session key that is currently in use by another host.
The driver should automatically try a different key.
Restart application service if any errors occur.
The failover driver attempted to use a failover
session key that is not valid. Retry opening the
device or restart application services.
An event caused the device to close the failover
session that was in use. The driver should
automatically open a new session, if not restart
application services.
A normal event informing the device driver that an
event has caused a change in the media changer
state information. The device driver should
automatically update media changer state
information and continue.
A normal event informing the device driver that this
path is not an active control path. The device driver
will automatically use a different path.
1
If advanced path failover is enabled on a tape drive or a library, and the advanced path failover driver is not installed
on the host, this error will be reported to applications attempting to read/write the tape drive or move media using the
changer.
2
In rare cases when all paths to a tape drive are lost while commands are in progress it is possible for this error to be
reported once when the connection is opened next. Closing the device and retrying the connection will clear this
condition.
78 Troubleshooting failover operation
Page 79

Advanced troubleshooting techniques
The techniques in this chapter assume an advanced level of experience.
Preparing to generate Windows driver debug dump log files
Generating a driver debug dump log file requires installing checked drivers and the DebugView
application.
Procedure
1. Navigate to the Hewlett Packard Enterprise technical support website (http://www.hpe.com/
support/storage) and then download drivers for the host with debug capability enabled.
2. Navigate to the support website and then download drivers for the host with debug capability
enabled.
3. Uninstall the released drivers. See Uninstalling the drivers.
4. In Windows 2008 or 2012 systems, place the system in Test Mode by opening a command window,
entering the command bcdedit testsigning on and then restarting.
After restarting, the desktop displays Test Mode in the lower right. If this step is not done, after
installing a checked driver, the system will boot into Recovery Mode. If the bcdedit command is not
recognized, it is not required for that system.
For further details, see:
ff553484(v=vs.85).aspx.
5. Configure the location for saving the dump file and the type of the debug output. A kernel dump is
preferred to the much larger complete memory dump.
6. Install the appropriate checked drivers for your operating system. See Installing the Windows
advanced path failover drivers. When prompted whether to allow installation of an unsigned driver,
allow installation.
7. In Windows 2008 or 2012 enable the debug print filter by editing the registry using one of these
methods:
Using a registry editing application:
a. Run a registry editing application (for example, Regedit.exe) with administrative privileges.
b. Navigate to HKEY_LOCAL_MACHINE\SYSTEM\CurrentControlSet\Control\Session
Manager\Debug Print Filter. You may need to create the key Debug Print Filter.
c. Add a sub-key DEFAULT, which is different from the automatically created sub-key “(Default),”
with type DWORD and set it to 15 (0xF).
Open a command window with administrative privileges and issue the command:
http://msdn.microsoft.com/en-us/library/windows/hardware/
reg add HKEY_LOCAL_MACHINE\SYSTEM\CurrentControlSet\Control\Session
Manager\Debug Print Filter" /v DEFAULT /t REG_DWORD /D 15
Advanced troubleshooting techniques 79
Page 80

8. Restart the system after updating the registry so the changes will take effect.
9. Navigate to http://technet.microsoft.com/en-us/sysinternals/bb896647 and then download
DebugView. Unzip the files to a local folder. There is no installer.
10. Run DebugView and configure it to capture Kernel-Mode debug output by selecting Capture >
Capture Kernel (Ctrl+K).
11. To capture driver debug messages during boot time, select Capture > Log Boot.
12. Select a file that will receive the log with File > Log to File or File > Log to File As....
13. See the DebugView help file for details. If Help does not work because the right pane displays
Navigation to the webpage was canceled, locate the dbgview.chm file in the destination
folder. Right-click the file, select Properties, and on the General Tab on the lower right click
Unblock.
80 Advanced troubleshooting techniques
Page 81

Support and other resources
Accessing Hewlett Packard Enterprise Support
• For live assistance, go to the Contact Hewlett Packard Enterprise Worldwide website:
http://www.hpe.com/assistance
• To access documentation and support services, go to the Hewlett Packard Enterprise Support Center
website:
http://www.hpe.com/support/hpesc
Information to collect
• Technical support registration number (if applicable)
• Product name, model or version, and serial number
• Operating system name and version
• Firmware version
• Error messages
• Product-specific reports and logs
• Add-on products or components
• Third-party products or components
Accessing updates
• Some software products provide a mechanism for accessing software updates through the product
interface. Review your product documentation to identify the recommended software update method.
• To download product updates:
Hewlett Packard Enterprise Support Center
www.hpe.com/support/hpesc
Hewlett Packard Enterprise Support Center: Software downloads
www.hpe.com/support/downloads
Software Depot
www.hpe.com/support/softwaredepot
• To subscribe to eNewsletters and alerts:
www.hpe.com/support/e-updates
• To view and update your entitlements, and to link your contracts and warranties with your profile, go to
the Hewlett Packard Enterprise Support Center More Information on Access to Support Materials
page:
Support and other resources 81
Page 82

www.hpe.com/support/AccessToSupportMaterials
IMPORTANT:
Access to some updates might require product entitlement when accessed through the Hewlett
Packard Enterprise Support Center. You must have an HPE Passport set up with relevant
entitlements.
Customer self repair
Hewlett Packard Enterprise customer self repair (CSR) programs allow you to repair your product. If a
CSR part needs to be replaced, it will be shipped directly to you so that you can install it at your
convenience. Some parts do not qualify for CSR. Your Hewlett Packard Enterprise authorized service
provider will determine whether a repair can be accomplished by CSR.
For more information about CSR, contact your local service provider or go to the CSR website:
http://www.hpe.com/support/selfrepair
Remote support
Remote support is available with supported devices as part of your warranty or contractual support
agreement. It provides intelligent event diagnosis, and automatic, secure submission of hardware event
notifications to Hewlett Packard Enterprise, which will initiate a fast and accurate resolution based on your
product's service level. Hewlett Packard Enterprise strongly recommends that you register your device for
remote support.
If your product includes additional remote support details, use search to locate that information.
Remote support and Proactive Care information
HPE Get Connected
www.hpe.com/services/getconnected
HPE Proactive Care services
www.hpe.com/services/proactivecare
HPE Proactive Care service: Supported products list
www.hpe.com/services/proactivecaresupportedproducts
HPE Proactive Care advanced service: Supported products list
www.hpe.com/services/proactivecareadvancedsupportedproducts
Proactive Care customer information
Proactive Care central
www.hpe.com/services/proactivecarecentral
Proactive Care service activation
www.hpe.com/services/proactivecarecentralgetstarted
Warranty information
To view the warranty for your product or to view the Safety and Compliance Information for Server,
Storage, Power, Networking, and Rack Products reference document, go to the Enterprise Safety and
Compliance website:
www.hpe.com/support/Safety-Compliance-EnterpriseProducts
82 Customer self repair
Page 83

Additional warranty information
HPE ProLiant and x86 Servers and Options
www.hpe.com/support/ProLiantServers-Warranties
HPE Enterprise Servers
www.hpe.com/support/EnterpriseServers-Warranties
HPE Storage Products
www.hpe.com/support/Storage-Warranties
HPE Networking Products
www.hpe.com/support/Networking-Warranties
Regulatory information
To view the regulatory information for your product, view the Safety and Compliance Information for
Server, Storage, Power, Networking, and Rack Products, available at the Hewlett Packard Enterprise
Support Center:
www.hpe.com/support/Safety-Compliance-EnterpriseProducts
Additional regulatory information
Hewlett Packard Enterprise is committed to providing our customers with information about the chemical
substances in our products as needed to comply with legal requirements such as REACH (Regulation EC
No 1907/2006 of the European Parliament and the Council). A chemical information report for this product
can be found at:
www.hpe.com/info/reach
For Hewlett Packard Enterprise product environmental and safety information and compliance data,
including RoHS and REACH, see:
www.hpe.com/info/ecodata
For Hewlett Packard Enterprise environmental information, including company programs, product
recycling, and energy efficiency, see:
www.hpe.com/info/environment
Documentation feedback
Hewlett Packard Enterprise is committed to providing documentation that meets your needs. To help us
improve the documentation, send any errors, suggestions, or comments to Documentation Feedback
(docsfeedback@hpe.com). When submitting your feedback, include the document title, part number,
edition, and publication date located on the front cover of the document. For online help content, include
the product name, product version, help edition, and publication date located on the legal notices page.
Regulatory information 83
Page 84

Known issues and workarounds
Path failover issues are observed on Windows Server 2012
Symptom
On Windows Server 2012, path failover issues are observed, even after installing the advanced path
failover driver and rebooting the server twice. The installation file used was:
HP_StoreEver_High_Availability_Path_Failover_Driver_Windows_2012_2012_R2_Z755
0-01470.exe
Cause
The installer for the initial release of the advanced path failover driver has a defect that results in an
incorrect installation on Windows Server 2012. The defect in the installer has been fixed.
Action
1. Download and install the updated driver package.
2. Uninstall the advanced failover drivers.
a. Select Start > Programs > Control Panel.
b. Select the Advanced Failover Drivers entry and then click Uninstall/Change.
c. Follow the provided prompts to complete the driver removal.
3. Reboot the server.
4. Download the latest Advanced Failover Drivers for Windows Server 2012 from the Hewlett Packard
Enterprise website.
a. Navigate to http://www.hpe.com/support/hpesc.
b. Enter ESL G3 (for ESL G3) or MSL6480 (for MSL6480), and then click Go.
c. In the Results, select your library.
d. In the Download options tab, click Drivers, software & firmware.
e. In the Operating System drop-down, select OS Independent.
f. Click Driver — Storage Tape.
g. Click Obtain software for the High Availability Failover Driver for your operating system.
h. Follow the prompts to download the driver package.
5. Double-click the installer for your operating system to install the Tape Upper Bus Storage Filter driver.
6. Restart when requested.
7. After the system restarts, the installer will continue installing the Tape Multi-Path Intermediate Class
driver.
84 Known issues and workarounds
Page 85

Device connectivity is lost after several closely spaced path failovers
Symptom
If several closely spaced path failures occur on all of the available paths, the operating system might not
detect a path change and report that to the driver causing a loss of connectivity with the device.
Cause
The current implementation is failure tolerant only and not intended to fix unstable SAN environments.
Action
Locate and repair the SAN faults. When both the active path and the standby path have faults, the driver
is not always able to recover.
The device driver does not connect to the preferred path
Symptom
The device driver does not connect to the preferred path after a system boot or device rescan.
Cause
The current implementation of the Windows driver uses the first path to a device that was successfully
found.
Action
If a particular path is preferred, load the HBA for that path in the lower numbered hardware location.
The device driver does not connect to the highest performance path
Symptom
The device driver does not connect to the highest performance path after a system boot or device rescan.
Cause
By default, the driver prefers the first path in the hardware scan performed by the operating system. The
driver does not perform speed or performance comparisons of all available paths to a device to select the
best one as a primary.
Device connectivity is lost after several closely spaced path failovers 85
Page 86

Action
If a particular path is preferred, load the HBA for that path in the lower numbered hardware location.
A host in a multi-initiator environment does not discover a path to the library controller
Symptom
A host in a multi-initiator environment does not discover a path to the library controller when it is booted or
the devices are rescanned when another initiator is using the library.
Cause
Some applications create an exclusive connection to the tape library and prevent drivers from performing
proper discovery and binding. In multihost environments, device discovery on a newly introduced or
rebooted host can be problematic if the library is not idle during the discovery. This issue is not unique to
the advanced path failover drivers and can occur in environments not using the advanced path failover
drivers as well. (Windows and Linux)
Action
1. For Windows, reboot or rescan devices while the library is not being used.
2. For Linux, reboot or remove and reinsert the advanced failover drivers using
modprobe
while the library is not being used.
Tape library access commands fail with "Reservation Conflict" errors or "Medium Removal Prevented" errors
Symptom
In rare cases, it is possible to have a reservation or prevention setting that is no longer associated with a
host. These rare cases include:
• Access to all paths on the active control path drive is lost at the same time that a reservation or
prevent media removal setting is in the process of being changed
• All paths are lost to an active control path drive in a multi-initiator environment and one host does not
recover from the path failure
Cause
A failure of the active control path drive and activation of the passive control path drive near the same
time that a reservation is being released can result in the reservation not being released correctly. This
issue is not unique to the advanced path failover driver and is most likely to occur in traditional multipath
configurations.
86 A host in a multi-initiator environment does not discover a path to the library controller
Page 87

Action
1. Clear the stale settings using the Windows diagnostic application from Actions > Clear Nexus
Settings.
2. Clear the stale settings from the ESL G3 GUI. Navigate to Tools > Drives and then click Remove IT
Nexus.
3. Use the library GUI to power-cycle the tape drive hosting the library controller and then clear persistent
reservation settings using the application that established the settings.
Known issues and workarounds 87
Page 88

Data Protector device discovery with advanced path failover
When using the Data Protector Autoconfigure functionality, Data Protector will discover both active and
passive control and data paths to the library robot control and drive paths respectively. Data Protector will
associate all active data paths with the active control path, and can be identified by the library in the list
that includes the selection box. All other listed libraries will correspond to passive control paths. All active
data paths will be listed in the collapsed tree under the active control path. The following example, Data
Protector Autoconfigure discovery result, shows an ESL G3 library with 6 LTO-6 drives and the active
control and data paths associated under the library.
When configuring devices manually, Data Protector will also find all active and passive device paths for
robot and drive. Data Protector recognizes the paths correctly and marks all passive paths with a red ‘x’
and the active path with a green ‘check’. To verify Data Protector has discovered the active paths
correctly, the Advance Failover Diagnostic tool can be used to cross reference all paths and symbolic
driver names. The following example shows the Diagnostic tool display of the above library and 6 LTO
drives and their associated paths:
88 Data Protector device discovery with advanced path failover
Page 89
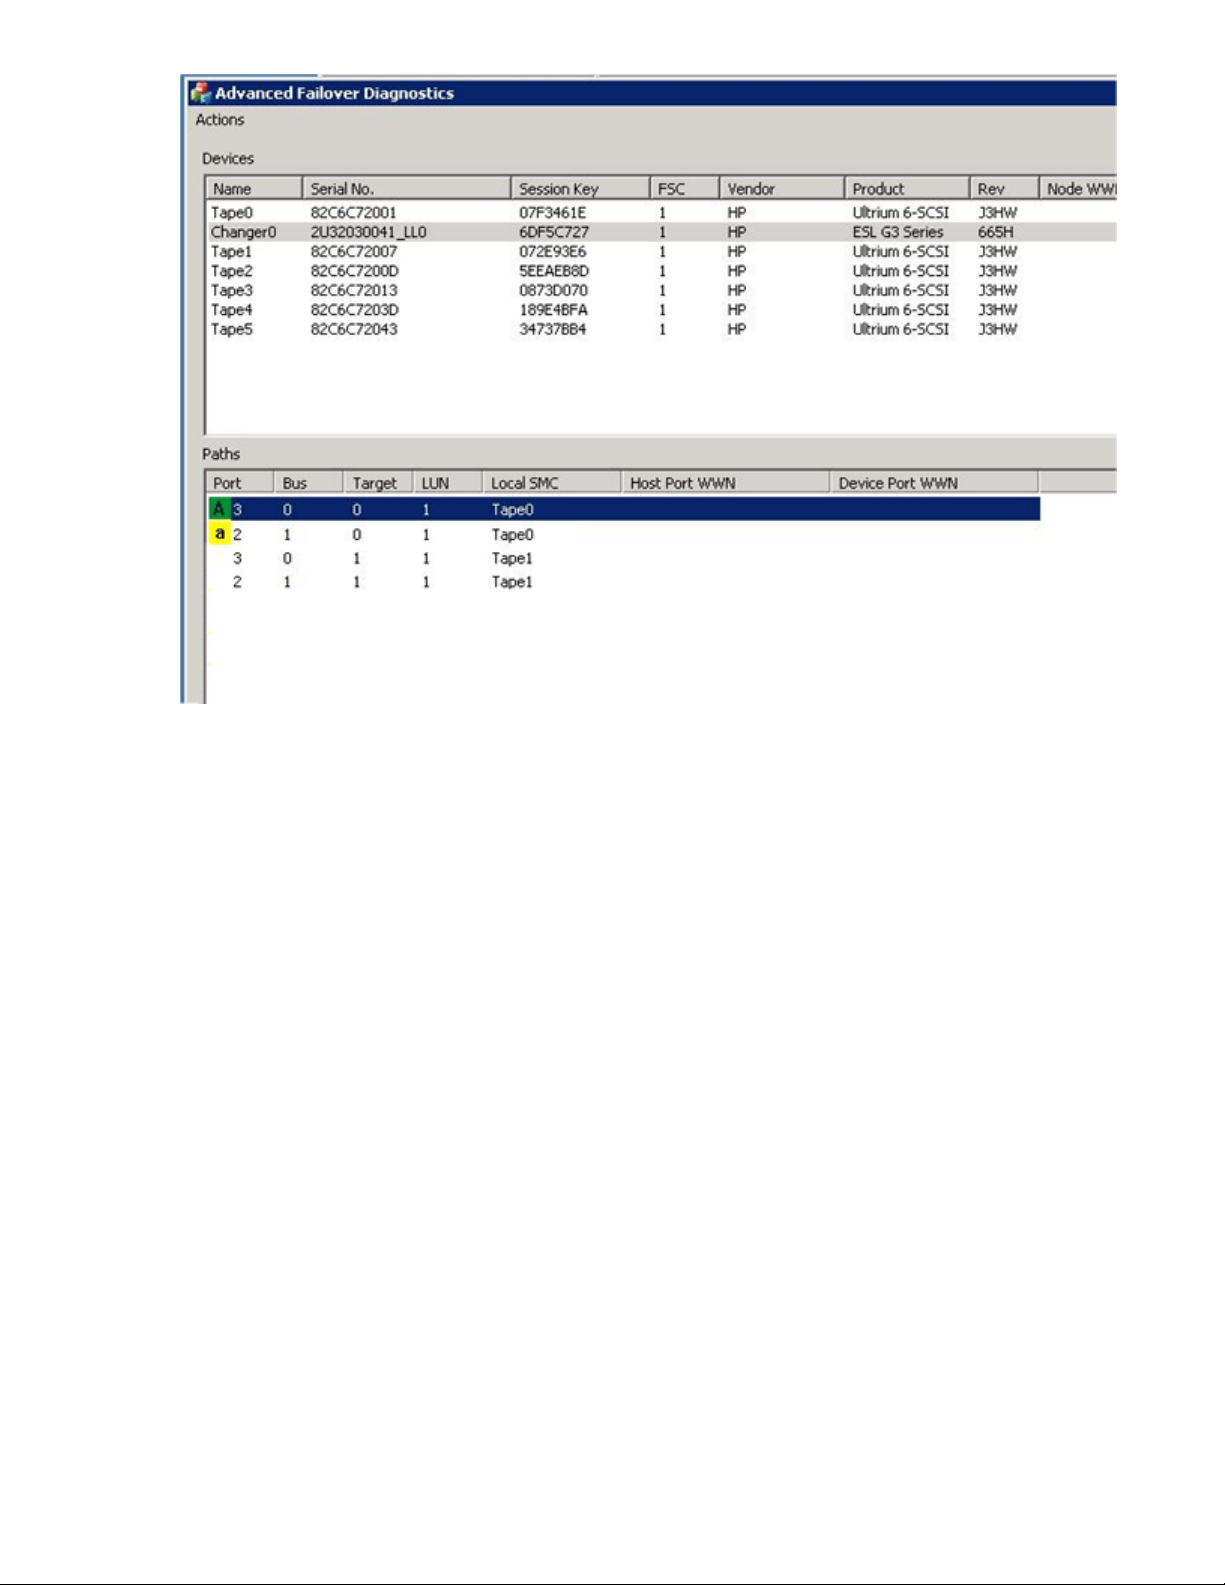
Data Protector device discovery with advanced path failover 89
Page 90

Troubleshooting Commvault Simpana device discovery with HP-UX 11.31
Commvault Simpana fails to discover devices when run on HP-UX 11.31
Symptom
Commvault Simpana fails to discover devices when run on HP-UX 11.31.
Cause
Commvault Simpana does not always work with multiple legacy paths and the virtual path to the tape
library with HP-UX 11.31.
Action
If Commvault Simpana is not connecting to the virtual library path, removing the legacy I/O nodes and
their device special files from the system will fix the issue. Use the following command: cmd “rmsf –L”
NOTE:
Use ioscan to confirm that the paths from the legacy schgr drivers are gone. After these paths have
been removed from the ioscan output, return to Commvault to do the device detection and
configuration procedures again.
The APF drivers do not support Commvault Express. For supported versions of Commvault
Simpana, see the Design Guide for Backup and Archive on the Backup, Recovery and Archive
website: http://www.hpe.com/storage/daprcompatibility
root@ssdcl197 [/opt/simpana/Base]# ioscan -knfC autoch
Class I H/W Path Driver S/W State H/W Type Description
========================================================================
autoch 2 0/5/0/0/0/0.2.0.255.0.0.1 schgr CLAIMED DEVICE HP ESL G3 Series
/dev/rac/c4t0d1
autoch 0 0/5/0/0/0/0.2.1.255.0.0.1 schgr CLAIMED DEVICE HP ESL G3 Series
/dev/rac/c2t0d1
autoch 3 0/5/0/0/0/0.5.0.255.0.0.1 schgr CLAIMED DEVICE HP ESL G3 Series
/dev/rac/c5t0d1
autoch 1 0/5/0/0/0/0.5.1.255.0.0.1 schgr CLAIMED DEVICE HP ESL G3 Series
/dev/rac/c3t0d1
autoch 5 0/5/0/0/0/1.2.0.255.0.0.1 schgr CLAIMED DEVICE HP ESL G3 Series
/dev/rac/c6t0d1
autoch 7 0/5/0/0/0/1.2.1.255.0.0.1 schgr CLAIMED DEVICE HP ESL G3 Series
/dev/rac/c8t0d1
autoch 6 0/5/0/0/0/1.5.0.255.0.0.1 schgr CLAIMED DEVICE HP ESL G3 Series
/dev/rac/c7t0d1
autoch 8 0/5/0/0/0/1.5.1.255.0.0.1 schgr CLAIMED DEVICE HP ESL G3 Series
/dev/rac/c9t0d1
In the following ioscan output, the legacy schgr driver reports all of the library legacy paths through the
tape drives. Commvault Simpana sees all of these paths as possible paths to the library. The following
ioscan output shows only the virtual device path, which uses the eschgr driver. This path is the path to
90 Troubleshooting Commvault Simpana device discovery with HP-UX 11.31
Page 91

configure into Commvault. For HP-UX, select the path of the virtual device for the library controller and
ignore the others. # ioscan -knfNC autoch
root@ssdcl197 [/]# ioscan -knNfC autoch
Class I H/W Path Driver S/W State H/W Type Description
===================================================================================
autoch 4 64000/0xfa00/0x9 eschgr CLAIMED DEVICE HP ESL G3 Series /dev/rchgr/autoch4
The same set of paths is displayed in the Commvault GUI. Normally Commvault only sees one
connection to the library, as shown for the first two ESL G3 libraries in the list. The third library shows nine
connections (# library paths through the drives * # host connections + the
virtual bus connection). The line item with virtbus as the path to the ESL G3 Library is the
virtual path to the library, which is the path to configure with Commvault. If the listing does not include a
connection with the virtbus path, Commvault does not detect the library controller. In this case, follow
the directions in the workaround to remove the legacy I/O nodes and their device special files from the
system.
Troubleshooting Commvault Simpana device discovery with HP-UX 11.31 91
 Loading...