

Page 1

StoreEver LTO 3/4/5/6
Half-Height SAS Tape Drives
User Guide
Abstract
This guide is intended for users who install, operate, and maintain Hewlett Packard Enterprise LTO-3, LTO-4, LTO-5, and LTO-6
Ultrium half-height tape drives. This guide provides information about installing, using, and troubleshooting the tape drives.
Part Number: EH969-90973R
Published: June 2016
Edition: 7
Page 2

© Copyright 2009, 2016 Hewlett Packard Enterprise Development LP
The information contained herein is subject to change without notice. The only warranties for Hewlett Packard Enterprise products and services
are set forth in the express warranty statements accompanying such products and services. Nothing herein should be construed as constituting
an additional warranty. Hewlett Packard Enterprise shall not be liable for technical or editorial errors or omissions contained herein.
Confidential computer software. Valid license from Hewlett Packard Enterprise required for possession, use, or copying. Consistent with FAR
12.211 and 12.212, Commercial Computer Software, Computer Software Documentation, and Technical Data for Commercial Items are licensed
to the U.S. Government under vendor's standard commercial license.
Links to third-party websites take you outside the Hewlett Packard Enterprise website. Hewlett Packard Enterprise has no control over and is not
responsible for information outside the Hewlett Packard Enterprise website.
Acknowledgments
Linear Tape-Open, LTO, LTO Logo, Ultrium and Ultrium Logo are trademarks of Quantum, Hewlett Packard Enterprise and IBM in the US, other
countries or both.
Microsoft® and Windows® are either registered trademarks or trademarks of Microsoft Corporation in the United States and/or other countries.
UNIX® is a registered trademark of The Open Group.
Page 3

Contents
1 Before you start...................................................................................................5
Which operating systems are supported?............................................................................................5
Power specifications.............................................................................................................................5
How do I connect the drive to my server?............................................................................................6
Internal drives..................................................................................................................................6
External drives.................................................................................................................................7
Rackmount drives............................................................................................................................8
LTFS and HPE StoreOpen Standalone................................................................................................8
2 Drivers and backup software...............................................................................9
Install drivers.........................................................................................................................................9
Installing on Windows......................................................................................................................9
Installing on Linux and UNIX...........................................................................................................9
Installing on IA64.............................................................................................................................9
Diagnostic, management, and support tools........................................................................................9
Upgrade backup software...................................................................................................................10
Enable encryption...............................................................................................................................10
3 Installing an internal LTO Ultrium tape drive .....................................................11
Before you start..................................................................................................................................11
Mounting requirements.......................................................................................................................12
Remove server cover..........................................................................................................................12
Attach mounting hardware - some servers.........................................................................................13
HPE ProLiant servers....................................................................................................................13
Mounting rails...........................................................................................................................13
Mounting screws......................................................................................................................14
Other servers.................................................................................................................................14
Install drive..........................................................................................................................................14
Connect SAS and power cords...........................................................................................................15
Supplied SAS cable.......................................................................................................................15
Option 1: Connect to a new HBA (all servers)...............................................................................16
Option 2: Connect cable to spare port on host SAS controller......................................................19
Option 3: Connect cable to port on host SAS controller and replace existing SAS cable.............21
Secure the drive..................................................................................................................................23
Mounting hardware used...............................................................................................................23
No mounting hardware used.........................................................................................................25
Reboot the server...............................................................................................................................25
4 Installing an external LTO Ultrium tape drive ....................................................26
Before you start..................................................................................................................................26
Connecting the tape drive to an external SAS port............................................................................26
Reboot the server ..............................................................................................................................27
5 Verifying the installation.....................................................................................28
6 Operating the tape drive....................................................................................29
About the LTO tape drive....................................................................................................................29
LTO-6 and LTO-5 Ultrium tape drives............................................................................................29
Earlier generation LTO Ultrium tape drives...................................................................................29
Loading a cartridge.............................................................................................................................30
Unloading a cartridge..........................................................................................................................30
Removing power from the drive..........................................................................................................31
7 Use the correct media.......................................................................................32
Cartridges...........................................................................................................................................32
Contents 3
Page 4

Cleaning cartridges........................................................................................................................32
Data cartridges..............................................................................................................................32
LTO Ultrium WORM data cartridges...................................................................................................33
LTO-6 and LTO-5 Ultrium tape drives and partitioning.......................................................................33
LTO-6, LTO-5 and LTO-4 Ultrium tape drives and encryption............................................................34
When should I use encryption?.....................................................................................................34
How do I enable encryption?.........................................................................................................34
When will I be asked to enter the key?..........................................................................................34
What happens if I do not remember the key?...............................................................................34
Does encryption affect tape drive performance?...........................................................................35
Does the tape drive encrypt media in an earlier Ultrium format?..................................................35
Where can I get more information?...............................................................................................35
Write protecting cartridges..................................................................................................................35
Cleaning the tape drive.......................................................................................................................36
Handling cartridges.............................................................................................................................36
Operating and storage environment...................................................................................................37
8 Diagnostic Tools and SMART components.......................................................38
Library & Tape Tools (L&TT) with integrated TapeAssure monitoring.................................................38
Main features available with Library & Tape Tools........................................................................38
HPE SMART components..................................................................................................................39
9 Troubleshooting.................................................................................................40
General Procedure.............................................................................................................................40
Understanding LED sequences..........................................................................................................41
Encryption LED(HPE LTO-6 and LTO-5 models only)...................................................................43
Problems with cartridges....................................................................................................................44
The cartridge is jammed................................................................................................................44
The drive will not accept the cartridge (or ejects it immediately)...................................................45
Encryption troubleshooting.................................................................................................................46
10 Replacing a tape drive.....................................................................................47
To disconnect your drive.....................................................................................................................47
To reconnect your tape drive..............................................................................................................47
11 Support and other resources...........................................................................48
Accessing Hewlett Packard Enterprise Support.................................................................................48
Accessing updates..............................................................................................................................48
Related information.............................................................................................................................49
Rack stability.......................................................................................................................................49
Websites.............................................................................................................................................49
Customer self repair...........................................................................................................................50
Registering your tape drive.................................................................................................................50
Remote support..................................................................................................................................50
Documentation feedback....................................................................................................................50
A Warranty and regulatory information.................................................................51
Warranty information...........................................................................................................................51
Regulatory information........................................................................................................................51
Belarus Kazakhstan Russia marking.............................................................................................51
Turkey RoHS material content declaration....................................................................................52
Ukraine RoHS material content declaration..................................................................................52
Index.....................................................................................................................53
4 Contents
Page 5
1 Before you start
This guide describes how to install and operate the following HPE LTO Ultrium tape drives:
• HPE LTO-6 Ultrium 6250 internal and external tape drives
• HPE LTO-5 Ultrium 3000 internal and external tape drives
• HPE LTO-4 Ultrium 1760 internal and external tape drives
• HPE LTO-3 Ultrium 920 internal and external tape drives
For a detailed product specification, see the HPE Tape Products website:
http://www.hpe.com/info/tape
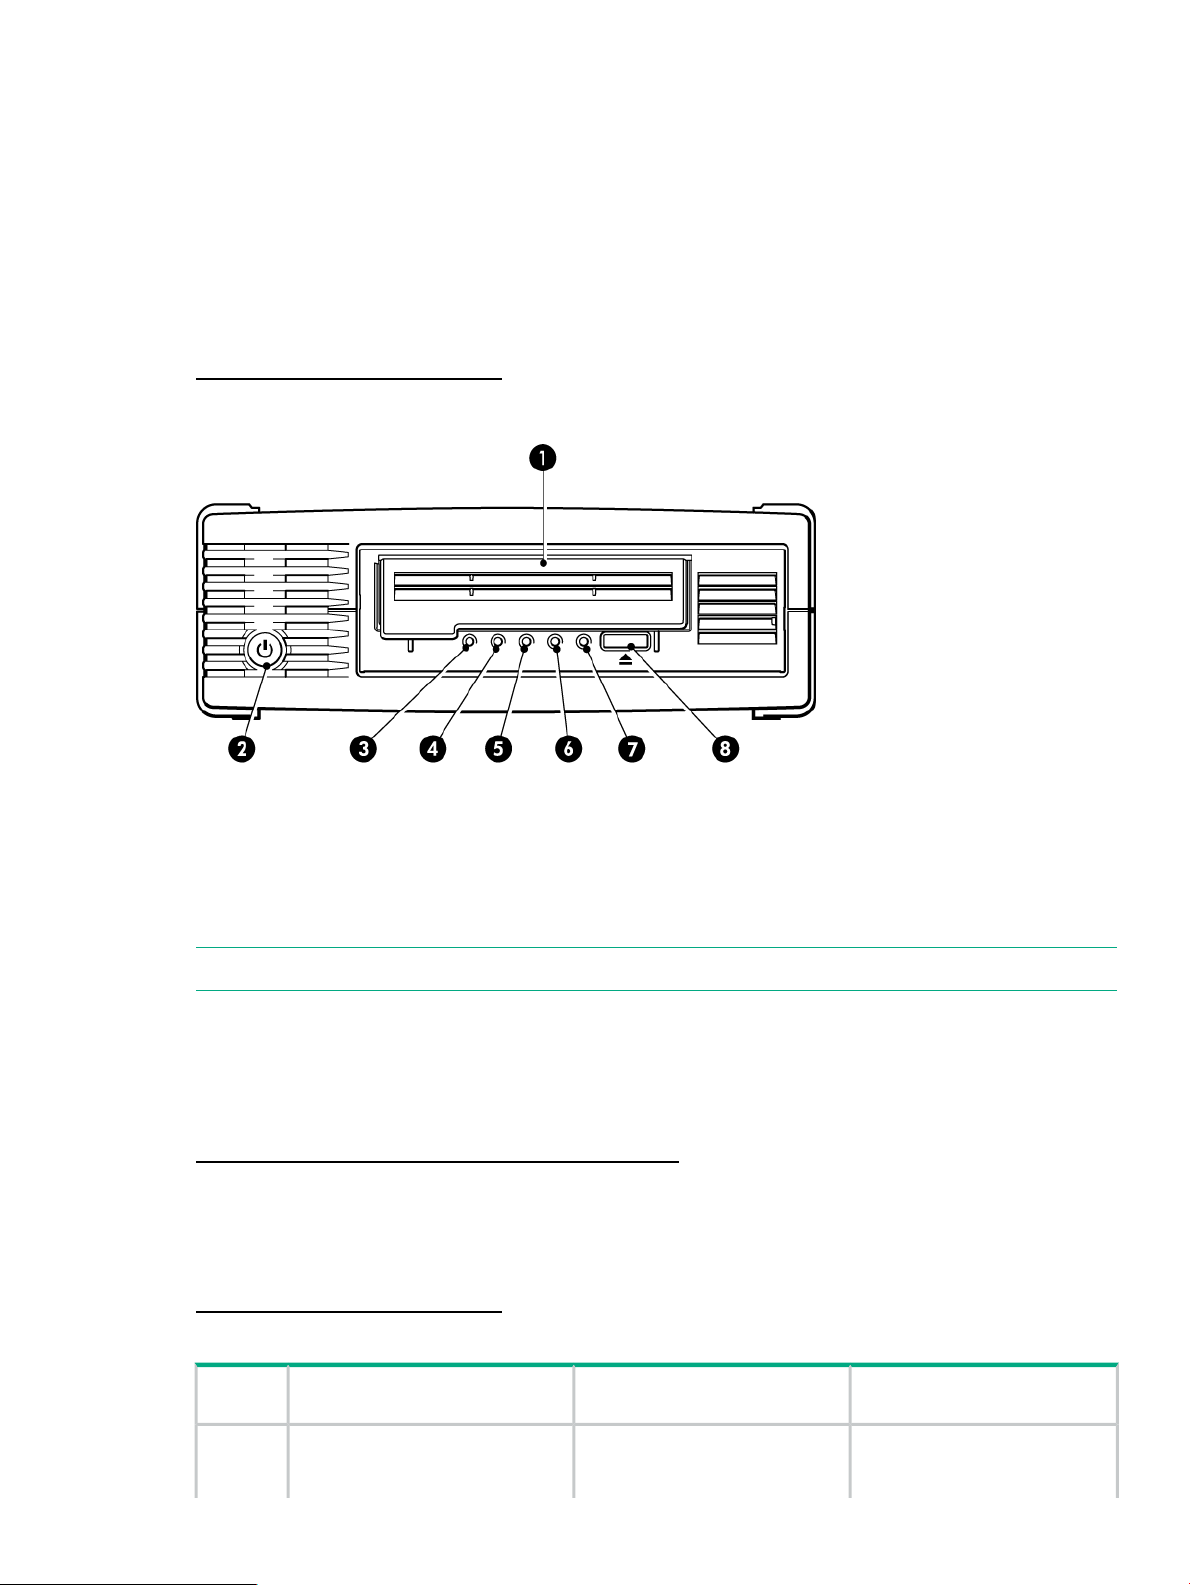
Figure 1 Front view of external tape drive
5. Tape LED1. Cartridge door
6. Drive LED2. On/Off switch (external drives only)
7. Ready LED3. Encryption LED (LTO-6 and LTO-5 only)
8. Eject button4. Clean LED
NOTE: LTO-4 and earlier tape drives do not have an Encryption LED.
Which operating systems are supported?
LTO Ultrium drives can be connected to servers running under Windows®, Linux, UNIX, and
other major operating systems. For the most recent information about supported operating
systems, see the Data Agile BURA website:
http://www.hpe.com/storage/buracompatibility
Power specifications
For a detailed product specification, refer to the QuickSpecs available from the Tape Products
website:
http://www.hpe.com/info/tape
Table 1 Power specifications
LTO-5 Ultrium 3000LTO-6 Ultrium 6250
Earlier generation LTO Ultrium
half-height tape drives
consumption
13 Watts idle7.5 Watts idle4.5 Watts idle (hibernate)Power
20 Watts typical24 Watts typical29 Watts typical (writing)
Which operating systems are supported? 5
Page 6

Table 1 Power specifications (continued)
LTO-5 Ultrium 3000LTO-6 Ultrium 6250
requirements
Power
requirements,
external
tape
drives
100–240 VAC, 50-60 Hz,
auto-ranging, 0.8A maximum
100–240 VAC, 50-60 Hz,
auto-ranging, 0.8A maximum
How do I connect the drive to my server?
Installation requires a SAS Smart Array controller or SAS HBA that supports tape.
NOTE: All non-Hewlett Packard Enterprise servers require an additional HBA.
The recommended way of connecting a tape drive to a SAS server, is to purchase and install
one of the supported HBAs. Always refer to the Data Agile BURA Compatibility Matrix BEFORE
you install your tape drive to ensure that you are connecting to a supported HBA running the
recommended firmware version. Be sure to check the details of the specific tape drive and server
combination that you require.
Earlier generation LTO Ultrium
half-height tape drives
33 Watts maximum40 Watts maximum42 Watts maximum
+5V @ 2.5A typical+5V @ 4.1A typical+5V @ 3.7A typicalPower
+5V @ 2.5A maximum+5V @ 4.3A maximum+5V @ 4.2A maximum
+12V @ 0.7A typical+12V @ 0.75A typical+12V @ 0.9A typical
+12V @ 2.1A maximum+12V @ 2.3A maximum+12V @ 2.3A maximum
100–240 VAC, 50-60 Hz,
auto-ranging, 0.7A maximum
For current information about supported HBAs, see the Data Agile BURA Compatibility Matrix
at:
http://www.hpe.com/storage/buracompatibility
Internal drives
The tape drive is installed into a spare drive bay in your server and is attached to the host server
internal SAS controller or SAS host bus adapter.
You need one industry-standard, 5¼-inch, half-height bay in which to install the LTO Ultrium tape
drive. Different models of server require different mounting methods. Refer to your server
documentation for detailed information. See also “Installing an internal LTO Ultrium tape
drive” (page 11).
The cable supplied with the tape drive is suitable for connecting to a mini-SAS (SFF-8086/8087)
connector on a dedicated HBA or on the server SAS controller. If your server has a SAS 4i
connector (SFF-8484), a suitable cable is available, but must be purchased separately.
NOTE: Power for the LTO-6 Ultrium 6250 and LTO-5 Ultrium 3000 tape drive is supplied
through the SAS cable. For all earlier models of tape drive, a separate power cable is required,
see http://www.hpe.com/storage/spock.
6 Before you start
Page 7
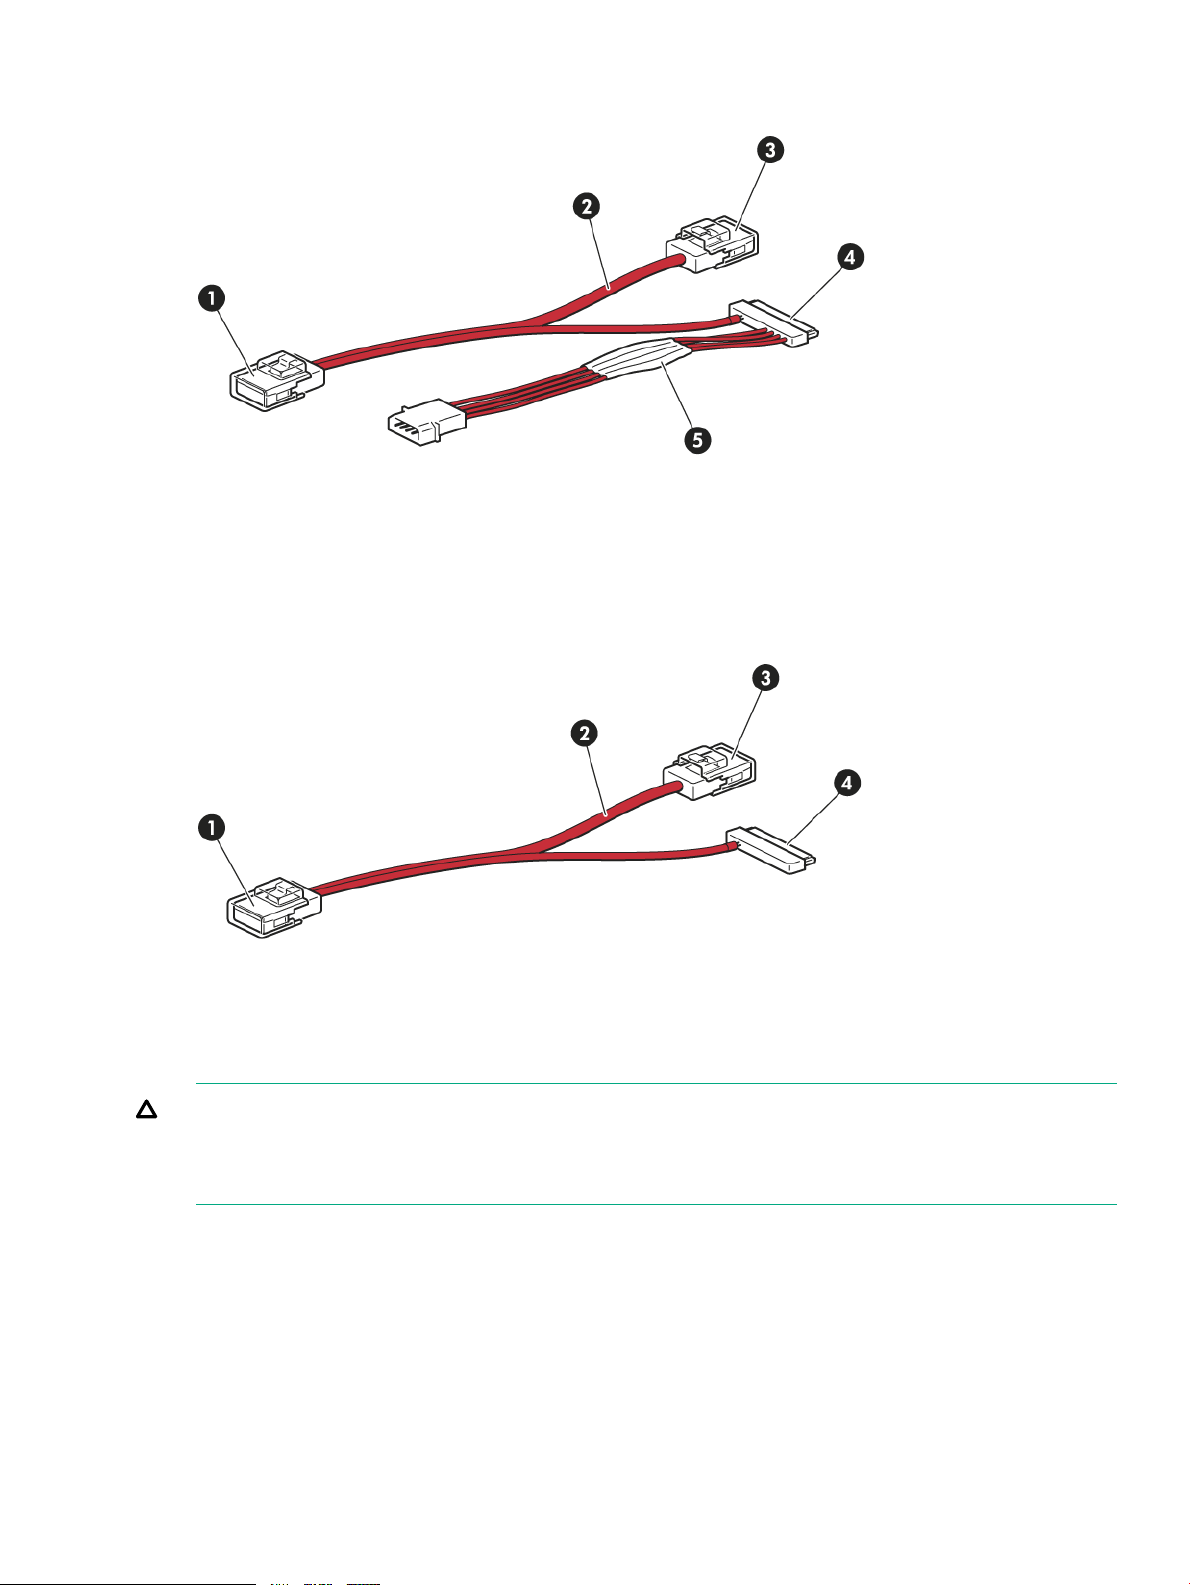
Figure 2 SAS with power cable supplied with LTO-6 Ultrium 6250 and LTO-5 Ultrium 3000
internal tape drives
2. Unused second branch on supplied cable1. Mini-SAS connector to server (remove cover)
4. SAS connector to tape drive3. Mini-SAS connector on second branch (unused, do not
remove cover)
5. Power cable and connector to server power supply
Figure 3 SAS without power cable supplied with earlier generation LTO internal tape drives
remove cover)
CAUTION: With all tape drives before LTO-6 Ultrium 6250 and LTO-5 Ultrium 3000, never
use a cable where power is supplied through the SAS connector because doing so may damage
the drive. Always use a spare power cord from the server internal power supply to the conventional
power connector on the drive itself.
See Connect SAS and power cables (page 15) for detailed instructions on connecting the SAS
cable.
External drives
External tape drives must be connected to an external port. The cable supplied with the tape
drive is suitable for connecting to an External Mini SAS High Density (SFF-8644) port on a
dedicated HBA (recommended) or the host SAS controller. If your server has an external Infiniband
(SFF-8470) connector, a suitable cable is available, and must be purchased separately.
2. Unused second branch on supplied cable1. Mini-SAS connector to server (remove cover)
4. SAS connector to tape drive3. Mini-SAS connector on second branch (unused, do not
How do I connect the drive to my server? 7
Page 8
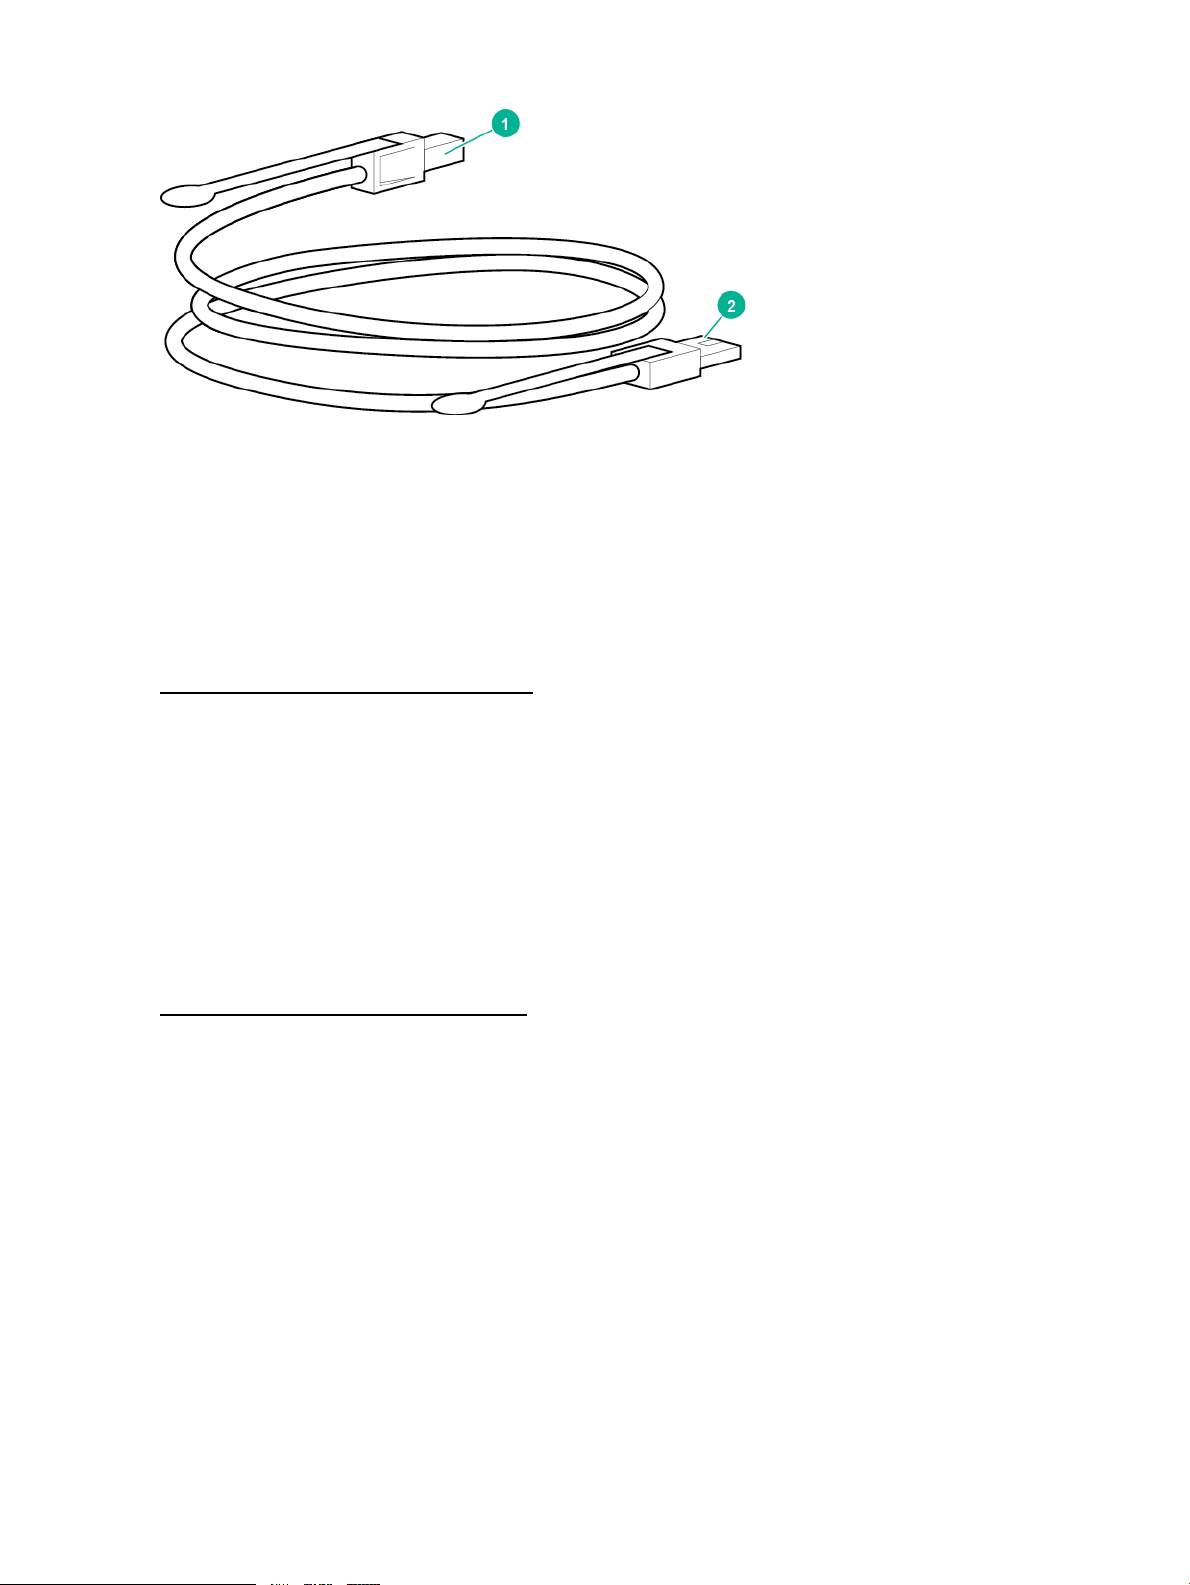
Figure 4 SAS cable supplied with the external tape drive
1. High-Density Mini SAS connector for the server
2. Mini SAS connector for the tape drive
For detailed instructions on connecting the external SAS tape drive, see Installing an external
LTO Ultrium tape drive (page 26).
Rackmount drives
Specific installation instructions for rackmount drives are not included in this guide. Refer to
http://www.hpe.com/info/rackmount for the most up-to-date information.
LTFS and HPE StoreOpen Standalone
LTO-5 and LTO-6 Ultrium Tape Drives feature HPE Linear Tape File System (LTFS) functionality.
LTFS makes tape self-describing, file-based, and easy-to-use and provides users with the ability
to use standard file operations on tape media for accessing, managing, and sharing files with an
interface that behaves just like a hard disk. In addition, with LTFS you can share data across
platforms, as you would with a USB drive or memory stick. Simply load a tape into the drive,
mount it into the file system, and it becomes visible as a disk.
HPE StoreOpen Standalone is a free application that helps LTFS users to use and manage single
tape drives. To find out more about LTFS and download StoreOpen Standalone, go to:
http://www.hpe.com/info/storeopen
8 Before you start
Page 9

2 Drivers and backup software
Install drivers
NOTE:
The Hewlett Packard Enterprise Tape driver is suitable for use in most applications, but refer
also to the documentation of your software application to ensure that you are using the
recommended driver.
Installing on Windows
Hewlett Packard Enterprise recommends installing the tape drivers on the server before connecting
the tape drive. Use the Tape driver with the Windows operating systems unless the software
application requires a different driver.
For driver, firmware, and software updates, see drivers & downloads on the support website:
http://www.hpe.com/support/hpesc
Installing on Linux and UNIX
The recommended backup applications use the operating system standard, built-in device drivers.
To upgrade drivers, patch to the latest version of the operating system or configure device files,
as described in the UNIX, Linux, and OpenVMS Configuration Guide available on the
documentation website:
http://www.hpe.com/info/enterprise/docs
Installing on IA64
If you are installing on an IA64 system, such as an HPE Integrity server, check the Data Agile
BURA Compatibility Matrix at http://www.hpe.com/storage/buracompatibility for the latest
information on the availability of backup application upgrades and drivers.
Diagnostic, management, and support tools
The following utilities are available from Hewlett Packard Enterprise, free of charge, and are
highly recommended:
• Library & Tape Tools (L&TT) is the recommended diagnostic and support tool for your Hewlett
Packard Enterprise tape drive. Use it to verify installation, update to the latest firmware and
confirm that your tape drive is functioning correctly before you use it for backup. L&TT version
5.0 onwards offers integrated TapeAssure monitoring for Windows users so it is recommended
that you preinstall L&TT to monitor your tape drive and be ready to run diagnostics should
you need to contact Hewlett Packard Enterprise support. It is available free at www.hpe.com/
support/tapetools.
• Tape Smart Components provide easy to use driver and firmware updates.
HPE Storage Tape Drivers (Windows)◦
◦ HPE Storage Tape Firmware (Windows)
◦ HPE Storage Tape Firmware (Linux)
These components are available as free downloads from the support center website:
http://www.hpe.com/support/hpesc
Install drivers 9
Page 10

Upgrade backup software
Check the Data Agile BURA Compatibility Matrix at http://www.hpe.com/storage/
buracompatibility for software compatibility and install any recommended upgrades. Make sure
that you have a backup application that supports LTO Ultrium tape drives and download any
upgrades or patches, if necessary.
For optimum performance, it is important to use a backup application that is appropriate for your
system configuration. In a direct attach configuration, where the tape drive is attached to a
standalone server, you can use backup software that is designed for a single-server environment.
In network configurations, you will need backup software that supports enterprise environments.
Hewlett Packard Enterprise, Veritas, EMC, Yosemite, and Computer Associates all provide
suitable products. Further details about these and other products that may be appropriate can
be found on the Data Agile BURA website.
Enable encryption
The LTO-6 Ultrium 6250, LTO-5 Ultrium 3000, and LTO-4 Ultrium 1760 tape drives include
hardware capable of performing data encryption while writing and data decryption while reading,
both at full speed. This feature is only possible with LTO Ultrium 6.25 TB, 3 TB, and 1.6 TB media.
See also LTO-6, LTO-5 and LTO-4 Ultrium tape drives and encryption (page 34).
To use the encryption capability, enable encryption via the backup software application. Refer
to http://www.hpe.com/storage/buracompatibility to find out which applications support this
advanced data protection capability.
10 Drivers and backup software
Page 11

3 Installing an internal LTO Ultrium tape drive
NOTE: If you are installing an external LTO Ultrium tape drive, see “Installing an external LTO
Ultrium tape drive” (page 26).
Before you start
Always refer to the Data Agile BURA Compatibility Matrix at http://www.hpe.com/storage/
buracompatibility to find out which cabling option is appropriate for your combination of server
and tape drive.
The internal tape drive may be installed in one of three configurations, each of which is described
in more detail in Connect SAS and power cables (page 15):
• Purchase and install an additional SAS HBA and connect the tape drive to the new HBA.
This configuration is suitable for all servers and is described as Option 1.
• Use the existing SAS controller and connect the tape drive to a spare SAS port on the host
SAS controller. This cabling option is suitable for some HPE ProLiant servers only. It is
described as Option 2.
• Use the existing SAS controller, but replace one of the existing SAS cables to the hard disk
drive bays. This option requires some recabling inside the server, and may also disconnect
one of the hard disk drive bays. This configuration is suitable for some ProLiant servers only
and, if it does disconnect a hard disk drive bay, you must be sure that the bay is not required
for use. Do not move a hard disk to create an empty bay because you may damage your
server configuration. Never use this option with RAID configurations. This cabling option is
described as Option 3.
For current information about SAS host controllers and cabling options with ProLiant servers,
see the Data Agile BURA website at:
http://www.hpe.com/storage/buracompatibility
Before you start 11
Page 12
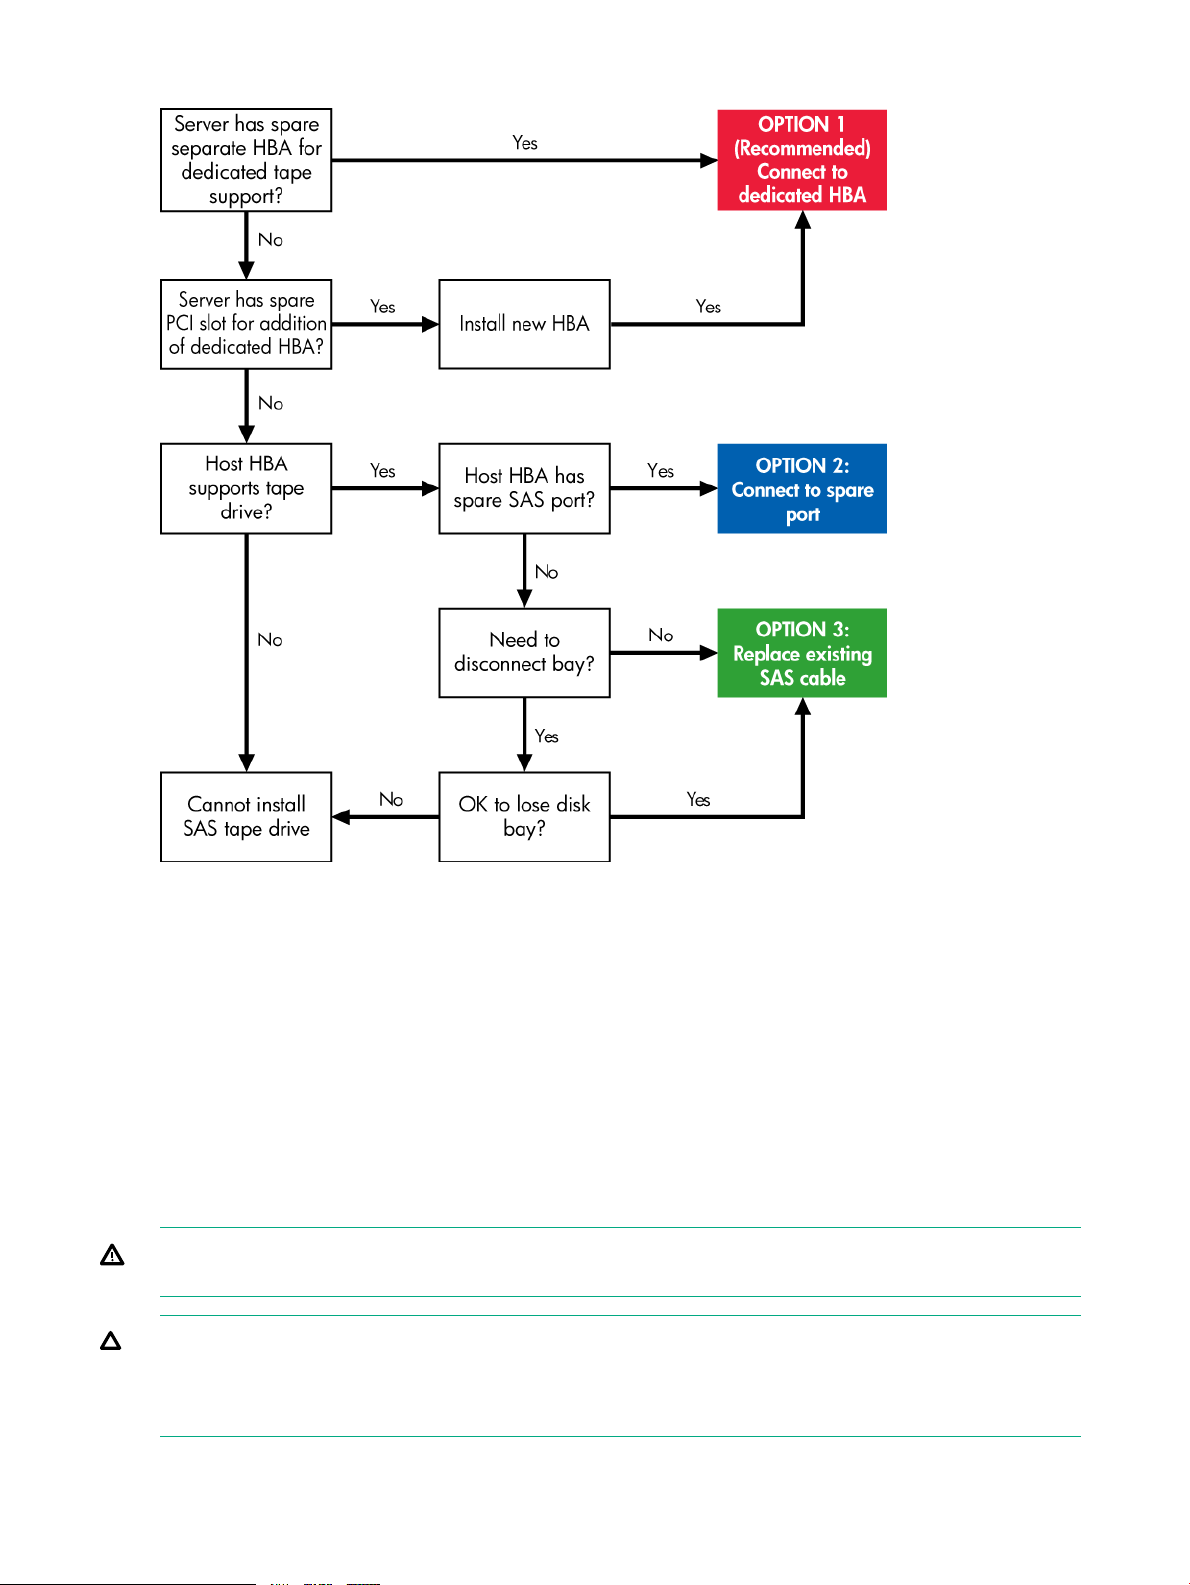
Figure 5 Decision tree for connecting an internal tape drive to an internal SAS port
Mounting requirements
You need one industry-standard, 5¼-inch, half-height bay in which to install the LTO Ultrium tape
drive.
For many servers, no mounting tray or rails are required. Devices simply slide into the server
chassis and are fixed with screws. Other servers have built-in trays or rails. Rail kits for a number
of industry-standard servers may be available.
Some servers use nonstandard mounting rails and do not include spares. If this is the case with
your system, you will have to order these accessories from the server manufacturer before you
can install the tape drive.
Remove server cover
WARNING! To avoid personal injury or damage to the server or tape drive, ensure that the
server is disconnected from the mains power supply while you install the drive.
CAUTION: Static electricity can damage electronic components. Always wear an anti-static
wriststrap if one is available. If not, after you have disconnected power from the server and
removed the cover, touch a bare metal part of the chassis. Similarly, touch a bare metal part of
the drive before installing it.
12 Installing an internal LTO Ultrium tape drive
Page 13

1. Assemble the necessary tools and materials:
• PoziDrive #1 screwdriver
• Phillips screwdriver (if your server uses Phillips screws)
• Flat-bladed screwdriver (if your server uses slotted screws)
• Torx screwdriver (if your server uses Torx screws)
• Your server manuals (for reference during installation)
2. Perform a normal system shutdown and turn off the server and any connected peripherals.
Ensure that the server is disconnected from the mains power supply.
3. Remove the cover and front panel from the server, as detailed in your server documentation.
As you work inside the server, you may have to disconnect other signal cables or power
cords from other devices to maneuver the new drive into place. If you disconnect cables,
make a note of their position and connections so you can put them back correctly later.
NOTE: The server must provide forced cooling and be capable of drawing 6 CFM (0.17
m3/minute or 10.08 m3/hour) of air through the tape drive at up to 40° C ambient operation.
This reduces to 4 CFM at 35° C ambient operation. Ensure that empty bays have the
appropriate blanking plates installed so that airflow is maintained.
4. Remove the filler panel from a spare 5¼-inch bay of your server, as described in your server
documentation. With some servers, you must also remove the half-height device divider.
Attach mounting hardware - some servers
If your server requires special rails or other hardware to install the tape drive, mount them on the
tape drive now.
If your server does not require special mounting hardware, proceed to Install drive (page 14)
now.
If the server or enclosure rails are less than 1.5 mm thick, use the washers from the GENERAL
MOUNTING SCREWS screw pack for a proper fit.
HPE ProLiant servers
NOTE: If mounting hardware is supplied with your tape drive, it may not be the same as shown
in the illustrations.
Different models of server require different mounting methods. The server may also incorporate
a locking mechanism to hold the tape drive in place. See Secure the drive (page 23).
Check your ProLiant server documentation to ascertain the correct method of mounting, and to
see whether mounting hardware is provided with the server.
Installing an internal LTO tape drive in an ML350 server requires a media cage kit.
• ML350 Gen8: PN 661618-B21
• ML350 Gen9: PN 726545-821
Mounting rails
Some ProLiant servers require mounting rails, which may be metal or plastic rails attached to
the server drive bay filler panel.
Attach mounting hardware - some servers 13
Page 14
Use a PoziDrive #1 screwdriver to attach the appropriate rails. Use the 4mm M3 screws provided
with the tape drive, in the screw pack labeled 'General Mounting Screws', as shown below.
CAUTION: Ensure that you use the 4mm M3 screws provided. The rails may be attached to
the filler panel by screws of a different thread/size type and these screws should not be used. If
the screws are too long, they may penetrate the mechanism and void the warranty.
If the server or enclosure rails are less than 1.5 mm thick, use the washers from the GENERAL
MOUNTING SCREWS screw pack for a proper fit.
Mounting screws
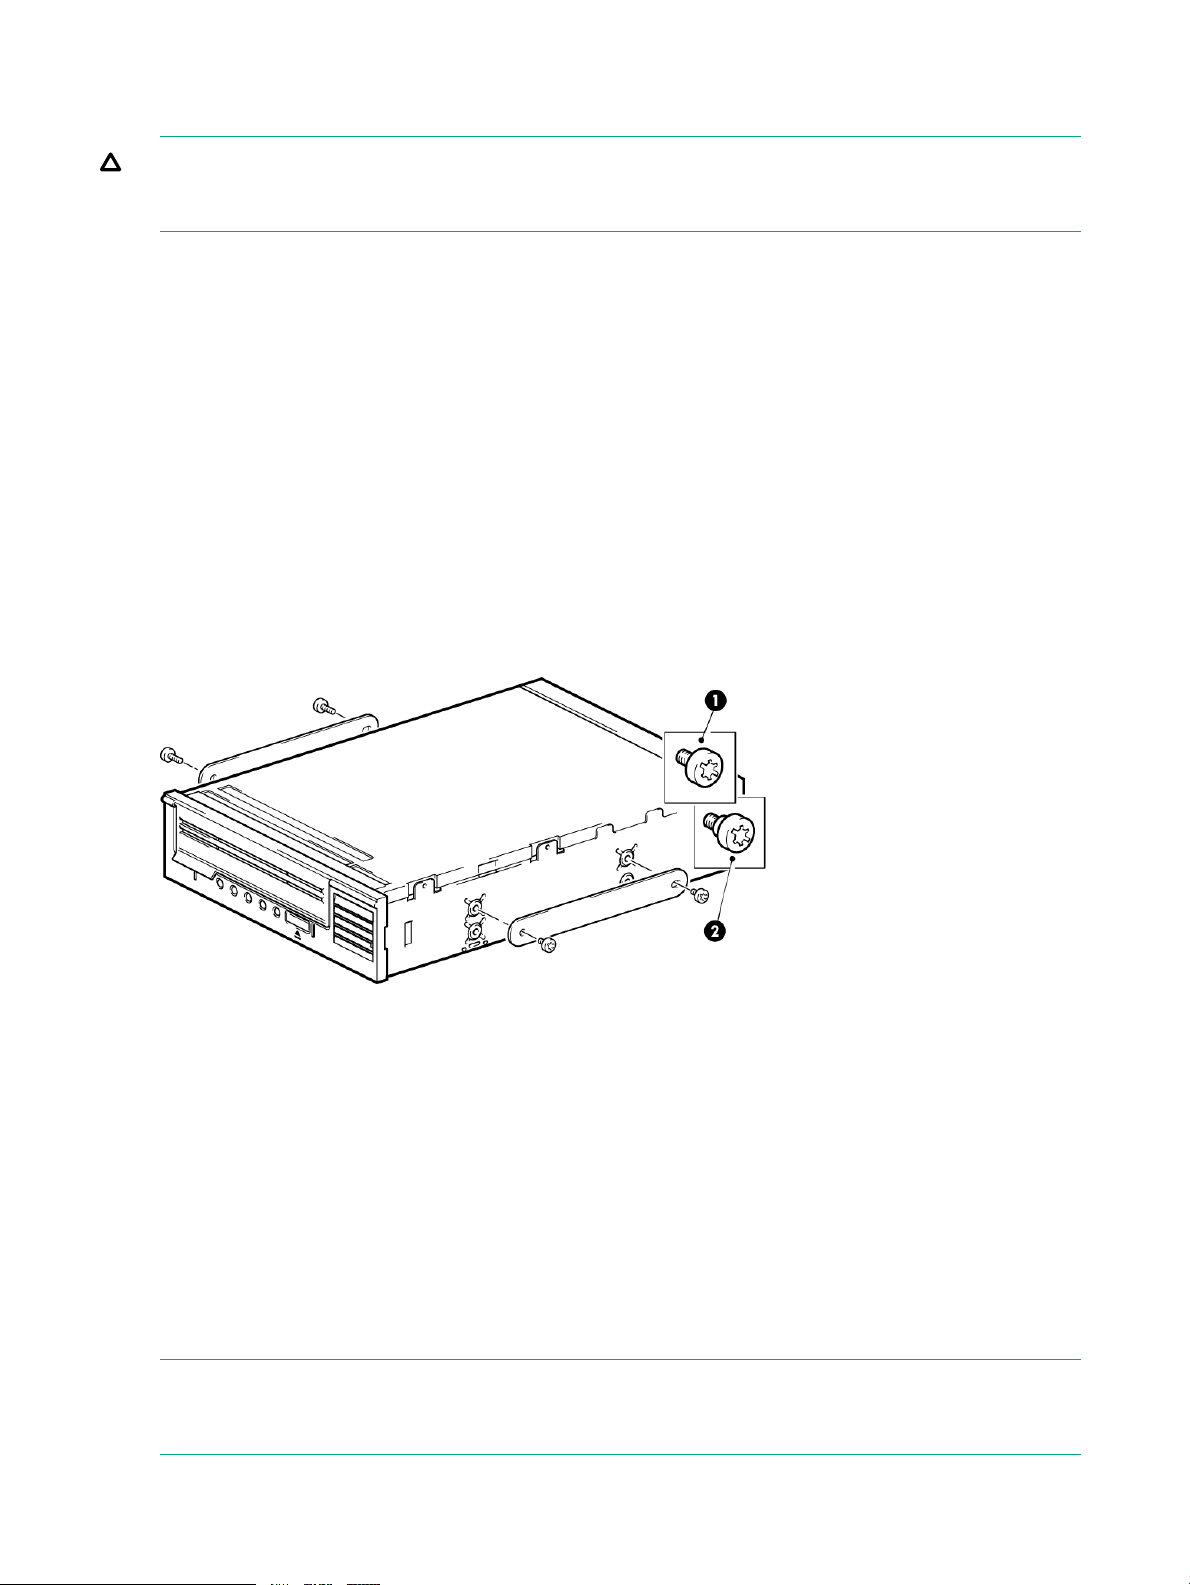
Other ProLiant server models, such as ML350 and ML370, only require the use of special locating
screws with no mounting rail.
Use a T15 Torx screwdriver to attach the appropriate screws. Locate both screws lightly in position
before tightening, as shown in the following figure.
• ProLiant ML350: Use the metal shims and screw pack labeled ‘ProLiant ML350'. This screw
pack contains 3mm screws, which have a thicker head than the general mounting screws.
• ProLiant ML370: Use the metal shims and screw pack labeled ‘ProLiant ML370'. This screw
pack contains shoulder screws, which have a thick offset piece and a thicker head than the
general mounting screws.
Figure 6 Attaching locating screws in a typical ProLiant ML350 or ML370
1. 3mm mounting screws ((ProLiant ML350 screw pack)
2. Shoulder mounting screws (ProLiant ML370 screw pack)
Other servers
Attach the appropriate mounting hardware. Refer to the manufacturer documentation for
instructions.
• If you are installing on a server that requires a tray, place the tape drive in the tray.
• Some servers have snap-on mounting rails attached to the filler panel, which can be removed
and attached to the tape drive with screws.
Install drive
NOTE: If cable access for the tape drive bay is awkward, it may be easier to access power
and other connections if the tape drive is installed in the top bay. You may need to move other
devices to lower bays to free the top bay. Refer also to your server documentation.
14 Installing an internal LTO Ultrium tape drive
Page 15

Slide the tape drive into the open bay, aligning the tray or rails with the slots in the bay. If your
server does not use mounting hardware, verify that the holes in the chassis are aligned with the
holes in the side of the tape drive.
Figure 7 Installing tape drive
Do not secure the drive at this point because you may have to move the drive to get the cables
into place.
Connect SAS and power cords
There are three options for connecting the tape drive. Each is described separately in this section.
• Connect to a dedicated HBA (recommended)
• Connect to a spare port on the host controller (recommended)
• If both ports on the host controller are in use, replace one of the existing cables with the
supplied SAS cable (not recommended, use this option with care)
Supplied SAS cable
Power is supplied from the SAS connector on the SAS cable supplied with LTO-6 Ultrium 6250
and LTO-5 Ultrium 3000 tape drives.
Connect SAS and power cords 15
Page 16

Figure 8 SAS with power cable supplied with LTO-6 Ultrium 6250 and LTO-5 Ultrium 3000
internal tape drives
Unused second branch on supplied cable2.Mini-SAS connector to server (remove cover)1.
3.
do not remove cover)
5.
Power cable and connector to server power
supply
SAS connector to tape drive4.Mini-SAS connector on second branch (unused,
The SAS connector on the cable supplied with all other LTO Ultrium tape drives does not provide
power. There is a separate power connector on the rear of the tape drive.
Figure 9 SAS without power cable supplied with earlier generation LTO internal tape drives
Unused second branch on supplied cable2.Mini-SAS connector to server (remove cover)1.
3.
do not remove cover)
SAS connector to tape drive4.Mini-SAS connector on second branch (unused,
NOTE: The cable supplied with the tape drive is suitable for connecting to a mini-SAS
(SFF-8086/8087) connector on a dedicated HBA or on the server SAS controller. If your server
has a SAS 4i connector (SFF-8484), a suitable cable is available, but must be purchased
separately, see http://www.hpe.com/storage/buracompatibility.
Option 1: Connect to a new HBA (all servers)
The following instructions are valid ONLY IF you have purchased and installed an additional
HBA. See “Decision tree for connecting an internal tape drive to an internal SAS port” (page 12)
and always refer to http://www.hpe.com/storage/buracompatibility BEFORE installing your
tape drive.
16 Installing an internal LTO Ultrium tape drive
Page 17
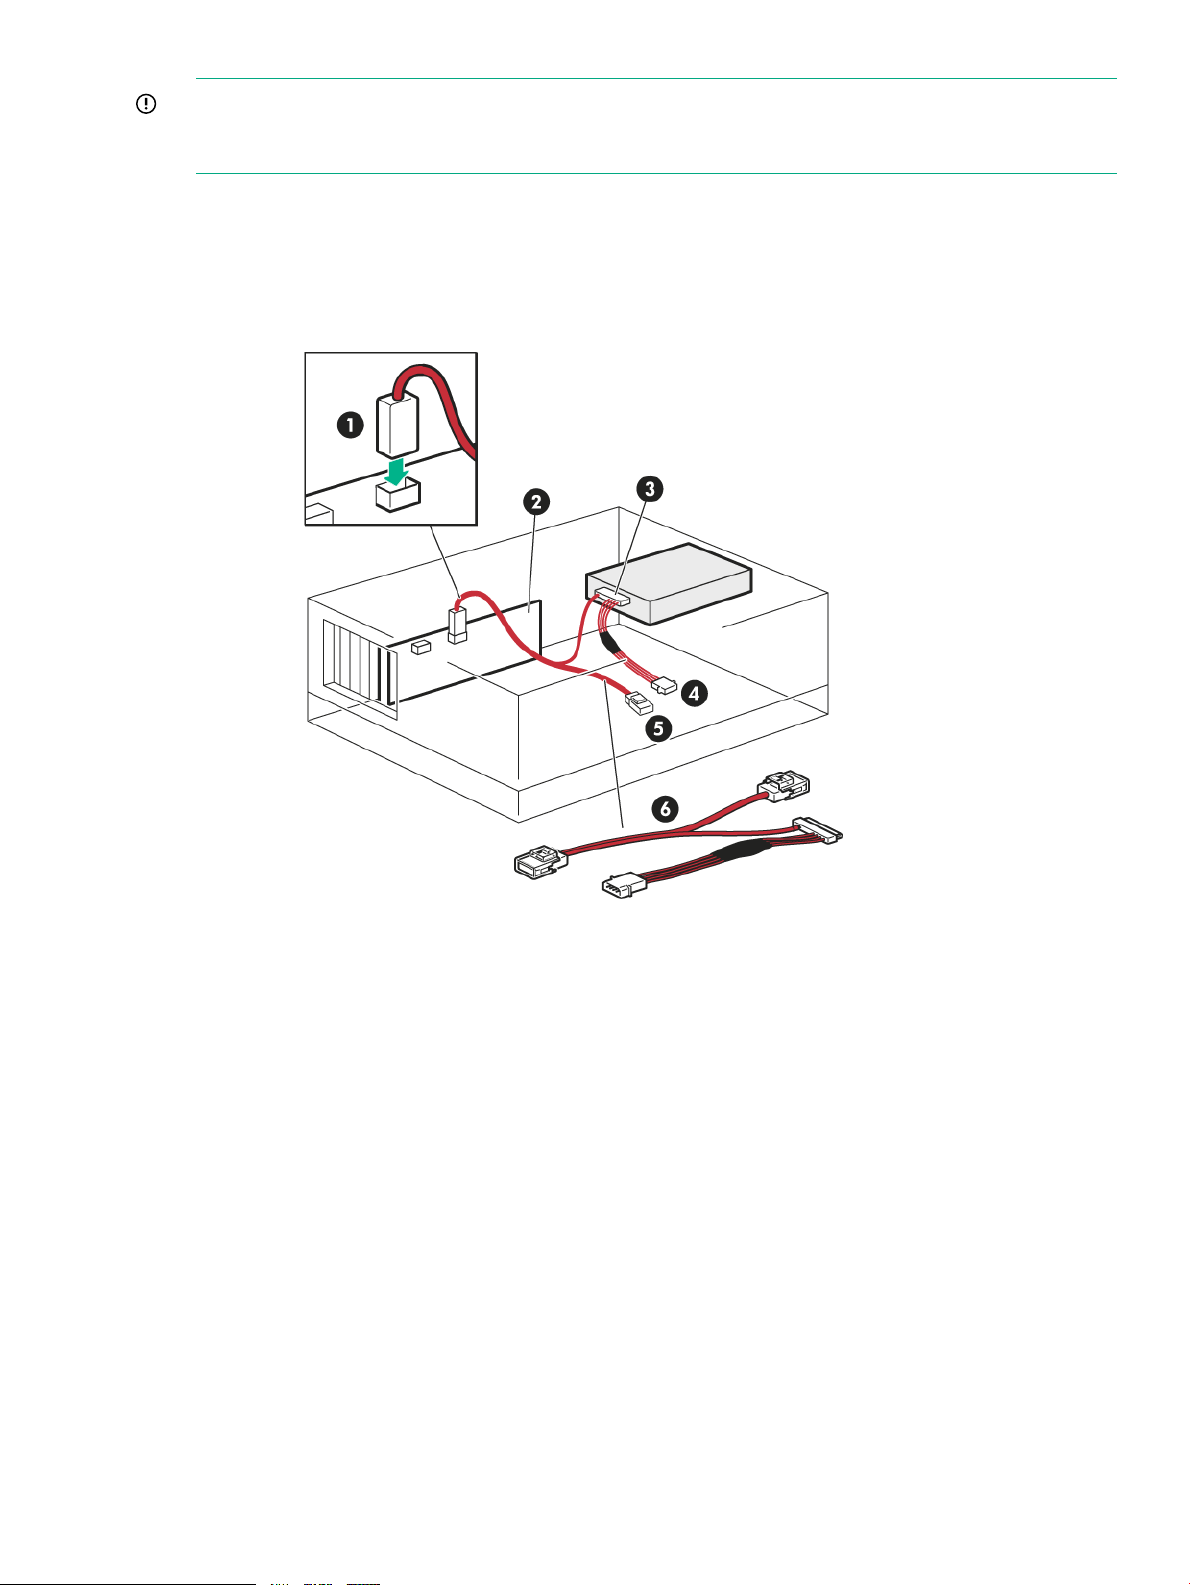
IMPORTANT: A SAS cable for connection to a dedicated HBA is supplied with the tape drive.
The cable is a split cable, but the second branch is not required. Do NOT remove the plastic
cover on the spare connector.
1. If necessary, install a new HBA. Follow the instructions supplied with the HBA to install it
and its driver.
2. Remove the plastic cover from the mini-SAS connector and connect the SAS cable supplied
with the tape drive to the new HBA.
Figure 10 Cabling to a new HBA (cable for LTO-5 and LTO-6 drives shown)
1.
to new HBA
4.SAS connector to tape drive3.
5.
remove plastic cover)
New SAS HBA2.Remove plastic cover and connect SAS cable
Power connector to server ( LTO-6 Ultrium
6250 and LTO-5 Ultrium 3000 only)
SAS cable supplied with tape drive6.Unused connector on SAS cable (do not
3. Connect the other end of the SAS cable to the tape drive.
LTO-6 Ultrium 6250 and LTO-5 Ultrium 3000 tape drives: Connect a spare power cable
from the server internal power supply to the power connector on the SAS data cable.
Connect SAS and power cords 17
Page 18

Figure 11 Connecting cables to the LTO-6 Ultrium 6250 and LTO-5 Ultrium 3000 tape
drive
Power connector2.SAS connector to tape drive1.
Earlier generation LTO Ultrium tape drives: Connect a spare power cord from the server
internal power supply to the power connector on the tape drive.
Figure 12 Connecting cables to earlier generation LTO Ultrium tape drives
CAUTION: Never use a cable where power is supplied through the SAS connector because
doing so may damage the drive. Always use a spare power cord from the internal power
supply in the server. This caution does not apply to LTO-6 Ultrium 6250 and LTO-5 Ultrium
3000 tape drives.
4. There will be unused SAS cabling within the server because the other SAS connector is not
required in this configuration. Coil and secure the unused cabling so that it does not interfere
with other components inside the server.
5. Now go to Secure the drive (page 23).
18 Installing an internal LTO Ultrium tape drive
Power connector2.SAS connector1.
Page 19

Option 2: Connect cable to spare port on host SAS controller
The following instructions apply to some Hewlett Packard Enterprise servers. They are valid
ONLY IF the host SAS controller on your server is supported and has a spare SAS connector.
See the decision chart “Decision tree for connecting an internal tape drive to an internal SAS
port” (page 12) and always refer to http://www.hpe.com/storage/buracompatibility BEFORE
installing your tape drive.
IMPORTANT: This installation uses the SAS cable supplied with the tape drive to connect to
an internal port on the host SAS controller. It does not modify your existing SAS configuration.
The second branch of the split cable is not required for this installation. Do NOT remove the
plastic cover on the spare mini-SAS connector.
1. Remove the plastic cover from the mini-SAS connector and connect the SAS cable supplied
with the tape drive to the spare SAS port on the host SAS controller.
Figure 13 Cabling to the spare SAS port (some ProLiant servers, cable for LTO-5 and
LTO-6 drives shown)
1.
cover on mini-SAS connector)
4.Connect SAS cable to spare SAS port (remove
6.SAS connector to tape drive3.
Power connector to server ( LTO-6 Ultrium
6250 and LTO-5 Ultrium 3000 tape drives only)
SAS cable supplied with tape drive5.Host SAS controller2.
Unused connector on SAS cable (do not
remove cover on mini-SAS connector)
2. Connect the other end of the SAS cable to the tape drive.
LTO-6 Ultrium 6250 and LTO-5 Ultrium 3000 tape drives: Connect a spare power cable
from the server's internal power supply to the power connector on the SAS data cable.
Connect SAS and power cords 19
Page 20

Figure 14 Connecting cables to the LTO-6 Ultrium 6250 and LTO-5 Ultrium 3000 tape
drive
Power connector2.SAS connector to tape drive1.
Earlier generation LTO Ultrium tape drives: Connect a spare power cord from the server's
internal power supply to the power connector on the tape drive.
Figure 15 Connecting cables to earlier generation LTO Ultrium tape drives
CAUTION: Never use a cable where power is supplied through the SAS connector because
using a powered cable may damage the drive. Always use a spare power cord from the
server's internal power supply. This caution does not apply to LTO-6 Ultrium 6250 and
LTO-5 Ultrium 3000 tape drives.
3. There will be unused SAS cabling within the server because the other SAS connector is not
required in this configuration. Coil and secure the unused cabling so that it does not interfere
with other components inside the server.
4. Now go to Secure the drive (page 23).
20 Installing an internal LTO Ultrium tape drive
Power connector2.SAS connector1.
Page 21

Option 3: Connect cable to port on host SAS controller and replace existing SAS cable
The following instructions are valid for some ProLiant servers.
NOTE: This option is not recommended for Gen8 or Gen9 servers because you lose the use
of all four hard drive bays.
This installation uses the HPE SAS split cable to replace one of the existing SAS cables from
the host SAS controller to the server SAS hard disk drive bays. The SAS data cable has four
data paths; this configuration diverts the wiring from one of the hard disk drive bays to the tape
drive. You may lose the use of a hard disk drive bay with this cabling solution.
CAUTION: Do NOT use this option with RAID configurations.
1. Remove the plastic covers from both connectors on the supplied mini-SAS cable. You will
need to use the SAS connector on the second branch of the cable for this installation.
2. Hewlett Packard Enterprise strongly recommends that the tape drive is connected to the
second SAS port on the host controller, which is the port that connects to the hard disk drive
bays with the highest numbers. Look at the front of the server and establish which SAS cable
is connected to the hard disk drive bays with the highest numbers.
Cable routing varies from one server to another. You may need to remove other components,
such as fan banks, while you work with the cable. Always refer to your server documentation
for server-specific cabling instructions.
CAUTION: It is not possible to identify which disk drive bay will be lost for all servers (it
is normally the highest-numbered disk bay). The only way to be sure, is to check the disk
LEDs after installing the tape drive. For this reason, you should never attempt this installation
if you have a disk RAID configuration.
3. Remove the existing SAS cable.
Figure 16 Removing the existing SAS cable
Rear of server3.Host SAS controller (HBA)1.
Front of server4.Cable to be removed2.
4. Connect the replacement cable supplied with the tape drive to the host SAS controller, as
illustrated in the following diagram.
Connect SAS and power cords 21
Page 22

Figure 17 Cable routing with replacement SAS cable
Connect replacement SAS cable to disk bay3.Replacement SAS cable1.
2.
HBA
Power connector to server ( LTO-6 Ultrium 6250 and LTO-5 Ultrium 3000 only)5.
SAS connector to tape drive4.Connect replacement SAS cable to host SAS
5. Attach the SAS cable to the SAS connector on the tape drive.
LTO-6 Ultrium 6250 and LTO-5 Ultrium 3000 tape drives: Connect a spare power cable
from the server's internal power supply to the power connector on the SAS data cable.
Figure 18 Connecting cables to the LTO-6 Ultrium 6250 and LTO-5 Ultrium 3000 tape
drive
Power connector2.SAS connector to tape drive1.
All other LTO Ultrium tape drives: Connect a spare power cord from the server's internal
power supply to the power connector on the tape drive.
22 Installing an internal LTO Ultrium tape drive
Page 23

Figure 19 Connecting cables to all other LTO Ultrium tape drives
Power connector2.SAS connector to tape drive1.
CAUTION: Never use a cable where power is supplied through the SAS connector because
using a powered cable may damage the drive. Always use a spare power cord from the
server's internal power supply. This caution does not apply to LTO-6 Ultrium 6250 and
LTO-5 Ultrium 3000 tape drives.
6. If you have lost the use of a disk bay, we strongly recommend that you attach the supplied
sticker to the blanking plate of the disk bay to show that it is disconnected.
NOTE: If you subsequently install a hard disk in this bay, it will not work. This does not
mean that there is a fault with either the disk or the server.
7. Now go to Secure the drive (page 23).
Secure the drive
NOTE: The server latches and side views of your server model may not be the same as shown
in the illustrations. Refer to your server documentation.
Mounting hardware used
Ensure that you use the correct mounting rails or locating screws, as described in “Attach mounting
hardware - some servers” (page 13). The server used in the illustration below has a locking
mechanism to hold the tape drive in place.
Secure the drive 23
Page 24

1. Push the server latch down to lock the tape drive into position, as shown in the following
figure.
Figure 20 Securing drive, mounting hardware used
1. Plastic rail
2. Server latch
2. Ensure that blanking plates are in place over empty bays and replace the cover on the server.
24 Installing an internal LTO Ultrium tape drive
Page 25

No mounting hardware used
1. If the drive is secured with fasteners, use a PoziDrive #1 screwdriver to secure the 4mm M3
screws provided with the tape drive. If the server sheet metal is less than 1.5mm thick, use
the screws and washers provided in the GENERAL MOUNTING SCREWS screw pack so
the screws can be tightened without damaging the drive. (The washers are not needed if
the server sheet metal is at least 1.5mm thick.)
Figure 21 Securing drive, no mounting hardware used
1. M3 screws, supplied with tape drive
2. Ensure that blanking plates are in place over empty bays and replace the cover on the server.
Reboot the server
Reboot the server to power up the tape drive and server.
Watch the boot screen carefully after installation. If there are any error or unexpected messages
go back and check the SAS cabling carefully.
• Have you installed the SAS cable correctly?
• Have you reconnected all devices securely?
If the problem is unresolved, refer to “Troubleshooting” (page 40) for further guidelines.
Reboot the server 25
Page 26

4 Installing an external LTO Ultrium tape drive
This chapter describes how to connect your tape drive to an external port on the host controller
or new HBA. A suitable cable is supplied with your tape drive for connecting to an external
mini-SAS port.
If you are installing an internal LTO Ultrium tape drive, see “Installing an internal LTO Ultrium
tape drive” (page 11).
Before you start
External tape drives must be connected to an external port. The cable supplied with the tape
drive is suitable for connecting to an External Mini SAS High Density (SFF-8644) port on a
dedicated HBA (recommended) or the host SAS controller. If your server has an external Infiniband
(SFF-8470) connector, a suitable cable is available, and must be purchased separately.
Figure 22 SAS cable supplied with the external tape drive
1. High-Density Mini SAS connector for the server
2. Mini SAS connector for the tape drive
If the server has a different type of SAS port, either purchase the appropriate cable, or purchase
and install a recommended HBA and associated drivers before installing the tape drive. For
current information about supported cables and HBAs, see the Data Agile BURA Compatibility
Matrix at:
http://www.hpe.com/storage/buracompatibility
WARNING! The supplied power cord is Hewlett Packard Enterprise approved for your specific
geographic region. Use of a non-Hewlett Packard Enterprise approved power cord may result
in: 1) not meeting individual country-specific safety requirements; 2) insufficient conductor ampacity
that could result in overheating with potential personal injury and/or property damage; and 3) an
unapproved power cord could fracture resulting in the internal contacts being exposed, which
potentially could subject the user to a shock hazard. Hewlett Packard Enterprise disclaims all
liability in the event a non-Hewlett Packard Enterprise approved power cord is used.
Connecting the tape drive to an external SAS port
1. If installing a new HBA, follow the instructions supplied with the HBA to install it and its driver.
2. Connect the supplied SAS cable to the external SAS connector on the host SAS controller
or new HBA.
26 Installing an external LTO Ultrium tape drive
Page 27

Figure 23 Connecting the SAS cable to the server
1. SAS connector on server
3. Connect the SAS and power cords to the tape drive and plug the other end of the power
cord into the power outlet.
Figure 24 Connecting the cables to the tape drive
2. Power connector
Reboot the server
Switch on the tape drive and power up the server. The power on/off switch is on the front panel.
Watch the boot screen carefully after installation. If there are any error or unexpected messages
go back and check the SAS cabling carefully.
If the problem is unresolved, refer to “Troubleshooting” (page 40) for further guidelines.
3. Power on/off switch1. SAS connector
Reboot the server 27
Page 28

5 Verifying the installation
Once you have installed the drive hardware, check that drivers have been installed correctly and
you have the correct version of backup software, and verify that the tape drive is functioning
properly before you store your valuable data.
1. Switch on the drive and the server.
2. The tape drive will run its hardware self-test, which takes about 5 seconds. If self-test passes,
the green Ready LED flashes and then shows steady green. If the test fails, the Drive Error
and Tape Error LEDs flash, while the Ready and Clean LEDs are off. This continues until
the drive is reset. See Understanding LED sequences (page 41) for more information about
front panel lights.
• If you installed drivers before connecting the tape drive (Windows only)
The tape drive should be detected automatically and the correct drivers used. (See
Install drivers (page 9).) If the Windows Found New Hardware wizard runs, cancel it
- you can use Device Manager to check that the driver is installed.
• Installing drivers after connecting the tape drive (Windows only)
If you have not already installed drivers, the Windows Found New Hardware wizard
will run when you power on the server and tape drive. Follow the on-screen instructions
to search for the required driver on the server. If necessary, download the driver from
the support website:
http://www.hpe.com/support/hpesc
• Installing drivers (other operating systems)
Drivers are included with the operating system and should be loaded automatically. To
upgrade drivers, patch to the latest version of the operating system.
NOTE: Certain backup applications require you to use their own Tape driver instead of
the Hewlett Packard Enterprise Tape driver.
3. Verify that the tape drive installation was successful.
Library & Tape Tools (L&TT) is the recommended diagnostic and support tool for your Hewlett
Packard Enterprise tape drive. Use it to verify installation and confirm that your tape drive
is functioning correctly before you use it for backup. It is available free at http://
www.hpe.com/support/tapetools.
4. For all operating systems, ensure that you have downloaded any upgrades necessary for
your backup application. Check http://www.hpe.com/storage/buracompatibility for software
compatibility and install any recommended upgrades.
5. Carry out a backup and restore test to check that the drive can write data to tape. Use a
blank cartridge.
Windows Backup or UNIX native backup applications can be used to check basic tape drive
operation, but they will not support all the advanced features of your tape drive. We
recommend that you upgrade your software application before running this test.
28 Verifying the installation
Page 29

6 Operating the tape drive
About the LTO tape drive
See also Understanding LED sequences (page 41).
LTO-6 and LTO-5 Ultrium tape drives
Figure 25 Front view of LTO-6 and LTO-5 external tape drive
Earlier generation LTO Ultrium tape drives
Earlier versions of the LTO Ultrium tape drive do not have an Encryption LED.
Figure 26 Front view of earlier LTO Ultrium external tape drives
5. Tape LED1. Cartridge door
6. Drive LED2. On/Off switch (external drives only)
7. Ready LED3. Encryption LED
8. Eject button4. Clean LED
4. Tape LED
5. Drive LED1. Cartridge door
6. Ready LED2. On/Off switch (external drives only)
7. Eject button3. Clean LED
About the LTO tape drive 29
Page 30

Loading a cartridge
1. Lift the cartridge door (4) and insert the cartridge into the slot in the front of the drive with
the arrow uppermost and facing the drive door(2).
Figure 27 Inserting a cartridge
2. Apply gentle pressure until the drive takes the cartridge and loads it. (See figure above.)
3. The Ready light (3) flashes green while the drive performs its load sequence. When the
cartridge is loaded, the Ready light shows steady green.
Unloading a cartridge
CAUTION: Never try to remove a cartridge before it is fully ejected.
2. Arrow indicates leading direction1. Label area
4. Cartridge door3. Ready light
30 Operating the tape drive
Page 31

1. Press the Eject button on the front panel.
Figure 28 Ejecting a cartridge
1. Eject button
2. The drive will complete its current task, rewind the tape to the beginning, and eject the
cartridge. The rewind process may take up to 10 minutes. The Ready light will flash to indicate
that the unload process is still in progress.
Removing power from the drive
To ensure reliable operation, do not remove power from the drive during read, write, fast-search,
load, and unload activities.
Removing power from the drive 31
Page 32

7 Use the correct media
For best performance, use Hewlett Packard Enterprise branded media. Order online at: http://
www.hpe.com/info/storagemedia.
Cartridges
Cleaning cartridges
The recommended cleaning cartridge is the HPE Ultrium universal cleaning cartridge, C7978A
(Orange). This cleaning cartridge is designed to work with any LTO Ultrium drive. It may be used
for up to 50 cleans.
NOTE: The earlier Ultrium Cleaning cartridge, C7979A (Blue), is supported only on LTO Ultrium
448 and Ultrium 232 tape drives (but not on LTO Ultrium 1760, Ultrium 3000 and Ultrium 6250
tape drives).
Do not use early, nonuniversal Ultrium cleaning cartridges from other manufacturers.
Data cartridges
LTO Ultrium tape drives use Ultrium tape cartridges. These are single-reel cartridges that match
your drive's format and are optimized for high capacity, throughput, and reliability. Compatible
media can be recognized by the Ultrium logo, which is the same as the logo on the front of your
drive. Do not use other format cartridges in your tape drive and do not use Ultrium cartridges in
other format tape drives.
For optimum performance always use a data cartridge that matches the specification of your
tape drive (see table below). A lower specification will have a lower transfer speed and may not
support write activities; a higher specification will not support read or write.
Hewlett Packard Enterprise recommends:
• LTO-6 Ultrium 6.25 TB RW and LTO-6 Ultrium 6.25 TB WORM cartridges for use with LTO-6
tape drives.
• LTO-5 Ultrium 3 TB RW and LTO-5 Ultrium 3 TB WORM tape cartridges for use with LTO-5
tape drives.
• LTO-4 Ultrium 1.6 TB RW and Ultrium 1.6 TB WORM tape cartridges for use with LTO-4
tape drives.
• LTO-3 Ultrium 800 GB RW and Ultrium 800 GB WORM tape cartridges for use with LTO-3
tape drives.
• LTO-2 Ultrium 400 GB RW tape cartridges for use with LTO-2 tape drives.
Table 2 Data cartridge compatibility
LTO tape
drive model
6250
3000
Ultrium 200
GB* data
cartridge
Ultrium 400
GB* data
cartridge
Ultrium 800
GB* data
cartridge
read onlynot supportednot supportedLTO-5 Ultrium
Ultrium 1.6
TB* data
cartridge
read onlynot supportednot supportednot supportedLTO-6 Ultrium
read/write and
write
many once/read
Ultrium 3 TB*
data cartridge
read/write and
write
many once/read
(C7975A) and
writeonce/read
Ultrium 6.25
TB** data
cartridge
read/write
(C7976A) and
writeonce/read
many
(C7976W)
not supportedread/write
32 Use the correct media
Page 33

Table 2 Data cartridge compatibility (continued)
LTO tape
drive model
1760
920
448
* Capacity assumes 2:1 compression.
** Capacity assumes 2.5:1 compression.
Ultrium 200
GB* data
cartridge
read/writeLTO-2 Ultrium
Ultrium 400
GB* data
cartridge
read onlynot supportedLTO-4 Ultrium
read/writeread onlyLTO-3 Ultrium
(C7972A)
Ultrium 800
GB* data
cartridge
read/write and
write once/read
many
(C7973A) and
write
once/read
many
(C7973W)
Ultrium 1.6
TB* data
cartridge
(C7974A) and
write
once/read
many
(C7974W)
Ultrium 3 TB*
data cartridge
many
(C7975W)
Ultrium 6.25
TB** data
cartridge
not supportednot supportedread/write
not supportednot supportednot supportedread/write
not supportednot supportednot supportednot supportedread/write
NOTE: The LTO-1 Ultrium 100 GB* data cartridge, C7970A, is also supported on LTO-2 Ultrium
448 tape drives. It is not supported on LTO-3 Ultrium 920, LTO-4 Ultrium 1760, LTO-5 Ultrium
3280, and LTO-6 Ultrium 6250 tape drives.
LTO Ultrium WORM data cartridges
The LTO Ultrium 6250, 3000, 1760 and 920 tape drive includes support for both rewritable and
Write-Once, Read-Many, WORM, data cartridges. WORM cartridges provide an enhanced level
of data security against accidental or malicious alteration of data on the tape cartridge. The
WORM data cartridge can be appended to maximize the full capacity of the tape cartridge, but
the user will be unable to erase or overwrite data on the cartridge. Any attempt to modify a WORM
cartridge to enable writing over existing data will result in the media becoming permanently write
protected. It should still be readable in a WORM drive, depending upon the severity of the
tampering, but no further appended backups will be possible.
WORM data cartridges are clearly identified by their distinctive, two-tone cartridge color. They
can only be used with LTO Ultrium tape drives that support the WORM feature.
To check whether your backup or archive software application supports WORM cartridges, refer
to the following website: http://www.hpe.com/storage/buracompatibility
For information on how your LTO Ultrium tape drive and WORM cartridge can help your business
meet Information Lifecycle Management and regulatory compliance requirements, refer to the
Hewlett Packard Enterprise Support Center at: http://www.hpe.com/support/hpesc
LTO-6 and LTO-5 Ultrium tape drives and partitioning
The LTO-6 Ultrium 6250 tape drive supports up to four tape partitions, when used with LTO-6
Ultrium 6.25 TB RW cartridges. The LTO-5 Ultrium 3000 tape drive supports two tape partitions,
when used with Ultrium 3 TB RW cartridges. Tape partitioning is not supported with WORM
cartridges or with earlier generations of cartridge. It is not supported on earlier-generation tape
drives. If you insert a partitioned tape into a tape drive that does not support partitioning, it will
be ejected.
LTO Ultrium WORM data cartridges 33
Page 34

To check for the latest information about support for partitioning and any required firmware
upgrades, go to http://www.hpe.com/support/downloads. Refer to your backup application
documentation for information about creating and using partitions on the tape drive.
LTO-6, LTO-5 and LTO-4 Ultrium tape drives and encryption
The LTO-6, LTO-5, and LTO-4 tape drives include hardware capable of performing data encryption
at full speed while writing data, and decrypting when reading.
Encryption is the process of changing data into a form that cannot be read until it is deciphered,
protecting the data from unauthorized access and use. LTO-6, LTO-5 and LTO-4 tape drives
use the strongest version of the industry-standard AES encrypting algorithm to protect your data.
To use this feature, you need:
• A backup application that supports hardware encryption
• LTO-6 Ultrium 6.25 TB media (C7976A or C7976W), LTO-5 Ultrium 3 TB media (C7975A
or C7975W) or LTO-4 Ultrium 1.6 TB media (C7974A or C7974W); no encryption will be
performed when writing earlier generations of tape
When should I use encryption?
Your company policy will determine when you to use encryption. For example, it may be mandatory
for company confidential and financial data, but not for personal data. Company policy will also
define how encryption keys should be generated and managed. Backup applications that support
encryption will generate a key for you or allow you to enter a key manually.
NOTE: Encryption with keys that are generated directly from passwords or passphrases may
be less secure than encryption using truly random keys. Your application should explain the
options and methods that are available. Refer to your application user documentation for more
information.
How do I enable encryption?
Hardware encryption is turned off by default and is switched on by settings in your backup
application, where you also generate and supply the encryption key. Your backup application
must support hardware encryption for this feature to work. The software supplied with the tape
drive provides this support. See the Data Agile BURA website at http://www.hpe.com/storage/
buracompatibility for an up-to-date list of other suitable backup software.
When will I be asked to enter the key?
Encryption is primarily designed to protect the media once it is offline and to prevent it being
accessed from another machine. You will be able to read and append the encrypted media
without being prompted for a key as long as it is being accessed by the machine and application
that first encrypted it.
There are two main instances when you will need to know the key:
• If you try to import the media to another machine or another instance of the backup application
• If you are recovering your system after a disaster
What happens if I do not remember the key?
If you are unable to supply the key when requested to do so, neither you nor Hewlett Packard
Enterprise Support will be able to access the encrypted data.
34 Use the correct media
Page 35

This guarantees the security of your data, but also means that you must be careful in the
management of the encryption key used to generate the tape.
WARNING! Keep a record or backup of your encryption keys and store them in a secure place
separate from the computer running the backup software.
Does encryption affect tape drive performance?
Hardware encryption can be used with or without compression and without speed or capacity
penalties.
Does the tape drive encrypt media in an earlier Ultrium format?
Encryption is supported only on LTO-6 Ultrium 6.25 TB media (C7976A or C7976W), LTO-5
Ultrium 3 TB media (C7975A or C7975W) and LTO-4 Ultrium 1.6 TB media (C7974A or C7974W).
Encrypted LTO Ultrium 6.25 TB, 3 TB, and 1.6 TB tapes can be read on any compatible Ultrium
tape drive that supports hardware encryption.
• LTO-6 Ultrium tape drives can read and write encrypted LTO-6 Ultrium 6.25 TB media and
Ultrium 3 TB media; they can read Ultrium 1.6 TB media.
• LTO-5 Ultrium tape drives can read and write encrypted LTO-5 Ultrium 3 TB media and
Ultrium 1.6 TB media.
• LTO-4 Ultrium tape drives can read and write encrypted LTO-4 Ultrium 1.6 TB media.
Hardware encryption is not supported on any earlier Ultrium media, such as LTO-3 Ultrium 800
GB and LTO-2 Ultrium 400 GB.
Where can I get more information?
For more information about AES encryption, encryption keys, and using hardware encryption
with your LTO Ultrium tape drive, see the White Papers on http://www.hpe.com/info/enterprise/
docs.
For detailed instructions about enabling encryption, refer to the documentation supplied with your
backup application. This documentation will also highlight any default states, for example when
copying tapes, that may need changing if using encrypted tapes.
Write protecting cartridges
WARNING! Always remove the cartridge from the tape drive before you change the write
protection.
If you want to protect the data on a cartridge from being altered or overwritten, you can write
protect the cartridge.
• To write protect a cartridge, push the switch to the right to prevent any data recording on
the cartridge. Note the padlock on the tab that indicates that the cartridge is protected.
• To write enable a cartridge, push the switch to the left to allow data recording on the cartridge.
The following figure illustrates the location of the write-protect tab.
Write protecting cartridges 35
Page 36

Figure 29 Write protecting a cartridge
1. Write-protect tab (padlock indicates that cartridge is protected)
CAUTION: Write-protection will not protect your cartridges against magnets. Write-protection
will not prevent a cartridge being erased by bulk-erasure or degaussing. Do not bulk erase Ultrium
format cartridges. Doing so will destroy prerecorded servo information and make the cartridge
unusable.
Cleaning the tape drive
LTO Ultrium tape drives do not require regular cleaning. Only use an Ultrium universal cleaning
cartridge when the orange Clean LED is flashing.
Use the Ultrium Universal Cleaning cartridge (C7978A) with LTO Ultrium tape drives, as other
cleaning cartridges will not load and run.
To clean the tape drive:
1. Insert the Ultrium Universal Cleaning cartridge.
2. The drive will carry out its cleaning cycle and eject the cartridge on completion (which can
take up to 5 minutes). During the cleaning cycle, the orange Clean LED will be on solidly
and the green Ready LED will flash.
Each Ultrium universal cleaning cartridge (C7978A) can be used up to 50 times with LTO
Ultrium tape drives. If the cleaning cartridge is ejected immediately with the Tape LED on,
it has expired.
Handling cartridges
• Do not open the cartridge door and touch the tape media.
• Keep the cartridge in the case provided.
• Store and transport cartridges in their case in the vertical orientation.
• Follow the temperature, humidity, and acclimatization guidelines on the cartridge packaging.
36 Use the correct media
Page 37

• Avoid dropping the cartridge as this could cause it to be damaged.
• Do not exceed the normal cartridge life.
• Do not leave cartridges loaded in the drive, particularly if the drive is to be moved.
• Do not leave cartridges in direct sunlight or in places where magnetic fields are present (for
example, under telephones, next to monitors or near transformers).
• Apply labels in the label area only.
• Do not bulk erase (or degauss) Ultrium format cartridges because this will render them
unusable.
Operating and storage environment
To prevent condensation and for long life, the cartridge should only be operated or stored as
follows:
• Operation: 10° C to 40° C (50° F to 104° F)
• Day-to-day storage (in plastic container): 16° C to 32° C (60° F to 90° F)
• Noncondensing relative humidity: 20% to 80% (operating), 20% to 80% (nonoperating)
• Wet bulb temperature should not exceed 26° C (79° F)
Tapes intended for long-term storage should be stored in the plastic containers, at temperatures
between 5° C and 23° C (41° F and 73° F) and 20% to 50% relative humidity.
Operating and storage environment 37
Page 38

8 Diagnostic Tools and SMART components
Library & Tape Tools (L&TT) with integrated TapeAssure monitoring
L&TT is the recommended diagnostic and support tool for Hewlett Packard Enterprise tape
storage products. It is supported on all major operating systems and is available as a free
download from the L&TT web site:
http://www.hpe.com/support/tapetools
L&TT version 5.0 onwards offers integrated TapeAssure monitoring for Windows users so it is
recommended that you preinstall L&TT when you first install your tape drive and use it to monitor
your drive from the first backup. You can also find out your backup performance and drive and
tape utilization using TapeAssure.
TIP: Should you need to contact Hewlett Packard Enterprise Support at any time, the support
engineer will ask that you update the drive firmware and run diagnostics using L&TT. It is not
always convenient to install L&TT at the time of a support call and it is important that you are
able to update firmware and run diagnostics when asked. Preinstalling L&TT will speed up the
call significantly. It is also useful to the support engineer, if there is a lifetime of monitoring data
available.
Non-Windows users will need to use the latest 4.x version until 5.x supports their operating
system. Look for updates from the website. Even though 4.x versions do not include TapeAssure
monitoring it is still a good idea to have L&TT preinstalled on your server should you need to
contact Hewlett Packard Enterprise Support.
Main features available with Library & Tape Tools
Once you have installed L&TT, you will be able to choose from the following features:
• Device identification: shows part number, serial number, and information about any cartridge
loaded.
• Firmware upgrade: allows you to locate and upgrade to the latest firmware. You will need
to be connected to the Internet to locate and upgrade firmware.
• Run tests: allows you to run proactive tests on your drive, such as the drive assessment
test, which will verify the functionality of your drive in around 20 minutes. Hewlett Packard
Enterprise recommends running this test before calling Hewlett Packard Enterprise Support.
You will need to provide a ‘trusted' cartridge that can be written to during this test.
• Generate a support ticket: this is a full dump of the drive logs along with interpretation and
is used by Hewlett Packard Enterprise Support to learn about the condition of your drive.
Most useful is the device analysis section which is the output from approximately 140 rules
forming a comprehensive analysis of the health of your drive. These rules may give advice
such as cleaning the drive or trying a different tape if issues are found. The support ticket
can be sent to Hewlett Packard Enterprise Support for further analysis.
• Run the performance tests: these tests allow you to verify the performance of your tape drive
and measure the data rate of your source data independent of the backup application. They
are useful for finding the bottleneck in your system if you are not getting the expected backup
(or restore) performance.
• TapeAssure health monitoring (Windows only from 5.0 onwards): look out for any concerns
from your backups using the red/yellow/green indicators on the screen. The yellow indicator
38 Diagnostic Tools and SMART components
Page 39

is used when there is still margin available so often gives you a chance to react before
backups start failing.
• TapeAssure performance and utilization information (Windows only from 5.0 onwards): use
this information to find out if you are making the most of your backup system or to measure
the effect of any configuration changes you make.
Full details on how to use L&TT are available from the L&TT user guide available from the website
or from the help button in the Windows version.
HPE SMART components
Tape Smart Components provide easy to use driver and firmware updates. They are available
as free downloads from:
http://www.hpe.com/support/hpesc
• HPE Storage Tape Drivers for Microsoft Windows
This utility will automatically install the SCSI, SAS, Fibre Channel, and USB drivers for
Hewlett Packard Enterprise Ultrium and DAT tape drives, tape autoloaders, and tape libraries
for systems running Microsoft Windows.
• HPE Storage Tape Firmware for Microsoft Windows
This utility will automatically upgrade the SCSI, SAS, and USB firmware for Hewlett Packard
Enterprise Ultrium and DAT tape drives for systems running Microsoft Windows.
• HPE Storage Tape Firmware for Linux
This utility will automatically upgrade the SCSI, SAS, and USB firmware for Hewlett Packard
Enterprise Ultrium and DAT tape drives for systems running RedHat Enterprise Linux and
Novell SuSe Linux Enterprise Server.
HPE SMART components 39
Page 40

9 Troubleshooting
NOTE: Many users can use Library & Tape Tools and TapeAssure to help diagnose problems,
see Diagnostic Tools and Performance (page 38). We also recommend the detailed
troubleshooting guide at http://www.hpe.com/support/hpesc for comprehensive troubleshooting
information.
General Procedure
If a problem occurs, the first step is to try to establish whether the problem lies with the cartridge,
the drive, the host computer and connections, or the way the system is being operated.
Has the system just been installed?
There could be an installation problem:
1. Check through the information in the relevant installation chapter of this guide.
2. Has the system booted? If not, check that all hard disks are correctly seated in the hard disk
bay and then check the cabling between the disks and the SAS controller.
3. Does an error appear during the boot sequence about a change to the RAID configuration?
This error only appears if you have used the supplied cable to replace an existing SAS cable.
Check the cabling between the disks and the SAS controller. If the problem persists, you
have probably disconnected a hard disk drive bay that was in use. See Option 3: Connect
cable to port on host SAS controller and replace existing SAS cable (page 21) for more
information.
4. Has the system booted but the operating system has not seen the tape drive? Check that
the drive has power, the READY light should be illuminated. If it is not, check that the power
cord is connected correctly to the tape drive. If READY is illuminated, check the cabling
between the tape drive and the SAS controller. Ensure that the HBA port to which the drive
is connected is enabled. If an external drive was powered on after the server, power cycle
the server.
5. Are appropriate Tape drivers and HBA drivers as well as supported application software
installed on the host?
6. Check the environmental conditions against the specified limits.
Table 3 Environmental specifications for LTO Ultrium tape drives
Operating
Are you using new cartridges or a different brand of cartridge? Have you been using the
particular cartridge for a very long time?
The problem could lie with the cartridge:
1. Check through the media information in Use the correct media (page 32).
2. Check that you are using an Ultrium cartridge. Compatible media can be recognized by the
Ultrium logo, which is the same as the logo on the front of your drive.
3. Use the correct media type:
• LTO-6 Ultrium 6.25 TB RW and LTO-6 Ultrium 6.25 TB WORM cartridges for use with
• LTO-5 Ultrium 3 TB RW and LTO-5 Ultrium 3 TB WORM tape cartridges for use with
40 Troubleshooting
Noncondensing humidity rangeTemperature range
20% to 80% RH (noncondensing)50° to 95° F (10° to 40° C) at a minimum of 6
CFM airflow
10% to 95% RH (noncondensing)-40° to 151° F (-40° to 66° C)Storage
LTO-6 tape drives.
LTO-5 tape drives.
Page 41

• LTO-4 Ultrium 1.6 TB RW* and Ultrium 1.6 TB WORM tape cartridges for use with
LTO-4 tape drives.
• LTO-3 Ultrium 800 GB RW and Ultrium 800 GB WORM tape cartridges for use with
LTO-3 tape drives.
• LTO-2 Ultrium 400 GB RW tape cartridges for use with LTO-2 tape drives.
4. Has the cartridge been write-protected, see Write protecting cartridges (page 35)?
5. Clean the tape heads with the cleaning cartridge, see Cleaning cartridges (page 32). Make
sure that you are using the Ultrium Universal cleaning cartridge, C7978A.
6. If the Tape LED is flashing, the cartridge is probably faulty. Try using a different cartridge.
7. Try the operation again.
8. If the problem still occurs and you have not yet replaced the cartridge, try using a different
cartridge.
9. If the problem is still there, the problem probably lies with the drive or the host computer.
Has the drive been moved recently? Have any cables been disconnected and reconnected?
Has the environment changed—unusually hot, cold, damp, or dry? Has there been dust
or dirt near the drive. Have reasonable precautions against static been taken?
The problem could lie with the drive:
1. Check the cables and connectors.
2. Clean the tape heads with the cleaning cartridge.
3. If the problem persists, check the environmental conditions against the specified limits, see
table above, or refer to http://www.hpe.com/support/hpesc. Perhaps move the drive to a
more suitable site.
Has a new operating system been installed in the host computer? Has new backup software
been installed?
The problem could lie with the host or the software. Consult the computer's operating manuals,
the software manual, or seek help from a service engineer.
Understanding LED sequences
Figure 30 Front view of HPE LTO-6 external tape drive
5. Tape LED1. Cartridge door
6. Drive LED2. On/Off switch (external drives only)
7. Ready LED3. Encryption LED (LTO-6 and LTO-5 only)
8. Eject button4. Clean LED
Understanding LED sequences 41
Page 42

The LED sequences in the following table relate to the Clean, Tape, Drive, and Ready LEDs.
The LTO-6 Ultrium 6250 and LTO-5 Ultrium 3000 tape drive also has an Encryption LED that
describes encryption status. This is described separately in Encryption LED (page 43). The
meaning of different patterns of LEDs, without encryption enabled, is as follows:
Table 4 Clean, Tape, Drive, and Ready LED sequences
Action requiredCauseLED Sequence
All LEDs OFF.
Ready and Clean OFF. Drive
and Tape FLASH.
Ready is ON.
Ready FLASHES.
Drive may not have power, may
be faulty, or may have been
power cycled or reset during a
firmware upgrade.
power-on self test (POST).
normal activity (read, write).
Make sure that the drive is switched on. The
power on/off switch on an external drive
incorporates a green LED.
Check the power cord connection and replace
the cable if necessary. On external drives, you
can use the power cord from your monitor or
another device to check that the connection is
working.
If the power supply is present and all LEDs remain
off, power cycle or reset the drive. If it still fails,
call for service.
Power cycle or reset the drive.The drive has failed to execute
If the error condition reappears, call for service.
None. This is normal.The drive is ready for operation.
None.The drive is carrying out a
If the drive is upgrading firmware, do not reset or
power cycle it.
Ready FLASHES fast.
Ready is OFF, others are ON.
Clean FLASHES.
Ready FLASHES and Clean is
ON.
Tape FLASHES.
None.The drive is downloading
firmware.
reprogrammed.
The drive requires cleaning.
Cleaning is in progress.
The drive believes the current
tape or the tape just ejected is
faulty. data cartridge or Ultrium Universal Cleaning
Do not reset or power cycle the drive.
None.Firmware is being
Do not reset or power cycle the drive.
Load the Ultrium cleaning cartridge. See Cleaning
cartridges (page 32) for supported cartridges and
instructions.
If the Clean LED is still flashing when you load a
new or known good data cartridge after cleaning,
call for service.
None. The cleaning cartridge will eject on
completion.
The cleaning cycle can take up to 5 minutes to
complete.
Unload the tape cartridge. Make sure that you
are using the correct format cartridge; an Ultrium
Cartridge. (See Use the correct media (page 32).)
42 Troubleshooting
Page 43

Table 4 Clean, Tape, Drive, and Ready LED sequences (continued)
Action requiredCauseLED Sequence
Reload the cartridge. If the Tape LED still flashes
or starts flashing during the next backup, load a
new or known good cartridge.
If the Tape LED is now off, discard the 'suspect'
tape cartridge. If it is still on, call for service.
The tape is ejected immediately
and Tape FLASHES, or Drive
FLASHES on unloading tape.
Drive FLASHES.
Drive, Tape, and Ready
FLASH.
Drive and Ready ON with Tape
and Clean OFF. Alternates
repeatedly.
The tape cartridge memory (CM)
may be faulty.
The drive mechanism has
detected an error.
There is a firmware download
problem.
Write protect the cartridge by sliding the switch
on the tape cartridge, see Write protecting
cartridges (page 35). The tape can be loaded and
the data read. Once the data is recovered, the
cartridge must be discarded.
Load a new cartridge. If the error persists, power
cycle or reset the drive.
If the Drive LED remains on, call for service.
Insert a cartridge to clear the LED sequence. If
the condition persists, call for service.
Power cycle or reset the drive.The drive has a firmware error.
Upgrade the firmware. If the condition persists,
call for service.
Encryption LED(HPE LTO-6 and LTO-5 models only)
The encryption LED may be blue or amber, as described in the following table. The state of the
other LEDs depends upon the activity, as described below.
Table 5 Encryption LED, LTO-6 Ultrium 6250 and LTO-5 Ultrium 3000 tape drives
StateEncryption LED (Blue or Amber)
At power onOn
The drive is idle and there is no encryption key.Off
The tape drive is reading/writing unencrypted data or unloading a cartridge.Off with Ready flashing green
On (solid blue)
green
Alternate flashing, blue and amber
The drive is idle but the encryption key is loaded. The drive is ready to
read/write encrypted data.
The drive is reading/writing encrypted data.On (solid blue) with Ready flashing
There is an encryption-related error. This is cleared after unload executes or
successful encryption/decryption resumes. See also Encryption
troubleshooting (page 46).
Understanding LED sequences 43
Page 44

NOTE: The Encryption LED only functions if you are using backup software that supports
hardware encryption and this feature is enabled in the backup application. See http://
www.hpe.com/storage/buracompatibility for backup application compatibility.
Problems with cartridges
If you experience any problems using Hewlett Packard Enterprise branded cartridges, check:
• The cartridge case is intact and that it contains no splits, cracks, or damage.
• The cartridge has been stored at the correct temperature and humidity. This prevents
condensation. See the insert included with the tape cartridge for storage conditions.
• The write-protect switch is fully operational. It should move from side to side with a positive
click.
• The World Wide Web site for more detailed troubleshooting information: http://www.hpe.com/
support/hpesc.
The cartridge is jammed
If the cartridge is jammed or the backup application is unable to eject it, you can force eject the
cartridge. Once the cartridge is successfully ejected, it is good practice to run Library & Tape
Tools to diagnose the problem and to upgrade the firmware. If the failure occurs regularly, contact
customer service at http://www.hpe.com/support/hpesc.
1. Attempt a drive unload/eject operation from the backup software.
Many backup applications will issue a Prevent Media Removal (PMR) command to the
drive robot in an attempt to prevent human interference during a backup job. If this occurs,
the software that issued the PMR must be used to load and unload tapes.
2. Shut down backup software and, if in a Windows environment, stop removable storage
services.
3. Press the Eject button on the front of the tape drive.
Sometimes it is necessary to use the Eject button instead of software to unload a tape
because software can lose communication with the product or a rogue application can
prevent the software from unloading the tape.
IMPORTANT: This can take several minutes in many cases. Ensure that drive activity
has stopped before continuing on (waiting 10 minutes is usually enough). It is important that
you allow sufficient time for the drive to complete rewinding the cartridge. If you interrupt it,
you may damage the media or the tape drive.
4. Run the Library and Tape Tools (L&TT) Stuck Tape test.
Run L&TT (http://www.hpe.com/support/tapetools) on a host connected to the product,
select the drive, select the tests, and run the Stuck Tape test.
• This test can overcome many nonphysical causes of a stuck tape.
• Follow the instructions in L&TT. It may take several minutes and may not appear to be
doing anything. Allow the test to complete on its own.
• Check the results when the test is complete for additional information and suggestions.
NOTE: While L&TT is running, it is good practice to obtain a Support Ticket to capture all
the logs in case they are needed by Hewlett Packard Enterprise Support.
44 Troubleshooting
Page 45

5. If the cartridge could be ejected before this step, there is no problem with the drive or media
and the following steps are not required. If it could not be ejected using the steps above,
there may be a problem with the cartridge or drive.
Power down the drive.
6. Disconnect the data cable.
7. After at least 15 seconds, power the drive back up and wait until the drive is idle/ready.
CAUTION: Use care when disconnecting data cables to ensure that connectors are not
reversed, pins are not bent, and so on.
IMPORTANT: Powering up with a cartridge in the drive can take several minutes. It is
important that you allow sufficient time for the drive to complete rewinding the cartridge. If
you interrupt it, you may damage the media or the tape drive.
8. Ensure that drive activity has stopped (waiting 10 minutes after power up is usually long
enough). Push the Eject button.
This step attempts to overcome unload issues due to the drive being in an abnormal state
or because Prevent Media Removal has been incorrectly left on after being set by a rogue
application.
9. Initiate a force eject or emergency unload operation by pressing and holding the Eject button
for 15 seconds. This step causes the drive to try everything possible to unload the tape.
CAUTION: You may lose data if you force eject a cartridge that is in the middle of a backup.
The tape may also become unreadable because an EOD (End of Data) mark may not be
properly written.
10. If the cartridge is still jammed, the tape drive has failed. Contact customer support at http://
www.hpe.com/support.
Once the cartridge is successfully ejected, it is good practice to run Library & Tape Tools to
diagnose the problem and upgrade the firmware. If the failure occurs regularly on multiple
cartridges, contact customer support at http://www.hpe.com/support.
The drive will not accept the cartridge (or ejects it immediately)
The cartridge may have been damaged, for example dropped, or the drive may have a fault. If
it is a cleaning cartridge, it has probably expired and should be discarded immediately. For data
cartridges:
1. Check that the drive has power (the power cord is properly connected and the Ready LED
is on).
2. Check that you are using the correct media. Use only Ultrium media.
Table 6 Data cartridge compatibility
LTO tape
drive model
Ultrium 200
GB* data
cartridge
Ultrium 400
GB* data
cartridge
Ultrium 800
GB* data
cartridge
Ultrium 1.6
TB* data
cartridge
Ultrium 3
TB* data
cartridge
Ultrium 6.25
TB** data
cartridge
Ultrium 6250
Ultrium 3000
read onlynot supportednot supportednot supportedLTO-6
read onlynot supportednot supportedLTO-5
read/write
and write
read/write
and write
many once/read
(C7975A)
and write
Problems with cartridges 45
read/write
(C7976A) and
writeonce/read
many
(C7976W)
not supportedread/write
Page 46

Table 6 Data cartridge compatibility (continued)
LTO tape
drive model
Ultrium 1760
Ultrium 920
Ultrium 448
* Capacity assumes 2:1 compression.
** Capacity assumes 2.5:1 compression.
Ultrium 200
GB* data
cartridge
read/writeLTO-2
Ultrium 400
GB* data
cartridge
read onlynot supportedLTO-4
read/writeread onlyLTO-3
(C7972A)
Ultrium 800
GB* data
cartridge
read/write and
write
many once/read
(C7973A) and
write
once/read
many
(C7973W)
Ultrium 1.6
TB* data
cartridge
once/read
many
(C7974A)
and writeonce/read
many
(C7974W)
Ultrium 3
TB* data
cartridge
once/read
many
(C7975W)
Ultrium 6.25
TB** data
cartridge
not supportednot supportedread/write
not supportednot supportednot supportedread/write
not supportednot supportednot supportednot supportedread/write
NOTE: The LTO-1 100 GB* data cartridge, C7970A, is also supported on LTO-2 Ultrium
448 tape drives. It is not supported on any other LTO Ultrium tape drives.
3. Make sure that you have loaded the cartridge with the correct orientation (see Inserting a
cartridge (page 30)).
4. Check for damage to your media and discard it, if it is damaged.
5. Use a new or known, good piece of media and see if it loads. If it does, the original cartridge
is faulty and should be discarded.
6. Check if another LTO Ultrium drive of the same model will accept the cartridge. If it does,
the original drive may be faulty. Before calling customer service, check that the tape drive
is responding. See Troubleshooting with Library & Tape Tools (page 38).
Encryption troubleshooting
• Ensure that you are using an LTO-6, LTO-5, or LTO-4 tape drive and LTO Ultrium 6.25 TB,
3 TB, or 1.6 TB media, respectively.
• Ensure that your software supports hardware encryption. It may be necessary to update the
software. Consult http://www.hpe.com/storage/buracompatibility or your software vendor
for more information.
• Ensure that the correct key or pass phrase has been entered.
• Ensure that your HBA supports the encryption commands. It may be necessary to update
the firmware. Consult http://www.hpe.com/storage/buracompatibility for more information.
46 Troubleshooting
Page 47

10 Replacing a tape drive
If your tape drive proves to be faulty and cannot be repaired and it is still covered by the original
warranty, it will be replaced. Hewlett Packard Enterprise will provide a replacement tape drive
free of charge. Based on availability and where geography permits, the replacement tape drive
will be shipped for next business day delivery. Same day or four-hour delivery may be offered
at an additional charge where geography permits. If you request Hewlett Packard Enterprise to
install the replacement tape drive, you will be charged for the travel and labor costs of this service.
See the complete Hewlett Packard Enterprise limited warranty statement at: http://www.hpe.com/
info/storagewarranty
To disconnect your drive
1. Unpack your replacement drive, and retain the packaging.
2. Power off the server and disconnect from the mains power supply.
3. Internal drives only: Remove the cover from the server. Observing normal anti-static
precautions remove any screws that are holding the tape drive in place.
4. Disconnect the drive's power and SAS cables. Slide internal drives carefully out of the
mounting bay.
5. Put the drive into the packaging that contained the replacement drive.
6. Return the faulty drive to your local Hewlett Packard Enterprise Service Center. Instructions
on where to return faulty drives will be shipped with the replacement drive. Ship the defective
drive back to Hewlett Packard Enterprise within a defined period of time, normally five (5)
business days. The defective part must be returned with the associated documentation in
the provided shipping material. Failure to return the defective part may result in Hewlett
Packard Enterprise billing you for the replacement. Hewlett Packard Enterprise will pay all
shipping and part return costs and determine the courier/carrier to be used.
NOTE: If you are not replacing an internal tape drive immediately, you should insert a blanking
plate into the empty bay. Replace the cover on the server and secure with screws, as appropriate.
To reconnect your tape drive
Follow the step-by-step instructions in this User Guide.
To disconnect your drive 47
Page 48

11 Support and other resources
Accessing Hewlett Packard Enterprise Support
• For live assistance, go to the Contact Hewlett Packard Enterprise Worldwide website:
www.hpe.com/assistance
• To access documentation and support services, go to the Hewlett Packard Enterprise Support
Center website:
www.hpe.com/support/hpesc
Information to collect
• Technical support registration number (if applicable)
• Product name, model or version, and serial number
• Operating system name and version
• Firmware version
• Error messages
• Product-specific reports and logs
• Add-on products or components
• Third-party products or components
Accessing updates
• Some software products provide a mechanism for accessing software updates through the
product interface. Review your product documentation to identify the recommended software
update method.
• To download product updates, go to either of the following:
Hewlett Packard Enterprise Support Center Get connected with updates page:
◦
www.hpe.com/support/e-updates
◦ Software Depot website:
www.hpe.com/support/softwaredepot
• To view and update your entitlements, and to link your contracts and warranties with your
profile, go to the Hewlett Packard Enterprise Support Center More Information on Access
to Support Materials page:
www.hpe.com/support/AccessToSupportMaterials
IMPORTANT: Access to some updates might require product entitlement when accessed
through the Hewlett Packard Enterprise Support Center. You must have an HP Passport
set up with relevant entitlements.
48 Support and other resources
Page 49

Related information
The following documents provide related information:
• ‘Start here' poster for an overview of the installation information in this guide (available in
English, French, German, and Japanese)
• UNIX, Linux, and VMS Configuration Guide for configuration information on non-Windows
systems (available in English only)
You can find these documents on the Manuals page of the Hewlett Packard Enterprise Support
Center website:
http://www.hpe.com/support/hpesc
Product documentation is available in the Storage section of the Hewlett Packard Enterprise
Information Library.
http://www.hpe.com/info/storage/docs
To find documents for this product:
1. In the Products and Solutions pane, select StoreEver Tape, the types of documents and
your language.
2. In the StoreEver Tape pane, select StoreEver LTO Ultrium Tape Drives.
Rack stability
Rack stability protects personnel and equipment.
WARNING! To reduce the risk of personal injury or damage to equipment:
• Extend leveling jacks to the floor.
• Ensure that the full weight of the rack rests on the leveling jacks.
• Install stabilizing feet on the rack.
• In multiple-rack installations, fasten racks together securely.
• Extend only one rack component at a time. Racks can become unstable if more than one
Websites
component is extended.
LinkWebsite
www.hpe.com/info/enterprise/docsHewlett Packard Enterprise Information Library
www.hpe.com/support/hpescHewlett Packard Enterprise Support Center
www.hpe.com/assistanceContact Hewlett Packard Enterprise Worldwide
www.hpe.com/support/e-updatesSubscription Service/Support Alerts
www.hpe.com/support/softwaredepotSoftware Depot
www.hpe.com/support/selfrepairCustomer Self Repair
compatibility matrix
www.hpe.com/info/insightremotesupport/docsInsight Remote Support
www.hpe.com/info/hpux-serviceguard-docsServiceguard Solutions for HP-UX
www.hpe.com/storage/spockSingle Point of Connectivity Knowledge (SPOCK) Storage
www.hpe.com/storage/whitepapersStorage white papers and analyst reports
Related information 49
Page 50

Customer self repair
Hewlett Packard Enterprise customer self repair (CSR) programs allow you to repair your product.
If a CSR part needs to be replaced, it will be shipped directly to you so that you can install it at
your convenience. Some parts do not qualify for CSR. Your Hewlett Packard Enterprise authorized
service provider will determine whether a repair can be accomplished by CSR.
For more information about CSR, contact your local service provider or go to the CSR website:
www.hpe.com/support/selfrepair
Registering your tape drive
Once you have installed and tested your LTO Ultrium tape drive, please take a few minutes to
register your product.
1. Navigate to the Hewlett Packard Enterprise support website: http://www.hpe.com/support
2. Select HPE Servers, Storage and Networking.
3. Select Manage my contracts & warranties.
4. Follow the directions on the website to create an account or sign in using HP Passport, and
then register the tape drive.
To ensure that your registration is complete, there are a number of questions on the electronic
form that are mandatory. Other questions are optional. However, the more you feel able to
complete, the better Hewlett Packard Enterprise can meet your needs.
Remote support
Remote support is available with supported devices as part of your warranty or contractual support
agreement. It provides intelligent event diagnosis, and automatic, secure submission of hardware
event notifications to Hewlett Packard Enterprise, which will initiate a fast and accurate resolution
based on your product’s service level. Hewlett Packard Enterprise strongly recommends that
you register your device for remote support.
For more information and device support details, go to the following website:
www.hpe.com/info/insightremotesupport/docs
Documentation feedback
Hewlett Packard Enterprise is committed to providing documentation that meets your needs. To
help us improve the documentation, send any errors, suggestions, or comments to Documentation
Feedback (docsfeedback@hpe.com). When submitting your feedback, include the document
title, part number, edition, and publication date located on the front cover of the document. For
online help content, include the product name, product version, help edition, and publication date
located on the legal notices page.
50 Support and other resources
Page 51

A Warranty and regulatory information
For important safety, environmental, and regulatory information, see Safety and Compliance
Information for Server, Storage, Power, Networking, and Rack Products, available at
www.hpe.com/support/Safety-Compliance-EnterpriseProducts.
Warranty information
HPE ProLiant and x86 Servers and Options
www.hpe.com/support/ProLiantServers-Warranties
HPE Enterprise Servers
www.hpe.com/support/EnterpriseServers-Warranties
HPE Storage Products
www.hpe.com/support/Storage-Warranties
HPE Networking Products
www.hpe.com/support/Networking-Warranties
Regulatory information
Belarus Kazakhstan Russia marking
Manufacturer and Local Representative Information
Manufacturer information:
• Hewlett Packard Enterprise Company, 3000 Hanover Street, Palo Alto, CA 94304 U.S.
Local representative information Russian:
• Russia:
• Belarus:
• Kazakhstan:
Warranty information 51
Page 52

Local representative information Kazakh:
• Russia:
• Belarus:
• Kazakhstan:
Manufacturing date:
The manufacturing date is defined by the serial number.
CCSYWWZZZZ (serial number format for this product)
Valid date formats include:
• YWW, where Y indicates the year counting from within each new decade, with 2000 as the
starting point; for example, 238: 2 for 2002 and 38 for the week of September 9. In addition,
2010 is indicated by 0, 2011 by 1, 2012 by 2, 2013 by 3, and so forth.
• YYWW, where YY indicates the year, using a base year of 2000; for example, 0238: 02 for
2002 and 38 for the week of September 9.
Turkey RoHS material content declaration
Ukraine RoHS material content declaration
52 Warranty and regulatory information
Page 53

Index
A
accessing
updates, 48
B
backup software
drivers, 9
encryption, 10
supported, 10
backup software problems, 41
Belarus Kazakhstan Russia EAC marking, 51
buttons
Unload, 31
C
cables, 6
cabling options
connect external drive to external SAS port, 26
connect to new HBA, 16
connect to spare SAS port on host HBA, 19
external drives to external SAS port, 26
internal drive, 11, 15
replace cable to SAS port , 21
cartridges
cleaning, 32, 36
data, 32
encryption, 34
handling, 36
inserting, 30
jammed, 44
loading, 30
not accepted, 45
operating and storage environment, 37
power off, 31
problems, 40
removing, 31
write once, read many, 33
write protecting, 35
cleaning cartridges, 32, 36
compatibility
backup software, 10
connect external drive to external SAS port, 26
connect external drive to new HBA
external SAS port, 26
connect to existing HBA
recable SAS port, 21
spare SAS port, 19
connect to new HBA, 16
connecting SAS cables
internal drive, 11, 15
connectivity, 6
operating systems, 5
contacting Hewlett Packard Enterprise, 48
customer self repair, 50
D
data cartridges, 32
diagnostic tools
L&TT, 38
document
related information, 49
documentation
Hewlett Packard Enterprise website, 49
providing feedback on, 50
drive
operating, 29, 30
drivers
backup software, 9
IA64, 9
installing, 9
UNIX, 9
windows, 9
E
EAC marking
Belarus Kazakhstan Russia, 51
encryption, 34
backup software, 10
encryption LED, 43
EuroAsian Economic Commission (EAC), 51
external drive
cabling to external SAS port, 26
F
front panel
drives, 29, 30
front view, 5, 29
H
handling cartridges, 36
host
problems, 41
I
IA64
drivers, 9
inserting cartridges, 30
installation
prepare mounting bay, 12
problems, 40
verifying, 28
installing
drivers, 9
internal drive, 11
installing external
reboot server, 27
installing internal
attach mounting hardware, 13
install drive, 14
prepare mounting bay, 13
reboot server, 25
53
Page 54

secure drive, 23
internal drive
cabling to new HBA, 16
cabling to spare SAS port, 19
installing, 11
mounting requirements, 12
replace cabling to SAS port, 21
replacing, 47
troubleshooting
cartridge ejected, 45
jammed cartridge, 44
L&TT, 38
LEDs, 41
Turkey RoHS material content declaration, 52
J
jammed cartridge, 44
L
L&TT, 38
LEDs, 41
at power-on, 28
encryption, 43
loading cartridges, 30
LTO tape drives
models supported, 5
M
media see cartridges
models supported, 5
mounting bay, 12
mounting requirements, 12
mounting screws
warranty , 14
O
operating systems, 5
operation
drives, 29, 30
P
partitioning, 33
power off, 31
power on button, 29
power specifications, 5
R
rack stability
warning, 49
registration, 50
regulatory information, 51
Turkey RoHS material content declaration, 52
Ukraine RoHS material content declaration, 52
related documentation, 49
remote support, 50
replacing tape drive, 47
U
Ukraine RoHS material content declaration, 52
Ultrium tape drive
front view, 5, 29
LEDs, 41
loading, 30
models supported, 5
powering off, 31
UNIX
drivers, 9
Unload button, 31
updates
accessing, 48
V
verify installation, 28
W
warning
rack stability, 49
warranty
mounting screws, 14
warranty information, 51
HPE Enterprise servers, 51
HPE Networking products, 51
HPE ProLiant and x86 Servers and Options, 51
HPE Storage products, 51
websites, 49
customer self repair, 50
product manuals, 49
Windows
drivers, 9
WORM cartridges, 33
write protect, 35
S
SCSI
guidelines, 6
support
Hewlett Packard Enterprise, 48
supported models, 5
T
tape drive
54 Index
 Loading...