

Page 1

HP StorageWorks XP
Provisioning Manager
User Guide
Part number: T1783-96002
First edition: November, 2005
About this guide 1
Page 2

Legal and notice information
© Copyright 2005 Hewlett-Packard Development Company, L.P.
Hewlett-Packard Company makes no warranty of any kind with regard to this material, including, but not limited to, the implied warranties
of merchantability and fitness for a particular purpose. Hewlett-Packard shall not be liable for errors contained herein or for incidental or
consequential damages in connection with the furnishing, performance, or use of this material.
This document contains proprietary information, which is protected by copyright. No part of this document may be photocopied,
reproduced, or translated into another language without the prior written consent of Hewlett-Packard. The information is provided “as is”
without warranty of any kind and is subject to change without notice. The only warranties for HP products and services are set forth in the
express warranty statements accompanying such products and services. Nothing herein should be construed as constituting an
additional warranty. HP shall not be liable for technical or editorial errors or omissions contained herein.
®
is a registered trademark of the International Business Machines Corp. in the U.S.
AIX
HACMP/6000 is a trademark of the International Business Machines Corp. in the U.S.
Java and all Java-based trademarks and logos are trademarks or registered trademarks of Sun Microsystems, Inc. in the United States
and other countries.
Linux is a registered trademark of Linus Torvalds.
Microsoft is a registered trademark of Microsoft Corp. in the U.S. and other countries.
Microsoft Internet Explorer is a product name of Microsoft Corp.
Mozilla is a trademark of the Mozilla Foundation in the U.S. and other countries.
Netscape is a registered trademark of Netscape Communications Corporation in the United States and other countries.
Netscape Navigator is a registered trademark of Netscape Communications Corporation in the United States and other countries.
Solaris™ is a trademark or registered trademark of Sun Microsystems, Inc. in the United States and other countries.
All SPARC trademarks are used under license and are trademarks or registered trademarks of SPARC International, Inc., in the United
States and other countries. Products bearing SPARC trademarks are based upon an architecture developed by Sun Microsystems, Inc.
Sun is a trademark or registered trademark of Sun Microsystems, Inc. in the United States and other countries.
Sun Microsystems is a trademark or registered trademark of Sun Microsystems, Inc. in the United States and other countries.
Sun StorEdge is a trademark or registered trademark of Sun Microsystems, Inc. in the United States and other countries.
UNIX is a registered trademark of The Open Group in the United States and other countries.
VERITAS is a trademark or registered trademark of Symantec Corporation in the U.S. and other countries.
®
Windows
is a registered trademark of Microsoft Corp. in the U.S. and other countries.
Windows Server™ is a registered trademark of Microsoft Corp. in the U.S. and other countries.
HP StorageWorks XP Provisioning Manager includes a part whose copyright is owned by Sun Microsystems, Inc.
HP StorageWorks XP Provisioning Manager includes a part whose copyright is owned by UNIX System Laboratories, Inc.
Other product and company names mentioned in this document may be the trademarks of their respective owners.
HP StorageWorks XP Provisioning Manager User Guide
2
Page 3

Contents
About this guide
Revision history
Revision tables ..................................................................................................................................................... 13
1 Overview of HP StorageWorks XP Provisioning Manager
1-1 The Provisioning Manager Mission ........................................................................................................... 14
1-1-1 Managing Various Storage Subsystems as a Storage Pool........................................................... 14
1-1-2 Managing Multiple Hosts from a Single Interface ........................................................................... 15
1-2 Provisioning Manager Components .......................................................................................................... 16
1-3 Programs Related to Provisioning Manager.............................................................................................. 17
1-4 Installing Provisioning Manager ................................................................................................................ 17
1-5 Operations That Can Be Performed With Provisioning Manager.............................................................. 18
1-6 Manipulating Storage Subsystems............................................................................................................ 19
1-6-1 When Data Assets Have Increased................................................................................................ 21
1-6-2 When the Unit for Managing Storage Pools Has Been Changed................................................... 21
1-7 Using Provisioning Manager with Other Products..................................................................................... 21
1-7-1 Using Provisioning Manager with HDLM ........................................................................................ 21
1-7-2 Using Provisioning Manager with Volume Managers ..................................................................... 23
1-7-3 About Single Sign-On Functionality................................................................................................ 26
2 Provisioning Manager Planning and Startup
2-1 Before Logging in to Provisioning Manager .............................................................................................. 27
2-2 Logging in to Provisioning Manager ..........................................................................................................28
2-3 Registering and Viewing License Information ........................................................................................... 30
2-4 Starting Provisioning Manager Operation ................................................................................................. 31
2-5 Using Provisioning Manager Windows...................................................................................................... 32
2-5-1 About the Menu-Bar Frame............................................................................................................ 33
2-5-2 About the Navigation Frame........................................................................................................... 33
2-5-3 About the Method Frame................................................................................................................ 35
2-5-4 About the Information Frame.......................................................................................................... 35
2-5-5 About Popup Dialog Boxes ............................................................................................................ 36
3 Using Provisioning Manager
3-1 Managing Storage Pools ...........................................................................................................................37
3-1-1 Viewing Storage Pool Usage Status .............................................................................................. 37
3-1-2 Storage Pools and Storage Areas Provided by Device Manager................................................... 38
3-1-3 Creating a Storage Pool .................................................................................................................39
3-1-4 Linking Storage Pools with CLPR and SLPR Functions................................................................. 40
3-1-5 Moving Volumes between Storage Pools....................................................................................... 42
3-1-6 Viewing Usage Status for Storage Pools........................................................................................ 42
3-1-7 Viewing Storage Pool Information from Different Perspectives...................................................... 43
3-1-8 Viewing a List of Volumes .............................................................................................................. 43
3-1-9 Moving Volumes between Storage Pools....................................................................................... 43
3-2 Allocating and Unallocating Volumes ........................................................................................................44
3-2-1 Allocating a Volume to a Host ........................................................................................................44
3-2-2 Unallocating a Volume.................................................................................................................... 45
3-3 Managing Hosts ........................................................................................................................................ 45
3-3-1 Viewing Host Information................................................................................................................ 45
3-3-2 Updating Host Information.............................................................................................................. 45
3-4 Creating, Expanding, and Deleting File Systems ......................................................................................45
3-4-1 Creating a File System ...................................................................................................................45
3-4-2 Expanding a File System................................................................................................................ 47
3-4-3 Deleting a File System.................................................................................................................... 48
3-5 Creating and Deleting Device Files ...........................................................................................................48
3-5-1 Creating a Device File ....................................................................................................................48
3-5-2 Deleting a Device File..................................................................................................................... 50
3-6 About Provisioning Plans .......................................................................................................................... 50
3-6-1 Creating a Provisioning Plan ..........................................................................................................50
3-6-2 Deleting a Provisioning Plan........................................................................................................... 51
3-7 Managing Transaction Logs ...................................................................................................................... 52
4 Working With OS-Based Constraints
Contents 3
Page 4

4-1 Restrictions on Host Management ............................................................................................................ 54
4-1-1 Configuring Cluster Software.......................................................................................................... 54
4-2 Restrictions When the Host OS is Windows®............................................................................................ 54
4-2-1 Prerequisites for the Host ............................................................................................................... 54
4-2-2 Restrictions on Adding File Systems .............................................................................................. 55
4-2-3 Restrictions on Expansion and Deletion......................................................................................... 55
4-2-4 Restrictions on Adding Device Files ............................................................................................... 56
4-2-5 Restrictions on Related Products ................................................................................................... 57
4-2-6 Improving Windows® Host Performance ........................................................................................ 57
4-2-7 Notes on Using the Volume Manager RAID Functionality.............................................................. 57
4-2-8 Deleting a Mount Point Directory.................................................................................................... 57
4-2-9 About File System and Device File Sizing Discrepancies .............................................................. 57
4-2-10 Preventing Misrecognition of the Disk Number and Drive Letter.................................................... 57
4-2-11 Notes on Removing a File System That Is Being Used.................................................................. 57
4-2-12 Notes on Changing the Software Configuration ............................................................................. 58
4-2-13 Notes on Changing a Host Name................................................................................................... 58
4-2-14 Notes on Mounting a Folder in Windows® 2000 .............................................................................58
4-3 Restrictions When the Host OS is Solaris™ ............................................................................................. 58
4-3-1 Prerequisites for the Host ............................................................................................................... 58
4-3-2 Notes on Adding File Systems .......................................................................................................59
4-3-3 Restrictions on Expansion and Deletion......................................................................................... 59
4-3-4 Restrictions on Creating a File System ..........................................................................................60
4-3-5 About Using a Shared Volume Group ............................................................................................ 60
4-3-6 Setting the Unit of Volume Management........................................................................................ 61
4-3-7 Notes on Changing the Software Configuration ............................................................................. 61
4-3-8 Notes on Changing a Host Name................................................................................................... 61
4-3-9 Improving Solaris™ Host Performance .......................................................................................... 61
4-3-10 Using the Volume Manager RAID Functionality .............................................................................61
4-3-11 About Fragment and Data Compression (Saving Disk Space) ......................................................61
4-3-12 Using a Log and Specifying Log Size Using a File System............................................................ 61
4-3-13 Changing the File System Check at Startup Setting ......................................................................62
4-3-14 Ensuring Dynamic Link Manager Operations ................................................................................. 62
4-3-15 Deleting a Mount Point Directory.................................................................................................... 62
4-4 Restrictions When the Host OS is AIX®..................................................................................................... 62
4-4-1 Prerequisites for the Host ............................................................................................................... 62
4-4-2 Restrictions on Expansion and Deletion......................................................................................... 62
4-4-3 Restrictions on Creating a File System and Device File................................................................. 63
4-4-4 About Using a Host as a Cluster Resource .................................................................................... 64
4-4-5 About Using a Shared Volume Group ............................................................................................ 64
4-4-6 Setting the Unit of Volume Management........................................................................................ 65
4-4-7 Improving AIX® Host Performance .................................................................................................65
4-4-8 Using the Volume Manager RAID Functionality .............................................................................65
4-4-9 About the big vg Format Volume Group ......................................................................................... 65
4-4-10 About Fragment and Data Compression (Saving Disk Space) ......................................................65
4-4-11 About Creating a Logical Volume for the JFS Log .........................................................................65
4-4-12 Changing the Size of the Logical Volume for the JFS Log ............................................................. 65
4-4-13 Changing the File System Check at Startup Setting ......................................................................65
4-4-14 Ensuring Dynamic Link Manager Operations ................................................................................. 66
4-4-15 Deleting a Mount Point Directory.................................................................................................... 66
4-4-16 AIX® File System and Device File Sizes......................................................................................... 66
4-4-17 Notes on Changing the Software Configuration ............................................................................. 66
4-4-18 Notes on Changing a Host Name................................................................................................... 66
4-5 Restrictions When the Host OS is Linux ................................................................................................... 66
4-5-1 Prerequisites for the Host ............................................................................................................... 67
4-5-2 About Host Management in Linux Environments ...........................................................................67
4-5-3 Volume Configurations Displayed by Provisioning Manager.......................................................... 69
4-5-4 Notes on Md Devices .....................................................................................................................70
4-5-5 Improving Linux Host Performance ................................................................................................ 70
4-6 Restrictions When the Host OS is HP-UX................................................................................................. 71
4-6-1 Prerequisites for the Host ............................................................................................................... 71
4-6-2 Restrictions on Expansion and Deletion......................................................................................... 72
4-6-3 Restrictions on Related Products ................................................................................................... 72
4-6-4 About Host Management in HP-UX Environments......................................................................... 72
4-6-5 Improving HP-UX Host Performance.............................................................................................. 75
4-7 Maximum Setting Values........................................................................................................................... 77
Contents 4
Page 5

5 Managing Storage Pools
5-1 Managing a Storage Pool.......................................................................................................................... 79
5-1-1 Perspective from a Parent Group to Subordinate Groups.............................................................. 80
5-1-2 Perspective from a Child Group to Its Subordinate Groups ...........................................................81
5-1-3 Number of Volumes That Can Be Displayed.................................................................................. 83
5-2 Viewing a Storage Pool Overview .............................................................................................................83
5-3 Viewing Storage Pool Usage Status for Each Storage Subsystem Model................................................ 85
5-4 Viewing Storage Pool Usage Status for Each RAID Level........................................................................ 87
5-5 Viewing Storage Pool Usage Status for Each Storage Subsystem Series ............................................... 88
5-6 Viewing Storage Pool Usage Status for Each Storage Subsystem........................................................... 90
5-7 Viewing a List of Unallocated Volumes on a Host..................................................................................... 92
5-8 Allocating a Volume to a Host from a List of Unallocated Volumes .......................................................... 94
5-9 Viewing a List of Allocated Volumes on a Host......................................................................................... 96
5-10 Allocating a Volume on a Host from a List of Allocated Volumes.............................................................. 97
5-11 Releasing a Volume Allocated on a Host from a List of Allocated Volumes ............................................. 99
5-12 Moving Volumes between Storage Pools................................................................................................ 101
6 Viewing Host Information
6-1 Preparing to View Host Information......................................................................................................... 104
6-2 Displaying Host Information ....................................................................................................................104
6-3 Viewing a List of Accessible Hosts.......................................................................................................... 107
6-4 Viewing a List of File Systems Mounted on the Hosts ............................................................................ 107
6-5 Viewing Detailed Host Information .......................................................................................................... 108
6-6 Updating Host Information....................................................................................................................... 109
7 Managing File Systems
7-1 Overview of Managing File Systems .......................................................................................................110
7-2 Viewing File System Information ............................................................................................................. 110
7-3 Adding a File System .............................................................................................................................. 111
7-3-1 Selecting a Volume....................................................................................................................... 113
7-3-2 Setting Parameters....................................................................................................................... 114
7-3-3 Confirming the Settings ................................................................................................................114
7-4 Viewing the File System Information for a Mount Point........................................................................... 116
7-5 Expanding a File System......................................................................................................................... 117
7-5-1 Selecting a Volume....................................................................................................................... 118
7-5-2 Confirming the Settings ................................................................................................................119
7-6 Deleting a File System ............................................................................................................................ 121
7-7 Viewing the Data Path for a Mount Point ................................................................................................ 123
8 Managing Device Files
8-1 Overview of Managing Device Files ........................................................................................................125
8-2 Viewing Device File Information ..............................................................................................................125
8-3 Adding a Device File ............................................................................................................................... 126
8-3-1 Selecting a Volume....................................................................................................................... 127
8-3-2 Setting Parameters....................................................................................................................... 128
8-3-3 Confirming the Settings ................................................................................................................129
8-4 Viewing Information about Device File Paths.......................................................................................... 130
8-5 Deleting a Device File ............................................................................................................................. 131
8-6 Viewing the Data Path for Each Path Name ........................................................................................... 133
9 Managing Provisioning Plans
9-1 About Managing Provisioning Plans........................................................................................................ 134
9-2 Viewing an Allocation Plan ......................................................................................................................135
9-3 Changing Allocation Plan Security Levels............................................................................................... 135
9-4 Editing an Allocation Plan........................................................................................................................ 136
10 Viewing Transaction Logs
10-1 About Viewing Transaction Logs............................................................................................................. 138
10-2 Viewing Transaction Logs ....................................................................................................................... 138
10-3 Resuming Operation after Processing is Interrupted .............................................................................. 139
11 Troubleshooting
11-1 Troubleshooting Procedures During Setup Operations........................................................................... 141
11-1-1 When Setup Fails .........................................................................................................................141
11-1-2 When Setup is Interrupted............................................................................................................ 142
11-2 Function-Specific Summary of Troubleshooting Steps ........................................................................... 142
11-3 Troubleshooting Method.......................................................................................................................... 161
11-3-1 Checking the Device Manager Agent Error Log ........................................................................... 162
Contents 5
Page 6

11-3-2 Collecting Error Information .......................................................................................................... 162
11-4 Server Address Specified during Installation........................................................................................... 165
11-5 Inconsistency in the Display between the Navigation and Information Frames ......................................165
11-6 Error Messages ....................................................................................................................................... 165
11-6-1 Provisioning Manager Server Messages ...................................................................................... 166
11-6-2 Provisioning Manager GUI Messages .......................................................................................... 180
11-6-3 Provisioning Manager Agent Messages .......................................................................................188
11-6-4 Messages Common to Provisioning Manager Components ........................................................197
Glossary
Index
Contents 6
Page 7

Figures
Figure 1-1 Example of a Storage Pool....................................................................................................................... 15
Figure 1-2 Setup of Storage Subsystems and Hosts................................................................................................. 16
Figure 1-3 Principal Components of Provisioning Manager....................................................................................... 17
Figure 1-4 Operation Flow for Installing Provisioning Manager ................................................................................. 18
Figure 1-5 Using Provisioning Manager to Manipulate Storage Subsystems ............................................................ 20
Figure 1-6 Path Redundancy Provided by HDLM...................................................................................................... 23
Figure 1-7 Linking with a Volume Manager (Creating a File System)........................................................................ 24
Figure 1-8 Linking with a Volume Manager (Expanding a File System) ....................................................................25
Figure 1-9 Calling Other Products from the Tools Menu ........................................................................................... 26
Figure 2-1 Provisioning Manager Title Dialog Box..................................................................................................... 29
Figure 2-2 Provisioning Manager Login Dialog Box................................................................................................... 29
Figure 2-3 Login Dialog Box Displaying an Error Message .......................................................................................30
Figure 2-4 Main Window of Provisioning Manager .................................................................................................... 30
Figure 2-5 Provisioning Manager Version Information Dialog Box ............................................................................31
Figure 2-6 List Objects - Provisioning Manager Subwindow ..................................................................................... 32
Figure 2-7 Frames of the Provisioning Manager Window.......................................................................................... 33
Figure 2-8 Subwindow Example Displayed in the Information Frame .......................................................................35
Figure 2-9 Example of a Popup Dialog Box............................................................................................................... 36
Figure 3-1 Organizing Storage Pools in Different Ways ............................................................................................ 37
Figure 3-2 Storage Pool Management in Concept..................................................................................................... 38
Figure 3-3 Relationships between Logical Groups, User Groups, My Storage Areas, and Storage Pools ............... 39
Figure 3-4 Creating a Storage Pool by Using the CLPR and SLPR Functions.......................................................... 41
Figure 3-5 Assigning a Volume by Using the CLPR and SLPR Functions ................................................................ 41
Figure 3-6 Partitioned Resource Administration by Server for Each SLPR ............................................................... 42
Figure 3-7 Example of Moving Volumes between Storage Pools.............................................................................. 44
Figure 3-8 Host File System/Device File and Subsystem LU (with Volume Manager) .............................................. 46
Figure 3-9 Host File System/Device File and Subsystem LU (without Volume Manager) ......................................... 47
Figure 3-10 Relationship Between Host File System/Device File and Subsystem LU (Expanding a File System) ... 48
Figure 3-11 Relationship between Host Device File and Subsystem LU (without Volume Manager) ....................... 49
Figure 3-12 Relationship between Host Device File and Subsystem LU (with VM) .................................................. 50
Figure 3-13 Add Allocation Plan Dialog Box .............................................................................................................. 51
Figure 3-14 Delete Allocation Plan - PlanName Dialog Box ...................................................................................... 52
Figure 4-1 Configurations Displayed by Provisioning Manager ................................................................................. 69
Figure 4-2 Configurations Yielding Incorrect Display of MD Device Information ....................................................... 70
Figure 5-1 User Groups and Access Scopes............................................................................................................. 80
Figure 5-2 Volume Contents: Scope of C_Group01 Overlaps Scope of C_Group02 ................................................ 83
Figure 5-3 Storage Pool Subwindow and Show Properties - Storage Pool Subwindow............................................ 84
Figure 5-4 Show Properties - Storage Pool Subwindow when Details is Selected.................................................... 84
Figure 5-5 Show Properties - Storage Pool Subwindow when the Show Information Button is Clicked ................... 85
Figure 5-6 Analyze per Model - Storage Pool Subwindow ........................................................................................ 86
Figure 5-7 Analyze per Model - Storage Pool Subwindow when Details is Selected ................................................86
Figure 5-8 Analyze per Model - Storage Pool Subwindow, When Show Information is Clicked................................ 87
Figure 5-9 Analyze per RAID Level - Storage Pool Subwindow ................................................................................ 88
Figure 5-10 Analyze per RAID Level - Storage Pool Subwindow when Details is Selected ...................................... 88
Figure 5-11 Analyze per RAID Level - Storage Pool Subwindow when Show Information is Clicked ....................... 88
Figure 5-12 Analyze per Series - Storage Pool Subwindow ...................................................................................... 89
Figure 5-13 Analyze per Series - Storage Pool Subwindow when Details is Selected .............................................. 90
Figure 5-14 Analyze per Series - Storage Pool Subwindow, When Show Information is Clicked ............................. 90
Figure 5-15 Analyze per SubSystem - Storage Pool Subwindow .............................................................................. 91
Figure 5-16 Analyze per Subsystem - Storage Pool Subwindow when Details is Selected ...................................... 92
Figure 5-17 Analyze per Subsystem - Storage Pool Subwindow when the Show Information Button is Clicked ......92
Figure 5-18 List Unallocated LDEVs - Storage Pool Subwindow .............................................................................. 93
Figure 5-19 List Unallocated LDEVs - Storage Pool Subwindow, When Show LDEVs is Clicked ............................ 94
Figure 5-20 List Unallocated LDEVs - Storage Pool Subwindow .............................................................................. 94
Figure 5-21 List Unallocated LDEVs - Storage Pool Subwindow, When Show LDEVs is Clicked ............................ 96
Figure 5-22 List Allocated LDEVs - Storage Pool Subwindow................................................................................... 96
Figure 5-23 List Allocated LDEVs - Storage Pool Subwindow when Show LDEVs is Clicked .................................. 97
Figure 5-24 List Allocated LDEVs - Storage Pool Subwindow................................................................................... 98
Figure 5-25 List Allocated LDEVs - Storage Pool Subwindow when Show LDEVs is Clicked .................................. 99
Figure 5-26 List Allocated LDEVs - Storage Pool Subwindow................................................................................. 100
Figure 5-27 List Allocated LDEVs - Storage Pool Subwindow when Show LDEVs is Clicked ................................ 101
Figure 5-28 Move LDEVs Dialog Box ......................................................................................................................102
Figures 7
Page 8

Figure 5-29 Move LDEVs Dialog Box when Show LDEVs is Clicked ...................................................................... 102
Figure 6-1 Scope of LU Information Displayed When Using SDS/SVM ..................................................................106
Figure 6-2 Scope of File System, Device File, and Logical Volume Information Displayed Using SDS/SVM ......... 107
Figure 6-3 Hosts Subwindow and List Objects - Hosts Subwindow ........................................................................ 107
Figure 6-4 Hosts Subwindow and Analyze per File Systems - Hosts Subwindow................................................... 108
Figure 6-5 host-name Subwindow and Show Properties – host-name Subwindow ................................................ 109
Figure 7-1 File Systems and List Objects - File Systems Subwindow ..................................................................... 111
Figure 7-2 Add File System - Step 1 of 3 (Select Volume) ......................................................................................113
Figure 7-3 Add File System - Step 2 of 3 (Specify Parameters) .............................................................................. 114
Figure 7-4 Add File System - Step 3 of 3 (Summary of Changes)........................................................................... 115
Figure 7-5 MountPoint and Show Properties - MountPoint Subwindows ................................................................ 117
Figure 7-6 Expand File System - Step 1 of 2 (Select Volume) ................................................................................ 118
Figure 7-7 Expand File System - Step 2 of 2 (Summary of Changes)..................................................................... 119
Figure 7-8 Delete File System - MountPoint Dialog Box.......................................................................................... 122
Figure 7-9 Show Data Path Dialog Box (File System) ............................................................................................. 124
Figure 8-1 Device Files and List Objects - Device Files Subwindows ..................................................................... 126
Figure 8-2 Add Device File - Step 1 of 3 (Select Volume) .......................................................................................128
Figure 8-3 Add Device File - Step 2 of 3 (Specify Parameters) ............................................................................... 129
Figure 8-4 Add Device File - Step 3 of 3 (Summary of Changes)............................................................................ 129
Figure 8-5 path-name and Show Properties - PathName Subwindows................................................................... 131
Figure 8-6 Delete Device File - PathName Dialog Box ............................................................................................ 132
Figure 8-7 Show Data Path Dialog Box (Device File) .............................................................................................. 133
Figure 9-1 Allocation Plans and List Objects - Allocation Plans Subwindows ......................................................... 135
Figure 9-2 PlanName and Show Properties - plan-name Subwindows ................................................................... 135
Figure 9-3 Edit Allocation Plan - PlanName Dialog Box ..........................................................................................137
Figure 9-4 Save As - PlanName Dialog Box............................................................................................................ 137
Figure 10-1 Transaction Logs Subwindow and List Objects - Transaction Logs Subwindows................................ 139
Figure 10-2 Details - Transaction Logs Dialog Box ................................................................................................. 139
Figure 11-1 Message Dialog Example..................................................................................................................... 166
Figures 8
Page 9

Tables
Table 1 Document conventions ................................................................................................................................. 10
Table 2 Revisions ...................................................................................................................................................... 13
Table 1-1 Provisioning Manager Operations ............................................................................................................. 18
Table 1-2 Access Permissions for Provisioning Manager Operations ....................................................................... 18
Table 2-1 Operating Systems Supported by Management Clients that Use the GUI ................................................ 27
Table 4-1 Maximum Setting Values for Functions Creating a Device File and File System ...................................... 78
Table 11-1 Troubleshooting Information: Window Display ...................................................................................... 142
Table 11-2 Troubleshooting Information: Provisioning Manager Functions............................................................. 142
Table 11-3 Troubleshooting Information (Logging In).............................................................................................. 143
Table 11-4 Troubleshooting Information: Host Information Collection..................................................................... 143
Table 11-5 Troubleshooting Information: Host Information Display (continues on the next page) .......................... 144
Table 11-6 Troubleshooting Information: General Host Settings (continues on the following pages) ..................... 148
Table 11-7 Troubleshooting Information: Host Settings Related to Volume Creation ............................................. 151
Table 11-8 Troubleshooting Information: Host Settings Related to Volume Expansion (continues on the next page)
.................................................................................................................................................................................
Table 11-9 Troubleshooting Information: Host Settings Related to Volume Deletion .............................................. 156
Table 11-10 Troubleshooting Information: Storage Pool Information Display ......................................................... 159
Table 11-11 Troubleshooting Information: Transaction Log Deletion ...................................................................... 159
Table 11-12 Troubleshooting Information: Transaction Log Status (continues on the next pages)......................... 159
Table 11-13 Package Serial Number....................................................................................................................... 166
Table 11-14 Message Type ..................................................................................................................................... 166
Table 11-15 Provisioning Manager Server Messages (continues on the following pages) ..................................... 166
Table 11-16 Provisioning Manager GUI Messages (continues on the following pages).......................................... 180
Table 11-17 Provisioning Manager Agent Messages (continues on the following pages)....................................... 188
Table 11-18 Messages Common to Provisioning Manager Components................................................................ 198
153
Tables 9
Page 10

About this guide
This manual provides an overview of the HP StorageWorks XP Advanced Edition Provisioning Manager,
describes its operation, and provides step-by-step procedures on how to use its graphical user interface (GUI).
Intended audience
This manual is intended for those who use Provisioning Manager to operate and manage a system based on a
storage subsystem (magnetic disk array unit).
Specifically, this manual is intended for:
• First time users of Provisioning Manager, or users who wish to obtain an overview of Provisioning
Manager before installing a system.
• Users of the GUI who want to obtain an overview of Provisioning Manager and how to use the GUI
The readers of this manual should have the following knowledge:
• A basic knowledge of SANs (Storage Area Networks).
• Knowledge of installation, user setup, user group setup, volume creation, volume allocation, and logical
group creation for the HP StorageWorks XP Advanced Edition Device Manager.
• A basic knowledge of path control of Hitachi Dynamic Link Manager.
• A basic knowledge of Windows
systems) for a host managed by Provisioning Manager.
• If the host OS is Windows
• If the host OS is Solaris™, knowledge of VERITAS™ Volume Manager 3.5 and 4.0, VERITAS™ File
System 3.5 and 4.0, and SDS/SVM (Solstice DiskSuite and Solaris™ Volume Manager).
• If the host OS is AIX
• If the host OS is Linux, knowledge of Logical Volume Manager, ext2 and ext3
• If the host OS is HP-UX, knowledge of Logical Volume Manager and VERITAS™ File System.
®
, knowledge of Logical Volume Manager and Journaled File System.
®
, Solaris™, AIX®, Linux, or HP-UX, which are prerequisite OSs (operating
®
, knowledge of basic disks, dynamic disks, and NTFS.
Prerequisites
Prerequisites for installing this product include:
• Reading through the user’s guide
• Meeting all the minimum installation requirements
• Reviewing the readme.txt file on the CD for any last-minute announcements
Document conventions and symbols
Table 1 Document conventions
Convention Element Convention Element
Medium blue text: Figure 1 Cross-reference links and e-mail addresses
Medium blue, underlined text
(http://www.hp.com
Bold font • Key names
italics font Text emphasis
Monospace font • File and directory names
Monospace, italic font • Code variables
)
Web site addresses
• Text typed into a GUI element, such as into a box
• GUI elements that are clicked or selected, such as
menu and list
• System output
• Code
• Text typed at the command-line
• Command-line variables
Tables 10
Page 11

Table 1 Document conventions
Convention Element Convention Element
Monospace, bold font Emphasis of file and directory names, system output, code,
and text typed at the command-line
CAUTION: Indicates that failure to follow directions could result in damage to equipment or data.
IMPORTANT: Provides clarifying information or specific instructions.
NOTE: Provides additional information.
Tables 11
Page 12

HP technical support
Telephone numbers for worldwide technical support are listed on the HP web site:
http://www.hp.com/support/
Collect the following information before calling:
• Technical support registration number (if applicable)
• Product serial numbers
• Product model names and numbers
• Applicable error messages
• Operating system type and revision level
• Detailed, specific questions
For continuous quality improvement, calls may be recorded or monitored.
HP strongly recommends that customers sign up online using the Subscriber’s choice web site at
http://www.hp.com/go/e-updates
• Subscribing to this service provides you with email updates on the latest product enhancements, newest
versions of drivers, and firmware documentation updates as well as instant access to numerous other
product resources.
• After signing-up, you can quickly locate your products by selecting Business support and then Storage
under Product Category.
HP-authorized reseller
For the name of your nearest HP-authorized reseller:
• In the United States, call 1-800-345-1518
• Elsewhere, visit http://www.hp.com
and click Contact HP to find locations and telephone numbers
Helpful web sites
For additional product information, see the following web sites:
• http://www.hp.com
• http://www.hp.com/go/storage
• http://www.hp.com/support/
Tables 12
Page 13

Revision history
Revision tables
Table 2 Revisions
Date Edition Revision
November, 2005 First Initial release
Revision history (start here)
Revision history 13
Page 14

1 Overview of HP StorageWorks XP Provisioning Manager
This chapter explains the features of HP StorageWorks XP Provisioning Manager, its components, and its
relationships to other programs. The chapter also summarizes what you can do with Provisioning Manager,
and gives an overview of the procedures for installing and operating Provisioning Manager.
• The Provisioning Manager Mission (section
• Provisioning Manager Components (section
• Programs Related to Provisioning Manager (section
• Installing Provisioning Manager (section
• Operations That Can Be Performed With Provisioning Manager (section 1-5 )
• Manipulating Storage Subsystems (section
• Using Provisioning Manager With Other Products (section
1-1 The Provisioning Manager Mission
Storage subsystems and storage service providers (SSPs) have increased enormously in size and functionality
to meet the evolving needs of corporate customers and continuing demands for increased capacity.
HP StorageWorks XP Provisioning Manager is designed to simplify storage management and reduce its costs
by providing seamless control through a single interface over a wide variety of storage subsystems.
1-1-1 Managing Various Storage Subsystems as a Storage Pool
An area of managed data memory that resides on a set of storage subsystems is called a storage pool. The
storage pool is a collection of volumes (LUs). You can use Device Manager’s All Storage (My Storage)
functionality to divide the storage pool into hierarchies and manage those hierarchies for each user group.
HP StorageWorks XP Provisioning Manager enables you to integrate and manage various models and types of
storage subsystems as a single, logical storage pool (see
1-1 )
1-2 )
1-3 )
1-4 )
1-6 )
1-7 )
Figure 1-1).
By presenting the volumes associated with each user group as a single logical volume, Provisioning Manager
lets you manage those volumes without having to be concerned about where they actually reside. This reduces
the workload required to understand the usage condition of each volume and to maintain the various volumes.
For details about All Storage (My Storage) and user groups, see the HP StorageWorks Command View XP
Advanced Edition Device Manager Web Client User Guide.
Overview of HP StorageWorks XP Provisioning Manager 14
Page 15
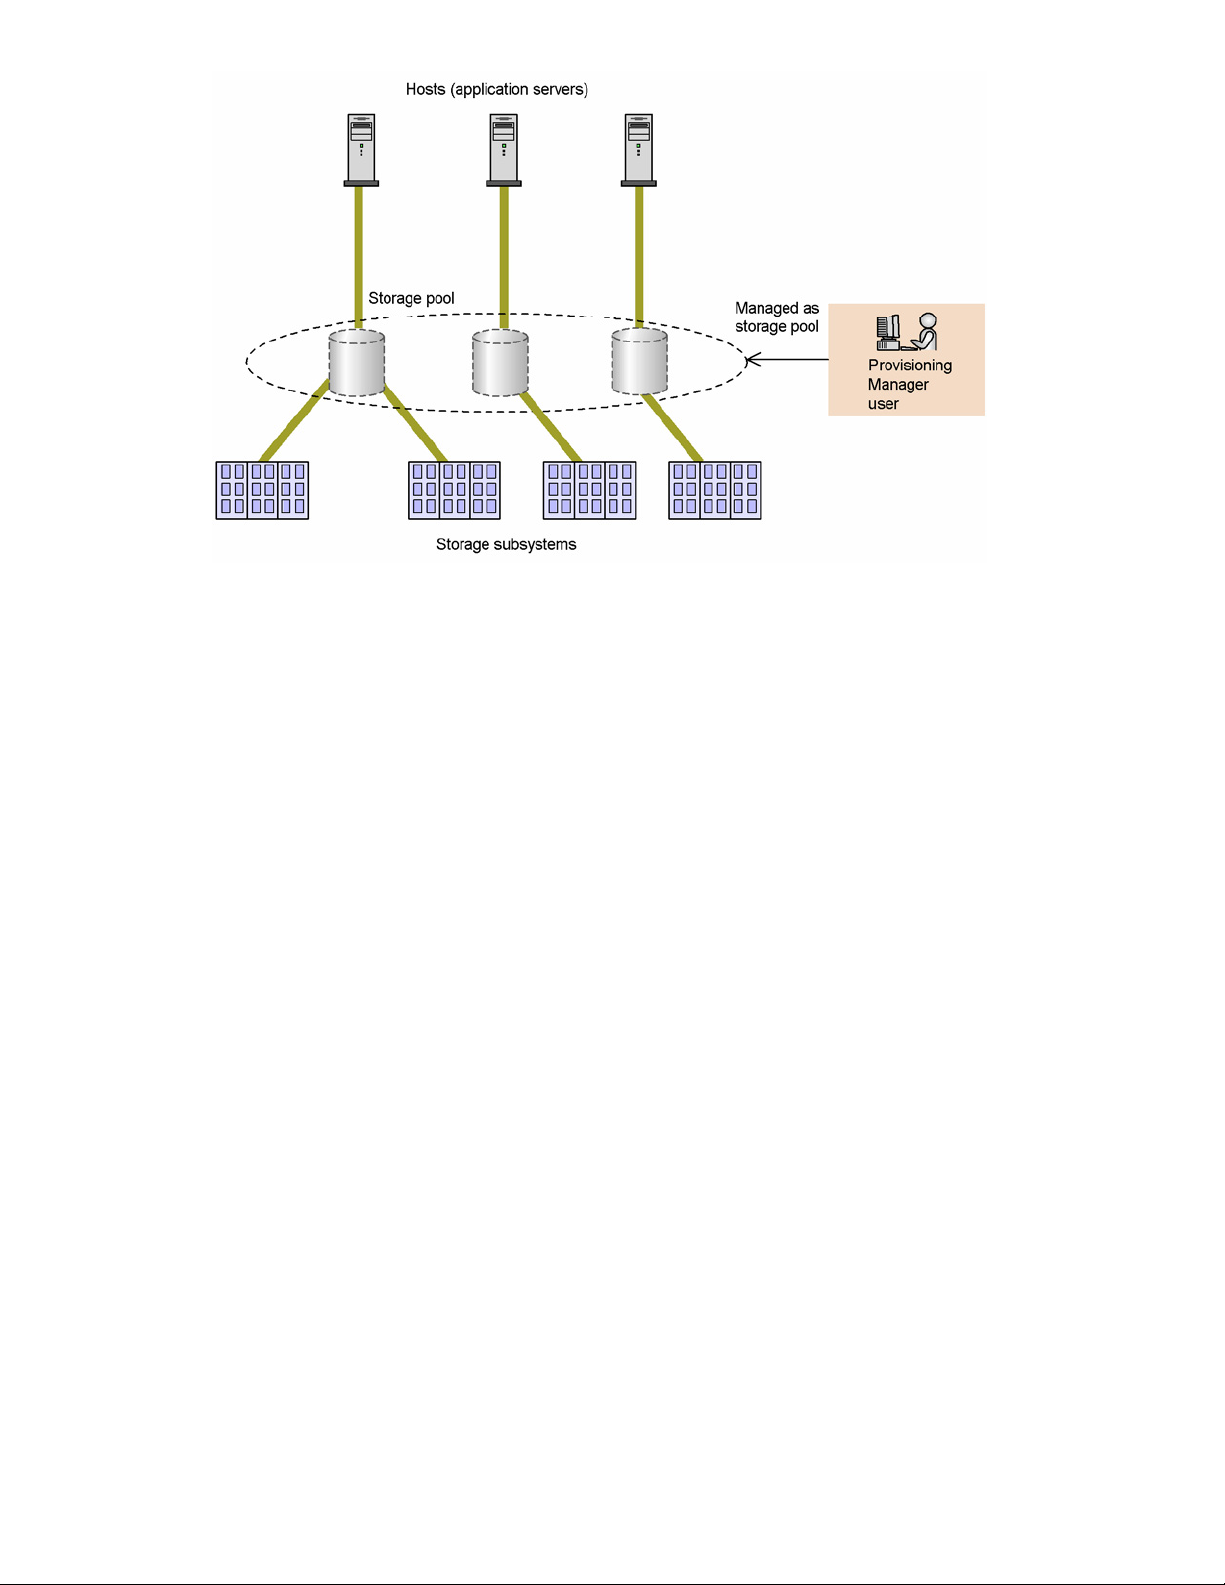
Figure 1-1 Example of a Storage Pool
As a way to locate volumes in a storage pool, you can use a provisioning plan to pre-define search conditions
for volume allocation. Specifying a provisioning plan when you analyze a storage pool or display a list of
volumes enables you to display only relevant items when searching from among a large number of volumes.
1-1-2 Managing Multiple Hosts from a Single Interface
Provisioning Manager provides the ability to manage different models of hosts using a single graphical user
interface. This enables you to manage hosts efficiently without worrying about functional differences between
them.
Using Provisioning Manager, you can view information required to manage storage subsystem operations,
such as the host volume configuration of file systems and device files, and the data paths used by HBA WWNs,
ports of the storage subsystem, and volumes of the storage subsystem. Moreover, by using volumes from the
storage pool that are allocated to various hosts, you can also create and remove file systems and device files.
Figure 1-2 shows the settings for storage subsystems and hosts that use Provisioning Manager.
Overview of HP StorageWorks XP Provisioning Manager 15
Page 16
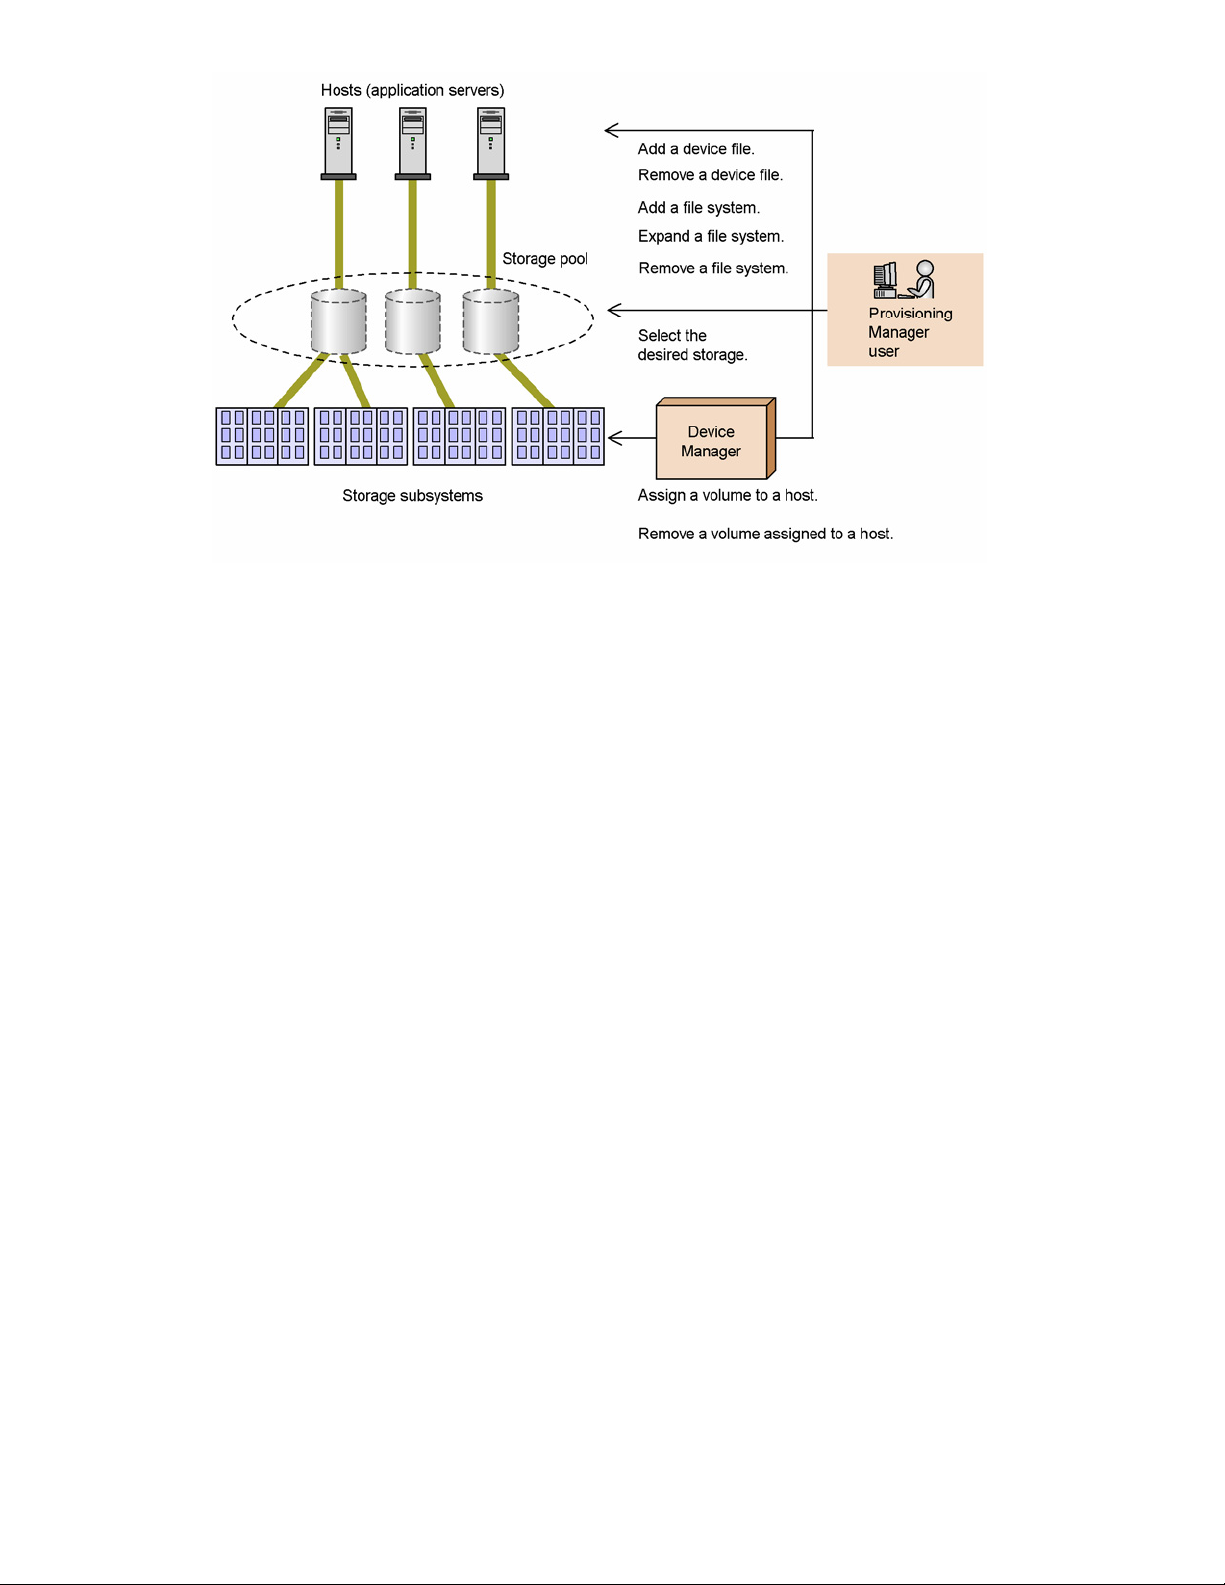
Figure 1-2 Setup of Storage Subsystems and Hosts
1-2 Provisioning Manager Components
Figure 1-3 shows the principal components of Provisioning Manager. Note that Provisioning Manager depends
on, and can co-exist on the same server with, Device Manager:
• Provisioning Manager server (management server)
The Provisioning Manager server controls storage pool management and host settings, based on
instructions from the system administrator and the storage user at the host side.
• Provisioning Manager client (management client)
The Provisioning Manager client is used by the system administrator and the storage user at the host side
to pass instructions for storage subsystem and host operations to the Provisioning Manager server.
• Device Manager server
This program is required in order to use Provisioning Manager. Device Manager server enables the setup
and viewing of storage subsystem configuration information from Provisioning Manager.
• Device Manager agent
Provisioning Manager uses Device Manager agent to enable the setup and viewing of host information.
Device Manager controls volume managers, file systems, and other programs, and implements
Provisioning Manager operations (device file addition, file system addition and expansion, etc.).
For more details about prerequisites for Provisioning Manager, related programs, and how to configure a
system, see the HP StorageWorks XP Provisioning Manager Installation and Configuration Guide.
Overview of HP StorageWorks XP Provisioning Manager 16
Page 17
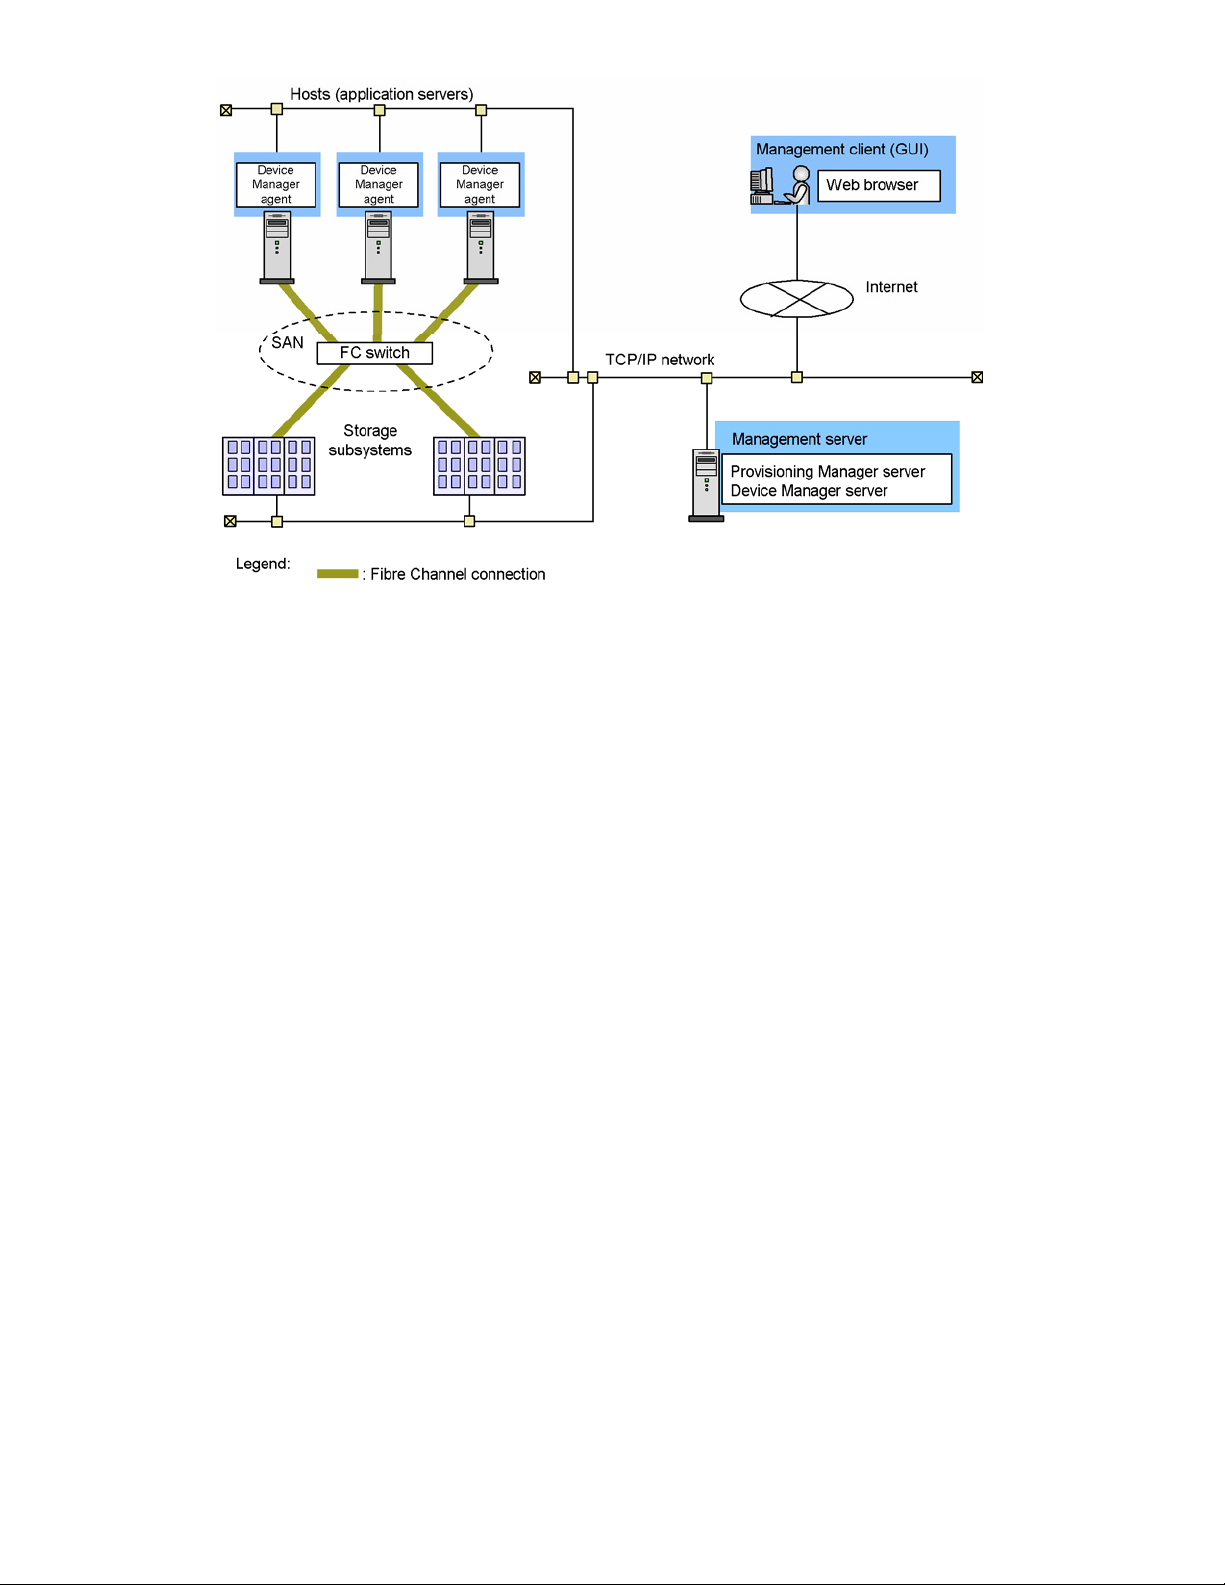
Figure 1-3 Principal Components of Provisioning Manager
1-3 Programs Related to Provisioning Manager
Hewlett-Packard sells several products related to Provisioning Manager:
Hitachi Dynamic Link Manager
Dynamic Link Manager is used to create a redundant configuration for the paths between host ports and
storage subsystems.
Dynamic Link Manager is a program product that manages access paths to the storage.
For details about Dynamic Link Manager, see the manual for Dynamic Link Manager.
By using the Provisioning Manager’s single sign-on functionality, you can start the following applications
in the Command View XP AE Suite series from Provisioning Manager. The initial screen of an activated
application is displayed in a new window.
HP StorageWorks Command View XP Advanced Edition Device Manager
Device Manager operates and manages the systems that use various models of storage subsystems.
Device Manager is a prerequisite program for Provisioning Manager.
For details about HP StorageWorks Command View XP Advanced Edition Device Manager, see the
Device Manager manuals.
1-4 Installing Provisioning Manager
To install Provisioning Manager, you perform the following general steps:
1. Install prerequisite and related programs.
Before installing Provisioning Manager, you must install and set up required and related programs. For
details about installing required and related programs, see the documentation for the applicable
programs.
2. Install Provisioning Manager server.
For details on installing Provisioning Manager server, see the HP StorageWorks XP Provisioning
Manager Installation and Configuration Guide.
3. Set up the Provisioning Manager server environment.
This action completes installation of Provisioning Manager. Users are now able to use a Provisioning Manager
client that provides communication with this Provisioning Manager server over the HTTP protocol to manage
storage pools.
Overview of HP StorageWorks XP Provisioning Manager 17
Page 18
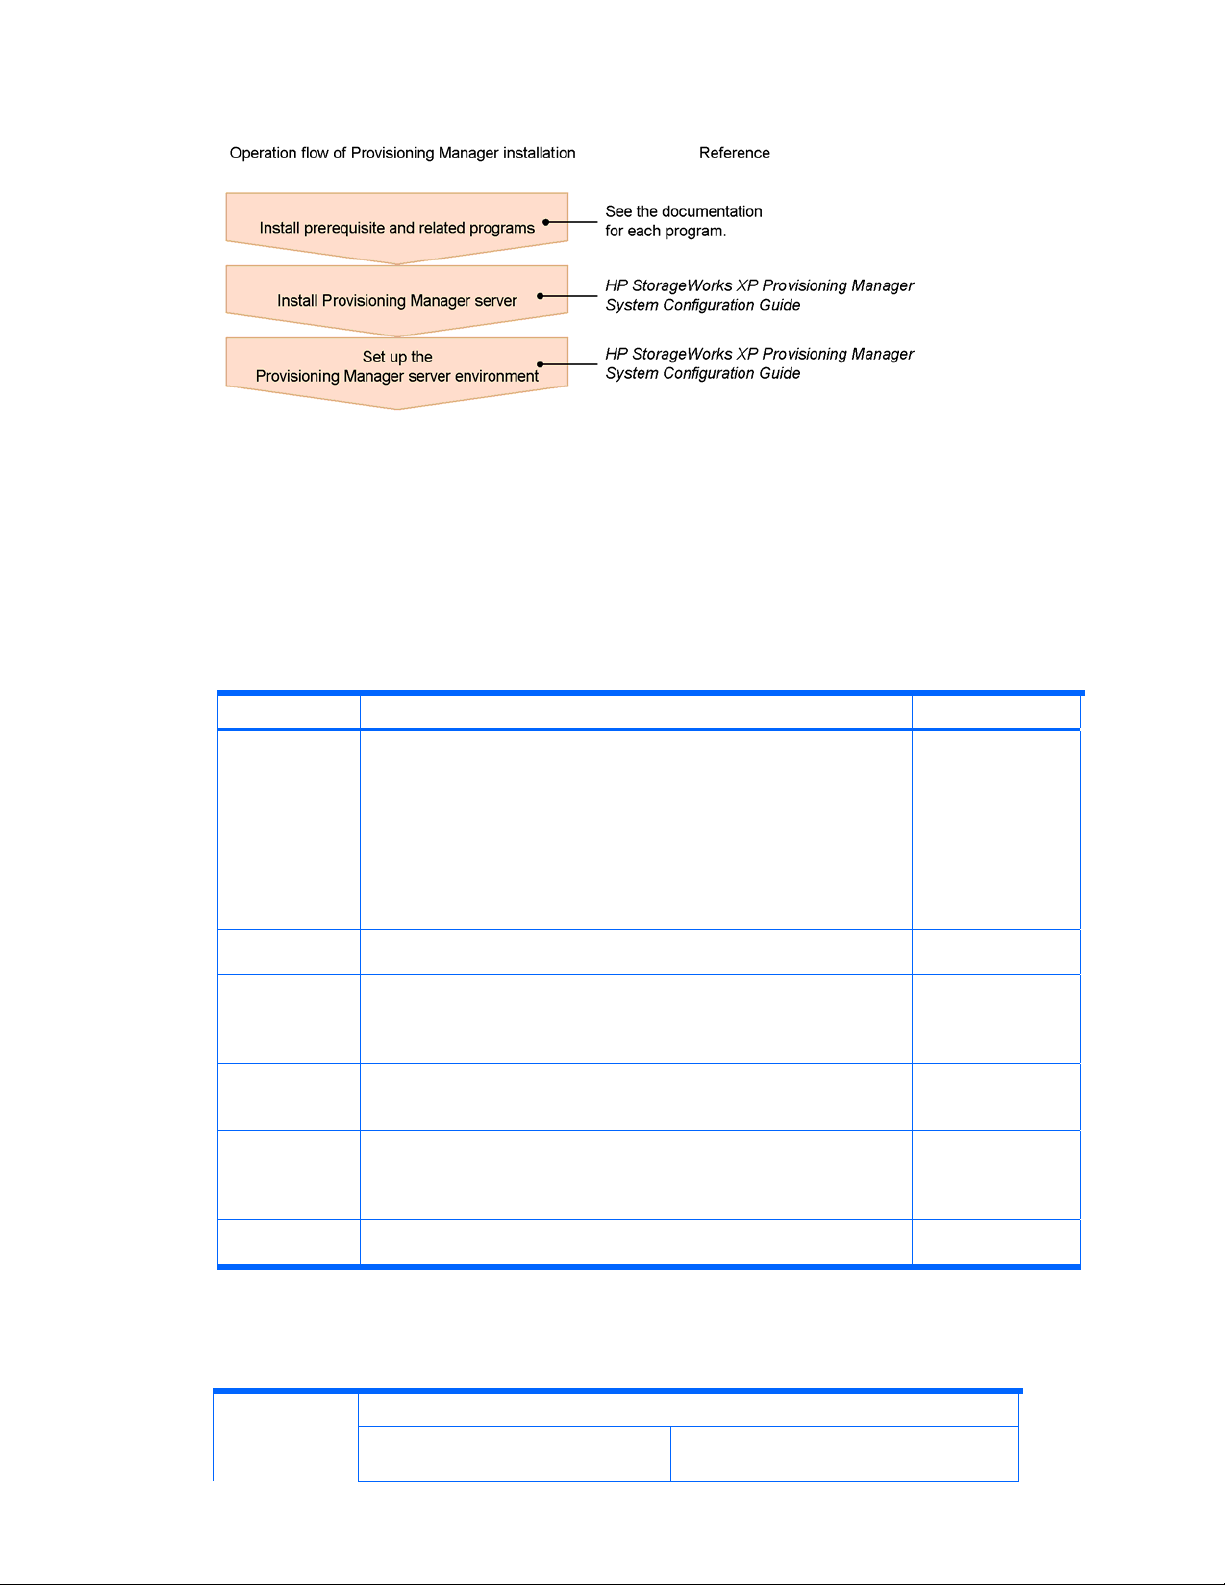
Figure 1-4 provides an overview of the operation flow used for installing Provisioning Manager onto a
management server.
Figure 1-4 Operation Flow for Installing Provisioning Manager
When you install a Provisioning Manager client, you do not need to configure installation or environment
settings. For details about the browser versions that can be used to operate Provisioning Manager clients and
how to work with the GUI, see 2 .
1-5 Operations That Can Be Performed With Provisioning Manager
Table 1-1 lists and describes operations that you can perform using Provisioning Manager.
Table 1-1 Provisioning Manager Operations
Managed Item Operation Section(s)
Storage pool • View a storage pool.
Enables you to view storage pool information from various
perspectives, including all storage pool information, by RAID level,
and by storage subsystem.
• View a list of volumes.
Enables you to view a list of allocated and unallocated volumes.
3-1 Managing
Storage Pools,
3-2 Allocating and
Unallocating
Volumes
• Allocate a volume.
• Unallocate a volume.
• Move a volume between storage pools.
Host • View a host.
• Update host information.
File system • View a file system.
• Create a file system.
• Expand a file system.
• Delete a file system.
Device file • View a device file.
• Create a device file.
• Delete a device file.
Provisioning
plan
Operation log • View transaction logs.
• View a provisioning plan
• Work with a provisioning plan
# A provisioning plan includes conditions for locating volumes in a storage
pool. It is used when creating file systems and device files.
• Re-start operations that were interrupted.
#
.
#
.
3-3 Managing
Hosts
3-4 Creating,
Expanding, and
Deleting File
Systems
3-5 Creating and
Deleting Device
Files
3-6 About
Provisioning Plans
3-7 Managing
Transaction Logs
Table 1-2 lists access permission levels for operations that you can perform using Provisioning Manager.
Table 1-2 Access Permissions for Provisioning Manager Operations
Operation Access Permission
System User Local User (permission applies to group to
which the user belongs)
Overview of HP StorageWorks XP Provisioning Manager 18
Page 19
System
Administrator
Storage
Administrator
Guest Local System
Administrator
Local Storage
Administrator
Local Guest
Viewing storage
pools or listing
volumes
Allocating or
unallocating
volumes
Moving volumes Y -- -- Y -- --
Viewing hosts or
updating
information
Viewing file
systems
Creating,
expanding, or
deleting file
systems
Viewing device
files
Creating or
deleting device
files
Viewing
provisioning plans
Adding
provisioning plans
Manipulating
provisioning plans
Viewing
transaction logs
Restarting
cancelled
processes
Y Y Y Y Y Y
Y Y -- Y Y --
Y Y Y Y Y Y
Y Y Y Y Y Y
Y Y -- Y Y --
Y Y Y Y Y Y
Y Y -- Y Y --
Y Y Y Y Y Y
Y Y -- Y Y --
Y Y -- Y Y --
Y Y Y Y Y Y
Y Y -- Y Y --
NOTE: For provisioning plans, you can set Public or Private as an attribute indicating the security level as
well as the access permissions. The operation permission depends on the combination of the security level
and the access permission. For details, see chapter 8, Managing Provisioning Plans.
1-6 Manipulating Storage Subsystems
This section provides examples of storage subsystem and host management operations that you can perform
after installing Provisioning Manager.
Figure 1-5 shows the operation flow as a result of using Provisioning Manager to manipulate storage
subsystems.
Overview of HP StorageWorks XP Provisioning Manager 19
Page 20
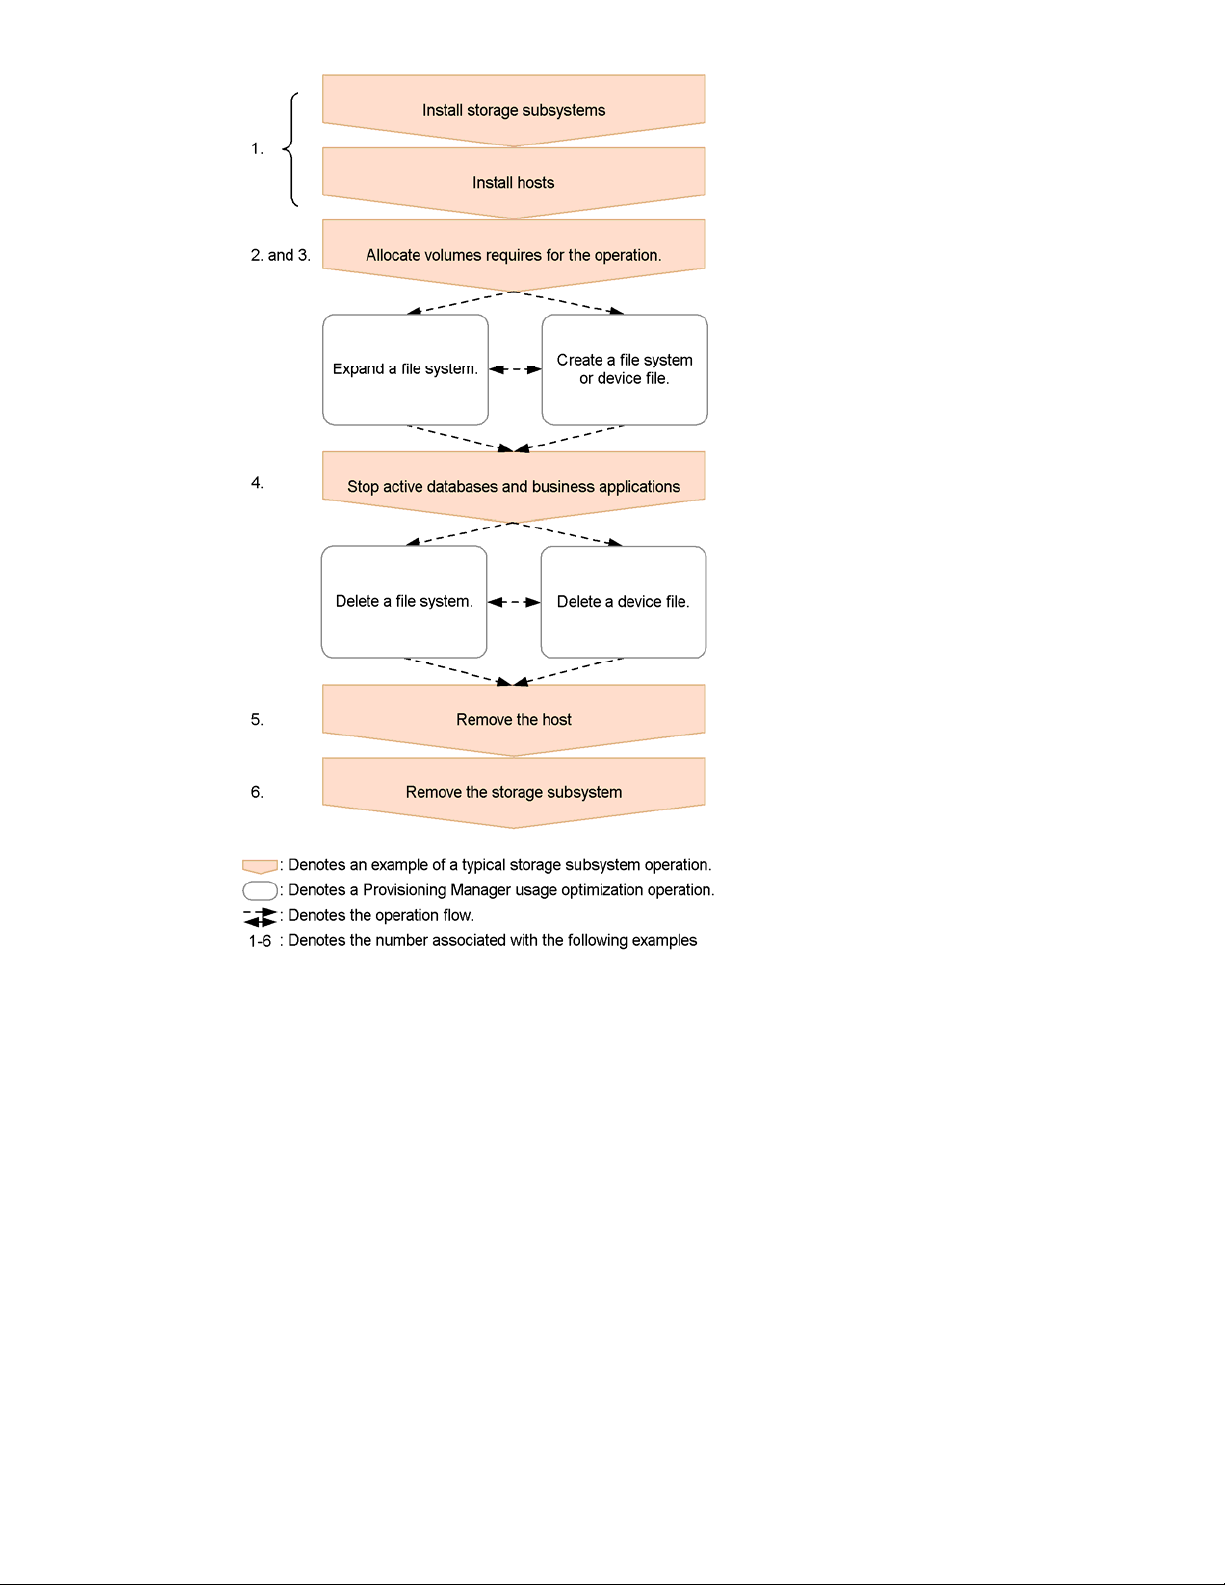
Figure 1-5 Using Provisioning Manager to Manipulate Storage Subsystems
The following explains the flow of operations on subsystems that use Provisioning Manager:
1. Install the storage subsystems and hosts. Use Device Manager to install. Installing storage subsystems
by using Device Manager allows you to use Provisioning Manager to manage all the LDEVs and LUs
defined in the storage subsystems. Also, installing the Device Manager agent on the installed host allows
you to use Provisioning Manager to manage the file systems and device files on the host.
2. Allocate the LDEVs to user groups created for each purpose so that you can manage storage pools by
usage, such as by database or business application. Use Device Manager to define user groups and the
access scope for the volumes. Provisioning Manager recognizes the volume access scope defined in this
manner as a storage pool that is a collection of volumes for each user group.
3. Use Provisioning Manager to manage volumes used by databases and business applications. First,
allocate a volume in a storage pool to a host on which the database or business application is running.
Then, assign each host volume as a file system or device file for databases or business applications.
Performing the above configuration enables databases or business applications to use the storage
subsystems.
4. If you wish to detach an allocated volume when you have decided to stop a database or business
application that is no longer needed, you can use Provisioning Manager to remove the file system or
device file.
5. To remove a host that is no longer needed, use Provisioning Manager to detach the volume from the host
to which it is allocated. Once you have confirmed that the volume is no longer allocated to the host you
wish to remove, you can safely remove the host from the SAN. After you have removed it, use Device
Overview of HP StorageWorks XP Provisioning Manager 20
Page 21

Manager to delete the host registration, which removes the host from under the control of Provisioning
Manager.
6. To remove a storage subsystem that is no longer needed, use Provisioning Manager to delete the file
systems and device files for all hosts that use the storage subsystem you wish to remove. Once you have
confirmed that no file system or device file that uses the storage subsystem you wish to remove exists,
you can safely remove the storage subsystem from the SAN. After you have removed it, use Device
Manager to delete the storage subsystem registration, which removes the storage subsystem from under
the control of Provisioning Manager.
For details about using Device Manager, see the HP StorageWorks Command View XP Advanced Edition
Device Manager Web Client User Guide.
1-6-1 When Data Assets Have Increased
To accommodate increases in data assets brought on by such occurrences as increases in the data handled
by a database or enhancement of business applications, you need to add one or more additional volumes to
the host. With Provisioning Manager, you can choose the way to add volumes, depending on the status of the
storage pool.
• Optimizing disparities in the usage ratio of storage pools
With Provisioning Manager, you can allocate storage pools for each user group and manage the volumes
within that storage pool. However, if disparities arise in the usage ratio of storage pools, we recommend
that you optimize disparities in their usage ratios to use limited resources efficiently. With Provisioning
Manager, you can view usage information on storage pools and list information about unallocated
volumes for each user group. Based on this information, you can use Provisioning Manager to allocate
surplus capacity to the storage pool where there is insufficient free capacity. This enables you to operate
your limited storage subsystem assets with a minimum of waste.
• Resolving a serious shortage of volumes
When you cannot resolve the shortage of volumes even by optimizing the usage ratio of storage pools or
reducing the amount of saved data, you must add one or more storage subsystems.
To add a volume to the host, you can use Device Manager to install a storage subsystem, and then use
Provisioning Manager to move the volume between the storage subsystems.
To add a volume to the host:
1. Use Device Manager to install storage subsystems and define LDEVs or LUs. This operation adds the
LDEVs or LUs to All Storage.
In Provisioning Manager, these volumes are added to the storage pool that is equivalent for All
Storage. For details about All Storage, see the HP StorageWorks Command View XP Advanced
Edition Device Manager Web Client User Guide.
2. Move the volume from the storage pool where the volumes were added to the desired storage pool by
using Provisioning Manager.
1-6-2 When the Unit for Managing Storage Pools Has Been Changed
When the unit for managing storage pools has been changed in response to the establishment of a new
department or office, or when the existing storage pools are divided or integrated, you must add a storage pool
according to the unit.
To add a storage pool:
1. Define new user groups or the access scope for volumes by using Device Manager. This operation adds
a new storage pool in Provisioning Manager.
2. Move the desired volume to the added storage pool.
Volumes that are already allocated to the host must be allocated to user groups separately by using Device
Manager. For details, see the Device Manager manuals.
1-7 Using Provisioning Manager with Other Products
This section outlines the advantages of using Provisioning Manager with Hitachi Dynamic Link Manager
(HDLM) and third-party Volume Managers.
1-7-1 Using Provisioning Manager with HDLM
Setting up more than one physical path between a host and a subsystem can enhance system reliability and
availability. You achieve path redundancy by using the path management functionality of Hitachi Dynamic Link
Overview of HP StorageWorks XP Provisioning Manager 21
Page 22

Manager (HDLM). You must install HDLM on each host in advance. Figure 1-6 provides an overview of the
relationships between HDLM, the host, the storage subsystem, and the management servers when path
redundancy is provided.
HDLM manages access paths from a host port to a port in the storage subsystem. Because HDLM provides
functionality for switching to another path in the event of a failure and for distributing the workload among the
paths, linking HDLM with Provisioning Manager provides the following advantages:
• Failover
You can set up multiple paths between the host and logical units (LUs) in the subsystem. If a failure
occurs on an active path, HDLM automatically switches to another normal path so that processing can
continue.
• Failback
When a failed path is recovered, HDLM can restore the recovered path to active status (the status in
which I/Os can be issued normally).
• Load distribution
You can set up multiple paths between the host and the LUs in the subsystem. Appropriate paths are
used for I/O processing at the LUs. This prevents performance in the overall system from being degraded
due to the workload being concentrated on a particular path.
• Path health check
HDLM can automatically check the status of paths at regular intervals and is able to detect failures. This
enables the user to recognize path errors and take appropriate action.
For more information on Dynamic Link Manager, please see the following documents:
• Hitachi Dynamic Link Manager User’s Guide for AIX® Subsystems
• Hitachi Dynamic Link Manager User’s Guide for Sun™ Solaris™ Subsystems
Overview of HP StorageWorks XP Provisioning Manager 22
Page 23

Figure 1-6 Path Redundancy Provided by HDLM
1-7-2 Using Provisioning Manager with Volume Managers
If you want to expand a file system that was created with Provisioning Manager, you can use third-party volume
manager software. Expanding a file system means increasing the size of the file system whenever it becomes
necessary to do so, without affecting the data in the existing files created in that file system.
Volume manager products are installed on the host, and can be used either together with HDLM or separately.
If a file system might be expanded after it is created, you must specify which volume manager was used to
create the file system.
volume manager is linked.
To create a file system, the volume manager creates a volume (disk) group for each LU, and then creates one
logical volume in the volume group as shown in
volume.
Figure 1-7 shows a system configuration (without using Dynamic Link Manager) when a
Figure 1-8 provides an overview of creating and expanding a file system.
Figure 1-7. The file system is then created in that logical
Overview of HP StorageWorks XP Provisioning Manager 23
Page 24
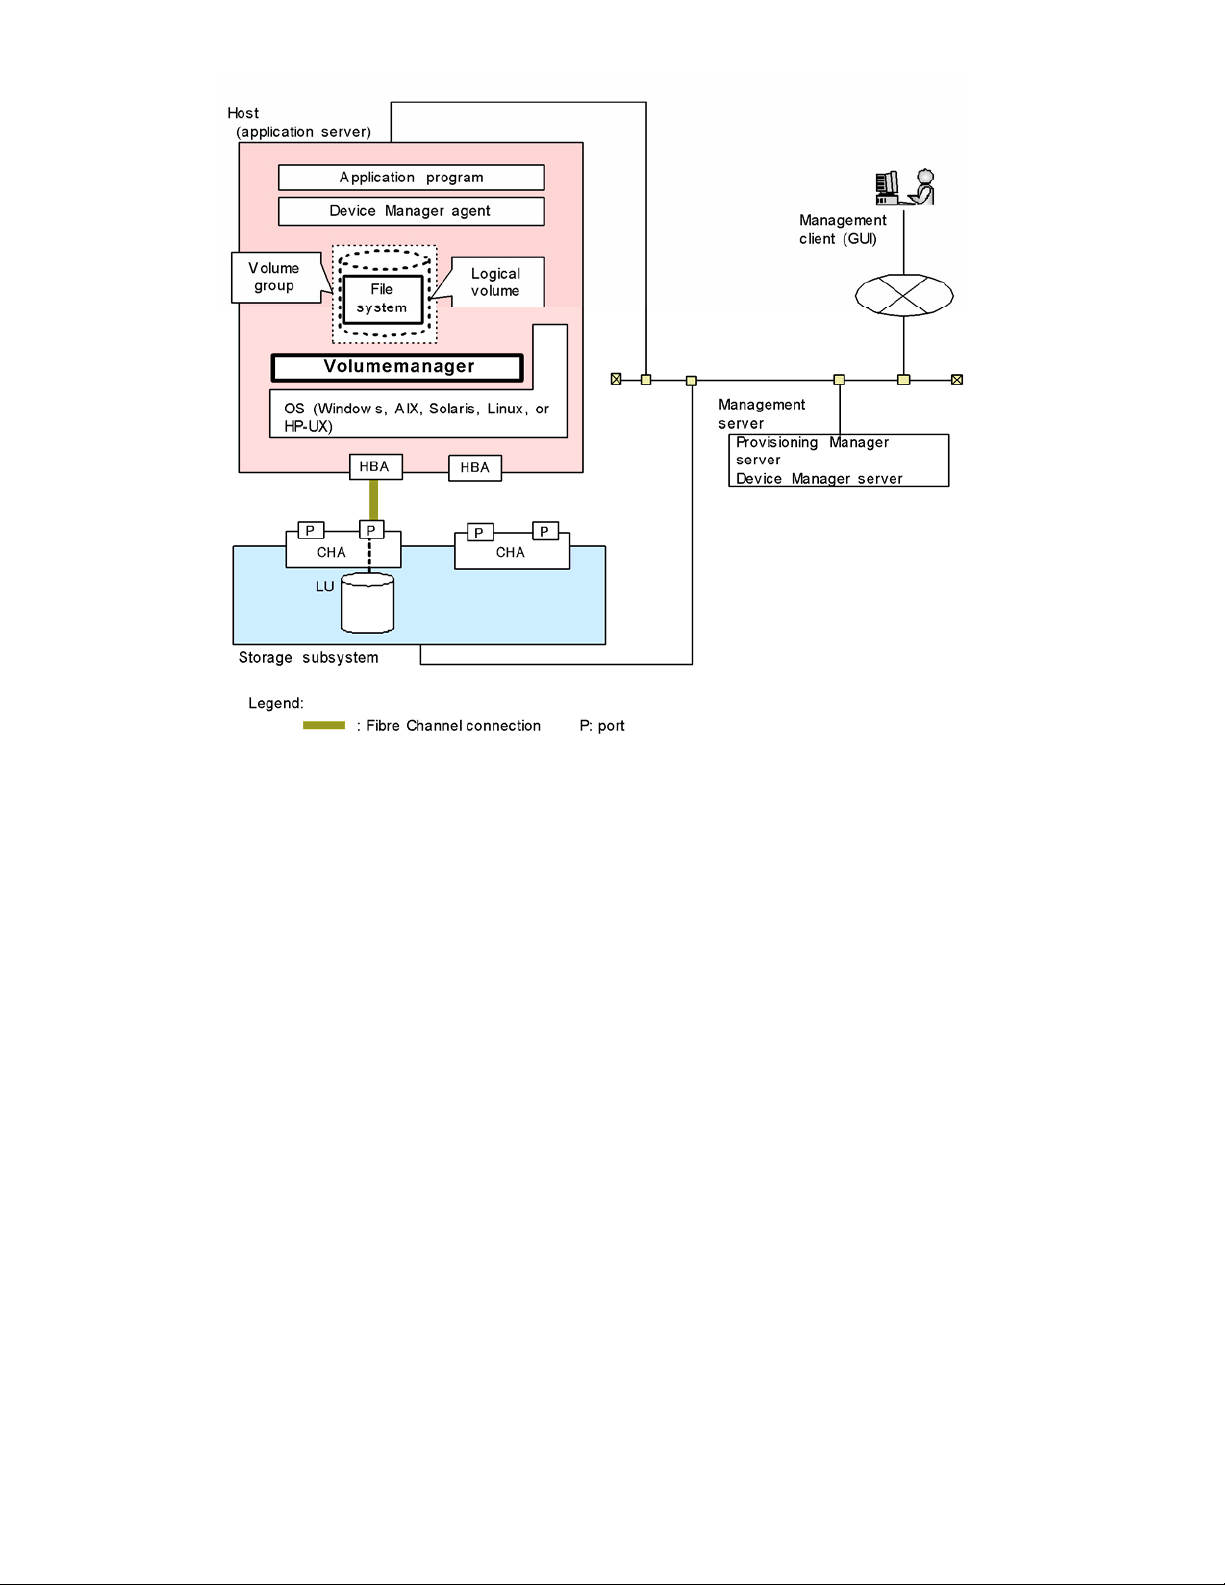
Figure 1-7 Linking with a Volume Manager (Creating a File System)
To expand a file system, the volume manager adds an LU into the volume (disk) group to expand the logical
volume as shown in
Figure 1-8, then the file system in the logical volume is expanded.
Overview of HP StorageWorks XP Provisioning Manager 24
Page 25

Figure 1-8 Linking with a Volume Manager (Expanding a File System)
1-7-2-1 Types of Volume Managers
A Volume Manager must be installed on the host. Some volume managers are provided by default with the
host OS. Other volume managers might be available even if they are not provided by default.
1-7-2-2 Setting Up for Volume Managers
You can link the volume managers of other manufacturers with Provisioning Manager. Some volume managers
are provided by default with the host OS. Other volume managers might be available on some OSs even if they
are not provided by default. You do not need to perform setup, other than installation of a volume manager that
is not provided by default with the host OS on the host, in order to link a volume manager with Provisioning
Manager. Even if a volume manager is installed on the host, each time you create a device file or file system,
you must specify on the GUI window whether that volume manager is to be used. As a result, the storage
subsystem might contain some device files and file systems created by using the volume manager, and some
that were created without using the volume manager. Even if a volume manager is installed on the host and set
up to link with Provisioning Manager, the user can use the volume manager directly to create, expand, and
delete volume (disk) groups and logical volumes. If Provisioning Manager used the volume manager to create
a file system or device file, the user can use the volume manager directly to expand or delete a target volume
group or logical volume.
1-7-2-3 Specifying Use of the Volume Manager
Even if a volume manager is installed on the host, you must specify through the interface whether that volume
manager is to be used each time you create a device file or file system. As a result, the storage subsystem
might contain a mix of device files and file systems: some created by using the volume manager, and some
created without using the volume manager.
1-7-2-4 Using the Volume Manager Directly
You can use the volume manager directly to create, expand, and delete volume (disk) groups and logical
volumes even if a volume manager is installed on the host and set up to link with Provisioning Manager.
If Provisioning Manager used the volume manager to create a file system or device file, you can use the
volume manager directly to expand or delete a target volume group or logical volume.
Overview of HP StorageWorks XP Provisioning Manager 25
Page 26

1-7-3 About Single Sign-On Functionality
You can use the single sign-on functionality of the Command View XP AE Suite Common Component to
launch other Command View XP AE Suite products from Provisioning Manager’s GUI, including Device
Manager. This functionality automatically permits you to launch other products without having to re-enter your
user ID and password.
To launch other products, click the Tools menu on the menu bar of Provisioning Manager’s main window, as
shown in
Figure 1-9 Calling Other Products from the Tools Menu
Installing, uninstalling, starting, or stopping Device Manager also installs, uninstalls, starts, or stops the
Command View XP AE Suite Common Component. When you restart Provisioning Manager to obtain
database synchronization or recover a failure, you only need to operate Provisioning Manager.
Figure 1-9, and then select the desired product in the displayed Tools window.
Overview of HP StorageWorks XP Provisioning Manager 26
Page 27

2 Provisioning Manager Planning and Startup
This chapter describes the prerequisites for using Provisioning Manager, and the procedure for starting and
logging into the program.
• Before logging in to Provisioning Manager (section
• Logging in to Provisioning Manager (section
• Registering and Viewing License Information (section
• Starting Provisioning Manager Operation (section
• Using Provisioning Manager Windows (section
2-1 )
2-2 )
2-3 )
2-4 )
2-5 )
2-1 Before Logging in to Provisioning Manager
Before starting Provisioning Manager, you must check the following:
• Check that Provisioning Manager has already been installed and configured for a Provisioning Manager
environment and is ready for operation. Write down the IP address of the Provisioning Manager server.
For details on the Provisioning Manager server, see the HP StorageWorks XP Provisioning Manager
Installation and Configuration Guide.
• If any of the following tasks were being performed in Device Manager, make sure that the tasks have
finished:
• Creating volumes
• Registering users
• Allocating a host and volume to a user group
For details on the settings in Device Manager, see the HP StorageWorks Command View XP Advanced
Edition Device Manager Web Client User Guide.
• Check what browser you are using and its version.
For Windows
®
, make sure that the browser you are using is Internet Explorer 6.0 or later.
For Solaris™, make sure that the browser you are using is Netscape Navigator 7.0 or Mozilla™ 1.4.
For HP-UX, make sure that the browser you are using is Mozilla 1.7.3_02.
• When you log in to Provisioning Manager for the first time, make sure that license information has already
been registered.
You cannot log in if license information has not been registered. For details, see
2-3 .
Table 2-1 Operating Systems Supported by Management Clients that Use the GUI
OS Name Version
Windows® 2000 Windows® 2000 Server SP3
Windows
Windows
Windows
Windows
Windows
Windows
Windows
Windows Server™ 2003
(32bits)
Windows® XP Windows® XP Professional
Solaris™
(SPARC version)
HP-UX HP-UX 11i v1 (PA-RISC)
Windows Server™ 2003 Standard Edition
Windows Server™ 2003 Enterprise Edition
Windows Server™ 2003 Datacenter Edition
Windows
Windows
Solaris™ 8
Solaris™ 9
HP-UX 11i v2 (PA-RISC and IPF)
®
2000 Advanced Server SP3
®
2000 Datacenter Server SP3
®
2000 Professional SP3
®
2000 Server SP4
®
2000 Advanced Server SP4
®
2000 Datacenter Server SP4
®
2000 Professional SP4
®
XP Professional SP1
®
XP Professional SP2
Provisioning Manager Planning and Startup 27
Page 28

IMPORTANT: The language that is displayed in the Provisioning Manager GUI depends on the language
setting in the browser being used. The date format also depends on the browser’s language setting is
displayed by default as shown below. Browser time is displayed in 24-hour clock format, regardless of the
language setting.
English: MM/DD/YYYY
•
• Japanese: YYYY/MM/DD
The language used in the Browse button in the Provisioning Manager Version Information dialog box and the
license selection dialog box displayed by the Browse button depend on the version of the OS and browser
being used. If you are using English versions of the OS and browser, text in these windows is displayed in
English. If you are using a Japanese version of the OS and browser, text in these windows is displayed in
Japanese.
CAUTION: Provisioning Manager operations may not return expected results if you perform any of the
following actions:
Clicking browser-provided buttons such as the Next button or the Back button
•
• Selecting an item in the menu that is displayed when you right-click in a window
• Using a shortcut key, such as the Backspace key or the Tab key
• Choosing a menu bar item in the browser window
None of these actions will damage the databases used internally by Provisioning Manager. If necessary, you
can recover from any of the above actions as follows:
In Internet Explorer, choose the View menu in the browser window, and then choose Refresh. The window that is
•
displayed after you log in is displayed.
• In Netscape Navigator or Mozilla, choose the View menu in the browser window, and then choose Reload. The
window that is displayed after you log in is displayed.
2-2 Logging in to Provisioning Manager
When you finish the preparations described in section 2-1 , you can start Provisioning Manager from the login
dialog box.
To log in to Provisioning Manager:
1. Start the browser and enter the Provisioning Manager server URL. Enter the URL in the following format:
http://Provisioning-Manager-server-address:port-number/ProvisioningManager/
In place of Provisioning-Manager-server-address, enter either the IP address of the Provisioning Manager
server or the host name.
For port-number, enter the port number of the Common Web Service of the Command View XP AE Suite
series. For details, see the HP StorageWorks Command View XP Advanced Edition Device Manager
Server Installation and Configuration Guide.
Example: If the IP address is 172.16.45.1 and the default value of the port number is 23015, enter the
address as shown below:
http://172.16.45.1:23015/ProvisioningManager/
The Provisioning Manager title dialog box is displayed (see
Figure 2-1).
Provisioning Manager Planning and Startup 28
Page 29

Figure 2-1 Provisioning Manager Title Dialog Box
2. Click the Go to Login page button. The login dialog box is displayed, as shown in
Figure 2-2 below.
Figure 2-2 Provisioning Manager Login Dialog Box
3. Enter the User ID (user name defined with Device Manager) and Password.
NOTE: The default User ID is “system”. The default password is “manager”.
The Password is case sensitive. If you enter an invalid password, a login dialog box displays an error
message. In such a case, enter the correct password. The dialog box displaying an error message is
shown in
Figure 2-3 below.
Provisioning Manager Planning and Startup 29
Page 30

Figure 2-3 Login Dialog Box Displaying an Error Message
4. Click the Login button. The main window of Provisioning Manager is displayed (see
NOTE: When you click the Login button without registering the license information, an error message
is displayed in the Login dialog box. Register the license information, and then log in to Provisioning
Manager.
Figure 2-4).
Figure 2-4 Main Window of Provisioning Manager
2-3 Registering and Viewing License Information
In the About - Provisioning Manager window, you can register or view license information. To register or view
the license information for Provisioning Manager:
1. Click the License button in the Login dialog box. The Provisioning Manager Version Information dialog
box is displayed (see
2. View or register the license information. You can view the version, license type, license management
number corresponding to the license key, and licensed capacity. The license type displays one of the
following: Permanent, Temporary, Emergency, Unregistered.
IMPORTANT: When a temporary license is used, the license management number and license
capacity that correspond to the license key are not displayed.
3. Configure the license information.
To enter the license key, select the License Key radio button, and enter the license key.
To use a license file, select the License File radio button, and use the Browse button to choose a license
file.
4. To confirm the license information configured in step 3, click the Save button. A message stating that the
license has been registered is displayed.
5. Click the Close button. The Login dialog box is displayed on the screen.
Figure 2-5).
Provisioning Manager Planning and Startup 30
Page 31

Figure 2-5 Provisioning Manager Version Information Dialog Box
2-4 Starting Provisioning Manager Operation
After you have logged in to the Provisioning Manager server, you can start Provisioning Manager operation.
You can access all the functionality from the main window of Provisioning Manager.
To start Provisioning Manager operations:
1. Log in to Provisioning Manager. The List Objects - Provisioning Manager subwindow is displayed (see
Figure 2-6).
2. Select an object from the Object List table in the information frame (lower right). You can select an object
in the navigation frame (left frame) to start operations as well. The following describes the operations
when you select an object from the Object List table in the information frame (lower right):
• To manage storage pools, select Storage Pool. For details about managing storage pools, see
section 3-1 .
• When you want to view the basic information of the host or manage the file system and the device
file, select Hosts.
For details about viewing host information, see section
For details about managing file systems, see section
For details about managing device files, see section
• When you want to manage the provisioning plan, select Provisioning Plans.
For details on managing provisioning plans, see section
• When you want to view the operation history, select Transaction Logs.
For details on viewing operation history, see section
3-1-1 .
3-4 .
3-5 .
3-6 .
3-7 .
Provisioning Manager Planning and Startup 31
Page 32

Figure 2-6 List Objects - Provisioning Manager Subwindow
2-5 Using Provisioning Manager Windows
This section describes the frames that make up the Provisioning Manager window and also items shown in the
pop-up window. Figure 2-7 shows the frames that make up the Provisioning Manager window.
The names and purposes of the frames are described below:
• Menu-bar frame (section 2-5-1 )
The menu-bar frame provides commands concerning overall operations of Provisioning Manager, such as
logging out and showing the version information. When a command is selected, the associated pop-up
dialog box is displayed.
• Navigation frame (section
The navigation frame lets you select a target on which you want to perform an operation by using
Provisioning Manager. When an item is selected in this frame, the subwindows to start the selected
operation are displayed in the method frame and the information frame.
The window displayed in each frame is called a subwindow in this manual.
• Method frame (section 2-5-3 )
The method frame lets you select the operation you want to start. When an item is selected, a subwindow
is displayed in the information frame. A pop-up dialog box might appear instead.
• Information frame (section
The information frame shows the information necessary for various settings in the table format.
2-5-2 )
2-5-4 )
For pop-up dialog box information, see section
2-5-5 .
Provisioning Manager Planning and Startup 32
Page 33

Figure 2-7 Frames of the Provisioning Manager Window
2-5-1 About the Menu-Bar Frame
The menu-bar frame provides commands to control overall operations of Provisioning Manager, such as
logging out and displaying version information. When a command link is selected, its associated pop-up dialog
box is displayed.
The menu-bar frame contains the following items (commands).
Tools
When you click the Tools link, a dialog box is displayed that allows you to display windows of other
programs.
Logout
When you click the Logout link, a dialog box is displayed for confirming that you wish to log out.
Close
When you click the Close link, a dialog box is displayed for confirming that you wish to close the
browser.
Profile
When you click the Profile link, a dialog box is displayed that lets you view user information.
About
When you click the About link, a dialog box is displayed that provides the product’s version
information and license information. You can also register license information in this dialog box.
Help
When you click the Help link, the Provisioning Manager Help is displayed.
2-5-2 About the Navigation Frame
The navigation frame lets you select a target on which you want to perform an operation by using Provisioning
Manager. When an item is selected in this frame, the subwindows to start the selected operation are displayed
in the method frame and the information frame.
Click Refresh to refresh information in the window.
Refresh
When you click Refresh link, the navigation frame is refreshed.
Provisioning Manager Planning and Startup 33
Page 34

IMPORTANT: The information set by using Device Manager is not automatically displayed in the
Provisioning Manager window. When you set the information by using Device Manager, click Refresh to
display the latest information.
Each item in the window is described below:
(1) Provisioning Manager
(2) Storage Pool
(3) Hosts
(4) Provisioning Plans
(5) Transaction Logs
(1) Provisioning Manager
When you click the Provisioning Manager link, a subwindow for starting Provisioning Manager operations
is displayed in the method frame and information frame.
(2) Storage Pool
When you click the Storage Pool link, a subwindow for starting storage pool management is displayed in
the method frame and information frame.
(3) Hosts
When you click the Hosts link, a subwindow for starting host operations is displayed in the method frame
and information frame.
• HostName
When you click
on the left of the Hosts link, a HostName is displayed.
When you click a HostName link, a subwindow for viewing basic information about the host is
displayed in the method frame and information frame.
• File Systems
When you click
on the left of the HostName link, File Systems is displayed.
When you click the File Systems link, a subwindow for starting file system management is displayed
in the method frame and information frame.
MountPoint
When you click
on the left of the File Systems link, a MountPoint is displayed.
When you click a MountPoint link, a subwindow for starting file system expansion or deletion is
displayed in the method frame and information frame.
• Device Files
When you click
on the left of the HostName link, Device Files is displayed.
When you click the Device Files link, a subwindow for starting device file management is displayed in
the method frame and information frame.
PathName
When you click
on the left of the Device Files link, a PathName is displayed.
When you click a PathName link, a subwindow for deleting the device file is displayed in the
method frame and information frame.
(4) Provisioning Plans
When you click the Provisioning Plans link, a subwindow for starting provisioning plan management is
displayed in the method frame and information frame.
Allocation Plans
When you click
on the left of the Provisioning Plans link, Allocation Plans is displayed.
Provisioning Manager Planning and Startup 34
Page 35

When you click the Allocation Plans link, a subwindow for starting allocation plan management is
displayed in the method frame and information frame.
PlanName
When you click
When you click a PlanName link, a subwindow for starting deletion or editing of an allocation plan is
displayed in the method frame and information frame.
(5) Transaction Logs
When you click the Transaction Logs link, a subwindow for starting transaction log management is
displayed in the method frame and information frame.
on the left of the Allocation Plans link, a PlanName is displayed.
2-5-3 About the Method Frame
The method frame lets you select details of the operation you want to start. When an item is selected, a
subwindow is displayed in the information frame. A pop-up dialog box might appear instead.
The common items are described below:
• subwindow-name
Displays the subwindow name. In this manual, a subwindow refers to a window displayed within a frame.
• method-name
Displays the method name. In this manual, a method refers to an item used to start an operation. When
selected, either a new subwindow is displayed in the information frame, or a pop-up dialog box is
displayed.
2-5-4 About the Information Frame
The information frame shows a table containing information necessary for various settings. Figure 2-8 shows
the subwindow example displayed in the information frame.
Figure 2-8 Subwindow Example Displayed in the Information Frame
Items used in common among windows are described below:
• Object address: The displayed frame indicates which object is selected in the navigation frame. The
object address displays the hierarchy from the root object (Provisioning Manager) of the navigation frame
to the selected object, separated by the right angle bracket (>).
For example, when the Host_C is selected in the navigation frame, the following is displayed:
Example: Provisioning Manager > Hosts > Host_C
• subwindow-name: Displays the subwindow name. In this manual, a subwindow refers to a window
displayed within a frame.
• Help: Displays Help, which lets you view details about items in the relevant frame.
Provisioning Manager Planning and Startup 35
Page 36

2-5-5 About Popup Dialog Boxes
Popup dialog boxes display detailed information and commands for performing operations with Provisioning
Manager.
Figure 2-9 Example of a Popup Dialog Box
The common items are described below:
Figure 2-9 shows an example of a pop-up dialog box.
• Object address
The dialog box displayed indicates which object is selected in the navigation frame. The object address
displays the hierarchy from the root object (Provisioning Manager) of the navigation frame to the selected
object, separated by the right angle bracket (>).
Example: Provisioning Manager > Provisioning Plans > Allocation Plans
• dialog-name
Displays the name of the dialog box.
• Help
Displays Help, which lets you view details about items in the current dialog box.
Provisioning Manager Planning and Startup 36
Page 37

3 Using Provisioning Manager
This chapter provides an overview of the main features of Provisioning Manager, with an emphasis on what
you can do with the product and how it contributes to improved efficiency.
• Managing Storage Pools (section
• Allocating and Unallocating Volumes (section
• Managing Hosts (section
• Creating, Expanding, and Deleting File Systems (section
• Creating and Deleting Device Files (section
• About Provisioning Plans (section
• Managing Transaction Logs (section 3-7 )
• Restrictions on Host Management (section
3-3 )
3-1 )
3-6 )
3-1 Managing Storage Pools
A storage pool is a collection of storage volumes (also called logical units or LUs). By organizing storage
volumes into categories, you can manage storage pools by administrator, application, usage, or other purpose.
This also allows you to manage storage logically by consolidating multiple storage subsystems consisting of
the same or different physical storage devices into a single logical storage area.
of storage pool organization.
3-2 )
3-4 )
3-5 )
4-1 )
Figure 3-1 shows an example
Figure 3-1 Organizing Storage Pools in Different Ways
3-1-1 Viewing Storage Pool Usage Status
You can display the allocation status (total capacity, allocated capacity, allocated ratio, and so on) of a storage
pool. Storage systems can be viewed from various perspectives as part of a provisioning plan. This enables
you to easily and efficiently manage massive storage volumes from a logical perspective, without having to be
aware of the physical boundaries or detailed hardware configuration of the storage subsystems.
Figure 3-2 is a conceptualization of storage pool management. In the figure, the terms allocated and
unallocated have the following meanings.
• Allocated: A state in which the relevant volume is assigned to a host (a path from the host to the storage
volume is set)
• Unallocated: A state in which the relevant volume is not assigned to a host (no path from the host to the
storage volume is set)
You can also view the allocation status of a storage pool in terms of the capacity base of each storage
subsystem, by using a provisioning plan to define filtering conditions. This enables you to easily and efficiently
monitor and perform the physical aspects of storage management, such as adding and removing storage
subsystems and disks.
Using Provisioning Manager 37
Page 38

Figure 3-2 Storage Pool Management in Concept
3-1-2 Storage Pools and Storage Areas Provided by Device Manager
A Provisioning Manager storage pool is created by applying the My Storage mechanism provided by Device
Manager.
• Each My Storage area has a one-to-one correspondence with a storage pool (when storage pools of user
groups at lower levels are included).
• The hierarchical structure of the logical groups enables hierarchical management of storage pools.
Figure 3-3 shows the relationships between logical groups, user groups, My Storage areas, and storage pools.
In Figure 3-3, the user groups UG A1 and UG A2 exist under the user group UG A, and UG A is under the
system administrator’s user group Admin.
Using Provisioning Manager 38
Page 39

Figure 3-3 Relationships between Logical Groups, User Groups, My Storage Areas, and Storage Pools
A storage pool is created for each user group. For each group, the range of the storage pool that can be used
(accessed and operated) contains the storage pool of the user group to which the user belongs and the storage
pools of any lower-order user groups in the hierarchy of user groups.
In contrast to the examples shown in
that sibling user groups, such as those depicted by UG_A1 and UG_A2 above, can share a common area.
3-1-3 Creating a Storage Pool
This section outlines the procedure for creating a storage pool. You create a storage pool using Device
Manager. Note that, for this procedure, you must have created storage volumes (LDEVs) of the required size
and number in the storage subsystem.
Only users with the following permissions are allowed to define user groups and create logical groups.
• Creating a logical group
Users with system administrator, storage administrator, local system administrator, or local storage
administrator permissions. However, users with local system administrator or local storage administrator
permissions can create only logical groups positioned below the user group to which they belong.
• Defining a user group
Users with system administrator or local system administrator permissions. However, users with local
system administrator permissions can define only user groups positioned below the user group to which
they belong.
To create a storage pool:
Figure 3-3, a My Storage area (storage pool) can also be configured so
1. Create logical groups by administrator, application, usage, or other purpose.
Create a hierarchical structure for the logical groups, taking into consideration your storage management
system.
2. Define a user group. At this point, you can optionally register users to the user group.
3. Associate logical groups with user groups. Configure the hierarchical structure of the user groups to be
the same as that of the logical groups.
4. Register the storage volumes (LDEVs) and the hosts that are to be managed under the user group.
Using Provisioning Manager 39
Page 40

3-1-4 Linking Storage Pools with CLPR and SLPR Functions
StorageWorks XP12000/XP10000 provide a function (CLPR) for logically dividing caches. StorageWorks
XP12000/XP10000 also provides a function (SLPR) for logically dividing resources in storage subsystems.
CLPR and SLPR functions enable you to assign a partitioned storage administrator to resources that have
been partitioned by purpose and usage.
Provisioning Manager displays CLPR and SLPR numbers as logical unit attributes. You can use these CLPR
and SLPR numbers to create a storage pool for each CLPR or SLPR by moving volumes and to search for the
optimum logical unit for hosts.
Only a user with System Administrator permissions can create storage pools and allocate logical units using
the CLPR and SLPR numbers. Use Device Manager to establish correspondence between the storage
subsystem administrator and partitioned storage administrator permissions and the Provisioning Manager
permissions.
The following figures show how to create a storage pool and how to assign a volume by using the CLPR and
SLPR functions:
Using Provisioning Manager 40
Page 41

Figure 3-4 Creating a Storage Pool by Using the CLPR and SLPR Functions
Figure 3-5 Assigning a Volume by Using the CLPR and SLPR Functions
Using Provisioning Manager 41
Page 42
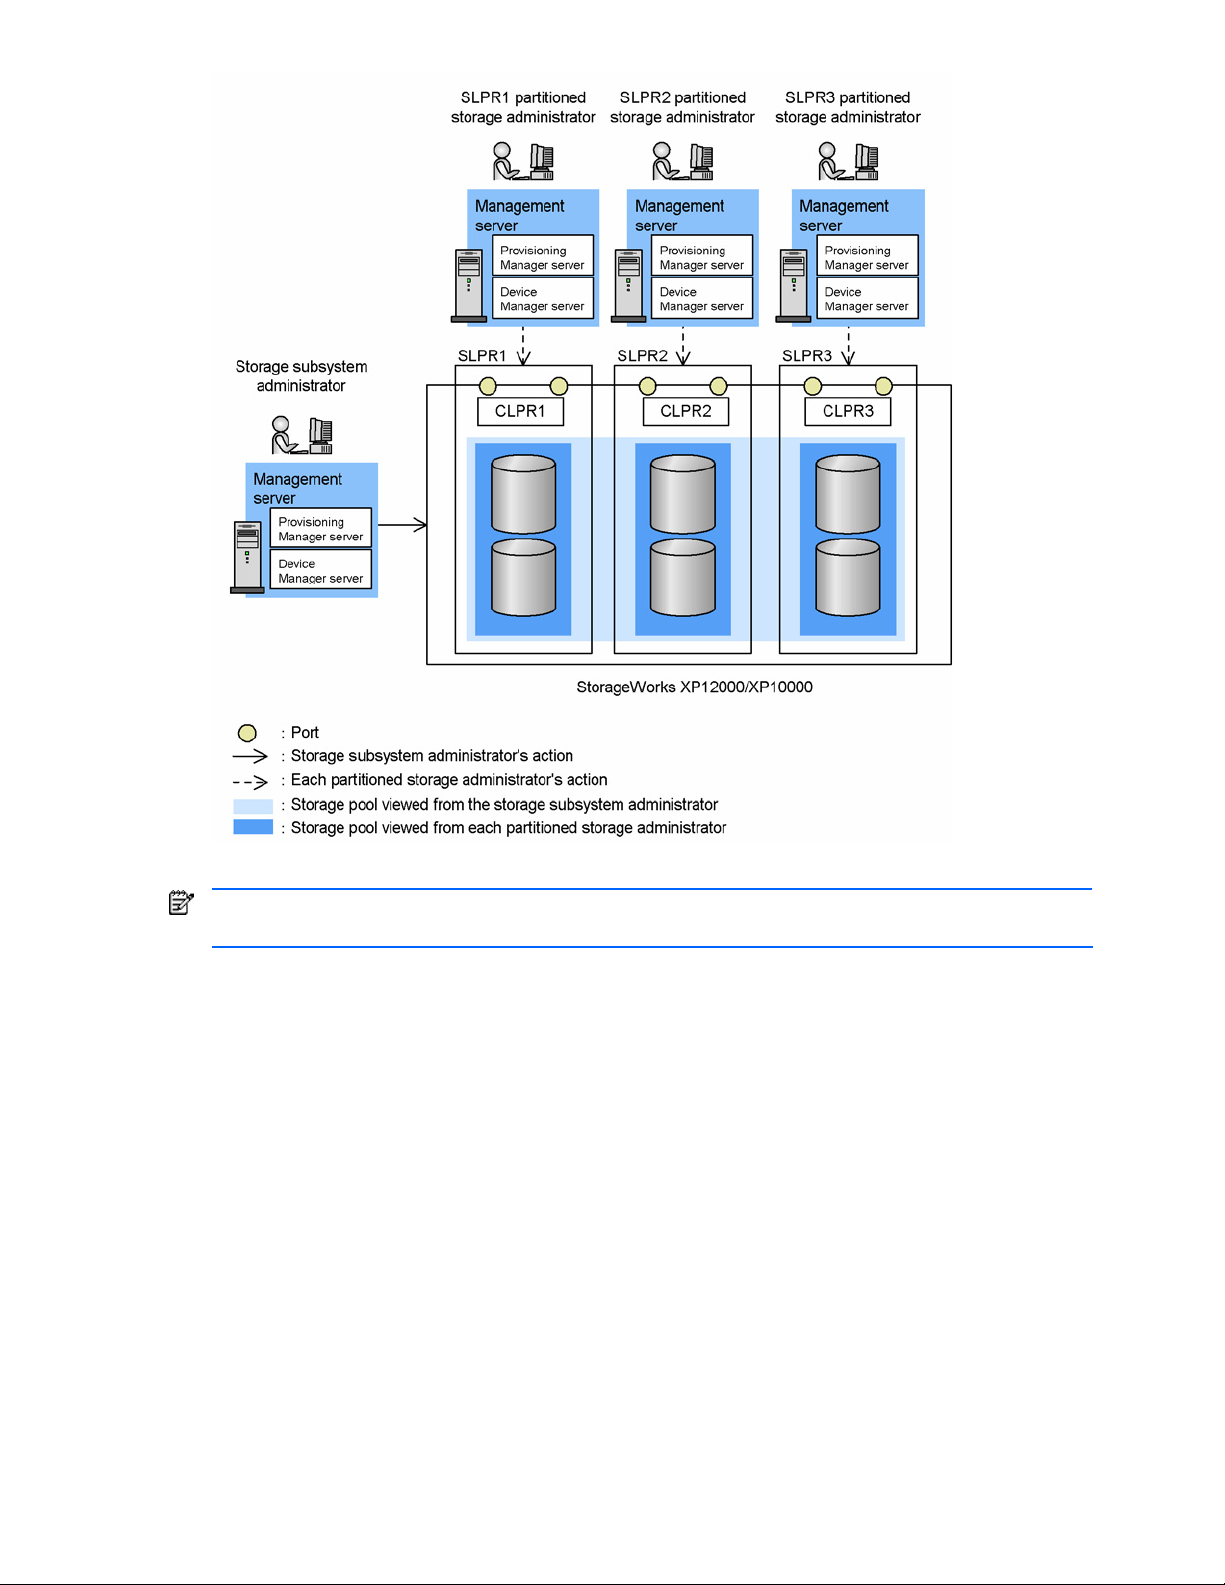
Figure 3-6
NOTE: The configuration shown in Figure 3-6 is also supported for SSP, etc. By installing a server for each
SLPR, you can manage resources in a specific SLPR from each server.
Partitioned Resource Administration by Server for Each SLPR
3-1-5 Moving Volumes between Storage Pools
You can move storage volumes that have not been allocated to a host into other storage pools. Use this
function when you want to redistribute unallocated storage volumes, based on the results of a storage pool
allocation status analysis obtained by displaying the storage pools in their entirety or from a particular
perspective.
3-1-6 Viewing Usage Status for Storage Pools
You can view the total capacity, allocated capacity, and the allocated ratio of a storage pool associated with a
user group. Summary and detailed views are available.
3-1-6-1 Summary View
If the specified user group has any user groups under it, calculated totals include storage pools of both the
specified user group and its lower-order user groups.
By changing the user group that is specified, you can move your perspective up or down within the user group
hierarchy (however, you cannot move your perspective to a user group higher than the user group of the
logged-on user).
3-1-6-2 Detailed View
If the specified user group has any user groups under it, calculated totals do not include the storage pools of its
lower-order user groups. Instead, the total capacity, allocated capacity, and allocated ratio of the storage pool
of the specified user group, and of the storage groups of its lower-order user groups, are displayed.
Using Provisioning Manager 42
Page 43

However, if there are any storage pools positioned two or more levels below the specified user group, the
figures for the storage pools of any user groups two and more levels below are totaled and added to those for
the storage groups of the user groups directly below the specified one.
By changing the user group that is specified, you can move your perspective up or down within the user group
hierarchy (however, you cannot move your perspective to a user group higher than the user group of the login
user).
3-1-7 Viewing Storage Pool Information from Different Perspectives
You can view information about storage pools from different perspectives. You can view such information by
classifying provisioning plan items into categories, or you can view information by storage subsystem. With
either perspective, you can view summary or detailed information for user groups.
3-1-7-1 Using Perspective Based on Provisioning Plan Items
By specifying provisioning plan items as a perspective, you can view total capacity, allocated capacity,
allocated ratio, and other information about storage pools as classified by the perspective.
3-1-7-2 Using Perspective Based on Storage Subsystems
By specifying storage subsystems and filtering conditions (provisioning plan) as a perspective, you can view
the total capacity, allocated capacity, allocated ratio, and other information about storage subsystems as
classified by the perspective.
3-1-8 Viewing a List of Volumes
You can narrow down and view a list of allocated and unallocated volumes included in a storage pool by
specifying a capacity (minimum and maximum values) or filtering conditions (provisioning plan).
3-1-9 Moving Volumes between Storage Pools
You can move storage volumes that have not been allocated to a host into other storage pools. Use this
function when you have determined that you must redistribute unallocated storage volumes, based on the
results of a storage pool allocation status analysis or due to the merging or splitting of one or more storage
pools.
Storage volumes can be moved by users with system administrator or local system administrator permissions.
Note, however, that the logged-on user cannot move storage pools to which he or she does not have access
rights. In other words, the logged-on user cannot move storage pools higher than the storage pool associated
with his or her user group. You cannot move any storage volumes to the storage pools where sibling user
groups share a common area.
Figure 3-7 shows an example of the storage volumes that a user is allowed to move. Note that you may not be
able to move storage volumes that have been allocated to a host using Device Manager.
Using Provisioning Manager 43
Page 44

Figure 3-7 Example of Moving Volumes between Storage Pools
3-2 Allocating and Unallocating Volumes
You can allocate a storage volume included in a storage pool to any host managed by a user group, and you
can unallocate a storage volume from a host. You can also use a filtering facility defined in a provisioning plan
to easily manipulate massive storage volumes that are displayed in a list of unallocated volumes or in a list of
allocated volumes.
This facility provides settings for storage subsystems only; host settings are performed using functionality,
described later, for managing hosts, and for creating file systems and device files.
3-2-1 Allocating a Volume to a Host
You can select one or more unallocated volumes that are listed and allocate them to a host. Allocating a
volume means to set a path between the host and the volume that is routed via a subsystem port.
When you allocate a volume to a host, configure all the settings for the storage subsystem from the list of
allocated volumes or the list of unallocated volumes displayed in Provisioning Manager.
Using Device Manager to allocate the volume to a host allows you to view host information in the Provisioning
Manager Show Hosts window.
Before allocating a volume to a host, however, the host must be set up as part of the system. The procedure
for setting up a host in a system differs depending on whether you plan to operate the host with or without a
Device Manager agent. Both of these cases are explained in the following sections.
3-2-1-1 Operating With the Device Manager Agent
To set up a host in a system:
1. Add the application server (host) to a network connected to a management server.
2. Install a Device Manager agent onto the host or restart the host if one is already installed. This step
registers the host in the system.
3. Use the Provisioning Manager update (refresh) function to register the host (the WWN of the host port) to
the system.
4. Use Device Manager to place the host under the management of the user group that manages the
storage pool.
Whether you operate with or without the Device Manager agent, registering a host to a system can be
performed by users with system administrator or storage administrator permissions. Placing a host under the
management of a user group can be performed by users with system administrator or local system
administrator permissions. However, users with local system administrator permissions can place hosts only
under the management of groups positioned below the user group to which they belong.
3-2-1-2 Operating Without the Device Manager Agent
To set up a host in a system:
Using Provisioning Manager 44
Page 45

1. Use the Device Manager host registration function to manually register the host in a system (register the
WWN of the host port).
2. Use Device Manager to place the host under the management of the user group that manages the
storage pool.
3-2-2 Unallocating a Volume
You can select one or more allocated volumes from among those listed to unallocate them from a host.
When you unallocate a volume from a host, configure all the settings for the storage subsystem from the list of
allocated volumes displayed in Provisioning Manager.
3-3 Managing Hosts
You can use Provisioning Manager to manage hosts to which storage volumes have been allocated.
Provisioning Manager provides functions for displaying and updating (refreshing) host information.
3-3-1 Viewing Host Information
You can view the attributes of a selected host. Here, the term attributes refers to the information needed to
operate Provisioning Manager, such as information for recognizing the host, a summary of the volume
operation information, and information on prerequisite and related products that are installed. Examples of the
information displayed in a Show Hosts window are listed below.
• Host recognizing information: Name and IP address of a host
• Summary of volume operation information: Total capacity of storage utilized by a host
• Information on prerequisite and related products: Operating systems, Device Manager agents, path
management software, volume managers, and similar products
Note that information normally reported using Device Manager agents that are not installed, or Device Manager
agents that are installed but are not active, cannot be displayed or configured as host information.
3-3-2 Updating Host Information
Not only can Provisioning Manager be used to obtain host information from a Device Manager agent but, by
using the update (refresh) function, you can update all information displayed by Provisioning Manager
whenever needed. You can update host attributes, and you can also update detailed information on volume
operation, such as file system information and device file information.
The only times other than by using the refresh function that information can be obtained from a Device
Manager agent is when the Device Manager agent is started, when a HiScan command is executed, or when
the agent periodically reports. This means that, if a user is performing manual operations on a host, the
configuration results are not updated to Provisioning Manager at that time. Note, also, that reports obtained
from Device Manager agents in these latter cases do not update information from prerequisite and related
products. The information from prerequisite and related products is registered in Provisioning Manager by the
refresh function.
3-4 Creating, Expanding, and Deleting File Systems
Creating a file system on a volume (LU) allocated to a host, expanding a file system, and deleting a file system
can all be performed from a management client in a single operation.
3-4-1 Creating a File System
Once you specify a host and select a volume (LU) from among the volumes allocated to that host, Provisioning
Manager can automatically perform a series of operations to create a file system on that volume. The created
file system is mounted on the file system that is on the host’s OS.
To create a file system, specify the following:
• File system type: Select a file system type from among those that can be used by the host.
• Mount point: Specify the path name to indicate the location of the mount point for the file system. This
path name is used later to recognize the file system.
CAUTION: Double-byte code, such as a Japanese character, is not usable for the mount point name to
be specified when adding a file system.
• Volume manager: To use a volume manager, select one from among the volume managers that are
installed. You must specify a volume manager to create an expandable file system.
Using Provisioning Manager 45
Page 46
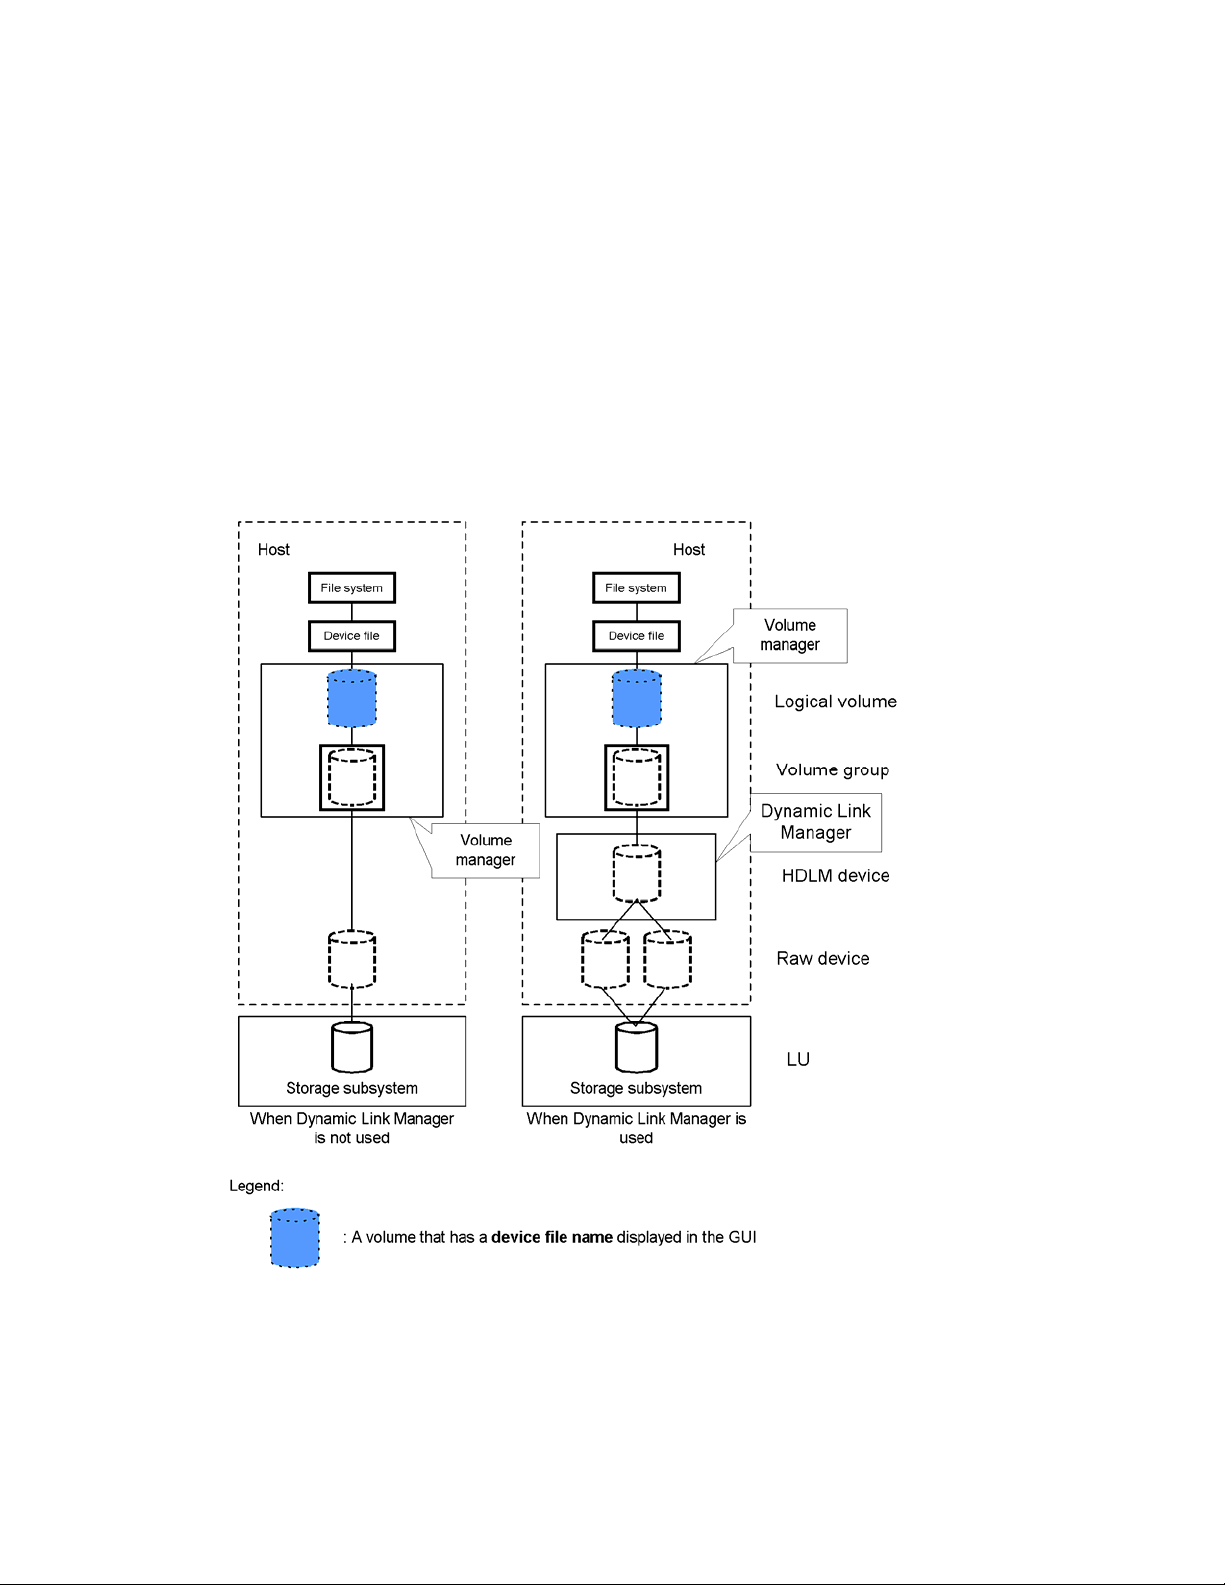
The process of creating a file system differs depending on whether Hitachi Dynamic Link Manager (HDLM)
software is installed on the host, and on whether a volume manager is to be used to manage the file system
being created.
A subsystem volume (LU) allocated to a host is treated as a raw device by the host. When HDLM is not used, a
single raw device is mapped to a single LU. If HDLM is used (when multiple paths exist between the host and
the subsystem), the same number of raw devices as paths are created, and all of these raw devices are
mapped to a single LU.
This is explained below, with the explanation divided up according to whether or not a volume manager is used.
3-4-1-1 Creating a File System With a Volume Manager
If a volume manager is being used, the process of creating a file system is performed as described below.
The volume manager builds a single volume group from the single raw device or from the HDLM device as a
single physical device. It then creates a single logical volume in that volume group. This logical volume is
treated as a device file, and the file system is created for this device file.
Figure 3-8 shows the relationship between the file system and device file that can be seen from the host, and
the LU in the subsystem. This figure assumes that there are two paths between the host and the subsystem LU
for when HDLM is being used
Figure 3-8 Host File System/Device File and Subsystem LU (with Volume Manager)
3-4-1-2 Creating a File System Without a Volume Manager
If a volume manager is not being used, the process of creating a file system is performed as described below.
• When HDLM is not being used, the raw device corresponding to the specified LU is treated as a device
file, and the file system is created for this device file.
• When HDLM is being used, a single HDLM device is created by consolidating the multiple raw devices
associated with the specified LU. This HDLM device is treated as a device file, and the file system is
created for this device file.
Using Provisioning Manager 46
Page 47
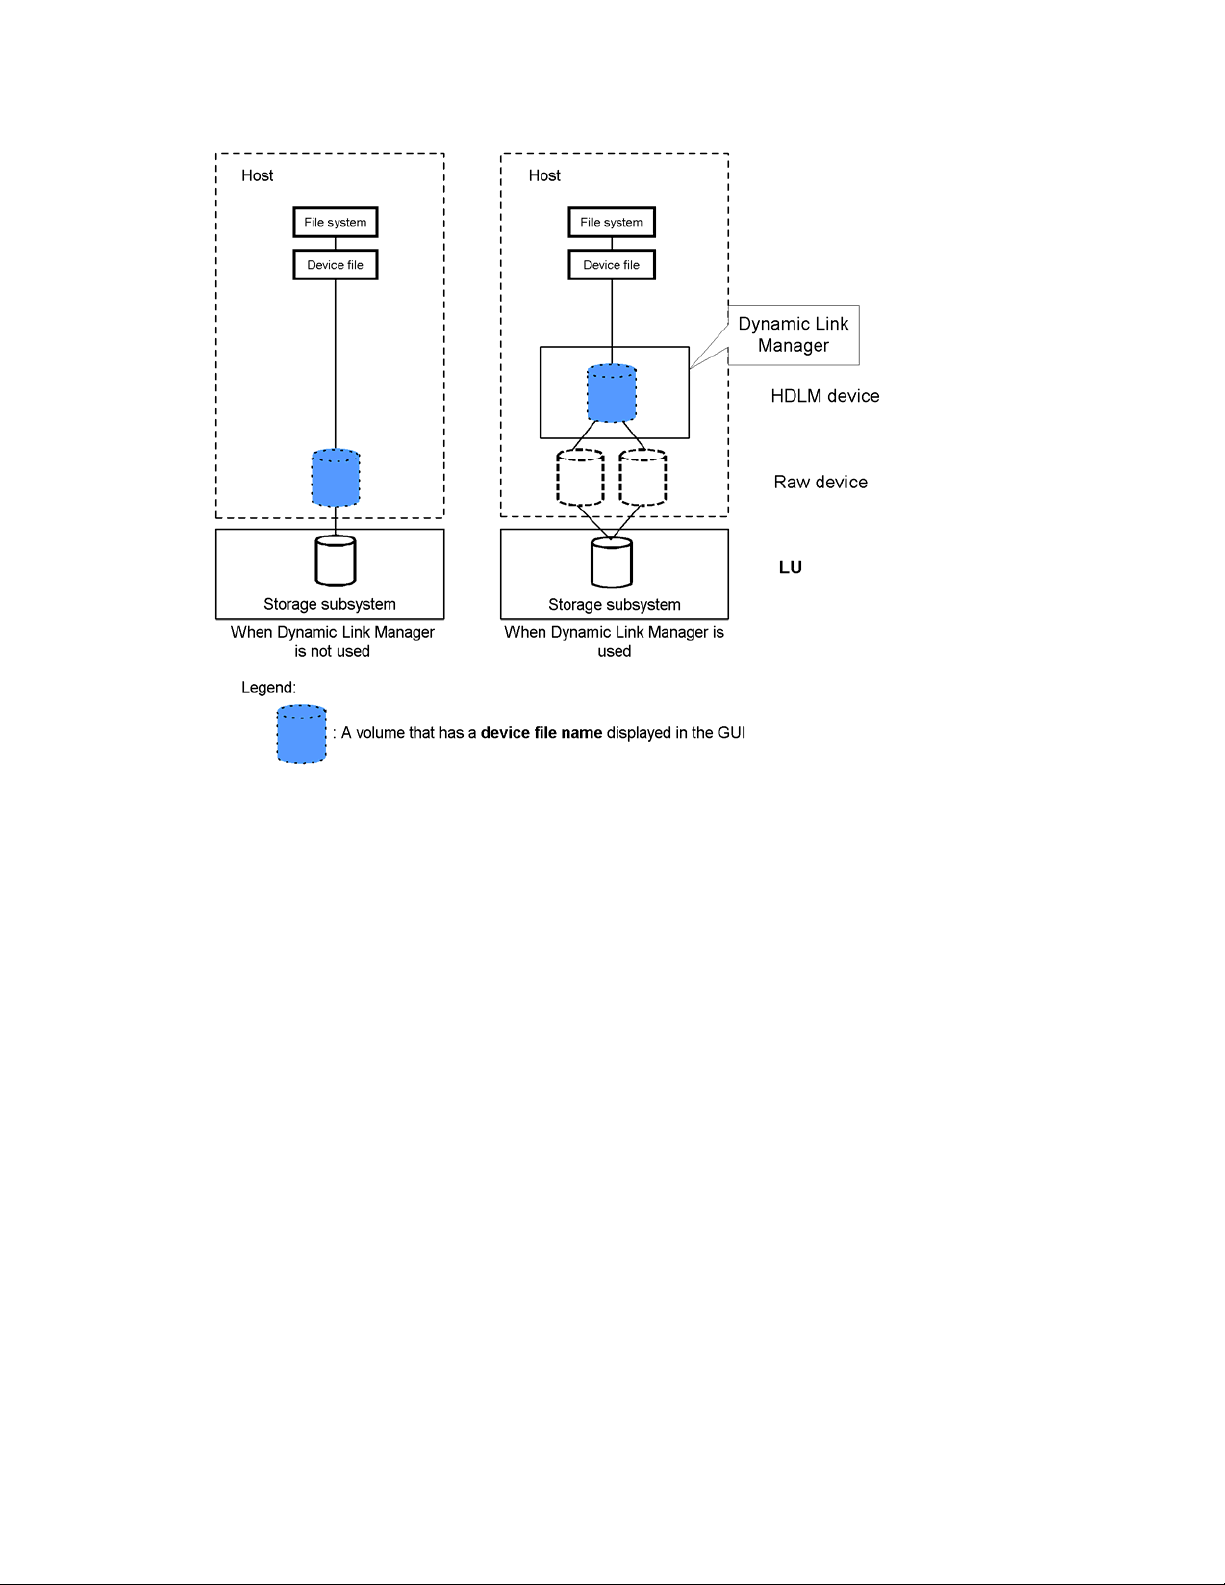
Figure 3-9 shows the relationship between the file system and device file that can be seen from the host, and
the LU in the subsystem. This figure assumes that there are two paths between the host and the subsystem LU
for when HDLM is being used.
Figure 3-9 Host File System/Device File and Subsystem LU (without Volume Manager)
3-4-2 Expanding a File System
Once you specify the file system you wish to expand and select a volume (LU) to be added from among the
volumes (LUs) allocated to the host, Provisioning Manager can automatically perform the process of expanding
the file system. However, the file system must have been created using a volume manager.
The volume specified to be added (a raw device or an HDLM device) is added to the volume group. The logical
volume configured from that volume group is then expanded, as is the file system on this logical volume.
Figure 3-10 shows the relationship between the file system and device file that can be seen from the host, and
the LU in the subsystem. This figure assumes that there are two paths between the host and the subsystem LU
when HDLM is being used.
Using Provisioning Manager 47
Page 48

Figure 3-10 Relationship Between Host File System/Device File and Subsystem LU (Expanding a File System)
3-4-3 Deleting a File System
Once you specify the file system you wish to delete, Provisioning Manager can automatically perform the
process of deleting the file system. The mount point specified by the user during the file system creation is not
deleted.
Note that this operation performs only the host-side operations; it does not remove the paths on the subsystem
side (it does not release LUNs), it does not release any LUSEs, nor does it release any volumes (LDEVs).
Therefore, the user must manually delete (unallocate) the volumes from the list or modify the Device Manager
security settings.
When you delete a file system, if a volume group has been created for the volume on which the file system
being deleted resides, the logical volume being used is deleted. Further, if the logical volume being deleted is
the last volume in the volume group, all of the physical volumes (LUs) configuring that volume group are
removed from that volume group, and the volume group is deleted.
3-5 Creating and Deleting Device Files
Creating a device file on a volume (LU) allocated to a host and deleting that device file can each be performed
from a management client in a single operation.
3-5-1 Creating a Device File
Once you specify a host and select a volume (LU) from among the volumes allocated to that host, Provisioning
Manager can automatically perform the process of creating a device file on that volume. This function is used
when you need only to create a device file on the volume, such as when the volume is being used for a
database, without having to create a file system.
As with the process of creating a file system, the process of creating a device file differs depending on whether
HDLM path management software is installed on the host, and on whether a volume manager is to be used to
manage the device file being created. Accordingly, whether to use HDLM and a volume manager differs
depending on whether the volume underlying the device file is a raw device associated with an LU, a created
HDLM device, or a created logical device.
Using Provisioning Manager 48
Page 49

Figure 3-11 shows the relationship between the device file that can be seen from the host and the LU in the
subsystem when no volume manager is being used. This figure assumes that there are two paths between the
host and the subsystem LU when HDLM is being used.
Figure 3-11 Relationship between Host Device File and Subsystem LU (without Volume Manager)
Figure 3-12 shows the relationship between the device file that can be seen from the host and the LU in the
subsystem when a volume manager is being used. This figure assumes that there are two paths between the
host and the subsystem LU when HDLM is being used.
Using Provisioning Manager 49
Page 50

Figure 3-12 Relationship between Host Device File and Subsystem LU (with VM)
3-5-2 Deleting a Device File
Once you specify the device file you wish to delete, Provisioning Manager can automatically perform the
process of deleting the device file. Note, however, that this operation performs only the host-side operations; it
does not remove the paths on the subsystem side (it does not release LUNs), it does not release any LUSEs,
nor does it release any volumes (LDEVs). Therefore, the user must manually delete (unallocate) the volumes
from the list or modify the Device Manager security settings.
When deleting a device file, if a volume group has been created for the device file being deleted, the logical
volume being used is deleted. Further, if the logical volume being deleted is the last volume in the volume
group, all of the physical volumes (LUs) configuring that volume group are removed from that volume group,
and the volume group is deleted.
3-6 About Provisioning Plans
A provisioning (allocation) plan is a collection of common items (parameters) that are specified when a storage
volume is operating. By predefining a provisioning plan, you can improve the operating efficiency of the storage
volumes.
You can apply a provisioning plan when performing the following operations:
• Viewing a storage pool by perspective (by subsystem)
• Viewing a list of allocated or unallocated volumes
• Moving a volume between storage pools
3-6-1 Creating a Provisioning Plan
You can specify the following items when creating a provisioning (allocation) plan:
• Plan name
• Description (you can specify the purpose of the plan or other desired information)
• Series name of the storage subsystem
Using Provisioning Manager 50
Page 51

• Model name of the storage subsystem
• RAID level of the storage volume (RAID 0, RAID 1, RAID 5, or other)
• Drive configuration of the storage volume (3D+1P, 2D+2D, or other)
You create a provisioning (allocation) plan in either of two ways:
• Create an entirely new provisioning plan
• Use an existing plan as a template, change some of its parameters, and then save this changed plan
under a different name.
In the Add Allocation Plan dialog box, you can add an allocation plan.
CAUTION: A user with guest or local guest access permission cannot add an allocation plan.
To add an allocation plan:
1. From the navigation frame, click Provisioning Plans.
2. Click Allocation Plans, located in the navigation frame immediately below Provisioning Plans. The method
frame displays the Allocation Plans subwindow
3. In the Allocation Plans subwindow, click Add Allocation Plan. The Add Allocation plan dialog box is
displayed (see Figure 3-13).
4. Specify settings for an allocation plan. For details about the settings items and restrictions, see the
windows Help.
5. When you finish specifying the settings, click the OK button. A confirmation dialog box is displayed for
confirming that the allocation plan is to be added.
6. Click the OK button. The Add Allocation Plan - Result dialog box is displayed.
7. In the Add Allocation Plan - Result dialog box, check the information for the allocation plan that you just
added.
IMPORTANT: The security level of the created allocation plan is configured as a private plan owned by
the user group to which the user who created the plan belongs.
8. Click the Close button. The dialog box closes, which completes the addition of the allocation plan.
Figure 3-13 Add Allocation Plan Dialog Box
3-6-2 Deleting a Provisioning Plan
In the Delete Allocation Plan – PlanName dialog box, a user can delete an allocation plan. You can also delete
allocation plans whose security level is public.
Using Provisioning Manager 51
Page 52

CAUTION:
•
A user with guest or local guest access permission cannot edit an allocation plan.
• Even for an allocation plan whose security level is public, if the login user’s access permission is Local Administrator
or Local Storage Administrator, the user cannot delete the following plans:
• An allocation plan that is owned by a user group positioned above the user group to which the login user belongs
• An allocation plan that is owned by a user group positioned in a different hierarchy from the user group to which
the login user belongs
To delete an allocation plan:
1. From the navigation frame, click Provisioning Plans.
2. Click Allocation Plans, located in the navigation frame immediately below Provisioning Plans. The method
frame displays the Allocation Plans subwindow. The information frame displays the List Objects Allocation Plans subwindow.
3. In the List Objects - Allocation Plans subwindow, click the plan name. The method frame displays the
PlanName subwindow.
4. In the PlanName subwindow, click Delete Allocation Plan. The Delete Allocation Plan - PlanName dialog
box is displayed (see
5. Click the OK button. A dialog box for confirming that you wish to delete the allocation plan is displayed.
6. If you still wish to delete the allocation plan, click the OK button.
7. Make sure that the target allocation plan is deleted in the Delete Allocation Plan - Result dialog box.
8. Click the Close button. The dialog box closes. This action completes deletion of the allocation plan.
Figure 3-14).
Figure 3-14 Delete Allocation Plan - PlanName Dialog Box
3-7 Managing Transaction Logs
A transaction log is a recording of the state and result of each operation performed by the user on a host and
the states and results of the sequence of configuration steps requested by Provisioning Manager to the host
(Device Manager agent) that is generated by these operations.
The following paragraphs explain some uses of a transaction log.
• Isolating an error
Because the state and result of each step are recorded, you can use the transaction log to isolate errors,
regardless of whether or not the operation executed successfully. Provisioning Manager expands a single
configuration operation specified by a user into multiple steps. This is helpful for isolating an error
because, in addition to the step at which the error occurred, you might also have to check the states and
results of the steps immediately preceding the step at which the error occurred.
• Checking the progress of a configuration operation
Because the state and result of each configuration step included in a configuration operation are
immediately recorded, you can use them to check the progress of an operation. Provisioning Manager
expands a single configuration operation specified by a user into multiple steps. This is helpful for
checking the progress of an operation, because an operation may take some time to complete,
depending on the environment.
• Restarting a configuration operation
Because the intermediate states of the configuration steps in a configuration operation are recorded, a
transaction log can be used to restart the configuration operation after user intervention has ended. This
is helpful because, although Provisioning Manager can be used to perform many configuration operations
centrally from a management client, in some environments you may not be able to avoid user
intervention, such as restarting of the host.
Using Provisioning Manager 52
Page 53

There are two levels by which you can view transaction logs. You can view a list of transaction logs or you can
view a detailed display of each transaction log in the list. In list view, by specifying the search conditions such
as time range, processing status, and user operation’s range, you can narrow down the range that you want to
view. For the operation that is being suspended, you can restart the operation from the list view window after
user intervention has ended.
Using Provisioning Manager 53
Page 54

4 Working With OS-Based Constraints
The following sections describe restrictions and notes on managing a host by using Provisioning Manager. The
restrictions and notes are given separately for each OS.
When adding a device file, or adding or expanding a file system for a host that is not recognizing any LUs, use
Device Manager to register the port WWN of the HBA for the host in advance. If no WWN is registered, no
volume will become selectable in the wizard step for selecting a volume, and you will be unable to continue
operations.
• Restrictions on Host Management (section
• Restrictions When the Host OS is Windows
• Restrictions When the Host OS is Solaris™ (section 4-3 )
• Restrictions When the Host OS is AIX
• Restrictions When the Host OS is Linux (section
• Restrictions When the Host OS is HP-UX (section 4-6 )
• Maximum Setting Values (section
4-7 )
4-1 Restrictions on Host Management
Some restrictions on host management apply regardless of the operating system involved, while others are
OS-specific.
4-1-1 Configuring Cluster Software
When you use the host management functionality to add, expand, or delete a file system, or add or delete a
device file, Provisioning Manager does not perform configuration of the cluster software. You must manually
configure the cluster software.
The cluster software that can use the file systems and device files created by the host management
functionality is as follows (note that it changes according to operating system):
®
• Windows
• Solaris™ host OS: VERITAS™ Cluster Server
• AIX
• Linux host OS: cluster software not supported
• HP-UX host OS: Serviceguard
host OS: Microsoft® Cluster Server (MSCS)
®
host OS: HACMP
4-1 )
®
(section 4-2 )
®
(section 4-4 )
4-5 )
4-2 Restrictions When the Host OS is Windows®
The following sections apply when the host OS is Windows®. For details about the maximum setting values for
manual configuration, see
WARNING! Make sure that you specify a unique port address for each port of the storage devices in the
same zone. If the same port addresses exist in the same zone, the OS cannot identify the ports and may not
recognize the device files. In such a state, if you add a device file, add a file system, or expand a file system
from Provisioning Manager, the device file cannot be recognized and an error occurs.
4-2-1 Prerequisites for the Host
• The Device Manager agent
You must install a Device Manager agent on a host managed by Provisioning Manager. If a Device
Manager agent is not installed, the values for some items may not be displayed.
If the Provisioning Manager support functionality for the Device Manager agent is not installed, the values
for some items may not be displayed.
• diskpart.exe command line utility
Provisioning Manager contains functionality that requires the diskpart.exe command line utility
provided by Microsoft
you must obtain the diskpart.exe command line utility separately. You can download this utility from
the Microsoft
When the OS is Windows 2003, the diskpart.exe command line utility will be started in the
®
Table 4-1 in 4-7 .
®
. When the OS of the host managed by Provisioning Manager is Windows® 2000,
web site. Install diskpart.exe in the Windows-system-installation-directory \system32.
Working With OS-Based Constraints 54
Page 55

background during host setting operation. Regardless of whether or not the host setting operation is
performed, do not stop the process of the diskpart.exe command line utility running in the background.
4-2-2 Restrictions on Adding File Systems
In the following cases, the file system is not added:
• The type of volume manager used in the applicable file system is neither a basic disk nor a dynamic disk
• The file system in use by the host is other than NTFS
• The specified mount point is already in use by another file system
Volumes that satisfy one of the following conditions cannot be used for file system addition:
• The volume manager is using a volume on a host where the Device Manager agent has been installed
• The volume is mounted on a host where the Device Manager agent has been installed
• The volume is being used as a command device
• The volume is being used as an S-VOL for Continuous Access XP
• The volume is being used as an S-VOL or SP-VOL for Business Copy XP
• The volume is being used as a V-VOL or POOL for Snapshot XP
• The volume is being used as an on-demand device
• The Read/Write permissions have not been set in the LUN Security XP Extension function
• The Auto LUN XP attribute has been set
• The volume emulation type is not one of the following: OPEN-3, OPEN-8, OPEN-9, OPEN-K, OPEN-E,
OPEN-L, OPEN-M, OPEN-V
• The volume size is less than 512 MB
• Multiple paths are assigned to the volume
• The volume is being used as a Differential Management LU
Mount points to which any of the following apply cannot be used to add a file system:
• The mount point has a name that includes two-byte characters, such as Japanese characters
• The mount point begins with a:, b:, A:, or B:
• The mount point exists on a network drive
4-2-3 Restrictions on Expansion and Deletion
4-2-3-1 Notes on Expanding a Logical Volume
Provisioning Manager cannot expand the following logical volumes:
• A basic disk
• A volume other than a simple volume and span volume
• A mirror volume
• A simple volume upgraded from a Windows
• A span volume upgraded from a Windows® 2000 basic disk volume set#
• A volume whose physical volume contains more than one logical volume
# Although the volume is displayed in the selection of the operation targets, selecting the volume results in an
error at execution of the operation.
4-2-3-2 Notes on Deleting a Logical Volume
Provisioning Manager cannot delete the following logical volumes:
• A volume other than a simple volume, span volume, or basic disk partition
• A mirror volume
• A volume whose physical volume contains more than one logical volume
# Although this volume is displayed in the selection of the operation targets, selecting the volume results in an
error at execution of the operation.
#
#
®
2000 basic disk partition#
#
#
4-2-3-3 Notes on Expanding a File System
Provisioning Manager cannot expand or add file systems in the following cases:
• The file system is of a type other than NTFS
• The volume manager used in the file system is neither a basic disk nor a dynamic disk
Working With OS-Based Constraints 55
Page 56

• The specified mount point is already in use by another file system
Provisioning Manager cannot expand file systems in the following cases:
• Multiple file systems have been mounted on the same folder
• RAID software has been configured in the file system.
Volumes cannot be used for file system expansion if any of the following apply:
• The volume manager is using a volume on a host where the Device Manager agent version 1.0 or later
has been installed
• The volume is mounted on a host where the Device Manager agent version 1.0 or later has been installed
• The volume is being used as a command device
• The volume is being used as an S-VOL for Continuous Access XP
• The volume is being used as an S-VOL or SP-VOL for Business Copy XP
• The volume is being used as a V-VOL or POOL for Snapshot XP
• The volume is being used as an on-demand device
• Read/Write permissions have not been set in the LUN Security XP Extension function
• The Auto Lun XP attribute has been set
• The volume emulation type is not one of the following: OPEN-3, OPEN-8, OPEN-9, OPEN-K, OPEN-E,
OPEN-L, OPEN-M, OPEN-V
• Volume size is less than 512 MB
• Multiple paths are assigned to the volume
• The volume is being used as a Differential Management LU
You cannot use the volume manager to expand the file system where the software RAID has been configured.
To configure RAID, use the functionality of the storage subsystem, not the volume manager.
Provisioning Manager can display a list of volumes, including the unmanaged LUs, and can specify settings for
the managed LUs. However, for an LU managed by a path manager, Provisioning Manager cannot acquire the
information managed by the path manager, such as the number of paths and data paths.
4-2-3-4 Notes on Deleting a File System
Provisioning Manager cannot delete the following file systems:
• A file system whose type is other than NTFS
• A file system whose mount point hierarchy includes other mount points
• A file system that contains more than one mount point
• A file system that has been mounted on the same folder as another file system
• A file system that is being used by a process
4-2-4 Restrictions on Adding Device Files
In the following case, the device file is not added:
• The type of volume manager used in the applicable file system is neither a basic disk nor a dynamic disk
Volumes that satisfy one of the following conditions cannot be used for device file addition:
• The volume manager is using that volume on a host where the Device Manager agent has been installed
• The volume is mounted on a host where the Device Manager agent has been installed
• The volume is being used as a command device
• The volume is being used as an S-VOL for Continuous Access XP
• The volume is being used as an S-VOL or SP-VOL for Business Copy XP
• The volume is being used as a V-VOL or POOL for Snapshot XP
• The volume is being used as an on-demand device
• The Read/Write permissions have not been set in the LUN Security Extension function
• The Auto LUN XP attribute has been set
• The volume emulation type is not one of the following: OPEN-3, OPEN-8, OPEN-9, OPEN-K, OPEN-E,
OPEN-L, OPEN-M, OPEN-V
• The volume size is less than 512 MB
• Multiple paths are assigned to the volume
Working With OS-Based Constraints 56
Page 57

4-2-5 Restrictions on Related Products
Software that cannot be used with Provisioning Manager
Provisioning Manager cannot be used on a host where VERITAS™ Volume Manager has been installed.
4-2-6 Improving Windows® Host Performance
Provisioning Manager uses the Windows® default settings for all settings that configure the host performance.
When you want to improve host performance by specifying the parameters for the file systems and device files,
change the appropriate settings manually.
4-2-7 Notes on Using the Volume Manager RAID Functionality
You cannot configure RAID by using Provisioning Manager. Use either of the following methods to configure
RAID:
• Configure RAID by using the functionality of the storage subsystem.
• Configure such RAID software as stripe volume and mirror volume software by manually executing
commands such as the ones for the volume manager.
NOTE: The use of the volume manager is limited to the online expansion for a newly-created volume (for a
span volume only).
4-2-8 Deleting a Mount Point Directory
File system mount points remain even after file systems themselves have been deleted. Use the OS command
to manually delete the mount point folder if it is no longer necessary.
4-2-9 About File System and Device File Sizing Discrepancies
In Windows®, when the file systems or device files are created, their sizes are smaller than the size of the
volume (LU). The reasons are as follows:
• For a Windows
Because this type of disk reserves 1 MB for the conversion of the disk to a dynamic disk, the total size of
the file systems or the device files is 1 MB smaller than the volume (LU).
• For a Windows
Because this type of disk reserves 1 MB for management, the total size of the file systems or the device
files is 1 MB smaller than the volume (LU).
®
basic disk
®
dynamic disk
4-2-10 Preventing Misrecognition of the Disk Number and Drive Letter
When a volume (LU) is deleted or added, the disk number and drive letter managed by the OS may change at
the time the OS is restarted. Because of this, if you perform an operation on a basic disk partition before the
host information in Provisioning Manager synchronizes the changed information, the operation may not be
performed properly.
Immediately after the OS or Provisioning Manager is restarted, verify the date and time when the host
information was last refreshed, and make sure that the changes made in the host configuration before the host
is restarted have been applied. Then, add or delete a volume.
Also for other host settings, if the information about actual configuration and the information in Provisioning
Manager are not synchronized, an error occurs. Before performing an operation, make sure that the
information is synchronized.
4-2-11 Notes on Removing a File System That Is Being Used
When you attempt to delete a file system being used, the logical volume cannot be deleted and an error
occurs.
Even if a file system being used is removed, it can be used until the host is restarted; however, it will be
unmounted when the host restarts. To continue using that file system, use a Windows
mount it or assign a drive letter to it.
Working With OS-Based Constraints 57
®
command to manually
Page 58

4-2-12 Notes on Changing the Software Configuration
For a host for which a host-setting operation has not finished (that is, for a host for which a suspended
operation exists in the operation log), do not change any of the software listed below by installing or uninstalling
them, or by changing the software version.
• OS
• File system
• Program prerequisite for Provisioning Manager
• Program related to Provisioning Manager
For specific software names, see system requirements, prerequisite programs and related programs described
in the manual HP StorageWorks XP Provisioning Manager Installation and Configuration Guide.
If you change any of the above software for a host for which a host-setting operation has not finished, that hostsetting operation cannot be guaranteed when it resumes from the operation log. Before you change any
software, see the operation log and make sure that all host-setting operations have finished.
4-2-13 Notes on Changing a Host Name
When you change the host name of a host machine, match the host name of the host machine with the host
management information of Device Manager, and then use Provisioning Manager.
If you update host information when the host name of the host machine and host management information of
Device Manager do not match, both the host name that existed from before the change and the one created
after the change are displayed in the host management window. In such a case, you might be unable to use
Provisioning Manager correctly.
4-2-14 Notes on Mounting a Folder in Windows® 2000
When you assign multiple LUs to one host in Windows® 2000, make sure that the folders you want to mount do
not have a parent-child relationship. If the folders have a parent-child relationship, you cannot correctly operate
a file system using Provisioning Manager. For example, if you mount the two folders H:\HPvM01 and
H:\HPvM01\HPvM02, you cannot operate the file system correctly. Instead, mount two folders such as, for
example, H:\HPvM01 and H:\HPvM02, which do not have a parent-child relationship.
The following describes how the program runs and what actions you should take if you mount folders that have
a parent-child relationship and attempt to operate a file system.
If a file system is added or expanded:
In the GUI window, an error (KARF62014-E) appears indicating that the file system does not exist. However, the
file system is added or expanded properly.
When the host information is updated, the file system information will be applied to the GUI window.
If a file system is deleted:
In the GUI window, an error (KARF62014-E) appears indicating that the file system does not exist, and the file
system is not deleted.
Delete the file system manually. Then, update the host information, and make sure that the file system has
been deleted.
4-3 Restrictions When the Host OS is Solaris™
The following sections describe restrictions that apply when the host OS is Solaris™. For details about the
maximum setting values for manual configuration, see
WARNING! Make sure that you specify a unique port address for each port of storage devices in the same
zone. If the same port addresses exist in the same zone, the OS cannot identify the ports and may not
recognize the device files. In such a state, if you add a device file, add a file system, or expand a file system
from Provisioning Manager, the device file cannot be recognized and an error occurs.
Table 4-1 in 4-7 .
4-3-1 Prerequisites for the Host
• The Device Manager agent
You must install the Device Manager agent on a host managed by Provisioning Manager. If the Device
Manager agent is not installed, the values for some items may not be displayed.
Working With OS-Based Constraints 58
Page 59

If the Provisioning Manager support functionality for the Device Manager agent is not installed, the values
for some items may not be displayed.
• VERITAS™ File System and VERITAS™ Volume Manager
To install VERITAS™ File System and VERITAS™ Volume Manager on the same host, use the same
version. If their versions are different, operations cannot be guaranteed.
• About unsupported volumes
Provisioning Manager cannot use any of the following volumes for addition, expansion, or deletion of file
systems or device files:
• Volumes that use extensible firmware interface (EFI) disk labels
• Volumes with no slice 2 that indicates the entire disk
For these volumes, use OS commands to manually specify settings, if necessary.
4-3-2 Notes on Adding File Systems
In the following case, the file system is not added:
• The specified mount point is already in use by another file system
Volumes that satisfy one of the following conditions cannot be used for file system addition:
• The volume manager is using a volume on a host where the Device Manager agent has been installed
• The volume is mounted on a host where the Device Manager agent has been installed
• The volume is being used as a command device
• The volume is being used as an S-VOL for Continuous Access XP
• The volume is being used as an S-VOL or SP-VOL for Business Copy XP
• The volume is being used as a V-VOL or POOL for Snapshot XP
• The volume is being used as an on-demand device
• The Read/Write permissions have not been set in the LUN Security XP Extension function
• The Auto Lun XP attribute has been set
• The volume emulation type is not one of the following: OPEN-3, OPEN-8, OPEN-9, OPEN-K, OPEN-E,
OPEN-L, OPEN-M, OPEN-V
• The volume size is less than 512 MB
• Dynamic Link Manager does not exist on the host, and multiple paths are assigned to the volume
• The volume is being used as a Differential Management LU
In any of the following environments, the file system cannot be added:
• The type of volume manager used in the applicable file system is neither VERITAS™ Volume Manager
3.5 nor VERITAS™ Volume Manager 4.0
• The file system in use at the host is neither UFS, nor VERITAS™ File System 3.5, nor VERITAS™ File
System 4.0
4-3-3 Restrictions on Expansion and Deletion
Limits on expanding and deleting a logical volume
Provisioning Manager cannot expand or delete a volume group whose target volume group is other than
VERITAS™ Volume Manager.
Notes on expanding a file system
Provisioning Manager cannot expand the following file system a file system whose type is other than
VERITAS™ File System.
Volumes to which one of the following conditions apply cannot be used for file system expansion:
• The volume manager is using a volume on a host where the Device Manager agent has been installed
• The volume is mounted on a host where the Device Manager agent has been installed
• The volume is being used as a command device
• The volume is being used as an S-VOL for Continuous Access XP
• The volume is being used as an S-VOL or SP-VOL for Business Copy XP
• The volume is being used as a V-VOL or POOL for Snapshot XP
• The volume is being used as an on-demand device
Working With OS-Based Constraints 59
Page 60

• The Read/Write permissions have not been set in the LUN Security XP Extension function
• The Auto Lun XP attribute has been set
• The volume emulation type is not one of the following: OPEN-3, OPEN-8, OPEN-9, OPEN-K, OPEN-E,
OPEN-L, OPEN-M, OPEN-V
• The volume size is less than 512 MB
• Dynamic Link Manager does not exist on the host, and multiple paths are assigned to the volume
• The volume is being used as a Differential Management LU
In any of the following environments, the file system cannot be expanded:
• The type of volume manager used in the applicable file system is neither VERITAS™ Volume Manager
3.5 nor VERITAS™ Volume Manager 4.0
• The type of file system in use at the host is neither VERITAS™ File System 3.5 nor VERITAS™ File
System 4.0
• RAID software has been configured in the file system.
• The file system was created without using a volume manager.
Notes on deleting a file system
Provisioning Manager cannot delete the following file systems:
• A file system whose type is other than UFS or VERITAS™ File System
• A file system whose mount point hierarchy includes other mount points.
• A file system currently used for processing
Even if a file system is deleted, the mount point directory remains. To delete unneeded directories, use an OS
command to delete them manually.
Using cluster software
When you use the host management functionality to add, expand, or delete a file system, or add or delete a
device file, Provisioning Manager does not perform configuration of the cluster software. You must manually
configure the cluster software.
VERITAS™ Cluster Server is cluster software that can use file systems and device files created by the host
management functionality.
4-3-4 Restrictions on Creating a File System
When using Provisioning Manager, if abnormal termination occurs while a file system was being created, that
file system must be checked to find whether it has a problem at system startup.
To enable this check process, you change a setting in one parameter for the command utility.
• To manually specify the setting, change /etc/vfstab. When entering a value, follow the input format
appropriate for each OS.
• Specify the setting value so that the file system is checked at system startup:
Setting value: 1 (Checks the file system at startup)
Default value: - (Does not check the file system at startup)
Depending on the cluster management software, if a standby configuration is used and this setting is specified
so that the file system is checked at startup, it may take time to switch the server when an error occurs. To
avoid this, the setting must be changed so that the file system check is not performed at startup. For details,
see the documentation for the relevant cluster management software.
4-3-5 About Using a Shared Volume Group
If you want to allow concurrent access to a volume by using the cluster management software, convert the
volume to a shared volume group: For example, execute the vxdg export command, and then use -s import
of the vxdg command.
Note, however, that you may not need to create a special volume group for concurrent access, depending on
the cluster management software. For details, see the documentation for the relevant cluster management
software.
Working With OS-Based Constraints 60
Page 61

4-3-6 Setting the Unit of Volume Management
In Provisioning Manager, the unit of volume management is an LU or a volume group. If you need to manage
volumes in smaller units, use an OS command or volume manager command to manually create, expand, or
delete a file system or device file.
There is a one-to-one correspondence between volume groups and volumes. The volume group is used only
for online expansion of a newly created volume. When adding a volume (LU) to a volume group, or deleting a
logical volume, make sure that you specify the volumes and physical partitions, and also specify the priority in
the order they are to be used. In this case, all the command options must be set to the default setting values.
4-3-7 Notes on Changing the Software Configuration
For a host for which a host-setting operation has not finished (that is, for a host for which a suspended
operation exists in the operation log), do not change any of the software listed below by installing or uninstalling
them, or by changing the software version.
• OS
• File system
• Program prerequisite for Provisioning Manager
• Program related to Provisioning Manager
For specific software names, see system requirements, prerequisite programs and related programs described
in the manual HP StorageWorks XP Provisioning Manager Installation and Configuration Guide.
If you change any of the above software for a host for which a host-setting operation has not finished, that hostsetting operation cannot be guaranteed when it resumes from the operation log. Before you change any
software, see the operation log and make sure that all host-setting operations have finished.
4-3-8 Notes on Changing a Host Name
When you change the host name of a host machine, match the host name of the host machine with the host
management information of Device Manager, and then use Provisioning Manager.
If you update host information when the host name of the host machine and host management information of
Device Manager do not match, both the host name that existed from before the change and the one created
after the change are displayed in the host management window. In such a case, you might be unable to use
Provisioning Manager correctly.
4-3-9 Improving Solaris™ Host Performance
Provisioning Manager uses the Solaris™ default settings for the settings except for the ones described in A.2
(2) Restrictions on creating a file system. When you want to improve host performance, manually adjust the
settings.
4-3-10 Using the Volume Manager RAID Functionality
You cannot configure RAID by using Provisioning Manager. Use either of the following methods to configure
RAID:
• Configure RAID by using the functionality of the storage subsystem.
• Configure such RAID software as stripe volume and mirror volume software by manually executing
commands such as the ones for the volume manager.
4-3-11 About Fragment and Data Compression (Saving Disk Space)
When creating many small size files (for example, files of several tens of kilobytes), reducing the fragment size
of the file system can save disk space but the duration of file system operations might increase.
The following value is specified by default as the file system fragment size:
• UFS: 1,024 bytes
• VERITAS™ File System: 1,024 bytes
When you want to create a file system with a fragment size different from the default, manually change the
setting for the fragment size, and then create the file system.
4-3-12 Using a Log and Specifying Log Size Using a File System
If you want to collect logs of the execution results when using VERITAS™ File System or UFS, manually mount
the file system by specifying the logging option, or perform the setup of the file system (/etc/vfstab).
Working With OS-Based Constraints 61
Page 62

The default setting value of the log size for VERITAS™ File System is 16 MB. Change this value as necessary.
In UFS, the log size is automatically determined. The maximum log size is approximately 1 MB for each 1-GB
file system, and total size is up to 64 MB.
4-3-13 Changing the File System Check at Startup Setting
Provisioning Manager specifies that the file system is to be checked at system startup after a file system is
created. To change this setting, manually change the setting specified in the information file for the file system,
such as /etc/filesystems, /etc/vfstab.
Depending on the cluster management software, if a standby configuration is used and this setting is specified
so that the file system is checked at startup, it may take time to switch the server when an error occurs. To
avoid this, the setting must be changed so that the file system check is not performed at startup. For details,
see the documentation for the relevant cluster management software.
4-3-14 Ensuring Dynamic Link Manager Operations
In any of the following environments, if a Device Manager agent version 1.0 or later is installed on the host,
Provisioning Manager can display a list of volumes, including the unmanaged LUs, and can be used to specify
settings for the managed LUs:
• When the LU is manually excluded from the Dynamic Link Manager management
• When multi-path management software other than Dynamic Link Manager is also used
However, for an LU managed by a path manager other than Dynamic Link Manager, Provisioning Manager
cannot acquire the information managed by the path manager, such as the number of paths and data paths.
To specify LU settings in the above environment, check the following items:
• That the version of the Device Manager agent installed on the host that manages the target LU is
version 1.0 or later
• That the target LU is managed by Dynamic Link Manager
NOTE: Provisioning Manager treats all LUs that are added when file systems or device files are added or
expanded as being under the management of Dynamic Link Manager.
4-3-15 Deleting a Mount Point Directory
Even if a file system is deleted, the mount point remains. Use the OS command to manually delete the folder
when you no longer need it.
4-4 Restrictions When the Host OS is AIX®
For details about the maximum setting values for manual configuration, see Table 4-1 in 4-7 .
4-4-1 Prerequisites for the Host
Device Manager agent
You must install the Device Manager agent on a host managed by Provisioning Manager. If the Device
Manager agent is not installed, the values for some items may not be displayed.
If the Provisioning Manager support functionality for the Device Manager agent is not installed, the values
for some items may not be displayed. The Provisioning Manager support functionality for the Device
Manager agent is installed on a Device Manager agent 1.0 or later that is supported by Provisioning
Manager.
4-4-2 Restrictions on Expansion and Deletion
Notes on expanding a file system
Provisioning Manager cannot expand file systems in the following cases:
• The volume manager used in the file system is other than Logical Volume Manager
• A file system whose type is other than JFS
• RAID software has been configured in the file system.
Notes on deleting a file system
Provisioning Manager cannot delete the following file systems:
• A file system whose type is other than JFS
Working With OS-Based Constraints 62
Page 63

• A file system whose mount point hierarchy includes other mount points.
• A file system that is being used by a process
4-4-3 Restrictions on Creating a File System and Device File
To unify interfaces for creating a file system or a device file, Provisioning Manager changes the following
command utility parameters from the default settings. When manually changing a value, follow the input format
appropriate for each OS.
Restrictions on creating a file system
• Size of a physical partition is specified so that a file system with the maximum size (128 GB (see Note 1)
designated by Provisioning Manager can be created on a single disk.
To specify manually, use the -s option of the mkvg command.
Setting value: 128 MB
®
5.1, as a value from 1 to 1,024 MB for AIX® 5.2, and
NOTE:
Default value: automatically specified 4 MB for AIX
as a value from 1 to 131,072 MB for AIX
®
5.3 (see Note 1 and Note 2).
• 1: The actual size is smaller than 128 GB. The maximum size of a file system or a device file to be created on a single
disk (LU) is as follows: 128 MB x 1,016 (the maximum number of physical partitions within a single disk) = 127 GB.
When you want to add or expand a disk whose size exceeds 127 GB, use the -t option of the chdev command to
change the maximum number of physical partitions for the corresponding volume group. Note, however, that the
higher the maximum number of physical partitions, the fewer the number of times the disk can be expanded. For
details, see the relevant OS and command reference documentation.
• 2: Minimum possible size for the physical partition is specified so that the specified physical partition size x 1,016 (the
maximum number of the physical partitions within a single disk) can cover the disk space. In the RAID system, a disk
corresponds to an LU that is recognized as /dev/hdiskN rather than to a physical disk.
• The maximum number of physical partitions to be allocated to a logical volume is specified so that a file
system with the maximum size (128 GB
#
) designated by Provisioning Manager can be created.
To specify manually, use the -x option of the mklv command.
Setting value: 1,024
Default value: 512
# 128 GB / 128 MB (size of a physical partition) = 1,024
• NBPI value (number of bytes per i-node) is specified so that a file system with the maximum size (128
GB) designated by Provisioning Manager can be created
#
.
To specify manually, use the -a nbpi option of the crfs command.
Setting value: 8,192 bytes
Default value: 4,096 bytes
#: If the NBPI value is too large, the number of i-nodes decreases resulting in a reduction of the number of files
and directories that can be managed. When the NBPI value is 4,096 bytes, which is the default value, the
maximum size of the file system is 64 GB. When the NBPI value is 8,192 bytes, the maximum size of the file
system is 128 GB.
• Because the maximum size of the file to be created is 2 GB by default, and the size is not changeable
once the file is created, the option to enable use of a larger file is specified at file creation
#
.
To specify manually, use the -a bf option of the crfs command.
Setting value: true
Default value: false
#: To create a large (128 KB) disk block, even if there is sufficient disk space for file creation, when a required
number of 32-consecutive disk blocks (4 KB x 32) does not exist, file creation fails. If consecutive disk blocks
do not exist, perform defragmentation (defragfs command) to ensure consecutive disk space.
• The setting is specified so that the file system is checked at startup to make sure that the file system does
not have a problem after the system terminated abnormally
#
.
To specify manually, use /etc/filesystems.
Setting value: check=true
Working With OS-Based Constraints 63
Page 64

Default value: check=false
#: Depending on the cluster management software, if a standby configuration is used and this setting is
specified so that the file system is checked at startup, it may take time to switch the server when an error
occurs. To avoid this, the setting must be changed so that the file system check is not performed at startup. For
details, see the documentation for the cluster management software.
Restrictions on creating a file system
#1
• Size of a physical partition is specified so that a file system with the maximum size (128 GB
) designated
by Provisioning Manager can be created on a single disk.
To specify manually, use the -s option of the mkvg command.
Setting value: 128 MB
®
Default value: automatically specified 4 MB for AIX
5.1, as a value from 1 to 1,024 MB for AIX® 5.2 (see
Note 1 and Note 2)
NOTE:
•
1: The actual size is smaller than 128 GB. The maximum size of a file system or a device file to be created on a single
disk (LU) is as follows: 128 MB x 1,016 (the maximum number of physical partitions within a single disk) = 127 GB.
When you want to add or expand a disk whose size exceeds 127 GB, use the -t option of the chdev command to
change the maximum number of physical partitions for the corresponding volume group. Note, however, that the
higher the maximum number of physical partitions, the fewer the number of times the disk can be expanded. For
details, see the relevant OS and command reference documentation.
• 2: Minimum possible size for the physical partition is specified so that the specified physical partition size x 1,016 (the
maximum number of the physical partitions within a single disk) can cover the disk space. In the RAID system, a disk
corresponds to an LU that is recognized as /dev/hdiskN rather than to a physical disk.
• The maximum number of physical partitions to be allocated to a logical volume is specified so that a file
system with the maximum size (128 GB#) designated by Provisioning Manager can be created.
Supplementary note: To specify manually, use the -x option of the mklv command.
Setting value: 1,024
Default value: 512
# 128 GB / 128 MB (size of a physical partition) = 1,024
4-4-4 About Using a Host as a Cluster Resource
To handle a host managed by Provisioning Manager as a resource of the cluster management software
(HACMP), the volume group must be disabled, and the file system must be unmounted.
If you do not perform these operations, the file system may be damaged and the system may stop. For details
about the settings, see the relevant OS documentation.
The following are the operations and commands to be executed by Device Manager agent to disable the
volume group and unmount the file system:
• Disable the volume group (for example, the varyoffvg command)
• Specify the setting for disabling the volume group at host startup (for example, the -a n option of the
chvg command)
• Unmount the file system (for example, the umount command)
• Specify the settings for unmounting at host startup (the -A no option of the chfs command).
4-4-5 About Using a Shared Volume Group
If you want to allow concurrent access to a volume by using the cluster management software, convert the
volume to a volume group that has the concurrent operation functionality by using the relevant commands: For
example, use the -c option of the chvg command, and then the convaryonvg command of the HACMP
utility.
Note, however, that you may not need to create a special volume group for concurrent access, depending on
the cluster management software. For details, see the documentation for the relevant cluster management
software.
Working With OS-Based Constraints 64
Page 65

4-4-6 Setting the Unit of Volume Management
In Provisioning Manager, the unit of volume management is an LU or a volume group. If you need to manage
volumes in smaller units, use an OS command or a volume manager command to manually create or expand a
file system or a device file.
There is a one-to-one correspondence between volume groups and volumes. The volume group is used only
for online expansion of a newly created volume. When adding a volume (LU) to a volume group, or deleting a
logical volume, make sure that you specify the volumes and physical partitions, and also specify the priority in
the order they are to be used. In this case, all the command options must be set to the default setting values.
4-4-7 Improving AIX® Host Performance
Provisioning Manager uses the AIX® default settings except for the ones described in 4-4-3 , Restrictions on
creating a file system and device file. When you want to improve host performance, manually adjust the
settings.
4-4-8 Using the Volume Manager RAID Functionality
You cannot configure RAID by using Provisioning Manager. Use either of the following methods to configure
RAID:
• Configure RAID by using the functionality of the storage subsystem.
• Configure such RAID software as stripe volume and mirror volume software by manually executing
commands such as the ones for the volume manager.
4-4-9 About the big vg Format Volume Group
If you want to use a special volume group (big vg format) that can handle more volumes, and create more
logical volumes than the default setting, use the OS command to create it manually.
Normally, you can only create the volume group according to the specified option. This volume group can
contain up to 32 physical volumes, and 255 logical volumes.
4-4-10 About Fragment and Data Compression (Saving Disk Space)
When creating many small size files (for example, files of several tens of kilobytes), reducing the fragment size
of the file system can save the disk space but the duration of file system operations might increase.
The following value is specified by default as the file system fragment size:
• JFS: 4,096 bytes
When you want to create a file system with a fragment size different from the default, manually change the
setting for the fragment size, and then create the file system.
4-4-11 About Creating a Logical Volume for the JFS Log
In Provisioning Manager, log files are created in the same volume group by default using the file system
creation command. The JFS log, however, is created on a disk separate from the file system disk to improve
the reliability and capability of the system. To create a logical volume for the JFS log, manually perform
configuration.
4-4-12 Changing the Size of the Logical Volume for the JFS Log
In Provisioning Manager, the log size for one logical partition is 128 MB by default. Change the log size of the
logical volume for the JFS log as necessary.
4-4-13 Changing the File System Check at Startup Setting
Provisioning Manager specifies that the file system is to be checked at system startup after a file system is
created. To change this setting, manually change the setting specified in the information file for the file system,
such as /etc/filesystems, /etc/vfstab.
Depending on the cluster management software, if a standby configuration is used and this setting is specified
so that the file system is checked at startup, it may take time to switch the server when an error occurs. To
avoid this, the setting must be changed so that the file system check is not performed at startup. For details,
see the documentation for the relevant cluster management software.
Working With OS-Based Constraints 65
Page 66

4-4-14 Ensuring Dynamic Link Manager Operations
In any of the following environments, if a Device Manager agent version 1.0 or later is installed on the host,
Provisioning Manager can display a list of volumes, including the unmanaged LUs, and can be used to specify
settings for the managed LUs:
• When the LU is manually excluded from the Dynamic Link Manager management
• When multi-path management software other than Dynamic Link Manager is also used
However, for an LU managed by a path manager other than Dynamic Link Manager, Provisioning Manager
cannot acquire the information managed by the path manager, such as the number of paths and data paths.
To specify LU settings in the above environment, check the following items:
• That the version of the Device Manager agent installed on the host that manages the target LU is
version 1.0 or later
• That the target LU is managed by Dynamic Link Manager
NOTE: Provisioning Manager treats all LUs that are added when file systems or device files are added or
expanded as being under the management of Dynamic Link Manager.
4-4-15 Deleting a Mount Point Directory
Even if a file system is deleted, the mount point remains. Use the OS command to manually delete the folder if
no longer necessary.
4-4-16 AIX® File System and Device File Sizes
In AIX®, when the file systems or device files are created, their sizes are smaller than the size of the volume
(LU). The reasons are as follows:
• Because one physical partition is reserved for the JFS log, the total size of the file systems or the device
files is smaller than the volume (LU) for the size of one physical partition.
• Because of a limit on the number of physical partitions within an LU (up to 1,016 physical partitions), the
maximum size of the file system and device file that can be created is 128 GB.
4-4-17 Notes on Changing the Software Configuration
For a host for which a host-setting operation has not finished (that is, for a host for which a suspended
operation exists in the operation log), do not change any of the software listed below by installing or uninstalling
them, or by changing the software version.
• OS
• File system
• Program prerequisite for Provisioning Manager
• Program related to Provisioning Manager
For specific software names, see system requirements, prerequisite programs and related programs described
in the manual HP StorageWorks XP Provisioning Manager Installation and Configuration Guide.
If you change any of the above software for a host for which a host-setting operation has not finished, that hostsetting operation cannot be guaranteed when it resumes from the operation log. Before you change any
software, see the operation log and make sure that all host-setting operations have finished.
4-4-18 Notes on Changing a Host Name
When you change the host name of a host machine, match the host name of the host machine with the host
management information of Device Manager, and then use Provisioning Manager.
If you update host information when the host name of the host machine and host management information of
Device Manager do not match, both the host name that existed from before the change and the one created
after the change are displayed in the host management window. In such a case, you might be unable to use
Provisioning Manager correctly.
4-5 Restrictions When the Host OS is Linux
The following sections describe restrictions and notes when the host OS is Linux.
For details about the maximum setting values for manual configuration, see
Table 4-1. in 4-7 .
Working With OS-Based Constraints 66
Page 67

4-5-1 Prerequisites for the Host
• Device Manager agent
You must install the Device Manager agent on a host managed by Provisioning Manager. If the Device
Manager agent is not installed, the values for some items may not be displayed.
If the Provisioning Manager support functionality for the Device Manager agent is not installed, the values
for some items may not be displayed. The Provisioning Manager support functionality for the Device
Manager agent is installed on a Device Manager agent 1.0 or later that is supported by Provisioning
Manager.
• When the host in use has not recognized any logical unit
When adding a device file, or adding or expanding a file system for a host that is not recognizing any LUs,
use Device Manager to register the port WWN of the HBA for the host in advance. If no WWN is
registered, no volume will become selectable in the wizard step for selecting a volume, and you will be
unable to continue operation.
4-5-2 About Host Management in Linux Environments
This section provides information about using Provisioning Manager to manipulate file systems and device
files.
4-5-2-1 Notes on Installing a Storage Subsystem
Make sure that you specify a unique port address for each port of storage devices in the same zone. If the
same port addresses exist in the same zone, the OS cannot recognize the ports and may not recognize the
device files. In such a state, if you add a device file, add a file system, or expand a file system from
Provisioning Manager, the device file cannot be recognized and an error occurs.
4-5-2-2 Notes on Adding File Systems
A file system cannot be added if Logical Volume Manager has not been installed.
Volumes to which one of the following conditions apply cannot be used for file system expansion:
• The volume manager is using a volume on a host where the Device Manager agent has been installed
• The volume is mounted on a host where the Device Manager agent has been installed
• The volume is being used as a command device
• The volume is being used as an S-VOL for Continuous Access XP
• The volume is being used as an S-VOL or SP-VOL for Business Copy XP
• The volume is being used as a V-VOL or POOL for Snapshot XP
• The volume is being used as an on-demand device
• The Read/Write permissions have not been set in the LUN Security XP Extension function
• The Auto Lun XP attribute has been set
• The volume emulation type is not one of the following: OPEN-3, OPEN-8, OPEN-9, OPEN-K, OPEN-E,
OPEN-L, OPEN-M, OPEN-V
• The volume size is less than 512 MB
• Multiple paths are assigned to the volume
Double-byte characters, such as Japanese characters, are not usable for the mount point name that is
specified when a file system is added.
4-5-2-3 Notes on Expanding File Systems
In the following cases, file systems cannot be expanded:
• The type of file system that is to be expanded is neither ext2 nor ext3
• Logical Volume Manager is not being used
• Other processing is using the file system to be expanded
• The logical volume that is mounted at the specified mount point is a snapshot volume
• There is more than one mount point for the file system to be expanded
• Multiple file systems have been mounted on the same directory
Volumes that satisfy one of the following conditions cannot be used for file system expansion:
• The volume manager is using a volume on a host where the Device Manager agent has been installed
Working With OS-Based Constraints 67
Page 68

• The volume is mounted on a host where the Device Manager agent has been installed
• The volume is being used as a command device
• The volume is being used as an S-VOL for Continuous Access XP
• The volume is being used as an S-VOL or SP-VOL for Business Copy XP
• The volume is being used as a V-VOL or POOL for Snapshot XP
• The volume is being used as an on-demand device
• The Read/Write permissions have not been set in the LUN Security XP Extension function
• The Auto Lun XP attribute has been set
• The volume emulation type is not one of the following: OPEN-3, OPEN-8, OPEN-9, OPEN-K, OPEN-E,
OPEN-L, OPEN-M, OPEN-V
• The volume size is less than 512 MB
• Multiple paths are assigned to the volume
4-5-2-4 Notes on Deleting File Systems
Even if a file system is deleted, the mount point directory remains. Use the OS command to manually delete
the directory if no longer necessary.
Provisioning Manager cannot delete the following file systems:
• The type of file system that is to be deleted is neither ext2 nor ext3
• Logical Volume Manager is not being used
• The logical volume that is mounted at the specified mount point is a snapshot volume
• There is a snapshot volume for the logical volume that is mounted at the specified mount point
• Other processing is using the file system to be deleted
• There is more than one mount point for the file system to be deleted
# The file systems can be expanded; however, an attempt to delete a file system will result in a run-time
error.
#
• Multiple file systems have been mounted on the same directory
4-5-2-5 Notes on Adding Device Files
In the following case, the device file is not added:
• The type of the volume manager used in the applicable file system is not Logical Volume Manager
Volumes that satisfy one of the following conditions cannot be used for device file addition:
• The volume manager is using that volume on a host where the Device Manager agent has been installed
• The volume is mounted on a host where the Device Manager agent has been installed
• The volume is being used as a command device
• The volume is being used as an S-VOL for Continuous Access XP
• The volume is being used as an S-VOL or SP-VOL for Business Copy XP
• The volume is being used as a V-VOL or POOL for Snapshot XP
• The volume is being used as an on-demand device
• The Read/Write permissions have not been set in the LUN Security XP Extension function
• The Auto Lun XP attribute has been set
• The volume emulation type is not one of the following: OPEN-3, OPEN-8, OPEN-9, OPEN-K, OPEN-E,
OPEN-L, OPEN-M, OPEN-V
• The volume size is less than 512 MB
• Multiple paths are assigned to the volume
4-5-2-6 Notes on Displayed Host Information
When the host OS is Linux, configure the volumes and devices in accordance with 4-5-3 . If the volumes and
devices are configured in a different pattern, the host information might not be displayed correctly.
Provisioning Manager cannot display md devices. For notes on using md devices, see section
4-5-4 .
Working With OS-Based Constraints 68
Page 69

4-5-2-7 Notes on Changing the Software Configuration
For a host for which a host-setting operation has not finished (that is, for a host for which a suspended
operation exists in the operation log), do not change any of the software listed below by installing or uninstalling
them, or by changing the software version.
• OS
• File system
• Program prerequisite for Provisioning Manager
• Program related to Provisioning Manager
For specific software names, see system requirements, prerequisite programs and related programs described
in the manual HP StorageWorks XP Provisioning Manager Installation and Configuration Guide.
If you change any of the above software for a host for which a host-setting operation has not finished, that hostsetting operation cannot be guaranteed when it resumes from the operation log. Before you change any
software, see the operation log and make sure that all host-setting operations have finished.
4-5-2-8 Notes on Changing a Host Name
When you change the host name of a host machine, match the host name of the host machine with the host
management information of Device Manager, and then use Provisioning Manager.
If you update host information when the host name of the host machine and host management information of
Device Manager do not match, both the host name that existed from before the change and the one created
after the change are displayed in the host management window. In such a case, you might be unable to use
Provisioning Manager correctly.
4-5-3 Volume Configurations Displayed by Provisioning Manager
This subsection describes the volume configurations for which Provisioning Manager can correctly display
information about file systems and devices. If volumes are configured differently than described here, displayed
information about file systems and devices might be incomplete.
Provisioning Manager can display information about configuration components in the configuration patterns
shown in
Figure 4-1.
Figure 4-1 Configurations Displayed by Provisioning Manager
Figure 4-1 shows examples of configuration components, such as physical and logical volumes, created in
one-to-one configuration. However, Provisioning Manager can also display information when these
configuration components are created, in the following one-to-many configurations:
• When multiple partitions exist in one physical volume.
Working With OS-Based Constraints 69
Page 70

• When multiple physical volumes or partitions create one volume group.
• When multiple logical volumes exist in one volume group.
• When one file system is mounted on multiple mount points.
Provisioning Manager can also display snapshot volumes, which look like logical volumes.
NOTE: Provisioning Manager cannot display information about volume groups or file systems created in md
devices.
4-5-4 Notes on Md Devices
If an md device is created, Provisioning Manager displays the LDEVs corresponding to the md device as
unused LDEVs. To avoid operational errors, the LDEVs corresponding to md devices must be excluded from
the storage pools of logged-in users.
In some configurations using an md device, Provisioning Manager does not correctly display information about
elements that are on the md device. For example, in
display information about file systems (FS), logical volumes (LV), and volume groups (VG) that are on the md
device.
Figure 4-2, Provisioning Manager does not correctly
Figure 4-2 Configurations Yielding Incorrect Display of MD Device Information
4-5-5 Improving Linux Host Performance
Provisioning Manager functionality can be used to ensure more flexible operations within existing systems.
4-5-5-1 Using Linux Command Utility Parameters
During system startup, Provisioning Manager checks file systems for errors as a countermeasure for events
such as abnormal system termination that may occur when file systems are being added. For this reason, the
command utility parameters shown below are changed from their initial settings. If you are manually setting the
attributes for file system checking during system startup, make changes to /etc/fstab. Enter appropriate
values in accordance with the input format supported by your OS.
Settings for the attribute for file system checking during system startup:
Setting value: 2 (checks file systems during system startup)
Working With OS-Based Constraints 70
Page 71

Initial setting: Not specified (does not check file systems during system startup)
Other than the above setting, Provisioning Manager uses the default performance-related settings in Linux. To
improve performance, adjust the settings manually.
4-5-5-2 Notes on Managing Volumes in Small Units
For Provisioning Manager, LUs or volume groupsare management units. If smaller units are necessary, such
as for specifying volumes and physical partitions and setting a usage order, then you must manually create,
expand, or delete applicable file systems and device files by using such methods as OS and volume manager
commands.
4-5-5-3 Notes on Using the RAID Functions
If you want to use the You cannot configure RAID by using Provisioning Manager. Use either of the following
methods to configure RAID:
• Configure RAID by using the functionality of the storage subsystem.
• Configure such RAID software as stripe volume and mirror volume software by manually executing
commands such as the ones for the volume manager.
4-5-5-4 Notes on Creating Many Small Files
When creating many small files with sizes of only a few tens of kilobytes each, you can save disk space by
setting a small value for the file system fragment size. However, the time required to manipulate the file system
will increase.
The following initial values have been set for the file system fragment size:
• ext2: 4,096 bytes
• ext3: 4,096 bytes
To create a file system with a different fragment size, manually change the setting for the fragment size and
then create the file system.
4-5-5-5 Notes on Creating a Journal Log Area for ext3 File Systems
A journal log for an ext3 file system is created with the initial settings in the root directory of the file system by
the file system creation command. If you want to create a journal log on an external device so that it can be
shared, you must set the journal log manually. You can specify the log size as a command option.
4-5-5-6 Notes on Creating and Expanding File Systems in Partitions
Provisioning Manager uses the entire disk to create and expand file systems. If you specify a disk that already
has partitions, Provisioning Manager creates a new label. If you want to create or expand a file system in
partitions, you must specify the settings manually.
4-5-5-7 Notes on the Procedure for Recognizing the Device After Deleting an LU
For a host running on Linux, if an LU is deleted, the OS-managed device name might be changed. If you have
deleted an LU, make sure that you perform the following actions:
1. If the device name is directly specified in /etc/fstab, change it to the new device name.
2. Update the host information.
4-5-5-8 Reason for Unmatched Volume and LU Sizes
In Linux, when an ext2 or ext3 file system is created, the size of the file system is smaller than that of the
volume (LU).
In an ext2 or ext3 file system, 5 percent of the whole area is reserved for use of the superuser only. Therefore,
the created file system is smaller than the volume (LU).
4-6 Restrictions When the Host OS is HP-UX
The following sections describe restrictions and notes when the host OS is HP-UX.
For details about the maximum setting values for manual configuration, see
4-6-1 Prerequisites for the Host
• The Device Manager agent
Table 4-1. in 4-7 .
Working With OS-Based Constraints 71
Page 72

You must install the Device Manager agent on a host managed by Provisioning Manager. If the Device
Manager agent is not installed, the values for some items may not be displayed. If the Provisioning
Manager support functionality for the Device Manager agent is not installed, the values for some items
may not be displayed.
• Version of VERITAS™ File System
Provisioning Manager supports VERITAS™ File System 3.5. When you are using HP-UX 11i v1, the
standard file system is VERITAS™ File System 3.3. To enable VERITAS™ File System 3.5, first install a
version of Software Pack (Optional HP-UX 11i v1 Core Enhancements) that was released in or after
December 2002. When you are using HP-UX 11i v2, the standard file system is VERITAS™ File System
3.5.
4-6-2 Restrictions on Expansion and Deletion
Limits on expanding and deleting a logical volume
Provisioning Manager cannot expand or delete the following logical volumes:
• A logical volume of a volume group other than a Logical Volume Manager volume group
• A logical volume whose component contains partitions(Note that partitions can be created in HP-UX 11i
v2 (IPF) only.)
Prerequisites When the Host in Use Has Not Recognized any Logical Unit
When adding a device file, or adding or expanding a file system for a host that is not recognizing any LUs, use
Device Manager to register the port WWN of the HBA for the host in advance. If no WWN is registered, no
volume will become selectable in the wizard step for selecting a volume, and you will be unable to continue
operation.
4-6-3 Restrictions on Related Products
Cluster software
When you use the host management functionality to add, expand, or delete a file system, or add or delete a
device file, Provisioning Manager does not perform configuration of the cluster software. You must manually
configure the cluster software. Cluster software that can use the file systems and device files created by the
host management functionality is Serviceguard.
Software that cannot be used with Provisioning Manager
Provisioning Manager does not support an environment in which a mirror volume exists or can exist. Therefore,
if MirrorDisk/UX has been installed on the host, you cannot use the Provisioning Manager functionality to
reference or set host information.
4-6-4 About Host Management in HP-UX Environments
This subsection provides important information about using Provisioning Manager to manipulate file systems
and device files.
4-6-4-1 Notes on Installing a Storage Subsystem
Make sure that you specify a unique port address for each port of storage devices in the same zone. If the
same port addresses exist in the same zone, the OS cannot recognize the ports and may not recognize the
device files. In such a state, if you add a device file, add a file system, or expand a file system from
Provisioning Manager, the device file cannot be recognized and an error occurs.
4-6-4-2 Notes on Displaying Host Information
For an LU managed by a path manager other than PV-link, Provisioning Manager cannot display information
(such as the number of paths and data paths) managed by the path manager, and cannot be used to specify
settings for the managed LUs.
4-6-4-3 Notes on Adding File Systems
In the following cases, the file system is not added:
• The volume manager used in the file system is other than Logical Volume Manager
• The file system in use by the host is other than VERITAS File System
• The specified mount point is already in use by another file system
• The file system contains partitions
Volumes that satisfy one of the following conditions cannot be used for file system addition:
Working With OS-Based Constraints 72
Page 73

• The volume manager is using a volume on a host where the Device Manager agent has been installed
• The volume is mounted on a host where the Device Manager agent has been installed
• The volume is being used as a command device
• The volume is being used as an S-VOL for Continuous Access XP
• The volume is being used as an S-VOL or SP-VOL for Business Copy XP
• The volume is being used as a V-VOL or POOL for Snapshot XP
• The volume is being used as an on-demand device
• The Read/Write permissions have not been set in LUN Security XP Extension function
• The Auto Lun XP attribute has been set
• The volume emulation type is not one of the following: OPEN-3, OPEN-8, OPEN-9, OPEN-K, OPEN-E,
OPEN-L, OPEN-M, OPEN-V
• The volume size is less than 512 MB
• Multiple paths are assigned to the volume without using PV-link
• The volume is being used as a Differential Management LU
• The volume size is greater than 1 TB
4-6-4-4 Notes on Expanding File Systems
In the following cases, file systems cannot be expanded:
• The file system uses a volume manager other than Logical Volume Manager
• The file system is a type other than VERITAS™ File System
• RAID software has been configured in the file system
• The file system contains partitions
Volumes that satisfy one of the following conditions cannot be used for expanding a file system:
• The volume manager is using a volume on a host where the Device Manager agent has been installed
• The volume is mounted on a host where the Device Manager agent has been installed
• The volume is being used as a command device
• The volume is being used as an S-VOL for Continuous Access XP
• The volume is being used as an S-VOL or SP-VOL for Business Copy XP
• The volume is being used as a V-VOL or POOL for Snapshot XP
• The volume is being used as an on-demand device
• The Read/Write permissions have not been set in the LUN Security XP Extension function
• The Auto Lun XP attribute has been set
• The volume emulation type is not one of the following: OPEN-3, OPEN-8, OPEN-9, OPEN-K, OPEN-E,
OPEN-L, OPEN-M, OPEN-V
• The volume size is less than 512 MB
• Multiple paths are assigned to the volume without using PV-link
• The volume is being used as a Differential Management LU
4-6-4-5 Notes on Deleting File Systems
Provisioning Manager cannot delete the following file systems:
• A file system that uses a volume manager other than Logical Volume Manager
• A file system whose type is not VERITAS™ File System
• A file system whose mount point hierarchy includes other mount points
• A file system that is being used by a process
• A file system that contains partitions
• A file system that is made up of volumes that satisfy the following conditions:
• Multiple paths are assigned to the volume without using PV-link
Even if a file system is deleted, the mount point directory remains. To delete unneeded directories, use an OS
command to delete them manually.
4-6-4-6 Notes on Adding Device Files
In the following cases, the device file is not added:
Working With OS-Based Constraints 73
Page 74

• The file system uses a volume manager other than Logical Volume Manager
• The device file contains partitions
Volumes that satisfy one of the following conditions cannot be used for device file addition:
• The volume manager is using that volume on a host where the Device Manager agent has been installed
• The volume is mounted on a host where the Device Manager agent has been installed
• The volume is being used as a command device
• The volume is being used as an S-VOL for Continuous Access XP
• The volume is being used as an S-VOL or SP-VOL for Business Copy XP
• The volume is being used as a V-VOL or POOL for Snapshot XP
• The volume is being used as an on-demand device
• The Read/Write permissions have not been set in the LUN Security XP Extension function
• The Auto LUN XP attribute has been set
• The volume emulation type is not one of the following: OPEN-3, OPEN-8, OPEN-9, OPEN-K, OPEN-E,
OPEN-L, OPEN-M, OPEN-V
• The volume size is less than 512 MB
• Multiple paths are assigned to the volume without using PV-link
• The volume size is greater than 1 TB
4-6-4-7 Notes on Deleting Device Files
A device file that contains partitions cannot be deleted. Also, a device file that is made up of volumes that
satisfy the following conditions cannot be deleted:
• Multiple paths are assigned to the volume without using PV-link
4-6-4-8 Notes on Partitions
Provisioning Manager does not support the following operations related to partitions (note that partitions can be
created in HP-UX 11i v2 (IPF) only):
• Adding and deleting partitions
• Adding, expanding, and deleting file systems that contain partitions
• Adding and deleting device files that contain partitions
If it is necessary to perform the above operations, perform them manually, using OS commands.
4-6-4-9 Notes on Snapshot File Systems
Provisioning Manager does not support the following operations related to snapshot file systems:
• Creating a snapshot file system at the same time that a file system of the VERITAS™ File System type is
created
• Creating a snapshot file system for an existing file system of the VERITAS™ File System type
• Deleting snapshot file systems
• Expanding and deleting file systems of the VERITAS™ File System type that are to be backed up
4-6-4-10 Notes on Physical Volume Groups
Provisioning Manager does not support creation and expansion of physical volume groups that are created
during processes such as volume mirroring. If it is necessary to create or expand physical volume groups,
perform these operations manually by using OS commands.
4-6-4-11 Notes on Setting PV-link
Provisioning Manager cannot specify the following settings related to PV-link:
• Specifying the type of link (primary link or alternate link) when adding each link to a volume group
• Changing the number of physical volume links for created volume groups
The maximum number of links that can be made to a physical volume is 8.
• Switching a primary link to an alternate link
You can manually switch to an appropriate link by using the Logical Volume Manager.
If it is necessary to specify the above settings, specify them manually, using OS commands.
Working With OS-Based Constraints 74
Page 75

4-6-4-12 Notes on Changing the Software Configuration
For a host for which a host-setting operation has not finished (that is, for a host for which a suspended
operation exists in the operation log), do not change any of the software listed below by installing or uninstalling
them, or by changing the software version.
• OS
• File system
• Program prerequisite for Provisioning Manager
• Program related to Provisioning Manager
For specific software names, see system requirements, prerequisite programs and related programs described
in the manual HP StorageWorks XP Provisioning Manager Installation and Configuration Guide.
If you change any of the above software for a host for which a host-setting operation has not finished, that hostsetting operation cannot be guaranteed when it resumes from the operation log. Before you change any
software, see the operation log and make sure that all host-setting operations have finished.
4-6-4-13 Notes on Changing a Host Name
When you change the host name of a host machine, match the host name of the host machine with the host
management information of Device Manager, and then use Provisioning Manager.
If you update host information when the host name of the host machine and host management information of
Device Manager do not match, both the host name that existed from before the change and the one created
after the change are displayed in the host management window. In such a case, you might be unable to use
Provisioning Manager correctly.
4-6-5 Improving HP-UX Host Performance
Provisioning Manager functionality can be used to ensure more flexible operations within existing systems.
4-6-5-1 Notes on the Parameters of Command Utilities
To unify interfaces for creating a file system or a device file, Provisioning Manager changes the following
command utility parameters from the default settings. When manually changing a value, follow the input format
appropriate for each OS. For performance-related settings, Provisioning Manager uses the HP-UX default
settings except for those described below. When you want to improve host performance, manually adjust the
settings.
The size of a physical partition is specified so that the maximum size of a physical volume that Logical Volume
Manager can recognize is 1 TB.
Supplementary note: To specify the setting manually, use the -s option of the vgcreate command.
Setting value: 256 MB
Default value: 4 MB
The maximum number of physical partitions for a physical volume is specified so that the maximum size of a
physical volume that Logical Volume Manager can recognize is 1 TB.
Supplementary note: To manually specify the setting, use the -e option of the vgcreate command.
Setting value: 4,096
#
Default value: 1,016
# When you execute the vgcreate command to create a volume group and specify a physical volume
larger than 1016 times the physical partition size, the default value is adjusted according to the size of
that physical volume.
The maximum number of physical volumes is specified for a volume group according to the maximum value
that can be specified using Provisioning Manager.
Supplementary note: To manually specify the setting, use the –p option of the vgcreate command.
Once a volume group is created, the maximum number of physical volumes for a volume group cannot be
changed. When specifying the setting, keep in mind the overall system operation.
Setting value: 32
Default value: 16
The setting is specified so that the file system is checked at startup to make sure that the file system will not
have problems after the system terminated abnormally
#
.
Working With OS-Based Constraints 75
Page 76

Supplementary note: To manually specify the setting, specify /etc/fstab.
Setting value: 2
Default value: 0 (Do not check the file system at startup)
# Depending on the cluster management software, if a standby configuration is used and this setting is
specified so that the file system is checked at startup, it may take time to switch the server when an error
occurs. To avoid this situation, the setting must be changed so that the file system check is not performed
at startup. For details, see the documentation for the relevant cluster management software.
4-6-5-2 Notes on Managing Volumes in Smaller Units
In Provisioning Manager, the unit of volume management is an LU or a volume group. If you need to manage
volumes in smaller units for purposes such as specifying volumes, physical partitions, and usage order, use an
OS command or volume manager command to manually create, expand, or delete a file system or device file.
4-6-5-3 Notes on Creating Many Small Files
When creating many small size files (for example, files of several tens of kilobytes), reducing the fragment size
of the file system can save the disk space but the duration of file system operations might increase.
The following value is specified by default as the file system fragment size:
• When the file system size is no more than 4 TB
1,024 bytes
• When the file system size is more than 4 TB but no more than 8 TB
2,048 bytes
• When the file system size is more than 8 TB but no more than 16 TB
4,096 bytes
• When the file system size is more than 16 TB but no more than 32 TB
8,192 bytes
When you want to create a file system with a fragment size different from the default, manually change the
setting for the fragment size, and then create the file system.
4-6-5-4 Notes on Handling File Systems and Device Files as Cluster Resources
To handle a file system and device files managed by Provisioning Manager as resources of the cluster
management software (Serviceguard), you must perform the following operations:
• Disable the volume group (use the -a n option of the vgchange command).
• Specify the setting for disabling the volume group at host startup (specify 0 for AUTO_VG_ACTIVATE in
the /etc/lvmrc file).
• Specify the volume groups that will be not be used as cluster resources (define these volume groups in
the custom_vg_activation function in the /etc/lvmrc file).
• Unmount the file system (use the umount command).
• Specify the settings for unmounting the file system at host startup. (edit /etc/fstab, by deleting or
commenting out the description in the file system to be used as cluster resource.)
• Mark the volume groups in a cluster as part of the high availability cluster (use the -c y option of the
vgchange command).
If you do not perform these operations, the file system might become damaged or the system may stop. For
details about the settings, see the relevant OS documentation.
4-6-5-5 Notes on Manipulating File Systems and Device Files Used as Cluster Resources
When you delete or expand a file system or device file used as a cluster resource, perform the following
operations before and after deletion or expansion. For operation details, see the documentation for the relevant
OS.
When deleting a file system or device file
Before you start deletion, perform the following on the host:
1. Stop the cluster.
If you continue operation without stopping the cluster, the cluster environment might become damaged.
You must stop the cluster before proceeding further.
Working With OS-Based Constraints 76
Page 77

2. Execute the vgchange command to remove the high availability cluster mark from the volume group.
3. From the cluster configuration file, delete the volume group that contains the file system or device file to
be deleted.
4. Reconfigure the cluster.
5. Execute the vgchange command to enable the volume group.
6. If you want to delete the file system, execute the mount command to mount the file system.
7. Use the GUI to update host information.
When expanding a file system
Before you start expansion, on the host, perform the operations described in When deleting a file system or
device file above.
Then, perform the expansion.
After you finish the expansion normally, perform the following on the host:
1. Execute the umount command to unmount the file system.
2. Execute the vgchange command to disable the volume group.
3. Add the volume group containing the expanded file system to the cluster configuration file.
4. Reconfigure the cluster.
5. Start the cluster.
6. Execute the vgchange command to add a high availability cluster mark to the volume group.
4-6-5-6 Notes on Allowing Concurrent Access to Volumes
If you want to allow concurrent access to a volume by using the cluster management software, execute the
vgchange command with the -S y option. The volume group in the cluster specified in the option will be marked
as shareable.
Note that, depending on the cluster management software, you may not need to create a special volume group
for concurrent access. For details, see the documentation for the relevant cluster management software.
4-6-5-7 Notes on Using the RAID Function
You cannot configure RAID by using Provisioning Manager. Use either of the following methods to configure
RAID:
• Configure RAID by using the functionality of the storage subsystem.
• Configure such RAID software as stripe volume and mirror volume software by manually executing
commands such as the ones for the volume manager.
4-6-5-8 About reason for Unmatched Volume and LU Sizes
In HP-UX Logical Volume Manager, when the file systems or device files are created, their sizes may be
smaller than the size of the volume (LU). The reasons are as follows:
• When HP-UX Logical Volume Manager creates file systems or device files, approximately 1% (normally,
as large as one physical partition) of the physical volume is used for reserved areas (PVRA and VGRA).
As a result, the total size of the file systems or the device files is smaller than the volume (LU) by one
percent (generally, the size of one physical partition).
• The maximum size of a physical volume that Logical Volume Manager recognizes within a volume group
is determined by the maximum size of a physical partition and the maximum number of physical
partitions. In the default settings for Provisioning Manager, this value is 1 TB, which is obtained as
follows: 256 MB (the maximum size of a physical partition) x 4,096 (the maximum number of physical
partitions). If the size of the volume (LU) specified when expanding a file system or device file exceeds
the maximum size of a physical volume that Logical Volume Manager can recognize, Logical Volume
Manager cannot recognize some areas in the volume (LU). Such areas are not used as a file system or
as a device file.
• When creating a file system or device file, do not specify a LU larger than the size that Logical Volume
Manager can recognize. If you specify such an LU, an error occurs.
4-7 Maximum Setting Values
Table 4-1 lists the maximum setting values for the functions for creating a device file and file system.
Working With OS-Based Constraints 77
Page 78

Table 4-1 Maximum Setting Values for Functions Creating a Device File and File System
Item Windows®
OS
Number of volume (disk)
-- 255 255 99 256
Solaris™ OS AIX® OS Linux OS
groups in a system
Number of logical volumes
per volume group
Number of logical volumes
1 1 1
(see Note 2)
255 255 255
1 1
255 256
HP-UX OS
(see Note 1)
in a system
Number of physical volumes per
volume group
Number of physical volumes per
logical volume
Number of file system expansion
(addition of LU) times
Logical volume size 2 TB 1 TB 128 GB 256 GB 2 TB
File system size 2 TB 1 TB 128 GB 256 GB 2 TB
Length of mount point path name
(characters)
NOTE:
•
1: The default value is 10. If you want to increase the number of volume groups, manually change the value of the
maxvgs kernel parameter according to the relevant OS documentation.
• 2: Not including logical volumes for the JFS log.
• 3: If a factor is specified (from 1 to 16) to change the maximum number of physical partitions when creating a volume
group, the maximum number changes to the result of the following formula:
• 1 divided by the value specified for the factor
• 4: In Windows
®
, this includes the number of the drive letter characters.
• 5: In the Logical Volume Manager for AIX
characters. If the size of the mount point information exceeds this value, the mount point cannot be recognized
properly. To avoid this, manually change /etc/filesystem
-- 32 32
(see Note 3)
32 32 32
(see Note 3)
31 31 31
244
(see Note 4)
®
, the information about a logical volume (LVCB) stores up to 128
244 244
(see Note 3)
(see Note 5)
32 32
32 32
31 31
244 244
Working With OS-Based Constraints 78
Page 79

5 Managing Storage Pools
This chapter explains how to manage storage pools using Provisioning Manager.
• Managing a Storage Pool (section
• Viewing a Storage Pool Overview (section 5-2 )
• Viewing Storage Pool Usage Status for Each Storage Subsystem Model (section
• Viewing Storage Pool Usage Status for Each RAID Level (section
• Viewing Storage Pool Usage Status for Each Storage Subsystem Series (section
• Viewing Storage Pool Usage Status for Each Storage Subsystem (section
• Viewing a List of Unallocated Volumes on a Host (section
• Allocating a Volume to a Host From a List of Unallocated Volumes (section 5-8 )
• Viewing a List of Allocated Volumes on a Host (section
• Allocating a Volume on a Host from a List of Allocated Volumes (section
• Releasing a Volume Allocated on a Host from a List of Allocated Volumes (section 5-11 )
• Moving Volumes between Storage Pools (section
NOTE: This manual focuses more on operations than on descriptions of items displayed in windows. For
details about items displayed in windows, see Help for each window.
5-1 Managing a Storage Pool
Provisioning Manager manages volumes that exist in multiple storage subsystems as a single logical storage
area (a storage pool). Provisioning Manager enables you to do the following to manage storage pools.
• View a storage pool from the following perspectives:
• Storage subsystem for each model
• Storage subsystem for each RAID level
• Storage subsystem for each series
• Each storage subsystem
• View a list of volumes allocated to the host
• View a list of volumes not allocated to the host
• Allocate and release volumes in the storage pool
• Move volumes between storage pools
A storage pool is associated with a user group. User groups can have a hierarchical relationship with other
user groups. The users who belong to a user group can access the storage pools associated with lower-level
user groups. For example, suppose that the parent group P_Group has child groups C_Group01 and
C_Group02, and the child user group C_Group01 has the grandchild group GC_Group.
these relationships.
5-1 )
5-3 )
5-4 )
5-5 )
5-6 )
5-7 )
5-9 )
5-10 )
5-12 )
Figure 5-1 illustrates
Managing Storage Pools 79
Page 80

Figure 5-1 User Groups and Access Scopes
In this case, the users who belong to the user group P_Group can view the storage pool usage status from the
following perspectives:
• From P_Group down to its subordinate groups
• From C_Group01 down to its subordinate groups
• From C_Group02 down to its subordinate groups
• From GC_Group down to its subordinate groups
NOTE: The storage pools and volume contents are displayed in the windows according to the following
rules:
• For megabytes (MB), only integers are used and digits after the decimal point are truncated.
• For gigabytes (GB) or above, a number is truncated to two decimal places. The thousandth and the following digits
are truncated.
• The usage ratio uses only integers (digits after the decimal point are truncated).
5-1-1 Perspective from a Parent Group to Subordinate Groups
From the perspective of P_Group, storage pool usage status is displayed in the following categories:
• Excluding Size of Child Groups: displays the storage pool usage status for the access scope of P_Group
excluding the access scopes of C_Group01 (GC_Group is fully contained in C_Group01) and
C_Group02. The figure below shows the corresponding scope within the scopes illustrated in
Figure 5-1.
Managing Storage Pools 80
Page 81

• Including Size of Child Groups: displays the storage pool usage status for the access scope of P_Group,
which extends to its subordinate groups as shown in the detail below from Figure 5-1.
5-1-2 Perspective from a Child Group to Its Subordinate Groups
From the perspective of C_Group01, the storage pool usage status is displayed in the following categories:
• Excluding Size of Child Groups: displays the storage pool usage status for the access scope of
C_Group01 excluding the access scope of GC_Group.
The figure below illustrates the scopes of access in play using the model first shown in
Managing Storage Pools 81
Figure 5-1.
Page 82
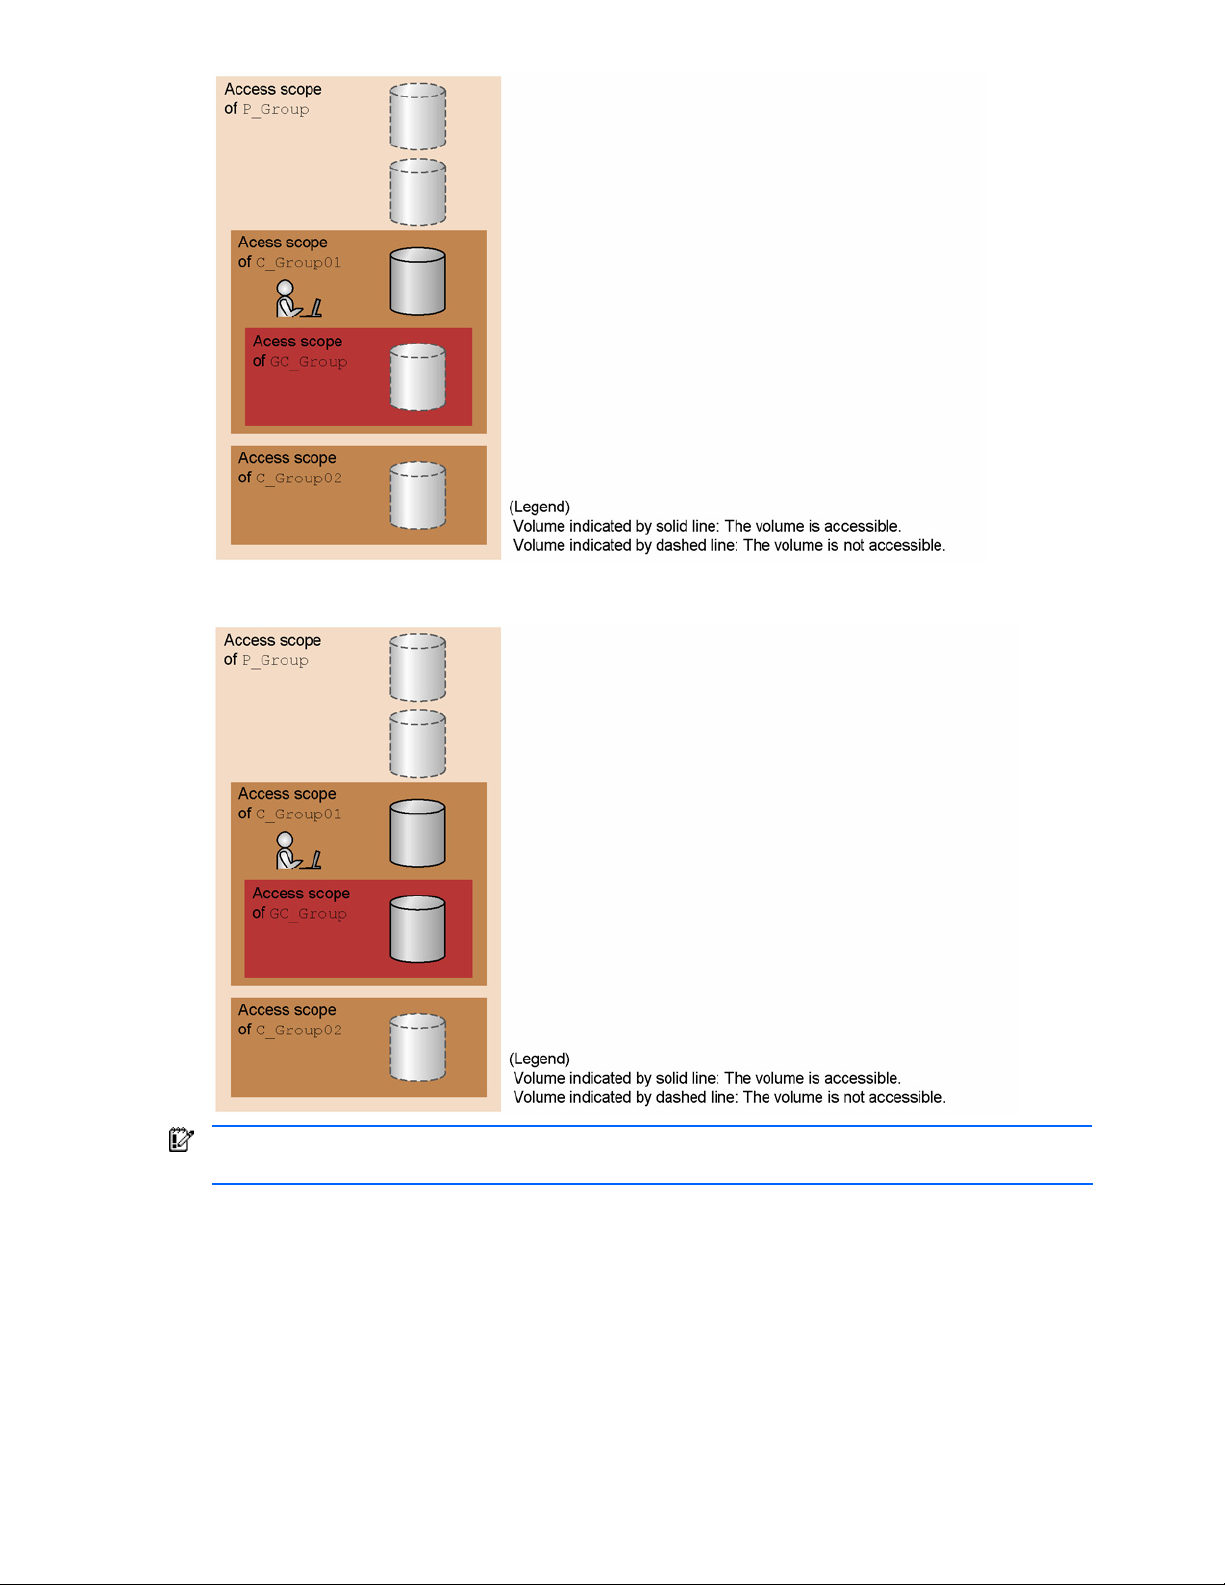
• Including Size of Child Groups: displays the storage pool usage status for the access scope of
C_Group01. The figure below shows the corresponding scope within the scopes illustrated in Figure 5-1.
IMPORTANT: As shown in Figure 5-2, when the scope of C_Group01 overlaps the scope of C_Group02,
the capacity of the overlapped part is counted in both C_Group01 and C_Group02.
Figure 5-2, the volume contents that can be viewed by each user group are as follows:
In
• P_Group including its child groups = 1 + 2 + 3 + 4 = 100 GB
• P_Group not including its child groups = 1 = 50 GB
• C_Group01 including its child groups = 2 + 3 = 30 GB
• C_Group02 not including its child groups = 3 + 4 = 30 GB
Therefore, the total capacity of P_Group not including its child groups, C_Group01 including its child groups,
and C_Group02 not including its child groups is larger than the capacity of P_Group including its child groups.
Managing Storage Pools 82
Page 83

Figure 5-2 Volume Contents: Scope of C_Group01 Overlaps Scope of C_Group02
5-1-3 Number of Volumes That Can Be Displayed
A maximum of 16,384 volumes can be displayed in the list of volumes (LDEVs). When the number of volumes
in the user group reaches 16,384, a warning message is displayed in the list window.
When the number of volumes in the user group exceeds 16,384, create a new child group, and then move the
excess volumes to this group to display them. The moved volumes can be displayed by selecting the created
child group in the list window.
You can use Device Manager to create a child group or move volumes. For details on using Device Manager to
perform these procedures, see the description about user management in the manual HP StorageWorks
Command View XP Advanced Edition Device Manager Web Client User Guide. For volumes that are not
allocated to a host, you can also use Provisioning Manager to move them. For details on using Provisioning
Manager to perform this procedure, see
5-12 .
5-2 Viewing a Storage Pool Overview
In the Show Properties - Storage Pool subwindow, you can view an overview of the accessible storage pool,
including total amount, allocated amount, unallocated amount, and usage rate of a storage pool.
NOTE: Information not reflecting the latest status might be displayed when the storage subsystem
information is being updated. In such a case, a warning message is displayed, so wait a while and then reexecute the view operation.
To view a storage pool overview:
1. In the navigation frame, select Storage Pool. The Storage Pool subwindow is displayed in the method
frame. The Show Properties - Storage Pool subwindow is displayed in the information frame. The
information displayed in the information frame at this point is the same as the information displayed when
Show Properties is selected in the Storage Pool subwindow.
displayed.
2. In the Show Properties - Storage Pool subwindow, specify the following items according to the
information you want to view.
View: This item lets you select either of the following items:
• Summary: Displays information on storage pools of the user group, including its child groups, to
which the logged-in user belongs. This is the initial screen of the Show Properties - Storage Pool
subwindow.
• Details: Displays information on storage pools of the groups under the user group to which the
logged-in user belongs. Different from Summary in that you can view only the parent group
information or the child group information rather than both at the same time.
When Details is selected (see
the Show Information button used to show information are displayed.
3. When Details is selected, set the User Group according to the contents that you want to display. You can
view information on storage pools of the specified user group, including the groups belonging to the user
group. Select a desired user group from the pull-down list.
Figure 5-4), the User Group button used to specify a user group and
Figure 5-3 shows these subwindows
Managing Storage Pools 83
Page 84

4. After specifying User Group, click the Show Information button. The storage pool information is displayed
according to the following scope (see
Figure 5-5):
• Storage pool information for the child groups of the user groups selected in User Group
• Storage pool information for the user groups set in User Group
• Child group storage pool information, including grandchild groups
IMPORTANT: The sum of the storage sizes of new groups and child groups that include the
contents of grandchild groups equals the sum of new groups that include child groups. However, if
there are multiple child groups, and if the access scopes of the child groups overlap, the contents of
new groups and child groups that include the contents of grandchild groups are larger than that of
new groups that include child groups. For details, see section
NOTE: When you click the Show Information button of the Storage Pool (Including Size of Child
5-1 .
Groups) - child-group-name table, the Show Properties - Storage Pool subwindow switches,
allowing you to view the child group storage pool information including the grandchild group
contents, and the child group storage pool information not including the grandchild group contents,
as well as all the storage pool information for the grandchild groups.
Figure 5-3 Storage Pool Subwindow and Show Properties - Storage Pool Subwindow
Figure 5-4 Show Properties - Storage Pool Subwindow when Details is Selected
Managing Storage Pools 84
Page 85
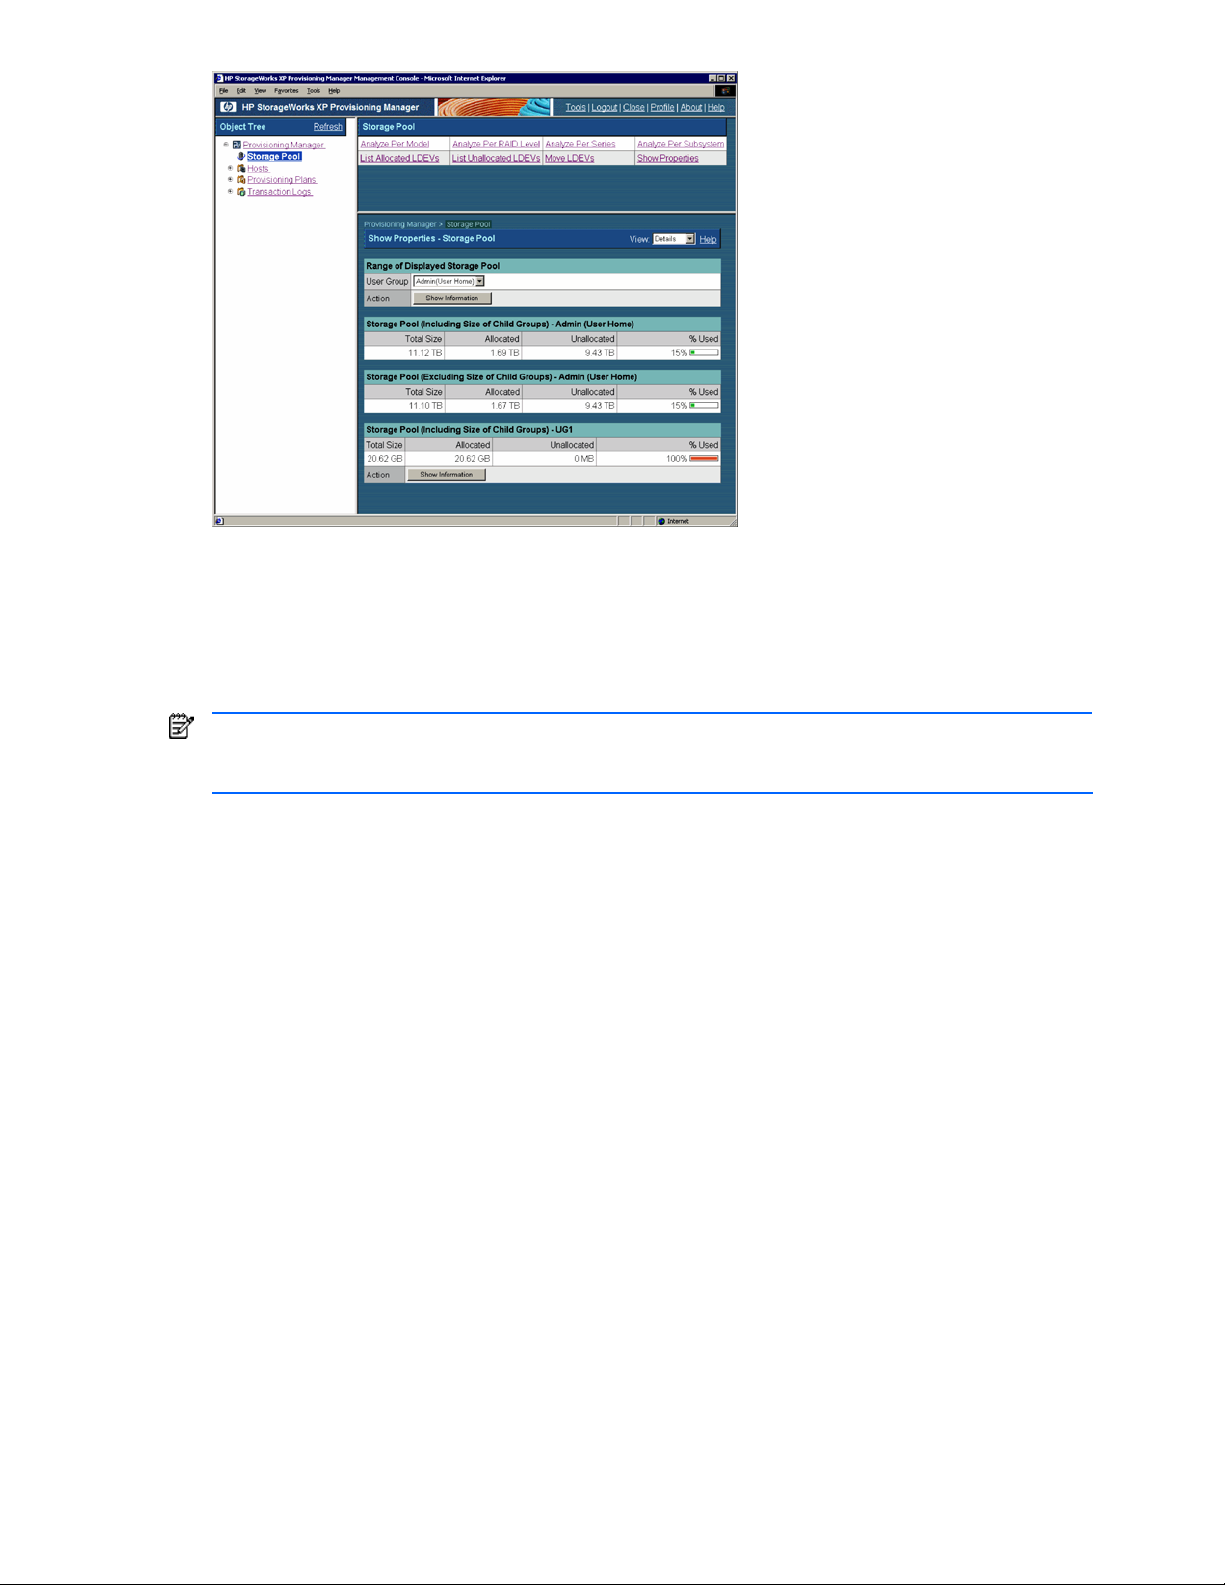
Figure 5-5 Show Properties - Storage Pool Subwindow when the Show Information Button is Clicked
5-3 Viewing Storage Pool Usage Status for Each Storage Subsystem Model
In the Analyze Per Model - Storage Pool subwindow, you can view the storage pool usage status (total amount,
allocated amount, unallocated amount, and usage rate) for each storage subsystem model.
NOTE: Information not reflecting the latest status might be displayed when the storage subsystem
information is being updated. In such a case, a warning message appears, so wait a while and then reexecute the view operation.
To view the storage pool usage status for each storage subsystem model:
1. In the navigation frame, select Storage Pool. The Storage Pool subwindow is displayed in the method
frame. The Show Properties - Storage Pool subwindow is displayed in the information frame.
2. In the Storage Pool subwindow, choose Analyze Per Model. The Analyze Per Model - Storage Pool
subwindow is displayed in the information frame (see
3. In the Analyze Per Model - Storage Pool subwindow, specify the following items according to the
information you want to view.
View: This item lets you select either of the following items:
Summary: Displays information on storage group of the user group, including its child groups, to
which the logged-in user belongs. This is the initial screen of the Analyze Per Model - Storage Pool
subwindow.
Figure 5-6).
Details: Displays information on storage pools of the groups under the user group to which the
logged-in user belongs. Different from Summary in that you can view only the parent group
information or the child group information rather than both at the same time.
When Details is selected (see
the Show Information button used to show information are displayed.
4. When Details is selected, set the User Group according to the contents that you want to view. You can
view information on storage pools of the specified user group, including the groups belonging to the user
group. Select a desired user group from the pull-down list.
5. After specifying User Group, click the Show Information button (see
information for each storage subsystem model is displayed according to the following scope:
• Storage pool information for the child groups of the user groups selected in User Group
• Storage pool information of the user groups set in User Group
• Storage pool information of the child groups, including the grandchild groups
Figure 5-7), the User Group button used to specify a user group and
Figure 5-8). The storage pool
Managing Storage Pools 85
Page 86

IMPORTANT: The sum of the storage sizes of new groups and child groups, including the contents
of grandchild groups, equals the sum of new groups, including child groups. However, if there are
multiple child groups, and if the access scope of the child groups overlaps, the contents of new
groups and child groups, including the contents of grandchild groups, are larger than that of new
groups, including child groups. For details, see section
NOTE: When you click the Show Information button of Storage Pool Per Model (Including Size of
Child Groups) - child-group-name, the Analyze Per Model - Storage Pool subwindow switches,
allowing you to view the child group storage pool information including the grandchild group
contents, and the storage pool information not including the grandchild group contents, as well as
all the storage pool information for the grandchild groups.
Figure 5-6 Analyze per Model - Storage Pool Subwindow
5-1 .
Figure 5-7 Analyze per Model - Storage Pool Subwindow when Details is Selected
Managing Storage Pools 86
Page 87

Figure 5-8 Analyze per Model - Storage Pool Subwindow, When Show Information is Clicked
5-4 Viewing Storage Pool Usage Status for Each RAID Level
In the Analyze Per RAID Level - Storage Pool subwindow, you can view the storage pool usage status (total
amount, allocated amount, unallocated amount, and usage rate) for each RAID level.
NOTE: Information not reflecting the latest status might be displayed when the storage subsystem
information is being updated. In such a case, a warning message appears, so wait a while and then reexecute the view operation.
To view the storage pool usage status for each RAID level:
1. In the navigation frame, select Storage Pool. The Storage Pool subwindow is displayed in the method
frame. The Show Properties - Storage Pool subwindow is displayed in the information frame.
2. In the Storage Pool subwindow, choose Analyze Per RAID Level. The Analyze Per RAID Level - Storage
Pool subwindow is displayed in the information frame (see
3. In the Analyze Per RAID Level - Storage Pool subwindow, specify the following items according to the
information you want to view.
View: This item lets you select either of the following items:
• Summary: Displays information on storage pools of the user group, including its child groups, to
which the logged-in user belongs. This is the initial screen of the Analyze Per RAID Level - Storage
Pool subwindow.
• Details: Displays information on storage pools of the groups under the user group to which the
logged-in user belongs. Different from Summary in that you can view only the parent group
information or the child group information rather than both at the same time.
When Details is selected (see
the Show Information button used to show information are displayed.
4. When Details is selected, set the User Group according to the contents that you want to display. You can
view information on storage pools of the specified user group, including the groups belonging to the user
group. Select a desired user group from the pull-down list.
5. After specifying User Group, click the Show Information button (see
information for each RAID level is displayed according to the following scope:
• Storage pool information for the child group contents of the user groups set by User Group
• Storage pool information set by User Group
• Storage information for child groups, including grandchild group content
Figure 5-10), the User Group button used to specify a user group and
Figure 5-9).
Figure 5-11). The storage pool
IMPORTANT: In most cases, the sum of the storage sizes of parent, child, and grandchild groups
equals the sum of parent and child groups. Grandchild groups only affect storage size calculations
if there are multiple child groups with overlapping scopes of access. For details, see section
NOTE: When you click the Show Information button of Storage Pool Per RAID Level (Including
Size of Child Groups) - child-group-name, the Analyze Per RAID Level - Storage Pool subwindow
toggles between the child group storage pool information with and without grandchild group
contents.
Managing Storage Pools 87
5-1 .
Page 88

Figure 5-9 Analyze per RAID Level - Storage Pool Subwindow
Figure 5-10 Analyze per RAID Level - Storage Pool Subwindow when Details is Selected
Figure 5-11 Analyze per RAID Level - Storage Pool Subwindow when Show Information is Clicked
5-5 Viewing Storage Pool Usage Status for Each Storage Subsystem Series
In the Analyze Per Series - Storage Pool subwindow, you can view the storage pool usage status (total
amount, allocated amount, unallocated amount, and usage rate) for each storage subsystem series.
NOTE: Information not reflecting the latest status might be displayed when the storage subsystem
information is being updated. In such a case, a warning message is displayed, so wait a while and then reexecute the view operation.
Managing Storage Pools 88
Page 89
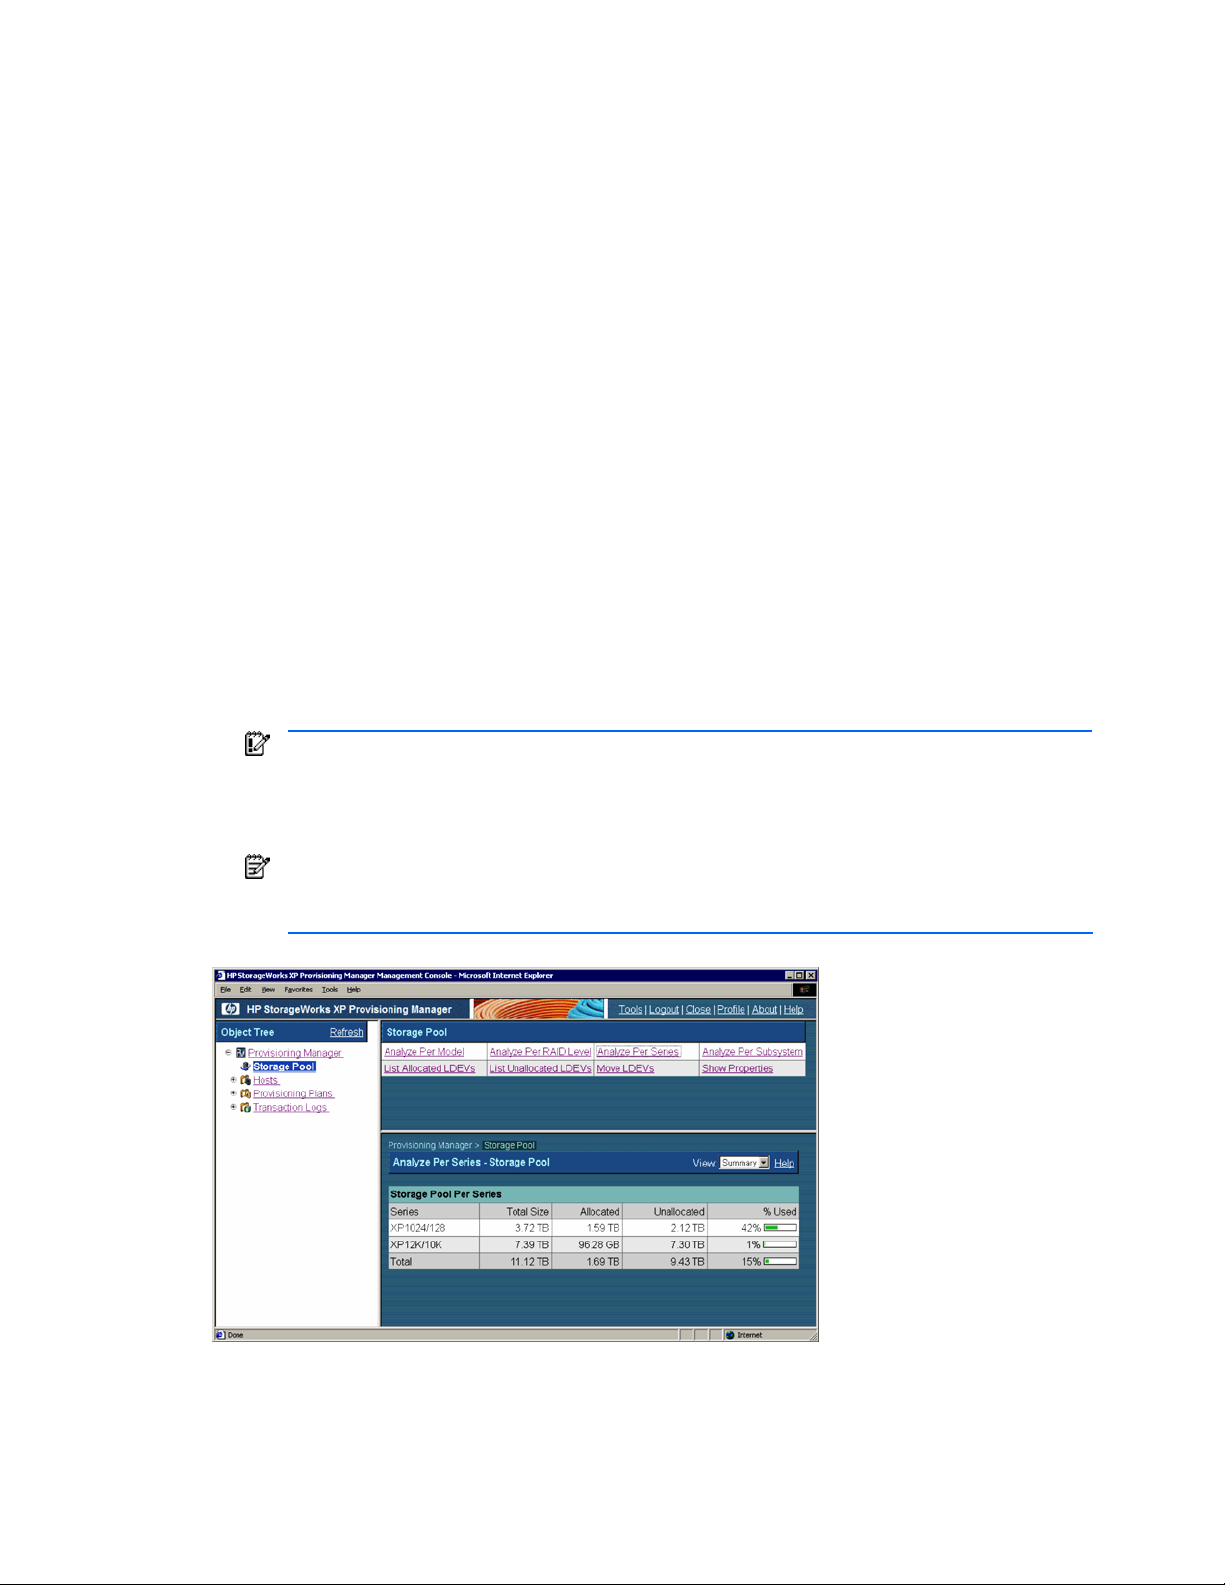
To view the storage pool usage status for each storage subsystem series:
1. In the navigation frame, select Storage Pool. The Storage Pool subwindow is displayed in the method
frame. The Show Properties - Storage Pool subwindow is displayed in the information frame.
2. In the Storage Pool subwindow, choose Analyze Per Series. The Analyze Per Series - Storage Pool
subwindow is displayed in the information frame (see
Figure 5-12).
3. In the Analyze Per Series - Storage Pool subwindow, specify the following items according to the
information you want to view.
View: This item lets you select either of the following items:
• Summary: Displays information on storage pools of the user group, including its child groups, to
which the logged-in user belongs. This is the initial screen of the Analyze Per Series - Storage Pool
subwindow.
• Details: Displays information on storage pools of the groups under the user group to which the
logged-in user belongs. Different from Summary in that you can view only the parent group
information or the child group information rather than both at the same time.
When Details is selected (see
Figure 5-13), the User Group button used to specify a user group and
the Show Information button used to show information are displayed.
4. When Details is selected, set the User Group according to the contents that you want to display. You can
view information on storage pools of the specified user group, including the groups belonging to the user
group. Select a desired user group from the pull-down list.
5. After specifying User Group, click the Show Information button (see
Figure 5-14). The storage pool
information for each storage subsystem series is displayed according to the following scope:
• Storage pool information for the child group contents of the user groups set by User Group
• Storage pool information set by User Group
• Storage information for child groups, including grandchild group content
IMPORTANT: The sum of the storage sizes of new groups and child groups, including the contents
of grandchild groups, equals the sum of new groups, including child groups. However, if there are
multiple child groups, and if the access scope of the child groups overlaps, the contents of new
groups and child groups, including the contents of grandchild groups, is larger than that of new
groups, including child groups. For details, see section
NOTE: When you click the Show Information button of Storage Pool Per Series (Including Size of
5-1 .
Child Groups) - child-group-name, the Analyze Per Series - Storage Pool subwindow toggles
between the child group storage pool information with and without the grandchild group contents.
Figure 5-12 Analyze per Series - Storage Pool Subwindow
Managing Storage Pools 89
Page 90

Figure 5-13 Analyze per Series - Storage Pool Subwindow when Details is Selected
Figure 5-14 Analyze per Series - Storage Pool Subwindow, When Show Information is Clicked
5-6 Viewing Storage Pool Usage Status for Each Storage Subsystem
In the Analyze Per Subsystem - Storage Pool subwindow, you can view the storage pool usage status (total
amount, allocated amount, unallocated amount, and usage rate) for each storage subsystem.
NOTE: Information not reflecting the latest status might be displayed when the storage subsystem
information is being updated. In such a case, a warning message is displayed, so wait a while and then reexecute the view operation.
To view the storage pool usage status for each storage subsystem:
1. In the navigation frame, select Storage Pool. The Storage Pool subwindow is displayed in the method
frame. The Show Properties - Storage Pool subwindow is displayed in the information frame.
2. In the Storage Pool subwindow, choose Analyze Per SubSystem. The Analyze Per SubSystem - Storage
Pool subwindow is displayed in the information frame (see
3. In the Analyze Per SubSystem - Storage Pool subwindow, specify the following items according to the
information you want to view.
View: This item lets you select either of the following items:
• Summary: Displays information on storage group of the user group, including its child groups, to
Figure 5-15).
which the logged-in user belongs. This is the initial screen of the Analyze Per SubSystem - Storage
Pool subwindow.
Managing Storage Pools 90
Page 91

• Details: Displays information on storage pools of the groups under the user group to which the
logged-in user belongs. Different from Summary in that you can view only the parent group
information or the child group information rather than both at the same time.
When Details is selected (see Figure 5-16), the User Group button used to specify a user group, the
Plan button used to specify an allocation plan, and the Show Information button used to show
information are displayed.
4. When Details is selected, set the User Group according to the contents that you want to display.
• User Group: You can view information on storage pools of the specified user group, including the
groups belonging to the user group. Select a desired user group from the pull-down list.
• Plan: You can view information on storage pools applicable to the specified allocation plan. Select a
desired allocation plan from the pull-down list. For details about allocation plans, see section
NOTE: When the Details button is clicked in Plan, the detailed information on the allocation plan
3-2 .
specified in Plan is displayed.
5. After specifying User Group and Plan, click the Show Information button (see Figure 5-17). The storage
pool information for each storage subsystem is displayed according to the following scope:
• Storage pool information for the child group contents of the user groups set by User Group
• Storage pool information set by User Group
• Storage information for child groups, including grandchild group content
IMPORTANT: The sum of the storage sizes of new groups and child groups, including the contents
of grandchild groups, equals the sum of new groups, including child groups. However, if there are
multiple child groups, and if the access scope of the child groups overlaps, the contents of new
groups and child groups, including the contents of grandchild groups, are larger than that of new
groups, including child groups. For details, see section
NOTE: When you click the Show Information button of Storage Pool Per Subsystem (Including
5-1 .
Size of Child Groups) - child-group-name, the Analyze Per Subsystem - Storage Pool subwindow
toggles between the child group storage pool information with and without grandchild group
contents.
Figure 5-15 Analyze per SubSystem - Storage Pool Subwindow
Managing Storage Pools 91
Page 92
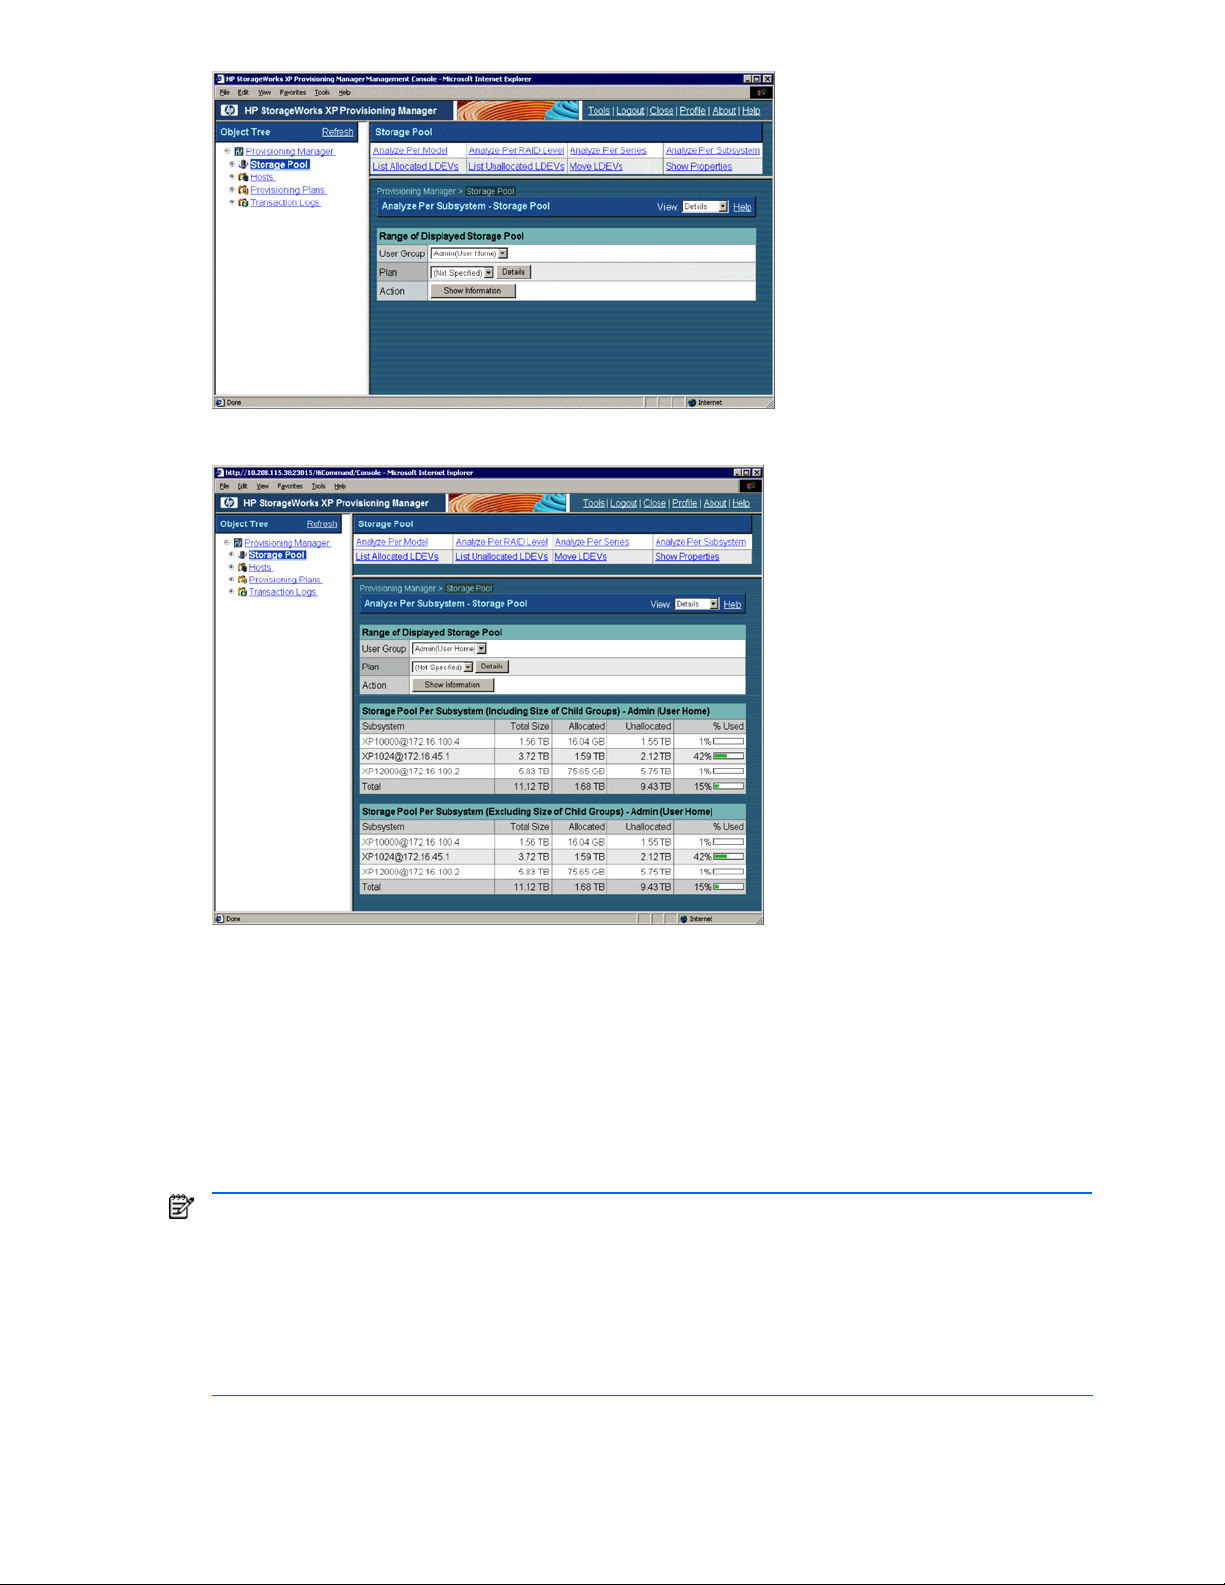
Figure 5-16 Analyze per Subsystem - Storage Pool Subwindow when Details is Selected
Figure 5-17 Analyze per Subsystem - Storage Pool Subwindow when the Show Information Button is Clicked
5-7 Viewing a List of Unallocated Volumes on a Host
In the List Unallocated LDEVs - Storage Pool subwindow, you can view the volumes not allocated on the host.
You can view the size, subsystem name, host, type, array group, RAID level, emulation type, attributes, copy
type, copy role, default controller, external subsystem, SLPR, and CLPR for each volume. When you select a
subsystem from the Subsystem pull-down list, only the volumes in the specified subsystems are displayed. For
details about the displayed items, see Help for the windows.
A maximum of 16,384 volumes can be displayed in the list of volumes. If you want to display information for
16,385 or more volumes, specify storage pool settings by following the procedure in
NOTE: Information not reflecting the latest status might be displayed when the storage subsystem
information is being updated. In such a case, a warning message is displayed, so wait a while and then reexecute the view operation.
NOTE: If the volume is operated using partitioned storage administrator permissions, and different SLPRs or
CLPRs are set for the LDEV that configures the selected volume, or the SLPR for the selected volume is
different from the one for the assigned port, an error message is displayed indicating that the operation
cannot be performed by the partitioned storage administrator. In such a case, use Device Manager to check
which LDEV is inconsistent, and then reset the SLPR and CLPR information for the storage subsystem.
To view the volumes:
1. In the navigation frame, select Storage Pool. In the method frame, the Storage Pool subwindow is
displayed. In the information frame, the Show Properties - Storage Pool subwindow is displayed.
5-1-3 .
Managing Storage Pools 92
Page 93
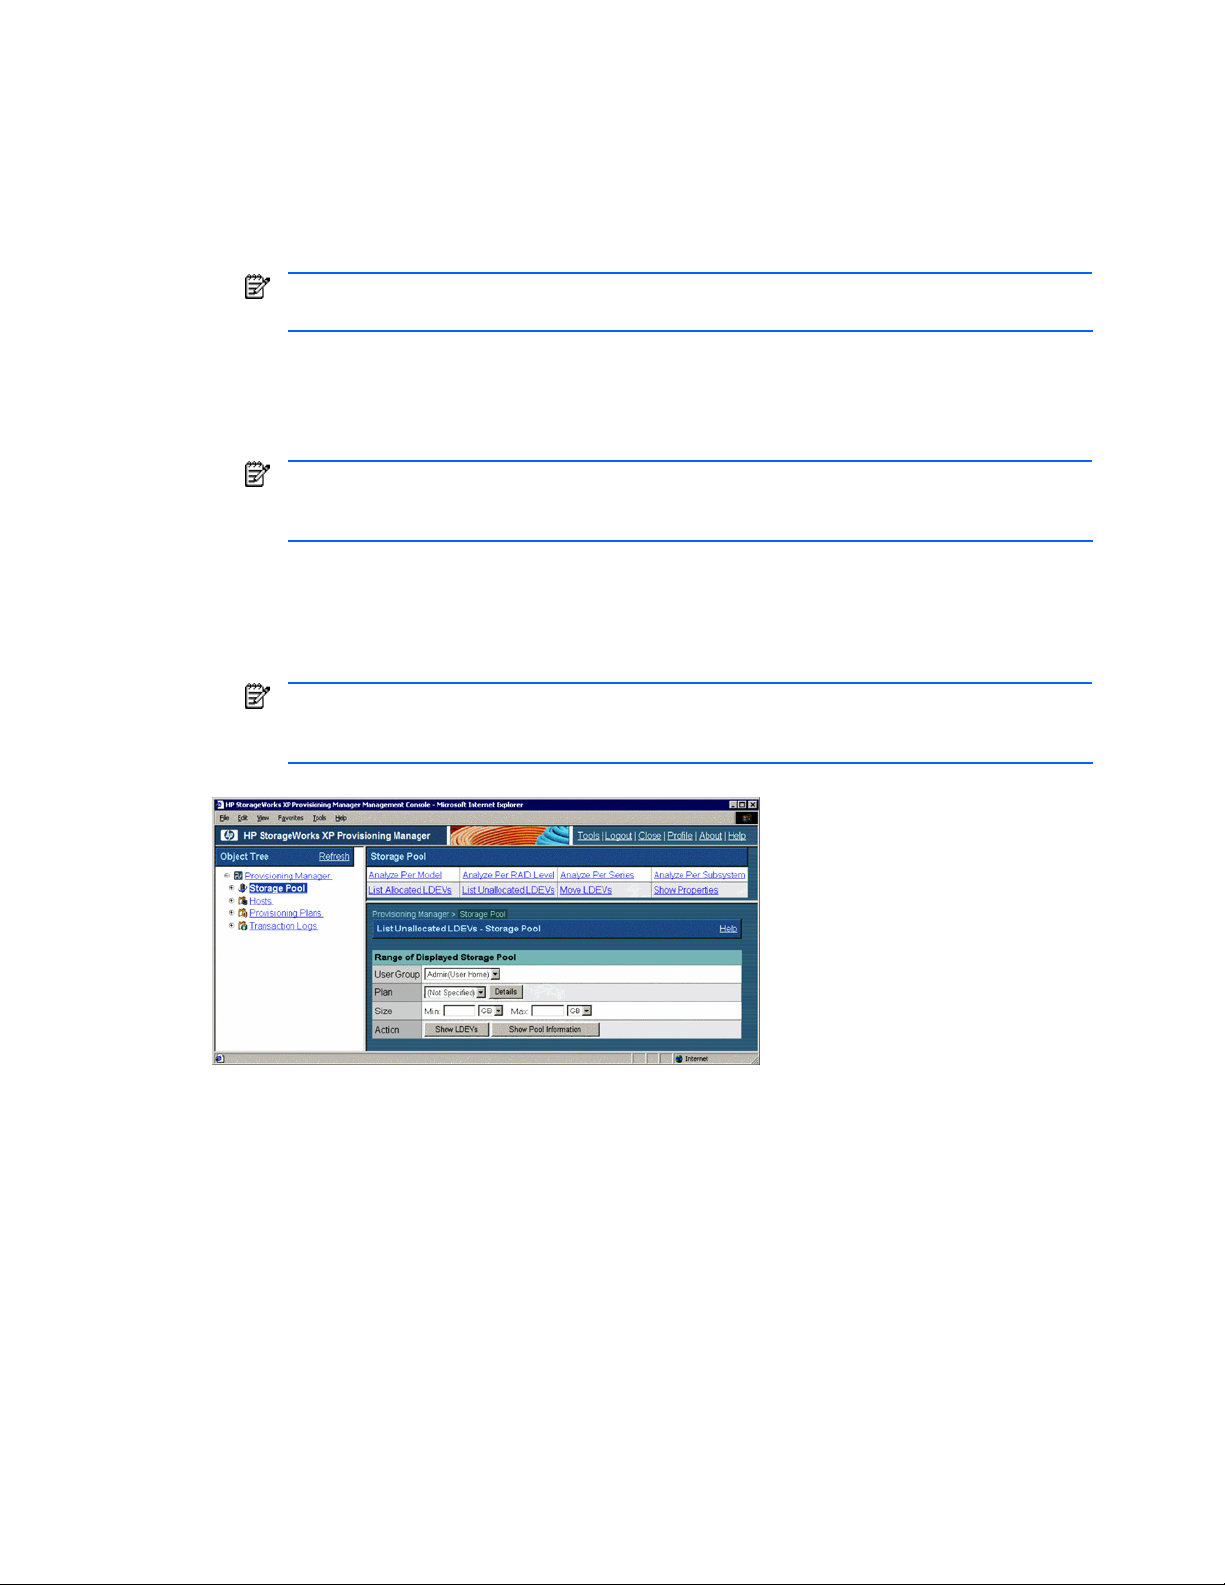
2. In the Storage Pool subwindow, select List Unallocated LDEVs. In the information frame, the List
Unallocated LDEVs - Storage Pool subwindow is displayed (see
Figure 5-18).
3. In the List Unallocated LDEVs - Storage Pool subwindow, specify the following items according to the
information about the volumes you want to view.
• User Group: You can view the volumes available for the specified user group. Select a desired user
group from the pull-down list.
• Plan: You can view the volumes applicable to the specified application plan. Select a desired
allocation plan from the pull-down list. For details about allocation plans, see section
NOTE: When the Details button is clicked, the detailed information about the allocation plan
3-2 .
specified in Plan is displayed in another window.
• Size: You can view the volumes that meet the specified size. Enter the minimum and maximum
values for the volume size, and select the units from the pull-down list. You can omit the minimum
and maximum values. If you omit the minimum and maximum values, the minimum and maximum
values are not taken into account. For details, see Help for the windows.
NOTE: When the Show Pool Information button is clicked, the Show Pool Information - Storage
Pool dialog box is displayed for the volumes that satisfy the conditions specified in User Group and
Plan.
4. Click the Show LDEVs button. The following items are displayed (see Figure 5-19):
• Allocate Storage button
• A list of the volumes that are in the storage pools of the user group selected in User Group, and meet
the conditions specified in Plan and Size
NOTE: The Allocate Storage button is displayed when any volume in the storage pool accessible
for the logged-in user satisfies the specified conditions. This button is not displayed if the access
privilege for the logged-in user is Guest or Local Guest. For details, see section
Figure 5-18 List Unallocated LDEVs - Storage Pool Subwindow
5-8 or 5-9 .
Managing Storage Pools 93
Page 94

Figure 5-19 List Unallocated LDEVs - Storage Pool Subwindow, When Show LDEVs is Clicked
5-8 Allocating a Volume to a Host from a List of Unallocated Volumes
In the List Unallocated LDEVs - Storage Pool subwindow, from a list of volumes not allocated on the host, you
can allocate volumes on a host. By selecting multiple volumes, you can also create a LUSE. The settings for
the selected volume are performed using Device Manager functionality. For details, see the HP StorageWorks
Command View XP Advanced Edition Device Manager Web Client User Guide.
A maximum of 16,384 volumes can be displayed in the list of volumes. If you want to display information for
16,385 or more volumes, specify storage pool settings by following the procedure in 5-1-3 .
NOTE: Information not reflecting the latest status might be displayed when the storage subsystem
information is being updated. In such a case, a warning message is displayed, so wait a while and then retry
the view operation.
NOTE: If the volume is operated using partitioned storage administrator permissions, and different SLPRs or
CLPRs are set for the LDEV that configures the selected volume, or the SLPR for the selected volume is
different from the one for the assigned port, an error message is displayed indicating that the operation
cannot be performed by the partitioned storage administrator. In such a case, use Device Manager to check
which LDEV is inconsistent, and then reset the SLPR and CLPR information for the storage subsystem.
To allocate the volumes:
1. From the navigation frame, select Storage Pool. In the method frame, the Storage Pool subwindow is
displayed. In the information frame, the Show Properties - Storage Pool subwindow is displayed.
2. In the Storage Pool subwindow, select List Unallocated LDEVs. In the information frame, the List
Unallocated LDEVs - Storage Pool subwindow is displayed (see
Figure 5-20).
Figure 5-20 List Unallocated LDEVs - Storage Pool Subwindow
3. In the List Unallocated LDEVs - Storage Pool subwindow, specify the following items according to the
information about the volumes you want to allocate.
Managing Storage Pools 94
Page 95

• User Group: You can view the volumes available for the specified user group. Select a desired user
group from the pull-down list.
• Plan: You can view the volumes applicable to the specified application plan. Select a desired
allocation plan from the pull-down list. For details about allocation plans, see section 3-2 .
NOTE: When the Details button is clicked, the detailed information about the allocation plan
specified in Plan is displayed in another window.
• Size: You can view the volumes that meet the specified size. Enter the minimum and maximum
values for the volume size, and select the units from the pull-down list. You can omit the minimum
and maximum values. If you omit the minimum and maximum values, the minimum and maximum
values are not taken into account. For details, see Help for the windows.
NOTE: When the Show Pool Information button is clicked, the Show Pool Information - Storage
Pool dialog box is displayed for the volumes that satisfy the conditions specified in User Group and
Plan.
4. Click the Show LDEVs button. The following items are displayed (see Figure 5-21):
• Allocate Storage button
• A list of the volumes that are in the storage pools of the user group selected in User Group, and meet
the conditions specified in Plan and Size
5. To further narrow down the volumes, use filtering.
In the list of volumes, from the pull-down list for an item, select the value that corresponds to the desired
volumes. The volumes that meet the selected value are selected from the displayed volumes.
6. Select the unallocated volume checkbox. Multiple volumes can be selected.
Note that you can select a maximum of 200 volumes at any one time. If you want to select more than 200
volumes, select them in multiple operations. For example, if you want to select 240 volumes, select 200
volumes in one operation, and the remaining 40 in another operation. Also, if a volume is related to more
than one volume path, the total number of selectable volumes decreases according to the number of
related paths. For example, if every volume is related to two volume paths, the number of selectable
volumes decreases to approximately 100.
7. Click the Allocate Storage button. The Device Manager’s Add Storage (Step: Define Host/Port
Connections) dialog box is displayed.
8. Allocate volumes using the Add Storage (Step: Define Host/Port Connections) dialog box. Set the
following items in this dialog box (for details, see the HP StorageWorks Command View XP Advanced
Edition Device Manager Web Client User Guide):
• Specify the path between the host WWN and the port of the storage subsystem
• Allocate the volume LUN
9. Check the processing result in the List Allocated LDEVs - Storage Pool subwindow. When you select List
Allocated LDEVs in the Storage Pool subwindow, the latest information reflecting the processing result is
displayed. For details, see section
5-9 .
Managing Storage Pools 95
Page 96

Figure 5-21 List Unallocated LDEVs - Storage Pool Subwindow, When Show LDEVs is Clicked
5-9 Viewing a List of Allocated Volumes on a Host
In the List Allocated LDEVs - Storage Pool subwindow, you can view the following information for each volume
allocated on a host: size, subsystem name, host, type, array group, RAID level, emulation type, attributes, copy
type, copy role, default controller, and external subsystem.
A maximum of 16,384 volumes can be displayed in the list of volumes. If you want to display information for
16,385 or more volumes, specify storage pool settings by following the procedure in
NOTE: Information not reflecting the latest status might be displayed when the storage subsystem
information is being updated. In such a case, a warning message is displayed, so wait a while and then reexecute the view operation.
NOTE: If the volume is operated using partitioned storage administrator permissions, and different SLPRs or
CLPRs are set for the LDEV that configures the selected volume, or the SLPR for the selected volume is
different from the one for the assigned port, an error message is displayed indicating that the operation
cannot be performed by the partitioned storage administrator. In such a case, use Device Manager to check
which LDEV is inconsistent, and then reset the SLPR and CLPR information for the storage subsystem.
To view the volumes:
1. From the navigation frame, select Storage Pool. In the method frame, the Storage Pool subwindow is
displayed. In the information frame, the Show Properties - Storage Pool subwindow is displayed.
2. In the Storage Pool subwindow, select List Allocated LDEVs. In the information frame, the List Allocated
LDEVs - Storage Pool subwindow is displayed (see
Figure 5-22).
5-1-3 .
Figure 5-22 List Allocated LDEVs - Storage Pool Subwindow
3. In the List Allocated LDEVs - Storage Pool subwindow, specify the following items according to the
information about the volumes you want to view.
• User Group: You can view the volumes allocated to the specified user group. Select a desired user
group from the pull-down list.
Managing Storage Pools 96
Page 97
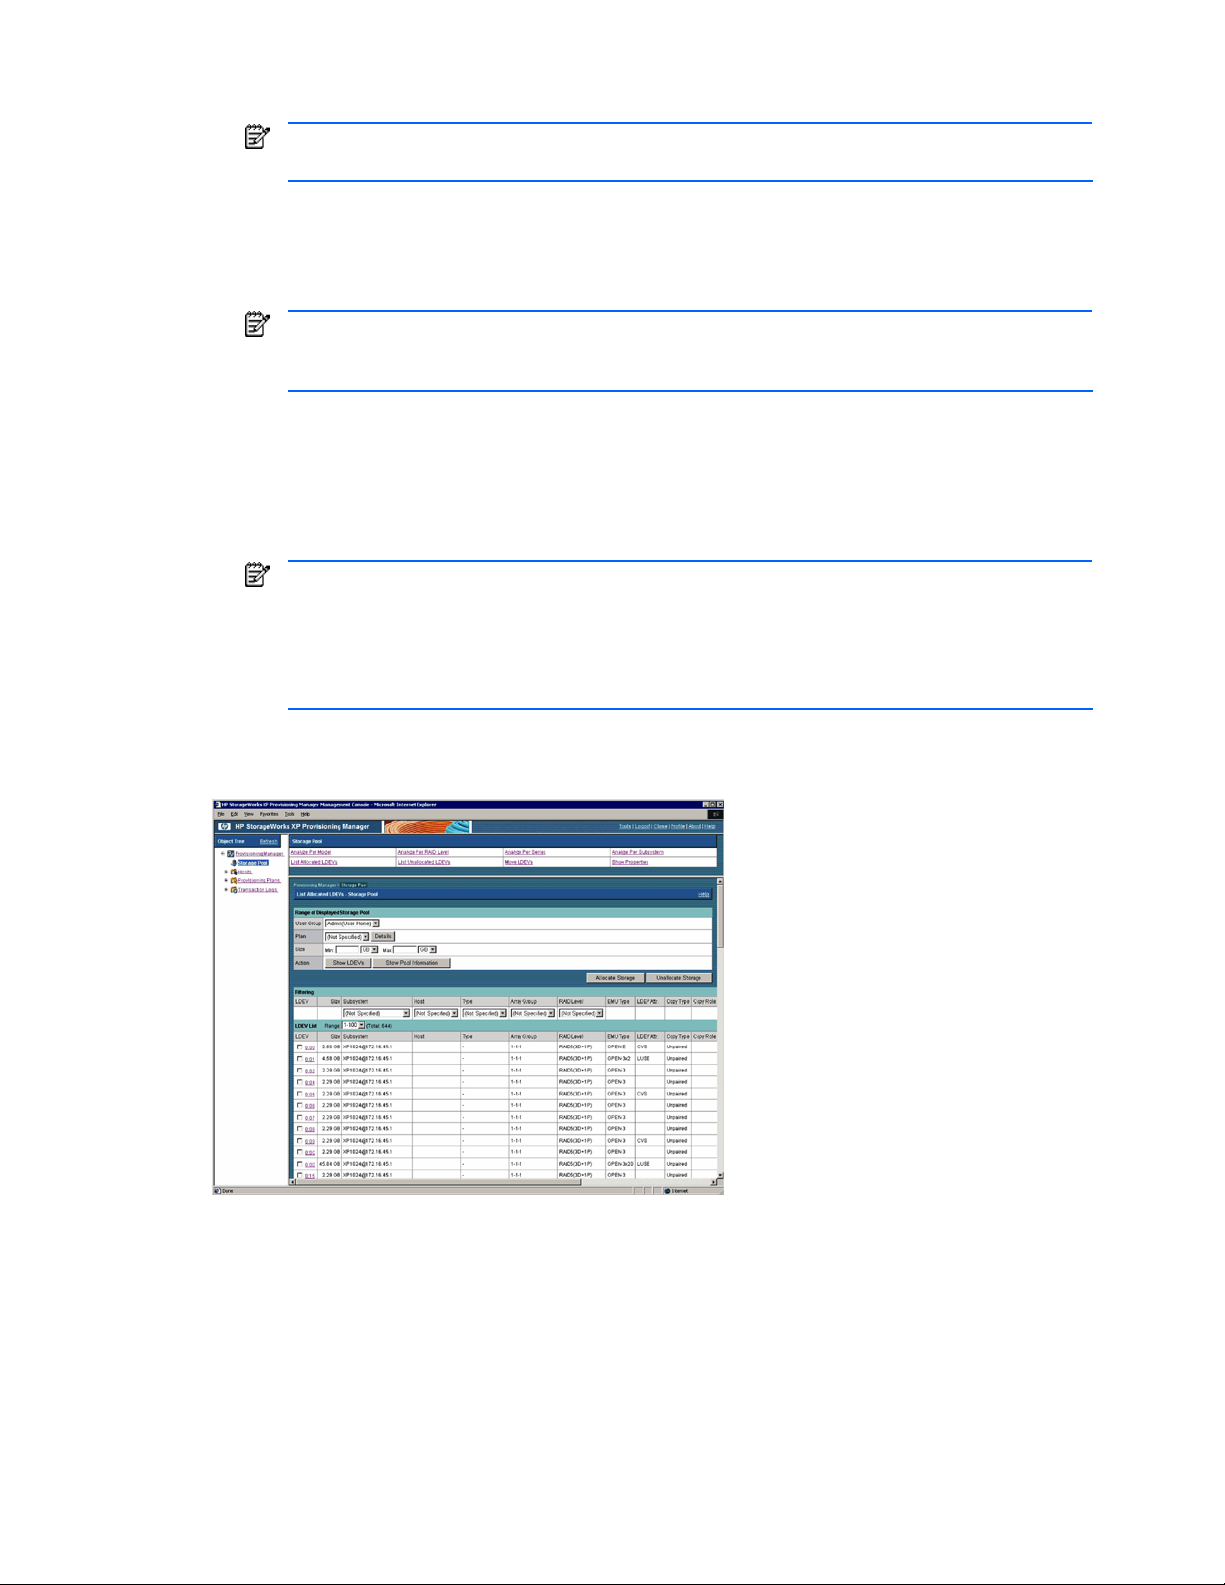
• Plan: You can view the volumes applicable to the specified application plan. Select a desired
allocation plan from the pull-down list. For details about allocation plans, see section
NOTE: When the Details button is clicked, the detailed information about the allocation plan
specified in Plan is displayed in another window.
• Size: You can view the volumes that meet the specified size. Enter the minimum and maximum
values for the volume size, and select the units from the pull-down list. You can omit the minimum
and maximum values. If you omit the minimum and maximum values, the minimum and maximum
values are not taken into account. For details, see Help for the windows.
NOTE: When the Show Pool Information button is clicked, the Show Pool Information - Storage
Pool dialog box is displayed for the volumes that satisfy the conditions specified in User Group and
Plan.
4. Click the Show LDEVs button. The following items are displayed (see Figure 5-23):
• Allocate Storage button
• Unallocate Storage button
• A list of the volumes that are in the storage pools of the user group selected in User Group, and meet
the conditions specified in Plan and Size
NOTE: The Allocate Storage and Unallocate Storage buttons are displayed when any volume in
the storage pool accessible for the logged-in user satisfies the specified conditions. These buttons
are not displayed if the access privilege for the logged-in user is Guest or Local Guest.
3-2 .
For details on the Allocate Storage button, see section
For details on the Unallocate Storage button, see section
When you select a subsystem from the Subsystem pull-down list, the volumes only in the specified
subsystem are displayed. For details about the displayed items, see Help for the windows.
5-8 or 5-10 .
5-11 .
Figure 5-23 List Allocated LDEVs - Storage Pool Subwindow when Show LDEVs is Clicked
5-10 Allocating a Volume on a Host from a List of Allocated Volumes
In the List Allocated LDEVs - Storage Pool subwindow, you can allocate volumes on a host from a list of
volumes allocated on that host. The allocation destination of the volume can be on the same or different host.
When an allocated volume is allocated to a host, more than one data path (consisting of an HBA WWN,
storage subsystem port, and storage subsystem volume) is specified. If multiple data paths are set for a
volume, the volume is shared by multiple hosts, such that if an error occurs in the data path, the volume can
still be used from another data path.
Managing Storage Pools 97
Page 98

NOTE: Information not reflecting the latest status might be displayed when the storage subsystem
information is being updated. In such a case, a warning message is displayed, so wait a while and then reexecute the view operation.
NOTE: If the volume is operated using partitioned storage administrator permissions, and different SLPRs or
CLPRs are set for the LDEV that configures the selected volume, or the SLPR for the selected volume is
different from the one for the assigned port, an error message is displayed indicating that the operation
cannot be performed by the partitioned storage administrator. In such a case, use Device Manager to check
which LDEV is inconsistent, and then reset the SLPR and CLPR information for the storage subsystem.
The settings of the selected volume are performed using Device Manager functionality. For details about
settings, see the HP StorageWorks Command View XP Advanced Edition Device Manager Web Client User
Guide.
A maximum of 16,384 volumes can be displayed in the list of volumes. If you want to display information for
16,385 or more volumes, specify storage pool settings by following the procedure in
5-1-3 .
To allocate the volumes:
1. In the navigation frame, select Storage Pool. In the method frame, the Storage Pool subwindow is
displayed. In the information frame, the Show Properties - Storage Pool subwindow is displayed.
2. In the Storage Pool subwindow, select List Allocated LDEVs. In the information frame, the List Allocated
LDEVs - Storage Pool subwindow is displayed (see
Figure 5-24).
Figure 5-24 List Allocated LDEVs - Storage Pool Subwindow
3. In the List Allocated LDEVs - Storage Pool subwindow, specify the following items according to the
information about the volumes you want to allocate.
• User Group: You can view the volumes allocated to the specified user group. Select a desired user
group from the pull-down list.
• Plan: You can view the volumes applicable to the specified application plan. Select a desired
allocation plan from the pull-down list. For details about allocation plan, see section
NOTE: When the Details button is clicked, the detailed information about the allocation plan
specified in Plan is displayed in another window.
• Size: You can view the volumes that meet the specified size. Enter the minimum and maximum
values for the volume size, and select the units from the pull-down list. You can omit the minimum
and maximum values. If you omit the minimum and maximum values, the minimum and maximum
values are not taken into account. For details, see Help for the windows.
NOTE: When the Show Pool Information button is clicked, the Show Pool Information - Storage
Pool dialog box is displayed for the volumes that satisfy the conditions specified in User Group and
Plan.
4. Click the Show LDEVs button. The following items are displayed (see Figure 5-25):
• Allocate Storage button
• Unallocate Storage button
• A list of the volumes that are in the storage pools of the user group selected in User Group, and meet
the conditions specified in Plan and Size
3-2 .
Managing Storage Pools 98
Page 99

NOTE: The Unallocate Storage button is displayed when any volume in the storage pool
accessible for the logged-in user satisfies the specified conditions. This button is not displayed if
the access privilege for the logged-in user is Guest or Local Guest.
For details, see section
5. To further narrow down the volumes, use filtering.
In the list of volumes, from the pull-down list for an item, select the value that corresponds to the desired
volumes. The volumes that meet the selected value are selected from the displayed volumes.
6. Select the allocated volume checkbox.
Note that you can select a maximum of 200 volumes at any one time. If you want to select more than 200
volumes, select them in multiple operations. For example, if you want to select 240 volumes, select 200
volumes in one operation, and the remaining 40 in another operation. Also, if a volume is related to more
than one volume path, the total number of selectable volumes decreases according to the number of
related paths. For example, if every volume is related to two volume paths, the number of selectable
volumes decreases to approximately 100.
7. Click the Allocate Storage button. The Device Manager’s Add Storage (Step: Define Host/Port
Connections) dialog box is displayed.
8. Allocate volumes using the Add Storage (Step: Define Host/Port Connections) dialog box. Set the
following items in this dialog box:
• Specify the path between the host WWN and the port of the storage subsystem
• Allocate the volume LUN
For details, see the HP StorageWorks Command View XP Advanced Edition Device Manager Web Client
User Guide.
9. Check the processing result on the List Allocated LDEVs - Storage Pool subwindow. When you select List
Allocated LDEVs in the Storage Pool subwindow, the latest information reflecting the processing result is
displayed. For details, see section
5-11 .
5-9 .
Figure 5-25 List Allocated LDEVs - Storage Pool Subwindow when Show LDEVs is Clicked
5-11 Releasing a Volume Allocated on a Host from a List of Allocated Volumes
In the List Allocated LDEVs - Storage Pool subwindow, from a list of volumes allocated on a host, you can
release volumes allocated on that host. The settings of the selected volume are performed using Device
Manager functionality. For details about settings, see the HP StorageWorks Command View XP Advanced
Edition Device Manager Web Client User Guide.
A maximum of 16,384 volumes can be displayed in the list of volumes. If you want to display information for
16,385 or more volumes, specify storage pool settings by following the procedure in
To release allocation of volumes:
5-1-3 .
Managing Storage Pools 99
Page 100

1. In the navigation frame, select Storage Pool. In the method frame, the Storage Pool subwindow is
displayed. In the information frame, the Show Properties - Storage Pool subwindow is displayed.
2. In the Storage Pool subwindow, select List Allocated LDEVs. In the information frame, the List Allocated
LDEVs - Storage Pool subwindow is displayed (see Figure 5-26).
Figure 5-26 List Allocated LDEVs - Storage Pool Subwindow
3. In the List Allocated LDEVs - Storage Pool subwindow, specify the following items according to the
information about the volume you want to unallocate.
• User Group: You can view the volumes allocated to the specified user group. Select a desired user
group from the pull-down list.
• Plan: You can view the volumes applicable to the specified application plan. Select a desired
allocation plan from the pull-down list. For details about allocation plan, see section
NOTE: When the Details button is clicked, the detailed information about the allocation plan
specified in Plan is displayed in another window.
• Size: You can view the volumes that meet the specified size. Enter the minimum and maximum
values for the volume size, and select the units from the pull-down list. You can omit the minimum
and maximum values. If you omit the minimum and maximum values, the minimum and maximum
values are not taken into account. For details, see Help for the windows.
3-2 .
NOTE: When the Show Pool Information button is clicked, the Show Pool Information - Storage
Pool dialog box is displayed for the volumes that satisfy the conditions specified in User Group and
Plan.
4. Click the Show LDEVs button. The following items are displayed (see Figure 5-27):
• Allocate Storage button
• Unallocate Storage button
• A list of the volumes that are in the storage pools of the user group selected in User Group, and meet
the conditions specified in Plan and Size
NOTE: The Allocate Storage button is displayed when any volume in the storage pool accessible
for the logged-in user satisfies the specified conditions. This button is not displayed if the access
privilege for the logged-in user is Guest or Local Guest.
For details, see section
5-8 or 5-10 .
5. To further narrow down the volumes, use filtering. In the list of volumes, from the pull-down list for an
item, select the value that corresponds to the desired volumes. The volumes that meet the selected value
are selected from the displayed volumes.
6. Select the checkbox for the volume for which allocation is to be released.
Note that you can select a maximum of 200 volumes at any one time. If you want to select more than 200
volumes, select them in multiple operations. For example, if you want to select 240 volumes, select 200
volumes in one operation, and the remaining 40 in another operation. Also, if a volume is related to more
than one volume path, the total number of selectable volumes decreases according to the number of
related paths. For example, if every volume is related to two volume paths, the number of selectable
volumes decreases to approximately 100.
Managing Storage Pools 100
 Loading...