

HP StorageWorks XP24000, StorageWorks XP20000, StorageWorks XP12000, StorageWorks XP10000 Configuration Guide for Novell Netware
Page 1

HP StorageWorks
XP Disk Array Configuration Guide for Novell
Netware
XP24000, XP20000, XP12000, XP10000
Part number: A5951–96055
Seventh edition: September 2007
Page 2

Legal and notice information
© Copyright 2003, 2007 Hewlett-Packard Development Company, L.P.
Confidential computer software. Valid license from HP required for possession, use or copying. Consistent with FAR 12.211
and 12.212, Commercial Computer Software, Computer Software Documentation, and Technical Data for Commercial Items
are licensed to the U.S. Government under vendor's standard commercial license.
The information contained herein is subject to change without notice. The only warranties for HP products and services are set
forth in the express warranty statements accompanying such products and services. Nothing herein should be construed as
constituting an additional warranty. HP shall not be liable for technical or editorial errors or omissions contained herein.
Microsoft, Windows, Windows XP, and Windows NT are U.S. registered trademarks of Microsoft Corporation.
Java is a US trademark of Sun Microsystems, Inc.
Page 3

Contents
About this guide ................................................................................... 7
Intended audience ...................................................................................................................... 7
Related documentation ................................................................................................................ 7
Document conventions and symbols ............................................................................................... 7
Conventions for storage capacity values ........................................................................................ 8
Graphical interface illustrations ..................................................................................................... 9
HP technical support ................................................................................................................... 9
Subscription service .................................................................................................................... 9
HP websites ............................................................................................................................... 9
Documentation feedback ............................................................................................................. 9
1 Installing and configuring Novell Netware for the XP disk array ............. 11
Features and requirements ......................................................................................................... 11
Fibre Channel interface ............................................................................................................. 11
Device emulation types .............................................................................................................. 12
Failover ................................................................................................................................... 12
SNMP configuration .................................................................................................................. 12
Installation roadmap ................................................................................................................. 13
Installing and configuring the disk array ...................................................................................... 13
Setting the host mode and host group mode for the disk array ports .......................................... 14
Setting the System Option Modes ......................................................................................... 15
Configuring the Fibre Channel ports ..................................................................................... 15
Fibre address .............................................................................................................. 15
Fabric and connection parameter settings ....................................................................... 15
Installing and configuring the host ............................................................................................... 16
Loading the operating system and software ........................................................................... 16
Installing and configuring the FCAs ..................................................................................... 16
Configuring NetWare Client ................................................................................................ 16
Configuring NetWare ConsoleOne ...................................................................................... 17
Fabric zoning and LUN security ............................................................................................ 17
Fabric zoning and LUN security for multiple operating systems ................................................. 18
Connecting the disk array to the NetWare server .......................................................................... 18
Defining the paths ..............................................................................................................19
Verifying new device recognition .......................................................................................... 19
Configuring disk devices ............................................................................................................ 20
Creating the disk partitions .................................................................................................. 20
Assigning the new devices to volumes ................................................................................... 22
Mounting the new volumes .................................................................................................. 23
Verifying client operations ................................................................................................... 24
2 Middleware configuration ................................................................. 25
Host failover ............................................................................................................................. 25
Multipath failover .............................................................................................................. 25
Helpful Multipath commands ......................................................................................... 26
XP Disk Array Configuration Guide for Novell Netware 3
Page 4

Configuring NetWare 6.x Servers for Cluster Services ............................................................. 27
Installing Cluster Services .............................................................................................. 27
Creating logical volumes .............................................................................................. 28
3 Troubleshooting ............................................................................... 31
Error conditions ........................................................................................................................ 31
Calling the HP support center ..................................................................................................... 32
Contact information ............................................................................................................ 32
Before you call ................................................................................................................... 32
A Path worksheet ................................................................................ 33
Worksheet ............................................................................................................................... 33
B Disk array supported emulations ........................................................ 35
Supported emulations ................................................................................................................ 35
Emulation specifications ............................................................................................................. 35
Glossary ............................................................................................ 39
Index ................................................................................................. 43
4
Page 5

Figures
..SNMP configuration ............................................................................................... 131
..Arbitrated loop fabric topology example .................................................................... 162
..Multi-cluster environment .......................................................................................... 183
XP Disk Array Configuration Guide for Novell Netware 5
Page 6

Tables
..Document conventions ............................................................................................... 71
..Fabric topology settings ........................................................................................... 162
..SAN fabric zoning and LUN security settings ............................................................. 183
..Error conditions ...................................................................................................... 314
..Path worksheet ....................................................................................................... 335
..Supported emulations ............................................................................................. 356
..Emulation specifications ........................................................................................... 357
6
Page 7

About this guide
This guide provides information about:
• Requirements and procedures for connecting an XP disk array to a Netware system
• Configuring the disk array for use with the Novell NetWare operating system
Intended audience
This guide is intended for system administrators with knowledge of:
• Requirements and procedures for connecting an XP disk array to a Netware system
• Configuring the disk array for use with the Novell NetWare operating system
Related documentation
The following documents provide related information:
• HP StorageWorks XP10000 Disk Array: Owner's Guide
• HP StorageWorks XP12000 Disk Array: Owner's Guide
• HP StorageWorks XP20000 Disk Array: Owner's Guide
• HP StorageWorks XP24000 Disk Array: Owner's Guide
• HP StorageWorks XP LUN Manager User’s Guide
• HP StorageWorks XP Command View Advanced Edition Software Device Manager Web Client
User’s Guide
• HP StorageWorks SAN Design Reference Guide
You can find these documents from the Manuals page of the HP Business Support Center website:
http://www.hp.com/support/manuals
In the Storage section, click Disk Storage Systems and then select your product.
Document conventions and symbols
Table 1 Document conventions
ElementConvention
Cross-reference links and e-mail addressesBlue text: Table 1
ttp://www.hp.com
Bold text • Keys that are pressed
Website addressesBlue, underlined text: h
• Text typed into a GUI element, such as a box
• GUI elements that are clicked or selected, such as menu
and list items, buttons, tabs, and check boxes
XP Disk Array Configuration Guide for Novell Netware 7
Page 8
ElementConvention
Text emphasisItalic text
Monospace text • File and directory names
• System output
• Code
• Commands, their arguments, and argument values
Monospace, italic text • Code variables
• Command variables
Emphasized monospace textMonospace, bold text
CAUTION:
Indicates that failure to follow directions could result in damage to equipment or data.
IMPORTANT:
Provides clarifying information or specific instructions.
NOTE:
Provides additional information.
TIP:
Provides helpful hints and shortcuts.
Conventions for storage capacity values
HP XP storage systems use the following values to calculate physical storage capacity values (hard
disk drives):
• 1 KB (kilobyte) = 1,000 bytes
•
1 MB (megabyte) = 1,0002 bytes
•
1 GB (gigabyte) = 1,0003 bytes
•
1 TB (terabyte) = 1,0004 bytes
HP XP storage systems use the following values to calculate logical storage capacity values (logical
devices):
• 1 KB (kilobyte) = 1,024 bytes
•
1 MB (megabyte) = 1,0242 bytes
About this guide8
Page 9

•
1 GB (gigabyte) = 1,0243 bytes
•
1 TB (terabyte) = 1,0244 bytes
• 1 block = 512 bytes
Graphical interface illustrations
The GUI illustrations in this guide were created using a Windows computer with the Internet Explorer
browser. Actual windows may differ depending on the operating system and browser used. GUI
contents also vary with licensed program products, storage system models, and firmware versions.
HP technical support
For worldwide technical support information, see the HP support website:
http://www.hp.com/support
Before contacting HP, collect the following information:
• Product model names and numbers
• Technical support registration number (if applicable)
• Product serial numbers
• Error messages
• Operating system type and revision level
• Detailed questions
Subscription service
HP recommends that you register your product at the Subscriber's Choice for Business website:
http://www.hp.com/go/e-updates
After registering, you will receive e-mail notification of product enhancements, new driver versions,
firmware updates, and other product resources.
HP websites
For additional information, see the following HP websites:
•http://www.hp.com
•http://www.hp.com/go/storage
•http://www.hp.com/service_locator
•http://www.hp.com/support/manuals
Documentation feedback
HP welcomes your feedback.
To make comments and suggestions about product documentation, please send a message to
storagedocsFeedback@hp.com. All submissions become the property of HP.
XP Disk Array Configuration Guide for Novell Netware 9
Page 10

About this guide10
Page 11

1 Installing and configuring Novell Netware
for the XP disk array
You and your HP service representative each play a role in installation. Your HP service representative
is responsible for installing the disk array and formatting the disk devices. You are responsible for
configuring the host server for the new devices with assistance from your HP service representative.
Features and requirements
Ask your HP service representative about the latest supported hardware and software.
The disk array has the following features:
• Storage capacity. The storage capacity for each model is listed below:
XP10000: Up to 240 drives for up to 69.2 TB, 48 FC ports
XP12000: Up to 1152 drives for up to 332 TB, 128 FC ports
XP20000: Up to 240 drives for up to 69.2 TB, 48 FC ports
XP24000: Up to 1152 drives for up to 332 TB, 256 FC ports
• Server support: Novell NetWare server
• Operating system support: Check with your HP representative for the current OS versions supported
by your XP disk array.
Before installing the disk array, ensure the environment conforms to these requirements:
• Fibre Channel Adapter (FCAs): Install FCAs and all utilities and drivers. Refer to the adapter
documentation for installation details.
• (Recommended) HP StorageWorks XP Remote Web Console, HP StorageWorks XP Command
View Advanced Edition Software or HP StorageWorks XP Command View with LUN management
feature for configuring disk array ports and paths.
• (Recommended) HP StorageWorks XP Array Manger.
• (Optional) Check with your HP representative for other XP software available for your system.
Fibre Channel interface
The XP family of disk arrays supports these Fibre Channel elements:
• Connection speeds of 1 Gbps, 2 Gbps, and 4 Gbps
• Short-wave non-OFC (open fiber control) optical interface
• Multimode optical cables with SC or LC connectors
• Public or private arbitrated loop (FC-AL) or direct fabric attach
• Fibre Channel switches
Even though the interface is Fibre Channel, this guide uses the term “SCSI disk” because disk array
devices are defined to the host as SCSI disks.
XP Disk Array Configuration Guide for Novell Netware 11
Page 12

Device emulation types
The XP family of disk arrays supports these device emulation types:
• OPEN-x devices: OPEN-x logical units represent disk devices. Except for OPEN-V, these devices
are based on fixed sizes. OPEN-V is a user-defined size based on a CVS device. Supported
emulations include OPEN-3, OPEN-8, OPEN-9, OPEN-E, OPEN-L, and OPEN-V devices.
• LUSE devices (OPEN-x*n): Logical Unit Size Expansion (LUSE) devices combine 2 to 36 OPEN-x
devices to create expanded LDEVs larger than standard OPEN-x disk devices. For example, an
OPEN-x LUSE volume created from ten OPEN-x volumes is designated as OPEN-x*10.
• CVS devices (OPEN-x CVS): Volume Size Configuration (VSC) defines custom volumes (CVS) that
are smaller than normal fixed-sized logical disk devices (volumes). OPEN-V is a CVS-based custom
disk size that you determine. OPEN-L does not support CVS. Although OPEN-V is a CVS-based
device, the product name in the SCSI inquiry string is OPEN-V opposed to the fixed size
OPEN-[389E] devices that appear as OPEN-x-CVS.
• LUSE (expanded) CVS devices (OPEN-x*n CVS): LUSE CVS combines CVS devices to create an
expanded device. This is done by first creating CVS custom-sized devices and then using LUSE to
combine from 2 to 36 CVS devices. For example, if three OPEN-9 CVS volumes are combined to
create an expanded device, this device is designated as OPEN-9*3-CVS. OPEN-V devices are
designated as OPEN-V*n (without CVS).
NOTE:
For the XP24000/XP20000/XP12000/XP10000 when connected to external storage devices, HP
recommends using OPEN-V as the emulation the array makes visible to the host. This allows configuration
of external storage LDEVs without losing data. Using any other emulation may cause data loss in the
external storage LUNs. For new deployments, OPEN-V should be chosen because some features (such as
XP Snapshot or Continuous Access Journal) are only supported with OPEN-V.
Refer to Table 6 on page 35 for detailed information.
Failover
The disk arrays support many standard software products that provide host, application, or I/O path
failover and management.
SNMP configuration
The XP family of disk arrays supports standard Simple Network Management Protocol (SNMP) for
remotely managing the disk array. The SNMP agent on the SVP performs error-reporting operations
requested by the SNMP manager. SNMP properties are usually set from the SVP but they can also
be set remotely using XP Remote Web Console, or XP Command View . For procedures, refer to the
applicable user guide available at:
http://www.hp.com/support/manuals.
Installing and configuring Novell Netware for the XP disk array12
Page 13

Figure 1 SNMP configuration
Installation roadmap
Perform these actions to install and configure the disk array:
1. Installing and configuring the disk array
• Setting the host mode and host group mode for the disk array ports
• Setting the System Option Modes
• Configuring the Fibre Channel ports
2. Installing and configuring the host
• Loading the operating system and software
• Installing and configuring the FCAs
• Configuring NetWare Client
• Configuring NetWare ConsoleOne
• Fabric zoning and LUN security
• Fabric zoning and LUN security for multiple operating systems
3. Connecting the disk array to the NetWare server
• Defining the paths
• Verifying new device recognition
4. Configuring disk devices
• Creating the disk partitions
• Assigning the new devices to volumes
• Mounting the new volumes
• Verifying client operations
Installing and configuring the disk array
The HP service representative performs these tasks:
• Assembling hardware and installing software
• Loading the microcode updates
• Installing and formatting devices
After these tasks are finished, use XP Remote Web Console, XP Command View, XP Command View
Advanced Edition Software, or XP Array Manager to complete the remaining tasks listed below. If
you do not have these programs, your HP service representative can perform these tasks for you.
XP Disk Array Configuration Guide for Novell Netware 13
Page 14
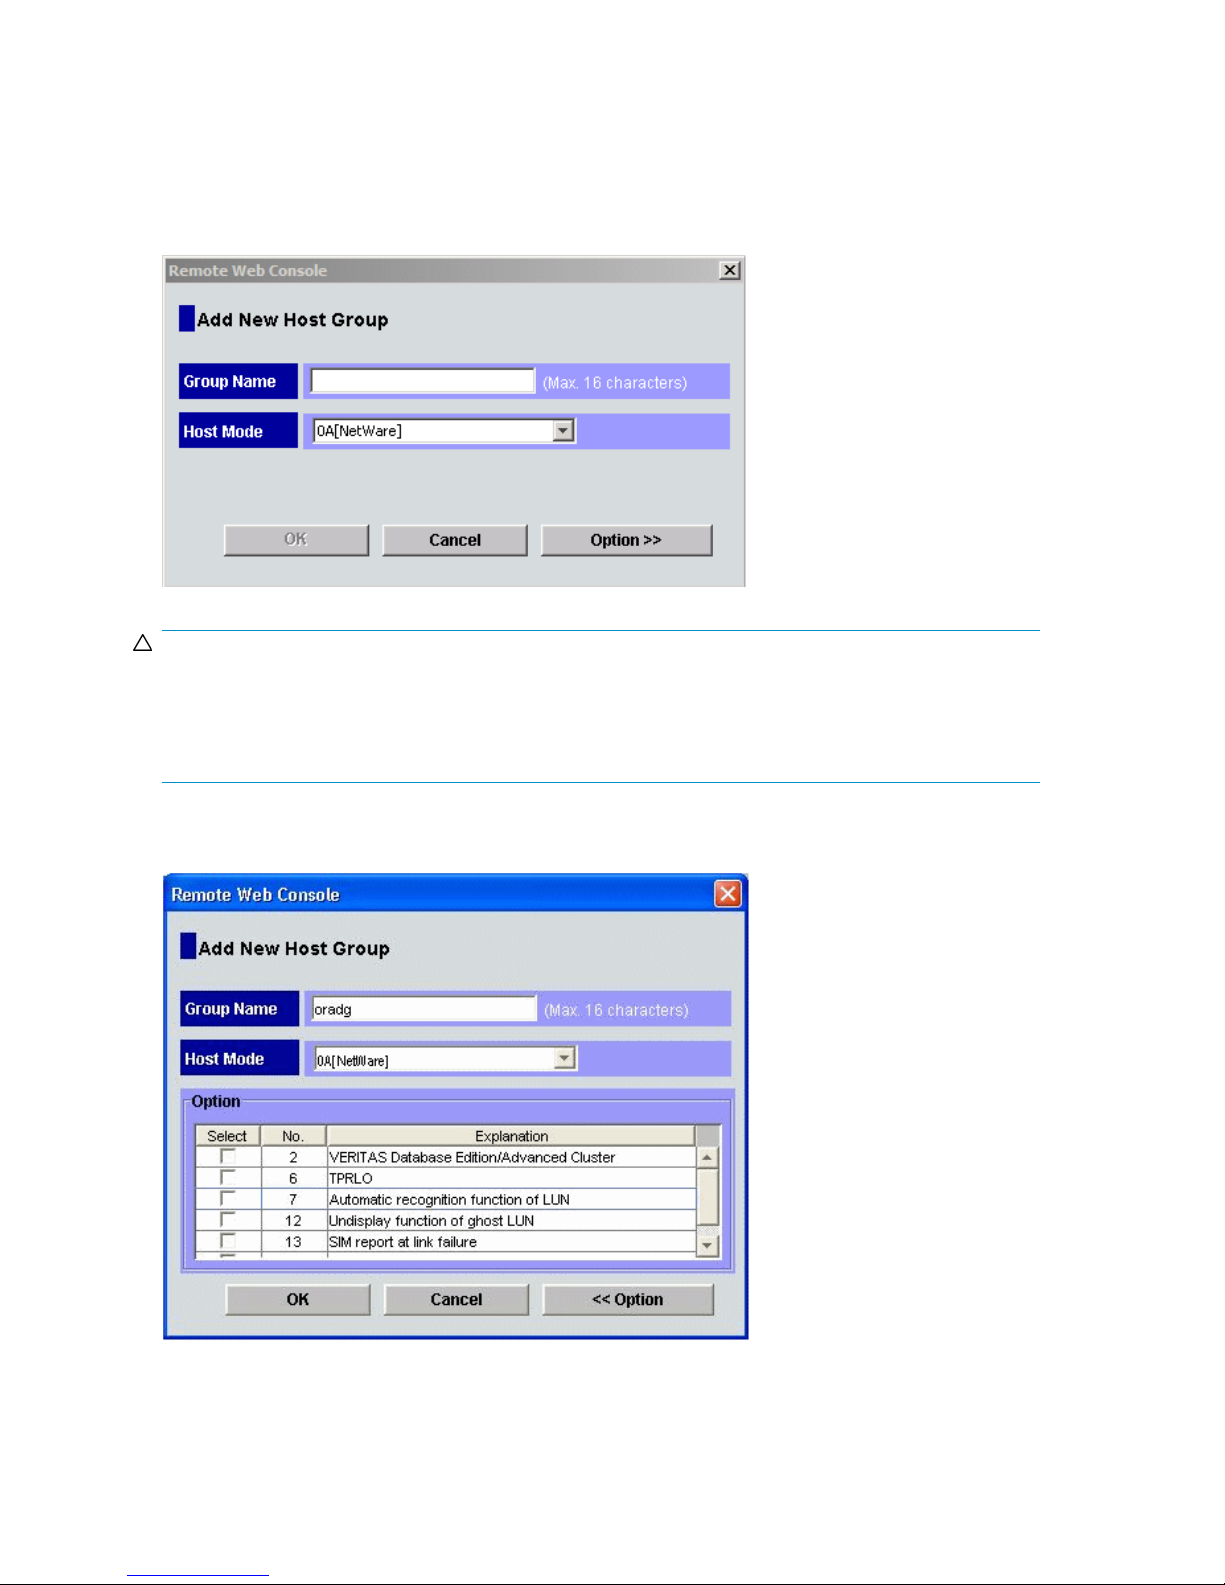
Setting the host mode and host group mode for the disk array ports
After the disk array is installed, you must set the host mode for each disk array port to match the host
OS. Set the host mode using LUN Manager in XP Remote Web Console (shown), XP Command View,
or XP Command View Advanced Edition Software. If these are not available, the HP service
representative can set the host mode using the SVP. The host mode setting for Novell Netware is 0A.
CAUTION:
The correct host mode must be set for all new installations (newly connected ports) to Novell Netware hosts.
Do not select a mode other than 0A for Novell Netware. The host modes must be set for certain middleware
environments (for example, Novell High Availability Server, NHAS, System Fault Tolerance, SFT III).
Changing a host mode after the host has been connected is disruptive and requires the server to be rebooted.
When a new host group is added, additional host group modes (host mode options) may be configured.
The storage administrator must verify if an additional host group mode is required for the host group.
Installing and configuring Novell Netware for the XP disk array14
Page 15

CAUTION:
Changing host group modes for ports where servers are already installed and configured is disruptive and
requires the server to be rebooted.
Setting the System Option Modes
The HP service representative sets the System Option Mode(s) based on the operating system and
software configuration of the host. Notify your HP representative if you install storage agnostic software
(such as backup or cluster software) that may require specific settings.
Configuring the Fibre Channel ports
Configure the disk array Fibre Channel ports by using XP Remote Web Console (shown), XP Command
View, or XP Command View Advanced Edition Software. Select the settings for each port based on
your storage area network topology. Use switch zoning if you connect different types of hosts to the
array through the same switch.
Fibre address
In fabric environments, the port addresses are assigned automatically. In arbitrated loop environments,
set the port addresses by selecting a unique arbitrated loop physical address (AL-PA) or loop ID for
each port. For specific values, refer to the HP StorageWorks XP LUN Manager User's Guide applicable
to your array.
Fabric and connection parameter settings
When configuring the disk array, use LUN Manager in XP Remote Web Console, XP Command View,
or XP Command View Advanced Edition Software to specify whether the hosts and the disk array are
XP Disk Array Configuration Guide for Novell Netware 15
Page 16

connected by a fabric switch. Also, you must specify FC-AL or point-to-point in the “Mode” field of
the Change Port Mode pane. The default is FC-AL.
If you are using a fabric switch, consult the switch's documentation to determine whether FC-AL or
point-to-point should be used. Some fabric switches require that you specify point-to-point to get the
system running.
For detailed topology information, refer to the HP StorageWorks SAN Design Reference Guide at:
http://www.hp.com/go/sandesign.
Figure 2 Arbitrated loop fabric topology example
Table 2 Fabric topology settings
Installing and configuring the host
This section explains how to install and configure Fibre Channel adapters (FCAs) that connect the
host to the disk array.
Loading the operating system and software
Follow the manufacturer's instructions to load the operating system and software onto the host. Load
all OS patches and configuration utilities supported by HP and the FCA manufacturer.
Installing and configuring the FCAs
Install and configure the Fibre Channel adapters using the FCA manufacturer's instructions.
ProvidesConnection parameterFabric parameter
Not supportedFC-ALON
NL-port (private arbitrated loop)FC-ALOFF
Not supportedPoint-to-pointON
Not supportedPoint-to-pointOFF
Configuring NetWare Client
NetWare 6.x
Installing and configuring Novell Netware for the XP disk array16
Page 17

NetWare Client software is required for the client system. After installing the software on the NetWare
server, follow these steps:
1. Open the Novell Client Configuration dialog and click the Advanced Settings tab.
2. Change the following parameters:
Give up on Requests to Sas: 180
Net Status Busy Timeout: 90
Configuring NetWare ConsoleOne
NetWare 6.x
Novell NetWare v6.x requires a tool called ConsoleOne to work in a storage environment. ConsoleOne
is a free Java utility used to manage network resources. Configure ConsoleOne as follows:
1. Ensure NetWare Client software is already installed.
2. Install ConsoleOne on the NetWare 6.x server.
3. From the NetWare Client, run ConsoleOne:
z:public/mgmt/consoleOne/1.2/bin/ConsoleOne
4. Right click the Server icon, and select Disk Management Devices.
5. Scroll left to the Media tab.
6. Click Partitions, New, and select a device.
7. Click Create, click NSS pools, click New, and name the pool. The pool name and volume name
can be the same.
8. Click Create, click NSS Logical Volume, select New, name the volume, then select the pool.
9. Select Allow volume quota to grow to pool size.
10. Leave the default settings on the next page and click Finish.
Fabric zoning and LUN security
If you plan to use clustering, install and configure the clustering software on the servers.
Clustering is the organization of multiple servers into groups. Within a cluster, each server is a node.
Multiple clusters compose a multi-cluster environment. The following example shows a multi-cluster
environment with three clusters, each containing two nodes. The nodes share access to the disk array.
XP Disk Array Configuration Guide for Novell Netware 17
Page 18

Figure 3 Multi-cluster environment
Within the Storage Area Network (SAN), the clusters must be homogeneous (all the same operating
system). Heterogeneous (mixed operating systems) clusters are not allowed. How you configure LUN
security and fabric zoning depends on the SAN configuration.
Fabric zoning and LUN security for multiple operating systems
You can connect multiple clusters with multiple operating systems to the same switch and fabric using
appropriate zoning and LUN security. Note:
• Storage port zones may overlap if more than one operating system needs to share an array port.
• Heterogeneous operating systems may share an XP array port if you set the appropriate host group
and mode. All others must connect to a dedicated XP array port.
• Use Secure Manager for LUN isolation when multiple hosts connect through a shared array port.
Secure Manager provides LUN security by allowing you to restrict which LUNs each host can
access.
Table 3 SAN fabric zoning and LUN security settings
LUN SecurityFabric ZoningOS MixEnvironment
Standalone SAN
(non-clustered)
Clustered SAN
Multi-Cluster SAN
present in the SAN)
type present in the SAN)
Connecting the disk array to the NetWare server
The HP service representative connects the disk array to the host by:
1. Verifying operational status of the disk array channel adapters, LDEVs, and paths.
2. Connecting the Fibre Channel cables between the disk array and the fabric switch or host.
3. Verifying the ready status of the disk array and peripherals.
Installing and configuring Novell Netware for the XP disk array18
Not requiredhomogeneous (a single OS type
Requiredheterogeneous (more than one OS
Must be used when
multiple hosts or cluster
nodes connect through
a shared port
Page 19

Defining the paths
Use XP Remote Web Console (shown), XP Command View (XP arrays only), or XP Command View
Advanced Edition Software to define paths (LUNs) between hosts and volumes in the disk array.
This process is also called “LUN mapping.” In XP Remote Web Console and XP Command View,
LUN mapping includes:
• Configuring ports
• Enabling LUN security on the ports
• Creating host groups
• Assigning Fibre Channel adapter WWNs to host groups
• Mapping volumes (LDEVs) to host groups (by assigning LUNs)
In XP Command View Advanced Edition Software, LUN mapping includes:
• Configuring ports
• Creating storage groups
• Mapping volumes and WWN/host access permissions to the storage groups
For details see HP StorageWorks XP LUN Manager User's Guide or HP StorageWorks XP Command
View Advanced Edition Software Device Manager Web Client User's Guide. Note the LUNs and
their ports, WWNs, nicknames, and LDEVs for later use in verifying host and device configuration.
Verifying new device recognition
To verify that the NetWare system recognizes the new disk array devices:
1. In the NetWare directory, enter SERVER to get to the server console.
2. At the server console, enter LIST DEVICES to display all devices. Use the Pause key as needed.
The device number (for example, 0x000B) and device type are displayed for each device:
Example
XP Disk Array Configuration Guide for Novell Netware 19
Page 20

NetWare prompt> LIST DEVICES
1. 0x000B: [V6E0-A2-D7D:0] HP OPEN-3 rev:0111
2. 0x000C: [V6E0-A2-D7D:1] HP OPEN-3 rev:0111
:
:
3. Record the device number for each new device on the worksheet in “Path Worksheet” on page 33.
This information will be useful later during disk partitioning and volume creation.
4. Verify that all new disk devices are listed.
Configuring disk devices
Configure the disks in the disk array using the same procedure for configuring any new disk on the
host. This includes the following procedures:
1. Creating the disk partitions
2. Assigning the new devices to volumes
3. Mounting the new volumes
4. Verifying client operations
Creating scripts to configure all devices at once may save you considerable time.
Creating the disk partitions
Before you create the disk partitions, consult the Novell documentation for confirmation about the
type of partition that is available with your operating system version.
NetWare 5.x
1. At the server console enter “LOAD NWCONFIG” to load the Configuration Options module.
2. On the Configuration Options screen, click Standard disk options and press Enter to access the
NetWare disk options.
3. On the Available Disk Options screen, select Modify disk partitions and Hot Fix and press Enter.
4. The Available Disk Drives screen lists the devices by device number. Record the device numbers.
On the Available Disk Drives screen, select the device to be partitioned and press Enter.
5. If the partition table has already been initialized, skip this step. If the partition table has not yet
been initialized, the partition table message is displayed. Press Enter to confirm the message.
When the “Initialize the partition table?” message appears, select Yes and press Enter to initialize
the partition table.
6. On the Disk Partition Options screen, select Create NetWare disk partition, and press Enter.
7. You are now prompted to create the partition either automatically or manually. Select the desired
option, and press Enter.
If you select automatic partitioning, NetWare will create the disk partition and hot fix area using
the available disk space (the hot fix area will be approximately two percent of the partition size).
If you select manual partitioning, enter a partition size and hot fix area.
8. On the Disk Partition Information screen, verify (or enter) the partition size and hot fix data area
size, and press F10 to save the changes. You are returned to the Disk Partition Options screen.
Installing and configuring Novell Netware for the XP disk array20
Page 21

9. Select Create NetWare disk partition again, and press Enter.
10. When the “Create NetWare Partition?” message appears, click Yes and press Enter to create
11. Press Esc until you are returned to the Available Devices screen. Repeat steps 4 through 10 to
12. When you are finished creating disk partitions, return to the Available Disk Options screen, click
NetWare 6.0
1. Start ConsoleOne on the Windows server.
2. Select and right click the targeted server, and then click Properties.
3. Select the Media tab, click Devices, and then initialize the new devices.
4. Click the Partitions option on the Media tab, select the desired device, and then select New... to
5. On the Create a new partition screen, select the desired device, select NSS in the Type box, and
6. Enter the size of the partition in bytes (B), kilobytes (KB), megabytes (MB), or gigabytes (GB) and
7. To reserve space for the Hot Fix error correction feature, select Hot Fix and enter the amount of
the specified disk partition on the selected device.
create the disk partition on each new OPEN-x and LUSE device.
Return to previous menu and press Enter.
open the Create a new partition screen.
click OK.
click OK.
space or percentage you want to reserve.
8. To mirror the partition, select Mirror and select one of the following options:
9. Select NSSPools on the Media tab, and select New… to open the Create a New Pool screen.
10. On the Create a New Pool screen, enter the name for the new pool, and click Next.
11. Select the disk to be included in the pool, and click Next.
12. On the Create Pool – Attribute Information screen, check Activate on Creation to make the new
13. Select a label for the partition (optional).
14. Click OK.
NetWare 6.5
Mirrored partitions must be compatible in data area size. This means the new partition must be
at least the same size or slightly larger than the other partitions in the group. The physical size
(combined data and Hot Fix size) of the partition must be at least 100 KB larger, but no more
than 120 MB larger than the data size of the existing partitions in the mirror group.
• Create New Mirror. This option means you are making the partition capable of being part of
a mirror group. You do not actually create the group until you add another mirrored partition
to the partition you are creating.
• Existing Mirror Group. (If you select this option, also select the ID of the mirrored partition.)
This shows a list of existing mirror groups that are compatible in data area size. This option
lets you add this new partition to one of the mirror groups in the list.
pool active, and then click Finish.
1. Enter NSSMU at the server console
2. In the main menu, select “Partitions.”
XP Disk Array Configuration Guide for Novell Netware 21
Page 22

3. Press Insert, then select a device where you want to create a partition.
4. Select “NSS” as the partition type.
5. Enter the size of the partition in bytes (B), kilobytes (KB), megabytes (MB), or gigabytes (GB) and
click OK.
Assigning the new devices to volumes
A volume can span as many as 32 devices, so you can assign more than one device to a volume.
The addition of new volumes to the NetWare server may require a memory upgrade. See the NetWare
documentation or contact Novell customer support.
NetWare 5.x
1. On the Available Disk Options screen, click NetWare Volume options and press Enter to display
the volume options.
The existing volumes are listed by volume name, and the volume options are displayed at the
bottom of the screen.
2. Execute the “Add/View/Modify volume segments” command by pressing the Ins or F3 key.
The Segment List of Volume Disk screen displays the existing devices by device number. The
Volume assignment column displays “(free space)” for each device that is not yet assigned to a
volume.
3. Execute the “Make a volume assignment” command as follows:
4. When the What do you want to do with this free segment? message appears,
5. In the Disk Segment Parameters screen, enter the new volume name (or verify the selected volume),
6. Press F10to save the new volume information and return to the Volume Disk Segment List screen.
7. On the Volume Disk Segment List screen, press F10 to save the new volume information and
8. Repeat the steps 1–7 until you have assigned all new disk array devices to volumes. When you
9. When the confirmation message appears, click Yes and then press Enter to save all changes and
NetWare 6.0
1. Move the cursor to the line containing the desired device.
2. Move the cursor onto “(free space)” in the Volume assignment column.
3. Press Enter.
select the desired option, and press Enter. If you selected “Make this segment part of another
volume,” select the volume you want to add this segment to, and press Enter.
and enter the disk segment size. The segment size is the same as the partition size entered during
disk partitioning.
return to the volume list.
are finished assigning new devices to volumes, press Esc to save your volume changes.
return to the Installation Option screen.
1. Using ConsoleOne, right click the targeted server and click Properties.
2. Click the Media tab and select NSSPools.
3. Click New... to open the Create a New Logical Volume screen and enter the name for the new
pool. Then click Next.
Installing and configuring Novell Netware for the XP disk array22
Page 23

4. On the Create Logical Volume – Storage Information screen, select the desired pool/device,
enter the desired Volume Quota, and click Next.
5. After you have created the pool, select Activate and Mount in the On Creation box, and then
click Finish.
NetWare 6.5
1. Enter NSSMU at the server console
2. In the main menu, select Pools.
3. Press Insert and enter a name for the new pool.
4. Select Activate and Mount in the On Creation box as desired.
5. Specify the Virtual Server Name, IP Address, Advertising Protocols and, if necessary, the CIFS
Server Name.
6. Select Create.
Mounting the new volumes
NetWare 5.x
1. From the Available Disk Options screen, click NetWare Volume options to display the volume
list and volume options,and then click Mount/Dismount an existing volume and press Enter.
2. On the Directory Services Login/Authentication screen, enter the NetWare administrator password,
3. An informational message displays the number of new volumes just added. Press Enter to continue.
4. You are now prompted to select the desired mount action. Click either Mount all volumes or
5. If you chose to mount volumes selectively, select the desired volume, press Enter to mount the
6. When you have confirmed that all new volumes/devices were mounted successfully, you are
NetWare 6.0
1. Using ConsoleOne right click the targeted server, and click Properties.
2. Click the Media tab, and click NSS Logical Volumes.
3. Click New, enter a name for the volume, then click Next.
4. In the Create Logical Volume - Storage Information window, select the desired pool/device, enter
then press Enter.
Mount volumes selectively as desired.
The mount status for all volumes is now displayed.
volume, and then confirm that the volume's status changed to MOUNTED. Repeat this step for
each new volume to confirm that all new volumes can be mounted successfully.
finished with disk array device configuration. Leave the new volumes mounted for now, so you
can verify that NetWare clients can access the new volumes.
the desired Volume Quota, then click Next.
5. In the Create Logical Volume - Storage Information window check Activate and Mount in the “On
Creation” box, then click Finish.
6. Confirm that the logical volume has been created.
XP Disk Array Configuration Guide for Novell Netware 23
Page 24

7. Map the created Logical Volume as the Network Drive.
8. Confirm the mapped drive.
Netware 6.5
1. Enter NSSMU at the server console.
2. In the main menu, select Volumes.
3. Press Insert and enter a name for the new volume, then click Next.
4. Select the desired pool/device, enter the desired Volume Quota, then click Next.
5. Review and change volume attributes as necessary.
6. Select Create.
Verifying client operations
After configuring the Novell NetWare system, verify that NetWare clients can access the new volumes.
To verify access:
1. Copy an existing file onto each new volume.
2. Verify that the file was copied successfully.
Installing and configuring Novell Netware for the XP disk array24
Page 25

2 Middleware configuration
The disk array supports many industry-standard middleware products which provide host failover and
logical volume management. Available host failover products for the Novell NetWare server operating
system include the Novell High Availability Server (NHAS), SFT III software products, Novell Clustering
Services, and Novell Multipath Support.
Logical volume management functions are included in the Novell NetWare server operating system
(for example, Installation Option NetWare Loadable Module, NWAdmin).
Host failover
The NHAS and SFT III software products provide hardware fault tolerance (that is, host failover
capability) for the Novell NetWare environment.
Novell Clustering Service provides fault tolerance by moving (failing over) server resources from one
server to another.
If you plan to use these products with the disk array, contact your HP service representative for the
latest information about support and configuration requirements.
For assistance with NHAS or SFT III operations, see the Novell user documentation, or contact Novell
customer support.
Multipath failover
The XP disk arrays support NetWare multipath failover. If multiple FCAs are connected to the disk
array with commonly-shared LUNs, you can configure path failover to recognize each new device
path:
1. In the startup.cfg file, enter
SET MULTI-PATH SUPPORT=ON LOAD SCSIHD.CDM AEN
2. If the line LOAD CPQSHD.CDM is present it should be commented out.
Example startup.cfg
SET MULTI-PATH SUPPORT=ON
LOAD ACPIDRV.PSM
######## End PSM Drivers ########
LOAD SCSIHD.CDM AEN
#LOAD CPQSHD.CDM
LOAD IDECD.CDM
######## End CDM Drivers ########
LOAD IDEATA.HAM SLOT=10011
LOAD CPQRAID.HAM SLOT=10019
LOAD QL2300.HAM SLOT=2 /LUNS /ALLPATHS /PORTNAMES/CONSOLE
LOAD QL2300.HAM SLOT=3 /LUNS /ALLPATHS /PORTNAMES /CONSOLE
######## End HAM Drivers ########
XP Disk Array Configuration Guide for Novell Netware 25
Page 26

3. Restart the server.
4. To see a list of the failover devices and paths, at the server prompt enter:
list failover devices
Example failover device path listing
0x20 [V6E0-A2-D0:0] HP OPEN-3 rev:HP16
Up 0x0D [V6E0-A2-D0:0] HP OPEN-3 rev:HP16 Priority = 0 selected
Up 0x1B [V6E0-A3-D0:0] HP OPEN-3 rev:HP16 Priority = 0
0x21 [V6E0-A2-D0:2] HP OPEN-3 rev:HP16
Up 0x0F [V6E0-A2-D0:2] HP OPEN-3 rev:HP16 Priority = 0 selected
Up 0x1D [V6E0-A3-D0:2] HP OPEN-3 rev:HP16 Priority = 0
0x22 [V6E0-A2-D0:4] HP OPEN-3 rev:HP16
Up 0x11 [V6E0-A2-D0:4] HP OPEN-3 rev:HP16 Priority = 0 selected
Up 0x1F [V6E0-A3-D0:4] HP OPEN-3 rev:HP16 Priority = 0
0x23 [V6E0-A2-D0:1] HP OPEN-3 rev:HP16
Up 0x0E [V6E0-A2-D0:1] HP OPEN-3 rev:HP16 Priority = 0 selected
Up 0x1C [V6E0-A3-D0:1] HP OPEN-3 rev:HP16 Priority = 0
0x24 [V6E0-A2-D0:1] HP OPEN-3 rev:HP16
Up 0x0E [V6E0-A2-D0:3] HP OPEN-3 rev:HP16 Priority = 0 selected
Up 0x1C [V6E0-A3-D0:3] HP OPEN-3 rev:HP16 Priority = 0
Helpful Multipath commands
Other useful Multipath commands are described below.
MM Set failover priority <pathid> = <number> </insert>
This command sets the priority level for each path. The ID must be a valid path ID, and the number
must be a decimal integer value in the range 1-4,000,000, with 1 being the highest priority and
4,000,000 being the lowest priority. The default value of 0 (zero) indicates that there is no priority.
The /insert option will move the priorities on all paths that were equal or lower than <number>. For
example, if the paths had priorities of 1,2,3,4, and a new path is assigned a number 2 using the
/insert option, then the paths that were 2, 3, and 4 are moved to 3, 4, and 5, and the new path
assigned priority 2.
MM Set failover state <pathid> = <Up: Down> </setpath>
This command sets the state of the path. The ID must be a valid path ID. If the path is Up, it can be
taken offline, and will not be used to switch to. Another path will be selected. If the path is offline,
the path will be reactivated, if possible, and set to an Up state. The /setpath option will reselect the
highest priority path that is up.
MM Set failover path <pathid>
This command moves the selected path to the one specified by the path ID. The ID must be a valid
path that is up. This does not alter the priorities on the paths, and any reselection of the path may
cause the path to change. A later option will be added to reassign that path to the highest priority.
MM Restore failover path device_id
This command forces the device to reselect the highest priority path that is online. The device_id must
be a valid device ID.
Middleware configuration26
Page 27

MM Reset failover registry
This command will delete all the failover entries in the registry, and recreate them again based on
the current set of failover devices.
As a path fails, it is automatically marked as a Down (offline) path, and the next highest priority path
is automatically selected. When the device is reactivated, the state is automatically reset to an Up
(online) state, and again the highest priority path is selected.
Use the NWCONFIG NetWare utility to create partitions/Volumes for each LUN. For additional
information consult these websites:
http://www.novell.com.
http://www.support.novell.com.
Configuring NetWare 6.x Servers for Cluster Services
The following requirements must be met in order to use clustering:
• NetWare 6.x on each server in the cluster.
• All servers must be in the same NDS tree.
• Cluster Services running on each server in the cluster.
• All servers must have a connection to the shared disk array.
• All cluster servers configured with the IP protocol and on the same IP subnet.
• One client running Windows 98 with Novell Client v4.83 or later.
Installing Cluster Services
1. Bring up all servers that will be in the cluster.
2. Log into a client as Administrator.
3. Insert the NetWare 6.x CD in the CD drive of the client.
4. Start Cluster Services installation:
Select Start and Run.
Enter “D: \ NWDEPLOY.EXE” and click OK (where D: points to the CD drive).
Double-click the Post-Installation Tasks folder.
Click Install or Upgrade a Novell Cluster.
Click Next on the NetWare Cluster Services for NetWare 6.0 Installation window.
5. Create the new cluster:
Select Create New Cluster on the NCS Action window,
Click Next.
Enter a Unique Cluster Object name (for example, Cluster_Object).
Click Browse.
Double-click to open the tree that contains the cluster servers.
Select the server context within the tree (Novell), and click OK.
Click Next.
6. Add servers to the cluster:
XP Disk Array Configuration Guide for Novell Netware 27
Page 28

Click Browse.
Highlight all of the servers that you want to add and click Add to Cluster. You may use the shift
and control keys to select multiple nodes.
After all servers in the cluster appear on the list, click Next.
Wait while NWDeploy accesses each node.
After all services have been accessed and added to the “NetWare Servers in Cluster” list, click
OK.
7. Enter a unique IP address for the Master_IP_Address_Resource (for example, 10.1.1.5) in the
Cluster IP Address Selection window and click Next.
8. Set up the shared media:
Verify that Yes is selected next to “Does the cluster have shared media?”
Select No next to “... mirror Cluster Partition”, if prompted.
Click Next to accept the default shared media settings, if prompted.
Select Start Clustering on newly added or upgraded servers after installation.
9. Install the licenses:
Insert the appropriate Cluster License diskette into drive A: of the client.
Click Next.
Click Next to select all available licenses.
Click Next at the summary screen.
10. Click Finish to complete installation. Main file copy starts now.
11. When the installation is complete, click Close.
12. Wait for the Deployment Manager to reappear on the client. Click Cancel, then click Yes to close
the Deployment Manager.
Creating logical volumes
NetWare 6.0
1. Using ConsoleOne, select the targeted server, right click, and click Properties.
2. Click the Media tab, and click NSS Logical Volumes.
3. Click New, enter a name for the volume, and click Next.
4. In the Create Logical Volume - Storage Information window, select the desired pool/device, enter
the desired Volume Quota, then click Next.
5. In the Create Logical Volume - Storage Information window check Activate and Mount in the “On
Creation” box, then click Finish.
6. Confirm that the logical volume has been created.
7. Map the created Logical Volume as the Network Drive.
8. Confirm the mapped drive.
Netware 6.5
1. Enter NSSMU at the server console.
2. In the main menu, select Volumes.
Middleware configuration28
Page 29

3. Press Insert and enter a name for the new volume, then click Next.
4. Select the desired pool/device, enter the desired Volume Quota, then click Next.
5. Review and change volume attributes as necessary.
6. Select Create.
XP Disk Array Configuration Guide for Novell Netware 29
Page 30

Middleware configuration30
Page 31

3 Troubleshooting
This section includes resolutions for various error conditions you may encounter.
If you are unable to resolve an error condition, ask your HP support representative for assistance. See
“Calling the HP support center” on page 32.
Error conditions
Depending on your system configuration, you may be able to view error messages (R-SIMS) as follows:
• In XP Remote Web Console (Status tab)
• In XP Command View Advanced Edition Software (“Alerts” window).
• In XP Command View (Event History or Event Notification windows).
Table 4 Error conditions
recognized by the host.
Recommended ActionError Condition
Verify the following:The logical devices are not
• The READY indicator lights on the disk array are ON.
• Fiber cables are correctly installed and firmly connected.
• The target IDs are properly configured. The LUNs for each TID must
start at 0 and continue sequentially without skipping any numbers.
• The TIDs/WWNs on each bus are unique. Do not install two
devices with the same ID on the same bus. Recheck the buses for
new devices.
• LUSE devices are not intermixed with normal LUNs on the same
port.
• The maximum number of LUSE devices per port has not been
exceeded.
• The disk array host mode is set correctly.
The host does not reboot properly
after hard shutdown.
Logical volumes cannot be created.
rebooting.
If you power off the host without executing the shutdown process, wait
three minutes to allow the disk array's internal timeout process to purge
queued commands. If the host restarts while the disk array is processing
queued commands, the host may not reboot successfully.
Verify that the disk array logical devices are correctly formatted.Physical volumes cannot be created.
Verify that the volume capacity for OPEN-x volumes is not greater than
the maximum capacity allowed. See Table 6 on page 35.
Verify that the capacity of the volume group is not less than the total
capacity of the partitioned logical volume.
Verify that the host was restarted correctly.A file system is not mounted after
Verify that the file system attributes are correct.
XP Disk Array Configuration Guide for Novell Netware 31
Page 32

because the disk array was busy or
it logged a panic message.
or the disk array has displayed “Not
Ready” and timed out.
Recommended ActionError Condition
Reboot the host.The disk array performs a self reboot
Contact HP.The disk array responds “Not Ready”
Check the FCA and make sure it was installed properly.The host detects a parity error.
Reboot the host.
The host hangs or devices are
declared and the host hangs.
Make sure there are no duplicate disk array TIDs and that disk array
TIDs do not conflict with any host TIDs.
Verify server hardware configuration. Ethernet card may need to be
in slot 9 for NetWare to function with the HP Netserver. Avoid shared
interrupts; if unavoidable, use sharing among similar card types. Check
for the latest device drivers and try simplifying the configuration.
Calling the HP support center
If you are unable to resolve an error condition, contact the HP support center for assistance.
Contact information
Telephone numbers for worldwide technical support are listed on the HP support web site:
http://www.hp.com/support/.
Before you call
Be sure to have the following information available:
• Technical support registration number (if applicable)
• Product serial numbers
• Product model names and numbers
• Applicable error messages
• Operating system type and revision level
• Detailed, specific questions
For continuous quality improvement, calls may be recorded or monitored.
Troubleshooting32
Page 33

A Path worksheet
Worksheet
Table 5 Path worksheet
control unit)
Device TypeLDEV (CU:LDEV) (CU =
Number
Alternate PathsPath 1SCSI Bus
TID:TID:TID:0:00
LUN:LUN:LUN:
TID:TID:TID:0:01
LUN:LUN:LUN:
TID:TID:TID:0:02
LUN:LUN:LUN:
TID:TID:TID:0:03
LUN:LUN:LUN:
TID:TID:TID:0:04
LUN:LUN:LUN:
TID:TID:TID:0:05
LUN:LUN:LUN:
TID:TID:TID:0:06
LUN:LUN:LUN:
TID:TID:TID:0:07
LUN:LUN:LUN:
TID:TID:TID:0:08
LUN:LUN:LUN:
TID:TID:TID:0:09
LUN:LUN:LUN:
TID:TID:TID:0:10
LUN:LUN:LUN:
XP Disk Array Configuration Guide for Novell Netware 33
Page 34

Path worksheet34
Page 35

B Disk array supported emulations
This appendix provides information about supported emulations and emulation specifications. Some
parameters may not be relevant to your array. Consult your HP representative for information about
supported configurations for your system.
Supported emulations
HP recommends using OPEN-V as the emulation for better performance and features that may not be
supported with the legacy emulations (OPEN-[389LE]).
Table 6 Supported emulations
LUSE & CVSCVSLUSEFixed SizeEmulationXP model
YesYesYesYesOPEN-3
YesYesYesYesOPEN-8XP10000
YesYesYesYesOPEN-9XP12000
YesYesYesYesOPEN-EXP20000
OPEN-KXP24000
OPEN-M
Emulation specifications
Table 7 Emulation specifications
Emulation
(Note 1)
Category
(Note 2)
Product name
(Note 3)
Blocks
(512 bytes)
YesYesOPEN-L
YesYesOPEN-V
Sector
size
(bytes)
Cylinders
Heads# of
Sectors
per
track
Capacity
MB*
(Note 4)
2347961533385124806720OPEN-3SCSI diskOPEN-3
70079615996651214351040OPEN-8SCSI diskOPEN-8
704296151001651214423040OPEN-9SCSI diskOPEN-9
1389396151975951228452960OPEN-ESCSI diskOPEN-E
3476196154943951271192160OPEN-LSCSI diskOPEN-L
XP Disk Array Configuration Guide for Novell Netware 35
Page 36

Emulation
(Note 1)
LUSE
CVS
Category
(Note 2)
Product name
(Note 3)
Blocks
(512 bytes)
Sector
size
(bytes)
Cylinders
Heads# of
Sectors
per
track
Capacity
MB*
(Note 4)
2347*n96153338*n5124806720*nOPEN-3*nSCSI diskOPEN-3*n
7007*n96159966*n51214351040*nOPEN-8*nSCSI diskOPEN-8*n
7042*n961510016*n51214423040*nOPEN-9*nSCSI diskOPEN-9*n
13893*n961519759*n51228452960*nOPEN-E*nSCSI diskOPEN-E*n
34761*n961549439*n51271192160*nOPEN-L*nSCSI diskOPEN-L*n
Note 79615Note 6512Note 5OPEN-3-CVSSCSI diskOPEN-3 CVS
Note 79615Note 6512Note 5OPEN-8-CVSSCSI diskOPEN-8 CVS
Note 79615Note 6512Note 5OPEN-9-CVSSCSI diskOPEN-9 CVS
Note 79615Note 6512Note 5OPEN-E-CVSSCSI diskOPEN-E CVS
Note 712815Note 6512Note 5OPEN-VSCSI diskOPEN-V
CVS LUSE
OPEN-3*n CVS
General notes:
*Capacity = (512 x number of blocks) ÷ 1024
The value n is the number of volumes combined together. For example, with 8 combined volumes:
OPEN-V*8.
Note 1:
The availability of an emulation depends on the disk array.
Note 2:
The devices are defined to the host as SCSI disk devices, even though the interface is Fibre Channel.
Note 79615Note 6512Note 5OPEN-3*n-CVSSCSI disk
Note 79615Note 6512Note 5OPEN-8*n-CVSSCSI diskOPEN-8*n CVS
Note 79615Note 6512Note 5OPEN-9*n-CVSSCSI diskOPEN-9*n CVS
Note 79615Note 6512Note 5OPEN-E*n-CVSSCSI diskOPEN-E*n CVS
Note 712815Note 6512Note 5OPEN-V*nSCSI diskOPEN-V*n
2
Disk array supported emulations36
Page 37

Note 3:
Note 4:
Note 5:
The command device (used for XP Raid Manager) is distinguished by -CM on the product name (for
example, OPEN-3-CM, OPEN-3-CVS-CM).
The device capacity can sometimes be changed by the BIOS or host adapter board. This may make
actual capacity different from that listed in the table.
The number of blocks for a CVS volume is calculated as follows:
# of blocks = (# of cylinders) × (# of heads) × (# of sectors per track)
Example
For an OPEN-3 CVS volume with capacity = 37 MB:
# of blocks = (53 cylinders–see Note 5) × (15 heads) ×
(96 sectors per track) = 76320
Example
For an OPEN-V CVS volume with capacity = 49 MB:
# of blocks = (53 cylinders–see Note 5) × (15 heads) ×
(128 sectors per track) = 101760
Note 6:
The number of cylinders for a CVS volume is calculated as follows ( ... means that the value should
be rounded up to the next integer):
OPEN-3/8/9/E: The number of cylinders for a CVS volume = # of cylinders = (capacity (MB)
specified by user) × 1024/720
Example
For an OPEN-3 CVS volume with capacity = 37 MB:
# of cylinders = 37 × 1024/720 = 52.62
(rounded up to next integer) = 53 cylinders
OPEN-V: The number of cylinders for a CVS volume = # of cylinders = (capacity (MB) specified by
user) × 16/15
Example
For an OPEN-V CVS volume with capacity = 49 MB:
# of cylinders = 49 × 16/15 = 52.26
(rounded up to next integer) = 53 cylinders
OPEN-3/8/9/E: The number of cylinders for a CVS LUSE volume = # of cylinders = (capacity (MB)
specified by user) × 1024/720 × n
Example
For a CVS LUSE volume with capacity = 37 MB and n = 4:
# of cylinders = 37 × 1024/720 × 4 = 52.62 × 4 = 53 × 4 = 212
OPEN-V: The number of cylinders for a CVS LUSE volume = # of cylinders = (capacity (MB) specified
by user) × 16/15 × n
Example
XP Disk Array Configuration Guide for Novell Netware 37
Page 38

Note 7:
For an OPEN-V CVS LUSE volume with capacity = 49 MB and n = 4:
# of cylinders = 49 × 16/15 × 4 = 52.26 × 4 = 53 × 4 = 212
The capacity of an OPEN-3/8/9/E CVS volume is specified in MB, not number of cylinders. The
capacity of an OPEN-V CVS volume can be specified in MB or number of cylinders. You set the
volume size using XP Remote Web Console, XP Command View (XP arrays only), or XP Command
View Advanced Edition Software.
Disk array supported emulations38
Page 39

Glossary
AL-PA Arbitrated loop physical address.
array group A group of 4 or 8 physical hard disk drives (HDDs) installed in an XP disk array
command device A volume on the disk array that accepts XP Continuous Access Software or XP
CU Control Unit. Contains LDEVs and is approximately equivalent to SCSI Target ID.
CVS Custom volume size. CVS devices (OPEN-x CVS) are custom volumes configured
emulation modes The logical devices (LDEVs) associated with each RAID group are assigned an
and assigned a common RAID level. RAID1 array groups consist of 4 (2D+2D)
or 8 HDDs (4D+4D). RAID5 array groups include a parity disk but also consist
of 4 (3D+1P) or 8 HDDs (7D+1P). All RAID6 array groups are made up of 8
HDDs (6D+2P).
Business Copy Software control operations which are then executed by the disk
array.
using array management software to be smaller than normal fixed-size OPEN
system volumes. Synonymous with volume size customization (VSC). OPEN-V is
a CVS-based volume.
emulation mode that makes them operate like OPEN system disk drives. The
emulation mode determines the size of an LDEV:
OPEN-3: 2.46 GB
OPEN-8: 7.38 GB
OPEN-9: 7.42 GB
OPEN-E: 13.56 GB
OPEN-L: 36 GB
OPEN-V: User-defined custom size
failover Using an alternate unit or path instead of a failed unit or path in order to continue
functioning.
FC Fibre Channel.
FCA Fibre Channel Adapter.
FC-AL Fibre Channel arbitrated loop.
FCP Fibre Channel Protocol.
HBA Host bus adapter.
host mode Each port can be configured for a particular host type. These modes are
represented as two-digit hexadecimal numbers. For example, host mode 08
represents an HP-UX host.
LDEV Logical device. An LDEV is created when a RAID group is carved into pieces
according to the selected host emulation mode (that is, OPEN-3, OPEN-8,
XP Disk Array Configuration Guide for Novell Netware 39
Page 40

OPEN-E). The number of resulting LDEVs depends on the selected emulation
mode. The term LDEV is often used synonymously with the term volume.
LUN Logical unit number. A LUN results from mapping a SCSI logical unit number,
port ID, and LDEV ID to a RAID group. The size of the LUN is determined by the
emulation mode of the LDEV and the number of LDEVs associated with the LUN.
For example, a LUN associated with two OPEN-3 LDEVs has a size of 4,693
MB.
LUSE A LUN is normally associated with only a single LDEV. The LUSE feature allows
a LUN to be associated with 1 to 36 LDEVs. Essentially, LUSE makes it possible
for applications to access a single large pool of storage. The LUSE feature is
available when the HP StorageWorks XP Array Manager product is installed.
OFC Open Fibre Control.
OPEN-
x
A general term describing any one of the supported OPEN emulation modes (for
example, OPEN-E. There are two types of OPEN-x devices: legacy OPEN-x
devices with a fixed size (such as, OPEN-3, OPEN-8, OPEN-9, OPEN-E), and
OPEN-V, which has a variable size and is a CVS-based volume.
PA Physical address.
path “Path” and “LUN” are synonymous. Paths are created by associating a port and
a LUN ID with an LDEV.
port A physical connection that allows data to pass between a host and the disk
array. The number of ports on an XP disk array depends on the number of
supported I/O slots and the number of ports available per I/O adapter. The XP
family of disk arrays supports Fibre Channel (FC) ports as well as other port
types. Ports are named by port group and port letter, such as CL1-A. CL1 is the
group, and A is the port letter.
RAID Redundant array of independent disks.
R-SIM Remote service information message.
SCSI Small computer system interface.
SIM Service information message.
SNMP Simple Network Management Protocol.
SVP Service processor, which is the PC built into the disk array. The SVP provides a
direct interface into the disk array. SVP use is reserved for HP support
representatives only.
SVS Storage Virtualization System, an appliance that manages multiple disk array
storage systems.
TID Target ID.
Volume On the XP array, a volume is a uniquely identified virtual storage device
composed of a control unit (CU) component and a logical device (LDEV)
component separated by a colon. For example 00:00 and 01:00 are two
uniquely identified volumes; one is identified as CU = 00 and LDEV = 00, and
the other as CU = 01 and LDEV = 00; they are two unique separate virtual
storage devices within the XP array.
Glossary40
Page 41

VSC Volume size customization. Synonymous with CVS.
WWN World Wide Name. A unique identifier assigned to a Fibre Channel device.
XP Command
View Advanced
Edition Software
XP Command
View
XP Remote Web
Console
HP StorageWorks XP Command View Advanced Edition Software, installs on
the user-provided Device Manager server and provides a browser-based platform
from which you can manage the SVS 200 and the XP family of disk arrays—even
globally distributed arrays.
HP StorageWorks XP Command View, a software product for managing XP
arrays. XP Command View runs on a Windows-based management workstation.
HP StorageWorks XP Remote Web Console. A browser-based program installed
on the SVP that allows you to configure and manage the disk array.
XP Disk Array Configuration Guide for Novell Netware 41
Page 42

Glossary42
Page 43

Index
A
arbitrated-loop physical address, 15
audience, 7
C
client, verifying operations, 24
clustering, 17, 18, 25, 27
configuration
cluster services, 27
device, 20
emulation types, 12
FCAs, 16
Fibre Channel ports, 15
host, 16
host mode, setting, 14
middleware, 25
port, 15
System Mode, 15
conventions
document, 7
storage capacity values, 8
D
device(s)
assigning to volumes, 22
configuration, 20
emulation types, 12
logical, not recognized by host, 31
recognition, 19
type specifications, 36
verifying, 19
disk array(s)
connecting, 18
features, 11
installation overview, 13
Not Ready error message, 32
operating system versions, 11
requirements, 11
self reboots, 32
server support, 11
storage capacity, 11
support for middleware products, 25
disk, partitions, 20
document
conventions, 7
related documentation, 7
documentation
HP website, 7
Novell, 27
providing feedback, 9
E
emulation(s)
device emulation types, 12
supported, 35
error conditions, 31
F
fabric environment
parameter settings, 15
port addresses, 15
zoning, 17, 18
failover, 12, 25
host, 25
multi-path, 25
FCA(s)
configuring, 16
multiple with shared LUNs, 25
supported, 16
Fibre Channel
connection speed, 11
interface, 11
parameter settings, 15
ports, configuring, 15
supported elements, 11
topology example, 15
file system(s)
not mounted after rebooting, 31
G
glossary, 39
H
help
obtaining, 9
XP Disk Array Configuration Guide for Novell Netware 43
Page 44

host
configuration, 16
doesnxd5 t reboot properly, 31
hangs up, 32
host mode, setting, 14
HP
service representative tasks, 13
technical support, 9, 32
I
installation
connecting disk array, 18
HP service representative tasks, 13
overview, 13
interface, Fibre Channel, 11
L
logical volumes, 25
cannot be created, 31
LUN(s)
creating, 19
mapping, 19
security, 17, 18
M
middleware
configuration, 25
disk array support, 25
multi-cluster environment, 17
multi-path failover, 25
N
NetWare
client settings, 17
ConsoleOne settings, 17
NHAS, 25
partitions
creating, 20
path(s)
defining, 19
worksheet, 33
physical volumes, cannot be created, 31
port(s)
address, 15
Fibre Channel, 15
host mode, setting, 14
R
related documentation, 7
S
SCSI disk, Fibre Channel interface and term
"SCSI disk", 11
Secure Manager XP, 18
security, LUN, 17, 18
server
support, 11
SFT III, 25
SNMP configuration, 12
storage capacity, 11
storage capacity values
conventions, 8
Subscriber's Choice, HP, 9
System Mode, setting, 15
T
technical support, 32
HP, 9
Novell, 27
service locator website, 9
topology, fabric, 15
troubleshooting, 31
error conditions, 31
technical support, 32
O
operating system(s)
loading, 16
LUN security for, 18
multiple, fabric zoning for, 18
NetWare
client settings, 17
ConsoleOne settings, 17
supported versions, 11
P
parity error, 32
44
V
volume(s)
assigning, 22
logical, 25
logical, cannot be created, 31
mounting, 23
physical, cannot be created, 31
Page 45

W
websites
HP , 9
HP Subscriber's Choice for Business, 9
Novell documentation, 27
Novell support, 27
product manuals, 7
worksheet, path, 33
X
XP Array Manager, 11, 13, 15, 19
XP Command View, 11, 13, 15, 19
XP Command View Advanced Edition Software,
11, 13, 19
XP family
storage capacity, 11
XP Remote Web Console, 11, 13, 19
Z
zoning, fabric, 17, 18
XP Disk Array Configuration Guide for Novell Netware 45
Page 46

46
 Loading...