

Page 1
Start here
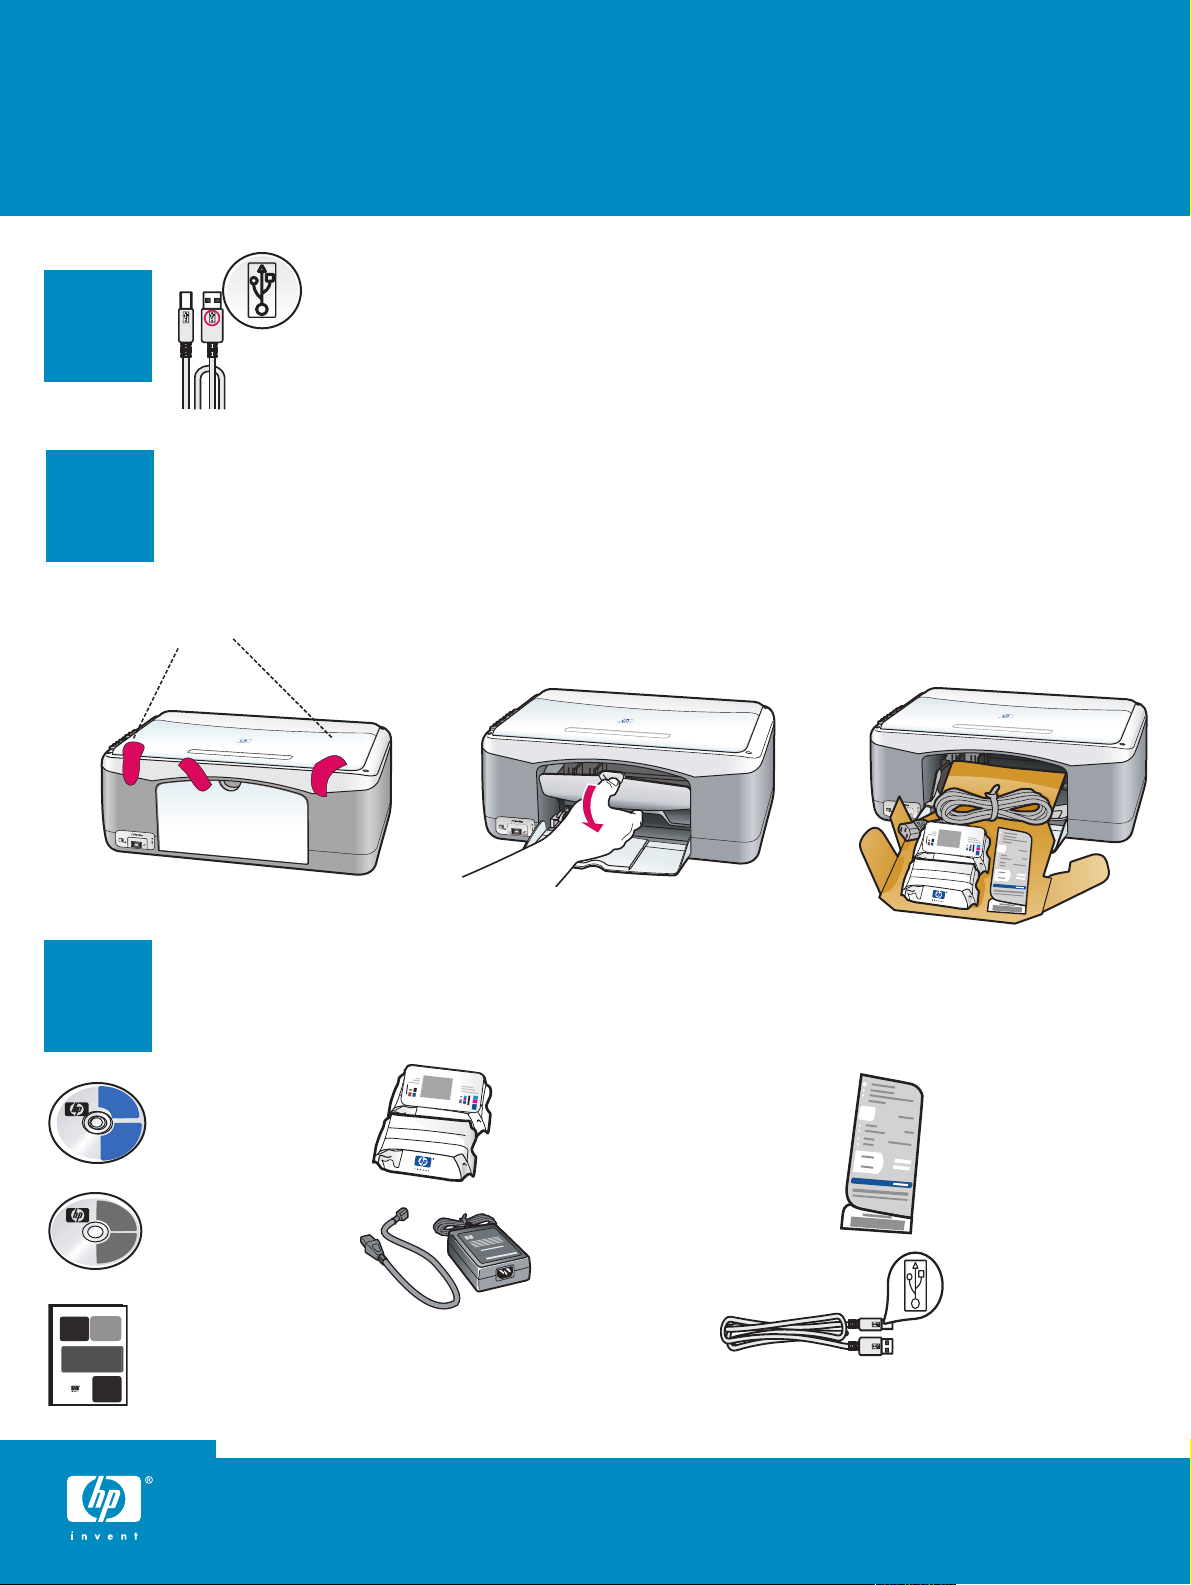
Important: Do not connect the USB
1
cable until software installation in
Step 15.
2
a Remove tape. b Lower the access door to check inside for shipping material and
Remove packaging
components.
3
Locate components
Windows CD
Macintosh CD
User (Reference)
Guide
hp psc 1300 & 1310 series setup poster
print cartridges
power adapter
and cord
control-panel overlay
(may be attached)
USB cable*
* The contents of your box may differ.
Page 2
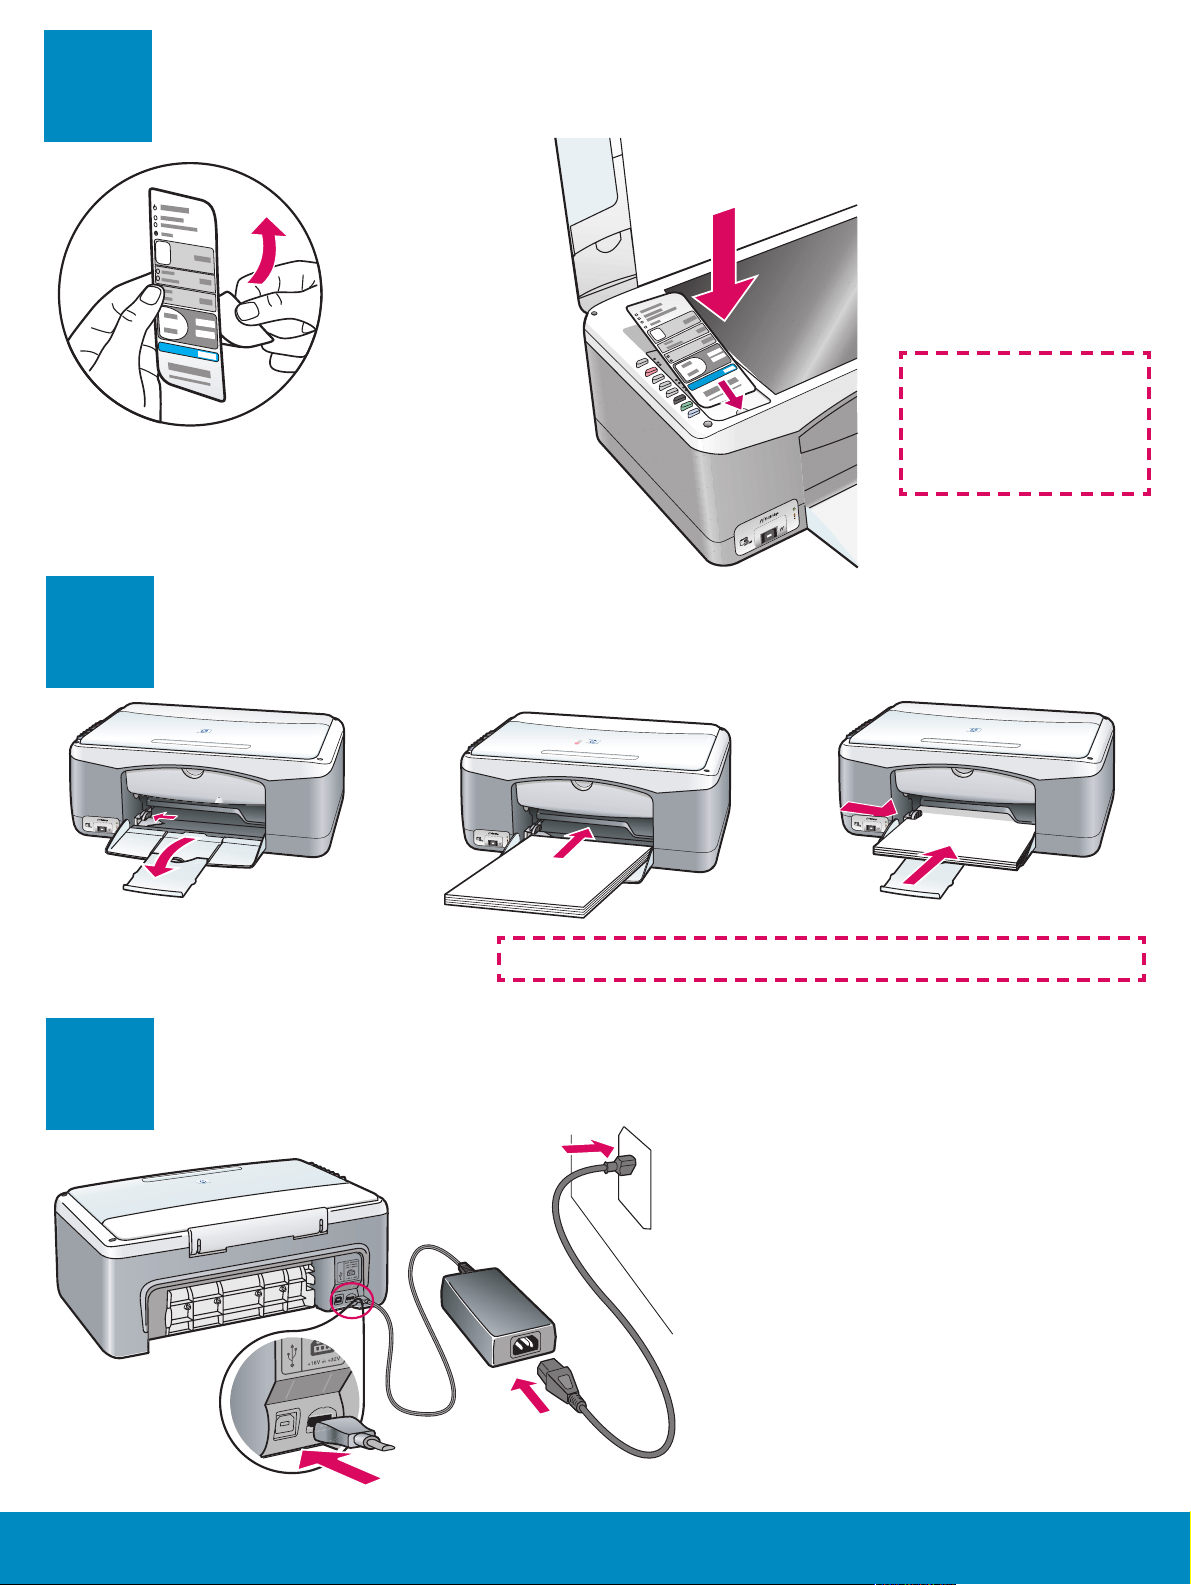
Attach the control-panel overlay (if not
4
5
attached)
a Remove the
adhesive
backing from
the control-panel
overlay.
Load plain white paper
b Raise the lid. Place
the control-panel
overlay into the
recess. Make sure it
sticks in place.
The HP PSC will not
work until you attach
the control-panel
overlay!
6
2 • HP PSC 1300 & 1300 Series
Connect the power adapter and cord
Forcing paper too far into the tray might cause a paper jam.
Page 3
7
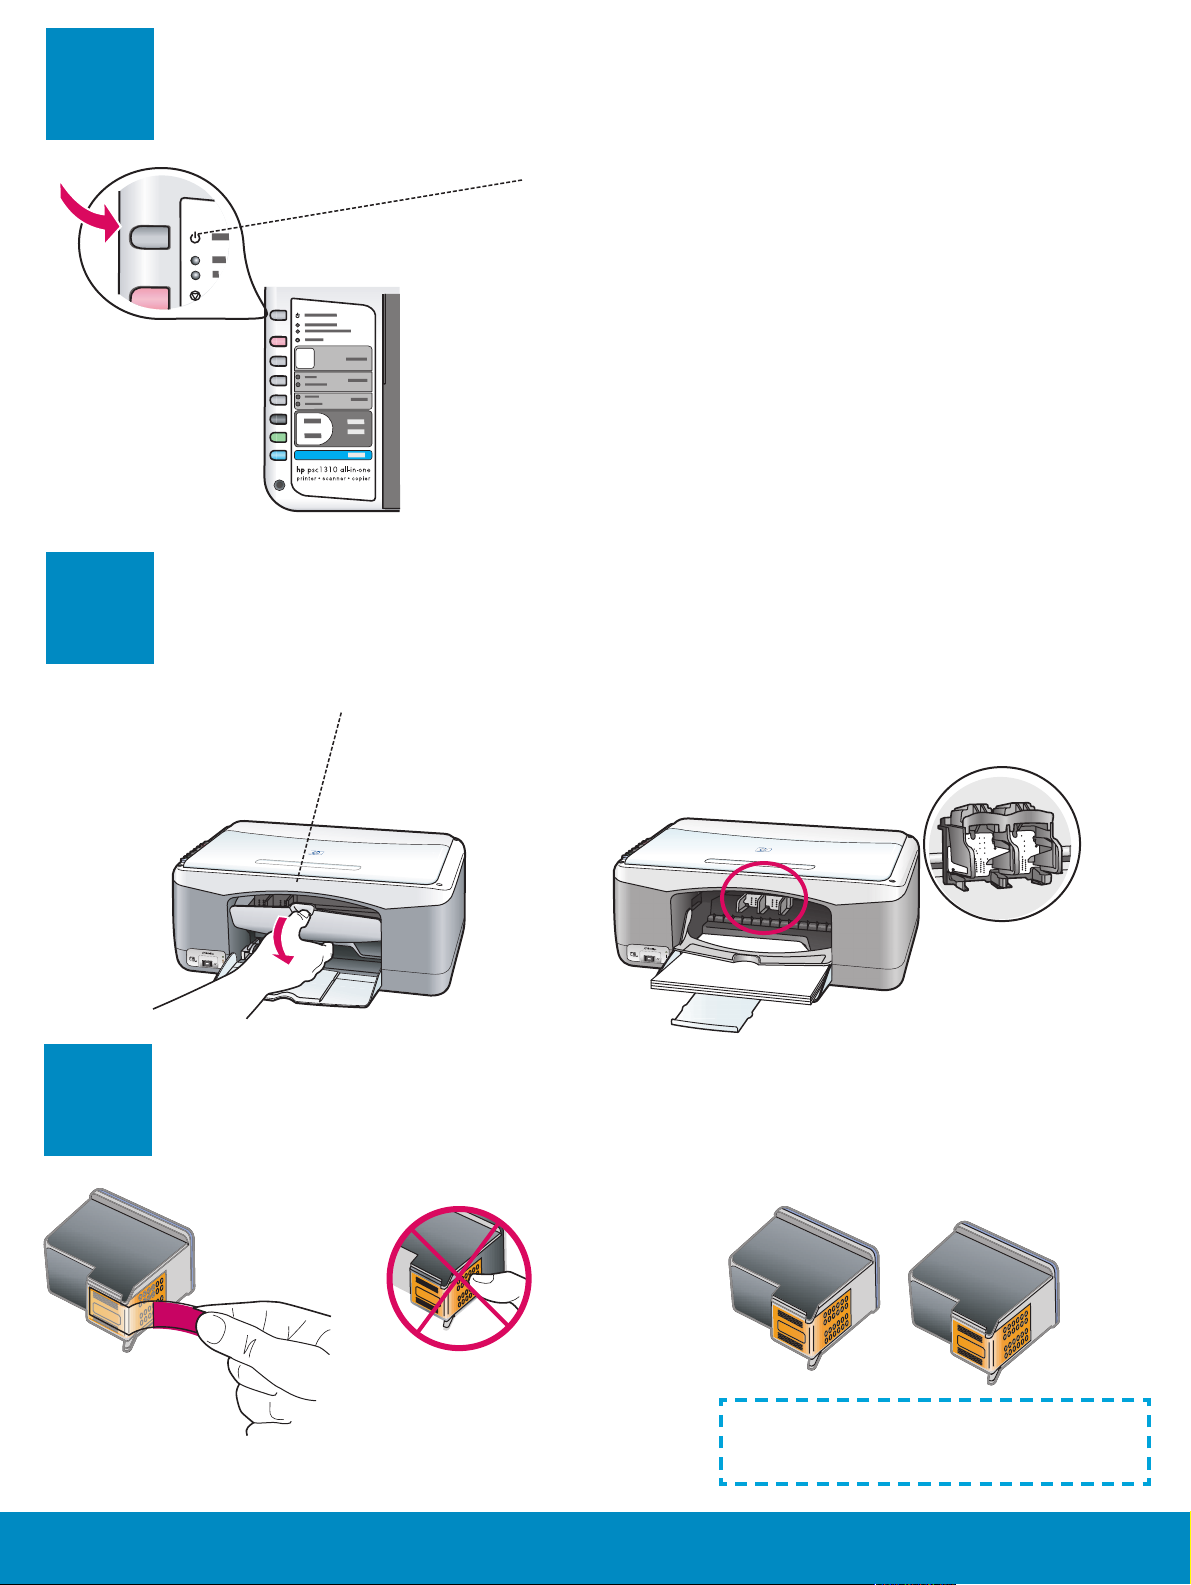
Turn on the device
Check for a light next to the On/
Resume button. Wait for it to fi nish
initializing.
8
9
Open access door
Lower the access door.
Prepare print cartridges
Remove the bright pink tape from
both print cartridges.
Do not touch the copper-colored
contacts or retape the cartridges.
HP PSC 1300 & 1310 Series • 3
Page 4

10
Insert the black print cartridge
a Hold the black print cartridge up
with the HP label on top.
b Slide the black print cartridge at
a slight angle into the right side of
the print carriage.
c Press fi rmly until the print cartridge
snaps into place.
11
Insert the tri-color print cartridge
a Hold the tri-color print cartridge
up with the HP label on top.
b Slide the tri-color print cartridge
at a slight angle into the left side
of the print carriage.
c Press fi rmly until the print cartridge
snaps into place.
d Make sure both cartridges are
secure, and then close the access
door.
4 • HP PSC 1300 & 1300 Series
Page 5

12
Align the print cartridges
Scan
button
a Wait for the print cartridge alignment page to print.
b Place the top of alignment page face down in the front corner
of the glass. Close the lid.
c Press the Scan button.
After the On light stops blinking, alignment is complete. Discard
or recycle the alignment page.
If you are not connecting the device to a computer, continue to the User Guide for information on how
to get started.
13
Turn on your computer
a Turn on your computer, login if necessary, and then wait for
the desktop to appear.
b Close any open programs.
hp psc 1300 & 1310 series - 5
HP PSC 1300 & 1310 Series • 5
Page 6

14
Insert the correct CD
Windows Users:
15
Connect the USB cable
a Insert the HP PSC
Windows CD.
b Follow the onscreen
instructions.
If the startup screen does
not appear, double-click
My Computer , doubleclick the CD-ROM icon ,
and then double-click
setup.exe .
Macintosh Users:
Insert the HP PSC
Macintosh CD. Go to
Step 15 before installing.
Macintosh Users: Windows Users:
When you see this screen, connect the USB
cable.
If you do not see this screen, see
Troubleshooting on the last
page.
a Connect the USB cable.
b Double-click the HP All-in-One installer
icon.
6 • HP PSC 1300 & 1300 Series
hp psc 1300 & 1310 series - 6
Page 7

16
Windows Users: Macintosh Users:
Continue software installation
If you do not see this screen, see
Troubleshooting on the last page.
Follow the onscreen instructions. Complete
the registration screen.
Make sure you complete all screens,
including the setup assistant.
17
Congratulations!
When you see the
Congratulations! screen, you are
ready to use your HP PSC. See the
User Guide or onscreen help to get
started.
hp psc 1300 & 1310 series - 7
HP PSC 1300 & 1310 Series • 7
Page 8

Troubleshooting
*Q5763-90209*
*Q5763-90209*
Q5763-90209
Problem:
Action:
Problem:
Action:
Problem:
Action:
The Check Print Cartridge message lights up after you insert the
print cartridges.
Remove the print cartridges. Make sure you remove all tape from the
copper contacts. Close the access door. Refer to Step 9.
Paper jammed during print cartridge alignment.
Turn off the device and remove the back door. Gently remove any
paper. Turn the device on and carefully insert the paper. Refer to
Step 5.
You did not see the screen telling you when to connect the USB cable.
Remove, and then re-insert the HP PSC Windows CD. Refer to Step 14.
Problem:
Action:
Problem:
Action:
Problem:
Action:
The Microsoft Add New Hardware Wizard screen appears.
(Windows only)
Click Cancel . Unplug the USB cable, and then insert the HP PSC
Windows CD. Refer to Steps 14 and 15.
The Device Setup Has Failed To Complete screen appears.
Verify that the control-panel overlay is fi rmly attached. Unplug the
HP PSC and plug it in again. Check all connections. Make sure the
USB cable is plugged into the computer. Do not plug the USB cable
into a keyboard or non-powered hub. Refer to Steps 4 and 15.
The Macintosh software does not install.
Make sure the USB cable is plugged into the computer before installing
the software. Do not plug the USB cable into a keyboard or nonpowered hub. Refer to Step 15.
Refer to the User Guide or HP Photo and Imaging help for more information.
Visit www.hp.com/support for assistance.
© Copyright 2004 Hewlett-Packard Development Company, L.P. Printed in USA.
 Loading...