

Page 1
Itt kezdje
Fontos: Az USB kábelt csak a 15. lépésben leírt
szoftvertelepítés után csatlakoztassa.
1
Important: Do not connect the USB cable until
software installation in Step 15.
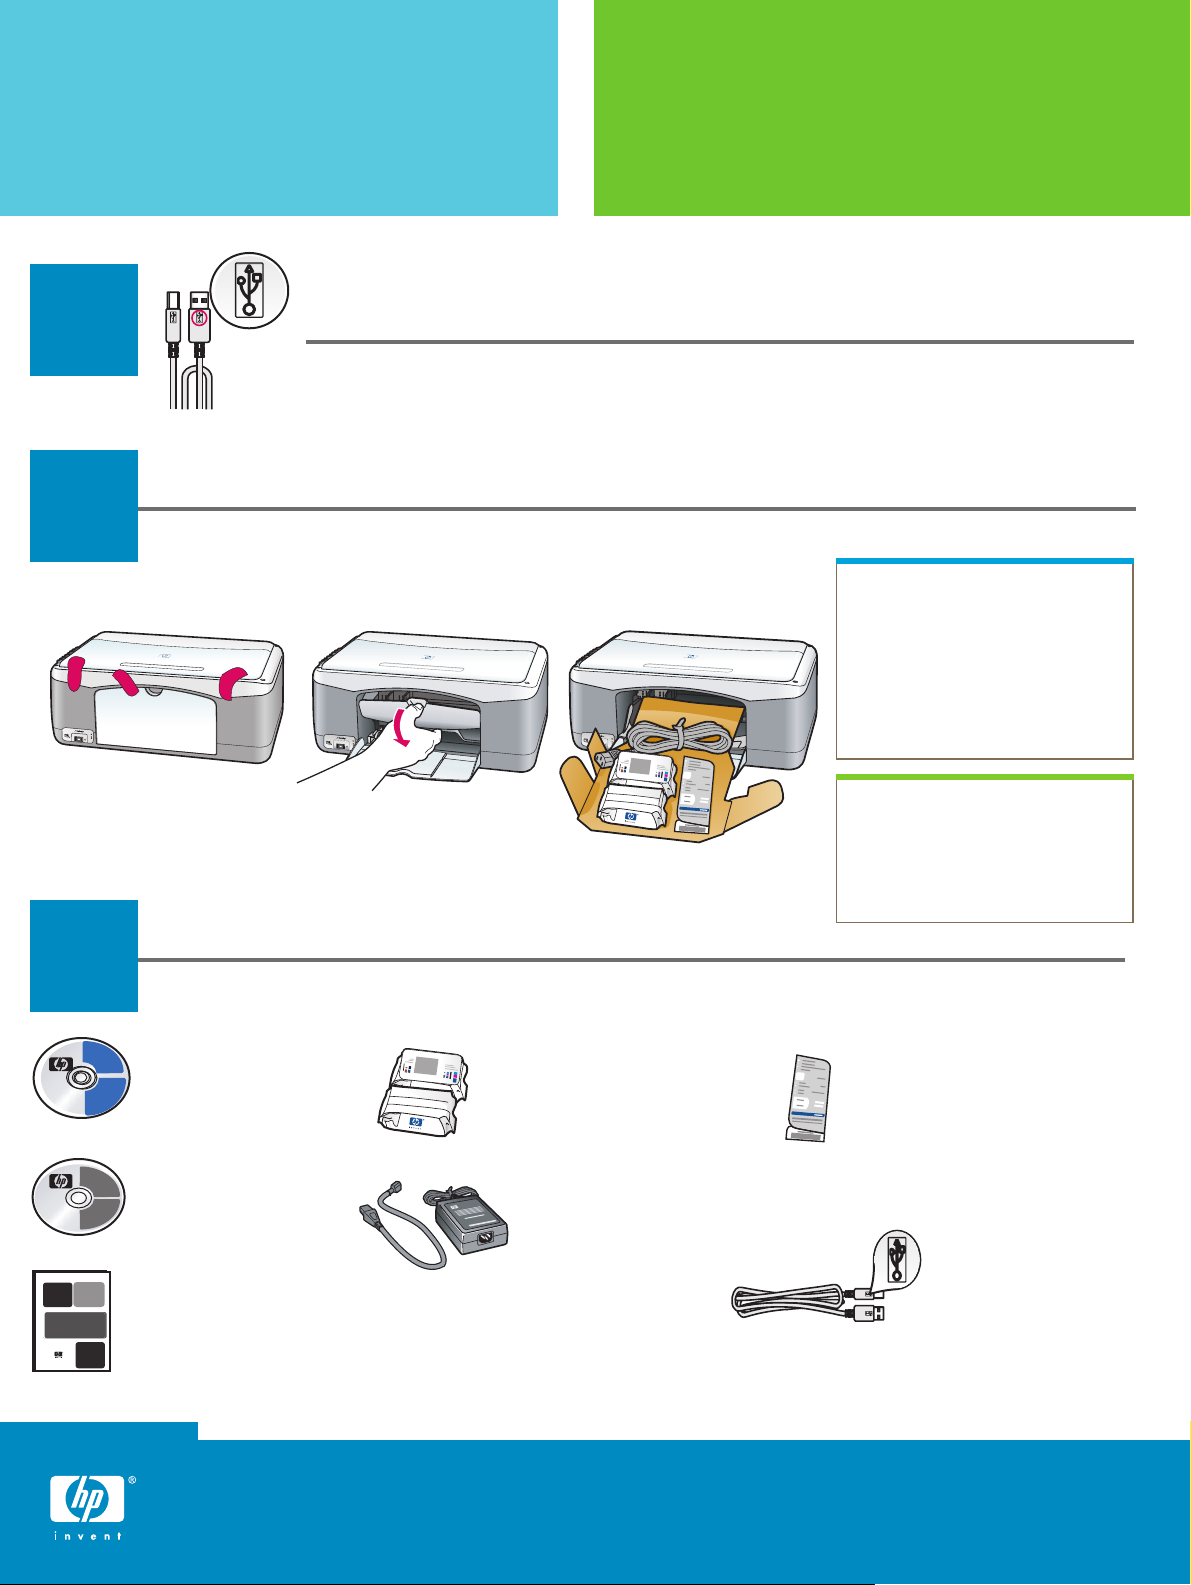
Távolítsa el a csomagolást
Start here
2
3
Remove packaging
Tartozékok
Locate components
Windows CD
Windows CD
Macintosh CD
Macintosh CD
Használati útmutató
nyomtatópatronok
print cartridges
hálózati adapter
és vezeték
power adapter
and cord
a Távolítsa el a szalagot.
b Nyissa ki a készülék
ajtaját, és vegye ki a
készülék belsejéből a
szállításhoz behelyezett
anyagokat és elemeket.
a Remove tape.
b Lower the access door to
check inside for shipping
material and components.
vezérlőpult-címke (egyes
esetekben felragasztva)
control-panel overlay
(may be attached)
USB kábel*
USB cable*
User (Reference) Guide
hp psc 1300 & 1310 series beállítási poszter
hp psc 1300 & 1310 series setup poster
* A csomag tartalma ettől eltérhet.
* The contents of your box may differ.
Page 2
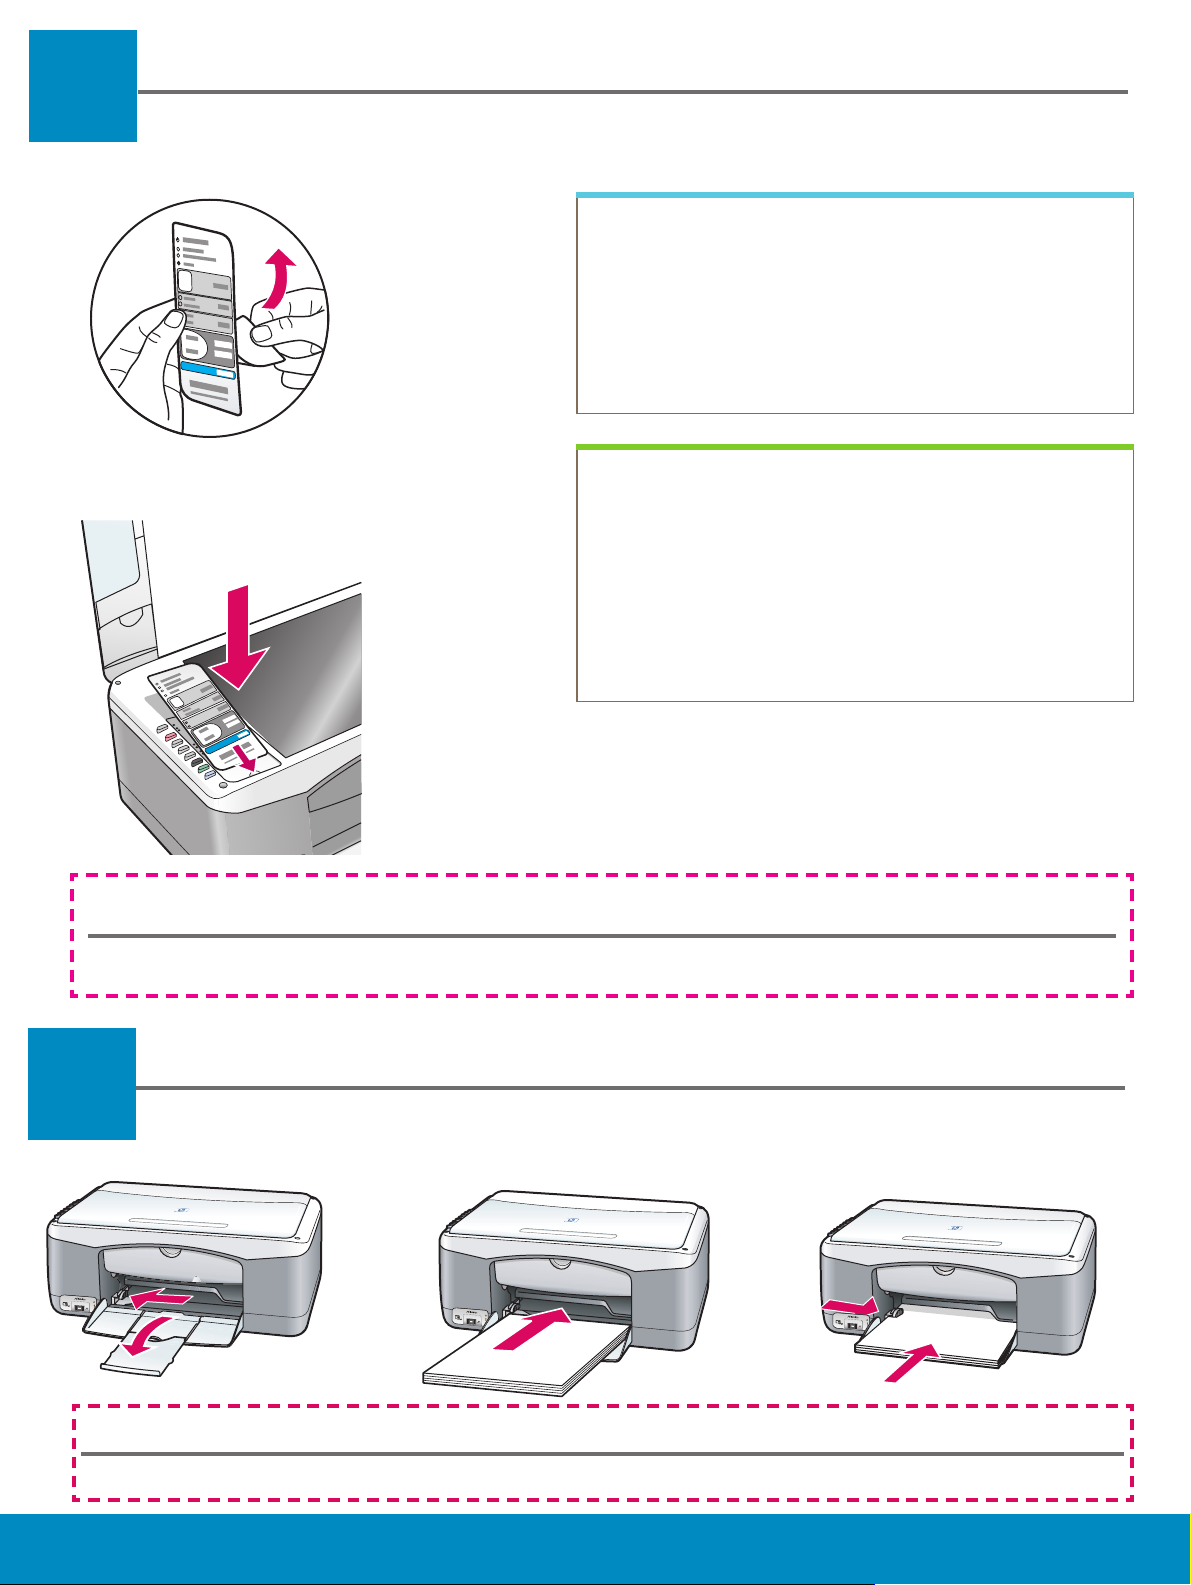
A vezérlőpult-címke felragasztása (ha nincs felragasztva)
4
Attach the control-panel overlay (if not attached)
a Távolítsa el az öntapadó hátoldalt a vezérlőpult-
címkéről.
b Emelje fel a fedelet. Helyezze a vezérlőpult-
címkét a mélyedésbe. Győződjön meg róla, hogy
a helyére tapadt.
a Remove the adhesive backing from the controlpanel overlay.
b Raise the lid. Place the control-panel overlay
into the recess. Make sure it sticks into place.
A HP PSC nem működik, amíg a vezérlőpult-címkét nem ragasztotta a helyére!
The HP PSC will not work until you attach the control-panel overlay!
Töltsön be sima fehér papírt
5
A papír túlzott benyomása a tálcába papírelakadást okozhat.
Forcing paper too far into the tray might cause a paper jam.
Load plain white paper
hp psc 1300 & 1310 series - 2
Page 3
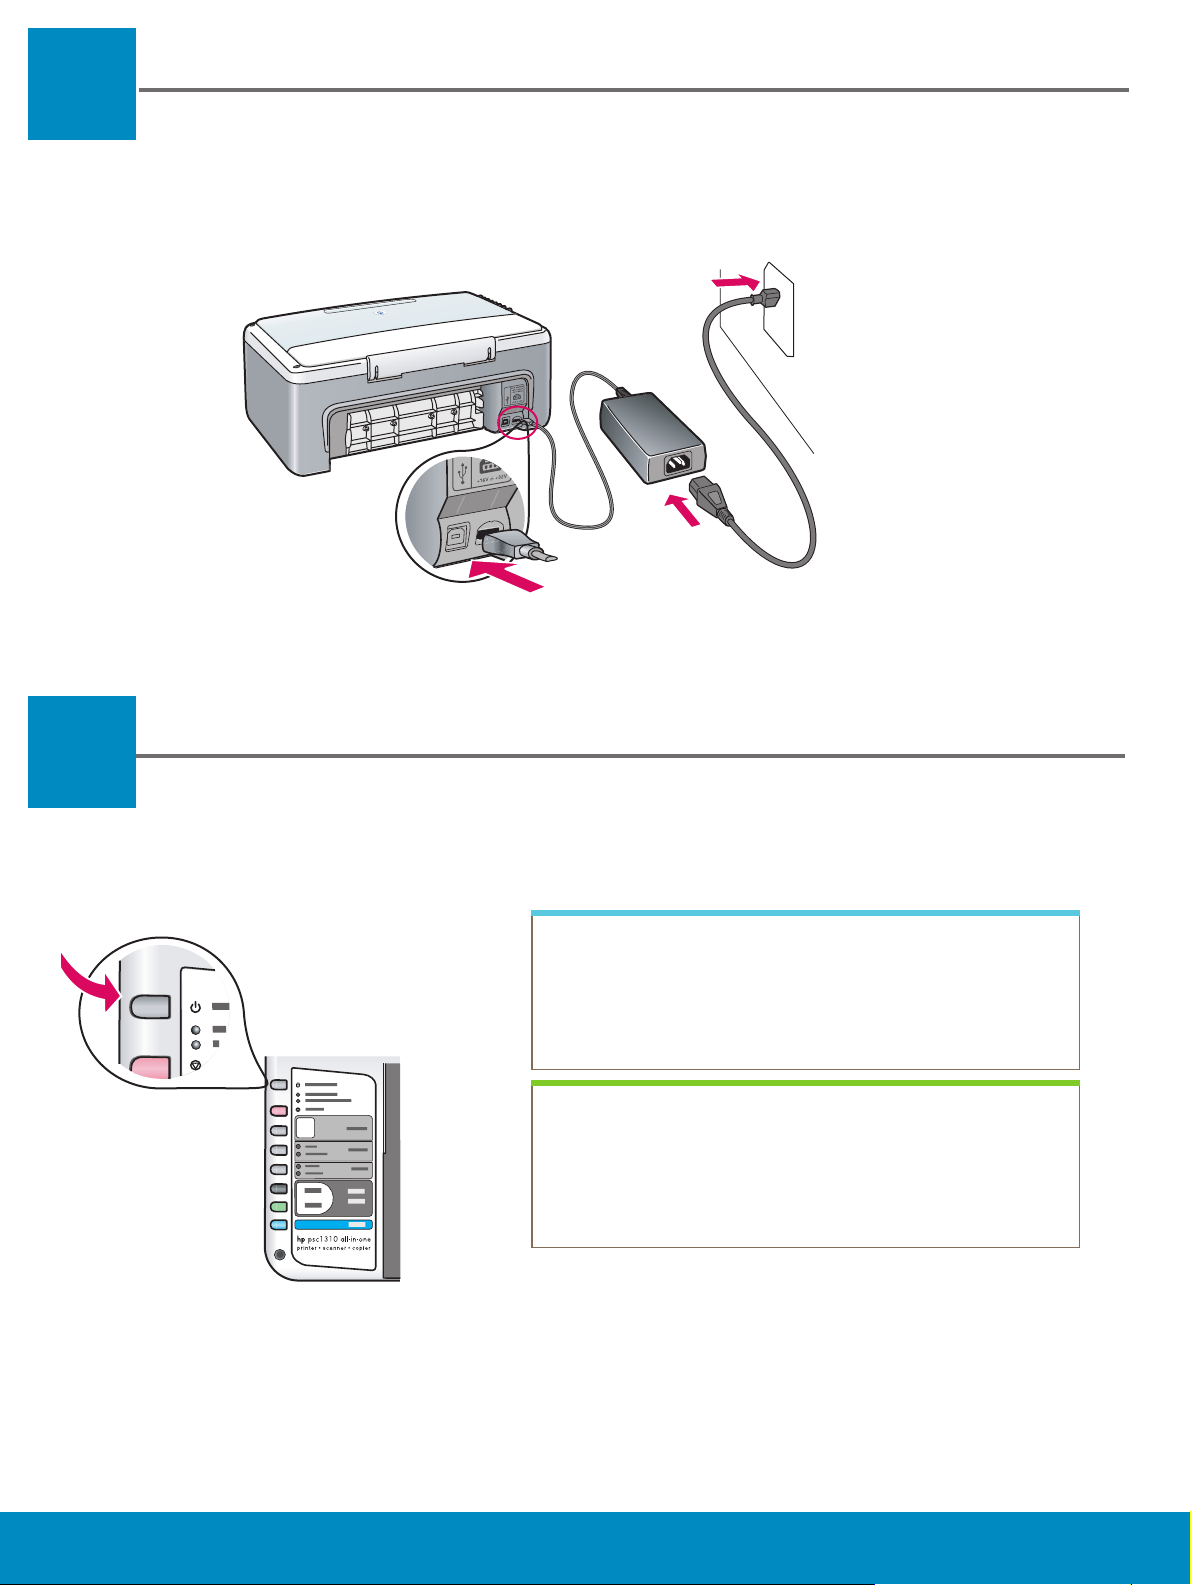
6
Csatlakoztassa a hálózati adaptert és a vezetéket
Connect the power adapter and cord
7
Kapcsolja be a készüléket
Turn on the device
Ellenőrizze a fényjelzést a Be/Folytatás gomb
mellett. Várjon az inicializálás befejezéséig.
Check for a light next to the On/Resume
button. Wait for it to fi nish initializing.
hp psc 1300 & 1310 series - 3
Page 4
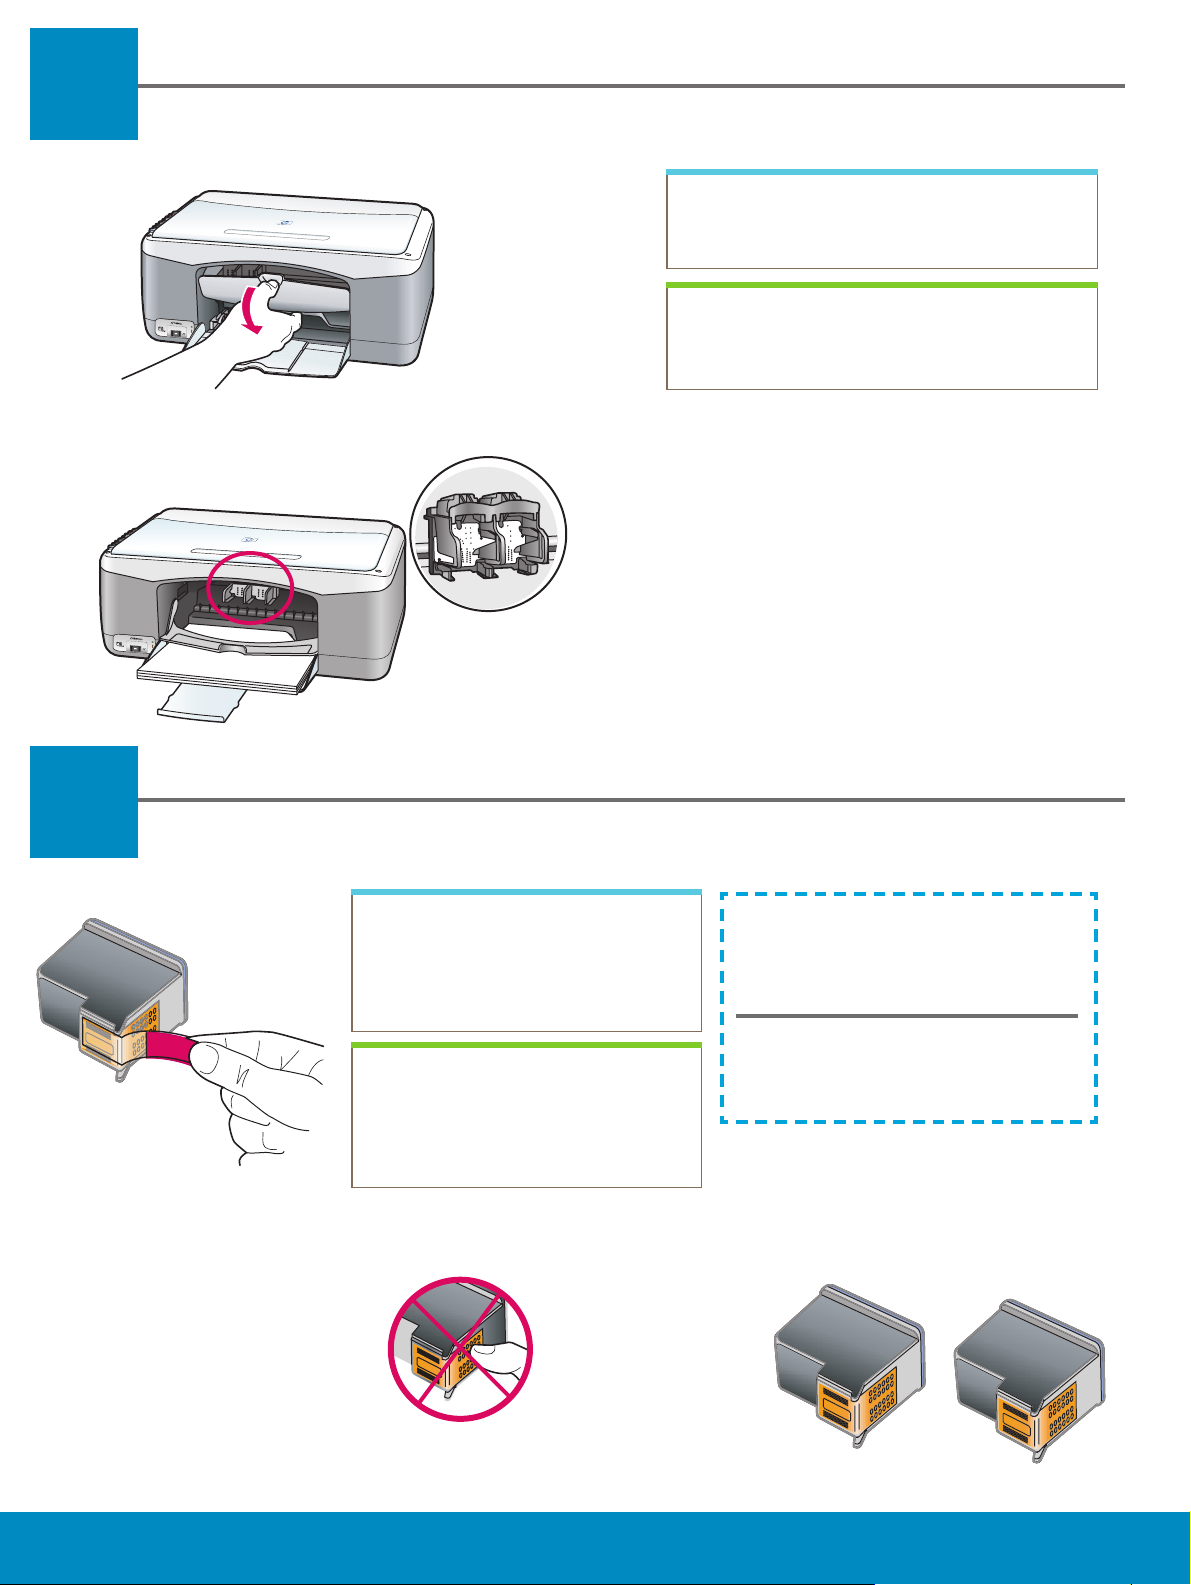
Nyissa ki az ajtót
8
Open access door
Nyissa le az ajtót.
Lower the access door.
9
Készítse elő a nyomtatópatronokat
Prepare print cartridges
Távolítsa el a rózsaszínű
fényes szalagot mindkét
nyomtatópatronról.
Remove the bright pink tape
from both print cartridges.
Ne érintse meg a rézszínű
érintkezőket, és ne helyezze
vissza a szalagot a patronokra.
Do not touch the copper-colored
contacts or retape the cartridges.
hp psc 1300 & 1310 series - 4
Page 5

Helyezze be a fekete nyomtatópatront
10
Insert the black print cartridge
a Tartsa a fekete nyomtatópatront úgy, hogy a HP
címke a tetején legyen.
b Csúsztassa be lapos szögben a fekete
nyomtatópatront a patrontartó jobb oldalába.
c Nyomja be erősen, amíg a nyomtatópatron be nem
kattan a helyére.
a Hold the black print cartridge up with the HP label
on top.
b Slide the black print cartridge at a slight angle into
the right side of the print carriage.
c Press fi rmly until the print cartridge snaps into place.
hp psc 1300 & 1310 series - 5
Page 6

Helyezze be a háromszínű nyomtatópatront
11
Insert the tri-color print cartridge
a tartsa a háromszínű nyomtatópatront úgy,
hogy a HP címke a tetején legyen.
b Csúsztassa be a háromszínű
nyomtatópatront a patrontartó bal oldalába.
c Nyomja be erősen, amíg a nyomtatópatron
be nem kattan a helyére.
d Győződjön meg róla, hogy mindkét patron
szilárdan a helyén van, majd zárja be az ajtót.
a Hold the tri-color print cartridge up with the
HP label on top.
b Slide the tri-color print cartridge at a slight
angle into the left side of the print carriage.
c Press fi rmly until the print cartridge snaps into
place.
d Make sure both cartridges are secure, and
then close the access door.
hp psc 1300 & 1310 series - 6
Page 7

Igazítsa a helyükre a nyomtatópatronokat
12
Align the print cartridges
a Várjon, amíg a nyomtatópatron igazítási
lap kinyomtatódik.
b Helyezze az igazítási lap felső részét
írással lefelé az üveglap elülső sarkába.
Zárja le a fedelet.
c Nyomja meg a Beolvasás gombot.
Ha a Be jelzőfény befejezte a villogást,
készen van az igazítás. Az igazítási lapot
dobja el vagy hasznosítsa újra.
a Wait for the print cartridge alignment
page to print.
b Place the top of alignment page face
down in the front corner of the glass. Close
the lid.
c Press the Scan button.
After the On light stops blinking, alignment
is complete. Discard or recycle the alignment
page.
Ha a készüléket nem csatlakoztatja számítógéphez, nézze meg a Használati útmutatóban található
további információt az első lépésekről.
If you are not connecting the device to a computer, continue to the User Guide for information on how
to get started.
hp psc 1300 & 1310 series - 7
Page 8

Kapcsolja be a számítógépet
13
14
Turn on your computer
a Kapcsolja be a számítógépet, ha szükséges,
jelentkezzen be, majd várjon az asztal
megjelenésére.
b Zárja be a nyitva lévő programokat.
a Turn on your computer, login if necessary, and
then wait for the desktop to appear.
b Close any open programs.
Helyezze be a megfelelő CD-t
Insert the correct CD
Windows
felhasználók:
Ha nem jelenik meg az indítóképernyő,
akkor kattintson duplán a Sajátgép
ikonra, majd a CD-ROM ikonra , és végül
kattintson duplán a setup.exe elemre.
Windows
Users:
a Helyezze be a HP PSC
Windows CD-t.
b Kövesse a képernyőn
megjelenő utasításokat.
a Insert the HP PSC
Windows CD.
b Follow the onscreen
instructions.
Macintosh
felhasználók:
Helyezze be a HP PSC Macintosh
CD-t. A telepítés előtt végezze el a
15. lépést.
Macintosh
Users:
If the startup screen does not appear, doubleclick My Computer , double-click the
CD-ROM icon, and then double-click
setup.exe .
hp psc 1300 & 1310 series - 8
Insert the HP PSC Macintosh CD.
Go to Step 15 before installing.
Page 9

Csatlakoztassa az USB kábelt
15
Connect the USB cable
Windows
felhasználók:
Ha ezt a képernyőt látja, csatlakoztassa
az USB kábelt.
When you see this screen, connect the
USB cable.
Windows
Users:
Macintosh
felhasználók:
a Csatlakoztassa az USB kábelt.
b Kattintson duplán a
HP All-in-One installer ikonra.
a Connect the USB cable.
b Double-click the
HP All-in-One installer icon.
Macintosh
Users:
Ha nem látja ezt a képernyőt,
akkor nézze meg az utolsó oldalon
található Hibaelhárítás részt.
If you do not see this screen, see
the Troubleshooting on the last
page.
hp psc 1300 & 1310 series - 9
Page 10

Folytassa a szoftver telepítését
16
Continue software installation
Windows
felhasználók:
Ha nem látja ezt a képernyőt, akkor
nézze meg az utolsó oldalon található
Hibaelhárítás részt. Kövesse a
képernyőn megjelenő utasításokat. Töltse
ki a regisztrációs képernyőt.
If you do not see this screen, see the
Troubleshooting on the last page. Follow
the onscreen instructions. Complete the
registration screen.
Windows
Users:
Macintosh
felhasználók:
Győződjön meg róla, hogy minden
képernyőt kitöltött, beleértve a beállítás
segédet is.
Make sure you complete all screens,
including the setup assistant.
Macintosh
Users:
Gratulálunk!
17
hp psc 1300 & 1310 series - 10
Congratulations!
Ha a Gratulálunk! feliratú
üdvözlőképernyőt látja, akkor készen
áll a HP PSC használatára. Az első
lépéseket nézze meg a Használati
útmutatóban vagy a képernyőn
megjelenő súgóban.
When you see the
Congratulations! screen, you are
ready to use your HP PSC. See the
User Guide or onscreen help to get
started.
Page 11

Hibaelhárítás
Probléma: Miután behelyezi a nyomtatópatronokat, kigyullad az
Ellenőrizze a nyomtatópatront jelzőfény.
Teendő:
Probléma:
Teendő:
Probléma:
Teendő:
Probléma:
Távolítsa el a nyomtatópatronokat. Győződjön meg róla, hogy
a réz érintkezőkről megfelelően eltávolította a szalagot.
Zárja vissza az ajtót. Lásd 9. lépés.
A papír elakadt a nyomtatóigazítás közben.
Kapcsolja ki a készüléket és távolítsa el a hátsó ajtót. Óvatosan
távolítsa el a papírt, ha van a készülékben. Kapcsolja be a
készüléket és óvatosan helyezze be a papírt. Lásd 5. lépés.
Nem jelent meg a USB kábel csatlakoztatására felszólító
képernyő.
Vegye ki, majd helyezze vissza a HP PSC Windows CD-t.
Lásd 14. lépés.
Megjelenik a Windows Microsoft Hardver hozzáadása
képernyő.
Teendő:
Probléma:
Teendő:
Probléma:
Teendő:
Kattintson a Mégse gombra. Húzza ki az USB kábelt, majd
helyezze be a HP PSC Windows CD-t. Lásd 14. és 15. lépés.
Megjelenik az Eszköz beállítása nem sikerült képernyő.
Győződjön meg róla, hogy a vezérlőpult-címke szilárdan tapad.
Húzza ki a HP PSC-t a számítógépből, majd csatlakoztassa újra.
Ellenőrizzen minden csatlakozást. Győződjön meg róla, hogy az
USB kábel be van dugva a számítógépbe. Ne csatlakoztassa az
USB kábelt billentyűzethez vagy árammal nem táplált hubhoz.
Lásd 4. és 15. lépés.
A Macintosh szoftver telepítése nem indul el.
A szoftver telepítése előtt győződjön meg róla, hogy az USB
kábel be van dugva a számítógép hátulján található portok
valamelyikébe. Ne csatlakoztassa az USB kábelt a billentyűzethez
vagy árammal nem táplált hubhoz. Lásd 15. lépés.
További információért lásd a Használati útmutatót vagy a HP Photo and Imaging
súgót. Látogasson el a www.hp.com/support weboldalra.
© Copyright 2004 Hewlett-Packard Development Company, LP Nyomtatás helye Németország.
Page 12

Troubleshooting
*Q5763-90221*
*Q5763-90221*
Q5763-90221
Problem:
Action:
Problem:
Action:
Problem:
Action:
Problem:
The Check Print Cartridge message lights up after you insert
print cartridges.
Remove print cartridges. Make sure you remove all tape from
copper contacts. Close the door. Refer to Step 9.
Paper jammed during print alignment.
Turn off the device and remove the back door. Gently remove any
paper. Turn the device on and carefully insert the paper. Refer to
Step 5.
You did not see the screen telling you when to connect the USB cable.
Remove, and then re-insert the HP PSC Windows CD. Refer to
Step 14.
The Windows Microsoft Add Hardware screen appears.
Action:
Problem:
Action:
Problem:
Action:
Click Cancel . Unplug the USB cable, and then insert the HP PSC
Windows CD. Refer to Steps 14 and 15.
The Device Setup Has Failed To Complete screen appears.
Verify that the control-panel overlay is fi rmly attached. Unplug the HP
PSC and plug it in again. Check all connections. Make sure the USB
cable is plugged into the computer. Do not plug the USB cable into a
keyboard or non-powered hub. Refer to Steps 4 and 15.
The Macintosh software does not install.
Make sure the USB cable is plugged into a port on the back of the
computer before installing the software. Do not plug the USB cable
into a keyboard or non-powered hub. Refer to Step 15.
Refer to the User Guide or HP Photo and Imaging help for more information.
Visit www.hp.com/support.
© Copyright 2004 Hewlett-Packard Development Company, LP Printed in Germany.
 Loading...