

HP ProBook 4320t Administrator's Reference Manual

HP 4320t Mobile Thin Client
Administrator Reference Guide

© Copyright 2010 Hewlett-Packard
Development Company, L.P.
Microsoft and Windows are U.S. registered
trademarks of Microsoft Corporation. SD
Logo is a trademark of its proprietor.
The information contained herein is subject
to change without notice. The only
warranties for HP products and services are
set forth in the express warranty statements
accompanying such products and services.
Nothing herein should be construed as
constituting an additional warranty. HP shall
not be liable for technical or editorial errors
or omissions contained herein.
Second Edition: October 2010
First Edition: May 2010
Document Part Number: 611726-002
Product notice
This guide describes features that are
common to most models. Some features
may not be available on your computer.

Safety warning notice
WARNING! To reduce the possibility of heat-related injuries or of overheating the computer, do not
place the computer directly on your lap or obstruct the computer air vents. Use the computer only on
a hard, flat surface. Do not allow another hard surface, such as an adjoining optional printer, or a soft
surface, such as pillows or rugs or clothing, to block airflow. Also, do not allow the AC adapter to
come into contact with the skin or a soft surface, such as pillows or rugs or clothing, during operation.
The computer and the AC adapter comply with the user-accessible surface temperature limits defined
by the International Standard for Safety of Information Technology Equipment (IEC 60950).
iii

iv Safety warning notice

Table of contents
1 Notebook tour ................................................................................................................................................. 1
Identifying the hardware ....................................................................................................................... 1
Display ................................................................................................................................. 1
Top ....................................................................................................................................... 2
Pointing devices .................................................................................................. 2
Lights ................................................................................................................... 3
Buttons, switches, and speakers ......................................................................... 4
Keys .................................................................................................................... 5
Front .................................................................................................................................... 6
Right side ............................................................................................................................. 7
Left side ............................................................................................................................... 7
Bottom ................................................................................................................................. 8
Wireless antennas ............................................................................................................... 8
Identifying the labels ............................................................................................................................. 9
2 HP Write Filters ............................................................................................................................................. 11
File-Based Write Filter ........................................................................................................................ 11
Using the File-Based Write Filter command line utility ...................................................... 11
Using the File-Based Write Filter configuration interface ................................................... 12
Using the File-Based Write Filter status utility ................................................................... 12
Enhanced Write Filter ......................................................................................................................... 13
Using the Enhanced Write Filter command line utility ....................................................... 13
Using the Enhanced Write Filter configuration interface .................................................... 14
Using the Enhanced Write Filter status utility .................................................................... 15
3 Configuration ................................................................................................................................................ 16
Local drives ........................................................................................................................................ 16
Drive Z ............................................................................................................................... 16
Drive C ............................................................................................................................... 16
Saving files ........................................................................................................................ 16
Mapping network drives ..................................................................................................... 17
Roaming profiles ................................................................................................................ 17
User accounts .................................................................................................................................... 17
Creating a new user account ............................................................................................. 17
Creating user profiles ......................................................................................................... 17
v

4 Applications .................................................................................................................................................. 19
Remote Desktop Connection ............................................................................................................. 19
HP Remote Graphics Software (RGS) ............................................................................................... 19
TeemTalk Terminal Emulation ........................................................................................................... 19
HP Device Manager ........................................................................................................................... 19
HP Client Automation ......................................................................................................................... 19
HP ThinState Capture ........................................................................................................................ 20
HP ThinState Deploy ......................................................................................................... 20
Microsoft Internet Explorer ................................................................................................................. 20
Windows Media Player ....................................................................................................................... 20
5 Pointing devices and keyboard ................................................................................................................... 21
Using pointing devices ....................................................................................................................... 21
Setting pointing device preferences ................................................................................... 21
Connecting an external mouse .......................................................................................... 21
Using the keyboard ............................................................................................................................ 21
Using hotkeys .................................................................................................................... 21
Displaying system information .......................................................................... 22
Decreasing screen brightness ........................................................................... 22
Increasing screen brightness ............................................................................ 22
Switching the screen image .............................................................................. 22
Muting speaker sound ....................................................................................... 23
Decreasing speaker sound ............................................................................... 23
Increasing speaker sound ................................................................................. 23
Playing the previous track or section of an audio CD or a DVD ........................ 23
Playing, pausing, or resuming an audio CD or a DVD ...................................... 23
Playing the next track or section of an audio CD or a DVD .............................. 23
Using the keypads .............................................................................................................................. 23
Using the embedded numeric keypad ............................................................................... 24
Enabling and disabling the embedded numeric keypad .................................... 24
Switching key functions on the embedded numeric keypad ............................. 25
Using an optional external numeric keypad ....................................................................... 25
6 Power ............................................................................................................................................................. 26
Power control and light locations ........................................................................................................ 26
Shutting down the computer ............................................................................................................... 27
Setting power options ......................................................................................................................... 27
Using power-saving states ................................................................................................. 27
Initiating and exiting Sleep ................................................................................ 27
Using the Power Meter ...................................................................................................... 28
vi

Using battery power ........................................................................................................................... 28
Displaying the remaining battery charge ........................................................................... 28
Inserting or removing the battery ....................................................................................... 28
Charging a battery ............................................................................................................. 29
Managing low battery levels .............................................................................................. 30
Identifying low battery levels ............................................................................. 30
Resolving a low battery level ............................................................................. 30
Resolving a low battery level when external power is available ....... 31
Resolving a low battery level when a charged battery is available ... 31
Resolving a low battery level when no power source is available . ... 31
Conserving battery power .................................................................................................. 31
Storing a battery ................................................................................................................ 31
Disposing of a used battery ............................................................................................... 31
Using external AC power .................................................................................................................... 32
Connecting the AC adapter ............................................................................................... 32
7 Multimedia ..................................................................................................................................................... 34
Using multimedia hardware ................................................................................................................ 34
Using the audio features .................................................................................................... 34
Using the audio-in (microphone) jack ................................................................ 35
Using the audio-out (headphone) jack .............................................................. 35
Adjusting the volume ......................................................................................... 35
Using the video features .................................................................................................... 35
Using the external monitor port ......................................................................... 35
Using the HDMI port .......................................................................................... 36
Using multimedia software ................................................................................................................. 37
Opening preinstalled multimedia software ......................................................................... 37
Using multimedia software ................................................................................................. 37
Preventing playback disruptions ........................................................................................ 38
8 Wireless ......................................................................................................................................................... 39
About integrated wireless devices ...................................................................................................... 39
Using wireless controls ....................................................................................................................... 39
Using the wireless button ................................................................................................... 39
Using operating system controls ........................................................................................ 39
Using WLAN ....................................................................................................................................... 39
Setting up a WLAN ............................................................................................................ 40
Connecting to a WLAN ...................................................................................................... 40
Using wireless security features ........................................................................................ 41
Identifying a WLAN device ................................................................................................. 41
vii

9 Modem and LAN ............................................................................................................................................ 42
Using a modem .................................................................................................................................. 42
Connecting a modem cable ............................................................................................... 42
Connecting a country- or region-specific modem cable adapter ....................................... 43
Selecting a location setting ................................................................................................ 44
Viewing the current location selection ............................................................... 44
Adding new locations when traveling ................................................................ 44
Solving travel connection problems .................................................................. 44
Connecting to a local area network .................................................................................................... 46
10 Security ........................................................................................................................................................ 47
Protecting the computer ..................................................................................................................... 47
Using passwords ................................................................................................................................ 48
Setting passwords in Windows .......................................................................................... 48
Using administrator and user passwords ........................................................................... 48
Automatic logon ................................................................................................ 48
Manual logon ..................................................................................................... 49
Administrator logon ........................................................................................... 49
Setting passwords in Computer Setup .............................................................................. 49
Using a setup password .................................................................................................... 49
Managing a setup password ............................................................................. 50
Entering a setup password ................................................................................ 50
Using a power-on password .............................................................................................. 50
Managing a power-on password ....................................................................... 50
Entering a power-on password ......................................................................... 51
Requiring a power-on password at restart ........................................................ 51
Installing a security cable ................................................................................................................... 51
11 Connecting hardware ................................................................................................................................. 53
Using a USB device ........................................................................................................................... 53
Connecting a USB device .................................................................................................. 53
Securing USB ports ........................................................................................................... 53
Using the USB Storage Options utility .............................................................. 54
12 Using Media Card Reader cards ................................................................................................................ 55
Inserting a digital card ........................................................................................................................ 55
Removing a digital card ...................................................................................................................... 56
13 Using ExpressCards ................................................................................................................................... 57
Configuring an ExpressCard .............................................................................................................. 57
viii

Inserting an ExpressCard ................................................................................................................... 57
Removing an ExpressCard ................................................................................................................ 58
14 Hardware upgrades .................................................................................................................................... 59
Identifying installed drives .................................................................................................................. 59
Handling drives ................................................................................................................................... 59
Using optical drives (select models only) ........................................................................................... 59
Inserting an optical disc (CD or DVD) ................................................................................ 60
Removing an optical disc (CD or DVD) ............................................................................. 60
When the disc tray opens .................................................................................. 61
When the disc tray does not open ..................................................................... 61
Using external drives .......................................................................................................................... 62
Using optional external devices ......................................................................................... 62
Using an optional external MultiBay or external MultiBay II ............................................... 63
Inserting and replacing memory modules .......................................................................................... 63
15 MultiBoot ..................................................................................................................................................... 70
About the boot order device ............................................................................................................... 70
Enabling boot devices in Computer Setup ......................................................................................... 70
Considering boot order changes ........................................................................................................ 71
Choosing MultiBoot preferences ........................................................................................................ 71
Setting a new boot order in Computer Setup ..................................................................... 72
Dynamically choosing a boot device using the F9 prompt ................................................. 72
Setting a MultiBoot Express prompt .................................................................................. 72
Entering MultiBoot Express preferences ........................................................................... 73
16 Computer Setup .......................................................................................................................................... 74
Starting Computer Setup .................................................................................................................... 74
Using Computer Setup ....................................................................................................................... 74
Navigating and selecting in Computer Setup ..................................................................... 74
Restoring factory settings in Computer Setup ................................................................... 75
Computer Setup menus ..................................................................................................................... 75
File menu ........................................................................................................................... 75
Security menu .................................................................................................................... 76
System Configuration menu .............................................................................................. 76
Appendix A Routine care ................................................................................................................................ 79
Cleaning the display ........................................................................................................................... 79
Cleaning the keyboard ....................................................................................................................... 79
Traveling and shipping ....................................................................................................................... 79
ix

Index ................................................................................................................................................................... 81
x
1 Notebook tour
Identifying the hardware
Components included with the computer may vary by region and model. The illustrations in this
chapter identify the standard features on most computer models.
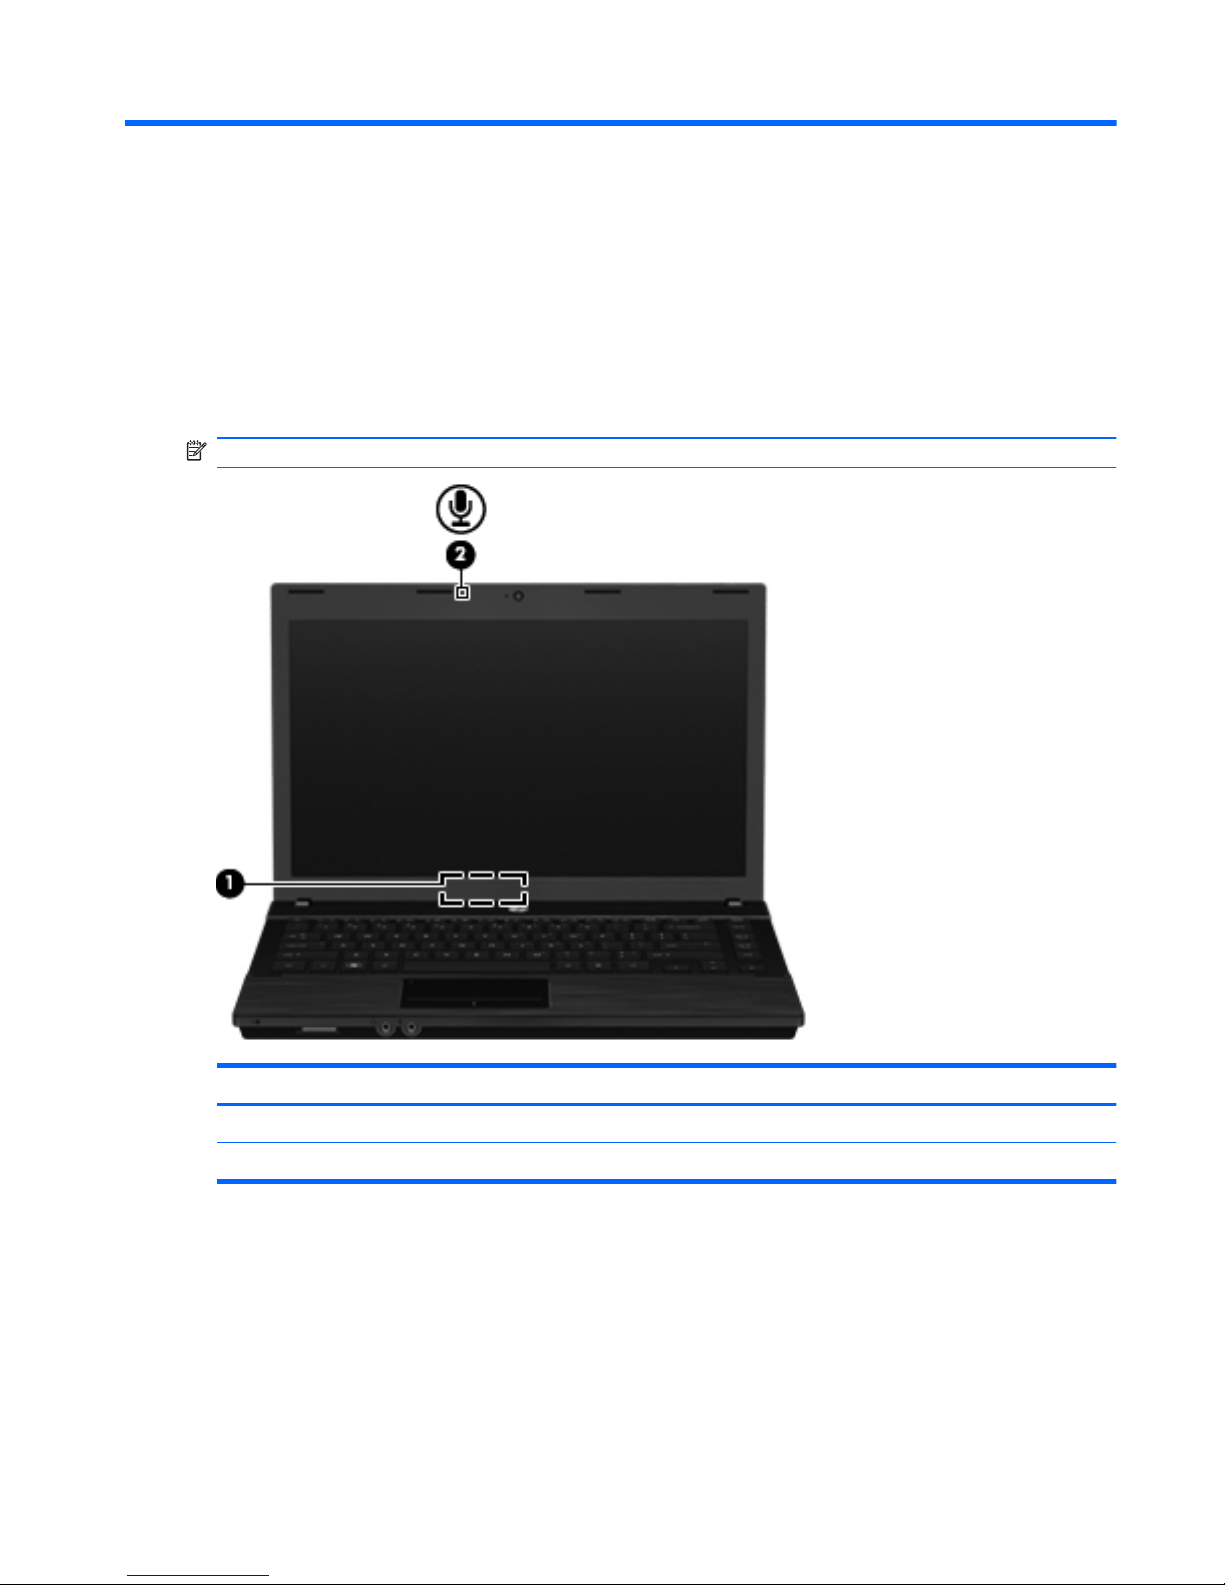
Display
NOTE: Your computer may look slightly different from the illustration in this section.
Component Description
(1) Internal display switch Turns off the display if the display is closed while the power is on.
(2) Internal microphone Records sound.
Identifying the hardware 1
Top
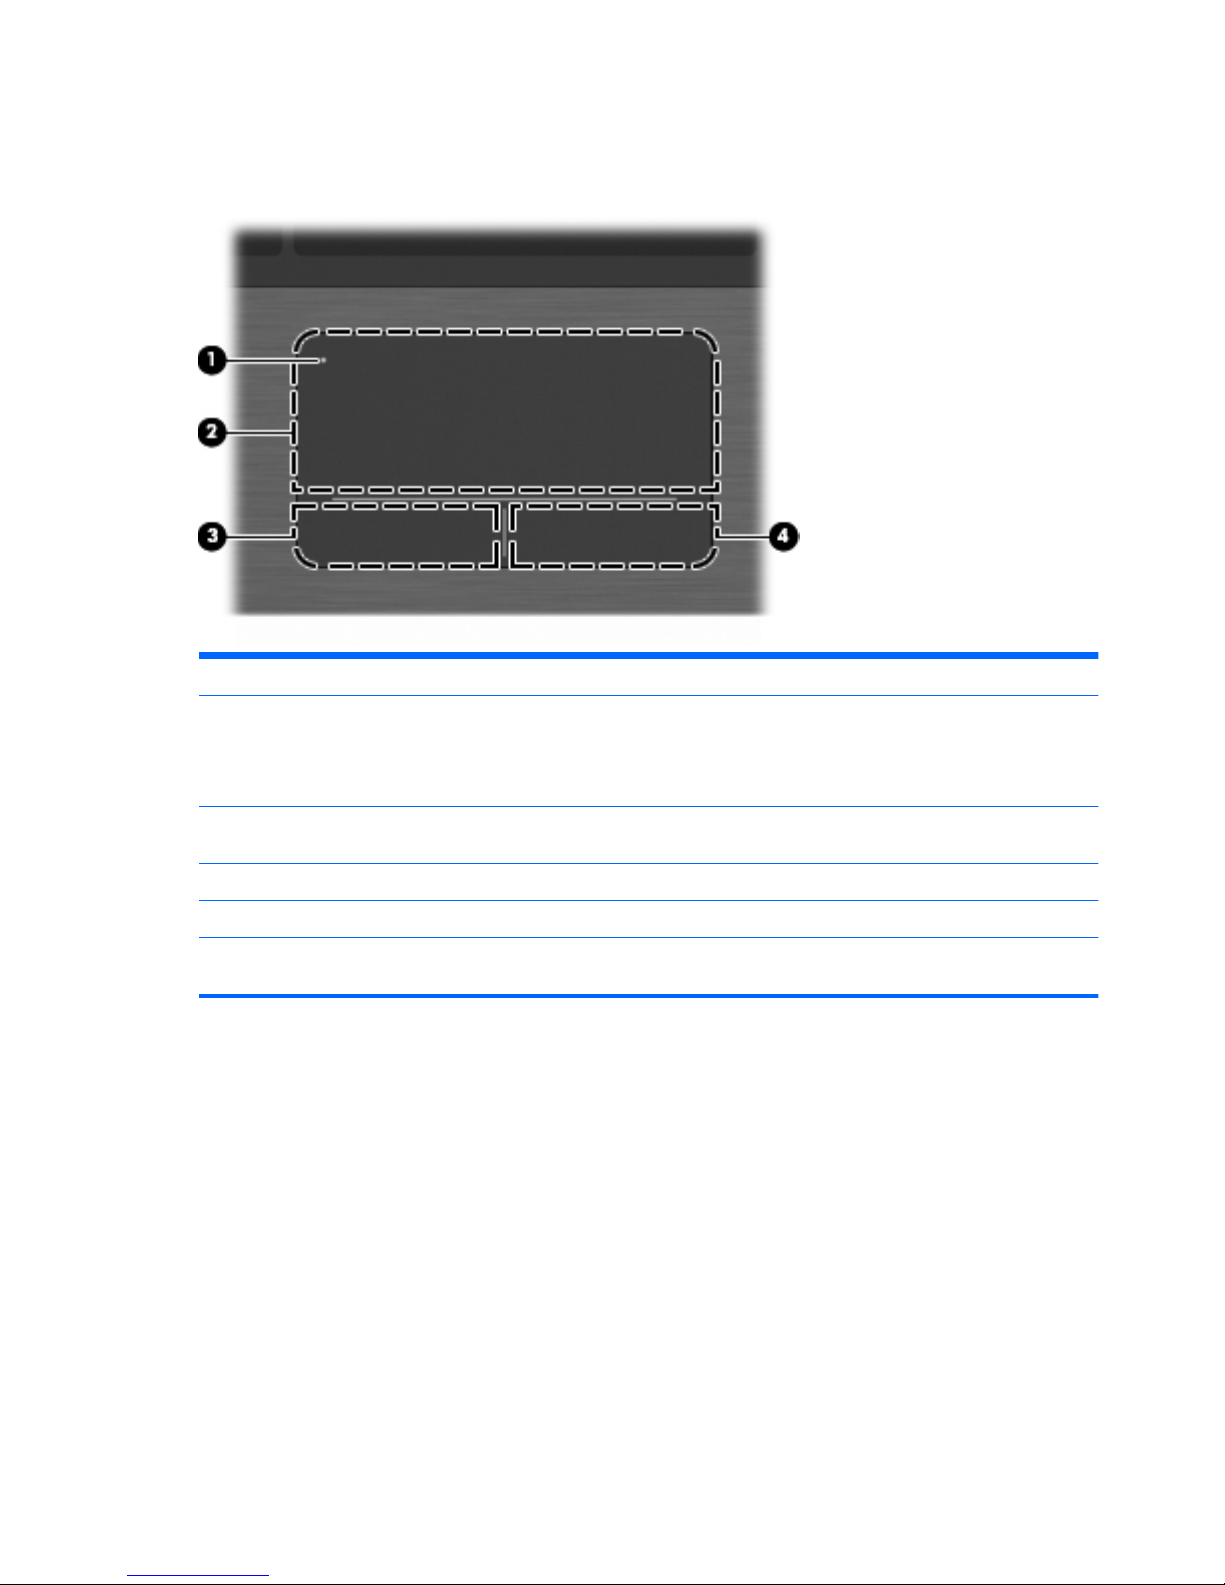
Pointing devices
Component Description
(1) TouchPad off indicator To turn the TouchPad zone on and off, quickly double-
tap the TouchPad off indicator.
NOTE: When the TouchPad zone is on, the light is
off.
(2) TouchPad zone* Moves the pointer and selects or activates items on the
screen.
(3) Left TouchPad button* Functions like the left button on an external mouse.
(4) Right TouchPad button* Functions like the right button on an external mouse.
*This table describes factory settings. To view or change pointing device preferences, select Start > Control Panel >
Mouse.
2 Chapter 1 Notebook tour
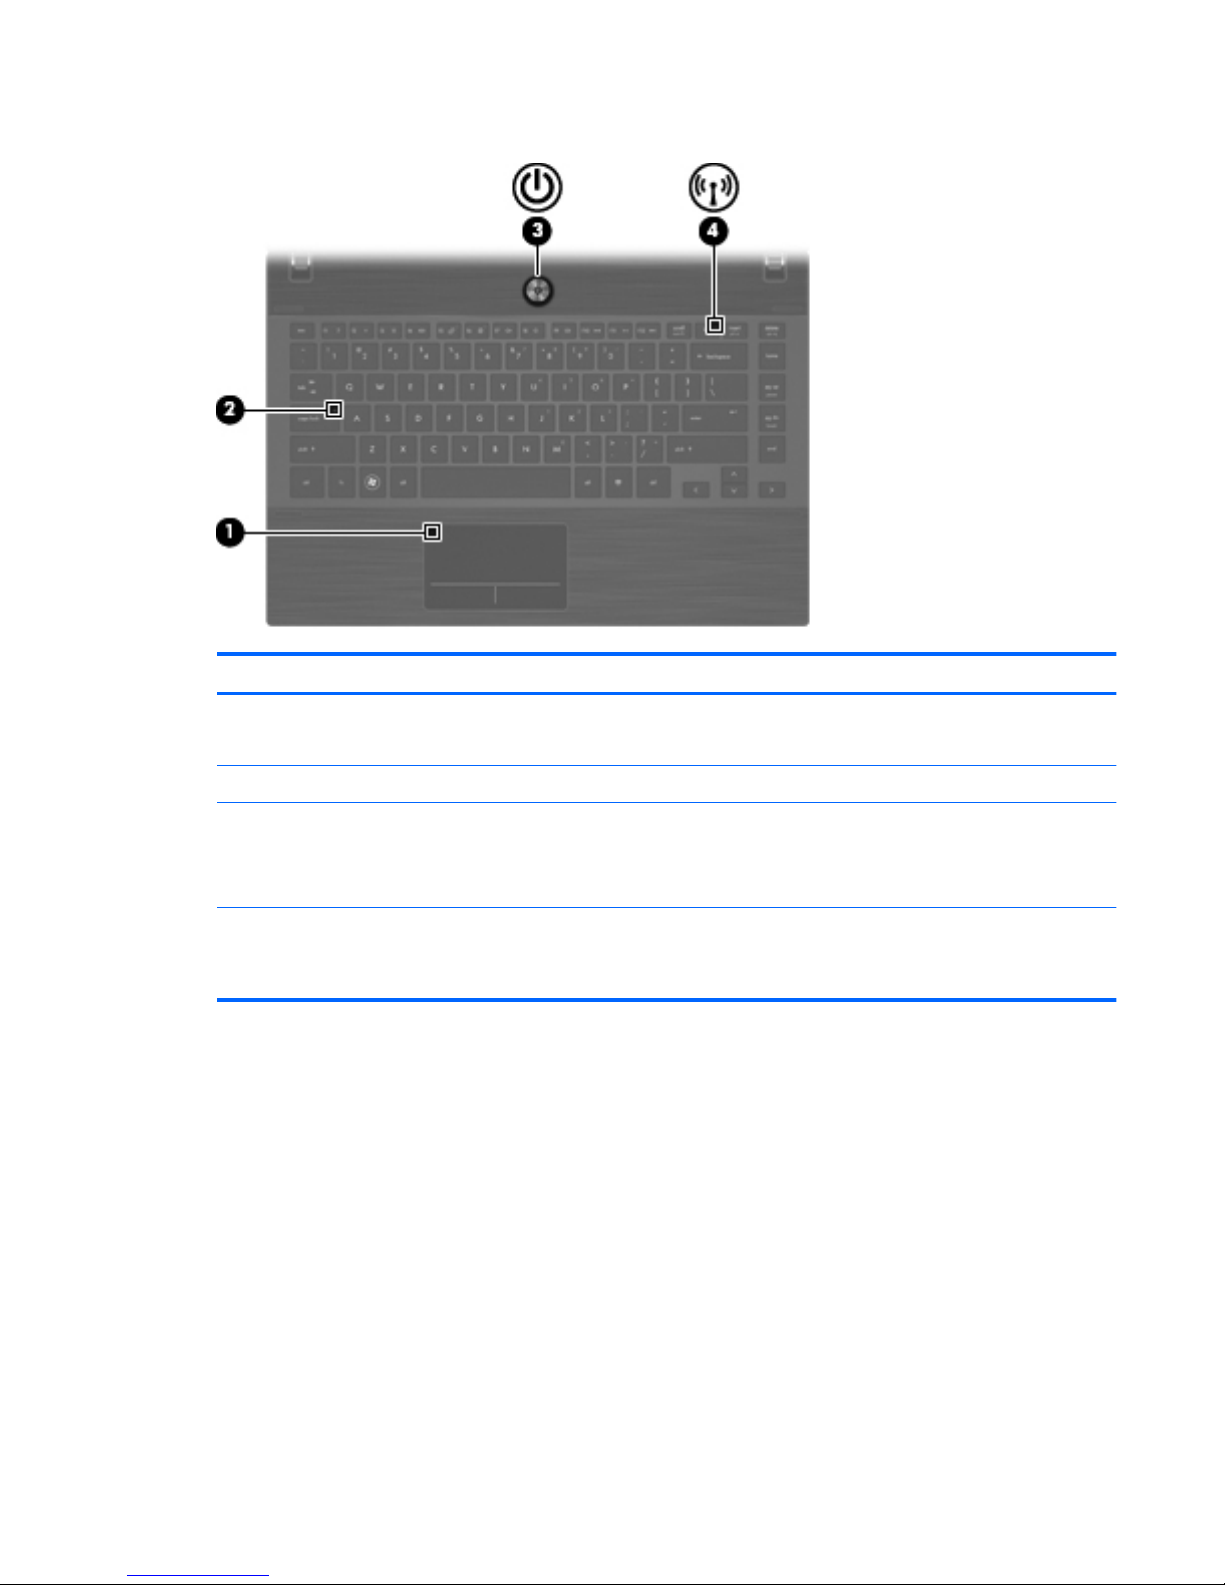
Lights
Component Description
(1) TouchPad off indicator ● On: The TouchPad zone is off.
● Off: The TouchPad zone is on.
(2) Caps lock light On: Caps lock is on.
(3) Power light ● On: The computer is on.
● Blinking: The computer is in the Sleep state.
●
Off: The computer is off.
(4) Wireless light
●
White: integrated wireless device is on, such as a
wireless local area network (WLAN) device.
●
Amber: All wireless devices are off.
Identifying the hardware 3
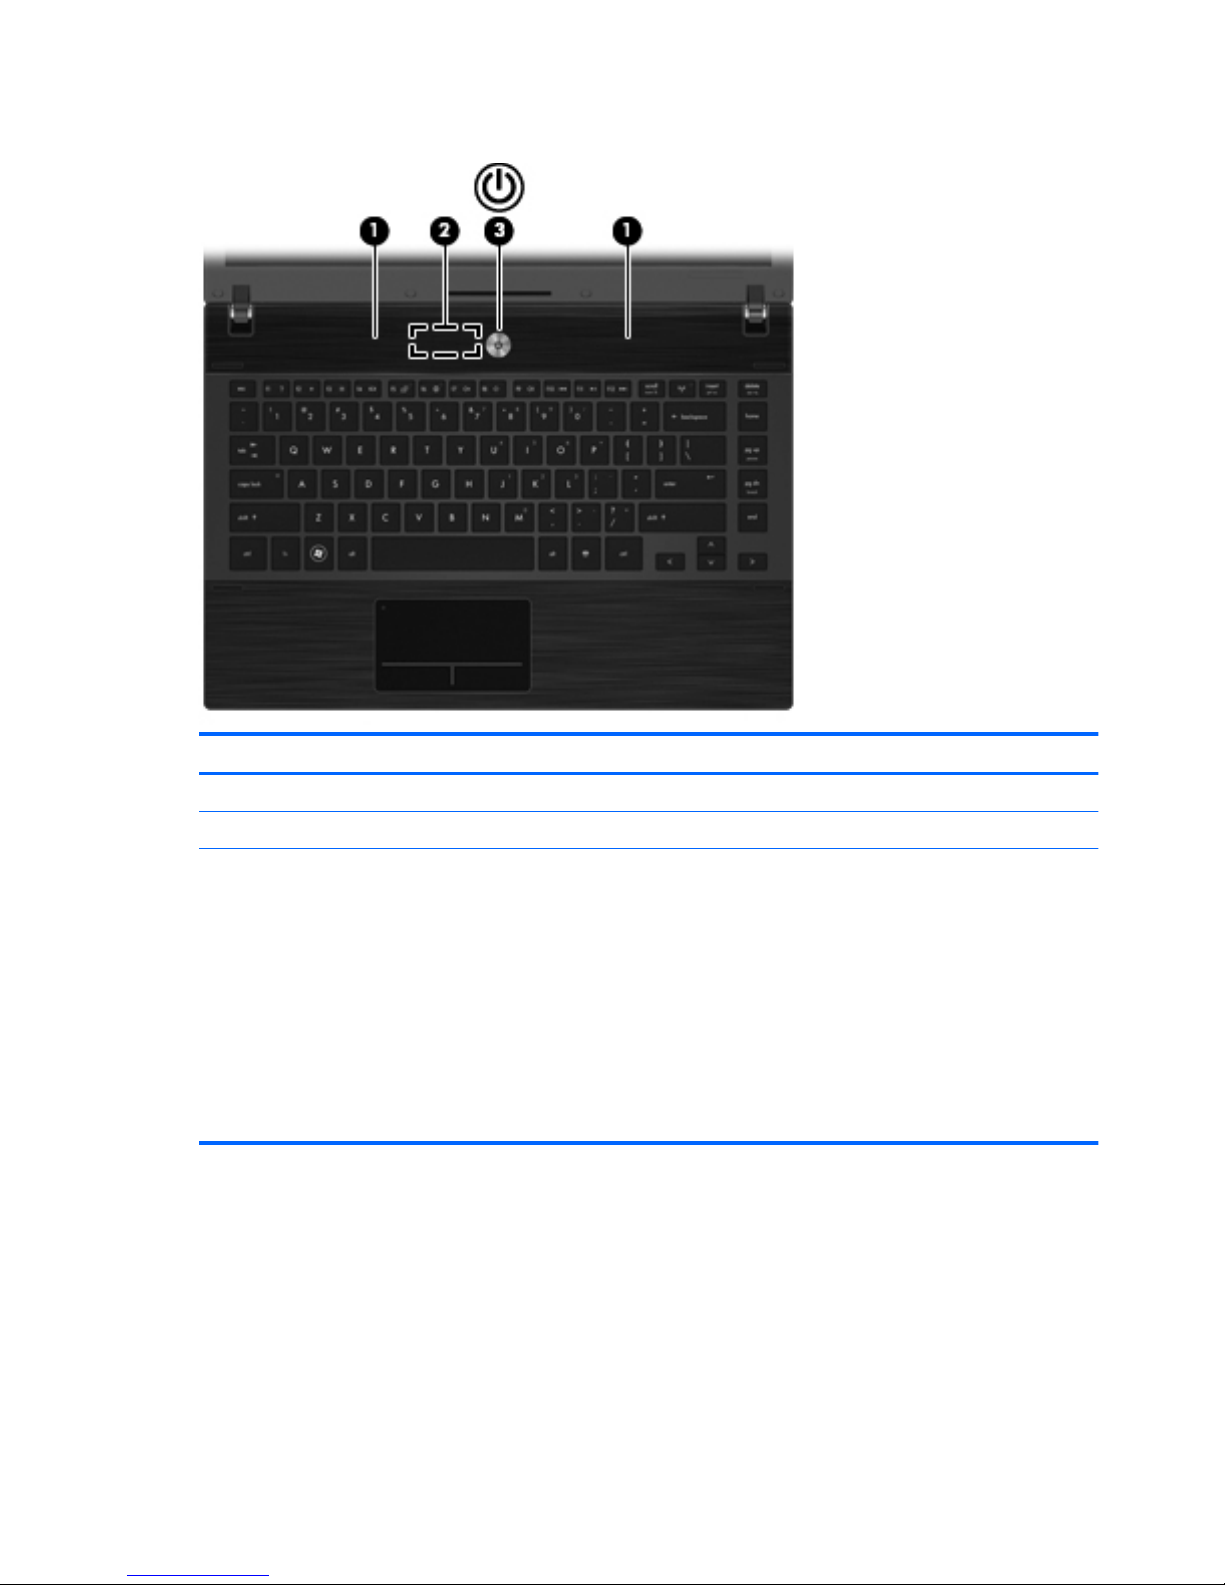
Buttons, switches, and speakers
Component Description
(1) Speakers (2) Produce sound.
(2) Internal display switch Turns off the display if the display is closed while the power is on.
(3) Power button ● When the computer is off, press the button to turn on the
computer.
● When the computer is on, press the button to shut down the
computer.
● When the computer is in the Sleep state, press the button
briefly to exit Sleep.
If the computer has stopped responding and Windows®
shutdown procedures are ineffective, press and hold the power
button for at least 5 seconds to turn off the computer.
To learn more about your power settings and how to change
them, select Start > Control Panel > Power Options.
4 Chapter 1 Notebook tour
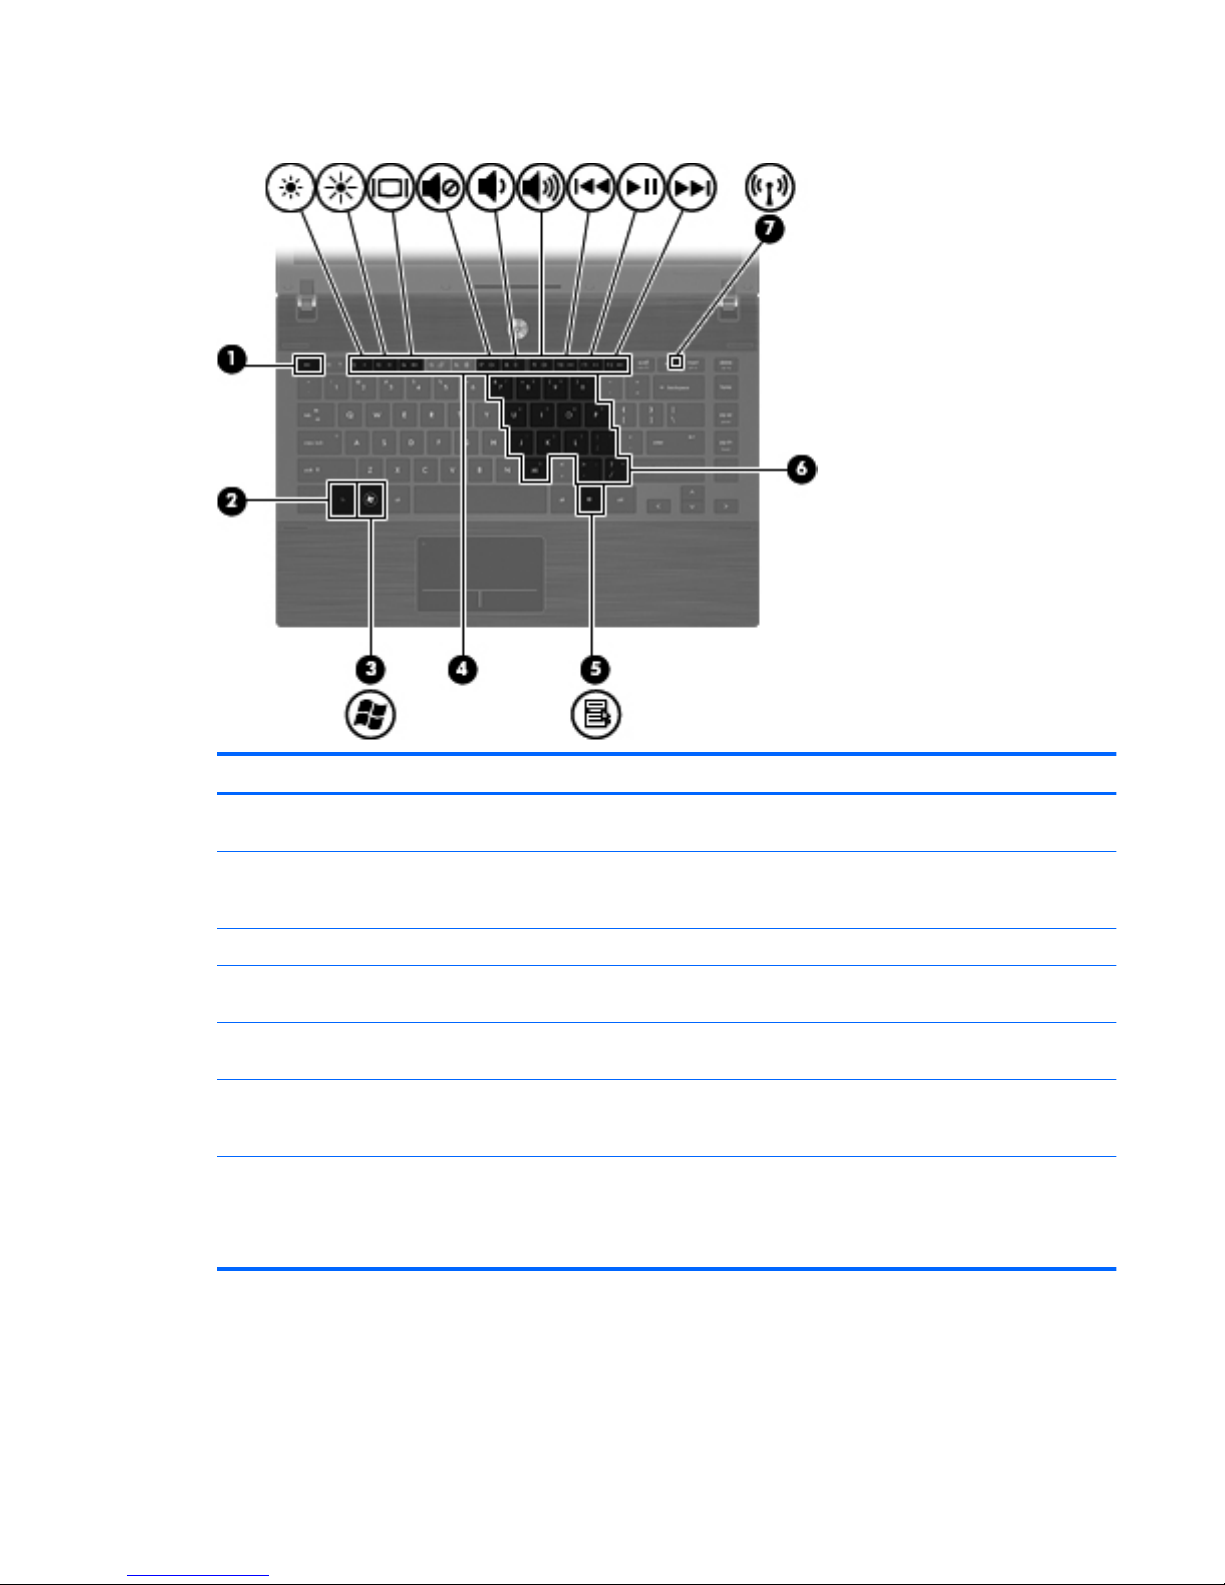
Keys
Component Description
(1) esc key Displays system information when pressed in
combination with the fn key.
(2) fn key Executes frequently used system functions when
pressed in combination with a function key or the esc
key.
(3) Windows logo key Displays the Windows Start menu.
(4) Function keys Execute frequently used system functions when
pressed in combination with the fn key.
(5) Windows applications key Displays a shortcut menu for items beneath the
pointer.
(6) Embedded numeric keypad keys Can be used like the keys on an external numeric
keypad, when pressed in combination with the fn and
num lk keys.
(7) Wireless key Turns the wireless feature on or off.
NOTE: This key does not establish a wireless
connection. To establish a wireless connection, a
wireless network must be set up.
Identifying the hardware 5

Front
Component Description
(1) Drive light Blinking: The flash drive or optional optical drive is
being accessed.
(2) Media Card Reader Supports the following optional digital card formats:
● Memory Stick (MS)
● Memory Stick Pro (MSP)
●
MultiMediaCard (MMC)
●
MultiMediaCard 4.2 (MMC Plus, including MMC
Plus HC)
● Secure Digital (SD) Memory Card
● Secure Digital High Capacity (SDHC) Memory
Card
● Secure Digital High Speed (SDHS) Memory Card
● xD-Picture Card (XD)
● xD-Picture Card (XD) Type H
● xD-Picture Card (XD) Type M
(3) Audio-out (headphone) jack Produces sound when connected to optional powered
stereo speakers, headphones, ear buds, a headset, or
television audio.
WARNING! To reduce the risk of personal injury,
adjust the volume before putting on headphones,
earbuds, or a headset. For additional safety
information, refer to the Regulatory, Safety, and
Environmental Notices.
NOTE: When a device is connected to the jack, the
computer speakers are disabled.
(4) Audio-in (microphone) jack Connects an optional computer headset microphone,
stereo array microphone, or monaural microphone.
6 Chapter 1 Notebook tour
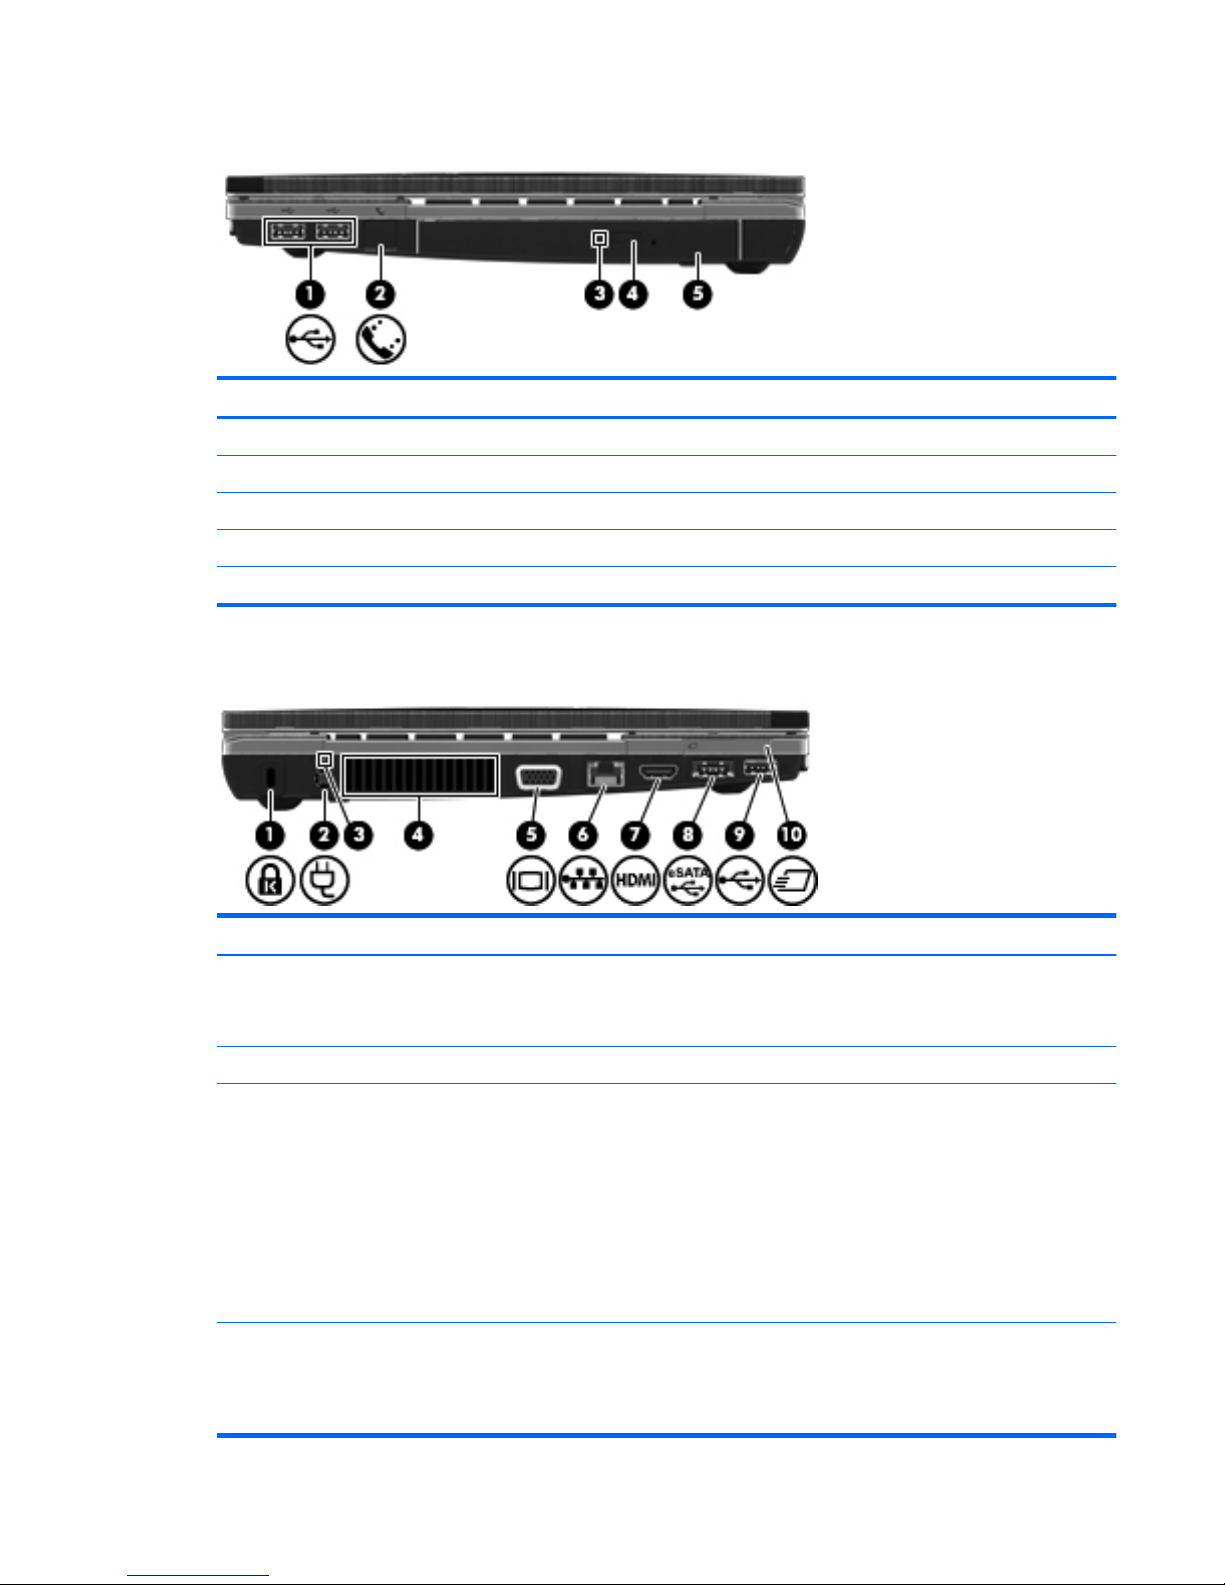
Right side
Component Description
(1) USB 2.0 ports (2) Connect optional USB devices.
(2) RJ-11 (modem) jack Connects a modem cable.
(3) Optical drive light (select models only) Blinking: The optical drive is being accessed.
(4) Optical drive eject button (select models only) Press to eject the optical disc.
(5) Optical drive (select models only) Reads optical discs.
Left side
Component Description
(1) Security cable slot Attaches an optional security cable to the computer.
NOTE: The security cable is designed to act as a deterrent, but
it may not prevent the computer from being mishandled or stolen.
(2) Power connector Connects an AC adapter.
(3) Battery light ● Amber: The battery is charging.
●
White: The battery is close to full charge capacity.
● Blinking amber: The battery is not charging and has
reached a low or critical battery level.
● Off: If the computer is plugged into an external power
source, the light turns off when the battery is fully charged. If
the computer is not plugged into an external power source,
the light stays off until the battery reaches a low battery
level.
(4) Vent Enables airflow to cool internal components.
NOTE: The computer fan starts up automatically to cool internal
components and prevent overheating. It is normal for the internal
fan to cycle on and off during routine operation.
Identifying the hardware 7

Component Description
(5) External monitor port Connects an external VGA monitor or projector.
(6) RJ-45 (network) jack Connects a network cable.
(7) HDMI port Connects an optional HDMI device.
(8) Combo eSATA/USB 2.0 port Connects an optional USB device or a high-performance eSATA
component, such as an eSATA external hard drive.
(9) USB 2.0 port Connects an optional USB device.
(10) ExpressCard/34 slot Supports an optional ExpressCard.
Bottom
Component Description
(1) Battery release latches (2) Release the battery from the battery bay.
(2) Battery bay Holds the battery.
Wireless antennas
Wireless antennas send and receive signals from one or more wireless devices. These antennas are
not visible from the outside of the computer.
8 Chapter 1 Notebook tour
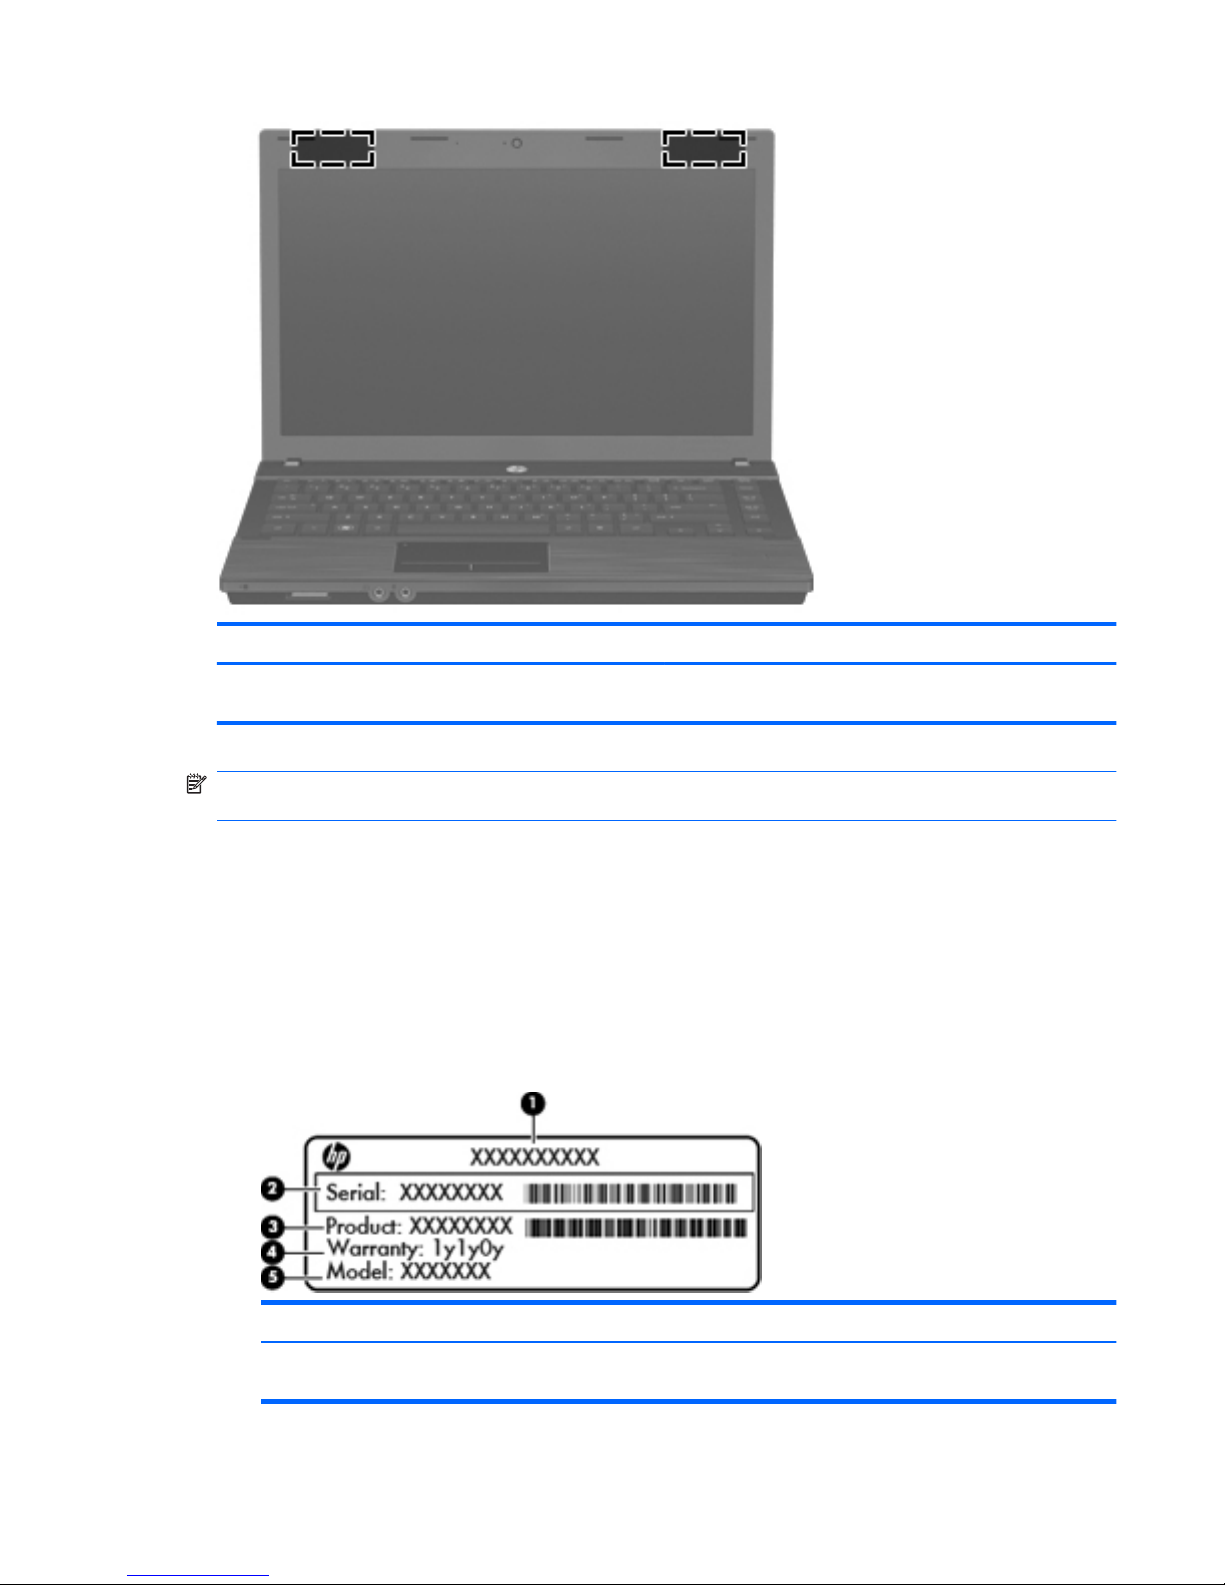
Component Description
WLAN antennas (2) Send and receive wireless signals to communicate with
wireless local area networks (WLANs).
NOTE: For optimal transmission, keep the areas immediately around the antennas free from
obstructions.
To see wireless regulatory notices, refer to the section of the Regulatory, Safety, and Environmental
Notices that applies to your country or region. These notices are located in the printed Getting Started
guide.
Identifying the labels
The labels affixed to the computer provide information you may need when you troubleshoot system
problems or travel internationally with the computer:
●
Service tag—Provides important information including the following:
Component Description
(1) Product name The product name affixed to the front of your
computer.
Identifying the labels 9

Component Description
(2) Serial number (s/n) An alphanumeric identifier that is unique to each
product.
(3) Part number/Product number (p/n) The number that provides specific information about
the product's hardware components. The part
number helps a service technician to determine what
components and parts are needed.
(4) Warranty period The duration of the warranty period for this
computer.
(5) Model description The alphanumeric identifier you need to locate
documents, drivers, and support for your computer.
Have this information available when you contact technical support. The service tag label is
affixed to the bottom of the computer.
● Regulatory label—Provides regulatory information about the computer. The regulatory label is
affixed to the bottom of the computer.
●
Modem approval label—Provides regulatory information about the modem and lists the agency
approval markings required by some of the countries or regions in which the modem has been
approved for use. You may need this information when traveling internationally. The modem
approval label is affixed to the bottom of the computer.
● Wireless certification label(s)—Provide information about wireless devices and the approval
markings of some of the countries or regions in which the devices have been approved for use.
If your computer model includes one or more wireless devices, one or more certification labels
are included with your computer. You may need this information when traveling internationally.
Wireless certification labels are affixed inside the memory module compartment.
10 Chapter 1 Notebook tour

2HP Write Filters
The File-Based Write Filter (FBWF) and the Enhanced Write Filter (EWF) provide two distinct ways to
provide a secure environment for your computer by protecting it from unauthorized writes to storage
and file systems. FBWF operates at the file level, and EWF operates at the sector level. Only one
write filter can be selected and active at one time.
File-Based Write Filter
The File-Based Write Filter (FBWF) provides a secure environment for your computer by protecting it
from undesired read and write access to write-sensitive or read-only storage. FBWF redirects all
writes targeted for protected volumes to a RAM cache called an overlay.
FBWF has only two states, enabled or disabled, and does not have an overlay volume. When FBWF
is disabled, all previous changes are lost.
Using the File-Based Write Filter command line utility
Windows® Embedded includes the FBWF command line utility. This utility enables you to issue a set
of commands to the FBWF driver, report the status of each protected overlay, and report the format of
the overall FBWF configurations.
By including the FBWF configuration interface in your configuration and building it into your image,
you enable use of the FBWF command line utility and the corresponding commands.
To use the FBWF command line utility, follow these steps:
1. Select Start > Run.
2. Type CMD in the Open field to access the system DOS prompt.
3. Click OK.
4. Type fbwfmgr c: at the prompt.
5. Press enter.
When you enter the fbwfmgr [boot command] syntax, use the following commands in the boot
command variable of the command line:
●
/disable
Disables the write filter on the next restart.
● /enable
Enables the write filter on the next restart.
● /displayconfig
Displays all current configuration information for the write filter including filter state, protected
volumes list, cache compression state, overlay cache threshold, cache pre-allocation status, and
write through paths.
●
/overlaydetail
File-Based Write Filter 11

Displays detail on the current overlay contents for all protected volumes including file and folder
contents and memory used.
●
/addexclusion
Adds a write through path to the exclusion list.
● /removeexclusion
Removes a write through path from the exclusion list.
● /setthreshold
Sets the overlay threshold value.
Using the File-Based Write Filter configuration interface
In addition to the DOS command-line tool, Windows Embedded includes a FBWF configuration
interface. You can access the FBWF interface by using the Windows Control Panel.
To access the FBWF interface, follow these steps:
1. Log on as an administrator.
2. Select Start > Control Panel.
3. Select HP WriteFilter Configuration.
The FBWF interface includes the following buttons:
● Enable/Disable Write Filter
Enable/disable the FBWF so that data written to the protected media is cached or not.
●
Enable/Disable Cache Compression
Enable/disable cache compression.
● Enable/Disable Cache Pre-allocation
Enable/disable cache pre-allocation.
● Set Cache Threshold
Set the amount of RAM in MB that the FBWF cache can use.
Using the File-Based Write Filter status utility
The FBWF status utility creates an icon in the notification area of the taskbar that shows the status of
the FBWF. You can right-click the icon to display and execute the available options.
The FBWF Status icon displays the following states:
●
Red lock: FBWF is disabled.
● Green lock: FBWF is enabled.
● Yellow lock: FBWF state will change on next boot.
If you are logged on as an administrator, you can change the status of FBWF by right-clicking the
icon and selecting the desired FBWF state.
NOTE: Because the fbwfmgr.exe utility and the FBWF status service execute separate code, status
changes made by fbwfmgr.exe are not automatically reflected by the FBWF status icon.
12 Chapter 2 HP Write Filters

If you use the command line to modify the FBWF, right-click the icon to refresh the status icon display
(click anywhere on the screen to close the context menu). The status icon display is refreshed
automatically when you make modifications through the FBWF Control Panel utility. The FBWF utility
always reflects the current status.
Enhanced Write Filter
The Enhanced Write Filter (EWF) provides a secure environment for your computer by protecting it
from undesired flash memory writes (the operating system and functional software components
reside in flash memory). The write filter also extends the life of the computer by preventing excessive
flash write activity. Instead of allowing writes directly to the flash memory, it intercepts all flash writes
and caches them.
To save changes to system configuration settings, you must disable the write filter cache or perform
the -commit command during the current boot session. Otherwise, the new settings will be lost when
the computer is shut down or restarted. If you do not want to make permanent changes, you can
enable the write filter.
The write filter cache contents are not lost when you log off and on again (as the same or different
user). You can disable the write filter cache after the new logon and still retain the changes.
After you disable the write filter, all future writes during the current boot session are written to the
flash with no further caching until the computer is restarted. You can also enable/disable the write
filter by using the command line.
NOTE: Only an account with administrator privileges can enable, disable, or commit the enhanced
write filter.
NOTE: Always enable the write filter after you have made all of your permanent changes.
Using the Enhanced Write Filter command line utility
CAUTION: When using the -commit command, all of the temporary contents are permanently
written to the flash memory.
NOTE: Because the Enhanced Write Filter commands are executed on the next boot, you must
restart the computer for the command to take effect.
Windows Embedded includes the EWF command line utility. This utility enables you to issue a set of
commands to the EWF driver, report the status of each protected volume overlay, and report the
format of the overall EWF configurations.
By including the EWF configuration interface in your configuration and building it into your image, you
enable use of the EWF command line utility and the corresponding commands.
To use the EWF command line utility, follow these steps:
1. Select Start > Run.
2. Type CMD in the Open field to access the system DOS prompt.
3. Click OK.
4. Type ewfmgr c: at the prompt.
5. Press enter.
Enhanced Write Filter 13

When you enter the ewfmgr [boot command] syntax, use the following commands in the boot
command variable of the command line:
● -all
Displays information about all protected volumes and performs a command, such as disable,
enable, and commit, on each volume, if specified.
●
-commit
Commits all current level data in the overlay to the protected volume, and resets the current
overlay value to 1. You can combine -commit with the -disable command to commit and
then disable.
●
-disable
Disables the overlay on the specified protected volume.
● -enable
Enables the EWF so that data written to the protected media is cached in the overlays. The
current overlay level becomes 1 as soon as EWF is started, and a new overlay is created at
level 1.
● -commitanddisable
Commits data in the overlay upon shutdown and disables EWF after the system reboots.
Using the Enhanced Write Filter configuration interface
In addition to the DOS command-line tool, Windows Embedded includes an EWF configuration
interface. You can access the EWF interface by using the Windows Control Panel.
To access the EWF interface, follow these steps:
1. Log on as an administrator.
2. Select Start > Control Panel.
3. Select HP WriteFilter Configuration.
The EWF interface includes the following buttons:
● Enable/Disable EWF
Enables the Enhanced Write Filter so that data written to the protected media is cached in the
overlays. Disables the overlay on the specified protected volume.
●
Overlay Configuration
Displays the overlay information and is a combination of the information supplied when
executing ewfmgr.exe c: -Description and ewfmgr.exe c: -Gauge from the DOS
prompt.
●
Clear Boot Command
Clears the boot command from the DOS prompt.
● Commit Data to Volume
Commits all current-level data in the overlay to the protected volume, and resets the current
overlay value to 1.
14 Chapter 2 HP Write Filters

Using the Enhanced Write Filter status utility
The EWF status utility creates an icon in the notification area of the taskbar that shows the status of
the filter. You can right-click the icon to display and execute the available options.
The EWF Status icon displays the following states:
●
Red lock: EWF is disabled.
● Green lock: EWF is enabled.
● Yellow lock: EWF state will change on next boot.
If you are logged on as an administrator, you can change the status of EWF by right-clicking the icon
and selecting the desired EWF state.
NOTE: Because the ewfmgr.exe utility and the EWF status service execute separate code, status
changes by ewfmgr.exe are not automatically reflected by the EWF status icon.
If you use the command line to modify the EWF, right-click the icon to refresh the status icon display
(click anywhere on the screen to close the context menu). The status icon display is refreshed
automatically when you make modifications through the EWF Control Panel utility. The EWF utility
always reflects the current status.
Enhanced Write Filter 15

3 Configuration
Local drives
The following sections describe the local drives on your computer.
Drive Z
Drive Z (HP RAMDisk) is a virtual drive that is created from the system's physical RAM. The
RAMDisk will look and behave like a standard fixed disk drive, but it is created at system startup and
destroyed at system shutdown. Therefore, HP recommends that you do not store information or data
on this virtual disk drive.
The RAMDisk is volatile memory space set aside for temporary data storage.
The following items are stored on the RAMDisk:
● Browser Web page cache
●
Browser history
● Browser cookies
● Browser cache
●
Temporary Internet files
● Print spooling
● User/system temporary files
You can also use the RAMDisk for temporary storage of other data (such as roaming profiles) at the
administrator’s discretion.
Use the RAMDisk Configuration dialog box to configure the RAMDisk size. If you change the size of
the RAMDisk, you will be prompted to restart for the change to take effect. To permanently save the
change, disable the write filter cache or issue the -commit command during the current boot session
before restarting.
NOTE: The default optimal RAMDisk size is 64 MB. The maximum RAMDisk size that you can set
is 96 MB. The minimum is 16 MB.
Drive C
CAUTION: If the available free space on the flash drive is reduced to below 3 MB, the computer
becomes unstable.
A write filter is used by the computer for security and to prevent excessive flash write activity.
Changes to the computer configuration are lost when the computer is restarted unless the write filter
cache is disabled or a -commit command is issued during the current boot session. For additional
information, refer to
HP Write Filters on page 11.
Saving files
The computer uses an embedded operating system with a fixed amount of flash memory. HP
recommends that you save files that you want to retain on a server rather than on your computer. Be
16 Chapter 3 Configuration

careful of application settings that write to the C drive, which resides in flash memory (in particular,
many applications by default write cache files to the C drive on the local system). If you must write to
a local drive, change the application settings to use the Z drive. To minimize writing to the C drive,
update the configuration settings.
Mapping network drives
To keep the mappings after the computer is restarted, follow these steps:
1. Disable the write filter cache during the current boot session or issue the –commit command.
2. Click Reconnect at logon.
Because a user logon cannot disable the write filter cache, you can retain the mappings created by a
user by logging off the user (do not shut down or restart the computer), logging back on as
administrator, and then disabling the write filter.
You can also assign the remote home directory by using the Local Users and Groups utility or by
other means known to administrators.
Roaming profiles
Write roaming profiles to the C drive. The profiles need to be limited in size and will not be retained
when the computer is restarted.
NOTE: For roaming profiles to work and be downloaded, sufficient flash space must be available.
You might need to remove software components to free up space for roaming profiles.
User accounts
Creating a new user account
NOTE: Be sure to disable the write filter cache during the boot session in which a new account is
created. The write filter must be reenabled after saving all of your permanent changes to flash.
You must log on as administrator to create user accounts locally or remotely. Because of local flash/
disk space constraints, you should keep the number of additional users to a minimum.
The Local Users and Groups utility allows the administrator to create, delete, and maintain user
accounts.
To access the Local Users and Groups utility:
▲
Select Start > Control Panel > Administrative Tools.
Creating user profiles
A new user profile is automatically configured from a template based on the default user or
administrator access settings in the registry, browser profiles, and ICA and Microsoft RDP initial
settings. If the default user or administrator profile settings are changed from those set at the factory,
the changed settings are automatically applied to the new user profile.
For the new user to match the characteristics of the default user, the administrator must create the
user in the User group and add the new user to the Administrator group. The default user is in both
groups; otherwise the new user will not be able to add a local printer. The user's actions are still
limited while the user is in the Administrator group.
User accounts 17

To create a user profile, follow these steps:
1. Log on as Administrator.
2. Select Start > Control Panel > Administrative Tools.
3. Double-click Computer Management.
The Local Users and Groups window opens.
4. Double-click the Users folder to view the contents in the right pane.
5. Click Action in the menu bar, and then click New User.
The New User dialog box opens.
6. Type the user name and password, and then select the attributes you want.
7. Click Create, and then click Close.
8. In the Local Users and Groups window, click the Users folder in the left pane.
9. In the right pane, double-click the name of the user you just created.
The Properties dialog box opens.
10. Click Member Of, and then click Add.
The Select Groups dialog box opens.
11. Type Administrators in the Enter the Object Names to Select box.
12. Click Check Names, and then click OK.
The newly created user is now a member of both the Administrator and User groups and should
match the privileges of the default user account.
18 Chapter 3 Configuration

4 Applications
Remote Desktop Connection
The Remote Desktop Connection utility allows you to establish connections to a Windows Terminal
Server or to access remote applications by using Microsoft Remote Desktop Protocol (RDP).
For additional information on how to use the Microsoft Remote Desktop Connection utility, go to the
Microsoft Web site at
http://www.microsoft.com.
HP Remote Graphics Software (RGS)
HP RGS is an advanced utility that allows a user to access and share the desktop of a remote
computer over a standard network. All applications run natively on the remote computer and take full
advantage of the computer and graphics resources of the sending computer.
TeemTalk Terminal Emulation
All computer models include terminal emulation software to support computing on legacy platforms.
The software uses the Telnet protocol to communicate with the computing platform. Refer to the
terminal emulation documentation (supplied separately) for instructions.
▲ To access the TeemTalk Connection Wizard and the TeemTalk Emulator, select Start > All
Programs > Hewlett-Packard.
HP Device Manager
HP Device Manager is a management solution that communicates with a large number of HP thin
clients, and provides remote and asset management, reporting, and security. HP Device Manager is
based on industry-standard technologies, such as RDMS and SSL encryption. For additional
information about HP Device Manager, go to the HP Web site at
http://www.hp.com/support/
devicemanager.
HP Client Automation
HP Client Automation allows an administrator, who works from a single console, continuous visibility
into the state of client devices, and reduces the complexity and effort of maintaining the appropriate
software, security patches, and operating system images. For additional information about HP Client
Automation, go to the HP Web site at
http://www.hp.com/go/clientautomation.
Remote Desktop Connection 19
 Loading...