

Page 1
HP Photosmart D5100 series
๑ᆩ֩
User Guide
Page 2
Page 3

HP Photosmart D5100 series 使用手册
简体中文
Page 4

版权和商标
© 2006 Hewlett-Packard Development
Company, L.P.
本文档所含信息如有更改,恕不另行通
知。未经事先书面许可,严禁复制、改
编或翻译本手册,除非版权法许可。
Hewlett-Packard 公司通告
本文档包含的信息如有更改,恕不另行
通知。
保留所有权利。除版权法允许之外,未
经 Hewlett-Packard 公司事先书面许
可,不得对本手册进行复制、改编或翻
译。
HP 产品与服务的唯一担保已在这些产
品与服务随附的质量担保声明中阐明。
此处的任何信息都不应视为额外的担
保。HP 将不会对本文包含的技术或编
辑错误或者疏忽负责。
商标
HP、HP 徽标和 Photosmart 归
Hewlett-Packard Development
Company, L.P. 所有。
Secure Digital 徽标归 SD Association
所有。
Microsoft 和 Windows 是 Microsoft
Corporation 的注册商标。
CompactFlash、CF 和 CF 徽标是
CompactFlash Association (CFA) 的商
标。
Memory Stick、Memory Stick Duo、
Memory Stick PRO 和 Memory Stick
PRO Duo 是 Sony Corporation 的商标
或注册商标。
MultiMediaCard 是德国 Infineon
Technologies AG 的商标并授权 MMCA
(MultiMediaCard Association)使用。
Microdrive 是 Hitachi Global Storage
Technologies 的商标。
xD-Picture Card 是 Fuji Photo Film Co.,
Ltd.、Toshiba Corporation 和 Olympus
Optical Co., Ltd. 的商标。
Mac、Mac 徽标和 Macintosh 是 Apple
Computer, Inc. 的注册商标。
iPod 是 Apple Computer, Inc. 的商标。
Bluetooth 商标归其所有者拥有,并授
权 Hewlett-Packard 公司使用。
PictBridge 和 PictBridge 徽标归
Camera & Imaging Products
Association (CIPA) 所有。
其他品牌及其产品均为其各自拥有者的
商标或注册商标。
标准型号
为了便于管理识别,已为本产品分配了
标准型号。本产品的标准型号为
VCVRA-0606。不要将此标准型号与产
品的销售名称(如 HP Photosmart
D5100 series 等)或产品编号(如
Q7090A 等)相混淆。
能源消耗 - Energy Star
Hewlett-Packard 公司致力于提供高质量
的环保产品。 有关 HP 环保产品服务计
划的信息,请参阅屏幕帮助。
®
Page 5

目录
1
欢迎使用.....................................................................................................5
访问 HP Photosmart 打印机屏幕帮助.........................................................5
打印机部件.................................................................................................6
打印机屏幕.................................................................................................8
2
准备打印...................................................................................................11
装入纸张...................................................................................................11
选择合适的纸张..................................................................................11
从控制面板或计算机进行打印............................................................12
在主纸盒中放入纸张...........................................................................12
在照片纸盒中放入纸张.......................................................................13
使用墨盒...................................................................................................14
购买替换墨盒.....................................................................................14
墨盒提示.............................................................................................14
插入并更换墨盒..................................................................................15
校准墨盒以获得最佳打印效果............................................................16
3
不使用计算机进行打印.............................................................................17
建立连接...................................................................................................17
从存储卡打印............................................................................................17
插入存储卡.........................................................................................18
存储卡类型..................................................................................18
支持的文件格式...........................................................................19
更改默认纸张尺寸..............................................................................19
确定要打印的照片..............................................................................20
选择照片布局.....................................................................................20
选择要打印的照片..............................................................................20
打印照片.............................................................................................21
取出存储卡.........................................................................................22
从数码相机打印照片.................................................................................22
使用 PictBridge 相机..........................................................................22
使用 Bluetooth 相机...........................................................................22
从其他 Bluetooth 设备打印照片................................................................23
建立 Bluetooth 连接...........................................................................23
从 Bluetooth 设备打印照片.................................................................23
从 iPod 打印照片......................................................................................23
4
从计算机打印............................................................................................25
使用打印机软件中的创意选项...................................................................25
HP Photosmart Premier (Windows)...................................................25
HP Photosmart Essential (Windows).................................................25
HP Photosmart Studio (Mac).............................................................26
HP Photosmart 共享..........................................................................26
在计算机屏幕上查看照片..........................................................................26
HP Photosmart D5100 series 使用手册
3
Page 6

将照片保存到计算机.................................................................................27
5
在 CD 和 DVD 上打印...............................................................................29
创建和打印 CD/DVD 标签........................................................................29
HP Photosmart Premier.....................................................................29
HP Photosmart Studio.......................................................................29
使用 HP Photosmart Premier.............................................................29
准备好打印机以便在 CD 和 DVD 上打印..................................................29
完成打印作业............................................................................................30
6
保养与维护...............................................................................................33
清洁和维护打印机.....................................................................................33
清洁打印机外部..................................................................................33
清洁墨盒.............................................................................................33
手动清洁墨盒触点..............................................................................33
更新软件...................................................................................................34
储存打印机和墨盒.....................................................................................34
储存打印机.........................................................................................35
储存墨盒.............................................................................................35
维护照片纸质量........................................................................................35
储存照片纸.........................................................................................35
拿取照片纸.........................................................................................35
7
疑难排解...................................................................................................37
打印机硬件问题........................................................................................37
打印问题...................................................................................................38
CD/DVD 打印问题....................................................................................42
Bluetooth 打印问题...................................................................................43
打印机屏幕状态指示器.............................................................................44
8
HP 支持....................................................................................................47
HP 电话支持.............................................................................................47
致电....................................................................................................48
退回 HP 维修服务部门(仅限北美)........................................................48
HP Quick Exchange Service (Japan only)...............................................48
其他保修选项............................................................................................49
9
技术规格...................................................................................................51
系统规格...................................................................................................51
打印机技术规格........................................................................................52
10
HP 保修条款.............................................................................................55
索引.................................................................................................................57
4 HP Photosmart D5100 series
Page 7

1
欢迎使用
感谢您购买 HP Photosmart D5100 series 打印机! 使用此款新型打印机,您可
以打印精美的照片并将照片保存到计算机。 您也可以使用 HP Photosmart D5100
series 打印机直接将图像打印到 CD 和 DVD 上。
本手册主要描述了如何从存储卡、数码相机、Bluetooth 设备以及 iPods 打印照
片。 要了解如何从计算机进行打印,请安装 HP Photosmart 软件并查看屏幕上
的“HP Photosmart 打印机帮助”。 有关将计算机与打印机配合使用的概述,
请参阅从计算机打印。 有关安装软件的信息,请参阅“快速入门”小册子。
本打印机附有下列文档:
●
快速入门小册子 — HP Photosmart D5100 series 快速入门小册子包含可帮
助您安装打印机并打印第一张照片的简要说明。
●
使用手册 — HP Photosmart D5100 series 使用手册是您正在阅读的这本手
册。 本手册描述了打印机的基本功能,并说明了如何在普通纸、照片纸、
CD 和 DVD 上进行打印。 另外,它还包含硬件疑难排解信息。
●
HP Photosmart 打印机帮助 — HP Photosmart 打印机屏幕帮助描述了如何
与计算机一起使用打印机,并包含软件疑难排解信息。
访问 HP Photosmart 打印机屏幕帮助
在计算机上安装 HP Photosmart 软件后,可以查看屏幕上的“HP Photosmart
打印机帮助”:
●
Windows PC: 从“开始”菜单中选择“程序”(在 Windows XP 中选
择“所有程序”)> “HP” > “Photosmart D5100 series” >
“Photosmart 帮助”。
●
Macintosh: 从 Finder 菜单选择帮助,然后选择 “Mac 帮助”。 在“帮
助查看器”中选择“库” > “HP Photosmart Mac 帮助”。
HP Photosmart D5100 series 使用手册
5
Page 8
第 1 章
打印机部件
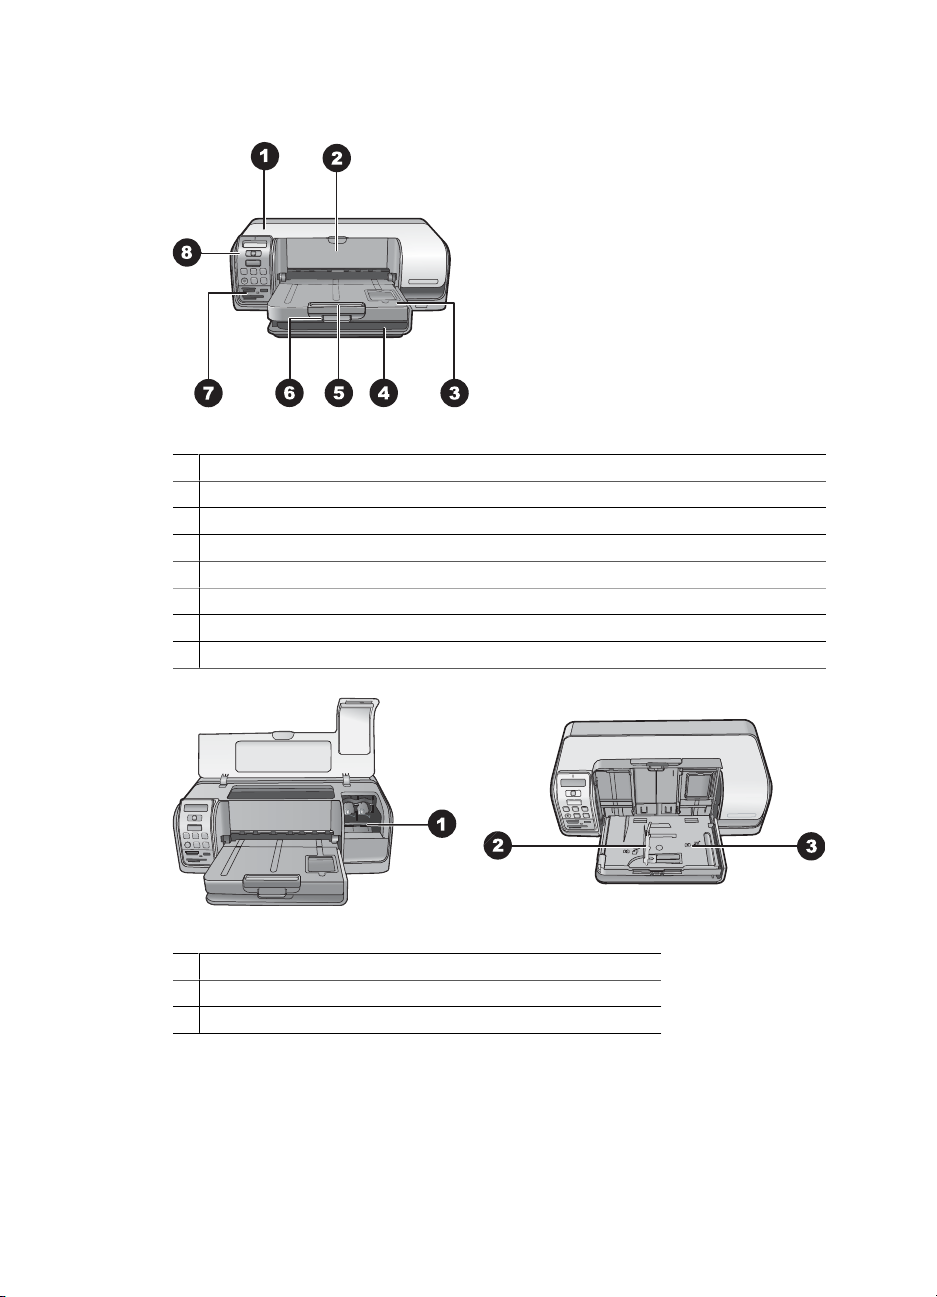
前视图
1
主机盖: 抬起此盖以更换墨盒。
2
CD/DVD 托盘: 放下此托盘并插入 CD/DVD 支架可以在 CD 和 DVD 上打印。
3
出纸盒: 从此纸盒获取打印页和照片。
4
主纸盒: 在这里装入纸张。
5
出纸盒延长板: 拉出延长板以接住大尺寸的输出页。
6
出纸盒卡销: 使用此卡销可以将出纸盒闭紧。
7
存储卡和 PictBridge 相机插槽: 在这里插入存储卡和 PictBridge 相机。
8
控制面板: 从这里控制打印作业。
内部视图
1
墨盒支架: 在这里装载墨盒。
2
照片纸宽度导轨: 调整此导轨使之适合不同的纸张宽度。
3
照片纸盒: 在这里装入照片纸或其他支持的小型介质。
6 HP Photosmart D5100 series
Page 9
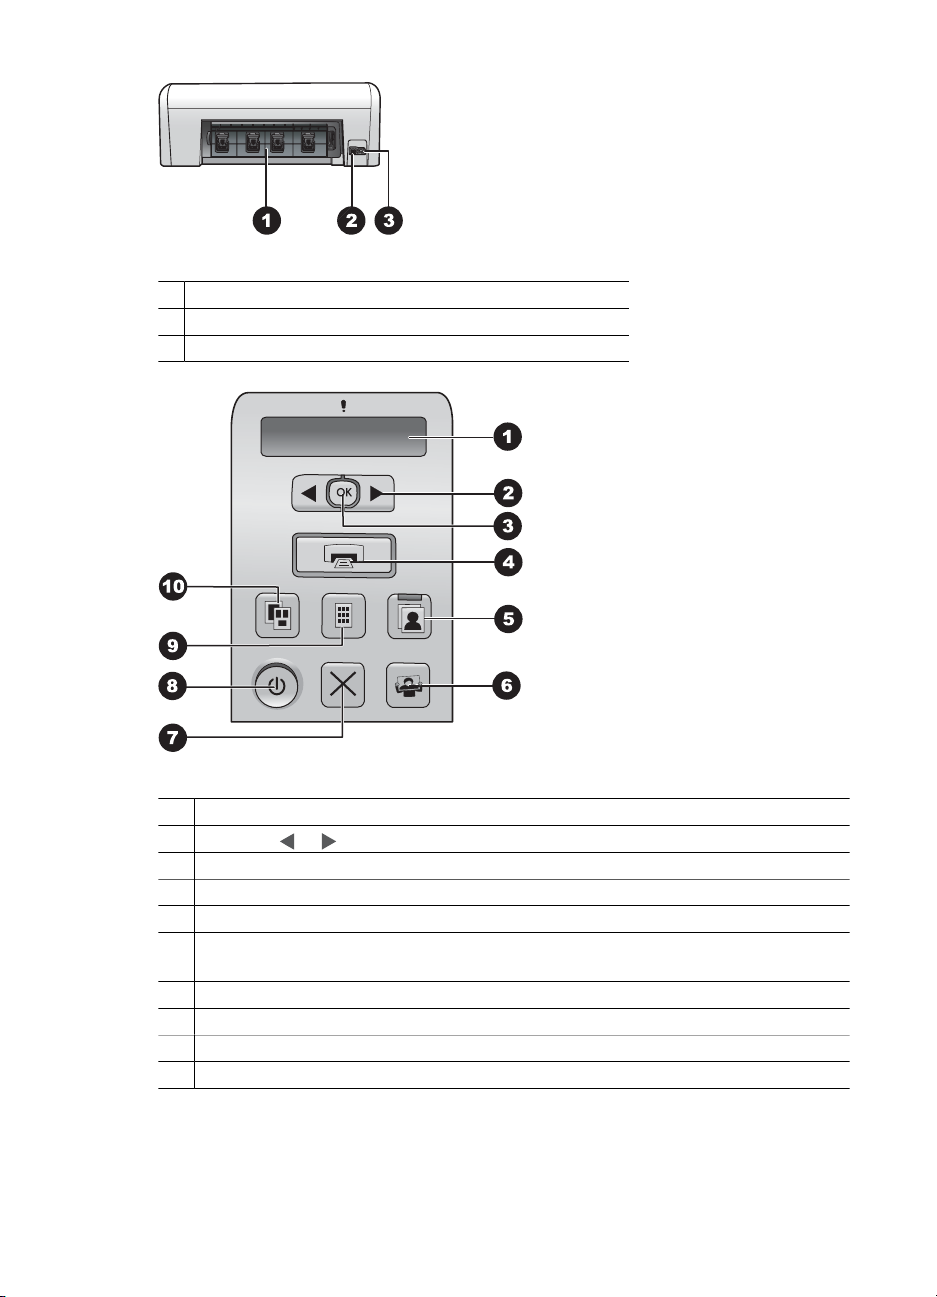
打印机后部
1
后检修门: 打开此门可清除卡纸。
2
USB 端口: 通过该端口连接计算机和打印机。
3
电源线接口: 使用此端口可连接打印机随附的电源线。
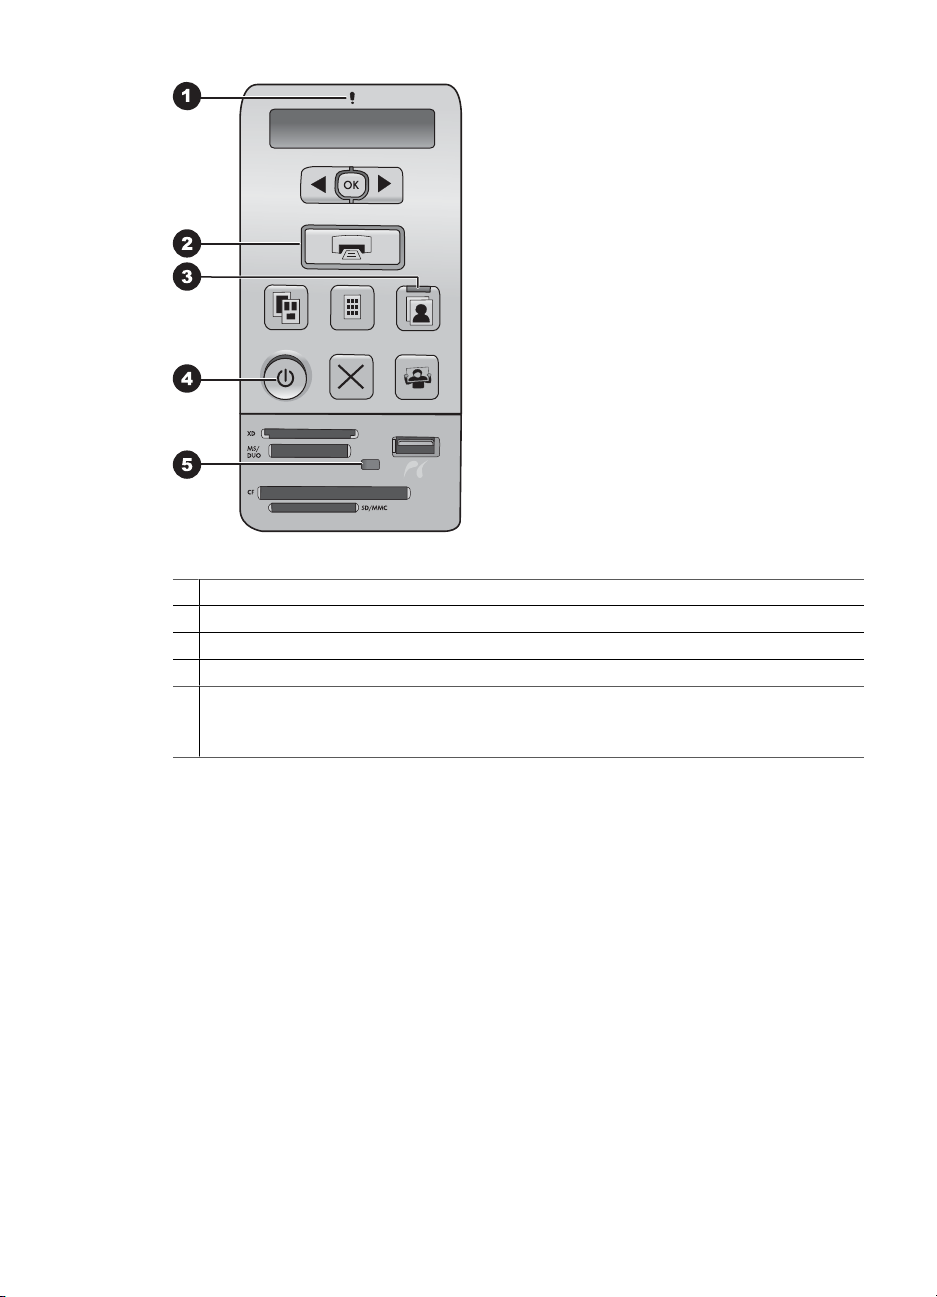
控制面板
1
打印机屏幕: 显示照片索引编号、页面布局信息和估计墨水量。
2
选择照片 和 : 浏览存储卡上的照片。
3
OK: 选择或取消选择所显示的照片索引编号,以进行打印。
4
打印: 从插入的存储卡打印选定的照片。
5
照片纸盒: 为下一个独立打印作业选择照片纸盒。
6
Photosmart Express: 在 Windows 计算机上打开 HP Photosmart Express 软
件,在 Mac 上打开 HP Photosmart Studio 软件。
7
取消: 取消当前的打印作业。
8
开/关机: 打开或关闭打印机。
9
照片索引: 打印存储卡上所有照片的缩略图。
10
布局: 选择照片布局。
HP Photosmart D5100 series 使用手册
7
Page 10
第 1 章
指示灯
1
注意: 如果出现错误或需要用户进行某些操作时呈红色闪烁。
2
打印: 如果打印机已准备好打印则呈绿色常亮,打印机忙时呈绿色闪烁。
3
照片纸盒: 绿色常亮表示将从照片纸盒执行下一个独立的打印作业。
4
电源: 如果打印机打开则呈绿色常亮,否则熄灭。
5
存储卡/PictBridge 相机: 正确插入存储卡或 PictBridge 相机时呈绿色常亮; 打印
机正在读取存储卡或 PictBridge 相机时呈绿色闪烁; 而在未插入存储卡或 PictBridge
相机或者插入了多个存储卡时熄灭。
打印机屏幕
HP Photosmart D5100 series 打印机屏幕会显示打印机的状态,并帮助选择要
打印的图像。 打印机屏幕显示了七个部分,包括一个复选图标、一个页面布局
图标、两个画笔图标、以及一个纸张图标,如图所示。
8 HP Photosmart D5100 series
Page 11
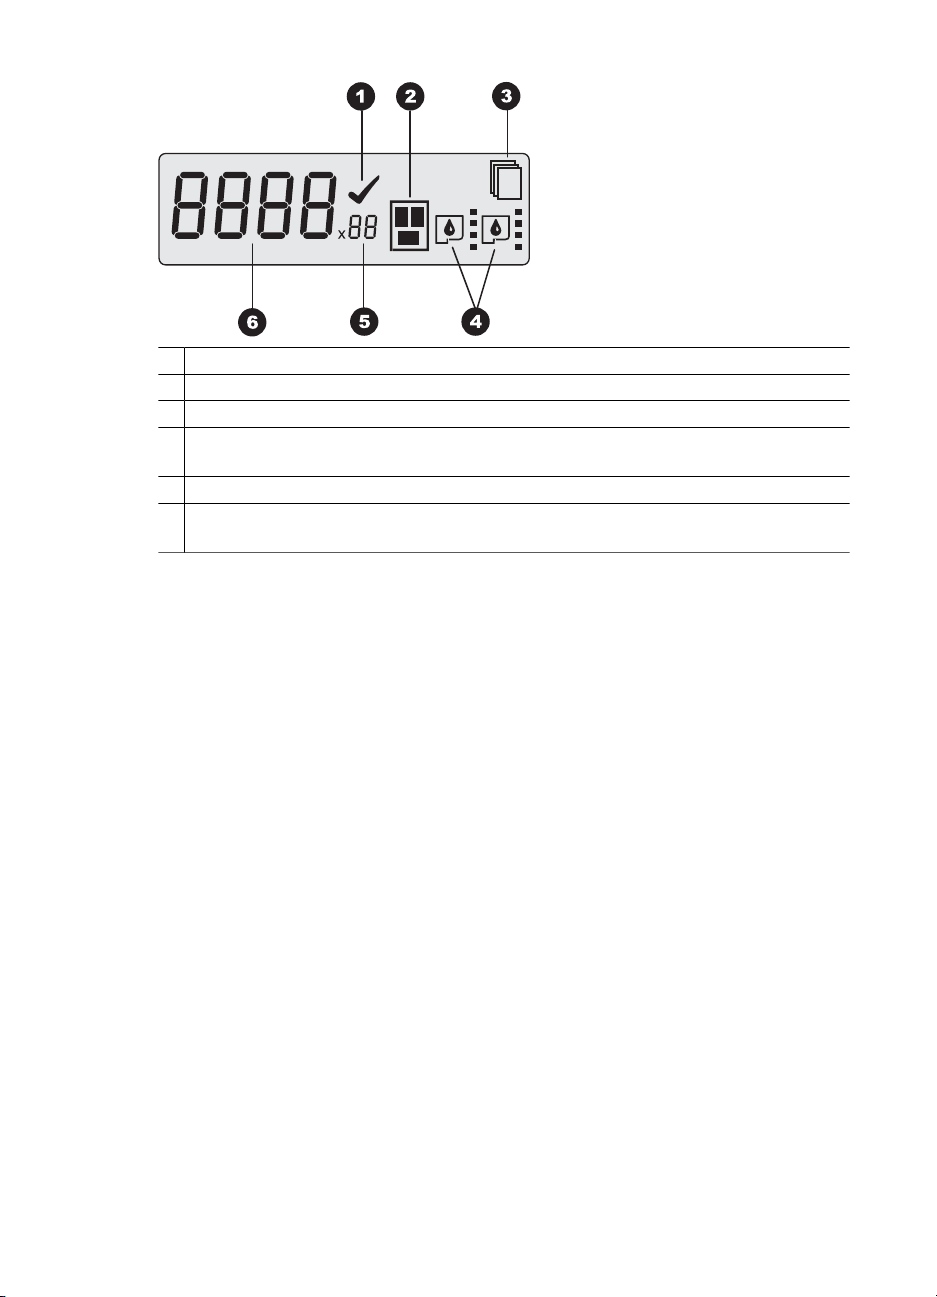
1
复选标记图标: 表示已经选定该照片进行打印。
2
页面布局图标: 表示已选定的页面布局。
3
纸张图标: 打印机缺纸或卡纸时闪烁。
4
画笔图标: 表示每个插槽中的墨盒。 已安装墨盒时显示此图标。 每个画笔图标旁
的条柱表示每个墨盒的估计墨水量。
5
份数图标: 表示要打印的份数。 只打印一份时不会出现图标。
6
图像数量图标: 表示存储卡上图像的数量。 它也表示是否存在数码打印指令格式
(DPOF)。
HP Photosmart D5100 series 使用手册
9
Page 12

第 1 章
10 HP Photosmart D5100 series
Page 13

2
准备打印
本节包括以下主题:
●
装入纸张
●
使用墨盒
装入纸张
为了获得更好的打印质量,请选择合适的纸张并将其正确装入主纸盒或照片纸
盒。
选择合适的纸张
要获得可用的 HP 纸张列表,或是要购买耗材,请访问:
●
www.hpshopping.com(美国)
●
www.hp.com/go/supplies(欧洲)
●
www.hp.com/jp/supply/inkjet(日本)
●
www.hp.com/paper(亚太地区)
要获得最佳打印效果,请选择以下高质量 HP 照片纸。
提示 每次只能装入同一类型和尺寸的纸张。 请勿在主纸盒或照片纸盒中
混用不同类型或尺寸的纸张。
要打印
优质、持久的打印件和扩印件 HP 超级照片纸
来自扫描仪和数码相机的中等或高分
辨率的图像
速干,而且防水和防指纹的光面照片 HP 高级照片纸
临时照片和商业照片 HP 照片纸
文本文档、草稿版本、测试和校准页 HP 多用途纸
保持纸张良好状态以便打印:
●
将未使用的纸张存放在其原始包装或塑料袋中。
●
将纸张平放于凉爽、干燥的位置。 如果纸张边角卷曲,则将纸张放在一个
塑料袋中并轻轻地朝卷曲的相反方向弯曲,直到纸张恢复平整。
●
拿取照片纸的边缘以免留下污迹。
HP Photosmart D5100 series 使用手册
所使用的纸张
(在某些国家/地区也称为 Colorfast 照
片纸。)
HP 高级照片纸
HP 普通照片纸
11
Page 14
第 2 章
从控制面板或计算机进行打印
当从计算机进行打印时,打印机支持的纸张尺寸介于 7.6 x 12.7 厘米到 22 x
61 厘米(3 x 5 英寸到 8.5 x 14 英寸)之间。 从控制面板直接打印时,支持的
纸张尺寸包括 A6、A4、带或不带裁边 10 x 15 厘米(4 x 6 英寸)、8.5 x 11 英
寸、Hagaki 和 L 尺寸。
在主纸盒中放入纸张
主纸盒支持以下介质:
●
Letter 或 A4 纸张
●
投影胶片
●
20 x 25 厘米(8 x 10 英寸)照片纸
●
宽度不小于 28.0 厘米(11 英寸)的信封
●
7.62 x 13 厘米(3 x 5 英寸)照片纸
●
A6 纸张
●
L 尺寸的卡片
●
13 x 18 厘米(5 x 7 英寸)照片纸
●
2L 尺寸的纸张
●
10 x 20 厘米(4 x 8 英寸)照片卡
●
B5 纸张
●
宽度小于 28.0 厘米(11 英寸)的信封
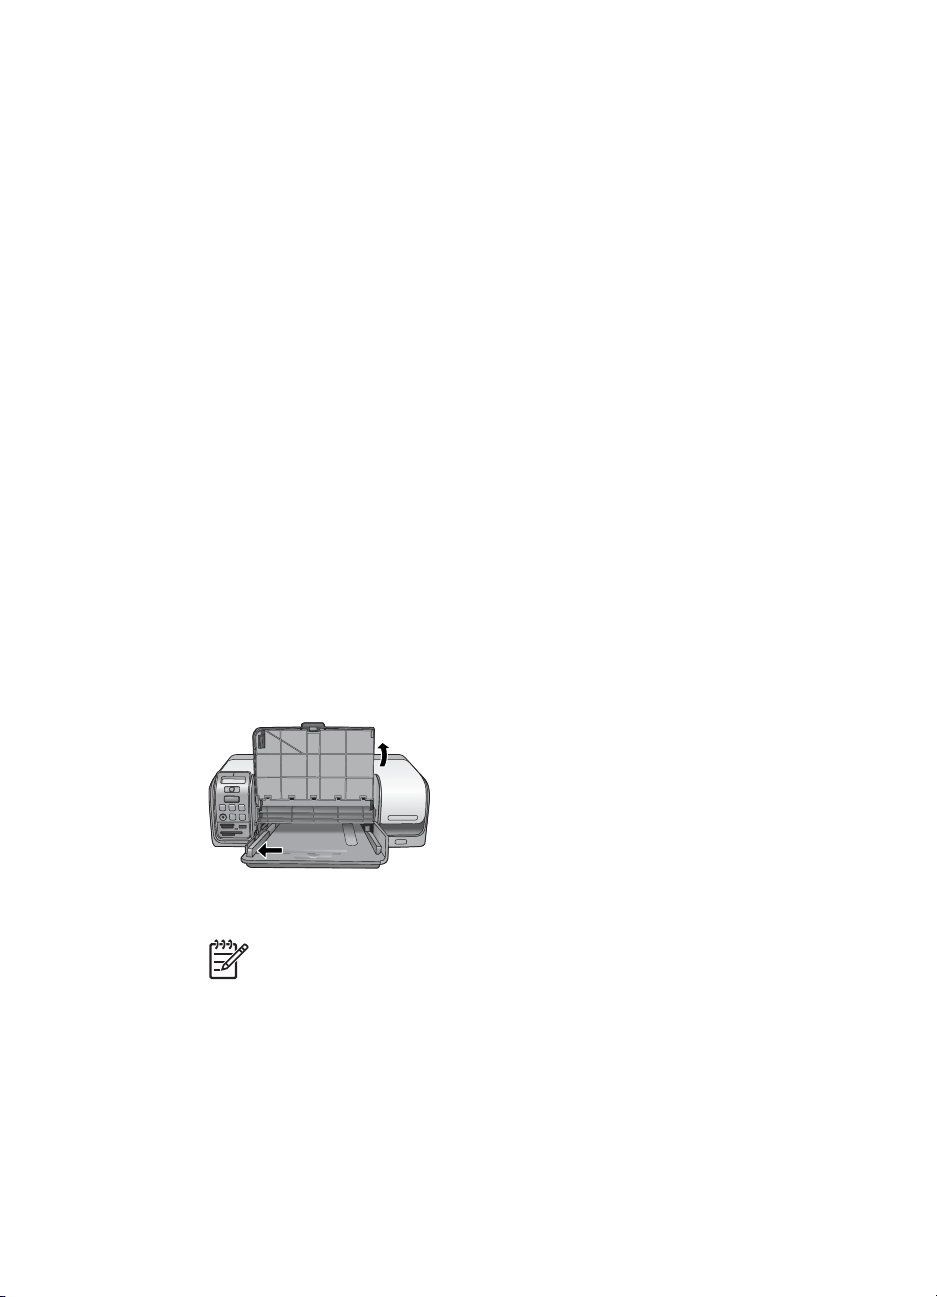
按照以下步骤在主纸盒中放入纸张:
1. 抬起照片纸盒。
2. 取出已装入主纸盒中的所有纸张。
3. 向左侧滑动纸张宽度导轨直至停稳。
4. 将纸张打印面朝下装入主纸盒。 向内滑动纸张,直至停稳。
装入信封时封口盖应在左侧。 将封口盖折入信封内,以免发生卡纸。
注意 将纸张与纸盒右侧对齐。
5. 滑动纸张宽度导轨,使其紧靠纸张的边缘,同时使纸张保持平整。
12 HP Photosmart D5100 series
Page 15
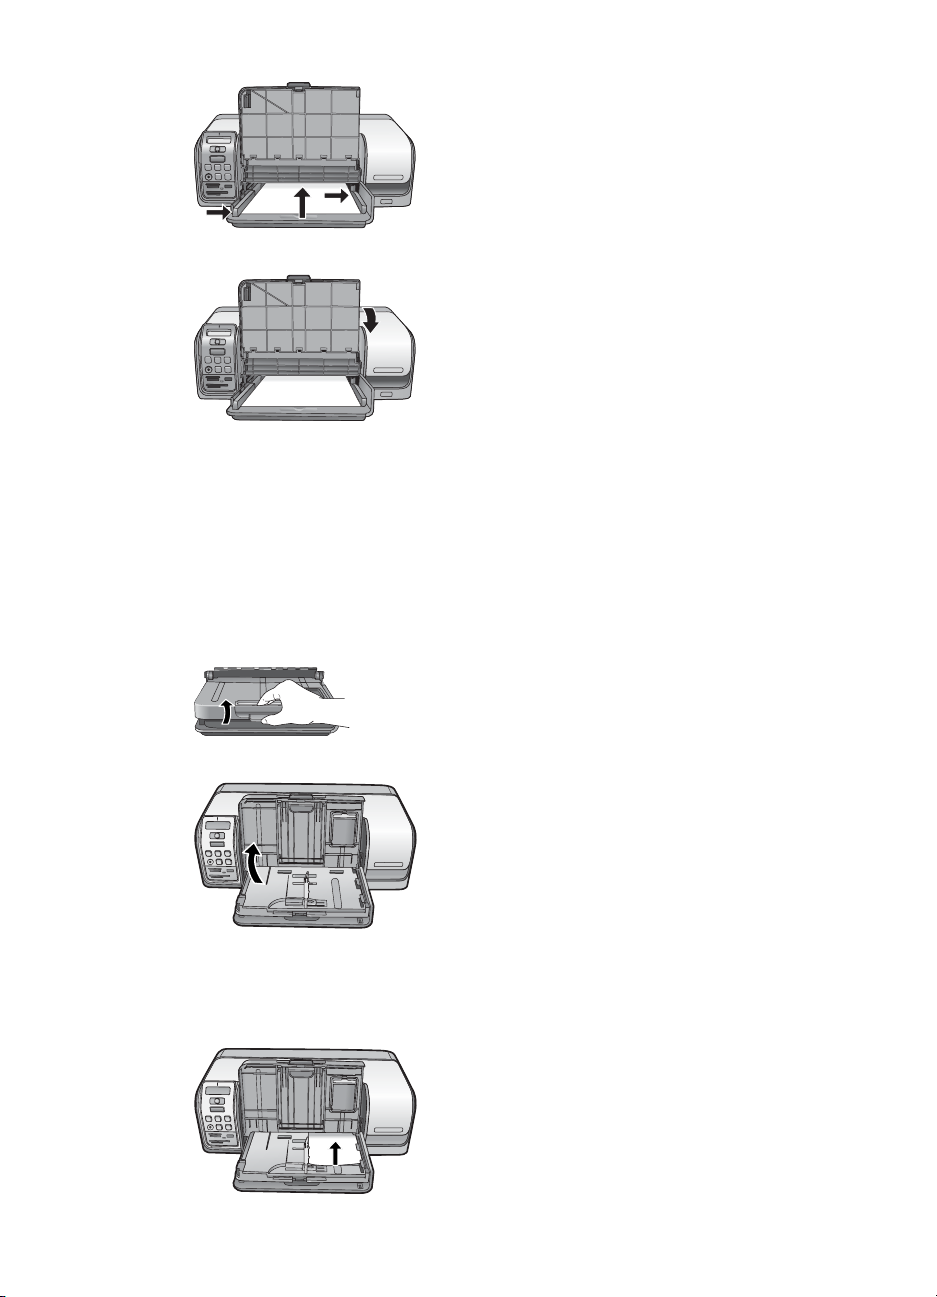
6. 放下照片纸盒。
在照片纸盒中放入纸张
照片纸盒支持以下介质:
●
10 x 15 厘米(4 x 6 英寸)照片纸(带或不带裁边)
●
13 x 18 厘米(5 x 7 英寸)照片纸
●
索引卡
●
Hagaki 卡
按照以下步骤在照片纸盒中放入纸张:
1. 从下面按压出纸盒卡销并向上抬起,将出纸盒与照片纸盒分开。
2. 抬起出纸盒。
3. 取出照片纸盒中已装入的所有纸张。
4. 向左侧滑动纸张宽度导轨直至停稳。
5. 将照片纸打印面朝下装入照片纸盒,最多 20 张。 向内滑动纸张,直至停
稳。
HP Photosmart D5100 series 使用手册
13
Page 16

第 2 章
6. 滑动纸张宽度导轨,使其紧靠纸张的边缘,同时使纸张保持平整。
7. 放下出纸盒直至回到其原始位置。 完全放下出纸盒时,其卡销会卡住。
8. 按控制面板上的“照片纸盒”按钮。
使用墨盒
您的 HP Photosmart D5100 series 打印机可以打印彩色和黑白照片。 HP 提供
多种墨盒,您可从中选择最适合于项目的墨盒。
购买替换墨盒
购买替换墨盒时,请参考本手册封底列出的墨盒编号。墨盒编号会因国家/地区
而异。您也可以在打印机软件中找到墨盒编号。
为 Windows 用户查找正确的墨盒编号
1. 右键单击 Windows 任务栏右端的“HP Digital Imaging Monitor”图标,然
2. 选择“设置”,然后选择“打印设置” > “打印机工具箱”。
3. 选择“估计墨水量”选项卡,然后单击“墨盒详细信息”。
为 Mac 用户查找正确的墨盒编号
1. 在 Dock 中点按 “HP Photosmart Studio”。
2. 点按 Studio 工具栏中的“设备”。
3. 从“信息和设置”弹出菜单中,选择“维护打印机”,然后点按“启动实用
4. 在“配置设置”列表中,点按“耗材信息”。
注意 将纸张与纸盒右侧对齐。
®
后选择“启动/显示 HP 解决方案中心”。
程序”。
墨盒提示
HP Vivera 墨水能够生成逼真的照片效果并具有出色的防褪色功能,生成的色彩
鲜明而且更持久!HP Vivera 墨水配方独特,并且对质量、纯度和防褪色功能进
行了科学检测。
为获得最佳打印质量,HP 建议在盒子上标记的安装期限之前安装所有零售墨
盒。
为获得最佳打印效果,HP 建议您使用原装 HP 墨盒。原装 HP 墨盒是专门为 HP
打印机设计并经过科学测试,可帮助您随时轻松获得卓越的打印效果。
注意 HP 无法担保非 HP 墨水的质量和可靠性。由于使用非 HP 墨水导
致的打印机故障或损坏不在保修范围之内。
小心 防止墨水渗漏或溢出:搬运打印机时让墨盒保持在安装位置,并避
免让用过的墨盒留在打印机外过长时间。
14 HP Photosmart D5100 series
Page 17
插入并更换墨盒
准备打印机和墨盒
1. 确保电源已打开。
2. 抬起打印机的主机盖。
3. 撕掉墨盒上的粉色胶带。
插入墨盒
1. 如果要更换 HP 黑色墨盒、HP 照片墨盒或 HP 灰色照片墨盒,请将右侧托
架中的墨盒向下按并向外拉以将其取出。
2. 手持新墨盒时使标签朝上。将墨盒略微向上倾斜滑入右侧托架中,使铜色触
点先进入。轻推墨盒,直至其卡入到位。
注意 请勿接触墨水喷嘴或铜色触点,也不要将胶带重新贴到墨盒上。
小心 要避免卡住墨盒,请确保装入墨盒时使其牢固卡入到位。
3. 重复以上步骤,在左侧托架内安装 HP 三色墨盒。
4. 放下主机盖。
HP Photosmart D5100 series 使用手册
15
Page 18

第 2 章
校准墨盒以获得最佳打印效果
在安装或更换墨盒后校准墨盒是很重要的步骤。 经校准的墨盒可在打印速度和
质量方面获得最佳效果。 每次安装或更换墨盒时,HP Photosmart D5100 series
打印机都会自动校准墨盒。
注意 安装或更换完墨盒后,打印机会持续发出声响几秒钟。 这是正常现
象。 打印机正在校准墨盒。
16 HP Photosmart D5100 series
Page 19

3
不使用计算机进行打印
HP Photosmart D5100 series 打印机使您无需计算机就能够打印出高质量的照
片。 在按照“HP Photosmart D5100 series 快速入门”小册子中的说明设置好
打印机后,请按以下步骤完成整个打印过程。
设置好打印机后,就可以从下列任何项目进行打印:
●
●
●
●
建立连接
该打印机可以通过多种方法连接到计算机或其他设备。不同的连接类型可以完成
不同的工作。
存储卡
PictBridge 兼容的数码相机
Bluetooth 设备
iPod(存有照片)
连接类型及所需准备工作
存储卡
兼容的数码相机存储卡。
将存储卡插入打印机前面相应的存储
卡插槽。
PictBridge
PictBridge 兼容的数码相机和 USB 电
缆。
将相机连接到打印机前面的相机端口。
Bluetooth
可选的 HP Bluetooth 无线打印机适配
器。
将 HP Bluetooth 无线打印机适配器连
接到打印机前面的相机端口。
iPod
iPod 及其随附的 USB 电缆。
将 iPod 连接到打印机前面的相机端
口。
从存储卡打印
您可以从插入打印机的存储卡打印照片,也可以使用打印机的控制面板选择并打
印照片。您还可以从存储卡直接打印相机选定的照片 — 使用数码相机将照片标
记为打印。
用途...
●
从存储卡直接打印到打印机。请参
阅从存储卡打印。
●
直接从打印机控制面板打印存储卡
上的照片索引。
从 PictBridge 兼容的数码相机直接打
印到打印机。有关详细信息,请参阅
从数码相机打印照片和相机随附的文
档。
从具有 Bluetooth 无线技术的设备打印
到打印机。
从 iPod(存有照片)直接打印到打印
机。 有关详细信息,请参阅从 iPod 打
印照片。
HP Photosmart D5100 series 使用手册
17
Page 20
第 3 章
插入存储卡
从存储卡打印方便快捷,而且不会消耗数码相机电池电量。有关插入存储卡的详
细信息,请参阅插入存储卡。
使用数码相机拍完照片后,可以从相机中取出存储卡并将其插入打印机中,以选
择并打印照片。 打印机可读取下列类型的存储卡: CompactFlash、Memory
Stick、Microdrive、MultiMediaCard、Secure Digital 及 xD-Picture Card。
小心 使用任何其他类型的存储卡都可能会损坏存储卡和打印机。
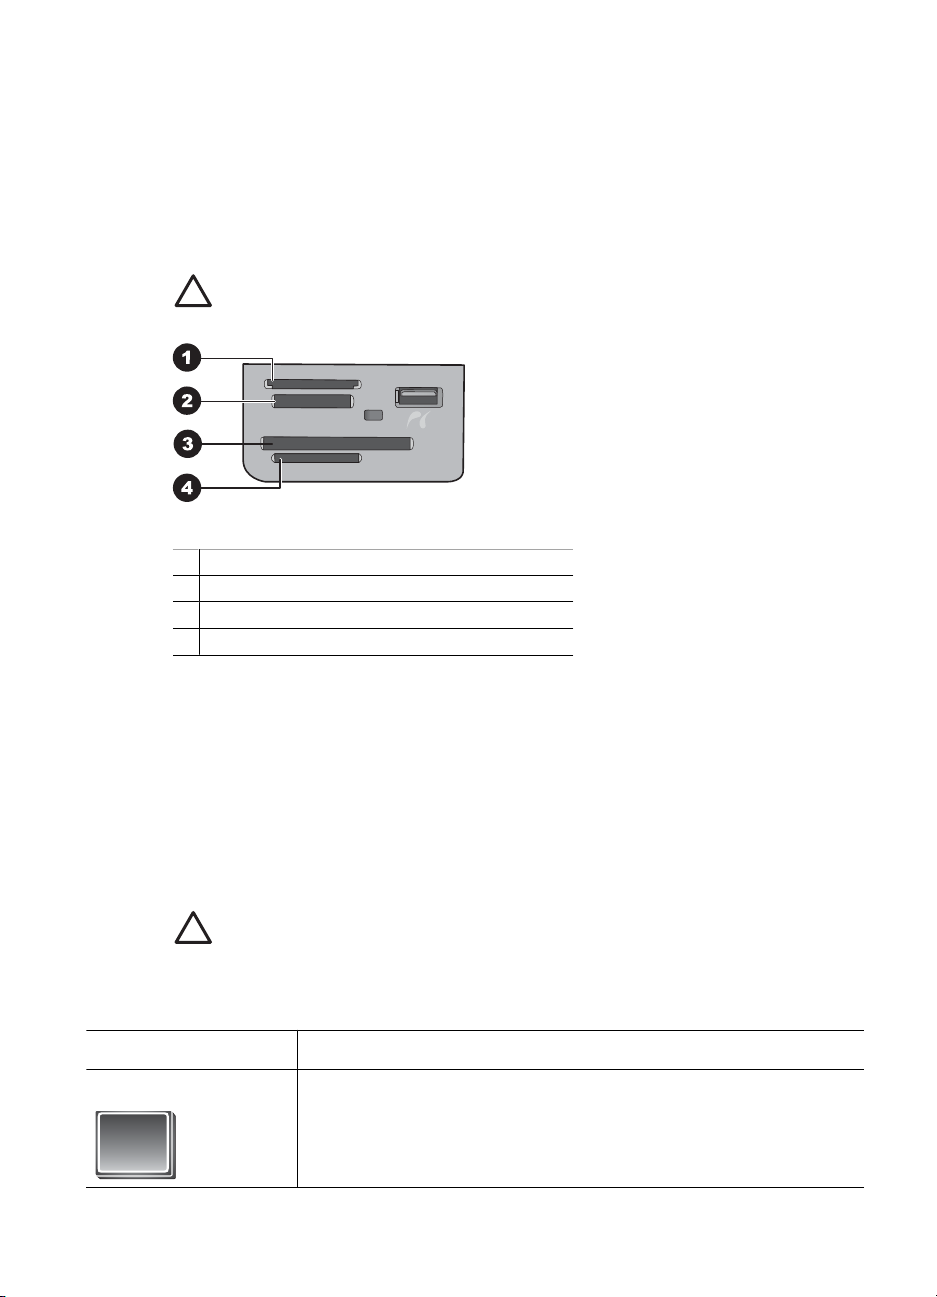
存储卡插槽
1
xD-Picture Card
2 Memory Stick
3
CompactFlash I 和 II、Microdrive
4
Secure Digital (SD)、MultiMediaCard (MMC)
存储卡类型
在下表中找到您的存储卡,并按照说明将其插入打印机中。
原则:
●
一次只插入一张存储卡。
●
将存储卡轻轻推入打印机,直到推不动为止。存储卡插槽只允许卡的一部分
插入打印机;请勿试图用力将存储卡完全插入打印机。
●
正确插入存储卡后,存储卡指示灯闪烁,然后保持绿色点亮。
小心 1 以其他任何方式插入存储卡都可能会损坏存储卡和打印机。
小心 2 当存储卡指示灯呈绿色闪烁时请勿抽出存储卡。有关详细信息,
请参阅取出存储卡。
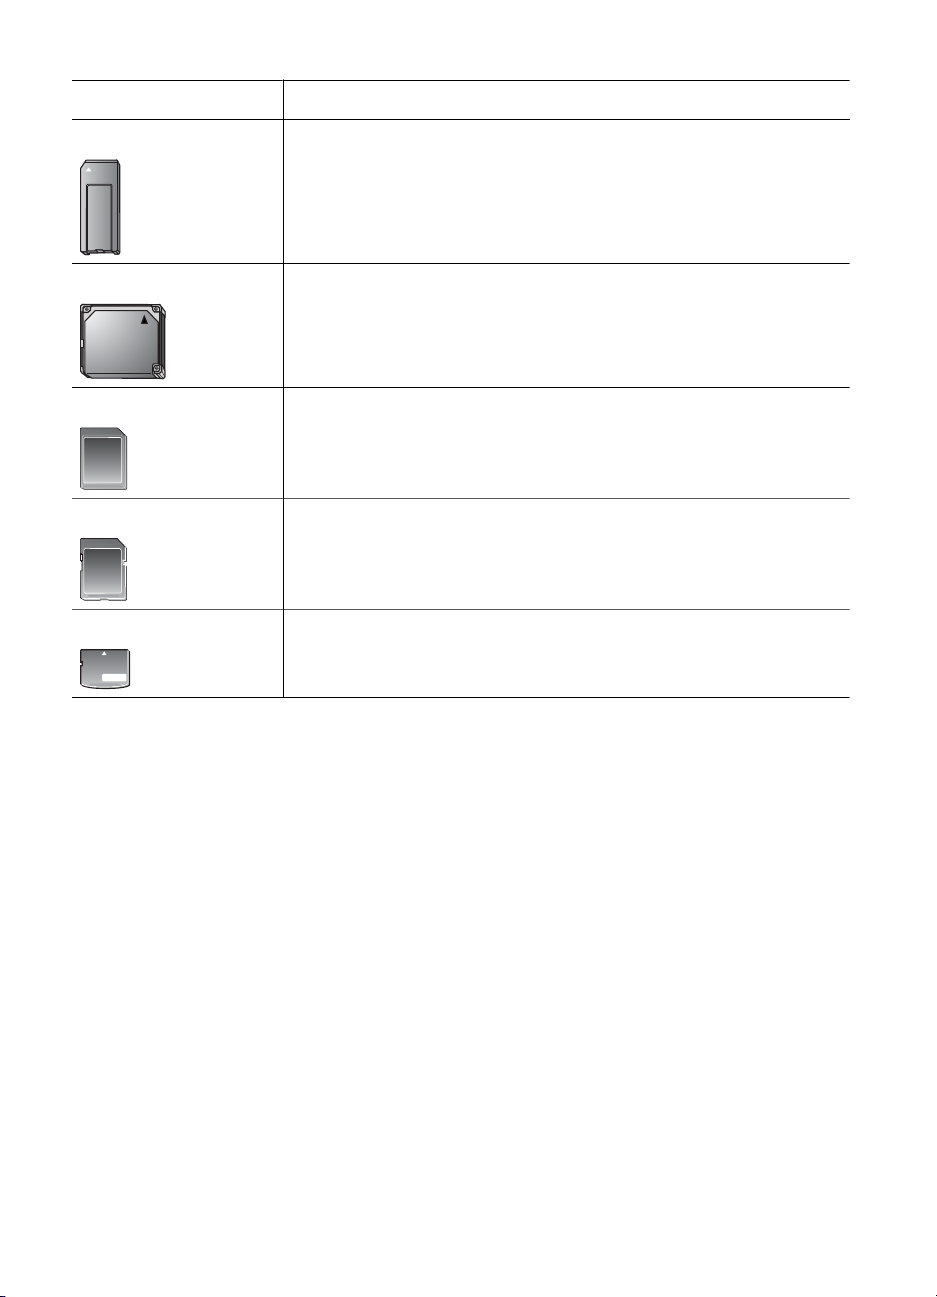
存储卡
CompactFlash ●
18 HP Photosmart D5100 series
如何插入存储卡
正面标签朝上,如果标签上有箭头,箭头应指向打印机
●
将具有金属针孔的一端先插入打印机
Page 21
(续)
存储卡 如何插入存储卡
Memory Stick ●
Microdrive ●
MultiMediaCard ●
Secure Digital ●
xD-Picture Card ●
斜角位于左侧
●
金属触点朝下
●
如果使用 Memory Stick Duo 或 Memory Stick PRO Duo 存
储卡,请在将卡插入打印机前先连接存储卡随附的适配器
正面标签朝上,如果标签上有箭头,箭头应指向打印机
●
将具有金属针孔的一端先插入打印机
斜角位于右侧
●
金属触点朝下
斜角位于右侧
●
金属触点朝下
将存储卡呈弧形的一边向外
●
金属触点朝下
支持的文件格式
打印机可以直接从存储卡识别并打印 JPEG 和未压缩的 TIFF 文件。 如果数码
相机以其他文件格式保存照片,请将这些文件保存到计算机然后使用软件应用程
序进行打印。 有关详细信息,请参阅屏幕上的“HP Photosmart 打印机帮助”。
更改默认纸张尺寸
当直接从存储卡打印时,可以使用“工具箱”来更改默认的纸张尺寸。 从照片
纸盒进行打印的小型纸张默认尺寸是 10 x 15 厘米(4 x 6 英寸),而大型打印
纸张默认尺寸是 21.6 x 28.0 厘米(8.5 x 11 英寸)。
更改默认的纸张尺寸
1. 右键单击 Windows 任务栏右端的“HP Digital Imaging Monitor”图标,然
后选择“启动/显示 HP 解决方案中心”。
2. 单击“设置”,选择“打印设置” > “打印机工具箱”。
3. 单击“配置纸张尺寸”选项卡。
4. 为小型纸张和大型纸张选择默认的纸张尺寸。
HP Photosmart D5100 series 使用手册
19
Page 22
第 3 章
确定要打印的照片
通过先打印照片索引来确定要打印的照片。 照片索引显示了存储卡上所有照片
的缩略图和索引编号(最多 2000 张)。 您可以用打印件上的索引编号来标示要
打印的照片。
打印照片索引
1. 插入存储卡。
2. 确保主纸盒中已装入了几页普通纸。
3. 按控制面板上的照片索引。
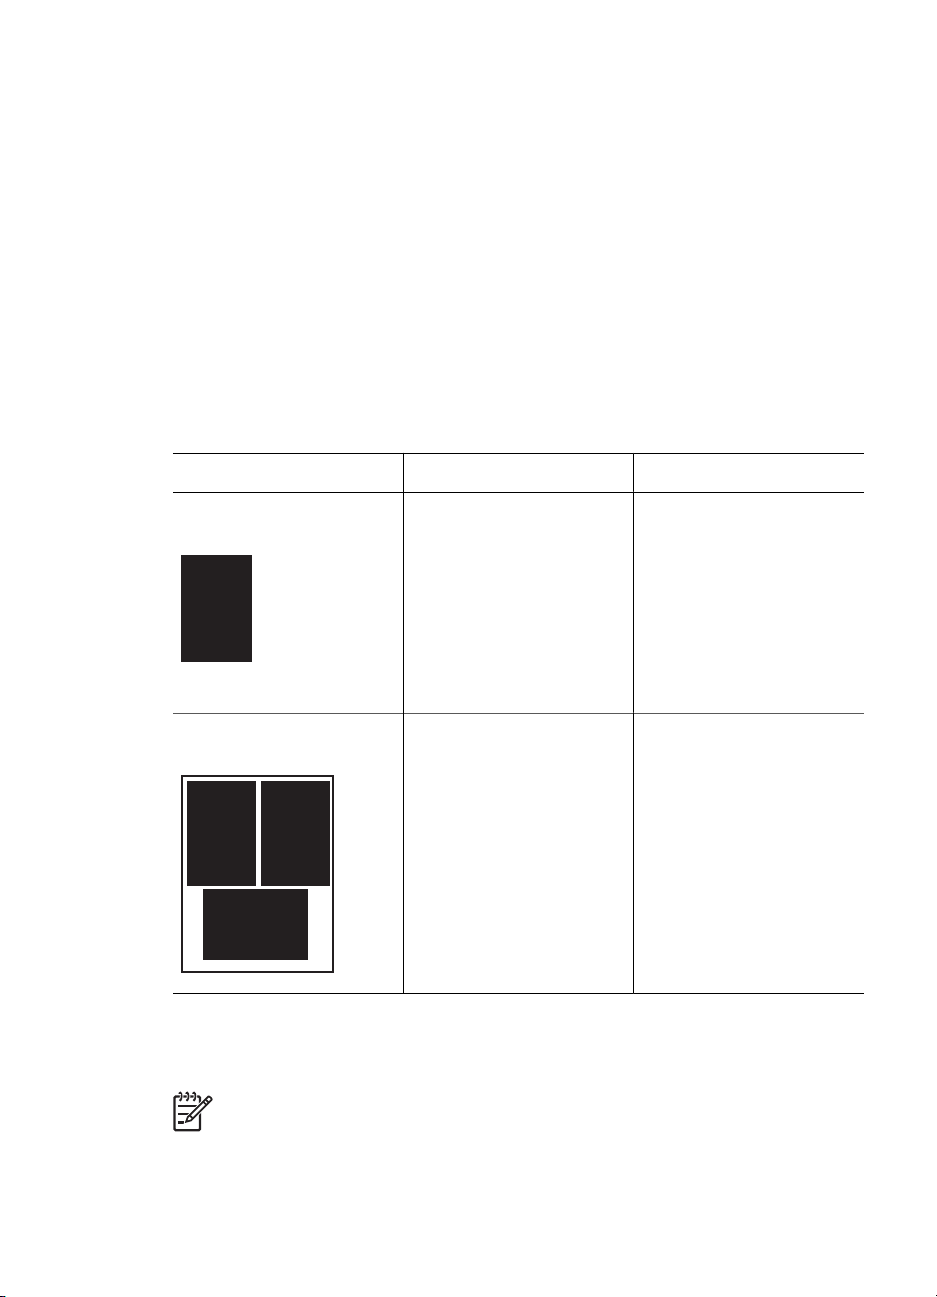
选择照片布局
按打印机上的布局可选择要打印的照片布局。从打印机控制面板选择的所有照片
将以此布局打印。打印出的照片的实际尺寸将根据打印机中装入的纸张尺寸而变
化,如下表所示。有关支持的照片尺寸的完整列表,请参阅打印机技术规格。
对于此布局
每页一张照片 4 x 6 英寸
每页三张照片 3.5 x 5 英寸
选择要打印的照片
以照片索引为指导,您可以从控制面板选择并打印照片。
纸张尺寸 照片尺寸
4 x 6 英寸
10 x 15 厘米
5 x 7 英寸
8.5 x 11 英寸
A4
Hagaki
L
10 x 15 厘米
5 x 7 英寸
8.5 x 11 英寸
21.0 x 29.7 厘米
10.0 x 14.8 厘米
9.0 x 12.7 厘米
1.5 x 2.25 英寸
4 x 6 英寸
5 x 7 英寸
8 x 10 英寸
8.5 x 11 英寸
A6
A4
Hagaki
L
1.75 x 2.625 英寸
2.25 x 3.375 英寸
3.33 x 5 英寸
4 x 6 英寸
4.77 x 7.15 英寸
10 x 15 厘米
4.52 x 6.78 厘米
3.96 x 5.94 厘米
注意 在打印选定的照片后,打印机将自动取消选择此选项。
20 HP Photosmart D5100 series
Page 23

如果想要… 操作
选择一张或多张照片 1. 确保存储卡已插入打印机。
注意 除了插入存储卡外,您还可以从连接
到前面相机端口的 iPod 选择照片。 有关
详细信息,请参阅从 iPod 打印照片。
2. 参考打印出来的照片索引,并确定要打印的照
片。注明其相应的索引编号。
3. 按选择照片
或 ,直到想要打印的第一张照片
的索引编号出现在打印机屏幕上。
提示 按住该按钮可快速查看索引编号。
4. 按 OK 选择要打印的照片。打印机屏幕上的编号
旁边出现一个选中标记,表示该照片被选中。
5. 重复步骤 2 至 4,直到选中所有要打印的照片。
注意 要取消选择照片,按取消。要为同一张
照片打印多份副本,请按 OK 直到您要打印的
份数出现在选中标记下方。
选择存储卡上的所有照片1. 确保存储卡已插入打印机。
2. 按住 OK 三秒钟。打印机屏幕将短暂显示 12 段
短线,随后选中标记会出现在屏幕上每个索引编
号的旁边。
取消选择选定的照片 要取消选择所有选定的照片,按住 OK 三秒钟。
打印照片
从存储卡打印照片
1. 插入存储卡。
2. 将照片纸放入主纸盒或照片纸盒中。
注意 要从照片纸盒进行打印,请按下控制面板上的“照片纸盒”按
钮。 打印机为下一个独立打印作业选择照片纸盒。
3. 选择一张或多张照片。 有关选择照片的详细信息,请参阅选择要打印的照
片。
4. 按打印。
在打印选定的照片后,打印机将自动取消选择这些照片。
HP Photosmart D5100 series 使用手册
21
Page 24

第 3 章
注意 某些数码相机有菜单功能,允许您选择存储卡上要打印的照片。相
机选择的照片将以临时“数字打印指令格式”(DPOF) 文件格式列出,以
备打印。DPOF 文件将在选定的照片打印后自动删除。
如果您已使用 DPOF 功能选定了照片,“dPOF” 将在插入存储卡时显
示在打印机屏幕上。 按打印以打印这些相机选择的照片,或按取消以取
消选择这些照片。
取出存储卡
等待直到存储卡指示灯停止闪烁并呈绿色常亮,然后将存储卡从打印机中轻轻抽
出。
小心 如果存储卡指示灯呈绿色闪烁,则表示打印机正在读取存储卡。 请
勿取下正被读取的存储卡,否则会损坏打印机或存储卡。
从数码相机打印照片
您可以使用 USB 电缆将 PictBridge 数码相机直接连接到打印机的相机端口来打
印照片。如果数码相机具备 Bluetooth 无线技术,则可以将可选的 HP
Bluetooth
机。
从数码相机打印时,打印机将使用已在相机上选择的设置。有关详细信息,请参
阅相机随附的文档。
®
无线打印机适配器插入打印机,然后以无线方式将照片发送到打印
使用 PictBridge 相机
通过直接将相机连接到打印机前面的 USB 端口,HP Photosmart D5100 series
打印机可以从 PictBridge 相机进行打印。
注意 有些 PictBridge 相机可能会将 5 × 7 英寸的纸张尺寸表示为 2L、
127 × 178 毫米或 13 × 18 厘米。
将 PictBridge 兼容的相机连接到打印机
1. 将相机设置为 PictBridge 模式,然后选择要打印的照片。
2. 将照片纸装入打印机。 有关信息,请参阅装入纸张。
3. 使用 PictBridge 兼容的数码相机所配带的 USB 电缆将相机连接到打印机前
面的相机端口中。
打印机识别出 PictBridge 兼容的相机后,就会自动打印选定的照片。
使用 Bluetooth 相机
如果数码相机具有 Bluetooth 无线技术,则可以购买可选的 HP Bluetooth 无线
打印机适配器并通过 Bluetooth 无线连接从相机进行打印。
打印 Bluetooth 相机上的照片
1. 将照片纸装入打印机。 有关信息,请参阅装入纸张。
2. 将 HP Bluetooth 无线打印机适配器插入打印机前面的相机端口。
22 HP Photosmart D5100 series
Page 25

当适配器准备接收数据时,适配器上的指示灯将闪烁。
3. 按照数码相机随附文档中的说明将照片发送到打印机。
从其他 Bluetooth 设备打印照片
您还可从其他具有 Bluetooth 无线技术的设备(如 PDA、笔记本电脑和移动电
话)进行打印。 有关详细信息,请参阅建立连接、HP Photosmart 屏幕帮助,
以及 Bluetooth 设备随附的文档。
建立 Bluetooth 连接
要使用 Bluetooth 连接,所有设备必须安装所需的硬件和软件。 此外,HP
Bluetooth 无线打印机适配器也必须连接到打印机前面的相机端口。 该适配器单
独提供。 有关详细信息,请参阅适配器随附的文档。
从 Bluetooth 设备打印照片
从任何 Bluetooth 设备进行打印的基本步骤都是相同的:
打印 Bluetooth 设备上的照片
1. 让设备搜索可用的 Bluetooth 打印机。
2. 当打印机显示在设备上时将它选中。
3. 打印。
查阅设备随附的文档以了解详细说明。
从 iPod 打印照片
在使用下列步骤将照片导入 iPod 并从 iPod 打印照片之前,请确保图像和
iPod 满足以下要求:
●
复制到 iPod 的图像必须是 JPEG 格式。
●
请确定 iPod 已格式化为 Windows 版(FAT 32 文件结构)。
iPod 默认为 Windows 文件结构。 要检查 iPod 是否已进行 Windows 格式
化,请转到 iPod 上的“设置” > “关于”。 如果在 Windows 中已格式
化,屏幕底部将显示“格式化窗口”。 如果它未在 Windows 中格式化,您
必须用 iPod 随附的 USB 电缆将它连接到 Windows 计算机上,然后按照屏
幕说明操作。
注意 只连接到 Macintosh 的 iPod 与打印机不兼容; 但是,您可以
将 iPod 连接到 Windows 计算机以使它能够兼容打印机。 在连接到
Windows 计算机之后,Macintosh 用户仍然可以使他们的 iPod 完全
同步到 Macintosh 和 Mac iTunes,并保持对打印机的支持。
将照片导入 iPod
1. 使用 iPod 的 Belkin 媒体阅读器,将照片从存储卡复制到 iPod。
2. 在 iPod 菜单上选择“导入照片”,确认 iPod 上是否有照片。 照片将显示
为“卷”。
HP Photosmart D5100 series 使用手册
23
Page 26

第 3 章
从 iPod 打印照片
1. 用 iPod 随附的 USB 电缆将 iPod 连接到打印机前面的相机端口。
2. 选择要打印的照片然后按打印。在打印选定的照片后,打印机将自动取消选
择该照片。有关选择和打印照片的详细信息,请参阅选择要打印的照片。
如果您不能用 iPod 打印到 HP Photosmart,请联系 HP 客户服务中心。 请参
阅 HP 支持。
24 HP Photosmart D5100 series
Page 27

4
从计算机打印
要从计算机打印,必须安装打印机软件。 软件安装过程中,HP Photosmart
Premier(Windows 完全安装用户)、HP Photosmart Essential(Windows 快
速安装用户)或 HP Photosmart Studio (Mac) 会安装到计算机上,您可以管
理、共享、编辑以及打印照片。
有关安装软件的详细信息,请参阅“快速入门手册”。 定期更新软件以确保您
拥有最新的功能和改进; 有关说明,请参阅更新软件。
注意 Windows 用户: HP Photosmart Premier 只能在速度不低于
®
Intel
Pentium III 处理器的计算机上使用。
®
使用打印机软件中的创意选项
有关如何打开并使用 HP Photosmart Premier (Windows)、HP Photosmart
Essential (Windows) 和 HP Photosmart Studio (Mac) 和 HP Photosmart 共享的
信息,请阅读以下提示。
HP Photosmart Premier (Windows)
HP Photosmart Premier 是一个简单易用的软件程序,除了基本的照片编辑和打
印外,它还为您提供一切所需功能使您在处理照片时获得无穷乐趣。 该软件还
可以让您访问 HP Photosmart 共享以便轻松共享照片。HP Photosmart Premier
只适用于 Windows 用户。
打开 HP Photosmart Premier(Windows 用户)
双击桌面上的“HP Photosmart Premier”图标。 如果需要帮助,请参阅
➔
HP Photosmart Premier 中的软件帮助。
浏览 HP Photosmart Premier 的众多功能:
●
查看 — 以多种尺寸和方式查看照片。 轻松组织和管理照片。
●
编辑 — 裁剪照片和修正有红眼的照片。 自动调整和增强不同尺寸和多种布
局的照片。
●
打印 — 打印不同尺寸和多种布局的照片。
●
分享 — 使用 HP Photosmart 共享可以无需大容量附件即可给亲友发送照
片,是一种更好的电子邮件方式。
●
创建 — 轻松创建相册页、卡片、日历、全景照片、CD 标签,等等。
●
备份 — 备份照片副本以进行存放和保存。
HP Photosmart Essential (Windows)
HP Photosmart Essential 是一个简单易用的软件程序,它为您提供基本的照片
编辑和打印功能。 使用该软件您还可以访问 HP Photosmart 共享以便轻松共享
照片。HP Photosmart Essential 只适用于 Windows 用户。
HP Photosmart D5100 series 使用手册
25
Page 28

第 4 章
打开 HP Photosmart Essential(Windows 用户)
双击桌面上的“HP Photosmart Essential”图标。 如果需要帮助,请参阅
➔
HP Photosmart Essential 中的软件帮助。
浏览 HP Photosmart Essential 的众多功能:
●
查看 — 以多种尺寸和方式查看照片。 轻松组织和管理照片。
●
编辑 — 裁剪照片和修正有红眼的照片。 自动调整和增强您的照片使之更臻
完美。
●
打印 — 打印不同尺寸和多种布局的照片。
●
共享 — 使用 HP Photosmart 共享可以无需大容量附件即可给亲友发送照
片,是一种更好的电子邮件方式。
HP Photosmart Studio (Mac)
点按 Dock 中的“HP Photosmart Studio”图标。
➔
浏览 HP Photosmart Mac 软件的众多功能,从 HP Photosmart Studio 可以访问
该软件:
●
导入 - 从 HP 数码相机导入照片或视频。
●
查看和管理 - 查看、组织和管理照片以及视频。
●
编辑 - 调整和增强图像。
●
幻灯片演示 - 创建照片的在线幻灯片演示。
●
全景 - 从多幅图像创建单幅全景图像。
●
创建 - 创建相册页、卡片、标签、海报、条幅等。
●
打印 - 以标准尺寸或索引页格式打印照片或视频帧。
●
共享 - 发送照片给亲友而无需大容量的附件。
●
订购 - 在线订购打印件和礼品。
HP Photosmart 共享
HP Photosmart 共享使您无需大容量的电子邮件附件即可将照片发送给亲友。必
须通过 USB 电缆将打印机连接到计算机,该计算机必须可以访问 Internet 并且
已安装了全部 HP 软件。有关详细信息,请参阅 HP Photosmart Premier、
HP Photosmart Essential 或 HP Photosmart Mac 帮助。
打开 HP Photosmart 共享(Windows 用户)
单击 HP Photosmart Premier 或 HP Photosmart Essential 中的“HP
➔
Photosmart 共享”选项卡。
打开 HP Photosmart 共享(Mac 用户)
在 HP Photosmart Studio 中,选择要共享的照片,然后点按任务栏中
➔
的“共享”按钮。
在计算机屏幕上查看照片
当打印机与计算机相连时,可以将存储卡插入打印机中,并在计算机屏幕上查看
照片。当插入存储卡时,HP Photosmart 软件为计算机提供了用于查看或保存照
片的选项。有关如何将打印机连接到计算机的信息,请参阅“快速入门”小册
子。
26 HP Photosmart D5100 series
Page 29

在屏幕上查看存储卡上的照片
1. 确保已从 HP Photosmart D5100 series CD 安装了软件,而且计算机已连接
到打印机背面的 USB 端口。
2. 将存储卡插入打印机中。HP Photosmart 软件将为您提供查看或保存照片的
选项。
3. 单击查看以打开照片查看器,并显示存储卡上第一幅图像。
4. 在打印机控制面板上,按选择照片
将照片保存到计算机
当您将打印机连接到计算机时,您可以将照片从存储卡保存到计算机。
将您的照片从存储卡保存到计算机
1. 确保已从 HP Photosmart D5100 series CD 安装了软件,而且计算机已连接
到打印机背面的 USB 端口。
2. 将存储卡插入打印机中。HP Photosmart 软件将为您提供用于查看或保存照
片的选项。
3. 单击保存。
4. 按照屏幕说明将照片保存到计算机上相应的文件夹中。
和 滚动浏览卡上的照片。
HP Photosmart D5100 series 使用手册
27
Page 30

第 4 章
28 HP Photosmart D5100 series
Page 31

5
在 CD 和 DVD 上打印
除了在纸张上打印外,您还可以用 HP Photosmart D5100 series 打印机在 CD
和 DVD 上打印。 您可以在 Windows 计算机上使用 HP Phototsmart Premier 软
件或者在 Mac 上使用 HP Photosmart Studio 为 CD 或 DVD 设计和创建自定义
标签。 然后将标签打印在可打印的 CD 或 DVD 介质上。
提示 建议您先将数据写入到 CD 或 DVD 中,然后再在上面打印标签。
创建和打印 CD/DVD 标签
有关如何打开并使用 HP Photosmart Premier 软件和 HP Photosmart Studio 的
信息,请参阅下列提示。
HP Photosmart Premier
HP Photosmart Premier 是一个简单易用的软件,它为您提供一切所需功能使您
在处理照片时获得无穷乐趣。 该软件也可以帮您设计和创建 CD 和 DVD 标签。
打开 HP Photosmart Premier
双击桌面上的“HP Photosmart Premier”图标。 如果需要帮助,请参
➔
阅“HP Photosmart 软件帮助”。
HP Photosmart Studio
HP Photosmart Studio 是一个简单易用的软件,它为您提供一切所需功能,使
您在 Mac 上处理照片时获得无穷乐趣。 该软件也可以帮您设计和创建 CD 和
DVD 标签。
打开 HP Photosmart Studio
在 Dock 中,点按“HP Photosmart Studio”图标。
➔
使用 HP Photosmart Premier
打开软件之后,您可以在“创建”选项卡下为 CD 和 DVD 设计和创建标签。 创
建标签之后,单击“创建”页面中的“打印”,在介质上打印标签。 如果需要
帮助,请参阅软件中的屏幕帮助。
提示 请先在 CD/DVD 托盘中装入介质,然后在软件中单击“打印”。
如果需要帮助,请参阅在 CD/DVD 托盘中放入支架。
准备好打印机以便在 CD 和 DVD 上打印
创建 CD/DVD 标签之后,在 CD/DVD 托盘中装入可打印介质。
HP Photosmart D5100 series 使用手册
29
Page 32

第 5 章
小心 将介质装入 CD/DVD 托盘之前,确保打印机后面有大约 10 厘米
(4 英寸)的空间。
在 CD/DVD 支架上放入光盘
将介质卡入打印机随附的 CD/DVD 支架上。 确保打印面朝上。
➔
注意 如果要使用小尺寸的介质,请如图所示将 CD/DVD 支架侧边翻
过来。
在 CD/DVD 托盘中放入支架
1. 向下拉 CD/DVD 托盘。
2. 将 CD/DVD 支架插入 CD/DVD 托盘,直至托盘中的箭头与支架中的箭头对
齐。 标有箭头的一边进入 CD/DVD 托盘。
3. 单击软件中的“打印”。
在介质上打印时,打印机会退回 CD/DVD 支架。 CD/DVD 支架在打印机后部伸
出大约 7.5 厘米(3 英寸)。
完成打印作业
在介质上成功打印后,请按照以下步骤操作。
30 HP Photosmart D5100 series
Page 33

取下 CD/DVD 支架
1. 从 CD/DVD 托盘中小心取出 CD/DVD 支架。
2. 关闭 CD/DVD 托盘。
注意 只有关闭 CD/DVD 托盘之后,才能执行其他打印作业。
3. 从 CD/DVD 支架中取出介质。
提示 从 CD/DVD 支架中取出介质之前,请留出足够时间以晾干打印
面。
小心 从 CD/DVD 支架中取出介质时,请勿触摸打印面。
HP Photosmart D5100 series 使用手册
31
Page 34

第 5 章
32 HP Photosmart D5100 series
Page 35

6
保养与维护
HP Photosmart D5100 series 打印机很少需要维护。遵照本章所述的指导原
则,可延长打印机及打印耗材的使用寿命,并确保您总是能够打印出高质量的照
片。
清洁和维护打印机
按照本节所述的简易步骤进行操作,就可以保持打印机和墨盒的清洁并维护良好
的状态。
清洁打印机外部
清洁打印机的外部
1. 关闭打印机,然后从打印机背面断开电源线。
2. 用蘸有少量清水的软布擦拭打印机的外部。
3. 抬起主机盖,然后使用经过清水稍微润湿的软布擦拭墨盒区域。
小心 请勿使用任何种类的清洁液。家用清洁剂和洗涤剂会损坏打印机的
表面涂层。请勿清洁打印机内部。防止任何液体进入打印机内部。请勿润
滑支撑墨盒底座滑动的金属杆。底座前后移动时发出声响是正常现象。
清洁墨盒
如果在打印出的照片上发现白线或单色条纹,则可能需要清洁墨盒。 可以使用
打印机随附的软件执行墨盒自动清洁程序。 有关详细信息,请参阅“HP
Photosmart 打印机帮助”。
如果已经完成了全部三级自动墨盒清洁步骤,但测试页上仍有白色条纹或颜色缺
失,则可能需要手动清洁墨盒触点。有关详细信息,请参阅手动清洁墨盒触点。
注意 如果墨盒或打印机最近被摔过,可能也会在打印结果中看到白色条
纹或颜色缺失。此问题是暂时性的,在 24 小时之内即可消除。
手动清洁墨盒触点
如果在有很多灰尘的环境中使用打印机,则污垢会在墨盒触点上积聚并导致打印
问题。
清洁墨盒触点
1. 准备好清洁触点所需的以下物品:
–
蒸馏水(自来水中包含的杂质可能会损坏墨盒)
–
棉签或其他不会粘到墨盒上的无绒毛软布
2. 打开打印机的主机盖。
3. 取出墨盒将其放在纸上,并使墨水喷嘴板朝上。注意,不要用手指触摸铜色
触点或墨水喷嘴板。
HP Photosmart D5100 series 使用手册
33
Page 36

第 6 章
4. 用蒸馏水轻轻润湿棉签,并挤掉棉签上多余的水分。
5. 轻轻地用棉签擦拭铜色触点。
6. 重复步骤 4 和 5,直到干净棉签上没有墨迹或灰尘。
7. 将墨盒装入打印机,然后合上主机盖。
8. 打印机会自动校准墨盒。 打印机校准时会发出声响。 这是正常现象。
更新软件
定期下载最新的打印机软件更新,以确保软件拥有最新的功能和改进。 要下载
打印机软件更新,请访问 www.hp.com/support 或使用“HP 软件更新”。 确保
计算机在执行软件更新前已连接到 Internet。
下载软件(Windows 用户)
1. 从 Windows 的“开始”菜单,选择“程序”(在 Windows XP 中,选
2. 单击“下一步”。 “HP 软件更新”将搜索用于打印机软件更新的 HP 网
3. 如果有可用的软件更新,单击软件更新程序旁边的复选框将其选中。
4. 单击“下一步”。
5. 按照屏幕上的说明完成安装。
小心 请勿将墨盒放在打印机外面超过 30 分钟。墨水喷嘴暴露于空
气中超过上述时间就会变干并导致打印问题。
小心 请勿触摸墨水喷嘴板。触摸墨水喷嘴板将导致喷嘴堵塞、墨水
故障以及电路接触不良。
注意 在有些国家/地区,您可以直接联系 HP 以订购 HP Photosmart
Premier 软件更新 CD。
择“所有程序”)> “HP” > “HP 软件更新”。 将打开“HP 软件更
新”窗口。
站。 如果计算机没有安装最新版本的打印机软件,则“HP 软件更新”窗口
中会出现一个软件更新。
如果计算机安装了最新版本的打印机软件,“HP 软件更新”窗口中将会出
现没有可用的更新信息。
下载软件 (Mac)
注意 在使用“HP Photosmart 更新工具”前,确保已连接到 Internet。
1. 从 Finder 中选择“转到” > “应用程序”。
2. 选择“Hewlett-Packard” > “Photosmart” > “HP Photosmart 更新工
具”。
3. 按照屏幕上的说明检查软件更新。
如果使用防火墙,您需要在更新工具中输入代理服务器信息。
储存打印机和墨盒
为保护打印机和墨盒,在不使用时应将它们妥善储存。
34 HP Photosmart D5100 series
Page 37

储存打印机
储存墨盒
您可以按照下列步骤存放打印机:
1. 关闭打印机。
2. 取出纸盒中的所有纸张。
3. 如果展开了出纸盒延长板,请将它推进去。
4. 关闭 CD/DVD 托盘。
打印机在设计上可经受长期或短期的闲置。
●
将打印机储存在室内避光且温度适中的地方。
●
如果打印机和墨盒已超过一个月未使用,请在打印之前先使用打印机随附的
软件执行墨盒自动清洁程序。 有关详细信息,请参阅“HP Photosmart 打
印机帮助”。
储存打印机时,请始终将正在使用的墨盒留在打印机中。在关机断电期间,打印
机会将墨盒保存在保护罩中。
小心 在拔下电源线之前,请确保打印机完成了断电操作过程。此过程可
使打印机能够正确地储存墨盒。
按照下列提示操作将有助于维护 HP 墨盒并确保稳定的打印质量:
●
将所有不使用的墨盒保存在其原始密封包装中,直到需要时再取出来。 请
在室温下存放墨盒(15–35 摄氏度或 59–95 华氏度)。
●
准备将墨盒安装在打印机中之前,不要取下覆盖在墨水喷嘴上的塑料胶带。
如果从墨盒上取下了塑料胶带,请勿尝试再将其贴上。重新贴上胶带会损坏
墨盒。
维护照片纸质量
为使照片纸获得最佳打印效果,请遵守本节中的下列指导原则。
储存照片纸
●
将照片纸储存在原始包装中,或放入可重新封装的塑料袋中。
●
将包好的照片纸放在平坦、凉爽、干燥的表面上。
●
将未使用的照片纸放回原始包装,或放入可重新封装的塑料袋中。将纸张留
在打印机内或暴露于外界环境中会使纸张发生卷曲或变黄。
拿取照片纸
●
请始终拿取照片纸的边缘以免留下手印。
●
如果照片纸边缘卷曲,将纸张放在塑料储存袋中并轻轻地朝卷曲的相反方向
弯曲,直到纸张恢复平整。
HP Photosmart D5100 series 使用手册
35
Page 38

第 6 章
36 HP Photosmart D5100 series
Page 39

7
疑难排解
HP Photosmart D5100 series 打印机在设计上具有可靠易用的特点。 本章对有
关使用打印机的常见问题作了解答。 本章包含有关下列主题的信息:
●
打印机硬件问题
●
打印问题
●
CD/DVD 打印问题
●
Bluetooth 打印问题
●
打印机屏幕状态指示器
有关软件安装的疑难排解信息,请参阅打印机随附的“快速入门”小册子。 有
关使用打印机软件以及从计算机打印的疑难排解信息,请参见“HP Photosmart
打印机帮助”。 有关查看打印机帮助的信息,请参阅欢迎使用。
打印机硬件问题
联系 HP 客户服务中心前,请先阅读本章中的疑难排解提示,或访问
www.hp.com/support 以获得在线支持服务。
注意 将打印机连接到计算机时,HP 建议使用长度不超过 3 米(10 英
尺)的 USB 电缆,以将因潜在的高电磁场所引起的注入噪声降至最低。
打印指示灯呈绿色闪烁,但打印机不打印。
解决方法 打印机正在处理信息。请等待完成。
警示灯呈红色闪烁。
解决方法 打印机需要维护。请尝试以下操作:
●
如果打印机连接了计算机,请查看计算机屏幕上的说明。
●
如果要在 CD/DVD 上打印 CD 标签,请在 CD/DVD 托盘中插入 CD/DVD
支架。
●
如果打印机上连有数码相机,请查看相机屏幕上的说明。
●
如果打印机未与计算机连接,请检查是否出现下列问题:
– 主机盖打开
–缺纸
–卡纸
– 墨盒支架被卡住
– 墨盒缺失或未正确插入
– 墨盒胶带未撕下
– 安装了错误的墨盒
– 包装材料未拆除
●
如果用以上说明无法解决问题,请关闭打印机并拔下打印机电源线。等
待 10 秒钟,然后再插上电源线。打开打印机电源。
HP Photosmart D5100 series 使用手册
37
Page 40

第 7 章
打印机找不到且无法显示存储卡上的索引编号。
解决方法
请尝试以下操作:
●
取出并重新插入存储卡。
●
关闭打印机,然后拔下电源线。等待 10 秒钟,然后再插上电源线。打
开打印机电源。
●
存储卡可能包含打印机无法直接从存储卡读取的文件类型。
– 将照片保存到计算机,然后从计算机进行打印。 有关详细信息,请
参阅相机随附的文档以及屏幕上的“HP Photosmart 打印机帮助”。
– 下次拍照时,将数码相机设置为以打印机可直接从存储卡读取的文
件类型保存照片。有关支持的文件格式的列表,请参阅技术规格。
有关将数码相机设置为以特定文件格式保存照片的说明,请参阅相
机随附的文档。
打印机已插上电源,但无法开启。
解决方法
●
打印机可能消耗的功率太多。拔下打印机电源线。等待大约 10 秒钟,
然后插上电源线,开启打印机。
●
打印机所插入的接线板电源可能已经关闭。打开接线板开关,然后打开
打印机电源。
打印机开启时发出声响,或打印机一段时间不使用后发出声响。
解决方法 打印机长时间不用后(约 2 周)或其电源中断然后恢复时,可能
发出声响。 这是正常现象 — 打印机正在执行自动维护程序以确保生成最佳
质量的输出。
打印问题
联系 HP 客户服务中心前,请先阅读本章中的疑难排解提示,或访问
www.hp.com/support 以获得在线支持服务。
打印机无法打印无边框照片。
解决方法 确保已经选择了正确的纸张尺寸。打印机不能在所有尺寸的纸上
打印无边框照片。有关选择用于无边框照片的纸张尺寸的信息,请参阅选择
照片布局。
38 HP Photosmart D5100 series
Page 41

打印速度非常慢。
解决方法 您可能遇到了下列某种问题。
●
您可能正在打印含有高分辨率图形或照片的项目或 PDF 文件。打印含
有图形或照片的大型复杂项目要比文本文档慢。
●
打印机可能处于“墨水备份打印模式”。取下一个墨盒后,打印机将进
入该模式。重新装入缺失的墨盒。
打印机无法正确送入或输出照片纸。
解决方法 可能存在以下问题。
●
如果正在使用照片纸盒进行打印,可能在主纸盒中装有纸张。 使用照片
纸盒打印前,请先取出主纸盒中的所有纸张。
●
确保已关闭 CD/DVD 托盘。 只有先关闭 CD/DVD 托盘,打印机才会加
载纸张。
●
打印机所处的环境可能过于潮湿或过于干燥。一次装入一张照片纸。
●
照片纸可能卷曲。 如果照片纸卷曲,请将其放入塑料袋,然后轻轻地朝
卷曲的相反方向弯曲,直到纸张恢复平整。 如果问题仍然存在,则使用
没有卷曲的照片纸。
●
主纸盒中可能装入了太多的纸张。 从主纸盒中取出一些纸,然后尝试重
新打印。 有关装入纸张的说明,请参阅装入纸张。
●
纸张可能太薄或太厚。 为了获得最佳效果,请使用 HP 纸张。 有关详
细信息,请参阅选择合适的纸张。
●
两张或多张纸粘在了一起。 从纸盒中取出纸张并散开纸张使其相互分
离。 重新将纸张装入纸盒并尝试重新打印。
打印页从出纸盒掉落。
解决方法 打印出来的纸张可能会从出纸盒中掉出来。 为防止这种情况,
打印时始终要展开出纸盒延长板。
打印出的纸张有褶皱或卷曲
解决方法 正在打印的项目使用的墨水比平时多。 请从计算机上打印项
目,并使用打印机软件降低墨水饱和度。 有关详细信息,请参阅屏幕上
的“HP Photosmart 打印机帮助”。
HP Photosmart D5100 series 使用手册
39
Page 42

第 7 章
打印出的文档是斜的或者不居中。
解决方法
●
纸张宽度导轨可能定位不正确。确保纸张宽度导轨紧靠纸的边缘,同时
保持纸张平整。
●
可能没有正确装入纸张。 确保在主纸盒中按正确的方向装入纸张。 有
关装入纸张的说明,请参阅装入纸张。
●
可能没有正确装入照片纸。 重新装入照片纸,确保照片纸在照片纸盒中
的方向正确。 有关装入照片纸的说明,请参阅装入纸张。
打印出的颜色不尽人意。
解决方法
●
您可能没有使用针对该项目的最佳墨盒。 要打印文本文档和图形,请使
用 HP 三色墨盒和 HP 黑色墨盒。 要打印彩色照片,请使用 HP 三色墨
盒和 HP 照片墨盒或 HP 灰色照片墨盒。 有关详细信息,请参阅插入并
更换墨盒。
●
您可能在“墨水备份打印模式”下打印。缺失其中一个墨盒时,打印机
会进入“墨水备份打印模式”。请重新安装缺失的墨盒。
●
墨盒的墨水用完。请更换。
●
墨盒的某些墨水喷嘴堵塞。清洁墨盒。请参阅清洁墨盒。
●
您可能没有使用针对该项目的最佳介质。 有关纸张的详细信息,请参
阅选择合适的纸张。
打印机未输出纸张。
原因
●
纸盒可能是空的。 加载照片纸盒。 有关装入纸张的信息,请参阅装入
纸张。
●
可能出现卡纸。
解决方法
小心 请勿从打印机前面清除卡纸。否则会对打印机造成永久性损坏。
清除卡纸
1. 关闭打印机,然后拔下打印机电源插头。
2. 取下后检修门。
40 HP Photosmart D5100 series
Page 43

3. 轻轻从打印机中取出卡住的纸张。
4. 重新装上后检修门。
5. 插上打印机的电源插头,然后开启打印机。
6. 清除完卡纸后,再次打印文档。
如果在照片纸上打印时遇到了卡纸,请尝试以下操作:
●
将照片纸尽可能深地插入照片纸盒。
●
一次装入一张照片纸。
打印机输出空白页。
解决方法
●
在打印机屏幕上检查画笔图标中是否有交叉号。 如果有交叉号,则墨盒
的墨水已用完。 如果画笔图标的墨滴只有一个墨水量条,则墨水量可能
太低不足以进行打印。 更换墨水已用完的墨盒。 有关检查墨水量的详
细信息,请参见“HP Photosmart 打印机帮助”。
●
您可能已经开始打印,然后又取消了打印进程。如果在开始打印前取消
了进程,打印机可能已经装入纸张准备打印。下次打印时,打印机会在
开始新的打印作业前先退出空白页。
按下“打印”按钮后不打印照片。
解决方法 您可能没有按下 OK 来选择照片。有关如何选择照片的说明,请
参阅选择要打印的照片。
打印机显示缺墨指示器,但不知道应替换哪个墨盒。
解决方法 两个画笔图标代表墨盒。 依据画笔图标中的交叉符号更换墨
盒。 有关详细信息,请参阅打印机屏幕状态指示器。
HP Photosmart D5100 series 使用手册
41
Page 44

第 7 章
打印质量差。
解决方法
●
您可能在“墨水备份打印模式”下打印。当缺少其中一个墨盒时,打印
机进入“墨水备份打印模式”。请用新的墨盒更换缺失的墨盒。
●
其中一个墨盒中的墨水可能快用完了。 在打印机屏幕上检查画笔图标中
是否有交叉号。 一个墨水量条表示墨水量低。 如果墨盒的墨水量不
足,请更换。 有关详细信息,请参阅插入并更换墨盒。
●
使用打印机专用照片纸。 为了获得最佳效果,请使用 HP 纸张。
●
您可能打印到了纸张错误的一面上。确保打印面朝下装入纸张。
●
您可能在数码相机上选择了低分辨率设置。缩小图像尺寸并尝试再次打
印。为了在以后获得更好的效果,请将数码相机设为较高的照片分辨
率。
●
墨盒可能出现问题。请尝试以下操作:
– 取出并重新装入墨盒。
–从 HP Photosmart “工具箱”执行墨盒自动清洁程序。 有关详细信
– 如果这样做无法解决问题,尝试清洁墨盒上的铜色触点。有关详细
– 如果这些措施都不能解决问题,则请更换墨盒。
息,请参阅“HP Photosmart 打印机帮助”。
信息,请参阅手动清洁墨盒触点。
打印的照片与要求的纸张不符。
解决方法
●
您可能没有正确装入照片纸。打印面朝下装入照片纸。
●
照片纸可能没有正确送入打印机。请尝试以下操作:
– 如果遇到卡纸,请参阅清除卡纸。
– 一次装入一张照片纸。
●
您选择了错误的布局。有关信息,请参阅选择照片布局。
●
有关如何优化照片质量的信息,请参阅 HP Photosmart 打印机在线帮
助。
CD/DVD 打印问题
联系 HP 客户服务中心前,请先阅读本节,或访问 www.hp.com/support 以获得
在线支持服务。
从软件发出打印命令之后,警示灯呈红色闪烁。
解决方法 这是正常现象。 打印机正在等待您在 CD/DVD 托盘中插入 CD/
DVD 支架。 有关在 CD/DVD 托盘中放入支架的信息,请参阅在 CD/DVD
托盘中放入支架。
42 HP Photosmart D5100 series
Page 45

CD/DVD 支架未完全装入。
解决方法
●
将 CD/DVD 支架缓缓推入 CD/DVD 托盘。
●
如何问题仍然存在,则在支架下侧粘一条双面胶带,并使其通过支架中
孔。
在 CD/DVD 上未打印标签。 CD/DVD 支架几乎完全从打印机后面退了出来。
解决方法
手动取下支架并关闭 CD/DVD 托盘。 拔出电源线。 几秒钟后再插上电源插
头。 将 CD/DVD 支架插入 CD/DVD 托盘以重新开始打印。 有关在 CD/DVD
托盘中放入支架的信息,请参阅在 CD/DVD 托盘中放入支架。
CD/DVD 支架会从打印机后面伸出。
解决方法 这是正常现象。 CD/DVD 支架会从打印机后面伸出大约 7.5 厘
米(3 英寸)。
Bluetooth 打印问题
联系 HP 客户服务中心前,请先阅读本节,或访问 www.hp.com/support 以获得
在线支持服务。 确保同时阅读 HP Bluetooth 无线打印机适配器和 Bluetooth 设
备随附的文档。
Bluetooth 设备无法找到打印机。
解决方法
●
确保 Bluetooth 设备已插入打印机前面的相机端口。当适配器准备好接
收数据时,适配器上的指示灯会闪烁。
●
您可能距离打印机太远。 将 Bluetooth 设备移到更靠近打印机的地
方。 Bluetooth 设备与打印机之间建议的最大距离为 10 米(30 英尺)。
●
确保 Bluetooth 设备与打印机兼容。 有关详细信息,请参阅技术规格。
打印机不输出纸张。
解决方法 打印机可能无法识别具有 Bluetooth 无线技术的设备所发送的文
件类型。有关打印机支持的文件格式的列表,请参阅打印机技术规格。
HP Photosmart D5100 series 使用手册
43
Page 46

第 7 章
打印质量差。
解决方法 打印的照片可能分辨率较低。为了获得更好的效果,请将数码相
机设为较高的照片分辨率。用 VGA 分辨率的相机拍摄的照片(例如无线电
话中的照片)可能没有足够的分辨率来生成高质量的打印件。
打印机屏幕状态指示器
打印机屏幕有两个状态指示器:一个显示墨盒状态,另一个显示纸张状态。
指示器...
含义...
如果出现墨滴和单一的墨水量条,则
表示墨盒中的墨水不足。 您需要更换
墨盒。
左侧墨盒中的墨水不足时,仅左侧的
墨水量条减少为一个。 请更换左侧墨
盒。
右侧墨盒中的墨水不足时,仅右侧的
墨水条减少为一个。 请更换右侧墨盒。
画笔图标闪烁时,则表示墨盒出现错
误。 两个画笔图标都闪烁时,则表示
两个墨盒都出现错误。 更换墨盒以重
新开始打印。
只有左侧画笔图标闪烁时,则表示左
侧墨盒出现错误。 请更换左侧墨盒。
只有右侧画笔图标闪烁时,则表示右
侧墨盒出现错误。 请更换右侧墨盒。
购买替换墨盒时,请参阅本手册封底
列出的墨盒编号。 有关详细信息,请
参阅插入并更换墨盒
当纸张图标开始闪烁时,则表示出现
卡纸或打印机缺纸。
有关清除卡纸的详细信息,请参阅清
除卡纸。
44 HP Photosmart D5100 series
Page 47

(续)
指示器... 含义...
有关装入纸张的信息,请参阅装入纸
张。
HP Photosmart D5100 series 使用手册
45
Page 48

第 7 章
46 HP Photosmart D5100 series
Page 49

8
HP 支持
注意 HP 支持服务的名称会因国家/地区而异。
如果遇到问题,请按以下步骤操作:
1. 查阅打印机随附的文档。
–
快速入门手册: “HP Photosmart D5100 series 快速入门手册”介绍
了如何安装打印机并打印第一张照片。
–
使用手册: “使用手册”是您正在阅读的这本手册。 本手册说明了此
款打印机的基本功能,以及如何在不连接计算机的情况下使用打印机,
并包含硬件疑难排解信息。
–
HP Photosmart 帮助: HP Photosmart 屏幕帮助说明如何与计算机一起
使用打印机,并包含软件疑难排解信息。 请参阅访问 HP Photosmart
打印机屏幕帮助。
2. 如果使用文档中的信息还不能解决问题,请访问 www.hp.com/support 以执
行下列操作:
–
访问在线支持页面
–
向 HP 发送电子邮件寻求问题答案
–
通过在线聊天与 HP 技术人员联系
–
检查软件更新
可选择的支持种类和可用性随产品、国家/地区以及语言而异。
3. 仅限于欧洲:与您当地的经销商联系。如果打印机出现硬件故障,需要将打
印机带到购买该打印机的经销商处。在打印机的有限保修期内维修是免费
的。超过保修期后,需要支付维修费用。
4. 如果使用屏幕帮助或 HP 网站无法解决问题,则请联系您所在国家/地区的
HP 支持。 有关国家/地区电话号码的列表,请参阅 HP 电话支持。
HP 电话支持
打印机在保修期内时,您可获得免费的电话支持。有关详细信息,请参阅包装盒
内的保修声明,或访问 www.hp.com/suppor 查看免费支持的期限。
免费电话支持期满后,您需要支付额外费用以获得 HP 帮助。请与 HP 经销商联
系,或拨打您所在国家/地区的支持电话以了解支持选项。
要通过电话接受 HP 支持,请拨打您所在地区的支持电话号码。 您需要支付电
话公司的标准电话费。
北美: 致电 1-800-474-6836 (1-800–HP-INVENT)。 美国电话支持分英语和西
班牙语两种,提供每周 7 天、每天 24 小时全天候服务(支持天数或小时数如有
变更,恕不另行通知)。 保修期内,此项服务是免费的。 过了保修期,可能要
收费。
西欧:奥地利、比利时、丹麦、西班牙、法国、德国、爱尔兰、意大利、荷兰、
挪威、葡萄牙、芬兰、瑞典、瑞士以及英国的客户应访问 www.hp.com/
support 了解各自所在国家/地区的电话支持号码。
其他国家/地区:参阅本手册封面中的支持电话号码列表。
HP Photosmart D5100 series 使用手册
47
Page 50

第 8 章
致电
请在计算机和打印机旁边致电 HP 支持。 准备提供以下信息:
●
打印机型号(位于打印机前部)
●
打印机序列号(位于打印机底部)
●
计算机操作系统
●
打印机软件版本:
– Windows PC: 要查看打印机软件版本,请右键单击 Windows 任务栏
中的“HP Digital Imaging Monitor”图标并选择“关于”。
– Macintosh:要查看打印机软件版本,请使用“打印”对话框。
●
打印机屏幕或计算机显示器上显示的信息
●
以下问题的解答:
– 您在电话中提及的情况以前发生过吗?可否重现这种情况?
– 在发生此情况前后,您是否在计算机上安装了任何新的硬件或软件?
退回 HP 维修服务部门(仅限北美)
HP 会安排将您的产品运送到 HP 主要维修中心。 我们将支付往返的运输费用和
修理费。 此项服务在硬件保修期内是免费的。
HP Quick Exchange Service (Japan only)
48 HP Photosmart D5100 series
Page 51

其他保修选项
付费后可以享用打印机延长服务计划。请访问 www.hp.com/support,选择您的
国家/地区和语言,然后浏览有关延长服务计划的服务和保修信息。
HP Photosmart D5100 series 使用手册
49
Page 52

第 8 章
50 HP Photosmart D5100 series
Page 53

9
系统规格
技术规格
本节列出了安装打印机软件所需的最低系统需求,并提供了打印机的部分技术规格。
有关完整的打印机技术规格和系统需求列表,请参阅屏幕上的“HP Photosmart 打印机
帮助”。 有关详细信息,请参阅欢迎使用。
组件 Windows 计算机最低需求 Macintosh 最低需求
操作系统 Microsoft Windows 98、
2000 Professional、Me、
XP Home 和 XP
Professional
处理器 Intel Pentium II(或同性
能处理器)或更快
®
®
®
Mac OS X 10.2 及以上
G3 或更快
RAM
可用磁盘空间
视频显示器 800 x 600,16 位或更高 800 x 600,16 位或更高
CD-ROM 驱动器
连接 USB 2.0 全速: Microsoft
浏览器
建议 128 MB
500 MB 150 MB
4x 4x
Windows 98、2000
Professional、Me、XP
Home 和 XP Professional
PictBridge: 使用前面的
相机端口
Bluetooth: 使用可选的
HP Bluetooth 无线打印机适
配器
Microsoft Internet Explorer
5.5 或更高版本
128 MB
USB 2.0 全速: Mac OS X
10.2 及以上
PictBridge: 使用前面的
相机端口
—
HP Photosmart D5100 series 使用手册
51
Page 54

第 9 章
打印机技术规格
类别 技术规格
介质规格 建议的最大长度: 35.6 厘米(14 英寸)
介质尺寸 照片纸,10 x 15 厘米(4 x 6 英寸)
支持的介质尺寸 从计算机打印时支持的尺寸
建议的最大厚度: 292 微米(11.5 密耳)
带裁边的照片纸,10 x 15 厘米带 1.25 厘米裁边(4 x 6 英寸
带 0.5 英寸裁边)
照片纸,13 x 18 厘米(5 x 7 英寸)
照片纸,10 x 30 厘米(4 x 12 英寸)全景
照片卡,10 x 20 厘米(4 x 8 英寸)
索引卡,10 x 15 厘米(4 x 6 英寸)
Hagaki 卡,10.0 x 14.8 厘米(3.9 x 5.8 英寸)
A6 卡,10.5 x 14.8 厘米(4.1 x 5.8 英寸)
L 尺寸卡,9.0 x 12.7 厘米(3.5 x 5 英寸)
带裁边的 L 尺寸卡,9.0 x 12.7 厘米带 12.5 厘米裁边(3.5 x
5 英寸带 0.5 英寸裁边)
7.6 x 12.7 厘米至 22 x 61 厘米(3 x 5 英寸至 8.5 x 24 英寸)
从控制面板打印时支持的尺寸
公制: A6、A4、10 x 15 厘米(带或不带裁边); 英制:
3.5 x 5 英寸、4 x 6 英寸(带或不带裁边)、4 x 12 英寸、
5 x 7 英寸、8 x 10 英寸、8.5 x 11 英寸; 其他: Hagaki 和 L
尺寸
支持的介质类型 纸张(普通纸、喷墨纸、照片纸和全景照片纸)
信封
投影胶片
标签纸
卡片(索引卡、贺卡、Hagaki 卡、A6、L 尺寸)
烫印转印纸
Avery C6611 和 C6612 照片不干胶贴纸: 10 x 15 厘米(4 x 6
英寸),每页具有 16 个矩形或椭圆形标签
120 毫米和 80 毫米的可打印 CD
120 毫米和 80 毫米的可打印 DVD
图像文件格式 JPEG 基线
TIFF 24 位 RGB 未压缩隔行扫描
TIFF 24 位 YCbCr 未压缩隔行扫描
TIFF 24 位 RGB Packbits 隔行扫描
TIFF 8 位灰色未压缩/Packbits
52 HP Photosmart D5100 series
Page 55

(续)
类别 技术规格
TIFF 8 位彩色未压缩/Packbits
TIFF 1 位未压缩/Packbits/1D Huffman
存储卡 CompactFlash I 型和 II 型
Microdrive
MultiMediaCard
Secure Digital
Memory Stick
xD-Picture Card
存储卡支持的文件格式打印
JPEG
未压缩 TIFF
保存
所有文件格式
纸盒 – 支持的介质尺寸主纸盒
7.6 x 12.7 厘米至 21.6 x 35.6 厘米(3 x 5 英寸至 8.5 x 14 英
寸)
照片纸盒
10 x 15 厘米(4 x 6 英寸)、10 x 15 厘米(4 x 6 英寸)带裁
边、索引卡和 Hagaki 卡
出纸盒
所有支持的尺寸
纸盒容量 主纸盒
耗电量 关机: 2.13 W AC
电源要求 输入频率: 50/60 Hz, (+/- 3Hz)
HP Photosmart D5100 series 使用手册
125 张普通纸
15 个信封
20 - 40 张卡片(视厚度而定)
20 张标签纸
25 张投影胶片、烫印转印纸或照片纸
照片纸盒
25 张照片纸
出纸盒
50 张普通纸
10 张卡片或信封
25 张标签或烫印转印纸
打印: 6.604 W AC
闲置: 2.28 W AC
53
Page 56

第 9 章
(续)
类别 技术规格
输入电压: 100 到 240,Vac (+/- 10%)
环境技术规格 建议的温度范围: 15–30°C (59–86°F)
最大温度范围: 10–35°C (50–95°F)
储存温度范围: -30–65° C (–22–149° F)
建议的湿度范围: 20–80% RH
最大湿度范围: 15–80% RH
墨盒 1 个 HP 黑色墨盒
1 个 HP 三色墨盒
1 个 HP 照片墨盒
1 个 HP 灰色照片墨盒
注意 本手册封底上列出了可用于本打印机的墨盒编号。
打印速度(最大) 黑色打印: 每分钟 23 页
彩色打印: 每分钟 21 页
照片: 27 秒打印一张 10 x 15 厘米(4 x 6 英寸)的照片
连接 USB 2.0 全速: Microsoft Windows 98、2000 Professional、
Me、XP Home 和 XP Professional; Mac OS X 10.2 及以上
PictBridge: Microsoft Windows 98、2000 Professional、
Me、XP Home 和 XP Professional; Mac OS X 10.2 及以上
Bluetooth: Microsoft Windows XP Home 和 XP Professional
USB 支持 Microsoft Windows 98、2000 Professional、Me、XP Home
和 XP Professional
Mac OS X 10.2 及以上
一条长度不超过 3 米(10 英尺)的通用串行总线 (USB) 2.0 全
速兼容电缆
54 HP Photosmart D5100 series
Page 57

10
HP 保修条款
HP Photosmart D5100 series 使用手册
55
Page 58

第 10 章
56 HP Photosmart D5100 series
Page 59

索引
B
Bluetooth
连接到打印机 17
疑难排解 43
参阅
帮助.
保养与维护 33
布局, 选择 20
C
插入
储存
存储卡
D
DPOF 文件 21
打印
打印机
打印机帮助
打印机屏幕 8
打印机软件
疑难排解
存储卡 18
墨盒 15
打印机 35
墨盒 35
照片纸 35
插入 18
打印照片索引 20
取出 22
支持的文件格式 19
不使用计算机 17
从 BlueTooth 设备 17
从 PictBridge 相机 17
从存储卡 17, 21
从计算机 25
从相机 22
选择布局 20
照片索引 20
保养与维护 33
部件 6
储存 35
电源问题 38
规格 52
连接 17
清洁 33
文档 5
状态指示器 44
访问 5
更新 34
打印机软件, 更新 25
E
Energy Star 2
G
更换墨盒 15
规范声明
标准型号 2
规格 51
H
Hewlett-Packard 公司通告 2
HP Photosmart Essential 25
HP Photosmart Premier 25
HP Photosmart Studio(仅限
Mac) 26
HP Photosmart 共享 26
HP 解决方案中心 14
HP 支持 47
I
iPod 17
J
JPEG 文件格式 19
计算机
打印, 不使用 17
打印自 25
将照片保存到 27
系统规格 51
将照片保存到计算机 27
M
Macintosh
HP Photosmart Mac 软件
26
墨盒
插入 15
储存 35
更换 15
清洁 33
清洁触点 33
缺墨 41
状态指示器 44
N
能源消耗 2
P
PictBridge 相机
相机端口 22
Q
清洁
打印机 33
墨盒 33
墨盒触点 33
取出存储卡 22
S
参阅
数码相机.
T
TIFF 文件格式 19
U
USB
端口 6
规格 51
W
文档, 打印机 5
文件格式, 支持的 19
无边框照片
选择布局 20
X
系统规格 51
相机
Bluetooth 22
PictBridge 22
打印自 22
端口 6
连接到打印机 17
相机选择的照片 21
Y
疑难排解
Bluetooth 43
CD 42
DVD 42
HP 支持 47
相机
HP Photosmart D5100 series 使用手册
57
Page 60

打印机声响 38
打印质量 42
电源问题 38
墨水不足 41
照片索引编号未显示 38
纸张问题 39
指示灯闪烁 37
Z
照片
保存到计算机 27
编号未显示 38
不打印 41
打印 21
索引 20
选择布局 20
选择进行打印 20
支持的文件格式 19
纸盒, 纸张 6
纸张
尺寸 52
购买和选择 11
维护 11, 35
疑难排解 39
纸盒 6
状态指示器 44
质量
疑难排解 42
照片纸 35
58 HP Photosmart D5100 series
Page 61

HP Photosmart D5100 series User Guide
English
Page 62

Copyrights and trademarks
© 2006 Hewlett-Packard Development
Company, L.P.
The information contained herein is
subject to change without notice.
Reproduction, adaptation, or
translation without prior written
permission is prohibited, except as
allowed under the copyright laws.
Hewlett-Packard Company
notices
The information contained in this
document is subject to change without
notice.
All rights reserved. Reproduction,
adaptation, or translation of this
material is prohibited without prior
written permission of Hewlett-Packard,
except as allowed under copyright
laws.
The only warranties for HP products
and services are set forth in the express
warranty statements accompanying
such products and services. Nothing
herein should be construed as
constituting an additional warranty. HP
shall not be liable for technical or
editorial errors or omissions contained
herein.
Trademarks
HP, the HP logo, and Photosmart are
property of Hewlett-Packard
Development Company, L.P.
The Secure Digital logo is a trademark
of the SD Association.
Microsoft and Windows are registered
trademarks of Microsoft Corporation.
CompactFlash, CF, and the CF logo are
trademarks of the CompactFlash
Association (CFA).
Memory Stick, Memory Stick Duo,
Memory Stick PRO, and Memory Stick
PRO Duo are trademarks or registered
trademarks of Sony Corporation.
MultiMediaCard is a trademark of
Infineon Technologies AG of Germany,
and is licensed to the MMCA
(MultiMediaCard Association).
Microdrive is a trademark of Hitachi
Global Storage Technologies.
xD-Picture Card is a trademark of Fuji
Photo Film Co., Ltd., Toshiba
Corporation, and Olympus Optical Co.,
Ltd.
Mac, the Mac logo, and Macintosh are
registered trademarks of Apple
Computer, Inc.
iPod is a trademark of Apple Computer,
Inc.
Bluetooth is a trademark owned by its
proprietor and used by HewlettPackard Company under license.
PictBridge and the PictBridge logo are
trademarks of the Camera & Imaging
Products Association (CIPA).
Other brands and their products are
trademarks or registered trademarks of
their respective holders.
Regulatory model
identification number
For regulatory identification purposes,
your product is assigned a Regulatory
Model Number. The Regulatory Model
Number for your product is
VCVRA-0606. This regulatory number
should not be confused with the
marketing name (HP Photosmart
D5100 series, etc.) or product numbers
(Q7090A, etc.).
Energy consumption Energy Star®
Hewlett-Packard Company is
committed to providing quality products
in a environmentally sound manner. For
information about the HP's
environmental product stewardship
program see the onscreen help.
Page 63

Contents
1Welcome.................................................................................................................5
Accessing the onscreen HP Photosmart Printer Help.............................................5
Printer parts.............................................................................................................6
Printer screen..........................................................................................................8
2 Get ready to print.................................................................................................11
Load paper............................................................................................................11
Choose the right paper...................................................................................11
Print from the control panel or a computer.....................................................11
Load the main tray..........................................................................................12
Load the photo tray........................................................................................13
Using print cartridges.............................................................................................14
Purchasing replacement print cartridges........................................................14
Print cartridge tips..........................................................................................14
Inserting and replacing the print cartridges....................................................15
Aligning the print cartridges for maximum results..........................................15
3 Print without a computer....................................................................................17
Getting connected.................................................................................................17
Print from a memory card......................................................................................17
Insert a memory card.....................................................................................18
Change the default paper size.......................................................................19
Decide which photos to print..........................................................................20
Select a photo layout......................................................................................20
Select photos to print.....................................................................................21
Print your photos............................................................................................21
Remove a memory card.................................................................................22
Printing photos from a digital camera....................................................................22
Using a PictBridge camera.............................................................................22
Using a Bluetooth camera..............................................................................23
Print photos from other Bluetooth devices............................................................23
Make the Bluetooth connection......................................................................23
Print photos from a Bluetooth device.............................................................23
Print photos from an iPod......................................................................................23
4 Print from a computer.........................................................................................25
Use creative options in the printer software..........................................................25
HP Photosmart Premier (Windows)...............................................................25
HP Photosmart Essential (Windows).............................................................25
HP Photosmart Studio (Mac)..........................................................................26
HP Photosmart Share....................................................................................26
View photos on your computer screen..................................................................26
Save your photos to a computer...........................................................................27
5 Print on CDs and DVDs.......................................................................................29
Create and print CD/DVD labels...........................................................................29
HP Photosmart Premier.................................................................................29
Memory card types..................................................................................18
Supported file formats.............................................................................19
HP Photosmart D5100 series User Guide 3
Page 64

HP Photosmart Studio ...................................................................................29
Using HP Photosmart Premier.......................................................................29
Prepare your printer to print on CDs and DVDs....................................................29
Finish the print job.................................................................................................31
6 Care and maintenance........................................................................................33
Cleaning and maintaining the printer.....................................................................33
Cleaning the exterior of the printer.................................................................33
Cleaning the print cartridges..........................................................................33
Manually cleaning the print cartridge contacts...............................................33
Updating the software...........................................................................................34
Storing the printer and print cartridges..................................................................35
Storing the printer...........................................................................................35
Storing the print cartridges.............................................................................35
Maintaining the quality of photo paper..................................................................35
Storing photo paper........................................................................................36
Handling photo paper.....................................................................................36
7 Troubleshooting..................................................................................................37
Printer hardware problems....................................................................................37
Printing problems...................................................................................................38
CD/DVD printing problems....................................................................................42
Bluetooth printing problems...................................................................................43
Printer screen status indicators.............................................................................44
8 HP Support...........................................................................................................47
HP Support by phone............................................................................................47
Placing a call..................................................................................................48
Return to HP repair service (North America only).................................................48
HP Quick Exchange Service (Japan only)............................................................48
Additional warranty options...................................................................................49
9 Specifications......................................................................................................51
System specifications............................................................................................51
Printer specifications.............................................................................................52
10 HP Warranty.........................................................................................................55
Index............................................................................................................................57
4 HP Photosmart D5100 series
Page 65

1
Welcome
Thank you for purchasing an HP Photosmart D5100 series printer! With your new photo
printer you can print beautiful photos and save photos to your computer. You can also
print images directly on CDs and DVDs using the HP Photosmart D5100 series printer.
This guide primarily explains how to print photos from memory cards, digital cameras,
Bluetooth devices, and iPods. To learn how to print from your computer, install the HP
Photosmart software and view the onscreen HP Photosmart Printer Help. For an
overview of using a computer and the printer together, see Printing from a computer. For
information about installing the software, see the Quick Start booklet.
The printer comes with the following documentation:
● Quick Start booklet — The HP Photosmart D5100 series Quick Start booklet
contains quick and easy instructions to help you set up the printer and print your first
photo.
● User Guide — The HP Photosmart D5100 series User Guide is the book you are
reading. This book describes the basic features of the printer, explains how to print
on plain paper, photo paper, CDs, and DVDs. In addition, this book contains
hardware troubleshooting information.
● HP Photosmart Printer Help — The onscreen HP Photosmart Printer Help
describes how to use the printer with a computer and contains software
troubleshooting information.
Accessing the onscreen HP Photosmart Printer Help
After you have installed the HP Photosmart software on a computer, you can view the
onscreen HP Photosmart Printer Help:
● Windows PC: From the Start menu, select Programs (in Windows XP, select All
Programs) > HP > Photosmart D5100 series > Photosmart Help.
● Macintosh: From the Finder Help menu, select Mac Help. On the Help Viewer,
select Library > HP Photosmart Mac Help.
HP Photosmart D5100 series User Guide 5
Page 66

Chapter 1
Printer parts
Front View
1 Main cover: Lift this cover to change cartridges.
2 CD/DVD tray: Lower this tray to insert the CD/DVD holder to print on CDs and DVDs.
3 Output tray: Collect your printed papers and photos from this tray.
4 Main tray: Load paper here.
5 Output tray extension: Pull the extension to hold large output paper.
6 Output tray latch: Use this latch to firmly close the output tray.
7 Memory card and PictBridge camera slots: Insert memory cards and PictBridge cameras
here.
8 Control panel: Control the print job from here.
Inside view
1 Cartridge holder: Load print cartridges here.
2 Photo paper-width guide: Adjust this guide for different paper widths.
3 Photo tray: Load photo paper or other supported small media here.
6 HP Photosmart D5100 series
Page 67

Back of printer
1 Rear access door: Open this door to clear a paper jam.
2 USB port: Use this port to connect a computer to the printer.
3 Power cord connection: Use this port to connect the power cord included with the printer.
Control panel
1 Printer screen: Displays photo index number, page layout information, and approximate ink
levels.
2
Select Photos and : Scrolls through photos on a memory card.
3 OK: Selects or deselects the displayed photo index number for printing.
4 Print: Prints selected photos from the inserted memory card.
5 Photo Tray: Selects the photo tray for the next standalone print job.
6 Photosmart Express: Opens the HP Photosmart Express software on a Windows computer
and the HP Photosmart Studio software on a Mac.
7 Cancel: Cancels the current print job.
8 On: Turns the printer on or off.
9 Photo Index: Prints thumbnails of all the photos on a memory card.
10 Layout: Chooses the photo layout.
HP Photosmart D5100 series User Guide 7
Page 68

Chapter 1
Indicator lights
1 Attention: Flashing red if there is an error or if some user action is required.
2 Print: Solid green if the printer is ready to print, pulsing green if the printer is busy.
3 Photo Tray: Solid green to indicate that the next standalone print job will be carried out from
the photo tray.
4 Power: Solid green if the printer is on, otherwise off.
5 Memory card / PictBridge camera: Solid green if the memory card or PictBridge camera is
correctly inserted; flashing green if the printer is accessing a memory card or a PictBridge
camera; and off if no memory card or PictBridge camera is inserted or more than one card is
inserted.
Printer screen
The printer screen of the HP Photosmart D5100 series printer displays the status of the
printer and helps in the selection of images for printing. The printer screen consists of
seven segment displays, a check mark icon, a page layout icon, two pen icons, and a
paper icon as shown in the figure.
8 HP Photosmart D5100 series
Page 69

1 Check mark icon: Indicates that the photo has been selected for printing.
2 Page layout icon: Indicates the page layout selected.
3 Paper icon: Flashes when the printer is out of paper or there is a paper jam.
4 Pen icons: Represent the cartridges in each chute. The icons appear when the cartridges are
installed. The bars next to each pen icon indicate the approximate ink levels in each cartridge.
5 Copies icon: Indicates the number of copies to be printed. No icon is present when only one
copy is to be printed.
6 Image number icon: Indicates the number of the image on the memory card. It also indicates
the presence of Digital Print Order Format (DPOF).
HP Photosmart D5100 series User Guide 9
Page 70

Chapter 1
10 HP Photosmart D5100 series
Page 71

2
Get ready to print
This section includes the following topics:
● Loading paper
● Using print cartridges
Load paper
For better quality, choose the right paper and load it correctly in the main tray or photo
tray.
Tip Load only one type and size of paper at a time. Do not mix paper types or
sizes in the main tray or the photo tray.
Choose the right paper
For a list of available HP paper, or to purchase supplies, go to:
● www.hpshopping.com (U.S.)
● www.hp.com/go/supplies (Europe)
● www.hp.com/jp/supply_inkjet (Japan)
● www.hp.com/paper (Asia/Pacific)
To get the best results from the printer, choose from these high-quality HP photo papers.
To print
High-quality, long-lasting prints and
enlargements
Medium- to high-resolution images from
scanners and digital cameras
Instant dry, water and fingerprint-resistant
glossy photos
Casual and business photos HP Photo paper
Text documents, draft versions, test and
alignment pages
To keep your paper in good condition for printing:
● Store unused paper in its original packaging or in a plastic bag.
● Keep the paper flat in a cool, dry place. If the corners curl, place the paper in a plastic
bag and gently bend it in the opposite direction until it lies flat.
● Hold photo paper by the edges to avoid smears.
Print from the control panel or a computer
When printing from a computer, the printer supports paper sizes from 7.6 x 12.7 cm to
22 x 61 cm (3 x 5 inch to 8.5 x 14 inch). When printing from the control panel directly,
Use this paper
HP Premium Plus photo paper
(Also known as Colorfast photo paper in
some countries/regions.)
HP Premium photo paper
HP Advanced photo paper
HP Everyday photo paper
HP Multipurpose paper
HP Photosmart D5100 series User Guide 11
Page 72

Chapter 2
the paper sizes supported include A6, A4, 10 x 15 cm (4 x 6 inch) with or without a tab,
8.5 x 11 inch, Hagaki, and L-size.
Load the main tray
The main tray supports the following media:
● Letter or A4 paper
● Transparencies
● 20 x 25 cm (8 x 10 inch) photo paper
● Envelopes 28.0 cm (11 inches) wide and greater
● 7.62 x 13 cm (3 x 5 inch) photo paper
● A6 paper
● L-size cards
● 13 x 18 cm (5 x 7 inch) photo paper
● 2L-size paper
● 10 x 20 cm (4 x 8 inch) photo cards
● B5 paper
● Envelopes smaller than 28.0 cm (11 inches) wide
Follow the steps to load your main tray:
1. Raise the photo tray.
2. Remove any paper that is loaded in the main tray.
3. Slide the paper-width guide to the left until it stops.
4. Load the paper in the main tray with the side to be printed facing down. Slide the
paper in until it stops.
Load envelopes with the flap on the left. Tuck the flaps inside the envelopes to avoid
paper jams.
Note Align the paper to the right edge of the tray.
5. Slide the paper-width guide to fit close to the edges of the paper without bending
the paper.
6. Lower the photo tray.
12 HP Photosmart D5100 series
Page 73

Load the photo tray
The photo tray supports the following media:
● 10 x 15 cm (4 x 6 inch) photo paper (with or without tab)
● 13 x 18 cm (5 x 7 inch) photo paper
● Index cards
● Hagaki cards
Follow the steps to load the photo tray:
1. Press the output tray latch from below and lift upwards to separate the output tray
from the photo tray.
2. Raise the output tray.
3. Remove any paper that is loaded in the photo tray.
4. Slide the paper-width guide to the left until it stops.
5. Load up to 20 sheets of photo paper into the photo tray with the side to be printed
facing down. Slide the paper in until it stops.
Note Align the paper to the right edge of the tray.
6. Slide the paper-width guide to fit close to the edges of the paper without bending
the paper.
HP Photosmart D5100 series User Guide 13
Page 74

Chapter 2
7. Lower the output tray to its original position. The output tray latch clicks when the
output tray is lowered completely.
8. Press the Photo Tray button on the control panel.
Using print cartridges
Your HP Photosmart D5100 series printer can print color and black-and-white photos.
HP provides different types of print cartridges so you can choose the best cartridges for
your project.
Purchasing replacement print cartridges
When purchasing replacement cartridges, refer to the cartridge numbers that appear on
the back cover of this guide. These cartridge numbers may vary by country/region. You
can also find the cartridge numbers in the printer software.
To find the correct print cartridge numbers for Windows users
1. Right-click the HP Digital Imaging Monitor icon on the far right of the Windows
taskbar and select Launch/Show HP Solution Center.
2. Select Settings, and then select Print Settings > Printer Toolbox.
3. Select the Estimated Ink Levels tab, and then click Print Cartridge Information.
To find the correct print cartridge numbers for Mac users
1. Click HP Photosmart Studio in the Dock.
2. Click Devices in the Studio toolbar.
3. From the Information and Settings pop-up menu, choose Maintain Printer and
then click Launch Utility.
4. In the Configuration Settings list, click Supply Info.
®
Print cartridge tips
HP Vivera Inks deliver true-to-life photo quality and exceptional fade resistance resulting
in vivid colors that last for generations! HP Vivera Inks are specially-formulated and
scientifically tested for quality, purity, and fade resistance.
For best print quality, HP recommends that you install all retail print cartridges before the
install-by date stamped on the box.
For optimal printing results, HP recommends using only genuine HP print cartridges.
Genuine HP print cartridges are designed and tested with HP printers to help you easily
produce great results, time after time.
Note HP cannot guarantee the quality or reliability of non-HP ink. Printer service
or repairs required as a result of printer failure or damage attributable to the use
of non-HP ink will not be covered under warranty.
Caution To prevent ink loss or spillage: leave the print cartridges installed while
transporting the printer, and avoid leaving used print cartridge(s) out of the printer
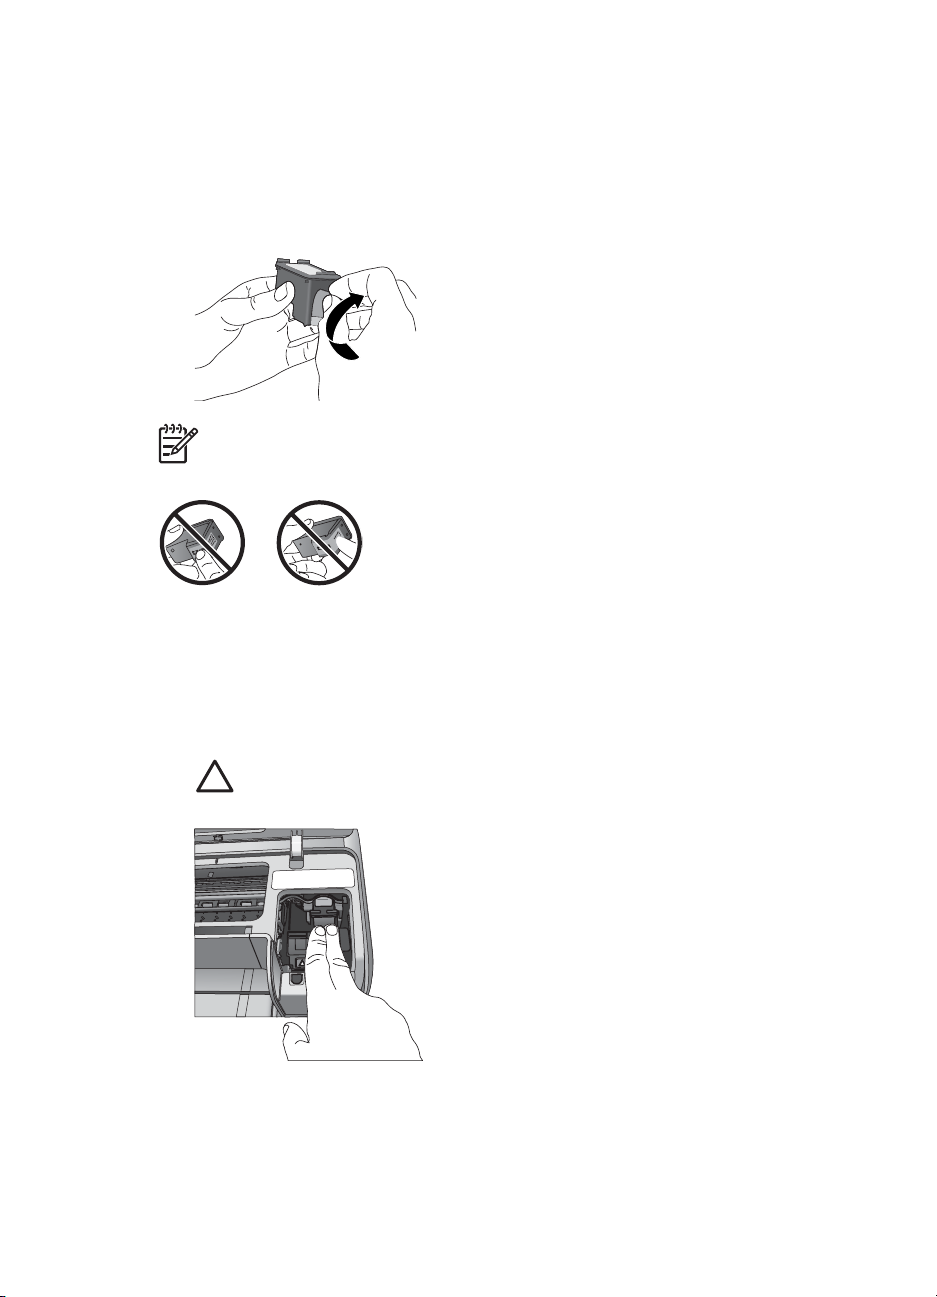
for extended lengths of time.
14 HP Photosmart D5100 series
Page 75

Inserting and replacing the print cartridges
To prepare the printer and cartridges
1. Make sure the power is on.
2. Raise the main cover of the printer.
3. Remove the pink tape from the cartridges.
Note Do not touch the ink nozzles or the copper-colored contacts, and do not
re-tape the cartridges.
To insert the cartridges
1. If you are replacing an HP Black, HP Photo, or HP Gray Photo cartridge, push down
and pull outward on the cartridge in the right stall to remove it.
2. Hold the new cartridge with the label on top. Slide the cartridge at a slight upward
angle into the right stall so the copper-colored contacts go in first. Gently push the
cartridge until it snaps into place.
Caution To avoid print carriage jams, make sure the print cartridge snaps
securely into place as you insert it.
3. Repeat the previous steps to install the HP Tri-color cartridge in the left stall.
4. Lower the main cover.
Aligning the print cartridges for maximum results
It is important to align the print cartridges whenever you install or replace a print cartridge.
Aligning the print cartridges allows them to perform with maximum results in print speed
HP Photosmart D5100 series User Guide 15
Page 76

Chapter 2
and quality. The HP Photosmart D5100 series printer automatically aligns the print
cartridges every time you insert or replace a print cartridge.
Note When you insert or replace a print cartridge, the printer makes noise for a
few seconds. This is normal. The printer is aligning the cartridges.
16 HP Photosmart D5100 series
Page 77

3
Print without a computer
The HP Photosmart D5100 series lets you print high-quality photos without even turning
on a computer. After setting up the printer using the instructions in the HP Photosmart
D5100 series Quick Start booklet, refer to these steps for start-to-finish printing.
Once you have set up the printer, you can print from any of the following:
● Memory card
● PictBridge-compatible digital camera
● Bluetooth device
● iPod (with photos stored in it)
Getting connected
This printer offers several ways of connecting to computers or other devices. Each
connection type lets you do different things.
Connection type and what you need
Memory cards
A compatible digital camera memory card.
Insert the memory card into the
appropriate memory card slot on the front
of the printer.
PictBridge
A PictBridge-compatible digital camera
and a USB cable.
Connect the camera to the camera port on
the front of the printer.
Bluetooth
An optional HP Bluetooth wireless printer
adapter.
Connect the HP Bluetooth wireless printer
adapter to the camera port on the front of
the printer.
iPod
An iPod and the USB cable that came with
it.
Connect the iPod to the camera port on
the front of the printer.
This lets you...
● Print directly from a memory card to
the printer. See Print from a memory
card.
● Print a photo index of photos on a
memory card directly from the printer
control panel.
Print directly from a PictBridge-compatible
digital camera to the printer. For more
information, see Printing photos from a
digital camera and the camera
documentation.
Print from any device with Bluetooth
wireless technology to the printer.
Print directly from an iPod (with photos
stored in it) to the printer. For more
information, see Print photos from an
iPod.
Print from a memory card
You can print photos from a memory card by inserting the card into the printer and using
the printer control panel to select and print photos. You can also print camera-selected
HP Photosmart D5100 series User Guide 17
Page 78

Chapter 3
photos—photos you marked for printing using a digital camera—directly from a memory
card.
Printing from a memory card is quick and easy, and does not drain the digital camera
batteries. For more information on inserting memory cards, see Insert a memory card.
Insert a memory card
After you have taken pictures with a digital camera, you can remove the memory card
from the camera and insert it into the printer to select and print your photos. The printer
can read the following types of memory cards: CompactFlash, Memory Stick, Microdrive,
MultiMediaCard, Secure Digital, and xD-Picture Card.
Caution Using any other type of memory card may damage the memory card
and the printer.
Memory card slots
1 xD-Picture Card
2 Memory Stick
3 CompactFlash I and II, Microdrive
4 Secure Digital (SD), MultiMediaCard (MMC)
Memory card types
Find your memory card in the following table and use the instructions to insert the card
into the printer.
Guidelines:
● Insert only one memory card at a time.
● Gently push the memory card into the printer until it stops. The memory card slot
allows for only a portion of the card to insert into the printer; do not try to force the
memory card all the way into the printer.
● When the memory card is inserted correctly, the memory card light flashes and then
remains solid green.
Caution 1 Inserting the memory card any other way may damage the card and
the printer.
Caution 2 Do not pull out a memory card while the memory card light is flashing
green. For more information, see Remove a memory card.
18 HP Photosmart D5100 series
Page 79

Memory card How to insert the memory card
CompactFlash ● Front label faces up, and if the label has an arrow, the arrow points
toward the printer
● Edge with metal pinholes goes into the printer first
Memory Stick ● Angled corner is on the left
● Metal contacts face down
● If you are using a Memory Stick Duo or Memory Stick PRO Duo
card, attach the adapter that came with the card before you insert
the card into the printer
Microdrive ● Front label faces up, and if the label has an arrow, the arrow points
toward the printer
● Edge with metal pinholes goes into the printer first
MultiMediaCard ● Angled corner is on the right
● Metal contacts face down
Secure Digital ● Angled corner is on the right
● Metal contacts face down
xD-Picture Card ● Curved side of card points toward you
● Metal contacts face down
Supported file formats
The printer can recognize and print JPEG and uncompressed TIFF files directly from the
memory card. If your digital camera saves photos in other file formats, save the files to
your computer and print them using a software application. For more information, see
the onscreen HP Photosmart Printer Help.
Change the default paper size
Use the Toolbox to change the default paper sizes when printing directly from a memory
card. The default small paper size for printing from the photo tray is 10 x 15 cm (4 x 6 inch),
and the default large paper size for printing is 21.6 x 28.0 cm (8.5 x 11 inch).
HP Photosmart D5100 series User Guide 19
Page 80

Chapter 3
To change default paper sizes
1. Right-click the HP Digital Imaging Monitor icon on the far right of the Windows
taskbar and select Launch/Show HP Solution Center.
2. Click Settings and select Print Settings > Printer Toolbox.
3. Click the Configure Paper Size tab.
4. Select the default paper sizes for small paper and large paper.
Decide which photos to print
Decide which photos to print by first printing a photo index. A photo index shows
thumbnail views and index numbers for all the photos on a memory card (2000
maximum). You will use the index numbers on the printout to indicate which photos you
want to print.
To print a photo index
1. Insert a memory card.
2. Make sure there are a few sheets of plain paper loaded in the main tray.
3. Press Photo Index on the control panel.
Select a photo layout
Press Layout on the printer to select a layout for the photos you want to print. All photos
selected from the printer control panel will print in this layout. The actual size of the prints
will vary according to the size of paper you load in the printer, as shown in the following
table. For a complete list of supported photo sizes, see Printer specifications.
For this layout
One photo per sheet 4 x 6 inch
Three photos per sheet 3.5 x 5 inch
Paper size Photo size
10 x 15 cm
5 x 7 inch
8.5 x 11 inch
A4
Hagaki
L
4 x 6 inch
5 x 7 inch
8 x 10 inch
8.5 x 11 inch
A6
A4
Hagaki
L
4 x 6 inch
10 x 15 cm
5 x 7 inch
8.5 x 11 inch
21.0 x 29.7 cm
10.0 x 14.8 cm
9.0 x 12.7 cm
1.5 x 2.25 inch
1.75 x 2.625 inch
2.25 x 3.375 inch
3.33 x 5 inch
4 x 6 inch
4.77 x 7.15 cm
10 x 15 cm
4.52 x 6.78 cm
3.96 x 5.94 cm
20 HP Photosmart D5100 series
Page 81

Select photos to print
Using the photo index as a guide, you can select and print photos from the control panel.
Note Once your selected photos print, the printer automatically deselects them.
If you want to…
Select one or more
photos
Do this
1. Make sure your memory card is inserted in the printer.
Note Instead of inserting a memory card, you
can also select photos from an iPod that is
connected to the front camera port. For more
information, see Print photos from an iPod.
2. Refer to the photo index you printed and decide which
photo(s) to select for printing. Note their corresponding
index numbers.
3. Press Select Photos
the first photo you want to print appears on the printer
screen.
Tip Press and hold the button to view the
index numbers rapidly.
4. Press OK to select the photo for printing. A check mark
appears next to the number on the printer screen to
indicate your selection.
5. Repeat steps 2 through 4 until you have selected all
the photos you want to print.
Note To deselect a photo, press Cancel. To print
multiple copies of the same photo, press OK until
the number of copies you want to print appears
below the check mark.
or
until the index number of
Select all photos on the
memory card
Deselect the selected
photos
1. Make sure your memory card is inserted in the printer.
2. Press and hold OK for three seconds. The printer
screen briefly displays twelve dashes, and then check
marks appear next to each index number on the
screen.
To deselect all selected photos, press and hold OK for
three seconds.
Print your photos
To print photos from a memory card
1. Insert a memory card.
2. Load photo paper in the main tray or photo tray.
HP Photosmart D5100 series User Guide 21
Page 82

Chapter 3
Note To print from the photo tray, press the Photo Tray button on the control
panel. The printer selects the photo tray for the next standalone print job.
3. Select one or more photos. For information on selecting photos, see Select photos
to print.
4. Press Print.
Once the selected photos print, the printer automatically deselects them.
Note Some digital cameras have a menu feature that allows you to select photos
on a memory card to be printed. The camera-selected photos are listed for printing
in a temporary Digital Print Order Format (DPOF) file. The DPOF file is
automatically deleted after the selected photos have printed.
If you have selected photos using the DPOF feature, dPOF appears on the printer
screen when you insert the memory card. Press Print to print these cameraselected photos, or press Cancel to deselect them.
Remove a memory card
Wait until the Memory Card light stops flashing and remains solid green, and then gently
pull the memory card to remove it from the printer.
Caution If the Memory Card light is flashing green, the printer is accessing the
memory card. Do not remove a memory card while it is being accessed because
this may damage the printer or the memory card.
Printing photos from a digital camera
You can print photos by connecting a PictBridge digital camera directly to the camera
port of the printer with a USB cable. If you have a digital camera with Bluetooth wireless
technology, you can insert the optional HP Bluetooth
printer and send photos to the printer wirelessly.
When you print from a digital camera, the printer uses the settings that you selected on
the camera. For more information, see the documentation that came with the camera.
Using a PictBridge camera
The HP Photosmart D5100 series printer prints from a PictBridge camera by directly
connecting the camera to the front USB port of the printer.
Note Some PictBridge cameras might list the 5 x 7 inch paper size as 2L,
127 x 178 mm, or 13 x 18 cm.
To connect a PictBridge-compatible camera to the printer
1. Set the camera to PictBridge mode, and then select the photos you want to print.
2. Load photo paper in the printer. For information, see Load paper.
3. Connect the PictBridge-compatible digital camera to the camera port on the front
of the printer using the USB cable that came with the camera.
Once the printer recognizes the PictBridge-compatible camera, the selected photos
print automatically.
®
wireless printer adapter in the
22 HP Photosmart D5100 series
Page 83

Using a Bluetooth camera
If you have a digital camera with Bluetooth wireless technology, you can purchase the
optional HP Bluetooth wireless printer adapter and print from a camera using a Bluetooth
wireless connection.
To print photos from a Bluetooth camera
1. Load photo paper in the printer. For information, see Load paper.
2. Insert the HP Bluetooth wireless printer adapter into the camera port on the front of
the printer.
The light on the adapter will flash when the adapter is ready to receive data.
3. Follow the instructions in the documentation that came with the digital camera to
send photos to the printer.
Print photos from other Bluetooth devices
You can also print from other devices with Bluetooth wireless technology, such as PDAs,
notebook computers, and mobile phones. For more information, see Getting
connected, the onscreen HP Photosmart Printer Help, and the documentation that came
with the Bluetooth device.
Make the Bluetooth connection
To use Bluetooth connectivity, all devices must have the necessary hardware and
software installed. In addition, an HP Bluetooth wireless printer adapter must be
connected to the camera port on the front of the printer. The adapter is available
separately. For more information, see the documentation that came with the adapter.
Print photos from a Bluetooth device
The basic procedure for printing from any Bluetooth device is the same:
To print photos from a Bluetooth device
1. Have the device search for available Bluetooth printers.
2. Select the printer when it appears on the device.
3. Print.
Check the documentation that came with the device for detailed instructions.
Print photos from an iPod
Before using the steps below to import photos to and print photos from your iPod, make
sure your images and your iPod meet the following requirements:
● The images you copy to the iPod must be in JPEG format.
● Make sure the iPod is formatted for Windows (FAT 32 file structure).
iPod defaults to the Windows file structure. To check if your iPod was formatted for
Windows, go to Settings > About on your iPod. If it was formatted in Windows, it
will display Format Windows at the bottom of the screen. If it was not formatted in
Windows, you must connect the iPod to a Windows PC using the USB cable that
came with the iPod and follow the onscreen instructions.
HP Photosmart D5100 series User Guide 23
Page 84

Chapter 3
Note iPods that have only been connected to a Macintosh are not
compatible with the printer; however, you can connect the iPod to a Windows
PC to make it compatible. After connecting to a Windows PC, Macintosh
users can still fully synchronize their iPods back to Macintosh and Mac
iTunes and maintain printer support.
To import photos to an iPod
1. Copy photos from a memory card to your iPod using the Belkin Media Reader for
iPod.
2. Verify that photos are on your iPod by selecting Photo Import on the iPod menu.
Photos appear as Rolls.
To print photos from an iPod
1. Connect the iPod to the camera port on the front of the printer using the USB cable
that came with the iPod.
2. Select the photo(s) you want to print and press Print. Once the selected photos print,
the printer automatically deselects them. For more information on selecting and
printing photos, see Select photos to print.
If you are unable to print to the HP Photosmart using your iPod, please contact
HP Customer Care. See HP Support.
24 HP Photosmart D5100 series
Page 85

4
Print from a computer
To print from a computer, the printer software must be installed. During software
installation, either HP Photosmart Premier (Windows Full-install users), HP Photosmart
Essential (Windows Express-install users) or the HP Photosmart Studio (Mac) is installed
on your computer, allowing you to organize, share, edit, and print photos.
For more information on installing the software, see the Quick Start Guide. Update the
software regularly to ensure you have the latest features and improvements; for
instructions, see Updating the software.
Note Windows users: HP Photosmart Premier can only be used on computers
with processors that have Intel
®
Pentium® III (or equivalent) and higher.
Use creative options in the printer software
Read through these tips on how to open and use HP Photosmart Premier (Windows),
HP Photosmart Essential (Windows), HP Photosmart Studio (Mac), and HP Photosmart
Share.
HP Photosmart Premier (Windows)
HP Photosmart Premier is an easy-to-use software program that gives you everything
you need to have fun with your photos, in addition to basic photo editing and printing.
This software also gives you access to HP Photosmart Share so that you can easily share
your photos. HP Photosmart Premier is only available to Windows users.
Open HP Photosmart Premier (Windows users)
Double-click the HP Photosmart Premier icon on your desktop. If you need help,
➔
see the software help within HP Photosmart Premier.
Explore the many features of HP Photosmart Premier:
● View — View photos in multiple sizes and ways. Easily organize and manage your
photos.
● Edit — Crop your photos and fix photos with red eye. Automatically adjust and
enhance your photos in different sizes and in multiple layouts.
● Print — Print your photos in different sizes and in multiple layouts.
● Share — Send photos to family and friends without the bulky attachments using HP
Photosmart Share, a better way to send e-mail.
● Create — Easily create album pages, cards, calendars, panoramic photos, CD
labels, and more.
● Back-up — Make back-up copies of your photos to store and save.
HP Photosmart Essential (Windows)
HP Photosmart Essential is an easy-to-use software program that gives you basic photo
editing and printing capabilities. This software also gives you access to HP Photosmart
Share so that you can easily share your photos. HP Photosmart Essential is only
available for Windows users.
HP Photosmart D5100 series User Guide 25
Page 86

Chapter 4
Open HP Photosmart Essential (Windows users)
Double-click the HP Photosmart Essential icon on your desktop. If you need help,
➔
see the software help within HP Photosmart Essential.
Explore the many features of HP Photosmart Essential:
● View — View photos in multiple sizes and ways. Easily organize and manage your
photos.
● Edit — Crop your photos and fix photos with red eye. Automatically adjust and
enhance your photos to make them perfect.
● Print — Print your photos in different sizes and in multiple layouts.
● Share — Send photos to family and friends without the bulky attachments with HP
Photosmart Share, a better way to send e-mail.
HP Photosmart Studio (Mac)
Click the HP Photosmart Studio icon in the Dock.
➔
Explore the many features of the HP Photosmart Mac software that is accessible from
the HP Photosmart Studio:
● Import — Import photos or videos from an HP digital camera.
● View and Manage — View, organize, and manage your photos and videos.
● Edit — Adjust and enhance your images.
● Slideshow — Create an online slideshow of your photos.
● Panorama — Create a single panoramic image from several images.
● Create — Create album pages, cards, labels, posters, banners, and more.
● Print — Print your photos and frames from video in standard sizes or in index sheet
format.
● Share — Send photos to family and friends without the bulky attachments.
● Shop — Order online prints and gifts.
HP Photosmart Share
HP Photosmart Share allows you to send photos to family and friends without bulky email attachments. The printer must be connected through a USB cable to a computer
with Internet access and have all the HP software installed. For more information, see
the HP Photosmart Premier, HP Photosmart Essential, or HP Photosmart Mac help.
Open HP Photosmart Share (Windows users)
Click the HP Photosmart Share tab within HP Photosmart Premier or
➔
HP Photosmart Essential.
Open HP Photosmart Share (Mac users)
In HP Photosmart Studio, select photos to share, and then click the Share button in
➔
the toolbar.
View photos on your computer screen
When the printer is connected to a computer, you can insert a memory card in the printer
and view the photos on your computer screen. When you insert the memory card, the
HP Photosmart software gives you the option of viewing or saving the photos to the
computer. For information about how to connect the printer to your computer, see the
Quick Start booklet.
26 HP Photosmart D5100 series
Page 87

To view memory card photos onscreen
1. Make sure that you have installed the software from the HP Photosmart D5100
series CD, and that the printer is connected to a computer at the USB port on the
back of the printer.
2. Insert a memory card into the printer. The HP Photosmart software will give you the
option of viewing or saving your photos.
3. Click View to open Photo Viewer and display the first image on the memory card.
4. On the printer control panel, press Select Photos
photos on the card.
Save your photos to a computer
When you connect the printer to a computer, you can save your photos from a memory
card to the computer.
To save your photos from a memory card to a computer
1. Make sure that you have installed the software from the HP Photosmart D5100
series CD, and that the printer is connected to a computer at the USB port on the
back of the printer.
2. Insert a memory card into the printer. The HP Photosmart software will give you the
option of viewing or saving your photos.
3. Click Save.
4. Follow the onscreen instructions to save photos to the appropriate folder on your
computer.
and to scroll through the
HP Photosmart D5100 series User Guide 27
Page 88

Chapter 4
28 HP Photosmart D5100 series
Page 89

5
Print on CDs and DVDs
In addition to printing on paper, your HP Photosmart D5100 series printer also allows
you to print on CDs and DVDs. You can design and create a custom label for your CD
or DVD using the HP Phototsmart Premier Software on a Windows computer or the HP
Photosmart Studio on a Mac. You can then print the label on your printable CD or DVD
media.
Tip It is recommended that you write your data to the CD or DVD before printing
the label on it.
Create and print CD/DVD labels
Read through these tips on how to open and use the HP Photosmart Premier Software
and the HP Photosmart Studio.
HP Photosmart Premier
HP Photosmart Premier is an easy-to-use software that provides you with all the tools
you need to have fun with your photos. This software also helps you to design and create
labels for your CDs and DVDs.
Opening HP Photosmart Premier
Double-click the HP Photosmart Premier icon on your desktop. If you need help,
➔
see the HP Photosmart Software Help.
HP Photosmart Studio
HP Photosmart Studio is an easy-to-use software that provides you with all the tools you
need to have fun with your photos on a Mac. This software also helps you to design and
create labels for your CDs and DVDs.
Opening HP Photosmart Studio
In the Dock, click the HP Photosmart Studio icon.
➔
Using HP Photosmart Premier
After opening the software, you can design and create labels for your CDs and DVDs
under the Create tab. After creating your label, click Print on the Create page to print the
label on your media. If you need help, see the onscreen Help within the software.
Tip Before you click Print in the software, load the media in the CD/DVD tray.
If you need help, see Load the CD/DVD tray.
Prepare your printer to print on CDs and DVDs
After creating your CD/DVD label, load the CD/DVD tray with a printable media.
HP Photosmart D5100 series User Guide 29
Page 90

Chapter 5
Caution Before you load the media on the CD/DVD tray, ensure that your printer
has approximately 10 cm (4 inches) clearance behind it.
Load the CD/DVD holder
Securely snap the media on the CD/DVD holder that came with your printer. Ensure
➔
that the printable surface is facing up.
Note If you are using a smaller-sized media, flip over the CD/DVD holder
ring as shown in figure I.
Load the CD/DVD tray
1. Pull down the CD/DVD tray.
2. Insert the CD/DVD holder into the CD/DVD tray until the arrows on the tray line up
to the arrows on the holder. The side marked with arrows goes into the CD/DVD
tray.
3. Click Print in the software.
The printer pulls the CD/DVD holder while printing on the media. The CD/DVD holder
might protrude about 7.5 cm (3 inches) at the back of the printer.
30 HP Photosmart D5100 series
Page 91

Finish the print job
After successfully printing on the media, follow the steps below.
Remove the CD/DVD holder
1. Carefully remove the CD/DVD holder from the CD/DVD tray.
2. Close the CD/DVD tray.
Note Other printing jobs are implemented only after the CD/DVD tray is
closed.
3. Remove the media from the CD/DVD holder.
Tip Allow sufficient time for the printed surface to dry before removing the
media from the CD/DVD holder.
Caution Do not touch the printed surface while removing the media from
the CD/DVD holder.
HP Photosmart D5100 series User Guide 31
Page 92

Chapter 5
32 HP Photosmart D5100 series
Page 93

6
Care and maintenance
The HP Photosmart D5100 series printer requires very little maintenance. Follow the
guidelines in this chapter to extend the life span of the printer and printing supplies, and
to ensure that the photos you print are always of the highest quality.
Cleaning and maintaining the printer
Keep the printer and print cartridges clean and well-maintained using the simple
procedures in this section.
Cleaning the exterior of the printer
To clean the exterior of the printer
1. Turn off the printer, and then disconnect the power cord from the back of the printer.
2. Wipe the outside of the printer with a soft cloth that has been lightly moistened with
water.
3. Raise the main cover and wipe the area around the print cartridges with a soft cloth
that has been lightly moistened with water.
Caution Do not use any type of cleaning solution. Household cleaners and
detergents may damage the printer finish. Do not clean the interior of the printer.
Keep all fluids away from the interior. Do not lubricate the metal rod on which the
print cartridge cradle slides. Noise is normal when the cradle moves back and
forth.
Cleaning the print cartridges
If you notice white lines or single-color streaks on the photos you print, the print cartridges
might need to be cleaned. You can run an automatic cartridge cleaning procedure using
the software that came with the printer. For more information, see the HP Photosmart
Printer Help.
If you complete all three levels of the automatic cartridge cleaning procedure and still
see white streaks or missing colors on the test page, you may need to manually clean
the print cartridge contacts. For more information, see Manually cleaning the print
cartridge contacts.
Note If the cartridge or printer has been recently dropped, you may also see
white streaks or missing colors in your prints. This problem is temporary and
clears up within 24 hours.
Manually cleaning the print cartridge contacts
If the printer is used in a dusty environment, debris may accumulate on the print cartridge
contacts and cause printing problems.
HP Photosmart D5100 series User Guide 33
Page 94

Chapter 6
To clean the print cartridge contacts
1. Gather the following items to clean the contacts:
– Distilled water (tap water may contain contaminants that can damage the print
cartridge)
– Cotton swabs or other soft, lint-free material that will not stick to the print
cartridge
2. Open the main cover of the printer.
3. Remove the print cartridge and place it on a piece of paper with the ink nozzle plate
facing up. Be careful not to touch the copper-colored contacts or the ink nozzle plate
with your fingers.
Caution Do not leave the print cartridge outside the printer for more than
30 minutes. Ink nozzles exposed to the air longer than this may dry out and
cause printing problems.
4. Lightly moisten a cotton swab with distilled water and squeeze any excess water
from the swab.
5. Gently wipe the copper-colored contacts with the cotton swab.
Caution Do not touch the ink nozzle plate. Touching the ink nozzle plate
will result in clogs, ink failure, and bad electrical connections.
6. Repeat steps 4 and 5 until no ink residue or dust appears on a clean swab.
7. Insert the print cartridges in the printer, and then close the main cover.
8. The printer automatically aligns the print cartridges. The printer makes noise while
aligning the printer. This is normal.
Updating the software
Download the latest printer software update periodically to ensure you have the latest
features and improvements. To download printer software updates, visit www.hp.com/
support or use HP Software Update. Make sure the computer is connected to the
Internet before performing software updates.
Note In some countries/regions, you can contact HP directly to order
HP Photosmart Premier software updates on CD.
Downloading the software (Windows users)
1. From the Windows Start menu, select Programs (in Windows XP, select All
Programs) > HP > HP Software Update. The HP Software Update window opens.
2. Click Next. HP Software Update searches the HP website for printer software
updates. If the computer does not have the most recent version of the printer
software installed, a software update appears in the HP Software Update window.
If the computer has the most recent version of the printer software installed, No new
updates are available appears in the HP Software Update window.
3. If a software update is available, click the check box next to the software update to
select it.
4. Click Next.
5. Follow the onscreen instructions to complete the installation.
34 HP Photosmart D5100 series
Page 95

Downloading the software (Mac)
Note Make sure you are connected to the Internet before you use
HP Photosmart Updater.
1. From the Finder, choose Go > Applications.
2. Choose Hewlett-Packard > Photosmart > HP Photosmart Updater.
3. Follow the onscreen instructions to check for software updates.
If you are behind a firewall, you need to enter the proxy server information in the
updater.
Storing the printer and print cartridges
Protect the printer and print cartridges by storing them properly when you are not using
them.
Storing the printer
You can store the printer by following these steps:
1. Turn off the printer.
2. Remove all paper from the paper trays.
3. If the output tray extension is pulled out, push it in.
4. Close the CD/DVD tray.
The printer is designed to withstand long or short periods of inactivity.
● Store the printer indoors out of direct sunlight in a place without temperature
extremes.
● If the printer and print cartridges have not been used for one month or more, use
the software that came with the printer to run the automatic cartridge cleaning
procedure before printing. For more information, see the HP Photosmart Printer
Help.
Storing the print cartridges
When you store the printer, always leave the active print cartridges inside the printer.
The printer stores the print cartridges in a protective cap during the power-down cycle.
Caution Make sure the printer completes its power-down cycle before you
unplug the power cord. This allows the printer to store the print cartridges
properly.
Follow these tips to help maintain HP print cartridges and ensure consistent print quality:
● Keep all unused print cartridges in their original sealed packages until they are
needed. Store print cartridges at room temperature (15–35 degrees C or 59–95
degrees F).
● Do not remove the plastic tape covering the ink nozzles until you are ready to install
the print cartridge in the printer. If the plastic tape has been removed from the print
cartridge, do not attempt to reattach it. Reattaching the tape damages the print
cartridge.
Maintaining the quality of photo paper
For best results with photo paper, follow the guidelines in this section.
HP Photosmart D5100 series User Guide 35
Page 96

Chapter 6
Storing photo paper
● Store the photo paper in its original packaging or in a resealable plastic bag.
● Store the packaged photo paper on a flat, cool, and dry surface.
● Return unused photo paper to its original packaging or in a resealable plastic bag.
Paper left in the printer or exposed to the environment may curl or yellow.
Handling photo paper
● Always hold photo paper by the edges to avoid fingerprints.
● If the photo paper has curled edges, place it in its plastic storage bag and gently
bend it in the opposite direction of the curl until the paper lies flat.
36 HP Photosmart D5100 series
Page 97

7
Troubleshooting
The HP Photosmart D5100 series printer is designed to be reliable and easy to use. This
chapter answers frequently asked questions about using the printer. It contains
information about the following topics:
● Printer hardware problems
● Printing problems
● CD/DVD printing problems
● Bluetooth printing problems
● Printer screen status indicators
For troubleshooting information about software installation, see the Quick Start booklet
that came with the printer. For troubleshooting information about using the printer
software and printing from a computer, see the HP Photosmart Printer Help. For
information about viewing the Printer Help, see Welcome.
Printer hardware problems
Before contacting HP Customer Care, read this section for troubleshooting tips or go to
the online support services at www.hp.com/support.
Note When connecting the printer to a computer, HP recommends using a USB
cable of less than 10 feet (3 meters) in length to minimize injected noise due to
potential high electromagnetic fields.
The Print light is pulsing green, but the printer is not printing.
Solution The printer is busy processing information. Wait for it to finish.
The Attention light is flashing red.
Solution The printer requires attention. Try the following:
● If the printer is connected to a computer, check the computer screen for
instructions.
● If you are printing a CD label on a CD/DVD, insert the CD/DVD holder in the
CD/DVD tray now.
● If you have a digital camera connected to the printer, check the camera screen
for instructions.
● If the printer is not connected to a computer, check for the following problems:
– Main cover open
– Out of paper
– Paper jam
– Print carriage jammed or stuck
– Print cartridge missing or inserted incorrectly
– Print cartridge tape not removed
HP Photosmart D5100 series User Guide 37
Page 98

Chapter 7
– Incorrect print cartridge installed
– Packaging materials are not removed
● If you are unable to solve the problem by using the instructions above, turn off
the printer and unplug the printer power cord. Wait 10 seconds, and then plug
it in again. Turn on the printer.
The printer does not find and display the index numbers from my memory card.
Solution
Try the following:
● Remove and reinsert the memory card.
● Turn off the printer, and then unplug the power cord. Wait about 10 seconds,
and then plug it in again. Turn on the printer.
● The memory card may contain file types the printer cannot read directly from
the memory card.
– Save the photos to a computer, and then print them from the computer. For
more information, see the documentation that came with the camera and
the onscreen HP Photosmart Printer Help.
– The next time you take photos, set the digital camera to save them in a file
format the printer can read directly from the memory card. For a list of
supported file formats, see Specifications. For instructions on setting the
digital camera to save photos in specific file formats, see the
documentation that came with the camera.
The printer is plugged in, but it will not turn on.
Solution
● The printer may have drawn too much power. Unplug the printer power cord.
Wait about 10 seconds, and then plug the power cord back in. Turn on the
printer.
● The printer may be plugged into a power strip that is turned off. Turn on the
power strip, and then turn on the printer.
The printer makes noises when I turn it on, or starts making noises on its own after
it has been sitting unused for a while.
Solution The printer may make noises after long periods of inactivity
(approximately 2 weeks), or when its power supply has been interrupted and then
restored. This is normal operation—the printer is performing an automatic
maintenance procedure to ensure that it produces the best quality output.
Printing problems
Before contacting HP Customer Care, read this section for troubleshooting tips or go to
the online support services at www.hp.com/support.
38 HP Photosmart D5100 series
Page 99

The printer does not print borderless photos.
Solution Make sure you have selected an appropriate paper size. The printer
cannot print borderless photos on all sizes of paper. For information about selecting
the paper size for borderless photos, see Select a photo layout.
Printing is very slow.
Solution You could have one of the following problems.
● You may be printing a project containing a high-resolution graphic, a highresolution photo, or a PDF. Large, complex projects containing graphics or
photos print slower than text documents.
● The printer may be in Ink-backup Printing Mode. The printer enters this mode
when one of the print cartridges has been removed. Replace the missing print
cartridge.
Photo paper does not feed into or come out of the printer correctly.
Solution You may have one of these problems.
● If you are using the photo tray for printing, there may be paper loaded in the
main tray. Remove any paper from the main tray before using the photo tray for
printing.
● Ensure that the CD/DVD tray is closed. The printer does not load paper until
the CD/DVD tray is closed.
● The printer may be in an extremely high- or low- humidity environment. Load
one sheet of photo paper at a time.
● The photo paper may be curled. If the photo paper is curled, place the paper in
a plastic bag and gently bend it the opposite direction of the curl until the paper
lies flat. If the problem persists, use photo paper that is not curled.
● There may be too much paper loaded in the main tray. Remove some paper
from the main tray and try printing again. For paper loading instructions, see
Load paper.
● The paper may be too thin or too thick. Use HP paper for best results. For more
information, see Choose the right paper.
● Two or more pieces of paper may be stuck together. Remove the paper from
the tray and shuffle the paper so it does not stick together. Reload the paper
into the tray and try printing again.
Printed pages are dropping off of the output tray.
Solution Pages can drop off of the output tray when they are printed. To prevent
this, always extend the output tray extension when you print.
The printout is rippled or curled
Solution The project you are printing uses a larger amount of ink than normal.
Print the project from a computer, and use the printer software to lower the ink
saturation level. See the onscreen HP Photosmart Printer Help for more information.
HP Photosmart D5100 series User Guide 39
Page 100

Chapter 7
The document printed at an angle or is off-center.
Solution
● The paper-width guide may not be set properly. Make sure that the paper-width
guide is close to the edge of the paper without bending it.
● The paper may not be loaded correctly. Make sure the paper is correctly
oriented in the main tray. For paper loading instructions, see Load paper.
● The photo paper may not be loaded correctly. Reload the photo paper, make
sure that the photo paper is correctly oriented in the photo tray. For photo paperloading instructions, see Load paper.
Colors are not printing satisfactorily.
Solution
● You may not be using the best print cartridges for the project. To print text
documents and graphics, use the HP Tri-color and HP Black print cartridges.
To print color photos, use the HP Tri-color and HP Photo or HP Gray Photo
cartridges. For more information, see Inserting and replacing the print
cartridges.
● You may be printing in Ink-backup Printing Mode. The printer enters Ink-backup
printing mode when one of the print cartridges is missing. Replace the missing
cartridge.
● A cartridge is out of ink. Replace it.
● Some of the ink nozzles on a cartridge are clogged. Clean the cartridges.
See Cleaning the print cartridges.
● You may not be using the best media for the project. For more information on
papers, see Choose the right paper.
No page came out of the printer.
Cause
● The paper trays may be empty. Load the paper tray. For information on loading
paper, see Load paper.
● There may be a paper jam.
Solution
Caution Do NOT remove jammed paper from the front of the printer. Doing
so can cause irreversible damage to the printer.
To clear a paper jam
1. Turn off the printer, and then unplug the printer.
2. Remove the rear access door.
40 HP Photosmart D5100 series
 Loading...