

Page 1

*
0
#
9
6
8
5
7
HP Photosmart C4340 All-in-One series
Basics Guide
Guide d’utilisation
Page 2

Hewlett-Packard Company notices
The information contained in this document is subject to change without notice.
All rights reserved. Reproduction, adaptation, or translation of this material is prohibited without prior written permission of Hewlett-Packard, except
as allowed under copyright laws. The only warranties for HP products and services are set forth in the express warranty statements accompanying
such products and services. Nothing herein should be construed as constituting an additional warranty. HP shall not be liable for technical or editorial
errors or omissions contained herein.
© 2007 Hewlett-Packard Development Company, L.P.
Windows, Windows 2000, and Windows XP are U.S. registered trademarks of Microsoft Corporation.
Windows Vista is either a registered trademark or trademark of Microsoft Corporation in the United States and/or other countries.
Intel and Pentium are trademarks or registered trademarks of Intel Corporation or its subsidiaries in the United States and other countries.
Avis publiés par la société Hewlett-Packard
Les informations contenues dans ce document peuvent faire l'objet de modifications sans préavis.
Tous droits réservés. La reproduction, l'adaptation ou la traduction de ce matériel est interdite sans l'accord écrit préalable de Hewlett-Packard, sauf
dans les cas permis par la législation relative aux droits d'auteur. Les seules garanties relatives aux produits et services HP sont décrites dans les
déclarations de garantie expresse accompagnant lesdits produits et services. Aucun élément de ce document ne constitue une garantie
supplémentaire. Hewlett-Packard ne saurait être tenu pour responsable des erreurs ou omissions techniques ou rédactionnelles de ce document.
© 2007 Hewlett-Packard Development Company, L.P.
Windows, Windows 2000 et Windows XP sont des marques déposées de Microsoft Corporation aux Etats-Unis.
Windows Vista est une marque déposée ou une marque de Microsoft Corporation aux Etats-Unis et/ou dans d'autres pays.
Intel et Pentium sont des marques ou des marques déposées d'Intel Corporation ou de ses filiales aux Etats-Unis et dans d'autres pays.
Page 3

HP Photosmart C4340
All-in-One series
Basics Guide
English
Page 4

Contents
1 HP All-in-One overview
The HP All-in-One at a glance....................................................................................................2
Control panel buttons.................................................................................................................3
Find more information.................................................................................................................4
2 Fax setup
Set up the HP All-in-One for faxing............................................................................................6
Change settings on the HP All-in-One to receive faxes...........................................................24
Set the fax header....................................................................................................................25
Test your fax setup...................................................................................................................25
3 Use the HP All-in-One features
Load originals and load paper..................................................................................................27
Avoid paper jams......................................................................................................................28
Print 10 x 15 cm (4 x 6 inch) photos.........................................................................................28
Scan an image..........................................................................................................................29
Make a copy.............................................................................................................................30
Send a basic fax.......................................................................................................................30
Receive a fax............................................................................................................................31
Replace the print cartridges......................................................................................................32
Clean the HP All-in-One...........................................................................................................35
4 Troubleshooting and support
Uninstall and reinstall the software...........................................................................................37
Setup troubleshooting...............................................................................................................38
Fax setup troubleshooting........................................................................................................41
Clear paper jams......................................................................................................................57
Print cartridge troubleshooting..................................................................................................58
Support process.......................................................................................................................58
English
5 Technical information
System requirements................................................................................................................59
Product specifications...............................................................................................................59
Regulatory notices....................................................................................................................59
Warranty...................................................................................................................................60
1
Page 5

1 HP All-in-One overview
Use the HP All-in-One to quickly and easily accomplish tasks such as making a copy,
scanning documents, printing photos, or sending and receiving faxes You can access
many HP All-in-One functions directly from the control panel, without turning on your
computer.
English
NOTE: This guide introduces basic operations and troubleshooting, as well as
provides information for contacting HP support and ordering supplies.
The onscreen Help details the full range of features and functions, including use of
the HP Photosmart software that came with the HP All-in-One.
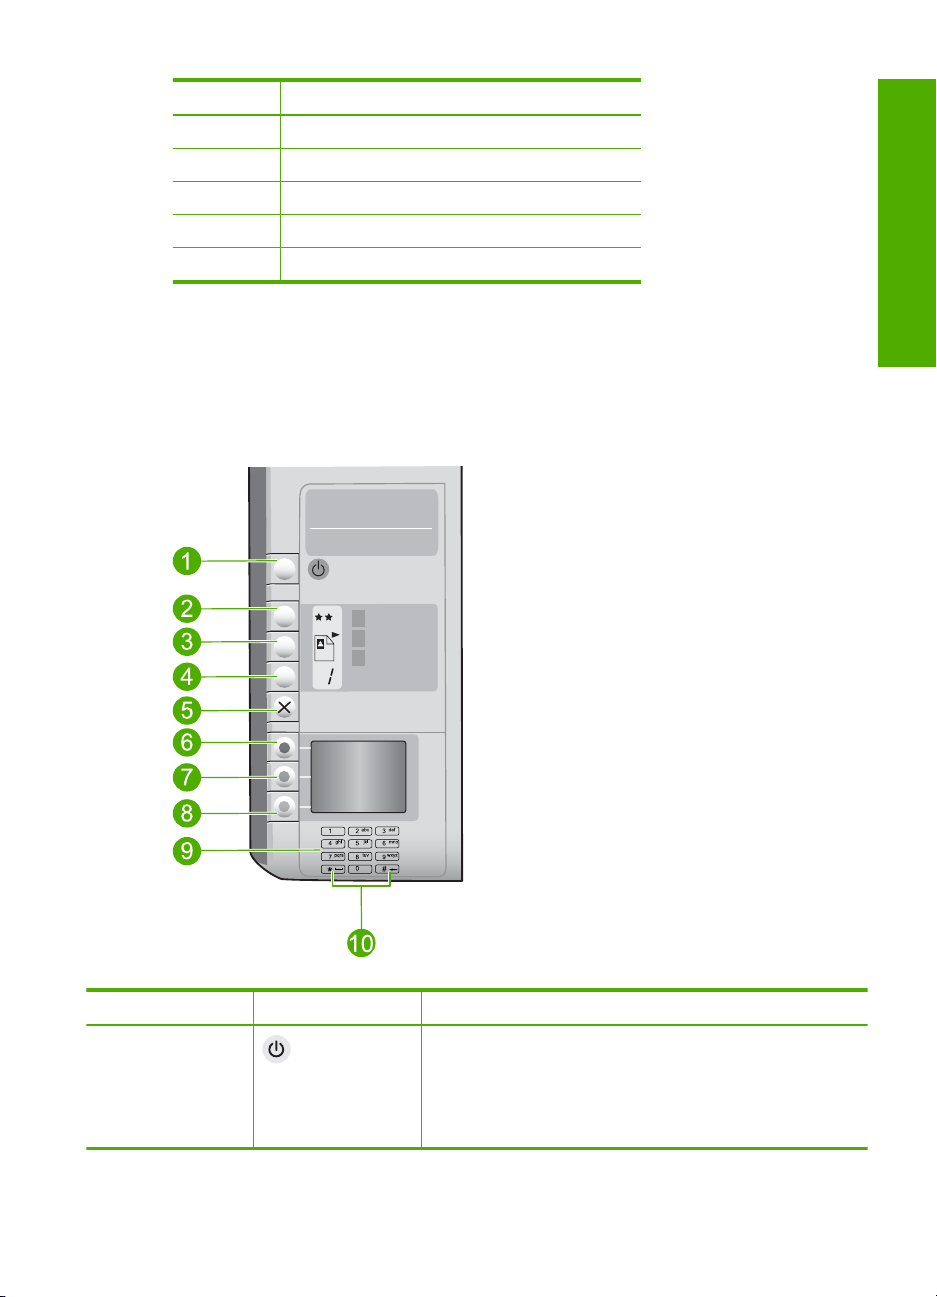
The HP All-in-One at a glance
Label Description
1 Control panel
2 On button
3 Keypad
4 Memory card slots and Photo light
5 Input tray
6 Tray extender
7 Paper-width guide
8 Print cartridge door
9 Glass
10 Lid backing
2 HP Photosmart C4340 All-in-One series
Page 6
(continued)
Label Description
11 Rear door
12 Rear USB port
13 Power connection*
14 1-LINE (fax) port
15 2-EXT (phone) port
* Use only with the power adapter supplied by HP.
Control panel buttons
The following diagram and related table provide a quick reference to the HP All-in-One
control panel features.
English
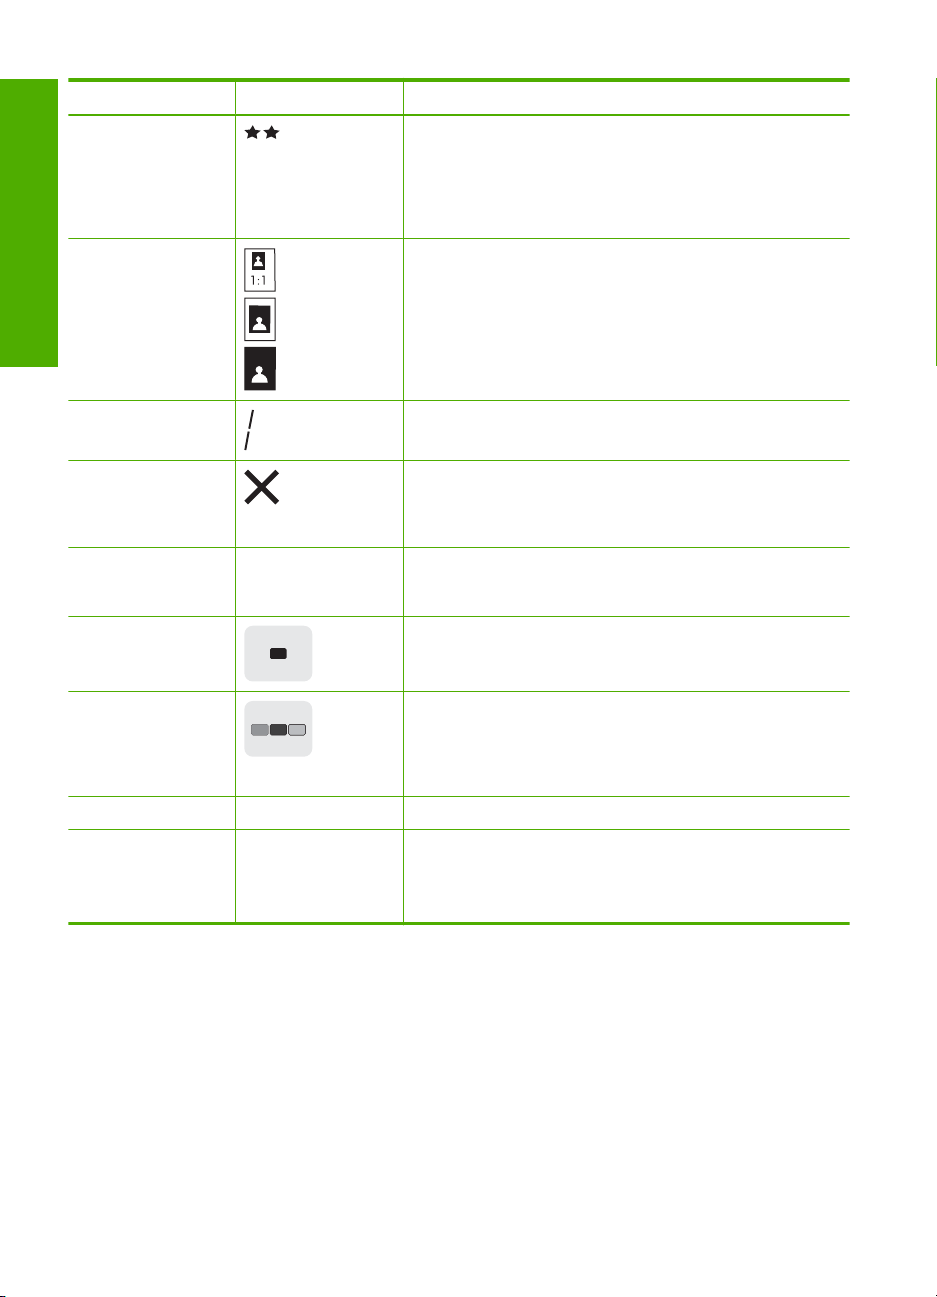
Label Icon Name and Description
1 On: Turns the product on or off. When the product is off, a
minimal amount of power is used by it. You can further reduce
power consumption by holding down the On button for three
seconds. This puts the product in Standby/Off state. To
completely remove power, turn off the product, and then
unplug the power cord.
Control panel buttons 3
Page 7
Chapter 1
(continued)
Label Icon Name and Description
2 Quality: Changes the copy quality or the quality of photos you
3 Size: Changes the image size to 100% (Actual Size), fits it to
English
4 Copies: Specifies the number of copies.
5 Cancel: Stops a task (such as scanning, copying, or faxing)
6 Scan/Fax: Opens the Scan/Fax menu. When a memory card
7 Start Copy Black: Starts a black-and-white copy. When a
8 Start Copy Color: Starts a color copy. When a memory card
9 Keypad: Enters fax numbers, values, or text.
10 * (Space and Symbols):Enters asterisks, spaces, and
print from a memory card. One star represents fast quality, two
stars represent normal quality, and three stars represent best
quality. However, the quality produced varies depending on
the paper type. The default quality for plain paper is two stars
and photo paper is three stars.
the page (Resize to Fit), or prints borderless images
(Borderless). The default setting is 100% for plain paper and
borderless for photo paper.
or resets settings (such as Quality, Size, and Copies). If an
error occurs, it cancels the error and resumes printing when
pressed once.
is inserted, this button advances to the next photo on the
memory card when pressed.
memory card is inserted, this button acts as a previous image
button.
is inserted, this button starts printing the image currently on
the display. In certain situations (for example, after clearing a
paper jam), this button resumes printing or confirms the
settings.
symbols for fax-related tasks.
# (Backspace): Enters pound signs and clears the incorrect
entry for fax-related tasks.
Find more information
A variety of resources, both printed and onscreen, provide information about setting up
and using the HP All-in-One.
4 HP Photosmart C4340 All-in-One series
Page 8

• Setup Guide
The Setup Guide provides instructions for setting up the HP All-in-One and installing
software. Make sure you follow the steps in the Setup Guide in order.
If you have problems during setup, see Troubleshooting in the last section of the
Setup Guide, or see “
Troubleshooting and support” on page 37 in this guide.
• Onscreen Help
The onscreen Help provides detailed instructions on features of the HP All-in-One
that are not described in this Basics Guide, including features that are only available
using the software you installed with the HP All-in-One.
•
www.hp.com/support
If you have Internet access, you can get help and support from the HP Web site. This
Web site offers technical support, drivers, supplies, and ordering information.
English
Find more information 5
Page 9

2 Fax setup
After completing all the steps in the Setup Guide, use the instructions in this section to
complete your fax setup. Please keep your Setup Guide for later use.
In this section, you will learn how to set up the HP All-in-One so that faxing works
successfully with equipment and services you might already have on the same phone
line as the HP All-in-One.
English
Set up the HP All-in-One for faxing
TIP: You can also use the Fax Setup Wizard (Windows) or Fax Setup Utility (Mac)
to help you quickly set up some important fax settings such as the answer mode and
fax header information. You can access the Fax Setup Wizard (Windows) or Fax
Setup Utility (Mac) through the software you installed with the HP All-in-One. After
you run the Fax Setup Wizard (Windows) or Fax Setup Utility (Mac), follow the
procedures in this section to complete your fax setup.
Before you begin setting up the HP All-in-One for faxing, determine which kind of phone
system your country/region uses. The instructions for setting up the HP All-in-One for
faxing differ depending on whether you have a serial- or parallel-type phone system.
• If you do not see your country/region listed in the table below, you probably have a
serial-type phone system. In a serial-type phone system, the connector type on your
shared telephone equipment (modems, phones, and answering machines) does not
allow a physical connection to the "2-EXT" port on the HP All-in-One. Instead, all
equipment must be connected at the telephone wall jack.
NOTE: In some countries/regions that use serial-type phone systems, the phone
cord that came with the HP All-in-One might have an additional wall plug attached
to it. This enables you to connect other telecom devices to the wall jack where
you plug in the HP All-in-One.
• If your country/region is listed in the table below, you probably have a parallel-type
telephone system. In a parallel-type phone system, you are able to connect shared
telephone equipment to the phone line by using the "2-EXT" port on the back of the
HP All-in-One.
NOTE: If you have a parallel-type phone system, HP recommends you use the
2-wire phone cord supplied with the HP All-in-One to connect the HP All-in-One
to the telephone wall jack.
Table 2-1 Countries/regions with a parallel-type phone system
Argentina Australia Brazil
Canada Chile China
Colombia Greece India
Indonesia Ireland Japan
6 HP Photosmart C4340 All-in-One series
Page 10

Countries/regions with a parallel-type phone system (continued)
Korea Latin America Malaysia
Mexico Philippines Poland
Portugal Russia Saudi Arabia
Singapore Spain Taiwan
Thailand USA Venezuela
Vietnam
If you are unsure which kind of telephone system you have (serial or parallel), check with
your telephone company.
Choose the correct fax setup for your home or office
To fax successfully, you need to know what types of equipment and services (if any) share
the same phone line with the HP All-in-One. This is important because you might need
to connect some of your existing office equipment directly to the HP All-in-One, and you
might also need to change some fax settings before you can fax successfully.
To determine the best way to set up the HP All-in-One in your home or office, first read
through the questions in this section and record your answers. Next, refer to the table in
the following section and choose the recommended setup case based on your answers.
Make sure to read and answer the following questions in the order they are presented.
1. Do you have a digital subscriber line (DSL) service through your telephone company?
(DSL might be called ADSL in your country/region.)
Yes, I have DSL.
❑
No.
❑
If you answered Yes, proceed directly to “
DSL” on page 11. You do not need to continue answering questions.
If you answered No, please continue answering questions.
2. Do you have a private branch exchange (PBX) phone system or an integrated
services digital network (ISDN) system?
If you answered Yes, proceed directly to “
PBX phone system or an ISDN line” on page 12. You do not need to continue
answering questions.
If you answered No, please continue answering questions.
3. Do you subscribe to a distinctive ring service through your telephone company that
provides multiple phone numbers with different ring patterns?
Yes, I have distinctive ring.
❑
No.
❑
If you answered Yes, proceed directly to “
on the same line” on page 13. You do not need to continue answering questions.
If you answered No, please continue answering questions.
Are you unsure if you have distinctive ring? Many phone companies offer a distinctive
ring feature that allows you to have several phone numbers on one phone line.
When you subscribe to this service, each phone number will have a different ring
pattern. For example, you can have single, double, and triple rings for the different
numbers. You might assign one phone number with a single ring to your voice calls,
Case B: Set up the HP All-in-One with
Case C: Set up the HP All-in-One with a
Case D: Fax with a distinctive ring service
English
Set up the HP All-in-One for faxing 7
Page 11

English
Chapter 2
and another phone number with double rings to your fax calls. This allows you to tell
the difference between voice and fax calls when the phone rings.
4. Do you receive voice calls at the same phone number you will use for fax calls on the
HP All-in-One?
Yes, I receive voice calls.
❑
No.
❑
Please continue answering questions.
5. Do you have a computer dial-up modem on the same phone line as the HP All-in-One?
Yes, I have a computer dial-up modem.
❑
No.
❑
Are you unsure if you use a computer dial-up modem? If you answer Yes to any of
the following questions, you are using a computer dial-up modem:
• Do you send and receive faxes directly to and from your computer software
applications through a dial-up connection?
• Do you send and receive e-mail messages on your computer through a dial-up
connection?
• Do you access the Internet from your computer through a dial-up connection?
Please continue answering questions.
6. Do you have an answering machine that answers voice calls at the same phone
number you will use for fax calls on the HP All-in-One?
Yes, I have an answering machine.
❑
No.
❑
Please continue answering questions.
7. Do you subscribe to a voice mail service through your telephone company at the same
phone number you will use for fax calls on the HP All-in-One?
Yes, I have a voice mail service.
❑
No.
❑
After you have completed answering the questions, proceed to the next section to
select your fax setup case.
Select your fax setup case
Now that you have answered all the questions about the equipment and services that
share the phone line with the HP All-in-One, you are ready to choose the best setup case
for your home or office.
From the first column in the following table, choose the combination of equipment and
services applicable to your home or office setting. Then look up the appropriate setup
case in the second or third column based on your phone system. Step-by-step
instructions are included for each case in the sections that follow.
If you have answered all the questions in the previous section and have none of the
described equipment or services, choose "None" from the first column in the table.
NOTE: If your home or office setup is not described in this section, set up the
HP All-in-One as you would a regular analog phone. Make sure you use the phone
cord supplied in the box to connect one end to your telephone wall jack and the other
end to the port labeled 1-LINE on the back of the HP All-in-One. If you use another
phone cord, you might experience problems sending and receiving faxes.
8 HP Photosmart C4340 All-in-One series
Page 12

Other equipment/services
sharing your fax line
Recommended fax setup for
parallel-type phone systems
Recommended fax setup for
serial-type phone systems
None
(You answered No to all
questions.)
DSL service
(You answered Yes to question
1 only.)
PBX or ISDN system
(You answered Yes to question
2 only.)
Distinctive ring service
(You answered Yes to question
3 only.)
Voice calls
(You answered Yes to question
4 only.)
Voice calls and voice mail
service
(You answered Yes to
questions 4 and 7 only.)
Computer dial-up modem
(You answered Yes to question
5 only.)
Voice calls and computer dialup modem
(You answered Yes to
questions 4 and 5 only.)
Voice calls and answering
machine
(You answered Yes to
questions 4 and 6 only.)
Voice calls, computer dial-up
modem, and answering
machine
(You answered Yes to
questions 4, 5, and 6 only.)
Voice calls, computer dial-up
modem, and voice mail service
(You answered Yes to
questions 4, 5, and 7 only.)
“Case A: Separate fax line (no
voice calls received)”
on page 10
“Case B: Set up the
HP All-in-One with DSL”
on page 11
“Case C: Set up the
HP All-in-One with a PBX
phone system or an ISDN line”
on page 12
“Case D: Fax with a distinctive
ring service on the same line”
on page 13
“Case E: Shared voice/fax
line” on page 14
“Case F: Shared voice/fax line
with voice mail” on page 15
“Case G: Fax line shared with
computer dial-up modem (no
voice calls received)”
on page 16
“Case H: Shared voice/fax line
with computer dial-up modem”
on page 17
“Case I: Shared voice/fax line
with answering machine”
on page 19
“Case J: Shared voice/fax line
with computer dial-up modem
and answering machine”
on page 20
“Case K: Shared voice/fax line
with computer dial-up modem
and voice mail” on page 22
“Case A: Separate fax line (no
voice calls received)”
on page 10
“Case B: Set up the
HP All-in-One with DSL”
on page 11
“Case C: Set up the
HP All-in-One with a PBX
phone system or an ISDN
line” on page 12
“Case D: Fax with a distinctive
ring service on the same line”
on page 13
“Case E: Shared voice/fax
line” on page 14
“Case F: Shared voice/fax line
with voice mail” on page 15
Not applicable.
Not applicable.
Not applicable.
Not applicable.
Not applicable.
English
For additional fax setup information, in specific countries/regions, see the Fax
Configuration Web site listed below.
Set up the HP All-in-One for faxing 9
Page 13
English
Chapter 2
Austria www.hp.com/at/faxconfig
Germany www.hp.com/de/faxconfig
Switzerland (French) www.hp.com/ch/fr/faxconfig
Switzerland (German) www.hp.com/ch/de/faxconfig
United Kingdom www.hp.com/uk/faxconfig
Spain www.hp.es/faxconfig
The Netherlands www.hp.nl/faxconfig
Belgium (French) www.hp.be/fr/faxconfig
Belgium (Dutch) www.hp.be/nl/faxconfig
Portugal www.hp.pt/faxconfig
Sweden www.hp.se/faxconfig
Finland www.hp.fi/faxconfig
Denmark www.hp.dk/faxconfig
Norway www.hp.no/faxconfig
Ireland www.hp.com/ie/faxconfig
France www.hp.com/fr/faxconfig
Italy www.hp.com/it/faxconfig
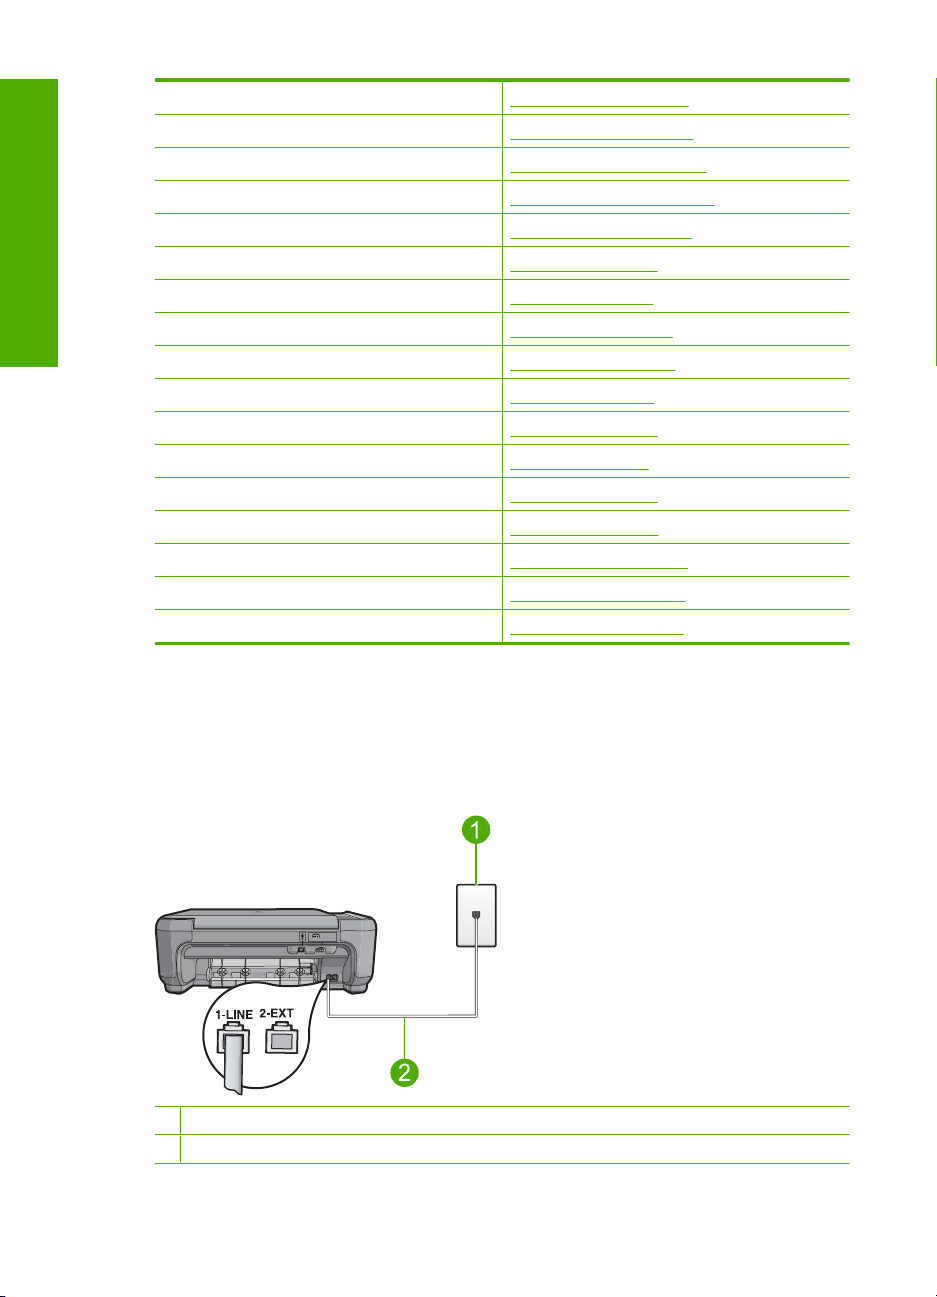
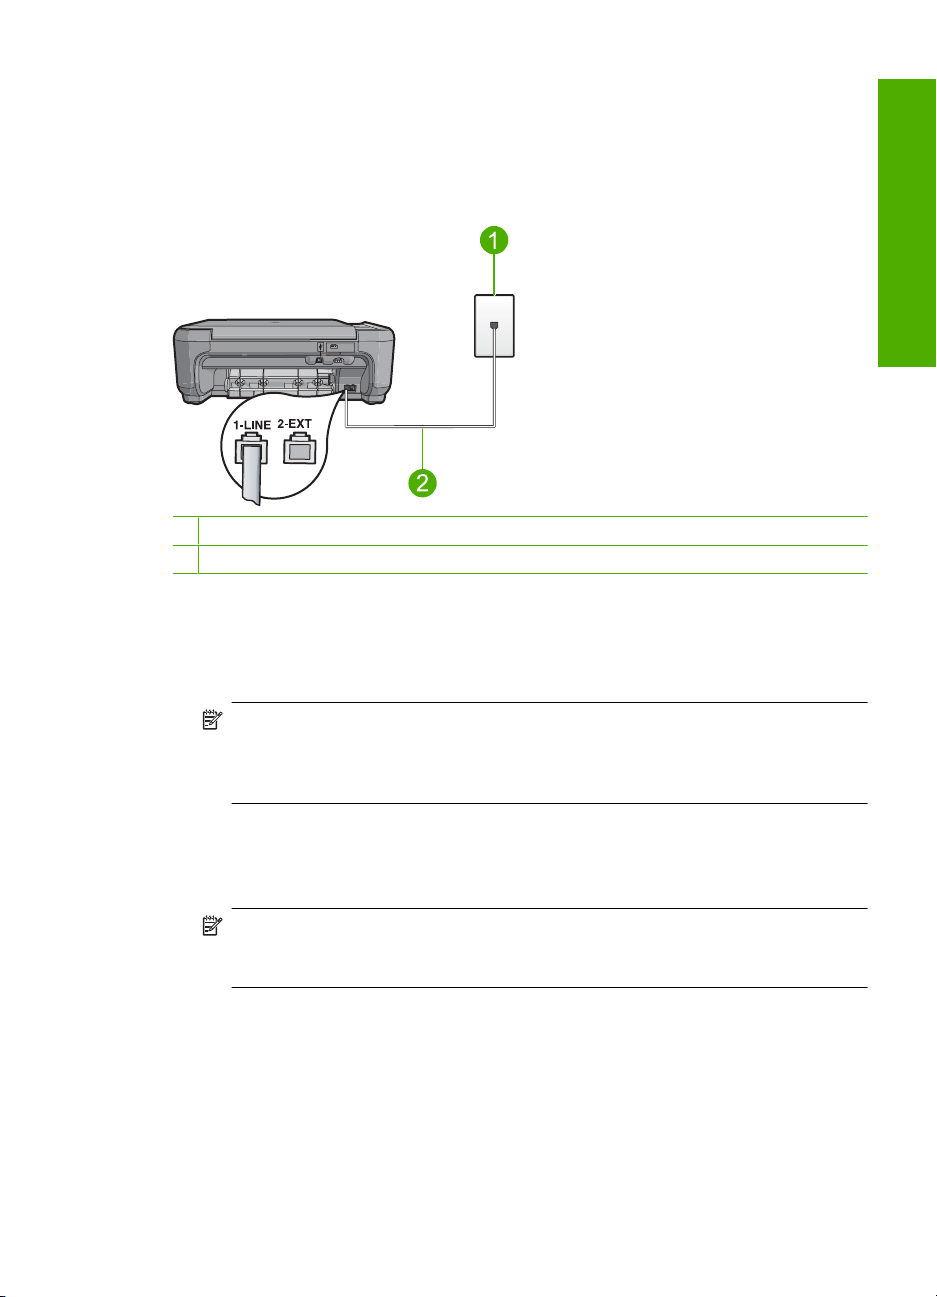
Case A: Separate fax line (no voice calls received)
If you have a separate phone line on which you receive no voice calls, and you have no
other equipment connected on this phone line, set up the HP All-in-One as described in
this section.
Figure 2-1 Back view of the HP All-in-One
1 Telephone wall jack
2 Use the phone cord supplied in the box with the HP All-in-One to connect to the "1-LINE" port
10 HP Photosmart C4340 All-in-One series
Page 14
To set up the product with a separate fax line
1. Using the phone cord supplied in the box with the product, connect one end to your
telephone wall jack, then connect the other end to the port labeled 1-LINE on the back
of the product.
NOTE: If you do not use the supplied cord to connect from the telephone wall
jack to the product, you might not be able to fax successfully. This special phone
cord is different from the phone cords you might already have in your home or
office.
2. Change the Auto Answer setting to the lowest number of rings to wait before
answering (two rings).
3. Run a fax test.
When the phone rings, the product will answer automatically after the number of rings
you set in the Auto Answer setting. Then it will begin emitting fax reception tones to the
sending fax machine and receive the fax.
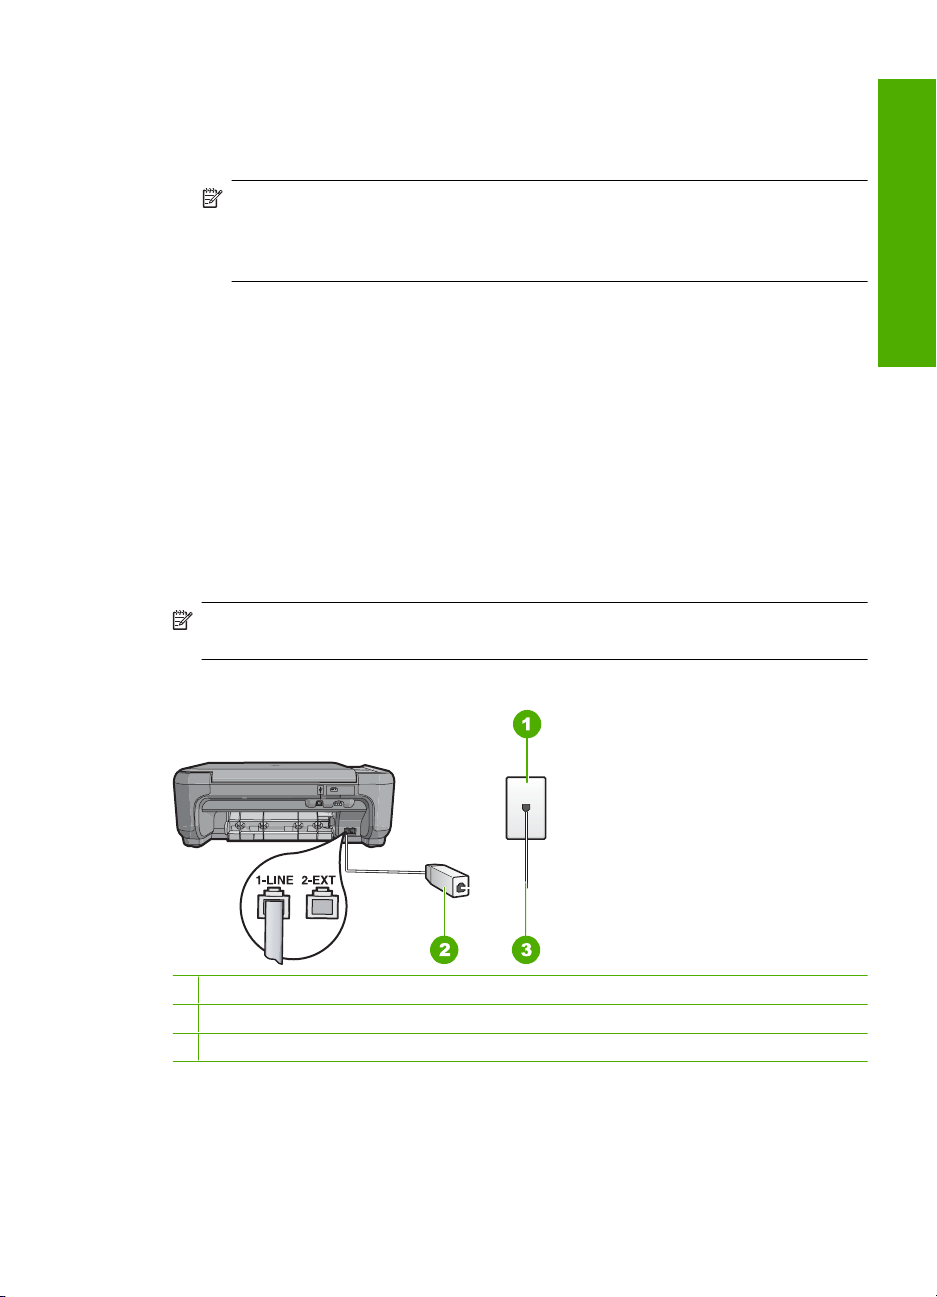
Case B: Set up the HP All-in-One with DSL
If you have a DSL service through your telephone company, use the instructions in this
section to connect a DSL filter between the telephone wall jack and the HP All-in-One.
The DSL filter removes the digital signal that can interfere with the HP All-in-One, so the
HP All-in-One can communicate properly with the phone line. (DSL might be called ADSL
in your country/region.)
NOTE: If you have a DSL line, ensure that the DSL Filter is connected. Otherwise,
you will not be able to send and receive faxes with the HP All-in-One.
English
Figure 2-2 Back view of the HP All-in-One
1 Telephone wall jack
2 DSL filter and cord supplied by your DSL provider
3 Use the phone cord supplied in the box with the HP All-in-One to connect to the "1-LINE" port
Set up the HP All-in-One for faxing 11
Page 15

Chapter 2
To set up the product with DSL
1. Obtain a DSL filter from your DSL provider.
2. Connect the DSL filter cord to the telephone wall jack.
NOTE: If you do not use the supplied cord to connect from the telephone wall
jack to the product, you might not be able to fax successfully. This special phone
cord is different from the phone cords you might already have in your home or
office.
3. Using the phone cord supplied in the box with the product, connect one end to the
English
DSL filter in your telephone wall jack, then connect the other end to the port labeled
1-LINE on the back of the product.
NOTE: If you have other office equipment or services attached to this phone line,
such as a distinctive ring service, answering machine, or voice mail, see the
appropriate section in this section for additional setup guidelines.
4. Run a fax test.
Case C: Set up the HP All-in-One with a PBX phone system or an ISDN line
If you are using a PBX phone system, do the following:
• Connect the product to the port that is designated for fax and phone use.
• Make sure you use the supplied cord to connect from the telephone wall jack to the
product.
• Set the call waiting tone to Off.
NOTE: Many digital PBX systems include a call-waiting tone that is set to "on"
by default. The call waiting tone will interfere with any fax transmission, and you
will not be able to send or receive faxes with the HP All-in-One. Refer to the
documentation that came with your PBX phone system for instructions on how to
turn off the call-waiting tone.
• Dial the number for an outside line before dialing the fax number.
If you are using an ISDN converter/terminal adaptor, do the following:
• Connect the product to the port that is designated for fax and phone use.
NOTE: Some ISDN systems allow you to configure the ports for specific phone
equipment. For example, you might have assigned one port for telephone and
Group 3 fax and another port for multiple purposes. If you have problems when
connected to the fax/phone port of your ISDN converter, try using the port
designated for multiple purposes; it might be labeled "multi-combi" or something
similar.
• Make sure you use the supplied cord to connect from the telephone wall jack to the
product. If you do not, you might not be able to fax successfully. This special phone
cord is different from the phone cords you might already have in your home or office.
If the supplied phone cord is too short, you can purchase a coupler from your local
electronics store and extend it.
• Make sure that the terminal adapter is set to the correct switch type for your country/
region, if possible.
12 HP Photosmart C4340 All-in-One series
Page 16
Case D: Fax with a distinctive ring service on the same line
If you subscribe to a distinctive ring service (through your telephone company) that allows
you to have multiple phone numbers on one phone line, each with a different ring pattern,
set up the HP All-in-One as described in this section.
Figure 2-3 Back view of the HP All-in-One
1 Telephone wall jack
2 Use the phone cord supplied in the box with the HP All-in-One to connect to the "1-LINE" port
To set up the product with a distinctive ring service
1. Using the phone cord supplied in the box with the product, connect one end to your
telephone wall jack, then connect the other end to the port labeled 1-LINE on the back
of the product.
English
NOTE: If you do not use the supplied cord to connect from the telephone wall
jack to the product, you might not be able to fax successfully. This special phone
cord is different from the phone cords you might already have in your home or
office.
2. Change the Auto Answer setting to the lowest number of rings to wait before
answering (two rings).
3. Change the Distinctive Ring setting to match the pattern that the telephone company
assigned to your fax number.
NOTE: By default, the product is set to answer all ring patterns. If you do not set
the Distinctive Ring to match the ring pattern assigned to your fax number, the
product might answer both voice calls and fax calls or it might not answer at all.
4. Run a fax test.
The HP All-in-One will automatically answer incoming calls that have the ring pattern you
selected (Distinctive Ring setting) after the number of rings you selected (Auto
Answer setting). Then it will begin emitting fax reception tones to the sending fax machine
and receive the fax.
Set up the HP All-in-One for faxing 13
Page 17
Chapter 2
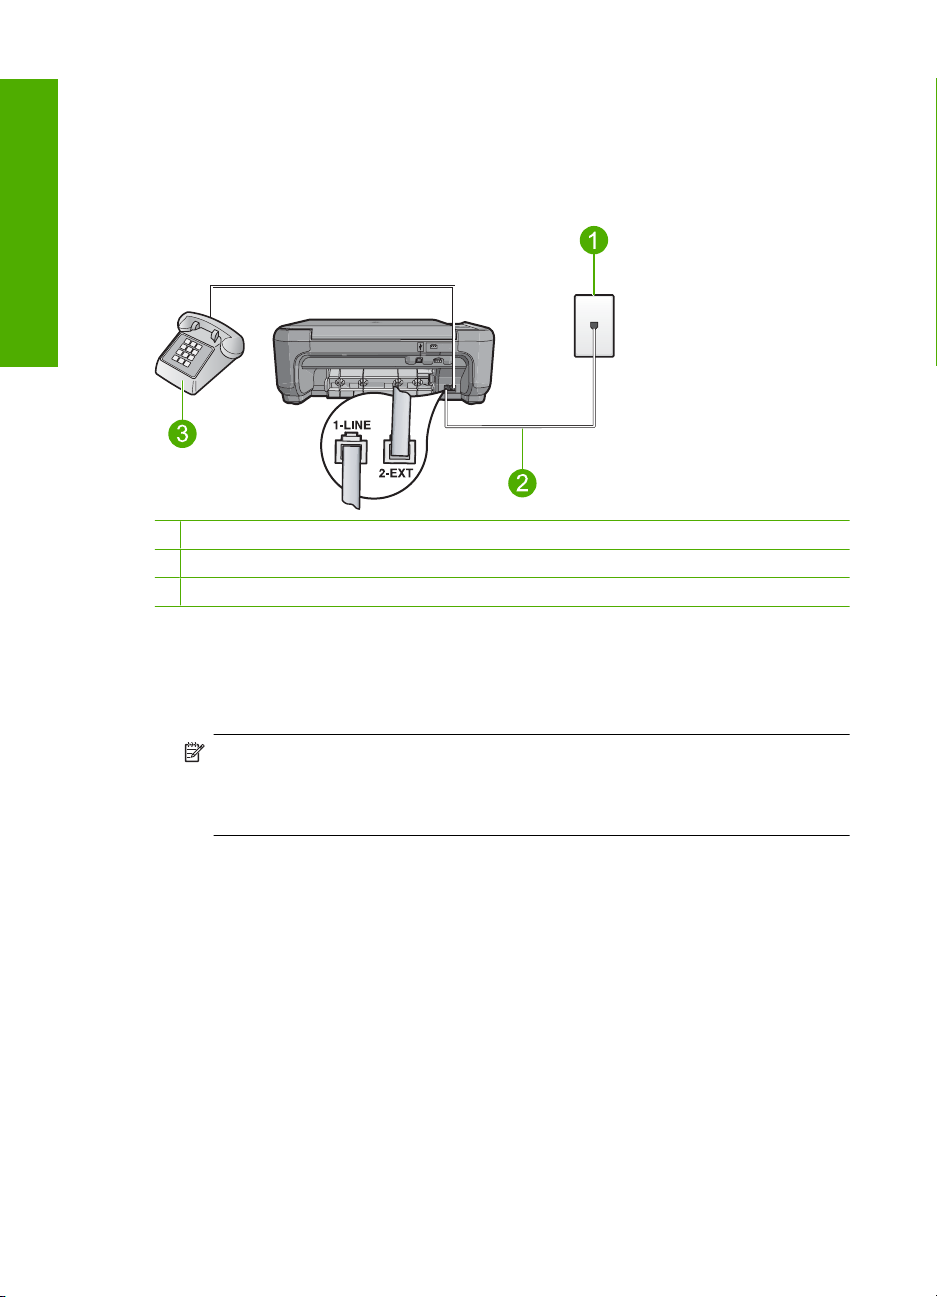
Case E: Shared voice/fax line
If you receive both voice calls and fax calls at the same phone number, and you have no
other office equipment (or voice mail) on this phone line, set up the HP All-in-One as
described in this section.
Figure 2-4 Back view of the HP All-in-One
English
1 Telephone wall jack
2 Use the phone cord supplied in the box with the HP All-in-One to connect to the "1-LINE" port
3 Telephone (optional)
To set up the product with a shared voice/fax line
1. Using the phone cord supplied in the box with the product, connect one end to your
telephone wall jack, then connect the other end to the port labeled 1-LINE on the back
of the product.
NOTE: If you do not use the supplied cord to connect from the telephone wall
jack to the product, you might not be able to fax successfully. This special phone
cord is different from the phone cords you might already have in your home or
office.
2. Now you need to decide how you want the product to answer calls, automatically or
manually:
• If you set up the product to answer calls automatically, it answers all incoming
calls and receives faxes. The product will not be able to distinguish between fax
and voice calls in this case; if you suspect the call is a voice call, you will need to
answer it before the product answers the call. To set up the product to answer
calls automatically, turn on the Auto Answer setting.
• If you set up the product to answer faxes manually, you must be available to
respond in person to incoming fax calls or the product cannot receive faxes. To
set up the product to answer calls manually, turn off the Auto Answer setting.
14 HP Photosmart C4340 All-in-One series
Page 18
3. Do one of the following, depending on your phone system:
• If you have a parallel-type phone system, remove the white plug from the port
labeled 2-EXT on the back of the product, and then connect a phone to this port.
• If you have a serial-type phone system, you might plug your phone directly on top
of the product cable which has a wall plug attached to it.
4. Run a fax test.
If you pick up the phone before the product answers the call and hear fax tones from a
sending fax machine, you will need to answer the fax call manually.
Case F: Shared voice/fax line with voice mail
If you receive both voice calls and fax calls at the same phone number, and you also
subscribe to a voice mail service through your telephone company, set up the
HP All-in-One as described in this section.
NOTE: You cannot receive faxes automatically if you have a voice mail service at
the same phone number you use for fax calls. You must receive faxes manually; this
means you must be available to respond in person to incoming fax calls. If you want
to receive faxes automatically instead, contact your telephone company to subscribe
to a distinctive ring service, or to obtain a separate phone line for faxing.
Figure 2-5 Back view of the HP All-in-One
English
1 Telephone wall jack
2 Use the phone cord supplied in the box with the HP All-in-One to connect to the "1-LINE" port
Set up the HP All-in-One for faxing 15
Page 19
Chapter 2
To set up the product with voice mail
1. Using the phone cord supplied in the box with the product, connect one end to your
telephone wall jack, then connect the other end to the port labeled 1-LINE on the back
of the product.
NOTE: If you do not use the supplied cord to connect from the telephone wall
jack to the product, you might not be able to fax successfully. This special phone
cord is different from the phone cords you might already have in your home or
office.
English
2. Turn off the Auto Answer setting.
3. Run a fax test.
You must be available to respond in person to incoming fax calls, or the product cannot
receive faxes.
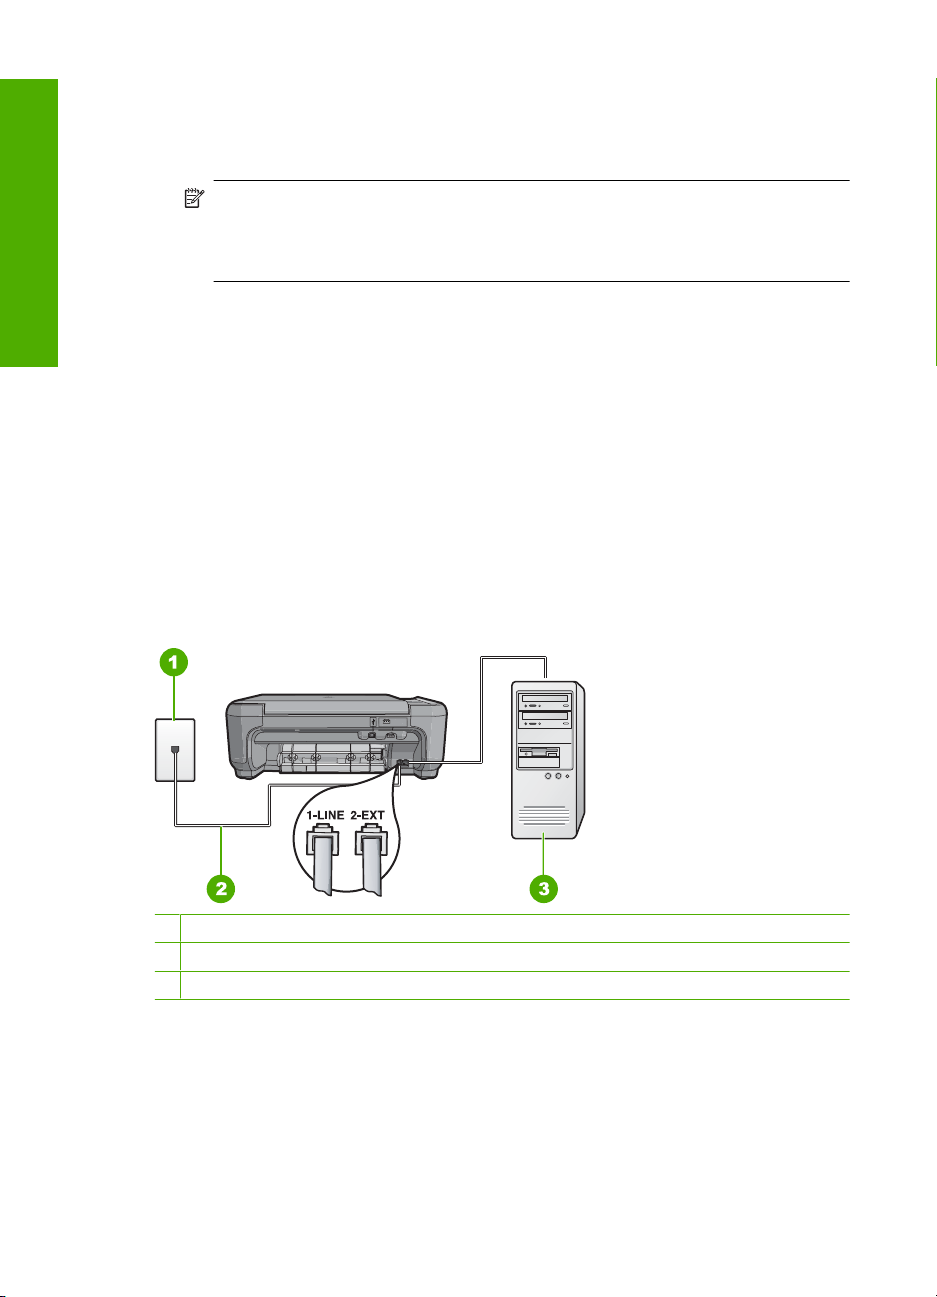
Case G: Fax line shared with computer dial-up modem (no voice calls received)
If you have a fax line on which you receive no voice calls, and you also have a computer
dial-up modem connected on this line, set up the HP All-in-One as described in this
section.
Since your computer dial-up modem shares the phone line with the HP All-in-One, you
will not be able to use both your modem and the HP All-in-One simultaneously. For
example, you cannot use the HP All-in-One for faxing if you are using your computer dialup modem to send an e-mail or access the Internet.
Figure 2-6 Back view of the HP All-in-One
1 Telephone wall jack
2 Use the phone cord supplied in the box with the HP All-in-One to connect to the "1-LINE" port
3 Computer with modem
To set up the product with a computer dial-up modem
1. Remove the white plug from the port labeled 2-EXT on the back of the product.
2. Find the phone cord that connects from the back of your computer (your computer
dial-up modem) to a telephone wall jack. Disconnect the cord from the telephone wall
jack and plug it into the port labeled 2-EXT on the back of the product.
16 HP Photosmart C4340 All-in-One series
Page 20

3. Using the phone cord supplied in the box with the product, connect one end to your
telephone wall jack, then connect the other end to the port labeled 1-LINE on the back
of the product.
NOTE: If you do not use the supplied cord to connect from the telephone wall
jack to the product, you might not be able to fax successfully. This special phone
cord is different from the phone cords you might already have in your home or
office.
4. If your modem software is set to receive faxes to your computer automatically, turn
off that setting.
NOTE: If you do not turn off the automatic fax reception setting in your modem
software, the product will not be able to receive faxes.
5. Change the Auto Answer setting to the lowest number of rings to wait before
answering (two rings).
6. Run a fax test.
When the phone rings, the product will answer automatically after the number of rings
you set in the Auto Answer setting. Then it will begin emitting fax reception tones to the
sending fax machine and receive the fax.
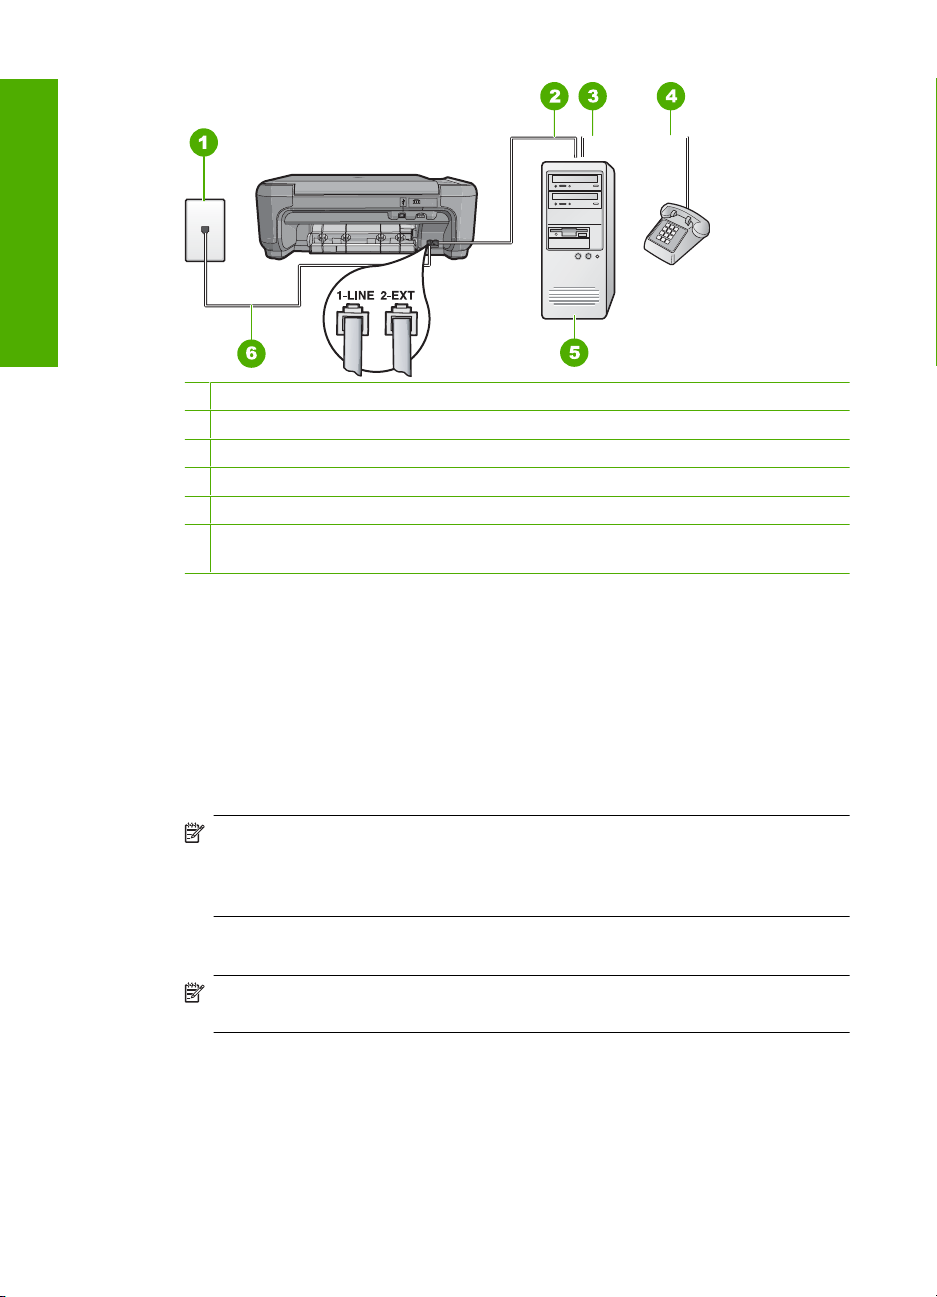
Case H: Shared voice/fax line with computer dial-up modem
If you receive both voice calls and fax calls at the same phone number, and you also have
a computer dial-up modem connected on this phone line, set up the HP All-in-One as
described in this section.
Since your computer dial-up modem shares the phone line with the HP All-in-One, you
will not be able to use both your modem and the HP All-in-One simultaneously. For
example, you cannot use the HP All-in-One for faxing if you are using your computer dialup modem to send an e-mail or access the Internet.
There are two different ways to set up the HP All-in-One with your computer based on
the number of phone ports on your computer. Before you begin, check your computer to
see if it has one or two phone ports.
• If your computer has only one phone port, you will need to purchase a parallel splitter
(also called a coupler). Refer to the onscreen help for specific setup instructions.
• If your computer has two phone ports, set up the HP All-in-One as described below.
English
Figure 2-7 Back view of the HP All-in-One
Set up the HP All-in-One for faxing 17
Page 21
English
Chapter 2
1 Telephone wall jack
2 "IN" phone port on your computer
3 "OUT" phone port on your computer
4 Telephone
5 Computer with modem
6 Use the phone cord supplied in the box with the HP All-in-One to connect to the "1-LINE"
port
To set up the product on the same phone line as a computer with two phone ports
1. Remove the white plug from the port labeled 2-EXT on the back of the product.
2. Find the phone cord that connects from the back of your computer (your computer
dial-up modem) to a telephone wall jack. Disconnect the cord from the telephone wall
jack and plug it into the port labeled 2-EXT on the back of the product.
3. Connect a phone to the "OUT" port on the back of your computer dial-up modem.
4. Using the phone cord supplied in the box with the product, connect one end to your
telephone wall jack, then connect the other end to the port labeled 1-LINE on the back
of the product.
NOTE: If you do not use the supplied cord to connect from the telephone wall
jack to the product, you might not be able to fax successfully. This special phone
cord is different from the phone cords you might already have in your home or
office.
5. If your modem software is set to receive faxes to your computer automatically, turn
off that setting.
NOTE: If you do not turn off the automatic fax reception setting in your modem
software, the product will not be able to receive faxes.
18 HP Photosmart C4340 All-in-One series
Page 22
6. Now you need to decide how you want the product to answer calls, automatically or
manually:
• If you set up the product to answer calls automatically, it answers all incoming
calls and receives faxes. The product will not be able to distinguish between fax
and voice calls in this case; if you suspect the call is a voice call, you will need to
answer it before the product answers the call. To set up the product to answer
calls automatically, turn on the Auto Answer setting.
• If you set up the product to answer faxes manually, you must be available to
respond in person to incoming fax calls or the product cannot receive faxes. To
set up the product to answer calls manually, turn off the Auto Answer setting.
7. Run a fax test.
If you pick up the phone before the product answers the call and hear fax tones from a
sending fax machine, you will need to answer the fax call manually.
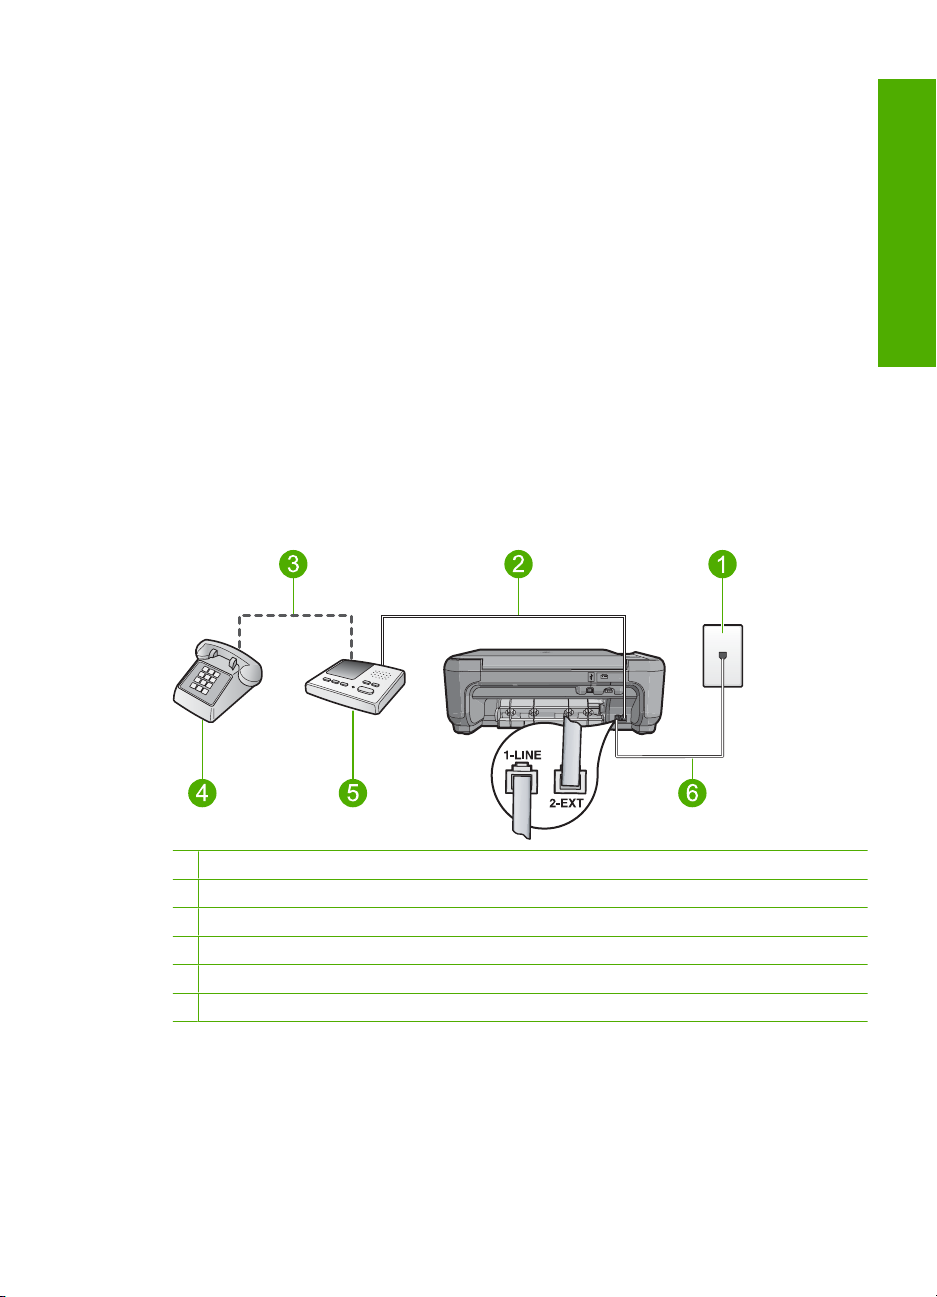
Case I: Shared voice/fax line with answering machine
If you receive both voice calls and fax calls at the same phone number, and you also have
an answering machine that answers voice calls at this phone number, set up the
HP All-in-One as described in this section.
Figure 2-8 Back view of the HP All-in-One
English
1 Telephone wall jack
2 "IN" port on your answering machine
3 "OUT" port on your answering machine
4 Telephone (optional)
5 Answering machine
6 Use the phone cord supplied in the box with the HP All-in-One to connect to the "1-LINE" port
Set up the HP All-in-One for faxing 19
Page 23

English
Chapter 2
To set up the product with a shared voice/fax line with answering machine
1. Remove the white plug from the port labeled 2-EXT on the back of the product.
2. Unplug your answering machine from the telephone wall jack, and connect it to the
port labeled 2-EXT on the back of the product.
NOTE: If you do not connect your answering machine directly to the product, fax
tones from a sending fax machine might be recorded on your answering machine,
and you probably will not be able to receive faxes with the product.
3. Using the phone cord supplied in the box with the product, connect one end to your
telephone wall jack, then connect the other end to the port labeled 1-LINE on the back
of the product.
NOTE: If you do not use the supplied cord to connect from the telephone wall
jack to the product, you might not be able to fax successfully. This special phone
cord is different from the phone cords you might already have in your home or
office.
4. (Optional) If your answering machine does not have a built-in phone, for convenience
you might want to connect a phone to the back of your answering machine at the
"OUT" port.
NOTE: If your answering machine does not let you connect an external phone,
you can purchase and use a parallel splitter (also known as a coupler) to connect
both the answering machine and telephone to the HP All-in-One. You can use
standard phone cords for these connections.
5. Set your answering machine to answer after a low number of rings.
6. Change the Auto Answer setting to the maximum number of rings supported by your
device. (The maximum number of rings varies by country/region.)
7. Run a fax test.
When the phone rings, your answering machine will answer after the number of rings you
have set, and then play your recorded greeting. The HP All-in-One monitors the call during
this time, "listening" for fax tones. If incoming fax tones are detected, the HP All-in-One
will emit fax reception tones and receive the fax; if there are no fax tones, the
HP All-in-One stops monitoring the line and your answering machine can record a voice
message.
Case J: Shared voice/fax line with computer dial-up modem and answering machine
If you receive both voice calls and fax calls at the same phone number, and you also have
a computer dial-up modem and answering machine connected on this phone line, set up
the HP All-in-One as described in this section.
Since your computer dial-up modem shares the phone line with the HP All-in-One, you
will not be able to use both your modem and the HP All-in-One simultaneously. For
example, you cannot use the HP All-in-One for faxing if you are using your computer dialup modem to send an e-mail or access the Internet.
There are two different ways to set the HP All-in-One with your computer based on the
number of phone ports on your computer. Before you begin, check your computer to see
if it has one or two phone ports.
20 HP Photosmart C4340 All-in-One series
Page 24
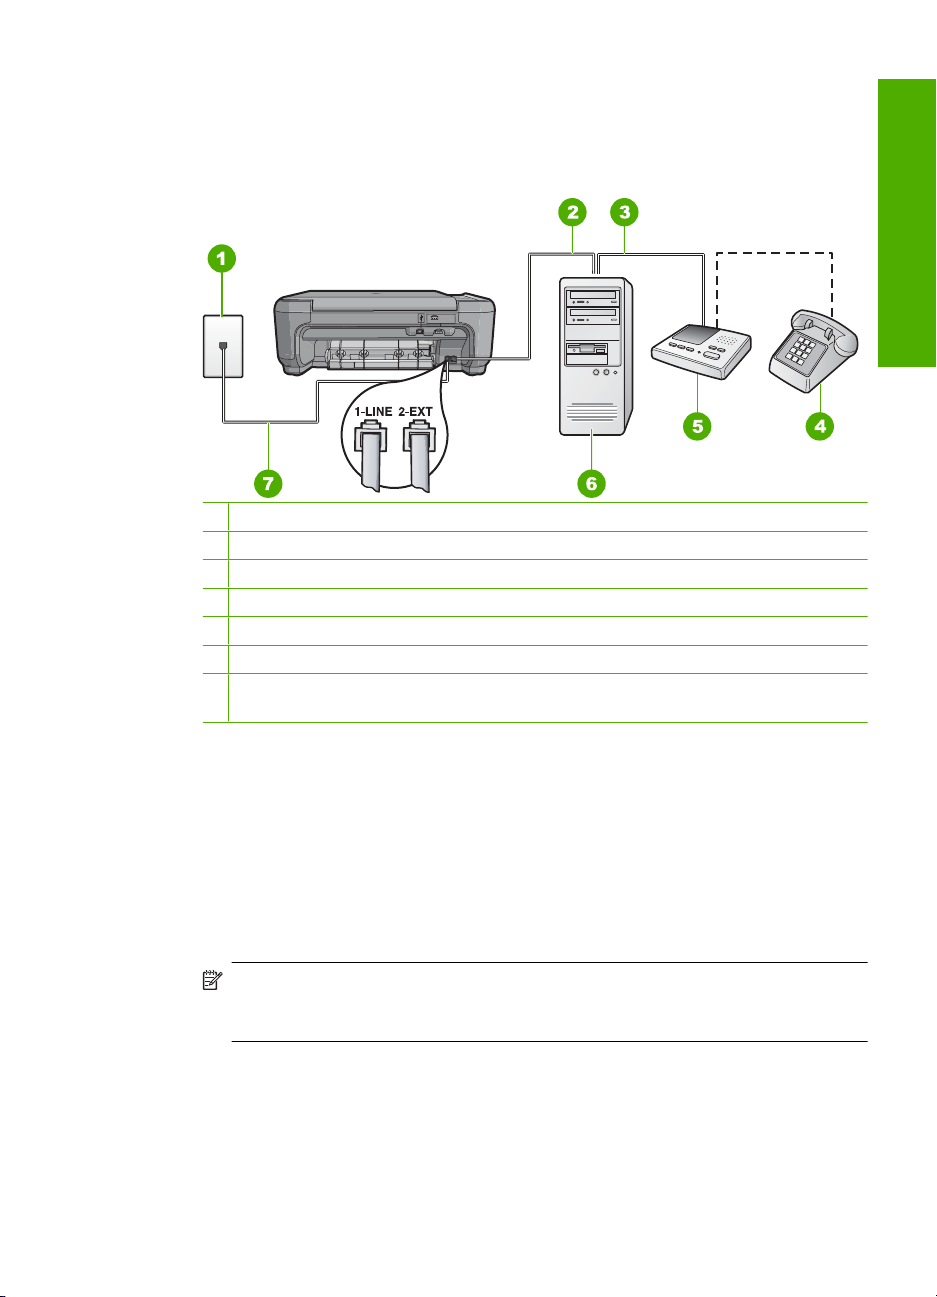
• If your computer has only one phone port, you will need to purchase a parallel splitter
(also called a coupler). Refer to the onscreen help for specific setup instructions.
• If your computer has two phone ports, set up the HP All-in-One as described below.
Figure 2-9 Back view of the HP All-in-One
1 Telephone wall jack
2 "IN" phone port on your computer
3 "OUT" phone port on your computer
4 Telephone (optional)
5 Answering machine
6 Computer with modem
7 Use the phone cord supplied in the box with the HP All-in-One to connect to the "1-LINE"
port
English
To set up the product on the same phone line as a computer with two phone ports
1. Remove the white plug from the port labeled 2-EXT on the back of the product.
2. Find the phone cord that connects from the back of your computer (your computer
dial-up modem) to a telephone wall jack. Disconnect the cord from the telephone wall
jack and plug it into the port labeled 2-EXT on the back of the product.
3. Unplug your answering machine from the telephone wall jack, and connect it to the
“OUT” port on the back of your computer modem.
This allows a direct connection between the HP All-in-One and your answering
machine, even though the computer modem is connected first in line.
NOTE: If you do not connect your answering machine in this way, fax tones from
a sending fax machine might be recorded on your answering machine, and you
might not be able to receive faxes with the product.
Set up the HP All-in-One for faxing 21
Page 25

English
Chapter 2
4. Using the phone cord supplied in the box with the product, connect one end to your
telephone wall jack, then connect the other end to the port labeled 1-LINE on the back
of the product.
NOTE: If you do not use the supplied cord to connect from the telephone wall
jack to the product, you might not be able to fax successfully. This special phone
cord is different from the phone cords you might already have in your home or
office.
5. (Optional) If your answering machine does not have a built-in phone, for convenience
you might want to connect a phone to the back of your answering machine at the
"OUT" port.
NOTE: If your answering machine does not let you connect an external phone,
you can purchase and use a parallel splitter (also known as a coupler) to connect
both the answering machine and telephone to the HP All-in-One. You can use
standard phone cords for these connections.
6. If your modem software is set to receive faxes to your computer automatically, turn
off that setting.
NOTE: If you do not turn off the automatic fax reception setting in your modem
software, the product will not be able to receive faxes.
7. Set your answering machine to answer after a low number of rings.
8. Change the Auto Answer setting to the maximum number of rings supported by your
product. (The maximum number of rings varies by country/region.)
9. Run a fax test.
When the phone rings, your answering machine will answer after the number of rings you
have set, and then play your recorded greeting. The HP All-in-One monitors the call during
this time, "listening" for fax tones. If incoming fax tones are detected, the HP All-in-One
will emit fax reception tones and receive the fax; if there are no fax tones, the
HP All-in-One stops monitoring the line and your answering machine can record a voice
message.
Case K: Shared voice/fax line with computer dial-up modem and voice mail
If you receive both voice calls and fax calls at the same phone number, use a computer
dial-up modem on the same phone line, and subscribe to a voice mail service through
your telephone company, set up the HP All-in-One as described in this section.
NOTE: You cannot receive faxes automatically if you have a voice mail service at
the same phone number you use for fax calls. You must receive faxes manually; this
means you must be available to respond in person to incoming fax calls. If you want
to receive faxes automatically instead, contact your telephone company to subscribe
to a distinctive ring service, or to obtain a separate phone line for faxing.
Since your computer dial-up modem shares the phone line with the HP All-in-One, you
will not be able to use both your modem and the HP All-in-One simultaneously. For
example, you cannot use the HP All-in-One for faxing if you are using your computer dialup modem to send an e-mail or access the Internet.
22 HP Photosmart C4340 All-in-One series
Page 26
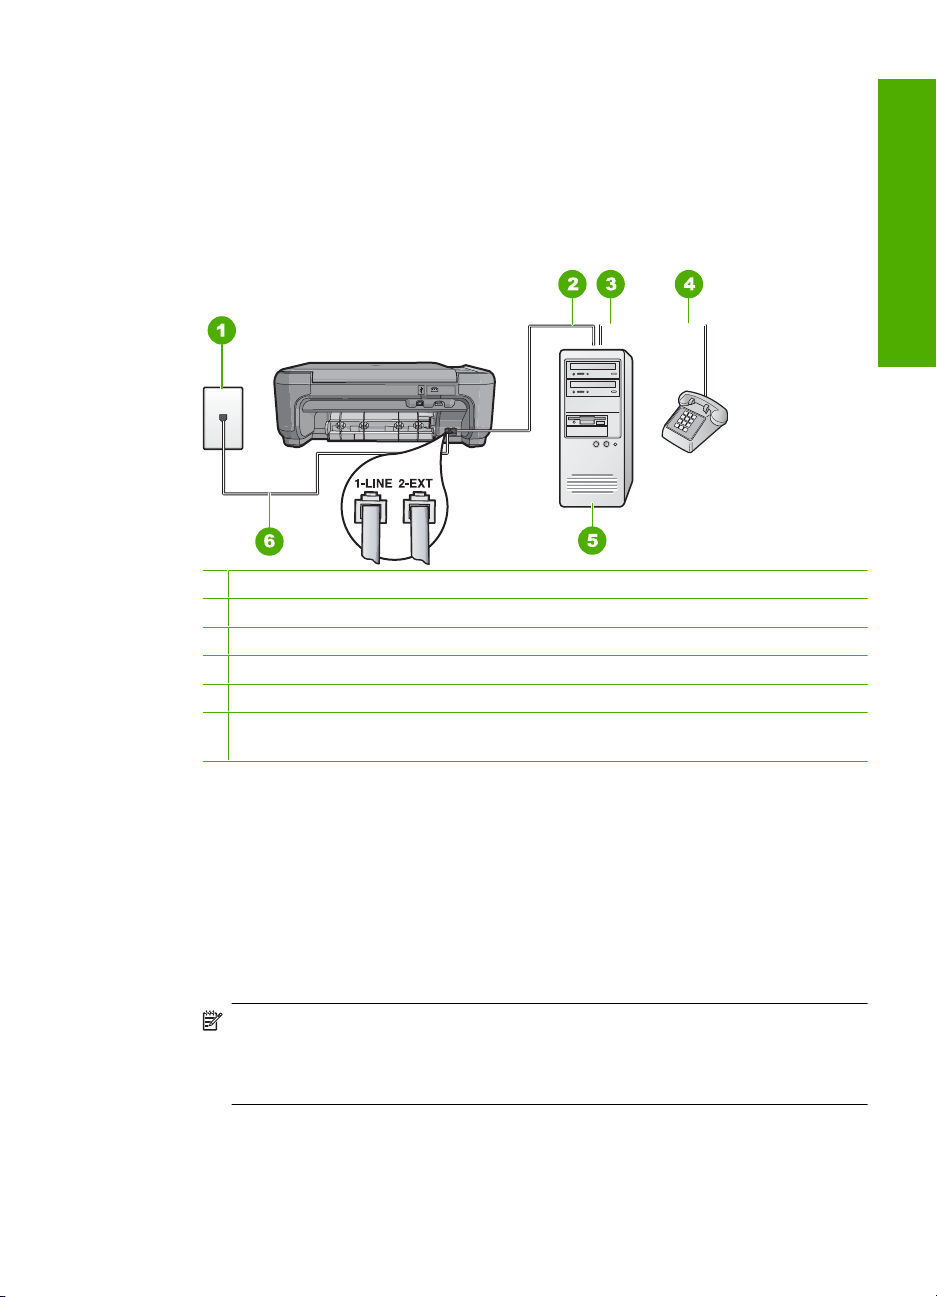
There are two different ways to set up the HP All-in-One with your computer based on
the number of phone ports on your computer. Before you begin, check your computer to
see if it has one or two phone ports.
• If your computer has only one phone port, you will need to purchase a parallel splitter
(also called a coupler). Refer to the onscreen help for specific setup instructions.
• If your computer has two phone ports, set up the HP All-in-One as described below.
Figure 2-10 Back view of the HP All-in-One
1 Telephone wall jack
2 "IN" phone port on your computer
3 "OUT" phone port on your computer
4 Telephone
5 Computer with modem
6 Use the phone cord supplied in the box with the HP All-in-One to connect to the "1-LINE"
port
English
To set up the product on the same phone line as a computer with two phone ports
1. Remove the white plug from the port labeled 2-EXT on the back of the product.
2. Find the phone cord that connects from the back of your computer (your computer
dial-up modem) to a telephone wall jack. Disconnect the cord from the telephone wall
jack and plug it into the port labeled 2-EXT on the back of the product.
3. Connect a phone to the "OUT" port on the back of your computer dial-up modem.
4. Using the phone cord supplied in the box with the product, connect one end to your
telephone wall jack, then connect the other end to the port labeled 1-LINE on the back
of the product.
NOTE: If you do not use the supplied cord to connect from the telephone wall
jack to the product, you might not be able to fax successfully. This special phone
cord is different from the phone cords you might already have in your home or
office.
Set up the HP All-in-One for faxing 23
Page 27

Chapter 2
5. If your modem software is set to receive faxes to your computer automatically, turn
off that setting.
NOTE: If you do not turn off the automatic fax reception setting in your modem
software, the product will not be able to receive faxes.
6. Turn off the Auto Answer setting.
7. Run a fax test.
You must be available to respond in person to incoming fax calls, or the HP All-in-One
English
cannot receive faxes.
Change settings on the HP All-in-One to receive faxes
In order to receive faxes successfully, you might need to change some settings on the
HP All-in-One. If you are unsure which setting to choose for a specific fax option, refer to
the detailed fax setup instructions provided in the printed documentation.
This section contains the following topics:
Choose the recommended answer setting for your setup
The Auto Answer setting determines whether or not the HP All-in-One answers incoming
calls, as well as how many rings to wait before answering. The correct setting depends
on how your home or office is set up. For information on which setting to choose, refer to
the setup instructions for your specific case in the previous pages.
To set the Auto Answer setting
1. Press the button next to Scan/Fax.
2. Press the button next to Fax Menu.
3. Press the button next to Fax Setup.
4. Press the button next to the down arrow to highlight Auto Answer, and then press
the button next to OK.
5. Press the button next to the appropriate setting and then press the button next to
OK.
Change the answer ring pattern for distinctive ringing
Many phone companies offer a distinctive ringing feature that allows you to have several
phone numbers on one phone line. When you subscribe to this service, each number will
have a different ring pattern. You can set up the HP All-in-One to answer incoming calls
that have a specific ring pattern.
If you connect the HP All-in-One to a line with distinctive ringing, have your telephone
company assign one ring pattern to voice calls and another ring pattern to fax calls. HP
recommends that you request double or triple rings for a fax number. When the
HP All-in-One detects the specified ring pattern, it will answer the call and receive the fax.
If you do not have a distinctive ring service, use the default ring pattern, which is All
Rings.
24 HP Photosmart C4340 All-in-One series
Page 28

To change the distinctive ring pattern from the control panel
1. Verify that the product is set to answer fax calls automatically after a specified number
of rings.
2. Press the button next to Scan/Fax.
3. Press the button next to Fax Menu.
4. Press the button next to Fax Setup.
5. Press the button next to the down arrow to highlight Distinctive Ring, and then press
the button next to OK.
6. Press the button next to the down arrow to highlight the appropriate option, and then
press the button next to OK.
When the phone rings with the ring pattern assigned to your fax line, the product
answers the call and receives the fax.
Set the fax header
The fax header prints your name and fax number on the top of every fax you send. HP
recommends that you set up the fax header by using the software that you installed with
the HP All-in-One. You can also set up the fax header from the control panel, as described
here.
NOTE: In some countries/regions the fax header information is a legal requirement.
To set a fax header from the control panel
1. Press the button next to Scan/Fax.
2. Press the button next to Fax Menu.
3. Press the button next to Fax Setup.
4. Press the button next to the down arrow to highlight Fax Header, and then press the
button next to OK.
5. Use the keypad to enter your personal or company name. When you have finished,
press the button next to OK.
6. Use the keypad to enter your fax number, and then press the button next to OK.
English
Test your fax setup
You can test your fax setup to check the status of the HP All-in-One and to make sure it
is set up properly for faxing. Perform this test after you have completed setting up the
HP All-in-One for faxing. The test does the following:
• Tests the fax hardware
• Verifies the correct type of phone cord is connected to the HP All-in-One
• Checks that the phone cord is plugged into the correct port
• Checks for a dial tone
• Checks for an active phone line
• Tests the status of your phone line connection
The HP All-in-One prints a report with the results of the test. If the test fails, review the
report for information on how to fix the problem and rerun the test.
Test your fax setup 25
Page 29

English
Chapter 2
To test your fax setup from the control panel
1. Set up the product for faxing according to your particular home or office setup
instructions.
2. Insert the print cartridges and load full-size paper in the input tray before starting the
test.
3. Press the button next to Scan/Fax.
4. Press the button next to Fax Menu.
5. Press the button next to Fax Setup.
6. Press the button next to the down arrow to highlight Run Fax Test, and then press
the button next to OK.
The status of the test appears on the display. The product also prints a detailed report.
7. Review the report.
• If the test passes and you are still having problems faxing, check the fax settings
listed in the report to verify the settings are correct. A blank or incorrect fax setting
can cause problems faxing.
• If the test fails, review the report for more information on how to fix any problems
found.
8. After you pick up the fax report, press the button next to OK.
If necessary, resolve any problems found and rerun the test.
26 HP Photosmart C4340 All-in-One series
Page 30
3 Use the HP All-in-One features
This chapter includes information about how to use the HP All-in-One for basic
operations. In addition, it provides instructions about how to load paper and replace the
print cartridges.
Load originals and load paper
You can copy, scan, or fax up to letter- or A4-size originals and thick publications by
loading them on the glass.
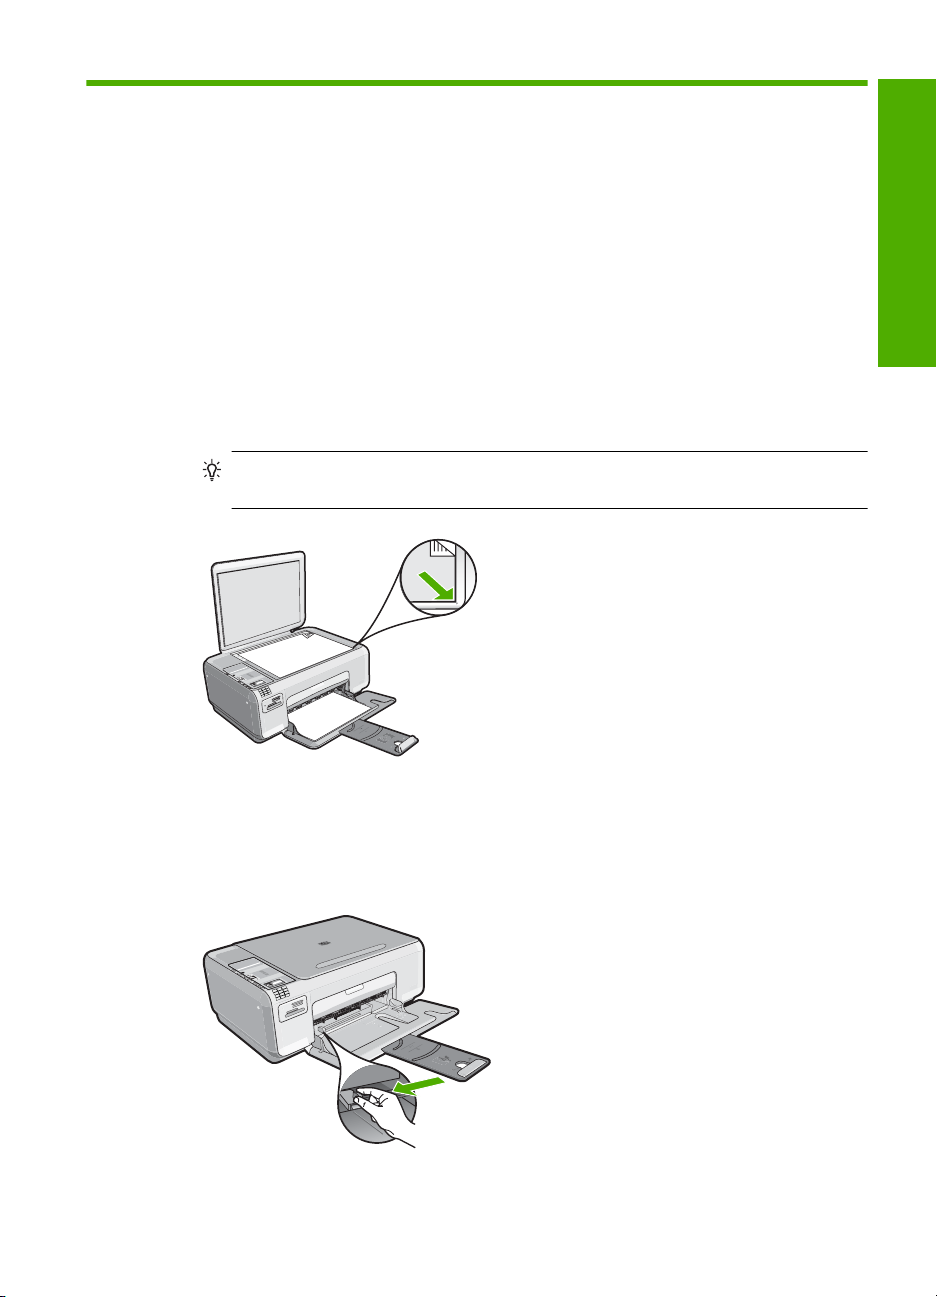
To load an original on the glass
1. Lift the lid to the open position.
2. Load your original print side down on the right front corner of the glass.
TIP: To get the correct copy size, make sure that there is no tape or other foreign
object on the glass.
English
3. Close the lid.
To load small-size photo paper in the input tray
1. Slide the paper-width guide to its outermost position.
Load originals and load paper 27
Page 31

Chapter 3
2. Insert the stack of photo paper into the far-right side of the input tray with the short
edge forward and the print side down. Slide the stack of photo paper forward until it
stops.
If the photo paper you are using has perforated tabs, load the photo paper so that the
tabs are closest to you.
3. Slide the paper-width guide inward until it stops at the edge of the paper.
Do not overload the input tray; make sure the stack of paper fits within the input tray
and is no higher than the top of the paper-width guide.
English
Avoid paper jams
To help avoid paper jams, follow these guidelines.
• Remove printed papers from the output tray frequently.
• Prevent curled or wrinkled photo paper by storing all unused photo paper flat in a
resealable bag.
• Ensure that paper loaded in the input tray lays flat and the edges are not bent or torn.
• Do not combine different paper types and paper sizes in the input tray; the entire stack
of paper in the input tray must be the same size and type.
• Adjust the paper-width guide in the input tray to fit snugly against all paper. Make sure
the paper-width guide does not bend the paper in the input tray.
• Do not overload the input tray; make sure the stack of paper fits within the input tray
and is no higher than the top of the paper-width guide.
• Do not force paper too far forward in the input tray.
• Use paper types that are recommended for the product.
Print 10 x 15 cm (4 x 6 inch) photos
You can select specific photos on your memory card to print as 10 x 15 cm (4 x 6 inch)
photos.
To print one or more 10 x 15 cm (4 x 6 inch) photos
1. Load 10 x 15 cm (4 x 6 inch) photo paper in the input tray.
2. Insert your memory card into the appropriate slot on the product.
28 HP Photosmart C4340 All-in-One series
Page 32

1 xD-Picture Card
2 Memory Stick, Memory Stick Pro, Memory Stick Select, Memory Stick Magic Gate,
Memory Stick Duo or Duo Pro (adapter optional), or Memory Stick Micro (adapter required)
3 Secure Digital (SD), Secure Digital Mini (adapter required), Secure Digital High Capacity
(SDHC), MultiMediaCard (MMC), MMC Plus, MMC Mobile (RS-MMC; adapter required),
TransFlash MicroSD Card, or Secure MultiMedia Card
4 CompactFlash (CF) types I and II
The most recent image on the card appears on the display.
3. Press the buttons next to the up arrow or down arrow icons on the display to scroll
through the photos on your memory card until the photo you want to print appears.
4. Leave the default Size setting as Borderless.
NOTE: The Quality setting is set to best mode (as indicated by the three star
icons on the display) and cannot be changed.
5. Press the Copies button until the number of copies you want to print appears on the
display.
6. Press the button next to Print on the display.
TIP: While the photo is printing, you can continue scrolling through the photos
on your memory card. When you see a photo you want to print, you can press the
Print button to add that photo to the print queue.
English
Scan an image
For original documents or images placed on the glass, you can start a scan from your
computer or from the HP All-in-One. This section explains the second option: how to scan
from the control panel of the HP All-in-One to a computer.
To use the scan features, the HP All-in-One and computer must be connected and turned
on. The HP Photosmart Software must also be installed and running on your computer
prior to scanning. To verify that the HP Photosmart Software is running on a Windows
computer, look for the HP Digital Imaging Monitor icon in the system tray at the lower
right side of the screen, near the time.
Scan an image 29
Page 33

Chapter 3
To scan to a computer
1. Load your original print side down on the right front corner of the glass.
English
2. Press the button next to Scan/Fax.
3. Press the button next to Start Scan.
4. Make any edits to the preview image, and then click Accept when you are finished.
Make a copy
You can make quality copies from the control panel.
NOTE: Closing the HP Digital Imaging Monitor icon in the Windows system tray
can cause the HP All-in-One to lose some of its scan functionality. If this happens,
you can restore full functionality by restarting your computer.
NOTE: Ensure that there are no memory cards inserted in the memory card slots
on the product.
The Scan/Fax menu appears.
A preview image of the scan appears on your computer, where you can edit it. Any
edits that you make apply to the current scan session only.
The HP Photosmart Software has many tools that you can use to edit your scanned
image. You can improve the overall image quality by adjusting the brightness,
sharpness, color tone, and saturation. You can also crop, straighten, rotate, or resize
the image.
To make a copy from the control panel
1. Load paper in the input tray.
2. Load your original print side down on the right front corner of the glass.
3. Press the button next to Start Copy Black or Start Copy Color to begin copying.
Send a basic fax
You can easily send a single- or multiple-page black-and-white or color fax using the
control panel, as described here.
NOTE: If you need printed confirmation that your faxes were successfully sent,
enable fax confirmation before sending any faxes.
NOTE: If the fax number you are dialing is busy or if there is no answer, the product
automatically redials the number several times. If you do not want to redial the
number, press Cancel when the product is dialing.
TIP: You can also send a fax manually by dialing from a phone or by using the
monitor dialing feature from the control panel. These features allow you to control the
pace of your dialing. They are also useful when you want to use a calling card to
charge the call and you need to respond to tone prompts while dialing.
30 HP Photosmart C4340 All-in-One series
Page 34

To send a basic fax from the control panel
1. Press the button next to Scan/Fax.
2. Press the button next to Start Fax.
The Send Fax screen appears.
3. Press the button next to the down arrow to highlight Black & White or Color, and
then press the button next to OK.
The Enter Number screen appears.
4. Enter the fax number using the keypad or press the button next to the up or down
arrow to redial a recently dialed number, and then press the button next to OK.
The Load Originals screen appears.
5. Load your original print side down on the right front corner of the glass, and then press
the button next to OK.
NOTE: If you are sending a color fax, the fax is sent immediately. If you are
sending a black and white fax, the fax is stored in memory until you have scanned
each page of the original.
The Another page? screen appears.
6. Do the following:
If you have another page to fax
a. Press the button next to OK to select Yes.
b. Repeat steps 5 and 6.
If you do not have another page to fax
▲ Press the button next to the down arrow to select No, and then press the button
next to OK.
The product sends the fax.
English
Receive a fax
The HP All-in-One can receive faxes automatically or manually. If you turn on the Auto
Answer option by setting the number of rings to wait, the HP All-in-One automatically
answers incoming calls and receives faxes. If you turn off the Auto Answer option, you
will need to receive faxes manually.
NOTE: If you receive a legal-size fax, the HP All-in-One reduces the fax so that it
fits on the paper that is loaded in the input tray. If the fax size is so large that it requires
more than a 60% reduction, the HP All-in-One might print the fax on more than one
page.
When you are on the phone, the person you are speaking with can send you a fax while
you are still connected. This is referred to as manual faxing. Use the instructions in this
section to receive a manual fax.
You can receive faxes manually from a phone that is:
• Directly connected to the HP All-in-One (on the 2-EXT port)
• On the same telephone line, but not directly connected to the HP All-in-One
Receive a fax 31
Page 35

Chapter 3
To receive a fax manually
1. Make sure the product is turned on and you have paper loaded in the input tray.
2. Make sure the Auto Answer setting is set to Don't answer or to a higher number of
rings so that you are able to answer the call before the product answers.
3. If you are currently on the phone with the sender, instruct the sender to press Start
on their fax machine.
You will hear fax tones from a sending fax machine.
4. Press the button next to Scan/Fax.
English
5. Press the button next to Start Fax.
The Fax Mode screen appears.
6. Press the button next to the down arrow to highlight Receive Fax Manually, and then
press the button next to OK.
After the product begins to receive the fax, you can hang up the phone or remain on
the line. The phone line is silent during fax transmission.
Replace the print cartridges
Follow these instructions to replace print cartridges. Following these instructions might
also help solve print quality issues related to the cartridges.
NOTE: When the ink level for the print cartridge is low, a message appears on your
computer screen. You can also check the ink levels by using the software installed
with the HP All-in-One.
When you receive a low-ink warning message, make sure you have a replacement print
cartridge available. You should also replace the print cartridges when you see faded text
or if you experience print quality issues related to the print cartridges.
To order print cartridges for the HP All-in-One, go to
prompted, choose your country/region, follow the prompts to select your product, and
then click one of the shopping links on the page.
www.hp.com/buy/supplies. If
To replace the print cartridges
1. Make sure the product is turned on.
CAUTION: If the product is turned off when you open the print cartridge door to
access the print cartridges, it will not release the cartridges for changing. You
might damage the product if the print cartridges are not docked safely when you
try to remove them.
2. Make sure you have letter or A4 unused plain white paper loaded in the input tray.
3. Open the print cartridge door.
The print carriage moves to the far right side of the product.
32 HP Photosmart C4340 All-in-One series
Page 36

4. Wait until the print carriage is idle and silent. Lightly press down on a print cartridge
to release it, and then pull the print cartridge toward you out of its slot.
If you are replacing the tri-color print cartridge, remove the print cartridge from the
slot on the left.
If you are replacing the black or photo print cartridge, remove the print cartridge from
the slot on the right.
1 Print cartridge slot for the tri-color print cartridge
2 Print cartridge slot for the black and photo print cartridges
English
TIP: If you are removing the black print cartridge in order to install the photo print
cartridge, store the black print cartridge in the print cartridge protector or an airtight
plastic container.
5. Remove the new print cartridge from its packaging and, being careful to touch only
the black plastic, gently remove the plastic tape by using the pink pull tab.
Replace the print cartridges 33
Page 37

English
Chapter 3
1 Copper-colored contacts
2 Plastic tape with pink pull tab (must be removed before installing)
3 Ink nozzles under tape
CAUTION: Do not touch the copper-colored contacts or ink nozzles. Also, do
not re-tape the print cartridges. Doing so can result in clogs, ink failure, and bad
electrical connections.
6. Hold the print cartridge with the HP logo on top, and insert the new print cartridge into
the empty cartridge slot. Make sure you push the print cartridge in firmly until it snaps
into place.
If you are installing the tri-color print cartridge, slide it into the left slot.
If you are installing a black or photo print cartridge, slide it into the right slot.
7. Close the print cartridge door.
34 HP Photosmart C4340 All-in-One series
Page 38

8. When prompted, press the button next to OK.
The product prints a print cartridge alignment page.
NOTE: If you have colored paper loaded in the input tray when you align the print
cartridges, the alignment will fail. Load unused plain white paper into the input
tray, and then try the alignment again.
9. Load the page print side down on the right front corner of the glass, and then press
the button next to OK to scan the page.
10. When the On light stops flashing, the alignment is complete. Remove the alignment
page and recycle or discard it.
Clean the HP All-in-One
To ensure that your copies and scans remain clear, you might need to clean the glass
and lid backing. You might also want to dust the exterior of the HP All-in-One.
Clean the glass
Fingerprints, smudges, hair, and dust on the main glass surface slow down performance
and affect the accuracy of the copy and scan features.
To clean the glass
1. Turn off the product, unplug the power cord, and raise the lid.
2. Clean the glass with a soft cloth or sponge slightly moistened with a nonabrasive
glass cleaner.
CAUTION: Do not use abrasives, acetone, benzene, or carbon tetrachloride on
the glass, since they can damage it. Do not place or spray liquid directly on the
glass. The liquid might seep under the glass and damage the product.
3. Dry the glass with a dry, soft, lint-free cloth to prevent spotting.
4. Turn on the product.
English
Clean the lid backing
Minor debris can accumulate on the white document backing located underneath the lid
of the HP All-in-One.
To clean the lid backing
1. Turn off the product, unplug the power cord, and raise the lid.
2. Clean the white document backing with a soft cloth or sponge slightly moistened with
a mild soap and warm water.
Wash the backing gently to loosen debris. Do not scrub the backing.
Clean the HP All-in-One 35
Page 39

English
Chapter 3
3. Dry the backing with a dry, soft, lint-free cloth.
CAUTION: Do not use paper-based wipes, as these might scratch the backing.
4. If further cleaning is needed, repeat the previous steps using isopropyl (rubbing)
alcohol, and wipe the backing thoroughly with a damp cloth to remove any residual
alcohol.
CAUTION: Be careful not to spill alcohol on the glass or exterior of the product,
as this might damage it.
5. Plug in the power cord, and then turn on the product.
36 HP Photosmart C4340 All-in-One series
Page 40

4 Troubleshooting and support
This chapter contains troubleshooting information for the HP All-in-One. Specific information is
provided for installation and configuration issues, and some operational topics. For more
troubleshooting information, see the onscreen Help that came with your software.
Many issues are caused when the HP All-in-One is connected to the computer using a USB cable
before the HP All-in-One software is installed on the computer. If you connected the HP All-in-One
to your computer before the software installation screen prompts you to do so, you must follow these
steps:
Troubleshooting common setup issues
1. Disconnect the USB cable from the computer.
2. Uninstall the software (if you have already installed it).
3. Restart your computer.
4. Turn off the product, wait one minute, then restart it.
5. Reinstall the product software.
CAUTION: Do not connect the USB cable to the computer until prompted by the software
installation screen.
For support contact information, see the inside back cover of this guide.
Uninstall and reinstall the software
If your installation is incomplete, or if you connected the USB cable to the computer before prompted
by the software installation screen, you might need to uninstall and then reinstall the software. Do
not simply delete the HP All-in-One application files from your computer. Make sure to remove them
properly using the uninstall utility provided when you installed the software that came with the
HP All-in-One.
To uninstall and reinstall the software
1. On the Windows taskbar, click Start, Settings, Control Panel (or just Control Panel).
2. Double-click Add/Remove Programs (or click Uninstall a program).
3. Select HP Photosmart All-in-One Driver Software, and then click Change/Remove.
Follow the onscreen instructions.
4. Disconnect the product from your computer.
5. Restart your computer.
English
NOTE: It is important that you disconnect the product before restarting your computer. Do
not connect the product to your computer until after you have reinstalled the software.
6. Insert the product CD-ROM into your computer’s CD-ROM drive and then start the Setup
program.
NOTE: If the Setup program does not appear, locate the setup.exe file on the CD-ROM
drive and double-click it.
NOTE: When the computer is turned on, a software group called the Terminate and Stay
Resident (TSR) programs automatically loads. These programs activate some of the
computer utilities, such as the anti-virus software, that are not required for the computer to
function. Occasionally, TSR's prevent the HP software from loading so that it does not install
properly. In Windows Vista and Windows XP, use the MSCONFIG utility to prevent TSR
programs and services from starting up.
7. Follow the onscreen instructions and the instructions provided in the Setup Guide that came
with the product.
Uninstall and reinstall the software 37
Page 41

Chapter 4
When the software installation is complete, the HP Digital Imaging Monitor icon appears in the
Windows system tray.
To verify that the software is properly installed, double-click the HP Solution Center icon on the
desktop. If the HP Solution Center shows the essential icons (Scan Picture and Scan
Document), the software has been properly installed.
Setup troubleshooting
Use this section to solve any problems you might encounter while setting up the HP All-in-One
hardware.
English
The product will not turn on
Try the following solutions if there are no light indications, no noise, and no movement from the
product when you turn it on.
Solution 1: Make sure you use the power cord that came with the product
Solution
• Make sure the power cord is firmly connected to both the product and the power adapter.
Plug the power cord into a power outlet, surge protector, or power strip.
1 Power connection
2 Power cord and adapter
3 Power outlet
• If you are using a power strip, make sure the power strip is turned on. Or, try plugging the
product directly into a power outlet.
• Test the power outlet to make sure it is working. Plug in an appliance that you know works,
and see if the appliance has power. If not, then there might be a problem with the power
outlet.
• If you plugged the product into a switched outlet, make sure the outlet is switched on. If it
is switched to on but still does not work, then there might be a problem with the power outlet.
Cause: The product was not being used with the power cord provided.
If this did not solve the issue, try the next solution.
Solution 2: Reset the product
Solution: Turn off the product, and then unplug the power cord. Plug the power cord back in,
and then press the On button to turn on the product.
38 HP Photosmart C4340 All-in-One series
Page 42

Cause: The product experienced an error.
If this did not solve the issue, try the next solution.
Solution 3: Press the On button more slowly
Solution: The product might not respond if you press the On button too quickly. Press the
On button once. It might take a few minutes for the product to turn on. If you press the On button
again during this time, you might turn the product off.
CAUTION: If the product still does not turn on, it might have a mechanical failure. Unplug
the product from the power outlet.
Contact HP support for service.
Go to:
www.hp.com/support. If prompted, choose your country/region, and then click
Contact HP for information on calling for technical support.
Cause: You pressed the On button too quickly.
If this did not solve the issue, try the next solution.
Solution 4: Contact HP to replace the power supply
Solution: Contact HP support to request a power supply for the product.
Go to: www.hp.com/support.
If prompted, choose your country/region, and then click Contact HP for information on calling
for technical support.
Cause: The power supply was not intended for use with this product.
If this did not solve the issue, try the next solution.
Solution 5: Contact HP support for service
Solution: If you have completed all of the steps provided in the previous solutions and are still
having a problem, contact HP support for service.
Go to:
www.hp.com/support.
If prompted, choose your country/region, and then click Contact HP for technical support.
Cause: You might need assistance to enable the product or software to function properly.
English
I connected the USB cable, but I am having problems using the product with my
computer
Solution: You must first install the software that came with the product before connecting the
USB cable. During installation, do not plug in the USB cable until prompted by the onscreen
instructions.
Once you have installed the software, connecting your computer to the product with a USB cable
is straightforward. Simply plug one end of the USB cable into the back of your computer and the
other into the back of the product. You can connect to any USB port on the back of your
computer.
Setup troubleshooting 39
Page 43

English
Chapter 4
For more information on installing the software and connecting the USB cable, see the Setup
Guide that came with the product.
Cause: The USB cable was connected before the software was installed. Connecting the USB
cable before you are prompted can cause errors.
After setting up the product, it does not print
Solution: If the product and computer are not communicating with each other, try the following:
• Look at the On light located on the product. If it is not lit, the product is turned off. Make sure
the power cord is firmly connected to the product and plugged into a power outlet. Press
the On button to turn on the product.
• Make sure the print cartridges are installed.
• Make sure you have paper loaded in the input tray.
• Check that the product does not have a paper jam.
• Check that the print carriage is not jammed.
Open the print cartridge door to access the print carriage area. Remove any objects that
are blocking the print carriage, including any packing materials. Turn the product off and
then turn it on again.
• Check that the product print queue is not paused (Windows) or stopped (Mac). If it is, choose
the appropriate setting to resume printing. For more information about accessing the print
queue, see the documentation that came with the operating system installed on your
computer.
• Check the USB cable. If you are using an older cable, it might not be working properly. Try
connecting it to another product to see if the USB cable works. If you experience problems,
the USB cable might need to be replaced. Also verify that the cable does not exceed 3
meters (9.8 feet) in length.
• Check the connection from the product to your computer. Verify that the USB cable is
securely plugged into the USB port on the back of the product. Make sure the other end of
the USB cable is plugged into a USB port on your computer. After the cable is connected
properly, turn the product off and then on again.
• If you are connecting the product through a USB hub, make sure the hub is turned on. If the
hub is on, try connecting directly to your computer.
• Check other printers or scanners. You might need to disconnect older products from your
computer.
• Try connecting the USB cable to another USB port on your computer. After you check the
connections, try restarting your computer. Turn the product off and then on again.
• If the product is offline, turn the product off and on again. Start a print job.
• If necessary, remove and then install the software you installed with the product again.
40 HP Photosmart C4340 All-in-One series
Page 44

For more information on setting up the product and connecting it to your computer, see the Setup
Guide that came with the product.
Cause: There was some communication problem between the product and the computer.
Fax setup troubleshooting
This section contains fax setup troubleshooting information for the HP All-in-One. If the HP All-in-One
is not set up properly for faxing, you might experience problems when sending faxes, receiving faxes,
or both.
The product is having problems sending and receiving faxes
Try the following solutions to resolve the issue. Solutions are listed in order, with the most likely
solution first. If the first solution does not solve the problem, continue trying the remaining solutions
until the issue is resolved.
Solution 1: Make sure you set up the product as described in the printed
documentation
Solution: Follow the instructions in your printed documentation to set up the product properly
for faxing, based on the equipment and services you have on the same phone line as the product.
Then, run a fax test to check the status of the product and to make sure you set it up properly.
The product prints a report with the results of the test. If the test fails, review the report for
information on how to fix the problem.
Cause: The product was not set up properly for faxing.
If this did not solve the issue, try the next solution.
Solution 2: Turn on the product
Solution: Look at the display on the product. If the display is blank and the On light is not lit,
the product is turned off. Make sure the power cord is firmly connected to the product and
plugged into a power outlet. Press the On button to turn on the product.
Cause: The product was turned off.
If this did not solve the issue, try the next solution.
English
Solution 3: Make sure you are using the correct type of phone cord
Solution
NOTE: This possible solution applies only in the countries/regions that receive a 2-wire
phone cord in the box with the product, including: Argentina, Australia, Brazil, Canada, Chile,
China, Colombia, Greece, India, Indonesia, Ireland, Japan, Korea, Latin America, Malaysia,
Mexico, Philippines, Poland, Portugal, Russia, Saudi Arabia, Singapore, Spain, Taiwan,
Thailand, USA, Venezuela, and Vietnam.
This special 2-wire phone cord is different from the more common 4-wire phone cords you might
already have in your office. Check the end of the cord and compare it to the two types of cords
shown below.
Fax setup troubleshooting 41
Page 45

English
Chapter 4
Make sure you used the phone cord supplied in the box with the product to connect to the
telephone wall jack.
One end of this special 2-wire phone cord should be connected to the port labeled 1-LINE on
the back of the product and the other end to your telephone wall jack, as shown below.
1 Telephone wall jack
2 Use the phone cord supplied in the box with the product
If you used a 4-wire phone cord, disconnect it, find the supplied 2-wire phone cord, and then
connect the 2-wire phone cord to the port labeled 1-LINE on the back of the product.
If the product came with a 2-wire phone cord adapter, you can use it with a 4-wire phone cord,
in case the supplied 2-wire phone cord is too short. Attach the 2-wire phone cord adapter to the
port labeled 1-LINE on the back of the product. Attach your 4-wire phone cord to the open port
on the adapter and to the telephone wall jack. For more information on using the 2-wire phone
cord adapter, see the documentation that came with it.
For more information on setting up the product, see the printed documentation that came with
the product.
Cause: The wrong phone cord was used to connect the product or the phone cord was plugged
into the wrong port.
If this did not solve the issue, try the next solution.
Solution 4: Make sure other office equipment is connected correctly
Solution
NOTE: This possible solution applies only in the countries/regions that receive a 2-wire
phone cord in the box with the product, including: Argentina, Australia, Brazil, Canada, Chile,
China, Colombia, Greece, India, Indonesia, Ireland, Japan, Korea, Latin America, Malaysia,
Mexico, Philippines, Poland, Portugal, Russia, Saudi Arabia, Singapore, Spain, Taiwan,
Thailand, USA, Venezuela, and Vietnam.
Make sure you have correctly connected the product to the telephone wall jack, and correctly
connected any additional equipment and services that share the phone line with the product.
Use the port labeled 1-LINE on the back of the product to connect to the telephone wall jack.
Use the 2-EXT port to connect to any other equipment, such as an answering machine or a
telephone, as shown below.
42 HP Photosmart C4340 All-in-One series
Page 46

1 Telephone wall jack
2 Use the phone cord supplied in the box with the product
3 Telephone (optional)
For more information on setting up the product, see the printed documentation that came with
the product.
Cause: Other office equipment (such as an answering machine or a telephone) was not set
up properly with the product.
If this did not solve the issue, try the next solution.
Solution 5: Try removing the splitter
Solution: A phone line splitter can cause faxing problems. (A splitter is a two-cord connector
that plugs into a telephone wall jack.) If you are using a splitter, remove it and connect the product
directly to the telephone wall jack.
Cause: You were using a phone line splitter.
If this did not solve the issue, try the next solution.
Solution 6: Make sure the telephone wall jack works properly
Solution: Try connecting a working telephone and phone cord to the telephone wall jack you
are using for the product and check for a dial tone. If you do not hear a dial tone, call your local
telephone company for service.
Cause: The telephone wall jack was not working properly.
If this did not solve the issue, try the next solution.
English
Solution 7: Check the phone line for noise
Solution: You can check the sound quality of the phone line by plugging a phone into the
telephone wall jack and listening for static or other noise. If the failure was due to noise on the
phone line, contact the sender to have them resend the fax. The quality might be better when
you try again. If the problem persists, turn Error Correction Mode (ECM) off and contact your
telephone company.
Cause: The phone line connection was noisy. Phone lines with poor sound quality (noise) can
cause faxing problems.
If this did not solve the issue, try the next solution.
Fax setup troubleshooting 43
Page 47

Chapter 4
Solution 8: Make sure extension phones or other equipment on the phone line are
not in use
Solution: Make sure extension phones (phones on the same phone line, but not connected
to the product) or other equipment are not in use or off the hook. For example, you cannot use
the product for faxing if an extension phone is off the hook, or if you are using a computer dialup modem to send e-mail or access the Internet.
Cause: Other equipment that uses the same phone line as the product might have been in
use.
If this did not solve the issue, try the next solution.
English
Solution 9: Make sure the product is connected to an analog phone line
Solution: Make sure you connect the product to an analog phone line or you will not be able
to send or receive faxes. To check if your phone line is digital, connect a regular analog phone
to the line and listen for a dial tone. If you do not hear a normal sounding dial tone, it might be
a phone line set up for digital phones. Connect the product to an analog phone line and try
sending or receiving a fax.
NOTE: If you are unsure of the kind of phone line you have (analog or digital), check with
your service provider.
Cause: The product might have been connected to a telephone wall jack that was set up for
digital phones.
If this did not solve the issue, try the next solution.
Solution 10: If you use a DSL service, make sure you have a DSL filter installed
Solution: If you use a DSL service, make sure that you have a DSL filter connected or you
will not be able to fax successfully. The DSL service sends out a digital signal on the phone line
that can interfere with the product, preventing the product from sending and receiving faxes.
The DSL filter removes the digital signal and allows the product to communicate properly with
the phone line.
To check if you already have a filter installed, listen to your phone line or dial tone. If you hear
noise or static on the line, you probably do not have a DSL filter installed, or it is installed
incorrectly. Obtain a DSL filter from your DSL provider. If you already have a DSL filter, make
sure it is connected correctly.
Cause: The product shares the same phone line with a DSL service and a DSL filter was not
connected.
If this did not solve the issue, try the next solution.
Solution 11: If you use a DSL service, make sure the DSL modem is properly
grounded
Solution: If the DSL modem is not properly grounded, it can create noise on the phone line.
Phone lines with poor sound quality (noise) can cause faxing problems. You can check the sound
quality of the phone line by plugging a phone into the telephone wall jack and listening for static
or other noise.
If you hear noise, turn off your DSL modem.
NOTE: For information on turning your DSL modem off, contact your DSL provider for
support.
44 HP Photosmart C4340 All-in-One series
Page 48

Completely remove power for at least 15 minutes, and then turn the DSL modem back on.
Listen to the dial tone again.
• If the dial tone sounds clear (no noise or static), try sending or receiving a fax.
NOTE: You might notice static on the phone line again in the future. If the product
stops sending and receiving faxes, repeat this process.
• If the phone line is still noisy, contact your phone company.
Cause: The product shares the same phone line with a DSL service and the DSL modem
might not have been properly grounded.
If this did not solve the issue, try the next solution.
Solution 12: If you use a PBX or ISDN converter, make sure you are using a port
designated for fax and phone use
Solution: Make sure the product is connected to the port that is designated for fax and phone
use. Also, make sure that the terminal adapter is set to the correct switch type for your country/
region, if possible.
NOTE: Some ISDN systems allow you to configure the ports for specific phone equipment.
For example, you might have assigned one port for telephone and Group 3 fax and another
port for multiple purposes. If you have problems when connected to the fax/phone port of
your ISDN converter, try using the port designated for multiple purposes; it might be labeled
"multi-combi" or something similar.
For more information on how to set up the product with a PBX phone system or ISDN line, see
the printed documentation that came with the product.
Cause: You were using either a PBX or an ISDN converter/terminal adapter.
If this did not solve the issue, try the next solution.
Solution 13: Check for and resolve any error messages
Solution: Check the display or your computer for an error message providing information
about the problem and how to solve it. If there is an error, the product will not send or receive a
fax until the error condition is resolved.
You can also check the status of the product by clicking Status in the HP Solution Center.
Cause: Another process caused an error in the product.
If this did not solve the issue, try the next solution.
Solution 14: Lower the fax speed
Solution: You might need to send and receive faxes at a slower rate. Try setting the Fax
Speed to Medium (14400) or Slow (9600) if you use one of the following:
• An Internet phone service
• A PBX system
• Fax over Internet Protocol (FoIP)
• An ISDN service
Cause: The Fax Speed setting was set too fast.
If this did not solve the issue, try the next solution.
English
Solution 15: If you are faxing over the Internet using IP phone, resend the fax at a
later time
Solution: Try resending your fax at a later time. Also, make sure your Internet service provider
supports faxing over the Internet.
If the problem persists, contact your Internet service provider.
Fax setup troubleshooting 45
Page 49

English
Chapter 4
Cause: You were faxing over the Internet using an IP phone, and there was a problem with
the transmission.
The product cannot receive faxes, but can send faxes
Try the following solutions to resolve the issue. Solutions are listed in order, with the most likely
solution first. If the first solution does not solve the problem, continue trying the remaining solutions
until the issue is resolved.
Solution 1: Make sure you set up the product as described in the printed
documentation
Solution: Follow the instructions in your printed documentation to set up the product properly
for faxing, based on the equipment and services you have on the same phone line as the product.
Then, run a fax test to check the status of the product and to make sure you set it up properly.
The product prints a report with the results of the test. If the test fails, review the report for
information on how to fix the problem.
Cause: The product was not set up properly for faxing.
If this did not solve the issue, try the next solution.
Solution 2: Check the Auto Answer setting
Solution: Depending on your office setup, you might be able to set the product to answer
incoming calls automatically. To find out what the recommended answer mode is for your office
setup, see the printed documentation that came with the product.
If you must have Auto Answer off, you will need to press Scan/Fax and Start Fax to receive a
fax.
Cause: Auto Answer was turned off, which means that the product would not answer
incoming calls. You must be available to respond in person to incoming fax calls in order to
receive faxes.
If this did not solve the issue, try the next solution.
Solution 3: Set the product to answer faxes manually
Solution: Set the product to answer faxes manually. You cannot receive faxes automatically
if you have a voice mail service at the same phone number you use for fax calls. You must
receive faxes manually; this means you must be available to respond in person to incoming fax
calls.
For more information on how to set up the product when you have a voice mail service, see the
printed documentation that came with the product.
Cause: You subscribed to a voice mail service at the same phone number you used for fax
calls.
If this did not solve the issue, try the next solution.
Solution 4: If you have a computer dial-up modem on the same phone line as the
product, make sure the modem software is not intercepting the fax
Solution: If you have a computer dial-up modem on the same phone line as the product, check
to make sure that the software that came with your modem is not set to receive faxes
automatically. Modems that are set up to receive faxes automatically take over the phone line
to receive all incoming faxes, which prevents the product from receiving fax calls.
Cause: You had a computer dial-up modem on the same phone line as the product.
If this did not solve the issue, try the next solution.
46 HP Photosmart C4340 All-in-One series
Page 50

Solution 5: If you have an answering machine on the same phone line as the
product, record a new outgoing message
Solution: Disconnect the answering machine and then try receiving a fax. If faxing is
successful without the answering machine, the answering machine might be causing the
problem. Reconnect the answering machine and record your outgoing message again.
• Record a message that is approximately 10 seconds in duration.
• Speak slowly and at a low volume when recording your message.
• Leave at least 5 seconds of silence at the end of the voice message.
• There should be no background noise when recording this silent time.
Cause: If you had an answering machine on the same phone line with the product, you might
have had one of the following problems:
• Your outgoing message might have been too long or too loud to allow the product to detect
fax tones, and the sending fax machine might have disconnected.
• Your answering machine might not have had enough quiet time after your outgoing message
to allow the product to detect fax tones. This problem is most common with digital answering
machines.
If this did not solve the issue, try the next solution.
Solution 6: If you have an answering machine on the same phone line as the
product, make sure it is connected to the correct port
Solution
NOTE: This possible solution applies only in the countries/regions that receive a 2-wire
phone cord in the box with the product, including: Argentina, Australia, Brazil, Canada, Chile,
China, Colombia, Greece, India, Indonesia, Ireland, Japan, Korea, Latin America, Malaysia,
Mexico, Philippines, Poland, Portugal, Russia, Saudi Arabia, Singapore, Spain, Taiwan,
Thailand, USA, Venezuela, and Vietnam.
When you have an answering machine on the same phone line you use for fax calls, you must
connect the answering machine directly to the product using the port labeled 2-EXT, as shown
below. You also need to set the correct number of rings to answer for both the answering
machine and product.
English
1 Telephone wall jack
2 Connect to the IN port on the answering machine
3 Connect to the OUT port on the answering machine
4 Telephone (optional)
Fax setup troubleshooting 47
Page 51

English
Chapter 4
5 Answering machine
6 Use the phone cord supplied in the box with the product
Make sure the product is set to receive faxes automatically and that the number of rings to wait
setting is correct. The number of rings to answer for the product should be greater than the
number of rings to answer for the answering machine. Set your answering machine to a low
number of rings and the product to answer in the maximum number of rings supported by your
product. (The maximum number of rings varies by country/region.) In this setup, the answering
machine will answer the call and the product will monitor the line. If the product detects fax tones,
the product will receive the fax. If the call is a voice call, the answering machine will record the
incoming message.
For more information on setting up the product, see the printed documentation that came with
the product.
Cause: The answering machine was not set up properly with the product.
If this did not solve the issue, try the next solution.
Solution 7: If you use a distintive ring service, make sure the Distinctive Ring
setting matches the ring pattern for your fax number
Solution: If you have a special ring pattern for your fax phone number (using a distinctive ring
service through your telephone company), make sure that the Distinctive Ring setting on the
product is set to match. For example, if the phone company has assigned your number a double
ring pattern, make sure Double Rings is selected as the Distinctive Ring setting.
NOTE: The product cannot recognize some ring patterns, such as those with alternating
short and long ringing patterns. If you are having problems with a ring pattern of this type,
ask your phone company to assign a non-alternating ring pattern.
If you are not using a distinctive ring service, make sure that the Distinctive Ring setting on the
product is set to All Rings.
Cause: You had a special ring pattern for your fax phone number (using a distinctive ring
service through your telephone company), and the Distinctive Ring setting on the product did
not match.
If this did not solve the issue, try the next solution.
Solution 8: If you do not use a distintive ring service, make sure the Distinctive
Ring setting is set to All Rings
Solution: If you are not using a distinctive ring service, make sure that the Distinctive Ring
setting on the product is set to All Rings.
Cause: The Distinctive Ring setting was not set to All Rings (and you were not using a
distinctive ring service).
If this did not solve the issue, try the next solution.
Solution 9: Make sure other equipment on the phone line is not reducing the fax
signal
Solution: If the product shares the same phone line with other types of phone equipment,
such as an answering machine, a computer dial-up modem, or a multi-port switch box, the fax
signal level might be reduced. The signal level can also be reduced if you use a splitter or connect
48 HP Photosmart C4340 All-in-One series
Page 52

extra cables to extend the length of your phone. A reduced fax signal can cause problems during
fax reception.
• If you are using a splitter or extension cables, try removing them and connecting the product
directly to the telephone wall jack.
• To find out if other equipment is causing a problem, disconnect everything except the
product from the phone line, and then try to receive a fax. If you can receive faxes
successfully without the other equipment, one or more pieces of the other equipment is
causing problems; try adding them back one at a time and receiving a fax each time, until
you identify which equipment is causing the problem.
Cause: The fax signal level might not have been strong enough, which can cause fax reception
problems.
If this did not solve the issue, try the next solution.
Solution 10: Clear the memory of the product
Solution: If Backup Fax Reception is enabled and there is an error condition on the product,
the memory might become full of faxes that have not yet been printed and the product will stop
answering calls. If an error condition exists that is preventing the product from printing faxes,
review the display for information on the error condition. Make sure:
• The product is set up correctly for faxing. See the printed documentation for more
information.
• There is paper loaded in the input tray.
• There is no paper jam.
• The print cartridge door is closed. If not, close the print cartridge door, as shown below:
• The print carriage is not stalled or blocked. Turn off the product, remove any objects that
are blocking the print cartridge carriage (including any packing materials), and then turn on
the product again.
Resolve any problems found. The product automatically begins printing all the unprinted faxes
from memory. To clear the memory, you can also delete the faxes stored in memory by turning
off the product.
Cause: The memory of the product was full.
If this did not solve the issue, try the next solution.
English
Solution 11: Check for error messages on the display
Solution: If an error condition exists that is preventing the product from printing faxes, review
the display for information on the error condition. Make sure:
• The product is on. Press the On button to turn on the product.
• The product is set up correctly for faxing. See the printed documentation for more
information.
• There is paper loaded in the input tray.
• There is no paper jam.
Fax setup troubleshooting 49
Page 53

English
Chapter 4
• The print carriage is not stalled or blocked. Turn off the product, remove any objects that
are blocking the print cartridge carriage (including any packing materials), and then turn on
the product again.
• The print cartridge door is closed. If not, close the print cartridge door, as shown below:
NOTE: If the product has an alignment message, you might be able to press the button
next to OK to clear the message and resume faxing.
After you resolve any problems found, the product can begin answering incoming fax calls.
Cause: An error condition was preventing the product from receiving faxes and Backup Fax
Reception was set to Off.
Fax tones are recorded on my answering machine
Try the following solutions to resolve the issue. Solutions are listed in order, with the most likely
solution first. If the first solution does not solve the problem, continue trying the remaining solutions
until the issue is resolved.
Solution 1: Make sure the answering machine is connected to the correct port
Solution
NOTE: This possible solution applies only in the countries/regions that receive a 2-wire
phone cord in the box with the product, including: Argentina, Australia, Brazil, Canada, Chile,
China, Colombia, Greece, India, Indonesia, Ireland, Japan, Korea, Latin America, Malaysia,
Mexico, Philippines, Poland, Portugal, Russia, Saudi Arabia, Singapore, Spain, Taiwan,
Thailand, USA, Venezuela, and Vietnam.
When you have an answering machine on the same phone line you use for fax calls, you must
connect the answering machine directly to the product using the port labeled 2-EXT, as shown
below.
50 HP Photosmart C4340 All-in-One series
Page 54

1 Telephone wall jack
2 Connect to the IN port on the answering machine
3 Connect to the OUT port on the answering machine
4 Telephone (optional)
5 Answering machine
6 Use the phone cord supplied in the box with the product
Make sure the product is set to receive faxes automatically and that the number of rings to wait
setting is correct. The number of rings to wait for the product should be greater than the number
of rings to answer for the answering machine. If the answering machine and the product are set
to the same number of rings to answer, both devices will answer the call and fax tones will be
recorded on the answering machine.
Set your answering machine to a low number of rings and the product to answer in the maximum
number of rings supported. (The maximum number of rings varies by country/region.) In this
setup, the answering machine will answer the call and the product will monitor the line. If the
product detects fax tones, the product will receive the fax. If the call is a voice call, the answering
machine will record the incoming message.
For more information on setting up the product when you have an answering machine, see the
printed documentation that came with the product.
Cause: The answering machine was not set up properly with the product or the number or
rings to wait setting was not correct.
If this did not solve the issue, try the next solution.
Solution 2: Set up the product to answer faxes automatically
Solution: Set up the product to answer incoming calls automatically by turning on Auto
Answer. If it is turned off, the product will not monitor incoming calls and receive faxes. In this
case, the answering machine will answer the fax call and record the fax tones.
For more information on setting up the product when you have an answering machine, see the
printed documentation that came with the product.
Cause: The product was set up to receive faxes manually, which means that the product would
not answer incoming calls. You must be available to respond in person to incoming fax calls, or
the product will not receive the fax and your answering machine will record the fax tones.
English
Fax setup troubleshooting 51
Page 55

English
Chapter 4
The product cannot send faxes, but can receive faxes
Try the following solutions to resolve the issue. Solutions are listed in order, with the most likely
solution first. If the first solution does not solve the problem, continue trying the remaining solutions
until the issue is resolved.
Solution 1: Make sure you set up the product as described in the printed
documentation
Solution: Follow the instructions in your printed documentation to set up the product properly
for faxing, based on the equipment and services you have on the same phone line as the product.
Then, run a fax test to check the status of the product and to make sure you set it up properly.
The product prints a report with the results of the test. If the test fails, review the report for
information on how to fix the problem.
Cause: The product was not set up properly for faxing.
If this did not solve the issue, try the next solution.
Solution 2: Check the fax number
Solution: Check to see that the fax number you entered is correct and in the proper format.
For example, you might need to dial a "9" prefix, depending on your phone system.
If your phone line has a PBX system, make sure you are dialing the number for an outside line
before dialing the fax number.
Cause: The number you entered when sending the fax was not in the proper format.
If this did not solve the issue, try the next solution.
Solution 3: Dial the fax number more slowly
Solution: Insert some pauses in the number sequence to slow the dialing pace. For example,
if you need to access an outside line before dialing the phone number, insert a pause following
the access number. If your number is 95555555, and 9 accesses an outside line, you might
insert pauses as follows: 9-555-5555. To enter a pause in the fax number you are typing, press
the symbols button on the keypad (indicated by an asterisk) until a dash (-) appears on the
display.
You can also send the fax using monitor dialing. This enables you to listen to the phone line as
you dial. You can set the pace of your dialing and respond to prompts as you dial.
Cause: The product might have been dialing too fast or too soon.
If this did not solve the issue, try the next solution.
Solution 4: Check the receiving fax machine for problems
Solution: Try calling the fax number from a telephone and listen for fax tones. If you cannot
hear fax tones, the receiving fax might not be turned on or connected, or a voice mail service
could be interfering with the recipient's phone line. You can also ask the recipient to check the
receiving fax machine for any problems.
Cause: The receiving fax machine was having problems.
The fax test failed
If you tried to run the fax test from your computer and the fax test failed to run, the product might be
busy with another task or have an error condition preventing it from running the fax test.
What to check
• The product is set up properly, connected to a power supply, and is connected to your computer.
For more information on setting up the product, see the Setup Guide that came with the product.
• The product is turned on. If it is not, press the On button to turn on the product.
• The print cartridges are installed correctly, the print cartridge carriage is not blocked, and the
print cartridge door is closed.
52 HP Photosmart C4340 All-in-One series
Page 56

• The product is not currently busy with another task such as aligning the printer. Check the
display. If the product is busy, wait until it completes the current task and run the fax test again.
• The rear door is attached to the back of the product.
• There are no error messages on the display. If there is an error message, resolve the problem
and run the fax test again.
If you run the fax test and the product reports that the test failed, read the following information
carefully to determine how to correct any problems with your fax setup. Different portions of the fax
test might fail for different reasons.
The "Fax Hardware Test" failed
Solution
• Turn off the product by pressing the On button located on the control panel and then unplug
the power cord from the back of the product. After a few seconds, plug the power cord back
in and turn the power on. Run the test again. If the test fails again, continue reviewing the
troubleshooting information in this section.
NOTE: Depending how long the product is unplugged, the date and time might be
erased. You might need to reset the date and time later, when you plug the power cord
back in.
• Try to send or receive a test fax. If you can send or receive a fax successfully, there might
not be a problem.
• If you are running the test from the Fax Setup Wizard, make sure the product is not busy
completing another task, such as making a copy. Check the display for a message indicating
that the product is busy. If it is busy, wait until it is finished and in the idle state, before
running the test.
After you resolve any problems found, run the fax test again to make sure it passes and the
product is ready for faxing. If the Fax Hardware Test continues to fail and you experience
problems faxing, contact HP Support. Go to
country/region, and then click Contact HP for information on calling for technical support.
www.hp.com/support. If prompted, choose your
English
The "Fax Connected to Active Telephone Wall Jack" test failed
Solution
• Check the connection between the telephone wall jack and the product to make sure the
phone cord is secure.
• Make sure you use the phone cord that came with the product. If you do not use the supplied
phone cord to connect from the telephone wall jack to the product, you might not be able to
send or receive faxes. After you plug in the phone cord that came with the product, run the
fax test again.
• Make sure you have correctly connected the product to the telephone wall jack. Using the
phone cord supplied in the box with the product, connect one end to your telephone wall
jack, then connect the other end to the port labeled 1-LINE on the back of the product. For
more information on setting up the product for faxing, see the printed documentation.
Fax setup troubleshooting 53
Page 57

English
Chapter 4
1 Telephone wall jack
2 Use the phone cord supplied in the box with the product
• If you are using a phone splitter, this can cause faxing problems. (A splitter is a two-cord
connector that plugs into a telephone wall jack.) Try removing the splitter and connecting
the product directly to the telephone wall jack.
• Try connecting a working phone and phone cord to the telephone wall jack that you are
using for the product and check for a dial tone. If you do not hear a dial tone, contact your
telephone company and have them check the line.
• Try to send or receive a test fax. If you can send or receive a fax successfully, there might
not be a problem.
After you resolve any problems found, run the fax test again to make sure it passes and the
product is ready for faxing.
The "Phone Cord Connected to Correct Port on Fax" test failed
Solution: Plug the phone cord into the correct port.
To plug the phone cord into the correct port
1. Using the phone cord supplied in the box with the product, connect one end to your
telephone wall jack, then connect the other end to the port labeled 1-LINE on the back of
the product.
NOTE: If you use the 2-EXT port to connect to the telephone wall jack, you will not be
able to send or receive faxes. The 2-EXT port should only be used to connect other
equipment, such as an answering machine or a telephone.
54 HP Photosmart C4340 All-in-One series
Page 58

1 Telephone wall jack
2 Use the phone cord supplied in the box with the product
2. After you have connected the phone cord to the port labeled 1-LINE, run the fax test again
to make sure it passes and the product is ready for faxing.
3. Try to send or receive a test fax.
The "Using Correct Type of Phone Cord with Fax" test failed
Solution
• Make sure you used the phone cord supplied in the box with the product to connect to the
telephone wall jack. One end of the phone cord should be connected to the port labeled 1LINE on the back of the product and the other end to your telephone wall jack, as shown
below.
English
1 Telephone wall jack
2 Phone cord supplied in the box with the product
• Check the connection between the telephone wall jack and the product to make sure the
phone cord is secure.
Fax setup troubleshooting 55
Page 59

English
Chapter 4
The "Fax Line Condition" test failed
Solution
• Make sure you connect the product to an analog phone line or you will not be able to send
or receive faxes. To check if your phone line is digital, connect a regular analog phone to
the line and listen for a dial tone. If you do not hear a normal sounding dial tone, it might be
a phone line set up for digital phones. Connect the product to an analog phone line and try
sending or receiving a fax.
• Check the connection between the telephone wall jack and the product to make sure the
phone cord is secure.
• Make sure you have correctly connected the product to the telephone wall jack. Using the
phone cord supplied in the box with the product, connect one end to your telephone wall
jack, then connect the other end to the port labeled 1-LINE on the back of the product. For
more information on setting up the product for faxing, see the printed documentation that
came with the product.
• Other equipment, which uses the same phone line as the product, might be causing the test
to fail. To find out if other equipment is causing a problem, disconnect everything except
the product from the phone line, and then run the test again.
◦ If the Fax Line Condition Test passes without the other equipment, then one or more
pieces of the equipment is causing problems; try adding them back one at a time and
rerunning the test each time, until you identify which piece of equipment is causing the
problem.
◦ If the Fax Line Condition Test fails without the other equipment, connect the product
to a working phone line and continue reviewing the troubleshooting information in this
section.
• If you are using a phone splitter, this can cause faxing problems. (A splitter is a two-cord
connector that plugs into a telephone wall jack.) Try removing the splitter and connecting
the product directly to the telephone wall jack.
After you resolve any problems found, run the fax test again to make sure it passes and the
product is ready for faxing. If the Fax Line Condition Test continues to fail and you experience
problems faxing, contact your telephone company and have them check the phone line.
NOTE: If you are unsure of the kind of phone line you have (analog or digital), check with
your service provider.
The "Dial Tone Detection" test failed
Solution
• Other equipment, which uses the same phone line as the product, might be causing the test
to fail. To find out if other equipment is causing a problem, disconnect everything except
the product from the phone line, and then run the test again. If the Dial Tone Detection
Test passes without the other equipment, then one or more pieces of the equipment is
causing problems; try adding them back one at a time and rerunning the test each time,
until you identify which piece of equipment is causing the problem.
• Try connecting a working phone and phone cord to the telephone wall jack that you are
using for the product and check for a dial tone. If you do not hear a dial tone, contact your
telephone company and have them check the line.
• Make sure you have correctly connected the product to the telephone wall jack. Using the
phone cord supplied in the box with the product, connect one end to your telephone wall
jack, then connect the other end to the port labeled 1-LINE on the back of the product. For
more information on setting up the product for faxing, see the printed documentation that
came with the product.
56 HP Photosmart C4340 All-in-One series
Page 60

1 Telephone wall jack
2 Use the phone cord supplied in the box with the product
• If you are using a phone splitter, this can cause faxing problems. (A splitter is a two-cord
connector that plugs into a telephone wall jack.) Try removing the splitter and connecting
the product directly to the telephone wall jack.
• If your telephone system is not using a standard dial tone, such as some PBX systems, this
might cause the test to fail. This will not cause a problem sending or receiving faxes. Try
sending or receiving a test fax.
• Check to make sure the country/region setting is set appropriately for your country/region.
If the country/region setting is not set or is set incorrectly, the test might fail and you might
have problems sending and receiving faxes.
• Make sure you connect the product to an analog phone line or you will not be able to send
or receive faxes. To check if your phone line is digital, connect a regular analog phone to
the line and listen for a dial tone. If you do not hear a normal sounding dial tone, it might be
a phone line set up for digital phones. Connect the product to an analog phone line and try
sending or receiving a fax.
NOTE: If you are unsure of the kind of phone line you have (analog or digital), check
with your service provider.
After you resolve any problems found, run the fax test again to make sure it passes and the
product is ready for faxing. If the Dial Tone Detection Test continues to fail, contact your
telephone company and have them check the phone line.
English
Clear paper jams
In case of a paper jam, check the rear door. You might need to clear the paper jam from the rear
door.
To clear a paper jam from the rear door
1. Press in the tab on the left side of the rear door to release the door. Remove the door by pulling
it away from the product.
Clear paper jams 57
Page 61

Chapter 4
2. Gently pull the paper out of the rollers.
English
CAUTION: If the paper tears when you are removing it from the rollers, check the rollers
and wheels for torn pieces of paper that might be remaining inside the product. If you do not
remove all the pieces of paper from the product, more paper jams are likely to occur.
3. Replace the rear door. Gently push the door forward until it snaps into place.
4. Press the button next to OK to continue the current job.
Print cartridge troubleshooting
If you are experiencing problems with printing, you might have a problem with one of the print
cartridges. For more information, see “
Support process
If you have a problem, follow these steps:
1. Check the documentation that came with the HP All-in-One.
2. Visit the HP online support Web site at
all HP customers. It is the fastest source for up-to-date device information and expert assistance
and includes the following features:
• Fast access to qualified online support specialists
• Software and driver updates for the HP All-in-One
• Valuable HP All-in-One and troubleshooting information for common problems
• Proactive device updates, support alerts, and HP newsgrams that are available when you
register the HP All-in-One
3. Call HP support. Support options and availability vary by device, country/region, and language.
For a list of support phone numbers, see the printed documentation that came with the product.
Replace the print cartridges” on page 32 in this guide.
www.hp.com/support. HP online support is available to
58 HP Photosmart C4340 All-in-One series
Page 62

5 Technical information
The technical specifications and international regulatory information for the HP All-in-One are
provided in this section.
For additional regulatory and environmental information, including the Declaration of Conformity
statement, see the onscreen Help.
System requirements
Software system requirements are located in the Readme file.
Product specifications
For product specifications, go to the HP Web site at www.hp.com/support.
Paper specifications
• Input tray capacity: Plain paper sheets: Up to 100 (20 lb./75 gsm. paper)
• Output tray capacity: Plain paper sheets: Up to 50 (20 lb./75 gsm. paper)
NOTE: For a complete list of supported media sizes, see the printer software.
Physical specifications
• Height: 16.97 cm (7.0 inches)
• Width: 44 cm (16.8 inches)
• Depth: 25.9 cm (10.2 inches)
• Weight: 4.5 kg (10 pounds)
Power specifications
• Power consumption: 25 watts maximum (average printing)
• Input voltage(0957-2231): AC 100 to 240 V ~ 600 mA 50–60 Hz
• Input voltage (0957-2248) : AC 200 to 240 V ~ 400 mA 50-60 Hz
• Output voltage: DC 32 V===375 mA, 16 V===500 mA
NOTE: Use only with the power adapter supplied by HP.
Environmental specifications
• Recommended operating temperature range: 15 ºC to 32 ºC (59 ºF to 90 ºF)
• Allowable operating temperature range: 5 ºC to 35 ºC (41 ºF to 95 ºF)
• Humidity: 15% to 80% RH non-condensing
• Non-operating (Storage) temperature range: –20 ºC to 50 ºC (–4 ºF to 122 ºF)
• In the presence of high electromagnetic fields, it is possible the output from the HP All-in-One
may be slightly distorted
• HP recommends using a USB cable less than or equal to 3 m (10 feet) in length to minimize
injected noise due to potential high electromagnetic fields
English
Regulatory notices
The HP All-in-One meets product requirements from regulatory agencies in your country/region. For
a complete listing of regulatory notices, see the onscreen Help.
Regulatory model identification number
For regulatory identification purposes, your product is assigned a Regulatory Model Number. The
Regulatory Model Number for your product is SNPRB-0722. This regulatory number should not be
confused with the marketing name (HP Photosmart C4340 All-in-One series, etc.) or product
numbers (CC270A, etc.).
Regulatory notices 59
Page 63

Chapter 5
Warranty
English
HP product Duration of limited warranty
Software Media 90 days
Printer 1 year
Print or Ink cartridges Until the HP ink is depleted or the “end of warranty” date printed
on the cartridge has been reached, whichever occurs first. This
Accessories 1 year unless otherwise stated
A. Extent of limited warranty
1. Hewlett-Packard (HP) warrants to the end-user customer that the HP products specified above will be free from defects
in materials and workmanship for the duration specified above, which duration begins on the date of purchase by the
customer.
2. For software products, HP’s limited warranty applies only to a failure to execute programming instructions. HP does not
warrant that the operation of any product will be interrupted or error free.
3. HP's limited warranty covers only those defects that arise as a result of normal use of the product, and does not cover
any other problems, including those that arise as a result of:
a. Improper maintenance or modification;
b. Software, media, parts, or supplies not provided or supported by HP;
c. Operation outside the product's specifications;
d. Unauthorized modification or misuse.
4. For HP printer products, the use of a non-HP cartridge or a refilled cartridge does not affect either the warranty to the
customer or any HP support contract with the customer. However, if printer failure or damage is attributable to the use of
a non-HP or refilled cartridge or an expired ink cartridge, HP will charge its standard time and materials charges to
service the printer for the particular failure or damage.
5. If HP receives, during the applicable warranty period, notice of a defect in any product which is covered by HP's
warranty, HP shall either repair or replace the product, at HP's option.
6. If HP is unable to repair or replace, as applicable, a defective product which is covered by HP's warranty, HP shall,
within a reasonable time after being notified of the defect, refund the purchase price for the product.
7. HP shall have no obligation to repair, replace, or refund until the customer returns the defective product to HP.
8. Any replacement product may be either new or like-new, provided that it has functionality at least equal to that of the
product being replaced.
9. HP products may contain remanufactured parts, components, or materials equivalent to new in performance.
10. HP's Limited Warranty Statement is valid in any country where the covered HP product is distributed by HP. Contracts
for additional warranty services, such as on-site service, may be available from any authorized HP service facility in
countries where the product is distributed by HP or by an authorized importer.
B. Limitations of warranty
TO THE EXTENT ALLOWED BY LOCAL LAW, NEITHER HP NOR ITS THIRD PARTY SUPPLIERS MAKES ANY
OTHER WARRANTY OR CONDITION OF ANY KIND, WHETHER EXPRESS OR IMPLIED WARRANTIES OR
CONDITIONS OF MERCHANTABILITY, SATISFACTORY QUALITY, AND FITNESS FOR A PARTICULAR
PURPOSE.
C. Limitations of liability
1. To the extent allowed by local law, the remedies provided in this Warranty Statement are the customer's sole and
exclusive remedies.
2. TO THE EXTENT ALLOWED BY LOCAL LAW, EXCEPT FOR THE OBLIGATIONS SPECIFICALLY SET FORTH IN
THIS WARRANTY STATEMENT, IN NO EVENT SHALL HP OR ITS THIRD PARTY SUPPLIERS BE LIABLE FOR
DIRECT, INDIRECT, SPECIAL, INCIDENTAL, OR CONSEQUENTIAL DAMAGES, WHETHER BASED ON
CONTRACT, TORT, OR ANY OTHER LEGAL THEORY AND WHETHER ADVISED OF THE POSSIBILITY OF
SUCH DAMAGES.
D. Local law
1. This Warranty Statement gives the customer specific legal rights. The customer may also have other rights which vary
from state to state in the United States, from province to province in Canada, and from country to country elsewhere in
the world.
2. To the extent that this Warranty Statement is inconsistent with local law, this Warranty Statement shall be deemed
modified to be consistent with such local law. Under such local law, certain disclaimers and limitations of this Warranty
Statement may not apply to the customer. For example, some states in the United States, as well as some governments
outside the United States (including provinces in Canada), may:
a. Preclude the disclaimers and limitations in this Warranty Statement from limiting the statutory rights of a consumer
(e.g., the United Kingdom);
b. Otherwise restrict the ability of a manufacturer to enforce such disclaimers or limitations; or
c. Grant the customer additional warranty rights, specify the duration of implied warranties which the manufacturer
cannot disclaim, or allow limitations on the duration of implied warranties.
3. THE TERMS IN THIS WARRANTY STATEMENT, EXCEPT TO THE EXTENT LAWFULLY PERMITTED, DO NOT
EXCLUDE, RESTRICT, OR MODIFY, AND ARE IN ADDITION TO, THE MANDATORY STATUTORY RIGHTS
APPLICABLE TO THE SALE OF THE HP PRODUCTS TO SUCH CUSTOMERS.
Dear Customer,
You will find below the name and address of the HP entity responsible for the performance of the HP Limited Warranty in your
country.
You may have additional statutory rights against the seller based on your purchase agreement. Those rights are not
in any way affected by this HP Limited Warranty.
Ireland: Hewlett-Packard Ireland Ltd. 30 Herbert Street IRL-Dublin 2
United Kingdom: Hewlett-Packard Ltd, Cain Road, Bracknell, GB-Berks RG12 1HN
warranty does not cover HP ink products that have been refilled,
remanufactured, refurbished, misused, or tampered with.
HP Limited Warranty
60 HP Photosmart C4340 All-in-One series
Page 64

Tout-en-un HP-Photosmart sérieC4340
Guide d'utilisation
Français
Page 65

Sommaire
1 Présentation de l'appareil HP Tout-en-un
L'appareil HP Tout-en-un en un coup d'œil..............................................................................63
Boutons du panneau de commande.........................................................................................64
Recherche d'informations supplémentaires..............................................................................66
2 Configuration du télécopieur
Configuration de l'appareil HP Tout-en-un pour la télécopie....................................................67
Modification des paramètres de votre appareil HP Tout-en-un pour la réception de
télécopies.................................................................................................................................86
Configuration de l'en-tête de télécopie.....................................................................................87
Test de la configuration de votre télécopieur............................................................................88
3 Utilisation des fonctions de l'appareil HP Tout-en-un
Chargement du papier et des originaux...................................................................................89
Prévention des bourrages papier.............................................................................................90
Impression de photos au format 10 x 15 cm (4 x 6 pouces).....................................................90
Français
Numérisation d'une image .......................................................................................................91
Création d'une copie.................................................................................................................92
Envoi d'une télécopie simple....................................................................................................92
Réception d'une télécopie........................................................................................................93
Remplacement des cartouches d'impression...........................................................................94
Nettoyage de l'appareil HP Tout-en-un....................................................................................97
4 Dépannage et assistance
Désinstallation et réinstallation du logiciel..............................................................................100
Dépannage concernant l'installation.......................................................................................101
Dépannage de la configuration du télécopieur.......................................................................104
Elimination de bourrages papier.............................................................................................122
Dépannage relatif aux cartouches d'impression.....................................................................123
Procédure d’assistance..........................................................................................................123
5 Renseignements techniques
Configurations système minimales.........................................................................................124
Spécifications de l'appareil.....................................................................................................124
Déclarations de conformité.....................................................................................................124
Garantie..................................................................................................................................126
62 Tout-en-un HP-Photosmart série-C4340
Page 66

1 Présentation de
l'appareil HP Tout-en-un
L'appareil HP Tout-en-un vous permet d'effectuer facilement et rapidement diverses
tâches telles que des copies, la numérisation de documents, l'impression de photos et
l'envoi ou la réception de télécopies. Bon nombre de ses fonctions sont directement
accessibles depuis son panneau de commande, sans pour autant nécessiter la mise sous
tension de l'ordinateur.
Remarque Le présent guide décrit le fonctionnement et les opérations de résolution
des incidents de base, et contient des informations pour entrer en contact avec le
service d'assistance HP et commander des consommables.
L'aide visible à l'écran détaille la totalité des fonctionnalités, y compris l'utilisation du
logiciel HP Photosmart fourni avec l'appareil HP Tout-en-un.
L'appareil HP Tout-en-un en un coup d'œil
Français
Etiquette Description
1 Panneau de configuration
2 Bouton Marche/arrêt
3 Clavier numérique
4 Logements pour carte mémoire et voyant Photo
5 Bac d'alimentation
6 Rallonge du bac
7 Guide de réglage de largeur du papier
L'appareil HP Tout-en-un en un coup d'œil 63
Page 67

Chapitre 1
(suite)
Etiquette Description
8 Capot d'accès aux cartouches d'impression
9 Vitre
10 Intérieur du capot
11 Porte arrière
12 Port USB arrière
13 Raccordement électrique*
14 Port télécopie (1-LINE)
15 Port téléphone (2-EXT)
* Utilisez uniquement l'adaptateur d'alimentation fourni par HP.
Boutons du panneau de commande
Le schéma et le tableau associé suivants décrivent brièvement les caractéristiques du
panneau de commande de l'appareil HP Tout-en-un.
Français
Etiquette Icône Nom et description
1 Marche/arrêt : Permet de mettre le produit sous tension et
64 Tout-en-un HP-Photosmart série-C4340
hors tension. Lorsque le produit est hors tension, il continue à
utiliser une quantité minimale de courant. Vous pouvez
Page 68

(suite)
Etiquette Icône Nom et description
réduire encore la consommation en maintenant le bouton
Marche/arrêt enfoncé pendant 3 secondes. Le produit est
alors placé en mode d'attente ou désactivé. Pour supprimer
toute alimentation, mettez le produit hors tension, puis
débranchez le cordon d'alimentation.
2 Qualité : Modifie la qualité des copies ou des photos
imprimées à partir d'une carte mémoire. Une étoile représente
la qualité d'impression rapide, deux étoiles la qualité normale
et trois étoiles la qualité supérieure. Toutefois, la qualité
réellement produite dépend du type de papier. Le paramètre
par défaut est deux étoiles pour le papier ordinaire et trois
étoiles pour le papier photo.
3 Format : permet d'ajuster la taille de l'image sur 100 % (Taille
réelle), de l'ajuster par rapport à la page (Redimensionner
pour ajuster) ou d'imprimer des images sans bordures (Sans
bordures). Le paramètre par défaut est 100 % pour le papier
ordinaire et sans bordures pour le papier photo.
4 Copies : permet de définir le nombre de copies.
5 Effacer : Met fin à une tâche (telle que numérisation, copie ou
télécopie) ou réinitialise les paramètres (tels que Qualité,
Format ou Copies). Si une erreur se produit, ce bouton
permet d'annuler l'erreur et de reprendre l'impression après
une pression sur le bouton.
6 Numériser/télécopier : permet d'ouvrir le menu Numériser/
télécopier. Lorsqu'une carte mémoire est insérée, chaque
pression sur ce bouton fait défiler une nouvelle photo
contenue dans la carte mémoire.
7 Démarrer copie noir : lance une copie noir et blanc.
Lorsqu'une carte mémoire est insérée, chaque pression sur
ce bouton permet de revenir à l'image précédente.
8 Démarrer copie couleur : lance une copie couleur.
Lorsqu'une carte mémoire est sélectionnée, ce bouton lance
l'impression de l'image actuellement affichée à l'écran. Dans
certains cas (par exemple, après l'élimination d'un bourrage
papier), ce bouton permet de relancer l'impression ou de
confirmer les paramètres.
9 Clavier : permet de saisir des numéros de télécopieur, des
valeurs ou du texte.
10 * (Espace et Symboles) : permet d'entrer des astérisques,
espaces et symboles pour les tâches liées à la télécopie.
# (Retour arrière) : permet d'entrer le signe dièse et d'effacer
l'entrée incorrecte pour les tâches liées à la télécopie.
Français
Boutons du panneau de commande 65
Page 69

Chapitre 1
Recherche d'informations supplémentaires
Diverses ressources, imprimées et en ligne, fournissent des informations sur la
configuration et l'utilisation de votre appareil HP Tout-en-un.
• Guide de configuration
Le guide de configuration fournit des instructions sur la configuration de l'appareil
HP Tout-en-un et l'installation du logiciel. Assurez-vous de suivre les instructions du
Guide de configuration dans l'ordre indiqué.
Si vous rencontrez des problèmes lors de la configuration, consultez les conseils de
dépannage dans la dernière section du Guide de configuration ou reportez-vous au
chapitre «
• Aide en ligne
L'aide en ligne fournit des instructions détaillées relatives aux fonctionnalités de
l'appareil HP Tout-en-un qui ne sont pas décrites dans le présent Guide d'utilisation,
notamment les fonctionnalités uniquement disponibles via le logiciel que vous avez
installé avec l'appareil HP Tout-en-un.
•
www.hp.com/support
Si vous disposez d'un accès Internet, vous pouvez obtenir de l'aide sur le site Web
HP. Vous y trouverez une assistance technique, des pilotes, des fournitures et des
informations pour passer des commandes.
Français
Dépannage et assistance, » page 100 du présent guide.
66 Tout-en-un HP-Photosmart série-C4340
Page 70

2 Configuration du télécopieur
Après avoir effectué toutes les opérations indiquées dans le Guide de configuration,
suivez les instructions de cette section pour procéder à la configuration de votre
télécopieur. Conservez votre Guide de configuration pour pouvoir l'utiliser ultérieurement.
Dans cette section, vous apprendrez à configurer l'appareil HP Tout-en-un pour que la
télécopie fonctionne correctement avec l'équipement et les services dont vous disposez
peut-être déjà sur la même ligne téléphonique que celle utilisée par
l'appareil HP Tout-en-un.
Conseil Vous pouvez également utiliser l'Assistant de configuration du
télécopieur (Windows) ou l'Utilitaire de configuration du télécopieur (Mac) pour
configurer rapidement certains paramètres de télécopie importants, tels que le mode
de réponse et les informations d'en-tête de la télécopie. Vous pouvez accéder à
l'Assistant de configuration du télécopieur (Windows) ou à l'Utilitaire de
configuration du télécopieur (Mac) via le logiciel que vous avez installé avec
l'appareil HP Tout-en-un. Après avoir exécuté l'Assistant de configuration du
télécopieur (Windows) ou l'Utilitaire de configuration du télécopieur (Mac), suivez
les procédures décrites dans cette section pour achever la configuration de votre
télécopieur.
Configuration de l'appareil HP Tout-en-un pour la télécopie
Avant de configurer l'appareil HP Tout-en-un pour la télécopie, indiquez le système
téléphonique utilisé dans votre pays/région. Les instructions relatives à la configuration
de l'appareil HP Tout-en-un pour la télécopie diffèrent selon que vous disposez d'un
système téléphonique en parallèle ou en série.
• Si votre pays/région n'apparaît pas dans le tableau ci-après, vous disposez
probablement d'un système téléphonique en série. Dans un système téléphonique
en série, le type de connecteur présent sur vos équipements téléphoniques partagés
(modems, téléphones et répondeurs) ne permet pas une connexion physique au port
"2-EXT" de l'appareil HP Tout-en-un. Tous les équipements doivent par conséquent
être reliés à la prise téléphonique murale.
Français
Remarque Dans certains pays/régions utilisant les systèmes téléphoniques en
série, le cordon téléphonique fourni avec l'appareil HP Tout-en-un peut comporter
une prise murale supplémentaire. Ceci vous permet de connecter d'autres
périphériques de télécommunications à la prise murale sur laquelle vous
branchez l'appareil HP Tout-en-un.
• Si votre pays/région figure dans le tableau ci-après, vous disposez probablement d'un
système téléphonique parallèle. Dans un système téléphonique parallèle, les
équipements téléphoniques partagés peuvent être reliés à la ligne téléphonique par
l'intermédiaire du port « 2-EXT » présent à l'arrière de l'appareil HP Tout-en-un.
Remarque Si vous disposez d'un système téléphonique en parallèle, HP
recommande d'utiliser le cordon téléphonique à 2 fils fourni avec l'appareil
HP Tout-en-un pour connecter ce dernier à la prise téléphonique murale.
Configuration de l'appareil HP Tout-en-un pour la télécopie 67
Page 71

Chapitre 2
Tableau 2-1 Pays/régions équipés d'un système téléphonique parallèle
Argentine Australie Brésil
Canada Chili Chine
Colombie Grèce Inde
Indonésie Irlande Japon
Corée Amérique latine Malaisie
Mexique Philippines Pologne
Portugal Russie Arabie Saoudite
Singapour Espagne Taïwan
Thaïlande Etats-Unis Vénézuela
Viêt-nam
Si vous ignorez le type de système téléphonique dont vous disposez (parallèle ou série),
contactez votre opérateur téléphonique.
Sélection de la configuration du télécopieur appropriée pour la maison ou le
Français
bureau
Pour utiliser votre système de télécopie correctement, vous devez savoir quels types
d'équipement et de service partagent éventuellement la même ligne téléphonique que
l'appareil HP Tout-en-un. C'est là un point important car vous devrez peut-être connecter
certains de vos équipements de bureau existants directement sur l'appareil
HP Tout-en-un. Il vous faudra peut-être également modifier certains des paramètres du
télécopieur avant d'être en mesure d'envoyer des télécopies.
Pour déterminer la meilleure manière de configurer votre appareil HP Tout-en-un pour
votre maison ou votre bureau, répondez d'abord aux questions de cette section et
enregistrez vos réponses. Reportez-vous ensuite au tableau dans la section suivante et
sélectionnez la configuration recommandée en fonction de vos réponses.
Veillez à répondre dans l'ordre aux questions suivantes.
1. Utilisez-vous un service ADSL fourni par votre opérateur téléphonique ? (ADSL est
également appelé DSL dans certains pays/régions).
Oui, je dispose d'un service ADSL.
❑
Non.
❑
Si vous avez répondu Oui, passez directement à «
Cas B : configuration de l'appareil
HP Tout-en-un avec une ligne ADSL, » page 73. Vous n'avez pas besoin de
répondre aux questions suivantes.
Si votre réponse est Non, passez à la question suivante.
2. Utilisez-vous un système téléphonique avec autocommutateur (PBX) ou un système
RNIS (réseau numérique à intégration de services) ?
Si vous avez répondu Oui, passez directement à «
Cas C : configuration de l'appareil
HP Tout-en-un avec un autocommutateur ou une ligne RNIS, » page 74. Vous
n'avez pas besoin de répondre aux questions suivantes.
Si votre réponse est Non, passez à la question suivante.
68 Tout-en-un HP-Photosmart série-C4340
Page 72

3. Etes-vous abonné à un service de sonnerie distincte auprès de votre opérateur
téléphonique qui offre plusieurs numéros de téléphone avec différentes sonneries ?
Oui, je dispose d'une sonnerie distincte.
❑
Non.
❑
Si vous avez répondu Oui, passez directement à «
Cas D : télécopieur avec service
de sonnerie distincte sur la même ligne, » page 74. Vous n'avez pas besoin de
répondre aux questions suivantes.
Si votre réponse est Non, passez à la question suivante.
N'êtes-vous pas certain de disposer d'une sonnerie distincte ? De nombreux
opérateurs téléphoniques proposent une fonction de sonnerie distincte permettant
d'avoir plusieurs numéros de téléphone sur une même ligne téléphonique.
Lorsque vous vous abonnez à ce service, chaque numéro est associé à une sonnerie
distincte. Par exemple, vous pouvez utiliser des sonneries simples, doubles ou triples
correspondant aux différents numéros. Vous pouvez associer un numéro de
téléphone à une sonnerie simple pour les appels vocaux et un autre numéro à une
sonnerie double pour les appels de télécopie. Ainsi, vous pouvez différencier les
appels vocaux des appels de télécopie lorsque la sonnerie retentit.
4. Recevez-vous des appels vocaux sur le même numéro de téléphone que vous
utiliserez pour vos appels de télécopie sur l'appareil HP Tout-en-un ?
Oui, je reçois des appels vocaux.
❑
Non.
❑
Passez à la question suivante.
5. Un modem d'ordinateur est-il installé sur la même ligne téléphonique que
l'appareil HP Tout-en-un ?
Oui, je possède un modem d'ordinateur.
❑
Non.
❑
Avez-vous un doute quant à la présence d'un modem d'ordinateur sur votre système ?
Si vous répondez Oui à l'une des questions suivantes, vous utilisez un modem
d'ordinateur :
• Envoyez-vous et recevez-vous directement des télécopies depuis vos
applications logicielles via une ligne commutée ?
• Envoyez-vous et recevez-vous les messages électroniques sur votre ordinateur
à l'aide d'une connexion par ligne commutée ?
• Avez-vous accès à Internet à partir de votre ordinateur via une connexion par
ligne commutée ?
Passez à la question suivante.
6. Disposez-vous d'un répondeur réceptionnant les appels vocaux sur le même numéro
de téléphone que celui que vous utiliserez pour vos appels de télécopie sur l'appareil
HP Tout-en-un ?
Oui, j'utilise un répondeur.
❑
Non.
❑
Passez à la question suivante.
7. Avez-vous souscrit un service de messagerie vocale auprès de votre opérateur
téléphonique sur le même numéro de téléphone que celui que vous utiliserez pour
vos appels de télécopie sur l'appareil HP Tout-en-un ?
Oui, j'utilise un service de messagerie vocale.
❑
Non.
❑
Français
Configuration de l'appareil HP Tout-en-un pour la télécopie 69
Page 73

Chapitre 2
Après avoir répondu à ces questions, passez à la section suivante pour sélectionner
votre configuration de télécopie.
Sélection de votre configuration de télécopie
A présent que vous avez répondu à toutes les questions sur les équipements et services
qui partagent la ligne téléphonique avec l'appareil HP Tout-en-un, vous êtes en mesure
de choisir la configuration la mieux adaptée à votre environnement domestique ou
professionnel.
Dans la première colonne du tableau suivant, sélectionnez la combinaison
d'équipements et de services correspondant à votre environnement (domicile ou bureau).
Recherchez ensuite la configuration appropriée dans la deuxième ou la troisième colonne
en fonction de votre système téléphonique. Les sections qui suivent fournissent des
instructions détaillées pour chaque configuration.
Si vous avez répondu à toutes les questions de la section précédente et que vous ne
possédez aucun des équipements ou services décrits, choisissez Aucun dans la
première colonne du tableau.
Remarque Si aucune configuration décrite dans cette section ne correspond à celle
de votre domicile ou de votre bureau, configurez votre appareil HP Tout-en-un comme
vous le feriez pour un téléphone analogique normal. Veillez à utiliser le cordon
téléphonique fourni avec votre appareil pour connecter l'une des extrémités à votre
Français
prise téléphonique murale et l'autre au port 1-LINE situé à l'arrière de l'appareil
HP Tout-en-un. Si vous utilisez un autre cordon, il se peut que vous rencontriez des
problèmes lors de l'envoi ou de la réception des télécopies.
Autres équipements et
services partageant votre
ligne de télécopie
Aucun
Vous avez répondu Non à
toutes les questions.
Service ADSL
Vous avez répondu Oui à la
question 1 uniquement.
Système PBX ou RNIS
Vous avez répondu Oui à la
question 2 uniquement.
Service de sonnerie distincte
Vous avez répondu Oui à la
question 3 uniquement.
Appels vocaux
Vous avez répondu Oui à la
question 4 uniquement.
70 Tout-en-un HP-Photosmart série-C4340
Configuration du télécopieur
recommandée pour les
systèmes téléphoniques en
parallèle
« Cas A : ligne de télécopie
distincte (aucun appel vocal
reçu), » page 72
« Cas B : configuration de
l'appareil HP Tout-en-un avec
une ligne ADSL, » page 73
« Cas C : configuration de
l'appareil HP Tout-en-un avec
un autocommutateur ou une
ligne RNIS, » page 74
« Cas D : télécopieur avec
service de sonnerie distincte
sur la même ligne, »
page 74
« Cas E : ligne vocale et de
télécopie partagée, »
page 75
Configuration du
télécopieur recommandée
pour les systèmes
téléphoniques en série
« Cas A : ligne de télécopie
distincte (aucun appel vocal
reçu), » page 72
« Cas B : configuration de
l'appareil HP Tout-en-un avec
une ligne ADSL, » page 73
« Cas C : configuration de
l'appareil HP Tout-en-un avec
un autocommutateur ou une
ligne RNIS, » page 74
« Cas D : télécopieur avec
service de sonnerie distincte
sur la même ligne, »
page 74
« Cas E : ligne vocale et de
télécopie partagée, »
page 75
Page 74

(suite)
Autres équipements et
services partageant votre
ligne de télécopie
Configuration du télécopieur
recommandée pour les
systèmes téléphoniques en
parallèle
Configuration du
télécopieur recommandée
pour les systèmes
téléphoniques en série
Appels vocaux et service de
messagerie vocale
Vous avez répondu Oui aux
questions 4 et 7 uniquement.
Modem d'ordinateur
Vous avez répondu Oui à la
question 5 uniquement.
Appels vocaux et modem
d'ordinateur
Vous avez répondu Oui aux
questions 4 et 5 uniquement.
Appels vocaux et répondeur
Vous avez répondu Oui aux
questions 4 et 6 uniquement.
Appels vocaux, modem
d'ordinateur et répondeur
téléphonique
Vous avez répondu Oui aux
questions 4, 5 et 6 uniquement.
Appels vocaux, modem
d'ordinateur et messagerie
vocale
Vous avez répondu Oui aux
questions 4, 5 et 7 uniquement.
« Cas F : ligne vocale et de
télécopie partagée avec une
messagerie vocale, »
page 77
« Cas G : ligne de télécopie
partagée avec un modem
d'ordinateur (aucun appel
vocal reçu), » page 78
« Cas H : ligne vocale et de
télécopie partagée avec un
modem, » page 79
« Cas I : ligne vocale et de
télécopie partagée avec un
répondeur, » page 81
« Cas J : ligne vocale et de
télécopie partagée avec un
modem et un répondeur, »
page 82
« Cas K : ligne vocale et de
télécopie partagée avec un
modem et une messagerie
vocale, » page 85
« Cas F : ligne vocale et de
télécopie partagée avec une
messagerie vocale, »
page 77
Non applicable.
Non applicable.
Non applicable.
Non applicable.
Non applicable.
Français
Pour obtenir des informations supplémentaires concernant la configuration du
télécopieur pour un pays ou une région spécifique, consultez le site Web approprié parmi
ceux répertoriés dans la liste ci-dessous.
Autriche www.hp.com/at/faxconfig
Allemagne www.hp.com/de/faxconfig
Suisse (Français) www.hp.com/ch/fr/faxconfig
Suisse (Allemand) www.hp.com/ch/de/faxconfig
Royaume-Uni www.hp.com/uk/faxconfig
Espagne www.hp.es/faxconfig
Pays-Bas www.hp.nl/faxconfig
Belgique (français) www.hp.be/fr/faxconfig
Belgique (Flamand) www.hp.be/nl/faxconfig
Portugal www.hp.pt/faxconfig
Configuration de l'appareil HP Tout-en-un pour la télécopie 71
Page 75

Chapitre 2
(suite)
Suède www.hp.se/faxconfig
Finlande www.hp.fi/faxconfig
Danemark www.hp.dk/faxconfig
Norvège www.hp.no/faxconfig
Irlande www.hp.com/ie/faxconfig
France www.hp.com/fr/faxconfig
Italie www.hp.com/it/faxconfig
Cas A : ligne de télécopie distincte (aucun appel vocal reçu)
Si vous disposez d'une ligne téléphonique distincte sur laquelle vous ne recevez aucun
appel vocal et si vous ne connectez aucun autre équipement à cette ligne, configurez
l'appareil HP Tout-en-un comme décrit dans cette section.
Figure 2-1 Vue arrière de l'appareil HP Tout-en-un
Français
1 Prise téléphonique murale
2 Utilisez le cordon téléphonique fourni avec l'appareil HP Tout-en-un pour la connexion au port
« 1-LINE »
Pour configurer le produit avec une ligne de télécopie séparée
1. Utilisez le cordon téléphonique fourni avec le produit : connectez l'une des extrémités
à votre prise téléphonique murale et l'autre au port 1-LINE situé à l'arrière du produit.
Remarque Si vous n'utilisez pas le cordon fourni pour la connexion entre la prise
téléphonique murale et le produit, vous ne pourrez peut-être pas envoyer de
télécopies. Ce cordon téléphonique spécial est différent de ceux que vous utilisez
éventuellement chez vous ou à votre bureau.
2. Changez le paramètre Réponse automatique pour que le nombre minimal de
sonneries avant réponse (deux sonneries) soit défini
3. Exécutez un test de télécopie.
Quand le téléphone sonnera, le produit répondra automatiquement après le nombre de
sonneries que vous avez défini dans le paramètre Réponse automatique. Il enverra
72 Tout-en-un HP-Photosmart série-C4340
Page 76

ensuite une tonalité de réception de télécopie au télécopieur d'origine et recevra la
télécopie.
Cas B : configuration de l'appareil HP Tout-en-un avec une ligne ADSL
Si votre opérateur téléphonique vous fournit une ligne ADSL, suivez les instructions de
cette rubrique pour connecter un filtre ADSL entre la prise téléphonique murale et
l'appareil HP Tout-en-un. Le filtre ADSL neutralise le signal numérique qui peut perturber
l'appareil HP Tout-en-un, permettant ainsi à l'appareil HP Tout-en-un de communiquer
correctement avec votre ligne téléphonique (DSL est également appelé ADSL dans
certains pays/régions).
Remarque Si vous disposez d'une ligne ADSL, vérifiez que le filtre ADSL est
correctement connecté. Si tel n'est pas le cas, vous ne pourrez pas envoyer ni
recevoir de télécopies avec l'appareil HP Tout-en-un.
Figure 2-2 Vue arrière de l'appareil HP Tout-en-un
Français
1 Prise téléphonique murale
2 Cordon et filtre ADSL fournis par votre fournisseur ADSL
3 Utilisez le cordon téléphonique fourni avec l'appareil HP Tout-en-un pour la connexion au port
« 1-LINE »
Pour configurer le produit avec une ligne ADSL
1. Procurez-vous un filtre ADSL auprès de votre fournisseur ADSL.
2. Connectez le cordon du filtre DSL à la prise téléphonique murale.
Remarque Si vous n'utilisez pas le cordon fourni pour la connexion entre la prise
téléphonique murale et le produit, vous ne pourrez peut-être pas envoyer de
télécopies. Ce cordon téléphonique spécial est différent de ceux que vous utilisez
éventuellement chez vous ou à votre bureau.
Configuration de l'appareil HP Tout-en-un pour la télécopie 73
Page 77

Chapitre 2
3. Utilisez le cordon téléphonique fourni avec le produit : connectez l'une des extrémités
au filtre ADSL branché sur votre prise téléphonique murale et l'autre au port libellé 1LINE, situé à l'arrière du produit.
Remarque Si d'autres équipements ou services bureautiques sont connectés à
cette ligne téléphonique, par exemple un service de sonnerie distincte, un
répondeur téléphonique ou une messagerie vocale, reportez-vous à la rubrique
appropriée dans cette section pour obtenir des indications supplémentaires.
4. Exécutez un test de télécopie.
Cas C : configuration de l'appareil HP Tout-en-un avec un autocommutateur ou une
ligne RNIS
Si vous utilisez un système téléphonique PBX, procédez comme suit :
• Connectez le produit au port destiné à la télécopie et au téléphone.
• Veillez à utiliser le cordon fourni pour raccorder le produit à la prise téléphonique
murale.
• Définissez la tonalité d'attente d'appel sur Désactiver.
Remarque De nombreux autocommutateurs numériques comportent une
tonalité d'appel en attente qui est activée par défaut. Or, cette fonction perturbera
vos transmissions par télécopie et vous ne pourrez pas envoyer ni recevoir de
Français
télécopies à l'aide de l'appareil HP Tout-en-un. Reportez-vous à la documentation
fournie avec votre autocommutateur pour obtenir des instructions sur la façon de
désactiver le signal d'appel en attente.
• Composez le numéro d'appel de ligne externe avant le numéro de télécopie.
Si vous utilisez un convertisseur ou un adaptateur de terminal ISDN, procédez comme
suit :
• Connectez le produit au port destiné à la télécopie et au téléphone.
Remarque Certains systèmes RNIS vous permettent de configurer les ports
pour un équipement téléphonique spécifique. Par exemple, vous pouvez affecter
un port au téléphone et à la télécopie Groupe 3 et un autre port à d'autres
fonctions. Si vous avez des problèmes lors de la connexion de votre convertisseur
RNIS au port de télécopie et de téléphonie, utilisez le port conçu pour plusieurs
fonctionnements. Il est nommé "multi-combi" ou un terme similaire.
• Veillez à utiliser le cordon fourni pour raccorder le produit à la prise téléphonique
murale. Si vous ne le faites pas, la télécopie risque de ne pas fonctionner. Ce cordon
téléphonique spécial est différent de ceux que vous utilisez éventuellement chez vous
ou à votre bureau. Si le cordon téléphonique fourni est trop court, vous pouvez
acheter un coupleur dans votre magasin d'articles électroniques et prolonger ainsi le
cordon.
• En outre, vérifiez également que l'adaptateur de terminal est défini au type de
commutateur approprié pour votre pays/région.
Cas D : télécopieur avec service de sonnerie distincte sur la même ligne
Si vous êtes abonné à un service de sonnerie distincte (fourni par votre opérateur
téléphonique) permettant d'avoir plusieurs numéros de téléphone sur une même ligne
74 Tout-en-un HP-Photosmart série-C4340
Page 78

téléphonique, chaque numéro étant associé à une sonnerie différente, configurez
l'appareil HP Tout-en-un comme décrit dans cette section.
Figure 2-3 Vue arrière de l'appareil HP Tout-en-un
1 Prise téléphonique murale
2 Utilisez le cordon téléphonique fourni avec l'appareil HP Tout-en-un pour la connexion au port
« 1-LINE »
Pour configurer le produit avec un service de sonnerie distincte, procédez comme
suit :
1. Utilisez le cordon téléphonique fourni avec le produit : connectez l'une des extrémités
à votre prise téléphonique murale et l'autre au port 1-LINE situé à l'arrière du produit.
Remarque Si vous n'utilisez pas le cordon fourni pour la connexion entre la prise
téléphonique murale et le produit, vous ne pourrez peut-être pas envoyer de
télécopies. Ce cordon téléphonique spécial est différent de ceux que vous utilisez
éventuellement chez vous ou à votre bureau.
2. Changez le paramètre Réponse automatique pour que le nombre minimal de
sonneries avant réponse (deux sonneries) soit défini
3. Modifiez le paramètre Sonneries distinctes conformément au paramètre attribué à
votre numéro de télécopieur par l'opérateur téléphonique.
Français
Remarque Par défaut, le produit est configuré pour répondre à toutes les
sonneries. Si vous ne définissez pas le paramètre Sonneries distinctes en
fonction du mode de sonnerie associé à votre numéro de télécopieur par votre
opérateur téléphonique, il se peut que le produit réponde à la fois aux appels
vocaux et aux appels de télécopie ou qu'il ne réponde pas du tout.
4. Exécutez un test de télécopie.
L'appareil HP Tout-en-un répond automatiquement aux appels entrants ayant la sonnerie
que vous avez sélectionnée (paramètre Sonneries distinctes) après le nombre de
sonneries que vous avez défini (paramètre Réponse automatique). Il enverra ensuite
une tonalité de réception de télécopie au télécopieur d'origine et recevra la télécopie.
Cas E : ligne vocale et de télécopie partagée
Si vous recevez à la fois des appels vocaux et de télécopie au même numéro de
téléphone et si vous ne disposez d'aucun autre équipement de bureau (ou messagerie
Configuration de l'appareil HP Tout-en-un pour la télécopie 75
Page 79

Français
Chapitre 2
vocale) sur cette ligne téléphonique, configurez l'appareil HP Tout-en-un comme décrit
dans cette section.
Figure 2-4 Vue arrière de l'appareil HP Tout-en-un
1 Prise téléphonique murale
2 Utilisez le cordon téléphonique fourni avec l'appareil HP Tout-en-un pour la connexion au port
« 1-LINE »
3 Téléphone (facultatif)
Pour configurer le produit avec une ligne vocale/télécopie partagée
1. Utilisez le cordon téléphonique fourni avec le produit : connectez l'une des extrémités
à votre prise téléphonique murale et l'autre au port 1-LINE situé à l'arrière du produit.
Remarque Si vous n'utilisez pas le cordon fourni pour la connexion entre la prise
téléphonique murale et le produit, vous ne pourrez peut-être pas envoyer de
télécopies. Ce cordon téléphonique spécial est différent de ceux que vous utilisez
éventuellement chez vous ou à votre bureau.
2. Il ne vous reste plus qu'à décider si vous souhaitez que le produit réponde
manuellement ou automatiquement aux appels de télécopie.
• Si vous configurez le produit pour qu'il réponde automatiquement aux appels, il
répond à tous les appels entrants et reçoit les télécopies. Dans ce cas, le produit
ne sera pas en mesure de faire la distinction entre les appels vocaux et les appels
de télécopie ; si vous pensez qu'il s'agit d'un appel vocal, vous devez prendre
l'appel avant que le produit ne s'en charge. Pour paramétrer le produit afin qu'il
réponde automatiquement aux appels, activez le paramètre Réponse
automatique.
• Si vous configurez le produit de sorte qu'il réponde manuellement aux
télécopies, vous devez pouvoir répondre personnellement aux appels de
télécopie entrants. Dans le cas contraire, votre produit ne pourra pas recevoir de
télécopies. Pour paramétrer le produit en vue de répondre aux appels
manuellement, désactivez le paramètre Réponse automatique.
76 Tout-en-un HP-Photosmart série-C4340
Page 80

3. Effectuez l'une des opérations suivantes, en fonction de votre système téléphonique :
• Si vous disposez d'un système téléphonique en parallèle, ôtez la prise blanche
du port 2-EXT à l'arrière du produit, puis branchez un téléphone sur ce port.
• Si vous utilisez un système téléphonique en série, vous pouvez connecter
directement le téléphone au câble du produit auquel est rattachée une prise
murale.
4. Exécutez un test de télécopie.
Si vous décrochez le téléphone avant que le produit ne réponde à l'appel et que vous
entendez les tonalités d'un télécopieur expéditeur, vous devrez répondre manuellement
à l'appel de télécopie.
Cas F : ligne vocale et de télécopie partagée avec une messagerie vocale
Si vous recevez à la fois des appels vocaux et des appels de télécopie au même numéro
de téléphone et si vous êtes également abonné à un service de messagerie vocale offert
par votre opérateur téléphonique, configurez l'appareil HP Tout-en-un comme décrit dans
cette section.
Remarque Vous ne pouvez pas recevoir de télécopies automatiquement si un
service de messagerie vocale est actif sur le même numéro de téléphone que celui
utilisé pour les appels de télécopie. Vous devez recevoir les télécopies manuellement.
Cela signifie que vous devez être présent pour répondre vous-même aux appels
entrants. Si vous souhaitez recevoir des télécopies automatiquement, contactez votre
opérateur téléphonique pour vous abonner à un service de sonnerie distincte ou pour
obtenir une ligne de téléphone distincte pour la télécopie.
Figure 2-5 Vue arrière de l'appareil HP Tout-en-un
Français
1 Prise téléphonique murale
2 Utilisez le cordon téléphonique fourni avec l'appareil HP Tout-en-un pour la connexion au port
« 1-LINE »
Configuration de l'appareil HP Tout-en-un pour la télécopie 77
Page 81

Chapitre 2
Configuration du produit avec une messagerie vocale
1. Utilisez le cordon téléphonique fourni avec le produit : connectez l'une des extrémités
à votre prise téléphonique murale et l'autre au port 1-LINE situé à l'arrière du produit.
Remarque Si vous n'utilisez pas le cordon fourni pour la connexion entre la prise
téléphonique murale et le produit, vous ne pourrez peut-être pas envoyer de
télécopies. Ce cordon téléphonique spécial est différent de ceux que vous utilisez
éventuellement chez vous ou à votre bureau.
2. Désactivez le paramètre Réponse automatique.
3. Exécutez un test de télécopie.
Vous devez prendre en personne les appels de télécopie entrants, sinon le produit ne
peut pas recevoir de télécopies.
Cas G : ligne de télécopie partagée avec un modem d'ordinateur (aucun appel vocal reçu)
Si vous utilisez une ligne de télécopie sur laquelle vous ne recevez pas d'appels vocaux
et que vous utilisez également un modem connecté sur cette ligne, configurez
l'appareil HP Tout-en-un comme décrit dans cette section.
Votre modem d'ordinateur partageant la ligne téléphonique avec l'appareil
HP Tout-en-un, vous ne pouvez pas utiliser simultanément le modem et l'appareil
Français
HP Tout-en-un. Par exemple, vous ne pouvez pas utiliser l'appareil HP Tout-en-un pour
une télécopie si vous êtes déjà en train d'utiliser le modem pour envoyer un courrier
électronique ou accéder à Internet.
Figure 2-6 Vue arrière de l'appareil HP Tout-en-un
1 Prise téléphonique murale
2 Utilisez le cordon téléphonique fourni avec l'appareil HP Tout-en-un pour la connexion au port
« 1-LINE »
3 Ordinateur avec modem
Pour configurer le produit avec un modem d'ordinateur
1. Ôtez la prise blanche du port 2-EXT à l'arrière du produit.
2. Localisez le cordon téléphonique qui relie l'arrière de votre ordinateur (ou le modem
à numérotation de votre ordinateur) à une prise murale. Débranchez le cordon de la
prise téléphonique murale et branchez-le sur le port 2-EXT à l'arrière du produit.
78 Tout-en-un HP-Photosmart série-C4340
Page 82

3. Utilisez le cordon téléphonique fourni avec le produit : connectez l'une des extrémités
à votre prise téléphonique murale et l'autre au port 1-LINE situé à l'arrière du produit.
Remarque Si vous n'utilisez pas le cordon fourni pour la connexion entre la prise
téléphonique murale et le produit, vous ne pourrez peut-être pas envoyer de
télécopies. Ce cordon téléphonique spécial est différent de ceux que vous utilisez
éventuellement chez vous ou à votre bureau.
4. Si le logiciel du modem de votre ordinateur est défini pour recevoir des télécopies
automatiquement, désactivez ce paramètre.
Remarque Si vous ne désactivez pas l'option de réception automatique de
télécopies dans le logiciel de votre modem, le produit ne pourra pas recevoir de
télécopies.
5. Changez le paramètre Réponse automatique pour que le nombre minimal de
sonneries avant réponse (deux sonneries) soit défini
6. Exécutez un test de télécopie.
Quand le téléphone sonnera, le produit répondra automatiquement après le nombre de
sonneries que vous avez défini dans le paramètre Réponse automatique. Il enverra
ensuite une tonalité de réception de télécopie au télécopieur d'origine et recevra la
télécopie.
Cas H : ligne vocale et de télécopie partagée avec un modem
Si vous recevez à la fois des appels vocaux et des appels de télécopie au même numéro
de téléphone et que vous utilisez un modem connecté sur cette ligne téléphonique,
configurez l'appareil HP Tout-en-un comme décrit dans cette section.
Votre modem d'ordinateur partageant la ligne téléphonique avec l'appareil
HP Tout-en-un, vous ne pouvez pas utiliser simultanément le modem et l'appareil
HP Tout-en-un. Par exemple, vous ne pouvez pas utiliser l'appareil HP Tout-en-un pour
une télécopie si vous êtes déjà en train d'utiliser le modem pour envoyer un courrier
électronique ou accéder à Internet.
Vous pouvez configurer l'appareil HP Tout-en-un de deux manières différentes avec votre
ordinateur, selon le nombre de ports téléphoniques dont dispose ce dernier. Avant de
commencer, vérifiez si votre ordinateur dispose d'un ou de deux ports téléphoniques :
• Dans ce cas, vous devez vous procurer un séparateur parallèle (appelé également
coupleur). Reportez-vous à l'aide en ligne pour obtenir des instructions de
configuration spécifiques.
• Si votre ordinateur est équipé de deux ports téléphoniques, configurez l'appareil
HP Tout-en-un comme décrit ci-dessous.
Français
Figure 2-7 Vue arrière de l'appareil HP Tout-en-un
Configuration de l'appareil HP Tout-en-un pour la télécopie 79
Page 83

Français
Chapitre 2
1 Prise téléphonique murale
2 Port téléphonique « IN » de votre ordinateur
3 Port téléphonique « OUT » de votre ordinateur
4 Téléphone
5 Ordinateur avec modem
6 Utilisez le cordon téléphonique fourni avec l'appareil HP Tout-en-un pour la connexion au
port « 1-LINE »
Pour configurer le produit sur la même ligne téléphonique qu'un ordinateur avec
deux ports téléphoniques
1. Ôtez la prise blanche du port 2-EXT à l'arrière du produit.
2. Localisez le cordon téléphonique qui relie l'arrière de votre ordinateur (ou le modem
à numérotation de votre ordinateur) à une prise murale. Débranchez le cordon de la
prise téléphonique murale et branchez-le sur le port 2-EXT à l'arrière du produit.
3. Connectez un téléphone au port « OUT » (sortie) situé à l'arrière de votre modem.
4. Utilisez le cordon téléphonique fourni avec le produit : connectez l'une des extrémités
à votre prise téléphonique murale et l'autre au port 1-LINE situé à l'arrière du produit.
Remarque Si vous n'utilisez pas le cordon fourni pour la connexion entre la prise
téléphonique murale et le produit, vous ne pourrez peut-être pas envoyer de
télécopies. Ce cordon téléphonique spécial est différent de ceux que vous utilisez
éventuellement chez vous ou à votre bureau.
5. Si le logiciel du modem de votre ordinateur est défini pour recevoir des télécopies
automatiquement, désactivez ce paramètre.
Remarque Si vous ne désactivez pas l'option de réception automatique de
télécopies dans le logiciel de votre modem, le produit ne pourra pas recevoir de
télécopies.
80 Tout-en-un HP-Photosmart série-C4340
Page 84

6. Il ne vous reste plus qu'à décider si vous souhaitez que le produit réponde
manuellement ou automatiquement aux appels de télécopie.
• Si vous configurez le produit pour qu'il réponde automatiquement aux appels, il
répond à tous les appels entrants et reçoit les télécopies. Dans ce cas, le produit
ne sera pas en mesure de faire la distinction entre les appels vocaux et les appels
de télécopie ; si vous pensez qu'il s'agit d'un appel vocal, vous devez prendre
l'appel avant que le produit ne s'en charge. Pour paramétrer le produit afin qu'il
réponde automatiquement aux appels, activez le paramètre Réponse
automatique.
• Si vous configurez le produit de sorte qu'il réponde manuellement aux
télécopies, vous devez pouvoir répondre personnellement aux appels de
télécopie entrants. Dans le cas contraire, votre produit ne pourra pas recevoir de
télécopies. Pour paramétrer le produit en vue de répondre aux appels
manuellement, désactivez le paramètre Réponse automatique.
7. Exécutez un test de télécopie.
Si vous décrochez le téléphone avant que le produit ne réponde à l'appel et que vous
entendez les tonalités d'un télécopieur expéditeur, vous devrez répondre manuellement
à l'appel de télécopie.
Cas I : ligne vocale et de télécopie partagée avec un répondeur
Si vous recevez à la fois des appels vocaux et des appels de télécopie au même numéro
de téléphone et si vous disposez également d'un répondeur qui répond aux appels
vocaux à ce numéro de téléphone, configurez l'appareil HP Tout-en-un comme décrit
dans cette rubrique.
Figure 2-8 Vue arrière de l'appareil HP Tout-en-un
Français
1 Prise téléphonique murale
2 Port « IN » de votre répondeur
3 Port « OUT » de votre répondeur
4 Téléphone (facultatif)
5 Répondeur
Configuration de l'appareil HP Tout-en-un pour la télécopie 81
Page 85

Français
Chapitre 2
6 Utilisez le cordon téléphonique fourni avec l'appareil HP Tout-en-un pour la connexion au port
« 1-LINE »
Pour configurer le produit avec une ligne vocale et de télécopie partagée et un
répondeur
1. Ôtez la prise blanche du port 2-EXT à l'arrière du produit.
2. Débranchez votre répondeur de la prise téléphonique murale et connectez-le au port
2-EXT situé à l'arrière du produit.
Remarque Si vous ne connectez pas directement votre répondeur au produit, il
se peut que des tonalités propres à un télécopieur en train d'émettre s'enregistrent
sur votre répondeur et il est fort probable alors que vous ne puissiez pas recevoir
de télécopies avec le produit.
3. Utilisez le cordon téléphonique fourni avec le produit : connectez l'une des extrémités
à votre prise téléphonique murale et l'autre au port 1-LINE situé à l'arrière du produit.
Remarque Si vous n'utilisez pas le cordon fourni pour la connexion entre la prise
téléphonique murale et le produit, vous ne pourrez peut-être pas envoyer de
télécopies. Ce cordon téléphonique spécial est différent de ceux que vous utilisez
éventuellement chez vous ou à votre bureau.
4. Si votre répondeur ne possède pas de téléphone intégré, vous souhaiterez peut-être,
pour plus de commodité, connecter un téléphone à l'arrière de votre répondeur au
port « OUT ». Cette opération est facultative.
Remarque Si votre répondeur ne permet pas de connecter un téléphone
externe, utilisez un séparateur parallèle (également appelé coupleur) pour
connecter le répondeur et le téléphone à l'appareil HP Tout-en-un. Vous pouvez
utiliser des cordons téléphoniques standard pour ces branchements.
5. Paramétrez le répondeur pour qu'il se déclenche après seulement quelques
sonneries.
6. Changez le paramètre Réponse automatique pour que le nombre maximal de
sonneries prévues par l'appareil soit défini (le nombre maximal de sonneries varie
selon le pays/la région).
7. Exécutez un test de télécopie.
Lorsque le téléphone sonne, votre répondeur répond après le nombre de sonneries que
vous avez défini et lit le message d'accueil que vous avez enregistré.
L'appareil HP Tout-en-un surveille l'appel au cours de cette période en étant à l'écoute
d'éventuelles tonalités de télécopie. Si des tonalités de télécopie entrantes sont
détectées, l'appareil HP Tout-en-un émet des tonalités de réception de télécopie et
réceptionne la télécopie. Si aucune tonalité de télécopie n'est détectée,
l'appareil HP Tout-en-un arrête la surveillance de la ligne et votre répondeur peut
enregistrer un message vocal.
Cas J : ligne vocale et de télécopie partagée avec un modem et un répondeur
Si vous recevez à la fois des appels vocaux et des appels de télécopie au même numéro
de téléphone et que vous utilisez un modem et un répondeur connectés sur cette ligne
téléphonique, configurez l'appareil HP Tout-en-un comme décrit dans cette section.
Votre modem d'ordinateur et l'appareil HP Tout-en-un partageant la même ligne
téléphonique, vous ne pouvez pas les utiliser simultanément. Par exemple, vous ne
82 Tout-en-un HP-Photosmart série-C4340
Page 86

pouvez pas utiliser l'appareil HP Tout-en-un pour une télécopie si vous êtes déjà en train
d'utiliser le modem pour envoyer un courrier électronique ou accéder à Internet.
Vous pouvez configurer l'appareil HP Tout-en-un de deux manières différentes avec votre
ordinateur, selon le nombre de ports téléphoniques dont dispose ce dernier. Avant de
commencer, vérifiez si votre ordinateur dispose d'un ou de deux ports téléphoniques :
• Dans ce cas, vous devez vous procurer un séparateur parallèle (appelé également
coupleur). Reportez-vous à l'aide en ligne pour obtenir des instructions de
configuration spécifiques.
• Si votre ordinateur est équipé de deux ports téléphoniques, configurez l'appareil
HP Tout-en-un comme décrit ci-dessous.
Figure 2-9 Vue arrière de l'appareil HP Tout-en-un
Français
1 Prise téléphonique murale
2 Port téléphonique « IN » de votre ordinateur
3 Port téléphonique « OUT » de votre ordinateur
4 Téléphone (facultatif)
5 Répondeur
6 Ordinateur avec modem
7 Utilisez le cordon téléphonique fourni avec l'appareil HP Tout-en-un pour la connexion au
port « 1-LINE »
Pour configurer le produit sur la même ligne téléphonique qu'un ordinateur avec
deux ports téléphoniques
1. Ôtez la prise blanche du port 2-EXT à l'arrière du produit.
2. Localisez le cordon téléphonique qui relie l'arrière de votre ordinateur (ou le modem
à numérotation de votre ordinateur) à une prise murale. Débranchez le cordon de la
prise téléphonique murale et branchez-le sur le port 2-EXT à l'arrière du produit.
Configuration de l'appareil HP Tout-en-un pour la télécopie 83
Page 87

Français
Chapitre 2
3. Débranchez votre répondeur de la prise téléphonique murale et connectez-le au port
« OUT » (sortie) situé à l'arrière de votre modem.
Il se crée ainsi une connexion directe entre l'appareil HP Tout-en-un et votre
répondeur, même si le modem est le premier à être connecté.
Remarque Si vous ne connectez pas votre répondeur de cette manière, des
tonalités de télécopie d'un télécopieur émetteur risquent d'être enregistrées sur
votre répondeur et vous ne pourrez probablement pas recevoir de télécopies avec
le produit.
4. Utilisez le cordon téléphonique fourni avec le produit : connectez l'une des extrémités
à votre prise téléphonique murale et l'autre au port 1-LINE situé à l'arrière du produit.
Remarque Si vous n'utilisez pas le cordon fourni pour la connexion entre la prise
téléphonique murale et le produit, vous ne pourrez peut-être pas envoyer de
télécopies. Ce cordon téléphonique spécial est différent de ceux que vous utilisez
éventuellement chez vous ou à votre bureau.
5. Si votre répondeur ne possède pas de téléphone intégré, vous souhaiterez peut-être,
pour plus de commodité, connecter un téléphone à l'arrière de votre répondeur au
port « OUT ». Cette opération est facultative.
Remarque Si votre répondeur ne permet pas de connecter un téléphone
externe, utilisez un séparateur parallèle (également appelé coupleur) pour
connecter le répondeur et le téléphone à l'appareil HP Tout-en-un. Vous pouvez
utiliser des cordons téléphoniques standard pour ces branchements.
6. Si le logiciel du modem de votre ordinateur est défini pour recevoir des télécopies
automatiquement, désactivez ce paramètre.
Remarque Si vous ne désactivez pas l'option de réception automatique de
télécopies dans le logiciel de votre modem, le produit ne pourra pas recevoir de
télécopies.
7. Paramétrez le répondeur pour qu'il se déclenche après seulement quelques
sonneries.
8. Changez le paramètre Réponse automatique pour que le nombre maximal de
sonneries prévues par votre produit soit défini (le nombre maximal de sonneries varie
selon le pays/la région).
9. Exécutez un test de télécopie.
Lorsque le téléphone sonne, votre répondeur répond après le nombre de sonneries que
vous avez défini et lit le message d'accueil que vous avez enregistré.
L'appareil HP Tout-en-un surveille l'appel au cours de cette période en étant à l'écoute
d'éventuelles tonalités de télécopie. Si des tonalités de télécopie entrantes sont
détectées, l'appareil HP Tout-en-un émet des tonalités de réception de télécopie et
réceptionne la télécopie. Si aucune tonalité de télécopie n'est détectée,
l'appareil HP Tout-en-un arrête la surveillance de la ligne et votre répondeur peut
enregistrer un message vocal.
84 Tout-en-un HP-Photosmart série-C4340
Page 88

Cas K : ligne vocale et de télécopie partagée avec un modem et une messagerie vocale
Si vous recevez à la fois des appels vocaux et des appels de télécopie au même numéro
de téléphone, que vous utilisez un modem sur la même ligne téléphonique et que vous
êtes abonné à un service de messagerie vocale fourni par votre opérateur téléphonique,
configurez l'appareil HP Tout-en-un comme décrit dans cette section.
Remarque Vous ne pouvez pas recevoir de télécopies automatiquement si un
service de messagerie vocale est actif sur le même numéro de téléphone que celui
utilisé pour les appels de télécopie. Vous devez recevoir les télécopies manuellement.
Cela signifie que vous devez être présent pour répondre vous-même aux appels
entrants. Si vous souhaitez recevoir des télécopies automatiquement, contactez votre
opérateur téléphonique pour vous abonner à un service de sonnerie distincte ou pour
obtenir une ligne de téléphone distincte pour la télécopie.
Votre modem d'ordinateur partageant la ligne téléphonique avec l'appareil
HP Tout-en-un, vous ne pouvez pas utiliser simultanément le modem et l'appareil
HP Tout-en-un. Par exemple, vous ne pouvez pas utiliser l'appareil HP Tout-en-un pour
une télécopie si vous êtes déjà en train d'utiliser le modem pour envoyer un courrier
électronique ou accéder à Internet.
Vous pouvez configurer l'appareil HP Tout-en-un de deux manières différentes avec votre
ordinateur, selon le nombre de ports téléphoniques dont dispose ce dernier. Avant de
commencer, vérifiez si votre ordinateur dispose d'un ou de deux ports téléphoniques :
• Dans ce cas, vous devez vous procurer un séparateur parallèle (appelé également
coupleur). Reportez-vous à l'aide en ligne pour obtenir des instructions de
configuration spécifiques.
• Si votre ordinateur est équipé de deux ports téléphoniques, configurez l'appareil
HP Tout-en-un comme décrit ci-dessous.
Français
Figure 2-10 Vue arrière de l'appareil HP Tout-en-un
1 Prise téléphonique murale
2 Port téléphonique « IN » de votre ordinateur
3 Port téléphonique « OUT » de votre ordinateur
4 Téléphone
5 Ordinateur avec modem
Configuration de l'appareil HP Tout-en-un pour la télécopie 85
Page 89

Français
Chapitre 2
6 Utilisez le cordon téléphonique fourni avec l'appareil HP Tout-en-un pour la connexion au
port « 1-LINE »
Pour configurer le produit sur la même ligne téléphonique qu'un ordinateur avec
deux ports téléphoniques
1. Ôtez la prise blanche du port 2-EXT à l'arrière du produit.
2. Localisez le cordon téléphonique qui relie l'arrière de votre ordinateur (ou le modem
à numérotation de votre ordinateur) à une prise murale. Débranchez le cordon de la
prise téléphonique murale et branchez-le sur le port 2-EXT à l'arrière du produit.
3. Connectez un téléphone au port « OUT » (sortie) situé à l'arrière de votre modem.
4. Utilisez le cordon téléphonique fourni avec le produit : connectez l'une des extrémités
à votre prise téléphonique murale et l'autre au port 1-LINE situé à l'arrière du produit.
Remarque Si vous n'utilisez pas le cordon fourni pour la connexion entre la prise
téléphonique murale et le produit, vous ne pourrez peut-être pas envoyer de
télécopies. Ce cordon téléphonique spécial est différent de ceux que vous utilisez
éventuellement chez vous ou à votre bureau.
5. Si le logiciel du modem de votre ordinateur est défini pour recevoir des télécopies
automatiquement, désactivez ce paramètre.
Remarque Si vous ne désactivez pas l'option de réception automatique de
télécopies dans le logiciel de votre modem, le produit ne pourra pas recevoir de
télécopies.
6. Désactivez le paramètre Réponse automatique.
7. Exécutez un test de télécopie.
Vous devez prendre en personne les appels de télécopie entrants, sinon l'appareil
HP Tout-en-un ne peut pas recevoir de télécopies.
Modification des paramètres de votre appareil
HP Tout-en-un pour la réception de télécopies
Pour recevoir des télécopies, vous devrez peut-être modifier certains paramètres de
l'appareil HP Tout-en-un. Si vous ne savez pas avec certitude quel paramètre choisir
pour une option de télécopie spécifique, reportez-vous aux instructions détaillées
relatives à la configuration du télécopieur fournies dans la documentation imprimée.
Cette section contient les rubriques suivantes :
Sélection du paramètre de réponse recommandé pour votre configuration
Le paramètre Réponse automatique détermine si l'appareil HP Tout-en-un répond aux
appels entrants, ainsi que le nombre de sonneries précédant la réponse. Le paramètre
le plus approprié dépend de la configuration utilisée chez vous ou sur votre lieu de travail.
Pour plus d'informations à ce sujet, reportez-vous aux instructions de configuration
correspondant à votre cas, dans les pages précédentes.
Pour activer le paramètre Réponse automatique
1. Appuyez sur le bouton Numériser/télécopier.
2. Appuyez sur le bouton Menu Télécopie.
86 Tout-en-un HP-Photosmart série-C4340
Page 90

3. Appuyez sur le bouton Configuration du télécopieur.
4. Appuyez sur le bouton situé près de la flèche dirigée vers le bas pour mettre en
surbrillance Réponse automatique, puis appuyez sur le bouton jouxtant l'icône
OK.
5. Appuyez sur le bouton jouxtant le paramètre approprié, puis appuyez sur le bouton
jouxtant l'icône OK.
Modification du type de sonnerie sur Sonnerie distincte
De nombreux opérateurs téléphoniques proposent une fonction de sonnerie distincte
permettant d'avoir plusieurs numéros de téléphone sur une même ligne téléphonique.
Lorsque vous vous abonnez à ce service, chaque numéro est associé à une sonnerie
différente. Vous pouvez configurer l'appareil HP Tout-en-un pour qu'il réponde à une
certaine sonnerie.
Si vous connectez l'appareil HP Tout-en-un à une ligne dotée d'une sonnerie distincte,
demandez à votre opérateur téléphonique de définir une sonnerie pour les appels vocaux
et une autre pour les télécopies. HP recommande de demander une sonnerie double ou
triple pour les télécopies. Lorsque l'appareil HP Tout-en-un détecte la sonnerie spécifiée,
il prend la ligne et reçoit la télécopie.
Si vous ne disposez pas du service de sonnerie distincte, conservez l'option par défaut
Toutes sonneries.
Pour modifier le type de sonnerie distincte à partir du panneau de commande
1. Vérifiez que le produit est configuré en vue de répondre automatiquement aux appels
de télécopie au bout d'un nombre de sonneries spécifié.
2. Appuyez sur le bouton Numériser/télécopier.
3. Appuyez sur le bouton Menu Télécopie.
4. Appuyez sur le bouton Configuration du télécopieur.
5. Appuyez sur le bouton situé près de la flèche dirigée vers le bas pour mettre en
surbrillance Sonneries distinctes, puis appuyez sur le bouton jouxtant l'icône OK.
6. Appuyez sur le bouton situé près de la flèche dirigée vers le bas pour mettre en
surbrillance l'option appropriée, puis appuyez sur le bouton jouxtant l'icône OK.
Lorsque la sonnerie définie pour la ligne de télécopie est activée, le produit prend la
ligne et reçoit la télécopie.
Français
Configuration de l'en-tête de télécopie
L'en-tête de télécopie imprime votre nom et votre numéro de télécopieur en haut de
chaque télécopie que vous envoyez. HP recommande de définir l'en-tête de télécopie au
moyen du logiciel que vous avez installé avec l'appareil HP Tout-en-un. Vous pouvez
également définir l'en-tête de télécopie à partir du panneau de commande, comme décrit
ici.
Remarque Dans certains pays/certaines régions, l'en-tête de télécopie est une
exigence légale.
Pour définir un en-tête de télécopie à partir du panneau de commande
1. Appuyez sur le bouton Numériser/télécopier.
2. Appuyez sur le bouton Menu Télécopie.
Configuration de l'en-tête de télécopie 87
Page 91

Chapitre 2
3. Appuyez sur le bouton Configuration du télécopieur.
4. Appuyez sur le bouton situé près de la flèche dirigée vers le bas pour mettre en
surbrillance En-tête de télécopie, puis appuyez sur le bouton jouxtant l'icône OK.
5. Utilisez le clavier pour saisir votre nom ou celui de votre société. Une fois l'opération
terminée, appuyez sur le bouton jouxtant l'icône OK.
6. Entrez votre numéro de télécopie à l'aide du clavier, puis appuyez sur le bouton
jouxtant l'icône OK.
Test de la configuration de votre télécopieur
Vous pouvez tester la configuration du télécopieur pour vérifier l'état de
l'appareil HP Tout-en-un et vous assurer qu'il est configuré correctement. Effectuez ce
test après avoir configuré l'appareil HP Tout-en-un pour la télécopie. Le test :
• Teste le matériel du télécopieur.
• Vérifie que le type de cordon téléphonique approprié est connecté à
l'appareil HP Tout-en-un.
• Vérifie que le cordon téléphonique est connecté au port approprié.
• Recherche une tonalité.
• Recherche une ligne téléphonique active.
• Teste l'état de la connexion à la ligne téléphonique.
Français
L'appareil HP Tout-en-un imprime les résultats du test dans un rapport. En cas d'échec
du test, le rapport vous indique comment résoudre le problème. Exécutez à nouveau le
test.
Test de la configuration de la télécopie depuis le panneau de commande
1. Configurez le produit pour télécopier selon vos instructions spécifiques de
configuration de domicile ou de lieu de travail.
2. Insérez les cartouches d'impression et chargez du papier au format standard dans le
bac d'alimentation avant de débuter le test.
3. Appuyez sur le bouton Numériser/télécopier.
4. Appuyez sur le bouton Menu Télécopie.
5. Appuyez sur le bouton Configuration du télécopieur.
6. Appuyez sur le bouton situé près de la flèche dirigée vers le bas pour mettre en
surbrillance Effectuez le test du télécopieur , puis appuyez sur le bouton jouxtant
l'icône OK.
Le statut du test s'affiche à l'écran. Le produit imprime également un rapport détaillé.
7. Consultez le rapport.
• Si le test réussit et que vous avez toujours des problèmes de télécopie, consultez
les paramètres de télécopie affichés dans le rapport pour vérifier que les
paramètres sont corrects. Un paramètre de télécopie vide ou incorrect peut
provoquer des problèmes de télécopie.
• En cas d'échec du test, consultez le rapport pour obtenir des informations de
résolution pour le problème.
8. Une fois que vous avez récupéré le rapport de télécopie, appuyez sur le bouton
jouxtant l'icône OK.
Si nécessaire, résolvez les problèmes rencontrés et exécutez à nouveau le test.
88 Tout-en-un HP-Photosmart série-C4340
Page 92

3 Utilisation des fonctions de
l'appareil HP Tout-en-un
Ce chapitre contient des informations sur l'utilisation des fonctions de base de
l'appareil HP Tout-en-un. Par ailleurs, il fournit des instructions sur le chargement du
papier et le remplacement des cartouches d'impression.
Chargement du papier et des originaux
Vous pouvez copier, numériser ou télécopier des originaux ou publications épaisses
jusqu'au format A4 ou Lettre en les chargeant sur la vitre.
Pour positionner un original sur la vitre
1. Mettez le capot en position ouverte.
2. Chargez l'original, face à imprimer vers le bas, dans l'angle avant gauche de la vitre.
Conseil Pour obtenir la taille de copie appropriée, assurez-vous que la vitre est
exemple de bande adhésive ou d'autre corps étranger.
Français
3. Fermez le capot.
Chargement de papier photo petit format dans le bac d'alimentation
1. Faites glisser le guide de réglage de largeur du papier jusqu'à sa position extrême.
Chargement du papier et des originaux 89
Page 93

Chapitre 3
2. Insérez la pile de papier photo à l'extrême droite du bac d'alimentation, le bord court
vers l'avant et la face à imprimer vers le bas. Faites-la glisser jusqu'à ce qu'elle soit
calée.
Si le papier photo utilisé est perforé, chargez-le de manière à ce que les perforations
soient le plus près de vous.
3. Faites glisser le guide de largeur de façon à ce qu'il touche le bord du papier.
Ne surchargez pas le bac d'alimentation ; assurez-vous que la pile de papier tient
dans le bac d'alimentation et ne dépasse pas le haut du guide de largeur.
Prévention des bourrages papier
Pour éviter les bourrages papier, respectez les principes suivants :
Français
• Retirez fréquemment le papier imprimé du bac de sortie.
• Evitez que le support photo ne se froisse ou n'ondule en le stockant à plat dans un
sachet étanche.
• Assurez-vous que le papier chargé dans le bac d'alimentation repose à plat et que
les bords ne sont pas cornés ou déchirés.
• Ne mélangez pas des papiers de types et de formats différents dans le bac
d'alimentation ; chargez un seul type et un seul format de papier à la fois.
• Ajustez le guide de largeur du bac d'alimentation pour qu'il se cale contre le papier
chargé. Assurez-vous que le guide de largeur ne courbe pas le papier chargé dans
le bac d'alimentation.
• Ne surchargez pas le bac d'alimentation ; assurez-vous que la pile de papier tient
dans le bac d'alimentation et ne dépasse pas le haut du guide de largeur.
• Ne poussez pas le papier trop loin dans le bac d'alimentation.
• Utilisez les types de papier recommandés pour l'appareil.
Impression de photos au format 10 x 15 cm (4 x 6 pouces)
Vous pouvez sélectionner sur votre carte mémoire des photos déterminées à imprimer
comme photos 10 x 15 cm.
Pour imprimer une ou plusieurs photos 10 x 15 cm
1. Chargez du papier 10 x 15 cm dans le bac d'alimentation.
2. Insérez la carte mémoire dans l'emplacement correspondant du produit.
90 Tout-en-un HP-Photosmart série-C4340
Page 94

1 xD-Picture Card
2 Memory Stick, Memory Stick Pro, Memory Stick Select, Memory Stick Magic Gate,
Memory Stick Duo ou Duo Pro (adaptateur facultatif) ou Memory Stick Micro (adaptateur
requis)
3 Secure Digital (SD), Secure Digital Mini (adaptateur requis), Secure Digital High Capacity
(SDHC), MultiMediaCard (MMC), MMC Plus, MMC Mobile (RS-MMC ; adaptateur requis),
TransFlash MicroSD Card ou Secure MultiMedia Card
4 CompactFlash (CF) types I et II
L'image la plus récente de la carte s'affiche à l'écran.
3. Appuyez sur les boutons jouxtant les icônes de flèche vers le haut et vers le bas sur
l'écran pour faire défiler les photos contenues dans la carte mémoire, jusqu'à ce que
celle que vous souhaitez imprimer apparaisse.
4. Laissez le paramètre de la Taille sur la valeur par défaut Sans bordure.
Remarque Le paramètre Qualité est défini sur le mode supérieur
(correspondant aux icônes à 3 étoiles sur l'écran) et n'est pas modifiable.
5. Appuyez sur le bouton Copies jusqu'à ce que le nombre de copies à imprimer
apparaisse à l'écran.
6. Appuyez sur le bouton jouxtant l'icône Imprimer sur l'écran.
Conseil Vous pouvez continuer à faire défiler les photos contenues dans la carte
mémoire durant l'impression de la photo. Dès que vous souhaitez lancer
l'impression d'une photo, il vous suffit d'appuyer sur le bouton Imprimer pour
l'ajouter à la file d'attente d'impression.
Numérisation d'une image
Dans le cas de documents originaux ou d'images placés sur la vitre, vous pouvez lancer
la numérisation à partir de votre ordinateur ou de l'appareil HP Tout-en-un. La présente
section présente la seconde option : comment numériser à partir du panneau de
commande de l'appareil HP Tout-en-un vers un ordinateur.
Pour permettre l'utilisation des fonctions de numérisation, l’appareil HP Tout-en-un et
l’ordinateur doivent être connectés et sous tension. Le logiciel HP Photosmart doit
Français
Numérisation d'une image 91
Page 95

Français
Chapitre 3
également être installé et en cours d’exécution sur l’ordinateur avant la numérisation.
Pour vérifier que le logiciel de l'appareil HP Photosmart est actif sur un ordinateur sous
Windows, contrôlez la présence du Moniteur d'imagerie numérique (HP Digital Imaging
Monitor) dans la barre d'état système située dans le coin inférieur droit de l'écran, près
de l'heure.
Remarque La fermeture de l'icône duMoniteur d'imagerie numérique dans la
barre d'état du système Windows peut entraîner la perte de certaines fonctionnalités
de numérisation de l'appareil HP Tout-en-un. Si cet incident se produit, vous pouvez
restaurer les fonctionnalités complètes en redémarrant votre ordinateur.
Pour numériser vers un ordinateur
1. Chargez l'original, face à imprimer vers le bas, dans l'angle avant droit de la vitre.
Remarque Assurez-vous qu'aucune carte mémoire n'est insérée dans les
emplacements du produit.
2. Appuyez sur le bouton Numériser/télécopier.
Le menu Numériser/télécopier s'affiche.
3. Appuyez sur le bouton Numériser.
Un aperçu de l'image numérisée s'affiche sur l'ordinateur. Vous pouvez la modifier à
cet endroit. Toute modification s'applique à la session de numérisation en cours
uniquement.
Le logiciel HP Photosmart dispose de nombreux outils permettant de modifier une
image numérisée. Vous pouvez améliorer la qualité globale de l'image en ajustant la
luminosité, le contraste, la nuance des couleurs et la saturation. Vous pouvez
également recadrer, redresser, faire pivoter ou redimensionner l'image.
4. Apportez les modifications nécessaires à l'image numérisée et cliquez ensuite sur
Accepter lorsque vous avez terminé.
Création d'une copie
Vous pouvez réaliser des copies de qualité à partir du panneau de commande.
Pour créer une copie à partir du panneau de configuration
1. Chargez du papier dans le bac d'alimentation.
2. Chargez l'original, face à imprimer vers le bas, dans l'angle avant gauche de la vitre.
3. Appuyez sur le bouton Démarrer copie noir ou Démarrer copie couleur pour
démarrer la copie.
Envoi d'une télécopie simple
Vous pouvez facilement envoyer une télécopie noir et blanc ou couleur d'une ou plusieurs
pages à partir du panneau de commande, comme décrit ici.
Remarque Si vous avez besoin d'une confirmation imprimée de l'envoi de vos
télécopies, activez la confirmation de télécopie avant d'envoyer une télécopie.
92 Tout-en-un HP-Photosmart série-C4340
Page 96

Remarque Si le numéro de télécopie que vous composez est occupé ou ne répond
pas, le produit compose à nouveau le numéro plusieurs fois de façon automatique.
Si vous ne souhaitez pas composer à nouveau le numéro, appuyez sur Effacer
pendant que le produit effectue la numérotation.
Conseil Vous pouvez aussi envoyer une télécopie manuellement à partir d'un
téléphone ou en utilisant la fonction de numérotation du panneau de commande. Ces
fonctions vous permettent de contrôler la vitesse de numérotation. Elles s'avèrent
également utiles si vous souhaitez utiliser une carte téléphonique pour la facturation
de l'appel et que vous devez effectuer certaines actions lors d'une tonalité donnée
durant la numérotation.
Pour envoyer une télécopie simple à partir du panneau de commande
1. Appuyez sur le bouton Numériser/télécopier.
2. Appuyez sur le bouton Démarrer la télécopie.
L'écran Envoi de télécopie s'affiche.
3. Appuyez sur le bouton situé près de la flèche dirigée vers le bas pour mettre en
surbrillance Noir et blanc ou Couleur, puis appuyez sur le bouton jouxtant l'icône
OK.
L'écran Entrer numéro s'affiche.
4. Entrez le numéro de télécopie à l'aide du clavier numérique ou appuyez sur le bouton
situé près de la flèche dirigée vers le haut ou vers le bas pour composer à nouveau
un numéro récent, puis appuyez sur le bouton jouxtant l'icône OK.
L'écran Chargement des originaux s'affiche.
5. Chargez l'impression originale en orientant la face à imprimer vers le bas dans le coin
inférieur droit de la vitre d'exposition et appuyez sur le bouton jouxtant l'icône OK.
Français
Remarque Si vous envoyez une télécopie couleur, l'envoi a lieu immédiatement.
Si vous envoyez une télécopie en noir et blanc, celle-ci est stockée en mémoire
jusqu'à ce que vous ayez numérisé chaque page de l'original.
L'écran Une autre page ? s'affiche.
6. Procédez comme suit :
Si vous souhaitez télécopier une autre page
a. Appuyez sur le bouton OK pour sélectionner Oui.
b. Répétez les étapes 5 et 6.
Si vous ne souhaitez pas télécopier une autre page
▲ Appuyez sur le bouton situé près de la flèche dirigée vers le bas pour sélectionner
Non, puis appuyez sur le bouton jouxtant l'icône OK.
Le produit envoie la télécopie.
Réception d'une télécopie
L'appareil HP Tout-en-un peut recevoir des télécopies automatiquement ou
manuellement. Si vous activez l'option Réponse automatique en définissant le nombre
de sonneries d'attente, l'appareil HP Tout-en-un répond automatiquement à tous les
appels entrants et reçoit les télécopies. Si vous désactivez l'option Réponse
automatique, vous devez recevoir les télécopies manuellement.
Réception d'une télécopie 93
Page 97

Français
Chapitre 3
Remarque Lors de la réception de télécopies au format Legal, l'appareil
HP Tout-en-un réduit la télécopie aux dimensions du papier chargé dans le bac
d'alimentation. Si les dimensions de la télécopie sont telles qu'elles nécessitent une
réduction supérieure à 60 %, il est possible que l'appareil HP Tout-en-un imprime la
télécopie sur plusieurs pages.
Lorsque vous téléphonez, la personne à qui vous parlez peut vous envoyer une télécopie
pendant que vous êtes en ligne. On appelle cela la télécopie manuelle. Suivez les
instructions de cette rubrique pour recevoir une télécopie manuelle.
Vous pouvez recevoir manuellement des télécopies à partir d'un téléphone lorsque celuici est :
• directement relié à l'appareil HP Tout-en-un (sur le port 2-EXT)
• installé sur la même ligne téléphonique, mais sans être connecté à l'appareil
HP Tout-en-un.
Pour recevoir une télécopie manuellement
1. Assurez-vous que le produit est sous tension et que vous avez chargé du papier dans
le bac d'alimentation.
2. Assurez-vous que le paramètre Réponse automatique est défini sur la valeur Ne
pas répondre ou sur un nombre de sonneries plus élevé, afin que vous puissiez
répondre à l'appel avant le produit.
3. Si vous êtes au téléphone avec l'expéditeur, informez-le qu'il faut appuyer sur la
touche Démarrer du télécopieur.
Des tonalités émises par un télécopieur se feront entendre.
4. Appuyez sur le bouton Numériser/télécopier.
5. Appuyez sur le bouton Démarrer la télécopie.
L'écran Mode télécopie s'affiche.
6. Appuyez sur le bouton situé près de la flèche dirigée vers le bas pour mettre en
surbrillance Réception manuelle des télécopies, puis appuyez sur le bouton
jouxtant l'icône OK.
Une fois que le produit commence à recevoir la télécopie, vous pouvez raccrocher
ou rester en ligne. La ligne téléphonique est silencieuse durant la transmission de la
télécopie.
Remplacement des cartouches d'impression
Pour remplacer les cartouches d'impression, suivez ces instructions. Ces instructions
peuvent également vous aider à résoudre les problèmes de qualité d'impression liés aux
cartouches.
Remarque Lorsque le niveau d'encre de la cartouche d'impression est bas, un
message s'affiche sur l'écran de l'ordinateur. Vous pouvez également vérifier les
niveaux d'encre depuis le logiciel installé avec l'appareil HP Tout-en-un.
Lorsqu'un message s'affiche pour vous avertir que le niveau d'encre est bas, assurezvous que vous disposez d'une cartouche de remplacement. Remplacez également les
cartouches lorsque le texte imprimé est pâle ou si vous rencontrez des problèmes de
qualité d'impression dus aux cartouches.
Pour commander des cartouches d'impression pour l'appareil HP Tout-en-un, consultez
www.hp.com/buy/supplies. Si le système vous y invite, choisissez votre pays/région,
94 Tout-en-un HP-Photosmart série-C4340
Page 98

suivez les indications pour sélectionner votre produit, puis cliquez sur l'un des liens
d'achat sur la page.
Pour remplacer les cartouches d'impression
1. Assurez-vous que le produit est sous tension.
Attention Si l'appareil est hors tension lorsque vous ouvrez la trappe d'accès
aux cartouches d'impression pour changer ces dernières, l'appareil ne les libère
pas. Vous risquez de l'endommager si les cartouches ne sont pas verrouillées en
toute sécurité du côté droit lorsque vous tentez de les retirer.
2. Vérifiez que vous avez bien chargé du papier blanc ordinaire vierge de format A4 ou
Lettre dans le bac d'alimentation.
3. Ouvrez le capot d'accès aux cartouches d'impression.
Le chariot d'impression se trouve à l'extrémité droite du produit.
4. Attendez que le chariot d'impression soit immobile et silencieux. Appuyez sur une
cartouche d'impression pour la libérer, puis tirez-la vers vous pour la dégager de son
logement.
Si vous remplacez la cartouche couleur, retirez la cartouche située dans le logement
de gauche.
Si vous remplacez une cartouche noire ou photo, retirez la cartouche située dans le
logement de droite.
1 Logement de la cartouche couleur
Français
Remplacement des cartouches d'impression 95
Page 99

Chapitre 3
2 Logement des cartouches noire et photo
Conseil Si vous retirez la cartouche d'impression noire pour installer la
cartouche photo, placez la cartouche noire dans l'étui de protection ou dans une
pochette en plastique hermétiquement fermée.
5. Retirez la nouvelle cartouche d'impression de son emballage en prenant garde de ne
toucher que le plastique noir et retirez délicatement l'adhésif plastique en tirant sur
la languette rose.
Français
1 Contacts en cuivre
2 Adhésif plastique avec sa languette rose (à retirer avant l'installation)
3 Buses d'encre sous le ruban adhésif
Attention Ne touchez pas les contacts en cuivre ni les buses d'encre. En outre,
ne replacez pas la bande adhésive des cartouches d'impression. Vous risqueriez
d'entraîner des obstructions, d'empêcher l'encre de s'écouler et de créer des
problèmes de connexion électrique.
6. Maintenez la cartouche d'impression de sorte que le logo HP soit orienté vers le haut,
puis insérez-la dans son logement. Veillez à bien enfoncer les cartouches
d'impression jusqu'à ce qu'elles s'enclenchent.
Si vous installez la cartouche d'impression couleur, faites-la glisser dans
l'emplacement de gauche.
Si vous installez une cartouche noire ou photo, faites-la glisser dans l'emplacement
de droite.
96 Tout-en-un HP-Photosmart série-C4340
Page 100

7. Fermez le capot avant.
8. Lorsque vous y êtes invité, appuyez sur le bouton jouxtant l'icône OK.
Le produit imprime une page d'alignement des cartouches d'impression.
Remarque Si le bac d'alimentation contient du papier couleur, l'alignement
échoue. Chargez du papier blanc ordinaire vierge dans le bac d'alimentation, puis
relancez l'alignement.
9. Chargez la page en orientant la face à imprimer vers le bas dans le coin inférieur droit
de la vitre d'exposition et appuyez sur le bouton près de OK pour numériser la page.
10. Lorsque le voyant Marche/arrêt clignote, l'alignement est terminé. Retirez la page
d'alignement, puis procédez à son recyclage ou à son élimination.
Nettoyage de l'appareil HP Tout-en-un
Nettoyez au besoin la vitre et le capot pour assurer la propreté des copies et des
numérisations. Pensez aussi à enlever la poussière sur l'extérieur de votre
appareil HP Tout-en-un.
Nettoyage de la vitre
Des empreintes, des taches, des cheveux et de la poussière sur la vitre principale
réduisent les performances et affectent la précision des fonctions de copie et de
numérisation.
Français
Nettoyage de l'appareil HP Tout-en-un 97
 Loading...