

Hp PHOTOSMART A526 User Manual [he]
HP Photosmart A520 series
Basics Guide
Вводное руководство
Hewlett-Packard Company notices
The information contained in this document is subject to change without notice.
All rights reserved. Reproduction, adaptation, or translation of this material is prohibited without prior written permission of Hewlett-Packard, except
as allowed under copyright laws. The only warranties for HP products and services are set forth in the express warranty statements accompanying
such products and services. Nothing herein should be construed as constituting an additional warranty. HP shall not be liable for technical or editorial
errors or omissions contained herein.
© 2007 Hewlett-Packard Development Company, L.P.
Windows, Windows 2000, and Windows XP are U.S. registered trademarks of Microsoft Corporation.
Windows Vista is either a registered trademark or trademark of Microsoft Corporation in the United States and/or other countries.
Intel and Pentium are trademarks or registered trademarks of Intel Corporation or its subsidiaries in the United States and other countries.
The Bluetooth trademarks are owned by its proprietor and used by Hewlett-Packard Company under license.
Уведомления компании Hewlett-Packard
Сведения, содержащиеся в настоящем документе, могут быть изменены без предварительного уведомления.
С сохранением всех прав. Воспроизведение, адаптация и перевод без предварительного письменного разрешения запрещены, за
исключением случаев, предусмотренных законодательством по защите авторских прав.
Компания HP не предоставляет каких-либо гарантий на изделия и услуги, кроме явно указанных в гарантийных обязательствах, прилагаемых к
изделиям и услугам. Никакая часть данного документа не может рассматриваться как дополнительные гарантийные обязательства. Компания
HP не несет ответственности за технические или редакторские ошибки и упущения в настоящем документе.
© Компания Hewlett-Packard Development, 2007 г
Windows, Windows 2000 и Windows XP являются зарегистрированными в США торговыми марками корпорации Microsoft.
Windows Vista является зарегистрированной торговой маркой или торговой маркой корпорации Microsoft в США и/или в других странах.
Intel и Pentium являются товарными марками или зарегистрированными товарными марками корпорации Intel или ее филиалов в США и других
странах.
Торговые марки Bluetooth принадлежат ее владельцу и используются компанией Hewlett-Packard по лицензии.

HP Photosmart A520 series
HP Photosmart A520 series Basics Guide
English

Contents
1 Get started
The HP Photosmart at a glance.................................................................................................5
Control panel buttons and indicator lights..................................................................................6
English
Printer menu...............................................................................................................................7
2 Print basics
Load paper.................................................................................................................................7
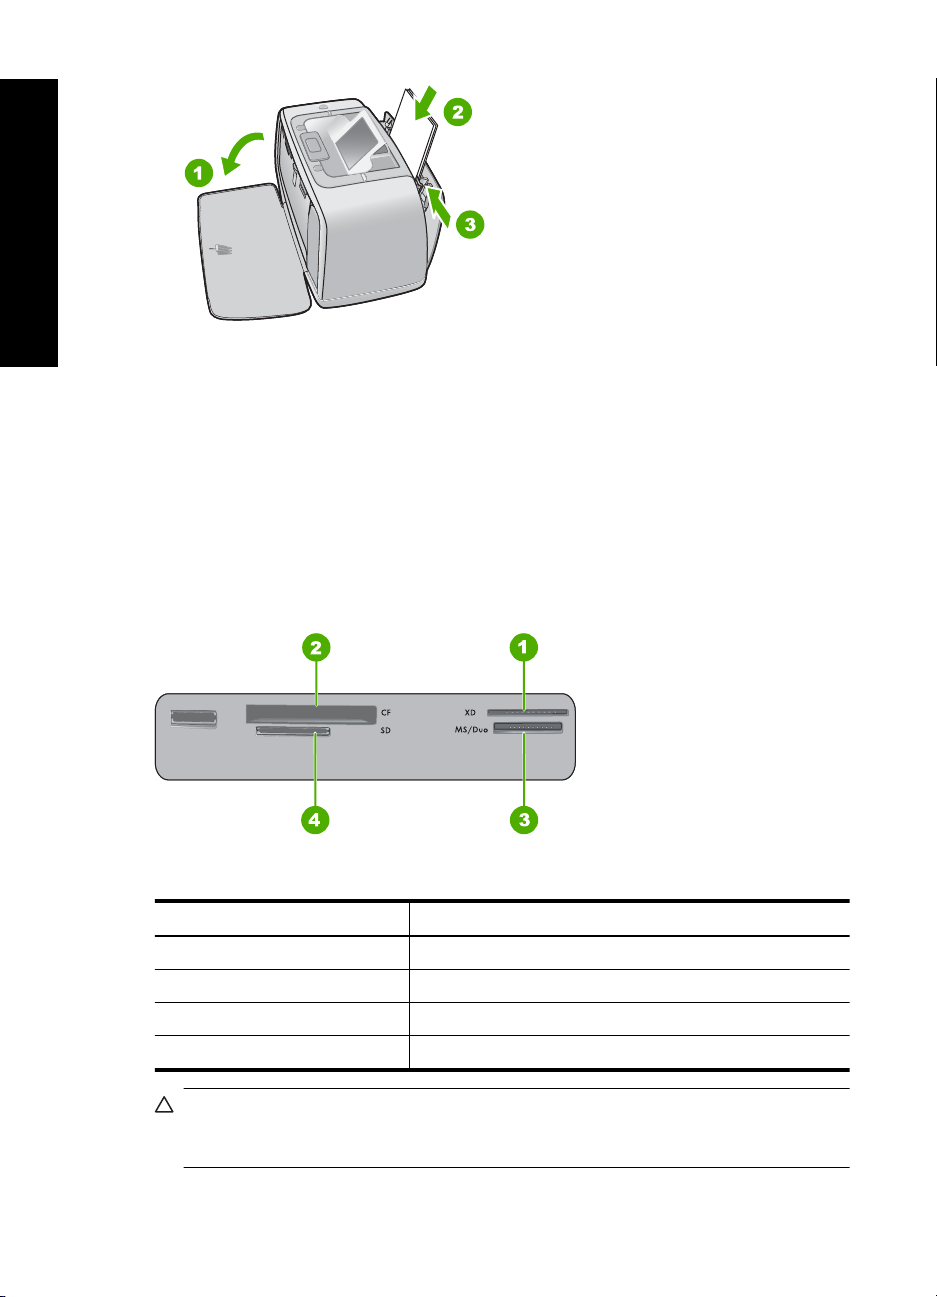
Insert a memory card..................................................................................................................8
Print a photo...............................................................................................................................9
Remove red eye in photos..........................................................................................................9
Connect to a computer...............................................................................................................9
Install the software and connect the USB cable...................................................................9
3 Troubleshooting and Support
Printing and hardware issues...................................................................................................10
Insert or replace the print cartridge...........................................................................................11
Support process.......................................................................................................................12
Regulatory model identification number SDGOA-0701............................................................13
Environmental statements........................................................................................................13
Find more information...............................................................................................................13
Printer specifications................................................................................................................13
HP Warranty.............................................................................................................................15
4 HP Photosmart A520 series
1 Get started
This section provides introductory information about the HP Photosmart A520 series
printer.
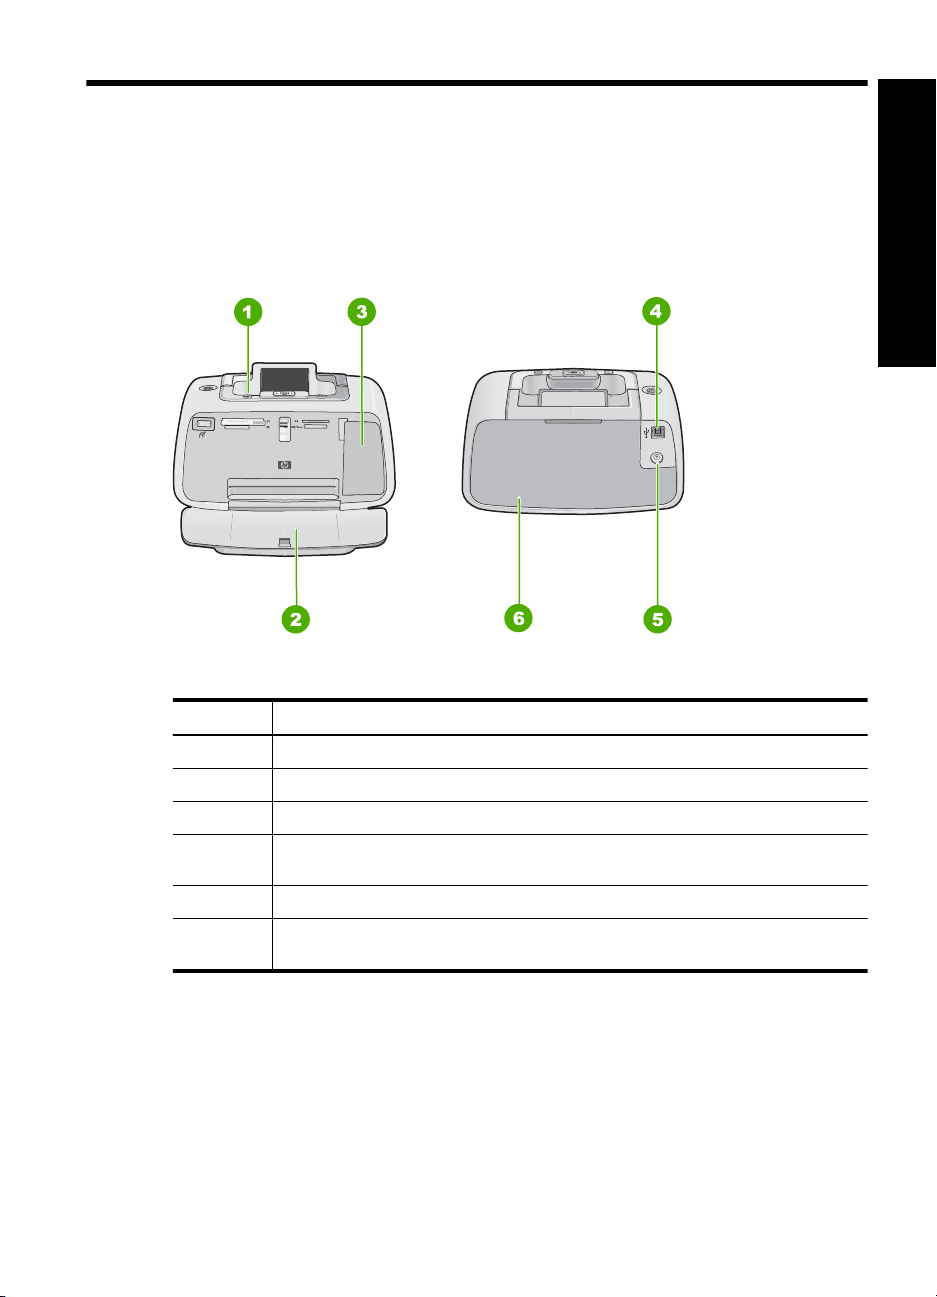
The HP Photosmart at a glance
Figure 1-1 Front and rear views
English
Label Description
1 Control panel: Control the basic functions of the printer from here.
2 Output tray (open): Collect your printed photos from this tray.
3 Print cartridge door (closed): Open this door to insert or replace a print cartridge.
4 USB port: Use this port to connect the printer to a computer using the supplied USB
5 Power cord connection: Connect the power cord here.
6 Input tray (closed): Load paper here. Open the output tray first. The input tray
cable.
opens automatically when you open the output tray.
Get started 5
Chapter 1
Control panel buttons and indicator lights
English
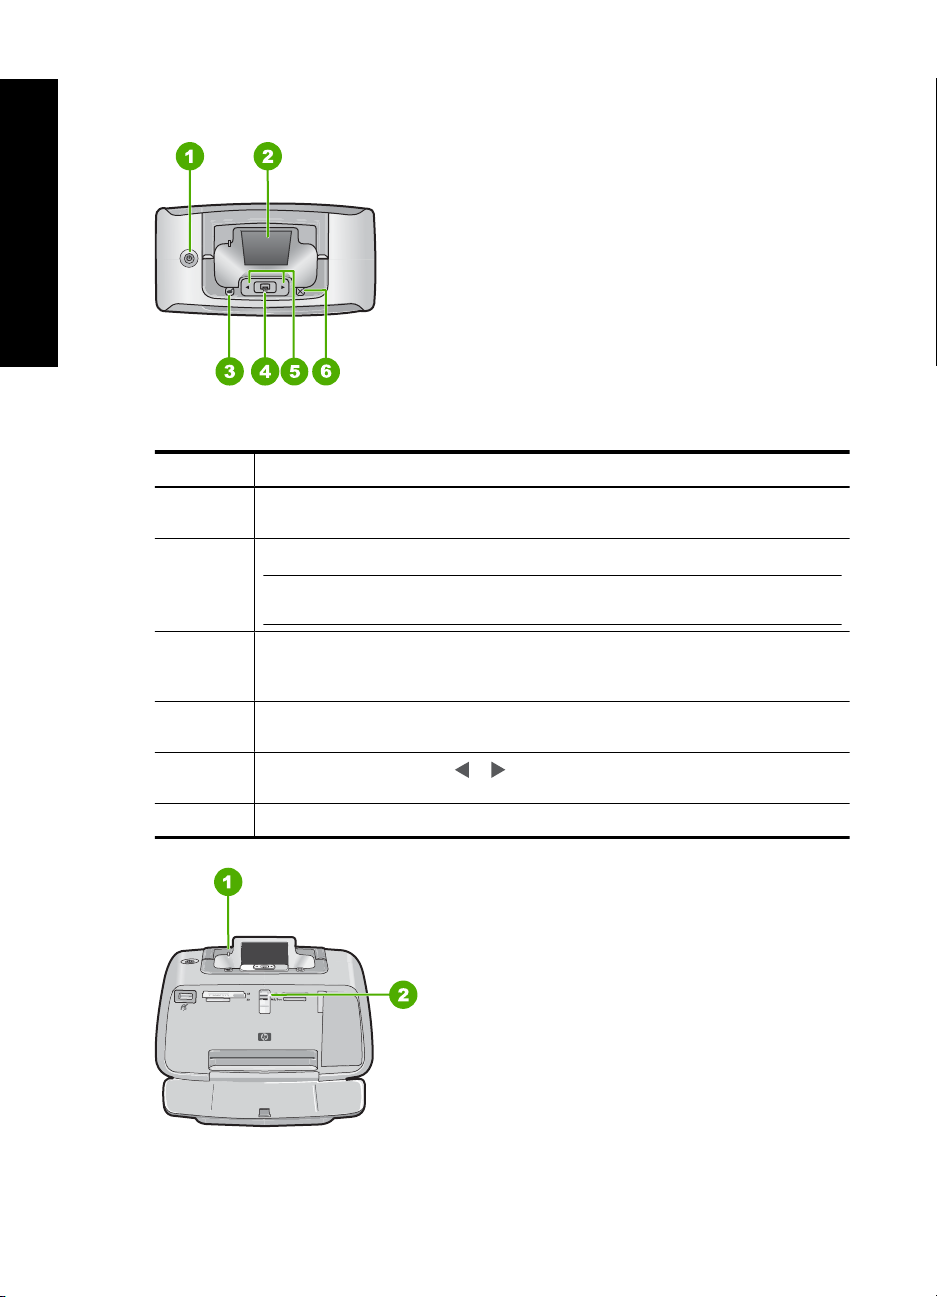
Figure 1-2 Control panel
Label Description
1 Power: Press to turn the printer on or off. The power button will glow when the power
2 Printer screen: View photos and menus here.
3 Red Eye: The Red Eye feature reduces the red-eye effect you sometime see in
4 Print: Press to print the currently viewed image from a memory card. The Print
5
6 Cancel: Press to stop an action, exit a menu, or to cancel printing a queued image.
is on. When the printer is idle, the button will pulse softly.
NOTE: The features available on the printer may vary by country/region and/or
model.
flash photos. This feature is off by default. Press this button to turn the feature on
or off.
button glows when the printer power is on.
Navigation arrows: Press or to scroll through photos on a memory card or to
navigate the printer menu.
Figure 1-3 Indicator lights
6 HP Photosmart A520 series

Label Description
1 Attention LED: Flashes red when the printer requires attention.
2 Memory card LED: This light turns aqua blue after the memory card is correctly
Printer menu
The Printer menu gives you many print options, allows you to change the printer defaults,
provides maintenance and troubleshooting tools, and provides how-to information for
common printing tasks.
NOTE: The features available on the printer may vary by country/region and/or
model.
To use the Printer menu
NOTE: If there is a memory card inserted in the card slots, remove it to access the
Printer menu.
1. Press or to open the Printer menu.
2. Pressing
menu option.
3. Press Print to select an option. Menu options that are not accessible are dimmed.
4. To exit a menu, press the Cancel button.
inserted. It flashes blue when the printer is communicating with the memory card
or when a connected computer is performing a read, write, or delete operation.
English
will move to the next option and pressing will move to the previous
2 Print basics
Load paper
Use HP Advanced Photo Paper. It is especially designed to work with the inks in your
printer to create beautiful photos. Other photo papers will produce inferior results.
The printer is set, by default, to print the best quality photos on HP Advanced Photo Paper.
If you print on a different type of paper, be sure to change the paper type. For information
on changing the paper type, see the onscreen Help.
To order HP papers and other supplies, go to
choose your country/region, follow the prompts to select your product, and then click one
of the shopping links on the page.
To load paper
1. Open the output tray. The input tray opens automatically.
www.hp.com/buy/supplies. If prompted,
Printer menu 7
Chapter 2
English
2. Load up to 20 sheets of photo paper with the print side or glossy side facing the front
of the printer. If you are using tabbed paper, load the paper so tab feeds in last. When
loading, slide the paper to the left side of the input tray and push the paper down firmly
until it stops.
3. Adjust the paper-width guide to fit close to the edge of the paper without bending the
paper.
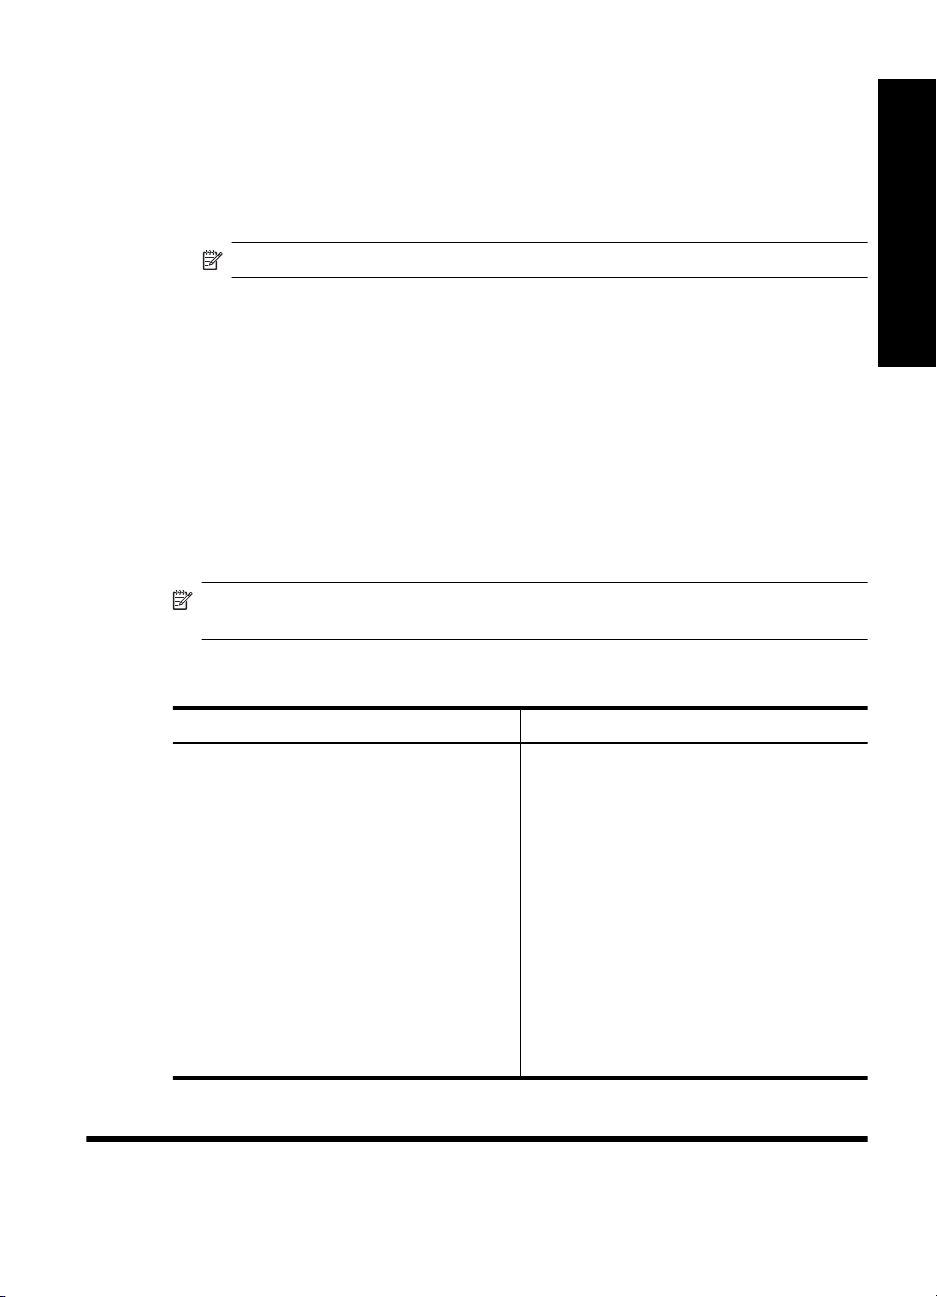
Insert a memory card
Insert a memory card into the appropriate slot with the label facing up and the metal
contacts going in first. Refer to the figure to select the correct slot for your memory card.
Figure 2-1 Memory card slots
Label Description
1 xD-Picture Card
2 Compact Flash I and II, Microdrive
3 Memory Stick
4 Secure Digital, MultiMediaCard (MMC)
CAUTION: Do not pull out the memory card while the memory card light is flashing.
A flashing light means the printer or computer is accessing the memory card. When
the memory card light on the printer is solid, it is safe to pull the card out of the slot.
8 HP Photosmart A520 series
Print a photo
To print a single photo
1. Navigate through the photos on the inserted memory card.
2. Display the photo you want to print.
3. Press Print.
NOTE: To print additional copies of the current image, press Print again.
Remove red eye in photos
The HP Photosmart A520 series includes a red-eye reduction function that fixes that redeye effect that sometime occurs in flash photos. This feature is off by default when you
turn on the printer. If you want to print a photo using this feature, you can turn it
pressing the Red Eye button.
Connect to a computer
Printing from a computer gives you more options for printing your images. Before printing
from your computer, you must install the HP Photosmart software and connect the USB
cable from the printer (using the USB port on the back) to your computer.
NOTE: The USB 2.0 cable required for printing from a computer might not be
included in the box with the printer, so you might need to purchase it separately.
Install the software and connect the USB cable
English
on by
Windows users Mac users
Important: Do not connect a USB cable until
you are prompted.
1. Insert the HP Photosmart CD into your
computer CD-ROM drive. If the Install
Wizard does not appear, locate the
setup.exe file on the CD-ROM drive and
double-click it. Wait several minutes while
the files load.
2. Click Next and follow the onscreen
instructions.
3. When prompted, connect one end of the
USB cable to the USB port on the back of
the printer, and connect the other end to the
USB port on your computer.
4. Follow the onscreen instructions until the
installation is finished and your computer
restarts.
1. Connect one end of the USB cable to the
USB port on the back of the printer, and
connect the other end to the USB port on
your computer.
2. Insert the HP Photosmart CD into your
computer's CD-ROM drive.
3. On your desktop, double-click the
HP Photosmart CD icon.
4. Double-click the HP Installer icon, and
follow the instructions on each installation
screen to install the printer software.
5. When the Congratulations screen appears,
click OK.
3 Troubleshooting and Support
Print a photo 9

Chapter 3
The HP Photosmart A520 series printer is designed to be reliable and easy to use. This
section answers frequently asked questions about using the printer and printing without
a computer.
NOTE: Before contacting HP support, read this section for troubleshooting tips or
go to the online support services at
Printing and hardware issues
www.hp.com/support.
English
The Attention light is flashing.
Cause: A printer error has occurred. Try the following solutions.
Solution:
• Check the printer screen for instructions. If you have a digital camera connected
to the printer, check the camera screen for instructions. If the printer is connected
to a computer, check the computer monitor for instructions.
• Turn off the printer.
• If the light continues to flash, go to
The printer is plugged in, but it will not turn on.
Solution:
• The printer may be plugged into a power strip that is turned off. Turn on the power
strip, and then turn on the printer.
• The printer may be plugged into an incompatible power source. If you are traveling
abroad, make certain the power source in the country/region you are visiting
complies with the power requirements and power cord of the printer.
• Check that the power adapter is functioning properly. To check the power adapter:
• Make sure the power adapter is connected to your printer and a compatible
power source.
• Press and hold down the Power button on the printer. If the Power button
lights up, then the power cord is working properly. If it fails to light, go to
www.hp.com/support or contact HP support.
www.hp.com/support or contact HP support.
The paper does not feed into the printer correctly, or the image printed offcenter.
Solution:
• The paper may not be loaded correctly. Reload the paper, making sure that the
paper is correctly oriented in the input tray and that the paper-width guide fits
close to the edge of the paper. For paper-loading instructions, see “
on page 7.
• The print cartridge may need to be aligned. For more information, see the
onscreen Help.
• The printer may need attention. Read the printer screen for instructions.
10 HP Photosmart A520 series
Load paper”

• The power may be off or there may be a loose connection. Make sure that the
power is on and the power cord is securely connected.
• The paper may have jammed while printing. See the following section for
instructions on clearing a paper jam.
The paper jammed while printing.
Solution: Try the following steps to clear the paper jam:
1. Turn off the printer, and then unplug it from the power source.
2. Pull out any paper that is jammed in the printer.
3. Remove any wrinkled or torn paper from the input tray or output tray. Load new
paper in the input tray.
4. Plug the printer back in, and turn it on. Try printing your document again.
Print quality is poor.
Solution:
• The print cartridge may be running out of ink. Check the ink-level icon on the
printer screen, and replace the cartridge if necessary. For more information, see
“
Insert or replace the print cartridge” on page 11.
• The print cartridge may need to be cleaned or aligned. These tasks can be
performed from the Printer menu. For more information on using the Printer menu,
see “
Printer menu” on page 7.
• Reduce the size of the image and try printing again. For better results in the future,
set the digital camera to a higher photo resolution.
• Make sure you are using the right type of photo paper for the project. For more
information, see “
• Make sure the print quality setting is set to the Best quality and that you have
selected the correct paper type. For more information, see the onscreen Help.
• Your photos are instantly dry, and can be handled immediately after they are
printed. However, HP recommends that you leave the printed surface of your
photos exposed to the air for 3 minutes after printing, to allow the colors to fully
develop before you stack them with other photos or place them in albums.
Load paper” on page 7.
English
Insert or replace the print cartridge
Use the HP 110 Tri-color Inkjet print cartridge to print black-and-white and color photos.
HP Vivera Inks deliver true-to-life photo quality and exceptional fade resistance, resulting
in vivid colors that last. HP Vivera Inks are specially formulated and scientifically tested
for quality, purity, and fade resistance.
CAUTION: Check that you are using the correct print cartridges. Also, note that HP
does not recommend modifying or refilling HP cartridges. Damage that results from
modifying or refilling HP cartridges is not covered by the HP warranty.
For best print quality, HP recommends that you install all retail print cartridges before the
date stamped on the box.
Insert or replace the print cartridge 11

English
Chapter 3
NOTE: Ink from the cartridges is used in the printing process in a number of different
ways, including in the initialization process, which prepares the device and cartridges
for printing, and in printhead servicing, which keeps print nozzles clear and ink flowing
smoothly. In addition, some residual ink is left in the cartridge after it is used. For more
information see
To insert or replace a print cartridge
1. Make sure the power is on and you have removed the cardboard from inside the
printer.
2. Open the print cartridge door of the printer.
3. Remove the bright pink tape from the cartridge.
NOTE: Do not touch the copper-colored contacts on the print cartridge.
4. If you are replacing a cartridge, push down and pull outward on the cartridge in the
cradle to remove it.
5. Hold the replacement cartridge with the label on top. Slide the cartridge at a slight
upward angle into the cradle so the copper-colored contacts go in first. Push the
cartridge until it snaps into place.
6. Close the print cartridge door.
The printer starts print cartridge alignment. See the onscreen Help for more
information.
Recycle the old cartridge. The HP Inkjet Supplies Recycling Program is available in
many countries/regions and lets you recycle used print cartridges free of charge. For
more information, go to
inkjet.html.
www.hp.com/go/inkusage.
www.hp.com/hpinfo/globalcitizenship/environment/recycle/
Support process
If you have a problem, follow these steps:
1. Check the documentation that came with the HP Photosmart.
2. Visit the HP online support Web site at
available to all HP customers. It is the fastest source for up-to-date device information
and expert assistance and includes the following features:
• Fast access to qualified online support specialists
• Software and driver updates for the HP Photosmart
• Valuable HP Photosmart and troubleshooting information for common problems
• Proactive device updates, support alerts, and HP newsgrams that are available
when you register the HP Photosmart
3. For Europe only: Contact your local point of purchase. If the HP Photosmart has a
hardware failure, you will be asked to bring it back to your local point of purchase.
(Service is provided at no charge during the device limited warranty period. After the
warranty period, you will be quoted a service charge.)
4. Call HP support. Support options and availability vary by device, country/region, and
language.
For a list of support phone numbers, see the phone number list on the inside of the
back cover.
12 HP Photosmart A520 series
www.hp.com/support. HP online support is

Regulatory model identification number SDGOA-0701
For regulatory identification purposes, the product is assigned a Regulatory Model
Number. The Regulatory Model Number for the product is SDGOA-0701. This regulatory
number should not be confused with the marketing name (HP Photosmart A520 series)
or product number (Q8526A).
Environmental statements
For Environmental Stewardship information, see the onscreen Help.
Find more information
Your new HP Photosmart A520 series printer comes with the following documentation:
• Setup Guide: The setup instructions explain how to set up the printer, install the HP
Photosmart software, and print a photo. Read this document first.
• Basics Guide: This is the book you are reading.
• Onscreen Help: The onscreen Help describes how to use the printer with or without
a computer and contains troubleshooting information.
After you have installed the HP Photosmart software on your computer, you can view the
onscreen Help on your computer:
• Windows PC: From the Start menu, select Programs (in Windows XP or Vista, select
All Programs) > HP > HP Photosmart A520 series > Photosmart Help.
• Mac: Select Help > Mac Help in the Finder, then select Library > HP Product
Help.
Printer specifications
For a complete list of specifications, see the onscreen Help. For information on accessing
the onscreen Help, see “
Operating System
Microsoft
Mac
Environmental Specifications
Maximum during operation: 5–40° C (41–104° F), 5–90% RH
Recommended during operation: 15–35 ° C (59–95° F), 20–80% RH
Power Consumption
U.S.
Printing: 14.46 W
Idle: 8.67 W
Off: 6.63 W
International
Printing: 13.56 W
Idle: 8.41 W
Off: 7.19 W
®
Windows XP Home, XP Professional, x64 Edition, or Vista
®
OS X 10.3x, 10.4x
English
Find more information” on page 13.
Regulatory model identification number SDGOA-0701 13
 Loading...