

Page 1

Quick Start Guide
Page 2

The information in this document is subject to change
without notice.
®
Hewlett-Packard
Company makes no warranty of any kind with
regard to this material, including, but not limited to, the implied
warranties of merchantability and fitness for a particular purpose.
HP shall not be liable for errors contained herein or for incidental
or consequential damages in connection with the furnishing,
performance, or use of this material.
HP assumes no responsibility for the use or reliability of its software
on equipment that is not furnished by HP.
This document contains proprietary information that is protected by
copyright. All rights are reserved. No part of this document may be
photocopied, reproduced, or translated to another language
without the prior written consent of HP.
Hewlett-Packard Company
Home Products Division
P.O. Box 4010
Cupertino, CA 95015-4010
USA
© Hewlett-Packard Company, 2002. All rights reserved.
Hewlett-Packard is a registered trademark of Hewlett-Packard
Company in the United States of America and other
countries/regions.
This product incorporates copyright protection technology that
is protected by method claims of certain U.S. patents and other
intellectual property rights owned by Macrovision Corporation and
other rights owners. Use of this copyright protection technology
must be authorized by Macrovision Corporation, and is intended
for home and other limited viewing uses only unless otherwise
authorized by Macrovision Corporation. Reverse engineering
or disassembly is prohibited. Apparatus Claims of U.S. Patent
Nos. 4,631,603, 4,577,216, 4,819,098, and 4,907,093
licensed for limited viewing uses only.
Other brand or product names are trademarks of their respective
holders.
Page 3
Start Here
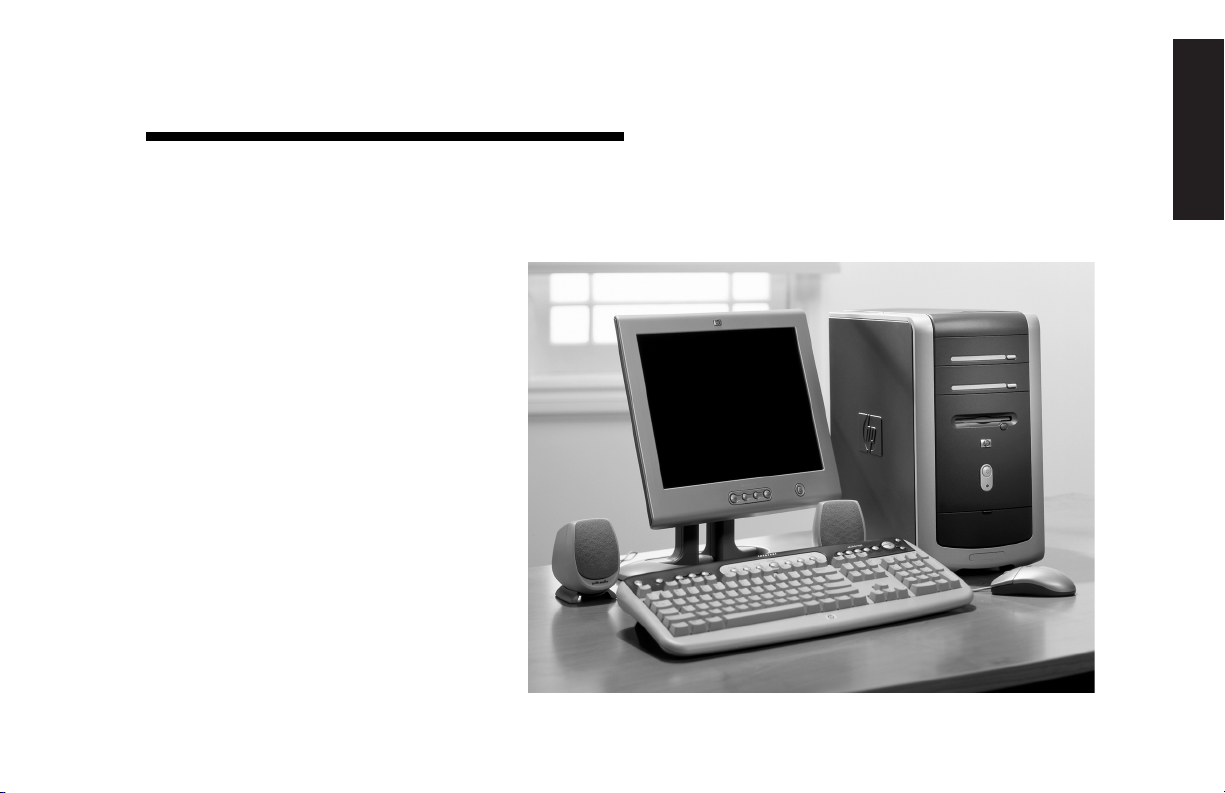
Welcome
Thank you for becoming a member
of the HP Pavilion home PC family.
This “Start Here” section is an
overview of some of the added
software features and tools
available on your HP Pavilion. The
rest of this
you information on how to use your
computer. With this guide, you can
use your computer with confidence.
Note:
computer may not match the
screens pictured on these pages.
Quick Start Guide
The screens on your
gives
Start Here
Quick Start Guide
iii
Page 4
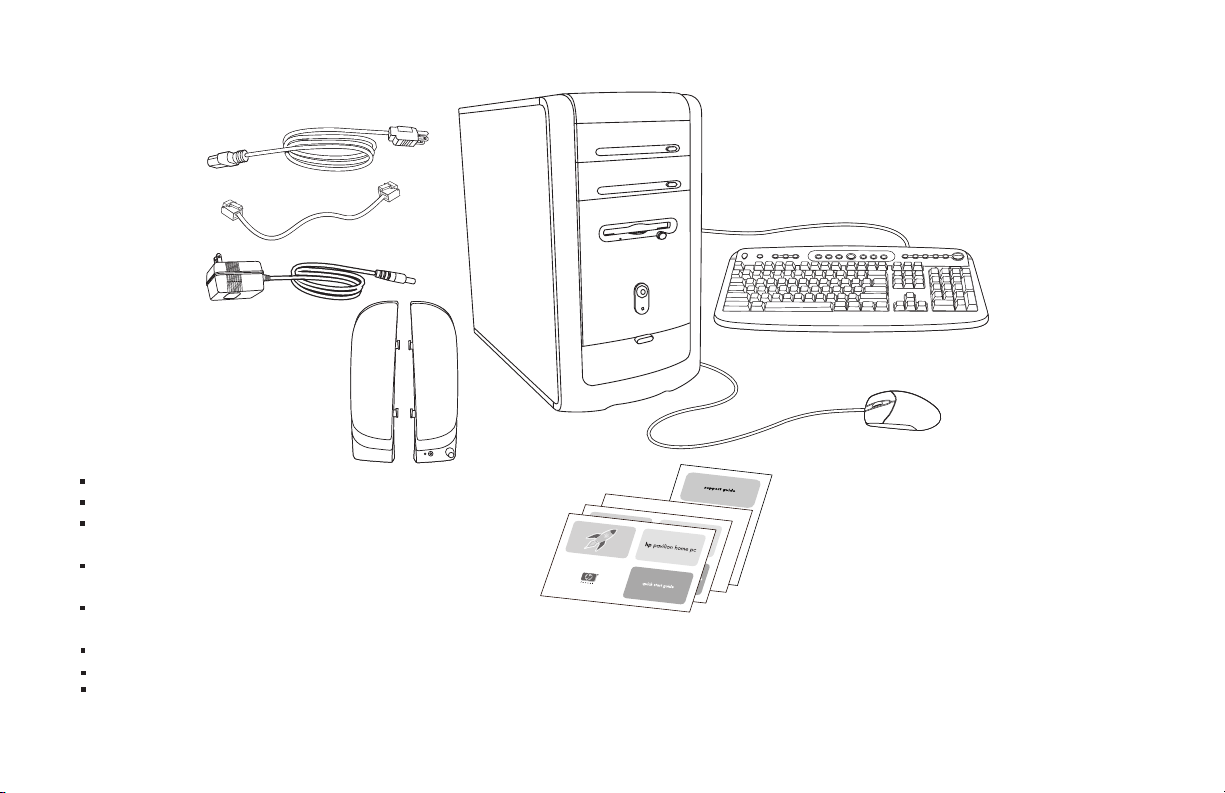
Inventory Checklist
Power cord
Modem cable
Transformer
(powered speakers only)
Speakers
The documentation includes:
Setup poster
Quick Start Guide
This
Support Guide,
warranty, license, regulatory, and safety information
Upgrading and Servicing the PC
(select models installed on PC, or in print)
Read first, addenda, or other
documents if applicable
HP DVD Writer
Microsoft Windows XP Home Edition Start Here
My HP Pavilion home PC
containing support,
guide
guide (select models)
brochure (select models)
guide
PC
Documentation
Note:
Your contents may vary.
Keyboard
Mouse
iv
HP Pavilion home PC
Page 5
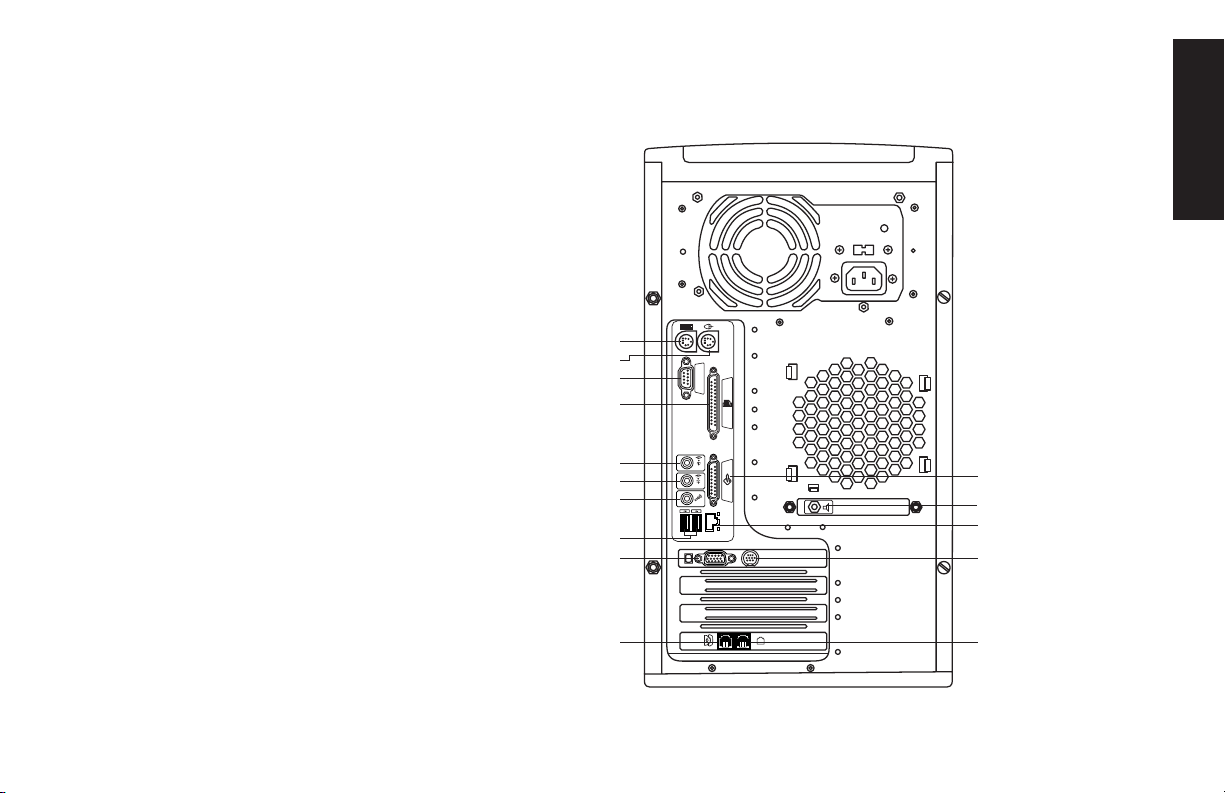
PC Back
Connect your keyboard, mouse,
monitor, and modem as described
in the setup poster. Turn on the
computer for the first time and finish
the registration process. Then, add a
printer or other device, or install any
software programs that came on
CDs or DVDs included in the
computer box (select models only).
Your computer may look different
from the one shown here.
Component, connector location,
type, and number vary by model.
PS/2 keyboard
PS/2 mouse
Serial
Parallel
Audio Out
Audio In
Microphone
USB
Monitor
Start Here
SERIAL
ETHERNET
SERIAL
Joystick
Speaker out
Ethernet
TV out
OUT
IN
Telephone
Modem
Quick Start Guide
v
Page 6

PC Front
Your computer may look different
from the one shown here.
Component, connector location,
type, and number vary by model.
Lower front cover opened
to show connectors
CD storage
cd-rom or hp cd-writer drive
dvd-rom or hp dvd writer drive
Diskette drive
On button
SERIAL
USBIEEE 1394
Serial
vi
HP Pavilion home PC
Page 7
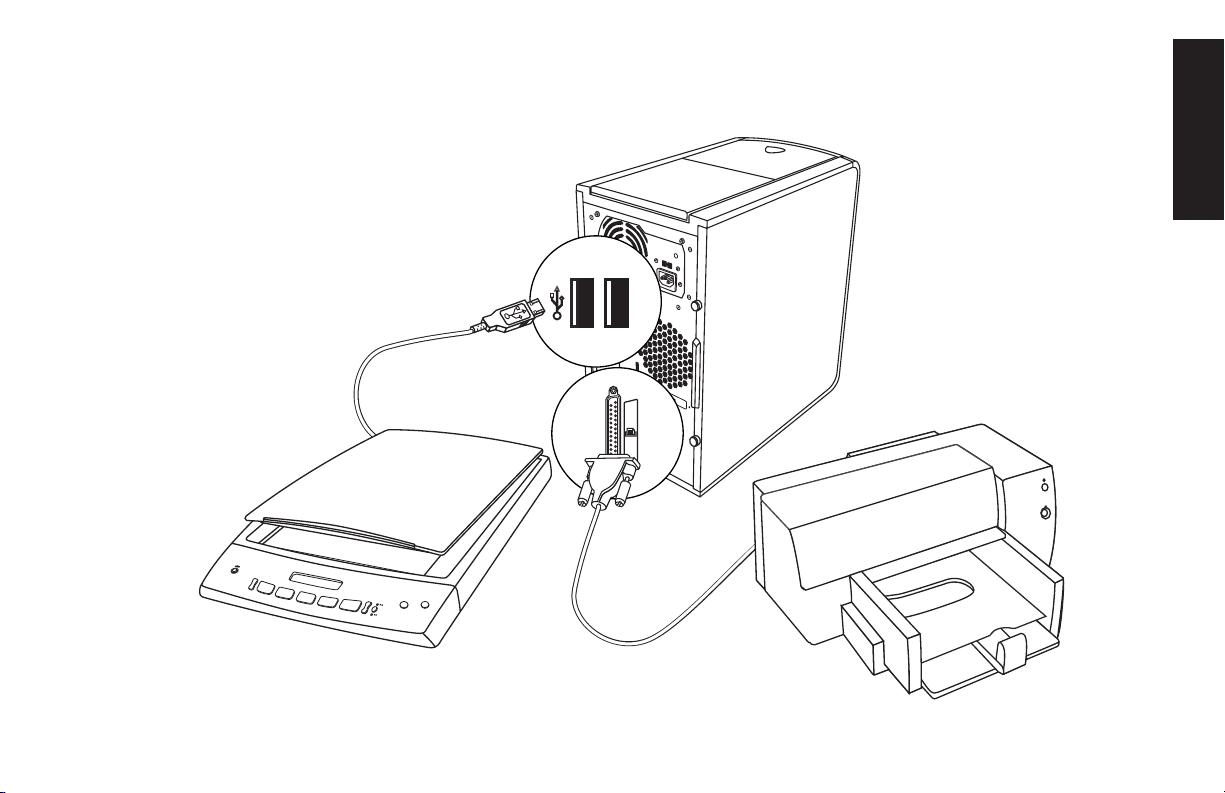
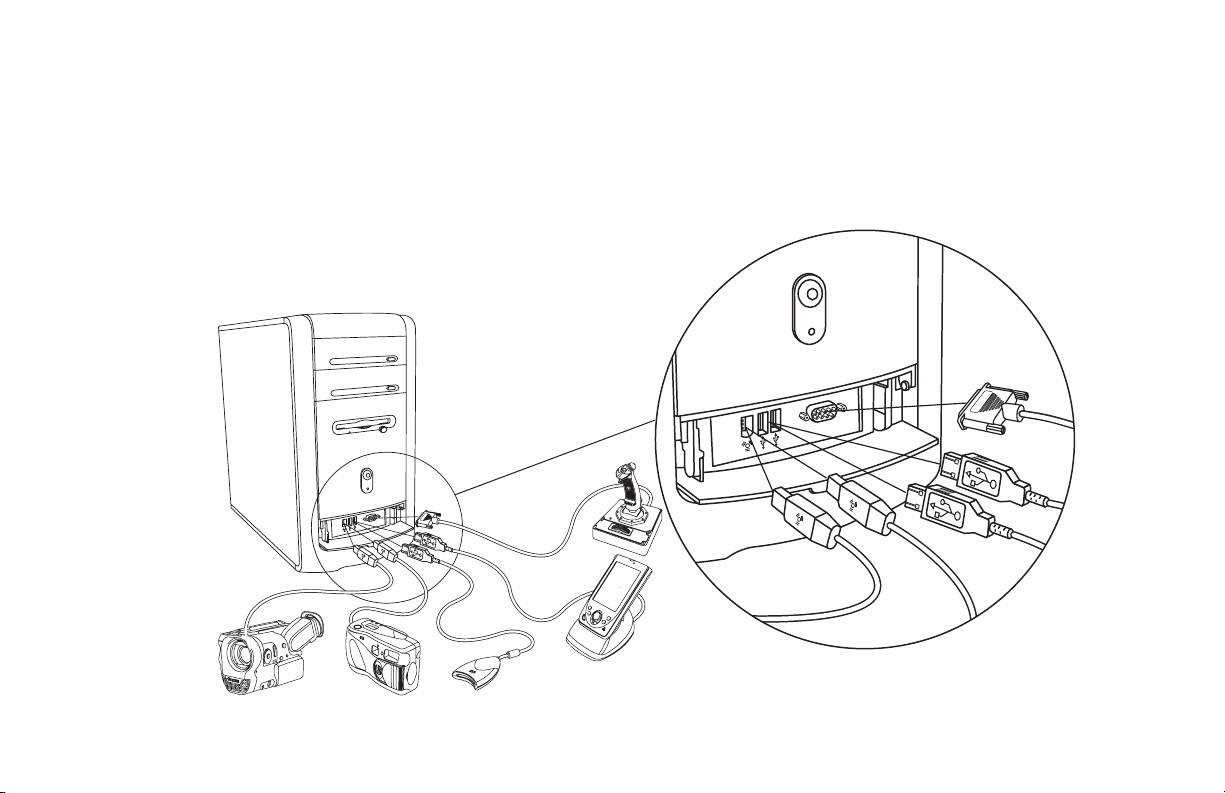
PC Back Connections
Your computer may look
different from the one shown
here. External components
shown in the following
figure are not included with
the PC. Back connector
location, type, and number
vary by model.
Note:
Before using your components,
you may need to install the
software that came with the
component.
Start Here
Quick Start Guide
vii
Page 8
PC Front Connections
Serial
Your computer may look
different from the one shown
here. External components
shown in the following
figure are not included with
the PC. Front connector
location, type, and number
vary by model.
Note:
Serial
Before using your components,
you may need to install the
software that came with the
component.
viii
HP Pavilion home PC
Page 9
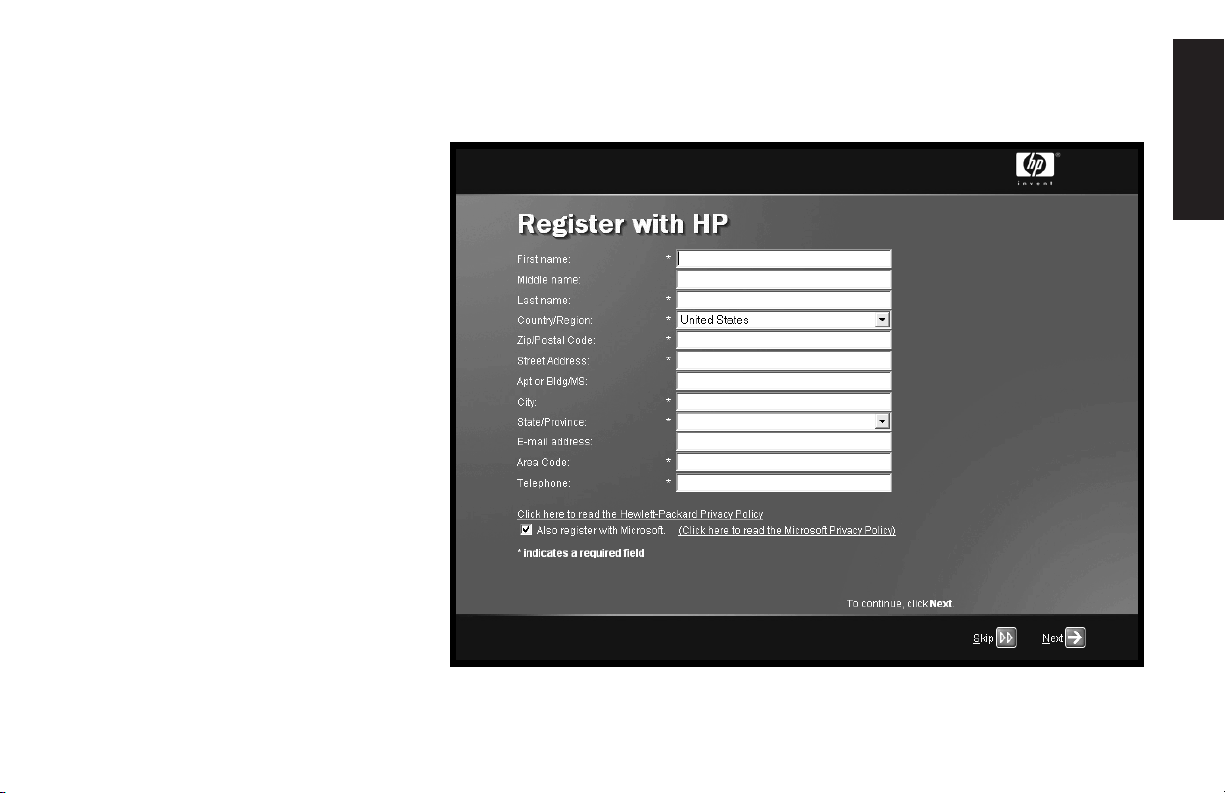
Register with HP
Register your HP Pavilion
home PC with Hewlett-Packard
so HP can assist you with your
technical support needs.
Start Here
Quick Start Guide
ix
Page 10
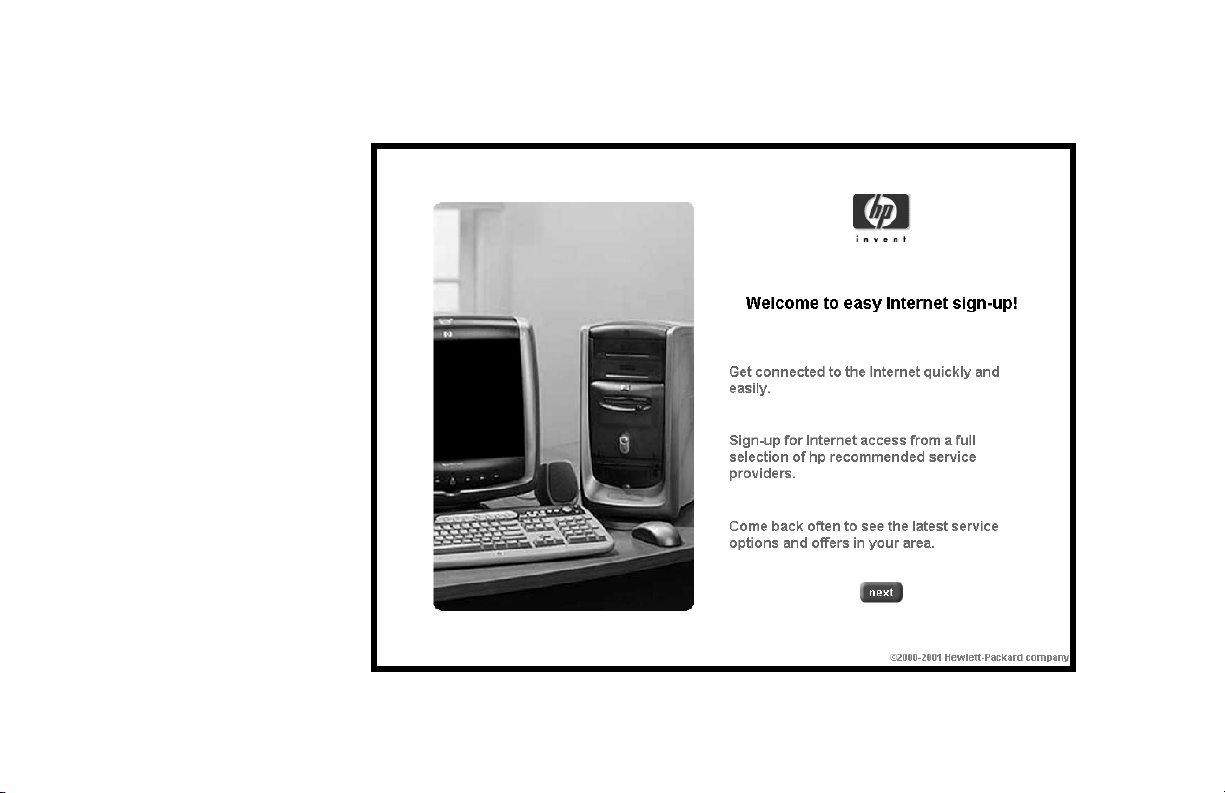
Internet
Click Start, choose
All Programs, and then click
Easy Internet Sign-up for
a simple step-by-step wizard
to guide you through setup for
the Internet and e-mail.
For information about modem
setup, the Internet, and e-mail,
see the related chapters inside
this guide. You can also find
helpful information by clicking
Start, Help and Support,
and then My HP Pavilion PC.
x
HP Pavilion home PC
Page 11
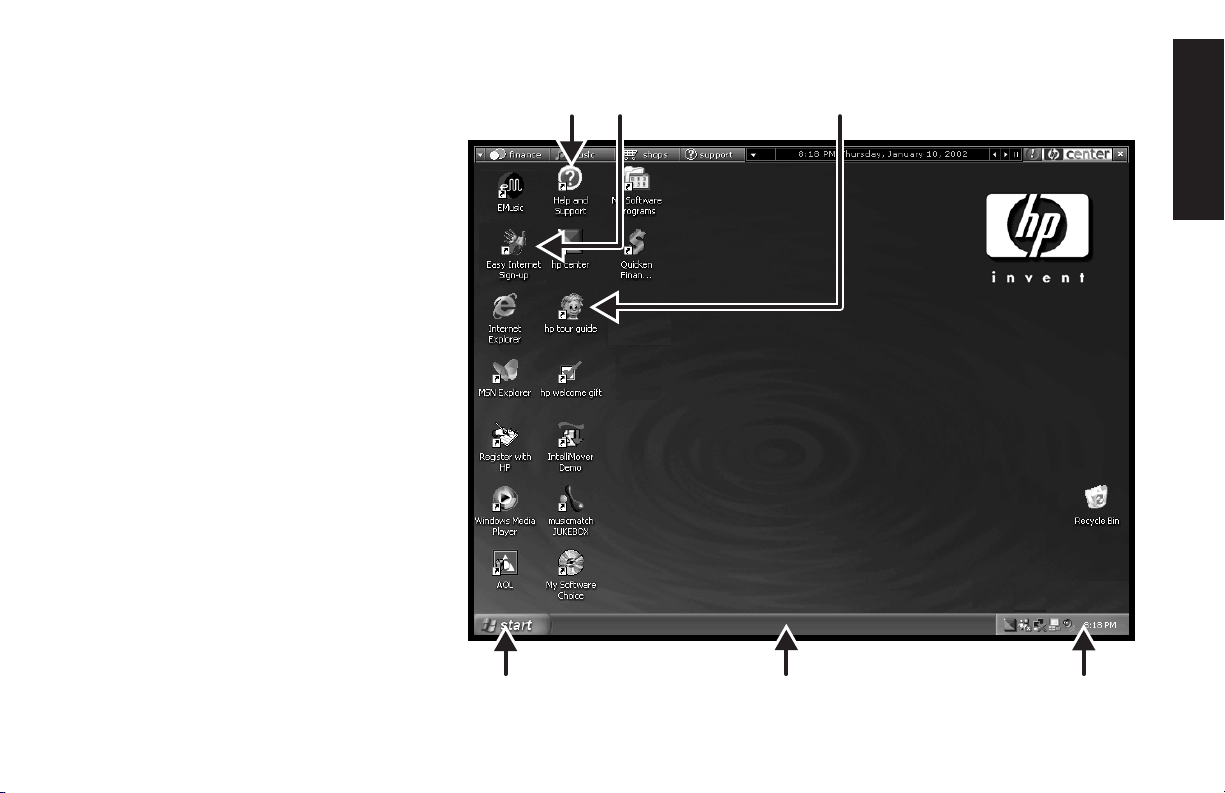
HP Desktop
The HP desktop has
shortcut icons that make it
easy to find the things you
need. Click the icon to
find out more information
about that program.
The screen on your
Note:
computer may not match
the screen pictured here.
Help and Support
Easy Internet Sign-up
HP Tour Guide
Start Here
Start button
Taskbar
System tray
Quick Start Guide
xi
Page 12
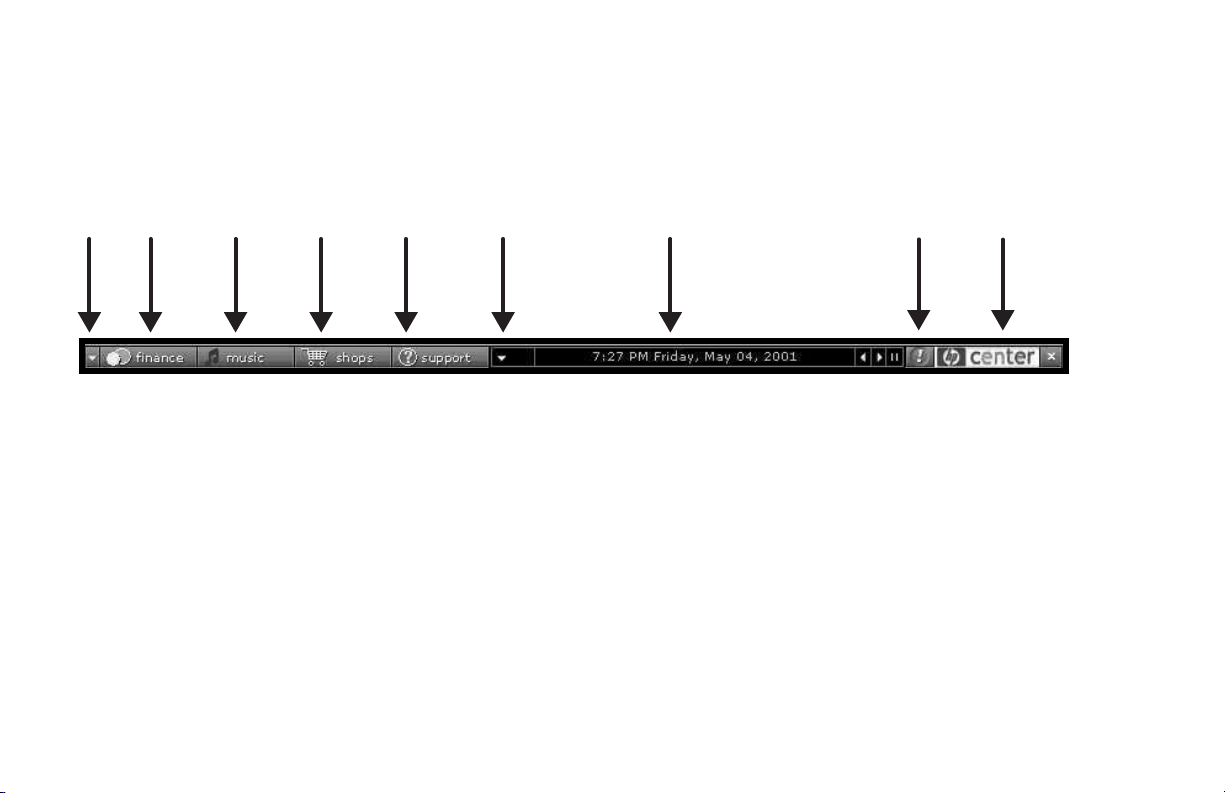
HP Center
Find the
latest music
software
and
services
See
more
buttons
Manage
your
personal
finances
Click Start, choose
All Programs, hp center,
and then click hp center
again. Get the latest support
updates and receive great
Internet deals on shopping,
personal finance, music,
and entertainment.
Get great
offers
from HP
and HP
partners
Find help
and
support
when you
need it
Customize ticker
View ticker
display
Alerts
you
to new
messages
Get
hp center
help
xii
HP Pavilion home PC
Page 13
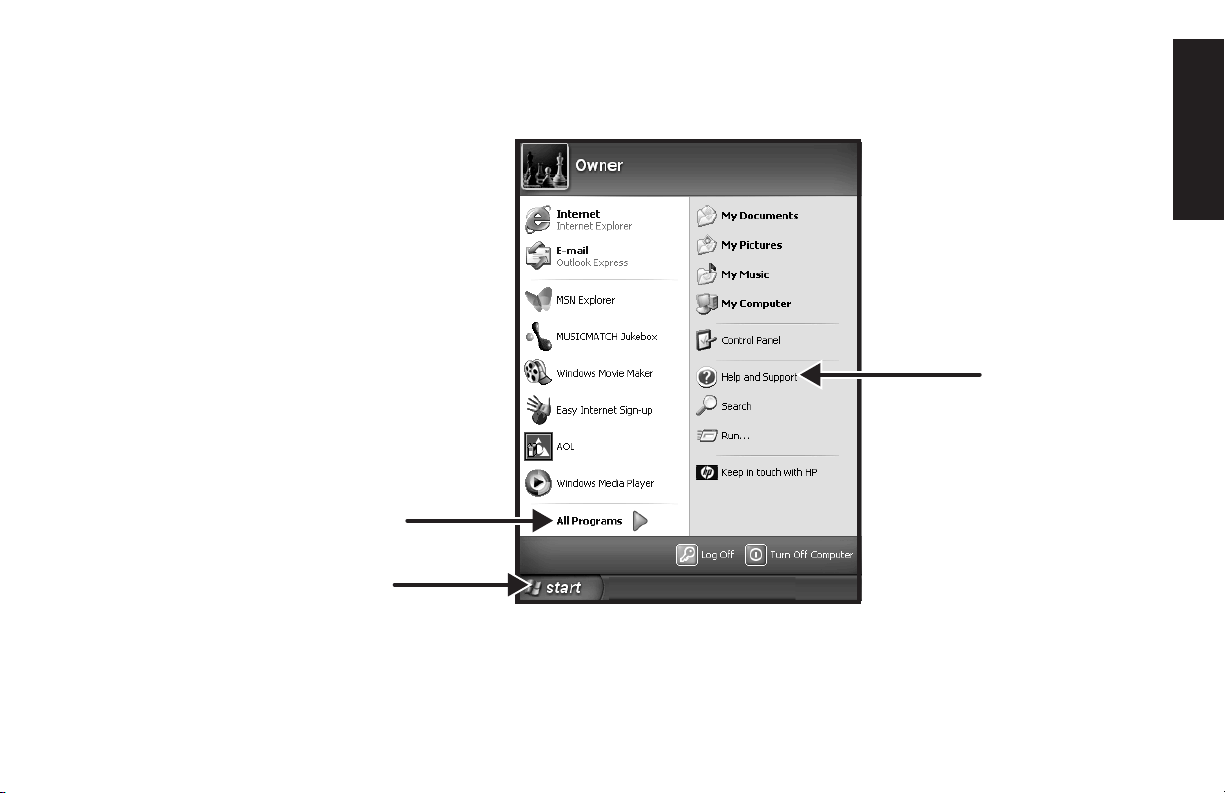
Start Menu
Click the Start button to
view the Start menu, the entry
point to everything on your
computer. Look at the following
pages to learn about important
software programs and tools
available to you.
Choose All Programs and
then choose Hewlett-Packard
to find HP-specific software.
All Programs
Start button
Note:
The screen on your computer may
not match the screen pictured here.
Start Here
Help and Support
Quick Start Guide
xiii
Page 14
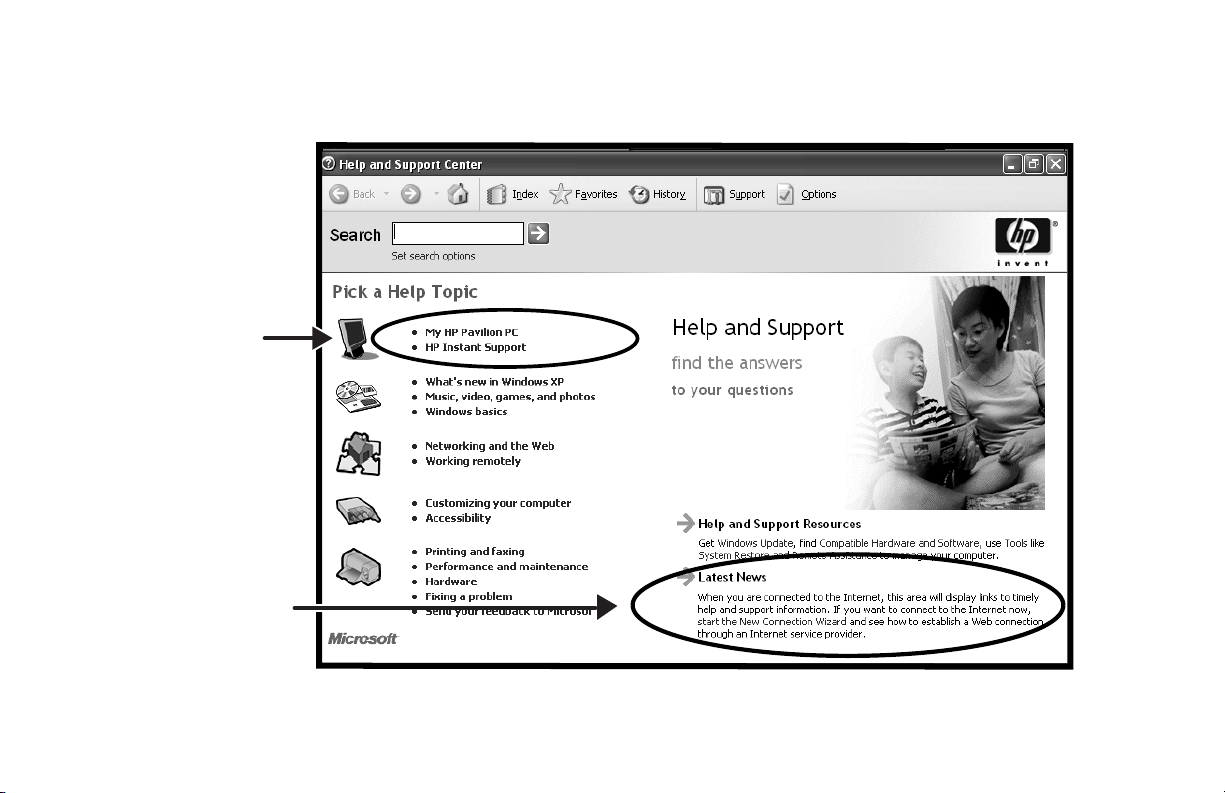
Help and Support
Click Start and then
Help and Support to
learn about your computer
and get your questions
answered.
HP Pavilion
information
and support
Help and
support news
xiv
HP Pavilion home PC
Page 15
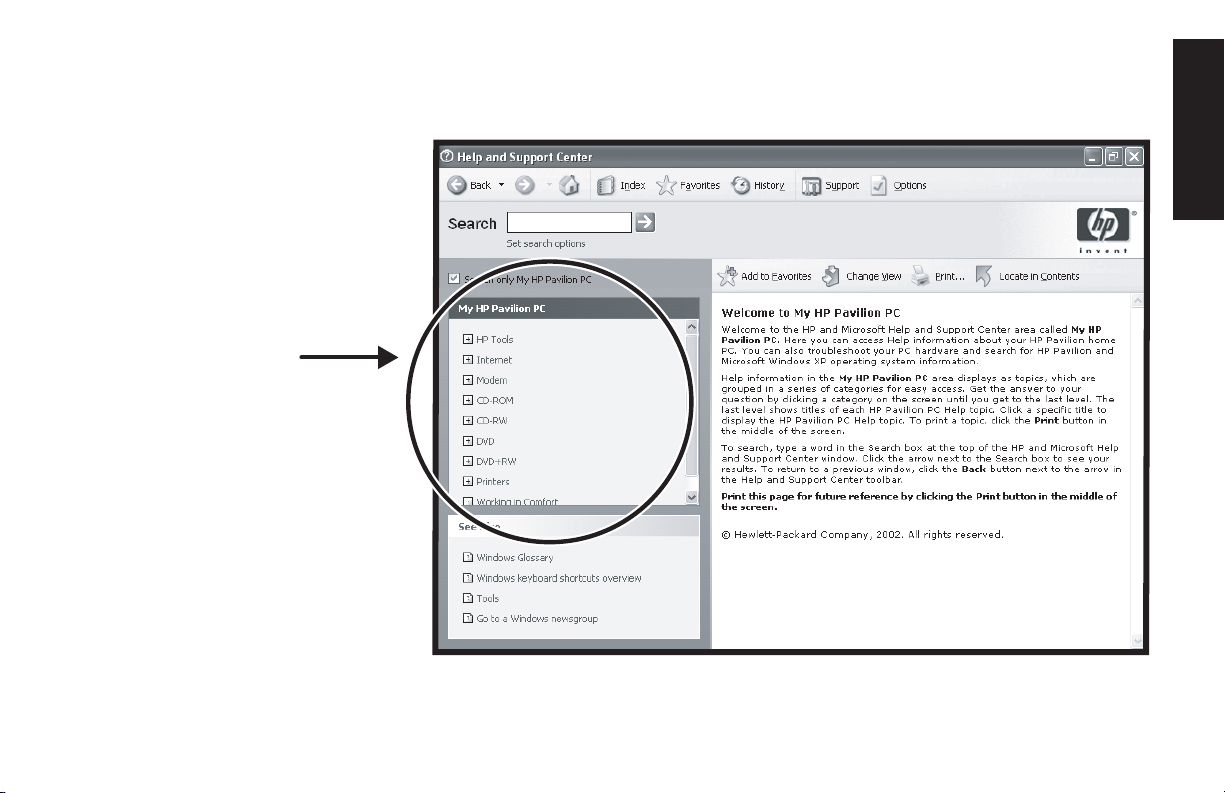
My HP Pavilion PC
Learn how
to use your
HP Pavilion
home PC
Click Start, Help and
Support, and then My
HP Pavilion PC for
detailed instructions and
information about your
HP Pavilion.
Start Here
Quick Start Guide
xv
Page 16
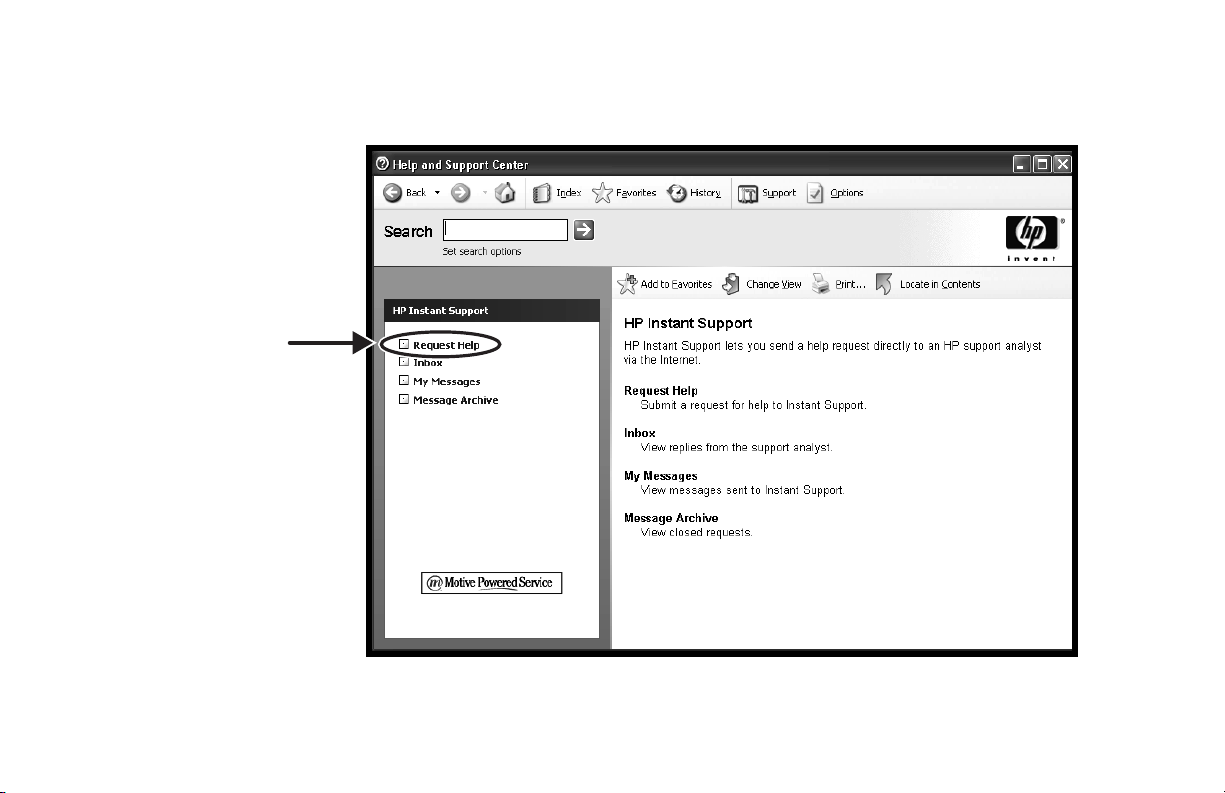
HP Instant Support
Send a help request
Click Start, Help and
Support, and then
HP Instant Support.
Run tests yourself, or contact
an HP Support analyst for
help over the Internet.
xvi
HP Pavilion home PC
Note:
HP Instant Support is not available in all models.
Page 17
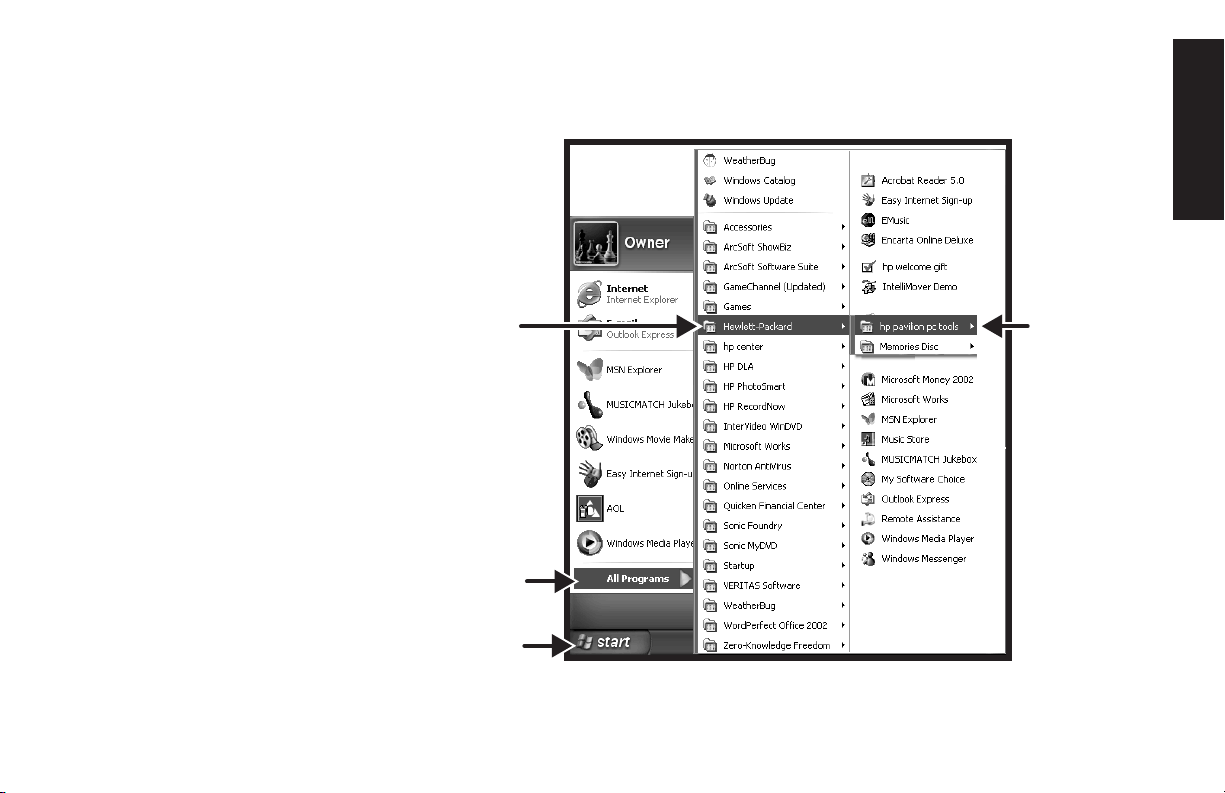
All Programs
Click Start and then choose
All Programs to find all
the software programs on
your computer. Choose
Hewlett-Packard, and then
click hp pavilion pc tools
to find HP drivers and the
HP Tour Guide.
Hewlett-Packard
All Programs
t button
Star
Note:
The screen on your computer may not match the
screen pictured here.
Start Here
hp pavilion
pc tools
Quick Start Guide
xvii
Page 18

HP Tour Guide
Click Start, choose
All Programs,
Hewlett-Packard, click
hp pavilion pc tools, and
then click hp tour guide.
Or
Click the icon on the desktop
(select models).
Let the HP Tour Guide show
you the desktop and the basics
of the Internet and e-mail.
xviii
HP Pavilion home PC
Page 19
Your HP Pavilion home PC Support Guide
You can get help over the
telephone from HP.
See the
included with the computer
documentation for the terms
of your HP Pavilion warranty
coverage, for license
information, and for support
telephone numbers and
addresses.
The
operating specifications for the
PC along with regulatory and
safety information.
Support Guide
Support Guide
contains
hp pavilion home pc
support guide
where to get help
ü
ü
warranty and license information
ü
ü
declaration of conformity
ü
ü
operating specifications
ü
ü
regulatory and safety information
ü
ü
Note:
Start Here
Your document contents may vary.
Quick Start Guide
xix
Page 20
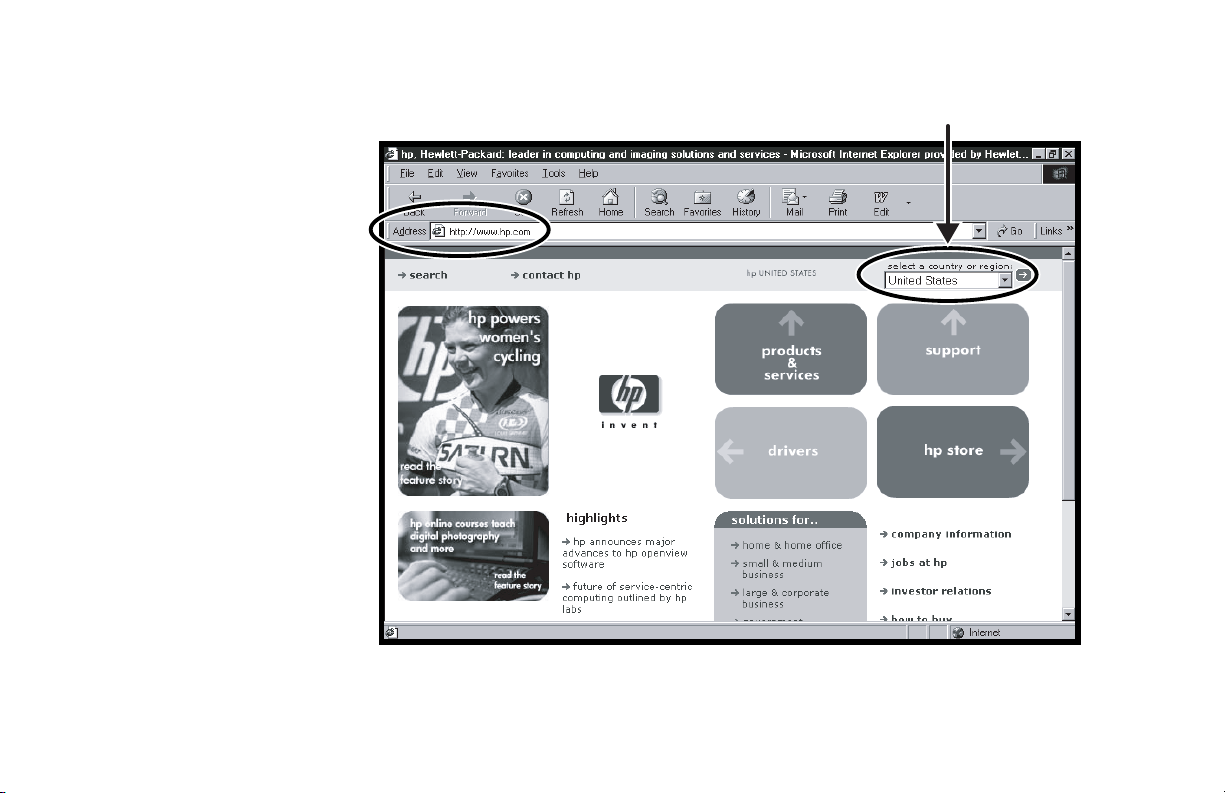
HP Web Sites
Type these Web site addresses
into the Address box of your
Internet browser, and then press
the Enter key on your keyboard
to find helpful information from
HP online.
www.hp.com
Go to HP’s main Web site for the
latest information about your
HP Pavilion home PC and all your
HP products. Receive technical
support, download software
updates, and find out about HP’s
home and business services.
www.hp.com/cposupport/
loc/regional.html
Use this worldwide direct link to
HP’s Customer Care Web site for
all your technical support needs.
www.myhpclub.com
Go to My HP Club Web site
for new HP Pavilion owner
information, tips and tricks,
activities, special deals, sneak
previews, and more.
Select your country/region
xx
HP Pavilion home PC
Page 21

Microsoft Windows XP Operating System
For questions about the Microsoft® Windows® XP operating
system, try these sources of information:
Help and Support, for onscreen help and
troubleshooting — click Start and then
Help and Support.
Start Here
Microsoft Windows
included with the computer documentation packet.
XP Home Edition Start Here
guide,
Quick Start Guide
xxi
Page 22

Recovery System and Hard Drive Space
HP Pavilion home PCs with Windows XP feature a
“recovery” partition included on the hard drive, thus
eliminating the need for recovery CDs that may get lost or
damaged. The recovery process from the hard drive (either
application or operating system) offers the following
advantages:
Selective: Ensures that the recovery data is matched to
the particular HP Pavilion home PC model. You can easily
recover only the application or system software you need.
Non-destructive: By recovering only the software you
need, you preserve user data and files.
Fast: Recovering only the necessary software
components, the recovery process is shorter and faster
from the hard drive.
Instructions for using system recovery and application
recovery are in your
section “Using Application Recovery and System
Recovery.” For information on viewing the space used by
the recovery partition on the hard drive, as well as steps
for deleting undesired software titles, refer to the section
“Freeing Up Space on Your Hard Disk Drive.”
In the event of a warranty hard drive failure, standard
warranty terms apply: a new “imaged” hard drive or
replacement PC that includes the Windows XP operating
system and the recovery partition, as well as all
pre-loaded software programs.
Quick Start Guide
; refer to the
xxii
HP Pavilion home PC
Page 23

Recovery CDs
Consumers who wish to have recovery CDs may purchase
those CDs for a minimal shipping and handling charge.
Based on HP’s contractual agreements with its software
partners, there are three approved scenarios in which
customers may wish to order Recovery CDs from HP:
The original hard drive has failed and the customer
does not want an imaged hard drive from HP (for
example, out-of-warranty).
The original hard drive has been replaced by a larger
capacity hard drive.
The original hard drive has been reformatted or
re-partitioned.
Important: This recovery CD set is a complete image of
the original HP Pavilion home PC hard drive contents and is
matched to your model number. When using the recovery
CDs to recover the hard drive, any files or software that you
created, saved, or installed on the computer will be
overwritten. Therefore, please remember to back up your
files prior to using your recovery CDs.
To order recovery CDs, contact the
HP Customer Care Center at 208-323-2551.
Start Here
Quick Start Guide
xxiii
Page 24

xxiv
HP Pavilion home PC
Page 25

Contents
Start Here ........................................... iii
Introducing the Quick Start Guide......... 1
Safety Information................................................. 1
Using the Quick Start Guide .................................. 3
Finding Additional Information ............................... 4
Setting Up the Computer ......................5
Turning On the Computer for the First Time .............. 5
Registering with HP............................................... 6
Getting Help ........................................................ 7
Protecting the PC .................................................. 7
Working in Comfort .............................................. 8
Using the Computer ............................. 9
Introducing the Basics ........................................... 9
Windows Operating System .............................. 9
Start Menu ....................................................... 9
HP Center ...................................................... 10
Help and Support ........................................... 11
Using the Mouse ................................................ 12
The Scroll Feature ........................................... 13
The Autoscroll Feature ..................................... 14
The Panning Feature ....................................... 14
Using the Keyboard............................................ 15
Introduction.................................................... 15
Features ........................................................ 18
Buttons .......................................................... 19
Button Configuration ....................................... 22
Adjusting Speaker Volume ................................... 23
Using a Microphone ........................................... 24
Adjusting Microphone Volume.......................... 25
Turning Off the Computer .................................... 26
Putting the Computer into Standby and
Hibernation Mode .............................................. 27
Standby Mode ............................................... 27
Hibernation Mode .......................................... 28
Automatic Standby or Hibernation Mode .......... 29
Quick Start Guide
xxv
Contents
Page 26

Setting Up and Using the Internet .......31
Introducing the Internet........................................ 31
What Is the Internet? ....................................... 31
What Is an ISP?.............................................. 32
What Is the World Wide Web? ........................ 32
What Is a URL? .............................................. 32
What Is an E-Mail Address?............................. 33
How Do I Search the Internet?.......................... 33
Setting Up the Modem ........................................ 34
Setting Up the Network Interface Adapter ............. 36
Setting Up Your Internet Account .......................... 39
Signing Up with an ISP Using
Easy Internet Sign-up....................................... 39
Connecting to the Internet.................................... 40
Using ISP-Provided Browser ............................. 40
Using Any Browser ......................................... 41
Visiting the Hewlett-Packard Web Site ................... 41
Viewing Online Manuals................................. 43
Sending and Receiving E-Mail ............................. 44
If the ISP Provides the Browser.......................... 44
If Using Outlook Express.................................. 45
Doing Common Tasks......................... 47
Inserting a CD or DVD .........................................47
Removing a CD or DVD .......................................48
Handling CDs.....................................................49
Playing Music CDs ..............................................49
Using MusicMatch Jukebox ..............................49
Using Windows Media Player ..........................51
Using the hp cd-writer Drive .................................52
Playing DVD Movies............................................53
Playing a DVD ................................................53
Viewing Help Information.................................54
Understanding DVD Terminology.......................55
Using the WinDVD Control Panel ......................55
Using Country/Region Codes ...........................56
Using the Combo Drive........................................57
Using the hp dvd writer Drive ...............................58
Playing VCD.......................................................58
Connecting External Components to
Your Computer....................................................59
Using HP Pavilion PC Tools ...................................64
xxvi
HP Pavilion home PC
Page 27

Getting HP Updates for the PC............ 65
Informing You of Changes.................................... 65
Using HP Center for Updates from HP Messages .... 65
Starting HP Center .......................................... 66
Turning Off the HP Center Service .................... 67
Re-enabling the HP Center Service.................... 68
Resolving Problems............................ 69
Troubleshooting.................................................. 69
Using Application Recovery and
System Recovery................................................. 75
System Restore ............................................... 75
Application Recovery ...................................... 75
System Recovery............................................. 76
Freeing Up Space on Your Hard Disk Drive............ 78
Displaying Hard Disk Space ............................ 79
Increasing Available Hard Disk Space............... 79
Reinstalling Programs ...................................... 80
Index................................................. 81
Contents
Quick Start Guide
xxvii
Page 28

xxviii
HP Pavilion home PC
Page 29

Introducing the Quick Start Guide
Safety Information
This product has not been evaluated for connection to an
“IT” power system (an AC distribution system with no direct
connection to earth, according to IEC 60950).
AC Power Safety Warning
Warning:
an AC outlet. The AC power cord is your
HP Pavilion PC’s main AC disconnecting
device and must be easily accessible at
all times. For your safety, the power
cord provided with your system has a
grounded plug. Always use the power
cord with a properly grounded wall
outlet to avoid the risk of electrical shock.
Install the computer near
Warning:
of an electric shock from the telephone
network, plug your computer into the
AC outlet before connecting it to the
telephone line. Also, disconnect the
telephone line before unplugging your
computer from the AC power outlet.
Warning:
a voltage select switch for use in a 115
or 230 VAC power system. The voltage
select switch has been pre-set to the
correct voltage setting for use in the
particular country/region where it was
initially sold. Changing the voltage select
switch to the incorrect position can
damage your PC and void any implied
warranty.
To reduce the possibility
Your system is provided with
Quick Start Guide
Introduction
1
Page 30

Warning:
modem cord from the telephone system
before installing or removing your
computer cover.
Always disconnect the
2
Warning:
with the cover removed.
Warning:
user-serviceable. To prevent damage
to the power supply, have a qualified
person repair or replace it. All other
components are user-serviceable.
Warning:
can damage disk drives, add-in cards,
and other components. If an ESD station
is not available, wear a wrist strap
attached to a metal part of the computer.
Place cards on a conductive foam pad or
inside the card wrapper, if possible, but
never on the card wrapper.
HP Pavilion home PC
Do not operate the computer
The power supply is not
Electrostatic discharge (ESD)
Page 31

Using the Quick Start Guide
Thank you for purchasing the HP Pavilion
home PC. We’ve made it easy for you to start
using the PC right away. The setup poster shows
you how to connect your computer, and this
Quick Start Guide
from there.
Note:
Be sure you set up the computer near a telephone
line so that you can easily connect the modem for
Internet access.
will help you continue
This
Quick Start Guide
will help you learn
how to:
3
Turn the computer on and off correctly.
3
Set up an Internet account and connect to the
Internet.
3
Adjust the speaker volume.
3
Insert and remove a CD disc.
3
Use the CD-ROM, DVD-ROM, hp cd-writer, or
hp dvd writer drive to play music, watch
movies, or record information.
3
Use HP Pavilion PC Tools.
3
Save power with standby and
hibernation modes.
3
Solve common problems.
Introduction
Quick Start Guide
3
Page 32

Finding Additional
Information
Look in the computer box for printed information
that describes important details or updates
regarding your model PC.
You can find online guides and information for
your PC at the HP Customer Care Web site. To
find online manuals for your PC:
Type
1
http://www.hp.com/cposupport/eschome.html
You can find additional information about the PC
in the onscreen Help and Support Center, which
.
Start
, and then
is on the computer. Just click
Help and Support
click
You can find information about accessing
internal parts of the computer chassis in the
Upgrading and Servicing the PC
guide included
with your PC (select models installed on your
system, others printed). To view guides installed
on your PC, refer to “Using HP Pavilion PC
Tools” on page 64.
Note:
4
The procedures in the
guide require you to turn off the PC and
the PC
disconnect it from any Internet and network
connections, and from power. If the guide is
installed on your computer, be sure to print it
for future reference.
HP Pavilion home PC
Upgrading and Servicing
into your browser address box, and press the
Enter key on your keyboard.
In the QuickFind box, type your product name
2
or number (
Pavilion 712a
, for example). The
product number is on the lower front of the
PC chassis.
Click product support for your language
3
when the Results window appears.
Click manuals to see a list of manuals for
4
your PC.
Page 33

Setting Up the Computer
Follow the steps shown on the setup poster to set
up the computer in your work area. Then read
the topics in this section that describe how to
turn on the computer for the first time, and finish
the registration process.
After registering, install any software programs
that came on CDs or DVDs included in the
computer box (select models only).
Note:
When you have completed these steps, you
may add any printer, scanner, camera, or other
peripheral equipment you have for your system.
Refer to “Connecting External Components
to Your Computer” on page 59 for connector
information.
Some programs come preinstalled on the PC.
Before installing a program, check to see if it
already installed on your system.
Turning On the Computer
for the First Time
After you’ve completed connecting the
components of the HP Pavilion by using the steps
illustrated on the setup poster, you’re ready to
turn on the computer.
First, press the Power button on the monitor.
Then, to turn on the computer, press the On
button on the front of the PC.
Note:
The power supply is pre-set for the country/region
in which you purchased the HP Pavilion. If you
move to another country/region, please make
sure you check its voltage requirements before
plugging your PC into an AC power outlet.
Quick Start Guide
Setup
5
Page 34

Your computer may look different from the ones
shown here.
On button
When you first turn on the computer, a series
of startup screens appears. To proceed with the
®
initial Microsoft
Windows® setup, you must
answer a few questions.
Registering with HP
As part of the initial setup in some
countries/regions, you will be prompted to
register the computer with HP. It’s important to
register so that you can be notified of changes
and updates to the HP Pavilion. This information
also assists HP Customer Care if you ever need
to call for support.
We recommend that you register the HP Pavilion
at this time. You can register any of these ways:
3
When you first start up your computer, follow
the onscreen instructions and register as soon
as you have a modem connection.
3
Double-click the registration icon on your
desktop, and follow the onscreen instructions.
3
Go to the HP Web site, and register online at
http://register.hp.com
6
HP Pavilion home PC
Page 35

Getting Help
You can get help over the telephone from HP.
See the
computer documentation for the terms of your
HP Pavilion warranty coverage and for support
telephone numbers.
Support Guide
included with the
Protecting the PC
HP provides a virus-scanning software program
to help protect your PC (select models only). The
program runs automatically when you start the
computer.
The virus-scanning program manufacturer
provides free virus scan updates through your
Internet connection for 90 days after your
HP Pavilion home PC purchase. You can
purchase a subscription service for updates
after your initial free period expires.
New types of viruses are invented all the
time. Be sure to get regular updates of your
virus-scanning software from the program
manufacturer.
If a software program or the operating system
gets damaged, you can reinstall the software.
Refer to “Using Application Recovery and
System Recovery” on page 75 for details.
When your PC has software problems, it’s
possible that a voltage spike, power outage, or
brownout has occurred. Symptoms of voltage
spikes include a flickering video display,
unexpected computer startups, and the computer
not responding to your commands. A voltage
spike can occasionally corrupt or destroy files,
so it is a good idea to consistently make backup
copies of your data files. Prevent voltage spikes
by installing a surge suppressor made for use
with computers between the power outlet and
the computer power cord.
Quick Start Guide
Setup
7
Page 36

Working in Comfort
After assembling the HP Pavilion, but before
you begin using the computer, make sure the
computer and your work area are properly set
up to maintain your comfort and productivity.
Refer to “Working in Comfort” in the Help
and Support Center for important ergonomic
information. Just click
Support, My HP Pavilion PC
Working in Comfort
click
Start, Help and
, and then
.
50–70 cm
(20–28 inches)
0–15˚
0–15˚
8
HP Pavilion home PC
Page 37

Using the Computer
Basics
Introducing the Basics
Windows Operating System
The operating system for your PC is Microsoft
Windows XP. Windows displays the desktop on
the monitor. The taskbar with the Start button
appears at the edge of the desktop display.
Start Menu
Click the
Use this menu to:
3
Select programs or documents.
3
Open the Help and Support Center.
3
Start a search.
3
Run a program.
3
Open the Control Panel to view or change
settings.
The Start menu also displays the buttons
and
button to end your current computer session and
to switch between users. Click the Tur n O ff
Computer button to turn off the computer or
to restart it.
Start
button to open the Start menu.
Turn Off Computer
Log Off
. Click the Log Off
Quick Start Guide
9
Page 38

HP Center
The HP Center toolbar appears.
3
HP Center is a service that brings you support
updates, special offers, and product news.
Note:
HP Center is not available in all models.
To open HP Center:
Click Start on the taskbar.
1
Choose All Programs.
2
Choose hp center, and then click hp
3
center again. The HP Center toolbar
appears.
Or
Right-click the HP Center icon in the
1
system tray area of the Start taskbar.
Choose Open hp center.
2
HP Center displays different topics of
information and then updates the information
when new details become available. Display the
information by using the HP Center buttons on
the toolbar.
Downloads occur while you are connected to
the Internet and your computer is idle. You can
read HP Center content even when you are not
connected to the Internet.
For more information, click the hp center logo
on the HP Center toolbar and choose Help.
Alerts you to
new messages
hp center
logo (Help)
10
HP Pavilion home PC
Page 39

To view HP Center content, open HP Center and
do any of the following:
1
When the alert exclamation point button
on the toolbar turns red, click it to view
new information.
2
Click a button on the HP Center toolbar, such
as Finance or Music. The toolbar shows up to
six buttons, based on your monitor resolution
and desktop settings.
Help and Support
To open the Help and Support Center, press
the Help button on your keyboard, or click
on the taskbar and select
Help and Support
Help has information, tours, and tutorials. Help
also has troubleshooting tools to assist you,
including HP Instant Support.
Note:
HP Instant Support is not available in all models.
Start
.
Basics
3
Click the
down arrow
on the left end of
the toolbar to select other buttons from a
drop-down menu.
4
Click the
toolbar, and then click
down arrow
on the left end of the
Customize
to add,
remove, or change the order of the buttons.
5
Click the
the toolbar, and choose
hp center
logo on
Help
for detailed instructions.
Quick Start Guide
11
Page 40

HP Instant Support
Using the Mouse
Note:
When you need assistance to solve a computerrelated problem, start HP Instant Support:
1
2
3
4
When you submit a problem to HP Instant
Support, you communicate over the Internet with
an HP Support analyst. The analyst will work
with you until the problem is solved.
HP Instant Support is not available in all models.
Click Start on the taskbar, and click Help
and Support.
Click HP Instant Support.
Click Request Help.
Follow the onscreen instructions to run a test
or submit a problem to HP Instant Support.
Your PC includes a mouse. When you move
the mouse, its roller ball moves and causes the
cursor on the screen to move. Use the mouse
on a flat surface.
You may have an optical mouse that uses a
light, instead of a roller ball, to sense movement.
Use the optical mouse on an opaque surface.
Note:
The optical mouse cannot work on a glass,
translucent, or reflective surface.
12
HP Pavilion home PC
Page 41

Some computers include a scrolling mouse. Like
an ordinary mouse, the scrolling mouse has two
buttons on the top. Click the left mouse button
to position the cursor or to select an item. Click
the right mouse button to display a menu of
commands available for the item you clicked.
Scroll wheel button
Left button
Right button
You can change the configuration of these
two mouse buttons for left-handed use. Refer to
“Reverse your mouse buttons” in the onscreen
Help and Support Center.
Use the wheel button in the middle of the mouse
to scroll or select items on the screen. You can
use the scrolling mouse in these ways:
3
Scroll through a document without having to
click the scroll bar on the screen.
3
Use the autoscroll feature to have the
document scroll automatically.
3
Skim through a document.
The Scroll Feature
Click the left mouse button to place the cursor in
the document. To scroll toward the beginning of
a document, roll the mouse wheel up (away from
you). To scroll toward the end of a document,
roll the wheel down (toward you).
Basics
Quick Start Guide
13
Page 42

The Autoscroll Feature
The Panning Feature
The autoscroll feature allows you to read
through a document while the document scrolls
automatically.
1
To use autoscroll, place the cursor next to the
text where you want to begin scrolling and
press the wheel button once. An autoscroll
icon appears.
2
To begin scrolling, move the mouse in the
direction you want to scroll. The farther you
move the pointer from the starting point, the
faster the document scrolls.
3
To stop autoscroll, press the wheel button
again.
Use the panning feature when you want to skim
through a document.
1
To use panning, press and hold down the
wheel button.
2
Slowly move the mouse in the direction you
want to scroll. The farther you move the
pointer from the starting point, the faster the
document pans.
3
To stop the panning feature, release the wheel
button.
14
HP Pavilion home PC
Page 43

Using the Keyboard
Alphanumeric keys
Introduction
The keyboard has an arrangement of standard
keys and special buttons.
The illustrations show the location of the keys
and buttons. The location of keys or buttons on
your keyboard may vary from the illustrations.
Basics
The alphanumeric keys are the main keys found
on a standard typewriter.
Quick Start Guide
15
Page 44

Function keys
Arrow keys
The function keys are the F1 through F12 keys
located above the main keys. Pressing F1
displays a Help window for the software
program being used. Pressing F3 displays a
search window. F1 and F3 are available at
all times. Other function key operations may
depend on what software program you are
using.
16
HP Pavilion home PC
The arrow keys are controls for up, down, right,
and left. You can use these keys instead of the
mouse to move the cursor for navigation in a
Web site, in a document, or in a game.
Page 45

Numeric keys
Special buttons
Basics
When the Num Lock LED (light-emitting diode)
on the keyboard is on, the numeric keys are the
number keys and arithmetic functions found on a
basic calculator. When the Num Lock LED on the
keyboard is off, the numeric keys are directional
keys used during games or to move the cursor.
Press the
numeric key functions.
Num Lock
key to lock and unlock the
The special buttons are at the top of the
keyboard. (Some models have some of these
special buttons on the left side of the main keys.)
These buttons operate a CD-ROM or DVD-ROM
player, connect you to the Internet, or provide
quick access to specific functions. To find out
what each special button does, see “Buttons”
on page 19.
Quick Start Guide
17
Page 46

Features
Note:
Your keyboard may not have all the features listed.
Your keyboard enables you to:
3
Adjust speaker volume.
3
Mute speaker sound.
3
Start and stop playing a CD or DVD, skip to
different tracks, and eject the disc tray.
3
Connect to the Internet (if you have an
established Internet account).
3
Search for information on the Internet.
3
Customize the buttons to open programs and
connect to Internet Web sites.
3
Place the PC into standby to save power.
3
Get support information.
3
Find a file or program on the hard drive.
3
Print.
18
HP Pavilion home PC
Page 47
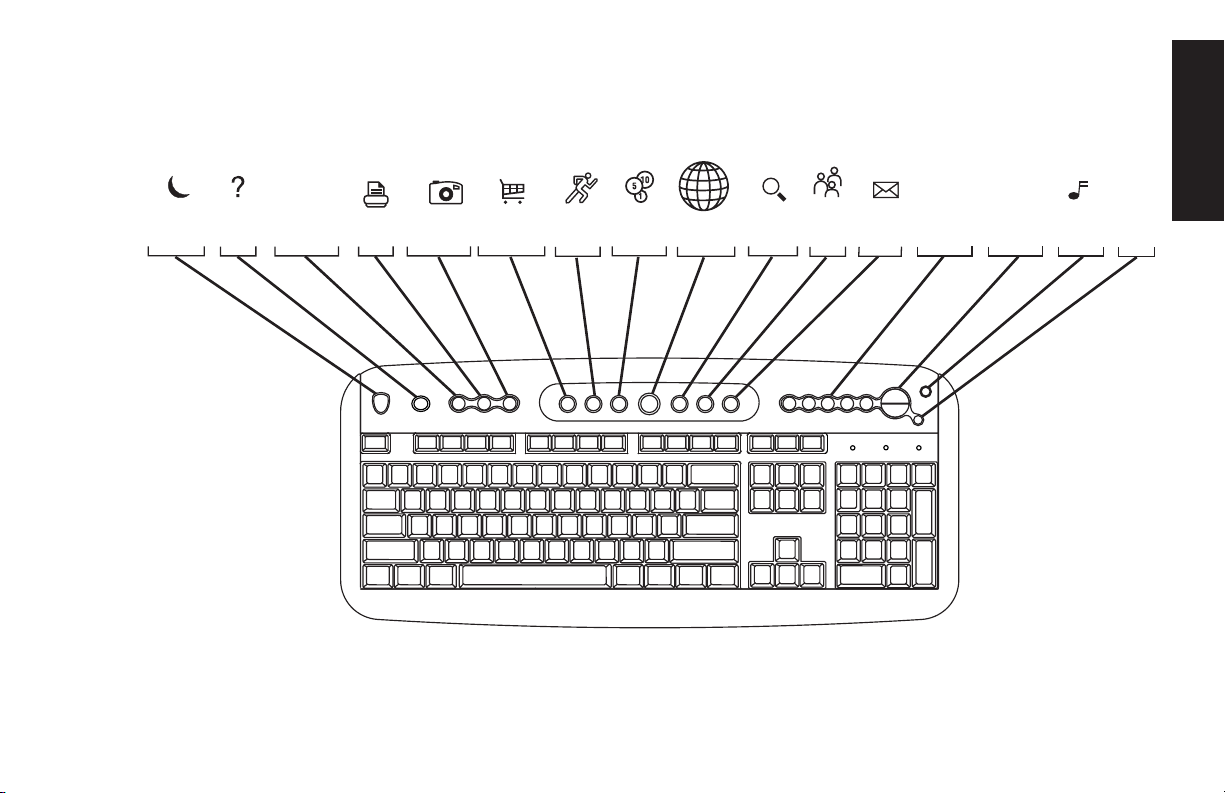
Buttons
The top of the keyboard has a number of special buttons.
hp
Standby
Help
My
HP Club
Print Sports
HP Picture
Toolkit
Shopping
Finance
Connect
Search
Chat
E-Mail
Media
Controls
Volume
Control
Music
Basics
Mute
Note:
Some buttons may be labeled differently on your keyboard.
Quick Start Guide
19
Page 48

Icon Feature Description
Standby Puts PC into power-saving mode (screen is blank but PC is still on). To make screen
reappear, press any key on keyboard, or press Standby again. May take 10–30
seconds before screen reappears.
Help Opens the Help and Support Center.
hp
20
HP Links to HP Web site.
Print Prints documents from most programs.
HP Picture Toolkit Opens HP Picture Toolkit view. Can be reconfigured.
Shopping
Sports
Finance
Connect
Search
Chat
E-Mail
HP Pavilion home PC
Goes to popular Web sites. Can be reconfigured to open any site or application.
Page 49

Icon Feature Description
Media Controls
(cd/dvd/mp3)
Volu me co ntro l
(Volume knob or
Volu me Up and
Volu me Do wn
buttons)
Music Starts MusicMatch Jukebox or Windows Media Player. Can be reconfigured.
Mute Turns speaker sound on and off.
Operates CD or DVD player: open and close top disc tray, skip tracks, pause,
and stop.
Volu me k no b:
volume when turned counterclockwise. Can be turned indefinitely, even after
maximum sound has been reached.
Volume Up and Down buttons:
volume and the Volume Down
Increases speaker volume when turned clockwise and decreases
Press the Volume Up
button to decrease volume.
button to increase
The Internet buttons will work only if you have established an Internet connection and have signed up
with an Internet Service Provider (ISP).
Basics
Quick Start Guide
21
Page 50

Button Configuration
You can reconfigure the special buttons on the
keyboard to open different programs or files, or
to connect to favorite Web sites.
1
2
3
4
5
Start
Click
Choose
Click
if present.
Double-click
In the Keyboard Properties window that
appears, click the
on the taskbar.
Control Panel
Printers and Other Hardware
Keyboard
.
.
Buttons
tab.
,
6
Double-click the button you want to change.
The button configuration window opens.
7
Choose the button capability from the dropdown list. Enter the Display Label and the
Address. (For a Web site, enter the complete
Web site URL in the Address box.)
8
Click OK.
9
On the Buttons tab, click
10
Repeat steps 6 through 9 for each button you
want to reconfigure.
11
Click OK when you are finished reconfiguring
the keyboard.
Apply
.
22
HP Pavilion home PC
Page 51

Adjusting Speaker Volume
The HP Pavilion includes a set of stereo speakers
that you can either attach to the monitor (select
models only) or place on the desk. For details on
connecting the speakers to the PC, see the setup
poster.
You can adjust speaker volume by:
3
Using the volume knob or buttons on the
keyboard.
3
Using the volume knob on the speakers (select
models only).
3
Using the Volume icon on the taskbar.
If you do not see this Volume icon, click
Start
Control Panel, Sounds, Speech, and
Audio Devices
Sounds and Audio Devices
click
, if present, and then double-
to open the
Sounds and Audio Devices Properties window.
Select the
taskbar
Place volume icon in the
check box. Click
Apply
, and then
click OK. The Volume icon appears in the
taskbar.
Note:
Some applications may result in low volume, even
when the volume knob is turned to its maximum
position. If this is the case, double-click the Volume
icon on the taskbar and increase the Volume
settings in the Volume settings window.
,
Basics
Quick Start Guide
23
Page 52

The two ways to use the Volume icon are:
1
Click the
2
Drag the Volume slider up to increase
Volu me
icon on the taskbar.
the volume or down to decrease the
volume.
3
When you are satisfied with the sound level,
click outside the Volume window to close this
window.
Using a Microphone
Your HP Pavilion home PC comes with one
microphone connector in the back of the PC.
Your computer may have another microphone
connector in the front of the PC under the access
door or on the monitor. Only one microphone
connector works at a time. The back connector
is already set up to work.
Or
Double-click the Volu me icon on the
1
taskbar. The Volume Control settings
window opens.
Drag the Volume slider up to increase the
2
volume or down to decrease the volume of a
specific sound control.
When you are satisfied with the sound level,
3
click the Close box (the X in the corner) to
close this window.
24
HP Pavilion home PC
If you would prefer to connect a microphone
to the front of your PC, follow this procedure
to select the working microphone:
Note:
1
If you connect your microphone to the back
of your PC, you do not need to perform this
procedure.
Double-click the Volu me icon on the
taskbar. The Volume Control settings
window opens.
Page 53

Note:
In the Volume Control window, select
2
If you do not see this Volume icon, click
Control Panel, Sounds, Speech, and
Audio Devices
Sounds and Audio Devices
Sounds and Audio Devices Properties window.
Select the
taskbar
click OK. The Volume icon appears in the
taskbar.
, if present, then double-click
Place volume icon in the
check box. Click
Apply
Options and click Properties.
In
Adjust volume for
3
, click Recording.
Start
to open the
, and then
,
Select the
8
Alternate Microphone
check box.
Click Close.
9
Click X (Close) on the upper-right corner of
10
Basics
the Recording Control window.
Adjusting Microphone Volume
If you need to adjust the volume of the
microphone, whether it is connected to the front
of the computer or to the back, follow the
procedure below:
Show the following volume controls
In
4
, select
the Microphone check box.
Click OK.
5
Select Options from the Recording Control
6
window, and click Advanced Controls.
Click the Advanced button.
7
Double-click the Volu me icon on the
1
taskbar. The Volume Control window
opens.
In the Volume Control window, select
2
Options and click Properties.
In
Adjust volume for
3
, click Recording.
Quick Start Guide
25
Page 54

Show the following volume controls
4
In
the Microphone check box.
Click OK.
5
Adjust the volume of Microphone
6
dragging the volume control slider.
Note:
7
8
9
10
If the volume is now acceptable, proceed directly
to step 10.
To make finer adjustments to the sound, click
the Advanced button, and then select the
Boost check box
Click Close.
Repeat step 6, if needed.
Click X (Close) on the upper-right corner of
the Volume Control window.
.
Balance by
, select
Turning Off the Computer
You can turn off the computer without pressing
any buttons on the computer chassis.
Close any open software programs. To
1
close programs, click X in the upper-right
corner of each window.
Click Start on the taskbar.
2
Click Turn Off Computer, at the bottom of
3
the menu.
Click Tur n Of f.
4
Turn off the monitor.
5
For information on alternatives to turning off
the computer, see the next section “Putting the
Computer into Standby and Hibernation Mode.”
26
HP Pavilion home PC
Page 55

Putting the Computer into
Standby and
Hibernation Mode
As an alternative to shutting down the computer,
you can put the PC in standby mode. To
conserve power, you can automatically put the
computer into standby and then hibernation by
setting the power management timers.
Standby Mode
When the computer is in standby mode, it
goes into a low-power state and the monitor is
blank as if it’s turned off. The next time you
use the computer, any programs, folders, and
documents that were open before you put the
computer in standby will be available. With
standby mode, you can save electricity without
having to wait for the PC to go through the
normal startup routine when you turn it on.
Standby mode also allows faxes to come
through to the computer, and it enables the PC
to automatically retrieve e-mail messages and
download information from the Internet, if you
have programmed the computer to do so.
To manually put the computer in standby:
1
Press the Standby button on the keyboard.
The screen goes dark, and the computer goes
into standby mode.
2
When you want to use the computer again,
press a key on the keyboard, or press the
Standby button. The screen display reappears
just as you left it.
Another way to manually put the computer into
standby is to:
1
2
3
Start
Click
Turn Off Computer
Click
Stand By
Click
on the taskbar.
.
.
Basics
Quick Start Guide
27
Page 56

If the computer does not work properly when
you wake it from standby, reset the computer:
press and hold the On button on the front of the
PC for approximately 5 seconds until the system
turns off. Then turn the computer back on.
Note:
Using the On button to reset the system is not
recommended and should be used only as a last
resort.
Hibernation Mode
Note:
When you want to use the computer again
4
If
Hibernate
set up your computer for hibernation; refer to
steps 1 through 6 of “Automatic Standby or
Hibernation Mode” on page 29.
is not present, you first need to
after hibernation, press the On button on the
front of the PC.
If the computer does not work properly when
you wake it from hibernation, restart the
computer:
When the computer is in hibernation mode, it
saves everything that is in computer memory to
the hard disk, turns off the monitor and the hard
disk, and then turns itself off. When you turn on
the computer, everything (programs, folders, and
documents) is restored to the screen.
To manually put the computer into hibernation:
Click Start on the taskbar.
1
Click Turn Off Computer.
2
Press the Shift key on the keyboard and click
3
Hibernate.
28
HP Pavilion home PC
Click Start on the taskbar.
1
Click Turn Off Computer.
2
Click Restart.
3
Page 57

Automatic Standby or
Hibernation Mode
To automatically put the computer into standby
or hibernation mode, modify the power
management settings:
1
2
3
Start
Click
Click
Click
on the taskbar.
Control Panel
.
Performance and Maintenance
if present.
Click the Power Schemes tab to set the
7
timers for standby and/or hibernation. In the
Power Schemes box, select a power scheme
from the drop-down list. Choose the timers:
3
To turn on auto-standby for the computer,
Basics
click a time (such as After 30 mins) in the
System standby list.
3
To set the timer for auto-hibernation, click
,
the time to elapse before hibernation in the
System hibernates list.
4
Double-click
5
Check if the auto-hibernation feature is
enabled by clicking the
and seeing if a check mark is in the
hibernation
Power Options
Hibernate
.
tab,
Enable
check box. If necessary, enable
the feature by clicking the check box so that
a check appears in it.
If you changed the
6
Enable hibernation
check
box, click Apply.
Note:
Click OK.
8
If both standby and hibernation timers are
set, the system hibernation timer must be set
for a longer time than the system standby
timer.
Quick Start Guide
29
Page 58

30
HP Pavilion home PC
Page 59

Setting Up and Using the Internet
Your HP Pavilion comes with:
3
Access to the ISPs in your area. Some ISPs
offer a traditional dial-up service, and others
offer faster technologies such as Digital
Subscriber Line (DSL) and cable. (DSL, ADSL,
and cable ISPs are not available in all
countries/regions.)
3
Internet Explorer Web browser.
3
Outlook Express e-mail software program.
3
V.90 modem and modem software (not
available in all models).
3
LAN (local area network) card (select
models only).
3
Special keyboard buttons to access the
Internet.
Introducing the Internet
What Is the Internet?
The Internet is a group of computers that
communicate with each other through telephone
lines, digital service, or cable lines. Each Internet
computer is independent, and its operators
choose which files to make available to users of
the Internet. To connect your PC to the Internet
and use the information and services available
there, you need an ISP.
Quick Start Guide
31
Internet
Page 60

What Is an ISP?
What Is the World Wide Web?
Internet Service Providers (ISPs) are businesses
that give you access to the Internet, and most of
them provide an electronic mail service (e-mail).
There is usually a monthly fee for this service.
The types of connection vary and may be a
telephone dial-up modem, a LAN (local area
network), cable modem, or DSL (Digital
Subscriber Line).
When your computer connects to the Internet, it
is actually communicating with the ISP’s Internet
computer. The ISP verifies your account and then
provides you access to the Internet. You use a
Web browser program to search, find, and
display Web site information. Some ISPs allow
you to use the browser program of your choice.
Some ISPs provide their own browser.
The World Wide Web (WWW), also called
the Web, is a public part of the Internet used
by individuals, companies, governments, and
organizations. These individuals and groups
have created millions of Web site pages in
support of their activities.
A Web page is a file or group of files that a
user can access by entering the Web page’s file
location, or URL.
What Is a URL?
The URL (Uniform Resource Locator) identifies a
file location, typically in the form
http://www.name.extension
32
HP Pavilion home PC
Page 61

The URL contains the protocol and the pathway
to a site and may include the path to a specific
dot,
file within that site. Each period, or
URL separates elements within the address. For
example, you will see the URL extension
used by companies. When you enter the URL
into your browser Address box and press the
Enter key on your keyboard, the browser
contacts that location and displays the Web
page for you.
in the
.com
What Is an E-Mail Address?
When you use e-mail, your e-mail address
identifies the electronic post office box where
people can send you electronic mail. E-mail
addresses have the form
name@domain_name
The
domain name
ISP or organization, and includes an extension
identifying the kind of organization the ISP is.
is usually the name of the
For example, if your name is Jane Jones and
XYZ is your ISP, your e-mail address might be
JaneJones@xyz.com
with the extension
a business. For information on using e-mail, see
“Sending and Receiving E-Mail” on page 44.
.com
indicating that XYZ is
How Do I Search the Internet?
The browser program you use includes a Search
feature. You may need to click a button or select
the feature from a menu to display it, depending
on the type of browser program it is.
The Search feature provides a box where you
enter a question or a word that describes the
information you want to find. If you enter one or
a few general words, you may get many general
results. If you enter several precise words, you
usually get fewer but more specific results.
Internet
Quick Start Guide
33
Page 62

The Windows Search feature includes direct
access to the Internet Explorer Search. (If the
ISP provides the browser, you may not be able
to use Internet Explorer to search the Internet.)
To begin a search:
1
2
3
4
5
Start
Click
Click
Click
to scroll down in the list to see this option.)
Type a word or question into the Search box.
Click
on the taskbar.
Search
Search the Internet
Search
.
.
. (You may have
Setting Up the Modem
The modem is used for connecting to an ISP that
provides telephone dial-up connection to the
Internet. There are other ways to connect to the
ISP that do not use the telephone modem, such
as a LAN (local area network) or DSL (Digital
Subscriber Line). See ”Setting Up the Network
Interface Adapter” on page 36 if you are
connecting through a LAN. Check with your
ISP for specifics on your connection.
Note:
Your computer may not come with a modem.
The computer connects to the Internet (if
needed), performs the search, and displays the
results. Click a link in the results list to display
the Web page.
There are also Web sites specifically created for
searching the Internet. These are called
engines.
to find information.
34
Search engines use a number of ways
HP Pavilion home PC
search
Before you can connect to the Internet and send
or receive e-mail and faxes using telephone
dial-up, you must connect the telephone line to
the modem, which is in the computer.
The setup poster shows you how to plug in a
modem/telephone cable to the computer modem
connector and to your telephone line wall jack
connector.
Page 63

To identify the modem connector, look at the
back panel of the computer. The modem looks
similar to one of the following illustrations.
Telephone Line switch
2
1
Note:
Or
Or
Your computer may have only one
modem/telephone connection.
Modem connector
Modem connector
To connect the cable between the modem and
the telephone line:
Plug one end of a modem cable into the Line
1
connector on the back of the computer. This
Line
connector is labeled with either
or a jack
symbol.
Plug the other end of the cable into the
2
telephone line jack on the wall.
Quick Start Guide
Internet
35
Page 64

3
On modems with a Telephone Line switch,
make sure the switch is in position 1.
Back of PC
2
1
Telephone
(optional)
Line
You can also connect a telephone to the
other connector on the modem (optional). By
connecting a telephone to the modem, you can
make regular (voice) telephone calls when you
are not using the modem — even if the computer
is turned off.
Telephone cable
(optional)
36
HP Pavilion home PC
Telephone
(optional)
Modem cable
Wall jack
Setting Up the
Network Interface Adapter
The network interface adapter (also called a
NIC
network interface card, or
high-performance connection to an Ethernet
(10BaseT) or Fast Ethernet (100BaseT) network.
After this adapter is connected to a LAN (local
area network), you will be able to get a highspeed connection to the Internet through the
LAN. For information about high-speed
providers, click the easy Internet sign-up
icon found on the desktop or in the Start menu
under All Programs.
) provides a
Page 65

This network connection also allows you to
share printers, data, and other devices among
your PCs.
Note:
Your computer may not come with a network
interface adapter.
To connect the network interface adapter to the
network:
Plug the network cable into the RJ-45 port on
1
the network adapter. The port is located on
the back of the computer.
Locate the RJ-45 port on the back of the
computer. (Refer to the illustration that matches
your system.)
RJ-45 port
Note:
Plug the other end of the network cable into
2
Do not connect a telephone cable (RJ-11
connector) to the network adapter port (RJ-45).
a 10BaseT or a 100BaseT port on the
network hub.
Note:
The hub is a device to which all computers on
the network are connected.
Warning:
cable into a telephone jack. Although the
plug on the network cable looks similar
to the plug on a telephone cable, they are
not the same.
DO NOT plug the network
Quick Start Guide
Internet
37
Page 66

3
With the computer turned on, check the LEDs
(light-emitting diodes) on the network adapter.
The LEDs on each type of network adapter are
described below. (Refer to the illustration that
matches your system.)
LEDs
3
10 LNK
— Lit green when connected to a
10BaseT port
3
100 LNK
— Lit green when connected to
a 100BaseT port
3
ACT
— Lit during network data transfer
activity
LEDs
3
100
— Lit green when connected to a
100BaseT port
3
LINK
— Lit green with valid network
connection
3
LINK
— Lit green with valid network
connection
3
ACTIVITY
— Lit yellow during network
data transfer activity
LEDs
38
HP Pavilion home PC
Page 67

Setting Up Your
Internet Account
Before you can connect to the Internet, you need
to sign up with an Internet Service Provider (ISP).
HP has made arrangements with leading ISPs
in your area to help you sign up for Internet
service. Use Easy Internet Sign-up to sign up with
an ISP. The software programs for available ISPs
are part of your system.
The Windows desktop may have a folder
called Online Services, which includes icons for
accessing various online services. These icons
are part of the Windows operating system, but
they are not functional in all countries/regions.
Signing Up with an ISP Using
Easy Internet Sign-up
Easy Internet Sign-up helps you sign up for a
new Internet account, set up an existing account,
or configure Internet access using a LAN (local
area network), cable modem, or DSL (Digital
Subscriber Line).
1
Connect the telephone line to your modem.
Refer to the setup poster and to “Setting Up
the Modem” on page 34.
Note:
Open Easy Internet Sign-up:
2
3
Or
3
If you decide to use a DSL or a cable Internet
connection, contact your ISP for any specific
software and hardware you may need.
Double-click the easy Internet
sign-up icon.
Click Start on the taskbar. Choose All
Programs. Click easy Internet
sign-up.
Internet
Quick Start Guide
39
Page 68

The Easy Internet Sign-up screen appears.
3
Follow the onscreen instructions.
Connecting to the Internet
A Web browser program searches for, finds,
and displays Web site information. How you
access and explore the Internet depends on
whether you are using an ISP that provides the
browser or an ISP that allows you to use any
browser.
Using ISP-Provided Browser
If you have signed up for an ISP that provides
the browser, you can open the browser program
and connect to the Internet by using either of the
following methods:
3
Double-click the ISP-provided icon on the
desktop.
Or
3
Press the Connect (or Internet) button
on the keyboard.
40
HP Pavilion home PC
Page 69

Using Any Browser
If you signed up for Internet access with an ISP
that allows any browser, use Internet Explorer
or another Web browser to explore the Internet.
To connect to the Internet, use either of the
following methods:
3
Or
3
Once you are connected to the Internet,
your browser displays your designated home
Web page.
Start
Click
All Programs
Explorer
on the taskbar, choose
, and click
Internet
.
Press the Connect (or Internet) button
on the keyboard.
You can go to a particular Web site by entering
the address (such as http://www.hp.com) in the
Address box in the Web browser and pressing
Enter on your keyboard. Or, you can use the
browser Search tool to search for references to
a specific word or phrase on the Web.
Visiting the
Hewlett-Packard Web Site
Internet
The Hewlett-Packard Web site is dedicated to
HP Pavilion home PC owners and to the entire
HP product line. There you will find the latest
news and information about all of your HP
products. You can receive technical support,
download software and driver updates, and find
out about HP’s home and business services.
Quick Start Guide
41
Page 70

To go to the HP Web site:
1
Establish a connection to the Internet.
2
Type
http://www.hp.com
into your Web
browser Address box, and press the Enter key
on your keyboard.
Select your country/region from the drop-
3
down list at the top of the page, and then
click the blue arrow to the right of the list.
From this Web page you can select the following
links:
Note:
3
These links may not be available in all
countries/regions.
Products and Services: Find detailed
information about all HP products and the
various business and personal computing
services HP offers.
3
Drivers: Download software and driver
updates.
3
Support: Receive technical support
and detailed product information such as
hardware warranties, specifications, and
instruction manuals. To go directly to the
support Web page for your PC model and
find online manuals for it, see “Viewing
Online Manuals” on page 43.
3
HP Store: Buy products, supplies, and
accessories online for your home, home
office, or business. At this site you can
find special offers on HP products, locate
replacement parts, and get addresses of store
and service locations that sell and repair HP
products.
3
Solutions: Find technology tips, educational
materials, and ideas you can use at home or
at work. You can also register your other HP
products.
Note:
For more information, refer to the HP Web site
information located in the
included with your HP Pavilion home PC.
Support Guide
42
HP Pavilion home PC
Page 71

Viewing Online Manuals
Note:
View online manuals for your PC by going to the
HP Web site:
Online
manuals
HP Pavilion home PC model numbers. Not all
models have online manuals.
are associated with specific
To go directly to the English language support
Web page for your HP Pavilion model and find
online manuals for it, use the following steps:
Establish a connection to the Internet.
1
Type
2
http://www.hp.com/cposupport/eschome.html
Establish a connection to the Internet.
1
Type
2
http://www.hp.com
into your Web
browser Address box, and press the Enter key
on your keyboard.
Select your country/region from the drop-
3
down list at the top of the page, and then
click the blue arrow to the right of the list.
Click Support, and then select your model.
4
into your Web browser Address box, and
press the Enter key on your keyboard.
In the Quick Find box, type your product
3
name and number, and then press the
Enter key on your keyboard. For example,
Pavilion xt865
or
Pavilion 7970
. The product
number is on the lower front of the PC chassis.
When the results window appears, click
4
product support for your PC model
(language).
Click manuals in the
5
If
Note:
Click a manual title to view it.
6
manuals
manuals associated with your model.
does not appear, there are no online
Ask a question
Quick Start Guide
box.
Internet
43
Page 72

Sending and Receiving
E-Mail
Your HP Pavilion home PC comes with an
electronic mail (e-mail) software program from
Microsoft called Outlook Express. Some ISPs use
Outlook Express. Other ISPs provide their own
e-mail program and Web browser, and they
may not let you use Outlook Express or your
preinstalled browser.
3
Microsoft Internet Explorer (included with
your HP Pavilion) or other browser program
(usually provided by an ISP).
3
A dial-up modem/telephone connection, or a
network adapter connection from your PC to
the ISP.
Note:
If you decide to use a DSL or a cable Internet
connection, contact your ISP for any specific
software and hardware you may need.
Note:
Some models have Microsoft Outlook instead of
Outlook Express. For details on using Microsoft
Outlook, open the Outlook program and
access Help.
Before you can send and receive e-mail,
you need:
3
An account with an Internet Service
Provider (ISP).
44
HP Pavilion home PC
If the ISP Provides the Browser
Follow the ISP’s instructions to download its Web
browser and e-mail program and to set up and
use your e-mail account. You will then be able to
send and receive e-mail each time you connect
to your ISP.
Page 73

If Using Outlook Express
Sending e-mail messages
After you sign up with an ISP and connect your
modem, you can run Outlook Express from the
Start menu.
The first time you start Outlook Express, the
Internet Connection Wizard window opens if
you are not already connected to the Internet.
You will need to provide connection information
such as an account name and password and the
names of an incoming and an outgoing mail
server to use Outlook Express. If you are unsure
how to answer any of the questions, contact
your ISP.
Open the Outlook Express program:
Click Start on the taskbar, and select
1
the Outlook Express icon.
Note:
Click the Create Mail button on the toolbar.
2
Type in, or select from an address book, the
3
You can also press the E-Mail button on the
keyboard to open Outlook Express (select
models only).
address of each recipient.
Type the message title in the Subject box.
4
Type your message in the New Message
5
window.
Internet
Quick Start Guide
45
Page 74

6
Click the
Send
button on the toolbar when
you’re finished.
7
If necessary, click the
Send/Recv
tool on the
toolbar to send any messages stored in the
Outbox.
Note:
When you compose a message without being
connected to the Internet, the message is stored
in the Outbox until the next time you log on to
the Internet and connect to your ISP.
Receiving e-mail messages
Start Outlook Express. See instructions above.
1
If necessary, click the Send/Recv tool on the
2
toolbar to have Outlook Express deliver new
messages from all listed e-mail accounts.
Click the Inbox folder to view the list of
3
incoming messages. Messages not yet read
appear in bold on the screen.
Note:
Click a message once to view it, or double-
4
click the message to expand it and read it in
its own window.
For more information about using Outlook
Express, go to the Help menu within the
program.
The messages stay in your Inbox until you
delete them or move them to another folder.
46
HP Pavilion home PC
Page 75

Doing Common Tasks
Inserting a CD or DVD
There are three basic types of compact disc (CD)
drives: CD-ROM drives, which can read audio
and data CD discs, CD-RW drives, which can
and
read
DVD-ROM drives, which can read DVD discs.
Select models have a DVD+R/RW drive, which
can read and write CD and DVD discs. Some
computers have a combo drive, which combines
the functions of a CD-RW and DVD or a CD-RW
and DVD+R/RW into one drive. On some PCs
the CD-RW drive is labeled hp cd-writer and the
DVD-RW drive is labeled hp dvd writer.
Note:
record audio and data CD discs, and
There are two types of DVD discs:
DVD+R/RW and DVD-R/RW. DVD-R and DVD-RW
discs do not work in the DVD+R/RW drive.
Make sure the computer is on.
1
Press the Eject button near the drive to eject
2
the disc tray.
Note:
Your computer may look different from the
ones shown here.
On some PCs, the media drive is located
behind a door on the front of the computer.
Eject button
Common Tasks
Drive door
Quick Start Guide
47
Page 76

3
Remove the CD/DVD from its case, holding
on to the disc edges only.
4
Gently place the disc in the tray with the label
facing up.
You can also close the tray by clicking the
close/open button on the control panel for
the program (such as MusicMatch Jukebox
or Windows Media Player) that controls the
drive.
5
Close the disc tray by gently pushing the tray
into the computer.
48
HP Pavilion home PC
Note:
For the top drive in the PC, you can close the
tray by pressing the media control open/close
button on the keyboard.
Removing a CD or DVD
Note:
1
2
3
4
You cannot remove a CD or DVD after you have
turned off the computer, so make sure you do so
before shutting down the computer.
Open the disc tray by pressing the Eject
button.
Holding on to the disc edges only, lift the CD
or DVD out of the tray.
Place the disc in its case.
Close the disc tray by gently pushing the tray
into the computer.
Page 77

Handling CDs
Playing Music CDs
To avoid damaging a CD, follow these
guidelines:
3
Return the CD to the case when you are
finished using it.
3
Handle the disc by its outside edges or center
hole only.
3
Do not touch the unlabeled side of a CD or
place the unlabeled side down on your desk.
Doing so could scratch the surface of the CD.
3
Store CDs at room temperature.
The HP Pavilion includes MusicMatch Jukebox
(select models) or Windows Media Player. This
software lets you play music CDs.
Using MusicMatch Jukebox
This software lets you play music CDs, as well as
record digital music files, create music CDs on
your hp cd-writer drive, organize your digital
music into libraries, and listen to music over the
Internet.
If you are connected to the Internet when playing
a music CD, MusicMatch Jukebox searches a
CD database on the Internet, displays the song
titles in the Playlist area, and then begins
playing the CD. The next time you play this CD,
you don’t need to be connected to the Internet —
MusicMatch Jukebox keeps the song titles.
Common Tasks
Quick Start Guide
49
Page 78

To play a music CD:
1
Insert the music CD into the drive. The
MusicMatch Jukebox window opens.
Or
If the MusicMatch window does not
automatically open, click Start on the
taskbar, choose All Programs, and then
select MusicMatch Jukebox.
To control the CD currently in the drive,
3
click the buttons in the MusicMatch Jukebox
window. To play a particular song, doubleclick its song title (or track number) in the
Playlist. You can also control the CD using
the media control buttons if your keyboard
has them.
For more information on this software, refer to
the online Help within the MusicMatch Jukebox
program. To view the Help menu:
Insert a CD in the drive. The MusicMatch
1
Jukebox window opens.
Or
If you are not currently connected to the
2
Internet, the CDDB Internet Connectivity
dialog box appears. If you want to search the
Internet for the name of the artist and the song
titles on the CD, you will need to connect to
the Internet and then click Continue
lookup. If you don’t want to connect to
the Internet, click Quit.
50
HP Pavilion home PC
If the MusicMatch window does not
automatically open, click Start on the
taskbar, select All Programs, and then
select MusicMatch Jukebox.
Click the Help menu in the MusicMatch
2
Jukebox menu bar.
Page 79

Using Windows Media Player
This software lets you play music CDs, as well as
play DVDs when you have a DVD-ROM drive.
You can use it to record digital music files, create
music CDs on your hp cd-writer drive, organize
your digital music into libraries, and listen to
music or view a music video over the Internet.
To play a music CD:
1
Insert the music CD into the drive. The
Windows Media Player window opens.
Or
If the Windows Media Player window does
not automatically open, click Start on the
taskbar, choose All Programs, and then
select Windows Media Player.
To control the CD currently in the drive, click
2
the buttons in the Windows Media Player
window. To play a particular song, doubleclick its song title (or track number) in the
Playlist. You can also control the CD using
the media control buttons if your keyboard
has them.
Quick Start Guide
Common Tasks
51
Page 80

When you click the Media Guide or the Radio
Tuner features, Windows Media Player connects
to the Internet and obtains information about the
CD selections or streaming radio stations.
For more information on this software, refer to
the online Help within the Windows Media
Player program. To view the Help menu:
1
Insert a CD in the drive. The Windows Media
Player window opens.
Or
If the Windows Media Player window does
not automatically open, click Start on the
taskbar, select All Programs, and then
select Windows Media Player.
Click the Help menu in the Windows Media
2
Player menu bar.
Using the hp cd-writer Drive
Using the hp cd-writer drive, you can play a
CD, or record onto a recordable disc (CD-R or
CD-RW).
Note:
1
2
3
4
5
From there, you can copy audio or data files
to a CD using the HP RecordNow software
program.
The hp cd-writer drive is available on select
models only.
Press the Eject button on the door of your
hp cd-writer drive, and place a CD in the
center of the CD-RW disc tray.
Close the disc tray by gently pushing the tray
into the computer.
Click Start on the taskbar.
Click My Computer.
Double-click the CD Drive icon.
52
HP Pavilion home PC
Page 81

To open HP RecordNow program:
1
2
3
Start
Click
Choose
Choose
on the taskbar.
All Programs
.
HP RecordNow
.
Playing DVD Movies
The DVD-ROM drive (select models only) can run
software on CD-ROMs, play music CDs, and
play DVD movies and software.
4
Click
Note:
RecordNow
For information about recording onto CDs,
refer to the Help menu in the HP RecordNow
program.
.
Playing a DVD
DVDs automatically play after you insert
the disc.
Note:
1
DVD movies are often localized to geographical
countries/regions. For information about this, see
“Using Country/Region Codes” on page 56.
Insert the disc into the DVD-ROM drive.
Note:
On a double-sided DVD, read the text
around the inner hole of the disc to determine
which side (A versus B or Standard versus
Widescreen) to play. Place the disc in the tray
with the label face up for the side you want
to play.
Quick Start Guide
Common Tasks
53
Page 82
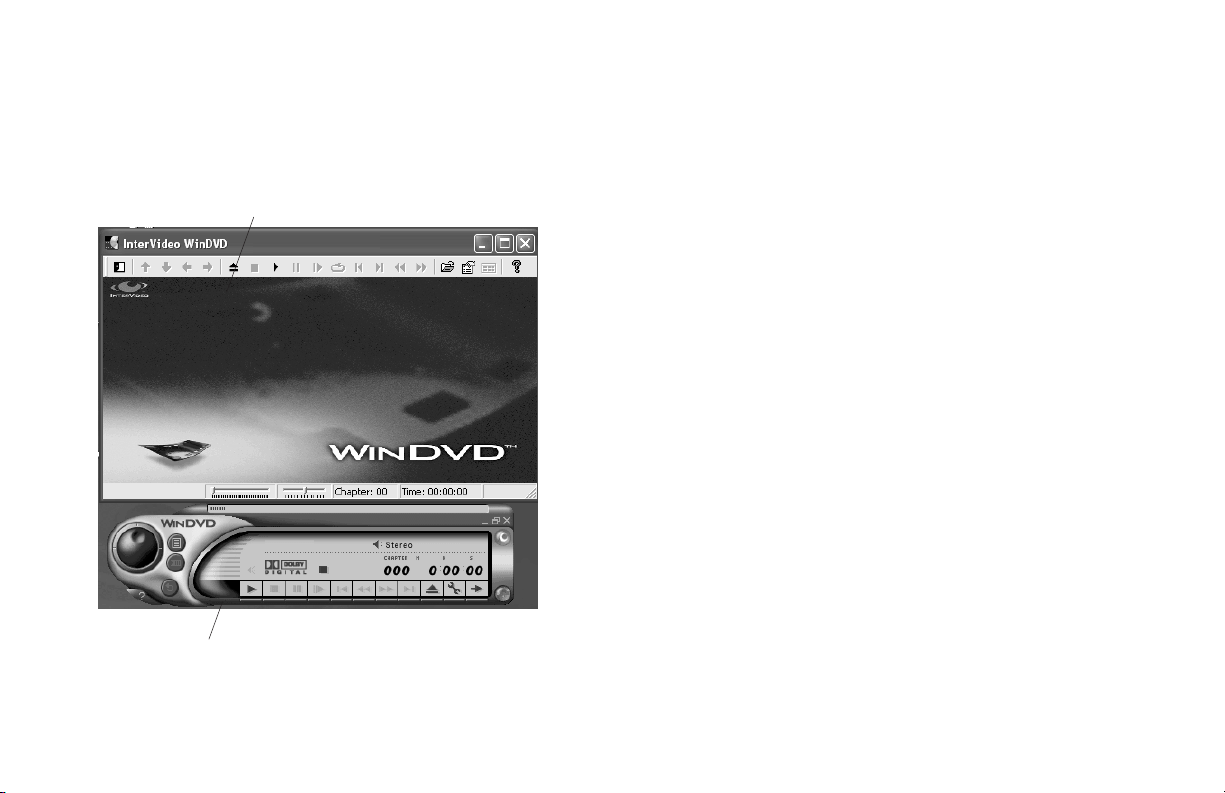
2
Close the disc tray by gently pushing the tray
into the computer. The movie plays in its own
resizable window, and the WinDVD control
panel appears.
Video window
You may want to start WinDVD and adjust the
settings before inserting the disc and starting the
movie.
To start WinDVD without a disc in the drive:
Click
Start
on the taskbar.
1
54
Control panel
HP Pavilion home PC
2
Choose
3
Choose
4
Click
All Programs
.
InterVideo WinDVD
InterVideo WinDVD
.
. The WinDVD
video window and control panel open.
Viewing Help Information
For information on the WinDVDTM software, refer
to the online Help within the program. To view
the Help menu:
1
Insert a DVD disc in the drive. The WinDVD
window opens.
Or
Page 83

If the program does not automatically open,
Start
click
on the taskbar, choose
Programs, InterVideo WinDVD
then click
2
Click the ? in the WinDVD menu bar.
InterVideo WinDVD
All
, and
again.
Understanding DVD Terminology
To understand the DVD controls, you should be
familiar with DVD terminology. Each DVD can
titles
hold one or more
have only one title on the DVD, but some DVDs
include several short movies, with each movie
being a separate title.
. Most full-length movies
Using the WinDVD Control Panel
The WinDVD control panel automatically
appears when you insert a DVD.
If you are playing a movie full screen and the
panel is hidden, you can redisplay it as follows:
Right-click anywhere in the video window.
1
Select
2
Click
3
View
Player
.
. The control panel appears.
Each title is divided into multiple
chapters
.
A chapter is a particular segment or scene in
the movie. When watching a DVD movie, you
have the ability to jump to the next chapter, the
previous chapter, or to a specific chapter.
A single image in a movie is called a
frame
.
3
To see what a button does on the control
panel, place the mouse pointer on the
button; the button title appears onscreen.
3
To move the WinDVD control panel, place
the mouse pointer on the panel (but not on
a button), and drag it to the desired
location on the screen.
Quick Start Guide
Common Tasks
55
Page 84

3
To resize the video window when it is not
full screen, place the mouse pointer on a
window corner and drag the border.
The country/region number is usually placed
over a world globe printed on the DVD
packaging and disc.
Or
Click the Full Screen button in the
upper-right corner of the WinDVD
control panel.
Using Country/Region Codes
DVDs sometimes come with country/region
codes imprinted as part of the disc data. These
codes prevent DVD movies from being played
in countries/regions of the world that are
different from where they were sold. You can
play DVDs from other countries/regions only five
times before the country/region code locks and
becomes permanent. Once the code locks, you
can only play DVDs from that country/region.
When the country/region code locks, if you
need help, contact HP Support.
DVDs without country/region codes will play on
any player or drive in any country/region.
The six major DVD countries/regions are:
3
Country/Region 1: North America
3
Country/Region 2: Japan, Europe,
Middle East, South Africa
3
Country/Region 3: Southeast Asia
3
Country/Region 4: Australia, New
Zealand, Mexico, Central and South America
3
Country/Region 5: Northwest Asia,
North Africa
3
Country/Region 6: China
WinDVD is not pre-set to a particular
country/region — the country/region code of
the first DVD movie you play determines your
DVD country/region.
56
HP Pavilion home PC
Page 85

For example, if you play a DVD with a
country/region 1 code, WinDVD sets the current
country/region of your DVD-ROM player to 1. If
you later play a DVD that is coded for a different
country/region, WinDVD asks if you want to set
this as the current country/region.
Warning:
country/region code only five times
before the setting becomes permanent.
When the country/region code locks, if
you need help, contact HP Support.
You can change the
Using the Combo Drive
The combo drive is available on select
models only.
When you insert a disc in the combo drive, the
computer automatically detects the type of disc:
3
If you insert a software program CD, it is
available for use.
3
If you insert a music CD, a window opens for
the program that plays CDs. See “Playing
Music CDs” on page 49.
3
If you insert a DVD movie, the Video window
and WinDVD control panel open. See
“Playing DVD Movies” on page 53.
If you insert a blank CD-R or CD-RW, use
HP RecordNow to copy audio or data files.
Common Tasks
Quick Start Guide
57
Page 86

Using the
Playing VCD
hp dvd writer Drive
The hp dvd writer is a DVD+R/RW drive
available on select models only.
The hp dvd writer drive plays movie DVDs
and music CDs, reads data CDs and DVDs, and
records files to DVD+RW, DVD+R, CD-R, and
CD-RW discs.
Note:
The guide for this drive is printed and included
in the computer box (select models).
There are two types of DVD discs:
DVD+R/RW and DVD-R/RW. DVD-R and DVD-RW
discs do not work in the DVD+R/RW drive.
Note:
With the VCD (Video CD) program, you can
play MPEG (Motion Picture Experts Group)
videos. These MPEG-1 files have a .dat or .mpg
extension.
To play a VCD:
1
2
The VCD program is available in select
models only.
Insert the VCD into a CD-ROM or DVD-ROM
drive.
Click Start, choose All Programs, select
Mediamatics VCDExpress, and then
click Mediamatics VCD Player. The
VCD Player control panel opens.
58
HP Pavilion home PC
Page 87

3
Click the play button on the panel.
Or
If you want to play a file, click the open
folder button on the panel. Choose the drive
and folder containing the MPEG-1 file, and
double-click the file you want to play.
Connecting
External Components
to Your Computer
You can connect external components to
your PC.
Use the control buttons in the VCD panel to
4
control the playback. The multimedia buttons
on the keyboard may not work with the VCD
program.
Note:
To identify the function of the control buttons in
the VCD panel, move the mouse slowly over
each button.
Connectors (or ports) connect hardware to your
PC. Depending on your model, connectors are
on the back or front of the PC. On some PCs,
flip open the cover on the lower front to see
connectors.
Quick Start Guide
59
Common Tasks
Page 88

Your computer may look different from the ones shown here. External components shown in the following
Serial
figure are not included with the PC. Front connector location, type, and number vary by model.
Note:
Before using your components,
you may need to install the
software that came with the
component.
Serial
60
HP Pavilion home PC
Page 89

External components shown in the following figure are not included with the PC. Back connector location,
type, and number vary by model.
Note:
Before using your components,
you may need to install the
software that came with the
component.
Common Tasks
Quick Start Guide
61
Page 90

Features, connectors, and locations vary by
model.
PS/2 keyboard
PS/2 mouse
Serial
Parallel
SERIAL
CD storage
cd-rom or hp cd-writer drive
dvd-rom or hp dvd writer drive
Diskette drive
Audio Out
Microphone
Telephone
62
Audio In
USB
Monitor
OUT
IN
ETHERNET
HP Pavilion home PC
SERIAL
Joystick
On button
Speaker out
Ethernet
TV out
SERIAL
Modem
USBIEEE 1394
Serial
Page 91

Symbols in this table identify connectors.
Symbol Description
Mouse (PS/2)
Keyboard (PS/2)
Universal Serial Bus (USB) for mouse,
keyboard, digital camera, or other
device with a USB connector
Printer (parallel)
Monitor
serial
Serial port for digital camera or other
serial device
Headphones
Speaker
Symbol Description
Audio Line Out (powered speakers)
OUT
Audio Line In
IN
Microphone
Joystick/MIDI
IEEE 1394 for video cameras or other
devices with very fast transfer rates
Common Tasks
Quick Start Guide
63
Page 92

Using HP Pavilion PC Tools
The HP Pavilion PC Tools folder in the All
Programs/Hewlett-Packard menu contains
special utilities for HP Pavilion owners. For
example, you’ll find a utility for displaying
system information. This folder also contains
the HP Tour Guide and any onscreen guides
included with your PC.
To see the items in the HP Pavilion PC Tools
folder:
1
2
3
4
5
Note:
64
Start
Click
Choose
Choose
Click
Click an item to view or use it.
If there are no guide titles listed in HP Pavilion PC
Tools, your PC has no onscreen guides.
HP Pavilion home PC
on the taskbar.
All Programs
Hewlett-Packard
hp pavilion pc tools
.
.
.
Page 93

Getting HP Updates for the PC
Informing You of Changes
HP provides an Internet-based service that
includes informing you when updates are
available for your PC.
The updates from HP messages are also
available to you through the HP Web site under
the driver update and support information for
your model PC. To go to the Web site, see
“Visiting the Hewlett-Packard Web Site” on
page 41.
Using HP Center for
Updates from HP Messages
HP Center is a service provided by HP to bring
you information, documents, digital media,
time-based notifications, and special offers.
Note:
HP Center is not available in all models.
HP Center also delivers Updates from
HP Messages. These messages inform you
of important information about your PC:
3
Product notices
3
System updates
3
Tips
The update message downloads when your PC
is idle, like other HP Center information, and
may display an alert or a notice that flashes on
your desktop. View messages as they arrive or
read them later. A message always asks for your
permission before installing a system update on
the PC.
Quick Start Guide
65
HP Updates
Page 94

Starting HP Center
The HP Center toolbar appears.
3
Right-click the
hp center
icon in the
system tray area of the taskbar, and
Open hp center
select
.
Or
3
Click Start on the taskbar, choose All
Programs, choose hp center, and then
click hp center again.
For detailed Help information, click the hp
center logo on the HP Center toolbar and
choose Help. For a description of a button or
area of the toolbar, place the cursor over the
toolbar.
Alerts you to
new messages
hp center
logo (Help)
66
HP Pavilion home PC
Page 95

Turning Off the HP Center Service
To permanently turn off the HP Center Service:
You can turn off the HP Center Service
temporarily (during the current PC session) or
permanently (for all future PC sessions).
To temporarily turn off the HP Center Service:
1
Right-click the
hp center
icon in the
system tray area of the taskbar.
2
Select
Shut down hp center service
.
The service is turned off until you restart the PC.
Note:
1
2
3
4
If you change your mind later, you can turn on the
service. See “Re-enabling the HP Center Service”
in the following section.
Click Start on the taskbar.
Choose All Programs.
Choose hp center.
Click Disable hp center.
The service is turned off until you re-enable it.
Quick Start Guide
HP Updates
67
Page 96

Re-enabling the HP Center Service
The service comes enabled with the PC. You
can turn off the service and re-enable it later,
using the steps below. When you re-enable the
HP Center Service, the service runs whenever
you are connected to the Internet, and you
receive messages as they become available.
To turn on the service:
1
Click
2
Choose
3
Choose
4
Click
68
Start
on the taskbar.
All Programs
hp center
Re-enable hp center
HP Pavilion home PC
.
.
.
Page 97

Resolving Problems
Troubleshooting
For help on general and miscellaneous problems you may be experiencing with the PC, refer to the
following pages for possible solutions. Look up the description of the problem, and try the solution listed.
For more detailed information, press the Help button on your keyboard, or click
Help and Support
select
Problem Solution
My computer won’t
turn on at all.
.
3
When you press the On button on the front of the computer, the following events
should happen:
1
The keyboard indicator lights flash.
2
The light next to the diskette drive flashes.
3
The hard disk spins or the diskette drive makes a noise.
4
The computer makes one beep indicating it is operating properly.
Start
on the taskbar and
Help
Warning:
115 or 230 VAC power system. The voltage select switch has been pre-set
to the correct voltage setting for use in the particular country/region
where it was initially sold. Changing the voltage select switch to the
incorrect position can damage your PC and void any implied warranty.
Your system is provided with a voltage select switch for use in a
Quick Start Guide
69
Page 98

Problem Solution
My computer won’t
turn on at all.
3
If the computer doesn’t go through the above procedure, check the following:
3
The power cord and all cables are securely plugged into the computer.
3
The power cord is plugged into a grounded outlet. Check to see whether the outlet
works by plugging another item into it.
3
The monitor is connected to the computer, plugged in, and turned on.
I installed a new
printer or other
device, and it won’t
work.
The computer doesn’t
make any sound.
3
Be sure that you installed the device drivers that came with the new device.
3
You may need an updated driver for Windows XP. For non-HP peripherals, contact the
vendor directly. For HP peripherals, visit the HP Web site. Refer to your
for details.
3
Check the speaker connection.
Note:
3
If your speakers have a power button, check whether it is turned on and the power
supply is turned on (select models only).
3
Remove the headphone connection.
3
Use the keyboard controls to increase the volume.
3
Press the Mute button on the keyboard to see if the mute feature is turned on.
3
Click the Volu me icon on the taskbar. Increase the volume, and make sure the
box is not selected.
Support Guide
Some systems include an adapter cable for the speakers. The left and right speaker
cables plug into the adapter cable. The adapter cable plugs into the speaker port on
the back of the computer.
Mute
70
HP Pavilion home PC
Page 99

Problem Solution
The computer (or part
of it) doesn’t seem to
be working.
3
Try restarting the computer as follows:
1
Click
2
Click
3
Click
3
If the computer shows no response to mouse or keyboard actions, reset the computer:
1
Press and hold the On button until the system turns off.
2
Wait a few seconds, and turn the computer back on.
Note:
3
It’s possible that a voltage spike, power outage, or brownout has occurred.
Symptoms of voltage spikes include a flickering video display, unexpected computer
startups, and the computer not responding to your commands. A voltage spike can
occasionally corrupt or destroy files, so it is a good idea to consistently make backup
copies of your data files. Prevent voltage spikes by installing a surge suppressor made
for use with computers between the power outlet and the computer power cord.
The monitor doesn’t
work, even though the
computer appears to.
3
Check the connection of the power cord into the monitor.
3
Make sure the monitor is turned on — it has its own power button.
3
Make sure the monitor power cord is plugged into a grounded outlet. Check to see
whether the outlet works by plugging another item into it. (If the light on the front of
the monitor is lit, the monitor is getting power.)
3
Check the cable connection between the monitor and the computer. The cable
connectors must be pushed in all the way.
3
Adjust the brightness and contrast controls on the monitor.
Start
on the taskbar.
Turn Off C om pu te r
Restart
Using the On button to reset the system is not recommended and should be used
only as a last resort.
.
.
Help
Quick Start Guide
71
Page 100

Problem Solution
When I push one
of the special or
multimedia buttons on
the keyboard, nothing
happens.
3
Check the button configuration. To reconfigure the button:
1
Click
2
Click
3
Click
4
Double-click
5
In the Keyboard Properties window that appears, click the
6
Double-click the button you want to change. The button configuration window
displays.
7
Choose the button capability from the drop-down list. Enter the Display Label and
the Address. (For a Web site, enter the complete Web site URL in the Address box.)
8
Click OK.
9
On the Buttons tab, click
10
Repeat steps 6 through 9 for each button you want to reconfigure.
11
Click OK when you are finished reconfiguring the keyboard.
The keyboard Print
3
Some programs do not recognize the Print button.
button doesn’t work.
I cannot remove a CD
or DVD disc.
3
You cannot remove a CD or DVD disc after you have turned off the computer. Turn on
the computer and press the Eject button to extend the tray.
Start
on the taskbar.
Control Panel
.
Printers and Other Hardware
Keyboard
.
Apply
.
, if present.
Buttons
tab.
72
HP Pavilion home PC
 Loading...