

Page 1

upgrade guide
hp OpenView
storage area manager
Product Version: 3.2
July 2004
Part Number: T2533-90000
This guide describes requirements and procedures for upgrading to hp OpenView Storage
Area Manager version 3.2.
Page 2

© Copyright 2001-2004 Hewlett-Packard Development Company, L.P.
Hewlett-Packard Company makes no warranty of any kind with regard to this material, including, but not limited to,
the implied warranties of merchantability and fitness for a particular purpose. Hewlett-Packard shall not be liable for
errors contained herein or for incidental or consequential damages in connection with the furnishing, performance,
or use of this material.
This document contains proprietary information, which is protected by copyright. No part of this document may be
photocopied, reproduced, or translated into another language without the prior written consent of Hewlett-Packard.
The information contained in this document is subject to change without notice.
Contains Embedded Engine™ software. Copyright © 2002 Solid Information Technology. All rights reserved.
Contains SNMP API software from AdventNet, Inc. Copyright © 1996-2002 AdventNet, Inc. All rights reserved.
Contains ILOG JViews Component Suite™
This product includes software developed by Apache Software Foundation (
This product includes code licensed from RSA Data Security.
Java™ is a U.S. trademark of Sun Microsystems, Inc.
Microsoft®, Windows®, and Windows NT® are U.S. registered trademarks of Microsoft Corporation.
UNIX® is a registered trademark of The Open Group.
Adobe® and Acrobat® are trademarks of Adobe Systems Incorporated.
Hewlett-Packard Company shall not be liable for technical or editorial errors or omissions contained herein. The
information is provided “as is” without warranty of any kind and is subject to change without notice. The warranties
for Hewlett-Packard Company products are set forth in the express limited warranty statements for such products.
Nothing herein should be construed as constituting an additional warranty.
Copyright © 1987-2002 by ILOG S.A. All rights reserved.
http://www.apache.org
).
Storage Area Manager Upgrade Guide
July 2004
Part Number: T2533-90000
Page 3

contents
About this Guide. . . . . . . . . . . . . . . . . . . . . . . . . . . . . . . . . . . . . . . . . . . . . . . . . . . .7
Overview. . . . . . . . . . . . . . . . . . . . . . . . . . . . . . . . . . . . . . . . . . . . . . . . . . . . . . . . . . . . . . . . . . 8
Intended audience. . . . . . . . . . . . . . . . . . . . . . . . . . . . . . . . . . . . . . . . . . . . . . . . . . . . . . . . 8
Prerequisites . . . . . . . . . . . . . . . . . . . . . . . . . . . . . . . . . . . . . . . . . . . . . . . . . . . . . . . . . . . . 8
Related documentation. . . . . . . . . . . . . . . . . . . . . . . . . . . . . . . . . . . . . . . . . . . . . . . . . . . . 9
Conventions . . . . . . . . . . . . . . . . . . . . . . . . . . . . . . . . . . . . . . . . . . . . . . . . . . . . . . . . . . . . . . 10
Document conventions. . . . . . . . . . . . . . . . . . . . . . . . . . . . . . . . . . . . . . . . . . . . . . . . . . . 10
Text symbols . . . . . . . . . . . . . . . . . . . . . . . . . . . . . . . . . . . . . . . . . . . . . . . . . . . . . . . . . . 10
Getting help . . . . . . . . . . . . . . . . . . . . . . . . . . . . . . . . . . . . . . . . . . . . . . . . . . . . . . . . . . . . . . 11
HP Technical Support . . . . . . . . . . . . . . . . . . . . . . . . . . . . . . . . . . . . . . . . . . . . . . . . . . . 11
HP websites . . . . . . . . . . . . . . . . . . . . . . . . . . . . . . . . . . . . . . . . . . . . . . . . . . . . . . . . . . . 11
HP authorized reseller . . . . . . . . . . . . . . . . . . . . . . . . . . . . . . . . . . . . . . . . . . . . . . . . . . . 12
1 Introduction . . . . . . . . . . . . . . . . . . . . . . . . . . . . . . . . . . . . . . . . . . . . . . . . . . . . . .13
What’s new for hp OpenView storage area manager 3.2 . . . . . . . . . . . . . . . . . . . . . . . . . . . . 14
Overall enhancements . . . . . . . . . . . . . . . . . . . . . . . . . . . . . . . . . . . . . . . . . . . . . . . . . . . 14
hp OpenView storage builder. . . . . . . . . . . . . . . . . . . . . . . . . . . . . . . . . . . . . . . . . . . . . . 15
hp OpenView storage accountant. . . . . . . . . . . . . . . . . . . . . . . . . . . . . . . . . . . . . . . . . . . 15
System requirements. . . . . . . . . . . . . . . . . . . . . . . . . . . . . . . . . . . . . . . . . . . . . . . . . . . . . . . . 16
Management server system requirements . . . . . . . . . . . . . . . . . . . . . . . . . . . . . . . . . . . . 16
Small storage networks . . . . . . . . . . . . . . . . . . . . . . . . . . . . . . . . . . . . . . . . . . . . . . . 16
Moderate to large storage networks. . . . . . . . . . . . . . . . . . . . . . . . . . . . . . . . . . . . . . 16
Management client system requirements. . . . . . . . . . . . . . . . . . . . . . . . . . . . . . . . . . . . . 17
SAN host system requirements . . . . . . . . . . . . . . . . . . . . . . . . . . . . . . . . . . . . . . . . . . . . 18
SAN host patch requirements. . . . . . . . . . . . . . . . . . . . . . . . . . . . . . . . . . . . . . . . . . . . . . 19
2 Verifying the environment for upgrade . . . . . . . . . . . . . . . . . . . . . . . . . . . . . . . . . .21
Preparing for upgrade . . . . . . . . . . . . . . . . . . . . . . . . . . . . . . . . . . . . . . . . . . . . . . . . . . . . . . . 22
Verifying management server and management client requirements. . . . . . . . . . . . . . . . . . . 23
3Storage Area Manager Upgrade Guide
Page 4

Contents
Verifying host requirements . . . . . . . . . . . . . . . . . . . . . . . . . . . . . . . . . . . . . . . . . . . . . . . . . . 24
Verifying hp OpenView storage optimizer requirements. . . . . . . . . . . . . . . . . . . . . . . . . . . . 25
Verifying hp OpenView storage allocater requirements . . . . . . . . . . . . . . . . . . . . . . . . . . . . 26
3 Upgrading from version 3.1 . . . . . . . . . . . . . . . . . . . . . . . . . . . . . . . . . . . . . . . . . .27
Overview. . . . . . . . . . . . . . . . . . . . . . . . . . . . . . . . . . . . . . . . . . . . . . . . . . . . . . . . . . . . . . . . . 28
Preparing to upgrade. . . . . . . . . . . . . . . . . . . . . . . . . . . . . . . . . . . . . . . . . . . . . . . . . . . . . . . . 29
Select the drives and directories for the database files . . . . . . . . . . . . . . . . . . . . . . . . . . 29
Saved legacy database . . . . . . . . . . . . . . . . . . . . . . . . . . . . . . . . . . . . . . . . . . . . . . . . 29
Migrated database . . . . . . . . . . . . . . . . . . . . . . . . . . . . . . . . . . . . . . . . . . . . . . . . . . . 30
Previously migrated database . . . . . . . . . . . . . . . . . . . . . . . . . . . . . . . . . . . . . . . . . . 30
Legacy database. . . . . . . . . . . . . . . . . . . . . . . . . . . . . . . . . . . . . . . . . . . . . . . . . . . . . 30
Backup database . . . . . . . . . . . . . . . . . . . . . . . . . . . . . . . . . . . . . . . . . . . . . . . . . . . . 30
Disable any anti-virus software . . . . . . . . . . . . . . . . . . . . . . . . . . . . . . . . . . . . . . . . . . . . 31
Uninstall the Host Agent software on the management server . . . . . . . . . . . . . . . . . . . . 31
Uninstall HP StorageWorks Command View SDM . . . . . . . . . . . . . . . . . . . . . . . . . . . . 31
Upgrading to Storage Area Manager 3.2 . . . . . . . . . . . . . . . . . . . . . . . . . . . . . . . . . . . . . . . . 32
Prepare the management server for the upgrade (Welcome Wizard) . . . . . . . . . . . . . . . 33
Migrate the current 3.1 database (Pre-upgrade Database Wizard) . . . . . . . . . . . . . . . . . 40
Install Storage Area Manager 3.2 (Installation Wizard) . . . . . . . . . . . . . . . . . . . . . . . . . 47
Set up the new 3.2 database (Post-upgrade Database Wizard) . . . . . . . . . . . . . . . . . . . . 53
Set up Storage Area Manager 3.2 (Setup Assistant) . . . . . . . . . . . . . . . . . . . . . . . . . . . . 57
Upgrade the Host Agent software (Setup Assistant) . . . . . . . . . . . . . . . . . . . . . . . . . . . . 63
Activate Storage Allocater (Setup Assistant). . . . . . . . . . . . . . . . . . . . . . . . . . . . . . . . . . 67
Finish the Setup Assistant and start a discovery (Setup Assistant) . . . . . . . . . . . . . . . . . 70
Performing additional post-upgrade tasks . . . . . . . . . . . . . . . . . . . . . . . . . . . . . . . . . . . . . . . 73
Install HP StorageWorks Command View SDM. . . . . . . . . . . . . . . . . . . . . . . . . . . . . . . 73
Install DPIs. . . . . . . . . . . . . . . . . . . . . . . . . . . . . . . . . . . . . . . . . . . . . . . . . . . . . . . . . . . . 73
Upgrade the management client. . . . . . . . . . . . . . . . . . . . . . . . . . . . . . . . . . . . . . . . . . . . 73
Windows-based management clients. . . . . . . . . . . . . . . . . . . . . . . . . . . . . . . . . . . . . 74
UNIX-based management clients . . . . . . . . . . . . . . . . . . . . . . . . . . . . . . . . . . . . . . . 75
Upgrade hp OpenView storage area manager MoM . . . . . . . . . . . . . . . . . . . . . . . . . . . . 76
Windows-based MoM clients . . . . . . . . . . . . . . . . . . . . . . . . . . . . . . . . . . . . . . . . . . 76
UNIX-based MoM clients . . . . . . . . . . . . . . . . . . . . . . . . . . . . . . . . . . . . . . . . . . . . . 77
Manage hosts with operating systems that are no longer supported . . . . . . . . . . . . . . . . 77
4 Storage Area Manager Upgrade Guide
Page 5

Contents
4 Troubleshooting . . . . . . . . . . . . . . . . . . . . . . . . . . . . . . . . . . . . . . . . . . . . . . . . . . .79
Database is empty after the upgrade is complete . . . . . . . . . . . . . . . . . . . . . . . . . . . . . . . . . . 80
Index . . . . . . . . . . . . . . . . . . . . . . . . . . . . . . . . . . . . . . . . . . . . . . . . . . . . . . . . . . .85
5Storage Area Manager Upgrade Guide
Page 6

Contents
6 Storage Area Manager Upgrade Guide
Page 7

about this
guide
This upgrade guide provides information to help you:
■ Upgrade from version 3.1 of Storage Area Manager
■ Troubleshoot Storage Area Manager installation
About this Guide topics include:
■ Overview, page 8
■ Conventions, page 10
■ Getting help, page 11
About this Guide
About this guide
7Storage Area Manager Upgrade Guide
Page 8

About this Guide
Overview
This section covers the following topics:
■ Intended audience
■ Prerequisites
■ Related documentation
Intended audience
This book is intended for use by customers and HP authorized service providers
who are experienced with the following:
■ Storage Area Manager
■ Storage networks
■ Management server, client, and SAN host operating systems
■ LANs
■ TCP/IP
■ HP OpenView Auto Pass
■ HP OpenView VantagePoint and HP OpenView Performance Agent (Storage
Optimizer administrators only)
■ Firewalls (optional)
■ Multi-homed systems (optional)
Prerequisites
Before you upgrade to Storage Area Manager 3.2, make sure that you consider the
following items:
■ Do you want to migrate the current database to the new Storage Area Manager
database schema, or do you want to create a new database?
■ Is your current Storage Area Manager environment stable and operational?
The procedures described in this guide assume that you are upgrading from a
working Storage Area Manager environment. If your current environment is
not stable and operational, contact your HP support representative before
upgrading.
8 Storage Area Manager Upgrade Guide
Page 9

Related documentation
In addition to this guide, HP provides:
■ hp OpenView storage area manager 3.2 installation guide (T2533-90001).
The installation guide includes requirements and procedures for installing,
setting up, and uninstalling Storage Area Manager.
■ hp OpenView storage area manager 3.2 administrator’s guide
(T2533-90002). The administrator’s guide includes setup and maintenance
procedures and Storage Area Manager interoperability information.
■ hp OpenView storage area manager 3.2 CLUI reference manual
(T2533-90003). The CLUI reference manual includes information on how to
operate the CLUI in its various modes and includes reference information on
each CLUI command.
■ hp OpenView integration guides. These guides provide the information
necessary to integrate Storage Area Manager with various hp OpenView
products. The integration guides are in the
Storage Area Manager CD #1.
■ Online help system. The online help provides immediate user assistance for
the tasks that can be performed within the Storage Area Manager and SAM
Manager of Managers user interfaces.
■ Release notes. The release notes alert you to known issues and late-breaking
information.
About this Guide
ov_integration directory on
Storage Area Manager Upgrade Guide
9
Page 10

About this Guide
Conventions
Conventions consist of the following:
■ Document conventions
■ Text symbols
Document conventions
This document follows the conventions shown in Tab le 1.
Table 1: Document conventions
Cross-reference links Blue text: Figure 1
Key names, menu items, and buttons Bold
Element Convention
Text symbols
File names and text emphasis
User input, command and directory
names, and system responses (output
and messages)
Variables <monospace, italic font>
Website addresses Blue, underlined sans serif font text:
Italics
Monospace font
http://www.hp.com
The following symbols may be found in the text of this guide. They have the
following meanings.
Caution: Text set off in this manner indicates that failure to follow directions
could result in damage to equipment or data.
Note: Text set off in this manner presents commentary, sidelights, or interesting points
of information.
10 Storage Area Manager Upgrade Guide
Page 11

Getting help
If you still have a question after reading this guide, contact an HP authorized
service provider or access our website:
HP Technical Support
Telephone numbers for worldwide technical support are listed on the following
HP website:
of origin.
Note: For continuous quality improvement, calls may be recorded or monitored.
Be sure to have the following information available before calling:
■ hp OpenView storage area manager version number
■ Applicable error messages
■ Detailed, specific questions
http://www.hp.com
http://www.hp.com/support/
About this Guide
.
. From this website, select the country
HP websites
■ Access storage at:
From this website, select the appropriate product or solution.
■ For product information, patches, and documentation, access the hp
OpenView website:
http://h18006.www1.hp.com/products/storage/software/sam/index.html
■ To download hp OpenView device plug-ins (DPIs), visit the DPI website:
http://www.openview.hp.com/products/dpi/index.html
■ For the latest troubleshooting information, access the hp OpenView technical
knowledge base website:
http://www.openview.hp.com/sso/ecare/keyword#results
Storage Area Manager Upgrade Guide
http://www.hp.com/country/us/eng/prodserv/storage.html
.
.
.
.
11
Page 12

About this Guide
HP authorized reseller
For the name of your nearest HP authorized reseller:
■ In the United States, call 1-800-345-1518.
■ In Canada, call 1-800-263-5868.
■ Elsewhere, see the HP website for locations and telephone numbers:
http://www.hp.com
.
12 Storage Area Manager Upgrade Guide
Page 13

Introduction
This chapter provides an overview of hp OpenView storage area manager. The
major topics in this chapter include:
■ What’s new for hp OpenView storage area manager 3.2, page 14
■ System requirements, page 16
1
13Storage Area Manager Upgrade Guide
Page 14

Introduction
What’s new for hp OpenView storage area manager 3.2
Storage Area Manager 3.2 introduces new features and capabilities across the
entire product suite of applications.
Overall enhancements
The following is introduced regardless of which applications you install and
license.
■ Extended support environment. Storage Area Manager 3.2 extends its
supported environment by:
— Adding Windows Server 2003 (32-bit) as a supported management server
platform.
— Adding RedHat Advanced Server 2.1 and Windows Server 2003 (32-bit)
as supported management client and Manager of Managers platforms.
— Adding HP-UX 11.23, OpenVMS 7.3-2, AIX 5.2, RedHat Advanced
Server 2.1, RedHat Advanced Server 3.0, and Windows Server 2003
(64-bit) as supported SAN host platforms.
Note: HP-UX 11.23, AIX 5.2, and Windows Server 2003 (64-bit) support for SAN
hosts were also added for Storage Area Manager 3.1 with the SANMG_00011 patch.
Note: Storage Allocater is not supported on the new SAN host platforms.
■ Storage Management Initiative Specification (SMI-S) support. Storage Area
Manager now manages devices through this specification for those devices
that support it.
■ Report utilities. You can now extract Storage Area Manager data for use with
third-party reporting tools. You can use any third-party reporting application
that supports Open Database Connectivity (ODBC) drivers.
■ Selective discovery. You can now determine which devices you want Storage
Area Manager to manage within your storage network. Rather than managing
all supported hosts, interconnect devices, and storage devices in the storage
network, you can customize Storage Area Manager to only discover and
manage those devices you want.
14 Storage Area Manager Upgrade Guide
Page 15

■ Filtered mapping. You can now customize the device map by configuring the
map to not display selected nodes.
■ Zone aliases. Storage Area Manager now discovers and displays properties
for zone aliases configured on switches that are supported by the
HP OpenView DPI for Brocade.
hp OpenView storage builder
Storage Builder 3.2 introduces the following new features. You must have Storage
Builder installed and licensed to obtain these new features.
■ Microsoft Exchange 2003 support. Storage Builder now collects and displays
managed application data for Microsoft Exchange 2003 organizations.
■ Oracle 9i RAC support. Storage Builder now supports Oracle 9i Real
Application Cluster (RAC). Shared storage is displayed in Capacity panels,
but is not double counted in Capacity totals.
■ Veritas Volume Manager (VxVM) support. Storage Builder now collects and
displays information about volume groups on Windows hosts that use
VxVM 3.0 and 3.1.
■ Logical space details for Oracle nodes. For Oracles databases and nodes,
view panels show the total, used, and free logical space.
Introduction
■ Host Managed Application panels. The new host panels show information
about the Exchange organizations and Oracle databases that are accessible to
the selected host.
hp OpenView storage accountant
Storage Accountant 3.2 introduces the following new features. You must have
Storage Accountant installed and licensed to obtain these new features.
■ Service level price calculator. Storage Area Manager’s service level price
calculator helps you calculate a service level price/GB/hour that considers the
total cost associated with storage.
■ Support for the StorageWorks XP/EVA Pay per use program. Storage
Accountant now supports the EVA through HP’s StorageWorks XP/EVA Pay
per use (PPU) program. For more information about the PPU program, visit
the following website:
http://www.hp.com/hps/ondemand/od_ppu.html
.
15Storage Area Manager Upgrade Guide
Page 16

Introduction
System requirements
This section describes only the system requirements that are new or have changed
for Storage Area Manager 3.2. For a complete list of system requirements, see the
hp OpenView storage area manager installation guide.
Management server system requirements
Small storage networks
■ Storage Area Manager now supports Windows Server 2003 (32-bit) Web
Server, Standard Server, and Enterprise. The management server must have
the following:
— 1 GHz processor
—1 GB RAM
—1 GB disk space
—CD-ROM drive
— Video card/display that supports resolutions of at least 800 x 600 with
64,000 colors
— 10/100 Mbps Ethernet
— Microsoft Internet Explorer (version supplied with operating system)
Netscape Navigator 4.7 (or newer)
Moderate to large storage networks
Any management server specifications that are not listed here remain the same
regardless of the size of the storage network.
■ For Windows 2000 Professional, Server, and Advanced Server, the
management server must now have a 2.4 GHz dual-processor.
■ For Windows Server 2003 (32-bit) Web Server, Standard Server, and
Enterprise Server, the management server must have the following:
— 2.4 GHz processor
—2 GB RAM
16 Storage Area Manager Upgrade Guide
Page 17

Management client system requirements
■ Storage Area Manager now supports Windows Server 2003 (32-bit) Web
Server, Standard Server, and Enterprise Server. The management client must
have the following:
— 500 MHz processor
— 512 MB RAM
— 95 MB disk space
— Video card that supports resolution of at least 800 x 600 with 64,000
colors
— 10/100 Mbps Ethernet
— Microsoft Internet Explorer (version supplied with browser)
Netscape Navigator 4.7 (or newer)
■ Storage Area Manager now supports HP-UX 11.11. The management client
must have the following:
— 400 MHz processor
— 256 MB RAM
— 150 MB disk space
Introduction
— Graphics card support with 64,000 colors or better
— 10/100 Mbps Ethernet
— Netscape Navigator 4.7 (or newer)
■ For Solaris 8.0, the management client must now have a 400 MHz processor.
■ For RedHat Advanced Server, the management client must now have the
following:
— 500 MHz processor
— 512 MB RAM
17Storage Area Manager Upgrade Guide
Page 18

Introduction
SAN host system requirements
Storage Area Manager no longer supports the following operating systems:
— HP-UX 11.20
—Solaris 7.0
— AIX 4.3.3
— Tru64 4.0f
—Windows NT 4.0
— OpenVMS 7.3
— Linux RedHat 7.1
— RedHat Enterprise Linux AS 2.1
■ Storage Area Manager now supports HP-UX 11.23. The SAN host must have
the following:
— 1 GB processor
— 512 MB RAM
— 322 MB disk space
— 10/100 Mbps Ethernet
■ For AIX 5.1, the SAN host must now have 346 MB disk space.
■ Storage Area Manager now supports AIX 5.2. The SAN host must have the
following:
— 340 MHz processor
— 256 MB RAM
— 346 MB disk space
— 10/100 Mbps Ethernet
■ Storage Area Manager now supports Windows Server 2003 (64-bit)
Enterprise Server and Data Center. The SAN host must have the following:
— 633 MHz processor
—1 GB RAM
— 200 MB disk space
18 Storage Area Manager Upgrade Guide
Page 19

■ Storage Area Manager now supports OpenVMS 7.3-2. The SAN host must
have the following:
— 617 MHz processor
— 512 MB RAM
— 150 MB disk space
— 10/100 Mbps
■ Storage Area Manager now supports RedHat Advanced Server 2.1, RedHat
Advanced Server 3.0, and United Linux 1.0. The SAN host must have the
following:
— 600 MHz processor
— 512 MB RAM
— 144 MB disk space
— 10/100 Mbps
SAN host patch requirements
Storage Area Manager now requires the following patches on the SAN hosts.
Introduction
Table 2: SAN host patch requirements
Operating system Patches
HP-UX 11.0 QPK1100 (Sept. 2003)
HP-UX 11.11 GOLDBASE11I (Dec. 2003)
HP-UX 11.23 Base 11.23 / Base 11.23 Auxiliary
AIX 5.1
■ OS Level 5.1.0.0-04
■ OS Level 5.1.0.0-05
AIX 5.2 OS Level 5.2.0.0-02
Tru64 5.1a
Tru64 5.1b
Windows Server 2003 (32-bit) Web
■ Patch Kit 4
■ Patch Kit 6
■ Patch Kit 2
■ Patch Kit 3
No Service Pack required
Server, Standard Server, and
Enterprise Server
19Storage Area Manager Upgrade Guide
Page 20

Introduction
Table 2: SAN host patch requirements
Operating system Patches
Windows Server 2003 (64-bit)
No Service Pack required
Enterprise Server and Data Center
Netware 6.0
OpenVMS 7.3-2
■ Service Pack 3 and 4
■ jvm 1.4.1
■ VMS732_F11X_V0100 F11X Facility
Kit for OpenVMS Alpha V7.3-2
■ VMS732_SYS_V0200 SYS Facility Kit
for OpenVMS Alpha V7.3-2
■ VMS732_PCSI_V0100 PCSI Facility Kit
for OpenVMS Alpha V7.3-2
■ VMS732_UPDATE_V0100 OpenVMS
Alpha V7.3-2 UPDATE Kit
■ VMS732_DCL_V0100 DCL Facility ECO
Kit for OpenVMS Alpha V7.3-2
■ VMS732_FIBRE_SCSI_V0200
FIBRE_CHANNEL/SCSI ECO Kit for
OpenVMS Alpha V7.3-2
Linux RedHat Advanced Server 2.1 U2 / Kernel 2.4.9
Linux RedHat Advanced Server 3.0 U1 / Kernel 2.4.21
United Linux 1.0 / SuSE Enterprise
Server 8
Service Pack 2a / Kernel 2.4.19
Service Pack 3 / Kernel 2.4.21
20 Storage Area Manager Upgrade Guide
Page 21

Verifying the environment for upgrade
Upgrading Storage Area Manager includes several preinstallation steps. The
procedures in this chapter should be completed before continuing with the
upgrade procedure. The topics covered in this chapter include:
■ Preparing for upgrade, page 22
■ Verifying management server and management client requirements, page 23
■ Verifying host requirements, page 24
■ Verifying hp OpenView storage optimizer requirements, page 25
■ Verifying hp OpenView storage allocater requirements, page 26
2
21Storage Area Manager Upgrade Guide
Page 22

Verifying the environment for upgrade
Preparing for upgrade
Preparing to upgrade Storage Area Manager requires three tasks:
1. Verify that the management server and any management clients meet or
exceed minimum system requirements and have the required software
products installed.
2. Verify that each host meets or exceeds minimum system requirements and has
certain features enabled that allow deployment of the Host Agent software.
3. Verify that the additional host and device requirements for Storage Optimizer
and Storage Allocater are met (required only for Storage Optimizer and
Storage Allocater installations).
22 Storage Area Manager Upgrade Guide
Page 23

Verifying the environment for upgrade
Verifying management server and management client requirements
This guide assumes that Storage Area Manager 3.1 is installed and that the
management server and management clients meet or exceed all of the minimum
system and patch requirements. See the hp OpenView storage area manager
installation guide for more information about the requirements.
If you intend to view and operate Storage Area Manager from a management
client, verify that the intended host meets the minimum system requirements for a
management client.
Note: Patches to support the JRE software are required on HP-UX and Solaris
management clients. For a list of required patches, see “SAN host patch requirements”
in the
hp OpenView storage area manager installation guide
.
23Storage Area Manager Upgrade Guide
Page 24

Verifying the environment for upgrade
Verifying host requirements
This guide assumes that Storage Area Manager 3.1 is installed and that the hosts
meet or exceed all of the minimum system and patch requirements.
Tabl e 3 identifies only the SAN host requirements that are new or have changed.
See the hp OpenView storage area manager installation guide for disk
requirements and verification procedures for other SAN hosts.
Table 3: HP-UX, AIX, and Linux RedHat SAN host directory requirements
Disk Space Requirement (in MB)
HP-UX
Directory
/opt 251 210 70
/etc 164
/var 70 65 70
/usr —65—
11.23
AIX
Linux
RedHat
In addition to the hardware system requirements, Storage Area Manager requires
certain features to be enabled for each host platform, thus allowing installation of
the Host Agent software.
Obtain the following information for each SAN host. You will need this
information during installation in order to deploy the Host Agent software to each
SAN host.
■ Hostname
■ User name (root, administrator, or superuser)
■ Password
Note: The user name must have administrator privileges on Windows hosts, and
superuser privileges on Unix hosts.
For Windows-based SAN hosts, the password may not include special characters such
as ampersands (&), commas (,), semicolons (;), vertical bars (|); carets (^), or
parentheses.
For HP-UX and Solaris hosts, the hostname may not exceed eight characters.
24 Storage Area Manager Upgrade Guide
Page 25

Verifying the environment for upgrade
Verifying hp OpenView storage optimizer requirements
The requirements for Storage Optimizer are the same as for Storage Area
Manager 3.1. See the hp OpenView storage area manager installation guide to
verify these requirements.
25Storage Area Manager Upgrade Guide
Page 26

Verifying the environment for upgrade
Verifying hp OpenView storage allocater requirements
The requirements for Storage Allocater are the same as for Storage Area
Manager 3.1. See the hp OpenView storage area manager installation guide to
verify these requirements.
26 Storage Area Manager Upgrade Guide
Page 27

Upgrading from version 3.1
This chapter is intended only for users who are upgrading from hp OpenView
storage area manager version 3.1. The topics covered in this chapter include:
■ Overview, page 28
■ Preparing to upgrade, page 29
■ Upgrading to Storage Area Manager 3.2, page 32
■ Performing additional post-upgrade tasks, page 73
3
27Storage Area Manager Upgrade Guide
Page 28

Upgrading from version 3.1
Overview
This chapter describes only the procedure for upgrading from Storage Area
Manager 3.1 to Storage Area Manager 3.2.
Caution: If you are upgrading from any version prior to 3.1, HP highly
recommends that you contact your HP support representative. If you upgrade
from a version prior to 3.1 without consulting your HP support representative,
there is a risk that the upgrade will not be successful.
28 Storage Area Manager Upgrade Guide
Page 29

Preparing to upgrade
This section describes the tasks that you must complete before you begin
upgrading to Storage Area Manager 3.2.
Select the drives and directories for the database files
During the upgrade, the Pre-upgrade Database Wizard and the Post-upgrade
Database Wizard provide several opportunities to specify where you want to store
various database files. You should decide where you want to store each database
file before you begin the upgrade. Select the drives and directories that contain
sufficient disk space. The Database Wizards enforce disk-space requirements to
ensure that the upgrade is successful.
Note: The size of the current Storage Area Manager 3.1 database is equivalent to the
size of the files in the sanmgr\managementserver\db directory.
The following sections describe the database files for which you can specify a
location.
Upgrading from version 3.1
Saved legacy database
The Pre-upgrade Database Wizard provides the opportunity to save a copy of the
legacy database and user-defined settings. The legacy database is the current
Storage Area Manager 3.1 database. The location that you specify for the saved
legacy database (for example, c:\temp\saved_legacy_db) must have disk
space that is equal to the current Storage Area Manager 3.1 database.
If you do not intend to migrate the current 3.1 database to the new 3.2 database
schema during the upgrade, HP recommends that you save a copy of the
current 3.1 database. If you do not migrate the current 3.1 database, the
Installation Wizard creates an empty database for Storage Area Manager 3.2.
After you are comfortable with Storage Area Manager 3.2, you can then migrate
the current 3.1 database to the new 3.2 database schema.
29Storage Area Manager Upgrade Guide
Page 30

Upgrading from version 3.1
Migrated database
The Pre-upgrade Database Wizard converts the data in the current 3.1 database to
the new 3.2 database schema, and saves the new migrated database to the location
that you specify (for example, c:\temp\migrated_db). The location that
you specify must have disk space that is sufficient to hold the current 3.1 database.
You cannot save the migrated database to the same location as the current 3.1
database (sanmgr\managementserver\db). However, after Storage Area
Manager 3.2 is installed, the Post-upgrade Database Wizard provides the option to
move the migrated database to another location, including the
sanmgr\managementserver\db directory.
Previously migrated database
After Storage Area Manager 3.2 is installed, the Post-upgrade Database Wizard
checks to see if a migrated database exists. If you migrated the database at the
beginning of the upgrade, the Post-upgrade Database Wizard shows the location
of the previously migrated database, and provides the option to move the
previously migrated database to another location. For consistency with Storage
Area Manager 3.1, you can move the migrated database to the
sanmgr\managementserver\db directory.
After Storage Area Manager 3.2 is installed and operational, the migrated
database becomes the current 3.2 database, regardless of the location.
Legacy database
After Storage Area Manager 3.2 is installed, the Post-upgrade Database Wizard
checks to see if a legacy database exists, shows the location of the legacy database,
and provides the option to move the legacy database to another location (for
example, c:\temp\legacy_db). If you moved the migrated database to the
sanmgr\managementserver\db directory, you should move the legacy
database to another location.
Backup database
The Post-upgrade Database Wizard provides the opportunity to specify where you
want to save the backup database. The backup database is a copy of the current 3.2
database. HP recommends that you store the current 3.2 database and the backup
database on separate physical drives (for example, c:\temp\backup_db).
30 Storage Area Manager Upgrade Guide
Page 31

Upgrading from version 3.1
Disable any anti-virus software
Before you begin the upgrade, HP strongly recommends that you disable any
anti-virus software that is running on the management server. If the anti-virus
software is scanning the Storage Area Manager files when the installer tries to
remove the files, the installer prompts you to reboot the management server. If this
happens, wait until the upgrade is complete before you reboot the management
server.
Uninstall the Host Agent software on the management server
If a Host Agent is installed on the management server, you must uninstall the Host
Agent software before upgrading to Storage Area Manager. See the hp OpenView
storage area manager installation guide for more information.
Uninstall HP StorageWorks Command View SDM
If Command View SDM is installed on the Storage Area Manager management
server, you must uninstall Command View SDM before upgrading to Storage
Area Manager 3.2. See the Command View SDM product documentation to
uninstall the product. Storage Area Manager will not proceed with upgrading the
management server if it detects that Command View SDM is installed.
31Storage Area Manager Upgrade Guide
Page 32

Upgrading from version 3.1
Upgrading to Storage Area Manager 3.2
This section provides only the instructions for upgrading from Storage Area
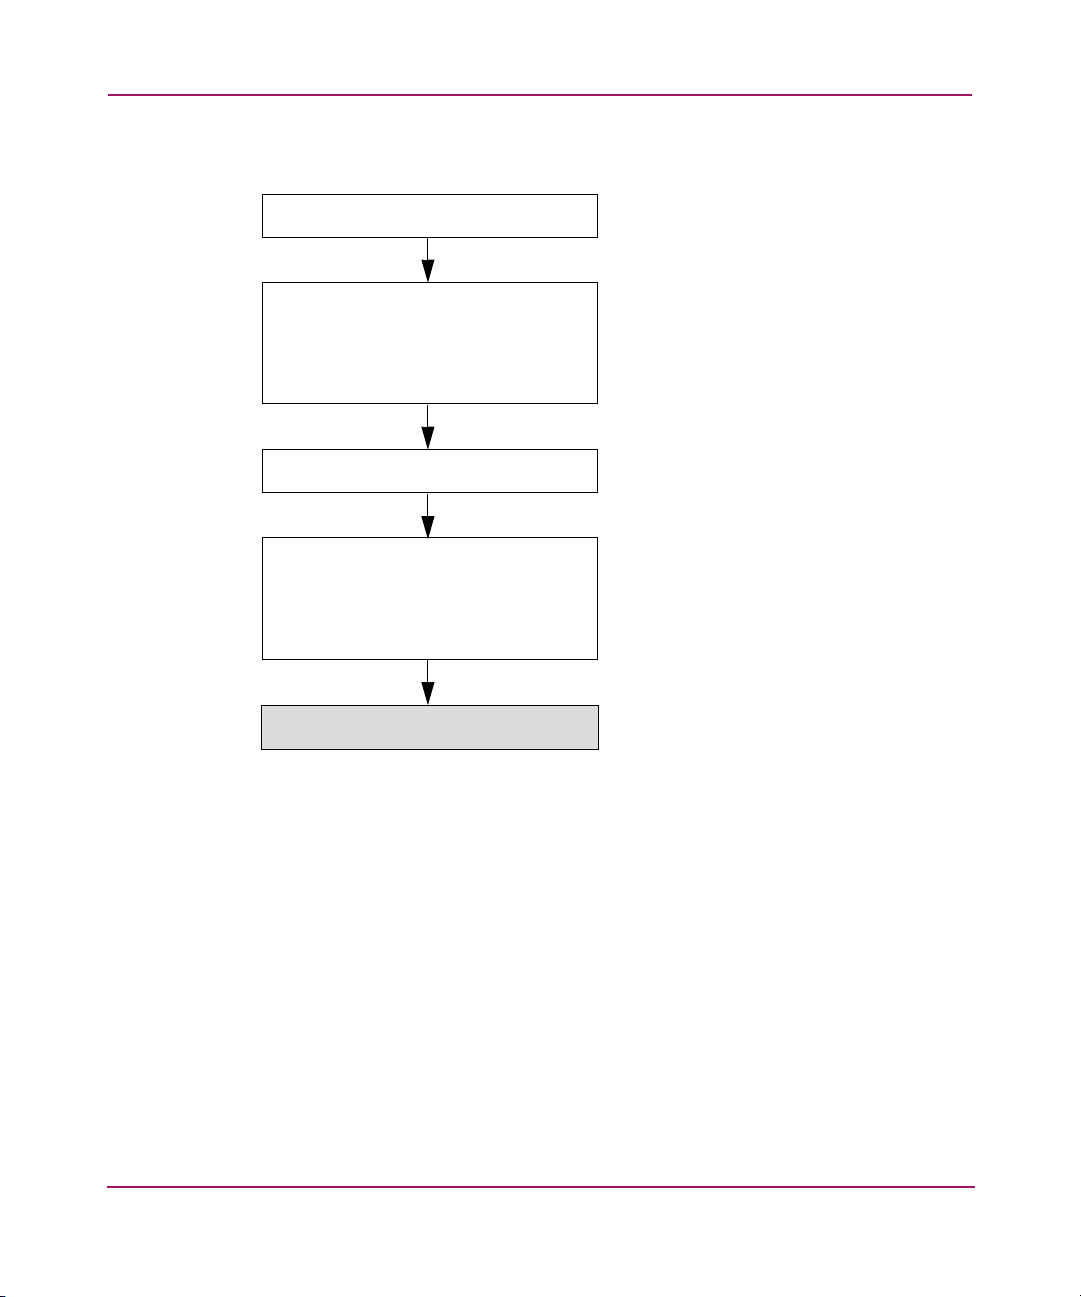
Manager 3.1 to Storage Area Manager 3.2. The following flowchart illustrates the
steps in the upgrade.
Welcome Wizard
Pre-upgrade Database Wizard
- location of
- legacy database: save to directory
- migrated database: specify directory
- relocate migrated database
- relocate legacy database
- save backup of migrated database
solid.ini
file
Installation Wizard
Post-upgrade Database Wizard
Setup Assistant
Figure 1: Upgrade flow diagram
The following sections provide instructions for each of these steps:
■ Prepare the management server for the upgrade (Welcome Wizard), page 33
■ Migrate the current 3.1 database (Pre-upgrade Database Wizard), page 40
■ Install Storage Area Manager 3.2 (Installation Wizard), page 47
■ Set up the new 3.2 database (Post-upgrade Database Wizard), page 53
■ Set up Storage Area Manager 3.2 (Setup Assistant), page 57
■ Upgrade the Host Agent software (Setup Assistant), page 63
32 Storage Area Manager Upgrade Guide
Page 33

Upgrading from version 3.1
■ Activate Storage Allocater (Setup Assistant), page 67
■ Finish the Setup Assistant and start a discovery (Setup Assistant), page 70
Prepare the management server for the upgrade (Welcome Wizard)
Welcome Wizard
Pre-upgrade Database Wizard
- location of
- legacy database: save to directory
- migrated database: specify directory
- relocate migrated database
- relocate legacy database
- save backup of migrated database
solid.ini
file
Installation Wizard
Post-upgrade Database Wizard
Setup Assistant
Figure 2: Upgrade flow diagram - Welcome Wizard
The Welcome Wizard is the first phase in the upgrade. During this phase, the
Welcome Wizard performs the following tasks:
■ Identifies the current version of Storage Area Manager
■ Checks for obsolete hosts
■ Verifies that the management server environment is set up correctly
■ Displays the license agreement
33Storage Area Manager Upgrade Guide
Page 34

Upgrading from version 3.1
■ Verifies the system requirements on the management server
■ Specifies the management server’s IP address for multi-homed servers only
Follow these steps to prepare the management server for the upgrade:
1. Log on to the management server where Storage Area Manager 3.1 is
installed.
2. Close all Windows applications and disable any antivirus programs.
3. Insert the hp OpenView storage area manager 3.2 CD #1 in the CD-ROM
drive.
4. Click the Install OpenView Storage Area Manager link. The Welcome
window displays.
Figure 3: Welcome window
34 Storage Area Manager Upgrade Guide
Page 35

Upgrading from version 3.1
5. Click the Next button to display the following window.
Figure 4: Current version installed
6. To determine if Storage Area Manager 3.2 no longer supports any of the hosts
in your current environment, click the Check for Obsoleted Hosts button.
Any obsoleted hosts in your environment are listed in a text editing
application.
35Storage Area Manager Upgrade Guide
Page 36

Upgrading from version 3.1
7. Click the Next button to display the following window.
Figure 5: Environment setup resources
8. If you have not already prepared the environment for the upgrade, review the
indicated information and perform any tasks that are required for your
environment.
Note: The Release Notes are located in the root of both Storage Area Manager 3.2
installation CDs and in the \doc directory on CD #1.
36 Storage Area Manager Upgrade Guide
Page 37

Upgrading from version 3.1
9. Click the Next button. The License Agreement window displays.
Figure 6: License Agreement window
10. Carefully read the agreement. To accept the agreement and continue
installation, select I accept the terms in the license agreement and click the
Next button. The System Requirements window displays.
Figure 7: System Requirements window
37Storage Area Manager Upgrade Guide
Page 38

Upgrading from version 3.1
11. Click the Next button to continue. If the machine on which you are installing
Storage Area Manager is multi-homed, the Local LAN Interface IP Address
window displays.
Figure 8: Local LAN Interface IP Address window
Note: If Storage Area Manager is not installed on a multi-homed management server,
Storage Area Manager 3.2 uses the existing LAN IP address.
38 Storage Area Manager Upgrade Guide
Page 39

Upgrading from version 3.1
12. Select the appropriate IP address from the IP drop-down list, and click the
Next button. The Installation wizard notifies you that a previous version of
Storage Area Manager is installed.
Figure 9: Previous version installed
13. Click the Next button to begin the database migration process. See “Migrate
the current 3.1 database (Pre-upgrade Database Wizard)” on page 40 for more
information.
Click the Cancel button to terminate the upgrade process. If you cancel the
upgrade process, Storage Area Manager 3.1 and the current 3.1 database are
not modified.
Caution: A command window opens and is automatically minimized on the
taskbar. Do not close this window at any time during the upgrade process.
Closing this window terminates the upgrade process.
39Storage Area Manager Upgrade Guide
Page 40

Upgrading from version 3.1
Migrate the current 3.1 database (Pre-upgrade Database Wizard)
Welcome Wizard
Pre-upgrade Database Wizard
- location of
- legacy database: save to directory
- migrated database: specify directory
- relocate migrated database
- relocate legacy database
- save backup of migrated database
solid.ini
file
Installation Wizard
Post-upgrade Database Wizard
Setup Assistant
Figure 10: Upgrade flow diagram - Pre-upgrade Database Wizard
The Pre-upgrade Database Wizard is the second phase of the upgrade. During this
phase, you perform the following tasks:
■ Specify the location of the database configuration file (solid.ini).
■ Optional. Save a copy of the current 3.1 database to a location that you specify
(for example, c:\temp\saved_legacy_db).
HP recommends that you save a copy of the current 3.1 database. If the
upgrade is not successful, you can continue using Storage Area Manager 3.1
with the current 3.1 database.
40 Storage Area Manager Upgrade Guide
Page 41

Upgrading from version 3.1
■ Optional. Migrate the current 3.1 database to the new 3.2 database schema,
and saves the migrated database to a location that you specify (for example,
c:\temp\migrated_db).
If you migrate the current 3.1 database, you cannot save the migrated database
to the same location as the current 3.1 database
(sanmgr\managementserver\db). However, after Storage Area
Manager 3.2 is installed, the Post-upgrade Database Wizard provides the
option to move the migrated database to another location, including the
sanmgr\managementserver\db directory.
If you do not migrate the current 3.1 database, the Post-upgrade Database
Wizard creates an empty database for Storage Area Manager 3.2.
After the database migration is complete, you can stop the upgrade and verify that
the migrated database is in the location that you specified. If the database
migration is successful, you can start the upgrade again, and continue installing
Storage Area Manager 3.2. If the database migration is not successful, you can
continue using Storage Area Manager 3.1 with the current 3.1 database.
If you previously chose to begin the database migration process, any Storage Area
Manager 3.1 services are automatically terminated. The Pre-upgrade Database
Wizard Welcome window displays.
Figure 11: Pre-upgrade Database Wizard Welcome window
41Storage Area Manager Upgrade Guide
Page 42

Upgrading from version 3.1
1. Click the Next button to display the following window.
Figure 12: Migrate the current database or create a new database
2. Select Yes, migrate the current database and click the Next button to
display the following window.
Note: If you select No, do not migrate the current database, Storage Area
Manager 3.2 contains an empty database when the upgrade is complete.
Figure 13: Database configuration file directory
3. Enter the location of the current database configuration file (solid.ini file).
Click the Browse button to help you locate the drive and directory where the
current database configuration file is stored.
42 Storage Area Manager Upgrade Guide
Page 43

Upgrading from version 3.1
4. Click the Next button to display the following window.
Figure 14: Saved legacy database directory
5. Select Yes, I want to save the legacy database. Enter the location where you
want to store a copy of the current 3.1 database.
Click the Browse button to help you locate the drive and directory where you
want to save the current 3.1 database.
Note: If you do not intend to migrate the current 3.1 database to the new 3.2
database schema during the upgrade, HP recommends that you save a copy of the
current 3.1 database. The Installation Wizard creates an empty database for
Storage Area Manager 3.2. After you are have tested Storage Area Manager 3.2
and are comfortable with the upgrade, you can then migrate the current 3.1
database to the new 3.2 database schema.
43Storage Area Manager Upgrade Guide
Page 44
Upgrading from version 3.1
6. Click the Next button to display the following window.
Figure 15: Migrated database directory
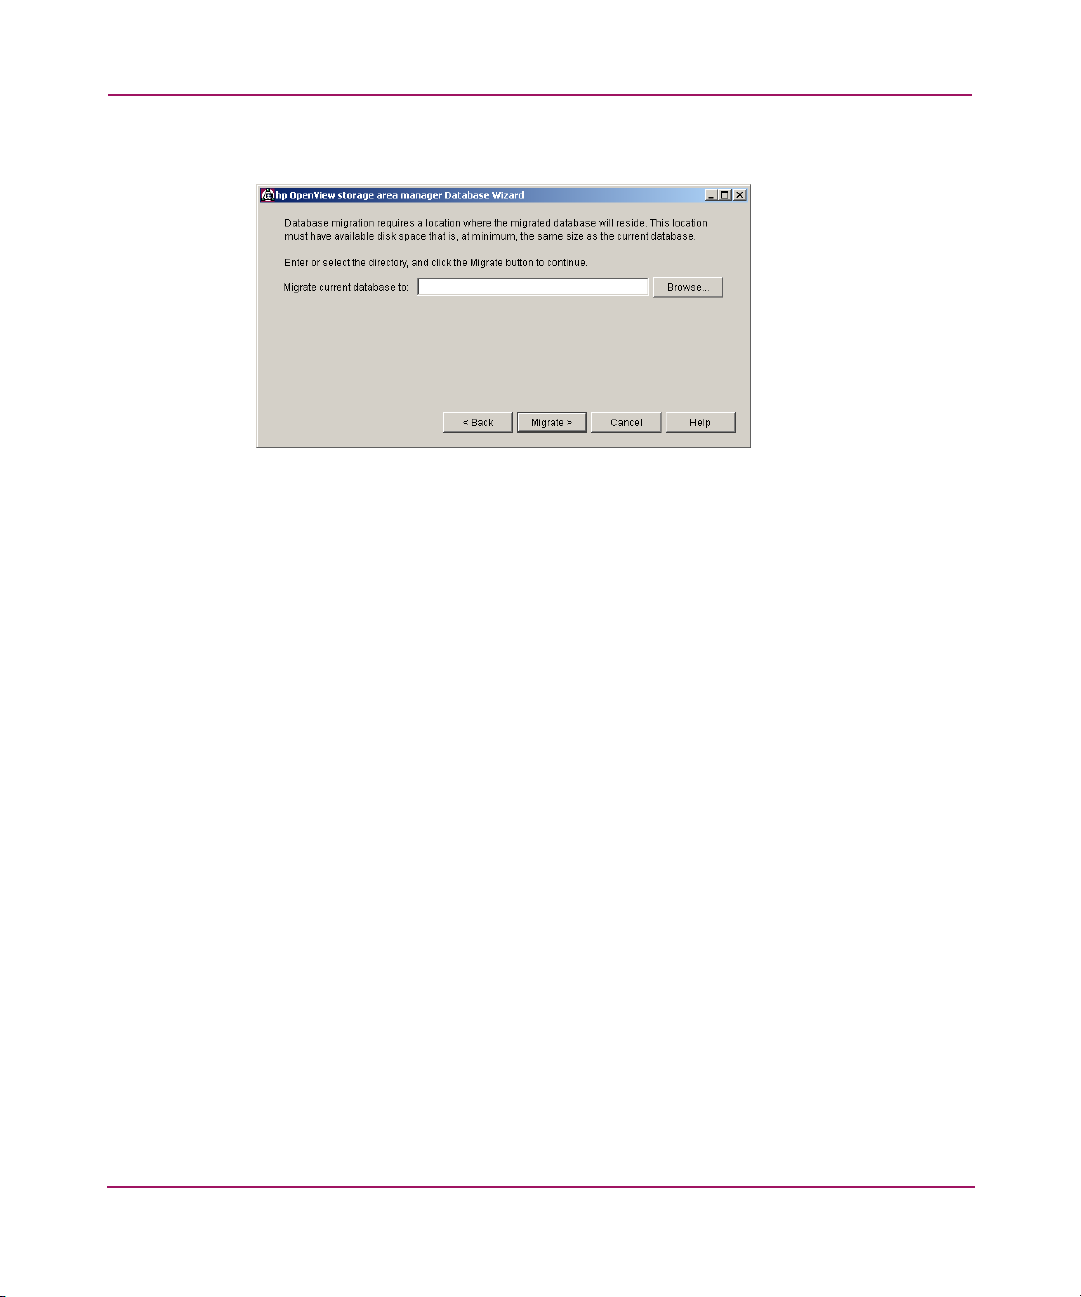
7. Enter the location where you want to store the migrated database.
Click the Browse button to help you locate the drive and directory where you
want to store the migrated database.
8. Click the Migrate button.
The wizard determines if there is adequate disk space. If there is not enough
disk space in either location to complete the migration, a warning screen
displays. Click the Back button on the warning screen to go back and change
a directory location.
If the wizard determines there is adequate disk space, but it does not meet the
minimum recommendation, you are provided with the option to continue. In
this instance, click the Next button. However, you should consider making
more disk available to Storage Area Manager in the future.
44 Storage Area Manager Upgrade Guide
Page 45

Upgrading from version 3.1
A progress indicator displays the status of the migration. The larger the
database to migrate, the longer the progress indicator displays.
Figure 16: Database migration progress indicator
When the database migration is complete, the following window displays.
Figure 17: Database migration summary window
45Storage Area Manager Upgrade Guide
Page 46

Upgrading from version 3.1
9. Click the Next button to display the following window.
Figure 18: Initiate installation
10. Select Yes, proceed to install, and click the Next button to proceed with the
installation. See “Install Storage Area Manager 3.2 (Installation Wizard),”
page 47 for more information.
Select No, stop here and click Next to terminate the installation. If you cancel
the installation, Storage Area Manager 3.1 is still available with the
current 3.1 database. To verify that the database migration was successful,
check to see if the migrated database is in the location that you specified. You
can then restart the upgrade, and continue to install Storage Area
Manager 3.2.
46 Storage Area Manager Upgrade Guide
Page 47

Install Storage Area Manager 3.2 (Installation Wizard)
Welcome Wizard
Pre-upgrade Database Wizard
Upgrading from version 3.1
- location of
- legacy database: save to directory
- migrated database: specify directory
- relocate migrated database
- relocate legacy database
- save backup of migrated database
solid.ini
file
Installation Wizard
Post-upgrade Database Wizard
Setup Assistant
Figure 19: Upgrade flow diagram - Installation Wizard
The Installation Wizard is the third phase of the upgrade. During this phase, the
installer performs the following tasks:
■ Stops the Storage Area Manager 3.1 services
■ Uninstalls Storage Area Manager 3.1
■ Installs Storage Area Manager 3.2
47Storage Area Manager Upgrade Guide
Page 48

Upgrading from version 3.1
If you stop the upgrade while Storage Area Manager 3.1 is being uninstalled, the
installer might not be able to restore Storage Area Manager 3.1 correctly. If the
installer can restore Storage Area Manager 3.1, you can continue using Storage
Area Manager 3.1 with the current 3.1 database until you are ready to continue
with the upgrade. If the installer cannot restore Storage Area Manager 3.1, you
can do one of the following:
■ Reinstall Storage Area Manager 3.1 and continue using the current 3.1
database.
■ Install Storage Area Manager 3.2. If you migrated the database, the installer
detects the location of the migrated database and uses it as the current
database for Storage Area Manager 3.2. If you did not migrate the database,
the installer creates an empty database for Storage Area Manager 3.2.
If you stop the upgrade after Storage Area Manager 3.1 is uninstalled but before
Storage Area Manager 3.2 is installed, Storage Area Manager 3.1 and the
current 3.1 database are no longer available. If this happens, you must install
Storage Area Manager 3.2. If you migrated the database, the installer detects the
location of the migrated database and uses it as the current database. If you did not
migrate the database, the installer creates an empty database for Storage Area
Manager 3.2.
48 Storage Area Manager Upgrade Guide
Page 49

Upgrading from version 3.1
If you previously chose to proceed to the installation, a window displays and
indicates that a previous version of Storage Area Manager is installed.
1. Click the Next button to continue.
See Chapter 3, “Installing hp OpenView storage area manager,” in the
hp OpenView storage area manager installation guide for more information.
Figure 20: Uninstall Storage Area Manager 3.1
49Storage Area Manager Upgrade Guide
Page 50

Upgrading from version 3.1
When the Storage Area Manager 3.1 is uninstalled, the following window
displays.
Figure 21: Setup Type window
2. Select Install Everything (Recommended) to install all of the Storage Area
Manager modules.
Select Customize to specify which Storage Area Manager modules you want
to install.
To change the location where Storage Area Manager 3.2 is installed, click the
Browse button, and select the location.
50 Storage Area Manager Upgrade Guide
Page 51

Upgrading from version 3.1
3. Click the Next button. A summary of the features that you selected to install
displays.
Figure 22: Summary of features to install
4. Review the summary information, and click the Install button to begin the
installation. A progress window displays.
Figure 23: Installation progress window
51Storage Area Manager Upgrade Guide
Page 52

Upgrading from version 3.1
5. When prompted, insert hp OpenView storage area manager CD #2 into the
CD-ROM drive to complete the installation.
When the installation is complete, the Post-upgrade Database Wizard
Welcome window displays.
Figure 24: Post-upgrade Database Wizard Welcome window
6. Click the Next button to set up the new Storage Area Manager 3.2 database.
See “Set up the new 3.2 database (Post-upgrade Database Wizard),” page 53
for more information.
Click the Cancel button to terminate the upgrade process.
Note: If you cancel the upgrade, Storage Area Manager 3.2 is installed with an empty
database.
52 Storage Area Manager Upgrade Guide
Page 53

Upgrading from version 3.1
Set up the new 3.2 database (Post-upgrade Database Wizard)
Welcome Wizard
Pre-upgrade Database Wizard
- location of
- legacy database: save to directory
- migrated database: specify directory
- relocate migrated database
- relocate migrated database
- relocate legacy database
- relocate legacy database
- save backup of migrated database
- save backup of migrated database
solid.ini
file
Installation Wizard
Post-upgrade Database Wizard
Post-upgrade Database Wizard
Setup Assistant
Figure 25: Upgrade flow diagram - Post-upgrade Database Wizard
The Post-Upgrade Database Wizard is the fourth phase of the upgrade. During this
phase, you can move the legacy database and the migrated database to new
locations, and specify where you want Storage Area Manager to store the backup
of the current 3.2 database.
If you migrated the current 3.1 database, the migrated database becomes the
current database for Storage Area Manager 3.2. If you did not migrate the
current 3.1 database, the Pre-upgrade Database Wizard creates an empty database
for Storage Area Manager 3.2.
53Storage Area Manager Upgrade Guide
Page 54

Upgrading from version 3.1
After Storage Area Manager 3.2 is installed, the following window displays.
Figure 26: Relocate migrated database window
1. Select No, I do not want to relocate the database to leave the migrated
database in the current location.
Select Yes, I want to relocate the database to move the migrated database to
another location. Enter the location where you want to move the migrated
database.
Click the Browse button to help you locate the drive and directory where you
want to move the migrated database.
Note: The migrated database becomes the current database for Storage Area
Manager 3.2.
Caution: Do not relocate the database to a shared network drive. It is not a
supported configuration.
54 Storage Area Manager Upgrade Guide
Page 55

Upgrading from version 3.1
2. Click the Next button to display the following window.
Figure 27: Relocate legacy database window
3. Select No, I do not want to relocate the legacy database to leave the legacy
database in the current location.
Select Yes, I want to relocate the legacy database to move the legacy
database to another location. Enter the location where you want to move the
legacy database.
4. Click the Next button to display the following window.
Figure 28: Backup database directory
55Storage Area Manager Upgrade Guide
Page 56

Upgrading from version 3.1
5. Enter the location where you want to store the database backup. HP
recommends that you store the database and the backup database on separate
physical drives.
Click the Browse button to help you locate the drive and directory where you
want to store the database backup.
Note: The location you select must have a minimum of 10 GB of available disk space.
6. Click the Install button to complete the migration. A confirmation window
displays that shows the location of the database directories.
Figure 29: Database location summary
Depending on the choices that you made during the upgrade, you will have
the following files:
— Previously migrated database. If you migrated the database, this is the
directory where you specified that the migrated database should be stored
(for example, c:\temp\migrated_db).
— Current database directory. If you relocated the migrated database, this is
the new directory where you specified that the database should be stored
(for example, sanmgr\managementserver\db). If you did not
relocate the migrated database, this is the directory where you specified
that the migrated database should be stored (for example,
c:\temp\migrated_db). Regardless of the location, this is the
database that Storage Area Manager 3.2 uses.
56 Storage Area Manager Upgrade Guide
Page 57

— Current backup directory. This is the directory where Storage Area
Manager saves a copy of the current database.
— Previous legacy database. If you saved the legacy database, this is the
location where you specified that a copy of the current database should be
stored (for example, c:\temp\legacy_db).
— Current legacy database. This is the location of the Storage Area
Manager 3.1 database.
7. Click the Finish button to complete the installation. The installer stops and
starts the Storage Area Manager services, opens Storage Area Manager 3.2,
and starts the Setup Assistant. See “Set up Storage Area Manager 3.2 (Setup
Assistant),” page 57 for more information.
Set up Storage Area Manager 3.2 (Setup Assistant)
Welcome Wizard
Pre-upgrade Database Wizard
Upgrading from version 3.1
solid.ini
- location of
- legacy database: save to directory
- migrated database: specify directory
Installation Wizard
Post-upgrade Database Wizard
- relocate migrated database
- relocate legacy database
- save backup of migrated database
Figure 30: Upgrade flow diagram - Setup Assistant
file
Setup Assistant
57Storage Area Manager Upgrade Guide
Page 58

Upgrading from version 3.1
The Setup Assistant is the fifth phase of the upgrade. After you have completed
the installation, Storage Area Manager uses the settings and configurations that
the migrated release provides. However, you can use the Setup Assistant to
perform the following tasks:
■ Change the storage domain name.
■ Specify SNMP discovery ranges.
■ Define management proxies.
■ Upgrade the Host Agent software.
■ Activate Storage Allocater.
■ Start a discovery.
Note: For more information about using the Setup Assistant, see “Setting up
hp OpenView storage area manager” in the
installation guide.
hp OpenView storage area manager
58 Storage Area Manager Upgrade Guide
Page 59

Upgrading from version 3.1
1. In the Setup Assistant, click the Next button until the Set Storage Domain
Name window displays.
Figure 31: Set Storage Domain Name window
2. The Storage Domain name from the previous version of Storage Area
Manager is listed in the window. Change the name, if needed, and click the
Next button. The installer prompts you to confirm the storage domain name.
Caution: If you rename the storage domain, you must update the Host Agent
software after the entire upgrade is complete. The management server cannot
collect data from the host and the host’s status is Unknown/Unreachable until
you update the Host Agent software. See the
manager installation guide
Host Agent software.
or online help system for a procedure to update the
hp OpenView storage area
59Storage Area Manager Upgrade Guide
Page 60

Upgrading from version 3.1
3. Click the Ye s button. The Set SNMP Discovery Ranges window displays.
Figure 32: Set SNMP Discovery Ranges window
60 Storage Area Manager Upgrade Guide
Page 61
Upgrading from version 3.1
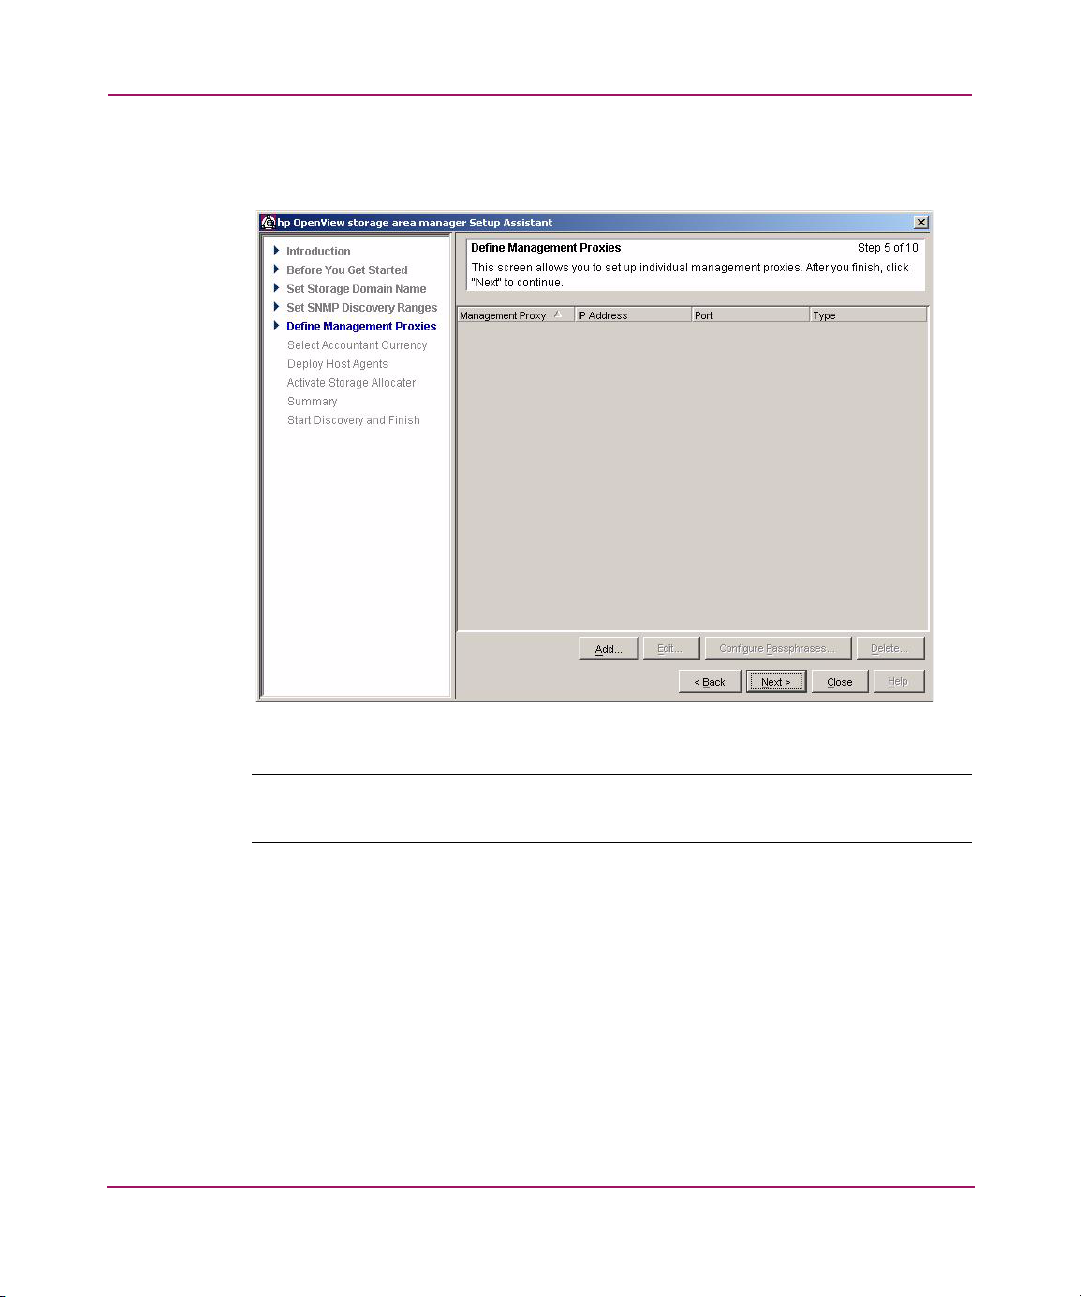
4. Make any necessary changes to the discovery ranges, and click the Next
button. The Define Management Proxies window displays.
Figure 33: Define Management Proxies window
Note: This window is new for Storage Area Manager 3.2. See the
storage area manager installation guide
for more information.
hp OpenView
61Storage Area Manager Upgrade Guide
Page 62

Upgrading from version 3.1
5. Make any necessary changes, and click the Next button. The Select
Accountant Currency window displays.
Figure 34: Select Accountant Currency window
6. When upgrading from Storage Area Manager 3.1 to Storage Area
Manager 3.2, you cannot change the currency locale and type. Click the Next
button to continue with the Setup Assistant. See “Upgrade the Host Agent
software (Setup Assistant),” page 63 for more information.
62 Storage Area Manager Upgrade Guide
Page 63

Upgrade the Host Agent software (Setup Assistant)
Welcome Wizard
Pre-upgrade Database Wizard
Upgrading from version 3.1
- location of
- legacy database: save to directory
- migrated database: specify directory
- relocate migrated database
- relocate legacy database
- save backup of migrated database
solid.ini
file
Installation Wizard
Post-upgrade Database Wizard
Setup Assistant
Figure 35: Upgrade flow diagram - Setup Assistant, Deploying Host Agent software
After installing Storage Area Manager on the management server and migrating
the database, you must upgrade the Host Agent software on the hosts on which the
previous version was installed.
63Storage Area Manager Upgrade Guide
Page 64

Upgrading from version 3.1
After you have viewed the accountant locale and currency, the Deploy Host
Agents window displays.
Figure 36: Deploy Host Agents window
64 Storage Area Manager Upgrade Guide
Page 65

Upgrading from version 3.1
1. Click the Go To Deploy Host Agents button. The Install/Modify Host Agent
Software window displays. The managed host list includes the same hosts that
were listed when you upgraded from the previous version.
Note: If you uninstalled the Host Agent software from the management server when
preparing for the upgrade, include the management server in the list of hosts to be
deployed.
Figure 37: Install/Modify Host Agent Software window
2. If necessary, add hosts to the managed hosts list as described in the
hp OpenView storage area manager installation guide.
3. Click the Select All button to select all Host Agents.
65Storage Area Manager Upgrade Guide
Page 66

Upgrading from version 3.1
4. Click the Install/Modify Selected Hosts button. The Host Agents are
upgraded to version 3.2. As each Host Agent is upgraded, the version number
updates.
Figure 38: Updating Host Agents during migration
Note: If a host fails installation, right-click the host in the Managed Host List and select
Repair Hint from the shortcut menu.
If an authentication error occurs, right-click the host in the Managed Host List and
choose Change Password in the shortcut menu. Enter the new user name and
password, and click OK. Repeat this process for any hosts that had authentication
errors.
66 Storage Area Manager Upgrade Guide
Page 67

Activate Storage Allocater (Setup Assistant)
Welcome Wizard
Pre-upgrade Database Wizard
Upgrading from version 3.1
- location of
- legacy database: save to directory
- migrated database: specify directory
- relocate migrated database
- relocate legacy database
- save backup of migrated database
solid.ini
file
Installation Wizard
Post-upgrade Database Wizard
Setup Assistant
Figure 39: Upgrade flow diagram - Setup Assistant, Activating Storage Allocater
If the hosts on which a previous version was installed were using Storage
Allocater, Storage Allocater will be updated on these hosts during the Host Agent
installation step.
67Storage Area Manager Upgrade Guide
Page 68

Upgrading from version 3.1
If any of your Storage Allocater hosts requires a reboot, a window similar to the
following displays.
Figure 40: Reboot the listed Storage Allocater hosts
1. Click the Close button and reboot the hosts that indicated a required reboot.
Windows and Solaris hosts require a reboot in order to complete the activation
process.
Caution: If Storage Allocater is active on the management server (localhost),
do not reboot the management server until you have completed the Setup
Assistant and the server is listed in the Storage Area Manager Resources tree
(step 5, page 72).
68 Storage Area Manager Upgrade Guide
Page 69

Upgrading from version 3.1
2. After Host Agent upgrade is complete for all of the selected hosts, click the
Exit button to return to the Setup Assistant. The Activate Storage Allocater
window displays.
Figure 41: Activate Storage Allocater window
3. Do one of the following:
■ If you are using Storage Allocater, and you added hosts that were not
running a previous version of Storage Area Manager, activate Storage
Allocater on those hosts. For details about activating Storage Allocater,
see “Activating hp OpenView storage allocater” in the hp OpenView
storage area manager installation guide.
■ If you did not add additional hosts, click the Next button to skip the
Storage Allocater activation procedure. The installer prompts you to
confirm that you want to skip this step. Click the Yes button.
69Storage Area Manager Upgrade Guide
Page 70
Upgrading from version 3.1
Finish the Setup Assistant and start a discovery (Setup Assistant)
Welcome Wizard
Pre-upgrade Database Wizard
- location of
- legacy database: save to directory
- migrated database: specify directory
- relocate migrated database
- relocate legacy database
- save backup of migrated database
solid.ini
file
Installation Wizard
Post-upgrade Database Wizard
Setup Assistant
Figure 42: Upgrade flow diagram - Setup Assistant, Starting discovery
70 Storage Area Manager Upgrade Guide
Page 71

Upgrading from version 3.1
After you have set up Storage Area Manager 3.2, the Setup Assistant Summary
window displays.
Figure 43: Setup Assistant Summary window
71Storage Area Manager Upgrade Guide
Page 72

Upgrading from version 3.1
1. Click the Next button to continue with the Setup Assistant. The Start
Discovery and Finish window displays.
Figure 44: Start Discovery and Finish window
2. Verify that you rebooted all hosts (other than the management server) that
indicated a required reboot after the Host Agent upgrade procedure.
3. Click the Finish button to initiate the device discovery process and exit the
Setup Assistant.
4. When you are prompted to confirm that you want to start discovery, click the
Ye s button.
5. After the initial discovery process is finished, if you activated Storage
Allocater on the management server (localhost), reboot the server after it
displays in the Storage Area Manager Resources tree.
72 Storage Area Manager Upgrade Guide
Page 73

Performing additional post-upgrade tasks
When the upgrade process is completed, perform the following tasks:
■ Install HP StorageWorks Command View SDM, page 73
■ Install DPIs, page 73
■ Upgrade the management client, page 73
■ Upgrade hp OpenView storage area manager MoM, page 76
■ Manage hosts with operating systems that are no longer supported, page 77
Install HP StorageWorks Command View SDM
If you uninstalled Command View SDM when preparing for the upgrade, you can
install Command View SDM 1.08.
Install DPIs
Storage Area Manager Device Plug-Ins (DPIs) are installed on the management
server as part of the product installation. However, new and updated DPIs are
available at
DPIs on this website that are applicable to your storage environment.
Any custom DPIs implemented for the previous version of Storage Area Manager
are not automatically migrated to the new version of Storage Area Manager.
However, during the migration process Storage Area Manager saves all legacy
DPIs in the <installation directory>\sanmgr\
managementserver\device.old directory.
Contact an HP representative for assistance with migrating legacy, custom DPIs to
the new version of Storage Area Manager.
http://www.openview.hp.com/products/dpi
Upgrading from version 3.1
. Download and install any
Upgrade the management client
The Storage Area Manager management server and remote management clients
must use the same version in order to operate correctly. After you update the
management server, you must update each remote management client.
73Storage Area Manager Upgrade Guide
Page 74

Upgrading from version 3.1
Windows-based management clients
1. Start the Storage Area Manager remote management client, and attempt to
connect to the management server. A message displays alerting you that the
management client and management server are not the same version.
Figure 45: Current version of Windows-based management client
2. Click the Upgrade button. The hp OpenView storage area manager - GUI
downloads window displays.
3. Click the Download Windows Remote Client GUI link.
4. Save the file to a directory.
5. Go to the directory where you downloaded the files, and double-click
clientsetup.exe. The Client Setup Welcome window displays.
Figure 46: Client Setup Welcome window
74 Storage Area Manager Upgrade Guide
Page 75

6. Click the Next button. The License Agreement window displays.
7. Carefully read the agreement. To accept the agreement and continue, select I
accept the terms in the license agreement, and click the Next button. A
message displays alerting you that a previous version of the Storage Area
Manager management client is installed.
8. Click the Next button. A confirmation message displays that asks if you want
to uninstall the product.
9. Click the Ye s button to continue upgrading the management client. The
System Requirements window displays.
10. Click the Next button to continue. The Destination Folder window displays.
11. Click the Next button to continue. The Ready to Install the Program window
displays.
12. Click the Install button to upgrade the management client to Storage Area
Manager 3.2.
13. Click the Finish button.
UNIX-based management clients
1. Log on to the host for which you want to upgrade the client.
Upgrading from version 3.1
2. Close Storage Area Manager if it is open.
3. Change to the directory where you downloaded the Storage Area Manager
client uninstall script (uninstall_client).
4. To uninstall the old version of the management client, enter the following
command:
./uninstall_client
5. Use the operating system's native command to remove the following
directories:
/opt/sanmgr/client
/var/opt/sanmgr/client
/etc/opt/sanmgr/client
75Storage Area Manager Upgrade Guide
Page 76

Upgrading from version 3.1
6. Install the new version of the management client as described in the
hp OpenView storage area manager installation guide.
Note: If you do not remove the JRE directory as part of step 5, you do not need to
download the JRE as part of step 6. Both versions of the Storage Area Manager client
use the same version of the JRE.
Upgrade hp OpenView storage area manager MoM
The Storage Area Manager management server and Storage Area Manager
Manager of Managers (MoM) must use the same version in order to operate
correctly. After you update the management server, you must update Storage Area
Manager MoM.
Windows-based MoM clients
1. Log on to the host on which Storage Area Manager MoM is installed.
2. Close Storage Area Manager MoM if it is open.
3. Close all Windows applications.
4. On the taskbar, click the Start button.
5. Select Programs > HP OpenView Storage Area Manager > Uninstall
Storage Area Manager MoM. A confirmation message displays.
6. Click the Ye s button to continue. The Installation wizard uninstalls Storage
Area Manager MoM.
7. Reinstall Storage Area Manager MoM as described in Chapter 4, “Setting up
management clients and MoM” of the hp OpenView storage area manager
installation guide. Make sure that you download Storage Area Manager MoM
from the management server where the updated version of Storage Area
Manager is installed.
8. Set up Storage Area Manager MoM as described in Chapter 4, “Setting up
management clients and MoM” of the hp OpenView storage area manager
installation guide.
76 Storage Area Manager Upgrade Guide
Page 77

UNIX-based MoM clients
1. Log on to the host on which you which Storage Area Manager MoM is
installed.
2. Close Storage Area Manager MoM if it is open.
3. Change to the directory where you downloaded the Storage Area Manager
MoM uninstall script (uninstall_mom).
4. To uninstall the old version of the management client, enter the following
command:
./uninstall_mom
5. Use the operating system's native command to remove the following
directories:
/opt/sanmgr/mom
/var/opt/sanmgr/mom
/etc/opt/sanmgr/mom
6. Reinstall Storage Area Manager MoM as described in Chapter 4, “Setting up
management clients and MoM,” of the hp OpenView storage area manager
installation guide.
7. Set up Storage Area Manager MoM as described in Chapter 4, “Setting up
management clients and MoM,” of the hp OpenView storage area manager
installation guide.
Upgrading from version 3.1
Note: If you do not remove the JRE directory as part of step 5, you do not need to
download the JRE as part of step 6. Both versions of Storage Area Manager MoM use
the same version
Manage hosts with operating systems that are no longer supported
The 3.1 version of the Host Agent can co-exist with version 3.2 of the
management server for a short period of time. This enables you the opportunity to
migrate the unsupported host to a supported operating system. Contact an HP
support representative for more information.
77Storage Area Manager Upgrade Guide
Page 78

Upgrading from version 3.1
78 Storage Area Manager Upgrade Guide
Page 79

Troubleshooting
This chapter includes symptoms, probable causes, and recommended solutions for
difficulties that you might encounter while upgrading and configuring Storage
Area Manager.
Refer to the hp OpenView storage area manager administrator’s guide for
additional troubleshooting information.
The topics covered in this chapter include:
■ Database is empty after the upgrade is complete, page 80
4
79Storage Area Manager Upgrade Guide
Page 80

Troubleshooting
Database is empty after the upgrade is complete
If you migrated the current 3.1 database to the new 3.2 database schema, and then
canceled the upgrade after the installation was complete but before the
Post-upgrade Database Wizard ran, the installer creates an empty database for
Storage Area Manager 3.2. To access the new 3.2 database, perform the following
steps:
1. From the command line, issue the following command:
startdbwizard.cmd support
The following window displays.
Figure 47: Database Control Wizard Welcome window
2. Click the Next button to display the following window.
Figure 48: Choose activity
80 Storage Area Manager Upgrade Guide
Page 81

Troubleshooting
3. Select I would like to migrate my legacy database to the new version of
Storage Area Manager, and click the Next button. The Database Migration
window displays.
Figure 49: Legacy database location
4. Enter the location of the legacy database.
Click the Browse button to help you locate the drive and directory where the
legacy database is located.
5. Click the Next button to display the following window.
Figure 50: Migrated database and backup database locations
81Storage Area Manager Upgrade Guide
Page 82

Troubleshooting
6. Enter the location where you want to store the migrated database and the
location where you want to store the database backup.
Click the Browse button to help you locate the drive and directory where you
want to store the migrated database and database backup.
Note: HP recommends that you store the database and the backup database on
separate physical drives. HP also recommends that the database directory and the
backup database directory each contain at least 5 GB of free space.
7. Click the Migrate button. The database migration progress window displays.
Figure 51: Database migration progress window
82 Storage Area Manager Upgrade Guide
Page 83

When the database migration is complete, a summary of the directory
locations displays.
Figure 52: Database location confirmation window
8. Click the Finish button.
Troubleshooting
83Storage Area Manager Upgrade Guide
Page 84

Troubleshooting
84 Storage Area Manager Upgrade Guide
Page 85

index
A
audience 8
authorized reseller, HP 12
C
Command View SDM, uninstalling 31
conventions
document 10
text symbols 10
D
document
conventions 10
prerequisites 8
related documentation 9
E
end-user license agreement, accepting during
installation 37
F
features
new for version 3.2 14 to 15
G
getting help 11
H
help, obtaining 11
Host Agent software, upgrading 63
HP
authorized reseller 12
storage website 11
technical support 11
I
installation
preparing for 22 to 26
installation requirements
Storage Allocater 26
Storage Optimizer 25
L
license agreement, accepting during installation
37
Index
M
Index
management client
software requirements 23
system requirements 17
upgrading 73
management server
software requirements 23
system requirements 16
Manager of Managers (MoM), upgrading 76
O
operating systems, obsolete
list of 18
85Storage Area Manager Upgrade Guide
Page 86

Index
P
prerequisites 8
R
related documentation 9
requirements
software 23
Storage Allocater 26
Storage Optimizer 25
S
SAN hosts
patch requirements 19
system requirements 18, 24
software requirements 23
Storage Accountant
enhancements 15
Storage Allocater
activating 67
installation requirements 26
Storage Area Manager
preparing for installation 22 to 26
troubleshooting 79 to 83
upgrading 28 to 77
Storage Area Manager MoM, upgrading 76
Storage Builder
enhancements 15
Storage Optimizer
installation requirements 25
symbols in text 10
system requirements
list of 16 to 19
management client
verifying 23
management server
verifying 23
U
UNIX-based management clients
upgrading 75
UNIX-based MoM clients
upgrading 77
upgrading
from version 3.1 32 to 72
W
websites
HP storage 11
Windows-based management clients,
upgrading 74
Windows-based MoM clients, upgrading 76
T
technical support, HP 11
text symbols 10
troubleshooting 79 to 83
86 Storage Area Manager Upgrade Guide
 Loading...