

Page 1

user guide
hp OpenView
storage provisioner
Part Number: J4783-90004
This document describes how to use Storage Provisioner to configure your provisioning
environment and manage your storage customers.
Product Version: 1.1
Second Edition (May, 2003)
Page 2

©Copyright 2002-2003 Hewlett-Packard Development Company, L.P.
Hewlett-Packard Company makes no warranty of any kind with regard to this material, including, but not limited to,
the implied warranties of merchantability and fitness for a particular purpose. Hewlett-Packard shall not be liable for
errors contained herein or for incidental or consequential damages in connection with the furnishing, performance,
or use of this material.
This document contains proprietary information, which is protected by copyright. No part of this document may be
photocopied, reproduced, or translated into another language without the prior written consent of Hewlett-Packard.
The information contained in this document is subject to change without notice.
Microsoft®, MS Windows®, Windows®, and Windows NT® are U.S. registered trademarks of Microsoft
Corporation.
UNIX® is a registered trademark of The Open Group.
Java™ is a US trademark of Sun Microsystems, Inc.
Hewlett-Packard Company shall not be liable for technical or editorial errors or omissions contained herein. The
information is provided “as is” without warranty of any kind and is subject to change without notice. The warranties
for Hewlett-Packard Company products are set forth in the express limited warranty statements for such products.
Nothing herein should be construed as constituting an additional warranty.
Printed in the U.S.A.
OpenView Storage Provisioner User Guide
Second Edition (May, 2003)
Part Number: J4783-90004
Page 3

contents
About This Guide . . . . . . . . . . . . . . . . . . . . . . . . . . . . . . . . . . . . . . . . . . . . . . . . . . . . .11
Overview. . . . . . . . . . . . . . . . . . . . . . . . . . . . . . . . . . . . . . . . . . . . . . . . . . . . . . . . . . . . . . . . . 12
Intended Audience . . . . . . . . . . . . . . . . . . . . . . . . . . . . . . . . . . . . . . . . . . . . . . . . . . . . . . 12
Related Documentation . . . . . . . . . . . . . . . . . . . . . . . . . . . . . . . . . . . . . . . . . . . . . . . . . . 12
Document Conventions . . . . . . . . . . . . . . . . . . . . . . . . . . . . . . . . . . . . . . . . . . . . . . . . . . . . . 13
Symbols in Text . . . . . . . . . . . . . . . . . . . . . . . . . . . . . . . . . . . . . . . . . . . . . . . . . . . . . . . . 13
Symbols on Equipment . . . . . . . . . . . . . . . . . . . . . . . . . . . . . . . . . . . . . . . . . . . . . . . . . . 14
Rack Stability . . . . . . . . . . . . . . . . . . . . . . . . . . . . . . . . . . . . . . . . . . . . . . . . . . . . . . . . . . . . . 16
Getting Help . . . . . . . . . . . . . . . . . . . . . . . . . . . . . . . . . . . . . . . . . . . . . . . . . . . . . . . . . . . . . . 17
HP Technical Support . . . . . . . . . . . . . . . . . . . . . . . . . . . . . . . . . . . . . . . . . . . . . . . . . . . 17
HP Storage Provisioner Support Website . . . . . . . . . . . . . . . . . . . . . . . . . . . . . . . . . . . . 17
Training Information . . . . . . . . . . . . . . . . . . . . . . . . . . . . . . . . . . . . . . . . . . . . . . . . . . . . 17
HP Authorized Reseller . . . . . . . . . . . . . . . . . . . . . . . . . . . . . . . . . . . . . . . . . . . . . . . . . . 18
Introducing Storage Provisioner . . . . . . . . . . . . . . . . . . . . . . . . . . . . . . . . . . . . . . . . . .19
Overview. . . . . . . . . . . . . . . . . . . . . . . . . . . . . . . . . . . . . . . . . . . . . . . . . . . . . . . . . . . . . . . . . 20
Compatibility with Storage Allocator . . . . . . . . . . . . . . . . . . . . . . . . . . . . . . . . . . . . . . . 20
About Storage Provisioner . . . . . . . . . . . . . . . . . . . . . . . . . . . . . . . . . . . . . . . . . . . . . . . . . . . 21
Features . . . . . . . . . . . . . . . . . . . . . . . . . . . . . . . . . . . . . . . . . . . . . . . . . . . . . . . . . . . . . . 21
Provisioning Framework . . . . . . . . . . . . . . . . . . . . . . . . . . . . . . . . . . . . . . . . . . . . . . . . . . . . 23
Storage Utilities . . . . . . . . . . . . . . . . . . . . . . . . . . . . . . . . . . . . . . . . . . . . . . . . . . . . . . . . 24
Storage Utility Characteristics. . . . . . . . . . . . . . . . . . . . . . . . . . . . . . . . . . . . . . . . . . 24
Storage Utility High-Availability Configurations . . . . . . . . . . . . . . . . . . . . . . . . . . . 25
Service Levels . . . . . . . . . . . . . . . . . . . . . . . . . . . . . . . . . . . . . . . . . . . . . . . . . . . . . . . . . 26
Reporting . . . . . . . . . . . . . . . . . . . . . . . . . . . . . . . . . . . . . . . . . . . . . . . . . . . . . . . . . . . . . 26
Contents
Getting Started with Storage Provisioner . . . . . . . . . . . . . . . . . . . . . . . . . . . . . . . . . . . .27
About the User Interface. . . . . . . . . . . . . . . . . . . . . . . . . . . . . . . . . . . . . . . . . . . . . . . . . . . . . 28
Understanding Relationships . . . . . . . . . . . . . . . . . . . . . . . . . . . . . . . . . . . . . . . . . . . . . . 29
Navigation Pane Relationship . . . . . . . . . . . . . . . . . . . . . . . . . . . . . . . . . . . . . . . . . . 30
1OpenView Storage Provisioner User Guide
Page 4

Contents
About Interface Relationships . . . . . . . . . . . . . . . . . . . . . . . . . . . . . . . . . . . . . . . . . . 32
About Storage Provisioner Tabs . . . . . . . . . . . . . . . . . . . . . . . . . . . . . . . . . . . . . . . . . . . 32
About Help. . . . . . . . . . . . . . . . . . . . . . . . . . . . . . . . . . . . . . . . . . . . . . . . . . . . . . . . . . . . 33
Toolbar Controls . . . . . . . . . . . . . . . . . . . . . . . . . . . . . . . . . . . . . . . . . . . . . . . . . . . . 33
Navigation Pane. . . . . . . . . . . . . . . . . . . . . . . . . . . . . . . . . . . . . . . . . . . . . . . . . . . . . 34
Content Pane . . . . . . . . . . . . . . . . . . . . . . . . . . . . . . . . . . . . . . . . . . . . . . . . . . . . . . . 35
Getting Started with the Quick Tour . . . . . . . . . . . . . . . . . . . . . . . . . . . . . . . . . . . . . . . . . . . 37
Starting Storage Provisioner. . . . . . . . . . . . . . . . . . . . . . . . . . . . . . . . . . . . . . . . . . . . . . . . . . 39
Starting Storage Provisioner for Consumer . . . . . . . . . . . . . . . . . . . . . . . . . . . . . . . . . . . 41
Using Storage Provisioner. . . . . . . . . . . . . . . . . . . . . . . . . . . . . . . . . . . . . . . . . . . . . . .45
Overview. . . . . . . . . . . . . . . . . . . . . . . . . . . . . . . . . . . . . . . . . . . . . . . . . . . . . . . . . . . . . . . . . 46
Working with Storage Utilities. . . . . . . . . . . . . . . . . . . . . . . . . . . . . . . . . . . . . . . . . . . . . . . . 47
Using the Storage Utilities Tab . . . . . . . . . . . . . . . . . . . . . . . . . . . . . . . . . . . . . . . . . . . . 47
About Utilities . . . . . . . . . . . . . . . . . . . . . . . . . . . . . . . . . . . . . . . . . . . . . . . . . . . . . . . . . 48
Viewing Utilities . . . . . . . . . . . . . . . . . . . . . . . . . . . . . . . . . . . . . . . . . . . . . . . . . . . . 48
Creating Utilities . . . . . . . . . . . . . . . . . . . . . . . . . . . . . . . . . . . . . . . . . . . . . . . . . . . . 48
Modifying Utilities . . . . . . . . . . . . . . . . . . . . . . . . . . . . . . . . . . . . . . . . . . . . . . . . . . 51
Deleting Utilities . . . . . . . . . . . . . . . . . . . . . . . . . . . . . . . . . . . . . . . . . . . . . . . . . . . . 51
About Storage Systems . . . . . . . . . . . . . . . . . . . . . . . . . . . . . . . . . . . . . . . . . . . . . . . . . . 52
Viewing Storage Systems . . . . . . . . . . . . . . . . . . . . . . . . . . . . . . . . . . . . . . . . . . . . . . . . 52
Discovering New Storage Systems . . . . . . . . . . . . . . . . . . . . . . . . . . . . . . . . . . . . . . 53
Discovering a Single Storage System . . . . . . . . . . . . . . . . . . . . . . . . . . . . . . . . . . . . 55
Managing Storage Systems . . . . . . . . . . . . . . . . . . . . . . . . . . . . . . . . . . . . . . . . . . . . 56
Unmanaging Storage Systems. . . . . . . . . . . . . . . . . . . . . . . . . . . . . . . . . . . . . . . . . . 56
Modifying Storage Systems. . . . . . . . . . . . . . . . . . . . . . . . . . . . . . . . . . . . . . . . . . . . 57
Deleting Storage Systems . . . . . . . . . . . . . . . . . . . . . . . . . . . . . . . . . . . . . . . . . . . . . 59
Replacing a Storage System . . . . . . . . . . . . . . . . . . . . . . . . . . . . . . . . . . . . . . . . . . . 60
About Customer Groups and Customers . . . . . . . . . . . . . . . . . . . . . . . . . . . . . . . . . . . . . 61
Customer Groups . . . . . . . . . . . . . . . . . . . . . . . . . . . . . . . . . . . . . . . . . . . . . . . . . . . . . . . 61
Viewing Customer Groups . . . . . . . . . . . . . . . . . . . . . . . . . . . . . . . . . . . . . . . . . . . . 62
Creating Customer Groups . . . . . . . . . . . . . . . . . . . . . . . . . . . . . . . . . . . . . . . . . . . . 62
Modifying Customer Groups. . . . . . . . . . . . . . . . . . . . . . . . . . . . . . . . . . . . . . . . . . . 62
Deleting Customer Groups . . . . . . . . . . . . . . . . . . . . . . . . . . . . . . . . . . . . . . . . . . . . 63
Customers. . . . . . . . . . . . . . . . . . . . . . . . . . . . . . . . . . . . . . . . . . . . . . . . . . . . . . . . . . . . . 63
Viewing Customers . . . . . . . . . . . . . . . . . . . . . . . . . . . . . . . . . . . . . . . . . . . . . . . . . . 64
Creating Customers . . . . . . . . . . . . . . . . . . . . . . . . . . . . . . . . . . . . . . . . . . . . . . . . . . 65
Modifying Customer Information . . . . . . . . . . . . . . . . . . . . . . . . . . . . . . . . . . . . . . . 66
2 OpenView Storage Provisioner User Guide
Page 5

Contents
Deleting Customers . . . . . . . . . . . . . . . . . . . . . . . . . . . . . . . . . . . . . . . . . . . . . . . . . . 67
About Customer Volumes . . . . . . . . . . . . . . . . . . . . . . . . . . . . . . . . . . . . . . . . . . . . . . . . 68
Viewing Customer Volumes . . . . . . . . . . . . . . . . . . . . . . . . . . . . . . . . . . . . . . . . . . . 68
Managing Unmanaged Volumes . . . . . . . . . . . . . . . . . . . . . . . . . . . . . . . . . . . . . . . . . . . 69
Modifying Customer Volumes . . . . . . . . . . . . . . . . . . . . . . . . . . . . . . . . . . . . . . . . . 71
Deleting Customer Volumes . . . . . . . . . . . . . . . . . . . . . . . . . . . . . . . . . . . . . . . . . . . 72
About Quotas . . . . . . . . . . . . . . . . . . . . . . . . . . . . . . . . . . . . . . . . . . . . . . . . . . . . . . . . . . 72
Viewing Quotas. . . . . . . . . . . . . . . . . . . . . . . . . . . . . . . . . . . . . . . . . . . . . . . . . . . . . 73
Customer Quota View. . . . . . . . . . . . . . . . . . . . . . . . . . . . . . . . . . . . . . . . . . . . . 73
Storage Utility Quota View. . . . . . . . . . . . . . . . . . . . . . . . . . . . . . . . . . . . . . . . . 73
Granting Quotas. . . . . . . . . . . . . . . . . . . . . . . . . . . . . . . . . . . . . . . . . . . . . . . . . . . . . 74
Working with Service Levels . . . . . . . . . . . . . . . . . . . . . . . . . . . . . . . . . . . . . . . . . . . . . . . . . 77
Using the Service Levels Tab . . . . . . . . . . . . . . . . . . . . . . . . . . . . . . . . . . . . . . . . . . . . . 77
Viewing Service Levels . . . . . . . . . . . . . . . . . . . . . . . . . . . . . . . . . . . . . . . . . . . . . . . . . . 78
Creating Service Levels . . . . . . . . . . . . . . . . . . . . . . . . . . . . . . . . . . . . . . . . . . . . . . . . . . 79
Modifying Service Levels . . . . . . . . . . . . . . . . . . . . . . . . . . . . . . . . . . . . . . . . . . . . . . . . 80
Deleting Service Levels . . . . . . . . . . . . . . . . . . . . . . . . . . . . . . . . . . . . . . . . . . . . . . . . . . 82
Working with Reporting Tools. . . . . . . . . . . . . . . . . . . . . . . . . . . . . . . . . . . . . . . . . . . . . . . . 83
Using the Usage Reports Tab. . . . . . . . . . . . . . . . . . . . . . . . . . . . . . . . . . . . . . . . . . . . . . 83
About Current Usage Reports . . . . . . . . . . . . . . . . . . . . . . . . . . . . . . . . . . . . . . . . . . . . . 84
Viewing Volumes Report . . . . . . . . . . . . . . . . . . . . . . . . . . . . . . . . . . . . . . . . . . . . . 85
Viewing Quotas Report . . . . . . . . . . . . . . . . . . . . . . . . . . . . . . . . . . . . . . . . . . . . . . . 85
About the Billing History Report. . . . . . . . . . . . . . . . . . . . . . . . . . . . . . . . . . . . . . . . . . . 86
Viewing Billing History Report . . . . . . . . . . . . . . . . . . . . . . . . . . . . . . . . . . . . . . . . 86
About Exporting Data . . . . . . . . . . . . . . . . . . . . . . . . . . . . . . . . . . . . . . . . . . . . . . . . . . . 87
Modifying the java.policy . . . . . . . . . . . . . . . . . . . . . . . . . . . . . . . . . . . . . . . . . . . . . 88
Exporting Reports . . . . . . . . . . . . . . . . . . . . . . . . . . . . . . . . . . . . . . . . . . . . . . . . . . . 89
About Printing Reports . . . . . . . . . . . . . . . . . . . . . . . . . . . . . . . . . . . . . . . . . . . . . . . . . . 90
Printing Data . . . . . . . . . . . . . . . . . . . . . . . . . . . . . . . . . . . . . . . . . . . . . . . . . . . . . . . 91
Provisioning Storage. . . . . . . . . . . . . . . . . . . . . . . . . . . . . . . . . . . . . . . . . . . . . . . . . . .95
Overview. . . . . . . . . . . . . . . . . . . . . . . . . . . . . . . . . . . . . . . . . . . . . . . . . . . . . . . . . . . . . . . . . 96
Using the Provisioning Tab . . . . . . . . . . . . . . . . . . . . . . . . . . . . . . . . . . . . . . . . . . . . . . . 96
Viewing a Customer’s Environment . . . . . . . . . . . . . . . . . . . . . . . . . . . . . . . . . . . . . . . . . . . 97
Working with Hosts and Host Groups . . . . . . . . . . . . . . . . . . . . . . . . . . . . . . . . . . . . . . . . . . 98
About Host Groups . . . . . . . . . . . . . . . . . . . . . . . . . . . . . . . . . . . . . . . . . . . . . . . . . . . . . 98
Viewing Host Group . . . . . . . . . . . . . . . . . . . . . . . . . . . . . . . . . . . . . . . . . . . . . . . . . 98
Host Group View . . . . . . . . . . . . . . . . . . . . . . . . . . . . . . . . . . . . . . . . . . . . . . . . 98
3OpenView Storage Provisioner User Guide
Page 6

Contents
Creating a Host Group (Optional) . . . . . . . . . . . . . . . . . . . . . . . . . . . . . . . . . . . . . . . 99
Modifying a Host Group . . . . . . . . . . . . . . . . . . . . . . . . . . . . . . . . . . . . . . . . . . . . . . 99
Deleting a Host Group. . . . . . . . . . . . . . . . . . . . . . . . . . . . . . . . . . . . . . . . . . . . . . . 100
About Hosts . . . . . . . . . . . . . . . . . . . . . . . . . . . . . . . . . . . . . . . . . . . . . . . . . . . . . . . . . . 100
Viewing Hosts . . . . . . . . . . . . . . . . . . . . . . . . . . . . . . . . . . . . . . . . . . . . . . . . . . . . . 100
Host View . . . . . . . . . . . . . . . . . . . . . . . . . . . . . . . . . . . . . . . . . . . . . . . . . . . . . 101
Creating Hosts . . . . . . . . . . . . . . . . . . . . . . . . . . . . . . . . . . . . . . . . . . . . . . . . . . . . . 101
Modifying Hosts . . . . . . . . . . . . . . . . . . . . . . . . . . . . . . . . . . . . . . . . . . . . . . . . . . . 104
Deleting Hosts . . . . . . . . . . . . . . . . . . . . . . . . . . . . . . . . . . . . . . . . . . . . . . . . . . . . . 104
Working with Paths . . . . . . . . . . . . . . . . . . . . . . . . . . . . . . . . . . . . . . . . . . . . . . . . . . . . . . . 106
About Paths . . . . . . . . . . . . . . . . . . . . . . . . . . . . . . . . . . . . . . . . . . . . . . . . . . . . . . . . . . 106
Viewing Path Information . . . . . . . . . . . . . . . . . . . . . . . . . . . . . . . . . . . . . . . . . . . . . . . 107
Creating Paths . . . . . . . . . . . . . . . . . . . . . . . . . . . . . . . . . . . . . . . . . . . . . . . . . . . . . . . . 107
Creating Paths for HSG80 Storage Systems . . . . . . . . . . . . . . . . . . . . . . . . . . . . . . 107
Creating Paths for HSV110 Storage Systems . . . . . . . . . . . . . . . . . . . . . . . . . . . . . 111
Modifying Paths. . . . . . . . . . . . . . . . . . . . . . . . . . . . . . . . . . . . . . . . . . . . . . . . . . . . . . . 114
Deleting Paths . . . . . . . . . . . . . . . . . . . . . . . . . . . . . . . . . . . . . . . . . . . . . . . . . . . . . . . . 115
Working with Volume Groups and Volumes. . . . . . . . . . . . . . . . . . . . . . . . . . . . . . . . . . . . 117
About Volume Groups. . . . . . . . . . . . . . . . . . . . . . . . . . . . . . . . . . . . . . . . . . . . . . . . . . 117
Viewing Volume Group Information . . . . . . . . . . . . . . . . . . . . . . . . . . . . . . . . . . . 117
Volume Group View. . . . . . . . . . . . . . . . . . . . . . . . . . . . . . . . . . . . . . . . . . . . . 117
Creating Volume Groups (Optional). . . . . . . . . . . . . . . . . . . . . . . . . . . . . . . . . . . . 118
Modifying Volume Groups . . . . . . . . . . . . . . . . . . . . . . . . . . . . . . . . . . . . . . . . . . . 118
Deleting Volume Groups. . . . . . . . . . . . . . . . . . . . . . . . . . . . . . . . . . . . . . . . . . . . . 119
About Volumes . . . . . . . . . . . . . . . . . . . . . . . . . . . . . . . . . . . . . . . . . . . . . . . . . . . . . . . 119
Viewing Volume Information . . . . . . . . . . . . . . . . . . . . . . . . . . . . . . . . . . . . . . . . . 119
Volume Views . . . . . . . . . . . . . . . . . . . . . . . . . . . . . . . . . . . . . . . . . . . . . . . . . . . . . 120
Storage Provider Volume Views. . . . . . . . . . . . . . . . . . . . . . . . . . . . . . . . . . . . 120
Storage Customer Volume Views. . . . . . . . . . . . . . . . . . . . . . . . . . . . . . . . . . . 121
Creating Volumes . . . . . . . . . . . . . . . . . . . . . . . . . . . . . . . . . . . . . . . . . . . . . . . . . . 121
Modifying Volumes. . . . . . . . . . . . . . . . . . . . . . . . . . . . . . . . . . . . . . . . . . . . . . . . . 124
Deleting Volumes . . . . . . . . . . . . . . . . . . . . . . . . . . . . . . . . . . . . . . . . . . . . . . . . . . 125
Accessing Volumes . . . . . . . . . . . . . . . . . . . . . . . . . . . . . . . . . . . . . . . . . . . . . . . . . 126
Maintaining Storage Provisioner . . . . . . . . . . . . . . . . . . . . . . . . . . . . . . . . . . . . . . . . .129
Overview. . . . . . . . . . . . . . . . . . . . . . . . . . . . . . . . . . . . . . . . . . . . . . . . . . . . . . . . . . . . . . . . 130
Backing Up Configuration Data . . . . . . . . . . . . . . . . . . . . . . . . . . . . . . . . . . . . . . . . . . . . . . 131
Restoring Configuration Data. . . . . . . . . . . . . . . . . . . . . . . . . . . . . . . . . . . . . . . . . . . . . . . . 134
4 OpenView Storage Provisioner User Guide
Page 7

Contents
Uninstalling Storage Provisioner . . . . . . . . . . . . . . . . . . . . . . . . . . . . . . . . . . . . . . . . . . . . . 136
Reinstalling Storage Provisioner . . . . . . . . . . . . . . . . . . . . . . . . . . . . . . . . . . . . . . . . . . . . . 138
Troubleshooting . . . . . . . . . . . . . . . . . . . . . . . . . . . . . . . . . . . . . . . . . . . . . . . . . . . . .139
Overview. . . . . . . . . . . . . . . . . . . . . . . . . . . . . . . . . . . . . . . . . . . . . . . . . . . . . . . . . . . . . . . . 140
Browser Issues . . . . . . . . . . . . . . . . . . . . . . . . . . . . . . . . . . . . . . . . . . . . . . . . . . . . . . . . . . . 141
Supported Browser Matrix. . . . . . . . . . . . . . . . . . . . . . . . . . . . . . . . . . . . . . . . . . . . . . . 141
Poor User Interface Resolution . . . . . . . . . . . . . . . . . . . . . . . . . . . . . . . . . . . . . . . . . . . 141
Browser Window Closures . . . . . . . . . . . . . . . . . . . . . . . . . . . . . . . . . . . . . . . . . . . . . . 142
MA Window Not Closed . . . . . . . . . . . . . . . . . . . . . . . . . . . . . . . . . . . . . . . . . . . . . . . . 142
Wait Indicator Disappears . . . . . . . . . . . . . . . . . . . . . . . . . . . . . . . . . . . . . . . . . . . . . . . 143
Operation Not Cancelled . . . . . . . . . . . . . . . . . . . . . . . . . . . . . . . . . . . . . . . . . . . . . . . . 143
Error Types . . . . . . . . . . . . . . . . . . . . . . . . . . . . . . . . . . . . . . . . . . . . . . . . . . . . . . . . . . . . . . 144
Informational Messages . . . . . . . . . . . . . . . . . . . . . . . . . . . . . . . . . . . . . . . . . . . . . . . . . 145
Change Host Access to a Volume . . . . . . . . . . . . . . . . . . . . . . . . . . . . . . . . . . . . . . 145
Delete a Storage Utility . . . . . . . . . . . . . . . . . . . . . . . . . . . . . . . . . . . . . . . . . . . . . . 146
Delete (General) . . . . . . . . . . . . . . . . . . . . . . . . . . . . . . . . . . . . . . . . . . . . . . . . . . . 146
Delete Host . . . . . . . . . . . . . . . . . . . . . . . . . . . . . . . . . . . . . . . . . . . . . . . . . . . . . . . 147
Delete Path. . . . . . . . . . . . . . . . . . . . . . . . . . . . . . . . . . . . . . . . . . . . . . . . . . . . . . . . 147
Delete Service Level . . . . . . . . . . . . . . . . . . . . . . . . . . . . . . . . . . . . . . . . . . . . . . . . 147
Discover. . . . . . . . . . . . . . . . . . . . . . . . . . . . . . . . . . . . . . . . . . . . . . . . . . . . . . . . . . 148
Grant Access to Storage Utility. . . . . . . . . . . . . . . . . . . . . . . . . . . . . . . . . . . . . . . . 148
Invalid Configuration . . . . . . . . . . . . . . . . . . . . . . . . . . . . . . . . . . . . . . . . . . . . . . . 149
No Hosts for Allocation. . . . . . . . . . . . . . . . . . . . . . . . . . . . . . . . . . . . . . . . . . . . . . 149
No Quota for Migrating Volume. . . . . . . . . . . . . . . . . . . . . . . . . . . . . . . . . . . . . . . 149
No Service Levels Match Selected Volume . . . . . . . . . . . . . . . . . . . . . . . . . . . . . . 150
No Volumes Available . . . . . . . . . . . . . . . . . . . . . . . . . . . . . . . . . . . . . . . . . . . . . . 150
Remove Storage System from Management . . . . . . . . . . . . . . . . . . . . . . . . . . . . . . 151
Confirmation Messages . . . . . . . . . . . . . . . . . . . . . . . . . . . . . . . . . . . . . . . . . . . . . . . . . 151
Error Messages. . . . . . . . . . . . . . . . . . . . . . . . . . . . . . . . . . . . . . . . . . . . . . . . . . . . . . . . 152
Login Error . . . . . . . . . . . . . . . . . . . . . . . . . . . . . . . . . . . . . . . . . . . . . . . . . . . . . . . 152
Look Up Error . . . . . . . . . . . . . . . . . . . . . . . . . . . . . . . . . . . . . . . . . . . . . . . . . . . . . 153
Server Communication Error. . . . . . . . . . . . . . . . . . . . . . . . . . . . . . . . . . . . . . . . . . 153
System Resources Locked. . . . . . . . . . . . . . . . . . . . . . . . . . . . . . . . . . . . . . . . . . . . 154
Update Errors. . . . . . . . . . . . . . . . . . . . . . . . . . . . . . . . . . . . . . . . . . . . . . . . . . . . . . 154
Update HBA Error. . . . . . . . . . . . . . . . . . . . . . . . . . . . . . . . . . . . . . . . . . . . . . . . . . 154
Warning Messages . . . . . . . . . . . . . . . . . . . . . . . . . . . . . . . . . . . . . . . . . . . . . . . . . . . . . 155
Restore Database . . . . . . . . . . . . . . . . . . . . . . . . . . . . . . . . . . . . . . . . . . . . . . . . . . . 155
5OpenView Storage Provisioner User Guide
Page 8

Contents
Warning (General). . . . . . . . . . . . . . . . . . . . . . . . . . . . . . . . . . . . . . . . . . . . . . . . . . 155
About the Events Tab . . . . . . . . . . . . . . . . . . . . . . . . . . . . . . . . . . . . . . . . . . . . . . . . . . . . . . 156
Using the Events Tab . . . . . . . . . . . . . . . . . . . . . . . . . . . . . . . . . . . . . . . . . . . . . . . . . . . 156
Viewing Events . . . . . . . . . . . . . . . . . . . . . . . . . . . . . . . . . . . . . . . . . . . . . . . . . . . . . . . 157
Deleting Events . . . . . . . . . . . . . . . . . . . . . . . . . . . . . . . . . . . . . . . . . . . . . . . . . . . . . . . 157
About the Diagnostic Logs. . . . . . . . . . . . . . . . . . . . . . . . . . . . . . . . . . . . . . . . . . . . . . . . . . 159
Viewing Diagnostic Logs. . . . . . . . . . . . . . . . . . . . . . . . . . . . . . . . . . . . . . . . . . . . . . . . 159
Figures
1 Storage Provisioner environment. . . . . . . . . . . . . . . . . . . . . . . . . . . . . . . . . . . . . . . . . . . 23
2 Provisioning framework. . . . . . . . . . . . . . . . . . . . . . . . . . . . . . . . . . . . . . . . . . . . . . . . . . 24
3 Session pane. . . . . . . . . . . . . . . . . . . . . . . . . . . . . . . . . . . . . . . . . . . . . . . . . . . . . . . . . . . 28
4 Navigation panes . . . . . . . . . . . . . . . . . . . . . . . . . . . . . . . . . . . . . . . . . . . . . . . . . . . . . . . 28
5 Content pane. . . . . . . . . . . . . . . . . . . . . . . . . . . . . . . . . . . . . . . . . . . . . . . . . . . . . . . . . . . 29
6 Navigation pane relationships . . . . . . . . . . . . . . . . . . . . . . . . . . . . . . . . . . . . . . . . . . . . . 30
7 Example of highlighted items . . . . . . . . . . . . . . . . . . . . . . . . . . . . . . . . . . . . . . . . . . . . . 31
8 Storage Provisioner tabs. . . . . . . . . . . . . . . . . . . . . . . . . . . . . . . . . . . . . . . . . . . . . . . . . . 32
9 Help toolbar . . . . . . . . . . . . . . . . . . . . . . . . . . . . . . . . . . . . . . . . . . . . . . . . . . . . . . . . . . . 33
10 Help navigation pane . . . . . . . . . . . . . . . . . . . . . . . . . . . . . . . . . . . . . . . . . . . . . . . . . . . . 35
11 Help content pane. . . . . . . . . . . . . . . . . . . . . . . . . . . . . . . . . . . . . . . . . . . . . . . . . . . . . . . 36
12 Management Appliance home page. . . . . . . . . . . . . . . . . . . . . . . . . . . . . . . . . . . . . . . . . 39
13 Tools page . . . . . . . . . . . . . . . . . . . . . . . . . . . . . . . . . . . . . . . . . . . . . . . . . . . . . . . . . . . . 40
14 Storage Provisioner . . . . . . . . . . . . . . . . . . . . . . . . . . . . . . . . . . . . . . . . . . . . . . . . . . . . . 41
15 URL and port number . . . . . . . . . . . . . . . . . . . . . . . . . . . . . . . . . . . . . . . . . . . . . . . . . . . 42
16 Tools page . . . . . . . . . . . . . . . . . . . . . . . . . . . . . . . . . . . . . . . . . . . . . . . . . . . . . . . . . . . . 43
17 Login dialog box . . . . . . . . . . . . . . . . . . . . . . . . . . . . . . . . . . . . . . . . . . . . . . . . . . . . . . . 43
18 Storage Utilities toolbar . . . . . . . . . . . . . . . . . . . . . . . . . . . . . . . . . . . . . . . . . . . . . . . . . . 47
19 Create Storage Utility window. . . . . . . . . . . . . . . . . . . . . . . . . . . . . . . . . . . . . . . . . . . . . 49
20 Create Storage Utility. . . . . . . . . . . . . . . . . . . . . . . . . . . . . . . . . . . . . . . . . . . . . . . . . . . . 50
21 Storage Utilities tab . . . . . . . . . . . . . . . . . . . . . . . . . . . . . . . . . . . . . . . . . . . . . . . . . . . . . 53
22 Discover window . . . . . . . . . . . . . . . . . . . . . . . . . . . . . . . . . . . . . . . . . . . . . . . . . . . . . . . 54
23 Discover acknowledgement . . . . . . . . . . . . . . . . . . . . . . . . . . . . . . . . . . . . . . . . . . . . . . . 54
24 Discover results . . . . . . . . . . . . . . . . . . . . . . . . . . . . . . . . . . . . . . . . . . . . . . . . . . . . . . . . 55
25 Discover action confirmation. . . . . . . . . . . . . . . . . . . . . . . . . . . . . . . . . . . . . . . . . . . . . . 56
26 Unmanaged storage systems – highlighted . . . . . . . . . . . . . . . . . . . . . . . . . . . . . . . . . . . 57
27 Modify Storage System window . . . . . . . . . . . . . . . . . . . . . . . . . . . . . . . . . . . . . . . . . . . 58
28 Delete Storage System confirmation . . . . . . . . . . . . . . . . . . . . . . . . . . . . . . . . . . . . . . . . 59
29 Remove Storage System confirmation. . . . . . . . . . . . . . . . . . . . . . . . . . . . . . . . . . . . . . . 61
6 OpenView Storage Provisioner User Guide
Page 9

Contents
30 Delete customer confirmation . . . . . . . . . . . . . . . . . . . . . . . . . . . . . . . . . . . . . . . . . . . . . 63
31 Create Customer window. . . . . . . . . . . . . . . . . . . . . . . . . . . . . . . . . . . . . . . . . . . . . . . . . 65
32 Create Customer – group name . . . . . . . . . . . . . . . . . . . . . . . . . . . . . . . . . . . . . . . . . . . . 66
33 Delete customer confirmation . . . . . . . . . . . . . . . . . . . . . . . . . . . . . . . . . . . . . . . . . . . . . 67
34 Select a volume . . . . . . . . . . . . . . . . . . . . . . . . . . . . . . . . . . . . . . . . . . . . . . . . . . . . . . . . 69
35 Add volume to management window . . . . . . . . . . . . . . . . . . . . . . . . . . . . . . . . . . . . . . . 70
36 Modify Volume window . . . . . . . . . . . . . . . . . . . . . . . . . . . . . . . . . . . . . . . . . . . . . . . . . 71
37 Delete volume confirmation. . . . . . . . . . . . . . . . . . . . . . . . . . . . . . . . . . . . . . . . . . . . . . . 72
38 Storage Utility Access window . . . . . . . . . . . . . . . . . . . . . . . . . . . . . . . . . . . . . . . . . . . . 75
39 Storage Utility Access window . . . . . . . . . . . . . . . . . . . . . . . . . . . . . . . . . . . . . . . . . . . . 76
40 Service Levels tab . . . . . . . . . . . . . . . . . . . . . . . . . . . . . . . . . . . . . . . . . . . . . . . . . . . . . . 77
41 Create Service Level window . . . . . . . . . . . . . . . . . . . . . . . . . . . . . . . . . . . . . . . . . . . . . 79
42 Create Service Level window . . . . . . . . . . . . . . . . . . . . . . . . . . . . . . . . . . . . . . . . . . . . . 80
43 Modify Service Level window. . . . . . . . . . . . . . . . . . . . . . . . . . . . . . . . . . . . . . . . . . . . . 81
44 Service level delete confirmation. . . . . . . . . . . . . . . . . . . . . . . . . . . . . . . . . . . . . . . . . . . 82
45 Usage Reports tab . . . . . . . . . . . . . . . . . . . . . . . . . . . . . . . . . . . . . . . . . . . . . . . . . . . . . . 84
46 Current Volume Usage Report. . . . . . . . . . . . . . . . . . . . . . . . . . . . . . . . . . . . . . . . . . . . . 85
47 Quota Report . . . . . . . . . . . . . . . . . . . . . . . . . . . . . . . . . . . . . . . . . . . . . . . . . . . . . . . . . . 86
48 Billing History Report . . . . . . . . . . . . . . . . . . . . . . . . . . . . . . . . . . . . . . . . . . . . . . . . . . . 87
49 Save Quota Report window . . . . . . . . . . . . . . . . . . . . . . . . . . . . . . . . . . . . . . . . . . . . . . . 89
50 Save Quota Report confirmation . . . . . . . . . . . . . . . . . . . . . . . . . . . . . . . . . . . . . . . . . . . 90
51 Report example . . . . . . . . . . . . . . . . . . . . . . . . . . . . . . . . . . . . . . . . . . . . . . . . . . . . . . . . 91
52 Text Import Wizard – step 1 . . . . . . . . . . . . . . . . . . . . . . . . . . . . . . . . . . . . . . . . . . . . . . 92
53 Text Import Wizard – step 2 . . . . . . . . . . . . . . . . . . . . . . . . . . . . . . . . . . . . . . . . . . . . . . 93
54 Text Import Wizard – step 3 . . . . . . . . . . . . . . . . . . . . . . . . . . . . . . . . . . . . . . . . . . . . . . 94
55 Provisioning tab . . . . . . . . . . . . . . . . . . . . . . . . . . . . . . . . . . . . . . . . . . . . . . . . . . . . . . . . 96
56 Customer selection. . . . . . . . . . . . . . . . . . . . . . . . . . . . . . . . . . . . . . . . . . . . . . . . . . . . . . 97
57 Create Host Group window . . . . . . . . . . . . . . . . . . . . . . . . . . . . . . . . . . . . . . . . . . . . . . . 99
58 Create Host window. . . . . . . . . . . . . . . . . . . . . . . . . . . . . . . . . . . . . . . . . . . . . . . . . . . . 102
59 Create Host window – Host Groups. . . . . . . . . . . . . . . . . . . . . . . . . . . . . . . . . . . . . . . . 103
60 Delete host confirmation . . . . . . . . . . . . . . . . . . . . . . . . . . . . . . . . . . . . . . . . . . . . . . . . 105
61 Create Path window . . . . . . . . . . . . . . . . . . . . . . . . . . . . . . . . . . . . . . . . . . . . . . . . . . . . 108
62 Create Path – storage utility . . . . . . . . . . . . . . . . . . . . . . . . . . . . . . . . . . . . . . . . . . . . . . 109
63 Create Path – HBA entry . . . . . . . . . . . . . . . . . . . . . . . . . . . . . . . . . . . . . . . . . . . . . . . . 110
64 Path button . . . . . . . . . . . . . . . . . . . . . . . . . . . . . . . . . . . . . . . . . . . . . . . . . . . . . . . . . . . 111
65 Create Path – path name. . . . . . . . . . . . . . . . . . . . . . . . . . . . . . . . . . . . . . . . . . . . . . . . . 111
66 Create Path – select storage utility. . . . . . . . . . . . . . . . . . . . . . . . . . . . . . . . . . . . . . . . . 112
67 Create Paths – Host Ports. . . . . . . . . . . . . . . . . . . . . . . . . . . . . . . . . . . . . . . . . . . . . . . . 113
7OpenView Storage Provisioner User Guide
Page 10

Contents
68 HBA Port World Wide Name . . . . . . . . . . . . . . . . . . . . . . . . . . . . . . . . . . . . . . . . . . . . 113
69 Create Path – Host Port with WWN . . . . . . . . . . . . . . . . . . . . . . . . . . . . . . . . . . . . . . . 114
70 Delete path selection . . . . . . . . . . . . . . . . . . . . . . . . . . . . . . . . . . . . . . . . . . . . . . . . . . . 115
71 Delete Path confirmation . . . . . . . . . . . . . . . . . . . . . . . . . . . . . . . . . . . . . . . . . . . . . . . . 116
72 Create Volume Group window . . . . . . . . . . . . . . . . . . . . . . . . . . . . . . . . . . . . . . . . . . . 118
73 Path selection . . . . . . . . . . . . . . . . . . . . . . . . . . . . . . . . . . . . . . . . . . . . . . . . . . . . . . . . . 122
74 Create Volume – volume name . . . . . . . . . . . . . . . . . . . . . . . . . . . . . . . . . . . . . . . . . . . 122
75 Create Volume – volume group. . . . . . . . . . . . . . . . . . . . . . . . . . . . . . . . . . . . . . . . . . . 123
76 Path and associated volume . . . . . . . . . . . . . . . . . . . . . . . . . . . . . . . . . . . . . . . . . . . . . . 124
77 Delete volume selection. . . . . . . . . . . . . . . . . . . . . . . . . . . . . . . . . . . . . . . . . . . . . . . . . 125
78 Delete Volume confirmation . . . . . . . . . . . . . . . . . . . . . . . . . . . . . . . . . . . . . . . . . . . . . 125
79 Access button . . . . . . . . . . . . . . . . . . . . . . . . . . . . . . . . . . . . . . . . . . . . . . . . . . . . . . . . . 126
80 Select host paths. . . . . . . . . . . . . . . . . . . . . . . . . . . . . . . . . . . . . . . . . . . . . . . . . . . . . . . 126
81 Select Location window. . . . . . . . . . . . . . . . . . . . . . . . . . . . . . . . . . . . . . . . . . . . . . . . . 131
82 New Folder window. . . . . . . . . . . . . . . . . . . . . . . . . . . . . . . . . . . . . . . . . . . . . . . . . . . . 131
83 Select Location window. . . . . . . . . . . . . . . . . . . . . . . . . . . . . . . . . . . . . . . . . . . . . . . . . 132
84 Download confirmation . . . . . . . . . . . . . . . . . . . . . . . . . . . . . . . . . . . . . . . . . . . . . . . . . 132
85 Download confirmation . . . . . . . . . . . . . . . . . . . . . . . . . . . . . . . . . . . . . . . . . . . . . . . . . 133
86 Select Location window. . . . . . . . . . . . . . . . . . . . . . . . . . . . . . . . . . . . . . . . . . . . . . . . . 134
87 Restore window . . . . . . . . . . . . . . . . . . . . . . . . . . . . . . . . . . . . . . . . . . . . . . . . . . . . . . . 134
88 Remove Application page . . . . . . . . . . . . . . . . . . . . . . . . . . . . . . . . . . . . . . . . . . . . . . . 136
89 Change host access to a volume. . . . . . . . . . . . . . . . . . . . . . . . . . . . . . . . . . . . . . . . . . . 145
90 Delete storage utility window . . . . . . . . . . . . . . . . . . . . . . . . . . . . . . . . . . . . . . . . . . . . 146
91 General deletion confirmation . . . . . . . . . . . . . . . . . . . . . . . . . . . . . . . . . . . . . . . . . . . . 146
92 Delete Host message . . . . . . . . . . . . . . . . . . . . . . . . . . . . . . . . . . . . . . . . . . . . . . . . . . . 147
93 Delete Path message. . . . . . . . . . . . . . . . . . . . . . . . . . . . . . . . . . . . . . . . . . . . . . . . . . . . 147
94 Delete Service Level message . . . . . . . . . . . . . . . . . . . . . . . . . . . . . . . . . . . . . . . . . . . . 147
95 Discover storage systems message. . . . . . . . . . . . . . . . . . . . . . . . . . . . . . . . . . . . . . . . . 148
96 Quota error message. . . . . . . . . . . . . . . . . . . . . . . . . . . . . . . . . . . . . . . . . . . . . . . . . . . . 148
97 No hosts to allocate error message. . . . . . . . . . . . . . . . . . . . . . . . . . . . . . . . . . . . . . . . . 149
98 Not sufficient customer quota . . . . . . . . . . . . . . . . . . . . . . . . . . . . . . . . . . . . . . . . . . . . 149
99 No defined service levels . . . . . . . . . . . . . . . . . . . . . . . . . . . . . . . . . . . . . . . . . . . . . . . . 150
100 No available volumes error . . . . . . . . . . . . . . . . . . . . . . . . . . . . . . . . . . . . . . . . . . . . . . 150
101 Volumes still assigned error . . . . . . . . . . . . . . . . . . . . . . . . . . . . . . . . . . . . . . . . . . . . . 151
102 Destroy file warning message . . . . . . . . . . . . . . . . . . . . . . . . . . . . . . . . . . . . . . . . . . . . 151
103 Invalid login error . . . . . . . . . . . . . . . . . . . . . . . . . . . . . . . . . . . . . . . . . . . . . . . . . . . . . 152
104 Verification error . . . . . . . . . . . . . . . . . . . . . . . . . . . . . . . . . . . . . . . . . . . . . . . . . . . . . . 153
105 Server communication error . . . . . . . . . . . . . . . . . . . . . . . . . . . . . . . . . . . . . . . . . . . . . 153
8 OpenView Storage Provisioner User Guide
Page 11

Contents
106 Systems resources in use by another . . . . . . . . . . . . . . . . . . . . . . . . . . . . . . . . . . . . . . . 154
107 Combined storage more than quota . . . . . . . . . . . . . . . . . . . . . . . . . . . . . . . . . . . . . . . . 154
108 Invalid configuration data error. . . . . . . . . . . . . . . . . . . . . . . . . . . . . . . . . . . . . . . . . . . 155
109 Multiple hosts writing to same volume message. . . . . . . . . . . . . . . . . . . . . . . . . . . . . . 155
110 Events log . . . . . . . . . . . . . . . . . . . . . . . . . . . . . . . . . . . . . . . . . . . . . . . . . . . . . . . . . . . 156
111 Events log . . . . . . . . . . . . . . . . . . . . . . . . . . . . . . . . . . . . . . . . . . . . . . . . . . . . . . . . . . . 157
112 Events log – delete entry . . . . . . . . . . . . . . . . . . . . . . . . . . . . . . . . . . . . . . . . . . . . . . . . 158
113 Delete confirmation . . . . . . . . . . . . . . . . . . . . . . . . . . . . . . . . . . . . . . . . . . . . . . . . . . . . 158
114 View Log Files dialog box . . . . . . . . . . . . . . . . . . . . . . . . . . . . . . . . . . . . . . . . . . . . . . 159
115 Diagnostic message example. . . . . . . . . . . . . . . . . . . . . . . . . . . . . . . . . . . . . . . . . . . . . 160
Tables
1 Document Conventions . . . . . . . . . . . . . . . . . . . . . . . . . . . . . . . . . . . . . . . . . . . . . . . . . . 13
2 Utility Characteristics. . . . . . . . . . . . . . . . . . . . . . . . . . . . . . . . . . . . . . . . . . . . . . . . . . . . 25
3 Interface Relationships. . . . . . . . . . . . . . . . . . . . . . . . . . . . . . . . . . . . . . . . . . . . . . . . . . . 32
4 Toolbar Icons . . . . . . . . . . . . . . . . . . . . . . . . . . . . . . . . . . . . . . . . . . . . . . . . . . . . . . . . . . 34
5 Supported Browser Matrix. . . . . . . . . . . . . . . . . . . . . . . . . . . . . . . . . . . . . . . . . . . . . . . 141
9OpenView Storage Provisioner User Guide
Page 12

Contents
10 OpenView Storage Provisioner User Guide
Page 13

about this
guide
About This Guide
This user’s guide provides information to help you:
■ Create and manage storage utilities.
■ Customize storage service levels.
■ Create customer access to storage.
About this Guide topics include:
■ Overview, page 12
■ Document Conventions, page 13
■ Rack Stability, page 16
■ Getting Help, page 17
About this Guide
About this Guide
11OpenView Storage Provisioner User Guide
Page 14

About this Guide
Overview
This section covers the following topics:
■ Intended Audience
■ Related Documentation
Intended Audience
This book is intended for use by storage providers who are experienced with the
following:
■ HP StorageWorks HSG-based Controllers
■ HP StorageWorks HSV-based Controllers
■ HP OpenView Storage Management Appliance
Related Documentation
In addition to this guide, HP provides corresponding information:
■ HP OpenView Storage Provisioner specifications at:
http://www .hp.com/products1/stor a g e /p roducts/storagesoftware/openvi ewstora
geprovisioner/specifications.html
■ HP OpenView Storage Provisioner Installation Guide
■ HP OpenView Storage Provisioner Release Notes
■ HP OpenView Storage Provisioner Users's Guide
■ HP OpenView storage Provisioner Quick Reference Guide
You can find these documents at:
http://www .hp.com/products1/stor a g e /p roducts/storagesoftware/openvi ewstora
gepro visioner/information_library.html
■ HP StorageWorks HSG and HSV Command View EVA online Help
12 OpenView Storage Provisioner User Guide
Page 15
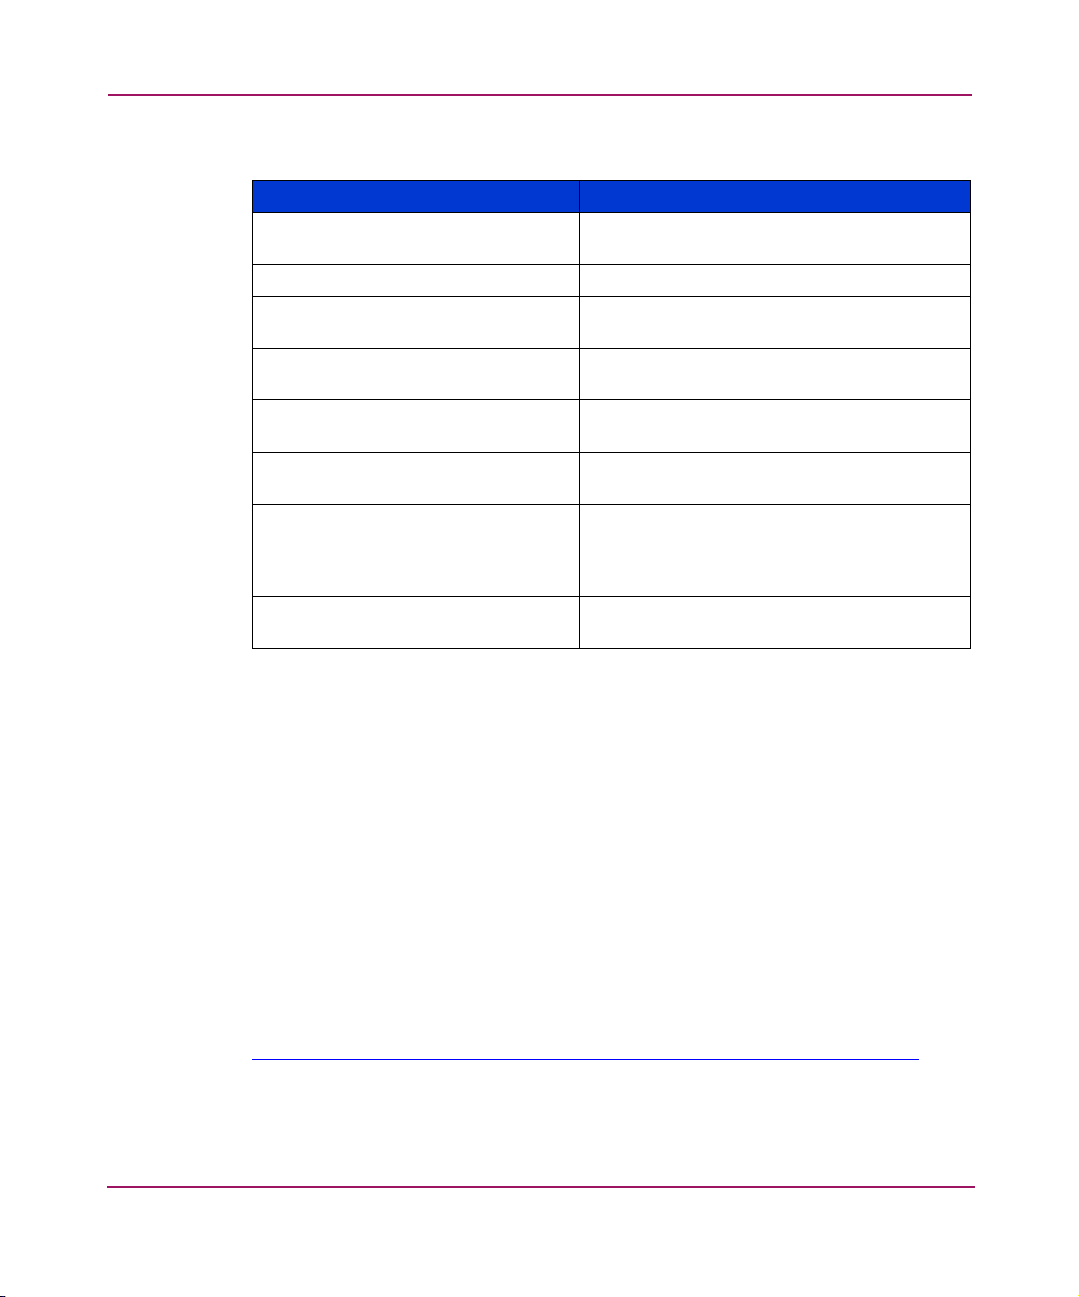
Document Conventions
The document conventions included in Tab le 1 apply in most cases.
Table 1: Document Conventions
Element Convention
Cross-reference links Blue text – Figure 1
Key and field names, menu items,
buttons, and dialog box titles
File names, application names, and text
emphasis
User input, command and directory
names, and system responses (output
and messages)
Variables <monospace, italic font>
Website addresses Blue, underlined sans serif font text:
About this Guide
Bold
Italics
Monospace font
COMMAND NAMES are uppercase
monospace font unless they are case
sensitive
http://www.hp.com
Symbols in Text
The following symbols may be in this guide. They have the following meanings.
WARNING: Text set off in this manner indicates that failure to follow
directions in the warning could result in bodily harm or death.
Caution: Text set off in this manner indicates that failure to follow directions
could result in damage to equipment or data.
Note: Text set off in this manner presents commentary, sidelights, or interesting points
of information.
OpenView Storage Provisioner User Guide
13
Page 16
About this Guide
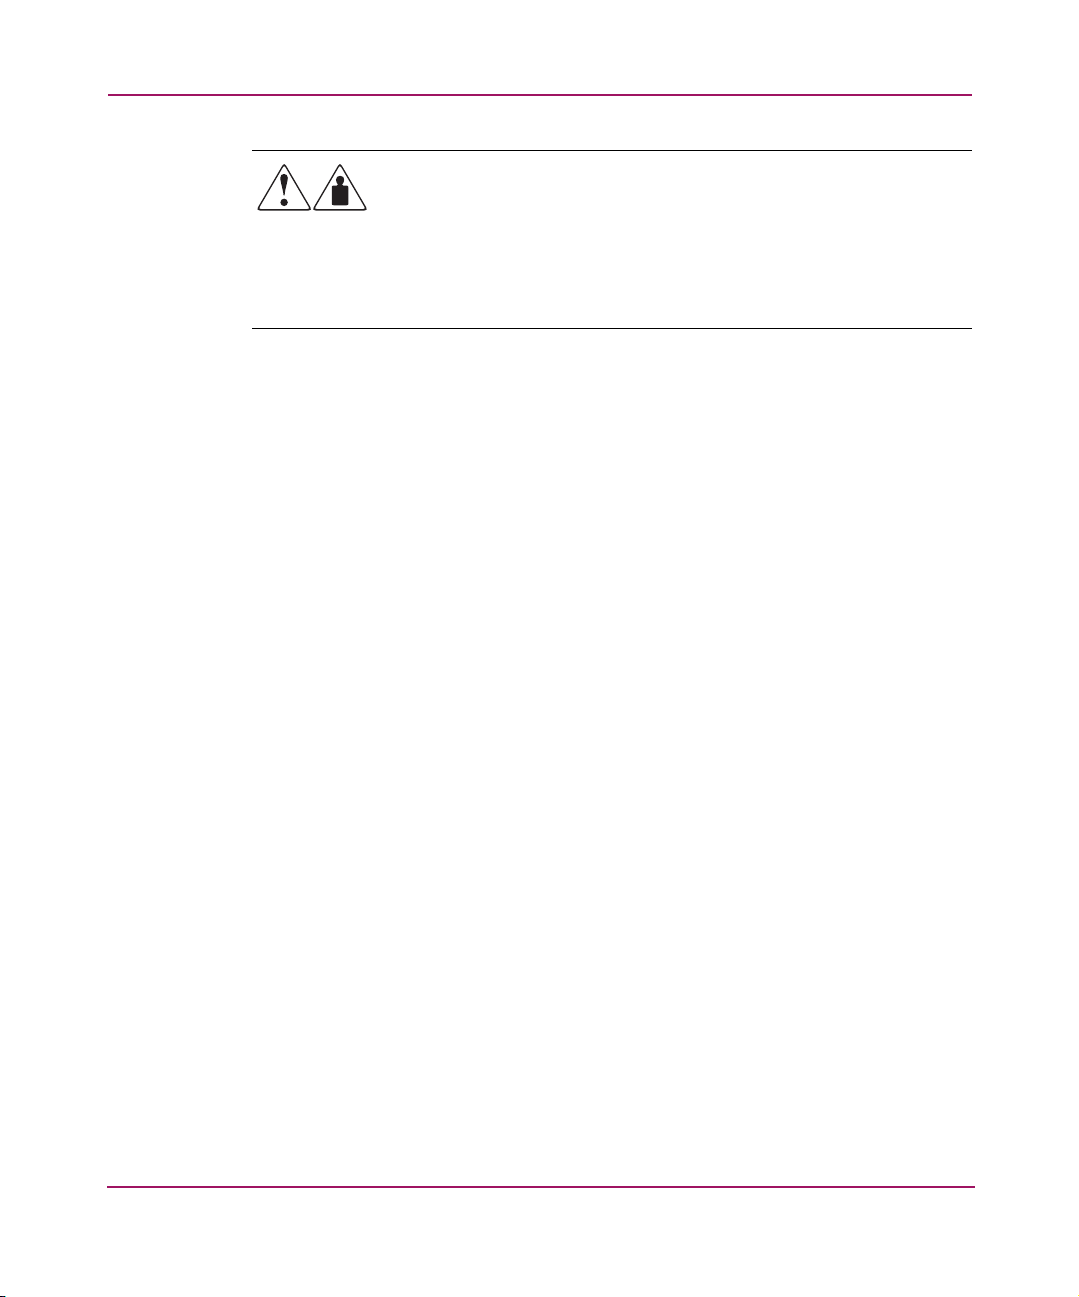
Symbols on Equipment
The following equipment symbols may be found on hardware for which this guide
pertains. They have the following meanings.
Any enclosed surface or area of the equipment marked with these
symbols indicates the presence of electrical shock hazards. Enclosed
area contains no operator serviceable parts.
WARNING: To reduce the risk of personal injury from electrical shock
hazards, do not open this enclosure.
Any RJ-45 receptacle marked with these symbols indicates a network
interface connection.
WARNING: To reduce the risk of electrical shock, fire, or damage to the
equipment, do not plug telephone or telecommunications connectors
into this receptacle.
Any surface or area of the equipment marked with these symbols
indicates the presence of a hot surface or hot component. Contact with
this surface could result in injury.
WARNING: To reduce the risk of personal injury from a hot component,
allow the surface to cool before touching.
Power supplies or systems marked with these symbols indicate the
presence of multiple sources of power.
WARNING: To reduce the risk of personal injury from electrical
shock, remove all power cords to completely disconnect power
from the power supplies and systems.
14 OpenView Storage Provisioner User Guide
Page 17
About this Guide
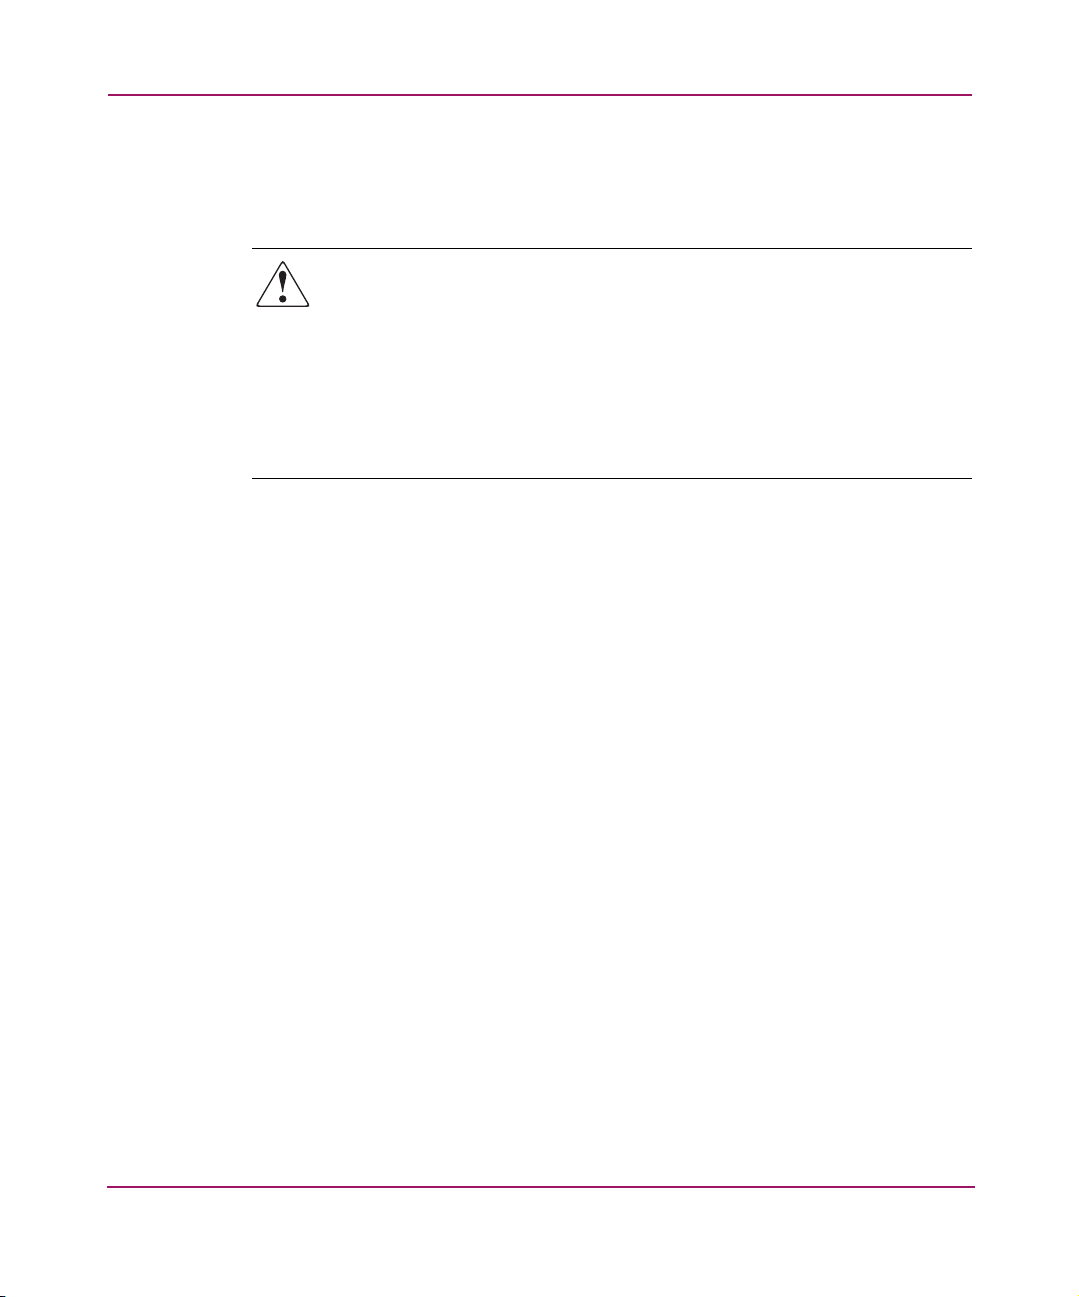
Any product or assembly marked with these symbols indicates that the
component exceeds the recommended weight for one individual to
handle safely.
WARNING: To reduce the risk of personal injury or damage to the
equipment, observe local occupational health and safety requirements
and guidelines for manually handling material.
OpenView Storage Provisioner User Guide
15
Page 18
About this Guide
Rack Stability
Rack stability protects personnel and equipment.
WARNING: To reduce the risk of personal injury or damage to the
equipment, be sure that:
■ The leveling jacks are extended to the floor.
■ The full weight of the rack rests on the leveling jacks.
■ In single rack installations, the stabilizing feet are attached to the rack.
■ In multiple rack installations, the racks are coupled.
■ Only one rack component is extended at any time. A rack may become
unstable if more than one rack component is extended for any reason.
16 OpenView Storage Provisioner User Guide
Page 19

Getting Help
If you have a question after reading this guide, contact an HP authorized service
provider or access our website:
HP Technical Support
In North America, call technical support at 1-800-652-6672, available 24 hours a
day, 7 days a week.
Note: For continuous quality improvement, calls may be recorded or monitored.
Be sure to have the following information available before calling:
■ Technical support registration number (if applicable)
■ Product serial numbers
■ Product model names and numbers
■ Applicable error messages
http://www.hp.com
About this Guide
.
■ Operating system type and revision level
■ Detailed, specific questions
HP Storage Provisioner Support Website
The HP website has the latest information on this product, as well as the latest
drivers.
http://h20000.www2.hp.com/bizsup port/TechSupport/Home.jsp?locale=en_US&pr
odTypeId=12169&p rodSerie sId=316220
From this website, select the appropriate product or solution.
Training Information
For product training information see the HP OpenView training website at:
http://www.openview.hp.com/ training/
OpenView Storage Provisioner User Guide
.
17
Page 20

About this Guide
HP Authorized Reseller
For the name of your nearest HP authorized reseller:
■ In the United States, call 1-800-345-1518.
■ In Canada, call 1-800-263-5868.
■ Elsewhere, see the HP website for locations and telephone numbers:
http://www .hp .com
.
18 OpenView Storage Provisioner User Guide
Page 21

Introducing Storage Provisioner
Welcome to the HP OpenView Storage Provisioner User Guide. This manual
provides key Storage Provisioner features and concepts about provisioning, along
with a quick tour to get you started and instructions on how to use Storage
Provisioner. This chapter includes:
■ Overview
■ About Storage Provisioner
■ Provisioning Framework
1
19OpenView Storage Provisioner User Guide
Page 22

Introducing Storage Provisioner
Overview
Storage Provisioner enables storage providers to manage storage utilities,
customize service levels, and allow customer access to each storage utility. For
storage consumers, Storage Provisioner enables self-service allocation of new
storage within the bounds of their existing Service Level Agreements. It also
provides direct control of host access to volumes without requiring provider
intervention. Reporting features provide usage and billing reports for both
providers and consumers. Additionally, storage providers and consumers can
export configuration data, providing a backup of the provisioning environment.
Using the restore task, it is easy and convenient to bring the configuration back to
a known state.
Storage Provisioner resides on the HP OpenView Storage Management Appliance
and is provided as a Management Appliance application. For simplification, The
HP OpenView Storage Management Appliance is referred to as “Management
Appliance” throughout this guide.
Storage Provisioner manages HP StorageWorks HSG80 Array Controllers and
HSV110 Virtual Controllers.
Compatibility with Storage Allocator
WARNING: Storage Allocator and Storage Provisioner should not be used to
manage LUNs on the same storage arrays or hosts. LUNs managed by
Storage Provisioner are not visible on Storage Allocator. Therefore, Storage
Allocator could potentially allocate a LUN that Storage Provisioner has also
allocated. This could cause data corruption (information to be overwritten).
20 OpenView Storage Provisioner User Guide
Page 23

About Storage Provisioner
Provisioning storage is the process that allocates storage resources based upon
storage needs. Storage Provisioner takes this concept further by providing a
graphical user interface that lets you create your provisioning environment, define
customers and service levels, and manage your storage allocations to meet
customers’ needs. Storage providers focus on the management of storage systems
and SANs, and storage consumers focus on management of their hosts and
applications. Within Storage Provisioner, you no longer need to manually set up
LUNs or manually keep track of your customers’ usage.
Features
Storage Provisioner for Storage Providers enables you to do the following:
■ Manage storage systems, storage utilities, and service levels.
■ Create, modify, and delete consumer accounts and groups, along with service
levels and storage utilities.
■ Discover storage systems.
■ Display customer quotas and storage utility access information.
■ View customer storage history information and current usage information for
volumes and connections.
Introducing Storage Provisioner
■ Export and save storage usage and volume report information.
■ Save configuration data to a file and restore that data back into Storage
Provisioner.
Storage Provisioner for Storage Consumers enables customers to do the
following:
■ Create, modify, and delete hosts, paths, and volumes.
■ Access volumes.
■ View storage and host summary information.
■ View storage history and current usage information for volumes and
connections.
■ Export, save, and print storage usage and volume report information.
Storage Providers manage:
■ Utilities – A set of storage systems.
21OpenView Storage Provisioner User Guide
Page 24

Introducing Storage Provisioner
■ Service Levels – Storage attributes that define the level of requirements for all
storage systems within the service level.
■ Storage Systems – HSG-based storage systems and HSV-based storage
systems.
■ Customers – The owners of hosts and applications on the hosts, and the users
that pay storage providers for storage used.
■ Quota – The limit placed on a customer’s storage usage and connectivity into
a utility.
Storage Consumers manage:
■ Hosts – Application servers that use storage presented by the storage systems.
■ Paths – The defined connection from one host to one storage utility that
specifies the set of host bus adapters (HBA) that make the connection.
■ Volumes – The collection of raw storage blocks on a storage system that
contains data.
Additionally, storage providers can view and manage storage consumers’ hosts,
paths, and volumes.
22 OpenView Storage Provisioner User Guide
Page 25
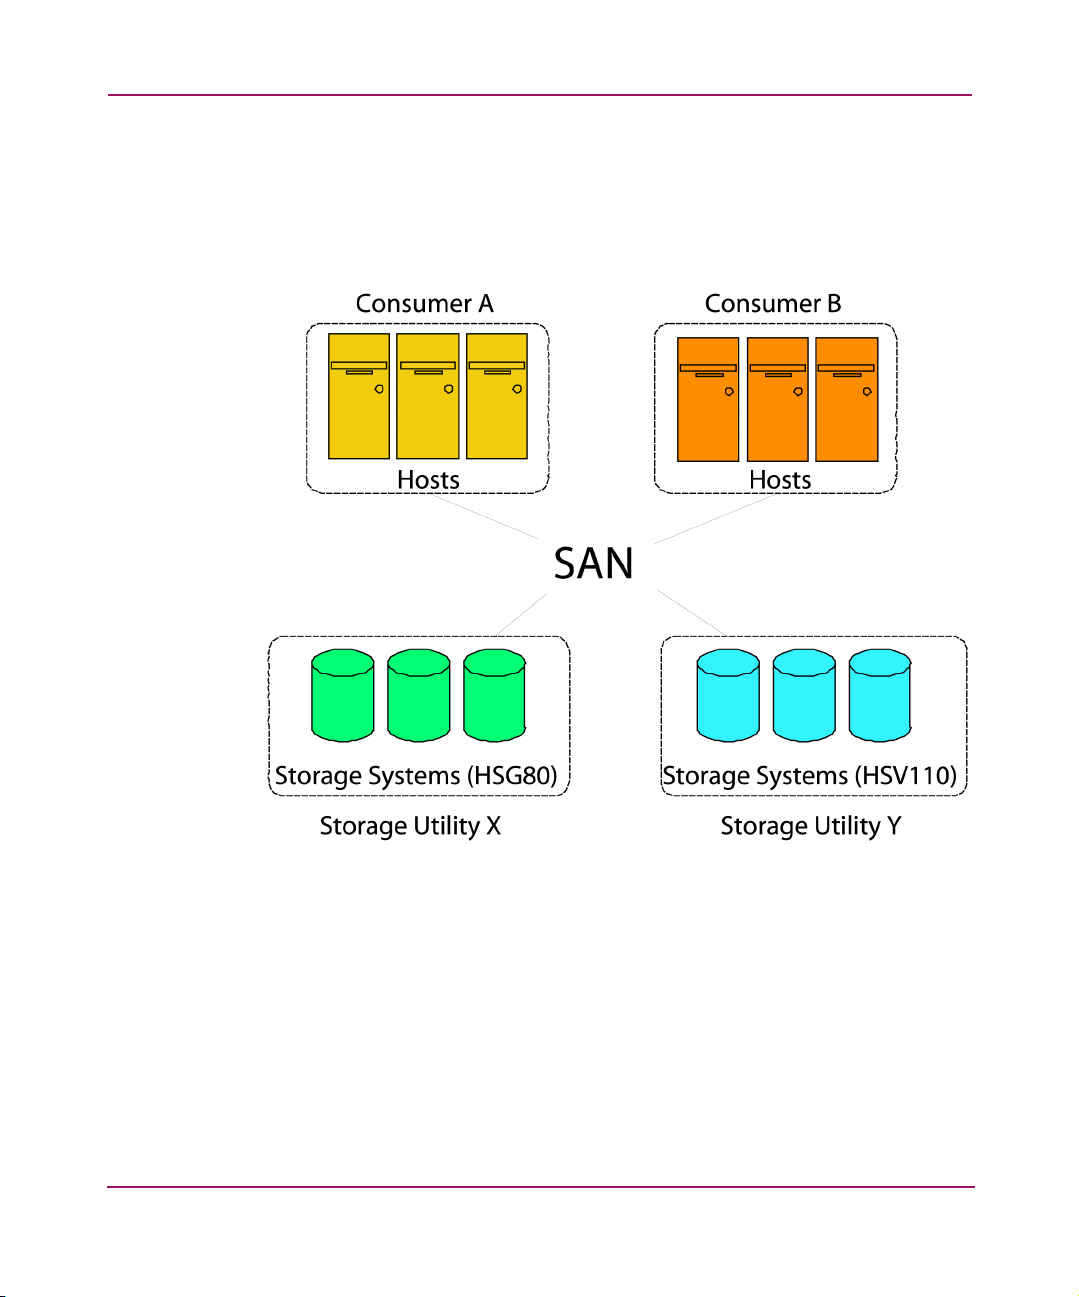
Provisioning Framework
The Storage Provisioner environment consists of a Storage Area Network (SAN)
that includes host systems (servers), storage systems, controllers, network, a
Management Appliance, and storage software.
Introducing Storage Provisioner
Figure 1: Storage Provisioner environment
Storage Provisioner also discovers existing storage systems that are already
configured as a part of your SAN. Once discovered, they display in an
Unmanaged Systems group. Then, you can move them into utilities for
management by Storage Provisioner. Additionally, if changes are made to your
SAN outside of Storage Provisioner (for example, by using one of the HSG
Element Manager or the Command View EVA), you can acknowledge those
changes in Storage Provisioner by using the Discover task within Storage
Provisioner.
23OpenView Storage Provisioner User Guide
Page 26
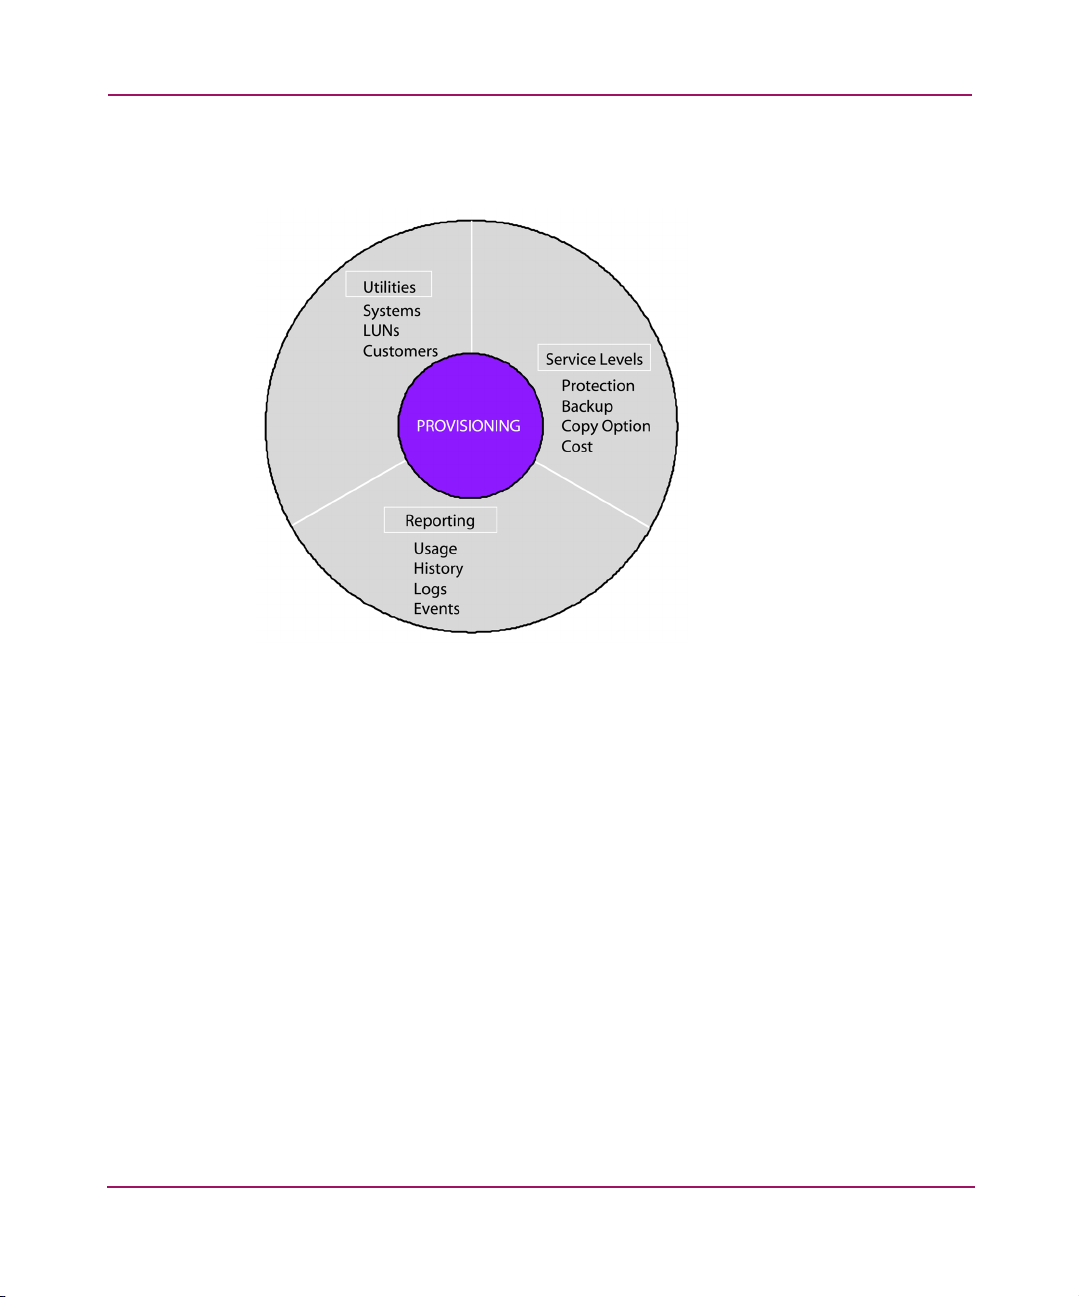
Introducing Storage Provisioner
Storage Provisioner divides provisioning into three areas: Storage Utilities,
Service Levels, and Reporting.
Figure 2: Provisioning framework
Storage Utilities
Storage utilities provide the framework for provisioning storage requirements. A
storage utility is a set of storage systems managed by the storage provider. It is the
basis for granting access to storage. That is, the storage provider manages the
storage system, and the storage customer manages the hosts and applications that
need storage.
Storage Utility Characteristics
Tabl e 2 provides a list of utility characteristics to use when creating utilities and
grouping storage systems within them.
24 OpenView Storage Provisioner User Guide
Page 27
Introducing Storage Provisioner
Table 2: Utility Characteristics
Utility Characteristic Storage System
Managed by only one Management
Appliance.
Supports only multibus mode. Preconfigured to match utility.
Allows a maximum of 25 storage
systems in a utility.
Allows a maximum of 16 storage
systems in a utility.
Supports only storage systems using
fabric topology.
Supports storage systems in
dual-redundant configurations.
Supports a prespecified group of
host operating systems.
Supports SCSI-3 Mode only. Preconfigured prior to Storage Provisioner
Configured with Command Console LUN
(CCL).
HSG80 Storage Systems.
HSV110 Storage Systems.
Preconfigured prior to Storage Provisioner
management.
Preconfigured prior to Storage Provisioner
management.
HSG80 Storage Systems. No changes
required to storage system. Storage
Provisioner protects the number of supported
host paths to the utility.
management.
Storage Utility High-Availability Configurations
Storage Provisioner supports two high-availability configurations: straight cable
and cross cable.
■ A straight-cable configuration consists of two storage systems, a host system,
a host path with two HBAs, and each path is connected to the same utility.
■ A cross cable configuration consists of two storage systems, a host system, a
host path with two HBAs, and each host may contain multiple paths (two
HBAs each) with each path connected to the same storage utility or another
utility.
In both configurations, each HBA sees each storage system within the utility.
High-availability configurations provide for improved performance and greater
availability of your storage systems. For more information about straight cable
and cross cable configurations, refer to the SAN Design Reference Guide at:
http://h18000.www1.hp.com/products/storageworks/san/docume n tati on.html
.
25OpenView Storage Provisioner User Guide
Page 28

Introducing Storage Provisioner
Service Levels
Service levels allow storage providers to define storage attributes that give storage
consumers access to available storage within a utility. You define service levels
when you set up customers to access storage systems and volumes. Service Levels
also allow you to define the cost for storage usage. The service level name and
description are the only two attributes visible to the storage customer.
When you create a service level, you specify storage attributes that define the level
of requirements for all storage systems within the service level. These attributes
include the type of storage system, protection level, copy option, backup option,
and price per gigabyte. The service level storage attributes are applied when
Storage Provisioner creates volumes. For example, several different customers
may have different storage requirements. One customer may have a very large
environment that includes applications that need a lot of storage within a
high-availability environment. The service level defined for this customer may
include the following:
■ HSV110 storage system.
■ VRAID 5 Protection Level.
■ Instantaneous Snapshot Copy option.
■ $15 per Gigabyte.
A different customer may only need VRAID 1 Protection Level with Backup
option.
Note: Storage Provisioner does not configure any backup applications. The Copy
option and Backup option document the configuration you completed outside of
Storage Provisioner after volumes are created by the storage consumer. These options
also enable Storage Provisioner to reserve storage for making snapshots or clones. By
reserving the storage for these options, you reduce the storage size available during the
provisioning process to ensure that Storage Provisioner does not allocate more storage
than is required.
Reporting
Reporting tools allow the storage provider and storage consumer to review storage
usage, quotas, and billing history. Reporting tools also provide administrative
tools that display generated logs and events. The administrative tools are used to
help the storage provider diagnose a problem when one occurs.
26 OpenView Storage Provisioner User Guide
Page 29

Getting Started with Storage Provisioner
This chapter provides instructions for using the graphical user interface and help
system, using the quick tour to get started, and starting Storage Provisioner for
Providers and Storage Provisioner for Consumers. This chapter includes:
■ About the User Interface
■ Getting Started with the Quick Tour
■ Starting Storage Provisioner
2
27OpenView Storage Provisioner User Guide
Page 30
Getting Started with Storage Provisioner
About the User Interface
The Storage Provisioner user interface consists of a tripane window containing the
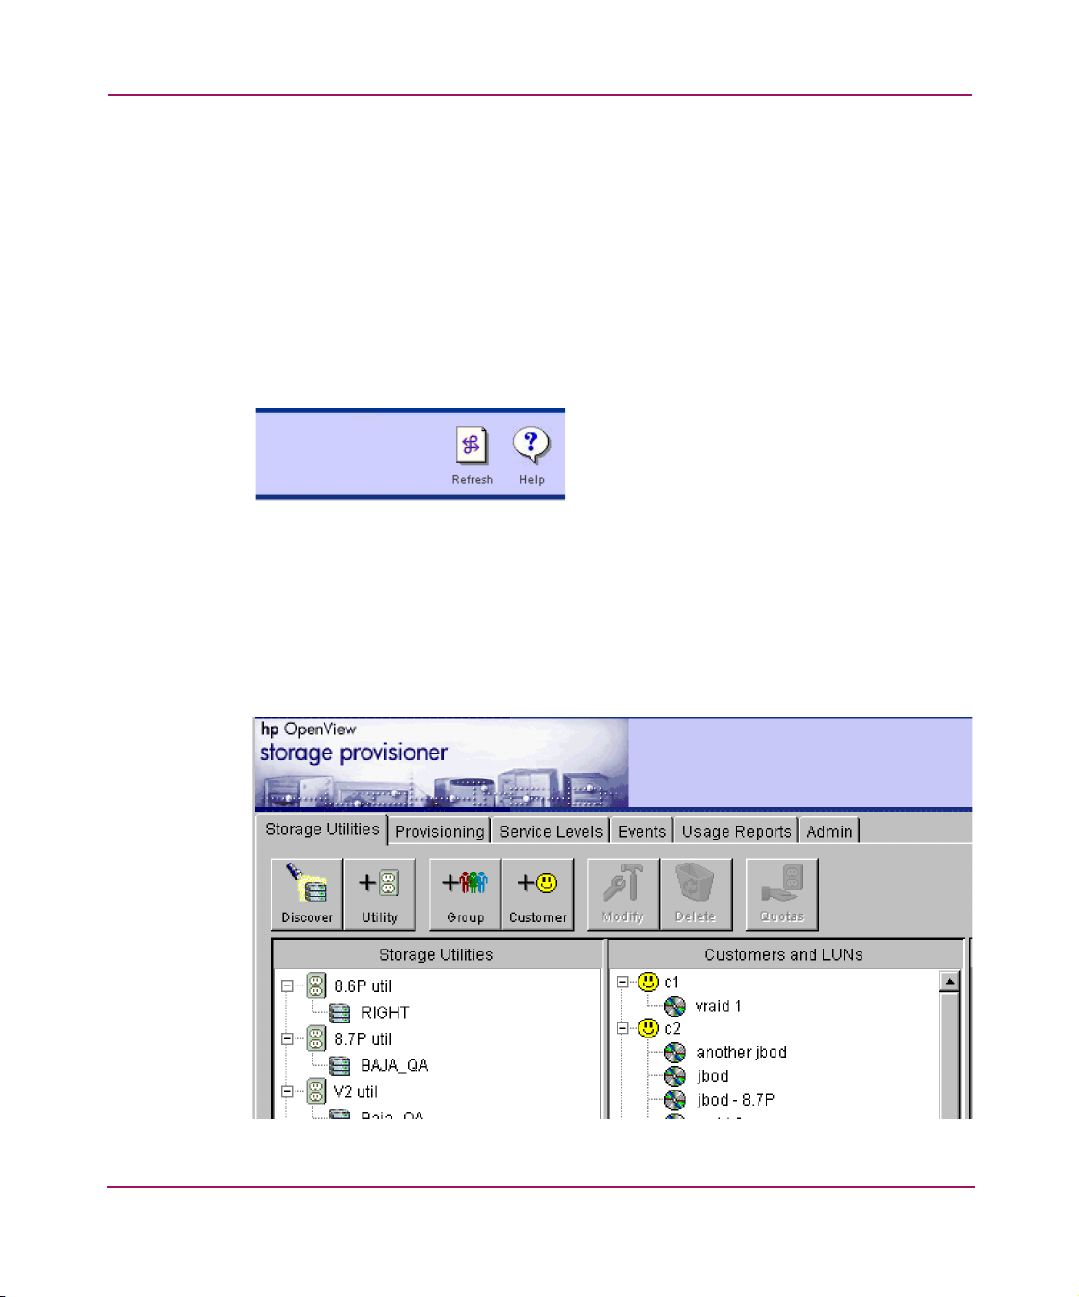
following:
■ Session pane – Includes links that you can select to perform various functions:
— Refresh – Updates Storage Provisioner with changes made by other users.
A refresh of the provisioning display automatically occurs when you
select a new tab or when a create, modify, or delete occurs.
— Help – Displays
Figure 3: Session pane
■ Navigation pane – Displays links where you view information about your
storage utilities, customers, and service levels. Storage Provisioner provides
two views:
— Storage Utilities
— Customers and LUNs
general online help in a separate browser.
Figure 4: Navigation panes
28 OpenView Storage Provisioner User Guide
Page 31

Getting Started with Storage Provisioner
When you click a link, information about the selected resource displays in the
Content pane. Also, the actions available to you on the toolbar change
depending upon your selection in the Navigation pane.
■ Content pane – Displays information about the item that you selected in the
Navigation pane. When you select an item in the Navigation pane, related
information displays in the Content pane. For example, the screen below
displays when you click the storage utility called hsg80-blue utility in the
Navigation pane. The summary for the selected storage utility displays in the
Content pane. See Figure 4.
Figure 5: Content pane
Additionally, Storage Provisioner provides tabs and toolbar buttons for easy
access to actions that help you manage your storage utilities, customers, and
service levels.
Understanding Relationships
The Storage Provisioner user interface has two Navigation panes and a Content
pane when the Storage Utilities tab is selected. The two navigation panes contain
trees that share relationships between the items in the trees. Storage Provisioner
highlights these relationships visually so you can see how one component fits into
the SAN from multiple viewpoints.
29OpenView Storage Provisioner User Guide
Page 32

Getting Started with Storage Provisioner
The Storage Utilities tab contains Navigation panes for managing how to allocate
storage space to customers.
Figure 6: Navigation pane relationships
Each Navigation pane provides a different view of the same SAN.
■ Storage Utilities pane – The tree in this pane shows all the managed utilities,
along with which storage systems are in each utility.
■ Customers and LUNs pane – The tree in this pane shows all the customer
groups, along with which LUNs are in each group.
In this example, the LUN called jbod is the primary selection indicated in the
darker highlighting. It is associated with the storage system called BLUE
indicated by the lighter highlighting.
Navigation Pane Relationship
Items in the two navigation trees (shown in Figure 6) are related. If you highlight
an item in one tree that is related to an item in the other tree, the interface shows
you the relationship by automatically highlighting the related item in the other
tree. See Figure 7.
30 OpenView Storage Provisioner User Guide
Page 33

Getting Started with Storage Provisioner
Figure 7: Example of highlighted items
The advantage in this example is that you can see where one storage element
appears in the SAN from both the provider and consumer views. This feature also
works from either tree.
Note: The same name may be associated with different types of objects. For example,
Horizon
customer.
could be the name of a storage utility and the name used to identify a
31OpenView Storage Provisioner User Guide
Page 34

Getting Started with Storage Provisioner
About Interface Relationships
The following table shows which relationships exist in the provider interface
between the two Navigation panes. Although the table only shows relationships
from the Storage Utilities tree to the Customers and LUNs tree, all of these
relationships also work in reverse.
Table 3: Interface Relationships
Storage Utilities Tree Item Customers and LUNs Tree Item
Storage utility name Customer name
Storage system name LUN name
About Storage Provisioner Tabs
You can use the tabs described below to access functions at the application level.
When a tab is selected, it displays a set of toolbar buttons. The toolbar buttons
allow you to manage your storage utilities, customers, and service levels. Storage
Provisioner tabs allow you to manage and review the following:
■ Storage Utilities – Allows you to discover storage utilities and storage
systems, and display and create storage utilities, customers, and service levels.
■ Provisioning – Allows you to select a customer and display that customer’s
storage information.
■ Service Levels – Allows you to display the current defined storage levels and
to create new levels.
■ Events – Allows you to display a list of the actions generated by Storage
Provisioner.
■ Usage Reports – Allows you to display information about volumes and
connections and to view a history of usage.
■ Admin – Allows you to save your data to a file and import the file back into
your Storage Provisioner.
Figure 8: Storage Provisioner tabs
32 OpenView Storage Provisioner User Guide
Page 35

When you select a tab and an item from the Navigation pane, a customized set of
toolbar buttons displays, providing access to functions for that specific selection.
For example, if you select the Service Levels tab and a service level from the
Navigation pane, the toolbar buttons that appear are appropriate to the selected
service level (in this case, Create, Modify, and Delete).
About Help
The Storage Provisioner Help system uses a tripane window (a window with three
panes) that displays the toolbar, Navigation pane, and Content pane. The toolbar
assists you in viewing the current Help system. The Navigation pane contains a
table of contents (TOC), index, and word-search to help you find a topic. The
Content pane displays the current or selected Help topic.
Toolbar Controls
The toolbar contains Previous and Next buttons, similar to those found in web
browsers. The Previous and Next buttons enable you to browse backward and
forward through previously viewed topics. They do not advance you backward
and forward in order of the help topics as listed in the Table of Contents (TOC).
Next to the Previous and Next buttons are the Print buttons. You use the Print
buttons to set up the page’s print options and to print the help topic that is
displayed in the Content pane.
Getting Started with Storage Provisioner
Figure 9: Help toolbar
The next level of controls, located below the toolbar, allows you to view the help
files.
33OpenView Storage Provisioner User Guide
Page 36

Getting Started with Storage Provisioner
Table 4: Toolbar Icons
Icon Description
TOC – displays a list of topics in the Navigation pane designed to
help you use the application. The TOC is set up based upon tasks that
you may need to perform.
Index
Navigation pane. Select a topic in the Navigation pane to display the
related information in the Content pane. Also, you can type a topic in
the Find input field.
Search
and press Enter to display a list of topics that contain that word or
phrase. The first topic in the list displays its information in the Content
pane.
The search is case-sensitive.When you type in a word or phrase, the
help system searches throughout the files to find an exact match. The
term
use of lowercase and uppercase letters.
Navigation Pane
– displays a defined list of topics in alphabetical order in the
– allows you to type a word or phrase in the indicated area
case-sensitive
means that the search distinguishes between the
The Navigation pane is located below the toolbar and displays the TOC in a
hierarchical format. This format provides navigation information by displaying
individual topics grouped into categories. Each category can contain subcategories
and individual topics. To open and close a category, double-click the category
name or single-click the level icon to its left. To view a help topic, click the title.
34 OpenView Storage Provisioner User Guide
Page 37

Getting Started with Storage Provisioner
Content Pane
Figure 10: Help navigation pane
When you select a topic in the Table of Contents, that topic displays in the Content
pane. Scroll through and read topics as you do when using a web browser.
35OpenView Storage Provisioner User Guide
Page 38

Getting Started with Storage Provisioner
Content PaneNavigation Pane
Figure 11: Help content pane
36 OpenView Storage Provisioner User Guide
Page 39

Getting Started with the Quick Tour
After you install and start Storage Provisioner for Storage Providers, you must set
up your storage requirements, service levels, and customers and allocate volumes
for use by your customers. After configuration, notify your customers of the login
username and password they need to access Storage Provisioner for Storage
Consumers. Use the following procedure as a guide for configuring Storage
Provisioner:
General Setup
1. Use the Command View EVA to set the local host name, password, and CLI
Config option. You can access Command View EVA from the Devices menu
in the Management Appliance.
2. Review Storage Provisioner concepts about utilities, service levels, and
reporting tools.
See “Introducing Storage Provisioner” on page 19.
3. Modify your local system to export and print provisioning data.
See “About Exporting Data” on page 87 and “About Printing
Reports” on page 90.
4. Start Storage Provisioner.
See “Starting Storage Provisioner” on page 39.
Create the Storage Environment
Getting Started with Storage Provisioner
1. Discover any storage systems.
See “Discovering New Storage Systems” on page 53.
2. Create the service levels.
See “Working with Service Levels” on page 77
3. Create the storage utilities.
See “Creating Utilities” on page 48.
4. Create the customer accounts.
See “Creating Customers” on page 65.
5. (Optional) Create customer groups.
See “Creating Customer Groups” on page 62.
Provide Access to Storage
1. Assign storage systems to utilities.
See “Granting Quotas” on page 74.
2. Migrate unmanaged storage to managed storage. See “Managing Unmanaged
Volumes” on page 69.
37OpenView Storage Provisioner User Guide
Page 40

Getting Started with Storage Provisioner
Notify Your Customers and Back Up the Configuration Data
1. Let your customers know how to access Storage Provisioner for Storage
Consumers. See “Starting Storage Provisioner for Consumer” on page 41.
2. Back up your provisioning data to a file on your local system. See “Backing
Up Configuration Data” on page 131.
38 OpenView Storage Provisioner User Guide
Page 41

Starting Storage Provisioner
Storage providers start Storage Provisioner from the Management Appliance.
After you define storage allocations, service levels, and customers, the storage
consumer can start Storage Provisioner for Storage Consumers through a
designated URL and port number that you provide.
To Start Storage Provisioner:
1. Browse to the Management Appliance from a web-enabled workstation. The
Management Appliance login page displays.
2. Enter your username and password, and click OK. The Management
Appliance home page displays.
Getting Started with Storage Provisioner
Figure 12: Management Appliance home page
39OpenView Storage Provisioner User Guide
Page 42

Getting Started with Storage Provisioner
3. Click the Tools icon.
The Management Appliance Tools page opens.
Figure 13: Tools page
Note: The Tools page may contain other application icons.
4. Click the storage provisioner icon.
If prompted, accept the download of the Java™ applet.
40 OpenView Storage Provisioner User Guide
Page 43

Getting Started with Storage Provisioner
Storage Provisioner opens in a new browser window.
Figure 14: Storage Provisioner
Note: If this is a new installation, no information displays in the navigation panes. See
Discovering New Storage Systems to find available storage.
Starting Storage Provisioner for Consumer
Storage consumers launch Storage Provisioner for Consumers with a designated
URL and port that you provide. To help get your storage customers get started,
review the following procedure with your storage customers. Also, provide your
storage customers with the HP OpenView Storage Provisioner for Consumers
Quick Reference. You can download the quick reference at:
http://h18000.www1.hp.com/products/storageworks/san/docume n tati on.html
To start Storage Provisioner for Consumers:
1. Provide URL login information.
a. You will assign utilities, service levels, and storage allocations.
41OpenView Storage Provisioner User Guide
Page 44

Getting Started with Storage Provisioner
b. The Storage Provisioner designated port number is 7777. The login
instructions contain the URL to the Management Appliance and the
designated port number:
Example:
http://11.111.111.62:7777
where:
11.111.111.62 is the URL to the Management Appliance.
7777 is the designated port number.
2. Open a browser application.
3. In your browser address bar, enter the URL and port number. The URL and
port number are separated by a colon (:). See the example in Figure 15.
Figure 15: URL and port number
4. The Storage Management Appliance Tools page displays.
42 OpenView Storage Provisioner User Guide
Page 45

Getting Started with Storage Provisioner
Figure 16: Tools page
5. Click storage provisioner. If prompted, accept the download of the Java
applet. A new browser window opens with the login dialog box.
Figure 17: Login dialog box
6. Enter the your username and password, and then click Login. Storage
Provisioner for Consumers opens in a new browser window.
43OpenView Storage Provisioner User Guide
Page 46

Getting Started with Storage Provisioner
Note: The storage provider creates the username and password. Provide this
information to each customer.
Storage Provisioner for Consumers displays the customer’s current total storage
quota and unused quota graphically.
44 OpenView Storage Provisioner User Guide
Page 47

Using Storage Provisioner
This chapter includes the tasks that Storage Provisioner performs to help you
manage your provisioning environment and storage consumers. This chapter is
divided into three main areas:
■ Overview
■ Working with Storage Utilities
■ Working with Service Levels
■ Working with Reporting Tools
3
45OpenView Storage Provisioner User Guide
Page 48

Using Storage Provisioner
Overview
Storage Provisioner provides storage providers with the tools to manage storage
requirements, service levels, and customers. Storage Provisioner also provides
storage consumers with the tools to manage their own storage allocations after
configuration by the storage provider. Storage Provisioner includes tasks such as
discovering storage systems, creating utilities and customers, and assigning
storage systems to utilities. Storage Provisioner uses wizards that step you through
the process of creating your provisioning environment by prompting you to enter
information or prompting you to make a selection.
46 OpenView Storage Provisioner User Guide
Page 49

Working with Storage Utilities
Storage Provisioner manages storage systems by grouping them into storage
utilities that share the same storage type. There are two storage types: HSG80 and
HSV110. A storage utility may exist with only HSG80 storage systems or only
HSV110 storage systems, but not both. You can start creating your provisioning
environment by creating a storage utility for your HSG80 storage systems and
HSV110 storage systems. Using the Storage Utilities tab, you can define and
manage your storage and customer information by:
■ Defining utilities.
■ Discovering and managing storage systems.
■ Defining customer groups and customers.
■ Managing customer volumes.
■ Assigning quotas and granting access to volumes.
Using the Storage Utilities Tab
The Storage Utilities tab is the key to creating and managing your provisioning
environment.
Using Storage Provisioner
To use the Storage Utilities tab:
1. Start Storage Provisioner for Storage Providers.
2. Select the Storage Utilities tab.
When you select the Storage Utilities tab, the Storage Utilities toolbar
displays.
Figure 18: Storage Utilities toolbar
47OpenView Storage Provisioner User Guide
Page 50

Using Storage Provisioner
About Utilities
Storage Provisioner allows you to create and manage storage utilities through
tasks that you need to manage storage and customers. The Utility button provides
the tasks associated with defining and managing the utility. From the Storage
Utilities tab, you can:
■ View storage utility information.
■ Create a utility.
■ Modify storage utility information.
■ Delete a utility.
Viewing Utilities
To view utilities:
The selected storage utility is highlighted, as well as the customer assigned to that
utility.
In the Storage Utilities tab, select a storage utility displayed in the Navigation
pane.
A storage utility is identified by the following icon:
Creating Utilities
To create a utility:
1. In the Storage Utilities tab, click Utility on the toolbar.
A window opens to step you through the process to create a storage utility for
management by your Storage Provisioner.
48 OpenView Storage Provisioner User Guide
Page 51

Using Storage Provisioner
Figure 19: Create Storage Utility window
2. Enter a Utility Name and select the Storage Type from the pull-down list.
■ The storage utility name must be unique.
■ Storage Provisioner supports only Multibus mode for both the HSG80
and HSV110 storage systems.
■ Storage Provisioner does not manage storage systems configured in
Transparent mode. An error message appears if you attempt to add a
storage system configured in Transparent mode.
3. Click Next.
49OpenView Storage Provisioner User Guide
Page 52

Using Storage Provisioner
Figure 20: Create Storage Utility
4. Select the Host OS for this utility.
■ Storage Provisioner supports all host operating systems (servers) that are
supported by the Management Appliance.
■ When creating a storage utility containing HSG80 storage systems, the
valid host operating systems are:
Note: The path-to-host selections are recommendations for an optimum operating
SAN (see the SAN Design Reference Guide). The guide can be found at:
http://h18000.www1.hp.com/products/storageworks/san/documentation.html
However, Storage Provisioner does not limit you to these recommendations. You can
exceed the number of path-to-host recommendations.
— 24 Paths to Tru64, OpenVMS
— 8 Paths to Tru64, Windows NT®, Sun, Novell, OpenVMS, HP-UX
— 6 Paths to Tru64, Windows NT, Sun, Novell, IBM AIX, HP-UX,
OpenVMS
50 OpenView Storage Provisioner User Guide
Page 53

5. Click Finish to complete the action or Cancel to stop the action.
When you click Finish, the new storage utility displays in the Navigation pane.
Modifying Utilities
To modify an existing utility:
1. In the Storage Utilities tab, select a storage utility listed in the Navigation
2. Click Modify on the toolbar.
3. Modify the Utility Name or the Host OSes (HSG80 only). Remember, the
4. Click Finish to complete the action or Cancel to stop the action.
When you click Finish, the modifications are updated for that utility.
Using Storage Provisioner
■ Regardless of the host operating system, Storage Provisioner supports 256
hosts per storage utility containing HSV110 storage systems.
pane.
A window opens to step you through the process to modify the selected
storage utility’s information.
display reflects the fields for the appropriate storage system, HSG80 or
HSV110.
■ The storage utility name must be unique.
■ Changing the host OSes for the storage utility (HSG80 storage systems
only) alters the number of available paths. If the change decreases the
available paths to fewer than the number of paths already in use for
customer quotas, a warning message displays, and an event is added to the
event log.
Deleting Utilities
To delete a utility:
1. In the Storage Utilities tab, select a storage utility listed in the Navigation
2. Click Delete on the toolbar.
Caution: Before deleting a utility, you must remove all assigned storage
systems, paths, and quotas. Otherwise, an information message displays.
pane.
A window opens where you confirm the delete action.
51OpenView Storage Provisioner User Guide
Page 54

Using Storage Provisioner
3. Select Ye s at the bottom of the confirmation window.
The storage utility is removed and is no longer managed by Storage Provisioner.
About Storage Systems
Storage systems are storage arrays using either HSG-based storage systems or
HSV-based storage systems. With Storage Provisioner, you can discover and
manage storage systems to meet your customer’s storage requirements. Storage
systems are assigned to utilities for management by Storage Provisioner.
Unmanaged storage systems are those storage systems that are a part of your
SAN, but are not currently managed by Storage Provisioner. For storage systems,
you can:
■ View existing storage system information.
■ Discover new storage systems or discover a single storage system.
■ Manage and Unmanage storage systems.
■ Modify storage systems.
■ Remove storage systems from Storage Provisioner.
■ Replace a storage system controller.
Note: Storage Provisioner cannot manage a storage system with an invalid
configuration. If the following conditions are met, then an invalid storage system exists:
– The system is unmanaged and is not in FABRIC mode.
– The system does not have dual-redundant controllers configured.
Viewing Storage Systems
Storage Provisioner manages both HSG80 storage systems and HSV storage
systems.
To view storage systems:
1. In the Storage Utilities tab, select a storage system displayed in the
Navigation pane.
A storage system is identified by the following icon:
52 OpenView Storage Provisioner User Guide
Page 55

Your storage system is highlighted and the Content pane changes to display details
about the selected storage system.
Discovering New Storage Systems
To discover new storage systems within your SAN:
Note: Depending upon the size of your SAN, the discovery process can take a long
time to complete. Be sure that you are ready to perform the discovery. Also, after you
start the discovery process, let the discovery complete. If you cancel or abort the
discovery, unfavorable results could occur.
1. Select the Storage Utilities tab.
If this is the first time using or setting up Storage Provisioner, there are no
storage systems currently managed by Storage Provisioner. Therefore, the
Storage Utilities and Customers and LUNs Navigation panes are blank.
Using Storage Provisioner
Figure 21: Storage Utilities tab
2. Click Discover on the toolbar.
When you click Discover, a window opens to continue the action since the
discovery of storage systems can take a long time depending upon the size of
the SAN.
53OpenView Storage Provisioner User Guide
Page 56

Using Storage Provisioner
Figure 22: Discover window
3. Click Discover in the confirmation window to launch discovery.
4. Click OK to acknowledge the discovery.
Figure 23: Discover acknowledgement
If this is the first time using or setting up Storage Provisioner, your discovered
storage systems display in the Storage Utilities pane under Unmanaged Systems.
To move your unmanaged storage systems into a managed utility, see “Managing
Storage Systems” on page 56.
54 OpenView Storage Provisioner User Guide
Page 57

Figure 24: Discover results
Discovering a Single Storage System
You can select a storage system in the Navigation pane and perform a single
discovery.
Using Storage Provisioner
Note: The discovery of a single storage system is only available
initial discovery.
after
you perform the
To discover a single storage system:
1. In the Storage Utilities tab, select a storage system from the Navigation pane.
2. Click Discover on the toolbar.
A window opens where you confirm the action.
Note: You can also use this feature to discover new storage systems in the SAN.
Remember, a discovery of all storage systems could take a while, depending upon the
size of your SAN. This option lets you minimize the discovery time by selecting a single
storage system.
55OpenView Storage Provisioner User Guide
Page 58

Using Storage Provisioner
Figure 25: Discover action confirmation
3. Click the option to discover the single storage system, in this example
Discover Right only. When you select the first option, the Discover button
displays.
4. Click Discover.
The discovery process is performed for the selected storage system.
Managing Storage Systems
To manage systems:
Note: Storage systems must be configured in SCSI-3 mode.
1. Create a storage utility. See “Creating Utilities” on page 48.
2. Modify the storage system to associate it with the storage utility. See
“Modifying Storage Systems” on page 57.
After you create a storage utility and associate a storage system to it, the storage
system is managed by Storage Provisioner.
Unmanaging Storage Systems
Storage Provisioner allows you to remove a managed storage system from
management by moving the storage system to the Unmanaged Storage Systems
group. You may want to do this if the storage system is experiencing problems or
if the storage system is scheduled for maintenance. For example, if the storage
system goes to an offline status because one of the controllers in the controller pair
is in a failed state, you need to determine the reason for the failed state and correct
56 OpenView Storage Provisioner User Guide
Page 59

the problem. First, you should move the storage system to the Unmanaged Storage
Systems group. Once the problem is corrected, you can move the storage system
back into a storage utility for management by Storage Provisioner. You can only
move a storage system to the unmanaged group if there are no managed volumes
assigned to the storage system.
Note: If you select to unmanage a system, Storage Provisioner removes all information
about that storage system. Unmanaged storage systems are those storage systems that
are not currently managed by Storage Provisioner. Unmanaged storage systems display
in Storage Provisioner as unmanaged storage systems.
Modifying Storage Systems
To modify an existing storage system:
1. In the Storage Utilities tab, select a storage system listed in the Navigation
pane.
Using Storage Provisioner
Figure 26: Unmanaged storage systems – highlighted
2. Click Modify on the toolbar.
57OpenView Storage Provisioner User Guide
Page 60

Using Storage Provisioner
3. Enter the new storage system name, if appropriate, and click Next.
4. Select from the list of storage utilities.
Note: When you select the Unmanaged Storage System group, Storage Provisioner
ceases to manage that storage system.
A window opens to step you through the process to modify the selected
system’s information.
This list consists of each defined storage utility and an unmanaged storage
systems group. If a storage system has allocated volumes assigned, then it
cannot change storage utilities.
Figure 27: Modify Storage System window
5. Click Finish to complete the modifications or Cancel to stop.
When you click Finish, the modifications display in the Navigation pane.
58 OpenView Storage Provisioner User Guide
Page 61

Deleting Storage Systems
To delete a storage system:
1. In the Storage Utilities tab, select a storage system listed in the Navigation
pane.
Note: If LUNs are highlighted in the Customer and LUNs Navigation pane, then one or
more customers still have access to the selected storage system. You cannot delete the
selected storage system in this case. An information message instructs you on how to
proceed.
2. Click Delete on the toolbar.
A window with two option buttons displays to confirm the delete action.
■ Remove the system from management.
■ Do not remove the system (default selection).
3. Make the appropriate selection to remove or not to remove the system.
Using Storage Provisioner
Figure 28: Delete Storage System confirmation
When you select the first option, the Remove button becomes active.
4. Click Remove.
The storage system is removed from Storage Provisioner and is no longer
managed by Storage Provisioner. If you change your mind and want this storage
system managed by Storage Provisioner, you must perform a discovery. See
“Discovering New Storage Systems” on page 53.
59OpenView Storage Provisioner User Guide
Page 62

Using Storage Provisioner
Replacing a Storage System
When you need to replace one of your storage system controllers, Storage
Provisioner helps you make this transition. A storage system needs replacing
when the storage system is re-initialized, a controller is replaced (physically), the
storage system name changes, or the storage system is presented differently by the
HSG Element Manager or Command View EVA. Storage Provisioner no longer
recognizes the storage system as a managed storage system. The storage system
displays as offline in the Navigation pane.
To replace a storage system:
1. In the Storage Utilities tab, select an offline storage system listed in the
Navigation pane.
A storage system is identified by the following icon:
Your selection is highlighted. If the offline storage system has associated
volumes, the associated volumes highlight in a light color.
2. (Optional) Remove all associated volumes. Select the associated volumes and
click Delete on the toolbar.
The volumes display in the Unmanage Volumes group.
3. Click Discover on the toolbar.
When you click Discover, a window opens to continue the action since the
discovery of storage systems can take a long time depending upon the size of
the SAN. (See “Discovering New Storage Systems” on page 53.)
4. Select the offline storage system in the Navigation pane.
5. Click Delete on the toolbar.
When you click Delete, a window opens to continue the action.
If the storage system does not have associated volumes, choose one of the
following:
— Remove the storage system from management.
— Do not remove the storage system from management.
— Replace the storage system.
60 OpenView Storage Provisioner User Guide
Page 63

Using Storage Provisioner
Figure 29: Remove Storage System confirmation
— Select the last option to replace the storage system with another storage
system, and click Replace.
6. If the storage system has associated volumes, then only the Replace option
displays in the dialog. Click Replace.
A list of the unmanaged storage systems displays.
7. Select the replace storage system from the list.
Note: Storage systems displayed in this list must be online, displayed under
Unmanaged Storage Systems in the Navigation pane, and the storage system type must
match the system being replaced (such as HSG or HSV).
8. Click Finish.
When you click Finish, the modifications display in the Navigation pane.
About Customer Groups and Customers
With Storage Provisioner, you can manage your customers by grouping customers
with similar characteristics into groups. For example, you may want to define one
group to represent all accounting customers.
Customer Groups
Customer groups is optional, and provides a convenient mechanism to help you
manage and organize customers. Using the Storage Utilities tab, you can:
■ View customer group information.
■ Create customer groups.
61OpenView Storage Provisioner User Guide
Page 64

Using Storage Provisioner
■ Modify customer group information.L
■ Delete a customer group.
Viewing Customer Groups
To view customer group information:
1. In the Storage Utilities tab, select a customer group displayed in the
Navigation pane.
A customer group is identified by the following icon:
The Content pane displays details about that customer group.
The Customer Group view displays the number of customers associated with that
group.
Creating Customer Groups
To create a customer group:
1. In the Storage Utilities tab, click Group for customers, , on the toolbar.
A window opens to step you through the process to add a customer group.
2. Enter the customer group name.
3. Click Finish.
When you click Finish, the new customer group displays in the Navigation pane.
You can now place customers within the new customer group.
Modifying Customer Groups
To modify an existing customer group:
1. In the Storage Utilities tab, select a customer group listed in the Navigation
pane.
2. Click Modify on the toolbar.
A window opens to step you through the process.
3. Change the name of the selected customer group.
4. Click Finish.
The modifications are complete.
62 OpenView Storage Provisioner User Guide
Page 65

Deleting Customer Groups
To delete a customer group:
1. In the Storage Utilities tab, select a customer group listed in the Navigation
pane.
2. Click Delete on the toolbar.
A window opens where you confirm the delete action. Remember, you must
remove all customers associated with the selected group before you can delete
the group.
Figure 30: Delete customer confirmation
3. Select Ye s to delete the customer group or No to cancel.
When you select Ye s, the customer group is removed from Storage Provisioner.
Using Storage Provisioner
Customers
With Storage Provisioner, you can manage your customer information and storage
requirements, and grant access to that storage. When you set up your customers,
you assign a username and password. Customers use this username and password
to access Storage Provisioner for Storage Consumers. To help manage your
customers through Storage Provisioner, you can:
■ View customer information.
■ Create a customer.
■ Modify customer information.
■ Delete customer.
63OpenView Storage Provisioner User Guide
Page 66

Using Storage Provisioner
Viewing Customers
To view customer information:
1. In the Storage Utilities tab, select a customer displayed in the Navigation
pane.
A customer is identified by the following icon:
The Content pane displays details about that customer. Any associated
relationship is highlighted in a lighter color.
The Customer Detail screen for the selected customer displays the following
information:
■ User Name – Label assigned to identify the customer.
■ Total Quota – Amount of total storage (in gigabytes) allocated for usage by
the customer.
■ Quota Used – Amount of storage (in gigabytes) actually used by the customer.
■ Quota Remaining – Amount of unused storage (in gigabytes).
■ Number of Units – Number of volumes that the customer has created.
64 OpenView Storage Provisioner User Guide
Page 67

Creating Customers
To create a customer:
1. In the Storage Utilities tab, click Customer on the toolbar.
A window opens to step you through the process of adding a customer and
customer information.
Using Storage Provisioner
Figure 31: Create Customer window
2. Enter the customer information and click Next.
65OpenView Storage Provisioner User Guide
Page 68

Using Storage Provisioner
Figure 32: Create Customer – group name
3. Select the appropriate customer group from the list of existing customer
groups. Remember, customer groups help you organize and manage your
customers with similar characteristics.
4. Click Finish.
The new customer displays in the Customer and LUNs Navigation pane.
Modifying Customer Information
To modify existing customer information:
1. In the Storage Utilities tab, select a customer listed in the Navigation pane.
2. Click Modify on the toolbar.
A window opens to step you through the process of modifying the selected
customer’s information.
3. Make your changes for the selected customer and click Next to continue.
66 OpenView Storage Provisioner User Guide
Page 69

A second window opens for you to make changes to the group of your
selected customer.
Note: You can also remove a customer from a customer group by holding down the
Control key (Ctrl) while clicking the customer group.
4. Click Finish to complete the action or Cancel to stop the action.
5. When you click Finish, your modifications are completed.
Deleting Customers
To delete a customer:
Note: Before you delete a customer, you must remove all volumes. If all volumes are not
removed, a message window reminds you that a volume exists for the selected
customer.
1. In the Storage Utilities tab, select a customer listed in the Navigation pane.
Using Storage Provisioner
2. Click Delete on the toolbar.
A window opens where you can confirm the delete action.
Figure 33: Delete customer confirmation
When you click Yes , the customer is removed and is no longer managed by
Storage Provisioner.
67OpenView Storage Provisioner User Guide
Page 70

Using Storage Provisioner
About Customer Volumes
Volumes are a collection of raw storage blocks that contain data that is read and
written to by host applications. The amount and type of storage is determined by
the service level agreement between the storage provider and the storage
consumer. Volumes are assigned by the storage customer to allocate the
appropriate amount and type of storage needed by the host applications. With
customer volumes, you can:
■ View customer volume information.
■ Manage unmanaged volumes (migrate a volume into Storage Provisioner).
■ Modify customer volumes.
■ Delete customer volumes.
Viewing Customer Volumes
To view customer volumes:
In the Storage Utilities tab, select a volume from the Customers and LUNs
Navigation pane.
Your selection is highlighted. Additionally, the storage system that contains
the volume is also highlighted. The Content pane changes to display
information about that volume.
The Customer Volume view displays the following:
■ Unit – Name of the logical unit number.
■ Service Level – Defined service level to which the unit is associated.
■ Size – Unit size in gigabytes.
■ Type – RAID level of the volume.
■ Reserve Space for Copy – Allocates space to copy unit; valid values are Yes or
No.
■ Drives – Number of drives used in the volume.
■ Drive X – Each drive that is used in the volume showing a DISK00000 name;
where X is the number of each drive.
■ Preferred Controller – The assigned primary controller.
■ Write Protect – Valid values are Yes or No.
■ Read Cache – Valid values are Yes or No.
■ Read Ahead Cache – Valid values are Yes or No.
68 OpenView Storage Provisioner User Guide
Page 71

■ Writeback Cache – Valid values are Yes or No.
■ Max Cached Transfer – Maximum size of the cached transfer in blocks.
■ LUN ID – World Wide Name of the volume.
Managing Unmanaged Volumes
Volumes that display in the Unmanaged Volumes group are volumes that were
previously configured for existing storage and are not currently managed by
Storage Provisioner.
To migrate unmanaged volumes:
1. In the Storage Utilities tab, select a volume listed in the Unmanaged Volumes
group in the Customer and LUNs Navigation pane.
Using Storage Provisioner
Figure 34: Select a volume
2. Click Modify on the toolbar.
A window opens where you can add the volume to management.
69OpenView Storage Provisioner User Guide
Page 72

Using Storage Provisioner
Figure 35: Add volume to management window
3. Enter the requested information.
■ Customers – Only those customers with assigned quota to the storage
utility and enough quota to include the migrated volume appear in the
pull-down list.
■ Service Levels – Only those service levels with a defined storage type
(HSV or HSG) and defined protection level that matches the volume
appear in the pull-down list.
■ Created – Automatically provided; the HSV storage system date is
determined by the creation date of the volume. The HSG storage system
date is the current date.
■ Reserve Space for Copy – (Required) Select the check box to reserve
space for copy. The default is not check (cleared) for migrated volumes.
4. Click Finish to complete or Cancel to stop.
When you click Finish, the migrated volume is now manageable by Storage
Provisioner.
70 OpenView Storage Provisioner User Guide
Page 73

Modifying Customer Volumes
To modify customer volume information:
1. In the Storage Utilities tab, select a customer volume listed in the Customers
and LUNs Navigation pane.
2. Click Modify on the toolbar.
A window opens where you can modify the volume information.
Using Storage Provisioner
Figure 36: Modify Volume window
3. Select either the Reserve Space for Copy or Unmanage check boxes.
■ Reserve Space For Copy – Informs Storage Provisioner that extra space
is needed for this volume. When Reserve Space For copy is selected,
Storage Provisioner reserves an equal amount of storage for use during a
snapshot or cloning. Reserve Space for Copy is automatically checked
when a volume is created with a service level that has snapshot or clone
selected.
■ Unmanage – Informs Storage Provisioner that this volume is no longer
required for management. When you select the Unmanage option, Storage
Provisioner moves this volume to the Unmanaged Volumes group.
71OpenView Storage Provisioner User Guide
Page 74

Using Storage Provisioner
4. Click Finish to complete the action or Cancel to stop the action.
When you click Finish, your modifications are complete.
Deleting Customer Volumes
To delete a volume:
1. In the Storage Utilities tab, select a volume from the Customers and LUNs
Navigation pane.
2. Click Delete on the toolbar.
A window opens with two selections.
3. Select one of the options.
Figure 37: Delete volume confirmation
When you select the first option, the Delete button becomes active.
4. Click Delete.
When you click Delete, the volume is removed and is no longer allocated to the
customer.
About Quotas
Storage Provisioner allows you to view and grant quotas for a customer’s storage
requirements. It also allows you to deny a customer access to a storage utility.
Using the Storage Utilities tab, you can:
■ View quota – Displays information about a customer’s storage requirements.
■ Grant access – Allows you to allocate or deny storage access to a customer.
72 OpenView Storage Provisioner User Guide
Page 75

Viewing Quotas
To view quota information:
1. Select the Storage Utilities tab.
2. Hold down the Shift key and select both a storage utility and a customer.
3. Click Quotas on the toolbar.
Customer Quota View
The quota information for a selected customer includes:
■ Username – Displays the customer’s name.
■ Total Quota – Displays the amount of storage available to the customer.
■ Quota Used – Displays the amount of storage the customer is using.
■ Quota Remaining – Displays the amount of unused storage for that customer.
■ Number of Units – Displays the number of logical units (LUNs) available to
Using Storage Provisioner
The selected items are highlighted.
A window displays that steps you through the process to grant the customer
access to the storage utility.
customer.
Storage Utility Quota View
The quota information for a selected storage utility includes:
■ Controller Type – Displays the name of the controller.
■ Storage Systems – Displays the amount of storage available to the utility.
■ Physical Storage
— Total – Displays the amount of storage the utility is using.
— Unused – Displays the amount of unused storage for that utility.
■ Usable Storage – Service level list of the type of storage available to the
utility.
■ Failover mode – Type of failover mode; Multibus only.
■ Operating Systems Allowed – List of the operating systems allowed in utility.
■ Hosts Available – Number of hosts available in the storage utility.
■ Hosts Allocated – Number of hosts allocated in the storage utility.
■ Hosts Used – Number of hosts used in the storage utility.
73OpenView Storage Provisioner User Guide
Page 76

Using Storage Provisioner
■ Volumes Available – Number of volumes available in the storage utility.
■ Volumes Allocated – Number of volumes allocated in the storage utility.
■ Volumes Used – Number of volumes used in the storage utility.
Granting Quotas
To grant storage allocations (quotas):
1. Select the Storage Utilities tab.
2. Enable the Quotas button by holding down the Shift key and clicking to
Note: Both the storage utility and the customer must be selected before selecting the
Quotas button so the quota is associated to the storage utility and the customer.
3. Select Quotas on the toolbar.
select a storage utility and a customer.
Both selected items are highlighted in the Navigation panes.
A window opens where you begin the process to grant access to storage
allocations.
74 OpenView Storage Provisioner User Guide
Page 77

Figure 38: Storage Utility Access window
Using Storage Provisioner
4. Select one of the options.
Deny access – Denies the customer access to the storage utility and disables
host access to any existing volume in that utility. All customer volumes must
be removed before access can be denied.
Set quota to – Specifies the amount of storage (in gigabytes) to allow the
customer to use in the utility. It is the amount of usable storage, not physical
storage. Storage Provisioner allows you to allocate more storage than is
physically available in the utility. You can use this to help allocate for budgets
and add storage as necessary.
5. Enter the Quota amount.
6. Click Next to move to the next window display or Cancel to stop the task.
The Number of Host Paths window displays.
75OpenView Storage Provisioner User Guide
Page 78

Using Storage Provisioner
Figure 39: Storage Utility Access window
7. Specify the number of allocated paths (HSG80 only) or number of hosts and
volumes (HSV110 only), and enter a message to the customer.
Note: In HSG-based utilities, the quota limits the number of paths a customer can use
to connect hosts to the utility. In HSV-based utilities, the quota limits the number of hosts
a customer can connect to the utility.
To allocate paths for HSG80 storage systems, the number of paths should not
exceed the number of unallocated paths for the utility, and must not be less
than the number of paths used by the customer in that utility. Storage
Provisioner allows you to over-allocate paths (a warning message displays).
8. Click Finish to complete the action, or Cancel to stop the action.
When you click Finish, the customer is granted access to the storage utility.
76 OpenView Storage Provisioner User Guide
Page 79

Working with Service Levels
Service levels provide a way to name a group of storage attributes. The storage
provider defines service levels with the appropriate storage attributes. The storage
consumer can select the required service levels. The service levels also define the
cost for storage.
The Service Level tab allows you to view, create, modify and delete service levels.
When you make a selection, a window opens to step you through the process.
Using the Service Levels tab, you can:
■ View service levels.
■ Create service levels.
■ Modify service levels.
■ Delete service levels.
Using the Service Levels Tab
To use the Service Levels tab:
In the Service Levels tab, click Create on the toolbar or a defined service
level displayed in the Navigation pane.
■ If you clicked Create, a window opens to step you through the process to
add a service level. See “Creating Service Levels” on page 79.
■ If you selected a defined service level displayed in the Navigation pane,
you can modify or delete it. See
or “Deleting Service Levels” page 82.
Using Storage Provisioner
“Modifying Service Levels” on page 80
Figure 40: Service Levels tab
The Service Levels tab has toolbar buttons that allow you to create, modify, and
delete service levels for your customers.
77OpenView Storage Provisioner User Guide
Page 80

Using Storage Provisioner
Viewing Service Levels
When you first select the Service Level tab, the Navigation and Content panes
automatically change to display the currently defined service levels. If service
levels are not defined, then the Navigation pane contains no data. In this case the
Create button is active.
When you select a service level from the Navigation pane, the Content pane
changes to display information about that service level. This information includes:
■ Service Name – Defined name for service level.
■ Description – A short description of the service level.
■ Storage System – Type of storage system included in the service level;
choices are HSG80 or HSV110.
■ RAID Level – Name of the RAID level
— HSG80 storage systems choices – JBOD, RAID 0, RAID 1, RAID 3/5, or
RAID 0+1
— HSV110 storage systems choices – VRAID 0, VRAID 1, or VRAID 5.
■ Copy Option – Defined option for your service.
— HSG80 storage systems choices – None, Clone, or Snapshot.
— HSV110 storage systems choices – None, Standard Snapshot, Virtually
Capacity-Free Snapshot, or Instantaneous Snapclone.
■ Backup – Option that you determine for your service; choices are Yes or No.
■ Price (per GB) – Price per GB in dollars.
■ Existing Volumes – Number of volumes that are defined with this service
level.
78 OpenView Storage Provisioner User Guide
Page 81

Creating Service Levels
To create a service level:
1. In the Service Levels tab, click Create on the toolbar.
A window opens to step you through the process to create a new service level.
Using Storage Provisioner
Figure 41: Create Service Level window
2. Enter the appropriate information to create the new service level. This
includes Service Name, Description, and Storage System Type (HSG80 or
HSV110).
3. Click Next to continue or Cancel to stop the action.
The service level options window displays.
79OpenView Storage Provisioner User Guide
Page 82

Using Storage Provisioner
Figure 42: Create Service Level window
4. Enter the options for this service level. This includes Protection Level, Copy
Option, Backup option, and Cost.
5. Click Finish.
When you click Finish, the new service level displays in the Navigation pane.
Click Refresh in the Session pane to make the new service level available to the
existing utilities.
Modifying Service Levels
To modify an existing service level:
1. In the Service Levels tab, select a service level listed in the Navigation pane.
2. Click Modify on the toolbar.
A window displays the service level information.
80 OpenView Storage Provisioner User Guide
Page 83

Using Storage Provisioner
Figure 43: Modify Service Level window
3. Make the appropriate changes to the Name, Description, or Storage System
Type, and click Next.
4. Make the appropriate changes to the Protection Level, Copy Option, Backup
Option, or Cost.
Note: When the service level has assigned volumes, you cannot modify Protection
Level and Copy Option. These two fields display as inactive.
5. Click Finish to complete the modify action or Cancel to stop the action.
When you click Finish, the modifications for the service level display.
81OpenView Storage Provisioner User Guide
Page 84

Using Storage Provisioner
Deleting Service Levels
To delete a service level:
Note: Before you delete a service level, be sure that no volumes are assigned to it. If
volumes are assigned, an information window displays reminding you that there are
assigned volumes.
1. In the Service Levels tab, select a service level listed in the Navigation pane.
2. Click Delete on the toolbar.
A window opens to confirm the delete action.
Figure 44: Service level delete confirmation
3. Select Ye s to delete the service level, or No to stop the deletion.
If Ye s is selected, the service level is removed and is no longer available.
82 OpenView Storage Provisioner User Guide
Page 85

Working with Reporting Tools
The Usage Reports tab contains information about activities for customers,
storage utilities, and service levels. Additionally, you can export each of the
reports to a file, import the information into a spreadsheet program, and print the
spreadsheet report.
Using Storage Provisioner
Note: Before you can export report data, the
modified your
need to repeat the procedure. See “Modifying the java.policy” on page 88.
java.policy
From the Usage Reports tab, you can:
■ View reports.
— Volume report.
— Quotas report.
— Billing History report.
■ Export the reports to other applications.
■ Print the reports.
Using the Usage Reports Tab
To use the Usage Reports tab:
1. Select the Usage Reports tab.
A window opens where you can select the type of report.
java.policy
file during installation of Storage Provisioner, then you do not
file must be modified. If you
83OpenView Storage Provisioner User Guide
Page 86

Using Storage Provisioner
Figure 45: Usage Reports tab
2. From the list, select a report to view:
Current Usage – Click View Volumes or click View Quotas.
Volume Usage During – Enter dates and click View History.
When you select a report the window changes to display the selected report
information.
About Current Usage Reports
The Current Usage reports presents information for the following:
■ Viewing Volumes – Allows you to view current volume usage.
■ Viewing Quotas – Allows you to view current usage for quotas.
Once the reports are displayed, you can export or print any report, see “Exporting
Reports” on page 89 or “Printing Data” on page 91.
84 OpenView Storage Provisioner User Guide
Page 87

Viewing Volumes Report
To view the Current Volume Usage report:
1. Select the Usage Reports tab.
2. Click View Volumes.
The Current Volume Usage report displays.
Figure 46: Current Volume Usage Report
The Current Volume Usage report displays the following information:
■ Storage utility – Name of the storage utility assigned to in Storage
Provisioner.
■ Storage system – Name of the storage system where the volume resides.
Using Storage Provisioner
■ Name – The name assigned by the customer to the volume.
■ Customer – Name (at the time the event occurred) of the owner of the volume.
■ Service Level – Defined service level.
■ Size (GB) – Volume size in GB.
Viewing Quotas Report
To view the Quotas report:
1. Select the Usage Reports tab.
2. Click View Quotas.
The Quotas report displays.
85OpenView Storage Provisioner User Guide
Page 88

Using Storage Provisioner
Figure 47: Quota Report
The Quotas report contains the following information:
■ Customer – Label that represents the customer name.
■ Storage Utility – Name of the defined storage utility.
■ Quota – Name of the storage component in the storage utility; valid storage
■ Allocated – Number assigned to the customer in the storage utility for host,
■ Used – Number used in the storage utility for host, storage, path, or volume.
components are host, path, volume, or storage.
storage, path, or volume.
About the Billing History Report
When the Usage Reports tab is selected, you can select the type of report for
viewing. The Billing History report allows you to define a date range and view
history for volume usage for that date range. To export or print the Billing History
report, see “Exporting Reports” on page 89 or “Printing Data” on page 91
Viewing Billing History Report
To view the Billing History report:
1. Select the Usage Reports tab.
The display changes to allow you to select the report for viewing.
2. Enter a date range to define the time period of your history report.
Format for the date range is: mm/dd/yy (month/day/year).
3. Click View History.
86 OpenView Storage Provisioner User Guide
Page 89

Using Storage Provisioner
The Billing History Report displays.
Figure 48: Billing History Report
The Billing History Report contains the following information:
■ Title – Name of report (Billing History Report) with defined date range; if
dates are not specified, the report displays all data.
■ Group – Name of the group.
■ Customer – Label that represents that customer.
■ Service Level – Defined service level for volume.
■ Unit – Logical Unit Number of volume.
■ Storage Utility – Name of the storage utility.
■ Volume Name – The unit number and the customer-assigned name.
■ Size (GB) – Volume size in GBs.
■ Created – Creation date of the volume.
■ Deleted – Date the volume was deleted.
■ Days – Number of days that the volume has been active for the customer.
■ Cost – Dollar amount per gigabyte.
About Exporting Data
Storage Provisioner provides the capability for you to export the Current Usage
report, Volume Usage report, or a diagnostic log. You specify a folder on your
system to hold the exported data file. The data is saved in plain text format,
delimited by commas. Then you can use a spreadsheet program to format, display,
or print the report.
Note: Before you can export report data, the
modified your java.policy file during installation of Storage Provisioner, then you do not
need to repeat the procedure. See “Modifying the java.policy” on page 88.
java.policy
file must be modified. If you
87OpenView Storage Provisioner User Guide
Page 90

Using Storage Provisioner
t
Modifying the java.policy
Note: Modifying your
card
. If you modified your
then you do not need to repeat the procedure.
java.policy
java.policy
file is also described in the
file during installation of Storage Provisioner,
HP OpenView Installation
To modify your java.policy file:
1. On your hard drive, locate your java.policy file by using your computer’s
search function.
2. Open the file.
3. Make the appropriate change that copies the following grant line near the top
of the file:
grant {
permission java.security.AllPermission;
};
4. Edit this part of the java.policy file to look like this:
grant {
permission java.security.AllPermission;
};
//Standard extensions get all permissions by defaul
grant codeBase “file:${java.home}/lib/ext/*”{
permission java.security.AllPermission;
};
//default permissions granted to all domains
5. Save your modified java.policy file.
You can now export your provisioning data.
88 OpenView Storage Provisioner User Guide
Page 91

Exporting Reports
To export a report:
1. Select the Usage Reports tab or the Admin tab.
2. Select a report to export:
3. After the report displays, click Export.
Using Storage Provisioner
The Usage Reports tab allows you to view current usage or volume usage, and
the Admin tab allows you to view diagnostic logs.
■ From the Usage Reports tab you can select one of the following:
Current Usage – Click View Volumes or Click View Quotas.
Volume Usage During – Enter date and Click View History.
■ From the Admin tab, select:
Diagnostic Logs – Click View.
The Save Quota Report windows opens.
Figure 49: Save Quota Report window
4. Select a folder, enter a file name, and click Save. Folder names and file names
must be less than 30 characters in length.
89OpenView Storage Provisioner User Guide
Page 92

Using Storage Provisioner
The report information is saved with the specified file name in the specified
folder. A confirmation message displays.
Figure 50: Save Quota Report confirmation
5. Click OK to acknowledge your saved file.Your report information is now
ready for you to print, See
About Printing Reports
Storage Provisioner provides the capability for you to save report information into
a text file. With this text file, you can use a spreadsheet program to print a
formatted report of the information.
“About Printing Reports” on page 90”.
Note: Before you can export report data, your
modified your
need to repeat the procedure. See “Modifying the java.policy” on page 88.
java.policy
file during installation of Storage Provisioner, then you do not
java.policy
file must be modified. If you
The report information is saved to a text file, delimited by commas, in the
following format:
■ The first line contains column headings within quotes.
■ The second line and additional lines contain the information from each row on
the report.
■ All text fields and dates are in quotes.
■ Fields that are blank appear as empty quotes.
■ Numbers are displayed without quotes and decimals and are used as needed to
describe a value.
90 OpenView Storage Provisioner User Guide
Page 93
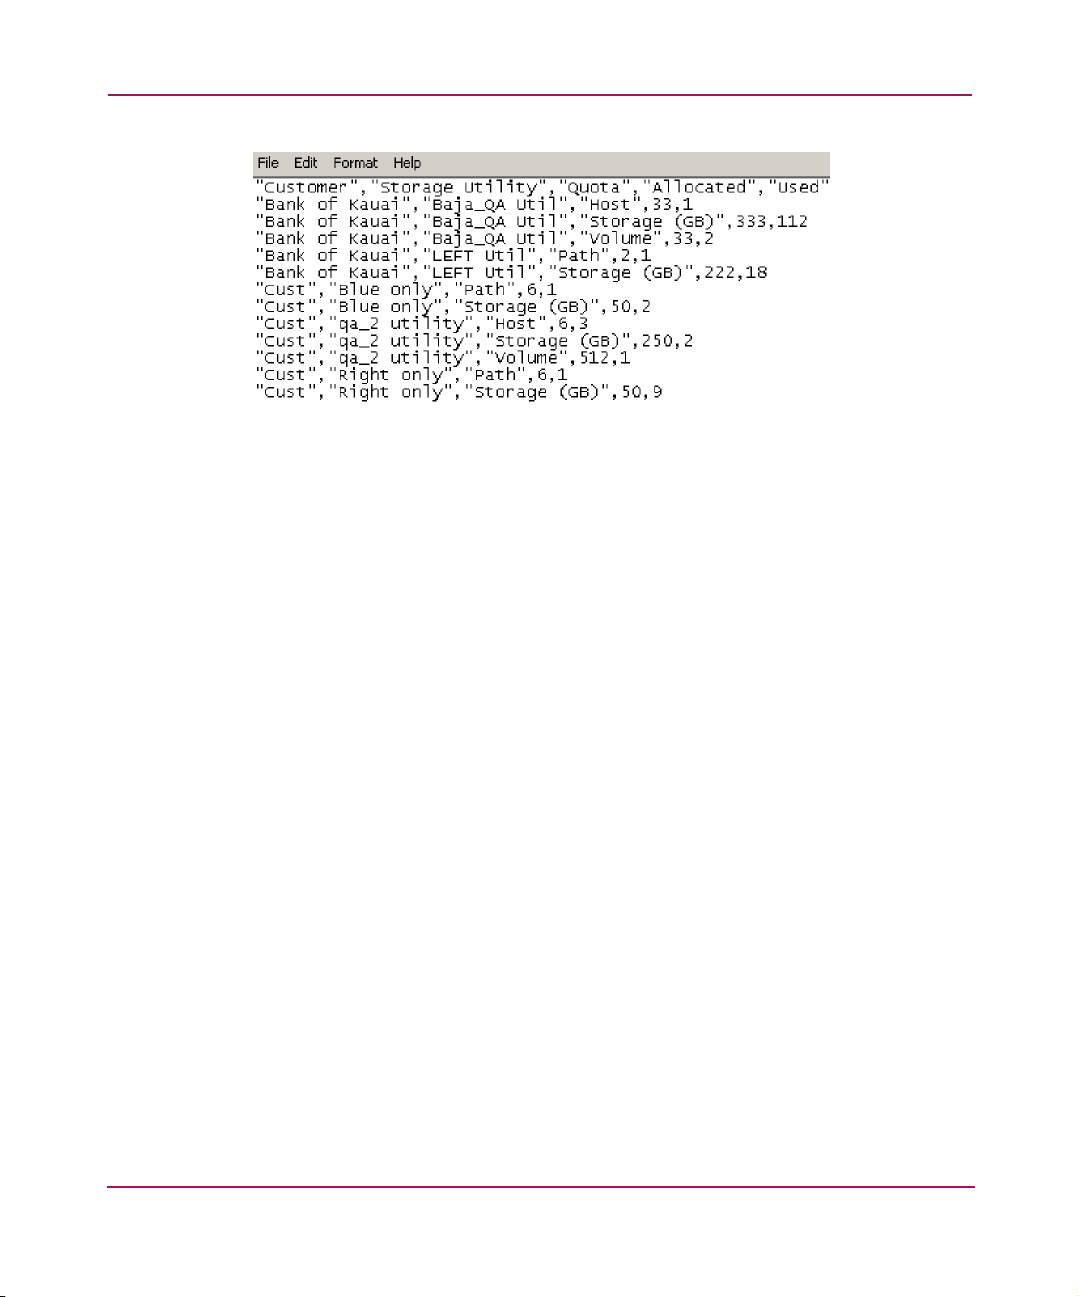
Printing Data
Using Storage Provisioner
Figure 51: Report example
To print the report file:
1. Access your spreadsheet application.
In this example, Microsoft Excel is used.
2. Open the saved report text file using the File menu. To open the saved text file,
you may need to expand the file display to include all file types.
In this example, the file name is C:\Document and Settings\QuotaRpt.
The Text Import Wizard opens, starting a three-step process.
91OpenView Storage Provisioner User Guide
Page 94

Using Storage Provisioner
Figure 52: Text Import Wizard – step 1
3. Select the Delimited option in the Choose the file type that best describes
your data field for the Original data type.
4. Click Next.
92 OpenView Storage Provisioner User Guide
Page 95

Using Storage Provisioner
Figure 53: Text Import Wizard – step 2
5. Click the Comma option field in the Delimiters field, and set the Tex t
Qualifier field to quote (“).
6. Click Next.
93OpenView Storage Provisioner User Guide
Page 96

Using Storage Provisioner
Figure 54: Text Import Wizard – step 3
7. Click the General option in the Column data format area.
8. Click Finish.
The report information appears in a Microsoft Excel spreadsheet.
9. Select Print from the File menu to print the spreadsheet.
94 OpenView Storage Provisioner User Guide
Page 97

Provisioning Storage
This chapter includes the tasks that Storage Provisioner performs to help you
manage your storage consumers provisioning environment. This chapter provides
the following:
■ Overview
■ Viewing a Customer’s Environment
■ Working with Hosts and Host Groups
■ Working with Paths
■ Working with Volume Groups and Volumes
4
95OpenView Storage Provisioner User Guide
Page 98

Provisioning Storage
Overview
Storage Provisioner provides a complete storage management solution for storage
utility providers and storage consumers. The Provisioning tab allows you to view
your storage customers’ environment, to allocate new storage, and to control host
access. When you select the Provisioning tab, a customized set of toolbar buttons
displays to help you manage your storage. It lets you select a customer and display
the selected customer’s storage environment. Additionally, you can perform the
same tasks as your storage customer to manage the customer’s provisioning
requirements.
Note: The Provisioning tab in Storage Provisioner for Providers provides the same tasks
as the Manage Storage tab in Storage Provisioner for Consumers.
You can manage your customer’s provisioning requirements using the following
features:
■ Select a customer and view the provisioning environment.
■ Create, modify, and delete hosts.
■ Create, modify, and delete paths.
■ Create, modify, and delete volumes.
■ Assign volumes for usage.
Using the Provisioning Tab
To use the Provisioning tab:
1. Start Storage Provisioner for Storage Providers.
2. Select the Provisioning tab.
When you select the Provisioning tab, the Provisioning toolbar displays.
Figure 55: Provisioning tab
96 OpenView Storage Provisioner User Guide
Page 99

Viewing a Customer’s Environment
To help you understand your customer needs, Storage Provisioner provides access
into your customers’ provisioning environment. After selecting a customer, the
customer’s provisioning environment displays in the Navigation panes.
To view a customer’s environment:
1. Start Storage Provisioner for Storage Providers.
2. In the Provisioning tab, select a customer from the Customer pull-down list.
Provisioning Storage
Figure 56: Customer selection
When you select a customer, the Hosts and Volumes Navigation panes display
the selected customer’s provisioning environment.
97OpenView Storage Provisioner User Guide
Page 100

Provisioning Storage
Working with Hosts and Host Groups
Customers run applications on hosts (servers). Each host contains Host Bus
Adapters (HBAs) that connect the host to the SAN. Volumes are visible to the
hosts through the HBAs. This connection allows the hosts to read and write data to
the volumes. Hosts use paths to connect them to a storage utility.
About Host Groups
With Storage Provisioner, you can manage hosts by arranging them into groups.
Host groups allow you to organize and manage your host systems in some
meaningful manner, but they are optional. That is, you may want to group host
systems that are all in one location, or that are a part of a system such as
Accounting. With host groups, you can:
■ View existing host group information.
■ Create host groups.
■ Modify host group information.
■ Delete host groups.
Viewing Host Group
To view host group information:
In the Provisioning tab, select a host group displayed in the Navigation pane.
Host groups are identified by the following icon:
Host Group View
After you select a host group, the Content pane changes to display information
about that group. This information includes:
■ Number of Hosts – Displays the number of hosts that are in that group.
■ Total Storage Used – Amount of storage in gigabytes (GB) used by the group.
■ Storage Breakdown – Amount of storage in gigabytes (GB) for each service
level.
98 OpenView Storage Provisioner User Guide
 Loading...