

Page 1

HP Insight Control for VMware vCenter Server User Guide
Abstract
This document contains detailed instructions for configuring and using HP Insight Control for VMware vCenter Server. It is
intended for system administrators who are experienced in virtual and physical IT infrastructure administration and understand
server virtualization, storage, and networking concepts.
HP Part Number: 678315-003
Published: May 2013
Edition: 1
Page 2

© Copyright 2012, 2013 Hewlett-Packard Development Company, L.P.
Confidential computer software. Valid license from HP required for possession, use or copying. Consistent with FAR 12.211 and 12.212, Commercial
Computer Software, Computer Software Documentation, and Technical Data for Commercial Items are licensed to the U.S. Government under
vendor's standard commercial license.
The information contained herein is subject to change without notice. The only warranties for HP products and services are set forth in the express
warranty statements accompanying such products and services. Nothing herein should be construed as constituting an additional warranty. HP shall
not be liable for technical or editorial errors or omissions contained herein.
This program contains code licensed under the Affero GPLv3. Please consult with your attorney for any legal advice.
Acknowledgements
Microsoft®, Windows®, and Windows Server® are U.S. registered trademarks of Microsoft Corporation.
Java® is a registered trademark of Oracle and/or its affiliates.
Page 3

Contents
1 Overview..................................................................................................7
2 Configuring Insight Control for vCenter..........................................................8
Role-based security...................................................................................................................9
GUI Theme Selection (vSphere Client only)...................................................................................9
Configuring the Server Module for vCenter..................................................................................9
Associating the VMware host to iLO.....................................................................................10
Automatic association....................................................................................................10
Manual association.......................................................................................................10
Onboard Administrator Single Sign-On................................................................................11
Accessing management tools..............................................................................................11
Configuring the Storage Module for vCenter..............................................................................11
About the Storage Administrator Portal.................................................................................11
Configuring storage systems and management servers............................................................12
Adding HP StoreVirtual storage systems............................................................................14
Adding HP 3PAR StoreServ.............................................................................................14
Adding HP EVA Command View management servers.......................................................15
Adding HP EVAs...........................................................................................................16
Adding HP MSA 2000 G2 storage systems......................................................................16
Adding HP MSA P2000 G3 storage systems....................................................................17
Adding HP XP P9000 storage systems.............................................................................18
Adding HP XP storage systems........................................................................................18
Adding HP StoreOnce Backup........................................................................................19
Viewing storage systems and management servers.............................................................19
Modifying configured storage systems and management servers..........................................20
Removing a storage system or management server.............................................................20
Configuring the VMware VASA provider...............................................................................21
Adding the Storage Module for vCenter to the vendor providers list using the vSphere
Client..........................................................................................................................21
Registering the VASA Provider from the vSphere Web Client...............................................22
Adding a CA-signed certificate.......................................................................................22
3 Using Insight Control for vCenter................................................................24
Accessing Insight Control for vCenter........................................................................................25
Comparing vSphere Client to vSphere Web Client integration..................................................26
Using the vSphere Client to access Insight Control for vCenter..................................................27
Using the vSphere Web Client to access Insight Control for vCenter..........................................27
HP Insight Management pages.................................................................................................28
vSphere Client pages ........................................................................................................28
vSphere Web Client pages.................................................................................................29
Using the Server Module for vCenter.........................................................................................30
Navigating HP Insight Management with the Server Module....................................................31
Changing Server Management properties.............................................................................31
Setting the power cost for a cluster..................................................................................32
Using the Insight Control Deployment Wizard (vSphere Client).................................................32
Server provisioning (vSphere Web Client).............................................................................33
Connecting to the HP provisioning server..........................................................................33
Running the Server Provisioning wizard............................................................................33
Setting host network configuration preferences.......................................................................34
Managing clusters.............................................................................................................34
Cluster Overview page..................................................................................................36
Viewing cluster information.............................................................................................36
Contents 3
Page 4

Viewing cluster infrastructure information..........................................................................36
Viewing software and firmware on clustered servers...........................................................37
Managing servers..............................................................................................................37
Host Overview page......................................................................................................38
Viewing host information................................................................................................39
Viewing host/server infrastructure information...................................................................39
Viewing server networking information.............................................................................39
Host network configuration.............................................................................................40
Setting a reference host in a cluster..................................................................................41
Using the network diagram............................................................................................42
Viewing host software and firmware................................................................................43
Power cycling a server...................................................................................................43
Rediscovering devices....................................................................................................43
Using HP VMware ESXi Smart Components......................................................................44
Viewing news feeds, tasks, and health information.................................................................44
Viewing news feed information.......................................................................................44
Viewing health/status information...................................................................................45
Monitoring tasks...........................................................................................................45
Launching into HP tools.......................................................................................................45
Using the Storage Module for vCenter.......................................................................................46
Navigating HP Insight Management with the Storage Module..................................................46
Managing datastores....................................................................................................46
Managing VMs............................................................................................................46
Refreshing Storage Module for vCenter data..........................................................................47
Manually refreshing the cache........................................................................................47
Using HP Insight Management...................................................................................48
Using the Storage Administrator Portal........................................................................48
Restarting a cache refresh..............................................................................................48
Restarting a cache refresh using HP Insight Management...............................................48
Restarting a cache refresh using the Storage Administrator portal....................................49
Changing the automatic cache refresh settings..................................................................49
Customizing Storage Module for vCenter tables.....................................................................49
Viewing storage information of a host...................................................................................51
Viewing cluster storage information......................................................................................53
Viewing storage information of a datastore...........................................................................55
Viewing storage information of a virtual machine...................................................................57
Viewing detailed storage information....................................................................................58
Viewing storage volumes................................................................................................58
Viewing virtual disks......................................................................................................61
Viewing HBAs...............................................................................................................61
Viewing paths...............................................................................................................61
Viewing replications......................................................................................................64
Viewing VMs to volumes................................................................................................65
Viewing HP Infrastructure....................................................................................................68
Using the HP Infrastructure page.....................................................................................69
4 Provisioning storage..................................................................................70
Customizing the location of virtual disks on an HP EVA................................................................70
Viewing the audit log..............................................................................................................71
Creating a datastore...............................................................................................................71
Expanding a datastore............................................................................................................75
Deleting a datastore...............................................................................................................76
Deleting an unassigned volume................................................................................................77
Creating a VM from a template................................................................................................77
Cloning a VM........................................................................................................................82
4 Contents
Page 5

5 Viewing hardware alert notifications...........................................................87
Insight Control for vCenter events..............................................................................................87
Onboard Administrator events.............................................................................................87
vCenter Server event category: info.................................................................................88
vCenter Server event category: warning...........................................................................88
vCenter Server event category: error................................................................................89
HP SNMP agent and HP CIM provider events........................................................................90
Alarms..................................................................................................................................90
6 Troubleshooting........................................................................................92
Viewing the log files................................................................................................................92
Troubleshooting Insight Control for vCenter................................................................................92
HP Insight Management tab not available in the vSphere Web Client.......................................93
HP Insight Management tab not available in vSphere Client....................................................93
vSphere Client, Insight Control for vCenter, or Storage Module for vCenter is unresponsive..........93
Slow response in the vSphere Client.....................................................................................94
vCenter service terminates during startup..............................................................................94
Internet Explorer Permission denied script error immediately after installation..............................94
Stale or corrupt cache or cookies results in GUI anomalies......................................................94
Error Communicating with iLO at VM host.............................................................................95
Recovering News Feed and Tasks data from an earlier version of Insight Control for vCenter........95
Troubleshooting the Server Module for vCenter...........................................................................96
Infrastructure portlet is not displayed for blades......................................................................96
Network portlet for blades is missing the diagram link............................................................96
Server summary data is not displayed for host.......................................................................96
Health status or information is missing for specific hosts or clusters............................................97
Auto-login not working for URLs provided for managed nodes by Insight Control for vCenter........97
Virtual Connect Manager launch link from Insight Control for vCenter prompts for login
credentials........................................................................................................................97
HP SIM auto-login fails from Insight Control for vCenter...........................................................97
Clicking HP Insight power management launch link does not go to expected HP SIM page.........98
Cost Advantage field not showing values..............................................................................98
Events not delivered by Insight Control for vCenter to vCenter Server.........................................98
Firmware inventory information is not shown..........................................................................98
No Virtual Connect information is available for this host error..................................................99
Troubleshooting the Storage Module for vCenter.........................................................................99
Storage Administrator Portal login credentials........................................................................99
Storage Module for vCenter GUI not responsive to mouse clicks...............................................99
Refresh takes a long time to complete...................................................................................99
Error Unexpected state: The setup helper has not been created occurs during array or management
server configuration............................................................................................................99
Port conflict occurs when trying to configure HP EVA Command View and MSA proxy provider
for use with Storage Module for vCenter.............................................................................100
HP MSA 2000 G2 or HP MSA P2000 G3 array information not displayed in Storage Module
GUI...............................................................................................................................100
HP XP P9000 virtual disk information missing from Storage Overview page.............................101
Concatenated replicated LUNs not recognized as replicated LUNs.........................................101
Duplicate LUNs displayed in Storage Module for vCenter interface.........................................101
LUN displayed multiple times for VM or datastore that is part of a cluster................................102
Storage Administrator Portal information cannot be exported.................................................102
Internet Explorer script error occurs in environment with 100 or more LUNs..............................102
HP MSA P2000 G3 virtual disks displayed as local or unmanaged disks................................102
Cannot configure datastore block size................................................................................102
Cannot configure HP MSA P2000 G3 array when using user-created account.........................103
Contents 5
Page 6

7 Support and other resources....................................................................104
Information to collect before contacting HP...............................................................................104
How to contact HP................................................................................................................104
Registering for software technical support and update service.....................................................104
How to use your software technical support and update service.............................................104
HP authorized resellers..........................................................................................................105
Related information...............................................................................................................105
8 Documentation feedback.........................................................................106
A Firewall port requirements.......................................................................107
Glossary..................................................................................................108
Index.......................................................................................................110
6 Contents
Page 7

1 Overview
HP Insight Control for VMware vCenter Server (Insight Control for vCenter) is a single integrated
application that you use to manage ProLiant servers and HP storage systems. The application
consists of three modules. The core module is required along with one or two optional components:
the Server Module for vCenter and Storage Module for vCenter.
Core Module Provides the framework required by the Server Module for vCenter
Server Module for vCenter Adds HP ProLiant and HP BladeSystem hardware monitoring into
Storage Module for vCenter Enables monitoring of the HP storage infrastructure from the
and Storage Module for vCenter.
the vCenter Server console. Provides server hardware management
capabilities, including comprehensive monitoring, firmware update,
ESX/ESXi image deployment, remote control, end-to-end
monitoring for Virtual Connect, and power optimization for HP
servers in the VMware environment.
vCenter Server console. Provides storage configuration and status
information for mapping VMs, datastores, and hosts to LUNs on
HP storage systems.
Supports provisioning on HP 3PAR StoreServ, HP StoreVirtual, HP
MSA P2000 G3, and HP EVA storage systems. Supported
provisioning tasks include creating, expanding, or deleting a
datastore, and creating or cloning a VM. DIsplays view-only
information for the HP StoreOnce Backup systems.
For installation instructions, see the HP Insight Control for VMware vCenter Server Installation
Guide.
7
Page 8

2 Configuring Insight Control for vCenter
Insight Control for vCenter is managed as a plug-in in the vCenter Server environment. Several
settings can impact the interaction between Insight Control for vCenter and vCenter Server. These
settings, which you access on the Home Settings page, allow you to do the following:
• Select a background color theme for vCenter (vSphere Client only)
• Manage credentials
• Generate a self-signed certificate or a certificate signing request
• Upload new certificates
To access the Home Settings page:
1. Navigate to the vSphere Client or vSphere Web Client home page.
2. Under Administration, click the HP Insight Management Administration icon.
The home page provides access to the following administration pages. In the vSphere Client a
drop-down list is used and in the vSphere Web Client links are provided in the left navigation
pane.
• GUI Theme Selection (vSphere Client only)
This page enables you to select your preferred view of the vCenter vSphere Client GUI, either
dark text on a light background or light text on a dark background.
• vCenter Credential Management (vSphere Client)
vCenter Credentials (vSphere Web Client)
This page lists the credentials for all vCenters that are configured in the environment. You can
update, delete credentials of an existing entry or add credentials for a new vCenter.
• Certificate Upload
This page enables you to upload the signed certificate request returned to you by the Certificate
Authority.
• Certificate Management
This page enables you to generate a new self-signed certificate for Insight Control for vCenter
or generate a certificate signing request to be signed by a Certificate Authority. You can install
a certificate once it is signed.
• Server Password Management (vSphere Client)
Server Credentials (vSphere Web Client)
If you have a server module installed, this page enables you to view, add, delete, and edit
server passwords.
Use this page to enter credentials that will allow access to iLO, Onboard Administrator, Virtual
Connect, VMware host, SNMP community string, and HP SIM.
• Server Module Configuration
This page provides configuration information about HP SIM port, device poll interval, event
poll interval, power cost, and Virtual Connect uplink over subscription factor.
Other options are available if you have the optional server or storage modules installed.
8 Configuring Insight Control for vCenter
Page 9

IMPORTANT:
• If you have a Proxy-enabled Windows client and an ESXi host using iLO or other management
software, you must disable or bypass the Proxy Server for the connection between the Insight
Control for vCenter/vSphere Client and iLO on the ProLiant server running as an ESX/ESXi
host system. For instructions, see “Error Communicating with iLO at VM host” (page 95).
• If you are using a Windows firewall, enable the firewall to access the ports used by Insight
Control for vCenter.
Role-based security
Insight Control for vCenter uses role-based security access. Windows or domain users/groups can
be assigned any of the vCenter roles. Insight Control for vCenter classifies these roles into three
categories:
• Administrator—The vCenter administrator role maps to this category
• Read-only—The vCenter read-only and view-only roles map to this category
• User—All other vCenter roles map to this category
An administrator can:
• Run the setup wizard
• Edit the password database
• Use the properties link to edit properties
• Launch HP management tools using SSO
• Access the Insight Control for vCenter Server vSphere Client home page
• Manage and update firmware
• Host network configuration
• Server deployment
A read-only user can:
• View Insight Control for vCenter
A user can:
• Launch HP management tools, and then log on to use them
• View Insight Control for vCenter
For information about assigning a user access role, see the HP Insight Control for VMware vCenter
Server Installation Guide.
GUI Theme Selection (vSphere Client only)
The vSphere Client GUI Theme Selection page enables you to select your preferred view of the
GUI, either dark text on a light background or light text on a dark background.
Configuring the Server Module for vCenter
After you install the Server Module for vCenter, you can manage Server Module features on the
Home Settings page in the vSphere Client.
To access the Home Settings page:
1. Navigate to the vSphere Client home page.
2. Under Administration, click the HP Insight Management Administration icon.
Role-based security 9
Page 10
The home page allows you to access the following server administration pages.
• Server Password Management
The Server Password Management page allows you to view, add, delete, and edit server
credentials.
Use this page to enter credentials that will allow access to iLO, Onboard Administrator, Virtual
Connect, VMware host, SNMP community string, and HP SIM.
• Server Module Configuration
The Server Module Configuration page provides configuration information for HP SIM port,
device poll interval, event poll interval, power cost, and Virtual Connect uplink over subscription
factor.
Associating the VMware host to iLO
In order for Insight Control for vCenter to display HP management information correctly, the VMware
host must be associated with its iLO. The method of iLO association varies, depending on the
VMware host configuration.
Automatic association
Automatic host-to-iLO association occurs when Insight Control for vCenter has HP Management
Agents for VMware ESX or the HP ESXi Offline Bundle for VMware ESXi installed on the host and
communication credentials are enabled via the Host Properties page or the Server Password
Management page.
Manual association
You can manually associate the host to iLO using either the vSphere Client VMware Power
Management settings or the Insight Control for vCenter Host Properties page. Manual association
is supported in all versions of Insight Control for vCenter.
Using the VMware Power Management settings
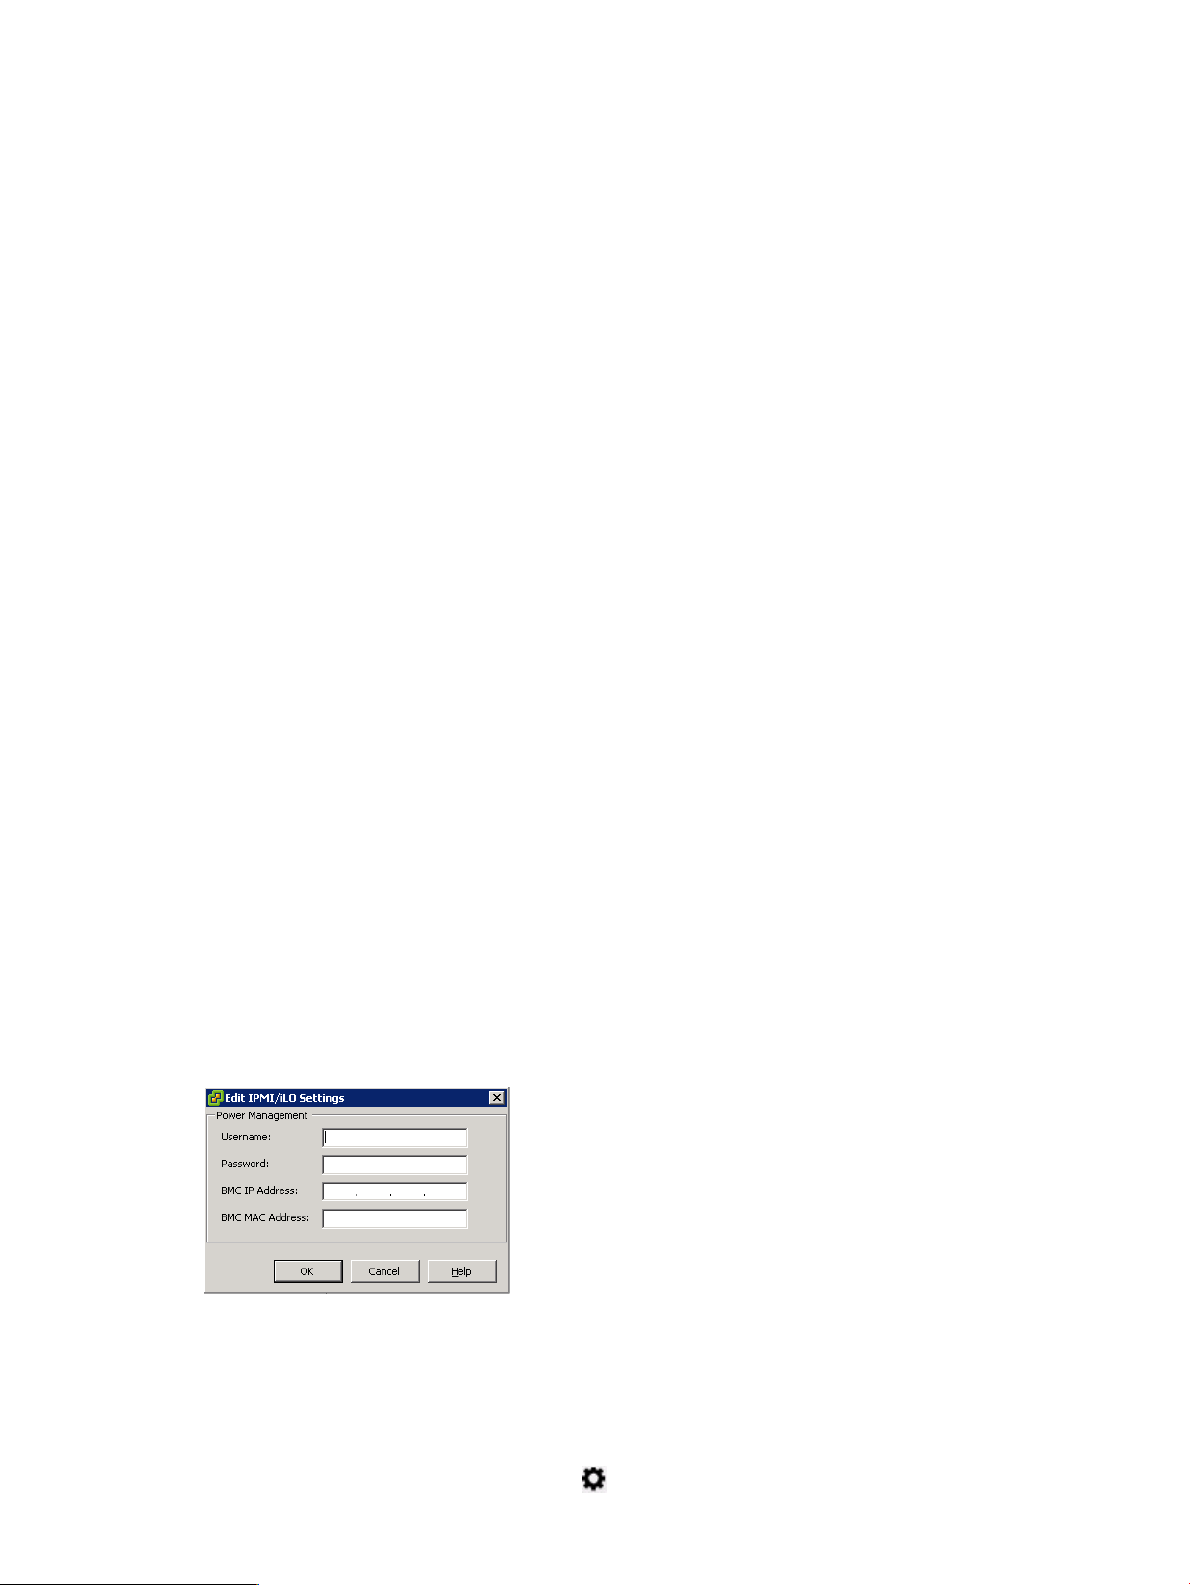
1. In the vSphere user interface, select the host to be associated, and then click the Configuration
tab.
2. In the Software section, click Power Management.
3. Click the Properties link.
The Edit IPMI/iLO Settings dialog box appears. See Figure 1 (page 10).
Figure 1 Edit IPMI/iLO Settings dialog box
4. Enter the iLO user name, iLO password, iLO IP address, and iLO MAC address, and then click
OK.
Using the Insight Control for vCenter Host Properties page
1. In the vSphere Client, select a host, and then click the HP Insight Management tab.
2. Move your cursor over the Settings icon , and select Host Properties.
10 Configuring Insight Control for vCenter
Page 11

3. Enter the iLO IP address or host name, and a user name and password.
Onboard Administrator Single Sign-On
To enable SSO, you must upload the Insight Control for vCenter certificate to the Onboard
Administrator.
1. On the Onboard Administrator, navigate to Users/Authentication→HP SIM Integration.
2. Set the trust mode to Trust by Certificate.
3. Locate and copy the certificate using one of the following methods:
• In the vSphere Client, access the HP Home Settings page. See “Configuring the Server
Module for vCenter” (page 9).
Click the Certificate Administration tab. Copy the text from the Self Signed Certificate text
box.
• Access the certificate in the following file:
install location\uim\server.pem
Open this file with a text editor, such as Notepad, and then copy the text.
4. Click the Onboard Administrator SIM Integration Certificate Upload tab, and then paste the
contents of the Insight Control for vCenter certificate into the box.
Accessing management tools
Depending on the software installed, links will be available for the following:
• HP SIM (SIM)
• Onboard Administrator (OA)
• iLO Remote Management (iLO)
• HP Insight Control power management (IPM)
• Virtual Connect Manager (VC)
• Virtual Connect Enterprise Manager (VCEM)
Access is determined by enabled communication credentials set in the Host Properties page or the
Server Password Management page and user/group vCenter role. For more information, see
“Configuring the Server Module for vCenter” (page 9) and “Role-based security” (page 9).
Configuring the Storage Module for vCenter
After the Storage Module for vCenter is installed, use the Storage Administrator Portal to configure
the storage systems and management servers. If you want to configure the HP VASA feature (ESXi
5.0 and later), configure the storage systems and management servers, and then complete the
procedure “Configuring the VMware VASA provider” (page 21).
For information about the Storage Administrator Portal, see “About the Storage Administrator
Portal” (page 11).
For configuration instructions, see “Configuring storage systems and management servers” (page 12)
and “Configuring the VMware VASA provider” (page 21).
About the Storage Administrator Portal
The Storage Administrator Portal for VMware vCenter enables you to configure storage systems
and management servers for management by the Storage Module for vCenter.
For storage systems that support provisioning, use the Storage Administrator Portal to assign access
permissions to storage pools. You can use the vSphere Client to perform storage provisioning
operations such as adding a new datastore, deleting or expanding an existing datastore, creating
Configuring the Storage Module for vCenter 11
Page 12

new VMs, or cloning existing VMs on storage pools that are set to Full Access. For more information,
see “Provisioning storage” (page 70).
To access the Storage Administrator Portal:
1. Access the Storage Administrator Portal using one of the following methods:
• From the Start menu—Select Start→ All Programs→HP Insight Control for vCenter→Storage
Administrator Portal for vCenter.
• From the Desktop—Double-click the HP Insight Control Storage Administrator Portal for
vCenter icon on the Desktop.
• Click the Settings icon and select Storage Administrator Portal
• From the vSphere Web Client HP Insight Management Administration Storage
Administrator page, click Storage Administrator Portal in the left pane. You are not
prompted for credentials when accessing the Storage Administrator Portal this way.
The Storage Administrator Portal login screen appears.
2. Enter your user name and password, and then click OK.
This is the login information that you configured during the installation process.
A list of configured storage systems and management servers appears, displaying the storage
system name, type, model, firmware, identifier, management servers/managed storage systems,
current user, storage pools, and storage pool access settings. If a storage system was added
recently without performing a cache refresh, or if there are no active management servers for
a storage system, the Storage System Firmware column displays No Active Managers.
TIP: If an active manager was added recently, and No Active Managers is displayed,
click Refresh Cache to retrieve information about the new manager.
Configuring storage systems and management servers
1. Verify that the HP storage systems and management servers meet the network connectivity
requirements described in the HP Insight Control for VMware vCenter Server Installation Guide.
2. Use the following procedures to add, modify, and remove arrays and management servers:
• “Adding HP StoreVirtual storage systems” (page 14)
• “Adding HP 3PAR StoreServ” (page 14)
• “Adding HP EVA Command View management servers” (page 15)
• “Adding HP EVAs” (page 16)
• “Adding HP MSA 2000 G2 storage systems” (page 16)
• “Adding HP MSA P2000 G3 storage systems” (page 17)
• “Adding HP XP P9000 storage systems” (page 18)
• “Adding HP XP storage systems” (page 18)
• “Adding HP StoreOnce Backup” (page 19)
• “Modifying configured storage systems and management servers” (page 20)
• “Removing a storage system or management server” (page 20)
3. Click Refresh Cache in the Storage Administrator Portal to manually refresh the Storage Module
for vCenter cache. You can also use the cache refresh icon to update the cache.
For instructions, see “Manually refreshing the cache” (page 47).
12 Configuring Insight Control for vCenter
Page 13

4. Verify the configuration of the storage systems.
For example, select a host, and navigate to the Storage Details page. Confirm that the HP
Insight Management tab displays data from the storage systems used by the selected host.
For information about navigating the GUI, see “Navigating HP Insight Management with the
Storage Module” (page 46).
Configuring the Storage Module for vCenter 13
Page 14

Adding HP StoreVirtual storage systems
To add an HP StoreVirtual storage system (also called a management group):
1. Access the Storage Administrator Portal.
For instructions, see “About the Storage Administrator Portal” (page 11).
2. Click Add.
The Add Storage System or Management Server page appears.
3. Select HP StoreVirtual in the Type list, and then click Next.
The Add HP StoreVirtual page appears.
4. Enter the following connection parameters for the HP StoreVirtual storage node managing the
storage system you want to add, and then click Next.
• Management server host name or IP address
• User name
• Password
The Add HP StoreVirtual page appears, displaying the specified storage system and all of its
storage nodes.
5. Click Next.
The Add HP StoreVirtual page appears, listing the storage pools on the selected storage
system.
6. Select the Full Access check box for one or more storage pools to enable provisioning by the
Storage Module for vCenter.
Storage pools do not need to be assigned Full access if they are not intended to be used for
provisioning operations.
7. Click Finish.
The storage node is added to the Configured Storage Systems and Management Servers list.
Adding HP 3PAR StoreServ
To add an HP 3PAR StoreServ:
1. Access the Storage Administrator Portal.
For instructions, see “About the Storage Administrator Portal” (page 11).
2. Click Add.
The Add Storage System or Management Server page appears.
3. Select HP 3PAR StoreServ in the Type list, and then click Next.
The Add HP 3PAR StoreServ page appears.
4. Enter the following connection parameters for the HP 3PAR StoreServ Server managing the
HP 3PAR StoreServ you want to add, and then click Next.
• Management server host name or IP address
• User name
• Password
The Add HP 3PAR StoreServ page appears, listing the selected management server and storage
system.
5. Click Next.
The Add HP 3PAR StoreServ page appears, listing the storage pools on the selected storage
system.
14 Configuring Insight Control for vCenter
Page 15

6. Select the Full Access check box for one or more storage pools to enable provisioning by the
Storage Module for vCenter.
Storage pools do not need to be assigned Full access if they are not intended to be used for
provisioning operations.
7. Click Finish.
The HP 3PAR StoreServ is added to the Configured Storage Systems and Management Servers
list.
Adding HP EVA Command View management servers
To view information about an HP EVA in the vSphere Client, use the Storage Administrator Portal
to add the HP EVA Command View management server and the HP EVA. You can add a
management server and associate a storage system in a single step, or you can add them separately
and associate them by modifying either the HP EVA Command View management server or the
HP EVA.
To add an HP EVA Command View management server:
1. Access the Storage Administrator Portal.
For instructions, see “About the Storage Administrator Portal” (page 11).
2. Click Add.
The Add Storage System or Management Server page appears.
3. Select HP EVA Command View in the Type list, and then click Next.
The Add HP EVA Command View page appears.
4. Enter the following parameters for the HP EVA Command View management server you want
to add, and then click Next.
• Server host name or IP address
• User name
• Password
The Add HP EVA Command View page appears. The Available HP EVAs box shows all
available HP EVAs managed (actively or passively) by the HP EVA Command View server.
The Selected HP EVAs box shows the HP EVAs that will be monitored by the Storage Module
for vCenter.
5. To add a storage system, select one or more available storage systems, and then click Add.
To remove a storage system, select one or more storage systems, and then click Remove.
TIP: Click Add All or Remove All, respectively, to add or remove all storage systems.
The Add HP EVA Command View page appears, listing the storage pools on the selected HP
EVAs.
If you selected one or more passively managed HP EVAs, you must configure the storage pool
access for those storage systems when you add their active HP EVA Command View
management servers.
6. Select the Full Access check box for one or more storage pools to enable provisioning by the
Storage Module for vCenter.
Storage pools do not need to be assigned Full access if they are not intended to be used for
provisioning operations.
7. Click Finish.
The management server and all of the selected storage systems are added to the Configured
Storage Systems and Management Servers list.
Configuring the Storage Module for vCenter 15
Page 16

Adding HP EVAs
To view information about an HP EVA, use the Storage Administrator Portal to add the storage
system and associate it with a HP EVA Command View management server. During the initial
Storage Module for vCenter configuration, add the HP EVAs and HP EVA Command View
management servers in a single step as described in “Adding HP EVA Command View management
servers” (page 15). After the initial configuration, you can add and remove HP EVA and
management server associations by modifying the configuration for either the HP EVA Command
View management server or the HP EVA.
To add HP EVAs:
1. Access the Storage Administrator Portal.
For instructions, see “About the Storage Administrator Portal” (page 11).
2. Click Add.
The Add Storage System or Management Server page appears.
3. Select HP EVA in the Type list, and then click Next.
The Add HP EVA page appears. The Storage Name list shows all available HP EVAs. The
Available HP EVA Command View servers box shows all configured HP EVA Command View
servers that manage the selected HP EVA. The Selected HP EVA Command View servers box
shows all HP EVA Command View servers that the Storage Module for vCenter can use to
manage the selected HP EVA.
4. Select the storage system that you want to manage.
5. To add a HP EVA Command View server, select one or more available servers, and then click
Add.
To remove a server, select one or more servers, and then click Remove.
NOTE: The list of available servers includes only HP EVA Command View management
servers that were added using the procedure “Adding HP EVA Command View management
servers” (page 15).
TIP: Click Add All or Remove All, respectively, to add or remove all HP EVA Command View
servers.
6. Click Next.
The Add HP EVA page appears, listing the storage pools on the selected HP EVA.
7. Select the Full Access check box for one or more storage pools to enable provisioning by the
Storage Module for vCenter.
Storage pools do not need to be assigned Full access if they are not intended to be used for
provisioning operations.
8. Click Finish.
The storage system is added to the Configured Storage Systems and Management Servers
list.
Adding HP MSA 2000 G2 storage systems
To add an HP MSA 2000 G2 storage system:
1. Verify that a supported version of the HP MSA 2000 G2 firmware is installed.
For the supported firmware versions, see the HP SPOCK website:
http://www.hp.com/storage/spock
16 Configuring Insight Control for vCenter
Page 17

2. Ensure that the HP MSA 2000 G2 SMI-S proxy provider is installed on the same server as the
Storage Module for vCenter.
The Insight Control for vCenter installer places version 1.1.2.0 of the MSA SMI-S proxy provider
installer and the HP MSA2000 G2 SMI-S Proxy Provider User Guide in the following folder:
install directory\Storage\tools
IMPORTANT: You must install version 1.1.2.0 of the MSA SMI-S proxy provider to add
support for the MSA in your VMware environment. Earlier versions of the MSA SMI-S proxy
provider are not supported by the Storage Module for vCenter. For installation instructions,
see the MSA SMI-S proxy provider documentation.
HP EVA Command View and the MSA SMI-S proxy provider cannot coexist on the same
server.
3. Access the Storage Administrator Portal.
For instructions, see “About the Storage Administrator Portal” (page 11).
4. Click Add.
The Add Storage System or Management Server page appears.
5. Select HP MSA 2000 G2 in the Type list, and then click Next.
The Add HP MSA 2000 G2 page appears. All available HP MSA 2000 G2 storage systems
are listed by serial number in a drop-down list.
6. Select a storage system, and then click Finish.
The storage system is added to the Configured Storage Systems and Management Servers
list.
NOTE: The HP MSA 2000 G2 storage system does not support provisioning by the Storage
Module for vCenter.
Adding HP MSA P2000 G3 storage systems
To add an HP MSA P2000 G3 storage system:
1. Verify that a supported version of the HP MSA P2000 G3 firmware is installed.
For the supported firmware versions, see the HP SPOCK website:
http://www.hp.com/storage/spock
2. Access the Storage Administrator Portal.
For instructions, see “About the Storage Administrator Portal” (page 11).
3. Click Add.
The Add Storage System or Management Server page appears.
4. Select HP MSA P2000 G3 in the Type list, and then click Next.
The Add HP MSA P2000 G3 page appears.
A HP MSA P2000 G3 System is managed by one or two controllers. After connecting to a
controller, the software discovers the other controllers, if applicable.
5. Enter the following connection parameters for one of the controllers managing the HP MSA
P2000 G3 you want to add, and then click Next.
• Controller host name or IP address
• User name
• Password
The Add HP MSA P2000 G3 page appears, listing the selected storage system and controllers.
Configuring the Storage Module for vCenter 17
Page 18

6. Click Next.
The Add HP MSA P2000 G3 page appears, listing the storage pools on the selected HP MSA
P2000 G3 System.
7. Select the Full Access check box for one or more storage pools to enable provisioning by the
Storage Module for vCenter.
Storage pools do not need to be assigned Full access if they are not intended to be used for
provisioning operations.
8. Click Finish.
The HP MSA P2000 G3 System is added to the Configured Storage Systems and Management
Servers list.
Adding HP XP P9000 storage systems
To add an HP XP P9000 storage system:
1. Verify that a command device from the P9000 storage system is presented to the host running
the Storage Module for vCenter. Make sure that the command device is enabled and security
is disabled for the command device.
2. Access the Storage Administrator Portal.
For instructions, see “About the Storage Administrator Portal” (page 11).
3. Click Add.
The Add Storage System or Management Server page appears.
4. Select HP XP P9000 in the Type list, and then click Next.
The Add HP XP P9000 storage systems page appears. The available P9000 storage systems
are listed by serial number.
5. Select a storage system.
6. Enter the Remote Web Console credentials, and then click Finish.
The array is added to the Configured Storage Systems and Management Servers list.
NOTE: The HP XP P9000 storage system does not support provisioning by the Storage
Module for vCenter.
Adding HP XP storage systems
To add an HP XP storage system:
1. Verify that a command device from the XP array is presented to the host running the Storage
Module for vCenter.
2. Access the Storage Administrator Portal.
For instructions, see “About the Storage Administrator Portal” (page 11).
3. Click Add.
The Add Storage System or Management Server page appears.
4. Select HP XP in the Type list, and then click Next.
The Add HP XP storage systems page appears. The available HP XP storage systems are listed
by serial number.
5. Select a storage system.
18 Configuring Insight Control for vCenter
Page 19

6. Enter the Remote Web Console credentials, and then click Finish.
The storage system is added to the Configured Storage Systems and Management Servers
list.
NOTE: The HP XP storage system does not support provisioning by the Storage Module for
vCenter.
Adding HP StoreOnce Backup
To add an HP StoreOnce Backup:
1. Access the Storage Administrator Portal.
For instructions, see “About the Storage Administrator Portal” (page 11).
2. Click Add.
The Add Storage System or Management Server page appears.
3. Select HP StoreOnce Backup in the Type list, and then click Next.
The Add HP StoreOnce Backup page appears.
4. Enter the following connection information for the HP StoreOnce Backup array you want to
add, and then click Next.
• Management server host name or IP address
• User name
• Password
A summary of the information is displayed.
5. Click Finish.
The HP StoreOnce Backup array is added to the Configured Storage Systems and Management
Servers list.
NOTE: The HP StoreOnce Backup system needs to be configured as a cluster (single node or
multi node), for it to be added to the Storage Administrator Portal. Adding a non-clustered HP
StoreOnce Backup system is not supported. Once the backup system is added to the configured
list of storage systems, it is necessary to do a refresh to make the Storage module aware of the
newly added system.
Viewing storage systems and management servers
To view the configured storage systems and management servers, log in to the Storage Administrator
Portal.
For instructions, see “About the Storage Administrator Portal” (page 11).
The list of configured storage systems and management servers appears, displaying the following
information:
• System Name—Storage system or management server name
• System Type—Storage system or management server type
• System Model—Storage system model
• System Firmware—Storage system firmware version
• System Identifier—Storage system-determined identifier as follows:
HP StoreVirtual—Management group name◦
◦ HP 3PAR StoreServ—Storage system serial number
Configuring the Storage Module for vCenter 19
Page 20

◦ HP EVA—Storage system WWN
◦ HP MSA 2000 G2/HP MSA P2000 G3—Storage system serial number
◦ HP XP/HP XP P9000—Storage system serial number
◦ HP StoreOnce Backup—Backup system serial number
• Managers/Managing—Management servers or management consoles for the listed systems
or systems managed by listed management servers
• Current User—Name of user currently logged in to the system
• Storage Pool—Available storage pools
• Access—Access setting for each storage pool
Modifying configured storage systems and management servers
You can make the following changes to configured storage systems or management servers:
• HP EVAs:
Change the user name or password for a HP EVA Command View management server.◦
◦ Modify the list of HP EVA Command View servers associated with an HP EVA.
◦ Modify the list of HP EVAs associated with an HP EVA Command View server.
• HP EVA, HP StoreVirtual, and HP MSA P2000 G3 storage systems: Modify the storage pool
access permissions.
• HP XP and HP XP P9000 storage systems: Change the Remote Web Console host name or IP
address, user name, and password.
• HP 3PAR StoreServ: Change the management server host name or IP address, user name, and
password.
• HP StoreOnce Backup: Change the username and/or password for the management console
if the username and/or password has changed on the device.
NOTE:
• The HP EVA Command View server password is required to modify HP EVA Command View
servers.
• The storage node password is required to modify HP StoreVirtual array information.
• The controller user name and password are required to modify HP MSA P2000 G3 array
information.
To modify a configured a storage system or management server:
1. Access the Storage Administrator Portal.
For instructions, see “About the Storage Administrator Portal” (page 11).
2. Select a storage system or management server in the Configured Storage Systems and
Management Servers list, and then click Modify.
3. Complete the screens necessary to modify the selected storage system or management server
The sequence of screens displayed and the information required is dependent of the item
being modified. Help is available for the screens if you need it.
Removing a storage system or management server
When you remove a storage system or management server from the list of storage systems managed
by the Storage Module for vCenter, the Storage Module for vCenter stops collecting and displaying
20 Configuring Insight Control for vCenter
Page 21
data for that storage system or management server. Disks from the removed storage system are
displayed as unmanaged disks in the vSphere Client.
Consider the following:
• Removing an HP EVA does not remove the associated management servers.
• Removing an HP EVA Command View management server does not remove the associated
arrays.
• Removing an HP StoreVirtual management group removes all of the storage nodes in the
group.
To remove a storage system or management server:
1. Log in to the Storage Administrator Portal.
For instructions, see “About the Storage Administrator Portal” (page 11).
2. Select a storage system or management server in the Configured Storage Systems and
Management Servers list, and then click Remove.
A confirmation dialog box opens.
3. Click Yes to confirm that you want to remove the storage system or management server.
Configuring the VMware VASA provider
If you want to use the VASA functionality in the vSphere Client, add the Storage Module for vCenter
to the vendor providers list and add a CA-signed certificate.
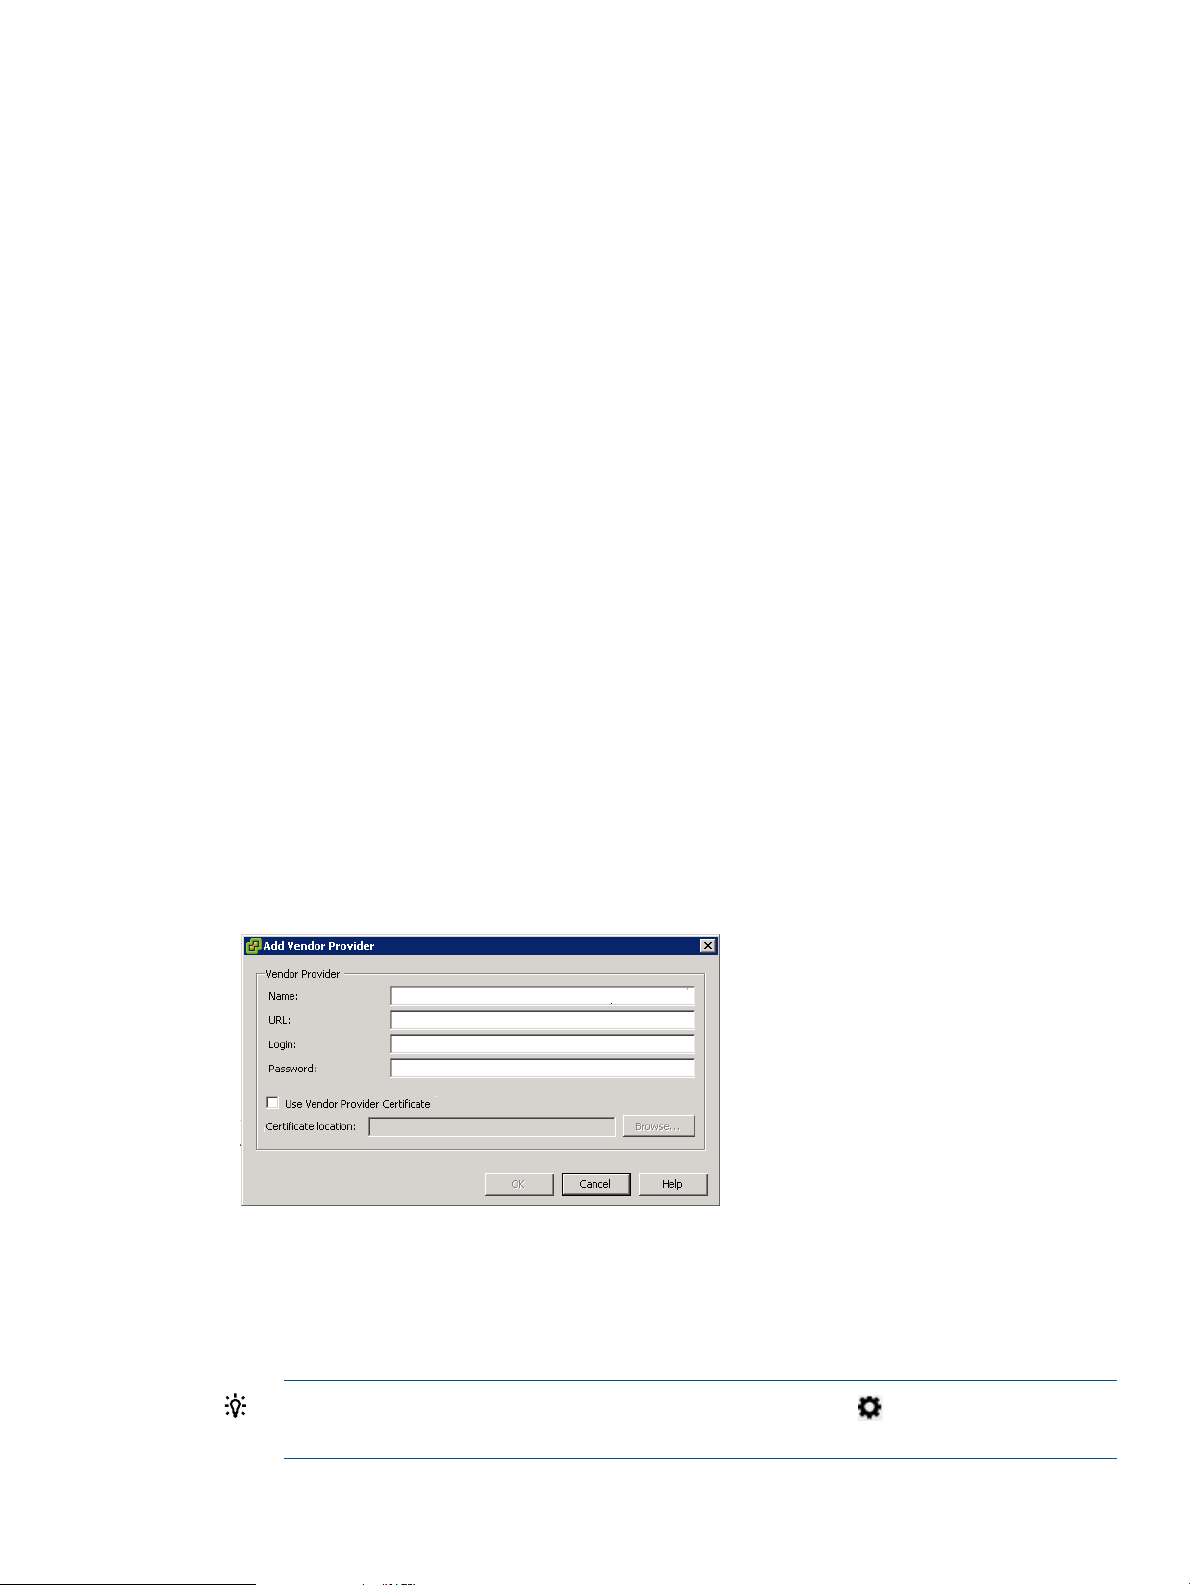
Adding the Storage Module for vCenter to the vendor providers list using the vSphere Client
To add the Storage Module for vCenter to the vendor providers list:
1. Navigate to the Home page in the vSphere Client.
2. Click Storage Providers in the Administration section.
The Vendor Providers page opens.
3. Click Add.
The Add Vendor Provider dialog box opens.
4. Enter the following information:
• Name: Enter HPICSM.
• URL: Enter
https://vasaProvider_server_name:port/vasa_provider_ws/vasaService.
TIP: To view the VASA Provider URL, click the Settings icon on the client page, and
then select VASA Provider.
Configuring the Storage Module for vCenter 21
Page 22
• Login: Enter the login information for the system that runs the vSphere Client.
• Password: Enter the password for the system that runs the vSphere Client.
5. Click OK.
The HPICSM provider is added to the Vendor Providers list in the vSphere Client.
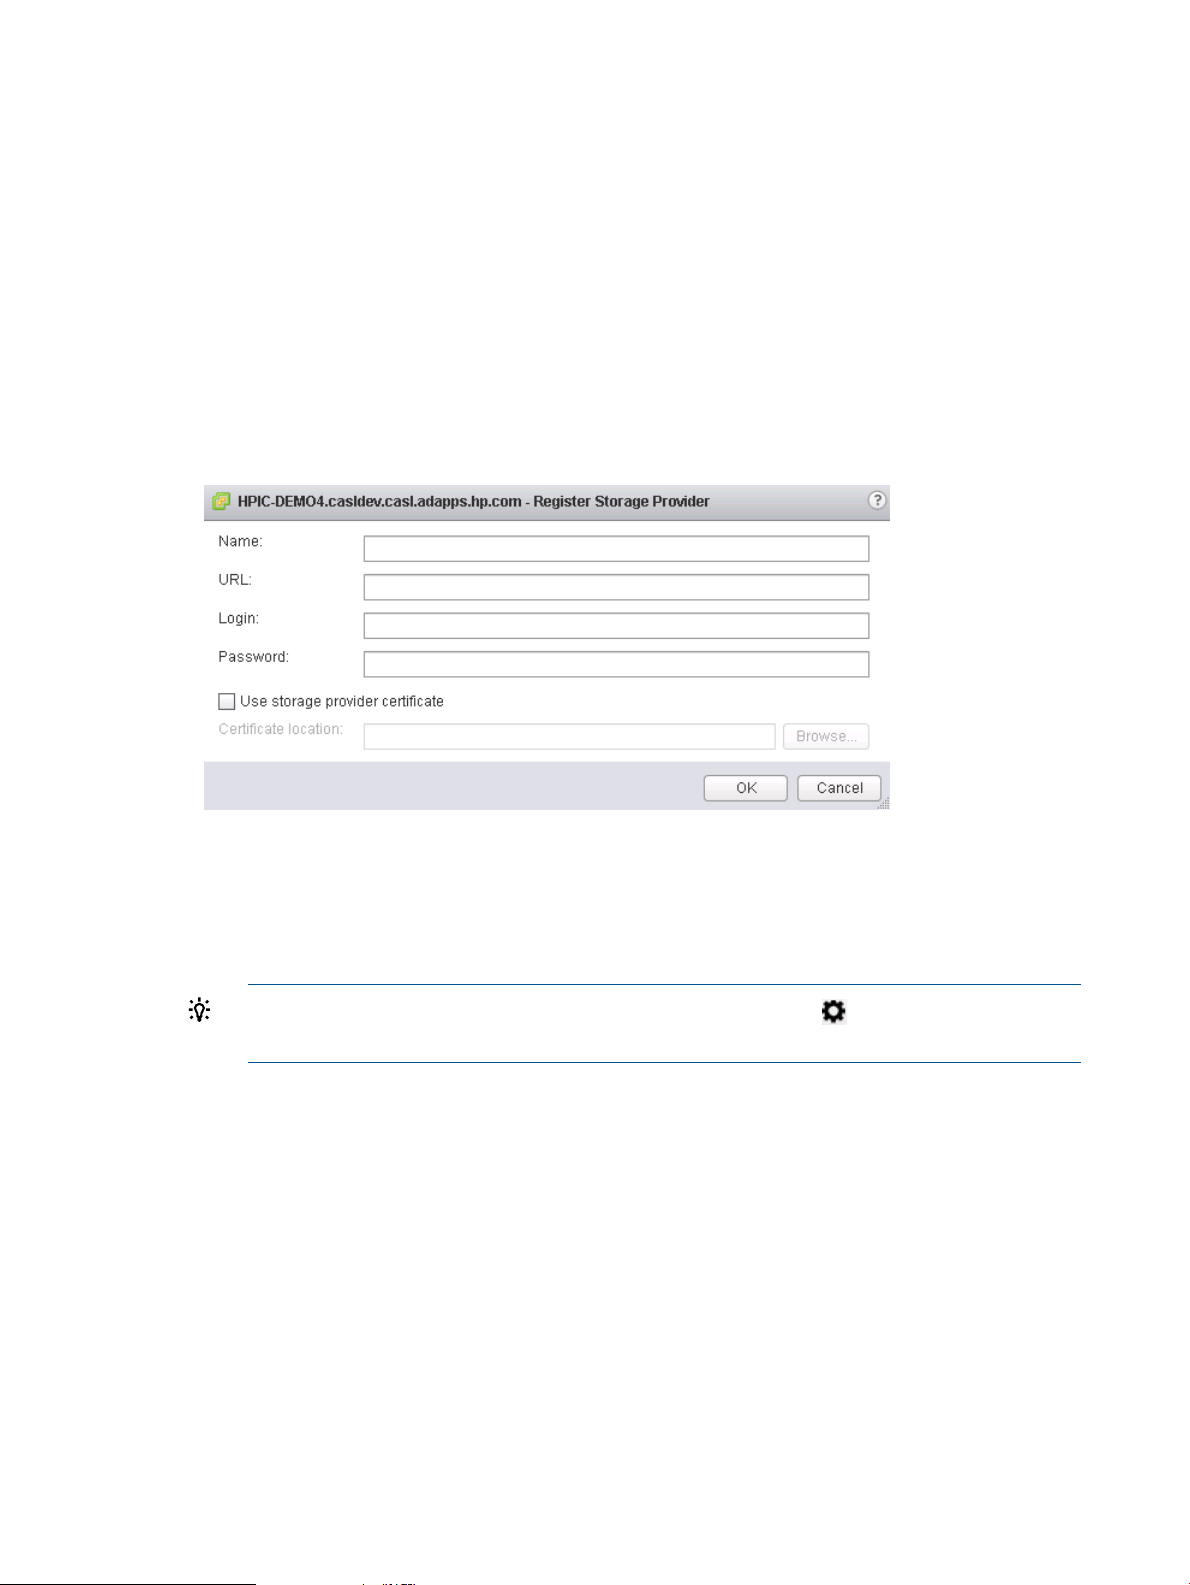
Registering the VASA Provider from the vSphere Web Client
To add the Storage Module for vCenter to the Storage Providers list:
1. Right-click a datastore in the left pane of Insight Control for vCenter, and then click Manage
Storage Providers.
The Storage Providers page opens.
2. Click the green add icon (+).
The Add Vendor Provider dialog box opens.
3. Enter the following information:
• Name: Enter HPICSM.
• URL: Enter
https://vasaProvider_server_name:port/vasa_provider_ws/vasaService.
TIP: To view the VASA Provider URL, click the Settings icon on the client page, and
then select VASA Provider URL.
• Login/Password: Enter the login information for the system that runs the vSphere Web
Client.
4. Click OK.
Adding a CA-signed certificate
HP recommends using a CA-signed certificate when using the Storage Module for vCenter with
the VMware VASA provider.
To add a signed certificate:
1. Navigate to the Home page in the vSphere Client.
2. Click the HP Insight Management Administration icon.
3. Click on Certificate Management in the left pane.
The Certificate Management page opens.
4. Select the Generate Certificate Signing Request option.
22 Configuring Insight Control for vCenter
Page 23
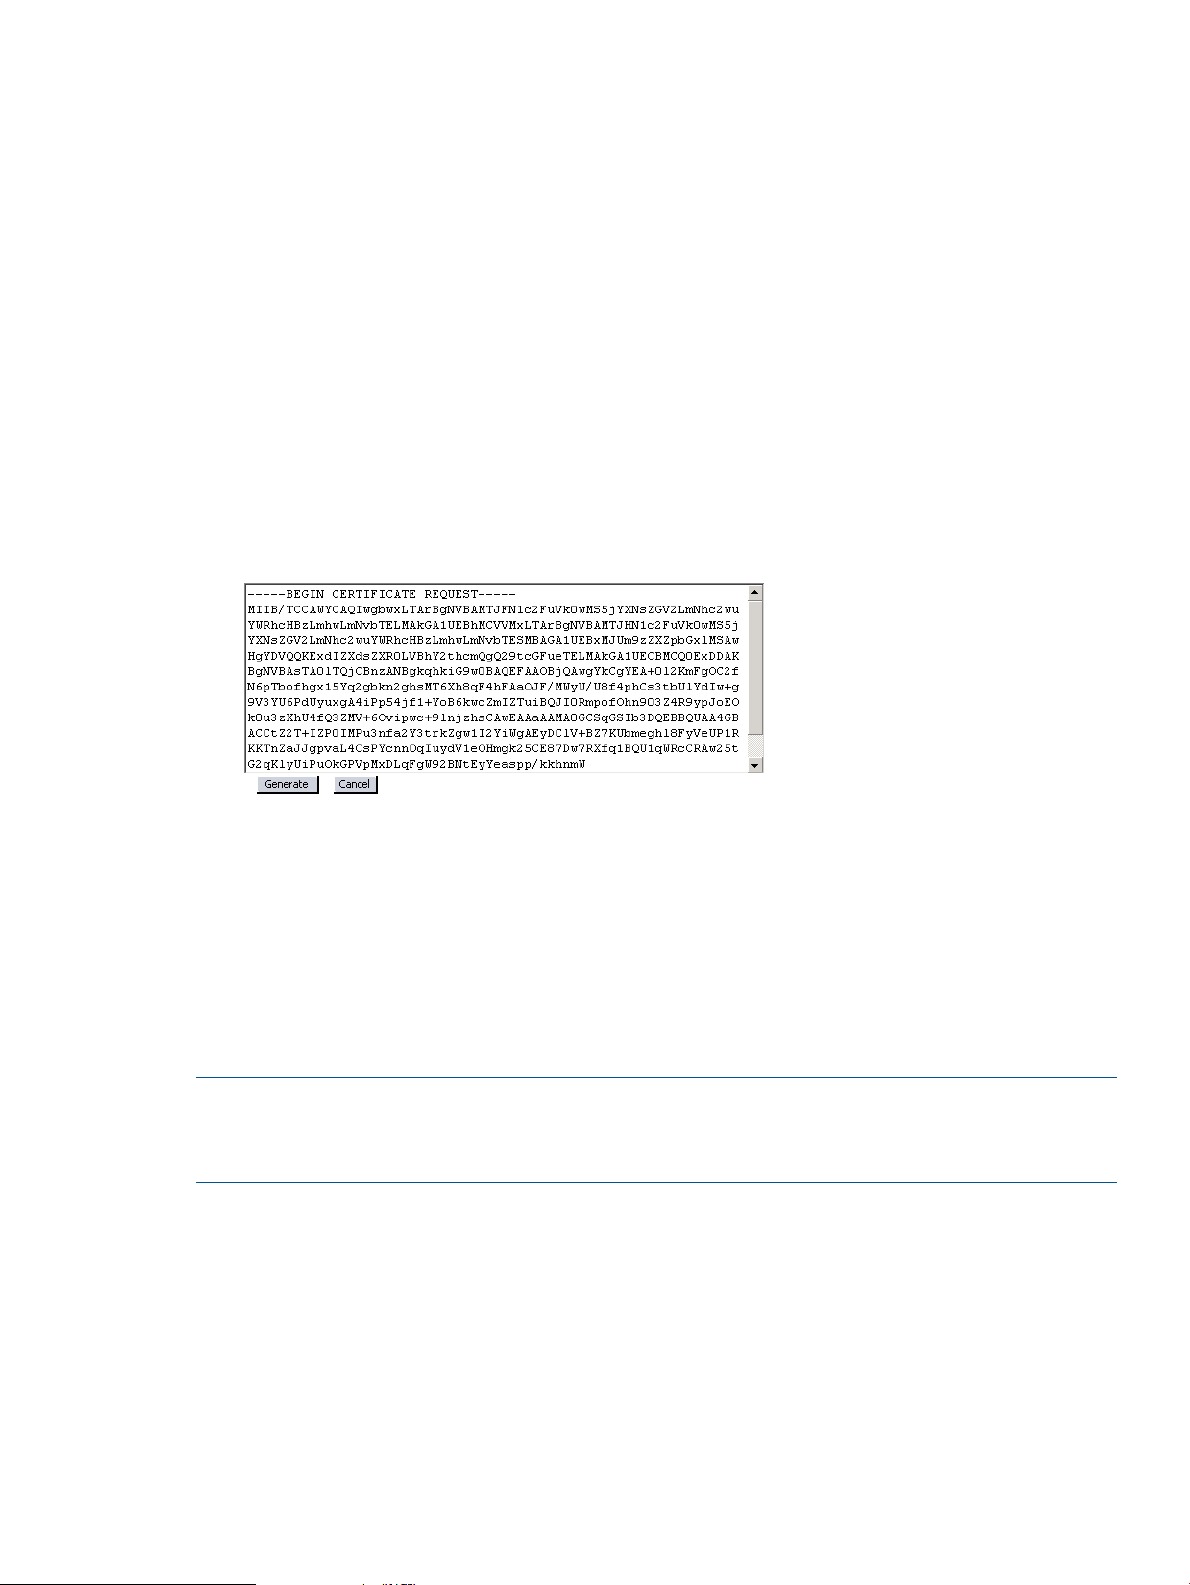
5. Enter the following information in the Certificate Info section:
• Country
• State
• Locality
• Organization
• Common Name—The fully qualified vCenter Server name.
6. Optionally, enter the following information in the Optional Certificate Info section:
• Organizational Unit
• Email
• Surname
• Given Name
7. Click Generate.
The certificate signing request is generated. A certificate request with 1024-bit encryption is
generated. .
8. Copy the certificate signing request text.
9. Use the Certification Authority tool to generate the CA-signed certificate.
This step is performed outside the vSphere Client application. For instructions, see the
Certification Authority tool documentation.
10. Copy the generated CA-signed certificate to the server on which the Storage Module for
vCenter is installed.
11. Select Certificate Upload from the Actions drop-down list.
12. Paste the CA-signed certificate in the text box, and then click Upload.
NOTE: After installing a certificate, you must restart all services for Insight Control for vCenter.
When using the vSphere Web Client, after the services are started, log out of the vSphere Web
Client, and then log back in.
Configuring the Storage Module for vCenter 23
Page 24
3 Using Insight Control for vCenter
This chapter describes the processes for accessing and using the software.
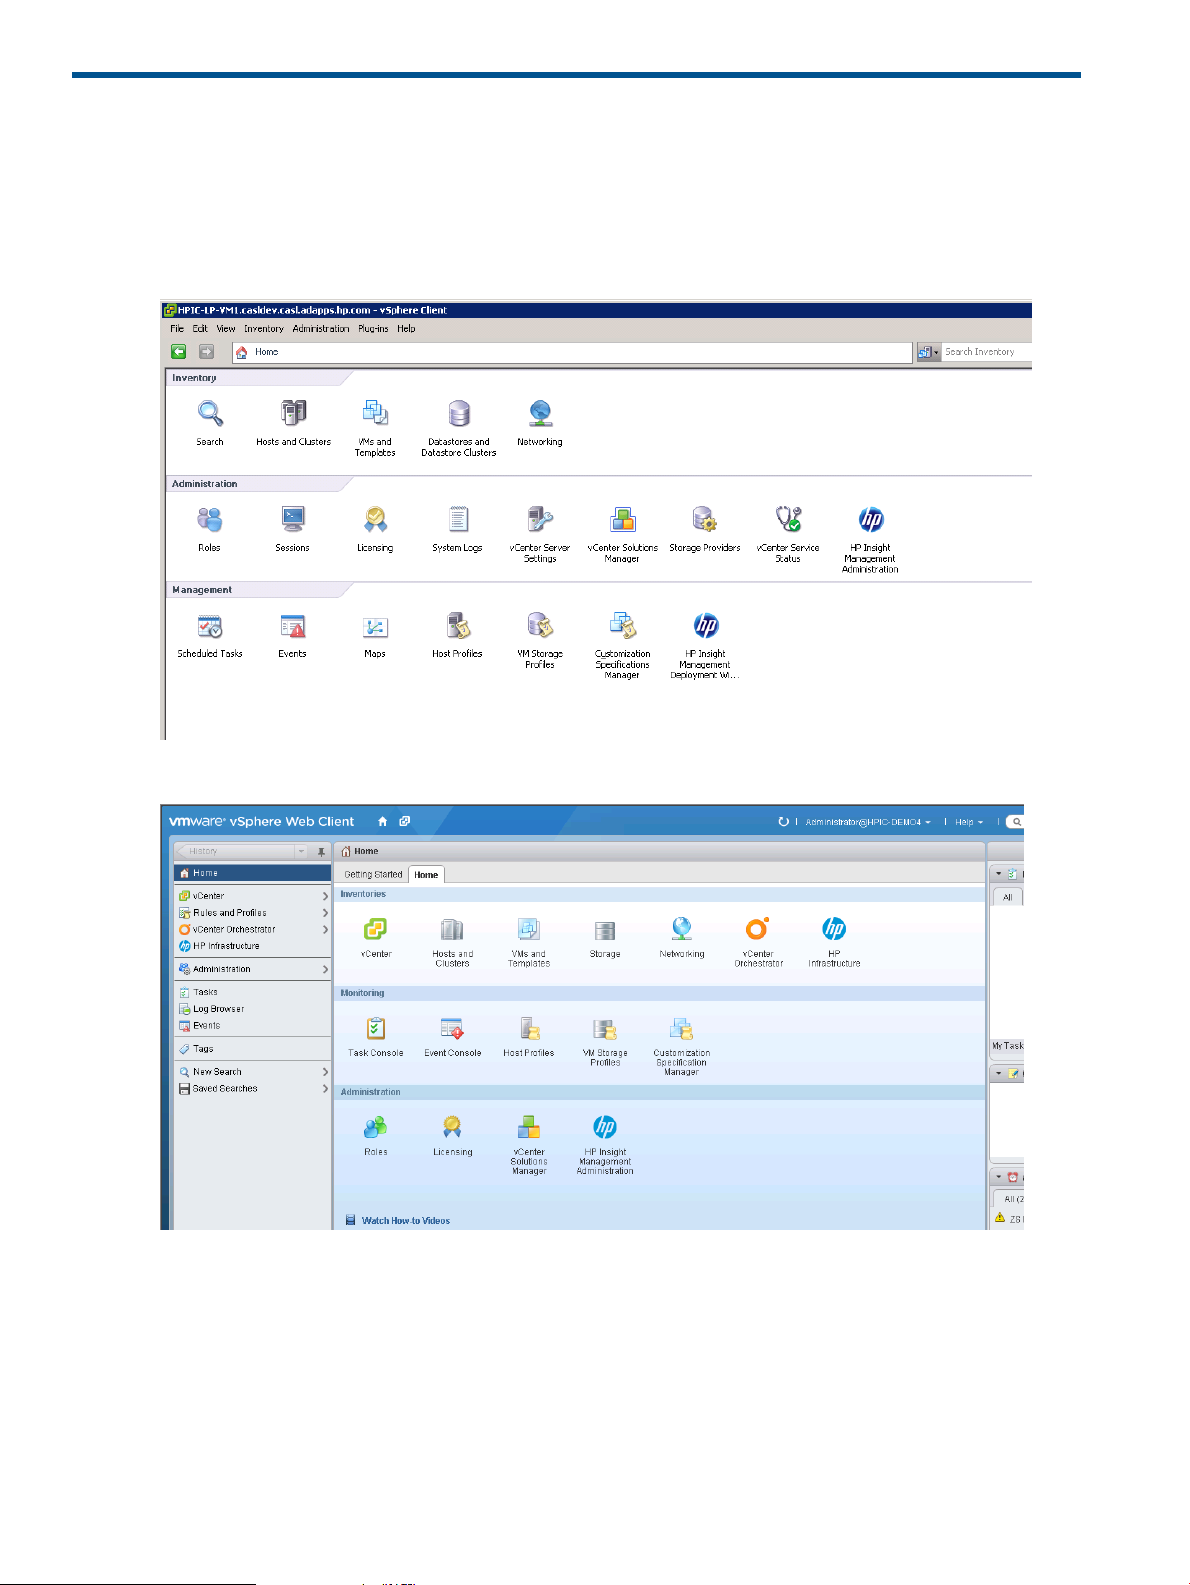
You can access resource inventory, HP Insight Management Administration tools and the HP Insight
Management Deployment Wizard from the vSphere Client home page.
Figure 2 vSphere Client home page
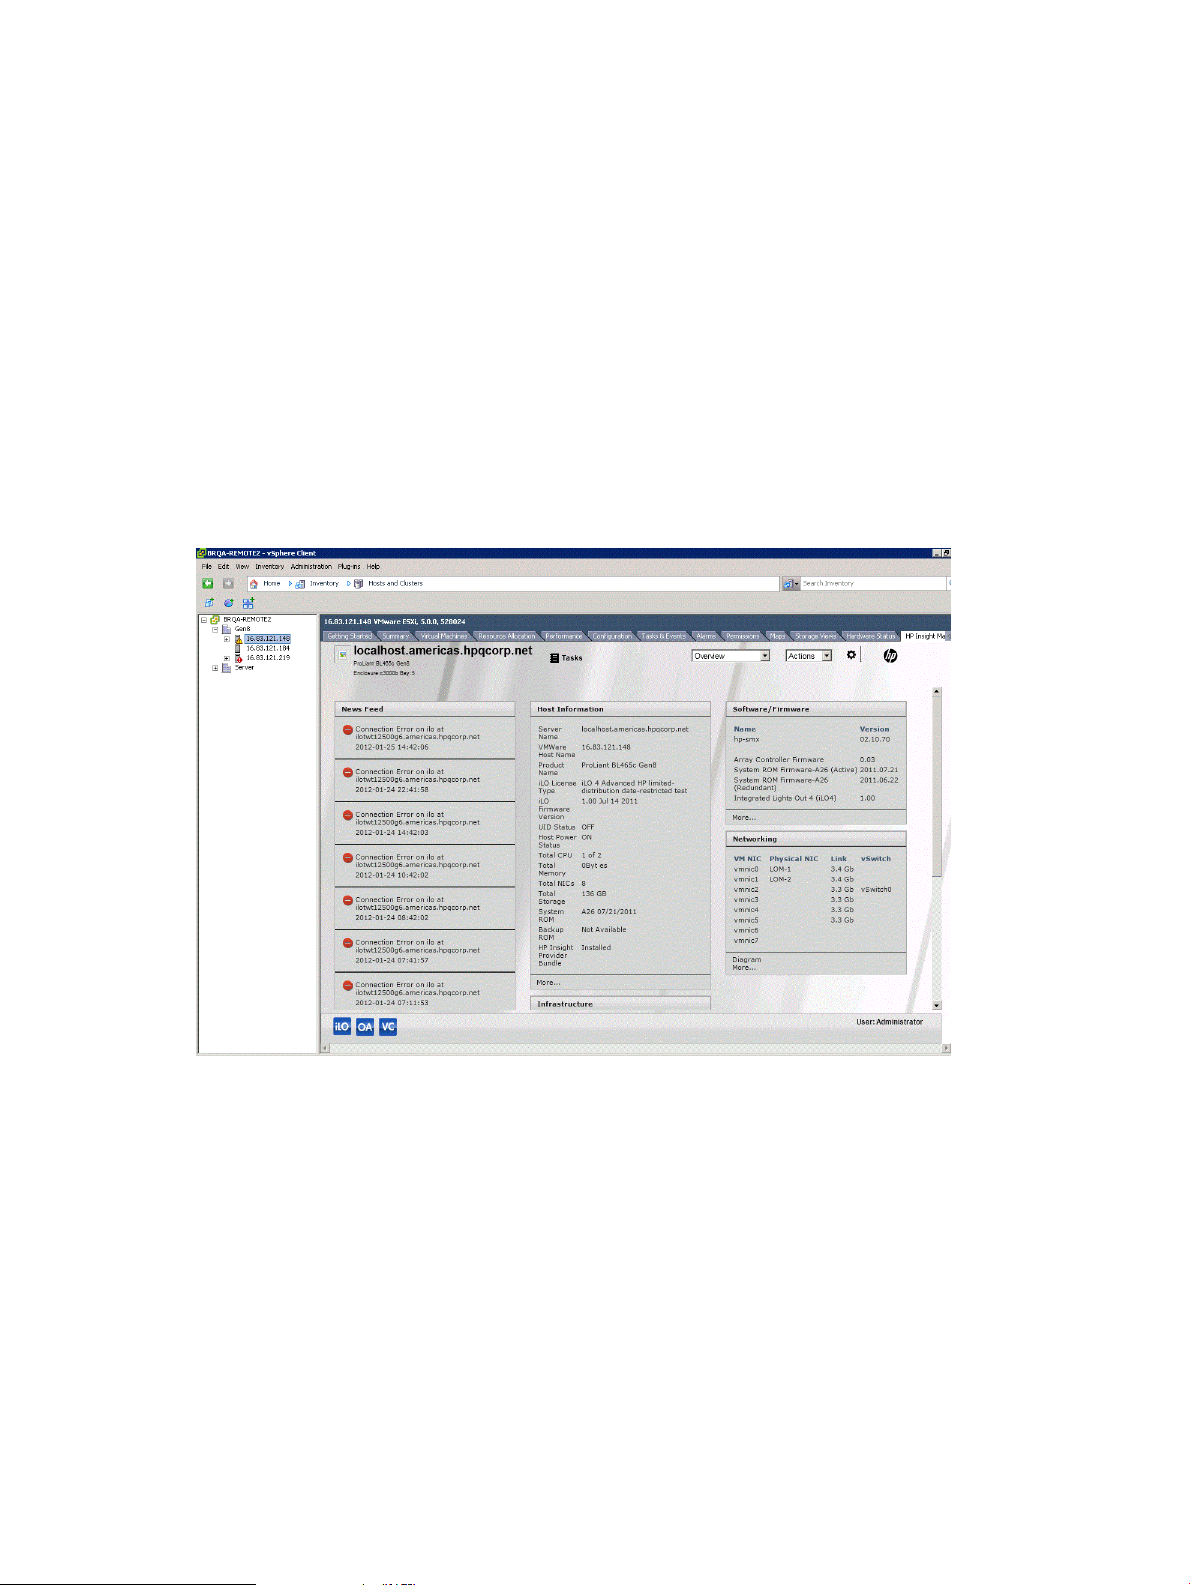
Figure 3 vSphere Web Client home page
For more information about HP Insight Management Administration, see “Configuring Insight
Control for vCenter” (page 8). For more information about using the deployment wizard, see
“Using the Insight Control Deployment Wizard (vSphere Client)” (page 32).
24 Using Insight Control for vCenter
Page 25
Accessing Insight Control for vCenter
After completing the installation and configuration procedures, you can access Insight Control for
vCenter two ways:
• “Using the vSphere Client to access Insight Control for vCenter” (page 27)
• “Using the vSphere Web Client to access Insight Control for vCenter” (page 27)
Except where noted in “Comparing vSphere Client to vSphere Web Client integration” (page 26),
each method displays the same Insight Control for vCenter information in a slightly different format.
• The vSphere Client is a .Net client that utilizes drop-down lists to navigate Insight Control for
vCenter. See Figure 4 (page 25).
• The vSphere Web Client is a web-based client that utilizes tabs to navigate Insight Control
for vCenter. The HP Insight Management content is displayed on the Monitor page and the
Manage page.
See Figure 5 (page 26).
Figure 4 vSphere Client — Overview
Accessing Insight Control for vCenter 25
Page 26
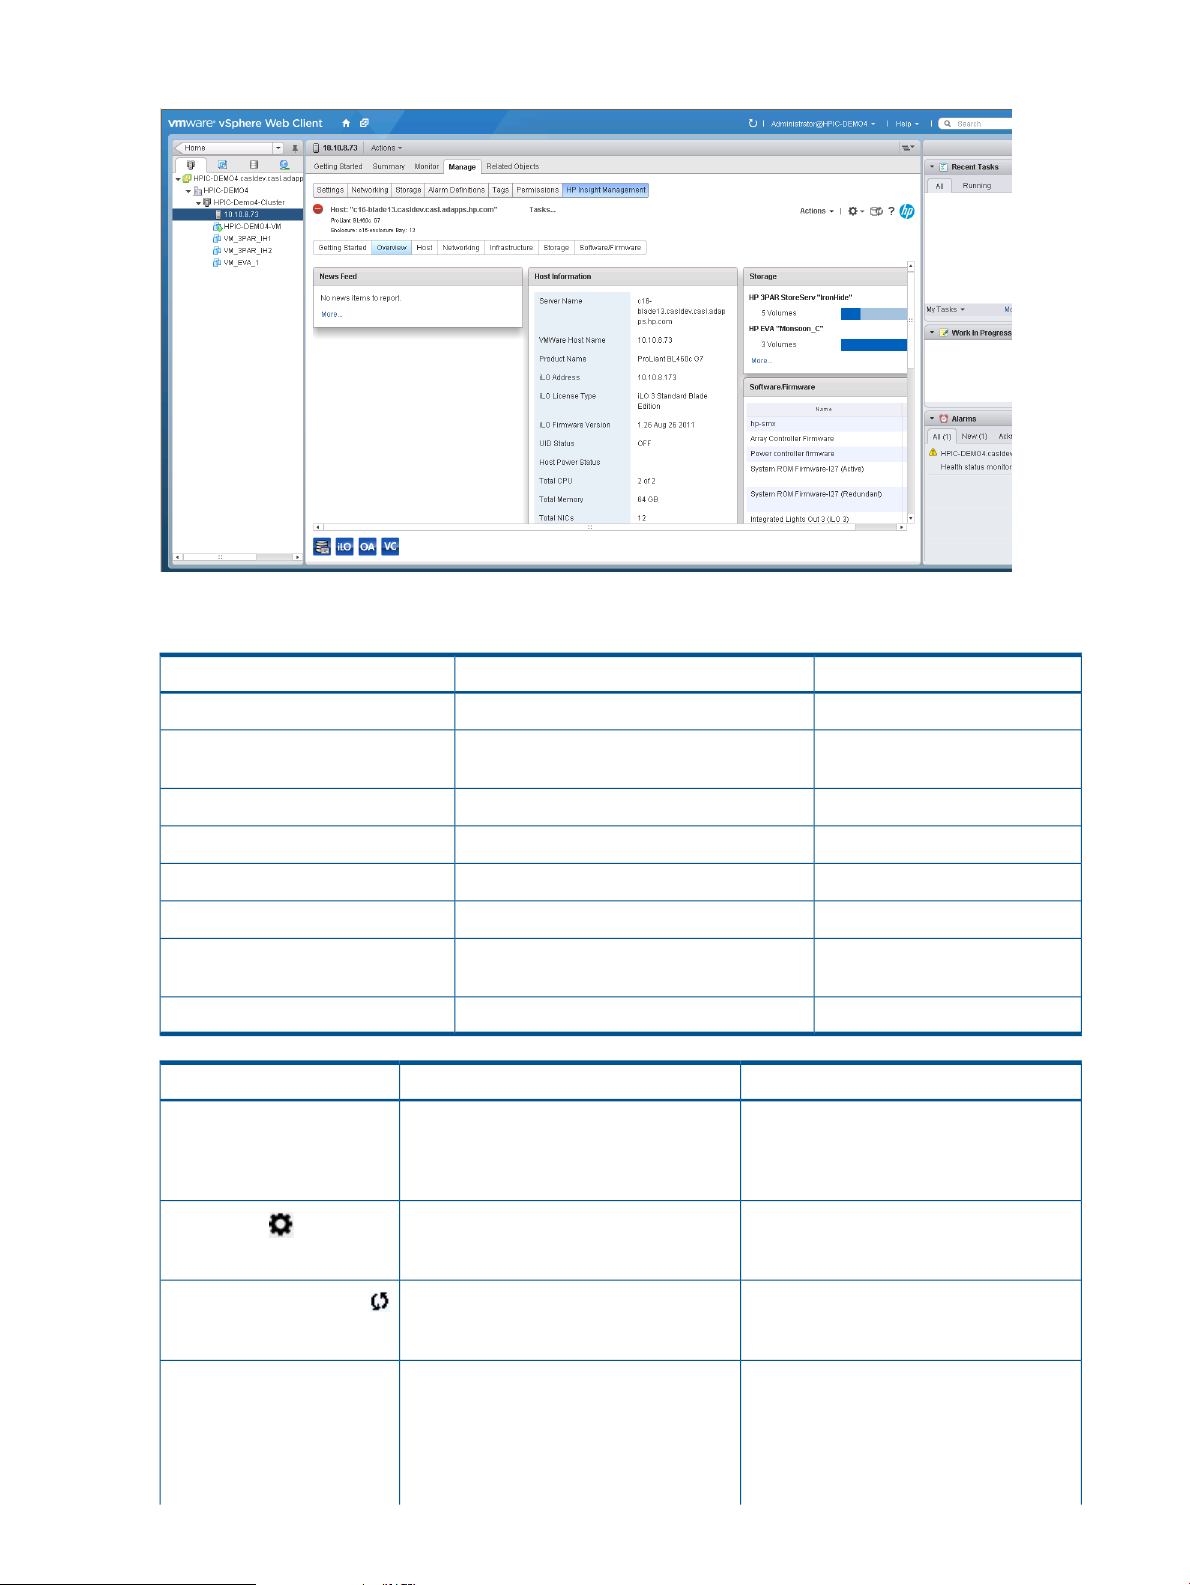
Figure 5 vSphere Web Client — Overview
Comparing vSphere Client to vSphere Web Client integration
Theme setting
table cells
Credential table
Settings icon
theme
Users other than administrators receive a
message indicating that they do not have
an adequate role or permission to modify
the table.
All roles can use the drop-down list to view
Host Properties.
vSphere Web ClientvSphere Client
Uses a series of tabsUses a drop-down listNavigation
Not availableYou can select a dark or light background
YesYesCluster view
YesYesNetwork diagram
IC server provisioningRDPBare metal deployment capability
YesYesFirmware update capability
YesYesStorage provisioning operation from
YesYesDelete storage volume capability
NotesDifference compared to vSphere ClientvSphere Web Client item
The vSphere Web Client mimics VMware
behavior that provides non-administrators
read-only privileges.
The vSphere Web Client mimics VMware
behavior that provides non-administrators
read-only privileges.
Refresh/page reload icon
News Feed Summary
26 Using Insight Control for vCenter
that includes options to Reload page and
Refresh data cache.
The vSphere Web Client displays fewer
keywords and task details to make the
message easier to decipher.
You can reload the page.vSphere Web Client has a drop-down list
For example, the vSphere Client displays
task.running, Create Datastore,
Administrator, Creating
disks(s) on array xxxyyyyzzzz,
and the vSphere Web Client displays
Creating disks(s) on aray
Page 27
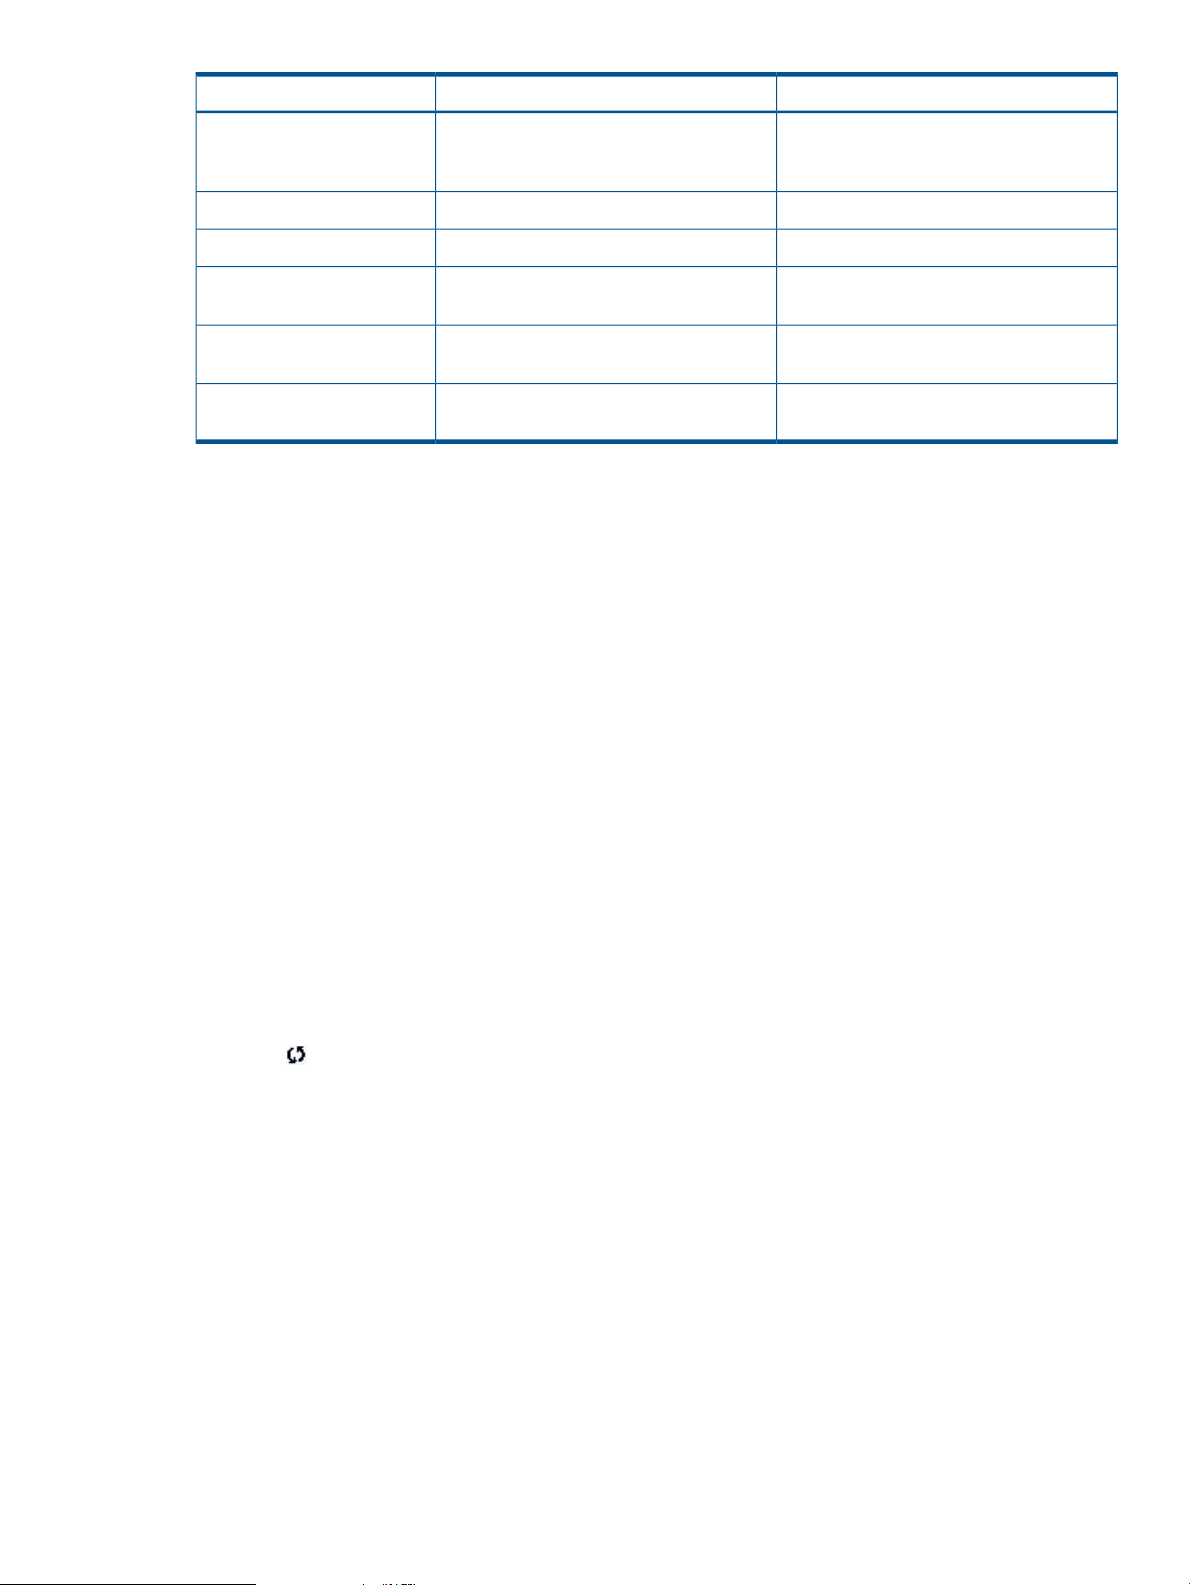
NotesDifference compared to vSphere ClientvSphere Web Client item
xxxyyyyzzzz for the same event. You
can use the Task portlet to view the task
details.
Use the Tasks tab or click the event.Does not display the More link.Task Summary icon
Use the Health tab or click the event.Does not display the More link.Health Summary icon
Software/Firmware details
tab
Footer
All tables
combined in a single table.
vSphere Web Client does not display the
user name.
Client.
You can sort by all updates.Software and firmware information is
The user name appears in the VMware
header.
Enhancement.Ability to filter and export to vSphere Web
Using the vSphere Client to access Insight Control for vCenter
After completing the installation and configuration procedures, you use the vSphere Client to access
Insight Control for vCenter:
1. Log into the vSphere Client.
In most configurations, this is the same server that you configured during the installation
process.
2. Depending on the options installed, you can do one of the following:
• To use the Server Module for vCenter, select a cluster or an HP server/host in the inventory
tree.
• To use the Storage Module for vCenter, select a host, cluster, datastore, or VM in the
inventory tree.
3. Click the HP Insight Management tab.
If the HP Insight Management tab is not visible, click the right-arrow located to the right of the
tabs until you can see the HP Insight Management tab.
An overview of the VMware component selected in appears. While Insight Control for VMware
vCenter collects information about this VMware component or corresponding HP iLO, HP
Onboard Administrator, or Virtual Connect modules; the values presented in the overview
page can be empty. HP Insight Management refreshes the contents on a periodic basis and
updates information. To initiate a manual refresh of the overview page, click the page reload
icon located on the upper right section of the page.
Using the vSphere Web Client to access Insight Control for vCenter
After completing the installation and configuration procedures, you use the vSphere Web Client
to access Insight Control for vCenter.
1. Log into the vSphere Web Client.
The vSphere Web Client home page is displayed.
2. Select a cluster, host, VM, or datastore from the left navigation pane.
3. Click the Monitor or Manage tab.
Accessing Insight Control for vCenter 27
Page 28

4. Click the HP Insight Management tab.
An overview of the VMware component that you selected appears. While Insight Control for
VMware vCenter collects information about this VMware component or corresponding HP
iLO, HP Onboard Administrator, or Virtual Connect modules; the panes in the overview page
display loading.... HP Insight Management refreshes the contents on a periodic basis and
updates information. To initiate a manual refresh of the Storage Module cache, click the cache
refresh icon located on the upper right section of the page.
HP Insight Management pages
The organization and presentation of information on the HP Insight Management pages differs
between the vSphere Client and the vSphere Web Client.
vSphere Client pages
Depending on the component selected in the inventory tree and your configuration, the information
displayed on the overview page varies. However, the information displayed on the top and the
bottom of all HP Insight Management pages is consistent.
The top of the HP Insight Management pages show:
• The consolidated status of the managed HP component. The most severe status of a component
is displayed. Moving your cursor over the status icon shows the status overview. Click More
for details about the status of the components.
• The DNS name/IP address and a brief description of the selected server (if a host or cluster
is selected).
• A Tasks icon. Moving your cursor over the Tasks icon shows a list of tasks currently being
performed. You can click More to monitor long-running tasks.
• A Navigation drop-down list used to display different views and level of detail. Overview is
the default.
• An Actions drop-down list used to perform actions on the server/host, a VM, or a Datastore.
For example, you can select a host and then use the Actions list to Create Datastore or Create
VM provisioning operations. The type of provisioning operations listed in the drop-down list
will depend on the type of component selected in the inventory tree.
• A page reload icon that you can click to refresh the display.
• A Settings icon that you use to modify configuration settings.
• A help ? icon used to display help files.
The bottom of the HP Insight Management pages shows:
• Links to launch HP Management consoles, if applicable.
Links that appear to be transparent indicate that the tool is inaccessible or that no data is
available.
• Logged-in user name
The main section in the Overview page displays multiple boxes called portlets that provide summary
information about the selected VMware component. The portlets will vary based on your
configuration and the selected component. Portlets display information such as:
• Server/Host Information
• Networking
• Infrastructure
• Software/Firmware
28 Using Insight Control for vCenter
Page 29

• Storage
• News Feed (a list of recent events)
For detailed information about portlet items, do one of the following:
• Click More at the bottom of the portlet
• Select the name of the portlet from the navigation list.
NOTE: When you access HP Insight Management, you might see security warnings related to
the website security certificate. To prevent these warnings from appearing in the future, click View
Certificate, and then follow the on-screen instructions to import the certificate.
See the VMware documentation for a complete description of the VMware GUI.
TIP: You can alter the look of the Overview page by moving the portlets to suit your preference.
Click and drag portals to change the location in which they appear on the page.
vSphere Web Client pages
The HP Insight Management information is displayed on the Monitor and Manage pages. Depending
on the component selected in the inventory tree and your configuration, the information displayed
varies. However, the information displayed on the top and the bottom of all HP Insight Management
pages is consistent.
The top of the HP Insight Management pages show:
• The consolidated status of the managed HP component. The most severe status of a component
is displayed. Moving your cursor over the status icon shows the status overview. Click the
status icon for details about the status of the components.
• The DNS name/IP address and a brief description of the selected server (if a host or cluster
is selected).
• An Actions drop-down list that you use to perform actions on the server/host, a VM, or a
Datastore. For example, you can select a host and then use the Actions list to Create Datastore
or Create VM provisioning operations. The type of provisioning operations listed in the
drop-down list will depend on the type of component selected in the inventory tree..
• A Settings icon that you use to modify configuration settings.
• A cache refresh icon used to refresh the cache.
• A help ? icon used to display help files.
• A row of tabs used to display different views and level of detail. The Monitor page tabs are
the same for all components. The Manage page tabs differ depending on the component
selected.
Monitor page tabs
◦ Getting Started
◦ News Feed
◦ Health
◦ Tasks
Manage page tabs (vary depending on component selected)
◦ Getting started
◦ Overview
HP Insight Management pages 29
Page 30

◦ Host
◦ Cluster
◦ Networking
◦ Infrastructure
◦ Storage
◦ Software/Firmware
The bottom of the HP Insight Management pages shows:
• Links to launch HP Management consoles, if applicable.
Links that appear to be transparent indicate that the tool is inaccessible or that no data is
available.
The main section in the Manage→Overview page displays multiple boxes called portlets that
provide summary information about the selected VMware component. The portlets will vary based
on your configuration and the selected component. Portlets display information such as:
• Server/Host Information
• Networking
• Infrastructure
• Software/Firmware
• Storage
• News Feed (a list of recent events)
For detailed information about portlet items, do one of the following:
• Click More at the bottom of the portlet. Some of the portlets details are displayed on the
Manage page.
• Click the corresponding tab. The tabs for some of the information are on the Manage page.
NOTE: When you access HP Insight Management, you might see security warnings related to
the website security certificate. To prevent these warnings from appearing in the future, click View
Certificate, and then follow the on-screen instructions to import the certificate.
See the VMware documentation for a complete description of the VMware GUI.
Using the Server Module for vCenter
After Insight Control for vCenter is installed, the HP Insight Management tab is added to the vSphere
Client. Insight Control for vCenter enables you to complete the following tasks when using HP
ProLiant servers and BladeSystem enclosures on the network:
• Monitor health status
• Manage server information
• Manage and update firmware inventory
• Alert and event forwarding from Onboard Administrator, HP SNMP agents, and HP CIM
providers to vCenter Server
Use Insight Control for vCenter to manage clusters and hosts remotely, manage system health and
configuration, optimize power usage, and for Virtual Connect networking. The administrator can
manage the system and monitor the Virtual Connect network, gather information about individual
HP ProLiant servers and BladeSystem enclosures or the infrastructure, and launch certain HP tools.
30 Using Insight Control for vCenter
Page 31

Navigating HP Insight Management with the Server Module
Information from iLO, Onboard Administrator, HP SNMP agents, HP CIM providers, and Virtual
Connect Manager is compiled and displayed on the HP Insight Management page at both the
cluster level and the host level.
NOTE:
• In the vSphere Web Client, information is displayed on the Monitor and Manage pages.
In order for iLO information to display, iLO must be associated with the VMware host. For more
information, see “Associating the VMware host to iLO” (page 10).
If you have a server module installed and a cluster is selected in the inventory tree, HP Insight
Management provides the following information:
• Status/Health
• Infrastructure
• Software/Firmware
• News Feed
• Cluster
• Tasks
If you have a server module installed and a host is selected in the inventory tree, HP Insight
Management provides the following information:
• Status/Health
• Overview
• Host
• Networking
• Software/Firmware
• Infrastructure
• News Feed
• Tasks
NOTE: For information about navigating HP Insight Management with the Storage Module for
vCenter, see “Navigating HP Insight Management with the Storage Module” (page 46).
Depending on the context of the page, links are available to launch HP tools, as needed.
Changing Server Management properties
To change host properties, select a host from the inventory tree, and then access HP Insight
Management. Move the cursor over the Settings icon , and select Host Properties.
The Host Properties page opens and allows you to modify the properties of the selected host.
To change cluster properties, select a cluster from the inventory tree, and then access HP Insight
Management. Move the cursor over the Settings icon , and select Cluster Properties
The Cluster Properties page opens and allows you to modify the properties of the selected cluster.
When updating the properties information at the cluster level, information is updated for all servers
in the cluster. When updating the properties information at the host or server level, information is
updated for that host or server only.
Using the Server Module for vCenter 31
Page 32

Setting the power cost for a cluster
Before entering the power cost settings for a cluster, ensure that the cluster meets the following
requirements:
• The cluster contains at least one HP ProLiant server or BladeSystem enclosure.
• The cluster is DRS-enabled.
• The cluster is configured for DPM.
To determine if the cluster is DRS-enabled, navigate to the vCenter Server Summary tab for the
cluster and review the cluster information.
From the HP Insight Management Administration page, select Server Module Configuration screen
for the cluster, enter the power cost. Entering the power cost for a cluster generates the cost
advantage information, which is displayed for each host on the Cluster detail page.
The Cost Advantage value is calculated as follows:
Cost Advantage = (number of hours the server was down) × (power cost) × (average power)
Entering the Power Cost will only calculate the Cost Advantage if all of the requirements in this
section are applicable for the cluster. If the requirements are not met by the cluster, the cost
advantage is always zero.
Using the Insight Control Deployment Wizard (vSphere Client)
The HP Insight Control Deployment Wizard facilitates the deployment of the ESXi image using RDP
by providing a drag-and-drop interface to deploy ESX/ESXi from the vSphere Client. You can also
add the newly created hosts to a cluster or datacenter.
Prerequisites
Before using the wizard, you must have installed the following:
• HP Insight Control for vCenter
• HP RDP from the HP Insight Rapid Deployment website.
NOTE: You must use the RDP-configured IP that was provided during the RDP installation.
• HP SIM
• HP Deployment Connector (included with Insight Control for vCenter)
NOTE: If you try to use the HP Insight Control Deployment Wizard without installing the
Deployment Connector, the wizard prompts you to download and install it. Follow the on-screen
instructions.
The Deployment Connector installer is also available in the install
directory\uim\static\bin directory.
You must also create a job folder and use the RDP console to copy (drag and drop) corresponding
ESX/ESXi images into that folder before you use Insight Control for vCenter deployment.
To use the HP Insight Control Deployment Wizard:
1. Navigate to the vSphere Client home page.
2. Under Management, click HP Insight Control Deployment Wizard.
The Step 1 – Choose Targets window opens.
3. Select each system to which you want to deploy ESX/ESXi images, and then click Next.
The Step 2 – Configure Networking window opens.
32 Using Insight Control for vCenter
Page 33

4. For the network interface, do one of the following, and then click Next:
• Select the DHCP check box.
• Enter a static IP address, network domain, gateway, and DNS server information.
The Step 3 – Deploy window opens.
5. Drag and drop the OS onto all or selected host systems, and then click Next.
The Step 4 – Add to vCenter window opens.
6. Select the host systems that you want to configure, enter the user names and passwords, select
the cluster or datacenter to which you want to add the system, and then click Next.
The Step 5 – Summary window opens.
7. Monitor the status of the deployment and when the process is complete, click Finish.
The hosts that you selected in Step 6 are added to vCenter.
8. Verify that the DNS and DHCP are configured correctly.
Server provisioning (vSphere Web Client)
When using the vSphere Web Client, the Server Module for vCenter can be used to perform server
provisioning. This involves establishing communication with the HP server provisioning server and
then using the Server Provisioning wizard.
Connecting to the HP provisioning server
Communication must be established with the HP server provisioning server before HP Insight
Management can be used for server provisioning.
1. Access the HP Insight Management Administration page.
2. Select Configure Deployment in the left pane.
The Configure Insight Control Server Provisioning page is displayed.
3. Enter the Host Name or IP Address of the HP server provisioning server.
4. Enter a valid Username and Password.
The user must have the necessary access privileges.
5. Click Save.
Running the Server Provisioning wizard
Server provisioning is done using the Server Provisioning wizard.
1. Start the Server Provisioning wizard using one of the following methods:
• In the left pane right-click on a cluster or a Datacenter and then select HP Insight
Management→HP Insight Control server provisioning
• In the left pane select a cluster or a Datacenter and then select Actions→HP Insight
Management→HP Insight Control server provisioning
The Server Provisioning wizard opens.
2. Select the job plan and the target servers where the ESXi image will be installed, and click
Next.
The Configure VMware Host Management Interfaces screen is displayed.
3. Enter the credentials and the network configuration information for each host, and click Next.
The credentials are used to communicate with the host after the image has been installed on
the server to add the host to the cluster or datacenter. Where the host is added is determined
by the object selected when the wizard was launched. For example, if a cluster was selected,
the host will be added to the cluster. If a Datacenter was selected, the host will be added to
the Datacenter.
Using the Server Module for vCenter 33
Page 34

A summary screen is displayed.
4. Click Submit.
Setting host network configuration preferences
These settings are used to evaluate the network configuration of a host with respect to its Virtual
Connect profile.
NOTE: This feature is available only on the vSphere Web Client.
1. Access the HP Insight Management Administration page.
2. Select Host Network Configuration Preferences in the left pane.
The Host Configuration Preferences page is displayed which lists all the networks discovered
in the VC domains available.
3. Select the Virtual Connect network to be tagged as the Management, VMotion and FT network.
All the other networks are considered to be VM networks.
4. Select the default switch type that will be considered/used during host consistency checks and
configuration. If the default switch type selected is the vSphere Distributed Switch, then select
the version that you intend to use for the distributed switch.
NOTE:
• The host network configuration feature is not supported for hosts running the ESX classic
version.
• If your environment has different ESXi versions and you intend to use the vSphere
Distributed Switch for host network configuration, ensure that the correct vSphere
Distributed Switch version is configured so that host network configuration uses this switch
version across all hosts in your environment.
It is recommended that the lowest vSphere Distributed Switch version (corresponding to
the lowest ESXi version in your environment) is configured so that host network
configuration can use this switch version across all hosts in your environment.
5. Click Save.
Click Clear to reset all the selections to the default values.
TIP: Click Refresh to refresh the Networks.
Managing clusters
To access the cluster overview summary, select a cluster in the inventory tree. If you are using the
vSphere Client, select the HP Insight Management tab. If you are using the vSphere Web Client,
then click Manage→HP Insight Management→Overview.
The Cluster Overview page appears. The appearance of the page varies, depending on which
client you are using.
34 Using Insight Control for vCenter
Page 35

Figure 6 Cluster overview page (vSphere Client)
Figure 7 Cluster overview page (vSphere Web Client)
The Overview page for Cluster Management displays status summary information.
Depending on the software installed, links may be available for the following:
• HP SIM
• Onboard Administrator
• iLO Remote Management
• HP Insight Control power management
• Virtual Connect Manager
• Virtual Connect Enterprise Manager
Using the Server Module for vCenter 35
Page 36

NOTE: With the exception of Virtual Connect Manager, administrators can launch tools without
providing login credentials.
Cluster Overview page
The Cluster Overview page displays information for the selected cluster. It displays portlets that
provide summary information about the cluster. The portlets displayed are determined by the HP
Insight Control for VMware vCenter modules (Server, Storage, or both) that have been installed.
Server Module for vCenter portlets
• Cluster
• Infrastructure
• Software/Firmware
• News Feed
Storage Module for vCenter portlets
• Software/Firmware
• Storage
• News Feed
For more information on the controls and operation of the Overview page, see “HP Insight
Management pages” (page 28)
Storage information
If the Storage Module for vCenter is installed, the Overview page includes the following:
• A Storage portlet
• Links to the array management software for configured arrays (if available)
• Array health status information
• Array firmware version information
• Storage-related News Feed topics
For more information, see “Navigating HP Insight Management with the Storage Module” (page 46).
Viewing cluster information
To view information about a cluster:
1. Select a cluster in the inventory tree and access HP Insight Management.
The Cluster portlet on the Overview page provides an overview of the cluster.
2. For detailed information about the cluster, click More at the bottom of the Cluster portlet or
do one of the following:
• From the vSphere Client, select Cluster from the drop-down list.
• From the vSphere Web Client, click the Cluster tab on the Manage page.
The details include information about the cluster power supplies, interconnect, and OA
information.
Viewing cluster infrastructure information
To view infrastructure information about a selected cluster:
1. Select a cluster in the inventory tree and access HP Insight Management.
The Infrastructure portlet on the Overview page provides an overview of the cluster.
36 Using Insight Control for vCenter
Page 37

2. For detailed cluster infrastructure information, click More at the bottom of the Infrastructure
portlet or do one of the following:
• From the vSphere Client, select Infrastructure from the drop-down list.
• From the vSphere Web Client, click the Infrastructure tab on the Manage page.
Viewing software and firmware on clustered servers
NOTE: Firmware information is available for ESXi systems with either the HP Offline Bundle or
HP ESXi custom image installed only.
To view firmware information and/or update firmware for the selected cluster or servers in the
cluster:
1. Select a cluster in the inventory tree and access HP Insight Management.
The Software/Firmware portlet on the Overview page provides an overview of primary software
and firmware versions.
2. For detailed software and firmware information, click More at the bottom of the
Software/Firmware portlet or do one of the following:
• From the vSphere Client, select Software/Firmware from the drop-down list.
• From the vSphere Web Client, click the Software/Firmware tab on the Manage page.
The details include software/firmware name, version, and a brief description.
Managing servers
To access the host overview summary, select a host in the inventory tree. If you are using the
vSphere Client, select the HP Insight Management tab. If you are using the vSphere Web Client,
then click Manage→HP Insight Management→Overview.
The Host Overview page appears. The appearance of the page varies, depending on which client
you are using.
Figure 8 Host Overview page — vSphere Client view
Using the Server Module for vCenter 37
Page 38

Figure 9 Host Overview page — vSphere Web Client view
Depending on the software installed, links are available to launch HP tools.
Host Overview page
The Host Overview page displays information for the selected host. The Overview page displays
portlets that provide summary information about the host. The portlets displayed are determined
by the HP Insight Control for VMware vCenter modules (Storage, Server, or both) that have been
installed.
Server Module for vCenter portlets
• Host Information
• Networking
• Infrastructure
• Software/Firmware
• News Feed
Storage Module for vCenter portlets
• Software/Firmware
• Storage
• News Feed
For more information on the controls and operation of the Overview page, see “HP Insight
Management pages” (page 28)
Storage information
If the Storage Module for vCenter is installed, the Overview page includes the following:
• A Storage portlet
• Links to the array management software for configured arrays (if available)
• Array health status information
• Array firmware version information
• Storage-related News Feed topics
38 Using Insight Control for vCenter
Page 39

For more information, see “Navigating HP Insight Management with the Storage Module” (page 46).
Viewing host information
To view information about the host server:
1. Select a host in the inventory tree and access HP Insight Management.
The Host information portlet on the Overview page provides an overview of the host server.
2. For more information about the host server configuration, click More at the bottom of the Host
Information portlet or do one of the following:
• From the vSphere Client, select Host from the drop-down list.
• From the vSphere Web Client, click the Host tab on the Manage page.
The details include status, memory, CPU and firmware details, and logs.
To view the IML or iLO logs for a host:
1. Select an HP ProLiant server, BladeSystem enclosure, or host in the inventory tree, and then
access HP Insight Management.
The Overview page opens.
2. Click More at the bottom of the Host Information portlet, or select Host.
Detailed host information is displayed, which includes both iLO and IML logs.
To view the Onboard Administrator logs for a host:
1. Select a blade from the inventory tree and navigate to HP Insight Management.
2. Click More at the bottom of the Infrastructure portlet, or select Infrastructure.
Detailed Infrastructure information is displayed, which includes the OA logs.
Viewing host/server infrastructure information
The Host Infrastructure page displays information about blade status, enclosure status, and the
enclosure power and thermal status as well as interconnect and OA information.
NOTE: The Infrastructure portlet appears for blades only.
To view an overview of the blade server infrastructure:
1. Select a blade server in the inventory tree and access HP Insight Management.
The Infrastructure portlet on the Overview page displays an overview of the blade server
infrastructure.
2. For detailed host infrastructure information, click More at the bottom of the Infrastructure portlet
or do one of the following:
• From the vSphere Client, select Infrastructure from the drop-down list.
• From the vSphere Web Client, click the Infrastructure tab on the Manage page.
Details include information about the server enclosure, including power, airflow, and thermal
information; interconnects, power supplies, and OA logs.
Viewing server networking information
The Networking page displays configuration information such as a list of NICs and vSphere
switches, as well as Virtual Connect Network information. The Networking portlet, which displays
an overview of the networking, is displayed on the Overview page.
To view Networking information about a selected server:
Using the Server Module for vCenter 39
Page 40

1. Select a server in the inventory tree, and then access HP Insight Management.
The Networking portlet on the Overview page provides an overview of the host network
configuration.
The network configuration status of the host is displayed at the top of the portlet. See “Host
network configuration” (page 40).
2. For detailed networking information, click More at the bottom of the Networking portlet or do
one of the following:
• From the vSphere Client, select Networking from the drop-down list.
• From the vSphere Web Client, click the Networking tab on the Manage page.
Host network configuration
NOTE:
• This feature is available only in the vSphere Web Client.
• The host network configuration feature is not supported for hosts running the ESX classic
version.
1. The host network configuration status on the networking portlet of the Host Overview page
indicates one of the following:
• OK ( ) —indicates the host networking configuration matches the networks configured
in the Virtual Connect Profile for this host. No action is required on a host in this state.
• Mismatch ( ) —indicates the host configuration does not match the networks configured
in the Virtual Connect Profile for this host. Clicking the networking configuration status
will display the recommended actions for configuring the VMware host network based
on the network preferences and Virtual Connect profile networks. Clicking on Apply
Recommended Actions will help modify the host configuration to match the reference host.
• ? ( ) —indicates the host configuration status is not known. This is due to the fact that
a reference host has not been configured for the cluster.
• NA ( ) —indicates the host configuration status is not applicable. This is due to the fact
that the host does not have a Virtual Connect profile available against it.
NOTE: For information on setting up a reference host, see “Setting a reference host in
a cluster” (page 41).
2. Click the network configuration status icon.
The Host Network Configuration screen is displayed. This displays the overall network status,
the virtual connect profile status and the host network status for the current host. Recommended
40 Using Insight Control for vCenter
Page 41

actions are included for configuring the VMware host network based on the network preference
and Virtual Connect networks.
• The Virtual Connect profile status indicates whether the Virtual Connect profile for this
host matches the profile of the reference host.
If the Virtual Connect profile status is Mismatch, the required changes need to be made
using the Virtual Connect Manager to ensure that the Virtual Connect profile of this host
matches that of the reference host.
• The Host Network Status indicates whether the host configuration with regard to its Virtual
Connect profile is correct.
If the Virtual Connect profile status is OK, then a mismatch in the Host Network Status
can be corrected by triggering a host configuration using the Apply Recommended Action.
• The overall status is a combination of both the above status indicators.
NOTE:
• Ensure that the Virtual Connect profile status for each host in the cluster is OK. If it is not,
you will need to modify the Virtual Connect profile (ethernet connections section) for that
host using the Virtual Connect Manager interface to match the Virtual Connect profile
configuration of the reference host. This will ensure that the same set of networks is
available on both the hosts.
• The host configure option should be triggered only after the Virtual Connect profile for
the host matches the reference host.
3. Click Apply Recommended Actions.
Confirmation screen is displayed which lists all the networking configuration changes that will
be done. Review the changes that will be made.
4. Click Apply to perform the actions.
Once the changes are applied, the final status is shown in the news feed section. To view
progress updates, access the Tasks page under HP Insight Management.
NOTE:
• Host network configuration can fail on hosts having VMs running on them. The status and task
details are shown under tasks for the host. Insight Control for vCenter does not move the VMs
before performing host network configuration. The cluster on which the host resides must be
DRS enabled to handle VM movement automatically, or the VMs must be manually moved
from the host before attempting host network configuration for the host.
• If host network configuration fails after the host is put into maintenance mode, the host remains
in maintenance mode and is not added back into the cluster. If this occurs, view the task details
to determine the cause of the failure and resolve the issue manually (typically a vCenter/host
configuration modification). The host configure operation should then be retried so the host
is configured correctly and added back into the cluster.
Setting a reference host in a cluster
The reference host for a cluster identifies the host whose Virtual Connect Profile is considered as
the reference configuration when comparing all the hosts in the cluster.
Using the Server Module for vCenter 41
Page 42

NOTE:
• This feature is available only on the vSphere Web Client.
• Only blade servers are supported as a reference host.
• Ensure that no host configuration operations are being performed within the cluster when
selecting or changing a reference host.
• If there is no reference host identified for the cluster, then the first host where the recommended
actions are applied would be marked as the reference host for that cluster.
1. From the vSphere Web Client, for a selected host, click the Networking tab on the Manage
page.
2. Select the Network Details view.
3. Click Set Reference Host to set the selected host as the reference host.
Using the network diagram
Host networking provides an option to display the end-to-end network from the VM to the external
switch on a blade server when Virtual Connect is installed. See “Virtual Connect Network Diagram”
(page 43).
To view a network diagram in the vSphere Web Client, click Network Diagram at the bottom of
the Networking portlet, or click Manage→Networking→Network Diagram.
To view a network diagram in the vSphere Client, click Network Diagram at the bottom of the
Networking portlet, or select Network Diagram from the pull-down navigation list.
While viewing the diagram:
• If you move the cursor over a Virtual Connect Ethernet network, iSCSI network, or FC SAN,
the end-to-end network connection appears brighter. Potential bottlenecks are indicated when
an information icon symbol is shown.
You can modify bottleneck thresholds by selecting Home→Administration→HP Insight
Management Administration→Server Module Configuration. Select the Virtual Connect Over
Subscription factor to set the threshold.
• If you move the cursor over the information bubbles, details about the network hardware and
status are displayed.
• If you move the cursor over a Virtual Connect uplink port, details about the port and connection
status appear. For Ethernet uplink ports, a network traffic graph is included.
• A solid line indicates a primary network connection, proportioned according to bandwidth;
the thicker the line, the greater the bandwidth.
• A dashed line indicates standby connections.
• The switches in the network diagram are color-coded according to the colors of the switch
bays at the back of the enclosure.
• The switch ports in the network diagram are displayed with icons that show the shape of the
port on the physical Virtual Connect switch.
• When using the vSphere Web Client, save a copy of the diagram in PNG format by clicking
the Save icon .
42 Using Insight Control for vCenter
Page 43

Figure 10 Virtual Connect Network Diagram
Viewing host software and firmware
NOTE: Firmware information is available for ESXi systems with the HP Offline Bundle or HP ESXi
custom image installed only.
To view firmware information and/or update firmware for the selected server:
1. Select a server in the inventory tree and access HP Insight Management.
The Software/Firmware portlet on the Overview page provides an overview of primary software
and firmware versions.
2. For detailed software and firmware information, click More at the bottom of the
Software/Firmware portlet or do one of the following:
• From the vSphere Client, select Software/Firmware from the drop-down list.
• From the vSphere Web Client, click the Software/Firmware tab on the Manage page.
The details include software/firmware name, version, and a brief description.
Within the Software/Firmware page, you can do the following:
• View software inventory
• View firmware inventory
• Generate a firmware inventory list in CSV file format by clicking Export (csv) at the bottom of
the page
Power cycling a server
NOTE: This feature is available only on the vSphere Web Client.
The power to a ProLiant server can be turned off and on using the Power Control feature.
To use this feature, select Power Control from the Actions drop-down list.
IMPORTANT: Because this is not a graceful shutdown of the server, this feature should be used
with caution.
Rediscovering devices
NOTE: This feature is available only on the vSphere Web Client.
A rediscovery of all the devices associated with a selected host can be initiated using the Rediscover
Node feature. The rediscovery process may take up to 15 minutes to complete. Information collected
from the devices will be missing in various places in the plug-in until the rediscovery is complete.
Using the Server Module for vCenter 43
Page 44

To use this feature, select Rediscover Node from the Actions drop-down list.
Using HP VMware ESXi Smart Components
HP Smart Components can be used to update firmware on an ESXi host.
IMPORTANT: Your ESXi Host must have the HP Providers installed.
Manage Smart Components
To update the firmware on a host, Smart Components must either be staged on your own web
server or uploaded to the Insight Control for VMware vCenter server using the Manage Smart
Components tab.
NOTE:
• HP VMware ESXi Smart Components can be downloaded from the http://www.hp.com
website
• For more information on managing Smart Components, click More.
To upload Smart Components to the Insight Control for VMware vCenter server:
1. From the Actions drop-down list, select Firmware.
2. Click Manage Smart Components.
3. Select the Smart Component file you would like to upload to the Insight Control for VMware
vCenter server.
4. Click Upload
Update firmware using Smart Components
To update firmware for the hosts on a cluster or selected hosts in the cluster, complete the following
steps:
1. From the Actions drop-down list, select Firmware.
2. Click Smart Component Update.
3. Select a Smart Component from the drop down list or enter the URL of the location where a
Smart Component is staged on your web server.
4. Select the Force Component Update option to install the firmware even if the firmware version
is already installed on the host
If this option is not selected, a message is displayed if the version of firmware is already
installed. The upgrade is not performed until the Force Component Update option is selected.
5. If updating firmware on a cluster, select the hosts to be updated, or select Select All to update
all hosts.
6. Click Update.
TIP: To monitor the firmware update, click the Status Update link to display the Software/Firmware
Status Update page.
Viewing news feeds, tasks, and health information
Viewing news feed information
To view a list of recent events for the selected object:
1. Select a component in the inventory tree for which you want news feeds and access HP Insight
Management.
The News Feed portlet on the Overview page provides an overview of recent events.
44 Using Insight Control for vCenter
Page 45

2. For detailed news feed information, click More at the bottom of the News Feed portlet or do
one of the following:
• From the vSphere Client, select News Feed from the drop-down list.
• From the vSphere Web Client, click the News Feed tab on the Monitor page.
The details include object status, timestamp and a brief message.
Viewing health/status information
To view health/status information for the selected object:
1. Select a component in the inventory tree for which you want health/status information and
access HP Insight Management.
The Health/Status portlet on the Overview page provides a status overview.
2. For detailed health information, click More at the bottom of the portlet or do one of the
following:
• From the vSphere Client, select Status from the drop-down list.
• From the vSphere Web Client, click the Health tab on the Monitor page.
TIP: You can also access health/status information using the status icon located at the top left of
each HP Insight Management page. Moving your cursor over the status icon provides a list of icon
definitions. For more detailed information, click More at the at the bottom of the list.
Monitoring tasks
To view task information for the selected object:
1. Select a component in the inventory tree for which you want task information and access HP
Insight Management.
The Tasks portlet on the Overview page provides a tasks overview.
2. For detailed task information, click More at the bottom of the Tasks portlet or do one of the
following:
• From the vSphere Client, select Tasks from the drop-down list.
• From the vSphere Web Client, click the Tasks tab on the Monitor page.
The details include Task status, Task name, Description, and Time stamp.
TIP:
• When using the vSphere Client, you can also access task information using the Tasks icon
located at the top of each HP Insight Management page. Moving your cursor over the task
icon provides a list of currently running tasks. For more detailed information, click More at the
at the bottom of the list.
• When using the vSphere Web Client, a list of recent task is displayed in the right pane of the
HP insight Management page.
Launching into HP tools
Insight Control for vCenter provides links to launch HP tools if available. Some of the tools that can
be launched from the HP Insight Management tab are as follows:
• HP SIM
• iLO
• Onboard Administrator
Using the Server Module for vCenter 45
Page 46

• Insight Control power management
• Virtual Connect Enterprise Manager
• HP storage system management utilities
When configured for vCenter administrators, auto-login is enabled for direct launch into the HP
tools listed in this section. Users with read-only access cannot access the HP tools. Other
non-administrative vCenter Server users are prompted to enter a user name and password to access
the HP tools.
NOTE: If you are using the vSphere Web Client, links that appear to be transparent indicate that
the tool is inaccessible or that no data is available.
Using the Storage Module for vCenter
Use the Storage Module for vCenter to view, customize, and refresh storage information that is
displayed in the vSphere Client.
Navigating HP Insight Management with the Storage Module
HP Insight Management displays information about HP storage systems. To access the Overview
page, select a component in the inventory tree, and then access HP Insight Management. In the
vSphere Client, select the HP Insight Management tab. In the vSphere Web Client, click the Manage
tab and click HP Insight Management.
For more information, see “Accessing Insight Control for vCenter” (page 25).
The Overview page for servers and clusters is shared between the Server Module and Storage
Module. The Overview page for datastores and VMs is available only when the Storage Module
is installed. For information about the overview pages, see the following:
• “Managing servers” (page 37)
• “Managing clusters” (page 34)
• “Managing datastores” (page 46)
• “Managing VMs” (page 46)
Managing datastores
To display the Overview page for a datastore, select a datastore in the inventory tree and access
HP Insight Management.
From the Overview page, you can do the following:
• Access the News Feed, Storage, and Software/Firmware portlets.
• Perform provisioning operations from the Actions drop-down list. For more information, see
“Provisioning storage” (page 70).
• View read-only information about the storage associated with the selected component.
Managing VMs
To display the Overview page for a VM, select a VM in the inventory tree, and access HP Insight
Management.
From the Overview page, you can do the following:
• Access the News Feed, Storage, and Software/Firmware portlets.
• Perform provisioning operations from the Actions drop-down list. For more information, see
“Provisioning storage” (page 70).
• View read-only information about the storage associated with the selected component.
46 Using Insight Control for vCenter
Page 47

Refreshing Storage Module for vCenter data
After installation, the Storage Module collects information about the VMware environment and the
HP storage systems configured in the VMware environment.
When a cache refresh is in progress:
• The refresh status is listed at the top of each storage page. To view details about the cache
refresh, move the cursor over the refresh status.
NOTE: If the data for the Storage Module for vCenter is current, the text Last Updated is
displayed. If a refresh is in progress, the text Updating storage map is displayed.
• A message appears at the top of the Storage Administrator Portal page. See Figure 11
(page 47).
Figure 11 Refresh in progress (Storage Administrator Portal)
Click Check Refresh Progress to update the refresh status.
The time it takes for a refresh to complete depends on the size of the environment and the number
of arrays configured in the Storage Module.
NOTE: Previously gathered data is displayed in the GUI during a cache refresh.
You can change the automatic cache refresh settings or manually refresh the cache. For more
information, see “Manually refreshing the cache” (page 47).
• “Manually refreshing the cache” (page 47)
• “Restarting a cache refresh” (page 48)
• “Changing the automatic cache refresh settings” (page 49)
Manually refreshing the cache
When you make changes to the VMware environment using VMware operations (for example,
Add Datastore, New Virtual Machine, and Remove (VM) From Inventory), the changes are not
reflected in the vSphere Client until the cache is refreshed. HP recommends that you manually
refresh the cache whenever you do any of the following:
• Add, remove, or modify storage systems.
• Add or remove VMware hosts, VMs, or datastores using VMware operations.
• Change the storage provisioning using the storage system management console.
• Delete a VM from a disk using a VMware command.
NOTE: Provisioning changes performed by the Storage Module for vCenter do not require a
manual cache refresh. This information is automatically updated when the provisioning operation
is complete. For more information, see “Provisioning storage” (page 70).
Use the following procedures to start a cache refresh immediately using HP Insight Management
or the Storage Administrator Portal.
Using the Storage Module for vCenter 47
Page 48

Using HP Insight Management
1. Click the cache refresh icon . In the vSphere Client this icon is located in the top right
corner of any storage page.
HP Insight Management Refresh screen displays the options available.
2. Click Continue to continue the cache refresh, or click Cancel to stop the refresh.
If you click Cancel when the refresh process is in a state where it is safe to cancel, the operation
is stopped. If it is not safe to cancel, the operation is cancelled as soon as it is safe to stop
the operation.
3. Optional: Move the cursor over the refresh status on any storage page to view the elapsed
time and estimated time remaining.
Using the Storage Administrator Portal
1. Log in to the Storage Administrator Portal.
2. Click Refresh Cache in the top right corner of the Storage Administrator Portal.
The Storage Administrator Portal displays the options shown in Figure 12 (page 48).
Figure 12 Manual cache refresh options—Storage Administrator Portal
3. Click OK to continue the cache refresh.
4. Optional: Click Check Refresh Progress to update the elapsed time and estimated time
remaining. See Figure 11 (page 47).
Restarting a cache refresh
Restarting a cache refresh stops the existing refresh process and starts a new one. If a cache refresh
is in progress and changes are made that will require another refresh, use the following procedure
to start a new refresh immediately instead of waiting for the current refresh to finish.
Restarting a cache refresh using HP Insight Management
1. Click the cache refresh icon . In the vSphere Client, this icon is located in the top right
corner of any storage page.
The HP Insight Management tab displays the available options.
2. Click Restart.
48 Using Insight Control for vCenter
Page 49

Restarting a cache refresh using the Storage Administrator portal
1. Click the Refresh Cache link in the top right corner of the Storage Administrator Portal.
The Storage Administrator Portal displays the options shown in Figure 13 (page 49).
Figure 13 Restart cache refresh options
2. Click Restart.
Changing the automatic cache refresh settings
You can change the default cache refresh settings by editing the standalone.xml file.
1. Open the standalone.xml file, which is located in the following directory (assuming that
the default installation directory was used):
<install folder>\JBoss\standalone\configuration
2. Add the following parameters in the system-properties node:
• Caching.RefreshInterval: Specifies the time, in milliseconds, to wait between
cache refreshes
• Caching.InactivityTimeout: Specifies the time, in milliseconds, to wait after
inactivity before stopping cache refreshes
For example:
<property name="Caching.RefreshInterval" value="3600000"/>
<property name="Caching.InactivityTimeout" value="10800000"/>
3. Restart the HP Insight Control Storage Module for vCenter Service.
Customizing Storage Module for vCenter tables
Storage Module for vCenter pages include tables that present detailed storage information about
hosts, VMs, and datastores. The table structure can be customized to meet you needs.
Consider the following when working with the information in the storage tables:
• Click Export Table to export the information in a tab to a .csv file. When prompted to browse
to a download folder, select a folder, and then click OK.
• Enter a value in the text box below a column heading to filter the list by a specific value.
• Click the divider between columns and drag to resize a column.
• Click a column heading to sort the data by the selected column.
• In the vSphere Client, click a triangle icon to the right of a column heading to change the
sorting order. To use ascending order, click the triangle that points up. To use descending
order, click the triangle that points down.
In the vSphere Web Client, click on the column heading to sort the table by the content of the
column. Clicking on the column heading reverses the sort order.
Using the Storage Module for vCenter 49
Page 50

• In the vSphere Client, click the heading of a column and drag the column to a different location
in the table.
• Click Save Column Settings to save the changes.
• Customize the tables as needed. The following changes are saved in cookies and are retained
across page reloading and vSphere Client sessions:
◦ Resized column widths
◦ Sorting criteria for one or multiple columns
◦ Information about hidden columns
Selecting columns for display in the vSphere Client
Click Columns to select the columns to display.
The Select columns dialog box lists the currently displayed columns on the left and the hidden
columns on the right. See Figure 14 (page 50).
• Click the minus icon next to a column to remove it from the table, or click Remove all to remove
every column.
• Click the plus icon next to a column to add it to the table, or click Add All to add every column.
• Enter a value in the text box above the hidden columns to filter the list by a specific value.
• Drag and drop items in the list to change the column display order.
• Click OK to save the changes after you add or remove columns.
Figure 14 Adding and removing columns (vSphere Client)
Selecting columns for display in the vSphere Web Client
Select Select Columns... from the pull-down Filter list.
50 Using Insight Control for vCenter
Page 51

A list of the columns is displayed. See Figure 15 (page 51).
• Check the box next to a column to display it. Click Select All to select all the columns.
• Clear the box next to a column to not display it.
• Click OK to save the changes after you add or remove columns.
Figure 15 Adding and removing columns (vSphere Web Client)
Viewing storage information of a host
To view storage information for a host:
1. Select a host in the inventory tree and access HP Insight Management.
The Storage portlet on the Overview page provides an overview of the storage systems.
2. For detailed storage information, click More at the bottom of the Storage portlet or do one of
the following:
• From the vSphere Client, select Storage Details from the drop-down list.
• From the vSphere Web Client, click the Storage tab on the Manage page.
The storage details page appears.
3. Click Summary.
The storage summary displays information about HP storage and includes a graphical
representation of the information.
Viewing summary information
The storage summary displays the following information about the selected host:
HP Storage Provisioned to Host
• Volumes—Number of volumes available to the host from configured HP storage systems and
whether any are thin-provisioned
• HP Storage Provisioned—Amount of storage available to the host from configured HP storage
systems
• HP Storage Used—Amount of storage from configured HP storage systems that is used by the
host
Using the Storage Module for vCenter 51
Page 52

NOTE: The HP Storage Used value can differ from the HP Storage Provisioned value if thin
provisioning or demand-allocated snapshots are used.
• HP Storage ThP Savings—Amount of storage saved through the use of thin provisioning
• Volumes overprovisioned—Number of over-provisioned volumes
Provisioned from Host to Virtual Machines
• Current storage inventory—Number of datastores, RDMs, and unused volumes provisioned
to VMs
• Host Provisioned Capacity—Total amount of storage available to the host, including HP storage,
local storage, and unmanaged disks
• Host Used Capacity—Amount of storage used by the host
• Host Available Capacity—Amount of unused storage on the host
• Datastores overprovisioned—The number of over-provisioned datastores
HP Storage Arrays
This section lists the arrays that present disks to the selected host. For each array, move the cursor
over the status bar to view storage information.
The following information is displayed for each array:
HP Storage Provisioned to Host
• Volumes—Number of volumes presented to the selected host from the array
• Used—Amount of storage used by the host from the array
• Total—Total amount of storage presented to the selected host from the array
• Free pool capacity—Amount of available storage in the selected array. The number reflects
the difference between configured storage and used storage.
◦ HP XP P9000 or HP XP—Amount of available storage in the P9000 or XP thin provisioning
storage pool for P9000 or XP array storage that is provisioned to this cluster
◦ HP EVA or HP StoreVirtual—Amount of available storage in HP EVA and HP StoreVirtual
array storage pools provisioned to this cluster
• % Savings—Amount of storage saved through the use of array-based thin provisioning
Storage Pool
• Total pool size—Total size of the storage pool
• Provisioned used on pool—Amount of provisioned space used on the storage pool
• Provisioned free on pool—Amount of provisioned space free on the storage pool
• Unallocated space on pool—Amount of space not provisioned or allocated on the storage
pool
Available HP StoreOnce Backup Systems
This section lists the HP StoreOnce Backup Systems available. For each HP StoreOnce Backup
System, move the cursor over the status bar to view storage information.
For each configured backup system, all the service sets are displayed. For each service set the
following information is displayed:
• Used—The amount of data stored on the service set by the services on the service set.
• Total—Total amount of storage on the service set.
• Deduplication Ratio—The deduplication ratio of data stored on the service set.
52 Using Insight Control for vCenter
Page 53

Datastores
This section lists the datastores provisioned from the selected host to VMs. For each datastore,
move the cursor over the status bar to view storage information.
The following information is displayed for each datastore:
• Virtual disks—Number of virtual disks on datastores provisioned from the selected host to VMs
• Total—Amount of storage provisioned on the host as virtual disks (VMDKs or RDMs)
• Used—Amount of storage used on the host as virtual disks (VMDKs or RDMs)
• % Savings—Amount of storage saved through the use of VMware-based thin provisioning
Viewing detailed information
Click the Storage Volumes, Virtual Disks, HBAs, Paths, Replications, or VMs to Volumes tab to view
detailed information about the selected host. For information about the values displayed in these
tabs, see the following:
• “Viewing storage volumes” (page 58)
• “Viewing virtual disks” (page 61)
• “Viewing HBAs” (page 61)
• “Viewing paths” (page 61)
• “Viewing replications” (page 64)
• “Viewing VMs to volumes” (page 65)
Viewing cluster storage information
To view storage information for a cluster:
1. Select a cluster in the inventory tree and access HP Insight Management.
The Storage portlet on the Overview page provides an overview of the storage.
2. For detailed storage information, click More at the bottom of the Storage portlet or do one of
the following:
• From the vSphere Client, select Storage Details from the drop-down list.
• From the vSphere Web Client, click the Storage tab on the Manage page.
The storage details page appears.
3. Click Summary.
The storage summary displays information about HP storage and includes a graphical
representation of the information.
Viewing summary information
The storage summary displays the following information about the selected cluster:
HP Storage Provisioned to Cluster
• Volumes—Number of volumes available to the cluster from configured HP storage systems
and whether any are thin-provisioned
• HP Storage Provisioned—Amount of storage available to the cluster from configured HP storage
systems
• HP Storage Used—Amount of storage from configured HP storage systems that is used by the
cluster
NOTE: The HP Storage Used value can differ from the HP Storage Provisioned value if thin
provisioning or demand-allocated snapshots are used.
Using the Storage Module for vCenter 53
Page 54

• HP Storage ThP Savings—Amount of storage saved through the use of array-based thin
provisioning
• Volumes overprovisioned—Number of over-provisioned volumes
Provisioned from Cluster to Virtual Machines
• Current storage inventory—Number of datastores, RDMs, and unused volumes provisioned
to VMs
• Cluster Provisioned Capacity—Total amount of storage available to the cluster, including HP
storage, local storage, and unmanaged disks
• Cluster Used Capacity—Amount of storage used by the cluster
• Cluster Available Capacity—Amount of unused storage available to the cluster
• Datastores overprovisioned—The number of over-provisioned datastores
• VMDK/RDM Provisioned—Amount of storage provisioned by the cluster as virtual disks (VMDKs
or RDMs)
• VMDK/RDM Used—Amount of storage used by the cluster as virtual disks (VMDKs or RDMs)
HP Storage Arrays
This section lists the arrays that present disks to the selected cluster. For each array, move the cursor
over the status bar to view storage information.
The following information is displayed for each array:
• Volumes—Number of volumes presented to the selected cluster from the array
• Used—Amount of storage used by the cluster from the array.
• Total—Total amount of storage presented to the selected cluster from the array
• % Savings—Amount of storage saved through the use of array-based thin provisioning
• Free pool capacity—Amount of available storage in the selected array. The number reflects
the difference between configured storage and used storage.
◦ HP StoreVirtual—Amount of available storage in HP StoreVirtual array storage pools
provisioned to this cluster
◦ HP 3PAR StoreServ—Storage available in HP 3PAR StoreServ common provisioning group
◦ HP EVA—Amount of available storage in HP EVA storage pools provisioned to this cluster
◦ HP XP or HP XP P9000—Amount of available storage in the HP XP P9000 or HP XP thin
provisioning storage pool for HP XP P9000 or HP XP array storage that is provisioned to
this cluster
◦ HP StoreOnce Backup—Deduplication Ratio
Available HP StoreOnce Backup Systems
This section lists the HP StoreOnce Backup Systems available. For each HP StoreOnce Backup
System, move the cursor over the status bar to view storage information.
For each configured backup system, all the service sets are displayed. For each service set the
following information is displayed:
• Used—The amount of data stored on the service set by the services on the service set.
• Total—Total amount of storage on the service set.
• Deduplication Ratio—The deduplication ratio of data stored on the service set.
Datastores
54 Using Insight Control for vCenter
Page 55

This section lists the datastores provisioned from the selected host to VMs. For each datastore,
move the cursor over the status bar to view storage information.
The following information is displayed for each datastore:
• Virtual disks—Number of virtual disks on datastores provisioned from the selected host to VMs
• Total—Amount of storage provisioned on the host as virtual disks (VMDKs or RDMs)
• Used—Amount of storage used on the host as virtual disks (VMDKs or RDMs)
• % Savings—Amount of storage saved through the use of VMware thin provisioning
Viewing detailed information
Click the Storage Volumes, Virtual Disks, HBAs, Paths, Replications, or VMs to Volumes tab to view
detailed information about the selected cluster. For information about the values displayed in these
tabs, see the following:
• “Viewing storage volumes” (page 58)
• “Viewing virtual disks” (page 61)
• “Viewing HBAs” (page 61)
• “Viewing paths” (page 61)
• “Viewing replications” (page 64)
• “Viewing VMs to volumes” (page 65)
Viewing storage information of a datastore
To view information about datastore storage availability and use:
1. Select a datastore in the inventory tree and access HP Insight Management.
The Storage portlet on the Overview page provides an overview of the storage.
2. For detailed storage information, click More at the bottom of the Storage portlet or do one of
the following:
• From the vSphere Client, select Storage Details from the drop-down list.
• From the vSphere Web Client, click the Storage tab on the Manage page.
The storage details page appears.
3. Click Summary.
The storage summary displays information about HP storage and includes a graphical representation
of the information.
Viewing summary information
The Summary tab displays the following information about the selected datastore:
HP Storage Provisioned to Datastores
• Volumes—Number of volumes available to the datastore from configured HP storage systems
and whether any are thin-provisioned
• HP Storage Provisioned—Amount of storage available to the datastore from HP storage systems
• HP Storage Used—Amount of storage from HP storage systems that is used by the datastore
• HP Storage ThP Savings—Amount of storage saved through the use of array-based thin
provisioning
• Volumes overprovisioned—Number of over-provisioned volumes
Using the Storage Module for vCenter 55
Page 56

Provisioned from Datastore to Virtual Machines
• Current storage inventory—Number of datastores, RDMs, and unused volumes provisioned
to VMs
• Datastore Provisioned Capacity—Total amount of storage available to the datastore
• Datastore Used Capacity—Amount of storage used by the datastore
• Datastore Available Capacity—Amount of available storage on the datastore
• Datastores overprovisioned—The number of over-provisioned datastores
HP Storage Arrays
This section lists the arrays that provide storage to the selected datastore. For each array, move
the cursor over the status bar to view storage information.
The following information is displayed for each array:
• Volumes—Number of volumes presented to the selected datastore from the array
• Used—Amount of storage used by the datastore from the array
• Total—Total amount of storage presented to the selected datastore from the array
• Free pool capacity—Amount of HP storage available in storage pools
Datastores
This section lists the selected datastore. Move the cursor over the status bar to view storage
information.
The following information is displayed for the datastore:
• Virtual disks—Number of virtual disks on the datastore
• Total—Amount of storage on this datastore that is provisioned by VMDKs or RDMs
• Used—Amount of storage on this datastore that is used by VMDKs or RDMs
• % Savings—Amount of storage saved through the use of thin provisioning
Available HP StoreOnce Backup Systems
This section lists the HP StoreOnce Backup Systems available. For each HP StoreOnce Backup
System, move the cursor over the status bar to view storage information.
For each configured backup system, all the service sets are displayed. For each service set the
following information is displayed:
• Used—The amount of data stored on the service set by the services on the service set.
• Total—Total amount of storage on the service set.
• Deduplication Ratio—The deduplication ratio of data stored on the service set.
Viewing detailed information
Click the Storage Volumes, Virtual Disks, HBAs, Paths, Replications, or VMs to Volumes tab to view
detailed information about the selected datastore. For information about the values displayed in
these tabs, see the following:
• “Viewing storage volumes” (page 58)
• “Viewing virtual disks” (page 61)
• “Viewing HBAs” (page 61)
• “Viewing paths” (page 61)
• “Viewing replications” (page 64)
• “Viewing VMs to volumes” (page 65)
56 Using Insight Control for vCenter
Page 57

Viewing storage information of a virtual machine
To view storage information for a VM:
1. Select a VM in the inventory tree and access HP Insight Management.
The Storage portlet on the Overview page provides an overview of the storage.
2. For detailed storage information, click More at the bottom of the Storage portlet or do one of
the following:
• From the vSphere Client, select Storage Details from the drop-down list.
• From the vSphere Web Client, click the Storage tab on the Manage page.
The storage details page appears.
3. Click Summary.
The storage summary displays information about HP storage and includes a graphical representation
of the information.
Viewing summary information
The Summary tab displays the following information about the selected VM:
HP Storage Provisioned to Virtual Machine
• Volumes—Number of volumes available to the VM from configured HP storage systems and
whether any are thin-provisioned
• HP Storage Provisioned—Amount of storage available to the VM from HP storage systems
• HP Storage Used—Amount of storage from HP storage systems that is used by the VM
• HP Storage ThP Savings—Amount of storage saved through the use of array-based thin
provisioning
• Volumes overprovisioned—Number of over-provisioned volumes
Provisioned by Virtual Machine
• Current storage inventory—Number of datastores, RDMs, and unused volumes provisioned
by the selected VM
• Virtual Machine Provisioned Capacity—Amount of storage provisioned by VMDKs or RDMs
• Virtual Machine Used Capacity—Total amount of storage used by the VM
• Virtual Machine Available Capacity—Amount of storage available to the VM
HP Storage Arrays
This section lists the arrays that provide storage to the selected VM. For each array, move the
cursor over the status bar to view storage information.
The following information is displayed for each array:
• Volumes—Number of volumes presented to the selected VM from the array
• Used—Amount of storage used by the VM from the array.
• Total—Total amount of storage presented to the selected VM from the array
• Free pool capacity—Amount of HP storage available in storage pools on the array
Datastores
This section lists the datastores provisioned from the selected host to VMs. For each datastore,
move the cursor over the status bar to view storage information.
The following information is displayed for each datastore:
• Virtual disks—Number of virtual disks on datastores provisioned from the selected host to VMs
• Total—Amount of storage provisioned on the host as virtual disks (VMDKs or RDMs)
Using the Storage Module for vCenter 57
Page 58

• Used—Amount of storage used on the host as virtual disks (VMDKs or RDMs)
• % Savings—Amount of storage saved through the use of VMware thin provisioning
Available HP StoreOnce Backup Systems
This section lists the HP StoreOnce Backup Systems available. For each HP StoreOnce Backup
System, move the cursor over the status bar to view storage information.
For each configured backup system, all the service sets are displayed. For each service set the
following information is displayed:
• Used—The amount of data stored on the service set by the services on the service set.
• Total—Total amount of storage on the service set.
• Deduplication Ratio—The deduplication ratio of data stored on the service set.
Viewing detailed information
Click the Storage Volumes, Virtual Disks, HBAs, Paths, Replications, or VMs to Volumes tab to view
detailed information about the selected VM. For information about the values displayed in these
tabs, see the following:
• “Viewing storage volumes” (page 58)
• “Viewing virtual disks” (page 61)
• “Viewing HBAs” (page 61)
• “Viewing paths” (page 61)
• “Viewing replications” (page 64)
• “Viewing VMs to volumes” (page 65)
Viewing detailed storage information
When you view storage information in HP Insight Management, the Storage page includes another
row of tabs and a filter that you can use to view specific information about storage components,
such as:
• Summary
• Storage Volumes
• Virtual Disks
• HBAs
• Paths
• Replications
• VMs to Volumes
Viewing storage volumes
The storage volumes page displays the following information:
• Array Disk Name
HP StoreVirtual—Volume name◦
◦ HP 3PAR StoreServ—Volume name
◦ HP EVA—Disk path on the storage system
◦ HP MSA 2000 G2/HP MSA P2000 G3—Volume name
58 Using Insight Control for vCenter
Page 59

◦ HP XP P9000/HP XP—LDKC:CU:LDEV (for example, HP OPEN-V-CVS (00:04:3F))
◦ HP StoreOnce Backup—Not applicable
• Array Name
HP StoreVirtual—Management group name◦
◦ HP 3PAR StoreServ—Array display name
◦ HP EVA—Array display name
◦ HP MSA 2000 G2/HP MSA P2000 G3—System name
◦ HP XP P9000/HP XP—Array serial number
◦ HP StoreOnce Backup—Not applicable
• Array Type—HP array type
• Datastore/RDM—Datastore name or the associated .vmdk name for the RDM
• Type—Disk type (Datastore or RDM)
• Paths—Number of paths to the disk
• VMware Disk Identifier—Disk name assigned by VMware
• Path ID—Path ID assigned by VMware
• Array Disk RAID—RAID level of the array disk
• Array Disk Total Capacity—Array disk capacity (in GB)
• Array Disk Allocated Capacity—Capacity allocated by the storage system. For a thin-provisioned
disk, this value might differ from the Array Disk Total Capacity value.
• Array Disk Provisioned—Specifies whether the disk is thin provisioned or normal (not supported
on HP MSA 2000 G2/HP MSA P2000 G3)
• Array Disk Type—Array disk type
• Storage Pool
HP StoreVirtual—Name of the cluster.◦
◦ HP 3PAR StoreServ—Disk group where the vdisk is located.
◦ HP EVA—Disk group where the vdisk is located.
This value is displayed only when demand allocated snapshots are used. For other volume
types, no value is displayed.
◦ HP MSA 2000 G2/HP MSA P2000 G3—Name of the vdisk or snap pool where the
volume is located.
◦ HP XP P9000/HP XP—Disk group or storage pool used for allocating storage to the disk.
This might be a P9000 or XP thin provisioning pool, a P9000 or XP Snapshot pool, an
internal parity group, or an external group.
◦ HP StoreOnce Backup—Not applicable
• Storage Pool Available Capacity
HP StoreVirtual—Unallocated space in the storage pool (cluster) that can be used to meet
◦
storage needs for a snapshot or thin-provisioned volume. The calculation of this value
Using the Storage Module for vCenter 59
Page 60

assumes all unallocated space is formatted the same as this volume. For all other volume
types, no value is displayed.
◦ HP 3PAR StoreServ—Unallocated space in the storage pool that can be used to meet
storage needs for a snapshot or thin-provisioned volume. For all other volume types, no
value is displayed. The calculation of this value assumes that all disk space uses the same
RAID type as this volume.
◦ HP EVA—Unallocated space in the storage pool that can be used to meet storage needs
for a snapshot or thin-provisioned volume. For all other volume types, no value is displayed.
The calculation of this value assumes that all disk space uses the same RAID type as this
volume.
◦ HP MSA 2000 G2/HP MSA P2000 G3—Unallocated space in the storage pool (cluster)
that can be used to meet storage needs for a snapshot or thin-provisioned volume. The
calculation of this value assumes all unallocated space is formatted the same as this
volume. For all other volume types, no value is displayed.
◦ HP XP P9000/HP XP—P9000 or XP thin provisioning pool capacity.
◦ HP StoreOnce Backup—Not applicable
• Storage Pool Domain Name—Domain name assigned to CPG (applies only to HP 3PAR
StoreServ)
• Copy Pool Name—Assigned Copy CPG (applies only to HP 3PAR StoreServ)
• Array Disk Emulation Type (HP XP P9000 and HP XP arrays only)—LDEV emulation type.
• Replicated—Specifies whether the disk is replicated
• Physical Device Type—The type of device in the CPG (applies only to HP 3PAR StoreServ).
The types can be FC, NL, or SSD.
• Zero Detection—Detect and discard zeros during volume copying (applies only to HP 3PAR
StoreServ)
• Volume ID—Internal volume ID (applies only to HP 3PAR StoreServ)
• Volume Status—Volume health status (applies only to HP 3PAR StoreServ)
• Drive Speed—Physical drive speed (applies only to HP 3PAR StoreServ)
• Creation Time—Source volume creation time (applies only to HP 3PAR StoreServ)
• Expiration Time—Source volume expiration time (applies only to HP 3PAR StoreServ)
• Retention Time—Source volume retention time (applies only to HP 3PAR StoreServ)
• User Space Warning—Alert threshold for a volume's User CPG (applies only to HP 3PAR
StoreServ)
• User Space Limit—Write failure threshold for a volume's User CPG (applies only to HP 3PAR
StoreServ)
• Copy Space Warning—Alert threshold for a volume's Copy CPG (applies only to HP 3PAR
StoreServ)
• Copy Space Limit—Write failure threshold for a volume's Copy CPG (applies only to HP 3PAR
StoreServ)
Related topics
• “Refreshing Storage Module for vCenter data” (page 47)
• “Customizing Storage Module for vCenter tables” (page 49)
60 Using Insight Control for vCenter
Page 61

Viewing virtual disks
The virtual disks page displays the following information:
• Virtual Disk Name—Virtual disk name assigned by VMware
• Virtual Disk Type—Virtual disk type (VMDK or RDM)
• Virtual Machine—Name of the VM associated with the selected VMDK or RDM
• Datastore—Datastore name or the .vmdk name for the RDM
• Provisioned Capacity—Disk capacity visible to a VM using this VMDK or RDM
• Allocated Capacity—Disk capacity reserved by VMware for the VMDK or RDM
For an RDM, this value will match the provisioned capacity value. For a VMDK, this value
might be less than the provisioned capacity value if VMware thin provisioning is used. This
is separate from thin provisioning configured in the storage system.
• VMware Provisioned—Thick or thin
Viewing HBAs
The HBAs page displays the following information:
• Host Names—Host name or cluster host names
• Type—HBA type
• VMware Device Identifier—HBA identifier assigned by VMware
• WWN/IQN—HBA WWN
• Label—HBA identifier assigned by VMware
Viewing paths
The paths page displays the following information:
• Array Disk Name
• Array Name
NOTE: No HBA WWN address is available for HP MSA 2000 G2/HP MSA P2000 G3
SAS arrays.
HP StoreVirtual—Volume name◦
◦ HP 3PAR StoreServ—Volume name
◦ HP EVA—Path for the virtual disk on the storage system
◦ HP MSA 2000 G2/HP MSA P2000 G3—Volume name
◦ HP XP P9000/HP XP—Emulation type and LDKC:CU:LDEV (for example, HP OPEN-V-CVS
(00:04:3F))
◦ HP StoreOnce Backup—Not applicable
HP StoreVirtual—Management group name◦
◦ HP 3PAR StoreServ—Array display name
◦ HP EVA—Array display name
◦ HP MSA 2000 G2/HP MSA P2000 G3—System name
Using the Storage Module for vCenter 61
Page 62

◦ HP XP P9000/HP XP—Array serial number
◦ HP StoreOnce Backup—Not applicable
• Host HBA Port WWN/IQN
HP StoreVirtual—IQN assigned to the host◦
◦ HP 3PAR StoreServ (FC)—WWN for the host port on the host end of this path
◦ HP 3PAR StoreServ (iSCSI)—IQN assigned to the host
◦ HP EVA—WWN for the host port on the host end of this path
◦ HP MSA 2000 G2/HP MSA P2000 G3 (FC, SAS)—WWN for the host port on the host
end of this path
◦ HP MSA 2000 G2/HP MSA P2000 G3 (iSCSI)—IQN assigned to the host
◦ HP XP P9000/HP XP—WWN for the host port on the host end of this path
◦ HP StoreOnce Backup—Not applicable
• Array Port WWN/IQN
HP StoreVirtual—IQN used by the host for connecting to this disk on this storage system◦
◦ HP 3PAR StoreServ (FC)—WWN for the storage system port on the storage system end
of this path
◦ HP 3PAR StoreServ (iSCSI)—IQN used by the host for connecting to this disk on this
storage system
◦ HP EVA—WWN for the storage system port on the storage system end of this path
◦ HP MSA 2000 G2/HP MSA P2000 G3 (FC, SAS)—WWN for the storage system port
on the storage system end of this path
◦ HP MSA 2000 G2/HP MSA P2000 G3 (iSCSI)—IQN used by the host for connecting
to this disk on this storage system
◦ HP XP P9000/HP XP—WWN for the storage system port on the storage system end of
this path
◦ HP StoreOnce Backup—Not applicable
• LUN—LUN used for presenting the storage disk from the storage system port to the host HBA
port
• Host—Host that is currently running the selected VM
• Array Type—HP array type
• Array Controller—Controller used for this path
• Array Port—storage system's port identifier used for this path
HP StoreVirtual—Not applicable◦
◦ HP 3PAR StoreServ—Port WWN of the controller node
◦ HP EVA—Port name configured in HP EVA Command View
◦ HP MSA 2000 G2/HP MSA P2000 G3—Port on the array controller used for this path
62 Using Insight Control for vCenter
Page 63

◦ HP XP P9000/HP XP—Port number
◦ HP StoreOnce Backup—Not applicable
• Host Group
HP StoreVirtual—Name configured for the host's IQN in the management console◦
◦ HP 3PAR StoreServ—Name of the host object containing the host WWN for this path
◦ HP EVA—Name of the host object containing the host WWN for this path
◦ HP MSA 2000 G2/HP MSA P2000 G3—Nickname of the host with the host WWN for
this path
◦ HP XP P9000/HP XP—Name of the host group containing the HBA WWN on the array
port for this path
◦ HP StoreOnce Backup—Not applicable
• Host Access
HP StoreVirtual—Host access level assigned to the presentation of the disk to the host (for
◦
example, READ/WRITE or READ-ONLY)
◦ HP 3PAR StoreServ—N/A. 3PAR storage volumes operate in a read-only/read-write
configuration.
◦ HP EVA—Host access level assigned to the presentation of the disk to the host (for example,
READ/WRITE or READ-ONLY)
◦ HP MSA 2000 G2/HP MSA P2000 G3—Access setting for volume mapping (for example,
READ/WRITE or READ-ONLY)
◦ HP XP P9000/HP XP—Host access level assigned to the volume
NOTE: The HP XP P9000/HP XP array does not allow host access to be specified on
a per-host or per-path basis.
◦ HP StoreOnce Backup—Not applicable
• Array Port Speed
HP StoreVirtual—Not applicable◦
◦ HP 3PAR StoreServ—Speed at which the port is connected to the SAN (Gb/s)
◦ HP EVA—Speed at which the port is connected to the SAN (Gb/s)
◦ HP MSA 2000 G2/HP MSA P2000 G3
FC—Speed at which the port is connected to the SAN (Gb/s)–
– iSCSI—Speed at which the network port is connected to the network (Gb/s)
– SAS—Speed at which the port is connected to the host or switch (Gb/s)
◦ HP XP P9000/HP XP—Speed at which the port is connected to the SAN (Gb/s)
◦ HP StoreOnce Backup—Not applicable
Using the Storage Module for vCenter 63
Page 64

• Host Mode
HP StoreVirtual—Not applicable◦
◦ HP 3PAR StoreServ—Not applicable
◦ HP EVA—Host mode assigned to the HP EVA host object
◦ HP MSA 2000 G2/HP MSA P2000 G3—Name of the host's profile
◦ HP XP P9000/HP XP—Host mode assigned to the host group
◦ HP StoreOnce Backup—Not applicable
• Preferred Path
HP StoreVirtual—Not applicable◦
◦ HP 3PAR StoreServ—Not applicable
◦ HP EVA—Specifies whether the path uses a port on the controller that is configured as
the preferred path for the vdisk (Yes, No, No preference)
◦ HP MSA 2000 G2/HP MSA P2000 G3—Not applicable
◦ HP XP P9000/HP XP—Not applicable
◦ HP StoreOnce Backup—Not applicable
• Active Path—Specifies whether the path is active or in standby status
If a path is active and then goes offline, a standby path takes over.
• Path ID—Path ID assigned by VMware
• VMware Disk Identifier—Disk name assigned by VMware
Viewing replications
The replications page displays the following information:
• Source Disk Name—Source replication disk
• Source Array—Array identifier for the local (source) array; displayed only for Continuous
Access replications and not supported for HP MSA 2000 G2/HP MSA P2000 G3 arrays
• Replication Type—The type of replication used:
HP StoreVirtual—Snapshot, Remote Snapshot◦
◦ HP 3PAR StoreServ—Virtual copy, Physical copy
◦ HP EVA—Snapshot, Snapclone, Mirrorclone, Continuous Access
◦ HP MSA 2000 G2/HP MSA P2000 G3—Not applicable
◦ HP XP P9000/HP XP—P9000 or XP Business Copy, P9000 or XP Snapshot, P9000 or
XP Continuous Access
◦ HP StoreOnce Backup—Not applicable
• Replica Name—Target replication disk
• Replica Array—Array identifier for the remote (target) array; displayed only for Continuous
Access replications and not supported for HP MSA 2000 G2/HP MSA P2000 G3 arrays
• Replica Status—Status of the replica (for example, PAIR, SUSPEND, SYNCHED, or COPY)
64 Using Insight Control for vCenter
Page 65

• Replication Group
HP StoreVirtual—Not applicable◦
◦ HP 3PAR StoreServ—Remote Copy group name
◦ HP XP P9000/HP XP—Replica group ID
◦ HP EVA—Data replication group name
◦ HP StoreOnce Backup—Not applicable
• Datastore/RDM Type—Datastore/RDM type (Datastore or RDM)
• Datastore Name—Datastore name
• Source Creation Time—Source volume creation time (applies only to HP 3PAR StoreServ)
• Source Expiration Time—Source volume expiration time (applies only to HP 3PAR StoreServ)
• Source Retention Time—Source volume retention time (applies only to HP 3PAR StoreServ)
Related topics
• “Refreshing Storage Module for vCenter data” (page 47)
• “Customizing Storage Module for vCenter tables” (page 49)
Viewing VMs to volumes
The VMs to volumes page displays the following information:
NOTE: The same VM can appear multiple times, based on the number of available paths to a
storage disk.
• Virtual Machine—VM name
• VM Provisioned Capacity—Amount of storage provisioned on the host as virtual disks (VMDKs
or RDMs)
• VM Allocated Capacity—Amount of storage used on the host as virtual disks (VMDKs or RDMs)
• Virtual Disk Name—Virtual disk name assigned by VMware
• Virtual Disk Type—Virtual disk type (VMDK or RDM)
• Virtual Disk Provisioned Capacity—Actual size of the VMware virtual disk
• Virtual Disk Allocated Capacity—Allocated capacity of VMware virtual disk
• VMware Provisioned—Thick or thin
• Datastore—The datastore that contains the VM
• VMware Disk Identifier—Disk name assigned by VMware
• Array Disk Name
HP StoreVirtual—Volume name◦
◦ HP 3PAR StoreServ—Volume name
◦ HP EVA—Path for the virtual disk on the storage system
◦ HP MSA 2000 G2/HP MSA P2000 G3—Volume name
Using the Storage Module for vCenter 65
Page 66

◦ HP XP P9000/HP XP—Emulation type and LDKC:CU:LDEV (for example, HP OPEN-V-CVS
(00:04:3F))
◦ HP StoreOnce Backup—Not applicable
• Array Disk Type—Array disk type
• Array Name
HP StoreVirtual—Management group name◦
◦ HP 3PAR StoreServ—Array display name
◦ HP EVA—Array display name
◦ HP MSA 2000 G2/HP MSA P2000 G3—System name
◦ HP XP P9000/HP XP—Array serial number
◦ HP StoreOnce Backup—Not applicable
• Array Type—HP array type
• Array Disk Total Capacity—Total amount of storage available to the datastore
• Array Disk Allocated Capacity—Size of the virtual disk on the array
• Array Disk Provisioned—Whether the virtual disk uses thick or thin provisioning
• Array Controller—Controller used for this path
• Array Port—Storage system's port identifier used for this path
• Host Group
HP StoreVirtual—Name configured for the host's IQN in the management console◦
◦ HP 3PAR StoreServ—Name of the host object containing the host WWN for this path
◦ HP EVA—Name of the host object containing the host WWN for this path
◦ HP MSA 2000 G2/HP MSA P2000 G3—Nickname of the host with the host WWN for
this path
◦ HP XP P9000/HP XP—Name of the host group containing the HBA WWN on the array
port for this path
◦ HP StoreOnce Backup—Not applicable
• Host Access
HP StoreVirtual—Host access level assigned to the presentation of the disk to the host (for
◦
example, READ/WRITE or READ-ONLY)
◦ HP 3PAR StoreServ—N/A. 3PAR storage volumes operate in a read-only/read-write
configuration.
◦ HP EVA—Host access level assigned to the presentation of the disk to the host (for example,
READ/WRITE or READ-ONLY)
◦ HP MSA 2000 G2/HP MSA P2000 G3—Access setting for volume mapping (for example,
READ/WRITE or READ-ONLY)
◦ HP XP P9000/HP XP—Host access level assigned to the volume
66 Using Insight Control for vCenter
Page 67

NOTE: The HP XP P9000/HP XP array does not allow host access to be specified on
a per-host or per-path basis.
◦ HP StoreOnce Backup—Not applicable
• Host Mode
HP StoreVirtual—Not applicable◦
◦ HP 3PAR StoreServ—Not applicable
◦ HP EVA—Host mode assigned to the HP EVA host object
◦ HP MSA 2000 G2/HP MSA P2000 G3—Name of the host's profile
◦ HP XP P9000/HP XP—Host mode assigned to the host group
◦ HP StoreOnce Backup—Not applicable
• Host Name—Host name
• Current Owner—Specifies whether the host is the current owner of the selected VM
• Host HBA Port WWN
HP StoreVirtual—IQN assigned to the host◦
◦ HP 3PAR StoreServ (FC)—WWN for the host port on the host end of this path
◦ HP 3PAR StoreServ (iSCSI)—IQN assigned to the host
◦ HP EVA—WWN for the host port on the host end of this path
◦ HP MSA 2000 G2/HP MSA P2000 G3 (FC, SAS)—WWN for the host port on the host
end of this path
◦ HP MSA 2000 G2/HP MSA P2000 G3 (iSCSI)—IQN assigned to the host
◦ HP XP P9000/HP XP—WWN for the host port on the host end of this path
◦ HP StoreOnce Backup—Not applicable
• Array Port WWN
HP StoreVirtual—IQN used by the host for connecting to this disk on this storage system◦
◦ HP 3PAR StoreServ (FC)—WWN for the storage system port on the storage system end
of this path
◦ HP 3PAR StoreServ (iSCSI)—IQN used by the host for connecting to this disk on this
storage system
◦ HP EVA—WWN for the storage system port on the storage system end of this path
◦ HP MSA 2000 G2/HP MSA P2000 G3 (FC, SAS)—WWN for the storage system port
on the storage system end of this path
◦ HP MSA 2000 G2/HP MSA P2000 G3 (iSCSI)—IQN used by the host for connecting
to this disk on this storage system
◦ HP XP P9000/HP XP—WWN for the storage system port on the storage system end of
this path
◦ HP StoreOnce Backup—Not applicable
Using the Storage Module for vCenter 67
Page 68

• LUN Number—LUN used for presenting the storage disk from the storage system port to the
host HBA port
• Path ID—Path ID assigned by VMware
• Preferred Path
HP StoreVirtual—Not applicable◦
◦ HP 3PAR StoreServ—Not applicable
◦ HP EVA—Specifies whether the path uses a port on the controller that is configured as
the preferred path for the vdisk (Yes, No, No preference)
◦ HP MSA 2000 G2/HP MSA P2000 G3—Not applicable
◦ HP XP P9000/HP XP—Not applicable
◦ HP StoreOnce Backup—Not applicable
• Active Path—Specifies whether the path is active or in standby status
Viewing HP Infrastructure
NOTE: The HP Infrastructure feature is available on the vSphere Web Client only.
The Storage Module for vCenter provides an inventory list that can be displayed to view more
information on the configured storage systems. To view the storage systems on the HP Infrastructure
page, they must first be configured using the Storage Administrator Portal. For more information,
see “Configuring the Storage Module for vCenter” (page 11).
TIP: After configuring the storage systems, initiate cache refresh and make sure the refresh action
is finished before opening the HP Infrastructure page.
To access the HP Infrastructure page, on the vSphere Web Client home page click on the HP
Infrastructure link in the left navigation pane or click the HP Infrastructure icon under Inventories.
The HP Infrastructure page is displayed. See Figure 16 (page 68).
Figure 16 HP Infrastructure page
68 Using Insight Control for vCenter
Page 69

Using the HP Infrastructure page
The HP Infrastructure page displays information for all storage systems configured in the plug-in’s
environment. The number adjacent to the HP Storage Systems link in the left navigation panel
indicates the number of storage systems that have been configured using the Storage Administrator
Portal. Click on HP Storage Systems to expand the list of configured arrays and backup systems.
The inventory list indicates the type and name of array or backup system. Select an item from the
list to display more information in the center pane. The information displayed is determined by the
type of storage system selected.
TIP: Use the small expand/contract icon to the left of a field to view detailed information.
The infrastructure information is organized into the following sections:
• Header—The first line of information includes details like health, storage system type, and the
name of the item selected. The standard HP Insight Management icons are also displayed.
The health of the storage system is indicated using color-coded icons. A green icon ( )
indicates that there are no warnings or errors for this storage system. A yellow icon ( ) or
red icon ( ) indicates warnings or errors respectively. Details on the health may be obtained
by logging in to the management console for the storage system.
• Overview—Displays system information such as the model, serial number, and firmware
version. If an array is selected, the amount of storage provisioned to VMware is displayed. If
the storage system has a web based management console, a link is provided to launch the
management console.
• System Summary portlet—Displays the number of controllers on the system for arrays. Expand
the controllers to see the names of the individual controllers and ports. For backup systems,
the rolled up status at the cluster level is displayed along with the capacity and the deduplication
ratio. In addition, the configured user and the IP address of the management system, if
applicable, are displayed.
• Storage Summary portlet—Provides additional details about the storage on the system. For
an array, all the storage pools are listed. Expand each storage pool name to see capacity
information for that storage pool and access level as specified in the Storage Administrator
Portal. For HP 3PAR StoreServ arrays, the RAID value of the CPG and the drive type of the
physical disks are also displayed.
For a StoreOnce backup system, this section displays the service sets in the cluster. Upon
expanding each service set, the rolled up health, serial number, capacity, services, and
deduplication ratio are displayed. Expand the node name to see the primary and the secondary
nodes on which the service set is running. Expand each of the services label to see the status
of the service and the number of backup targets for VTL, NAS, and catalyst services.
Using the Storage Module for vCenter 69
Page 70

4 Provisioning storage
The Storage Module for vCenter supports storage provisioning for HP 3PAR StoreServ, HP
StoreVirtual, HP EVA, and HP MSA P2000 G3 arrays. You can perform storage provisioning
operations such as creating a new datastore, deleting or expanding an existing datastore, creating
new VMs, or cloning existing VMs.
For HP EVAs, provisioning operations are supported for thick-provisioned virtual disks. If a datastore,
RDM, or VM was created on a thin-provisioned virtual disk outside of the Storage Module for
vCenter, it can be cloned to a thick-provisioned virtual disk.
To perform the tasks in this chapter, you must:
• Use an HP array that supports provisioning.
• Use the Storage Administrator Portal to set the Full Access permission for the storage pools to
be used for the provisioning operations. For more information, see “About the Storage
Administrator Portal” (page 11).
• Disable the browser pop-up blocker. If the pop-up blocker is enabled, provisioning cannot be
initiated by right-clicking a VM, host, cluster, or datastore in the inventory tree.
• Use a cluster with configured hosts when performing provisioning operations on a cluster.
TIP: By default, Internet Explorer shows the page URL in the title bar of a pop-up browser window.
To show the window title, enable the following Internet Explorer security settings:
• Allow script-initiated windows without size or position constraints
• Allow websites to open windows without address or status bars
Customizing the location of virtual disks on an HP EVA
Before performing provisioning operations on HP EVAs, you might want to change the folder in
which your virtual disk is created.
When you create a datastore on an HP EVA using the Storage Module for vCenter, by default,
the associated virtual disks are created at the root level of the Virtual Disks folder. You can
customize the location of the virtual disks by modifying the configuration.xml file, which is
located in the following directory:
install folder\Storage\JBoss\standalone\configuration
Changing the default location for all HP EVAs
To change the default location for all HP EVAs, modify the value \Virtual Disks\ in the
following section of the configuration.xml file:
<!-- EVA Global Default folder -->
<entry key="EVA.DefaultFolder">\Virtual Disks\</entry>
Changing the default location for a specific HP EVA
To change the default location for a specific HP EVA, add the following text to the
configuration.xml file:
<!-- Array-specific default folder -->
<entry key="EVA.DefaultFolder.ArrayName">\Virtual Disks\FolderName</entry>
Use ArrayName to specify an array, and FolderName to specify the virtual disk location.
NOTE: FolderName must exist on the HP EVA, or provisioning operations will fail.
70 Provisioning storage
Page 71

Viewing the audit log
The Storage Module for vCenter provides an audit log for provisioning operations. The audit log,
provisionAuditLog.txt, is available in the following directory:
<install directory>/Storage/JBoss/standalone/log.
Creating a datastore
You can create a new datastore on a host or cluster that meets the following prerequisites.
Hosts
• The host must exist in the vSphere Client.
• In an FC environment, the SAN must be zoned between the storage pools and the host.
• The host must be configured as a hostgroup or host on the array.
• HP StoreVirtual arrays in an iSCSI environment only:
The iSCSI initiator on the host must be installed and configured.◦
◦ The iSCSI array IP address or hostname must be configured in the iSCSI initiator's dynamic
discovery list on the host.
Clusters
• The cluster and its hosts must exist in the vSphere Client.
• In an FC environment, the SAN must be zoned between the storage pools and the cluster
hosts.
• The cluster hosts must be configured as hostgroups or hosts on the array.
• The cluster hosts can belong to separate hostgroups.
NOTE: The Storage Module for vCenter does not support configurations that have all cluster
hosts in a single hostgroup.
• HP StoreVirtual arrays in an iSCSI environment only:
The iSCSI initiator on all cluster hosts must be installed and configured.◦
◦ The iSCSI array IP address or hostname must be configured in the iSCSI initiator's dynamic
discovery list on all cluster hosts.
Creating a datastore
To add a datastore to a host or cluster:
1. Start the vSphere Client and access HP Insight Management.
2. Use one of the following methods to start the Add Datastore wizard:
• Right-click a host or cluster and select HP Insight Management Actions→Create Datastore.
• In the vSphere Web Client, select Actions→Create Datastore on the HP Insight Management
page for a host or cluster.
• In the vSphere Client, select Create Datastore from the Actions drop-down list.
• Right-click a host or cluster in any Storage Module for vCenter table, and then select
Create Datastore.
The Create Datastores – Specify Storage window opens.
Viewing the audit log 71
Page 72

3. Enter the following information:
• Quantity: Enter the number of datastores to create.
• Datastore Capacity: Enter the capacity for the new datastores.
NOTE: The actual value used by the software might be slightly higher than specified in
order to accommodate the VMware overhead.
• Storage Pools: Select a storage pool to use for the new datastore.
This window lists the configured storage pools with Full Access on arrays that support
provisioning.
TIP: Select the Name or Available Capacity option to sort the list of storage pools.
The wizard displays the Capacity Before and Capacity After values for the available
storage pools.
If there is not enough space available in the selected storage pool, a message is displayed
in the Warnings box.
• RAID Level: Select a RAID level for the new datastores. The wizard lists all RAID levels
supported by the selected storage pool.
4. Click Next.
For HP 3PAR StoreServs only, the Create Datastores — Specify Copy Space window opens.
72 Provisioning storage
Page 73

5. Select the copy space for the HP 3PAR StoreServ.
6. Click Next.
The Create Datastores – Specify New Names window opens.
Creating a datastore 73
Page 74

7. Enter the following information:
• New Datastore Names: Enter the base name for the new datastores. The # symbol is
required and represents the numeric sequence for the new datastore names. In the
generated datastore names, the # symbol is replaced with a number.
• Where # is numeric and starts at: Enter the start value for the numeric sequence of datastore
names. The default values are as follows:
Default start value for numeric sequenceNumber of datastores to add
11–9
0110–99
001100–999
The Generated Names box shows the names of the datastores that will be created.
8. Click Next.
The Create Datastores – Review and Validate window opens.
9. Click Next to validate that it is possible to create the datastores.
The Review and Validate window is updated with icons showing the success or failure of the
validation processes.
A green icon indicates success, and a red icon indicates failure. If a validation step fails, a
message is displayed in the Warning and Validation Results box. Correct the problem, and
then click Retry to repeat the validation step. If you need to change values entered in the
wizard, use the Back and Next buttons to navigate.
10. Click Next to view a summary of the requested actions.
The Summary window opens.
74 Provisioning storage
Page 75

11. Click Finish to create the specified datastores.
You can view the progress of the task in the Recent Tasks pane at the bottom of the vSphere
Client window or the right side of the vSphere Web Client window.
TIP: No manual cache refresh is necessary. When a provisioning operation is complete,
the Storage Module for vCenter data is refreshed automatically.
Expanding a datastore
You can expand the size of a datastore if it is located on a single disk.
1. Start the vSphere Client and access HP Insight Management.
2. Use one of the following methods to open the Expand Datastore window:
• Right-click a datastore and select HP Insight Management→Expand Datastore.
• In the vSphere Web Client, select Actions→Expand Datastore on the HP Insight
Management page for a datastore.
• In the vSphere Client, select Expand Datastore from the Actions drop-down list.
• Right-click a datastore in any Storage Module for vCenter table, and then select Expand
Datastore.
The Expand Datastore window opens.
Expanding a datastore 75
Page 76

3. Enter the new capacity in the Requested Datastore Capacity box.
The following rules apply when expanding datastores:
• A datastore can be expanded only if it is located on a single disk on an array that supports
provisioning by the Storage Module for vCenter.
• The requested capacity cannot exceed the total capacity of the storage pool.
• The requested capacity cannot be less than or equal to the original datastore capacity.
When you enter the new capacity, the Expand Datastore window displays the Capacity Before
and Capacity After values for the related storage pool.
Capacity Before and Capacity After are approximate values. The actual virtual disk size might
be slightly larger to accommodate the VMware overhead.
4. Click Finish to expand the selected datastore.
A dialog box notifies you that you can view the progress of the task in the Recent Tasks pane
at the bottom of the vSphere Client window.
5. Click OK.
TIP: No manual cache refresh is necessary. When a provisioning operation is complete,
the Storage Module for vCenter data is refreshed automatically.
Deleting a datastore
You can delete a datastore if it is not used by a VM or VM template.
• If the disk used by the datastore is replicated using snapshot, the delete operation will fail.
• If the datastore is used by a VM or VM template, the delete operation will fail.
To delete a datastore:
1. Start the vSphere Client and access HP Insight Management.
2. Use one of the following methods to specify a datastore to delete:
• Right-click a datastore and select HP Insight Management→Delete Datastore.
• In the vSphere Web Client, select Actions→Delete Datastore on the HP Insight Management
page for a datastore.
76 Provisioning storage
Page 77

• In the vSphere Client, select Delete Datastore from the Actions drop-down list.
• Select a datastore in the inventory tree, click Storage Tools in the HP Management pane,
and then click the Delete Datastore link.
• Right-click a datastore in any Storage Module for vCenter table and select Delete Datastore.
The Storage Module for vCenter prompts you to confirm the delete request.
3. Click Delete to confirm the request.
The Storage Module for vCenter removes the storage volumes from all hosts, deletes the
volumes, and re-scans the hosts. When these tasks are complete, the deleted datastore is no
longer displayed in the vSphere Client.
TIP: No manual cache refresh is necessary. When a provisioning operation is complete,
the Storage Module for vCenter data is refreshed automatically.
Deleting an unassigned volume
An unassigned volume is a volume that is not associated with a datastore or RDM. You can delete
unassigned storage volumes that belong to arrays that support provisioning.
To delete an unassigned volume:
1. Start the vSphere Client and access HP Insight Management.
2. Locate an unassigned volume in any Storage Module for vCenter table. For example, you
could delete a volume from the Storage volumes table.
3. Right-click the volume and select Delete Volume.
The Storage Module for vCenter prompts you to confirm the delete request.
4. Click Delete.
The Storage Module for vCenter removes the LUN presentation from all hosts, deletes the
volume, and re-scans the hosts. When these tasks are complete, the deleted volume is no
longer displayed in the vSphere Client.
TIP: No manual cache refresh is necessary. When a provisioning operation is complete,
the Storage Module for vCenter data is refreshed automatically.
Creating a VM from a template
You can create one or more VMs from a VM template. While creating VMs:
• The VM template must exist in the vSphere Client.
• Creating a VM has the same prerequisites as creating a datastore. For more information, see
“Creating a datastore” (page 71). During the process of creating the new VM, one or more
new datastore are created.
• All of the files associated with the new VMs are created on the new datastores.
• If the template contains an RDM, the operation will fail during the process of creating the new
VM.
Deleting an unassigned volume 77
Page 78

NOTE: When VMware converts a VM to a template, all RDMs are converted to empty virtual
disks (VMDKs). Therefore, VMs created from this template will not have associated RDMs. For
more information, see Virtual Disk Compatibility Modes in the VMware vSphere Online Library.
• If a cluster is used to initiate the VM creation, all hosts in the cluster must be zoned to the
storage, and hostgroups must be configured.
To create one or more VMs from a template:
1. Start the vSphere Client and access HP Insight Management.
2. Use one of the following methods to start the Create Virtual Machines wizard:
• Right-click a host or cluster and select HP Insight Management→Create VM from Template.
• Right-click a host or cluster in any Storage Module for vCenter table, and then select
Create VM from Template.
• In the vSphere Web Client, select Actions→Create VM from Template on the HP Insight
Management page for a host or cluster.
• In the vSphere Client, select Create VM from Template from the Actions drop-down list.
• Right-click a VM template and select HP Insight Management→Create VM from Template.
The Create Virtual Machines – Specify VMs window opens.
3. Enter the following information:
• Owner: Select the host or cluster that will own the new VMs. This information is entered
automatically if you initiated the VM creation from a host or cluster.
• VM Template: Select the template to use for the new VMs. This information is entered
automatically if you initiated the VM creation from a VM template.
• VM Quantity: Enter the number of VMs to create.
• VM Initial State: Specify whether the initial VM state is Power On or Power Off.
• Customization Specification: Specify a customization specification (if available). For more
information, see the VMware documentation.
78 Provisioning storage
Page 79

4. Click Next.
The Create Virtual Machines – Specify Storage window opens.
5. Enter the following information:
• Quantity: The number of datastores to create to support the new VMs. This value must be
less than or equal to the number of new VMs.
• Datastore Capacity: The minimum capacity for each new datastore.
The datastore capacity value is approximate. The actual virtual disk sizes might be slightly
larger to accommodate the VMware overhead.
• Storage Pools: Select the storage pool to use for the new datastores.
This window lists the configured storage pools with Full Access on arrays that support
provisioning. If there is not enough space available in the selected storage pool, a message
is displayed in the Warnings box.
TIP: Select the Name or Available Capacity option to sort the list of storage pools.
• RAID Level: Select the RAID level for the new datastores. The wizard lists all RAID levels
supported by the selected storage pool.
6. Click Next.
The Create Virtual Machines – Specify Names window opens.
Creating a VM from a template 79
Page 80

7. Enter the following information:
• VM Names: Enter the base name for the new VMs. The # symbol is required and represents
the numeric sequence for the new names. In the generated VM names, the # symbol is
replaced with a number.
The default values are as follows:
Default start value for numeric sequenceNumber
11–9
0110–99
001100–999
The Generated Names box shows the names of the VMs that will be created.
• Datastore Names: Enter the base name for the new datastores. The # symbol is required
and represents the numeric sequence for the new names. In the generated datastore
names, the # symbol is replaced with a number.
The Generated Names box shows the names of the datastores that will be created.
• Where # is numeric and starts at: For both the VM and datastore names, enter the start
value for the numeric naming sequence. The default value is 1.
8. Click Next.
The Create Virtual Machines – Review and Validate window opens.
80 Provisioning storage
Page 81

9. Click Next to validate that it is possible to create the VMs.
The Create Virtual Machines – Review and Validate window is updated with icons showing
the success or failure of the validation processes.
A green icon indicates success, and a red icon indicates failure. If a validation step fails, a
message is displayed in the Warning and Validation Results box. Correct the problem, and
then click Retry to repeat the validation step. If you need to change values entered in the
wizard, use the Back and Next buttons to navigate.
10. Click Next to view a summary of the requested actions.
The Summary window opens.
Creating a VM from a template 81
Page 82

11. Click Finish to create the specified VMs and datastores.
You can view the progress of the task in the Recent Tasks pane at the bottom of the vSphere
Client window.
TIP: No manual cache refresh is necessary. When a provisioning operation is complete,
the Storage Module for vCenter data is refreshed automatically.
Cloning a VM
You can clone one or more VMs from an existing VM.
The following rules apply when cloning VMs:
• Cloning a VM has the same prerequisites as creating a datastore. For more information, see
“Creating a datastore” (page 71).
• The source VM must exist in the vSphere Client.
• The source VM must be in a stopped state.
• The file structure for the cloned VMs will match the original VM.
• The original VM can have multiple datastores, but each datastore should be on one disk only.
• If the original VM has multiple datastores, the new VM will have the same number of datastores.
• The cloned VMs use the same storage pool as the source VM.
• If snapshots are used for creating the new VMs and datastores, the original VM files cannot
be deleted.
• Each snapshot is created in the same storage pool as each source disk.
To clone one or more VMs from an existing VM:
1. Start the vSphere Client and access HP Insight Management.
2. Use one of the following methods to start the Clone Virtual Machine wizard:
• Right-click a VM and select HP Insight Management→Clone VM.
• In the vSphere Web Client, select Actions→Clone VM on the HP Insight Management
page for a host or cluster.
82 Provisioning storage
Page 83

• In the vSphere Client, select Clone VM from the Actions drop-down list.
• Right-click a VM in any Storage Module for vCenter table, and then select Clone VM.
The Clone Virtual Machine – Clone Parameters window opens.
3. Enter the following information:
• Target Owner: Select the host or cluster that will own the new VMs.
• Target VM Quantity: Enter the number of VMs to create.
• Target VM Initial State: Specify whether the initial VM state is Power On or Power Off.
• Customization Specification: Specify a customization specification (if available). For more
information, see the VMware documentation.
• Clone Type: Select Snapshot or Clone.
A snapshot is a demand-allocated snapshot that remains associated with the source
volume. A clone is a fully allocated (thin-provisioned) copy that is not associated with the
source volume.
• Storage Pool: The storage pool used by the source VM is displayed automatically along
with the Capacity Before and Capacity After details.
4. Click Next.
The Clone Virtual Machine – Specify New Names window opens.
Cloning a VM 83
Page 84

5. Enter the following information:
• New VM Names: Enter the base name for the new VMs. The # symbol is required and
represents the numeric sequence for the new names. In the generated VM names, the #
symbol is replaced with a number.
The default values are as follows:
Default start value for numeric sequenceNumber
11–9
0110–99
001100–999
The Generated Names box shows the names of the VMs that will be created.
• New Datastore Names: Enter the base name for the new datastores. The # symbol is
required and represents the numeric sequence for the new names. In the generated
datastore names, the # symbol is replaced with a number.
The Generated Names box shows the names of the datastores that will be created.
• Where # is numeric and starts at: For both the VM and datastore names, enter the start
value for the numeric naming sequence. The default value is 1.
6. Click Next.
The Clone Virtual Machine – Review and Validate window opens.
84 Provisioning storage
Page 85

7. Click Next to validate that it is possible to create the cloned VMs.
The Review and Validate window is updated with icons showing the success or failure of the
validation processes.
A green icon indicates success, and a red icon indicates failure. If a validation step fails, a
message is displayed in the Warning and Validation Results box. Correct the problem, and
then click Retry to repeat the validation step. If you need to change values entered in the
wizard, use the Back and Next buttons to navigate.
8. Click Next to view a summary of the requested actions.
The Summary window opens.
Cloning a VM 85
Page 86

9. Click Finish to create the specified VMs.
You can view the progress of the task in the Recent Tasks pane at the bottom of the vSphere
Client window.
TIP: No manual cache refresh is necessary. When a provisioning operation is complete,
the Storage Module for vCenter data is refreshed automatically.
86 Provisioning storage
Page 87

5 Viewing hardware alert notifications
This chapter describes the Insight Control for vCenter hardware alert events and alarms.
Insight Control for vCenter events
Insight Control for vCenter loads events from Onboard Administrator, HP SNMP agents, and HP
CIM providers into vCenter Server, enabling administrators to view and manage them from the
vSphere Client. This provides administrators with a single, heterogeneous view of all host system
events within the managed environment.
To view HP hardware tasks and events, navigate to the Tasks & Events tab in the vSphere Client,
or the Events tab in the vSphere Web Client. See Figure 17 (page 87).
Figure 17 Tasks & Events tab (events view)
Onboard Administrator events
Insight Control for vCenter registers with the Onboard Administrator to receive supported events
as they occur. These events fit into defined vCenter Server categories.
Operational status event
Hardware event
Subsystem event
vCenter Server event categoryEvent descriptionEvent type
InfoOK, OtherOperational status event
WarningUnknown, DegradedOperational status event
ErrorNon-recoverable error, Predictive
failure, Error
InfoInserted, Removed, Power
management, Power state, iLO alive
WarningiLO dead, Interconnect resetHardware event
ErrorBlade faultHardware event
InfoOK, OtherSubsystem event
WarningUnknown, DegradedSubsystem event
ErrorNon-recoverable error, Predictive
failure, Error
Insight Control for vCenter events 87
Page 88

For more information, see the HP BladeSystem Onboard Administrator User Guide, which is
available on the HP website: http://www.hp.com/go/oa.
vCenter Server event category: info
Blade events
Enclosure name: Blade in bay number status changed to OK.
Enclosure name: Blade in bay number status changed to other.
Enclosure name: Blade in bay number: inserted
Enclosure name: Blade in bay number: removed
Enclosure name: Blade in bay number: shutdown
Enclosure name: Blade in bay number: fault
Enclosure name: Blade in bay number: power management
Enclosure name: Blade in bay number: power state
Enclosure name: Blade in bay number: iLO alive
Interconnect events
Enclosure name: Interconnect in bay number status changed to OK.
Enclosure name: Interconnect in bay number status changed to other.
Enclosure name: Interconnect in bay number: inserted
Enclosure name: Interconnect in bay number: removed
Power supply events
Enclosure name: Power supply in bay number status changed to OK.
Enclosure name: Power supply in bay number status changed to other.
Enclosure name: Power supply in bay number: inserted
Enclosure name: Power supply in bay number: removed
Fan events
Enclosure name: Fan in bay number status changed to OK.
Enclosure name: Fan in bay number status changed to other.
Enclosure name: Fan in bay number: inserted
Enclosure name: Fan in bay number: removed
Thermal events
Enclosure name: Thermal status changed to OK.
Enclosure name: Thermal status changed to other.
Power subsystem events
Enclosure name: Power subsystem status changed to OK.
Enclosure name: Power subsystem status changed to other.
Fan zone events
Enclosure name: Fan zone number status changed to OK.
Enclosure name: Fan zone number status changed to other.
vCenter Server event category: warning
Blade events
Enclosure name: Blade in bay number status changed to unknown.
Enclosure name: Blade in bay number status changed to degraded.
88 Viewing hardware alert notifications
Page 89

Enclosure name: Blade in bay number: iLO dead
Interconnect events
Enclosure name: Interconnect in bay number status changed to unknown.
Enclosure name: Interconnect in bay number: reset
Power supply events
Enclosure name: Power supply in bay number status changed to unknown.
Enclosure name: Power supply in bay number status changed to degraded.
Fan events
Enclosure name: Fan in bay number status changed to unknown.
Enclosure name: Fan in bay number status changed to degraded.
Thermal events
Enclosure name: Thermal status changed to unknown.
Enclosure name: Thermal status changed to degraded.
Power subsystem events
Enclosure name: Power subsystem status changed to unknown.
Enclosure name: Power subsystem status changed to degraded.
Fan zone events
Enclosure name: Fan zone number status changed to unknown.
Enclosure name: Fan zone number status changed to degraded.
vCenter Server event category: error
Blade events
Enclosure name: Blade in bay number status changed to non-recoverable error.
Enclosure name: Blade in bay number status changed to predictive failure.
Enclosure name: Blade in bay number status changed to error.
Interconnect events
Enclosure name: Interconnect in bay number status changed to non-recoverable error.
Enclosure name: Interconnect in bay number status changed to predictive failure.
Enclosure name: Interconnect in bay number status changed to error.
Power supply events
Enclosure name: Power supply in bay number status changed to non-recoverable error.
Enclosure name: Power supply in bay number status changed to predictive failure.
Enclosure name: Power supply in bay number status changed to error.
Fan events
Enclosure name: Fan in bay number status changed to non-recoverable error.
Enclosure name: Fan in bay number status changed to predictive failure.
Enclosure name: Fan in bay number status changed to error.
Thermal events
Enclosure name: Thermal status changed to non-recoverable error.
Enclosure name: Thermal status changed to predictive failure.
Enclosure name: Thermal status changed to error.
Power subsystem events
Insight Control for vCenter events 89
Page 90

Enclosure name: Power subsystem status changed to non-recoverable error.
Enclosure name: Power subsystem status changed to predictive failure.
Enclosure name: Power subsystem status changed to error.
Fan zone events
Enclosure name: Fan zone number status changed to non-recoverable error.
Enclosure name: Fan zone number status changed to predictive failure.
Enclosure name: Fan zone number status changed to error.
HP SNMP agent and HP CIM provider events
HP Insight Control for vCenter registers with HP SNMP agents and HP CIM providers to receive
traps from HP SNMP agents and indications from HP CIM providers as they occur. Events created
based on these traps and indications fit into the defined vCenter Server categories.
These events contain the following information:
vCenter Server event categoryEvent severityEvent datasource type
InfoNormal or InformationHP SNMP agents or HP CIM providers
WarningWarning or MinorHP SNMP agents or HP CIM providers
ErrorMajor or CriticalHP SNMP agents or HP CIM providers
Alarms
• Event source
• Event name
• Event category
• Event description
When an Insight Control for vCenter event is delivered to vCenter Server, the overall host status
changes based on the corresponding event category or the host status. An alarm is triggered when
the changes to the host status meet the criteria assigned by the administrator.
Overall host statusEvent category
GreenInformational
YellowWarning
RedError
The following Insight Control for vCenter events can cause alarms in vCenter Server:
• Alarms associated with the HP server SNMP traps
These alarms can be triggered by any event generated from an SNMP trap. The alarm states
are controlled by the event category.
• Alarms associated with the HP server WBEM indications
These alarms can be triggered by any event generated from a WBEM indication. The alarm
states are controlled by the event category.
90 Viewing hardware alert notifications
Page 91

• Alarms associated with HP ProLiant and HP BladeSystem fan zones
These alarms are triggered by an HP BladeSystem subsystem event. The alarm states are
controlled by the type (severity) of the event. The alarms are triggered on all HP ProLiant and
BladeSystem servers in the affected fan zone.
• Alarms associated with HP ProLiant and HP BladeSystem power subsystem
These alarms are triggered by an HP BladeSystem power subsystem event. The alarm states
are controlled by the type (severity) of the event. The alarms are triggered on all HP ProLiant
and BladeSystem servers in the affected enclosure.
Alarm icon
When an alarm occurs, an icon appears to the right of the vSphere Client window along the bar
above the vSphere Client tabs or on the host icon in the inventory tree. To view the alarm in the
Alarms tab, click the icon. The Alarms tab displays a list of all alarms.
Alarms 91
Page 92

6 Troubleshooting
Before troubleshooting issues with Insight Control for vCenter, you must do the following:
• Verify that the correct user name and password are entered for vCenter Server.
• Verify that the software is installed and configured as described in the HP Insight Control for
VMware vCenter Server Installation Guide.
• View the log files. For instructions, see “Viewing the log files” (page 92).
Viewing the log files
Server module logs are located in the following directories:
NOTE: This document assumes that the software is installed in C:\Program Files (x86)\
HP. For 32-bit systems, replace C:\Program Files (x86)\ with C:\Program Files\.
DirectoryFile
install folder\serverInsight Control for vCenter hpserver.log
install folder\uimhpuim.log
install folder\hpcshpcs.log
The following vSphere Web Client logs are available:
• C:\ProgramData\VMware\vSphere Web Client\serviceability\logs\
vsphere_client_virgo.log
• C:\ProgramData\VMware\vSphere Web Client\serviceability\logs\
com.hp.asi.hpic4vc.ui-1.0.0\log.log
Storage Module for vCenter logs are available in the directory C:\Program Files\HP\HP
Insight Control Storage Module for vCenter\Storage\Jboss\standalone\log.
For example:
hpstoragemodule_February_2012_Log_1.log is the Storage Module for vCenter log from
February 2012.
Array-specific Storage Module for vCenter logs are available in the following directory: C:\
Program Files\HP\HP Insight Control Storage Module for vCenter\Storage\
Jboss\standalone\log.
• For HP EVAs: array_evaemdo_wrapper.log
• For HP XP P9000/HP XP arrays: array_xpdo_wrapper.log
You can also view the log file in the vSphere Client:
1. Navigate to the vSphere Client Home page.
2. Click the System Logs icon under Administration.
Troubleshooting Insight Control for vCenter
This section includes general troubleshooting information for Insight Control for vCenter. For
troubleshooting information specific to the Server Module for vCenter, see “Troubleshooting the
Server Module for vCenter” (page 96). For troubleshooting information specific to the Storage
Module for vCenter, see “Troubleshooting the Storage Module for vCenter” (page 99).
92 Troubleshooting
Page 93

HP Insight Management tab not available in the vSphere Web Client
Possible cause: The vSphere Web Client has not deployed the plug-in.
NOTE: The plug-in is deployed only when the web-client is executed.
Action: Execute the vSphere Web Client.
1. If the vSphere Web Client was running when the plug-in was installed, log out of the Web
Client.
2. Log into the vSphere Web Client.
For the first invocation of vSphere Web Client after the plug-in is installed, you might notice
a delay before the GUI appears.
3. Verify that the HP Insight Management icon appears in the home page of the plug-in.
If not, log out of the vSphere Web Client, and then log back in.
4. Verify that the HP Insight Management icon appears in the home page of the vSphere Web
Client.
HP Insight Management tab not available in vSphere Client
Possible cause 1: The Insight Control for vCenter plug-in is not enabled.
Action: Verify the status of the plug-in in the vSphere Client.
1. Start the vSphere Client.
2. Select Plug-ins→Manage Plug-ins.
3. Verify that the Insight Control for vCenter module is in Enabled status.
Possible cause 2: Communication between the systems running Insight Control for vCenter, vCenter
Server, and the vSphere Client is not established.
Action:
• Ensure that a host, cluster, datastore, or VM is selected in the left pane of the vSphere Client
window.
• Use the arrows to scroll through the vCenter Server tabs and locate the HP Insight Management
tab. The HP Insight Management tab might be collapsed by vSphere Client due to lack of
space on the GUI.
• Verify network connectivity between the systems running Insight Control for vCenter, vCenter
Server, and the vSphere Client. Ensure that at least one network path exists between these
systems. Use tools such as Ping, as needed.
• Verify that any DNS names used by the systems running Insight Control for vCenter, vCenter
Server, and the vSphere Client resolve properly. If the DNS names do not resolve correctly,
use IP addresses to configure Insight Control for vCenter.
• Ensure that all firewall programs are configured to enable Insight Control for vCenter to access
the TCP/IP port on the system on which the program is installed.
vSphere Client, Insight Control for vCenter, or Storage Module for vCenter is unresponsive
Possible cause: A required service is not running.
Action: Verify that the following services are running:
• VMware vCenter Server
• HP Common Services
• HP Insight Control for vCenter Server
Troubleshooting Insight Control for vCenter 93
Page 94

• HP Insight Control Storage Module for vCenter
• HP Insight Control for vCenter UI Manager
Slow response in the vSphere Client
Possible cause: The system on which Insight Control for vCenter is installed does not meet the
hardware requirements for all software installed on the server.
Action: Ensure that:
• HP SIM and vCenter Server are not installed on the same server. This is not a supported
configuration.
• All hardware requirements are met for all software installed on the system.
For more information about installation requirements for Insight Control for vCenter, see the
HP Insight Control for VMware vCenter Server Installation Guide.
vCenter service terminates during startup
Possible cause: vCenter Server depends on SQL Server. If the vCenter service starts before SQL
server, vCenter Server fails to connect to its database.
Action: See article 1007669 in the VMware Knowledge Base.
Internet Explorer Permission denied script error immediately after installation
The following message appears when you start the vSphere Client after installing Insight Control
for vCenter:
Figure 18 Internet Explorer script error: Permission denied
Action: Close the window, add the vCenter host to the Internet Explorer list of trusted sites, and
then start the vSphere Client again.
Stale or corrupt cache or cookies results in GUI anomalies
Possible cause: Insight Control for vCenter uses the VMware plug-in architecture, which uses an
embedded Internet Explorer component to display the Insight Control for vCenter GUI. GUI anomalies
might occur if the Internet Explorer cache or cookies are stale or corrupted.
Action: Clear the cache in Internet Explorer.
1. Select Tools→Internet Options.
2. Click Delete in the Browsing history section of the General tab.
The Delete Browsing History dialog box opens.
3. Delete the temporary Internet files and cookies, and then click OK.
94 Troubleshooting
Page 95

Error Communicating with iLO at VM host
The following error appears if the Windows Proxy Server is enabled and the ESX host is using iLO
3:
Error Communicating with iLO at "VM hostname" Text object has no
attribute 'ribcl' .
Possible cause: Windows proxy server settings are not configured to allow LAN communication
from the Insight Control for vCenter Server to iLO 3 on the target ESX/ESXi host system.
Action: Disable or bypass Windows Proxy Server for the connection between the Insight Control
for vCenter/vSphere client and iLO 3 on the ProLiant server running as an ESX/ESXi host system.
To disable the Windows Operating System default proxy setting on the Insight Control for vCenter
server:
1. Start the windows registry editor program regedit.
2. Navigate to
Computer\HKEY_USERS\.DEFAULT\Software\Microsoft\Windows\CurrentVersion\Internet
Settings.
3. Manually change the ProxyEnable value from 1 (enabled) to 0 (disabled).
4. Click OK.
To bypass Windows Proxy Server using Microsoft Internet Explorer or to verify if the TCP IP address
is configured for a proxy server that does not exist or does not match the existing proxy server,
use the Windows Internet Explorer LAN settings using the Microsoft Internet Explorer Tools menu
(Tools→Internet Options→Connections→Local Area Network (LAN) settings).
For more information about configuring a proxy server, see to the Microsoft KB article 819961 at
http://support.microsoft.com/kb/819961.
Recovering News Feed and Tasks data from an earlier version of Insight Control for vCenter
When upgrading to Insight Control for vCenter 7.2 from versions 7.0 or 7.1, the News Feed and
Tasks data from the earlier version is saved in a folder named
<exportFolder>\icvc\uim\share\db_pre7.2. The default <exportFolder> is the same
as the installation folder, unless it was changed during custom installation of the earlier version of
Insight Control for vCenter.
To view the saved News Feed and Tasks data, the earlier version of Insight Control for vCenter
must be used. Perform the following steps to view the data:
1. Uninstall Insight Control for vCenter version 7.2. The 7.2 installer does not support the
downgrade option.
2. Rename <export folder>\icvc\uim\share\db to <export
folder>\icvc\uim\share\db_7.2
This saves the version 7.2 News Feed and Tasks data.
3. Rename <export folder>\icvc\uim\share\db_pre7.2 to <export
folder>\icvc\uim\share\db
4. Install the earlier version of Insight Control for vCenter.
The News Feed and Tasks data from the earlier version can now be viewed.
After viewing the data from the earlier version, reinstall version 7.2 using the following steps:
1. Uninstall the earlier version of Insight Control for vCenter.
2. Rename <export folder>\icvc\uim\share\db to <export
folder>\icvc\uim\share\db_pre7.2
This saves the News Feed and Tasks data for the earlier version.
Troubleshooting Insight Control for vCenter 95
Page 96

3. Rename <export folder>\icvc\uim\share\db_7.2 to <export
folder>\icvc\uim\share\db
4. Install Insight Control for vCenter version 7.2.
Troubleshooting the Server Module for vCenter
This section includes troubleshooting information specific to the Server Module for vCenter. For
general Insight Control for vCenter troubleshooting, see “Troubleshooting Insight Control for vCenter”
(page 92). For troubleshooting information specific to the Storage Module for vCenter, see
“Troubleshooting the Storage Module for vCenter” (page 99).
Infrastructure portlet is not displayed for blades
Possible cause: OA credentials are missing or incorrect.
Action: Use the Host Properties page or the Server Password Management page to verify that the
OA credentials are correct and reachable for Insight Control for vCenter, and change them if
necessary.
Network portlet for blades is missing the diagram link
Possible cause: Virtual Connect credentials are missing or incorrect.
Action: Use the Host Properties page or the Server Password Management page to verify that the
Virtual Connect credentials are correct and reachable for Insight Control for vCenter, and change
them if necessary.
Server summary data is not displayed for host
Possible cause 1: iLO is not associated with the host system.
Action: Verify that iLO is associated with the host system.
Use one of the following methods to associate iLO with a host:
• Configure iLO in vCenter.
Use this method if you are using a VMware cluster with power management. In the vSphere
Client, select a host and click the Configuration tab. Click the Power Management link in the
Software section, and then click Properties in the upper-right corner. Enter the iLO settings,
and then click OK.
• Configure iLO from the HP Insight Management tab.
Select a host and click the HP Insight Management tab. Move your cursor over the Settings
icon, and then select Host Properties. Enter the iLO settings, and then click Save.
• Use automatic association.
Verify that the HP SNMP agents/HP CIM providers are installed on the host and that the
credentials are correct:
◦ Insight Control for vCenter Version 6.3 and later can make the host-to-iLO association by
communicating directly with the ESX or ESXi host. The HP Management Agents for VMware
ESX or the HP ESXi Offline Bundle for VMware ESXi must be installed on the host for the
automatic association to occur.
◦ For Insight Control for vCenter Version 6.2.2 and earlier, the VMware host-to-iLO
Possible cause 2: The host lost its connection to iLO.
Action: Re-seat the host in its enclosure.
96 Troubleshooting
association is automatically derived from HP SIM if HP SIM is present in the environment.
HP SIM can require that the HP Management Agents for VMware ESX or the HP ESXi
Offline Bundle for VMware ESXi are installed on the host.
Page 97

Health status or information is missing for specific hosts or clusters
Possible cause: Active and properly authenticated communication between vCenter Server, Insight
Control for vCenter, HP Management Agents for VMware ESX /HP ESXi Offline Bundle for VMware
ESXi, or Virtual Connect Manager (blades only), and the managed nodes is not established with
their management processors.
Action: Verify that properly authenticated communication is established.
• Verify that the iLO information is associated correctly with the corresponding host system as
described in “Associating the VMware host to iLO” (page 10).
• Verify that the HP Management Agents for VMware ESX or the HP ESXi Offline Bundle for
VMware ESXi are installed and that the credentials are properly configured in Insight Control
for vCenter.
• Verify that either the global credentials or the credentials specific to each iLO, Onboard
Administrator, and VMware host are configured properly.
• Ensure that the initial polling cycle is complete. This may take a few moments, depending on
the settings.
Auto-login not working for URLs provided for managed nodes by Insight Control for vCenter
Possible cause: A valid user name and password are not configured, or an SSO certificate (for
SSO to Onboard Administrator) is not installed.
Action: Verify the user credentials or SSO settings:
• Ensure that the credentials provided are for a vCenter Server administrator. Auto-login is
available only for vCenter Server administrators. For more information, see “Launching into
HP tools” (page 45).
• Ensure that the correct credentials are provided for iLO, Onboard Administrator, and HP SIM.
The information can be entered using the global credentials setting or by entering the individual
settings for each iLO, Onboard Administrator, and HP SIM on the network. For more information
about managing passwords and other system administration tasks, see “Configuring Insight
Control for vCenter” (page 8).
• For SSO to Onboard Administrator, follow the procedure for configuring the SSO certificate
described in “Onboard Administrator Single Sign-On” (page 11).
Virtual Connect Manager launch link from Insight Control for vCenter prompts for login credentials
Cause: Virtual Connect Manager does not support auto-login.
HP SIM auto-login fails from Insight Control for vCenter
Possible cause: HP SIM uses cookies for auto-login. If the browser is configured to block all cookies,
the HP SIM auto-login feature for Insight Control for vCenter does not work.
Action: Configure the Microsoft Internet Explorer browser to accept cookies.
1. Select Tools→Internet Options.
2. Click the Privacy tab and change the setting to Medium.
3. Remain in the Privacy tab, and click Sites.
4. In the Address of website box, enter the HPSIM IP address, click Allow, and then click OK.
5. Click the Security tab.
6. Set the Internet and Local intranet zones security level to Medium.
7. Click OK.
Troubleshooting the Server Module for vCenter 97
Page 98

Microsoft Windows 2008 Internet Explorer Enhanced Security can also block cookies. Be sure to
change the security settings to enable cookies in Server Manager in the Internet Explorer Enhanced
Security Configuration (ESC) menu.
Clicking HP Insight power management launch link does not go to expected HP SIM page
Possible cause: If the Insight power management plug-in for HP SIM is not installed and the Insight
power management launch link under Insight Control for vCenter is selected, HP SIM cannot launch
the Insight power management pages. For the HP Insight power management link to work correctly,
Insight Control for vCenter requires that both HP SIM and the HP Insight power management plug-in
are installed.
Action: Install and configure the Insight power management plug-in for HP SIM.
Cost Advantage field not showing values
Possible cause: The managed vCenter Server cluster is not a DPM-configured cluster or the power
cost value is not configured.
Action: Verify the cluster type and power cost setting.
• Verify that the cluster is DRS-enabled. This feature applies only to DRS-enabled clusters with
DPM configured.
• Verify that the power cost value is configured correctly. For more information, see “Setting
the power cost for a cluster” (page 32).
Events not delivered by Insight Control for vCenter to vCenter Server
Possible cause: Insight Control for vCenter is not configured to deliver events to vCenter Server.
Action: Verify that your systems are configured to deliver events to vCenter Server.
• Note which events are delivered from Onboard Administrator to vCenter Server as defined
in “Viewing hardware alert notifications” (page 87). If any of those events are not delivered
to vCenter Server by Insight Control for vCenter, verify that the managed node is an HP ProLiant
c-Class server blade and that the corresponding Onboard Administrator is accessible from
the default system browser on the system where Insight Control for vCenter is installed.
For all other events delivered by Insight Control for vCenter to vCenter Server, the HP SNMP
agents or HP CIM providers must be installed and configured.
• Verify that the Onboard Administrator is configured to forward events to Insight Control for
vCenter.
1. Access the Insight Control for vCenter Home Settings page.
2. Click the Configuration tab.
3. Verify that OA Settings Forward Events is set to Yes. If No is currently selected, select
Yes, and then click Save.
Firmware inventory information is not shown
Possible causes: Insight Control for VMware vCenter supports firmware discovery only on ESXi
hosts that have the HP ESXi offline bundle for VMware installed. The ESXi user name and password
are required for communication with HP CIM providers.
• If the host is not running ESXi, the following message is displayed:
There are no firmware components to display.
Firmware inventory is only supported on hosts running ESXi.
• If the HP ESXi offline bundle for VMware is not installed on the host, the following message
is displayed:
98 Troubleshooting
Page 99

There are no firmware components to display.
The HP ESXi Offline Bundle for VMware is not installed on this host.
• If some other error occurs, the following message is displayed:
There are no firmware components to display.
An error occurred while discovering firmware.
For more information, see the Insight Control for vCenter logs. For information about accessing
the logs, see “Viewing the log files” (page 92).
No Virtual Connect information is available for this host error
The following scenarios can cause this error:
• Servers are not blade servers.
• The blade server is not configured with Virtual Connect.
• The Virtual Connect credentials are not valid.
• Other errors occurred while retrieving Virtual Connect data.
For more information, see the Insight Control for vCenter logs. For information about accessing
the logs, see “Viewing the log files” (page 92).
Troubleshooting the Storage Module for vCenter
This section includes troubleshooting information specific to the Storage Module for vCenter. For
general Insight Control for vCenter troubleshooting, see “Troubleshooting Insight Control for vCenter”
(page 92). For troubleshooting information specific to the Server Module for vCenter, see
“Troubleshooting the Server Module for vCenter” (page 96).
Storage Administrator Portal login credentials
During the Storage Module for vCenter installation, you specify the login credentials to use for the
Storage Administrator Portal. These credentials are only for logging in to the Storage Administrator
Portal; they do not grant the VMware Administrator role that is required to perform Storage Module
for vCenter provisioning operations on HP arrays. To use the Storage Module for vCenter
provisioning features, you must configure the VMware Administrator role in a vSphere session. For
instructions, see the HP Insight Control for VMware vCenter Server Installation Guide.
Storage Module for vCenter GUI not responsive to mouse clicks
Possible cause: The Temporary Internet Files directory is full.
Action: Delete the temporary files created by Internet Explorer.
Refresh takes a long time to complete
In environments with HP EVAs, a refresh takes a long time.
Possible cause: A hardware failure on an HP EVA. Some hardware failures can negatively impact
HP EVA Command View performance and lead to significantly longer refresh times by the Storage
Module for vCenter.
Action: Remove or replace any failed drive on the HP EVA.
Error Unexpected state: The setup helper has not been created occurs during array or management server configuration
Possible cause: The Insight Control for vCenter host name contains one or more unsupported
characters.
When you enter a host name, the only supported characters are a–z (case insensitive), 0–9, and
hyphens.
Troubleshooting the Storage Module for vCenter 99
Page 100

Action: Complete the following procedure:
1. Open the configuration.json file, which is located in the install folder\uim
(assuming that the default installation directory was used).
2. Change the Insight Control for vCenter host name to the IP address.
3. Save and close the file.
4. Edit the install
folder\storage\jboss\standalone\configuration\standalone.xml file.
5. Change the <wsdl-host> host name to the IP address.
6. Save and close the file.
7. Restart the HP Insight Control Storage Module for vCenter Service.
8. Restart the vSphere Client.
Port conflict occurs when trying to configure HP EVA Command View and MSA proxy provider for use with Storage Module for vCenter
Possible cause: HP EVA Command View and the HP MSA 2000 G2 SMI-S proxy provider cannot
coexist on the same server because they use the same ports to communicate.
Action: If you want to manage an HP EVA and an MSA array with the same vCenter management
server and the Storage Module for vCenter, do not install the Storage Module for vCenter on the
HP EVA Command View management server.
HP MSA 2000 G2 or HP MSA P2000 G3 array information not displayed in Storage Module GUI
Possible cause: The SMI-S service on the array might be unresponsive.
Use the following actions to solve this issue. If one action does not work, proceed to the next action.
Action: Restart the HP MSA 2000 G2 or HP MSA P2000 G3 SMI-S service. This will not affect
disk access.
1. Log in to the SMU interface of the HP MSA 2000 G2 or HP MSA P2000 G3 array as a user
with Manage access. Use the available management IP address (for example:
http://Management_IP_address).
2. Select Configuration→Services→Management.
3. Clear the Storage Management Initiative Specification (SMI-S) check box, and then click Apply.
4. Select the Storage Management Initiative Specification (SMI-S) check box, and then click Apply.
The SMI-S service is now running.
5. Refresh the Storage Module for vCenter data.
For instructions, see “Refreshing Storage Module for vCenter data” (page 47).
Action 2: Restart the HP MSA 2000 G2 or HP MSA P2000 G3 array management controller.
IMPORTANT: This procedure restarts the HP MSA 2000 G2 or HP MSA P2000 G3 array
controller. If you restart a management controller, communication with it is lost until it restarts
successfully . This will not affect disk access. If the restart fails, the partner management controller
remains active with full ownership of operations and configuration information. Other applications
(such as Microsoft VSS and VDS) that rely on the management controller services might be affected.
1. Log in to the SMU interface of the HP MSA 2000 G2 or HP MSA P2000 G3 array as a user
with Manage access. Use the available management IP address (for example:
http://Management_IP_address).
2. Select Configuration→System Settings→Network Interfaces.
3. Determine which controller has the IP address used in Step 1.
4. Select Tools→Shutdown or Restart Controller.
100 Troubleshooting
 Loading...