

Page 1
Page 2

HP Oicejet 7610 Wide Format e-All-in-One
User Guide
Page 3

Copyright information
Hewlett-Packard Company notices
Acknowledgements
© Copyright 2016 HP Development Company,
L.P.
Edition 3, 8/2016
The information contained in this document is
subject to change without notice.
All rights reserved. Reproduction, adaptation,
or translation of this material is prohibited
without prior written permission of HewlettPackard, except as allowed under copyright
laws.
The only warranties for HP products and
services are set forth in the express warranty
statements accompanying such products and
services. Nothing herein should be construed
as constituting an additional warranty. HP shall
not be liable for technical or editorial errors or
omissions contained herein.
Microsoft, Windows, Windows XP, Windows
Vista, Windows 7, and Windows 8 are U.S.
registered trademarks of Microsoft
Corporation.
ENERGY STAR and the ENERGY STAR mark are
registered U.S. marks.
Page 4

Safety information
Always follow basic safety precautions when
using this product to reduce risk of injury from
re or electric shock.
1. Read and understand all instructions in the
documentation that comes with the printer.
2. Observe all warnings and instructions
marked on the product.
3. Unplug this product from wall outlets before
cleaning.
4. Do not install or use this product near water,
or when you are wet.
5. Install the product securely on a stable
surface.
6. Install the product in a protected location
where no one can step on or trip over the line
cord, and the line cord cannot be damaged.
7. If the product does not operate normally, see
Solve a problem on page 90.
8. There are no user-serviceable parts inside.
Refer servicing to qualied service personnel.
Page 5

Page 6

Table of contents
1 Get started .................................................................................................................................................... 1
Accessibility ............................................................................................................................................................ 2
HP EcoSolutions (HP and the Environment) .......................................................................................................... 3
Manage Power ..................................................................................................................................... 3
Optimize Printing Supplies .................................................................................................................. 4
Understand the printer parts ................................................................................................................................. 5
Front view ............................................................................................................................................ 5
Printing supplies area .......................................................................................................................... 6
Back view ............................................................................................................................................. 6
Use the printer control panel ................................................................................................................................. 7
Overview of buttons and lights ........................................................................................................... 7
Control panel display icons ................................................................................................................. 7
Change printer settings ....................................................................................................................... 8
Select the mode ................................................................................................................ 9
To select a dierent mode ................................................................................................ 9
To change settings for a mode ......................................................................................... 9
Change the printer settings .............................................................................................. 9
HP Digital Solutions ............................................................................................................................................. 10
HP Digital Scan (Scan to computer and Scan to Email) .................................................................... 10
HP Digital Fax (Fax to PC and Fax to Mac) ......................................................................................... 10
Select print paper ................................................................................................................................................ 11
Recommended papers for printing and copying .............................................................................. 11
Recommended papers for photo printing ........................................................................................ 12
Tips for selecting and using paper .................................................................................................... 12
Load an original on the scanner glass ................................................................................................................. 14
Load an original in the automatic document feeder (ADF) ................................................................................. 15
Load paper ........................................................................................................................................................... 16
Load standard-size paper ................................................................................................................. 16
Load envelopes ................................................................................................................................. 17
Load cards and photo paper .............................................................................................................. 17
Load custom-size paper .................................................................................................................... 18
Insert a memory device ....................................................................................................................................... 19
ENWW v
Page 7

Install the accessories ......................................................................................................................................... 20
Install the automatic two-sided printing accessory (duplexer) ....................................................... 20
Turn on accessories in the printer driver .......................................................................................... 20
To turn on accessories (Windows) .................................................................................. 20
To turn on accessories on (Mac OS X) ............................................................................. 20
Maintain the printer ............................................................................................................................................. 22
Clean the scanner glass ..................................................................................................................... 22
Clean the exterior .............................................................................................................................. 22
Clean the automatic document feeder ............................................................................................. 23
Restore factory defaults ................................................................................................................... 23
Update the printer ............................................................................................................................................... 24
Update the printer using the embedded web server ........................................................................ 24
Update the printer using the printer control panel .......................................................................... 24
Open the HP printer software (Windows) ............................................................................................................ 25
Turn the printer o .............................................................................................................................................. 26
2 Print ........................................................................................................................................................... 26
Print documents .................................................................................................................................................. 27
Print documents (Windows) .............................................................................................................. 27
Print documents (Mac OS X) .............................................................................................................. 27
Print brochures .................................................................................................................................................... 28
Print brochures (Windows) ................................................................................................................ 28
Print brochures (Mac OS X) ................................................................................................................ 28
Print on envelopes ............................................................................................................................................... 30
Print on envelopes (Windows) .......................................................................................................... 30
Print on envelopes (Mac OS X) .......................................................................................................... 30
Print photos ......................................................................................................................................................... 32
Print photos on photo paper (Windows) ........................................................................................... 32
Print photos on photo paper (Mac OS X) ........................................................................................... 32
Print photos from a memory device ................................................................................................. 33
Print on special and custom-sized paper ............................................................................................................ 34
Print on special or custom-sized paper (Mac OS X) .......................................................................... 34
Set up custom sizes (Mac OS X) ......................................................................................................... 34
Print borderless documents or photos ............................................................................................................... 36
Print borderless documents or photos (Windows) ........................................................................... 36
Print borderless documents or photos (Mac OS X) ........................................................................... 36
Print on both sides (duplexing) ........................................................................................................................... 38
Perform two-sided printing (Windows) ............................................................................................ 38
Perform two-sided printing (Mac OS X) ............................................................................................ 38
Tips for print success ........................................................................................................................................... 39
vi ENWW
Page 8

3 Scan ........................................................................................................................................................... 41
Scan an original ................................................................................................................................................... 43
Scan to a computer ............................................................................................................................ 43
Scan an original to a computer from the printer control panel ..................................... 43
Scan an original to a computer from HP printer software ............................................. 43
Scan to a memory device .................................................................................................................. 44
Scan to Email ..................................................................................................................................... 44
Scan using Webscan ............................................................................................................................................ 46
Scanning documents as editable text ................................................................................................................. 47
To scan documents as editable text ................................................................................................. 47
Guidelines for scanning documents as editable text ....................................................................... 48
4 Copy ........................................................................................................................................................... 49
Copy documents .................................................................................................................................................. 50
Change copy settings ........................................................................................................................................... 51
Save copy settings ............................................................................................................................................... 52
5 Fax ............................................................................................................................................................. 52
Send a fax ............................................................................................................................................................ 53
Send a standard fax .......................................................................................................................... 53
Send a standard fax from the computer ........................................................................................... 54
Send a fax manually from a phone ................................................................................................... 54
Send a fax using monitor dialing ...................................................................................................... 55
Send a fax from memory .................................................................................................................. 56
Schedule a fax to send later .............................................................................................................. 56
Send a fax to multiple recipients ...................................................................................................... 57
Send a fax in Error Correction Mode ................................................................................................. 57
Receive a fax ........................................................................................................................................................ 59
Receive a fax manually ...................................................................................................................... 59
Set up backup fax .............................................................................................................................. 60
Reprint received faxes from memory ............................................................................................... 60
Poll to receive a fax ........................................................................................................................... 61
Forward faxes to another number .................................................................................................... 61
Set the paper size for received faxes ................................................................................................ 62
Set automatic reduction for incoming faxes .................................................................................... 62
Block unwanted fax numbers ........................................................................................................... 62
Add numbers to the junk fax list ..................................................................................... 63
Remove numbers from the junk fax list ......................................................................... 63
Print a Junk Fax Report ................................................................................................... 63
Receive faxes to your computer using HP Digital Fax (Fax to PC and Fax to Mac) ........................... 64
ENWW vii
Page 9

Fax to PC and Fax to Mac requirements .......................................................................... 64
Activate Fax to PC and Fax to Mac .................................................................................. 64
Modify Fax to PC and Fax to Mac settings ...................................................................... 65
Set up speed-dial entries .................................................................................................................................... 66
Set up and change speed-dial entries .............................................................................................. 66
Set up and change group speed-dial entries .................................................................................... 66
Delete speed-dial entries .................................................................................................................. 67
Print a list of speed-dial entries ........................................................................................................ 67
Change fax settings ............................................................................................................................................. 68
Congure the fax header ................................................................................................................... 68
Set the answer mode (Auto answer) ................................................................................................. 68
Set the number of rings before answering ....................................................................................... 69
Change the answer ring pattern for distinctive ring ......................................................................... 69
Set the dial type ................................................................................................................................ 70
Set the redial options ........................................................................................................................ 70
Set the fax speed ............................................................................................................................... 70
Set the fax sound volume ................................................................................................................. 71
Fax and digital phone services ............................................................................................................................ 72
Fax over Internet Protocol ................................................................................................................................... 73
Use reports .......................................................................................................................................................... 74
Print fax conrmation reports .......................................................................................................... 74
Print fax error reports ....................................................................................................................... 75
Print and view the fax log ................................................................................................................. 75
Clear the fax log ................................................................................................................................ 75
Print the details of the last fax transaction ...................................................................................... 76
Print a Caller ID Report ...................................................................................................................... 76
View the Call History ......................................................................................................................... 76
6 Web Services ............................................................................................................................................... 76
What are Web Services? ....................................................................................................................................... 78
HP ePrint ............................................................................................................................................ 78
Printer Apps ....................................................................................................................................... 78
Set up Web Services ............................................................................................................................................. 79
Set up Web Services using the printer control panel ........................................................................ 79
Set up Web Services using the embedded web server ..................................................................... 79
Set up Web Services using the HP printer software ......................................................................... 80
Use Web Services ................................................................................................................................................. 81
HP ePrint ............................................................................................................................................ 81
Print using HP ePrint ....................................................................................................... 81
Find the printer's email address ..................................................................................... 81
Turn o HP ePrint ............................................................................................................ 81
viii ENWW
Page 10

Printer Apps ....................................................................................................................................... 82
Use Printer Apps .............................................................................................................. 82
Manage Printer Apps ....................................................................................................... 82
Turn o Printer Apps ....................................................................................................... 82
Remove Web Services .......................................................................................................................................... 83
7 Work with ink cartridges .............................................................................................................................. 83
Information on ink cartridges and the printhead ................................................................................................ 84
Check the estimated ink levels ............................................................................................................................ 85
Printing with black or color ink only .................................................................................................................... 86
Replace the ink cartridges ................................................................................................................................... 87
Store printing supplies ........................................................................................................................................ 89
Anonymous usage information storage .............................................................................................................. 90
8 Solve a problem ........................................................................................................................................... 90
HP support ........................................................................................................................................................... 92
Obtain electronic support ................................................................................................................. 92
HP support by phone ......................................................................................................................... 92
Before you call ................................................................................................................ 93
Phone support period ..................................................................................................... 93
Telephone support numbers .......................................................................................... 93
After the phone support period ...................................................................................... 94
General troubleshooting tips and resources ....................................................................................................... 95
Solve printer problems ........................................................................................................................................ 96
The printer shuts down unexpectedly .............................................................................................. 96
The printer is making some unexpected noises ............................................................................... 96
Alignment fails .................................................................................................................................. 96
The printer is not responding (nothing prints) ................................................................................. 97
The printer prints slowly ................................................................................................................... 97
Solution 1: Use a lower print quality setting .................................................................. 97
Solution 2: Check the ink levels ...................................................................................... 97
Solution 3: Contact HP support ...................................................................................... 98
Blank or partial page printed ............................................................................................................ 98
Something on the page is missing or incorrect ................................................................................ 99
Placement of the text or graphics is wrong ...................................................................................... 99
Print quality troubleshooting ............................................................................................................................ 101
Solution 1: Make sure you are using original HP ink cartridges ..................................................... 101
Solution 2: Check the ink levels ...................................................................................................... 101
Solution 3: Check the paper loaded in the input tray ..................................................................... 102
Solution 4: Check the paper type .................................................................................................... 102
Solution 5: Check the print settings ............................................................................................... 102
ENWW ix
Page 11

Solution 6: Print and evaluate a print quality report ...................................................................... 103
Solution 7: Contact HP support ....................................................................................................... 103
Solve paper-feed problems ............................................................................................................................... 105
Solve copy problems .......................................................................................................................................... 107
No copy came out ............................................................................................................................ 107
Copies are blank .............................................................................................................................. 107
Documents are missing or faded .................................................................................................... 107
Size is reduced ................................................................................................................................. 108
Copy quality is poor ......................................................................................................................... 108
Copy defects are apparent .............................................................................................................. 109
The printer prints half a page, then ejects the paper ..................................................................... 110
Paper mismatch .............................................................................................................................. 110
Solve scan problems .......................................................................................................................................... 111
Scanner did nothing ........................................................................................................................ 111
Scan takes too long ......................................................................................................................... 111
Part of the document did not scan or text is missing ..................................................................... 112
Text cannot be edited ...................................................................................................................... 112
Error messages appear ................................................................................................................... 113
Scanned image quality is poor ........................................................................................................ 113
Scan defects are apparent .............................................................................................................. 114
Solve fax problems ............................................................................................................................................ 116
The fax test failed ........................................................................................................................... 116
The "Fax Hardware Test" failed ..................................................................................... 117
The "Fax Connected to Active Telephone Wall Jack" test failed ................................... 117
The "Phone Cord Connected to Correct Port on Fax" test failed .................................. 118
The "Using Correct Type of Phone Cord with Fax" test failed ...................................... 118
The "Dial Tone Detection" test failed ............................................................................ 119
The "Fax Line Condition" test failed .............................................................................. 120
The display always shows Phone O Hook .................................................................................... 121
The printer is having problems sending and receiving faxes ......................................................... 121
The printer is having problems sending a manual fax ................................................................... 122
The printer cannot receive faxes, but can send faxes .................................................................... 123
The printer cannot send faxes, but can receive faxes .................................................................... 124
Fax tones are recorded on my answering machine ........................................................................ 124
The phone cord that came with my printer is not long enough ..................................................... 125
Color faxes do not print ................................................................................................................... 125
The computer cannot receive faxes (Fax to PC and Fax to Mac) .................................................... 125
Solve problems using Web Services and HP websites ...................................................................................... 126
Solve problems using Web Services ............................................................................................... 126
Solve problems using HP websites ................................................................................................. 127
Solve memory device problems ........................................................................................................................ 128
x ENWW
Page 12

The printer cannot read the memory device .................................................................................. 128
The printer cannot read photos on the memory device ................................................................. 128
Solve network problems ................................................................................................................................... 129
Solve Ethernet network problems .................................................................................................. 129
Solve wireless problems ................................................................................................................. 129
Basic wireless troubleshooting .................................................................................... 130
Advanced wireless troubleshooting ............................................................................. 131
Step 1: Make sure your computer is connected to your network .............. 132
Step 2: Make sure that the printer is connected to your network ............. 133
Step 3: Make sure your computer is not connected over a Virtual
Private Network (VPN) ............................................................................... 134
Step 4: Make sure the printer is online and ready ..................................... 134
Step 5: Make sure the HP printer labeled (Network) is set as the
default printer driver (Windows only) ........................................................ 135
Step 6: Check to see if the rewall software is blocking communication . 135
After resolving the problems ........................................................................................ 136
Reset the Printer Network Settings ................................................................................................ 136
Congure your rewall software to work with the printer ............................................................................... 137
Solve printer management problems ............................................................................................................... 138
Embedded web server cannot be opened ...................................................................................... 138
Troubleshoot installation issues ....................................................................................................................... 140
Hardware installation suggestions ................................................................................................. 140
HP software installation suggestions ............................................................................................. 140
Understand the Printer Status Report .............................................................................................................. 142
Understand the network conguration page ................................................................................................... 144
Printhead maintenance ..................................................................................................................................... 146
Clean the printhead ......................................................................................................................... 146
Align the printhead .......................................................................................................................... 147
Uninstall and reinstall the HP software ............................................................................................................ 149
Clear jams .......................................................................................................................................................... 150
Clear paper jams .............................................................................................................................. 150
Avoid paper jams ............................................................................................................................. 152
Appendix A Technical information ................................................................................................................. 155
Warranty information ........................................................................................................................................ 156
Hewlett-Packard limited warranty statement ............................................................................... 157
Ink cartridge warranty information ................................................................................................ 157
Printer specications ......................................................................................................................................... 159
Physical specications .................................................................................................................... 159
Product features and capacities ..................................................................................................... 160
Processor and memory specications ............................................................................................ 160
ENWW xi
Page 13

System requirements ...................................................................................................................... 160
Network protocol specications ..................................................................................................... 160
Embedded web server specications ............................................................................................. 161
Paper specications ........................................................................................................................ 161
Understand specications for supported paper .......................................................... 161
Understand supported sizes ...................................................................... 161
Understand supported paper types and weights ...................................... 164
Set minimum margins .................................................................................................. 164
Guidelines for printing on both sides of a page ........................................................... 165
Print resolution ............................................................................................................................... 166
Copy specications .......................................................................................................................... 166
Fax specications ............................................................................................................................ 166
Scan specications .......................................................................................................................... 167
Web Services specications ............................................................................................................ 167
HP ePrint ....................................................................................................................... 167
Printer Apps .................................................................................................................. 168
HP website specications ............................................................................................................... 168
Environmental specications ......................................................................................................... 168
Electrical specications .................................................................................................................. 168
Acoustic emission specications .................................................................................................... 169
Memory device specications ......................................................................................................... 169
USB ash drives ............................................................................................................ 169
Regulatory information ..................................................................................................................................... 170
Regulatory Model Number .............................................................................................................. 170
FCC statement ................................................................................................................................. 171
Notice to users in Korea .................................................................................................................. 171
VCCI (Class B) compliance statement for users in Japan ................................................................ 171
Notice to users in Japan about the power cord .............................................................................. 172
Noise emission statement for Germany ......................................................................................... 172
GS Declaration (Germany) ............................................................................................................... 172
Notice to users of the U.S. telephone network: FCC requirements ................................................ 173
Notice to users of the Canadian telephone network ...................................................................... 174
Notice to users in the European Economic Area ............................................................................. 175
Notice to users of the German telephone network ........................................................................ 175
Australia wired fax statement ........................................................................................................ 175
European Union Regulatory Notice ................................................................................................. 175
Regulatory information for wireless products ............................................................................... 177
Exposure to radio frequency radiation ......................................................................... 177
Notice to users in Brazil ................................................................................................ 177
Notice to users in Canada ............................................................................................. 178
Notice to users in Taiwan .............................................................................................. 178
xii ENWW
Page 14

Notice to users in Mexico .............................................................................................. 179
Notice to users in Japan ................................................................................................ 179
Environmental product stewardship program .................................................................................................. 180
European Union Commission Regulation 1275/2008 .................................................................... 180
Paper use ......................................................................................................................................... 180
Plastics ............................................................................................................................................ 180
Material safety data sheets ............................................................................................................ 181
Recycling program .......................................................................................................................... 181
HP inkjet supplies recycling program ............................................................................................. 181
Disposal of waste equipment by users in private households in the European Union .................. 182
Power consumption ........................................................................................................................ 183
Chemical Substances ...................................................................................................................... 183
Battery information ........................................................................................................................ 183
Battery disposal in Taiwan ............................................................................................ 183
Attention California users ............................................................................................. 183
Battery disposal in the Netherlands ............................................................................. 184
RoHS notices (China only) ............................................................................................................... 184
RoHS notices (Ukraine only) ............................................................................................................ 184
Third-party licenses .......................................................................................................................................... 185
Appendix B HP supplies and accessories ......................................................................................................... 195
Order printing supplies online ........................................................................................................................... 196
Supplies ............................................................................................................................................................. 197
Ink cartridges .................................................................................................................................. 197
HP paper .......................................................................................................................................... 197
Appendix C Additional fax setup .................................................................................................................... 197
Set up faxing (parallel phone systems) ............................................................................................................ 199
Select the correct fax setup for your home or oice ...................................................................... 200
Case A: Separate fax line (no voice calls received) ......................................................................... 201
Case B: Set up the printer with DSL ................................................................................................ 202
Case C: Set up the printer with a PBX phone system or an ISDN line ............................................. 203
Case D: Fax with a distinctive ring service on the same line .......................................................... 204
Case E: Shared voice/fax line .......................................................................................................... 205
Case F: Shared voice/fax line with voice mail ................................................................................. 206
Case G: Fax line shared with computer modem (no voice calls received) ...................................... 207
Set up the printer with a computer dial-up modem .................................................... 208
Set up the printer with a computer DSL/ADSL modem ................................................ 209
Case H: Shared voice/fax line with computer modem .................................................................... 210
Shared voice/fax with computer dial-up modem ........................................................ 210
Shared voice/fax with computer DSL/ADSL modem .................................................... 212
ENWW xiii
Page 15

Case I: Shared voice/fax line with answering machine ................................................................... 213
Case J: Shared voice/fax line with computer modem and answering machine ............................. 215
Shared voice/fax line with computer dial-up modem and answering machine .......... 215
Shared voice/fax line with computer DSL/ADSL modem and answering machine ..... 217
Case K: Shared voice/fax line with computer dial-up modem and voice mail ............................... 218
Serial-type fax setup ......................................................................................................................................... 221
Test fax setup .................................................................................................................................................... 222
Appendix D Network setup ............................................................................................................................ 222
Set up the printer for wireless communication ................................................................................................ 224
Before you begin ............................................................................................................................. 224
Set up the printer on your wireless network .................................................................................. 224
Set up the printer using the HP printer software ......................................................... 225
Set up the printer using the Wireless Setup Wizard ..................................................... 225
Set up the printer using WiFi Protected Setup (WPS) .................................................. 225
To connect the printer using the Push Button Method .............................. 226
To connect the printer using the PIN Method ............................................ 226
Set up the printer using the embedded web server (EWS) .......................................... 226
Change the connection type ........................................................................................................... 227
Change from an Ethernet connection to a wireless connection .................................. 227
Change from a USB connection to a wireless connection ............................................ 227
Change from a wireless connection to a USB or Ethernet connection ......................... 228
Test the wireless connection ........................................................................................................... 228
Guidelines for ensuring wireless network security ........................................................................ 228
Overview of security settings ....................................................................................... 228
Add hardware addresses to a wireless router (MAC ltering) ...................................... 229
Other wireless security guidelines ............................................................................... 229
Guidelines for reducing interference on a wireless network .......................................................... 230
Change basic network settings ......................................................................................................................... 231
View and print network settings ..................................................................................................... 231
Turn the wireless radio on and o .................................................................................................. 231
Change advanced network settings .................................................................................................................. 232
Set link speed .................................................................................................................................. 232
View IP settings ............................................................................................................................... 232
Change IP settings ........................................................................................................................... 232
Reset network settings ................................................................................................................... 233
HP wireless direct printing ................................................................................................................................ 234
Turn on HP wireless direct printing ................................................................................................. 234
Print from a wireless-capable mobile device ................................................................................. 235
Print from a wireless-capable computer ........................................................................................ 235
Print from a wireless-capable computer (Windows) .................................................... 235
xiv ENWW
Page 16

Print from a wireless-capable computer (Mac OS X) .................................................... 236
Appendix E Printer management tools ........................................................................................................... 236
Toolbox (Windows) ............................................................................................................................................ 237
Open the Toolbox ............................................................................................................................ 237
HP Utility (Mac OS X) .......................................................................................................................................... 238
To open HP Utility ............................................................................................................................ 238
Embedded web server ....................................................................................................................................... 239
About cookies .................................................................................................................................. 239
To open the embedded web server ................................................................................................ 239
Appendix F How do I? .................................................................................................................................... 240
Appendix G Errors (Windows) ........................................................................................................................ 240
Fax memory full ................................................................................................................................................. 243
Unable to communicate with printer ................................................................................................................ 244
Low on ink .......................................................................................................................................................... 245
Cartridge Problem ............................................................................................................................................. 246
Replace the ink cartridge ................................................................................................................................... 247
Paper Mismatch ................................................................................................................................................. 248
The cartridge cradle cannot move .................................................................................................................... 249
Paper Jam .......................................................................................................................................................... 250
The printer is out of paper ................................................................................................................................. 251
Printer Oine .................................................................................................................................................... 252
Printer Paused ................................................................................................................................................... 253
Document failed to print ................................................................................................................................... 254
Printer failure ..................................................................................................................................................... 255
Door or cover open ............................................................................................................................................ 256
Previously used ink cartridge installed ............................................................................................................. 257
Ink cartridges depleted ..................................................................................................................................... 258
Ink cartridge failure ........................................................................................................................................... 259
Printer supply upgrade ...................................................................................................................................... 260
Printer supply upgrade successful .................................................................................................................... 261
Printer supply upgrade problem ....................................................................................................................... 262
Non-HP ink cartridges installed ........................................................................................................................ 263
Using Original HP Cartridges has its Rewards ................................................................................................... 264
Counterfeit Cartridge Advisory .......................................................................................................................... 265
Used, Relled or Counterfeit Cartridge Detected ............................................................................................. 266
Use SETUP cartridges ........................................................................................................................................ 267
Do not use SETUP cartridges ............................................................................................................................. 268
ENWW xv
Page 17

Not enough ink at startup ................................................................................................................................. 269
Use black ink only? ............................................................................................................................................ 270
Use color ink only? ............................................................................................................................................. 271
Incompatible ink cartridges ............................................................................................................................... 272
Ink sensor failure ............................................................................................................................................... 273
Ink sensor warning ............................................................................................................................................ 274
Problem with printer preparation ..................................................................................................................... 275
Color cartridge out of ink ................................................................................................................................... 276
Black cartridge out of ink .................................................................................................................................. 277
Automatic document feeder cover open ........................................................................................................... 278
Problem with ink system ................................................................................................................................... 279
Index ........................................................................................................................................................... 281
xvi ENWW
Page 18

1 Get started
This guide provides details about how to use the printer and how to resolve problems.
●
Accessibility
●
HP EcoSolutions (HP and the Environment)
●
Understand the printer parts
●
Use the printer control panel
●
HP Digital Solutions
●
Select print paper
●
Load an original on the scanner glass
●
Load an original in the automatic document feeder (ADF)
●
Load paper
●
Insert a memory device
●
Install the accessories
●
Maintain the printer
●
Update the printer
●
Open the HP printer software (Windows)
●
Turn the printer o
NOTE: If you are using the printer with a computer running Windows XP Starter Edition, Windows Vista
Starter Edition, Windows 7 Starter Edition, or Windows 8 Starter Edition, some features might not be
available. For more information, see System requirements on page 160.
ENWW 1
Page 19

Accessibility
The printer provides a number of features that make it accessible for people with disabilities.
Visual
The HP software provided with the printer is accessible for users with visual impairments or low vision by
using your operating system's accessibility options and features. The software also supports most assistive
technology such as screen readers, Braille readers, and voice-to-text applications. For users who are color
blind, colored buttons and tabs used in the HP software have simple text or icon labels that convey the
appropriate action.
Mobility
For users with mobility impairments, the HP software functions can be executed through keyboard
commands. The HP software also supports Windows accessibility options such as StickyKeys, ToggleKeys,
FilterKeys, and MouseKeys. The printer doors, buttons, paper trays, and paper guides can be operated by
users with limited strength and reach.
Support
For more details about the accessibility of this printer and HP's commitment to product accessibility, visit HP's
website at www.hp.com/accessibility.
For accessibility information for Mac OS X, visit the Apple website at www.apple.com/accessibility.
2 Chapter 1 Get started ENWW
Page 20

HP EcoSolutions (HP and the Environment)
Hewlett-Packard is committed to helping you optimize your environmental footprint and empowering you to
print responsibly—at home or in the oice.
For more detailed information about environmental guidelines, HP follows during the manufacturing process,
see Environmental product stewardship program on page 180. For more information about HP's
environmental initiatives, visit www.hp.com/ecosolutions.
This section contains the following topics:
●
Manage Power
●
Optimize Printing Supplies
Manage Power
To conserve electricity, the printer comes with the following features:
Sleep mode
Power usage is reduced while in Sleep mode. After initial setup of printer, the printer goes into low-power
mode after 5 minutes of inactivity.
To change the time to Sleep mode
▲
From the printer control panel, touch the (eco button), touch Sleep, and then touch the desired
option.
NOTE: If you change your country or region from the printer control panel, the time to sleep mode is
automatcially set to the default, which is 5 minutes.
Auto- o
This feature turns the printer o after 2 hours of inactivity to help reduce energy use. Auto-O turns the
printer o completely, so you must use the Power button to turn the printer back on. If your printer supports
this energy saving feature, Auto-O is automatically enabled or disabled depending on printer capabilities
and connection options. Even when Auto-O is disabled, the printer enters Sleep mode after 5 minutes of
inactivity to help reduce energy use.
●
Auto-O is enabled when the printer is turned on, if the printer does not have network, fax or Wi-Fi
Direct capability, or is not using these capabilities.
●
Auto-O is disabled when a printer’s wireless or Wi-Fi Direct capability is turned on or when a printer
with fax, USB, or Ethernet network capability establishes a fax, USB, or Ethernet network connection.
Schedule On and O
Use the printer's Schedule On and O feature, and then select the days and time you want the printer to turn
on and turn o automatically. For example, you can schedule the printer to turn on at 8 a.m. and turn o at 8
p.m. from Monday to Friday. In this way, you will save energy during the night and weekends.
To congure the printer's Schedule On and O feature
▲
From the printer control panel, touch the (eco button), touch Schedule On and O, and then set the
time to turn on and o the printer.
ENWW HP EcoSolutions (HP and the Environment) 3
Page 21

CAUTION: HP recommends that you replace a missing ink cartridge as soon as possible to avoid print quality
issues and possible extra ink usage or damage to the ink system. Never turn o the printer when a cartridge is
missing.
Optimize Printing Supplies
To optimize printing supplies such as ink and paper, try the following:
●
Recycle used original HP ink cartridges through HP Planet Partners. For more information, visit
www.hp.com/recycle.
●
Optimize paper usage by printing on both sides of the paper. If the printer has an HP automatic twosided printing accessory (duplexer), see Print on both sides (duplexing) on page 38.
●
Save ink and paper when printing web content with HP Smart Print. For more information, visit
www.hp.com/go/smartprint.
●
Change the print mode to a draft setting. The draft setting uses less ink.
●
Do not clean the printhead unnecessarily. Doing so wastes ink and shortens the life of the cartridges.
4 Chapter 1 Get started ENWW
Page 22
Understand the printer parts
This section contains the following topics:
●
Front view
●
Printing supplies area
●
Back view
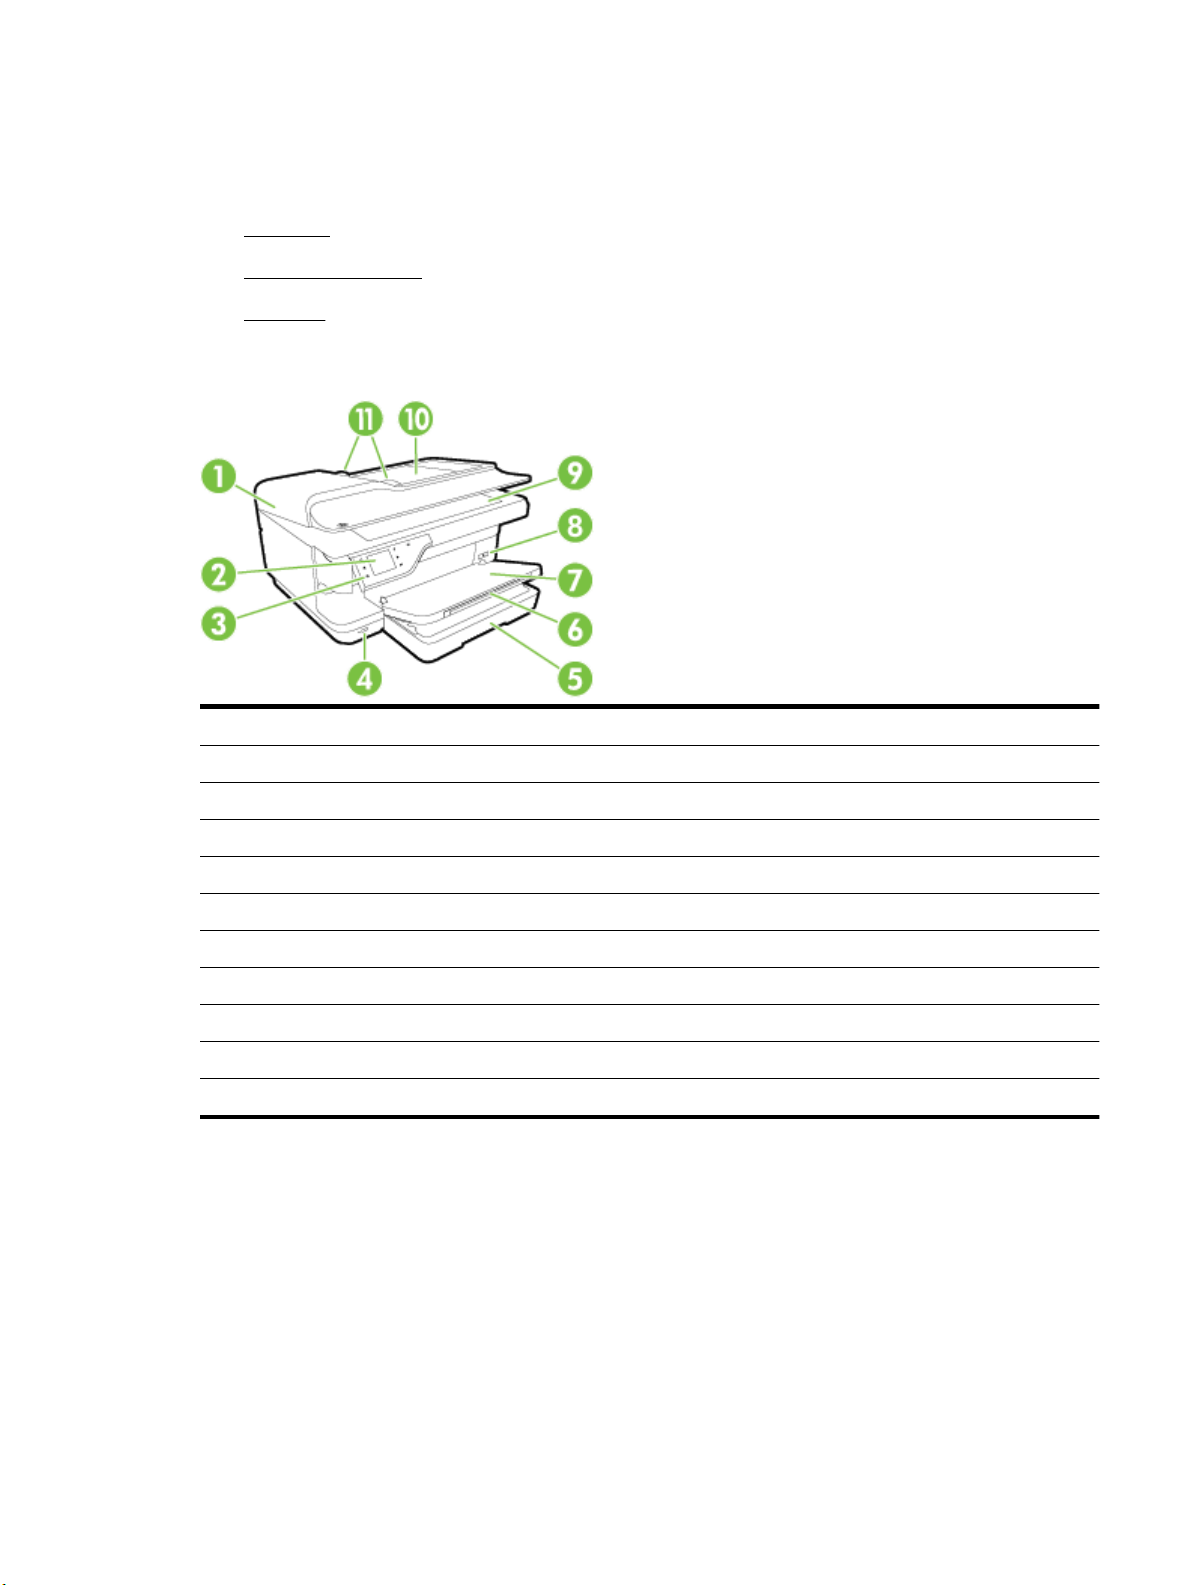
Front view
1 Automatic document feeder (ADF)
2 Control panel display
3 Control panel
4 Front universal serial bus (USB) port
5 Input tray
6 Output tray extension
7 Output tray
8 Power button
9 Scanner glass
10 Document feeder tray
11 Paper guides
ENWW Understand the printer parts 5
Page 23
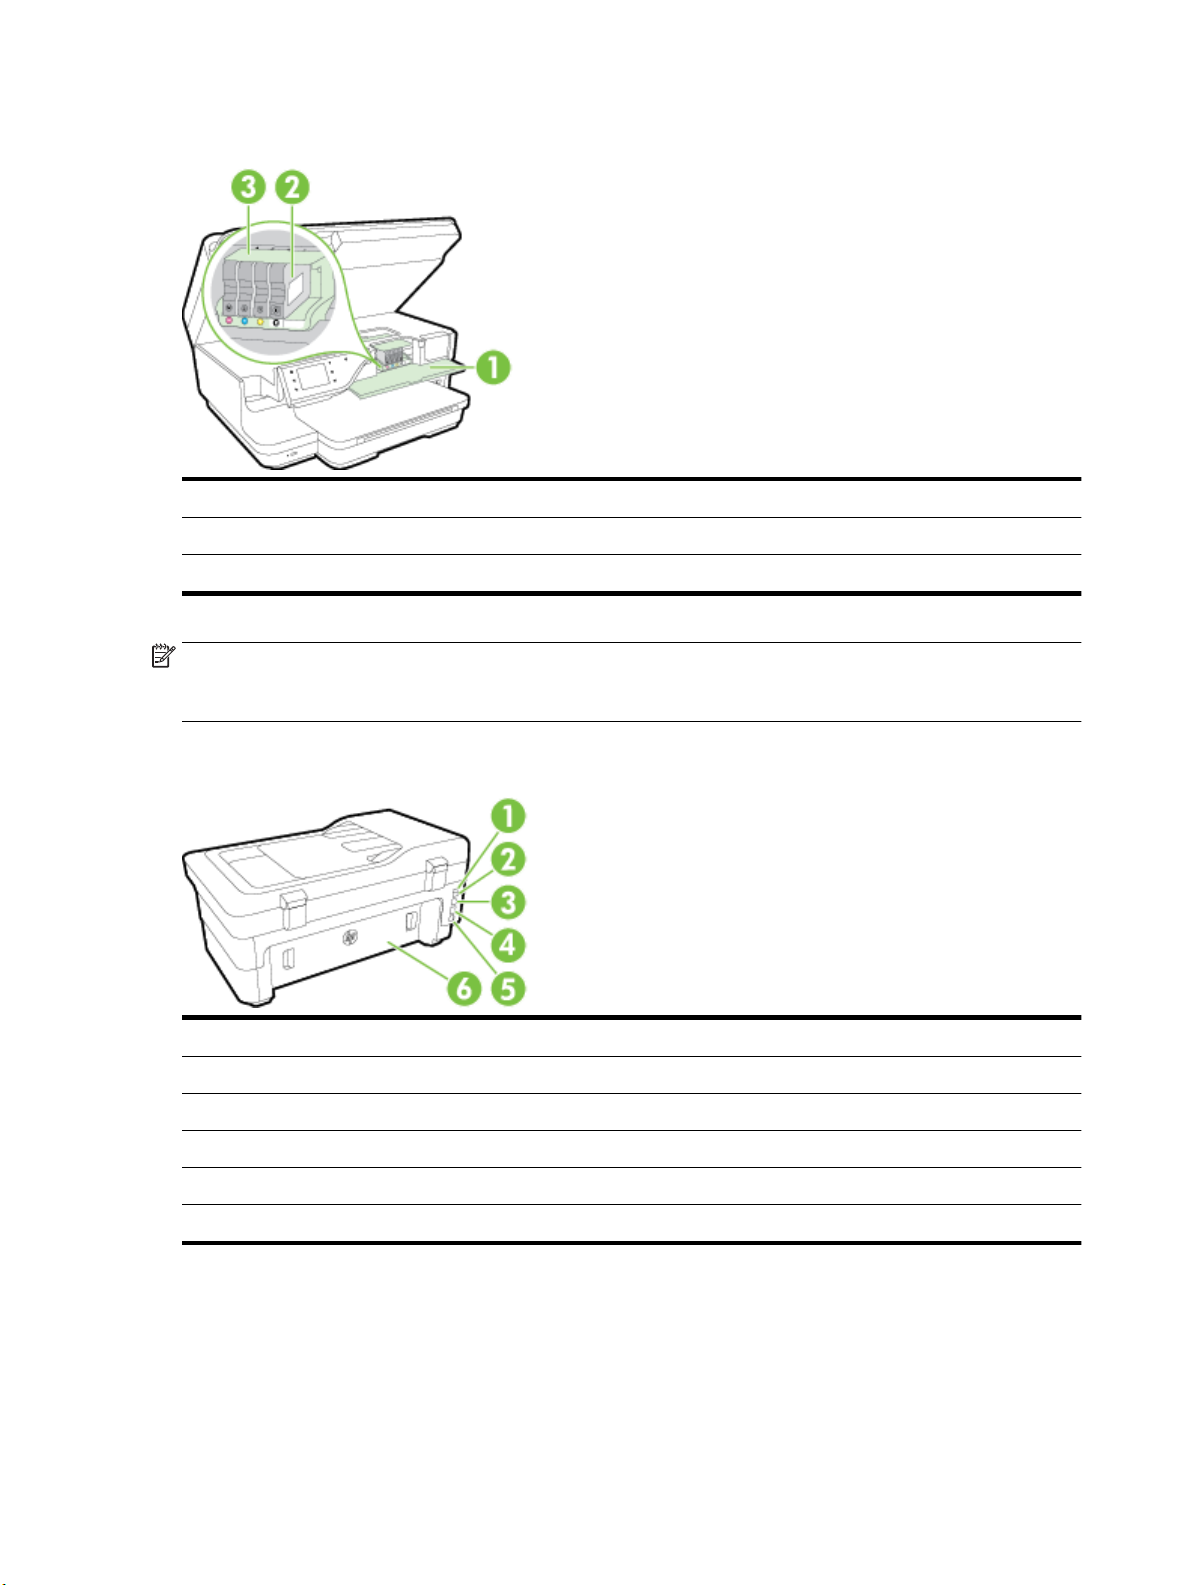
Printing supplies area
1 Ink cartridge access door
2 Ink cartridges
3 Printhead
NOTE: Printing supplies should be kept in the printer to prevent possible print quality issues or printhead
damage. Avoid removing supplies for extended periods of time. Do not turn o the printer when a cartridge is
missing.
Back view
1 Fax port (1-LINE)
2 Fax port (2-EXT)
3 Rear universal serial bus (USB) port
4 Ethernet network port
5 Power input
6 Rear access panel
6 Chapter 1 Get started ENWW
Page 24
Use the printer control panel
This section contains the following topics:
●
Overview of buttons and lights
●
Control panel display icons
●
Change printer settings
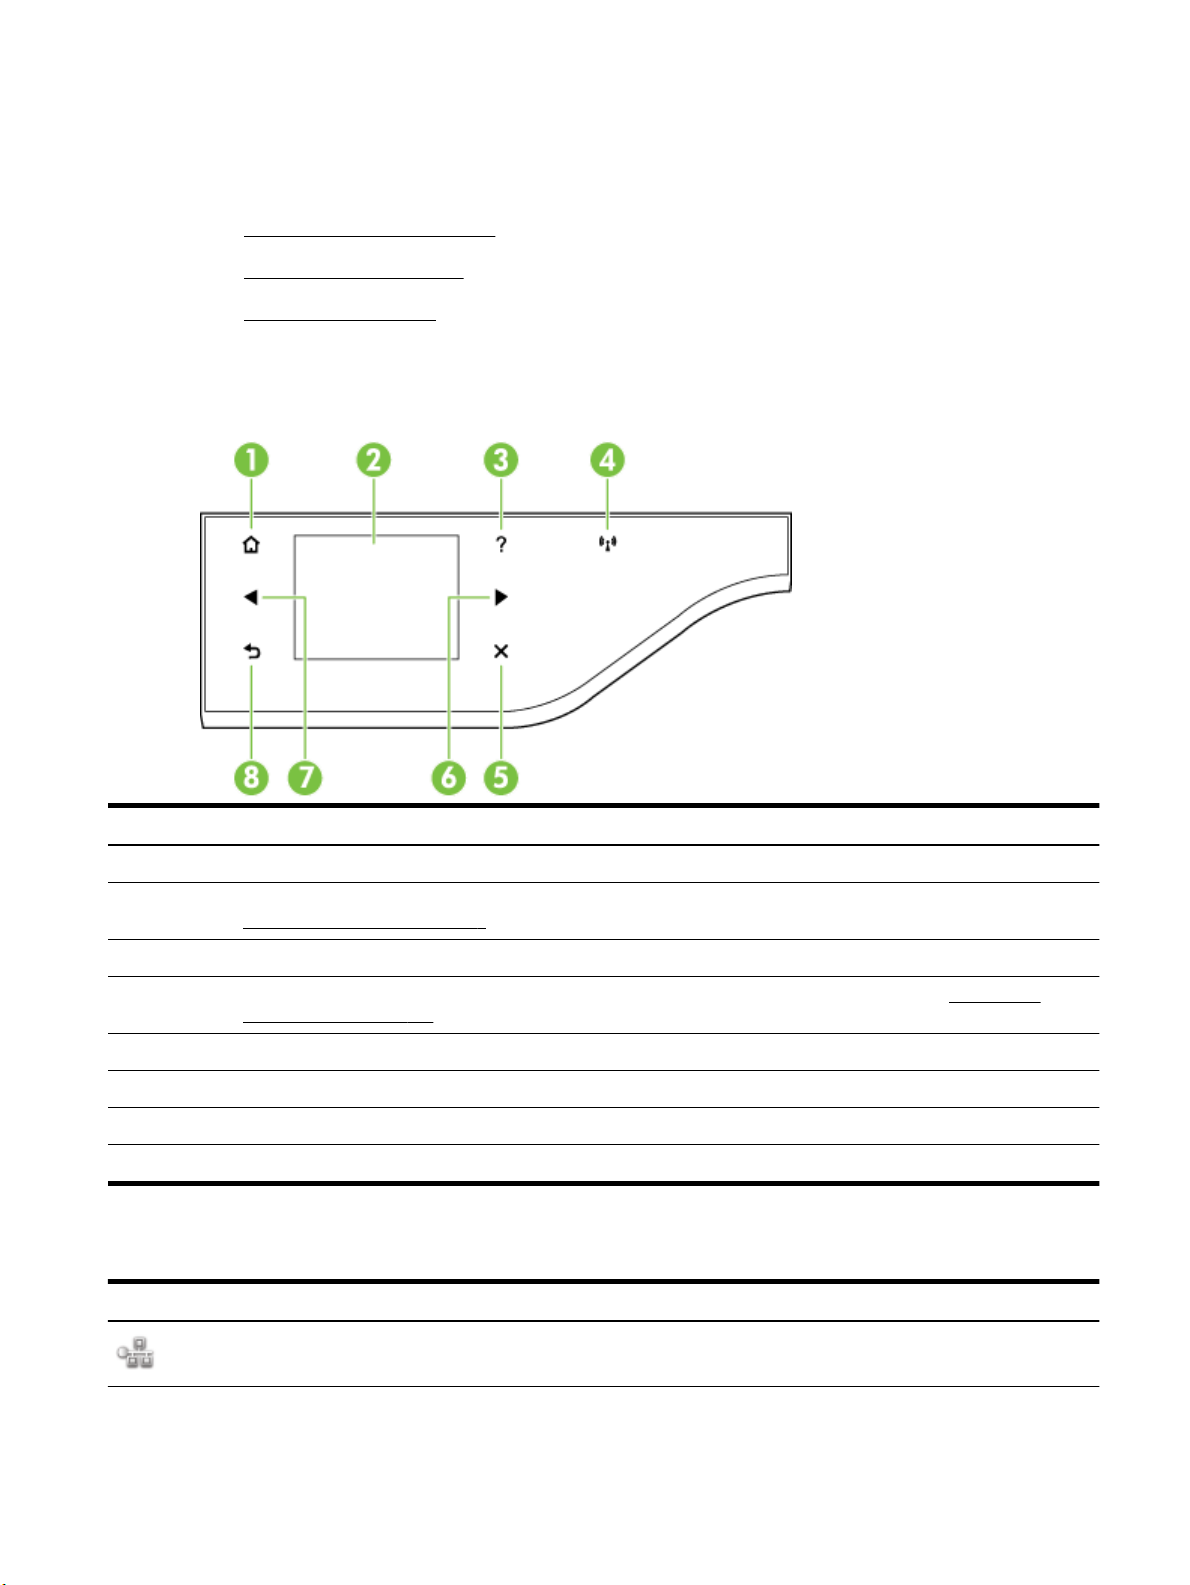
Overview of buttons and lights
The following diagrams and related tables provide a quick reference to the printer control panel features.
Label Name and Description
1 Home button: Returns to the home screen from any other screen.
2 Control panel display: Touch the screen to select menu options. For information about the icons that appear on the display, see
Control panel display icons on page 7.
3 Help button: Opens the Help menu.
4 Wireless light: By default, the wireless light is o. For more information about the wireless light status, see Basic wireless
troubleshooting on page 130.
5 Cancel button: Stops a job, exits a menu, or exits settings.
6 Right arrow button: Navigates through settings in the menu.
7 Left arrow button: Navigates through settings in the menu.
8 Back button: Returns to the previous menu.
Control panel display icons
Icon
Purpose
Shows that a wired network connection exists and also provides easy access to the network status screen.
ENWW Use the printer control panel 7
Page 25
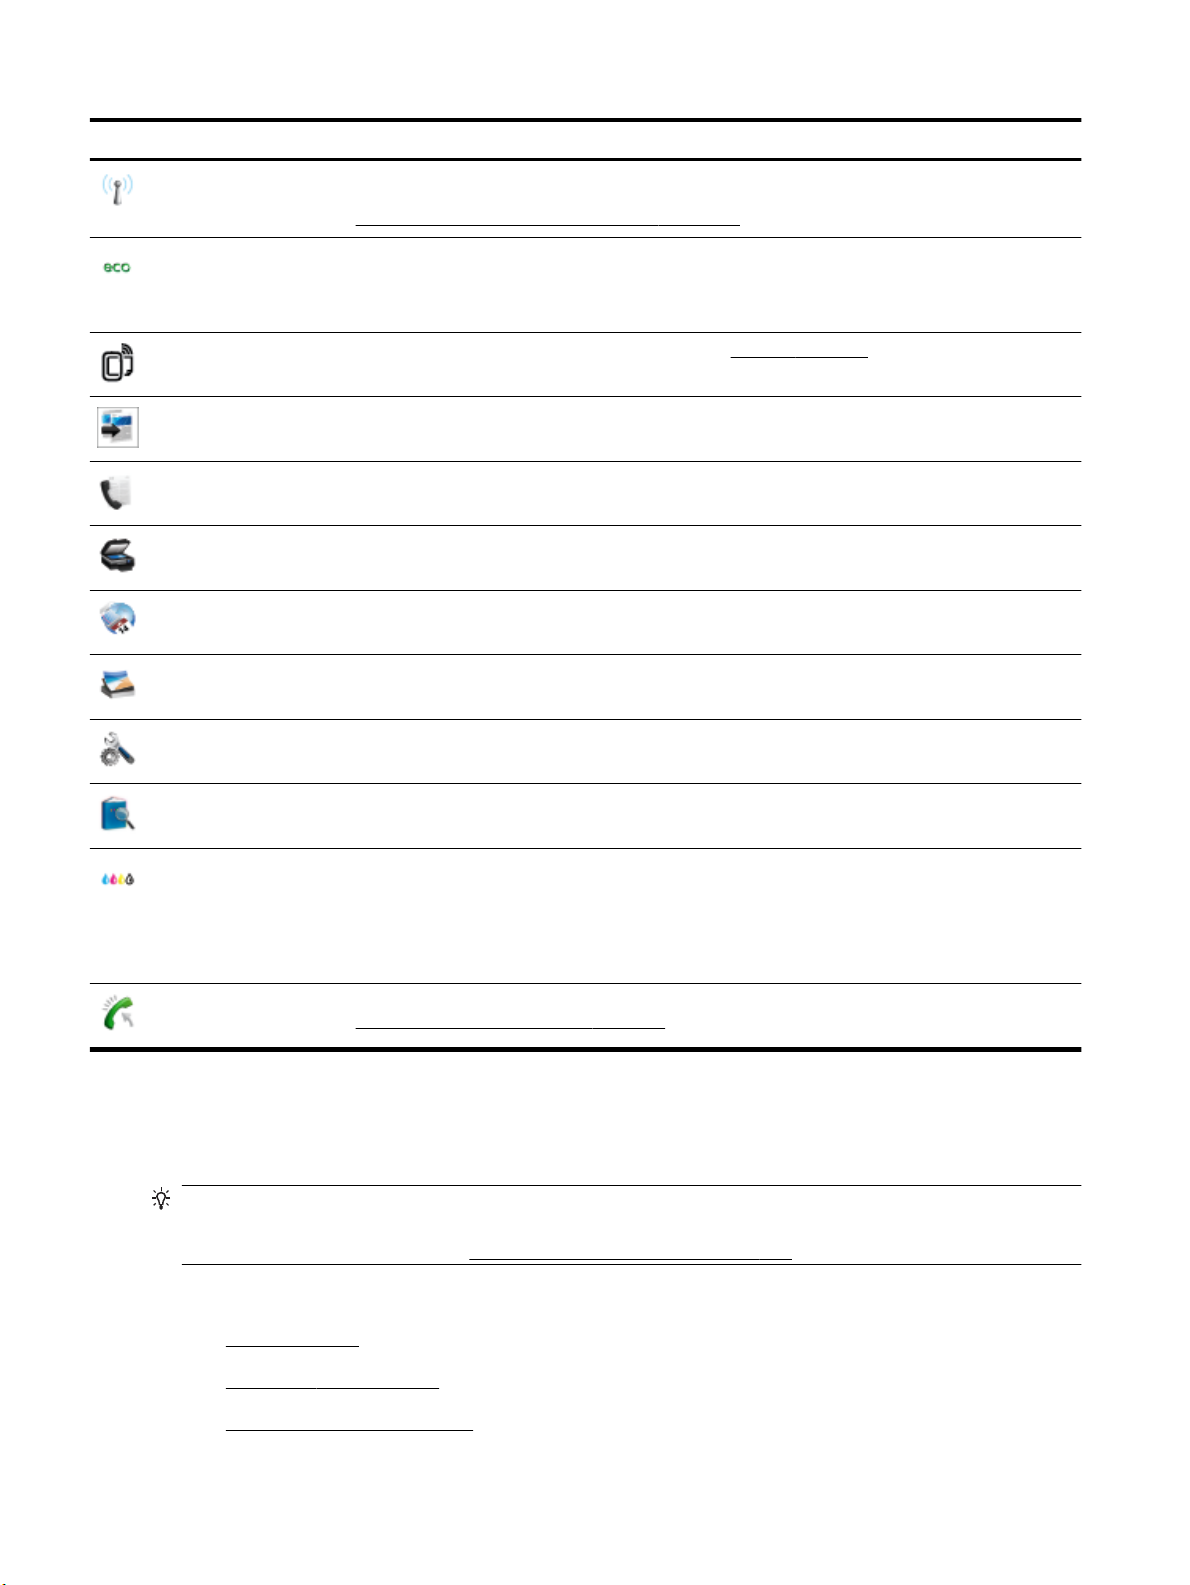
Icon Purpose
Shows that a wireless network connection exists. The signal strength is indicated by the number of curved lines.
This is for infrastructure mode. It also provides easy access to the network status screen. For more information,
see Set up the printer for wireless communication on page 224.
Displays a screen where you can learn about printer features that help conserve natural resources and reduce the
environmental impact of your printing choices.
TIP: You can congure settings for some features from this screen.
Shows that HP ePrint is turned on. For more information, see HP ePrint on page 81.
Displays a screen where you can make copies or select other options.
Displays a screen where you can send a fax, or choose fax settings.
Displays a screen where you can make a scan, or change scan settings.
Displays a screen where you can use HP Apps.
Displays a screen where you can adjust photo printing options.
Displays the Setup screen for generating reports, changing fax and other maintenance settings, and accessing
the Help screen.
Provides more information about the printer's features.
Displays a screen where you can see information about the ink cartridges, including ll levels. This icon has a red
border when an ink cartridge needs attention.
NOTE: Ink level warnings and indicators provide estimates for planning purposes only. When you receive a lowink warning message, consider having a replacement cartridge available to avoid possible printing delays. You do
not need to replace cartridges until prompted to do so.
Displays the status of the Auto Answer function. Touch Auto Answer to turn it on or o. For more information,
see Set the answer mode (Auto answer) on page 68.
Change printer settings
Use the control panel to change the printer mode and settings, print reports, or get help for the printer.
TIP: If the printer is connected to a computer, you can also change the printer settings using HP software
tools available on your computer, such as the HP printer software, HP Utility (Mac OS X), or the EWS. For more
information about these tools, see Printer management tools on page 236.
This section contains the following topics:
●
Select the mode
●
To select a dierent mode
●
To change settings for a mode
8 Chapter 1 Get started ENWW
Page 26

●
Change the printer settings
Select the mode
The main menu of the control panel display shows the available modes for the printer.
To select a mode, touch (Left arrow) or (Right arrow) to see the available modes, and then touch the icon
to select the desired mode. Follow the prompts on the control panel display to complete the job. The control
panel display returns to the main menu when the job is nished.
To select a dierent mode
Touch the (Back) button to return to the main menu. Touch (Left arrow) or (Right arrow) to scroll
through the available modes, and then touch the icon to select the desired mode.
To change settings for a mode
1. After selecting a mode, touch the arrow buttons to scroll through the available settings, and then touch
the setting you want to change.
2. Follow the prompts on the display to change the settings, and then touch Done .
NOTE: Touch the (Back) button to return to the previous menu.
Change the printer settings
To change the printer settings or print reports, use the options available in the Setup screen:
1. Touch (Right arrow), and then touch Setup .
2. Touch the arrows to scroll through the screens.
3. Touch the screen items to select screens or options.
NOTE: Use the (Back) button to return to the previous menu.
ENWW Use the printer control panel 9
Page 27

HP Digital Solutions
The printer includes a collection of digital solutions that can help you simplify and streamline your work.
●
HP Digital Scan (Scan to computer and Scan to Email)
●
HP Digital Fax (Fax to PC and Fax to Mac)
HP Digital Scan (Scan to computer and Scan to Email)
You can simply walk up to the printer, select the options from the printer control panel, and either scan
documents directly to a computer or quickly share them with business partners as email attachments.
For more information, see Scan on page 41.
HP Digital Fax (Fax to PC and Fax to Mac)
Never lose important faxes misplaced within a stack of paper pages again!
Use Fax to PC and Fax to Mac to automatically receive faxes and save faxes directly to your computer. With
Fax to PC and Fax to Mac, you can store digital copies of your faxes easily and eliminate the hassle of dealing
with bulky paper les. In addition, you can turn o fax printing altogether, saving money on paper and ink,
and reduce paper consumption and waste.
For more information, see Receive faxes to your computer using HP Digital Fax (Fax to PC and Fax to Mac)
on page 64.
10 Chapter 1 Get started ENWW
Page 28

Select print paper
The printer is designed to work well with most types of oice paper. It is best to test a variety of print paper
types before buying large quantities. Use HP paper for optimum print quality. Visit the HP website at
www.hp.com for more information about HP paper.
HP recommends plain papers with the ColorLok logo for printing everyday documents. All
papers with the ColorLok logo are independently tested to meet high standards of
reliability and print quality, and produce documents with crisp, vivid color, bolder blacks,
and that dry faster than ordinary plain papers. Look for papers with the ColorLok logo in
a variety of weights and sizes from major paper manufacturers.
This section contains the following topics:
●
Recommended papers for printing and copying
●
Recommended papers for photo printing
●
Tips for selecting and using paper
Recommended papers for printing and copying
If you want the best print quality, HP recommends using HP papers that are specically designed for the type
of project you are printing.
Depending on your country/region, some of these papers might not be available.
HP Brochure Paper
HP Professional Paper
HP Brochure and Flyer Paper
HP Tri-fold Brochure Paper
HP Premium Presentation Paper
HP Professional Paper
HP Bright White Inkjet Paper HP Bright White Inkjet Paper delivers high-contrast colors and sharp text. It is opaque enough for
HP Printing Paper HP Printing Paper is a high-quality multifunction paper. It produces documents that look and feel
HP Oice Paper HP Oice Paper is a high-quality multifunction paper. It is suitable for copies, drafts, memos and
HP Oice Recycled Paper HP Oice Recycled Paper is a high-quality multifunction paper made with 30% recycled ber. It
These papers are glossy-coated or matte-coated on both sides for two-sided use. They are the
perfect choice for producing professional quality marketing materials such as brochures and
mailers, as well as business graphics for report covers and calendars.
These papers are heavy two-sided matte papers perfect for presentations, proposals, reports, and
newsletters. They are heavyweight for an impressive look and feel.
two-sided color usage with no showthrough, which makes it ideal for newsletters, reports, and
yers. It features ColorLok Technology for less smearing, bolder blacks, and vivid colors.
more substantial than documents printed on standard multipurpose or copy paper. It features
ColorLok Technology for less smearing, bolder blacks, and vivid colors.
other everyday documents. It features ColorLok Technology for less smearing, bolder blacks, and
vivid colors.
features ColorLok Technology for less smearing, bolder blacks, and vivid colors.
ENWW Select print paper 11
Page 29

HP Premium Plus Photo Paper HP's best photo paper is heavyweight for producing professional quality photos. Features an
instant-dry nish for easy handling without smudging. It resists water, smears, ngerprints, and
humidity. It is available in several sizes, including A4, 8.5 x 11 inch, 10 x 15 cm (4 x 6 inch), 13 x 18
cm (5 x 7 inch), and two nishes – glossy or soft-gloss (satin matte). It is acid-free for longer
lasting documents.
HP Advanced Photo Paper This thick photo paper features an instant-dry nish for easy handling without smudging. It resists
water, smears, ngerprints, and humidity. Your prints have a look and feel comparable to a store
processed photo. It is available in several sizes, including A4, 8.5 x 11 inch, 10 x 15 cm (4 x 6 inch),
13x18 cm (5 x7 inch), A3, and two nishes – glossy or soft-gloss (satin matte). It is acid-free for
longer lasting documents.
HP Everyday Photo Paper Print colorful, everyday snapshots at a low cost, using paper designed for casual photo printing.
This aordable photo paper dries quickly for easy handling. Get sharp, crisp images when you use
this paper with any inkjet printer. Available in semi-gloss nish in 8.5 x 11 inch, A4, 4 x 6 inch, and
10 x 15 cm. It is acid-free for longer lasting documents.
To order HP papers and other supplies, go to www.hp.com . Go to Shop for Products & Services, and select
Ink & Toner .
NOTE: At this time, some portions of the HP web site are available in English only.
Recommended papers for photo printing
For the best print quality, HP recommends using HP papers that are specically designed for the type of
project you are printing. Depending on your country/region, some of these papers might not be available.
HP Premium Plus Photo Paper HP's best photo paper is heavyweight for producing professional quality photos. Features an
instant-dry nish for easy handling without smudging. It resists water, smears, ngerprints, and
humidity. It is available in several sizes, including A4, 8.5 x 11 inch, 10 x 15 cm (4 x 6 inch), 13 x 18
cm (5 x 7 inch), and two nishes – glossy or soft-gloss (satin matte). It is acid-free for longer
lasting documents.
HP Advanced Photo Paper This thick photo paper features an instant-dry nish for easy handling without smudging. It resists
water, smears, ngerprints, and humidity. Your prints have a look and feel comparable to a store
processed photo. It is available in several sizes, including A4, 8.5 x 11 inch, 10 x 15 cm (4 x 6 inch),
13x18 cm (5 x7 inch), A3, and two nishes – glossy or soft-gloss (satin matte). It is acid-free for
longer lasting documents.
HP Everyday Photo Paper Print colorful, everyday snapshots at a low cost, using paper designed for casual photo printing.
This aordable, photo paper dries quickly for easy handling. Get sharp, crisp images when you use
this paper with any inkjet printer. Available in semi-gloss nish in 8.5 x 11 inch, A4, 4 x 6 inch, and
10 x 15 cm. It is acid-free for longer lasting documents.
HP Photo Value Packs HP Photo Value Packs conveniently package original HP ink cartridges and HP Advanced Photo
Paper to save you time and take the guesswork out of printing aordable, lab-quality photos with
your HP printer. Original HP inks and HP Advanced Photo Paper have been designed to work
together so your photos are long lasting and vivid, print after print. Great for printing out an entire
vacation's worth of photos or multiple prints to share.
To order HP papers and other supplies, go to www.hp.com . Go to Shop for Products & Services and select
Ink & Toner .
NOTE: At this time, some portions of the HP web site are available in English only.
Tips for selecting and using paper
For the best results, observe the following guidelines.
12 Chapter 1 Get started ENWW
Page 30

●
Always use paper that conforms to the printer specications. For more information, see Paper
specications on page 161.
●
Load only one type of paper at a time into a tray or automatic document feeder (ADF).
●
When loading the trays and ADF, make sure the paper is loaded correctly. For more information, see
Load paper on page 16 or Load an original in the automatic document feeder (ADF) on page 15.
●
Do not overload the tray or ADF. For more information, see Load paper on page 16 or Load an original
in the automatic document feeder (ADF) on page 15.
●
To prevent jams, poor print quality, and other printing problems, avoid loading the following paper in the
trays or ADF:
—
Multipart forms
—
Media that is damaged, curled, or wrinkled
—
Media with cutouts or perforations
—
Media that is heavily textured, embossed, or does not accept ink well
—
Media that is too lightweight or stretches easily
—
Media that contains staples or clips
ENWW Select print paper 13
Page 31

Load an original on the scanner glass
You can copy, scan, or fax originals by loading them on the scanner glass.
NOTE: Many of the special features do not work correctly if the scanner glass and lid backing are not clean.
For more information, see Maintain the printer on page 22.
NOTE: Remove all originals from the document feeder tray before lifting the lid on the printer.
To load an original on the scanner glass
Use these steps to load an original on the scanner glass.
1. Lift the scanner lid.
2. Load your original print-side down as shown in the following illustration.
TIP: For more help on loading an original, refer to the engraved guides along the edge of the scanner
glass.
3. Close the lid.
14 Chapter 1 Get started ENWW
Page 32

Load an original in the automatic document feeder (ADF)
You can copy, scan, or fax a document by placing it in the automatic document feeder (ADF).
CAUTION: Do not load photos in the ADF; this might cause damage to your photos. Use only paper that is
supported by the printer. For more information, see Tips for selecting and using paper on page 12.
NOTE: Only single-sided documents can be scanned, copied, or faxed using the ADF. The ADF does not
support double-sided documents.
NOTE: B-size documents cannot be scanned, copied, or faxed using the ADF.
NOTE: Some features, such as the Fit to Page copy feature, do not work when you load your originals in the
ADF. You must load your originals on the scanner glass.
To load an original in the ADF
Use these steps to load a document in the ADF.
1. Load your original print-side up into the ADF.
a. If you are loading an original printed in portrait orientation, place the pages so that the top edge of
the document goes in rst. If you are loading an original printed in landscape orientation, place the
pages so that the left edge of the document goes in rst.
b. Slide the paper into the ADF until you hear a tone or see a message on the display indicating that
the loaded pages were detected.
TIP: For more help on loading originals in the ADF, refer to the diagram engraved in the document
feeder tray.
2. Slide the paper guides inward until they stop at the left and right edges of the paper.
ENWW Load an original in the automatic document feeder (ADF) 15
Page 33

Load paper
This section provides instructions for loading paper into the printer.
●
Load standard-size paper
●
Load envelopes
●
Load cards and photo paper
●
Load custom-size paper
Load standard-size paper
Use these instructions to load standard paper.
1. Lift the output tray.
2. Slide the paper width guide out as far as possible.
NOTE: If the paper is too long, pull the input tray to extend it.
3. Load the paper in portrait orientation and with the side to be printed facing down.
Make sure the stack of paper is inserted as far inside the printer as possible and does not exceed the line
marking in the tray.
NOTE: Do not load paper while the printer is printing.
4. Slide the paper guides in the tray until they touch the edge of the stack of paper.
5. Lower the output tray.
6. Pull out the output tray extension.
16 Chapter 1 Get started ENWW
Page 34

Load envelopes
Use these instructions to load an envelope.
1. Lift the output tray.
2. Slide out the paper width guides in the input tray as far as possible.
NOTE: If you are loading larger-size envelopes, pull up the front edge of the input tray to extend it.
3. Insert the envelopes print-side down and load according to the graphic.
Make sure the stack of envelopes does not exceed the line marking in the tray.
NOTE: Do not load envelopes while the printer is printing.
4. Slide the paper guides in the tray until they touch the edge of the stack of envelopes.
5. Lower the output tray.
6. Pull out the output tray extension.
Load cards and photo paper
Use these instructions to load cards and photo paper.
1. Lift the output tray.
2. Slide out the paper width guide in the input tray as far as possible.
NOTE: If you are loading larger-size paper, pull up the front edge of the input tray to extend it.
3. Insert the paper print-side down in the tray.
Make sure the stack of paper is inserted as far inside the printer as possible and does not exceed the line
marking in the tray. If the photo paper has a tab along one edge, make sure the tab is pointing towards
the front of the printer.
NOTE: Do not load paper while the printer is printing.
ENWW Load paper 17
Page 35

4. Slide the paper guides in the tray until they touch the edge of the stack of paper.
5. Lower the output tray.
6. Pull out the output tray extension.
Load custom-size paper
Use these instructions to load custom-size paper.
CAUTION: Use only custom-size paper that is supported by the printer. For more information, see Paper
specications on page 161.
1. Lift the output tray.
2. Slide the paper width guide out as far as possible.
NOTE: If you are loading larger-size paper, pull up the front edge of the input tray to extend it.
3. Insert the paper print-side down in the tray.
Make sure the stack of paper is inserted as far inside the printer as possible and does not exceed the line
marking in the tray.
NOTE: Do not load paper while the printer is printing.
4. Slide the paper guides in the tray until they touch the edge of the stack of paper.
5. Lower the output tray.
6. Pull out the output tray extension.
18 Chapter 1 Get started ENWW
Page 36

Insert a memory device
Using the USB port on the front of the printer, you can connect a USB ash drive. You can also transfer les
from the USB ash drive to your computer or scan les to the USB ash drive from the printer.
CAUTION: Attempting to remove a USB ash drive while it is being accessed can damage les on the USB
ash drive. You can safely remove a USB ash drive only when the status light is not blinking.
NOTE: The printer does not support encrypted USB ash drives.
For more information about USB ash drives that can be used with the printer, see Memory device
specications on page 169.
To connect a USB ash drive
▲
Insert the USB ash drive to the USB port on the front of the printer.
NOTE: If your USB ash drive does not t into this port due to size limitations, or if the connector on the
device is shorter than 11 mm (0.43 in), you will need to purchase a USB extension cable in order to use your
device with this port.
ENWW Insert a memory device 19
Page 37

Install the accessories
This section contains the following topics:
●
Install the automatic two-sided printing accessory (duplexer)
●
Turn on accessories in the printer driver
Install the automatic two-sided printing accessory (duplexer)
You can print on both sides of a sheet of paper automatically. For information on using the duplexer, see Print
on both sides (duplexing) on page 38.
To install the duplexer:
Slide the duplexer into the back of the printer until the unit locks into place. Do not press the buttons on
either side of the duplexer when installing the unit; use them only for removing the unit from the printer.
Turn on accessories in the printer driver
●
To turn on accessories (Windows)
●
To turn on accessories on (Mac OS X)
To turn on accessories (Windows)
1. Click Start , and then click Printers, Printers and Faxes , or Devices and Printers .
- Or -
Click Start , click Control Panel , and then double-click Printers.
- Or -
On the Start screen, click Control Panel , and then click View devices and printers.
2. Right-click the printer icon, and then click Properties .
3. Select the Device Settings tab. Click the accessory that you want to turn on, click Installed from the
drop-down menu, and then click OK.
To turn on accessories on (Mac OS X)
Mac OS X automatically turns on all accessories in the printer driver when you install the printer software. If
you add a new accessory later, follow these steps:
20 Chapter 1 Get started ENWW
Page 38

1. Open the System Preferences and then select Print & Fax or Print & Scan.
2. Select the printer from list of printers, and then click Options & Supplies.
3. Click the Driver tab.
4. Select the options you want to install, and then click OK.
ENWW Install the accessories 21
Page 39

Maintain the printer
This section provides instructions for keeping the printer in top working condition. Perform these
maintenance procedures as necessary.
●
Clean the scanner glass
●
Clean the exterior
●
Clean the automatic document feeder
●
Restore factory defaults
Clean the scanner glass
NOTE: Dust or dirt on the scanner glass, scanner lid backing, or scanner frame can slow down performance,
degrade the quality of scans, and aect the accuracy of special features such as tting copies to a certain
page size.
To clean the scanner glass
1. Turn o the printer. For more information, see Turn the printer o on page 26.
2. Lift the scanner lid.
3. Clean the scanner glass and lid backing by using a soft, lint-free cloth that has been sprayed with a mild
glass cleaner. Dry the scanner glass with a dry, soft, lint-free cloth.
CAUTION: Use only glass cleaner to clean the scanner glass. Avoid cleaners that contain abrasives,
acetone, benzene, and carbon tetrachloride, all of which can damage the scanner glass. Avoid isopropyl
alcohol because it can leave streaks on the scanner glass.
CAUTION: Do not spray the glass cleaner directly on the scanner glass. If too much glass cleaner is
applied, the cleaner could leak under the scanner glass and damage the scanner.
4. Close the scanner lid, and turn on the printer.
Clean the exterior
WARNING! Before cleaning the printer, turn the printer o by pressing the (Power) button and unplug the
power cord from the electrical socket.
22 Chapter 1 Get started ENWW
Page 40

Use a soft, damp, lint-free cloth to wipe dust, smudges, and stains o of the case. Keep uids away from the
interior of the printer, as well as from the printer control panel.
Clean the automatic document feeder
If the automatic document feeder picks up multiple pages or if it does not pick up plain paper, you can clean
the rollers and separator pad. Lift the automatic document feeder cover to access the pick assembly inside
the automatic document feeder, clean the rollers or separator pad, and then close the cover.
To clean the rollers or separator pad
1. Remove all originals from the document feeder tray.
2. Lift the automatic document feeder cover (1).
This provides easy access to the rollers (2) and separator pad (3).
1 Automatic document feeder cover
2 Rollers
3 Separator pad
3. Lightly dampen a clean lint-free cloth with distilled water, then squeeze any excess liquid from the cloth.
4. Use the damp cloth to wipe any residue o the rollers or separator pad.
NOTE: If the residue does not come o using distilled water, try using isopropyl (rubbing) alcohol.
5. Close the cover of the automatic document feeder.
Restore factory defaults
This section provides instructions about how to restore your printer back to the factory defaults.
1. Touch (Right arrow), and then touch Setup .
2. Touch Tools , and then touch Restore Factory Defaults.
ENWW Maintain the printer 23
Page 41

Update the printer
HP is always working to improve the performance of its printers and bring you the latest features. If the
printer is connected to a network and Web Services has been enabled, you can check for and install printer
updates.
To update the printer, use one of the following methods:
●
Update the printer using the embedded web server
●
Update the printer using the printer control panel
Update the printer using the embedded web server
1. Open the EWS. For more information, see Embedded web server on page 239.
2. Click the Web Services tab.
3. In the Web Services Settings section, click Product Update, click Check Now, and then follow the on-
screen instructions.
4. If the product update option is not available, follow these instructions:
a. In the Web Services Settings section, click Setup , click Continue, and follow the on-screen
instructions.
b. If prompted, choose to allow the printer to check for and install printer updates.
NOTE: If a printer update is available, the printer downloads and installs the update, and then restarts.
NOTE: If prompted for proxy settings and if your network uses proxy settings, follow the on-screen
instructions to set up a proxy server. If you do not have the details, contact your network administrator
or the person who set up the network.
Update the printer using the printer control panel
1.
On the printer control panel, touch (HP ePrint), touch OK , touch Settings , and then touch Printer
Update .
2. Touch Check for Product Update, and then follow the on-screen instructions.
To enable the printer to automatically check for updates:
1.
On the printer control panel, touch (HP ePrint), touch OK , touch Settings , and then touch Printer
Update .
2. Touch Auto Update and then touch On .
24 Chapter 1 Get started ENWW
Page 42

Open the HP printer software (Windows)
Open the HP printer software by doing one of the following:
●
From the computer desktop, click Start , select Programs or All Programs , click HP, click the folder for
the printer, and then select the icon with the printer's name.
●
On the Start screen, right-click an empty area on the screen, click All Apps on the app bar, and then click
the icon with the printer's name.
ENWW Open the HP printer software (Windows) 25
Page 43

Turn the printer o
Turn the printer o by pressing the (Power) button located on the printer. Wait until the power light turns
o before unplugging the power cord or turning o a power strip.
CAUTION: If you incorrectly turn the printer o, the print carriage might not return to the correct position,
causing problems with the ink cartridges and print quality issues.
CAUTION: HP recommends that you replace any missing cartridges as soon as possible to avoid print quality
issues, possible extra ink usage, or damage to the ink system. Never turn o the printer when ink cartridges
are missing.
2 Print
Most print settings are automatically handled by the software application. Change the settings manually only
when you want to change print quality, print on specic types of paper, or use special features. For more
information about selecting the best print paper for your documents, see Select print paper on page 11.
Choose a print job to continue:
Print documents on page 27
Print brochures on page 28
Print on envelopes on page 30
Print photos on page 32
Print on special and custom-sized paper on page 34
Print borderless documents or photos on page 36
26 Chapter 1 Get started ENWW
Page 44

Print documents
Follow the instructions for your operating system.
●
Print documents (Windows)
●
Print documents (Mac OS X)
TIP: This printer includes HP ePrint, a free service from HP that allows you to print documents on your HP
ePrint-enabled printer anytime, from any location, without any additional software or printer drivers. For
more information, see HP ePrint on page 81.
Print documents (Windows)
1. Load paper in the tray. For more information, see Load paper on page 16.
2. On the File menu in your software application, click Print .
3. Make sure the printer you want to use is selected.
4. To change settings, click the button that opens the Properties dialog box.
Depending on your software application, this button might be called Properties , Options , Printer
Setup , Printer , or Preferences .
5. Change the paper orientation on the Layout tab, and paper source, media type, paper size, and quality
settings on the Paper/Quality tab.
To print in black and white, click the Advanced button, and then select Black Ink Only from the Print in
Grayscale drop-down list under Printer Features.
6. Click OK .
7. Click Print or OK to begin printing.
Print documents (Mac OS X)
1. Load paper in the tray. For more information, see Load paper on page 16.
2. From the File menu in your software application, click Print .
3. Make sure the printer you want to use is selected in the Format For pop-up menu.
If you do not see print options in the Print dialog, do the following:
●
Mac OS X v10.6: Click the blue disclosure triangle next to the printer selection.
●
OS X Lion: Click Show Details .
4. Select a paper size from the pop-up menu.
If the Paper Size pop-up menu is not in the Print dialog, click the Page Setup button. When you are done
selecting the paper size, click OK to close Page Setup and return to the Print dialog.
5. Click Print .
ENWW Print documents 27
Page 45

Print brochures
Follow the instructions for your operating system.
●
Print brochures (Windows)
●
Print brochures (Mac OS X)
TIP: This printer includes HP ePrint, a free service from HP that allows you to print documents on your HP
ePrint-enabled printer anytime, from any location, without any additional software or printer drivers. For
more information, see HP ePrint on page 81.
Print brochures (Windows)
NOTE: To set print settings for all print jobs, make the changes in the HP software provided with the printer.
For more information on the HP software, see Printer management tools on page 236.
1. Load paper in the tray. For more information, see Load paper on page 16.
2. On the File menu in your software application, click Print .
3. Make sure the printer you want to use is selected.
4. To change settings, click the button that opens the Properties dialog box.
Depending on your software application, this button might be called Properties , Options , Printer
Setup , Printer , or Preferences .
5. Change the paper orientation on the Layout tab, and paper source, media type, paper size, and quality
settings on the Paper/Quality tab.
To print in black and white, click the Advanced button, and then select Black Ink Only from the Print in
Grayscale drop-down list under Printer Features.
6. Click OK .
7. Click Print or OK to begin printing.
Print brochures (Mac OS X)
1. Load paper in the tray. For more information, see Load paper on page 16.
2. From the File menu in your software application, click Print .
3. Make sure the printer you want to use is selected in the Format For pop-up menu.
If you do not see print options in the Print dialog, do the following:
●
Mac OS X v10.6: Click the blue disclosure triangle next to the printer selection.
●
OS X Lion: Click Show Details .
4. Select a paper size from the pop-up menu.
If the Paper Size pop-up menu is not in the Print dialog, click the Page Setup button. When you are done
selecting the paper size, click OK to close Page Setup and return to the Print dialog.
5. Click Paper Type/Quality from the pop-up menu, and then select the following settings:
28 Chapter 2 Print ENWW
Page 46

●
Paper Type: The appropriate brochure paper type
●
Quality: Normal or Best
6. Select any other print settings that you want, and then click Print to begin printing.
ENWW Print brochures 29
Page 47

Print on envelopes
Avoid envelopes with the following characteristics:
●
Very slick nish
●
Self-stick adhesives, clasps, or windows
●
Thick, irregular, or curled edges
●
Areas that are wrinkled, torn, or otherwise damaged
Make sure the folds of envelopes you load in the printer are sharply creased.
NOTE: For more information about printing on envelopes, see the documentation available with the
software program you are using.
Follow the instructions for your operating system.
●
Print on envelopes (Windows)
●
Print on envelopes (Mac OS X)
Print on envelopes (Windows)
1. Load envelopes print-side down in the tray. For more information, see Load paper on page 16.
2. On the File menu in your software application, click Print .
3. Make sure the printer you want to use is selected.
4. To change settings, click the button that opens the Properties dialog box.
Depending on your software application, this button might be called Properties , Options , Printer
Setup , Printer , or Preferences .
5. On the Layout tab, change the orientation to Landscape.
6. Click Paper/Quality , and then select the appropriate envelope type from the Paper Size drop-down list.
TIP: You can change more options for the print job by using the features available on the other tabs in
the dialog box.
7. Click OK , and then click Print or OK to begin printing.
Print on envelopes (Mac OS X)
1. Load envelopes print-side down in the tray. For more information, see Load paper on page 16.
2. From the File menu in your software application, click Print .
3. Make sure the printer you want to use is selected in the Format For pop-up menu.
If you do not see print options in the Print dialog, do the following:
●
Mac OS X v10.6: Click the blue disclosure triangle next to the printer selection.
●
OS X Lion: Click Show Details .
30 Chapter 2 Print ENWW
Page 48

4. Select a paper size from the pop-up menu.
If the Paper Size pop-up menu is not in the Print dialog, click the Page Setup button. When you are done
selecting the paper size, click OK to close Page Setup and return to the Print dialog.
5. Select the Orientation option.
6. Select any other print settings that you want, and then click Print to begin printing.
ENWW Print on envelopes 31
Page 49

Print photos
Do not leave unused photo paper in the input tray. The paper might start to curl, which could impair the
quality of your printout. Photo paper should be at before printing.
Follow the instructions for your operating system.
●
Print photos on photo paper (Windows)
●
Print photos on photo paper (Mac OS X)
●
Print photos from a memory device
TIP: This printer includes HP ePrint, a free service from HP that allows you to print documents on your HP
ePrint-enabled printer anytime, from any location, and without any additional software or printer drivers. For
more information, see HP ePrint on page 81.
Print photos on photo paper (Windows)
1. Load paper in the tray. For more information, see Load paper on page 16.
2. On the File menu in your software application, click Print .
3. Make sure the printer you want to use is selected.
4. To change settings, click the option that opens the printer Properties dialog box.
Depending on your software application, this option might be called Properties , Options , Printer
Setup , Printer , or Preferences .
5. On the Paper/Quality tab, select the appropriate photo paper type from the Media drop-down menu.
NOTE: Maximum DPI is only supported for color printing on HP Premium Plus Photo Papers and HP
Advanced Photo Papers.
6. Click Advanced, and then select Best or Maximum DPI from the Output Quality drop-down menu.
7. To print the photo in black and white, click the Print in Grayscale drop-down menu, and then select one
of the following options:
●
High-Quality Grayscale: uses all the available colors to print your photo in grayscale. This creates
smooth and natural shades of gray.
8. Click OK , and then click Print or OK to begin printing.
Print photos on photo paper (Mac OS X)
1. Load photo paper print-side down in the tray. For more information, see Load paper on page 16.
2. From the File menu in your software application, click Print.
3. Make sure the printer you want to use is selected.
If you do not see print options in the Print dialog, do the following.
●
Mac OS X v10.6: Click the blue disclosure triangle next to the printer selection.
●
OS X Lion: Click Show Details.
32 Chapter 2 Print ENWW
Page 50

4. Select a paper size from the pop-up menu.
If the Paper Size pop-up menu is not in the Print dialog, click the Page Setup button. When you are done
selecting the paper size, click OK to close Page Setup and return to the Print dialog.
5. Click Paper Type/Quality from the pop-up menu, and then select the following settings:
●
Paper Type: The appropriate photo paper type
●
Quality: Best or Maximum dpi
6. If necessary, change the photo and color options:
a. Click the disclosure triangle beside Color Options and select the appropriate Photo Fix options:
●
O: Applies no automatic adjustments to the image.
●
Basic: Automatically focuses the image; moderately adjusts image sharpness.
b. To print the photo in black and white, click Grayscale from the Color pop-up menu, and then select
one of the following options:
●
High Quality: Uses all the available colors to print your photo in grayscale. This creates
smooth and natural shades of gray.
7. Select any other print settings that you want, and then click Print to begin printing.
Print photos from a memory device
You can connect a USB ash drive (such as a keychain drive or portable hard drive) to the USB port on the
front of the printer.
For more information about using memory devices, see Insert a memory device on page 19.
CAUTION: Attempting to remove a memory device while it is being accessed can damage les on the
memory device. You can safely remove a memory card only when the status light is not blinking.
To print selected photos
NOTE: This function is only available if the memory device does not contain Digital Print Order Format
(DPOF) content.
1. Insert your memory device into the appropriate slot on the printer. The Photo screen appears on the
control panel display.
2. Touch View & Print. The photos are displayed.
3. Follow the instructions on the control panel display to select, edit, or print the photos.
ENWW Print photos 33
Page 51

Print on special and custom-sized paper
If your application supports custom-sized paper, set the size in the application before printing the document.
If not, set the size in the printer driver. You might need to reformat existing documents to print them correctly
on custom-sized paper.
Use only custom-sized paper that is supported by the printer. For more information, see Paper specications
on page 161.
NOTE: Dening custom-sized paper sizes is only available in the HP printing software in Mac OS X.
●
Print on special or custom-sized paper (Mac OS X)
●
Set up custom sizes (Mac OS X)
Print on special or custom-sized paper (Mac OS X)
NOTE: Before you can print on custom-sized paper, you must set up the custom sizes in the HP software
provided with the printer. For instructions, see Set up custom sizes (Mac OS X) on page 34.
1. Load the appropriate paper in the tray. For more information, see Load paper on page 16.
2. From the File menu in your software application, click Print .
3. Make sure the printer you want to use is selected in the Format For pop-up menu.
If you do not see print options in the Print dialog, do the following:
●
Mac OS X v10.6: Click the blue disclosure triangle next to the printer selection.
●
OS X Lion: Click Show Details .
4. Select a paper size from the pop-up menu.
If the Paper Size pop-up menu is not in the Print dialog, click the Page Setup button. When you are done
selecting the paper size, click OK to close Page Setup and return to the Print dialog.
5. Click Paper Handling from the pop-up menu.
6. Under Destination Paper Size, click Scale to t paper size, and then select the custom size.
7. Select any other print settings that you want, and then click Print to begin printing.
Set up custom sizes (Mac OS X)
1. Load paper in the tray. For more information, see Load paper on page 16.
2. From the File menu in your software application, click Page Setup , and then make sure the printer you
want to use is selected in the Format For pop-up menu.
- OR -
From the File menu in your software application, click Print , and then make sure the printer you want to
use is selected.
3. Select Manage Custom Sizes in the Paper Size pop-up menu.
34 Chapter 2 Print ENWW
Page 52

NOTE: If you do not see these options in the Print dialog, click the disclosure triangle next to the
Printer pop-up menu or click Show Details .
4. Click the + on the left side of the screen, double-click Untitled, and type a name for the new custom
size.
5. In the Width and Height boxes, type the dimensions, and then set the margins, if you want to customize
them.
6. Click OK .
ENWW Print on special and custom-sized paper 35
Page 53

Print borderless documents or photos
Borderless printing lets you print to the edges of certain photo media types and a range of standard media
sizes.
Before printing, open the le and make sure the size of the document or image matches the size of the media
loaded in the printer.
NOTE: Borderless printing is only available in some applications.
Follow the instructions for your operating system.
●
Print borderless documents or photos (Windows)
●
Print borderless documents or photos (Mac OS X)
Print borderless documents or photos (Windows)
1. Load paper in the tray. For more information, see Load paper on page 16.
2. On the File menu in your software application, click Print .
3. Make sure the printer you want to use is selected.
4. To change settings, click the button that opens the Properties dialog box.
Depending on your software application, this button might be called Properties , Options , Printer
Setup , Printer , or Preferences .
5. Click the Paper/Quality tab, and then click the Advanced button.
6. In the Borderless Printing option, click Print Borderless, and then click the OK button.
7. In the Media drop-down list, select the appropriate paper type.
8. Click OK , and then click Print or OK to begin printing.
Print borderless documents or photos (Mac OS X)
1. Load paper in the tray. For more information, see Load paper on page 16.
2. From the File menu in your software application, click Print.
3. Make sure the printer you want to use is selected.
If you do not see print options in the Print dialog, do the following.
●
Mac OS X v10.6: Click the blue disclosure triangle next to the printer selection.
●
OS X Lion: Click Show Details.
4. Select a paper size from the pop-up menu.
If the Paper Size pop-up menu is not in the Print dialog, click the Page Setup button. When you are done
selecting the paper size, click OK to close Page Setup and return to the Print dialog.
5. Click Paper Type/Quality from the pop-up menu, and then select the following settings:
36 Chapter 2 Print ENWW
Page 54

●
Paper Type: The appropriate paper type
●
Quality: Best or Maximum dpi
NOTE: If you do not see these options, click the disclosure triangle next to the Printer pop-up menu or
click Show Details .
6. Make sure the Print Borderless check box is selected.
7. If necessary, click the disclosure triangle beside Color Options and select the appropriate Photo Fix
options:
●
O: Applies no automatic adjustments to the image.
●
Basic: Automatically focuses the image; moderately adjusts image sharpness.
8. Select any other print settings that you want, and then click Print to begin printing.
ENWW Print borderless documents or photos 37
Page 55

Print on both sides (duplexing)
You can print on both sides of a sheet of media automatically by using the automatic two-sided printing
accessory (duplexer).
NOTE: Two-sided printing requires an automatic two-sided printing accessory (duplexer) to be installed on
the printer.
TIP: If the top and bottom margins in your document are smaller than 16 mm (0.63 inches), the document
might not print out correct.
●
Perform two-sided printing (Windows)
●
Perform two-sided printing (Mac OS X)
Perform two-sided printing (Windows)
1. Load the appropriate media. For more information, see Load paper on page 16.
2. Make sure the duplexer is installed correctly. For more information, see Install the automatic two-sided
printing accessory (duplexer) on page 20.
3. With a document open, click Print on the File menu, and then under the Print on Both Sides options on
the Layout tab, select either Flip on Long Edge or Flip on Short Edge.
4. Change any other settings, and then click OK .
5. Print your document.
Perform two-sided printing (Mac OS X)
1. Load the appropriate media. For more information, see Load paper on page 16.
2. Make sure the duplexer is installed correctly. For more information, see Install the automatic two-sided
printing accessory (duplexer) on page 20.
3. From the File menu in your software application, click Print .
4. Make sure the printer you want to use is selected in the Format For pop-up menu.
If you do not see print options in the Print dialog, do the following:
●
Mac OS X v10.6: Click the blue disclosure triangle next to the printer selection.
●
OS X Lion: Click Show Details .
5. Select a paper size from the pop-up menu.
If the Paper Size pop-up menu is not in the Print dialog, click the Page Setup button. When you are done
selecting the paper size, click OK to close Page Setup and return to the Print dialog.
6. Click the Layout pop-up menu, and then select the appropriate binding options for the document from
the Two-Sided pop-up menu.
7. Select any other print settings that you want, and then click Print to begin printing.
38 Chapter 2 Print ENWW
Page 56

Tips for print success
For good printing experience, HP ink cartridges should be correctly installed, have suicient ink, and working
properly; and paper should be properly loaded with correct print settings.
Ink tips
●
If the print quality is not acceptable, see Print quality troubleshooting on page 101 for more
information.
●
Use original HP ink cartridges.
●
Install both the black and color cartridges correctly.
For more information, see Replace the ink cartridges on page 87.
●
Check the estimated ink levels in the cartridges to make sure there is suicient ink.
For more information, see Check the estimated ink levels on page 85.
●
Always turn o the printer with (the Power button) to allow the printer to protect the nozzles.
Paper loading tips
For more information, also see Load paper on page 16.
●
Load a stack of paper (not just one page). All the paper in the stack should be of the same size and type
to avoid a paper jam.
●
Load paper with the print-side down in the main tray.
●
Ensure that paper loaded in the input tray lays at and the edges are not bent or torn.
●
Adjust the paper-width guides in the input tray to t snugly against all paper. Make sure the guides do
not bend the paper in the tray.
Printer settings tips (Windows)
●
To change default print settings, click Set Preferences under Print, Scan & Fax in the HP printer
software.
For more information to open the printer software, see Open the HP printer software (Windows)
on page 25.
●
To select the number of pages to print per sheet, on the Layout tab of the printer driver, select the
appropriate option from the Pages per Sheet drop-down list.
●
If you want to change the page orientation, set it in your application interface.
●
To view more printing settings, on the Layout or Paper/Quality tab of the printer driver, click the
Advanced button to open the Advanced Options dialog box.
ENWW Tips for print success 39
Page 57

—
Print in Grayscale: Allows you to print a black and white document using the black ink only. Select
Black Ink Only, and then click the OK button.
—
Pages per Sheet Layout: Helps you specify the order of the pages if you print document in more
than two pages per sheet.
NOTE: The preview on the Layout tab cannot reect what you select from the Pages per Sheet
Layout drop-down list.
—
Borderless Printing: Select this feature to print photos without border. Not all paper types support
this feature. You will see an alert icon beside the option if the selected paper type in the Media
drop-down list does not support it.
—
Preserve Layout: This feature only works with the duplex printing. If the image is larger than the
printable area, select this feature to scale the page content to be within the smaller margins so
that extra pages are not created.
—
HP Real Life Technologies: This feature smooths and sharpens images and graphics for improved
print quality.
—
Booklet: Allows you to print multiple-page document as a booklet. It places two pages on each side
of a sheet that can then be folded into a booklet in half size of the paper. Select a binding method
from the drop-down list, and then click OK.
○
Booklet-LeftBinding: The binding side after folded into a booklet appears at the left side.
Select the option if your reading habit is from left to right.
○
Booklet-RightBinding: The binding side after folded into a booklet appears at the right side.
Select the option if your reading habit is from right to left.
NOTE: The preview on the Layout tab cannot reect what you select from the Booklet drop-
down list.
—
Page Borders: Allows you to add the borders to the pages if you print the document with two or
more pages per sheet.
NOTE: The preview on the Layout tab cannot reect what you select from the Page Borders
drop-down list.
●
You can use printing shortcut to save setting time. A printing shortcut stores the setting values that are
appropriate for a particular kind of job, so that you can set all the options with a single click. To use it, go
to the Printing Shortcut tab, select one printing shortcut, and then click OK.
To add a new printing shortcut, after making settings on the Layout or Paper/Quality tab, click the
Printing Shortcut tab, click Save As and enter a name, and then click OK.
To delete a printing shortcut, select it, and then click Delete.
NOTE: You cannot delete the default printing shortcuts.
40 Chapter 2 Print ENWW
Page 58

Printer settings tips (OS X)
●
On the Print dialog, use the Paper Size pop-up menu to select the size of paper loaded in the printer.
●
On the Print dialog, choose the Paper Type/Quality pop-up menu and select the appropriate paper type
and quality.
●
To print a black and white document using only black ink, choose the Paper Type/Quality from the pop-
up menu and choose Grayscale from the Color pop-up menu.
Notes
●
Original HP ink cartridges are designed and tested with HP printers and papers to help you easily
produce great results, time after time.
NOTE: HP cannot guarantee the quality or reliability of non-HP supplies. Product service or repairs
required as a result of using a non-HP supply will not be covered under warranty.
If you believe you purchased original HP ink cartridges, go to:
www.hp.com/go/anticounterfeit
●
Ink level warnings and indicators provide estimates for planning purposes only.
NOTE: When you receive a low-ink warning message, consider having a replacement cartridge
available to avoid possible printing delays. You do not need to replace the cartridges until print quality
becomes unacceptable.
●
Software settings selected in the print driver only apply to printing, they do not apply to copying or
scanning.
●
You can print your document on both sides of the paper.
3 Scan
You can scan documents, photos, and other originals and send them to a variety of desitinations, such as a
folder on a computer.
When scanning documents, you can use the HP software to scan documents into a format that you can
search, copy, paste, and edit.
NOTE: Some scan functions are only available after you install the HP recommended software.
TIP: If you have problems scanning documents, see Solve scan problems on page 111.
This section contains the following topics:
ENWW 41
Page 59

●
Scan an original
●
Scan using Webscan
●
Scanning documents as editable text
42 Chapter 3 Scan ENWW
Page 60

Scan an original
This section contains the following topics:
NOTE: The printer must be connected to the computer and be turned on.
NOTE: Before scanning, make sure the HP software is installed, and on Windows computers, make sure the
scan feature is turned on.
NOTE: If you are scanning a borderless original, load the original on the scanner glass, not the ADF.
NOTE: TIFF black and PDF black are not supported for B-size scan.
The minimum top and bottom margins for your large original must match or exceed 5 mm (0.2 inch).
●
Scan to a computer
●
Scan to a memory device
●
Scan to Email
Scan to a computer
This section contains the following topics:
●
Scan an original to a computer from the printer control panel
●
Scan an original to a computer from HP printer software
Scan an original to a computer from the printer control panel
1. Load your original print-side down in the left-rear corner of the scanner glass or in the ADF.
For more information, see Load an original on the scanner glass on page 14 or Load an original in the
automatic document feeder (ADF) on page 15.
2. Touch Scan , and then select Computer.
3. Make changes to scan options, if needed.
4. Touch Start Scan .
Scan an original to a computer from HP printer software
NOTE: You can also use the HP printer software to scan documents into editable text. For more information,
see Scanning documents as editable text on page 47.
Windows
1. Load your original print-side down in the left-rear corner of the scanner glass or print-side up in the ADF.
For more information, see Load an original on the scanner glass on page 14 or Load an original in the
automatic document feeder (ADF) on page 15.
2. Open the HP printer software. For more information, see Open the HP printer software (Windows)
on page 25. In the window that appears, select Print, Scan & Fax or Print & Scan , and then select Scan
a Document or Photo under Scan .
ENWW Scan an original 43
Page 61

3. If necessary, make changes to the scan settings.
4. Click Scan and select a scan shortcut.
Mac OS X
1. Load the original print-side down in the left-rear corner of the scanner glass or print-side up in the ADF.
For more information, see Load an original on the scanner glass on page 14 or Load an original in the
automatic document feeder (ADF) on page 15.
2. From the computer desktop, double-click HP Scan in the Applications/Hewlett-Packard folder.
3. If necessary, make changes to the scan settings.
4. Click Continue and follow the on-screen instructions to complete the scan.
Scan to a memory device
You can scan directly to a memory device, such as a USB ash drive, from the printer control panel without
using a computer or the HP software provided with the printer.
NOTE: You can also use the HP printer software to scan documents into editable text. For more information,
see Scanning documents as editable text on page 47.
To scan an original to a memory device from the printer control panel
Use these steps to scan an original to a memory card.
1. Load your original print-side down in the left-rear corner of the scanner glass or print-side up in the ADF.
For more information, see Load an original on the scanner glass on page 14 or Load an original in the
automatic document feeder (ADF) on page 15.
2. Insert a memory device. For more information, see Insert a memory device on page 19.
3. Touch Scan , and then select Memory Device.
4. Make changes to scan options, if needed.
5. Touch Start Scan .
Scan to Email
1. Load your original print-side down on the left-rear corner of the scanner glass or print-side up in the
ADF.
For more information, see Load an original on the scanner glass on page 14 or Load an original in the
automatic document feeder (ADF) on page 15.
2. Touch Scan , and then touch Email.
3. On the control panel display, select the name that corresponds to the Outgoing Email Prole you want to
use.
4. If prompted, enter the PIN.
5. Select the TO email address (the email recipient) or enter an email address.
44 Chapter 3 Scan ENWW
Page 62

6. Enter or change the SUBJECT for the email message.
7. Change any scan settings, and then touch Start Scan .
NOTE: The connection might take some time, depending on network traic and connection speed.
ENWW Scan an original 45
Page 63

Scan using Webscan
Webscan is a feature of the embedded web server that lets you scan photos and documents from your printer
to your computer using a web browser. This feature is available even if you did not install the printer software
on your computer.
NOTE: If you are unable to open Webscan in the EWS, your network administrator might have turned it o.
For more information, contact your network administrator or the person who set up your network.
For more information, see Embedded web server on page 239.
To scan using Webscan
1. Load your original print-side down on the left-rear corner of the scanner glass or print-side up in the
ADF.
For more information, see Load an original on the scanner glass on page 14 or Load an original in the
automatic document feeder (ADF) on page 15.
2. Open the embedded web server. For more information, see Embedded web server on page 239.
3. Click the Scan tab, click Webscan in the left pane, change any settings, and then click Start Scan .
TIP: To scan documents as editable text, you must install the HP software included with the printer. For
more information, see Scanning documents as editable text on page 47.
46 Chapter 3 Scan ENWW
Page 64

Scanning documents as editable text
When scanning documents, you can use the HP software to scan documents into a format that you can
search, copy, paste, and edit. This allows you to edit letters, newspaper clippings, and many other documents.
This section contains the following topics:
●
To scan documents as editable text
●
Guidelines for scanning documents as editable text
To scan documents as editable text
Use the following guidelines for scanning documents as editable text.
Follow the instructions for your operating system.
Windows
1. Load your original print-side down in the left-rear corner of the glass or print-side up in the ADF.
For more information, see Load an original on the scanner glass on page 14 or Load an original in the
automatic document feeder (ADF) on page 15.
2. Open the HP printer software. For more information, see Open the HP printer software (Windows)
on page 25. In the window that appears, select Print, Scan & Fax Print & Scan , and then select Scan a
Document or Photo under Scan .
Mac OS X
3. Select the type of editable text you want to use in the scan:
I want to... Follow these steps
Extract just the text, without any of the formatting of the
original
Extract the text, as well as some of the formatting of the
original
Extract the text and make it searchable in PDF readers Select the Save as PDF shortcut from the list, and then select
Select the Save as Editable Text (OCR) shortcut from the list,
and then select Text (.txt) from the File Type drop-down
menu.
Select the Save as Editable Text (OCR) shortcut from the list,
and then select Rich Text (.rtf) from the File Type drop-down
menu.
Searchable PDF (.pdf) from the File Type drop-down menu.
4. To start the scan, click Scan , and then follow the on-screen instructions.
1. Load your original print-side down in the left-rear corner of the glass or print-side up in the ADF.
For more information, see Load an original on the scanner glass on page 14 or Load an original in the
automatic document feeder (ADF) on page 15.
2. From the computer desktop, double-click HP Scan in the Applications/Hewlett-Packard folder.
3. To start the scan, click Scan .
4. Follow the on-screen instructions to complete the scan.
5. After the scan is complete, click the File in the application menu bar, and then click Save .
ENWW Scanning documents as editable text 47
Page 65

6. Select the type of editable text you want to use in the scan:
I want to... Follow these steps
Extract just the text, without any of the formatting of the
original
Extract the text, as well as some of the formatting of the
original
Extract the text and make it searchable in PDF readers Select Searchable PDF from the Format pop-up menu.
Select TXT from the Format pop-up menu.
Select RTF from the Format pop-up menu.
7. Click Save .
Guidelines for scanning documents as editable text
To ensure that the software can convert your documents successfully, do the following:
●
Make sure the scanner glass or ADF window is clean.
When the printer scans the document, smudges or dust on the scanner glass or ADF window can be
scanned, as well, and can prevent the software from converting the document to editable text.
●
Make sure the document is loaded correctly.
When scanning documents as editable text from the ADF, the original must be loaded into the ADF with
the top forward and face up. When scanning from the scanner glass, the original must be loaded with
the top facing the right edge of the scanner glass.
Also, make sure the document is not skewed. For more information, see Load an original on the scanner
glass on page 14 or Load an original in the automatic document feeder (ADF) on page 15.
●
Make sure the text on the document is clear.
To successfully convert the document to editable text, the original must be clear and of high quality. The
following conditions can cause the software to not convert the document successfully:
—
The text on the original is faint or wrinkled.
—
The text is too small.
—
The structure of the document is too complex.
—
The text is tightly spaced. For example, if the text that the software converts has missing or
combined characters, "rn" might appear as "m."
—
The text is on a colored background. Colored backgrounds can cause images in the foreground to
blend too much.
●
Choose the correct prole.
Be sure to select a shortcut or preset that allows scanning as editable text. These options use scan
settings designed to maximize the quality of your OCR scan. In Windows, use the Editable Text (OCR) or
Save as PDF shortcuts. In Mac OS X, use the Documents preset.
●
Save your le in the correct format.
If you want to extract just the text from the document, without any of the formatting of the original,
select a plain text format (such as Text (.txt) or TXT). If you want to extract the text, as well as some of
48 Chapter 3 Scan ENWW
Page 66

the formatting of the original, select Rich Text Format (such as Rich Text (.rtf) or RTF) or searchable PDF
format ( Searchable PDF (.pdf) or Searchable PDF ).
4 Copy
You can produce high-quality color and grayscale copies on a variety of paper types and sizes.
NOTE: If you are copying a document when a fax arrives, the fax is stored in the printer's memory until the
copying nishes. As a result, the number of fax pages that can be stored in memory might be reduced.
This section contains the following topics:
●
Copy documents
●
Change copy settings
●
Save copy settings
ENWW 49
Page 67

Copy documents
NOTE: The minimum top and bottom margins for your large original must match or exceed 5 mm (0.2 inch).
You can make quality copies from the printer control panel.
To copy documents
1. Make sure you have paper loaded in the main tray. For more information, see Load paper on page 16.
2. Place your original face down on the scanner glass or face up in the ADF. For more information, see Load
an original on the scanner glass on page 14 or Load an original in the automatic document feeder (ADF)
on page 15.
NOTE: If you are copying a photo, place the photo on the scanner glass face down, as shown on the
icon on the edge of the scanner glass.
3. Touch Copy .
4. Change any additional settings. For more information, see Change copy settings on page 51.
5. To start the copy job, touch Black or Color .
NOTE: If you have a color original, selecting Black produces a black-and-white copy of the color
original, while selecting Color produces a full-color copy of the color original.
50 Chapter 4 Copy ENWW
Page 68

Change copy settings
You can customize copy jobs using the various settings available from the printer control panel, including the
following:
●
Number of copies
●
Copy paper size
●
Copy paper type
●
Two-sided printing (if the depluexer is installed)
●
ID copy
●
Copy speed or quality
●
Lighter/Darker settings
●
Resizing originals to t on dierent paper sizes
●
Copy collation
●
Shifting the copy margin
●
Copy enhancements
●
Cropping the copy with the paper layout
●
Copy preview
●
Set as New Defaults
You can use these settings for single copy jobs.
To change copy settings for a single job
1. Touch Copy .
2. Select the copy function settings you want to change.
3. Touch Black or Color .
ENWW Change copy settings 51
Page 69

Save copy settings
You can save settings to be used as defaults for future jobs.
To save the current settings as defaults for future jobs
1. Touch Copy .
2. Change the number of copies, and then touch Settings .
3. Make any changes to the settings, and then touch Set As New Defaults.
4. Touch Yes, and then touch Done .
5 Fax
You can use the printer to send and receive faxes, including color faxes. You can schedule faxes to be sent at
a later time and set up speed-dials to send faxes quickly and easily to frequently used numbers. From the
printer control panel, you can also set a number of fax options, such as resolution and the contrast between
lightness and darkness on the faxes you send.
NOTE: Before you begin faxing, make sure you have set up the printer correctly for faxing. You might have
already done this as part of the initial setup, by using either the control panel or the HP software provided
with the printer. You can verify the fax is set up correctly by running the fax setup test from the control panel.
For more information on the fax test, see Test fax setup on page 222.
NOTE: The printer does not support B-size fax.
This section contains the following topics:
●
Send a fax
●
Receive a fax
●
Set up speed-dial entries
●
Change fax settings
●
Fax and digital phone services
●
Fax over Internet Protocol
●
Use reports
52 Chapter 4 Copy ENWW
Page 70

Send a fax
You can send a fax in a variety of ways. Using the printer control panel, you can send a black-and-white or
color fax. You can also send a fax manually from an attached phone. This allows you to speak with the
recipient before sending the fax.
This section contains the following topics:
●
Send a standard fax
●
Send a standard fax from the computer
●
Send a fax manually from a phone
●
Send a fax using monitor dialing
●
Send a fax from memory
●
Schedule a fax to send later
●
Send a fax to multiple recipients
●
Send a fax in Error Correction Mode
Send a standard fax
You can easily send a single- or multiple-page black-and-white or color fax by using the printer control panel.
NOTE: If you need printed conrmation that your faxes were successfully sent, enable fax conrmation
before sending any faxes.
TIP: You can also send a fax manually from a phone or by using monitor dialing. These features allow you to
control the pace of your dialing. They are also useful when you want to use a calling card to charge the call
and you have to respond to tone prompts while dialing.
To send a standard fax from the printer control panel
1. Load your original print-side down in the left-rear corner of the scanner glass or print-side up in the ADF.
For more information, see Load an original on the scanner glass on page 14 or Load an original in the
automatic document feeder (ADF) on page 15.
2. Touch Fax .
3. Enter the fax number by using the keypad.
TIP: To add a pause in the fax number you are entering, touch * repeatedly, until a dash (-) appears on
the display.
4. Touch Black or Color .
If the printer detects an original loaded in the automatic document feeder, it sends the document to the
number you entered.
TIP: If the recipient reports issues with the quality of the fax you sent, you can try changing the
resolution or contrast of your fax.
ENWW Send a fax 53
Page 71

Send a standard fax from the computer
You can send a document on your computer as a fax, without printing a copy and faxing it from the printer.
NOTE: Faxes sent from your computer by this method use the printer's fax connection, not your Internet
connection or computer modem. Therefore, make sure the printer is connected to a working telephone line
and that the fax function is set up and functioning correctly.
To use this feature, you must install the printer software using the installation program provided on the HP
software CD provided with the printer.
Windows
1. Open the document on your computer that you want to fax.
2. On the File menu in your software application, click Print .
3. From the Name list, select the printer that has “Fax” in the name.
4. To change settings (such as selecting to send the document as a black fax or a color fax), click the
button that opens the Properties dialog box. Depending on your software application, this button might
be called Properties , Options , Printer Setup , Printer , or Preferences .
5. After you have changed any settings, click OK .
6. Click Print or OK .
7. Enter the fax number and other information for the recipient, change any further settings for the fax,
and then click Send Fax . The printer begins dialing the fax number and faxing the document.
Mac OS X
1. Open the document on your computer that you want to fax.
2. Double-click HP Scan in the Applications /Hewlett-Packard folder.
3. Select the printer that has “(Fax)” in the name.
4. Select Fax Recipients from the pop-up menu below the Orientation setting.
NOTE: If you cannot nd the pop-up menu, do tthe following:
Mac OS X v10.6: Click the blue disclosure triangle next to the Printer selection.
OS X 10.7: Click Show Details .
5. Enter the fax number and other information in the boxes provided, and then click Add to Recipients.
6. Select the Fax Mode and any other fax options you want, and then click Send Fax Now to begin dialing
the fax number and faxing the document.
Send a fax manually from a phone
Sending a fax manually allows you to make a phone call and talk with the recipient before you send the fax.
This is useful if you want to inform the recipient that you are going to send them a fax before sending it. When
you send a fax manually, you can hear the dial tones, telephone prompts, or other sounds through the
handset on your telephone. This makes it easy for you to use a calling card to send your fax.
54 Chapter 5 Fax ENWW
Page 72

Depending on how the recipient has their fax machine set up, the recipient might answer the phone, or the fax
machine might take the call. If a person answers the phone, you can speak with the recipient before sending
the fax. If a fax machine answers the call, you can send the fax directly to the fax machine when you hear the
fax tones from the receiving fax machine.
To send a fax manually from an extension phone
1. Load your original print-side down in the left-rear corner of the scanner glass or print-side up in the ADF.
For more information, see Load an original on the scanner glass on page 14 or Load an original in the
automatic document feeder (ADF) on page 15.
2. Touch Fax .
3. Dial the number by using the keypad on the phone that is connected to the printer.
NOTE: Do not use the keypad on the control panel of the printer when manually sending a fax. You
must use the keypad on your phone to dial the recipient's number.
4. If the recipient answers the telephone, you can engage in a conversation before sending your fax.
NOTE: If a fax machine answers the call, you will hear fax tones from the receiving fax machine.
Proceed to the next step to transmit the fax.
5. When you are ready to send the fax, touch Black or Color .
NOTE: If prompted, select Send Fax .
If you were speaking with the recipient before sending the fax, inform the recipient that they should
press Start on their fax machine after they hear fax tones.
The telephone line is silent while the fax is transmitting. At this point, you can hang up the telephone. If
you want to continue speaking with the recipient, remain on the line until the fax transmission is
complete.
Send a fax using monitor dialing
Monitor dialing allows you to dial a number from the printer control panel as you would dial a regular
telephone. When you send a fax using monitor dialing, you can hear the dial tones, telephone prompts, or
other sounds through the speakers on the printer. This enables you to respond to prompts while dialing, as
well as control the pace of your dialing.
TIP: If you are using a calling card and do not enter your PIN fast enough, the printer might start sending fax
tones too soon and cause your PIN not to be recognized by the calling card service. If this is the case, you can
create a speed dial entry to store the PIN for your calling card. For more information, see Set up speed-dial
entries on page 66.
NOTE: Make sure the volume is turned on to hear a dial tone.
To send a fax using monitor dialing from the printer control panel
1. Load your originals. For additional information, see Load an original on the scanner glass on page 14 or
Load an original in the automatic document feeder (ADF) on page 15.
2. Touch Fax , and then touch Black or Color .
If the printer detects an original loaded in the automatic document feeder, you hear a dial tone.
ENWW Send a fax 55
Page 73

3. When you hear the dial tone, enter the number by using the keypad on the printer control panel.
4. Follow any prompts that might occur.
TIP: If you are using a calling card to send a fax and you have your calling card PIN stored as a speed
dial, when prompted to enter your PIN, touch (Speed dial) to select the speed dial entry where you
have your PIN stored.
Your fax is sent when the receiving fax machine answers.
Send a fax from memory
You can scan a black-and-white fax into memory and then send the fax from memory. This feature is useful if
the fax number you are trying to reach is busy or temporarily unavailable. The printer scans the originals into
memory and sends them once it is able to connect to the receiving fax machine. After the printer scans the
pages into memory, you can immediately remove the originals from the document feeder tray or scanner
glass.
NOTE: You can only send a black-and-white fax from memory.
To send a fax from memory
1. Load your originals. For additional information, see Load an original in the automatic document feeder
(ADF) on page 15.
2. Touch Fax , and then touch Settings .
3. Touch Scan and Fax.
4.
Enter the fax number by using the keypad, touch (Speed dial) to select a speed dial, or touch (Call
history) to select a previously dialed or received number.
5. Touch Start Fax .
The printer scans the originals into memory and sends the fax when the receiving fax machine is
available.
Schedule a fax to send later
You can schedule a black-and-white fax to be sent within the next 24 hours. This enables you to send a blackand-white fax late in the evening, when phone lines are not as busy or phone rates are lower, for example.
The printer automatically sends your fax at the specied time.
You can only schedule one fax to be sent at a time. You can continue to send faxes normally, however, while
a fax is scheduled.
NOTE: You can only send scheduled faxes in black-and-white.
To schedule a fax from the printer control panel
1. Load your originals in the ADF. For additional information, see Load an original in the automatic
document feeder (ADF) on page 15.
2. Touch Fax , and then touch Settings .
3. Touch Send Fax Later .
56 Chapter 5 Fax ENWW
Page 74

4. Touch (Up arrow) and (Down arrow) to enter the send time, and then select Done .
5.
Enter the fax number by using the keypad, touch (Speed dial) to select a speed dial, or touch (Call
history) to select a previously dialed or received number.
6. Touch Start Fax .
The printer scans all pages and the scheduled time appears on the display. The fax is sent at the
scheduled time.
To cancel a scheduled fax
1. Touch Fax , touch Settings , and then touch Send Fax Later .
2. Touch Cancel Scheduled Fax, and then touch OK .
Send a fax to multiple recipients
You can send a fax to multiple recipients at once by grouping individual speed dial entries into group speed
dial entries.
To send a fax to multiple recipients using group speed dial
1. Load your originals. For additional information, see Load an original in the automatic document feeder
(ADF) on page 15.
2.
Touch Fax , touch (Speed dial), and then select the recipient group.
3. Touch Black .
If the printer detects an original loaded in the automatic document feeder, it sends the document to
each number in the group speed dial entry.
NOTE: You can only use group speed dial entries to send faxes in black and white, because of memory
limitations. The printer scans the fax into memory then dials the rst number. When a connection is
made, it sends the fax and dials the next number. If a number is busy or not answering, the printer
follows the settings for Busy Redial and No Answer Redial . If a connection cannot be made, the next
number is dialed and an error report is generated.
Send a fax in Error Correction Mode
Error Correction Mode (ECM) prevents loss of data due to poor phone lines by detecting errors that occur
during transmission and automatically requesting retransmission of the erroneous portion. Phone charges
are unaected, or might even be reduced, on good phone lines. On poor phone lines, ECM increases sending
time and phone charges, but sends the data much more reliably. The default setting is On . Turn ECM o only
if it increases phone charges substantially, and if you can accept poorer quality in exchange for reduced
charges.
Before turning the ECM setting o, consider the following. If you turn ECM o:
●
The quality and transmission speed of faxes you send and receive are aected.
●
The Fax Speed is automatically set to Medium .
●
You can no longer send or receive faxes in color.
ENWW Send a fax 57
Page 75

To change the ECM setting from the control panel
1. From the printer control panel, touch (Right arrow), and then touch Setup .
2. Touch Fax Setup , and then select Advanced Fax Setup .
3. Select Error Correction Mode .
4. Select On or O .
58 Chapter 5 Fax ENWW
Page 76

Receive a fax
You can receive faxes automatically or manually. If you turn o the Auto Answer option, you must receive
faxes manually. If you turn on the Auto Answer option (the default setting), the printer automatically answers
incoming calls and receives faxes after the number of rings that are specied by the Rings to Answer setting.
(The default Rings to Answer setting is ve rings.)
If you receive a Legal-size or larger fax and the printer is not currently set to use Legal-size paper, the printer
reduces the fax so that it ts on the paper that is loaded. If you have disabled the Automatic Reduction
feature, the printer prints the fax on two pages.
NOTE: If you are copying a document when a fax arrives, the fax is stored in the printer memory until the
copying nishes. This can reduce the number of fax pages stored in memory.
●
Receive a fax manually
●
Set up backup fax
●
Reprint received faxes from memory
●
Poll to receive a fax
●
Forward faxes to another number
●
Set the paper size for received faxes
●
Set automatic reduction for incoming faxes
●
Block unwanted fax numbers
●
Receive faxes to your computer using HP Digital Fax (Fax to PC and Fax to Mac)
Receive a fax manually
When you are on the phone, the person you are speaking with can send you a fax while you are still
connected. This is referred to as manual faxing. Use the instructions in this section to receive a manual fax.
NOTE: You can pick up the handset to talk or listen for fax tones.
You can receive faxes manually from a phone that is:
●
Directly connected to the printer (on the 2-EXT port)
●
On the same phone line, but not directly connected to the printer
To receive a fax manually
1. Make sure the printer is turned on and you have paper loaded in the main tray.
2. Remove any originals from the document feeder tray.
3. Set the Rings to Answer setting to a high number to allow you to answer the incoming call before the
printer answers. Or, turn o the Auto Answer setting so that the printer does not automatically answer
incoming calls.
4. If you are currently on the phone with the sender, instruct the sender to press Start on their fax
machine.
5. When you hear fax tones from a sending fax machine, do the following:
ENWW Receive a fax 59
Page 77

a. Touch Fax , and then select Black or Color .
b. After the printer begins to receive the fax, you can hang up the phone or remain on the line. The
phone line is silent during fax transmission.
Set up backup fax
Depending on your preference and security requirements, you can set up the printer to store all the faxes it
receives, only the faxes it receives while the printer is in an error condition, or none of the faxes it receives.
To set backup fax from the printer control panel
1. Touch (Right arrow), and then select Setup .
2. Touch Fax Setup , and then select Advanced Fax Setup .
3. Touch Backup Fax Reception.
4. Touch the required setting.
On The default setting. When Backup fax is On , the printer stores all received faxes in memory. This
enables you to reprint up to 30 of the most recently printed faxes if they are still saved in memory.
NOTE: When printer memory is low, it overwrites the oldest, printed faxes as it receives new faxes. If
the memory becomes full of unprinted faxes, the printer stops answering incoming fax calls.
NOTE: If you receive a fax that is too large, such as a very detailed color photo, it might not be stored
in memory due to memory limitations.
On Error Only Causes the printer to store faxes in memory only if an error condition exists that prevents the printer
from printing the faxes (for example, if the printer runs out of paper). The printer continues to store
incoming faxes as long as there is memory available. (If the memory becomes full, the printer stops
answering incoming fax calls.) When the error condition is resolved, the faxes stored in memory print
automatically, and then they are deleted from memory.
O Faxes are never stored in memory. For example, you might want to turn o Backup fax for security
purposes. If an error condition occurs that prevents the printer from printing (for example, the printer
runs out of paper), the printer stops answering incoming fax calls.
Reprint received faxes from memory
If you set the Backup fax mode to On , the received faxes are stored in memory, whether the printer has an
error condition or not.
NOTE: After the memory becomes full, the oldest, printed faxes are overwritten as new faxes are received.
If all the stored faxes are unprinted, the printer does not receive any fax calls until you print or delete the
faxes from memory. You might also want to delete the faxes in memory for security or privacy purposes.
Depending on the sizes of the faxes in memory, you can reprint up to eight of the most recently printed faxes,
if they are still in memory. For example, you might need to reprint your faxes if you lost the copy of your last
printout.
To reprint faxes in memory from the printer control panel
1. Make sure you have paper loaded in the main tray. For more information, see Load paper on page 16.
2. Touch (Right arrow), and then touch Setup .
60 Chapter 5 Fax ENWW
Page 78

3. Touch Fax Setup , touch Fax Tools, and then select Reprint Faxes in Memory.
The faxes are printed in the reverse order from which they were received with the most recently received
fax printed rst, and so on.
4. If you want to stop reprinting the faxes in memory, touch the (Cancel button).
Poll to receive a fax
Polling allows the printer to ask another fax machine to send a fax that it has in its queue. When you use the
Poll to Receive feature, the printer calls the designated fax machine and requests the fax from it. The
designated fax machine must be set for polling and have a fax ready to send.
NOTE: The printer does not support polling pass codes. Polling pass codes are a security feature that
require the receiving fax machine to provide a pass code to the printer it is polling in order to receive the fax.
Make sure the printer you are polling does not have a pass code set up (or has not changed the default pass
code) or the printer cannot receive the fax.
To set up poll to receive a fax from the printer control panel
1. Touch Fax , and then touch Settings .
2. Touch Poll to Receive .
3. Enter the fax number of the other fax machine.
4. Touch Start Fax .
Forward faxes to another number
You can set up the printer to forward your faxes to another fax number. If fax forwarding function is
enbabled, your printer can receive and forward the black-and-white faxes only.
Send a test fax to make sure the fax machine is able to receive your forwarded faxes.
To forward faxes from the printer control panel
1. Touch (Right arrow), and then touch Setup .
2. Touch Fax Setup , and then select Advanced Fax Setup .
3. Touch Fax Forwarding.
4. Touch On (Print and Forward) to print and forward the fax, or select On (Forward) to forward the fax.
NOTE: If the printer is not able to forward the fax to the designated fax machine (for example, if it is
not turned on), the printer prints the fax. If you set up the printer to print error reports for received
faxes, it also prints an error report.
5. At the prompt, enter the number of the fax machine intended to receive the forwarded faxes, and then
touch Done . Enter the required information for each of the following prompts: start date, start time,
end date, and end time.
6. Fax forwarding is activated. Touch OK to conrm.
If the printer loses power when fax forwarding is set up, it saves the fax forwarding setting and phone
number. When the power is restored to the printer, the fax forwarding setting is still On .
ENWW Receive a fax 61
Page 79

NOTE: You can cancel fax forwarding by selecting O from the Fax Forwarding menu.
Set the paper size for received faxes
You can select the paper size for received faxes. The paper size you select should match what is loaded in your
main tray. Faxes can be printed on Letter, A4, or Legal paper only.
NOTE: If an incorrect paper size is loaded in the main tray when you receive a fax, the fax does not print and
an error message appears on the display. Load Letter, A4, or Legal paper, and then touch OK to print the fax.
To set the paper size for received faxes from the printer control panel
1. Touch (Right arrow), and then touch Setup .
2. Touch Fax Setup , and then select Basic Fax Setup .
3. Touch Fax Paper Size, and then select an option.
Set automatic reduction for incoming faxes
The Automatic Reduction setting determines what the printer does if it receives a fax that is too large for the
default paper size. This setting is turned on by default, so the image of the incoming fax is reduced to t on
one page, if possible. If this feature is turned o, information that does not t on the rst page is printed on
a second page. Automatic Reduction is useful when you receive a Legal-size fax and Letter-size paper is
loaded in the main tray.
To set automatic reduction from the printer control panel
1. Touch (Right arrow), and then touch Setup .
2. Touch Fax Setup , and then select Advanced Fax Setup .
3. Touch Automatic Reduction , and then select On or O .
Block unwanted fax numbers
If you subscribe to a caller ID service through your phone provider, you can block specic fax numbers so the
printer does not print faxes received from those numbers. When an incoming fax call is received, the printer
compares the number to the list of junk fax numbers to determine if the call should be blocked. If the number
matches a number in the blocked fax numbers list, the fax is not printed. (The maximum number of fax
numbers you can block varies by model.)
NOTE: This feature is not supported in all countries/regions. If it is not supported in your country/region,
Junk Fax Blocker does not appear in the Fax Options or Fax Settings menu.
NOTE: If no phone numbers are added in the Caller ID list, it is assumed that you are not subscribed to a
Caller ID service.
●
Add numbers to the junk fax list
●
Remove numbers from the junk fax list
●
Print a Junk Fax Report
62 Chapter 5 Fax ENWW
Page 80

Add numbers to the junk fax list
You can block specic numbers by adding them to the junk fax list.
To add a number to the junk fax list
1. Touch (Right arrow), and then touch Setup .
2. Touch Fax Setup , and then select Basic Fax Setup .
3. Touch Junk Fax Blocker .
4. A message appears stating that Caller ID is required to block junk faxes. Touch OK to continue.
5. Touch Add Numbers.
6. To select a fax number to block from the caller ID list, touch Select from Caller ID History.
- or -
To manually enter a fax number to block, touch Enter new number.
7. After entering a fax number to block, touch Done .
NOTE: Make sure you enter the fax number as it appears on the control panel display, and not the fax
number that appears on the fax header of the received fax, as these numbers can be dierent.
Remove numbers from the junk fax list
If you no longer want to block a fax number, you can remove a number from your junk fax list.
To remove numbers from the list of junk fax numbers
1. Touch (Right arrow), and then touch Setup .
2. Touch Fax Setup , and then touch Basic Fax Setup .
3. Touch Junk Fax Blocker .
4. Touch Remove Numbers.
5. Touch the number you want to remove, and then touch OK .
Print a Junk Fax Report
Use the following procedure to print a list of blocked junk fax numbers.
To print a Junk Fax Report
1. Touch (Right arrow), and then touch Setup .
2. Touch Fax Setup , and then touch Basic Fax Setup .
3. Touch Junk Fax Blocker .
4. Touch Print Reports, and then touch Junk Fax List.
ENWW Receive a fax 63
Page 81

Receive faxes to your computer using HP Digital Fax (Fax to PC and Fax to Mac)
If the printer is connected to your computer with a USB cable, you can use HP Digital Fax (Fax to PC and Fax to
Mac) to automatically receive faxes and save faxes directly to your computer. With Fax to PC and Fax to Mac,
you can store digital copies of your faxes easily and also eliminate the hassle of dealing with bulky paper les.
Received faxes are saved as TIFF (Tagged Image File Format). Once the fax is received, you get an on-screen
notication with a link to the folder where the fax is saved.
The les are named in the following method: XXXX_YYYYYYYY_ZZZZZZ.tif, where X is the sender's
information, Y is the date, and Z is the time that the fax was received.
NOTE: Fax to PC and Fax to Mac are available for receiving black-and-white faxes only. Color faxes are
printed instead of being saved to the computer.
This section contains the following topics:
●
Fax to PC and Fax to Mac requirements
●
Activate Fax to PC and Fax to Mac
●
Modify Fax to PC and Fax to Mac settings
Fax to PC and Fax to Mac requirements
●
The administrator computer, the computer that activated the Fax to PC or Fax to Mac feature, must be on
at all times. Only one computer can act as the Fax to PC or Fax to Mac administrator computer.
●
The destination folder's computer or server must be on at all times. The destination computer must also
be awake, faxes will not be saved if the computer is asleep or in hibernate mode.
●
Paper must be loaded in the input tray. For more information, see Load paper on page 16.
Activate Fax to PC and Fax to Mac
On a computer running Windows, you can use the Digital Fax Setup Wizard to activate Fax to PC. On a Mac
computer, you can use the HP Utility.
To set up Fax to PC (Windows)
1. Open the HP printer software. For more information, see Open the HP printer software (Windows)
on page 25.
2. Double-click Fax Actions , and then double-click Digital Fax Setup Wizard .
3. Follow the on-screen instructions.
To set up Fax to Mac (Mac OS X)
1. Open HP Utility. For more information, see HP Utility (Mac OS X) on page 238.
2. Select the printer.
3. Click Digital Fax Archive in the Fax Settings section.
64 Chapter 5 Fax ENWW
Page 82

Modify Fax to PC and Fax to Mac settings
You can update the Fax to PC settings from your computer at any time from the Digital Fax Setup Wizard. You
can update the Fax to Mac settings from the HP Utility.
You can turn o Fax to PC or Fax to Mac and disable printing faxes from the printer control panel.
To modify settings from the printer control panel
1. Touch (Right arrow), and then touch Setup .
2. Touch Fax Setup , touch Basic Fax Setup , and then touch Fax to PC .
3. Select the setting that you want to change. You can change the following settings:
●
View PC hostname: View the name of the computer that is set up to administer Fax to PC or Fax to
Mac.
●
Turn O : Turn o Fax to PC or Fax to Mac.
NOTE: Use the HP software on your computer to turn on Fax to PC or Fax to Mac.
●
Disable Fax Print: Choose this option to print faxes as they are received. If you turn o printing,
color faxes will still print.
To modify settings from the HP software (Windows)
1. Open the HP printer software. For more information, see Open the HP printer software (Windows)
on page 25.
2. Double-click Fax Setup , and then double-click Digital Fax Setup Wizard .
3. Follow the on-screen instructions.
To modify settings from the HP software (Mac OS X)
1. Open HP Utility. For more information, see HP Utility (Mac OS X) on page 238.
2. Select the printer.
3. Click Digital Fax Archive in the Fax Settings section.
Turn o Fax to PC or Fax to Mac
1. Touch (Right arrow), and then touch Setup .
2. Touch Fax Setup , touch Basic Fax Setup , and then touch Fax to PC .
3. Touch Turn O .
ENWW Receive a fax 65
Page 83

Set up speed-dial entries
You can set up frequently used fax numbers as speed-dial entries. This lets you dial those numbers quickly by
using the printer control panel.
TIP: In addition to creating and managing speed-dial entries from the printer control panel, you can also
use tools available on your computer, such as the HP software included with the printer and the printer's
embedded web server (EWS). For more information, see Printer management tools on page 236.
This section contains the following topics:
●
Set up and change speed-dial entries
●
Set up and change group speed-dial entries
●
Delete speed-dial entries
●
Print a list of speed-dial entries
Set up and change speed-dial entries
You can store fax numbers as speed-dial entries.
To set up speed-dial entries
1. On the printer control panel, touch (Right arrow), and then touch Setup .
2. Touch Fax Setup , and then select Speed Dial Setup .
3. Touch Add/Edit Speed Dial , and then touch an unused entry number.
4. Type the fax number, and then touch Next .
NOTE: Be sure to include any pauses or other required numbers, such as an area code, an access code
for numbers outside a PBX system (usually a 9 or 0), or a long-distance prex.
5. Type the name for the speed-dial entry, and then touch Done .
To change speed-dial entries
1. On the printer control panel, touch (Right arrow), and then touch Setup .
2. Touch Fax Setup , and then select Speed Dial Setup .
3. Touch Add/Edit Speed Dial , and then touch the speed-dial entry you want to change.
4. If you want to change the fax number, type the new number, and then touch Next .
NOTE: Be sure to include any pauses or other required numbers, such as an area code, an access code
for numbers outside a PBX system (usually a 9 or 0), or a long-distance prex.
5. If you want to change the name of the speed-dial entry, type the new name, and then touch Done .
Set up and change group speed-dial entries
You can store groups of fax numbers as group speed-dial entries.
66 Chapter 5 Fax ENWW
Page 84

To set up group speed-dial entries
NOTE: Before you can create a group speed-dial entry, you must have already created at least one speed-
dial entry.
1. On the printer control panel, touch (Right arrow), and then touch Setup .
2. Touch Fax Setup , and then select Speed Dial Setup .
3. Touch Group Speed Dial , and then touch an unused entry number.
4. Touch the speed-dial entries you want to include in the group speed-dial entry, and then touch OK .
5. Type the name for the speed-dial entry, and then touch Done .
To change group speed-dial entries
1. On the printer control panel, touch (Right arrow), and then touch Setup .
2. Touch Fax Setup , and then select Speed Dial Setup .
3. Select Group Speed Dial , and then touch the entry you want to change.
4. If you want to add or remove speed-dial entries from the group, touch the speed-dial entries you want
to include or those you want to remove, and then touch OK .
5. If you want to change the name of the group speed-dial, type the new name, and then touch Done .
Delete speed-dial entries
To delete speed-dial entries or group speed-dial entries, complete the following steps:
1. On the printer control panel, touch (Right arrow), and then touch Setup .
2. Touch Fax Setup , and then touch Speed Dial Setup .
3. Touch Delete Speed Dial, touch the entry you want to delete, touch Delete, and then touch Yes to
conrm.
NOTE: Deleting a group speed-dial entry does not delete the individual speed-dial entries.
Print a list of speed-dial entries
To print a list of all of the speed-dial entries that have been set up, complete the following steps:
1. Load paper in the tray. For more information, see Load paper on page 16.
2. On the printer control panel, touch (Right arrow), and then touch Setup .
3. Touch Fax Setup , and then touch Speed Dial Setup .
4. Touch Print Speed Dial List.
ENWW Set up speed-dial entries 67
Page 85

Change fax settings
After completing the steps in the getting started guide that came with the printer, use the following steps to
change the initial settings or to congure other options for faxing.
●
Congure the fax header
●
Set the answer mode (Auto answer)
●
Set the number of rings before answering
●
Change the answer ring pattern for distinctive ring
●
Set the dial type
●
Set the redial options
●
Set the fax speed
●
Set the fax sound volume
Congure the fax header
The fax header prints your name and fax number on the top of every fax you send. HP recommends that you
set up the fax header by using the HP software provided with the printer. You can also set up the fax header
from the printer control panel, as described here.
NOTE: In some countries/regions, the fax header information is a legal requirement.
To set or change the fax header
1. Touch (Right arrow), and then touch Setup .
2. Touch Fax Setup , and then touch Basic Fax Setup .
3. Touch Fax Header.
4. Enter your personal or company name, and then touch Done .
5. Enter your fax number, and then touch Done .
Set the answer mode (Auto answer)
The answer mode determines whether the printer answers incoming calls.
●
Turn on the Auto Answer setting if you want the printer to answer faxes automatically. The printer
answers all incoming calls and faxes.
●
Turn o the Auto Answer setting if you want to receive faxes manually. You must be available to
respond in person to the incoming fax call or else the printer does not receive faxes.
To set the answer mode
1. Touch (Right arrow), and then touch Setup .
2. Touch Fax Setup , and then touch Basic Fax Setup .
3. Touch Auto Answer , and then select On or O .
68 Chapter 5 Fax ENWW
Page 86

Set the number of rings before answering
If you turn on the Auto Answer setting, you can specify how many rings occur before incoming calls are
automatically answered.
The Rings to Answer setting is important if you have an answering machine on the same phone line as the
printer, because you want the answering machine to answer the phone before the printer does. The number
of rings to answer for the printer should be greater than the number of rings to answer for the answering
machine.
For example, set your answering machine to a low number of rings and the printer to answer in the maximum
number of rings. (The maximum number of rings varies by country/region.) In this setup, the answering
machine answers the call and the printer monitors the line. If the printer detects fax tones, it receives the fax.
If the call is a voice call, the answering machine records the incoming message.
To set the number of rings before answering
1. Touch (Right arrow), and then ttouch Setup .
2. Touch Fax Setup , and then touch Basic Fax Setup .
3. Touch Rings to Answer .
4. Touch (Up arrow) or (Down arrow) to change the number of rings.
5. Touch Done to accept the setting.
Change the answer ring pattern for distinctive ring
Many phone companies oer a distinctive ring feature that allows you to have several phone numbers on one
phone line. When you subscribe to this service, each number is assigned a dierent ring pattern. You can set
up the printer to answer incoming calls that have a specic ring pattern.
If you connect the printer to a line with distinctive ring, have your telephone company assign one ring pattern
to voice calls and another ring pattern to fax calls. HP recommends that you request double or triple rings for
a fax number. When the printer detects the specied ring pattern, it answers the call and receives the fax.
TIP: You can also use the Ring Pattern Detection feature in the printer control panel to set distinctive ring.
With this feature, the printer recognizes and records the ring pattern of an incoming call and, based on this
call, automatically determines the distinctive ring pattern assigned by your telephone company to fax calls.
If you do not have a distinctive ring service, use the default ring pattern, which is All Rings .
NOTE: The printer cannot receive faxes when the main phone number is o the hook.
To change the answer ring pattern for distinctive ring
1. Verify that the printer is set to answer fax calls automatically.
2. Touch (Right arrow), and then touch Setup .
3. Touch Fax Setup , and then select Advanced Fax Setup .
4. Touch Distinctive Ring .
ENWW Change fax settings 69
Page 87

5. A message appears stating that this setting should not be changed unless you have multiple numbers
on the same telephone line. Touch Yes to continue.
6. Do one of the following:
●
Touch the ring pattern assigned by your telephone company to fax calls.
- Or -
●
Touch Ring Pattern Detection, and then follow the instructions on the printer control panel.
NOTE: If the Ring Pattern Detection feature cannot detect the ring pattern or if you cancel the feature
before it nishes, the ring pattern is automatically set to the default, which is All Rings .
NOTE: If you are using a PBX phone system that has dierent ring patterns for internal and external
calls, you must call the fax number from an external number.
Set the dial type
Use this procedure to set tone-dialing or pulse-dialing mode. The factory-set default is Tone. Do not change
the setting unless you know that your phone line cannot use tone dialing.
NOTE: The pulse-dialing option is not available in all countries/regions.
To set the dial type
1. Touch (Right arrow), and then touch Setup .
2. Touch Fax Setup , and then touch Basic Fax Setup .
3. Touch (Down arrow), and then touch Dial Type.
4. Touch to select Tone Dialing or Pulse Dialing.
Set the redial options
If the printer was unable to send a fax because the receiving fax machine did not answer or was busy, the
printer attempts to redial based on the settings for the busy-redial and no-answer-redial options. Use the
following procedure to turn the options on or o.
●
Busy redial: If this option is turned on, the printer redials automatically if it receives a busy signal. The
factory-set default for this option is On .
●
No answer redial: If this option is turned on, the printer redials automatically if the receiving fax
machine does not answer. The factory-set default for this option is O .
To set the redial options
1. Touch (Right arrow), and then touch Setup .
2. Touch Fax Setup , and then touch Advanced Fax Setup .
3. Touch Busy Redial or No Answer Redial , and then select the appropriate options.
Set the fax speed
You can set the fax speed used to communicate between your printer and other fax machines when sending
and receiving faxes.
70 Chapter 5 Fax ENWW
Page 88

If you use one of the following, setting the fax speed to a slower speed might be required:
●
An Internet phone service
●
A PBX system
●
Fax over Internet Protocol (FoIP)
●
An integrated services digital network (ISDN) service
If you experience problems sending and receiving faxes, try using a lower Fax Speed . The following table
provides the available fax speed settings.
Fax speed setting Fax speed
Fast v.34 (33600 baud)
Medium v.17 (14400 baud)
Slow v.29 (9600 baud)
To set the fax speed
1. Touch (Right arrow), and then touch Setup .
2. Touch Fax Setup , and then touch Advanced Fax Setup .
3. Touch Fax Speed .
4. Touch to select an option.
Set the fax sound volume
Use this procedure to increase or decrease the volume of the fax sounds.
To set the fax sound volume
1. Touch (Right arrow), and then touch Setup .
2. Touch Fax Setup , and then touch Basic Fax Setup .
3. Touch Fax Sound Volume.
4. Touch to select Soft, Loud, or O .
ENWW Change fax settings 71
Page 89

Fax and digital phone services
Many telephone companies provide their customers with digital phone services, such as the following:
●
DSL: A Digital subscriber line (DSL) service through your telephone company. (DSL might be called ADSL
in your country/region.)
●
PBX: A private branch exchange (PBX) phone system.
●
ISDN: An integrated services digital network (ISDN) system.
●
FoIP: A low-cost phone service that allows you to send and receive faxes with your printer by using the
Internet. This method is called Fax over Internet Protocol (FoIP). For more information, see Fax over
Internet Protocol on page 73.
HP printers are designed specically for use with traditional analog phone services. If you are in a digital
phone environment (such as DSL/ADSL, PBX, or ISDN), you might need to use digital-to-analog lters or
converters when setting up the printer for faxing.
NOTE: HP does not guarantee that the printer will be compatible with all digital service lines or providers, in
all digital environments, or with all digital-to-analog converters. It is always recommended that you discuss
with the telephone company directly for the correct setup options based on their line services provided.
72 Chapter 5 Fax ENWW
Page 90

Fax over Internet Protocol
You might be able to subscribe to a low cost phone service that allows you to send and receive faxes with your
printer by using the Internet. This method is called Fax over Internet Protocol (FoIP).
You probably use a FoIP service (provided by your telephone company) when you:
●
Dial a special access code along with the fax number, or
●
Have an IP converter box that connects to the Internet and provides analog phone ports for the fax
connection.
NOTE: You can only send and receive faxes by connecting a phone cord to the port labeled "1-LINE" on the
printer. This means that your connection to the Internet must be done either through a converter box (which
supplies regular analog phone jacks for fax connections) or your telephone company.
TIP: Support for traditional fax transmission over any Internet protocol telephone systems are often
limited. If you experience problems faxing, try using a slower fax speed or disabling the fax error-correction
mode (ECM). However, if you turn o ECM, you cannot send and receive color faxes. (For more information
about changing the fax speed, see Set the fax speed on page 70. For more information about using ECM, see
Send a fax in Error Correction Mode on page 57.
If you have questions about Internet faxing, contact your Internet faxing services support department or your
local service provider for further assistance.
ENWW Fax over Internet Protocol 73
Page 91

Use reports
You can set up the printer to print error reports and conrmation reports automatically for each fax you send
and receive. You can also manually print system reports as required; these reports provide useful system
information about the printer.
By default, the printer is set to print a report only if there is a problem sending or receiving a fax.
A conrmation message that indicates whether a fax was successfully sent appears briey on the control
panel display after each transaction.
NOTE: If the reports are not legible, you can check the estimated ink levels from the control panel or the HP
software. For more information, see Printer management tools on page 236.
NOTE: Ink level alerts and indicators provide estimates for planning purposes only. When you receive a lowink alert, consider having a replacement cartridge available to avoid possible printing delays. You do not need
to replace the ink cartridges until prompted to do so.
NOTE: Ensure that the printheads and ink cartridges are in good conditions and installed properly. For more
information, see Work with ink cartridges on page 83.
This section contains the following topics:
●
Print fax conrmation reports
●
Print fax error reports
●
Print and view the fax log
●
Clear the fax log
●
Print the details of the last fax transaction
●
Print a Caller ID Report
●
View the Call History
Print fax conrmation reports
If you require printed conrmation that your faxes were successfully sent, follow these instructions to enable
fax conrmation before sending any faxes. Select either On (Fax Send) or On (Send and Receive) .
The default fax conrmation setting is O . This means that a conrmation report is not printed for each fax
sent or received. A conrmation message indicating whether a fax was successfully sent appears briey on
the control panel display after each transaction.
NOTE: You can include an image of the rst page of the fax on the Fax Sent Conrmation report if you select
On (Fax Send) or On (Send and Receive) , and if you scan the fax to send from memory or use the Scan and
Fax option.
To enable fax conrmation
1. Touch (Right arrow), and then touch Setup .
2. Touch Fax Setup , and then touch Fax Reports .
3. Touch Fax Conrmation .
4. Touch to select one of the following options.
74 Chapter 5 Fax ENWW
Page 92

O Does not print a fax conrmation report when you send and receive faxes successfully. This is the
default setting.
On (Fax Send) Prints a fax conrmation report for every fax you send.
On (Fax Receive) Prints a fax conrmation report for every fax you receive.
On (Send and Receive) Prints a fax conrmation report for every fax you send and receive.
To include an image of the fax on the report
1. Touch (Right arrow), and then touch Setup .
2. Touch Fax Reports , and then touch Fax Conrmation .
3. Touch On (Fax Send) or On (Send and Receive) .
4. Touch Fax Conrmation with image.
Print fax error reports
You can congure the printer so that it automatically prints a report when there is an error during
transmission or reception.
To set the printer to print fax error reports automatically
1. Touch (Right arrow), and then touch Setup .
2. Touch Fax Setup , and then touch Fax Reports .
3. Touch Fax Error Report.
4. Touch to select one of the following.
On (Send and Receive) Prints whenever a fax error occurs.
O Does not print any fax error reports.
On (Fax Send) Prints whenever a transmission error occurs. This is the default setting.
On (Fax Receive) Prints whenever a receiving error occurs.
Print and view the fax log
You can print a log of faxes that have been received and sent by the printer.
To print the fax log from the printer control panel
1. Touch (Right arrow), and then touch Setup .
2. Touch Fax Setup , and then touch Fax Reports .
3. Touch Fax Log .
Clear the fax log
Use the following steps to clear the fax log.
ENWW Use reports 75
Page 93

NOTE: Clearing the fax log also deletes all faxes stored in memory.
To clear the fax log
1. Touch (Right arrow), and then touch Setup .
2. Do one of the following:
●
Touch Tools .
- Or -
●
Touch Fax Setup , and then touch Fax Tools.
3. Touch Clear Fax Log.
Print the details of the last fax transaction
The Last Fax Transaction report prints the details of the last fax transaction to occur. Details include the fax
number, number of pages, and the fax status.
To print the Last Fax Transaction report
1. Touch (Right arrow), and then touch Setup .
2. Touch Fax Setup , and then touch Fax Reports .
3. Touch Last Transaction.
Print a Caller ID Report
Use the following procedure to print a list of Caller ID fax numbers.
To print a Caller ID History Report
1. Touch (Right arrow), and then touch Setup .
2. Touch Fax Setup , and then touch Fax Reports .
3. Touch Caller ID Report.
View the Call History
Use the following procedure to view a list of all the calls placed from the printer.
NOTE: The call history cannot be printed. You can only view it from the printer control panel display.
To view the Call History
1. Touch (Right arrow), and then touch Fax .
2.
Touch (Call history).
76 Chapter 6 Web Services ENWW
Page 94

6 Web Services
The printer oers innovative, web-enabled solutions that can help you quickly access the Internet, obtain
documents, and print them faster and with less hassle—and all without using a computer.
NOTE: To use these web features, the printer must be connected to the Internet (either using an Ethernet
cable or wireless connection). You cannot use these web features if the printer is connected using a USB cable.
This section contains the following topics:
●
What are Web Services?
●
Set up Web Services
●
Use Web Services
●
Remove Web Services
ENWW 77
Page 95

What are Web Services?
The printer includes the following Web Services:
●
HP ePrint
●
Printer Apps
HP ePrint
HP ePrint is a free service from HP that allows you to print to your HP ePrint-enabled printer anytime, from
any location. It's as simple as sending an email to the email address assigned to your printer when you enable
Web Services on the printer. No special drivers or software are needed. If you can send an email, you can print
from anywhere, using HP ePrint.
Once you have signed up for an account on ePrintCenter, you can sign in to view your HP ePrint job status,
manage your HP ePrint printer queue, control who can use your printer's HP ePrint email address to print, and
get help for HP ePrint.
Printer Apps
Printer Apps allow you to easily locate and print preformatted web content, directly from your printer. You can
also scan and store your documents digitally on the Web.
Printer Apps provide a wide range of content, from store coupons to family activities, news, travel, sports,
cooking, photos, and many more. You can even view and print your online images from popular photo sites
Certain Printer Apps also allow you to schedule the delivery of app content to your printer.
Pre-formatted content designed specically for your printer means no cut-o text and pictures and no extra
pages with only one line of text. On some printers, you can also choose paper and print quality settings on the
print preview screen.
All without even having to turn on your computer!
78 Chapter 6 Web Services ENWW
Page 96

Set up Web Services
To set up Web Services, use one of the following methods.
NOTE: Before you set up Web Services, make sure you are connected to the Internet using either an
Ethernet or wireless connection.
●
Set up Web Services using the printer control panel
●
Set up Web Services using the embedded web server
●
Set up Web Services using the HP printer software
Set up Web Services using the printer control panel
The printer control panel provides an easy way to set up and manage Web Services.
To set up Web Services, complete the following steps:
1. Make sure the printer is connected to the Internet.
2.
On the printer control panel, touch (Apps) or (HP ePrint).
3. Touch Yes to accept the Web Services terms of use and enable Web Services.
4. In the Auto Update screen, touch Yes to allow the printer to automatically check for and install product
updates.
NOTE: If a printer update is available, the printer will download and install the update, and then
restart. You will have to repeat the instructions from step 1 to set up HP ePrint.
NOTE: If prompted for proxy settings and if your network uses proxy settings, follow the on-screen
instructions to set up a proxy server. If you do not have the proxy details, contact your network
administrator or the person who set up the network.
5. When the printer is connected to the server, the printer prints an information page. Follow the
instructions on the information page to nish the setup.
Set up Web Services using the embedded web server
You can use the printer's embedded web server (EWS) to set up and manage Web Services.
To set up Web Services, complete the following steps:
1. Open the EWS. For more information, see Embedded web server on page 239.
2. Click the Web Services tab.
3. In the Web Services Settings section, click Setup , click Continue, and follow the on-screen instructions
to accept the terms of use.
4. If prompted, choose to allow the printer to check for and install printer updates.
NOTE: If a printer update is available, the printer downloads and installs the update, and then restarts.
Repeat the instructions from step 1 to set up HP ePrint.
ENWW Set up Web Services 79
Page 97

NOTE: If prompted for proxy settings and if your network uses proxy settings, follow the on-screen
instructions to set up a proxy server. If you do not have the proxy details, contact your network
administrator or the person who set up the network.
5. When the printer is connected to the server, the printer prints an information page. Follow the
instructions on the information page to nish the setup.
Set up Web Services using the HP printer software
If you do not set up Web Services when you installed the HP software on your computer, you can still use the
software to set up Web Services.
To set up Web Services, complete the following steps for your operating system:
Windows:
1. Open the HP printer software. For more information, see Open the HP printer software (Windows)
on page 25.
2. In the window that appears, select Print, Scan & Fax or Print & Scan , and then select ePrint Setup. The
printer's embedded web server opens.
3. Click the Web Services tab.
4. In the Web Services Settings section, click Setup , click Continue, and follow the on-screen instructions
to accept the terms of use.
Mac OS X:
5. If prompted, choose to allow the printer to check for and install printer updates.
NOTE: If a printer update is available, the printer will download and install the update, and then
restart. You will have to repeat the instructions from step 1 to set up HP ePrint.
6. If your network uses proxy settings when connecting to the Internet, enter these settings:
a. Touch Enter Proxy.
b. Enter the proxy server settings, and then touch Done .
7. When the printer is connected to the server, the printer prints an information page. Follow the
instructions on the information page to nish the setup.
▲
To set up and manage Web Services in Mac OS X, you can use the printer's embedded web server (EWS).
For more information, see Set up Web Services using the embedded web server on page 79
80 Chapter 6 Web Services ENWW
Page 98

Use Web Services
The following section describes how to use and congure Web Services.
●
HP ePrint
●
Printer Apps
HP ePrint
HP ePrint allows you to print to your HP ePrint-enabled printer anytime, from any location.
To use HP ePrint, make sure to have the following:
●
An Internet- and email-capable computer or mobile device
●
An HP ePrint-capable printer on which Web Services has been enabled
TIP: For more information about managing and conguring HP ePrint settings and to learn about the latest
features, visit ePrintCenter at www.eprintcenter.com .
Print using HP ePrint
To print documents using HP ePrint, complete the following steps:
1. On your computer or mobile device, open your email application.
NOTE: For information about using the email application on your computer or mobile device, see the
documentation provided with the application.
2. Create a new email message, and then attach the le that you want to print. For a list of les that can be
printed using HP ePrint, as well as guidelines to follow when using HP ePrint, see Web Services
on page 76 and HP website specications on page 168.
3. Enter the printer's email address in the “To” line of the email message, and then select the option to
send the email message.
NOTE: The HP ePrint server does not accept email print jobs if there are multiple email addresses
included in the "To" or "Cc" elds. Only enter the email address of your HP printer in the "To" eld. Do not
enter any additional email addresses in the other elds.
Find the printer's email address
NOTE: Make sure you have created an ePrint account.
To sign up for an account on ePrintCenter, visit ePrintCenter at www.eprintcenter.com .
▲
From the printer control panel, touch (HP ePrint).
To customize the email address, touch Print Info. The printer prints an information page that contains
the printer code and instructions on how to customize the email address.
Turn o HP ePrint
1.
From the printer control panel, touch (HP ePrint), and then touch Settings .
2. Touch ePrint, and then touch O .
ENWW Use Web Services 81
Page 99

NOTE: To remove all Web Services, see Remove Web Services on page 83.
Printer Apps
Printer Apps allow you to easily locate and print pre-formatted web content, directly from your printer.
●
Use Printer Apps
●
Manage Printer Apps
●
Turn o Printer Apps
Use Printer Apps
To use the Printer Apps on your printer, touch Apps on the printer control panel display, and then touch the
Print App you want to use.
For more information about individual Printer Apps, visit www.eprintcenter.com .
Manage Printer Apps
You can manage your Printer Apps with ePrintCenter. You can add, congure, or remove Printer Apps, and set
the order in which they appear on your printer's display.
NOTE: To manage Printer Apps from ePrintCenter, create an account on ePrintCenter and add your printer.
For more information, visit www.eprintcenter.com .
Turn o Printer Apps
To turn o Printer Apps, complete the following steps:
1.
From the printer control panel, touch (HP ePrint), and then touch Settings .
2. Touch Apps, and then touch O .
NOTE: To remove all Web Services, see Remove Web Services on page 83.
82 Chapter 6 Web Services ENWW
Page 100

Remove Web Services
To remove Web Services, complete the following steps:
1.
On the printer control panel display, touch (HP ePrint), and then touch Settings .
2. Touch Remove Web Services.
7 Work with ink cartridges
To ensure the best print quality from the printer, you need to perform some simple maintenance procedures.
TIP: If you have problems copying documents, see Print quality troubleshooting on page 101.
This section contains the following topics:
●
Information on ink cartridges and the printhead
●
Check the estimated ink levels
●
Printing with black or color ink only
●
Replace the ink cartridges
●
Store printing supplies
●
Anonymous usage information storage
ENWW Remove Web Services 83
 Loading...