

Page 1
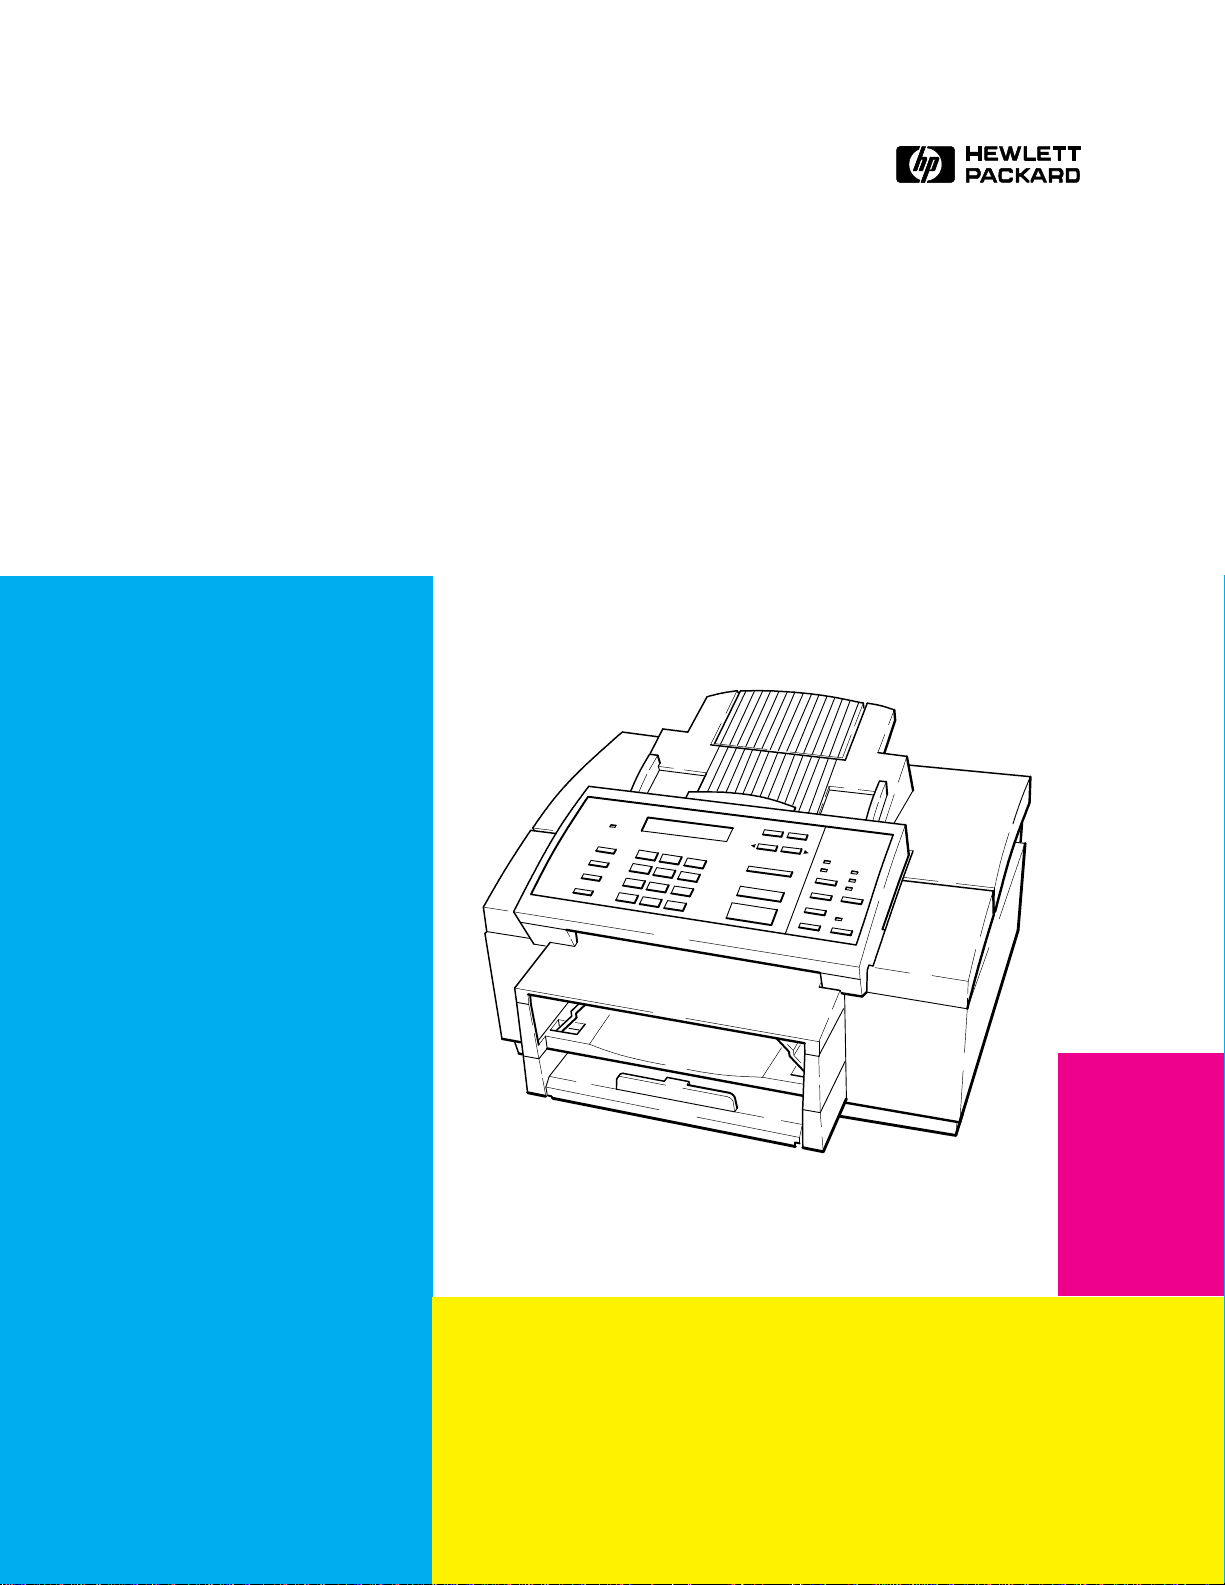
HP OfficeJet Family
Technical Support Solutions Guide
Page 2

Contents
Subject Page
Chapter 1: Product Information
Introduction 1-2. . . . . . . . . . . . . . . . . . . . . . . . . . . . . . . . . . . . . . . . . . . . . . . . . . . . . . . . . . . . . . . . . . . . . . . . . . . .
Product Description 1-2. . . . . . . . . . . . . . . . . . . . . . . . . . . . . . . . . . . . . . . . . . . . . . . . . . . . . . . . . . . . . . . . . . . . . .
Product Features 1-3. . . . . . . . . . . . . . . . . . . . . . . . . . . . . . . . . . . . . . . . . . . . . . . . . . . . . . . . . . . . . . . . . . . . . . . .
Simultaneous Tasking Features 1-4. . . . . . . . . . . . . . . . . . . . . . . . . . . . . . . . . . . . . . . . . . . . . . . . . . . . . . . . . . . . .
Product Specifications 1-7. . . . . . . . . . . . . . . . . . . . . . . . . . . . . . . . . . . . . . . . . . . . . . . . . . . . . . . . . . . . . . . . . . . .
Print Cartridges 1-10. . . . . . . . . . . . . . . . . . . . . . . . . . . . . . . . . . . . . . . . . . . . . . . . . . . . . . . . . . . . . . . . . . . . . . . . .
Software Programs 1-10. . . . . . . . . . . . . . . . . . . . . . . . . . . . . . . . . . . . . . . . . . . . . . . . . . . . . . . . . . . . . . . . . . . . . . .
Media 1-10. . . . . . . . . . . . . . . . . . . . . . . . . . . . . . . . . . . . . . . . . . . . . . . . . . . . . . . . . . . . . . . . . . . . . . . . . . . . . . . . .
Media Tray Capacities 1-11. . . . . . . . . . . . . . . . . . . . . . . . . . . . . . . . . . . . . . . . . . . . . . . . . . . . . . . . . . . . . . . . . . . .
Media Print Area 1-12. . . . . . . . . . . . . . . . . . . . . . . . . . . . . . . . . . . . . . . . . . . . . . . . . . . . . . . . . . . . . . . . . . . . . . . .
Ordering Information 1-13. . . . . . . . . . . . . . . . . . . . . . . . . . . . . . . . . . . . . . . . . . . . . . . . . . . . . . . . . . . . . . . . . . . . .
Chapter 2: Installation and Configuration
Introduction 2-2. . . . . . . . . . . . . . . . . . . . . . . . . . . . . . . . . . . . . . . . . . . . . . . . . . . . . . . . . . . . . . . . . . . . . . . . . . . .
Using Printer Driver Software 2-2. . . . . . . . . . . . . . . . . . . . . . . . . . . . . . . . . . . . . . . . . . . . . . . . . . . . . . . . . . . . . .
Using Microsoft Windows 3.1 2-2. . . . . . . . . . . . . . . . . . . . . . . . . . . . . . . . . . . . . . . . . . . . . . . . . . . . . . . . . . .
Using OS/2 2-3. . . . . . . . . . . . . . . . . . . . . . . . . . . . . . . . . . . . . . . . . . . . . . . . . . . . . . . . . . . . . . . . . . . . . . . . .
Using DOS Software Applications 2-3. . . . . . . . . . . . . . . . . . . . . . . . . . . . . . . . . . . . . . . . . . . . . . . . . . . . . . .
Hardware and Software Requirements 2-3. . . . . . . . . . . . . . . . . . . . . . . . . . . . . . . . . . . . . . . . . . . . . . . . . . . .
Installing the HP OfficeJet LX Software 2-3. . . . . . . . . . . . . . . . . . . . . . . . . . . . . . . . . . . . . . . . . . . . . . . . . . . . . .
Running the HP OfficeJet LX Manager 2-6. . . . . . . . . . . . . . . . . . . . . . . . . . . . . . . . . . . . . . . . . . . . . . . . . . . . . . .
Running the Eclipse FAX SE from the HP OfficeJet LX Manager 2-7. . . . . . . . . . . . . . . . . . . . . . . . . . . . . . . . . .
Sending a Fax Directly from the PC 2-8. . . . . . . . . . . . . . . . . . . . . . . . . . . . . . . . . . . . . . . . . . . . . . . . . . . . . . . . .
Receiving a Fax Directly to the PC 2-9. . . . . . . . . . . . . . . . . . . . . . . . . . . . . . . . . . . . . . . . . . . . . . . . . . . . . . . . . .
Using Other PC Fax Programs With the HP OfficeJet LX 2-10. . . . . . . . . . . . . . . . . . . . . . . . . . . . . . . . . . . . . . . .
Installing a Control Panel Overlay 2-10. . . . . . . . . . . . . . . . . . . . . . . . . . . . . . . . . . . . . . . . . . . . . . . . . . . . . . . . . . .
Installing a Print Cartridge 2-11. . . . . . . . . . . . . . . . . . . . . . . . . . . . . . . . . . . . . . . . . . . . . . . . . . . . . . . . . . . . . . . . .
Installing an Interface Cable for Printing 2-12. . . . . . . . . . . . . . . . . . . . . . . . . . . . . . . . . . . . . . . . . . . . . . . . . . . . .
Installing the Power Cord 2-13. . . . . . . . . . . . . . . . . . . . . . . . . . . . . . . . . . . . . . . . . . . . . . . . . . . . . . . . . . . . . . . . .
Installing a Document Catch Tray (optional) 2-13. . . . . . . . . . . . . . . . . . . . . . . . . . . . . . . . . . . . . . . . . . . . . . . . . .
Installing an Access Door Assembly 2-15. . . . . . . . . . . . . . . . . . . . . . . . . . . . . . . . . . . . . . . . . . . . . . . . . . . . . . . . .
Installing an Output Tray 2-15. . . . . . . . . . . . . . . . . . . . . . . . . . . . . . . . . . . . . . . . . . . . . . . . . . . . . . . . . . . . . . . . . .
Installing an Input Tray 2-16. . . . . . . . . . . . . . . . . . . . . . . . . . . . . . . . . . . . . . . . . . . . . . . . . . . . . . . . . . . . . . . . . . .
Installing a Tray Cover 2-17. . . . . . . . . . . . . . . . . . . . . . . . . . . . . . . . . . . . . . . . . . . . . . . . . . . . . . . . . . . . . . . . . . .
Loading Paper in the Input (Paper) Tray 2-18. . . . . . . . . . . . . . . . . . . . . . . . . . . . . . . . . . . . . . . . . . . . . . . . . . . . . .
Loading Envelopes in the Input (Paper) Tray 2-19. . . . . . . . . . . . . . . . . . . . . . . . . . . . . . . . . . . . . . . . . . . . . . . . . .
Setting the Paper Size in the Menu 2-20. . . . . . . . . . . . . . . . . . . . . . . . . . . . . . . . . . . . . . . . . . . . . . . . . . . . . . . . . .
Setting Up for Printing 2-21. . . . . . . . . . . . . . . . . . . . . . . . . . . . . . . . . . . . . . . . . . . . . . . . . . . . . . . . . . . . . . . . . . . .
Setting Up for Faxing (U.S., Australia, Canada and Mexico Installations) 2-22. . . . . . . . . . . . . . . . . . . . . . . . . . .
Receive fax calls only - no voice calls, on a dedicated fax line 2-22. . . . . . . . . . . . . . . . . . . . . . . . . . . . . . . . .
Receive voice and fax calls at the same phone number - without an answering machine 2-23. . . . . . . . . . . . .
Receive voice and fax calls at the same phone number - with an answering machine 2-24. . . . . . . . . . . . . . . .
Receive fax and voice calls on the same line with distinctive ring 2-25. . . . . . . . . . . . . . . . . . . . . . . . . . . . . . .
Setting the Reception Mode for Incoming Calls 2-27. . . . . . . . . . . . . . . . . . . . . . . . . . . . . . . . . . . . . . . . . . . . . . . .
Setting the Number of Rings to Answer 2-28. . . . . . . . . . . . . . . . . . . . . . . . . . . . . . . . . . . . . . . . . . . . . . . . . . . . . .
Selecting Tone or Pulse Dialing 2-29. . . . . . . . . . . . . . . . . . . . . . . . . . . . . . . . . . . . . . . . . . . . . . . . . . . . . . . . . . . . .
Entering the Date and Time 2-30. . . . . . . . . . . . . . . . . . . . . . . . . . . . . . . . . . . . . . . . . . . . . . . . . . . . . . . . . . . . . . . .
Entering the Header Information (company name and fax number) 2-31. . . . . . . . . . . . . . . . . . . . . . . . . . . . . . . . .
vii
Page 3

Subject Page
Setting Up for Faxing (U.K. Installation) 2-32. . . . . . . . . . . . . . . . . . . . . . . . . . . . . . . . . . . . . . . . . . . . . . . . . . . . .
Receive fax calls only - no voice calls, on a dedicated fax line 2-32. . . . . . . . . . . . . . . . . . . . . . . . . . . . . . . . .
Receive voice and fax calls at the same phone number - without an answering machine 2-33. . . . . . . . . . . . .
Receive voice and fax calls at the same phone number - with an answering machine 2-33. . . . . . . . . . . . . . . .
Setting Up for Faxing (Germany Installation) 2-34. . . . . . . . . . . . . . . . . . . . . . . . . . . . . . . . . . . . . . . . . . . . . . . . . .
Setting Up for Faxing (France Installation) 2-35. . . . . . . . . . . . . . . . . . . . . . . . . . . . . . . . . . . . . . . . . . . . . . . . . . . .
Receive fax calls only - no voice calls, on a dedicated fax line 2-35. . . . . . . . . . . . . . . . . . . . . . . . . . . . . . . . .
Receive voice and fax calls at the same phone number - without an answering machine 2-36. . . . . . . . . . . . .
Receive voice and fax calls at the same phone number - with an answering machine 2-37. . . . . . . . . . . . . . . .
Setting Up for Faxing (Netherlands Installation) 2-38. . . . . . . . . . . . . . . . . . . . . . . . . . . . . . . . . . . . . . . . . . . . . . .
Receive fax calls only - no voice calls, on a dedicated fax line 2-38. . . . . . . . . . . . . . . . . . . . . . . . . . . . . . . . .
Receive voice and fax calls at the same phone number - without an answering machine 2-39. . . . . . . . . . . . .
Receive voice and fax calls at the same phone number - with an answering machine 2-40. . . . . . . . . . . . . . . .
Chapter 3: Routine Maintenance
Introduction 3-2. . . . . . . . . . . . . . . . . . . . . . . . . . . . . . . . . . . . . . . . . . . . . . . . . . . . . . . . . . . . . . . . . . . . . . . . . . . .
Changing a Print Cartridge 3-2. . . . . . . . . . . . . . . . . . . . . . . . . . . . . . . . . . . . . . . . . . . . . . . . . . . . . . . . . . . . .
Exterior Cleaning 3-3. . . . . . . . . . . . . . . . . . . . . . . . . . . . . . . . . . . . . . . . . . . . . . . . . . . . . . . . . . . . . . . . . . . .
Chapter 4: Calibration and Adjustment
Introduction 4-2. . . . . . . . . . . . . . . . . . . . . . . . . . . . . . . . . . . . . . . . . . . . . . . . . . . . . . . . . . . . . . . . . . . . . . . . . . . .
Print Calib Chart 4-2. . . . . . . . . . . . . . . . . . . . . . . . . . . . . . . . . . . . . . . . . . . . . . . . . . . . . . . . . . . . . . . . . . . . . . . .
Chapter 5: Problem Resolution
Introduction 5-2. . . . . . . . . . . . . . . . . . . . . . . . . . . . . . . . . . . . . . . . . . . . . . . . . . . . . . . . . . . . . . . . . . . . . . . . . . . .
Multi-Function Task Chart 5-2. . . . . . . . . . . . . . . . . . . . . . . . . . . . . . . . . . . . . . . . . . . . . . . . . . . . . . . . . . . . . . . . .
Problem Solving Process 5-2. . . . . . . . . . . . . . . . . . . . . . . . . . . . . . . . . . . . . . . . . . . . . . . . . . . . . . . . . . . . . . . . . .
Typical Questions and Answers 5-3. . . . . . . . . . . . . . . . . . . . . . . . . . . . . . . . . . . . . . . . . . . . . . . . . . . . . . . . . . . . .
Error Notification: Beeps, Blinking Lights and Messages 5-6. . . . . . . . . . . . . . . . . . . . . . . . . . . . . . . . . . . . . . . .
Display Messages: What they mean and what to do 5-7. . . . . . . . . . . . . . . . . . . . . . . . . . . . . . . . . . . . . . . . . . . . .
Solving Problems While Printing, Faxing or Copying 5-16. . . . . . . . . . . . . . . . . . . . . . . . . . . . . . . . . . . . . . . . . . .
Diagnostic Codes: What they are, how to read them and what to do 5-22. . . . . . . . . . . . . . . . . . . . . . . . . . . . . . . .
Fax Session Protocol: Diagnostic Code appearances in a communication 5-22. . . . . . . . . . . . . . . . . . . . . . . . .
Diagnostic Code Descriptions 5-25. . . . . . . . . . . . . . . . . . . . . . . . . . . . . . . . . . . . . . . . . . . . . . . . . . . . . . . . . . .
Communication Error Codes (level 400 and 500) 5-27. . . . . . . . . . . . . . . . . . . . . . . . . . . . . . . . . . . . . . . . . . . .
Power-On Initialization Tests 5-34. . . . . . . . . . . . . . . . . . . . . . . . . . . . . . . . . . . . . . . . . . . . . . . . . . . . . . . . . . . . . . .
Special Menus and Functions 5-35. . . . . . . . . . . . . . . . . . . . . . . . . . . . . . . . . . . . . . . . . . . . . . . . . . . . . . . . . . . . . .
Service and Factory Menu 5-36. . . . . . . . . . . . . . . . . . . . . . . . . . . . . . . . . . . . . . . . . . . . . . . . . . . . . . . . . . . . . . . . .
Service and Factory Menu Structure 5-36. . . . . . . . . . . . . . . . . . . . . . . . . . . . . . . . . . . . . . . . . . . . . . . . . . . . . .
System Error Codes 5-41. . . . . . . . . . . . . . . . . . . . . . . . . . . . . . . . . . . . . . . . . . . . . . . . . . . . . . . . . . . . . . . . . . . . . .
User-Menu Associated Parameter Structure 5-42. . . . . . . . . . . . . . . . . . . . . . . . . . . . . . . . . . . . . . . . . . . . . . . . . . .
Officejet Parameter Descriptions 5-43. . . . . . . . . . . . . . . . . . . . . . . . . . . . . . . . . . . . . . . . . . . . . . . . . . . . . . . . . . . .
LIU Identification 5-43. . . . . . . . . . . . . . . . . . . . . . . . . . . . . . . . . . . . . . . . . . . . . . . . . . . . . . . . . . . . . . . . . . . .
Ring Detection and Auto Answering 5-44. . . . . . . . . . . . . . . . . . . . . . . . . . . . . . . . . . . . . . . . . . . . . . . . . . . . .
Eavesdrop Detection and Automatic Answering 5-47. . . . . . . . . . . . . . . . . . . . . . . . . . . . . . . . . . . . . . . . . . . .
Connection Establishment 5-50. . . . . . . . . . . . . . . . . . . . . . . . . . . . . . . . . . . . . . . . . . . . . . . . . . . . . . . . . . . . . .
Pause Control 5-53. . . . . . . . . . . . . . . . . . . . . . . . . . . . . . . . . . . . . . . . . . . . . . . . . . . . . . . . . . . . . . . . . . . . . . .
Dial Tone Detection 5-54. . . . . . . . . . . . . . . . . . . . . . . . . . . . . . . . . . . . . . . . . . . . . . . . . . . . . . . . . . . . . . . . . . .
Dialing 5-60. . . . . . . . . . . . . . . . . . . . . . . . . . . . . . . . . . . . . . . . . . . . . . . . . . . . . . . . . . . . . . . . . . . . . . . . . . . . .
Call Progress 5-62. . . . . . . . . . . . . . . . . . . . . . . . . . . . . . . . . . . . . . . . . . . . . . . . . . . . . . . . . . . . . . . . . . . . . . . .
Modem Configuration 5-65. . . . . . . . . . . . . . . . . . . . . . . . . . . . . . . . . . . . . . . . . . . . . . . . . . . . . . . . . . . . . . . . .
viii
Page 4

Subject Page
Fax Session Configuration 5-67. . . . . . . . . . . . . . . . . . . . . . . . . . . . . . . . . . . . . . . . . . . . . . . . . . . . . . . . . . . . .
Redialing 5-68. . . . . . . . . . . . . . . . . . . . . . . . . . . . . . . . . . . . . . . . . . . . . . . . . . . . . . . . . . . . . . . . . . . . . . . . . . .
Miscellaneous 5-70. . . . . . . . . . . . . . . . . . . . . . . . . . . . . . . . . . . . . . . . . . . . . . . . . . . . . . . . . . . . . . . . . . . . . . .
Chapter 6: Service and Support Information
Introduction 6-2. . . . . . . . . . . . . . . . . . . . . . . . . . . . . . . . . . . . . . . . . . . . . . . . . . . . . . . . . . . . . . . . . . . . . . . . . . . .
Product Warranty 6-2. . . . . . . . . . . . . . . . . . . . . . . . . . . . . . . . . . . . . . . . . . . . . . . . . . . . . . . . . . . . . . . . . . . . . . . .
HP Extended Warranties 6-2. . . . . . . . . . . . . . . . . . . . . . . . . . . . . . . . . . . . . . . . . . . . . . . . . . . . . . . . . . . . . . . . . .
HP Express Exchange 6-2. . . . . . . . . . . . . . . . . . . . . . . . . . . . . . . . . . . . . . . . . . . . . . . . . . . . . . . . . . . . . . . . . . . .
Standard Return (U.S. only) 6-2. . . . . . . . . . . . . . . . . . . . . . . . . . . . . . . . . . . . . . . . . . . . . . . . . . . . . . . . . . . . . . .
Returning the HP OfficeJet for Service 6-2. . . . . . . . . . . . . . . . . . . . . . . . . . . . . . . . . . . . . . . . . . . . . . . . . . . . . . .
HP Support Information 6-3. . . . . . . . . . . . . . . . . . . . . . . . . . . . . . . . . . . . . . . . . . . . . . . . . . . . . . . . . . . . . . . . . . .
Exchange Unit Ordering Information 6-3. . . . . . . . . . . . . . . . . . . . . . . . . . . . . . . . . . . . . . . . . . . . . . . . . . . . . . . .
Resources for U.S. Customers 6-4. . . . . . . . . . . . . . . . . . . . . . . . . . . . . . . . . . . . . . . . . . . . . . . . . . . . . . . . . . . . . .
Resources for Resellers (U.S. only) 6-6. . . . . . . . . . . . . . . . . . . . . . . . . . . . . . . . . . . . . . . . . . . . . . . . . . . . . . . . . .
Resources for HP Authorized Dealers (U.S. only) 6-7. . . . . . . . . . . . . . . . . . . . . . . . . . . . . . . . . . . . . . . . . . . . . .
Resources for Canadian Product Support 6-8. . . . . . . . . . . . . . . . . . . . . . . . . . . . . . . . . . . . . . . . . . . . . . . . . . . . .
Resources for European Product Support 6-9. . . . . . . . . . . . . . . . . . . . . . . . . . . . . . . . . . . . . . . . . . . . . . . . . . . . .
Resources for Australian Product Support 6-12. . . . . . . . . . . . . . . . . . . . . . . . . . . . . . . . . . . . . . . . . . . . . . . . . . . . .
HP Regional Sales Offices 6-13. . . . . . . . . . . . . . . . . . . . . . . . . . . . . . . . . . . . . . . . . . . . . . . . . . . . . . . . . . . . . . . . .
Interpreting the Serial Number Format 6-14. . . . . . . . . . . . . . . . . . . . . . . . . . . . . . . . . . . . . . . . . . . . . . . . . . . . . . .
Interpreting the PCA Date Code Format 6-14. . . . . . . . . . . . . . . . . . . . . . . . . . . . . . . . . . . . . . . . . . . . . . . . . . . . . .
Index
ix
Page 5

Subject Page
Figures
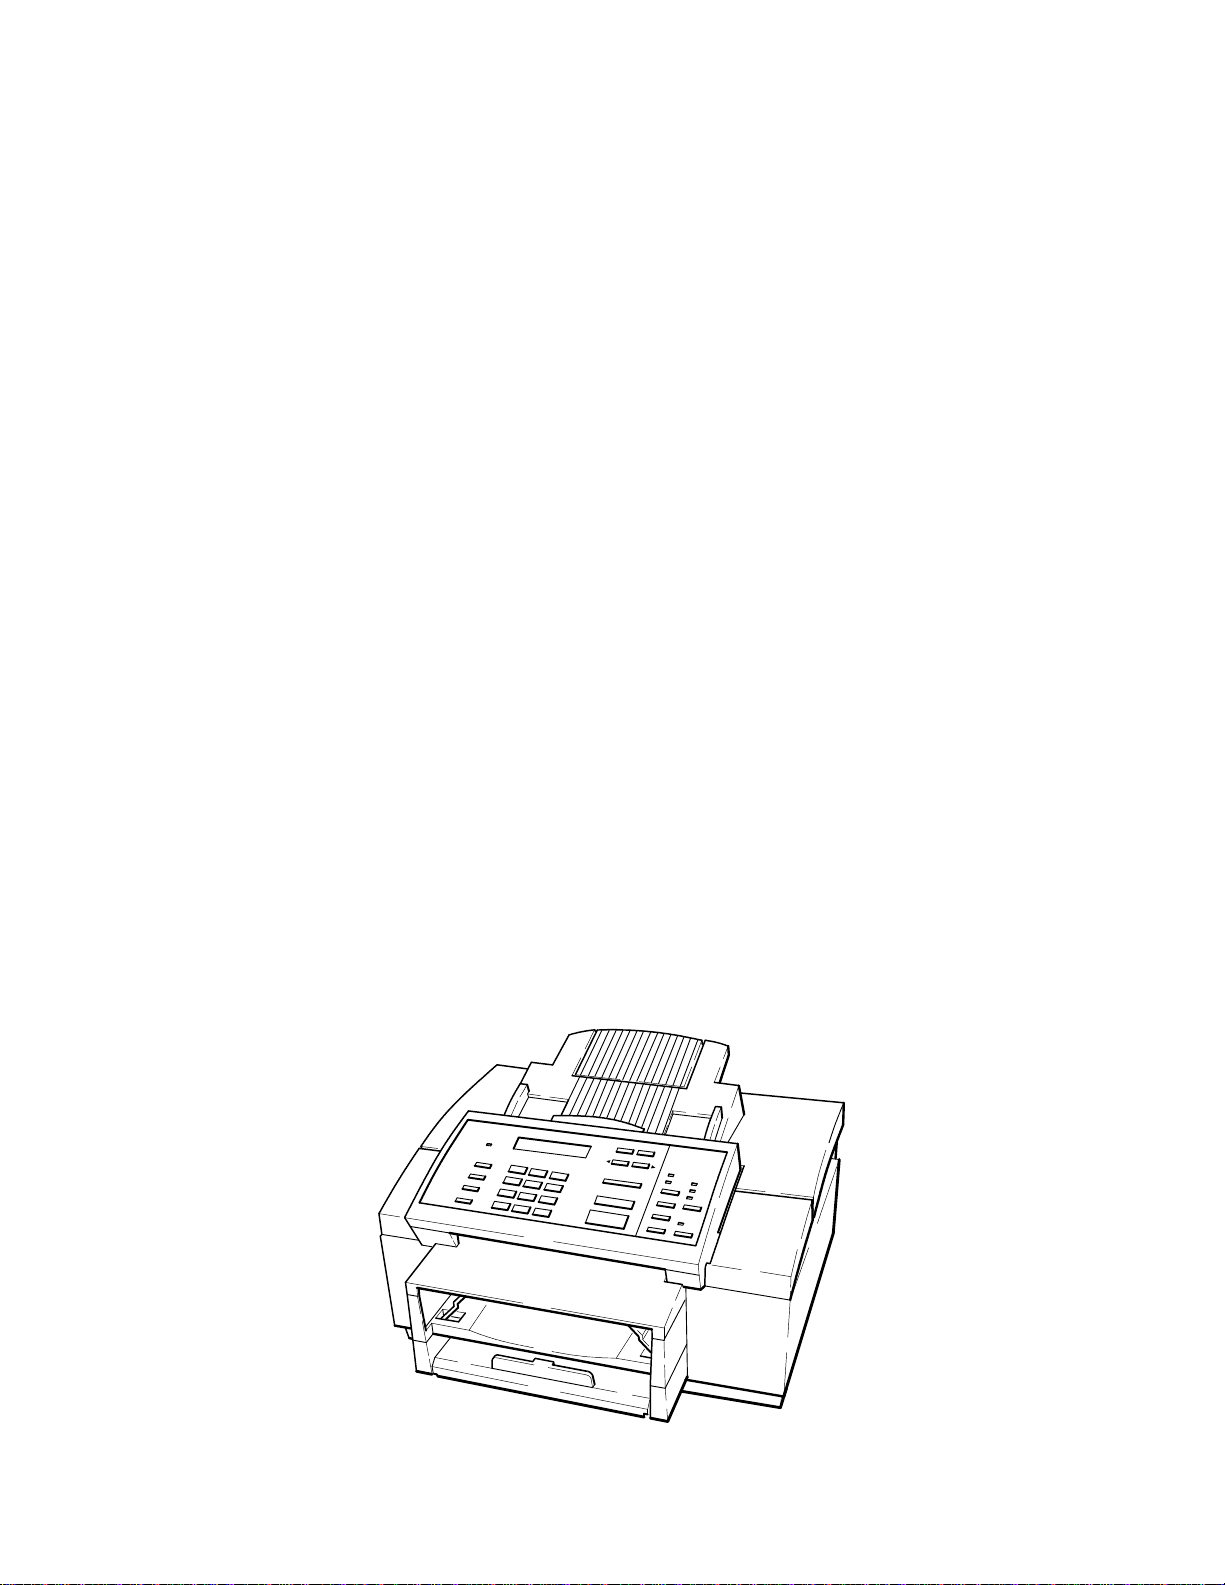
HP OfficeJet Printer/Fax/Copier 1-2. . . . . . . . . . . . . . . . . . . . . . . . . . . . . . . . . . . . . . . . . . . . . . . . . . . . . . . . . . . .
Maximum Media Print Area 1-12. . . . . . . . . . . . . . . . . . . . . . . . . . . . . . . . . . . . . . . . . . . . . . . . . . . . . . . . . . . . . . .
Tray Assemblies 1-14. . . . . . . . . . . . . . . . . . . . . . . . . . . . . . . . . . . . . . . . . . . . . . . . . . . . . . . . . . . . . . . . . . . . . . . . .
Removing the Protective Cover from the Back of the Control Panel Assembly 2-10. . . . . . . . . . . . . . . . . . . . . . . .
Installing the Print Cartridge 2-11. . . . . . . . . . . . . . . . . . . . . . . . . . . . . . . . . . . . . . . . . . . . . . . . . . . . . . . . . . . . . . .
Installing an Interface Cable for Printing 2-12. . . . . . . . . . . . . . . . . . . . . . . . . . . . . . . . . . . . . . . . . . . . . . . . . . . . .
Installing the Power Cord 2-13. . . . . . . . . . . . . . . . . . . . . . . . . . . . . . . . . . . . . . . . . . . . . . . . . . . . . . . . . . . . . . . . .
Installing a Document Catch Tray (optional) 2-13. . . . . . . . . . . . . . . . . . . . . . . . . . . . . . . . . . . . . . . . . . . . . . . . . .
Installing an Access Door Assembly 2-15. . . . . . . . . . . . . . . . . . . . . . . . . . . . . . . . . . . . . . . . . . . . . . . . . . . . . . . . .
Installing an Output Tray 2-15. . . . . . . . . . . . . . . . . . . . . . . . . . . . . . . . . . . . . . . . . . . . . . . . . . . . . . . . . . . . . . . . . .
Installing an Input Tray 2-16. . . . . . . . . . . . . . . . . . . . . . . . . . . . . . . . . . . . . . . . . . . . . . . . . . . . . . . . . . . . . . . . . . .
Installing a Tray Cover 2-17. . . . . . . . . . . . . . . . . . . . . . . . . . . . . . . . . . . . . . . . . . . . . . . . . . . . . . . . . . . . . . . . . . .
Loading Paper in the Input (Paper) Tray 2-18. . . . . . . . . . . . . . . . . . . . . . . . . . . . . . . . . . . . . . . . . . . . . . . . . . . . . .
Loading Envelopes in the Input (Paper) Tray 2-19. . . . . . . . . . . . . . . . . . . . . . . . . . . . . . . . . . . . . . . . . . . . . . . . . .
Connecting the HP OfficeJet to the Telephone Wall Jack (U.S., Australia, Canada, Mexico Installations) 2-22. . .
Connecting a Telephone to the HP OfficeJet (U.S., Australia, Canada, Mexico Installations) 2-23. . . . . . . . . . . . .
Connecting an Answering Machine to the HP OfficeJet (U.S., Australia, Canada, Mexico Installations) 2-24. . . .
Connecting the HP OfficeJet to the Telephone Wall Jack (U.K. Installation) 2-32. . . . . . . . . . . . . . . . . . . . . . . . . .
Connecting a Telephone for use with the HP OfficeJet (U.K. Installation) 2-33. . . . . . . . . . . . . . . . . . . . . . . . . . .
Connecting an Answering Machine for use with the HP OfficeJet (U.K. Installation) 2-33. . . . . . . . . . . . . . . . . . .
Connecting the HP OfficeJet to the Telephone Wall Jack (Germany Installation) 2-34. . . . . . . . . . . . . . . . . . . . . .
Connecting a Telephone or Answering Machine for use with the HP OfficeJet (Germany Installation) 2-34. . . . .
Connecting the HP OfficeJet to the Telephone Wall Jack (France Installation) 2-35. . . . . . . . . . . . . . . . . . . . . . . .
Connecting a Telephone for use with the HP OfficeJet (France Installation) 2-36. . . . . . . . . . . . . . . . . . . . . . . . . .
Connecting an Answering Machine for use with the HP OfficeJet (France Installation) 2-37. . . . . . . . . . . . . . . . .
Connecting the HP OfficeJet to the Telephone Wall Jack (Netherlands Installation) 2-38. . . . . . . . . . . . . . . . . . . .
Connecting a Telephone for use with the HP OfficeJet (Netherlands Installation) 2-39. . . . . . . . . . . . . . . . . . . . . .
Connecting an Answering Machine for use with the HP OfficeJet (Netherlands Installation) 2-40. . . . . . . . . . . . .
Changing a Print cartridge 3-2. . . . . . . . . . . . . . . . . . . . . . . . . . . . . . . . . . . . . . . . . . . . . . . . . . . . . . . . . . . . . . . . .
Calibration Chart 4-4. . . . . . . . . . . . . . . . . . . . . . . . . . . . . . . . . . . . . . . . . . . . . . . . . . . . . . . . . . . . . . . . . . . . . . . .
Diagnostic Code (Sample Report Form) 5-22. . . . . . . . . . . . . . . . . . . . . . . . . . . . . . . . . . . . . . . . . . . . . . . . . . . . .
HP OfficeJet Fax Session Protocol Diagram 5-24. . . . . . . . . . . . . . . . . . . . . . . . . . . . . . . . . . . . . . . . . . . . . . . . . .
Service and Factory Menu 5-36. . . . . . . . . . . . . . . . . . . . . . . . . . . . . . . . . . . . . . . . . . . . . . . . . . . . . . . . . . . . . . . .
x
Page 6

Tables
HP OfficeJet (LX) Features 1-3. . . . . . . . . . . . . . . . . . . . . . . . . . . . . . . . . . . . . . . . . . . . . . . . . . . . . . . . . . . . . . .
Simultaneous Tasking Matrix 1-4. . . . . . . . . . . . . . . . . . . . . . . . . . . . . . . . . . . . . . . . . . . . . . . . . . . . . . . . . . . . . .
HP OfficeJet Specifications 1-7. . . . . . . . . . . . . . . . . . . . . . . . . . . . . . . . . . . . . . . . . . . . . . . . . . . . . . . . . . . . . . . .
Ordering Information 1-13. . . . . . . . . . . . . . . . . . . . . . . . . . . . . . . . . . . . . . . . . . . . . . . . . . . . . . . . . . . . . . . . . . . . .
Error Notification: Beeps, Blinking Lights and Messages 5-6. . . . . . . . . . . . . . . . . . . . . . . . . . . . . . . . . . . . . . . .
Display Messages: What They Mean and What to do 5-7. . . . . . . . . . . . . . . . . . . . . . . . . . . . . . . . . . . . . . . . . . .
Solving Problems While Printing, Faxing or Copying 5-16. . . . . . . . . . . . . . . . . . . . . . . . . . . . . . . . . . . . . . . . . . .
Diagnostic Codes: What They Are, How to Read Them and What to do 5-22. . . . . . . . . . . . . . . . . . . . . . . . . . . .
Diagnostic Codes 5-25. . . . . . . . . . . . . . . . . . . . . . . . . . . . . . . . . . . . . . . . . . . . . . . . . . . . . . . . . . . . . . . . . . . . . . .
T30 States – Receive Errors 5-27. . . . . . . . . . . . . . . . . . . . . . . . . . . . . . . . . . . . . . . . . . . . . . . . . . . . . . . . . . . . . . . .
T30 States – Transmit Errors 5-28. . . . . . . . . . . . . . . . . . . . . . . . . . . . . . . . . . . . . . . . . . . . . . . . . . . . . . . . . . . . . .
Communication Error Codes (Level 400) 5-29. . . . . . . . . . . . . . . . . . . . . . . . . . . . . . . . . . . . . . . . . . . . . . . . . . . . .
Communication Error Codes (Level 500) 5-31. . . . . . . . . . . . . . . . . . . . . . . . . . . . . . . . . . . . . . . . . . . . . . . . . . . . .
Power-On Initialization Sequence Tests 5-34. . . . . . . . . . . . . . . . . . . . . . . . . . . . . . . . . . . . . . . . . . . . . . . . . . . . . .
Special Menus and Functions 5-35. . . . . . . . . . . . . . . . . . . . . . . . . . . . . . . . . . . . . . . . . . . . . . . . . . . . . . . . . . . . . .
System Error Codes 5-41. . . . . . . . . . . . . . . . . . . . . . . . . . . . . . . . . . . . . . . . . . . . . . . . . . . . . . . . . . . . . . . . . . . . .
HP OfficeJet User Menu – Associated Parameter Structure 5-42. . . . . . . . . . . . . . . . . . . . . . . . . . . . . . . . . . . . . . .
HP OfficeJet Parameter Descriptions 5-43. . . . . . . . . . . . . . . . . . . . . . . . . . . . . . . . . . . . . . . . . . . . . . . . . . . . . . . .
Exchange Unit Ordering Information 6-3. . . . . . . . . . . . . . . . . . . . . . . . . . . . . . . . . . . . . . . . . . . . . . . . . . . . . . . .
Resources for U.S. Customers 6-4. . . . . . . . . . . . . . . . . . . . . . . . . . . . . . . . . . . . . . . . . . . . . . . . . . . . . . . . . . . . .
Resources for Resellers 6-6. . . . . . . . . . . . . . . . . . . . . . . . . . . . . . . . . . . . . . . . . . . . . . . . . . . . . . . . . . . . . . . . . . .
Resources for HP Authorized Dealers 6-7. . . . . . . . . . . . . . . . . . . . . . . . . . . . . . . . . . . . . . . . . . . . . . . . . . . . . . . .
Resources for Canadian Product Support 6-8. . . . . . . . . . . . . . . . . . . . . . . . . . . . . . . . . . . . . . . . . . . . . . . . . . . . .
Resources for European Product Support 6-9. . . . . . . . . . . . . . . . . . . . . . . . . . . . . . . . . . . . . . . . . . . . . . . . . . . . .
Resources for Australian Product Support 6-12. . . . . . . . . . . . . . . . . . . . . . . . . . . . . . . . . . . . . . . . . . . . . . . . . . . .
HP Regional Sales Offices 6-13. . . . . . . . . . . . . . . . . . . . . . . . . . . . . . . . . . . . . . . . . . . . . . . . . . . . . . . . . . . . . . . .
xi
Page 7

Notes
xii
Page 8

1
Product Information
Subject Page
Introduction 1-2. . . . . . . . . . . . . . . . . . . . . . . . . . . . . . . . . . . . . . . . . . . . . . . . . . . . . . . . . . . . . . . . . . . . . . . . . . . .
Product Description 1-2. . . . . . . . . . . . . . . . . . . . . . . . . . . . . . . . . . . . . . . . . . . . . . . . . . . . . . . . . . . . . . . . . . . . . .
Product Features 1-3. . . . . . . . . . . . . . . . . . . . . . . . . . . . . . . . . . . . . . . . . . . . . . . . . . . . . . . . . . . . . . . . . . . . . . . .
Simultaneous Tasking Features 1-4. . . . . . . . . . . . . . . . . . . . . . . . . . . . . . . . . . . . . . . . . . . . . . . . . . . . . . . . . . . . .
Product Specifications 1-7. . . . . . . . . . . . . . . . . . . . . . . . . . . . . . . . . . . . . . . . . . . . . . . . . . . . . . . . . . . . . . . . . . . .
Print Cartridges 1-10. . . . . . . . . . . . . . . . . . . . . . . . . . . . . . . . . . . . . . . . . . . . . . . . . . . . . . . . . . . . . . . . . . . . . . . . .
Software Programs 1-10. . . . . . . . . . . . . . . . . . . . . . . . . . . . . . . . . . . . . . . . . . . . . . . . . . . . . . . . . . . . . . . . . . . . . . .
Media 1-10. . . . . . . . . . . . . . . . . . . . . . . . . . . . . . . . . . . . . . . . . . . . . . . . . . . . . . . . . . . . . . . . . . . . . . . . . . . . . . . . .
Media Tray Capacities 1-11. . . . . . . . . . . . . . . . . . . . . . . . . . . . . . . . . . . . . . . . . . . . . . . . . . . . . . . . . . . . . . . . . . . .
Media Print Area 1-12. . . . . . . . . . . . . . . . . . . . . . . . . . . . . . . . . . . . . . . . . . . . . . . . . . . . . . . . . . . . . . . . . . . . . . . .
Ordering Information 1-13. . . . . . . . . . . . . . . . . . . . . . . . . . . . . . . . . . . . . . . . . . . . . . . . . . . . . . . . . . . . . . . . . . . . .
Product Information 1-1
Page 9
Introduction
This Technical Support Solutions Guide contains information necessary to support the HP OfficeJet
Printer/Fax/Copier family of products. Although model and country-specific functionality may differ across the HP
OfficeJet product line, the support and service strategy is consistent. The products covered in this guide will be
commonly referred to as the HP OfficeJet
divided into six chapters as follows:
D Chapter 1 Product Information
D Chapter 2 Installation and Configuration
D Chapter 3 Routine Maintenance
D Chapter 4 Calibration and Adjustment
D Chapter 5 Problem Resolution
D Chapter 6 Service and Support Information
This Technical Support Solutions Guide is designed to be used with the HP OfficeJet LX User’s Guide as a complete
technical support reference package. This guide and the HP OfficeJet LX User’s Guide also support the standard HP
OfficeJet. The LX version is the HP OfficeJet with added PC-FAX functionality. Typical user setup tasks are
contained in the User’s Guide and answers to questions related to such tasks can be found there. Refer to the User’s
Guide when questions about setup, user settings and printer/fax/copier use are encountered. Refer to this guide for
information on troubleshooting and service and support programs.
except where model or country-specific differences are noted. This guide is
Product Description
The HP OfficeJet is a plain paper, thermal inkjet printer/facsimile (fax)/convenience copier machine. It is CCITT
group 3-ECM compatible. Designed to fit on a desktop, the HP OfficeJet weighs 8.8.5 kg (19.5 lb). The HP OfficeJet
has a full-featured printer, which can be used with your PC and either Windows or DOS drivers, and has 16 kB of
printer memory. Its built–in fax machine feature provides many advanced fax features including speed dialing
capability for 65 stations, with a 10 seconds per page transmission speed and 24 page fax memory. As a convenience
copier, the HP OfficeJet can be set to copy up to 99 copies of an original at a speed of 50 seconds per page. The LX
version of the HP OfficeJet uses Eclipse FAX
Computer (PC), receive faxes to the PC, and scan images into PC-based files. The LX version also uses a management
function that allows the HP OfficeJet LX to be set up from the PC using Windows-based menus. The HP OfficeJet
uses cut–sheet plain paper (100 sheet paper tray capacity) and a thermal inkjet cartridge.
R SE which provides the ability to send faxes directly from the Personal
HP OfficeJet (LX) Printer/Fax/Copier
Product Information1-2
Page 10

Product Features
The following table lists the features of the HP OfficeJet (LX) described in this guide.
HP OfficeJet (LX) Features
Feature Description
Shares a single line with the telephone and a
telephone answering machine (TAM)
Speed dialing A two-digit number represents a telephone number.
Fax settings Settings allow the user or service person to
Halftone scanning The ability to interpret shades of gray into dot
Error Correction Mode Detects errors that occur during the transmission of a
Automatic Journals The HP OfficeJet can be set to print a summary sheet
Print from PC functionality Allows printing of print jobs from the personal
Copy functionality Allows for up to 99 copies of an original, includes
Polling and being polled Ability to have a document ready for retrieval by
Sending faxes at deferred times The ability to delay fax transmissions to another
Automatic and fixed print reduction modes Print reduction modes which fit an incoming
Automatic and manual redialing Automatically redials if the line is busy or no
Backup (Out-of-paper, out-of-ink) reception Stores incoming faxes and print jobs in memory if
Remote diagnostics Allows remote access to all user settings and ma-
(Continued on next page)
Answering machine answers all calls. While your
greeting plays, the OfficeJet listens for a fax tone. If
fax tone is detected, the OfficeJet takes the call.
Provides quick and easy dialing for up to 60 locations and 5 groups of numbers.
customize the fax for specific needs.
patterns to produce an appearance of gray in an
image. Improves the image quality of photographs.
document and automatically requests resending of
the erroneous portion.
of each transaction or polling operation, to print a
journal of the last 30 transactions, print a record of
the speed dial numbers stored in memory, print a
menu structure diagram with current settings and to
print self-test and demo reports.
computer, when using appropriate printer driver.
copy reduction.
another fax station and to call other fax stations to
retrieve information.
station until a user-set time is reached.
document onto a given paper size.
answer; retains the last number dialed. Redials up to
5 times at 5 minute intervals.
out of paper or ink, or paper or ink is not installed.
chine parameters.
Product Information 1-3
Page 11
HP OfficeJet Features (Continued)
Feature Description
Sending to multiple fax numbers The ability to send a document to multiple (up to 10)
fax numbers.
Memory reception capacity Depending upon amount of information on pages
sent, memory allows for up to 24 page storage.
Fax to/from PC functionality
(HP OfficeJet LX only, using the Eclipse FAX SE
software program provided)
The ability to send and receive faxes from the PC
using Eclipse FAX SE functionality. Faxes can be
sent directly from the PC without printing them and
faxes can be received either to paper or to the PC
where they can be viewed, filed or printed.
HP OfficeJet LX Manager
(HP OfficeJet LX only, using the HP OfficeJet LX
Manager software program provided)
Convenience Scanning The user can use the HP OfficeJet LX as a conve-
Software Programs Windows and DOS printer drivers, a scanner driver
Allows the user to setup and monitor the status of the
HP OfficeJet LX from the PC using Windows-based
menus.
nience scanner to scan images into PC-based files.
and printer fonts are provided.
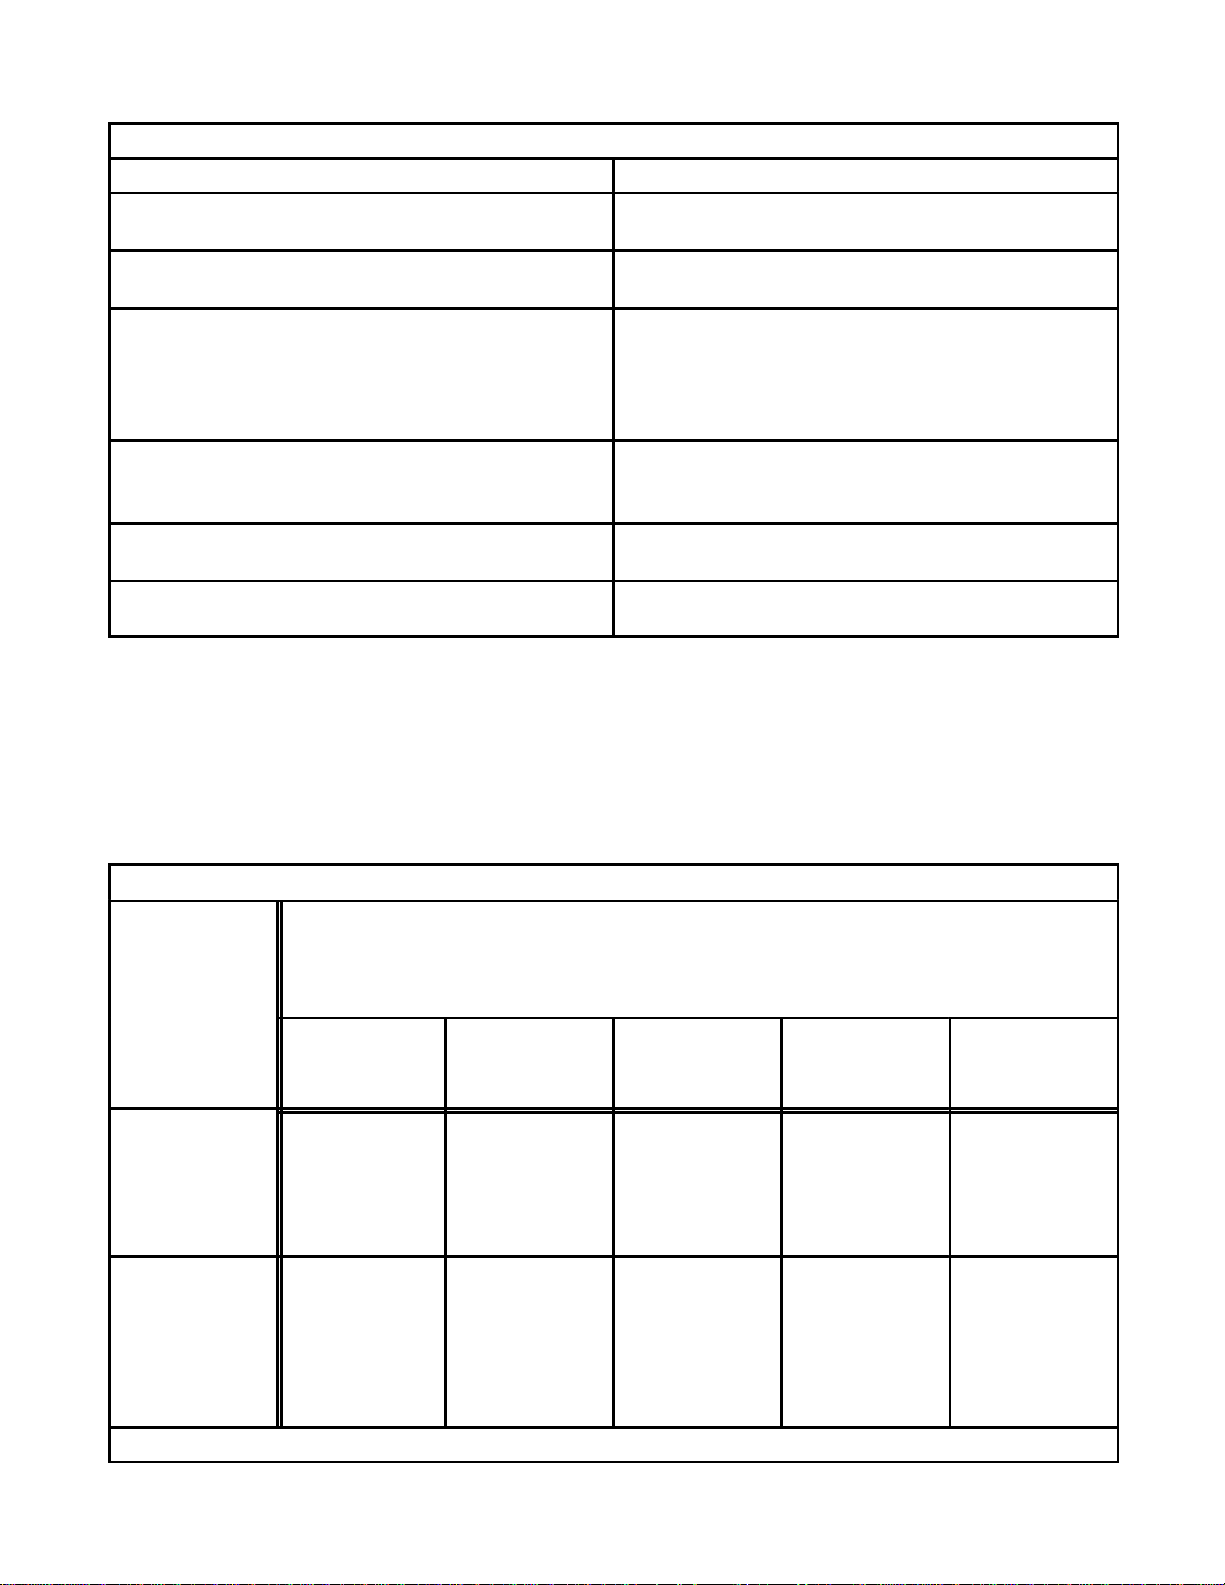
Simultaneous Tasking Features
The HP OfficeJet (LX) is capable of performing several tasks at the same time. Use the following chart as a reference
of which tasks can be performed simultaneously. Attempting to perform concurrent tasks not supported may result in
a display message or error condition.
Simultaneous Tasking Matrix
Note: PC fax capability is only present in the LX version
If the HP
OfficeJet (LX)
is:
Send a print
job or print a
PC fax
Can I?
Receive a
paper fax
Receive a PC
fax (LX only)
Send a fax
from the ADF
Send a PC fax
(LX only)
Printing a PC
file or printing
a PC fax
Receiving a
paper fax
Product Information1-4
YES
automatically
prints when
the first PC job
ends
YES
automatically
prints when
fax printing
ends
YES
automatically
prints when PC
print job ends
YES
automatically
prints when the
first fax is
finished
printing
(Continued on next page)
YES YES YES
YES YES YES
Page 12

If the HP
OfficeJet (LX)
is:
Simultaneous Tasking Matrix (Continued)
Note: PC fax capability is only present in the LX version
Can I?
Receiving a PC
fax (LX only)
Sending a fax
from the ADF
Sending a PC
fax (LX only)
Send a print
job or print a
PC fax
YES
(with delay)
print manager
automatically
sends print job
as soon as
received fax is
complete
YES NO
YES
(with delay)
print manager
sends one job
as soon as one
is complete
Receive a
paper fax
NO
two faxes
cannot be
transmitted
over the same
phone line at
the same time
two faxes
cannot be
transmitted
over the same
phone line at
the same time
NO
two faxes
cannot be
transmitted
over the same
phone line at
the same time
Receive a PC
fax (LX only)
NO
two faxes
cannot be
transmitted
over the same
phone line at
the same time
NO
two faxes
cannot be
transmitted
over the same
phone line at
the same time
NO
two faxes
cannot be
transmitted
over the same
phone line at
the same time
Send a fax
from the ADF
NO
two faxes
cannot be
transmitted
over the same
phone line at
the same time
NO
two faxes
cannot be
transmitted
over the same
phone line at
the same time
NO
two faxes
cannot be
transmitted
over the same
phone line at
the same time
Send a PC fax
(LX only)
YES
(with delay)
print manager
will send PC
fax as soon as
fax is complete
YES
(with delay)
print manager
will send PC
fax as soon as
fax is complete
YES
(with delay)
print manager
sends one fax
as soon as first
is complete
Making a Copy YES
automatically
prints when
copying ends
Scanning NO
scanning ties
up PC
resources
YES
automatically
prints when
copying ends
YES NO
YES NO
PC fax will be
routed to paper
fax
two documents
cannot be
scanned from
the ADF at the
same time
NO
two documents
cannot be
scanned from
the ADF at the
same time
Product Information 1-5
YES
NO
scanning ties
up PC
resources
Page 13

The following task combinations can be performed simultaneously.
1. An incoming fax will be stored in memory while:
D faxes in memory are printing
D a local copy is printing
D a print job is printing
D a report is printing
2. A fax can be sent from the automatic document feeder while:
D faxes in memory are printing
D a print job is printing
D a report is printing
3. Print jobs can be printed while:
D a fax is being sent from the automatic document feeder
D a delayed send fax from memory is being sent
D a delayed send fax from the automatic document feeder is being sent
D a broadcast fax from memory is being sent
D a document is polled from the automatic document feeder
4. A delayed send fax from memory can be sent while:
D a print job is printing
5. A broadcast fax from memory can be sent while:
D a print job is printing
6. A delayed send fax from the automatic document feeder can be sent while:
D a print job is printing
7. Remote fax machines can poll the HP OfficeJet while:
D faxes in memory are printing
D a print job is printing
D a report is printing
8. Faxes in memory can be printed while:
D an incoming fax is stored in memory (and takes over the display)
Product Information1-6
Page 14
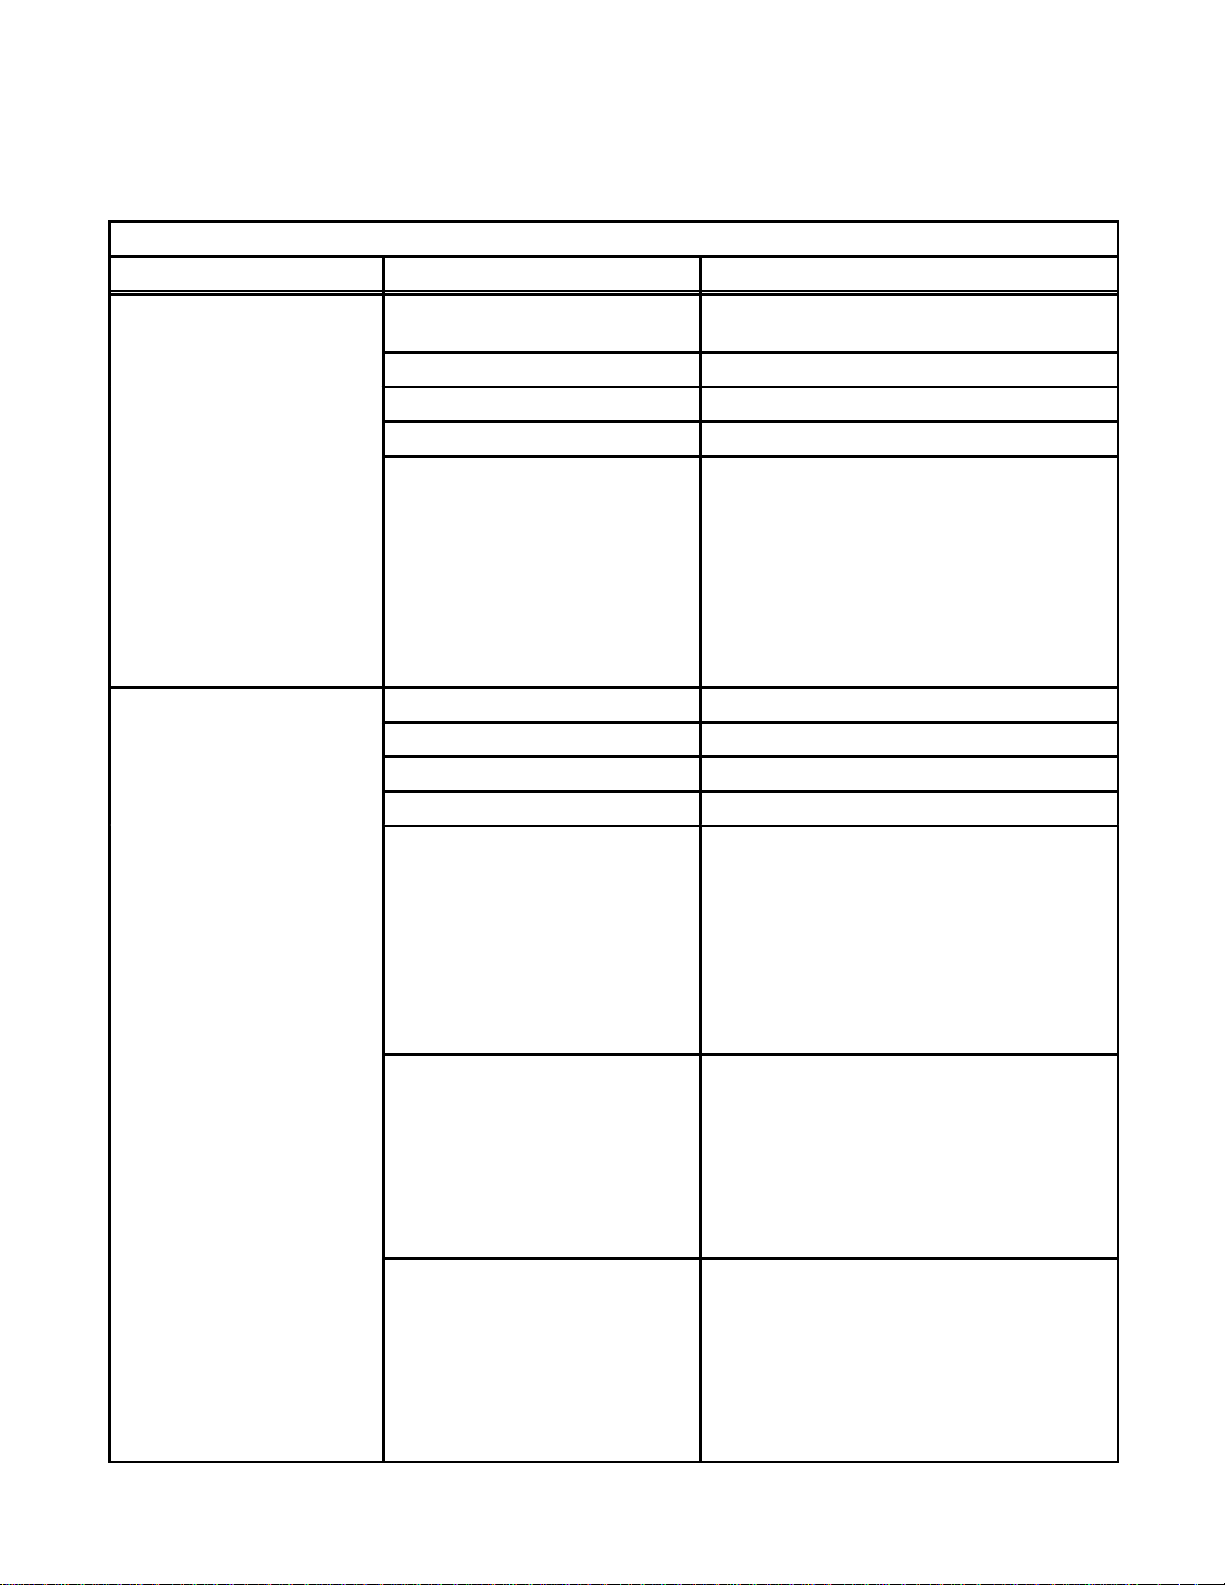
Product Specifications
Review the following table for product specifications of the HP OfficeJet.
HP OfficeJet Specifications
Function Specification Description
Overall Specifications Dimensions 17.25 w x 15.5 d x 11.125 h (inches)
438 w x 394 d x 283 h (mm)
Weight 19.5 lb (8.85 kg)
Power Source (autoranging) 100-240 Vac, 1.0 A, 50-60 Hz
Power Consumption 10 watts at idle, 45 watts maximum
Operating Environment Temperature range for best print quality:
15°C (59°F) to 35°C (95°F)
Allowable temperature/humidity range:
5°C (41°F) to 40°C (104°F), 15-80% RH
non-condensing
Maximum noise level generated:
Sound Power, LwAd = 6.4 B(A)
Sound Pressure, LpAm = 50 dB(A)
Printer Specifications Print Method Plain paper drop-on-demand thermal inkjet
Printer Memory 16 kB
Printer Command Language HP PCL Level 3
Printer Interface Parallel (Centronics)
Resolution
(dots per inch = dpi)
Print Speed
(page(s) per minute = ppm)
(characters per second = cps)
(characters per inch = cpi)
Paper sizes U.S. letter = 8.5 x 11 in.
Windows:
Presentation mode = 600 x 300 dpi with
REt
Normal mode = 600 x 300 dpi with REt
Fast mode = 300 dpi
DOS (text):
Letter quality = 600 x 300 dpi with REt
Draft quality = 300 dpi with ink reduction
Windows print speed:
Presentation mode = 1 ppm
Normal mode = 2.5 ppm
Fast mode = 3 ppm
DOS print speed:
Letter quality = 167 cps at 10 cpi
Draft quality = 240 cps at 10 cpi
U.S. legal = 8.5 x 14 in.
European A4 = 210 x 297 mm
Executive = 7.25 x 10.5 in
U.S. No. 10 envelope = 4.12 x 9.5 in
European DL envelope = 220 x 110 mm
U.S. transparency = 8.5 x 11 in.
European A4 transparency = 210x297 mm
Product Information 1-7
Page 15
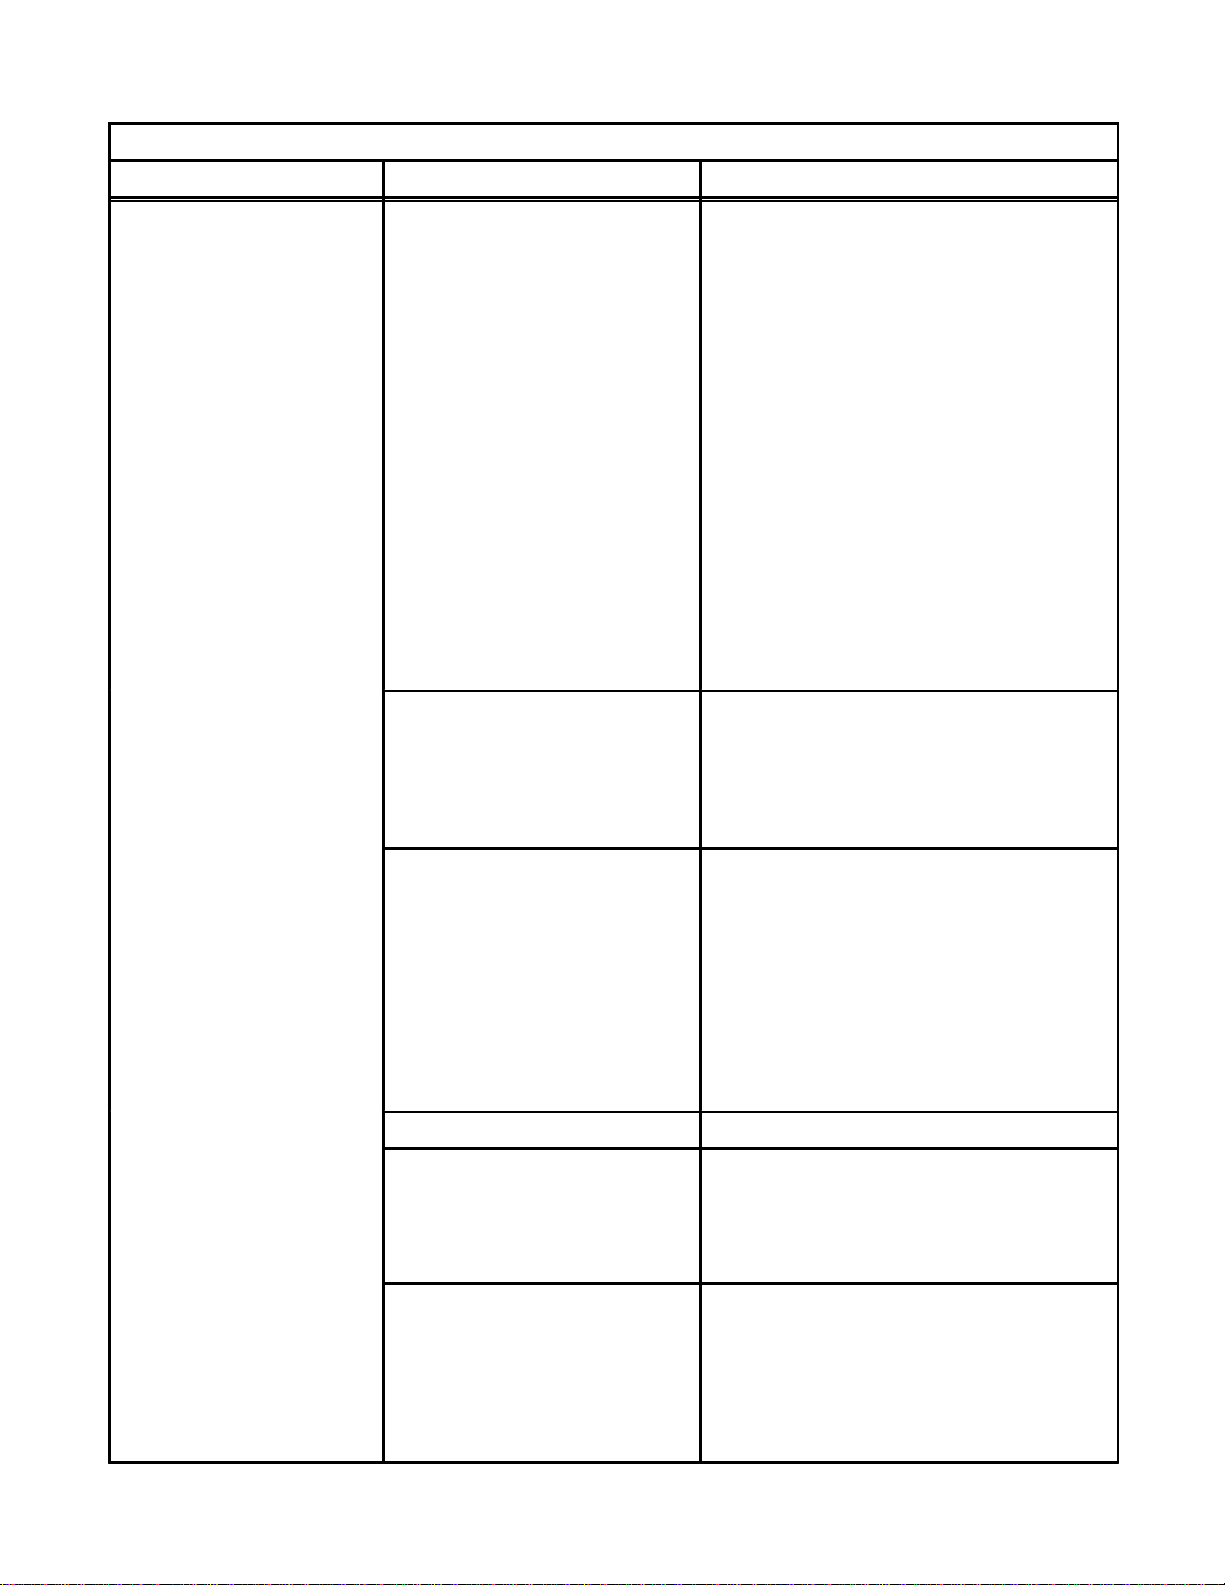
HP OfficeJet Specifications (continued)
Function Specification Description
Printer Specifications
(continued)
Internal Fonts Courier (Portrait Orientation):
Pitch: 5, 10, 16.67, 20 cpi
Point size: 6, 12 pt.
CG Times (Portrait Orientation):
Pitch: Proportional
Point size: 5, 6, 7, 8, 10, 12, 14 pt.
Letter Gothic (Portrait Orientation):
Pitch: 6, 12, 24 cpi
Point size: 6, 12 pt.
Univers (Portrait Orientation):
Pitch: Proportional
Point size: 5, 6, 7, 8, 10, 12, 14 pt.
Courier (Landscape Orientation):
Pitch: 10, 16.67, 20 cpi
Point size: 6, 12, 24 pt.
Letter Gothic (Landscape Orientation)
Point and Pitch: 6, 12, 24 pt for 12, 24 cpi;
4.75, 9.5, 19 pt for 16.67 cpi
Character Set Support PC-8, HP Roman 8, PC-8
Danish/Nor, UK ISO 4, German ISO 21,
French ISO 69, Italian ISO 15, Nor v.1 ISO
60, Swed Names ISO 11, Spanish ISO 17,
ASCII, Portug ISO 16, PC-850, ECMA-94
Latin 1, HP Legal
Printing Margins
(These numbers represent the
maximum printable area for this
device. However, your printer
driver may create a smaller
printable area.)
U.S. letter-size paper:
Top margin = 1.0 mm 〈± 1.0 mm)
Bottom margin = 10.9 mm (± 0.6 mm)
Left margin = 6.4 mm (± 1.0 mm)
Right margin = 6.4 mm (± 1.0 mm)
European A4-size paper:
Top margin = 1.0 mm 〈± 1.0 mm)
Bottom margin = 10.9 mm (± 0.6 mm)
Left margin = 3.4 mm (± 1.0 mm)
Right margin = 3.4 mm (± 1.0 mm)
Vertical Alignment ±0.002 in.
Scalable TrueTypet Fonts
for MicrosoftE Windows
Arial Black, CG Goudy Old Style,
Phyllis, Graphite Light, CG Poster
Bodoni, Lucida
Casual, Gill Sans
Shadow, Milestone Font, Signet
Roundhand, and PL Benguiat Frisky
Software Compatibility Microsoft Windows 3.1
WordPerfect
Lotus 1-2-3 for DOS
Also compatible with a range of DOS
applications (HP DeskJet), OS/2 versions
1.3, 2.0, 2.1 (HP DeskJet), and Microsoft
Windows 3.0 (HP DeskJet)
Product Information1-8
Page 16
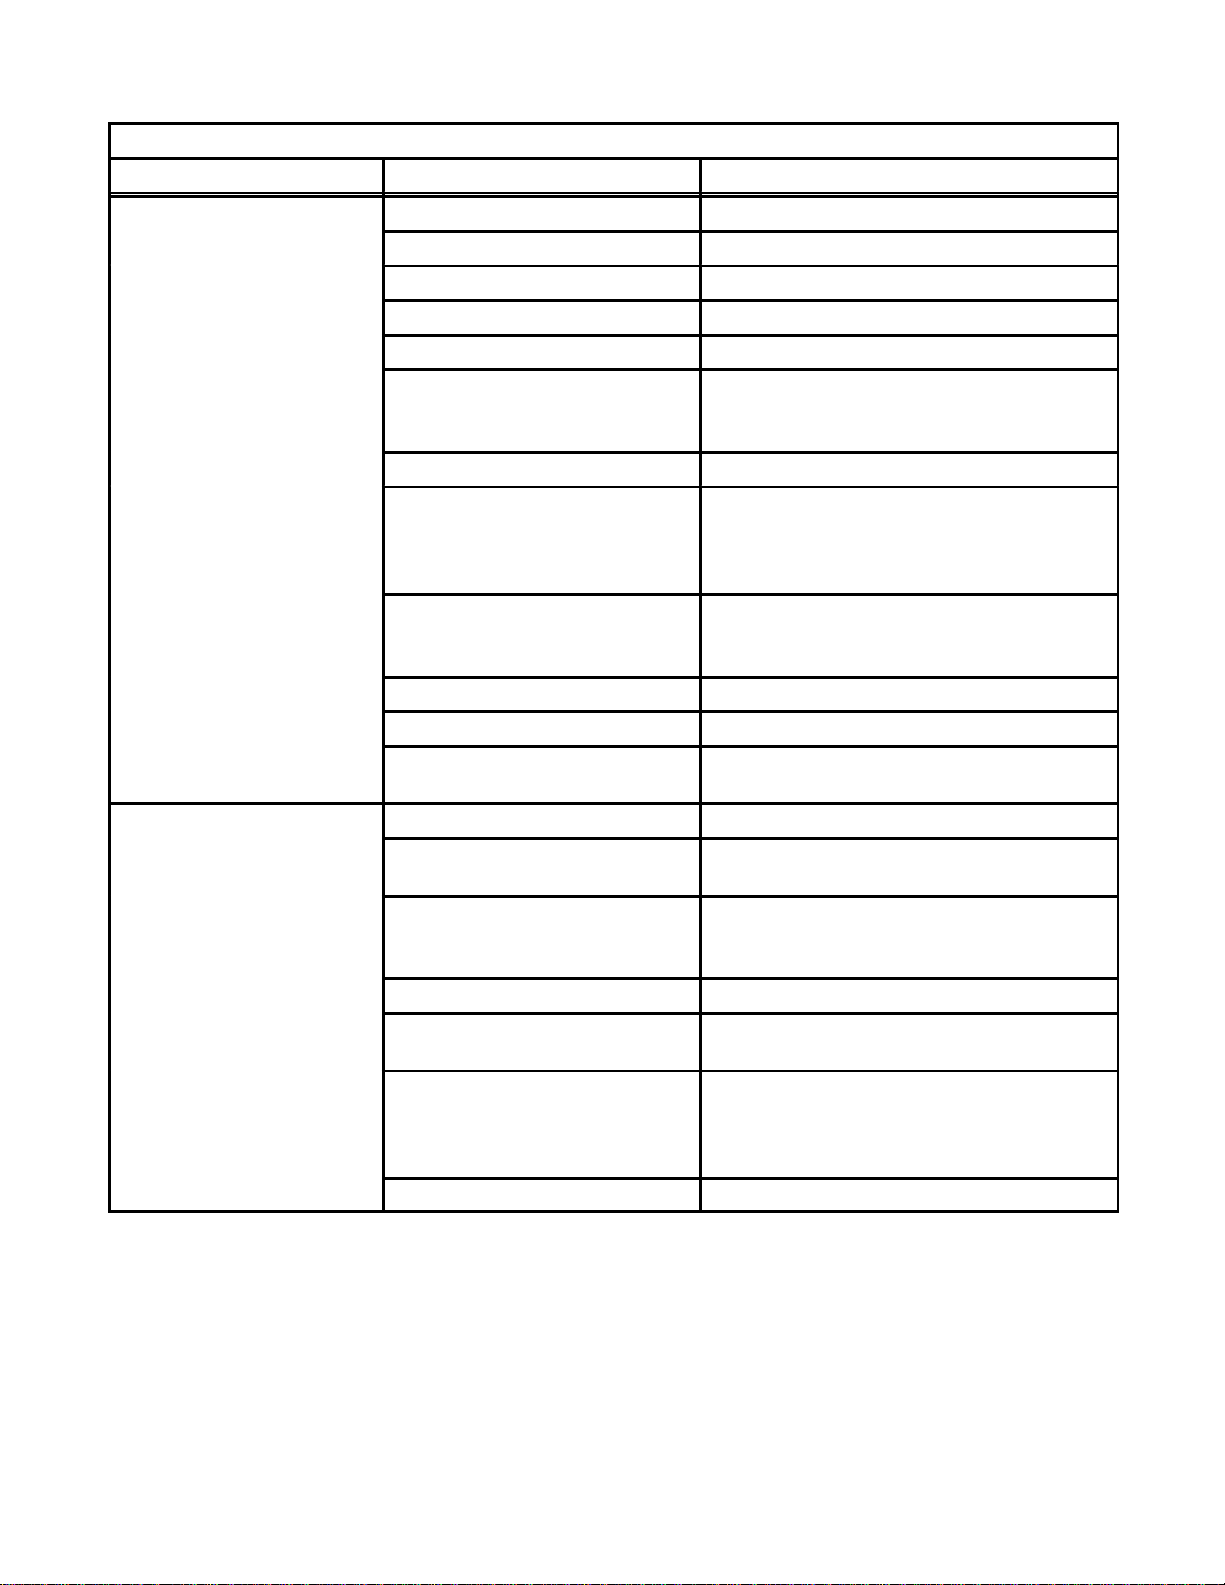
HP OfficeJet Specifications (continued)
Function Specification Description
Fax Specifications Coding Schemes MH, MR, MMR
Compatibility CCITT Group 3
Distinctive Ring Detect Yes
Image Memory 24 pages (CCITT chart #1, about 400 kB)
Modem Speed 9600, 7200, 4800 and 2400 bits per second
Paper Sizes U.S. letter = 8.5 x 11 in.
U.S. legal = 8.5 x 14 in.
European A4 = 210 x 297 mm
Paper Weight (faxes sent) 16 to 24 lb (60 to 90 g/m2)
Scan Margins (faxes sent) Top margin = 3.0 mm ± 3.0 mm
Bottom margin = 0.0 mm ± 4.0 mm
Center line = 0.0 mm ± 2.5 mm
Width = 216.2 mm ± 2.6 mm
Scan Resolution Standard = 100 x 200 dpi
Fine = 200 x 200 dpi
Photo = 200 x 200 dpi, 32 level grayscale
Scan Width Maximum = 8.5 inches (216 mm)
Speed Dialing 65 locations, including 5 groups
Transmission Speed 10 seconds per page
(CCITT chart #1 using ECM)
Copier Specifications Copy Speed 50 seconds per page
Scan Resolution Fine = 200 x 200 dpi
Photo = 200 x 200 dpi, 32 level grayscale
Paper Sizes U.S. letter = 8.5 x 11 in.
U.S. legal = 8.5 x 14 in.
European A4 = 210 x 297 mm
Multiple Copies Up to 99 (per full paper tray)
Copy Reduction 100%, 95%, 90%, 85%, 80%,
75% (Legal-to-Letter), 70%
Scan Margins Top margin = 3.0 mm ± 3.0 mm
Bottom margin = 2.0 mm ± 3.0 mm
Center line = 0.0 mm ± 2.5 mm
Width = 216.2 mm ± 2.6 mm
Scan Width Maximum = 8.5 inches (216 mm)
Product Information 1-9
Page 17

Print Cartridges
The HP OfficeJet uses one high–capacity black print cartridge, HP part number 51626A.
When printing text only on letter-size media, ink lasts, on average, about 1000 pages. Text used was CCITT test image
number 1, the Slerexe Company letter. If text of greater density is printed or quality mode is used, results may vary
considerably. Ink cartridge longevity is also affected by larger paper sizes containing more printed matter or photos or
illustrations. If the ink lasts much less than 1000 pages, ensure that you have removed both pieces of tape from the
print cartridge before beginning to use it, and that the conductive part of the cartridge surface is clean.
Software Programs
Several software programs and drivers are provided. The Eclipse FAX SE and HP OfficeJet LX Manager programs are
only provided and used with the LX version. The Windows and DOS drivers are provided with all models.
D Eclipse FAX SE allows the user to send high-quality faxes directly from the PC, receive faxes to the PC,
and scan images into PC-based files.
D HP OfficeJet LX Manager lets the user setup the HP OfficeJet LX from the PC, using Windows-based
menus, rather than the device’s front panel. The Manager also serves as a status monitor, displaying
information and error messages and also tells the user whether or not the HP OfficeJet LX is properly
connected.
D Windows and DOS printer drivers, printer fonts and a scanner driver are provided.
Media
An HP OfficeJet works with ordinary bond and photocopy papers. Paper properties are subject to change by paper
manufacturers, and Hewlett-Packard has no control over such changes. For optimum print quality, test paper (printing
on both sides) for suitability, before you purchase large quantities.
Use plain bond or white photocopy paper of high quality. It should be free of:
D Carbon
D Cuts or tears
D Grease spots
D Loose particles
D Dust
D Wrinkles
D Curled, bent or frayed edges
Colored bond and photocopy paper (such as pink, yellow, or blue) can be used, as long as it meets these specifications:
D Paper Size U.S. letter (8 1/2 in x 11 in), (216 x 279 mm)
U.S. legal (8 1/2 in x 14 in), (215 x 356 mm)
Executive (7.25 x 10.5 in), (184 mm x 267 mm)
A4 metric (8.27 x 11.7 in), (210 mm x 297 mm)
D Envelope Size U.S. No. 10 (4.12 x 9.5 in), (105 x 241 mm)
European DL (8.66 x 4.33 in), (220 x 110 mm)
D Paper Type Cut sheet
Product Information1-10
Page 18

D Cut Edge Conditions Sharp blade cut, with no visible fray.
D Finishing Dimensions ± 0.0313 inch of nominal, corners 90_± 0.20_
D Paper Grain Long grain
D Moisture Content 4% to 6% by weight
D Opacity 84% minimum
D Packaging Polylaminated moisture-proof ream wrap
D Paper weight 60 to 135 g/m
2 (
16 lb to 36 lb), 75 g/m
2 (
20 lb) recommended
D Wax Pick 2 inch minimum (Dennison)
Paper can be loaded automatically or manually. When loading paper, observe the following precautions:
D Handle all paper by the edges only
D Load all paper types the same way
D Use only one paper type in the printer’s paper tray at a time
D Always load paper print side up in the media tray
Plain paper has a print side which is not visible to the naked eye, so before removing paper from its package for use in
the printer, check the outside package label. Always load the paper into the machine with the print side facing down.
The print side will be indicated by an arrow or other symbol on the label.
Avoid the following types of media:
D Paper greater than 135 g/m
2
(36 lb) or less than 60 g/m
2
(16 lb)
D Paper with cutouts or perforations
D Multiple part forms
D Carbon copy forms
D Paper sizes other than those listed in this document
Media Tray Capacities
Sheet capacity for the various paper tray is as follows:
D Access door assembly (automatic document feed tray for faxes to be sent)
20 pages (paper weight ≤ 20 lb or 75 g/m2)
=
Minimum paper width = 6 in. (152 mm)
Maximum paper width = 8.5 in. (216 mm)
Maximum paper length = 17 in. (432 mm)
D Input Tray = 100 sheets at a paper weight ≤ 20 lb (75 g/m
D Output tray = 100 sheets at a paper weight ≤ 20 lb (75 g/m
2
) or 20 envelopes (U.S. No. 10 or European DL)
2
)
Product Information 1-11
Page 19
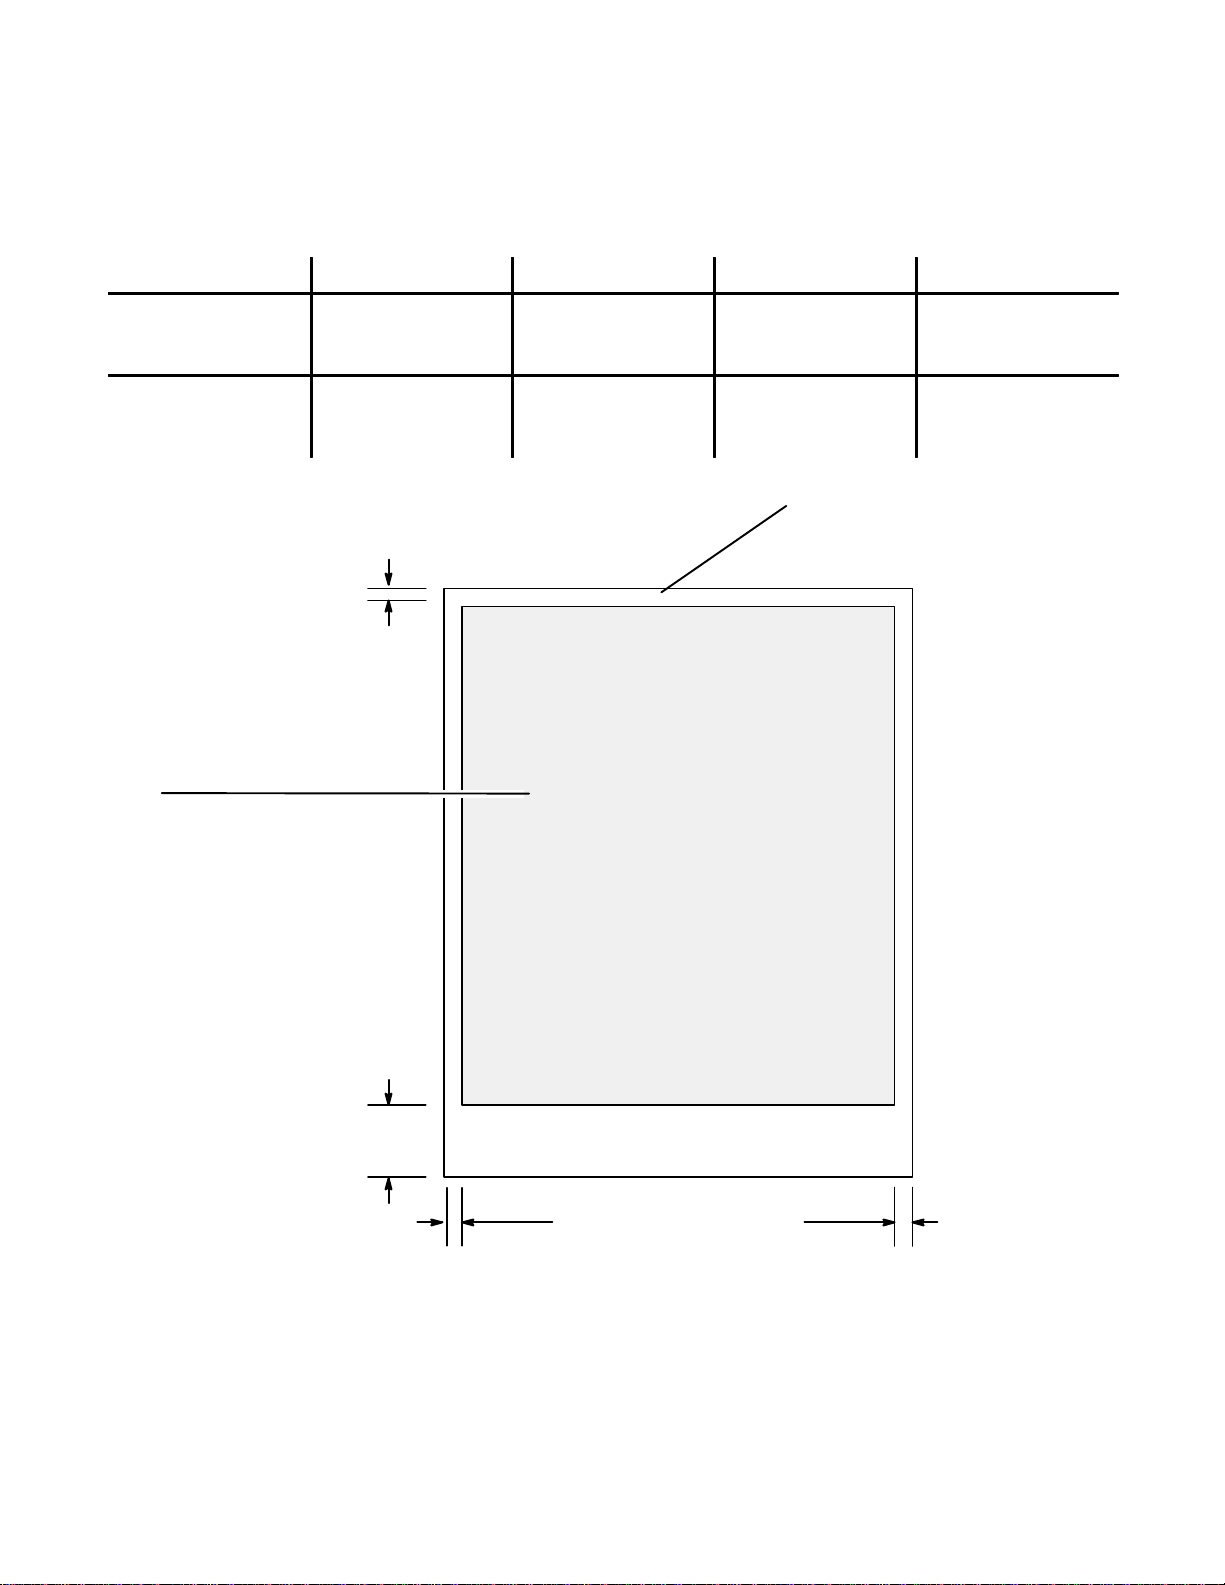
Media Print Area
Maximum printable area for the HP OfficeJet is dependent upon the media size being used. The printable area for the
media sizes are shown in the following diagram.
Paper Size Left Margin
U.S. Letter
8.5 x 11 in.
6.4 mm ± 1.0 mm
(0.25 x 0.04 in.)
(215 x 279 mm)
European A4
210 x 297 mm
3.4 mm ± 1.0 mm
(0.13 x 0.04 in.)
(8.27 x 11.7 in.)
1.0 mm
(0.04 in)
Printable area
Letter: 8.0 by 10.5 in
(203 by 267 mm)
Right Margin Top Margin Bottom Margin
6.4 mm ± 1.0 mm
(0.25 x 0.04 in.)
3.4 mm ± 1.0 mm
(0.13 x 0.04 in.)
1.0 mm ± 1.0 mm
(0.04 x 0.04 in.)
1.0 mm ± 1.0 mm
(0.04 x 0.04 in.)
Paper Size:
U.S. Letter 8.5 x 11 in. (215 x 279 mm)
U.S. Legal 11 x 14 in. (279 x 356 mm)
European A4 210 x 297 mm (8.27 x 11.7 in.)
10.9 mm ± 0.06 mm
(0.42 x 0.02 in.)
10.9 mm ± 0.06 mm
(0.42 x 0.02 in.)
Legal: 8.0 by 13.5 in
(203 by 343 mm)
A4 7.8 by 11.2 in
(198 by 284 mm
10.9 mm
(0.42 in)
6.4 mm (0.25 in.)
Maximum Media Print Area
6.4 mm (0.25 in.)
Product Information1-12
Page 20
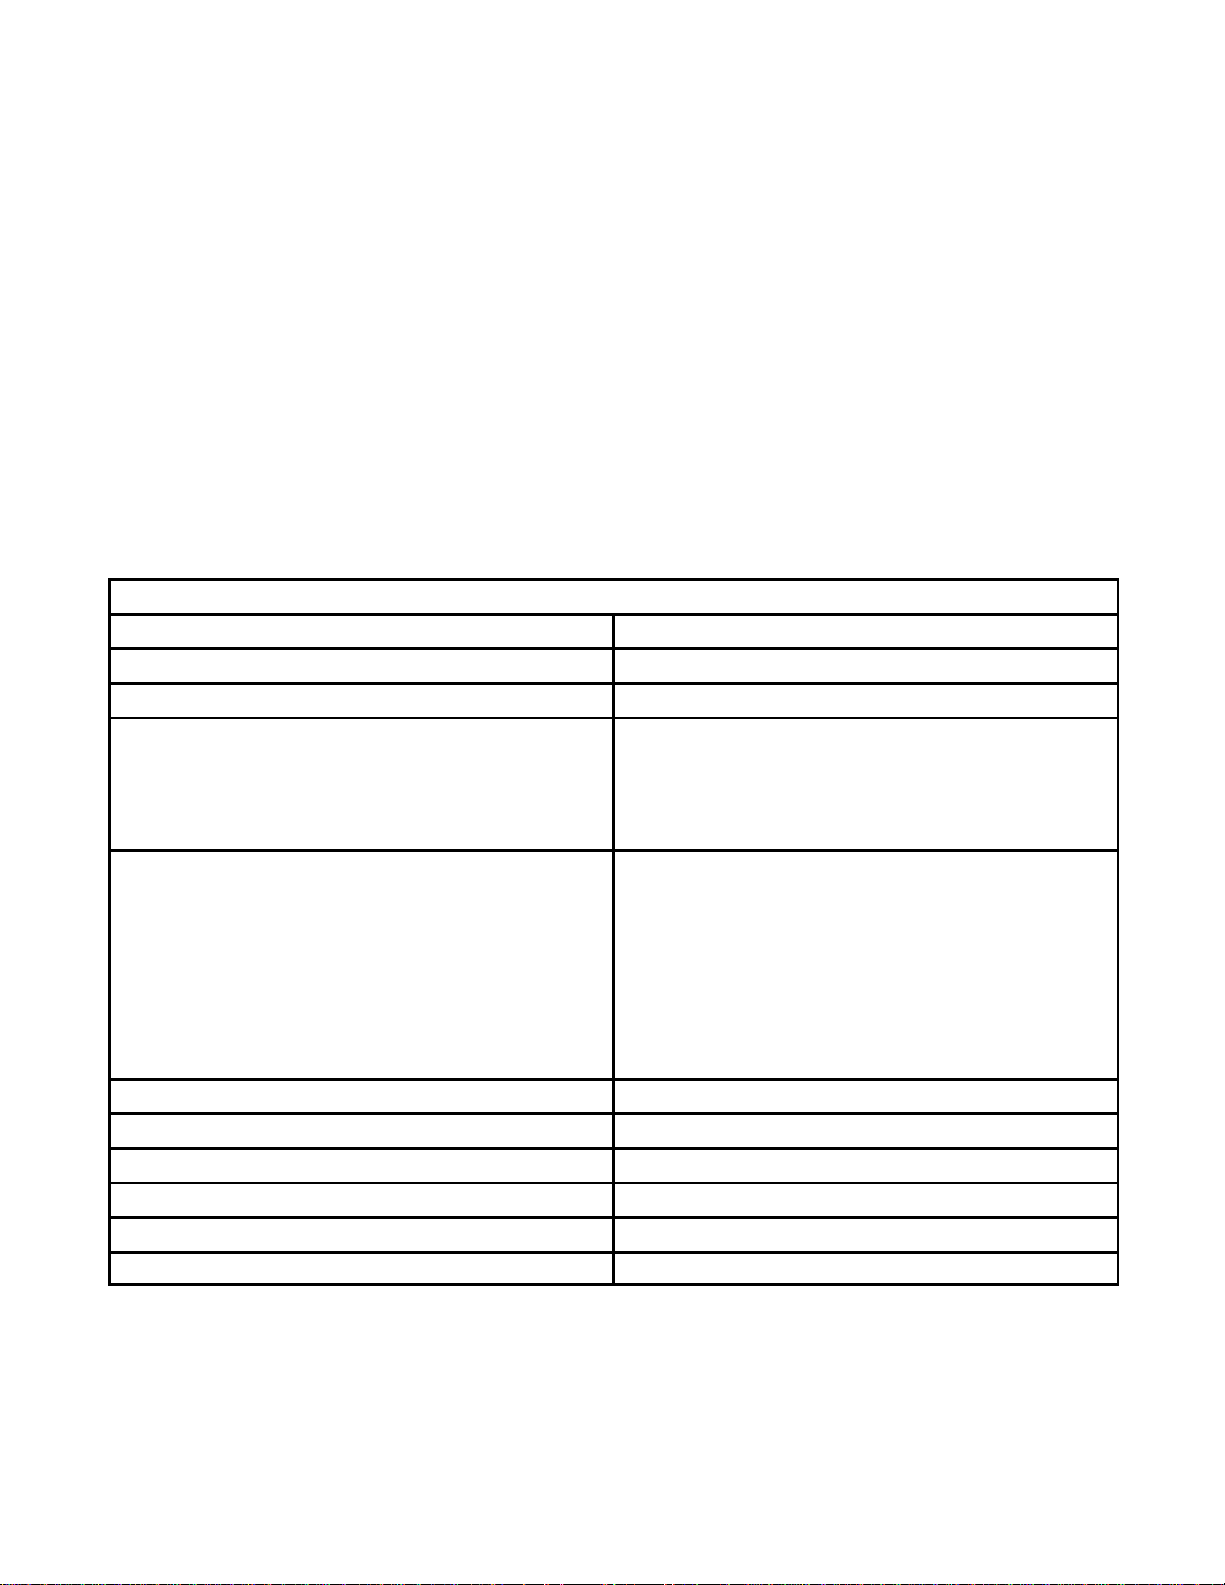
Ordering Information
Information on ordering exchange units under the HP Exchange program is provided with the program information in
Chapter 6 of this manual.
To order the supplies and accessories listed in the table below, contact your HP dealer. If your dealer is out of stock,
you can order directly from HP for fast shipping service:
Within the U.S.: Call 1-800-538-8787 for all supplies/accessories except documents.
Call 1-800-227-8164 to order user’s guides and technical reference guides.
In Canada: In Toronto, call 905-206-4727.
In the rest of Canada, call 1-800-387-3154.
In Europe: Refer to the European Product Support table in Chapter 6. The various countries have
different organizations to contact for support.
Availability, technical information and items shipped with the HP OfficeJet are subject to change without notice.
Ordering Information
Supply/Accessory HP Reorder Part Number
Centronics Parallel Interface Cable (shielded) HP C950A (2 meter), or HP C2951A (3 meter)
High Capacity InkJet Print Cartridge 51626A
Media
LX JetSeries Transparency Film (U.S. Letter)
LX JetSeries Transparency Film (European A4)
LX JetSeries Glossy Paper (U.S. Letter)
LX JetSeries Glossy Paper (European A4)
HP OfficeJet and HP OfficeJet LX User’s Guides
North America (English)
Canadian French
European French
German
Netherlands (Dutch)
United Kingdom (English)
Spanish (Mexico)
Australia (English)
HP DeskJet 500 Series Technical Reference Guide C2170-90099
Access Door (see diagram on next page) C2890-60064
Tray Cover (see diagram on next page) C2890-40054
Output Tray Assembly (see diagram on next page) C2890-60006
Document Catch Tray (see diagram on next page) C2890-60160
Input Tray Assembly (see diagram on next page) C2890-60005
51636F
51636G
51636H
51636J
HP OfficeJet HP OfficeJet LX
C2890-90001 C2891-90001
C2890-90003 C2891-90003
C2891-90004
C2891-90005
C2891-90011
C2891-90000
C2891-90006
C2891-90007
Product Information 1-13
Page 21
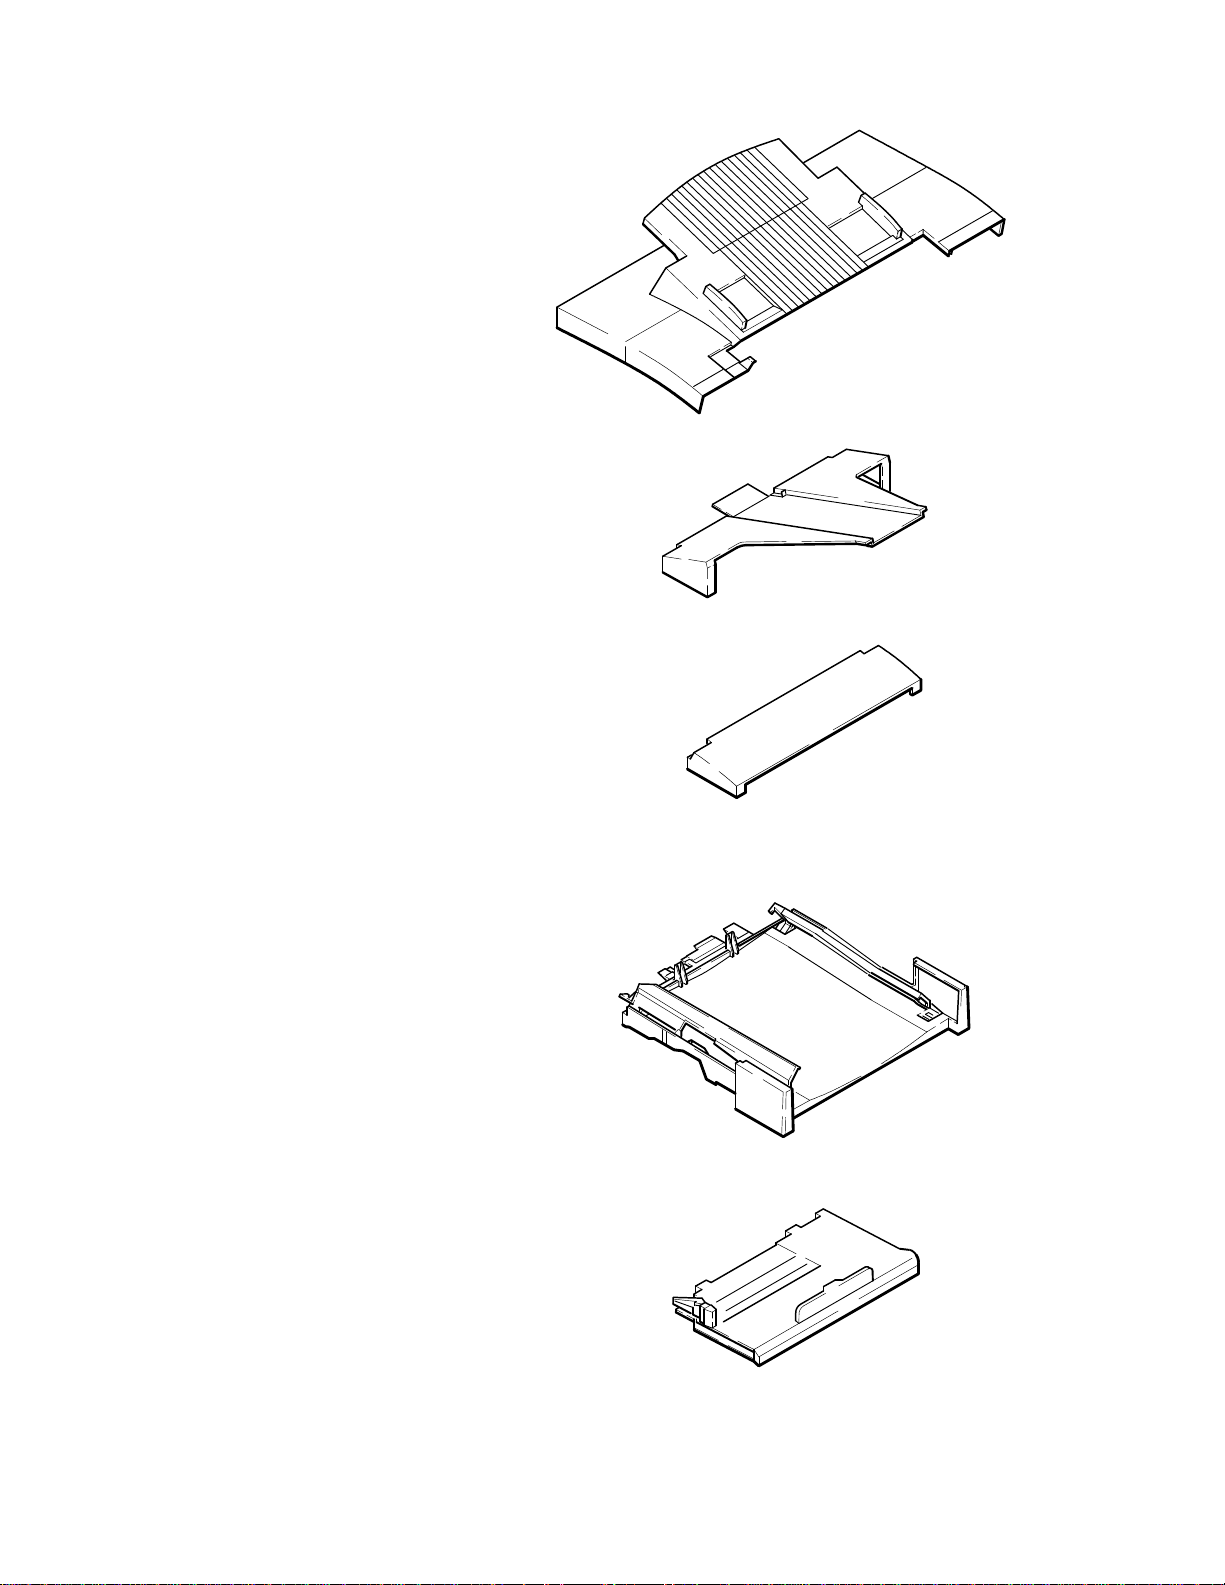
Access Door Assembly
Document Catch Tray Assembly
Tray Cover
Output Tray Assembly
Input Tray Assembly
Product Information1-14
Tray Assemblies
Page 22

2
Installation and Configuration
Subject Page
Introduction 2-2. . . . . . . . . . . . . . . . . . . . . . . . . . . . . . . . . . . . . . . . . . . . . . . . . . . . . . . . . . . . . . . . . . . . . . . . . . . .
Using Printer Driver Software 2-2. . . . . . . . . . . . . . . . . . . . . . . . . . . . . . . . . . . . . . . . . . . . . . . . . . . . . . . . . . . . . .
Using Microsoft Windows 3.1 2-2. . . . . . . . . . . . . . . . . . . . . . . . . . . . . . . . . . . . . . . . . . . . . . . . . . . . . . . . . . .
Using OS/2 2-3. . . . . . . . . . . . . . . . . . . . . . . . . . . . . . . . . . . . . . . . . . . . . . . . . . . . . . . . . . . . . . . . . . . . . . . . .
Using DOS Software Applications 2-3. . . . . . . . . . . . . . . . . . . . . . . . . . . . . . . . . . . . . . . . . . . . . . . . . . . . . . .
Hardware and Software Requirements 2-3. . . . . . . . . . . . . . . . . . . . . . . . . . . . . . . . . . . . . . . . . . . . . . . . . . . .
Installing the HP OfficeJet LX Software 2-3. . . . . . . . . . . . . . . . . . . . . . . . . . . . . . . . . . . . . . . . . . . . . . . . . . . . . .
Running the HP OfficeJet LX Manager 2-6. . . . . . . . . . . . . . . . . . . . . . . . . . . . . . . . . . . . . . . . . . . . . . . . . . . . . . .
Running the Eclipse FAX SE from the HP OfficeJet LX Manager 2-7. . . . . . . . . . . . . . . . . . . . . . . . . . . . . . . . . .
Sending a Fax Directly from the PC 2-8. . . . . . . . . . . . . . . . . . . . . . . . . . . . . . . . . . . . . . . . . . . . . . . . . . . . . . . . .
Receiving a Fax Directly to the PC 2-9. . . . . . . . . . . . . . . . . . . . . . . . . . . . . . . . . . . . . . . . . . . . . . . . . . . . . . . . . .
Using Other PC Fax Programs With the HP OfficeJet LX 2-10. . . . . . . . . . . . . . . . . . . . . . . . . . . . . . . . . . . . . . . .
Installing a Control Panel Overlay 2-10. . . . . . . . . . . . . . . . . . . . . . . . . . . . . . . . . . . . . . . . . . . . . . . . . . . . . . . . . . .
Installing a Print Cartridge 2-11. . . . . . . . . . . . . . . . . . . . . . . . . . . . . . . . . . . . . . . . . . . . . . . . . . . . . . . . . . . . . . . . .
Installing an Interface Cable for Printing 2-12. . . . . . . . . . . . . . . . . . . . . . . . . . . . . . . . . . . . . . . . . . . . . . . . . . . . .
Installing the Power Cord 2-13. . . . . . . . . . . . . . . . . . . . . . . . . . . . . . . . . . . . . . . . . . . . . . . . . . . . . . . . . . . . . . . . .
Installing a Document Catch Tray (optional) 2-13. . . . . . . . . . . . . . . . . . . . . . . . . . . . . . . . . . . . . . . . . . . . . . . . . .
Installing an Access Door Assembly 2-15. . . . . . . . . . . . . . . . . . . . . . . . . . . . . . . . . . . . . . . . . . . . . . . . . . . . . . . . .
Installing an Output Tray 2-15. . . . . . . . . . . . . . . . . . . . . . . . . . . . . . . . . . . . . . . . . . . . . . . . . . . . . . . . . . . . . . . . . .
Installing an Input Tray 2-16. . . . . . . . . . . . . . . . . . . . . . . . . . . . . . . . . . . . . . . . . . . . . . . . . . . . . . . . . . . . . . . . . . .
Installing a Tray Cover 2-17. . . . . . . . . . . . . . . . . . . . . . . . . . . . . . . . . . . . . . . . . . . . . . . . . . . . . . . . . . . . . . . . . . .
Loading Paper in the Input (Paper) Tray 2-18. . . . . . . . . . . . . . . . . . . . . . . . . . . . . . . . . . . . . . . . . . . . . . . . . . . . . .
Loading Envelopes in the Input (Paper) Tray 2-19. . . . . . . . . . . . . . . . . . . . . . . . . . . . . . . . . . . . . . . . . . . . . . . . . .
Setting the Paper Size in the Menu 2-20. . . . . . . . . . . . . . . . . . . . . . . . . . . . . . . . . . . . . . . . . . . . . . . . . . . . . . . . . .
Setting Up for Printing 2-21. . . . . . . . . . . . . . . . . . . . . . . . . . . . . . . . . . . . . . . . . . . . . . . . . . . . . . . . . . . . . . . . . . . .
Setting Up for Faxing (U.S., Australia, Canada and Mexico Installations) 2-22. . . . . . . . . . . . . . . . . . . . . . . . . . .
Receive fax calls only - no voice calls, on a dedicated fax line 2-22. . . . . . . . . . . . . . . . . . . . . . . . . . . . . . . . .
Receive voice and fax calls at the same phone number - without an answering machine 2-23. . . . . . . . . . . . .
Receive voice and fax calls at the same phone number - with an answering machine 2-24. . . . . . . . . . . . . . . .
Receive fax and voice calls on the same line with distinctive ring 2-25. . . . . . . . . . . . . . . . . . . . . . . . . . . . . . .
Setting the Reception Mode for Incoming Calls 2-27. . . . . . . . . . . . . . . . . . . . . . . . . . . . . . . . . . . . . . . . . . . . . . . .
Setting the Number of Rings to Answer 2-28. . . . . . . . . . . . . . . . . . . . . . . . . . . . . . . . . . . . . . . . . . . . . . . . . . . . . .
Selecting Tone or Pulse Dialing 2-29. . . . . . . . . . . . . . . . . . . . . . . . . . . . . . . . . . . . . . . . . . . . . . . . . . . . . . . . . . . . .
Entering the Date and Time 2-30. . . . . . . . . . . . . . . . . . . . . . . . . . . . . . . . . . . . . . . . . . . . . . . . . . . . . . . . . . . . . . . .
Entering the Header Information (company name and fax number) 2-31. . . . . . . . . . . . . . . . . . . . . . . . . . . . . . . . .
Setting Up for Faxing (U.K. Installation) 2-32. . . . . . . . . . . . . . . . . . . . . . . . . . . . . . . . . . . . . . . . . . . . . . . . . . . . .
Receive fax calls only - no voice calls, on a dedicated fax line 2-32. . . . . . . . . . . . . . . . . . . . . . . . . . . . . . . . .
Receive voice and fax calls at the same phone number - without an answering machine 2-33. . . . . . . . . . . . .
Receive voice and fax calls at the same phone number - with an answering machine 2-33. . . . . . . . . . . . . . . .
Setting Up for Faxing (Germany Installation) 2-34. . . . . . . . . . . . . . . . . . . . . . . . . . . . . . . . . . . . . . . . . . . . . . . . . .
Setting Up for Faxing (France Installation) 2-35. . . . . . . . . . . . . . . . . . . . . . . . . . . . . . . . . . . . . . . . . . . . . . . . . . . .
Receive fax calls only - no voice calls, on a dedicated fax line 2-35. . . . . . . . . . . . . . . . . . . . . . . . . . . . . . . . .
Receive voice and fax calls at the same phone number - without an answering machine 2-36. . . . . . . . . . . . .
Receive voice and fax calls at the same phone number - with an answering machine 2-37. . . . . . . . . . . . . . . .
Setting Up for Faxing (Netherlands Installation) 2-38. . . . . . . . . . . . . . . . . . . . . . . . . . . . . . . . . . . . . . . . . . . . . . .
Receive fax calls only - no voice calls, on a dedicated fax line 2-38. . . . . . . . . . . . . . . . . . . . . . . . . . . . . . . . .
Receive voice and fax calls at the same phone number - without an answering machine 2-39. . . . . . . . . . . . .
Receive voice and fax calls at the same phone number - with an answering machine 2-40. . . . . . . . . . . . . . . .
Installation and Configuration
2-1
Page 23

Introduction
In this chapter you will find information about installing the software applications provided, including the:
D Printer Drivers
(including Windows and DOS driver software)
D HP OfficeJet LX Software
(including the HP OfficeJet LX Manager and Eclipse FAX SE (PC fax applications)
You will find information about installing the:
D control panel overlay (if a new one is being installed)
D print cartridge
D interface cable for printing
D power cord
D document catch tray (installation is optional)
Instructions for installing the following customer orderable and installable parts are also provided:
D access door assembly
D output tray assembly
D input tray assembly
D tray cover
You will also be provided information on how to:
D load paper
D load envelopes
D set the paper size in the menu
D set up for printing
D set up for faxing
Using Printer Driver Software
Detailed information on each of the software installations and their usage is provided in the HP OfficeJet (LX) User’s
Guide. Also, the applications guides provided with each driver will provide specific information for the installation
and use of the software package.
Refer to the options listed below to determine which printer driver you need to install to make your computer and
software work with the HP OfficeJet. Printer drivers (also called printer software) are software files that control your
printer and allow your software application to access the printer’s features.
Using Microsoft) Windows 3.1
Install the HP OfficeJet Printer Software for Microsoft Windows 3.1 provided with your HP OfficeJet. See the
documentation that came with the printer software for installation instructions.
Installation and Configuration
2-2
Page 24
Using OS/2
The HP OfficeJet is compatible with the HP DeskJet printers. Therefore, look for the HP DeskJet 520 or DeskJet 510
printer model selection in OS/2. If it is not available, contact your IBM representative for information. If the HP
DeskJet 520 or DeskJet 510 printer is listed, install it with the instructions provided by IBM.
Using DOS software applications
For each DOS software application you use, you must install a specific printer driver. Your DOS software application
supplies printer drivers for many printer models. A printer driver that supports your printer features may already be in
your software application. Additional information is provided in this section, see Setting Up for Printing.
Hardware and Software Requirements
The following are the minimum computer system requirements:
D Parallel port must support bidirectional communication.
D 4 Megabytes (MB) of Random Access Memory (RAM). 8 MB RAM recommended.
D 5 MB hard disk space.
D Windows 3.1 operating system.
Note: To add the HP OfficeJet LX Manager to your Windows StartUp group, so that the HP OfficeJet
LX Manager will run automatically whenever you start Windows, make sure that your PC has enough
memory to run the HP OfficeJet LX Manager simultaneously with all the other applications you plan to
run. Then, open the HP OfficeJet LX Manager and StartUp groups, press the Ctrl key, and click and
drag the HP OfficeJet LX Manager icon into the StartUp group.
Installing the HP OfficeJet LX Software
The information provided here will help you with the installation of the HP OfficeJet LX Software including the HP
OfficeJet LX Manager and Eclipse FAX SE software applications. Additionally, other PC Fax programs usable with
the HP OfficeJet LX are described. Detailed information on custom installation and usage is provided in the HP
OfficeJet LX User’s Guide.
Use the following instructions when installing the software for the first time in the HP OfficeJet LX.
1. Check that you have properly set up the HP OfficeJet LX device, and that it is connected to your computer, turned
on, and has paper loaded.
2. Close any open applications, saving files if necessary.
3. Insert Disk 1 of the HP OfficeJet LX software into
your flexible disk drive.
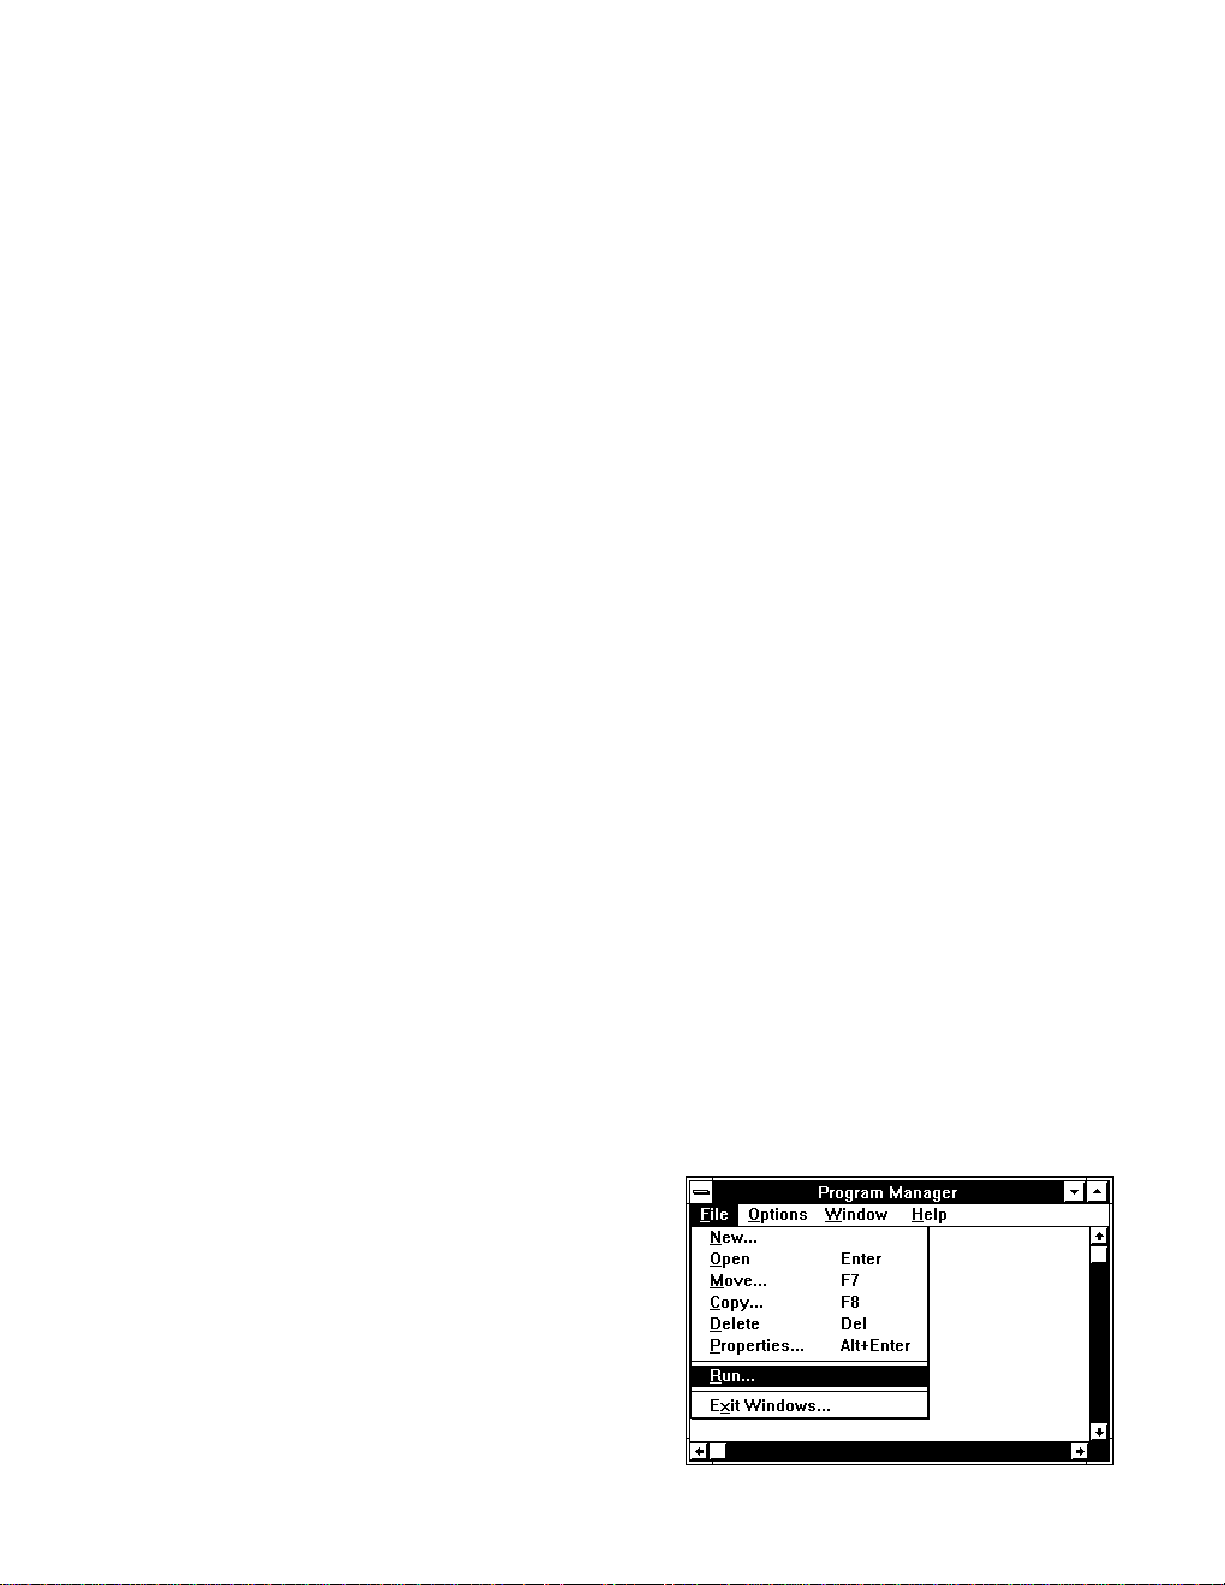
4. From the Windows Program Manager menu bar,
choose File/Run. The Run dialog box appears.
Installation and Configuration
2-3
Page 25
5. In the Command Line box, type one of the following commands, depending on which flexible disk drive you’re
Á
Á
Á
Á
Á
Á
Á
Á
A:SETUP.EXE
using:
or
B:SETUP.EXE.
6. An “initializing” screen appears, followed by a screen that asks the user to select Standard Installation,
Custom Installation, or Uninstall.
We recommend that first–time users choose Standard Installation, which copies all the HP OfficeJet LX software
to their hard disk and sets up the device for printing, scanning, and PC faxing. For information about Custom
Installation, see “Performing a Custom Installation” in the HP OfficeJet LX User’s Guide. For information about the
uninstall option, see “Using the Uninstall Option” in the HP OfficeJet LX User’s Guide.
Click the Standard Installation button and then the OK button.
7. A screen appears, allowing you to specify the directory in which your HP OfficeJet LX software will be installed.
The default directory is C:\HPOJET.
If this is acceptable, click the OK button.If it is not acceptable, follow the instructions on the screen to select a
different directory. Then click the OK button.
8. As installation takes place, screens are displayed that provide “must know” information about the HP OfficeJet LX.
Reading these screens will give you a head start on understanding how your new product works. Be sure to read these
screens completely before inserting a new installation disk.
9. After all the files have been copied to the hard disk, the setup program tries to communicate with your
HP OfficeJet LX.
If the device is properly connected and turned on, a screen appears, giving you the name of the port to which your HP
OfficeJet LX is connected. Click the OK button.
10. If the setup program cannot find your HP OfficeJet LX, follow the troubleshooting instructions on the screen to
correct the problem. Then click the Retry button. The setup program tries again to communicate with the HP
OfficeJet LX. If it succeeds, a screen appears, giving you the name of the port to which your HP OfficeJet LX is
connected. Click the OK button.
11. The PC Fax Cover Sheet Information dialog box appears. Complete it as directed, pointing and clicking in each
field to fill it in. When you are finished, click the OK button.
12. The Fax Header dialog box appears. Complete it as directed and click the OK button.
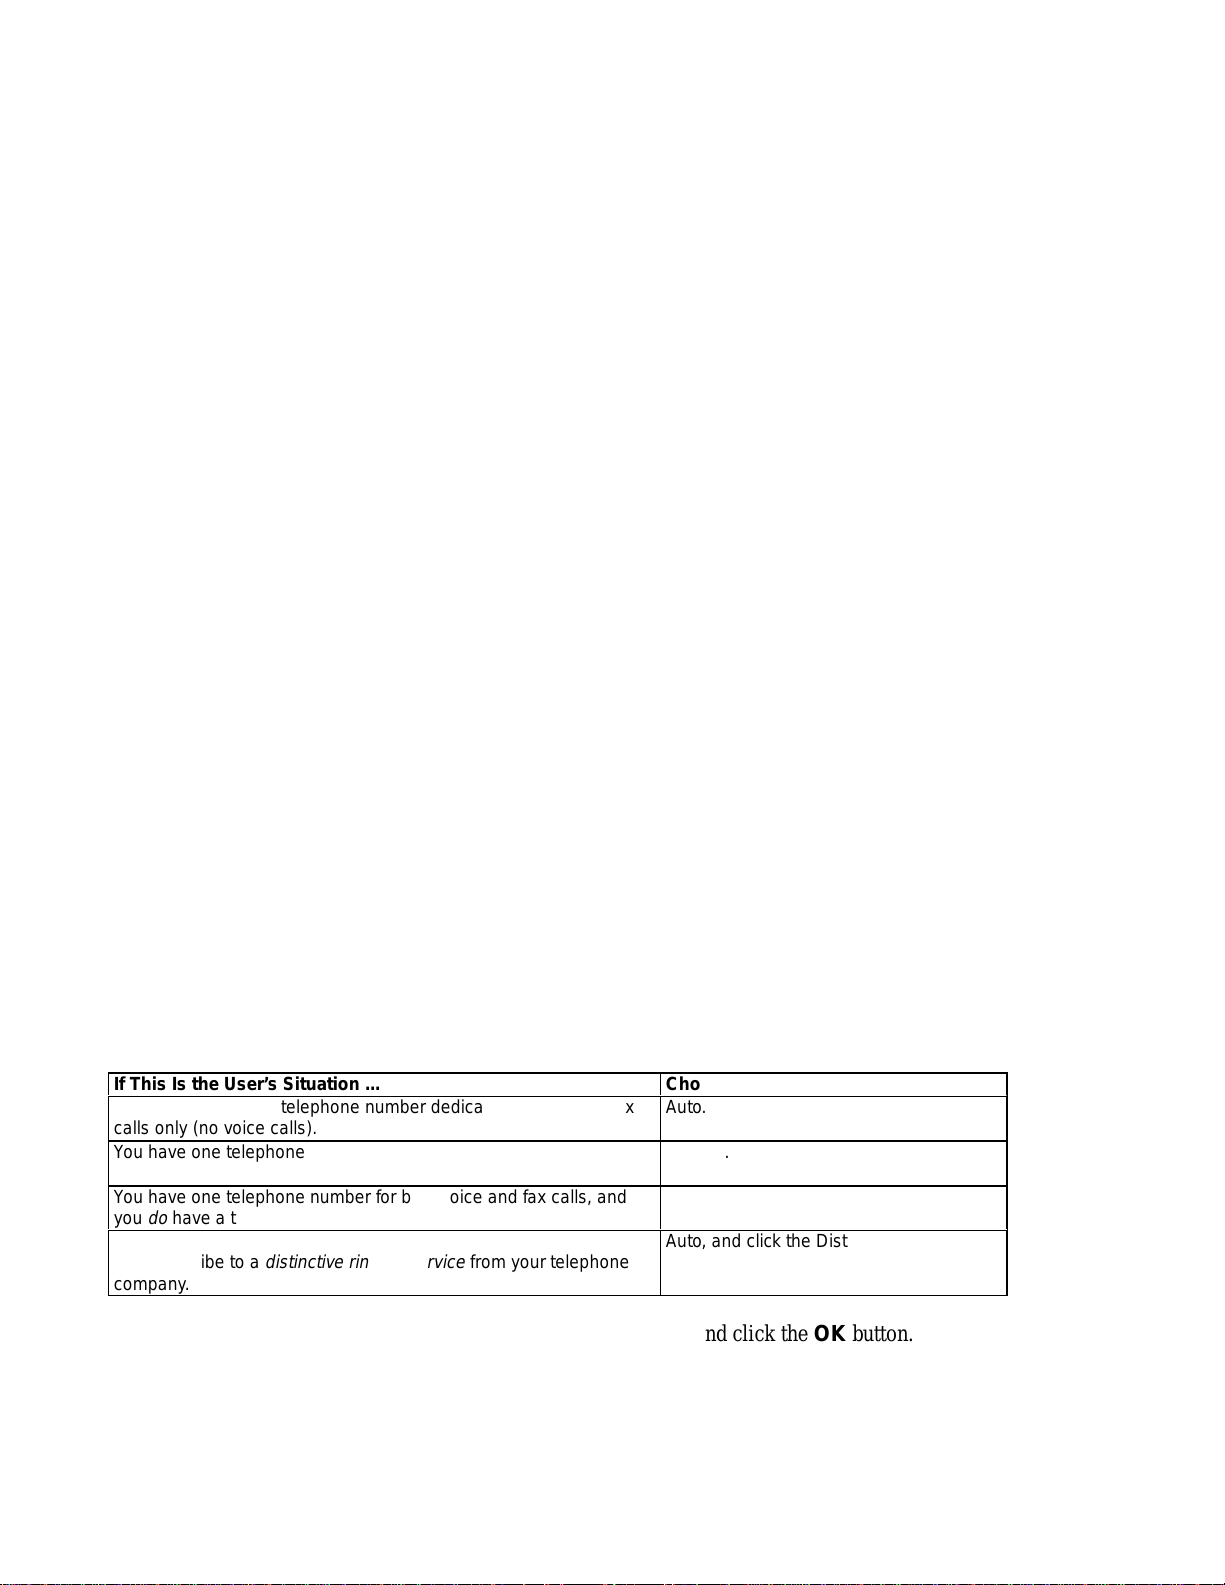
13. The Fax Receive Mode dialog box appears. Complete it as directed and click the OK button.
If This Is the User’s Situation ...
You have a separate telephone number dedicated to receiving fax
calls only (no voice calls).
БББББББББББББББББ
You have one telephone number for both voice and fax calls, and
don’t
you
have a telephone answering machine.
You have one telephone number for both voice and fax calls, and
do
have a telephone answering machine.
you
БББББББББББББББББ
You have one telephone number for both voice and fax calls, and
БББББББББББББББББ
you subscribe to a
company.
БББББББББББББББББ
distinctive ringing service
from your telephone
Choose This Setting
Auto.
ББББББББББ
Manual.
Fax/TAM.
ББББББББББ
Auto, and click the Distinctive Ring button
ББББББББББ
in the Settings box.
ББББББББББ
14. The Dialing Mode dialog box appears. Complete it as directed and click the OK button.
Installation and Configuration
2-4
Page 26
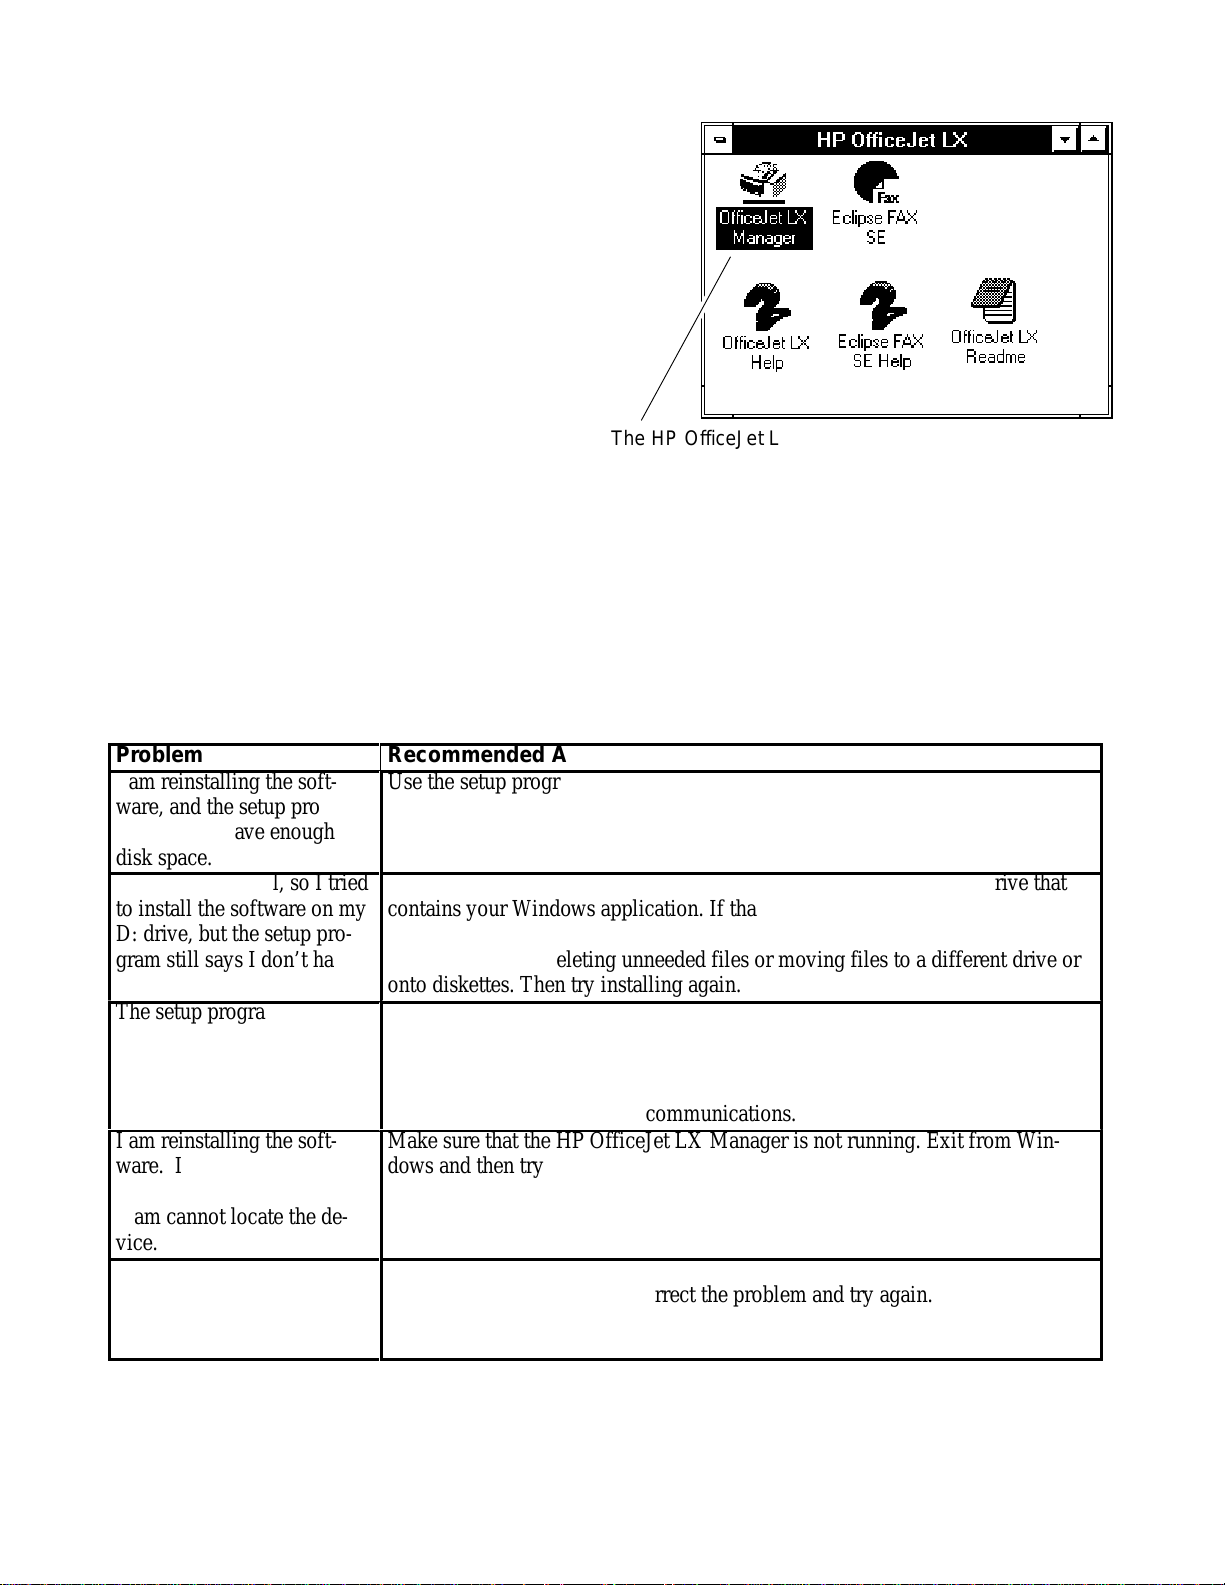
15. Next, the setup program creates the HP OfficeJet LX
Á
Á
Á
Á
Á
Á
Á
Á
Á
Á
Á
Á
Á
Á
Á
Á
Á
Á
Á
Á
Á
Á
Á
Á
Á
Á
Á
Á
program group and places it on the Windows desktop.
It should look similar to this:
The HP OfficeJet LX Manager icon
16. As a last step, the setup program gives you the option of reading tips that will help you understand the basic
functions of your new product.
As the first “tips” screen appears, your HP OfficeJet LX prints a Self Test report. This report shows samples of your
new internal fonts, reviews the factory device settings, notifies you about any print cartridge problems, and provides
product revision information.
Click the Exit button when you are ready to leave the setup program.
If difficulties arise with the installation, review the following recommendations:
Problem
I am reinstalling the software, and the setup program
ББББББББ
says I don’t have enough
ББББББББ
disk space.
My C: drive is full, so I tried
to install the software on my
ББББББББ
D: drive, but the setup pro-
ББББББББ
gram still says I don’t have
ББББББББ
enough disk space.
The setup program cannot
ББББББББ
locate my HP OfficeJet LX.
ББББББББ
ББББББББ
I am reinstalling the soft-
ББББББББ
ware. It used to run correct-
ББББББББ
ly, but now the setup program cannot locate the de-
ББББББББ
vice.
ББББББББ
I’m trying to uninstall the
ББББББББ
software, but the setup pro-
ББББББББ
gram says it cannot delete
ББББББББ
the directory.
Recommended Action
Use the setup program to uninstall the HP OfficeJet LX software. Then try
installing again.
ББББББББББББББББББББББ
ББББББББББББББББББББББ
The HP OfficeJet LX software requires several files to reside in the drive that
contains your Windows application. If that drive is full, the setup program can-
ББББББББББББББББББББББ
not install the HP OfficeJet LX software. Free as much space on the drive as
ББББББББББББББББББББББ
you can by either deleting unneeded files or moving files to a different drive or
ББББББББББББББББББББББ
onto diskettes. Then try installing again.
If you have followed the troubleshooting directions on the screen, the most
ББББББББББББББББББББББ
likely problem is that you need a different centronics cable. (About 10% of
centronics cables cannot support bidirectional communications.)
ББББББББББББББББББББББ
There is also a chance that your PC’s centronics port is either not set up for or
ББББББББББББББББББББББ
cannot support bidirectional communications.
Make sure that the HP OfficeJet LX Manager is not running. Exit from Win-
ББББББББББББББББББББББ
dows and then try again. Make sure that (1) the device is properly cabled to
ББББББББББББББББББББББ
your PC, (2) the device is turned on, and (3) the front panel says “Ready.”
ББББББББББББББББББББББ
ББББББББББББББББББББББ
Either the directory contains files that do not belong to the HP OfficeJet LX, or
ББББББББББББББББББББББ
one or more files are open. Correct the problem and try again.
ББББББББББББББББББББББ
ББББББББББББББББББББББ
Installation and Configuration
2-5
Page 27
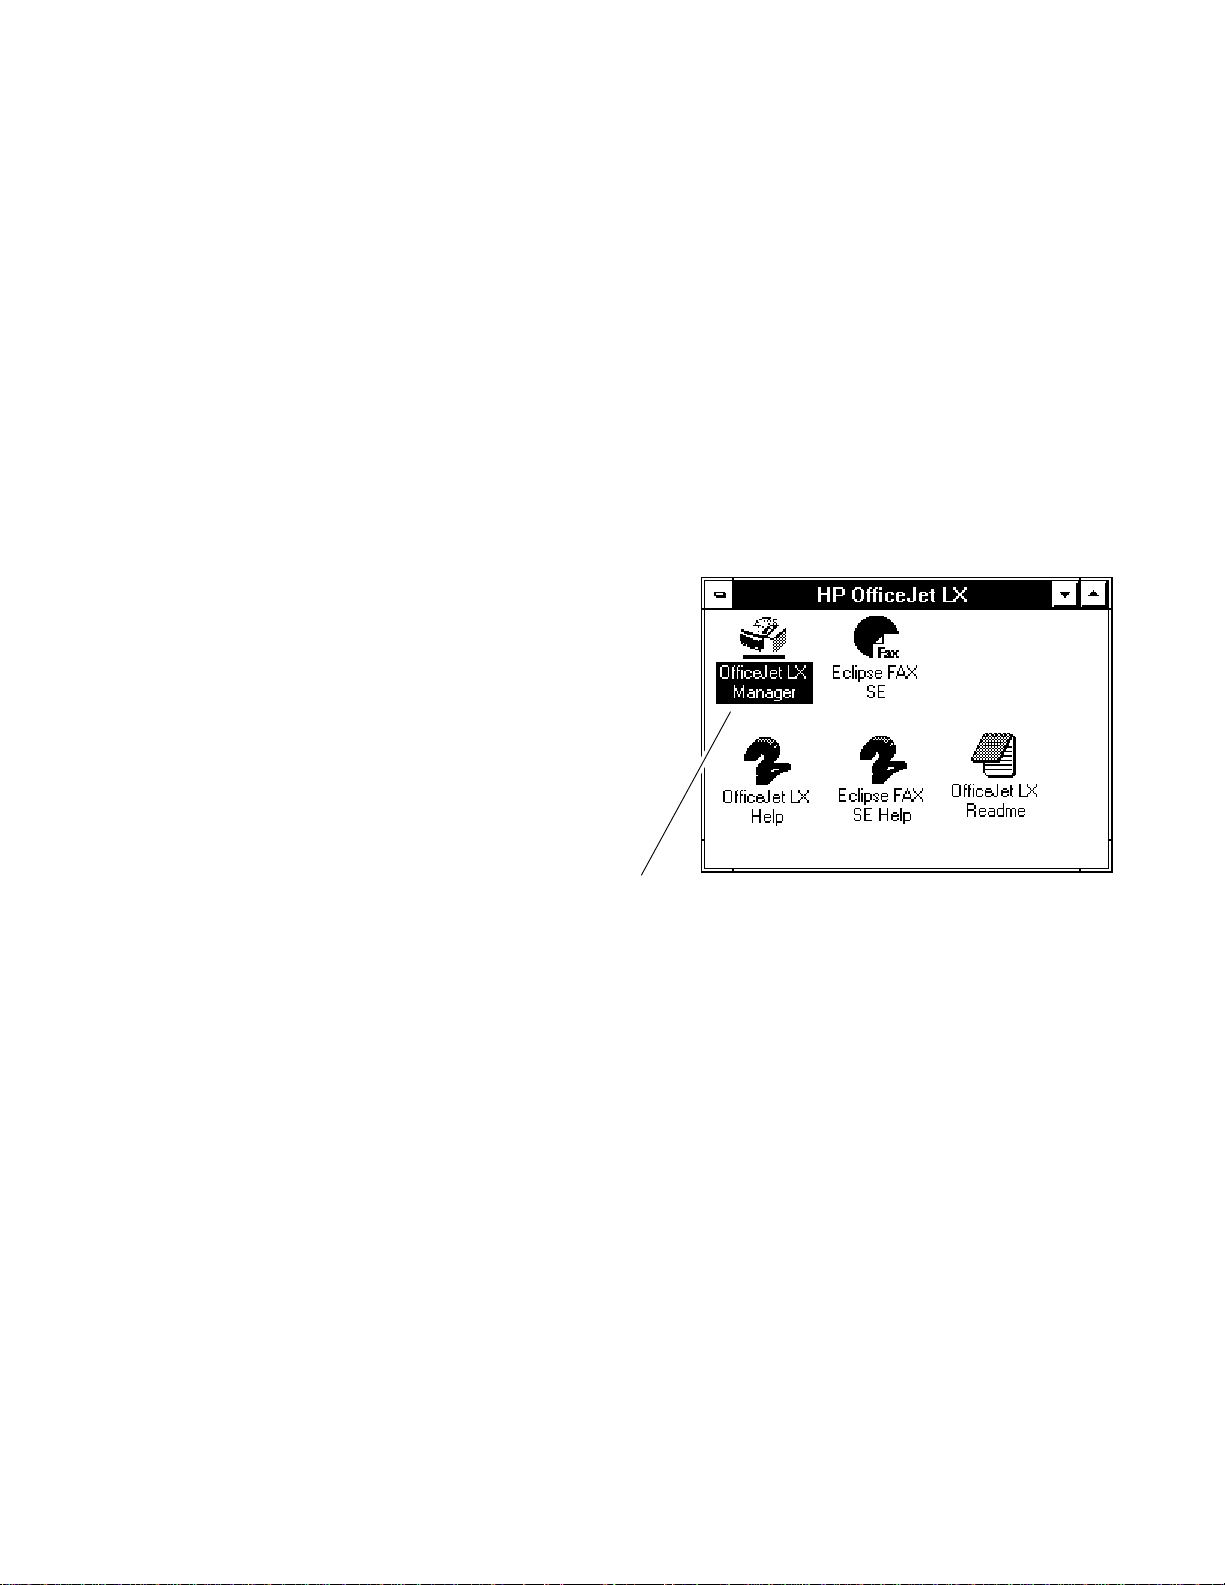
Running the HP OfficeJet LX Manager
The HP OfficeJet LX Manager is one of two software applications that are included with the HP OfficeJet LX. The
other software application is Eclipse FAX SE, which lets you do PC faxing and scanning.
The HP OfficeJet LX Manager allows the user to manage the way that their HP OfficeJet LX works. It can be used it to
do the following:
D Monitor the status of the HP OfficeJet LX.
D Print logs and reports.
D Change the device settings that were made during installation, and make additional settings that control
faxing, printing, and copying.
Note: The HP OfficeJet LX Manager has one other important function: it must be running in order for
you to use Eclipse FAX SE. It can be either open as a window or minimized.
To run the HP OfficeJet LX Manager, double-click the
HP OfficeJet LX Manager icon, which is placed in the
HP OfficeJet LX group during installation. The HP
OfficeJet LX Manager window appears.
You can minimize or close the HP OfficeJet LX Manager
as you would any other Windows application. Remember
that when this application is closed, you can make copies,
print, and send and receive paper faxes, but you cannot
use Eclipse FAX SE to send and receive PC faxes or do
PC scanning.
Additional detailed information on use of the Manager
is provided in the HP OfficeJet LX User’s Guide.
The HP OfficeJet LX Manager icon
Installation and Configuration
2-6
Page 28
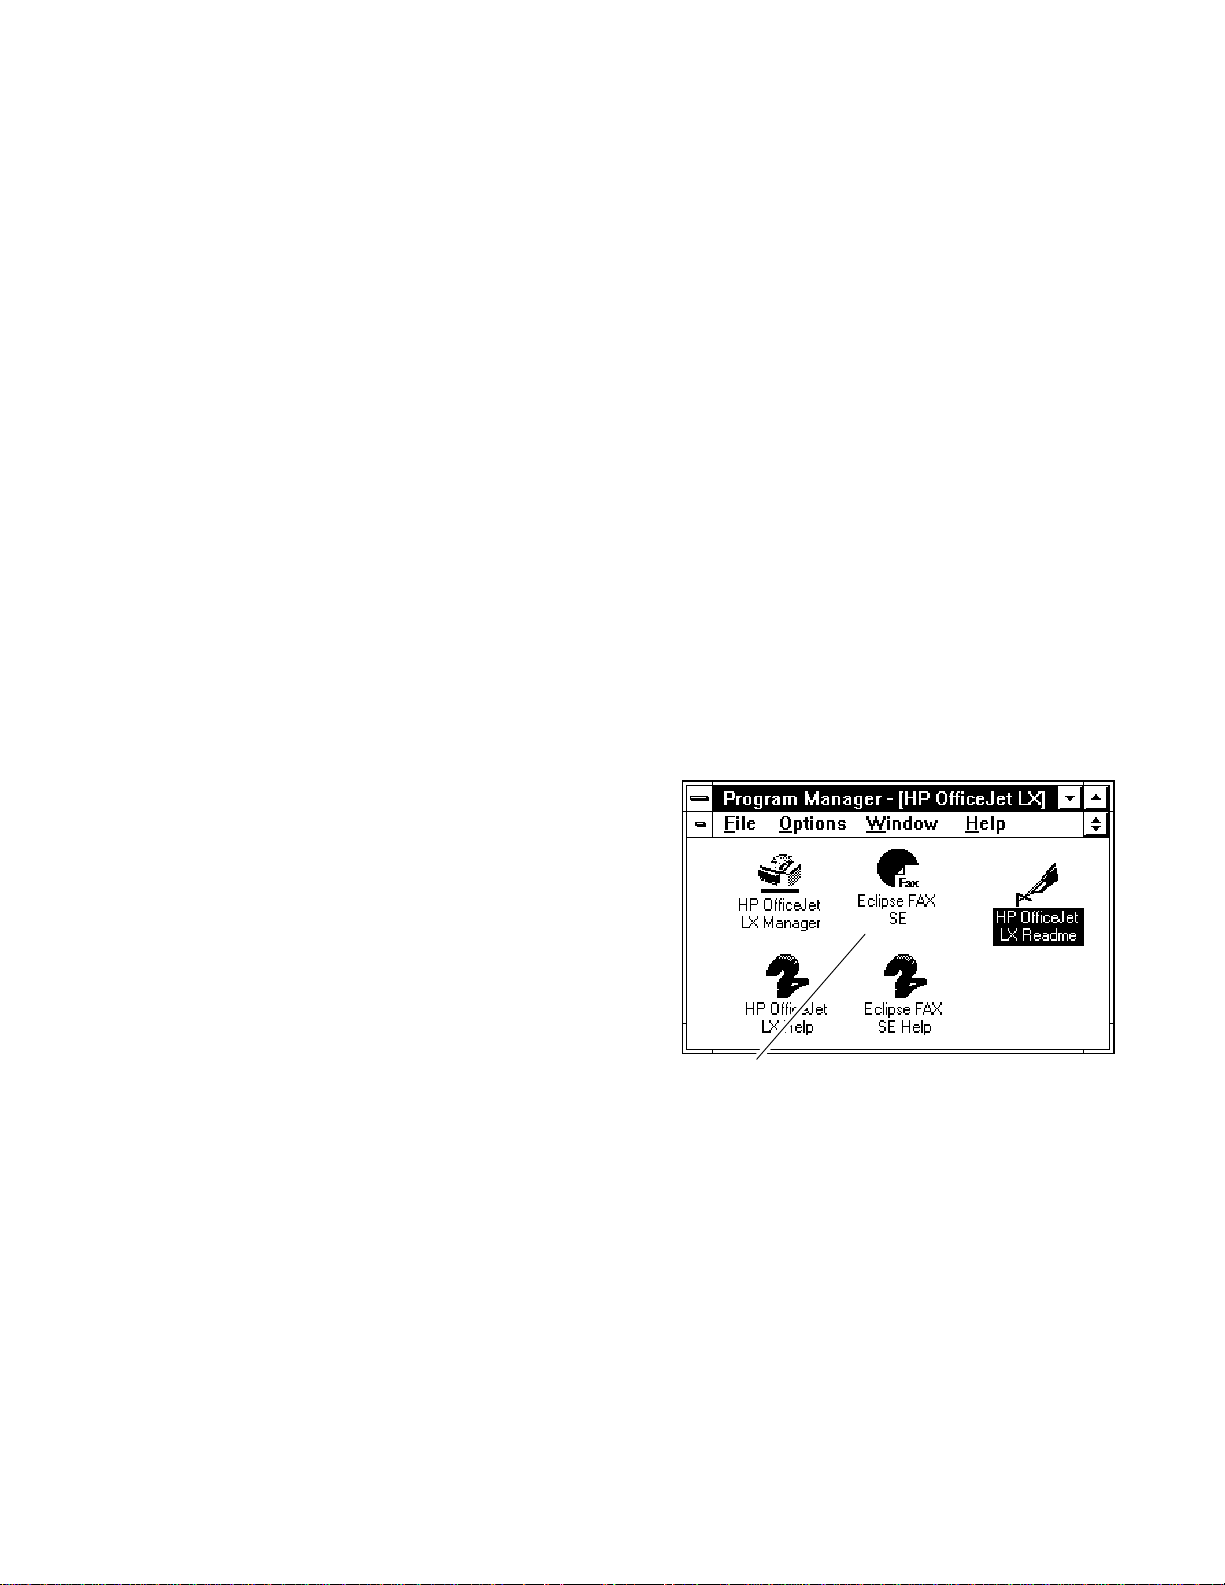
Running Eclipse FAX SE from the HP OfficeJet LX Manager
The HP OfficeJet LX includes a software application, Eclipse FAX SE, that allows you to send and receive faxes
directly to your PC, rather than to the device itself, and to do PC scanning.
Note: Eclipse FAX SE is a separate application from the HP OfficeJet LX Manager. Some of the
settings that you can make with the HP OfficeJet LX Manager affect PC faxing. In addition, the HP
OfficeJet LX Manager must be running in order for you to use Eclipse FAX SE. It can be either open
as a window or minimized.
There may be times when you want to run Eclipse FAX SE directly from the HP OfficeJet LX Manager. To do so, from
the HP OfficeJet LX Manager menu bar, choose File/Run Eclipse FAX SE.
Eclipse FAX SE makes it possible for you to do the following:
D Set up to six phonebooks (lists of names and fax numbers) for use with PC faxes. (Phonebooks are
similar to the Speed Dial entries that you use for paper faxing.)
D Create a document in any Windows application and then fax it directly from your PC.
D Receive faxes directly to your PC. Once an incoming fax has been received, you can use Eclipse FAX SE
to view, print, and delete it.
D Forward a fax you’ve received to another recipient.
D Fax a document to a file in order to use it later as a fax document.
D Scan a document into your PC to be sent as a fax, saved as a file, or printed.
There are two ways to run Eclipse FAX SE.
1. In the HP OfficeJet LX Manager menu bar, choose
File/Run Eclipse FAX SE.
2. Double-click the Eclipse FAX SE icon in the HP
OfficeJet LX program group, which is created during
installation.
The Eclipse FAX SE window appears.
Note the menu bar across the top of the window.
For additional information on using the Eclipse FAX SE
application, refer to the HP OfficeJet LX User’s Guide.
The Eclipse FAX SE icon
Installation and Configuration
2-7
Page 29
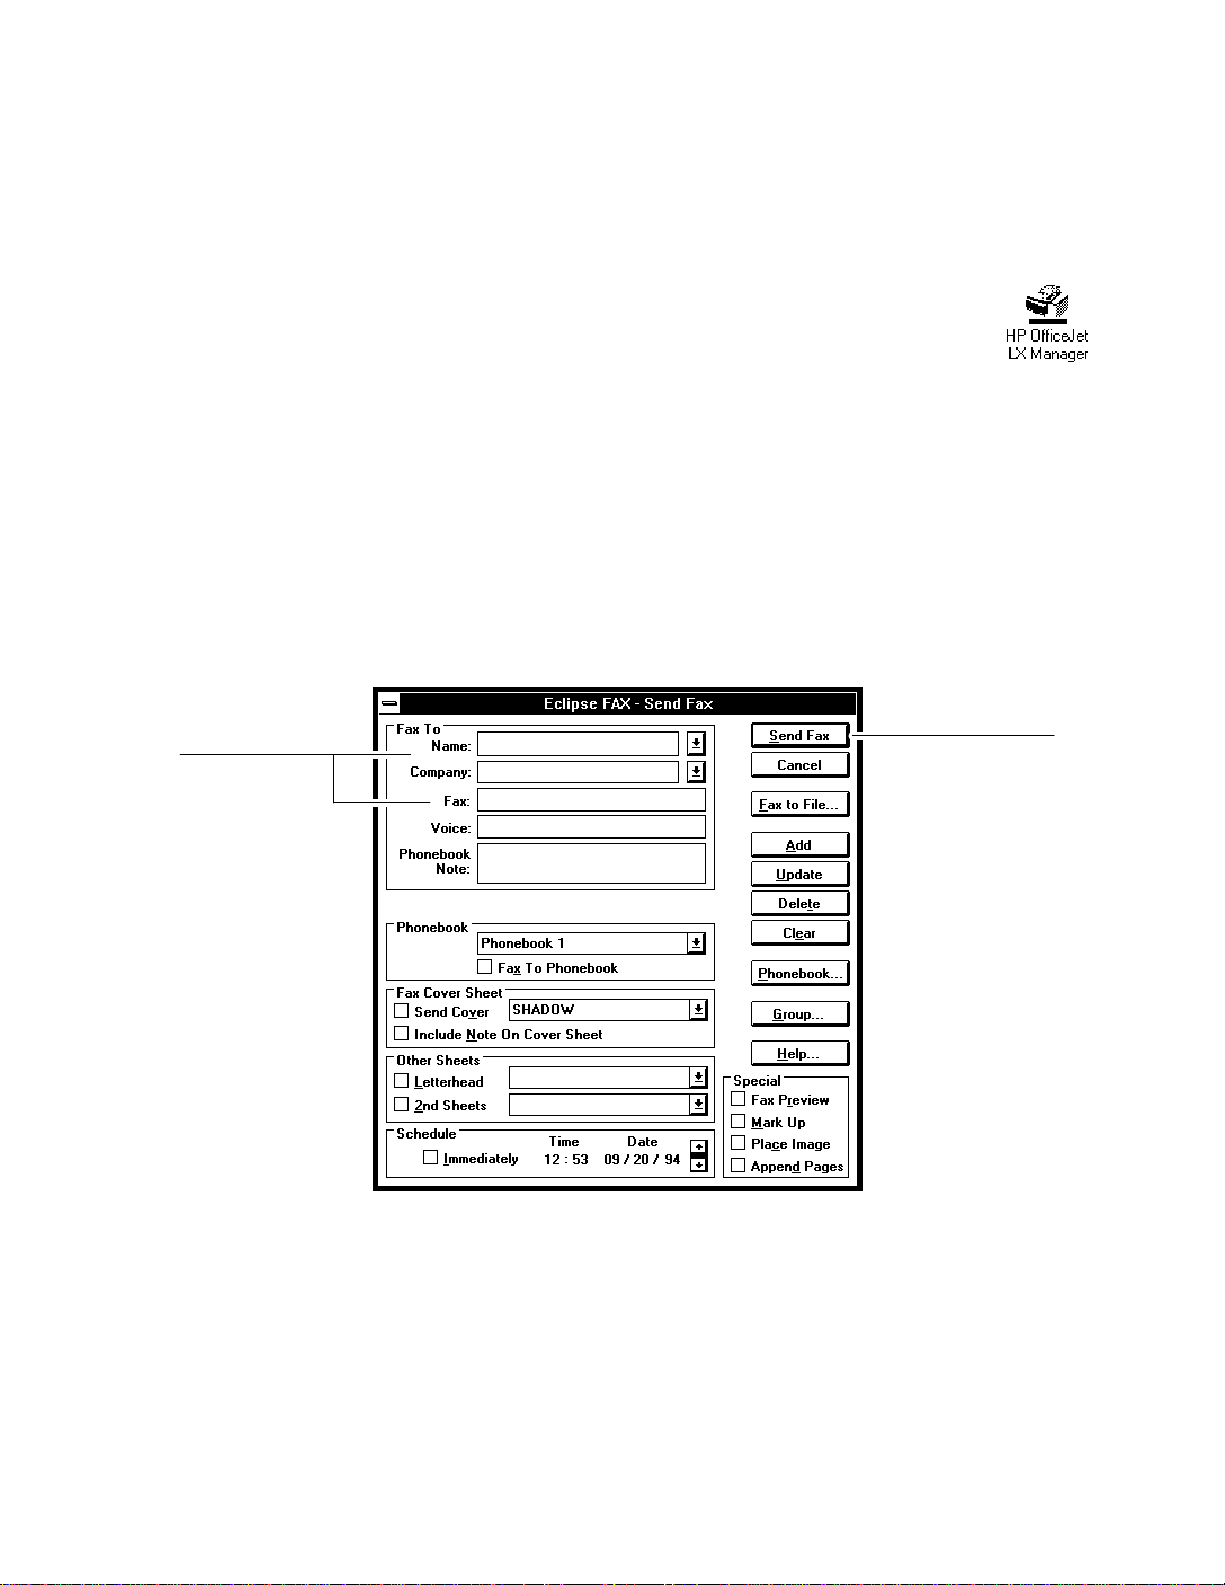
Sending a Fax Directly from the PC
To send a fax directly from the PC using Eclipse FAX SE, do the following:
1. Make sure of the following:
D The HP OfficeJet LX Manager is running (either in an open or minimized window).
(If it isn’t running, double-click the icon in the HP OfficeJet LX group window.)
D OfficeJet Setup/Route Received Faxes is set to To PC.
2. Using your Windows application, such as Write (in the Accessories group on your Windows desktop), either create
your fax or open an existing document.
3. Choose File/Print Setup in your Windows application and select E–FAX on CAS as the printer.
4. Use the application’s Print command to “print” the document. The Eclipse FAX SE Send Fax dialog box appears.
5. In the Send Fax dialog box,
D enter name and fax number of the intended recipients
D then click the Send Fax button to send it.
Name and Fax
number boxes
Send Fax button
6. When the fax is sent, you can either save your PC file or close without saving it.
For detailed information on using the Eclipse FAX SE application, refer to the HP OfficeJet LX User’s Guide.
To send paper faxes using the HP OfficeJet (LX) and not use the PC, refer to the HP OfficeJet (LX) User’s Guide.
Installation and Configuration
2-8
Page 30
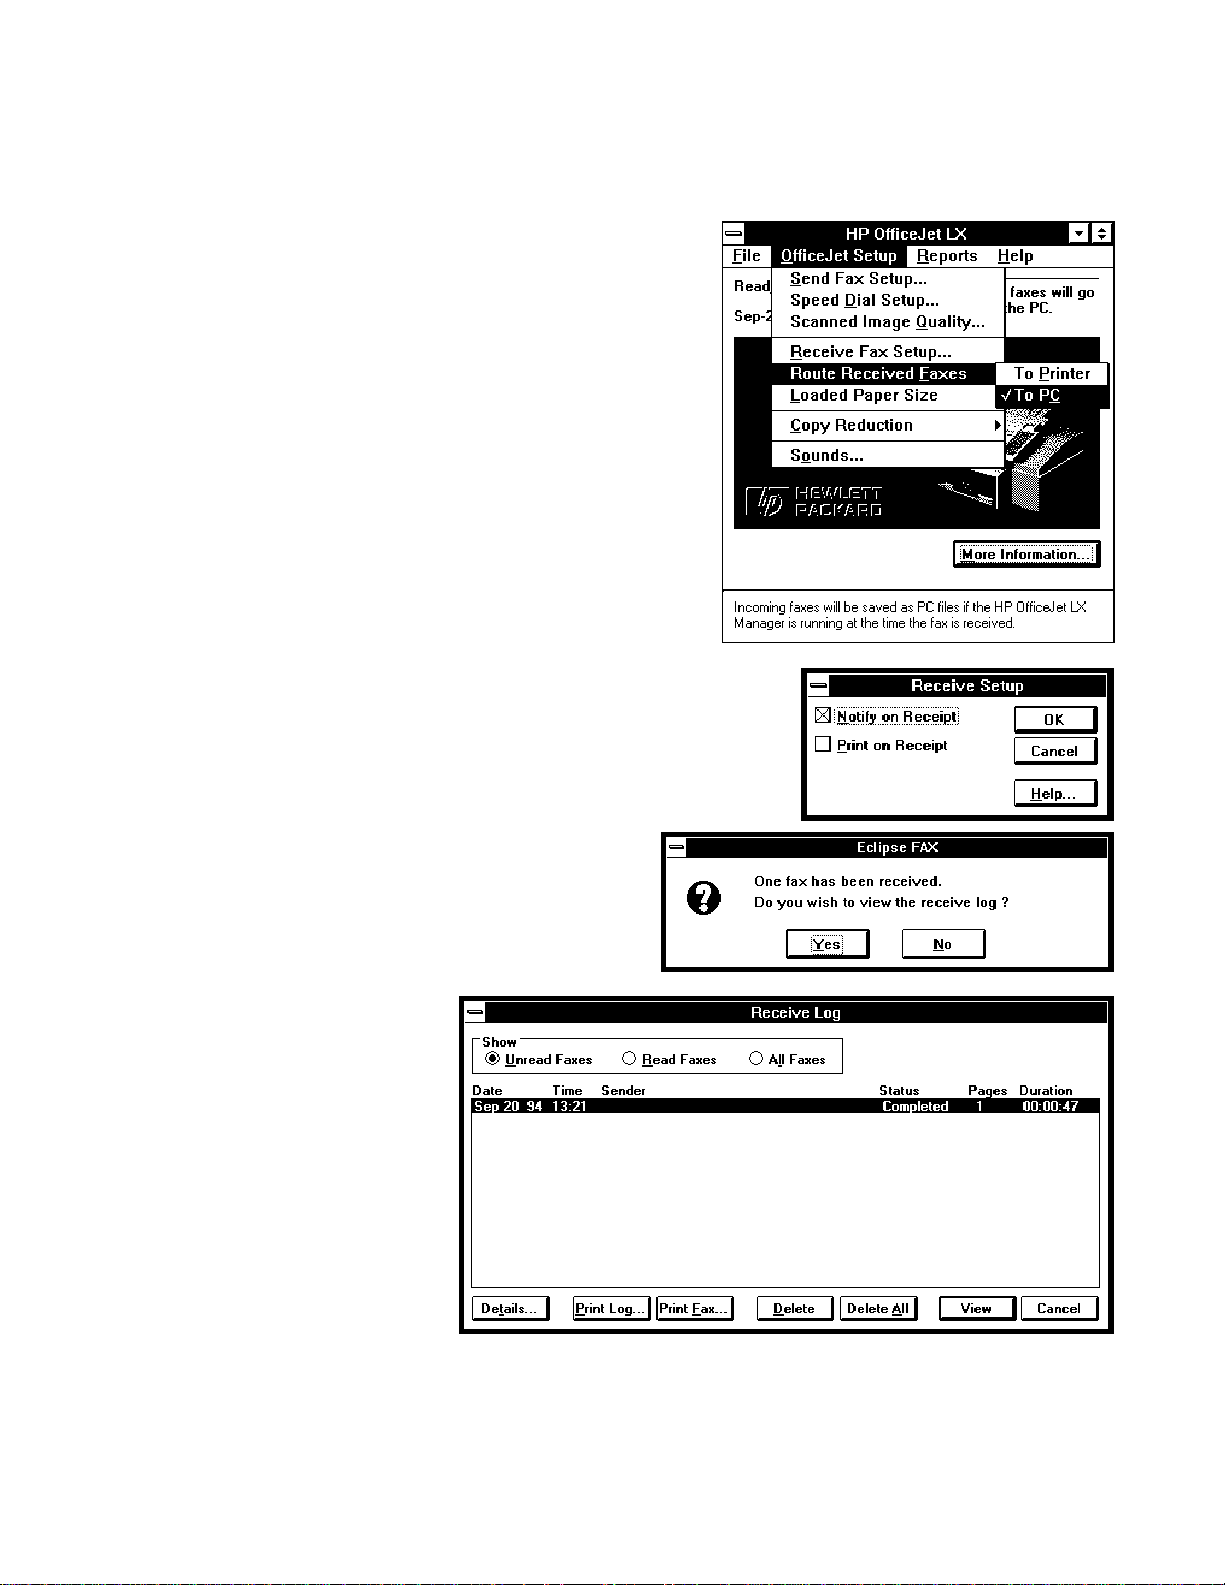
Receiving a Fax Directly to the PC
To receive a fax directly to the PC using Eclipse FAX SE, do the following:
1. Open the HP OfficeJet LX Manager and make sure the
OfficeJet Setup/Route Received Faxes option is set
to To Printer.
2. Make sure that the HP OfficeJet LX Manager is running
(it can be open or minimized).
3. Make sure the OfficeJet Setup/ Route Received Faxes
option is set to To PC.
4. Open the Eclipse FAX Manager and make sure the
Notify on Receipt box is checked in the Receive/Setup
dialog box.
5. Someone sends you a fax.
A message from Eclipse FAX SE appears, noting that a fax has
been received and asking if you want to view the Receive Log.
Notify on Receipt, which you selected in Step 4, controls
(
whether or not this message appears.)
6. Click the Yes button.
The Receive Log appears.
If necessary, click the
Unread Faxes button to
display the entry for the
fax you just received.
7. Highlight the entry and choose whether to print, delete, or view it.
For detailed information on using the Eclipse FAX SE application, refer to the HP OfficeJet LX User’s Guide.
To receive paper faxes using the HP OfficeJet (LX) and not use the PC, refer to the HP OfficeJet (LX) User’s Guide.
Installation and Configuration
2-9
Page 31
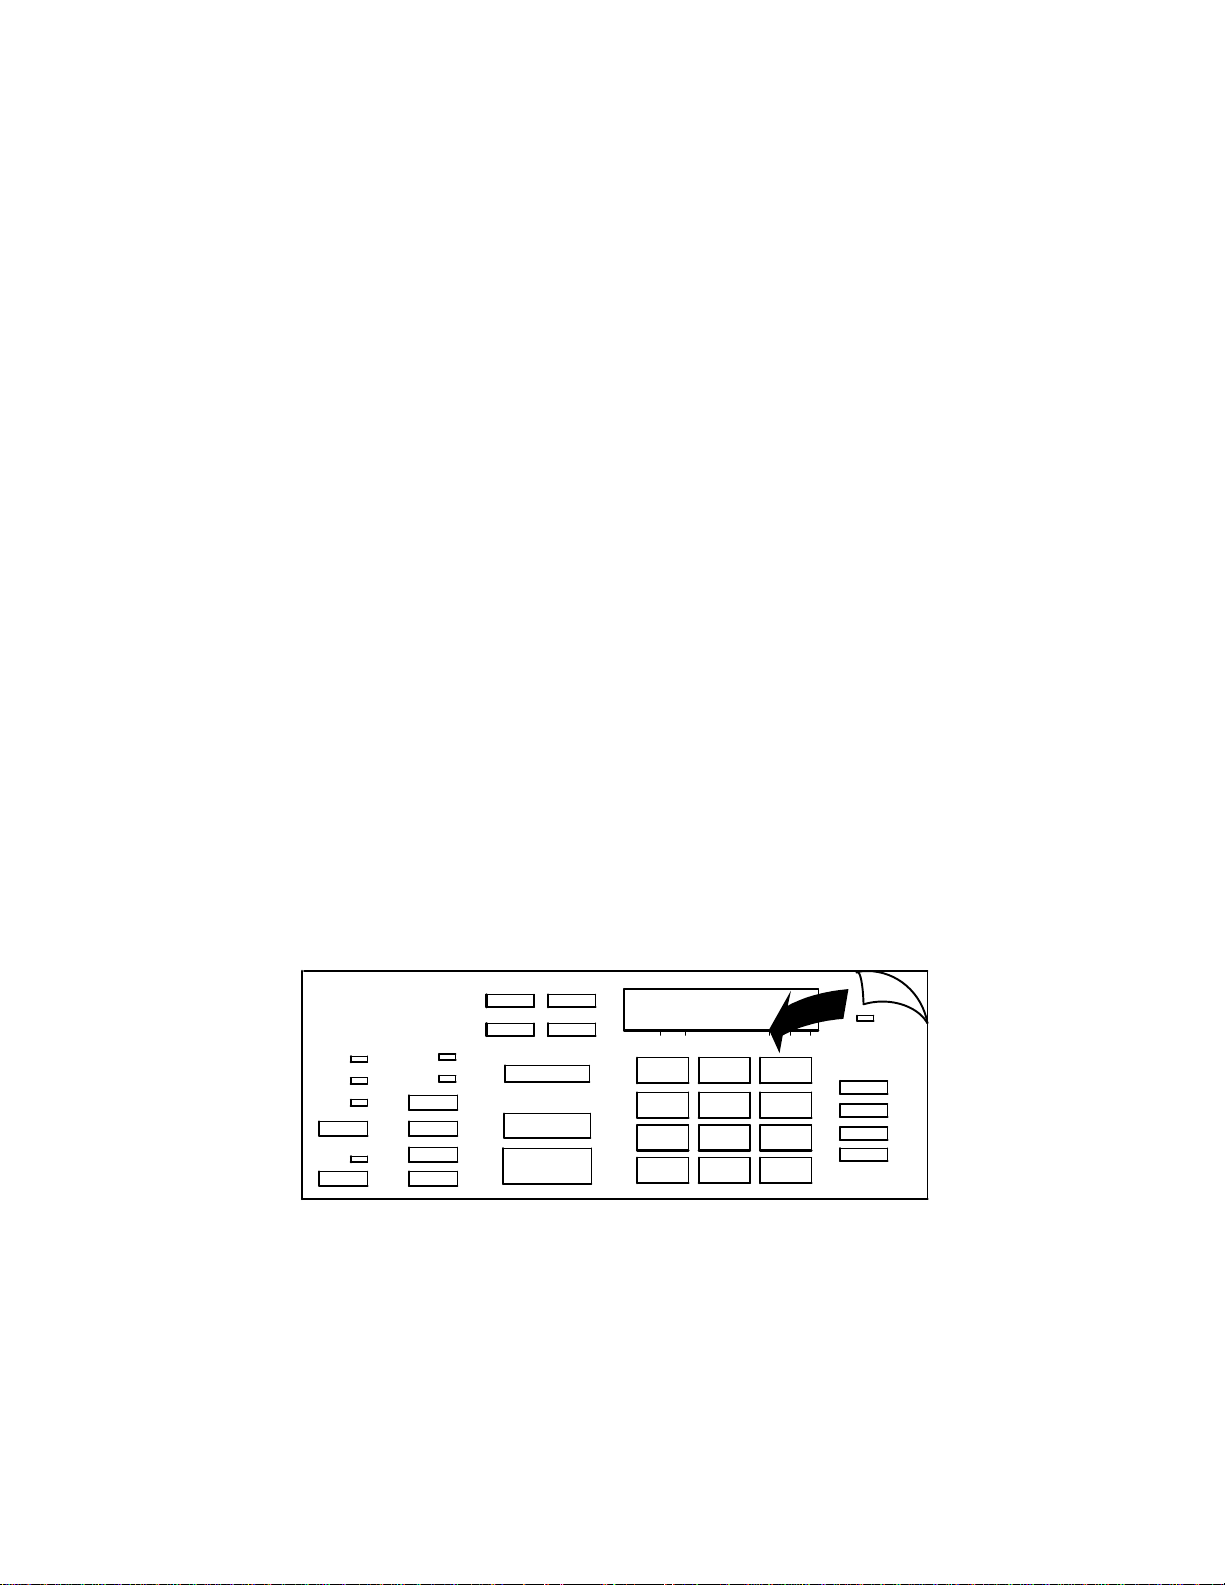
Using Other PC Fax Programs With the HP OfficeJet LX
The user can use most Windows–based PC fax software that supports standard CAS modems with the HP OfficeJet
LX. Please note that the HP OfficeJet LX Manager must be installed and running in order to use PC fax software with
the HP OfficeJet LX.
Hewlett-Packard has tested the following packages for compatibility with the HP OfficeJet LX:
D WinFax Pro 4.0 and 3.0, from Delrina
D DataFax 3.1, from Trio
D Eclipse FAX Professional 1.21 and 6.0, from Phoenix
D Faxworks Pro 3.0, from Sofnet
D Ultrafax 3.1, from SoftKey
D Faxit 1.0 and 2.0, from DCA/Alien
If your installation fails for any reason, refer to the application’s installation instructions or see the “Troubleshooting”
section in the HP OfficeJet LX User’s Guide.
Note: In order to run the HP OfficeJet LX Manager and Eclipse FAX SE for PC faxing and scanning,
you must be running Windows in 386 Enhanced Mode. (To see which mode you’re running, choose
Help/About Program Manager from your Windows Program Manager menu bar.) If you have an 80386
processor with at least 2 MB of RAM, your PC should run Windows in 386 Enhanced Mode by default.
If you have a 386 PC with at least 1 MB of RAM but your PC does not run Windows 386 mode by
default, you can cause it to run in this mode by typing WIN/3 to run Windows, rather than WIN.
Installing a Control Panel Overlay
Each HP OfficeJet is shipped with a control panel overlay installed, appropriate for the country of destination for the
product. The overlay has the HP logo and OfficeJet name as well as the control panel button names printed on it. If an
overlay needs to be installed, remove the protective cover from the back of the overlay and carefully position the
overlay on the control panel. Then press the overlay into place.
Removing the Protective Cover from the Back of the Control Panel Overlay
Installation and Configuration
2-10
Page 32
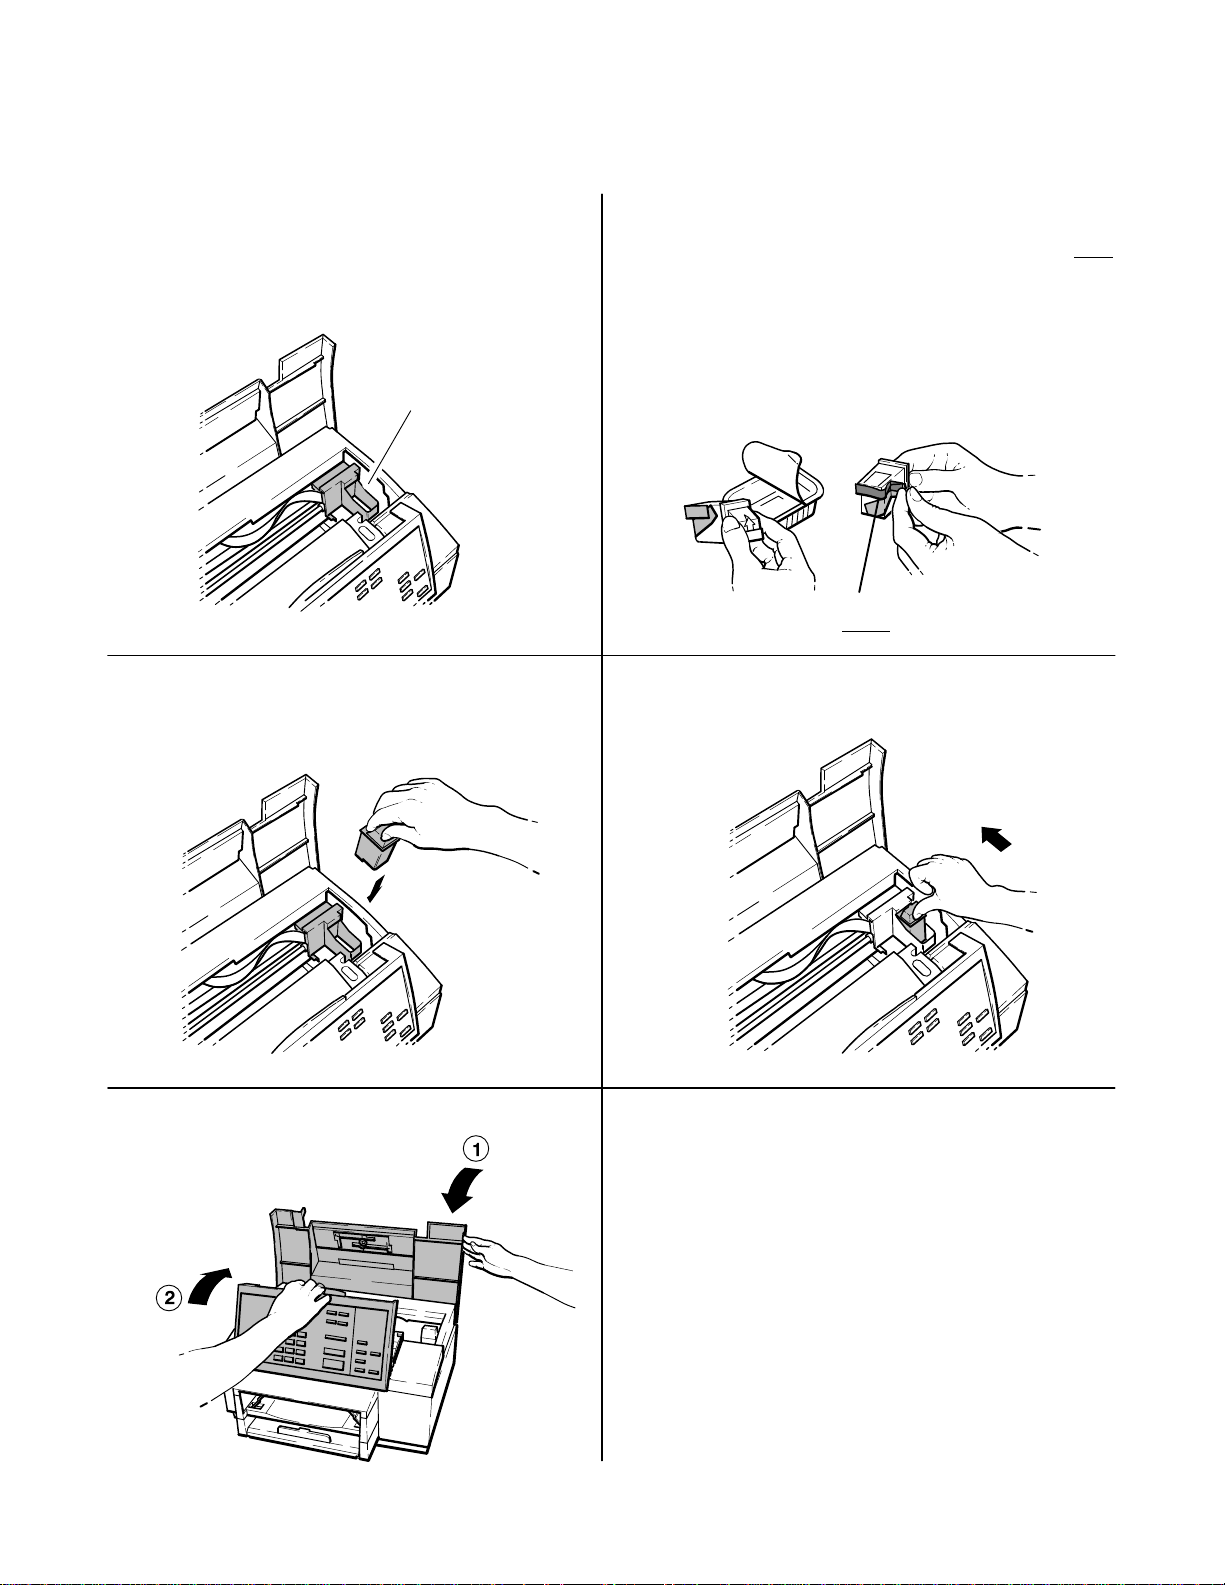
Installing a Print Cartridge
With the control panel and top cover open, locate
the print cartridge cradle inside the HP OfficeJet,
near on the right side.
Print cartridge cradle
Place the print cartridge down into the cradle as
34
shown. Align the green arrow on the cartridge
top with the green dot on top of the cradle.
Open the print cartridge box and container, then
21
grasp the print cartridge by the green top and remove
the cartridge from the container. Gently remove both
pieces of tape – blue and white – covering the ink
nozzles and vent hole.
CAUTIONS: 1) If you don’t remove the white tape,
the cartridge will prematurely fail.
2) Be careful not to touch the ink nozzles or the
copper contacts. Fingerprints may damage them.
Remove both pieces of tape!
Push the green arrow toward the green dot until
the cartridge snaps into place.
Close the top cover, then close the control panel.
5 Helpful Hint:
Be sure to close the control panel firmly, until it
snaps into place.
Installation and Configuration
2-11
Page 33
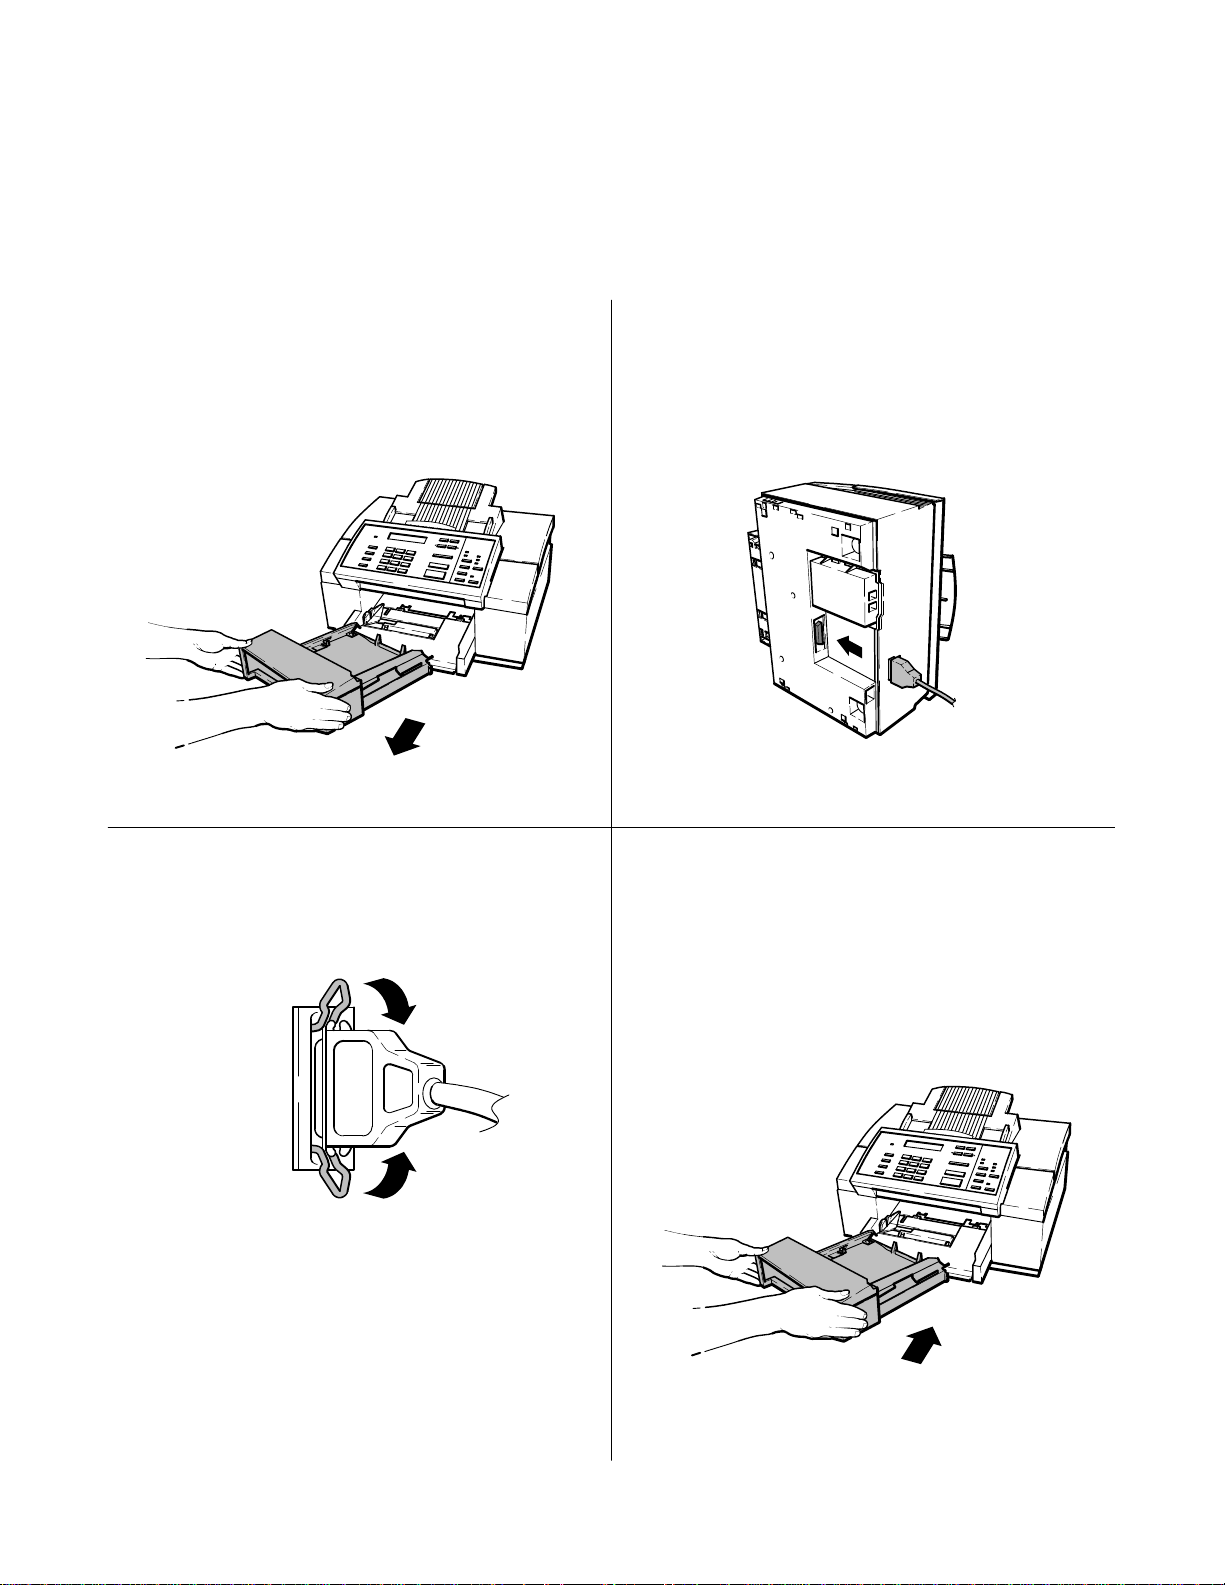
Installing an Interface Cable for Printing
You must purchase separately a shielded Centronics parallel interface cable to connect the HP
OfficeJet to your computer for printing. You can use the HP C2950A (2 meter) or the HP
C2951A (3 meter) Centronics parallel cable. See Chapter 1 for ordering information.
Make sure your computer is turned off by pressing
“O” on the On/Off switch (located on the left side
of the machine’s base). Then remove the output
tray from the HP OfficeJet and set it aside.
Snap both clips into the notches on the connector
3
as shown.
Place the HP OfficeJet on a stable surface at a
21
safe distance from the edge. Then tilt and rotate
the HP OfficeJet on its side so that the bottom of
the unit faces you as shown below. Connect the
printer end* of the interface cable firmly to the
interface port on the HP OfficeJet.
* The printer end of the interface cable has
notches, and the computer end has screws.
Return the HP OfficeJet to its upright position,
4
making sure it does not rest on the interface cable.
Insert the output tray.
Now connect the computer end of the interface
cable to the parallel (LPT 1) port on your
computer and tighten the screws on the
connector (not shown).
Installation and Configuration
2-12
Page 34
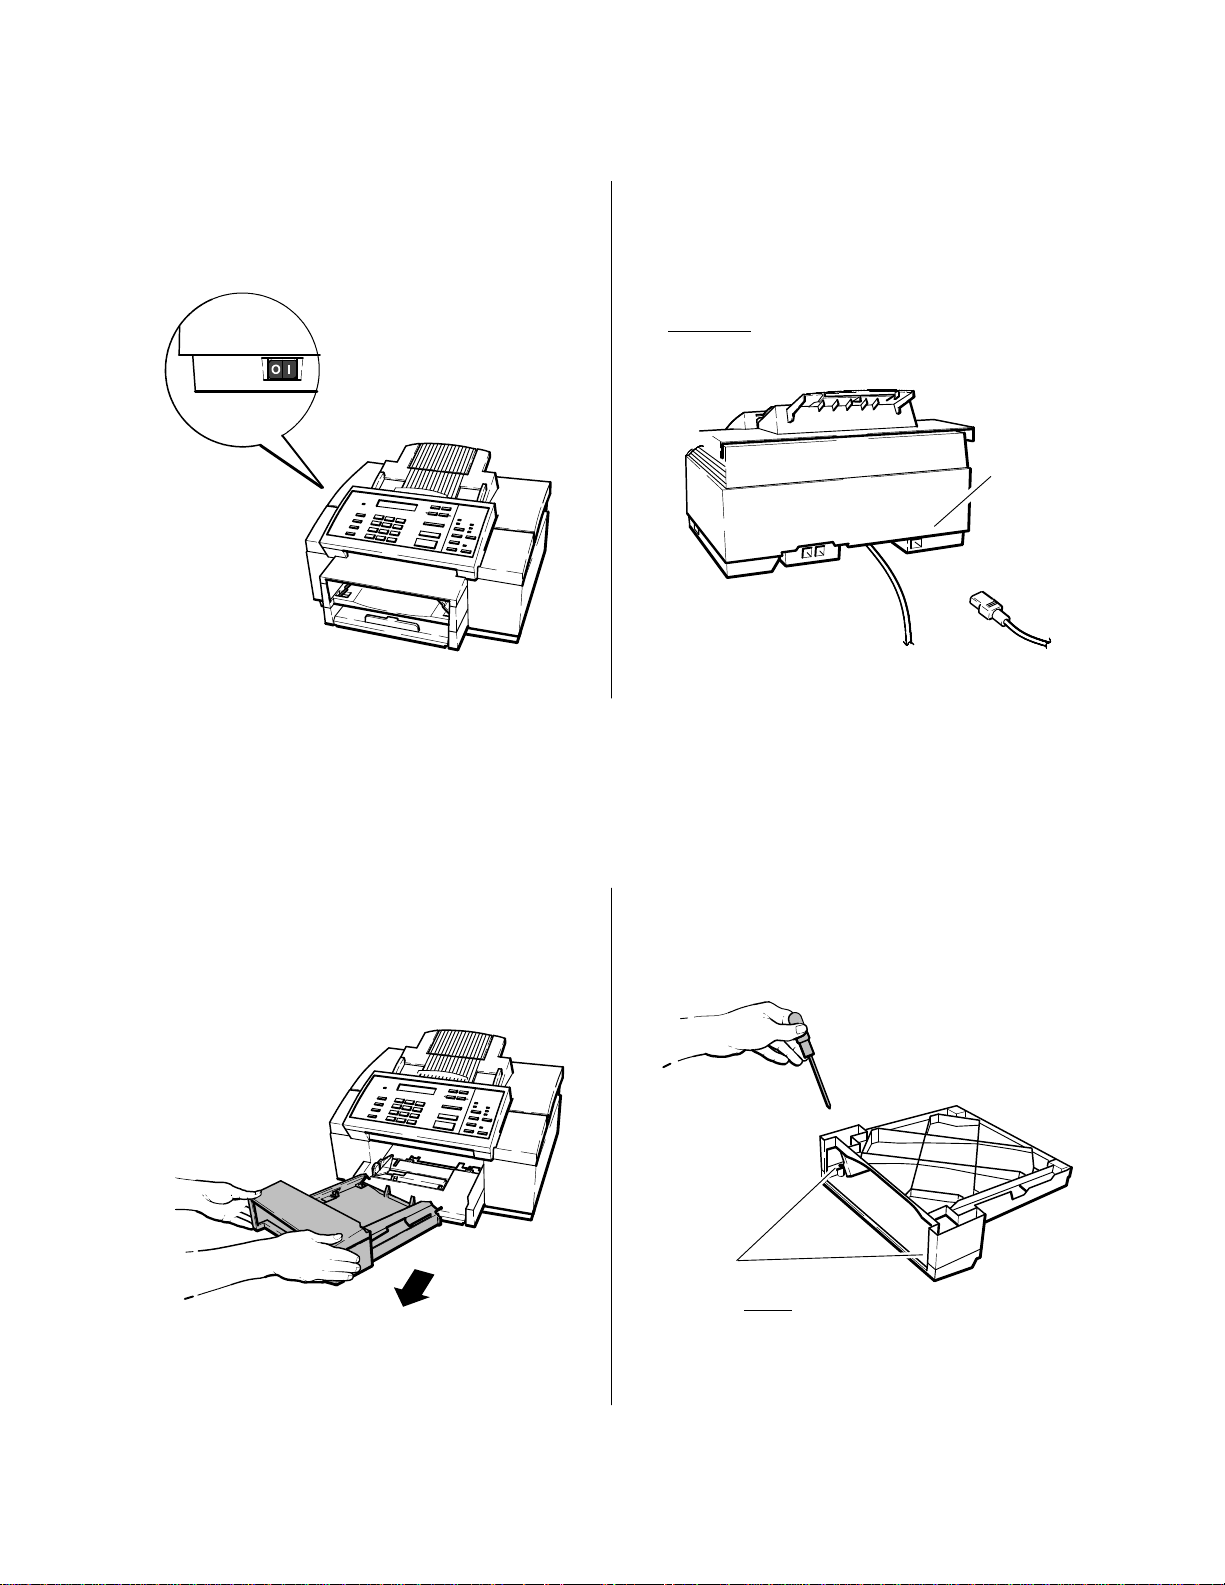
Installing the Power Cord
Make sure the printer is turned off by pressing
“O” on the On/Off switch (located on the left side
of the machine’s base).
Look on the back of the HP OfficeJet and locate
21
the power socket. Then plug the power cord
connector firmly into the power socket.
WARNING: To avoid the possibility of electric
shock, plug the other end of the cord into a
grounded
electrical outlet only.
Power
socket
Installing a Document Catch Tray (optional)
The document catch tray will hold your original documents after they have been scanned for faxing or copying.
Remove the output tray from the HP OfficeJet.
1 2
Turn over the output tray so that the bottom
faces you. Using a small Phillips-head
screwdriver, remove the two screws from the
bottom of the tray.
Remove both screws!
(Instructions are continued on next page)
Installation and Configuration
2-13
Page 35
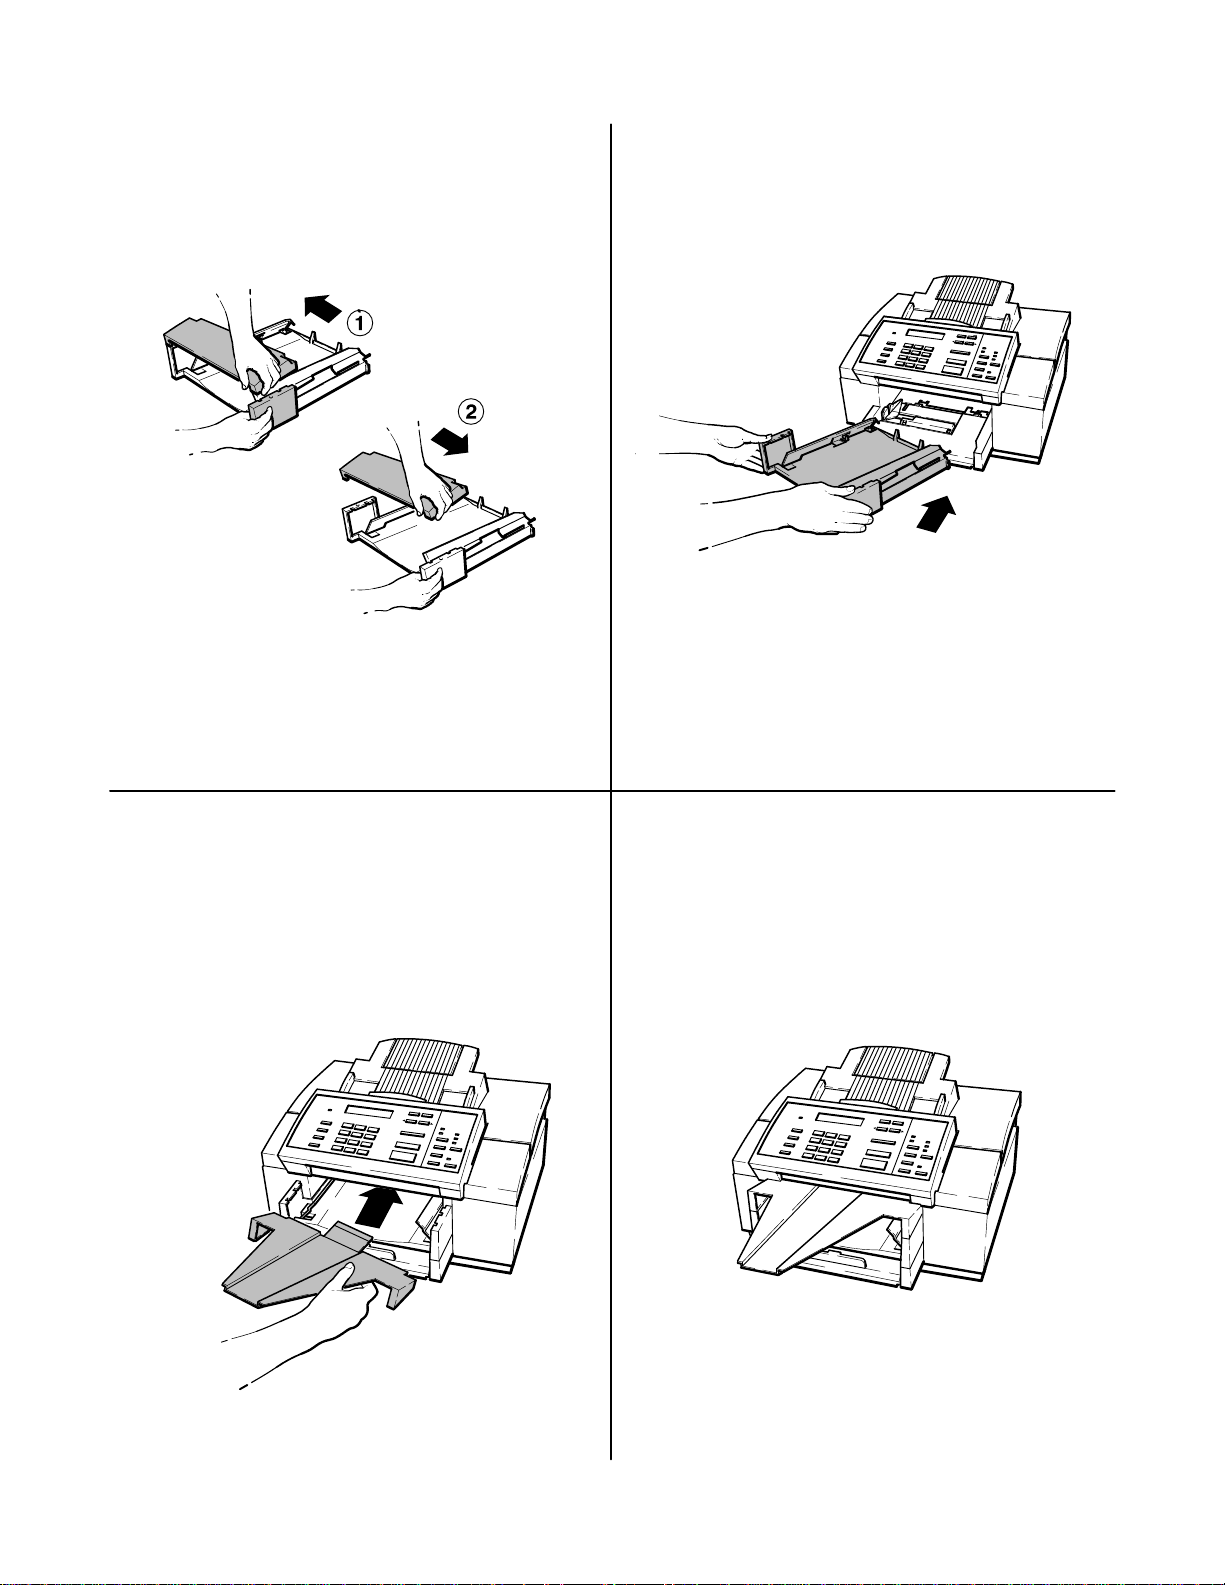
Remove the cover of the output tray by pushing
3
in on one side of the cover until it releases, then
pulling the cover in the opposite direction to
free the other side.
Replace the output tray. Store the cover and
4
screws together in case you want to reinstall the
cover later.
Install the catch tray by tucking the tab
underneath the control panel area (shown
below), then placing it to rest on the outer
edges of the output tray.
Be sure to align the catch tray so that the
65
notches are inside the edges of the output tray
and the front of the catch tray is flush with the
front of the output tray. When the catch tray is
installed correctly, here’s how the HP OfficeJet
should look:
For safety purposes, the catch tray is designed to
be removed easily by lifting up on the narrow end.
Installation and Configuration
2-14
Page 36
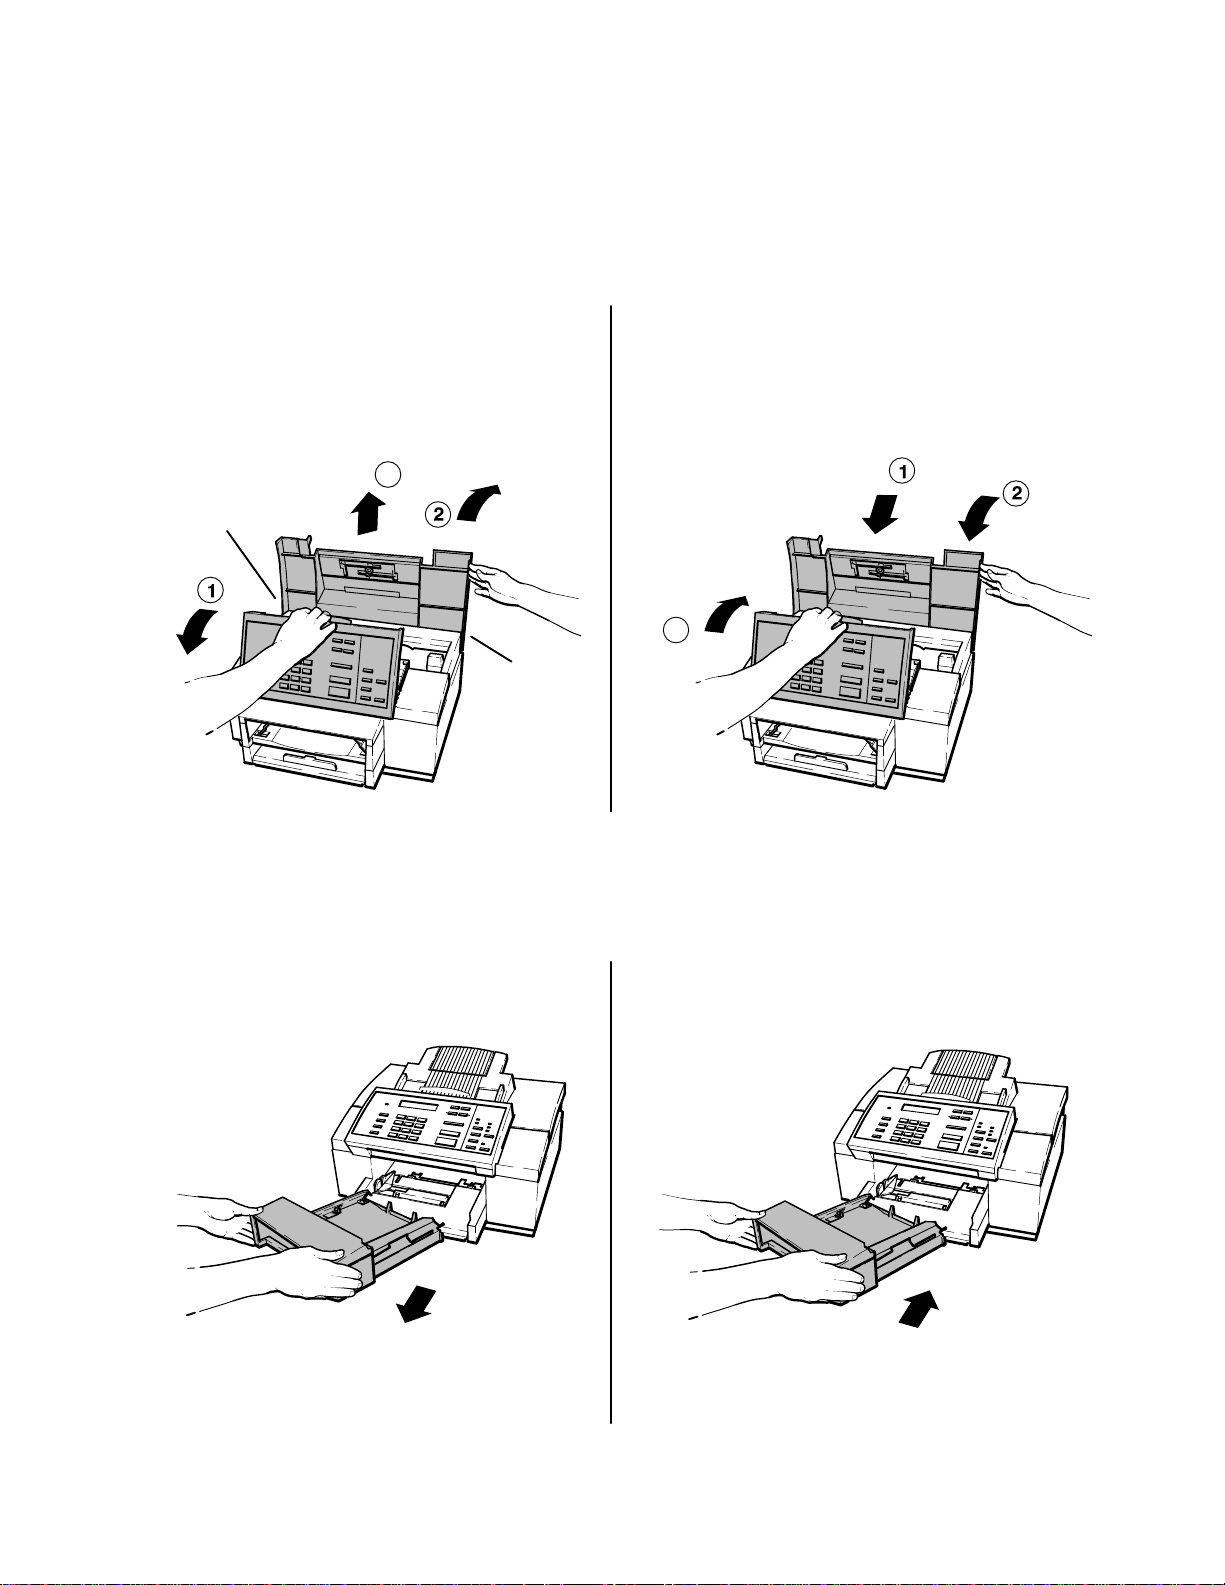
Installing an Access Door Assembly
The access door assembly contains the document feed tray and extender and adjustable paper size guides.
Originals of faxes to be sent or documents to be copied are placed on the feed tray for processing.
The tray extender can be raised to support legal size documents being faxed or copied.
The paper size guides are adjusted to fit the size of the original document being sent or copied.
To remove the old access door assembly, lift
1
open the control panel assembly and raise the
access door assembly to the fully open position.
Flex out the sides of the access door near
the lower corners and lift the access door
assembly straight up to remove it.
3
Flex outward
Installing an Output Tray
Flex outward
Flex out the sides of the access door near the
2
lower corners and lower the new access door
assembly into place.
Close the access door and control panel
assemblies.
Be sure to close the control panel firmly, until it
snaps into place.
3
The output tray collects faxes, print jobs, reports and copies after they are received and printed.
Remove the old output tray from the HP OfficeJet.
1
Install the new output tray into the HP OfficeJet.
2
Installation and Configuration
2-15
Page 37
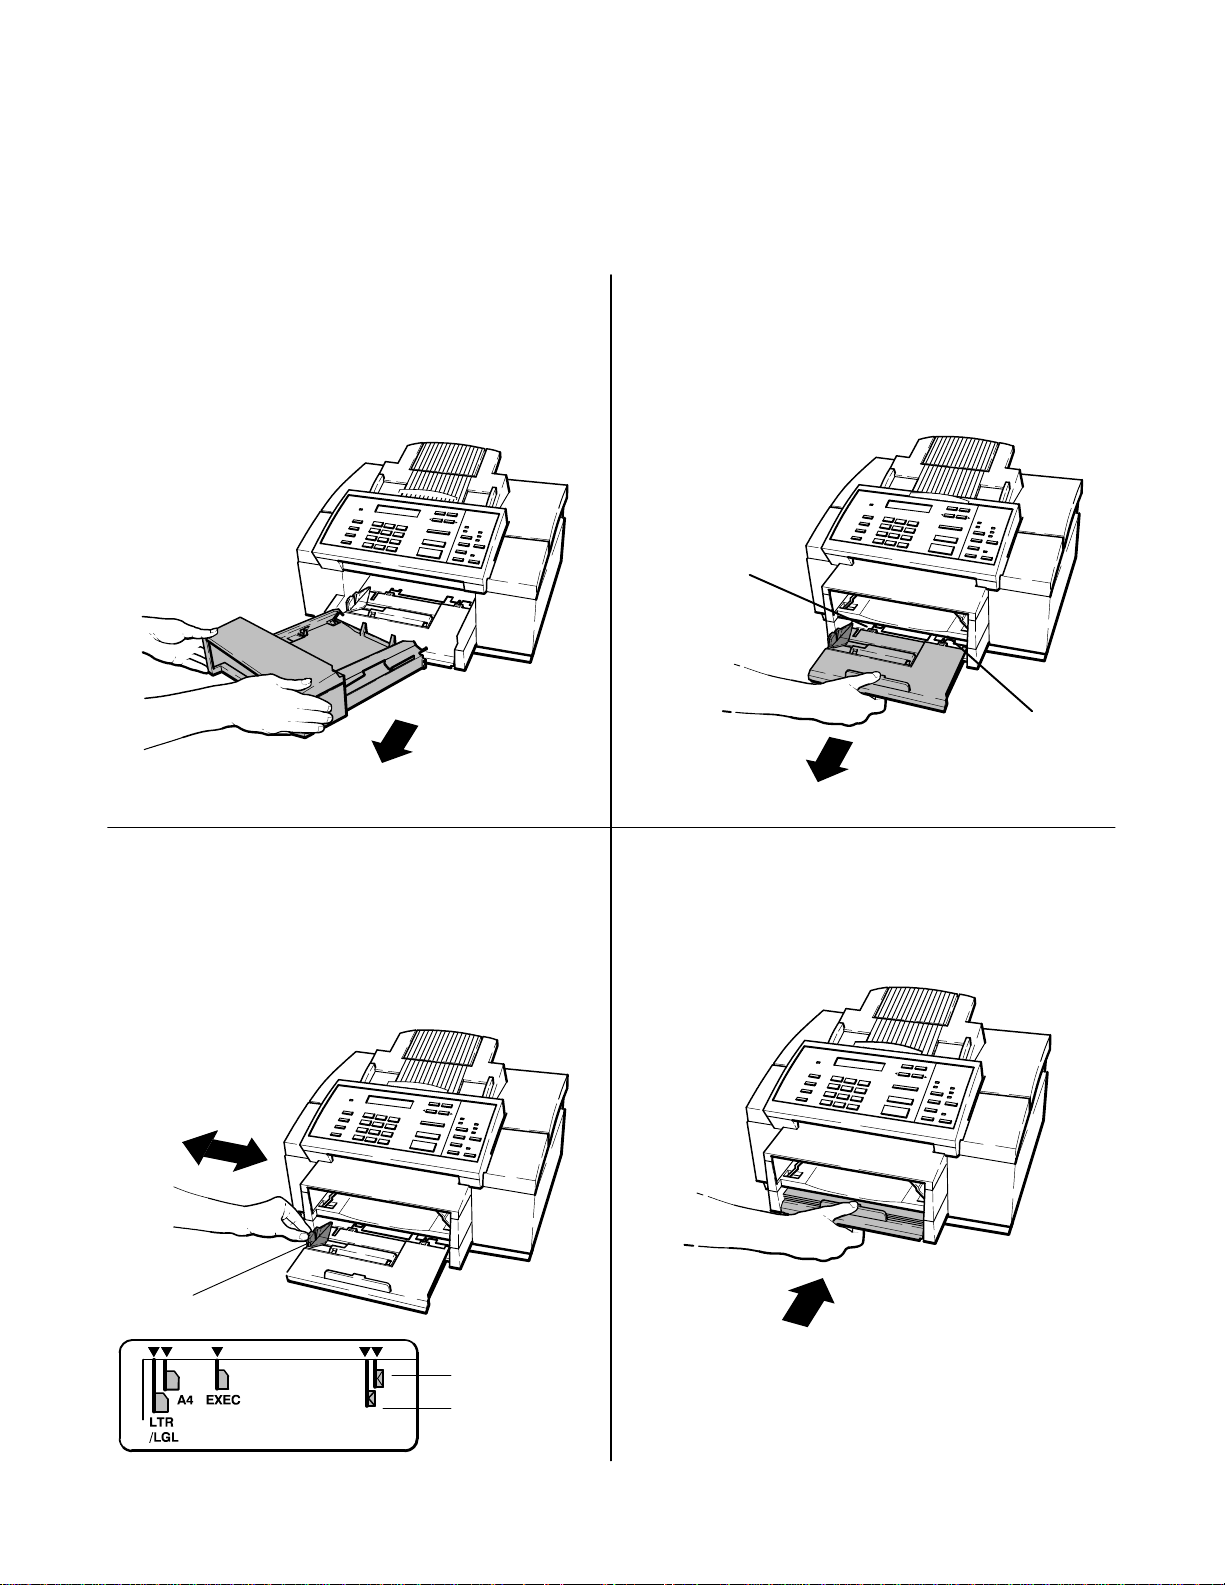
Installing an Input Tray
The input tray is also known as the paper supply tray. This tray is where paper is loaded for the printing
of received faxes, print jobs, reports and copies. The tray holds 100 sheets of paper.
Remove the output tray from the HP OfficeJet. While pulling the input tray forward, flex the
12
two tabs shown, one at a time, to release each
side of the tray. If the tray does not easily release,
you may need to slide the tray in slightly, flex the
tab and then pull the tray forward again.
Flex Tab
Flex Tab
Check the position of the paper size setting
34
and adjust if necessary.
Slide the green paper guide until it snaps into
place at the appropriate paper size setting.
Note: Only letter-, legal-, and A4-size paper
can be loaded for fax reception and copying.
Be sure to set the paper size in the menu.
When installing the output tray, slide the tray
all the way into the machine.
Paper Guide
Installation and Configuration
2-16
U.S. No. 10
envelope
European DL
envelope
Page 38
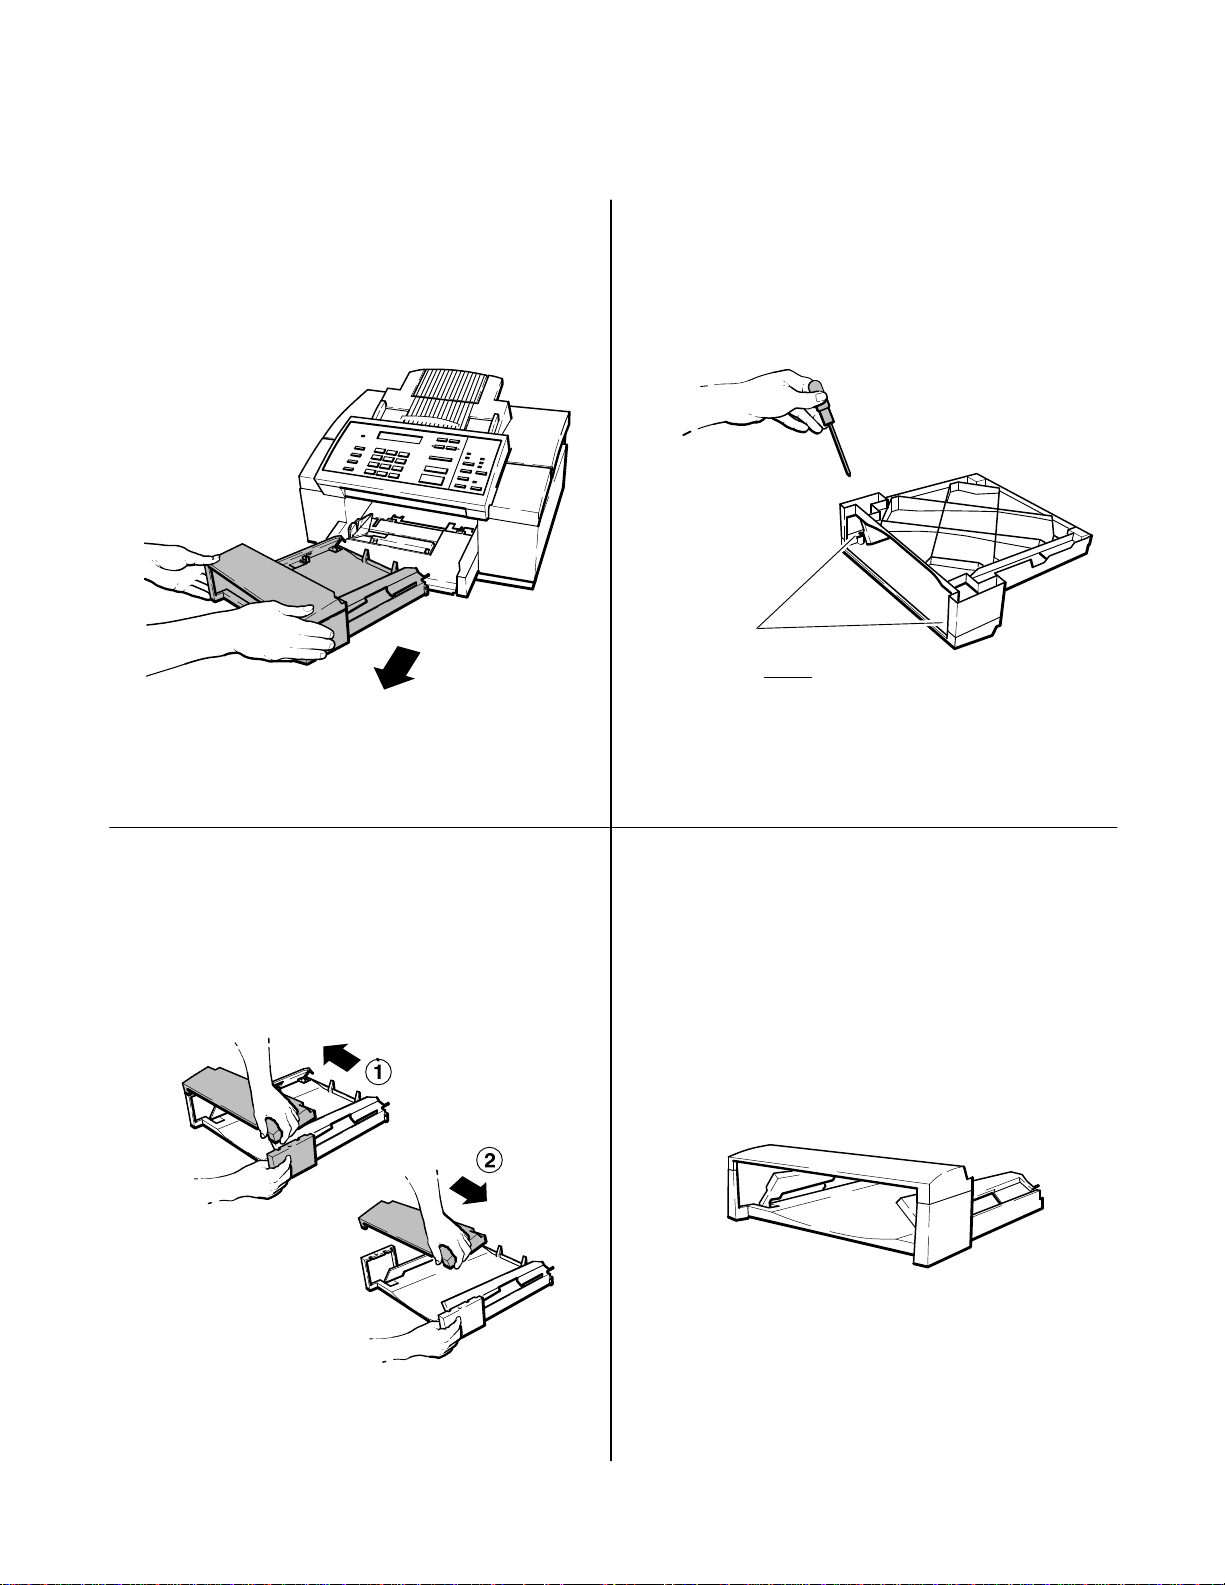
Installing a Tray Cover
Remove the output tray from the HP OfficeJet.
12
Turn over the output tray so that the bottom
faces you. Using a small Phillips-head
screwdriver, remove the two screws from the
bottom of the tray.
Remove both screws!
Remove the cover of the output tray by pushing
34
in on one side of the cover until it releases, then
pulling the cover in the opposite direction to
free the other side.
Install the new tray cover to the output tray.
Do not over-tighten the two screws or you
could damage the screw hole threads.
When properly installed, the tray assembly
should look like the one shown here.
Installation and Configuration
2-17
Page 39
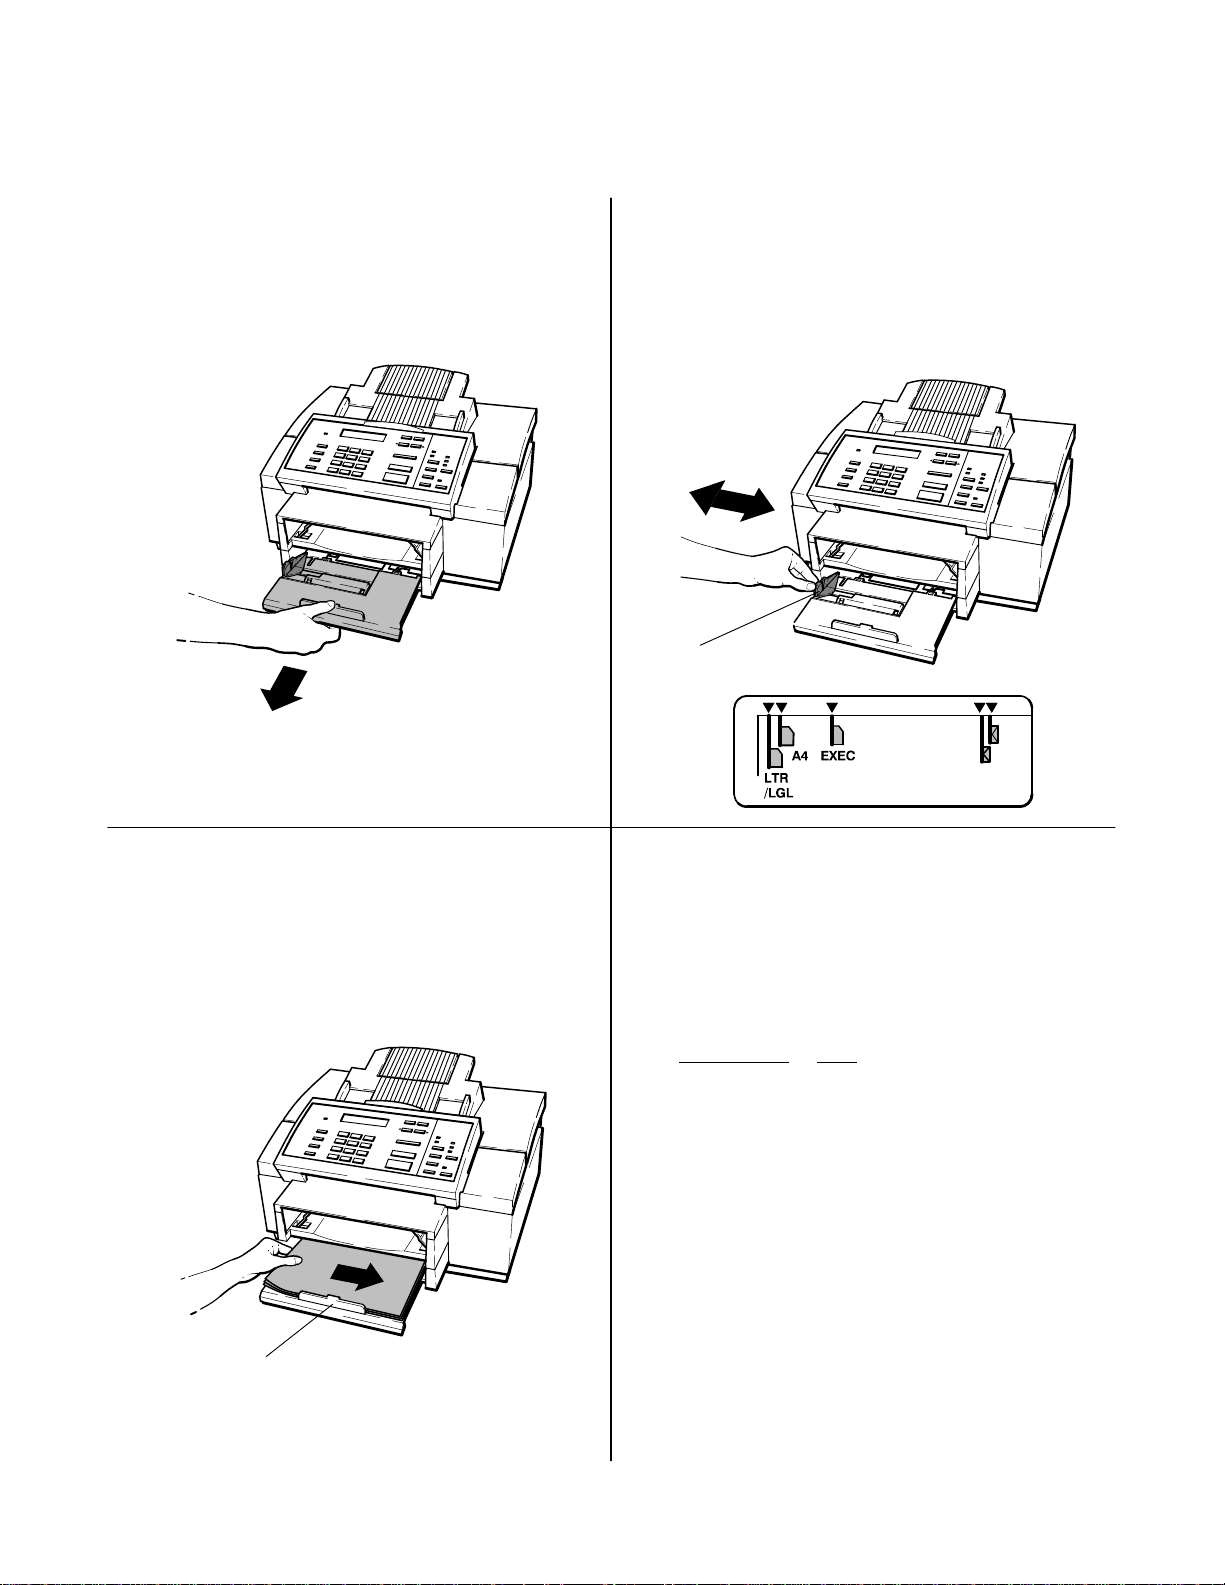
Loading Paper in the Input (Paper) Tray
Pull the input tray out until it is fully extended.
12
Check the position of the paper size setting
and adjust if necessary.
Slide the green paper guide until it snaps into
place at the appropriate paper size setting.
Note: Only letter-, legal-, and A4-size paper
can be loaded for fax reception and copying.
Be sure to set the paper size in the menu.
Paper Guide
You can load up to 100 sheets (about 1 cm. or
34
Helpful Hints:
1/2-inch thick stack) into the tray.
Load the paper (print side down), aligning the
right edge of the paper to the right side of the
tray. The paper stack should fit underneath the
Do not force the input tray all the way in when
closing it. The paper must not buckle or a paper
jam could occur.
grip on the input tray handle.
This table lists the allowable paper sizes.
Description
Letter
1
A4
Legal
Executive
1
A4 is the standard size for letters in European countries.
2
You cannot make copies or receive faxes on this paper size.
Size
8.5 x 11 inches (216 x 279 mm)
8.27 x 11.7 inches (210 x 297 mm)
8.5 x 14 inches (216 x 356 mm)
2
7.25 x 10.5 inches (184 x 267 mm)
Input Tray Handle Grip
Installation and Configuration
2-18
Page 40
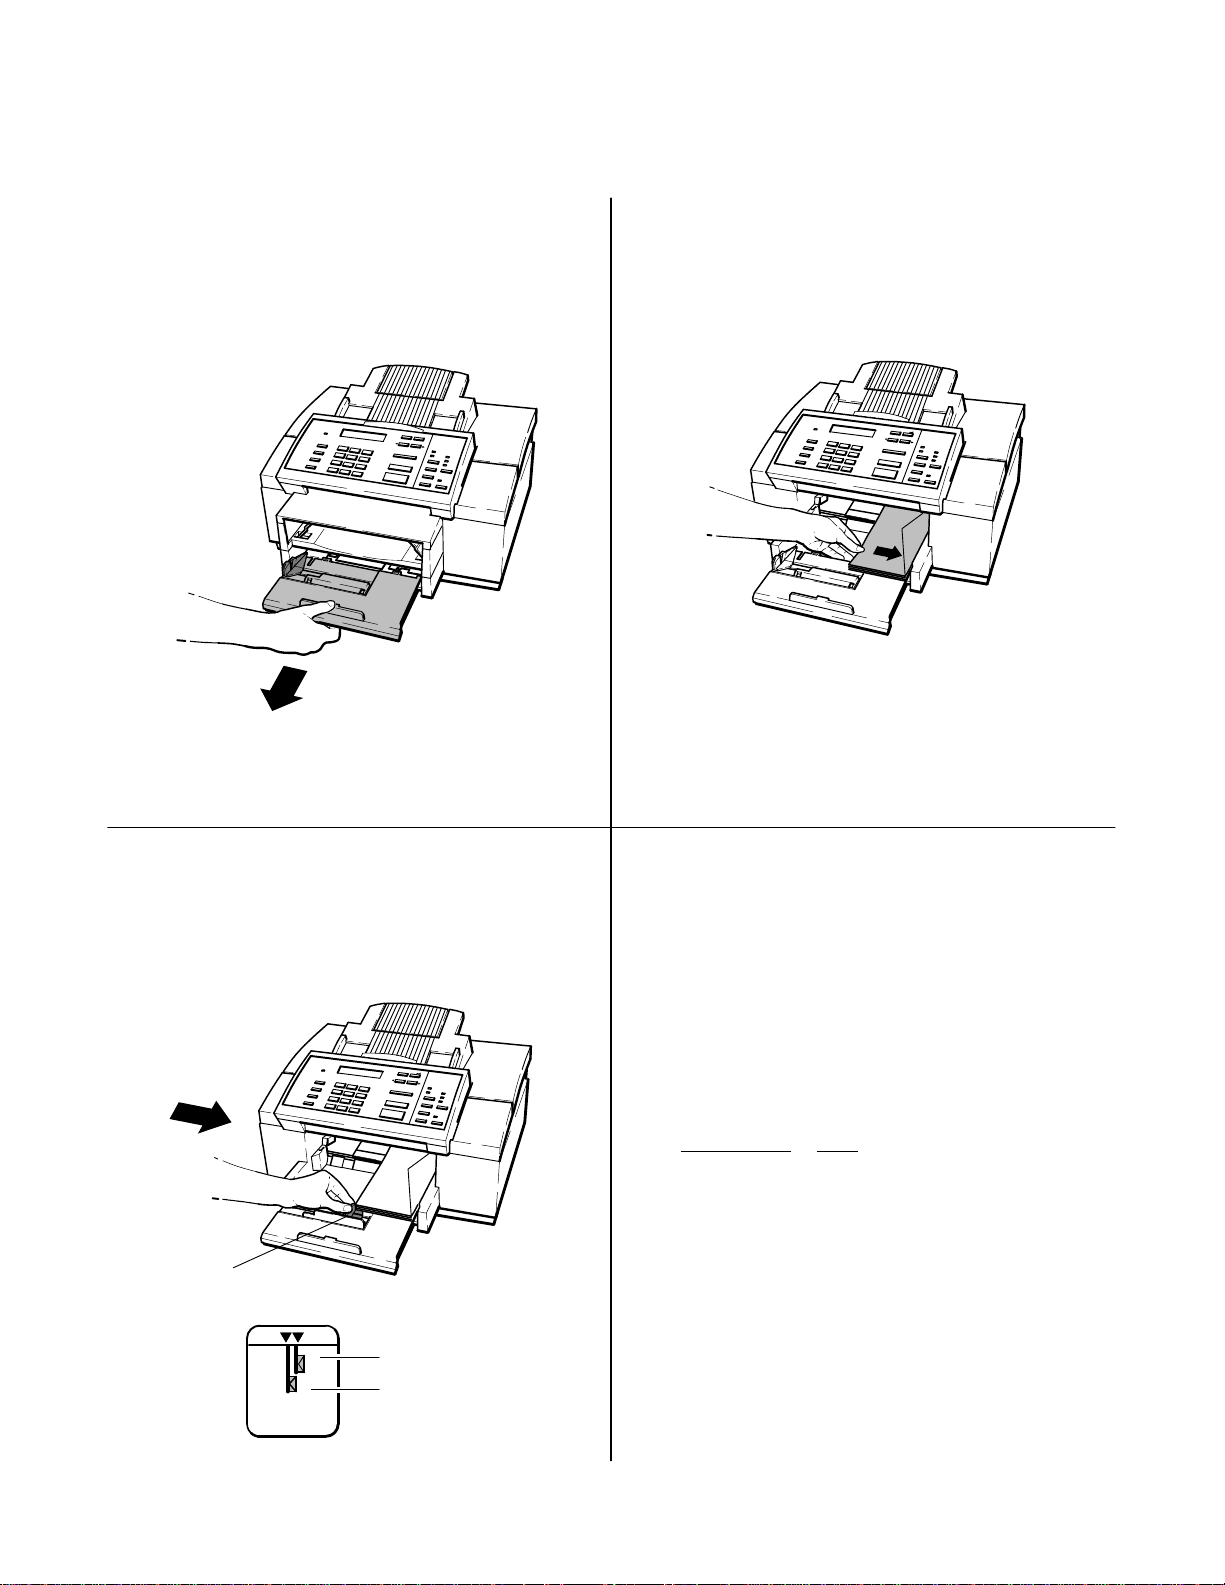
Loading Envelopes in the Input (Paper) Tray
Pull the input tray out until it is fully extended.
12
You can remove the output tray to facilitate
envelope loading as shown in this procedure. Be sure
to install the output tray before printing.
Load up to 20 envelopes flap up, with the
top edge aligned to the right side of the
HP OfficeJet, as shown.
Slide the green paper guide until it snaps into
34
place at the appropriate envelope size setting.
The envelope guide will pop up to keep the
envelopes vertically aligned. Install the output
tray if not already installed.
Paper Guide
U.S. No. 10
envelope
European DL
envelope
Helpful Hints:
Do not force the input tray all the way in when
closing it. The envelopes must not buckle or a
paper jam could occur.
The following table lists the two allowable
envelope sizes. Note that copies cannot be
made and faxes cannot be received on any
envelopes. Be sure to set the paper size in the
menu to envelopes before printing.
Description Size
U.S. No. 10
envelopes 9.5 x4.12 inches (241x105 mm)
European DL
envelopes 8.66x4.33 inches (220x110mm)
Installation and Configuration
2-19
Page 41
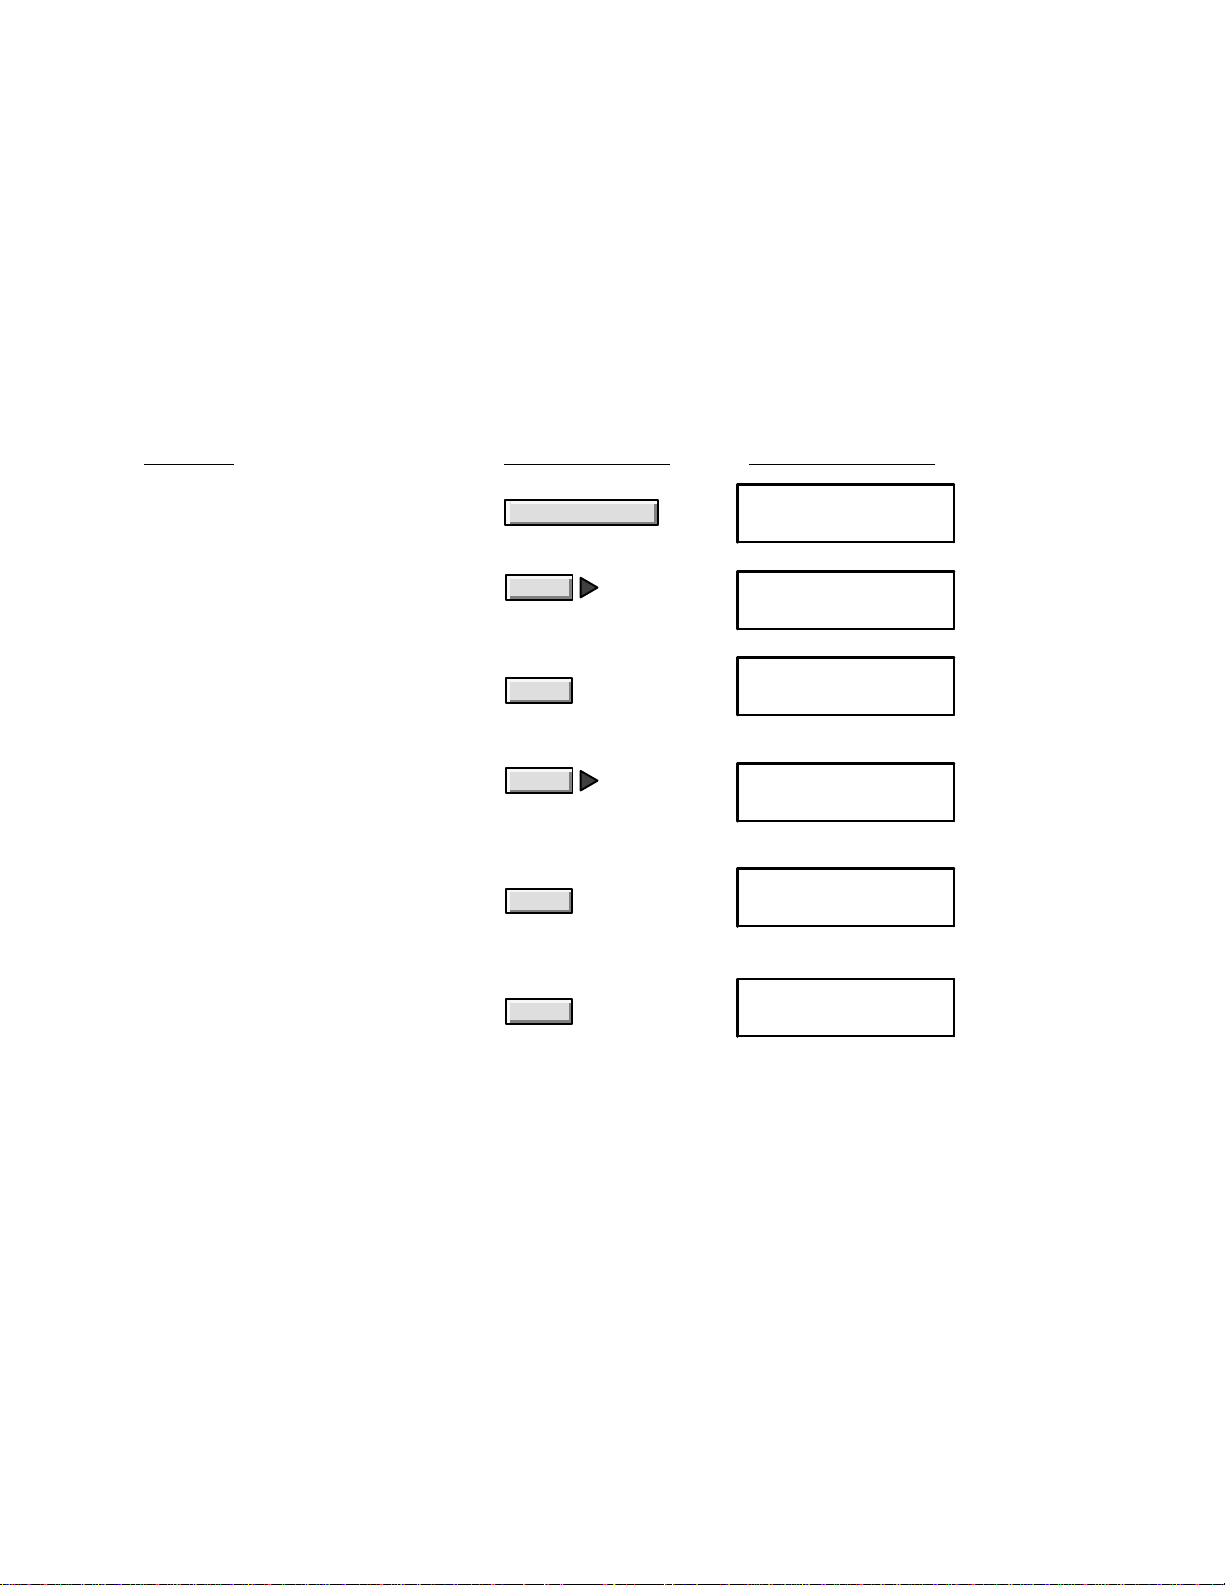
Setting the Paper Size in the Menu
Set the paper size in the menu to match the paper size loaded in the input tray. Setting the paper size allows the
HP OfficeJet to scale incoming faxes to fit the paper size loaded. The factory setting is Letter (8 1/2 x 11
inches). If Letter size paper is loaded, no changes is required unless the menu setting was previously changed
and not reset to Letter size. If Legal or Envelope sizes are loaded, set the menu to the appropriate size.
The paper size
in an HP OfficeJet LX is setup during installation of the software but can be changed using the HP
OfficeJet LX Manager software by selecting the Loaded Paper Size in the OfficeJet Setup dialog box as described in
the HP OfficeJet LX User’s Guide.
Using
Do this:
1. Press the Menu button to display
the menu.
2. Press Right Arrow multiple
times to move to “Paper Size.”
3. Press Enter/Save to select “Paper
Size.” The selected paper size is
marked with an asterisk (*).
4. Press Right Arrow multiple times
to move to the setting you want.
(The example is “Envelopes.”)
5. Press Enter/Save to select the
displayed setting. An asterisk (*)
denotes your new selection.
these buttons: For this display:
Menu
Enter/Save
Enter/Save
MENU
Time/Date, Header
MENU
Paper Size
PAPER SIZE
Letter (8.5 x 11 in) *
PAPER SIZE
Envelopes
PAPER SIZE
Envelopes *
6. Press Enter/Save to return to the
Ready display.
Installation and Configuration
2-20
Enter/Save
Ready Auto
Nov-1-94 12:32 PM
Page 42

Setting Up for Printing
Using an HP OfficeJet LX with the HP OfficeJet LX Manager to control printing is briefly described earlier in this
section. Detailed and custom setup information is provided in the HP OfficeJet LX User’s Guide.
In order to use the HP OfficeJet printer function with a personal computer, the interface cable and a printer driver (also
called printer software) must be installed to make the computer and computer software work with the HP OfficeJet.
Printer drivers are software files that control the printer and allow the computer software applications to access the
printer’s features.
The HP OfficeJet will work with Microsoft
drivers are supplied with the HP OfficeJet. Install the drivers according to the instructions supplied with the drivers.
Since the HP OfficeJet is compatible with HP DeskJet 520 and 510 printers, OS/2 users can select either from the
printer model selection menu.
Note: If using both Windows and DOS applications, be sure to exit Windows before running
the DOS applications. Do not run DOS applications from the MS-DOS prompt.
Each DOS software application requires a specific printer driver. Access to some printer features such as font selection
depends on the application and driver installed.
Determine if your software application provides a printer driver that you can use.
Check the printer selection or printer setup menu in your software application for a list of printer models. The list
below identifies recommended printer driver selections you can use and the type of support that each offers:
Windows 3.1, OS/2 and DOS software applications. Windows and DOS
Use this printer driver selection:
For this type of printer support:
HP DeskJet 520 printer All printer features
HP DeskJet 510 printer All printer features
HP DeskJet 550C printer All printer features (except color)
HP DeskJet Portable printer All printer features except
envelope printing
HP DeskJet 500 printer All printer features except for some
fonts and envelope printing
Note: Unlike the HP DeskJet 520 printer, the HP OfficeJet cannot be used with external font
cartridges nor accept downloadable character fonts from the PC.
Select the printer driver using the instructions provided by your software application manual.
If the HP DeskJet 520 printer is not listed, use one of the alternate printer drivers listed and contact your software
company to determine if an HP DeskJet 520 printer driver is available. You could also try the HP DeskJet, HP
DeskJet+ or other HP printer driver.
Note: You may need to add or change the MODE statement in your computer’s
AUTOEXEC.BAT file. The MODE statement tells your computer where to send printing
information. This statement is not always required. If the HP OfficeJet won’t print, check your
AUTOEXEC.BAT file to make sure the MODE statement for a Centronics parallel connection
to the LPT 1 port is: MODE LPT 1:,,P If you are not familiar with your
AUTOEXEC.BAT file, see your DOS manual for information.
If the HP OfficeJet won’t print, reconnect the interface cable and try again before referring to the troubleshooting
chapter in this manual.
Installation and Configuration
2-21
Page 43
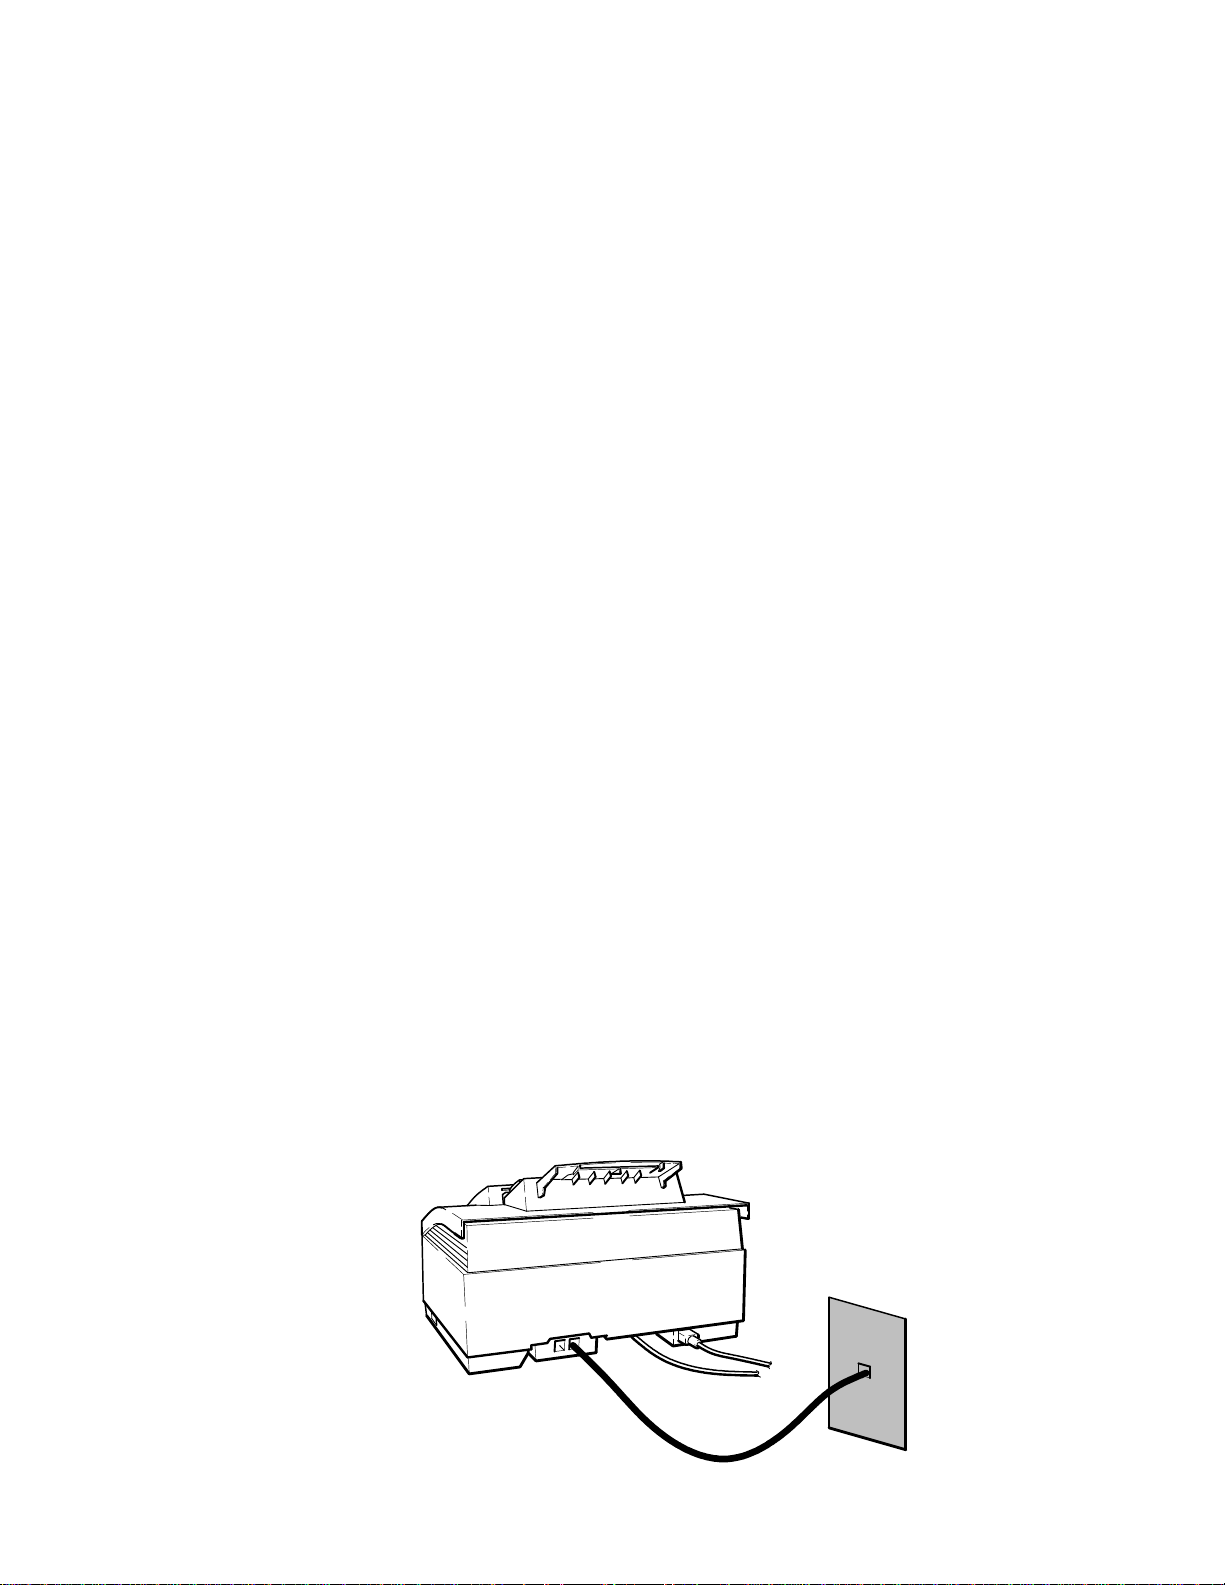
Setting Up for Faxing (U.S., Australia, Canada and Mexico Installations)
Using an HP OfficeJet LX with the HP OfficeJet LX Manager and Eclipse FAX SE to control faxing is briefly
described earlier in this section. Detailed information is provided in the HP OfficeJet LX User’s Guide.
mode in an HP OfficeJet LX is set during installation of the software, but can be changed using the HP OfficeJet LX
Manager software as described in the HP OfficeJet LX User’s Guide.
The following four types of installations are the ones recommended for use with the HP OfficeJet to achieve the best
call-handling results. While other situations are possible, it is recommended that one of these be used. Determine
which installation most closely meets the user’s needs and follow the instructions given.
D Receive fax calls only – no voice calls, on a dedicated fax line.
D Receive fax and voice calls at the same phone number – without an answering machine.
D Receive fax and voice calls at the same phone number – with an answering machine.
D Receive fax and voice calls on the same line with distinctive ring.
After selecting the best installation to meet the user needs, the correct reception mode and certain station specific
information will need to be set up. The procedures to accomplish this are in the following topics:
D Setting the Reception Mode for incoming calls.
D Setting the number of rings to answer.
D Selecting Tone or Pulse dialing
Reception
D Entering the Date and Time
D Entering the header information (company name and fax number).
Note:The HP OfficeJet is not supported with roll-over phone systems (such as the automatic
answering systems often used in large companies), voicemail, call waiting, and some other
advanced features provided by your phone company. If you have call waiting or other features
that can be temporarily turned off by pressing a series of buttons on your phone, we recommend
that you turn them off while sending and receiving faxes with the HP OfficeJet. Check with
your phone company if you need help.
Receive fax calls only – no voice calls, on a dedicated fax line
This installation is recommended when using a separate telephone line and number dedicated to receiving faxes only
(no voice calls). Installation consists of connecting the HP OfficeJet to the telephone wall jack with the telephone cord
provided with the machine and setting the Receive Mode to Auto. Auto receive mode is the factory default set at
shipment. If the setting was changed and you want to use Auto mode reception, you will need to set the mode to Auto.
Instructions for setting the Receive Modes are provided later in this chapter.
HP OfficeJet (LX)
Optional:
connect a telephone
to the “TEL” socket of
the HP OfficeJet for
outgoing voice calls if
desired.
You can
Telephone Wall Jack
Cord to socket labelled “LINE”
Installation and Configuration
2-22
Page 44
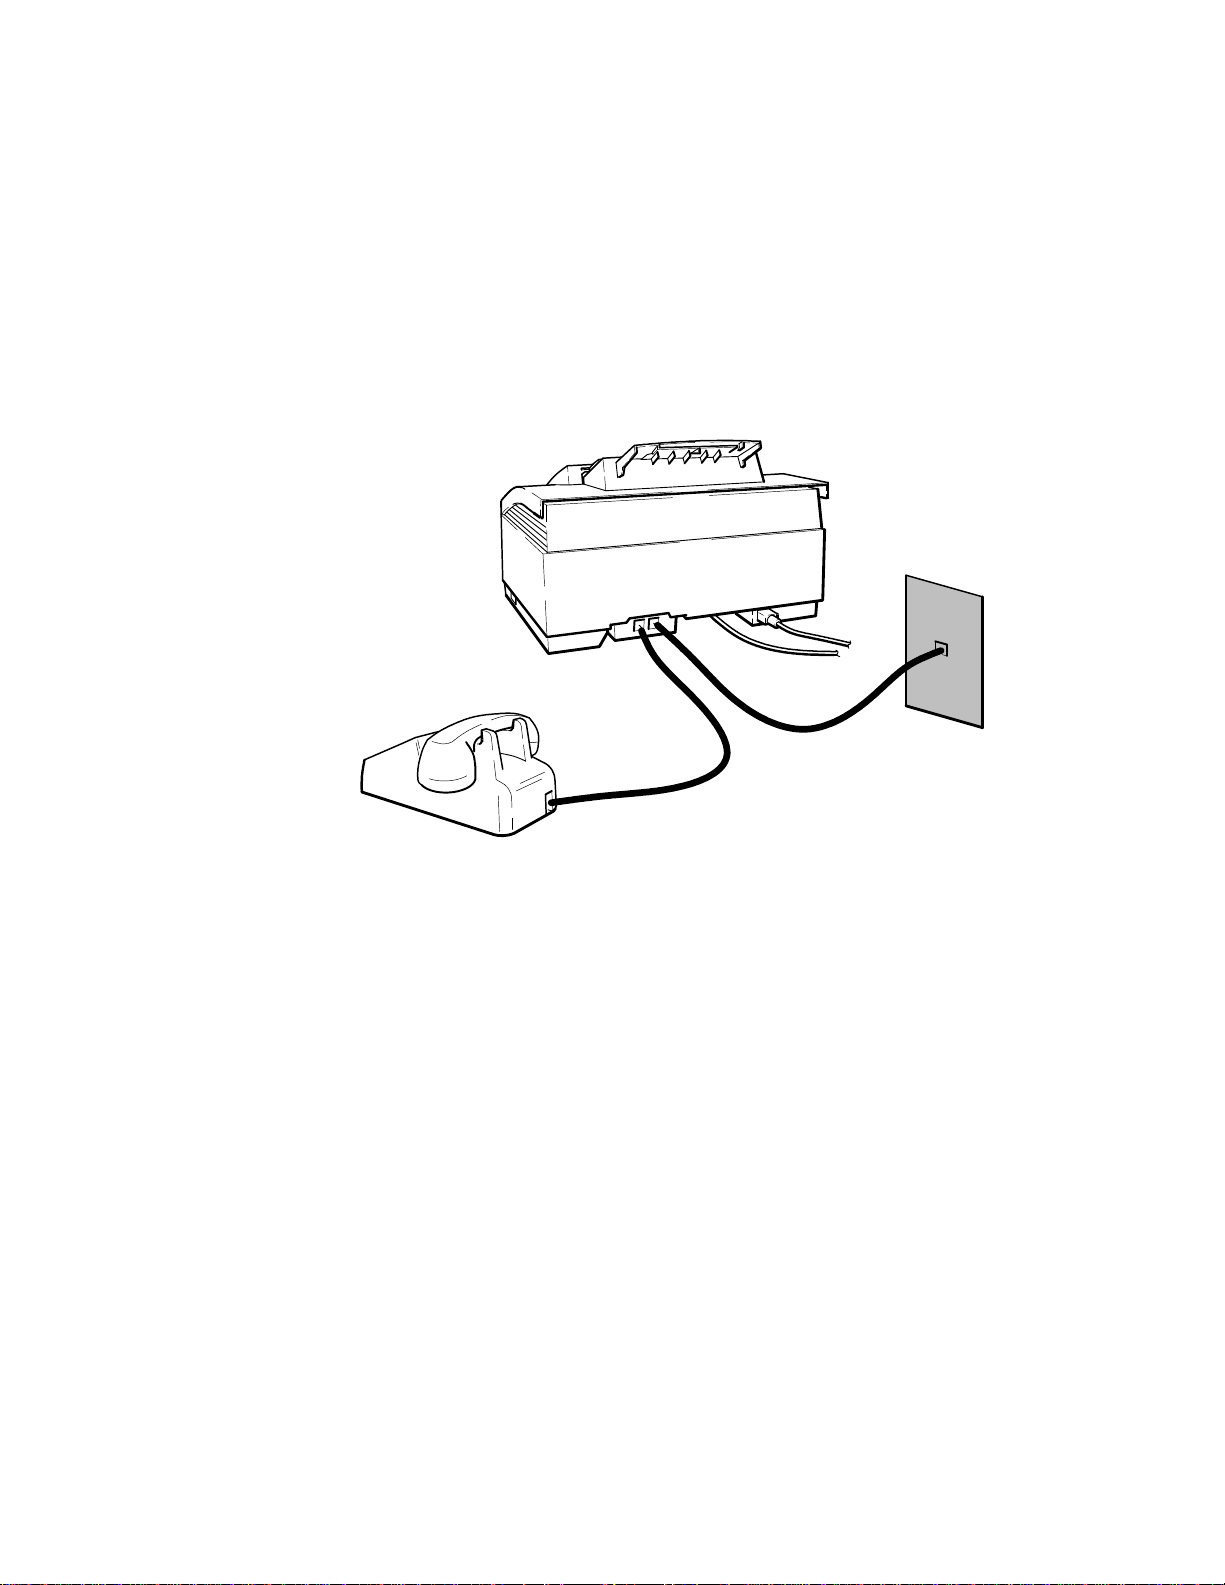
Note: In Auto receive mode, the HP OfficeJet will pick up the line after detecting the number
of rings specified in the Rings to Answer setting and then send a fax tone signal to the calling
fax machine to start communication. The fax is then sent and the HP OfficeJet will start to
receive it. The Rings to Answer setting is user defined through the front panel menu. You can
choose from 2 to 5 rings. The factory default is 2 rings.
Receive fax and voice calls at the same phone number – without an answering machine
This installation is recommended when using one telephone number for both fax and voice calls and not using a
telephone answering machine. Installation consists of connecting the HP OfficeJet to the telephone wall jack,
connecting a telephone directly to the HP OfficeJet and setting the Receive Mode to Manual. Instructions for setting
the Receive Modes are provided later in this chapter.
HP OfficeJet (LX)
Telephone Wall Jack
Telephone
Cord to socket labelled “LINE”
Cord to socket labelled “TEL”
Note: In Manual receive mode the HP OfficeJet will never pick up the line to answer a call.
All calls must be answered manually. Voice calls are treated as normal voice calls by answering
the phone. To receive a fax, you must first answer the phone, listen for the fax tone and then
press the Start/Copy button on the front panel. For fax calls, you must use the telephone that
is directly connected to the TEL jack on the back of the HP OfficeJet. After answering the
phone and the caller notifies you that a fax is about to be sent to you, or you hear a fax tone,
press the Start/Copy button and then hang up the telephone. The fax is then sent and the HP
OfficeJet will start to receive it.
If you have a shared fax/voice line and you want to be able to receive faxes automatically, you
cannot use Manual receive mode. To receive faxes automatically, you need to either connect an
answering machine to the HP OfficeJet and use Fax/TAM receive mode or, if your phone
company has a distinctive ringing service available, you could connect your HP OfficeJet to
receive fax and voice calls on the same line with distinctive ring in Auto receive mode.
Information on using an answering machine or distinctive ring are provided later in this chapter.
Installation and Configuration
2-23
Page 45
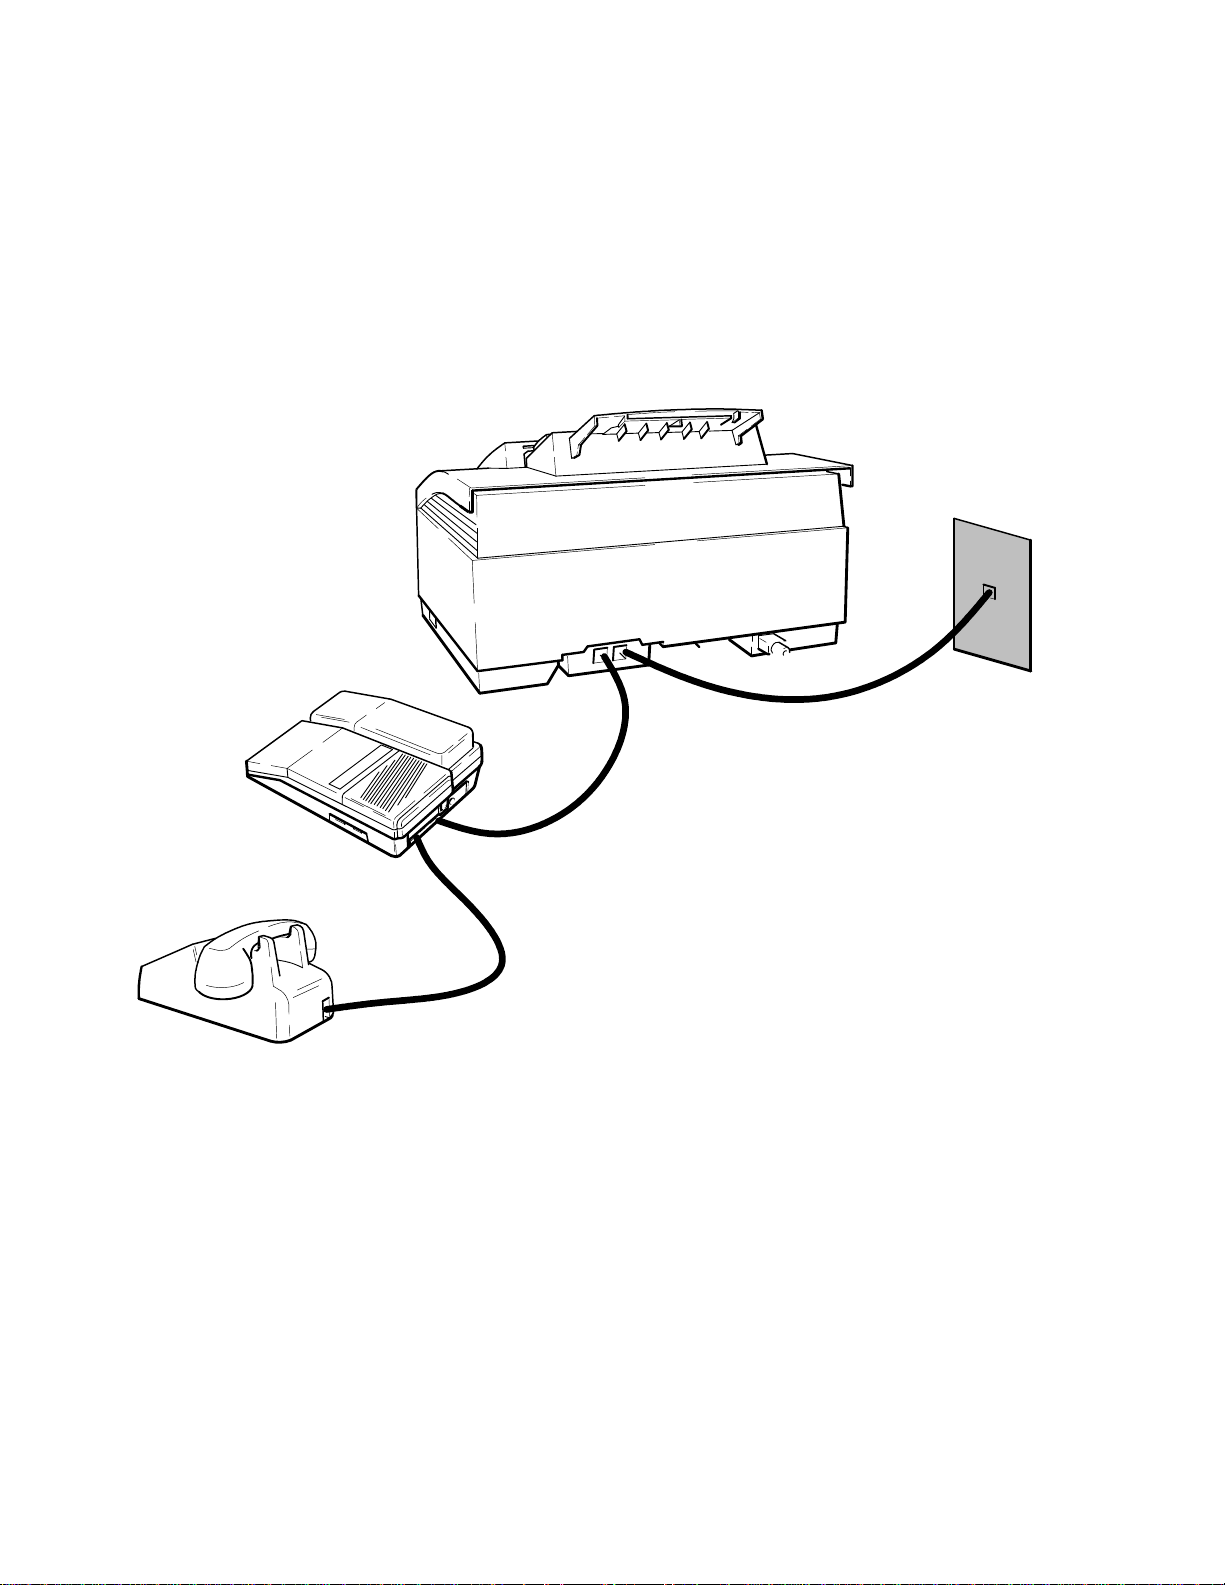
Receive fax and voice calls at the same phone number – with an answering machine
This installation is recommended when using one telephone number for both fax and voice calls and using a telephone
answering machine. Installation consists of connecting the HP OfficeJet to the telephone wall jack, connecting a
telephone answering machine directly to the HP OfficeJet and setting the Receive Mode to Fax/TAM. Instructions for
setting the Receive Mode are provided later in this chapter. Two scenarios are possible when using an answering
machine – one where the telephone handset is an attached part of the answering machine and one where the telephone
is a separate item that must be connected to the answering machine that is directly connected to the HP OfficeJet. Both
scenarios are depicted in the following diagram.
HP OfficeJet (LX)
Telephone Wall Jack
Answering Machine
Cord to socket labelled “LINE”
Telephone
Cord to socket labelled “TEL”
To Telephone Answering Machine socket labelled “Line” or “Wall”
To Telephone Answering Machine socket labelled “TEL”
For use with separate telephone if the phone
handset is not part of the answering machine
Note: In Fax/TAM receive mode the answering machine attached to the HP OfficeJet will
answer all incoming calls and begin the outgoing message recorded on the answering machine
tape. The HP OfficeJet will not pick up the line. During the outgoing message, the HP OfficeJet
will monitor the incoming line for a fax tone signal. If the HP OfficeJet detects a fax tone
signal, it will automatically take over the call and start to communicate with the calling fax
machine to receive the fax. If a fax tone signal is not detected, the answering machine accepts
the voice call and records the message.
Some older fax machines may not emit a fax calling tone. In this case the silent detect feature in
the HP OfficeJet must be used in order to take the fax call. This feature is accessed through the
front panel menu as described in the HP OfficeJet User’s Guide, and should only be used when
receiving a fax from an old model fax machine.
Installation and Configuration
2-24
Page 46
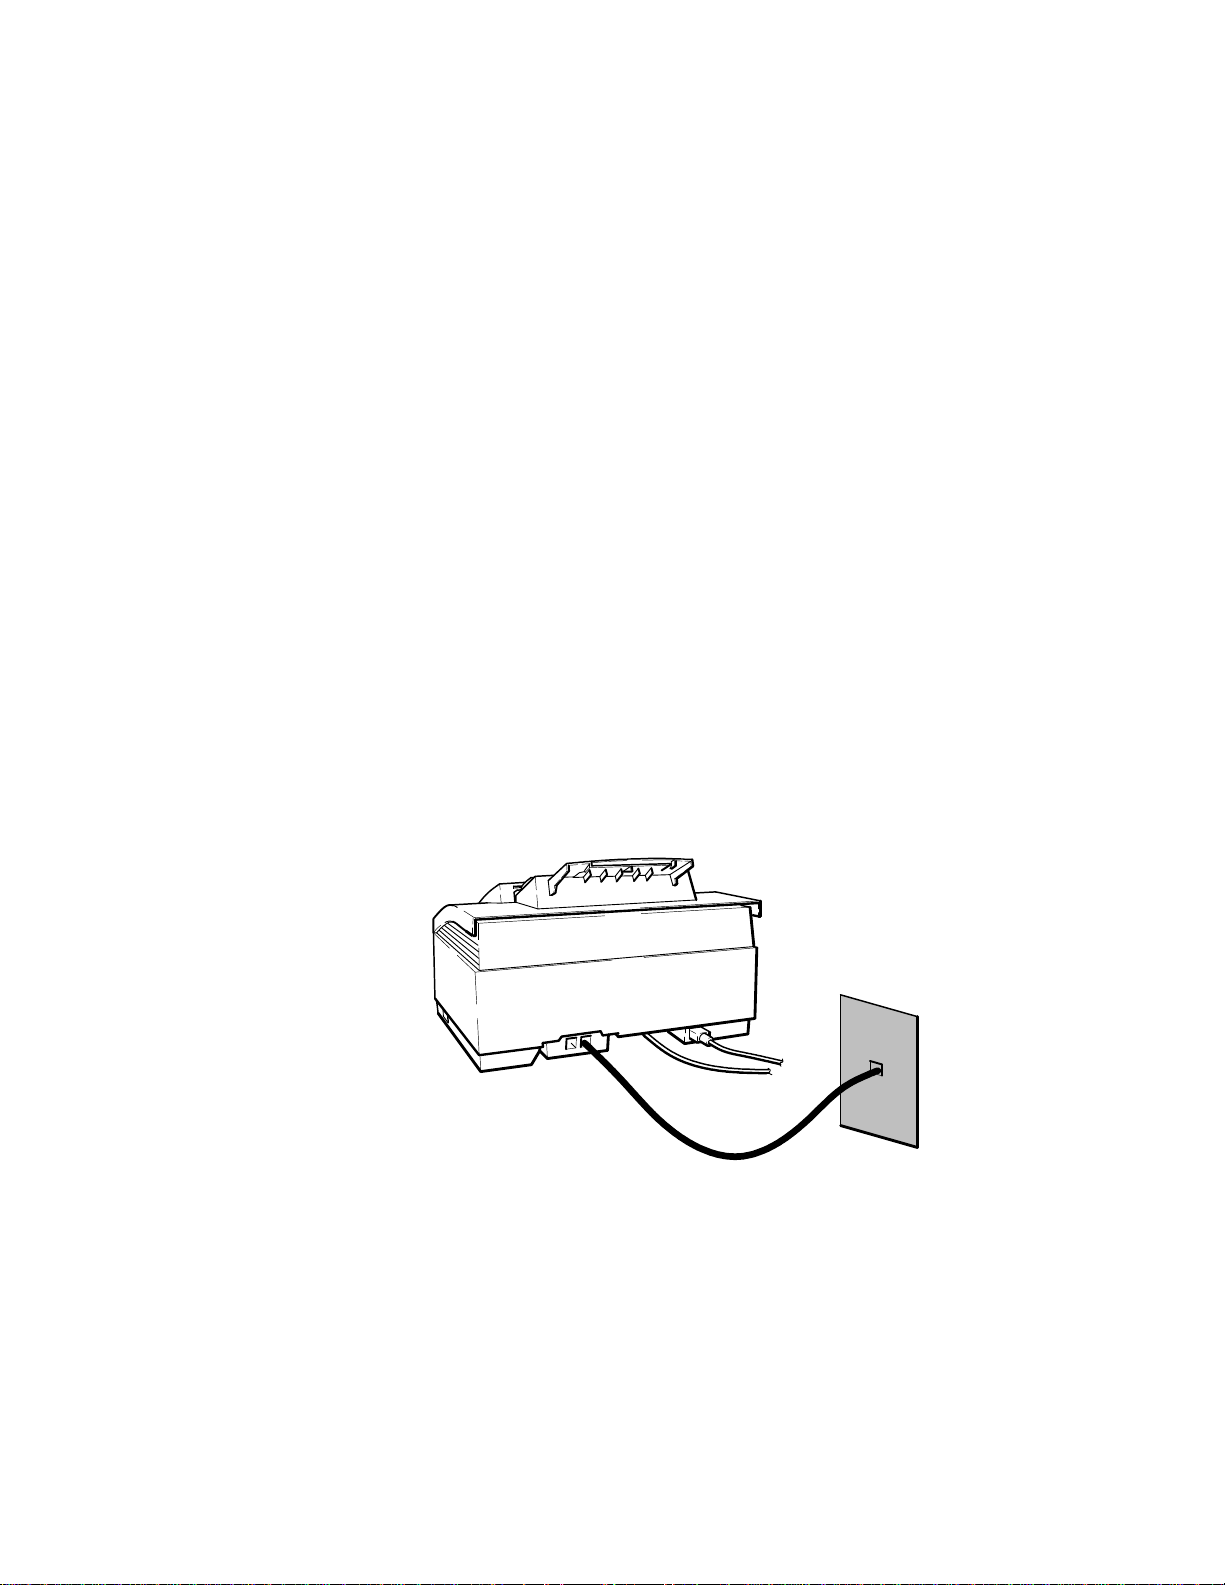
Receive fax and voice calls on the same line with distinctive ring
This installation is recommended when using one telephone number for both fax and voice calls and using a
distinctive ringing service through the local telephone company. The telephone company’s distinctive ring service
allows the use of 2 or 3 phone numbers on the same phone line. The HP OfficeJet, however, will only accept up to 2
numbers on a single line. Each of the phone numbers will have a distinctive ringing pattern: The first phone number
will have a single ring (ring) and the second will have a double ring (ring-ring) pattern. When activated, the HP
OfficeJet distinctive ring feature can use the ring patterns to distinguish between fax and voice calls received on the
same line. The feature will need to be set to ON in the OfficeJet if distinctive ring is to be used. If not used, the feature
must be deactivated. Factory default for the feature is OFF.
Note: The distinctive ring feature is not available in all local telephone system networks.
Currently, only certain U.S. regions and some Asian countries offer the service. The local
telephone company should be contacted for availability of the service.
This application can be used either with or without an answering machine attached to the HP OfficeJet. Installation
and setup for use of distinctive ring is as follows:
1. Connect the HP OfficeJet to the telephone wall jack.
2. If an answering machine is to be used, connected it to the HP OfficeJet, or to a separate wall jack.
3. Set the HP OfficeJet Receive Mode to Auto, or fax calls will not be received.
4. Also, if connecting an answering machine for voice calls on this line, make sure the setting on the answering
machine that controls the number of rings before answering is set to a number greater than the Rings to Answer
setting on the HP OfficeJet. For example, if the HP OfficeJet is set to 2 rings to answer, set the answering machine to 3
or more rings to answer. CAUTION: If you don’t do this, you may not receive your fax calls properly. Instructions on
setting the Receive Mode and HP OfficeJet Rings to Answer number are given later in this chapter.
HP OfficeJet (LX)
Optional:
You can connect
a telephone or answering
machine* to the “TEL”
socket of the HP OfficeJet.
Cord to socket labelled “LINE”
Telephone Wall Jack
Note: If using the telephone company’s distinctive ring service, have the single-ring assigned to
the phone number at which voice calls are to be received and the multiple-rings assigned to the
phone number(s) at which the fax calls are to be received.
When the HP OfficeJet’s Distinctive
Ring feature is set to On, it will only answer the phone and receive faxes when it detects any
multiple ring pattern.
The factory default setting for the HP OfficeJet distinctive ring feature is OFF. The feature should not be set to ON
unless the user has already subscribed to the telephone company’s distinctive ring service. If set to ON before service
is established, the HP OfficeJet will not receive faxes automatically.
Installation and Configuration
2-25
Page 47
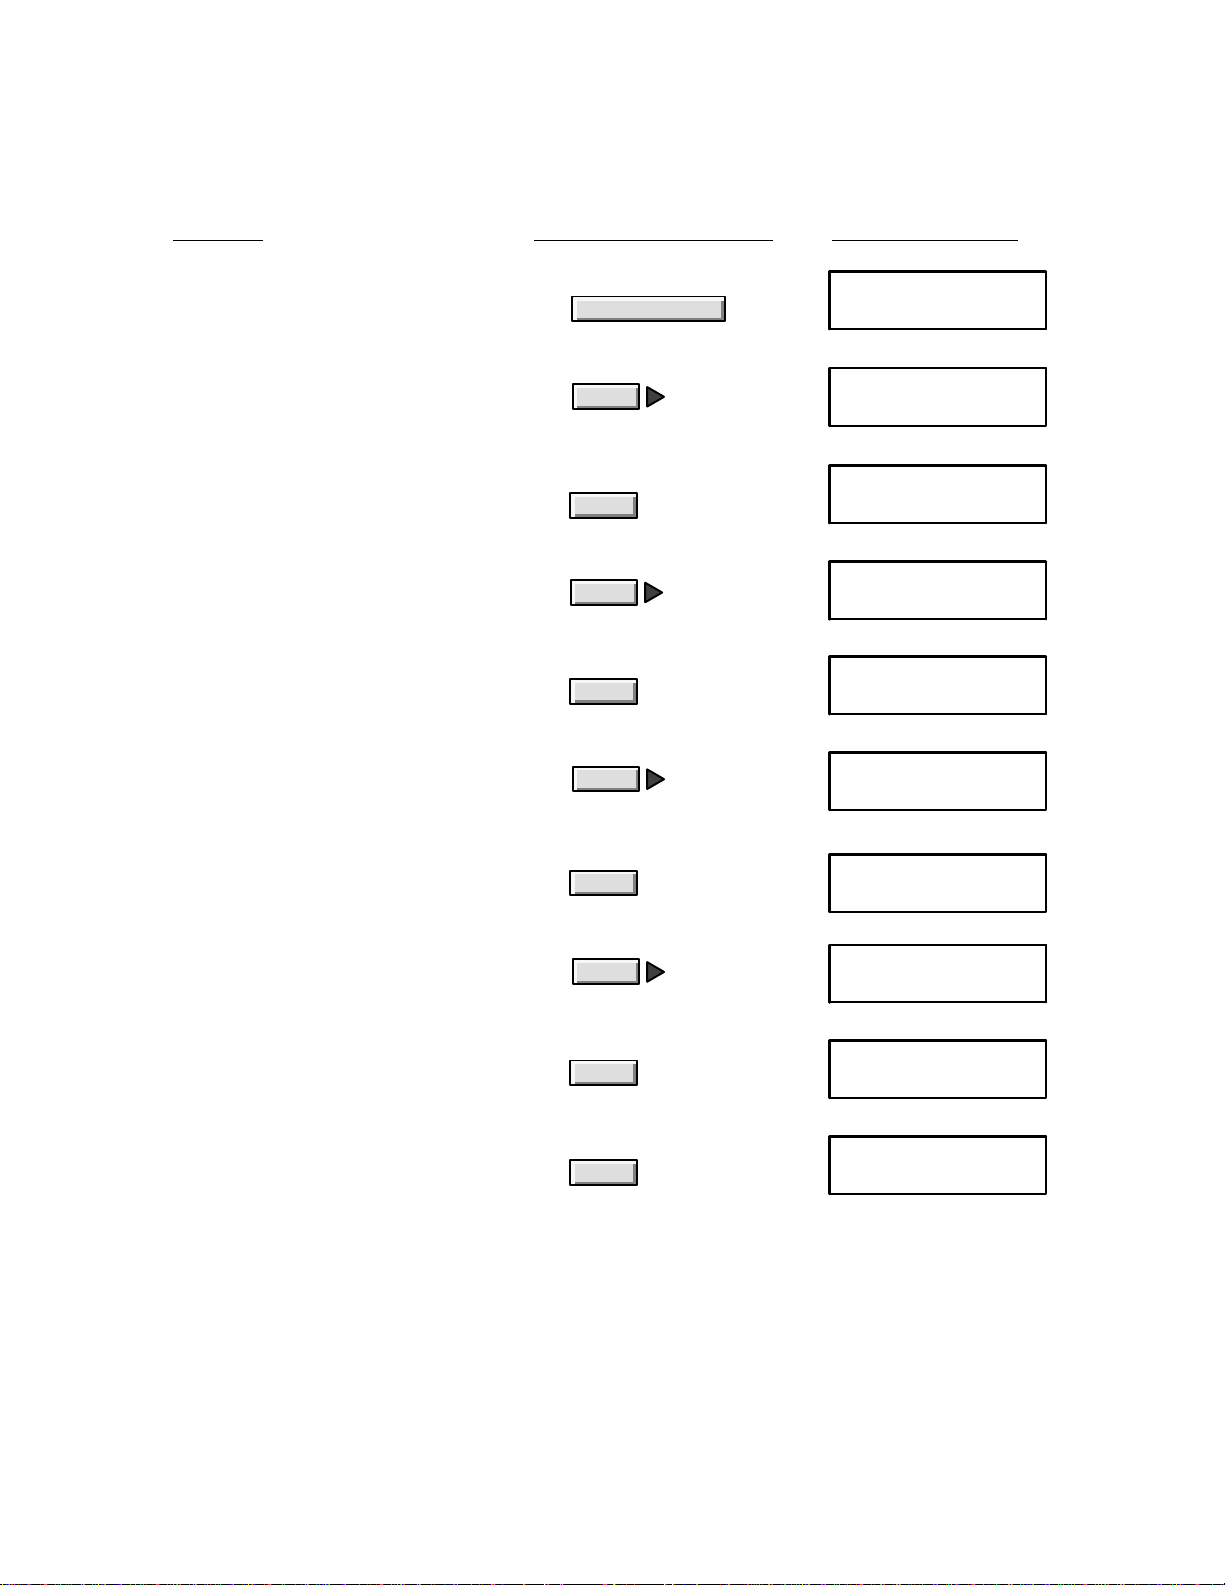
Distinctive Ring in an HP OfficeJet LX is set OFF, but can be set ON using the HP OfficeJet LX Manager software by
selecting the Distinctive Ring in the Receive Fax Setup dialog box as described in the HP OfficeJet LX User’s Guide.
To set the HP OfficeJet distinctive ring feature to ON, use the following instructions:
Do this: Using these buttons: For this display:
a. Press the Menu button to display the menu.
b. Press Right Arrow multiple times to move to
“Fax Settings.”
c. Press Enter/Save to select “Fax Settings.”
d. Press Right Arrow multiple times to move to
“Phone Setup.”
e. Press Enter/Save to select “Phone Setup.”
f. Press Right Arrow multiple times to move to
“Distinctive Ring.”
g. Press Enter/Save to select “Distinctive Ring.”
Note that an asterisk (*) denotes the current
selection.
Menu
Enter/Save
Enter/Save
Enter/Save
MENU
Time/Date, Header
MENU
Fax Settings
FAX SETTINGS
Speed Dial Setup
FAX SETTINGS
Phone Setup
PHONE SETUP
Rings to Answer
PHONE SETUP
Distinctive Ring
DISTINCTIVE RING
Off *
h. Press Right Arrow to move to the setting
you want.
i. Press Enter/Save to select the displayed setting.
An asterisk (*) denotes your new selection.
j. Press Enter/Save again to return to the
Ready display.
Installation and Configuration
2-26
Enter/Save
Enter/Save
DISTINCTIVE RING
On
DISTINCTIVE RING
On *
Ready Auto
Sep-21-94 12:45 PM
Page 48
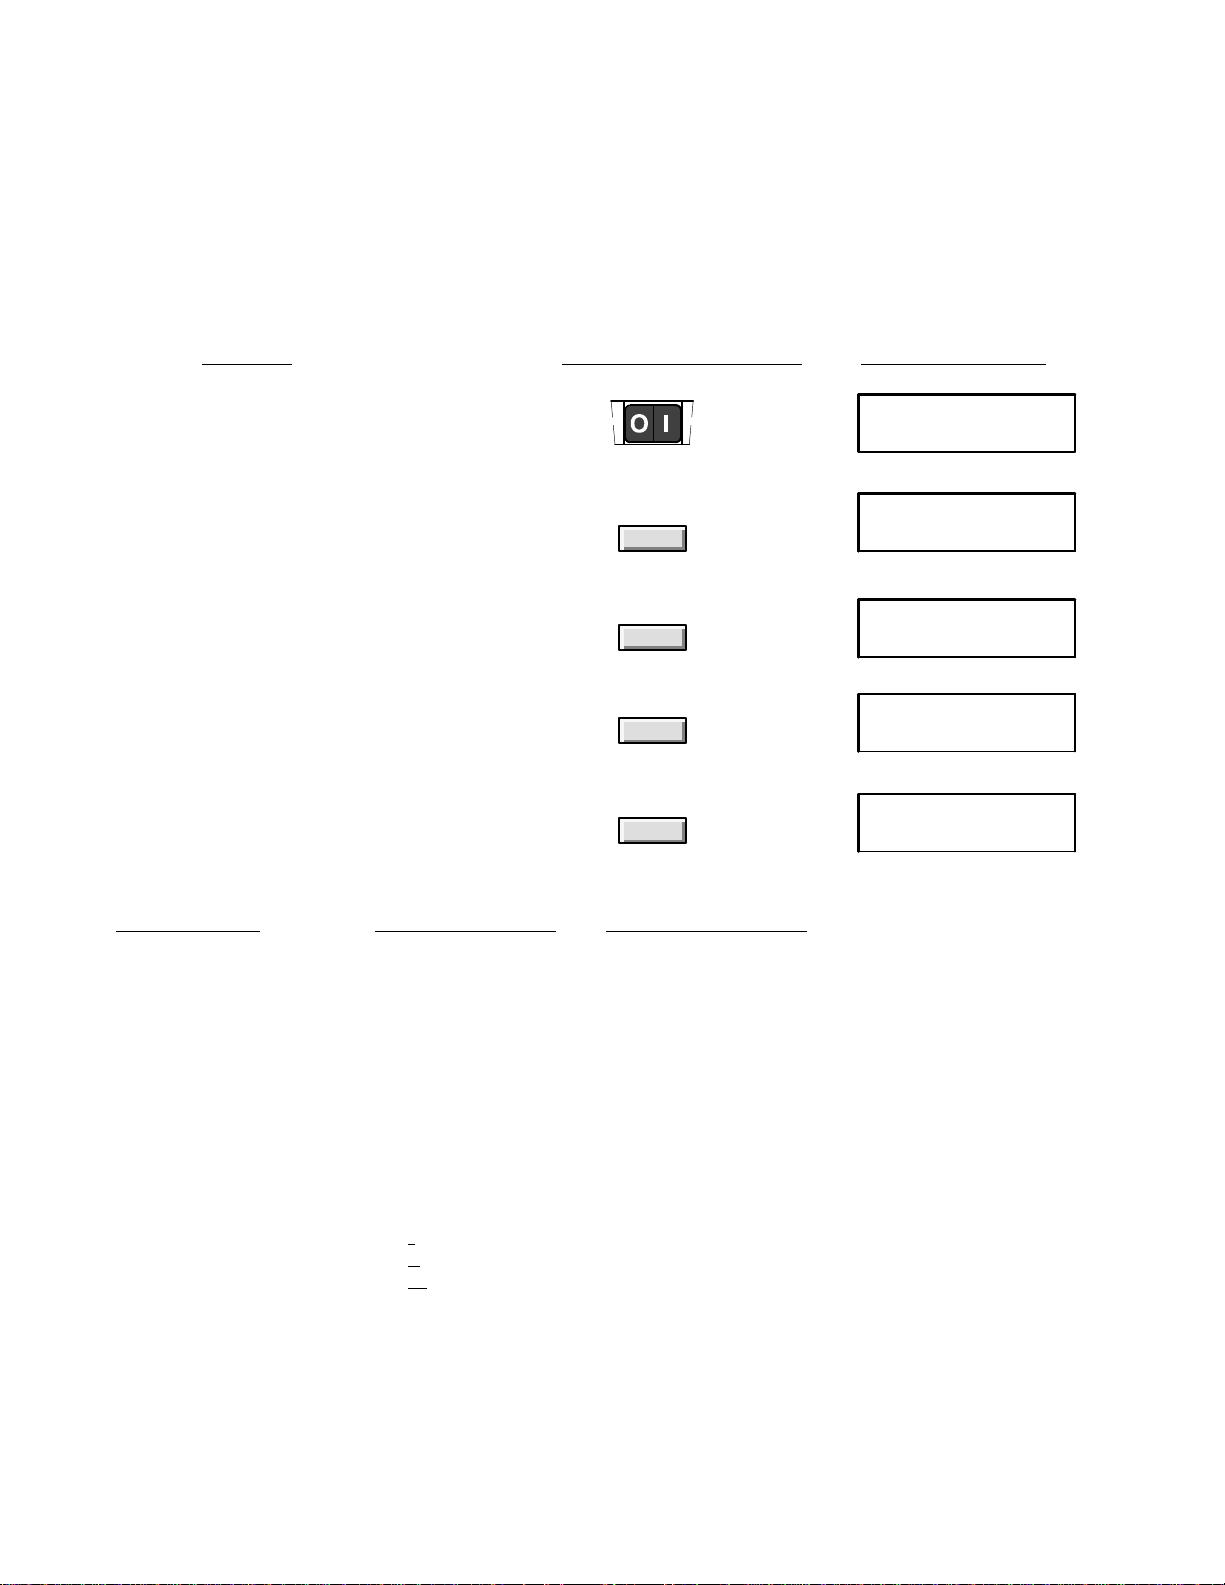
Setting the Reception Mode for Incoming Calls
The Reception Mode affects how the HP OfficeJet answers incoming fax and voice calls. Use the following instructions to
change the Reception Mode setting.
can be changed using the HP OfficeJet LX Manager software by selecting the Receive Mode in the Receive Fax Setup
dialog box as described in the HP OfficeJet LX User’s Guide.
Manual, and Fax/TAM) and when to use them.
Do this: Using these buttons: For this display:
Reception mode in an HP OfficeJet LX is set during installation of the software, but
The table describes the three Receive Mode settings (Auto,
1. Make sure the HP OfficeJet is turned on.
2. Press the Receive Mode button to display
the current Receive Mode setting, which is
marked with an asterisk (*). (The example
shown is Auto, the factory setting.)
3. Press Receive Mode multiple times to get to
the appropriate setting (see the following table).
(“Fax/TAM,” shown at right, is only an example.)
4. Press Enter/Save to select the displayed setting.
Note that an asterisk (*) denotes the new selection.
5. Press Enter/Save again to return to the Ready
display. Note that the Receive Mode selected is
displayed on the top line next to “Ready.”
If you have this Set the
type of setup:
Dedicated fax line
Receive Mode to: And read this note:
Auto
(receives only fax calls)
Shared fax/voice line,
Manual
no answering machine,
telephone connected
to HP OfficeJet
Shared fax/voice line,
with answering machine
Fax/TAM
(TAM means
elephone
t
nswering
a
achine)
m
Ready Auto
Jan-31-94 12:30 PM
Receive Mode
Receive Mode
Enter/Save
Enter/Save
RECEIVE MODE
Auto *
RECEIVE MODE
Fax/TAM
RECEIVE MODE
Fax/TAM *
Ready Fax/TAM
Jan-31-94 12:32 PM
When Auto is selected with a dedicated fax line, the
HP OfficeJet answers all incoming calls after the
number of rings specified in the Rings to Answer
setting and sends out fax reception tones to receive
a fax.
When Manual is selected, the HP OfficeJet never
answers incoming calls. To receive a fax, pick up the
handset of the phone connected to the HP OfficeJet,
press the Start/Copy button, then hang up the
phone.
When Fax/TAM is selected, the answering machine
answers all calls (after the number of rings specified
on that device), and the HP OfficeJet automatically
takes over the line when a fax tone is detected.
Notes: 1) This setting will not work unless you have
connected an answering machine
directly
to the HP
OfficeJet. 2) For best results, limit the greeting
message on the answering machine to 10 seconds.
Shared fax/voice line,
with Distinctive Ring
feature (with or without
an answering machine)
Auto
When Auto is selected and you have subscribed to a
distinctive ring feature through your phone company,
the HP OfficeJet will only answer incoming calls with
any multiple-ringing pattern.
Installation and Configuration
2-27
Page 49
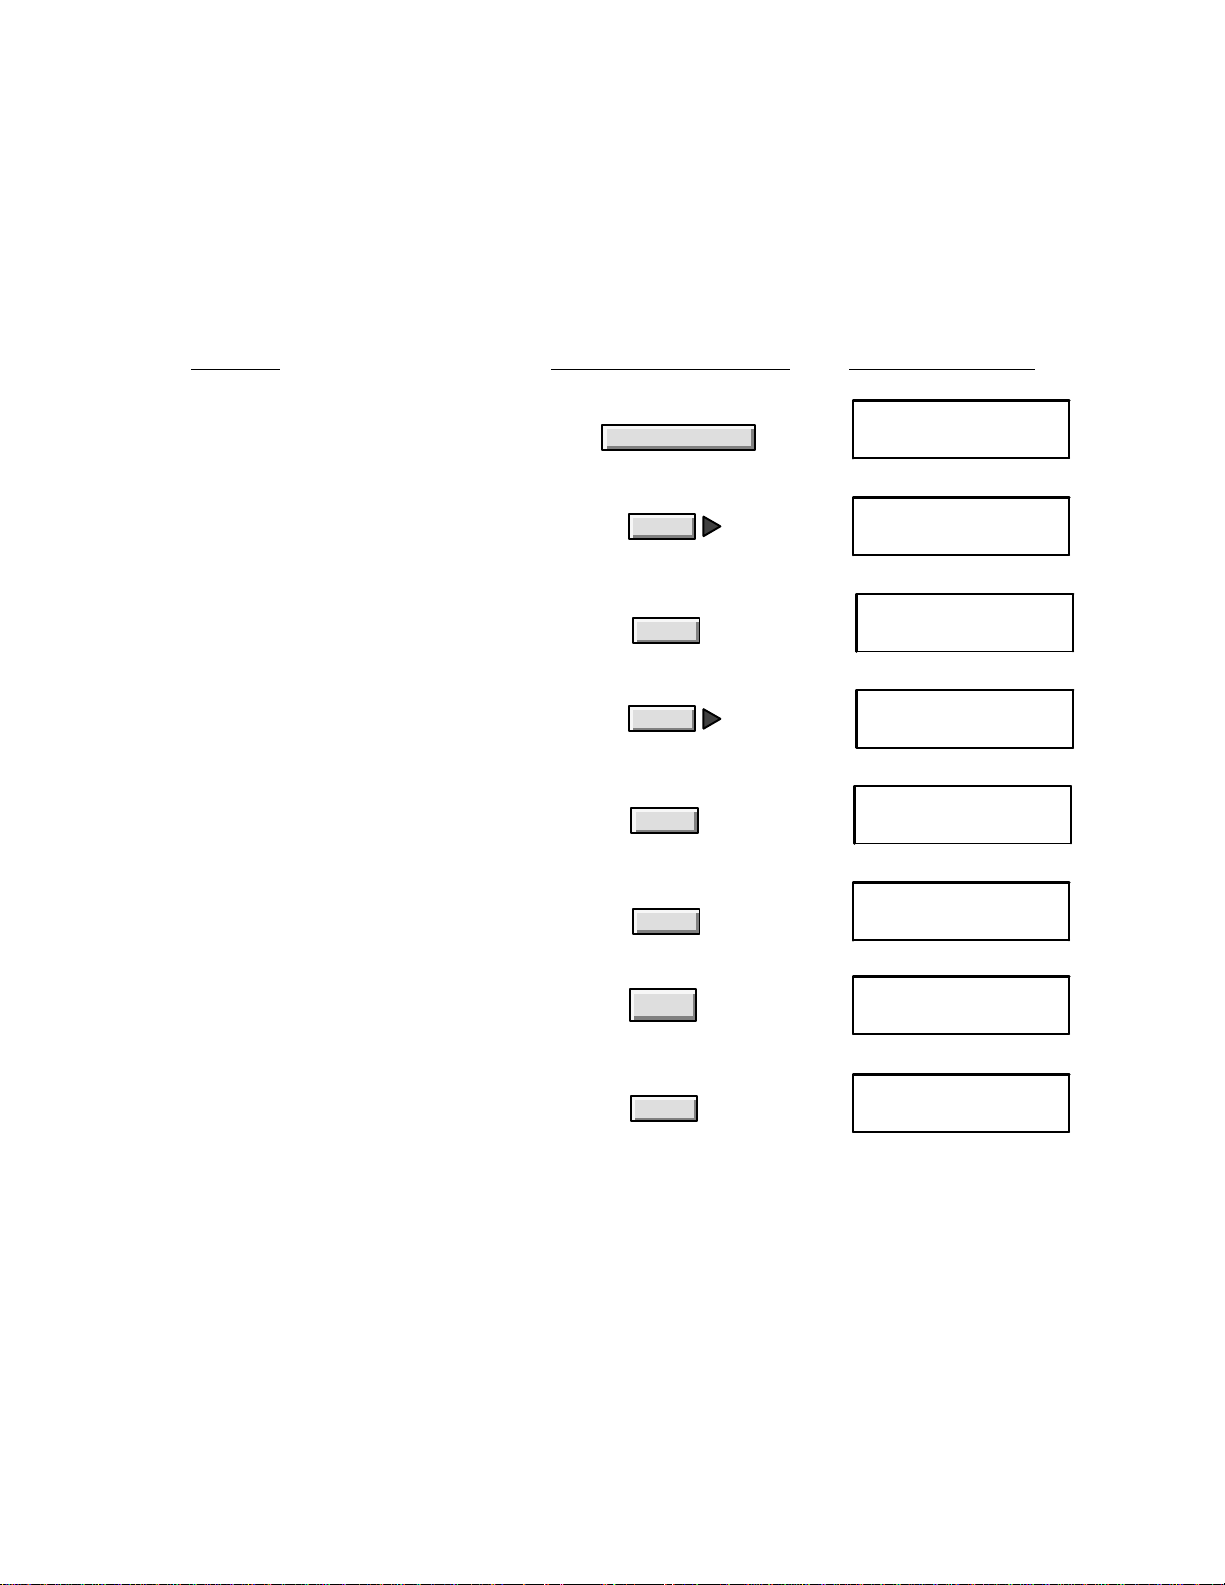
Setting the Number of Rings to Answer
The number of rings setting is ONLY used when the HP OfficeJet is used in the Auto Receive Mode. This setting is
used to determine the number of rings sensed before the HP OfficeJet answers a call. Although the range of rings may
vary for different countries, in the U.S.A., up to 5 rings can be set. The factory default setting is 2 rings.
rings to answer
in an HP OfficeJet LX is set during installation of the software, but can be changed using the HP
OfficeJet LX Manager software by setting the Rings to Answer in the Receive Fax Setup dialog box as described in the
HP OfficeJet LX User’s Guide.
The number of
Do this:
1. Press the Menu button to display the Menu.
2. Press Right Arrow multiple times to move
to “Fax Settings.”
3. Press Enter/Save to select “Fax Settings.”
4. Press Right Arrow multiple times to move
to “Phone Setup.”
5. Press Enter/Save to select “Phone Setup.”
(“Rings to Answer” is displayed.)
6. Press Enter/Save to select “Rings to
Answer.” The allowable range (in brackets)
and the factory setting (far right) are displayed.
Using these buttons: For this display:
Menu
Enter/Save
Enter/Save
Enter/Save
MENU
Time/Date, Header
MENU
Fax Settings
FAX SETTINGS
Speed Dial Setup
FAX SETTINGS
Phone Setup
PHONE SETUP
Rings to Answer
Rings to Answer
[2-5] 2
7. Enter a number up to 5, inclusive.
(The example shows that 5 has been entered.)
8. Press Enter/Save to save the new value and
return to the Ready display.
Installation and Configuration
2-28
5
Enter/Save
Rings to Answer
[2-5] 5
Ready Auto
Jan-31-94 12:36 PM
Page 50
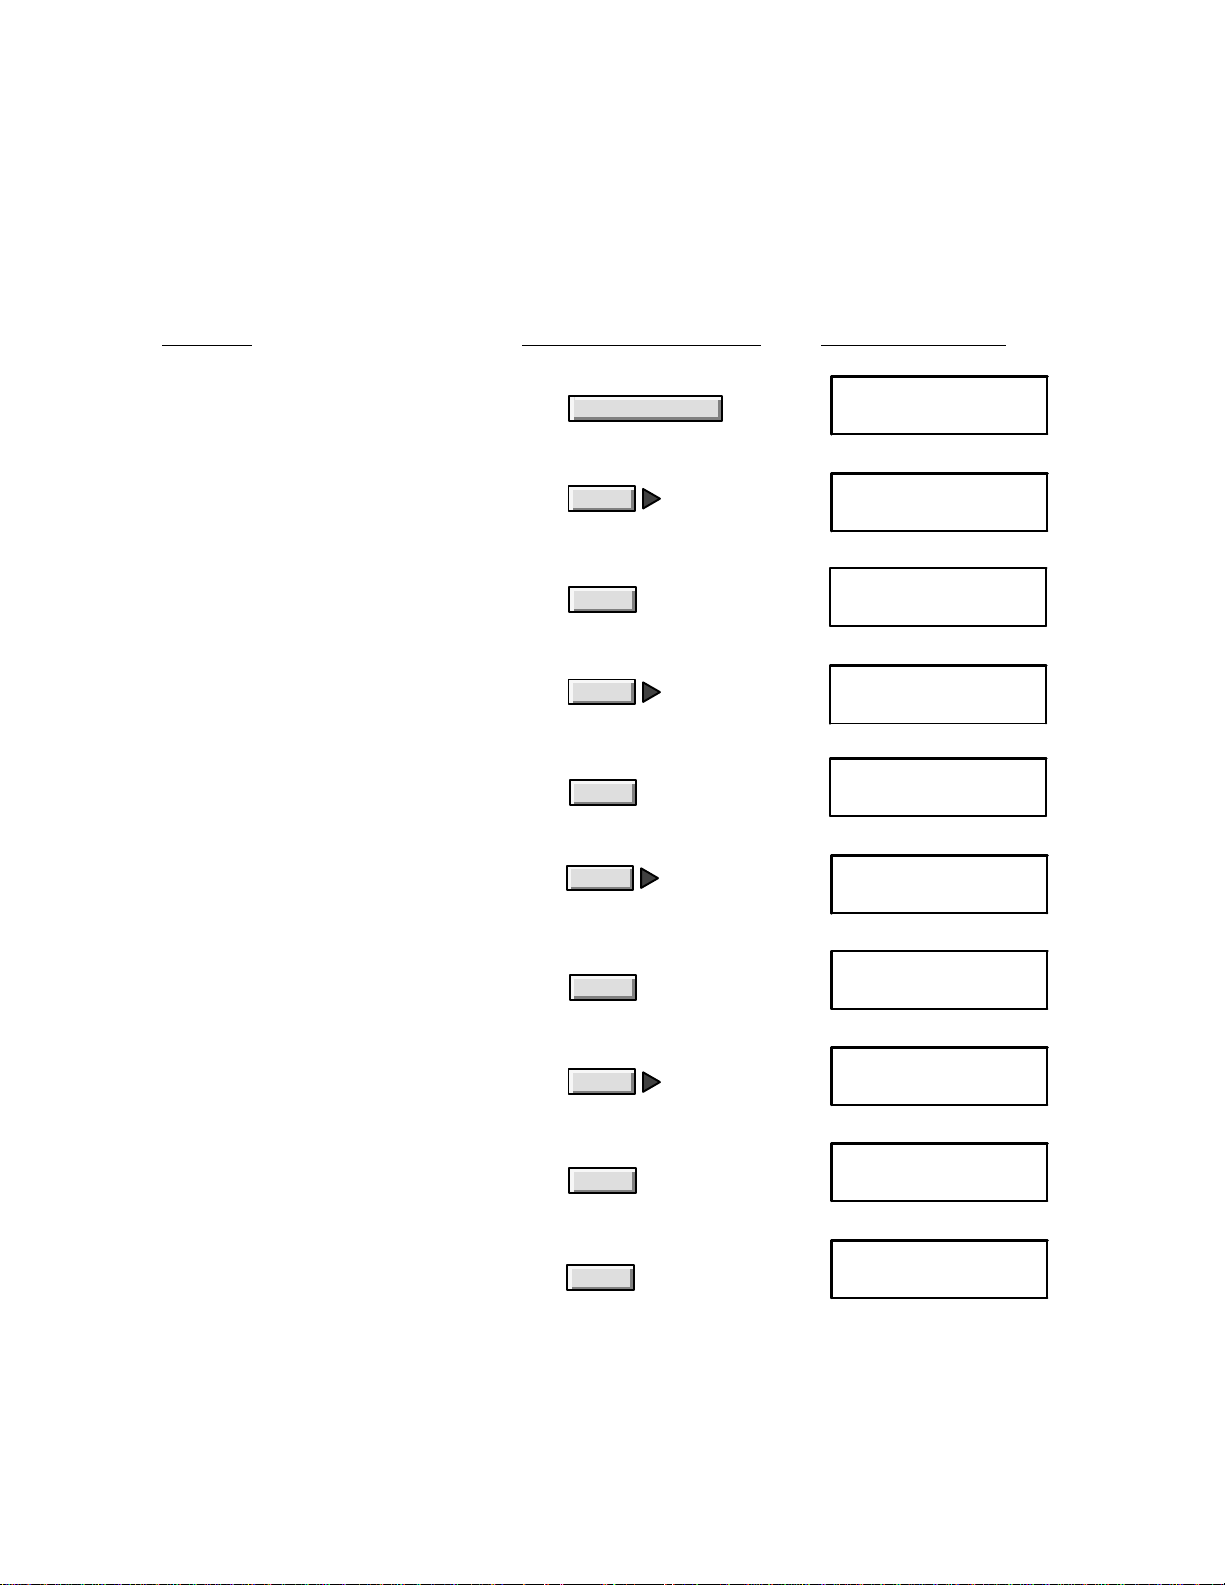
Selecting Tone or Pulse Dialing
The HP OfficeJet is factory set for touchtone (Tone) dialing telephone systems. If used with a rotary (Pulse) dialing
telephone system, the HP OfficeJet will need to be set for Pulse dialing. This procedure can be used to set for either
dialing system as required.
changed using the HP OfficeJet LX Manager software by selecting Tone or Pulse in the Dialing Mode menu of the
Send Fax Setup dialog box as described in the HP OfficeJet LX User’s Guide.
Do this: Using these buttons: For this display:
The dialing mode in an HP OfficeJet LX is set during installation of the software, but can be
1. Press the Menu button to display the menu.
2. Press Right Arrow multiple times to move
to “Fax Settings.”
3. Press Enter/Save to select “Fax Settings.”
4. Press Right Arrow multiple times to move
to “Phone Setup.”
5. Press Enter/Save to select “Phone Setup.”
6. Press Right Arrow multiple times to move
to “Dialing Mode.”
7. Press Enter/Save to select “Dialing Mode.”
The factory setting, Tone, is displayed.
Menu
Enter/Save
Enter/Save
Enter/Save
MENU
Time/Date, Header
MENU
Fax Settings
FAX SETTINGS
Speed Dial Setup
FAX SETTINGS
Phone Setup
PHONE SETUP
Rings to Answer
PHONE SETUP
Dialing Mode
DIALING MODE
Tone *
8. Press Right Arrow to move to “Pulse.”
9. Press Enter/Save to select “Pulse.” An
asterisk (*) denotes your new selection.
10.Press Enter/Save again to return to the
Ready display.
Enter/Save
Enter/Save
DIALING MODE
Pulse
DIALING MODE
Pulse *
Ready Fax/TAM
Jan-31-94 12:41 PM
Installation and Configuration
2-29
Page 51
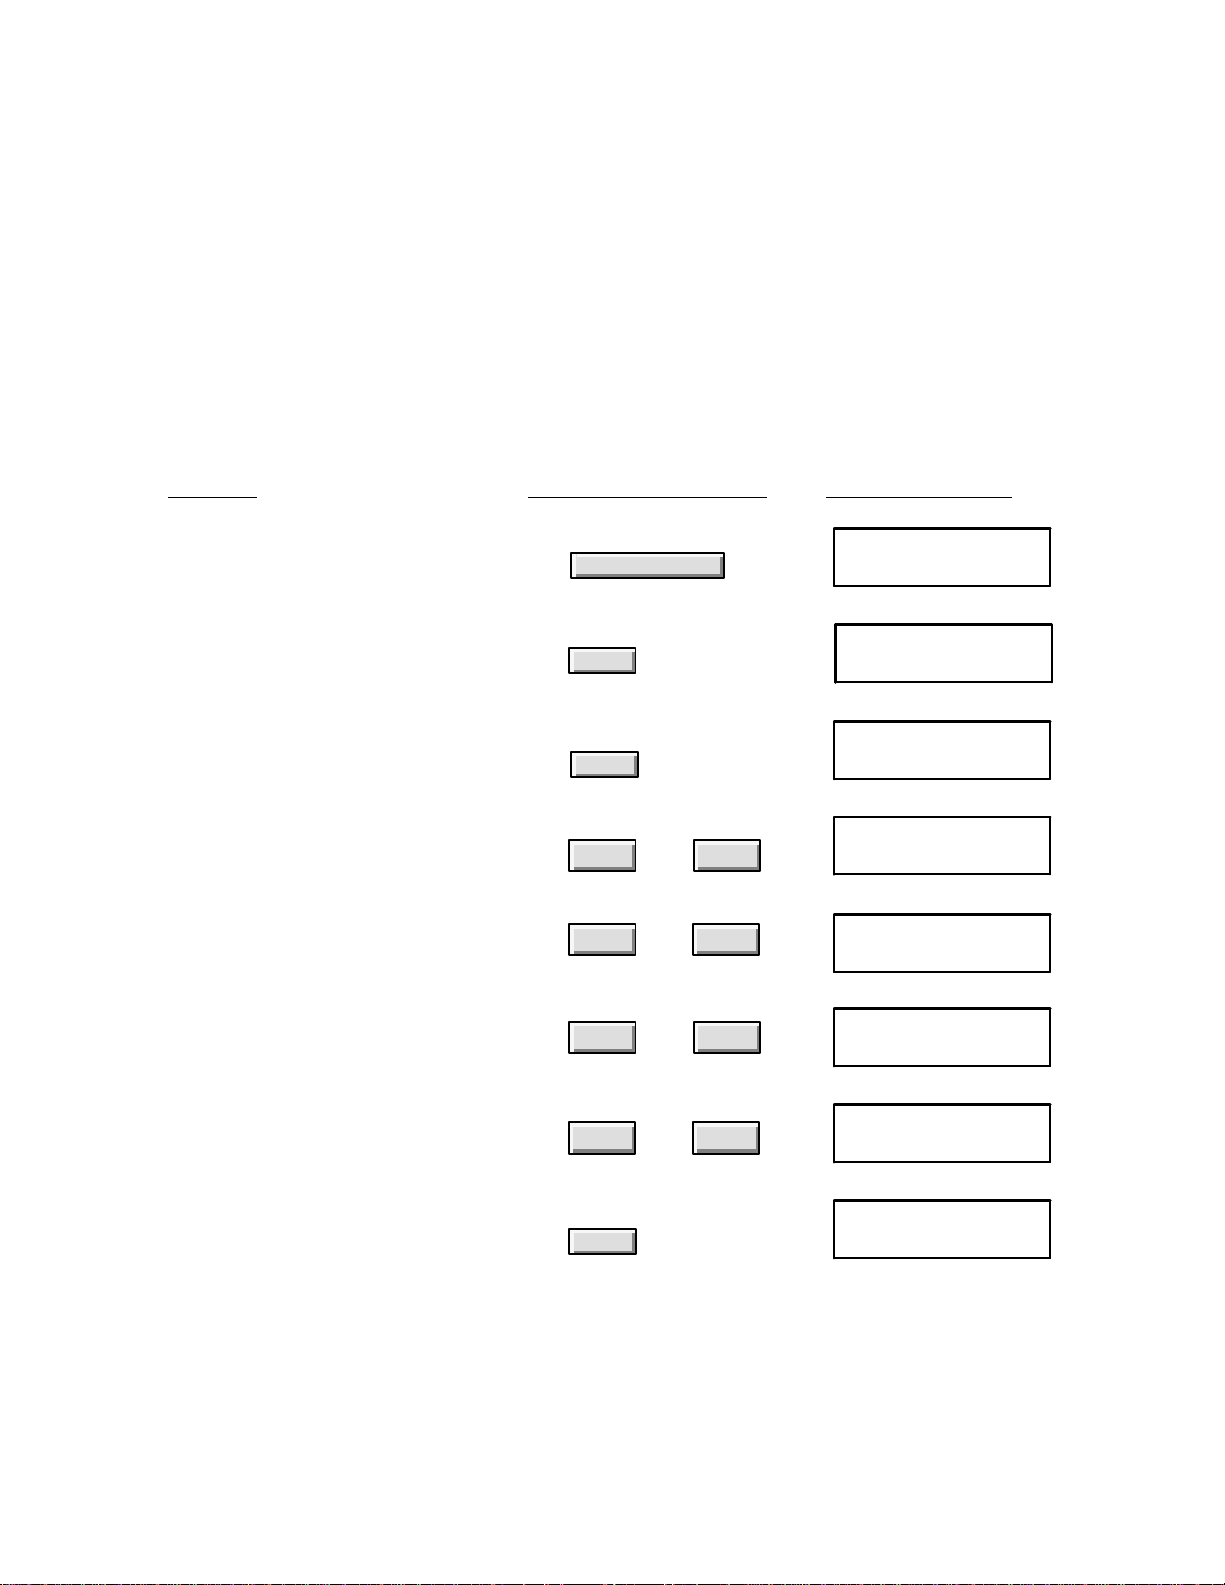
Entering the Date and Time
Date and Time entries are required on all outgoing faxes. The fax log report will also reflect the date and time of
transactions for reference. When entering the information, the current date and time should be entered for accurate
reports and tracking of transactions.
software, but can be changed using the HP OfficeJet LX Manager software by selecting the Send Fas Setup dialog box
and entering the information as described in the HP OfficeJet LX User’s Guide.
Note: The Telephone Protection Act of 1991 requires that all faxes transmitted in the U.S.A.
display the date and time they are sent in a header, footer or cover page. Most applications
contain the information in the document header.
The date and time can be entered using this procedure.
Do this: Using these buttons: For this display:
The date and time information in an HP OfficeJet LX is set during installation of the
1. Press the Menu button to display the menu.
(“Time/Date, Header” is displayed.)
2. Press Enter/Save to select “Time/Date,
Header.” (“Time/Date” is displayed.)
3. Press Enter/Save to select “Time/Date.”
4. Press “1” if you want to enter the time in
AM/PM format, or press “2” to enter the
time in 24-hour format. (The example shows
the AM/PM format.)
5. Enter the current time in the format you
selected. (Example shows AM/PM format.)
Press the Backspace button to correct any
mistakes.
6. If you chose AM/PM format, you will be
prompted to select AM or PM after entering
the time. Press “1” to select AM or “2” to
select PM.
7. Enter the current date in month-day-year
format.
Menu
Enter/Save
Enter/Save
12
09
12
09
or
through
or
through
MENU
Time/Date, Header
TIME/DATE, HEADER
Time/Date
Enter time format
1=AM/PM 2=24-hour
Enter time
12:46 PM
Enter 1=AM 2=PM
08:05 PM
Enter date
01-31-94
Enter date
09-20-94
8. Press Enter/Save to save the date
you entered.
Installation and Configuration
2-30
Enter/Save
Ready Fax/TAM
Sep-20-94 08:05 AM
Page 52
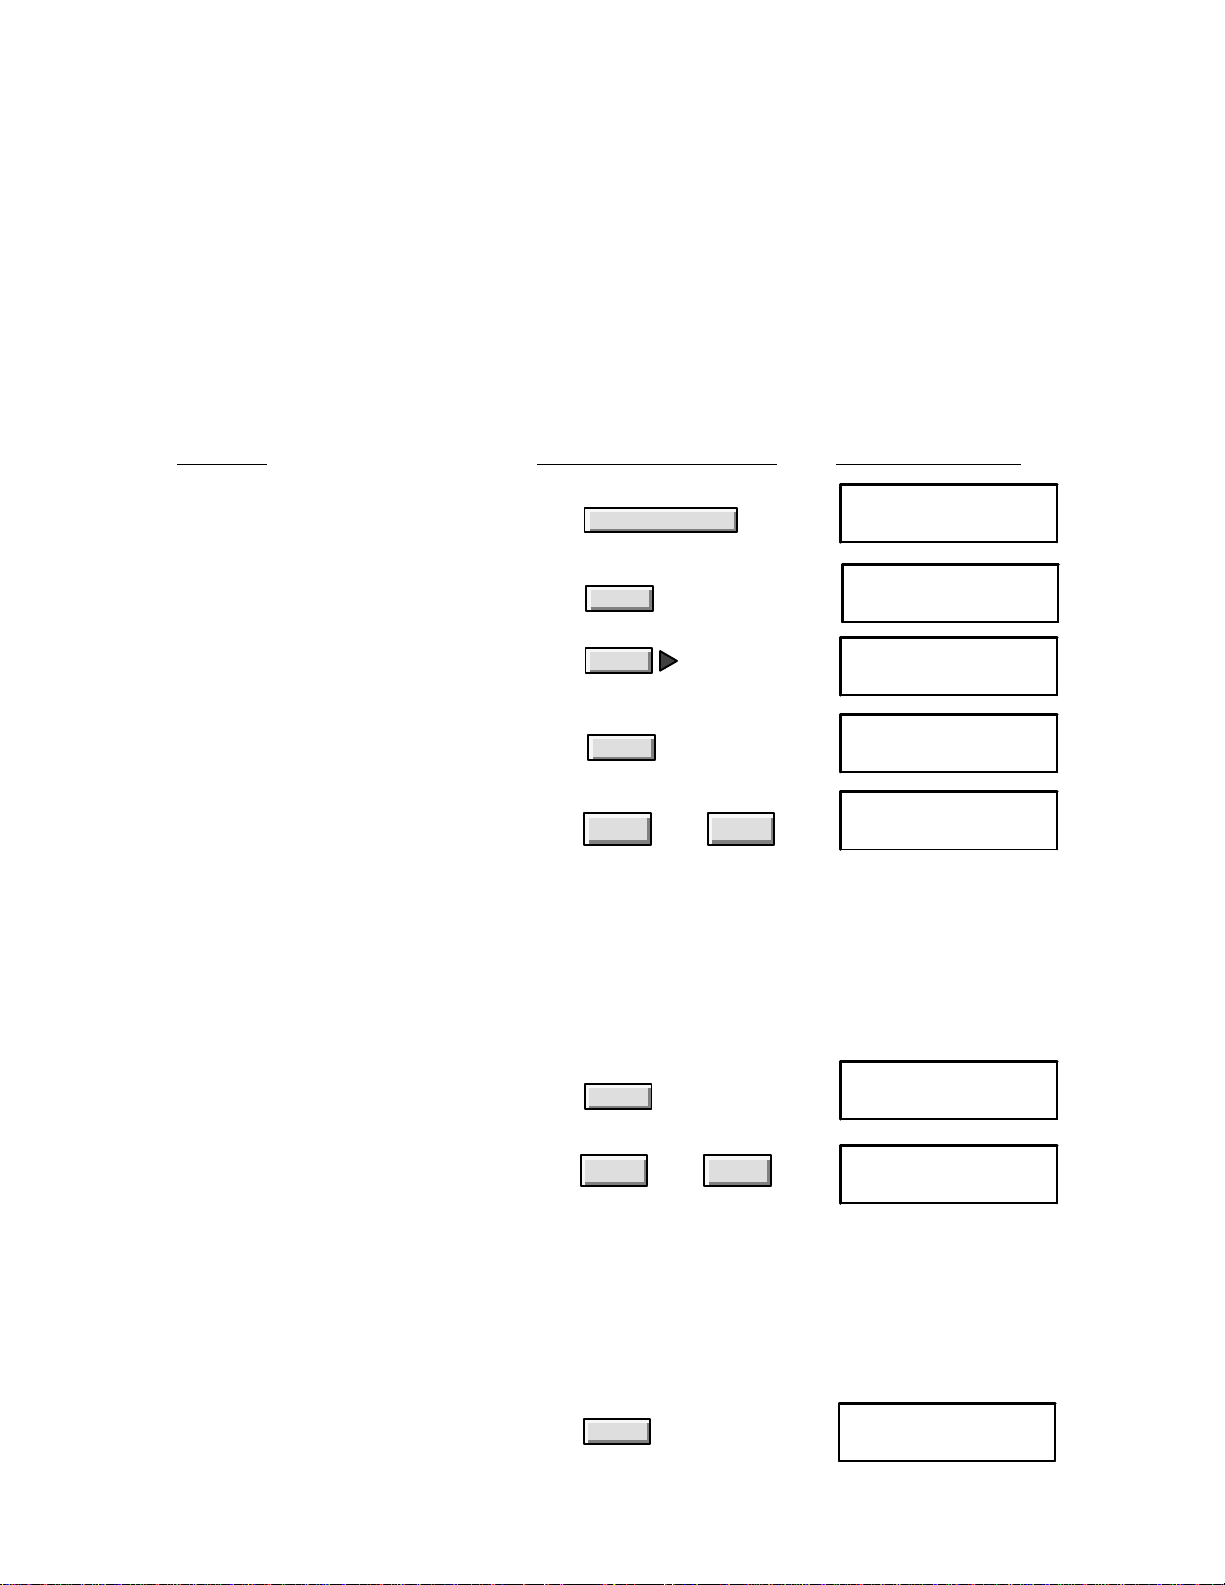
Entering the Header Information (company name and fax number)
Sender Identification and fax number entries are required on all outgoing faxes. This information will appear in the
header of transactions for reference.
software, but can be changed using the HP OfficeJet LX Manager software by selecting the Send Fas Setup dialog box
and entering the information as described in the HP OfficeJet LX User’s Guide.
Note: The Telephone Protection Act of 1991 requires that all faxes transmitted in the U.S.A.
display the sender’s identifying name and fax number in a header, footer or cover page. Most
applications contain the information in the document header.
Use this procedure to enter the information.
Do this: Using these buttons: For this display:
The header information in an HP OfficeJet LX is set during installation of the
1. Press the Menu button to display the menu.
“Time/Date, Header” is displayed.
2. Press Enter/Save to select “Time/Date,
Header.”
3. Press Right Arrow to move to “Fax Header.”
4. Press Enter/Save to select “Fax Header.”
5. Type the name you want displayed in the
header of your outgoing faxes, using these
Menu
Enter/Save
Enter/Save
ABC
29
WXYZ
through
MENU
Time/Date, Header
TIME/DATE, HEADER
Time/Date
TIME/DATE, HEADER
Fax Header
Enter header name
Enter header name
ACME Co.
guidelines:
•Enter up to 25 characters, including letters, symbols, and spaces.
• Use the number buttons 2 through 9 to enter the lowercase and uppercase letters shown above the buttons.
• After entering a character, use Right Arrow to move the cursor to the right before entering the next
character.
• Use the Space button to enter a space.
• Use the Symbols button to enter punctuation and symbols, such as a period (.), an asterisk (*), or an at
sign (@).
6. Press Enter/Save to save the name you typed.
Enter/Save
Enter header number
7. Enter the telephone number of the fax line
you’ve connected to your HP OfficeJet using
these guidelines:
through
0
9
Enter header number
619 555–1234
• Up to 20 characters are allowed, including numbers, spaces, dashes (–), and the plus sign (+).
• Use the Space button to enter a space.
• Use the Redial/Pause button to enter a 2-second pause, indicated by a dash (–).
• Use the Symbols button to enter a plus sign (+) before the country code when dialing your fax number
from another country. (For example, +1 619 555–1234.) The country code for the U.S. and Canada is 1.
For more information about international calls, contact the telephone company.
8. Press Enter/Save to save the fax number
you entered and return to the Ready display.
Enter/Save
Ready Fax/TAM
Sep-20-94 08:15 AM
Installation and Configuration
2-31
Page 53
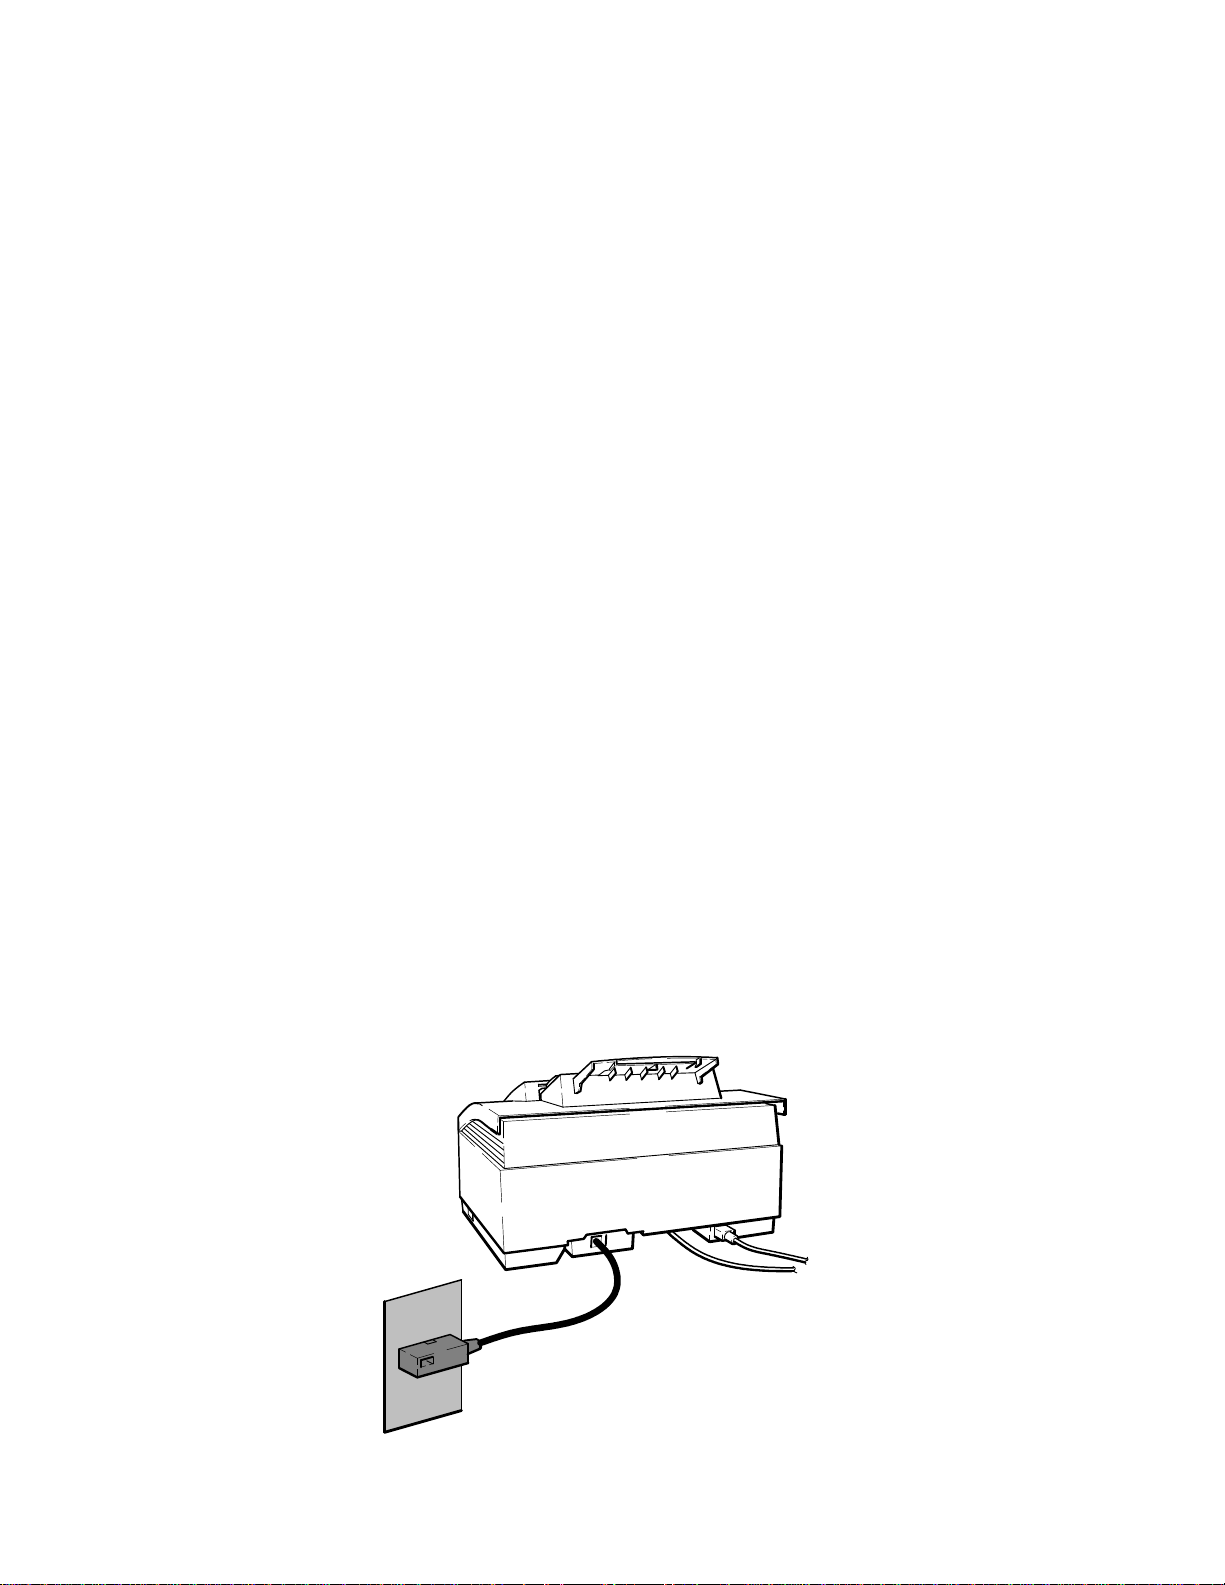
Setting Up for Faxing (U.K. Installation)
The following types of installations are the ones recommended for use with the HP OfficeJet LX to achieve the best
call-handling results. While other situations are possible, it is recommended that one of these be used. Determine
which installation most closely meets the user’s needs and follow the instructions given.
D Receive fax calls only – no voice calls, on a dedicated fax line.
D Receive fax and voice calls at the same phone number – without an answering machine.
D Receive fax and voice calls at the same phone number – with an answering machine.
After selecting the best installation to meet the user needs, the correct reception mode and certain station specific
information will need to be set up. The procedures to accomplish this are in the following topics which are presented
in the HP OfficeJet LX User’s Guide:
D Setting the Reception Mode for incoming calls.
D Setting the number of rings to answer.
D Selecting Tone or Pulse dialing
D Entering the Date and Time
D Entering the header information (company name and fax number).
Refer to the HP OfficeJet LX User’s Guide for use with the Mercury Telephone Network System.
Using an HP OfficeJet LX with the HP OfficeJet LX Manager and Eclipse FAX SE to control faxing is briefly
described earlier in this section. Detailed information is provided in the HP OfficeJet LX User’s Guide.
mode in an HP OfficeJet LX is set during installation of the software, but can be changed using the HP OfficeJet LX
Manager software by selecting the Receive Mode in the Receive Fax Setup dialog box as described in the HP OfficeJet
LX User’s Guide.
Reception
Receive fax calls only – no voice calls, on a dedicated fax line
This installation is recommended when using a separate telephone line and number dedicated to receiving faxes only
(no voice calls). Installation consists of connecting the HP OfficeJet to the telephone wall jack using the telephone
cord provided, and setting the Receive Mode to Auto. Refer to the HP OfficeJet LX User’s Guide.
HP OfficeJet LX
Telephone Wall Jack
Installation and Configuration
2-32
Page 54
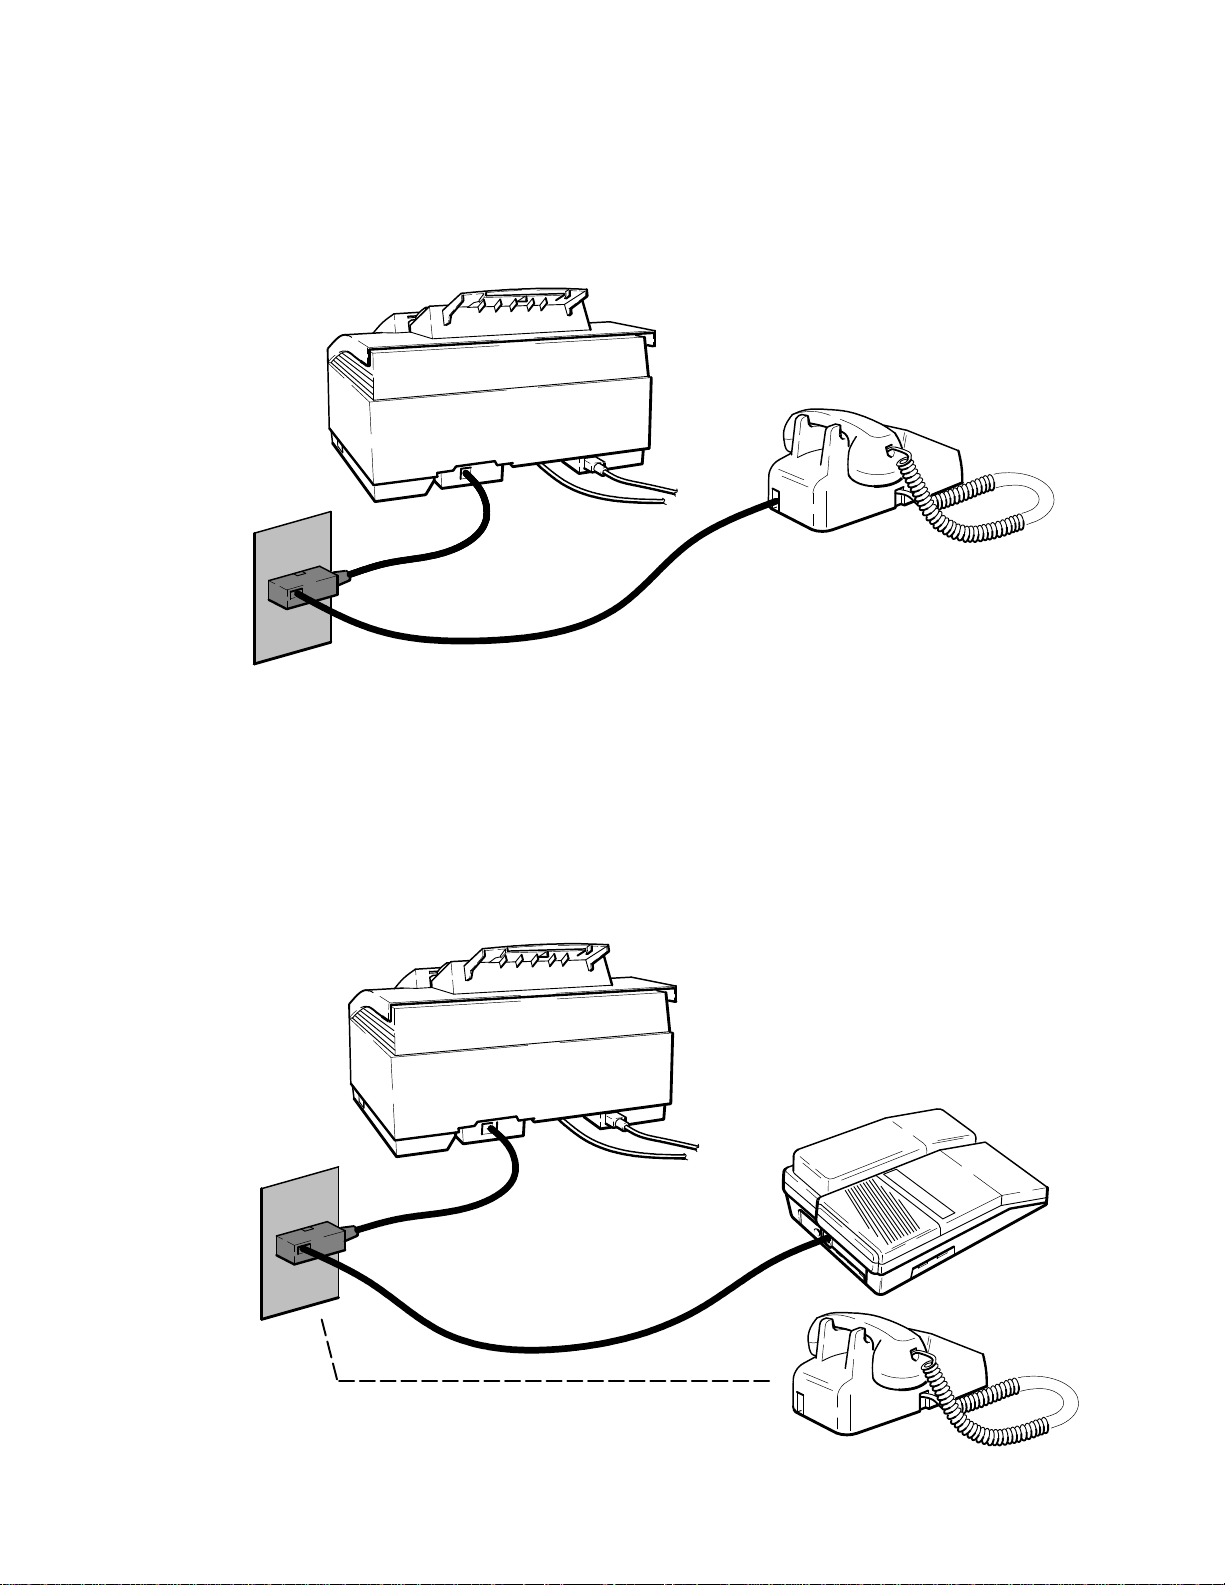
Receive fax and voice calls at the same phone number – without an answering machine
This installation is recommended when using one telephone number for both fax and voice calls and not using a
telephone answering machine. Installation consists of connecting the HP OfficeJet LX to the telephone wall jack,
connecting the telephone directly to the HP OfficeJet LX wall jack connector as shown, and setting the Receive Mode
to Manual. Refer to the HP OfficeJet LX User’s Guide.
HP OfficeJet LX
Telephone
Telephone Wall Jack
Receive fax and voice calls at the same phone number – with an answering machine
This installation is recommended when using one telephone number for both fax and voice calls and using a telephone
answering machine. Installation consists of connecting the HP OfficeJet LX to the telephone wall jack, connecting the
telephone answering machine directly to the HP OfficeJet LX wall jack connector as shown, and setting the Receive
Mode to Fax/TAM. Refer to the HP OfficeJet LX User’s Guide. Two scenarios are possible when using an answering
machine – one where the telephone handset is an attached part of the answering machine and one where the telephone
is a separate item that must be connected following the answering machine. Both scenarios are depicted in the
following diagram.
HP OfficeJet LX
Answering Machine
Telephone Wall Jack
For use with separate telephone if the phone handset is not part
of the answering machine, attach after the answering machine
cord is connected
Telephone
Installation and Configuration
2-33
Page 55
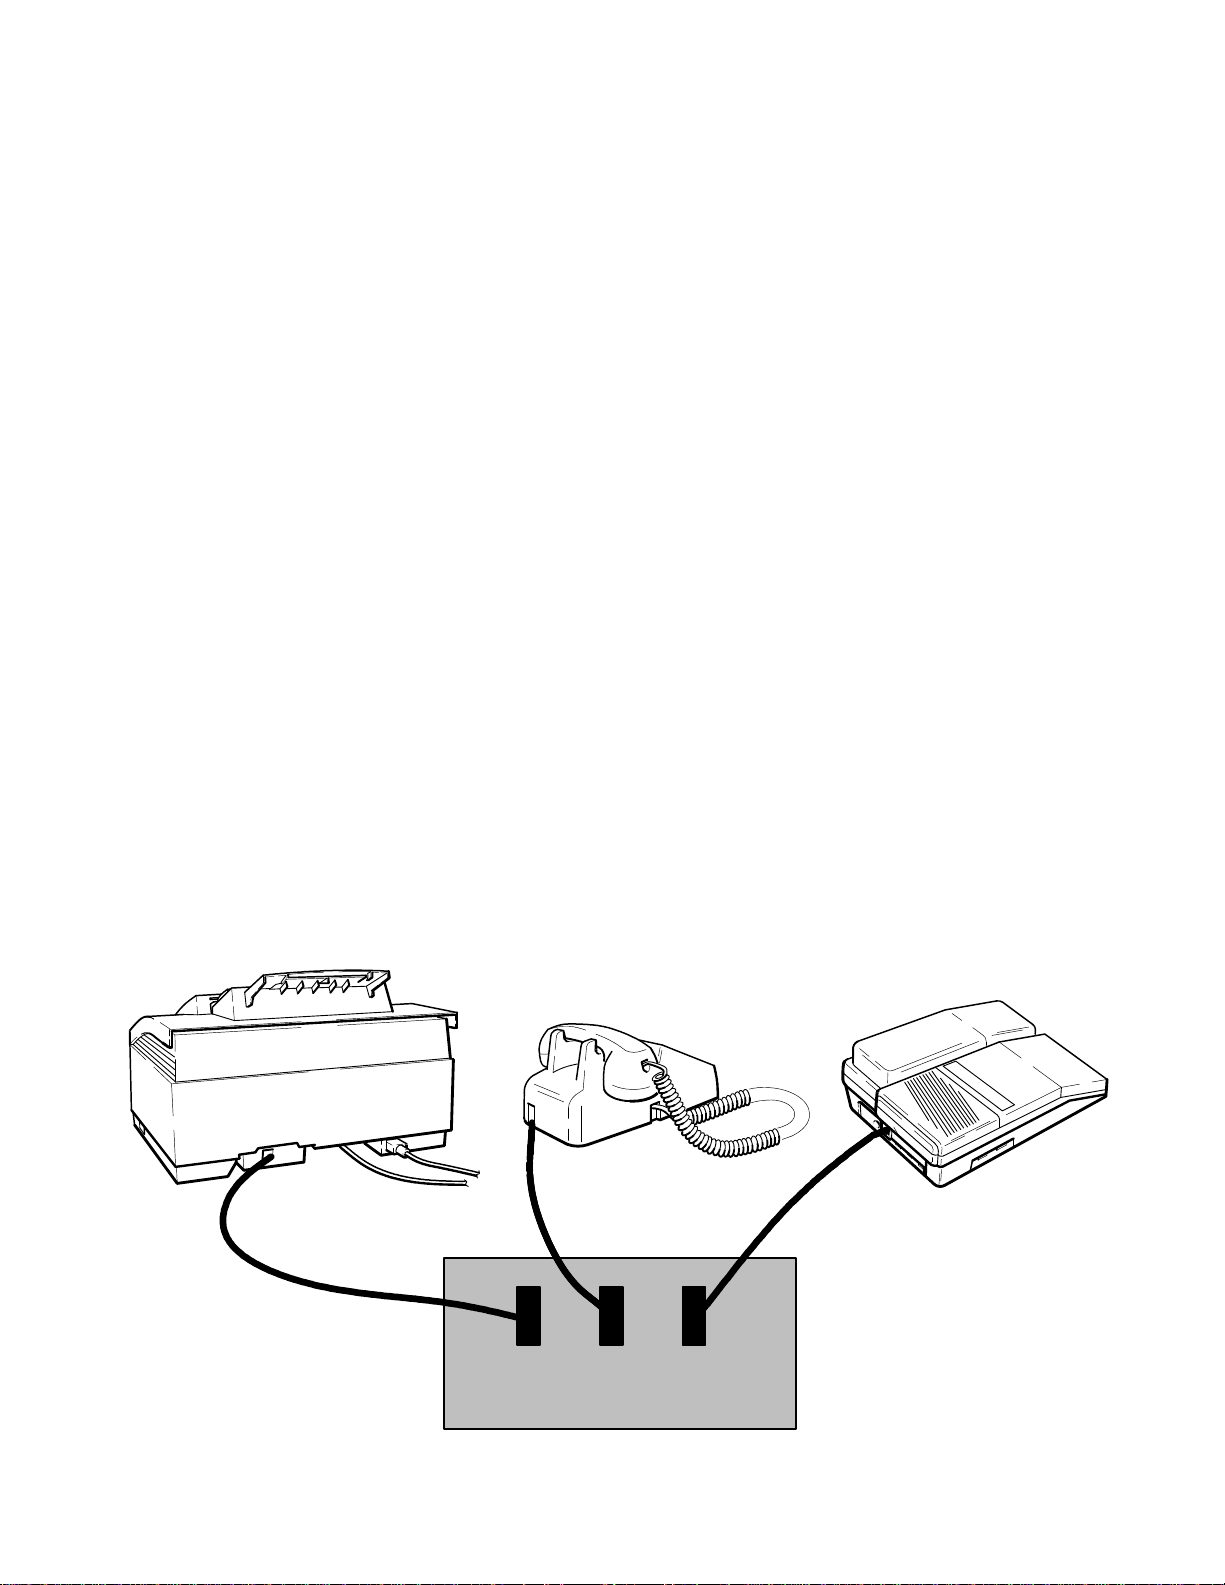
Setting Up for Faxing (Germany Installation)
The following types of installations are the ones recommended for use with the HP OfficeJet LX to achieve the best
call-handling results. While other situations are possible, it is recommended that one of these be used. Determine
which installation most closely meets the user’s needs and follow the instructions given.
D Receive fax calls only – no voice calls, on a dedicated fax line.
D Receive fax and voice calls at the same phone number – without an answering machine.
D Receive fax and voice calls at the same phone number – with an answering machine.
After selecting the best installation to meet the user needs, the correct reception mode and certain station specific
information will need to be set up. The procedures to accomplish this are in the following topics which are presented
in the HP OfficeJet LX User’s Guide:
D Setting the Reception Mode for incoming calls.
D Setting the number of rings to answer.
D Selecting Tone or Pulse dialing
D Entering the Date and Time
D Entering the header information (company name and fax number).
Refer to the HP OfficeJet LX User’s Guide for use in a PBX system.
Using an HP OfficeJet LX with the HP OfficeJet LX Manager and Eclipse FAX SE to control faxing is briefly
described earlier in this section. Detailed information is provided in the HP OfficeJet LX User’s Guide.
mode in an HP OfficeJet LX is set during installation of the software, but can be changed using the HP OfficeJet LX
Manager software by selecting the Receive Mode in the Receive Fax Setup dialog box as described in the HP OfficeJet
LX User’s Guide.
The three types of installation recommended can be depicted in the same diagram as shown below. Each device is
attached directly to the wall jack and specific N-F-N slot as shown. Installation consists of connecting the HP
OfficeJet, answering machine and telephone directly to the telephone wall jack as shown. Set the Receive Mode as
specified in the HP OfficeJet LX User’s Guide.
HP OfficeJet LX
Telephone
Answering Machine
Reception
Installation and Configuration
2-34
Telephone Wall Jack
NFN
Page 56
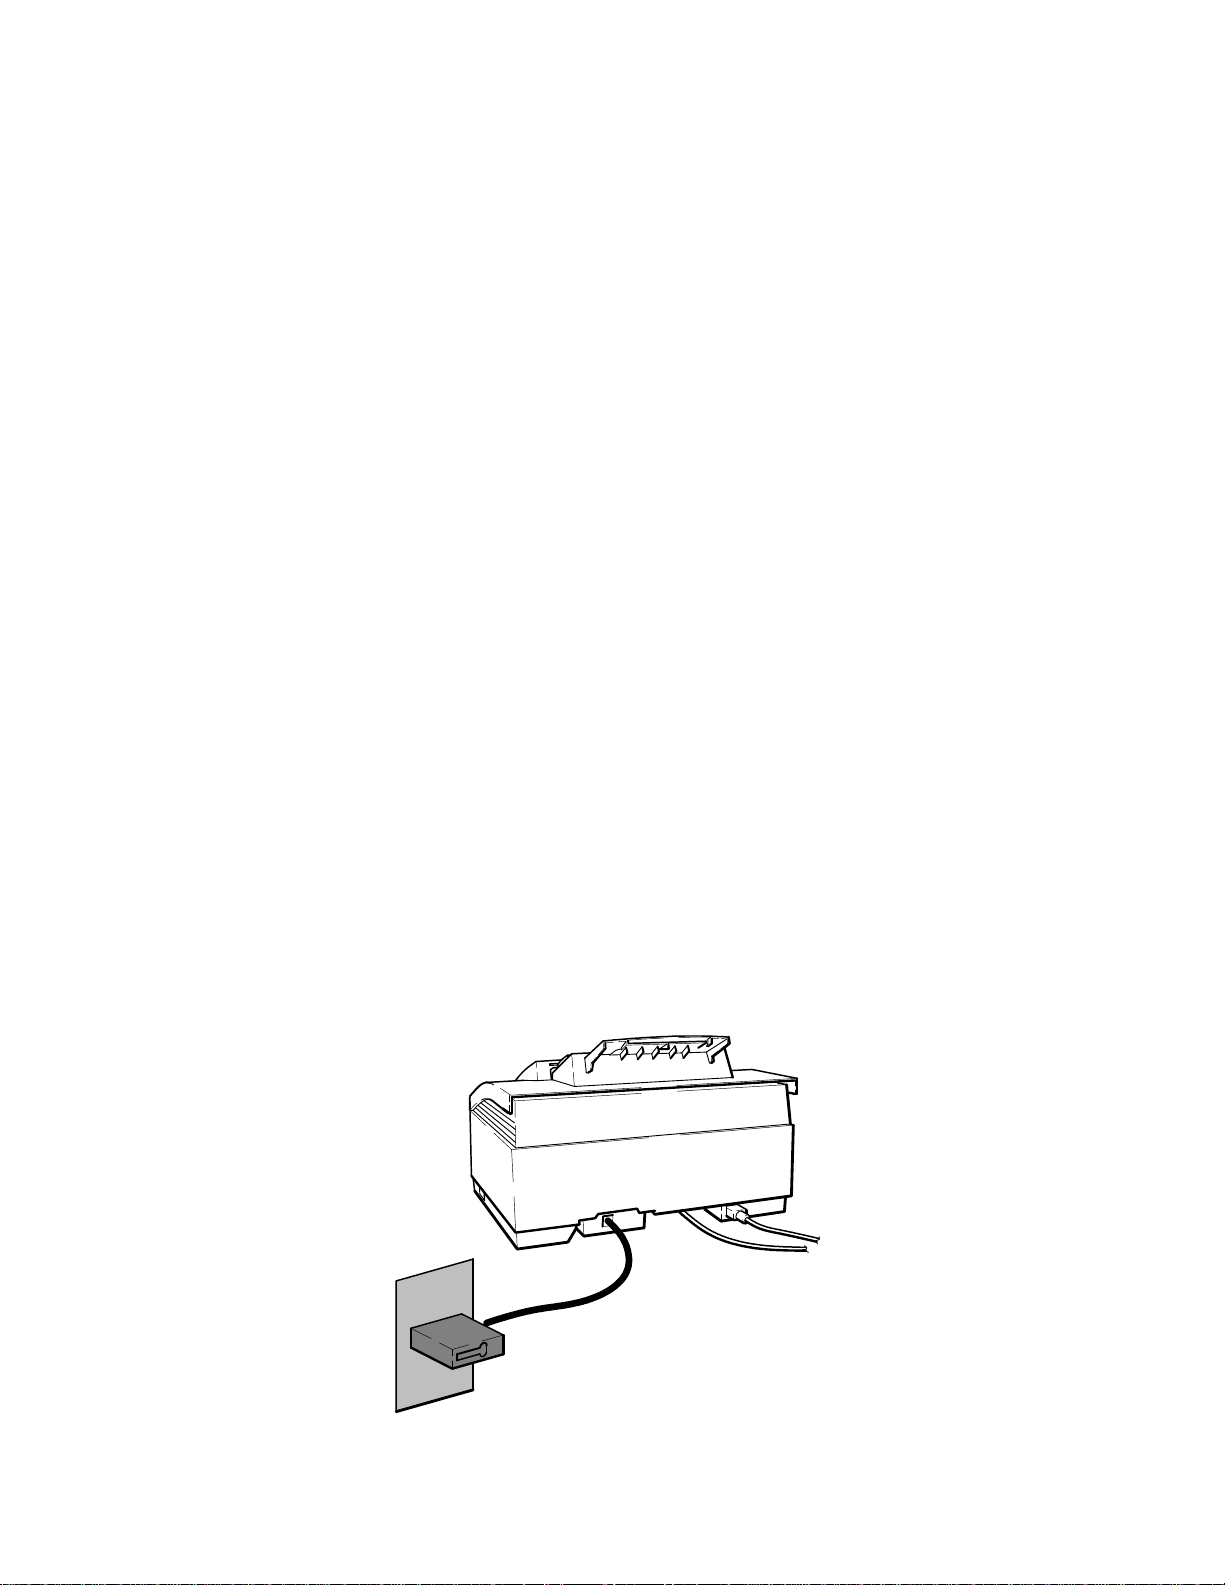
Setting Up for Faxing (France Installation)
The following types of installations are the ones recommended for use with the HP OfficeJet LX to achieve the best
call-handling results. While other situations are possible, it is recommended that one of these be used. Determine
which installation most closely meets the user’s needs and follow the instructions given.
D Receive fax calls only – no voice calls, on a dedicated fax line.
D Receive fax and voice calls at the same phone number – without an answering machine.
D Receive fax and voice calls at the same phone number – with an answering machine.
After selecting the best installation to meet the user needs, the correct reception mode and certain station specific
information will need to be set up. The procedures to accomplish this are in the following topics which are presented
in the HP OfficeJet LX User’s Guide:
D Setting the Reception Mode for incoming calls.
D Setting the number of rings to answer.
D Selecting Tone or Pulse dialing
D Entering the Date and Time
D Entering the header information (company name and fax number).
Using an HP OfficeJet LX with the HP OfficeJet LX Manager and Eclipse FAX SE to control faxing is briefly
described earlier in this section. Detailed information is provided in the HP OfficeJet LX User’s Guide.
mode in an HP OfficeJet LX is set during installation of the software, but can be changed using the HP OfficeJet LX
Manager software by selecting the Receive Mode in the Receive Fax Setup dialog box as described in the HP OfficeJet
LX User’s Guide.
Reception
Receive fax calls only – no voice calls, on a dedicated fax line
This installation is recommended when using a separate telephone line and number dedicated to receiving faxes only
(no voice calls). Installation consists of connecting the HP OfficeJet to the telephone wall jack using the telephone
cord provided, and setting the Receive Mode to Auto. Refer to the HP OfficeJet LX User’s Guide.
HP OfficeJet LX
Telephone Wall Jack
Installation and Configuration
2-35
Page 57
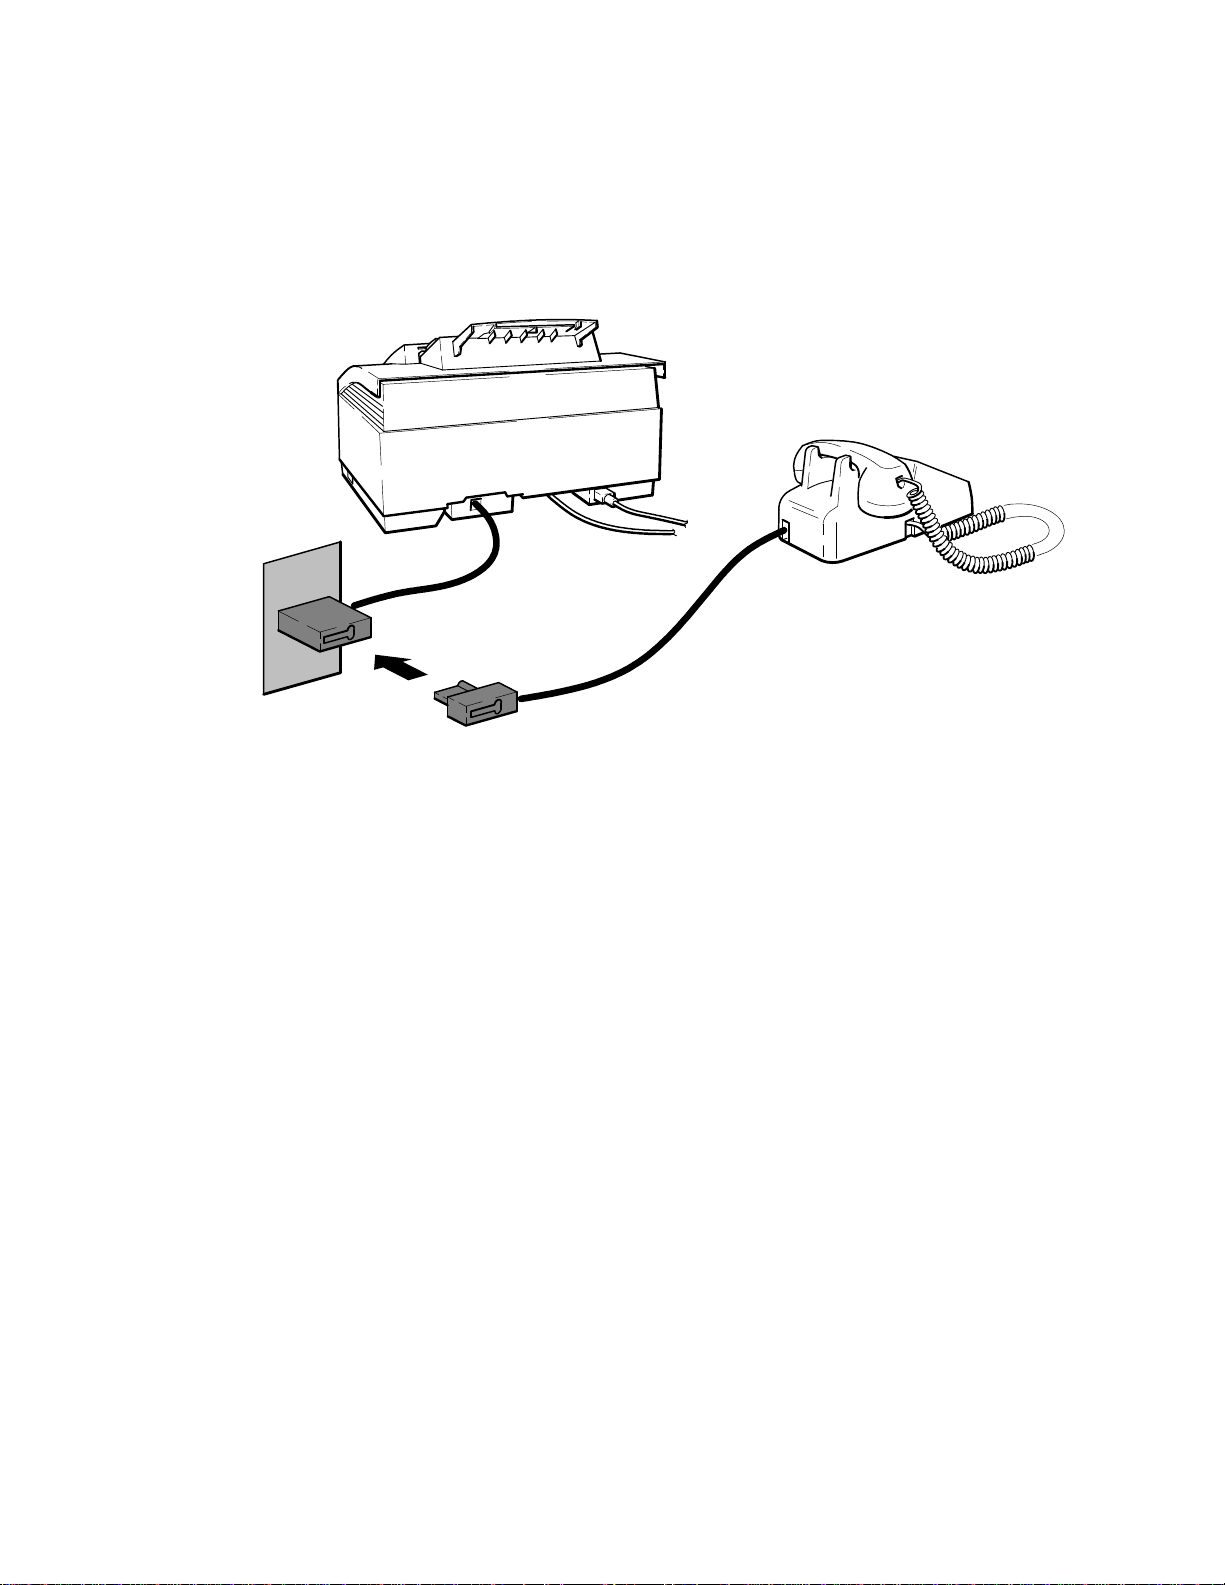
Receive fax and voice calls at the same phone number – without an answering machine
This installation is recommended when using one telephone number for both fax and voice calls and not using a
telephone answering machine. Installation consists of connecting the HP OfficeJet LX to the telephone wall jack,
connecting the telephone directly to the HP OfficeJet LX wall jack connector as shown, and setting the Receive Mode
to Manual. Refer to the HP OfficeJet LX User’s Guide.
HP OfficeJet LX
Telephone
Telephone Wall Jack
Installation and Configuration
2-36
Page 58
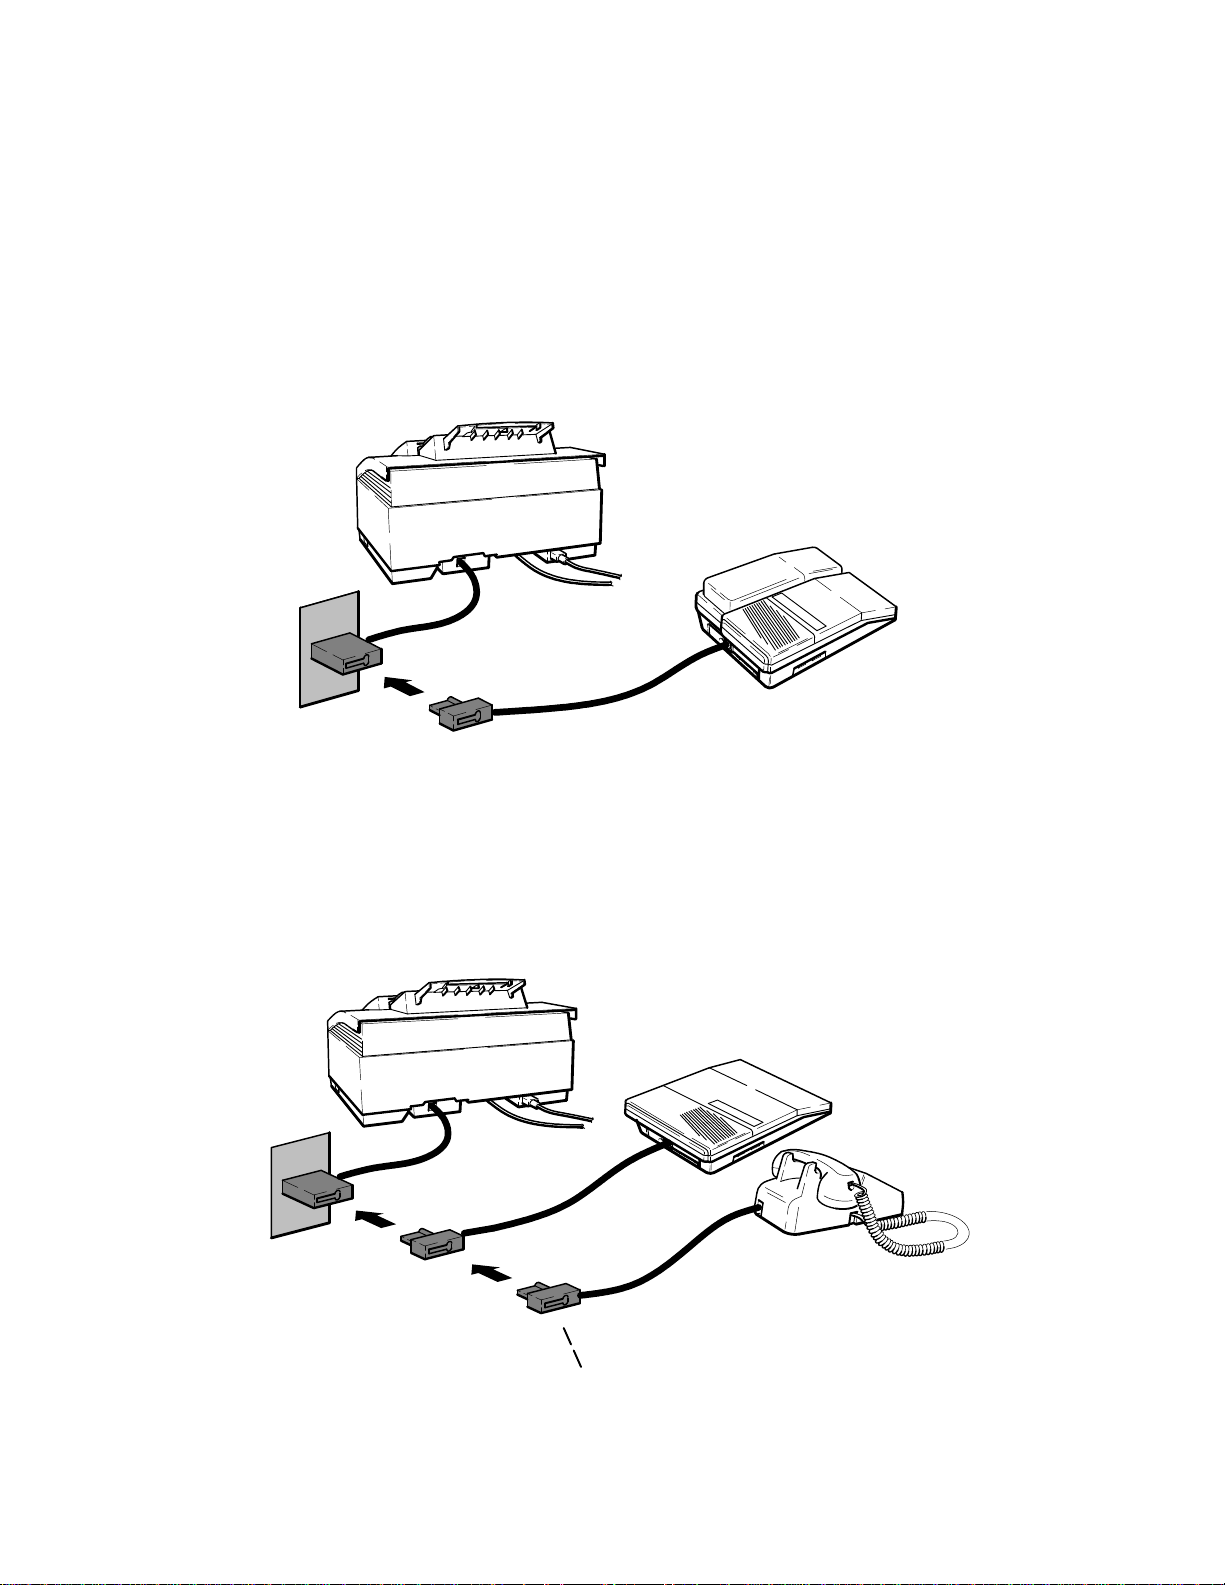
Receive fax and voice calls at the same phone number – with an answering machine
This installation is recommended when using one telephone number for both fax and voice calls and using a telephone
answering machine. Installation consists of connecting the HP OfficeJet LX to the telephone wall jack, connecting the
telephone answering machine directly to the HP OfficeJet LX wall jack connector as shown, and setting the Receive
Mode to Fax/TAM. Refer to the HP OfficeJet LX User’s Guide. Two scenarios are possible when using an answering
machine – one where the telephone handset is an attached part of the answering machine and one where the telephone
is a separate item that must be connected following the answering machine. Both scenarios are depicted in the
following diagram.
HP OfficeJet LX
Answering Machine with
Telephone Wall Jack
attached handset
HP OfficeJet LX
Telephone Wall Jack
Answering Machine
Telephone
For use with separate telephone if the phone handset
is not part of the answering machine, attach after the
answering machine cord is connected
Installation and Configuration
2-37
Page 59
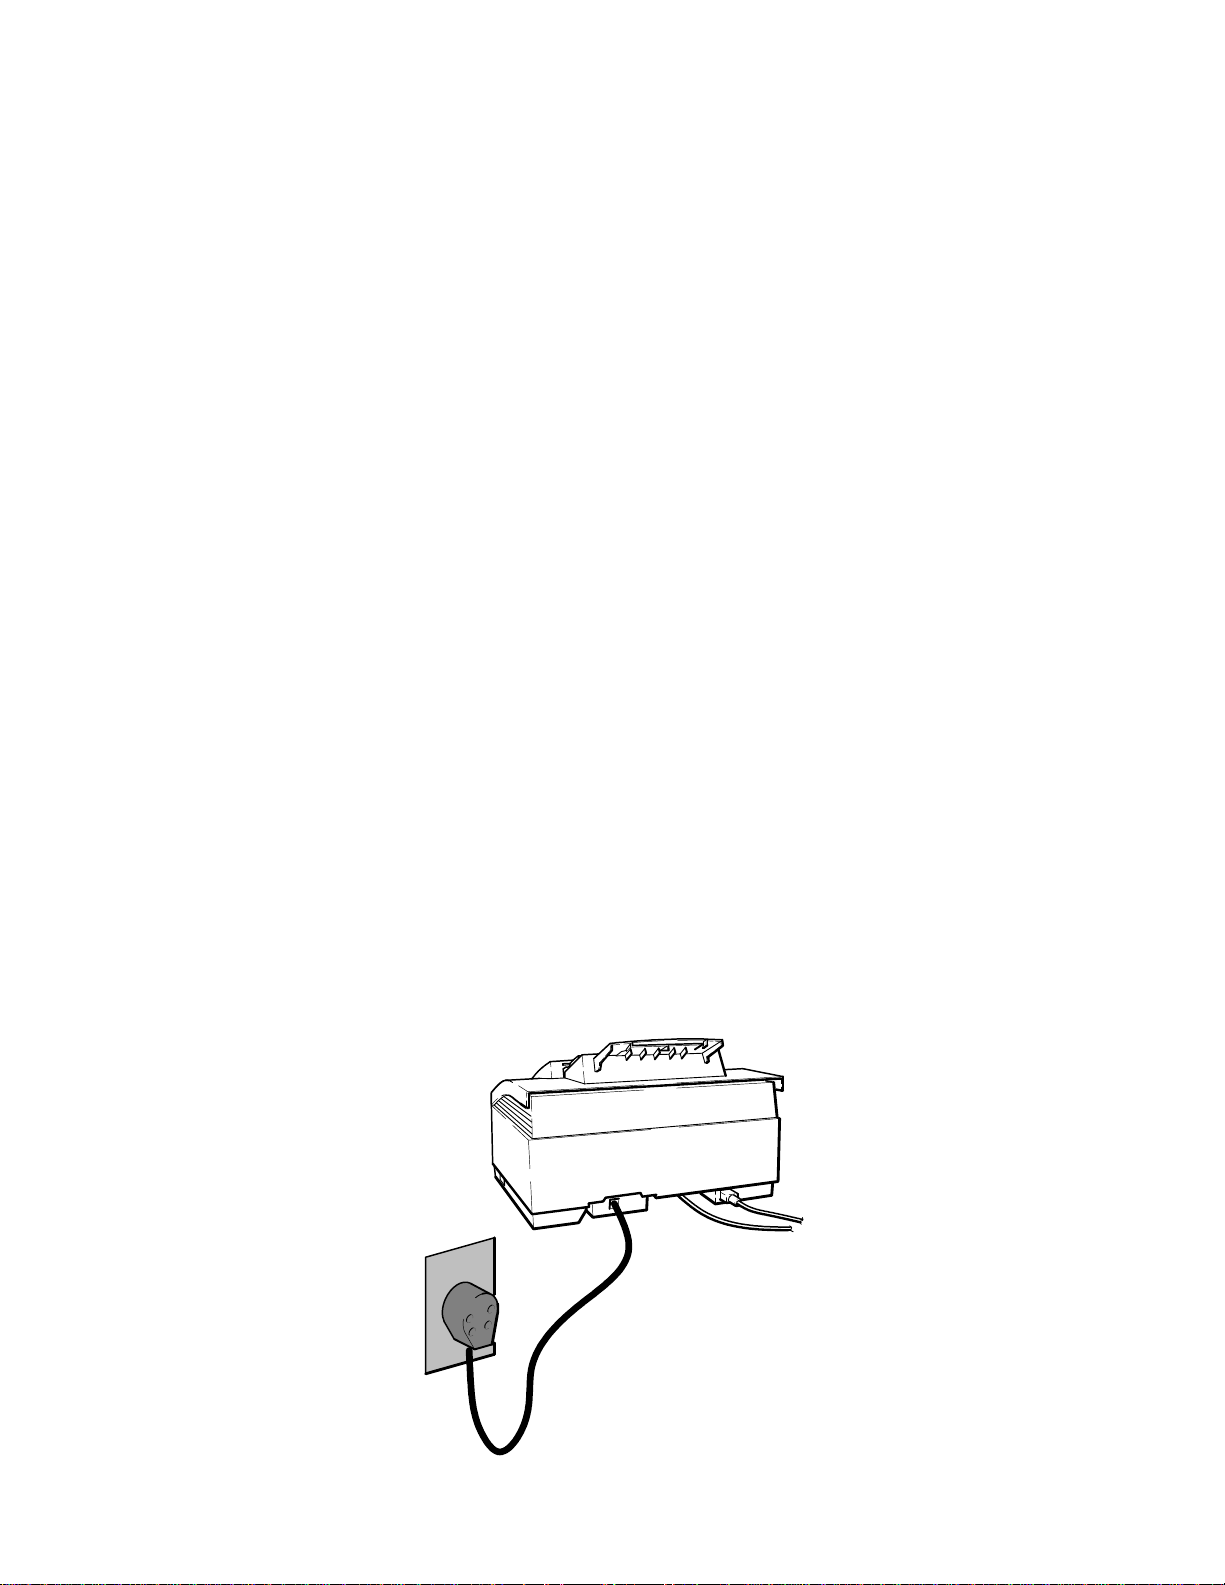
Setting Up for Faxing (Netherlands Installation)
The following types of installations are the ones recommended for use with the HP OfficeJet LX to achieve the best
call-handling results. While other situations are possible, it is recommended that one of these be used. Determine
which installation most closely meets the user’s needs and follow the instructions given.
D Receive fax calls only – no voice calls, on a dedicated fax line.
D Receive fax and voice calls at the same phone number – without an answering machine.
D Receive fax and voice calls at the same phone number – with an answering machine.
After selecting the best installation to meet the user needs, the correct reception mode and certain station specific
information will need to be set up. The procedures to accomplish this are in the following topics which are presented
in the HP OfficeJet LX User’s Guide:
D Setting the Reception Mode for incoming calls.
D Setting the number of rings to answer.
D Selecting Tone or Pulse dialing
D Entering the Date and Time
D Entering the header information (company name and fax number).
Using an HP OfficeJet LX with the HP OfficeJet LX Manager and Eclipse FAX SE to control faxing is briefly
described earlier in this section. Detailed information is provided in the HP OfficeJet LX User’s Guide.
mode in an HP OfficeJet LX is set during installation of the software, but can be changed using the HP OfficeJet LX
Manager software by selecting the Receive Mode in the Receive Fax Setup dialog box as described in the HP OfficeJet
LX User’s Guide.
Reception
Receive fax calls only – no voice calls, on a dedicated fax line
This installation is recommended when using a separate telephone line and number dedicated to receiving faxes only
(no voice calls). Installation consists of connecting the HP OfficeJet to the telephone wall jack using the telephone
cord provided, and setting the Receive Mode to Auto. Refer to the HP OfficeJet LX User’s Guide.
HP OfficeJet LX
Telephone Wall Jack
Installation and Configuration
2-38
Page 60
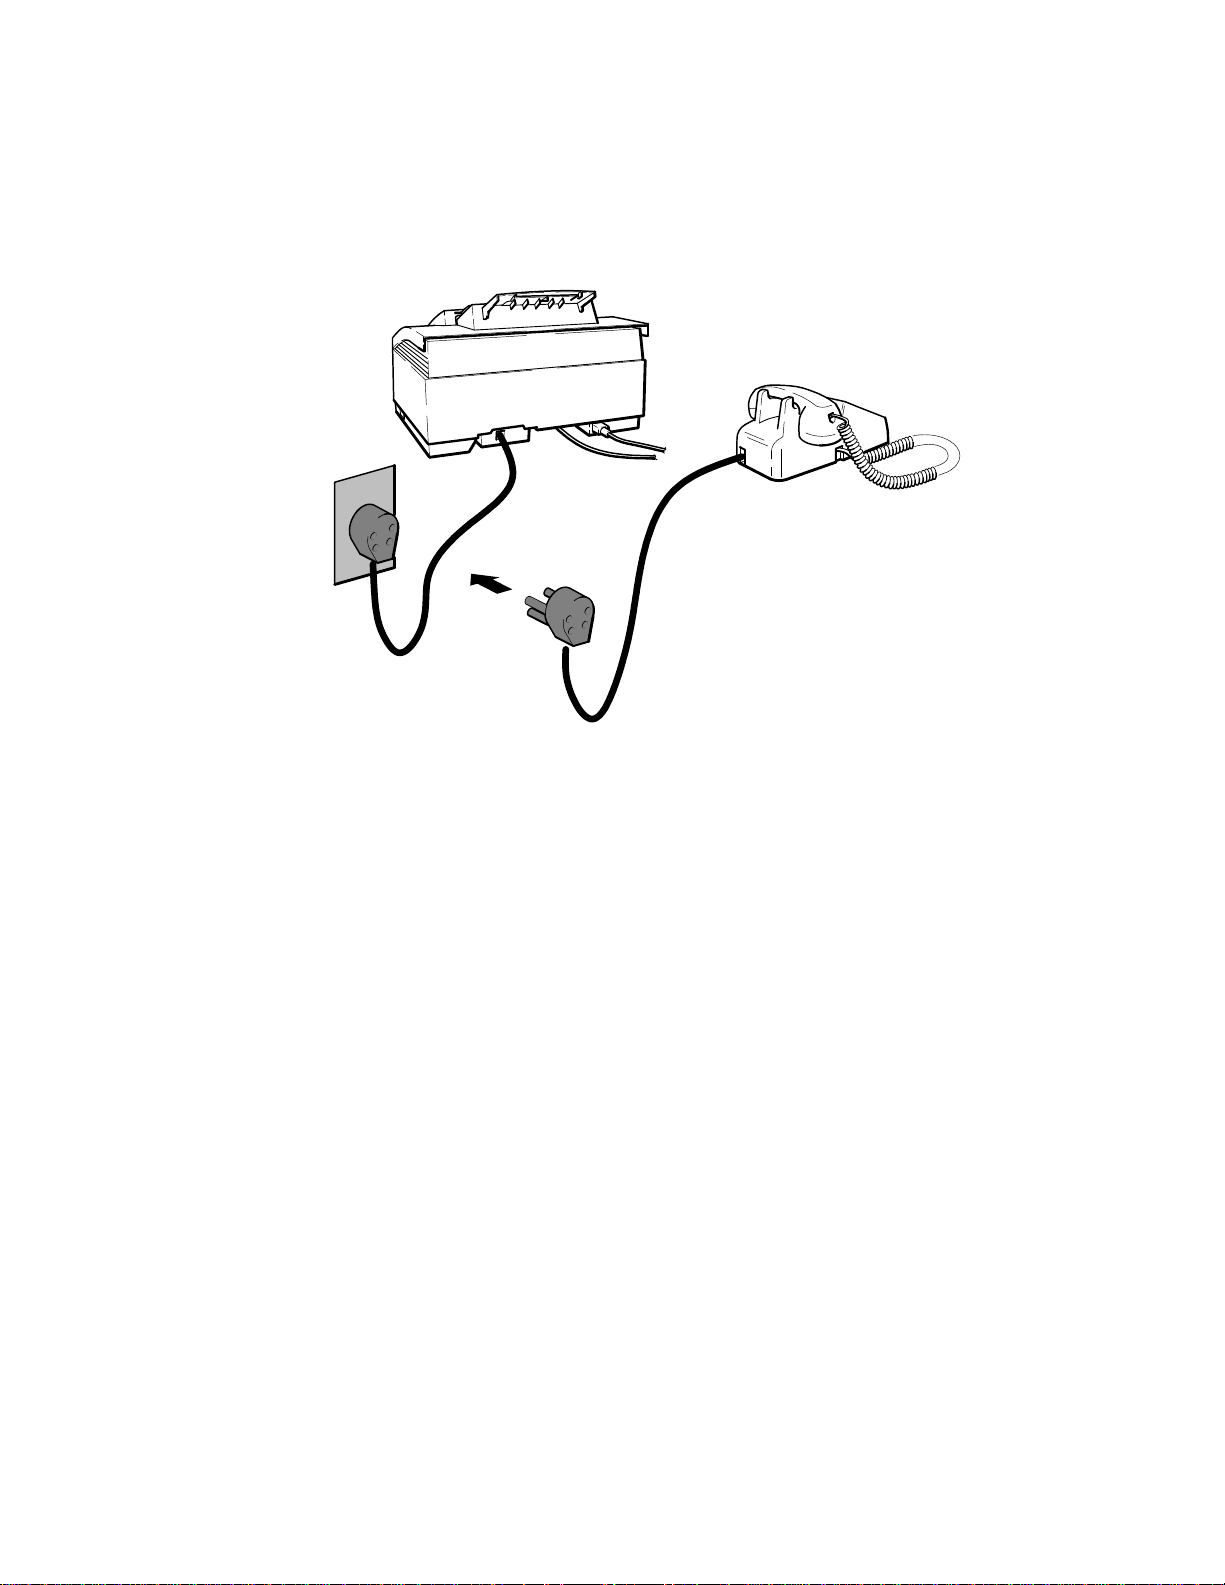
Receive fax and voice calls at the same phone number – without an answering machine
This installation is recommended when using one telephone number for both fax and voice calls and not using a
telephone answering machine. Installation consists of connecting the HP OfficeJet LX to the telephone wall jack,
connecting the telephone directly to the HP OfficeJet LX wall jack connector as shown, and setting the Receive Mode
to Manual. Refer to the HP OfficeJet LX User’s Guide.
HP OfficeJet LX
Telephone
Telephone Wall Jack
Installation and Configuration
2-39
Page 61
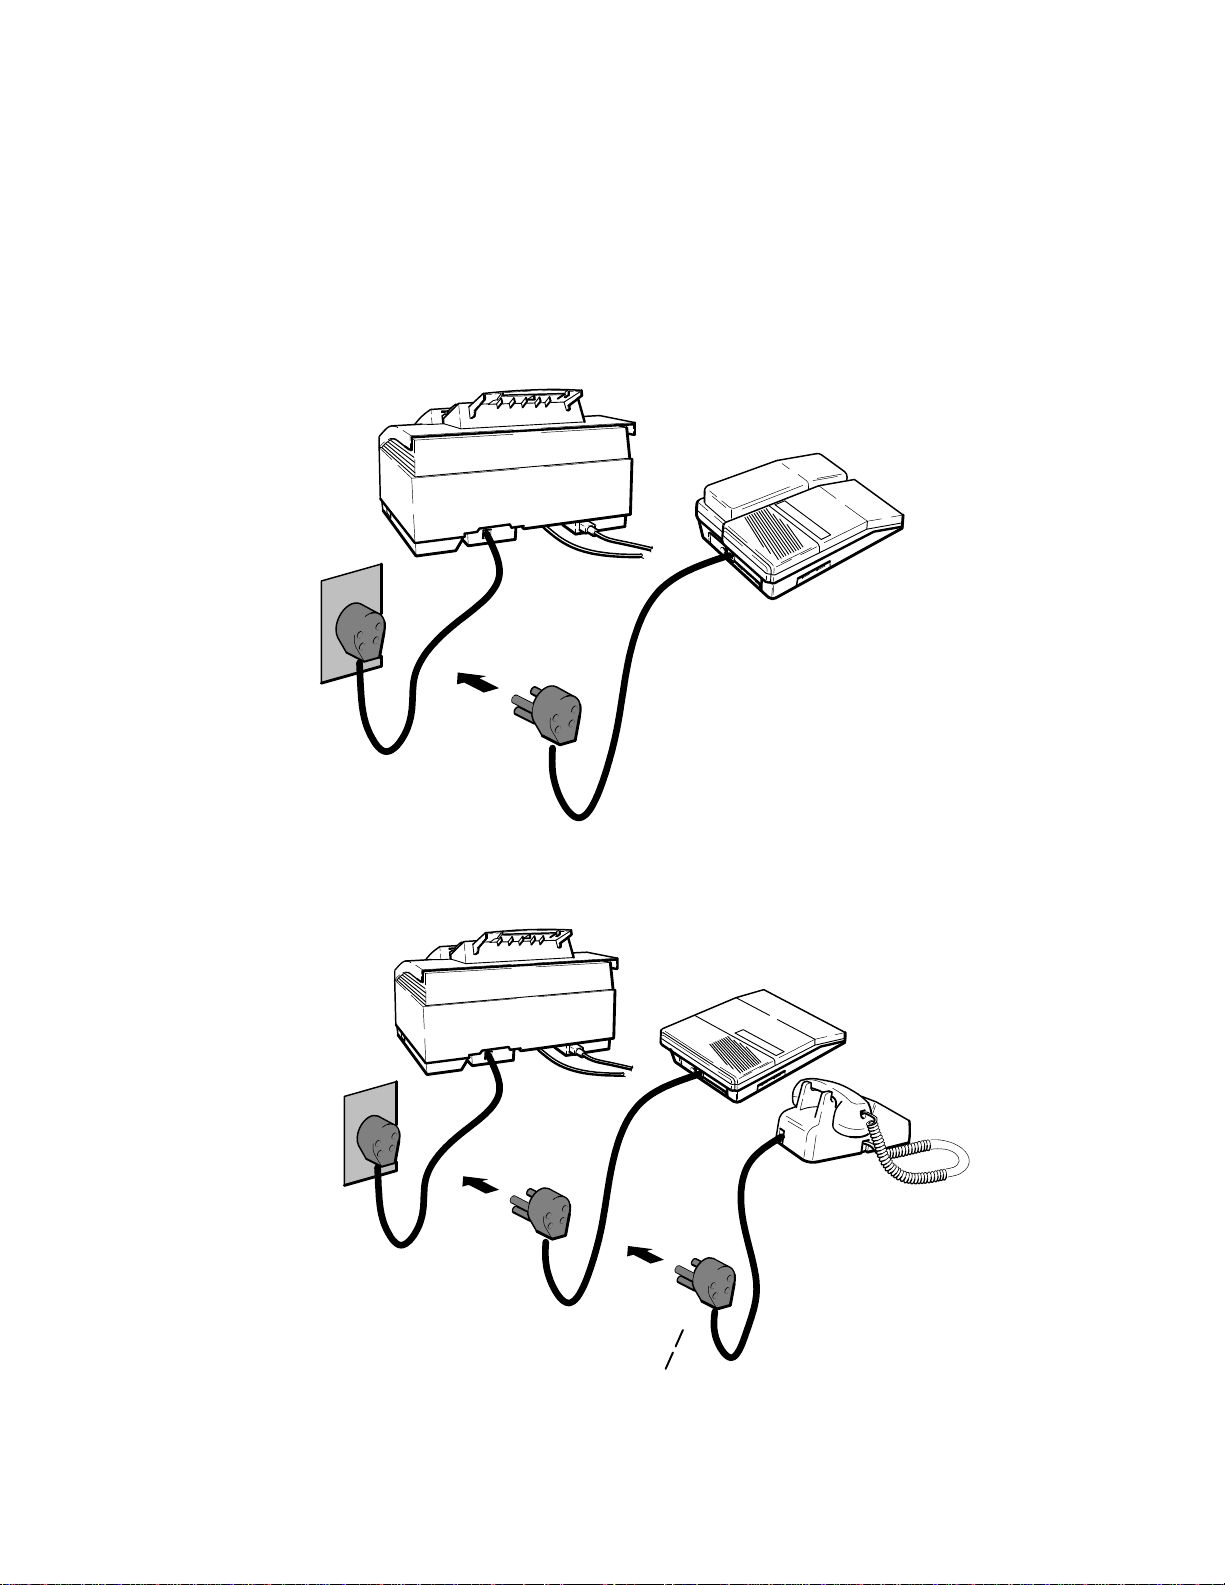
Receive fax and voice calls at the same phone number – with an answering machine
This installation is recommended when using one telephone number for both fax and voice calls and using a telephone
answering machine. Installation consists of connecting the HP OfficeJet LX to the telephone wall jack, connecting the
telephone answering machine directly to the HP OfficeJet LX wall jack connector as shown, and setting the Receive
Mode to Fax/TAM. Refer to the HP OfficeJet LX User’s Guide. Two scenarios are possible when using an answering
machine – one where the telephone handset is an attached part of the answering machine and one where the telephone
is a separate item that must be connected following the answering machine. Both scenarios are depicted in the
following diagram.
HP OfficeJet LX
Answering Machine with
attached handset
Telephone Wall Jack
HP OfficeJet LX
Telephone Wall Jack
Answering Machine
Telephone
Installation and Configuration
2-40
For use with separate telephone if the phone handset
is not part of the answering machine, attach after the
answering machine cord is connected
Page 62

3
Routine Maintenance
Subject Page
Introduction 3-2. . . . . . . . . . . . . . . . . . . . . . . . . . . . . . . . . . . . . . . . . . . . . . . . . . . . . . . . . . . . . . . . . . . . . . . . . . . .
Changing a Print Cartridge 3-2. . . . . . . . . . . . . . . . . . . . . . . . . . . . . . . . . . . . . . . . . . . . . . . . . . . . . . . . . . . . .
Exterior Cleaning 3-3. . . . . . . . . . . . . . . . . . . . . . . . . . . . . . . . . . . . . . . . . . . . . . . . . . . . . . . . . . . . . . . . . . . .
Routine Maintenance
3-1
Page 63
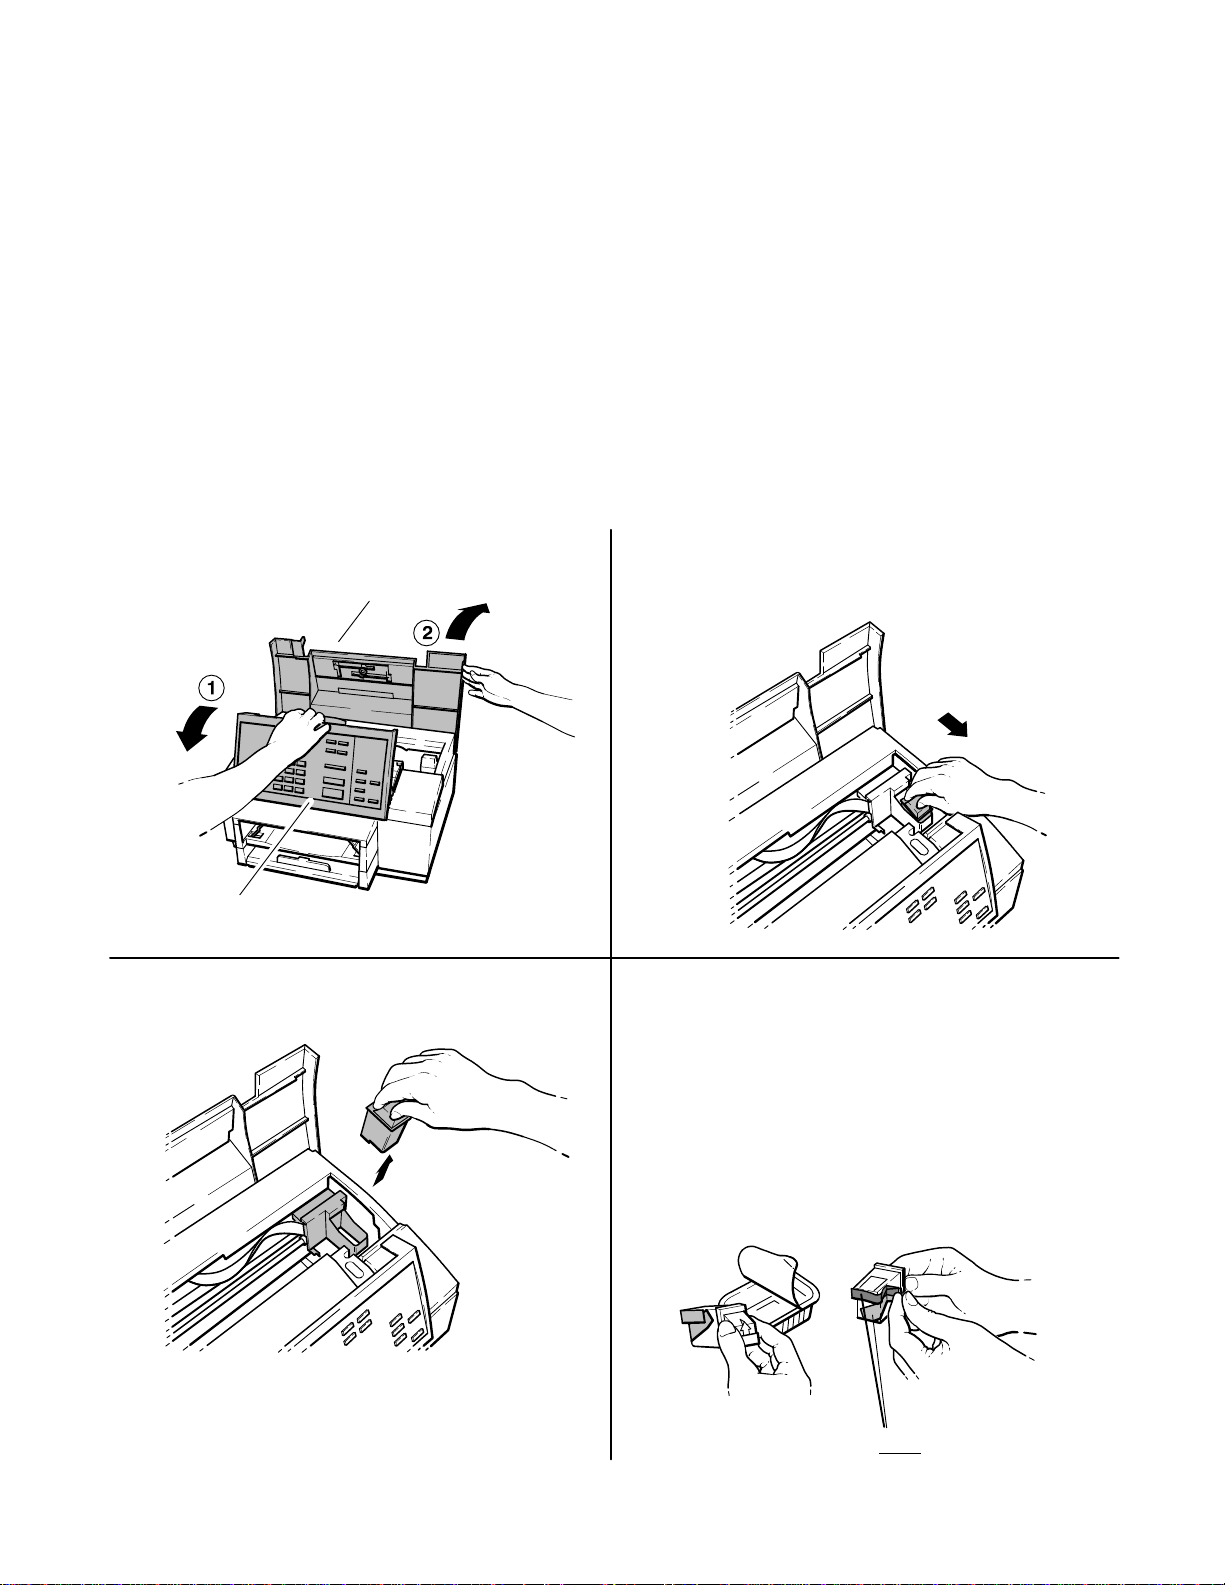
Introduction
Use the guidelines in this chapter to keep the HP OfficeJet in the best operating condition.
Changing a Print Cartridge
When installing or replacing a print cartridge, following these recommendations will optimize the performance and
extend the lifetime of the ink cartridge.
D Keep print cartridges in the print cradle in the machine to reduce exposure to air
D Keep new unused cartridges in their sealed packaging until ready to use
D Do not turn the machine OFF before printing is complete
Open the control panel, then the top cover.
1
Top cover
Control panel
Lift the print cartridge out of its cradle.
3
Pull the print cartridge toward you until it
2
releases and snaps forward.
Open the new print cartridge box and container,
4
then grasp the print cartridge by the green top
and remove the cartridge from the container.
Gently remove both pieces of tape – blue and
white – covering the ink nozzles and vent hole.
CAUTIONS: 1) If you don’t remove the white
tape, the ink in the cartridge will be depleted
prematurely.
2) Do not to touch the ink nozzles or the copper
contacts. Fingerprints may damage them.
Routine Maintenance
3-2
Remove both pieces of tape!
Page 64
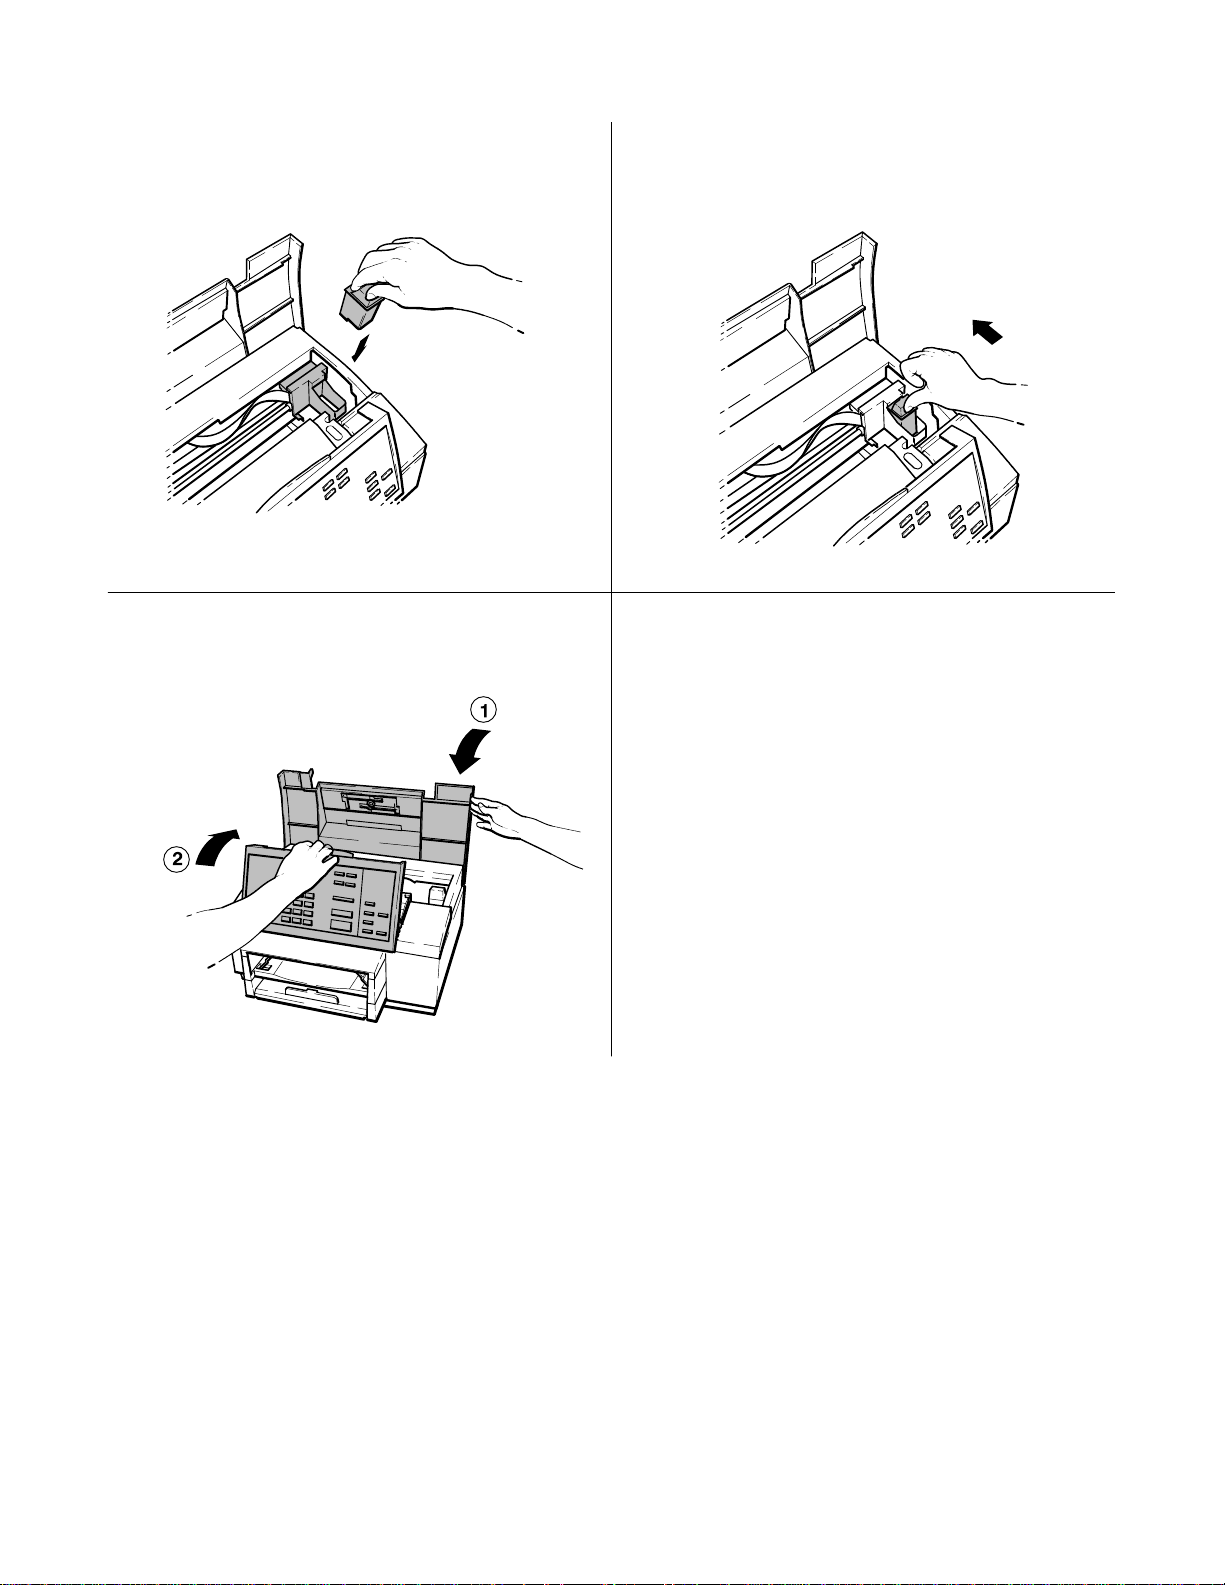
Place the print cartridge down into the cradle as
5
shown. Align the green arrow on the cartridge
top with the green dot on top of the cradle.
Push the green arrow toward the green dot until
6
the cartridge snaps into place.
Close the top cover, then close the control panel.
7
Exterior Cleaning
Follow the these recommendations when cleaning the exterior surfaces of the HP OfficeJet:
Helpful Hint:
Be sure to close the control panel firmly, until
both corners snaps into place.
D Use a soft cloth moistened with water to wipe dust off the exterior
D Do not clean the interior of the machine
D Keep liquids out of the interior of the unit
Routine Maintenance
3-3
Page 65

Notes:
Routine Maintenance
3-4
Page 66

4
Calibration and Adjustment
Subject Page
Introduction 4-2. . . . . . . . . . . . . . . . . . . . . . . . . . . . . . . . . . . . . . . . . . . . . . . . . . . . . . . . . . . . . . . . . . . . . . . . . . . .
Print Calib Chart 4-2. . . . . . . . . . . . . . . . . . . . . . . . . . . . . . . . . . . . . . . . . . . . . . . . . . . . . . . . . . . . . . . . . . . . . . . .
Calibration and Adjustment
4-1
Page 67

Introduction
The only procedure available outside of the factory environment is the calibration chart, which can be printed out and
used to determine if the top margin must be adjusted. This procedure is used to adjust the top margin when performing
a copy function. It is performed at the factory before shipment and should never need readjusting.
Print Calib Chart
WARNING: This procedure should only be accomplished under the direction of a trained HP support agent.
Do NOT perform this procedure unless directed to do so by the agent.
The distance between the page detect sensor and the location of the scanner will vary between machines due to parts
tolerances. This variation affects the top scanning margin. The scanner position calibration will adjust the top margin.
A Calibration Chart is used for this procedure and contains the following features:
D A check to see if the calibration is successful or needed
D Instructions on how to perform the calibration
D Calibration scale used to select the correct parameter value
To check if a calibration is needed, first print the Calibration Chart. Then cut the top of the chart along the dotted line.
Set the HP OfficeJet copy reduction setting to 100%. Make one copy of the chart by feeding the top end first into the
document feeder. If the hour-glass printed on the chart is either completely visible or not visible at all, a calibration is
needed. Ideally, exactly one-half of the hour-glass will be visible. Detailed instructions are provided in the following
paragraphs. A sample chart is provided following this procedure.
To print a calibration chart, you must enter the Service and Factory Menu. There are two methods that can be used to
access the Service and Factory Menu:
1. Press the “*” and “7” buttons simultaneously while powering on the HP OfficeJet.
2. From the “Enter Header Number” display, first use the “Backspace” button to erase the currently displayed
header number (if present), then press the “Redial/Pause”, “*”, “Redial/Pause”, “2”, “3”, “2” and “Enter/Save”
buttons in sequence. Press the menu button and scroll to the Service and Factory Menu.
Once the Service and Factory Menu has been accessed, it will remain part of the main menu structure until the HP
OfficeJet is powered OFF. Cycling the power OFF and then ON will remove the Service and Factory Menu from the
display and return to the regular user menu.
The same method used to navigate and select user menu functions is also used for the Service and Factory Menu. A
full description of the Service and Factory Menu is provided in chapter 5 of this manual.
Calibration and Adjustment
4-2
Page 68

After accessing the Service and Factory Menu, scroll to the Print Calib Chart submenu and start printing the chart.
The chart contains a complete description of the following procedure:
1. Remove the top portion of the chart by cutting along the dotted line.
2. Enter the Change Stored Parameter submenu and select parameter 200.
3. Write down the existing value at parameter 200, then enter a new value of 1500.
4. Press the front panel Resolution button until FINE is displayed on the front panel display.
5. Using the front panel menu, set the Copy Reduction to 100%.
6. Load the chart (with the top portion removed at the dotted line) into the automatic document feed tray and make one
copy. Make sure the chart is loaded top end first with the print side facing down.
7. Look at the copy and find the top most visible tick mark of the Calibration Value Scale where the scale is cut off.
8. Determine the Calibration Value corresponding to this tick mark by reading the “How to Read Scale” portion of the
sample chart following this procedure. The normal range is 550 to 650 on the scale.
9. Reenter the Service and Factory Menu.
10. Scroll to the Change Stored Parameter submenu and access parameter 200.
11. Enter the Calibration Value determined from the “How to Read Scale” into parameter location 200.
12. The calibration test is complete. Check that the calibration is correct by making another copy of the chart
previously used (with the top portion removed). Ideally, one-half of the hour-glass will be visible.
A sample calibration chart is provided on the next page. Refer to it facilitate performing the procedure and to obtain
the calibration value.
Calibration and Adjustment
4-3
Page 69
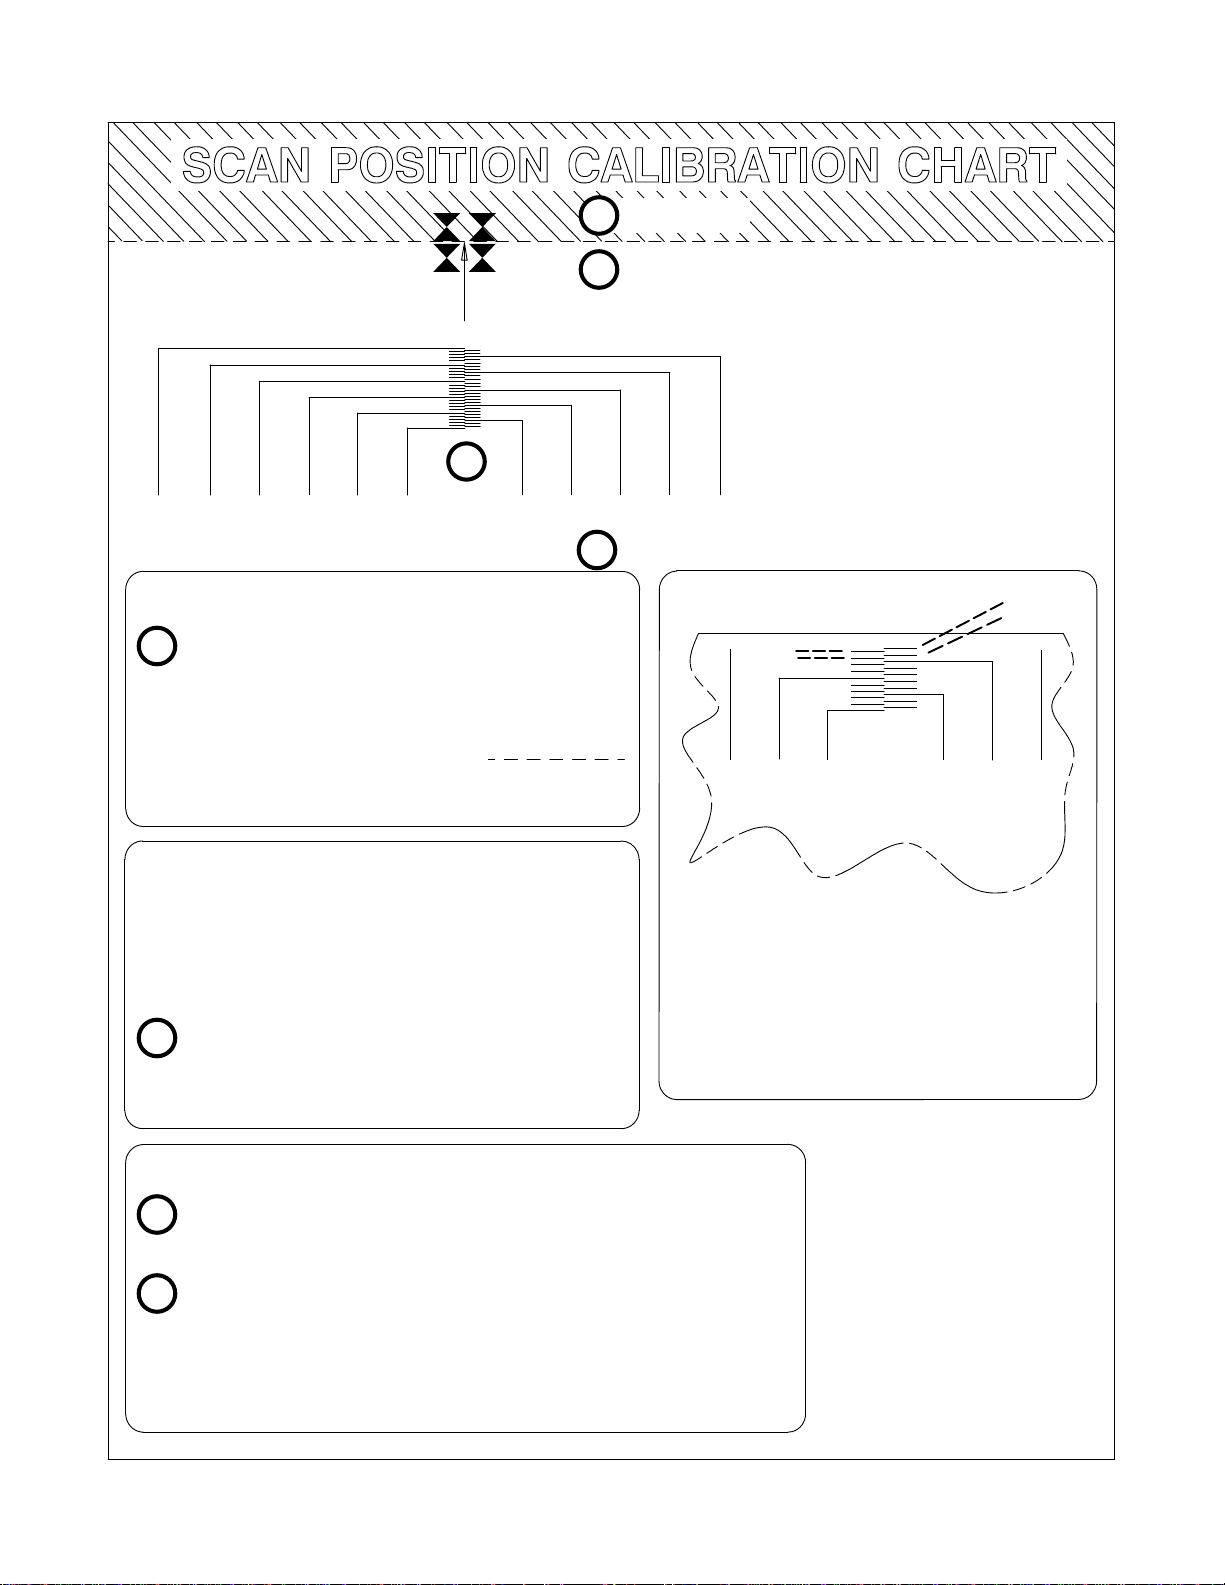
CUT HERE
1
FEED THIS END FIRST TOPTOP
4
5
950 850 750 650 550 450 500 600 700 800 900
CALIBRATION VALUE SCALE
SET-UP
Cut the top of this chart along the
1
dashed line.
Enter the “Change Parameter” menu and
2
select parameter 200.
a) note existing value:
b) enter new value: 1500
MEASUREMENT
Exit the Service Menu and
3
a) set Copy Reduction to: 100%
b) set Resolution to: FINE
Load this sheet (after the top portion
4
is removed) into the FAX document
feed tray (print side down, top end
first). Make one copy.
6
How to Read the Scale
630
610
630
530
610
510
590
490
570
470
580
560
540
520
640
620
680
660
640
620
500 600 700450550650
CALIBRATION VALUE SCALE
Moving from the left side to the right
side, the scale increments by 10 for
each scale tick mark (20 between
tick marks on the same side). The
highest readable value in this
example is 640.
CALIBRATION
Look at the copy and find the top most tick mark
5
of the Calibration Value Scale which is visible.
Determine the Calibration Value corresponding to this
6
tick mark. See “How to Read the Scale”.
7
Enter this value at parameter 200 location using the
“Change Parameter” menu. Calibration is complete.
Calibration and Adjustment
4-4
Page 70

5
Problem Resolution
Subject Page
Introduction 5-2. . . . . . . . . . . . . . . . . . . . . . . . . . . . . . . . . . . . . . . . . . . . . . . . . . . . . . . . . . . . . . . . . . . . . . . . . . . .
Multi-Function Task Chart 5-2. . . . . . . . . . . . . . . . . . . . . . . . . . . . . . . . . . . . . . . . . . . . . . . . . . . . . . . . . . . . . . . . .
Problem Solving Process 5-2. . . . . . . . . . . . . . . . . . . . . . . . . . . . . . . . . . . . . . . . . . . . . . . . . . . . . . . . . . . . . . . . . .
Typical Questions and Answers 5-3. . . . . . . . . . . . . . . . . . . . . . . . . . . . . . . . . . . . . . . . . . . . . . . . . . . . . . . . . . . . .
Error Notification: Beeps, Blinking Lights and Messages 5-6. . . . . . . . . . . . . . . . . . . . . . . . . . . . . . . . . . . . . . . .
Display Messages: What they mean and what to do 5-7. . . . . . . . . . . . . . . . . . . . . . . . . . . . . . . . . . . . . . . . . . . . .
Solving Problems While Printing, Faxing or Copying 5-16. . . . . . . . . . . . . . . . . . . . . . . . . . . . . . . . . . . . . . . . . . .
Diagnostic Codes: What they are, how to read them and what to do 5-22. . . . . . . . . . . . . . . . . . . . . . . . . . . . . . . .
Fax Session Protocol: Diagnostic Code appearances in a communication 5-22. . . . . . . . . . . . . . . . . . . . . . . . .
Diagnostic Code Descriptions 5-25. . . . . . . . . . . . . . . . . . . . . . . . . . . . . . . . . . . . . . . . . . . . . . . . . . . . . . . . . . .
Communication Error Codes (level 400 and 500) 5-27. . . . . . . . . . . . . . . . . . . . . . . . . . . . . . . . . . . . . . . . . . . .
Power-On Initialization Tests 5-34. . . . . . . . . . . . . . . . . . . . . . . . . . . . . . . . . . . . . . . . . . . . . . . . . . . . . . . . . . . . . . .
Special Menus and Functions 5-35. . . . . . . . . . . . . . . . . . . . . . . . . . . . . . . . . . . . . . . . . . . . . . . . . . . . . . . . . . . . . .
Service and Factory Menu 5-36. . . . . . . . . . . . . . . . . . . . . . . . . . . . . . . . . . . . . . . . . . . . . . . . . . . . . . . . . . . . . . . . .
Service and Factory Menu Structure 5-36. . . . . . . . . . . . . . . . . . . . . . . . . . . . . . . . . . . . . . . . . . . . . . . . . . . . . .
System Error Codes 5-41. . . . . . . . . . . . . . . . . . . . . . . . . . . . . . . . . . . . . . . . . . . . . . . . . . . . . . . . . . . . . . . . . . . . . .
User-Menu Associated Parameter Structure 5-42. . . . . . . . . . . . . . . . . . . . . . . . . . . . . . . . . . . . . . . . . . . . . . . . . . .
Officejet Parameter Descriptions 5-43. . . . . . . . . . . . . . . . . . . . . . . . . . . . . . . . . . . . . . . . . . . . . . . . . . . . . . . . . . . .
LIU Identification 5-43. . . . . . . . . . . . . . . . . . . . . . . . . . . . . . . . . . . . . . . . . . . . . . . . . . . . . . . . . . . . . . . . . . . .
Ring Detection and Auto Answering 5-44. . . . . . . . . . . . . . . . . . . . . . . . . . . . . . . . . . . . . . . . . . . . . . . . . . . . .
Eavesdrop Detection and Automatic Answering 5-47. . . . . . . . . . . . . . . . . . . . . . . . . . . . . . . . . . . . . . . . . . . .
Connection Establishment 5-50. . . . . . . . . . . . . . . . . . . . . . . . . . . . . . . . . . . . . . . . . . . . . . . . . . . . . . . . . . . . . .
Pause Control 5-53. . . . . . . . . . . . . . . . . . . . . . . . . . . . . . . . . . . . . . . . . . . . . . . . . . . . . . . . . . . . . . . . . . . . . . .
Dial Tone Detection 5-54. . . . . . . . . . . . . . . . . . . . . . . . . . . . . . . . . . . . . . . . . . . . . . . . . . . . . . . . . . . . . . . . . . .
Dialing 5-60. . . . . . . . . . . . . . . . . . . . . . . . . . . . . . . . . . . . . . . . . . . . . . . . . . . . . . . . . . . . . . . . . . . . . . . . . . . . .
Call Progress 5-62. . . . . . . . . . . . . . . . . . . . . . . . . . . . . . . . . . . . . . . . . . . . . . . . . . . . . . . . . . . . . . . . . . . . . . . .
Modem Configuration 5-65. . . . . . . . . . . . . . . . . . . . . . . . . . . . . . . . . . . . . . . . . . . . . . . . . . . . . . . . . . . . . . . . .
Fax Session Configuration 5-67. . . . . . . . . . . . . . . . . . . . . . . . . . . . . . . . . . . . . . . . . . . . . . . . . . . . . . . . . . . . .
Redialing 5-68. . . . . . . . . . . . . . . . . . . . . . . . . . . . . . . . . . . . . . . . . . . . . . . . . . . . . . . . . . . . . . . . . . . . . . . . . . .
Miscellaneous 5-70. . . . . . . . . . . . . . . . . . . . . . . . . . . . . . . . . . . . . . . . . . . . . . . . . . . . . . . . . . . . . . . . . . . . . . .
Problem Resolution
5-1
Page 71

Introduction
This chapter contains information which can be used to resolve problems encountered while using the HP OfficeJet.
Problems that require removing the top cover in order to troubleshoot or repair the machine must be referred to
qualified service personnel. Follow the instructions in this chapter to make certain the problem is in the machine and
not the result of an interface connection problem or a malfunction in the computer or software.
Multi-Function Task Chart
Use the Simultaneous Task Capability chart in Chapter 1 of this guide as a reference for which tasks can be performed
simultaneously. Attempting to perform concurrent tasks not supported may result in a display message or error
condition.
Problem Solving Process
1. Review the Troubleshooting chapter in the HP OfficeJet (LX) User’s Guide. Most problems are fairly simple to
resolve. The recommended way to solve them is to identify the problem and take the corrective steps provided.
2. A list of user available support resources is provided in Chapter 6. Use the resources list before calling the
Customer Support Center. The resources available can expedite problem resolution and get many users back in
operation without a service call. Some of the resources offer instant fax return of the support information requested.
3. Gather some basic information before calling for help. To facilitate prompt service, be sure to have the following
information readily available before contacting the HP Customer Support Center (CSC):
D Product name and serial number
D Description of the problem
D Purchase date and proof of purchase
D A valid credit card or purchase order number (required for HP’s Express Exchange option)
Call HP CSC: (208) 323-2551 Monday, Tuesday, Thursday, and Friday from 7:00 am to 6:00 pm (MST); Wednesday
from 7:00 am to 4:00 pm (MST).
An HP CSC agent will guide you through the following process to quickly determine and solve any problems you may
have:
D Setup and Operation Problems: First, the HP CSC agent will help solve any problems or answer any
questions relating to setup or operation.
D Remote Diagnostics: If setup or operation is not the problem, the HP CSC agent can attempt to identify
the problem using the remote diagnostics feature of your HP OfficeJet. This powerful capability provides
access to all user setup and machine operating parameters, and allows some problems to be detected and
corrected over the telephone line.
D Arranging Repair: If the problem can not be resolved over the phone, the HP CSC agent will arrange to
replace or repair the unit using the HP Express Exchange or Standard Return program through the
Corvallis Service Center.
Problem Resolution
5-2
Page 72

Typical Questions and Answers
The following series of questions are those typically asked by customers who need to know something about a
particular function or capability and which operations can be performed simultaneously.
Q: How fast does the HP OfficeJet print?
A: The HP OfficeJet can print up to 3 pages a minute. Draft and Letter print quality can be set using the front panel.
Also, various quality levels can be set through the printer drivers supplied with the unit. Draft quality print speed is 3
pages per minute and Letter quality print speed is 2 pages per minute.
Q: How fast does the HP OfficeJet send faxes?
A: The HP OfficeJet can send fax transmissions at up to 10 seconds per page. This speed is based on the standard
resolution with Error Correction Mode of the CCITT test chart #1. The speed of fax transmission through the wires is
dependent on the phone line, the receiving fax machine, the print density on the page(s) and the resolution setting.
Q: What is the page capacity of the fax document feed tray?
A: Using 20 lb. paper, the fax document feed tray will handle up to 20 pages. This tray assembly is commonly known
as the automatic document feed (ADF) assembly. Heavier weight paper restricts the number of sheets that the ADF
can handle and feed. If more than 20 sheets need to be sent, the additional sheets can be put on the ADF as the others
are processed through.
Q: What is the sheet capacity of the paper supply tray?
A: The front loading paper supply tray holds up to 100 sheets of plain paper. Letter, legal and A4 sizes can be used.
Q: Can I print a file from the PC and send a fax at the same time?
A: Yes. Load the fax document into the ADF and send. The PC print job will continue.
Q: Can I print a file from the PC and make copies at the same time?
A: No. The printer is busy with the print job and can”t simultaneously process copies through the print mechanism.
Q: What happens when the machine runs out of ink while printing an incoming fax?
A: The HP Officejet detects when the ink cartridge is empty. The incoming fax will be stored in memory until the
cartridge is replaced and then printed out. Based upon CCITT test chart #1, up to 24 pages can be stored in memory.
Q: What happens if I’m printing and someone tries to send me a fax?
A: The HP OfficeJet comes with 400kB of memory for fax/copy. When a fax is received during a print job, the fax is
stored in memory and printed after the print job is completed. Up to 24 pages can be stored in the memory. If a fax
exceeding the memory space is received, the fax will take precedence over the print job.
Q: What happens if the memory is filled with incoming faxes and someone tries to send me a fax?
A: Once the memory is filled, the HP OfficeJet will no longer answer and the sending party will get a busy or no
answer signal. The fax will not be sent and thus not lost. A front panel display will notify the user that fax reception is
disabled. As the faxes stored in memory are printed out, freeing up memory space, the HP OfficeJet will automatically
begin to answer fax calls again.
Q: Does the HP OfficeJet offer remote diagnostics?
A: Yes. This feature allows the HP OfficeJet support line to identify some problems over the phone lines and access
user setup settings and machine parameters.
Problem Resolution
5-3
Page 73

Q: I have only one shared line for fax and voice calls. If I pick up an extension phone and realize that the call is a
fax call and not a voice call, can I still receive the fax?
A: The HP OfficeJet can share a phone line with voice calls in the Fax/TAM receive mode. TAM is an acronym for
telephone answering machine. When the HP OfficeJet is set in the Fax/TAM receive mode, and an answering machine
is used, the HP OfficeJet monitors the calls and responds to incoming fax tones on the line. So, if the phone is picked
up and you realize the call is a fax call, wait until you hear the fax tone, then hang up and the fax will be received.
Q: Which printer drivers can I use and which are supplied with the HP OfficeJet?
A: The HP OfficeJet is designed for the PC environment. Microsoftr Windows and top-tier DOS software drivers are
supplied. The HP Officejet is supported on a wide range of DOS applications using the HP DeskJet 500 series printer
drivers. Six internal fonts for DOS applications reside in the HP Officejet. No font cartridge capability is provided.
Q: Are separate ink cartridges needed for the printer and fax?
A: No. One print cartridge is used to print, fax and copy.
Q: What is broadcasting and does the HP OfficeJet offer it?
A: Broadcasting is the ability to send a fax document to more than one station at the same time. This feature is also
referred to as group dialing. The HP OfficeJet offers group dialing and can be set to speed dial groups of numbers
previously stored in memory. You can also send to several fax numbers (up to 10) by pressing the Enter/Save button
instead of the Start/Copy button after entering a phone number. The display will prompt you for additional numbers.
Q: What is polling and does the HP OfficeJet offer it?
A: Polling is the ability to allow fax machines to communicate requests for faxes from each other. The calling machine
requests, via fax tones, that a document stored in the other machine’s ADF or memory be transmitted to it. Both
machines must be set up to use this feature or no polling can occur. The HP OfficeJet can be set up to poll or be polled.
Polling is restricted to one station at a time, no group polling is offered.
Q: Does the HP OfficeJet offer delayed sending of faxes to take advantage of lower phone rates or different
time zones?
A: Yes. The HP OfficeJet can be set to send a fax up to 24 hours later. The fax can be either stored in memory or placed
on the ADF until the requested sending time.
Q: How much memory is included for printing and faxing?
A: A total of 1 MB of memory resides in the HP Officejet. Approximately 400 kB of memory is used for the fax/copy
features, providing for about 24 pages of fax data storage. Approximately 584 kB of memory is needed for system
operation while about 16 kB is used for PC print job storage. If using memory storage functions such as broadcasting
and delayed sending, 32kB of memory is reserved for incoming faxes.
Q: Can I send a fax from memory to another fax machine’s memory?
A: Yes, providing the other fax machine has the capability and capacity to store the incoming message in memory.
Q: Can I receive a fax into memory from another fax machine’s memory?
A: Yes, providing the HP OfficeJet is set for backup reception (factory default) and sufficient memory is available.
Based upon CCITT test chart #1, up to 24 pages can be stored in memory.
Q: Does Eclipse FAX SE have to be running to receive PC faxes?
A: No, but the HP OfficeJet LX Manager does. You need to run the PC fax software package to view the fax.
Problem Resolution
5-4
Page 74
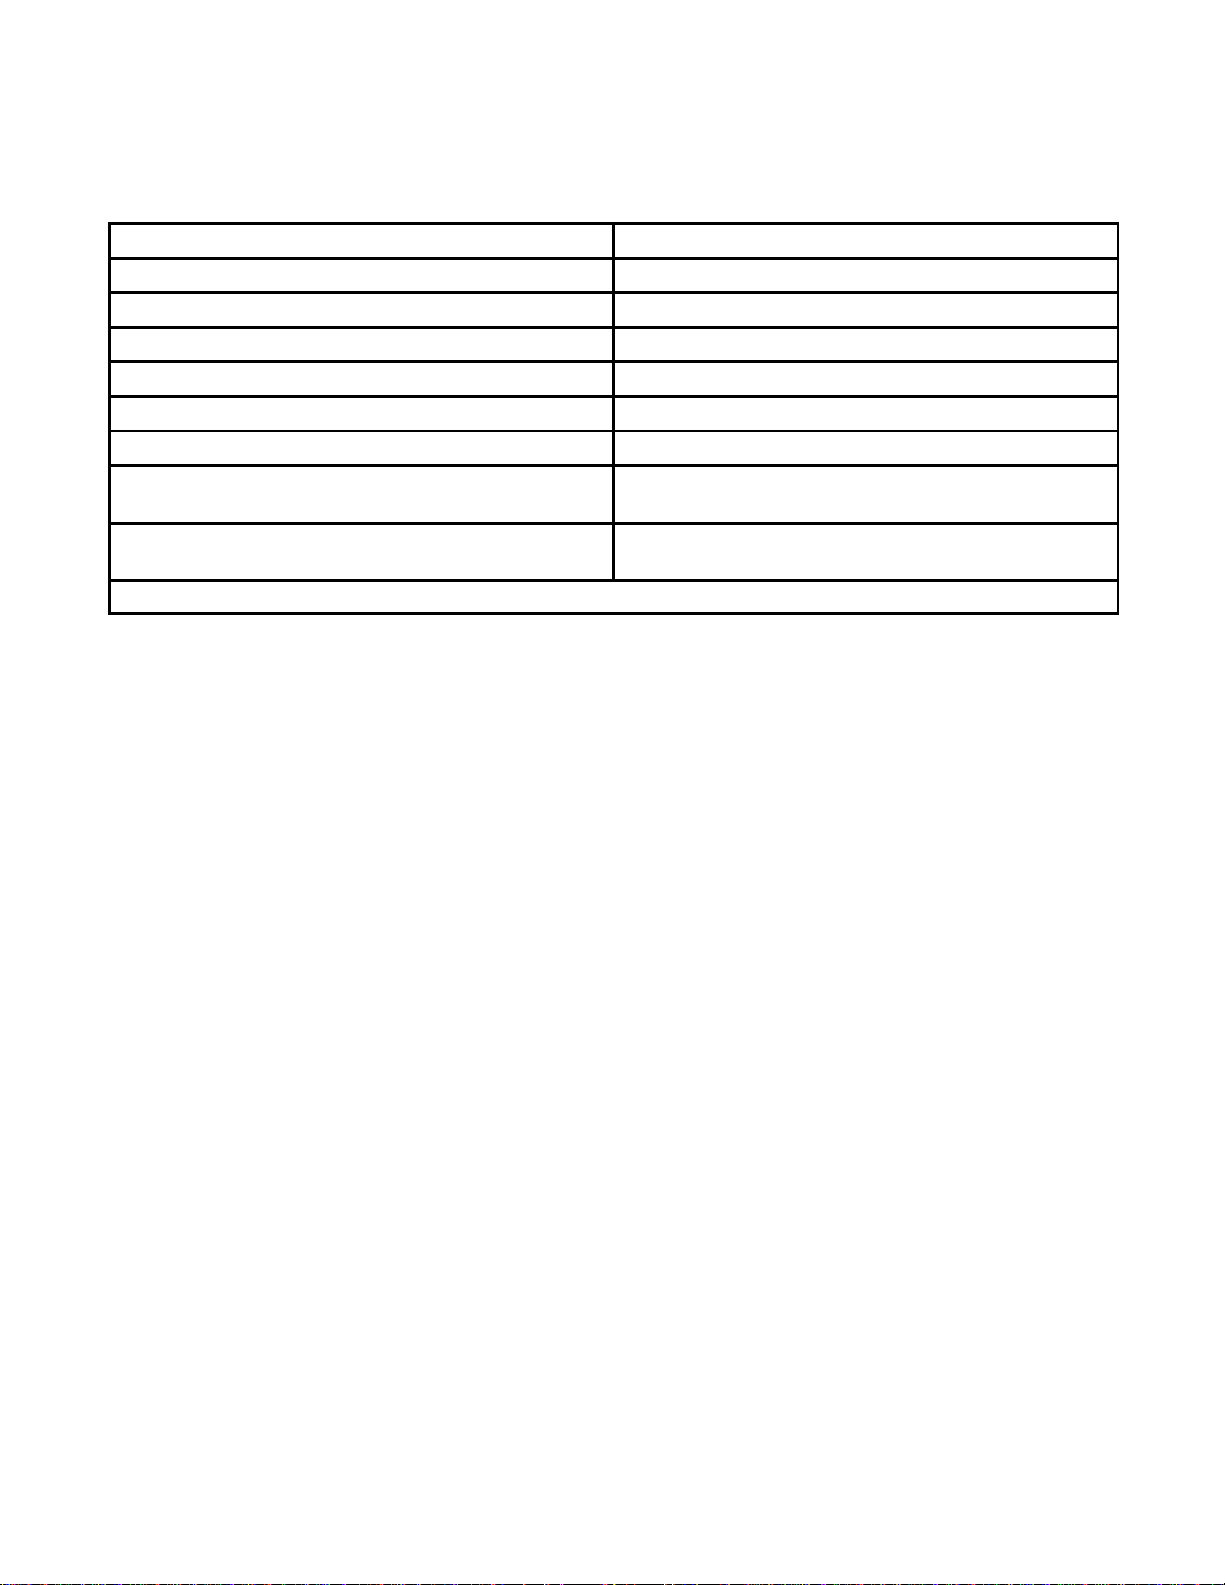
Q: What is the print resolution offered in the fax, printing and copy modes?
A; Refer to the following table.
Mode
Resolution
Printing from PC with Windows 3.1 driver 600 dpi x 300 dpi with REt
Printing from PC with DOS (text) 600 dpi x 300 dpi
Printing from PC with DOS (graphics) 300 dpi x 300 dpi
Fax printing 200 dpi receive scaled to 300 dpi
Fax sending (Standard) 100 dpi x 200 dpi (approximate)
Fax sending (Fine) 200 dpi x 200 dpi (approximate)
Fax sending (Photo) 200 dpi x 200 dpi (approximate) with 32 levels of
greyscale
Copy 200 dpi x 200 dpi (approximate) with Fine resolution
as default, can also use Photo mode
dpi = dots per inch; dots per 25,4 cm. REt = resolution enhancement technology
Q: What level of greyscale is provided for photo images?
A: The HP OfficeJet provides 256 levels of greyscale for printed documents through the printer drivers on Windows
and other applications for printing photographic images from the PC. 32 levels of grayscale are provided for faxing
and copying photographic images.
Q: Is the print quality similar for printing and faxing?
A: Print quality of documents sent from the PC applications with the Windows driver are the highest quality at 600 dpi
x 300 dpi with resolution enhancement to smooth the edges. In fax mode, the print quality is dependent on the
scanning resolution of the sending fax machine as well as the HP OfficeJet. The sending fax machine most likely
sends the fax at 100 dpi x 200 dpi or 200 dpi x 200 dpi. The HP OfficeJet receives faxes and then scales them to 300 dpi
for printing. In copy mode, the internal 200 dpi scanner scans the document and the data is scaled to 300 dpi for
printing.
Q: What fonts are supported?
A: There are six internal fonts in the HP OfficeJet to support DOS applications. When using the Windows driver, all of
the TrueType fonts are supported. An additional 14 TrueType fonts are shipped with the Windows 3.1 driver.
Although the HP OfficeJet is fully compatible with the HP DeskJet 520, it does not support font cartridges nor
downloadable soft fonts.
Q: What happens when a fax document larger than Letter size is received by the HP OfficeJet?
A: With automatic reduction set to ON, the HP OfficeJet automatically reduces the image to fit the paper size loaded
in the supply tray. The fax and copy functions support Letter, Legal and A4 paper sizes. Also, the paper size should
match the size set in the front panel menu.
Q: How long does it take to copy a document?
A: Copy speed is approximately 50 seconds per page for a typically dense letter-sized page of text. Dense text and
graphics will take longer. Copying in Photo mode resolution also takes longer.
Q: Can the copier reduce the copies made?
A: Yes. The copy feature includes the ability to reduce images from 100% down to 70% in 5% increments.
Problem Resolution
5-5
Page 75

Error Notification: Beeps, Blinking Lights and Messages
Certain error conditions can be incurred when a wrong button is pressed, a process is cancelled or an internal machine
problem is detected. The HP OfficeJet will notify the user when one of these conditions occurs. The error notification
can be in the form of beeps, blinking lights or messages in the display. Refer to the following table for conditions and
typical methods of notification.
Type of notification:
Three short beeps.
Nine short beeps. See Display light blinks on
and off. An error message is displayed that
describes the problem and tells you how to
solve it, if applicable.
Nine short beeps. See Display light blinks on
and off. A “SYSTEM ERROR” message is
displayed along with a three-digit code.
(Refer to the Displayed Messages” section later
in this chapter.) Record this code before calling
for service.
Error condition:
An unavailable function was requested.
A button for a function that wasn’t available at
that time was pressed.
(Example: You can’t use the Menu button while
sending a fax.)
An error interrupted an activity in progress.
An error occurred which has interrupted or
cancelled the current activity.
(Example: lifting the top of the control panel while
sending a fax causes the fax to be cancelled.)
You may need to take some action to clear the
error before continuing to use the HP OfficeJet.
Look up the displayed message in the next
section of this chapter for more information.
An internal problem was detected.
A problem with the internal mechanical or
electronic components has been detected.
Service is required.
Problem Resolution
5-6
Page 76
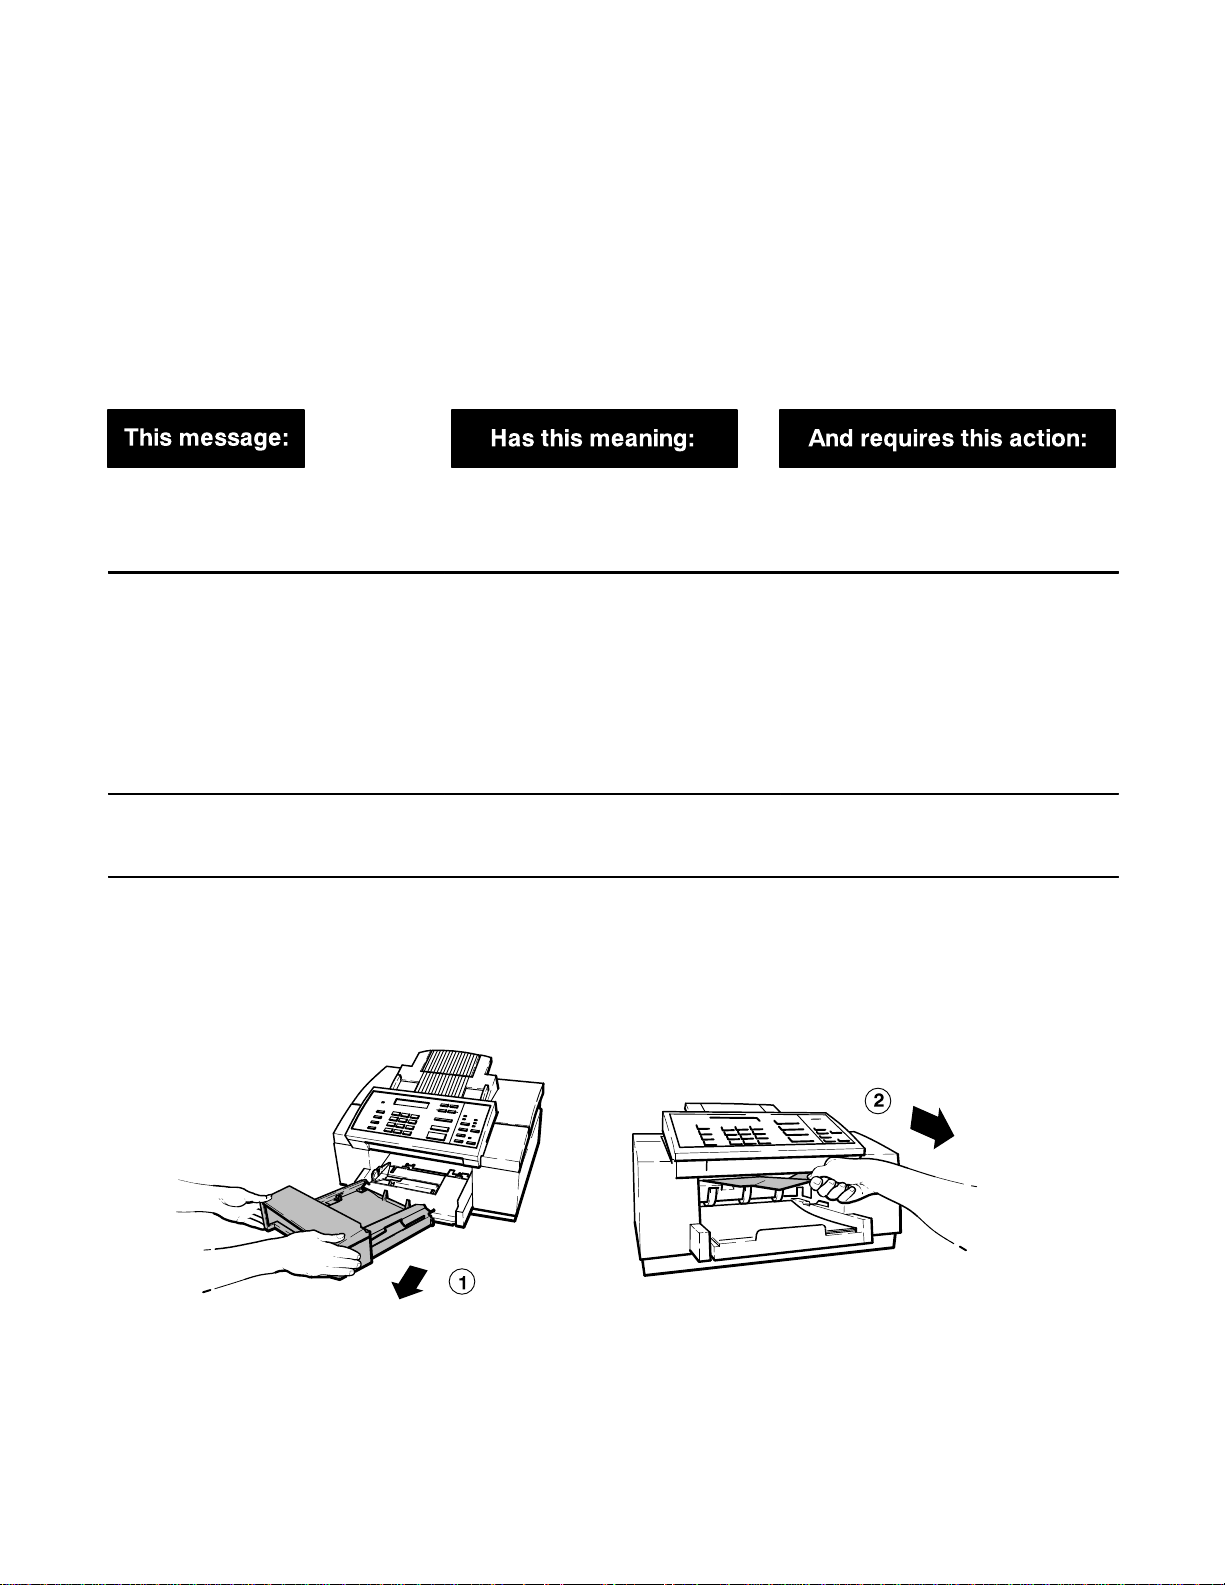
Display Messages: What they mean and what to do
Different error or operating conditions will cause the HP OfficeJet to notify the user when such conditions occur. The
messages will appear in the display. Refer to the following table for conditions, typical messages and recommended
corrective action.
The control panel display messages in the following table are presented in alphabetical order for easy reference.
Display Messages
nn pages sent
Poor Quality
Add paper
then press START
Cancel pending fax?
1=Yes 2=No
Clear print jam
then press START
The fax you just sent may contain
poor print quality resulting from
problems with the phone line.
You are printing and the paper tray
is empty.
You pressed Stop while the HP
OfficeJet was waiting to redial and
send a memory-stored fax.
A piece of paper has jammed inside
the printer mechanism.
Contact the receiver and verify
quality or resend the fax.
Load paper for your print job, then
press the Start/Copy button.
If paper is already loaded in the
paper tray when you get this
message, remove it. (Also check for
any partially-loaded sheets and
remove them, too.) Discard any
damaged or curled sheets from the
stack, then reload the stack and
press Start/Copy.
Press 1 to cancel the memorystored fax. Press 2 to continue
redialing the memory-stored fax.
Remove the output tray and pull out
all wrinkled or torn pieces of paper
from the paper path. Also remove
wrinkled or torn pieces of paper
from the paper tray. When finished,
replace the output tray and press
the Start/Copy button.
(Continued on next page)
Problem Resolution
5-7
Page 77
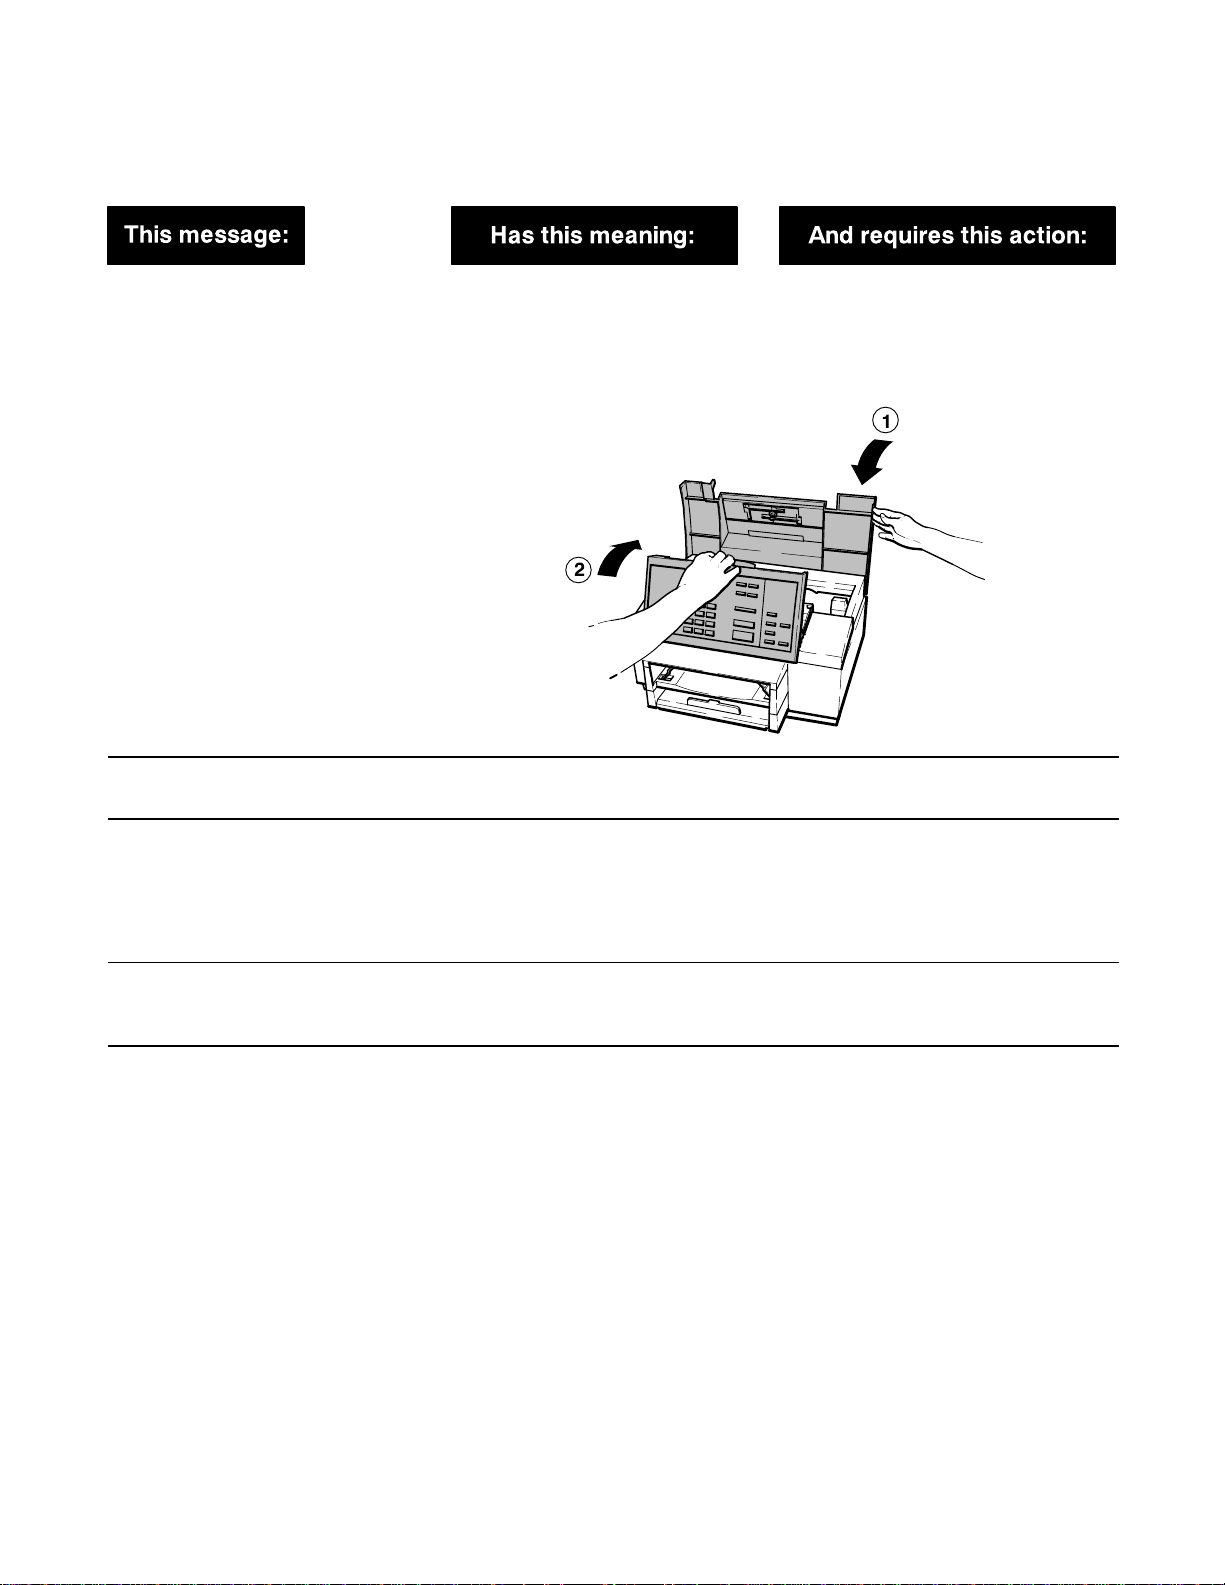
Display Messages (Continued)
Close cover
Copy cancelled
Delayed fax
pending
The control panel is open, the top
cover is open, or both the control
panel and the top cover are open.
Control panel
You pressed the Stop button while
copying was in progress.
You have already scheduled a
delayed fax. Only one delayed fax
can be scheduled at a time.
First close the top cover, then press
down on the control panel until it
snaps into place. When both are
closed properly, the “Close cover”
message will go away.
Top cover
No action is required.
Wait until after the delayed fax has
been sent, then set up the next one.
If you want to cancel the first
delayed fax instead, select Send
Fax Later, then select Cancel
Send.
Delete this fax?
1=Yes 2=No
Fax cancelled
(
fax number)
Problem Resolution
5-8
You pressed the Stop button while
a fax was being received or printed.
The bottom line displays the fax
number you were sending to or
receiving from when the fax was
cancelled. The fax could have been
cancelled because of one of the
following:
1) You pressed the Stop button.
2) You lifted the control panel.
3) You removed the document while
it was being scanned.
4) The document jammed while it
was being scanned.
(Continued on next page)
Press 1 to stop receiving and delete
the fax, or press 2 to continue
receiving and printing the fax.
If you intentionally cancelled the
fax, no action is required. If not, you
should resend the entire document.
Note: It’s possible that part of your
document was successfully
transmitted, but if you are not able
to check with the person you were
sending to, we recommend
resending the entire document.
Page 78

Display Messages (Continued)
Fax failed from
(
fax number)
Fax failed from
(unknown)
Fax in memory
Fax in memory
Memory full
A communication error between
your HP OfficeJet and the sending
fax machine resulted in a failed
transmission. The fax number of the
sending fax machine is displayed on
the bottom line.
A communication error between
your HP OfficeJet and the sending
fax machine resulted in a failed
transmission. The fax number of the
sending fax machine is unknown.
One or more incoming faxes were
stored in memory while the HP
OfficeJet was either out of paper,
out of ink, or the wrong size paper
for fax reception was loaded. This
message is displayed alternately
with the error message telling you
what needs to be corrected.
One or more incoming faxes were
stored in memory and filled the
memory to capacity while the HP
OfficeJet was either out of paper,
out of ink, or the wrong size paper
for fax reception was loaded. This
message is displayed alternately
with the error message telling you
what needs to be corrected.
Check for dial tone. You may want
to contact the person who tried to
send the document and ask them to
resend it. Failed transmissions are
most often caused by noise on the
telephone line.
Check for dial tone. You may want
to contact the person who tried to
send the document and ask them to
resend it. Failed transmissions are
most often caused by noise on the
telephone line.
Read the message that alternates
with this one (e.g., “Out of paper for
fax/copy”). Correct the indicated
problem.
Read the message that alternates
with this one (e.g., “Out of ink,
Replace pen”). Correct the
indicated problem.
The HP OfficeJet cannot receive
any more faxes until you correct the
problem and the memory-stored
faxes are printed.
Fax in memory
press START
Fax poll failed
Fax printing
disabled
A fax was stored in memory while
the HP OfficeJet was not ready to
print (out of paper, out of ink, wrong
size paper loaded, or printer busy),
but the problem has now been
corrected.
The HP OfficeJet tried to poll
another fax machine. The poll failed
because either there was no
answer, the line was busy, or the
other fax machine was not ready to
be polled.
The HP OfficeJet is out of ink.
Incoming faxes will be received to
memory until the print cartridge is
replaced.
(Continued on next page)
Press the Start/Copy button to
print the fax stored in memory.
Check with the sender to make sure
their machine is ready to be polled
and to verify the fax number. Then
set up to poll again.
Replace the print cartridge.
Problem Resolution
5-9
Page 79

Display Messages (Continued)
Fax reception
disabled
Fax send failed
No dial tone
Fax send failed
No document
Fax send failed
Try again
Fax to each
number separately
The HP OfficeJet is unable to
receive faxes due to one of the
following error conditions: the print
cartridge is out of ink or not
installed, paper has jammed during
printing, you’re out of paper, the
wrong size paper is loaded for fax
reception, or the memory is full.
You tried to send a fax, but your
telephone line is not operational.
This message is displayed when
there’s an error with a fax you
scheduled using the Send Fax Later
feature. It indicates that there was
no document in the fax loading tray
at the time you scheduled a fax to
be sent.
You tried to send a fax, but some
kind of communication error
occurred before the fax data could
be transmitted.
The HP OfficeJet tried to store a
document in memory before
sending it to a group of fax
numbers. There was not enough
memory to store the document.
Read the message that alternates
with this one, then correct the
error it describes.
Check your telephone line
connections to the wall jack and to
the HP OfficeJet. Try again.
Send your fax as desired: either
reschedule the fax using the Send
Fax Later feature, or send the fax
manually.
Try sending your fax again.
The fax machine you’re sending to
may not be ready to receive faxes.
Try contacting someone at the
receiving location.
You must send the fax to each fax
number separately.
Load document
before Start Time
Memory full
Press START
Memory full
Press STOP
Problem Resolution
5-10
You scheduled a fax using the Send
Fax Later feature and chose to
send it directly from the fax loading
tray.
You are in the middle of making
multiple copies of a document and
the memory is full.
The HP OfficeJet tried to store a
document into memory before
faxing it to multiple locations or at a
future fax time. Either there is a
received fax in memory waiting for
an error condition to be corrected
before it can be printed, or this
document is too large to fit into the
memory of the HP OfficeJet.
(Continued on next page)
Load the document in the fax
loading tray before the scheduled
start time. In the mean time, you
can send faxes as you normally
would.
Press the Start/Copy button. The
HP OfficeJet will make a single
copy of your document.
Press the Stop button. If there is an
error condition to correct, it will be
displayed. If no error message is
displayed, you can assume that this
document is too large to fit into
memory and you will need to send it
to one location at a time.
Page 80
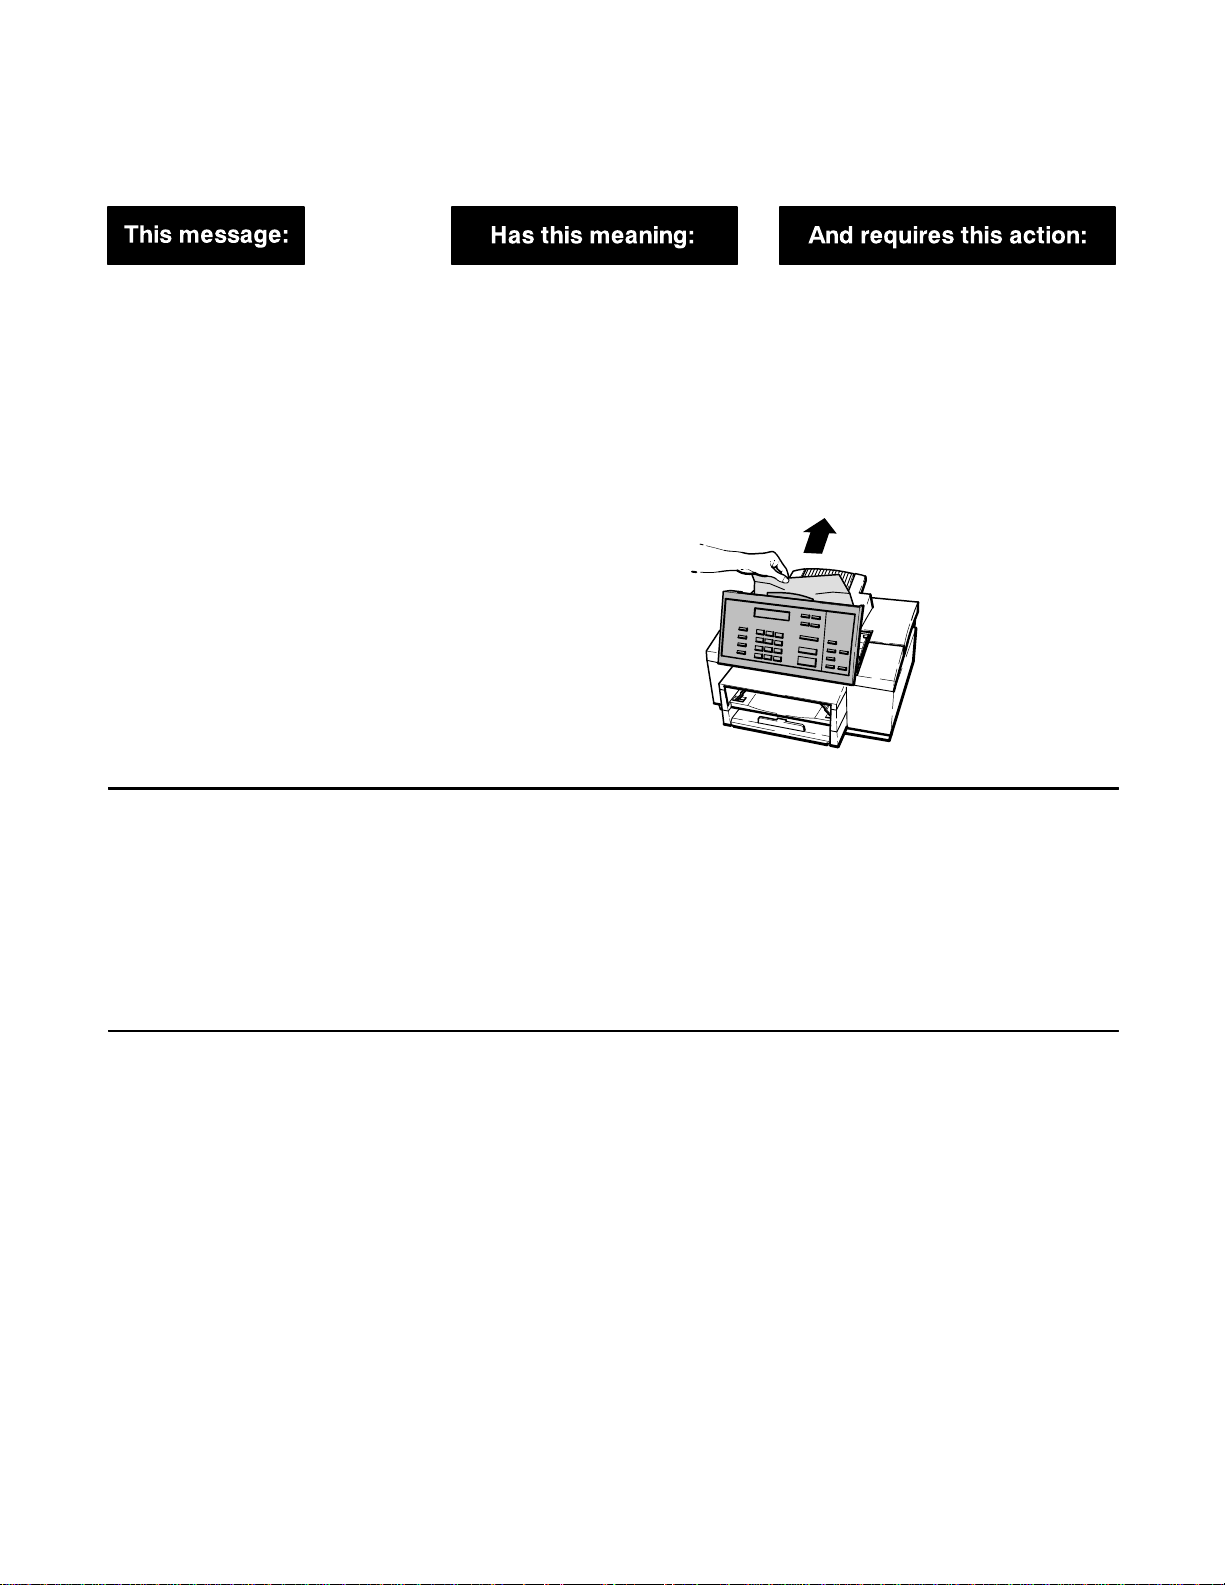
Display Messages (Continued)
Open cover
Clear copy jam
Open cover
Clear fax jam
The document you loaded for
copying was either loaded
improperly or jammed while
being scanned.
The document you loaded for faxing
was either loaded improperly or
jammed while being scanned.
If the document is
remove it and reload it.
If the document is jammed, open
the top of the control panel (pull the
top ledge toward you) and remove
the document. Close the control
panel by pressing it down firmly
until it snaps into place. Reload the
document.
If the document is
remove it and reload it.
If the document is jammed, open
the top of the control panel (pull the
top ledge toward you) and remove
the document. (See the illustration
for the previous message.) Close
the control panel by pressing it
down firmly until it snaps into place.
Reload the document.
not
jammed,
not
jammed,
Open cover
Load pen
No print cartridge is loaded in the
HP OfficeJet.
(Continued on next page)
Load a print cartridge.
Note: If you get this message after
recently installing a print cartridge,
try removing it and reloading it.
Make sure you have removed both
pieces of tape from the print
cartridge.
Problem Resolution
5-11
Page 81

Display Messages (Continued)
Out of ink
Replace pen
Out of paper
for fax/copy
Paper load failed
Press START
The print cartridge in the HP
OfficeJet is out of ink.
If you have the Backup Reception
feature turned on in the menu (On
is the factory setting) your incoming
faxes will be stored in memory until
you replace the print cartridge. You
can continue to print from your PC
for awhile, but your print quality may
be reduced and you will get blank
pages eventually.
The HP OfficeJet has attempted to
print a received fax or make a copy
and one of these conditions exists:
1) The paper tray is empty.
2) The wrong paper size is loaded
for receiving faxes, making copies,
and printing reports from the menu.
3) The paper loaded in the paper
tray is buckled (not flat), so the HP
OfficeJet can’t pick it correctly.
The HP OfficeJet has failed to pick
a piece of paper from the paper
tray.
Replace the print cartridge as soon
as possible.
If the memory fills to capacity
before you replace the print
cartridge, the HP OfficeJet won’t be
able to receive faxes and the “Fax
reception disabled” message will be
displayed alternately with this
message.
Note: If you get this message
after recently installing a print
cartridge, try removing it and
reloading it. Make sure that you
have removed both pieces of tape
from the print cartridge.
If paper or envelopes are loaded,
remove them. Then load either
Letter-, A4-, or Legal-size paper into
the paper tray. Make sure the paper
lays flat in the paper tray.
Press the Start/Copy button. If
paper is picked correctly, the
message will not be displayed
again, and you can continue to use
the HP OfficeJet normally.
Poll cancelled
Press START to send
Group full
Printer busy
Problem Resolution
5-12
You pressed Stop after setting up a
document to be polled. Your
to-be-polled setup has been
cancelled.
You have entered the limit, 10 fax
numbers, while sending to a group
of fax numbers (broadcasting).
The printer is in the middle of
printing a file from your PC, so it is
temporarily unavailable for other
types of printing.
(Continued on next page)
If the message reappears, try
removing the stack of paper from
the paper tray, straightening it, and
reloading.
No action is required.
Press the Start/Copy to begin
sending the fax to your group.
Wait for the print job to finish before
starting another operation that
requires printing (such as copying
or printing reports).
Page 82

Display Messages (Continued)
Printing. . .
(Date and Time)
Printing. . .
Waiting for data
Ready
Out of fax paper
Redial pending
Try again later
Remove document
and reload
Removing document
The HP OfficeJet is printing a file
from your PC.
The printer has paused to wait for
further print data.
Either there is no paper loaded in
the paper tray, or the wrong size paper is loaded for printing received
faxes, making copies, or printing
reports from the menu.
You tried to send a fax from the fax
loading tray while a memory-stored
fax was waiting to redial (sending to
a group or sending a delayed fax).
The HP OfficeJet was unable to
load the document you placed into
the fax loading tray.
A document is being ejected from
the fax loading tray after you
cancelled a fax or a copy, or after
the power was lost during scanning.
No action is required. You may send
a fax while printing, if desired. Received faxes will be stored in
memory, then printed when your
print job is complete.
Usually, no action is required.
However, if you are waiting for the
last page
time you see this message, press
Load/Eject to eject the last page.
If you want to be able to print
received faxes, make copies, or
print reports from the menu: Load
Letter-, A4-, or Legal-size paper into
the paper tray.
Wait until the memory-stored fax
has been sent before sending a fax
from the fax loading tray.
Remove the document from the fax
loading tray, straighten the stack,
and reload it.
No action is required. If you don’t
want to wait while each page is
ejected, open the control panel and
remove the document yourself.
Then close the control panel.
of your print job at the
Report cancelled
Report in memory
press START
Self test
(Please wait)
You pressed the Stop button while
a report was being printed.
The HP OfficeJet stored an
automatic report in memory while
the paper tray was empty.
Each time the power is turned on,
the HP OfficeJet tests itself to make
sure it’s in good working order. If it
finds a problem, an error message
will be displayed.
(Continued on next page)
No action is required.
Press Start/Copy to begin printing
the report.
Wait for a few seconds for this
message to clear before using the
HP OfficeJet.
If a “SYSTEM ERROR” message is
displayed that advises you to call for
service, record the 3-digit error
number before calling.
Problem Resolution
5-13
Page 83

Display Messages (Continued)
Store fax now?
1=Yes 2=No
Stored data lost
Call for service
Stored data lost
Check Settings
Storing. . .
Memory used: xx%
While scheduling a fax, you are
prompted to decide whether to
1) store the document in memory
for sending later, or
2) place the document in the fax
loading tray until the designated
start time.
Settings that were stored are lost.
All settings are returned to the
factory defaults.
Settings that were stored are lost.
All settings are returned to the
factory defaults.
You are storing a document in
memory to be faxed later, or to be
sent to a group of fax numbers. The
bottom line shows you how much of
the memory is being used to store
the document. There’s a total of
about 24 pages (400 KB) of
memory available for faxing and
copying.
If you want to store the fax in
memory until the start time, press
1. If you don’t want to use up the
memory, or if you don’t think your
document will fit into memory, press
2 and place your document in the
fax loading tray before the start
time.
You can continue to use the HP
OfficeJet (LX) but the battery may
be discharged. You should call for
service at your convenience. Refer
to Chapter 6 of this guide.
You can continue to use the HP
OfficeJet (LX) but the battery may
be discharged. You should call for
service at your convenience. Refer
to Chapter 6 of this guide.
Wait until the storing is complete to
make sure your document will fit
into the available memory. If your
document won’t fit in memory, a
message will tell you what to do
next.
SYSTEM ERROR
Call for service
nnn
An error has occurred that requires
servicing.
(Continued on next page)
Please record the error number,
then do one of the following:
If the error number begins with
: Turn off the power, then turn it
“1”
on again. If the error message is
gone, you may be able to continue
using the HP OfficeJet. But if the
error message remains, contact
HP’s Customer Support Center to
service your HP OfficeJet.* It
cannot be used until it is serviced.
If the error number begins with
: Contact HP’s Customer
“2”
Support Center to service your HP
OfficeJet.* There’s a problem with
the scanning device, so you won’t
be able to send faxes or make
copies reliably. However, you will be
able to receive faxes, print files from
your PC, and print reports until your
HP OfficeJet is serviced. Press
Stop to clear the error message.
Problem Resolution
5-14
Page 84

Display Messages (Continued)
If the error number begins with
: Contact HP’s Customer
“3”
Support Center to service your HP
OfficeJet.* There’s a problem with
the internal part that controls fax
transmissions, so you won’t be able
to send or receive faxes. However,
you will be able to mak e copies,
print files from your PC, and print
reports until your HP OfficeJet is
serviced. Press Stop to clear the
error message.
SYSTEM ERROR
nnn
Turn power off/on
Turn power off
Clear print jam
An error has occurred that may
require servicing. In some cases
the error can be cleared by turning
off the power, then turning it on
again.
A print jam has occurred. Turn off the power to the HP
Turn the power off, then on again. If
the message is no longer displayed,
the problem has been solved and
you can continue using your HP
OfficeJet normally.
If the message is still displayed
after powering off and on, there’s an
internal problem that requires
servicing. Record the 3-digit error
number in the message, then
contact HP’s Customer Support
Center to service your HP OfficeJet.
OfficeJet. Remove the output tray
and pull out all wrinkled or torn
pieces of paper from the paper
path. Also remove wrinkled or torn
pieces of paper from the paper tray.
When finished, replace the output
tray and turn on the power.
If this message is displayed
frequently, contact HP’s Customer
Support Center for help.
CAUTION: Any faxes stored in
memory will be deleted when you
turn off the power.
Waiting for poll
Waiting to dial
(fax number)
You have set up a document to be
polled from the fax loading tray.
The HP OfficeJet has tried to dial
the displayed fax number, but the
phone line is already in use. It could
be in use by a received fax,
because the phone is ringing, or
because your phone is off-hook.
No action is required. If you need to
send a fax or make a copy, you can
remove the document temporarily,
then replace it when you are done.
No action is required. The HP
OfficeJet will wait until the phone
line is free, then dial the fax
number.
Problem Resolution
5-15
Page 85
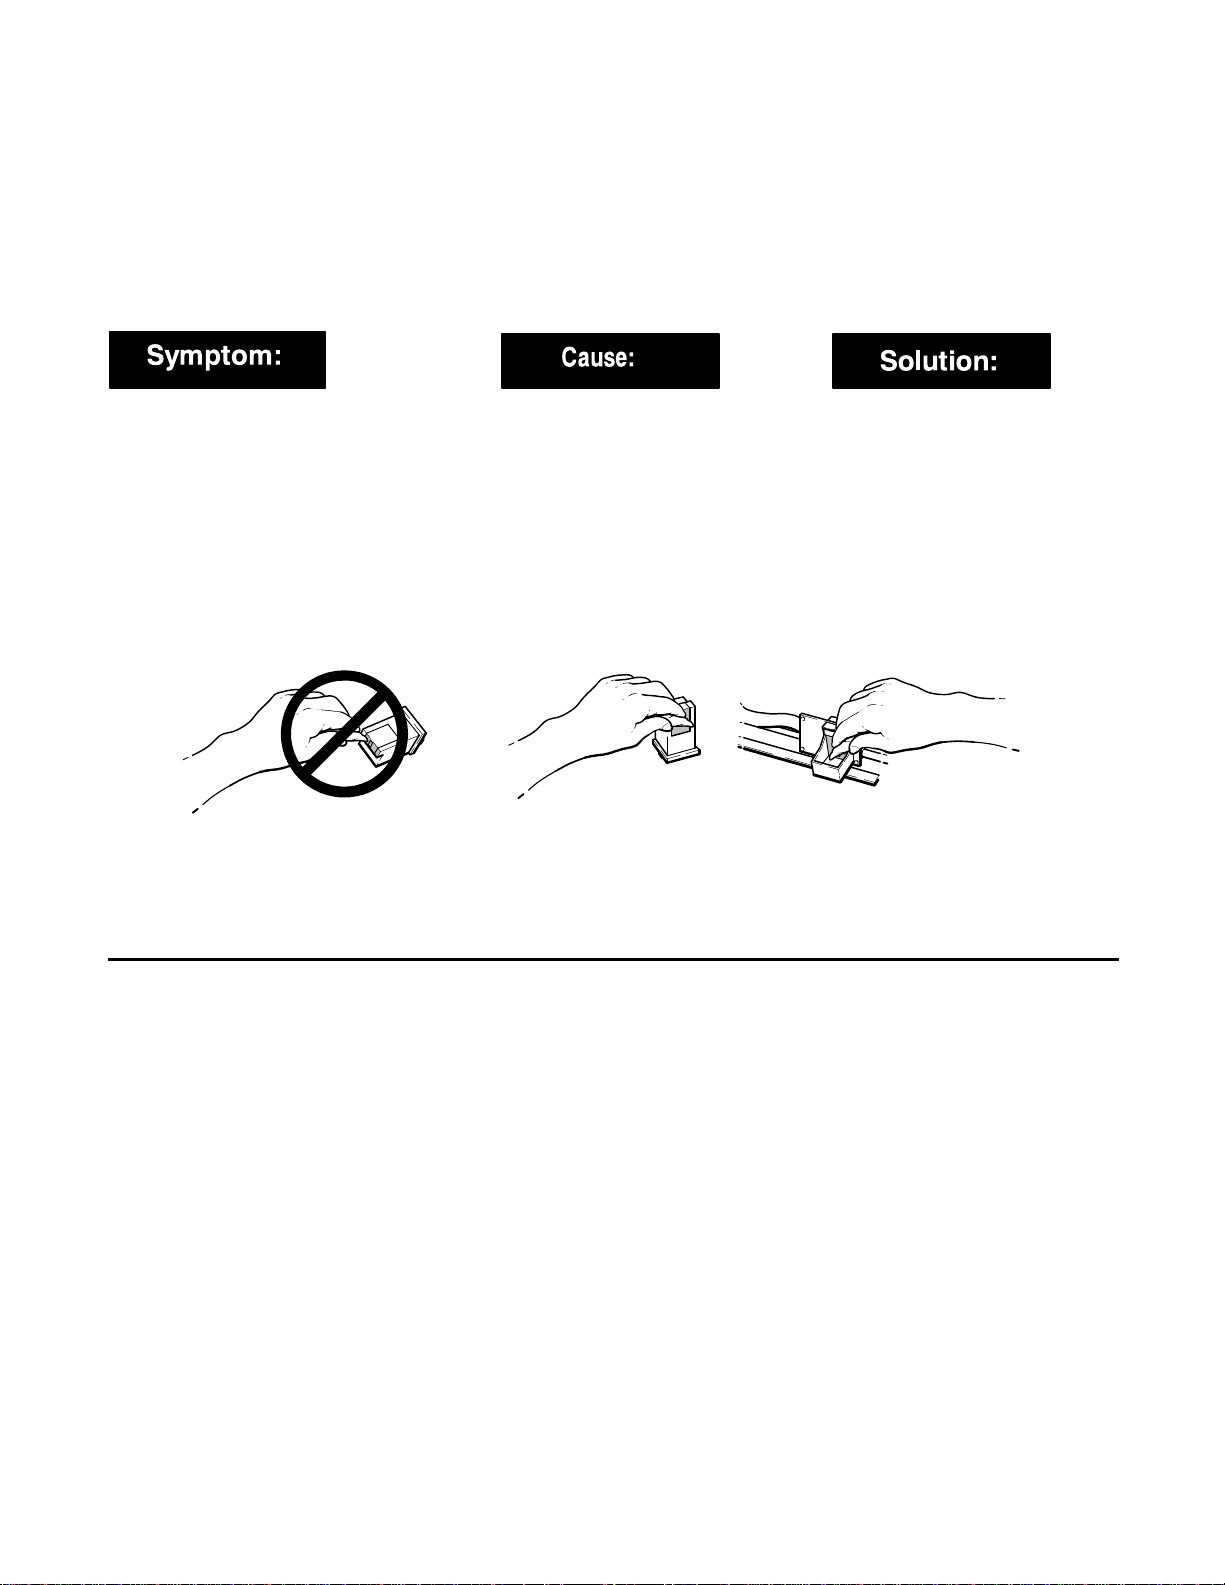
Solving Problems While Printing, Faxing or Copying
Use the following table of symptoms, causes and solutions to help resolve problems that may be experienced while
printing, faxing or copying.
Solving Printing/Faxing/Copying Problems
Lines or dots are missing from
the characters in the printout.
The print cartridge has dried ink
on the nozzles.
The connection between the print
cartridge and cradle is intermittent.
OR
The copper contacts of the print
cartridge are dirty.
The ink nozzles of the print
cartridge are clogged.
Remove the print cartridge and
reinstall it. Try printing again. You
may need to repeat this before the
ink resumes a continuous flow.
OR
1. Remove the print cartridge. Use
a lint-free damp cloth to gently
clean the copper contacts on the
print cartridge and the print
cartridge cradle.
2. Reinstall the print cartridge and
try printing again. If the print quality
remains poor after cleaning the
contacts, clean the ink nozzles as
described for the next symptom in
this table.
1. Press the Clean Pen button and
wait about 15 seconds while the ink
nozzles are cleaned automatically.
Then print the Self Test report.
Check the two print cartridge test
patterns in the Self Test report. If
the diagonal line has white gaps in
it, or if the area fill has horizontal
white lines in it, continue with step
2; otherwise, stop here and
continue printing normally.
Problem Resolution
5-16
(Continued on next page)
Page 86
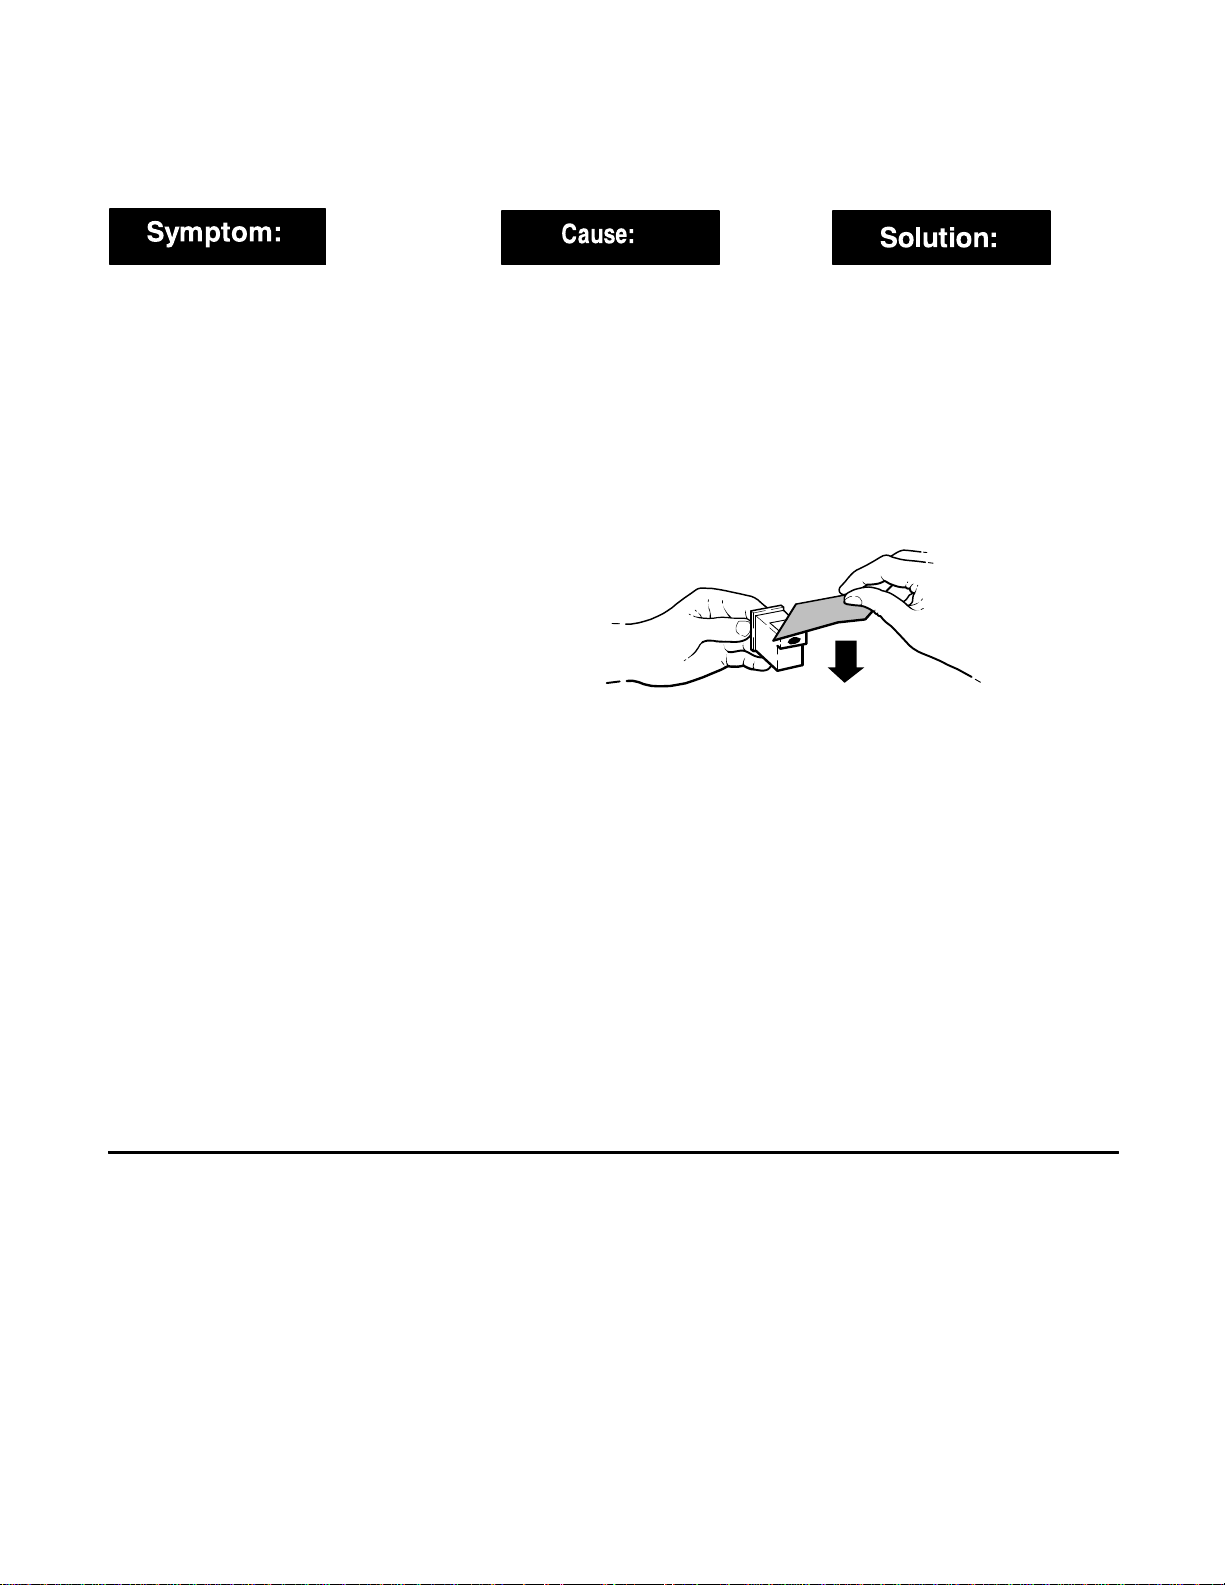
Solving Printing/Faxing/Copying Problems (Continued)
2. Remove the print cartridge. Hold
the print cartridge by the green top.
Use a stiff card or other rigid paper
to scrape the dried ink from the
nozzles. Then use a lint-free damp
cloth to gently clean the ink nozzles.
Reinstall the print cartridge and
print the Self Test report again.
Check for white gaps and white
lines. If you find some, continue
with step 3; otherwise, stop here
and continue printing normally.
The last page of the file wasn’t
printed.
The HP OfficeJet is waiting to see if
there is more data coming before
releasing the last page.
3. Remove the print cartridge. Hold
the print cartridge by the green top.
Place two drops of clean water on
the gold rectangle of the print
cartridge for about 60 seconds,
then gently remove the water from
the print cartridge with a lint-free
damp cloth. Reinstall the print
cartridge and try printing again. You
may need to print a few pages
before the ink resumes a
continuous flow.
CAUTION: Do not clean the print
cartridge unnecessarily, because it
may shorten the life of the print
cartridge.
4. If the print quality remains poor
after trying steps 1 through 3, install
a new print cartridge.
Press the Load/Eject button or wait
for a few minutes and your last
page will be released. If after five
minutes has passed and the HP
OfficeJet has not received any more
data, the last page of your file will
be printed.
(Continued on next page)
Problem Resolution
5-17
Page 87
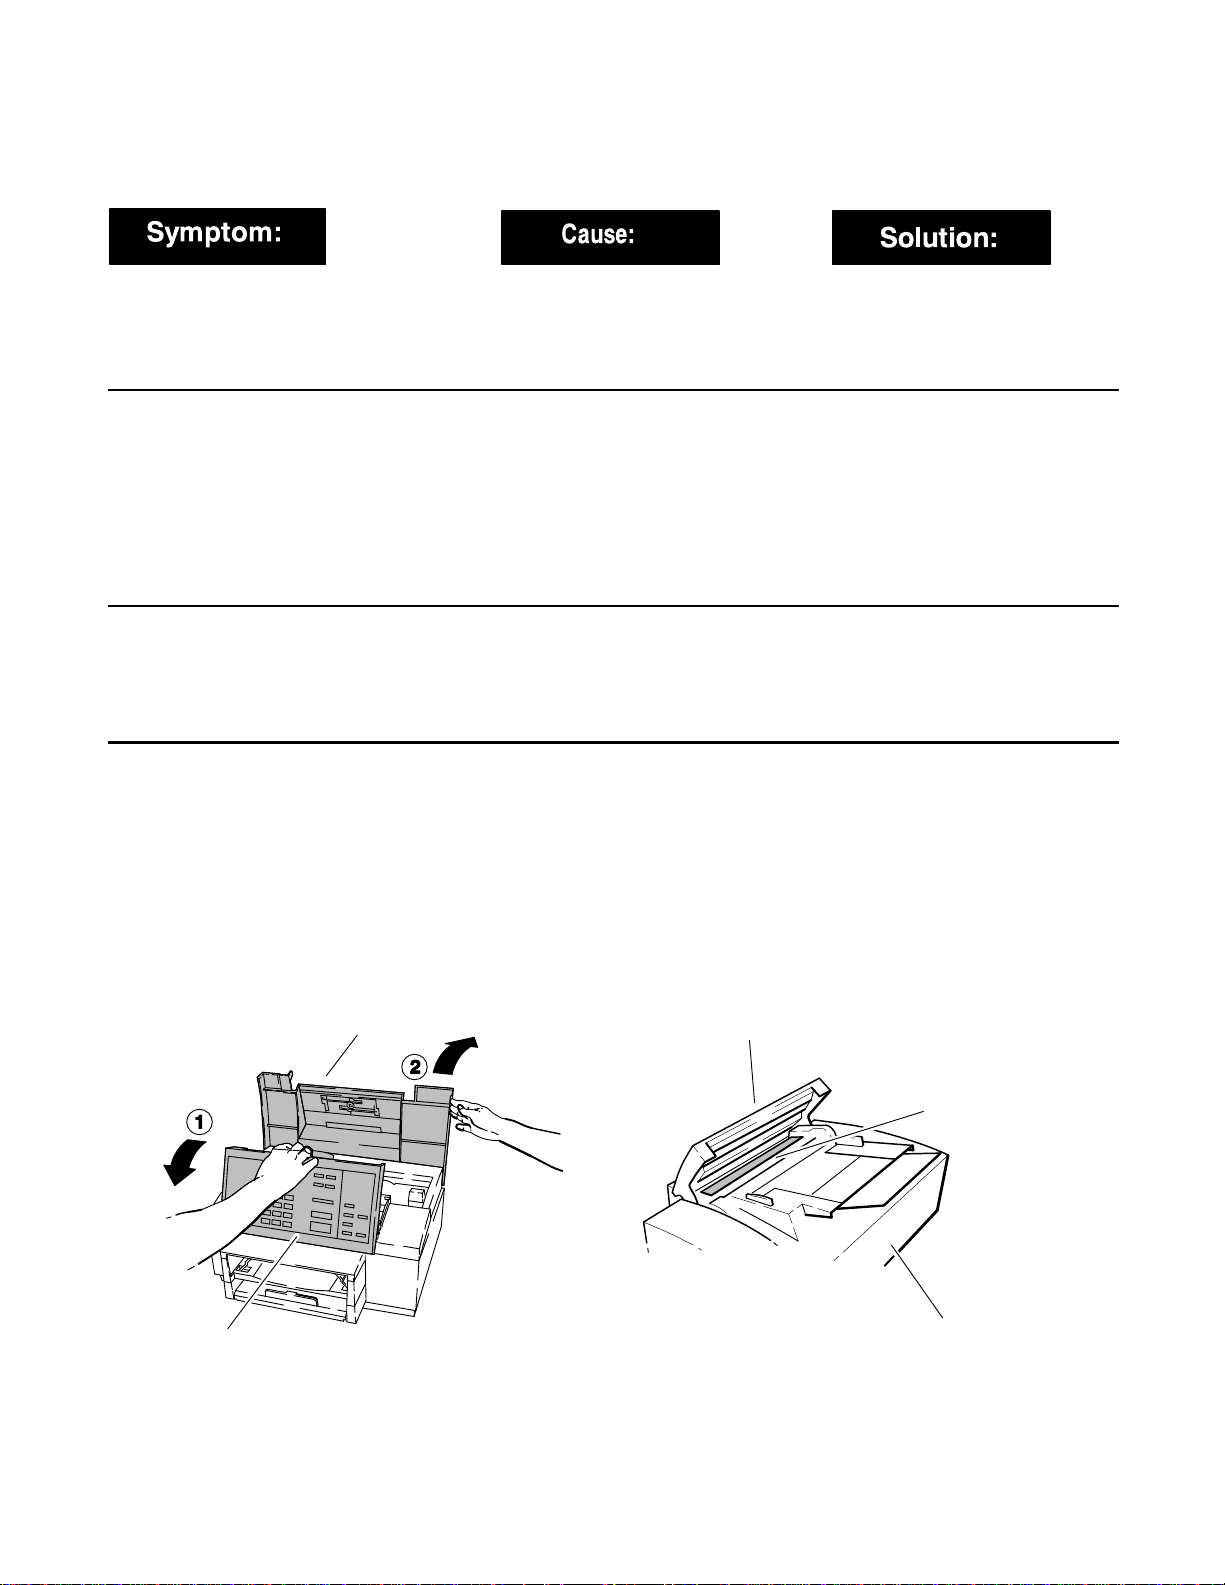
Solving Printing/Faxing/Copying Problems (Continued)
Parts of my documents are being
clipped when I print from my
Windows application.
I can’t get the font size I want
when printing from my DOS
application.
My phone call is cut off when I
try to make a copy.
There are dark streaks or lines
on copies or on faxes sent from
the HP OfficeJet.
The Windows driver for the HP
OfficeJet has a minimum top
margin of 0.33 in. (8.4 mm) and a
minimum bottom margin of 0.67 in.
(17 mm).
The HP OfficeJet does not support
the use of font cartridges.
If you are talking on a phone
attached directly to the HP OfficeJet and you press the Start/Copy
button, the HP OfficeJet assumes
that you are sending a fax.
The scanner glass or reflective tape
may be dirty.
Before you print your document,
make sure the entire document is
visible in the “Print Preview” of your
Windows application.
Some DOS application printer
drivers require that certain font
styles are resident on the printer.
The HP OfficeJet has various
internal fonts available but cannot
use additional fonts provided by HP
DeskJet font cartridges. You must
reformat your document using one
of the internal fonts in the HP
OfficeJet.
To resume your telephone
conversation, press the Stop
button.
Note: You cannot make copies while
talking on a phone attached directly
to the HP OfficeJet.
Apply some glass cleaner to a soft,
lint-free cloth, then gently wipe the
scanner glass and tape clean.
To locate the scanner glass and
tape: Open the control panel by
pulling the top ledge toward you,
then open the top cover. Look inside the control panel for a glass
strip that’s about 3/4-inch (1.9 cm)
wide and 9 inches (23 cm) long.
The tape is opposite the glass.
Control panel
Problem Resolution
5-18
Top cover
Control panel
Scanner glass
and reflective tape
Back of the HP OfficeJet
(Continued on next page)
Page 88

Solving Printing/Faxing/Copying Problems (Continued)
I can print, scan and change device settings with the HP OfficeJet LX manager, but PC Fax
doesn’t work properly.
The HP OfficeJet LX never answers a call.
Eclipse FAX SE doesn’t work on
the PC.
Nothing happens when I try to
print.
You may have a different CAS
installed. Only one CAS modem
can be used on a PC.
Distinctive Ring is set to ON, but
you don’t have Distinctive Ring service.
You may have previously installed a
CAS fax modem that was removed
before Eclipse FAX SE was
installed. Only one CAS modem
can be used on a PC.
If the HP OfficeJet LX printer
doesn’t respond when you try to
print, it may be set to the wrong
port.
Remove (delete) the software for
the other CAS modem.
Refer to the user’s guide for instructions on how to turn OFF the Distinctive Ring feature.
Remove (delete) the software for
the other CAS modem.
Run the Windows control panel, select Printers, select the HP Officejet LX, then click the Connect button. Select the port that is connected to your device. Do not select
HP OfficeJet LX. Click OK, close
Printers and the control panel, and
try printing again. If you still cannot
connect, close the HP OfficeJet LX
manager, exit Windows and turn the
machine OFF. Check the cable connections, port selection and setup.
Turn the machine back ON. Restart
Windows and the HP OfficeJet LX
manager.
You get the message, “LPT1 is in
use.”
You get the message, “Printer
not responding.”
The HP OfficeJet LX cannot access
LPT1.
Your HP OfficeJet LX is turned OFF
or disconnected.
(Continued on next page)
If you are using a switch to run two
printers from a single LPT port, be
sure that all HP OfficeJet LX activities are complete, and the HP OfficeJet LX manager and Eclipse FAX
SE are closed before switching to
another printer.
Turn your HP OfficeJet ON. Make
sure the interface cable is connected. Click Reconnect if your HP
OfficeJet LX was previously able to
connect to the device, check that
the cable is securely attached at
both ends,, the device is turned ON
and “Ready” is displayed on the
front panel. Check that any data
switch is set to connect to the HP
OfficeJet LX. Then click Recon-
nect.
Problem Resolution
5-19
Page 89

Solving Printing/Faxing/Copying Problems (Continued)
The date on the control panel
display is incorrect. The header
information and speed dial
numbers are missing.
Some of my menu settings seem
to have reverted to their factory
values without my changing
them.
I can’t receive a fax from my
extension phones.
Incoming calls are not being answered.
The battery inside the HP OfficeJet
has failed, causing all of the menu
features to revert to their factory
settings.
Settings that contained alphabetic
and numeric characters you entered
(such as header name and number,
speed dial names and numbers,
etc.) have been erased.
An internal error has caused some
or all of the menu features to revert
to their factory settings.
You don’t have the Fax/TAM
receive mode setup.
The Distinctive Ring feature may be
turned ON when the service is not
available in your area or you have
not yet subscribed to the service.
You can continue to operate your
HP OfficeJet without the battery.
However, if you re-enter the menu
settings and then turn off the power,
the settings will be erased again.
Contact HP’s Customer Support
Center regarding battery
replacement.
Print the Self Test report and check
the Current Settings column to find
out which menu settings have reverted to the factory settings.
Change the settings and re-enter
data as
appropriate.
For instructions on how to print the
Self Test report, see “Self Test Report” in Chapter 3.
If you need to be able to receive
faxes from extension phones,
change the setup to Fax/TAM.
Turn OFF the Distinctive Ring feature and request the fax be sent
again.
Items on the HP OfficeJet LX
manager menu bar are grayed
and the “Device Not Connected”
error is displayed.
Problem Resolution
5-20
The HP OfficeJet LX is not properly
connected.
(Continued on next page)
If this happens after a first-time
installation:
Verify that the device is turned ON
and the cable is properly
connected.
Verify that the cable is good.
Verify that your LPT port allows
bi-directional communication.
If you hav e been using the HP
OfficeJet LX manager and this
happens:
Verify that the device is turned ON
with the message “Ready” displayed.
Verify that the cable is properly
connected at both ends.
If a data switch is used, verify that it
is set to HP OfficeJet LX.
Restart Windows and try again.
Page 90

Solving Printing/Faxing/Copying Problems (Continued)
The printer prints part of a cancelled print job.
PC faxes quit during sending.
Faxes routed to the PC are
printed instead.
Once you start a print job, the document is sent to the printer. If you
cancel the print job,while the printer
is out of paper or otherwise disabled, the portion of the document
that was sent prints when the printer is available.
It is possible that your PC is overloaded with activity like sending
more than one fax at a time, or
starting applications that take a long
time.
If the HP OfficeJet LX manager is
not running, faxes are printed upon
receipt. If your PC is too busy, faxes
are printed on receipt.
To prevent portions of cancelled
print jobs from printing, press Load/
Eject on the front panel while the
message “Printing/Waiting for
data...” is displayed.
Try to reduce the activity on your
PC while faxes are being sent or received.
The HP OfficeJet LX manager may
have lost the connection to the device. Open the front cover and
make sure that the HP OfficeJet LX
manager says “Close Cover.” If it
does not, check the cable connection to the device. If it appears OK,
close and restart the HP OfficeJet
LX manager.
Problem Resolution
5-21
Page 91
Diagnostic Codes: What they are, how to read them and what to do
Diagnostic codes are 12- or 15- digit codes that can be used by a customer support representative to diagnose fax
transmission (send and receive) problems. The diagnostic codes appear on the Fax Log Report which the user can have
the HP OfficeJet print on demand or automatically after each fax transaction. Instructions for printing reports are
provided in Chapter 3 of the HP OfficeJet User’s Guide and in Chapter 3 of this document.
Use the sample Fax Log Report shown below to identify the diagnostic code. The paragraphs following the sample
will help to analyze the code and what problem may have affected the machine’s operation.
HP OfficeJet
Personal Printer/Fax/Copier
Last 30 faxes
Identification Result Pages Type Date Time Duration Diagnostic
5553756 OK 03 Sent Oct-19 10:14A 00:02:05 001000000000
999 555 4783 Stop 02 Received Oct-19 01:21P 00:01:38 001000000000
5551900 No Answer 00 Poll-in Oct-20 09:57A 00:00:09 001000000000403
Public Images Inc. Busy 00 Sent Oct-20 11:48A 00:00:08 001000000000
5557990 Error 01 Poll-out Oct-20 04:38P 00:01:18 001000000000411
5557990 Jammed 03 Sent Oct-20 05:10P 00:02:40 001000000000
Henry No Document 00 Sent Oct-21 01:00A 00:00:21 001000000000
999 555 8012 Power Fail 01 Received Oct-21 08:43A 00:01:27 001000000000
5554382 Power Fail 00 Sent Oct-21 08:43A 00:00:05 001000000000
The Corner Deli Cover Open 00 Sent Oct-21 11:15A 00:00:14 001000000000
5554164 No Dial Tone 00 Sent Oct-21 11:51A 00:00:12 001000000000
Fax Log Report for
ACME Co.
619 555-1234
Oct-27-94 2:30PM
The diagnostic codes appear in the right-most column of the Fax Log Report as shown. Note that most diagnostic
codes are 12 digits in length while some are 15 digits long. The 13th, 14th and 15th digits are only present when a
communication error condition has occurred. Communication errors can occur in transmit or receive operations.
Descriptions of each digit in the diagnostic code field are provided later in this section. To interpret the field, the digits
will be referenced according to their place in the field. Moving from left to right, the digit positions will be
reference-numbered 1 through 15.
Before describing the diagnostic codes in detail, it is beneficial to know when the types of codes (transmit or receive)
may appear in a communication.
Fax Session Protocol: Diagnostic Code appearances in a communication
The HP OfficeJet is designed as a group 3 facsimile machine. Group 3 facsimile protocol has a set of rules that govern
communication between a fax transmitter and receiver. The document to be sent is placed in the automatic document
feed mechanism of the sending machine. Pressing a button will call the fax number of the receiving fax machine and
start the electronic protocol (handshaking). The two fax machines then communicate to ensure a good connection and
that the transmitter selects only those options that the receiver can properly handle.
Communications are conducted in phases with different signal exchanges occurring during the phases. The phases are
described in the following paragraphs. The protocol exchange given in the following diagram shows the different
phases and which diagnostic codes could typically appear in each of those phases. Diagnostic codes can be used by a
customer support representative to diagnose fax transmission (send and receive) problems.
Problem Resolution
5-22
Page 92

Phase A - Call Setup: The calling fax machine dials the number of the receiving fax machine. The ring signal and the
CNG calling tone (0.5 sec duration, 1100 Hz frequency, sent at 3 sec intervals) are received at the called fax machine.
The CNG tone beeps indicate the call is from a fax machine instead of a voice call. The called fax machine answers the
ring signal by going off-hook and preparing for the incoming call. The receiving fax machine can be designated to
have the ac power OFF until the ring signal appears. Also, some fax machines answer an call immediately, so the ring
may not necessarily be heard by a person. After answering the ring, the called fax machine waits 1 second, sends a 3
second long 2100 Hz CED tone followed by 75 milliseconds of silence.
Phase B - Premessage Procedure: The called fax machine sends its digital identification signal (DIS) at 300 bits/sec
identifying its capabilities, including option features. Upon hearing this distinctive signal, the caller presses the
SEND button to connect the fax to the telephone line (all HP OfficeJets do this automatically, so the user doesn’t need
to). The calling fax machine automatically sends a digital command signal (DCS), locking the called unit into the
capabilities selected. The calling fax machine sends a high-speed training signal (TCF) for the data modem. The
called fax machine then sends a confirmation to receive (CFR) signal to confirm that the receiving modem is trained
(adjusted for low-error operation) and that the fax machine is ready to receive.
Phase C - Message Transmission: The calling fax sends a training signal and then a picture signals for the entire page
being sent.
Phase D - Postmessage Procedure: The calling fax machine sends an end of message (EOM) command which
switches the fax modem back to 300 bits/sec and signals that the message has been sent and there are no pages to
follow. If there are more pages to follow, the calling fax machine sends a multiple page (MPS) command. The called
fax machine sends a message confirmation (MCF) indicating the page was received successfully.
Phase E - Call Release: The calling fax machine sends a disconnect (DCN) signal and both fax machines disconnect
from the telephone line.
Use the following mnemonic descriptions when referring to the protocol diagram on the next page.
D CNG calling tone 1100 Hz, ON 0.5 sec, OFF 3 sec
D CED called station identification 2100 Hz
D DIS digital identification signal
D DCS digital command signal
D TCF training check zeroes for 1.5 sec
D CFR confirmation to receive 1850 or 1650 Hz for 3 sec
D MPS multipage signal
D EOM end of message 1100 Hz
D MCF message confirmation 1850 or 1650 Hz
D DCN disconnect
D EOP end of procedure
D RR receive ready
D CTC continue to correct
D PRI procedure interrupt
D PPS partial page signal
D EOR end of retransmission
D RTN retrain negative
Problem Resolution
5-23
Page 93
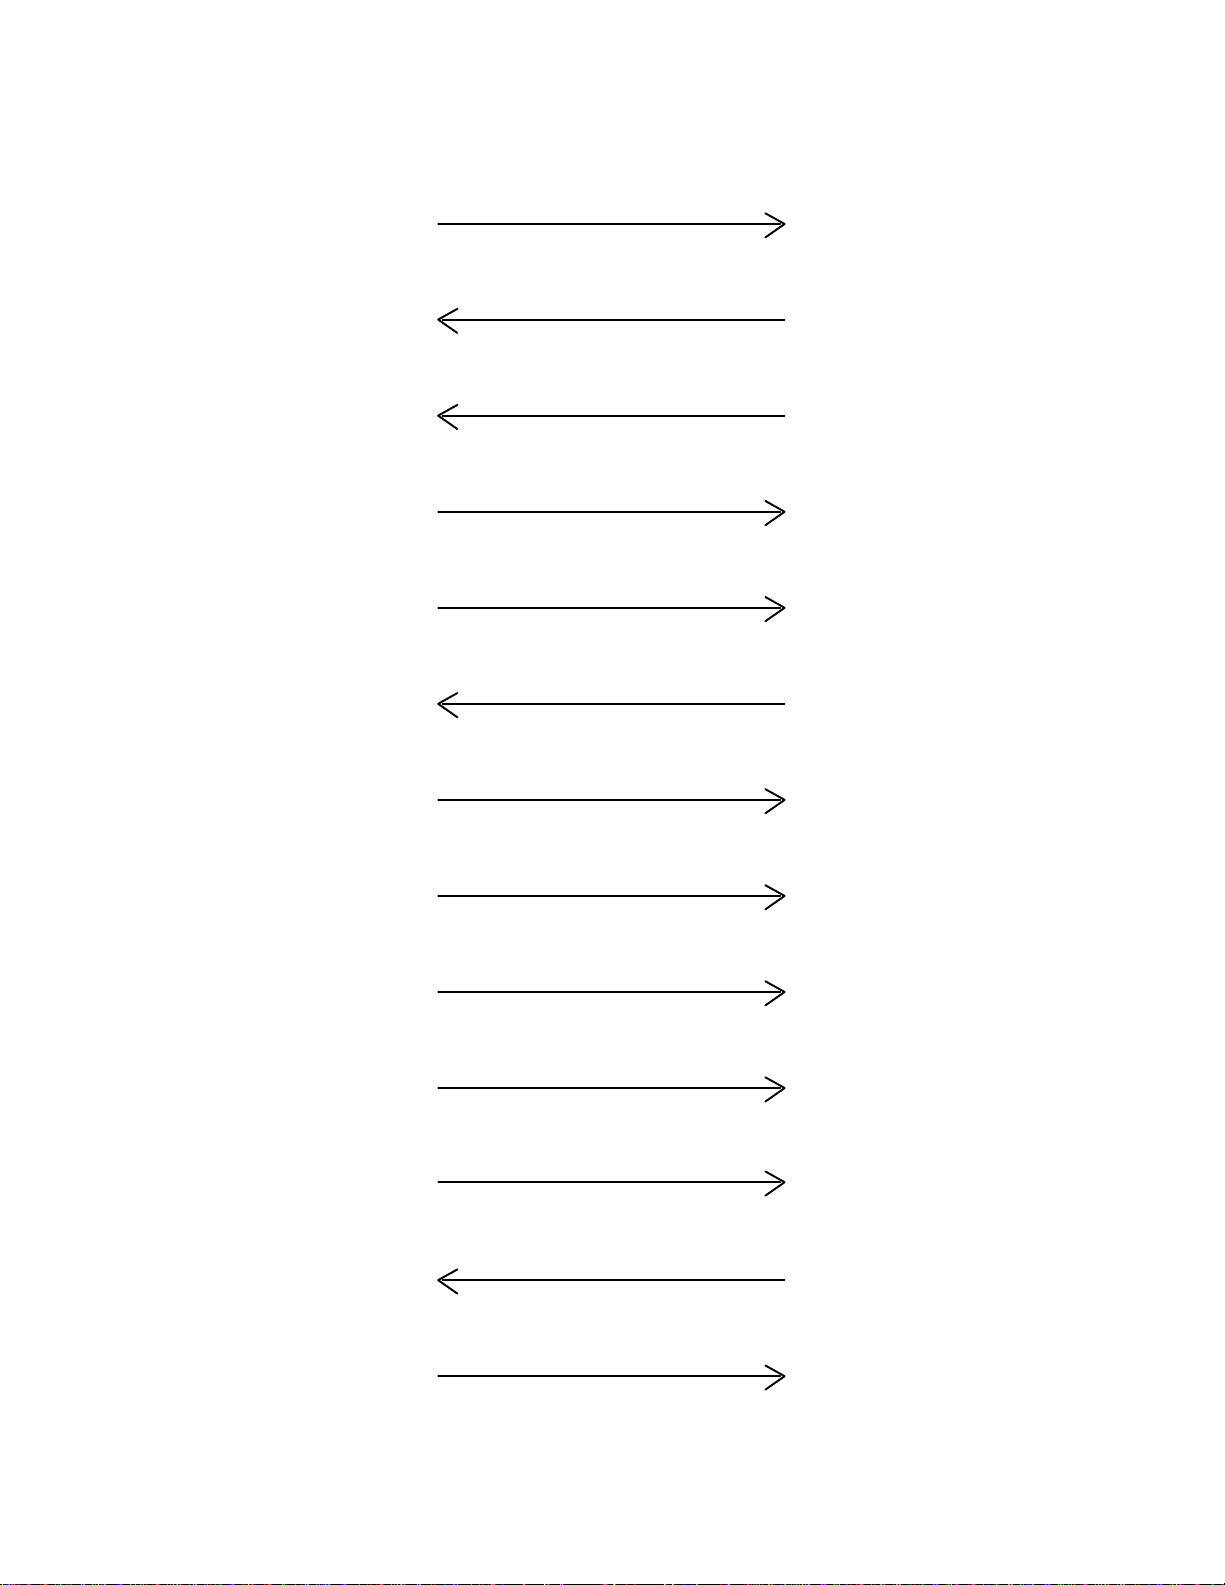
HP OfficeJet Fax Session Protocol Diagram
CALLING FAX MACHINE RECEIVING FAX MACHINE
Phase A
501, 502, 503, 505
CNG
Phase B
Phase C
Phase D
504
511, 512
521, 522, 523,
524, 525
526
551, 552, 553
531, 532, 533, 534,
554, 555, 561, 562,
563, 564, 565
CED
DIS
DCS
TCF
CFR
FAX MESSAGE
MPS
401, 402, 403,
411, 412, 413,
414
415, 416
431, 432, 441, 451,
461, 462, 463, 464,
471, 472, 473, 474,
475, 481
Phase C
Phase D
Phase E
Problem Resolution
5-24
535
541, 542, 543
MCF
FAX MESSAGE
EOM
MCF
DCN
421
422
Page 94

Diagnostic Code Descriptions
In the Diagnostic Code table are descriptions of each digit in the diagnostic code field. To interpret the field, the digits
will be referenced according to their place in the field. Moving from left to right, the digit positions will be
reference-numbered 1 through 15. Digits 1 through 5 in the codes are binary weighted.
DIAGNOSTIC CODES
sample code: 012420700102411
digit positions: 123456789(10)(11)(12)(13)(14)(15)
1st digit Always set to “0”.
2nd digit Session End. Different ways a fax session may have completed.
[1] = STOP was pressed.
[2] = DCN was received from the remote site (DCN = disconnect)
[4] = MEMORY filled during session
[8] = OPERATOR ALERT requested
3rd digit Operation. The type of fax session that occurred.
[1] = RECEIVE from a remote transmitter
[2] = TRANSMIT to a remote receiver
[4] = POLLED receive, system became a transmitter
[8] = POLLING transmit, system became a receiver
4th digit Training. Different options that have been requested or were set during training.
[1] = ID was received successfully (TSI or CSI)
[2] = RETRAIN/FALLBACK was requested
[4] = ECM was selected
5th digit Send Operations. Different types of send operations that were selected by the user.
[1] = DELAYED operation
[2] = BROADCAST operation
[4] = SPEED DIAL was used to select the dialing number
[8] = ADF was in use, document was not sent from memory
6th digit Protocol. Denotes the various resolution and coding methods used.
[0] = Standard resolution/MH coding (MH = modified Huffman)
[1] = Standard resolution/MR coding (MR = modified Read)
[2] = Standard resolution/MMR coding (MMR = modified modified Read)
[4] = Fine resolution/MH coding (MH = modified Huffman)
[5] = Fine resolution/MR coding (MR = modified Read)
[6] = Fine resolution/MMR coding (MMR = modified modified Read)
[8] = 300 DPI/MH coding (MH = modified Huffman)
[9] = 300 DPI/MR coding (MR = modified Read)
[A] = 300 DPI/MMR coding (MMR = modified modified Read)
7th digit Session Methodology. Session speed/type of data used for transmission and reception
[0] = 0 ms/line
[1] = 5 ms/line
[2] = 10 ma/line
[4] = 20 ms/line
[7] = 40 ms/line
[8] = 0 ms/line (Halftone)
[9] = 5 ms/line (Halftone)
[A] = 10 ms/line (Halftone)
[C] = 20 ms/line (Halftone)
[F] = 40 ms/line (Halftone)
Problem Resolution
5-25
Page 95

DIAGNOSTIC CODES (Continued)
8th digit
Modem baud rate speed used.
[0] = 2400 bps
[1] = 4800 bps
[2] = 7200 bps
[3] = 9600 bps
[4] = 12000 bps
[5] = 14400 bps
9th digit Always set to “0”.
10th digit Miscellaneous.
[1] = This journal entry needs to be printed
[2] = This was a Remote Diagnostic session
[4] = This was a PC send session
[8] = not used
11th digit (send only) Used to identify errors in the transmission of a fax to a remote receiver.
[0] = NULL XMT (XMT = transmit)
[1] = MPS XMT
[2] = EOP XMT
[3] = EOM XMT (EOM = end of message)
[4] = NULL XMT/RR REC
[5] = MPS XMT/RR REC
[6] = EOP XMT/RR REC
[7] = EOM XMT/RR REC
[8] = NULL XMT/CTC REC
[9] = MPS XMT/CTC REC
[A] = EOP XMT/CTC REC
[B] = EOM XMT/CTC REC
12th digit (send only) Used to identify errors in the transmission of a fax to a remote receiver.
[1] = PRI
[2] = PPS
[3] = PPS-PRI
[4] = EOR
[5] = EOR-PRI
[8] = RTN received (RTN = indicated line noise, subsequent
[9] = PRI/RTN received pages should be sent at a lower baud rate)
13th digit Communication error code. Only displayed if there is an error condition.
Refer to the Communication Error Code table in this section on the following pages.
14th digit Communication error code. Only displayed if there is an error condition.
Refer to the Communication Error Code table in this section on the following pages.
15th digit Communication error code. Only displayed if there is an error condition.
Refer to the Communication Error Code table in this section on the following pages
Problem Resolution
5-26
Page 96
Communication Error Codes (level 400 and 500)
An error in communication detected during a fax transmission or reception will cause a three-digit error code to
appear in positions 13 through 15 of the diagnostic code. Each fax transaction will have a corresponding diagnostic
code, but the error code positions will only be added if an error occurs. All communication error codes will be either
400 level (receive errors) or 500 level (transmit errors).
A knowledge of T30 protocol is recommended to fully understand the diagnostic codes. This table briefly describes
the T30 states and corresponding numeric value for Receive (RCV) and Transmit (XMT).
NUMERIC
STATE 0 1 2 3 4 5 6 7 8 9
RCV R F III VII VIII
VIIa
XMT T A D I
E IV
II
IX
VIIb
V
VIIIa IXa X B
VI * * C
A summary of T30 states relative to error codes dealing specifically with reception of a fax to the unit, or the
transmission of a fax from the unit, are provided in the next two tables. A detailed description of the 400 level receive
and 500 level transmit communication error codes is provided later in this section.
T30 States – Receive Errors
State Error Response Code (T30R)
R 1
2
3
4
F 1
2
3
4
5
6
III
NON-ECM
VII 1
VIII VIIa 1 PHONE DISCONNECTED OPERATOR ALERT
IX VIIb 1 PHONE DISCONNECTED OPERATOR ALERT
VIIIa 1
IXa 1
X 1 IRRELEVANT RESPONSE
B ANYTIME STATE B DISCONNECT (CHECK DIAG BIT DCN RCVD)
1
2
2
2
3
4
2
3
4
5
DCN RECEIVED
LINE DISCONNECT
TIMEOUT T1
T30R NO DOCUMENTS TO BE POLLED
NO POST MSG OR LOCAL INTERRUPT AT STATE F
LINE DISCONNECT WAIT ON HDLC TIMER
DCN RECEIVED
T30R NO DOCUMENTS TO BE POLLED
INVALID DCS
SPEED MISMATCH
PHONE DISCONNECTED OPERATOR ALERT
IRRELEVANT RESPONSE
ABSOLUTELY NO LOCAL RESPONSE FOR REMOTE INTERRUPT
PHONE DISCONNECTED OPERATOR ALERT
TIMEOUT T2
DCN RECEIVED
LINE DISCONNECT
IRRELEVANT RESPONSE
TIMEOUT T2
ERR TRANSMITTED
DCN RECEIVED
LINE DISCONNECT
IRRELEVANT RESPONSE
Problem Resolution
5-27
Page 97
T30 States – Transmit Errors
State Error Response Code (T30R)
T 1
2
3
4
5
A 1
2
3
D 1
2
3
4
5
6
I & II
NON ECM
E 1
IV & V
A
B
C
D
VI
A
B
C
D
C ANYTIME STATE C XMT DCN (CHECK DIAG BIT DCN SENT)
1
2
3
4
5
6
2
1
2
3
4
5
1
2
3
4
5
6
LINE BUSY
DCN RECEIVED
LINE DISCONNECT
IRRELEVANT RESPONSE
TIMEOUT
INCOMPATIBLE REMOTE RECEIVER
INCOMPATIBLE REMOTE TRANSMITTER
T30R POLLING PASSWORD INCORRECT
DCN RECEIVED
LINE DISCONNECT
NO RESPONSE ON ALL RETRIES
3 IDENTIFICATIONS RECEIVED WHILE WAITING FOR CFR
FALLBACK IMPOSSIBLE
IRRELEVANT RESPONSE
IRRELEVANT RESPONSE (CHECK DIAG BIT MPS EOP EOM)
DCN RECEIVED
LINE DISCONNECT
NO RESPONSE ON ALL RETRIES
FALLBACK IMPOSSIBLE (CHECK DIAG BIT MPS EOP EOM IN FTZ ONLY)
T30R AT LEAST ONE PAGE NOT CONFIRMED
TIMEOUT FTZ ONLY
PHONE DISCONNECTED OPERATOR ALERT
PPS NULL SET, FOLLOW PATH A
MPS SET, FOLLOW PATH B
EOP SET, FOLLOW PATH C
EOM SET, FOLLOW PATH D
DCN RECEIVED (CHECK DIAG BIT RR CTC)
LINE DISCONNECT (CHECK DIAG BIT RR CTC)
NO RESPONSE ON ALL RETRIES (CHECK DIAG BIT RR CTC)
IRRELEVANT RESPONSE (CHECK DIAG BIT CTC)
FALLBACK IMPOSSIBLE
EOR NULL SET, FOLLOW PATH A
MPS SET, FOLLOW PATH B
EOP SET, FOLLOW PATH C
EOM SET, FOLLOW PATH D
DCN RECEIVED (CHECK DIAG BIT RR)
LINE DISCONNECT (CHECK DIAG BIT RR)
NO RESPONSE ON ALL RETRIES (CHECK DIAG BIT RR)
IRRELEVANT RESPONSE
FALLBACK IMPOSSIBLE
T30R AT LEAST ONE PAGE NOT CONFIRMED
Refer to the following table for detailed descriptions of level 400 and 500 communication error codes:
Problem Resolution
5-28
Page 98
COMMUNICATION ERROR CODES
RECEIVE ERRORS (400 level codes) – Code numbers not listed are not used
CODE DESCRIPTION COMMENTS
401 DCN received You are called by a fax that is polling and from the DIS you
send, it is noted that there is no document to send. The calling fax then sends you a DCN (Sharp brand fax machines).
402 Line disconnect You transmitted a DCN and dropped the line after waiting 3
seconds for a received frame from the transmitter or the line
signal was gone more than 0.2 seconds.
403 Time-out Typically occurs if you are called by a person instead of a
fax. No fax commands are detected and you time-out.
404 No document to be polled You have polled another fax that does not have a document to
be polled. Ricoh FAX800 or an HP OfficeJet will cause this
error to be reported on the polling machine. Also may be
caused if a Canon B200 polled the HP OfficeJet but the Canon user did not press the <START> key soon enough to force
the Canon to poll rather than manual receive.
411 No post MSG or local interrupt This error occurs if the line drops or the calling fax aborts
during the training phase of the receive. For the first page at
least, the message is “Connecting...”
412 Line disconnect Time-out on the HDLC buffer. If the HDLC buffer finishes
due to a line drop and loss of data, the system will wait for
the message to finish to resynch and retransmit data to the
receiver. Receiver sent DCN and dropped line after waiting 3
seconds for a receive frame from the transmitter or the line
signal was gone for more than 0.2 seconds.
413 DCN received You have polled a fax and it disconnects instead of sending a
page. The sender fails to pick the next page in the scanner.
The sender presses STOP as the sender starts to transmit.
414 No documents to be polled There were no documents to be polled.
415 Invalid DCS DCS was received in the command frame but was invalid. A
valid DCS must correspond to the products request for ECM
mode ON or OFF.
416 Speed mismatch Set if the DCS frame received from a remote transmitter con-
tains a minimum scan speed non-compatible with the receiv-
er’s capabilities.
417 T30R
(at least one page not confirmed)
In the non- error correction mode, the unit sent an RTN sig-
nal indicating that the page received had many bad lines and
may not be readable (noisy line). In the error correction
mode, the unit fails to receive a complete correct page after
all attempts at resending.
419 System exception The fax receive was aborted. The most common cause is lack
of memory.
421 Phone disconnected The user has disconnected the line after the voice session
without continuing the fax session.
(Continued on next page)
Problem Resolution
5-29
Page 99
COMMUNICATION ERROR CODES (Continued)
RECEIVE ERRORS (400 level codes continued) – Code numbers not listed are not used
CODE DESCRIPTION COMMENTS
422 Irrelevant response In non-ECM mode the command received was none of the
expected responses.
431 No local response for
remote interrupt
Set by a receiver when working in ECM mode. The post-
message voice request command was received and there was
no local line request during T3 time-out.
432 Phone disconnected The user has disconnected the line after the voice session
without continuing the fax session while in ECM mode.
441 Phone disconnected The user has disconnected the line after the voice session
without continuing the fax session while in ECM mode.
451 Phone disconnected The user has disconnected the line after the voice session
without continuing the fax session while in ECM mode.
461 Time-out T2 timer time-out waiting for a command following an RNR.
462 DCN received A DCN was received in a command frame that was received
in response to RNR. The local unit ran out of memory while
receiving. When the sender asked RR (receive ready?), your
unit sent RNR (receiver not ready). The sender will ask RR
for 1–4 minutes and when it gives up waiting, will send a
DCN (disconnect) back to you.
463 Line disconnect Receiver sent DCN and dropped the line after waiting 3 sec-
onds for a received frame from the transmitter or the line sig-
nal was gone more than 0.2 seconds.
464 Irrelevant response In ECM mode the command received was not expected.
471 Time-out T2 timer time-out waiting for a command following an RNR.
472 ERR transmitted Set by a receiver in ECM if a transmitter decides to abort re-
transmissions of current block/page/document after 4 unsuc-
cessful retries and possible fallbacks in modem speed.
473 DCN received A DCN was received in a command frame that was received
in response to RNR.
474 Line disconnect Receiver sent DCN and dropped the line after waiting 3 sec-
onds for a received frame from the transmitter or the line sig-
nal was gone more than 0.2 seconds.
475 Irrelevant response In ECM mode the command received was not expected.
481 Irrelevant response In ECM mode, the command received was not RR.
(Continued on next page)
Problem Resolution
5-30
Page 100
COMMUNICATION ERROR CODES (Continued)
TRANSMIT ERRORS (500 level codes) – Code numbers not listed are not used
CODE DESCRIPTION COMMENTS
501 Line busy Busy tone detected during initial handshake. “BUSY” dis-
played on journal.
502 DCN received A DCN was received in a command frame that was received
in response to CNG. The remote side ended the session by
sending DCN (disconnect) very early in the session setup.
Between 2 HP OfficeJets, you can cause this condition by
pressing STOP on the receiving unit immediately upon see-
ing the “Answering...” display.
503 Line disconnect Receiver sent DCN and dropped the line after waiting 3 sec-
onds for a received frame or the line signal was gone more
than 0.2 seconds.
504 Irrelevant response Command following CNG was not valid.
505 Time-out T1 timer elapsed and no response received. “No answer” dis-
played on journal report.
511 Incompatible remote receiver Receiver is non-compatible for customizable functions.
512 Incompatible remote receiver Receiver is non-compatible or polling was requested and de-
nied.
513 Polling password incorrect You were polled and there was no document to send.
514 No documents to be polled The polling unit does not look at the DIS which says we do
not have a document to poll and requests us to send one any-
way.
515 Time-out Timer has elapsed.
521 DCN received DCN was received in a response frame following the training
phase. The remote side ended the session by sending DCN
(disconnect) during the session setup. Between 2 HP Office-
Jets, you can cause this condition by pressing STOP on the
receiving unit immediately upon seeing the “Connecting...”
display.
522 Line disconnect Receiver sent DCN and dropped the line after waiting 3 sec-
onds for a received frame or the line signal was gone more
than 0.2 seconds.
523 No response on all retries No response was received on all 3 attempts to establish con-
nection with DCS.We lost connection with the receiver, either
because the line dropped or because the receiver hung up.
524 Identification received Failure to sync with the remote unit. The line may be defec-
tive which keeps the remote unit from seeing the DCS com-
mand.
525 Fallback impossible Fallback in modem speed is needed but impossible (for ex-
ample: receiver supports V.29 but V.27 is needed). All at-
tempts to train with the remote unit have failed. The HP Offi-
ceJet attempts to train at 9600, 7200, 4800 and 2400 baud.
(Continued on next page)
Problem Resolution
5-31
 Loading...