

Page 1
Start Here
Important: Do not connect the USB cable until Step 16 or software may not install
properly. Follow the steps in order.
1
If you have problems during setup, see Troubleshooting in the last section.
ข้อมูลสำคัญ: โปรดอย่าต่อสาย USB จนกว่าจะถึงขั้นตอนที่ 16 มิฉะนั้นซอฟต์แวร์อาจติด
ตั้งไม่ถูกต้อง โปรดปฏิบัติตามขั้นตอนต่างๆ ตามลำดับ
หากท่านประสบปัญหาระหว่างการติดตั้ง โปรดดูที่ การแก้ไขปัญหาเบื้องต้น ในบทสุดท้าย
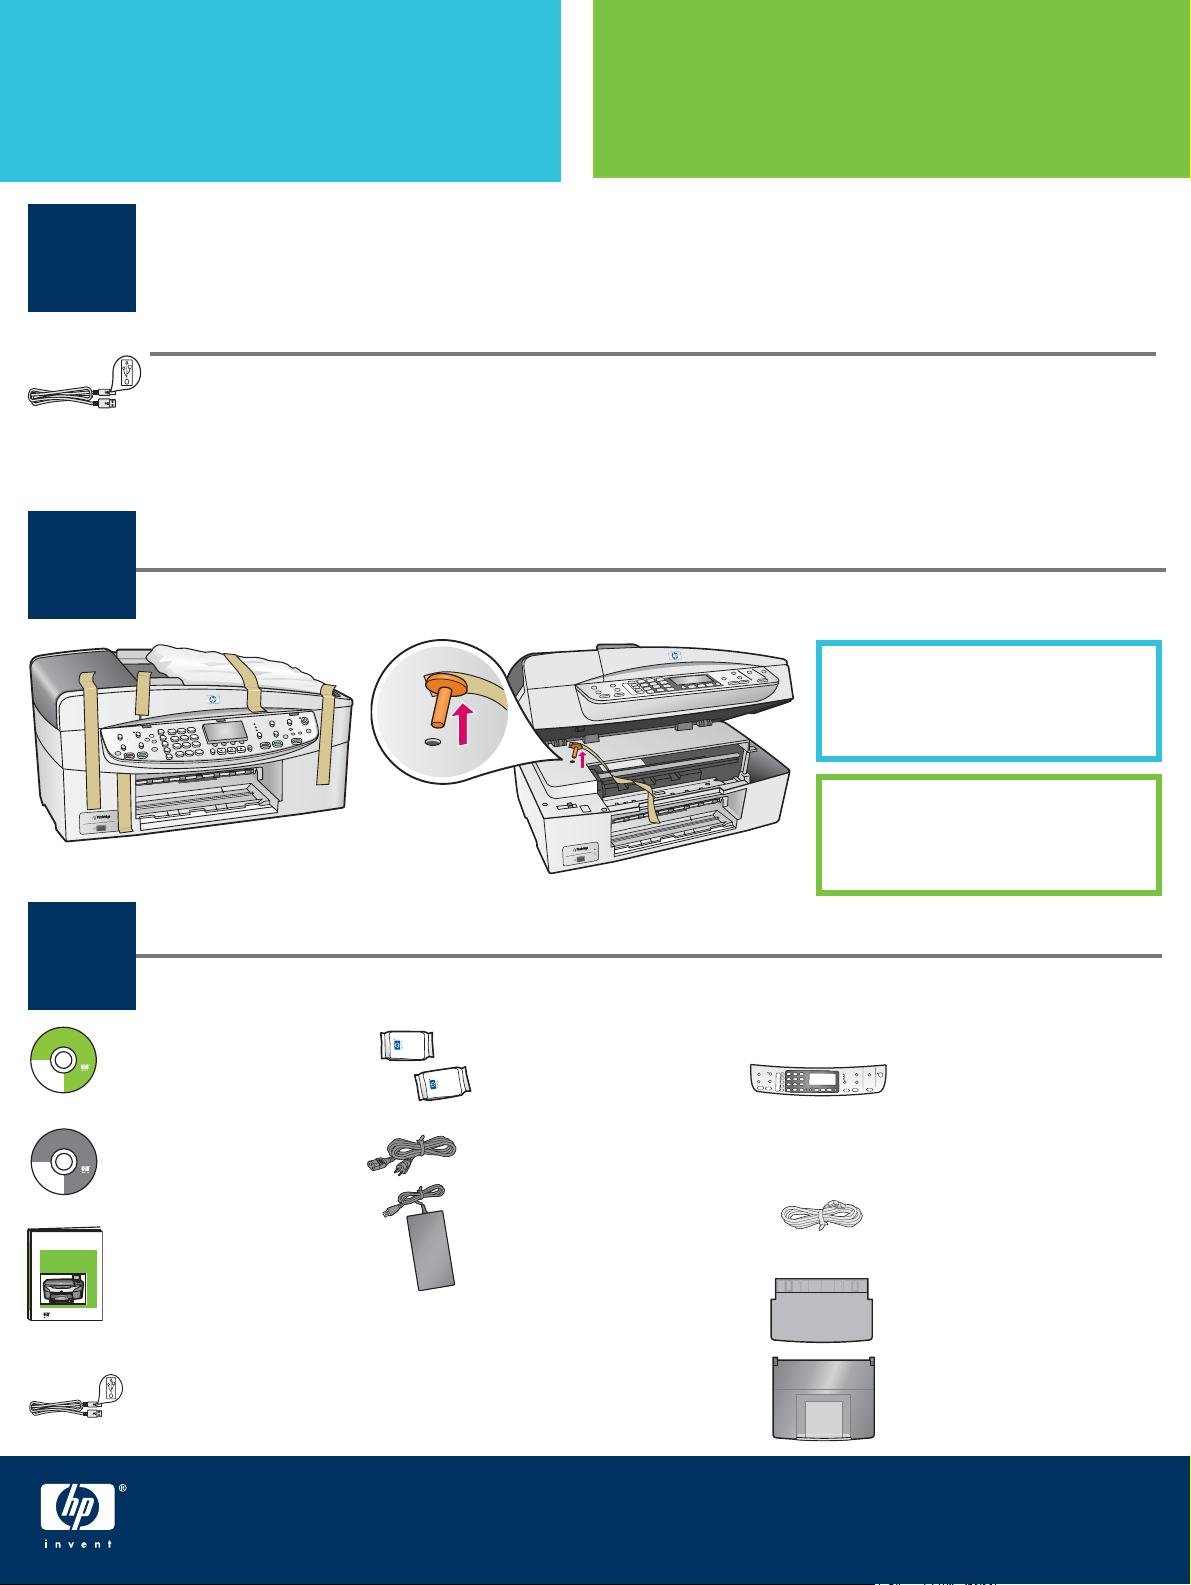
Remove all tape and inside lock
เริ่มต้นที่นี่
© 2004 Hewlett-Packard
Development Company, L.P.
Suomi
English
Français
Arabic
Deutsch
Bahasa
Greek
Português
Hangul
Hrvatski
Hebrew
Cesky
Magyar
Dansk
Italiano
Nederland
Español
© 2004 Hewlett-Packard
Development Company, L.P.
Suomi
English
Français
Arabic
Deutsch
Bahasa
Greek
Português
Hangul
Hrvatski
Hebrew
Cesky
Magyar
Dansk
Italiano
Nederland
Español
2
3
Title in HP Futura Book
14-20 pt., centered
Subtitle in 10-14 pt., centered, white
Title in HP Futura Book
14-20 pt., centered
Subtitle in 10-14 pt., centered, white
Magyar
Slovencina
Windows CD
Italiano
Slovenšcina
Japanese
Español
Español
Svenska
Norsk
Traditional-
Português
Chinese
Russian
Thai
Simplified
Türkçe
Chinese
Ukrainian
ซีดี Windows
Magyar
Slovencina
Italiano
Slovenšcina
Macintosh CD
Japanese
Español
Español
Svenska
Norsk
Traditional-
Português
Chinese
Russian
Thai
Simplified
Türkçe
Chinese
Ukrainian
ซีดี Macintosh
นำเทปทั้งหมดและล็อคภายในออก
Locate components
ตรวจสอบส่วนประกอบ
print cartridges
ตลับหมึกพิมพ์
power cord and
adapter
Lift the access door and remove the
orange shipping lock .
ยกฝาครอบขึ้น และถอด
ล็อคสำหรับการขนส่งสีส้ม ออก
control-panel overlay
(may be attached)
แผ่นปิดแผงควบคุม
(อาจติดตั้งไว้แล้ว)
phone cord
HP Photosmart 2600/2700 series all-in-one
HP Photosmart 2600/2700 series all-in-one
User Guide
User Guide
Horizontal cover image:
Replace this guideline area
with either a cropped product
photograph or a straight-on
front-view illustration
User Guide
คู่มือผู้ใช้
* Purchased separately.
The contents of your box may differ.
USB cable*
* ซื้อแยกต่างหาก สิ่งที่อยู่ในบรรจุภัณฑ์ของ
สายเคเบิล USB*
HP Offi cejet 6200 series all-in-one Setup Guide
ท่านอาจต่างไปจากนี้
สายไฟและอะแดปเตอร์
คู่มือการติดตั้ง HP Offi cejet 6200 series all-in-one
สายโทรศัพท์
top (output) tray
ถาด (กระดาษออก) ด้านบน
bottom paper tray
ถาดกระดาษด้านล่าง
Page 2
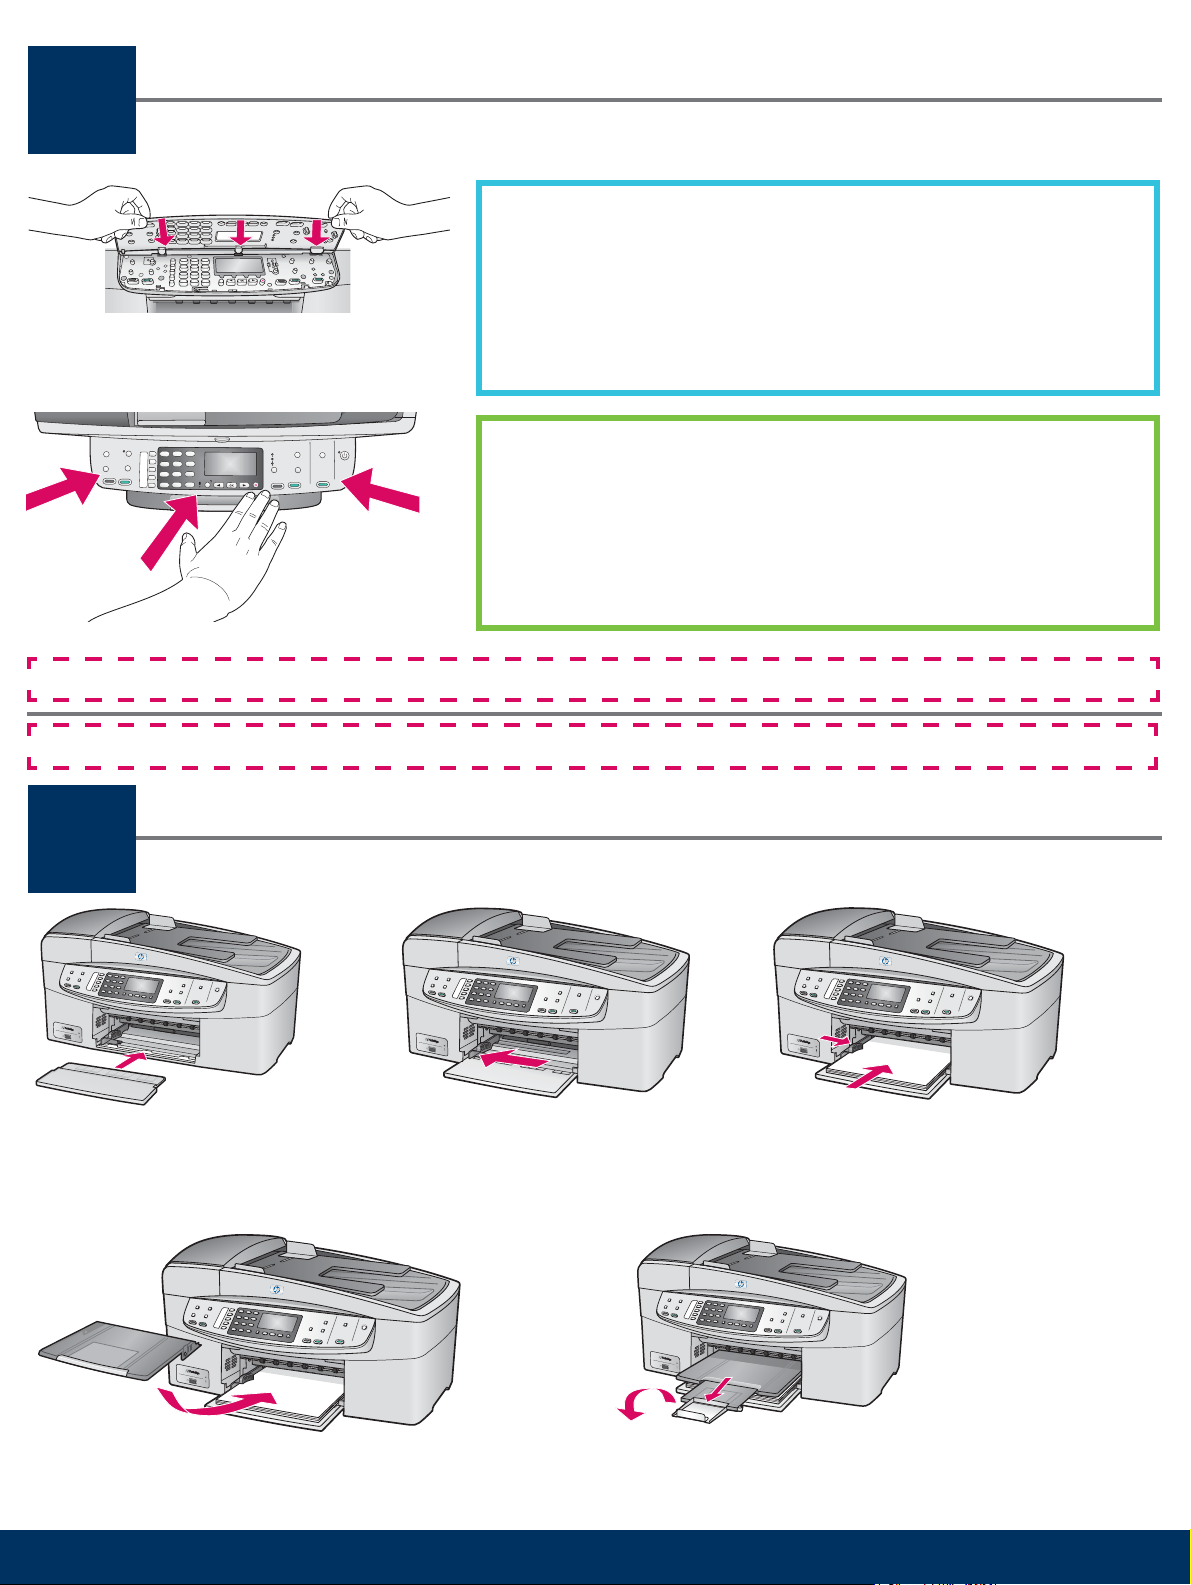
Attach the control-panel overlay (if not attached)
4
ต่อแผ่นปิดแผงควบคุม (ถ้ายังไม่ได้ติดตั้ง)
a Align the tabs of the control panel overlay with the device, and then
lower.
b Press down fi rmly on all edges and in the center of the overlay until
it snaps into place.
ก จัดให้แท็บของแผ่นปิดแผงควบคุมพอดีกับอุปกรณ์ และวางลง
ข กดลงให้แน่น ทุกด้าน และ ส่วนกลาง ของแผ่นปิด จนล็อคเข้าที่
The control-panel overlay must be attached for the HP all-in-one to work!
ท่านต้องติดตั้งแผ่นปิดแผงควบคุม เพื่อให้ HP all-in-one สามารถทำงานได้อย่างถูกต้อง
Load plain white paper
5
a Insert the bottom paper tray. b Slide the paper adjuster over. c Insert paper.
ก ใส่ถาดกระดาษด้านล่าง ข เลื่อนตัวปรับกระดาษ ค ใส่กระดาษ
ใส่กระดาษขาวธรรมดา
d Insert the top (output) tray. e Pull, and then fl ip the tray extender out.
ง ใส่ถาด (กระดาษออก) ด้านบน จ ดึง และพลิกที่รองถาดกระดาษออก
2 • HP all-in-one
Page 3
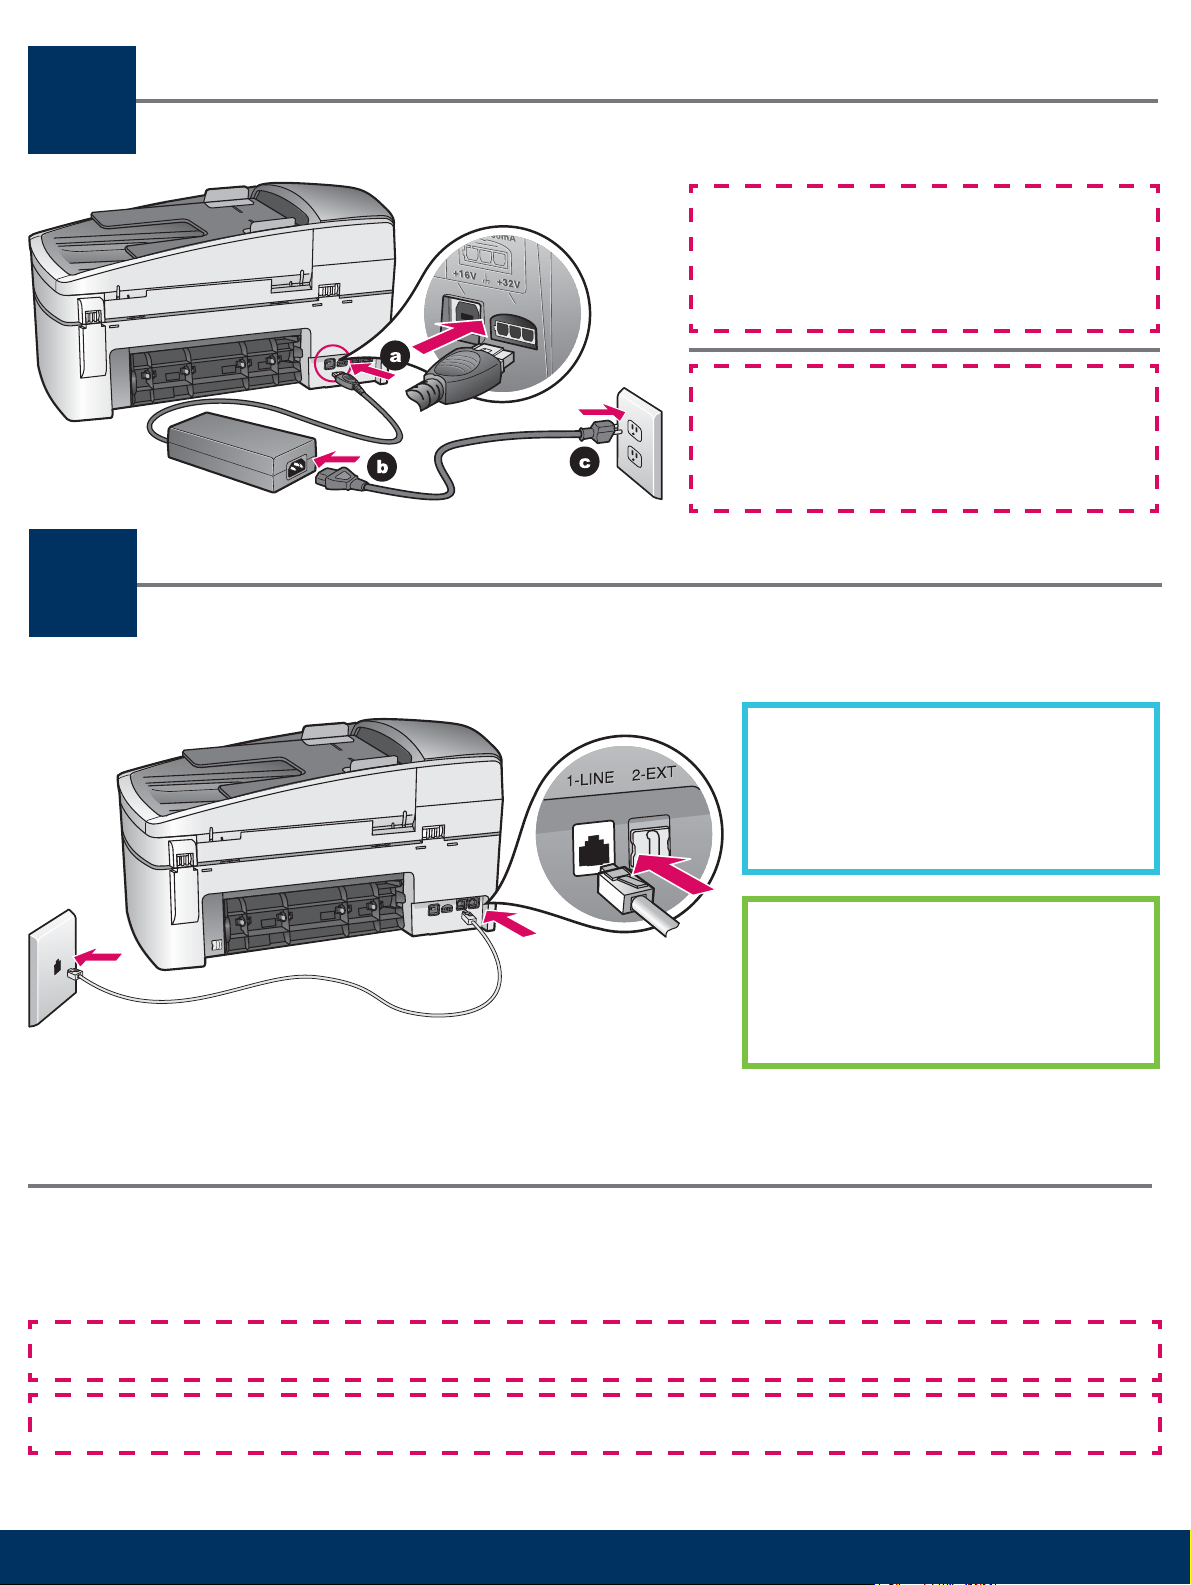
Connect the power cord and adapter
6
7
ต่อสายไฟและอะแดปเตอร์
Important: Do not connect the USB cable until
Step 16 or software may not install properly.
Follow the steps in order.
ข้อมูลสำคัญ: โปรดอย่าต่อสาย USB
จนกว่าจะถึงขั้นตอนที่ 16 มิฉะนั้นซอฟต์แวร์อา
จติดตั้งไม่ถูกต้อง โปรดปฏิบัติตามขั้นตอนต่างๆ
ตามลำดับ
Connect the supplied phone cord
ต่อสายโทรศัพท์ที่ให้มา
Connect one end of the supplied phone
cord to the phone port on the left (1-LINE)
and the other to a wall jack.
ต่อปลายด้านหนึ่งของสายโทรศัพท์ที่ให้มา
เข้ากับพอร์ตโทรศัพท์ที่ด้านซ้าย (1-LINE)
(สาย 1) และต่อปลายอีกด้านหนึ่งเข้ากับ
แจ็คที่ผนัง
To connect an answering machine or use a different phone cord, see the User Guide.
ในการต่อเครื่องตอบรับโทรศัพท์ หรือใช้สายโทรศัพท์ชนิดอื่น โปรดอ่านคู่มือผู้ใช้
Make sure to remove the orange shipping lock from inside the device before you press the On button.
ตรวจสอบว่าได้ถอดล็อคสำหรับการขนส่งสีส้มออกจากด้านในของอุปกรณ์ ก่อนที่จะกดปุ่ม เปิด
3 • HP all-in-one
Page 4
Press the On button and confi gure
8
On
a After you press the On button, the green light fl ashes, and then becomes solid. This may take up to a minute.
b Wait for the language prompt. Use the arrow keys to select your language, type the code, and then confi rm. Use the
arrow keys to select your country/region, type the code, and then confi rm.
ก หลังจากที่กดปุ่ม เปิด ไฟสถานะสีเขียวจะกะพริบ จากนั้นจะสว่างอย่างต่อเนื่อง ขั้นตอนนี้จะใช้เวลาประมาณหนึ่งนาที
ข โปรดรอจนระบบให้เลือกภาษา ใช้ปุ่มลูกศรเพื่อเลือกภาษา จากนั้นยืนยัน ใช้ปุ่มลูกศรเพื่อเลือกประเทศ/พื้นที่ จากนั้นยืนยัน
กดปุ่ม เปิด และกำหนดค่า
เปิด
Open access door
9
เปิดฝาครอบ
10
Lift the access door until it stops. Make sure the print
carriage moves to the right side.
ยกฝาครอบขึ้นจนสุด ตรวจสอบว่าตลับหมึกเลื่อนไปทางขวา
Remove tape from both cartridges
นำเทปออกจากตลับหมึกพิมพ์ทั้งหมด
Pull the pink tab to remove the tape from both print
cartridges.
ดึงแท็บสีชมพู เพื่อนำเทปออกจาก ทั้งสอง ตลับ
Do not touch the copper-colored contacts or retape the cartridges.
ห้ามแตะหน้าสัมผัสทองแดง หรือปิดเทปกลับเข้าที่เดิม
4 • HP all-in-one
Page 5

Insert the tri-color print cartridge
11
ใส่ตลับหมึกสามสี
The device must be On before you can insert the print cartridges.
a Hold the tri-color print cartridge with the HP label facing up.
b Place the tri-color print cartridge in front of the left slot.
c Push the cartridge fi rmly into the slot until it snaps into place.
เครื่องจะต้อง เปิดอยู่ ก่อนที่ท่านจะใส่ตลับหมึกพิมพ์
ก ถือตลับหมึก สามสี โดยให้ฉลาก HP อยู่ด้านบน
ข วางตลับหมึก สามสี ไว้ด้านหน้าของช่อง ซ้าย
ค ดันตลับหมึกเข้าสู่ช่องใส่จนล็อคเข้าที่
5 • HP all-in-one
Page 6

Insert the black print cartridge
12
ใส่ตลับหมึกสีดำ
a Hold the black print cartridge with the HP label facing up.
b Place the black print cartridge in front of the right slot.
c Push the cartridge fi rmly into the slot until it snaps into place.
d Close the access door.
ก ถือตลับหมึก สีดำ โดยให้ฉลาก HP อยู่ด้านบน
ข วางตลับหมึกพิมพ์ สีดำ ที่ด้านหน้าของช่อง ขวา
ค ดันตลับหมึกให้เข้าสู่ช่องใส่จนล็อคเข้าที่
ง ปิดฝาครอบ
6 • HP all-in-one
Page 7

Align the print cartridges
13
ปรับตั้งตลับหมึก
a Press OK at each of the prompts on the control panel to start
print cartridge alignment.
The alignment may take a few minutes.
b After the page prints, alignment is complete. Check the
display for the status, and then press OK . If it fails, see
Troubleshooting in the last section.
Recycle or discard the alignment page.
ก กด OK (ตกลง) เมื่อมีข้อความแจ้งที่แผงควบคุม ให้เริ่มต้นการ
ปรับตั้งตลับหมึก
การปรับตั้งอาจใช้เวลาสักครู่
ข หลังจากที่พิมพ์หน้ากระดาษแล้ว การปรับตั้งก็จะเสร็จ
สมบูรณ์ ตรวจสอบสถานะที่จอแสดงผล จากนั้นกด OK
(ตกลง) หากไม่สำเร็จ โปรดดูที่ การแก้ไขปัญหาเบื้องต้น
ในส่วนสุดท้าย
ทิ้งหรือนำหน้าสำหรับปรับตั้งกลับมาใช้อีกครั้ง
If you are not connecting the device to a computer, continue to the Fax Setup chapter in the User Guide for
information on how to fi nish fax setup.
หากท่านไม่ได้ต่อเครื่องเข้ากับคอมพิวเตอร์ โปรดดูที่หัวข้อ การตั้งค่าแฟกซ์ ในคู่มือผู้ใช้ เพื่อดูข้อมูลเกี่ยวกับ
การตั้งค่าแฟกซ์
7 • HP all-in-one
Page 8

Turn on your computer
14
15
เปิดเครื่องคอมพิวเตอร์
a Turn on your computer, login if necessary, and then
wait for the desktop to appear.
b Close any open programs.
ก เปิดเครื่องคอมพิวเตอร์ จากนั้นล็อกอิน ถ้าจำเป็น
และรอจนเดสก์ทอปปรากฏขึ้น
ข ปิดโปรแกรมที่เปิดอยู่ทั้งหมด
Insert the correct CD
ใส่แผ่นซีดีที่ถูกต้อง
Windows Users: Macintosh Users:
a Insert the HP all-in-one
Windows CD.
b Follow the onscreen instructions.
ผู้ใช้ Windows:
ก ใส่แผ่นซีดี HP all-in-one Windows
ข ทำตามคำแนะนำบนหน้าจอ
If the startup screen does not appear, double-click My
Computer ,double-click the CD-ROM icon, and then
double-click setup.exe .
Insert the HP all-in-one
Macintosh CD. Go to the next
step before installing software.
ผู้ใช้ Macintosh:
ใส่แผ่นซีดี Macintosh สำหรับ HP all-in-one
ไปที่ขั้นตอนถัดไป ก่อนที่จะติดตั้งซอฟต์แวร์
หากหน้าจอเริ่มต้นไม่ปรากฏขึ้น ให้ดับเบิลคลิกที่ My
Computer ดับเบิลคลิกไอคอนของ CD-ROM (ซีดีรอม )
จากนั้นดับเบิลคลิกที่ setup.exe
8 • HP all-in-one
Page 9

Connect the USB cable
16
ต่อสายเคเบิล USB
Macintosh Users:Windows Users:
You may have to wait several minutes before you see the
onscreen prompt to connect the USB cable.
Once the prompt appears, connect the USB cable to the
port on the back of the HP all-in-one, and then to any
USB port on your computer.
Connect the USB cable to the port on the back of
the HP all-in-one, and then to any USB port on
your computer.
ผู้ใช้ Windows: ผู้ใช้ Macintosh:
ท่านอาจต้องรอหลายนาที ก่อนที่จะพบข้อความแ
จ้งให้เชื่อมต่อสายเคเบิล USB เมื่อมีข้อความแจ้ง
ให้ต่อสาย USB เข้ากับพอร์ตที่ด้านหลังของเครื่อง
HP all-in-one จากนั้นต่อเข้ากับพอร์ต USB พอร์ตใดก็ได้
ที่เครื่องคอมพิวเตอร์
ต่อสายเคเบิล USB เข้ากับพอร์ตที่ด้านหลังของเค
รื่อง HP all-in-one จากนั้นต่อเข้ากับ พอร์ต USB
พอร์ตใดก็ได้ ของเครื่องคอมพิวเตอร์
If you do not see these screens, see Troubleshooting in the
last section.
หากท่านไม่พบหน้าจอนี้ โปรดดูที่ การแก้ไขปัญหาเบื้องต้น
ในส่วนสุดท้าย
9 • HP all-in-one
Page 10

Continue software installation
17
ติดตั้งซอฟต์แวร์ต่อ
Windows Users: Macintosh Users:
Follow the onscreen instructions. Complete the Fax
Setup Wizard and the Sign up now screen.
ผู้ใช้ Windows: ผู้ใช้ Macintosh:
ปฏิบัติตามคำแนะนำบนหน้าจอ ดำเนินการตาม Fax
Setup Wizard (วิซาร์ดการตั้งค่าแฟกซ์) และหน้าจอ
Sign up now (ลงทะเบียน) จนจบ
a Double-click the HP All-in-One Installer icon.
b Make sure you complete all screens, including
the Setup Assistant.
ก ดับเบิลคลิกที่ไอคอน HP All-in-One Installer
ข ตรวจสอบว่าท่านได้ป้อนข้อมูลในหน้าจอทั้งหมด
รวมถึงหน้าจอช่วยเหลือในการติดตั้งด้วย
Congratulations!
18
10 • HP all-in-one
ขอแสดงความยินดี!
HP Photosmart 2600/2700 series all-in-one
HP Photosmart 2600/2700 series all-in-one
User Guide
User Guide
Horizontal cover image:
Replace this guideline area
with either a cropped product
photograph or a straight-on
front-view illustration
When you see the Congratulations! screen, you are ready
to use your HP all-in-one.
See the User Guide or onscreen help to get started.
เมื่อท่านพบหน้าจอ Congratulations! (ขอแสดงความยินดี)
ท่านก็พร้อมที่จะใช้งาน HP all-in-one แล้ว
โปรดอ่านคู่มือผู้ใช้หรือวิธีใช้บนหน้าจอเพื่อเริ่มต้นใช้งาน
Page 11

Troubleshooting
www.hp.com/support
Problem:
Action:
Problem:
Action:
Problem:
Action:
A Carriage Jam message appears after you press the On button.
Open the access door. Remove the orange shipping lock from inside. Press the
OK button.
The Remove and check print cartridges message appears after you insert
print cartridges or the print cartridge alignment fails.
Remove print cartridges. Make sure you remove all tape from copper contacts.
Re-insert the cartridges, and then close the access door.
(Windows only) You did not see the screen telling you when to connect the
USB cable.
Remove, and then re-insert the HP all-in-one Windows CD. Refer to Step 15.
Problem:
Action:
Problem:
Action:
Problem:
Action:
(Windows only) The Microsoft Add Hardware screen appears.
Click Cancel . Unplug the USB cable, and then insert the HP all-in-one
Windows CD. Refer to Steps 15 and 16.
(Windows only) The Device Setup Has Failed To Complete screen appears.
Verify that the control-panel overlay is fi rmly attached. Unplug the
device and plug it in again. Check all connections. Make sure the USB cable
is plugged into the computer. Do not plug the USB cable into a keyboard or
non-powered hub. Refer to Steps 4 and 16.
(Macintosh only) The Macintosh software does not install.
Make sure the USB cable is plugged into the computer before installing the
software. Do not plug the USB cable into a keyboard or non-powered hub.
Refer to Step 16.
Refer to the User Guide for more information. Printed on recycled paper.
Visit www.hp.com/support for assistance.
© Copyright 2004 Hewlett-Packard Development Company, L.P. Printed in [].
Page 12

การแก้ไขปัญหาเบื้องต้น
*Q5800-90124*
*Q5800-90124*
Q5800-90124
ปัญหา:
การดำเนินการ:
ปัญหา:
การดำเนินการ:
ปัญหา:
การดำเนินการ:
ข้อความ Carriage Jam (แคร่ตลับหมึกติด) ปรากฏขึ้นหลังจากกดปุ่ม On (เปิด)
เปิดฝาครอบ นำล็อคสำหรับการขนส่งสีส้มออกจากด้านใน กดปุ่ม OK (ตกลง)
ข้อความ Remove and check print cartridges (นำตลับหมึกออกเพื่อตรวจสอบ)
ปรากฏขึ้นหลังจากใส่ตลับหมึก หรือพิมพ์หน้าปรับตั้ง
นำตลับหมึกออก ตรวจสอบว่าได้นำเทปออกจากหน้าสัมผัสทองแดงแล้ว
ใส่ตลับหมึกเข้าที่ และจากนั้นปิดฝาครอบ
(เฉพาะ Windows) ท่านไม่พบข้อความที่แจ้งให้ต่อสายเคเบิล USB
นำแผ่นซีดี HP all-in-one Windows ออกแล้วใส่กลับเข้าไปใหม่
โปรดอ่านขั้นตอนที่ 15
ปัญหา:
การดำเนินการ:
ปัญหา:
การดำเนินการ:
ปัญหา:
การดำเนินการ:
(เฉพาะ Windows) หน้าจอ Microsoft Add Hardware ปรากฏขึ้น
คลิกที่ Cancel (ยกเลิก) ถอดสายเคเบิล USB จากนั้นใส่แผ่นซีดี HP all-in-one
Windows โปรดอ่านขั้นตอนที่ 15 และ 16
(เฉพาะ Windows) หน้าจอ Device Setup Has Failed To Complete
(การตั้งค่าอุปกรณ์ไม่เสร็จสมบูรณ์) ปรากฏขึ้น
ตรวจสอบว่าได้ติดตั้งแผ่นปิดแผงควบคุมไว้อย่างแน่นหนา ถอดปลั๊กของอุปกรณ์
และต่อกลับเข้าดังเดิม ตรวจสอบการเชื่อมต่อทั้งหมด ตรวจสอบว่าสายเคเบิล
USB ต่อเข้ากับคอมพิวเตอร์แล้ว อย่าต่อสายเคเบิล USB เข้ากับแป้นพิมพ์หรือฮับ
ที่ไม่มีกระแสไฟฟ้า โปรดอ่านขั้นตอนที่ 4 และ 16
(เฉพาะ Macintosh) ไม่สามารถติดตั้งซอฟต์แวร์สำหรับ Macintosh
ต่อสายเคเบิล USB เข้ากับเครื่องคอมพิวเตอร์ ก่อนที่จะติดตั้งซอฟต์แวร์
อย่าต่อสายเคเบิล USB เข้ากับแป้นพิมพ์หรือฮับที่ไม่มีกระแสไฟฟ้า
โปรดอ่านขั้นตอนที่ 16
โปรดอ่านข้อมูลเพิ่มเติมในคู่มือผู้ใช้ พิมพ์ด้วยกระดาษรีไซเคิล โปรดไปที่ www.hp.com/support
เพื่อขอรับความช่วยเหลือ
© Copyright 2004 Hewlett-Packard Development Company, L.P. Printed in [].
 Loading...