

Page 1
Page 2

© Copyright HewlettPackard C om pa ny 1997
All rights are reserved. No
part of the document m ay
be photocopied,
reproduced, or translated
to another language
without the prior written
consent of HewlettPackard Company.
OmniPage® Limited
Edition V5.0 is a U.S.
registered trademark of
Caere Corporation.
Microsoft® is a U.S.
registered trademark of
Microsoft Corporation.
Windows® is a U.S.
registered trademark of
Microsoft Corporation.
Publication number:
C5313-90001
First Edition,
July 1997
Printed in USA.
This product is
approved for use in the
United States and
Canada Only. Local
country laws may prohibit
the use of this product
outside of the United
States or Canada. It is
strictly forbidden by law in
virtually every country to
connect nonap proved
telecommunications
equipment (fax machines)
to public telephone
networks.
Safety Information
Always follow basic safety
precautions when using
this product to r e duce risk
of injury from fire or
electric shock.
1. Read and understand
all instructions in the
User’s Guide.
WARNING:
Potential Shock Hazard
2. Use only a grounded
electrical outlet when
connecting the HP
OfficeJet to a power
source. If you don’t
know whether the
outlet is grounded,
check with a qualified
electrician.
3. Telephone lines can
develop hazardous
voltages. To avoid
electrical shock, do not
touch the contacts on
the end of the cord, or
any of the sockets on
the HP OfficeJet.
Replace damaged
cords immediately.
4. Never insta ll telephone
wiring during a
lightning storm.
5. Observe all warnings
and instructions
marked on the product.
6. Unplug this product
from wall outlets and
telephone jacks before
cleaning.
7. Do not install or use
this product near
water or when you are
wet.
8. Install the product
securely on a stable
surface.
9. Install the product in a
protected loca tion
where no one can step
on or trip over line
cord, and the line cord
will not be damaged.
10. If the product does not
operate normally, see
Troubleshooting.
11. No operatorserviceable parts
inside. Refer servicing
to qualified service
personnel.
Notice
The information c on ta ine d
in this document is subject
to change without notice.
Hewlett-Packard shall not
be liable for errors
contained herein or for
consequential damages in
connection with the
furnishing, performance,
or use of this material.
Information regarding
FCC Class B, Parts 15 and
68 requiremen ts can be
found in the back of the
User’s Guide.
Complete the following information. You’ll need it if you contact your dealer or Hewlett-Packard Company:
Date of Purchase:
Serial Number:
❏❏-❏❏-❏❏❏❏
❏❏❏❏❏❏❏❏❏❏❏❏
(Located on the back of the machine.)
Page 3

Table of Contents
Setting Up the HP OfficeJet............................. 1-1
1
Make Sure Everything Is in the Box.........................................1-2
If you don’t have a CD-ROM drive....................................1-2
1. Install the Tray ......................................................................1-3
2. Plug in the Line Connector ...................................................1-3
3. Connect the Printer Cable.....................................................1-4
4. Connect the Power Cord.......................................................1-4
5. Insert the Print Cartridges .....................................................1-5
6. Load the Paper Supply..........................................................1-6
7. Connect Your Office Equipment - IMPORTANT! ..............1-7
What should you connect?..................................................1-7
How to tell if you have a modem.................................1-9
How to tell if your modem is internal or external........1-9
How should you connect?.................................................1-10
8. Install the Software - REQUIRED!.....................................1-23
9. Make Sure Everything Works Properly..............................1-24
Print a report.....................................................................1-24
Receive a fax ....................................................................1-25
Make a copy......................................................................1-25
Scan a page to your computer...........................................1-25
What’s Next?...........................................................................1-26
Quick Tour ...................................................... 2-1
2
Loading the Paper Supply.........................................................2-2
Using a Scan/Copy Sleeve to Protect Your Original................2-3
Sending Faxes ...........................................................................2-4
Faxing paper documents.....................................................2-4
From the keypad...........................................................2-4
From the Document Assistant......................................2-5
Sending a fax directly from your software program...........2-6
Copying.....................................................................................2-7
i
Page 4

Quick Tour (continued)
2
Faxing.............................................................. 3-1
3
Copying from the keypad...................................................2-7
Copying from the Document Assistant ..............................2-8
Scanning....................................................................................2-9
Scanning images.................................................................2-9
Scanning text for editing (OCR).......................................2-10
Printing....................................................................................2-10
Using the Help System............................................................2-11
Other ways to get help.............................................................2-12
Sending a Paper Document.......................................................3-2
Sending from the keypad....................................................3-2
Dialing in real time ......................................................3-3
Dialing from a telephone that’s connected directly
to the HP OfficeJet.......................................................3-3
Speed dialing................................................................3-4
Sending from the Document Assistant...............................3-5
Sending a Fax Directly from Your Software Program..............3-6
Receiving Printed Faxes............................................................3-7
Answering settings .............................................................3-7
Manually receiving faxes....................................................3-8
Receiving faxes to your PC................................................3-8
Using Advanced Fax Features and Settings..............................3-9
Advanced fax send settings................................................3-9
Controlling how your faxed documents will look ........3-9
Changing the Resolution.......................................3-9
Changing the Contrast.........................................3-12
Redialing a fax number..............................................3-13
Redialing manually with the Redial/Pause button3-13
Changing the Automatic Redial
setting in the software..........................................3-13
Entering a pause during keypad dialing.....................3-14
Assigning speed dial codes........................................3-14
Faxing to a group of fax numbers ..............................3-16
ii
Page 5

Faxing (continued)
3
Changing the information printed at
the top of the faxes you send......................................3-17
Setting Tone or Pulse dialing type .............................3-17
Other advanced features for sending faxes ................3-18
Advanced fax receive settings..........................................3-19
Phone Answering: Automatic or Manual...................3-19
Changing the number of rings before answering.......3-20
Using Distinctive Ring...............................................3-21
Updating your fax receive setup.................................3-22
Changing the paper size setting .................................3-23
Other advanced features for receiving faxes..............3-23
Viewing lists of all sent and received faxes ....................3-24
Printing the fax reports.....................................................3-24
Fax History report......................................................3-24
Last Fax report...........................................................3-24
Adjusting sound volumes.................................................3-25
Changing the time and date..............................................3-25
Standalone Faxing...................................................................3-26
Standalone vs. PC Connected...........................................3-26
Copying ........................................................... 4-1
4
Copying from the Keypad.........................................................4-2
Controlling how your copies will look...............................4-2
Optimizing the quality .................................................4-3
Darkening and lightening — Contrast .........................4-4
Automatic collating............................................................4-4
Copying from the Document Assistant.....................................4-5
Controlling how your copies will look...............................4-6
Optimizing the quality .................................................4-6
Darkening and lightening — Contrast .........................4-6
Reducing and enlarging......................................................4-7
Copy quality .......................................................................4-7
Collating: On or Off ...........................................................4-8
iii
Page 6

Scanning.......................................................... 5-1
5
6
Scanning Your Document As an Image....................................5-2
Scanning from the Document Assistant.............................5-2
Scan Image Viewer.............................................................5-5
Selecting the area you want to edit .............................. 5-5
Cutting, pasting, and cropping an area.........................5-5
Save image...................................................................5-6
Scanning from TWAIN-compliant software...................... 5-7
How to tell if your software program supports TWAIN5-7
How to scan with TWAIN............................................5-7
Scanning Your Document to Edit the Words (OCR)................5-8
Printing............................................................ 6-1
Paper Types...............................................................................6-2
Selecting paper types and sizes ..........................................6-2
Loading tips........................................................................6-2
Loading plain and special papers.................................6-3
Loading letterhead paper..............................................6-3
Loading a single envelope............................................6-3
Loading multiple envelopes.........................................6-4
Loading transparencies ................................................6-4
Using the Print Settings.............................................................6-5
Locating the print settings ..................................................6-5
Using the Paper tab settings................................................6-5
Using the Setup tab settings................................................6-6
Print quality and speed.................................................6-6
Printing in color ...........................................................6-6
Printing in grayscale.....................................................6-7
Using the Advanced tab settings........................................6-7
Printing from Your Windows Software Program .....................6-8
Printing from the HP OfficeJet Manager ..................................6-8
iv
Page 7

Getting Help.................................................... 7-1
7
Sources of Information and Help..............................................7-2
Using the Help System..............................................................7-5
Understanding the Messages Displayed on the Keypad...........7-6
Additional Problem Solving Tips............................................7-21
Uninstalling the software..................................................7-21
Cleaning the scanner glass................................................ 7-22
Specifications .................................................. 8-1
8
Product Specifications...............................................................8-2
Overall Specifications.........................................................8-2
Printing Specifications........................................................8-2
Faxing Specifications .................................................... .....8-4
Copying Specifications.......................................................8-5
Scanning Specifications......................................................8-5
Ordering Information................................................................8-6
Obtaining a Material Safety Data Sheet (MSDS).....................8-6
Regulatory Information.............................................................8-7
Notice to Users of the U.S. Telephone Network:
FCC Requirements .............................................................8-7
Electromagnetic or Radio Frequency Interference:
FCC Requirements .............................................................8-8
Notice to Users of the Canadian Telephone Network........8-8
v
Page 8

vi
Page 9

Setting Up the
HP OfficeJet
............................................................................................................
efer to this chapter for more details about setting up the
1
card. Perform each step in sequence.
Make Sure Everything Is in the Box ........................................ 1-2
If you don’t have a CD-ROM drive..................................1-2
1. Install the Tray.................................................................... 1-3
2. Plug in the Line Connector................................................. 1-3
3. Connect the Printer Cable..................................................1-4
4. Connect the Power Cord ....................................................1-4
R
HP OfficeJet than are provided in the
Ready, Setup, Go
1. Setting Up
5. Insert the Print Cartridges ................................................... 1-5
6. Load the Paper Supply........................................................1-6
7. Connect Your Office Equipment - IMPORTANT! ................1-7
What should you connect?.............................................. 1-7
How should you connect? ............................................1-10
8. Install the Software - REQUIRED!..................................... 1-23
9. Make Sure Everything Works Properly..............................1-24
Print a report................................................................. 1-24
Receive a fax ................................................................ 1-25
Make a copy ................................................................. 1-25
Scan a page to your computer.......................................1-25
What’s Next?........................................................................ 1-26
Page 10
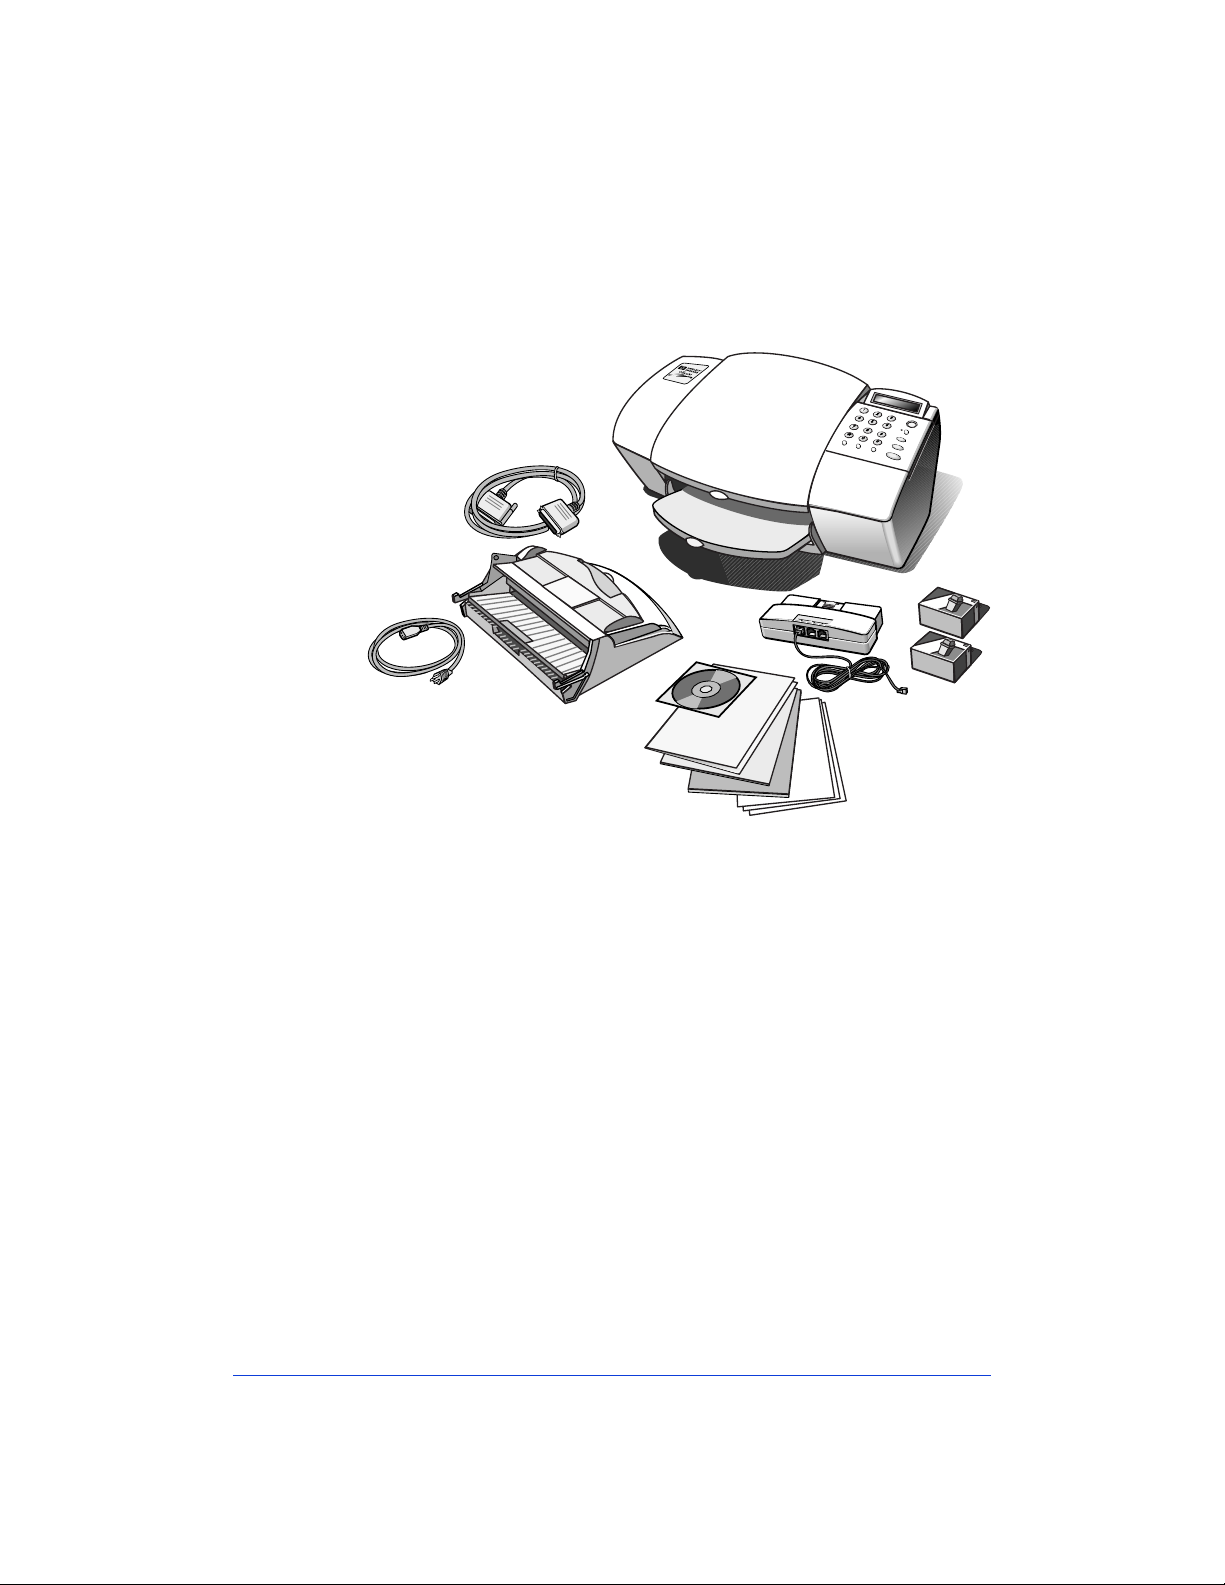
Make Sure Everything Is in
the Box
OfficeJet
a
b
c
d
f
a) HP OfficeJet Series 600
b) Bi-directional parallel cable
c) Paper/Document loading tray
d) Power cord
e) HP OfficeJet Series 600
software on compact disc
(CD-ROM)
HP OfficeJet Series 600 Ready,
f)
Setup, Go
g) Warranty statement
Card
j
e
g
h
h) OmniPage LE Optical
Character Recognition (OCR)
documentation
i) Scan/Copy sleeves
(for faxing, copying, and
scanning smaller-than-standardsized documents and for
protecting photos)
j) Fax/Phone line connector with
attached phone cord
k) Black and color print cartridges
i
k
1-2
If you don’t have a CD-ROM drive
Please call the HP OfficeJet Fulfillment Center at 1-888-HPDISKS
(1-888-473-4757) to recei v e the s oftw are on 3.5- inch flop py di skett es
by overnight mail.
Page 11
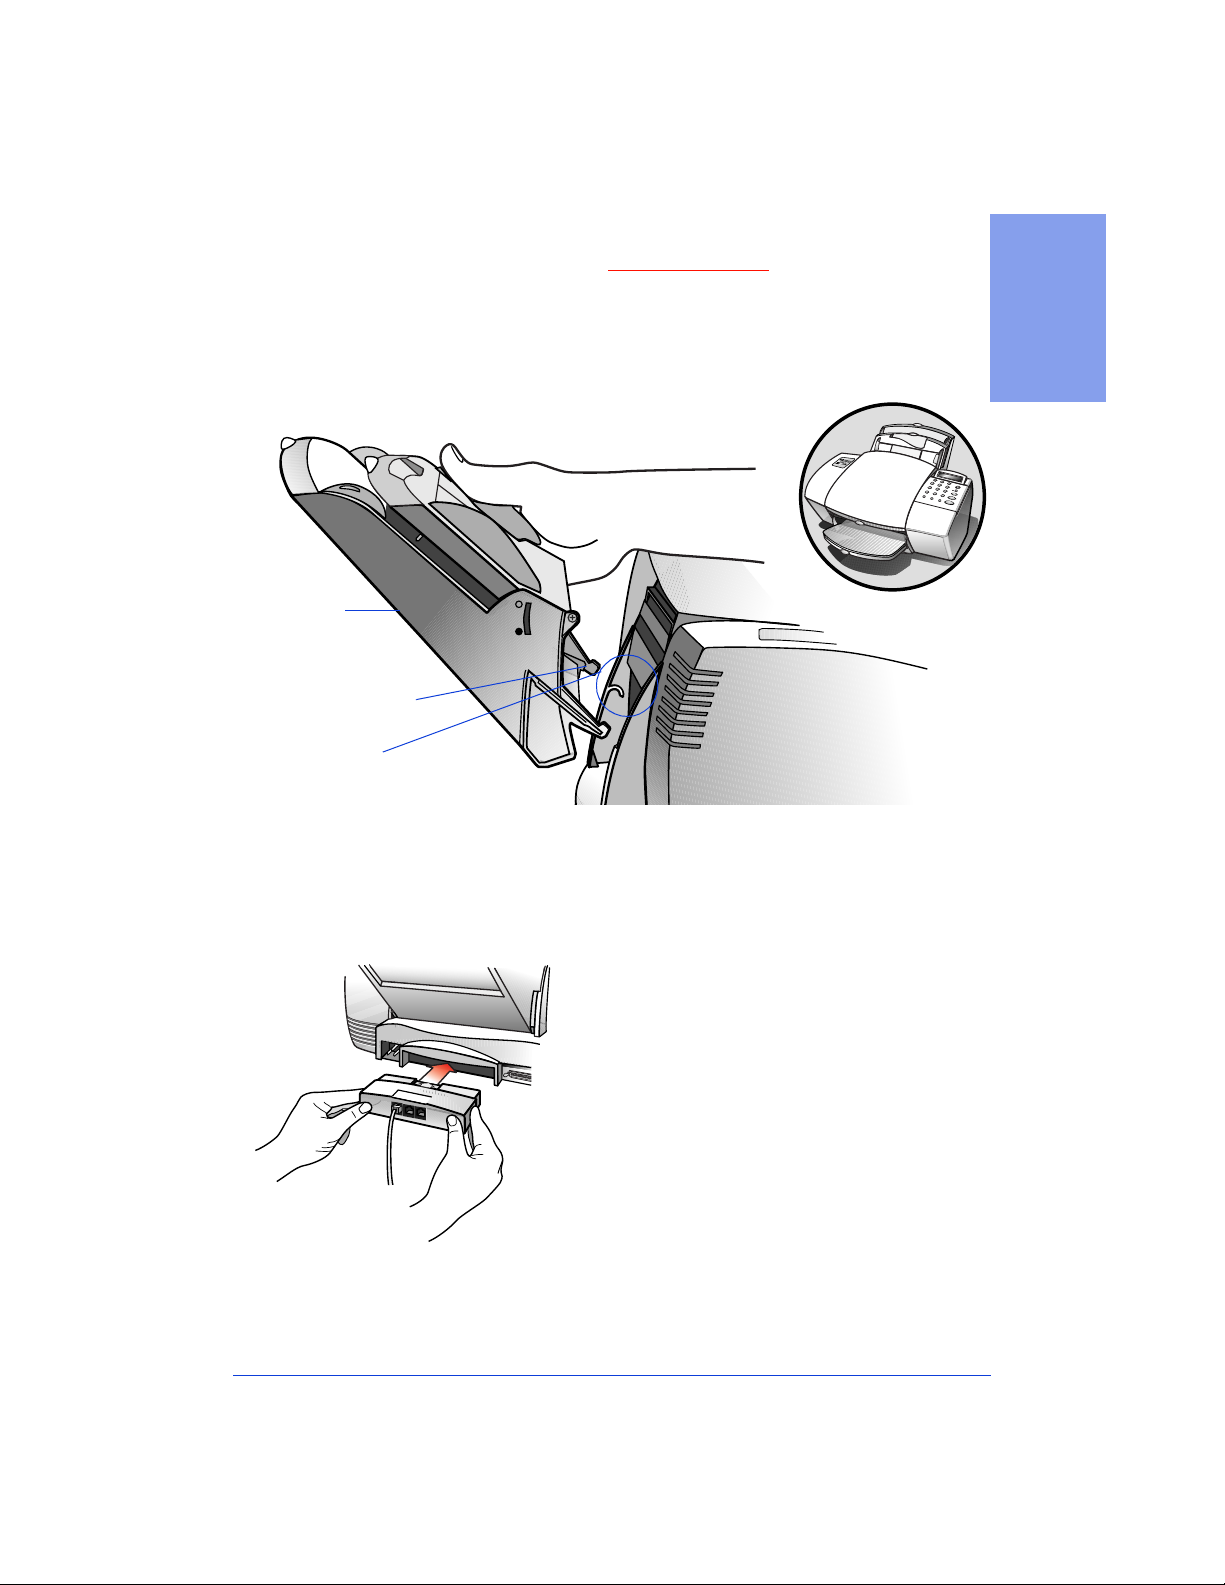
Hold the sides
of the Paper/
Document
Tray
Insert the
Bottom tabs
into the
Guides
Perform each step in sequence:
All steps are required!
1. Install the Tray
The tray fits s ecurel y int o the ba ck of t he HP Of f i ceJet near the to p as
shown.
After proper
tray placement
1. Setting Up
2. Plug in the Line Connector
Insert the fax/pho ne li ne connector into its
●
housing area on the back of the HP OfficeJet. Press it firmly into place. (Once in
place, it’s difficult to remove.)
Plug the loose end of the phone cord into
●
the telephone wall jack you will be using
for your fax line.
1-3
Page 12
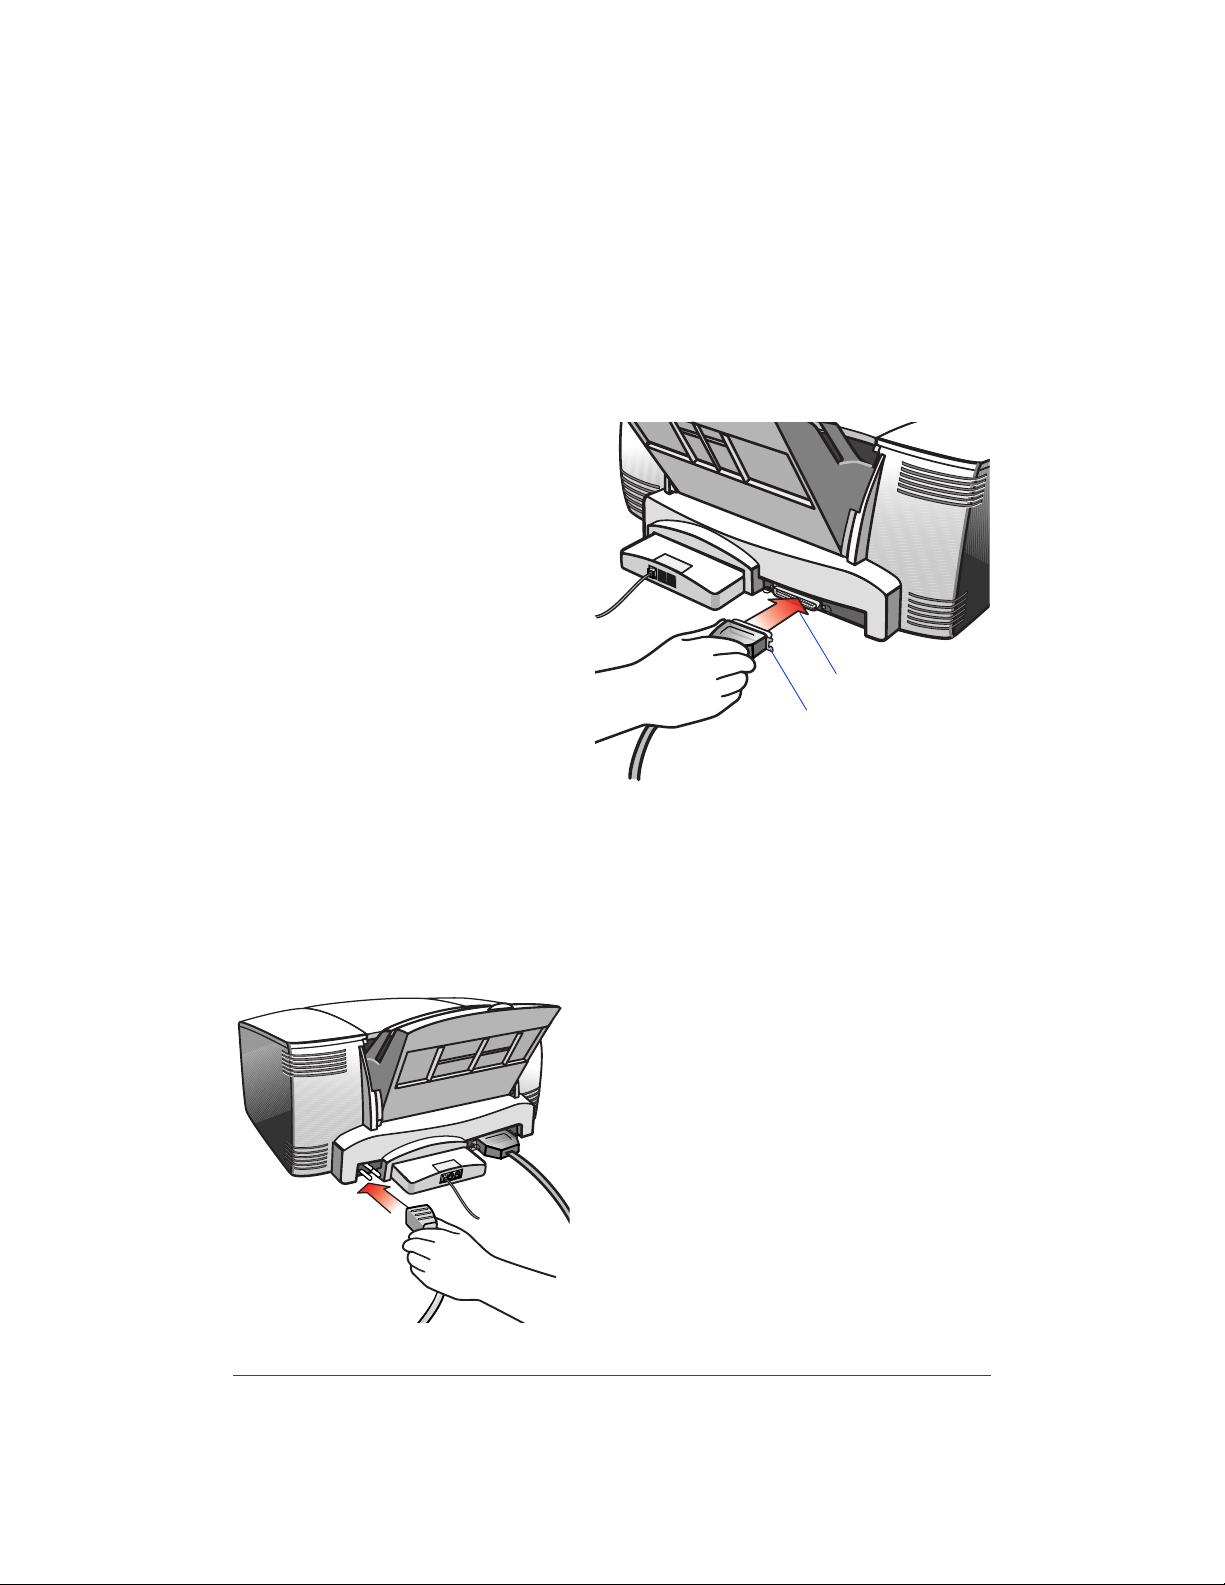
3. Connect the Printer Cable
Important:
attach the HP OfficeJet to your computer. If you do not use a bidirectional cable, the HP OfficeJet will not work.
For safety, turn off your computer before connecting the printer
●
cable.
Connect the
●
notched end
the bi-directional
parallel cable
firmly to the
cable port
back of the HP
OfficeJet. Snap
both metal clips
into the notches
on the connector.
Plug the other end
●
of the cable into
the
port
your computer.
Tighten the
connector’s screws.
You must use the enclosed bi-directional parallel cable to
of
on the
Cable port
Notched end
of cable
parallel (LPT1)
on the back of
1-4
4. Connect the Power Cord
Plug the power cord connector
●
the power socket on the back of the HP
OfficeJet.
Plug the other end of the power cord into a
●
grounded electrical outlet.
Warning:
shock, plug the other end of the power cord
into a grounded electrical outlet
Caution:
from the HP OfficeJet, detach this cable. The
On/Off button does not completely disconnect
the power.
T o a void the possibility of el ectrical
If you need to disconnect power
firmly
only
.
into
Page 13
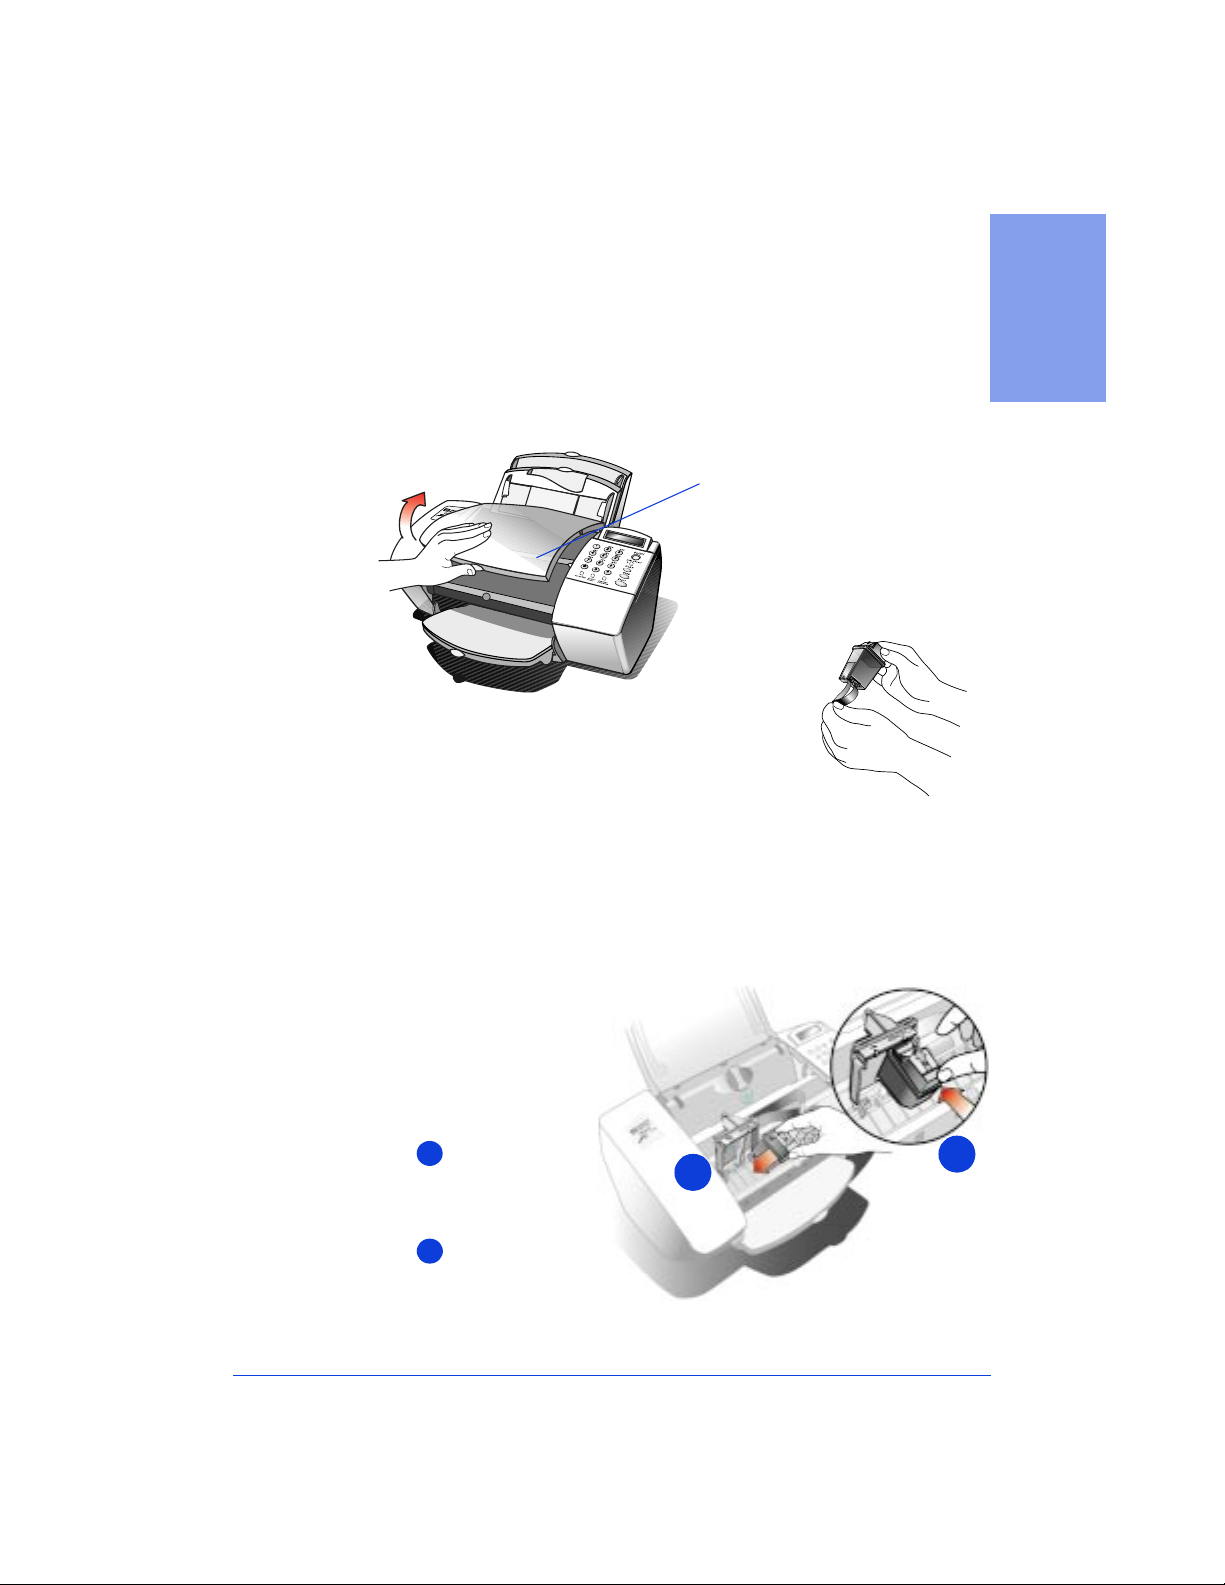
5. Insert the Print Cartridges
After you plug in the power, the HP OfficeJet powers up
●
automatically. The display on the ke ypad will read ,
Cartridge.”
Wait until the HP OfficeJet finishes start-up (about 10 seconds),
●
then open the
of the HP OfficeJet. The empty print
cover
cartridge holder mov es int o view .
Cover
“Insert Color
1. Setting Up
Remove the
●
print cartridge from its
color
packaging. Holding the blue top of the
cartridge, gently remove both pieces of tape
— clear blue a nd solid white — cov ering the ink nozzl es and v en t
hole. (If yo u do not remove the white tape, the ink will be
depleted prematurely.)
Be careful not to t ouch the in k nozzl es or t he coppe r c ontact s; f i ngerprints may damage them.
Next, place the
●
print
color
cartridge into the
cartridge holder
on the right as
shown:
1
First slide in
the bottom until it
1
clicks into place.
2
Then push the
top forward until
the cartridge snaps
into place.
2
1-5
Page 14
Remove the
●
clear blue tape covering the ink nozzles, then place the
print cartridge into the
print cartridge fro m its packagi ng. Pe el of f the
black
cartridge holder
on the left and push it
black
forward until it snaps into place. Again, try not to touch the ink
nozzles or copper contacts.
Close the HP OfficeJet’s cover.
●
If the print cartridge holder moves out of sight before you
Note:
finish inser ti ng bot h print cartridges, close th e cover all the way, then
open it again; the holder comes back into view. To prevent ink from
drying and clogging the nozzles, the holder returns to the parked
position after a few minutes.
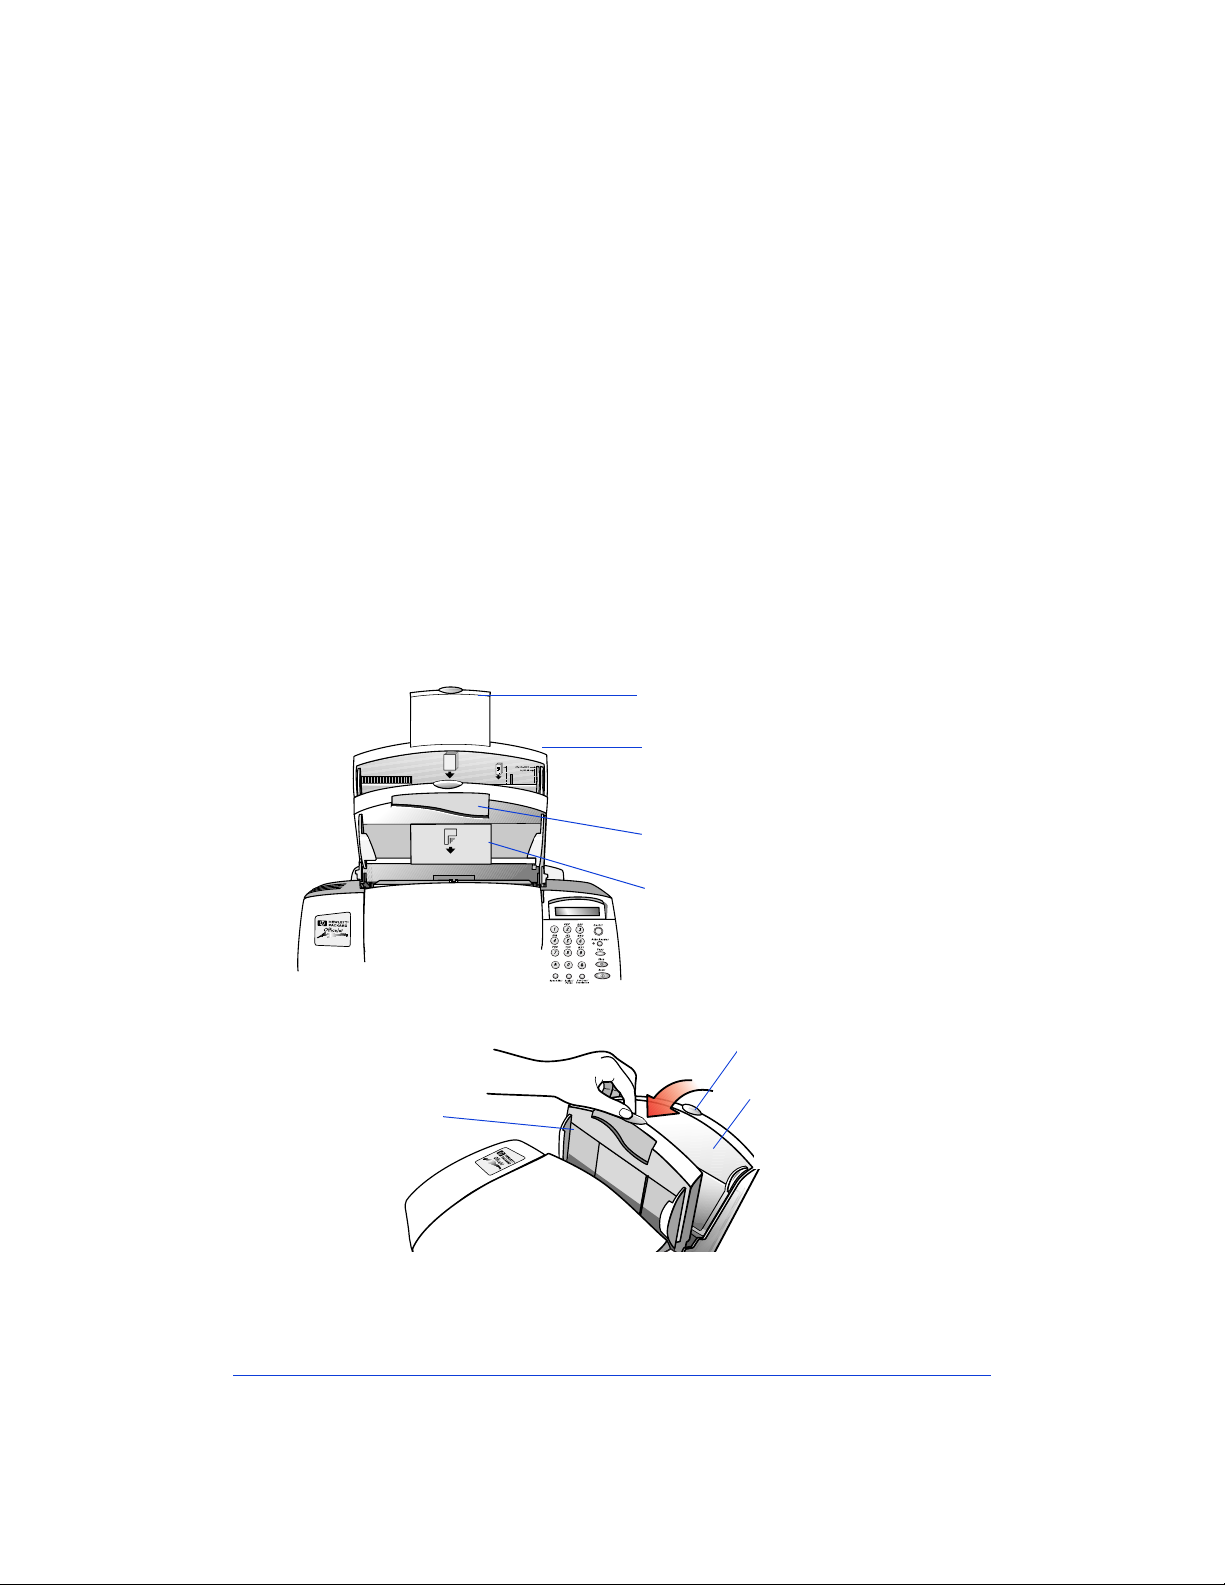
6. Load the Paper Supply
Now it’s time to load blank paper into the paper supply tray. First, a
quick description of the parts of the
paper/document tray
:
Pull the
Document
loading tray
completely
forward
Paper extension
- Use this extension
to support the paper.
Paper supply tray
- Use this tray to
load blank paper or a stack of envelopes.
Single-envelope tray
- Use this tray
to print on a single envelope.
Document loading tray
- Use this
tray to load your original documents
print-side away from you and top-
Pull up the paper
extension
Load blank paper
into the paper
supply tray
1-6
The
●
paper supply tray
paper. If necessa r y, adjust the
sliding it to fit your paper.
is factory set for letter- and legal-size
left paper guide
by pinching and
Page 15
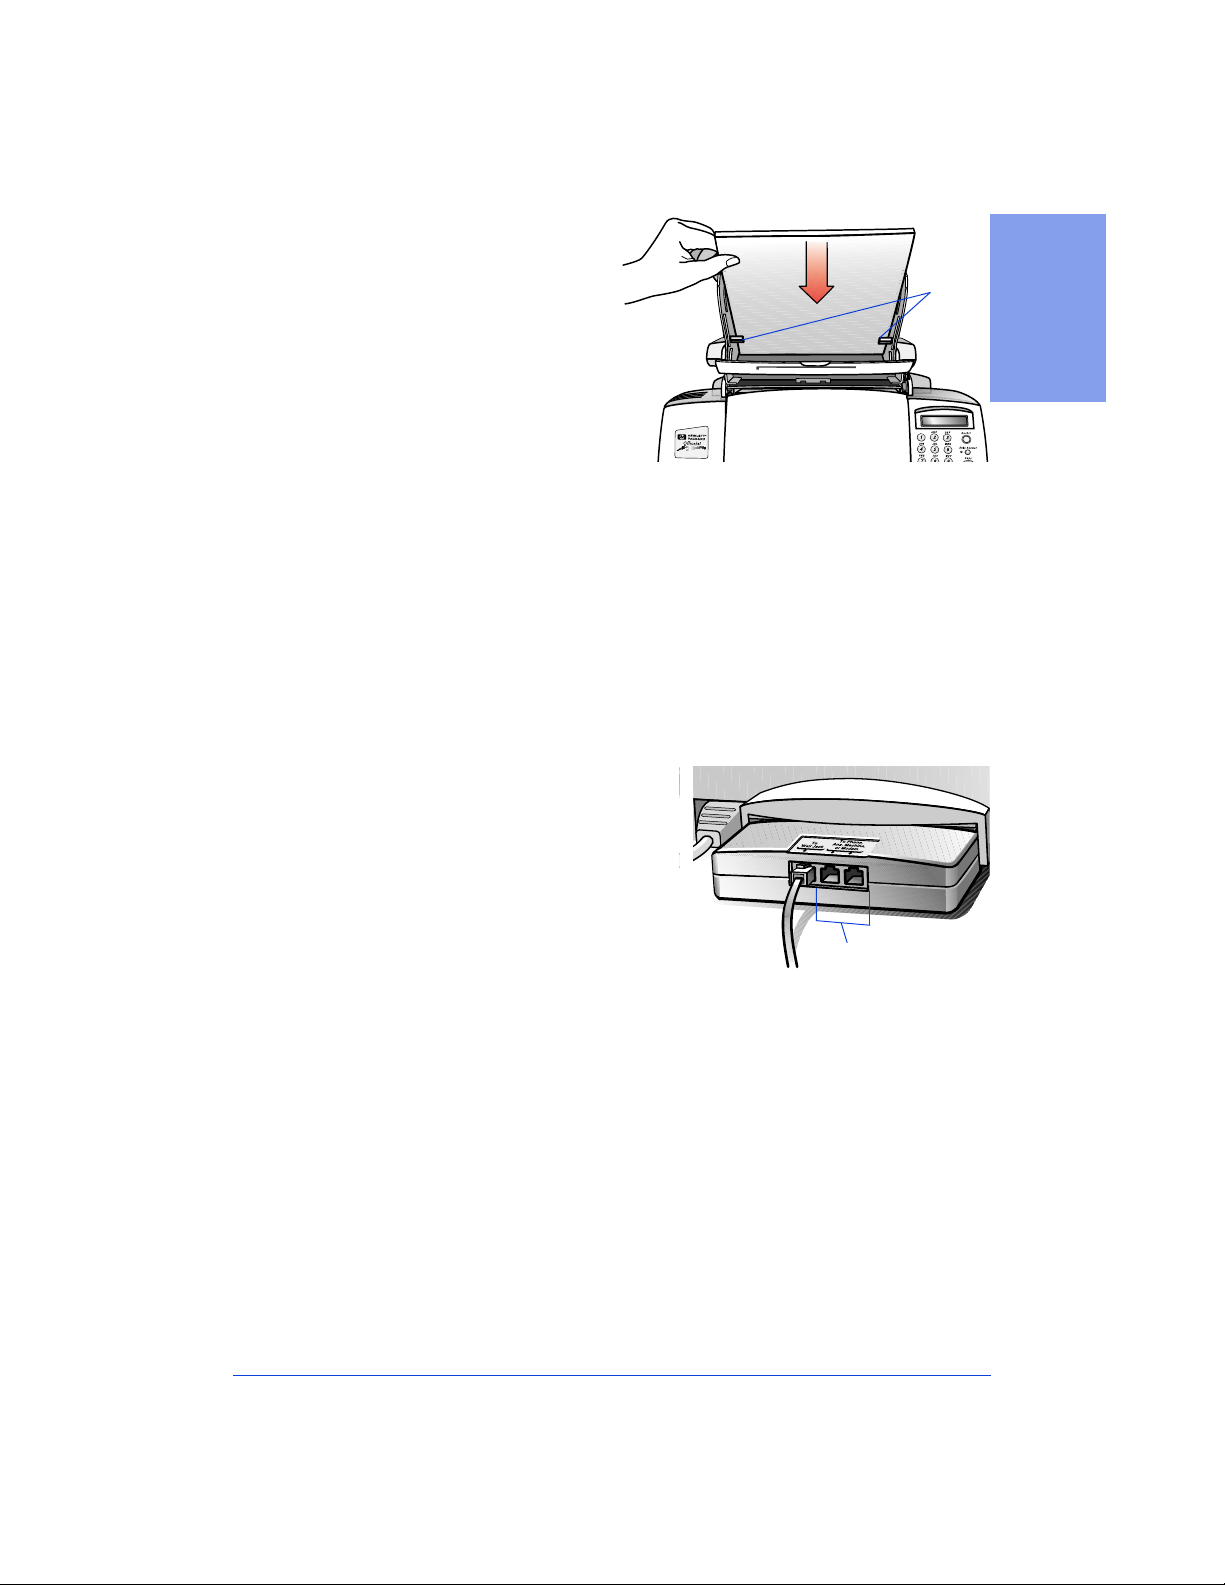
Load about a 1/2-inch-
s
●
thick stack of 20-lb
paper into the paper
supply tray. Make sure
the stack of paper fits
behind the
guides
part of the tray. Load
paper with the print
side facing toward you.
stack
on the lower
1. Setting Up
Stack
guide
OJ-14loadpa
Push the front
●
against the paper supply tr ay. You may want to pull up the
extension
See Chapter 6 for detailed instructions on loading envelopes
Note:
and other special paper/media types.
document loading tray
to support the paper.
backward until it rests
7. Connect Your Office
Equipment -
When you were installing the fax/
phone line connector in Step 2,
you may have noticed the two
ports on the back of the connector
labeled, “To Phone, Answering
Machine, or Modem.”
This means that you can use either
one of these ports to connect any
of these three types of device s you
have in your office; the two ports
are interchangeable.
IMPORTANT!
Connect other
equipment to either
of these two ports
paper
Remove the plugs from the two ports. Then refer to the following
instructions to connect your other equipment.
What should you connect?
Based on your specific equipment and the number of telephone lines
you have , there is only
questions in the fol lo w ing t able, circl e your answer s, the n look up the
appropriate setup scenario in the following “How should you
connect?” section.
optimum way to conn ect. Please re ad the
ONE
1-7
Page 16

Read these questions: Circle your answers:
1
Do you subscribe to a distinctive ring
service through your telephone company on
the same phone line to which you connected
your HP OfficeJet (in Step 3)?
(This telephone se rvi ce, which is unavailable
in many areas, allows you to have 2 or 3
phone numbers on the sa me pho ne li ne. Each
number has a ring with a different pattern so
you can tell t he difference bet ween incoming
calls.)
2
Is the HP OfficeJet connected to a
separate phone line that’s dedicated to
sending and receiving your fax calls (no
voice calls received)?
Circle A or B below, then read
what to do next.
No, I do not have a distinctive
A.
ring service.
Continue with question 2.
Yes, I have a distinctive ring
B.
service.
You do not need to answer any
more questions; skip directly to
“Shared li ne wit h dis ti nc ti ve ri ng
(Case B)” on page 1-22 for
connection instructions.
Circle C or D below, then read
what to do next.
Yes, the OfficeJet will be
C.
connected to a dedicated line.
Skip to question 4.
No, the OfficeJet will be
D.
connected to a shared phone line
that receives both fax and voice
calls.
Continue with question 3.
3
Do you use an answering machine or a
voicemail fe ature in you r computer to answer
voice calls on your shared phone line?
4
Do you have a modem — either internal
to your computer o r an exter nal box — on the
same phone line you will be using for t he HP
OfficeJet?
(If you’ re not sure if you ha ve a modem, re fer
to the following section “How to tell if you
have a modem” before answering this
question.)
1-8
Circle E, F, or G below, then
continue with question 4.
I use an ans wering machine.
E.
I use a voicemail feature in my
F.
computer.
I neither use an answering
G.
machine nor a voicemail feature
in my computer.
Circle H, I, or J below. Then
refer to “How should you
connect?” to match all of your
responses in this column to the
right setup scenario.
Yes, I have a modem inside
H.
my computer.
Yes, I have a modem that’s an
I.
external box.
No, I don’t have any kind of
J.
modem.
Page 17

How to tell if you have a modem
If you answer “Yes” to any of the following questions, then you have
a modem. Do you:
Send/receive faxes directly to/from your computer programs?
●
Use electronic mail (e-mail) on your computer?
●
Access the Internet or the World Wide Web from your computer?
●
Transfer data to or from other computers?
●
How to tell if your modem is internal or external
If your modem is an
internal modem
connected to the back of your computer and going to a wall jack.
, then you’ll hav e a phone cord
1. Setting Up
If your modem is an
external modem
, a communication cable will
be connected from the back of your compu ter to the box, and a phone
cord will go from the box to a wall jack.
1-9
Page 18

How should you connect?
Write down all of your responses to the questions in “What should
you connect?” then refer to the appropriate setup case indicated
below. For example, if you answered “A” to question 1, “D” to
question 2, “E” to question 3, and “H” to question 4, look up
“ADEH.”
Response: Refer to this section for connection instructions:
ACJ
ACH
ACI
ADGJ
ADGH
ADGI
ADEJ
ADFJ
ADEH
ADFH
ADEI
ADFI
B
“Dedicated line” (page 1-11)
“Dedicated line with internal modem” (page 1-11)
“Dedicated line with external modem” (page 1-12)
“Shared line” (page 1-13)
“Shared line with internal modem” (page 1-14)
“Shared line with external modem” (page 1-15)
“Shared li ne with answering machine” (page 1-16)
“Shared line with computer voicemail” (page 1-17)
“Shared line with internal modem and answering machine” (page 1-18)
“Shared line with internal modem and computer voicemail” (page 1-19)
“Shared line with external modem and answering machine” (page 1-20)
“Shared line with external modem and computer voicemail” (page 1-21)
“Shared line with distinctive ring” (page 1-22)
In all connection diagrams, it is always recommended that a
Note:
phone be connected to your HP OfficeJet. The main benefits of
connecting a phone are:
1-10
For the convenience of having a phone close to the HP OfficeJet
●
so that you can reach the
START
button when you receive faxes
manually.
In case you need to send a fax (press
●
START
) after calling
someone who must receive faxes manually.
For the convenience of making outgoing phone calls.
●
Page 19
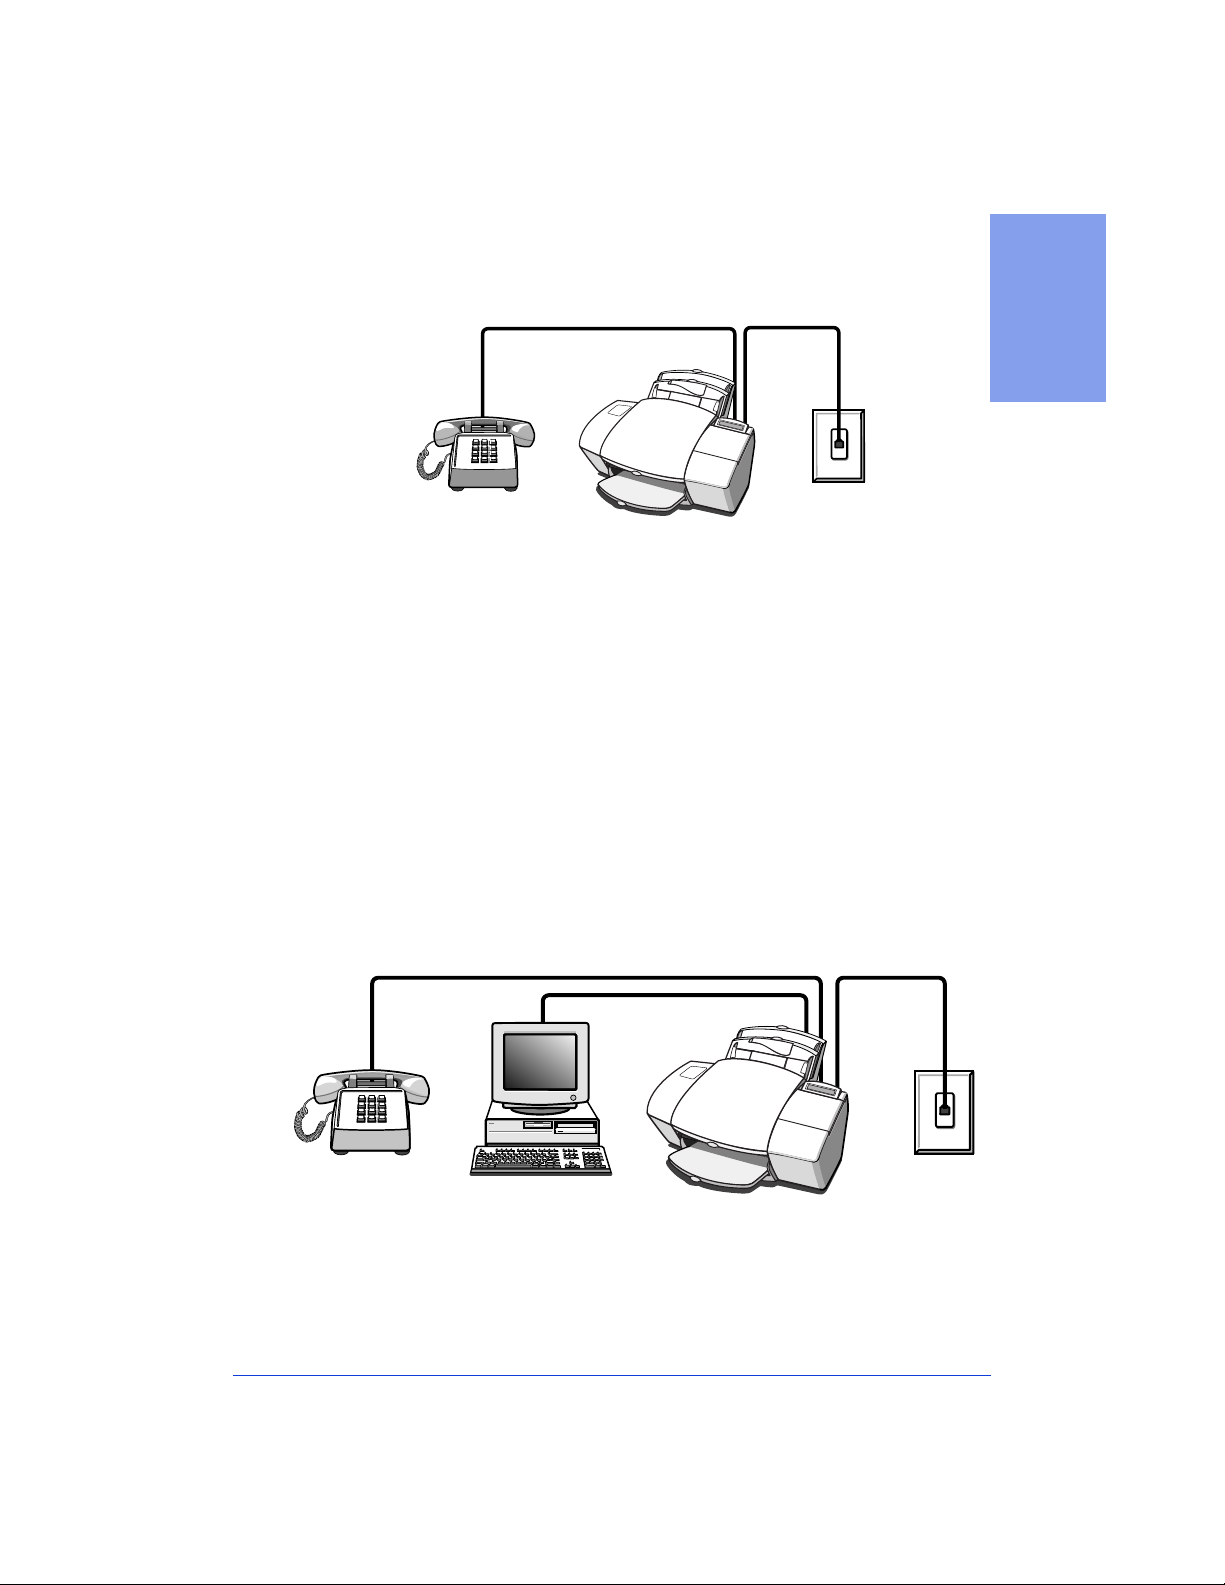
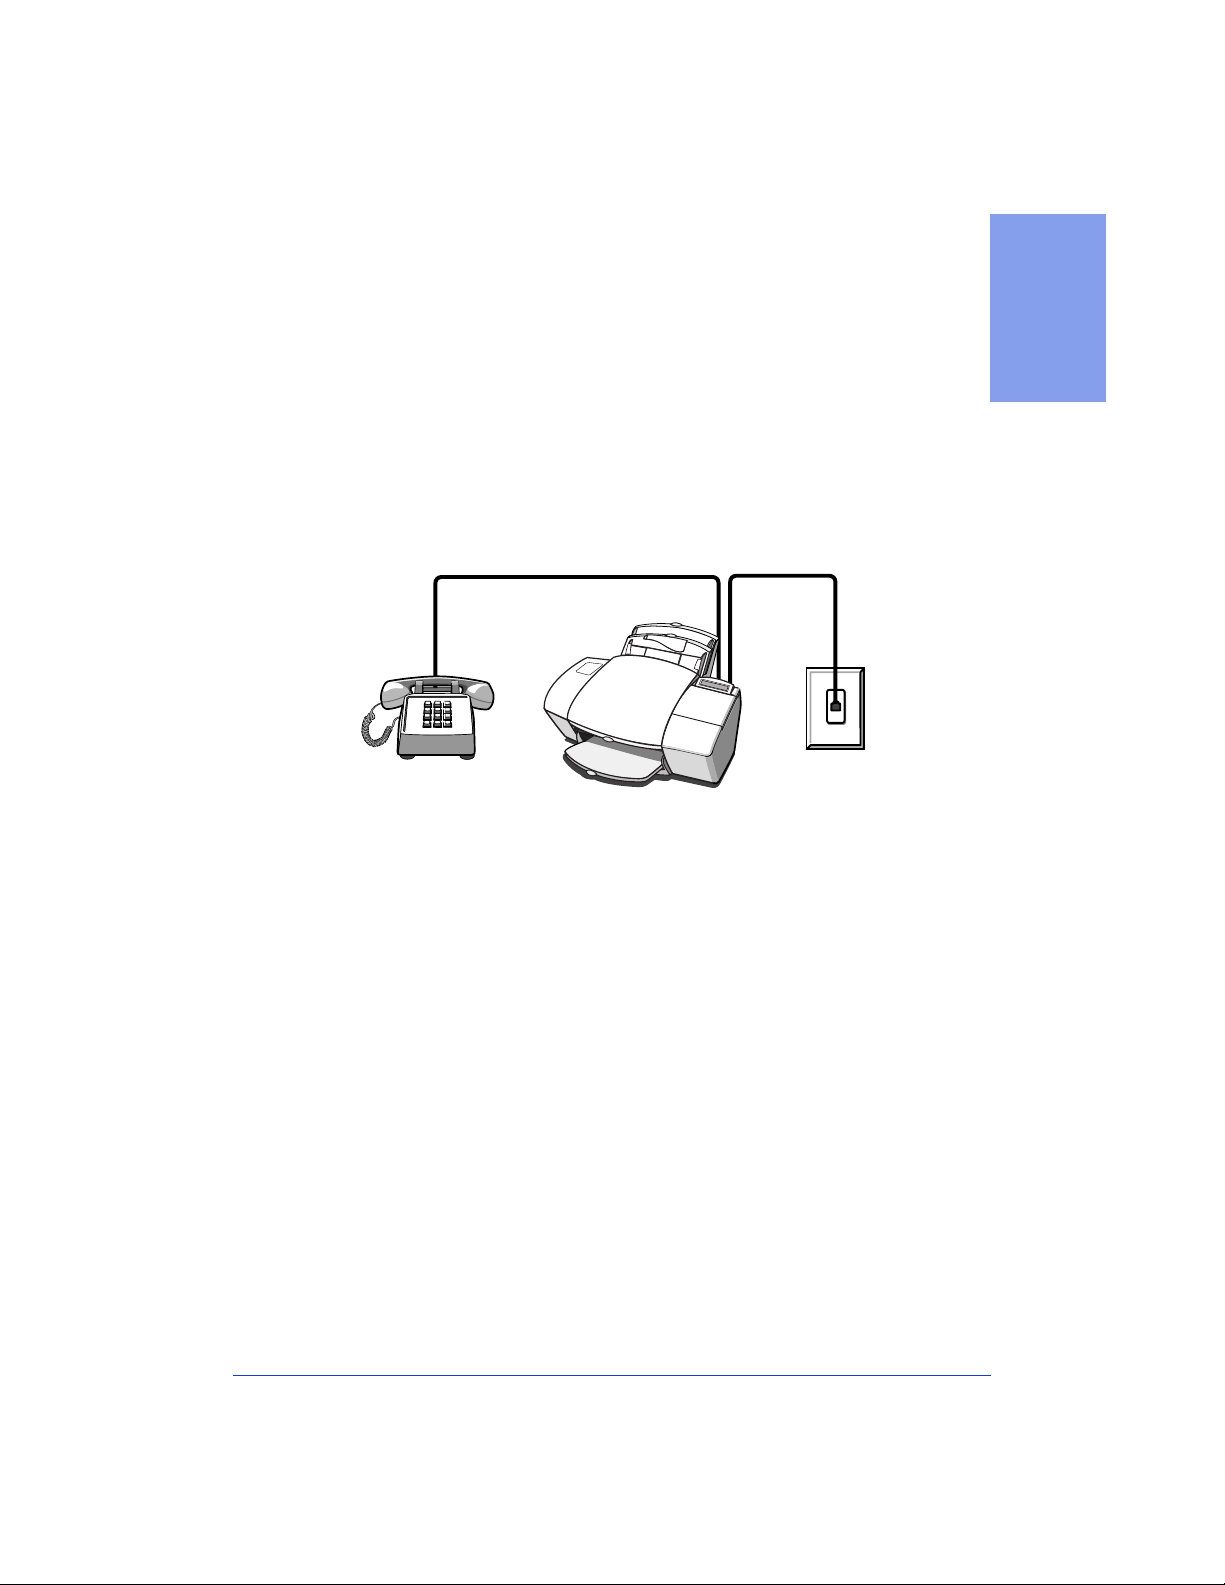
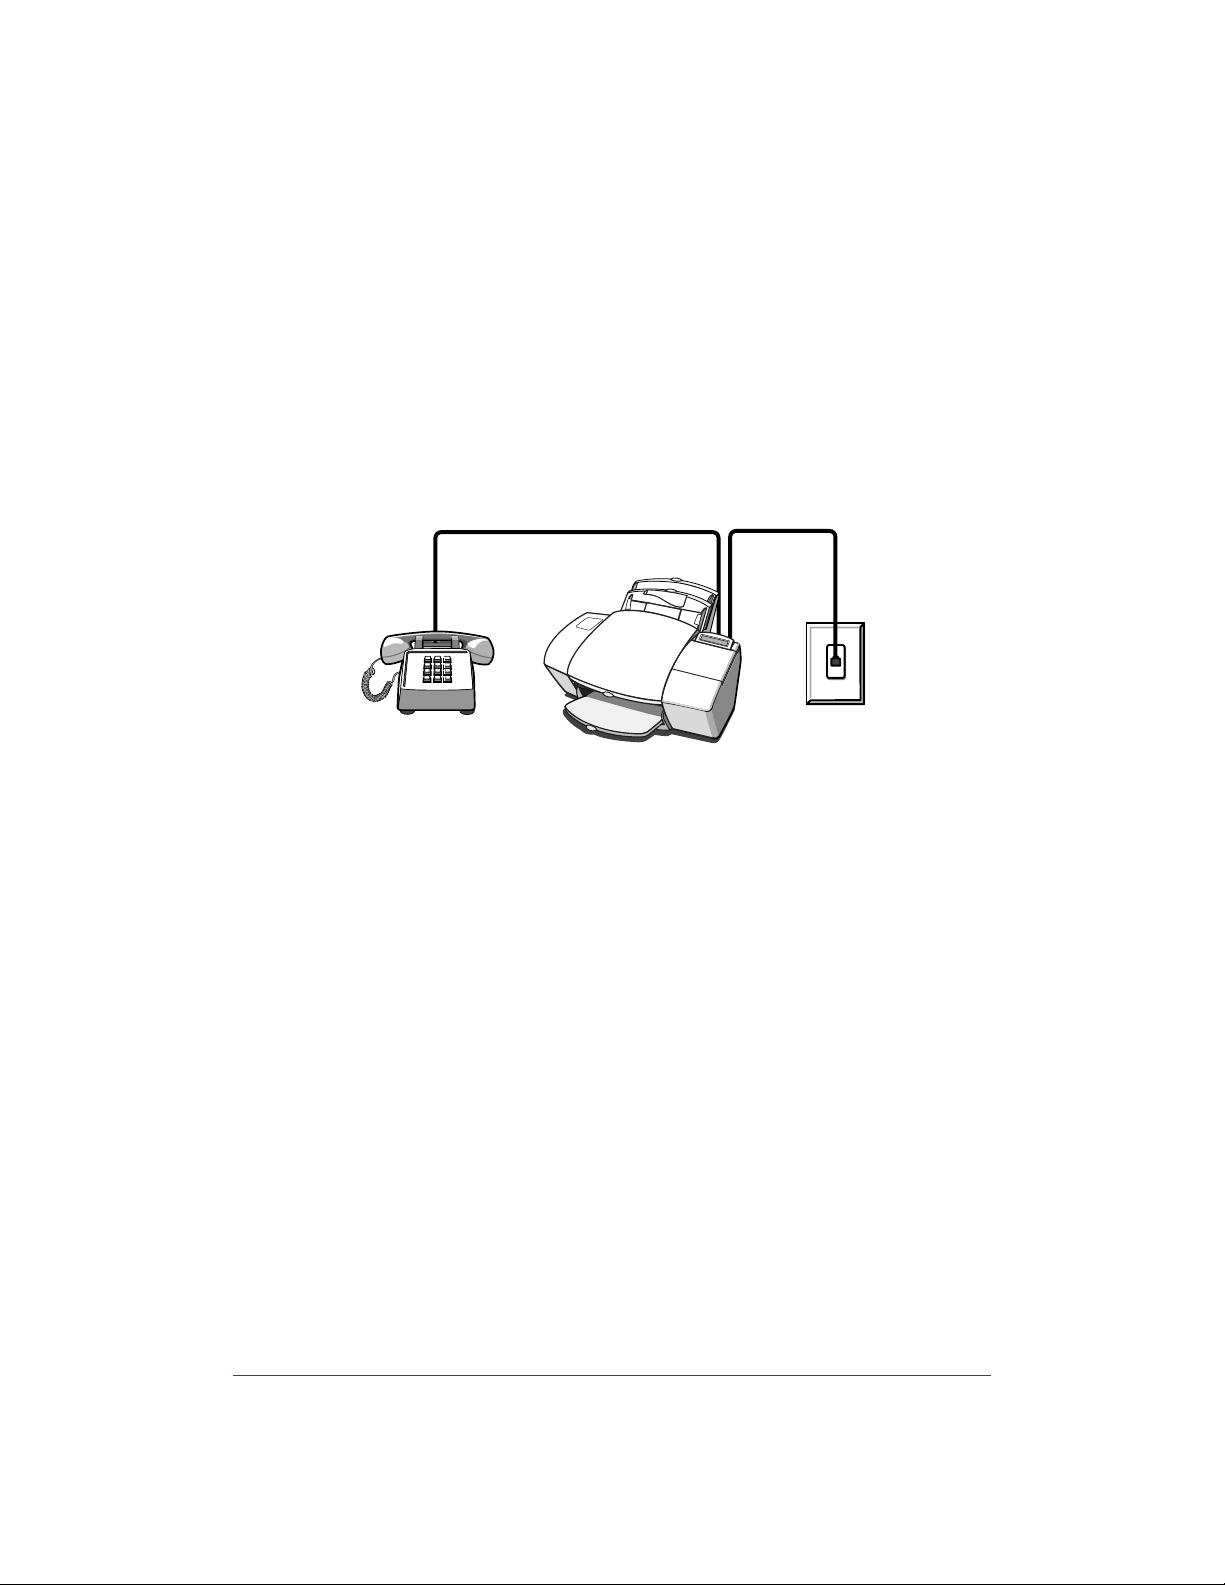
Dedicated line (Case ACJ)
j
If you connected the HP Of ficeJet to a dedicat ed phone line ( no v oice
calls recei ved) tha t has no other of f ice equipment conn ected to it , then
use this connection diagram.
1. Setting Up
Phone optional,
but recommended
●
Connect your phone to the HP OfficeJet.
Telephone
wall jack
Connect the cord
from your phone to either of the two ports on the back of the HP
OfficeJet labeled, “To Phone, Answering Machine, or Modem.”
After you install the software in Step 8, and answer the Setup
●
Wizard questions for this connection case, here’s how you’ll
automatically receive faxes with the HP OfficeJet:
will ring once, then the HP OfficeJet will answer and begin
emitting fax tones to the sending machine.
Continue with Step “8. Install the Software - REQUIRED!”
●
Your fax line
Dedicated line with internal modem (Case ACH)
If you connected the HP Of ficeJet to a dedicat ed phone line ( no v oice
calls received) that also has an internal modem connected to it, then
use this connection diagram.
Phone optional,
but recommended
●
Connect your internal modem to the HP OfficeJet.
phone cord that goes from the back of your computer (your
internal modem) to a wa ll jack . Disconne ct the cord fr om the w all
jack and plug it into either of the two ports on the back of the HP
OfficeJet labeled, “To Phone, Answering Machine, or Modem.”
Computer with
internal modem
Telephone
ack
wall
Find the
1-11
Page 20
Important:
If your internal modem’s software is set to automatically receive faxes to your computer, turn off that setting; if you
don’t, your HP OfficeJet will not be able to receive faxes properly.
●
Connect your phone to the HP OfficeJet.
Connect the cord
from your phone to either of the two ports on the back of the HP
OfficeJet labeled, “To Phone, Answering Machine, or Modem.”
After you install the software in Step 8, and answer the Setup
●
Wizard questions for this connection case, here’s how you’ll
automatically receive faxes with the HP OfficeJet:
will ring once, then the HP OfficeJet will answer and begin
emitting fax tones to the sending machine.
Continue with Step “8. Install the Software - REQUIRED!”
●
Your fax line
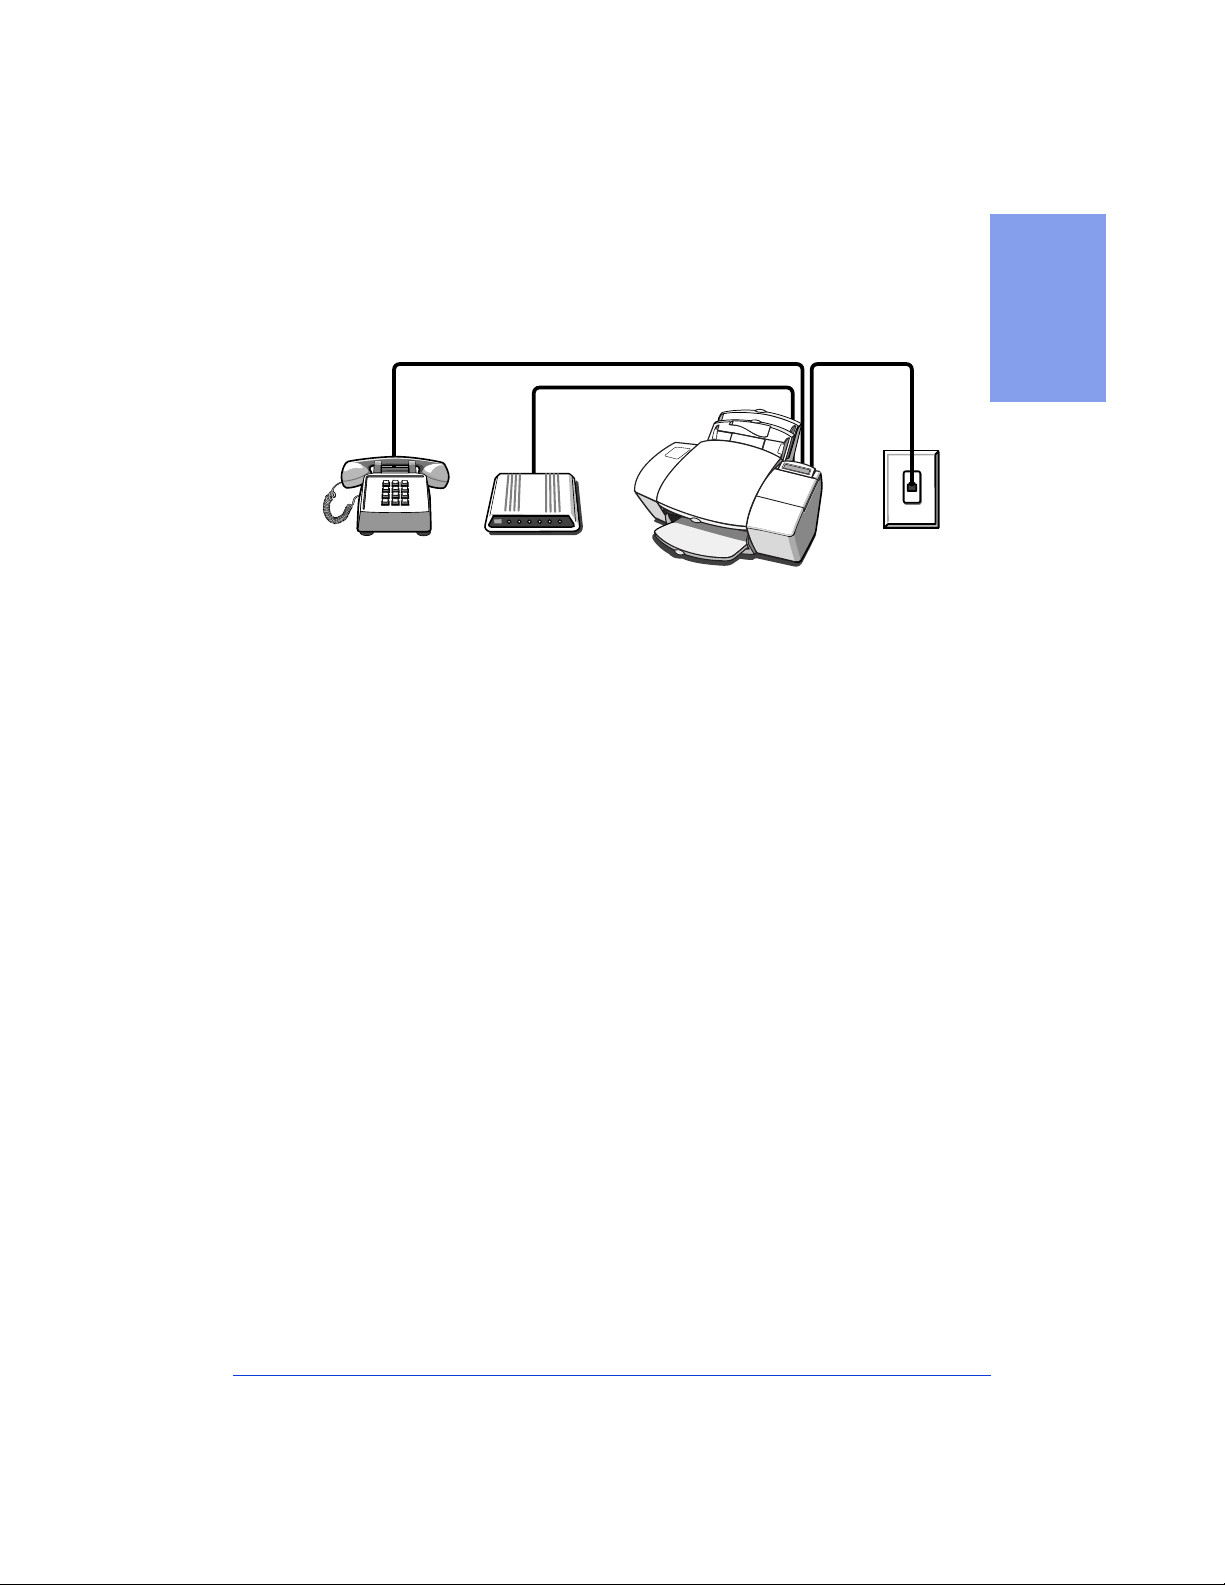
Dedicated line with external modem (ACI)
If you connected the HP Of ficeJet to a dedicat ed phone line ( no v oice
calls received) that also has an external modem connected to it, then
use this connection diagram.
Phone optional,
but recommended
1-12
External
modem
●
Connect your external modem to the HP OfficeJet.
Telephone
wall jack
Find the
phone cord that goes from the back of your external modem to a
wall jack. Disconnect t he cord from the wall jack and plug it into
either of the two ports on the back of the HP OfficeJet labeled,
“To Phone, Answering Machine, or Modem.”
Important:
If your external modem’s software is set to automatically receive faxes to your computer, turn off that setting; if you
don’t, your HP OfficeJet will not be able to receive faxes properly.
●
Connect your phone to the HP OfficeJet.
Connect the cord
from your phone to either of the two ports on the back of the HP
OfficeJet labeled, “To Phone, Answering Machine, or Modem.”
Page 21
After you install the software in Step 8, and answer the Setup
●
Wizard questions for this connection case, here’s how you’ll
automatically receive faxes with the HP OfficeJet:
will ring once, then the HP OfficeJet will answer and begin
emitting fax tones to the sending machine.
Continue with Step “8. Install the Software - REQUIRED!”
●
Your fax line
Shared line (Case ADGJ)
If you connected the HP OfficeJet to a shared phone line (receives
both voice and fa x calls) that has no other of fice equipment conne cted
to it, then use this connection diagram.
1. Setting Up
Phone optional,
but recommended
●
Connect your phone to the HP OfficeJet.
from your phone to either of the two ports on the back of the HP
OfficeJet labeled, “To Phone, Answering Machine, or Modem.”
With this setup, y ou’ll need to
●
OfficeJet will NOT answer incoming calls automatically.
receive a fax manually: When the phone rings, pick it up and
listen for fax tones; if you hear fax tones, press the START button
on the HP OfficeJet, then hang up the phone.
receiving faxes” on page 3-8 for more information.
Continue with Step “8. Install the Software - REQUIRED!”
●
Telephone
wall jack
Connect the cord
receive faxes manually
Refer to “Manually
; the HP
To
1-13
Page 22

Shared line with internal modem (Case ADGH)
If you connected the HP OfficeJet to a shared phone line (receives
both voice and fa x calls) that also has an inte rnal modem connected t o
it, then use this connection diagram.
Phone optional,
but recommended
●
Connect your internal modem to the HP OfficeJet.
phone cord that goes from the back of your computer (your
internal modem) to a wa ll jack . Disconnect the cor d from t he wal l
jack and plug it into either of t he t w o port s on t he bac k of t he HP
OfficeJet labeled, “To Phone, Answering Machine, or Modem.”
Important:
cally receive faxes to your computer, turn off that setting; if you
don’t, your HP OfficeJet will not be able to receive faxes properly.
●
Connect your phone to the HP OfficeJet.
from your phone to either of the two ports on the back of the HP
OfficeJet labeled, “To Phone, Answering Machine, or Modem.”
With this setup, you will need to
●
OfficeJet will NOT answer incoming calls automatically.
receive a fax manually: When the phone rings, pick it up and
listen for fax tones; if you hear fax tones, press the START button
on the HP OfficeJet, then hang up the phone.
receiving faxes” on page 3-8 for more information.
Continue with Step “8. Install the Software - REQUIRED!”
●
Computer with
internal modem
Telephone
wall jack
Find the
If your internal modem’s software is set to automati-
Connect the cord
receive faxes manually
Refer to “Manually
; the HP
To
1-14
Page 23
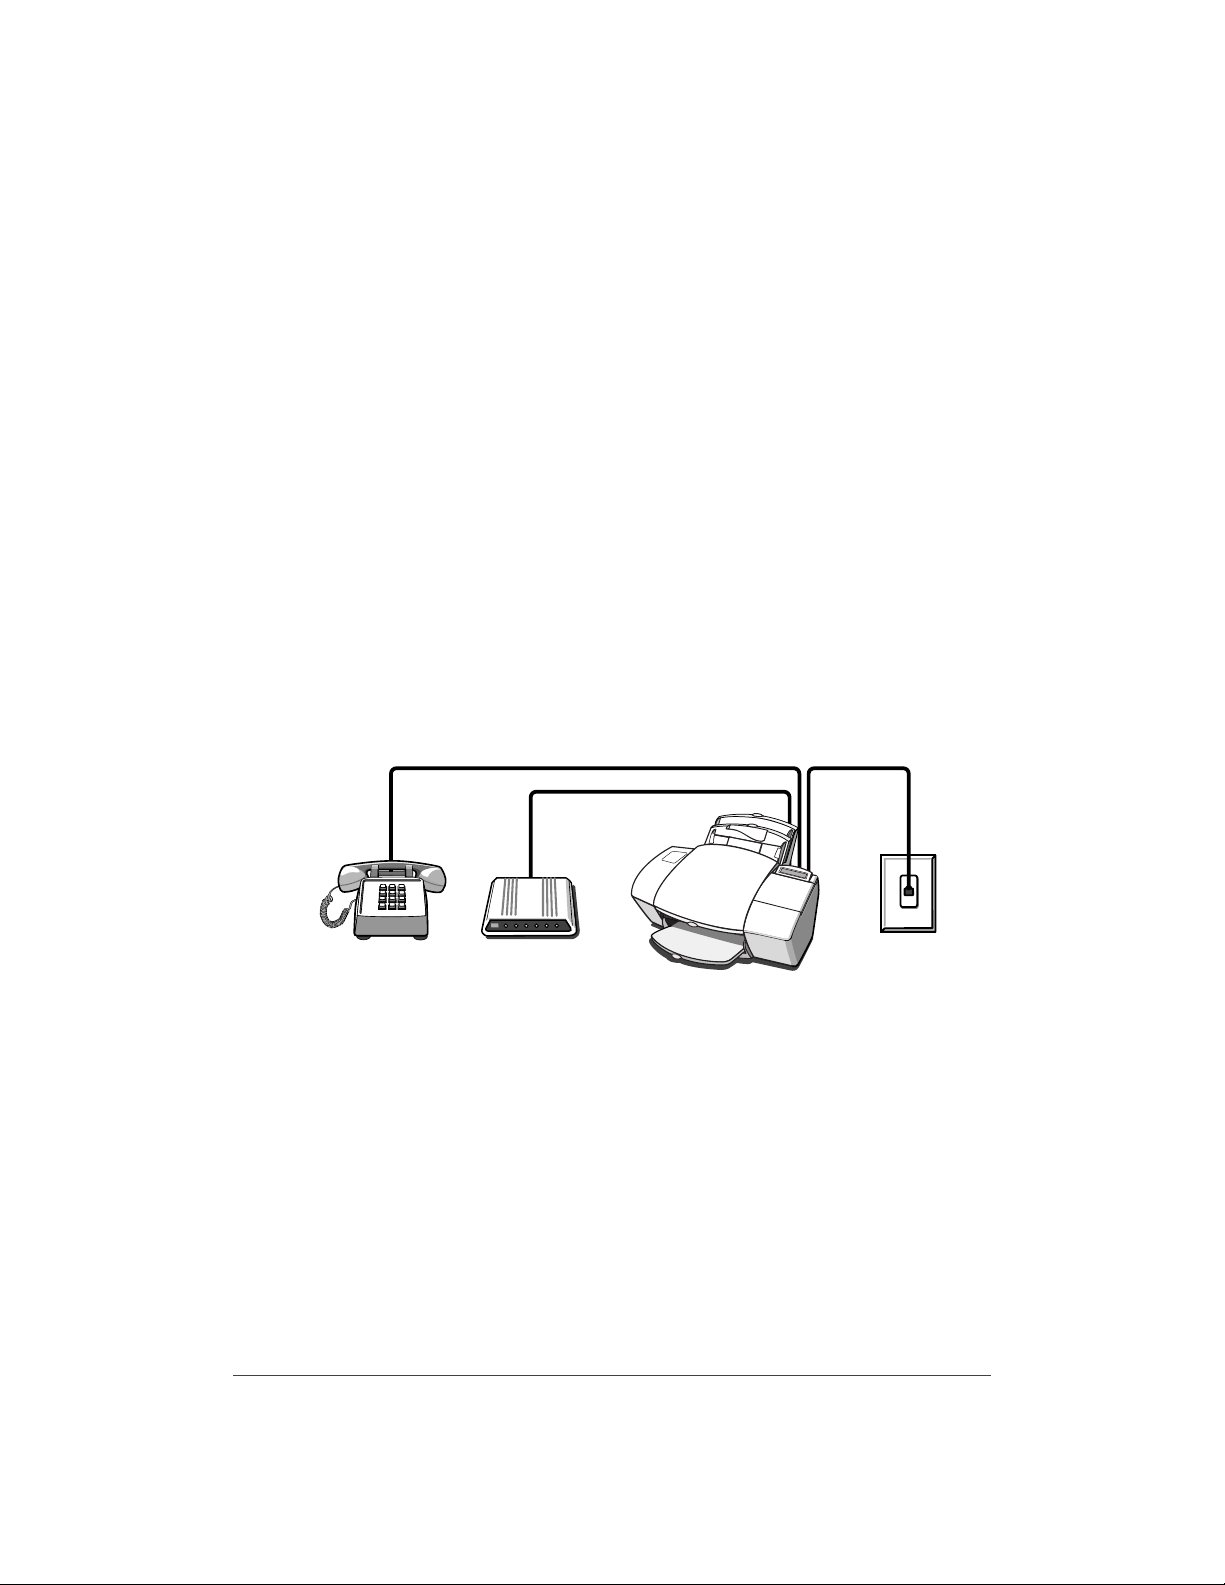
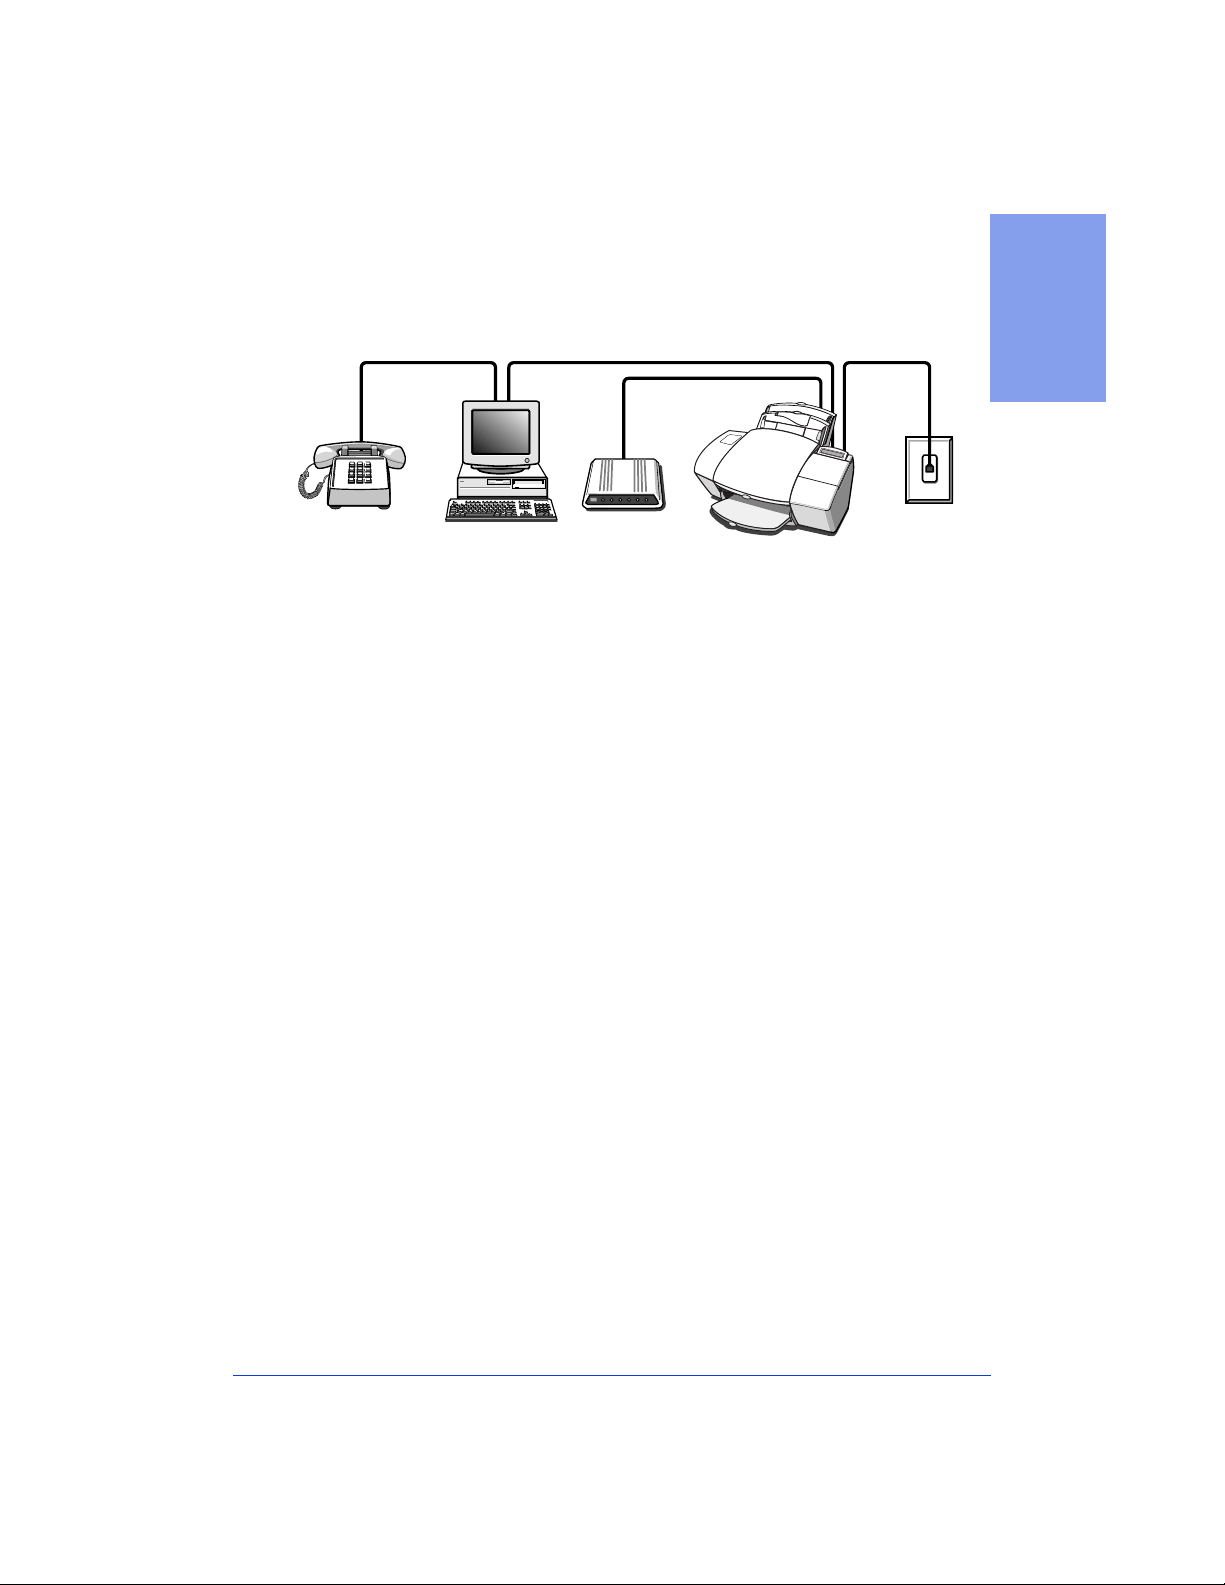
Shared line with external modem (Case ADGI)
If you connected the HP OfficeJet to a shared phone line (receives
both voice and fax calls) that also has an external modem connected
to it, then use this connection diagram.
1. Setting Up
Phone optional,
but recommended
●
Connect your external modem to the HP OfficeJet.
phone cord that goes from the back of your external modem to a
wall jack. Disconnect t he cord from the wall jack and plug it into
either of the two ports on the back of the HP OfficeJet labeled,
“To Phone, Answering Machine, or Modem.”
Important:
cally receive faxes to your computer, turn off that setting; if you
don’t, your HP OfficeJet will not be able to receive faxes properly.
●
Connect your phone to the HP OfficeJet.
from your phone to either of the two ports on the back of the HP
OfficeJet labeled, “To Phone, Answering Machine, or Modem.”
With this setup, you will need to
●
OfficeJet will NOT answer incoming calls automatically.
receive a fax manually: When the phone rings, pick it up and
listen for fax tones; if you hear fax tones, press the START button
on the HP OfficeJet, then hang up the phone.
receiving faxes” on page 3-8 for more information.
External
modem
Telephone
wall jack
Find the
If your external modem’s software is set to automati-
Connect the cord
receive faxes manually
; the HP
To
Refer to “Manually
Continue with Step “8. Install the Software - REQUIRED!”
●
1-15
Page 24

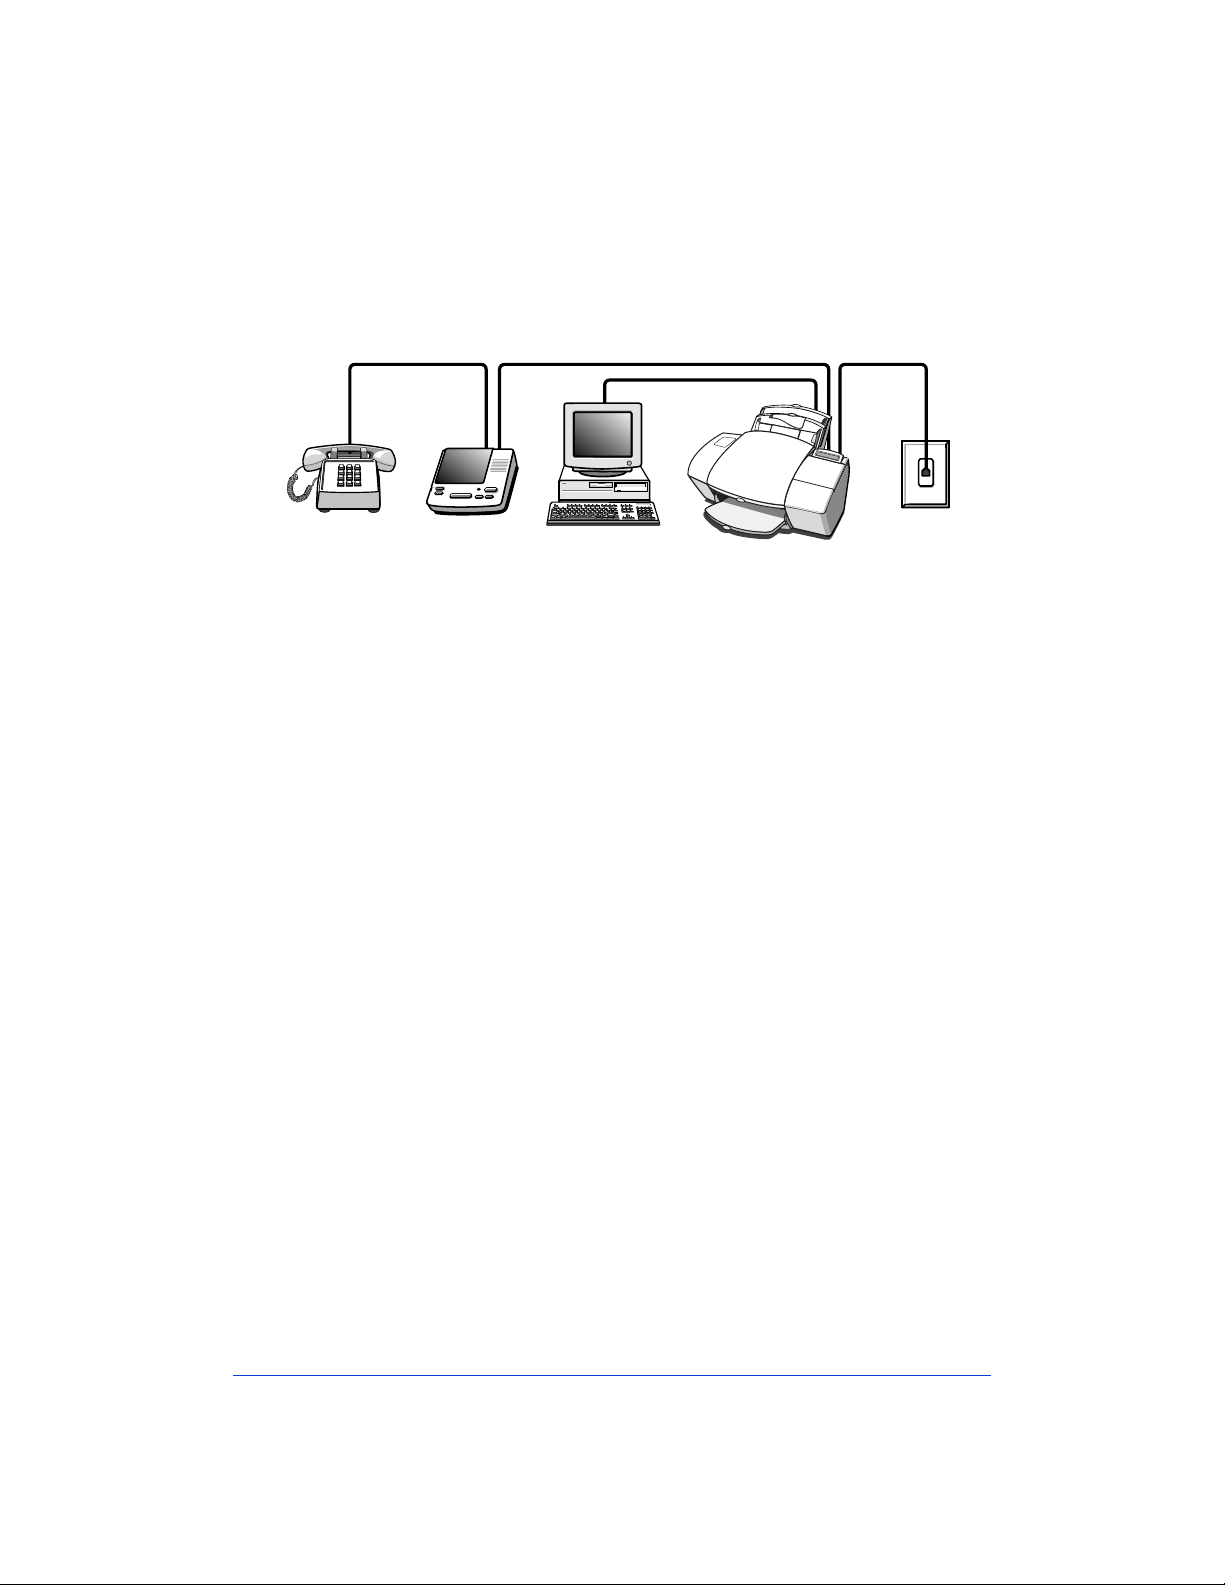
Shared line with answering machine (Case ADEJ)
If you connected the HP OfficeJet to a shared phone line (receives
both voice and fax calls) that also has an answering machine
connected to it, use this connection diagram.
Phone optional, but
recommended if
there’s no phone
handset on your
answering machine
●
Connect your answering machine to the HP OfficeJet.
the phone line from your a nswering mac hine to eith er of the ports
labeled, “To Phone, Answering Machine, or Modem” o n the b ack
of the HP OfficeJet.
Important:
fewer rings, and make sure your outgoing greeting message is no
longer than 30 seconds. If you don’t, you may not receive faxes
properly.
●
Connect your phone to the HP OfficeJet.
machine doesn’t have an attached phone handset, connect the
cord from your phone to eithe r of t he tw o ports on the bac k of t he
HP OfficeJet labeled, “To Phone, Answering Machine, or
Modem.”
After you install the software in Step 8, and answer the Setup
●
Wizard questions for this connection case, here’s how you’ll
automatically receive faxes with the HP OfficeJet:
answering machine will pick up the call after the number of rings
you’ve set, then the HP OfficeJet will “listen” while the answering
machine plays its greeting. If the HP OfficeJet detects fax tones, it
will cut off the answering machine and receive the fax. If you
don’t connect your answering machine directly to the HP
OfficeJet as described here, you may not receive your faxes
properly.
Answering
machine
Telephone
wall jack
Set your answering mach ine t o answe r cal ls aft er 4 o r
If your answering
Your
Plug
1-16
Continue with Step “8. Install the Software - REQUIRED!”
●
Page 25
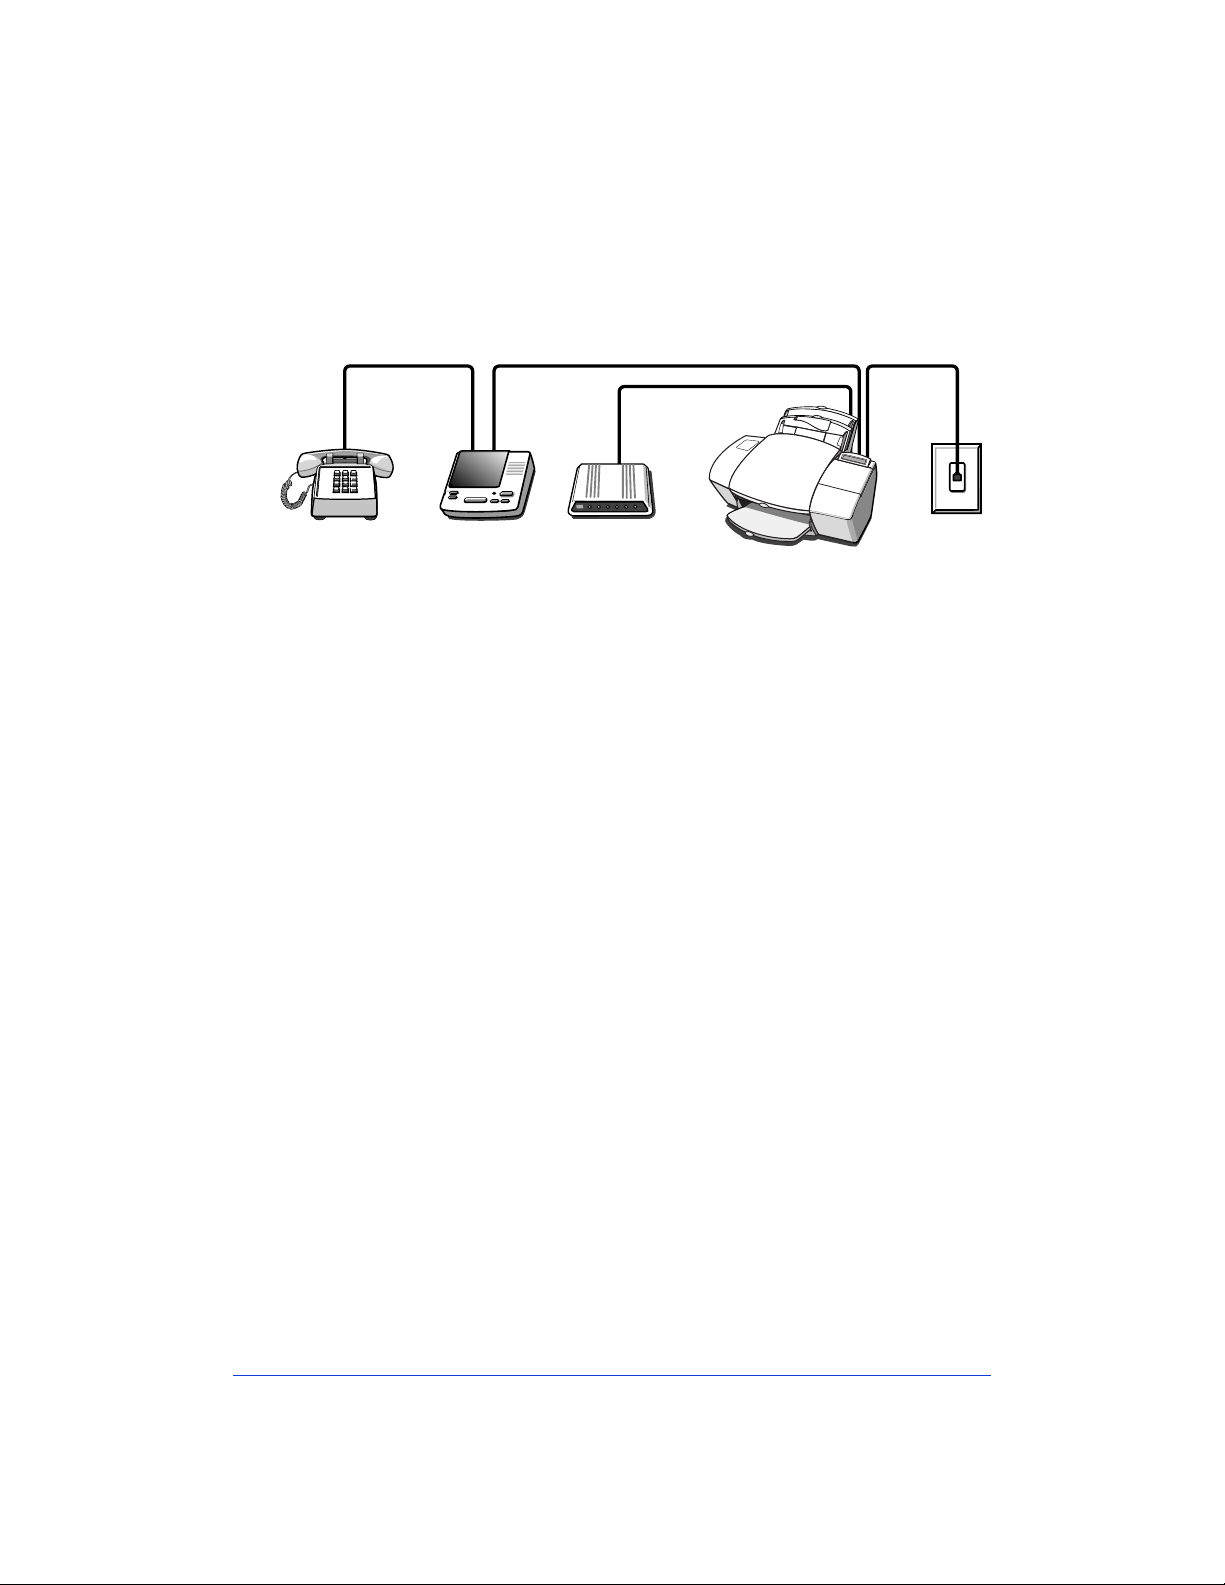
Shared line with computer voicemail (Case ADFJ)
If you connected the HP OfficeJet to a shared phone line (receives
both voice and fax calls) that also has computer voicemail, use this
connection diagram.
1. Setting Up
Phone optional,
but recommended
●
Connect your computer voicemail phone cord to the HP
OfficeJet.
computer to a wall jack. Disconnect the cord from the wall jack
and plug it into either of the two ports on the back of the HP
OfficeJet labeled, “To Phone, Answering Machine, or Modem.”
Important:
fewer rings, and make sure your outgoing greeting message is no
longer than 30 seconds. If you don’t, you may not receive faxes
properly.
●
Connect your phone to the HP OfficeJet.
from your phone to either of the two ports on the back of the HP
OfficeJet labeled, “To Phone, Answering Machine, or Modem.”
After you install the software in Step 8, and answer the Setup
●
Wizard questions for this connection case, here’s how you’ll
automatically recei ve f axes with the HP Of fic eJet:
voicemail will pick up the call after the number of rings you’ve
set, then the HP OfficeJet will “listen” while voicemail plays its
greeting. If the HP OfficeJet detects fax tones, it will cut off the
voicemail and receive the fax. If you don’t connect your computer
voicemail phone cord directly to the HP OfficeJet as described
here, you may not receive your faxes properly.
Computer with
voicemail feature
Telephone
wall jack
Locate the phone cord that goes from the back of yo ur
Set your voice ma il sof tware to answer calls a ft er 4 or
Connect the cord
Your computer
Continue with Step “8. Install the Software - REQUIRED!”
●
1-17
Page 26
Shared line with internal modem and answering
machine (Case ADEH)
If you connected the HP OfficeJet to a shared phone line (receives
both voice and fax calls) that also has an internal modem and an
answering machine connected to it, use this conn ect ion diagram.
Phone optional, but
recommended
●
●
●
●
Answering
machine
Computer with
internal modem
Connect your internal modem to the HP OfficeJet.
Telephone
wall jack
Find the
phone cord that goes from the back of your computer (your
internal modem) to a wa ll jack . Disconnect the cor d from t he wal l
jack and plug it into either of t he t w o port s on t he bac k of t he HP
OfficeJet labeled, “To Phone, Answering Machine, or Modem.”
Important:
If your internal modem’s software is set to automatically receive faxes to your computer, turn off that setting; if you
don’t, your HP OfficeJet will not be able to receive faxes.
Connect your answering machine to the HP OfficeJet.
Plug
the phone line from your a nswering mac hine to eith er of the ports
labeled, “To Phone, Answering Machine, or Modem” o n the b ack
of the HP OfficeJet.
Important:
Set your answering machine to answer calls after 4 or
fewer rings, and make sure your outgoing greeting message is no
longer than 30 seconds. If you don’t, you may not receive faxes.
Connect your phone to your answering machine.
Connect the
cord from your phone to the back of your answering machine.
After you install the software in Step 8, and answer the Setup
Wizard questions for this connection case, here’s how you’ll
automatically receive faxes with the HP OfficeJet:
answering machine will pick up the call after the number of rings
you’ve set, then the HP OfficeJet will “listen” while the answering
machine plays its greeting. If the HP OfficeJet detects fax tones, it
will cut off the answering machine and receive the fax. If you
don’t connect your answering machine directly to the HP
OfficeJet as described here, you may not receive your faxes.
Your
1-18
Continue with Step “8. Install the Software - REQUIRED!”
●
Page 27

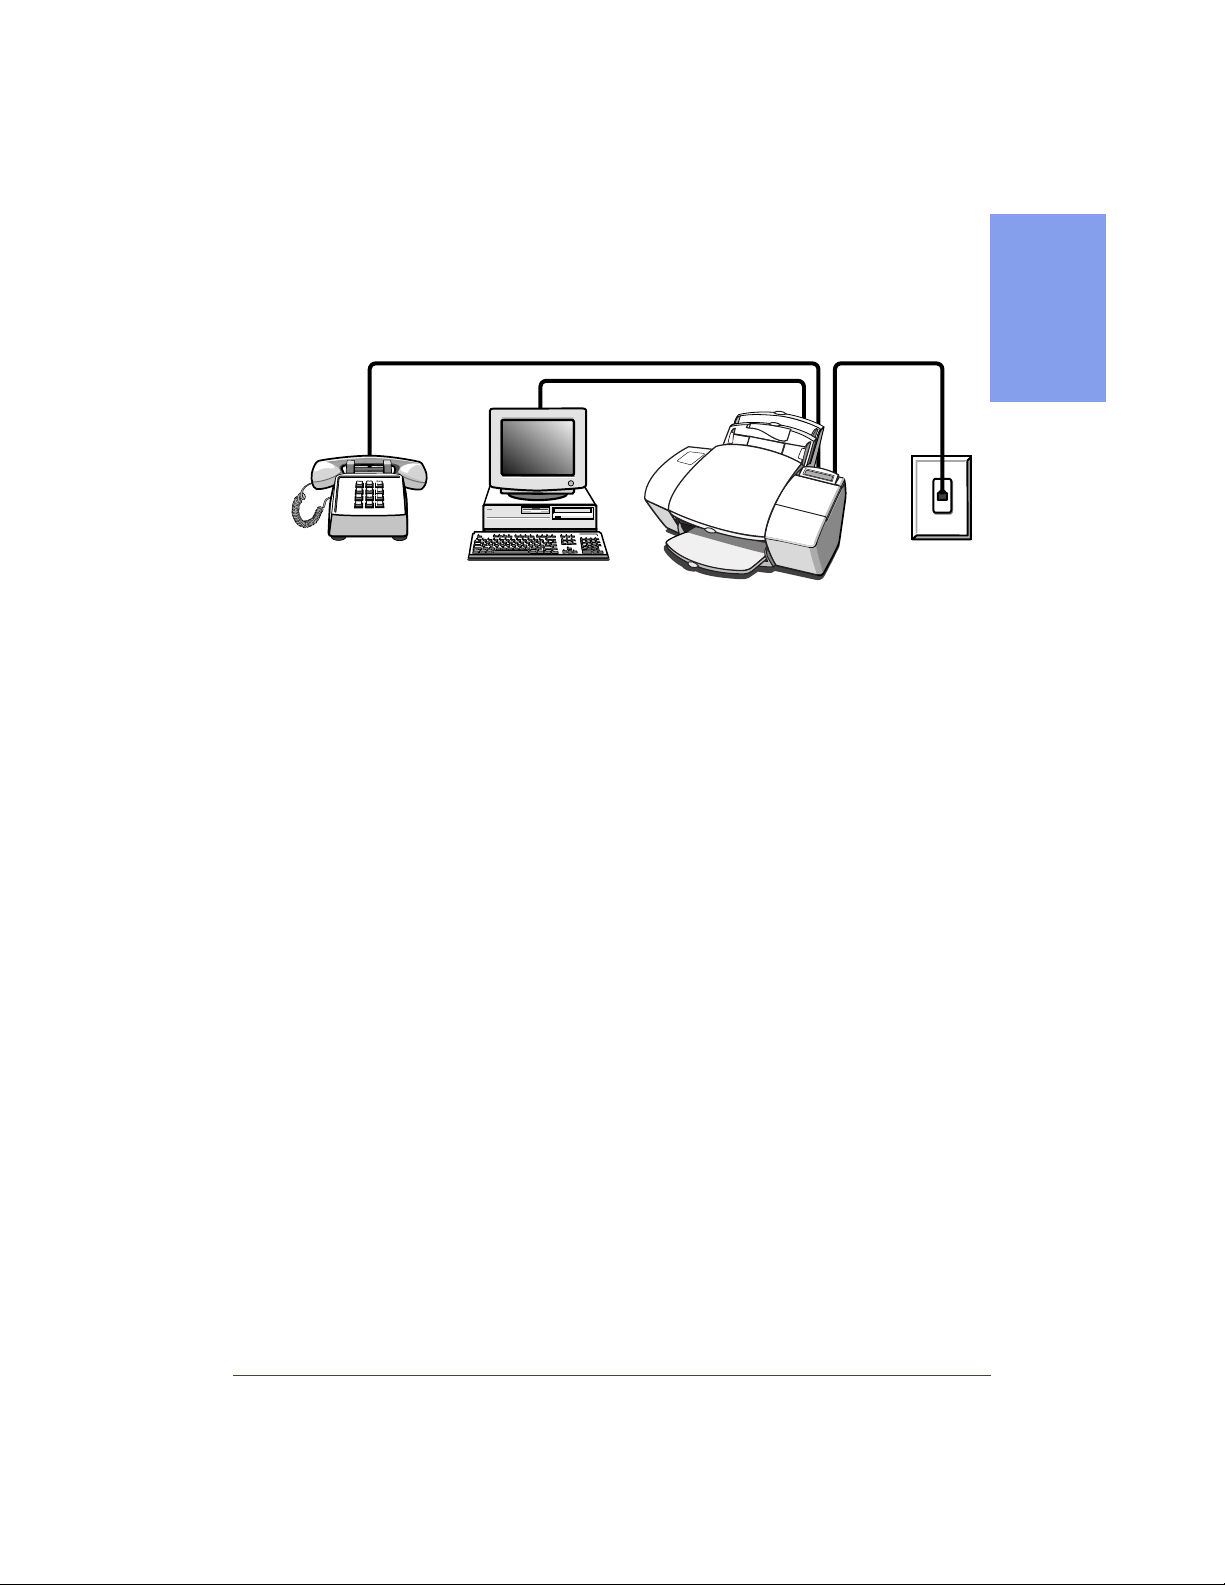
Shared line with internal modem and computer
voicemail (Case ADFH)
If you connected the HP OfficeJet to a shared phone line (receives
both voice and fa x calls) that also has an inte rnal modem connected t o
it and computer voicemail, use this connection diagram.
1. Setting Up
Phone optional,
but recommended
●
Connect your internal modem and voicemail phone cord to
the HP OfficeJet.
your computer (for your in terna l modem and v oi cem ail) to a w a ll
jack. Disconnect the cord from the wall jack and plug it into
either of the two ports on the back of the HP OfficeJet labeled,
“To Phone, Answering Machine, or Modem.”
Important:
fewer rings, and make sure your outgoing greeting message is no
longer than 30 seconds. If you don’t, you may not receive faxes.
Important:
cally receive faxes to your computer, turn off that setting; if you
don’t, your HP OfficeJet will not be able to receive faxes properly.
●
Connect your phone to the HP OfficeJet.
from your phone to either of the two ports on the back of the HP
OfficeJet labeled, “To Phone, Answering Machine, or Modem.”
After you install the software in Step 8, and answer the Setup
●
Wizard questions for this connection case, here’s how you’ll
automatically recei ve f axes with the HP Of fic eJet:
voicemail will pick up the call after the number of rings you’ve
set, then the HP OfficeJet will “listen” while voicemail plays its
greeting. If the HP OfficeJet detects fax tones, it will cut off the
voicemail and receive the fax. If you don’t connect your computer
voicemail phone cord directly to the HP OfficeJet as described
here, you may not receive your faxes properly.
Computer with
internal modem and
voicemail feature
Telephone
wall jack
Find the phone cord that goes from th e back of
Set your voice ma il sof tware to answer calls a ft er 4 or
If your internal modem’s software is set to automati-
Connect the cord
Your computer
Continue with Step “8. Install the Software - REQUIRED!”
●
1-19
Page 28
Shared line with external modem and answering
machine (Case ADEI)
If you connected the HP OfficeJet to a shared phone line (receives
both voice and fax calls) that also has an ext ernal modem and an
answering machine connected to it, then use this connection diagram.
Phone optional,
but recommended
●
●
●
●
Answering
machine
Connect your external modem to the HP OfficeJet.
External
modem
Telephone
wall jack
Find the
phone cord that goes from the back of your external modem to a
wall jack. Disconnect t he cord from the wall jack and plug it into
either of the two ports on the back of the HP OfficeJet labeled,
“To Phone, Answering Machine, or Modem.”
Important:
If your external modem’s software is set to automatically receive faxes to your computer, turn off that setting; if you
don’t, your HP OfficeJet will not receive faxes properly.
Connect your answering machine to the HP OfficeJet.
Plug
the phone line from your a nswering mac hine to eith er of the ports
labeled, “To Phone, Answering Machine, or Modem” o n the b ack
of the HP OfficeJet.
Important:
Set your answering mach ine t o answe r cal ls aft er 4 o r
fewer rings, and make sure your outgoing greeting message is no
longer than 30 seconds. If you don’t, you may not receive faxes.
Connect your phone to your answering machine.
Connect the
cord from your phone to the back of your answering machine.
After you install the software in Step 8, and answer the Setup
Wizard questions for this connection case, here’s how you’ll
automatically receive faxes with the HP OfficeJet:
answering machine will pick up the call after the number of rings
you’ve set, then the HP OfficeJet will “listen” while the answering
machine plays its greeting. If the HP OfficeJet detects fax tones, it
will cut off the answering machine and receive the fax. If you
don’t connect your answering machine directly to the HP
OfficeJet as described here, you may not receive your faxes
properly.
Your
1-20
Continue with Step “8. Install the Software - REQUIRED!”
●
Page 29
Shared line with external modem and computer
voicemail (Case ADFI)
If you connected the HP OfficeJet to a shared phone line (receives
both voice and fax calls) that also has an ext ernal modem and
computer voicemail, then use this connection diagram.
1. Setting Up
Phone optional,
but recommended
●
●
●
Computer with
voicemail feature
Connect your external modem to the HP OfficeJet.
External
modem
Telephone
wall jack
Find the
phone cord that goes from the back of your external modem to a
wall jack. Disconnect t he cord from the wall jack and plug it into
either of the two ports on the back of the HP OfficeJet labeled,
“To Phone, Answering Machine, or Modem.”
Important:
If your external modem’s software is set to a utomatically receive faxes to your computer, turn off that setting; if you
don’t, your HP OfficeJet will not be able to receive faxes.
Connect your computer voicemail phone cord to the HP
OfficeJet.
Locate the phone cord that goes from the back of yo ur
computer to a wall jack. Disconnect the cord from the wall jack
and plug it into either of the two ports on the back of the HP
OfficeJet labeled, “To Phone, Answering Machine, or Modem.”
Important:
Set your voice m ail software to answer c alls after 4 or
fewer rings, and make sure your outgoing greeting message is no
longer than 30 seconds. If you don’t, you may not receive faxes.
Connect your phone to your computer voicemail.
Connect the
cord from your phone to the back of your computer voicemail.
After you install the software in Step 8, and answer the Setup
●
Wizard questions for this connection case, here’s how you’ll
automatically recei ve f axes with the HP Of fic eJet:
voicemail will pick up the call after the number of rings you’ve
set, then the HP OfficeJet will “listen” while voicemail plays its
greeting. If the HP OfficeJet detects fax tones, it will cut off the
voicemail and receive the fax. If you don’t connect your computer
voicemail phone cord directly to the HP OfficeJet as described
here, you may not receive your faxes properly.
Continue with Step “8. Install the Software - REQUIRED!”
●
Your computer
1-21
Page 30
Shared line with distinctive ring (Case B)
If you connected the HP OfficeJet to a phone line that uses a
distinctive ring service through your telephone company, use this
connection diagram.
The distinctive ring telephone service, which is unavailable in many
areas, allows you to have 2 or 3 phone numbers on the same phone
line. Each number has a ring with a different pattern so you can tell
the difference between incoming calls.
For more detailed informat ion on setting up Dist inct i v e Ring , refer to
“Using Distinctive Ring” on page 3-21.
Phone optional, but
recommended
●
Connect your phone to the HP OfficeJet.
Telephone
wall jack
Connect the cord
from your phone to either of the two ports on the back of the HP
OfficeJet labeled, “To Phone, Answering Machine, or Modem.”
Important:
If you have an answeri ng machine for recei ving v oi ce
calls on this phone l ine (different phone numbe r) , set it to answer
after 3 or more rings. If you don’t, your HP OfficeJet will not be
able to receive your fax calls.
Important:
If you have an internal modem or an external modem
on this phone line (dif fere nt phone number), t urn of f the setti ng in
the modem’s software that automatically receives faxes to your
computer; if you don’t, your HP OfficeJet will not be able to
receive faxes properly.
Continue with Step “8. Install the Software - REQUIRED!”
●
1-22
Page 31

8. Install the Software -
REQUIRED!
You must install the software b efore
using your new HP OfficeJet – if you do
not, the HP OfficeJet will not work.
If you don’t have a CD-ROM drive,
contact the HP OfficeJet Fulfillment
Center at 1-888-HPDISKS (1-888-473-
4757) to receive the software on 3.5-inch
floppy diskettes by overnight mail.
1. Setting Up
Important:
must remove the previou s version of HP
OfficeJet software before installing the new version. Refer to
“Uninstalling the softwar e” on page 7-21 for more inform ation.
1
Turn on your computer.
2
This step has two sets of instructions: one for Windows 95, and
one for Windows 3.1.
If you are upgrading, you
Windows 95:
If the “New Hardwar e Found” scree n displays, close it b y clicking
the X in the uppe r right corner or the
Insert the HP Off iceJet CD into the CD-R OM dr iv e, or if you hav e
floppy disks, inser t Disk #1 into the floppy dri ve. If you’re installing from the CD, the HP OfficeJet Welcome screen will be displayed after a few seconds. If you’re installing from a floppy disk,
choose
a:\setup.exe
Click OK. Continue at step 3.
from the Windows 95
Run
where “a:” represents the letter of the floppy drive.
Cancel
Start
button.
menu, then type
Windows 3.1:
Insert the HP Off iceJet CD into the CD-R OM dr iv e, or if you hav e
floppy disks, insert Disk #1 into the floppy drive. Choose
from the
d:\setup.exe
drive or floppy drive. Click OK.
menu in the Program Manager, then type
File
where “d:” represents the letter of the CD-ROM
Run
1-23
Page 32

3
At the HP OfficeJet Welcome screen, click
HP OfficeJet Series 600 software on your PC
installing the software. Y ou’ll be asked to confirm the file
location and computer port where the OfficeJet will be
installed. Follow all instructions on the screen.
After the files are copied to your computer, you may
choose to install the OmniP age LE softw are f or scan nin g
text for editing. If you do not want to install it now, click
Cancel
The HP OfficeJet Setup Wizard will help you customize
your HP Office Jet so that it runs bes t with your parti cular
offi ce set up.
to continue with the HP OfficeJet software setup .
Install the
to begin
9. Make Sure Everything
Works Properly
Congratulations! Your off ice is now set up t o print, fax, c opy and scan
with your new HP OfficeJet.
If you want to make sure everything is working well — or to get a
quick start on learning some basics — follow the instructions below
to print, fax, copy, and scan.
1-24
Print a report
Print the Self Test Report to test the printing feature. Here’s how:
1
On your Windows desktop,
double-click
Manager
OfficeJet
Settings and Maintenance
2
Click the
then click
printing the Self Test Report.
This report sho ws you the current
and factory settings in your HP
OfficeJet, and can help you
diagnose print cartridge
problems.
HP OfficeJet
, click
HP
, then select
Maintenance
Self Test
to begin
.
tab,
Page 33

Receive a fax
T o v erify t hat you can r ecei ve f ax es properl y, call 1-800-44FAXHP to
have HP product information faxed to you.
If you have any trouble receiving the fax, review Step “7. Connect
Your Office Equipment - IMPORTANT!” If you still have problems,
refer to Chapter 7: Getting Help.
1. Setting Up
Make a copy
Make a copy of the Self Test Report to test the copying feature.
1
Place the report in the document tray with the printed
side facing away from you.
2
Press the
copies you want (up to 99).
button once, then enter the number of
Copy
3
Press the
button again to be gin copying.
Copy
Scan a page to your computer
Scan the Self Test Report to test the scanning feature. Here’s how:
1
Place the report in the document tray with the printed
side facing away from you.
2
Now look at your computer screen! The Document
Assistant asks you what you w ant to do. Click
Scan dialog box will be displayed.
3
Click
Start Scan
document displays on your computer screen.
to begin scanning. The scanned
Scan
. The
1-25
Page 34

What’s Next?
For a really quick start, try this:
Read through Chapter 2: Quick Tour. This chapter will get you
●
up-and-running quickly, as well as point you in the direction of
help alternatives (if you should need them).
While using the software, click
●
need,
If you get stuck, re fer t o Cha pt er 7: Getting Help. You’ll find lots
●
of troubleshooting information and other sources of help.
you need it.
when
to get information you
Help
1-26
Page 35

Quick Tour
............................................................................................................
ead this cha pter for a quick start in le arning
2
that contains abbreviated information about how to do your everyday
tasks. You’ll also find many pointers to more information and how to get
help.
Loading the Paper Supply.......................................................2-2
Using a Scan/Copy Sleeve to Protect Your Original ................ 2-3
Sending Faxes ........................................................................ 2-4
Faxing paper documents ................................................. 2-4
From the keypad ........................................................2-4
From the Document Assistant..................................... 2-5
Sending a fax directly from your software program.......... 2-6
Copying ................................................................................. 2-7
Copying from the keypad ................................................ 2-7
Copying from the Document Assistant ............................ 2-8
Scanning ................................................................................ 2-9
Scanning images............................................................. 2-9
Scanning text for editing (OCR).....................................2-10
R
the basics. This is the “executive summary”
2. Quick Tour
Printing ................................................................................ 2-10
Using the Help System......................................................... 2-11
Other ways to get help ......................................................... 2-12
Page 36

Paper extension
OJ-14loadpa
Loading the Paper Supply
1
Pull the document tray forward all the way until it
snaps into the upright position.
2
Pull up the paper extension at the back of the HP
OfficeJet to support the paper.
3
Stack
guides
Load about a 1/2-inch-thick stack of 20-lb paper
into the paper tray. The paper should fit behind the
stack guides
on the lower part of the tray as
shown.
Notes:
2-2
Use only plain letter- or legal-size paper for copy-
●
ing.
If you change the paper size in the tray, be sure to
●
update the paper size se tt ing in the software. Refer
to “Changing the paper size setting” on page 3-23
for instructions.
OfficeJet
4
Push the document tray b ack to its n ormal positi on,
resting in front of the paper tray.
5
Output
Tray
Extend the
output tray
slowly until it stops.
Page 37

Using a Scan/Copy Sleeve to
Protect Your Original
Several scan/copy sleeves are provided to protect fragile or damaged
original documents or photos while faxing, copying, or scanning
them. These sleeves have a transparent plastic front and white paper
backing.
Place your document inside a scan/copy sleeve when your original
document is:
2. Quick Tour
●
Smaller than standard letter size (8.5 x 11 inches).
standard pages may not load properly and could jam.
●
●
●
When placing the scan/copy sleeve into the document tray, load it
with the sealed edge down and the transparent side facing away from
you.
Caution:
copy sleeves to protect anything thicker than a photograph.
Rough edges may cause a paper jam.
Torn .
Precious or fragile.
document.
Very thin paper.
properly and could jam.
To avoid damaging the HP OfficeJet, do not use the scan/
For example, a photograph or a legal
Less than 20-lb weight paper may not load
Non-
2-3
Page 38

Sending Faxes
With the HP Of ficeJet, you can fax paper doc ument s or you can send
faxes directly from your computer.
Faxing paper documents
You can fax paper documents using either the keypad on the HP
OfficeJet or the Document Assistant screen on your computer. Use
the keypad for basic faxing; use the Document Assistant when you
want additional fax options lik e a tt aching a cover sheet, or sending to
more than one location.
From the keypad
1
Load your document (up to 20 pages) top down in
the document tray with the printed side facing
away from you. If necessary, slide the document
guides on the tray to the left or right to adjust them
for the width of your document.
2
Dial the fax number on the keypad.
2-4
3
Press the
For information on redialing and other dialing
methods, see Chapter 3: Faxing.
button to begin faxing.
Start
Page 39

From the Document Assistant
1
Load your document (up to 20 pages) top down in the document
tray with the printed side facing away from you. Look at your
computer screen.
The Document Assistant
displays on your
computer screen when
you load your document
into the document tray.
2
Click
Fax
Fax dialog box, such as attaching a cover sheet. To find out more
about the settings in the Send Fax dialog box, click the
button.
The Send
Fax dialog
box has
additional
faxing
options.
and explore the additional options you hav e in the Send
Help
2. Quick Tour
3
Enter the fax number and any other information, then click
Fax Now
to begin sending.
Send
2-5
Page 40

Sending a fax directly from your
software program
1
While your software program is open and your document file is
displayed on your computer screen, select
menu.
2
Select
Note:
stores the printer list. For example, in Microsoft Word you can
find the printe r list by clicki ng the
log box.
3
Print the document. The Send Fax dialog box displays.
4
Enter the fax number and any other information, then click
Fax Now
These related topics are described in the HP OfficeJet Help:
HP OfficeJet Series 600 Fax
Select this name from wherever your software program
to begin faxing.
as the printer and click OK.
Printer
from the
Print
button in the Print dia-
File
Send
Options available in the Send Fax dialog box — click the
●
button in the lower right corner.
How to use th e Ph one Book for entering fax na me s, n umber s and
●
speed dial setup — double -cli ck
Windows desktop, click
the
button in the lower right corner.
Help
Fax
HP OfficeJet Manager
, and select
Phone Book
. Then click
Help
on your
2-6
Page 41

Copying
Use the keypad to copy in black & white only. If you want to make a
color copy, use the Document Assistant.
Make sure
letter- and legal-size paper may be used for copying.
blank paper
is loaded in the paper tray. Only
2. Quick Tour
Copying from the keypad
1
Load your document (up to 20 pages) in the document
tray with the printed side facing away from you. If
necessary, slide the document guides to adjust them for
the width of your document.
2
Press the
you want (up to 99).
3
Press the
button, then enter the number of copies
Copy
button again to be gin copying.
Copy
See Chapter 4 for more deta iled information about
copying.
2-7
Page 42

Copying from the Document Assistant
1
The Document
Assistant asks you what
you want to do.
2
Enter the number of
copies – up to 99
Load your document in the HP OfficeJet’s document tray, then
look at your computer screen.
Click
and the Copy dialog box displays.
Copy
Select color or black &
white copying
Select the print media
Make the copy lighter or
darker than the original
Reduce as small as 50%
or enlarge as much as
200% of your original
3
When finished making your custom selections, click
to begin copying.
For more informat ion abou t th e setti ngs in th e Copy dialo g box, clic k
the
Help
Chapter 4.
Select the print
mode of your
copy
Turn on or off
collating
Start Copy
button on the lower right corner of the screen, or refer to
2-8
Page 43

Scanning
Scanning images
Click Color or Black &
White to select how you
want the image to be
scanned
Click Text, Photo,
Graphic, or Other to
optimize one of these
during the scan
1
Load your document (up to 20 pages) top down in the
document tray with the printed side facing away from
you. If necessary, slide the document guides to adjust
them for the width of your document. The Document
Assistant displays on your computer screen.
2
Click
dialog box displays.
at the Document As sistant. The Scan Setting s
Scan
2. Quick Tour
If necessary, adjust the
contrast
3
Click
Start Scan
your computer screen as it is scanned.
4
Now you can edit your image in the HP Image Viewer. Refer to
“Scan Image Viewer” on page 5-5 for more information.
For more information about scanning images, see Chapter 5:
Scanning, click the
down the
Topics
Help
, or refer to the
to begin scanning. The document displays on
button in the Scan Settings dialog box, pull
Help
menu in the Image Viewer screen and select
How to Scan with Your HP OfficeJet
Help
booklet.
2-9
Page 44

Scanning text for editing (OCR)
Scanning text for editing will only work if OmniPage LE is
Note:
installed on your computer. For more information on installing HP
OfficeJet software, refer to Step “8. Install the Software REQUIRED!” on page 1-23.
1
Follow the previous instructions for scanning images, except
click
checkbox in the “Optimize the scan for:” section.
2
The scanned text will appear in your selected word processor for
editing. Make s ur e you proofread the te xt in your word processor
and edit the document accordingly.
and then select the
Text
Scan text for editing (OCR)
Printing
You can print on many types of paper and other media: plain paper,
premium paper, transparencies, envelopes, and more. Refer to
Chapter 6 for specific information on supported media sizes, types,
and weights, and for special loading instructions.
To access the print settings — the Paper, Setup, and Advanced
●
tabs — double-click
desktop, click
Print
HP OfficeJet Manager
, then select
Print Settings
on your Windows
.
2-10
Explore all three Print settings
tabs: Paper, Setup, and
Advanced.
See the Help system and Chapter 6 for more information on printing
and the print settings.
Page 45

Using the Help System
When you need help just click the
OfficeJet dialog boxes, or explore the many topics from the main
menu of Help. Here’s how to access the main menu:
Click the Help button in either the
Document Assistant
You can also access the HP OfficeJet Manager by clicking
Note:
in the Document Assistant.
More
The HP OfficeJet Manager
menu.
Provides step-by-step
instructions on
accomplishing your tasks
Help
HP OfficeJet Manager
.
Helps you pinpoint the
causes of problems and
solve any difficulties you
may experience
button on any of the HP
or the
2. Quick Tour
Contains other
information you might
like to know about your
HP OfficeJet, as well as a
detailed guide to using
each feature in the
software
- Help is also available in every HP OfficeJet dialog box. Click
●
?
the ? in the upper right corner of the dialog box, then click the
setting you want to know more about. A brief description of the
setting will be displayed.
2-11
Page 46

Other ways to get help
Here are some other ways to get help if you need it:
If you need to . . . Look at . . .
Make changes to your HP
OfficeJet equipment or
software setup
Verify correct operation of
your HP OfficeJet
Understand the meaning of
a particular message
displayed on the HP
OfficeJet’s keypad
Call someone to help you
solve a problem, get
product information, or
place an order
See a list of detailed HP
OfficeJet specifications
●
Ready, Setup, Go
Chapter 1 of this
●
Chapter 1, “9. Make Sure
●
guide
User’s Guide
Everything Works Properl y”
section
Chapter 7, “Understanding the
●
Messages Displayed on the
Keypad” section
Chapter 7, “Sources of
●
Information and Help” section
Chapter 8
●
2-12
Get more information about
scanning
●
How to Scan with Your HP
OfficeJet
booklet
Page 47

Faxing
............................................................................................................
ead this chapter to learn how to send and
3
keypad and from the software . You’ll also learn how to change the fax
settings in both locations.
Sending a Paper Document .................................................... 3-2
Sending from the keypad ................................................3-2
Sending from the Document Assistant ............................. 3-5
Sending a Fax Directly from Your Software Program............... 3-6
Receiving Printed Faxes ......................................................... 3-7
Answering settings .......................................................... 3-7
Manually receiving faxes ................................................ 3-8
Receiving faxes to your PC.............................................. 3-8
Using Advanced Fax Features and Settings ............................. 3-9
Advanced fax send settings ............................................. 3-9
Advanced fax receive settings ....................................... 3-19
Viewing lists of all sent and received faxes.................... 3-24
Printing the fax reports .................................................. 3-24
Adjusting sound volumes .............................................. 3-25
Changing the time and date .......................................... 3-25
R
receive faxes, both from the HP OfficeJet’s
3. Faxing3. Faxing
Standalone Faxing................................................................ 3-26
Standalone vs. PC Connected .......................................3-26
Page 48

Document
guides
Sending a Paper Document
To fax a paper document, load the document in the document tray,
then
Assistant.
Note:
fragile or damaged origi nal documents or photos for faxing . For more
information regarding these sleeves, refer to “Using a Scan/Copy
Sleeve to Protect Your Original” on page 2-3.
Sending from the keypad
dial from the keypad, or select Fax from the Document
either
You may w ant to use the scan/copy sleeves prov ide d t o protect
1
Load your document top down in the document
tray, and with the printed side facing away from
you. You can load up to 20 pages, or a single scan/
copy sleeve.
If necessary, slide the
tray to the left or right to adjust them for the width
of your document.
Always remo ve stap les an d paper cli ps fro m
Note:
your original before faxing to avoid equipment
damage.
2
Dial the fax number on the HP OfficeJet’s
keypad.
When entering the fax number, be sure to
Note:
include all the numbers you would enter if you
were dialing the number from a phone. (For
example, enter 1 and the area code for longdistance calls.)
3
Press the
To cancel a fax in progress, press the
on the HP OfficeJet’s keypad.
These related topics are described later in this chapter:
Start
document guides
button to begin faxing.
Stop
on the
button
3-2
Resolution and Contrast settings are described under
●
“Controlling how your faxed documents will look” on page 3-9.
Redialing instructions are under “Redialing a fax number” on
●
page 3-13.
Page 49

Dialing in real time
With the faxing method described above, dialing begins
press the
the HP Off i ce Jet t o di al the numbers as you press the m. For example,
if you’re charging you r fax call to a calling card, you’ll need to wait
for the acceptance t one of your tele phon e compan y befo re di alin g the
calling card number.
If you have turned off the HP OfficeJet sound, click
Note:
OfficeJet
Maintenance
or
Loud
To dial in real time:
1
Load your document in the document tray.
2
Press the
The message display on the HP OfficeJet will read, “
and you’ll hear a dial tone.
3
Dial the number, just as you would using a telephone. If you are
using a calling card, follow the instructions on your card.
button. There may be times, however, when you want
Start
in the HP OfficeJet Manager and select
. The
Sound Volume
for dialing in real time.
button on the HP OfficeJet’s keypad.
Start
should be set to either
Settings and
you
after
HP
Medium
Off hook...”
3. Faxing
Dialing from a telephone that’s connected
directly to the HP OfficeJet
Instead of dialing from the HP OfficeJet’s keypad, you may prefer to
dial the fax number directly from a telephone. Use a phone that’s
connected either di rectly to th e back of the HP Off iceJet, or to another
device that’s connected directly to the back of the HP OfficeJet (like
an answering machine or modem).
To dial directly from a telephone:
1
Load your document in the document tray.
2
Pick up the handset of your telephone.
The message display on the HP OfficeJet will read,
hook.”
3
Dial the fax number on the telephone’s keypad and wait for the
line to begin ringing.
4
Press the
button on the HP OfficeJet to begin faxing.
Start
“Phone off-
3-3
Page 50

Speed dialing
Once you’ v e assi gned spe ed dial codes t o your f ax number s usin g the
HP OfficeJe t Manager softw are ( see “Advanced fax send settin gs” on
page 3-9), you can quickly dial those numbers using the
button and a one- or two-digit speed dial code.
To speed dial:
1
Load your document in the document tray.
2
Press the
Speed Dial
button on the HP
OfficeJet’s keypad.
Speed Dial
3-4
3
Dial the 1- or 2-digit speed dial code.
4
Press the
button on the HP OfficeJet’s
Start
keypad.
Page 51

Sending from the Document Assistant
1
Load your document top do wn in the doc ument t ray, and with the
printed side facing away from you. You can load up to 20 pages,
or a single scan/copy sleeve. If necessary, adjust the guides for
the width of your document. The
displayed on your computer screen.
Always remove staples and paper clips from your original
Note:
before faxing to avoid equipment damage.
When you load your
document, the Document
Assistant asks you what you
want to do.
2
Click
Fax
Document Assistant
. The Send Fax dialog box displays.
is
3. Faxing
Enter the fax number
or a Phone Book entry
3
Enter the fax number in the
your Phone Book. Enter any other information, such as a name.
When entering the fax number, include all the numbers
Note:
you would enter if you were dialing the number from a phone.
(For example, enter 1 and the area code for long-distance calls.)
For more information about the features and settings in the Send
Fax dialog box, click the
4
When you’re ready to begin sending, click
To cancel a fax in progress, press
Fax Number
button.
Help
Stop
box, or click an entr y in
Send Fax Now
.
on the keypad.
3-5
Page 52

These related topics are described later in this chapter:
Resolution and Contrast settings are described under
●
“Controlling how your faxed documents will look” on page 3-9.
Redialing instructions are under “Redialing a fax number” on
●
page 3-13.
Sending a Fax Directly from
Your Software Program
You don’t need to print a document before faxing it. When you want
to fax a document directly from your software program, use this
procedure.
1
While your software program is open and your document file is
displayed, select
2
Select
HP OfficeJet Series 600 Fax
(
Select this name from where your software program
Note:
stores the printer list. For example, in Microsoft Word you can
find the printe r list by clicki ng the Printer button in the Pr int
dialog box.)
Print
from the
menu.
File
as the printer and cl ick OK.
3-6
3
Print the document. The Send Fax dialog box displays.
4
Enter the fax number i n the F ax Number box, or select a n entry in
your Phone Book. Enter any other information, such as a name.
5
Click
Send Fax Now
progress, press
These related topics are described later in this chapter:
Resolution and Contrast settings are described under
●
“Controlling how your faxed documents will look” on page 3-9.
Redialing instructions are under “Redialing a fax number” on
●
page 3-13.
to begin sendin g th e f ax. T o cancel a fax in
on the HP OfficeJet’s keypad.
Stop
Page 53

Receiving Printed Faxes
The HP OfficeJet is factory-set to print received faxes. Before you
receive a fax call, b e sure to load the paper for r eceiving faxes, as
described in the section “Loading the Paper Supply” on page 2-2.
Answering settings
When you installed the HP OfficeJet Series 600 software, the Setup
Wizard asked you a series of questions about your phone lines and
equipment. Your answers determined which option was a utomaticall y
chosen for each of the Answering settings, and therefore determined
how your HP OfficeJet was set up to receive faxes.
There are two answering settings that affect how you receive faxes:
●
Phone Answering
Automatic, the HP OfficeJet wi ll a uto ma ti cal l y a nswer every call
received at your fax number. When set to Manual, you must
answer fax calls manually (s ee the following section, “Manually
Receiving Faxes” for instructions).
For instructions on how to change this setting, refer to “Phone
Answering: Automatic or Manual” on page 3-19.
●
Rings to Answer
Answering is set to Automatic, the HP OfficeJet will
automatically answer all calls after the number of rings specified
in this setting. For example, when Rings to Answer is set to 1
ring, your fax line will ring once, then the HP Off iceJet will be gin
sending fax tones. For instructions on how to change this setting,
refer to “Changing the number of rings before answering” on
page 3-20.
Notes:
If you
●
haven’t
answered the questions in the software during installation, don’t
change your answering settings now or you may not receiv e yo ur
faxes proper ly. If you
refer to “Updating your fax receive setup” on page 3-22 for
instructions on how to re-run the HP OfficeJet Setup Wizard.
(Automatic or Manual). When set to
(1 ring through 6 rings). When Phone
changed your office equipment setup since you
changed your of fice equipment setup,
have
3. Faxing
For a detailed description of how your office equipment should
●
be set up and the corresponding answering settings, see Step “7.
Connect Your Office Equipment - IMPORTANT!” on page 1-7.
3-7
Page 54

Press START
Manually receiving faxes
If you’re set up to receive faxes manually (Auto Answer light on
keypad is off), use the following procedure to receive faxes.
Make sure the re are no documents in the doc ument tray, or they may
be faxed after the next steps.
1
When the HP OfficeJet rings, pick up the handset
of a telephone that’s on the same telephone line as
the HP OfficeJet.
2
OR
Dial 1-2-3
from an
extension
Listen for the fax tone, pr ess the
the HP OfficeJet’s keypad, OR, if you’re receiving
from an extension phone (one that’s on the same
telephone line as the HP OfficeJet, but not
connected directly to it), dial
3
Now you can hang up the phone or you can sta y on
the line to have a conversation after the fax
finishes.
123
Start
.
button on
3-8
Receiving faxes to your PC
The HP OfficeJet is factory-set to print faxes, not receive them to
your PC. To receive faxes to your PC (also called PC faxes), change
the Receive Faxes set ting.
1
On your Windows
desktop, double-click
HP OfficeJet
Manager
and select
Settings
Receiving tab displays.
2
Select
click OK.
, click
Receive
. The
To PC
Fax
, then
,
Page 55

Notes:
Your computer mu st be powe red on to recei ve faxes. If it is turned
●
off, your received faxes will be printed.
If you’re set up to receive faxes manually, follow the instructions
●
under “Manually recei vin g faxes” on page 3-8. To view or pr int a
received fax, use the instructions in “Viewing lists of all sent and
received faxes” on page 3-24.
Using Advanced Fax Features
and Settings
The following sections describe some of the advanced fax features
available with the HP OfficeJet, both from the keypad and from the
software.
Advanced fax send settings
Controlling how your faxed documents will look
There are two settings that control how your faxed documents will
look when they’re printed at the receiving fax machine: Resolution
and Contrast.
3. Faxing
Changing the Resolution
The Resolution setting affects the quality, in dots-per-inch (dpi), of
your faxed documents. It also affects sending speed.
Use this
Resolution setting: For this result:
Fine
(factory setting)
(203 x 196 dpi)
Higher quality for words (factory setting).
Use this higher-quality setting for good all-around
●
quality.
Most fax machines can receive faxes at this higher
●
quality setting. If you select this setting and the
receiving fax machine doesn’t support it, your fax
will be sent at Standard resolution.
Text will have better quality than graphics and
●
photographs.
3-9
Page 56

Use this
Resolution setting: For this result:
Standard
(203 x 98 dpi)
300 dpi
(300 x 300 dpi)
Photo
(Grayscale image scan
up to 300 x 300 dpi)
Standard quality for words.
Use this setting when transmission speed is more
●
important than quality.
All fax machines can rece ive at this setting.
●
Text will have better quality than graphics and
●
photos.
Fastest fax transmission speed of all the Resolution
●
settings.
Best quality for words.
Only a few types of machines can receive faxes at
●
this setting. If you select this setting and the
receiving fax machine doesn’t support it, your fax
will be sent at the highest supported resolution.
Text will have better quality than graphics and
●
photos.
Best quality for photographs and graphics.
Use this setting when the quality of photographs and
●
graphics in your document is more important than
the quality of the words.
Your document wil l be scanned as a grayscale image
●
(which simulates shades of gray) at up to 300 x 300
dpi.
3-10
Slowest fax transmission speed of all the Resolution
●
settings.
The table on the following page describes how to change the
resolution for each type of fax. This setting needs to be changed
you begin faxing.
before
Notes:
When you change the Resolution setting, it will stay at the new
●
setting until you change it again.
The
●
Contrast/Resolution
settings also affect the quality of
copies made from the HP OfficeJet’s keypad. See “Optimizing
the quality” on page 4-3.
Page 57

Type of fax: Where and how to change the Resolution:
Paper fax sent from
the HP OfficeJet’s
keypad
Paper fax sent from
the HP OfficeJet
Document Assistant
Change the Resolution with the
Contrast/Resolution
button on the HP OfficeJet’s keypad.
1
Press the
2
Press 1 to select Resolution.
3
Press 1, 2, 3,
Contrast/Resolution
or 4
to select the Resolution:
button.
1 = Standard
2 = Fine (factory setting)
3 = 300 dpi
4 = Photo
When you change the Resolution setting from
Note:
the keypad, the HP OfficeJet Manager software is
automatically updated wi th the same Reso lution
setting.
Change the Resolution setting in the HP OfficeJet
Manager software.
1
Double-click the
HP OfficeJet Manager
icon on
your Windows desktop.
2
Click
3
In the Paper Fax Quality tab, click
Fine
Fax
, or
300 dpi
and select
to select the Resolution you
Send Settings
.
Standard,
want.
3. Faxing
PC fax sent directly
from your software
program
4
Click the
Optimize for photo or graphic
checkbox if appropriate, then click OK. When
selected, your document is scanned as a graysca le
image, then sent at the selected resolution setting
(Fine, Standard, or 300 dpi).
When you change the Resolution setting from
Note:
the HP OfficeJet Manager software, the keypad setting
is automatically updated with the same Resolution
setting.
Change the Resolution setting in the HP OfficeJet
Manager software.
Use the instructions for “Sending a Fax Directly from
Your Software Program” on page 3-6. Choose
Standard
only; other choices will result in Fine quality
Fine or
transmission.
3-11
Page 58

Changing the Contrast
Change this setting if you want the faxed document to be lighter or
darker than the original document. This setting needs to be cha nged
you begin faxing.
before
Notes:
When you change the Contrast setting, it will stay at the new
●
setting until you change it again.
The
●
Contrast/Resolution
settings also af fe ct the quality of
copies made from the HP Of f iceJet’s key pad. See “Dar kening and
lightening — Contrast” on page 4-4.
Type of fax sent: Where and how to change the Contrast:
Paper fax sent from
the HP OfficeJet’s
keypad
Paper fax sent from
the HP OfficeJet
Document Assistant
Use the
Contrast/Resolution
OfficeJet’s keypad to lighten or darken your fax.
1
Press the
2
Press 2 to select Contrast.
3
Press
Contrast/Resolution
1, 2, or 3
to select the Contrast you want:
1=Normal (the factory setting)
2=Lighten
3=Darken
When you change the Contrast setting from the
Note:
keypad, the HP OfficeJet Manager software is
automatically updated wi th the same Cont rast setting.
Change the Contrast setting in the HP OfficeJet
Manager software.
1
Double-click the
HP OfficeJet Manager
your Windows desktop.
button on the HP
button.
icon on
PC fax sent directly
from your software
program
3-12
2
Click
3
In the Pape r Fax Quality tab,
and select
Fax
Send Settings
drag the slider bar
.
in the Contrast area to the setting you want, then
click OK.
When you change the Contrast setting from the
Note:
HP OfficeJet Manager software, the keypad setting is
automatically updated wi th the same Cont rast setting.
Contrast settings are not applied to this type of fax.
Page 59

Redialing a fax number
If you dialed the fa x number from the HP Of ficeJet’s keypad, yo u can
press the
Redial/Pause
number.
The HP OfficeJet is factory-set to automatically redial at timed
intervals up to 5 times after a busy signal.
Redialing manually with the Redial/Pause button
To immediately begin r edi al ing the last fax number you dialed on the
HP OfficeJet’s keypad, press the
your document is still loaded in the document tray.
Notes:
button any time to redial the last-dialed fax
Redial/Pause
button. Make sure
If you press
●
Redial/Pause
while in th e middle of di aling a fax
number, the Pause feature takes effect and a dash (-) appears in
the message display.
You can’ t use the
●
Redial/Pause
button to redial a fax nu mber that
you originally entered in the Send Fax dialog box. The HP
OfficeJet will redial automatically as described below.
Changing the Automatic Redial setting in the software
Here’s how the Automatic Redial feature works:
The fax number will be redia led one minute afte r the unsucces sful fax
attempt (busy, no answer, or both, depending on your settings). If the
first redial is unsuccessful, the second redial will begin after a 5minute wait. After this, the fax number will be redialed up to 3 more
times if the transmission continues to be unsuccessful.
If you dialed the fax number from the HP OfficeJet’s keypad, the
message display will show the redial countdown time in seconds
during the waiting periods (unless the message display is already in
use).
1
Double-click
2
Click
Fax
HP OfficeJet Manager
and select
Send Settings
on your Windows desktop.
.
3. Faxing
3
Click the
4
In the Automatic Redial area, select
or
Redial on no answer
Dialing
tab.
. To turn off the Automatic Redial
feature, make both checkboxes blank.
Redial on busy signal
and/
3-13
Page 60

Entering a pause during keypad dialing
Press the
Redial/Pause
of your dialing sequence. A dash (-) will appear on the message
display, indicating where the pau se will occur i n the dia ling se quence .
Notes:
Refer to the instructions in “Dialing in real time” on page 3-3.
●
button to en ter a 2-seco nd pause in the middle
If you press
●
Redial/Pause
at any other time
except
while dialing
a fax number, the ma nual Redial feature takes effect (see
description in previous section).
Assigning speed dial codes
The number of speed dial codes you have depends upon the model
number of your HP OfficeJet. Your model number is displayed on
your keypad.
Model number Number of speed dial codes available
Model 600 100
Model 610 50
Model 630 100
Assigning a speed dial code to a single fax number
Use speed dial codes to store frequently used fax numbers.
1
Double-click
HP OfficeJet Manager
on your Windows desktop.
3-14
2
Click
3
Do either of the following.
●
To create a new phone book name:
and select
Fax
Phone Book
.
Enter any name and number information, then click the arrow
next to the Speed Dial entry box and select a speed dial code.
●
To add a speed dial code to an existing phone book name:
Click the name in the list and select a speed dial code.
4
Click
Add to Phone Book
Apply Changes
(for existing phone book names) to save the
(for new phone book names) or
information you just entered.
See “Speed dialing” on page 3-4 for speed dialing instructions.
Page 61

Assigning a speed dial code to a group of fax numbers
You can group fax numbers you dial frequently (such as your
department members at work) , and st ore th em into a group sp eed di al
code. You can store up to 20 numbers in a speed dial group.
Each group member must have an assigned speed dial code. If you
add the name of someone who doesn’t have a speed dial code, one
will be automatically assigned to them (if available), and you’ll be
asked to confirm it. If you prefer to pick your own speed dial code,
use the instructions in the previous section to assign it before adding
the name to a group speed dial code.
1
Double-click
2
Click
Fax
3
Do either of the following.
●
To create a new speed dial group:
Click
Create/Modify Group
HP OfficeJet Manager
and select
Phone Book
, then click
Create Group entry box, enter a name for the group you’l l create,
and click OK. Then select an unassigned spe ed dial code from the
group Speed Dial box.
●
To add names to an existing speed dial group:
Select a name from the Group Name box.
on your Windows desktop.
.
Create Group
. In the
3. Faxing
4
In the Phone Book list, cli ck o n th e first name you want to add to
this group, then click
5
Add more names to your group, for a total of up to 20 group
Add to Group
.
members.
The Group name does not appear in the Phone Book. It
Note:
appears when you click the
Create/Modify Group
button in the
Phone Book and in the list of names in the Send Fax dialog box.
3-15
Page 62

Faxing to a group of fax numbers
Choose from these many methods of faxing to groups.
Type of fax sent How to fax to a group of fax numbers
Paper fax sent from
the HP OfficeJet’s
keypad
Paper fax sent from
the HP OfficeJet
Document Assistant
Dial a group speed dial code you assigned
previously in the Phone Book.
Use the faxing instructions in “Speed dialing” on page
3-4. In step 3 of tha t p roc edur e, enter a speed dial code
that you’ve assigned to a group of numbers.
See “Assigning a speed dial code to a group of fax
numbers” on page 3-15 for instructions on creating a
speed dial group.
Choose from these two methods (a or b):
a) In the Send Fax dialog box, select a group name
from the Phone Book list.
Use the faxing instructions in “Sending from the
Document Assistant” on page 3-5. In step 3 of that
procedure, select a group name from the Group Name
list, then click
To create a group in the Phone Book, follow the
instructions in the “Assigning a speed dial code to a
group of fax numbers” on page 3-15.
b) In the Send Fax dialog box, create a temporary
group to be used only for the current fax.
In the Send Fax dialog box, click Create List. Enter
names and numbers in the “Fax to:” box, or select
names or groups from the Phone Book list. Click the
appropriate Add to List button. Click
to begin faxing.
Send Fax Now
.
Send Fax Now
PC fax sent directly
from your software
program
3-16
Choose from these two methods (a or b):
a) In the Send Fax dialog box, select a group name
from the Phone Book list.
Use the faxing instructions in “Sending a Fax Directly
from Your Softwa re Program” on pa ge 3-6. In step 4 of
that procedure, select a group name from the Phone
Book list, then click
To create a group in the Phone Book, use the
instructions above for the Document Assistant faxes.
b) In the Send Fax dialog box, create a temporary
group to be used only for the current fax.
Use the ins tructions ab ove for the Document Assistant
faxes.
Send Fax Now
.
Page 63

Changing the information printed at the top of the
faxes you send
When you first in stalled t he HP Of fi ceJet softw are, you wer e asked t o
enter your name and fax number. This information was stored for use
in the header that’s printed at the top of all of your outgoing faxes.
Notes:
●
Only the fax recipient will see this information upon receipt of
your fax; it’s not printed on your original document.
The T elepho ne Consumer Prot ection Act of 199 1 requires that, in
●
the U.S., all outgoing fax es iden tify the origi nator’s name and fax
number in a header, footer, or on the cover page of the outgoing
fax.
Use the following procedure to change the fax header information.
1
Double-click
2
Click
Fax
3
Click the
HP OfficeJet Manager
and select
Send Settings
Personal Information
on your Windows desktop.
.
tab and change the information
in the two entry boxes in the Fax Header Content section.
Setting Tone or Pulse dialing type
The HP OfficeJet is factory-set for tone dialing. Nearly all phones
being used in the U.S. have tone dialing.
Don’t change this setting unless you know your phone isn’t
Note:
capable of tone dialing. Pulse dialing is much slower than tone
dialing.
3. Faxing
1
Double-click
2
Click
Fax
3
Click the
HP OfficeJet Manager
and select
Dialing
Send Settings
tab and select
Phone Dialing Type section.
on your Windows desktop.
.
Tone Dial
or
Pulse Dial
in the
3-17
Page 64

Other advanced features for sending faxes
There are many advanced features available in the HP OfficeJet
software. The best way to learn about these features is to explore
them in the dialog boxes referenced in the following table, and click
the
button on the screen if you need more information.
Help
Additional features for
sending faxes
Where to locate these features in the HP
OfficeJet Manager software
Using the Phone Book Phone Book dialog box.
1
Double-click
HP OfficeJet Manager
your Windows desktop.
2
Including an electronic
cover page when sending
a fax
Click
Send Fax dialog box.
Use the faxing instructions in the appropriate
section earlier in this chapter to navigate to the
and select
Fax
Send Fax dialog box. Then click the
checkbox and click the
Edit
message on your cover page.
Faxing a one-page note
Cover Page Data dialog box.
that you type into the
Cover Page Data dialog
box
Changing your personal
information in the
Double-click
your Windows desktop.
2
Click
Fax
Personal Information tab of the Send Fax
Settings dialog box.
HP OfficeJet Manager
and select
1
electronic cover page
1
Double-click
HP OfficeJet Manager
your Windows desktop.
Phone Book
.
Cover Page
button to add a
Send Quick Note
on
on
.
on
Scheduling a fax to send
at a future time
3-18
2
Click
3
Click the
and select
Fax
Send Settings
Personal Information
.
tab and
change the information in any of the entry boxes
in the Cover Page Information section.
Select Fax Send Time dialog box.
1
Double-click
HP OfficeJet Manager
on
your Windows desktop.
2
3
Click
Click
and select
Fax
Send Fax Later
Send Fax
.
and fill in the entry
boxes in the Select Fax Send Time section.
Page 65

Advanced fax receive settings
Phone Answering: Automatic or Manual
When Phone Answering is set to Automatic, the HP OfficeJet will
automatically answer every call received at your fax number. When
set to Manual, you must answer fax calls manually (see “Manually
receiving faxes” on page 3-8 for instructions).
To change the
1
Look at the HP Of fi ceJet’s keypad to determine the current Pho ne
Phone Answering
setting:
Answering setting.
If the green
ting is
Automatic
Auto Answer
, and your HP OfficeJet is set to receive faxes
light is on, the
Phone Answering
automatically. It will a ut omati cally answer every call you receive
at your fax number — after the number of rings specified in the
Rings to Answer setting — then send receiving fax tones.
If the
Auto Answer
Manual
, and your HP OfficeJet can only receive faxes manually.
light is off, the
Phone Answering
setting is
It will never answer incoming calls automatically.
2
Press the
Auto Answer
button to change the setting.
Notes:
●
If you
haven’t
changed your office equipment setup since you
answered the questions in the software during installation, don’t
permanently change t his sett ing now or you may not receive your
faxes properly.
For a detailed description of how your office equipment should
●
be set up and the corresponding answering settings, see Step “7.
Connect Your Office Equipment - IMPORTANT!” on page 1-7.
set-
3. Faxing
If you decide to change this setting, you should do it only
●
temporarily (for one fax only), then change it back, or, if you
have changed your office equipment setup since you first
installed the software, re-run the Setup Wizard and make your
changes there. (Refer to “Updating your fax receive setup” on
page 3-22 for instructions on how to locate the Setup Wizard.)
3-19
Page 66

Changing the number of rings before answering
When Phone Answering is set to Automatic, the HP OfficeJet will
automatically answer all calls after the number of rings specified in
the Rings to Answer setting. For example, when Rings to Answer is
set to 1 ring, your fax line will ring once, then the HP OfficeJet will
begin sending fax tones.
When you installe d the s oftw ar e, the Setup Wizard ask ed y ou a se ries
of questions about your phone lines and equipment. Your answers
determined the
appropriate
and the Setup Wizard set it for you automatically.
If you decide to change this setting now, you should do it only
temporarily (for one fax only), then change it back, or, if you have
changed your office equipment setup since you installed the HP
OfficeJet, re-run the Setup Wizard and make your changes there.
(Refer to “Updating your fax receive setup” on page 3-22 for
instructions.)
option for this setting (a nd many others)
To change the
1
On your Windo ws deskt op, double-cli ck
click
2
Click the
Change the Rings to Answer
setting in the Answering tab.
Rings to Answer
, and select
Fax
Answering
setting:
Receive Settings
tab.
HP OfficeJet Manager
.
,
3-20
3
In the
Number of Rings to Answer
number between 1 and 6, inclusive.
box, enter or select a
Page 67

Using Distinctive Ring
If you have one phon e line tha t re ceives both v oi ce and f ax cal ls , you
may want to use this feature. The Distinctive Ring feature of the HP
OfficeJet, when used in conjunction with your telephone company’s
distinctive ringing service, allows both you and the HP OfficeJet to
distinguish between voice calls and fax calls when you receive both
on the same phone line.
Your telephone company may use a different name for this
Note:
service.
Use the following procedure to set up your HP OfficeJet and
telephone line for Distinctive Ring.
1
Call your telephone compan y to f i nd out i f they have a d isti nct i v e
ringing service available in your area.
Important:
If you can’t subscribe to this service through your
telephone company, the Distinctive Ring feature on the HP
OfficeJet
will not work
, and should be set to
All Rings
.
The telephone company’s distinctive ringing service allows you
to have 2 or 3 phone numbers on the same phone line, which
saves you the cost of paying for 2 or 3 separate lines. It also
allows you an d the HP OfficeJet t o hear wh ich phon e number has
been dialed. Each of the phone numbers will have a different
ringing sound: One can have a single ring, another can have a
double ring, and the third can have a triple ring.
2
When you set up the distinctive ringing service with your
telephone company, decide how many rings you want to assi gn to
your fax line: single, double, or triple rings.
3
If you’ve already installed the HP OfficeJet software, re -run the
HP OfficeJet Setup Wizard and enter the Distinctive Ring
information.
T o loca te the Setu p W izard, doub le-cli ck
●
on your Windows desktop, click
Setup Wizard
In the screen that asks if you subscribe to a distinctive ring
●
service, click
.
Yes
.
HP OfficeJet
HP OfficeJet Manager
, and select
3. Faxing
Fax
In the screen that asks you to choose a distinctive ring pattern,
●
click the number of rings you assigned in Step 2 above to your
fax line (single, double, or triple).
If you want the HP Of ficeJet to answer both d oubl e and tr i-
Note:
ple rings — for e xample, if y ou hav e two se parate fa x numbers on
your distinctive ring line — choose double and triple rings.
3-21
Page 68

In the screen that asks you to enter the phone number of your
●
dedicated fax line, enter the distinctive ring fax number.
4
If you have an answering machine for receiving voice calls on
this phone line (using one of the other distinctive ring phone
numbers for your voice calls), set it to answer after 3 or more
rings. If you don’t use this setting, your HP OfficeJet will not be
able to receive your fax calls.
5
If you have a modem on this phone line (using one of the other
distinctive ring phone numbers), turn off the setting in the
modem’s software that automatically receives faxes to your
computer; if you don’ t turn t his o f f, y our HP Of f i ceJet will not be
able to rec eive faxes properly.
Updating your fax receive setup
When you installed the so ftware , you we re ask ed a seri es of qu estio ns
about your of f ice e quipment setup. Your answers determined ho w the
HP OfficeJet was automatically set to receive faxes.
If any of the following information has changed since you first
installed the software, use the instructions in this section to update
your fax receive software settings.
If you don’t update the software settings, you may not receive
Note:
faxes properly.
If this information has changed, use the instructions that
follow this table:
Have you added or removed a distinctive ring feature on your
●
telephone line?
Have you added, changed, or removed any phone numbers or fax
●
numbers?
Have you changed from a dedicated fax line (no voice calls
●
received) to a shared fax line (receive both voice and fax calls) or
vice versa?
Have you added or removed an answering machine or computer
●
voicemail feature on the same telephone line that’s connected to
the HP OfficeJet?
Have you added or removed a modem — either internal to your
●
computer or an external box — on the same telephone line that’s
connected to the HP OfficeJet?
3-22
Page 69

To update your fax receive settings in the software:
1
Double-click
2
Click
HP OfficeJet
3
Follow the instructions in all of the Fax Setup Wizard screens,
HP OfficeJet Manager
and select
on your Windows desktop.
Fax Setup Wizard
.
updating where appropriate.
Changing the paper size setting
When you load a different paper size in the paper supply tray, you
also need to change the paper si ze in the Fax Recei v e settings if you’ll
be receiving faxes on the new paper.
The factory-set p aper s ize t o prin t f ax es on i s Let ter ( 8.5 x 11 inches ).
You can also print faxes on Legal-size paper (8.5 x 14 inches) or on
A4-size paper (210 x 297 mm).
1
On your Windows desktop, double-click on
Manager
2
Select a new paper size in the
, then click
and select
Fax
Receive Settings
Load Paper Size
HP OfficeJet
.
section.
3. Faxing
Other advanced features for receiving faxes
There are many advanced features ava il abl e in the software. The best
way to learn about these features is to explore them by clicking the
tabs in the Receive Fax Settings dialog box. Click the
each of the tabs for more information about the features and settings.
To locate the Receive Fax Settings dialog box, double-click on
●
HP OfficeJet Manager
and select
Receive Settings
on your Windows desktop, click
.
Help
button in
,
Fax
3-23
Page 70

Viewing lists of all sent and received
faxes
1
Double-click
History
2
Do any of the following:
HP OfficeJet Manager
.
, click
, and select
Fax
Fax
Click the
●
from the HP Off ice Jet. Bot h paper fa xe s and PC faxes (from your
software program) are included.
Click the
●
received, both printed faxes and PC faxes. To view a PC fax,
double-click it. To print a PC fax, click it once, then click
Fax
Click the
●
be sent at a future time.
Sent Faxes
Received Faxes
.
Pending
tab to see a list of all the faxes you’ve sent
tab to see a list of all the faxes you’ve
Print
tab to see a list of faxes that are scheduled to
Printing the fax reports
There are two fax reports you may want to print from time to time:
the Fax History report, and the Last Fax report.
Fax History report
The Fax History report is a list of the la st 30 fax transmissions: bot h
sent and received faxes.
Here’s how to print this report:
1
Double-click
History
.
HP OfficeJet Manager
, click
, and select
Fax
Fax
3-24
2
Click the
3
Click
Settings
Print Fax History
tab.
.
Last Fax report
The Last Fax report is factory-set to print automatically if an error
occurs while a fax is being sent or received (
To change when the Last Fax report is automatically printed, follow
steps 1 and 2 above, then click one of the options in the
Report Printing
section.
Error only
setting).
Automatic
Page 71

Adjusting sound volumes
There are three sound volumes you can adjust: the volume of
outgoing fax calls (dial tone, ringing, and fax tones), the rings for
incoming calls, and the beep sounds for the keypad buttons.
1
On your Windo ws deskt op, double-cli ck
click
HP OfficeJet
Volume tab displays.
2
Adjust the volume of all sounds by making a selection in the
Sound Volume
3
Adjust the volume of incoming calls by turning the sound on or
off. When
you’ll hear the rings; when the checkbox is bla nk, you won’ t hea r
anything when incoming fax calls are received.
Fax machine rings for incoming calls
, and select
section, which is factory-set to Soft.
Settings and Maintenance
HP OfficeJet Manager
. The
is checked,
,
4
Adjust the vol ume of the button beeps by turning the sound on or
off. When
beeps while pressing buttons, and you’ll hear the error beeps
when you press the wrong button; when the checkbox is blank,
you won’t hear anything when you press the buttons.
Buttons beep when pressed
is checked, you’ll hear
Changing the time and date
●
When the HP OfficeJet is connected to your computer
the bi-directional parallel cable, the time and date shown on the
keypad display are taken from the time that’s set in your
computer. If you need to change the time (for daylight savings,
for example) a nd da te, res et them on your computer, and the y will
automatically update in the HP OfficeJet.
●
When the HP OfficeJet is disconnected from your computer,
then powered off, the time and date information will be lost. The
message “
display on the HP OfficeJet. To reset the time and date, you can
either reconnect the HP OfficeJet to your computer with the bidirectional par allel cabl e, or you can pre ss th e
keypad and fo llow the instructions for setting the time and date.
Press START to set time/date, or STOP to skip
button on t he
Start
3. Faxing
with
” will
3-25
Page 72

Standalone Faxing
After you install the HP OfficeJet software with the HP OfficeJet
connected to the PC, the HP OfficeJet can be disconnected from the
PC and used as a standalone fax machine. However, without the HP
OfficeJet software, some features will not be available — see
“Standalone vs. PC Connected” below.
To use the HP OfficeJet as a standalone fax machine:
Move t he
●
Windows Startup group to the HP OfficeJet Series 600 program
group. Do not remove this icon. You may want to use it in the
future.
HP OfficeJet Series 600 Startup
icon from the
For Windows 95
Click
Settings
the
Start Menu Programs
the Programs, the n St ar tu p group and select
600 Startup
program group.
600
from the Start menu, then select
tab and click
. Click and drag this icon to t he
Advanced
Task ba r
. Double-click
HP OfficeJet Series
HP OfficeJet Series
For Windows 3.1
Open the Startup group and click and drag the
Series 600
If you unplug or turn off the HP OfficeJet, you may need to re-
●
enter the date/time information. All other fax information, such
as the speed dial codes and fax header, will be saved.
icon to the
HP OfficeJet Series 600
HP OfficeJet
program group.
Standalone vs. PC Connected
Standalone Mode PC Connected
. Click
Fax Send/Receive Y Y
Fax Forward N Y
Add/Change/Delete
Speed Dial Codes
Speed Dial Y Y
Change Fax Information N Y
Enter Date/Time Y (front panel) Y
3-26
NY
Page 73

Copying
............................................................................................................
ead this chapter to learn how to make copies
R
4
the copy settings in both locations.
For basic black- and-white copyi ng, use th e k ey pad. To copy in color, gain
more control over how your copies will look, or to copy long or complex
documents, copy using the HP OfficeJet Document Assistant on your
computer.
Copying from the Keypad....................................................... 4-2
Controlling how your copies will look ............................ 4-2
Optimizing the quality ............................................... 4-3
Darkening and lightening — Contrast ........................ 4-4
Automatic collating......................................................... 4-4
Copying from the Document Assistant ................................... 4-5
Controlling how your copies will look ............................ 4-6
Optimizing the quality ............................................... 4-6
Darkening and lightening — Contrast ........................ 4-6
Reducing and enlarging .................................................. 4-7
Copy quality ................................................................... 4-7
Collating: On or Off........................................................ 4-8
both from the HP OfficeJet’s keypad and from
the software. You’ll also learn how to change
4. Copying
Page 74

Document
guides
Copying from the Keypad
Copying from the keypad only supports black and white copying.
Also, copying from the keypad is not recommended for large or
complex documents. Copy co lor documen ts or l arge documents using
the Document Assistant.
You may w ant to use the scan/copy sleeves prov ide d t o protect
Note:
fragile or damaged original documents or photos for copying. For
more information regarding these sleeves, refer to “Using a Scan/
Copy Sleeve to Protect Your Original” on page 2-3.
If your original d ocume nt is a photograph, or if you want your copies
to be darker or lighter than your original, use the instructions in the
section, “Controlling how your copies will look” below.
1
Load your document with the printed side facing
away from you. You can load up to 20 pages, or a
single scan/copy sleeve. If necessary, slide the
document guides
adjust them for the width of your document.
Always remo ve stap les an d paper cli ps fro m
Note:
your original before copying to avoid equipment
damage.
on the tray to the left or right to
4-2
2
Press the
copies you want (up to 99).
3
Press the
The entire original document will be scanned
before copying begins.
T o c ancel a cop y i n progress , press the
on the HP OfficeJet’s keypad.
button, then enter the number of
Copy
button again to be gin copying.
Copy
Stop
button
Controlling how your copies will look
When you make a copy from the HP OfficeJet’s keypad, the way it
looks is determined by the Contrast and Resolution settings that are
selected on the keypad with the
The
Note:
paper faxes sent from the keypad. See “Changing the Resolution” on
page 3-9 and “Changing the Contrast” on page 3-12.
Contrast/Resolution
Contrast/Resolution
settings also affect the quality of
button.
Page 75

Optimizing the quality
Before beginning to copy, change the Resolution setting on the
keypad to optimize for words, drawings, or photographs.
When you change the Resolution setting, it will stay at the new
Note:
setting until you change it again.
1
Press the
2
Press 1 to select Resolution.
3
Press
select the best quality for
Use this Resolution: For this result:
Contrast/Resolution
1, 2, or 3
to select t he best quality
photographs and graphics
button.
for words
4. Copying
, or press 4 to
.
1= Standard
2= Fine (factory setting)
3= 300 dpi
(All three settings scan at
300 dpi)
4= Photo
(Scans as a grayscal e image
at 300 dpi)
Best quality for black & white words and for
simple line drawings (factory setting).
Use any of these three settings when the quality
●
of the text and simple line drawings is more
important than the quality of photographs and
more complex graphics.
Your document will be scanned at 300 dpi no
●
matter which of these Resolution settings is
selected.
Best quality for black & white photographs and
for more complex graphics.
Use this setting when the quality of photographs
●
and graphics in your document is mor e important
than the quality of the text.
Your document will be scanned as a grayscale
●
image (which simulates shades of gray) at 300
dpi.
4-3
Page 76

Darkening and lightening — Contrast
Before beginning to copy, change this setting if you want the copy to
be darker or lighter than your original document.
When you change the Contrast setting, it will stay at the new
Note:
setting until you change it again.
1
Press the
2
Press 2 to select Contrast.
3
Press
1 = Normal (the factory setting)
2 = Lighten
3 = Darken
Contrast/Resolution
1, 2, or 3
to select the Contrast you want:
button.
Automatic collating
Copies made from the keypad will be automatically collated (printed
in sets), with one exception: When the Photo setting is selected for
the Resolution using the
under “Optimizing the quality” on page 4-3), copies will not be
collated. For examples of page number sequences when collating is
on and off, refer to “Collating: On or Off” on page 4-8.
Contrast/Resolution
button (described
4-4
Page 77

Copying from the Document
Assistant
This copying method is recomme nded if you w ant to cop y in color or
you’re copying a document that requires a lot of memory to scan.
You may w ant to use the scan/copy sleeves prov ide d t o protect
Note:
fragile or damaged original documents or photos for copying. For
more information regarding these sleeves, refer to “Using a Scan/
Copy Sleeve to Protect Your Original” on page 2-3.
1
Load your document (up to 20 pages) in the document tray with
the printed side facing away from you.
Now look at your computer screen.
When you load your
document, the
Document Assistant
asks you what you
want to do.
4. Copying
2
Click
Change any of these copy
settings before beginning to
copy.
3
Click
To cancel a copy in progress, click the
dialog box (displayed during cop ying) or press the
keypad.
and the Copy dialog box displays.
Copy
Start Copy
to begin copying.
Cancel
button in the status
button on the
Stop
4-5
Page 78

Controlling how your copies will look
When you make a copy from the Document Assistant, the way it
looks is determined by the settings in the Copy dialog box. These
settings will not affect copies made from the keypad.
Optimizing the quality
The HP Office Jet sof tw are is fact ory-s et to opt imiz e the colo r in you r
copies. The
copy for tex t, phot os, an d g raphics on the p age. I f your ori ginal is j ust
black and white, click
Photo/Graphics
Color Text/Photo/Graphics
Black & White Text
accordingly.
Darkening and lightening — Contrast
When you want the copy to be darker or lighter than your original
document, drag the slider bar in the Contrast area to the Contrast
setting you want.
setting will optimize the
or
Black & White
4-6
Page 79

Reducing and enlarging
When you want the copy to be smaller or larger than your original
document, change the Reduce/Enlarge setting.
Reduce/Enlarge* method: Settings available:
Change the number in the
entry box.
(Factory setting = 100%)
Choose from the selection
box.
(Factory setting = Actual size)
Drag the slider bar.
(Factory setting = 100%)
* If you enlarge to a siz e that w on ’ t f i t on th e pap er you ha ve loaded, your copy
will be printed on multiple pages.
Enter a number between 50 and 200
reduce to as small as half of the original
size or to enlarge to up to twice the size.
Fit to Page
entire page within the print margins of the
HP OfficeJet.
Actual Size
as your original.
Legal to Letter
legal-size to letter-size.
Letter to A4
letter-size width to A4-size width.
A4 to Letter
A4- size width to letter-size width. (Make
sure you have le tter-size paper in the pape r
supply tray when you choose this setting,
or your copy will print on multiple pages.)
Drag to a number between 50 and 200
to reduce to as small as half the original
size or to enlarge to up to twice the size.
reduces the original to fit the
makes the copy the same size
reduces the original from
reduces the original from
enlarges the original from
to
4. Copying
Copy quality
The Copy Quality determines the print mode for your copy.
●
Normal
medium speed: 2.5 pages per minute (ppm) for monochrome
printing, and 0.7 ppm for color printing.
Choose
●
for monochrome printing, and 1 ppm for color printing.
Choose
●
speed: 1 ppm for monochrome printing, and 0.3 ppm for color
printing.
For help choosing the right quality, click
for me?
is the factory-set quality. It has medium quality and
EconoFast
Best
in the Copy Settings dialog box for a description of each.
for draft quality and the fastest speed: 4 ppm
for the highest quality output. It has the slowest
What is the right Quality
4-7
Page 80

Collating: On or Off
The HP OfficeJet is factory-set with the collating feature turned on.
Example when Collating is turned on:
If you make 3 copies of a 3-page document, the copies will be
●
printed as shown at left.
Copies ar e printed face-up, so the last page is printed first in
●
order to maintain the proper collated order in each set.
Example when Collating is turned
To turn off the collating feature, click the
●
off
:
Collate
checkbox to
remove the check mark.
With coll at ing tur ned off, each page of your orig ina l is sc anned
●
Zothecas
miscere
quadrupei,
Zothecas
miscere
quadrupei,
and copied before the next page is scanned. If you make 3 copies of a 3-page document, the copi es will be printed as sho wn at
left.
Notes:
●
The Collating setting will return to the factory setting (On) after
you complete an uncollated copy job.
Copies made from the keypad will always be collated, regardless
●
of the Collating setting in the Copy dialog box. The only
exception to th is is when the Photo setting is selected for the
Resolution using the
Contrast/Resolution
button (see
“Optimizing the quality” on pa ge 4- 3); copies made at this Photo
setting will not be collated.
4-8
Page 81

Scanning
............................................................................................................
ead this cha pter to learn how to scan a
R
5
document to edit the words (OCR scanning).
Photographs, dra wings, and tex t can be scanned i n color, black-and-whit e,
or in shades of gray.
document or a photograph, or how to scan a
Before you scan, review the
This booklet gives a brief, easy-to-underst an d overview of t he pr oce ss, so
that you can get the best results every time you scan.
For more detailed i nformatio n on OCR scanning , refer t o the Caere
product documentation that was included in the box with the HP Office-
Jet, the
Scanning Your Document As an Image .................................. 5-2
Scanning Your Document to Edit the Words (OCR) ................ 5-8
OmniPage
Scanning from the Document Assistant...........................5-2
Scan Image Viewer .........................................................5-5
Scanning from TWAIN-compliant software .....................5-7
®
Limited Edition User’s Guide.
How to Scan with Your HP OfficeJet
booklet.
®
OCR
5. Scanning
Page 82

Scanning Your Document As
an Image
Scanning from the Document Assistant
1
Load your document in the document tray with the printed side
facing away from you. You can load up to 20 pages (for black &
white only; color scans 1 page at a time), a single scan/copy
sleeve, or a single photo. If necessary, slide the document guides
on the tray to the left or right to adjust them for the width of your
document.
You may want to use the scan/copy sleeves provided to
Note:
protect fragile or damaged or igina l document s or photos for sc anning. Refer to “Using a Scan/Copy Sleeve to Protect Your Original” on page 2-3 for more information regarding these sleeves.
When you load your
document, the Document
Assistant asks you what you
want to do.
5-2
2
Click
Change any of the scan
settings.
and the Scan Settings dialog box displays.
Scan
Page 83

Make any chan ges you’d like to any of the settings. The samp le page
in the middle of the dialog box shows how the change in settings will
affect the scanned document.
Select
●
color. Select
if you have a color original and want to scan in
Color
Black & White
if you want a black and white scan
of your original.
●
is used to make the words and simple line drawings in your
Text
document appear to be the clearest elements after scanning. You
can scan up to 20 pages, or a single scan/copy sleeve with this
selection.
Note:
Do not click
Scan text for editing (OCR)
. Refer to “Scan-
ning Your Document to Edit the Words (OCR)” on page 5- 8 l at er
in this chapter for OCR scanni ng instr ucti ons. Or click t he but-
ton labeled,
Click
●
“What is OCR?”
to make photograph s i n yo ur document appear to be
Photo
for help on the subject.
the sharpest elements af ter sca nning. You can only scan one page
at a time with this selection.
If you plan to ma ke y our image larger than the original,
Note:
you will get better resul ts when you c heck t he box
. Click the button labeled,
for more information.
Graphic
to make more complex illustrations or graphic
“Why does ‘enlarged’
●
Enlarged
matter?”
Click
Photo will be
images in your document ap pea r to be t he shar pest e lement s aft er
scanning. You can only scan one page at a time with this
selection.
●
Click
and then click
Other
Change Custom Settings
your own custom scanning settings.
This information (for example, 100 x 100 dots
per inch, Color, Low compression for Color
Photo) is displayed on the Scan Se ttings d ialog
box.
For more information about the Custom
3
Click
Start Scan
Settings dialog box, click the
to begin scanning.
Help
Your scanned image will display in the Image Viewer window.
To cancel a scan in progress, click the
OfficeJet’s
Scanning
window, which is displayed during scan-
Cancel
button in the HP
ning.
to choose
5. Scanning
button.
5-3
Page 84

4
Use the tools in the Image Viewer window if you want to modify
the scanned image. Be sure to crop out the unwanted areas of
your image, including the extra white space around your image.
When you want to adjus t the colo r in a sc anned imag e, make sur e that
you make all nece ss ary t onal changes first (se tt ing hi ghl ight, shadow,
midtone values). Colors can shift if you make these adjustments later.
To view multiple s canned pages, click the right and left arrows in the
tool bar.
For instructions on using the Image Viewer tools, refer to “Scan
Image Viewer” on p age 5- 5 or pull down the Help menu in the Image
Viewer window and select
5
Save your image. Refer to “Save image” on page 5-6.
6
Choose either of the following methods to place the scanned
Help Topics
.
image into a document.
To copy-and-paste the scanned image into a document:
From the Image Viewer, select the ent ir e i mage (choose
a)
from the
menu), or the portion of the image that you want to
Edit
keep (use the Image Viewer tools), then select
Copy
Select All
from the
Edit
menu.
Open the document in your software program where you want to
b)
place the image.
Select
c)
Paste
from the
Edit
menu.
To import the scanned image into a document:
Open the document in your software program where you want to
a)
place the image.
Select
b)
from the
Import File
menu. Check your softwar e program’s documentation if
File
(or the command your software program uses)
you aren’t sure which command to use.
Browse to the location in which you saved the scanned image and
c)
select its file name.
5-4
Page 85

Scan Image Viewer
When you scan a doc ument as Text, Photo, Graph ic, or Other, t he HP
OfficeJet automatically displays the scanned image in the HP
OfficeJet Series 600 Image Viewer. You can use the Viewer to make
changes to the image and save the image file. You can also open the
image file in the Viewer and make changes to it at a later time.
Select
Image
tool
Cut
tool
Selecting the area you want to edit
Click the
●
from the
Hold down the left mouse button and drag across the part of the
●
Select Image
menu.
Edit
image you want to select, and then release the mouse button.
You can now make changes to the selected area.
tool in the edit toolbar or choose
Cutting, pasting, and cropping an area
Select the area you want to cut.
●
Click the
●
menu.
The selected area is cut and placed in the Windows clipboard.
The cut area in the original image is white.
tool in the Edit toolbar or select
Cut
from the
Cut
Select
Edit
5-5
5. Scanning
Page 86

Paste
tool
Crop
tool
If you want to paste the cut area in another part of the image,
●
click the
menu. The cut area is placed in the upper-left corner of the
Edit
tool in the Edit toolbar or select
Paste
Paste
from the
active window.
To drag the pasted area, click it with the left mouse button and
hold the button down as you move it. Click outside the pasted
area to add it to the image.
To crop an area that you want to keep, select the area using the
●
Select Image tool. Click the
from the
Crop
This is especial ly importa nt to cro p out unw anted el ements
Note:
Edit
menu.
tool in the Edit to olbar or sele ct
Crop
of your image, including extra white space around your image.
The original window is minimized and the selected area is dis-
played as a file in a new window. Save this new file.
For more informati on rega rding the ot her tools an d menu items, se lect
Help Topics
from the
Help
menu.
Save image
Pull down the
displays.
menu and select
File
. The Save As dialog box
Save
Change the file name,
folder, or type in the Save
As dialog box.
Your first scanned image will be assigned the name “scan1,” and
subsequent images will be named “scan2,” “scan3,” etc. Or you can
change the name of your scanned document in the
If you don’t change the location in the
image will be saved to
600\Images
3.1).
Select the file format you want in the
the application where you will insert the image supports the selected
file format.
5-6
c:\Program Files\HP OfficeJet Series
(Windows 95) or to
File name
Save in
box, your scanned
c:\HPOJ_600\Images
Save as type
box. Make sure
box.
(Windows
Page 87

Scanning from TWAIN-compliant
software
Some software programs use an industry standard called TWAIN to
allow images to be acquired directly from scanners. This eliminates
some steps from the scanning procedure.
How to tell if your software program supports
TWAIN
To find out if your application uses this method:
Locate
●
Check the software’s documentation. If you can’t find any
●
references to TWAIN, your program doesn’t support it.
Acquire
or
Acquire Image
under the
File
menu.
How to scan with TWAIN
If your software program does not support TWAIN, the
Note:
following procedure will not work.
1
Make sure your software program has the HP OfficeJet Series
600 selected as the scanning source. Usually, you can check this
by choosing
menu in your software.
File
If you can’t find where to select the scanning source in your software program, check the program’s documentation.
2
Open a document in your software where you want the image to
be placed.
3
Load your image or document in the document tray with the
printed side facing away from you (as many pages as your
software will allow, or a single scan/copy sleeve).
Note:
Select Source
If the Document Assistant displays, close it.
or
Acquire/Select Source
from the
5. Scanning
4
Select
Acquire Image
(Some programs may have a slightly different command, like
Acquire.)
If the Scan Settings dialog box displays, choose from the many
scanning options, or click
options. Some applications scan using their own settings. In this
case the Scan Settings dialog box won’t be displayed.
The scanned image will appear in t he Image Viewer. You can edit
your image using the Image Viewer tools — see “Scan Image
Viewer” on page 5-5. When you exit from the Image Viewer, the
edited image will appear in your application.
from the
Help
menu in your software.
File
for information about the
5-7
Page 88

Scanning Your Document to
Edit the Words (OCR)
Scan using the
your original document has words that you want to edit in your word
processing program.
Important:
make sure none of the letters or characters have been misinterpreted
by the OCR software. Even a spell checker won’t catch everything.
For more information about the OCR software, refer to the Caere
documentation that was shipped with the HP OfficeJet.
To scan your document using OCR:
1
Load your document in the document tray with the printed side
facing away from you. You can load up to 20 pages, or a single
scan/copy sleeve.
Note:
protect original documents for scanning. Refer to “Using a Scan/
Copy Sleeve to Protect Your Original” on page 2-3 for more
information.
Look at your computer screen.
When you load your
document, the
Document Assistant
asks you what you
want to do.
Optical Character Recognition
After scanning, proofread your document carefully to
You may want to use the scan/copy sleeves provided to
(OCR) method when
5-8
Page 89

2
Scan text for editing
Click
(OCR)
your document.
to edit the words in
3
4
Click
Scan
Click the
Click
Start Scan
and the Scan Settings dialog box displays.
Text
and
Scan text for editing (OCR)
checkboxes.
.
Your document wil l be scanned i nto the wor d processing program
that you selected when you installed the OmniPage OCR software (at the end of the HP OfficeJ et software installation).
To change the selected word processing program, double-
Note:
click the
click
the
results
5
Edit and proofread your scanned document carefully.
HP OfficeJet Manager
HP OfficeJet
Software
and select
tab, and select from the
menu.
icon on your W indo ws desktop ,
Settings and Maintenance
File format for OCR
. Click
5. Scanning
5-9
Page 90

5-10
Page 91

Printing
............................................................................................................
ead this cha pter to learn how to select and
6
find and use the print settings, and two ways to begin printing — from
your Windows software and from the HP OfficeJet Manager software.
Paper Types............................................................................ 6-2
Selecting paper types and sizes ....................................... 6-2
Loading tips .................................................................... 6-2
Loading plain and special papers ............................... 6-3
Loading letterhead paper............................................ 6-3
Loading a single envelope .......................................... 6-3
Loading multiple envelopes........................................ 6-4
Loading transparencies............................................... 6-4
Using the Print Settings .......................................................... 6-5
Locating the print settings ............................................... 6-5
Using the Paper tab settings ............................................ 6-5
Using the Setup tab settings ............................................ 6-6
Print quality and speed............................................... 6-6
Printing in color ......................................................... 6-6
Printing in grayscale ................................................... 6-7
Using the Advanced tab settings...................................... 6-7
R
load paper, envelopes, and other media, how to
Printing from Your Windows Software Program...................... 6-8
Printing from the HP OfficeJet Manager ................................. 6-8
6. Printing
Page 92

Paper Types
Selecting paper types and sizes
The HP Off ice Jet c an pri nt on an y of the f ollowing paper types. Refe r
to Chapter 8 for ordering information.
To produce intense, high quality color printing results, use HP
Note:
Premium InkJet Paper or HP Premium Glossy Paper.
Types of Paper Sizes of Paper* Capacity
Plain Paper (20 to 32 lb)
Envelopes
Cards (40 to 60 lb)
HP Premium InkJet Paper
HP Premium Transparency Film
HP Bright White Paper
HP Premium Glossy Paper
HP Greeting Card Paper
Avery paper labels
U.S. letter = 8.5 x 11 in
U.S. legal = 8.5 x 14 in
U.S. executive = 7.25 x 10.5 in
A4 = 210 x 297 mm
A5 = 148 x 210 mm
B5 = 182 x 257 mm
U.S. #10 = 4.12 x 9.5 in
U.S. #9 = 3.88 x 8.88 in
DL = 110 x 220 mm
C6 = 114 x 162 mm
A2 = 111 x 146 mm
U.S. index cards = 4 x 6 in,
and 5 x 8 in
A6 = 105 x 148 mm
U.S. letter = 8.5 x 11 in
A4 = 210 x 297 mm
U.S. letter = 8.5 x 11 in 50 sheets
150 sheets
of 20 lb
10
50 sheets
100 sheets
150 sheets
50 sheets
50 sheets
25 sheets
* Refer to “Paper Margins (Printing)*” on page 8-3.
Loading tips
Most papers have a side that’s been conditioned for printing and a
side that’s not conditioned for printing. The so-called “print side” is
usually indicated on the paper’s packaging. Before loading, check
your paper’s packaging to determine which is the print side, and
always load with the print side facing toward you
6-2
.
Page 93

Loading plain and special papers
The paper
extension supports
the paper
Before loa ding paper, be sure to pull
●
up the
paper extension
at the back of
the paper tray.
Load paper with the print side facing
●
toward you.
HP Premium InkJet Paper:
The print side has no corner arrow.
HP Premium Glossy Paper:
The print side
should face you
during loading
OJ-14loadpa
Load with the glossy side facing you.
Avery paper labels:
Load with the labels faci ng you.
Loading letterhead paper
Load letterhead paper with the let-
●
terhead edge down and facing toward
you.
Loading a single envelope
To print on a single envelope, you can to use the single-envelope
●
slot, so you don’t have to remove any paper already lo aded in the
paper supply tray.
Load a single envelope as shown,
●
with the address side facing toward
you and the stamp edge down.
Change the paper size in the print
settings to the envelope size you
loaded. Refer to “Using the Paper tab
settings” on page 6-5.
6. Printing
6-3
Page 94

Loading multiple envelopes
Pull the document tray forward and
●
remove any p aper from the paper supply
tray.
Pinch and slide the
●
right paper guide
to the envelope position.
Load the stack of envelopes (up to
●
10) with the address side facing toward
you and the stamp e dge down. Align the
right edge of the stack with the right
paper guide.
Pinch and slide the
●
left paper guide
until it touches the le ft edge of the env elope stack.
Push the document tray backward
●
until it rests against the paper tray.
6-4
Loading transparencies
Load transparencies (up to 50) with
●
the adhesive-strip edge down and facing away from you, and the rough side
facing toward you. The arrows on the
adhesiv e stri p will be on the side of the
transparency that faces away fr om you.
Page 95

Using the Print Settings
Locating the print settings
Two of the ways you can locate the pri nt settings are describe d be low.
There are other ways to locate the print settings, but the paths
Note:
are specifi c to the Windows v ersi on you’re runnin g – Windows 3.1 or
Windows 95. Refer to your Windows documentation for instructions.
●
From within your Windows software programs.
method to make temporary (per job) changes to the settings.
Typically, you first select
menu of your software program, then select
each software program determines the path you need to take
through its menus a nd pri nter s et up dia log box in order to di splay
the print settings.
●
From the HP OfficeJet Manager.
factory (default) settings, which will be applied to all print jobs
until you change the setting. Double-click the
Manager
select
icon on your Windows desktop, then click
Print Settings
.
Print
or
Print Setup
Setup
Use this method to change th e
Use this
from the File
. However,
HP OfficeJet
and
Print
Using the Paper tab settings
Use the Paper tab to change the paper orientation, paper size, paper
type, sequence of the pages, and number of copies.
For detailed information about each setting, click the
the bottom of the dialog box, then click the
The Paper tab in
the Print Settings
Reference
Help
tab.
button at
6-5
6. Printing
Page 96

Using the Setup tab settings
Use the Setup tab to control the print quality, print speed, and
ColorSmart print settings. For detailed information about each
setting, click the
click the
The Setup tab in
the Print Settings
Reference
button at the bottom of the dialog box, then
Help
tab.
6-6
Print quality and speed
●
●
●
Normal
Choose
Choose
is the factory-set quality.
EconoFast
Best
for draft quality and the fastest speed.
for the highest quality output but slowest speed.
Printing in color
To print in color, be sure you have created color text or pictures
within your document, then make sure color p rinting is turned on in
your software program. Color printing is typically turned on as the
factory setting in your software program’s Print dialog box.
The HP OfficeJet is factory set to print in color. If you have changed
the settings, be sure the
and the
Print in Grayscale
the print settings.
Automatic ColorSmart
option is unselected in the Setup tab of
option is selected
Page 97

Printing in grayscale
If you want to economize on the use of the color print cartridge, or if
you want to print significantly faster, print draft copies of your color
documents in grayscale.
To print in grayscale, select the
●
Setup tab.
Print in Grayscale
option in the
Using the Advanced tab settings
Aligning or cleaning the print cartridges may solve some printing
problems. If the Help system recommends this corrective action for
your particular problem, click the appropriate button in the
Cartridge Maintenance
If you print from DOS programs that run under Windows, you may
need to change the
Advanced
For detailed information about each setting, click the
the bottom of the dialog box, then click the
Advanced tab in
the Print Settings
tab.
area in the
Paper Size
Advanced
or
Character Set
tab.
settings in the
Reference
Help
tab.
Print
button at
6-7
6. Printing
Page 98

Printing from Your Windows
Software Program
1
In your software program, select
software program’s Print dialog box displays.
2
Make sure the
printer , then selec t
file you want to print and the number of copies.
3
If necessary, change any of the other print settings (in the three
previously-described tabs:
clicking
Print dialog box or
menu. Changes made to these print settings will affect only the
current print job.
Instead of Print, Print Setup, or Page Setup, your program
Note:
may have another similarly-named option in the File menu.
4
Click
Print
HP OfficeJet Series 600 Printer
All, Current Page,
Paper, Setup,
Properties, Printer Setup, or Printer
Print, Print Setup,
to begin printing.
from the
Print
or the specif ic pa ges of t he
and
or
Page Setup
menu. The
File
is the selected
Advanced
in the program’s
) by
in the
File
6-8
Printing from the HP
OfficeJet Manager
1
If necessary, change any of the print settings (in the
Setup, and Advanced
described in “Locating the print settings” on page 6-5.
2
Double-click the
desktop.
3
Click
displays.
4
Select the file you want to pri nt and click th e
Print
and select
tabs) using either of the methods
HP OfficeJet Manager
from the menu. The Print dialog box
Print
icon on your Windows
Print
Paper,
button.
Page 99

Getting Help
-
............................................................................................................
ead this cha pter to learn how to answer any questions
7
many sources of helpful information, plus you’ll learn where to look up
more information about messages that are displ aye d, how to clear err or mes
sages, and where to find additional troubleshooting information.
Sources of Information and Help............................................ 7-2
Using the Help System........................................................... 7-5
Understanding the Messages Displayed on the Keypad .......... 7-6
Additional Problem Solving Tips .......................................... 7-21
Uninstalling the software .............................................. 7-21
Cleaning the scanner glass ............................................ 7-22
R
you may have while using your HP OfficeJet. You’ll find
7. Getting Help7. Getting Help
Page 100

Sources of Information and
Help
Follow these four steps if you encounter a problem:
1
Review this chapter and the Help system for problem solving
information.
The
way to solve most problems is to take the corrective
fastest
steps outlined in this chapter, or in the Help system.
If you’re not sure about the meaning of a displayed message, or
●
you want to know how to clear an error message, refer to
“Understanding the Me ssages Displ ayed on the K eypad” on page
7-6.
If you experience a problem while using the HP Of f iceJet, refer to
●
the
Troubleshooting
Help System” on page 7-5 to l ocate
Explore the
●
How Do I?
topics in the Help system. See “Using the
Troubleshooting
help topics.
topics in the Help system if you want
step-by-step instructions or maintenance information. (See
“Using the Help System” on page 7-5 to locate
How Do I?
topics.)
For additional problem-solving tips, try using the following
●
support services: HP’s online support, HP’s fax-back support, or
the HP support Web site. (To find out how to access these
services, refer to the table on the next page.)
2
Make sure you are operating your HP OfficeJet in the correct
environment.
The HP OfficeJet is not supported in the following situations:
help
7-2
Roll-over phone syst ems ( suc h as automatic answering systems),
●
voicemail, call waiting, and some other advanced features
provided by your phone company.
PC local area networks.
●
Windows NT.
●
Switch boxes.
●
External parallel-port peripheral connections, such as a Zip
●
drive. The HP OfficeJet must be connected
directly
to an LPT
port on your computer.
3
Gather some basic information if you plan to call HP for help.
™
 Loading...