

Page 1
OFFICEJET 150
User Guide
L511
Page 2

Page 3

HP Officejet 150 (L511)
Mobile All-in-One Printer
User Guide
Page 4

Copyright information
© 2013 Copyright Hewlett-Packard
Development Company, L.P.
Hewlett-Packard Company
notices
The information contained in this
document is subject to change without
notice.
All rights reserved. Reproduction,
adaptation, or translation of this
material is prohibited without prior
written permission of Hewlett-Packard,
except as allowed under copyright
laws.
The only warranties for HP products
and services are set forth in the
express warranty statements
accompanying such products and
services. Nothing herein should be
construed as constituting an additional
warranty. HP shall not be liable for
technical or editorial errors or
omissions contained herein.
Acknowledgements
Bluetooth is a trademark owned by its
proprietor and used by HewlettPackard Company under license.
ENERGY STAR® and the ENERGY
STAR® mark are registered U.S.
marks.
Microsoft, Windows, Windows XP,
Windows Vista, Windows Mobile,
Windows 7, and Windows 8 are U.S.
registered trademarks of Microsoft
Corporation.
Safety information
Always follow basic safety precautions
when using this product to reduce risk
of injury from fire or electric shock.
1. Read and understand all
instructions in the documentation that
comes with the device.
2. Observe all warnings and
instructions marked on the product.
3. Unplug this product from wall
outlets before cleaning.
4. Do not install or use this product
near water, or when you are wet.
5. Install the product securely on a
stable surface.
6. Install the product in a protected
location where no one can step on or
trip over the line cord, and the line
cord cannot be damaged.
7. If the product does not operate
normally, see
8. There are no user-serviceable parts
inside. Refer servicing to qualified
service personnel.
Solve a problem.
Page 5

Contents
1 Get started
Accessibility................................................................................................................................7
HP EcoSolutions (HP and the Environment)..............................................................................8
Understand the printer parts.......................................................................................................9
Front view.............................................................................................................................9
Printing supplies area.........................................................................................................10
Back and side view.............................................................................................................11
Bottom view........................................................................................................................11
Use the printer control panel....................................................................................................12
Overview of buttons and lights...........................................................................................12
Control-panel display icons................................................................................................13
Change printer mode and settings.....................................................................................14
Select the mode and change the mode settings..........................................................14
Change the printer settings..........................................................................................14
Find the printer model number.................................................................................................14
Select print media.....................................................................................................................14
Recommended papers for printing and copying.................................................................15
Recommended papers for photo printing...........................................................................16
Tips for selecting and using media.....................................................................................17
Load an original in the scanner................................................................................................17
Load media...............................................................................................................................18
Load standard-size media..................................................................................................19
Load envelopes..................................................................................................................21
Load cards and photo paper...............................................................................................22
Load custom-size media.....................................................................................................23
Install and use the battery........................................................................................................24
Battery safety......................................................................................................................24
Understand the battery.......................................................................................................25
Charge and use the battery................................................................................................25
Insert a memory device............................................................................................................26
Print from mobile phones..........................................................................................................28
Maintain the printer...................................................................................................................28
Clean the printer.................................................................................................................29
Turn off the printer....................................................................................................................29
2Print
Print documents........................................................................................................................31
Print documents (Windows)................................................................................................31
Print documents (Mac OS X)..............................................................................................32
Print brochures.........................................................................................................................32
Print brochures (Windows).................................................................................................32
Print brochures (Mac OS X)................................................................................................33
1
Page 6

Print on envelopes....................................................................................................................33
Print on envelopes (Windows)............................................................................................33
Print on envelopes (Mac OS X)..........................................................................................34
Print a Web page......................................................................................................................34
Print a Web page (Windows)..............................................................................................34
Print a Web page (Mac OS X)............................................................................................35
Print photos..............................................................................................................................35
Print photos on photo paper (Windows).............................................................................36
Print photos on photo paper (Mac OS X)...........................................................................36
Print photos from a memory device ...................................................................................37
Print on special and custom-size paper....................................................................................37
Print on special or custom-size paper (Mac OS X).............................................................37
Print borderless documents......................................................................................................38
Print borderless documents (Windows)..............................................................................39
Print borderless documents (Mac OS X)............................................................................39
Print on both sides (duplexing).................................................................................................40
To perform duplexing (Windows)........................................................................................40
To perform duplexing (Mac OS X)......................................................................................40
3Scan
Scan an original........................................................................................................................43
Scan to a computer............................................................................................................43
Scan to a memory device...................................................................................................44
Scanning documents as editable text.......................................................................................45
To scan documents as editable text...................................................................................45
Guidelines for scanning documents as editable text..........................................................46
4Copy
Copy documents.......................................................................................................................49
Change copy settings...............................................................................................................49
5 Work with ink cartridges
Information about ink cartridges...............................................................................................51
Check the estimated ink levels.................................................................................................52
Handle the ink cartridges..........................................................................................................52
Replace the ink cartridges........................................................................................................53
Print with a single ink cartridge.................................................................................................55
Store printing supplies..............................................................................................................55
Store ink cartridges.............................................................................................................55
Ink cartridge maintenance........................................................................................................55
Align the ink cartridges.......................................................................................................55
Calibrate color.....................................................................................................................56
Clean the ink cartridges......................................................................................................56
To clean ink cartridges automatically...........................................................................57
To clean ink cartridges manually..................................................................................57
2
Page 7

Contents
6 Solve a problem
HP support................................................................................................................................59
Obtain electronic support....................................................................................................59
HP support by phone..........................................................................................................60
Before you call..............................................................................................................60
Phone support period...................................................................................................60
Telephone support numbers.........................................................................................61
After the phone support period.....................................................................................63
General troubleshooting tips and resources.............................................................................63
Solve printing problems............................................................................................................64
The printer shuts down unexpectedly.................................................................................64
All printer lights are on or flashing......................................................................................64
The printer is not responding (nothing prints).....................................................................64
Printer does not accept ink cartridge..................................................................................65
Printer takes a long time to print.........................................................................................65
Blank or partial page printed...............................................................................................66
Something on the page is missing or incorrect...................................................................67
Placement of the text or graphics is wrong.........................................................................68
Poor print quality and unexpected printouts.............................................................................68
General tips........................................................................................................................69
Meaningless characters print..............................................................................................70
Ink is smearing....................................................................................................................70
Ink is not filling the text or graphics completely..................................................................71
Output is faded or dull colored............................................................................................71
Colors are printing as black and white................................................................................72
Wrong colors are printing...................................................................................................72
Printout shows bleeding colors...........................................................................................73
Colors do not line up correctly............................................................................................73
Printouts have streaks or lines...........................................................................................74
Advanced ink cartridge maintenance.......................................................................................74
Clean the ink cartridge contacts.........................................................................................75
Clean the area around the ink nozzles...............................................................................76
Replace the ink service module..........................................................................................77
Solve paper-feed problems......................................................................................................78
Media is not supported for the printer.................................................................................78
Media is not picked up........................................................................................................78
Media is not coming out correctly.......................................................................................78
Pages are skewing.............................................................................................................78
Multiple pages are being picked up....................................................................................79
Solve copy problems................................................................................................................79
No copy came out...............................................................................................................79
Copies are blank.................................................................................................................80
Documents are missing or faded........................................................................................80
Size is reduced...................................................................................................................80
Copy quality is poor ...........................................................................................................80
Copy defects are apparent.................................................................................................81
The printer prints half a page, then ejects the paper..........................................................81
Paper mismatch..................................................................................................................82
3
Page 8

Solve scan problems................................................................................................................82
Scanner did nothing............................................................................................................82
Scan takes too long............................................................................................................83
Part of the document did not scan or text is missing..........................................................83
Text cannot be edited.........................................................................................................83
Error messages appear......................................................................................................84
Scanned image quality is poor ..........................................................................................84
Scan defects are apparent.................................................................................................85
Troubleshoot installation issues...............................................................................................85
Hardware installation suggestions......................................................................................86
Software installation suggestions.......................................................................................86
Problems setting up Bluetooth communication........................................................................87
Check the Bluetooth settings..............................................................................................87
Check the Bluetooth signal.................................................................................................87
Understand the printer information pages................................................................................87
Print printer information pages...........................................................................................88
Clear jams.................................................................................................................................88
Clear a jam in the printer....................................................................................................88
Tips for avoiding jams.........................................................................................................91
A Technical information
Warranty information................................................................................................................93
Hewlett-Packard limited warranty statement......................................................................94
Ink cartridge warranty information......................................................................................95
Printer specifications................................................................................................................96
Physical specifications........................................................................................................96
Printer features and capacities...........................................................................................96
Processor and memory specifications................................................................................97
System requirements..........................................................................................................97
Memory device specifications.............................................................................................97
Mobile phone printing information......................................................................................98
Media specifications...........................................................................................................98
Understand specifications for supported media...........................................................98
Set minimum margins.................................................................................................100
Guidelines for two-sided (duplex) printing..................................................................101
Print resolution..................................................................................................................101
Copy specifications...........................................................................................................101
Scan specifications...........................................................................................................102
Operating environment.....................................................................................................102
Electrical requirements.....................................................................................................102
Acoustic emission specification........................................................................................102
4
Page 9

Contents
Regulatory information...........................................................................................................104
Regulatory model number................................................................................................104
FCC statement..................................................................................................................105
Notice to users in Korea...................................................................................................105
VCCI (Class B) compliance statement for users in Japan................................................105
Notice to users in Japan about the power cord................................................................106
Noise emission statement for Germany...........................................................................106
LED indicator statement...................................................................................................106
Gloss of housing of peripheral devices for Germany........................................................106
European Union Regulatory Notice..................................................................................106
Regulatory information for wireless products...................................................................107
Exposure to radio frequency radiation........................................................................108
Notice to users in Brazil..............................................................................................108
Notice to users in Canada..........................................................................................108
Notice to users in Taiwan...........................................................................................109
Environmental product stewardship program.........................................................................110
Paper use.........................................................................................................................110
Plastics.............................................................................................................................110
Material safety data sheets...............................................................................................110
Recycling program............................................................................................................110
HP inkjet supplies recycling program...............................................................................110
Disposal of waste equipment by users in private households in the European Union.....111
Power consumption..........................................................................................................112
Chemical Substances.......................................................................................................112
Battery information...........................................................................................................112
RoHS notices (China only)...............................................................................................113
RoHS notices (Ukraine only)............................................................................................113
Third-party licenses................................................................................................................114
HP Officejet 150 (L511) Mobile Printer.............................................................................114
B HP supplies and accessories
Order printing supplies online.................................................................................................117
Accessories............................................................................................................................117
Supplies..................................................................................................................................117
Ink cartridges....................................................................................................................117
HP media..........................................................................................................................118
C Set up the printer for Bluetooth communication
Set up a Bluetooth connection................................................................................................119
Set Bluetooth security for the printer......................................................................................120
Set the Bluetooth Security Level......................................................................................120
Set the printer to be visible or not visible to Bluetooth devices........................................120
Reset Bluetooth settings...................................................................................................121
D Printer management tools
Toolbox (Windows).................................................................................................................123
HP Utility (Mac OS X).............................................................................................................123
Toolbox software for PDAs (Microsoft Windows Mobile)........................................................123
Uninstall and reinstall the HP software...................................................................................123
Index............................................................................................................................................129
5
Page 10

6
Page 11

1 Get started
This guide provides details about how to use the printer and to resolve problems.
Accessibility
•
•
HP EcoSolutions (HP and the Environment)
Understand the printer parts
•
•
Use the printer control panel
Find the printer model number
•
•
Select print media
•
Load an original in the scanner
Load media
•
•
Install and use the battery
•
Insert a memory device
•
Print from mobile phones
Maintain the printer
•
•
Turn off the printer
Accessibility
The printer provides a number of features that make it accessible for people with
disabilities.
Visual
The HP software provided with the printer is accessible for users with visual
impairments or low vision by using the operating system's accessibility options and
features. The software also supports most assistive technology such as screen
readers, Braille readers, and voice-to-text applications. For users who are color blind,
colored buttons and tabs used in the HP software and on the printer control panel have
simple text or icon labels that convey the appropriate action.
Mobility
For users with mobility impairments, the HP software functions can be executed
through keyboard commands. The HP software also supports Microsoft® Windows®
accessibility options such as StickyKeys, ToggleKeys, FilterKeys, and MouseKeys. The
printer doors, buttons, input tray, and paper guides can be operated by users with
limited strength and reach.
Support
For more details about the accessibility of this printer and HP's commitment to product
accessibility, visit HP's Web site at
For accessibility information for Mac OS X, visit the Apple Web site at
accessibility.
www.hp.com/accessibility.
www.apple.com/
Get started 7
Page 12

Chapter 1
HP EcoSolutions (HP and the Environment)
Hewlett-Packard is committed to helping you optimize your environmental footprint and
empowering you to print responsibly—at home or in the office.
For more detailed information about environmental guidelines, HP follows during the
manufacturing process, see
information about HP's environmental initiatives, visit
Manage power
To conserve electricity and extend the length of time you can use the printer, the
printer comes with the following features:
• Sleep mode
Power usage is reduced while in Sleep mode. To configure sleep mode settings,
touch Power Meter on the printer's control panel display, touch Settings, touch
Sleep Mode, and then touch the desired option. After the printer has been
inactive for this period of time, the printer will go into a low-power mode.
• Auto-Off
When Auto Power-Off is enabled, the printer will automatically turn off when the
printer has been inactive for the configured period of time. To configure Auto
Power-Off settings, touch Power Meter on the printer's control panel display,
touch Settings, touch Auto-Off, and then touch the desired option.
In addition, try the following:
• Turn off Bluetooth when not in use. To turn off Bluetooth, touch Bluetooth on the
printer's control panel display, and then touch Turn Off.
• To maximize battery life and capacity, be sure to charge, use, and store the
battery in places that meet the recommended temperature guidelines. For more
information about using the battery, see
Optimize printing supplies
To optimize printing supplies such as ink and paper, try the following:
• Recycle used original HP ink cartridges through HP Planet Partners. For more
information, visit
• Optimize paper usage by printing on both sides of the paper. If the printer has an
HP automatic two-sided printing accessory (duplexer), see
(duplexing). Otherwise, you can first print just the odd pages, flip the pages over,
and then print just the even pages.
• Save ink and paper when printing web content with HP Smart Print. For more
information, visit
• Change the print mode to a draft setting. The draft setting uses less ink.
• Do not clean the printhead unnecessarily. Doing so wastes ink and shortens the
life of the cartridges.
Environmental product stewardship program. For more
www.hp.com/ecosolutions.
Install and use the battery.
www.hp.com/recycle.
www.hp.com/go/smartprint.
Print on both sides
8 Get started
Page 13
Understand the printer parts
This section contains the following topics:
•
Front view
Printing supplies area
•
•
Back and side view
Bottom view
•
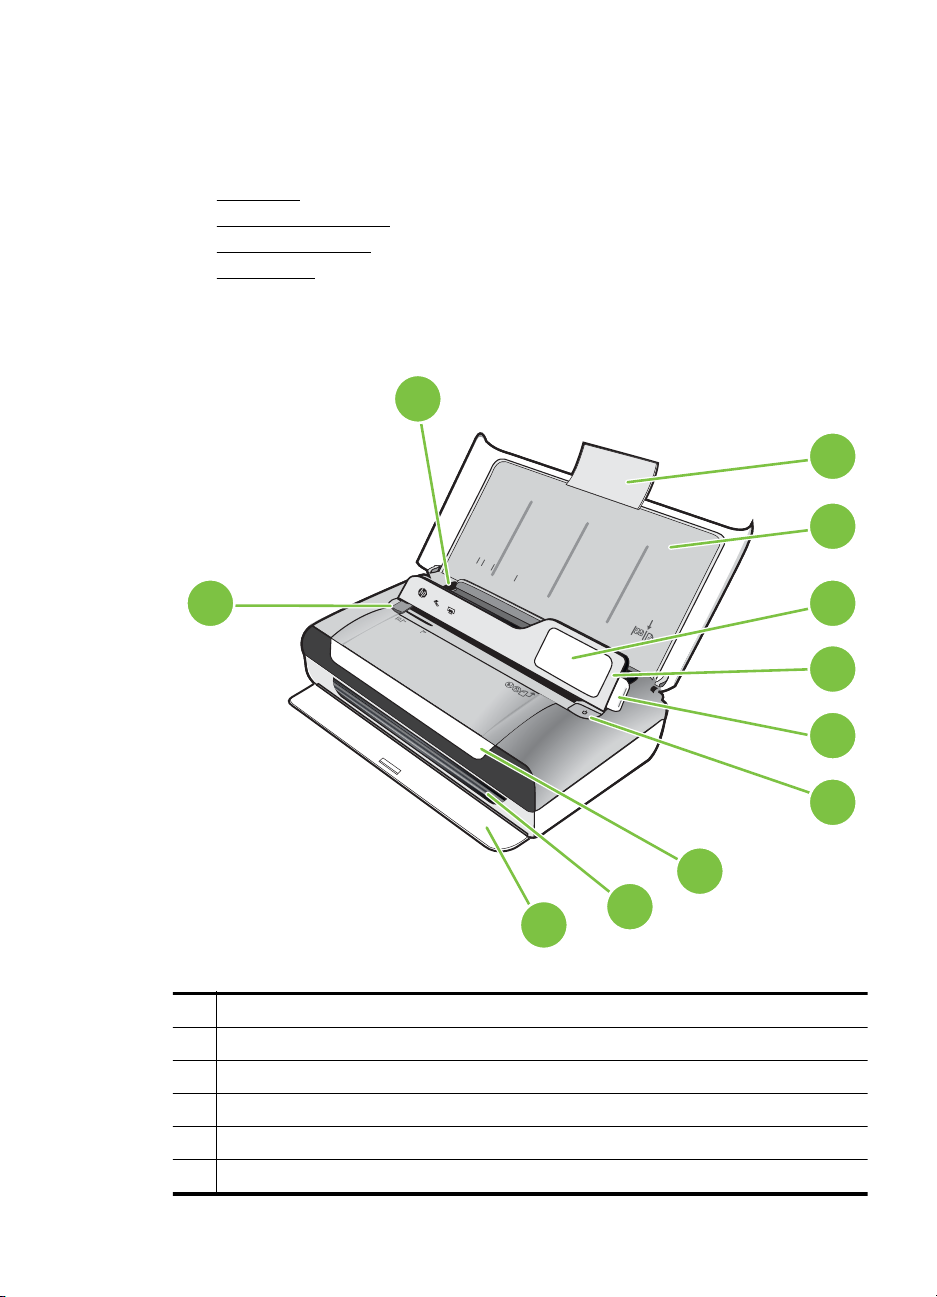
Front view
11
1
10
1 Input tray extension
2 Input tray
3 Narrow media guide
4 Control panel
5 Control panel latch
6 Power button
LTR
LGL
A
4
B
5
A
5
3
4
5
6
7
8
9
2
Understand the printer parts 9
Page 14
Chapter 1
(continued)
7 Cartridge access door
8 Output slot
9 Output door
10 Scanner media width guide
11 Media width guide
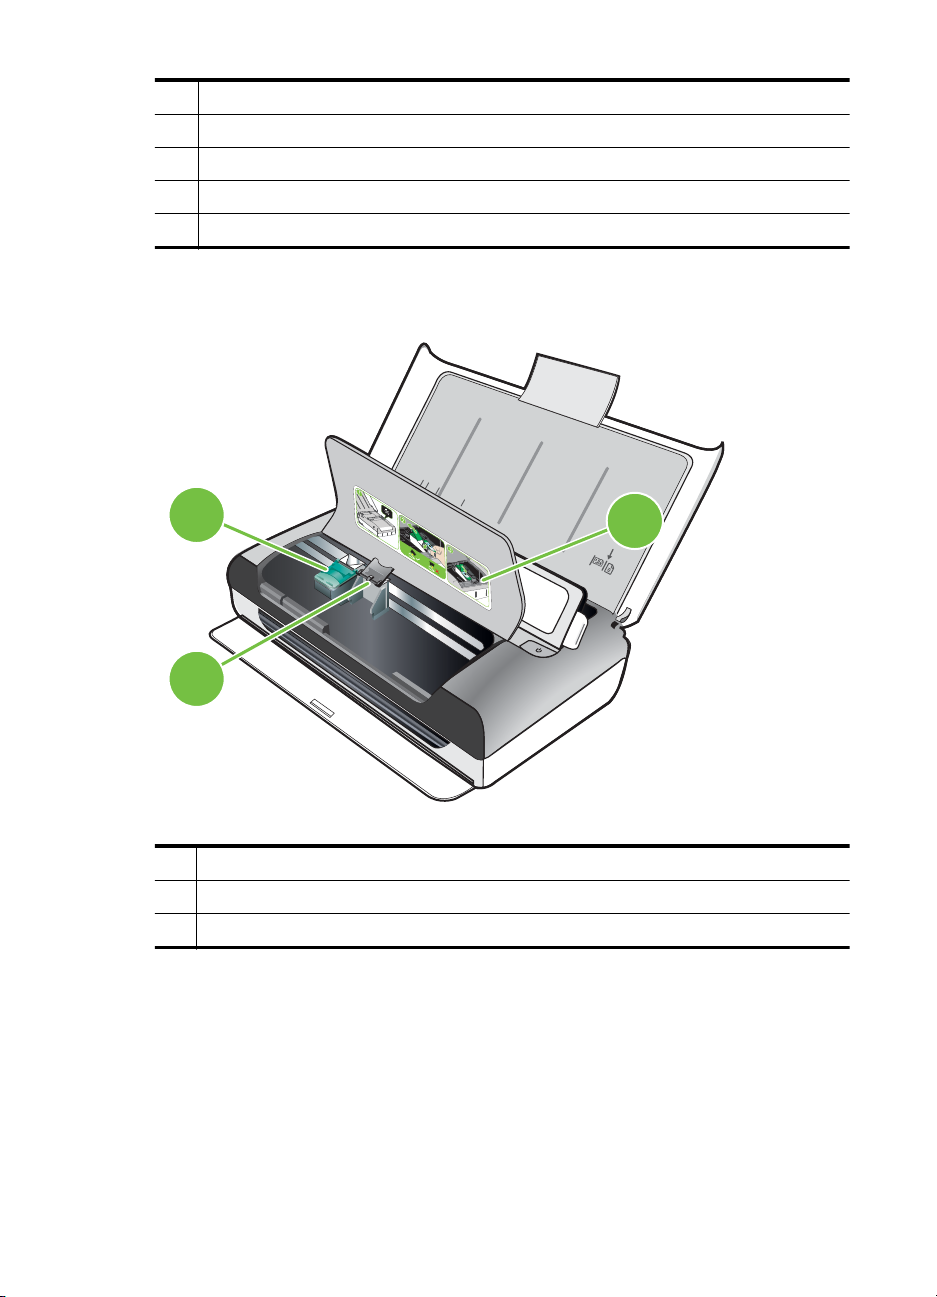
Printing supplies area
2
LTR
LGL
A4
B5
A5
1
3
1 Cartridge access door
2 Print cartridge latches
3 Print cartridge cradle compartments
10 Get started
Page 15
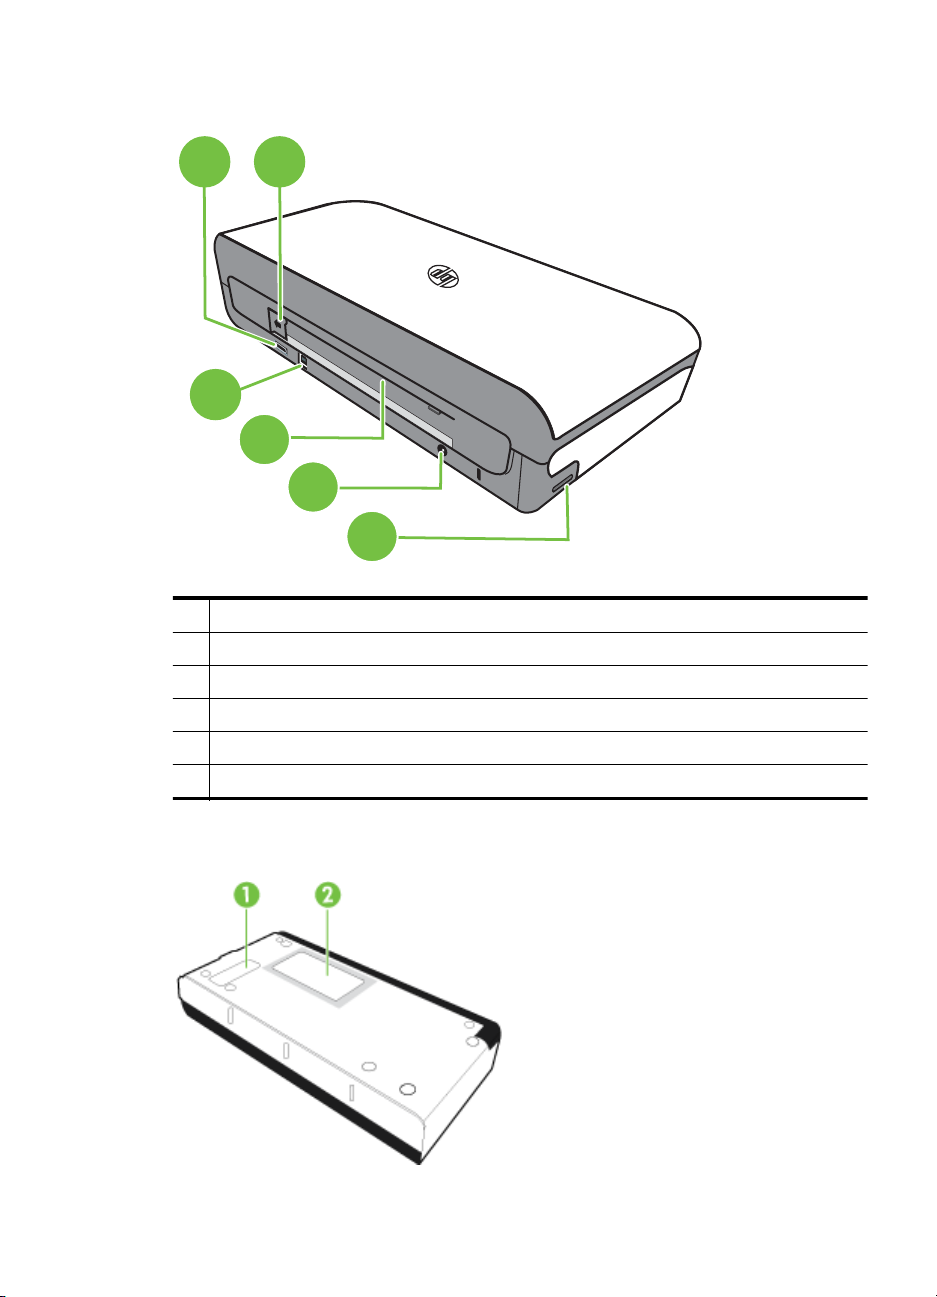
Back and side view
1
2
3
4
5
6
1 PictBridge Host USB port
2 Battery connector cover
3 Universal serial bus (USB) port
4Battery slot
5 Power input
6 Memory card slot
Bottom view
Understand the printer parts 11
Page 16
Chapter 1
1 Cover of replaceable ink service module
2 Card holder
Use the printer control panel
This section contains the following topics:
Overview of buttons and lights
•
•
Control-panel display icons
•
Change printer mode and settings
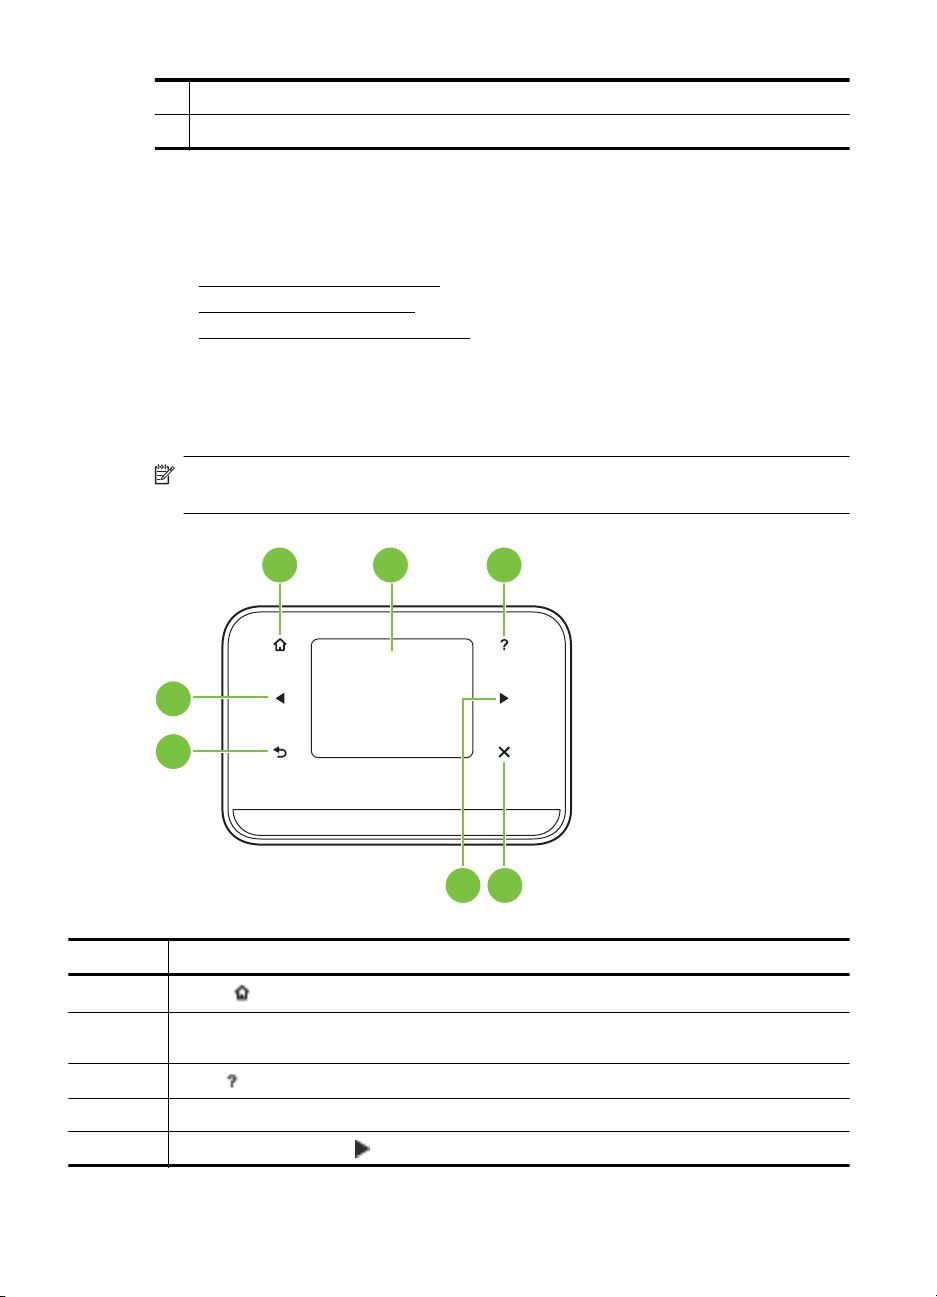
Overview of buttons and lights
The following diagram and related table provide a quick reference to the printer control
panel features.
NOTE: The buttons around the color display are available only if the action is
supported.
1 2 3
7
6
45
Label Name and Description
1
2 Color display: The color display is a touch sensitive (screen) user interface used to navigate
3
4 Cancel: Stops a job, exits a screen, or exits settings.
5 Right arrow (right arrow
12 Get started
Home (
and select the desired printer function.
Help (
): Touch this to return to the Home screen from any other screen.
): Touch the Help icon to open the Help screen.
): Navigates through settings in the screens.
Page 17
(continued)
Label Name and Description
6
7 Left arrow (left arrow
Back (
): Touch this to return to the previous screen.
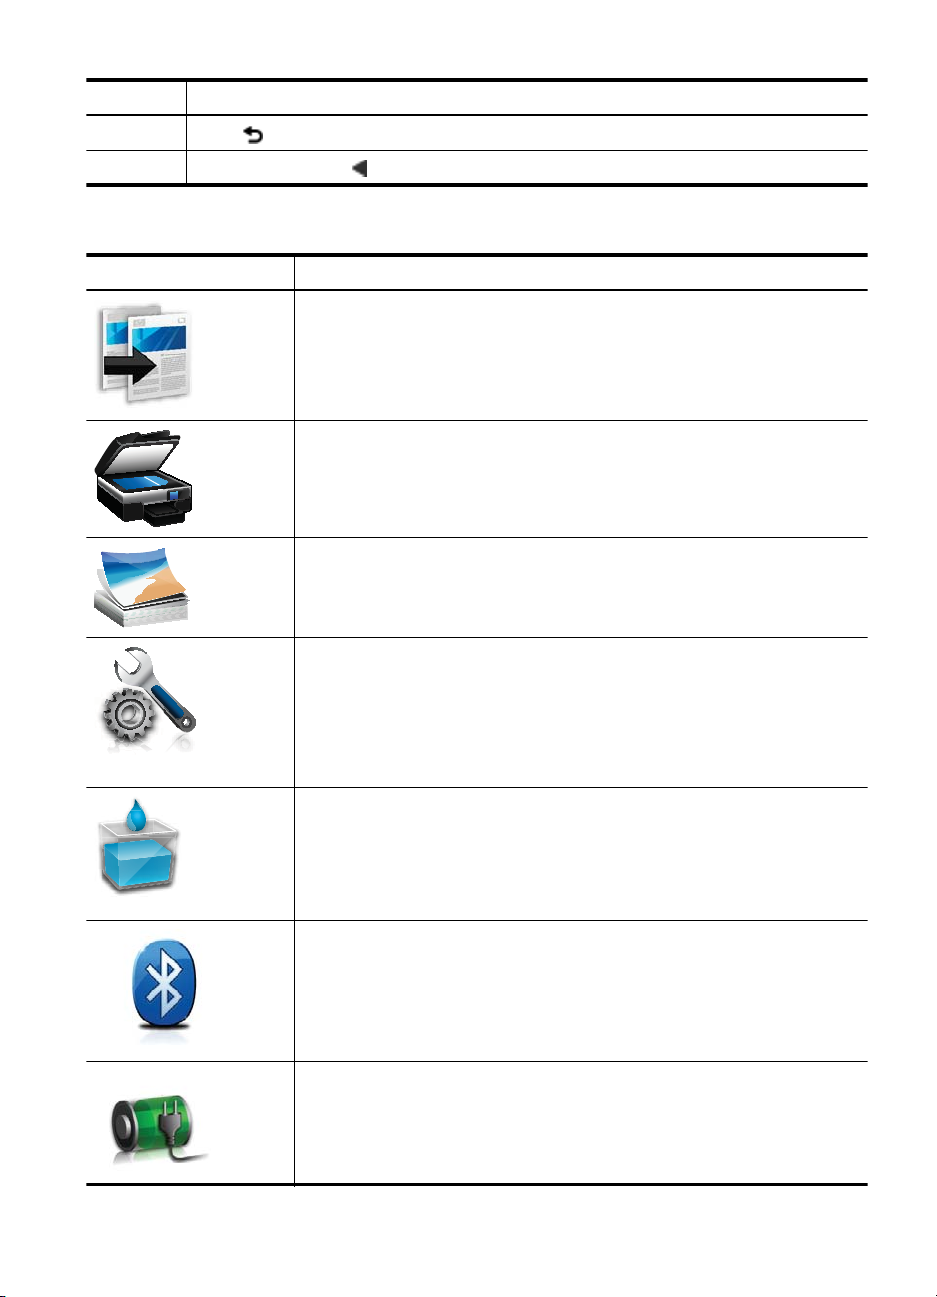
Control-panel display icons
Icon Purpose
Displays a screen where you can make copies or select other options.
Displays a screen where you can make a scan or change scan settings.
Displays a screen where you can adjust photo printing options.
Displays the Setup screen for generating reports and changing settings.
): Navigates through settings in the screens.
Displays a screen where you can see information about the ink cartridges,
including estimated fill levels.
NOTE: Ink level warnings and indicators provide estimates for planning
purposes only. When you receive a low-ink warning message, consider having
a replacement cartridge available to avoid possible printing delays. You do not
need to replace cartridges until print quality becomes unacceptable.
Displays the Bluetooth options and setup.
Displays the battery and power options.
Use the printer control panel 13
Page 18
Chapter 1
Change printer mode and settings
Use the control panel to change the printer mode (such as Copy or Scan) and settings
(such as the number of copies or the scan destination). Also, you can use the control
panel to print reports or get help for the printer.
TIP: You can use software programs provided with the printer to change printer
settings from a computer. For more information about these tools, see
management tools.
Select the mode and change the mode settings
The home screen of the control-panel display shows the available modes for the
printer.
1. To select a mode, touch the left arrow
modes, and then touch the icon to select the desired mode. To change the
settings for a mode, after selecting a mode, touch the arrow buttons to scroll
through the available modes settings, and then touch the setting you want to
change.
NOTE: Use the (Back) button to return to the previous menu.
2. Follow the prompts on the display to change the settings. The control-panel
display returns to the home screen when the job is finished.
Change the printer settings
To change the printer settings or print reports, use the options available in the Setup
screen:
1. Touch the right arrow
2. Touch the arrows to scroll through the screens.
3. Touch the screen items to select screens or options.
Printer
or the right arrow to see the available
, and then touch Setup.
NOTE: Use the (Back) button to return to the previous menu.
Find the printer model number
In addition to the model name that appears on the front of the printer, this printer has a
specific model number. You can use this number when obtaining support and to help
determine which supplies or accessories are available for the printer.
The model number is printed on a label inside the printer, near the ink cartridges area.
Select print media
The printer is designed to work well with most types of office media. It is best to test a
variety of print media types before buying large quantities. Use HP media for optimum
14 Get started
Page 19

print quality. Visit the HP Web site at www.hp.com for more information about HP
media.
HP recommends plain papers with the ColorLok logo for printing
and copying of everyday documents. All papers with the
ColorLok logo are independently tested to meet high standards
of reliability and print quality, and produce documents with crisp,
vivid color, bolder blacks and dry faster than ordinary plain
papers. Look for papers with the ColorLok logo in a variety of
weights and sizes from major paper manufacturers.
This section contains the following topics:
Recommended papers for printing and copying
•
•
Recommended papers for photo printing
Tips for selecting and using media
•
Recommended papers for printing and copying
If you want the best print quality, HP recommends using HP papers that are specifically
designed for the type of project you are printing.
Depending on your country/region, some of these papers might not be available.
HP Brochure Paper
HP Superior Inkjet
Paper
HP Bright White Inkjet
Paper
HP Printing Paper HP Printing Paper is a high-quality multifunction paper. It produces
HP Office Paper HP Office Paper is a high-quality multifunction paper. It is suitable for
HP Office Recycled
Paper
HP Premium
Presentation Paper
HP Professional Paper
HP Advanced Photo
Paper
These papers are glossy-coated or matte-coated on both sides for
two-sided use. They are the perfect choice for near-photographic
reproductions and business graphics for report covers, special
presentations, brochures, mailers, and calendars.
HP Bright White Inkjet Paper delivers high-contrast colors and sharp
text. It is opaque enough for two-sided color usage with no showthrough, which makes it ideal for newsletters, reports, and flyers. It
features ColorLok Technology for less smearing, bolder blacks and
vivid colors.
documents that look and feel more substantial than documents
printed on standard multipurpose or copy paper. It features ColorLok
Technology for less smearing, bolder blacks and vivid colors. It is
acid-free for longer lasting documents.
copies, drafts, memos and other everyday documents. It features
ColorLok Technology for less smearing, bolder blacks and vivid
colors. It is acid-free for longer lasting documents
HP Office Recycled Paper is a high-quality multifunction paper made
with 30% recycled fiber. It features ColorLok Technology for less
smearing, bolder blacks and vivid colors. It is acid-free for longer
lasting documents.
These papers are heavy two-sided matte papers perfect for
presentation, proposals, reports and newsletters. They are
heavyweight for an impressive look and feel.
This thick photo paper features an instant-dry finish for easy handling
without smudging. It resists water, smears, fingerprints, and humidity.
Your prints have a look and feel comparable to a store processed
Select print media 15
Page 20

Chapter 1
(continued)
photo. It is available in several sizes, including A4, 8.5 x 11 inch, 10 x
15 cm (4 x 6 inch), 13x18 cm (5 x7 inch) with a glossy finish. It is
acid-free for longer lasting documents.
HP Everyday Photo
Paper
Print colorful, everyday snapshots at a low cost, using paper
designed for casual photo printing. This affordable, photo paper dries
quickly for easy handling. Get sharp, crisp images when you use this
paper with any inkjet printer. Available in semi-gloss finish in 8.5 x11
inch, A4, 4 x 6 inch and 10 x 15 cm. It is acid-free for longer lasting
documents.
To order HP papers and other supplies, go to www.hp.com/buy/supplies. If prompted,
select your country/region, follow the prompts to select your printer, and then click one
of the shopping links on the page.
NOTE: At this time, some portions of the HP Web site are available in English
only.
Recommended papers for photo printing
If you want the best print quality, HP recommends using HP papers that are specifically
designed for the type of project you are printing.
Depending on your country/region, some of these papers might not be available.
HP Advanced Photo Paper
This thick photo paper features an instant-dry finish for easy handling without
smudging. It resists water, smears, fingerprints, and humidity. Your prints have a look
and feel comparable to a store processed photo. It is available in several sizes,
including A4, 8.5 x 11 inch, 10 x 15 cm (4 x 6 inch), 13 x 18 cm (5 x 7 inch) and two
finishes – glossy or soft gloss (satin matte). It is acid-free for longer lasting documents.
HP Everyday Photo Paper
Print colorful, everyday snapshots at a low cost, using paper designed for casual photo
printing. This affordable, photo paper dries quickly for easy handling. Get sharp, crisp
images when you use this paper with any inkjet printer. Available in semi-gloss finish in
8.5 x 11 inch, A4, 4 x 6 inch and 10 x 15 cm. It is acid-free for longer lasting
documents.
HP Photo Value Packs
HP Photo Value Packs conveniently package Original HP ink cartridges and HP
Advanced Photo Paper to save you time and take the guesswork out of printing
affordable professional photos with your HP printer. Original HP inks and HP Advanced
Photo Paper have been designed to work together so your photos are long lasting and
vivid, print after print. Great for printing out an entire vacation’s worth of photos or
multiple prints to share.
To order HP papers and other supplies, go to
select your country/region, follow the prompts to select your printer, and then click one
of the shopping links on the page.
NOTE: At this time, some portions of the HP Web site are available in English
only.
16 Get started
www.hp.com/buy/supplies. If prompted,
Page 21

Tips for selecting and using media
For the best results, observe the following guidelines.
• Always use media that conforms to the printer specifications. For more
information, see
• Load only one type of media at a time into the input tray.
• When loading the input tray or scanner, make sure the media is loaded correctly.
For more information, see
• Do not overload the input tray or scanner. For more information, see
specifications.
• To prevent jams, poor print quality, and other printing problems, avoid loading the
following media in the input tray or scanner:
◦ Multipart forms
◦ Media that is damaged, curled, or wrinkled
◦ Media with cutouts or perforations
◦ Media that is heavily textured, embossed, or does not accept ink well
◦ Media that is too lightweight or stretches easily
◦ Media that contains staples or clips
• Do not leave photo paper in the input tray for extended periods of time.
Media specifications.
Load media or Load an original in the scanner.
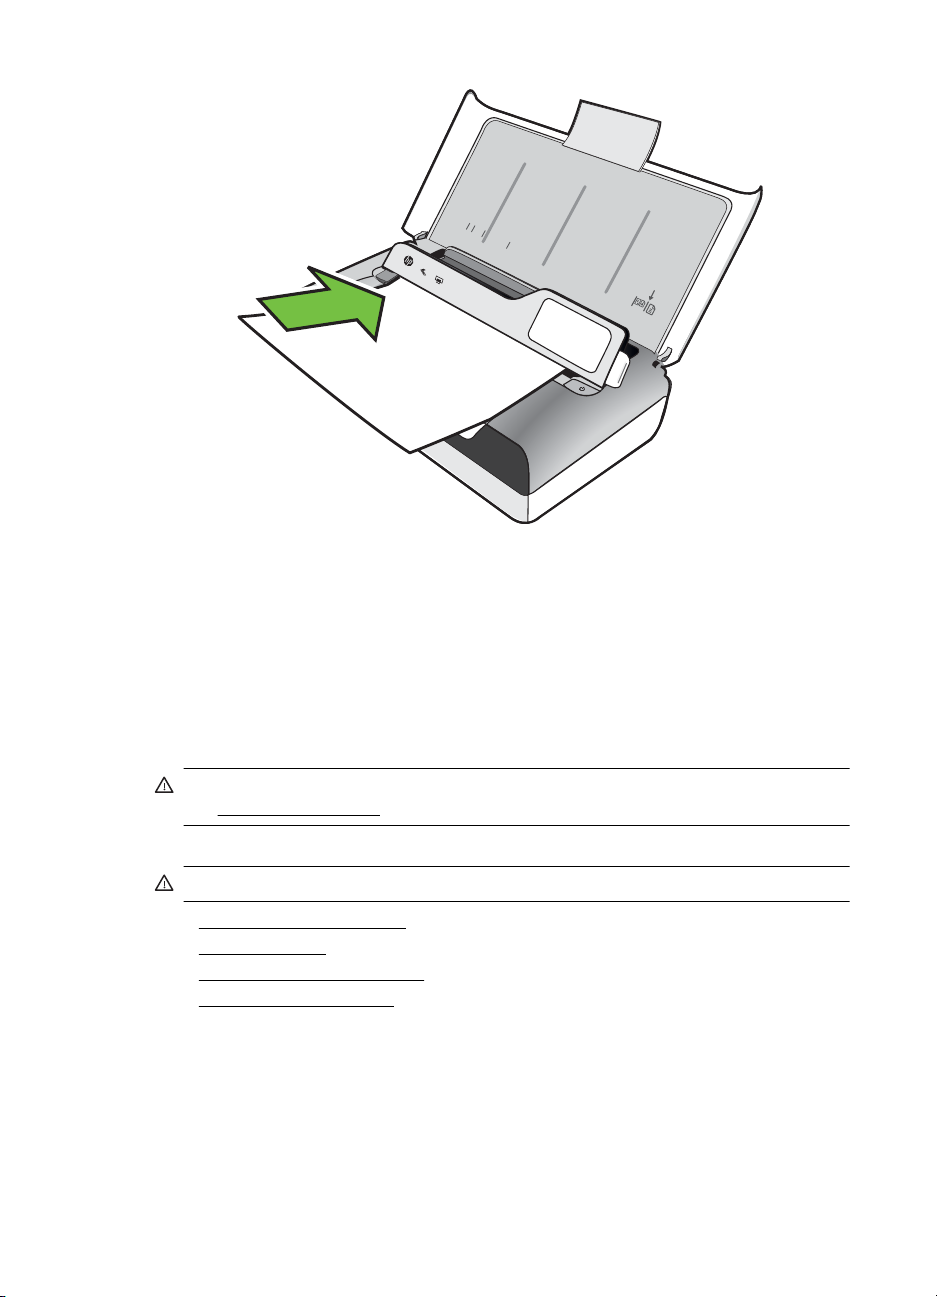
Load an original in the scanner
You can copy or scan documents by placing them in the scanner.
CAUTION: Do not load photos in the scanner; this might cause damage to the
photos. Use only media that is supported by the printer. For more information, see
Media specifications.
NOTE: The scanner can hold only 1 sheet of plain paper at a time. To scan
multiple pages, wait for the printer to finish scanning the page, and then load the
next page into the scanner.
Media
To load an original in the scanner
Use these steps to load a document in the scanner.
1. Insert the original, print-side down, into the scanner along the right edge, so that
the top edge of the original goes in first.
CAUTION: Only insert one page at a time into the scanner. Inserting more
than one page can cause jams and possibly damage your original.
Load an original in the scanner 17
Page 22
Chapter 1
LTR
L
A4
G
L
B
5
A5
2. Slide the original into the scanner until the scanner grips the page and you hear a
tone and see a message on the display indicating that the loaded page was
detected.
3. Slide the guide until it touches the edge of the original.
Load media
This section provides instructions for loading media into the printer.
CAUTION: Use only media that is supported by the printer. For more information,
see
This section contains the following topics:
CAUTION: Do not load media while the printer is printing.
• Load standard-size media
•
Load envelopes
Load cards and photo paper
•
•
Load custom-size media
18 Get started
Media specifications.
Page 23
Load standard-size media
To load media
Use these instructions to load standard media.
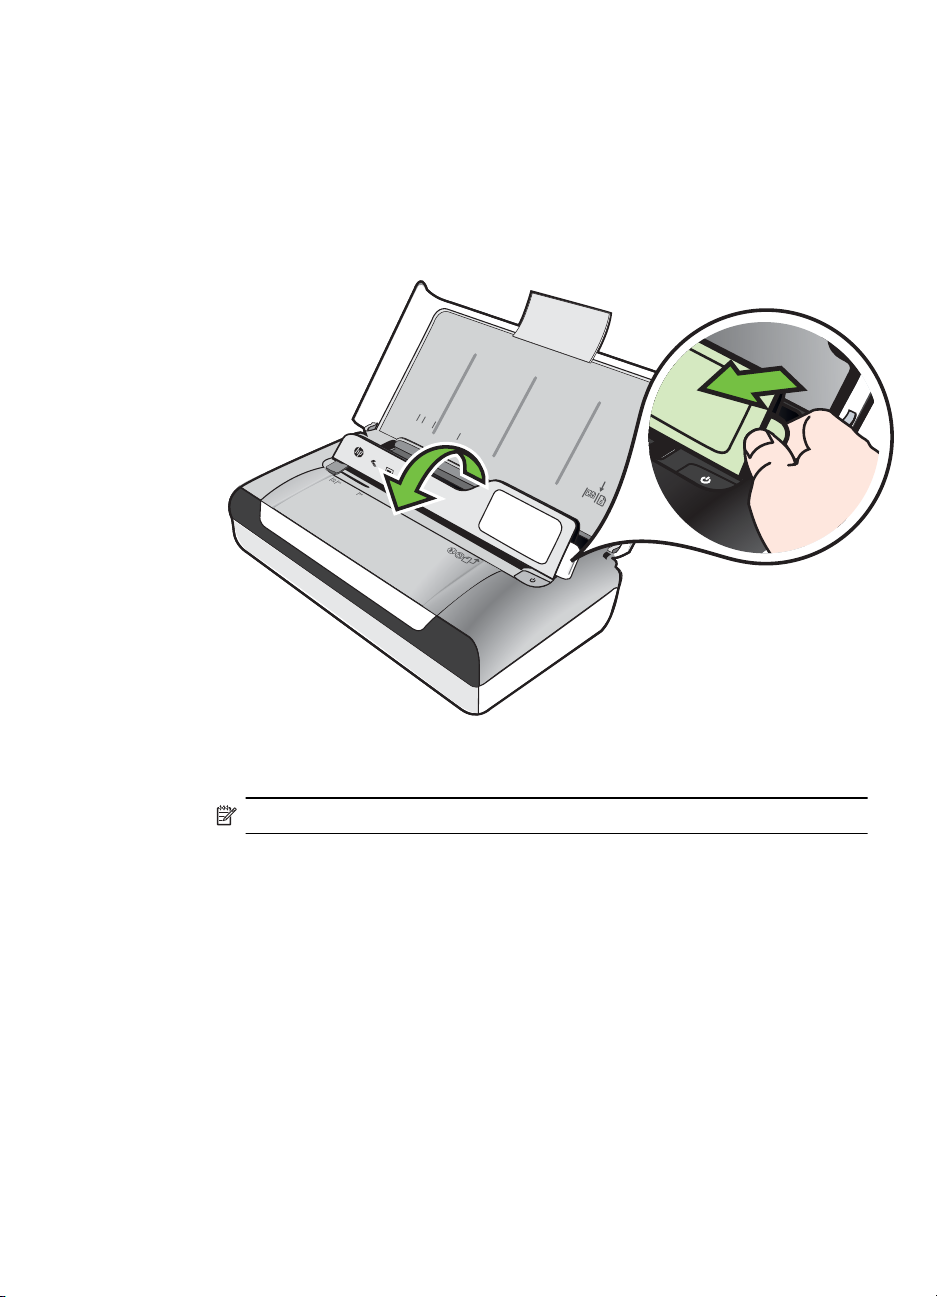
1. Lift the input tray.
2. Lift up the control panel using the control panel latch.
LTR
L
A4
G
L
B5
A
5
3. Slide the paper width guide out as far as possible.
NOTE: If you are loading larger-sized media, pull up the input tray extension.
Load media 19
Page 24
Chapter 1
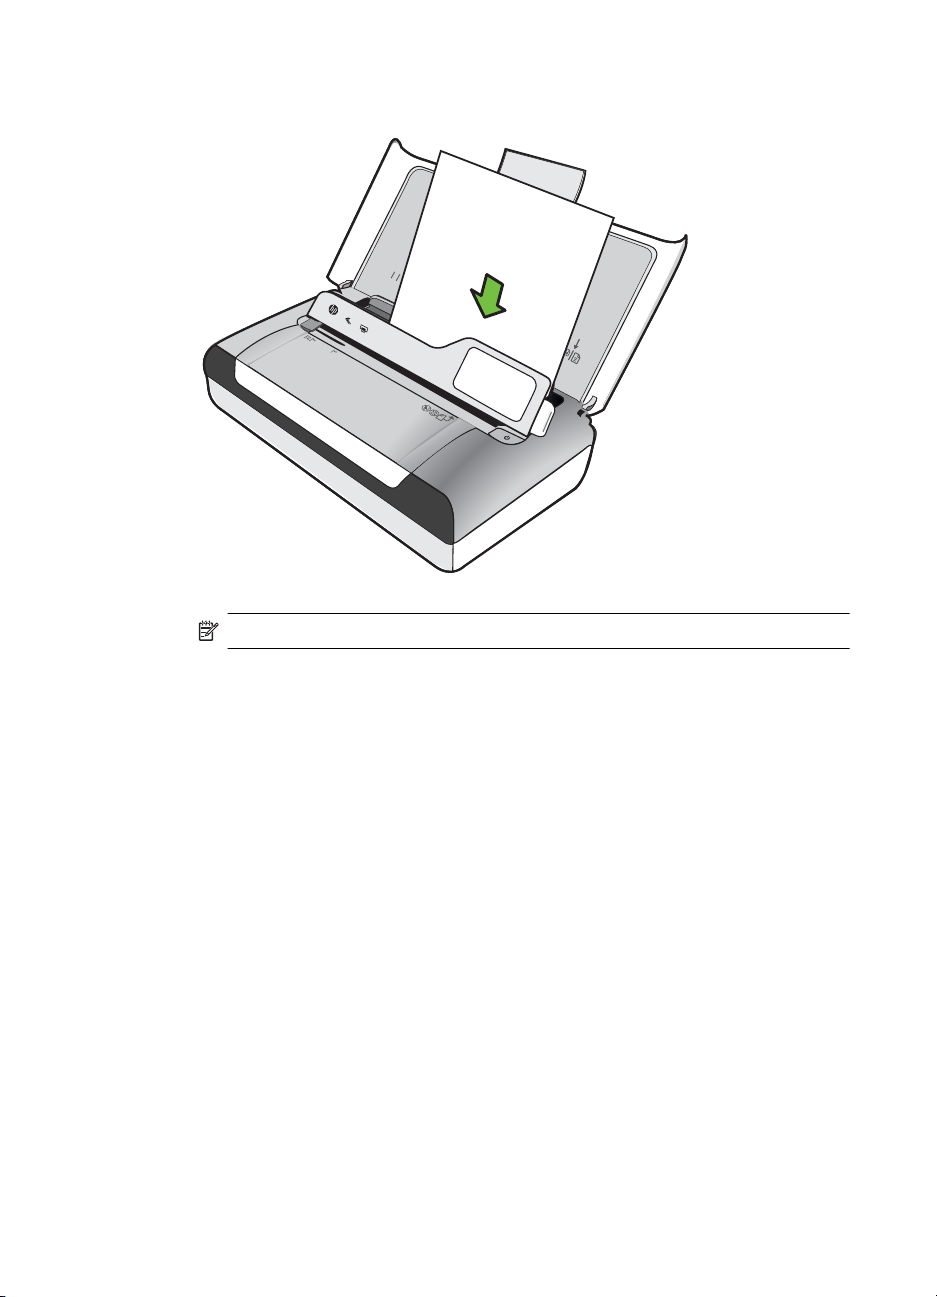
4. Insert the plain paper print-side up and align it squarely against the paper guide.
L
T
R
L
A
GL
4
B
5
A
5
NOTE: Do not load paper while the printer is printing.
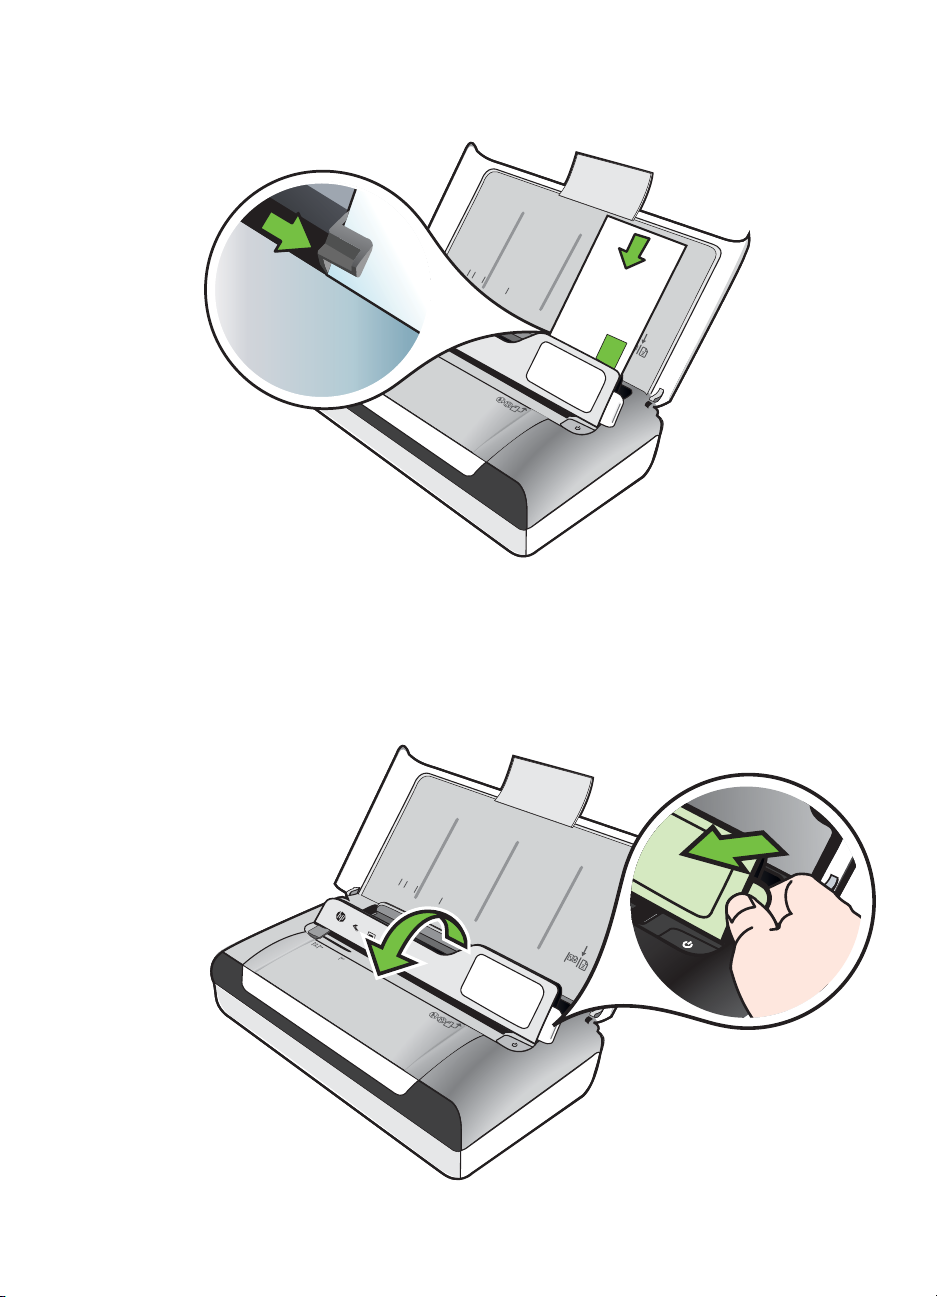
5. Adjust the paper width guide so it fits snugly against the sides of the paper.
20 Get started
Page 25

Load envelopes
To load envelopes
Use these instructions to load an envelope
1. Lift the input tray.
2. Lift up the control panel using the control panel latch.
LTR
L
A4
G
L
B5
A
5
3. Slide the paper width guide out as far as possible.
NOTE: If you are loading larger-sized media, pull up the input tray extension.
Load media 21
Page 26
Chapter 1
4. Load envelopes according to the graphic in the tray.
5. Adjust the width guide so it fits snugly against the sides of the envelope.
Load cards and photo paper
To load cards and photo paper
Use these instructions to load photo paper.
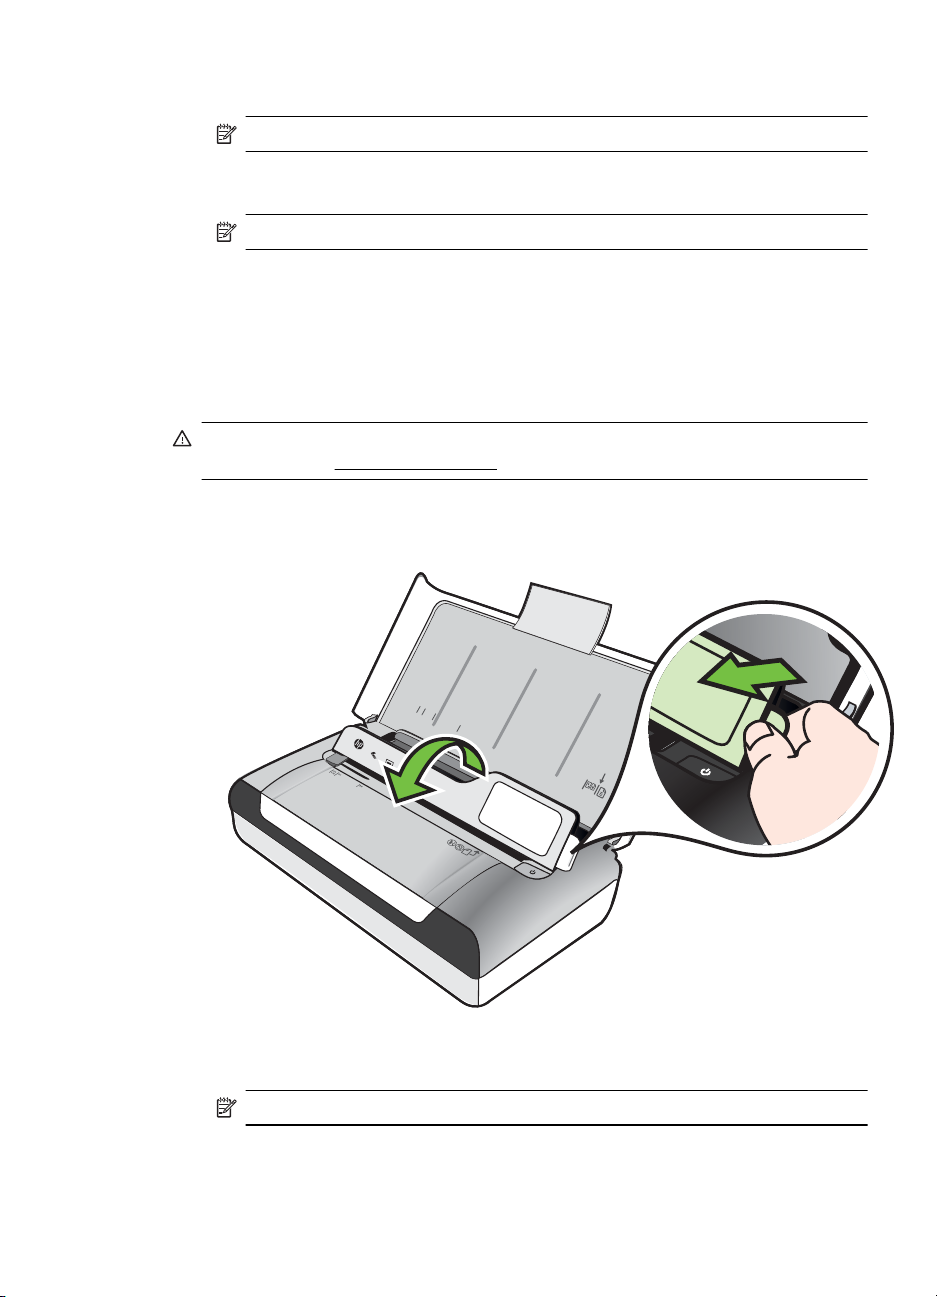
1. Lift the input tray.
2. Lift up the control panel using the control panel latch.
LTR
LGL
A4
B5
A5
22 Get started
L
T
R
L
A4
G
L
B5
A
5
Page 27
3. Slide the paper width guide out as far as possible.
NOTE: If you are loading larger-sized media, pull up the input tray extension.
4. Insert the media print-side up and align it squarely against the paper guide. If the
photo paper has a tab along one edge, make sure the tab is pointing up.
NOTE: Do not load paper while the printer is printing.
5. Adjust the paper width guide so it fits snugly against the sides of the paper.
Load custom-size media
To load cards and photo paper
Use these instructions to load custom-size media.
CAUTION: Use only custom-size media that is supported by the printer. For more
information, see
1. Lift the input tray.
2. Lift up the control panel using the control panel latch.
Media specifications.
LTR
L
A4
G
L
B5
A
5
3. Slide the paper width guide out as far as possible.
NOTE: If you are loading larger-sized media, pull up the input tray extension.
Load media 23
Page 28

Chapter 1
4. Insert the media print-side up and align it squarely against the paper guide.
NOTE: Do not load paper while the printer is printing.
5. Adjust the paper width guide so it fits snugly against the sides of the paper.
Install and use the battery
The printer comes with a lithium-ion rechargeable battery. It is also available for
purchase as an optional accessory. For more information, see
accessories.
This section contains the following topics:
Battery safety
•
•
Understand the battery
Charge and use the battery
•
Battery safety
• Use only the battery designed specifically for the printer. For more information,
see
HP supplies and accessories and Printer specifications.
• When discarding a battery, contact your local waste disposal provider regarding
local restrictions on the disposal or recycling of batteries. Though the lithium-ion
rechargeable battery is mercury-free, it might require recycling or proper disposal
at end-of-life. For more information, see
• The battery might explode if incorrectly replaced or disposed of in fire. Do not
short-circuit the battery.
• To purchase a replacement battery, contact your local dealer or HP sales office.
For more information, see
• To avoid risk of fire, burns, or damage to the battery, do not allow a metal object
to touch the battery contacts.
• Do not disassemble the battery. The battery has no serviceable parts inside.
• Handle a damaged or leaking battery with extreme care. If you come in contact
with the electrolyte, wash the exposed area with soap and water. If it contacts the
eye, flush the eye with water for 15 minutes and seek medical attention.
• Do not charge, store, or use the battery in places where the temperature exceeds
the limits specified in
Operating environment.
HP supplies and
Recycling program.
HP supplies and accessories.
Important notes
Take note of the following when charging or using the battery:
• Charge the battery for 4 hours before using the battery for the first time. For
• The battery charge light is amber when the battery is charging. If it is red, the
• To see battery status, touch Power Meter on the control-panel display. The
24 Get started
subsequent charges, it takes approximately 3 hours to fully charge the battery.
battery might be faulty and need to be replaced.
battery status is also displayed in Toolbox (Windows) and HP Utility (Mac OS X).
If you are using a Microsoft Windows Mobile® device, you can use the Toolbox
software for PDAs. For more information, see
Printer management tools.
Page 29
• If the battery is running low, either plug in the AC adapter to charge it or replace
the battery with one that is charged.
• A fully charged battery can print up to approximately 500 pages, scan up to
approximately 140 pages, or copy approximately 100 pages, depending on the
complexity of the jobs.
• By default, the printer goes into Sleep mode to conserve the battery if left idle for
5 minutes on battery power. You can configure this feature from the printer
control panel.
• Prior to long-term storage, fully charge the battery. Do not leave the battery in a
discharged (empty) state for more than 6 months.
• To maximize battery life and capacity, charge, store, and use the battery in
places that meet the guidelines specified in
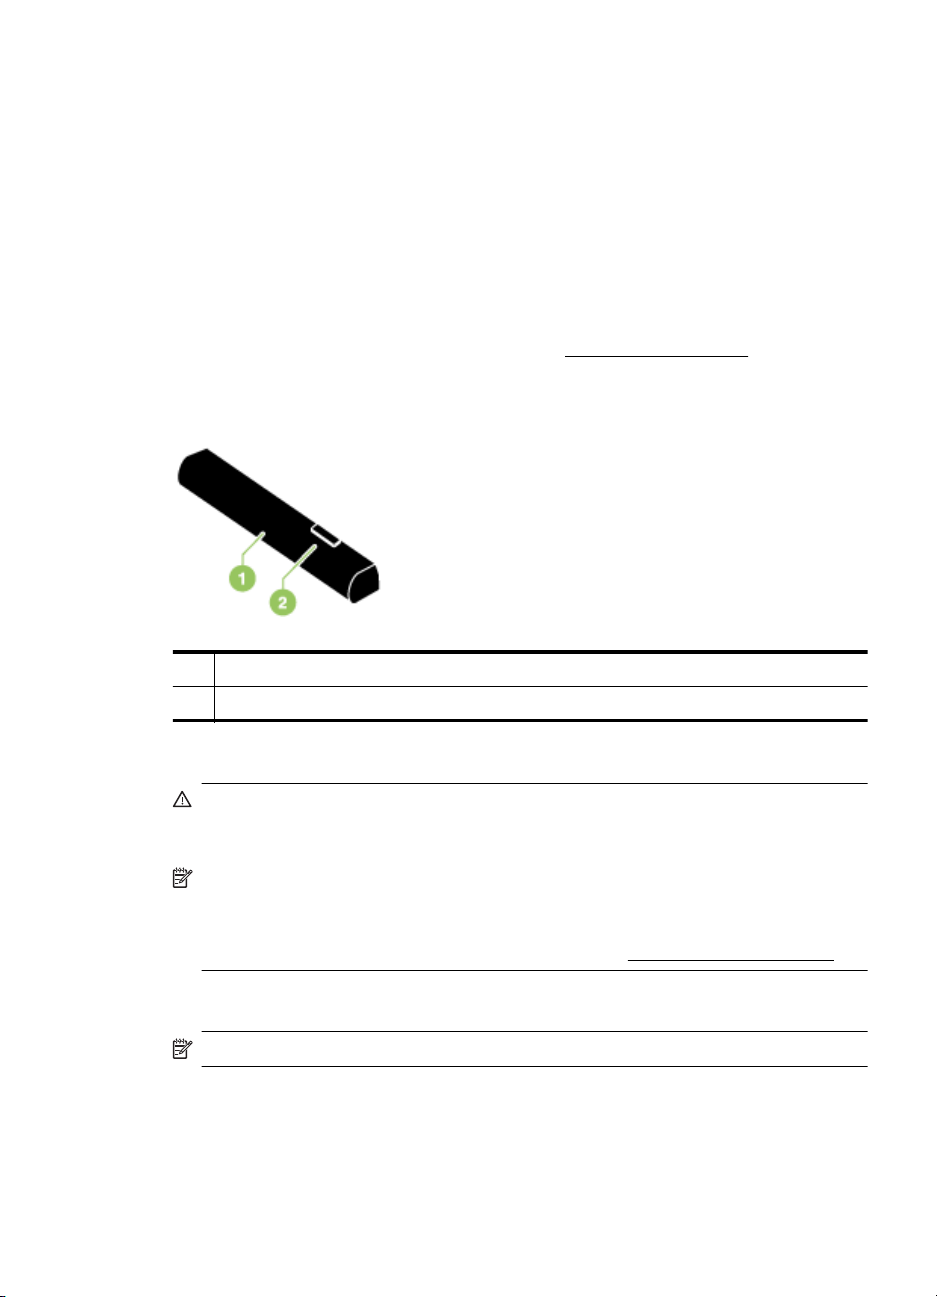
Understand the battery
1 Battery – Supplies power to the printer.
2 Battery release slider – Slides to release the battery.
Operating environment.
Charge and use the battery
WARNING! Charge the battery for 4 hours before using the battery for the first
time. Because the battery is normally warm while it is charging, do not charge it in a
briefcase or other confined space as this might cause the battery to overheat.
NOTE: The AC adapter is normally warm to the touch when plugged into an AC
outlet.
NOTE: Bluetooth printing uses more battery power than wired printing. For
information on checking the battery charge level, see
To install the battery
NOTE: You can install the battery with the printer turned on or off.
Install and use the battery.
Install and use the battery 25
Page 30

Chapter 1
1. Slide the battery into the battery slot at an angle, until the contacts on the battery
are flush with the contacts in the battery slot. The battery contact cover slides
open.
2. Push the battery into the battery slot until the battery clicks into place.
3. Plug in the AC adapter and turn on the printer. Allow the battery to charge for four
hours before using the battery for the first time.
4. After the battery is fully charged, you can use the printer without connecting to the
AC power supply.
To remove the battery
Follow these instructions to remove the battery.
1. Slide the battery release slider in the direction of the arrow.
2. Remove the battery.
Insert a memory device
If your digital camera uses a memory card to store photos, you can insert the memory
card into the printer to print or save your photos.
26 Get started
Page 31

Using the USB port on the back of the printer, you can connect a USB storage device,
or you can connect and print photos from a PictBridge-compatible camera. You can
also transfer files from the storage device to your computer.
CAUTION: Attempting to remove a memory device while it is being accessed can
damage files on the memory device. You can safely remove a memory card only
when the photo light is not blinking.
NOTE: The printer does not support encrypted memory devices.
For more information on the supported memory devices, see Memory device
specifications.
To insert a memory card
1. Turn the memory card so that the label faces up.
2. Insert the memory card into the memory card slot on the left side of the printer
until it snaps into place.
TIP: To remove a memory card, push in the card and then release it.
To connect a storage device
▲ Insert the USB storage device or the other end of the camera’s USB cable to the
USB port at the back of the printer.
Insert a memory device 27
Page 32

Chapter 1
NOTE: If you are connecting a digital camera, change the USB mode of the
camera to storage mode, and then connect one end of the USB cable to the
camera. Different cameras use different terms to describe the storage mode. For
instance, some cameras have a digital camera setting and a disk drive setting. In
this instance, the disk drive setting is the storage mode setting. If storage mode
does not work on your camera, you might need to upgrade the camera firmware.
For more information, see the documentation that came with the camera.
NOTE: If your USB device does not fit into this port due to size limitations, or if the
connector on the device is shorter than 11 mm (0.43 in), you will need to purchase
a USB extension cable in order to use your device with this port. For more
information on supported USB devices, see
Print from mobile phones
If you have a mobile phone that supports Bluetooth, you can purchase software that
allows you to print documents and photos from your phone.
NOTE: If you are using a mobile phone running Windows Mobile, you can use the
HP software CD to install the printing software.
For a list of mobile phones and printing software, as well as information about obtaining
the software, see
Mobile phone printing information.
Memory device specifications.
Maintain the printer
The printer does not require scheduled maintenance, except for replacing the ink
service module. For more information, see
attempt, however, to keep the printer free of dust and debris. This cleaning keeps the
printer in peak condition and might also make the diagnosis of problems easier.
WARNING! Turn off the printer and unplug the power cord before cleaning the
printer. If using the optional battery, turn off the printer and remove the battery
before cleaning.
This section covers the following topics:
Clean the printer
•
Replace the ink service module. You should
28 Get started
Page 33

Clean the printer
When you clean the printer, follow these guidelines:
• Clean the outside of the printer with a soft cloth moistened with mild detergent
and water.
NOTE: Clean the printer only with water or water mixed with a mild
detergent. Using other cleaners or alcohol can damage the printer.
• Clean the inside of the cartridge access door with a dry, lint-free cloth.
CAUTION: Be careful not to touch the rollers. Skin oils on the rollers can
cause print quality problems.
Turn off the printer
Turn off the printer by pressing (Power) located on the printer. Wait until the power
light turns off before unplugging the power cord or turning off a power strip. If you turn
off the printer incorrectly, the print carriage might not return to the correct position,
which might cause print quality issues or problems with the ink cartridges.
NOTE: Wait for the printer to completely shutdown before removing the power
cord from a surge protector or wall outlet, or removing the battery pack.
If you do not shut down the printer in this manner, the next time you start the printer, an
error message will show on the control panel display.
Turn off the printer 29
Page 34

Chapter 1
30 Get started
Page 35

2Print
Most print settings are automatically handled by the software application. Change the
settings manually only when you want to change print quality, print on specific types of
paper, change media size, or use special features. For more information about
selecting the best print media for your documents, see
This section contains the following topics:
Print documents
•
•
Print brochures
Print on envelopes
•
•
Print a Web page
•
Print photos
Print on special and custom-size paper
•
•
Print borderless documents
•
Print on both sides (duplexing)
Print documents
NOTE: With certain types of paper, you can print on both sides of a sheet of paper
(called “two-sided printing” or “duplex printing”). For more information, see
both sides (duplexing).
Follow the instructions for the operating system.
Print documents (Windows)
•
•
Print documents (Mac OS X)
Select print media.
Print on
Print documents (Windows)
1. Load paper in the tray. For more information, see Load media.
2. On the File menu in the software application, click Print.
3. Make sure the printer you want to use is selected.
4. To change settings, click the button that opens the Properties dialog box.
Depending on the software application, this button might be called Properties,
Options, Printer Setup, Printer, or Preferences.
5. Change the paper orientation on the Layout tab, and paper source, media type,
paper size, and quality settings on the Paper/Quality tab. To print in black and
white, click the Advanced button, and then change the Print in Grayscale
option.
6. Click OK.
7. Click Print or OK to begin printing.
Print 31
Page 36

Chapter 2
Print documents (Mac OS X)
1. Load paper in the tray. For more information, see Load media.
2. Select a paper size:
a.From the File menu in your software application, click Page Setup.
NOTE: If you do not see a Page Setup menu item, go to step 3.
b. Make sure the printer you want to use is selected in the Format For pop-up
menu.
c. Select the paper size from the Paper Size pop-up menu, and then click OK.
3. From the File menu in your software application, click Print.
4. Make sure the printer you want to use is selected.
5. Select the paper size from the Paper Size pop-up menu (if available).
6. Change the print settings for the option provided in the pop-up menus, as
appropriate for your project.
NOTE: If you do not see any options, click the disclosure triangle next to the
Printer pop-up menu or click Show Details.
7. Click Print to begin printing.
Print brochures
Follow the instructions for the operating system.
Print brochures (Windows)
•
Print brochures (Mac OS X)
•
Print brochures (Windows)
NOTE: To set print settings for all print jobs, make the changes in the HP software
provided with the printer. For more information on the HP software, see
management tools.
1. Load paper in the tray. For more information, see Load media.
2. On the File menu in the software application, click Print.
3. Select the printer you want to use.
4. To change settings, click the button that opens the Properties dialog box.
Depending on the software application, this button might be called Properties,
Options, Printer Setup, Printer, or Preferences.
5. Select a size from the Size drop-down menu. Select a brochure type from the
Paper Type drop-down menu.
6. Change any other print settings.
TIP: You can change more options for the print job by using the features
available on the other tabs in the dialog box.
7. Click Print to begin printing.
32 Print
Printer
Page 37

Print brochures (Mac OS X)
1. Load paper in the tray. For more information, see Load media.
2. Select a paper size:
a.From the File menu in your software application, click Page Setup.
NOTE: If you do not see a Page Setup menu item, go to step 3.
b. Make sure the printer you want to use is selected in the Format For pop-up
menu.
c. Select the paper size from the Paper Size pop-up menu, and then click OK.
3. From the File menu in your software application, click Print.
4. Make sure the printer you want to use is selected.
5. Select the paper size from the Paper Size pop-up menu (if available).
6. Click Paper Type/Quality from the pop-up menu, and then select the following
settings:
• Paper Type: The appropriate brochure paper type
• Quality: Normal or Best
NOTE: If you do not see any options, click the disclosure triangle next to the
Printer pop-up menu or click Show Details.
7. Select any other print settings that you want, and then click Print to begin
printing.
Print on envelopes
When you select envelopes, avoid envelopes that have a very slick finish, self-stick
adhesives, clasps, or windows. Also, avoid envelopes with thick, irregular, or curled
edges, or areas that are wrinkled, torn, or otherwise damaged.
Make sure the envelopes you load in the printer are tightly constructed and that the
folds are sharply creased.
NOTE: For more information about printing on envelopes, see the documentation
available with the software program you are using.
Follow the instructions for the operating system.
Print on envelopes (Windows)
•
•
Print on envelopes (Mac OS X)
Print on envelopes (Windows)
1. Load envelopes in the tray. For more information, see Load media.
2. On the File menu in the software application, click Print.
3. Select the printer you want to print to.
4. To change settings, click the button that opens the Properties dialog box.
Depending on the software application, this button might be called Properties,
Options, Printer Setup, Printer, or Preferences.
5. On the Features tab, change the orientation to Landscape.
Print on envelopes 33
Page 38

Chapter 2
6. In the Basic Options area, from the Size drop-down list, select More. Then,
select the appropriate envelope type.
TIP: You can change more options for the print job by using the features
available on the other tabs in the dialog box.
7. Click OK, and then click Print or OK to begin printing.
Print on envelopes (Mac OS X)
1. Load envelopes in the tray. For more information, see Load media.
2. Select a paper size:
a.From the File menu in your software application, click Page Setup.
NOTE: If you do not see a Page Setup menu item, go to step 3.
b. Make sure the printer you want to use is selected in the Format For pop-up
menu.
c. Select the appropriate envelope size from the Paper Size pop-up menu,
and then click OK.
3. From the File menu in your software application, click Print.
4. Make sure the printer you want to use is selected.
5. Select the appropriate envelope size in the Paper Size pop-up menu (if
available).
6. Select the Orientation option.
NOTE: If you do not see any options, click the disclosure triangle next to the
Printer pop-up menu or click Show Details.
7. Select any other print settings that you want, and then click Print to begin
printing.
Print a Web page
TIP: To print Web pages correctly, you might need to set the print orientation to
Landscape.
NOTE: With certain types of paper, you can print on both sides of a sheet of paper
(called “two-sided printing” or "duplex printing"). For more information, see
both sides (duplexing).
Follow the instructions for your operating system.
Print a Web page (Windows)
•
Print a Web page (Mac OS X)
•
Print a Web page (Windows)
If you are using a computer running Windows and Internet Explorer 6.0 or higher for
Web browsing, you can use HP Smart Web Printing to ensure simple, predictable Web
printing with control over what you want and how you want it printed. You can access
Print on
34 Print
Page 39

HP Smart Web Printing from the toolbar in Internet Explorer. For more information
about HP Smart Web Printing, see the help file provided with it.
1. Load paper in the tray. For more information, see
2. On the File menu in the software application, click Print.
3. Make sure the printer you want to use is selected.
4. If your Web browser supports it, select the items on the Web page that you want
to include in the printout.
For example, in Internet Explorer, click the Options tab to select options such as
As laid out on screen, Only the selected frame, and Print all linked
documents.
5. Click Print or OK to begin printing.
Print a Web page (Mac OS X)
1. Load paper in the tray. For more information, see Load media.
2. Select a paper size:
a.From the File menu in your software application, click Page Setup.
NOTE: If you do not see a Page Setup menu item, go to step 3.
b. Make sure the printer you want to use is selected in the Format For pop-up
menu.
c. Select the paper size from the Paper Size pop-up menu, and then click OK.
3. From the File menu in your software application, click Print.
4. Make sure the printer you want to use is selected.
5. Select the paper size from the Paper Size pop-up menu (if available).
6. Change the print settings for the option provided in the pop-up menus, as
appropriate for your project.
Load media.
7. Click Print to begin printing.
Print photos
Do not leave unused photo paper in the input tray. The paper might start to curl, which
could reduce the quality of the printout. Photo paper should be flat before printing.
Follow the instructions for the operating system.
Print photos on photo paper (Windows)
•
•
Print photos on photo paper (Mac OS X)
•
Print photos from a memory device
TIP: Some Web browsers include special options for printing Web pages. If
available, select the option for your Web browser from the pop-up menu. For
more information, see the documentation provided with your Web browser.
NOTE: If you do not see any options, click the disclosure triangle next to the
Printer pop-up menu or click Show Details.
Print photos 35
Page 40

Chapter 2
Print photos on photo paper (Windows)
1. Load paper in the tray. For more information, see Load media.
2. On the File menu in the software application, click Print.
3. Make sure the printer you want to use is selected.
4. To change settings, click the button that opens the Properties dialog box.
Depending on the software application, this button might be called Properties,
Options, Printer Setup, Printer, or Preferences.
5. If you want to print the photo in black and white, click the Features tab and then
change the Print in Grayscale option under Color Options.
6. Click OK, and then click Print or OK to begin printing.
Print photos on photo paper (Mac OS X)
1. Load paper in the tray. For more information, see Load media.
2. Select a paper size:
a.From the File menu in your software application, click Page Setup.
NOTE: If you do not see a Page Setup menu item, go to step 3.
b. Make sure the printer you want to use is selected in the Format For pop-up
menu.
c. Select the paper size from the Paper Size pop-up menu, and then click OK.
3. From the File menu in your software application, click Print.
4. Make sure the printer you want to use is selected.
5. Select the appropriate paper size from the Paper Size pop-up menu (if available).
6. Click Paper Type/Quality from the pop-up menu, and then select the following
settings:
• Paper Type: The appropriate photo paper type
• Quality: Best or Maximum dpi
36 Print
NOTE: If you do not see any options, click the disclosure triangle next to the
Printer pop-up menu or click Show Details.
7. If necessary, change the photo and color options:
a. Click the disclosure triangle beside Color Options and select the
appropriate Photo Fix options:
• Off: Applies no automatic adjustments to the image.
• Basic: Automatically focuses the image; moderately adjusts image
sharpness.
b. To print the photo in black and white, click Grayscale from the Color pop-
up menu, and then select one of the following options:
• High Quality: Uses all the available colors to print your photo in
grayscale. This creates smooth and natural shades of gray.
• Black Print Cartridge Only: Uses black ink to print your photo in
grayscale. The gray shading is created by varying patterns of black
dots, which might result in a grainy image.
8. Select any other print settings that you want, and then click Print to begin
printing.
Page 41

Print photos from a memory device
You can insert supported memory cards into the slot located on the left side of the
printer. In addition, you can connect a USB storage device (such as a keychain drive or
portable hard drive) to the USB port at the back of the printer. You can also connect a
digital camera in storage mode to the USB port at the back of the printer and print
photos directly from the camera.
For more information about using memory devices, see
CAUTION: Attempting to remove a memory device while it is being accessed can
damage files on the memory device. You can safely remove a memory card only
when the status light is not blinking.
To print selected photos
NOTE: This function is only available if the memory device does not contain
Digital Print Order Format (DPOF) content.
1. Insert your memory device into the appropriate slot on the printer. The Photo
screen appears on the control panel display.
2. Touch View & Print. The photos are displayed.
3. Follow the instructions on the control panel display to select, edit, or print the
photos.
Print on special and custom-size paper
If your application supports custom-size paper, set the size in the application before
printing the document. If not, set the size in the print driver. You might need to reformat
existing documents to print them correctly on custom-size paper.
Use only custom-size paper that is supported by the printer. For more information, see
Media specifications.
Insert a memory device.
NOTE: Defining custom-size media sizes is only available in the HP printing
software in Mac OS X.
Follow the instructions for your operating system.
Print on special or custom-size paper (Mac OS X)
•
Print on special or custom-size paper (Mac OS X)
NOTE: Before you can print on custom-size paper, you must set up the custom
size in the HP software provided with the printer. For instructions, see
custom sizes (Mac OS X).
Print on special and custom-size paper 37
Set up
Page 42

Chapter 2
1. Load the appropriate paper in the tray. For more information, see Load media.
2. Select a paper size:
a.From the File menu in your software application, click Page Setup.
NOTE: If you do not see a Page Setup menu item, go to step 3.
b. Make sure the printer you want to use is selected in the Format For pop-up
menu.
c. Select the paper size from the Paper Size pop-up menu, and then click OK.
3. From the File menu in your software application, click Print.
4. Make sure the printer you want to use is selected.
5. Select the appropriate paper size from the Paper Size pop-up menu (if available).
6. Click Paper Handling from the pop-up menu.
7. Under Destination Paper Size, click Scale to fit paper size, and then select the
custom size.
8. Select any other print settings that you want, and then click Print to begin
printing.
Set up custom sizes (Mac OS X)
1. Load paper in the tray. For more information, see Load media.
2. From the File menu in your software application, click Page Setup, and then
make sure the printer you want to use is selected in the Format For pop-up
menu.
- OR From the File menu in your software application, click Print, and then make sure
the printer you want to use is selected.
3. Select Manage Custom Sizes in the Paper Size pop-up menu.
NOTE: If you do not see any options, click the disclosure triangle next to the
Printer pop-up menu or click Show Details.
4. Click the + on the left side of the screen, double-click Untitled, and type a name
for the new, custom size.
5. In the Width and Height boxes, type the dimensions, and then set the margins, if
you want to customize them.
6. Click OK.
Print borderless documents
Borderless printing lets you print to the edges of certain photo media types and a range
of standard media sizes up to 4 x 6 inches (102 x 152 mm).
NOTE: You cannot print a borderless document if the paper type is set to Plain
paper.
NOTE: Before printing a borderless document, open the file in a software
application and assign the image size. Make sure the size corresponds to the
media size on which you are printing the image.
38 Print
Page 43

NOTE: Not all applications support borderless printing.
Follow the instructions for the operating system.
Print borderless documents (Windows)
•
•
Print borderless documents (Mac OS X)
Print borderless documents (Windows)
1. Load paper in the tray. For more information, see Load media.
2. On the File menu in the software application, click Print.
3. Select the printer you want to print to.
4. To change settings, click the button that opens the Properties dialog box.
Depending on the software application, this button might be called Properties,
Options, Printer Setup, Printer, or Preferences.
5. Click the Features tab.
6. In the Size list, click More, and then select the borderless size loaded in the tray.
If a borderless image can be printed on the specified size, the Borderless check
box is selected.
7. In the Paper type drop-down list, click More, and then select the appropriate
paper type.
8. Select the Borderless check box if it is not already checked.
If the borderless paper size and paper type are not compatible, the printer
software displays an alert and allows you to select a different type or size.
9. Click OK, and then click Print or OK to begin printing.
Print borderless documents (Mac OS X)
1. Load paper in the tray. For more information, see Load media.
2. Select a borderless paper size:
a.From the File menu in your software application, click Page Setup.
NOTE: If you do not see a Page Setup menu item, go to step 3.
b. Make sure the printer you want to use is selected in the Format For pop-up
menu.
c. Select an available borderless paper size from the Paper Size pop-up
menu, and then click OK.
3. From the File menu in your software application, click Print.
4. Make sure the printer you want to use is selected.
5. Select the paper size from the Paper Size pop-up menu (if available).
6. Click Paper Type/Quality from the pop-up menu, and then select the following
settings:
• Paper Type: The appropriate paper type
• Quality: Best or Maximum dpi
NOTE: If you do not see any options, click the disclosure triangle next to the
Printer pop-up menu or click Show Details.
7. Make sure the Print Borderless check box is selected.
Print borderless documents 39
Page 44

Chapter 2
8. If necessary, click the disclosure triangle beside Color Options and select the
appropriate Photo Fix options:
• Off: Applies no automatic adjustments to the image.
• Basic: Automatically focuses the image; moderately adjusts image
sharpness.
9. Select any other print settings that you want, and then click Print to begin
printing.
Print on both sides (duplexing)
You can print on both sides manually using the Windows printer software.
You can print on both sides of a sheet using a Macintosh computer by first printing the
odd-numbered pages, turning the pages over, and then printing the even-numbered
pages.
To perform duplexing (Windows)
•
•
To perform duplexing (Mac OS X)
To perform duplexing (Windows)
1. Load the appropriate media. See Guidelines for two-sided (duplex) printing and
Load media.
2. With a document open, on the File menu, click Print, and then click Properties.
3. Click the Features tab.
4. Select Manually from the two-sided printing drop-down list.
5. To automatically resize each page to match the document's onscreen layout,
ensure Preserve Layout is selected. Clearing this option might result in
unwanted page breaks.
6. Select or clear the Flip Pages Up check box to match the way you want the
binding. See the graphics in the print driver for examples.
7. Change any other desired settings and click OK.
8. Print the document.
9. After the first side of the document is printed, follow the onscreen instructions and
reload the paper into the tray to complete printing.
10. After reloading the paper, click Continue in the onscreen instructions to continue
the print job.
To perform duplexing (Mac OS X)
1. Load the appropriate media. For more information, see Guidelines for two-sided
(duplex) printing and Load media.
2. Select a paper size:
a.From the File menu in your software application, click Page Setup.
NOTE: If you do not see a Page Setup menu item, go to step 3.
b. Make sure the printer you want to use is selected in the Format For pop-up
menu.
c. Select the paper size from the Paper Size pop-up menu, and then click OK.
40 Print
Page 45

3. From the File menu in your software application, click Print.
4. Make sure the printer you want to use is selected.
5. Select the paper size from the Paper Size pop-up menu (if available).
6. Click the Paper Handling pop-up menu, select Odd Only in the Pages to Print
pop-up menu, and then click Print .
NOTE: If you do not see any options, click the disclosure triangle next to the
Printer pop-up menu or click Show Details.
7. Flip the paper over and then print the even-numbered pages.
Print on both sides (duplexing) 41
Page 46

Chapter 2
42 Print
Page 47

3 Scan
You can use the printer’s control panel to scan documents and other originals and
send them to a variety of destinations, such as a folder on a computer. You can also
scan these originals from your computer using either the HP software provided with the
printer or TWAIN-compliant or WIA-compliant programs.
You can use the HP software on your computer to convert the text in scanned
documents into a format that you can search, copy, paste, and edit.
NOTE: Some scan functions are only available after you install the HP software.
NOTE: Scan functions are supported only through a USB connection. Scan
functions are not available through a Bluetooth connection.
NOTE: For better scan quality, use color scan and avoid scanning under direct
sunlight or intense light.
This section contains the following topics:
Scan an original
•
•
Scanning documents as editable text
Scan an original
NOTE: Your printer and computer must be connected and turned on.
NOTE: If you are scanning an original from the printer control panel or from your
computer using a the HP printer software, the HP software provided with the printer
must also be installed and running on your computer prior to scanning.
This section contains the following topics:
Scan to a computer
•
•
Scan to a memory device
Scan to a computer
NOTE: Before scanning to a computer, install the HP software and make sure the
printer is connected to the computer with a USB cable.
NOTE: To scan using HP Scan application or TWAIN compliant software, full HP
software needs to be installed.
Scan 43
Page 48

Chapter 3
To scan an original to a computer from the printer control panel
Use these steps to scan from the control panel.
1. Insert the original in the scanner. For more information, see
Load an original in
the scanner.
2. Touch Scan, and then select Scan To computer.
NOTE: If you are using a computer running Mac OS X, make sure you quit
the HP Scan application before scanning from the printer control panel.
3. Touch the type of document you want to save.
4. Touch Start Scan.
To scan an original from HP printer software
1. Insert the original in the scanner. For more information, see
Load an original in
the scanner.
2. On the computer, open the HP scanning software:
• Windows: From the computer desktop, click Start, select Programs or All
Programs, select the folder for your HP printer, select HP Scan, and then
select the scan shortcut you want to use.
• Mac OS X: Double-click the HP Scan 3 icon. This icon is located in the
Hewlett-Packard folder in the Applications folder at the top level of the
hard disk.
TIP: To scan and send documents as email attachments on a computer
running Windows, select Attach to E-mail from the Scan Shortcuts list, and
then follow any onscreen instructions. Also, be sure you have already set up a
valid e-mail account.
3. To start the scan, click Scan.
NOTE: For more information, see the online Help provided with the scanning
software.
NOTE: Use the HP software to scan documents into editable text, a format
that allows you to search, copy, paste, and edit within the scanned document.
Use this format to edit letters, newspaper clippings, and many other
documents. For more information, see
Scan to a memory device
NOTE: To scan to a memory device, you do not need to install the HP software or
connect the printer to a computer.
To scan an original to a memory device from the printer control panel
Use these steps to scan an original to a memory device.
1. Insert your original print-side down in the scanner. For more information, see
Load an original in the scanner.
2. Insert a memory device. For more information, see
3. Touch Scan, and then touch Memory Card or USB Drive.
44 Scan
Scanning documents as editable text.
Insert a memory device.
Page 49

4. Touch Document Type to select the type of document you want to save. Make
changes to scan options, if needed.
Touch Resolution if you want to change the output quality.
5. Touch Start Scan.
Scanning documents as editable text
When scanning documents, you can use the HP software to scan documents into a
format that you can search, copy, paste, and edit. This allows you to edit letters,
newspaper clippings, and many other documents.
This section contains the following topics:
•
To scan documents as editable text
Guidelines for scanning documents as editable text
•
To scan documents as editable text
Use the following guidelines for scanning documents as editable text.
Follow the instructions for your operating system.
Windows
1. Insert your original print-side down in the scanner. For more information, see
Load an original in the scanner.
2. From the computer desktop, click Start, select Programs or All Programs,
select the folder for your HP printer, and then select HP Scan.
3. Select the type of editable text you want to use in the scan:
I want to... Follow these steps
Extract just the text, without any of the
formatting of the original
Extract the text, as well as some of the
formatting of the original
Select the Save as Editable Text shortcut
from the list, and then select Text File
(*.txt) from the File Type drop-down menu.
Select the Save as Editable Text shortcut
from the list, and then select Rich Text File
(*.rtf) from the File Type drop-down menu.
Or
Select the Save as PDF (searchable)
shortcut from the list, and then select PDF-
Searchable (*.pdf) from the File Type
drop-down menu.
4. To start the scan, click Scan, and then follow the onscreen instructions.
Mac OS X
1. Insert your original print-side down in the scanner. For more information, see
Load an original in the scanner.
2. Double-click the HP Scan 3 icon. This icon is located in the Hewlett-Packard
folder in the Applications folder at the top level of the hard disk.
3. From the HP Scan menu, click Preferences.
Scanning documents as editable text 45
Page 50

Chapter 3
4. Select the Documents preset from the Presets pop-up menu.
5. To start the scan, click Scan.
6. After the scan is complete, click the Save button in the HP Scan toolbar
7. Select the type of editable text you want to use in the scan:
I want to... Follow these steps
Extract just the text, without any of the
formatting of the original
Extract the text, as well as some of the
formatting of the original
Select TXT from the Format pop-up menu.
Extract the text, as well as some of the
formatting of the original
Select RTF or PDF-Searchable from the
Format pop-up menu.
8. Click Save.
Guidelines for scanning documents as editable text
To ensure that the software can convert your documents successfully, do the following:
• Make sure the scanner glass is clean.
When the printer scans the document, smudges or dust on the scanner glass can
be scanned, as well, and can prevent the software from converting the document
to editable text.
• Make sure the document is loaded correctly.
When scanning documents as editable text, the original must be loaded with the
top forward and face up.
Also, make sure the document is not skewed. For more information, see
original in the scanner.
• Make sure the text on the document is clear.
To successfully convert the document to editable text, the original must be clear
and of high quality. The following conditions can cause the software to not
convert the document successfully:
◦ The text on the original is faint or wrinkled.
◦ The text is too small.
◦ The structure of the document is too complex.
◦ The text is tightly spaced. For example, if the text that the software converts
has missing or combined characters, "rn" might appear as "m."
◦ The text is on a colored background. Colored backgrounds can cause
images in the foreground to blend too much.
Load an
46 Scan
Page 51

• Choose the correct profile.
Be sure to select a shortcut or preset that allows scanning as editable text. These
options use scan settings designed to maximize the quality of your OCR scan. In
Windows, use the Editable Text (OCR) or Save as PDF shortcuts. In Mac OS X,
use the Documents preset.
• Save your file in the correct format.
If you want to extract just the text from the document, without any of the
formatting of the original, select a plain text format (such as Text (.txt) or TXT). If
you want to extract the text, as well as some of the formatting of the original,
select Rich Text Format (such as Rich Text (.rtf) or RTF) or searchable PDF
format (Searchable PDF (.pdf) or PDF-Searchable).
Scanning documents as editable text 47
Page 52

Chapter 3
48 Scan
Page 53

4Copy
You can produce high-quality color and black-and-white copies on a variety of paper
types and sizes.
NOTE: For better copy quality, use color copy and avoid copying under direct
sunlight or intense light.
This section contains the following topics:
Copy documents
•
Change copy settings
•
Copy documents
You can make quality copies from the printer control panel.
To copy documents
1. Make sure you have paper loaded in the input tray.
2. Insert the original in the scanner. For more information, see
the scanner.
3. Touch Copy.
4. Touch the left and right arrows to select the number of copies.
5. Touch Settings to change copy settings. For more information, see
settings
6. To start the copy job, touch one of the following:
• Start Black: To select a black-and-white copy job.
• Start Color : To select a color copy job.
Load an original in
Change copy
NOTE: If you have a color original, selecting the Black function produces a
black-and-white copy of the color original, while selecting Color produces a
full-color copy of the color original.
Change copy settings
You can customize copy jobs using the various settings available from the printer's
control panel, including the following:
• Copy paper size
• Copy paper type
• Resize copies
• Copy quality
• Lighter/Darker settings
• Set as New Defaults - After making settings changes, touch this to make it the
default for all copies.
Copy 49
Page 54

Chapter 4
You can use these settings for single copy jobs, or you can save settings to be used as
defaults for future jobs.
To change copy settings for a single job
1. Touch Copy, and then touch Settings .
2. Select the copy function settings you want to change.
3. Touch Start Black or Start Color.
To save the current settings as defaults for future jobs
1. Touch Copy, and then touch Settings.
2. Make any changes to the copy function settings, and then touch Set as new
defaults.
3. Touch Yes.
50 Copy
Page 55

5 Work with ink cartridges
This section contains the following topics:
Information about ink cartridges
•
•
Check the estimated ink levels
•
Handle the ink cartridges
•
Replace the ink cartridges
Print with a single ink cartridge
•
•
Store printing supplies
•
Ink cartridge maintenance
Information about ink cartridges
The following tips help maintain HP ink cartridges and ensure consistent print quality.
• If you need to replace an ink cartridge, wait until you have the new ink cartridge
available to install before removing the old cartridge.
CAUTION: Do not leave untaped ink cartridges outside of the product for an
extended period of time. This can result in damage to the ink cartridge.
• Keep all ink cartridges in the original sealed packages until they are needed.
•
Turn off the printer by pressing the
Wait until the power light turns off before unplugging the power cord or turning off
a power strip. If you improperly turn off the printer, the print carriage might not
return to the correct position causing problems with the ink cartridges and print
quality issues. For more information, see
• Store ink cartridges at room temperature (15-35° C or 59-95° F).
• You do not need to replace the cartridges until print quality becomes
unacceptable, but a significant decrease in print quality may be the result of one
or more depleted cartridges. Possible solutions include checking the estimated
ink levels remaining in the cartridges, and cleaning the ink cartridges. Cleaning
the ink cartridges uses some ink. For more information, see
cartridge maintenance.
• Do not clean ink cartridges unnecessarily. This wastes ink and shortens the life of
the cartridges.
• Handle ink cartridges carefully. Dropping, jarring, or rough handling during
installation can cause temporary printing problems.
• If you are transporting the product, do the following to prevent ink leaking from
the print carriage or other damage from occurring to the product:
◦
Make sure you turn off the product by pressing the
The print carriage should be parked on the right side in the service station.
◦ Make sure you leave the ink cartridges installed.
(Power) button located on the product.
Turn off the printer.
Advanced ink
(Power) button.
Related topics
Check the estimated ink levels
Work with ink cartridges 51
Page 56

Chapter 5
Check the estimated ink levels
You can check the estimated ink levels from Toolbox (Windows), HP Utility (Mac OS
X), or the Toolbox software for PDAs. For information about using these tools, see
Printer management tools. You can also print the Printer Status page to view this
information (see
NOTE: Ink level alerts and indicators provide estimates for planning purposes
only. When you receive a low-ink alert, consider having a replacement cartridge
available to avoid possible printing delays. You do not have to replace the
cartridges until the print quality is unacceptable.
NOTE: If you have installed a refilled or remanufactured cartridge, or a cartridge
that has been used in another printer, the ink level indicator might be inaccurate or
unavailable.
NOTE: Ink from the cartridges is used in the printing process in a number of
different ways, including in the initialization process, which prepares the product
and cartridges for printing, and in printhead servicing, which keeps print nozzles
clear and ink flowing smoothly. In addition, some residual ink is left in the cartridge
after it is used. For more information, see
Understand the printer information pages).
Handle the ink cartridges
www.hp.com/go/inkusage.
Before you replace or clean an ink cartridge, you should know the part names and how
to handle the ink cartridges.
1 Copper-colored contacts
2 Plastic tape with pink pull tab (must be removed before installing)
3 Ink nozzles under tape
Hold the ink cartridges by their black plastic sides, with the label on top. Do not touch
the copper-colored contacts or the ink nozzles.
52 Work with ink cartridges
Page 57

NOTE: Handle the ink cartridges carefully. Dropping or jarring cartridges can
cause temporary printing problems, or even permanent damage.
Replace the ink cartridges
You can check the estimated ink levels from Toolbox (Windows), HP Utility (Mac OS),
or the Toolbox software for PDAs (Microsoft Windows Mobile). For information about
using these tools, see
diagnostic page to view this information (see
pages).
NOTE: The ink levels shown are an estimate only. Actual ink volumes might vary.
After removing a cartridge from its package, install it right away. Do not remove a
cartridge from the printer for long periods of time.
To find out which ink cartridges work with the printer, see
CAUTION: To prevent clogs, ink failure, and bad electrical connections, do not
touch the ink cartridge ink nozzles or copper contacts, and do not remove the
copper strips.
To replace the ink cartridges
Follow these instructions to replace an ink cartridge.
1. Remove the new ink cartridge from its package and then pull the colored tab to
remove the protective film from the cartridge.
Printer management tools. You can also print the self-test
Understand the printer information
Supplies.
1 Copper-colored contacts
2 Plastic tape with pink pull tab (must be removed before installing)
3 Ink nozzles under tape
2. With the printer turned on, open the cartridge access door. Wait for the carriage
to stop moving. This should take only a few seconds.
CAUTION: Only remove or install ink cartridges when the ink cartridge
carriage stops moving.
Replace the ink cartridges 53
Page 58

Chapter 5
3. Lift the ink cartridge latch open and gently remove the ink cartridge from its cradle
compartment.
4. Insert the new ink cartridge into its cradle compartment at the same angle at
which you removed the old ink cartridge. Check the symbol on the latch against
the symbol on the ink cartridge to make sure you are inserting the correct ink
cartridge.
5. Close the ink cartridge latch. If the cartridge is inserted correctly, closing the latch
gently pushes the cartridge into its cradle compartment. Press the latch to make
sure it is seated flat on the cartridge.
54 Work with ink cartridges
Page 59

6. Close the cartridge access door.
7. Wait for the carriage to complete the ink cartridge initialization routine before
using the printer.
NOTE: Do not open the cartridge access door until the ink cartridge
initialization is complete.
Print with a single ink cartridge
If one of the ink cartridges runs out of ink before you can replace it, you can still print
with a single ink cartridge.
Empty cartridge Cartridges used Output
Black Prints with only the tri-color ink
Tri-color Prints with only the black or photo ink
Photo Prints with only the tri-color ink
NOTE: Printing with one ink cartridge might be slower and the print quality might
be affected. It is recommended to print with both ink cartridges. For borderless
printing, the tri-color ink cartridge must be installed.
cartridge
cartridge
cartridge
Store printing supplies
This section covers the following topics:
Store ink cartridges
•
Store ink cartridges
Store an ink cartridge in an airtight container with the print nozzles facing up.
Ink cartridge maintenance
This section contains the following topics:
Align the ink cartridges
•
Calibrate color
•
•
Clean the ink cartridges
Color and grayscale
All documents print in
grayscale
Color and grayscale
Align the ink cartridges
Whenever you install a new ink cartridge, you should align the ink cartridges for the
best possible print quality. If the printout is grainy, has stray dots, jagged edges, or the
ink is bleeding into another color, you can realign them through Toolbox, or HP Utility
(Mac OS). For information about using these tools, see
Printer management tools.
Ink cartridge maintenance 55
Page 60

Chapter 5
NOTE: Load plain paper into the input tray before aligning the ink cartridges. An
alignment page is printed during the alignment process.
• Printer control panel: Touch the right arrow , touch Setup, touch Tools, and
• Toolbox (Windows): Open Toolbox. For more information, see
• HP Utility (Mac OS): Open HP Utility. For more information, see
Calibrate color
If you are not satisfied with the appearance of colors, you can calibrate the colors
manually to ensure the best print quality.
NOTE: Calibrate the color only when the tri-color and photo ink cartridges are
installed together. The photo ink cartridge is available for purchase as an optional
accessory. For more information, see
NOTE: If you are using a Windows Mobile, you can calibrate the color using the
Toolbox software for PDAs. For more information, see
(Microsoft Windows Mobile).
Color calibration balances color tints on printed pages. It is only necessary if:
• Printed colors have visibly shifted toward yellow, cyan or magenta.
• There is a color tinge in the gray shades.
Low ink levels in the ink cartridges might also produce incorrect colors.
• Toolbox (Windows): Open Toolbox. For more information, see
• HP Utility (Mac OS): Open HP Utility. For more information, see
then select Align Ink Cartridges.
Toolbox
(Windows). Click the Printer Services tab, and then click Align Ink Cartridges
and follow the onscreen instructions.
HP Utility (Mac
OS X). Click Align and follow the onscreen instructions.
HP supplies and accessories.
Toolbox software for PDAs
Toolbox
(Windows). Click the Printer Services tab, and then click Calibrate Color and
follow the onscreen instructions.
HP Utility (Mac
OS X). Click Calibrate Color and follow the onscreen instructions.
Clean the ink cartridges
If printed characters are incomplete, or if dots or lines are missing from the printouts,
you might need to clean the ink cartridges. These are symptoms of clogged ink
nozzles, which can result from prolonged exposure to air.
NOTE: Before you clean the ink cartridges, make sure the ink cartridge ink levels
are not low or empty. Low ink levels can also cause incomplete characters, missing
lines, or dots on the printouts. You can check the ink level of the cartridges from the
printer control panel, the Printer Status tab in Toolbox (Windows), HP Utility (Mac
OS), or the Toolbox software for PDAs. For more information, see
cartridges.
This section contains the following topics:
To clean ink cartridges automatically
•
•
To clean ink cartridges manually
56 Work with ink cartridges
Work with ink
Page 61

To clean ink cartridges automatically
NOTE: Clean the ink cartridges only when print quality is poor. Cleaning uses ink
and shortens the life of the ink cartridges. There are three levels of cleaning
available. After one level of cleaning, perform the next level of cleaning only if the
results are not satisfactory.
Control panel
1. Touch right arrow
, and then touch Setup.
2. Touch Tools, and then touch Clean Ink Cartridges.
3. Follow the onscreen instructions.
Toolbox (Windows)
1. Open Toolbox. For more information, see
Toolbox (Windows).
2. Click the Services tab, click Clean the Print Cartridges, and then follow the
onscreen instructions.
HP Utility (Mac OS X)
1. Open HP Utility. For more information, see
HP Utility (Mac OS X).
2. Click Clean and follow the onscreen instructions.
To clean ink cartridges manually
Poor contact between the ink cartridges and the ink cartridge cradles can cause error
messages or affect print quality. When this occurs, try cleaning the electrical contacts
on the ink cartridges and ink cartridge cradles.
NOTE: Before cleaning the ink cartridges manually, remove and reinsert the
cartridges to make sure they are inserted correctly.
1. Turn on the device and open the front access cover.
The print carriage moves to the center of the printer.
2. Wait until the print carriage is idle and silent, and then unplug the power cord
from the back of the device.
3. Lift the ink cartridge latch open and gently remove the ink cartridge from its cradle
compartment.
4. Inspect the ink cartridge contacts for ink and debris buildup.
5. Dip a clean foam rubber swab or lint-free cloth into distilled water, and squeeze
any excess water from it.
6. Hold the ink cartridge by its sides.
Ink cartridge maintenance 57
Page 62

Chapter 5
7. Clean only the copper-colored contacts. Allow the ink cartridges to dry for
approximately ten minutes.
1 Copper-colored contacts
2 Ink nozzles (do not clean)
8. Insert the ink cartridge into its cradle compartment at the same angle at which
you removed the old ink cartridge.
9. Close the ink cartridge latch. If the cartridge is inserted correctly, closing the latch
gently pushes the cartridge into its cradle compartment. Press the latch to make
sure it is seated flat on the cartridge.
10. Repeat if necessary for the other ink cartridge.
11. Close the front access cover and plug the power cord into the back of the device.
12. Wait for the carriage to complete the ink cartridge initialization routine and return
to the home position at the left side of the printer before using the printer.
NOTE: Do not open the front access cover until the ink cartridge initialization
is complete.
13. Align the ink cartridges. For more information, see Align the ink cartridges.
58 Work with ink cartridges
Page 63

6 Solve a problem
This section contains the following topics:
HP support
•
•
General troubleshooting tips and resources
•
Solve printing problems
Poor print quality and unexpected printouts
•
•
Advanced ink cartridge maintenance
•
Solve paper-feed problems
•
Solve copy problems
Solve scan problems
•
•
Troubleshoot installation issues
•
Problems setting up Bluetooth communication
•
Understand the printer information pages
•
Clear jams
HP support
If you have a problem, follow these steps
1. Check the documentation that came with the printer.
2. Visit the HP online support Web site at
is available to all HP customers. It is the fastest source for up-to-date printer
information and expert assistance and includes the following features:
• Fast access to qualified online support specialists
• Software and driver updates for the HP printer
• Valuable troubleshooting information for common problems
• Proactive printer updates, support alerts, and HP newsgrams that are
available when you register the HP printer
For more information, see
3. Call HP support. Support options and availability vary by printer, country/region,
and language. For more information, see
Obtain electronic support.
www.hp.com/support. HP online support
HP support by phone.
Obtain electronic support
To find support and warranty information, go to the HP Web site at www.hp.com/
support. If prompted, choose your country/region, and then click Contact HP for
information on calling for technical support.
This Web site also offers technical support, drivers, supplies, ordering information and
other options such as:
• Access online support pages.
• Send HP an e-mail message for answers to your questions.
• Connect with an HP technician by using online chat.
• Check for HP software updates.
Solve a problem 59
Page 64

Chapter 6
You can also obtain support from the HP software provided with your computer. For
more information, see
Support options and availability vary by printer, country/region, and language.
HP support by phone
The phone support numbers and associated costs listed here are those in effect at time
of publication and are applicable only for calls made on a land line. Different rates
might apply for mobile phones.
For the most current HP list of telephone support numbers and call costs information,
www.hp.com/support.
see
During the warranty period, you can obtain assistance from the HP Customer Care
Center.
NOTE: HP does not provide telephone support for Linux printing. All support is
provided online at the following web site:
question to begin the support process.
The HPLIP Web site does not provide support for Windows or Mac OS X. If you are
using these operating systems, see
This section contains the following topics:
Before you call
•
Phone support period
•
•
Telephone support numbers
•
After the phone support period
Printer management tools.
https://launchpad.net/hplip. Click Ask a
www.hp.com/support.
Before you call
Call HP support while you are in front of the computer and the HP All-in-One. Be
prepared to provide the following information:
• Model number (for more information, see
• Serial number (located on the back or bottom of the printer)
• Messages that appear when the situation occurs
• Answers to these questions:
◦ Has this situation happened before?
◦ Can you re-create it?
◦ Did you add any new hardware or software to the computer at about the
◦ Did anything else occur prior to this situation (such as a thunderstorm or
Phone support period
One year of phone support is available in North America, Asia Pacific, and Latin
America (including Mexico).
60 Solve a problem
Find the printer model number)
time that this situation began?
moving the printer)?
Page 65

Telephone support numbers
In many locations, HP provides toll free telephone support during the warranty period.
However, some of the support numbers might not be toll free.
HP support 61
Page 66

Chapter 6
For the most current list of telephone support numbers, see www.hp.com/support.
62 Solve a problem
Page 67

After the phone support period
After the phone support period, help is available from HP at an additional cost. Help
might also be available at the HP online support Web site:
Contact your HP dealer or call the support phone number for your country/region to
learn more about support options.
www.hp.com/support.
General troubleshooting tips and resources
NOTE: Many of the steps below require HP software. If you did not install the HP
software, you can install it using the HP software CD included with the printer, or
you can download the software from the HP support Web site:
support.
Try these when you begin troubleshooting a printing problem.
• For a paper jam, see
• For paper-feed problems, such as the paper skew and paper pick, see
paper-feed problems.
• Make sure that the power light is on and not blinking. When the printer is turned
on for the first time, it takes approximately a minute to initialize it after the ink
cartridges are installed.
• If the power cord is plugged in, make sure that the power cord and other cables
are working and are firmly connected to the printer. Make sure that the printer is
connected firmly to a functioning alternating current (AC) power outlet and is
turned on. For voltage requirements, see
• If the printer is using battery power, make sure that the battery has been charged.
For more information, see
• Media is loaded correctly in the input tray and is not jammed in the printer.
• All packing tapes and materials are removed.
• The printer is set as the current or default printer. For Windows, set it as the
default in the Printers folder. For Mac OS X, set it as the default in the Print &
Fax or Print & Scan section of the System Preferences. See the computer's
documentation for more information.
• Pause Printing is not selected if you are using a computer running Windows.
• You are not running too many programs when you are performing a task. Close
programs that you are not using or restart the computer before attempting the
task again.
Clear jams.
Electrical requirements.
Charge and use the battery.
www.hp.com/
Solve
Troubleshooting topics
Solve printing problems
•
Poor print quality and unexpected printouts
•
•
Solve paper-feed problems
•
Solve copy problems
Solve scan problems
•
•
Troubleshoot installation issues
•
Problems setting up Bluetooth communication
Clear jams
•
General troubleshooting tips and resources 63
Page 68

Chapter 6
Solve printing problems
This section contains the following topics:
•
The printer shuts down unexpectedly
All printer lights are on or flashing
•
•
The printer is not responding (nothing prints)
Printer does not accept ink cartridge
•
•
Printer takes a long time to print
•
Blank or partial page printed
Something on the page is missing or incorrect
•
•
Placement of the text or graphics is wrong
The printer shuts down unexpectedly
Check the power and power connections
• Make sure the printer is connected firmly to a functioning alternating current (AC)
power outlet. For voltage requirements, see
• If you are using the battery, make sure it is installed correctly.
All printer lights are on or flashing
Electrical requirements.
A non-recoverable error has occurred
Disconnect all cables (such as power cord and USB cable), remove the battery, wait
about 20 seconds, and then reconnect the cables. If the problem persists, visit the HP
Web site (
fixes and updates.
www.hp.com/support) for the latest troubleshooting information, or printer
The printer is not responding (nothing prints)
Check the print queue
A print job might be stuck in the print queue. To fix, open the print queue, cancel the
printing of all documents in the queue, and then reboot the computer. After the
computer reboots, try printing again. See the operating system help for information on
opening the print queue and canceling print jobs.
Check the printer setup
For more information, see
Check the printer software installation
If the printer is turned off when printing, an alert message should appear on the
computer screen; otherwise, the printer software might not be installed correctly. To
resolve this, uninstall the software completely, and then reinstall the printer software.
For more information, see
General troubleshooting tips and resources.
Uninstall and reinstall the HP software.
64 Solve a problem
Page 69

Check the cable connections
Make sure both ends of the USB cable are secure.
Check any personal firewall software installed on the computer
The personal software firewall is a security program that protects a computer from
intrusion. However, the firewall might block communication between the computer and
the printer. If there is a problem communicating with the printer, try temporarily
disabling the firewall. If the problem persists, the firewall is not the source of the
communication problem. Re-enable the firewall.
If disabling the firewall allows you to communicate with the printer, you might want to
assign a static IP address to the printer and re-enable the firewall.
Check the Bluetooth connection
Printing larger files using a Bluetooth wireless connection can sometimes cause the
print job to fail. Try printing a smaller file. For more information, see
for Bluetooth communication.
Printer does not accept ink cartridge
Check the ink cartridge
• Remove and reinstall the ink cartridge.
• Make sure the ink cartridge is intended for use in this printer. For more
information, see
Work with ink cartridges.
Set up the printer
Clean the ink cartridge manually
Complete the ink cartridge cleaning procedure. For more information, see
cartridges manually.
Turn off the printer after removing the ink cartridge
After removing the ink cartridge, turn off the printer, wait about 20 seconds, and turn it
on again without the ink cartridge installed. After the printer has restarted, reinsert the
ink cartridge.
NOTE: Make sure you turn off the printer correctly. For more information, see
Turn off the printer.
Printer takes a long time to print
Check the system resources
• Make sure the computer has enough resources to print the document in a
reasonable amount of time. If the computer meets only the minimum system
requirements, documents might take longer to print. For more information on
minimum and recommended system requirements, see
• If the computer is too busy running other programs, documents can print more
slowly. Try closing some programs, and then print the document again.
To clean ink
System requirements.
Solve printing problems 65
Page 70

Chapter 6
Check the printer software settings
Print speed is slower when Best or Maximum dpi is selected as the print quality. To
increase the print speed, select different print settings in the print driver. For more
information, see
Print.
Check for radio interference
If the printer is connected using Bluetooth wireless and is printing slowly, then the radio
signal might be weak. For more information, see
communication.
Check the Bluetooth wireless connection
Printing larger files using a Bluetooth wireless connection can sometimes cause the
print job to fail. Try printing a smaller file. For more information, see
up Bluetooth communication.
Blank or partial page printed
Clean the ink cartridge
Complete the ink cartridge cleaning procedure. For more information, see
cartridges automatically.
Check the battery charge level
If the printer is using battery power, make sure the battery is charged and functioning
properly. If the battery charge level is critically low, the printer might not print the entire
page before ejecting the page. Plug in the power cord to begin charging the battery.
For more information about using the battery, see
Set up the printer for Bluetooth
Problems setting
To clean ink
Install and use the battery.
Check the media settings
• Make sure you select the correct print quality settings in the print driver for the
media loaded in the input tray.
• Make sure the page settings in the print driver match the page size of media
loaded in the input tray.
Check the Bluetooth connection
Printing larger files using a Bluetooth connection can sometimes cause the print job to
fail. Try printing a smaller file. For more information, see
communication.
More than one page feeds through the printer
For more information on paper-feed problems, see
There is a blank page in the file
Check the file to make sure there is no blank page.
66 Solve a problem
Problems setting up Bluetooth
Solve paper-feed problems.
Page 71

Something on the page is missing or incorrect
Check the ink cartridges
• Check to make sure that both cartridges are installed and functioning correctly.
• Ink cartridges might need to be cleaned. For more information, see
cartridges automatically.
• Ink cartridges might have run out of ink. Replace any empty cartridge.
• Try removing and reinstalling the cartridges, making sure they snap firmly into
place. For more information, see
Check the margin settings
Make sure the margin settings for the document do not exceed the printable area of the
printer. For more information, see
Check the color print settings
Make sure Print in Grayscale is not selected in the print driver.
Check the printer location and length of USB cable
High electromagnetic fields (such as those generated by monitors, motors, fans, TVs,
and other such printers) can sometimes cause slight distortions to printouts. Move the
printer away from the source of the electromagnetic fields. Also, it is recommended that
you use a USB cable that is less than 3 meters (9.8 feet) long to minimize the effects of
these electromagnetic fields.
Work with ink cartridges.
Set minimum margins.
To clean ink
Check the PictBridge settings
If printing using a PictBridge device, make sure the media settings in the device are
correct or are defaulting to the current printer settings. If defaulting to the current printer
settings, then check Toolbox (Windows), HP Utility (Mac OS), or Toolbox software for
PDAs (Windows Mobile) to make sure the current printer settings are correct.
Check the borderless print settings
If printing using a PictBridge device, make sure the media settings in the device are
correct or are defaulting to the current printer settings.
Check the Bluetooth connection
Printing larger files using a Bluetooth wireless connection can sometimes cause the
print job to fail. Try printing a smaller file. For more information, see
Problems setting
up Bluetooth communication.
Check the mobile phone font
Boxes might appear when trying to print Asian fonts from a mobile phone on printers
purchased outside Asia. Asian fonts for Bluetooth mobile phone printing are supported
only by models purchased in Asia.
Solve printing problems 67
Page 72

Chapter 6
Placement of the text or graphics is wrong
Check how the media is loaded
Make sure the guides fit snugly against the edges of the media, and make sure the
input tray is not overloaded. For more information, see
Check the media size
• Content on a page might be cut off if the document size is larger than the media
that you are using.
• Make sure the media size selected in the print driver match the size of media
loaded in the input tray.
Check the margin settings
If the text or graphics are cut off at the edges of the page, make sure the margin
settings for the document do not exceed the printable area of the printer. For more
information, see
Check the page-orientation setting
Make sure the media size and page orientation selected in the application match the
settings in the print driver. For more information, see
Check the printer location and length of USB cable
High electromagnetic fields (such as those generated by monitors, motors, fans, TVs,
and other such devices) can sometimes cause slight distortions to printouts. Move the
printer away from the source of the electromagnetic fields. Also, it is recommended that
you use a USB cable that is less than 3 meters (9.8 feet) long to minimize the effects of
these electromagnetic fields.
If the above solutions do not work, the problem might be caused by the inability of the
application to interpret print settings correctly. See the release notes for known
software conflicts, refer to the application's documentation, or contact the software
manufacturer for specific help.
Set minimum margins.
Load media.
Print.
Poor print quality and unexpected printouts
Print a print quality page to help solve print quality problems. For more information, see
Understand the printer information pages.
This section covers the following topics:
General tips
•
•
Meaningless characters print
•
Ink is smearing
Ink is not filling the text or graphics completely
•
•
Output is faded or dull colored
•
Colors are printing as black and white
Wrong colors are printing
•
•
Printout shows bleeding colors
68 Solve a problem
Page 73

• Colors do not line up correctly
•
General tips
Check the ink cartridges
• Check to make sure that both cartridges are installed and functioning correctly.
• Ink cartridges might need to be cleaned. For more information, see
• Ink cartridges might have run out of ink. Replace any empty cartridge.
• Try removing and reinstalling the cartridges, making sure they snap firmly into
• Whenever you install a new ink cartridge, you should align the ink cartridges for
• Dropping or subjecting the ink cartridges to impact might cause temporary
• Use the appropriate ink cartridge for the project. For best results, use the HP
• Make sure ink cartridges have not been tampered with. Refilling processes and
Printouts have streaks or lines
To clean ink
cartridges automatically.
place. For more information, see
Work with ink cartridges.
the best possible print quality. If the printout is grainy, has stray dots, jagged
edges, or the ink is bleeding into another color, you can realign them through
Toolbox or the print driver (Windows), HP Utility (Mac OS), or the Toolbox
software for PDAs (Windows Mobile). For more information, see
Align the ink
cartridges.
missing nozzles in the ink cartridge. To resolve this problem, leave the ink
cartridge in the printer for 2 to 24 hours.
black ink cartridge to print text documents and use the HP photo ink cartridge to
print color or black and white photos.
the use of incompatible inks can disrupt the intricate printing system and result in
reduced print quality and damage to the printer or ink cartridge. HP does not
guarantee or support refilled ink cartridges. For ordering information, see
HP
supplies and accessories.
Check the paper quality
The paper might be too moist or too rough. Make sure the media meets HP
specifications, and try to print again. For more information, see
Media specifications.
Check the type of media loaded in the printer
Make sure the tray supports the type of media you have loaded. For more information,
see
Media specifications.
Check the rollers in the printer
The rollers in the printer might be dirty, causing lines or smudges to appear on the
printout. Turn off the printer, remove the battery, and then disconnect the power cord.
Clean the output rollers in the printer with a lint-free cloth lightly dampened with water,
and then try to print again.
Check the printer location and length of USB cable
High electromagnetic fields (such as those generated by monitors, motors, fans, TVs,
and other such devices) can sometimes cause slight distortions to printouts. Move the
Poor print quality and unexpected printouts 69
Page 74

Chapter 6
printer away from the source of the electromagnetic fields. Also, it is recommended that
you use a USB cable that is less than 3 meters (9.8 feet) long to minimize the effects of
these electromagnetic fields.
Check the Bluetooth connection
Printing larger files using a Bluetooth connection can sometimes cause the print job to
fail. Try printing a smaller file. For more information, see
communication.
Meaningless characters print
If an interruption occurs to a job that is printing, the printer might not recognize the rest
of the job.
Cancel the print job and wait for the Home screen to appear on the printer controlpanel display. If the Home screen does not appear, cancel all jobs and wait again.
When the Home screen appears on the printer control-panel display, resend the job. If
prompted by the computer to retry the job, click Cancel.
Check the cable connections
If the printer and computer are connected with a USB cable, the problem might be due
to a poor cable connection.
Make sure the cable connections at both ends are secure. If the problem persists, turn
off the printer, disconnect the cable from the printer, turn on the printer without
connecting the cable, and delete any remaining jobs from the print spooler. When the
Power light is on and not flashing, reconnect the cable.
Problems setting up Bluetooth
Check the document file
The document file might be damaged. If you can print other documents from the same
application, try printing a backup copy of the document, if available.
Check the mobile phone font
Boxes might appear when trying to print Asian fonts from a mobile phone on printers
purchased outside Asia. Asian fonts for Bluetooth mobile phone printing are supported
only by models purchased in Asia.
Ink is smearing
Check the print settings
• When you print documents that use a lot of ink or less adsorbent media, allow
more time to dry before handling the printouts. In the print driver, select the Best
print quality, and also increase the ink drying time and reduce the ink saturation
using the ink volume under the advanced features (Windows) or ink features
(Mac OS X). However, note that decreasing ink saturation might give printouts a
"washed-out" quality.
• Color documents that have rich, blended colors can wrinkle or smear when
printed using the Best print quality. Try using another print mode, such as
Normal, to reduce ink, or use HP Premium Paper designed for printing vivid color
documents. For more information, see
70 Solve a problem
Print.
Page 75

Check the media size and type
• Do not allow the printer to print media that is smaller than the print job. If you are
doing borderless printing, make sure the correct media size is loaded. If you are
using the incorrect size, ink smears might appear on the bottom of subsequent
pages.
• Some types of media do not accept ink well. For these types of media, ink dries
more slowly and smearing might occur. For more information, see
specifications.
Ink is not filling the text or graphics completely
Check the ink cartridges
• Check to make sure that both ink cartridges are installed and functioning
correctly.
• Ink cartridges might need to be cleaned. For more information, see
cartridges automatically.
• Ink cartridges might have run out of ink. Replace any empty cartridge.
• Make sure ink cartridges have not been tampered with. Refilling processes and
the use of incompatible inks can disrupt the intricate printing system and result in
reduced print quality and damage to the printer or ink cartridge. HP does not
guarantee or support refilled ink cartridges. For ordering information, see
supplies and accessories.
Check the media type
Some media types are not suitable for use with the printer. For more information, see
Media specifications.
Media
To clean ink
HP
Output is faded or dull colored
Check the print mode
The Draft or Fast mode in the print driver allows you to print at a faster rate, which is
good for printing drafts. To get better results, select Normal or Best. For more
information, see
Check the paper type setting
When printing on special media, select the corresponding media type in the print driver.
For more information, see
Check the ink cartridges
• Check to make sure that both ink cartridges are installed and functioning
correctly.
• Ink cartridges might need to be cleaned. For more information, see
cartridges automatically.
Print.
Print on special and custom-size paper.
To clean ink
Poor print quality and unexpected printouts 71
Page 76

Chapter 6
• Ink cartridges might have run out of ink. Replace any empty cartridge.
• Make sure ink cartridges have not been tampered with. Refilling processes and
the use of incompatible inks can disrupt the intricate printing system and result in
reduced print quality and damage to the printer or ink cartridge. HP does not
guarantee or support refilled ink cartridges. For ordering information, see
supplies and accessories.
Colors are printing as black and white
Check the print settings
Make sure Print in Grayscale is not selected in the print driver. Open the printer
Properties dialog box, click the Features tab, and then make sure that Print in
Grayscale is not selected in the Color options.
Check the ink cartridges
• Check to make sure that both the black and the tri-color ink cartridges are
installed and functioning correctly. For more information, see
ink cartridge.
• Ink cartridges might need to be cleaned. For more information, see
cartridges automatically.
• Ink cartridges might have run out of ink. Replace any empty cartridge.
• Try removing and reinstalling the cartridges, making sure they snap firmly into
place. For more information, see
• Make sure ink cartridges have not been tampered with. Refilling processes and
the use of incompatible inks can disrupt the intricate printing system and result in
reduced print quality and damage to the printer or ink cartridge. HP does not
guarantee or support refilled ink cartridges. For ordering information, see
supplies and accessories.
HP
Print with a single
To clean ink
Work with ink cartridges.
HP
Wrong colors are printing
Check the print settings
Make sure Print in Grayscale is not selected in the print driver. Open the printer
Properties dialog box, click the Features tab, and then make sure that Print in
Grayscale is not selected in the Color options.
Check the ink cartridges
• Check to make sure that both ink cartridges are installed and functioning
correctly.
• Ink cartridges might need to be cleaned. For more information, see
cartridges automatically.
• Ink cartridges might have run out of ink. Replace any empty cartridge.
72 Solve a problem
To clean ink
Page 77

• Try removing and reinstalling the cartridges, making sure they snap firmly into
place. For more information, see
• Make sure ink cartridges have not been tampered with. Refilling processes and
the use of incompatible inks can disrupt the intricate printing system and result in
reduced print quality and damage to the printer or ink cartridge. HP does not
guarantee or support refilled ink cartridges. For ordering information, see
supplies and accessories.
Printout shows bleeding colors
Check the ink cartridges
• Check to make sure that both ink cartridges are installed and functioning
correctly.
• Ink cartridges might need to be cleaned. For more information, see
cartridges automatically.
• Ink cartridges might have run out of ink. Replace any empty cartridge.
• Try removing and reinstalling the cartridges, making sure they snap firmly into
place. For more information, see
• Make sure ink cartridges have not been tampered with. Refilling processes and
the use of incompatible inks can disrupt the intricate printing system and result in
reduced print quality and damage to the printer or ink cartridge. HP does not
guarantee or support refilled ink cartridges. For ordering information, see
supplies and accessories.
Check the media type
Some media types are not suitable for use with the printer. For more information, see
Media specifications.
Work with ink cartridges.
HP
To clean ink
Work with ink cartridges.
HP
Colors do not line up correctly
Check the ink cartridges
• Check to make sure that both ink cartridges are installed and functioning
correctly.
• Ink cartridges might need to be cleaned. For more information, see
cartridges automatically.
• Ink cartridges might have run out of ink. Replace any empty cartridge.
• Try removing and reinstalling the cartridges, making sure they snap firmly into
place. For more information, see
To clean ink
Work with ink cartridges.
Poor print quality and unexpected printouts 73
Page 78

Chapter 6
• Whenever you install a new ink cartridge, you should align the ink cartridges for
the best possible print quality. If the printout is grainy, has stray dots, jagged
edges, or the ink is bleeding into another color, you can realign them through
Toolbox or the print driver (Windows), HP Utility (Mac OS), or the Toolbox
software for PDAs (Windows Mobile). For more information, see
cartridges.
• Make sure ink cartridges have not been tampered with. Refilling processes and
the use of incompatible inks can disrupt the intricate printing system and result in
reduced print quality and damage to the printer or ink cartridge. HP does not
guarantee or support refilled ink cartridges. For ordering information, see
supplies and accessories.
Check the graphics placement
Use the zoom or print preview feature of the software to check for gaps in the
placement of graphics on the page.
Printouts have streaks or lines
Check the print mode
Try using the Best mode in the print driver. For more information, see
Check the ink cartridges
• Check to make sure that both ink cartridges are installed and functioning
correctly.
• Clean the ink cartridges. For more information, see
automatically or Clean the area around the ink nozzles.
• Ink cartridges might have run out of ink. Replace any empty cartridge.
• Try removing and reinstalling the cartridges, making sure they snap firmly into
place. For more information, see
• Whenever you install a new ink cartridge, you should align the ink cartridges for
the best possible print quality. If the printout is grainy, has stray dots, jagged
edges, or the ink is bleeding into another color, you can realign them through
Toolbox or the print driver (Windows), HP Utility (Mac OS), or the Toolbox
software for PDAs (Windows Mobile). For more information, see
cartridges.
• Make sure ink cartridges have not been tampered with. Refilling processes and
the use of incompatible inks can disrupt the intricate printing system and result in
reduced print quality and damage to the printer or ink cartridge. HP does not
guarantee or support refilled ink cartridges. For ordering information, see
supplies and accessories.
Align the ink
HP
Print.
To clean ink cartridges
Work with ink cartridges.
Align the ink
HP
Advanced ink cartridge maintenance
This section contains the following topics:
Clean the ink cartridge contacts
•
•
Clean the area around the ink nozzles
Replace the ink service module
•
74 Solve a problem
Page 79

Clean the ink cartridge contacts
Before cleaning the ink cartridge contacts, remove the ink cartridge and verify that
nothing is covering the ink cartridge contacts, then reinstall the ink cartridge.
Make sure you have the following materials available:
• Dry foam rubber swabs, lint-free cloth, or any soft material that will not come
apart or leave fibers.
TIP: Coffee filters are lint-free and work well for cleaning ink cartridges.
• Distilled, filtered, or bottled water (tap water might contain contaminants that can
damage the ink cartridges).
CAUTION: Do not use platen cleaners or alcohol to clean the ink cartridge
contacts. These can damage the ink cartridge or the printer.
To clean the ink cartridge contacts
1. Turn on the device and open the front access cover.
The print carriage moves to the center of the printer.
2. Wait until the print carriage is idle and silent, and then unplug the power cord
from the back of the device.
3. Lift the ink cartridge latch open and gently remove the ink cartridge from its cradle
compartment.
4. Inspect the ink cartridge contacts for ink and debris buildup.
5. Dip a clean foam rubber swab or lint-free cloth into distilled water, and squeeze
any excess water from it.
6. Hold the ink cartridge by its sides.
7. Clean only the copper-colored contacts. Allow the ink cartridges to dry for
approximately ten minutes.
1 Copper-colored contacts
2 Ink nozzles (do not clean)
Advanced ink cartridge maintenance 75
Page 80

Chapter 6
8. Insert the ink cartridge into its cradle compartment at the same angle at which
you removed the old ink cartridge.
9. Close the ink cartridge latch. If the cartridge is inserted correctly, closing the latch
gently pushes the cartridge into its cradle compartment. Press the latch to make
sure it is seated flat on the cartridge.
10. Repeat if necessary for the other ink cartridge.
11. Close the front access cover and plug the power cord into the back of the device.
12. Wait for the carriage to complete the ink cartridge initialization routine and return
to the home position at the left side of the printer before using the printer.
NOTE: Do not open the front access cover until the ink cartridge initialization
is complete.
13. Align the ink cartridges. For more information, see Align the ink cartridges.
Clean the area around the ink nozzles
If the printer is used in a dusty environment, a small amount of debris might
accumulate inside the printer. This debris can include dust, hair, carpet, or clothing
fibers. When debris gets on the ink cartridges, it can cause ink streaks and smudges
on printed pages. Ink streaking can be corrected by cleaning around the ink nozzles as
described here.
NOTE: Clean the area around the ink nozzles only if you continue to see streaks
and smudges on your printed pages after you have already cleaned the ink
cartridges by using the software you installed with the printer. For more information,
To clean ink cartridges automatically.
see
Make sure you have the following materials available:
• Dry foam rubber swabs, lint-free cloth, or any soft material that will not come
apart or leave fibers.
TIP: Coffee filters are lint-free and work well for cleaning ink cartridges.
• Distilled, filtered, or bottled water (tap water might contain contaminants that can
damage the ink cartridges).
CAUTION: Do not touch the copper-colored contacts or ink nozzles.
Touching these parts can result in clogs, ink failure, and bad electrical
connections.
To clean the area around the ink nozzles
1. Turn on the printer and open the front access cover.
The print carriage moves to the center of the printer.
2. Wait until the print carriage is idle and silent, and then unplug the power cord
from the back of the device.
76 Solve a problem
Page 81

3. Lift the ink cartridge latch open and gently remove the ink cartridge from its cradle
compartment.
NOTE: Do not remove both ink cartridges at the same time. Remove and
clean each ink cartridge one at a time. Do not leave an ink cartridge outside
the printer for more than 30 minutes.
4. Place the ink cartridge on a piece of paper with the ink nozzles facing up.
5. Lightly moisten a clean swab with distilled water, and squeeze any excess water
from it.
6. Clean the face and edges around the ink nozzle area with the swab, as shown
below.
1 Nozzle plate (do not clean)
2 Face and edges around the ink nozzle area
CAUTION: Do not clean the nozzle plate.
7. Insert the ink cartridge into its cradle compartment at the same angle at which
you removed the old ink cartridge.
8. Close the ink cartridge latch. If the cartridge is inserted correctly, closing the latch
gently pushes the cartridge into its cradle compartment. Press the latch to make
sure it is seated flat on the cartridge.
9. Repeat if necessary for the other ink cartridge.
10. Close the front access cover and plug the power cord into the back of the device.
11. Wait for the carriage to complete the ink cartridge initialization routine and return
to the home position at the left side of the printer before using the printer.
NOTE: Do not open the front access cover until the ink cartridge initialization
is complete.
12. Align the ink cartridges. For more information, see Align the ink cartridges.
Replace the ink service module
The replaceable ink service module holds waste ink from the black ink cartridge. When
the ink service module is almost full, the printer prompts you to replace it. When you
are notified by the control panel that the ink service module is full, contact HP support
to obtain a new module. For more information, see
HP support. If you have a new ink
Advanced ink cartridge maintenance 77
Page 82

Chapter 6
service module, install it immediately by following the instructions that came with the
module.
TIP: When the ink service module is full, the printer stops printing. However, until
the replacement arrives, you can continue printing by removing the black ink
cartridge and printing with just the tri-color ink cartridge. Color results and print
speeds, though, might be affected. For more information about printing with a
single ink cartridges, see
CAUTION: Allowing the ink service module to fill completely can result in black ink
spillage. Take care to avoid spilling the ink in the ink service module. Ink can
permanently stain fabric and other materials.
Print with a single ink cartridge.
Solve paper-feed problems
For information on resolving jams, see Clear jams.
This section contains the following topics:
•
Media is not supported for the printer
Media is not picked up
•
•
Media is not coming out correctly
Pages are skewing
•
•
Multiple pages are being picked up
Media is not supported for the printer
Use only media that is supported for the printer and the tray being used. For more
information, see
Media specifications.
Media is not picked up
• Make sure media is loaded in the tray. For more information, see Load media.
Fan the media before loading.
• Make sure the paper guides are snug, but not tight, against the stack.
• Make sure media in the tray is not curled. Uncurl paper by bending it in the
opposite direction of the curl.
• Make sure to fully extend the input tray extension.
Media is not coming out correctly
If printed media stacks up outside the printer, it can prevent media from coming out of
the printer correctly.
Pages are skewing
• Make sure the media loaded in the input tray is aligned to the paper guide.
• Load media into the printer only when it is not printing.
• Make sure to fully extend the input tray extension.
78 Solve a problem
Page 83

Multiple pages are being picked up
• Fan the media before loading.
• Make sure the paper guides are snug, but not tight, against the stack.
• Make sure the tray is not overloaded with paper.
• Use HP media for optimum performance and efficiency.
Solve copy problems
If the following topics do not help, see HP support for information about HP support.
No copy came out
•
Copies are blank
•
•
Documents are missing or faded
•
Size is reduced
Copy quality is poor
•
•
Copy defects are apparent
•
The printer prints half a page, then ejects the paper
Paper mismatch
•
No copy came out
• Check the power
◦ If using AC power, make sure that the power cord is securely connected,
and the printer turned on.
◦ If using a battery, make sure that the battery is charged, and the printer
turned on.
• Check the status of the printer
◦ The printer might be busy with another job. Check the control-panel display
for information about the status of jobs. Wait for any job that is processing to
finish.
◦ The printer might be jammed. Check for jams. See
• Check the input tray
Make sure that media is loaded. See
• Check the battery charge level
If the printer is using battery power, make sure the battery is charged and
functioning properly. If the battery charge level is critically low, the printer might
not print the entire page before ejecting the page. Plug in the power cord to begin
charging the battery. For more information about using the battery, see
use the battery.
Clear jams.
Load media for more information.
Install and
Solve copy problems 79
Page 84

Chapter 6
Copies are blank
• Check the media
The media might not meet HP media specifications (for example, the media is too
moist or too rough). See
• Check the settings
The contrast setting might be set too light. On the printer control panel, touch
Copy, touch Lighter Darker, and then use the arrows to create darker copies.
• Check the scanner
Make sure that the original has been loaded correctly. For more information, see
Load an original in the scanner.
Documents are missing or faded
• Check the media
The media might not meet HP media specifications (for example, the media is too
moist or too rough). See
• Check the settings
The quality setting of Fast (which produces draft-quality copies) might be
responsible for the missing or faded documents. Change to the Normal or Best
setting.
• Check the original
◦ The accuracy of the copy depends on the quality and size of the original.
Use the Copy menu to adjust the brightness of the copy. If the original is
too light, the copy might not be able to compensate, even if you adjust the
contrast.
◦ Colored backgrounds might cause images in the foreground to blend into
the background, or the background might appear in a different shade.
Media specifications for more information.
Media specifications for more information.
Size is reduced
• The reduce/enlarge or other copy feature might have been set from the printer
control panel to reduce the scanned image. Check the settings for the copy job to
make sure that they are for normal size.
• The HP software settings might be set to reduce the scanned image. Change the
settings, if needed. See the onscreen Help for the HP software for more
information.
Copy quality is poor
• Take steps to improve the copy quality
◦ Use quality originals.
◦ Load the original correctly. If the original is loaded incorrectly in the scanner,
it might skew, causing unclear images. See
information.
80 Solve a problem
Media specifications for more
Page 85

◦ Use or make a carrier sheet to protect the originals.
◦ For better copy quality, avoid using the printer under direct sunlight or
intense light.
• Check the scanner
The scanner might need cleaning. To clean the scanner, use the cleaning cloth
provided with the printer and see the information provided with the cloth.
Copy defects are apparent
• Vertical white or faded stripes
The media might not meet HP media specifications (for example, the media is too
moist or too rough). See
• Too light or dark
Try adjusting the contrast and copy-quality settings.
• Copy is slanted or skewed
Make sure that the scanner width adjuster is snug against the side of the media.
• Unclear text
◦ Try adjusting the contrast and copy-quality settings.
◦ The default enhancement setting might not be suitable for the job. Check
the setting and change it to enhance text or photographs, if needed. For
more information, see
• Incompletely filled text or graphics
Try adjusting the contrast and copy-quality settings.
• Large, black typefaces look splotchy (not smooth)
The default enhancement setting might not be suitable for the job. Check the
setting and change it to enhance text or photographs, if needed. For more
information, see
Media specifications for more information.
Change copy settings.
Change copy settings.
The printer prints half a page, then ejects the paper
Clean the ink cartridge
Complete the ink cartridge cleaning procedure. For more information, see
cartridges automatically.
Check the battery charge level
If the printer is using battery power, make sure the battery is charged and functioning
properly. If the battery charge level is critically low, the printer might not print the entire
page before ejecting the page. Plug in the power cord to begin charging the battery.
For more information about using the battery, see
Check the media settings
• Make sure you select the correct print quality settings in the print driver for the
media loaded in the trays.
• Make sure the page settings in the print driver match the page size of media
loaded in the tray.
To clean ink
Install and use the battery.
Solve copy problems 81
Page 86

Chapter 6
More than one page feeds through the printer
For more information on paper-feed problems, see
There is a blank page in the file
Check the file to make sure there is no blank page.
Paper mismatch
Check the settings
Verify that the loaded media size and type matches the control panel settings.
Solve scan problems
If the following topics do not help, see HP support for information about HP support.
NOTE: If you are starting the scan from a computer, see the software Help for
troubleshooting information.
• Scanner did nothing
Scan takes too long
•
•
Part of the document did not scan or text is missing
Text cannot be edited
•
•
Error messages appear
•
Scanned image quality is poor
Scan defects are apparent
•
Solve paper-feed problems.
Scanner did nothing
• Check the original
Make sure that the original is loaded correctly. For more information, see
original in the scanner.
• Check the printer
◦ To scan to computer or e-mail, the printer must be connected to the
computer through a USB connection.
◦ The printer might be coming out of Sleep mode after a period of inactivity,
which delays processing a short while. Wait until the Home screen appears
on the printer control-panel display.
• Check the HP software
Make sure the HP software provided with the printer is installed correctly.
82 Solve a problem
Load an
Page 87

Scan takes too long
Check the settings
◦ If you set the resolution too high, the scan job takes longer and results in larger
files. To obtain good results when scanning or copying, do not use a resolution
that is higher than needed. You can lower the resolution to scan more quickly.
◦ If you acquire an image through TWAIN, you can change the settings so that the
original scans in black and white. See the onscreen Help for the TWAIN program
for information.
Part of the document did not scan or text is missing
• Check the original
◦ Make sure that the original document meets minimum size requirements.
For more information, see
◦ Make sure that you loaded the original correctly. For more information, see
Load an original in the scanner.
◦ Colored backgrounds can cause images in the foreground to blend into the
background. Try adjusting the settings before you scan the original, or try
enhancing the image after you scan the original.
• Check the settings
◦ Make sure that the input media size is large enough for the original that you
are scanning.
◦ If you are using the HP software provided with the printer, the default
settings in the HP software might be set to automatically perform a specific
task other than the one that you are attempting. See the onscreen Help for
the HP software for instructions about changing the properties.
Load an original in the scanner.
Text cannot be edited
• Check the settings
◦ When you scan the original, make sure that you select a document type in
the software that creates editable text. If text is classified as a graphic, it is
not converted to text.
◦ If you are using a separate OCR (optical character recognition) program,
the OCR program might be linked to a word-processing program that does
not perform OCR tasks. For more information, see the documentation
provided with the OCR program.
◦ Make sure you have selected an OCR language that corresponds to the
language used for the document you are scanning. For more information,
see the documentation provided with the OCR program.
• Check the originals
◦ When scanning documents as editable text, the original must be loaded into
the scanner with the top forward and face down. Also, make sure the
document is not skewed. For more information, see
scanner.
◦ The software might not recognize text that is tightly spaced. For example, if
the text that the software converts has missing or combined characters, "rn"
might appear as "m."
Load an original in the
Solve scan problems 83
Page 88

Chapter 6
◦ The accuracy of the software depends on the image quality, text size, and
structure of the original and the quality of the scan itself. Make sure that
your original has good image quality.
◦ Colored backgrounds can cause images in the foreground to blend too
much.
Error messages appear
• "Unable to activate TWAIN source" or "An error occurred while acquiring
the image"
◦ If you are acquiring an image from another device, such as a digital camera
or another scanner, make sure that the other device is TWAIN-compliant.
Devices that are not TWAIN-compliant do not work with the HP software.
◦ Make sure that you have connected the USB cable to the correct port on the
back of the computer.
◦ Verify that the correct TWAIN source is selected. In the software, check the
TWAIN source by selecting Select Scanner on the File menu.
• Error, The Scan cannot be performed because another program has control
of the HP imaging device
If you are using a computer running Mac OS X, quit the HP Scan application. If
you get the error message again, restart the computer and try to scan again.
Scanned image quality is poor
The original is a second-generation photo or picture
Reprinted photographs, such as those in newspapers or magazines, are printed by
using tiny dots of ink that make an interpretation of the original photograph, which
degrades the quality. Often, the ink dots form unwanted patterns that can be detected
when the image is scanned or printed or when the image appears on a screen. If the
following suggestions do not solve the problem, you might need to use a better-quality
version of the original.
◦ To eliminate the patterns, try reducing the size of the image after scanning.
◦ Print the scanned image to see if the quality is better.
◦ Make sure that the resolution and color settings are correct for the type of scan
job.
Text or images on the back of a two-sided original appear in the scan
Two-sided originals can "bleed" text or images from the back side to the scan if the
originals are printed on media that is too thin or too transparent.
The scanned image is skewed (crooked)
The original might have been placed incorrectly. Be sure to use the media guide when
you load the original. For more information, see
The image quality is better when printed
The image that appears on the screen is not always an accurate representation of the
quality of the scan.
◦ Try adjusting the computer monitor settings to use more colors (or levels of gray).
On Windows computers, you typically make this adjustment by opening Display
on the Windows control panel.
◦ Try adjusting the resolution and color settings.
Load an original in the scanner.
84 Solve a problem
Page 89

The scanned image shows blots, lines, vertical white stripes, or other defects
The defects might be on the original and not a result of the scanning process.
Graphics look different from the original
The graphics settings might not be suitable for the type of scan job that you are
performing. Try changing the graphics settings.
• Take steps to improve the scan quality
◦ Use high-quality originals.
◦ Load the original correctly. If the original is loaded incorrectly in the scanner,
it might skew, which causes unclear images. For more information, see
Load an original in the scanner.
◦ Adjust the software settings according to how you plan to use the scanned
page.
◦ Use or make a carrier sheet to protect the originals.
◦ For better scan quality, avoid using the printer under direct sunlight or
intense light.
• Check the scanner
The scanner might need cleaning. To clean the scanner, use the cleaning cloth
provided with the printer and see the information provided with the cloth.
Scan defects are apparent
• Blank pages
Make sure that the original document is loaded correctly. For more information,
see
Load an original in the scanner
• Too light or dark
◦ Try adjusting the settings. Be sure to use the correct resolution and color
settings.
◦ The original image might be very light or dark or might be printed on colored
paper.
• Unclear text
Try adjusting the settings. Make sure that the resolution and color settings are
correct.
• Size is reduced
The HP software settings might be set to reduce the scanned image. See the HP
software Help for more information about changing the settings.
Troubleshoot installation issues
If the following topics do not help, see HP support for more information.
•
Hardware installation suggestions
•
Software installation suggestions
Troubleshoot installation issues 85
Page 90

Chapter 6
Hardware installation suggestions
Check the printer
• Make sure that all packing tape and material have been removed from outside
and inside the printer.
• Make sure that the printer is loaded with paper.
• Make sure that no errors on the control panel.
Check the hardware connections
• Make sure that any cords and cables that you are using are in good working
order.
• Make sure that the power cord is connected securely to both the printer and to a
working power outlet. Or, make sure that the battery is correctly installed and
charged.
Check the battery charge level
If the printer is using battery power, make sure the battery is charged and functioning
properly. If the battery charge level is critically low, the printer might not print the entire
page before ejecting the page. Plug in the power cord to begin charging the battery.
For more information about using the battery, see
Check the covers
Make sure that all latches and covers are closed correctly.
Install and use the battery.
Software installation suggestions
Check the computer system
• Make sure that the computer is running one of the supported operating systems.
• Make sure that the computer meets at least the minimum system requirements.
• In the Windows device manager, make sure that the USB drivers have not been
disabled.
• If you are using a computer running Windows, and the computer cannot detect
the printer, run the uninstallation utility (util\ccc\uninstall.bat on the HP software
CD) to perform a clean uninstallation of the print driver. Restart the computer, and
reinstall the print driver.
Verify installation preliminaries
• Before installing software, make sure that all other programs are closed.
• If the computer does not recognize the path to the CD-ROM drive that you type,
make sure that you are specifying the correct drive letter.
• If the computer cannot recognize the HP software CD in the CD-ROM drive,
inspect the HP software CD for damage. You can download the print driver from
the HP Web site:
NOTE: After correcting any problems, run the installation program again.
86 Solve a problem
www.hp.com/support.
Page 91

Problems setting up Bluetooth communication
If you have problems printing using a Bluetooth connection, try the following
suggestions. For more information on configuring wireless settings, see
printer for Bluetooth communication.
Windows
▲ Check the Bluetooth settings. For more information, see
Bluetooth communication.
Mac OS
▲ Delete and re-add the printer in Print & Fax or Print & Scan (Mac OS).
Check the Bluetooth settings
• Check the Bluetooth settings. For more information, see Set up the printer for
Bluetooth communication
• To configure Bluetooth settings or monitor printer status (such as ink levels) using
Toolbox (Windows), you must connect the printer to the computer with a USB
cable.
Check the Bluetooth signal
Wireless communication can be interrupted or unavailable if there is signal
interference, distance or signal strength problems, or if the printer is not ready .
• Make sure the printer is within range of the Bluetooth sending device. Bluetooth
printing allows wireless printing up to 10 meters (30 feet).
• If a document doesn't print, there could be signal interruption. If a message
appears on the computer explaining that there is a signal problem, cancel the
print job and then resend it from the computer.
Set up the printer for
Set up the
Understand the printer information pages
The printer information pages contain detailed printer information, including firmware
version number, serial number, service ID, print cartridge information, default page
settings, and printer media settings.
NOTE: The printer must not be processing any print jobs while you print the
configuration and diagnostic pages.
If you need to call HP, it is useful to print diagnostic and configuration pages before
calling.
Understand the printer information pages 87
Page 92

Chapter 6
Print printer information pages
You can print the following printer information pages from the control panel on the
printer, without being connected to the printer.
To print a print quality page
On the printer control panel, touch Setup, touch Reports, and then touch Print
Quality Diagnostic Report.
Use the report to view current print cartridge health, and to troubleshoot printer
problems.
To print a status page
On the printer control panel, touch Setup, touch Reports, and then touch Print Status
Report.
Use the status page to view default page settings and printer media settings.
Clear jams
Occasionally, media becomes jammed during a job. Try the following remedies to
reduce jams.
• Make sure that you are printing with media that meets specifications. For more
information, see
• Make sure that you are printing with media that is not wrinkled, folded, or
damaged.
• Make sure that the input tray is loaded correctly and is not too full. For more
information, see
• Make sure that the original is loaded correctly. For more information, see
original in the scanner.
This section contains the following topics:
Clear a jam in the printer
•
Tips for avoiding jams
•
Media specifications.
Load media.
Load an
Clear a jam in the printer
To clear a jam
Use these steps to clear a paper jam.
1. Turn off the printer.
2. Unplug the power cord.
NOTE: If using the optional battery, remove the battery. For more
information, see
3. Remove media that is not jammed from the input tray and the output slot.
NOTE: Do not put your hands inside the input tray. Use tweezers instead
and be careful not to scratch the inside of the printer.
88 Solve a problem
Install and use the battery.
Page 93

4. Locate the media jam.
Jammed media is visible in the output slot
a. Gently pull it toward you and out from the slot. If the media is not visible,
open the cartridge access door and clear jammed media.
NOTE: Remove jammed media slowly and steadily to prevent media
tear.
LTR
LGL
A4
B5
A5
b. If the print carriage is obstructing the jam, gently push it to one side and
then remove the media.
c. If the jammed media is not visible in the print area inside the printer, remove
what is visible in the input tray.
Clear jams 89
Page 94

Chapter 6
Media is jammed in the scanner
a. Lift the latch to release the scanner glass.
b. Gently pull the media from behind the control panel, up and away from the
printer.
c. After all jammed media is removed from the scanner, gently lift the scanner
glass until it snaps into place.
90 Solve a problem
Page 95

5. Plug in the power cord, and then turn on the printer.
NOTE: If using the optional battery, reconnect the battery.
6. Touch OK to continue the current job.
The printer continues the print job on the next page. Resend the page or pages
that were jammed in the printer.
Tips for avoiding jams
• Make sure that nothing is blocking the paper path.
• Do not overload the input tray. For more information, see
• Load paper correctly and when the printer is not printing. For more information,
Load media.
see
• Do not use media that is curled or crumpled.
• Always use media that conforms with specifications. For more information, see
Media specifications.
• Make sure media is aligned against the right side of the input tray.
• Make sure the media guides are adjusted snugly against the media, but do not
crinkle or bend it.
• Make sure to remove paper clips, staples, pins, or other attachments from the
paper.
Media specifications.
Clear jams 91
Page 96

Chapter 6
92 Solve a problem
Page 97

A Technical information
This section contains the following topics:
• Warranty information
• Printer specifications
• Regulatory information
• Environmental product stewardship program
• Third-party licenses
Warranty information
This section contains the following topics:
• Hewlett-Packard limited warranty statement
• Ink cartridge warranty information
Technical information 93
Page 98

Appendix A
Hewlett-Packard limited warranty statement
HP product Duration of limited warranty
Software Media 90 days
Printer 1 year
Print or Ink cartridges Until the HP ink is depleted or the “end of warranty” date
printed on the cartridge has been reached, whichever occurs
first. This warranty does not cover HP ink products that have
been refilled, remanufactured, refurbished, misused, or
tampered with.
Printheads (only applies to products with customer 1 year
replaceable printheads)
Accessories 1 year unless otherwise stated
A. Extent of limited warranty
1. Hewlett-Packard (HP) warrants to the end-user customer that the HP products specified above will be free from
defects in materials and workmanship for the duration specified above, which duration begins on the date of
purchase by the customer.
2. For software products, HP’s limited warranty applies only to a failure to execute programming instructions. HP
does not warrant that the operation of any product will be interrupted or error free.
3. HP's limited warranty covers only those defects that arise as a result of normal use of the product, and does not
cover any other problems, including those that arise as a result of:
a. Improper maintenance or modification;
b. Software, media, parts, or supplies not provided or supported by HP;
c. Operation outside the product's specifications;
d. Unauthorized modification or misuse.
4. For HP printer products, the use of a non-HP cartridge or a refilled cartridge does not affect either the warranty
to the customer or any HP support contract with the customer. However, if printer failure or damage is
attributable to the use of a non-HP or refilled cartridge or an expired ink cartridge, HP will charge its standard
time and materials charges to service the printer for the particular failure or damage.
5. If HP receives, during the applicable warranty period, notice of a defect in any product which is covered by HP's
warranty, HP shall either repair or replace the product, at HP's option.
6. If HP is unable to repair or replace, as applicable, a defective product which is covered by HP's warranty, HP
shall, within a reasonable time after being notified of the defect, refund the purchase price for the product.
7. HP shall have no obligation to repair, replace, or refund until the customer returns the defective product to HP.
8. Any replacement product may be either new or like-new, provided that it has functionality at least equal to that of
the product being replaced.
9. HP products may contain remanufactured parts, components, or materials equivalent to new in performance.
10. HP's Limited Warranty Statement is valid in any country where the covered HP product is distributed by HP.
Contracts for additional warranty services, such as on-site service, may be available from any authorized HP
service facility in countries where the product is distributed by HP or by an authorized importer.
B. Limitations of warranty
TO THE EXTENT ALLOWED BY LOCAL LAW, NEITHER HP NOR ITS THIRD PARTY SUPPLIERS MAKES
ANY OTHER WARRANTY OR CONDITION OF ANY KIND, WHETHER EXPRESS OR IMPLIED WARRANTIES
OR CONDITIONS OF MERCHANTABILITY, SATISFACTORY QUALITY, AND FITNESS FOR A PARTICULAR
PURPOSE.
C. Limitations of liability
1. To the extent allowed by local law, the remedies provided in this Warranty Statement are the customer's sole
and exclusive remedies.
2. TO THE EXTENT ALLOWED BY LOCAL LAW, EXCEPT FOR THE OBLIGATIONS SPECIFICALLY SET FORTH
IN THIS WARRANTY STATEMENT, IN NO EVENT SHALL HP OR ITS THIRD PARTY SUPPLIERS BE LIABLE
FOR DIRECT, INDIRECT, SPECIAL, INCIDENTAL, OR CONSEQUENTIAL DAMAGES, WHETHER BASED ON
CONTRACT, TORT, OR ANY OTHER LEGAL THEORY AND WHETHER ADVISED OF THE POSSIBILITY OF
SUCH DAMAGES.
D. Local law
1. This Warranty Statement gives the customer specific legal rights. The customer may also have other rights
which vary from state to state in the United States, from province to province in Canada, and from country to
country elsewhere in the world.
2. To the extent that this Warranty Statement is inconsistent with local law, this Warranty Statement shall be
deemed modified to be consistent with such local law. Under such local law, certain disclaimers and limitations
of this Warranty Statement may not apply to the customer. For example, some states in the United States, as
well as some governments outside the United States (including provinces in Canada), may:
a. Preclude the disclaimers and limitations in this Warranty Statement from limiting the statutory rights of a
consumer (e.g., the United Kingdom);
b. Otherwise restrict the ability of a manufacturer to enforce such disclaimers or limitations; or
c. Grant the customer additional warranty rights, specify the duration of implied warranties which the
manufacturer cannot disclaim, or allow limitations on the duration of implied warranties.
3. THE TERMS IN THIS WARRANTY STATEMENT, EXCEPT TO THE EXTENT LAWFULLY PERMITTED, DO
NOT EXCLUDE, RESTRICT, OR MODIFY, AND ARE IN ADDITION TO, THE MANDATORY STATUTORY
RIGHTS APPLICABLE TO THE SALE OF THE HP PRODUCTS TO SUCH CUSTOMERS.
The name and address of the HP entity responsible for the performance of the HP Limited Warranty in your country is as
follows:
United Kingdom: Hewlett-Packard Ltd Cain Road Bracknell GB-Berks RG12 1HN
Eire: Hewlett-Packard Ireland Limited, 63-74 Sir John Rogerson's Quay, Dublin 2
Malta: Hewlett-Packard International Trade B.V. Malta Branch, 48, Amery Street, Sliema SLM 1701, MALTA
You may have additional statutory rights against the seller based on your purchase agreement. Those rights are not in any
way affected by this HP Limited Warranty.
94 Technical information
HP Limited Warranty
Page 99

Ink cartridge warranty information
The HP cartridge warranty is applicable when the printer is used in its designated HP printer. This
warranty does not cover HP ink products that have been refilled, remanufactured, refurbished,
misused, or tampered with.
During the warranty period the printer is covered as long as the HP ink is not depleted and the
end of warranty date has not been reached. The end of warranty date, in YYYY/MM/DD format,
can be found on the printer as indicated:
Warranty information 95
Page 100

Appendix A
Printer specifications
This section contains the following topics:
•
Physical specifications
• Printer features and capacities
Processor and memory specifications
•
•
System requirements
• Memory device specifications
Mobile phone printing information
•
•
Media specifications
• Print resolution
Copy specifications
•
•
Scan specifications
• Operating environment
Electrical requirements
•
•
Acoustic emission specification
Physical specifications
Size (width x depth x height)
• Printer: 355.6 x 176.5 x 89.5 mm (14.00 x 6.95 x 3.52 inches)
• Printer with battery: 355.6 x 198.5 x 89.5 mm (14.00 x 7.81 x 3.52)
Printer weight (does not include print supplies)
• Printer: 3.0 kg (6.5 lb)
• Printer with battery: 3.1 kg (6.9 lb)
Printer features and capacities
Feature Capacity
Connectivity • USB 2.0-compliant high-speed device
Ink cartridges Black and tri-color ink cartridge
Supply yields Visit
Printer languages HP PCL 3 GUI
Printer control panel language support
Language availability varies by country/region.
96 Technical information
• PictBridge/USB 2.0 high-speed host
port
• Memory cards (Secure Digital, High
Capacity Secure Digital)
• Bluetooth 2.0 Enhanced Data Rate,
backward compatible with 1.0
(Bluetooth Profiles supported: HCRP,
BIP, OPP, SPP)
www.hp.com/pageyield/ for more
information on estimated ink cartridge yields.
Bulgarian, Croatian, Czech, Danish, Dutch,
English, Finnish, French, German, Greek,
Hungarian, Italian, Japanese, Korean,
Norwegian, Polish, Portuguese, Romanian,
Russian, Simplified Chinese, Slovak,
 Loading...