

Page 1

© Copyright HewlettPackard Company 1996
All rights are reserved. No part
of the document may be
photocopied, reproduced, or
translated to another language
without the prior written
consent of Hewlett-Packard
Company.
Publication number:
C5300-90004
First Edition,
November, 1996
Printed in U.S.A.
AA
cknockno
wledgmentswledgments
A
ckno
wledgments
AA
cknockno
wledgmentswledgments
AGaramond, Garamond,
™
Adobe
, PhotoShop LE,
PhotoDeluxe, are registered
trademarks of Adobe Systems,
Incorporated which may
be registered in certain
jurisdictions.
MS-DOS
®
and Windows
®
are registered trademarks of
Microsoft Corporation.
NN
oticeotice
N
otice
NN
oticeotice
The information contained in
this document is subject to
change without notice and
should not be construed as a
commitment by the HewlettPackard Company.
HH
ee
wlett-Pwlett-P
ackarackar
H
e
wlett-P
HH
ee
wlett-Pwlett-P
rr
esponsibility for any erresponsibility for any err
r
esponsibility for any err
rr
esponsibility for any erresponsibility for any err
that may appear in thisthat may appear in this
that may appear in this
that may appear in thisthat may appear in this
document nor does it makedocument nor does it make
document nor does it make
document nor does it makedocument nor does it make
exprexpr
essed or implied warrantyessed or implied warranty
expr
essed or implied warranty
exprexpr
essed or implied warrantyessed or implied warranty
of any kind with rof any kind with r
of any kind with r
of any kind with rof any kind with r
material, including, but notmaterial, including, but not
material, including, but not
material, including, but notmaterial, including, but not
limited to, the impliedlimited to, the implied
limited to, the implied
limited to, the impliedlimited to, the implied
warranties of merwarranties of mer
warranties of mer
warranties of merwarranties of mer
and fitness for a parand fitness for a par
and fitness for a par
and fitness for a parand fitness for a par
purpose.purpose.
purpose. The Hewlett-Packard
purpose.purpose.
d assumes nod assumes no
ackar
d assumes no
ackarackar
d assumes nod assumes no
orsors
ors
orsors
egaregar
d to thisd to this
egar
d to this
egaregar
d to thisd to this
chantabilitychantability
chantability
chantabilitychantability
ticularticular
ticular
ticularticular
Company shall not be liable
for incidental or consequential
damages in connection with,
or arising out of the furnishing, performance, or use of
this document and the
program material which it
describes.
WARNING
The Warning label calls
attention to a procedure,
practice, or the like which, if
not correctly performed or
adhered to, could result in
personal injury. Do not
proceed beyond a Warning
label until the indicated
conditions are fully understood and met.
CAUTION
The Caution label calls
attention to an operating
procedure, practice, or the
like, which, if not correctly
performed or adhered to,
could result in damage to or
destruction of part or all of the
product. Do not proceed
beyond a Caution label until
the indicated conditions are
fully understood and met.
Regulatory information can
be found in the “Technical
Information” chapter of this
User’s Guide.
It is not lawful in many places
to make copies of the
following items. When in
doubt, check with a legal
representative first.
• Governmental paper or
documents
– Passports
– Immigration papers
– Selective service papers
– Identification badges,
cards, or insignias
• Governmental stamps
– Postage stamps
– Food stamps
• Checks or drafts drawn on
Governmental agencies
• Paper currency, traveler’s
check, or money orders
• Certificates of deposit
• Copyrighted works
OmniPage Limited Edition is
a registered trademark of
Caere Corporation.
®
Intel
and Pentium® are
registered trademarks of Intel
Corporation.
Hewlett-Packard Company
San Diego Printer Division
16399 W. Bernardo Drive
San Diego, CA 92127-1899 U.S.A.
Owner’s Information
HP OfficeJet Pro 1150C
Serial Number:
Date of Purchase:
Place of Purchase:
Address:
Phone Number:
Service Contract Number:
Date of Contract Expiration:
Adobe PhotoDeluxe Serial Number: HGW100H7100006-570
Adobe PhotoShop LE Serial Number:
Caere OmniPage Serial Number:
Page 2

User’s Guide
HP OfficeJet Pro 1150C
Page 3

Safety symbols
!
This symbol is placed on the printer where it is
necessary for you to refer to the manual in order
to understand a hazard.
This symbol is placed on the printer within the
area where hazardous voltage is present. Only
trained service persons should perform work in
this area.
This symbol is placed on the printer within the
area where electrostatic discharge (ESD) may
occur. ESD can damage the printer’s electronic
components. Avoid touching electronic components or circuit paths. Use proper grounding
devices when circuits are open to outside areas.
Page 4

Contents
chapter 1 Setting Up Your New HP OfficeJet Pro 1150C
Features ............................................................................................................................................................................................ 1-2
System Requirements ........................................................................................................................................................................ 1-3
LPTx/Parallel Port ........................................................................................................................................................................ 1-4
Eight Easy Steps to Set Up Your HP OfficeJet Pro 1150C ................................................................................................................. 1-6
Unpack Your HP OfficeJet Pro 1150C ......................................................................................................................................... 1-6
Attach the Front-Panel Overlay .................................................................................................................................................... 1-8
Unlock the Scanner ..................................................................................................................................................................... 1-8
Load Paper into Your HP OfficeJet Pro 1150C ............................................................................................................................. 1-9
Insert the Black and Color Print Cartridges ................................................................................................................................ 1-10
Connect the Cable and Power Cord ............................................................................................................................................ 1-12
Install the Software .................................................................................................................................................................. 1-14
Windows 95 Installation ...................................................................................................................................................... 1-15
Windows 3.1x Installation ................................................................................................................................................... 1-22
Diskette Users Only ............................................................................................................................................................. 1-23
Align Your Black and Color Print Cartridges ............................................................................................................................... 1-24
chapter 2 Copying
Start Copying .................................................................................................................................................................................... 2-1
Change Copy Quality ......................................................................................................................................................................... 2-2
Reduce or Enlarge Copies .................................................................................................................................................................. 2-3
Copy on a Variety of Paper Types ...................................................................................................................................................... 2-3
Make Copies Lighter or Darker ........................................................................................................................................................... 2-4
Change Color Intensity ...................................................................................................................................................................... 2-4
Change the Front Panel Language ...................................................................................................................................................... 2-5
Change Copy Paper Size .................................................................................................................................................................... 2-5
Stop Copying ..................................................................................................................................................................................... 2-6
chapter 3 Printing
Start Printing .................................................................................................................................................................................... 3-2
Stop Printing ..................................................................................................................................................................................... 3-2
Stop a print job from the HP OfficeJet Pro 1150C ................................................................................................................. 3-2
Stop a print job from Windows 95 ......................................................................................................................................... 3-3
Stop a print job from Windows 3.1x ....................................................................................................................................... 3-3
chapter 4 Scanning
Scan Text or Graphics into Your Document ........................................................................................................................................ 4-3
Windows 95 .......................................................................................................................................................................... 4-3
Windows 3.1x ....................................................................................................................................................................... 4-4
Scan Text into a Separate File Using Caere OmniPage Limited Edition ................................................................................................ 4-5
Scan Pictures into a Separate File Using HP OfficeJet Pro PictureScan .............................................................................................. 4-6
Edit Your Scanned Pictures ................................................................................................................................................................ 4-7
Edit your scanned pictures in Windows 95 ............................................................................................................................. 4-7
Edit your scanned pictures in Windows 3.1x (Windows 95 if you are not using HP PictureLink) .............................................. 4-7
Scan and edit your pictures using Adobe PhotoDeluxe ............................................................................................................ 4-8
Page 5

chapter 5 Getting Help
Get Task Help ................................................................................................................................................................................... 5-1
Get Troubleshooting Help .................................................................................................................................................................. 5-2
Use Product Services ......................................................................................................................................................................... 5-3
Get Help from HP .............................................................................................................................................................................. 5-3
HP Support Services .............................................................................................................................................................. 5-3
HP Customer Support ............................................................................................................................................................ 5-5
Get Help from Caere .......................................................................................................................................................................... 5-7
Get Help from Adobe ......................................................................................................................................................................... 5-8
chapter 6 Maintaining Your HP OfficeJet Pro 1150C
Cleaning the exterior case ................................................................................................................................................................. 6-1
Cleaning the glass ............................................................................................................................................................................. 6-2
chapter 7 Hewlett-Packard Limited Warranty
Extent of Limited Warranty ................................................................................................................................................................ 7-1
Limitations of Warranty ..................................................................................................................................................................... 7-3
Limitations of Liability ....................................................................................................................................................................... 7-4
Warranty Service ............................................................................................................................................................................... 7-4
Express service ..................................................................................................................................................................... 7-4
Warranty Upgrades ............................................................................................................................................................................ 7-5
Returning Your HP OfficeJet Pro 1150C for Service .......................................................................................................................... 7-5
Prepare your HP OfficeJet Pro 1150C for shipment ............................................................................................................... 7-6
chapter 8 Technical Information
System Requirements ........................................................................................................................................................................ 8-1
Hewlett-Packard Software Solution ................................................................................................................................................... 8-1
Adobe PhotoDeluxe (CD-ROM) ........................................................................................................................................................... 8-2
Adobe Photoshop LE (Floppy Disks) .................................................................................................................................................... 8-2
Caere OmniPage Limited Edition ......................................................................................................................................................... 8-2
Speed Specifications ......................................................................................................................................................................... 8-3
Functional Specifications ................................................................................................................................................................... 8-3
Power Specifications ......................................................................................................................................................................... 8-4
Environmental Specifications ............................................................................................................................................................. 8-4
Physical Specifications ...................................................................................................................................................................... 8-4
Regulatory Notices ............................................................................................................................................................................ 8-5
Declaration of Conformity (According to ISO/IEC Guide 22 and EN45014) .......................................................................................... 8-6
Ordering accessories and supplies ...................................................................................................................................................... 8-6
Index
Page 6

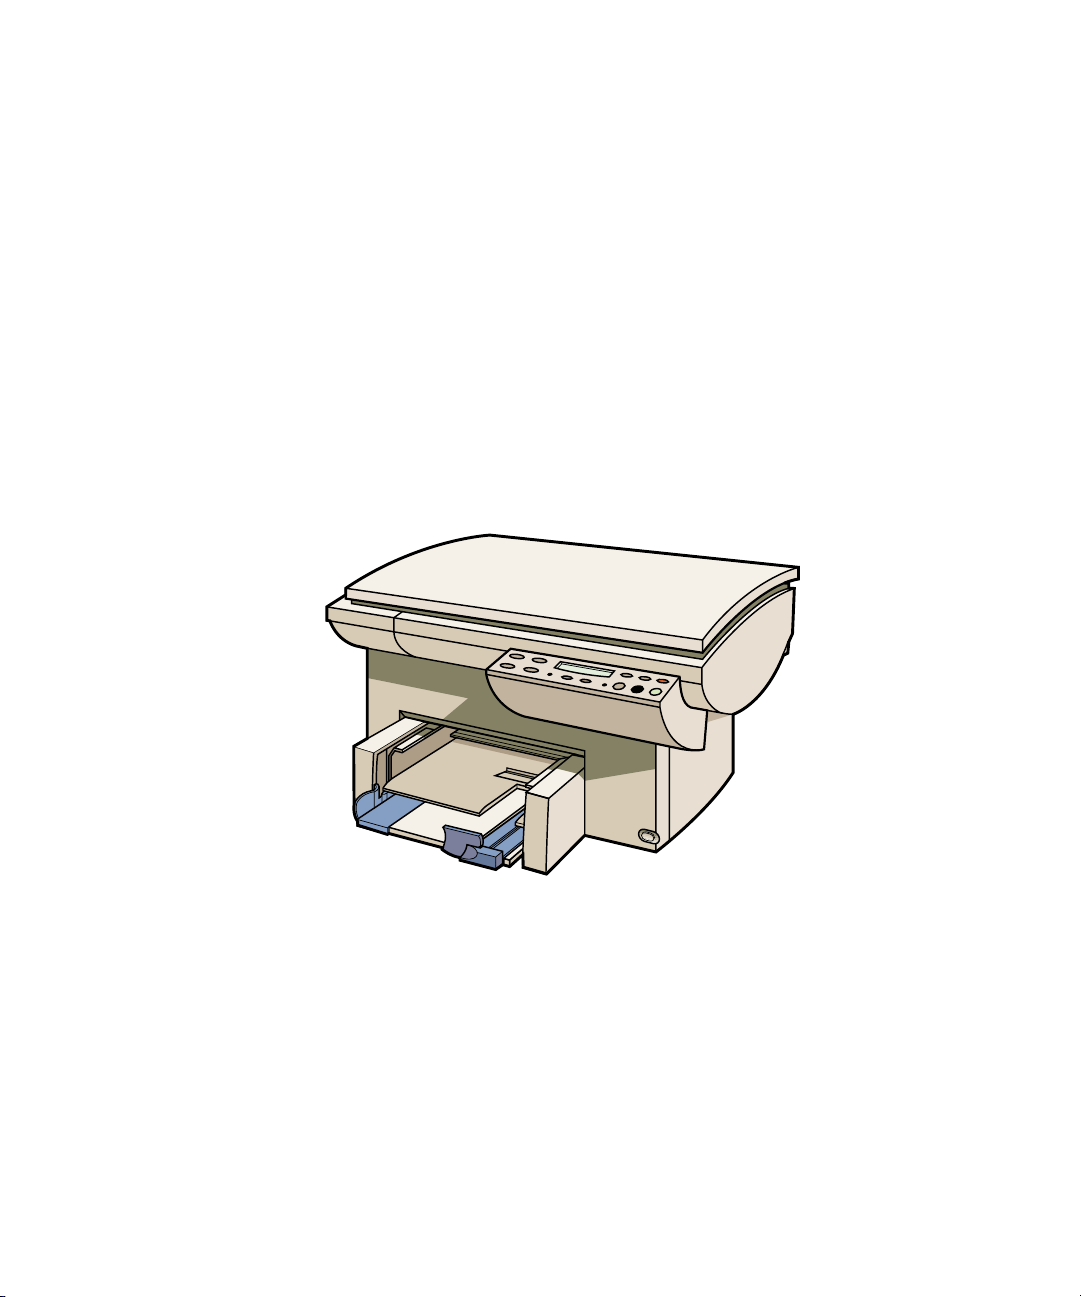
Setting Up Your New
chapter one
HP OfficeJet Pro 1150C
1
Congratulations! You have just purchased the one system that will handle
your crucial office functions more efficiently—the HP OfficeJet Pro
1150C. With your HP OfficeJet Pro 1150C you can print, scan, or copy
documents in color or black and white.
This user’s guide will get you up and running and show you how to
perform the most common tasks with your HP OfficeJet Pro 1150C.
Although this guide provides a broad perspective of what you can do with
your HP OfficeJet Pro 1150C, at times you may need additional
information. If you find that you need more detail, use online help. For
more information on accessing online help, see Chapter 5, “Getting Help.”
Or for late-breaking updates, click on the
Pro Utilities program group/folder, which will be installed with
the software included in the HP OfficeJet Pro 1150C box.
Readme icon in your HP OfficeJet
NOTE Do not plug in the HP OfficeJet Pro 1150C. Follow the eight easy set up steps on
the following pages.
HP OfficeJet Pro 1150C User’s Guide 1-1
Page 7
Features
Your HP OfficeJet Pro 1150C provides you with:
◆
All-in-one professional quality color
◆
Printing software for Windows 3.1x and Windows 95
◆
Standalone scanning software for Windows 3.1x and Windows 95
◆
Caere OmniPage Limited Edition optical character recognition (OCR)
software for Windows 3.1x and Windows 95
◆
Adobe PhotoDeluxe image editing software for Windows 3.1x and
Windows95—available on CD-ROM only
◆
Microsoft Win32S software for Windows 3.1x
◆
HP PictureLink software for Windows 95 (scans images directly into
Windows 95 applications)
1-2 Setting Up Your New HP OfficeJet Pro 1150C
Page 8

System Requirements
To set up your HP Officejet Pro 1150C, your computer must meet these
specifications.
Minimum Recommended
(Custom install of) (Typical installation)
Printing and Scanning
software only)
Processor 486 Pentium
DOS 6.0 or later 6.0 or later
Windows 3.1x 95
RAM 8 MB 16 MB
Disk Space Needed
to Install 17 MB 51 MB
to Run 8 MB 38 MB
Video Display 256 colors 16.7 million colors
Media 3.5” floppy drive CD-ROM drive
Parallel Port Bidirectional IEEE-1284 ECP (Extended
Capabilities Port)
HP OfficeJet Pro 1150C User’s Guide 1-3
Page 9

LPTx/Parallel Port
DirDir
ect Connectionect Connection
Dir
ect Connection
DirDir
ect Connectionect Connection
dirdir
Your HP OfficeJet Pro 1150C must be connected
parallel port. Do not use a switch box or the pass-through
port of another parallel port product such as a scanner, data/tape drive,
or CD-ROM drive.
CAUTION Connecting your HP OfficeJet Pro 1150C to a switch box or the pass-through
port of another parallel product can cause erratic behavior of both products and
the possible loss of information.
PP
arar
allel Pallel P
oror
t Mt M
ode/Tode/T
P
ar
allel P
or
PP
arar
allel Pallel P
Your computer’s parallel port can be set to more than one mode. Most
computers have a Setup, Hardware Configuration, or other screen that is
displayed during the boot process. The screen displays your current settings.
Common settings for parallel port modes are: Centronics(R), Bi-directional,
ECP (Extended Capabilities Port), and EPP (Enhanced Parallel Port). In
order to scan using your HP OfficeJet Pro 1150C, you must have the port
set to bidirectional or ECP.
For the best scanning speed, your HP OfficeJet Pro 1150C needs to be
connected to an Extended Capabilities Port (ECP). This specific parallel port
mode is available in recently manufactured computers. Your computer may
have ECP mode but not have it turned on.
oror
t M
t Mt M
ode/T
ode/Tode/T
ypeype
ype
ypeype
ectly ectly
dir
ectly to your computer’s
dirdir
ectly ectly
NOTE If your computer does not have an ECP mode, set the port to bidirectional. Your
HP OfficeJet Pro 1150C will work in bidirectional mode. It will scan more
slowly than if the computer was set to ECP.
If your computer has a separate EPP mode, do not use it. Set your port to bidirectional or ECP only. Hewlett-Packard does not support EPP mode with your HP
OfficeJet Pro 1150C.
To learn more about changing the parallel port mode in your computer,
consult your computer’s User’s Guide or the ECP document that will be
installed in your HP OfficeJet Pro Utilities program group/folder when you
install your software.
1-4 Setting Up Your New HP OfficeJet Pro 1150C
Page 10

If you have more parallel products than you have ports or if your parallel
port does not support ECP, consider buying an ECP card for your computer.
This will be helpful especially if you do much scanning. The ECP document
in your HP OfficeJet Pro Utilities program group/folder contains a list of
recommended ECP cards.
Communication Communication
Communication
Communication Communication
As part of the software installation process, a test is performed to confirm
communication between your PC and the HP OfficeJet Pro 1150C. Results
of the test will be presented on your PC monitor. If the bidirectional
communication test fails, it is highly recommended you read important
information about bidirectional communication and ECP in the ECP
document that is located in your HP OfficeJet Pro Utilities program group/
folder.
NOTE If bidirectional communication is not established during the communications
test, you must manually set the front panel language and paper size. Refer
to “Change the Front Panel Language” in Chapter 2.
TT
estest
T
est
TT
estest
HP OfficeJet Pro 1150C User’s Guide 1-5
Page 11
Eight Easy Steps to Set Up Your HP OfficeJet Pro 1150C
To properly set up your HP OfficeJet Pro 1150C, follow the eight easy steps
in this guide in the order shown below.
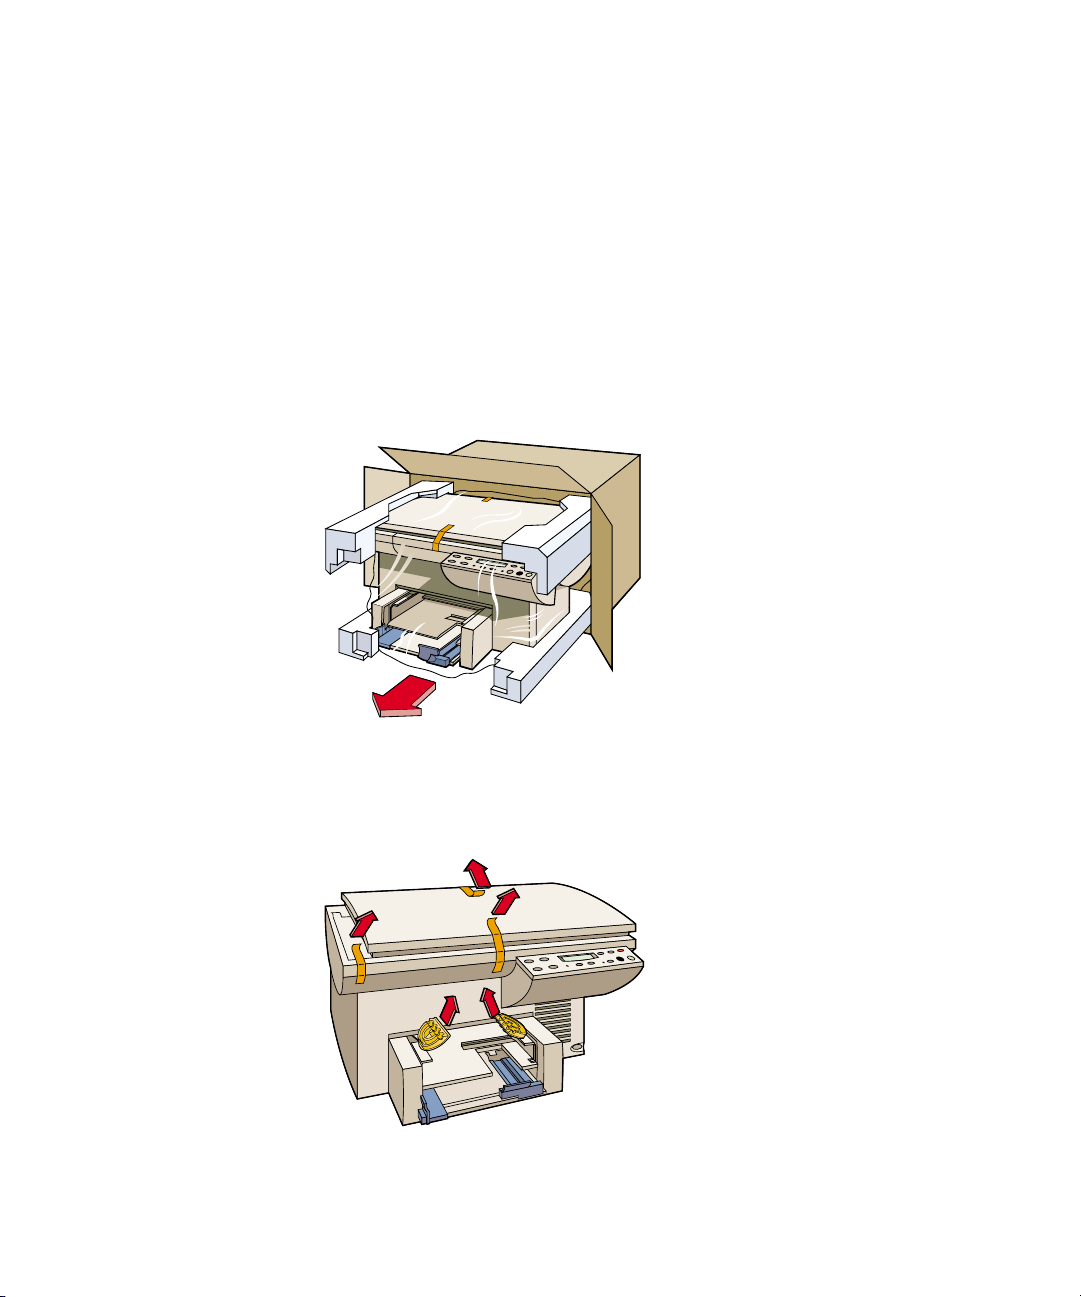
1 Unpack Your HP OfficeJet Pro 1150C
1 Remove the cardboard tray containing the accessory items.
2 Rest the box on its side and pull your HP OfficeJet Pro 1150C out.
3 Remove the packing material and the orange packing tape from the outside
of the unit.
4 Remove the two yellow/orange plastic inserts from the print tray by pulling
up and toward the center of the HP OfficeJet Pro 1150C.
1-6 Setting Up Your New HP OfficeJet Pro 1150C
Page 12

5 Check that the following items are included with your HP OfficeJet Pro
1150C:
◆
power cord
◆
IEEE-1284 parallel printer cable
◆
two CD-ROM disks and a set of software diskettes
◆
one black and one color print cartridge
◆
front-panel overlay (has text on it)
If any of the items are missing or damaged, contact the dealer from whom
you purchased your HP OfficeJet Pro 1150C.
HP OfficeJet Pro 1150C User’s Guide 1-7
Page 13
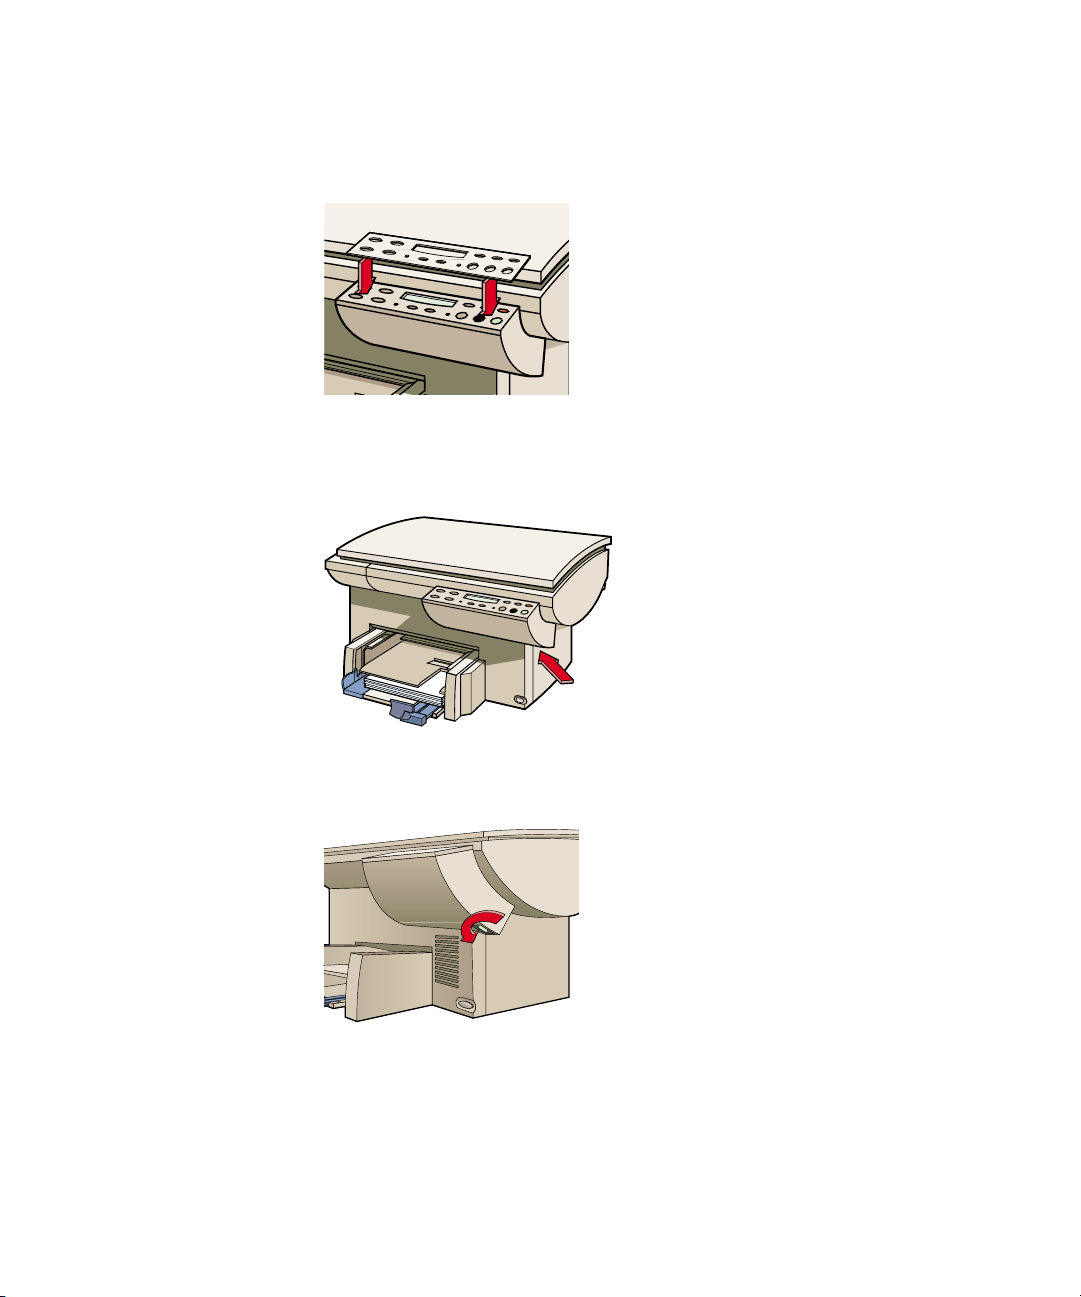
2 Attach the Front-Panel Overlay
Align the front-panel overlay with the front-panel buttons. Push straight
down firmly on both ends and the middle to snap the overlay into place.
3 Unlock the Scanner
The scanner lock is located beneath the front panel.
Unlock the scanner by twisting the green knob (lever) located beneath the
front panel, toward the back of your HP OfficeJet Pro 1150C, until it stops.
(The knob (lever) only turns one way.)
NOTE Leave the scanner unlocked unless you need to move your HP OfficeJet Pro
1150C. Locking the scanner protects it during moving. (Refer to “Returning your
HP OfficeJet Pro 1150C for Service” in Chapter 7 for locking instructions.)
1-8 Setting Up Your New HP OfficeJet Pro 1150C
Page 14
4 Load Paper into Your HP OfficeJet Pro 1150C
1 If you haven’t already done so, remove the yellow/orange shipping inserts
from the paper tray.
2 Slide the paper width and length adjusters to their outermost positions.
3 Insert up to a 3/4-inch (19 mm) stack of paper into the bottom (IN) tray,
print side down, until it stops.
NOTE The output tray can hold a maximum of 50 sheets. If you are printing more than
50 sheets, remove the excess sheets from the output tray. The excess sheets may
either fall off the tray or cause a paper jam if they are not removed.
4 Slide the paper width and length adjusters in until they stop at the edges
of the paper.
HP OfficeJet Pro 1150C User’s Guide 1-9
Page 15
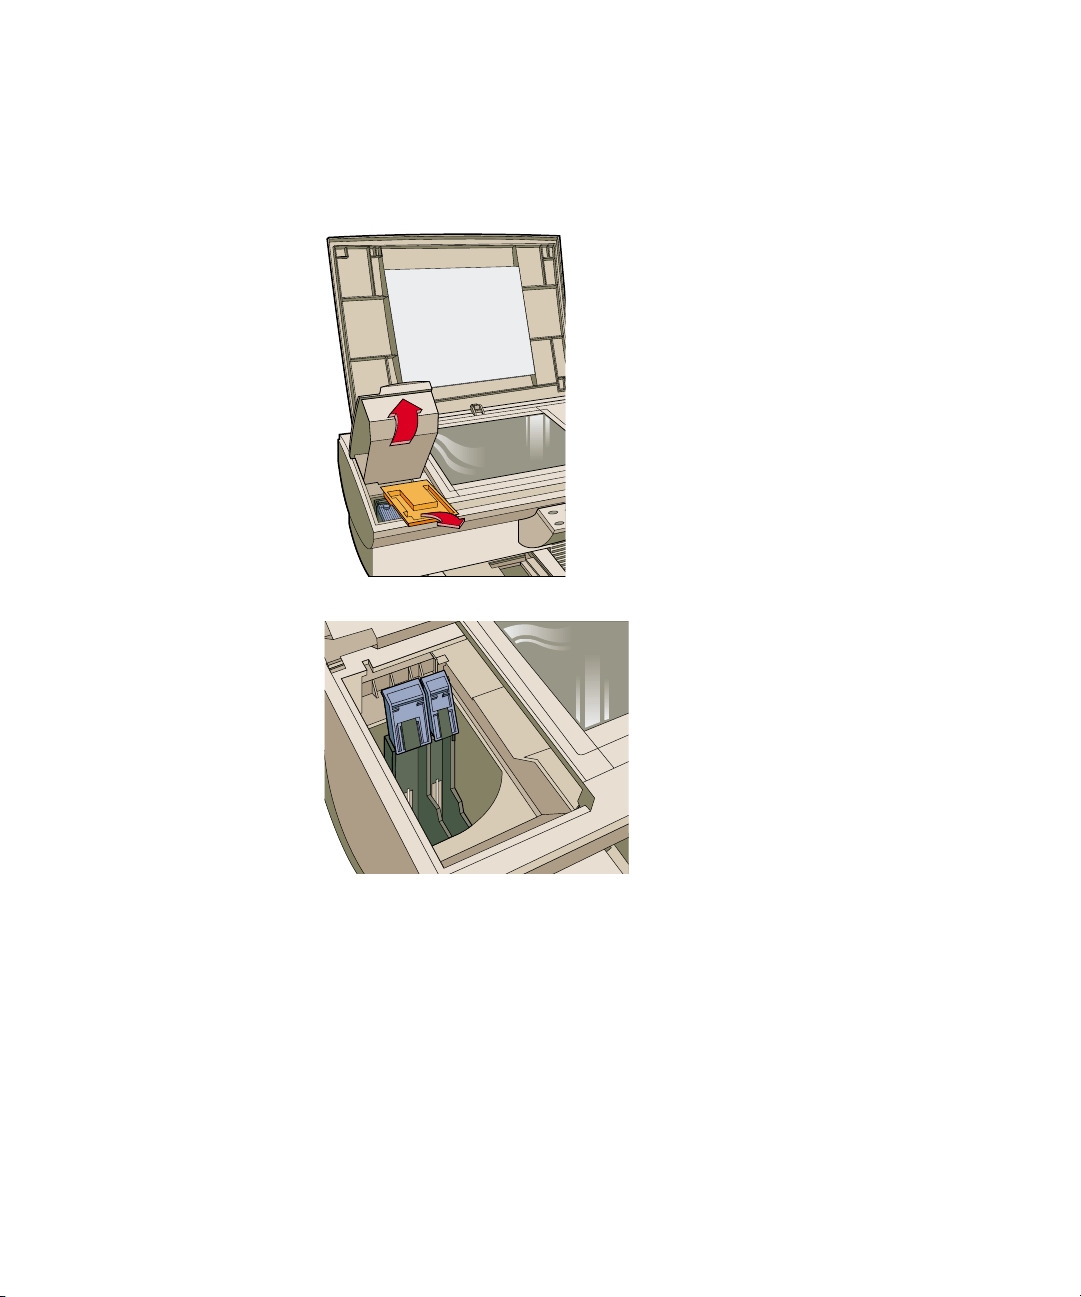
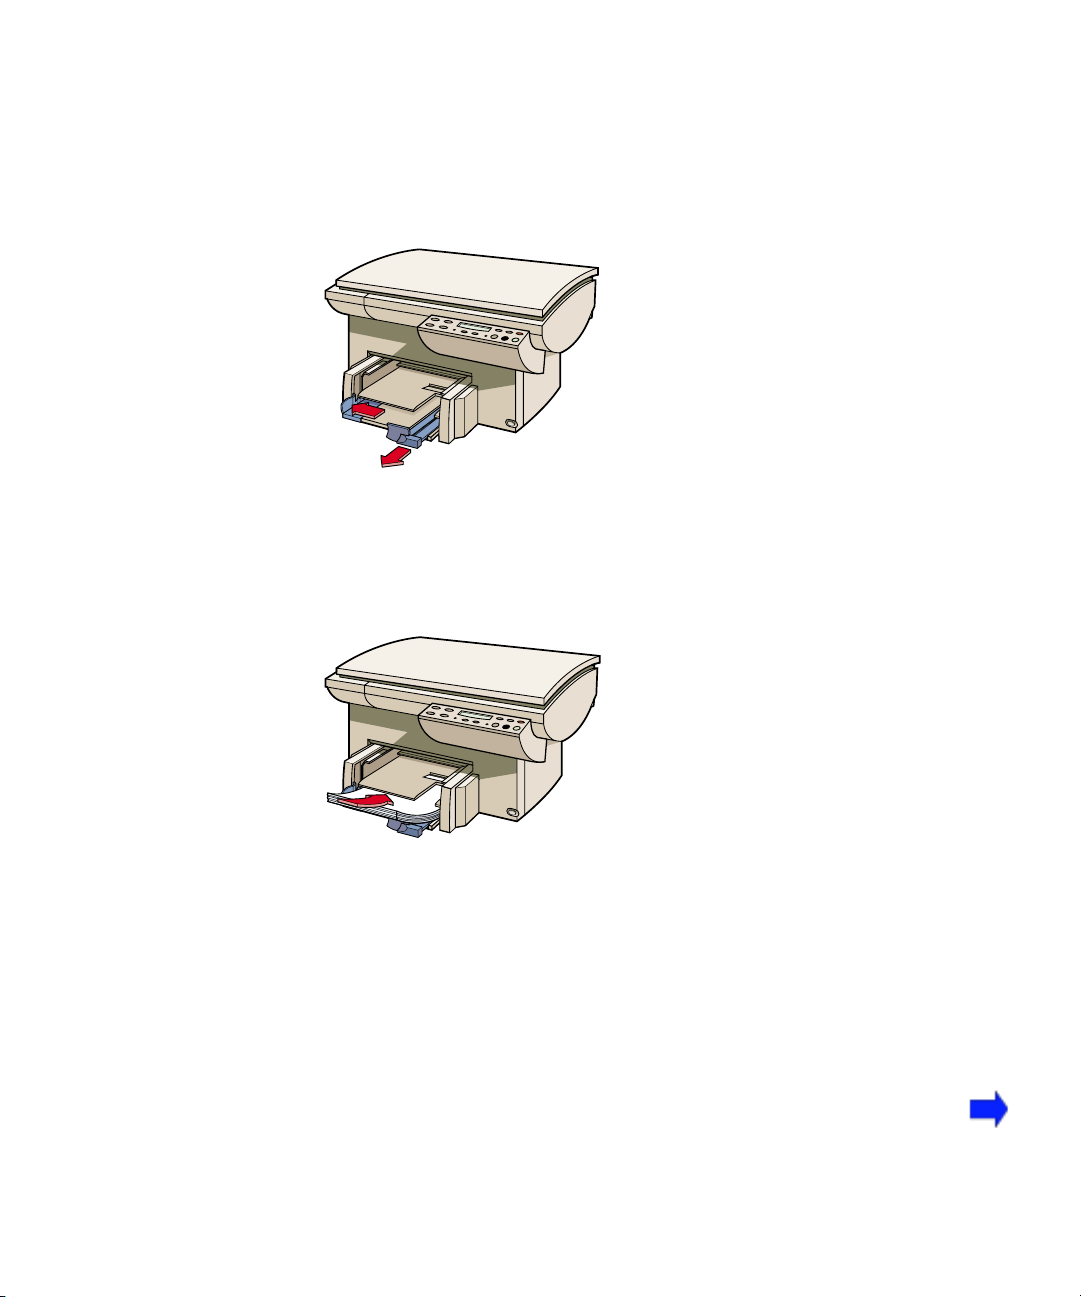
5 Insert the Black and Color Print Cartridges
1 Lift the document cover, then open the print cartridge access cover and
remove and discard the yellow/orange shipping insert from the inside of
the cartridge cradles.
2 Lift up both of the print cartridge latches.
1-10 Setting Up Your New HP OfficeJet Pro 1150C
Page 16
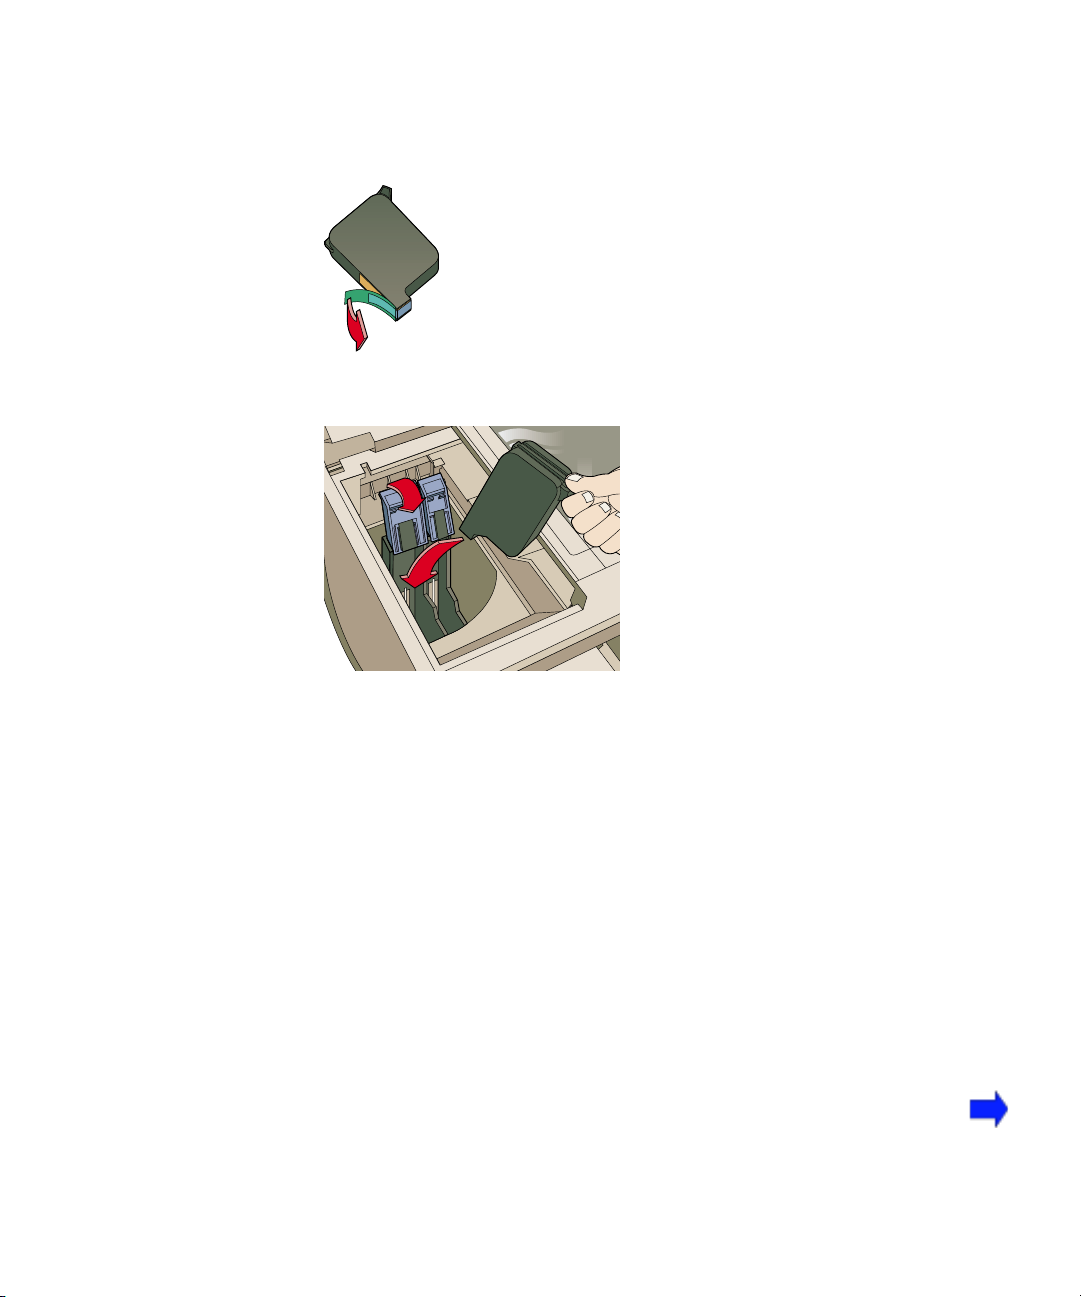
3 Remove the color print cartridge (the thicker one) from its package and,
being careful to touch only the black plastic, gently remove both the green
pull tab and blue tape covering the nozzles.
4 Push the color print cartridge firmly down into the cradle on the left, and
close the cartridge latch.
5 Repeat steps 3 and 4 to install the black print cartridge into the cradle on the
right.
6 Close the print cartridge access cover.
NOTE Both print cartridges must be correctly installed for HP OfficeJet Pro 1150C
to work.
HP OfficeJet Pro 1150C User’s Guide 1-11
Page 17
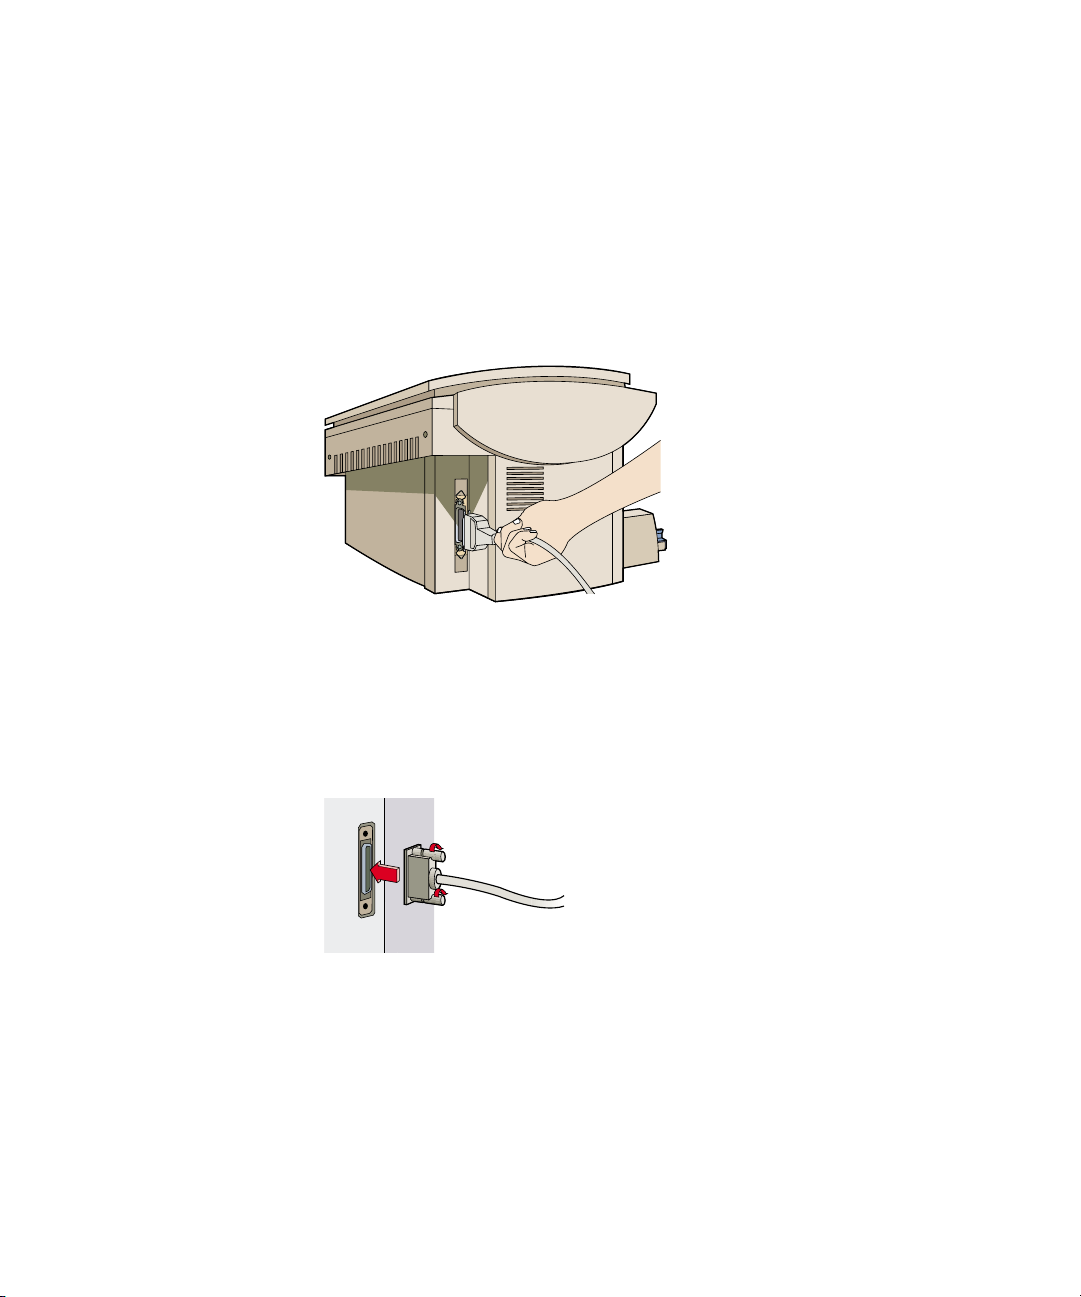
6 Connect the Power Cord
1 Turn off your computer.
IMPORTANT Use the cable that was shipped with your product. It is a specialized IEEE-1284
parallel cable that is necessary for the proper functioning of your HP OfficeJet Pro
1150C.
2 Connect the printer cable to HP OfficeJet Pro 1150C, snapping both clips
into the notches. (The connector is located on the left side toward the back
of the product.)
3 Plug the other end of the cable into the computer’s parallel port and tighten
the screws. Do not use a switch box or the pass-through port of another
parallel port product such as a scanner, data/tape drive, or CD-ROM drive.
CAUTION Connecting your HP OfficeJet Pro 1150C to a switch box or the pass-through
port of another parallel product can cause erratic behavior of both products and
the possible loss of information.
1-12 Setting Up Your New HP OfficeJet Pro 1150C
Page 18
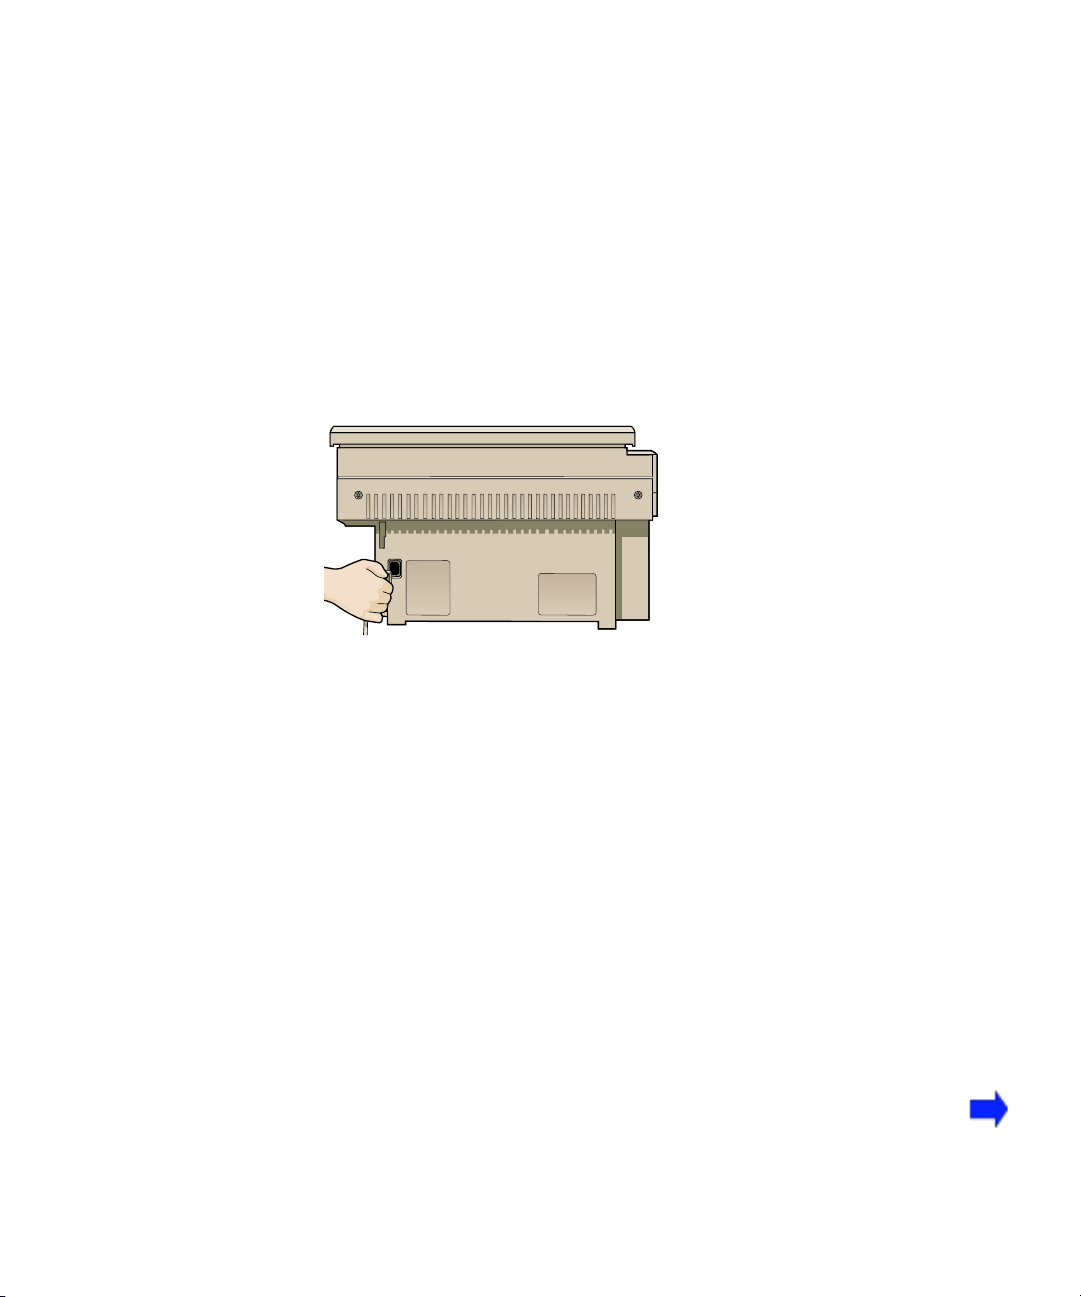
The HP OfficeJet Pro 1150C comes with the power cord for the country to
which it is shipped. If the plug on your power cord doesn’t look familiar,
contact your dealer or local HP Sales and Support Office.
WARNING In case of emergencies, be sure that the plug in the outlet is readily accessible to
all persons. Power is present in the product even if the On/Off button is off. To
completely shut off power, you must disconnect the power cord.
Be sure to use the power cord with a properly grounded outlet to avoid electric
shock.
4 Plug the power cord into the back of the HP OfficeJet Pro 1150C and then
into a grounded outlet.
HP OfficeJet Pro 1150C User’s Guide 1-13
Page 19

7 Install the Software
NOTE Do not turn on the computer.
IMPORTANT As part of the software installation process, a test is performed to confirm
You need to install software for the HP OfficeJet Pro 1150C to work with
your computer. If your HP OfficeJet Pro 1150C came with a CD-ROM set
and diskettes,
use the CD-Ruse the CD-R
use the CD-R
use the CD-Ruse the CD-R
OM setOM set
OM set
OM setOM set
for installationfor installation
for installation, if at all possible.
for installationfor installation
If your HP OfficeJet Pro 1150C came with a two-disk CD-ROM set, all
your software will be installed in a single installation procedure. The twodisk CD-ROM set includes the following software:
✦
HP OfficeJet Pro 1150C printer software needed for printing
and scanning
✦
FontSmart font utility software
✦
Caere OmniPage Limited Edition text recognition software (also known
as optical character recognition (OCR) software)
✦
Adobe PhotoDeluxe image editing software on the second CD-ROM
Keep the second CD-ROM near your computer, because you’ll need to have
it in your CD-ROM drive when using the Adobe PhotoDeluxe software
templates.
communication between your PC and the HP OfficeJet Pro 1150C. Results of
the test will be presented on your PC monitor. If the bidirectional communication test fails, it is highly recommended you read important information about
bidirectional communication and ECP in the ECP document that is located in
your HP OfficeJet Pro Utilities program group/folder.
If bidirectional communication is not established during the communications
test, you must manually set the front panel language and paper size. Refer to
“Change the Front Panel Language” in Chapter 2.
1-14 Setting Up Your New HP OfficeJet Pro 1150C
Page 20

WW
indoindo
indo
indoindo
ws 95 Iws 95 I
ws 95 I
ws 95 Iws 95 I
W
WW
NOTE If you are installing software for Windows 3.1x, refer to “Windows 3.1x
Installation” later in this chapter for instructions.
1 Turn on the HP OfficeJet Pro 1150C.
2 Turn on or reboot your computer.
IMPORTANT You must turn on the HP OfficeJet Pro 1150C before the computer.
nstallationnstallation
nstallation
nstallationnstallation
HP OfficeJet Pro 1150C User’s Guide 1-15
Page 21
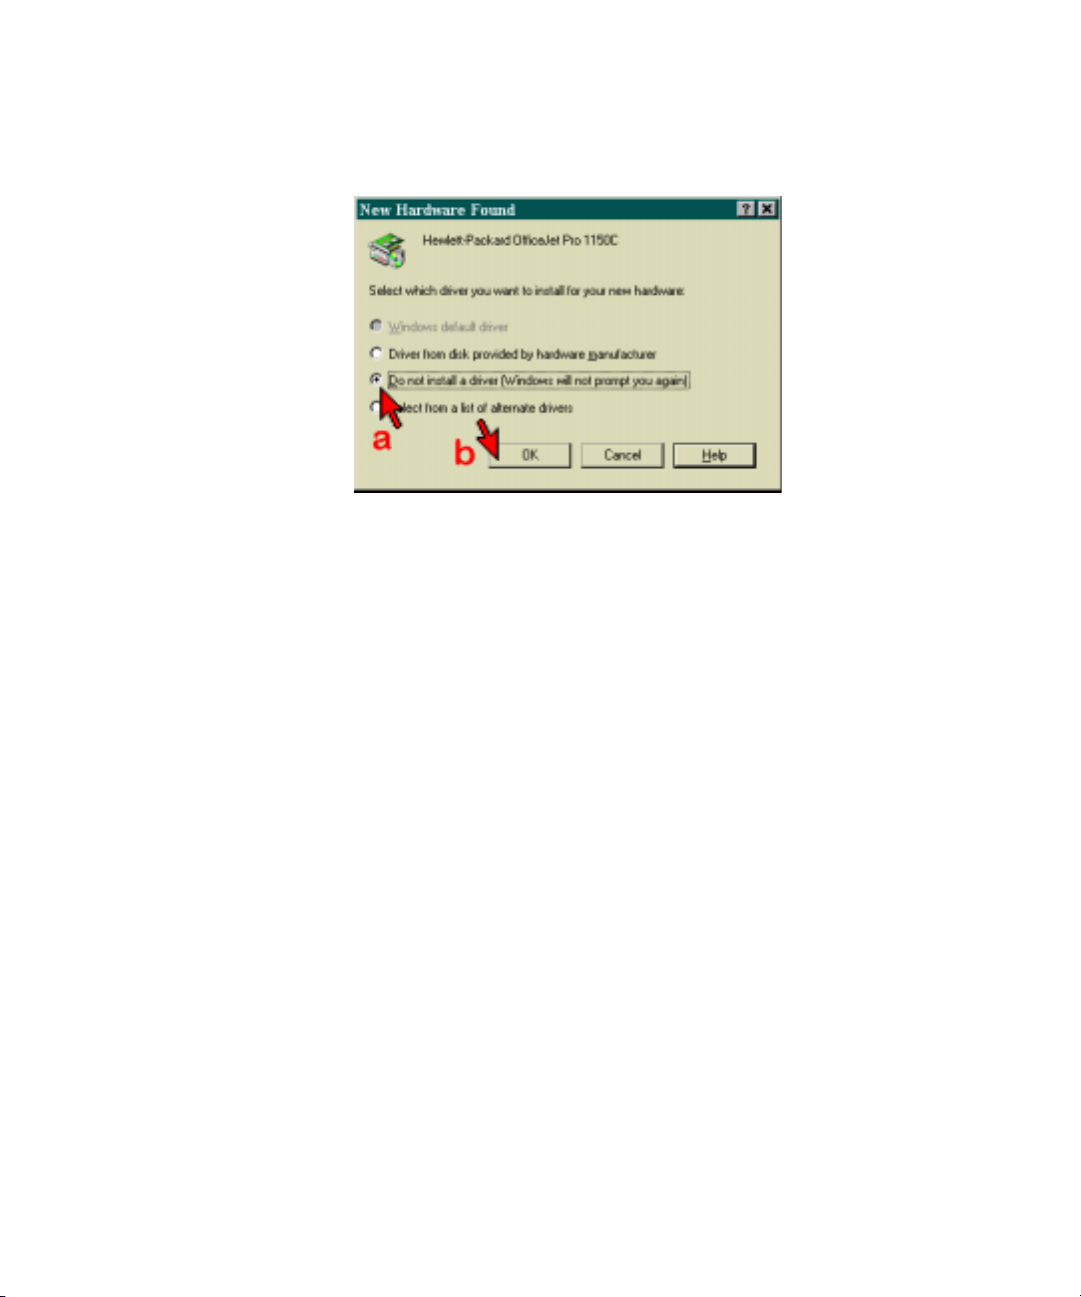
3 When you see the New Hardware Found windows, do the following:
a Click “Do not install a driver (Windows will not prompt you again).”
b Click OK.
IMPORTANT If this is the first time you’ve installed the software and you don’t see the above
screen, make sure you’ve completely set up your HP OfficeJet Pro 1150C using the
cable that came with it, and repeat steps 1 and 2.
If you’ve partially or completely installed this software before, you will not see the
above screen. Continue with Step c.
c Insert the HP OfficeJet Pro 1150C CD-ROM number 1 or diskette
number 1 into its specific drive.
1-16 Setting Up Your New HP OfficeJet Pro 1150C
Page 22
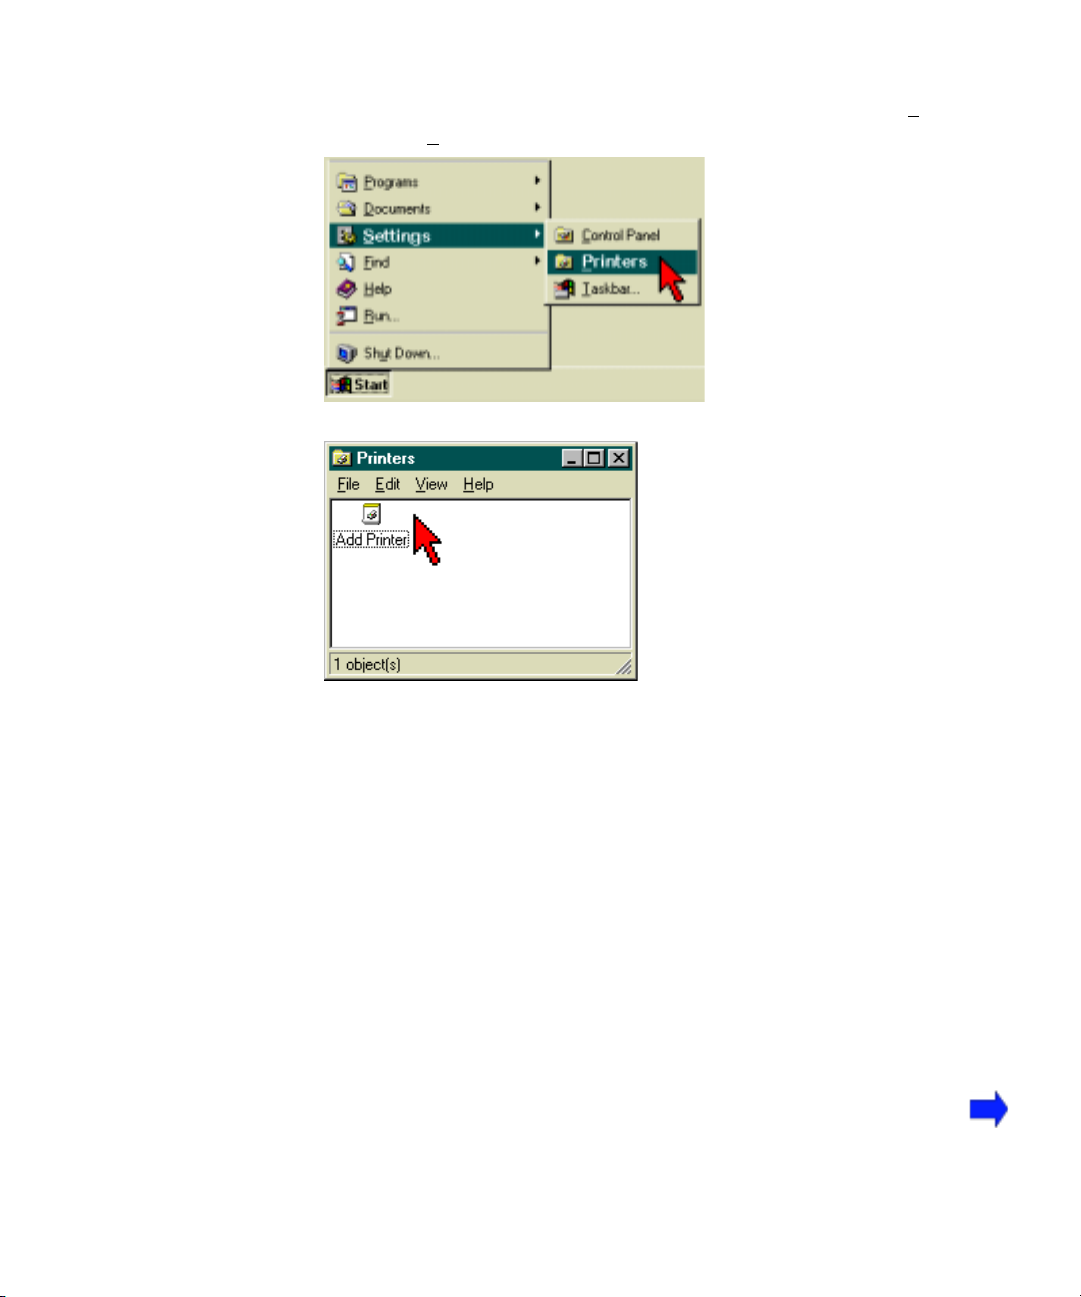
d Click Start (in the lower left corner of your screen), and select Settings
and the Printers.
e Double-click the Add Printer icon.
HP OfficeJet Pro 1150C User’s Guide 1-17
Page 23
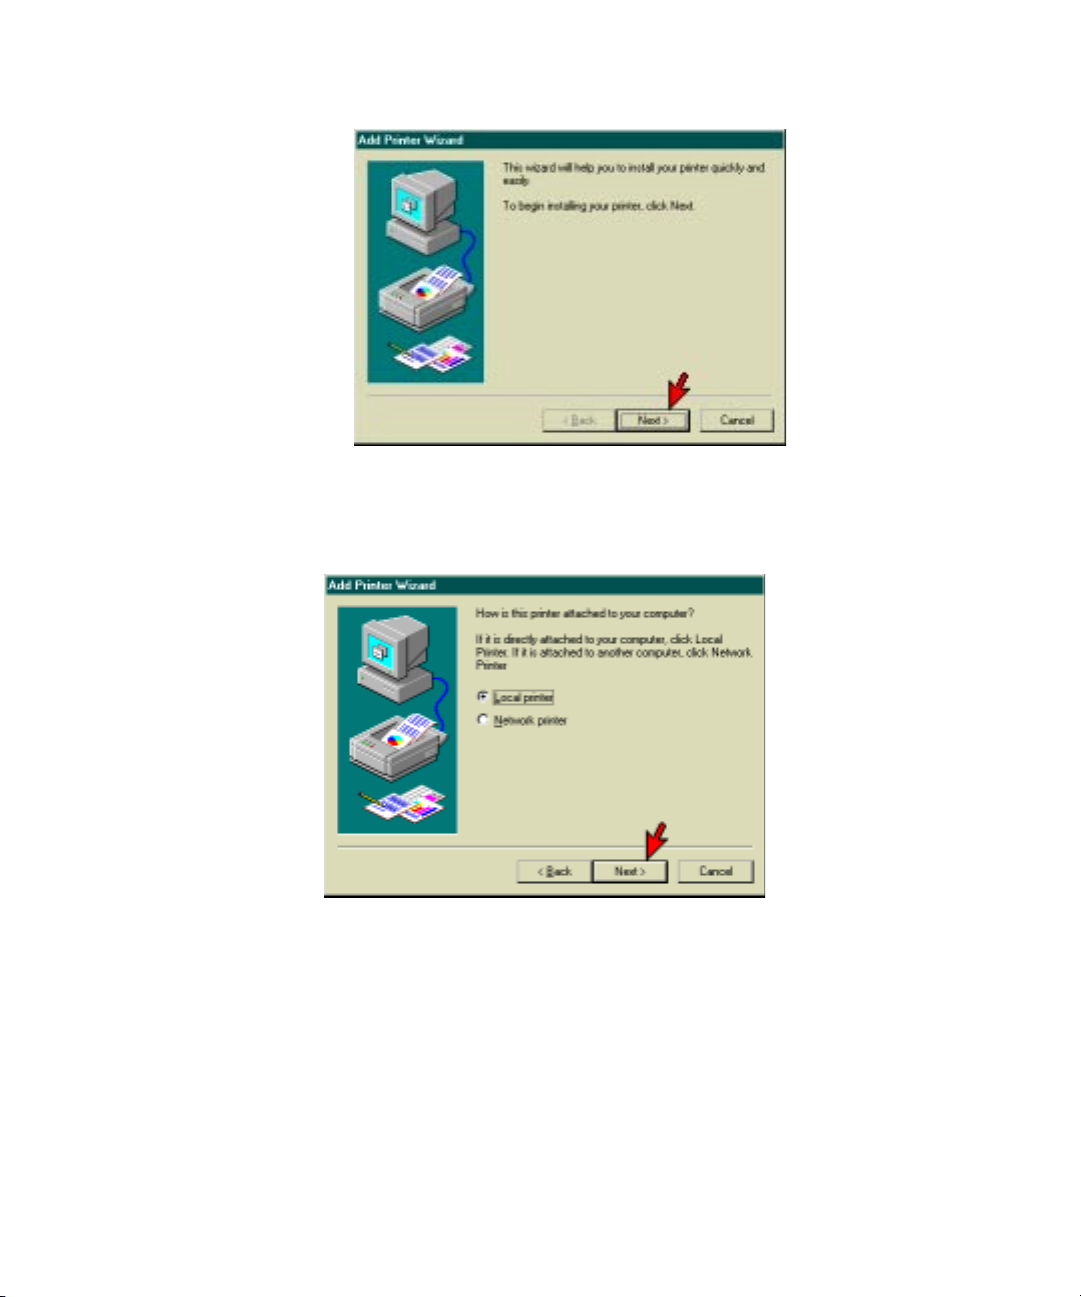
f The Add Printer Wizard will start. Click Next>.
g Click Next>, unless you HP OfficeJet Pro 1150C is not connected
directly to your computer.
NOTE If your HP OfficeJet Pro 1150C is not directly connected to your
computer, you will not be able to scan.
1-18 Setting Up Your New HP OfficeJet Pro 1150C
Page 24

h Click Have Disk.
i Type D:\instal\ substituting your CD-ROM drive letter for the D. If you
are installing from diskettes, type your floppy drive letter.
HP OfficeJet Pro 1150C User’s Guide 1-19
Page 25

j Click Next> if the HP OfficeJet Pro 1150C is listed under Printers.
Otherwise, go back to Step h.
k Select the port to which the HP OfficeJet Pro 1150C is connected and
then click Next>.
1-20 Setting Up Your New HP OfficeJet Pro 1150C
Page 26

l Click Finish.
4 Follow the instructions on the screen. Generally you should select Typical
Installation, and then click Next, Yes, Continue, Select, OK or Finish on
each screen.
5 When you see the Caere OmniPage Limited Edition screen, Select Source,
be sure to select: HP OfficeJet Pro PictureScan.
6 When the Adobe PhotoDeluxe Serial Number (HGW100H71000006-570)
is displayed, do not change it.
HP OfficeJet Pro 1150C User’s Guide 1-21
Page 27

WW
indoindo
indo
indoindo
ws 3.1x Iws 3.1x I
ws 3.1x I
ws 3.1x Iws 3.1x I
W
WW
1 Insert the HP OfficeJet Pro 1150C CD-ROM number 1 or diskette number
nstallationnstallation
nstallation
nstallationnstallation
1 into its specific drive.
2 From the Program Manager, select the File menu and choose Run.
3 Type
D:\setupD:\setup
D:\setup substituting the correct drive letter for the D. If you are
D:\setupD:\setup
installing from diskettes, type your floppy drive letter. Press the Enter key
on your keyboard.
4 Follow the instructions on the screen. Generally you should select Typical
installation and click Next, Yes, Continue, OK or Finish on each screen, and
insert each disk as prompted to install the software.
NOTE If you are installing from diskettes, you will be prompted to restart your computer
between sections of software. This is not necessary. You only need to restart the
computer at the end.
If you do not have Win32S installed on your computer, it will be installed for you
during the installation process. As part of the Win32S installation, you have the
option of installing a game called FreeCell. The game is used to test the Win32S
installation. If the game appears to work fine, the Win32S installation was
successful. You do not need to play the game for any particular length of time.
IMPORTANT As part of the software installation process, a test is performed to confirm
communication between your PC and the HP OfficeJet Pro 1150C. Results of
the test will be presented on your PC monitor. If the bidirectional communications test fails, it is highly recommended you read important information about
bidirectional communication and ECP in the ECP document that is located in
your HP OfficeJet Pro Utilities program group/folder.
If bidirectional communication is not established during the communications
test, you must manually set the front panel language and paper size. Refer to
“Change the Front Panel Language” in Chapter 2.
1-22 Setting Up Your New HP OfficeJet Pro 1150C
Page 28

Diskette UDiskette U
Diskette U
Diskette UDiskette U
sers Osers O
sers O
sers Osers O
nlynly
nly
nlynly
You will have to separately install Caere OmniPage Limited Edition.
1 Insert disk number 1 into your drive.
2 Windows 95: Windows 3.1x:
From the Task bar, select From the Program Manager, open the
Start and choose Run File menu and choose Run.
3 Type A:\setup and press the Enter key on your keyboard.
4 Follow the instructions on the screen. Generally you should select Typical
installation and click Next, Yes, Continue, OK or Finish on each screen.
HP OfficeJet Pro 1150C User’s Guide 1-23
Page 29

8 Align Your Black and Color Print Cartridges
1 “Press Resume to Align Cartridges” will appear on the front panel display,
after the product initializes.
NOTE If the displayed message is not in your language, change the front panel language
before proceeding with the next step. Refer to “Change the Front Panel Language”
in Chapter 2.
2 Press the Select/Resume button.
A page is printed with two sets of paired lines on it. A set of numbered,
horizontal lines appears at the top of the page, and a set of vertical lines, each
with a unique letter, appears at the bottom of the page.
The mid-range number for horizontal alignment appears on the front panel
display.
3 If necessary, use the Plus (+) and Minus (–) buttons on the front panel to
change the number on the display to the number that represents the best
horizontal alignment pattern on the page.
4 Press the Select/Resume button to select that number.
The mid-range letter for vertical alignment appears on the front panel
display.
5 If necessary, use the Plus (+) and Minus (–) buttons on the front panel to
change the letter on the display to the letter that represents the best vertical
alignment pattern on the page.
6 Press the Select/Resume button to select that letter.
The HP OfficeJet Pro 1150C prints another page to confirm that the print
cartridges are now correctly aligned. Match the alignment in Sample 2 to
Sample 1. If the lines are not straight, repeat the Align Cartridges procedure,
by pressing the Menu button until Align Cartridges is displayed, and then
pressing Select/Resume.
1-24 Setting Up Your New HP OfficeJet Pro 1150C
■
Page 30

Start Copying
chapter two
Copying
2
1 If it is not already on, turn on the HP OfficeJet Pro 1150C by pressing
the white Power
the product.
NOTE The scanner light remains on for approximately 12 hours after you turn on the
HP OfficeJet Pro 1150C or make the first copy of the day. This keeps the bulb
warm for optimal copying performance. The light uses very little power and
continues to meet Energy Star requirements.
button located on the lower right front corner of
2 Lift the document cover and place the original face down on the glass along
the two green borders.
NOTE All originals, including small photographs, must be placed in the corner along the
two green borders.
HP OfficeJet Pro 1150C User’s Guide 2-1
Page 31

NOTE To copy bulky originals, remove the top cover by raising it and then pulling
Change Copy Quality
3 Close the document cover.
4 To make more than one copy, press the Plus (+) button until the number of
copies you want to make is displayed on the front panel.
5 Press the Copy Quality button until the speed and quality of the copy you
want to make is displayed. Refer to the next section on copy quality for
more information.
6 Press the Black/White button for a black and white copy or the Color
button for a color copy.
straight up. To replace the top cover, insert the two hinges back into the slots on
the top of the HP OfficeJet Pro 1150C.
The Copy Quality button changes the speed and quality of the copy. You
can choose from the following three copy settings: Best, Normal, and Draft.
The Best setting produces the highest copy quality for all media and eliminates the banding effect that sometimes occurs in solid areas. However, the
Best setting copies more slowly than the Normal setting for most documents.
2-2 Copying
The Normal setting delivers high-quality output and is the recommended
setting for most of your copying. Normal is the default copy-quality setting
for most paper types.
The Draft setting copies faster than the Normal setting and delivers comparable output for text. Using Draft also cuts down on the frequency of
replacing your print cartridges because it uses less ink.
1 Press the Copy Quality button.
2 Press the Plus (+) or Minus (–) button to view the available copy-quality
settings.
3 Press the Select/Resume button to choose a setting.
Page 32

Reduce or Enlarge Copies
Using the predefined settings in the HP OfficeJet Pro 1150C, you can
quickly and easily reduce or enlarge images.
1 Press the Reduce/Enlarge button.
2 Press the Plus (+) or Minus (–) button to scroll through the list of setting
options. Refer to the Copier Help Card for the list of options.
NOTE You can easily “auto-enlarge” a small image so that it fits a letter-sized page while
maintaining its length-to-width ration.
3 Press the Select/Resume button to select an option.
Copy on a Variety of Paper Types
1 Load a stack of paper in the IN tray.
NOTE You can load premium inkjet papers, such as Premium, Glossy, and Transparency,
to improve the quality of the copies you make. Refer to Chapter 1, “Setting Up
Your HP OfficeJet Pro 1150C,” for instructions on loading paper.
2 Press the Paper Type
3 Press the Plus(+)
button to view the current paper type.
or Minus(–) button repeatedly until the appropriate paper
type is displayed.
4 Press the Select/Resume button to choose the setting.
NOTE If you are making multiple copies using transparencies and the copy quality
is set to Draft, be sure you immediately remove each finished transparency from
the output tray. This prevents ink from smearing and allows the ink to dry on
the transparency.
HP OfficeJet Pro 1150C User’s Guide 2-3
Page 33

Make Copies Lighter or Darker
1 Press the Lighter/Darker button. The range of lightness/darkness value
appears on a nine-point scale on the display.
2 Press the Plus (+) button to make the copy darker and the round dot moves
to the right on the scale. Press the Minus (–) button to make the copy lighter
and the round dot moves to the left on the scale.
3 Press the Select/Resume button to choose the setting of lightness or darkness
you specified on the scale.
Change Color Intensity
1 Press the Color Intensity button. The range of color intensity values appears
on a seven-point scale on the display.
2-4 Copying
2 Press the Plus (+) button to produce copies with more intense or vivid colors
and the round dot moves to the right on the scale. Press the Minus (–)
button to produce copies with paler, more subtle colors and the round dot
moves to the left on the scale.
3 Press the Select/Resume button to choose the setting of color intensity you
specified on the scale.
NOTE You can also use the Enhance Light Colors (ELC) setting to enhance the light-
color backgrounds in documents, such as maps and invoices, so the background
appears on the copy. Press the Menu button repeatedly until ELC appears on the
front panel display. Press the Plus (+) or Minus (–) button to turn ELC on
(noted by a round dot) and press the Select/Resume button.
Page 34

Change the Front Panel Language
If you installed the HP OfficeJet Pro 1150C software using the procedure in
Chapter 1, “Setting Up Your HP OfficeJet Pro 1150C,” the language used
on the front panel should already be set. If you did not install the HP
OfficeJet Pro 1150C software, or to display a different language on the front
panel, follow these steps:
1 While holding down the Select/Resume button, press the Color Intensity
button.
2 Release both buttons. The default language is displayed.
3 Press the Plus (+) or Minus (–) button to scroll through the following
available languages: English, French, Italian, German, Portuguese, Spanish,
Finnish, Danish, Norwegian, Swedish, and Dutch.
4 Press the Select/Resume button to select the displayed language.
Once you have selected a language, you will be prompted to select Letter
or A4 as the default paper size.
5 Press the Plus (+) or Minus (–) button to view the list of paper sizes.
6 Press the Select/Resume button to choose the paper size you want.
NOTE To cancel without making a selection, press the Clear/Stop button.
Change Copy Paper Size
1 Press the Menu button repeatedly until you see “Copy Paper Size” on the
2 Press the Plus (+) or Minus (–) button to scroll through the paper sizes.
3 Press the Select/Resume button when you see the paper size you want.
NOTE To cancel without making a selection, press the Clear/Stop button.
With your HP OfficeJet Pro 1150C, you can copy on both A4- and lettersized paper. Use the Menu button to indicate which paper size you have in
the IN tray.
front panel display. Press the Select/Resume button to view the current
default paper size.
HP OfficeJet Pro 1150C User’s Guide 2-5
Page 35

Stop Copying
■■
■ Press the Clear/Stop button to stop copying.
■■
TIP You can also stop printing by pressing the Clear/Stop button.
2-6 Copying
Page 36

chapter three
Printing
3
Using your HP OfficeJet Pro 1150C, you can print on many sizes and
types of paper, such as letter-sized, A4-sized, and legal-sized paper. You
can also print on envelopes, labels, cards, and even custom-sized letterhead
or stationery.
You can print on any of the following types of paper:
◆
Copier paper or letterhead
◆
HP Premium InkJet Paper
◆
HP Premium Glossy Paper
◆
HP Premium Transparency Film
If you would like more information on printing on these types of paper,
see the online help. For more information on accessing help, see Chapter 5,
“Getting Help.”
HP OfficeJet Pro 1150C User’s Guide 3-1
Page 37

Start Printing
1 If it is not already on, turn on HP OfficeJet Pro 1150C by pressing
the white Power button located on the lower right front corner of
the product.
NOTE The scanner light remains on for approximately 12 hours after you turn on the
HP OfficeJet Pro 1150C or make the first copy of the day. This keeps the bulb
warm for optimal scanning and copying performance. The light uses very little
power and continues to meet Energy Star requirements.
2 Load paper into the bottom (IN) tray of the HP OfficeJet Pro 1150C.
For more detailed instructions on loading paper, see Chapter 1, “Setting
Up Your HP OfficeJet Pro 1150C.”
3 In your software program’s print setup dialog box or in the HP OfficeJet
Pro 1150C Properties dialog box, change the print settings as necessary.
For detailed instructions on changing print settings, such as Paper Size and
Orientation, see the online help. For more information on accessing help,
see Chapter 5, “Getting Help.”
4 From your software program’s File menu, choose Print.
Stop Printing
3-2 Printing
SS
top a print job frtop a print job fr
S
top a print job fr
SS
top a print job frtop a print job fr
■■
■ Press the Clear/Stop button to stop printing.
■■
om the HP Oom the HP O
om the HP O
om the HP Oom the HP O
fficeJfficeJ
fficeJ
fficeJfficeJ
et Pet P
et P
et Pet P
rr
o 1150Co 1150C
r
o 1150C
rr
o 1150Co 1150C
Page 38

SS
top a print job frtop a print job fr
S
top a print job fr
SS
top a print job frtop a print job fr
1 On the taskbar, click Start, and then select Printers from the Settings menu.
2 Double-click the HP OfficeJet Pro 1150C icon.
3 From the list, select the document you want to cancel.
4 From the Document menu, select Cancel Printing.
SS
top a print job frtop a print job fr
S
top a print job fr
SS
top a print job frtop a print job fr
1 In the Main program group in Program Manager, double-click Print
Manager.
2 From the list, select the document you want to cancel.
3 From the Document menu, select Delete Document.
om om
om
om om
om om
om
om om
WW
W
WW
WW
W
WW
indoindo
indo
indoindo
indoindo
indo
indoindo
ws 95ws 95
ws 95
ws 95ws 95
ws 3.1xws 3.1x
ws 3.1x
ws 3.1xws 3.1x
HP OfficeJet Pro 1150C User’s Guide 3-3
Page 39

3-4 Printing
Page 40

chapter four
Scanning
4
Using your HP OfficeJet Pro 1150C and the software programs that come
with it, you can scan text and pictures and make changes to the scanned text
or pictures. You can use HP OfficeJet Pro PictureScan, Caere OmniPage
Limited Edition and Adobe PhotoDeluxe (or Adobe Photoshop LE) to scan
and modify text or pictures, and then incorporate the text or pictures
directly into your document.
If you are running Windows 95, and you installed HP PictureLink when
you set up your HP OfficeJet Pro 1150C, you can scan a picture directly
into your document.
NOTE Make sure you are using Windows 95 compliant 32-bit software programs.
If Scan Picture does not appear on your program’s file menu, you can run
the HP PictureLink Configuration utility. It is located in your HP OfficeJet
Pro Utilities program group. Click Custom to add HP PictureLink capability. The HP PictureLink Configuration utility will do a compatibility test.
If the test passes, Scan Picture should appear on the File menu the next time
you run the program. If the test fails, you can scan pictures using HP
OfficeJet Pro PictureScan as a stand-alone program as described on the
following pages.
HP OfficeJet Pro 1150C User’s Guide 4-1
Page 41

If you installed Caere OmniPage Limited Edition when you set up your HP
Office Jet Pro 1150C, you can scan text directly into your word-processing
program. You simply place the original you want to scan on the glass, and
then choose Acquire Text from your software program’s File menu.
If Acquire Text does not appear on your File menu, you may not have OCR
Aware selected in the Caere OmniPage Limited Edition. OCR Aware allows
you to access Caere OmniPage Limited Edition directly from your software
program’s File menu and insert text that you scanned into the open document. You can select OCR Aware from the Tools menu in Caere OmniPage
Limited Edition. Refer to the Caere OmniPage Limited Edition online help
for more information.
If you are running Windows 3.1x, some of your software programs may
already be set up to work as described above. For those that are not, you can
still scan text and pictures and incorporate them into your documents—it
just takes a few more steps. For more detailed help on scanning, see the
online help. For more information on accessing help, see Chapter 5,
“Getting Help.”
If your software program does not have Scan Picture or Acquire Text on its
File menu, do the following:
◆
To scan an image, run HP OfficeJet Pro PictureScan located in the
HP OfficeJet Pro 1150C Utilities program group. For help on using
HP OfficeJet Pro PictureScan, click Help once you’re inside HP OfficeJet
Pro PictureScan.
4-2 Scanning
◆
To scan text, run Caere OmniPage Limited Edition. Caere OmniPage
Limited Edition is an optical character recognition (OCR) software
program that came with your HP OfficeJet Pro 1150C. Caere OmniPage
Limited Edition will change the image of the text into editable text. For
help on using Caere OmniPage Limited Edition, choose Contents
from the Help menu once you’re inside Caere OmniPage Limited Edition.
For further help, see Chapter 5, “Getting Help.”
Page 42

Scan Text or Graphics into Your Document
You can follow specific steps to scan text and graphics into your document.
The steps depend on the operating system you are using, Windows 3.1x or
Windows 95.
1 If it is not already on, turn on HP OfficeJet Pro 1150C by pressing
the white Power
the product.
NOTE The scanner light remains on for approximately 12 hours after you turn on the
HP OfficeJet Pro 1150C or make the first copy of the day. This keeps the bulb
warm for optimal scanning performance. The light uses very little power and
continues to meet Energy Star requirements.
2 Lift the document cover and place the original face down on the glass along
the two green borders. Make sure the top of the document is placed to the
right. This ensures the document is scanned right-side up.
button located on the lower right front corner of
WW
indoindo
W
WW
ws 95ws 95
indo
ws 95
indoindo
ws 95ws 95
3 From your program’s File menu, choose Scan Picture. HP OfficeJet Pro
PictureScan does a preview scan and automatically finds the picture and
sets the correct picture type and exposure. You can modify the picture
from here.
Choose Accept once you are satisfied with the scanned picture.
-Or-
HP OfficeJet Pro 1150C User’s Guide 4-3
Page 43

4 To scan text, from the program you are currently in, such as a word
processor, choose Acquire Text on the File menu. Caere OmniPage
Limited Edition starts. The text is scanned and appears in the preview
area on the screen. You can adjust the page image and modify the area
of text you want to capture.
NOTE If you do not have Acquire Text as an option on the File menu, you may not
have OCR Aware selected in Caere OmniPage Limited Edition. OCR Aware
allows you to access Caere OmniPage Limited Edition directly from the
software program’s File menu and insert text that you scanned into the open
document.
WW
indoindo
W
WW
ws 3.1xws 3.1x
indo
ws 3.1x
indoindo
ws 3.1xws 3.1x
3 To scan a picture, double-click the HP OfficeJet Pro PictureScan icon
and choose Scan. The icon is located in the HP OfficeJet Pro 1150C
Utilities program group. HP OfficeJet Pro PictureScan does a preview
scan and the picture appears in the preview area. Do not move the
document on the glass before doing the final scan.
NOTE A border appears around the picture during the preview. You can crop the
picture using the marquee or lasso tool. The resulting border shows what will
be scanned after you choose Accept. You can also click on Options to change
other settings such as picture type. Refer to the HP OfficeJet Pro PictureScan
help for more detailed information.
Choose Accept once you are satisfied with the scanned picture.
-Or-
4-4 Scanning
4 To scan text, from the program you are currently in, such as a word
processor, choose Acquire Text on the File menu. Caere OmniPage
Limited Edition starts. The text is scanned and appears in the preview
area on the screen. You can adjust the page image and modify the area
of text you want to capture.
NOTE If you do not have Acquire Text as an option on the File menu, you may not
have OCR Aware selected in Caere OmniPage Limited Edition. OCR Aware
allows you to access Caere OmniPage Limited Edition directly from the
software program’s File menu and insert text that you scanned into the open
document.
Page 44

5 In HP OfficeJet Pro PictureScan or Caere OmniPage Limited Edition, make
changes as necessary.
For detailed instructions on using HP OfficeJet Pro PictureScan, click its
Help button. For detailed instructions on using Caere OmniPage Limited
Edition, choose Contents from the Help menu in Caere OmniPage Limited
Edition.
6 To insert the scanned picture or text into your document, do the following:
◆
In HP OfficeJet Pro PictureScan, click Accept.
◆
In Caere OmniPage Limited Edition, click OCR.
TIP If you encounter problems while scanning, use the HP OfficeJet Pro 1150C
troubleshooting help. To access the troubleshooting help, select HP OfficeJet Pro
Help from the Help menu of your software program.
Scan Text into a Separate File Using Caere OmniPage Limited Edition
1 Double-click the Caere OmniPage Limited Edition icon in the Caere
Applications program group.
2 If it is not already on, turn on HP OfficeJet Pro 1150C by pressing the
white Power
button located on the lower right front corner of the product.
NOTE The scanner light remains on for approximately 12 hours after you turn on the
HP OfficeJet Pro 1150C or make the first copy of the day. This keeps the bulb
warm for optimal scanning performance. The light uses very little power and
continues to meet Energy Star requirements.
3 Lift the document cover and place the original face down on the glass along
the two green borders. Make sure the top of the document is placed to the
right. This ensures the document is scanned right-side up.
4 In the Caere OmniPage Limited Edition main window, choose Acquire
Image from the File menu.
Caere OmniPage Limited Edition scans the page and displays it in the
preview window.
HP OfficeJet Pro 1150C User’s Guide 4-5
Page 45

5 From the File menu, choose OCR.
Caere OmniPage Limited Edition recognizes the document’s text. After
OCR takes place, a dialog box gives you the option to scan additional pages
or to finish.
After you finish scanning, the Save As dialog box appears. If it does not,
choose Save As Document from the File menu.
6 In the File Name box, enter a name for your document.
7 In the Save Text As Type list, select the file type for the word-processing
format you normally use.
8 Click OK.
Caere OmniPage Limited Edition saves the text file. You can now import the
file into your word processor or spreadsheet and edit the text.
Scan Pictures into a Separate File Using HP OfficeJet Pro PictureScan
1 Double-click the HP OfficeJet Pro PictureScan icon, located in the HP
OfficeJet Pro 1150C Utilities program group.
2 If it is not already on, turn on HP OfficeJet Pro 1150C by pressing the
white Power button located on the lower right front corner of the product.
4-6 Scanning
3 Lift the document cover and place the original face down on the glass along
the two green borders. Make sure the top of the document is placed to the
right. This ensures the document is scanned right-side up.
4 When the HP OfficeJet Pro PictureScan Task Manager window is displayed,
click Scan.
HP OfficeJet Pro PictureScan does a preview scan and the picture is
displayed in the preview area. Do not move the page on the scanner glass
before doing the final scan.
NOTE A border appears around the picture during the preview. You can crop the picture
using the marquee or lasso tool. The resulting border shows what will be scanned
after you choose Accept. You can also click on Options to change other settings
such as picture type. Refer to HP OfficeJet Pro PictureScan help for more detailed
information.
Page 46

5 Click Accept.
6 In the Save As dialog box, give the file a name, and then click Save.
HP OfficeJet Pro PictureScan scans the picture and saves it to the filename
you specified.
7 You can now import the picture file into your program.
Edit Your Scanned Pictures
You can edit your scanned pictures using the image editor software provided
with your HP OfficeJet Pro 1150C. If you installed the software for your
HP OfficeJet Pro 1150C from a CD-ROM, your image editor is Adobe
PhotoDeluxe. If you installed the software from floppy disks, you must order
Adobe Photoshop LE through HP’s Distribution Center. (See Chapter 5,
“Getting Help”, for more details.)
EE
E
dit y
EE
1 Double-click the picture in your document that was scanned using
HP PictureLink.
NOTE Adobe PhotoDeluxe may need to be open in the foreground.
dit ydit y
our scanned picturour scanned pictur
our scanned pictur
dit ydit y
our scanned picturour scanned pictur
es in es in
es in
es in es in
WW
W
WW
indoindo
indo
indoindo
ws 95ws 95
ws 95
ws 95ws 95
2 Modify the picture.
NOTE For detailed information on using Adobe PhotoDeluxe, choose its Help button.
After you have finished editing your picture, you can click the Exit button and
the modified picture appears in your document.
EE
dit ydit y
our scanned picturour scanned pictur
E
dit y
our scanned pictur
EE
dit ydit y
our scanned picturour scanned pictur
(W(W
indoindo
indo
indoindo
ws 95 if yws 95 if y
ws 95 if y
ws 95 if yws 95 if y
(W
(W(W
1 Double-click the Adobe PhotoDeluxe icon in the Adobe PhotoDeluxe
program group.
2 Click Open File.
3 Select the file you want, and then click Open.
ou arou ar
ou ar
ou arou ar
es in es in
WW
indoindo
es in
W
es in es in
WW
e not using HP Pe not using HP P
e not using HP P
e not using HP Pe not using HP P
indo
indoindo
ws 3.1xws 3.1x
ws 3.1x
ws 3.1xws 3.1x
icturictur
ictur
icturictur
eLeL
ink)ink)
eL
ink)
eLeL
ink)ink)
HP OfficeJet Pro 1150C User’s Guide 4-7
Page 47

4 Modify the picture.
For detailed information on using Adobe PhotoDeluxe, choose its Help
button.
After you have finished editing your picture, you can export it and then
place it into your word-processing or desktop-publishing program.
5 From the File menu, choose Export, and then choose File Formats.
6 Choose the file format you want.
7 Give the file a name, and then click the Save button.
Scan and edit yScan and edit y
Scan and edit y
Scan and edit yScan and edit y
1 Double-click the Adobe PhotoDeluxe icon in the Adobe PhotoDeluxe
program group.
2 Click Acquire from the File menu. The Acquire menu appears.
3 Click TWAIN_32 from the Acquire menu. HP OfficeJet Pro Picture Scan
does the preview scan of your picture. You can then modify the picture.
4 Click Accept when you are ready to do the final scan.
5 Modify the picture.
For detailed information on using Adobe PhotoDeluxe, choose its Help
button.
After you have finished editing your picture, you can export it and then
place it into your word-processing or desktop-publishing program.
6 From the File menu, choose Export, and then choose File Formats.
7 Choose the file format you want.
8 Give the file a name, and then click the Save button.
our picturour pictur
our pictur
our picturour pictur
es using Aes using A
es using A
es using Aes using A
dobe Pdobe P
dobe P
dobe Pdobe P
hotoDhotoD
hotoD
hotoDhotoD
eluxelux
elux
eluxelux
ee
e
ee
4-8 Scanning
Page 48

Get Task Help
chapter five
Getting Help
5
Online help contains detailed procedures that guide you through most tasks
you may want to perform with your HP OfficeJet Pro 1150C. Online help is
also a troubleshooting tool. When problems occur, the quickest way to find
a solution is to use the online troubleshooting feature. With a few clicks of
the mouse button, you’ll find your specific symptom and details on how to
fix it.
1 Double-click the HP OfficeJet Pro 1150C Toolbox icon on your desktop or
from within the HP OfficeJet Pro Program Utilities group.
-OrIn Windows 95, select HP OfficeJet Pro Help from the Help menu of your
software program.
2 Click the How Do I? tab.
3 Click the appropriate category.
HP OfficeJet Pro 1150C User’s Guide 5-1
Page 49

4 Click the task for which you want more information.
TIP If you can’t find the task you’re looking for, try using the keyword index. To open
NOTE You can also access scanning help for Caere OmniPage Limited Edition and
Get Troubleshooting Help
1 Double-click the HP OfficeJet Pro 1150C Toolbox icon on your desktop or
2 Click the Troubleshooting tab.
3 Click the appropriate category.
4 Click the symptom that matches what you are seeing with your HP OfficeJet
the index, click the Index button (if you’re using Windows 95) or the Search
button (if you’re using Windows 3.1x).
Adobe PhotoDeluxe through the HP OfficeJet Pro help.
from within the HP OfficeJet Pro Program Utilities group.
-OrIn Windows 95, select HP OfficeJet Pro Help from the Help menu of your
software program.
Pro 1150C.
5-2 Getting Help
5 Answer the troubleshooting questions on your screen to reach the possible
solutions for your symptom.
NOTE You can also access scanning help for Caere OmniPage Limited Edition and
Adobe PhotoDeluxe through the HP OfficeJet Pro help.
Page 50

Use Product Services
Get Help from HP
From the Product Services tab of the HP OfficeJet Pro 1150C Toolbox, you
can clean and align the print cartridges, print a self-test page, test the communication between your HP OfficeJet Pro 1150C and your computer, test
and calibrate the scanner, and calibrate your screen.
1 Double-click the HP OfficeJet Pro 1150C Toolbox icon on your desktop.
-OrIn Windows 95, select HP OfficeJet Pro Help from the Help menu of your
software program.
2 Click the Product Services tab.
3 Click the service you want performed.
HP SHP S
upporuppor
t St S
erer
HP S
uppor
HP SHP S
upporuppor
If you can’t find the answer you need in this book or in online help, you can
contact one of the HP support services listed in the following pages.
Some support services are available only in the U.S. and Canada, while
others are available in many countries worldwide. If a support service
number is not listed for your country, contact your nearest authorized HP
dealer for help.
t S
t St S
er
erer
vicesvices
vices
vicesvices
HP OfficeJet Pro 1150C User’s Guide 5-3
Page 51

HP Distribution Center
To order current printer and scanner drivers in the U.S., dial 1-800- HP
DISKS (1-800-473-4757).
In Europe, dial one of the following numbers:
◆
English +44 (0) 1429-865-511
◆
French +44 (0) 1429-863-343
◆
German +44 (0) 1429-863-353
◆
Italian +44 (0) 1429-520-013
◆
Spanish +44 (0) 1429-520-012
In Latin America, drivers are available in English, Spanish, and Portuguese.
Dial one of the following fax numbers:
◆
Outside Brazil (011) 55-11-268-7269
◆
Any city in Brazil, outside São Paulo City (011) 268-7269
◆
In São Paulo 268-7269
In Asia and Australia, dial one of the following numbers:
◆
Asia Pacific 65-740-4477
◆
Australia (Sydney) 612-565-6099
HP CHP C
HP C
HP CHP C
ustomer Sustomer S
ustomer S
ustomer Sustomer S
upporuppor
uppor
upporuppor
tt
t
tt
If you still need help, call the HP Customer Support Center. Before calling,
have your serial number handy and be sitting at your computer. We will
need to know what version of Windows you are running and the amount
of RAM and free hard disk space you have.
Calling in the U.S. and Canada during warranty
Call (208) 323-2551 Monday through Friday from 6 am to 10 pm
Mountain Standard Time (MST) and Saturdays from 9 am to 4 pm MST.
This service is free during the warranty period of the HP OfficeJet Pro
1150C; however, your standard long-distance phone charges still apply.
HP OfficeJet Pro 1150C User’s Guide 5-5
Page 52

Calling in the U.S. and Canada post warranty
If your printer is not under warranty, you can call (800) 999-1148. A percall out-of-warranty support fee will be charged to your credit card. You can
also call (900) 555-1500 ($2.50 per minute) from 7 am to 6 pm MST and
Saturdays from 9 am to 3 pm MST. Charges begin only when you connect
with a support technician. (Prices are subject to change without notice.)
Calling in Europe
You can call the support center in the following countries:
◆ Europe (English): +44-171-512-5205 ◆ Denmark: 39-29-4099
◆ United Kingdom: 0171-512-5202 ◆ Finland: 02-03-47-288
◆ Germany: 0180-525-8143 ◆ Norway: 22-11-6299
◆ France: 50-43-98-53 ◆ Sweden: 08-619-2170
◆ Belgium (French): 02-626-88-06 ◆ Spain: 902-321-123
◆ Belgium (Dutch): 02-626-8807 ◆ Italy: 022-641-0350
◆ Portugal: 01-441-7199 ◆ Netherlands: 020-606-8751
◆ Ireland: 01-662-5525 ◆ Austria: 0660-6386
5-6 Getting Help
◆ Switzerland (French & German): 084-880-1111
Calling in Australia and New Zealand
Call (03) 272-8000 in Australia or (09) 356 6640 in New Zealand. This
service is free for 12 months from the date of original purchase; however,
your standard long-distance phone charges still apply. For technical assistance after the free period, a $25 flat fee per single incident will apply.
Calling Elsewhere in the World
◆ Brazil: 55-11-829-6612
◆ Mexico: 011-525-264-2075
Contact your local dealer or nearest HP Sales and Support Office for
information on obtaining technical assistance or hardware repair services.
Page 53

Get Help from Caere
Dial-up services
Product support and information for Caere OmniPage Limited Edition are
available through the following services:
Service How to Contact Service Provided
CompuServe GO CAERE forum/updates
America Online Keyword CAERE forum/updates
Fax on demand 408-354-8471 common Q&A
Caere BBS 408-395-1631 text/help files/updates
Internet support@caere.com email help
Registered users in North America who need further assistance can also
call Caere Product Support at 408-395-8319.
International support
These numbers are for international users:
◆
Australia: (02) 955-71400
◆
Austria: 0660-5878
◆
Belgium: 0800-111-11
◆
Denmark: 800-17328
◆
Finland: 0800-111844
◆
France: 0800-916010
◆
Germany: 0130-810915
◆
United Kingdom: 0800-614-759
◆
Other European Countries: +353-1-7063908 (TEL),
◆
Italy: 1678-77416
◆
Netherlands: 06-022-2083
◆
Norway: 800-11667
◆
Portugal: 05055-3242
◆
Spain: 900-95-3539
◆
Sweden: 020-791091
◆
Switzerland: 155-8226
+353-1-2957530 (FAX)
All Other Countries, contact your local distributor.
HP OfficeJet Pro 1150C User’s Guide 5-7
Page 54

Get Help from Adobe
If you have Adobe PhotoDeluxe, there is a toll call. Adobe offers free technical support for 90 days on Adobe Photoshop LE. The 90 day clock begins
with the customer’s first phone call to Adobe. If you have Adobe Photoshop
LE, you can call (206)628-2040.
Dial-up services
Product support and information for Adobe PhotoDeluxe and Adobe
Photoshop LE are available through the following services:
Service How to Contact Service Provided
Internet techdocs@adobe.com email help
Fax 206-628-5737 common Q&A
World Wide Web http://www.adobe.com updates/text/files
CompuServe ADOBEAPP forum/updates
America Online Keyword ADOBE forum/updates
5-8 Getting Help
Adobe BBS 206-623-6984 updates/text/files
Person-to-Person Product Support
Per-Minute 900 Cost Per Flat Fee Cost Per
Product Number Access Minute Phone Number Incident
Windows (900) 555-2200 $2/minute (206) 441-5142 $25/incident
Page 55

International Support
These numbers are fax numbers for international users. Call the appropriate
number to receive information from Adobe via fax.
Austria: Int + 44-131-451-6882
Belgium: Int + 44-131-451-6883
France: Int + 44-131-458-6889
Germany: Int + 44-131-451-6884
Italy: Int + 44-131-451-6890
Netherlands: Int + 44-131-451-6885
Sweden: Int + 44-131-451-6886
Switzerland: Int + 44-131-451-6887
UK and Ireland: Int + 44-131-451-6888
Dial-up serDial-up ser
Dial-up ser
Dial-up serDial-up ser
Service How to Contact Service Provided
Faxback appropriate fax number common Q&A
World Wide Web http://www.adobe.com updates/text/files
CompuServe ADOBEAPP forum/updates
Adobe BBS ++44-131-458-4666 updates/text/files
vice for Ivice for I
vice for I
vice for Ivice for I
nternter
national Unational U
nter
national U
nternter
national Unational U
listed and select option 3
serssers
sers
serssers
HP OfficeJet Pro 1150C User’s Guide 5-9
Page 56

5-10 Getting Help
Page 57

chapter six
Maintaining Your HP OfficeJet
Pro 1150C
With minimal maintenance you can keep your HP OfficeJet Pro 1150C
in top working condition. Perform the following maintenance procedures
as necessary.
Cleaning the exterior case
Use a soft, damp, lint-free cloth to wipe dust, smudges, and stains off
the case. The interior of the HP OfficeJet Pro 1150C does not require
cleaning. Keep fluids away from the interior of the HP OfficeJet Pro 1150C.
6
HP OfficeJet Pro 1150C User’s Guide 6-1
Page 58

Cleaning the glass
WARNING Turn off the HP OfficeJet Pro 1150C and remove the power cord before cleaning.
CAUTION Do not use abrasives, acetone, benzene, or carbon tetrachloride on the glass; these
Even though the HP OfficeJet Pro 1150C is off, power is still being supplied if
the power cord is plugged in.
1 Turn off the HP OfficeJet Pro 1150C remove the power cord and then raise
the document cover.
2 Clean the glass with a soft cloth or sponge moistened with warm water and
a mild soap or detergent.
can damage the glass.
3 Rinse the soft cloth or sponge with clean water, wring out excess water, and
wipe off the remaining soap or detergent on the glass.
4 Dry the glass with a chamois or cellulose sponge to prevent spotting. If soap
or detergent does not clean the glass sufficiently, use isopropyl alcohol as a
cleaning agent.
6-2 Maintaining Your HP OfficeJet Pro 1150C
Page 59

Hewlett-Packard Limited Warranty
Product Number: C5300A
Duration of Limited Warranty (Hardware): 1 Year
Duration of Limited Warranty (Software): 90 Days
Duration Limited Warranty (Print Cartridges): 90 Days
Extent of Limited Warranty
chapter seven
7
1 Hewlett-Packard (HP) warrants to the end-user customer that HP products
will be free from defects in materials and workmanship, for a specified time
after the date of purchase by the customer. The duration of this limited
warranty is stated above. Certain additional conditions and limitations of
HP’s warranty are stated in the User’s Guide. Those conditions and limitations include:
(a) For software products, the warranty applies only to the media upon
which the product is recorded; and
(b) HP does not warrant the operation of any product to be uninterrupted
or error free.
HP OfficeJet Pro 1150C User’s Guide 7-1
Page 60

2 HP’s limited warranty covers only those defects which arise as a result of
normal use of the product, and do not apply to any:
(a) Improper or inadequate maintenance;
(b) Software or interfacing not supplied by HP;
(c) Unauthorized modification or misuse;
(d) Operation outside the product’s environmental specifications, including
duty cycle abuse or use of a mechanical switchbox without a designated
surge protector;
(e) Use of non-supported printing media; or
(f) Improper site preparation or maintenance.
3 For HP printer products, the use of a non-HP or refilled print cartridge does
not affect either the warranty to the customer or any HP support contract
with the customer; print cartridge includes both toner cartridges and ink
cartridges. However, if printer failure or damage is attributable to the use of
a non-HP or refilled print cartridge, HP will charge its standard time and
materials charges to service the printer for the particular failure or damage.
4 If any software media product or print cartridge product proves defective
during the applicable warranty period, and if the product is covered by HP’s
warranty, the customer shall return the product for replacement.
5 If HP receives, during the applicable warranty period, notice of a defect in
hardware product which is covered by HP’s warranty, HP shall either repair
or replace the product, at its option. Any replacement product may be either
new or like-new, provided that it has functionality at least equal to that of
the product being replaced.
7-2 HP Limited Warranty
6 If HP is unable to repair or replace, as applicable, a defective product which
is covered by HP’s warranty, HP shall, within a reasonable time after being
notified of the defect, refund the purchase price for the product, provided
the customer returns the product.
7 On-site warranty and return to HP warranty services are available from any
authorized HP service facility or repair depot worldwide. Specific information regarding product returns is contained in the User’s Guide.
8 This Limited Warranty Statement gives the customer specific legal rights.
The customer may also have other rights which vary from state to state in
the United States, from province to province in Canada, and from country
to country elsewhere in the world.
Page 61

Limitations of Warranty
1 NEITHER HP NOR ANY OF ITS THIRD PARTY SUPPLIERS MAKES
2 To the extent that this Limited Warranty Statement is inconsistent with the
ANY OTHER WARRANTY OF ANY KIND, WHETHER EXPRESS OR
IMPLIED, WITH RESPECT TO ITS PRODUCTS. HP AND ITS
THIRD PARTY SUPPLIERS SPECIFICALLY DISCLAIM THE IMPLIED WARRANTIES OF MERCHANTABILITY AND FITNESS FOR
A PARTICULAR PURPOSE.
law of the locality where the customer uses the HP product, this Limited
Warranty Statement shall be deemed modified to be consistent with such
local law. Under such local law, certain limitations of this Limited Warranty
Statement may not apply to the customer. For example, some states in the
United States, as well as some governments outside the United States (including provinces in Canada) may:
(a) Preclude the disclaimers and limitations in this Warranty Statement
from limiting the statutory rights of a consumer (e.g. Australia and the
United Kingdom);
(b) Otherwise restrict the ability of a manufacturer to make such disclaimers
or impose such limitations; or
(c) Grant the customer additional warranty rights, specify the duration of
implied warranties which the manufacturer cannot disclaim, or not
allow limitations on how long an implied warranty lasts.
3 To the extent allowed by local law, the remedies provided in this Warranty
Statement are the customer’s sole and exclusive remedies.
4 Products with a return to HP warranty may be returned to the closest HP
authorized repair center worldwide if any of the conditions are met:
(a) It was purchased at non-U.S. prices; or
(b) It is a product with worldwide warranty coverage*.
If none of these conditions are met, the product
authorizauthoriz
authoriz
authorizauthoriz
*
ed red r
epair center within the countrepair center within the countr
ed r
epair center within the countr
ed red r
epair center within the countrepair center within the countr
Worldwide warranty coverage may require special approval from Hewlett-Packard.
Contact your reseller or your HP sales representative for information.
must be rmust be r
must be r
must be rmust be r
y of original pury of original pur
y of original pur
y of original pury of original pur
HP OfficeJet Pro 1150C User’s Guide 7-3
eturned to aneturned to an
eturned to an
eturned to aneturned to an
chase.chase.
chase.
chase.chase.
Page 62

Limitations of Liability
In addition to the conditions listed above, on-site warranty service outside
the country of initial purchase is subject to HP terms regarding travel zone
coverage and to local on-site service capabilities.
HP will pay for return of the product to the customer for products with
Return to HP Warranty, except for products returned to another country.
5 Service and support outside the initial country of purchase is subject to the
product being sold in the country where service is requested.
Products configured to operate in a different country may be subject to
delays in completing any repairs and may include other service limitations.
Worldwide warranty coverage is limited to Base Factory Warranty coverage
for the product according to the warranty code appearing on HP’s price list
in effect on the date the product is shipped to the reseller.
On-site warranty coverage, where specified, is provided by the reseller or by
HP’s support offices within HP defined travel zones.
EXCEPT FOR THE OBLIGATIONS SPECIFICALLY SET FORTH
IN THIS WARRANTY STATEMENT, IN NO EVENT SHALL HP
BE LIABLE FOR ANY DIRECT, INDIRECT, SPECIAL, INCIDENTAL,
OR CONSEQUENTIAL DAMAGES, WHETHER BASED ON CONTRACT, TORT, OR ANY OTHER LEGAL THEORY AND WHETHER
ADVISED OF THE POSSIBILITY OF SUCH DAMAGES.
Warranty Service
7-4 HP Limited Warranty
EE
xprxpr
ess seress ser
ess ser
ess seress ser
vicevice
vice
vicevice
E
xpr
EE
xprxpr
To obtain HP Express service, the customer must contact an HP service
office or an HP customer support center for basic troubleshooting first.
If a customer unit needs a minor part replacement and these parts can
normally be replaced by the customer, the customer replaceable components
may be serviced through expedited part shipment. In this event, HP will
prepay shipping charges, duty and taxes; provide telephone assistance on
replacement of the component; and pay shipping charges, duty and taxes
for any part that HP asks to be returned.
Page 63

For some repairs, the HP Customer Support Center may direct customers to
designated Authorized Service Providers who are certified by HP to service
the HP OfficeJet Pro 1150C.
If a customer unit needs to be returned to HP for repair, HP will expedite
the repair or provide a replacement unit and will utilize an express delivery
service, when available by courier or by mail system to expedite the return
of the repaired or replacement unit.
Warranty Upgrades
Extended warranties and service option upgrades may be obtained through
you local HP authorized dealer or HP service centers.
In the U.S. and Canada, extended warranties may also be obtained by calling
HP at 1-800-835-4747.
Returning Your HP OfficeJet Pro 1150C for Service
After obtaining authorization for hardware service from HP Customer
Support Center, be sure to pack your HP OfficeJet Pro 1150C in a
protective carton. We recommend you save the original shipping container
for this purpose.
NOTE In-transit damage is not covered by the warranty, so always insure your shipment.
Use these guideline before returning your HP OfficeJet Pro 1150C for
service:
1 Use the troubleshooting instructions to make certain the problem is in
your HP OfficeJet Pro 1150C product and not the result of configuration
problems or a malfunction in your computer or software. If possible, identify the defective function.
HP OfficeJet Pro 1150C User’s Guide 7-5
Page 64

2 If repair is required, follow the steps in “Prepare Your HP OfficeJet Pro
1150C for Shipment” on the next page. Please include these items in
the box.
• A description of the exact configuration at the time of the problem,
including the interface cable, computer and peripherals, and software
in use.
• A brief description of symptoms for service personnel (samples of print
quality problems are helpful).
• A copy of the sales slip or other proof of purchase to establish the
warranty coverage period.
• Your name, address, and a phone number where you may be reached
during the day.
PP
rr
eparepar
e ye y
epar
eparepar
our HP Oour HP O
e y
our HP O
e ye y
our HP Oour HP O
P
r
PP
rr
1 Turn on the HP OfficeJet Pro 1150C.
2 Raise the document cover, and then raise the print cartridge access cover.
3 Remove both print cartridges and close the print cartridge latches
NOTE Print cartridges that remain inside may cause damage.
4 Put in orange packing inserts (if available).
fficeJfficeJ
fficeJ
fficeJfficeJ
et Pet P
rr
o 1150C for shipmento 1150C for shipment
et P
r
o 1150C for shipment
et Pet P
rr
o 1150C for shipmento 1150C for shipment
7-6 HP Limited Warranty
5 Turn off the HP OfficeJet Pro 1150C.
6 To minimize shipment damage to the HP OfficeJet Pro 1150C, lock
the scanner.
Page 65

System Requirements
Hewlett-Packard Software Solution
chapter eight
Technical Information
8
Minimum Recommended
(HP Components Only) (Typical installation
with all components)
Processor 486 Pentium
DOS 6.0 or later 6.0 or later
Windows 3.1x 95
RAM 8 MB 20 MB
Disk Space Needed
to Install 17 MB 51 MB
to Run 8 MB 38 MB
Video Display 256 colors 16.7 million colors
Media 3.5” floppy disk drive CD-ROM drive
Parallel Port Bi-directional IEEE-1284 Enhanced
Capabilities Port (ECP)
HP OfficeJet Pro 1150C User’s Guide 8-1
Page 66

Adobe PhotoDeluxe (CD-ROM)
• Intel® or Pentium® processor
• MS-DOS 6.0 or later
®
• Microsoft
Windows 3.1x or later, Windows 95, or Windows NT 3.5
• 8MB or more of RAM
• 45MB or more of available hard-disk space
• 256-color or greater display adapter
• Sound card (recommended)
• CD-ROM drive
Adobe Photoshop LE (Floppy Disks)
• Intel 80386- or 80486-based or faster PC with a minimum of 8MB of
RAM (16MB for Windows NT)
• MS-DOS 5.0 or later (not required for Windows 95)
• Microsoft Windows 3.1x, Windows 95, or Windows NT 3.5
• 256-color display adapter and compatible monitor
• A mouse or other compatible pointing device
For the best performance, Adobe Systems recommends the following:
• Intel Pentium processor
• MS-DOS 6.0 or later
• At least 16MB of RAM (32MB for Windows NT)
• A 24-bit color display adapter
• A PC-compatible scanner
8-2 Technical Information
Caere OmniPage Limited Edition
• A computer with an 80386 or higher processor
• Microsoft Windows version 3.1x, or higher running in Enhanced mode
• MS-DOS 5.0 or higher
• Windows-compatible mouse
• 8MB RAM
• 4MB available hard disk space for one language, 6MB for two languages
• 10MB swap file for U.S., 12MB swap file for non-U.S.
Page 67

Speed Specifications
11
1
ed, text)ed, text)
ed, text)
ed, text)ed, text)
11
11
1
11
22
2
22
22
2
22
BB
lack Plack P
rint Srint S
B
lack P
BB
lack Plack P
peed (letter-sizpeed (letter-siz
rint S
peed (letter-siz
rint Srint S
peed (letter-sizpeed (letter-siz
ed, text)ed, text)
ed, text)
ed, text)ed, text)
EconoFast mode: 8 pages per minute
Normal mode: 7 pages per minute
Best mode: 4 pages per minute
Color PColor P
Color P
Color PColor P
(letter-siz(letter-siz
(letter-siz
(letter-siz(letter-siz
rint Srint S
rint S
rint Srint S
ed, mixed, mix
ed, mix
ed, mixed, mix
peedpeed
peed
peedpeed
ed text, and graphics)ed text, and graphics)
ed text, and graphics)
ed text, and graphics)ed text, and graphics)
EconoFast mode: 4 pages per minute
Normal mode: 2 pages per minute
Best mode: 1 page per minute
BB
lack Copy Slack Copy S
B
lack Copy S
BB
lack Copy Slack Copy S
peed (letter-sizpeed (letter-siz
peed (letter-siz
peed (letter-sizpeed (letter-siz
EconoFast mode: 7 pages per minute
Normal mode: 5 pages per minute
Best mode: 3 pages per minute
Color Copy SColor Copy S
Color Copy S
Color Copy SColor Copy S
(letter-siz(letter-siz
(letter-siz
(letter-siz(letter-siz
peedpeed
peed
peedpeed
ed, mixed, mix
ed text, and graphics)ed text, and graphics)
ed, mix
ed text, and graphics)
ed, mixed, mix
ed text, and graphics)ed text, and graphics)
EconoFast mode: 3 pages per minute
Normal mode: 1 page per minute
Best mode: .8 pages per minute
22
2
Scan SScan S
Scan S
Scan SScan S
peed (100 dpi)peed (100 dpi)
peed (100 dpi)
peed (100 dpi)peed (100 dpi)
22
Color photograph: Normal (8 bit)—15 secs–3 by 5 in
Color photograph: Best (24 bit)—15 secs–3 by 5 in
22
2
Scan SScan S
Scan S
Scan SScan S
peed (300 dpi)peed (300 dpi)
peed (300 dpi)
peed (300 dpi)peed (300 dpi)
22
Color drawing (24 bit): 29 secs–3 by 5 in
22
2
OCR Scanning (300 dpi)OCR Scanning (300 dpi)
OCR Scanning (300 dpi)
OCR Scanning (300 dpi)OCR Scanning (300 dpi)
22
Return to program speed
Text page (4 bit): 36 secs–8.5 by 11 in
Functional Specifications
OO
perating Sperating S
O
perating S
OO
perating Sperating S
Windows 95
Windows 3.1x
Windows NT mini driver (printer only)
DOS support (DeskJet 660C compatability)
Network–netware 3.12, 4.1 (printer only)
SS
oftwaroftwar
S
oftwar
SS
oftwaroftwar
OCR Software–Caere OmniPage Limited Edition–Caere
Corporation
Image Editor–Adobe PhotoDeluxe (CD), Adobe
Photoshop LE
PictureLink–HP integration software for Windows 95
HP OfficeJet Pro PictureScan–TWAIN compliant
Integrated installer for CD-ROM
I/OI/O
I/O
I/OI/O
Centronics IEEE 1284 bi-directional
MLC
PP
aper Saper S
P
aper S
PP
aper Saper S
U.S. letter-sized (8.5 by 11 in)
U.S. legal (printing only) (8.5 by 14 in)
U.S. executive (7.25 by 10.5 in)
U.S. no. 10 envelope (4.12 by 9.5 in)
Index card (4 by 6 in)
Index card (5 by 8 in)
European A4 (210 by 297 mm)
European A5 (148 by 210 mm)
European DL envelope (220 by 110 mm)
European C6 envelope (114 by 162 mm)
European A6 card (105 by 148.5 mm)
Avery InkJet Labels
Custom sizes:Width: 3.94–8.5 in (100–216 mm)
ystems & Systems & S
ystems & S
ystems & Systems & S
ee
e
ee
oftwaroftwar
e Compatibilitye Compatibility
oftwar
e Compatibility
oftwaroftwar
e Compatibilitye Compatibility
(3.5 in disks)–Adobe Corporation
scanning software
iziz
eses
iz
es
iziz
eses
Length: 5.79–14 in (148–356 mm)
1
Actual speed varies by content of files and software application.
2
Actual speed varies by content.
DD
uty Cuty C
yy
uty C
uty Cuty C
clecle
y
cle
yy
clecle
D
DD
Maximum Monthly Usage: 1000 pages
HP OfficeJet Pro 1150C User’s Guide 8-3
Page 68

PP
aper waper w
P
PP
60–135g/m2 (16–36 lb)
EE
E
EE
75–90 g/m2 (20–24 lb)
CarCar
Car
CarCar
110–200 g/m (110 index max; 8.5 pt max thickness)
BB
B
BB
Econofast: 300 by 300 dpi
Normal: 600 by 600 dpi
Best: 600 by 600 dpi
Color RColor R
Color R
Color RColor R
Econofast: 300 by 300 dpi
Normal: 300 by 300 dpi CREt
Best: 600 by 300 dpi CREt
ColorsColors
Colors
ColorsColors
Up to 16.8 million
LanguageLanguage
Language
LanguageLanguage
PCL3 with color printer language
FF
F
FF
FontSmart Technology: 126 scaleable fonts for Windows
DOS: 4 built-in scaleable typefaces—Courier, CG Times,
OO
O
OO
Resolution Enhancement technology (REt)/Color (CREt)
ColorSmart technology, HP Real Life Imaging System
eighteight
aper w
eight
aper waper w
eighteight
nvnv
elope welope w
nv
nvnv
d wd w
d w
d wd w
lack Rlack R
lack R
lack Rlack R
ontsonts
onts
ontsonts
therther
ther
therther
eighteight
elope w
eight
elope welope w
eighteight
eighteight
eight
eighteight
esolutionesolution
esolution
esolutionesolution
esolutionesolution
esolution
esolutionesolution
Univers, Letter Gothic—15 fonts
Power Specifications
SS
ourour
ce vce v
our
ce v
ourour
ce vce v
rr
equencyequency
r
equency
rr
equencyequency
oltageoltage
oltage
oltageoltage
S
SS
100–240V
FF
F
FF
50–60 Hz
Environmental Specifications
OO
perating rangesperating ranges
O
perating ranges
OO
perating rangesperating ranges
5°–40°C (41°–104°F)
RR
ecommended rangesecommended ranges
R
ecommended ranges
RR
ecommended rangesecommended ranges
15°–35°C (59°–95°F)
HH
umidityumidity
H
umidity
HH
umidityumidity
15%–80% RH non-condensing
NN
on-operating rangeson-operating ranges
N
on-operating ranges
NN
on-operating rangeson-operating ranges
-40°–70°C (-104°–140°F)
Physical Specifications
HH
eighteight
H
eight
HH
eighteight
12.8 in (326 mm)
WW
idthidth
W
idth
WW
idthidth
21.3 in (540 mm)
DD
epthepth
D
epth
DD
epthepth
17.7 in (450 mm)
8-4 Technical Information
WW
eighteight
W
eight
WW
eighteight
32.2 lb (14.61 kg)
Page 69

Regulatory Notices
FCC SFCC S
tatement (U.S.A.)tatement (U.S.A.)
FCC S
tatement (U.S.A.)
FCC SFCC S
tatement (U.S.A.)tatement (U.S.A.)
The United States Federal Communications Commission
(in 47 CFR 15.105) has specified that the following notice
be brought to the attention of users of this product.
TT
elecommunications Gelecommunications G
T
elecommunications G
TT
elecommunications Gelecommunications G
Pursuant to Section 22 of Telecommunications Act of
1984 this product is approved for secondary attachment
to approved primary attachment devices connected to the
telecommunication network under the General Approval
(NS/G/1234/5/100003).
eneral Aeneral A
eneral A
eneral Aeneral A
pprppr
ppr
pprppr
oo
vv
al (UK)al (UK)
o
v
al (UK)
oo
vv
al (UK)al (UK)
This equipment has been tested and found to comply with
the limits for a Class B digital device, pursuant to part 15
of the FCC Rules. These limits are designed to provide
reasonable protection against harmful interference in a
residential installation. This equipment generates, uses
and can radiate radio frequency energy and, if not installed
and used in accordance with the instructions, any cause
harmful interference to radio communications. However,
there is no guarantee that interference will not occur in a
particular installation. If this equipment does cause
harmful interference to radio or television reception,
which can be determined by turning the equipment off
and on, the user is encourages to try to correct the
interference by one or more of the following measures:
• reorient the receiving antenna
• increase the separation between the equipment and
the receiver
• connect the equipment into an outlet on a circuit
different from that to which the receiver is connected
• consult the dealer or an experienced radio/TV
technician for help
The user may find the following booklet prepared by the
Federal Communications Commission helpful: How to
Identify and Resolve Radio-TV Interference Problems. This
booklet is available from the US Government Printing
Office, Washington DC, 20402. Stock No. 004-00000345-4.
DOC SDOC S
tatement (Canada)tatement (Canada)
DOC S
tatement (Canada)
DOC SDOC S
tatement (Canada)tatement (Canada)
Le present appareil numerique n'emet pas de bruitis
radioelectriques depassant les limits applicables aux
appareils numeriques de la class B prescrites dans le
Reglement sur le brouillage radioelectrique edicte par
le ministere des Communications du Canada.
This digital apparatus does not exceed the Class B limits
for radio noise emissions from digital apparatus set out in
the Radio Interference Regulations of the Canadian
Department of Communications.
GG
eräuschemissioneräuschemission
G
eräuschemission
GG
eräuschemissioneräuschemission
LpA < 70 dB
am Arbeitsplatz
im Normalbetrieb
nach DIN 45635 T. 19
VV
CCI-2CCI-2
V
CCI-2
VV
CCI-2CCI-2
CACA
UTIONUTION
CA
UTION: Pursuant to Part 15.21 of the FCC Rules,
CACA
UTIONUTION
any changes or modifications to this equipment not
expressly approved by the Hewlett-Packard Company, may
cause harmful interference and void the FCC authorization to operate this equipment.
HP OfficeJet Pro 1150C User’s Guide 8-5
Page 70

Declaration of Conformity
(According to ISO/IEC Guide 22 and EN45014)
Hewlett-Packard Company, 16399 West Bernardo Drive,
San Diego, California 92127-1899, USA
ANDAND
AND
ANDAND
Hewlett-Packard Singapore Pte. Ltd, 1 Clementi Loop
#4-01/12, Margatio Districentre, Clementi West
Distripart, Singapore 129808, Republic of Singapore
declares, that the product, HP OfficeJet Pro 1150C,
Scanner-Printer-Copier, model number C5300A conforms
to the following Product Specifications:
SS
afety:afety:
S
afety: EN60950:1992 +A1 & A2
SS
afety:afety:
IEC 950:1991 +A1, A2 & A3
UL1950, 3rd Edn:1995
CSA22.2 No.950 3rd Edn.:1995
NON-016-SCFI-1993
EMKO TSE(74-SEC)207/1994
EMC:EMC:
EMC: CISPR22:1993/EN55022:1994 - Class B*
EMC:EMC:
EN50082-1:1992
IEC 1000-4-2:1995 / EN61000-4-2:
1995 - 4kV CD, 8kV AD
IEC 1000-4-3:1995 / prEN55024-3:
1991 - 3V/m
IEC 1000-4-4:1995 / EN61000-4-4:
1995 - 1.0 KV Power Line
FCC Part 15 - Class B / ICES-003,
Issue 2 / VCCI-2*
IEC 1000-3-2:1995 / EN61000-3-2:1995
IEC 1000-3-3:1994 / EN61000-3-3:1995
Supplementary Information: LED'S IN THIS PRODUCT ARE CLASS I IN ACCORDANCE TO IEC825-1.
The Product herewith complies with the requirements of
the Low Voltage Directive 73/23/EEC and EMC Directive
89/336/EEC, and carries the CE marking accordingly.
Ordering accessories and supplies
In the U.S., you may order printer supplies by calling
HP Direct, 1-800-538-8787, to get the name of your local
authorized HP dealer.
Outside the U.S. call your local authorized HP dealer.
HP RHP R
eoreor
eor
eoreor
umberumber
umber
umberumber
derder
der
derder
HP R
HP RHP R
SS
upplies/Aupplies/A
S
upplies/A
SS
upplies/Aupplies/A
PP
rint carrint car
P
rint car
PP
rint carrint car
Black print cartridge 51645A
Tri-color print cartridge 51641A
MM
ediaedia
M
edia
MM
ediaedia
HP Premium InkJet Paper, Letter
HP Premium InkJet Paper, A4
HP Premium Glossy Paper, Letter
HP Premium Glossy Paper, A4
HP Premium Transparency Film, Letter
HP Premium Transparency Film, A4
HP IEEE-1284 A-B PHP IEEE-1284 A-B P
HP IEEE-1284 A-B P
HP IEEE-1284 A-B PHP IEEE-1284 A-B P
ccessoriesccessories
ccessories
ccessoriesccessories
tridgestridges
tridges
tridgestridges
(200 sheets, 8.5 by 11 in) 51634Y
(200 sheets, 210 by 297 mm) 51634Z
(50 sheets, 8.5 by 11 in) C3836A
(10 sheets, 8.5 by 11 in) C3833A
(50 sheets, 210 by 297 mm) C3837A
(10 sheets, 210 by 297 mm) C3831A
(50 sheets, 8.5 by 11 in) C3834A
(20 sheets, 8.5 by 11 in) C3828A
(50 sheets, 210 by 297 mm) C3835A
(20 sheets, 210 by 297 mm) C3832A
arallel Cablearallel Cable
arallel Cable
arallel Cablearallel Cable
NN
N
NN
* The product was tested in a typical system with a Hewlett-Packard
Vectra Personal Computer System.
8-6 Technical Information
2 meter length C2950A
3 meter length C2951A
Page 71

index
A
accessories, ordering 8-6
Adobe PhotoDeluxe 1-2, 1-14
aligning
front-panel overlay 1-8
print cartridges 1-24
attaching
front panel overlay 1-8
parallel cable 1-12
audio tips 5-4
B
bidirectional communication
settings 1-4
testing 1-5, 1-14
black and white copying 2-2
C
cable. See parallel cable
Caere OmniPage Limited Edition
for scanning 4-1, 4-5
installing 1-23
canceling a print job 3-3
cartridges, print. See print cartridges
CD-ROM, installing with 1-14
changing paper size 2-5
cleaning
printer 6-1
scanner 6-1
color
copies 2-2, 2-4
intensity, changing 2-4
print cartridges 1-24
communication test 1-5
connecting
parallel cable 1-12
power cord 1-13
contrast, controlling 2-4
Copy Quality button
changing quality 2-2
changing speed 2-2
copying
black and white 2-2
changing color intensity 2-4
changing paper size 2-5
color 2-2, 2-4
controlling contrast 2-4
documents 2-1
enlarging 2-3
from bulky originals 2-2
paper types 2-3
quality 2-2
reducing 2-3
transparencies 2-3
customer support
express service 7-4
in Europe 5-6
obtaining 5-5
online help 5-1
post warranty 5-6
using internet 5-4
warranty information 7-1
worldwide 5-6, 5-7, 5-9
D
declaration of conformity 8-6
dial-up services 5-7, 5-8
disk operating system (DOS) 8-1
disk space requirements 8-1
diskettes, installing with 1-23
DOS (disk operating system) 8-1
duty cycle 8-3
E
ECP (Extended Capabilities Port) 1-4
editing scanned pictures 4-7
ELC (Enhance Light Colors) 2-4
Enhance Light Colors (ELC) 2-4
Enhanced Parallel Port (EPP) 1-4
enlarging images 2-3
EPP (Enhanced Parallel Port) 1-4
express service 7-4
Extended Capabilities Port (ECP) 1-4
extended warranty 7-5
F
features 1-2
FontSmart 1-14
FreeCell 1-22
front panel, language options 2-5
front-panel overlay
aligning 1-8
attaching 1-8
illustration 1-8
G
graphics
enlarging 2-3
reducing 2-3
resizing 2-3
scanning 4-2
H
hardware illustration 1-2
help, online 5-1
how do I? 5-1
HP PictureLink 1-2
Index I-1
Page 72

I
installing
Adobe PhotoDeluxe 1-14
Caere OmniPage Limited Edition
1-14
FontSmart 1-14
for Windows 3.1x 1-22
for Windows 95 1-15
OCR 1-14
print cartridges 1-10, 1-11
software 1-14, 1-22
using CD ROM 1-14, 1-16
using diskettes 1-16, 1-23
international support 5-6, 5-7, 5-9
Internet, obtaining support using 5-4
K
keyword index, using 5-2
L
language options 2-5
lock, scanner 1-8
M
memory requirements 1-3
Menu button 2-5
moving scanner 1-8
O
OCR (optical character recognition)
1-2, 1-14
online
for troubleshooting 5-1
help 5-1
optical character recognition (OCR)
1-2, 1-14
ordering
accessories 8-6
printer drivers 5-5
scanner drivers 5-5
supplies 8-6
output tray
adding paper 1-9
illustration 1-9
P
paper
adjusting 1-9
loading 1-9
output tray 1-9
sizes 3-1, 8-3
types 2-3, 3-1
weight 8-4
paper size
changing 2-5
selecting 2-5
parallel cable
connecting 1-12
using IEEE-1284 1-12
parallel port
bidirectional 1-4
connecting 1-4
requirements 8-1
settings 1-4
port, parallel 1-4
power cord
avoiding electrical shock 1-13
connecting 1-13
previewing scans 4-6
print cartridges
access cover 1-10
adjusting 1-24
aligning 1-24
cleaning 5-3
inserting 1-10
installing 1-10, 1-11
printer
cleaning 6-1
driver, ordering 5-5
on/off button 3-2
printing
canceling a print job 3-3
errors 5-3
loading paper 3-2
paper types 3-1
problems 5-3
self-test page 5-3
starting 3-2
stopping a print job 3-2
product
features 1-2
maintaining 6-1
number 7-1
ordering information 8-6
regulatory information 8-5
returning 7-5, 7-6
servicing 7-5
shipping 7-6
software 1-2
system requirements 1-3, 8-1
product specifications. See specifications
product support. See customer support
Q
quality, changing 2-2
R
RAM (random access memory) 1-3
random access memory (RAM) 1-3
Readme file, for updates 1-1
reducing images 2-3
regulatory information 8-5
repairs 7-5
requirements, system 1-3, 8-1
resizing images 2-3
returning product 7-5, 7-6
S
Scan Picture
compatibility 4-1
using 4-1
scanner
cleaning 6-1
driver, ordering 5-5
moving 1-8
unlocking 1-8
scanner light 2-1, 4-5
scanner lock
illustration 1-8
location 1-8
I-2 Index
Page 73

scanning
cropping image 4-4
editing 4-7
editing using Adobe PhotoDeluxe 4-8
graphics 4-2
inserting image 4-5
into documents 4-4, 4-5
into separate files 4-6
preview 4-6
speed 8-3
text 4-2, 4-4
using Windows 3.1x 4-4
using Windows 95 4-4
self-test page, printing 5-3
servicing product 7-5
setting up the HP OfficeJet Pro
front-panel overlay 1-6
inserting print cartridges 1-10
loading paper 1-9
unlocking scanner 1-6
unpacking 1-6
settings
bi-directional 1-4
Centronics(R) 1-4
ECP 1-4
EPP 1-4
size, changing paper 2-5
software
installing 1-14
obtaining updates 1-1
requirements 8-2
space requirements 1-3
specifications
environmental 8-4
functional 8-3
operating systems 8-3
paper sizes 8-3
physical 8-4
power 8-4
software 8-3
speed 8-3
speed, changing 2-2
stopping a print job 3-2, 3-3
supplies, ordering 8-6
support. See customer support
switch box 1-4
system requirements 1-3
T
testing bidirectional communication 1-14
text recognition software 1-14
transparencies, copying on 2-3
troubleshooting 5-2
turning printer on/off 3-2
U
unlocking scanner 1-8
V
video display 1-3
W
warranty
conditions and limitations 7-1
duration 7-1
limitations 7-3
service 7-4
upgrades 7-5
Windows 3.1x
installing 1-22
scanning in 4-4
stopping a print job 3-3
Windows 95
installing 1-15
scanning in 4-3
stopping a print job 3-3
worldwide support 5-6, 5-7, 5-9
Index I-3
Page 74

As an Energy Star Partner,
Hewlett-Packard Company
has determined that this product
meets Energy Star guidelines for
energy efficiency.
®
All materials used to produce
this manual are recyclable. Use
local laws and guidelines to
recycle this manual.
Copyright © 1996
Hewlett-Packard Company
Printed in USA 11/96
MM
anual Panual P
M
anual P
MM
anual Panual P
C5300-90004C5300-90004
C5300-90004
C5300-90004C5300-90004
arar
ar
arar
t Nt N
t N
t Nt N
umberumber
umber
umberumber
 Loading...