

Page 1
Page 2

Page 3

Take a Look at All HP Support Has to Offer
Along with your product, you receive a variety of support services from
Hewlett-Packard and our support partners designed to give you the
results you need, quickly and professionally.
Online Services:for 24-hour
access to information over your
modem, wesuggest these services.
Obtaining Software:
For U.S. and Canada:
For Asia-Pacific Countries:
For Australia,New Zealand, and
India:
For European English:
HP Direct Ordering for
Accessories and Supplies
HP Support Assistant CD-ROM: This support tool offers a comprehensive online information system designed to provide technical and
HP Service Information: Tolocate HP-authorized dealers, call (1) (800) 243-9816 (U.S.)or (1) (800) 387-3867 (Canada).
HP Service Agreements: Call (1) (800) 835-4747 (U.S.) or (1) (800) 268-1221 (Canada).
HP FIRST: HP FIRST Fax will deliver detailed troubleshooting information on common software and troubleshooting tips for your HP product.
Call from any touch-tone phone and request up to three documents per call.These documents will be sent to the fax of your choice.
Australia
Austria
Belgium (Dutch)
Belgium (French)
Canada
China
Denmark
English (outside of UK)
Finland
France
Germany
Hong Kong
Hungary
India
Indonesia
Italy
Japan
WorldWide Web URL—Printer drivers, updatedHP printer software, plusproduct and support
information canbe obtained fromthe following URLs:
in theU.S.: http://www.hp.com in Europe: http://www2.hp.com
Printer drivers can beobtained from thefollowing sites:
in Japan: ftp://www.jpn. hp.com/drivers/ in Korea: http://www.hp.co.kr
in Taiwan: http://www.hp.com.tw or from a local driver website of http://www.dds.com.tw
HP Bulletin Board Service—Our electronic download service provides convenient access to HP
printer drivers, updated HP printer software, product information, and troubleshooting hints. Set your
communication software to N,8,1 and dial or use:
in the U.S.and Canada: (1) (208) 344-1691 in Taiwan: (886) (2) 923-3233
in Korea: HITEL or CHOLIAN (Go HPK) in Australia: (61) (3) 9890-0276
in New Zealand: (64) (9) 356-3660 in China: (86) (10) 6261-4172
European Bulletin Board Service numbers are listed at http://www2.hp.com.
America OnLine—(America OnLine/Bertelsmann is available in France, Germany, and the
UK)—Printer drivers, updated HP printer software, and support documentation are available to help
answer questions on HP products. Use Keyword HP to start your tour or call (1) (800) 827-6364 and ask
for representative #1118 to subscribe.
CompuServe—Printer drivers, updated HP printer software, and interactive sharing of technical
information with other members are available on CompuServe’s HP User’s forums (GO HP), or call (1)
(800) 524-3388 and ask for representative #51 to subscribe. (CompuServe is also available in the UK,
France,Belgium, Switzerland, Germany, and Austria.)
Phone: (1) (970) 339-7009 Mail: Hewlett-Packard Company
Fax: (1) (970) 330-7655 P.O.Box 1754
Contact Fulfill Plus at (65) 740-4477 (Hong Kong, Indonesia, Malaysia, Philippines, or Singapore). For
Korea, call (82) (2) 3270-0805 or (82) (2) 3270-0893.
For Australia and New Zealand, call (61) (2) 565-6099. For India, call (91) (11) 682-6035.
Call (44) (142) 986-5511.
Call (1) (800) 538-8787 (U.S.) or (1) (800) 387-8164 (Canada).
product information on HP products. To subscribe to this quarterly service in the U.S.or Canada, call (1)
(800) 457-1762. In Hong Kong, Indonesia, Malaysia, or Singapore, call Fulfill Plus at (65) 740-4477.
(61) (3) 9272-2627
(43) (1) 0660-8128
(32) (2) 0800-11906
(32) (2) 0800-17043
(1) (800) 333-1917
(86) (10) 6505-5280
(45) 8001-0453
(31) (20) 681-5792
(358) (9) 0800-13134
(33) (146) 0800-905900
(49) (13) 081-0061
(852) 2506-2422
(36) (1) 252-4647
(91) (11) 682-6035
(62) (21) 352-2044
(39) (2) 1678-59020
(81) (3) 3335-8622
Korea
Malaysia
Netherlands
New Zealand
Norway
Philippines
Portugal
Singapore
Spain
Sweden
Switzerland (French)
Switzerland (German)
Taiwan
Thailand
United Kingdom
United States
Greeley, CO 80632 USA
(82) (2) 769-0543
(60) (3) 298-2478
(31) (20) 0800-222420
(64) (9) 356-6642
(47) 800-11319
(65) 291-7951
(351) (1) 0505-313342
(65) 275-7251
(34) (90) 099-3123
(46) (2) 079-5743
(41) (1) 0800-551526
(41) (1) 0800-551527
(886) (2) 719-5589
(66) (2) 661-3511
(44) (134) 0800-960271
(1) (800) 333-1917
Page 4

Customer Support Options Worldwide
In addition to the phone numbers listed below, refer to the
Administrator’s Guide for worldwide sales and service addresses and
phone numbers for countries not listed here.
Customer Support & Product
Repair Assistance for the U.S. and
Canada:
European Customer Support Center Language and In-Country Options Available
HP provides a free telephone support service during the warranty period. By calling a telephone number listed below,you will be connected to
a responsive team waiting to help you.If you require support after your warranty has expired, you can receive support for a fee through the
same telephone number. The fee is charged on a per-incident basis. When calling HP, please have the following information ready: product
name and serial number, date of purchase, and description of the problem.
Danish: Denmark (45) 3929-4099
Dutch: Belgium (32) (2) 626-8806
English: Ireland (353) (1) 662-5525
Finnish: Finland (358) (9) 0203-47288
French: Belgium (32) (2) 626-8807
If you require support after your warranty has expired or additional product repair services, or if your country is not listed below, see
“Worldwide HP Sales and Service Offices” in appendix E.
Argentina
Australia
Brazil
Canada
China
Czech Republic
Greece
Hong Kong
Hungary
India
Indonesia
Japan
Korea
Netherlands (31) (20) 606-8751
UK (44) (171) 512-5202
International (44)(171) 512-5202
France (33) (45) 043-9853
Switzerland (41) (84) 880-1111
Call (1) (208) 323-2551 Monday through Friday from 6 am to 6 pm (Mountain Time)
during the Warranty Period. However,your standard long-distance phone charges still apply.
your serial number ready when calling.
Post-warrantytelephone assistance is available to answer your product questions.Call (1) (900)
555-1500 ($2.50* per minute, U.S.only) or call (1) (800) 999-1148 ($25* per call, Visa or MasterCard,
U.S.and Canada).
change.
Open Monday through Friday 8:30 to 18:00 CET
(54) (1) 781-4059
(54) (1) 781-4069
(61) (3) 272-8000
(55) (11) 709-1444
(1) (208) 323-2551
(86) (10) 6261-4174
(86) (10) 6261-4175
(86) (10) 6261-4176
(86) (10) 6262-5666
(42) (2) 471-7321
(30) (1) 689-6411
(852) 800-7729
(36) (1) 343-0310
(91) (11) 682-6035
(91) (11) 682-6069
(62) (21) 350-3408
(81) (3) 3335-8333
(82) (2) 3270-0700; outside Seoul,
call (82) (80) 999-0700
Charges begin only when you connect with a support technician.*Prices subject to
German: Austria (43) (1) 0660-6386
Italian: Italy (39) (2) 264-10350
Norwegian: Norway (47) 2211-6299
Portuguese: Portugal (351) (1) 441-7199
Spanish: Spain (34) (90) 232-1123
Swedish: Sweden (46) (8) 619-2170
In-country Support Numbers
Malaysia
México D.F.
México Guadalajara
México Monterey
Middle East/Africa
New Zealand
Philippines
Poland
Portugal
Russia
Singapore
Switzerland
Taiwan
Thailand
Turkey
Germany (49) (180) 525-8143
(60) (3) 295-2566
(52) (5) 326-4600
(52) (3) 669-9500
(52) (83) 378-4240
(41) (22) 780-7111
(64) (9) 356-6640
(63) (2) 894-1451
(48) (22) 37-5065
(351) (1) 301-7330
(7) (95) 923-5001
(65) 272-5300
(41) (1) 753-7111
(886) (2) 717-0055
(66) (2) 661-4011
(66) (2) 661-4012
(90) (1) 224-5925
free of charge
Have
Page 5

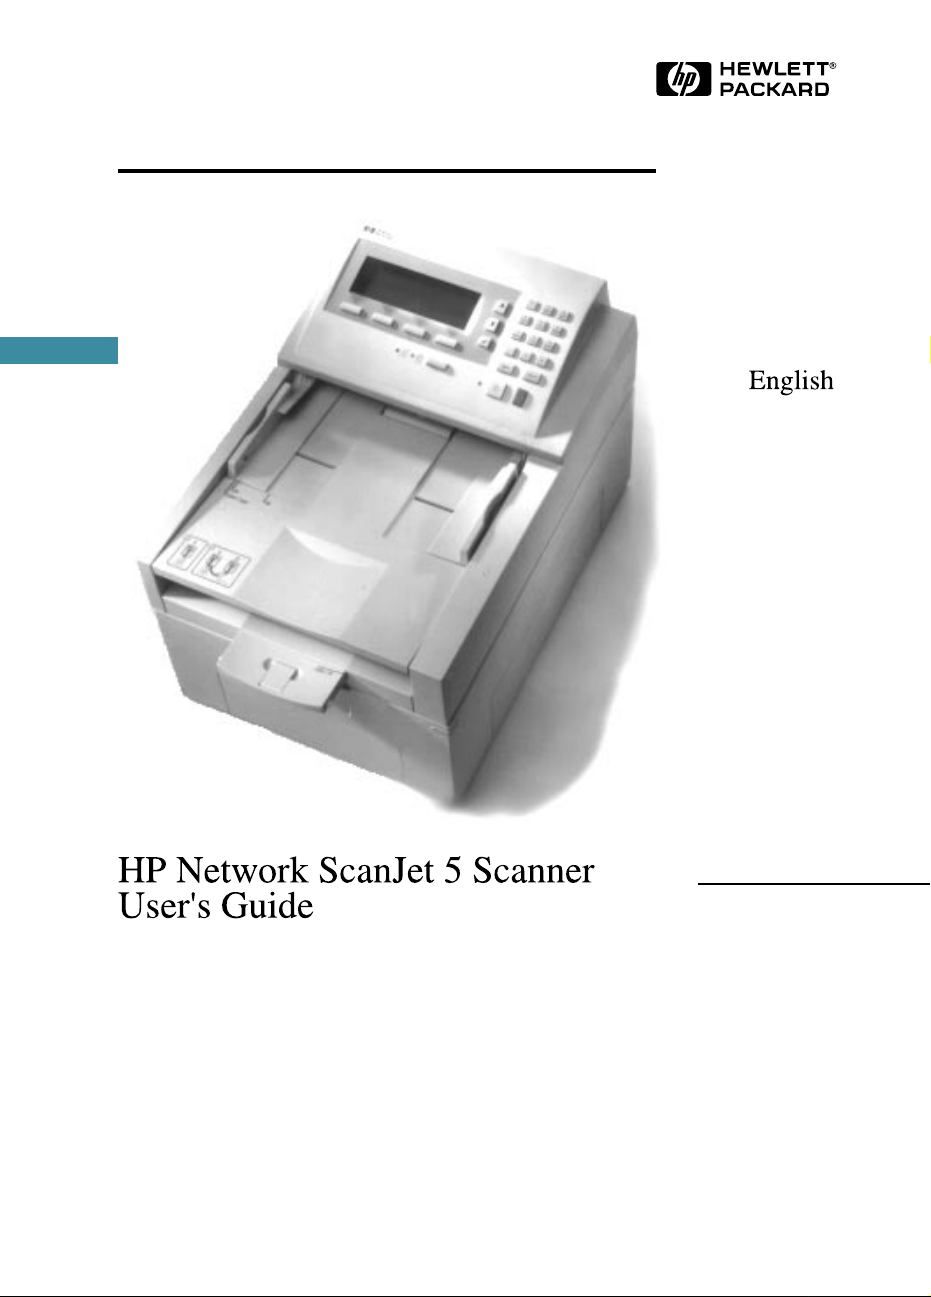
HP Network ScanJet 5 Scanner
User’s Guide
Page 6

Copyright Information
© 1997 Hewlett-Packard
Company
All Rights Reserved.
Reproduction, adaptation, or
translation without prior written
permission is prohibited, except
as allowed under the copyright
laws.
Publication number:
C1306-90919
Second Edition: October 1997
Warranty
The information contained in
this document is subject to
change without notice.
Hewlett-Packard makes no
warranty of any kind with
regard to this material,
including, but not limited to,
the implied warranties of
merchantability and fitness for
a particular purpose.
Hewlett-Packard shall not be
liable for errors contained herein
or for incidental or consequential
damages in connection with the
furnishing, performance, or use
of this material.
NOTE TO U.S.
GOVERNMENT USERS:
RESTRICTED RIGHTS
COMMERCIAL COMPUTER
SOFTWARE: “Use, duplication
or disclosure by the Government
is subject to restrictions as set
forth in subparagraph (c) (1) (ii)
of the Rights in TechnicalData
Clause at DFARS 52.227-7013.”
Material scanned by this product
may be protected by
governmental laws and other
regulations, such as copyright
laws. The customer is solely
responsible for complying with
all such laws and regulations.
TrademarkCredits
PaperPort™ is a registered
trademark of Visioneer, Inc. in
the United States and other
countries. Microsoft® and
Windows® are U.S. registered
trademarks of Microsoft
Corporation. Lotus® and Lotus
1-2-3® are U.S. registered
trademarks of Lotus
Corporation. Adobe
Photoshop™ is a registered
trademark of Adobe Systems,
Incorporated, which may be
registered in certain
jurisdictions. OmniPage
Professional and OmniPage Lite
are registered trademarks of the
Caere Corporation.All other
products mentioned herein may
be trademarks of their respective
companies.
Page 7

CONTENTS
1 Getting Started
Overview . . . . . . . . . . . . . . . . . . . . . . . . . . . . . . . . 11
Installation Requirements . . . . . . . . . . . . . . . . . . . . . . . 12
Software Installation . . . . . . . . . . . . . . . . . . . . . . . . 12
Using the Scanner Control Panel . . . . . . . . . . . . . . . . . . . 15
Scanner Users . . . . . . . . . . . . . . . . . . . . . . . . . . . . . 16
Document Destinations . . . . . . . . . . . . . . . . . . . . . . . . 18
Receiving Scanned Documents at Your Desktop . . . . . . . . . . 18
Recipients of Your Scanned Documents . . . . . . . . . . . . . . 19
2 Using the Scanner
What You Can Scan . . . . . . . . . . . . . . . . . . . . . . . . . . 21
Loading a Document . . . . . . . . . . . . . . . . . . . . . . . . . 22
Loading a Document on the Scanner Glass . . . . . . . . . . . . 23
Selecting Your Settings at the Control Panel . . . . . . . . . . . . . 24
During Scanning . . . . . . . . . . . . . . . . . . . . . . . . . . . . 28
Scanning Double-Sided Documents . . . . . . . . . . . . . . . . . . 29
Faxing to a Number Not Listed in Destination Lists . . . . . . . . . 30
Scanning to a Printer . . . . . . . . . . . . . . . . . . . . . . . . . . 31
3 Working at Your Computer
Using the HP Network ScanJet 5 Utility . . . . . . . . . . . . . . . 33
Starting the HP Network ScanJet 5 Utility . . . . . . . . . . . . . 33
Creating and Maintaining Your Private Destination List . . . . . . . 34
Viewing Your Private Destination List . . . . . . . . . . . . . . . 34
Automatic Workflows . . . . . . . . . . . . . . . . . . . . . . . . 35
Distribution Lists . . . . . . . . . . . . . . . . . . . . . . . . . . 37
Internet E-mail Destinations . . . . . . . . . . . . . . . . . . . . 37
Fax Destinations . . . . . . . . . . . . . . . . . . . . . . . . . . 40
Creating and Maintaining Your Inboxes . . . . . . . . . . . . . . . . 41
Changing Your Current Inbox . . . . . . . . . . . . . . . . . . . 41
Creating a New Inbox . . . . . . . . . . . . . . . . . . . . . . . . 42
Configuring an Inbox . . . . . . . . . . . . . . . . . . . . . . . . 43
Disabling the Current Inbox . . . . . . . . . . . . . . . . . . . . 44
Configuring PaperPort Software to Open Automatically . . . . . 44
Choosing the Notification Method and Time . . . . . . . . . . . . 45
Creating or Changing YourPassword . . . . . . . . . . . . . . . . . 46
Viewing Your Transaction Log . . . . . . . . . . . . . . . . . . . . . 46
EN Contents-7
Page 8

4 Working in the PaperPort Software
General Features . . . . . . . . . . . . . . . . . . . . . . . . . . . . 47
Page View and Desktop View . . . . . . . . . . . . . . . . . . . 47
The Command Bar . . . . . . . . . . . . . . . . . . . . . . . . . 49
Setting Preferences . . . . . . . . . . . . . . . . . . . . . . . . . 50
Automatic Saving . . . . . . . . . . . . . . . . . . . . . . . . . 51
Giving Titles to Items . . . . . . . . . . . . . . . . . . . . . . . 51
Displaying and Hiding Elements . . . . . . . . . . . . . . . . . . 52
Rotating or Flipping an Item . . . . . . . . . . . . . . . . . . . . 52
Deleting Items . . . . . . . . . . . . . . . . . . . . . . . . . . . 53
Undoing an Action . . . . . . . . . . . . . . . . . . . . . . . . . 53
Working in Desktop View . . . . . . . . . . . . . . . . . . . . . . . 54
Selecting and Deselecting Items . . . . . . . . . . . . . . . . . . 54
Moving and Arranging Items . . . . . . . . . . . . . . . . . . . . 55
Duplicating Items . . . . . . . . . . . . . . . . . . . . . . . . . . 55
Working in Page View . . . . . . . . . . . . . . . . . . . . . . . . . 56
Changing the Display Size of an Item . . . . . . . . . . . . . . . 57
Panning an Item . . . . . . . . . . . . . . . . . . . . . . . . . . 57
Inverting an Image . . . . . . . . . . . . . . . . . . . . . . . . . 57
5 Managing Scanned Items
Working with Stacks . . . . . . . . . . . . . . . . . . . . . . . . . . 59
Creating Stacks . . . . . . . . . . . . . . . . . . . . . . . . . . . 59
Navigating within a Stack . . . . . . . . . . . . . . . . . . . . . 60
Unstacking Pages . . . . . . . . . . . . . . . . . . . . . . . . . 60
Reordering Pages in a Stack . . . . . . . . . . . . . . . . . . . . 61
Inserting a Page in a Stack . . . . . . . . . . . . . . . . . . . . . 62
Working with Folders . . . . . . . . . . . . . . . . . . . . . . . . . 63
Filing Items in Folders . . . . . . . . . . . . . . . . . . . . . . . 63
Displaying Items in Folders . . . . . . . . . . . . . . . . . . . . 64
Creating, Renaming, and Deleting Folders . . . . . . . . . . . . 65
6 Annotating Scanned Items
Using the Annotation Tools . . . . . . . . . . . . . . . . . . . . . . 67
Copying, Cutting, and Pasting . . . . . . . . . . . . . . . . . . . 68
Cropping an Item . . . . . . . . . . . . . . . . . . . . . . . . . . 69
Working with Sticky Notes . . . . . . . . . . . . . . . . . . . . . 70
Adding Markup Text . . . . . . . . . . . . . . . . . . . . . . . . 71
Highlighting Information . . . . . . . . . . . . . . . . . . . . . . 71
Adding Freehand Annotations . . . . . . . . . . . . . . . . . . . 72
Drawing Lines and Arrows . . . . . . . . . . . . . . . . . . . . . 72
Creating New Items . . . . . . . . . . . . . . . . . . . . . . . . 73
Adding Graphics to Items . . . . . . . . . . . . . . . . . . . . . 73
Fine-TuningAnnotations . . . . . . . . . . . . . . . . . . . . . . . 74
Selecting the Font or Color . . . . . . . . . . . . . . . . . . . . . 74
Editing Annotation Text . . . . . . . . . . . . . . . . . . . . . . 75
Moving and Resizing Annotations . . . . . . . . . . . . . . . . . 76
Contents-8 EN
Page 9

Copying, Cutting, and Pasting Annotations . . . . . . . . . . . . 77
Displaying and Hiding Annotations . . . . . . . . . . . . . . . . 77
Undoing Annotations . . . . . . . . . . . . . . . . . . . . . . . . 78
Deleting Annotations . . . . . . . . . . . . . . . . . . . . . . . . 78
7 Importing and Exporting with the PaperPort Software
Using the Import and Export Feature . . . . . . . . . . . . . . . . . 79
Exporting Items . . . . . . . . . . . . . . . . . . . . . . . . . . . 80
Exporting Compressed Files . . . . . . . . . . . . . . . . . . . . 81
Printing from Other Applications . . . . . . . . . . . . . . . . . . . 82
Adding Summary Information to Items . . . . . . . . . . . . . . . . 83
Finding Information . . . . . . . . . . . . . . . . . . . . . . . . . . 84
Finding Files . . . . . . . . . . . . . . . . . . . . . . . . . . . . 84
Finding Items . . . . . . . . . . . . . . . . . . . . . . . . . . . . 84
Finding Annotations . . . . . . . . . . . . . . . . . . . . . . . . 86
Using Object Linking and Embedding (OLE) . . . . . . . . . . . . . 87
8 Linking to Other Applications
Using Link Icons . . . . . . . . . . . . . . . . . . . . . . . . . . . . 89
Using Links . . . . . . . . . . . . . . . . . . . . . . . . . . . . 90
Using Printer Links . . . . . . . . . . . . . . . . . . . . . . . . . . 91
Using Fax Links . . . . . . . . . . . . . . . . . . . . . . . . . . . . 92
Using Word Processor OCR Links . . . . . . . . . . . . . . . . . . 93
Using E-Mail Links . . . . . . . . . . . . . . . . . . . . . . . . . . 95
Receiving PaperPort Files in E-Mail . . . . . . . . . . . . . . . . 95
Setting Preferences for Links . . . . . . . . . . . . . . . . . . . . . 96
PaperPort Link Preferences . . . . . . . . . . . . . . . . . . . . . 96
9 Troubleshooting and Error Messages
Overview . . . . . . . . . . . . . . . . . . . . . . . . . . . . . . . . 99
Scanner Troubleshooting . . . . . . . . . . . . . . . . . . . . . . . 100
Scanner is not Working . . . . . . . . . . . . . . . . . . . . . . . 100
Control Panel is not Working . . . . . . . . . . . . . . . . . . . . 100
Scanned Image Quality is Poor . . . . . . . . . . . . . . . . . . . 100
Scanner Overheats . . . . . . . . . . . . . . . . . . . . . . . . . 100
Clearing Paper Jams . . . . . . . . . . . . . . . . . . . . . . . . . . 101
Control Panel Error Messages . . . . . . . . . . . . . . . . . . . . . 105
Internal Errors . . . . . . . . . . . . . . . . . . . . . . . . . . . . 105
Network Errors . . . . . . . . . . . . . . . . . . . . . . . . . . . 105
Transaction Log Error Messages . . . . . . . . . . . . . . . . . . 106
HP Network ScanJet 5 Utility Error Messages . . . . . . . . . . . . 108
PaperPort Software Troubleshooting . . . . . . . . . . . . . . . . . 111
Installation Problems . . . . . . . . . . . . . . . . . . . . . . . . 111
Printing Problems . . . . . . . . . . . . . . . . . . . . . . . . . . 112
Fax Problems . . . . . . . . . . . . . . . . . . . . . . . . . . . . 112
OCR Problems . . . . . . . . . . . . . . . . . . . . . . . . . . . 112
Import and Export File Problems . . . . . . . . . . . . . . . . . . 113
EN Contents-9
Page 10

Missing E-Mail Links . . . . . . . . . . . . . . . . . . . . . . . 114
PaperPort Software Error Messages . . . . . . . . . . . . . . . . . 116
A Installing the PaperPort Viewer
Overview . . . . . . . . . . . . . . . . . . . . . . . . . . . . . . . . 121
Obtaining Extra Copies of PaperPort Viewer . . . . . . . . . . . 121
Installing PaperPort Viewerfor Windows . . . . . . . . . . . . . . . 122
Installing PaperPort Viewer for Macintosh . . . . . . . . . . . . . . 123
Starting the PaperPort Viewers . . . . . . . . . . . . . . . . . . . . 124
B Warranty and Support Information
Warranty and Service Statement . . . . . . . . . . . . . . . . . . . 125
Hardware Service During the Warranty Period . . . . . . . . . . 126
Hardware Service After the Warranty Period . . . . . . . . . . . 126
Replacement Parts and Accessories . . . . . . . . . . . . . . . . . . 127
Contents-10 EN
Page 11

Getting Started
Overview
The HP Network ScanJet 5 scanner can scan items such as memos,
letters, brochures, photographs, newspaper clippings, and
advertisements and store and distribute them electronically.
Anyone can use the HP Network ScanJet 5 scanner to scan documents
and send them to destinations listed in the scanner control panel (or fax
numbers you enter at the scanner). However, if you want to create your
own destination list or receive scanned documents at your computer,
you’ll need to use the HP Network ScanJet 5 Utility.
In addition, PaperPort™ software for HP has been provided with the HP
Network ScanJet 5 scanner and can be used as your inbox to receive
scanned documents at your computer.
1
EN Getting Started 11
Page 12

Installation Requirements
To use the HP Network ScanJet 5 Utility, the PaperPort software, OCR
software, and online documentation, you need the following:
• A personal computer, 386 or above (486 recommended)
• Microsoft Windows 3.1, Windows 3.11, Windows for Workgroups
3.11, Windows 95, or Windows NT 3.51 (and above)
• 4 megabytes (MB) or more of internal memory (RAM); 8 MB to use the
OCR software included with the network scanner
• 15 MB of free hard disk space for stand-alone installation and 1 MB of
free hard disk space for a shared installation
• VGA or SVGA monitor (recommended settings for your monitor: 256
or more colors, and 640 x 480 resolution)
• 3 MB of free temporary memory for decompressing files and file
comparisons
Software Installation
With the HP Network ScanJet 5 Installation program you can install the
following software components:
• HP Network ScanJet 5 Utility (required)
• Adobe Acrobat Reader (required only for online documentation)
• PaperPort software (optional)
• Caere OmniPage Limited Edition OCR software (optional)
You need to install the HP Network ScanJet 5 Utility on your computer
(unless your network administrator does this for you). The PaperPort
software can be installed entirely on your computer (in the directory you
choose), or the program files can be installed on your network and the
data files on your computer, depending on what your network
administrator has chosen.
You can install either from the network or from the installation CD.
Before you begin, you’ll need to know where the install program is
located and where you want the programs and data files to reside. If
you’re installing from the network, Windows 3.1 users must have a drive
mapped to the network server volume where your network administrator
placed the HP Network ScanJet 5 Utility install program. If you cannot
find the install program, contact your network administrator.
The steps required to start the install program vary slightly depending on
the platform you’re using, as described in the procedures that follow.
12 Getting Started EN
Page 13

To install on Windows 3.1, Window 3.11, or Windows
for Workgroups 3.11
1 Turn on your computer and log on to your network.
2 Start Microsoft Windows.
3 In Program Manager, from the File menu choose Run.
4 Type the path your network administrator gave you.
5 Press [Enter] or click OK. The HP Network ScanJet 5 Installation
program starts and takes a few moments to initialize.
6 Follow the instructions on the screen.
To install on Windows 95 or Windows NT 4.0
1 Turn on your computer.
2 Log on to your network.
3 Click Start and then click Run.
4 Type the path your network administrator gave you.
5 Press [Enter] or click OK. The HP Network ScanJet 5 Installation
program starts and takes a few moments to initialize.
6 Follow the instructions on the screen.
To install on Windows NT 3.51
1 Turn on your computer.
2 Log on to your network.
3 In Program Manager from the File menu, choose Run.
4 Type the path your network administrator gave you.
5 Press [Enter] or click OK. The HP Network ScanJet 5 Installation
program starts and takes a few moments to initialize.
6 Follow the instructions on the screen.
1
Getting Started
EN Getting Started 13
Page 14

During the installation process, you’ll need to specify the following:
• The software components you want to install.
• If you are using a stand-alone installation, you will need to specify
where to install all files on your hard drive.
• If you are using a workstation installation, you will need to specify
where to install the data files on your hard drive. The program files will
be installed on the network and will be shared with others in your
workgroup.
After the installation is complete, restart Windows to use the PaperPort
software.
That’s it. You have finished installing the user software. Watch the
on-screen One-Minute Guide for a quick introduction to the PaperPort
software.
To run the One-Minute Guide
1 Double-click the PaperPort icon in the PaperPort program group.
2 From the Help menu, choose One-Minute Guide.
14 Getting Started EN
Page 15
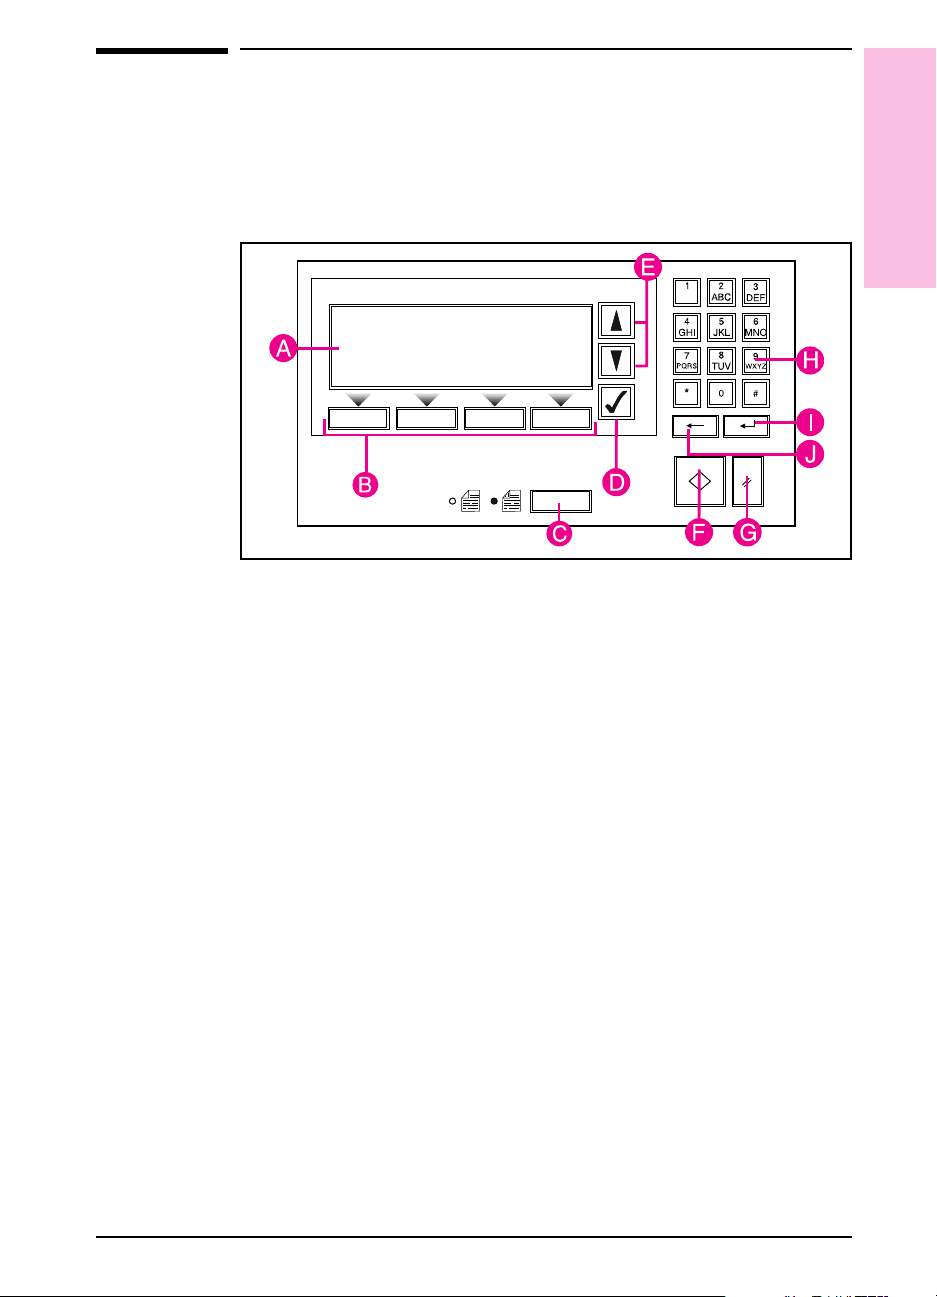
Figure 1
Using the Scanner Control Panel
Use the scanner control panel to identify yourself to the scanner if you
have a private destination list you want to use and to select destinations
for a scanned document.
A Display—Displays user and destination lists, and status and error
messages.
B Soft keys—Press to perform the function displayed above the key.
C Single/double-sided key—Press to select single or double-sided
original (indicated by the light next to the icon).
D Select key—Press to select a user name or a destination.
E Scroll arrows—Press to move up and down in the user and destination
lists.
F Go key—Press to scan the document.
G Abort key—Press to stop the scanning and return to the main display
screen.
H Keypad—Use to type your name, password, destinations, and fax
numbers.
I Enter key—Press to send information to the scanner.
J Backspace key—Press to move the selection block to the left.
1
Getting Started
EN Getting Started 15
Page 16
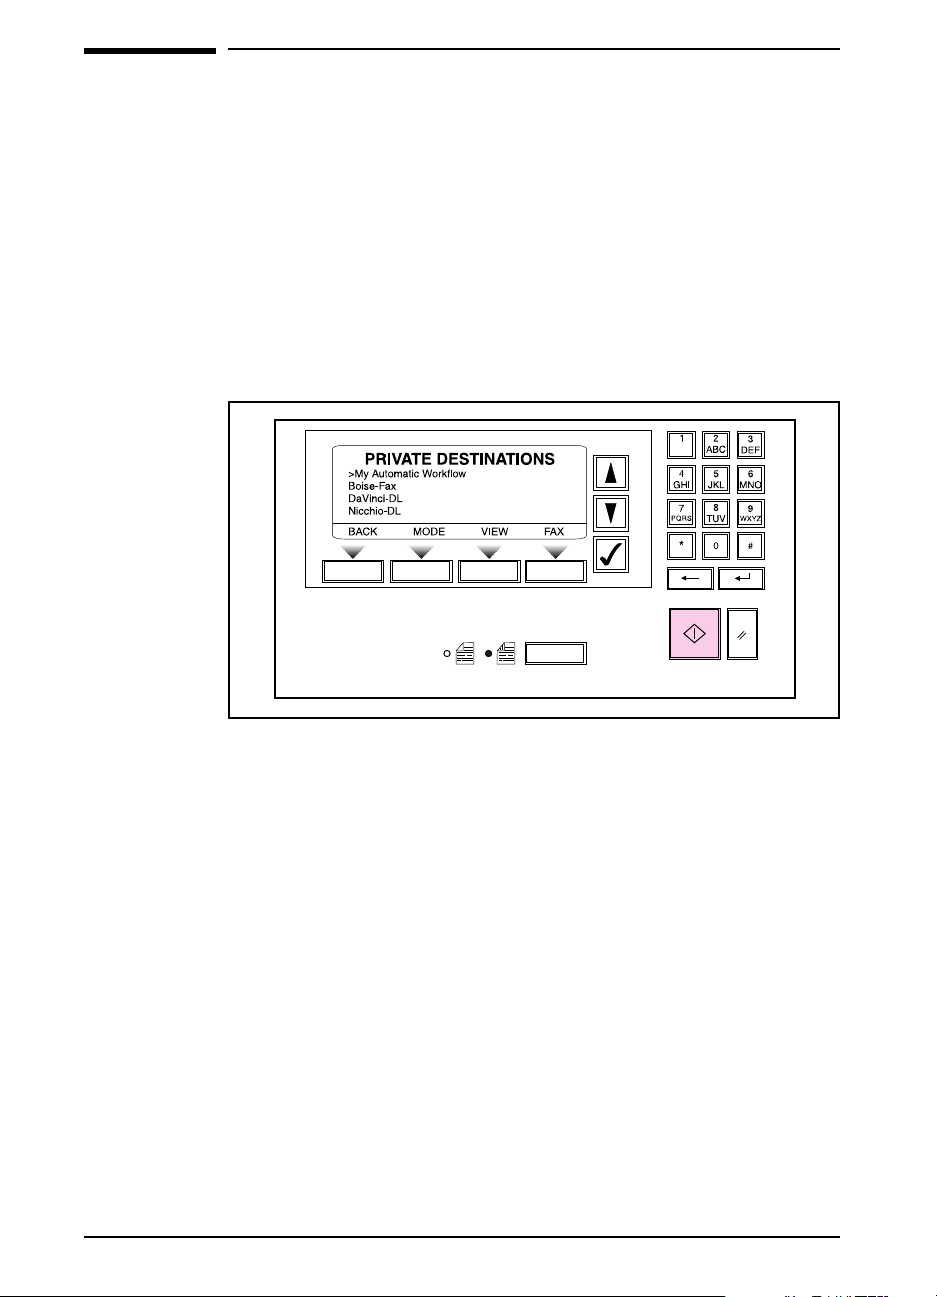
Figure 2
Scanner Users
Two groups of users can scan and distribute documents with the HP
Network ScanJet 5 scanner:
• Registered users, who have been added to the public destination list by
the network administrator and who have the HP Network ScanJet 5
Utility installed on their local computers. Registered users can create
private destination lists by copying destinations from the public
destination list and creating their own destinations. From the scanner
control panel, registered users can access both their private destination
list and the public destination list to build a temporary destination list to
distribute the document they are currently scanning.
16 Getting Started EN
Page 17
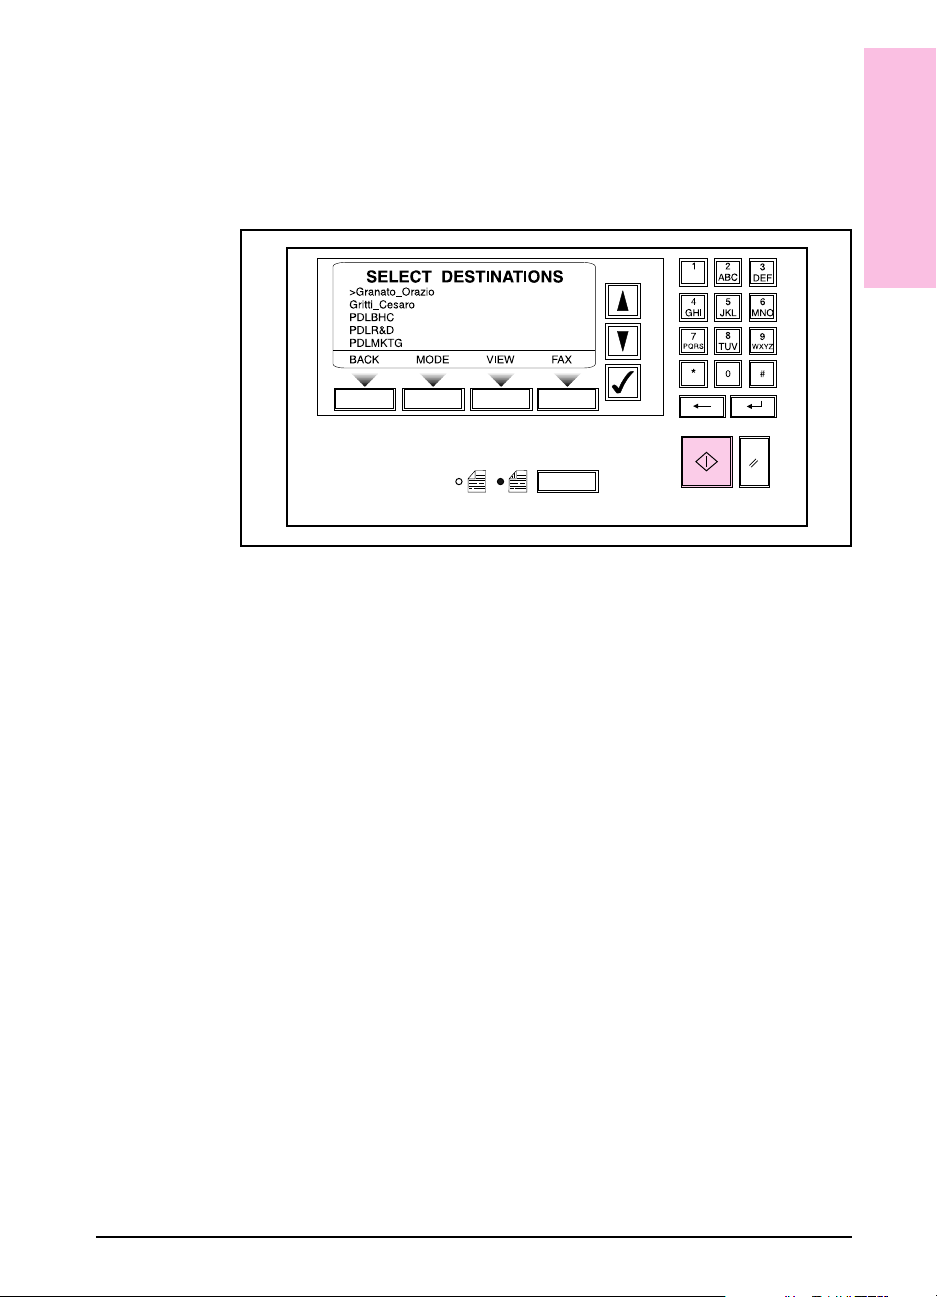
Figure 3
• General users, who have not been added to the public destination list
and who do not have the HP Network ScanJet 5 Utility installed on their
local computers. From the scanner control panel, they can access the
public destination list to build a temporary destination list for the
document they are currently scanning, and they can scan to a printer.
(The network administrator has the option of preventing general users
from using the scanner.)
Information the general users need to operate the scanner is included in
the Quick Reference card. This user’s guide addresses the registered user.
1
Getting Started
EN Getting Started 17
Page 18

Document Destinations
Scanned documents are sent to the destinations you select at the scanner
control panel using public and private destination lists. When you send a
scanned document, it can arrive at one or more of the following
destinations:
• The application you have designated as your inbox in the HP Network
ScanJet 5 Utility. From the inbox, it can be further distributed to other
users via e-mail, and so forth, imported as a graphic into other
applications or read into word processing applications using the OCR
feature.
• The inbox of another registered user or multiple registered users.
• A fax machine.
• An Internet e-mail address.
If you have the PaperPort software installed on your computer or on
your network, you can send a scanned document directly to the
application you have designated in your automatic workflow in the HP
Network ScanJet 5 Utility. In addition, at the scanner control panel you
can select the printer to which to copy a scanned document.
Receiving Scanned Documents at Your Desktop
Use the HP Network ScanJet 5 Utility to identify an application installed
on your computer as an inbox. An inbox is a container where all the
documents sent to your computer from the HP Network ScanJet 5
scanner are collected. An inbox can be a thumbnail desktop, a file
system directory, or a printer, as described in Chapter 3, Working at Your
Computer.
After a scanned document arrives at your computer, you can use a
program such as the PaperPort software to organize and store your
documents or annotate them before sending them to another computer
program or distributing them to other people.
18 Getting Started EN
Page 19

Recipients of Your Scanned Documents
If you scan documents to an Internet e-mail address, you should make
sure the recipients have a way to view the document which will arrive as
either a .PDF or .TIF file.
Alternatively, you can export the scanned document into another file
format, such as .TIF or .BMP, that the recipient can view, as described in
Chapter 7, Importing and Exporting with the PaperPort Software.
1
Getting Started
EN Getting Started 19
Page 20

20 Getting Started EN
Page 21

Using the Scanner
What You Can Scan
Scanning a document can be as simple as loading the document in the
scanner, selecting a destination from the list displayed at the scanner
control panel, and pressing [Go].
Before scanning with the Automatic Document Feeder (ADF), you need
to clear any paper from the scanner glass and eliminate conditions that
may cause paper jams. Observe the following to minimize the
possibility of paper jams:
• Straighten any curls or wrinkles from documents before putting them on
the document tray. If this is not possible, scan these documents using the
scanner glass, or make photocopies of the documents and scan the
photocopies.
• Remove staples, paper clips, paper sticky notes, and any other materials
from documents.
• Avoid documents with tears, perforations, or punch holes.
2
If you would like to scan items made of unusual media, use the scanner
glass rather than the ADF. Examples of unusual media include:
• lightweight (onionskin) papers
• transparencies
• gum-backed paper
• magazine pages
• multiple-copy forms
Use one of the following paper sizes in the ADF:
• Letter: 8.5 x 11 in (216 x 279 mm)
• A4: 210 x 297 mm (8.3 x 11.7 in)
• Legal: 8.5 x 14 in (216 x 356 mm)
Use paper within the following weight range in the ADF:
• Minimum: 16 lb (60 g)
• Maximum: 36 lb (135 g)
EN Using the Scanner 21
Page 22
Loading a Document
Load your document in either the
automatic document feeder or on the
scanner glass, as described in the
following procedures.
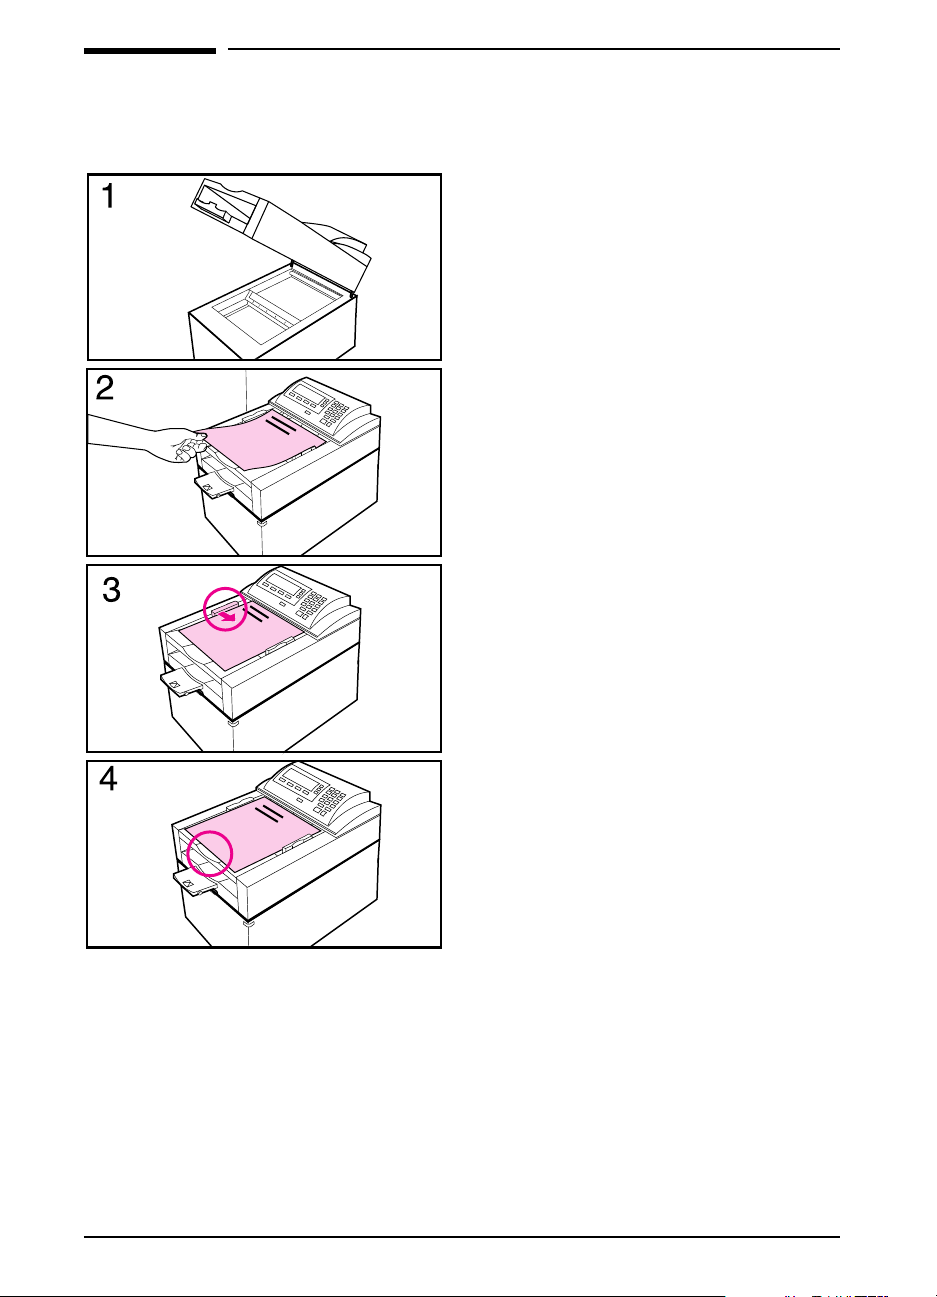
To load a document in the ADF
1 Make sure there isn’t any paper on
2 Place the document (up to 50 pages)
3 Adjust the document guide to touch
4 Align the bottom edge of the paper
the scanner glass.
face up on the document tray with the
top of the document near the feeder
cover and the side of the document
against the paper guide with the
arrows.
the left side of the paper stack.
stack with the correct paper size
mark. Sliding the paper too far under
the feeder cover can cause paper
misfeeds.
22 Using the Scanner EN
Page 23
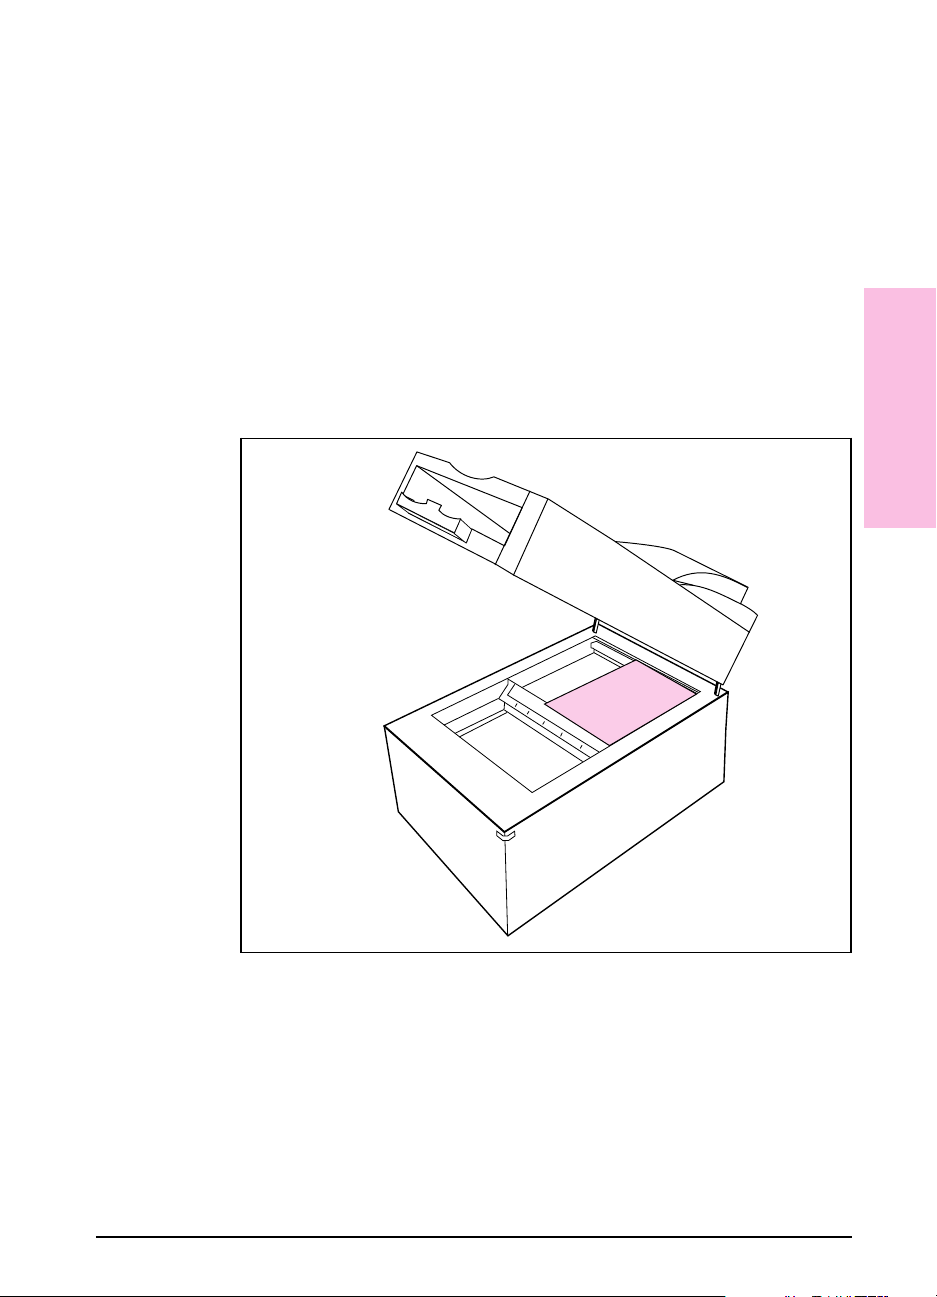
Loading a Document on the Scanner Glass
Use the scanner glass for regular or irregular sizes or types of paper. If
the scanner doesn’t detect a document in the feeder, it will assume the
job is from the scanner glass.
If you’re using a custom paper size, be sure to specify the exact size in
the HP Network ScanJet 5 Utility, as described in Chapter 3, Working at
Your Computer.
Figure 4
To load a document on the scanner glass
1 Place the document face down on the scanner glass.
2 Place small, custom-sized documents into the upper-left corner of the
glass as shown in the following illustration.
2
Using the
Scanner
EN Using the Scanner 23
Page 24
Selecting Your Settings at the Control Panel
Before scanning a document, at the control panel select the destination,
type of image being scanned, and the paper size.
Note At any point before you begin scanning, you can press the back arrow
on the keypad to return to the previous menu or you can press [Abort] to
return to the main menu and start over.
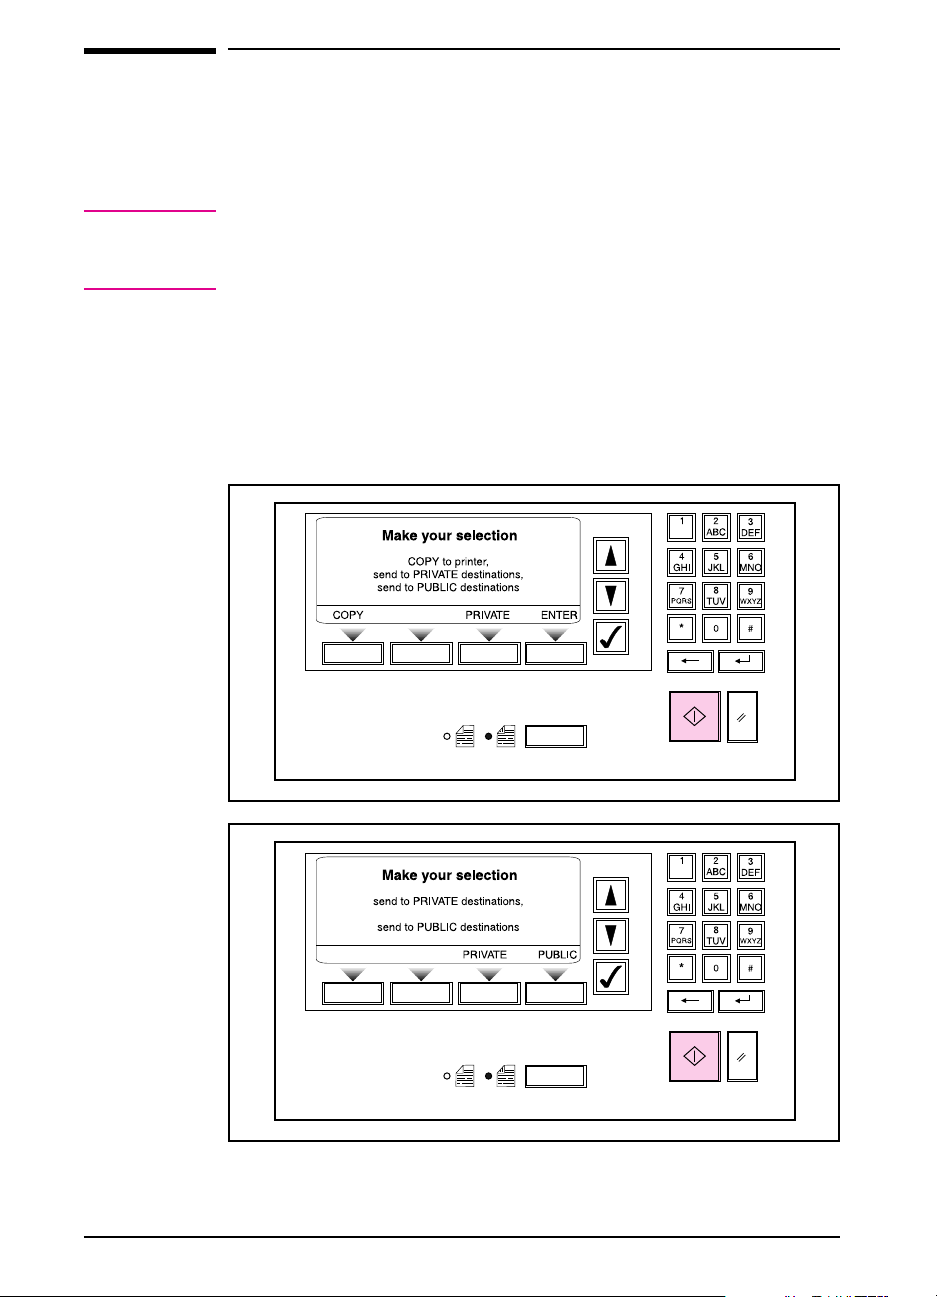
To select the control panel settings
1 At the opening screen display on the scanner control panel, type your
user name on the keypad (this is the name the network administrator
used to register you for the scanner). Figure 5 is the screen that appears
when the printer is configured. Figure 6 is the screen that appears when
no printer is configured.
Figure 5
Figure 6
24 Using the Scanner EN
Page 25
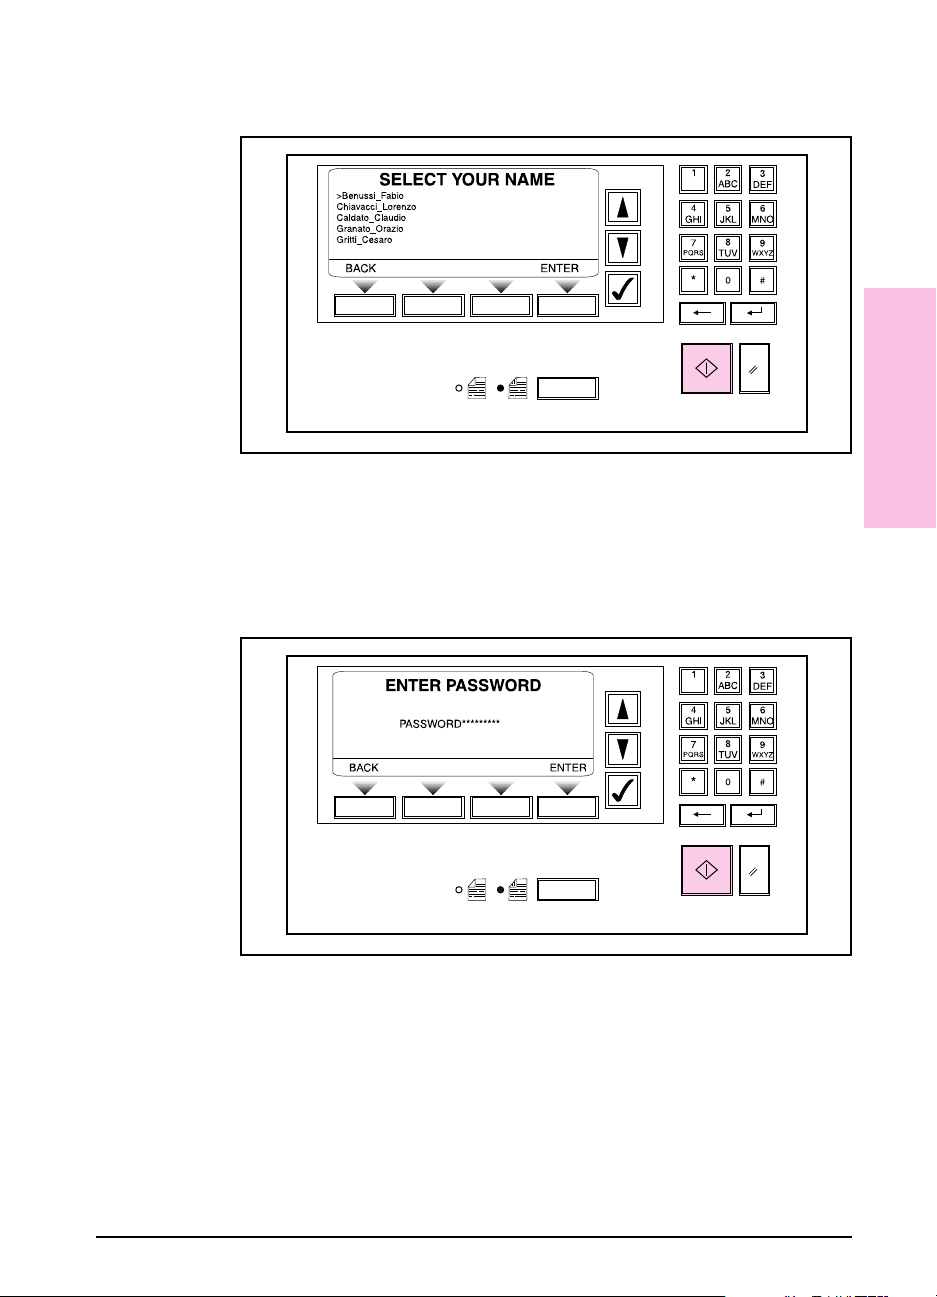
Figure 7
The Select Your Name screen appears, with the list of users
automatically scrolled to the portion of the alphabet indicated by the
first letters you typed.
2 Use the up-and-down arrow keys to scroll through the list (you can hold
an arrow key down to move more quickly). When your name is
highlighted, press [Select] (check mark key).
3 If you have entered a password in the HP Network ScanJet 5 Utility (as
described in Chapter 3, Working at YourComputer), the Enter Password
screen appears. Type your password and press [Enter].
2
Using the
Scanner
Figure 8
4 On the Private Destinations screen, select one or more destinations from
your private destination list by using the arrow keys to scroll to a
destination and then pressing [Select] (check mark key).
You can scan to users, fax numbers, e-mail addresses, and distribution
lists, or you can choose an automatic workflow. (See Chapter 3, Working
at Your Computer, for more information about destinations.)
EN Using the Scanner 25
Page 26
Figure 9
You can also add destinations from the public destination list by
selecting the Public entry when you are viewing your private list. You
can return to your private list by pressing the back arrow.
5 Before you begin scanning, you can view the selected destinations or
change a setting:
• If you want to view the destinations you have selected before you begin
scanning, press [View] to display the Selected Destinations screen.
You can deselect a destination from this list by scrolling to the
destination and pressing [Select] (check mark key) again.
• If you want to change a setting for the current document, press [Mode]
to display the Select Mode screen.
Figure 10
6 Select a mode appropriate for the content of the document to be
scanned, and press [Enter].
• If you want to change the paper size for the current document, on the
Select Mode screen, press [Format] to display the Select Format screen.
26 Using the Scanner EN
Page 27
Figure 11
Select the paper size of the document to be scanned, and press [Enter].
(You can specify a custom paper size in the HP Network ScanJet 5
Utility, as described in Chapter 3, Working at YourComputer.)
7 Press [Go] to scan the document.
2
Using the
Scanner
EN Using the Scanner 27
Page 28

During Scanning
While your document is being scanned, the scanner control panel
displays messages indicating the page number being scanned.
Note When you scan documents using the scanner glass, press the [Go] key to
scan each page. When you have completed the job, press [Complete].
All pages scanned will be considered one document.
At any point after you press [Go], you can press [Abort] to stop the
scanning process.
The control panel displays error messages if problems occur during
scanning. See the troubleshooting information in Chapter 9,
Troubleshooting and Error Messages, to resolve anyproblems that
might occur.
When your scanning job is successfully completed, the scanner control
panel displays Done and the number of pages scanned.
The control panel then displays the destination list again with the
previous destinations selected. If you have another document to scan to
the same destinations, you only need to press [Go].
To scan to different destinations, press [Abort] to select new
destinations, or press [Backspace] to return to the previous screen. Or,
wait for a short period and the opening control panel screen will once
again be displayed.
28 Using the Scanner EN
Page 29
Scanning Double-Sided Documents
You can scan double-sided documents by
inserting the document to be scanned into
the document feeder twice.
After you’ve selected your scanning
destinations and changed settings (if
appropriate), press [Single/Double-Sided]
icons so that the double-sided light is on.
To scan a double-sided document
1 Place your document in the feeder
with the first side face up and the top
of the document going into the feeder
first.
2 Press [Go] to begin scanning. As the
document is being scanned, a
message appears telling you that the
scanner is scanning the front page.
3 When the scanner finishes the first
side, the control panel prompts you to
turn the document over. (The scanner
does not automatically scan the other
side; you must turn it over manually,
placing the top of the document into
the feeder first, as shown in the
illustration.) Turn the document over
and press [Continue].
2
Using the
Scanner
As the document is being scanned, the
message Scanner is scanning the
back page appears.
The scanned document will appear as one
multi-paged, correctly-paginated
document on your desktop.
EN Using the Scanner 29
Page 30
Figure 12
Faxing to a Number Not Listed in
Destination Lists
The fax server must be installed and running for you to scan a document
to a fax machine.
To fax to a number not in a destination list
1 Place the pages (up to 50) face up in the automatic document feeder, or
place a single sheet face down on the scanner glass, as described
previously under “Loading a Document.”
2 Press [Enter].
3 Press [Fax]. The scanner control panel displays the Enter Fax Number
screen.
4 Using the keypad, type in the new fax numberand then press [Enter].
This temporarily adds the new fax number to the destination list.
5 Press [Go].
30 Using the Scanner EN
Page 31

Scanning to a Printer
You can quickly make a copy of your
document by scanning it directly to a
printer. The printer name you select can
refer to either a physical printer or a
logical print queue.
To scan to a printer
1 On the main screen display of the
2 On the Select Printer screen, select
3 On the Enter Number Of Copies
scanner control panel, press [Copy].
the name of the printer to which you
want to scan the document and press
[Go].
screen, use the keypad to enter the
number of copies you want, and press
[Go].
2
Using the
Scanner
EN Using the Scanner 31
Page 32

32 Using the Scanner EN
Page 33

Working at Your Computer
Using the HP Network ScanJet 5 Utility
The HP Network ScanJet 5 Utility is available to all registered users of
the HP Network ScanJet 5 scanner and has been installed on your
computer or on your network. Use the HP Network ScanJet 5 Utility to
define your inbox, where you’ll receive all scanned documents. You can
also use the HP Network ScanJet 5 Utility to create a private
destinations list, which you can display on the scanner control panel.
Starting the HP Network ScanJet 5 Utility
The HP Network ScanJet 5 Utility is started automatically when
Windows is started, or you may double-click the HP Network ScanJet 5
Utility icon in the HP Network ScanJet 5 scanner program group or
folder.
3
EN Working at YourComputer 33
Page 34

Creating and Maintaining Your Private
Destination List
Your private destination list can contain any of the following:
• Individual user destinations, selected from the public destination list.
• Private distribution lists, created by choosing multiple users, fax
numbers from the public or private destination list, or Internet e-mail
addresses and grouping them into distribution lists.
• Public distribution lists, copied from the public destination list.
• Fax numbers, selected from the public or private destination list.
• Internet e-mail addresses, created in the HP Network ScanJet 5 Utility
or imported from others’ private destination lists.
Your private destination list may also contain automatic workflows,
which you create in the HP Network ScanJet 5 Utility.
Once you define your private destination list, the scanner will display
this list on the scanner control panel after you’ve selected your name
(and entered your password) at the control panel. You can then build a
temporary destination list from your private destination list prior to
scanning a document.
Viewing Your Private Destination List
At any time, on the Profile tab of the HP Network ScanJet 5 Utility
dialog box, you can view the destinations you have added to your private
destination list.
To view your private destination list
1 Click the Profile tab in the HP Network ScanJet 5 Utility dialog box.
2 In the Tools box, select the type of destination you want to view. These
destinations can be automatic workflows, faxes, or distribution lists.
3 Click either the summary or detailed icon to display information
regarding the destinations.
4 To see the contents of a distribution list, select the name in the
Destinations box and then click Edit or double-click the name.
34 Working at Your Computer EN
Page 35

Automatic Workflows
When you select an automatic workflow as a destination from the
scanner control panel, the incoming electronic document bypasses your
inbox and goes straight to the target application. An automatic workflow
can be associated with a named group of settings that optimizes the
scanning quality of the type of documents typically scanned to the
application selected for the automatic workflow.
Note If you select an automatic workflow, you cannot select any other
destinations at the same time.
Automatic workflows can only be created by registered users in their
private destination list. The PaperPort software must be installed in
order to create an automatic workflow.
Note The first time you scan to an automatic workflow, the PaperPort
software Preferences dialog box may appear. Make any changes you
want and click OK to continue.
To create an automatic workflow
1 On the Profile tab of the HP Network ScanJet 5 Utility, click New to
display the New Destination dialog box.
2 Select Automatic Workflow.
3 Click OK.
4 In the Name box, type a name that will identify the automatic workflow
in your destination list, such as “Scan to Paintbrush.”
5 In the Application box, click the name of the application that will
receive the scanned documents.
6 In the Setting box, select a setting appropriate for the application
selected. (See the following procedure for information regarding
settings.)
7 Click OK. The name of the new automatic workflow entry now appears
in the Destinations box of the Profile tab when you click Automatic
Workflow in the Tools box.
You can edit an automatic workflow by selecting it in the Destinations
box and clicking Edit.
3
Computer
Working at Your
EN Working at YourComputer 35
Page 36

To create a setting
1 On the Profile tab of the scanner utility, click New.
2 Select Automatic Workflow and click OK.
3 In the Automatic WorkflowDestination dialog box, in the Setting box,
click New.
4 In the New Setting dialog box, enter a setting name in the Name box.
5 Specify the Image Quality by adjusting the following:
• Resolution—Select greater resolution to increase the clarity of an
image. However, greater resolution increases file size.
• Scaling—Decrease or increase the size of an image from 4% to 400%.
• Intensity—Adjust the intensity value from 1 to 255.
• Contrast—Select lower numbers for blended images of gray shades;
select higher numbers for stark black and white images. The Contrast
option is not available if the Output Data Type is 1 bpp Threshold.
6 Specify the Data Format by using the following options:
• Output Data Type—Select an output data type, which will modify the
number of bits per pixel.
• Dithering—If you have selected dithering as the output data type,
specify the type of dithering.
• Compression—Select the type of compression you want to use to
decrease file size. Select None to scan without compressing the file.
Note CCITT G4 is not available if the Output Data Format is Grayscale 4 bpp
or Grayscale 8 bpp or if the File Format is PCL5.
• File Format—Select a file format for the scanned document. TIFF
Multipage is not available if the Output Data Type is Grayscale 4 bpp or
Grayscale 8 bpp.
• Background Control—Select if you want background control.
• Page Format—Select the paper size for the scanned document. To use
the size selected at the scanner control panel, select Control Panel
Selected. To create a custom size, select Custom. Then type a size in the
Width and Height boxes. For the width, you can type anything between
0.01 and 8.5 inches (0.01 and 21.58 cm). For the height, you can type
anything between 0.01 and 14 inches (0.01 and 35.54 cm).
Note If you select a paper size larger than the document you are scanning, a
black boarder will appear on the image and the file size will become
unnecessarily large. If you select a paper size smaller than the document
you’re scanning, you might cut off part of the image.
7 Click OK.
36 Working at Your Computer EN
Page 37

Distribution Lists
If you repeatedly scan to the same group of users, e-mail addresses, or
fax machines, you can simplify your task by creating a distribution list
to include these destinations.
To create a distribution list
1 On the Profile tab of the HP Network ScanJet 5 Utility dialog box, click
New.
2 Select Distribution List.
3 Click OK.
4 In the Name box, enter a name for the distribution list. This is the name
that will be displayed on the scanner control panel.
5 In the Available box, select a user, e-mail address, or a fax and click
Include to display the selection in the Included box (and remove it from
the Available box). You can include destinations from both your private
and the public destination lists. Repeat until the distribution list is
complete.
6 Click OK to close the dialog box. The name of the new distribution list
appears in the Destinations box of the Profile tab when you click
Distribution Lists in the Tools box.
You can edit the distribution list by selecting it in the Destinations box
of the Profile tab and then clicking Edit.
3
Computer
Working at Your
Internet E-mail Destinations
You can send scanned documents to e-mail addresses in your private
destination list. (You cannot put e-mail addresses in the public
destination list.) This feature is available in the Window 95 and
Windows NT environments.
If recipients view an incoming e-mail message directly from their e-mail
application, they can view the document in Portable Document Format
(.PDF) or multipage Tagged Image File (.TIF) format. You can find a
free .PDF viewer for viewing .PDF e-mail messages on the Adobe
website: www.adobe.com. Also, anyone with Windows NT 4.0 can view
e-mail messages sent in .TIF format because the .TIF viewer is bundled
with that operating system.
You can automatically send yourself a return copy of your e-mail
messages. To do this, select the Options menu on the Profile tab. Select
Internet E-Mail and then Receive a cc: copy. Select either PDF or
Multipage TIFF as your file type. You can turn return copies off at
anytime by selecting None in the Receive a cc: copy submenu.
EN Working at YourComputer 37
Page 38

You can select the language of standard text in your e-mail message
when you are adding e-mail destinations in the New E-mail Destination
dialog box under Subject and Text. Your language choices are English,
French, Italian, German, Spanish, and Custom.
You can also create personalized subject line and text for all of your
e-mail messages. To do this, select the Options menu on the Profile tab.
Select Internet E-Mail and then Customize message.
To add an e-mail destination
1 On the Profile tab of the HP Network ScanJet 5 Utility dialog box, select
New.
2 Select Internet E-mail.
Note Internet E-mail is dimmed if e-mail is disabled. E-mail is disabled if
you are using Novell NetWare or if the maximum number of e-mail
addresses has been reached.
3 Click OK.
Note The first time you create a destination, the E-mail Return Address
window appears. Select the default .PDF or .TIF file type in the E-mail
Return Address list box (depending on what viewer you have). Type
your e-mail address and click OK. All return messages will come to this
address.
4 In the New E-Mail Destination dialog box, type the recipient’s name and
e-mail address.
Note To tell the difference on the control panel between entries such as e-mail
and fax destinations, add a designation tag. For example, John Doe-E
could be an e-mail destination and John Doe-F could be a fax
destination for that same person.
5 Change the file type or predefined language for subject line and message
text if desired.
6 Click Add.
7 Repeat steps 4-6 to add more addresses. (The information after the @
sign is preserved to simplify further entries.)
8 Click Close when you are finished.
38 Working at Your Computer EN
Page 39

To edit an e-mail destination
1 On the Profile tab of the HP Network ScanJet 5 Utility dialog box, select
the destination you want to edit.
2 Select Edit.
3 Change the destination and click OK.
To delete an e-mail destination
1 On the Profile tab of the HP Network ScanJet 5 Utility dialog box, select
the destination you want to delete.
2 Select Delete.
3 To confirm deletion, select Yes.
To change your e-mail return address
1 On the Options menu of the HP Network ScanJet 5 Utility dialog box,
point to Internet E-mail.
2 Select Return address.
3 Change the e-mail address and select OK.
Note To view your return address, select Who Am I on the Options menu.
To export e-mail destinations for others to use
1 On the Profile tab of the HP Network ScanJet 5 Utility dialog box, select
the Options menu.
2 Point to Internet E-mail and select Export.
3 In the File name list box, assign a name to the file you are exporting.
4 In the Save in list box at the top of the dialog box, select the directory
where you would like the file saved.
5 Click Save. The file is copied to the directory you selected.
To import e-mail destinations to your private destination
list
1 On the Profile tab of the HP Network ScanJet 5 Utility dialog box, select
the Options menu.
2 Point to Internet E-mail, and then click Import.
3 In the Look in list box, select the directory where the exported e-mail
destination file is saved.
4 Select the file to import.
5 Select Open. The e-mail destinations in the file become part of your
private destination list.
3
Computer
Working at Your
EN Working at YourComputer 39
Page 40

Fax Destinations
If a fax server is installed on your network and has been configured for
the scanner, you can include fax numbers as part of your private
destination list.
To create your fax destination list
1 On the Profile tab of the HP Network ScanJet 5 Utility dialog box, click
New.
2 Select Fax.
3 Click OK.
4 In the Name box, type a name identifying the fax destination.
Note To tell the difference on the control panel between entries such as e-mail
and fax destinations, add a designation tag. For example, John Doe-E
could be an e-mail destination and John Doe-F could be a fax
destination for that same person.
5 In the Number box, type the fax number of the fax destination.
6 In the Retry box, click the down or the up arrow to select the number of
times you want to redial if the destination fax is not answering.
7 In the Accounting Code box, type a code that you can use to keep track
of fax expenses. This code appears with the fax number on the
accounting log. If you don’t enter accounting information here, the
accounting information that your network administrator has associated
with the fax server will be used.
8 Click OK to close the dialog box. The name of the new fax entry
appears in the Destinations box of the Profile tab when you click Faxes
in the Tools box.
You can edit the fax destination by selecting it in the Destinations box of
the Profile tab and then clicking Edit.
40 Working at Your Computer EN
Page 41

Creating and Maintaining Your Inboxes
An inbox holds the scanned documents sent to an individual’s computer
(except those documents directed to a specific destination in an
automatic workflow). You can have only one current inbox. The default
inbox you identified when you installed the scanner software is used
until you select a different one.
The Inbox tab lists supported inbox applications and devices that it finds
on your computer, including the following:
• PaperPort software
• E-mail packages (Lotus cc:Mail, MS Mail, and MS Exchange)
Changing Your Current Inbox
The available inboxes the HP Network ScanJet 5 Utility detects on your
computer are displayed on the Inbox tab in the Preferred Inbox list.
To change your preferred inbox, select the inbox you want to make the
current one from the list. All new incoming scanned documents will be
routed to the new inbox.
3
Computer
Working at Your
EN Working at YourComputer 41
Page 42

Creating a New Inbox
You can create a new inbox in addition to those automatically
recognized by the HP Network ScanJet 5 Utility. This may be necessary
if you have developed an in-house application that you want to use as an
inbox. Such applications could be common-directory applications, such
as the Win95 Explorer shell extension, or a launch-application, which
directs the HP Network ScanJet 5 Utility to start the specified
application and place the scanned document in its directory. Youcan
create three types of inboxes: directory, launch-application, and printer.
To create a new directory inbox
1 On the Inbox tab of the HP Network ScanJet 5 Utility dialog box, click
Add New Inbox.
2 In the Add New Inbox dialog box, select Directory.
3 Click OK. The New Directory Inbox dialog box appears.
4 In the Name Of Inbox box, type a name for the inbox as it will appear in
the Preferred Inbox list on the Inbox tab.
5 In the File Type box, select the file type you want to use to save scanned
documents.
6 In the Directory Where Documents Should Be Stored box, enter the
directory path to the location to save scanned documents.
7 Click OK.
To create a new launch-application inbox
1 On the Inbox tab of the HP Network ScanJet 5 Utility dialog box, click
Add New Inbox.
2 In the Add New Inbox dialog box, select Launch-Application.
3 Click OK. The New Application Inbox dialog box appears.
4 In the Name Of Inbox box, type a name for the inbox as it will appear in
the Preferred Inbox list on the Inbox tab.
5 In the File Type box, select a file type to use for scanned documents
when opening them in the application.
6 In the Application To Start box, enter a file path to the application.
Insert %F to indicate where the filename(s) of the document should be
placed.
7 In the Directory Where Documents Should Be Stored box, enter the
directory path for the location where you want to save the scanned
documents.
8 Click OK.
42 Working at Your Computer EN
Page 43

To create a new printer inbox
1 On the Inbox tab of the HP Network ScanJet 5 Utility dialog box, click
Add New Inbox.
2 In the Add New Inbox dialog box, select Printer.
3 Click OK. The New Printer Inbox dialog box appears.
4 In the Name Of Inbox box, type a name for the inbox as it will appear in
the Preferred Inbox list on the Inbox tab.
5 In the Printer box, select the printer you want to use as an inbox.
6 Click OK.
Configuring an Inbox
You can change inbox properties after an inbox has been created. The
information you can configure depends on the type of inbox, for
example:
• All inboxes—Specify an inbox name.
• Directory inboxes—Specify the directory path for the folder that will
hold incoming documents. Also specify the desired file format for these
files.
• Launch-application inboxes—Specify the path to the application and a
file format.
• Printers used as inboxes—Specify the printer name.
3
Computer
Working at Your
To configure an inbox
1 On the Inbox tab of the HP Network ScanJet 5 Utility dialog box, click
Inbox Properties.
2 In the Inbox Properties dialog box, click the tab with the name of the
inbox you want to configure.
3 Change inbox properties and click OK.
EN Working at YourComputer 43
Page 44

Disabling the Current Inbox
When you disable your current inbox, other people cannot send scanned
documents to you, either by selecting your name or by selecting a
distribution list that contains your name on the scanner control panel.
When they attempt to send you a document, the control panel displays a
message saying that the document can’t be delivered to you because
your inbox is disabled.
To disable your current inbox, select Disable Inbox on the Inbox tab.
Note Even when your inbox is disabled, you can still send scanned documents
to yourself as part of an automatic workflow you have defined.
Configuring PaperPort Software to Open
Automatically
You can set PaperPort software to automatically open when you receive
a new scanned document in your inbox. When the scanned document is
received, it will automatically be opened and placed as an untitled item
in the PaperPort software. For more information about using PaperPort
software, see Chapter 4, Working in PaperPort Software.
To configure the PaperPort software to open
automatically
1 On the Inbox tab of the HP Network ScanJet 5 Utility dialog box, click
Inbox Properties.
2 Click the PaperPort tab.
3 Select Yes to set the PaperPort software to open when receiving a
scanned document.
4 Click OK.
44 Working at Your Computer EN
Page 45

Choosing the Notification Method and Time
You can specify how often the HP Network ScanJet 5 Utility will check
for new scanned documents. If you want to be notified when a scanned
document arrives at your inbox, you can choose one of several
notification methods.
To choose the notification method and time
1 On the Inbox tab of the HP Network ScanJet 5 Utility dialog box, click
Inbox Properties.
2 Click the General tab.
3 Select the method by which you want to be notified:
• Display A Message Box—The scanner utility displays a message box.
• Beep—The scanner utility causes your computer to beep.
• Flash the Window/Icon—The scanner utility title bar (or icon when
minimized) flashes.
4 Use the slider bar to specify how often to check for new scanned
documents.
3
Computer
Working at Your
EN Working at YourComputer 45
Page 46

Creating or Changing Your Password
If you are a registered scanner user, you can use a password to access
your private destination list on the scanner control panel.
To create or change your password
1 On the Inbox tab of the HP Network ScanJet 5 Utility dialog box, click
Inbox Properties.
2 Type a new password in the New box.
3 Type the new password once again in the Confirm box.
ViewingYourTransaction Log
The transaction log lists all scanned documents you have sent and
received, as well as errors that have occurred. For each job, the
following information is given: user name, date, time, number of pages
scanned, destination(s), success/failure of delivery.
To view the transaction log
1 On the Inbox tab of the HP Network ScanJet 5 Utility dialog box, click
Transaction Log.
2 To print the transaction log, click Print.
3 To save the transaction log to a file, click Save to display the Save As
dialog box. The log is saved as unformatted text in the file and location
you specify.
4 To delete all log entries, click Clear Log.
46 Working at Your Computer EN
Page 47

Working in the PaperPort Software
General Features
The PaperPort software allows you to annotate, organize, and find
scanned items. You can also electronically link scanned documents to
other applications such as fax, electronic mail (e-mail), and word
processing applications. Unless you specify otherwise, the PaperPort
software is the default inbox for receiving scanned documents at your
computer.
Page View and Desktop View
The PaperPort software has two ways to view scanned material:
• Page View is a close-up of one page at a time and allows you to read
and annotate the page.
• Desktop View provides an overall view of the PaperPort items, shown
as thumbnails (an icon representing a scanned item). In the PaperPort
software, single-page scanned documents are referred to as items.
Multi-page scanned items are referred to as stacks.
4
EN Working in the PaperPort Software 47
Page 48

Figure 13
Desktop View displays the Command Bar(A), Link Bar(B), and Status Bar(C).
To switch between Desktop View and Page View
Switch between Desktop View and Page View in any of the following
ways:
• Click Desktop or Page on the Command Bar.
• From the View menu, chose Page View or Desktop View.
• In Desktop View, double-click an item to display that item in Page
View.
48 Working in the PaperPort Software EN
Page 49

The Command Bar
The buttons on the Command Bar provide quick access to various
commands on the menus. Some of the buttons are not available in both
views.
Icon Description Icon Description
Desktop—Switches from
Page View to Desktop
View.Available only in
Page View.
Page—Switches from
Desktop View to Page
View.Available only in
Desktop View.
Find—Finds an item in the
Desktop View;finds
annotations in Page View.
Browse—Shows a list of
items.
Rotate—Rotates the
selected item 90 degrees
to the right.
Stack—Stacks selected
items into one stack.
Available only in Desktop
View.
Unstack—Unstacks the
pages of the selected stack.
Available only in Desktop
View.
Unstack 1—Unstack the
current page of the stack.
Available only in Desktop
View.
Arrange—Rearranges the
items in Desktop View.
OLE Rtn— Switches to the
application you are using
with OLE. Available only
when using an OLE feature.
4
Software
PaperPort
Duplicate—Makes an
electronic copy of the
selected item. Available
only in Desktop View.
EN Working in the PaperPort Software 49
Page 50

Setting Preferences
You can customize the PaperPort software so that it is displayed
according to your preferences.
To select preferences
1 From the Edit menu, choose Preferences. The PaperPort Preferences
dialog box appears.
2 Click the Desktop icon.
3 Select the options you want. The options are explained in the following
table.
Option Description
Scan to Desktop As you scan items, they appear on the PaperPort
desktop view as thumbnails.
Scan to Page
View
Show Text with
Icons
ShowT oolTips Displays short descriptions of the Command Bar buttons
Color Screen Select this option if your computer has a color monitor;
Maximize
Window at
Startup
UseGrayDialog
Background
4 Click OK to save the Desktop Preferences and exit the Preferences
The scanned items first appear in Page View instead of
Desktop View.
When this option is selected, the buttons on the
Command Bar have names on them. When this option is
cleared, the buttons will be smaller and will not have any
text on them.
and Annotations.
otherwise clear this option.
Select this option if you want the PaperPort window to be
maximized (fill the computer screen) when the PaperPort
software starts.
Will show PaperPort boxes with a gray instead of a white
background.The gray background color appears the next
time you restart Windows.
dialog box.
50 Working in the PaperPort Software EN
Page 51

Automatic Saving
Every item in the PaperPort software is automatically saved as soon as
you scan it. Any changes that you make to an item, such as adding a
note or giving an item a new title, are automatically saved as well.
If you want to delete items from the Desktop but save back-up copies or
save them in some other format, such as .BMP or TIFF, from the File
menu, choose Export. For details see Chapter 7, Importing and
Exporting with the PaperPort Software.
Giving Titles to Items
The PaperPort software items can have titles of up to 30 characters long,
such as “Smithers Contract” or “Letter to Jones, Ltd.”
The title of an item appears in the following three places in the
PaperPort software:
• At the top of the item in Desktop View
• On the Document Navigator (under the Command Bar) in Page View
• On the Status Bar
To retitle an item in Desktop View
1 Select the item. If you have not titled an item, the PaperPort software
automatically names the item “Untitled.”
2 Click the title. An edit box appears around the title.
- Or From the File menu, choose Change Title. An edit box appears around
the title.
3 Type the new title, and press [Enter]. The item will have the new title.
To retitle an item in Page View
1 From the File menu, choose Change Title. The Change Item Title
dialog box appears.
2 Enter a new title for the item, and click OK. The item will have the new
title.
4
Software
PaperPort
EN Working in the PaperPort Software 51
Page 52

Displaying and Hiding Elements
Display or hide the Folders, Command Bar, Link Bar, Status Bar, or
Tool Palette by selecting each from the View menu. A check mark next
to the menu item indicates the tool bar or folders are visible.
Note Not all menu items are available in both views.
Rotating or Flipping an Item
Rotate a page in 90 degree increments or flip it in 180 degree increments
to change the direction of an image on the page.
To rotate or flip an item
1 Select the page you want to rotate, or display it in Page View.
2 Do any one of the following:
• From the Page menu, choose Rotate Right or Rotate Left to rotate the
item 90 degrees.
• On the Command Bar, choose Rotate Right to rotate the item 90
degrees to the right.
• From the Page menu, choose Flip to rotate the item 180 degrees from
its current position.
Note Annotations and pages that have annotations cannot be rotated. To
temporarily remove the annotations and rotate the page, select the
annotations and from the Edit menu choose Cut. Then rotate the page.
If you choose Paste, the annotations will be restored but not rotated.
52 Working in the PaperPort Software EN
Page 53

Deleting Items
Deleting an item permanently removes it from your computer. If you
want to save an item, from the File menu choose Export before deleting
the item from the PaperPort software. For more information on
exporting files, see Chapter 7, Importing and Exporting with the
PaperPort Software.
To delete an item
1 Select the item in Desktop View, or display the item in Page View.
2 Press [Delete].
- Or From the File menu, choose Delete Item.
- OrIn Desktop View, choose Delete from the Edit menu.
3 Click Yes to delete the item.
- Or If you have selected multiple items, click YestoAllto delete all items at
once.
Undoing an Action
To undo the last action you made in the PaperPort software, from the
Edit menu, choose Undo. For example, if you move a thumbnail on the
Desktop, choose Undo Move, and the thumbnail will move back to its
original location. Similarly, if you highlight a section of text on a page
in Page View, choose Undo Highlight to remove that highlighting.
When you undo an action, the Undo command changes to Redo. Redo
replaces anything you deleted with Undo.
To undo all annotations and other changes made to the item, in Page
View, choose Undo All Changes from the Edit menu.
EN Working in the PaperPort Software 53
4
Software
PaperPort
Page 54

Working in Desktop View
Desktop View provides an overall view of PaperPort items and stacks.
Each item in Desktop View is shown as a thumbnail (an icon
representing a scanned item).
Selecting and Deselecting Items
Before performing an action on an item, such as moving it or printing it,
you must select the item. A red (or dark) line around an item indicates
that it is selected.
To select items in Desktop View
• To select a single item, click its thumbnail.
• To select multiple items, click each thumbnail while holding down
[Shift] or [Ctrl].
- Or Position the cursor, click the left mouse button, and drag a selection box
around the items you want to select. Release the mouse button to select
the items. Any item partially enclosed or touched by the selection box
will be selected.
• From the Edit menu, select all items by choosing Select All.
To deselect items in Desktop View
• To deselect a single item, click elsewhere on the screen.
• To deselect a single item from a group of selected items, hold down
[Shift] and click each item you want to deselect.
• To deselect all items, choose Deselect All from the Edit menu.
- Or Click elsewhere on the screen.
54 Working in the PaperPort Software EN
Page 55

Moving and Arranging Items
If you would like to organize the items in Desktop View, you can either
move each thumbnail with the mouse or use the PaperPort software’s
Arrange feature.
To move an item, drag it to a new location in the Desktop View.
To arrange all of the items in Desktop View, from the Desktop menu
choose Arrange Desktop, or on the Command Bar, click Arrange.The
thumbnails are automatically arranged in rows on the screen.
If you want only to arrange certain items in Desktop View, select the
items you want to arrange. Then from the Desktop menu, choose
Arrange Selected Items. The selected items will be arranged in rows
after the unselected items.
Duplicating Items
Create a duplicate of a selected item in Desktop View in anyof the
following ways:
• From the Desktop menu, choose Duplicate Item.
• On the Command Bar, click Duplicate.
• Press [Ctrl] while dragging the item to another location in Desktop
View. The pointer will have a plus (+) sign in it to indicate the selected
item will be duplicated.
EN Working in the PaperPort Software 55
4
Software
PaperPort
Page 56

Figure 14
Working in Page View
Page View displays an item one page at a time and allows you to read
and add annotations to a page. Use the Navigators to display other pages
of a stack, see other items, or enlarge the image.
A Zoom Navigator—Click the “minus” and “plus” magnifying glasses to
reduce or enlarge the image. Click Actual to return the image to its
actual size. The scale of the image is shown on the right side of the
Status Bar.
B Page Navigator—Click the arrows to scroll between pages in the stack.
Click between the arrows to activate the Go To Page feature.
C Document Navigator—Click the arrows to scroll among the items in
the PaperPort software. Click between the arrows to see a list of the
items in the PaperPort software.
D Annotation Tool Bar—Use these tools to add notes, highlight areas, or
cut and paste selections. For more information on using the Annotation
Tools, see Chapter 6, Annotating Scanned Items.
E Status Bar—Use to view information about the current item: the title,
the dots per inch at which the item was scanned (resolution), whether
the image is color or black and white, and the percentage of enlargement
or reduction of the page.
56 Working in the PaperPort Software EN
Page 57

Changing the Display Size of an Item
Use the Zoom Navigator or Zoom commands from the View menu to
zoom in and display the details of a page, or zoom out and make the
page smaller on the screen while in Page View.The page magnification
is shown in the status bar in Page View. Use any of the following
methods to change the display size:
• From the View menu, choose Zoom In or Zoom Out.
• Click the plus (+) or minus (-) magnifying glass on the Zoom Navigator.
• From the View menu, choose Actual Size or click Actual Size on the
Zoom Navigator to view the page at its actual size (100%).
• From the View menu, choose Fit to Window to enlarge or reduce an
item to fit the entire item into the Page View window.
Panning an Item
Panning an item is a quick way to scroll through an item in Page View
when the entire item is not visible on the screen.
To pan an item
1 Display the item in Page View.
2 Click Pan on the Annotation Tool Bar.
3 Place the pointer on the item. The pointer changes to a hand.
4 Press the mouse button and drag up, down, right, or left. The area of the
page you are viewing changes as you drag the pointer.
The Pan tool remains active until you deselect it or view a different item.
Inverting an Image
This feature allows you to change an item from black-on-white to
white-on-black.
To invert an image
1 Display the item in Page View.
2 Choose Invert from the Page menu. The image is reversed from
black-on-white to white-on-black. Gray shades are reversed as well.
Repeat these steps to change the image back to its original appearance.
EN Working in the PaperPort Software 57
4
Software
PaperPort
Page 58

58 Working in the PaperPort Software EN
Page 59

Managing Scanned Items
Working with Stacks
In the PaperPort software, a stack is an item with multiple pages. Use
the stack feature to organize multipage documents.
When you use the automatic document feeder to scan a document, the
document will appear as a multipage stack in Desktop View. When you
scan an item, each scanned page appears in Desktop View as a one-page,
untitled item.
Creating Stacks
Any page or stack in Desktop View can be stackedonto any other page
or stack.
5
To stack items using drag-and-drop
1 In Desktop View, select the item to stack.
2 Place the pointer on the selected item, and press and hold down the left
mouse button.
3 Move the pointer onto the second (target) item so the target item
becomes highlighted, and release the mouse button.
The selected item is stacked on top of the target item. Repeat steps 1
through 3 to stack additional items.
Note You can add Summary Information about the stack after creating it.
Summary Information for individual pages that are then stacked is
retained only for the bottom page in the stack. For details, see “Adding
Summary Information to Items” in Chapter 7.
EN Managing Scanned Items 59
Page 60

To stack items using the Stack Selected Items command
or the Stack button
1 In Desktop View, select the items you want to stack in the order that you
want them to be stacked. The first item selected will be on top.
2 From the Desktop menu, choose Stack Selected Items.
- Or Click Stack on the Command Bar.
Navigating within a Stack
To move between pages in a stack, select the stack and click the arrows
on the scroll bar (Page Navigator) below the stack. To move to a specific
page in a stack, click the middle of the Page Navigator scroll bar to
bring up the Go To Page dialog box or choose Go To Page from the
Page menu. Then enter the page number.
Unstacking Pages
Unstack pages to move pages to another stack, replace pages with new
ones, or delete pages from the stack without disturbing the rest of the
pages.
Note You do not need to unstack pages to add annotations. Double-click a
stack to display it in Page View, where you can see and annotate the
pages one page at a time.
To unstack a single page from a stack
1 In Desktop View,select the stack.
2 Use the Page Navigator to display the page you want to unstack.
3 From the Desktop menu, choose Unstack Current Page.
- Or Click Unstack 1.
The PaperPort software unstacks the selected page and displays it as a
new, untitled item.
60 Managing Scanned Items EN
Page 61

To unstack a whole stack
1 In Desktop View,select the stack.
2 From the Desktop menu, choose Unstack.
- Or Click Unstack on the Command Bar.
The PaperPort software unstacks the pages, and shows all of the pages
as selected, untitled items in Desktop View.
Note Any Summary Information for a stack is lost during the unstacking.
Reordering Pages in a Stack
After creating a stack, you can reorder the pages.
To reorder the pages in a stack
1 In Desktop View,select the stack.
2 From the Desktop menu, choose Reorder. A dialog box displays the
current order of the pages in the stack. If the page you want to reorder is
not visible, use the horizontal scroll bar.
3 Select the page you want to move.
4 Drag the page to its new location. A vertical line shows the new location
of the page.
5 Click OK to close the dialog box. The pages reorder automatically.
EN Managing Scanned Items 61
5
Scanned Items
Managing
Page 62

Inserting a Page in a Stack
Both the page you want to insert and the target stack must be displayed
in Desktop View.
To insert a page in an existing stack
1 In Desktop View, select the target stack.
2 Use the Page Navigator to move to the location where you want to insert
the new page.
Note The new page will be inserted on top of the current page.
3 Select the page you want to insert and drag it onto the target stack. The
PaperPort software places the page at the new location.
Alternatively, you can drag a page onto the stack and reorder the pages
using Reorder. For more information on using the Reorder command,
see “Reordering Pages in a Stack” earlier in this section.
Tip You can insert a new page into a stack as a section separator. To create a
new, blank page in the PaperPort software, choose New Item from the
File menu. The PaperPort software displays a new untitled item. You can
then insert it into the stack.
To add a page at the end of a stack
1 In Desktop View,select the stack.
2 Drag the stack onto the page.
Note When you add a page at the end of a stack, any summary or title
information for the stack will be lost.
To copy a page in a stack
1 In Desktop View,select the stack.
2 Use the Page Navigator to move the page you want to copy to the top of
the stack.
3 From the Desktop menu, choose Duplicate Current Page. A duplicate
of the selected item appears as a new, untitled item in Desktop View.
62 Managing Scanned Items EN
Page 63

Working with Folders
Create folders in the PaperPort software to help you organize your
scanned items and stacks.
Filing Items in Folders
The PaperPort software provides you with an initial set of folders that
appears in a column down the left side of Desktop View. The default
names for these folders are as follows:
• Main Folder
• Articles & Clippings
• Bank Accounts
• Investments
• Medical
• Phone Numbers
• Real Estate
• Receipts
• Taxes
• Travel
To file an item in a folder
1 In Desktop View, select the item to file.
2 Drag it to the target folder. When the folder title is highlighted, release
the mouse button. The folder flashes to let you know the selected item
has been filed.
To move items between folders
1 Open the folder in which the item currently resides.
2 Select the item.
3 Drag the item onto another folder. When the title of the target folder is
highlighted, release the mouse button. The folder title flashes to let you
know the selected item has been filed.
- Or From the Desktop menu, choose Move to Folder, select the target
folder, and click OK. The PaperPort software moves the item into the
new folder.
EN Managing Scanned Items 63
5
Scanned Items
Managing
Page 64

To copy items to another folder
• Hold down [Ctrl] as you select an item and drag the item into the new
folder. The title of the target folder flashes to let you know the selected
item has been copied and filed.
- Or Select the item. From the Desktop menu, select Copy to Folder, select
the target folder, and click OK. The PaperPort software copies the item
into the new folder.
Displaying Items in Folders
Display either thumbnails of the contents of a single folder or a list of
the contents of all your folders (with a thumbnail of the item selected).
The contents of a folder are always displayed in the order in which they
appeared when you last opened the folder.
To display items in a folder
• Click the folder icon. Thumbnails of the contents of the folder are
displayed on the Desktop.
• Click another folder icon to close the currently open folder.
To display a list of folder contents
1 From the Edit menu, choose Browse, or click Browse on the Command
Bar. The Browse dialog box appears. In Desktop View, the dialog box
lists all of the folders and their contents. In Page View, only the contents
of the open folder are listed.
2 Select an item in the list to display its thumbnail.
3 Double-click the selected item. The item is displayed in Desktop View.
The icons to the left of the item’s name indicate which items are stacks
and which are single pages. You can see the pages of a selected stack by
clicking the Page Navigator on the thumbnail.
64 Managing Scanned Items EN
Page 65

Creating, Renaming, and Deleting Folders
Delete, rename, or create new folders to match the way you organize
information. The Main Folder, at the top of the column, cannot be
deleted. It is the default folder into which all scanned items are placed if
the PaperPort software is not running when you scan the item. If the
PaperPort software is running and a folder is open, the item is filed
automatically in the open folder.
Note You can create only one level of folders; that is, you can’t create folders
within folders.
To create a folder
1 From the File menu, choose New Folder.
2 In the New Folder dialog box, type the title for the folder. The title can
be up to 30 characters.
3 Click OK. The folder appears in the folder column. Folders are arranged
in alphabetical order, but the Main Folder is always first.
To rename a folder
1 Select the folder that you want to rename. Its current title is highlighted.
2 Click the title again to select it for editing.
3 Type the new title and press [Enter].
To delete a folder
1 Select the folder you want to delete.
Note When you delete a folder, you delete all the items in it. If you want to
save any items, first move the items to another folder.
2 From the Edit menu, choose Delete. A message asks you to confirm the
deletion. If the folder contains items, a message also asks if you want to
delete each item. You can delete items one by one or all at the same time.
3 Click Yes to delete the folder, or click No to keep it.
EN Managing Scanned Items 65
5
Scanned Items
Managing
Page 66

66 Managing Scanned Items EN
Page 67

Annotating S canned Items
Using the Annotation Tools
In Page View, the Annotation Tool Bar is displayed on the left side of
your monitor. Annotation tools are described in the following table.
Icon Description Icon Description
6
Edit Annotations (Pointer)
—Selects, moves, and
resizes annotations on a
page.
Select an Area (Select)—
Selects an area to cut or
copy for pasting.
Align the Page (Straighten
Page)—Straightens an item
that was skewed when
scanned, either horizontally
or vertically.
Pan Image (Hand)—Quickly
scrollsanitemup,down,
right, or left.
Add Sticky Note—Writes a
note at any place on the
page.
Add Text(Markup)—Add a line
of text. Useful for filling in
preprinted forms because the
form will remains visible as you
type text.
Add Highlighting
(Highlighter)—Highlights any
line of text on a page.
Add Freehand Annotation—
Draws freehand marks, such as
circling text and underlining
sentences.
Add Line or Arrow—Draws
straight lines, with or without
arrowheads, to point to specific
parts of a page.
EN Annotating Scanned Items 67
Page 68

Copying, Cutting, and Pasting
The PaperPort software allows you to copy, cut, and paste items within
the PaperPort software and between it and other applications.
Note The Copy As Text command on the Edit menu uses the OCR feature to
copy text from the PaperPort software to another application. For
details, see “Word Processor OCR Link” in Chapter 8.
To copy and paste items
1 In Page View on the Annotation Tool Bar, click Select an Area.The
cursor changes to a cross hair.
2 Drag the cross hair to enclose the area you want to copy. A dashed box
appears around the area as you select it. If you need to increase or
decrease the size of the area that you selected, drag one of the selection
handles on the dashed selection box.
3 From the Edit menu, choose Copy.
4 To paste onto another page, display that page in Page View.
- Or To paste the selection in Desktop View, switch to Desktop View.
5 From the Edit menu, choose Paste. The copied item appears in the top
left corner in Page View or as a new item in Desktop View.
6 Drag the item to its new position in Page View.
7 Click anywhere on the page when you have finished.
Note You cannot use Select an Area to copy and paste annotations. For
information about copying and pasting annotations, see “Fine-Tuning
Annotations” later in this chapter.
To copy and paste items to another application
Note When copying to another application, the copied item appears on the
current page in that application. The pasted item can then be moved to
its correct position in that application.
1 In Page View on the Annotation Tool Bar, click Select an Area.The
cursor changes to a cross hair.
2 Drag the cross hair to enclose the area you want to copy. A dashed box
appears around the area as you select it.
3 From the Edit menu, choose Copy.
4 Switch to the application and position the cursor where you want to
paste the item.
5 From the Edit menu, choose Paste. The copied item appears. A pasted
selection is treated as a graphic; you cannot edit the text.
6 Select the item and drag it to its new location.
7 Click anywhere on the page when you have finished moving the item.
68 Annotating Scanned Items EN
Page 69

To copy and paste an item from another application
Note If the copied image is a graphic, pasting it into Desktop View will create
a new item with the image on it. Pasting it into Page View places the
image on the page being displayed.
If the copied image is text, it can be posted to a sticky note or an Add
Text markup note in Page View. The copied text cannot be pasted
directly to an item in Desktop View.
1 In the other application, copy or cut the information to the clipboard.
2 In Page View,display the target page.
3 On the Annotation Tool Bar, click Add Text.
4 Position the cursor on the target page, and click the left mouse button.
5 From the Edit menu, choose Paste. The copied image will appear on the
displayed page.
Cropping an Item
Crop an item to display only a portion of it. The portion inside the crop
marks remains, and the portion outside the crop marks is deleted.
To crop an item
1 In Page View on the Annotation Tool Bar, click Select an Area. The
cursor changes to a cross hair.
2 Drag the cross hair to enclose the area you want to crop. A dashed box
appears around the area as you select it. If you need to increase or
decrease the size of the area that you selected, drag one of the handles
on the dashed selection box.
3 From the Edit menu, choose Crop. The portion of the item outside of
the selection box is removed from the page. The thumbnail in Desktop
View indicates that an area has been cropped from the page.
6
Annotating
Scanned Items
EN Annotating Scanned Items 69
Page 70

Working with Sticky Notes
Sticky Notes can contain several lines of text and can be placed
anywhere on an item. When you place a Sticky Note on a page, the note
covers the information beneath it. However, you can make Sticky Notes
as large or small as you like or collapse them to minimize the amount of
information that is hidden. You can change the color of the text or its
background, as described in “Fine-Tuning Annotations” later in this
chapter.
Note Use Find Annotation to search for text on both Sticky Notes and on
Markup text.
To add a Sticky Note
1 In Page View on the Annotation Tool Bar, click Add Sticky Note.The
cursor changes to a small sticky-note symbol with cross hairs.
2 Click anywhere on the item, and the default note size appears. The
insertion point is ready for you to begin typing.
3 Type the note text. The note box expands to accommodate the amount of
text you type.
4 Click Edit Annotations, then select the note. Drag the handles on the
note box to resize it.
To collapse a Sticky Note
1 In Page View on the Annotation Tool Bar, click Edit Annotations.
2 Select the note or notes that you want to collapse.
3 From the Annotations menu, choose Collapse Sticky Notes. All
selected notes change to a collapsed form.
Tip Avoid putting collapsed sticky notes close together on the page if others
will be viewing the item using the PaperPort Viewer. In the PaperPort
Viewer, all notes are collapsed or expanded. If placed too close together,
some notes may overlap when expanded.
To expand a collapsed Sticky Note
1 In Page View on the Annotation Tool Bar, click Edit Annotations.
2 Double-click on the note you want to expand.
- Or From the Annotations menu, choose Expand Sticky Notes.The
selected note expands. Double-click on the note. The text pointer
appears at the beginning of the note so that you can start typing new text.
70 Annotating Scanned Items EN
Page 71

Adding Markup Text
Use Add Text for preprinted forms. The added text looks and prints just
as if you had typed it on the original form.
To add Markup text
1 In Page View on the Annotation Tool Bar, click Add Text. The cursor
changes to an insertion point.
2 Select the location in the target item where you want to add a markup
and type the text.
3 To end the note, click elsewhere on the page.
- Or Select one of the other Annotation tools.
Markups should be a single line. You cannot press enter and type a
second line.
Highlighting Information
Use the Highlighter tool to emphasize or mark important paragraphs or
key phrases of an item.
To highlight an item
1 In Page View on the Annotation Tool Bar, click Add Highlighting.
2 Position the cursor at the beginning of the text, hold down the left mouse
button, and drag the cursor across the text you want to highlight.
6
Annotating
Scanned Items
EN Annotating Scanned Items 71
Page 72

Adding Freehand Annotations
Use Freehand to draw, underline, circle, scribble, or mark an item.
To add a freehand annotation
1 In Page View on the Annotation Tool Bar, click Add Freehand
Annotation. The cursor changes to a pencil.
2 Drag the pencil to make annotations on the item.
To change the line width of the freehand annotation
1 In Page View on the Annotation Tool Bar, click Edit Annotations.
2 Select the freehand annotation.
3 From the Annotations menu, choose Line Width.
4 Select one of the line width options. The selected freehand annotation is
displayed in the new width.
Drawing Lines and Arrows
Use Add Line or Arrow to point to important details or connect an
annotation to an area in an item.
To add lines and arrows
1 In Page View on the Annotation Tool Bar, click Add Line or Arrow.
The cursor changes to a cross hair.
2 Drag the mouse to draw a line with an arrow.
To change the line width or arrowheads
1 In Page View on the Annotation Tool Bar, click Add Line or Arrow.
2 Select the line or arrow. Handles appear at each end.
3 From the Annotations menu, choose Line Arrowhead or Line Width.
4 Select one of the arrowhead or line-width options. The selected line or
arrow is drawn with the new arrowhead style.
72 Annotating Scanned Items EN
Page 73

Creating New Items
You can create a new, blank item, and then add annotations or copy and
paste text or graphics onto it.
To create a new item
1 From the File menu, choose New Item.
2 A new, blank item appears. In Page View you can cut and paste items
onto the new item.
Adding Graphics to Items
A picture or graphic can be added to an item. Use this feature to
incorporate art from other applications.
To add a graphic
1 Launch the application that contains the graphic and display the graphic.
2 Copy the graphic to the Clipboard. The graphic cannot be larger than the
page you’re pasting it to in the PaperPort software. If you think the
graphic won’t fit on the page, try reducing its size within the application
before copying it to the PaperPort software.
3 Switch to the PaperPort software.
4 Display the target item in Page View. If you paste the selected graphic in
Desktop View, a new item is created containing the selected graphic.
5 From the Edit menu, choose Paste. The graphic appears in the item at
the upper-left corner of the page with a dotted outline around it.
6
Annotating
Scanned Items
Note Do not click anywhere else on the page or on another tool until the
graphic is positioned exactly as you want it. If you click elsewhere on
the page or if you click on another tool, the graphic is deselected and
embedded in the page, and it cannot be moved. If the graphic is not
where you want it, choose Undo Paste or Undo All from the Edit
menu.
6 To move the graphic, place the pointer within the dotted outline. The
pointer changes to a hand.
7 Drag the graphic to the new location.
8 When the graphic is positioned where you want it, click elsewhere on
the page. The graphic is now embedded in the item.
EN Annotating Scanned Items 73
Page 74

Fine-TuningAnnotations
You can fine-tune an annotation by specifying the font and color of the
text or background or by moving and resizing the annotation.
Selecting the Font or Color
You can select the font, style, point size, or color of the text of a text
markup or Sticky Note before or after typing it. You can also change the
color of an annotation already drawn on the page.
To set the font, style, point size, or color
1 In Page View on the Annotation Tool Bar, click either Add Text or Add
Sticky Note.
2 From the Annotations menu, choose Font.
3 Select options from the Font, Font Style, Size,orColor lists. As you
make your selections, the sample changes to show you the new font
characteristics.
4 Click OK. When you type text with the annotation tool, the text will
have the new font characteristics.
To edit the font features of an existing annotation
1 On the Annotation Tool Bar, click Edit Annotations.
2 Select the annotation.
3 From the Annotations menu, choose Font.
4 Select new font features from the Font dialog box, and then click OK.
The text in the annotation will have the new characteristics. If necessary,
the annotation box will resize to fit the new text.
To set the color for a tool
1 On the Annotation Tool Bar, click a tool.
2 From the Annotations menu, choose Color.
3 Select the color you want to use and click OK. Now the tool will draw
in that color. If you click the Sticky Note tool, the background of the
sticky note annotation will be the color you selected.
To change the color of text, use the Font command as described earlier
in this section.
74 Annotating Scanned Items EN
Page 75

To change the color of an existing annotation
1 On the Annotation Tool Bar, click Edit Annotations.
2 Select the annotation to recolor.
3 From the Annotations menu, choose Color.
4 Select a new color from the Color dialog box, and then click OK.
Note You cannot change the background color of Add Textannotations.
Editing Annotation Text
You can edit the text of a Sticky Note or markup.
To edit annotation text
1 In Page View on the Annotation Tool Bar, click Edit Annotations.
2 Double-click the annotation containing the text. The cursor becomes a
text-insertion pointer in the text.
3 Edit the text. Use the standard Windows editing features to edit the
annotation text. You can also use Cut, Copy, Paste, and Delete from the
Edit menu.
4 When you are finished editing, click elsewhere on the page, or select
one of the other annotation tools.
6
Annotating
Scanned Items
EN Annotating Scanned Items 75
Page 76

Moving and Resizing Annotations
After adding an annotation, you can move it to another location on the
page or change its size
To resize annotations
1 In Page View on the Annotation Tool Bar, click Edit Annotations.
2 Select the annotation you want to resize. Handles appear on the frame
surrounding the annotation, indicating it is selected.
Note Freehand and Add Text annotations cannot be resized.
3 Point to the handle to drag. The pointer becomes a resize pointer.
4 Drag a handle to change the size.
To move an annotation
1 In Page View on the Annotation Tool Bar, click Edit Annotations.
2 Select the annotation you want to move.
3 Point inside the annotation box (not on a handle).
4 Drag the annotation to the new location.
For information on moving annotations to a different page or item, see
“Copying, Cutting, and Pasting Annotations” later in this section.
76 Annotating Scanned Items EN
Page 77

Copying, Cutting, and Pasting Annotations
To move an annotation to a different page in a stack or copy and use it in
another item, use Cut, Copy, and Paste from the Edit menu.
Note You cannot copy annotations to documents in other applications.
To copy, cut, and paste annotations
1 In Page View on the Annotation Tool Bar, click Edit Annotations.
2 Select the annotations that you want to cut or copy.
3 From the Edit menu, choose Cut or Copy.
4 Display the page to which you want to move or paste the annotation.
This can be a page within the same stack or a page in a different item.
5 From the Edit menu, choose Paste. The pasted annotation appears at the
top-left corner of the page.
6 Drag the annotation to the location you want.
Displaying and Hiding Annotations
You can display or hide annotations in the PaperPort software. Activate
these options using Show Annotations on the Annotation menu.
6
Annotating
Scanned Items
Note When ShowAnnotations is checked, the annotations will be visible on
all Desktop items.
EN Annotating Scanned Items 77
Page 78

Undoing Annotations
The undo options only apply to the page on which you’re working.
To undo the newest annotation, from the Edit menu, choose Undo New
Annotation. The last annotation added to the page is removed. This
command is only available immediately after you add a new annotation.
If you do anything else, such as move or resize the annotation or switch
to another page and back, the Undo New Annotation command is no
longer available.
To undo all the annotations, from the Edit menu choose Undo All
Changes.
Deleting Annotations
You can delete individual annotations one at a time or delete multiple
annotations at the same time.
To delete annotations
1 In Page View on the Annotation Tool Bar, click Edit Annotations.
2 Select the annotation(s) you want to delete.
3 Press [Delete].
- Or From the Edit menu, choose Delete.
78 Annotating Scanned Items EN
Page 79

Importing and Exporting with the PaperPort Software
Using the Import and Export Feature
Using the PaperPort software, you can import files created in other
applications and export files to other applications. Importing allows you
to edit, organize, or annotate in the PaperPort software. Exporting allows
you to save a copy of an item either as a backup or in another file format.
The PaperPort software can import and export items in the following file
formats:
Format Description
PaperPort file (.MAX) A file previouslysaved in the PaperPort software for
Windows or the PaperPort software for Macintosh.
7
Bitmap (.BMP) A format used often for displaying and storing images.
Tag Image File Format
(.TIF)
PC Paintbrush (.PCX) A format commonly used for paint applications.
Windows Images (.DCX) A format for multipage .PCX files.
Joint Photographic
Exports Group (.JPG)
Graphic Interchange
Format (.GIF)
EN Importing and Exporting with the PaperPort Software 79
A format that works well for storage and exchange
between desktop publishing and graphic arts
applications.TIFF also works well between different
platforms,such as Microsoft Windows and Macintosh.
The PaperPort software supports single and multipage
TIFFs.
An international standard for the compression of digital
photographic images.
A format for images on online services and the World
Wide Web.
Page 80

To import a file created in another application or to
open a previously exported item
1 From the File menu, choose Import.
2 From the List Files of Type drop-down list, select the format type.
3 In the File Name list, select the file to import and click OK.
Exporting Items
Exporting an item saves a copy of it as a file. The original item remains
in the PaperPort software.
Note If you export a PaperPort software item in any format other than a
PaperPort (.MAX) file, annotations in that file cannot be edited, deleted,
or moved. If the annotations are hidden, they are not exported.
To export an item as a file
1 In Desktop View, select the item you want to export. To export one page
from a stack, display the page, unstack the page, and select it.
2 From the File menu, choose Export.
3 In the Export Files as Type drop-down list, select the file format.
4 Select the drive and directory where you want to save the item.
5 Type the name of the file in the File Name box. If you don’t type a name
for the file, the PaperPort software uses the item’s title. If the title is
longer than eight characters, the PaperPort software uses only the first
eight characters of the title.
6 Click OK.
80 Importing and Exporting with the PaperPort Software EN
Page 81

Exporting Compressed Files
Because exported files can sometimes be large and take a long time to
export, the PaperPort software has a built-in compression feature for
files that are exported in the .JPG file format.
Compression speeds up the export process, but at the same time
decreases the image quality. The PaperPort software lets you adjust the
image quality setting to meet your particular needs.
To set compression and image quality
1 From the Edit menu, choose Preferences.
2 In the Category list, click the Import/Export icon.
3 Drag the slider to adjust the image quality.
Higher image quality gives lower compression and slower export speed.
Lower image quality gives higher compression and faster export speed.
7
Exporting
Importing and
EN Importing and Exporting with the PaperPort Software 81
Page 82

Printing from Other Applications
You can print files from other applications to the PaperPort software.
Note Color images are converted to grayscale when printed to the PaperPort
software. To retain the color, use the PaperPort software Import
command to import the file to the PaperPort software.
To print from other applications to the PaperPort
software
1 Open the file in the application you want to print from.
2 In the application, choose the command to set up the printer. If you have
questions about how to set up the printer in your application, refer to its
user’s manual.
3 In the list of printers, select PaperPort on Desktop and click PaperPort to
set it as the current printer.
4 Choose Print to PaperPort. The file will appear as a new, untitled item in
Desktop View.
Note After you finish printing to the PaperPort software, reset the application
to your regular printer.
82 Importing and Exporting with the PaperPort Software EN
Page 83

Adding Summary Information to Items
You can add summary information to items to help you find them
quickly.
Note If you’re going to combine items into a stack, add the summary
information after stacking the pages. If you add summary information to
individual items and then stack those items, the summary information
will be lost.
To add summary information to an item
1 Select an item or display the item in Page View.
2 From the File menu, choose Summary Info.
3 Enter the summary information in the Summary Information dialog box.
The fields are described in the following table.
Option Description
Title The field will be blank if the item is “Untitled.” Changing the title here
also changes it in Desktop View.
Creator Type your name.
Keywords Words the PaperPort software uses to find items.Separate keywords
with a comma. During a search, tell the PaperPort software which
keywordsto find, and the PaperPort software finds items with
keywords that match any that you specify.
7
Exporting
Importing and
Comments Add any additional information about the items.The PaperPort
software can also use these comments to search for and find items.
4 Click OK. Summary information is attached to the item and will appear
in the Summary Information dialog box.
EN Importing and Exporting with the PaperPort Software 83
Page 84

Finding Information
The PaperPort software allows you to quickly find files, items, or
annotations.
Finding Files
If you want to import a file, but don’t remember its name or where it’s
located, use the Find File feature from the Import dialog box.
To find a file that you have already exported
1 In the Import dialog box, click Find File.
2 Select the drive and directory where you want to search for the file.
3 Select Search Subdirectories to search all the subdirectories within the
specified directory.
4 Enter information in the Search by Date Modified box to find the file
based on the date when it was last modified. Enter the date in
month/day/year format. Select Before to search all files prior to the date;
select After to search after that date. For a description of the remaining
fields, see the following section, “Finding Items.”
5 In the Search for Text boxes, enter the text on which the search should
be based.
6 Click Find. The PaperPort software will search using the criteria you’ve
specified and will list all matching files.
Finding Items
You can find items by the text in the Summary Information dialog box
and Annotation text.
To find an item in Desktop View
1 From the Edit menu, choose Find Item.
- Or Click Find on the command bar.
2 In the appropriate box, type the information that you want the PaperPort
software to use to find the item. The search options are described in
Table 7-1.
3 Select the search criteria, as described in Table 7-2.
4 Click Find to find the first item that matches the search criteria and
select it in Desktop View.
- Or Click Find All to find all items that match your search criteria and list
them in the Items Found dialog box. Then, double-click an item in the
list to display its thumbnail, or click Go To.
84 Importing and Exporting with the PaperPort Software EN
Page 85

Tip If you chose Find and want to see the next item in the search that meets
the search criteria, from the Edit menu, choose Find Next or press [F3].
Table 7-1 Search Options
Search Option Description
Title The title assigned to the item.
Creator The name listed in the Summary Information dialog box as
the creator of the item.
Keywords Theitem’s keywords listed in the Summary Information
dialog box.
Comments Comments added in the item’s Summary Information dialog
box.
Annotation Annotation text added to the item with the PaperPort
AnnotationTools.
Table 7-2 Search Criteria
Search Criteria Description
Match Any Field
Match All Fields
Case Sensitive
Whole Word Only
Find items when any of the search criteria in the Find Item
dialog box matches any information in the Summary
Information dialog box.
Find only those items that match all of the search criteria.
This option is available only when there is text in more than
one of the criteria fields.
Finds only items where the title, creator, keywords,
comments, and annotations have exactly the same
combination of uppercase and lowercase characters as the
search criteria text.
Finds items only if the whole word of the summary
information matches the whole word of the search criteria
text.
7
Exporting
Importing and
Folders: Search
All/Search Current
Direction:Up/Down Tells the PaperPort software which direction to search first
EN Importing and Exporting with the PaperPort Software 85
Search All: Searches all of your personal folders.
Search Current: Searches only the folder that is currently
open.
when you choose Find.(If you choose Find All, the
direction doesn’t matter.) To search backward through the
items, select Up.
Page 86

Finding Annotations
You can find an annotation based on the text in an Add Text markup or
Sticky Note.
Note You can find annotation text in both Page View and Desktop View.In
Page View, the PaperPort software searches through the pages of the
stack. In Desktop View, the PaperPort software searches through all
items on the desktop and selects the thumbnail that has the annotation.
In Page View, the annotation that is found is selected. In Desktop View,
the item found with the annotation text is selected.
To find an annotation
1 In Page View, from the Edit menu, choose Find Annotation.
- Or In Desktop View, from the Edit menu, choose Find Item.
2 Enter the text you want to find and select the search options.
3 Click Find and the PaperPort software begins searching.
4 To find the next occurrence of the annotation, from the Edit menu
choose Find Next.
Tip If the annotation you’re looking for is on a page in a stack, find the stack
in Desktop View, switch to Page View, and then press [F3].The
PaperPort software finds the page with the annotation and displays it.
86 Importing and Exporting with the PaperPort Software EN
Page 87

Using Object Linking and Embedding
(OLE)
You can insert a PaperPort software item into another Windows
application, such as Microsoft Word, using object linking and
embedding (OLE). The item will appear as a thumbnail in the Word
document (the container application), creating a special link between the
PaperPort software and Word. When you double-click the thumbnail in
Word, the PaperPort software opens and you can view or edit the item. If
you edit the item in the PaperPort software, those edits will also appear
in the thumbnail in Word.
Note Before starting, check the application’s documentation to see if it
supports OLE.
To insert a PaperPort software item into another
application
1 In the container application, click where you want the scanned object to
be inserted.
2 From that application’s Edit or Insert menu, choose Insert Object,ora
similar command.
3 Select PaperPort Document and click OK. The PaperPort software
opens. A message summarizes the steps to insert an item.
4 Click Continue.
5 In Desktop View, select the item that you want to insert into the other
application.
6 On the Command Bar, click OLE Rtn.
- Or From the File menu, choose Return to <File Name>, where the file
name is the name of the container file.
A message appears asking you to complete the OLE connection.
7 Click Yes to insert the selected item into the container application. The
scanned item appears at the insertion point in that application.
- Or To select a different item, click Cancel, and the PaperPort software
remains open. If you do not want to insert the item, click No.
7
Exporting
Importing and
EN Importing and Exporting with the PaperPort Software 87
Page 88

You can insert an item into a container application in two other ways:
• Copy the item from the PaperPort software to the clipboard and paste it
into the container application. The OLE link is established when the
item is pasted.
• Open both applications, select the item in the PaperPort software and,
while holding down [Ctrl], drag the item into the container application.
When you release the mouse button in the container application, the
OLE link is established.
To edit an inserted OLE item
1 In the container application, double-click the item’s thumbnail. The
PaperPort software opens and a temporary copy of the item is selected.
In Desktop View, a dotted outline around the copy indicates it is linked
to a container application.
2 Edit the item in Page View. Annotations will appear on the item in Page
View but not on the thumbnail in the container application. Other edits,
such as pasted graphics, will appear on the thumbnail.
3 From the File menu, choose Update PaperPort Document in <File
Name>. The file name is the name of the container file. If you updated
the item, the container application is displayed with the updated
thumbnail.
Note If you don’t want to update the item in the container application, click
OLE Rtn, or choose Return to <File Name> from the File menu.
88 Importing and Exporting with the PaperPort Software EN
Page 89

Linking to Other Applications
Using Link Icons
With the PaperPort software you can send scanned items to other
applications using icons on the Link Bar. The links available to the
PaperPort software depend on the applications installed on your
computer. The PaperPort software automatically displays the link icons
described as follows:
• Printer—Print items instead of selecting the Print command from the
File menu.
• Fax —Fax items using your fax software. If you are using one of the fax
applications that the PaperPort software supports, the icon for that
application appears. If you are using another fax application, the icon
will be a generic fax icon. You can select that fax application in the
PaperPort Preferences dialog box.
• Word Processor—Open items after the text is converted by your OCR
software. The PaperPort software will create a link icon for each
supported OCR application on your computer. You can then convert
text directly to that application using the drag-and-drop techniques.
• Spreadsheet—Displays the spreadsheet selected for the OCR software
provided with the PaperPort software. Use this link when you want to
convert a scanned spreadsheet into editable numbers and text. Like the
word processor link, this link will process an item, convert the text and
numbers, and then open the item in the selected spreadsheet application.
• E-mail—Send a PaperPort item as an attachment to an e-mail message.
The Link Bar displays an e-mail icon for each supported e-mail
application installed on your computer.
• OCR—If other OCR applications are installed on your computer, their
icons will appear on the Link Bar. When you use an OCR link, the OCR
application will ask what format to convert the file to.
• Graphics (and other applications)—The PaperPort software adds
icons for other applications, such as graphics applications, to the Link
Bar as needed.
8
Tip For information about selecting the scanning options that will give the
best results for items that you want to process with your OCR software,
or send as e-mail or fax, see Chapter 2, Using the Scanner.
EN Linking to Other Applications 89
Page 90

Using Links
The steps for using links are similar regardless of the type of link.
To use links
1 Scan the item into the PaperPort software.
2 Drag the item onto the appropriate link icon on the Link Bar.
- Or From the File menu, choose Links and select the appropriate link
application from the Links submenu.
- Or Select the item and click the link icon.
3 Continue using the linked application as described in its documentation.
Note Some applications limit the number of pages that can be received from
the PaperPort link. If you have trouble with large stacks of pages, try
sending the pages in smaller batches.
90 Linking to Other Applications EN
Page 91

Using Printer Links
You can print items from both Page View and Desktop View in black
and white and in grayscale.
To print an item
1 In Desktop View, select the item to print. If you’re displaying the item in
Page View, you do not have to select it.
Note If the item has annotations that you don’t want to print, display the item
in Page View. Then clear the Show Annotations command on the
Annotations menu.
2 Drag the item onto the Printer icon on the Link Bar.
- Or Click the Printer icon.
- Or From the File menu, choose Print.
Note If you have cleared Display Print Dialog in the PaperPort Preferences
dialog box, printing starts immediately. Skip steps 3 and 4.
3 In the Print dialog box, select the print options as described in the
following table.
8
Applications
Linking to Other
Print Option Description
Print Range All: Prints all pages of the selected item.
Pages: Prints a range of pages from the selected
stack.Type the pages to print from and to.
Print to File Prints pages to a file instead of to a printer.When
you click OK, a dialog box appears in which you
designate which file to print to.
Copies Prints the number of copies you specify.
Collate Copies Prints each set of copies as specified in Copies,
with all pages in consecutive order.
4 Click OK to begin printing.
EN Linking to Other Applications 91
Page 92

Using Fax Links
You can scan an item into the PaperPort software, add annotations, and
fax the item provided your computer has access to a fax modem and fax
software.
To send items using the fax link
1 In Desktop View, select the item you want to fax.
2 If you don’t want PaperPort annotations to appear in the faxed item,
clear Show Annotations from the Annotations menu.
3 Drag the item onto the Fax icon on the Link Bar.
- Or From the File menu, choose Links. Then select the fax name from the
submenu.
- Or Click the Fax icon.
- Or To send a fax from Page View, from the File menu, choose Links.
4 To complete the fax, refer to the documentation that came with your fax
software.
To read a fax in the PaperPort software
1 From the File menu, choose Import Fax. The Import Fax dialog box
appears and lists the faxed items available in the PaperPort software.
2 Select one of the faxed items in the list. A thumbnail of it appears in the
dialog box.
- Or Click Select All to convert all of the faxed items.
3 Click Import. The selected faxed item(s) appear in Desktop View.
4 Display the item in Page View to read the fax.
92 Linking to Other Applications EN
Page 93

Using Word Processor OCR Links
Once text is scanned into the PaperPort software, the text becomes an
image that cannot be edited. However, the PaperPort software has
optical character recognition (OCR) software to process scanned text
when using a Word Processing or Spreadsheet link icon. The OCR
software converts the scanned text image to editable text; it does not
translate photos or graphics. You can process an entire item or only the
text that you select. You have several options for using OCR software
with the PaperPort software, as described in the following procedures.
To use the provided OCR software
1 In Desktop View,select an item.
2 Drag the item onto the Word Processing or Spreadsheet icon on the
Link Bar.
- Or Click the Word Processing or Spreadsheet icon.
- Or From the File menu, select Links and then select the word processing or
spreadsheet software from the submenu.
The OCR software converts the item to editable text. The word
processing or spreadsheet application opens and the converted text is
displayed as an untitled document.
8
Applications
Linking to Other
To process text using another OCR software link
1 In Desktop View,select an item.
2 Drag the item onto that OCR icon on the Link Bar.
- Or Click the OCR icon.
- Or From the File menu, choose Links and then select the OCR software
from the submenu.
The file is processed by the OCR software and then opens in your
selected word processing or spreadsheet application.
EN Linking to Other Applications 93
Page 94

To process text using the Copy As Text command
1 In Desktop View, select an item.
2 From the Edit menu, choose Copy As Text. The PaperPort software
processes the text with the OCR software and places the editable text on
the Clipboard. You can then paste the text into another application, such
as a word processor.
Note If you want to process only a portion of a page, display the item in Page
View, on the Annotation Tool Bar, click Edit Annotations, and then
select the portion of text that you want to process.
94 Linking to Other Applications EN
Page 95

Using E-Mail Links
You can send an item from the PaperPort software using your e-mail
software.
To send items using e-mail
1 In Desktop View, select the item you want to send.
2 Drag the item onto the E-Mail icon on the Link Bar.
- Or Click the E-Mail icon.
- Or From the File menu, select Links, then select the e-mail software name
from the Links submenu.
3 If necessary, log on to your e-mail software.
4 Fill in the message information and send the message.
The PaperPort software creates a file with a .MAX extension and
attaches the item to an e-mail message. If the item is a single page, the
file name begins with PAGE and is followed by the item’s number, for
example PAGE0002.MAX.
Note If you want to send a PaperPort item to someone who doesn’t currently
have the PaperPort software, you can attach the PaperPort Viewer. For
more information on PaperPort Viewers, see Appendix A.
8
Applications
Linking to Other
Receiving PaperPort Files in E-Mail
When you receive an e-mail message with an attached PaperPort file,
you can view the attached file in one of the following ways, depending
on your e-mail software:
• Double-click the attachment to display it.
• Press [Shift] and double-click the attachment to automatically run the
PaperPort software and display the attachment.
• Save the attached file using your e-mail Save or Save As command, and
then open the attachment in the PaperPort software.
EN Linking to Other Applications 95
Page 96

Setting Preferences for Links
Each link icon on the Link Bar has a set of preferences for customizing
the way the link operates.
To set preferences for the Links
1 From the Edit menu, choose Preferences.
- Or Right-click the link icon, and choose Preferences.
Use the scrollbar to see the link icons on the list.
2 Click the icon you want to customize. The options in the Preferences
dialog box will apply to the icon you clicked.
3 Select the options for the link and click OK.
Note Use the generic fax and word processor links to specify software that is
not automatically supported by the PaperPort software. To use one of
these links, click it and then assign the desired application’s .EXE file to
it.
PaperPort Link Preferences
The options available in the PaperPort Preferences dialog box depend on
the applications that reside on your computer. Therefore, some of your
PaperPort preference options may differ from those shown in the
following table.
Link Icon Option Description
All that appear on the
Link Bar
E-Mail File Format to Use Select the file format in which to save the item when it is attached to
Fax, Generic Fax Automatic Page
Display Link Icon Select to see the icon on the Link Bar. If this option is not selected,
Save Password Select if you want the PaperPort software to require a password
Receipt Select for a return receipt when the e-mail message is received and
Log Select if you want a copy of the message to be put into the user’s
Orientation
the icon does not appear, but you can still use the link by choosing
it from the Link submenu.
an e-mail message.The available formats may include PaperPort
(.MAX) and several Windows graphics formats. If you choose
PaperPort (.MAX), the recipient must have the PaperPort software
or the PaperPort Viewer installed to read the attached PaperPort file.
before starting the e-mail application. If you save your password,
the PaperPort software bypasses the Login dialog box. Not all
e-mail links support this preference.
opened by a recipient.
log.
Select to determine whether the page is in portrait or landscape
mode, and send it in that mode.
96 Linking to Other Applications EN
Page 97

Link Icon Option Description
Setup Click to display a dialog box for other fax setup options, such as
Generic Fax Select a Fax Driver Assign a fax driver to your fax software (one that the PaperPort
Graphics and
additional OCR
Printer Collate Copies Select to print multiple copies, with the pages of each copy in
Word Processor,
Spreadsheet,Copy as
Text, Generic Word
Processor
File Format to Use Select the file format in which to save the graphic item. The options
Replace Desktop Item if
Modified
Show Annotation Warning If selected, a warning message appears when you drag an image
AutomaticPage
Orientation
Display Print Dialog Select to display the Print dialog box before the item is printed.
Word Processor Software Enter the path name for the software that will receive converted text
Browse Click to select the software file (.EXE) for the OCR link. When you
Document Format Select the format for the converted text.For supported software, the
OCR Package Select supported OCR software to assign a word processor link on
OCR Settings Click to see special settings for the OCR software you selected. Two
page size and orientation. The options depend on the fax software.
software does not configure automatically). The PaperPort software
willaddthefaxicontotheLinkBar.
will be Windows graphics formats, such as .BMP and .PCX.
Select if you want an image that you modified in a graphics program
to replace the original one in the PaperPort software.
onto the graphics link, reminding you that if you make any changes
to the image in the graphics software and save the changes, all
annotations made to the item in the PaperPort software are deleted.
sequence.
Select to change the page orientation of the printer to match the
selected item’s page orientation.
from OCR software.You can also set this link to send converted text
to a word processor software or spreadsheet.
find and select the .EXE file, the full path name is entered in the
Application field.
PaperPort software will automatically choose the correct format.
The format must be supported by both the OCR software and the
word processor software.
the Link Bar.
typical options are:
Auto Orientation: Matches the orientation of the converted text to
the original text.
Decolumnized Output: Organizes the text into a single format,
even if the original document has multiple columns such as those in
a newspaper article.
8
Applications
Linking to Other
EN Linking to Other Applications 97
Page 98

98 Linking to Other Applications EN
Page 99

Troubleshooting and Error Messages
Overview
This chapter describes problems that can occur during the scanning
process, including error messages you may encounter, that can originate
from several sources:
• At the scanner. Most of the messages displayed on the control panel of
the scanner are status or information messages. However, error
messages, requiring some action to be taken before scanning can
proceed, are also displayed. These messages, together with
recommended actions, are described in this chapter.
• In the user software. Messages are displayed in the HP Network ScanJet
5 Utility when an error occurs while the user is performing some
function connected with scanning. If the user is using the PaperPort
software as their inbox, problems may occur and error messages may be
displayed in connection with this software. Solutions to the HP Network
ScanJet 5 Utility and PaperPort software problems and error messages
can be found both in this document and in the HP Network ScanJet 5
Scanner Administrator’s Guide.
• In the administrative software. Error messages are displayed in
JetAdmin when an error occurs during an administrative process.
Solutions to these problems can be found later in this chapter.
9
EN Troubleshooting and Error Messages 99
Page 100

Scanner Troubleshooting
If you have problems with the scanner, proceed as described in the
following paragraphs.
Scanner is not Working
Make sure of the following:
• The power cord is connected securely to the scanner and is plugged into
an electrical outlet.
• The scanner is turned on.
• The scanner is connected to the network.
• The scanner is unlocked. If you try to scan a document when the scanner
is locked, it will emit a harsh, grinding sound.
If these conditions are met, turn the scanner off, wait 30 seconds, and
turn the scanner back on to reset it.
Control Panel is not Working
Make sure of the following:
• The power cord is plugged into an electrical outlet.
• The control panel is correctly connected to the network box.
• Check the control panel contrast. You can change the contrast using the
arrow keys.
If the problem persists, call your network administrator.
Scanned Image Quality is Poor
If scanned pages are blank, white, or have repeated patterns, first make
sure that a page is not already on the scanner glass.
Scanner Overheats
The scanner automatically shuts off if environmental conditions cause it
to overheat. If this happens, switch the on/off switch to off, wait for the
scanner to cool down, and switch on the scanner to operate.
100 Troubleshooting and Error Messages EN
 Loading...