

Page 1
Installing the
HP NetStorage 6000
NOTE: Installation may take from 15 minutes to 2 hours, depending on
the amount of system configuration you require.
HP NETSTORAGE 6000
Gather Information
Record the following information if you are not
using DHCP:
IP Address
Subnet Mask
Gateway Address
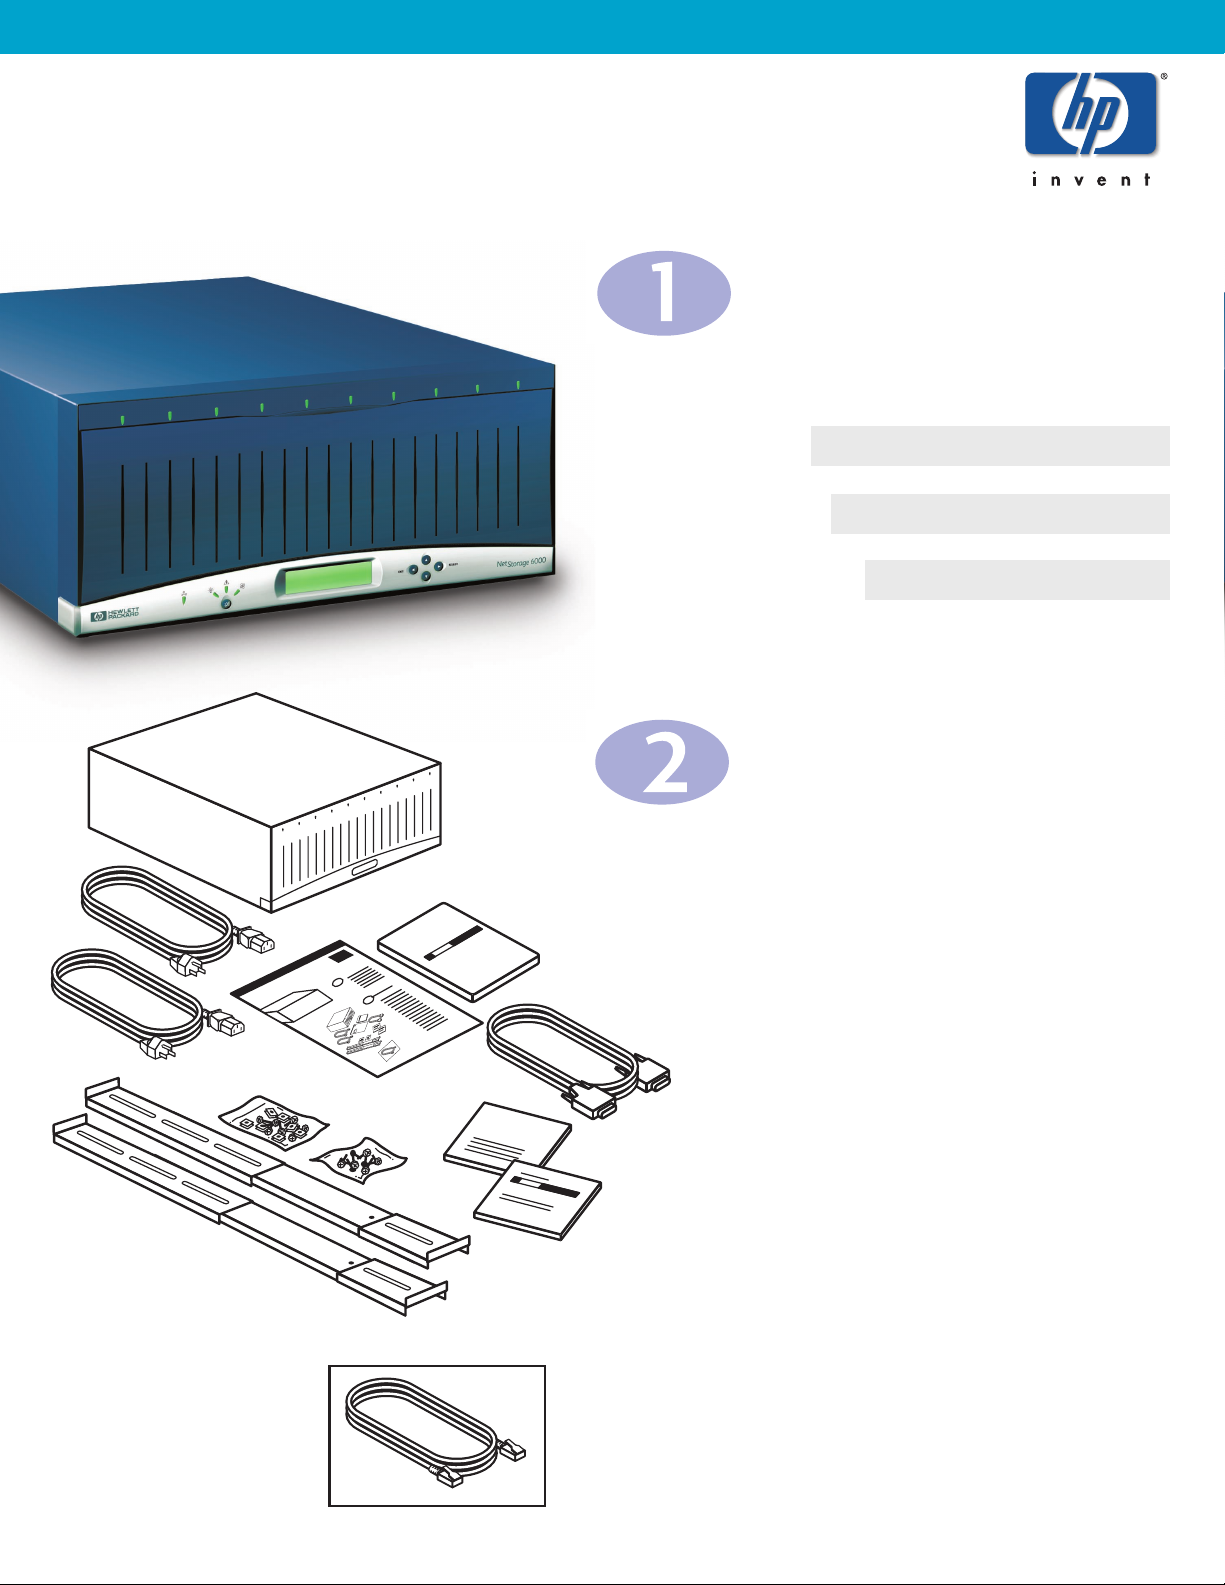
Check Contents
WARNING: The unit is heavy. Have someone
help you remove it from the box.
Primary Parts:
1. HP NetStorage 6000
2. Two power cables
3. Installation Poster
4. User's Guide
Accessories:
5. HP TopTools CD
6. HP NetStorage 6000 CD
7. RS 232 cable (for TTY monitor connection
when network is down)
8. Two rail assemblies for rack mounting
9. Rack mounting hardware
Accessory You Need to Supply:
10. Network cable
1
2
3
4
5
6
7
8
9
10
Page 2
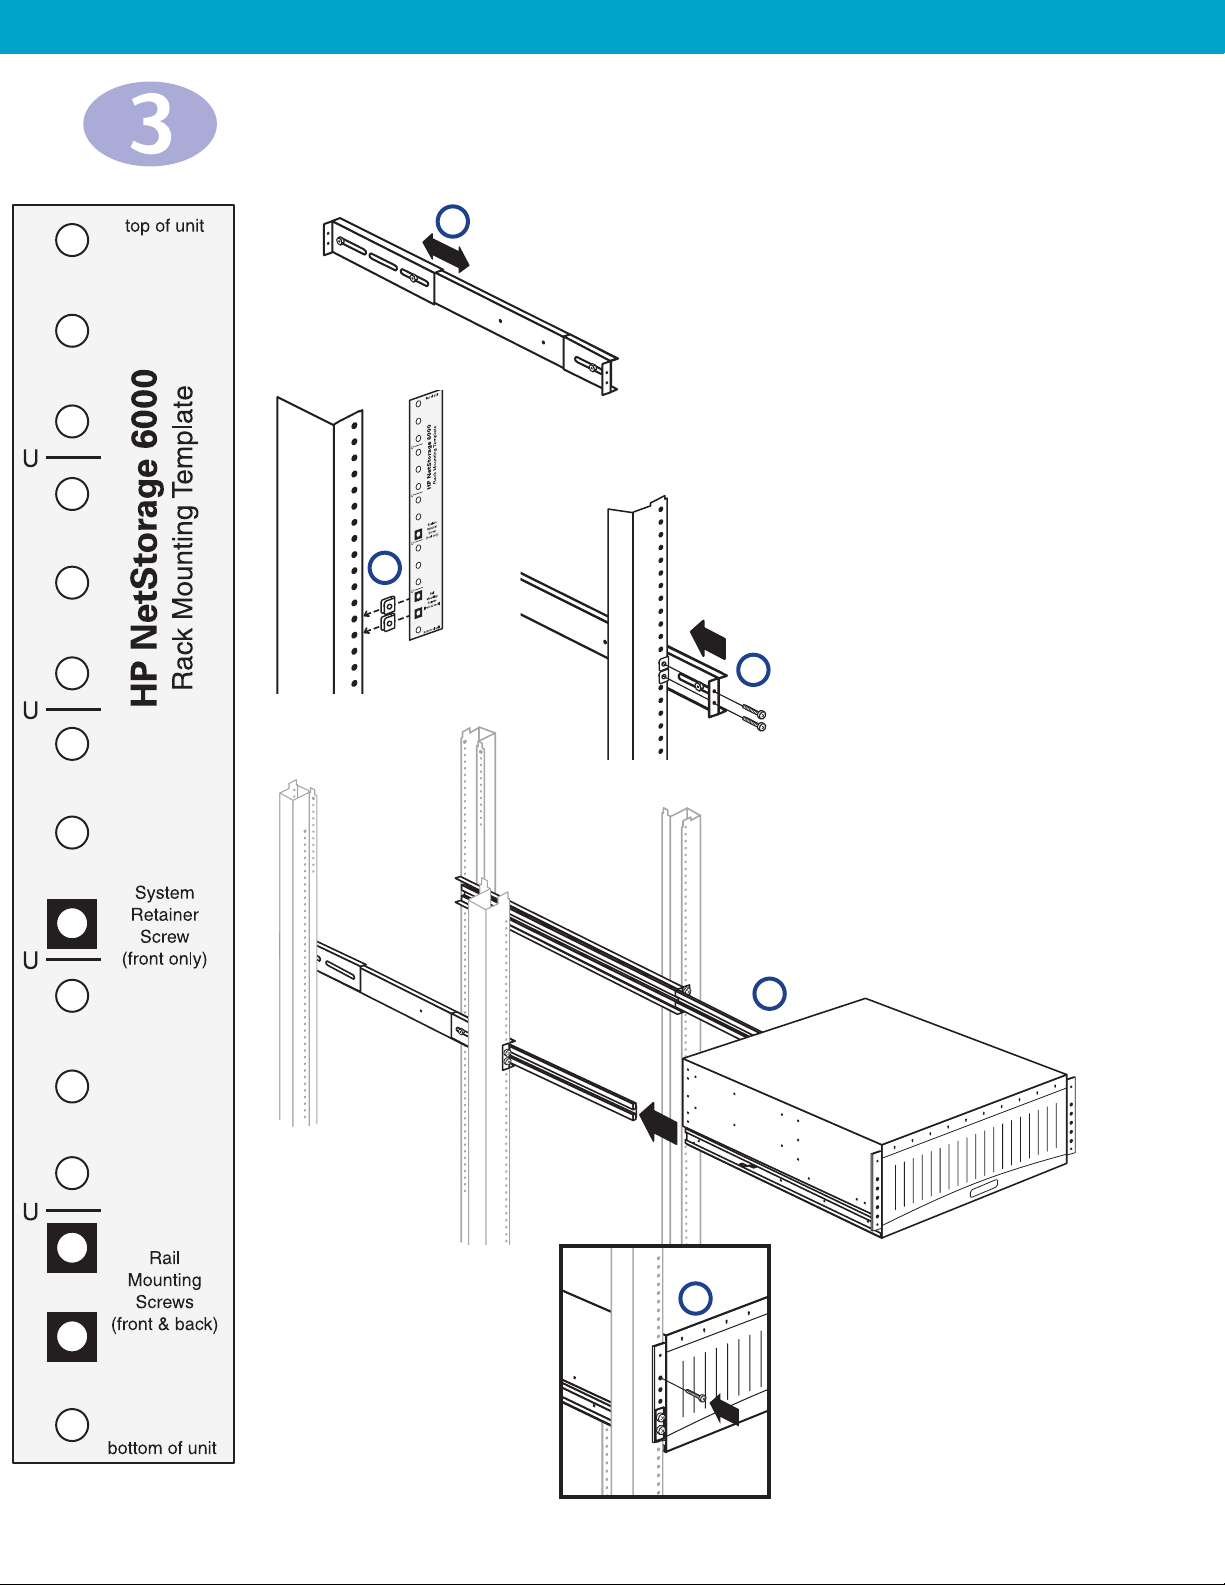
Place the Unit in a Rack (optional)
NOTE: The unit comes with two sets
of rack mounting hardware. Use the set
that works best with your rack. To mount
the unit, you will need the following
tools:
• Flathead screwdriver
• 11/32" wrench
• Torx-25 screwdriver (HP racks)
• Phillips screwdriver (Rittal racks)
A. Adjust the rail assemblies to fit the
depth of your rack by loosening the
screws and sliding the rear bracket.
B. Using the template at the side of this
poster, determine where to mount
the rails. Assemble the nut fasteners
to the rack in the positions indicated
on the template.
C. Screw the front and rear of the rail to
the rack.
D. Repeat steps A-C for the second rail
assembly.
E. Slide the unit into the mounted rails.
WARNING: The unit is heavy.
Have someone help you place it on
the rack.
F. If desired, secure the unit by
inserting a system retainer screw.
NOTE: The rails are equipped with
safety latches to prevent inadvertent
removal of the unit. To disengage,
press the metal spring clip at the front
of each rail.
D
B
A
C
F
Page 3

Connect the Unit
A. Connect a network cable to the network interface card (NIC) port.
B. Remove the protective cap from the primary and secondary
sockets on the back of the unit. Connect both power cables.
NOTE: Although the unit can operate with only the primary socket
connected, using only one power cable will generate an error.
C. Power on the unit.
D. Press the alarm-reset button on the front panel to turn off
the alarm.
NOTE: The normal boot process takes several minutes. At times,
the LCD panel will display initializing messages or go blank, and
the system status lights will flash.
Enter Network Configuration Information
A
B
C
Primary
Secondary
Hard Drive LED (No light: empty, Green: unit functional but inactive,
Blinking green: drive active, Blinking amber: drive rebuilding, Red: fault)
Network
Indicator
Fan Fault
Indicator
Alarm Reset
Power Supply Fault Indicator
General Fault
Indicator
LCD Panel
• navigates through menus
• moves cursor to the left
• exits the current menu selection
without saving
Front panel arrow buttons navigate through the LCD menus when
setting network configuration information.
• scrolls up/down through menu items
• increases/decreases values
• navigates through menus
• moves cursor to the right
• saves characters and returns to
previous menu
Configuring With DHCP
A. When the NIC 1 information appears on the LCD
panel, write down the IP address.
NOTE: On units with more than one NIC port, the
LCD panel displays DHCP offers in ascending order,
and returns to NIC 1 when completed.
B. Press the button to continue. The LCD panel
displays a temporary name:
N1234567890
CPU: 0% [ --
>
Menu]
C. Move to the computer that manages the
HP NetStorage 6000, and proceed to Step 6.
NOTE: If DHCP is unsuccessful, follow the
instructions for configuring without DHCP.
Configuring Without DHCP
A. After initialization, the LCD panel displays:
DHCP Discovery NIC 1
No offers
B. Press any button to get to the LCD panel menu,
and select Set Static IP.
C. Enter or accept the following values, and move
the cursor to the far right to save them:
• IP address
• Subnet mask
• Broadcast address
• Gateway address (if necessary)
D. When the LCD panel displays a temporary
name, move to the computer that manages the
HP NetStorage 6000, and proceed to Step 6.
Determine whether your network uses DHCP and follow the appropriate instructions.
LCD Selector
Buttons
Page 4

Use a Web Browser to Configure
Network Settings
A. Using a computer on the network, open a web browser and
type the unit’s IP address in the address or location field.
You will need to use Internet Explorer 4.01 or later, or
Netscape 4.51 or later. If you have trouble connecting, try
enabling the option to bypass the proxy server for local
addresses.
NOTE: Depending on the level of security you have set on
your browser, security warning dialog boxes may appear.
You must accept content from, or grant privileges to,
Hewlett-Packard Company. If you do not, the
HP NetStorage 6000 pages will not display properly.
B. Select Configuration > Network Settings > TCP/IP Settings.
C. Create a new System Name. If necessary, fill in the DNS fields
and make changes to the NIC port information. Click Apply.
NOTE: If your system supports UNIX and Windows users and you wish to share files, several
mapping options are available by selecting Network Settings > NT/UNIX Mapping. For more
information on network settings, see the HP NetStorage 6000 User’s Guide, or click in the
upper right corner of the web interface.
Set System and Alert Settings
In the Configuration tab:
A. Select System Settings > Informational Settings.
• Fill in the unit's contact information, location, and asset
number and click Apply.
B. Select System Settings > Date and Time.
• Select the current date, time and time zone, and click
Apply.
C. Select System Settings > Administrative Password.
• Click the box if you are using a UPS with your system,
and click Apply.
D. Several optional alert setting configurations are also
available:
• SMTP/email
• SNMP/Network Management
• Syslog
To configure these settings, select Alert Settings, click on the
desired link, fill in each field, and click Apply.
If Supporting UNIX Users:
A. Select UNIX Settings.
B. Fill in the NIS and Management
information and click Apply.
If Supporting Windows Users:
A. Select Windows Settings.
B. Fill in the Network Neighborhood and
WINS fields, then select the Security
Mode.and click Apply.
*C4475-90103*
C4475-90103
Page 5

Build the Storage System
Attach a Backup Tape Device (optional)
A. Shut down and power off the HP NetStorage 6000.
B. Connect the SCSI jumper cable to the tape device and
attach the terminator.
C. Connect the SCSI interface cable to the HP NetStorage 6000
and to the tape device.
D. Connect the power cable to the storage device, and plug it into
a grounded outlet. Power on the autoloader.
E. Power on the HP NetStorage 6000.
F. Press the alarm-reset button on the front panel of the
HP NetStorage 6000 to turn off the alarm.
NOTE: For information on verifying installation and configuring
the backup software, see the HP NetStorage 6000 User’s Guide.
For other information, refer to the HP SureStore DLT Autoloader
User's Guide.
Planning: In this system, storage is spread across logical drives. On these drives, you must create file
volumes to divide your disk space. Each logical drive can be divided into as many as 4 file volumes.
It is important that you plan storage space allocation prior to
creating file volumes. Although the HP NetStorage 6000 allows
you to expand your file volumes later, you may want to reserve
extra space during setup to allow for easier expansion. This will
save time and effort later if you need more storage space in a
particular file volume.
To Create a File Volume:
A. Select Storage > Logical Drives > Actions >
Create File Volume.
B. In the dialog box that appears, enter a new file volume
name, designate which partition to allocate from, enter
desired file system size, and click OK.
Once you have created a file volume, you can share that storage space with other user as follows:
You can attach an HP SureStore DLT Autoloader 1/9 to your unit to perform local backups. To order an
new autoloader (C7146NB), or a SCSI cable for an existing autoloader (D6020A), please contact your
HP Authorized Reseller. To connect the autoloader:
For Windows Users:
A. Select Storage > File Volumes.
B. If you want to create directories, select a file
volume and click Actions > Create Directory.
C. In the Windows Networking box, select the
desired share option:
• Not Shared to deny access.
• Share As to allow access.
D. Fill in the fields, and click Apply.
For UNIX Users:
A. Select Storage > File Volumes.
B. Select a file volume.
C. Click the UNIX Networking option you want.
D. Click Apply.
NetStorage 6000
Power
Cables
Network
Cable
Terminator
Jumper
Autoloader
SCSI
Cable
You have now completed the configuration of your HP NetStorage 6000.
Page 6

Register Your HP NetStorage 6000
Troubleshooting
For information on troubleshooting, refer to the HP NetStorage 6000 User's Guide.
Need Help?
Topic Where to Look
General information HP NetStorage 6000 User's Guide
Context-sensitive help HP NetStorage 6000 web interface (click
)
HP Online Support www.hp.com/support/ns6000
HP Customer Care (970) 635-1000
HP Authorized Resellers www.hp.com or (800) 826-4111
Ordering products www.bstore.hp.com
Integrate with Network Management Applications (optional)
Your HP NetStorage 6000 comes with two CDs:
• HP NetStorage CD provides software that integrates your unit into your network management application.
• HP TopTools CD provides a free software package to manage all of your HP devices.
NOTE: Version 5.0 is preferred. If you have an earlier version, please upgrade your software.
To install the HP integration packages:
A. Insert the CD in the CD-ROM drive of the computer that contains your network management application.
B. Find your application in the table below, and run the program for that application.
Register your HP NetStorage 6000 now to have access to technical support, receive product upgrades,
and learn about HP special offers:
A. Using the HP NetStorage 6000 web interface, click the Support tab.
B. Select Contact Information > Register Via the Web.
C. Click Register at HP.com web site and follow the onscreen instructions.
D. Check for upgrades by selecting Support > Upgrade > Check My Configuration.
If there is a newer version of software available, download it now.
HP OpenView Network Node Manager version 6.0 \Ovw\WinNT setup.exe
for Windows NT
HP OpenView Network Node Manager version 6.0 for Unix \Ovw\HPUX_Sol install.sh
Manage X version 4.21 for Windows NT \ManageX\WinNT managex_inst_guide.pdf
Computer Associates Unicenter TNG Framework version 2.2 \Ca_frmwk\WinNT setup.exe
for Windows NT
Computer Associates Unicenter TNG Framework version 2.2 \Ca_frmwk\HPUX_Sol install.sh
for Unix
Network Management Platform Path to Program to Run
Integration Pack
 Loading...