

Page 1

Managing the HP NetStorage 6000 Using Telnet
Table of Contents
Accessing Telnet . . . . . . . . . . . . . . . . . . . . . . . . . . . . . . . . . . . . . . . . . . . . . . . . . . . . . . . . . . .2
Telnet Menu Basics . . . . . . . . . . . . . . . . . . . . . . . . . . . . . . . . . . . . . . . . . . . . . . . . . . . . . . . . .2
Key Descriptions . . . . . . . . . . . . . . . . . . . . . . . . . . . . . . . . . . . . . . . . . . . . . . . . . . . . . . . . . . . . . . .3
Viewing the Main Menu . . . . . . . . . . . . . . . . . . . . . . . . . . . . . . . . . . . . . . . . . . . . . . . . . . . . .3
Using Telnet to Set Up a Host Server Name . . . . . . . . . . . . . . . . . . . . . . . . . . . . . . . . . . . . .4
Using Telnet to Manage Basic Procedures Within the Server File System . . . . . . . . . . . .5
Configuring a New Disk Volume . . . . . . . . . . . . . . . . . . . . . . . . . . . . . . . . . . . . . . . . . . . . . . . . . . .5
Deleting a Disk Volume . . . . . . . . . . . . . . . . . . . . . . . . . . . . . . . . . . . . . . . . . . . . . . . . . . . . . . . . . .6
Using Telnet to Mange Additional Procedures Within the Server File System . . . . . . . .7
Viewing the Activity Monitor . . . . . . . . . . . . . . . . . . . . . . . . . . . . . . . . . . . . . . . . . . . . . . . . . . . . .7
Using Tape Backup . . . . . . . . . . . . . . . . . . . . . . . . . . . . . . . . . . . . . . . . . . . . . . . . . . . . . . . . .8
Creating and Maintaining Backup Jobs . . . . . . . . . . . . . . . . . . . . . . . . . . . . . . . . . . . . . . . . . . . . . .9
Scheduling Backup Jobs . . . . . . . . . . . . . . . . . . . . . . . . . . . . . . . . . . . . . . . . . . . . . . . . . . . . . . . . .10
Running Unscheduled Backup Jobs . . . . . . . . . . . . . . . . . . . . . . . . . . . . . . . . . . . . . . . . . . . . . . . .11
Running a Tape Restore . . . . . . . . . . . . . . . . . . . . . . . . . . . . . . . . . . . . . . . . . . . . . . . . . . . . . . . . .12
Viewing Backup and Restore Status . . . . . . . . . . . . . . . . . . . . . . . . . . . . . . . . . . . . . . . . . . . . . . . .13
Determining Tape Magazine Contents . . . . . . . . . . . . . . . . . . . . . . . . . . . . . . . . . . . . . . . . . . . . . .14
Other Local Backup Operations . . . . . . . . . . . . . . . . . . . . . . . . . . . . . . . . . . . . . . . . . . . . . . . . . . .15
Showing the Log . . . . . . . . . . . . . . . . . . . . . . . . . . . . . . . . . . . . . . . . . . . . . . . . . . . . . . . . . . . . . . .16
Using the Console . . . . . . . . . . . . . . . . . . . . . . . . . . . . . . . . . . . . . . . . . . . . . . . . . . . . . . . . .16
Locking the Console . . . . . . . . . . . . . . . . . . . . . . . . . . . . . . . . . . . . . . . . . . . . . . . . . . . . . . . . . . . .16
Unlocking the Console . . . . . . . . . . . . . . . . . . . . . . . . . . . . . . . . . . . . . . . . . . . . . . . . . . . . . . . . . . 16
Shutting Down the System . . . . . . . . . . . . . . . . . . . . . . . . . . . . . . . . . . . . . . . . . . . . . . . . . . . . . . .17
Setting the Time Zone, Time and Date . . . . . . . . . . . . . . . . . . . . . . . . . . . . . . . . . . . . . . . . . . . . . .18
Managing the Disks and Volumes . . . . . . . . . . . . . . . . . . . . . . . . . . . . . . . . . . . . . . . . . . . .19
Removing the Disk Partitions . . . . . . . . . . . . . . . . . . . . . . . . . . . . . . . . . . . . . . . . . . . . . . . . . . . . .19
Verifying a Volume . . . . . . . . . . . . . . . . . . . . . . . . . . . . . . . . . . . . . . . . . . . . . . . . . . . . . . . .2 0
General SFS Volume Information . . . . . . . . . . . . . . . . . . . . . . . . . . . . . . . . . . . . . . . . . . . . . . . . .20
Renaming a Disk Partition . . . . . . . . . . . . . . . . . . . . . . . . . . . . . . . . . . . . . . . . . . . . . . . . . .20
Turning Quotas On and Off . . . . . . . . . . . . . . . . . . . . . . . . . . . . . . . . . . . . . . . . . . . . . . . . .20
Adding an Extension Segment . . . . . . . . . . . . . . . . . . . . . . . . . . . . . . . . . . . . . . . . . . . . . . .21
Attaching a Journal Segment . . . . . . . . . . . . . . . . . . . . . . . . . . . . . . . . . . . . . . . . . . . . . . . .22
Accessing Checkpoint Settings . . . . . . . . . . . . . . . . . . . . . . . . . . . . . . . . . . . . . . . . . . . . . . . . . . . .23
Maintaining Users . . . . . . . . . . . . . . . . . . . . . . . . . . . . . . . . . . . . . . . . . . . . . . . . . . . . . . . . .24
Adding a User . . . . . . . . . . . . . . . . . . . . . . . . . . . . . . . . . . . . . . . . . . . . . . . . . . . . . . . . . . . . . . . . .24
Deleting a User . . . . . . . . . . . . . . . . . . . . . . . . . . . . . . . . . . . . . . . . . . . . . . . . . . . . . . . . . . . . . . . .25
Editing a User . . . . . . . . . . . . . . . . . . . . . . . . . . . . . . . . . . . . . . . . . . . . . . . . . . . . . . . . . . . . . . . . . 25
Modifying a Host . . . . . . . . . . . . . . . . . . . . . . . . . . . . . . . . . . . . . . . . . . . . . . . . . . . . . . . . . .26
Adding a Host . . . . . . . . . . . . . . . . . . . . . . . . . . . . . . . . . . . . . . . . . . . . . . . . . . . . . . . . . . . . . . . . .26
Deleting a Host . . . . . . . . . . . . . . . . . . . . . . . . . . . . . . . . . . . . . . . . . . . . . . . . . . . . . . . . . . . . . . . .26
Editing a Host . . . . . . . . . . . . . . . . . . . . . . . . . . . . . . . . . . . . . . . . . . . . . . . . . . . . . . . . . . . . . . . . . 26
i
Page 2

Contents
Using Remote Services . . . . . . . . . . . . . . . . . . . . . . . . . . . . . . . . . . . . . . . . . . . . . . . . . . . . .27
Editing NIS Information . . . . . . . . . . . . . . . . . . . . . . . . . . . . . . . . . . . . . . . . . . . . . . . . . . . . . . . . .27
Viewing and Modifying Admin . . . . . . . . . . . . . . . . . . . . . . . . . . . . . . . . . . . . . . . . . . . . . .28
Using the Access Control Screens . . . . . . . . . . . . . . . . . . . . . . . . . . . . . . . . . . . . . . . . . . . .29
Managing Volume Access . . . . . . . . . . . . . . . . . . . . . . . . . . . . . . . . . . . . . . . . . . . . . . . . . . . . . . .29
Using the Trusted Hosts . . . . . . . . . . . . . . . . . . . . . . . . . . . . . . . . . . . . . . . . . . . . . . . . . . . . . . . . .29
Adding a Trusted Host . . . . . . . . . . . . . . . . . . . . . . . . . . . . . . . . . . . . . . . . . . . . . . . . . . . . . . . . . .30
Deleting a Trusted Host . . . . . . . . . . . . . . . . . . . . . . . . . . . . . . . . . . . . . . . . . . . . . . . . . . . . . . . . .31
SMB/CIFS Setup . . . . . . . . . . . . . . . . . . . . . . . . . . . . . . . . . . . . . . . . . . . . . . . . . . . . . . . . . .32
SMB/CIFS Shares . . . . . . . . . . . . . . . . . . . . . . . . . . . . . . . . . . . . . . . . . . . . . . . . . . . . . . . . .33
Configuring E-mail . . . . . . . . . . . . . . . . . . . . . . . . . . . . . . . . . . . . . . . . . . . . . . . . . . . . . . . .34
Commands . . . . . . . . . . . . . . . . . . . . . . . . . . . . . . . . . . . . . . . . . . . . . . . . . . . . . . . . . . . . . . .35
ii
Page 3

0DQDJLQJWKH
+31HW6WRUDJH
8VLQJ7HOQHW
elnet is the alte rnative method for mana ging the HP NetStor age 6000 on your network . To
T
use Telnet, you need an ANSI-compatible terminal emulator.
1
Page 4
Managing the HP NetStorage 6000 Using Telnet
Accessing Telnet
To access Telnet, you need an ANSI-compatible terminal emulator.
1. From the Start menu displayed on your desktop taskbar, select Run.
2. In the Run window, use the drop-down arrow to select Telnet.
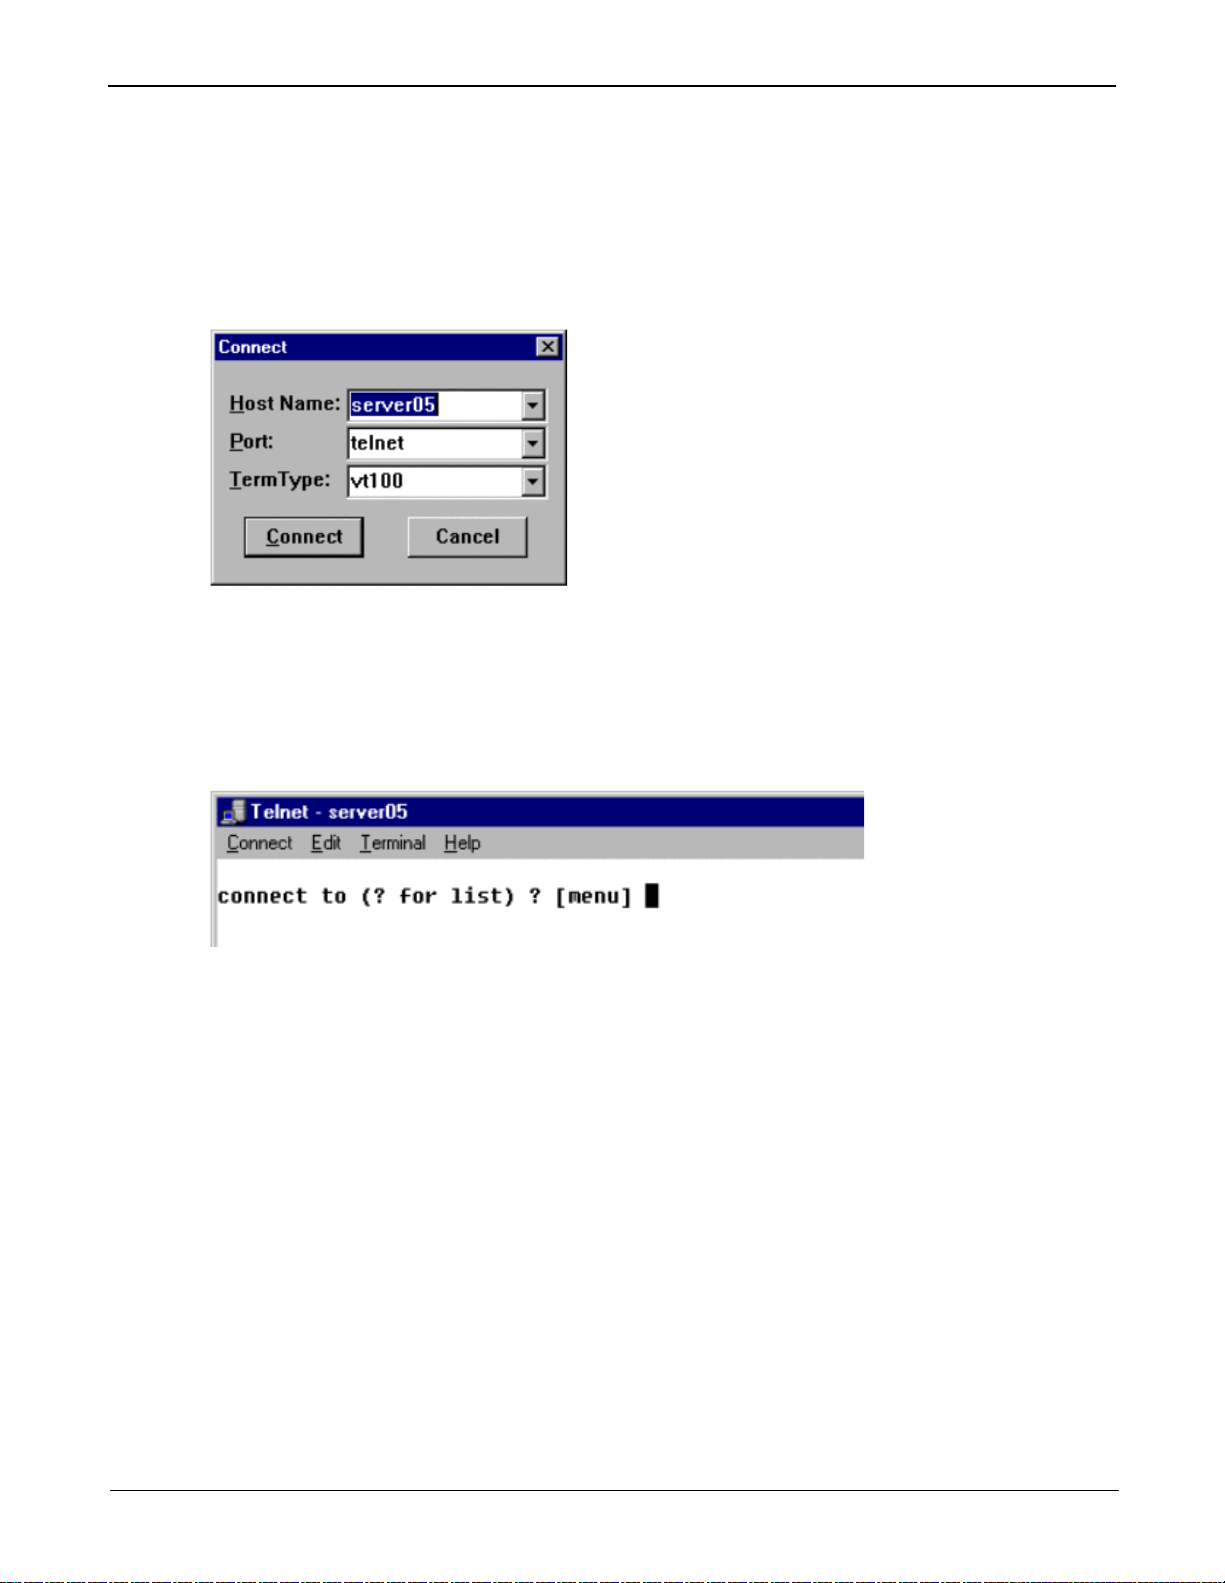
3. From the Connect menu, select Remote System. The following appears:
4. In Host Name, enter the server name. For example, Server 1.
5. In Port, select telnet.
6. Click Connect. If the administration access is password protected, you are asked for the password.
7. Once connected, the telnet screen displays the following prompt:
8. Press Enter (default).
Telnet Menu Basics
This section describes each Telnet screen used for setting up and maintaining your system. Here are a few
basic guidelines for using Telnet:
• To select a menu, press the number or letter associated with the item.
For example, press 1 to select 1. Activity Monitor screen.
• The box at the bottom of every screen displays the tasks you can perform and which letter you need to
select to execute the action.
•Press Enter to view the default menu. If admin acce ss is passwor d protecte d, you will be prompted for the
password before the menu.
•Use the sp ace bar to scroll through a list.
• A box containing menu options displays on the bottom of each screen.
2
Page 5
Managing the HP NetStorage 6000 Using Telnet
Key Descriptions
The following keys are used to edit screen fields:
Backspace, Delete, Ctrl+H Deletes the previous character
Ctrl+U Deletes the entire field
Enter, Ctrl+M, Ctrl+J, Ctrl+I, Tab Entry is complete and the cursor proceeds to the next field
Esc Exits the screen with no change
If you do not want to change a field value, press Enter and the cursor skips over the field without changing
the information.
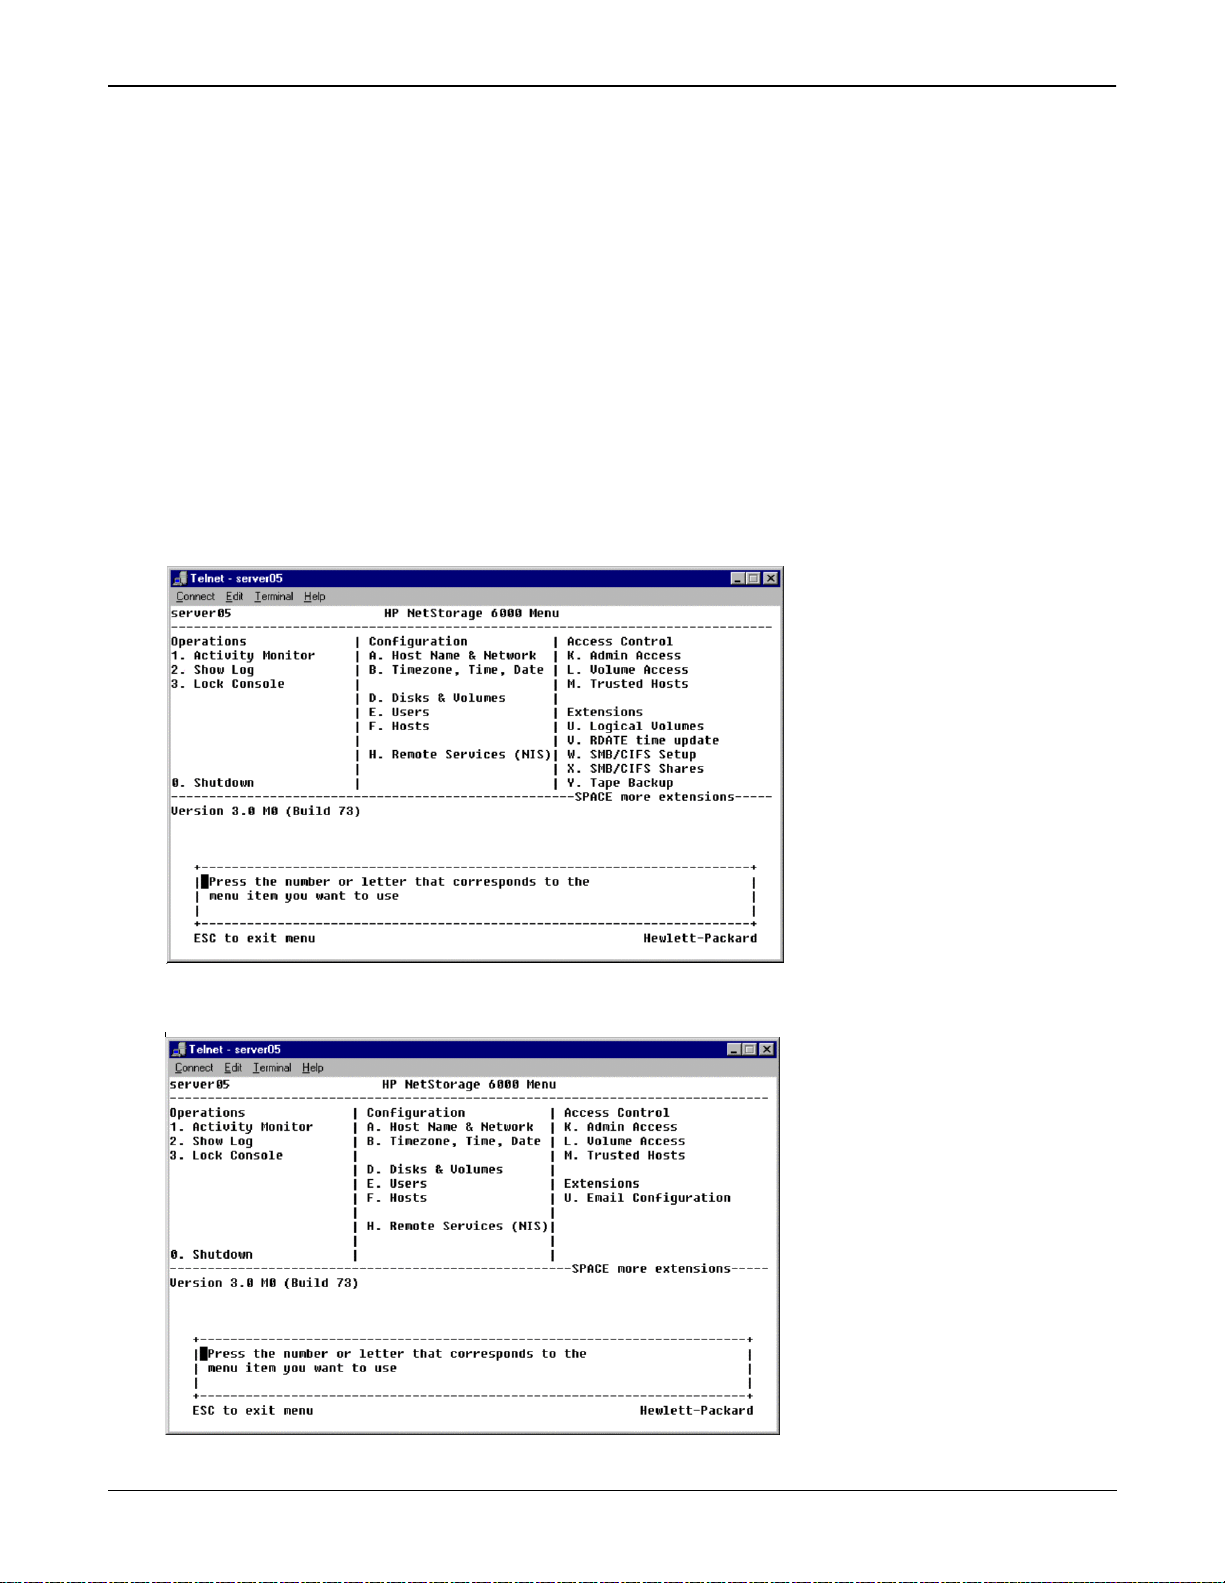
Viewing the Main Menu
The main menu is divided into four categories: Operations, Configuration, Access Control, and Extensions.
Select the category by pressing the corresponding letter or number. The following appears:
Click the space bar to view more options under the Extension list.
3
Page 6
Managing the HP NetStorage 6000 Using Telnet
The Main Menu consists of the following sections:
• Operations Press any number to perform the corresponding server operation.
• Configurations Press any letter to perform the corresponding server configuration com-
mand.
• Access Control Press any letter to set up access to the corresponding menu items.
• Extensions Press any letter to select the corresponding extension. U se the space bar
to scroll through the extension list.
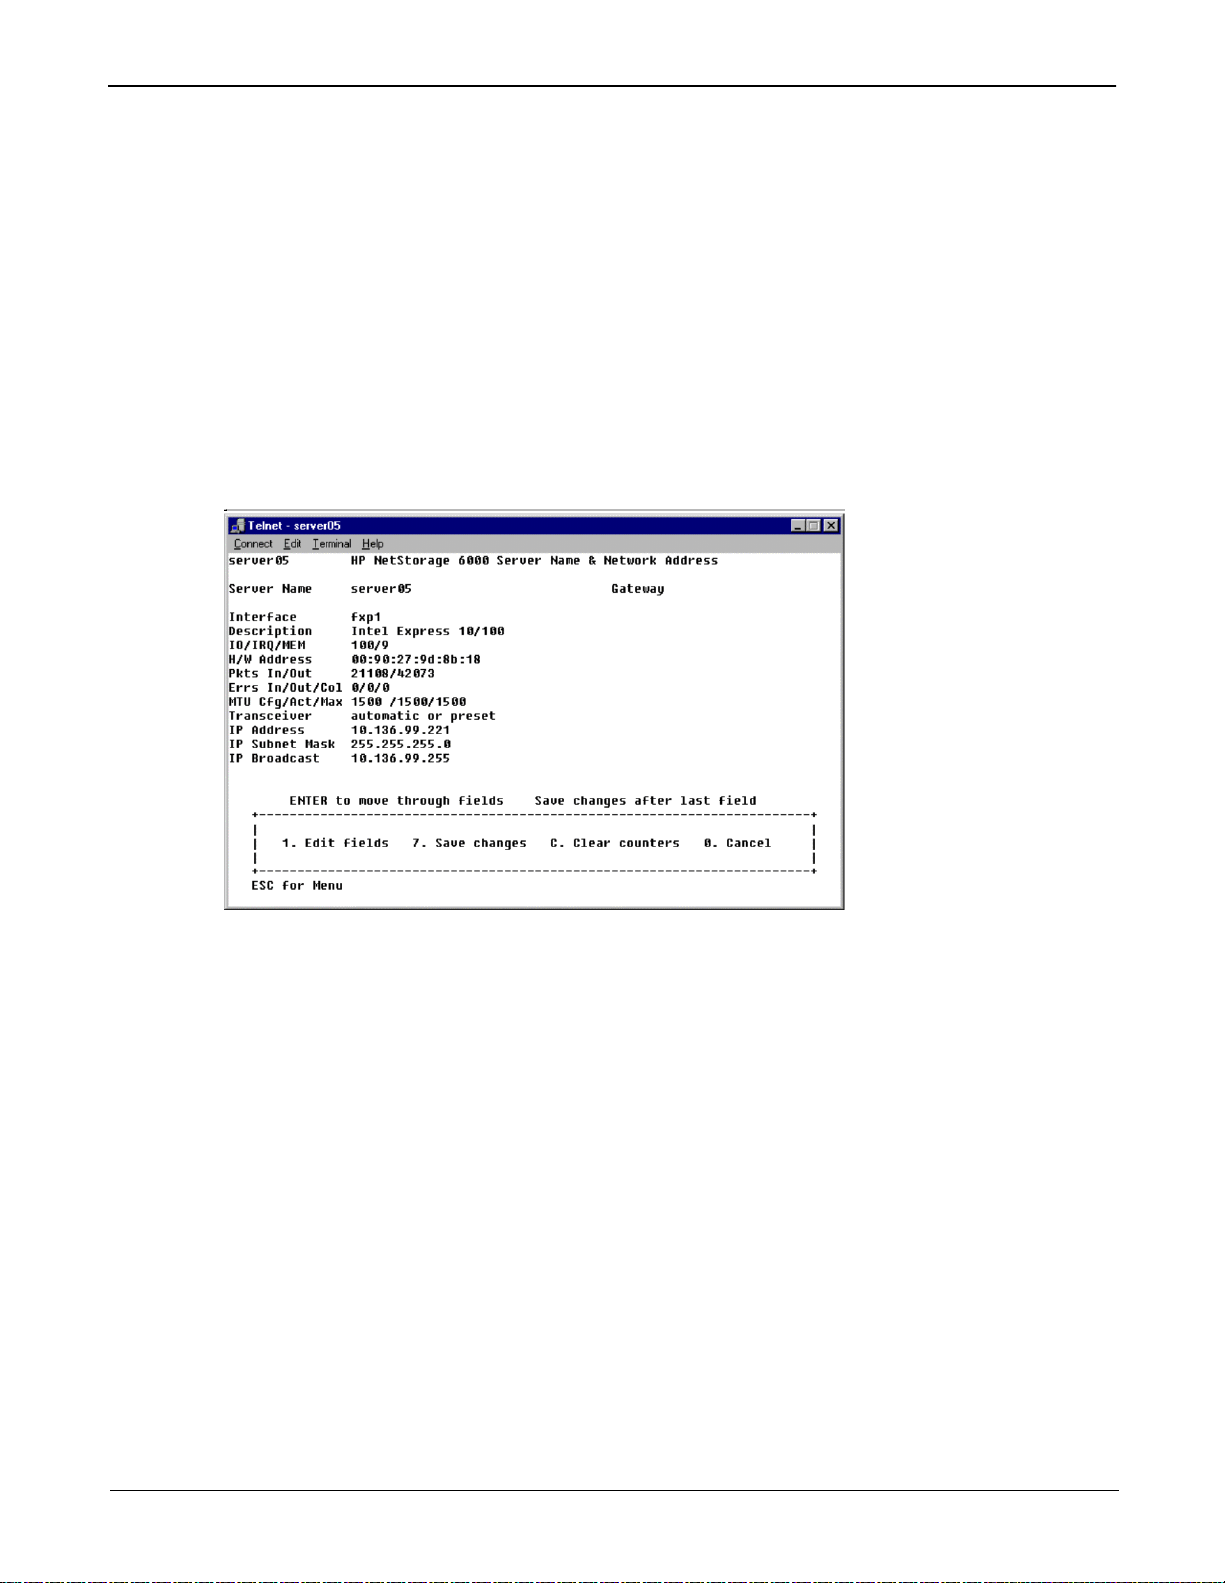
Using Telnet to Set Up a Host Server Name
To setup host server name, IP address, and the transmit rate:
1. From the Configuration Menu, select A. Host Name & Network. The following appears:
2. Select 1. Edit fields
3. Enter server host name, press Enter.
4. Enter the Maximum Transfer Unit (MTU). Press Enter for default.
5. Select the transceiver type, press Enter.
6. Enter the server IP address, press Enter.
7. Enter the network IP Subnet Mask, press Enter.
8. Enter the network IP Bro adca st number, press Enter
9. Enter the network IP Gateway, press Enter.
10. Select 7. Save changes.
4
Page 7

Managing the HP NetStorage 6000 Using Telnet
Using Telnet to Manage Basic Procedures Within the Server File
System
There are several procedures available through Telnet that allows you to manage the Server File System
(SFS) volumes. The most common are:
• Configuring a new disk volume
• Deleting a disk volume
• Creating and deleting sfsext partitions
• Combining an extended disk partition with an sfs partition
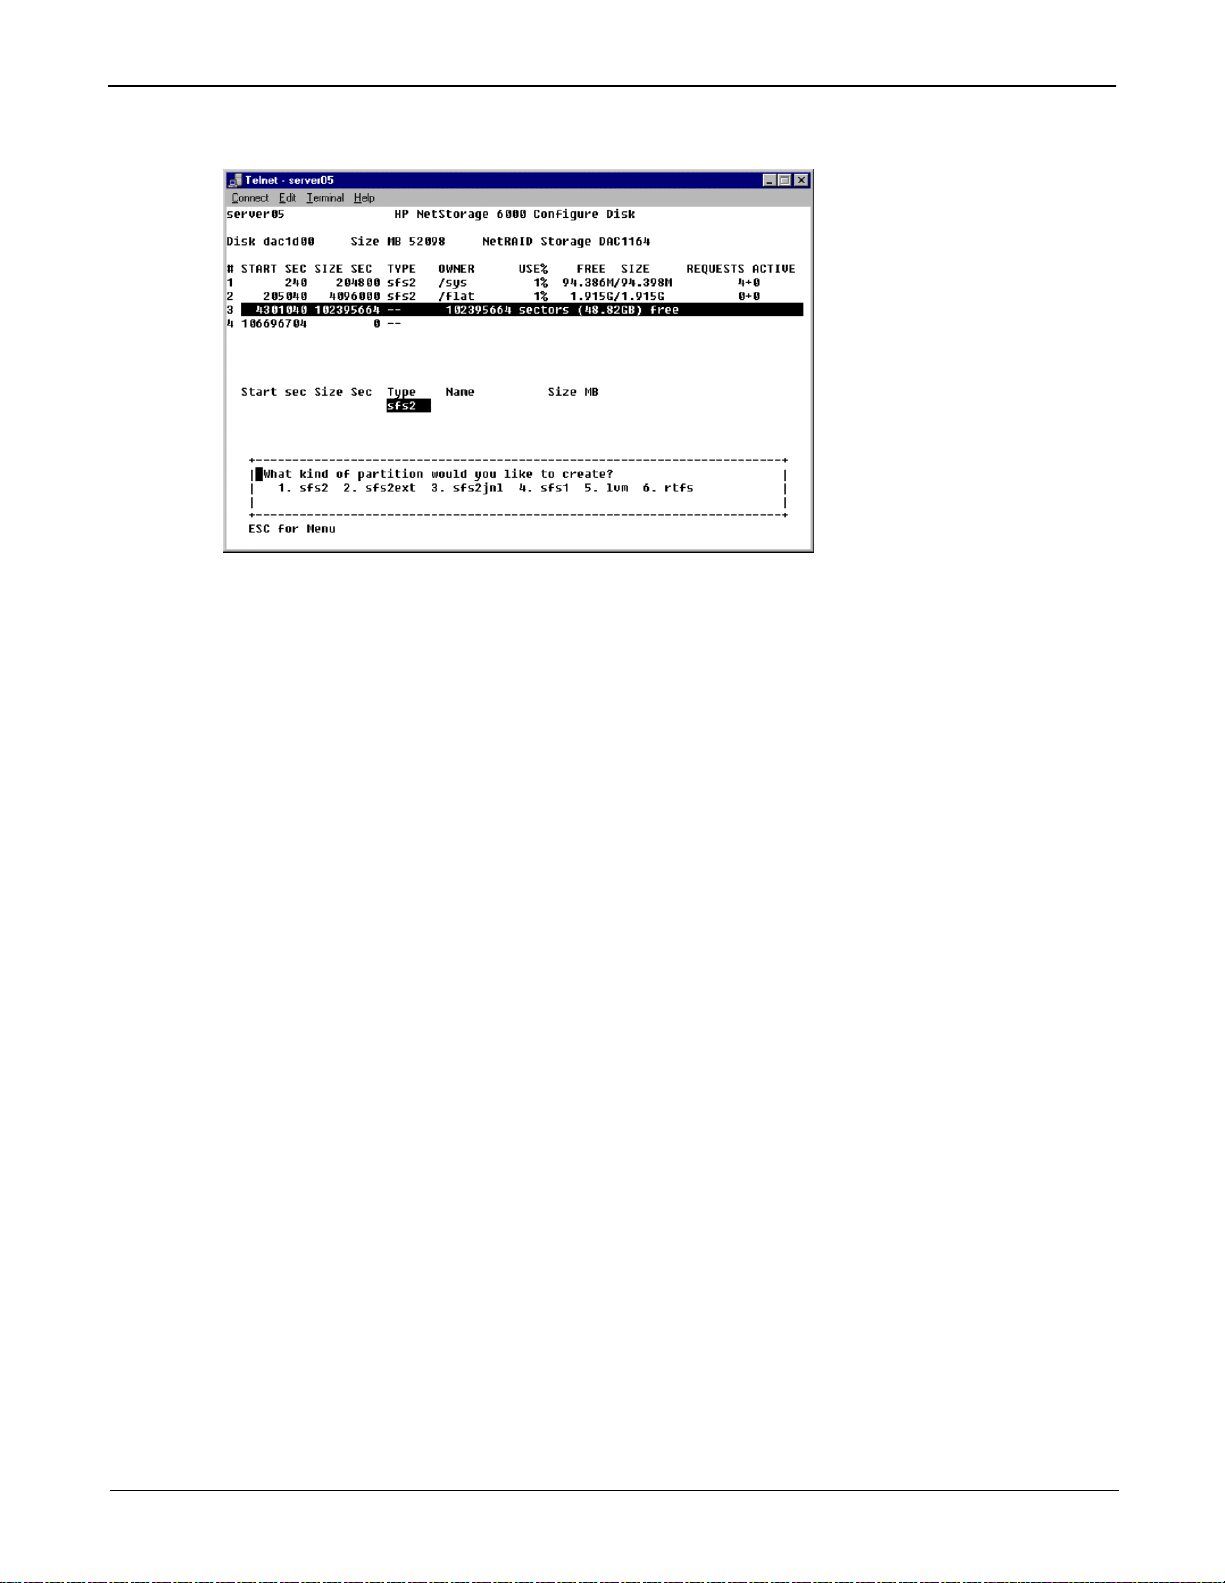
Configuring a New Disk Vo lume
To configure a new disk volume:
1. From the Configuration menu, select D. Disks & Volumes. The following appears:
2. Select the letter next to the drive you want to configure. The following appears:
5
Page 8
Managing the HP NetStorage 6000 Using Telnet
3. Select Create & init partition. The following appears:
4. Select the partition type for the drive.
5. Press Enter to except the default, for example, sfs2, sfs2ext, sfs2jnl, sfs1, or lvm.
6. Enter the disk volume label and press Enter.
7. Enter the disk volume size and press Enter or press Enter for the defaul t size.
8. Select 7. Proceed with create.
Wait for the message
Disk menu.
9. When finished, press Esc until your are back at the main menu.
Initialization OK and Mount OK and press Esc to return to the Con figure
Deleting a Disk Volume
To delete a disk volume:
1. From the Configuration menu, select D. Disks & Volumes.
2. Select the letter next to the drive you want to reconfig ure.
3. Select 1. Change/Delete <the volume label name>.
4. Select 8. Delete.
5. Enter the disk volume name and press Enter.
6. Select 7. Proceed with delete .
Wait for the message
menu.
Delete OK and Delpart OK and press Esc to return to the Configure Disk
7. Press Esc until your are back at the main menu.
6
Page 9

Managing the HP NetStorage 6000 Using Telnet
Using Telnet to Mange Additional Procedures Within the Server
File System
Viewing the Activity Monitor
The activity screen continuously reports the status of your server. From the main menu, choose 1. Activity
Screen.
The Activity Monitor lists th e following info rmation:
• Volume Displays the first 22 file volumes.
• Use% Displays the amount of space used on the volume.
• Reqs Displays the number of requests processed for the volume in the last 10 seconds.
• Device Displays the name of the device.
• Load Displays the percentage of CPU load.
• Peak Displays the highest usage per second in the last 10 minutes.
• Client Displays name or address of the user.
• Reqs Displays the number of requests processed for the volume in the last 10 seconds.
Press Esc to return to the ma in menu.
7
Page 10
Managing the HP NetStorage 6000 Using Telnet
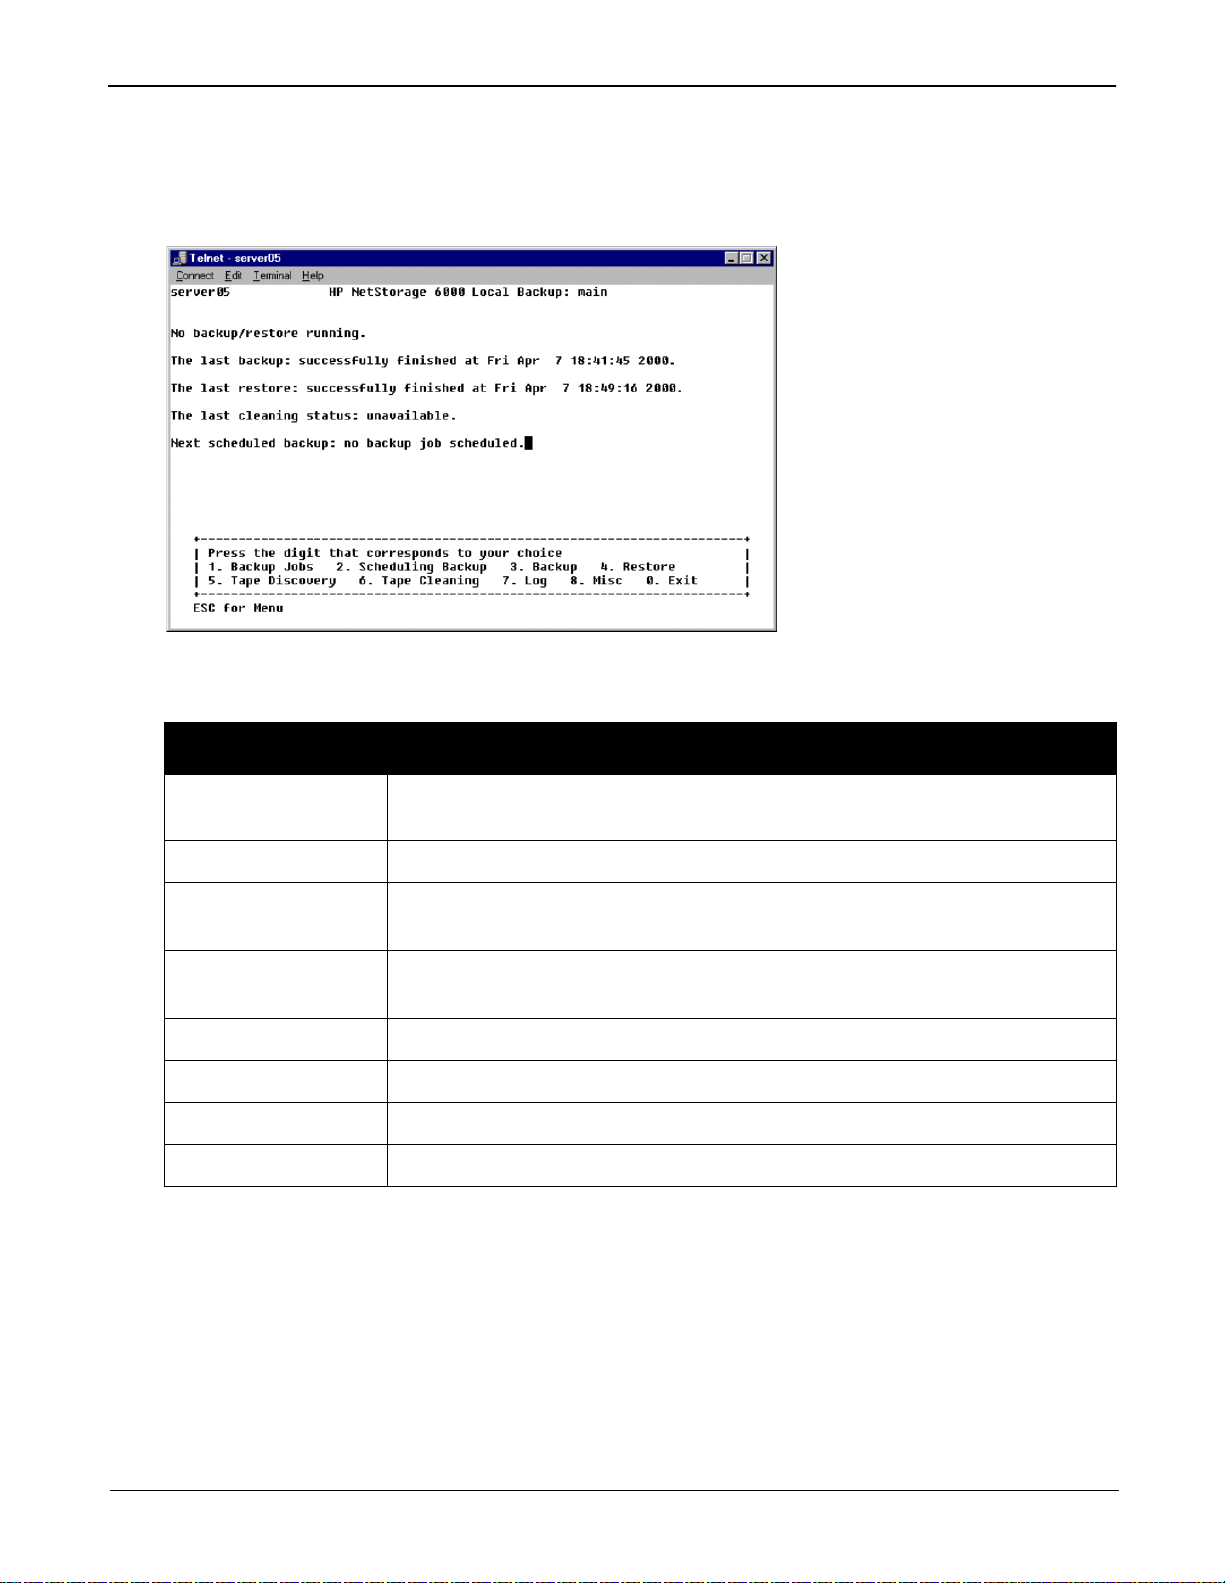
Using Tape Backup
The Tape Backup screens control local tape backup, restore, scheduling, and status options. From the main
menu, press Y. Tape Backup to display the following:
Select the number corresponding to the task you are performing:
Number Task
1. Backup Jobs Specify the data to backup a nd how back ups are to be performe d by crea ting and e diti ng
backup jobs.
2. Scheduling Backup Determine which day of the week backup jobs will be executed.
3. Backup Start a backup job immediately (witho ut schedulin g) or monitor the sta tus of previ ous and
current backups.
4. Restore Begin restoring data from a backup tape or monitor the status of previous and current
restores.
5. Tape Discovery Examine and access general information from tapes currently in the tape magazine.
6. Tape Cleaning Reserve slots in the magazine for cleaning tapes and track time from last cleaning.
7. Log View the log of recent tape related events.
8. Misc Alter serial numbers used on tapes and how long tapes are protected from overwrite.
8
Page 11
Managing the HP NetStorage 6000 Using Telnet
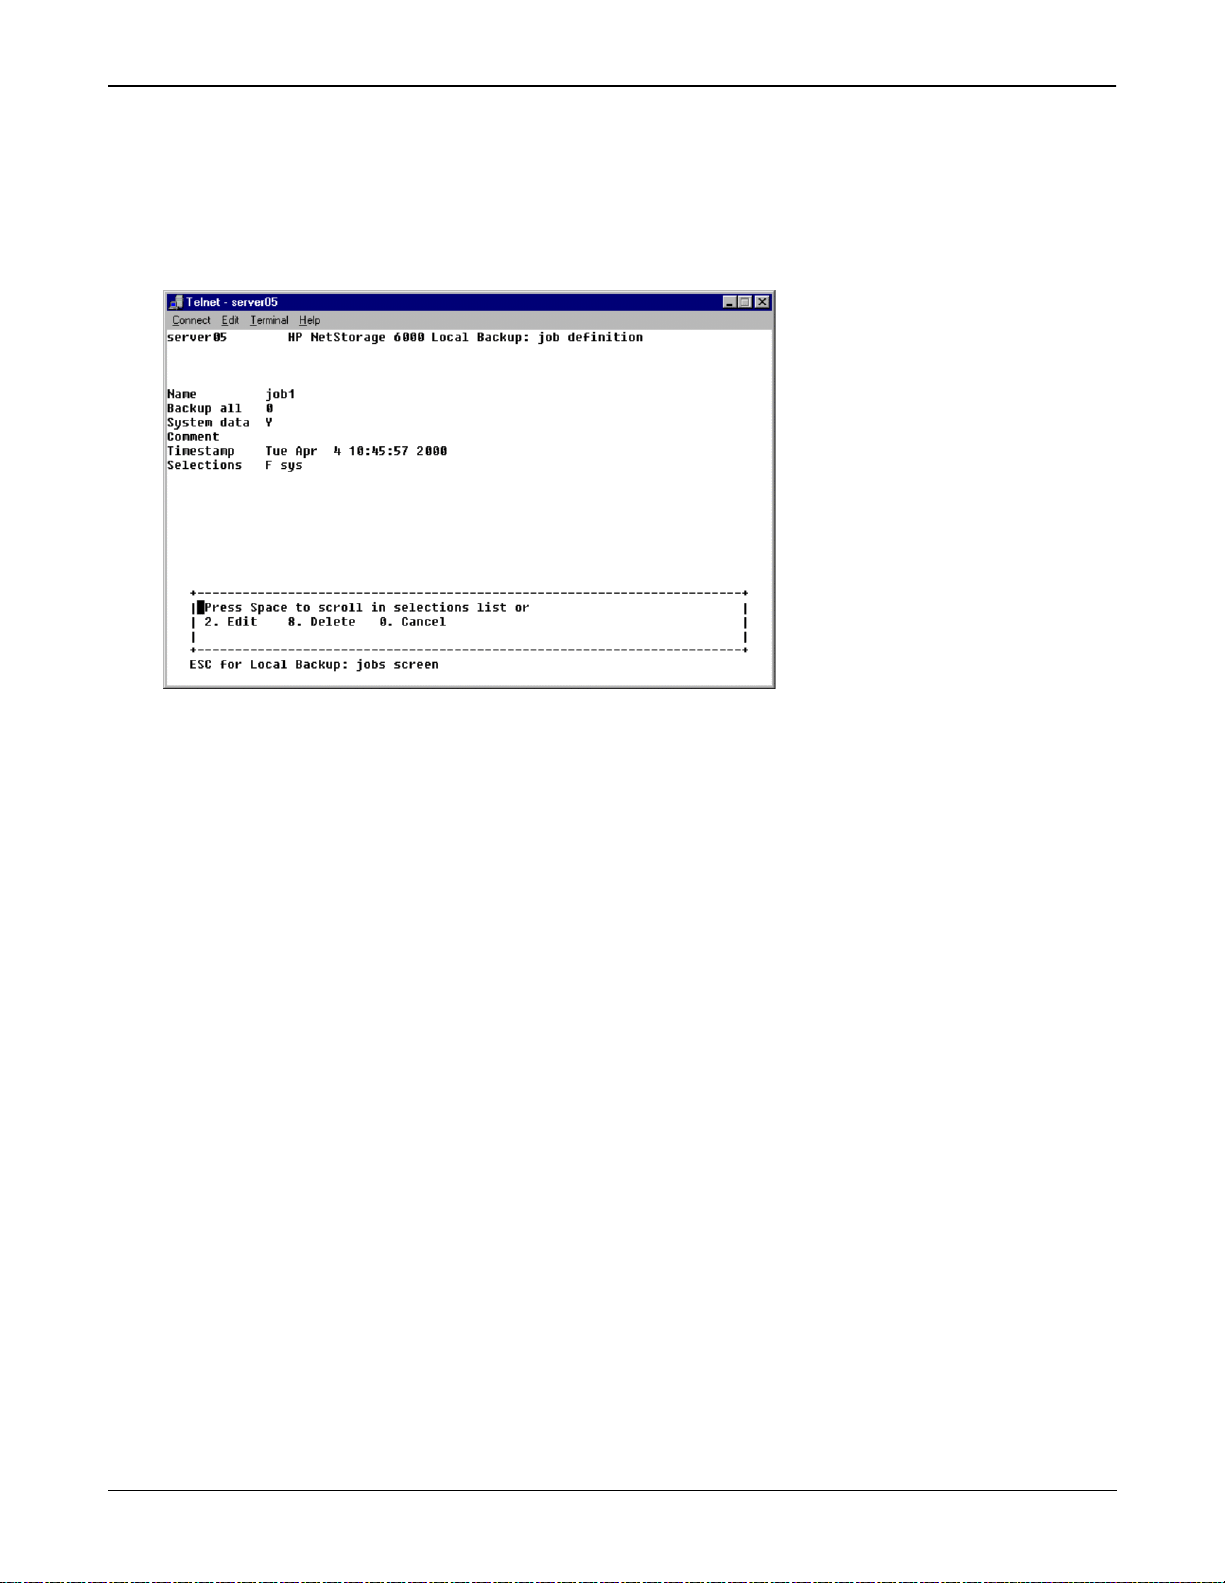
Creating and Maintaining Backup Jobs
A backup job describes what and how data is to be backed up when the job is run. From the Tape Backup
main menu, select 1. Backup Jobs, the n either choose t he lett er of the job you wish t o edit or ente r 1. Add to
create a new job. If you’ve picked an existing job, you may enter 2. Edit to alter the job parame ters or
8. Delete to delete the job from the data base.
To add or edit parameters for a backup job:
1. Enter the name of the job.
2. Enter the Backup all setting. If set to anything but zero, your entire system will be backed up. If you
wish to backup the entire system, indicate how the backup will be performed using the following
codes:
• F: A full backup of all data, regardless of modification and last backup information.
• D: A differential backup only of data changed since the last full backup, as determined by the
archive bit on each object.
• A: A full backup without the archive bit being reset.
• I: An incremental backup of the data changed since either the last incremental or last full
backup.
3. Enter Y or N to backup special system data for disaster recovery.
4. If desired, enter a comment annotating all executions of this job.
5. Enter one or more directories to be backed up. If you enter the root directory of a volume, the entire
volume will be backed up. For each entry, use the following codes to indicate how the backup will be
performed:
• F: A full backup of all data, regardless of modification and last backup information.
• D: A differential backup only of data changed since the last full backup, as determined by the
archive bit on each object.
• A: A full backup without the archive bit being reset.
• I: An incremental backup of the data chan ged si nce ei ther the l ast i ncrement al or last ful l back up.
9
Page 12
Managing the HP NetStorage 6000 Using Telnet
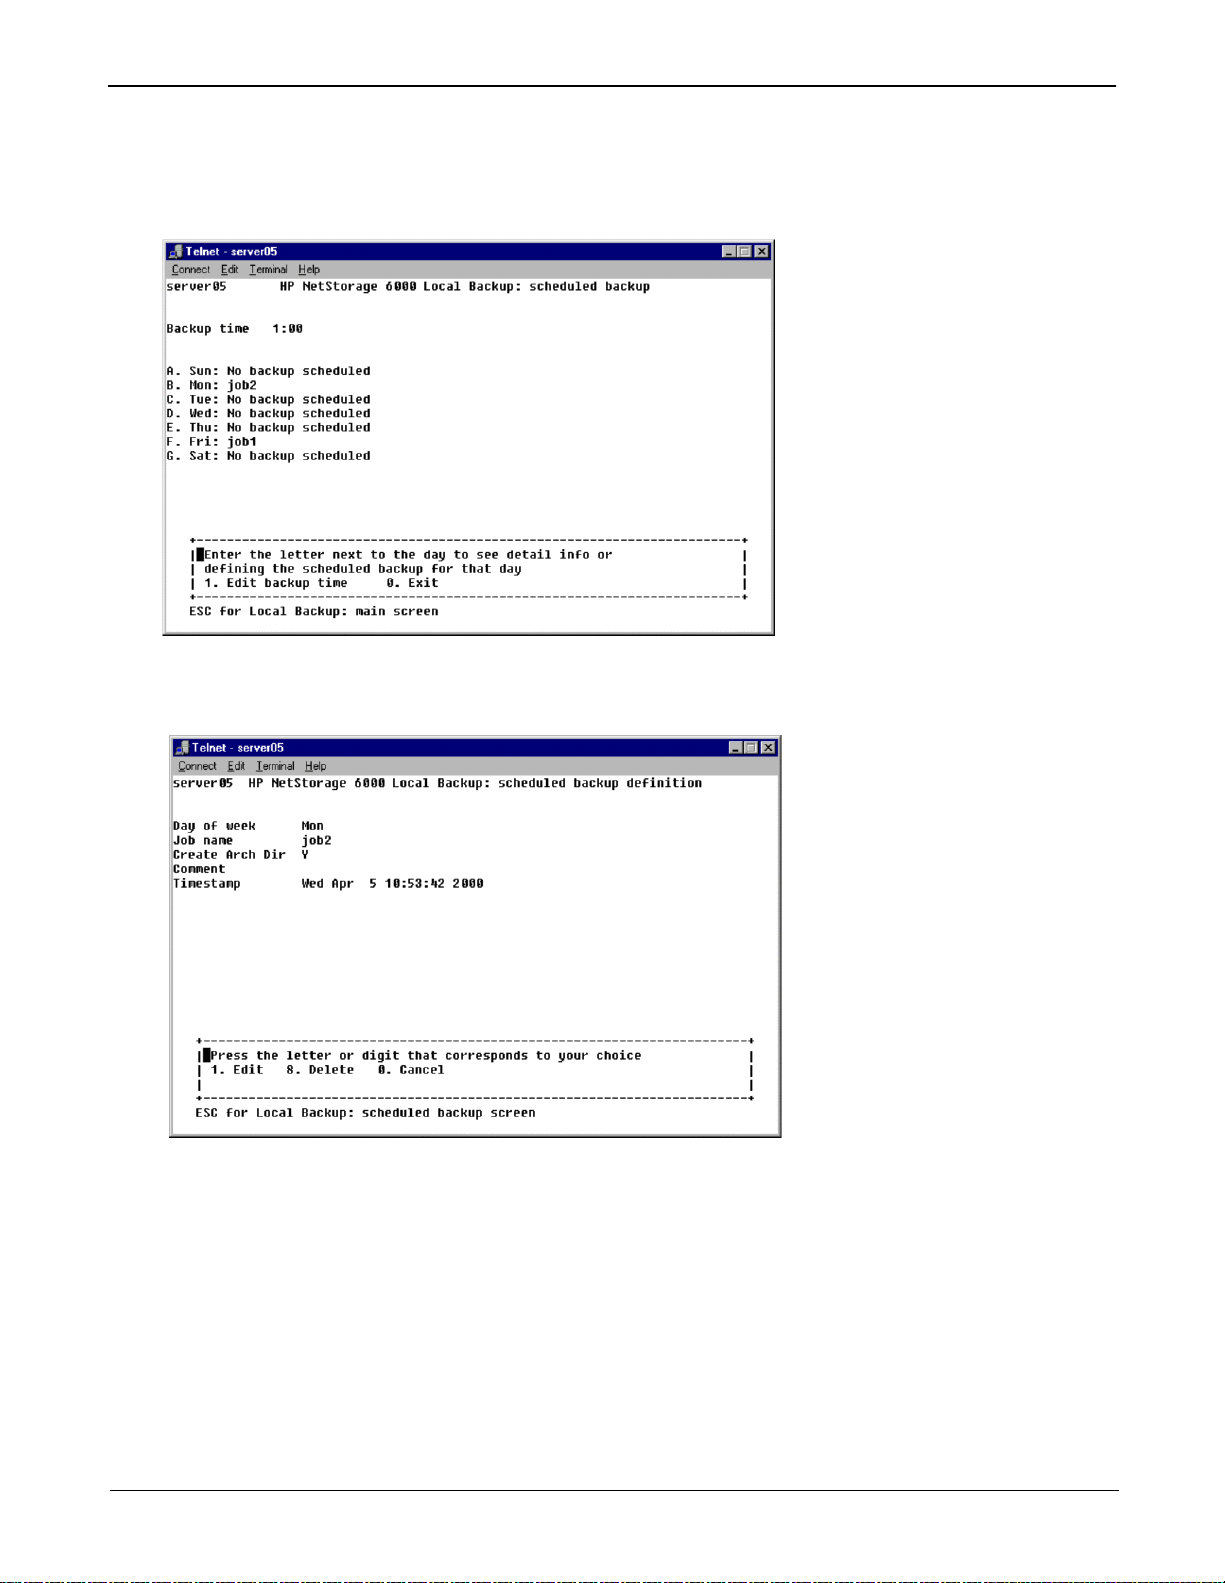
Scheduling Backup Jobs
From the Tape Backup main menu, select 2. Scheduling Backup to run backup jobs automatically on set
days of the week.
Enter the letter corresponding to the day of the week you wish to edit, or enter 1. Edit backup time to alter
the time of day scheduled jobs are executed.
Once you have selected a day of the week, you can either enter 1. Edit to change the job scheduled for that
day or enter 8. Delete to clear activity scheduled for that day. To edit the schedule for a day:
1. Enter the name of an existing job.
10
2. Enter Y in Create Arch Dir if you want a list of all files and directories backed up to be included on
the tape along with the data. The archive directory speeds up searches for files and directories in a
restore.
3. If desired, enter a comment to be included on the tape whenever the backup is executed.
Page 13
Managing the HP NetStorage 6000 Using Telnet
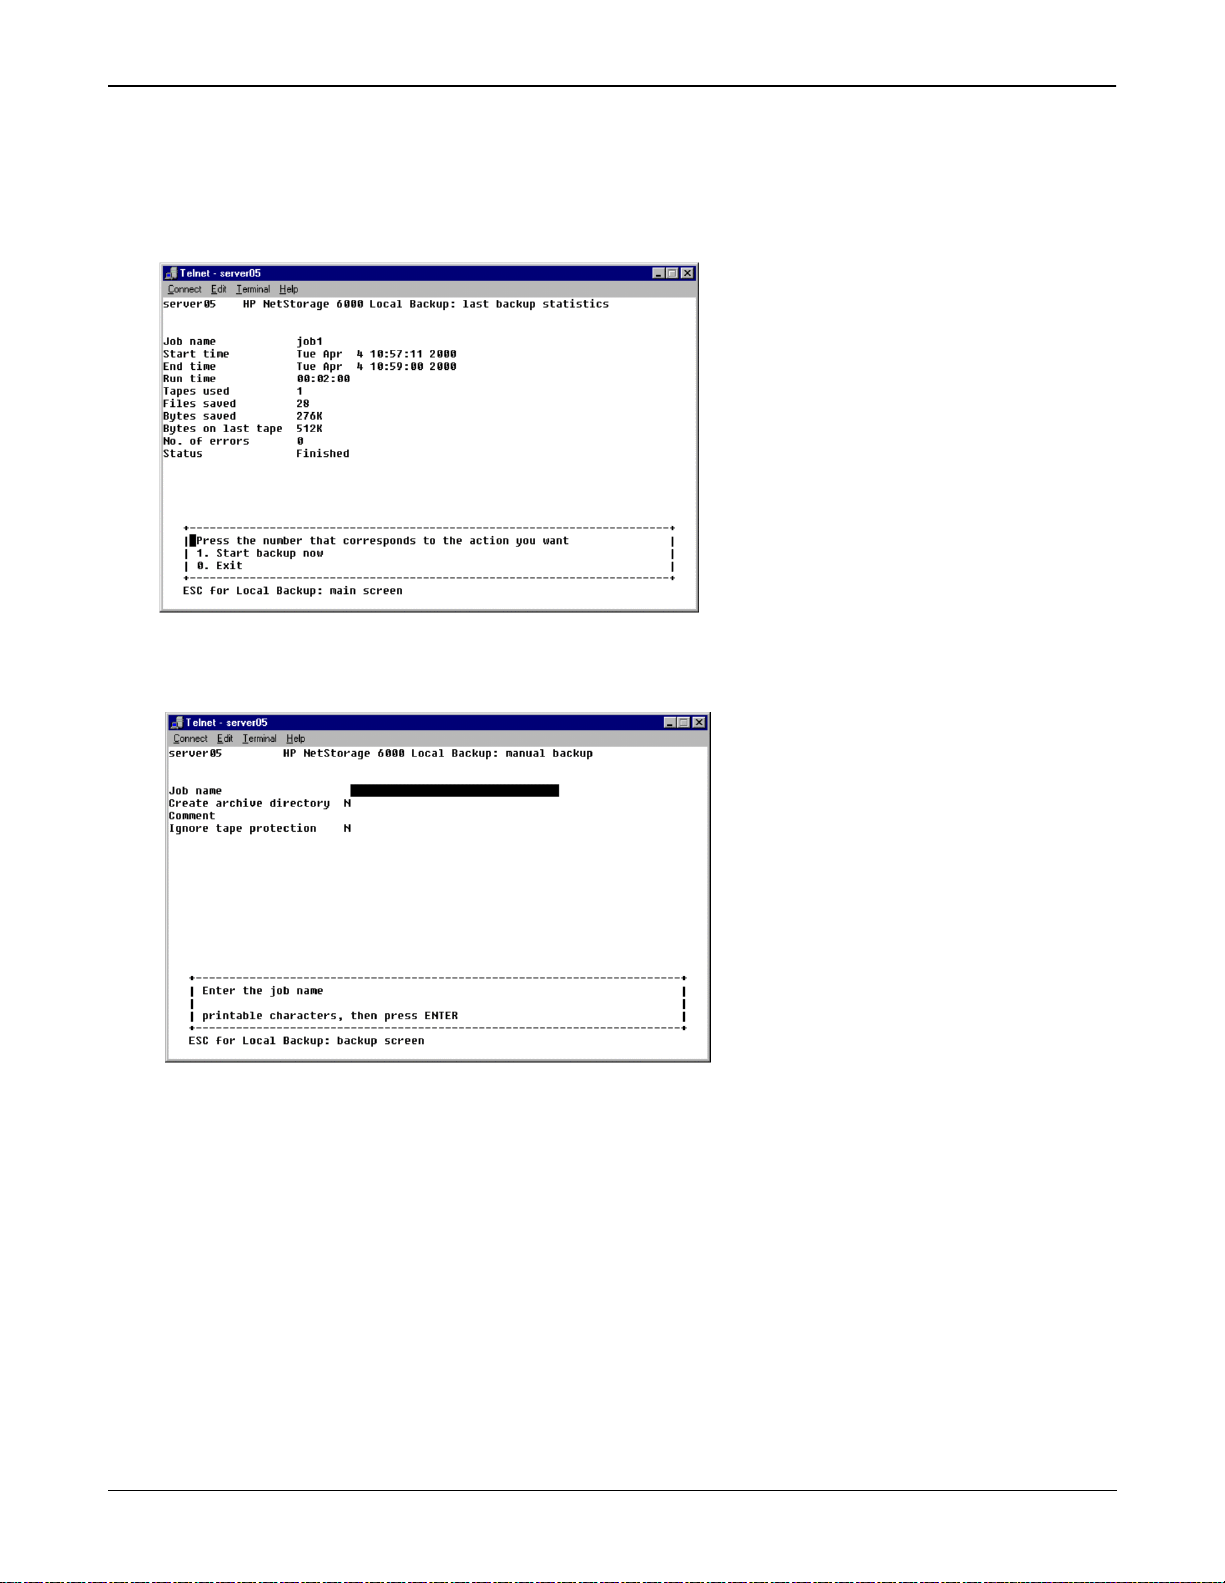
Running Unscheduled Backup Jobs
From the Tape Backup main menu, select 3. Backup to run a backup job manually. A screen showing the
status of the last backup job run or the current backup activity displays. Enter 1. Start backup now to begin
execution of a backup job.
A screen showing the status of the last backup job run or of current backup activity displays. Enter 1. Start
backup now to begin execution of a backup job.
To begin execution of a backup job:
1. Enter the name of an existi ng job to run.
2. Enter Y in Create Arch Dir if you want a list of all files and directories backed up to be included on
the tape along with the data. The archive directory speeds up searches for files and directories in a
restore.
3. If desired, enter a comment to be included on the tape when the backup is executed.
4. Enter Y for Ignore tape protection if you wish the backup to overwrite tapes regardless of how
recently they were written.
5. Enter 1. Edit fields to alter any settings or enter 7. Start backup to begin the specified backup job
immediately.
11
Page 14
Managing the HP NetStorage 6000 Using Telnet
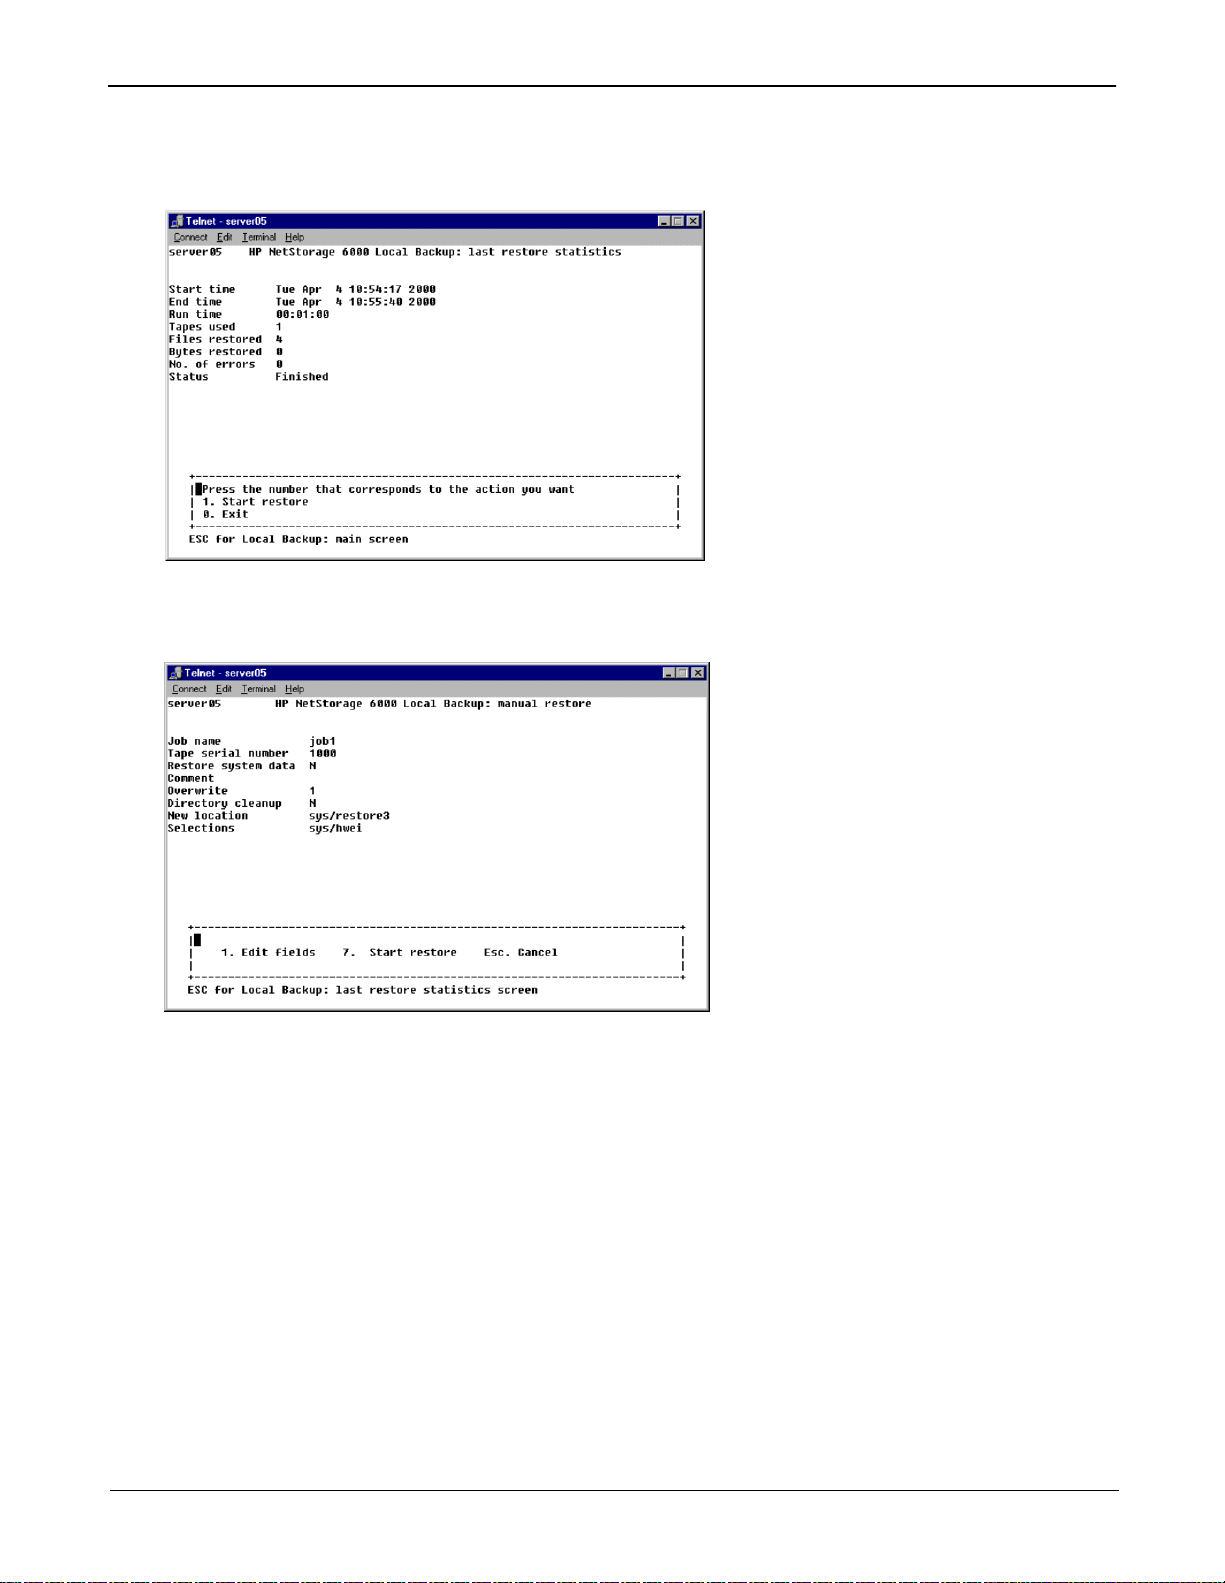
Running a Tape Restore
From the Tape Backup main menu, select 4. Restore to restore data from a tape.
A screen showing the status of the last restore run or the current restore activity displays. Enter 1. Start
restore to begin restoring data from tape.
Data needed to begin a restore can be obtained by using the Tape Discovery options. To begin a restore:
1. Enter the job name found on the tape you are restoring from.
2. Enter the serial number of the tape you are restoring data from.
3. Enter N for Restore system data unless you are recovering from a system disaster. Restoring system
data should only be done in emergency situations and can have severe consequences for existing data.
4. If you desire, you may annotate the restore operation with a comment.
5. Specify an overwrite policy to resolve conflicts between data being restored from tape and data
currently on the disk.
• 0: No Overwrite specifies t hat tape data w ill never overw rite existing disk data.
• 1: Normal Overwrite.
• 2: Force Overwrite always overwrites disk data with restored tape data.
12
Page 15
Managing the HP NetStorage 6000 Using Telnet
6. Enter Y for Directory cleanup if you wish to delete files on disk that did not exist at the time the
backup was performed.
7. If you wish to restore data from tape to a location on disk other than where it came from, specify the
directory in New location.
8. Enter one or more directories on tape to restore.
9. Enter 1. Edit fields to make further changes to your choice or enter 7. Start restore to begin the
restore.
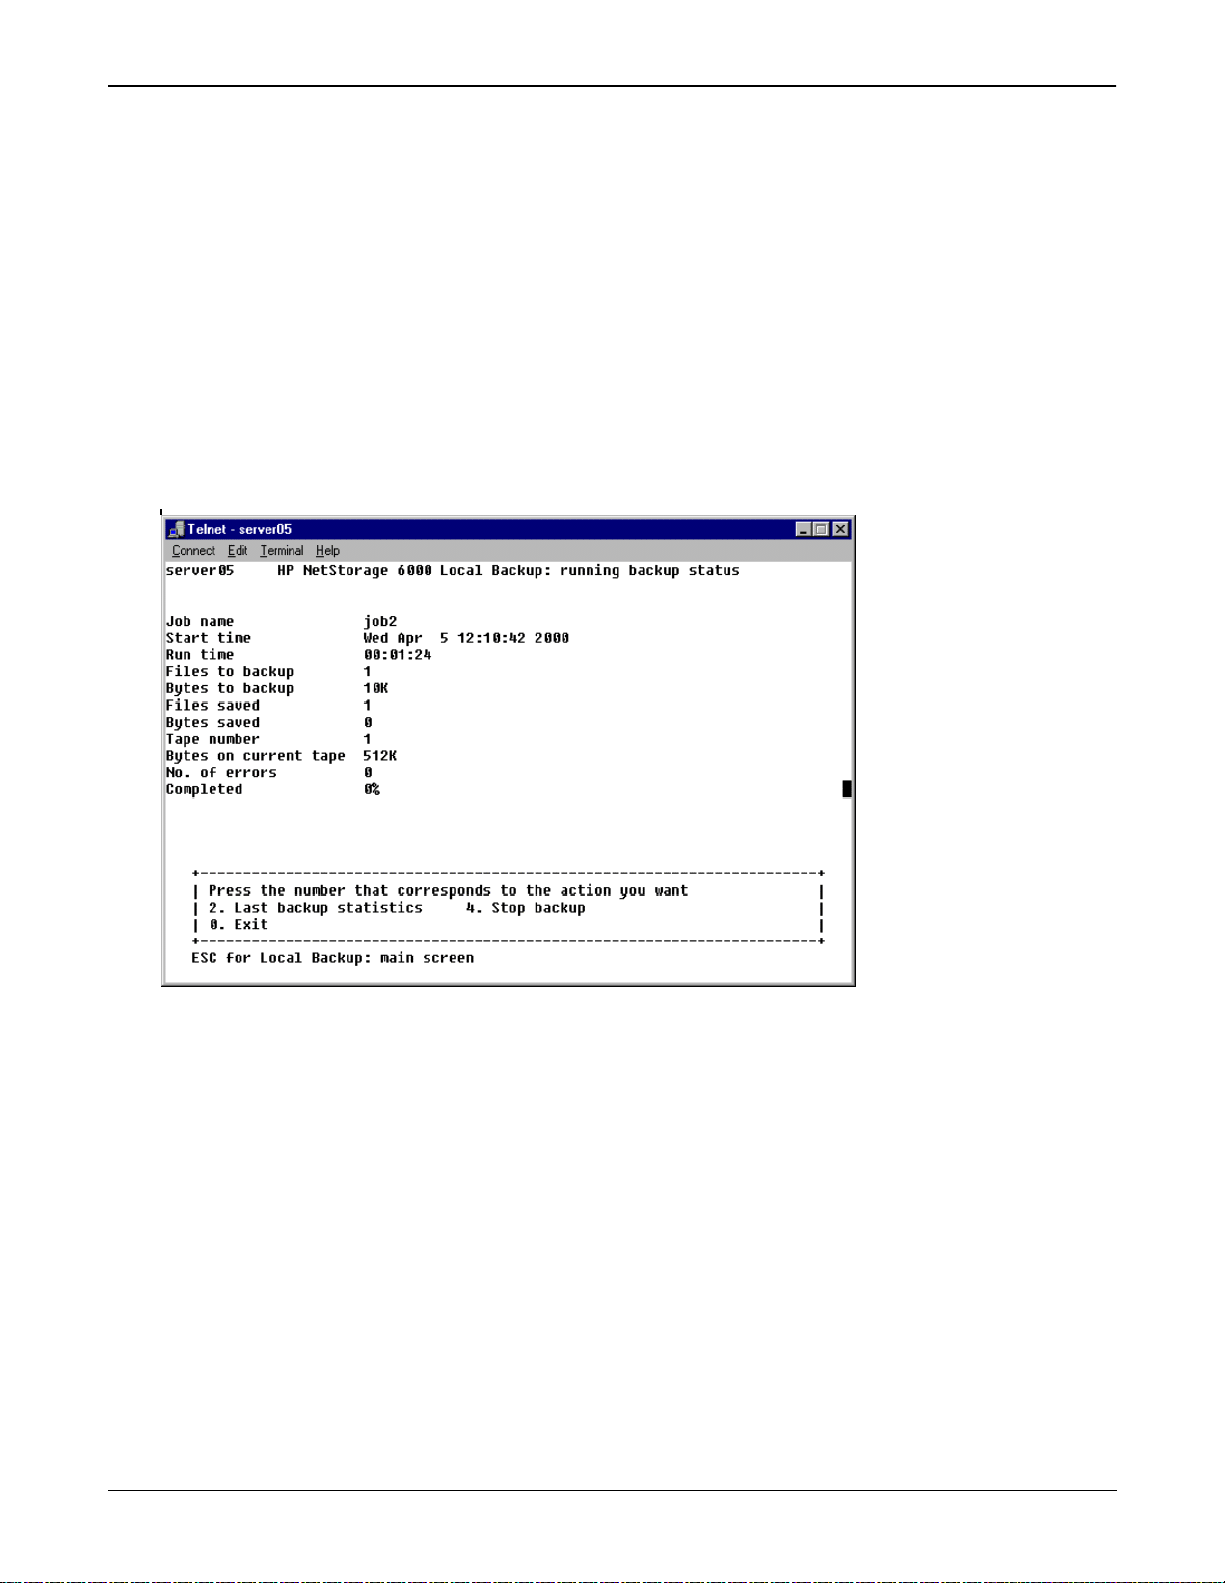
Viewing Backup and Restore Status
Enter 7. Log to see the log of all tape related events. Enter 3. Backup to see the status of the last backup or
4. Restore to see the status of the last restore. If a backup or restore is running, the status of the current
activity displays.
If a job is running, enter 2. Last backup statistics or 2. Last restore statistics to view statistics of the last
completed job. Enter 4. Stop backup or 4. Stop restore to terminate the curren t activity.
13
Page 16
Managing the HP NetStorage 6000 Using Telnet
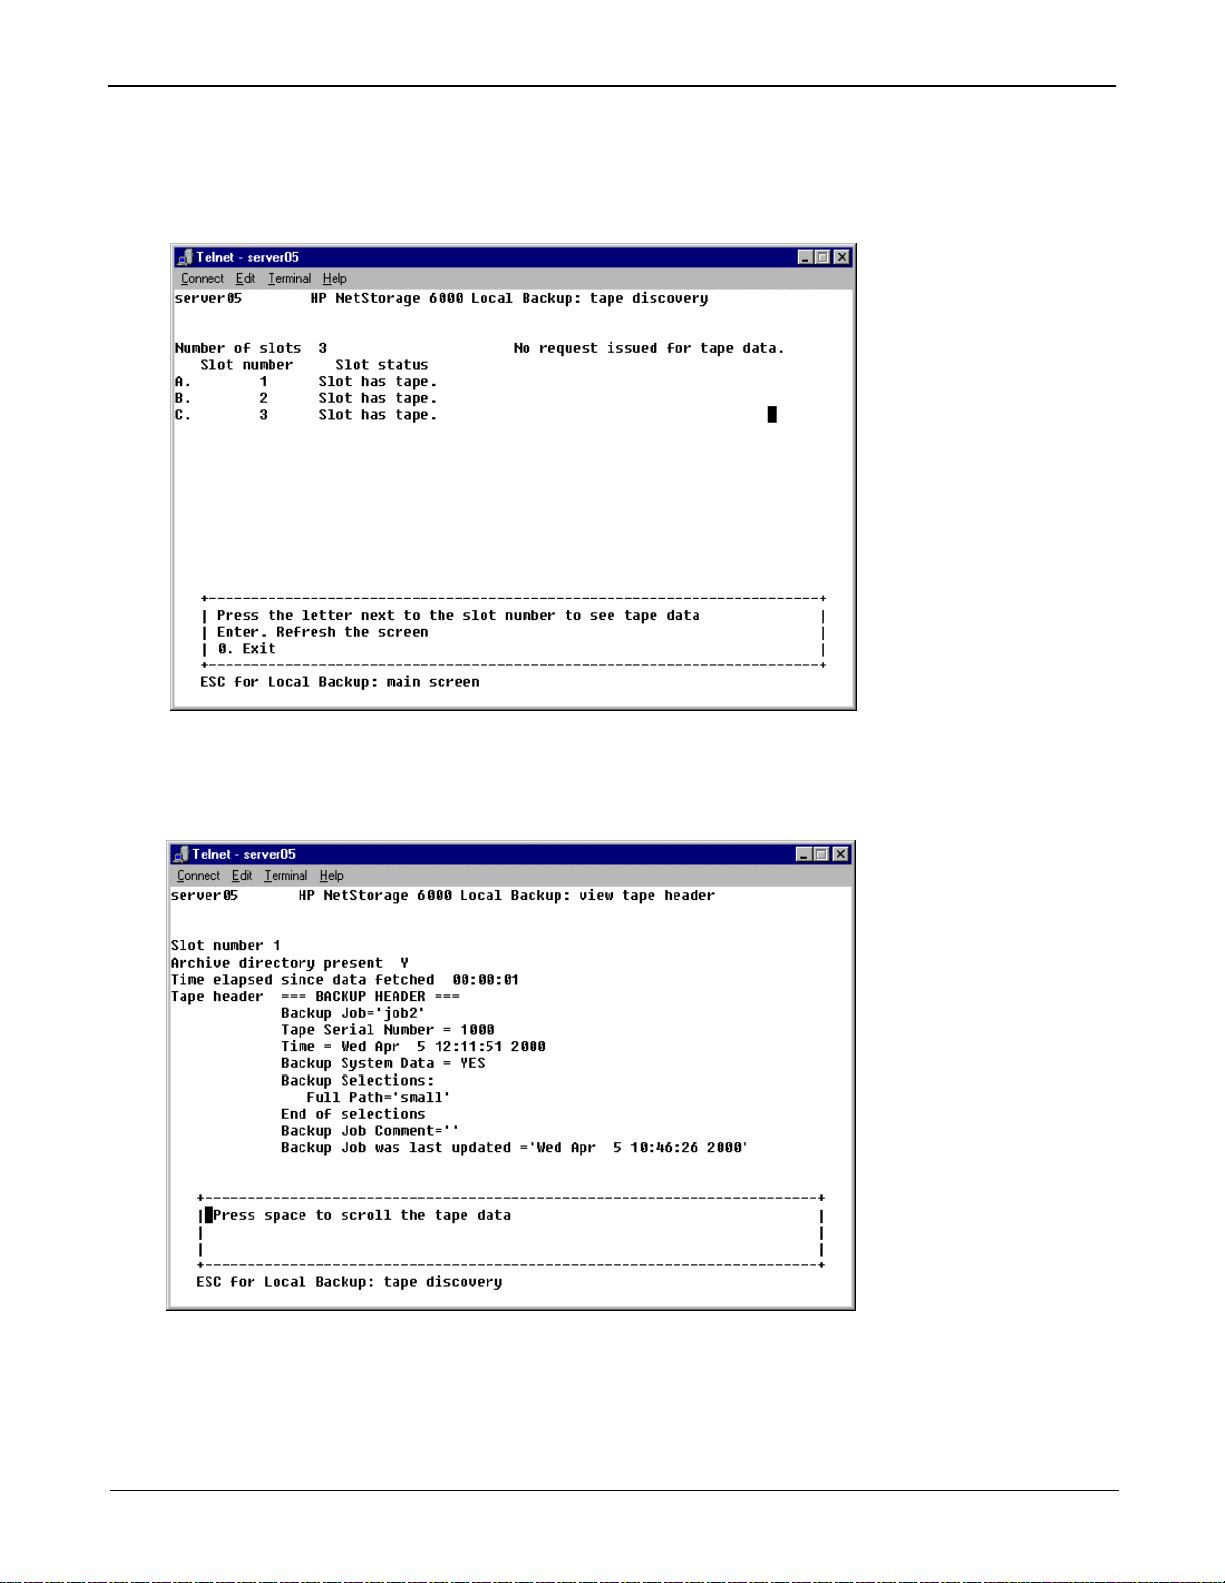
Determining Tape Magazine Contents
From the Tape Backup main menu, select 5. Tape Discovery to read header and label information from the
tapes currently loaded into the magazine.
Enter the letter corresponding to the tape slot you wish to query. A Data is not ready message disp lays until
the tape drive reads tape header and label information. When the query is complete, a screen displays the
contents of the slot queried.
The tape header information indicates the various job and run settings selected when the backup was
performed.
14
Page 17

Managing the HP NetStorage 6000 Using Telnet
Other Local Backup Operations
From the Tape Backup main menu, select 6. Tape Cleaning to access tape cleaning functions.
Enter 1. Define cl eani ng sl ot to reserve a slot in the magazine for cleaning tapes. This slot will be skipped in
all backup and restore ope rations. If a cleaning slot has been specified, you may enter 4. Start tape cleaning
to begin a cleaning operation on the drive. Enter 2. Change tape cleaning counter to alter the count of how
many times the drive has been cleaned.
From the Tape Backup main menu, you may also enter 8. Misc to access additional local backup functions.
Enter a new Tape serial number to change the numbering scheme for tapes found in the drive. The Tape
protection number is the number of days after a tape has been written that it will be protected from
overwrite by future backup operations.
15
Page 18

Managing the HP NetStorage 6000 Using Telnet
Showing th e Log
Use the Show Log screen to display the most recent log entries. From the main menu, select 2. Show Log.
The following screen displays:
Two types of log entries display:
• System Startup Log Entries Reports device configurations, volumes and other pertinent
information.
• Normal Operation Log Entries Reports device errors, security violations and other routing status
information. The release number and software serial number is listed
last.
Using the Console
Use the Lock Console menu option to disable or enable most of the main menu options, preventing
unauthorized use of the console.
Note You must have an administrative password set, in order for the Lock Console function to be
effective.
Locking the Console
1. From the ma in menu, select 3. Lock Console.
2. Enter the administrative password.
3. Select Y.
Unlocking the Console
1. From the ma in menu, select Unlock Console.
2. Enter the administrative password.
3. Select Y.
16
Page 19

Managing the HP NetStorage 6000 Using Telnet
Shutting Down the System
The HP NetStorage 6000 is designed for continuous operation. In the event a system shutdown or reboot
becomes necessary, follow the procedure below.
To shut down the system:
1. From the ma in menu, select 0. Shutdown. The following appears:
2. From the Shutdown menu, select R. Reboot to reboot the system or select H. Shutdown to turn the
system off.
All services stop, all delay wr ite to dis ks are comp leted and t he system is re-booted or turned of f, based
on what yo u selected.
17
Page 20

Managing the HP NetStorage 6000 Using Telnet
Setting the Time Zone, Time and Date
Use the Timezone, Time Date menu option to change time zone, time, and date set on the HP NetStorage
6000. The real-time clock on the motherboard keeps track of local time.
To set up time parameters:
1. From the ma in menu, select B.Timezone, Time, Date. The following appears:
2. Select the appropriate timezone, then press Enter.
3. Select daylight savings time Y or N.
4. Type the new date, then press Enter. The format is month-day-year:
1001997 equals October 1, 1997
5. Type the current time, then press Enter. The format is military standard:
1300 equals 1:00 p.m.
6. Select 7. Save changes.
Note The HP NetStorage 6000 ser ver is a lso capa ble of automatically updatin g it s cl ock from an RDATE
server. From the main menu, enter V. RDate time update to specify an RDATE server.
18
Page 21

Managing the HP NetStorage 6000 Using Telnet
Managing the Disks and Volumes
View this screen to inspect the status of a disk drive and to manage the Server File System (SFS) volumes.
You have to manage DOS volumes (partitions) from DOS using the fdisk and format commands.
Removing the Disk Partitions
To remove the disk partitions:
1. From the ma in menu, select D. Disks & Volumes. The following appears:
2. Enter the letter next to the drive you are configuring. The following screen displays:
3. Select Change/delete corresponding to the disk you are removing the partition from.
4. Select Z. Zap Partition.
5. Select 7. Proceed with Zap.
19
Page 22

Managing the HP NetStorage 6000 Using Telnet
Verifying a Volume
When you verify a Server File Sys tem (SFS) v olume, impor tant data on t he disk is examin ed for c onsist ency.
Inconsistencies are reported and you are given the option to make repairs.
Note Before you proceed, make sure you want to remove the partition. You cannot undo this action.
1. From the ma in menu, select D. Disks & Volumes.
2. Type the letter corresponding to the volume you are verifying.
3. Select Change/delete corresponding to the SFS volume you are verifying.
4. Select 2. Check.
General SFS Volume Information
If you decide to make repairs to the inconsistent SFS volumes, certain rules are followed, attempting to return
the volume to a reasonable state. Some files or file contents may be lost during the repair process. We
recommend you backup the entire volume before attempting repairs.
Inconsistencies in an SFS volume usually indicate a problem with a hardware component. Most often the
problem is faulty memory, controllers and/or disks. If you find an SFS volume with inconsistencies, be sure
to inspect your hardware, following the procedures in the hardware manual included in your package.
If you have no SFS volume on the dri ve an d the re is r oom for one , you have the option to create one. If there
is an SFS volume, menu items appe ar on t he bo tt om of t he screen to check, rename, or d el ete th e vol ume. To
re-initialize an SFS volume on the drive, delete it, then recreate it.
Renaming a Disk Partition
To rename a partition:
1. From the ma in menu, select D. Disks & Volumes.
2. Type the letter next to the drive you are renaming.
3. Select 1.Change/delete.
4. Select 3.Rename.
5. Enter the new name of the partition and press Enter.
The disk partition has been renamed.
Turning Quotas On and Off
Quotas track and li mit t he amount of d isk sp ace ea ch user and gro up uses . The q uota t racki ng fun ction ca n be
turned on and off.
1. From the ma in menu, select D. Disks & Volumes.
20
2. Type the letter next to the drive you are renaming.
3. Select 1.Change/delete/ext.
4. Select 4.Quotas on/off.
5. Select 1.Turn quotas on or 8.Turn quotas off.
Page 23

Adding an Extension Segment
1. From the ma in menu, select D. Disks & Volumes.
2. Type the letter corresponding to the drive you are configuring.
3. Select 1. Change/delete. The following appears:
Managing the HP NetStorage 6000 Using Telnet
4. Select 5. Segments. The following appears:
5. Select 1. Add an extension segment.
21
Page 24

Managing the HP NetStorage 6000 Using Telnet
Attaching a Journal Segment
1. From the ma in menu, select D. Disks & Volumes.
2. Type the letter corresponding to the drive you are configuring.
3. Select 1. Change/delete (the number for this option varies). The following appears:
4. Select 5. Segments. The following appears:
5. Select 5. Segments.
22
6. Select 2. Attach a journal segment.
Page 25

Managing the HP NetStorage 6000 Using Telnet
Accessing Checkpoint Settings
1. Type the letter of a drive containing the volume you wish to view.
2. Drives can have mult iple v olume s conf igured on them. Se lect the numbe r of t he Change/delete option
corresponding to the volume you wish to edit.
3. Enter 6. Checkpoints.
The checkpoints screen shows the basic chec kpoint set tings for this volume. The botto m of the display shows
the automatic checkpoint schedules that have been enabled. The top of the display shows the various flags
controlling checkpoint operation and policy. Enter 1. Edit to alter these flags. Enter 3. Analys is to obtain
detailed data on checkpoint settings and the ? Help option for a detailed discussion of the meaning of these
settings and of checkpoints in general.
23
Page 26

Managing the HP NetStorage 6000 Using Telnet
Maintaining Users
Accessing the system through Telnet allows you to modify user information. From the main menu, select
E. Users to add, delete, and edit users.
Note We do not recommend creating a new user home directo ry. User home directories should be limited
to System Administrato rs.
Adding a User
1. From the ma in menu, select E. Users. The following screen displays:
24
2. Type the new user name, then press Enter.
3. Type the user identifying number (UID), then press Enter.
4. Type the user group number (GID), then press Enter.
5. Type the user ’s full name, then press Enter.
6. Type the user home directory, then press Enter.
7. Type the user password, then press Enter.
8. Select 7. Save changes.
Page 27

Deleting a User
To delete a user:
1. From the ma in menu, select E. Users.
2. Type the name of the user you are deleting, then press Enter.
Managing the HP NetStorage 6000 Using Telnet
3. Select 8. Delete.
Editing a User
To edit a user:
1. From the ma in menu, select E. Users.
2. Type the name of the user you are editing, then press Enter.
3. Select 1. Edit.
4. Change the information in the appropriate fields and press Enter to maneuver to the next field.
5. Select 7. Save changes.
25
Page 28

Managing the HP NetStorage 6000 Using Telnet
Modifying a Host
Telnet allows you to modify host information.
Note If the host already exists, the host information displays.
Adding a Host
1. From the ma in menu, select F. Hosts.
2. Type the new host name, then press Enter.
The system will make sure the host name does not already exists. If not, the following screen displays:
3. Press Enter to add the host.
4. Enter the new host IP address.
5. Select 7. Save Changes.
Deleting a Host
1. From the ma in menu, select F. Hosts.
2. Type the host name you are deleting and press Enter.
3. Select 8. Delete.
Editing a Host
1. From the ma in menu, select F. Hosts.
2. Type the host name you are editing and press Enter.
3. Select 1. Edit.
4. Enter the new Host Name and/or Internet IP Address.
5. Select 7. Save changes.
26
Page 29

Managing the HP NetStorage 6000 Using Telnet
Using Remote Services
This screen controls Network Information Service (NIS), updates of the hosts, updates of user lists and
Network System Logger (SYSLOG).
Note Once NIS is set up, periodically inspect the server to see if the master files have changed. When a
file changes, it is copied from the NIS server to the local file. The Enable field allows you t o disable
NIS updates without losing the setup information, so it still exists when you re-enable it.
Once the SYSLOG is set up, a log message is sent to the selected server. This allows you to
centralize a record of log messages from all the servers onto one system.
Editing NIS Information
To edit the NIS:
1. From the ma in menu, select H. Remote Services (NIS). The following screen displays:
2. Select 1. Edit fields.
3. Press Enter to move through the fields. Follow the prompts at the bottom of the screen.
4. Select 7. Save changes.
27
Page 30

Managing the HP NetStorage 6000 Using Telnet
Viewing and Modifying Admin
Admin provides the basic administrative information available to the user.
To modify Telnet through Admin:
1. From the ma in menu, select K. Admin.
2. Within the Admin area, there are two levels of access and protection:
• Grant access Click Yes to allow access from network clients, and Yes to deny.
• Password Protect Click Yes to enable password protection and Yes to disable.
28
Page 31

Managing the HP NetStorage 6000 Using Telnet
Using the Access Control Screens
Use the Access Control menu options to configure access restrictions to server resources.
Caution Once you save the changes, the existing NFS mounts from clients are updated to reflect the new
parameters. We recommend you restrict the volume containing the configuration files (the boot
directory) to read only.
Note Hosts on the trusted list are allowed read/write access regardless of the volume access parameters.
Managing Volume Access
To manage the volume access:
1. From the main menu, select L: V olume Acce ss to c ontrol the type of ac cess y ou assign to t he vol umes.
The following screen displays:
2. Enter the letter corresponding to the volume to change its general access.
3. Enter the number corresponding to the type of access you are assigning:
read/write access, read only access or no access
4. Select 7. Save changes.
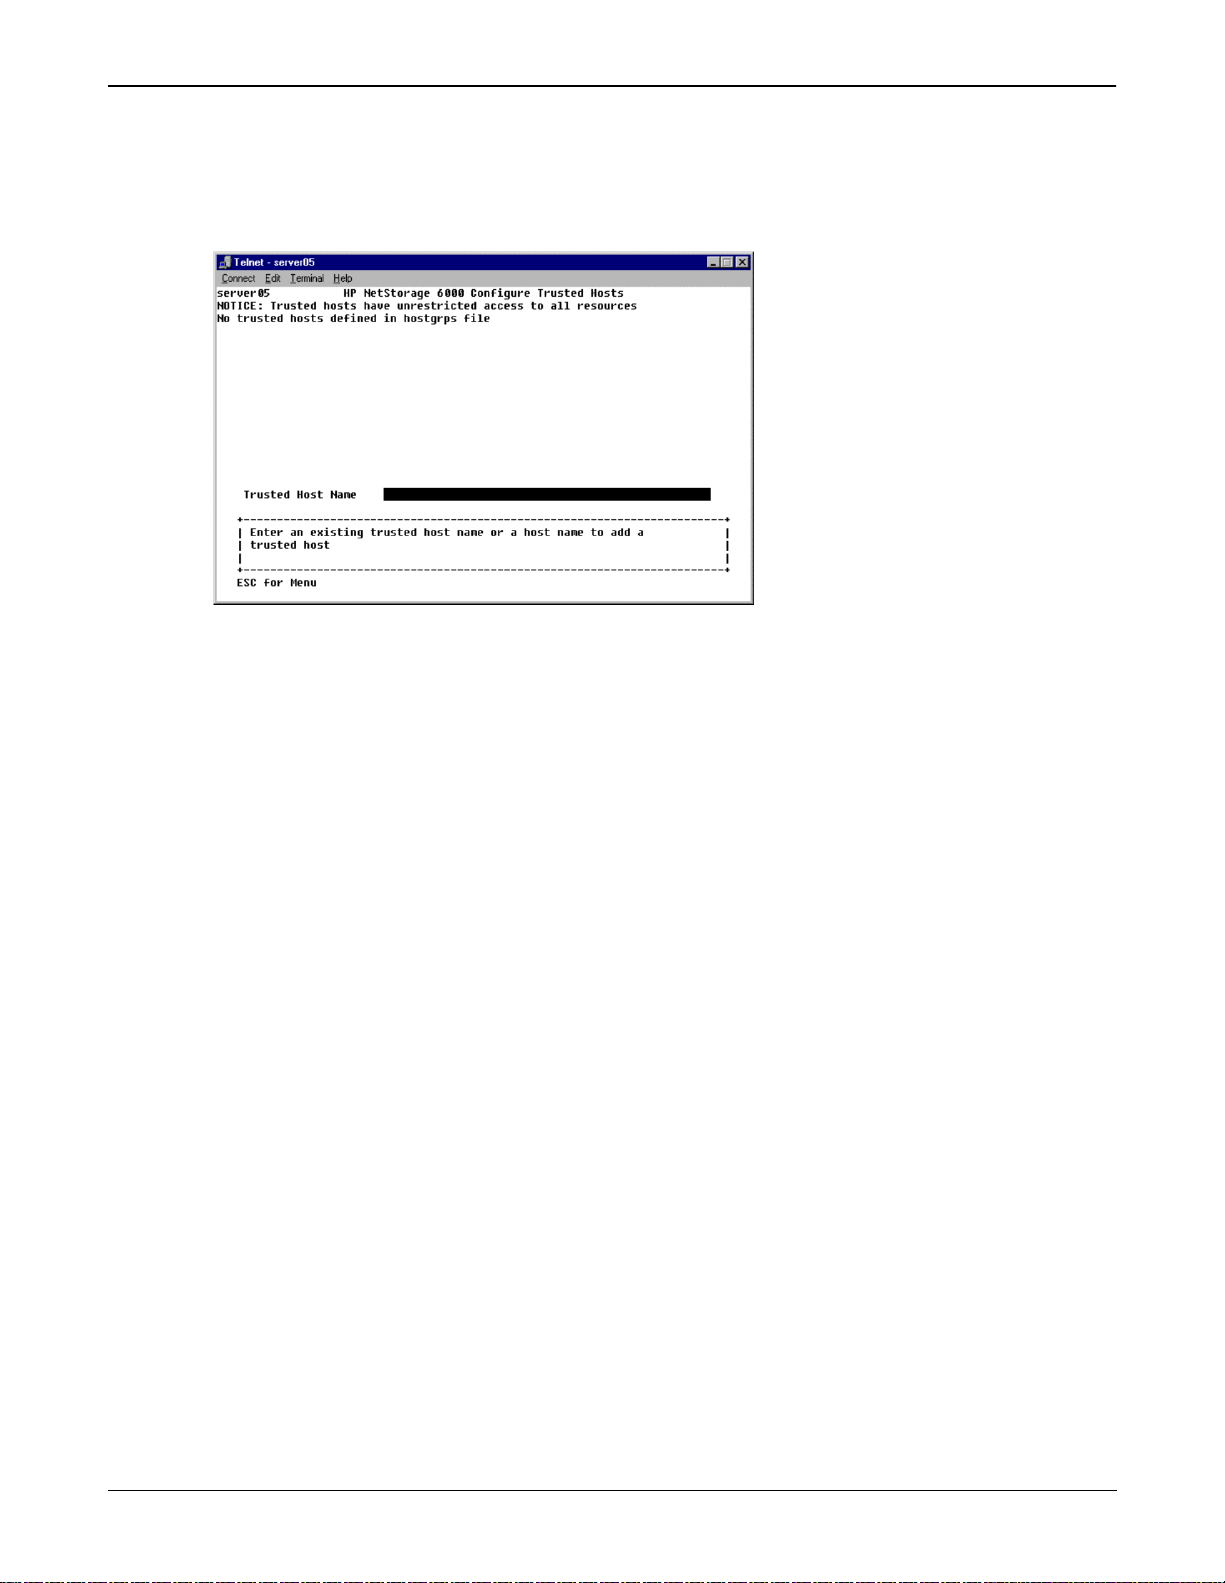
Using the Trusted Hosts
Use the Trusted Hosts menu option to manage the users with unrestricted access to all resources. From the
main menu, select Trusted hosts are not required to enter a password.
29
Page 32

Managing the HP NetStorage 6000 Using Telnet
Adding a Trusted Host
To add a trusted host:
1. From the ma in menu, select Trusted Hosts. The following screen displays:
2. Type a new host name, then press Enter.
The system will make sure the host name does not already exist. If not, the following screen displays:
Note If the trusted host already exists, the host informatio n displays.
3. Select 7. Add to list.
The new trusted host has been added and the name displays at the top of the screen.
30
Page 33
Managing the HP NetStorage 6000 Using Telnet
Deleting a Trusted Host
To delete a trusted host:
1. From the ma in menu, select Trusted Hosts. The following screen displays:
2. Type in the name of the trusted host you are deleting and press Enter.
3. Select 8. Delete.
The trusted hosts is automa tically removed from the list.
31
Page 34

Managing the HP NetStorage 6000 Using Telnet
SMB/CIFS Setup
SMB/CIFS informs the Windows environment about file availability. Through the set up menu, you organi ze
how Telnet will respond to system queries.
To set up the SMB/CIFS:
1. From the Telnet main menu, select W. SMB/CIFS Setup.
2. Enter 1. Edit Fields.
3. Enter a resource domain name (such as, workgroup).
4. If necessary, enter the master (authentication) domain name.
5. Define the scope and description.
6. Enter the primary and secondary WINS IP addresses.
7. Assign a Keep Alive parameter.
8. Assign a security mode. There are two levels:
• Se cure share level
• NT Domain (Auto UID)
32
Page 35

Managing the HP NetStorage 6000 Using Telnet
SMB/CIFS Shares
After the SMB/CIFS set up is complete, SM B/CIF S shar es m ust be def ine d. Shar es de fi ne th e volumes to be
shared by the system.
To set up the SMB/CIFS shares:
1. From the ma in menu, select X: SMB/CIFS Shares.
2. Select the letter of an existing share or select 8. Add a share.
3. Enter a Share name as it will appear to Windows machines browsing this share.
4. Enter a path in the Directory.
5. Enter a Comment about this directory.
6. Enter 1. Yes if you wish to control access to this share with passwords, enter 2. No otherwise.
7. If selected, enter the passwords for read/write access or read-only access.
8. Enter the User ID and Group ID to be used by Windows users browsing this share.
9. Enter 1. Edit fields to make further changes or 7. Save changes to save changes made.
33
Page 36

Managing the HP NetStorage 6000 Using Telnet
Configuring E-mail
This menu configures the Telnet ability to send e-mail to specific recipients when there is a problem with the
RAID subsystem or the UPS module. The following appears:
To configure the RAID/UPS e-mail:
1. From the Telnet main menu press the space bar then select U. E-mail Configuration.
2. From the E-mail Configuration screen, select 1. Edit fields.
3. Type the information requested by each field. Press Enter to move between fields.
• SMTP Server Name This is the mail server; all mail is directed here. The server name must be
present in the host file or the DOS server.
• Recipient 1...4 These are the e-mail addresses of the four people automatically notified in
case of a RAID or UPS problem.
• Notification Level The level a problem must be at before the recipients are notified via e-mail.
1) None: No notifications sent.
2) errors: Notifications sent only for errors.
3) errors_warnings: Notifications sent for errors and low priority
warnings.
• RAID Subject Field The topic displayed in the subject field of any e-mail notification dealing
with RAID pr oblems; useful in multiple s erver environments.
• UPS Subject Field The topic displayed in the subject field of any e-mail notification dealing
with UPS problems useful in multiple server environments.
34
4. Select 7. Save Changes to save the current configuration. Select 0. Cancel to abort this operation.
E-mail configuration is complete.
5. Press Esc to return to the mai n menu.
Page 37

&RPPDQGV
he following pages contain reference information about the commands and variables used in
T
rlogin and Telnet. It is arranged in alphabetical order.
35
Page 38

Managing the HP NetStorage 6000 Using Telnet
? The ? character is used to obtain help and in wildcard patterns.
* The * character is used in wildcard patterns. See wildcard.
$
The $ character is used to begin a variable name in command. See
variable
.
# The # character is used to begin a comment in many files. See comment.
approve Use the approve command to test the access control configuration. It reports the success
(approval) or failure (disapproval) of the access request indicated by the arguments.
Examples:
approve files /vol17 a client
approve print * 192.3.4.5
attach Use the attach command to explicitly establish device configuration information. It may be
used when auto configuration procedure makes a mistake.
cat Use the cat command to view the contents of a file.
chkdsk Use the chkdsk DOS command to inspect for inconsistencies and errors in DOS volumes.
control Use the control command to examine or change device parameters. It is similar to the DOS
mode command or the UNIX
Usage:
control device [ arg[=value] ... ]
stty command.
With just a device name, the control command reports the current parameters for the de vice.
With one or mor e ar g=value ar g uments, the de vice para meter(s) c hange an d the paramet ers are
reported.
crashlocks The crashlocks command causes the file lock manager to restart as though the server were
just rebooted. The prima ry r ea son to use
crashlocks is when a network client crashes wit hout
releasing the file locks it holds.
df The df command reports the file volumes, size and amount of free space.
disk Use the disk command to examine or change the partition table information. With no argu-
ments, the
disk command gives a list of the disk drives on the system.
36
Page 39

Commands
With an ar gument , the drive parti tion table is examined an d shown. If there is no SFS partiti on
and enough disk space for one, you are asked if you want to delete the partition.
disk command does not manage volumes. It repairs the partition table in emergencies.
The
After deleting a partition, promptly shutdown and reboot the system.
Example:
disk
disk hrdc0d0
disk aha1d30
echo The echo command simply shows its arguments. It is usually used in command scripts to
report progress.
Example:
echo hello world
echo this is a longer message
exit The exit command causes the command line interpreter to stop processing commands. When
the
exit command is used from a command s cript, t he r emainder of the s cript is ignor ed. When
used from a remote (T e lnet) connect ion, the connecti on is closed. When used from the co nsole,
exit command is effectively ignored.
the
fsck The fsck command performs consistency checks on the SFS volumes named by the argu-
ments. The
fsck command may take a very long time depending on how many f il es are on t he
volume. Any inconsistencies are reported, and you are asked whether or not to make repairs.
The
fsck command does not inspect DOS volumes; use the chkdsk command under DOS.
Usage:
fsck volume …
Example: fsck vol7
halt The halt command initiates a procedure that stops the server in an orderly fashion and then
halts the computer. This is typically used before powering off the system.
Usage:
halt
help The help command with no arguments lists the commands available through the command
interpreter. With arguments, th e
Command can be a wildcard, and a description for each command that matches the wildcard
help command gives a brief description and usage message.
is given.
Usage:
help [ command … ]
Example: help
help control
help pj*
37
Page 40

Managing the HP NetStorage 6000 Using Telnet
hostlook The hostlook command is us ed to verify tha t the hosts file is correct. Each hostname/addr
argument is looked up in the hosts file, and the results of the are reported. A hostname/addr
argument may be a host name (e.g. a client), or a host Internet address (e.g. 192.3.4.5). Wildcards may not be used.
Usage:
hostlook hostname/addr …
Example: hostlook a client
hostlook 192.3.4.5
hostlook no such
hostmatch The hostmatch command is primarily us ed to verify that the hostgrps fi le is set up prope rly.
The hostpatn argument may be:
• a host name (e.g., aclient) which must be present in the hosts file
• an Internet address (e.g., 192.3.4.5)
• a wildcard that matches a host name or address (e.g., acl*, 192.3.4.*)
• an @ followed by a host group name (e.g., @general, @trusted); see
hostgrps for details
A hostname/addr argument may be a host name (e.g., a client), or a hos t I nterne t addre ss (e.g.,
192.3.4.5). Wildcards may not be used. Each hostname/addr argument is tested for whether it
matches the hostpatn argument, and the results are shown.
Usage:
hostmatch hostpatn hostname/addr …
keymon The keymon command reports the exact codes receive d for eac h key you press. Keymon con-
tinues to report on keys until the stopchar is used. The purpose of keymon is to aid in troubleshooting TELNET access, since different client TELNET programs map keys differently —
especially line endings. For example, some TELNET programs send CR LF line endings,
some send CR NUL line endings, and there may be other line ending sequences.
38
Each code is reported wit h a single outpu t line of the form:
[M-][C-]x 0xhh
where:
M if the high (0x80 ) bit is set
C if the code is a cont rol character
x the base character of the code
0xhh the hexadecimal value for the code
For example, CR LF results in the output lines:
C-M 0x0D
C-J 0x0A
Usage: keymon stopchar
Example: keymon X
keymon Q
Page 41

Commands
locks The locks command reports the current file locks held by network clients. The actual name of
the file on which locks are held is not available. Instead, the volume name and node number
are reported, which should help you identify the actual file. Every attempt is made to identify
the lock owner as a process ID on a particular client.
Usage:
locks
locks See lockd, statd, and crashlocks.
load The load command is used to load a module or to r eport the loaded modules. A loadable mod-
ule is a file separate from the main «upperCaseProduct» i mage th at cont ains an extensi on, such
as a device driver, additional service, or field maintenance patch.
During startup, the boot di recto ry is s canned for modul es. A modul e fil e name en ds with
.nsm.
The modules are then loaded in alphabetical order. Dependencies between modules are handled by adjusting the module file names so that they are loaded in correct order.
Usage:
load [ filename ]
Example: load
load $bootdir/perftest.nsm
loadvars The loadvars command loads the variable settings contained in the values file.
Usage:
loadvars
logtail The logtail command shows the last 31 log entries. During system startup, log entries are
made which report device configurations, volumes, and other pertinent information. During
normal operation, log entries are made which report device errors, security violations, and
other routine status information.
Usage:
logtail
ls The ls command is used to ge t a l ist o f the file s and s ubdire ctori es i n a direc tory. The directory
argument must be supplied, and must be the true pathname of the directory (e.g., wildcards
may not be used).
Usage:
ls directory
Example: ls /
ls $bootdir
ls /vol7/util
menu The menu command starts the Main Menu.
The
menu command may be accessed from a network client via the TELNET protocol, pro-
vided the network client supports an ANSI terminal mode. The ANSI terminal escape
sequences used by the menu system are:
ESC [ H ESC [ 2 J clear the screen
39
Page 42

Managing the HP NetStorage 6000 Using Telnet
ESC [ row ; col H position the cursor
ESC [ 0 m normal video mode
ESC [ 1 m bright video mode
ESC [ 7 m reverse video mode
Usage: menu
netstat Use the netstat command to inspect the network interface and network routine table status.
Usage:
netstat [-i|-r]
network file systemSee NFS.
nfsunmount Use the nfsunmount command is to unmount a remote NFS volume.
Usage:
nfsunmount localname
Example: nfsunmount /xsvol
See nfsmount.
nfsmount Use the nfsmount command to inspect, establish or change an NFS volume.
The main purpose for establishing an NFS mount is to enable the backup system to access
remote files and directories. Once the NFS mount is established, the remote files appear to the
backup system as local and are remembered by the server using variables (see
ables have the format:
nfsvol. localname. parameter=value.
Use the menu, or the nfsunmount command to remove an established NFS mount.
set). The vari-
40
You must provide three essential parameters:
• a short local name (localname) by which the backup system may identify the volume.
• the name or Internet address of the remote system on which the files reside.
• the name of the appropriate directory on the remote system (server:path).
You may also specify options for the NFS mount at the time the mount is established (e.g.,
when server:path is given). Or you may modify the options by giving the local name and the
new value for the option.
rsize The size of read requests in bytes, between 512 and 8192. Must be an even multiple
of 512. Default: rsize=8192.
wsize The size of write requests, between 512 and 8192. Must be an even multiple of 512.
Default: wsize=8192.
timeout The number of seconds to wait between retries. Default: timeout=2.
tries The maximum number of retries before giving up on the remote server. Default:
retries=5.
Page 43

Commands
perm The permission this server may allow itself for accessing remote files. This may be
for read-only access, in which case this server will make no attempt to create or
modify files on the remote server. Or it may be rw for read-write access, in which
case this se rver may create or modify file s. In order to restore files from tape to the
remote server, this must be set to
rw. Default: perm=rw.
During backup, the files and directories are read using user ID 0 (root). Make sure the remote
system will allow your «upperCaseProduct» root access so that all files and directories can be
backed up. Otherwise, an access violation might occur, preventing the backup. On UNIX systems, see file /etc/exports and possibly the exportfs(1) command. On remote «upperCaseProduct» systems, simply ente r t his «upperCaseProduct» ho st as a trusted host usin g menu i t em
Trusted Hosts
.
M.
Usage:
Example: nfsmount /xsvol other-\*(Ns:/svol
nfsunmount — command
The nfsunmount command is used to unmount a remote NFS volume.
Usage:
Example: nfsunmount /xsvol
password — command
The password comman d is us ed to s et, ch ange, or clea r a pas sword. The passwor d may be for
a user, for administrative access to the command interpreter and menus, or for access to the
modems. The last usage synopsis is used for a user with the name admin or modem.
You are asked to enter the password, and as you do the * character is printed for security.
When you press the enter key, you are asked to verify the new password by entering it again.
Usage: password
nfsmount [ localname [ server:path] [ option=value … ]]
nfsmount /xsvol perm=ro
nfsmount
nfsunmount localname
See nfsmount.
user
password admin
password modem
password user user
Example: password fred
password user fred
password admin
ping The ping command is used to see if another host is responding to the net-work. A small
inquiry packet is sent, and the remote host sends back a reply.
Ping is an application of the
ICMP protocol.
Usage:
ping hostname/addr …
Example: ping aclient
ping 192.3.4.10
41
Page 44

Managing the HP NetStorage 6000 Using Telnet
pwtest The pwtest command is used to verify a password. The password may be for a user, for
administrative access to the command in terpret er and menus, or for access to the modems. The
last usage synopsis is used when for a user with the name admin or modem.
You are asked to enter the password, and as you do the
* character is prin ted for securit y. When
you press the enter key, you are told whether or not the pass-word is correct.
Usage:
pwtest us e r
pwtest ad m i n
pwtest mod em
pwtest us e r user
Example: pwtest fr ed
pwtest us er fr e d
pwtest ad m i n
quit The quit command is another name for the exit command.
Usage:
quit
ratecopy The ratecopy command copies file source-filename to file new-filename and then reports the
time and speed of the operation. This may be used as a basic test of server operations, or may
be used to evaluate different disk drives. Blocksize is the size in bytes of each read and write
request. The default blocksize is 8192 bytes.
Usage:
ratecopy source-filename new- filen ame [ blocksi ze ]
Example: ratecopy $bootdir/testfile /vol7/testfile
ratecopy $bootdir/testfile /vol7/testfile 512
ratecopy /vol7/1meg-file /vol8/1meg-file
ratecpu The ratecpu command runs a series of CPU int ensive opera tions , and t hen re ports the sec onds
required to complete the series. This may be used to compare the CPU performance of different hardware platforms. The
ratecpu command seizes the system, and should only be run
when the server is not being used by network clients.
Usage:
ratecpu
ratemem The ratemem command runs a series o f memor y i nt ensive operations, and then reports the sec -
onds required to complete the series. This may be used to compare the memory perfo rmance of
different hardware platforms. The
ratemem command seizes the system, and should only be
run when the server is not being used by network clients.
Usage:
ratemem
ratenet The ratenet command sends packets to another network host, and then reports the time
required.
42
Page 45

Commands
The packets sent are the same as the ping command (ICMP protocol). Nsend is the number of
packets to send; the de fault is one. Size is the size i n bytes o f each packe t sent; t he default is 56
bytes. Maxfail is the maximum number of retries for the entire test; the default is three.
Usage:
ratenet hostname/addr [ nsend [ size [ maxfail ] ] ]
Example: ratenet aclient
ratenet 192.3.4.10
ratenet aclient 1000
ratenet other 100 1200
ratenet 192.3.4.5 5 56 10
rateread The rateread command reads the entire contents of file filename from disk, and then reports
the time and speed of the operation. This may be used as a basic test of server operations, or
may be used to evaluate different disk d rives. Filename must already exist, and must be the
true pathname of the file; wildcards may not be used.
Blocksize is the size in bytes of each read request. The default
blocksize is 8192 bytes.
Note that «upperCaseProduct» caches files in memory in case they are accessed again. If you
use rateread on a fi le t wice , the second pe rforma nce i s muc h fas te r tha n the fir st. Th e o nly way
to force rateread to access disk is to use a file that is larger than your system’s memory, or to
use several files that together are larger than your system’s memory.
Usage:
rateread filename [ blocksize ]
Example: rateread $bootdir/netserve.img
rateread $bootdir/netserve.img 512
rateread /vol7/big-huge-file 16384
ratewrite The ratewrite command crea tes file fi lename on disk, wri tes totalk b kilo-byte s of random data
to the file, and then reports the time and speed of the operation. This may be used as a basic
test of server operations, or may be used to evaluate different disk drives.
Totalkb is the total size of the file to be written given in 1024 byte un its. For example, a totalkb
of 256 would result in a file that is 262144 bytes in size. Blocksize is the size in bytes of each
write request. The default blocksize is 8192 bytes.
Usage:
ratewrite filename totalkb [ blocksize ]
Example: ratewrite $bootdir/testfile 256
ratewrite $bootdir/testfile 256 8192
ratewrite /vol7/1meg-file 1024
reboot The reboot command initiates a pr ocedure that stops the server in an orderly fa shi on and then
reboots the computer.
Usage:
reboot
report The report command gives a overall status report including:
• each volume’s backup status, size, and free space
43
Page 46

Managing the HP NetStorage 6000 Using Telnet
• the network parameters
• the timezone parameter s
• the modem and printer configuration
When used with no argument, the information is displayed directly to the user. When given a
file argument, the information is stored into the named file. When given a printer argument,
the information is queued for the named printer. The presence of a / character indicates that the
argument is a file name rather than a printer name.
Usage:
report [ file| printer]
Example: report
report ps1
report $bootdir/report.out
revoke The revoke command deletes the remote NFS mount information for each host given. It can
be used to clean up mounts that are no longer in use when the client can not do so.
Usage:
revoke hostname/addr …
Example: revoke aclient
revoke 192.3.4.5
savevars The savevars command save all variable values to the values files.
Usage:
savevars
scanvars The scanvars command initiates a procedure that scans the system variables to determine
configuration information. The configuration information includes:
• the server network address and other network parameters (inet.*)
• printers
• modems
You would usually use
scanvars after you have changed several configuration variables with
the set command, and want the changes to take effect. Normally, you would use the
command or the menus to ma ke conf iguration changes, a nd the variables a re scanned automatically.
Example:
set com2.ptype printer
set com2.setting 4800n81n
scanvars
unset com2.*
scanvars
set inet.ipaddr 192.3.4.100
scanvars
set The set command changes the value associated with a variable. The variable is created if nec-
essary. The
44
show command is used to examine the values of variables.
periph
Page 47

Commands
Usage: set varname value
Example: set hostname server10
set inet.addr 192.3.4.100
show The show command gives the names and value s of variables. W ith no varname/patn a rgument,
show gives the names and values of all variables.
The varname/patn arguments may be a variable name (e.g., hostname), or a wildcard that
matches multiple names (e.g., com?.name, inet.*).
Usage:
show [ varname/patn … ]
Example: show
show com1.*
show *.ptype
show *dir*
shutdown The shutdown command initiates a procedure that stops the server in an orderly fashion and
then reboots the computer.
Usage:
shutdown
source The source command reads and executes commands from filename. By saving commonly
used command sequences in a file, you can use the
Usage:
source filename
source command to execute the sequence.
Example: source $bootdir/myscript.ncf
source /vol7/scripts/quickinfo.ncf
status The status command inspects low-level serve r status info rmation. The what ar guments , if any,
specify what status information is reported:
hi Hardware interrupt counts
si Software interrupt counts
ai Address space informatio n, including m emory utilization
ti Thread status information
dm Device manager information
fs File system information including size, free space, and activity
rm Remote mount information, including the mounting client, the directory pathname
mounted, and activity
up Uptime, how long since the server was last started
all All of the above.
With no arguments, thread status is reported.
45
Page 48

Managing the HP NetStorage 6000 Using Telnet
Usage: status [ what … ]
Example: status
status up rm fs
tar The tar command is used to manipulate tape archives. The first letter of mode must be one of:
c Create a new archive containing directories. Archives created with this mode are writ-
ten in the traditional tar format, and are easily imported and exported by many different systems.
F Make full backup of directories, the file.bdl argument is required. Archives created
with this mode are also written in the traditional format. After the archive is complete,
a list of directories and identifying information for each directory is written to file.bdl
.bdl stands for backup directory list). A timestamp is als o written which indicates the
(
time of the full backup.
P Make partial backup of directories, the file.bdl argument is required. Archives created
with his mode contain non-traditional information. Files older than the timestamp in
file.bdl are included in the archive. As each directory is encountered, file.bdl is
checked to make sure the identifying information is the same. If not, all files and directories beneath the encoun tered directory are included in th e archive. A file list for each
directory is also put in the new archive; these are called dumpdir records. File.bdl is
left unchanged.
R Restore directories from the arch i ve, al l files and direct or ies i f no d irectory arguments
are given. As files are restored from tape, their modification time, UID and GID ownerships, and permission bits are also restored. When dumpdir records (see
P option
above) are encountered, the directory on disk is examined. Any files in the directory
that are not in the file list are removed .
t Table of contents ( list) of archive, all file s and direc tories if no director y arg uments are
given.
x Extract directories from archive, all files and directories if no directory arguments are
given. As files are restored from tape, their modification time, UID and GID ownerships, and permission bits are also restored. Dumpdir records (see P option above) are
ignored.
mode may then contain parameter and option key letters. The ARG-fbLVC arguments must
be given in the same order as the parameters options:
b Specifies the block size in 512-byte records (default 20).
C Specifies a dir ectory pa th prefi x. Disk file s are named pr efix/su bpath, but t ape file s are
named subpath (no default). The
C argument is used to effectively “change directory”
before reading or writing the archive.
f Specifies the file/device name of the archive (default $tape).
46
Page 49

Commands
L Specifies the length of the tape in megabytes. This also enables multi-tape archives
(default 0, not multi-tape). This option only has effect when creating a new archive
with one of the
c, F, or P modes. Most multi-volume tar commands sense the end-of-
tape based on write errors, but this tar does not. Files are not spli t ac ros s m ult iple tape
volumes. When a fi le wi ll n ot fi t on th e curr ent ta pe (ba sed on t he fi le si ze a nd the t ape
size), the current tape ends and the next tape is requested. When reading a tape with
one of the
MORE—
v Verbose option, tattles as things are done.
V Specifies a volume label to be written new archives (no default). This option only has
effect when creat ing an arc hiv e with one of th e
R, t, or x modes, a volume label record (see V below) with the name —
causes tar to request the next tape of the set.
c, F, or P modes. Non-traditional infor-
mation is written to the new archive. The first record of each tape of the new archive is
a volume label which contains the name given as a parameter. When both the
options are given, tar also writes volume labe l recor ds with t he name
—MORE—at the
L and V
end of all but the last tape of the tape set.
The partial backup and vol ume label f eatures u se record t ypes that are compatib le with
the GNU tar command, v1.10.
Usage:
tar mode [ file.bdl [ ARG-bCfLV … ] [ directory … ]
Example: tar cvfLVC aha1t50 40 XFER0821 /vol7/products src doc bin
tar xvC /vol6/from-dave games
tar FLV $bootdir/vol7.bdl 2000 Aug08 /vol7
tar PLV $bootdir/vol7.bdl 2000 Aug10 /vol7
telnet The telnet command establishes a terminal connection with remote system \f2hostname/addr.
It is primarily used during administration to make sure the remote s yst em i s pr ope rly prepared
to interact with \*(Ns. For example, to make sure that «upperCaseProduct» host name and
address are known to the remote system, or to make sure that «upperCaseProduct» has the
trusted access rights necessary for backup.
The best way to terminat e the co nnection is to exit from th e remote s ystem, which should cl ose
the connection and return to the «upperCaseProduct» command prompt. The key Control-_
(simultaneously press and hold the control and shift keys, and then press the underscore key)
also breaks the connection.
The telnet terminal emulat or is ve ry ba sic, but can support screen ed it ors (like the UNIX vi(1)
command). Try these terminal types: vt100-am, vt100, ansi, pcansi, xterm, vt52.
Usage:
telnet hostname/addr
Example: telnet ahost
telnet 192.3.4.10
unset The unset command deletes variables. The varname/patn arguments may be a variable name
(e.g., hostname), or a wildcard that matches multiple names (e.g., com?.name, inet.*).
Usage:
unset varname/patn …
Example: unset lpt1.soj
unset com1.*
47
Page 50

Managing the HP NetStorage 6000 Using Telnet
uptime The uptime command reports how lon g the s erver has be en runnin g, the curre nt ti me of day i n
24-hour format, and the recent CPU utilization.
Usage:
uptime
userlook The userlook command is used to verify that the passwd file is correct.
Each username/uid argument is looked up in the passwd file, and the results of the lookup are
reported. A username/uid argument may be a user’s login (e.g., fred, jjsmith), or a user’s UID
(e.g., 211, 1047). Wildcards may not be used.
Usage:
userlook username/uid …
Example: userlook fred
userlook 1011
userlook nobody nosuch
version The version command reports the product name, release level, part number, and serial number
of the «upperCaseProduct» software.
Usage:
version
48
Page 51

Managing the HP NetStorage 6000 Using Telnet
Index
A
access control screens 29
accessing
checkpoint settings23
Telnet 2
activity monitor7
adding
extension segment21
host 26
trusted host 30
user 24
admin, viewing and modifying 28
attaching a journal segm ent 22
B
backup and restore status 13
backup jobs
creating and maintaining 9
scheduling 10
unscheduled 11
C
checkpoint 23
commands
# 36
$ 36
* 36
? 36
approve 36
attach 36
cat 36
chkdsk 36
control 36
crashlocks 36
df 36
disk 36
echo 37
exit 37
fsck 37
halt 37
help 37
hostlook 38
hostmatch 38
keymon 38
load 39
loadvars 39
locks 39
logtail 39
ls 39
menu 39
netstat 40
network file system40
nfsmount 40
nfsunmount 40
nfsunmount - command 41
password - command 41
ping 41
pwtest 42
quit 42
ratecopy 42
ratecpu 42
ratemem 42
ratenet 42
rateread 43
ratewrite 43
reboot 43
report 43
revoke 44
savevars 44
scanvars 44
set 44
show 45
shutdown 45
source 45
status 45
tar 46
telnet 47
unset 47
uptime 48
userlook 48
version 48
configuring
e-mail 34
new disk volume 5
console 16
locking 16
unlocking 16
contents, tape magazine14
creating and maintaining backup jobs 9
D
deleting
disk volume 6
host 26
trusted host 31
user 25
49
Page 52

Managing the HP NetStorage 6000 Using Telnet
E
editing
host 26
NIS information 27
user 25
e-mail 34
G
general SFS volume information 20
H
host
adding 26
deleting 26
editing 26
modifying 26
host server name set up 4
J
journal segment 22
K
key descriptions 3
M
main menu 3
maintaining users 24
managing
additiona l procedures within the server file
system 7
basic procedures within the server file system 5
disks and volumes19
volume access 29
menu basics 2
modifying a host 26
S
scheduling backup jobs10
setting the time zone, time and date 18
setting up a host server name 4
SFS volume 20
showing the log 16
shuting down the system 17
SMB/CIFS
setup 28
shares 33
, 32
T
tape backup 8
tape magazine contents 14
tape restore 12
Telnet main menu 3
trusted host 29
adding 30
deleting 31
turning quotas on and off 20
U
unscheduled backup jobs11
user
adding 24
deleting 25
editing 25
maintaining 24
using
access control screens 29
backup 8
console 16
remote services 27
remote volumes 27
trusted hosts29
N
new disk volume 5
NIS information 27
O
other local backup operations 15
Q
quotas 20
R
remote services27
removing the disk partitions 19
renaming a disk partition 20
restoring from tape 12
50
V
verifying a volume 20
viewing
activity monitor7
backup and restore status 13
log 16
main menu 3
viewing and modifying admin 28
volume access 29
Z
zap partition19
 Loading...