

Page 1
LASERJET PRO MFP
User Guide
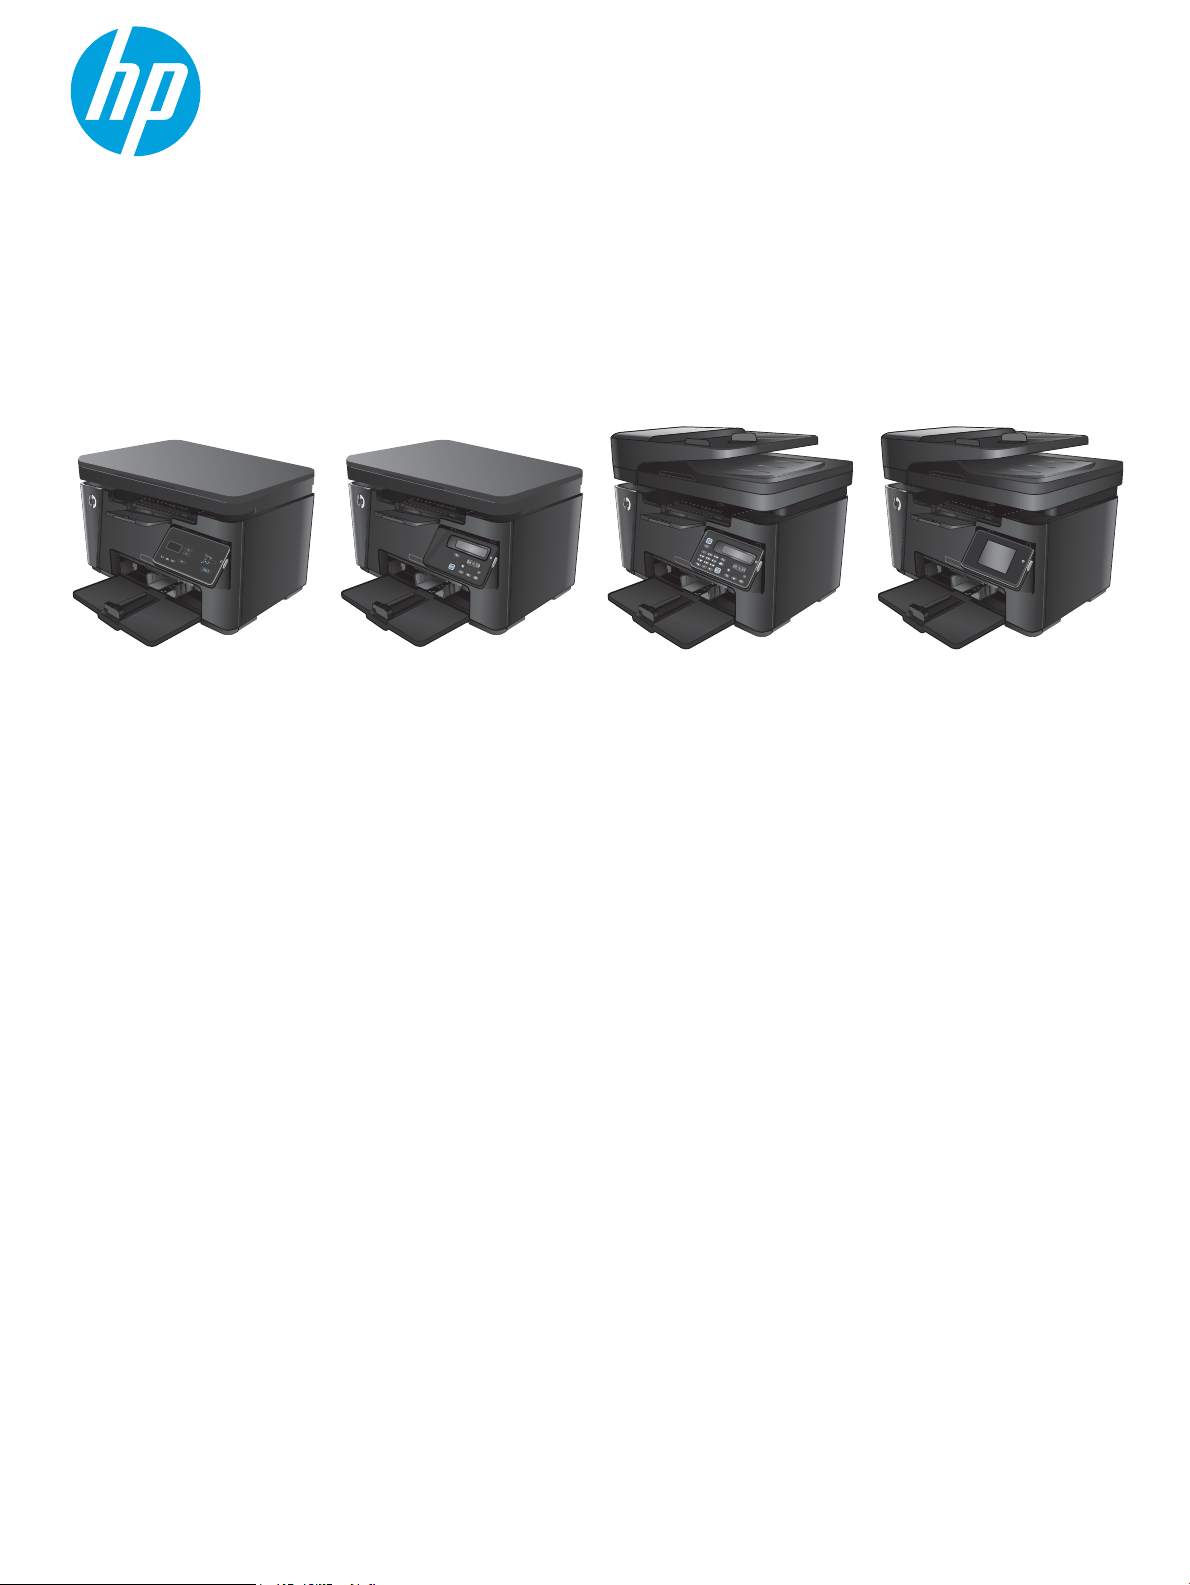
M125-126 M125-126 M127-128 M127-128
Page 2

Page 3

HP LaserJet Pro MFP M125, M126, M127,
M128
User Guide
Page 4

Copyright and License
Trademark Credits
© Copyright 2015 HP Development Company,
L.P.
Reproduction, adaptation, or translation
without prior written permission is prohibited,
except as allowed under the copyright laws.
The information contained herein is subject to
change without notice.
The only warranties for HP products and
services are set forth in the express warranty
statements accompanying such products and
services. Nothing herein should be construed
as constituting an additional warranty. HP shall
not be liable for technical or editorial errors or
omissions contained herein.
Edition 1, 11/2015
Adobe®, Acrobat®, and PostScript® are
trademarks o
Apple and the Apple logo are trademarks of
Apple Computer, Inc., registered in the U.S. and
other countries. iPod is a trademark of Apple
Computer, Inc. iPod is for legal or rightholderauthorized copying only. Don't steal music.
Bluetooth is a trademark owned by its
proprietor and used by HP Company under
license.
Microsoft®, Windows®, Windows® XP, and
Windows Vista® are U.S. registered trademarks
of Microsoft Corporation.
f Adobe Systems Incorporated.
Page 5

Table of contents
1 Product introduction ..................................................................................................................................... 1
Product comparison ............................................................................................................................................... 2
Product views ......................................................................................................................................................... 4
Product front view ............................................................................................................................... 4
Product back view ............................................................................................................................... 5
Control panel overview .......................................................................................................................................... 6
M125a, M125r, M125ra, M126a .......................................................................................................... 6
M125nw, M125rnw, M126nw .............................................................................................................. 7
M127fn, M127fs, M128fn, M127fp, M128fp ....................................................................................... 8
M127fw and M128fw .......................................................................................................................... 9
Control-panel Home screen (touchscreen only) ............................................................................... 10
2 Paper trays ................................................................................................................................................. 11
Supported paper sizes and types ........................................................................................................................ 12
Supported paper sizes ...................................................................................................................... 12
Supported paper types ..................................................................................................................... 13
Load the input tray .............................................................................................................................................. 14
Tray adjustment for small paper sizes ............................................................................................. 16
3 Print ........................................................................................................................................................... 19
Print tasks (Windows) .......................................................................................................................................... 19
How to print (Windows) ..................................................................................................................... 19
Manually print on both sides (Windows) ........................................................................................... 20
Print multiple pages per sheet (Windows) ........................................................................................ 22
Select the paper type (Windows) ...................................................................................................... 24
Additional printing information ........................................................................................................ 25
Print tasks (Mac OS X) .......................................................................................................................................... 27
How to print (Mac OS X) ..................................................................................................................... 27
Manually print on both sides (Mac OS X) ........................................................................................... 27
Print multiple pages per sheet (Mac OS X) ........................................................................................ 28
Select the paper type (Mac OS X) ...................................................................................................... 28
ENWW iii
Page 6

Additional printing information ........................................................................................................ 28
Web-based printing ............................................................................................................................................. 30
HP ePrint ............................................................................................................................................ 30
HP ePrint software ............................................................................................................................ 30
AirPrint ............................................................................................................................................... 31
Set up HP Wireless Direct Printing ....................................................................................................................... 32
4 Copy ........................................................................................................................................................... 33
Make a copy .......................................................................................................................................................... 34
Copy on both sides (duplex) ................................................................................................................................ 35
Optimize copy quality .......................................................................................................................................... 36
Adjust the lightness or darkness for copies (LED control panel only) ................................................................ 37
Reduce or enlarge copies (LED control panel only) ............................................................................................. 38
5 Scan ........................................................................................................................................................... 39
Scan by using the HP Scan software (Windows) ................................................................................................. 39
Scan by using the HP Scan software (Mac OS X) ................................................................................................. 40
6 Fax ............................................................................................................................................................. 41
Connect and congure the product for fax ......................................................................................................... 42
Connect the product .......................................................................................................................... 42
Congure the product ....................................................................................................................... 43
Congure fax time, date, and header ............................................................................. 43
Control panel ................................................................................................ 43
HP Fax Setup Wizard (Windows) .................................................................. 44
Congure for stand-alone fax ........................................................................................ 44
Congure for an answering machine .............................................................................. 46
Congure for an extension phone .................................................................................. 46
Install the HP Fax software (Windows, optional) .............................................................................. 48
Send a fax ............................................................................................................................................................ 49
Send a fax by dialing manually from the product control panel ...................................................... 49
Send a fax using the HP software (Windows) ................................................................................... 50
Create, edit, and delete speed-dial entries ......................................................................................................... 51
Create and edit speed-dial entries .................................................................................................... 51
Delete speed-dial entries .................................................................................................................. 51
7 Manage the product ..................................................................................................................................... 53
Change the product connection type (Windows) ................................................................................................ 54
Use HP Web Services applications (touchscreen models only) .......................................................................... 55
HP Device Toolbox (Windows) ............................................................................................................................. 56
iv ENWW
Page 7

HP Utility for Mac OS X ......................................................................................................................................... 58
Open the HP Utility ............................................................................................................................ 58
HP Utility features ............................................................................................................................. 58
Product security features .................................................................................................................................... 60
Set or change the product password ................................................................................................ 60
Lock the product ................................................................................................................................ 61
Economy settings ................................................................................................................................................ 62
Print with EconoMode ....................................................................................................................... 62
Congure the Sleep/Auto O After setting ....................................................................................... 62
A Cartridge is low or Cartridge is very low message displays on the product control panel ............................. 64
Enable or disable the Very Low settings ........................................................................................... 64
Replace the toner cartridge ................................................................................................................................. 66
8 Solve problems ............................................................................................................................................ 69
Control panel help system (touchscreen models only) ...................................................................................... 70
Interpret control-panel light patterns (LED model only) .................................................................................... 71
Print information pages ....................................................................................................................................... 73
Conguration page ............................................................................................................................ 73
Supplies status page ......................................................................................................................... 73
Restore the factory-set defaults ......................................................................................................................... 75
Solve paper feed or jam problems ...................................................................................................................... 76
The product does not pick up paper ................................................................................................. 76
The product picks up multiple sheets of paper ................................................................................ 76
Frequent or recurring paper jams ..................................................................................................... 76
Prevent paper jams ........................................................................................................................... 78
Clear jams from the input tray ............................................................................................................................. 79
Clear jams in the toner-cartridge area ................................................................................................................ 82
Clear jams in the output bin ................................................................................................................................. 85
Clear jams in the document feeder ..................................................................................................................... 88
Improve print quality ........................................................................................................................................... 90
Print from a dierent software program .......................................................................................... 90
Set the paper-type setting for the print job ..................................................................................... 90
Check the paper-type setting (Windows) ....................................................................... 90
Check the paper-type setting (Mac OS X) ....................................................................... 90
Check the toner-cartridge status ...................................................................................................... 91
Print a cleaning page ......................................................................................................................... 91
Inspect the toner cartridge for damage ............................................................................................ 92
Check the paper and printing environment ...................................................................................... 92
Use paper that meets HP specications ......................................................................... 92
Check the product environment ..................................................................................... 93
Check the EconoMode settings ......................................................................................................... 93
ENWW v
Page 8

Improve copy and scan quality ............................................................................................................................ 94
Check the scanner glass for dirt and smudges ................................................................................. 94
Check the paper settings .................................................................................................................. 94
Optimize for text or pictures ............................................................................................................. 95
Edge-to-edge copying ....................................................................................................................... 95
Clean the pickup rollers and separation pad in the document feeder ............................................. 96
Improve fax image quality ................................................................................................................................... 97
Check the scanner glass for dirt or smudges ................................................................................... 97
Check the send-fax resolution setting .............................................................................................. 97
Check the lightness/darkness setting ............................................................................................... 98
Check the Error Correction setting .................................................................................................... 98
Check the Fit-to-Page setting ........................................................................................................... 99
Clean the pickup rollers and separation pad in the document feeder ............................................. 99
Send to a dierent fax machine ...................................................................................................... 100
Check the sender's fax machine ..................................................................................................... 100
Solve wired network problems .......................................................................................................................... 101
Poor physical connection ................................................................................................................ 101
The computer is using the incorrect IP address for the product .................................................... 101
The computer is unable to communicate with the product ........................................................... 101
The product is using incorrect link and duplex settings for the network ...................................... 102
New software programs might be causing compatibility problems .............................................. 102
The computer or workstation might be set up incorrectly ............................................................. 102
The product is disabled, or other network settings are incorrect .................................................. 102
Solve wireless network problems ..................................................................................................................... 103
Wireless connectivity checklist ....................................................................................................... 103
The product does not print after the wireless conguration completes ....................................... 104
The product does not print, and the computer has a third-party rewall installed ...................... 104
The wireless connection does not work after moving the wireless router or product .................. 104
Cannot connect more computers to the wireless product ............................................................. 104
The wireless product loses communication when connected to a VPN ......................................... 104
The network does not appear in the wireless networks list .......................................................... 104
The wireless network is not functioning ........................................................................................ 105
Perform a wireless network diagnostic test ................................................................................... 105
Reduce interference on a wireless network ................................................................................... 105
Solve fax problems ............................................................................................................................................ 107
Check the hardware setup .............................................................................................................. 107
Faxes are sending slowly ................................................................................................................ 108
Fax quality is poor ........................................................................................................................... 109
Fax cuts o or prints on two pages ................................................................................................. 110
vi ENWW
Page 9

9 Parts, supplies, and accessories .................................................................................................................. 111
Order parts, accessories, and supplies ............................................................................................................. 112
Customer self-repair parts ................................................................................................................................ 112
Accessories ........................................................................................................................................................ 112
Index ........................................................................................................................................................... 113
ENWW vii
Page 10

viii ENWW
Page 11

1 Product introduction
●
Product comparison
●
Product views
●
Control panel overview
Go to www.hp.com/support/ljMFPM125series, www.hp.com/support/ljMFPM126series, www.hp.com/
support/ljMFPM127series, or www.hp.com/support/ljMFPM128series for HP's all-inclusive help for your
product:
●
Solve problems.
●
Download software updates.
●
Join support forums.
●
Find warranty and regulatory information.
You can also go to www.hp.com/support for Worldwide support and other HP products.
ENWW 1
Page 12
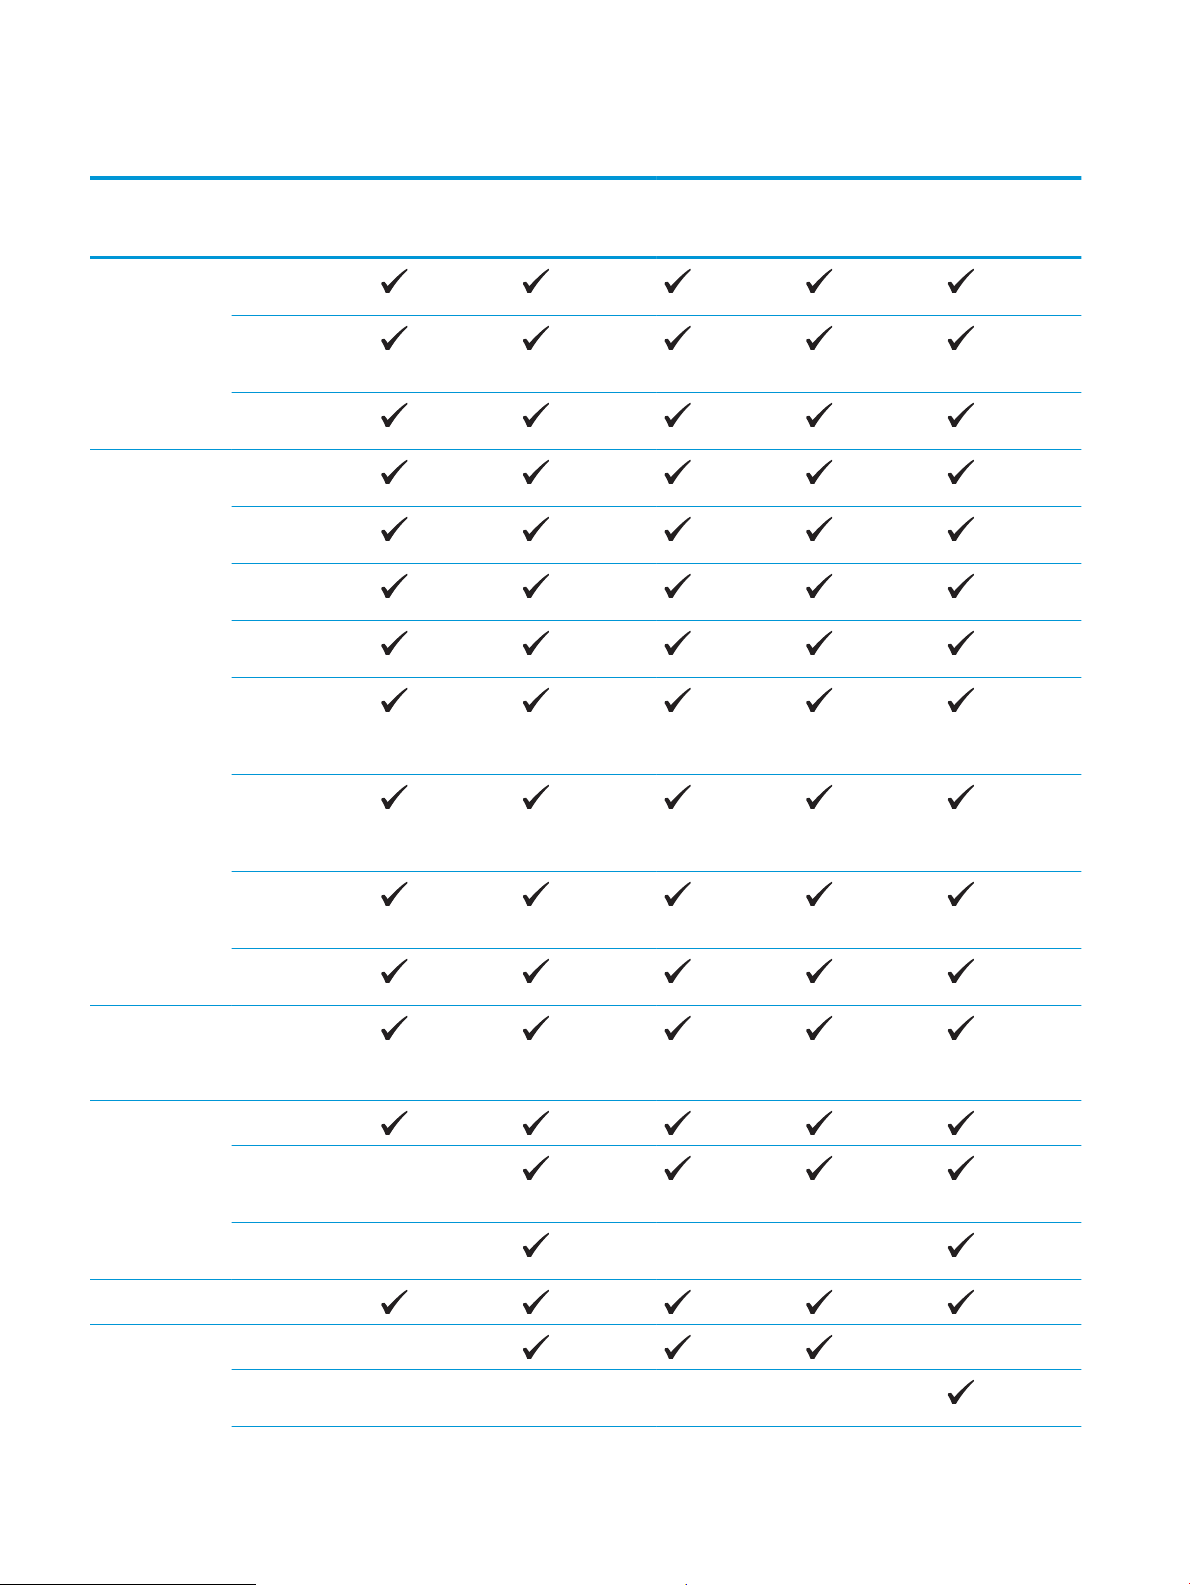
Product comparison
M125a, M125r,
Paper handling Input tray (150-
sheet capacity)
Standard output
bin (100-sheet
capacity)
Short-paper
extender tool
Supported
operating
systems
Windows XP, 32bit
Windows Vista,
32-bit and 64-bit
Windows 7, 32-bit
and 64-bit
Windows 8, 32-bit
and 64-bit
Windows 2003
Server (32-bit and
64-bit), print and
scan drivers only
M125ra, M126a
M125nw,
M125rnw,
M126nw
M127fn, M127fs,
M128fn
M127fp, M128fp M127fw, M128fw
Windows 2008
Server (32-bit and
64-bit), print and
scan drivers only
Windows 2012
Server, print and
scan drivers only
Mac OS X v10.6.8
or later
Supported print drivers
The HP PCLmS print driver is included on
the in-box CD as the default print driver.
Connectivity Hi-Speed USB 2.0
10/100/1000
Ethernet LAN
connection
Wireless network
connection
Memory 128 MB RAM
Control-panel
display
2-line LCD
Color graphical
touchscr
een
2 Chapter 1 Product introduction ENWW
Page 13

M125a, M125r,
M125ra, M126a
2-digit LED
Print Prints 20 pages
per minute (ppm)
on A4-siz
and 21 ppm on
Letter-size paper
e paper
M125nw,
M125rnw,
M126nw
M127fn, M127fs,
M128fn
M127fp, M128fp M127fw, M128fw
Copy Flatbed scanner
supports p
to A4 or Lettersize
Document feeder
Copy resolution is
300 dots per inch
(dpi)
Scan Scan resolution up
to 1200 dpi
Scans in color
Fax V.34 with two
RJ-11 fax por
Telephone handset
aper up
ts
ENWW Product comparison 3
Page 14

Product views
1 2
6
3
45 7
Product front view
1 Output bin
2 Scanner
3 Power on/o button
4 Control panel (tilts up for easier viewing and type varies by model)
5 Input tray
6 Document feeder
7 Short-paper extender tool
4 Chapter 1 Product introduction ENWW
Page 15
Product back view
1
4
3
2
5
6
1 Slot for cable-type security lock
2 Hi-Speed USB 2.0
3 Ethernet port
4 Power connection
5 Fax "line in" port for attaching the fax phone line to the product
6 Telephone "line out" port for attaching an extension phone, answering machine, or other device
ENWW Product views 5
Page 16
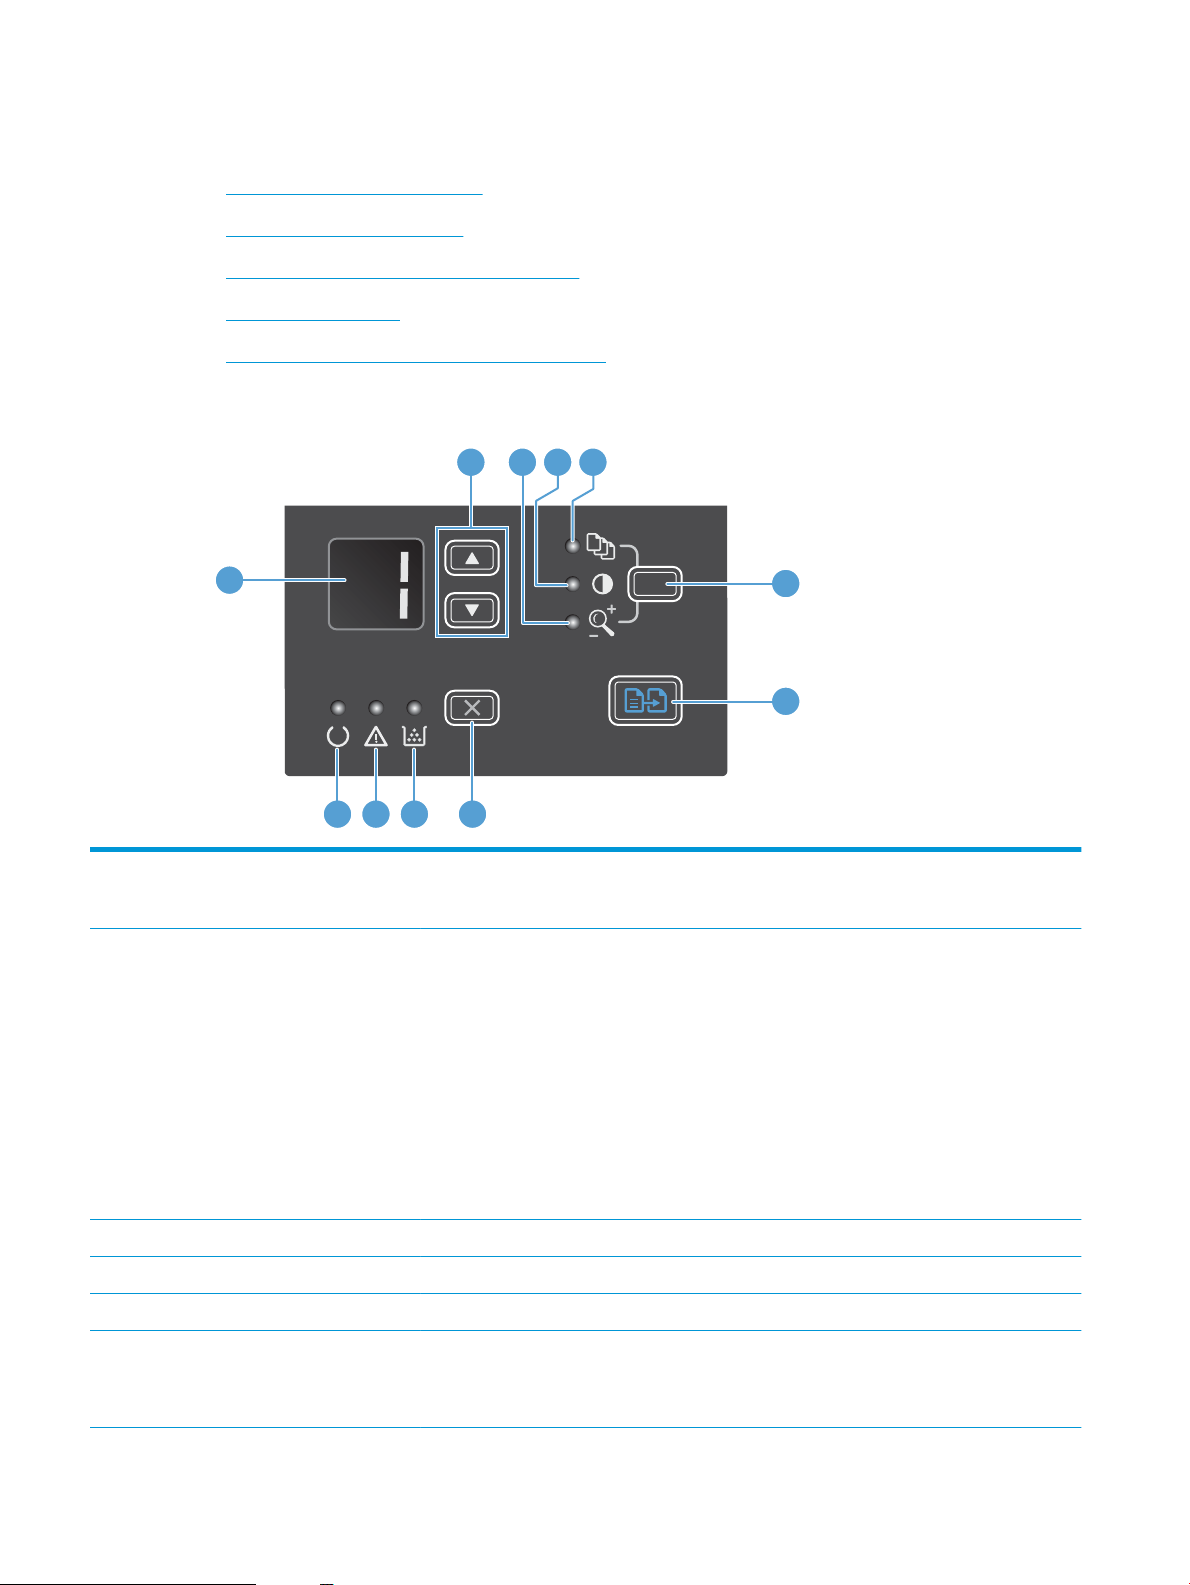
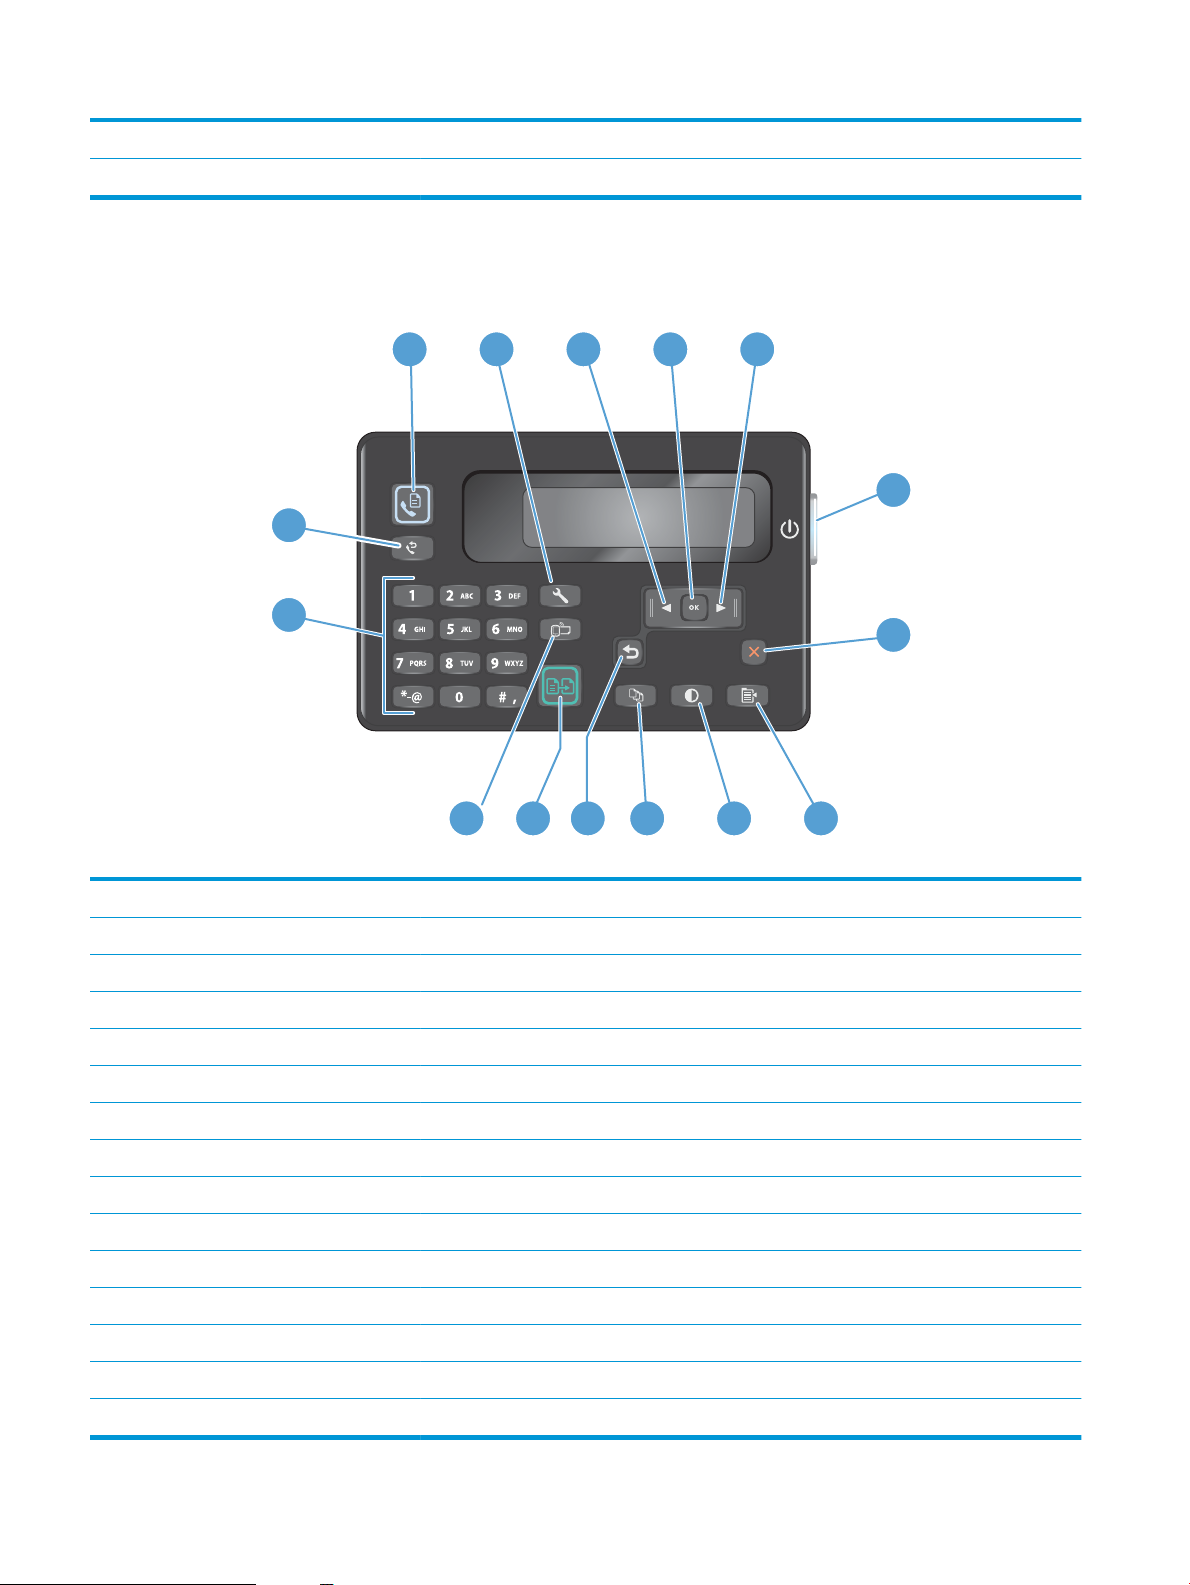
Control panel overview
2 3 4 5
6
1
7
891011
●
M125a, M125r, M125ra, M126a
●
M125nw, M125rnw, M126nw
●
M127fn, M127fs, M128fn, M127fp, M128fp
●
M127fw and M128fw
●
Control-panel Home screen (touchscreen only)
M125a, M125r, M125ra, M126a
1 LED display screen Displays the number of copies, the level of darkness for copies, and the percentage of copysize
reduction or enlar
attention.
2 Up and down arrows Increases or decreases the number of copies, the level of darkness for copies, or the percentage of
copy-size reduction or enlargement.
●
Number of copies: Press the buttons for less than one second to increase or decrease by 1
increment. P
increments.
●
Level of darkness for copies: Press the buttons for less than one second to increase or
decrease b
to the maximum or minimum value.
●
Percentage of copy-size reduction or enlargement: Press the buttons for less than one
second to incr
3 Reduce/Enlarge copy light Indicates the copy-size reduction or enlargement feature is active.
4 Darker/Lighter copy light Indicates the copy-darkness feature is active.
5 Number Of Copies light Indicates the number-of-copies feature is active.
longer to increase or decrease by 100% increments.
6 Setup button Scrolls between the copy settings for number of copies, darkness, and copy size for each job. The
default option is the number of copies. To change the default settings for all jobs, scroll to the
setting and then press and hold the button for 3 seconds. When the light is blinking, adjust the
setting. Press this button again to save the setting.
gement. It also shows error codes that alert you of problems that require
ress the buttons for one second or longer to increase or decrease by 10
y 1 increment. Press the buttons for one second or longer to increase or decrease
ease or decrease by 10% increments. Press the buttons for one second or
6 Chapter 1 Product introduction ENWW
Page 17

7 Start Copy button Starts a copy job.
1
43
2 5
9
8
6
10
7
1112
13
8 Cancel button Cancels the current job, or clears the last setting you made. When the product is in the Ready
state, press this button to reset the copy settings to the default values.
9 Toner-level status light Indicates the level of toner in the print cartridge is low.
10 Attention light Indicates a problem with the product.
11 Ready light Indicates the product is ready or is processing a job.
M125nw, M125rnw, M126nw
1 Wireless button Enable/Disable wireless
2 Setup button Opens the Setup menu
3 Left arrow button Moves the cursor to the left or scrolls through menu options
4 OK button Conrms a setting or conrms an action to proceed
5 Right arrow button Moves the cursor to the right or scrolls through menu options
6 Power on/o button Turns the product on or o
7 Cancel button Clears settings, cancels the current job, or exits the current menu
8 Copy Settings button Opens the Copy Settings menu
9 Lighter/Darker button Adjusts the darkness setting for the current copy job
10 Number of Copies button Sets the number of copies
11 Back button Returns to the previous screen
ENWW Control panel overview 7
Page 18
12 Start Copy button Starts a copy job
1
43
2 5
9
8
6
10
7
111213
14
15
13 ePrint button Opens the Web Services menu
M127fn, M127fs, M128fn, M127fp, M128fp
1 Start Fax button Starts a fax job
2 Setup button Opens the Setup menu
3 Left arrow button Moves the cursor to the left or scrolls through menu options
4 OK button Conrms a setting or an action to proceed
5 Right arrow button Moves the cursor to the right or scrolls through menu options
6 Power on/o button Turns the product on or o
7 Cancel button Clears settings, cancels the current job, or exits the current menu
8 Copy Settings button Opens the Copy Settings menu
9 Lighter/Darker button Adjusts the darkness setting for the current copy job
10 Number of Copies button Sets the number of copies
11 Back button Returns to the previous screen
12 Start Copy button Starts a copy job
13 ePrint button Opens the Web Services menu
14 Numeric keypad Use the keypad to enter fax numbers or select menu options
15 Fax Redial button Recalls the fax number used for the previous fax job
8 Chapter 1 Product introduction ENWW
Page 19
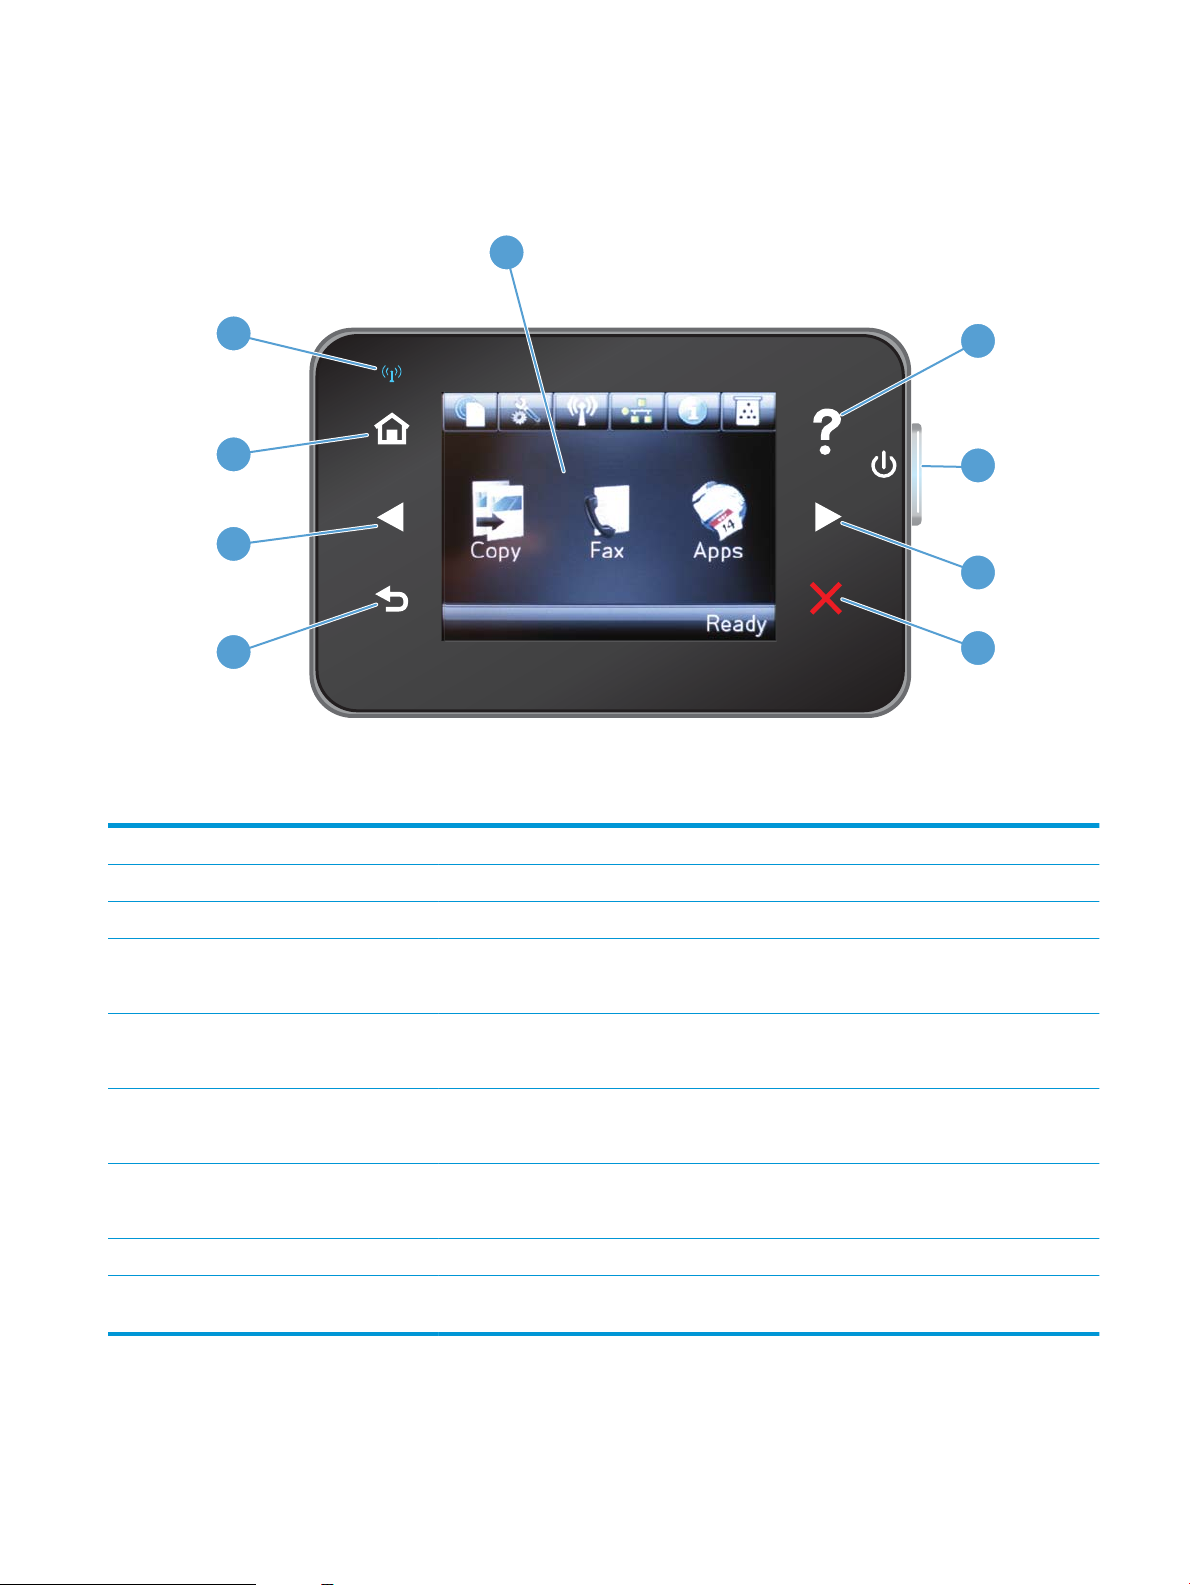
M127fw and M128fw
1
9
8
2
4
5
7
6
3
1 Touchscreen display Provides access to the product features and indicates the current status of the product
2 Help button and light Provides access to the control-panel help system
3 Power on/o button Turns the product on or o
4 Right arrow button Moves the cursor to the right or moves the display to the next screen
NOTE: This button illuminates only when the current screen can use this feature.
5 Cancel button Clears settings, cancels the current job, or exits the current screen
6 Back button and light Returns to the previous screen
7 Left arrow button Moves the cursor to the left or moves the display to the previous screen
NOTE: This button illuminates only when the current screen can use this feature.
NOTE: This button illuminates only when the current screen can use this feature.
NOTE: This button illuminates only when the current screen can use this feature.
8 Home button and light Provides access to the Home screen
9 Wireless light Indicates the wireless network is enabled. The light blinks while the product is establishing a
connection to the wireless network.
ENWW Control panel overview 9
Page 20
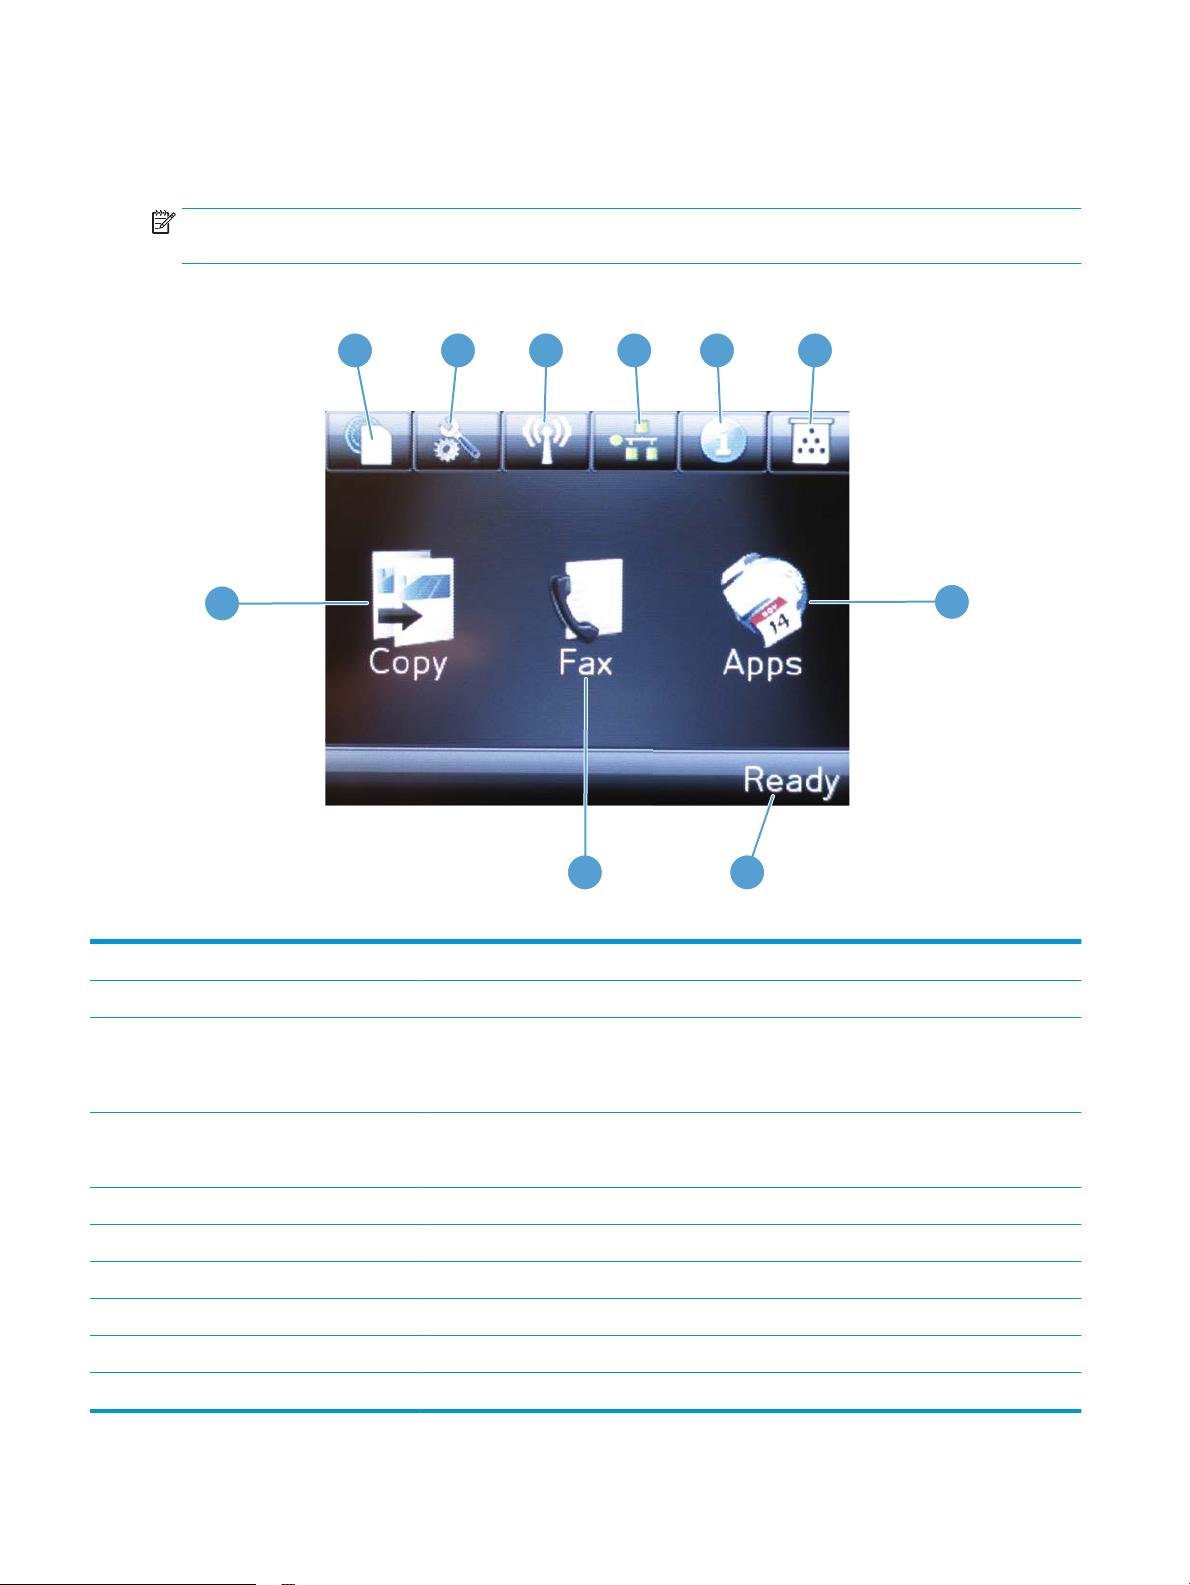
Control-panel Home screen (touchscreen only)
1
2
3
4
5 6
10
7
89
The Home screen provides access to the product features, and it indicates the product status.
NOTE: Depending on the product conguration, the features on the Home screen can vary. The layout might
also be reversed for some languages.
1 HP Web Services button Provides quick access to HP Web Services features, including HP ePrint
2 Setup button Opens the Setup menu
3 Wireless button Provides access to the Wireless menu and wireless status information
4 Network button Provides access to network settings and information
5 Information button Provides product status information
6 Supplies button Provides information about supplies status
7 Apps button Provides access to the Apps menu to print directly from select Web applications
8 Product status Provides information about the overall product status
9 Fax button Provides access to the fax feature
10 Copy button Provides access to the copy feature
10 Chapter 1 Product introduction ENWW
NOTE: When you are connected to a wireless network, this icon changes to a set of signal
strength bars.
NOTE: This button displays only when the product is connected to a network.
Page 21

2 Paper trays
●
Supported paper sizes and types
●
Load the input tray
Go to www.hp.com/support/ljMFPM125series, www.hp.com/support/ljMFPM126series, www.hp.com/
support/ljMFPM127series, or www.hp.com/support/ljMFPM128series for HP's all-inclusive help for your
product:
●
Solve problems.
●
Download software updates.
●
Join support forums.
●
Find warranty and regulatory information.
You can also go to www.hp.com/support for Worldwide support and other HP products.
ENWW 11
Page 22

Supported paper sizes and types
●
Supported paper sizes
●
Supported paper types
Supported paper sizes
NOTE: To obtain the best results, select the correct paper size and type in the print driver before printing.
Size Dimensions
Letter 216 x 279 mm (8.5 x 11 in)
Legal 216 x 356 mm (8.5 x 14 in)
A4 210 x 297 mm (8.3 x 11.7 in)
A5 148 x 210 mm (5.8 x 8.3 in)
A6 105 x 148 mm (4.1 x 5.8 in)
B5 (JIS) 182 x 257 mm (7.2 x 10.1 in)
Executive 184 x 267 mm (7.3 x 10.5 in)
Postcard (JIS) 100 x 148 mm (3.9 x 5.8 in)
Double Postcard (JIS) 200 x 148 mm (7.9 x 5.8 in)
16K 184 x 260 mm (7.2 x 10.3 in)
16K 195 x 270 mm (7.7 x 10.6 in)
16K 197 x 273 mm (7.8 x 10.8 in)
8.5 x 13 216 x 330 mm (8.5 x 13 in)
Envelope #10 105 x 241 mm (4.1 x 9.5 in)
Envelope Monarch 98 x 191 mm (3.9 x 7.5 in)
Envelope B5 176 x 250 mm (6.9 x 9.8 in)
Envelope C5 162 x 229 mm (6.4 x 9 in)
Envelope DL 110 x 220 mm (4.3 x 8.7 in)
Custom 76 x 127 mm to 216 x 356 mm (3 x 5 in to 8.5 x 14 in)
12 Chapter 2 Paper trays ENWW
Page 23

Supported paper types
NOTE: To obtain the best results, select the correct paper size and type in the print driver before printing.
●
Plain
●
HP EcoSMART Lite
●
Light 60–74g
●
Midweight 96–110g
●
Heavy 111–130g
●
Extra Heavy 131–175g
●
Monochrome Laser Transparency
●
Labels
●
Letterhead
●
Preprinted
●
Prepunched
●
Colored
●
●
●
●
●
Rough
Bond
Recycled
Envelope
Vellum
ENWW Supported paper sizes and types 13
Page 24
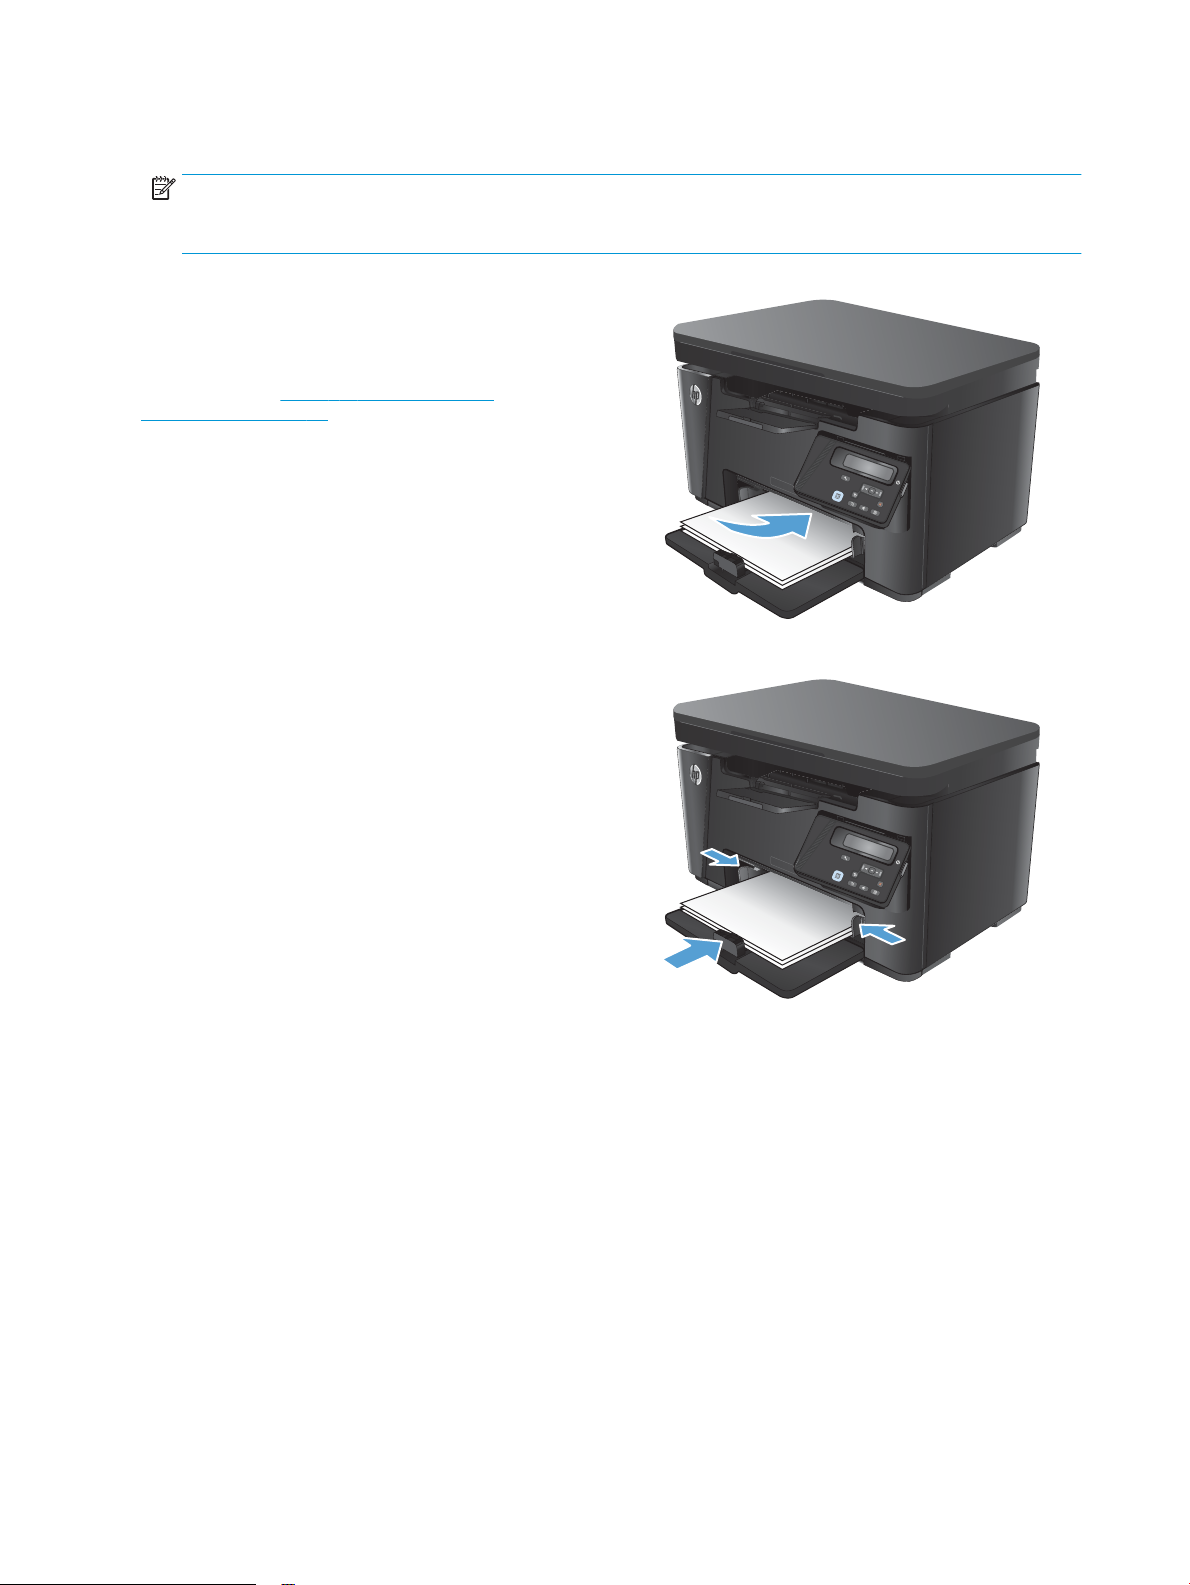
Load the input tray
NOTE: When you add new paper, make sure that you remove all of the paper from the input tray and
straighten the stack. Do not fan the paper. This reduces jams by preventing multiple sheets of paper from
feeding through the product at one time.
1. Load the paper face-up with the top forward in
the input tray.
The orientation of the paper in the tray varies
depending on the type of print job. For additional
information, see Table 2-1 Input tray paper
orientation on page 15.
2. Adjust the paper guides until they are snug
against the paper.
14 Chapter 2 Paper trays ENWW
Page 25
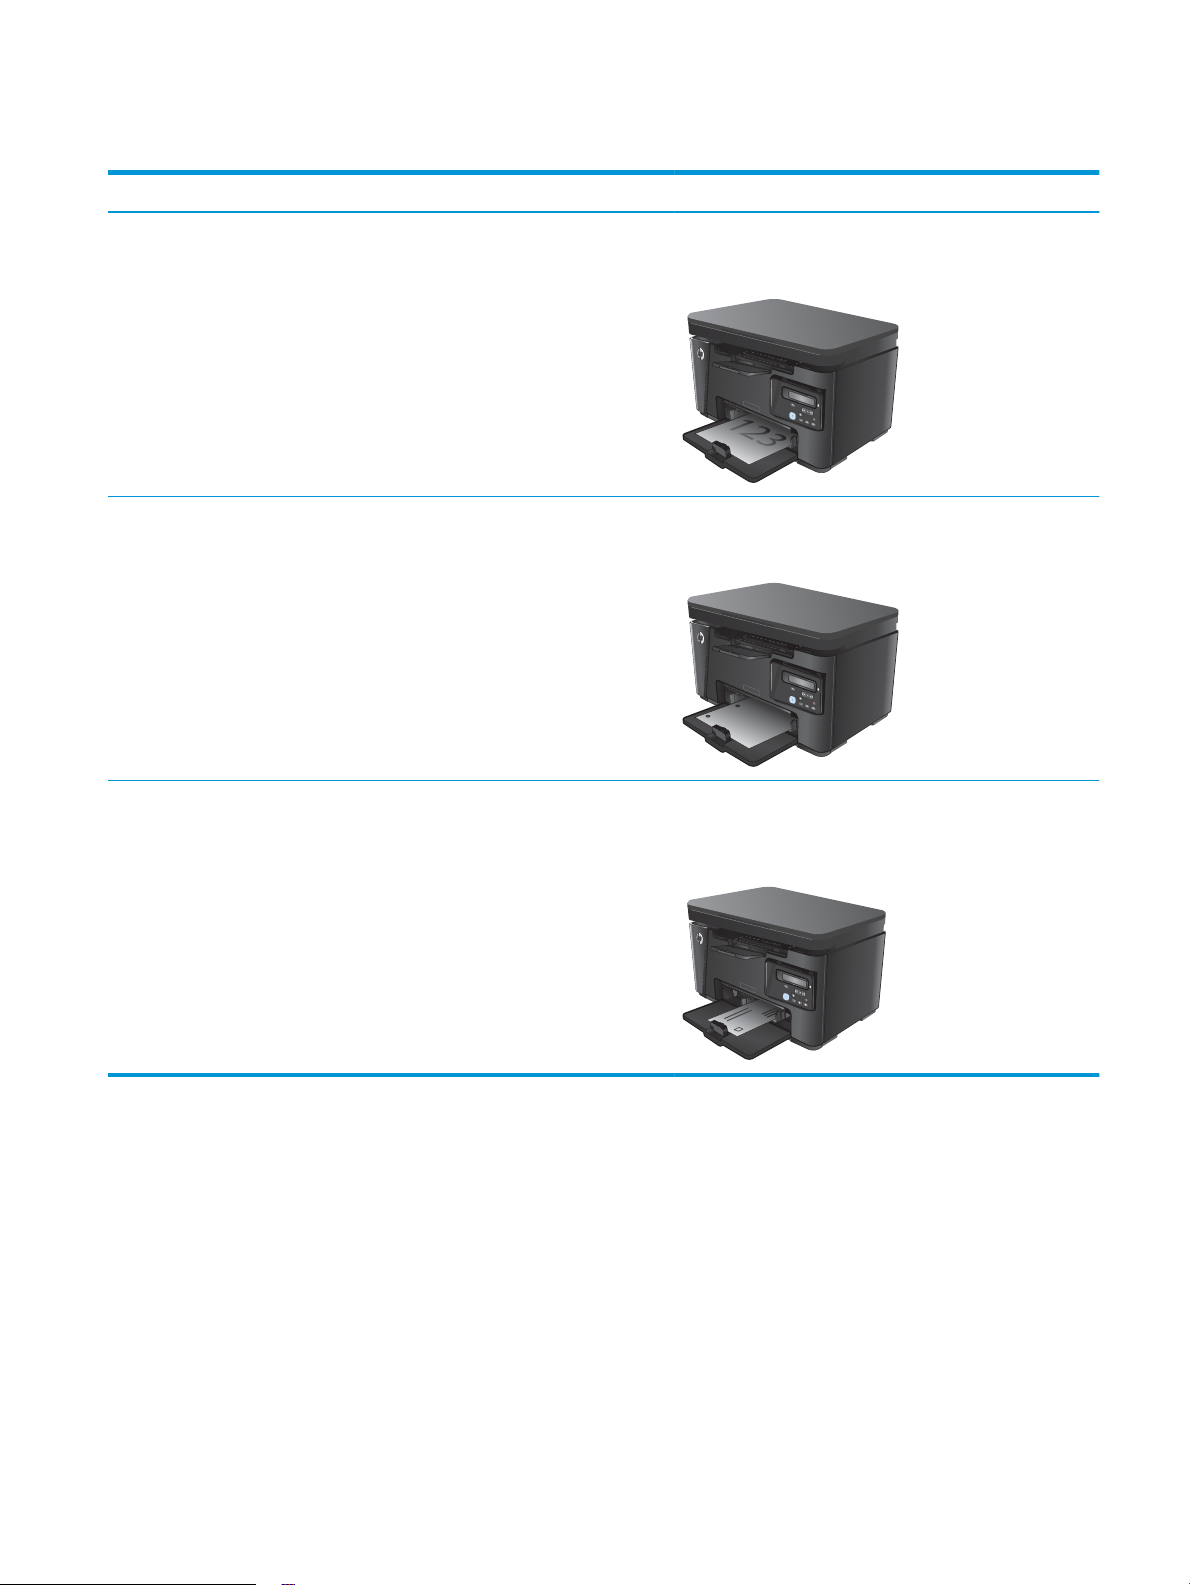
Table 2-1 Input tray paper orientation
Paper type Duplex mode How to load paper
Preprinted or letterhead 1–sided printing or 2–sided printing Face-up
Top edge leading into the product
Prepunched 1–sided printing or 2–sided printing Face-up
Holes toward the left side of the product
Envelopes 1-sided printing Face-up
Top edge toward the right of the tray, postage end entering
the product las
t
ENWW Load the input tray 15
Page 26
Tray adjustment for small paper sizes
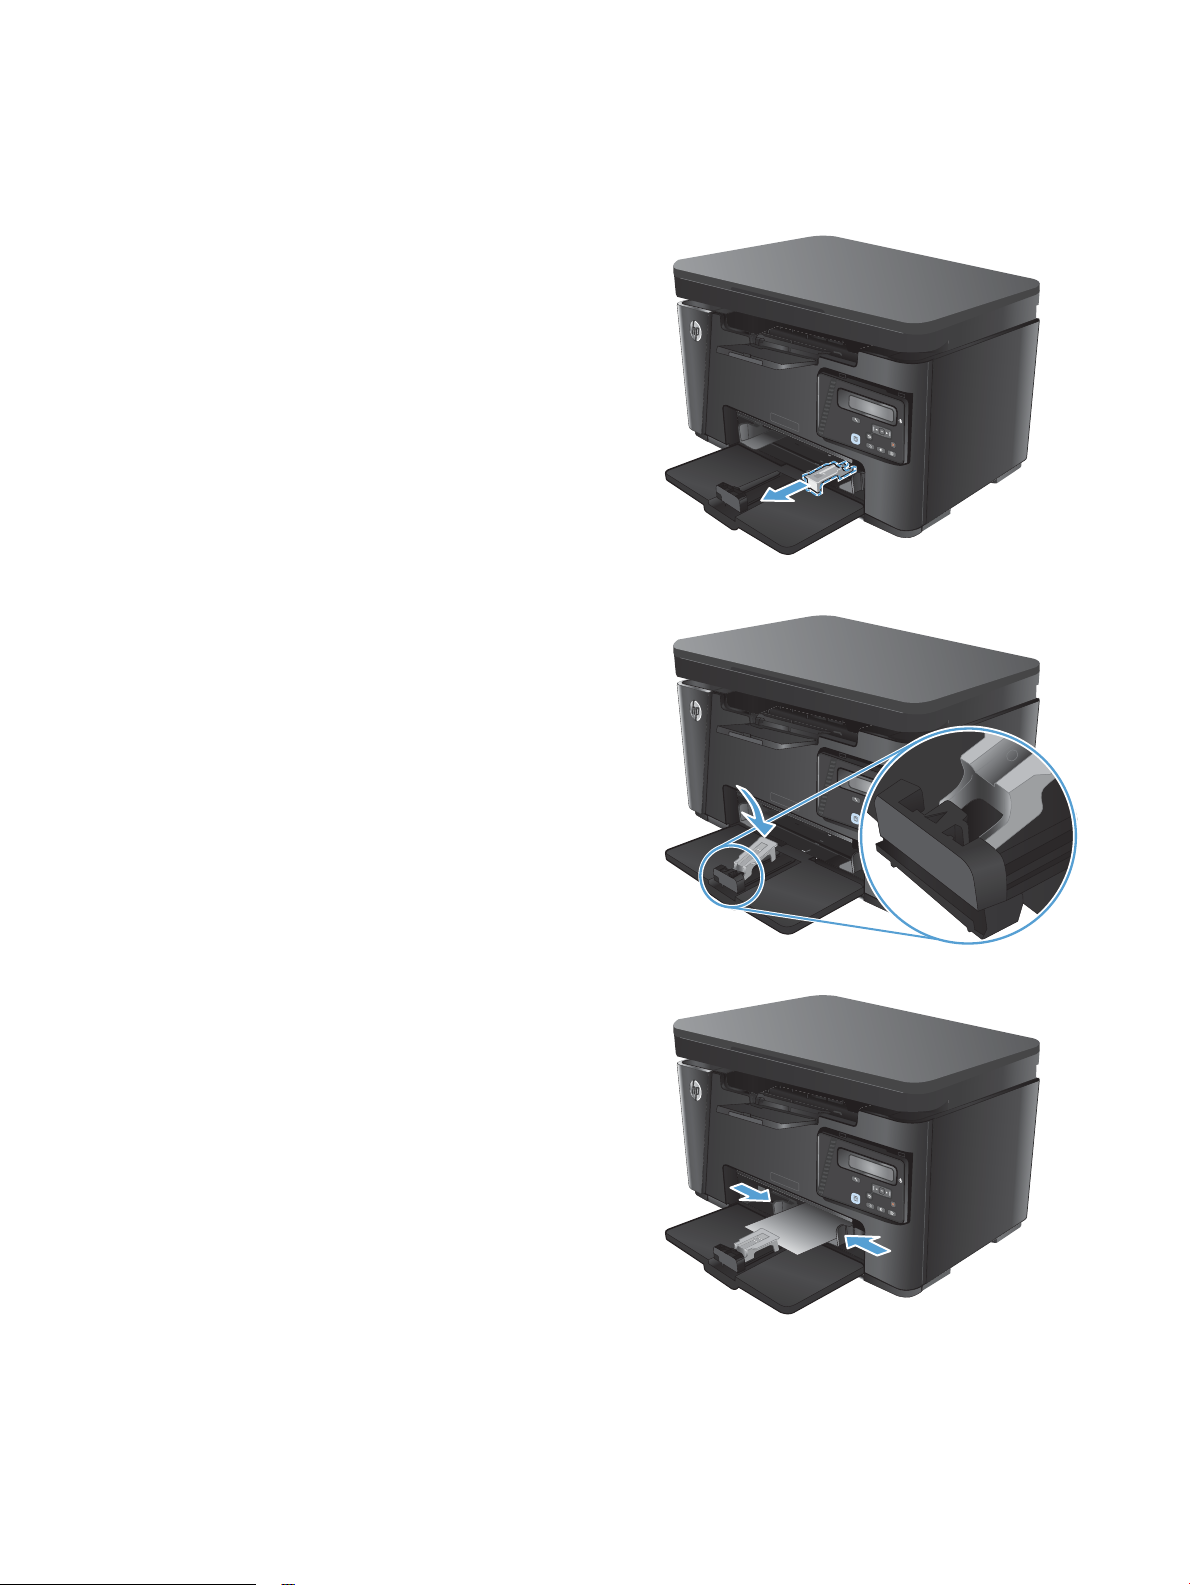
To print on paper shorter than 185 mm (7.3 in), use the short-paper extender to modify the input tray.
1. Remove the short-paper extender tool from the
storage slot on the right side of the input area.
2. Attach the tool to the paper length guide on the
input tray.
3. Load the paper into the tray, and then adjust the
paper guides until they are snug against the
paper.
16 Chapter 2 Paper trays ENWW
Page 27
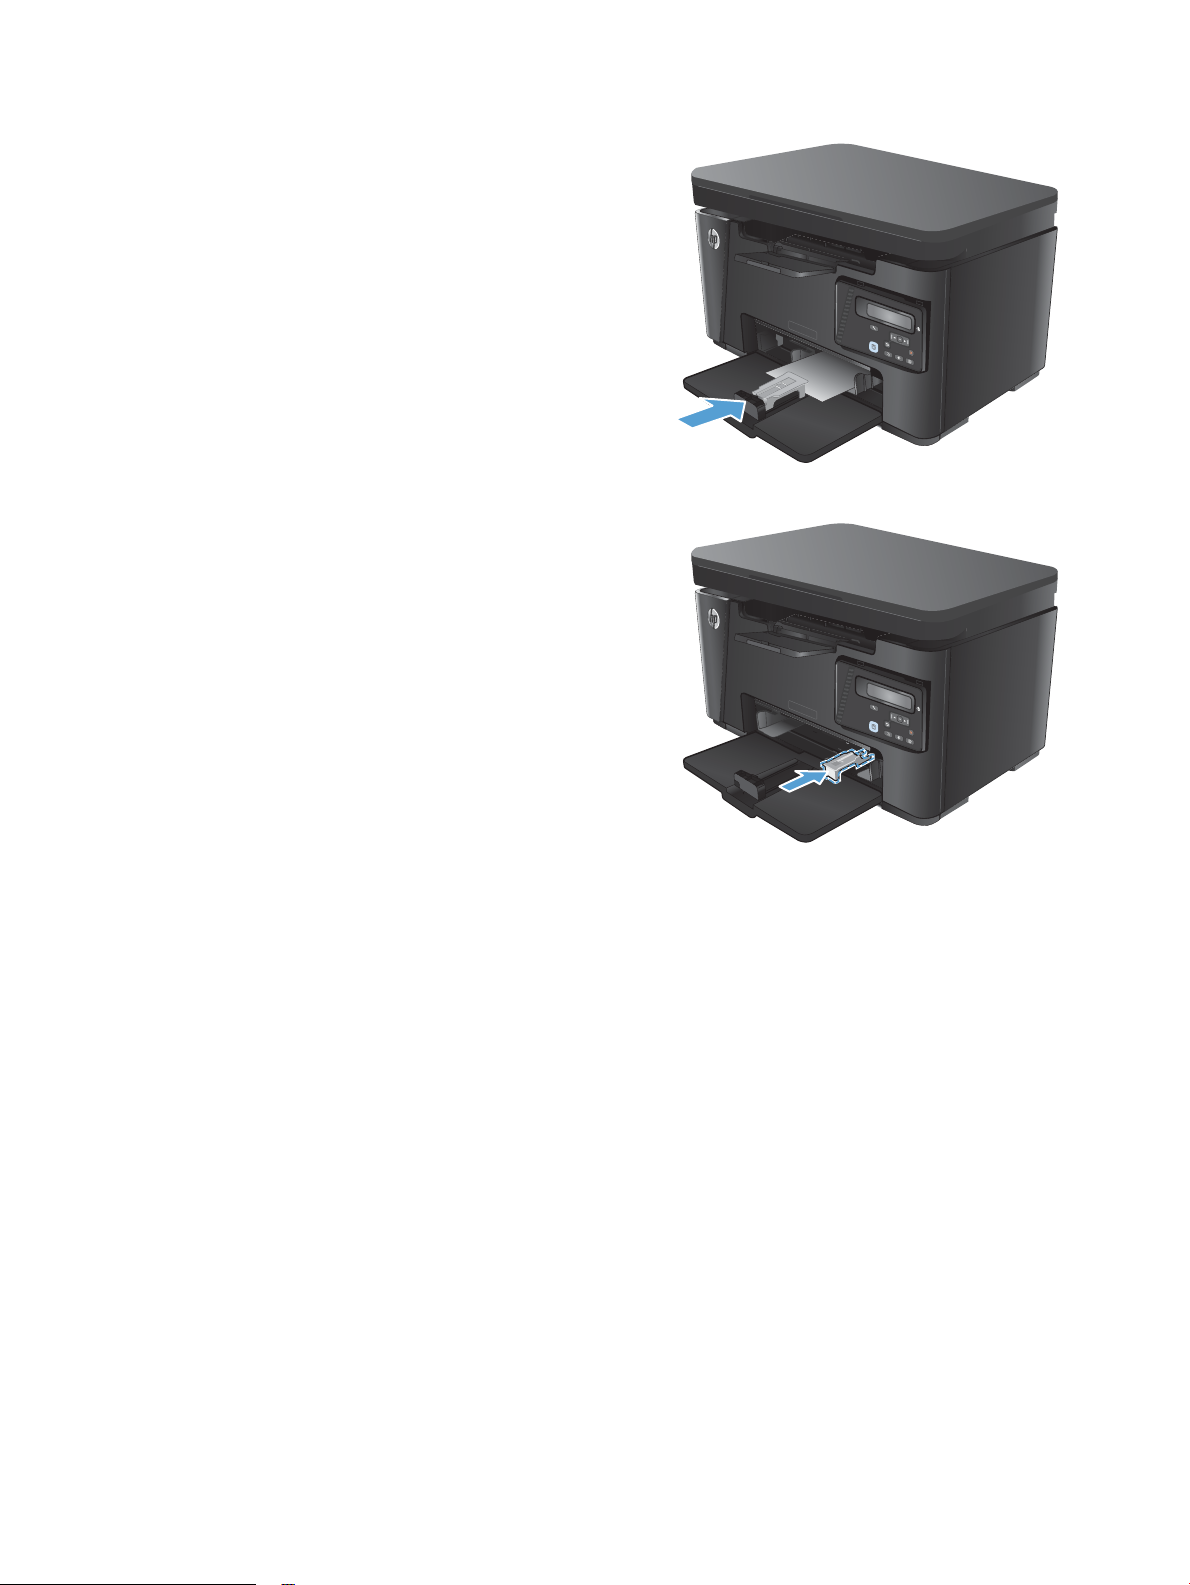
4. Push the paper into the product until it stops, and
then push the paper length guide in so the
extender tool supports the paper.
5. When nished printing on short paper, remove
the short-paper extender tool from the input
tray, and then place it in the storage slot.
ENWW Load the input tray 17
Page 28

18 Chapter 2 Paper trays ENWW
Page 29

3 Print
●
Print tasks (Windows)
●
Print tasks (Mac OS X)
●
Web-based printing
●
Set up HP Wireless Direct Printing
Go to www.hp.com/support/ljMFPM125series, www.hp.com/support/ljMFPM126series, www.hp.com/
support/ljMFPM127series, or www.hp.com/support/ljMFPM128series for HP's all-inclusive help for your
product:
●
Solve problems.
●
Download software updates.
●
Join support forums.
●
Find warranty and regulatory information.
You can also go to www.hp.com/support for Worldwide support and other HP products.
Print tasks (Windows)
●
How to print (Windows)
●
Manually print on both sides (Windows)
●
Print multiple pages per sheet (Windows)
●
Select the paper type (Windows)
●
Additional printing information
How to print (Windows)
The following procedure describes the basic printing process for Windows.
1. From the software program, select the Print option.
2. Select the product from the list of printers, and then click or tap the Properties or Preferences button to
open the print driver.
NOTE: The name of the button varies for dierent software programs.
3. Click or tap the tabs in the print driver to congure the available options.
ENWW Print tasks (Windows) 19
Page 30
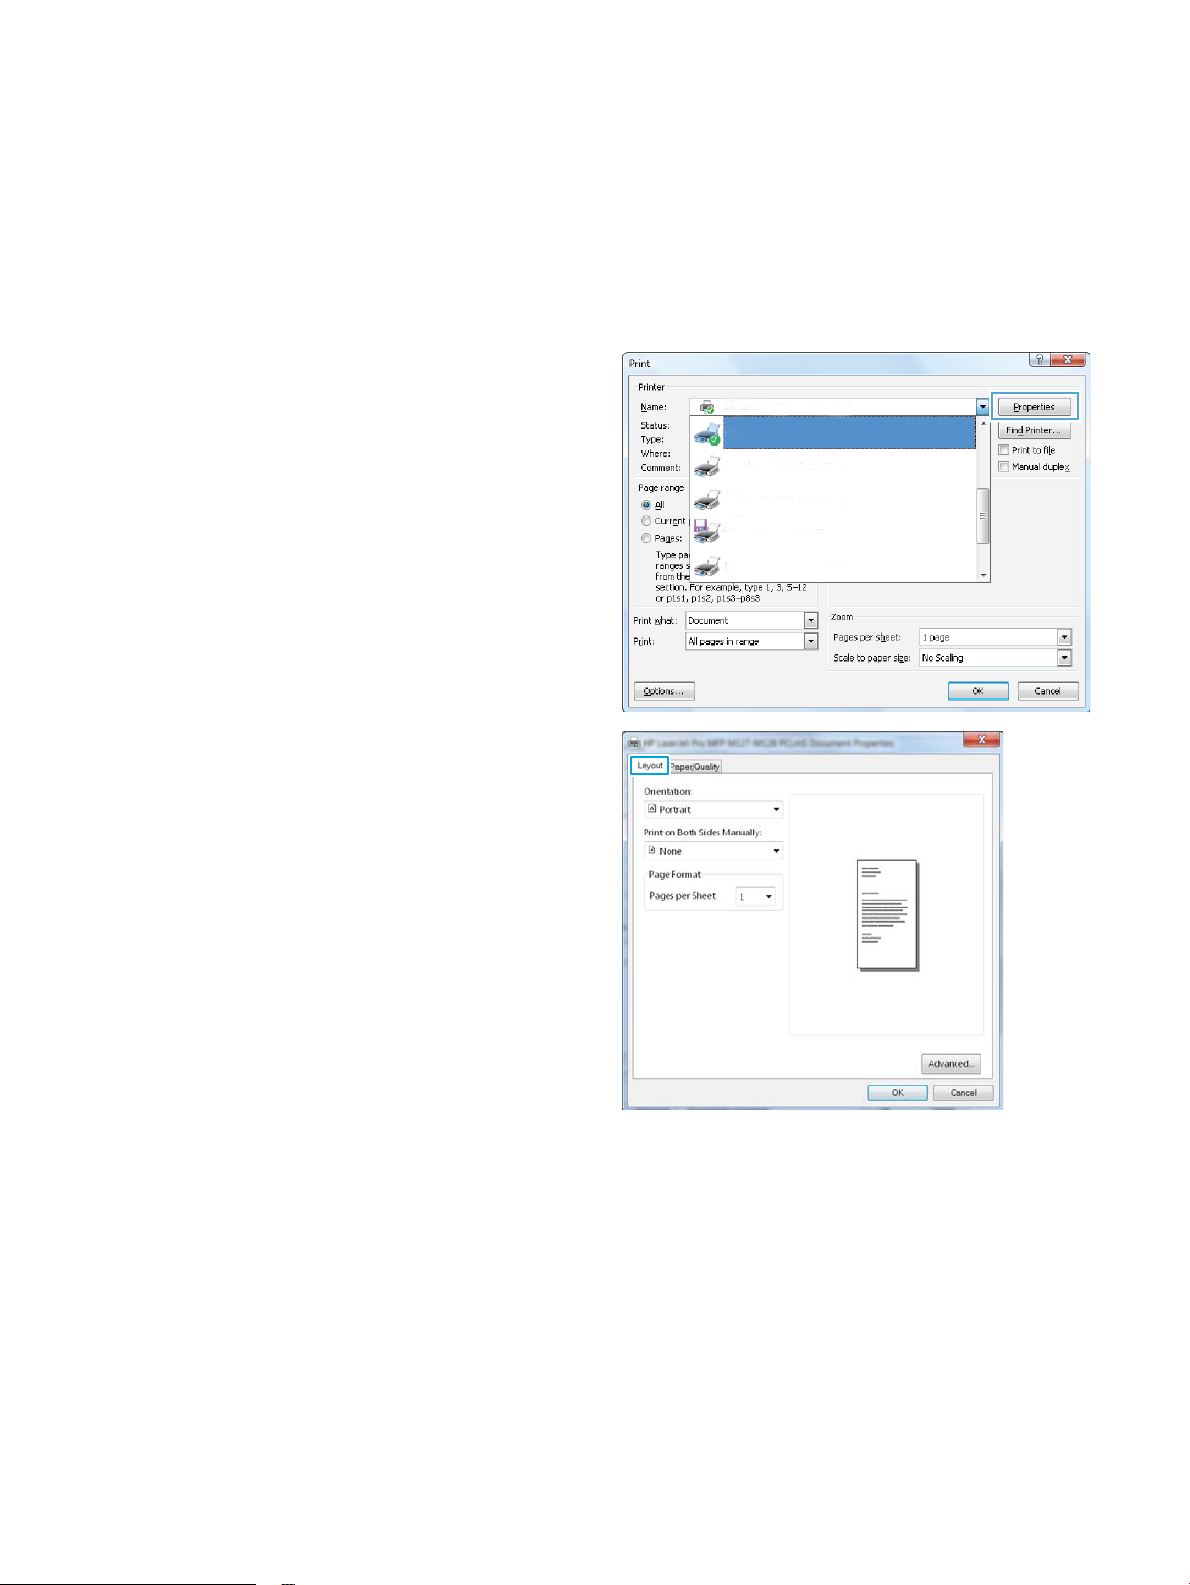
4. Click or tap the OK button to return to the Print dialog box. Select the number of copies to print from
this screen.
5. Click or tap the OK button to print the job.
Manually print on both sides (Windows)
1. From the software program, select the Print
option.
2. Select the product from the list of printers, and
then click or tap the Properties or Preferences
button to open the print driver.
NOTE: The name of the button varies for
dierent software programs.
3. Click or tap the Layout tab.
20 Chapter 3 Print ENWW
Page 31

4. Select the appropriate duplex option from the
Print on Both Sides Manually drop-down list,
and then click or tap the OK button.
5. In the Print dialog box, click or tap the OK button
to print the job. The product will print the rst
side of all the pages in the document rst.
6. Retrieve the printed stack from the output bin,
ace it with the printed-side facing down,
and pl
top edge rst in the input tray.
7. At the computer, click or tap the OK button to
8. If prompted, touch or press the appropriate
ENWW Print tasks (Windows) 21
t the second side of the job.
prin
ontrol panel button to continue.
c
Page 32

Print multiple pages per sheet (Windows)
1. From the software program, select the Print
option.
2. Select the product from the list of printers, and
then click or tap the Properties or Preferences
button to open the print driver.
NOTE: The name of the button varies for
dierent software programs.
3. Click or tap the Layout tab.
4. Select the correct Orientation option from the
drop-down list.
22 Chapter 3 Print ENWW
Page 33

5. Select the correct number of pages per sheet
from the Pages per sheet drop-down list, and
then click or tap the Advanced button.
6. Select the correct Pages per Sheet Layout option
from the drop-down list.
ENWW Print tasks (Windows) 23
Page 34

7. Select the correct Page Borders option from the
drop-down list, click or tap the OK button to close
the Advanced Options dialog box, and then click
or tap the OK button to close the Properties or
Preferences dialog box.
8. In the Print dialog box, click or tap the OK button
to print the job.
Select the paper type (Windows)
1. From the software program, select the
option.
2. Select the product from the list of printers, and
then click or tap the
button to open the print driver.
Properties or Preferences
Print
NOTE: The name of the button varies for
dierent software programs.
24 Chapter 3 Print ENWW
Page 35

3. Click or tap the Paper/Quality tab.
4. From the Media: drop-down list, select the
correct paper type, and then click or tap the OK
button to close the Properties or Preferences
dialog box.
5. In the Print dialog box, click the OK button to
print the job.
Additional printing information
Go to www.hp.com/support to visit the support Web site for this product and for details about performing
specic print tasks, such as the following:
ENWW Print tasks (Windows) 25
Page 36

●
Select the paper size
●
Select the page orientation
●
Create a booklet
●
Select the quality settings
●
Select page borders
26 Chapter 3 Print ENWW
Page 37

Print tasks (Mac OS X)
●
How to print (Mac OS X)
●
Manually print on both sides (Mac OS X)
●
Print multiple pages per sheet (Mac OS X)
●
Select the paper type (Mac OS X)
●
Additional printing information
How to print (Mac OS X)
The following procedure describes the basic printing process for Mac OS X.
1. Click the File menu, and then click the Print option.
2. In the Printer menu, select the product.
3. Open the menus drop-down list or click Show Details, and then select other menus to adjust the print
settings.
4. Click the Print button.
Manually print on both sides (Mac OS X)
NOTE: This feature is available if you install the HP print driver. It might not be available if you are using
AirPrint.
1. Click the File menu, and then click the Print option.
2. In the Printer menu, select the product.
3. Open the menus drop-down list or click Show Details, and then click the Manual Duplex menu.
4. Click the Manual Duplex box, and then select a binding option.
5. Click the Print button. The product will print the rst side of all the pages in the document rst.
ENWW Print tasks (Mac OS X) 27
Page 38

6. Retrieve the printed stack from the output bin, and place it with the printed-side facing down, top edge
rst in the input tray.
7. At the computer, click the Continue button to print the second side of the job.
8. If prompted, touch the appropriate control panel button to continue.
Print multiple pages per sheet (Mac OS X)
1. Click the File menu, and then click the Print option.
2. In the Printer menu, select the product.
3. Open the menus drop-down list or click Show Details, and then click the Layout menu.
4. From the Pages per Sheet drop-down list, select the number of pages that you want to print on each
sheet.
5. In the Layout Direction area, select the order and placement of the pages on the sheet.
6. From the Borders menu, select the type of border to print around each page on the sheet.
7. Click the Print button.
Select the paper type (Mac OS X)
1. Click the File menu, and then click the Print option.
2. In the Printer menu, select the product.
3. Open the menus drop-down list or click Show Details, and then click the Finishing menu.
4. Select a type from the Media-type drop-down list.
5. Click the Print button.
Additional printing information
Go to www.hp.com/support to visit the support Web site for this product and for details about performing
specic print tasks, such as the following:
28 Chapter 3 Print ENWW
Page 39

●
Create and use printing shortcuts or presets
●
Select the paper size, or use a custom paper size
●
Select the page orientation
●
Create a booklet
●
Scale a document to t a specic paper size
●
Print the rst or last pages of the document on dierent paper
●
Print watermarks on a document
ENWW Print tasks (Mac OS X) 29
Page 40

Web-based printing
Several options are available for remote printing over the Internet.
HP ePrint
Use HP ePrint to print documents by sending them as an email attachment to the product's email address
from any email enabled device.
To use HP ePrint, the product must meet these requirements:
●
The product must be connected to a wired or wireless network and have Internet access.
●
HP Web Services must be enabled on the product, and the product must be registered with HP
Connected.
LCD control panel
1. Find the product IP address.
a. On the product control panel, press the Setup button.
b. Open the following menus:
●
Network Setup
●
Show IP Address
2. To open the HP Embedded Web Server, enter the product IP address into the address line of a Web
browser on the c
3. Click the HP Web Services tab on the HP Embedded Web Server, and then click Enable. The product
en
ables Web Services, and then prints an information page.
The information page contains the printer code that you use to register your HP product at HP
Connected.
4. Go to www.hpconnected.com to create an HP ePrint account and complete the setup process.
Touchscreen control panel
1. From the Home screen on the product control panel, touch the Web Services button.
2. Touch the Enable Web Services button. The product enables Web Services, and then prints an
information page.
The information page contains the printer code that you use to register your HP product at HP
Connected.
3. Go to www.hpconnected.com to create an HP ePrint account and complete the setup process.
For more information, go to www.hp.com/support to view additional information for your product.
HP ePrint software
omputer.
The HP ePrint software makes it easy to print from a desktop or laptop computer to any HP ePrint-capable
product. After installing the software, open the Print option from your application, and then select HP ePrint
from the installed printers list. This software makes it easy to nd HP ePrint-enabled products that are
30 Chapter 3 Print ENWW
Page 41

AirPrint
registered to your HP Connected account. The target HP product can be at your desk or in a remote location,
such as a branch oce or across the globe.
For Windows, the HP ePrint software also supports traditional direct IP printing to local network printers on
the network (LAN or WAN) to supported PostScript® products.
Go to www.hp.com/go/eprintsoftware for drivers and information.
NOTE: The HP ePrint software is a PDF workow utility for Mac, and is not technically a print driver. HP
ePrint software for Mac supports print paths only through HP Connected and does not support direct IP
printing to local network printers.
Direct printing using Apple’s AirPrint is supported for iOS 4.2 or later. Use AirPrint to print directly to the
product from an iPad, iPhone (3GS or later), or iPod touch (third generation or later) in the following
applications:
●
Mail
●
Photos
●
Safari
●
iBooks
●
Select third-party applications
To use AirPrint, the product must be connected to the same wireless network as the Apple device. For more
information about using AirPrint and about which HP products are compatible with AirPrint, go to
www.hp.com/go/airprint.
NOTE: AirPrint does not support USB connections. AirPrint provides print-only mobile functionality. AirPrint
does not support scanning.
ENWW Web-based printing 31
Page 42

Set up HP Wireless Direct Printing
NOTE: This feature is available with wireless models only and the product might require a rmware update
to use this feature.
The HP Wireless Direct Printing feature lets you print from your wireless mobile device directly to an
HP Wireless Direct-enabled product without requiring connection to an established network or the Internet.
Use HP Wireless Direct to print wirelessly from the following devices:
●
iPhone, iPad, or iTouch using Apple AirPrint or the HP ePrint mobile app
●
Mobile devices that run Android or Symbian using the HP ePrint Home & Biz application
●
Any Wi-Fi capable computer with any operating system.
For more information on HP Wireless Direct, go to www.hp.com/go/wirelessprinting, and then click HP
Wireless Direct.
To set up HP Wireless Direct from the control panel, complete the following steps:
LCD control panel
1. At the product control panel, press the OK button to open the menus.
2. Open the following menus:
●
Network Setup
●
Wireless Menu
●
Wireless Direct
3. Select the On option, and then press the OK button. The product saves the setting and then returns the
control panel to the Wireless Direct Settings menu.
Touchscreen control panel
1. From the Home screen on the product control panel, touch the Wireless button.
2. Open the following menus:
●
Wireless Menu
●
Wireless Direct Settings
●
On/O
3. Touch the
Wireless Direct Settings menu.
On menu item. The product saves the setting and then returns the control panel to the
32 Chapter 3 Print ENWW
Page 43

4 Copy
●
Make a copy
●
Copy on both sides (duplex)
●
Optimize copy quality
●
Adjust the lightness or darkness for copies (LED control panel only)
●
Reduce or enlarge copies (LED control panel only)
Go to www.hp.com/support/ljMFPM125series, www.hp.com/support/ljMFPM126series, www.hp.com/
support/ljMFPM127series, or www.hp.com/support/ljMFPM128series for HP's all-inclusive help for your
product:
●
Solve problems.
●
Download software updates.
●
Join support forums.
●
Find warranty and regulatory information.
You can also go to www.hp.com/support for Worldwide support and other HP products.
ENWW 33
Page 44

Make a copy
LED control panel
1. Load the document on the scanner glass according to the indicators on the product.
2. Close the scanner.
3. At the product control panel, press the Setup button, and make sure that the Number of Copies
light is on.
4. Press the arrow buttons to adjust the number of copies.
5. Press the Start Copy button to start copying.
LCD control panel
1. Load the document on the scanner glass according to the indicators on the product.
2. Close the scanner.
3. At the product control panel, press the Number of Copies button.
4. Select the number of copies.
5. Press the Start Copy button to start copying.
Touchscreen control panel
1. Load the document on the scanner glass according to the indicators on the product.
2. Close the scanner.
3. From the Home screen on the product control panel, touch the Copy button.
4. Touch the arrows to change the number of copies, or touch the existing number and type the number of
copies.
5. Touch the Start Copy button to start copying.
34 Chapter 4 Copy ENWW
Page 45

Copy on both sides (duplex)
1. Load the document on the scanner glass according to the indicators on the product.
2. Close the scanner.
3. Start the copy job.
●
LED and LCD control panels: On the product control panel, press the Start Copy button
●
Touchscreen control panel: From the Home screen on the product control panel, touch the Copy
button.
4. Retrieve the printed page from the output bin, and place it with the printed-side facing down, top edge
rst in the input tray.
5. Flip the original document on the scanner glass to copy the second side.
6. Start the copy job.
●
LED and LCD control panels: On the product control panel, press the Start Copy button
●
Touchscreen control panel: From the Home screen on the product control panel, touch the Copy
button.
7. Repeat this process until you have copied all of the pages.
ENWW Copy on both sides (duplex) 35
Page 46

Optimize copy quality
The following copy-quality settings are available:
●
Auto Select: Use this setting when you are not concerned about the quality of the copy.
●
Mixed: Use this setting for documents that contain a mixture of text and graphics.
●
Text: Use this setting for documents that contain mostly text. This is the default setting for Copy
Optimize.
●
Picture: Use this setting for documents that contain mostly graphics.
LED control panel
1. Click the Start button, and then click the Programs item.
2. Click your HP product group, and then click the HP Device Toolbox item.
3. On the Systems tab, click Copy Setup.
LCD control panel
1. Load the document on the scanner glass according to the indicators on the product.
2. Close the scanner.
3. On the product control panel, press the Copy Menu button.
4. Open the Optimize menu.
5. Use the arrow buttons to scroll through the options, and then press the OK button to select it.
6. Press the Start Copy button to start copying.
Touchscreen control panel
1. Load the document on the scanner glass according to the indicators on the product.
2. Close the scanner.
3. From the Home screen on the product control panel, touch the Copy button.
4. Touch the Settings button, and then scroll to and touch the Optimize button.
5. Touch the arrow buttons to scroll through the options, and then touch an option to select it.
6. Touch the Start Copy button to start copying.
36 Chapter 4 Copy ENWW
Page 47

Adjust the lightness or darkness for copies (LED control panel only)
1. On the product control panel, press the Setup button repeatedly until the Darker/Lighter light is
on.
2. Use the arrow buttons to increase or decrease the Darker/Lighter setting.
NOTE: The setting returns to the default value after two minutes.
ENWW Adjust the lightness or darkness for copies (LED control panel only) 37
Page 48

Reduce or enlarge copies (LED control panel only)
1. Load the document onto the scanner glass.
2. On the product control panel, press the Setup button repeatedly until the Reduce/Enlarge light is
on.
3. Press the up arrow to increase the copy size, or press the down arrow to decrease the copy size.
4. Press the Start Copy button to start copying.
38 Chapter 4 Copy ENWW
Page 49

5 Scan
●
Scan by using the HP Scan software (Windows)
●
Scan by using the HP Scan software (Mac OS X)
Go to www.hp.com/support/ljMFPM125series, www.hp.com/support/ljMFPM126series, www.hp.com/
support/ljMFPM127series, or www.hp.com/support/ljMFPM128series for HP's all-inclusive help for your
product:
●
Solve problems.
●
Download software updates.
●
Join support forums.
●
Find warranty and regulatory information.
You can also go to www.hp.com/support for Worldwide support and other HP products.
Scan by using the HP Scan software (Windows)
Use the HP Scan software to initiate scanning from software on your computer. You can save the scanned
image as a le or send it to another software application.
1. Load the document on the scanner glass according to the indicators on the product.
NOTE: For best results, load small-size paper (Letter, A4, or smaller) with the long edge of the paper
along the left side of the scanner glass.
2. Click Start, and then click Programs (or All Programs in Windows XP).
3. Click HP, and then select your product.
4. Click HP Scan, select a scanning shortcut, and then adjust the settings if necessary.
5. Click Scan.
NOTE: Click Advanced Settings to gain access to more options.
Click Create New Shortcut to create a customized set of settings and save it in the list of shortcuts.
ENWW Scan by using the HP Scan software (Windows) 39
Page 50

Scan by using the HP Scan software (Mac OS X)
Use the HP Scan software to initiate scanning from software on your computer.
1. Load the document on the scanner glass according to the indicators on the product.
NOTE: For best results, load small-size paper (letter, A4, or smaller) with the long edge of the paper
along the left side of the scanner glass.
2. Open the HP Scan software, which is located in the HP folder inside the Applications folder.
3. Follow the on-screen instructions to scan the document.
4. When you have scanned all the pages, click the Done button to save them to a le.
40 Chapter 5 Scan ENWW
Page 51

6 Fax
●
Connect and congure the product for fax
●
Send a fax
●
Create, edit, and delete speed-dial entries
Go to www.hp.com/support/ljMFPM125series, www.hp.com/support/ljMFPM126series, www.hp.com/
support/ljMFPM127series, or www.hp.com/support/ljMFPM128series for HP's all-inclusive help for your
product:
●
Solve problems.
●
Download software updates.
●
Join support forums.
●
Find warranty and regulatory information.
You can also go to www.hp.com/support for Worldwide support and other HP products.
ENWW 41
Page 52

Connect and congure the product for fax
●
Connect the product
●
Congure the product
●
Install the HP Fax software (Windows, optional)
Connect the product
The product is an analog device. HP recommends using the product on a dedicated analog telephone line.
NOTE: Some countries/regions might require an adapter for the telephone cable that came with the
product.
1.
Connect the telephone cable to the fax port
on the product and to the telephone jack on the
wall.
2. (Optional) To connect an answering machine or
ex
tension phone, pull down the rubber plug from
the telephone port
another tel
the product and to the “line in” port on the
answering machine or extension phone.
ephone cable to the telephone port on
on the product. Connect
42 Chapter 6 Fax ENWW
Page 53

Congure the product
How you congure the product varies depending on whether you set it up for standalone fax, with an
answering machine, or with an extension phone.
NOTE: Conguring the fax time, date, and header settings is required to use the fax feature.
●
Congure fax time, date, and header
●
Congure for stand-alone fax
●
Congure for an answering machine
●
Congure for an extension phone
Congure fax time, date, and header
You might have congured these settings when you installed the software. You can congure these settings
at any time by using the product control panel or the HP Fax Setup Wizard.
●
Control panel
●
HP Fax Setup Wizard (Windows)
Control panel
LCD control panel
1. On the product control panel, press the Setup button.
2. Select System Setup, and then select Time/Date.
3. Select the 12-hour clock or 24-hour clock.
4. Use the keypad to enter the current time, and then press the OK button.
5. Select the date format.
6. Use the keypad to enter the current date, and then press the OK button.
7. Select Fax Setup, and then select Fax Header.
8. Use the keypad to enter your fax number, and then press the OK button.
NOTE: The maximum number of characters for the fax number is 20.
9. Use the keypad to enter your company name or header, and then press the OK button.
NOTE: The maximum number of characters for the fax header is 40.
Touchscreen control panel
1.
Fr
om the Home screen on the product control panel, touch the Setup
button.
2. Select Fax Setup, and then select Basic Setup.
3. Select
4. Select the 12-hour clock or 24-hour clock.
ENWW Connect and congure the product for fax 43
Time/Date.
Page 54

5. Use the keypad to enter the current time, and then touch the OK button.
6. Select the date format.
7. Use the keypad to enter the current date, and then touch the OK button.
8. Select Fax Header.
9. Use the keypad to enter your fax number, and then touch the OK button.
NOTE: The maximum number of characters for the fax number is 20.
10. Use the keypad to enter your company name or header, and then touch the OK button.
To enter special characters that are not on the standard keypad, touch the @#$ button to open a keypad
that contains special characters.
NOTE: The maximum number of characters for the fax header is 40.
HP Fax Setup Wizard (Windows)
1. Click Start, and then click Programs.
2. Click HP, click the name of the product, and then click Fax Setup Wizard.
3. Follow the on-screen instructions to congure the fax settings.
Congure for stand-alone fax
You can use the product as a stand-alone fax machine without connecting it to a computer or a network.
LCD control panel
1. On the product control panel, press the Setup button.
2. Select System Setup, and then select Time/Date.
3. Select the 12-hour clock or 24-hour clock.
4. Use the keypad to enter the current time, and then press the OK button.
5. Select the date format.
6. Use the keypad to enter the current date, and then press the OK button.
7. Select Fax Setup, and then select Fax Header.
8. Use the keypad to enter your fax number, and then press the OK button.
NOTE: The maximum number of characters for the fax number is 20.
9. Use the keypad to enter your company name or header, and then press the OK button.
NOTE: The maximum number of characters for the fax header is 40.
44 Chapter 6 Fax ENWW
Page 55

Touchscreen control panel
1.
From the Home screen on the product control panel, select Setup .
. Sel
2
3. Follow the on-screen prompts and select the appropriate response for each question.
Fax Setup, and then select Fax Set-Up Utility.
ect
NOTE: The maximum number of characters for the fax number is 20. The maximum number of
charact
ers for the fax header is 40.
ENWW Connect and congure the product for fax 45
Page 56

Congure for an answering machine
If you connect a telephone answering machine to the product, you need to congure the Rings to Answer and
Answer Mode settings for the product. Follow these steps to congure the product:
LCD control panel
1. On the product control panel, press the Setup button.
2. Select Fax Setup, and then select Fax Recv. Setup.
3. Select Rings to Answer.
4. Set the product rings
the answering machine is set. Use the keypad to enter the number of rings, and then press the OK
button.
5. Press the Back button to return to the Fax Recv. Setup menu.
6. Select
7. Select TAM, and then press the OK button.
Touchscreen control panel
1.
. Sel
2
. Sel
3
4. Set the product rings-to-answer setting for at least one ring more than the number of rings for which
. Sel
5
Answer Mode.
With this set
The product picks up a call if fax tones are detected.
Fr
om the Home screen on the product control panel, select Setup
Fax Setup, and then select Basic Setup.
ect
Rings to Answer.
ect
the answ
button.
ect Back to return to the
-to-answer setting for at least one ring more than the number of rings for which
ting, the product listens for fax tones after the answering machine has picked up the call.
.
ering machine is set. U
se the k
Basic Setup
eypad to enter the number of rings, and then touch the OK
menu.
6. Select
7. Select TAM, and then touch the OK button.
Answer Mode.
With this setting, the product listens for fax tones after the answering machine has picked up the call.
The product picks up a cal
l if fax tones are detected.
Congure for an extension phone
If you connect an extension phone to the product, you need to change some fax settings for the product to
work with this conguration. Follow these steps to congure the product:
LCD control panel
1. On the product c
2. Select Fax Setup, and then select Fax Recv. Setup.
3. Select Extension Phone.
46 Chapter 6 Fax ENWW
ontrol panel, press the Setup
button.
Page 57

4. Make sure that the On option is selected.
With this setting turned on, you can alert the product to pick up the incoming fax call by pressing 1-2-3
sequentially on the telephone keypad. Turn this setting o only if you use pulse dialing or if you have a
service from your telephone company that also uses the 1-2-3 sequence. The telephone company
service does not work if it conicts with the product.
5. Press the Back button to return to the Fax Recv. Setup menu.
6. Select
7. Select Fax/Tel, and then press the OK button.
8. Press the Back button to return to the Fax Recv. Setup menu.
9. Select
10. Select the number of seconds after which the product should stop sounding the Fax/Tel audible ring to
Touchscreen control panel
1.
2. Select
3. Select
4. Make sure that the On
Answer Mode.
With this setting, the pr
call. If the call is a fax call, the product handles the call as an incoming fax. If the incoming call is
detected as a voice call, the product generates an audible synthesized ring to alert you of an incoming
voice call.
Fax/Tel Ring Time.
tify you of an incoming voice call, and then press the OK button.
no
om the Home screen on the product control panel, select Setup
Fr
Fax Setup, and then select Advanced Setup.
Extension Phone.
With this setting turned on, you can alert the product to pick up the incoming fax call by pressing 1-2-3
sequentially on the telephone keypad. Turn this setting o only if you use pulse dialing or if you have a
service from your telephone company that also uses the 1-2-3 sequence. The telephone company
service does not work if it conicts with the product.
oduct automatically picks up all calls and determines if the call is a voice or fax
.
option is selected.
5. Select Back twice to return to the Fax Setup menu.
6. Select
7. Select
8. Select Back twice to return to the Fax Setup menu.
9. Select
10. Select the number of seconds after which the product should stop sounding the Fax/Tel audible ring to
ENWW Connect and congure the product for fax 47
Basic Setup, and then select Answer Mode.
Fax/Tel.
With this setting, the product automatically picks up all calls and determines if the call is a voice or fax
call. If the call is a fax call, the product handles the call as an incoming fax. If the incoming call is
detected as a voice call, the product generates an audible synthesized ring to alert you of an incoming
voice call.
Advanced Setup, and then select Fax/Tel Ring Time.
notify y
ou of an incoming voice call.
Page 58

Install the HP Fax software (Windows, optional)
With the HP Fax software, you can fax electronic documents from a computer if you meet the following
requirements:
●
The product is connected directly to the computer or to a network to which the computer is connected.
●
The product software is installed on the computer.
●
The computer operating system is one that this product supports.
NOTE: The HP Fax software that came with the product is the only computer fax program that works
with the product. The product is not compatible with fax software produced by other manufacturers.
If the HP Fax software is not installed on your computer, use one of the following methods to install the
software.
●
Software CD: Insert the software CD that shipped with your HP product into the computer, and then
follow the on-screen instructions.
●
Download from the Web: Go to www.hp.com/support, click Drivers & Software, and then follow the on-
screen instructions to download the latest HP software.
NOTE: When prompted by the software installer, make sure that HP Fax Software is selected as one of the
software components to install.
48 Chapter 6 Fax ENWW
Page 59

Send a fax
●
Send a fax by dialing manually from the product control panel
●
Send a fax using the HP software (Windows)
CAUTION: To prevent damage to the product, do not use an original that contains correction tape, correction
uid, paper clips, or staples. Also, do not load photographs, small originals, or fragile originals into the
document feeder.
Send a fax by dialing manually from the product control panel
LCD control panel
1. Load the document.
●
If you are loading an original on the scanner glass, place it on the scanner glass face-down, in the
left rear corner of the scanner glass.
●
If you are loading multiple pages in the document feeder, load the pages face-up, and then adjust
the paper guides until they are snug against the paper.
NOTE: If documents are in the document feeder and on the scanner glass at the same time, the
product processes the document in the document feeder and not the one on the scanner glass.
2. On the product control panel, use the keypad to enter the fax number.
NOTE: To use access codes, credit cards, or calling cards, you must dial the fax number manually to
allow for pauses and dialing codes. To send a fax to an international destination, dial manually to allow
for pauses and international dialing codes. You cannot use speed dials with access codes, credit cards,
calling cards, or to dial international destinations.
3.
Press the Start Fax button. The product starts the fax job.
NOTE: If you are faxing from the scanner glass and your document includes multiple pages, follow the
control panel prompts to conrm and load additional pages.
Touchscreen control panel
1. Load the document.
●
If you are loading an original on the scanner glass, place it on the scanner glass face-down, in the
left rear corner of the scanner glass.
●
If you are loading multiple pages in the document feeder, load the pages face-up, and then adjust
the paper guides until they are snug against the paper.
NOTE: If documents are in the document feeder and on the scanner glass at the same time, the
product processes the document in the document feeder and not the one on the scanner glass.
2. From the Home screen on the product control panel, select Fax.
3. Use the keypad to enter the fax number.
ENWW Send a fax 49
Page 60

NOTE: To use access codes, credit cards, or calling cards, you must dial the fax number manually to
allow for pauses and dialing codes. To send a fax to an international destination, dial manually to allow
for pauses and international dialing codes. You cannot use speed dials with access codes, credit cards,
calling cards, or to dial international destinations.
4. Select Start Fax.
NOTE: If you are faxing from the scanner glass and your document includes multiple pages, follow the
control panel prompts to conrm and load additional pages.
Send a fax using the HP software (Windows)
1. Load the document.
●
If you are loading an original on the scanner glass, place it on the scanner glass face-down, in the
left rear corner of the scanner glass.
●
If you are loading multiple pages in the document feeder, load the pages face-up, and then adjust
the paper guides until they are snug against the paper.
NOTE: If documents are in the document feeder and on the scanner glass at the same time, the
product processes the document in the document feeder and not the one on the scanner glass.
2. Click Start, click Programs (or All Programs in Windows XP), and then click HP.
3. Click the product name, and then click HP Send Fax. The fax software opens.
4. Enter the fax number of one or more recipients.
5. Click Send Now.
50 Chapter 6 Fax ENWW
Page 61

Create, edit, and delete speed-dial entries
You can store frequently dialed fax numbers (up to 100 entries) as speed-dial entries.
●
Create and edit speed-dial entries
●
Delete speed-dial entries
Create and edit speed-dial entries
LCD control panel
1. On the product control panel, press the Setup button.
2. Select Fax Setup, and then select Phone Book.
3. Select
4. Select an unassigned number for the new entry, and then press the OK button.
5. Use the keypad to enter the fax number for the entry, and then press the OK button.
6. Use the keypad to enter a name for the entry, and then press the OK button.
T
ouchscreen control panel
1. From the Home screen on the product control panel, touch the Fax button.
2. Select Fax Menu, and then select Phone Book Setup.
3. Select
4. Select an unassigned number from the list.
5. Use the keypad to enter a name for the entry, and then touch the
6. Use the keypad to enter the fax number for the entry, and then touch the OK button.
Add/Edit.
Individual Setup.
Delete speed-dial entries
LCD control panel
1. On the product c
ontrol panel, press the Setup
OK button.
button.
2. Select
. Sel
3
4. Select the entry you want to delete, and then press the OK button.
Touchscreen control panel
. F
1
2. Select
ENWW Create, edit, and delete speed-dial entries 51
Fax Setup, and then select Phone Book.
Delete.
ect
NOTE: If you want to delete all speed-dial entries, select Delete All.
rom the Home screen on the product control panel, touch the Fax button.
Fax Menu
, and then select Phone Book Setup.
Page 62

3. Select Delete Entry.
4. Select the entry you want to delete, and then touch the OK button.
NOTE: If you want to delete all speed-dial entries, select Delete All Entries.
52 Chapter 6 Fax ENWW
Page 63

7 Manage the product
●
Change the product connection type (Windows)
●
Use HP Web Services applications (touchscreen models only)
●
HP Device Toolbox (Windows)
●
HP Utility for Mac OS X
●
Product security features
●
Economy settings
●
A Cartridge is low or Cartridge is very low message displays on the product control panel
●
Replace the toner cartridge
Go to www.hp.com/support/ljMFPM125series, www.hp.com/support/ljMFPM126series, www.hp.com/
support/ljMFPM127series, or www.hp.com/support/ljMFPM128series for HP's all-inclusive help for your
product:
●
Solve problems.
●
Download software updates.
●
Join support forums.
●
Find warranty and regulatory information.
You can also go to www.hp.com/support for Worldwide support and other HP products.
ENWW 53
Page 64

Change the product connection type (Windows)
If you are already using the product and you wish to change the way it is connected, use the Recongure your
HP Device shortcut on your computer desktop to change the connection. For example, you can recongure
the product to use a dierent wireless address, to connect to a wired or wireless network, or change from a
network connection to a USB connection. You can change the conguration without inserting the product CD.
After you select the type of connection you wish to make, the program goes directly to the portion of the
product setup procedure that needs to change.
54 Chapter 7 Manage the product ENWW
Page 65

Use HP Web Services applications (touchscreen models only)
Several innovative applications are available for this product that you can download directly from the
Internet. For more information and to download these applications go to the HP Connected Web site at
www.hpconnected.com.
To use this feature, the product must be connected to a computer or network that has an Internet connection.
HP Web Services must be enabled on the product.
1. From the Home screen on the product control panel, touch the Web Services button.
2. Touch the
After you download an application from the HP Connected Web site, it is available in the Apps menu on
the product con
Enable Web Services button.
trol panel. This process enables both HP Web Services and the Apps menu.
ENWW Use HP Web Services applications (touchscreen models only) 55
Page 66

HP Device Toolbox (Windows)
Use the HP Device Toolbox for Windows to check product status or to view or change product settings from
your computer. This tool opens the HP Embedded Web Server for the product.
NOTE: This tool is available only if you performed a full installation when you installed the product.
Depending on how the product is connected, some features might not be available.
1. Click the Start button, and then click the Programs item.
2. Click your HP product group, and then click the HP Device Toolbox item.
Tab or section Description
Home tab
Provides product, status, and
conguration information.
System tab
Provides the ability to congure the
product from your computer.
●
Device Status: Shows the product status and shows the approximate percent life
remaining of HP supplies.
●
Supplies Status: Shows the approximate percent life remaining of HP supplies. Actual
supply life remaining can vary. Consider having a replacement supply available to install
when print quality is no longer acceptable. The supply does not need to be replaced
unless the print quality is no longer acceptable.
●
Device Conguration: Shows the information found on the product conguration page.
●
Network Summary: Shows the information found on the product network conguration
page.
●
Reports: Print the conguration and supplies status pages that the product generates.
●
Event Log: Shows a list of all product events and errors.
●
Device Information: Provides basic product and company information.
●
Paper Setup: Change the default paper-handling settings for the product.
●
Print Quality: Change the default print-quality settings for the product.
●
EcoSMART Console: Change the default times for entering Sleep mode or Auto Power
Down mode. Congure which events cause the product to wake.
●
Paper Types: Congure print modes that correspond to the paper types that the product
accepts.
●
System Setup: Change the system defaults for the product.
●
Service: Perform the cleaning procedure on the product.
●
Save and Restore: Save the current settings for the product to a le on the computer. Use
this le to load the same settings onto another product or to restore these settings to
this product at a later time.
●
Administration: Set or change the product password. Enable or disable product features.
NOTE: The System tab can be password-protected. If this product is on a network, always
consult with the administrator before changing settings on this tab.
Print tab
Provides the ability to change default
print settings from your computer.
Printing: Change the default product print settings, such as number of copies and paper
orientation. These are the same options that are available on the control panel.
56 Chapter 7 Manage the product ENWW
Page 67

Tab or section Description
Fax tab
Networking tab
Provides the ability to change
network settings from your
computer.
HP Web Services tab Use this tab to set up and use various Web tools with the product.
●
Phone Book: Add or delete entries in the fax phone book.
●
Junk Fax List: Set fax numbers to block from sending faxes to the product.
●
Fax Activity Log: Review recent fax activity for the product.
Network administrators can use this tab to control network-related settings for the product
when it is connected to an IP-based network. It also allows the network administrator to set up
Wireless Direct functionality. This tab does not appear if the product is directly connected to a
computer.
ENWW HP Device Toolbox (Windows) 57
Page 68

HP Utility for Mac OS X
Use the HP Utility for Mac OS X to view or change product settings from your computer.
You can use the HP Utility when the product is connected with a USB cable or is connected to a TCP/IP-based
network.
Open the HP Utility
From the Finder, click Applications, click HP, and then click HP Utility.
If HP Utility is not included, use the following procedure to open it:
1. At the computer, open the Apple menu, click the System Preferences menu, and then click the Print
& Fax icon or the Print & Scan icon.
2. Select the product in the left side of the window.
3. Click the Options & Supplies
4. Click the Utility tab.
5. Click the Open Printer Utility button.
HP Utility feature
The HP Utility toolbar is at the top of every page. It includes these items:
●
Devices: Click this button to show or hide Mac products found by the HP Utility in the Printers pane at
the lef
t side of the screen.
●
All Settings: Click this button to return to the HP Utility main page.
●
HP Support: Click this button to open a browser and go to the HP support Web site for the product.
●
Supplies: Click this button to open the HP SureSupply Web site.
●
Registration: Click this button to open the HP registration Web site.
●
Recycling: Click this button to open the HP Planet Partners Recycling Program Web site.
HP Utility consists of pages that you open by clicking in the All Settings list. The following table describes the
tasks tha
Menu Item Description
t you can perform with HP Utility.
button.
s
Information and Support Supplies Status Show the product supplies status and provides links for ordering
supplies online
58 Chapter 7 Manage the product ENWW
Device Information Show information about the currently selected product, including
the product Servic
Version), the Serial Number, and the IP address.
.
e ID (if assigned), the rmware version (FW
Page 69

Menu Item Description
File Upload Transfer les from the computer to the product. You can upload
the following types of les:
●
HP LaserJet printer command language (.PRN)
●
Portable document format (.PDF)
●
Text (.TXT)
HP Connected Access the HP Connected Web site.
Information Message Center Display error events that have occurred with the product.
Printer Settings Auto-o Congure the product to automatically turn o after a period of
inactivity. You can adjust the number of minutes after which the
product turns o.
Network Settings Congure the network settings, such as the IPv4 settings, IPv6
settings, Bonjour settings, and other settings.
Supplies Management Congure how the product should behave when supplies are
nearing the end of their estimated life.
Trays Conguration Change the paper size and type for each of the trays.
Additional Settings Open the HP Embedded Web Server (EWS) for the product.
NOTE: USB connections are not supported.
Fax Settings Basic Fax Settings Set up the elds in the fax header and congure how the product
answers incoming calls.
Junk Fax Blocking Store the fax numbers you want to block.
Fax Forwarding Set up the product to send the incoming faxes to a dierent
number.
Fax Logs View the logs of all faxes.
Fax Speed Dials Add fax numbers to the speed dial list.
ENWW HP Utility for Mac OS X 59
Page 70

Product security features
The product supports security standards and recommended protocols that help you keep the product secure,
protect critical information on your network, and simplify the way you monitor and maintain the product.
For in-depth information about HP's secure imaging and printing solutions, visit www.hp.com/go/
secureprinting. The site provides links to white papers and FAQ documents about security features.
Set or change the product password
Use the HP Embedded Web Server to set a password or change an existing password for a product on a
network.
LCD control panel
1. Find the product IP address.
a. On the product control panel, press the Setup button.
b. Open the following menus:
●
Network Setup
●
Show IP Address
2. To open the HP Embedded Web Server, enter the product IP address into the address line of a Web
br
owser.
NOTE: You can also access the HP Embedded Web Server from the HP Device Toolbox for Windows or
the HP Utility for Mac O
3. Click the System tab, and then click the Product Security link.
NOTE: If a password has previously been set, you are prompted to provide the password. Enter the
passw
ord, and then click the Apply button.
4. Enter the new password in the New Password box and in the Verify Password
5. At the bottom of the window, click the
Touchscreen control panel
1.
Fr
om the Home screen on the product control panel, touch the Network
IP addres
2. To open the HP Embedded Web Server, enter the product IP address into the address line of a Web
owser.
br
NOTE: You can also access the HP Embedded Web Server from the HP Device Toolbox for Windows or
the HP Utility for Mac O
3. Click the System tab, and then click the Product Security link.
S X.
box.
Apply button to save the password.
button to nd the product
s.
S X.
NOTE: If a password has previously been set, you are prompted to provide the password. Enter the
ord, and then click the Apply button.
passw
60 Chapter 7 Manage the product ENWW
Page 71

4. Enter the new password in the New Password box and in the Verify Password box.
5. At the bottom of the window, click the Apply button to save the password.
Lock the product
1. You can attach a security cable to the slot on the
back of the product.
ENWW Product security features 61
Page 72

Economy settings
●
Print with EconoMode
●
Congure the Sleep/Auto O After setting
Print with EconoMode
This product has an EconoMode option for printing drafts of documents. Using EconoMode can use less toner.
However, using EconoMode can also reduce print quality.
HP does not recommend the full-time use of EconoMode. If EconoMode is used full-time, the toner supply
might outlast the mechanical parts in the toner cartridge. If print quality begins to degrade and is no longer
acceptable, consider replacing the toner cartridge.
NOTE: If this option is not available in your print driver, you can set it using the HP Embedded Web Server.
1. From the software program, select the Print option.
2. Select the product, and then click the Properties or Preferences button.
3. Click the Paper/Quality tab.
4. Click the EconoMode check box.
Congure the Sleep/Auto O After setting
LCD control panel
1. On the product control panel, press the Setup button.
2. Open the following menus:
3. Use the arrow keys to select the time for the Sleep/Auto O delay, and then press the
4. The product automatically wakes when it receives jobs or when you press a button on the product
●
System Setup
●
Energy Settings
●
Sleep/Auto O After
OK button.
NOTE: The default value is 15 Minutes.
c
ontrol panel. You can change which events cause the product to wake. Open the following menus:
●
System Setup
●
Energy Settings
●
Wake/Auto On Events
To turn o a wake event, select the event, and then select the No option.
62 Chapter 7 Manage the product ENWW
Page 73

Touchscreen control panel
1.
From the Home screen on the product control panel, touch the Setup button.
2. Open the following menus:
●
System Setup
●
Energy Settings
●
Sleep/Auto O After
. Sel
3
ect the time for the Sleep/Auto O delay.
NOTE: The default value is 15 Minutes
. The pr
4
oduct automatically wakes when it receives jobs or when you touch the screen on the product
ontrol panel. You can change which events cause the product to wake. Open the following menus:
c
●
System Setup
●
Energy Settings
●
Wake/Auto On Events
To turn o a wake event, select the event, and then select the No option.
.
ENWW Economy settings 63
Page 74

A Cartridge is low or Cartridge is very low message displays on the product control panel
A Cartridge is low or Cartridge is very low message displays on the product control panel, and the product
does not print.
NOTE: Toner level warnings and indicators provide estimates for planning purposes only. When an indicator
shows low-toner levels, consider having a replacement cartridge available to avoid possible printing delays.
You do not need to replace cartridges until print quality becomes unacceptable.
Once an HP toner cartridge has reached “very low”, HP’s Premium Protection Warranty on that toner cartridge
has ended.
You can change the way the product reacts when supplies reach the Very Low state. You do not have to reestablish these settings when you install a new toner cartridge.
Enable or disable the Very Low settings
You can enable or disable the default settings at any time, and you do not have to re-enable them when you
install a new toner cartridge.
LCD control panel
1. On the product control panel, press the Setup button.
2. Open the following menus:
●
System Setup
●
Supply Settings
●
Black Cartridge
●
Very Low Setting
3. Select one of the following options, and then press the
●
Select the Stop option to set the product to stop printing until you replace the toner cartridge.
●
Select the Prompt option to set the product to stop printing and prompt you to replace the toner
car
tridge. You can acknowledge the prompt and continue printing.
●
Select the Continue option to set the product to alert you that the toner cartridge is very low, but
to con
Touchscreen control panel
1.
Fr
om the Home screen on the product control panel, touch the Setup
2. Open the following menus:
●
System Setup
OK button:
tinue printing.
button.
●
Supply Settings
64 Chapter 7 Manage the product ENWW
Page 75

●
Black Cartridge
●
Very Low Setting
3. Select one of the following options:
●
Select the Stop option to set the product to stop printing until you replace the toner cartridge.
●
Select the Prompt option to set the product to stop printing and prompt you to replace the toner
cartridge. You can acknowledge the prompt and continue printing.
●
Select the Continue option to set the product to alert you that the toner cartridge is very low, but to
continue printing.
For models with fax, when the product is set to the Stop option there is some risk that faxes will not print
after the new cartridge is installed if your product has received more faxes than the memory can hold while
stopped.
For models with fax, when the product is set to the Prompt option there is some risk that faxes will not print
after the new cartridge is installed if your product has received more faxes than the memory can hold while
the product is waiting for the prompt to be acknowledged.
Once an HP toner cartridge has reached Very Low, HP’s Premium Protection Warranty on that toner cartridge
has ended. All print defects or cartridge failures incurred when an HP toner cartridge is used in Continue at
very low mode will not be considered to be defects in materials or workmanship in the toner cartridge under
the HP Print Cartridge Warranty Statement.
ENWW A Cartridge is low or Cartridge is very low message displays on the product control panel 65
Page 76

Replace the toner cartridge
When a toner cartridge approaches the end of useful life, you are prompted to order a replacement. You can
continue printing with the current cartridge until redistributing the toner no longer yields acceptable print
quality.
1. Lift the scanner assembly.
2. Open the to
3. Remove the toner cartridge.
p cover.
66 Chapter 7 Manage the product ENWW
Page 77
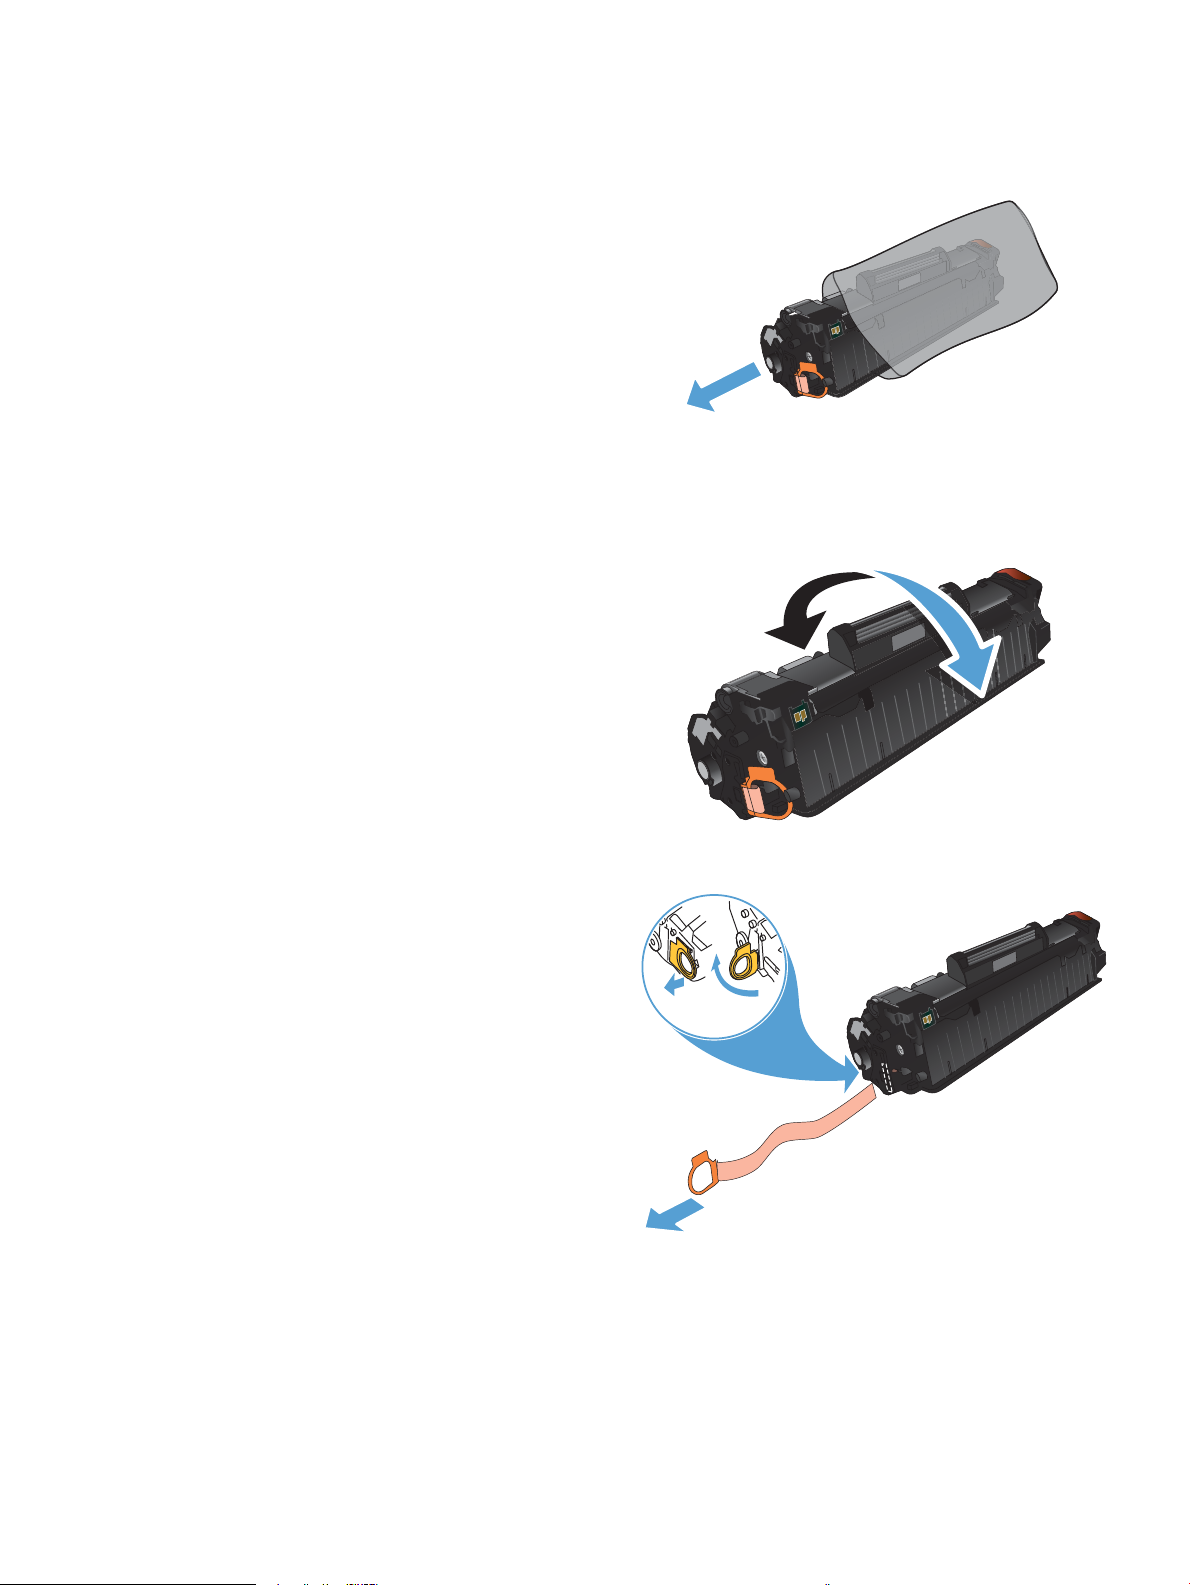
4. Remove the new toner cartridge from the bag.
Place the used toner cartridge in the bag for
recycling.
5
6. Bend the tab on the left side of the cartridge until
asp both sides of the toner cartridge and
. Gr
dis
tribute the toner by gently rocking the
cartridge.
CAUTION: Do not touch the shutter or the
surfac
e of the roller.
the tab breaks loose. Pull the tab until all the tape
is removed from the cartridge. Place the tab and
tape in the toner cartridge box to return for
recycling.
ENWW Replace the toner cartridge 67
Page 78

7. Align the toner cartridge with the tracks inside
the product, and then insert the toner cartridge
until it is rmly seated.
8. Close the top cover.
9. Lower the scanner assembly.
68 Chapter 7 Manage the product ENWW
Page 79

8 Solve problems
●
Control panel help system (touchscreen models only)
●
Interpret control-panel light patterns (LED model only)
●
Print information pages
●
Restore the factory-set defaults
●
Solve paper feed or jam problems
●
Clear jams from the input tray
●
Clear jams in the toner-cartridge area
●
Clear jams in the output bin
●
Clear jams in the document feeder
●
Improve print quality
●
Improve copy and scan quality
●
Improve fax image quality
●
Solve wired network problems
●
Solve wireless network problems
●
Solve fax problems
Go to www.hp.com/support/ljMFPM125series, www.hp.com/support/ljMFPM126series, www.hp.com/
support/ljMFPM127series, or www.hp.com/support/ljMFPM128series for HP's all-inclusive help for your
product:
●
Solve problems.
●
Download software updates.
●
Join support forums.
●
Find warranty and regulatory information.
You can also go to www.hp.com/support for Worldwide support and other HP products.
ENWW 69
Page 80

Control panel help system (touchscreen models only)
The product has a built-in Help system that explains how to use each screen. To open the Help system, touch
the Help button in the upper-right corner of the screen.
For some screens, the Help opens to a global menu where you can search for specic topics. You can browse
through the menu structure by touching the buttons in the menu.
Some Help screens include animations that guide you through procedures, such as clearing jams.
For screens that contain settings for individual jobs, the Help opens to a topic that explains the options for
that screen.
If the product alerts you of an error or warning, touch the Help button to open a message that describes the
problem. The message also contains instructions to help solve the problem.
70 Chapter 8 Solve problems ENWW
Page 81

Interpret control-panel light patterns (LED model only)
If the product requires attention, an error code appears on the control-panel display.
Table 8-1 Status-light legend
Symbol for "light o"
Symbol for "light on"
Symbol for "light blinking"
Table 8-2 Control-panel light patterns
Light status Error code State of the product Action
All lights are o. The product is turned o or in
Ready and attention lights
blink.
Ready light is on.
The status lights cycle during
The product is in the ready
ow power mode.
l
the format
period or when the product is
processing a cleaning page.
stat
ter initialization
e.
Press the power button to turn
on the product.
No action is required. Wait for
the initialization period to end.
The product should enter the
ready state when the
initialization period is nished.
No action is required. The
product is ready to receive a
print job.
Ready light is blinking.
The product is receiving or
proce
ssing data.
No action is required. The
product is receiving or
processing a print job.
ENWW Interpret control-panel light patterns (LED model only) 71
Page 82

Table 8-2 Control-panel light patterns (continued)
Light status Error code State of the product Action
Attention light is blinking. E0 Paper is jammed in the product. Clear the jam.
E1 The input tray is empty. Load the tray.
E2 A door is open. Verify that the print-cartridge
door is fully closed.
E4 The toner cartridge is very low. Press the Start Copy button to
continue or replace the toner
cartridge.
E5 The toner cartridge is very low. Replace the toner cartridge.
H0 The product is in manual-feed
mode.
H1 The product is processing a
manual duplex job.
The attention and toner lights
are blinking.
The toner light is on. The print cartridge has reached
E3 The print cartridge is missing or
is not installed correctly.
the end of its estimated useful
life. When the supply has
reached this condition, the HP
Premium Protection warranty
for that supply has ended.
Load the correct paper type
and size into the input tray.
Press the Start Copy button to
continue.
Load the pages into the input
tray to print the second sides.
Press the Start Copy button to
continue.
Install the print cartridge.
You do not need to replace the
print cartridge at this time
unless print quality is no longer
acceptable.
The attention and ready lights
are on.
E6
E7
E8
E9
The product has experienced a
fatal error from which it cannot
recover.
1. Turn o the product or
disconnect the power cord
from the product.
2. Wait 30 seconds, and then
turn on the product or
reconnect the power cord
to the product.
3. Wait for the product to
initialize.
If the error persists, contact HP
customer support.
72 Chapter 8 Solve problems ENWW
Page 83

Print information pages
Information pages reside within the product memory. These pages help diagnose and solve problems with the
product.
Conguration page
The conguration page lists current product settings and properties. It also contains a status log report. To
print a conguration page, do the following:
LED control panel
1. From the product control panel, press and hold the Cancel button for 10 seconds.
2. Release the Cancel button.
LCD control panel
1. From the product control panel, press the Setup button.
2. Open the Repor
3. Use the arrow keys to select Cong Report and then press the OK button to begin printing the report.
To
uchscreen control panel
1. From the Home screen on the product control panel, touch the Setup button.
2. Touch the
3
ouch the Conguration Report button.
. T
Supplie
LED control panel
LCD c
s status page
1
rom the product control panel, press and hold the Cancel button for 10 seconds.
. F
2. Release the Cancel button.
The supplies status page prints after the conguration
on
trol panel
1. On the product c
ts menu.
Reports menu.
ontrol panel, press the Setup
page prints.
button.
2. Open the following menus:
●
Reports
●
Supplies status
3. Use the arrow keys to select
ENWW Print information pages 73
Print Supplies status page, and then press the OK button.
Page 84

Touchscreen control panel
1. From the Home screen on the product control panel, touch the Supplies button.
2. Touch the
Report button to print the supplies status page.
74 Chapter 8 Solve problems ENWW
Page 85

Restore the factory-set defaults
Restoring the factory-set defaults returns all of the product and network settings to the factory defaults. It
will not reset the page count, tray size, or language. To restore the product to the factory-default settings,
follow these steps.
CAUTION: Restoring the factory-set defaults returns all of the settings to the factory defaults, and it also
deletes any pages that are stored in the memory.
LCD control panel
1. From the product control panel, press the Setup button.
2. Open the Ser
3. Select the Restore Defaults option, and then touch the OK button.
The product aut
Touchscreen control panel
1.
Fr
om the Home screen on the product control panel, touch the Setup
2. Touch the Service menu.
3. Select the
The product automatically restarts.
vice menu.
omatically restarts.
button.
Restore Defaults option, and then touch the OK button.
ENWW Restore the factory-set defaults 75
Page 86

Solve paper feed or jam problems
If the product has recurring problems with paper feeding or with jams, use the following information to
reduce the number of occurrences.
The product does not pick up paper
If the product does not pick up paper from the tray, try these solutions.
1. Open the product and remove any jammed sheets of paper.
2. Load the tray with the correct size of paper for your job.
3. Make sure the paper size and type are set correctly on the product control panel.
4. Make sure the paper guides in the tray are adjusted correctly for the size of paper. Adjust the guides to
the appropriate indentation in the tray.
5. Check the product control panel to see if the product is waiting for you to acknowledge a prompt to feed
the paper manually. Load paper, and continue.
6. The pickup roller and separation pad might be contaminated.
The product picks up multiple sheets of paper
If the product picks up multiple sheets of paper from the tray, try these solutions.
1. Remove the stack of paper from the tray and ex it, rotate it 180 degrees, and ip it over. Do not fan the
paper. Return the stack of paper to the tray.
2. Use only paper that meets HP specications for this product.
3. Use paper that is not wrinkled, folded, or damaged. If necessary, use paper from a dierent package.
4. Make sure the tray is not overlled. If it is, remove the entire stack of paper from the tray, straighten the
stack, and then return some of the paper to the tray.
5. Make sure the paper guides in the tray are adjusted correctly for the size of paper. Adjust the guides to
the appropriate indentation in the tray.
6. Make sure the printing environment is within recommended specications.
Frequent or recurring paper jams
Follow these steps to solve problems with frequent paper jams. If the rst step does not resolve the problem
continue with the next step until you have resolved the problem.
1. If paper has jammed in the product, clear the jam and then print a conguration page to test the
product.
2. Check that the tray is congured for the correct paper size and type on the product control panel. Adjust
paper settings if necessary.
3. Turn the product o, wait 30 seconds, and then turn it on again.
4. Print a cleaning page to remove excess toner from inside the product.
76 Chapter 8 Solve problems ENWW
Page 87

LED control panel
a. Click the Start button, and then click the Programs item.
b. Click your HP product group, and then click the HP Device Toolbox item.
c. On the Systems tab, click Service.
LCD control panel
a. From the product control panel, press the Setup button.
b. Open the Service menu.
c. Use the arrow keys to select the
The product prints the rst side and then prompts you to remove the page from the output bin and
reload it in Tray 1, keeping the same orientation. Wait until the process is complete. Discard the
page that prints.
Touchscreen control panel
a. From the Home screen on the product control panel, touch the Setup button.
b. Touch the
. T
c
ouch the
d. Load plain letter or A4 paper when you are prompted.
. T
e
ouch the OK button to begin the cleaning process.
The pr
reload it in Tray 1, keeping the same orientation. Wait until the process is complete. Discard the
page that prints.
. P
5
rint a conguration
LED control panel
. P
a
ress and hold the Cancel button until the Ready light starts blinking.
Service menu.
Cleaning Page button.
oduct prints the rst side and then prompts you to remove the page from the output bin and
page to test the product.
Cleaning mode option, and then press the OK button.
b
elease the Cancel button.
. R
LCD control panel
a
rom the Home screen on the product control panel, touch the Setup button.
. F
b. Touch the Reports menu.
c. Touch the Conguration Report button.
Touchscreen control panel
a. From the Home screen on the product control panel, touch the Setup button.
b. Touch the Reports menu.
c. Touch the Conguration Report button.
ENWW Solve paper feed or jam problems 77
Page 88

If none of these steps resolves the problem, the product might need service. Contact HP customer support.
Prevent paper jams
To reduce the number of paper jams, try these solutions.
1. Use only paper that meets HP specications for this product.
2. Use paper that is not wrinkled, folded, or damaged. If necessary, use paper from a dierent package.
3. Use paper that has not previously been printed or copied on.
4. Make sure the tray is not overlled. If it is, remove the entire stack of paper from the tray, straighten the
stack, and then return some of the paper to the tray.
5. Make sure the paper guides in the tray are adjusted correctly for the size of paper. Adjust the guides so
they are touching the paper stack without bending it.
6. Make sure that the tray is fully inserted in the product.
7. If you are printing on heavy, embossed, or perforated paper, use the manual feed feature and feed
sheets one at a time.
8. Verify that the tray is congured correctly for the paper type and size.
9. Make sure the printing environment is within recommended specications.
78 Chapter 8 Solve problems ENWW
Page 89

Clear jams from the input tray
A Jam in tray 1. Clear Jam and press [OK] message displays on the product control panel.
1. Remove any loose paper from the input tray.
2
3. Open the to
t the scanner assembly.
. Lif
p cover.
ENWW Clear jams from the input tray 79
Page 90

4. Remove the toner cartridge.
5. Remove any jammed paper visible in the input
ay area. Use both hands to remove jammed
tr
paper to avoid tearing the paper.
6. Remove any jammed paper from the toner-
tridge area.
car
80 Chapter 8 Solve problems ENWW
Page 91

7. Reinsert the toner cartridge.
8. Close the top cover.
9. Lower the scanner assembly.
ENWW Clear jams from the input tray 81
Page 92

Clear jams in the toner-cartridge area
A Jam in cartridge area message displays on the product control panel.
1. Lift the scanner assembly.
2. Open the to
3. Remove the toner cartridge.
p cover.
82 Chapter 8 Solve problems ENWW
Page 93

4. Remove any jammed paper from the toner-
cartridge area. Use both hands to remove
jammed paper to avoid tearing the paper.
5. Reinsert the toner cartridge.
ENWW Clear jams in the toner-cartridge area 83
Page 94

6. Close the top cover.
7. Lower the scanner assembly.
84 Chapter 8 Solve problems ENWW
Page 95

Clear jams in the output bin
A Jam in output bin message displays on the product control panel.
1. Lift the scanner assembly.
2. Open the to
3. Remove any jammed paper from the output bin
ea. Use both hands to remove jammed paper to
ar
avoid tearing the paper.
p cover.
ENWW Clear jams in the output bin 85
Page 96

4. Remove the toner cartridge.
5. Remove any jammed paper from the toner-
6. Reinsert the toner cartridge.
tridge area.
car
86 Chapter 8 Solve problems ENWW
Page 97

7. Close the top cover.
8. Lower the scanner assembly.
ENWW Clear jams in the output bin 87
Page 98

Clear jams in the document feeder
A Jam in the document feeder message displays on the product control panel.
1. Remove any loose paper from the input tray of
the document feeder.
2. Remove any jammed paper visible in the input
tray area. Use both hands to remove jammed
paper to avoid tearing the paper.
3. Lift the document-feeder input tray.
4. Lift the jam-access cover in the document feeder.
88 Chapter 8 Solve problems ENWW
Page 99

5. Remove any jammed paper.
6. Close the jam-access cover.
7. Close the document-feeder input tray.
ENWW Clear jams in the document feeder 89
Page 100

Improve print quality
●
Print from a dierent software program
●
Set the paper-type setting for the print job
●
Check the toner-cartridge status
●
Print a cleaning page
●
Inspect the toner cartridge for damage
●
Check the paper and printing environment
●
Check the EconoMode settings
Print from a dierent software program
Try printing from a dierent software program. If the page prints correctly, the problem is with the software
program from which you were printing.
Set the paper-type setting for the print job
Check the paper-type setting if you are printing from a software program and the pages have any of these
problems:
●
smeared print
●
fuzzy print
●
dark print
●
curled paper
●
scattered dots of toner
●
loose toner
●
small areas of missing toner
Check the paper-type setting (Windows)
1. From the software program, select the Print option.
2. Select the product, and then click the Properties or Preferences button.
3. Click the Paper/Quality tab.
4. From the Media: drop-down list, select the correct paper type.
5. Click the OK button to close the Document Properties dialog box. In the Print dialog, click the OK button
to print the job.
Check the paper-type setting (Mac OS X)
1. Click the File menu, and then click the Print option.
2. In the Printer menu, select the product.
90 Chapter 8 Solve problems ENWW
 Loading...