

Page 1

HP Insight Online
User's Guide
Document Release Date: June 2014
Software Release Date: June 2014
Page 2

Legal Notices
Warranty
The only warranties for HP products and services are set forth in the express warranty statements
accompanying such products and services. Nothing herein should be construed as constituting an
additional warranty. HP shall not be liable for technical or editorial errors or omissions contained herein.
The information contained herein is subject to change without notice.
Restricted Rights Legend
Confidential computer software. Valid license from HP required for possession, use or copying.
Consistent with FAR 12.211 and 12.212, Commercial Computer Software, Computer Software
Documentation, and Technical Data for Commercial Items are licensed to the U.S. Government under
vendor's standard commercial license.
Copyright Notice
© Copyright 2014 Hewlett-Packard Development Company, L.P.
Page 2 of 51HP Insight Online:User's Guide
Page 3

Contents
Contents 3
Chapter 1: Overview 5
Chapter 2: Sign in and complete device registration 6
Complete direct connect device registration 7
Edit service information 9
Chapter 3: Manage your devices 11
The All devices view 11
Types of objects in the All devices view 12
Device groups 12
Solutions 13
Devices 16
Your default device group 17
Refresh devices 19
Manually added devices 19
Devices with expired contracts or warranties 20
Deleting devices 20
Create, maintain, and delete device groups 21
Roles and administrator types 23
Chapter 4: Reports and messages 26
Reports 26
Message log 26
Chapter 5: Service Credits 28
Overview 28
Administrator and member roles 29
My Service Credits 30
My services 30
My orders 31
Shop HP services 31
Chapter 6: HP Authorized Channel Partners 33
Overview 33
Page 3 of 51HP Insight Online:User's Guide
Page 4

Contents
Types of HP Authorized Channel Partners 33
Enabling access to customer’s device information 33
The My Customers view 34
Service levels 37
Removing customer groups from the view 38
Chapter 7: Manage contracts and warranties 41
Derived contracts and warranties 41
Link contracts and warranties 42
Share contracts and warranties 44
Display your user name and email 46
Batch link tool 46
CSV file size and requirements 48
Upload status values 48
CSV file field values 49
Chapter 8: Support and other resources 51
Contacting HP 51
HP Authorized Channel Partners 51
Documentation feedback 51
Related information 51
HP Insight Online:User's Guide Page 4 of 51
Page 5

Chapter 1: Overview
HP Support Center (http://www.hp.com/go/hpsc) is home to HP Insight Online. Through Insight Online,
you and, optionally, HP Authorized Channel partners, have web access to feature services such as:
l Devices, which provides the ability to organize and monitor your managed devices.
l Service events, generated and reported to HP by managed devices.
l Support Cases associated with your HP Passport ID.
l Contracts and warranties associated with your HP Passport ID, or shared with you by other users.
l Service credits, which allows you to view Proactive Service Credits you have purchased, and HP
Proactive Select Services exchanged and available for exchange for those credits.
These features are available for your managed devices, which are devices that typically have a
management protocol such as SNMP or WBEM installed. Managed devices include:
l Servers, storage systems, solutions and switches, registered for remote support using the central
connect method. With central connect you register the device to communicate with HP through an HP
Insight Remote Support (RS) centralized Hosting Device in your local environment.
l ProLiant Gen8 servers registered for remote support using the direct connect method. This method is
available using HP iLO Management Engine 4 1.40 or later, or Intelligent Provisioning 1.60 or later.
l BladeSystem c-Class enclosures registered for remote support using the direct connect method. This
method is available using the Onboard Administrator (OA) 4.11 or later.
Page 5 of 51HP Insight Online:User's Guide
Page 6
Chapter 2: Sign in and complete device registration
To use the various feature services of Insight Online you must sign in using your HP Passport ID. You can
then complete device registration if needed. Successful device registration assumes you have done the
following:
l For devices that use the central connect method, you have correctly installed and configured Insight
RS, and specified your HP Authorized Channel Partners in the Hosting Device Setup Wizard.
l For devices that use the direct connect method, you have registered using the iLO or OA interface, and
completed the registration process in Insight Online. The registration process in Insight Online includes
specifying HP Authorized Channel Partners. See Complete direct connect device registration.
Detailed information about setting up these devices is available in the HP Insight Remote Support and
Insight Online Setup Guide for ProLiant Gen8 Servers and BladeSystem c-Class Enclosures
(http://www.hp.com/go/insightremotesupport/docs).
Another user in your company may have completed this registration process, and shared the contract and
warranties or devices with you. In that case you can simply sign in to Insight Online using your HP
Passport ID and see the devices.
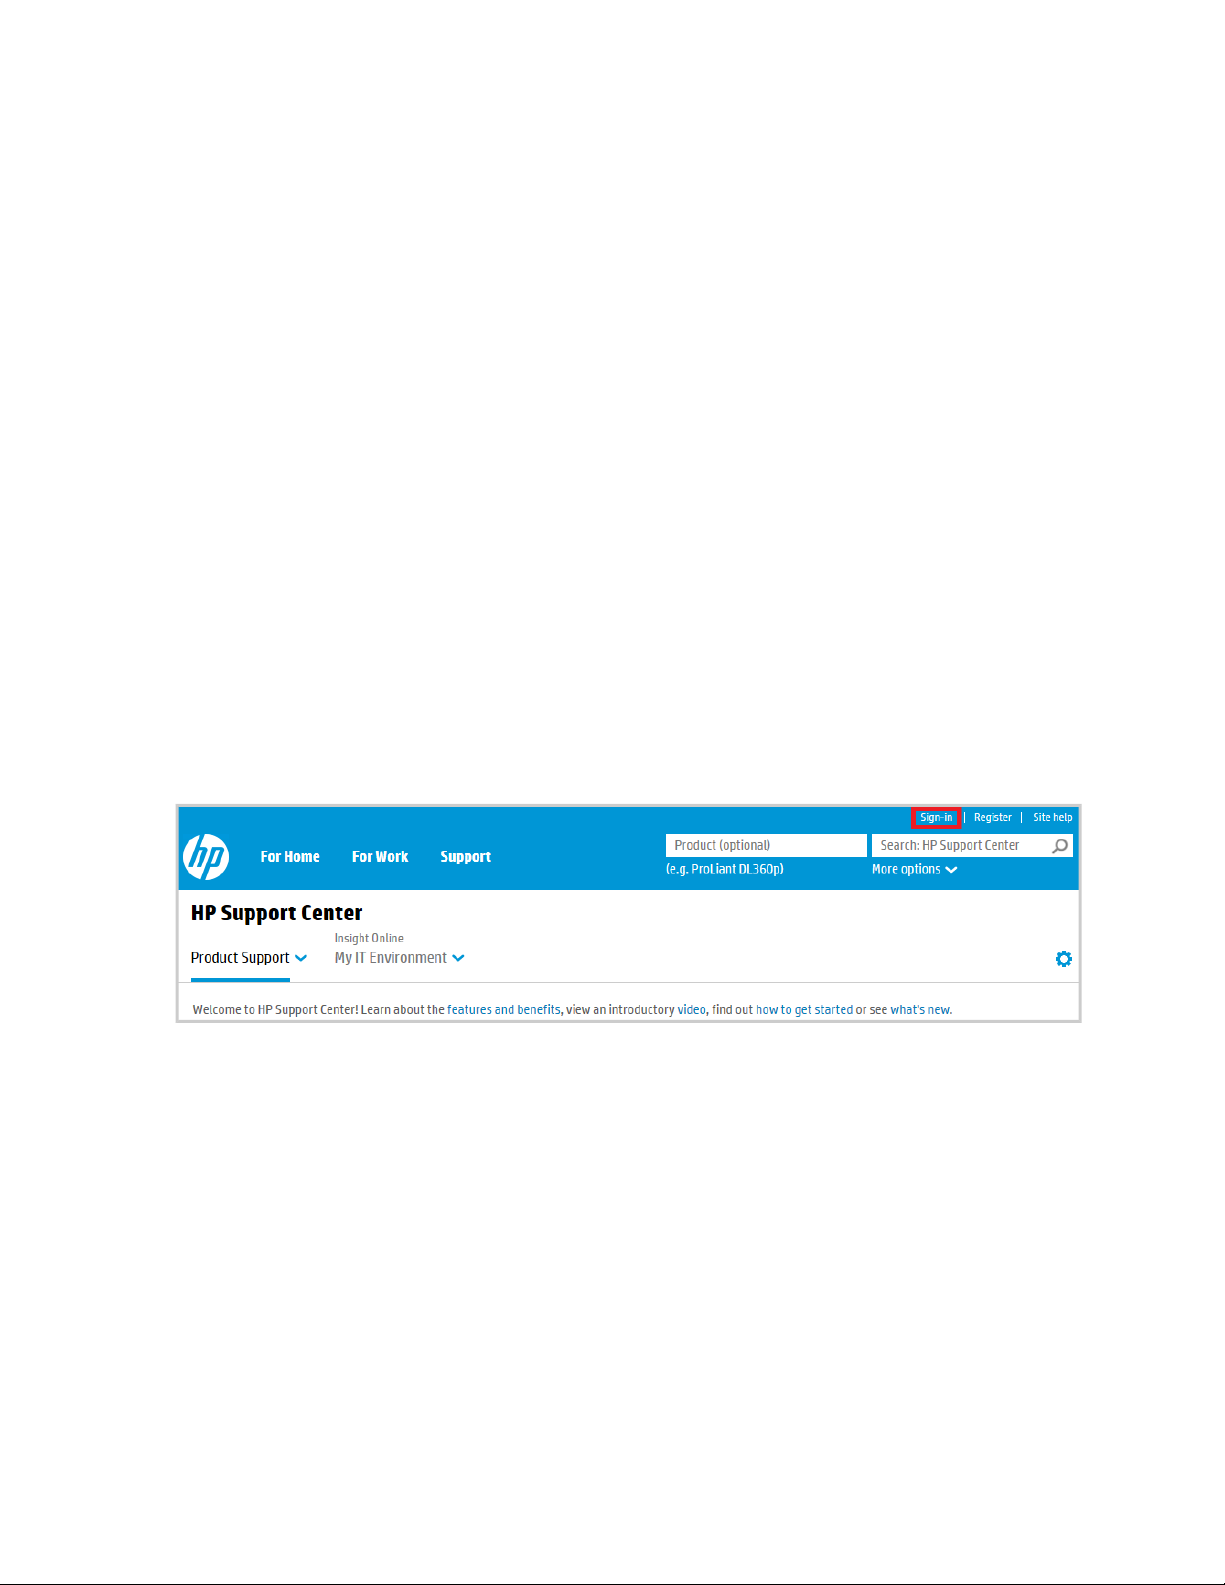
To create the link to your devices, sign in to Insight Online through the HP Support Center
(http://www.hp.com/go/hpsc), using your HP Passport ID and password as shown in the figures below:
Figure 2.1 Sign in to the HP Support Center
Page 6 of 51HP Insight Online:User's Guide
Page 7

Chapter 2: Sign in and complete device registration
Figure 2.2 HP Passport Sign-in
Complete direct connect device registration
Once you have signed in, devices that have been registered using the central connect method will be
visible in Insight Online without any action on your part. However, for devices registered using the direct
connect method, you must complete the registration process in Insight Online. Once you have signed in:
1. Click on the Insight Online My IT Environment tab. The Dashboard appears.
2. Click on the Complete Registration link in the Devices section:
Figure 2.3 Complete registration from the Dashboard
3. The Complete device registration page appears. Select one or more devices, then click Next. You
HP Insight Online:User's Guide Page 7 of 51
Page 8

Chapter 2: Sign in and complete device registration
can complete registration for multiple devices at one time if they share site, contact, and channel
partner information.
4. Enter site and support information, then click Next. The Provide HP Authorized Channel Partner
Information page appears.
5. Do one of the following:
n Accept the default settings if support for your IT infrastructure is provided by HP.
n If support is provided by an HP Authorized Channel Partner, enter the partner location ID for an HP
Authorized Service Partner or HP Authorized Reseller.
Click Check ID to verify that the correct partner is selected.
6. Select the Optimize my IT environment check box to allow HP or an HP Authorized Channel
Partner to contact you about optimizing your HP environment. If you choose to have a channel partner
manage your devices, select this option to allow the partner to see configuration details for the
devices.
7. Click Next. The Validate and Submit page appears.
8. Click Complete Registration.
If you select more than fifteen devices:
l The registration is submitted by a batch process, whose name is "DC_REG" plus the timestamp in
Coordinated Universal Time (UTC). For example:
DC_REG 2013–10–30 12:39:59:999 UTC
l You will be prompted to continue and to optionally provide an email address to receive a notification
that the batch process has begun, and a notification when it has completed. Use the batch process
name to look up the status of the process in your message log.
l Devices in the list are grayed out if you do not have administrative privilege to modify them, or if they
are part of a current batch process submitted by you or another user. When you receive the email
saying the batch process is complete, you can click on the refresh devices button to remove the
devices included in your batch process from the list, and to update the count of unregistered devices on
the dashboard.
The email notifications contain summary status information and a link to your message log which
contains more details.
If you select fifteen or fewer devices:
l The submission occurs interactively and the result appears on the next page with status about
registration and about contract and warranty linking.
When you complete registration, if you provided partner information and selected to have your IT
environment optimized, the partner will be able to view and manage your devices from the My Customers
tab. See HP Authorized Channel Partners for more information.
You can change the partner information, contact information, and the optimize my IT environment
selection for direct connect devices at any time:
HP Insight Online:User's Guide Page 8 of 51
Page 9
Chapter 2: Sign in and complete device registration
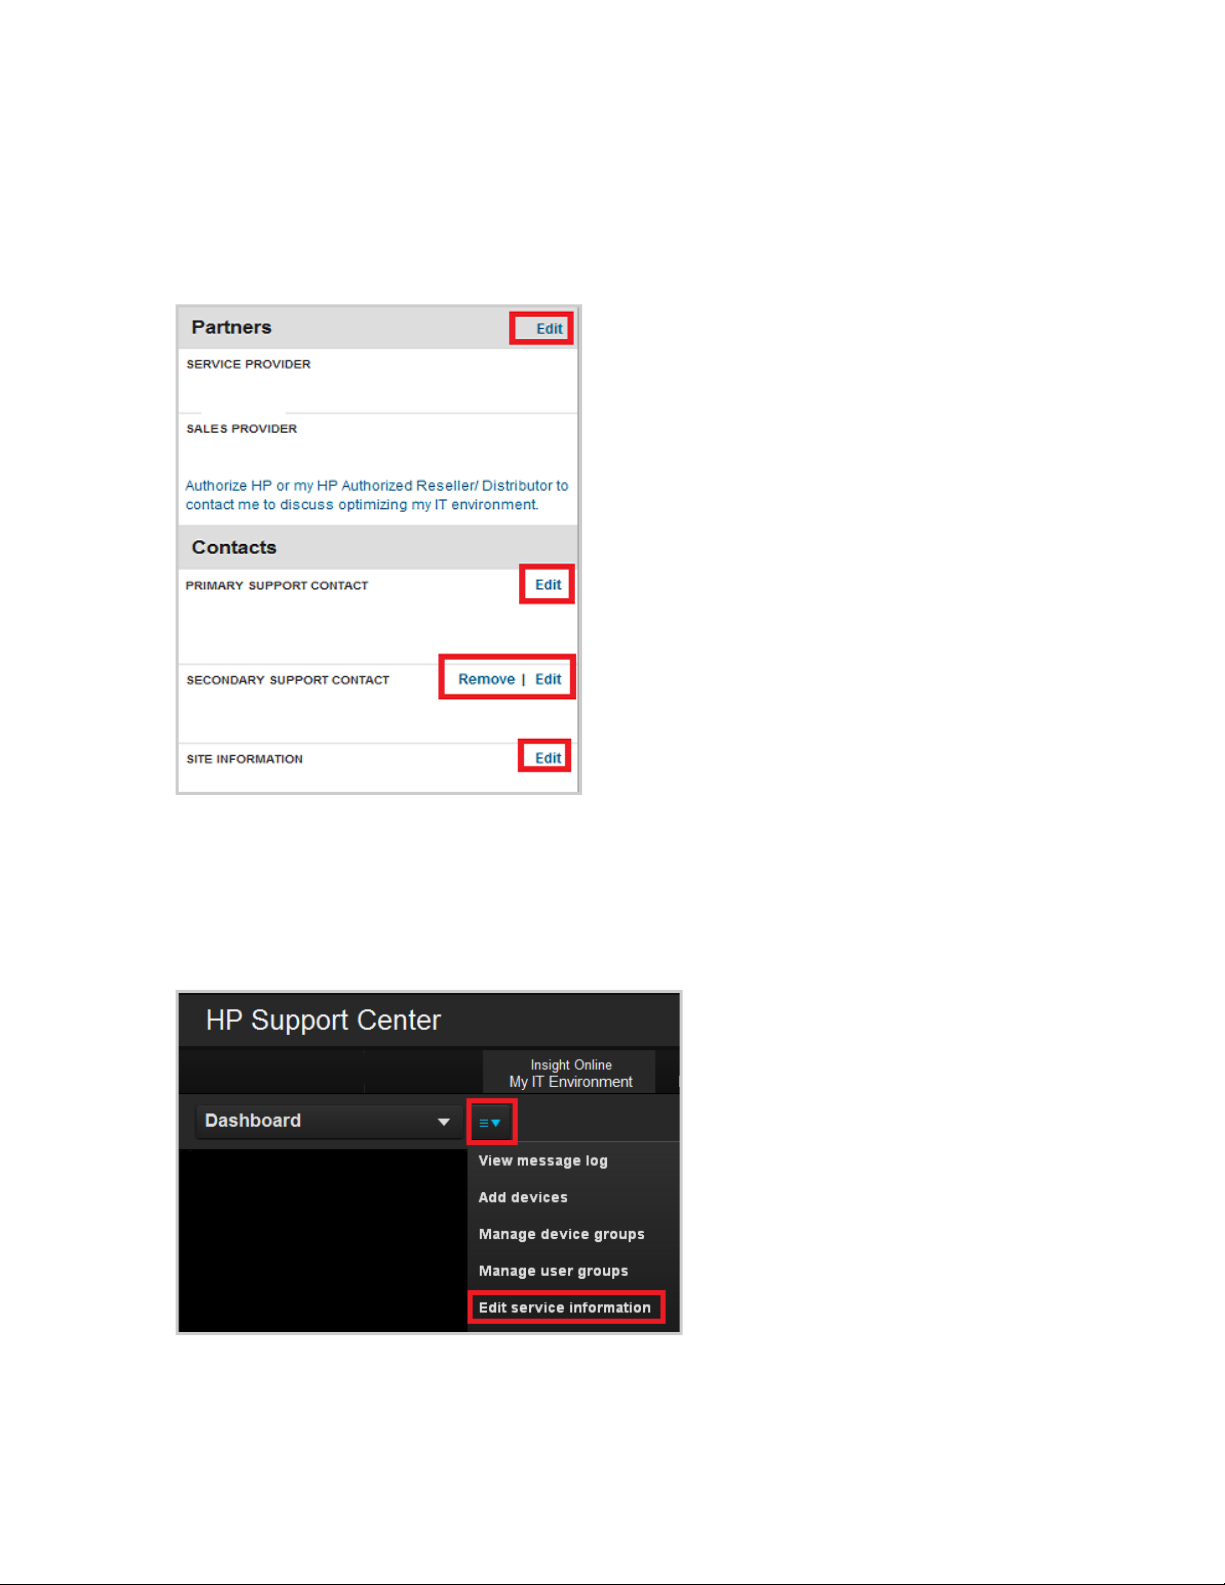
l By group. See Edit service information.
l By individual device. Click on the device, and in the Configuration area of the Overview tab, click on
the Edit links in the Partners and Contacts sections:
Figure 2.4 Change partner and contact information on an individual device
Edit service information
Once direct connect devices are registered, you can edit their site, support contact and partner information
as a group. Select Edit service information from the Dashboard or Devices, to reach the page:
Figure 2.5 Edit service information from the Dashboard
Then complete the following steps:
HP Insight Online:User's Guide Page 9 of 51
Page 10

Chapter 2: Sign in and complete device registration
1. Select groups from Select device groups and click Next. The list shows only device groups that
contain direct connect devices that you have administrative privileges to modify:
Figure 2.6 Edit service information
2. Select target devices whose information you want to change and click Next. Only direct connect
devices that you have administrative privileges to modify are listed.
3. Edit service information. Edit site, primary and secondary service information and support contact
information. Select an HP Authorized Channel partner. You can select HP or if you select a different
partner, provide that partner's location ID. Select to optimize your IT environment. That is, consent or
do not consent to having HP or an HP Authorized Channel Partner contact you about optimizing your
environment. Select this option if you plan to have an HP Authorized Channel Partner manage your
devices. See Enabling access to customer’s device information for details.
4. Validate and submit the new information.
The changes are applied to all the devices you selected. Changes are submitted by a batch process. The
name of the batch process is "DC_EDIT" plus the timestamp in Coordinated Universal Time (UTC). For
example:
DC_EDIT 2013–10–30 12:39:59:999 UTC
You are prompted to continue and to provide an optional email address to receive a notification when the
batch process has completed.
Devices included in a batch process submitted by you or by another user remain in the device list but are
grayed out. When you receive the email notification that your batch process is complete, you can click on
the refresh devices button (Refresh devices) to return the devices included in that process to their normal
state.
The email notifications contain summary status information and a link to your message log. Use the batch
process name to look up the status of the process in the message log.
For central connect devices, you must change this information in the Insight RS Hosting Device user
interface.
HP Insight Online:User's Guide Page 10 of 51
Page 11

Chapter 3: Manage your devices
When you first sign in, the Dashboard is the initial display. Click Devices on the left or select Devices
from the main menu to navigate to the All devices view:
Figure 3.1 Devices in the Dashboard
Figure 3.2 Devices in the main menu
The All devices view
The All devices view is similar but not identical to a view of your default device group. (See Your default
device group.) The All devices view is a mixed view, containing:
l Device groups shared with you by other users (All devices view, device groups). These device groups
may be top-level groups, child groups, or lowest-level groups, in the environment of the user who
shared the group with you.
l Second-level (child) device groups you created.
Page 11 of 51HP Insight Online:User's Guide
Page 12

Chapter 3: Manage your devices
l Individual devices registered using the direct connect method, whose registration must be completed.
l Individual devices in your default device group that you have not put into a child group.
l Individual devices that you have put into a child group, that you have not removed from your default
device group.
l Solutions
Objects in the All devices view are displayed in the following order:
1. Device groups
2. Hosting devices (physical and virtual machines)
3. Solutions
4. Incompletely registered devices
5. Critical devices
6. Normal devices
7. Manually added devices
By default these are sorted by status. From the View drop-down menu you can sort by name, and filter by
device type (critical, normal, non-remote), problem (monitoring, collections), and overdue communication.
Types of objects in the All devices view
The All devices view contains three types of object: device groups, solutions and devices.
Figure 3.3 Device group, solution, devices
Device groups
A device group is a container that you create or that another user has shared with you. Each device group
displays the following:
Table 3.1 Icons and text in device groups
Icon or text Meaning
Group name User defined. If the name is truncated, hover over the name to see
the complete version.
Red circle
Devices in the device group with critical service event status.
HP Insight Online:User's Guide Page 12 of 51
Page 13

Chapter 3: Manage your devices
Icon or text Meaning
Green square
Orange exclamation point
Device total Number of devices in the device group.
Group total Number of child groups in the device group. For device groups
Hover your mouse over a device group to see summary information such as totals for critical service
events, devices with remote support issues, cases, and expired contracts and warranties. Click on a
summary to view details. Click on a device group to see devices and child device groups within it.
You can create two levels of device groups below your default device group. Your default device group can
contain child device groups (second level) which can in turn contain child device groups (third and lowest
level). Create second- and third-level child groups as a way to organize large numbers of devices into
categories.
Devices in the device group with normal service event status.
One or more of the devices in the group has a remote support
issue. Hover over the device group to see the number.
shared with you, this total only includes the number of child groups
within that have been shared with you. (Sharing a device group
does not automatically share child groups within it.)
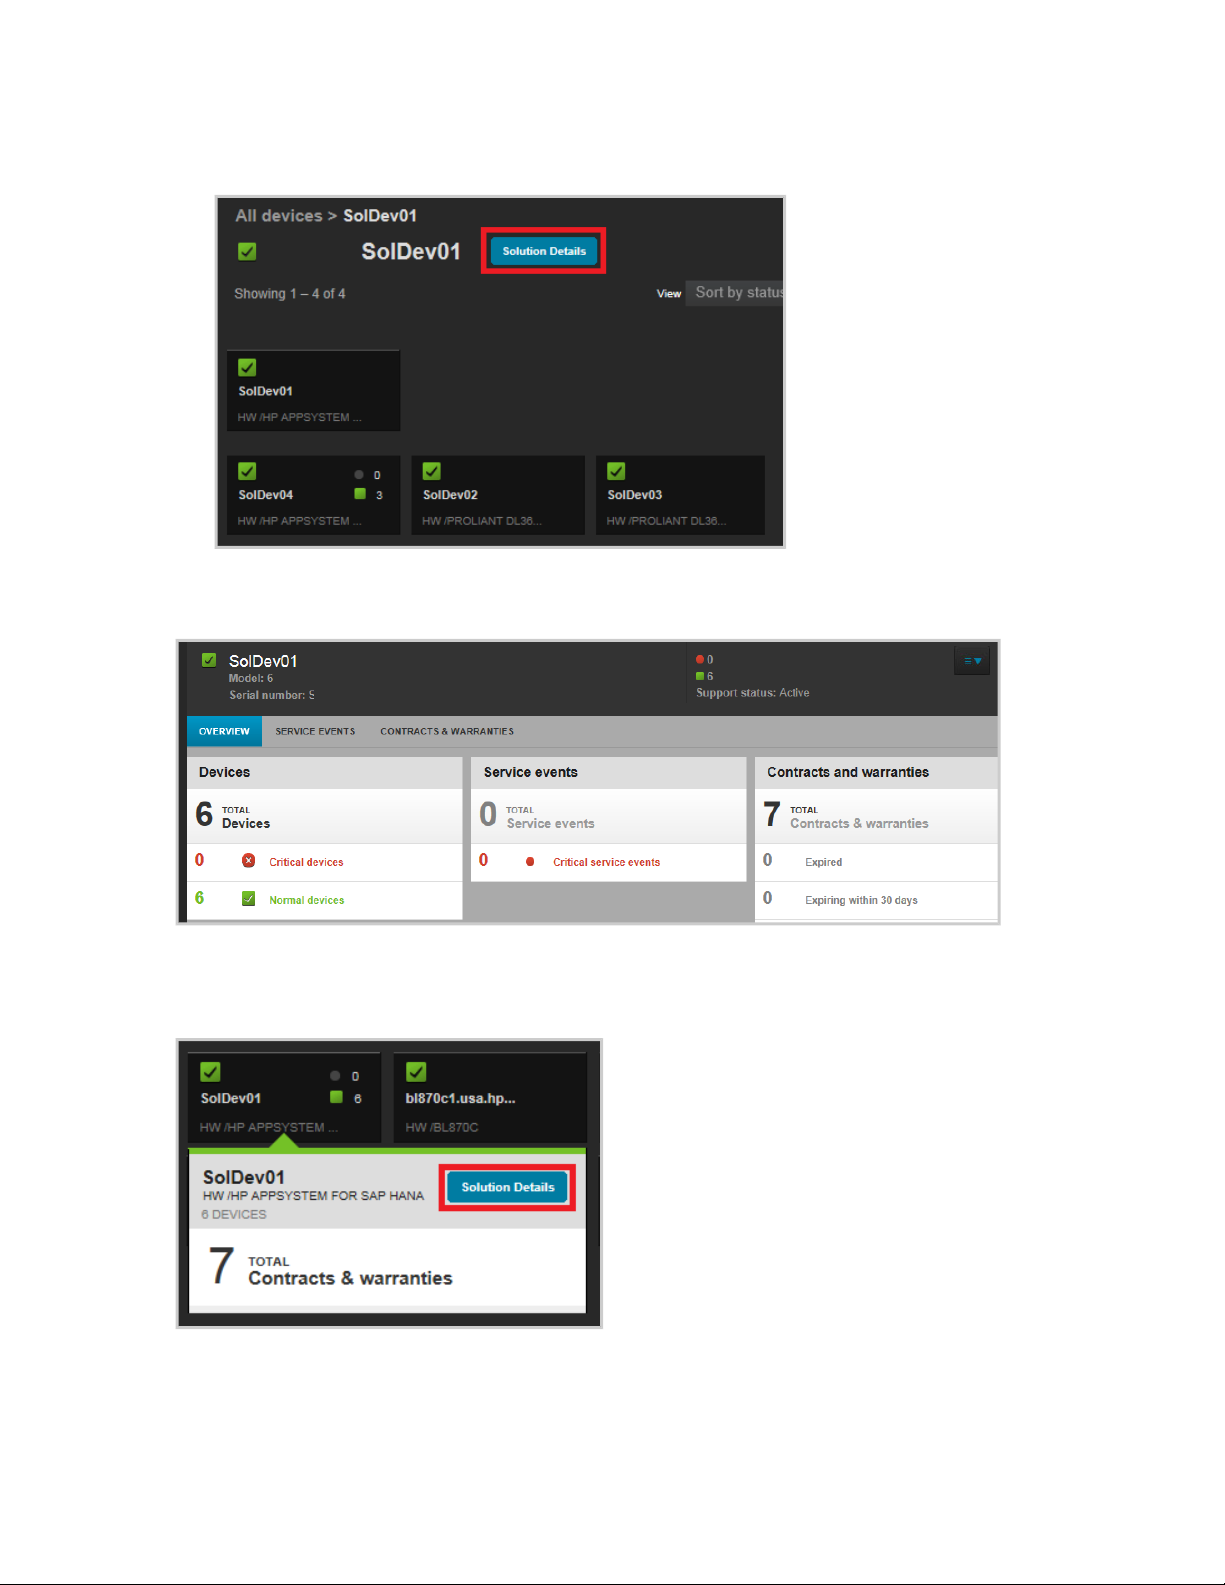
Solutions
A solution is a collection of devices configured together for a specific business purpose. Solutions are
created and managed in Insight RS and are read-only in Insight Online. In Insight Online, solutions have
characteristics of both devices and device groups. The differences can be seen in two contexts, "solution
as container", and "solution as device", explained below.
Solution as container
A solution behaves like a device group, in that it contains devices, and its details screen lists totals for the
devices it contains. In Insight RS, the devices in the container are the components you add to a solution.
1. In the All devices view, click on a solution:
The resulting screen displays the devices in the solution, similar to a device group:
HP Insight Online:User's Guide Page 13 of 51
Page 14
Chapter 3: Manage your devices
Figure 3.4 Solution as container
2. Click on the Solution Details button to view solution details, similar to a device group details screen:
Figure 3.5 Solution details
You can also reach the solution details by hovering over the solution in the All devices view to reveal the
Solution Details button:
Figure 3.6 Hover over solution
HP Insight Online:User's Guide Page 14 of 51
Page 15
Chapter 3: Manage your devices
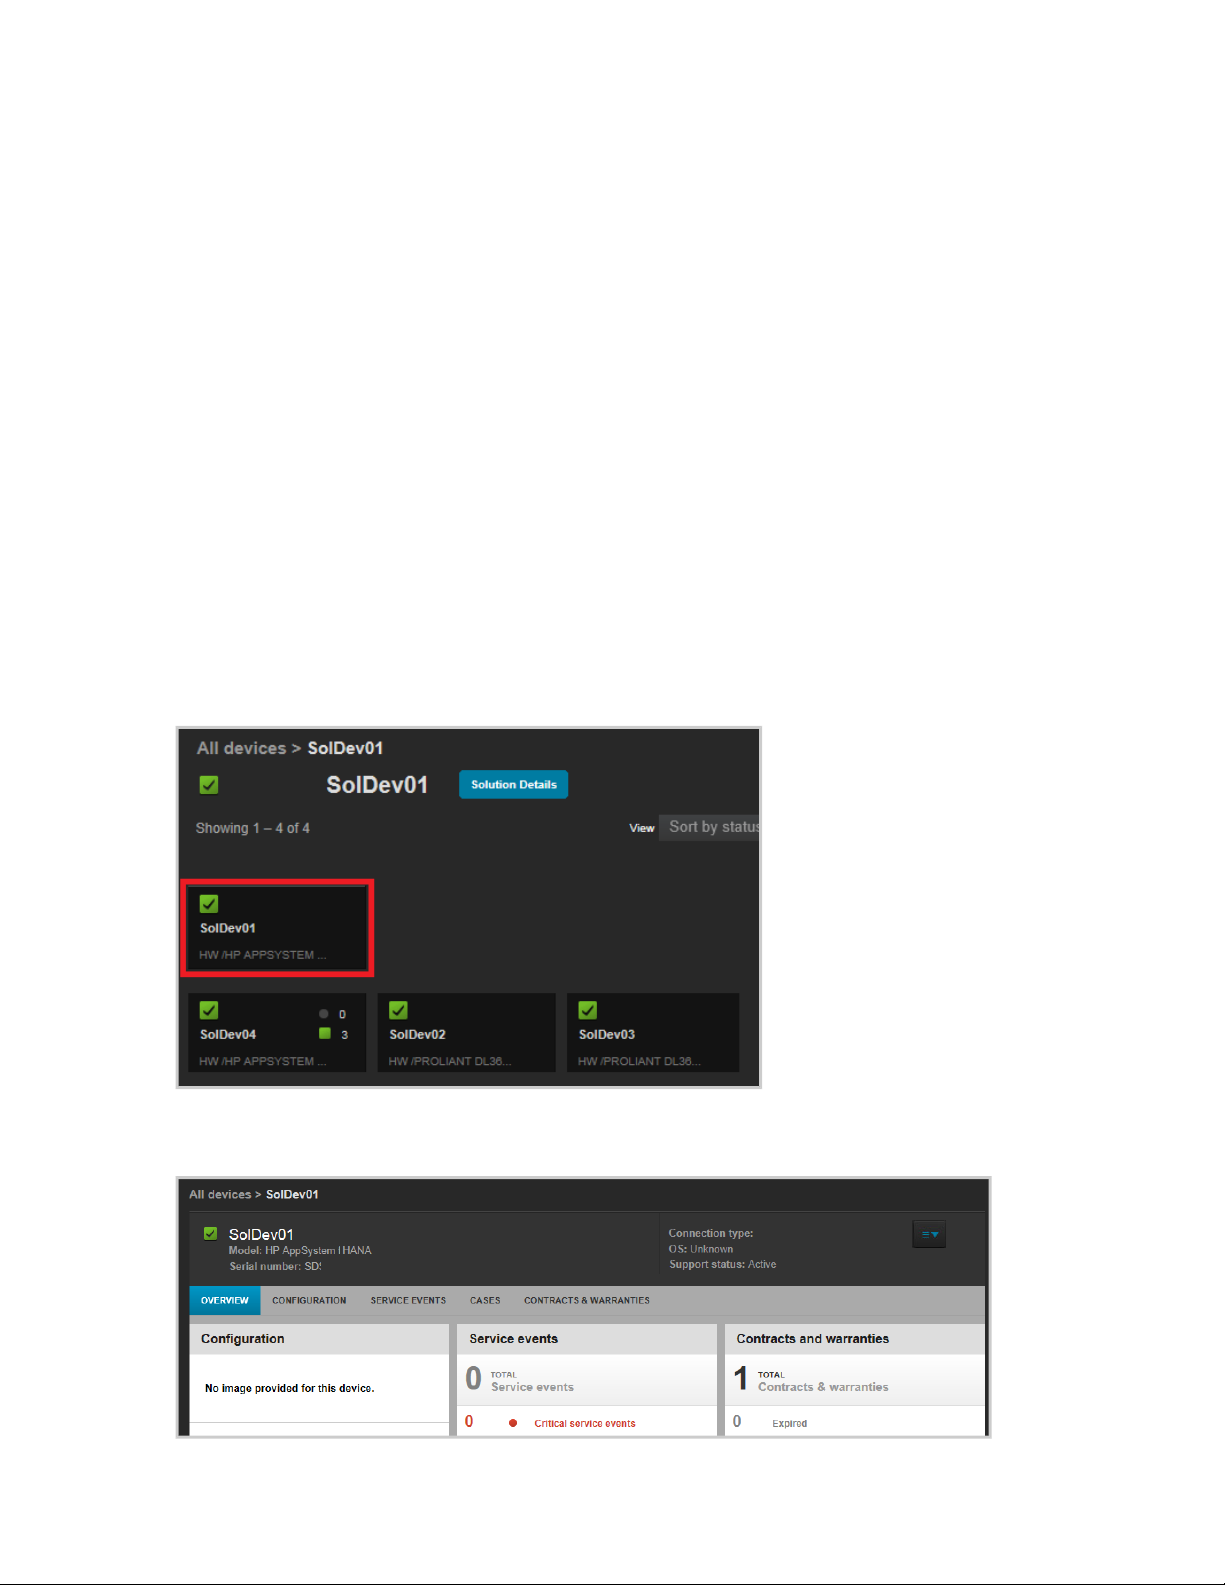
Solution as device
In the All devices view, a solution looks like a device. The solution is associated with a particular device,
which you specify in Insight RS when creating the solution, using the following fields:
l Name
l Type
l Serial number
l Product number
l Product model
l Custom delivery ID
In the All devices view of Insight Online, view the details of the solution as device as follows:
1. Click on a solution.The resulting screen displays the devices in the solution, similar to a device group.
In addition, the device associated with the solution itself is listed first, on its own row.
2. Click on the device in the first row to view the details of the device.
Figure 3.7 Solution as device
The device details are similar to those of any other device:
Figure 3.8 Solution as device details
HP Insight Online:User's Guide Page 15 of 51
Page 16

Chapter 3: Manage your devices
Devices
A device may be in different states:
l Incompletely registered (direct connect only)
l Remote health status displayed (direct connect only)
l Critical
l Normal
l Manually-added (so not remotely supported)
A device can be an Insight RS hosting device. An Insight RS hosting device may be a virtual machine or a
physical server. In both cases the Insight RS hosting device:
l Will appear in the device view as a normal device, named "Insight RS host"
l Can be added to child device groups
l Is part of the device count, both overall and within device groups
When the Insight RS hosting device is a virtual machine, it is not included in counts of service events,
remote support issues, cases, or contracts and warranties, and information about those features is not
available. Its device type is listed as a type of virtual platform.
When the Insight RS hosting device is a physical server, the device type and model of the physical server
are displayed.
For individual devices, the view displays the following:
Table 3.2 Icons and text in individual devices
Icon or text Meaning
Incomplete A device was registered using the direct connect method, and its
registration must be completed. Click on the device to complete
its registration. Devices with incomplete registrations will remain
in your default device group, or in default device groups shared
with you by other users. Once you or another authorized user has
completed its registration you can move the device to a child
group.
Orange exclamation point
Device has a remote support issue.
Green square with check
Red circle with X.
Device has normal service event status.
Device has a critical service event.
HP Insight Online:User's Guide Page 16 of 51
Page 17

Chapter 3: Manage your devices
Icon or text Meaning
Device name Typically a name you entered, when registering the device.
Otherwise obtained automatically from the Windows
“ComputerName” property, or through the Agentless
Management Service (AMS), which is a lightweight service that
collects OS-based information and provides it to iLO.
Device type/model Example: HW / HP Next Generation ProLiant DL380 server
Hover your mouse over a device to display summary information. Click on a summary to view details. For
a device whose registration is complete, click on the device to go to its individual screen.
To simplify what you see in the All devices view, you can create child groups (see Create a new child
device group), put devices into those child groups, then remove the devices from your default device group
(using Manage device groups > Edit device groups and selecting your default device group). Then only
groups, consisting of child groups and groups shared with you by other users, will appear in this view.
Your default device group
When you first sign in, Insight Online creates a default device group named according to the information
you provided in your HP Passport account profile, in the form:
first name + last name + "Devices"
For example, Marie Curie's default device group is: Marie Curie Devices. Each user has only one
default device group. Your default device group contains:
l Devices recognized as being associated with your HP Passport ID, registered through either central or
direct connect methods, that you have not moved into a child device group.
l Devices you add manually that you have not put into a child device group.
l Second-level child device groups you create.
Every device group is associated with a user group. You are the only user in the user group associated
with your default device group, and you cannot add users to it. To give other users the administrator role,
or any other role, for your default device group, create another user group or use an existing user group,
assign roles to it, and associate it with your default device group. To do so, click on Manage device
groups then Edit device group in the Actions drop-down menu at the far right, and follow the procedure.
Your default device group does not appear by name in the All devices view, because the view is
displaying (among other things, as listed above), the contents of your default device group. To see your
default device group, click on Manage device groups in the Actions drop-down menu. From there you
perform such functions as adding and removing devices, adding and deleting child device groups, and
updating the contract and warranty status of the devices in the group.
In the All devices view, you cannot distinguish child groups created by you from groups shared with you
by others. Look at Manage device groups when you need to make this distinction. In Manage device
groups, child groups created by you appear under your default device group. They are indented. For
example, Child device group in your All devices view shows a child device group. In Manage device
HP Insight Online:User's Guide Page 17 of 51
Page 18

Chapter 3: Manage your devices
groups, your child device groups are indented. Child device groups are indented shows a child group
created by you, because it is indented under your default device group.
Figure 3.9 Child device group in your All devices view
Figure 3.10 Child device groups are indented
Groups shared with you by other users on the other hand appear in Manage device groups at the same
level as your default device group. That is, they appear at the top level, not indented (In Manage device
groups, device groups shared with you are not indented). This does not necessarily mean they are top-
level groups in the environment of the user who shared them with you. A group shared with you could be a
child (second level) or bottom (third level) group in the environment of the original user, and it will still
appear at the same level as your default device group. If another user shares two or three levels of groups
with you, the topmost shared group appears at the same level as your default device group.
Figure 3.11 Device groups shared with you are not indented
Sharing a device group does not share its child groups. Child groups must be explicitly shared to make
them visible and accessible. This means that if another user shares a device group with you but not its
HP Insight Online:User's Guide Page 18 of 51
Page 19

Chapter 3: Manage your devices
child groups, you will not be able to see child groups under that device group, even if you are an
administrator. This can cause side effects such as in device and group counts, and in a possible inability
to delete a device group. If that happens contact the other administrators of the device group you are trying
to delete. The administrators are listed in Manage Device groups in the Device group administrators
column. See Create, maintain, and delete device groups for more information.
You can rename any device group, but you should be careful about renaming your default device group,
especially in a complex environment with many users and shared device groups, because the name is the
only indication that it is your default device group.
Refresh devices
Device groups shared with you, devices, device properties, and contract and warranty information may all
be added, removed or modified outside Insight Online while you are signed in. Batch processes that finish
can change device counts and the content of device listings. Click on the refresh devices button in the
upper right to bring Insight Online's view of these items up to date:
Figure 3.12 Refresh devices
The effect is the same as signing out and signing in again.
Manually added devices
You can add devices manually in Insight Online, using the Add Device function, but doing so does not
register the devices for remote support. This means that you do not see service events or configuration
details for those devices. However, adding devices may still be useful, since it allows you to view contract
or warranty details for these devices, and allows you to see all your devices, whether remotely supported
or not, in one place.
Devices are always associated with a contract or warranty, even if the contract or warranty has expired.
Contracts and warranties associated with remote support devices are automatically linked to the HP
Passport ID registered for the device, and are visible in Insight Online. However adding a device in Insight
Online manually requires that you first identify the contract or warranty that covers the device, and then
link it to your HP Passport ID.
If the device you want to add is not listed in the contracts and warranties that are linked to your HP
Passport ID, you must find the contract or warranty that covers the device, add it, and link to it. See Link
contracts and warranties to devices not remotely supported for more information.
Manually added devices display a gray circular icon in the device view, that indicates the device is not
registered for remote support. Remote support and manually added devices shows a remote supported
device on the left, and a manually added device on the right.
HP Insight Online:User's Guide Page 19 of 51
Page 20

Chapter 3: Manage your devices
Figure 3.13 Remote support and manually added devices
Devices with expired contracts or warranties
Devices whose contract or warranty has expired are still displayed in the devices view, with “Support
Expired” displayed:
Figure 3.14 Device whose contract or warranty support has expired
If support coverage for a device has expired, contact your HP Services sales representative or HP
Authorized Channel Partner to purchase continued support coverage.
Deleting devices
The result of deleting a device (Delete device in the Actions drop-down menu) from Insight Online depends
on the type of device and connection method:
l You can delete manually added devices entirely.
l You cannot delete central connect devices in Insight Online. The menu option is available but disabled.
To delete such a device, use the Insight RS console. Select the device in the Device Summary tab,
then select Actions > Delete selected.
l You can delete direct connect devices, but note that this is not a true delete or unregister; it only
removes the device from the Insight Online view of devices. To delete such a device, go to the device
management user interface where the device was originally registered (iLO, Intelligent Provisioning,
OA) and disable or delete the device there. Delete the device from Insight Online only as a last resort, if
the device remains in the view even after you have disabled or deleted the device as described.
HP Insight Online:User's Guide Page 20 of 51
Page 21

Chapter 3: Manage your devices
See the HP Insight Remote Support and Insight Online Setup Guide for ProLiant Gen8 Servers and
BladeSystem c-Class Enclosures (http://www.hp.com/go/insightremotesupport/docs) for more
information about deleting central connect and direct connect devices.
Figure 3.15 Delete device in the Actions drop-down menu
Create, maintain, and delete device groups
Device groups let you arrange your devices into logical groupings to make managing your environment
easier. Put devices that you want to manage in the same way into a group. You can then manage the
group as a whole rather than managing each individual device.
Device groups you create in Insight Online are child device groups within your default device group. The
default device group is created when you first sign in, and is associated with a default user group
containing only yourself.
Click on Create new child device group under Manage device groups:
Figure 3.16 Create a new child device group
When you create a child device group, you must associate it with at least one user group. Your own HP
Passport ID is in the default user group, which is always listed, so you can add that first, and add other
user groups later. In this way you can construct a meaningful set of child device groups, and add user
groups to them afterwards.
HP Insight Online:User's Guide Page 21 of 51
Page 22

Chapter 3: Manage your devices
All devices are in your default device group to begin with. Devices must be in at least one device group,
and can be in more than one device group. For example, you can create a child device group based on
function, such as servers, and another child device group based on location, such as Houston, and put the
same devices into both groups. You can associate each device group with a different user group.
Devices that you put into a child device group remain in your default device group unless you explicitly
remove them. After you put devices into child groups, you can then remove them from your default device
group (using Manage device groups > Edit device groups and selecting your default device group), to
simplify what you see in the top-level All devices view.
Device groups can be nested two levels downward. That is, your top-level or default device group can
contain child groups, which in turn can contain child groups.
If you have more than sixty devices in a device group, HP recommends that you move the devices into
child groups. This is just a guideline, to make the management of your devices easier and improve the
performance of the device page.
When other users share device groups with you, you see those groups in your All devices view.
To create new child device group, complete the following steps:
1. Click on Manage device groups in the Actions drop-down menu.
2. Click on Create new child device group in the Actions drop-down menu at the far right of your
default device group, or of a second-level child device group.
3. Provide a group name and add devices:
Figure 3.17 Provide a child device group name
4. Verify the derived contracts and warranties associated with the device group.
5. Associate a group of users with the device group.
6. Assign feature service roles to the members of the user group.
Insight Online creates a derived contract and warranty share (described in Share contracts and warranties)
automatically when you create a device group.
You can edit a device group that you have created or that has been shared with you as an administrator at
any time. From Manage device groups select Edit device group from the Actions drop-down menu at
the far right of the line containing the device group you want to change. You can perform these actions:
HP Insight Online:User's Guide Page 22 of 51
Page 23

Chapter 3: Manage your devices
l Change the group name and description.
l Add or remove devices in the group.
l View contracts and warranties linked to your HP Passport account that are associated with the
devices in the group.
l Add or remove user groups associated with the device group.
l View the administrators and members of user groups.
l View or change the roles granted to user groups associated with the device group.
If you are a device group administrator, Delete device group is listed in the Actions drop-down menu of
the group (Delete device group). You must remove all devices and delete all child device groups from a
device group before you can delete it.
Figure 3.18 Delete device group
Note that it is possible for a device group to contain child groups that you cannot see, if they have not been
shared with you. For example:
l You have shared a device group with another user and that user has created a child group within that
group and not shared it with you.
l Another user has shared a device group with you and that user has created a child group within the
shared group and not shared it with you. (Sharing a group does not automatically share child groups
within it.)
In these scenarios you will not be able to delete the device group. You must contact the other
administrators of the device group. Though you cannot see an unshared child group or know exactly who
the creator is, the creator will be one of the administrators of the device group, since only an administrator
could have created a child group. The email addresses of the administrators are listed in Manage Device
groups in the Device group administrators column. Contact the administrators in the list to find out
which of them created the child group, and ask the creator to share the child group with you or to delete it.
Roles and administrator types
During the process of creating a device group you can specify existing user groups, or create and populate
new user groups, with whom to share that device group.
HP Insight Online:User's Guide Page 23 of 51
Page 24

Chapter 3: Manage your devices
Feature service roles are permissions granted to users of a user group. When you create a device group,
you associate one or more user groups to it, and assign roles to those user groups.
There are three types of administrator, and it is important to be aware of the distinction. They do not
overlap:
Administrator
type
User group
administrator
Device group
administrator
Description
l Add and remove users
l Assign administrator and member privileges to users
l Delete the user group
User group administrator and member privileges are unrelated to feature service
roles.
l Assign roles to one or more user groups
l Modify roles assigned to user groups
l Create child device groups
l Add, edit, and remove devices from the device group
l Delete the device group
l Delete devices
You have device group administrator privilege for any child device group you
create. All administrators of a device group have equal privileges.
Contract and
warranty share
administrator
l Add or remove contracts and warranties
l Associate additional user groups with the share
l Assign share roles to the user groups
l Modify share roles assigned to user groups
After specifying user groups, for each user group you then enable or disable roles that represent access to
feature services. Assign feature service roles to a user group shows the assignment of roles to a user
group, in the context of a particular device group.
HP Insight Online:User's Guide Page 24 of 51
Page 25

Chapter 3: Manage your devices
Figure 3.19 Assign feature service roles to a user group
Feature service roles are associated with a user group only in the context of a specific device group or
contract and warranty share. This means that the same user group can have different roles assigned to it
in different contexts. For example, in Assign feature service roles to a user group the device group creator
has associated the “PFG Operator User Group Test” user group with the device group, and is assigning
several feature roles to it. A contract and warranty share administrator meanwhile could associate this
same user group with a contract and warranty share, and assign different feature service roles to it.
Roles assigned to a user group are group-wide. That is, they apply equally to both administrators and
members of the user group. In this example both administrators and members of the user group “PFG
Operator User Group Test” become device group administrators, since it is checked off.
The same mechanism is used when creating contract and warranty shares. See Roles are assigned
group-wide for examples.
User groups you create during the process of creating a device group are also available to associate with
other device groups, or with contract and warranty shares.
You can associate more than one user group with the same device group or contract and warranty share.
Do this if you want to assign different roles to different groups of users. Roles and feature services are
grayed out if no contract or warranty exists that allows them. Purchasing a contract or warranty will
activate the ability to assign these roles and feature services to the user group.
You cannot delete a user group if it is the only user group that has administrator role for a device group or
for a contract and warranty share.
HP Insight Online:User's Guide Page 25 of 51
Page 26

Chapter 4: Reports and messages
Reports
The reporting feature lets you easily generate reports, save them for reuse, and view a log of prior results,
allowing you to manage your reports efficiently. Reports are available to users and to HP Authorized
Channel Partners. You can generate reports for the following:
l HP Care Packs only
l Support agreements only (use the Contracts report)
l HP Care Packs, support agreements, and warranties (use the Contracts and warranties report)
l Device configuration
l Firmware
l Service events
l Support cases
See the HP Insight Online Reporting Guide (www.hp.com/support/InsightOnline_RG_en) for details.
Message log
The message log is a list of messages about direct connect devices that are registered to your HP
Passport ID or that are in device groups shared with you. The messages contain information about issues
such as monitoring, registration and connection problems, and overdue communications. The log can also
contain messages about the status of batch processes submitted for completion of device registration,
and the update of service information.
Each message in the log contains fields for time generated, message type, device name and description.
By default the listing is sorted by Coordinated Universal Time (UTC) time generated, not converted to the
time zone specified in your profile. Click on the other column heads to sort by those fields. Select a
message type from the View drop-down menu at the top to display messages of a particular type. Click on
the description field to display the individual message, or hover over the field to see the first 290
characters of the description.
In an individual message, click on the device name to go to the overview for that device.
Access the message log from various locations. Click on the View message log item on these pages:
l The Dashboard’s Actions drop-down menu (View message log from the Dashboard).
l The Devices feature's top-level view (in the Actions drop-down menu).
Page 26 of 51HP Insight Online:User's Guide
Page 27

Chapter 4: Reports and messages
l An individual device group page (in the Actions drop-down menu at the far right).
l An individual device page (in the Actions drop-down menu at the far right).
Figure 4.1 View message log from the Dashboard
The messages that display (Message log sample) depend on where you access the log. From the
Dashboard or the Devices top level, messages for all devices are listed. From a device group page, only
messages for devices in the group are listed. From an individual device page, only messages for that
device are listed.
Figure 4.2 Message log sample
Messages are for remotely supported devices only, not manually added devices.
HP Insight Online:User's Guide Page 27 of 51
Page 28
Chapter 5: Service Credits
Overview
The Service Credits feature provides access to:
l Service Credits purchased on HP support agreements.
l The HP services exchanged for those credits.
l Additional HP services available for exchange of Service Credits.
l For authorized users, the ability to purchase HP services using a shopping cart.
To access Service Credits, you must have a proactive services support agreement in your HP Passport
profile.
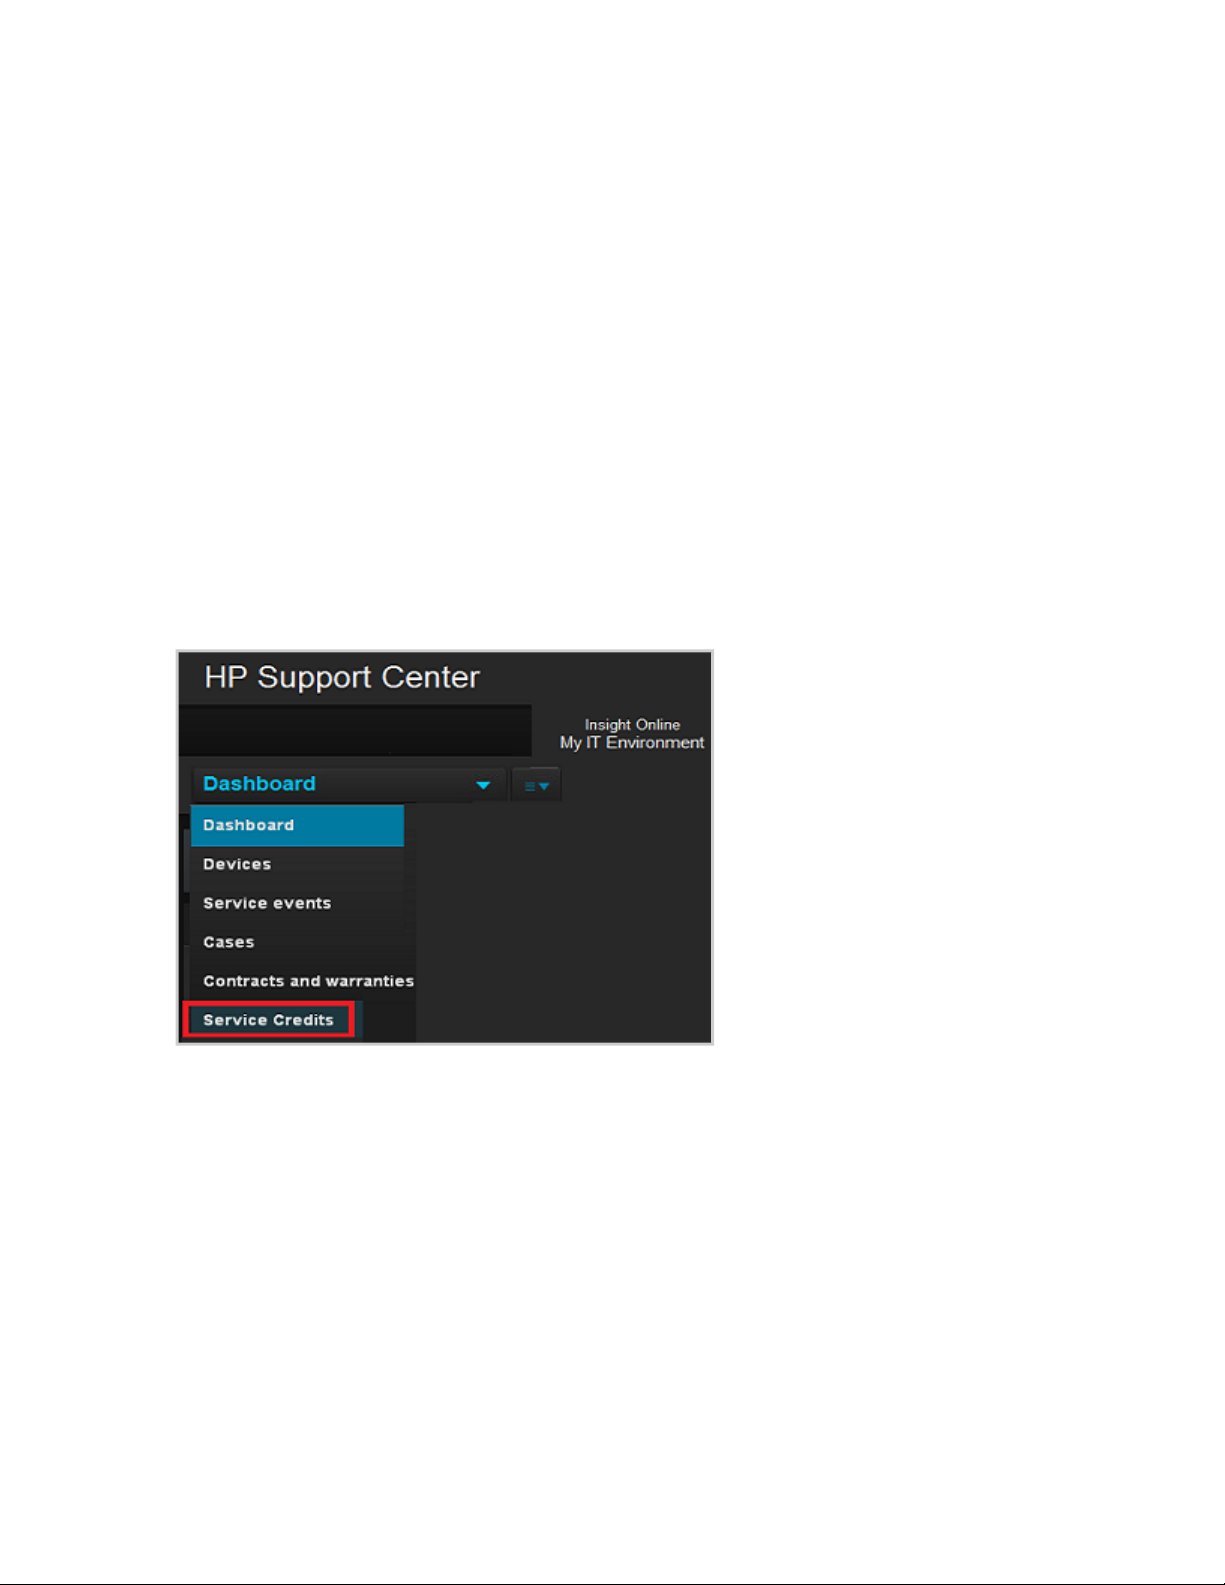
From the Insight Online My IT Environment tab, select Service Credits from the main menu (Select
Service Credits from the main menu) to reach the Service Credits home page.
Figure 5.1 Select Service Credits from the main menu
The Service Credits home page provides a summary of your Service Credit information (Service Credits
home). Click on any of the section headings, or use the Actions drop-down menu (Service Credits Actions
drop-down menu) to see detailed information. You can print the displayed results from any page.
Page 28 of 51HP Insight Online:User's Guide
Page 29

Chapter 5: Service Credits
Figure 5.2 Service Credits home
Figure 5.3 Service Credits Actions drop-down menu
The items in the Actions drop-down menu are described beginning in My Service Credits.
Administrator and member roles
Two types of roles are associated with Service Credits:
HP Insight Online:User's Guide Page 29 of 51
Page 30

Chapter 5: Service Credits
l Administrators will see a shopping cart in the upper right of the Service Credits pages, and can use
Shop HP services to purchase more services by adding them to the cart (Service Credits shopping
cart).
l Members can view My Service Credits and My services, and access featured HP services.
Administrator and member roles exist in the context of a contract and warranty share. To access Service
Credits, the contract and warranty share must contain at least one service support agreement, and include
a user group that includes your HP Passport ID, with the administrator or member role enabled for Service
Credits. This is the same mechanism used for granting access to other features of the HP Support Center.
See Share contracts and warranties for more information.
Figure 5.4 Service Credits shopping cart
My Service Credits
The My Service Credits page displays Service Credits against all your active and expired support
agreements. These agreements are either linked to your HP Passport ID or shared with you by another
user who granted you access as described in Roles and administrator types. Support agreements that
expired within the past two years are included.
The displayed list shows Service Credits by Support agreement, which can include a Service Agreement
ID (SAID) or a Support Account Reference (SAR). If you have no currently active Service Credits, you
can use the View filter to see expired or all Service Credits instead. You can filter by status or search
using the drop-down and search box at the top. Click on an SAID or SAR to go to a page showing the
details of the specific agreement in the Contracts & Warranties area. Click on an individual Service Credit
item to see details. Sort the results by any column by clicking on the column head.
My services
The My services page displays HP services purchased using Service Credits from active and expired
support agreements. These agreements are either linked to your HP Passport ID or shared with you by
HP Insight Online:User's Guide Page 30 of 51
Page 31

Chapter 5: Service Credits
another user. Support agreements that expired within the past two years are included.
Click on a service activity name in the list to go to the service overview page in Shop HP services. By
default, the list is sorted by status. Filter the results by status using the View drop-down menu. Sort the
results by any column by clicking on the column head. Click on the contextual help icon next to the service
name to see a brief description of the service.
For each order listed under a single service, use the Actions drop-down menu at the far right of the row to
go to the details page which shows the status of all purchased instances of the service. The details page
also provides additional functions which vary depending on the current status of the service and your role.
They include:
l E-mail HP. Use this form to request that an HP services representative contact you to discuss your
business needs. The HP representative will contact you within three HP business days of submitting
the request. Provide details and contact information in the form.
l Schedule service. Schedule and unschedule services in the list using the Actions drop-down menu at
the far right. After you make the change, the status and dates for that service will be updated in the list.
l Reschedule service. Change the date of the service. When rescheduling, HP will review the request
within three HP business days and either confirm or will email you proposing an alternate date and
time.
l Remove scheduled date. Revert a service to the unscheduled status.
l Cancel service. If you cancel a service, the Service Credits associated with that service are refunded
to the support agreement that has the furthest expiration date, up to what it contributed to the original
order. Cancellation information is appended to the original order in My orders. Service Credits cannot
be refunded to a support agreement where those Service Credits have since expired.
My orders
The My orders page displays your orders purchased using Service Credits. The list displays the service
activity within the order, as well as other details. You can filter the list, sort it by column head, and search
for orders. Use the Actions drop-down menu on the far right of each row to view details. If you are an
administrator, the menu includes a link to reorder services. Click on an order in the list to see order details.
Shop HP services
Service Credits administrators can click on any of the service category links on the right of the Service
Credits home page, or on Shop HP services in the Actions drop-down menu, to reach Shop HP
services:
HP Insight Online:User's Guide Page 31 of 51
Page 32

Chapter 5: Service Credits
Figure 5.5 Shop HP services
You can choose a variety of HP services from the list. Filter the list using the category and subcategory
drop-down menus, and sort the results by category, subcategory and service activity. You can also search
for HP services using the search text box.
Click on a service activity in the list to see an overview. This displays a price, in Service Credits, for the
service, and boxes for you to enter the quantity of the service, to add to your cart. Some activities have
prerequisites. If so, click on the Prerequisites tab, and purchase them in the same way.
If you have support agreements spanning more than one country you will be asked, only once, to specify
the country for the HP service. Select the country from the drop-down menu.
The cart may indicate that you need to make changes to your services. If so make the necessary changes
then proceed. Before submitting your order you can review the order and specify which Service Credits
you want to use. By default the checkout process assigns Service Credits to pay for cart contents by
expiration date, with those scheduled to expire first being used first. You can change this before
submitting the order, by using the Service Credits to use field in the right column.
Review the information, check the box indicating you have understood and accepted the scope of the
services as described, and submit. When checkout completes successfully, an order number is
displayed, and confirmation is emailed to you.
View the current contents of the cart at any time by clicking on the cart.
You can request a custom service activity. Provide details of your request, your contact information, the
support agreement containing the Service Credits you wish to use, and submit the form. An HP
representative will contact you within three HP business days.
You can also provide feedback using the feedback form.
HP Insight Online:User's Guide Page 32 of 51
Page 33

Chapter 6: HP Authorized Channel Partners
Overview
If you have enabled an HP Authorized Channel Partner to view your remote support devices, that partner
can do so by using the My Customers section in Insight Online. This section is only visible to those who
are recognized as an HP Authorized Channel Partner at sign in.
Types of HP Authorized Channel Partners
There are two types of HP Authorized Channel Partner:
l HP Authorized Reseller. To become an HP Authorized Reseller, a company must apply to become a
partner on the Global Partner Portal (GPP) and meet certain criteria. Once approved, HP will assign the
company a partner location ID. Individuals at the partner company can register to become users of the
partner portal. During registration, users create an HP Passport ID that is linked to their company’s
location ID. The same HP Passport ID is used to sign in to Insight Online. Insight Online will identify
you as an HP Authorized Reseller.
l HP Authorized Service Partner. Upon reaching a level of HP sales, HP offers your company, as an
HP Authorized Reseller, training to deliver break-fix service as a ServiceOne partner. If this is of
interest, your company can become accredited as an HP Authorized Service Partner. Once HP
accredits your company, Insight Online will automatically identify you as an HP Authorized Service
Partner at sign in.
If a customer does not assign a channel partner, service delivery defaults to HP. As a Service Delivery
Partner, you have the option to have Insight RS cases automatically routed to you.
Enabling access to customer’s device information
As an HP Authorized Channel Partner, you must share your partner location ID with your customers and
ask them to associate it with the devices they want you to manage. To allow you to view configuration
information for their devices, you must also ask them to optimize their IT environment.
For central connect devices, customers should use the Insight RS Hosting Device Setup Wizard:
l On the Receiving Remote Support screen, check ”Consent to have HP or my HP Authorized
Channel Partner contact me to discuss optimizing my IT environment”. Checking this option will affect
all devices managed by Insight RS. Only you as the HP Authorized Channel Partner will be able to
receive configuration information, and not HP. HP will not contact your customers if you are the
registered partner in Insight RS and Insight Online.
l On the HP Authorized Channel Partners screen, click the Partner ID option and enter the partner
location ID.
For direct connect devices, customers should use Insight Online. The information can be added in three
places:
Page 33 of 51HP Insight Online:User's Guide
Page 34

Chapter 6: HP Authorized Channel Partners
l At Step 3 of the Complete device registration sequence. For one or more devices. See Customer
provides partner location ID and optimizes IT environment.
l After registration, using Edit Service Information from the Actions drop-down menu. For one or more
devices. See Edit service information.
l For an individual device, from the Edit link on the Configuration tab of the device’s details page. See
Change partner and contact information on an individual device.
Enter the partner location ID and check Optimize my IT environment . Note that for direct connect
devices this action only applies to the specific devices you select.
Figure 6.1 Customer provides partner location ID and optimizes IT environment
The My Customers view
For you as an HP Authorized Channel Partner, the default active tab in Insight Online depends on where
you sign in:
l From the HP Support Center using your HP Passport ID: You are recognized as an HP Authorized
Channel Partner. Your default tab is My IT Environment, the same as for a customer. Use that to
manage your own devices as a standard user. The My Customers tab is also active. Click on it to
manage your customer’s devices.
l From a link in a partner portal such as the Global Partner Portal (GPP) or Channel Services Network
(CSN): You do not have to sign in again with your HP Passport ID. Your default tab is My Customers.
The My IT Environment tab is also active. Click on it to manage your own devices.
HP Insight Online:User's Guide Page 34 of 51
Page 35

Chapter 6: HP Authorized Channel Partners
The Partner Portal button in the My Customers tab links to partner information about Insight Online and
Insight RS.
Customers do not see the My Customers tab. It is only visible as a result of the two scenarios above. The
top-level content of this tab contains customer objects, rather than devices and device groups:
Figure 6.2 My Customers shows customers, not devices
HP Insight Online:User's Guide Page 35 of 51
Page 36

Chapter 6: HP Authorized Channel Partners
Click on a customer object to see the customer's devices. As a partner you can only see those devices
that have been associated by the customer with your partner location ID as described in Enabling access
to customer’s device information. Some differences exist in this view, depending on the type of channel
partner:
Table 6.1 Customer information available to HP Channel Partners
Insight Online feature
Devices and solutions:
Configuration details x x x
Service levels x x x
Reports:
Device configuration x x x
Contracts and
warranties
Support case x
Service event x
Firmware x
HP Authorized
Reseller
x x
HP Authorized
Service Partner
Customer opt in
required
(Reseller only)
Service events:
Details x
Icons in dashboard x
Link to Channel Services
Network (CSN)
For direct connect devices, the device owner can change the partner location ID at any time, either
individually or by group. See Edit service information. See also the HP Insight Online FAQs
(http://h20195.www2.hp.com/V2/GetDocument.aspx?docname=4AA3-9252ENW) for more information.
x
Favorite customers
In the Customers view, you can designate a customer "favorite" by hovering over a customer object and
clicking "Add as favorite".
HP Insight Online:User's Guide Page 36 of 51
Page 37

Chapter 6: HP Authorized Channel Partners
Figure 6.3 Add a favorite customer
A star is then added to the customer object. Selecting at least one favorite customer activates the
"Favorites only" filter on the right.
Figure 6.4 Favorite customers
You can select a maximum of 25 favorites.
Initially, all customers are displayed by default. Click on "Favorites only" to display favorite customers,
and "All customers" to change back. This choice remains your default customer view until you change it.
The View filters and the Search action will apply to the set of customers you are viewing--either all
customers or favorites only.
You can hover over a favorite customer object and remove it from your favorites. If you remove all
favorites, the "Favorites only" filter is deactivated.
Service levels
HP Authorized Channel Partners can use the Service levels feature to view information about the highest
service level (such as an HP warranty, support agreement or an HP Care Pack) available that applies to
each device that is monitored by HP remote support. For HP Authorized Resellers to see service level
HP Insight Online:User's Guide Page 37 of 51
Page 38

Chapter 6: HP Authorized Channel Partners
information, customers must opt in from Insight RS for central connect devices, or from Insight Online for
direct connect devices.
From the details screen of a device, click the Service levels area on the right. The service levels details
screen displays. Check the "Include all active service levels"to show both the highest service level (an
HP Care Pack, for example) and other applicable service levels as well (a warranty, for example).
Figure 6.5 The Service level details of a device
Removing customer groups from the view
As a partner you may need to remove a customer group from your All customers view if there are no longer
devices associated with this customer. Duplicate customer groups may be created over time, or your
relationship with the customer may have changed. Since a customer group is like a device group,
removing a customer group is like removing a device group. You remove the customer group from Manage
device groups. To remove a customer group, two conditions must first be met:
1. No devices must appear in the customer group. For zero devices to appear in the customer group, the
customer must do one or more of the following, depending on the kind of devices in their environment:
n Disable their connection to Insight Online from the Insight RS console (Administrator Settings >
HP Insight Online tab) that contains the devices managed by the partner.
n Or, delete all central connect devices from the Insight RS instance that contains the devices
managed by the partner.
n Remove all direct connect devices from their Insight Online My IT Environment by using the
Insight RS console (preferred), or by using the Insight Online Delete device function.
n Or, change the partner location ID for all devices managed by the partner. The partner location ID
of direct connect devices can be changed in Insight Online using Edit service information (Edit
service information), and of central connect devices in the Insight RS console in the Company
Information > Channel partners screen.
2. Child device groups that you, or any other partner administrator, have created within the customer
group must be removed. Child groups created by the customer do not matter, since you as a partner
do not see them.
Once there are zero devices and zero child groups remaining in the customer group, you can remove the
customer group from different paths:
HP Insight Online:User's Guide Page 38 of 51
Page 39

Chapter 6: HP Authorized Channel Partners
1. From the All customers view, navigate to the Dashboard of the customer group:
n Hover over the customer group and click on Group details
Or:
n Click on the customer group and click on Group details
Or:
n Click on the customer group, then select Dashboard from the main menu.
2. Once in the Dashboard, click on Manage device groups in the Actions drop-down menu.
3. In the device groups listing, on the line of the customer group you want to remove, click on the
Actions drop-down menu at the far right, then click on Delete customer group:
Figure 6.6 Delete customer group
It is possible for another partner administrator with access to the same customer group to create a child
device group within it. If that child group is not shared with you, you will not be able to delete the customer
group. You must contact the other administrators of the customer group. Though you cannot see an
unshared child device group or know exactly who the creator is, the creator will be one of the
administrators of the customer group you are trying to delete, since only an administrator could have
created the child device group. You can see who these administrators are in Manage Device groups in
the Device group administrators column. Contact the administrators in the list to find out which of them
created the child group, and ask the creator to share the child group with you or to delete it.
HP Insight Online:User's Guide Page 39 of 51
Page 40

Chapter 6: HP Authorized Channel Partners
Page 40 of 51HP Insight Online:User's Guide
Page 41

Chapter 7: Manage contracts and warranties
Contracts and warranties include support agreements, HP Care Packs, and warranties. Contracts and
warranties are managed through HP’s Support Agreement Manager (http://www.esca.hp.com) website.
This means that a contract or warranty already exists for any remote support device.
If you sign in to Insight Online using the same HP Passport ID used to register the device (see Complete
direct connect device registration), you do not have to link your ID to the contracts and warranties that
cover the remote support devices; they are linked to your ID automatically and appear as a derived
contract and warranty share. See Derived contracts and warranties.
Since contracts and warranties are associated with the devices they cover, the link between your HP
Passport ID and a contract or warranty provides access to information about the devices covered by the
contract or warranty. This information is available to you from the Insight Online devices area.
Derived contracts and warranties
In your list of contract and warranty shares, some are derived by Insight Online. Derived means that
Insight Online determines the contracts and warranties that are associated with a given group of devices,
and automatically creates a contract and warranty share containing those contracts and warranties. This
occurs for:
l Your default device group.
l A child device group you create.
l A device group you are an administrator of.
Derived contract and warranty shares are marked by a red asterisk. The name of the contract and
warranty share is the same as the name of the corresponding device group. You can view the details of
these derived contract and warranty shares but unlike a contract and warranty share that you create
yourself, you cannot edit them:
Figure 7.1 View details of a derived contract and warranty share
However, you can update the derived contract and warranty share from Manage device groups in the
device group area, by selecting Run contract and warranty update in the Actions drop-down menu of
the corresponding device group:
Page 41 of 51HP Insight Online:User's Guide
Page 42

Chapter 7: Manage contracts and warranties
Figure 7.2 Run contract and warranty update
Link contracts and warranties
To enable devices to be registered for remote support in Insight Online, you must link a contract or a
warranty that covers those devices to your HP Passport ID. Link contracts and warranties to your HP
Passport ID from the Contracts and warranties item in the main menu. The procedure is similar for
support agreements (shown), HP Care Packs, and warranties.
Figure 7.3 Linking a support agreement, with ownership types
HP Insight Online:User's Guide Page 42 of 51
Page 43

Chapter 7: Manage contracts and warranties
To link to a contract or warranty, you need your HPPassport ID and the following information:
Contract or warranty
Identifier Required additional information
type
Support agreement Service Agreement ID Support Account Reference (SAR)
HPCare Pack HPCare Pack ID HPCare Pack product number*, country of
purchase
Warranty Warranty serial number Warranty product number*, country of purchase
The table below lists the location of the required information:
Required information Where to find
Service AgreementID B,C,D
Support Account Reference (SAR) B,C,D
HPCare Pack ID B,C
Warranty serial number A, B, D
HPCare Pack product number* B, D
Warranty product number* A, B
A. On the product itself.
B. On the support documentation.
C. At the Electronic Support Contract Assistant website.
D. On the customer cover letter that describes the contract or warranty.
* The product number(s) of the products covered by the HPCare Pack or warranty
The first person who links an HP contract or warranty becomes the initial owner. As owner you decide the
ownership type: single or multiple. This choice affects the visibility of the contract or warranty. In general it
is best practice to select multiple ownership, since this type of support is typically managed by a group,
not an individual.
If you try to link a contract or warranty and see an error message stating that the support agreement is
already linked to someone else, contact that owner to get access rights. This may be the result of the
owner selecting single ownership when creating the link, and not creating a share with a user group that
includes you. The owner may not be revealed, if the owner has not shared his or her contact information,
so you may have to find the contract administrator on your site to identify the owner. Once identified the
owner should change the ownership type for that contract or warranty link from single to multiple, or add
you to a share with the necessary privileges.
HP Insight Online:User's Guide Page 43 of 51
Page 44

Chapter 7: Manage contracts and warranties
Share contracts and warranties
After you have linked contracts and warranties to your HP Passport ID, you can then share them with
other users. You do this by creating a contract and warranty share:
Figure 7.4 Creating a contract and warranty share
To create a contract and warranty share, perform the following steps:
1. From Manage contracts & warranties, click Create new share.
2. Name the share and provide a description.
3. Select one or more existing user groups, or create new ones.
4. Assign roles and feature services to the selected user groups. Assign the administrator role to the first
group.
You must assign the first user group you add in Step 4 the role of share administrator, because at least one
user group must have that role. Select the "administrator" checkbox. You can change this later, as long as
one user group has administrator role.
To add subsequent user groups with the role of member, do not check any boxes, since the member role is
the default.
Note:User group privileges are not the same as share roles. If you create a user group to assign to the
share you are making, the administrators you assign to the user group do not automatically become
administrators of the share. When creating a share, when you select a user group and assign roles to it,
those roles apply to all users in the user group equally. You are assigning roles to the group as a whole--it
does not matter whether any given user is an administrator or a member of the user group itself.
HP Insight Online:User's Guide Page 44 of 51
Page 45

Chapter 7: Manage contracts and warranties
In the table below for example, two user groups are created, one for share administrators and one for share
members. Note that Francis Lee, though a member of the user group, becomes an administrator of the
share. Similarly Pradesh Jones and Akiko Yamada, though administrators of the user group, become
members of the share:
Table 7.1 Roles are assigned group-wide
User groups and users User group privilege Assign role to share Role in share
"Paris contract share admins"
- Marie Curie admin
admin
admin
- Francis Lee member admin
"Paris contract share members"
- Pradesh Jones admin
member
member
- Akiko Yamada admin member
If you want everyone in the user group to have administrator role for the share, you only need one user
group.
The table below lists the differences between a share administrator and a share member.
Table 7.2 Share administrators and share members
Task Share
administrator
Share
member
Can add to and remove contracts from the share x
Can view contracts in the share x x
Can add and remove user groups associated with the share x
Can change the roles of the user groups associated with the
share
x
Can view administrators of the share x x
Can view members of the share x
User groups that you create during this process are also available to associate with other contract and
warranty shares, and with device groups during the process of creating a device group.
HP Insight Online:User's Guide Page 45 of 51
Page 46

Chapter 7: Manage contracts and warranties
Display your user name and email
Simplify the management of your contracts and warranties by allowing other authenticated and entitled
users to see your user name and email address. Select "Yes" to share this information, or "No" to keep it
private:
The result of this action depends on the ownership type of each contract or warranty:
Table 7.3 Display your user name and email
Button
value
Yes visible You, via email, for access.
No hidden Their contract or warranty administrator.
You can view and change this setting at any time. Regardless of the selection you make, if you are the
single owner of a contract or warranty and you create a share including it, the users in the associated user
group, both administrators and members, will be able to see your information as well as the information of
the other administrators and members in that user group. In other words visibility among users within a
share takes precedence over this setting.
Result
Multiple ownership Single ownership
Visibility of your information, from any
other user who also links as a multiple
owner to that same contract or
warranty:
If another user tries to link to that same
contract or warranty, that user is directed
to contact:
Batch link tool
The Batch link tool allows you to link up to 2500 contracts and warranties to your HP Passport ID in a
single operation. If you have more than 2500, you can resubmit as many times as you need to, until all of
your contracts and warranties are linked to your account.
From Contracts and warranties click on Batch link tool either in the Actions drop-down menu or on the
page itself.
HP Insight Online:User's Guide Page 46 of 51
Page 47

Chapter 7: Manage contracts and warranties
Follow the steps listed on the upload page:
l Download the latest Microsoft Excel template file from the link in Step 1. The format of the template
name is "name-date_version", where the date is represented as YYYY-MM-DD.
l Read the detailed instructions in the Readme sheet of the template.
l Enter information, one contract or warranty per line, according to the titles at the top of each column.
Enter a maximum of 2500 lines, for each instance of the template you create. Note that some of the
fields are optional.
l Do a "Save as", to comma-separated value (CSV) format. (Select CSV (Comma delimited) (*.csv)
option only from "Save as type" in Excel.) The result is a plain text file containing the entries from the
spreadsheet, with each field on each line separated by a comma.
l Optionally, update your user name and e-mail display option. Select "Yes" to allow other users to see
your user name and email address when they view these contracts and warranties, or select "No" to
keep this information private.
l Check the boxes to verify that you have selected the most recent template, and that you have a CSV
file.
HP Insight Online:User's Guide Page 47 of 51
Page 48

Chapter 7: Manage contracts and warranties
l Browse to the CSV file on your local computer, then click Upload.
CSV file size and requirements
The file name must have an extension of .csv. File maximums:
l Name length: 50 characters.
l Size: 5 MB
l Number of lines: 2500
Upload status values
After you upload the CSV file, a popup window appears. Click on the Close button. An initial file check
occurs verifying that the file size is within limits and has the correct file extension. If this file check
succeeds, the batch upload summary page displays. This page lists the upload date and status, and a link
to a report file, for each CSV file you have uploaded. Click on a report file link to view the report, which
contains details about the upload. You can also save the report file. The default sort for the list is by date.
Click on the Status or Report file headings to sort by those fields instead. Status values for each uploaded
batch file in the list are as follows:
l Completed.
l Completed with errors. See the report file for details.
l Invalid file format. The file was not recognized as a valid CSV file.
l File exceeds limit. The file was longer than 2500 lines or greater than 5 MB.
HP Insight Online:User's Guide Page 48 of 51
Page 49

Chapter 7: Manage contracts and warranties
l Pending. Files that have been received and have not completed processing. A maximum of two
uploads can be pending.
l System error. The file itself may be fine. Try uploading again later.
CSV file field values
The CSV field values are the same as the columns in the Excel spreadsheet. They are, in order:
A. One of:
n Service Agreement ID (SAID)
n HP Care Pack ID
n Warranty serial number
B. The product number of the product covered by the HP Care Pack or by the warranty, if the obligation
type is HP Care Pack or Warranty.
C. Support Account Reference, if the obligation type is Support Agreement
D. Obligation Type. One of:
n Support Agreement
n HP Care Pack
n Warranty
E. Country (HP Care Pack or warranty only).
F. Ownership Model: Multiple or Single.
G. Nickname. Optional. You can add a nickname for an HP Care Pack or warranty. SAIDs have
predefined nicknames, added at the time of signing the contract.
Normally you export from the downloaded template and "save as", and do not need to edit or even look at
the CSV file. There may be cases however, such as if an invalid file format error occurs and you suspect
that the file may be corrupt, where it is useful to inspect the file.
The following is a valid sample line for a warranty from a CSV file. In this example, double commas
surround an empty optional field. The third field, SAR, is empty because a warranty does not need an
SAR.
XY08K33099,SP936UC,,Warranty,France,SINGLE,WarrantyNickName1
Each line should contain at least six commas. Additional commas at the end of the line, which may occur
if any text, even a space, was in the seventh column of the template file you exported from, are ignored.
Report files list the processing result of each line including entries that were not able to be processed,
typically for the following reasons:
l A support agreement was inactive or was in single ownership mode.
l A warranty was inactive or was migrated to an Uplifted Care Pack.
l An HP Care Pack was inactive, was in single ownership mode, or was uplifted to a Support
Agreement.
HP Insight Online:User's Guide Page 49 of 51
Page 50

Chapter 7: Manage contracts and warranties
You should address these cases individually, by reactivating or by changing the ownership mode to
multiple. Once you have done so you can then resubmit a file containing these entries for batch
processing, or depending on their number, simply link them interactively.
HP Insight Online:User's Guide Page 50 of 51
Page 51

Chapter 8: Support and other resources
Contacting HP
For worldwide technical support information, see the HP support website:
http://www.hp.com/support
Before contacting HP, collect the following information:
l Product model names and numbers
l Technical support registration number (if applicable)
l Product serial numbers
l Error messages
l Operating system type and revision level
l Detailed questions
HP Authorized Channel Partners
For the name of the nearest HP Authorized Channel Partner, see the following sources:
l In the United States, see the HP U.S. service locator website: http://www.hp.com/service_locator
l In other locations, see the Contact HP worldwide website: http://www.hp.com/go/assistance
Documentation feedback
HP welcomes your feedback. To make comments and suggestions about product documentation, send a
message to: docsfeedback@hp.com. Include the document title and part number in your message. All
submissions become the property of HP.
Related information
l HP Insight Remote Support documentation at the HP Enterprise Information Library
(http://www.hp.com/go/insightremotesupport/docs)
l HP Insight Online FAQs (http://h20195.www2.hp.com/V2/GetDocument.aspx?docname=4AA3-
9252ENW)
l HP Support Center Insight Online help
(http://h20564.www2.hp.com/portal/site/hpsc/template.PUBLIC_SPF_GLOBAL_
HELP/#insightOnline)
Page 51 of 51HP Insight Online:User's Guide
 Loading...