

Page 1

HP Insight Cluster Management Utility v7.2
User Guide
Abstract
This guide describes how to install, configure, and use HP Insight Cluster Management Utility (CMU) v7.2 on HP systems. HP
Insight CMU is software dedicated to the administration of HPC and large Linux clusters. This guide is intended primarily for
administrators who install and manage a large collection of systems. This document assumes you have access to the documentation
that comes with the hardware platform where the HP Insight CMU cluster will be installed, and you are familiar with installing
and administering Linux operating systems.
HP Part Number: 5900-3115
Published: November 2013
Edition: 1
Page 2

© Copyright 2013 Hewlett-Packard Development Company, L.P.
Confidential computer software. Valid license from HP required for possession, use or copying. Consistent with FAR 12.211 and 12.212, Commercial
Computer Software, Computer Software Documentation, and Technical Data for Commercial Items are licensed to the U.S. Government under
vendor's standard commercial license. The information contained herein is subject to change without notice. The only warranties for HP products
and services are set forth in the express warranty statements accompanying such products and services. Nothing herein should be construed as
constituting an additional warranty. HP shall not be liable for technical or editorial errors or omissions contained herein.
Microsoft® and Windows® are U.S. registered trademarks of Microsoft Corporation. Linux™ is a trademark of Linus Torvalds in the U.S. Red Hat™
and RPM™ are trademarks of Red Hat, Inc.Java® is a registered trademark of Oracle and/or its affiliates.
Page 3

Contents
1 Overview................................................................................................11
1.1 Features...........................................................................................................................11
1.1.1 Compute node monitoring............................................................................................11
1.1.2 HP Insight CMU configuration......................................................................................11
1.1.3 Compute node administration......................................................................................12
1.1.4 System disk replication................................................................................................12
2 Installing and upgrading HP Insight CMU....................................................13
2.1 Installing HP Insight CMU...................................................................................................13
2.1.1 Management node hardware requirements....................................................................13
2.1.2 Disk space requirements..............................................................................................14
2.1.3 Support for non-HP servers..........................................................................................14
2.1.4 Planning for compute node installation..........................................................................14
2.1.5 Firmware upgrade requirements...................................................................................15
2.1.6 Configuring the local smart array card..........................................................................15
2.1.7 Configuring the management cards..............................................................................15
2.1.8 Configuring the BIOS..................................................................................................15
2.1.8.1 DL3xx, DL5xx, DL7xx, Blades...............................................................................16
2.1.8.1.1 OA IP address: Blades only...........................................................................16
2.1.8.1.2 Configuring iLO cards from the OA: Blades only..............................................16
2.1.8.1.3 Disabling server automatic power on: Blades only............................................16
2.1.8.2 DL160 G5, DL165c G5, DL165c G6, and DL180 G5 Servers...................................17
2.1.8.3 DL160 G6 Servers..............................................................................................18
2.1.8.4 SL2x170z G6 and DL170h G6 Servers BIOS setting................................................18
2.2 Preparing for installation....................................................................................................20
2.2.1 HP Insight CMU kit delivery.........................................................................................20
2.2.2 Preinstallation limitations............................................................................................20
2.2.3 Operating system support...........................................................................................21
2.2.3.1 RHEL 6 support..................................................................................................21
2.2.4 HP Insight CMU CD-ROM directory structure.................................................................21
2.2.5 HP Insight CMU installation checklist............................................................................22
2.2.6 Login privileges.........................................................................................................22
2.2.7 SELinux and HP Insight CMU......................................................................................22
2.3 Installation procedures.......................................................................................................22
2.4 Installing HP Insight CMU with high availability....................................................................27
2.4.1 HA hardware requirements.........................................................................................29
2.4.2 Software prerequisites................................................................................................29
2.4.3 Installing HP Insight CMU under HA............................................................................29
2.4.3.1 Overview .........................................................................................................29
2.4.3.2 HP Insight CMU HA service requirements..............................................................30
2.4.3.3 Installing and testing..........................................................................................30
2.4.4 Configuring HA control of HP Insight CMU...................................................................30
2.4.5 HP Insight CMU configuration considerations................................................................33
2.4.6 Upgrading HP Insight CMU HA service........................................................................33
2.5 Upgrading HP Insight CMU................................................................................................34
2.5.1 Upgrading to v7.2 important information......................................................................34
2.5.2 Dependencies...........................................................................................................34
2.5.2.1 64-bit versions on management node...................................................................34
2.5.2.2 tftp client..........................................................................................................34
2.5.2.3 Java version dependency....................................................................................35
2.5.2.4 Monitoring clients..............................................................................................35
2.5.3 Stopping the HP Insight CMU service...........................................................................35
Contents 3
Page 4

2.5.4 Upgrading Java Runtime Environment...........................................................................35
2.5.5 Removing the previous HP Insight CMU package...........................................................35
2.5.6 Installing the HP Insight CMU v7.2 package..................................................................35
2.5.7 Installing your HP Insight CMU license.........................................................................36
2.5.8 Restoring the previous HP Insight CMU configuration......................................................36
2.5.9 Configuring the updated UP Insight CMU.....................................................................37
2.5.10 Starting HP Insight CMU...........................................................................................38
2.5.11 Deploying the monitoring client..................................................................................39
2.6 Saving the HP Insight CMU database..................................................................................39
2.7 Restoring the HP Insight CMU database...............................................................................39
3 Launching the HP Insight CMU GUI............................................................40
3.1 HP Insight CMU GUI.........................................................................................................40
3.2 HP Insight CMU main window............................................................................................40
3.3 Administrator mode...........................................................................................................41
3.4 Quitting administrator mode..............................................................................................41
3.5 Changing X display address..............................................................................................41
3.6 Launching the HP Insight CMU GUI.....................................................................................41
3.6.1 Launching the HP Insight CMU GUI using a web browser...............................................41
3.6.2 Launching the HP Insight CMU GUI from the Java file.....................................................42
3.6.3 Configuring the GUI client on Linux workstations............................................................42
3.6.4 Launching the HP Insight CMU Time View GUI..............................................................43
4 Defining a cluster with HP Insight CMU.......................................................44
4.1 HP Insight CMU service status.............................................................................................44
4.2 High-level checklist for building an HP Insight CMU cluster.....................................................44
4.3 Cluster administration........................................................................................................44
4.3.1 Node management....................................................................................................45
4.3.1.1 Scanning nodes..................................................................................................46
4.3.1.2 Adding nodes....................................................................................................47
4.3.1.3 Modifying nodes................................................................................................48
4.3.1.4 Importing nodes.................................................................................................49
4.3.1.5 Deleting nodes...................................................................................................49
4.3.1.6 Exporting nodes.................................................................................................49
4.3.1.7 Contextual menu................................................................................................49
4.3.2 Network entity management.......................................................................................49
4.3.2.1 Adding network entities......................................................................................50
4.3.2.2 Deleting network entities.....................................................................................50
5 Provisioning a cluster with HP Insight CMU..................................................51
5.1 Logical group management................................................................................................51
5.1.1 Modifying logical groups.............................................................................................52
5.1.2 Deleting logical groups...............................................................................................52
5.1.3 Renaming logical groups.............................................................................................52
5.2 Autoinstall........................................................................................................................53
5.2.1 Autoinstall requirements..............................................................................................53
5.2.2 Autoinstall templates..................................................................................................53
5.2.3 Autoinstall calling methods ........................................................................................54
5.2.4 Using autoinstall from GUI..........................................................................................54
5.2.4.1 Creating an autoinstall logical group....................................................................54
5.2.4.2 Registering compute nodes.................................................................................55
5.2.4.3 Autoinstall compute nodes..................................................................................55
5.2.5 Using autoinstall from CLI...........................................................................................56
5.2.5.1 Registering an autoinstall logical group.................................................................56
5.2.5.2 Adding nodes to autoinstall logical group.............................................................56
5.2.5.3 Autoinstall compute nodes..................................................................................57
4 Contents
Page 5

5.2.6 Customization...........................................................................................................57
5.2.6.1 RHEL autoinstall customization for nodes configured with Dynamic Smart Array RAID
(B120i, B320i RAID mode).............................................................................................58
5.2.7 Restrictions...............................................................................................................58
5.3 Backing up......................................................................................................................58
5.3.1 Backing up a disk from a compute node in a logical group.............................................58
5.4 Cloning...........................................................................................................................61
5.4.1 Preconfiguration........................................................................................................62
5.4.2 Reconfiguration.........................................................................................................63
5.4.3 Cloning Windows images..........................................................................................64
5.5 Node static info................................................................................................................64
5.6 Rescan MAC....................................................................................................................65
5.7 HP Insight CMU image editor.............................................................................................66
5.7.1 Expanding an image..................................................................................................66
5.7.2 Modifying an image..................................................................................................67
5.7.3 Saving a modified cloning image................................................................................67
5.8 HP Insight CMU diskless environments.................................................................................68
5.8.1 Overview.................................................................................................................68
5.8.1.1 Enabling diskless support in HP Insight CMU..........................................................69
5.8.2 The system-config-netboot diskless method....................................................................70
5.8.2.1 Operating systems supported...............................................................................70
5.8.2.2 Installing the operating system on the management node and the golden node.........70
5.8.2.3 Modifying the TFTP server configuration ...............................................................70
5.8.2.4 Populating the HP Insight CMU database.............................................................71
5.8.2.5 Creating a diskless image..................................................................................71
5.8.2.6 Creating a diskless logical group.........................................................................71
5.8.2.7 Adding nodes into the logical group....................................................................72
5.8.2.8 Booting the compute nodes.................................................................................73
5.8.2.9 Understanding the structure of a diskless image.....................................................74
5.8.2.10 Customizing your diskless image........................................................................74
5.8.2.10.1 files.custom...............................................................................................74
5.8.2.10.2 Using reconf-diskless-image.sh....................................................................74
5.8.2.10.3 Using reconf-diskless-snapshot.sh................................................................75
5.8.2.10.4 Templates and image file...........................................................................76
5.8.2.11 Best practices for diskless clusters........................................................................76
5.8.3 The HP Insight CMU oneSIS diskless method.................................................................76
5.8.3.1 Operating systems supported...............................................................................77
5.8.3.2 Enabling oneSIS support....................................................................................77
5.8.3.3 Preparing the HP Insight CMU management node.................................................77
5.8.3.4 Preparing the golden node.................................................................................77
5.8.3.5 Capturing and customizing a oneSIS diskless image..............................................78
5.8.3.5.1 Creating an HP Insight CMU oneSIS diskless image........................................78
5.8.3.5.2 Customizing an HP Insight CMU oneSIS diskless image..................................80
5.8.3.6 Manage the writeable memory usage by the oneSIS diskless clients.........................81
5.8.3.7 Adding nodes and booting the diskless compute nodes..........................................81
5.8.4 Scaling out an HP Insight CMU diskless solution with multiple NFS servers........................82
5.8.4.1 Comments on High Availability (HA)....................................................................84
6 Monitoring a cluster with HP Insight CMU....................................................85
6.1 Installing the HP Insight CMU monitoring client......................................................................85
6.2 Deploying the monitoring client..........................................................................................85
6.3 Monitoring the cluster........................................................................................................86
6.3.1 Node and group status...............................................................................................87
6.3.2 Selecting the central frame display..............................................................................87
6.3.3 Global cluster view in the central frame........................................................................88
Contents 5
Page 6

6.3.4 Resource view in the central frame...............................................................................89
6.3.4.1 Resource view overview......................................................................................89
6.3.4.2 Detail mode in resource view..............................................................................90
6.3.5 Gauge widget..........................................................................................................90
6.3.6 Node view in the central frame...................................................................................91
6.3.7 Using Time View.......................................................................................................92
6.3.7.1 Tagging nodes...................................................................................................92
6.3.7.2 Adaptive stacking..............................................................................................93
6.3.7.3 Bindings and options..........................................................................................93
6.3.7.3.1 Mouse control.............................................................................................93
6.3.7.3.2 Keyboard control........................................................................................94
6.3.7.3.3 Custom cameras.........................................................................................94
6.3.7.3.4 Options.....................................................................................................94
6.3.7.4 Technical dependencies......................................................................................94
6.3.7.5 Troubleshooting.................................................................................................95
6.3.8 Archiving user groups................................................................................................95
6.3.8.1 Visualizing history data......................................................................................96
6.3.8.2 Limitations........................................................................................................96
6.4 Stopping HP Insight CMU monitoring..................................................................................96
6.5 Customizing HP Insight CMU monitoring, alerting, and reactions............................................96
6.5.1 Action and alert files..................................................................................................96
6.5.2 Actions....................................................................................................................97
6.5.3 Alerts.......................................................................................................................98
6.5.4 Alert reactions..........................................................................................................99
6.5.5 Modifying the sensors, alerts, and alert reactions monitored by HP Insight CMU..............100
6.5.6 Using collectl for gathering monitoring data...............................................................100
6.5.6.1 Installing and starting collectl on compute nodes..................................................100
6.5.6.2 Modifying the ActionAndAlerts.txt file................................................................101
6.5.6.3 Installing and configuring colplot for plotting collectl data.....................................102
6.5.6.3.1 Plotting data............................................................................................103
6.5.7 Monitoring GPUs and coprocessors...........................................................................105
6.5.7.1 Monitoring NVIDIA GPUs..................................................................................105
6.5.7.2 Monitoring AMD GPUs.....................................................................................106
6.5.7.3 Monitoring Intel coprocessors............................................................................107
6.5.8 Monitoring HP Insight CMU alerts in HP Systems Insight Manager.................................108
6.5.9 Extended metric support...........................................................................................109
6.5.9.1 Configuring iLO4 AMS extended metric support...................................................112
6.5.9.1.1 Configuring the HP iLO SNMP port..............................................................113
6.5.9.1.2 Accessing and viewing the HP iLO data via SNMP........................................114
6.5.9.1.3 Configuring HP iLO SNMP metrics in HP Insight CMU....................................115
7 Managing a cluster with HP Insight CMU..................................................118
7.1 Unprivileged user menu....................................................................................................118
7.2 Administrator menu.........................................................................................................118
7.3 SSH connection..............................................................................................................118
7.4 Management card connection..........................................................................................119
7.5 Virtual serial port connection............................................................................................119
7.6 Shutdown.......................................................................................................................119
7.7 Power off.......................................................................................................................119
7.8 Boot..............................................................................................................................120
7.9 Reboot...........................................................................................................................120
7.10 Change UID LED status...................................................................................................120
7.11 Multiple windows broadcast............................................................................................121
7.12 Single window pdsh.......................................................................................................121
7.12.1 cmudiff examples....................................................................................................122
6 Contents
Page 7

7.13 Parallel distributed copy (pdcp)........................................................................................125
7.14 User group management.................................................................................................125
7.14.1 Adding user groups.................................................................................................125
7.14.2 Deleting user groups...............................................................................................126
7.14.3 Renaming user groups.............................................................................................126
7.15 HP Insight firmware management.....................................................................................126
7.15.1 Viewing and analyzing BIOS settings........................................................................126
7.15.2 Checking BIOS versions..........................................................................................127
7.15.3 Installing and upgrading firmware............................................................................127
7.16 Customizing the GUI menu..............................................................................................127
7.16.1 Saving user settings.................................................................................................128
7.17 HP Insight CMU CLI........................................................................................................128
7.17.1 Starting a CLI interactive session................................................................................128
7.17.2 Basic commands.....................................................................................................128
7.17.3 Specifying nodes....................................................................................................130
7.17.4 Administration and cloning commands......................................................................132
7.17.5 Administration utilities pdcp and pdsh.......................................................................138
7.17.6 HP Insight CMU Linux shell commands.......................................................................138
8 Advanced topics....................................................................................139
8.1 Accessing the GUI for non-root users..................................................................................139
8.1.1 Custom menu options for non-root users.......................................................................140
8.1.2 Configuring sudo support .........................................................................................140
8.1.3 Examples................................................................................................................141
8.2 HP Insight CMU diskless API............................................................................................141
8.2.1 Build diskless image.................................................................................................142
8.2.2 Delete diskless image..............................................................................................143
8.2.3 Configure diskless node...........................................................................................143
8.2.4 Post node configuration............................................................................................143
8.2.5 Unconfigure diskless node........................................................................................143
8.2.6 Boot diskless node..................................................................................................144
8.2.7 Diskless check.........................................................................................................144
8.3 HP Insight CMU remote hardware control API.....................................................................145
8.4 Customizing kernel arguments for the HP Insight CMU provisioning kernel..............................146
8.4.1 PXE-boot configuration file keywords..........................................................................147
8.5 Support for ScaleMP.......................................................................................................148
8.6 Cloning mechanisms.......................................................................................................148
8.7 Support for Intel Xeon Phi cards........................................................................................150
8.7.1 Intel Xeon Phi card IP address and host name assignment algorithm...............................151
8.7.2 Cloning an image with Intel Xeon Phi cards configured with independent IP addresses.....152
8.7.3 HP Insight CMU oneSIS diskless file system support for independent addressing of Intel
Xeon Phi cards................................................................................................................154
9 Support and other resources....................................................................159
9.1 Contacting HP.................................................................................................................159
9.1.1 Before you contact HP...............................................................................................159
9.1.2 HP contact information..............................................................................................159
9.1.3 Subscription service..................................................................................................159
9.1.4 Documentation feedback...........................................................................................159
9.2 Related information.........................................................................................................159
9.3 Typographic conventions..................................................................................................160
A Troubleshooting.....................................................................................162
A.1 HP Insight CMU logs.......................................................................................................162
A.1.1 cmuserver log files....................................................................................................162
A.1.2 Cloning log files......................................................................................................162
Contents 7
Page 8

A.1.3 Backup log files.......................................................................................................162
A.1.4 Monitoring log files..................................................................................................162
A.2 Network boot issues.......................................................................................................162
A.2.1 Troubleshooting network boot...................................................................................163
A.3 Backup issues................................................................................................................163
A.4 Cloning issues...............................................................................................................164
A.5 Administration command problems...................................................................................164
A.6 GUI problems................................................................................................................164
1 HP Insight CMU manpages......................................................................167
cmu_boot(8)........................................................................................................................168
cmu_show_nodes(8).............................................................................................................169
cmu_show_logical_groups(8).................................................................................................171
cmu_show_network_entities(8)................................................................................................172
cmu_show_user_groups(8).....................................................................................................173
cmu_show_archived_user_groups(8)........................................................................................174
cmu_add_node(8)................................................................................................................175
cmu_add_network_entity(8)...................................................................................................177
cmu_add_logical_group(8)....................................................................................................178
cmu_add_to_logical_group_candidates(8)...............................................................................179
cmu_add_user_group(8)........................................................................................................180
cmu_add_to_user_group(8)....................................................................................................181
cmu_change_active_logical_group(8)......................................................................................182
cmu_change_network_entity(8)...............................................................................................183
cmu_del_from_logical_group_candidates(8).............................................................................184
cmu_del_from_network_entity(8).............................................................................................185
cmu_del_archived_user_groups(8)...........................................................................................186
cmu_del_from_user_group(8).................................................................................................187
cmu_del_logical_group(8).....................................................................................................188
cmu_del_network_entity(8).....................................................................................................189
cmu_del_node(8)..................................................................................................................190
cmu_del_snapshots(8)...........................................................................................................191
cmu_del_user_group(8).........................................................................................................192
cmu_console(8)....................................................................................................................193
cmu_power(8)......................................................................................................................194
cmu_custom_run(8)...............................................................................................................196
cmu_clone(8).......................................................................................................................197
cmu_backup(8)....................................................................................................................198
cmu_scan_macs(8)...............................................................................................................199
cmu_rescan_mac(8)..............................................................................................................203
cmu_mod_node(8)................................................................................................................204
cmu_monstat(8)....................................................................................................................207
cmu_image_open(8).............................................................................................................209
cmu_image_commit(8)..........................................................................................................210
cmu_config_nvidia(8)............................................................................................................211
cmu_config_amd(8)..............................................................................................................212
cmu_config_intel(8)...............................................................................................................213
cmu_mgt_config(8)...............................................................................................................214
cmu_firmware_mgmt(8).........................................................................................................216
cmu_monitoring_dump(8)......................................................................................................217
cmu_rename_archived_user_group(8)......................................................................................218
Glossary..................................................................................................219
Index.......................................................................................................221
8 Contents
Page 9

Figures
1 Typical HPC cluster...........................................................................................................13
2 iLO server power controls..................................................................................................17
3 NIC2 on the SL2x170z G6 Server......................................................................................18
4 HP Insight CMU main window...........................................................................................40
5 Change X display address dialog box................................................................................41
6 Cluster administration menu...............................................................................................44
7 Node management window..............................................................................................45
8 Scan node dialog............................................................................................................46
9 Management card password window.................................................................................47
10 Scan node result..............................................................................................................47
11 Add node dialog.............................................................................................................48
12 Populated database node management window..................................................................48
13 Network entity management..............................................................................................50
14 Create a logical group ....................................................................................................51
15 Add logical group............................................................................................................51
16 Logical group management...............................................................................................52
17 Logical group management autoinstall................................................................................54
18 New autoinstall logical group............................................................................................55
19 Autoinstall log.................................................................................................................56
20 Backup dialog box...........................................................................................................59
21 Backup status window......................................................................................................60
22 Cloning procedure...........................................................................................................61
23 Cloning status..................................................................................................................62
24 Node static info...............................................................................................................65
25 Rescan MAC...................................................................................................................66
26 Naming a logical group...................................................................................................72
27 Adding nodes to logical groups.........................................................................................73
28 Booting the compute nodes...............................................................................................73
29 Monitoring client installation..............................................................................................85
30 Main window..................................................................................................................86
31 Node status....................................................................................................................87
32 Monitoring window..........................................................................................................88
33 Resource view overview....................................................................................................89
34 Alert messages................................................................................................................90
35 Resource view details.......................................................................................................90
36 Memory used summary....................................................................................................91
37 Node details...................................................................................................................92
38 Time view.......................................................................................................................93
39 Archiving deleted user groups............................................................................................95
40 Archived user groups........................................................................................................96
41 ColPlot window.............................................................................................................104
42 ColPlot results................................................................................................................105
43 HP Insight CMU alert converted to SIM event.....................................................................109
44 cmu_config_ams command.........................................................................................112
45 Verify AMS submenu......................................................................................................113
46 Configure iLO SNMP port...............................................................................................113
47 Configure iLO finished....................................................................................................114
48 SNMP query.................................................................................................................114
49 Get/Refresh SNMP data.................................................................................................115
50 View/Compare SNMP data............................................................................................115
51 cmu_ams_metrics......................................................................................................116
Page 10

52 cmu_get_ams_metrics..............................................................................................116
53 Instant view display........................................................................................................117
54 Contextual menu for administrator....................................................................................118
55 Halt dialog ..................................................................................................................119
56 Power off dialog box......................................................................................................120
57 Boot dialog box.............................................................................................................120
58 Reboot dialog box.........................................................................................................120
59 Multiple windows broadcast command.............................................................................121
60 pdsh window................................................................................................................122
61 Parallel distributed copy window......................................................................................125
62 User group management.................................................................................................126
63 Certificate error.............................................................................................................165
64 Java control panel..........................................................................................................165
Tables
1 Directory structure............................................................................................................21
2 Valid archived user group parameters.................................................................................96
3 Extended metric fields.....................................................................................................111
4 Operational HP Insight CMU GUI features available by default for non-root users ..................139
5 HP Insight CMU GUI features and their corresponding commands .......................................141
Examples
1 date command.............................................................................................................122
2 dmidecode command...................................................................................................123
Page 11

1 Overview
HP Insight Cluster Management Utility (CMU) is a collection of tools that manage and monitor a
large group of computer nodes, specifically HPC and large Linux Clusters. You can use HP Insight
CMU to lower the total cost of ownership (TCO) of this architecture. HP Insight CMU helps manage,
install, and monitor the compute nodes of your cluster from a single interface. You can access this
utility through a GUI or a CLI.
1.1 Features
HP Insight CMU is scalable and can be used for any size cluster.
The HP Insight CMU GUI:
• Monitors all the nodes of your cluster at a glance.
• Configures HP Insight CMU according to your actual cluster.
• Manages your cluster by sending commands to any number of compute nodes.
• Replicates the disk of a compute node on any number of compute nodes.
The HP Insight CMU CLI:
• Manages your cluster by sending commands to any number of compute nodes.
• Replicates the disk of a compute node on any number of compute nodes.
• Saves and restores your HP Insight CMU database.
1.1.1 Compute node monitoring
You can monitor many nodes using a single window. HP Insight CMU provides the connectivity
status of each node as well as sensors. HP Insight CMU provides a default set of sensors such as
CPU load, memory usage, I/O performance, and network performance. You can customize this
list or create your own sensors. You can display sensor values for any number of nodes.
Information provided by HP Insight CMU is used to ensure optimum performance and for
troubleshooting. You can fix thresholds to trigger alerts. All information is transmitted across the
network at time intervals, using a scalable protocol for real-time monitoring.
1.1.2 HP Insight CMU configuration
HP Insight CMU requires a dedicated management server running RHEL or SLES. CentOS and
Scientific Linux are supported on the management node, but require active approval and verification
form HP. The management node can run a different OS from the compute nodes. However, HP
recommends running the same OS on the compute nodes and on the management node.
IMPORTANT: HP Insight CMU does not qualify management nodes. Any server with a supported
operating system can become an HP Insight CMU management node.
For details on specific operating systems supported, see the HP Insight CMU release notes for your
version of the product.
All cluster nodes must be connected to the management node through an Ethernet network. Each
compute node must have a management card. These management cards must be connected to an
Ethernet network. This network must be accessible by the management node.
HP Insight CMU is configured and customized using the HP Insight CMU GUI. Tasks include:
• Manually adding, removing, or modifying nodes in the HP Insight CMU database
• Invoking the scan node procedure to automatically add several nodes
• Adding, deleting, or customizing HP Insight CMU groups
1.1 Features 11
Page 12

• Managing the system images stored by HP Insight CMU
• Configuring actions performed when a node status changes such as display a warning, execute
a command, or send an email
• Exporting the HP Insight CMU node list in a simple text file for reuse by other applications
• Importing nodes from a simple text file into the HP Insight CMU database
1.1.3 Compute node administration
The HP Insight CMU GUI and CLI enable you to perform actions on any number of selected compute
nodes. Tasks include:
• Halting
• Rebooting
• Booting and powering off, using the compute node management card
• Broadcasting a command to selected compute nodes, using a secure shell connection or a
management card connection
• Direct node connection by clicking a node to open a secure shell connection or a management
card connection
1.1.4 System disk replication
The HP Insight CMU GUI and CLI enable you to replicate a system disk image on any number of
selected compute nodes. Tasks include:
• Creating a new image (While backing up a compute node system disk, you can dynamically
choose which partitions to backup.)
• Replicating available images on any number of compute nodes in the cluster
• Managing as many different images as needed for different software stacks, different operating
systems, or different hardware
• Cloning from one to many nodes at a time with a scalable algorithm which is reliable and
does not stop the entire cloning process if any nodes are broken
• Customizing reconfiguration scripts associated with each image to execute specific tasks on
compute nodes after cloning
12 Overview
Page 13
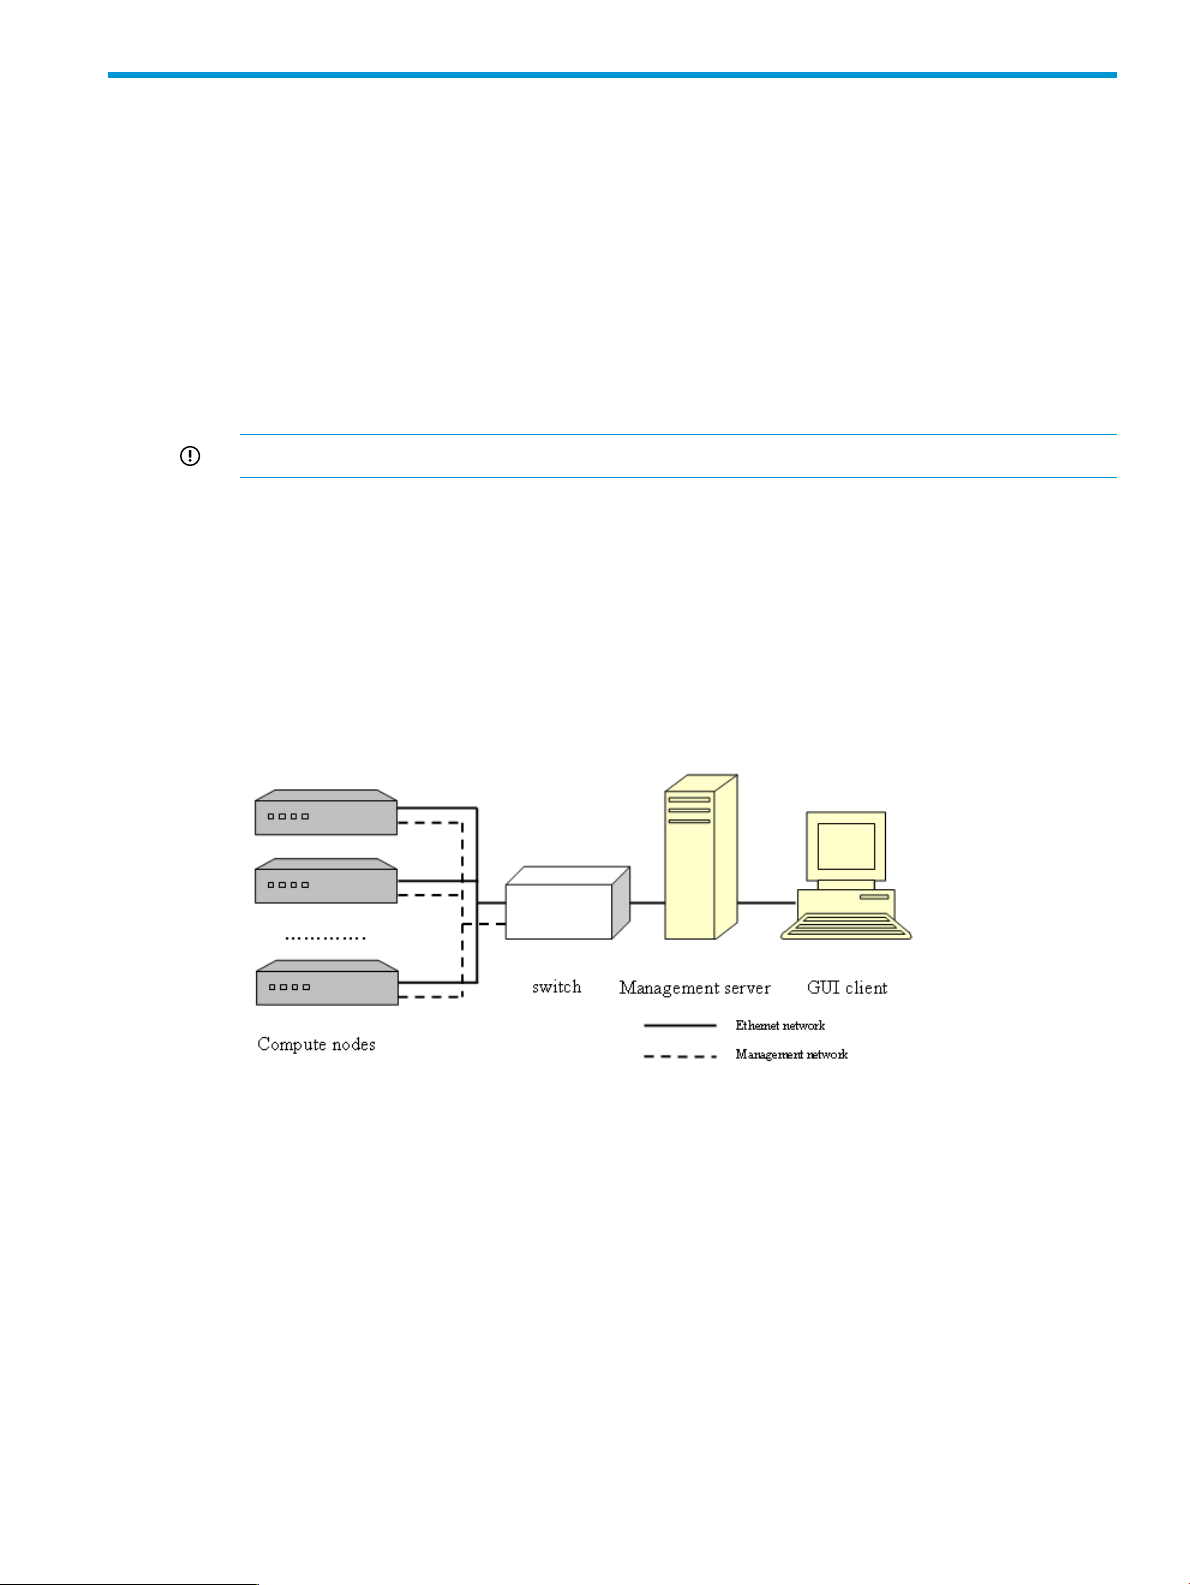
2 Installing and upgrading HP Insight CMU
2.1 Installing HP Insight CMU
A typical HP Insight CMU cluster contains three kinds of nodes. Figure 1 (page 13) shows a typical
HPC cluster.
• The management node is the central point that connects all the compute nodes and the GUI
clients. Installation, management, and monitoring are performed from the management node.
The package cmu-v7.2-1.x86_64.rpm must be installed on the management node. All
HP Insight CMU files are installed under the /opt/cmu directory.
• The compute nodes are dedicated to user applications. A small software application that
provides a monitoring report is installed on the compute nodes.
IMPORTANT: All compute nodes must be connected to an Ethernet network.
• The client workstations are any PC systems running Linux or Windows operating systems that
display the GUI. The administrator can install, manage, and monitor the entire cluster from a
client workstation. Users can monitor the cluster and access compute nodes from their
workstations.
A management card is required on each node to manage the cluster. These management cards
must be connected to an Ethernet network. The management node must have access to this network.
Figure 1 Typical HPC cluster
2.1.1 Management node hardware requirements
The HP Insight CMU management node needs access to the compute nodes, the compute node
management cards (iLOs), and the HP Insight CMU GUI clients. Each of these components is
typically on a separate network, though that is not strictly required. Using independent networks
ensures good network performance and isolates problems if network failures occur. A recommended
NIC/network configuration for the management node is:
• Connect one NIC to a network established for compute node administration.
• Connect a second NIC to the network connecting the HP Insight CMU management node to
the HP Insight CMU GUI clients.
• A third NIC is typically used to provide access to the network connecting all the compute node
management cards (iLOs).
2.1 Installing HP Insight CMU 13
Page 14

NOTE: The IP address of the NIC connected to the compute node administration network is
needed during configuration of the HP Insight CMU management node.
2.1.2 Disk space requirements
A total of 400 MB of free disk space is necessary to install all the subsets or packages required
for HP Insight CMU. Up to 4 Gb of additional space is needed to store each master disk image.
2.1.3 Support for non-HP servers
IMPORTANT: You must obtain a valid license to run HP Insight CMU on non-HP hardware.
The following section describes how HP Insight CMU functions with non-HP servers.
Provisioning
• autoinstall works (assumes PXE-boot support).
• Diskless works (assumes PXE-boot support).
• Backup and cloning must be tested. These processes rely on the HP Insight CMU netboot kernel
which needs the network and disk drivers for non-HP hardware. If these drivers for non-HP
hardware exist in the kernel.org source tree, then backup and cloning should work. If
backup and cloning does not work on your specific hardware, contact HP services.
Monitoring
• All monitoring works, including the GUI.
• If provisioning is not used, monitoring requires password-less ssh to be configured for the root
account on all nodes.
NOTE: Backup and cloning configures this automatically.
Remote management
• All xterm-based features work. For example:
single|multi xterm◦
◦ pdsh with cmudiff
◦ pdcp
• Power control and console access depend on non-HP hardware. HP Insight CMU supports
IPMI. Otherwise, a new power interface can be configured. HP Insight CMU has an API for
power control.
• BIOS and firmware management are HP-specific.
• Custom menu support works.
2.1.4 Planning for compute node installation
Two IP addresses are required for each compute node.
• Determine the IP address for the management card (iLO) on the management network.
• Determine the IP address for the NIC on the administration network.
HP recommends assigning contiguous ranges of static addresses for nodes located in the same
rack. This method eases the discovery of the nodes and makes the cluster management more
convenient.
14 Installing and upgrading HP Insight CMU
Page 15

The management cards must be configured with a static IP address. All the compute node
management cards must have a single login and password.
NOTE: HP Insight CMU uses DHCP and PXE. Do not run other DHCP or PXE servers on the HP
Insight CMU management network in the range of ProLiant MAC addresses belonging to the HP
Insight CMU cluster.
NOTE: The settings described in this document are based on the assumption that the administration
network on each compute node is connected to, and will PXE boot from, NIC1. While this
configuration enables all supported hardware to be imaged by HP Insight CMU, some operating
systems might not configure eth0 as NIC1. For example, RHEL5.4 on the ProLiant DL385 G6 Server
defaults eth0 to NIC3. To simplify the installation process for your operating system, HP recommends
wiring your administration network to the NIC that defaults to eth0 and set that NIC to PXE boot
rather than NIC1.
2.1.5 Firmware upgrade requirements
Depending on the type of compute nodes in the cluster, you might have to upgrade the firmware
on each compute node.
IMPORTANT: All compute nodes must have the same firmware version.
2.1.6 Configuring the local smart array card
HP Insight CMU does not configure local disks. If you have a hardware RAID controller, configure
a logical drive to be used later by the operating system. The same logical drive must be created
on each compute node.
The Compaq Array must be configured on each node of the cluster. You can choose any RAID
level. If you have only one physical drive, before performing the initial operating system installation,
configure it in a logical RAID0 drive. Otherwise, the disk is not detected during the Linux installation
procedure and during the cloning procedure.
2.1.7 Configuring the management cards
To configure the management cards such as iLO:
1. Power on the server.
2. Access the management card.
3. Assign the same username and password to all management cards.
4. Assign a fixed IP address to each management card.
NOTE: On Blade servers, to configure the IP addresses on the iLO cards, you can use the
EBIPA on the OA. For instructions, see “Configuring iLO cards from the OA: Blades only”
(page 16).
NOTE: Blade servers do not use the Single Sign-On capability. You must configure each
Blade individually and create the same username and password. For instructions, see “Disabling
server automatic power on: Blades only” (page 16).
2.1.8 Configuring the BIOS
Generally, BIOS parameters that affect HP Insight CMU are:
• Boot order parameters. (Network boot must have the highest priority.)
• Parameters that enable the BIOS boot process and the Linux boot process to be visualized at
the iLO serial console. (Those parameters must be set for BIOS startup and Linux boot to be
monitored from a remote connection through the iLO port.)
2.1 Installing HP Insight CMU 15
Page 16

• Parameters that affect the behavior of the local disk controller. Parameter names can differ
from one server to another and cannot be documented exhaustively.
IMPORTANT: If the boot order is not correctly set, then cloning and backup fail on the cluster.
Examples are provided in the following sections.
2.1.8.1 DL3xx, DL5xx, DL7xx, Blades
Parameters:
• Virtual serial port COM1
• Embedded NIC
NIC 1 PXE boot or PXE enabled◦
◦ NIC 2 Disabled
◦ NIC 3 Disabled (not always present)
◦ NIC 4 Disabled (not always present)
• Boot order
PXE1.
2. CD
3. DISK
• BIOS Serial console
BIOS Serial Console Auto◦
◦ Speed 9600 Bd
◦ EMS Console COM1
◦ Interface Mode Auto
2.1.8.1.1 OA IP address: Blades only
Assign the OA IP address in the same subnet as the administration network.
2.1.8.1.2 Configuring iLO cards from the OA: Blades only
Use the EBIPA to assign consecutive addresses to the iLO:
• 16 addresses on the c7000 Enclosure
• 8 addresses on the c3000 Enclosure
To configure the iLO cards:
1. Open a browser to the OA.
2. In the right window, select Device Bays.
3. Select Bay 1.
4. In the left window, select the Enclosure Setting tab and then Enclosure Bay IP Addressing.
5. Enter the IP address of the first iLO card.
6. Click Auto Fill or the red arrow.
Each iLO is reset and assigned an IP address by the OA.
7. From the HP Insight CMU management node, ping each iLO.
2.1.8.1.3 Disabling server automatic power on: Blades only
On each Blade server:
16 Installing and upgrading HP Insight CMU
Page 17
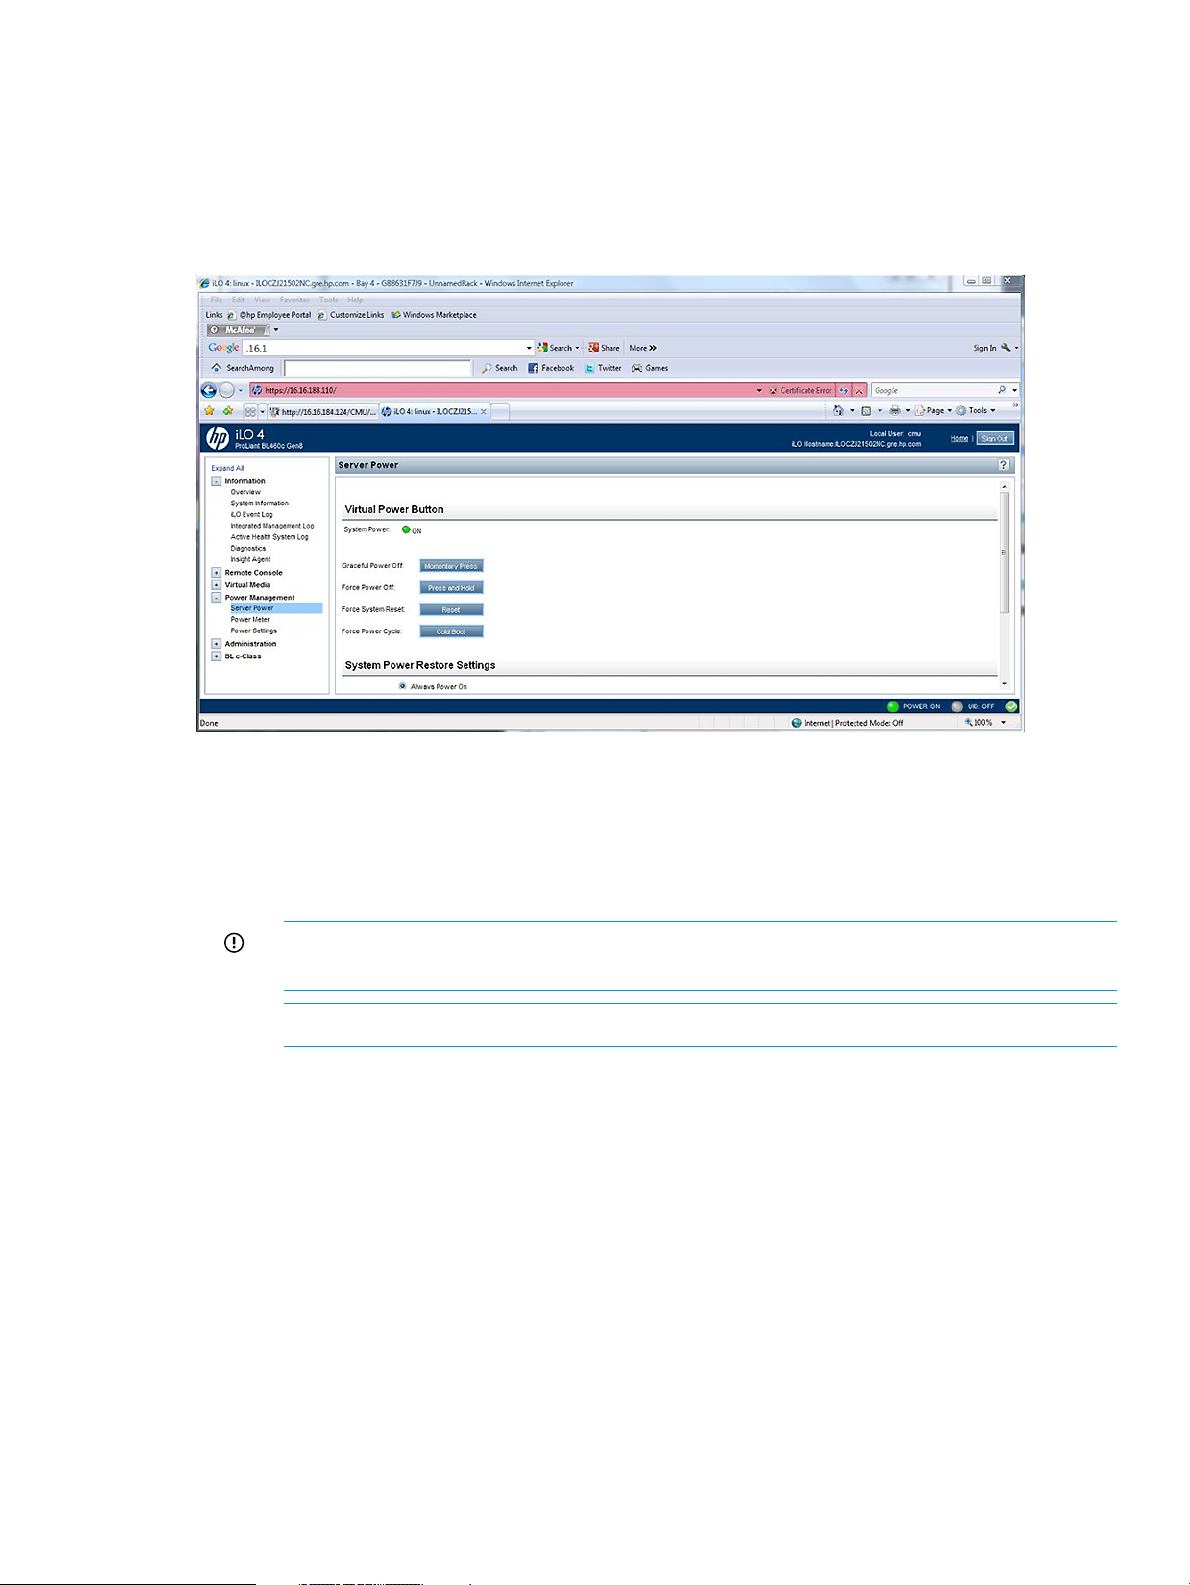
1. Access the iLO card.
2. Create the username and password. Each server must have the same username and password.
3. Select the Power Management tab.
4. For Automatically Power On Server, select No.
5. Select Submit.
Figure 2 iLO server power controls
2.1.8.2 DL160 G5, DL165c G5, DL165c G6, and DL180 G5 Servers
• IDE
ATA/IDE Enhanced◦
◦ Configure SATA as IDE
IMPORTANT: The embedded SATA Raid Controller option is not supported. Do not
select this option.
NOTE: These IDE settings only apply to the DL160 G5 Server.
• IPMI
Serial Port assigned to System◦
◦ Serial Port Switching Disabled
◦ Serial Port Connection Mode Direct
• LAN
Share NIC mode Disabled◦
◦ DHCP Disabled
• Remote Access
Remote access Enabled◦
◦ Redirection Always
2.1 Installing HP Insight CMU 17
Page 18

◦ Terminal VT100
• Boot Configuration
Boot Order◦
1. Embedded NIC
2. Disk or smart array
◦ Embedded NIC1 Enabled
2.1.8.3 DL160 G6 Servers
• IPMI
Serial Port assigned to System◦
◦ Serial Port Connection Mode Direct
• PCI
NIC1 control Enabled◦
◦ NIC1 PXE Enabled
• SATA
SATA#1 Controller Mode AHCI◦
• Boot Configuration
Boot Order◦
1. NIC
2. CD
3. Disk
2.1.8.4 SL2x170z G6 and DL170h G6 Servers BIOS setting
IMPORTANT: To enable BIOS updates, you must restart the server. You can restart the server
with Ctrl+Alt+Delete immediately after leaving the BIOS, or you can physically restart the server
by using the power switch on the server.
Figure 3 NIC2 on the SL2x170z G6 Server
• BIOS settings
Post speedup Enabled◦
18 Installing and upgrading HP Insight CMU
Page 19

◦ Numlock Enabled
◦ Restore after AC loss Last state
◦ Post F1 prompt Delayed
• CPU setup
Proc hyper threading Disabled◦
• IDE configuration
SATA controller mode AHCI◦
◦ Drive cache Enabled
◦ IDE timeout 35
• Chipset ACPI configuration
High Performance Event timer Enabled◦
• IPMI serial port configuration
Serial port assignment BMC◦
◦ Serial port switching Enabled
◦ Serial port connection mode Direct
• LAN configuration
If your node is wired with the LO100i management port shared with NIC2:
◦ BMC NIC Allocation Shared
◦ LAN protocol: HTTP, telnet, ping Enabled
Otherwise, if your node is wired with a dedicated management port for LO100i:
◦ BMC NIC Allocation Dedicated
◦ LAN protocol: HTTP, telnet, ping Enabled
• Remote Access
BIOS Serial console Enabled◦
◦ EMS console support Enabled
◦ Flow control Node
◦ Redirection after BIOS POST Enabled
◦ Serial port 9600 8,n,1
• Boot device priority
Network ( 0500 )◦
◦ Removable device
◦ Hard Disk
• Enable PXE for the NIC that is connected to the administration network.
2.1 Installing HP Insight CMU 19
Page 20

2.2 Preparing for installation
2.2.1 HP Insight CMU kit delivery
The HP Insight CMU kit is delivered on CD-ROM and is provided in the appropriate format for
your operating system. These features enable HP Insight CMU files to be installed directly from the
CD-ROM to your disk. The Linux versions of HP Insight CMU are in the Red Hat Package Manager
(RPM) format.
2.2.2 Preinstallation limitations
• HP Insight CMU monitors only the compute nodes and not the infrastructure of the cluster.
• For cloning Linux images:
HP Insight CMU requires that each partition of the golden image node is at least 50%
◦
free. Alternatively, if this condition cannot be satisfied, then the largest partition of the
golden node must be less than or equal to the compute node memory size.
◦ HP Insight CMU does not support software RAID or LVM on compute nodes.
◦ HP Insight CMU only clones one disk or logical drive per compute node.
• Limitations for backup and cloning Windows images:
The Windows backup and cloning feature is supported only on specific Moonshot
◦
cartridges. No other platforms are supported.
◦ HP Insight CMU can backup and clone only one disk per compute node.
◦ The Windows golden node must be shutdown gracefully before attempting a backup
operation.
◦ The golden image size (the total size of compressed part-archi*.tar.bz2 files) must
be less than 85% of RAM size on the nodes to be cloned. For example, on nodes with
8GB RAM, the maximum image size available for cloning is approximately 7GB. A
simple Windows install image is usually approximately 3GB when compressed.
NOTE: Windows unattended autoinstall does not have this limitation.
◦ Windows dynamic disks are not supported. Only Windows basic disks are supported.
◦ When multiple (>1) primary and (>1) logical partitions are present in a Windows backup
image, drive letters (e.g. D:, E: ) assigned to the partitions on the cloned nodes are not
consistent with the golden node.
◦ The local “Administrator” account password and desktop are reset on cloned nodes. Any
content placed in the “Administrator” desktop directory is lost after cloning.
◦ Cloned nodes reboot twice after the first disk-boot for host specific customizations.
◦ GPT partition table is not supported.
IMPORTANT: HP Insight CMU does not support RAID arrays created by B110i RAID controllers
(e.g. SL4545 G7). Any attempts to backup or clone such RAID arrays will fail.
NOTE: You can partially overcome some of these limitations by using a reconfiguration script
after cloning. For more information about reconfiguration, see “Reconfiguration” (page 63).
20 Installing and upgrading HP Insight CMU
Page 21

2.2.3 Operating system support
HP Insight CMU software is generally supported on Red Hat Enterprise Linux (RHEL) 5 and 6; and
SUSE Linux Enterprise Server (SLES) 11.
The HP Insight CMU diskless environment is supported on RHEL5, RHEL6, and SLES11.
Ubuntu 12.x and 13.x are supported on the compute nodes only, on HP Ubuntu certified servers.
Debian is supported on the compute nodes only, but requires active approval and verification from
HP. Contact HP for support.
CentOS and Scientific Linux are supported on the compute nodes and the management nodes,
but require active approval and verification from HP. Contact HP for support.
For details on specific operating systems supported, see the HP Insight CMU release notes for your
version of the product.
Windows 7 SP1 is supported only on HP ProLiant m700 Server cartridges.
Windows Server 2012 and Windows Server 2012 R2 are supported only on HP ProLiant m300
Server cartridges.
2.2.3.1 RHEL 6 support
HP Insight CMU v7.2 supports RHEL6 on the management node and compute nodes. HP Insight
CMU continues to support a mix of operating systems. For example, RHEL6 is not required on the
management node if RHEL6 is installed on your compute nodes. However, you must use HP Insight
CMU v7.2 when RHEL6 is installed anywhere in your HP Insight CMU cluster. As with all HP Insight
CMU releases, all backup images from previous HP Insight CMU versions can be used with v7.2.
HP Smart Array warning with RHEL6 and future Linux releases
If your compute nodes have P212, P410, P410i, P411, P711, P712, P812, or all newer controllers
proposed by HP after April 1, 2011, then running RHEL6+ (or SLES 11SP1 with the optional driver)
will make them appear as standard /dev/sd* SCSI devices and not as /dev/cciss/c*d*.
Other controllers such as HP Smart Array P400, P800, and P700m will continue to appear as
/dev/cciss/c*d* with RHEL6+.
Having these particular nodes means that HP Insight CMU users might have to create new logical
groups and declare backup devices as /dev/sd* instead of /dev/cciss/c*d*. For example,
you can clone a RHEL5 image on a P410i-based compute node, then clone it with RHEL6 and HP
Insight CMU will switch from /dev/cciss/c*d* to /dev/sd*.
As a result of support for RHEL6, HP Insight CMU v7.2 now supports:
• The ext4 file system
• UUID support in fstabs (replaced at backup by HP Insight CMU)
• dhcpd.conf alternate path support
• SHA512 password support for RHEL6 management nodes
• hpsa/cciss support
2.2.4 HP Insight CMU CD-ROM directory structure
The directory structure of the HP Insight CMU CD-ROM is organized as described in Table 1.
Table 1 Directory structure
Linux
ContentsSubdirectory
HP Insight CMU kit for X86_64. CMU-<version>.x86_64.rpm (HP Insight
CMU v7.2 for X86_64)
Examples of configuration files required for the HP Insight CMU installationConfigFiles
2.2 Preparing for installation 21
Page 22

Table 1 Directory structure (continued)
ContentsSubdirectory
Useful tools that can be used in conjunction with HP Insight CMUTools
Documentation and release notesDocumentation
Licenses
Contains the following licenses: Apache_LICENSE-2_0.txt, gluegen_LICENSE.txt,
jogl_LICENSE.txt. Also contains system-config-netboot-legalnotice.html
2.2.5 HP Insight CMU installation checklist
The following list summarizes the steps needed to install HP Insight CMU on your HPC cluster:
Preparing the management node:
1. For hardware requirements, see “Management node hardware requirements” (page 13).
2. Perform a full installation of your base OS on your management node.
3. Install required rpm files. For details, see “Installation procedures” (page 22)
4. Install Oracle Java version 1.6u33 or later.
5. Install HP Insight CMU rpm.
6. Install HP Insight CMU license.
7. Configure HP Insight CMU.
8. Start HP Insight CMU.
9. Configure HP Insight CMU to start automatically.
Preparing the compute nodes:
For instructions on how to prepare the compute nodes for installation, see “Planning for compute
node installation” (page 14)
Preparing the GUI client workstation:
1. Install Java Runtime Environment version 1.6u33 or later.
2. Install cmugui.jar (optional).
3. Configure X Window server. (Optional)
2.2.6 Login privileges
To install HP Insight CMU, you must be logged in as root and have administrator privileges on the
installation node. If relevant for the cluster, you must know the password of the management cards
on the compute nodes.
2.2.7 SELinux and HP Insight CMU
HP recommends disabling SELinux on the management node and the compute node creating the
image. To disable SELinux in RHEL versions, set SELINUX=disabled in the /etc/sysconfig/
selinux file and restart the node. If you must use SELinux with HP Insight CMU, please contact
support.
2.3 Installation procedures
IMPORTANT: All steps in this section must be performed on the node designated as your HP
Insight CMU management node.
1. Install a base operating system on your HP Insight CMU management node and perform any
configuration steps that are necessary for the node to work within your local environment (e.g.
configure DNS, set up ntp time synchronization, etc). For details on which operating systems
22 Installing and upgrading HP Insight CMU
Page 23

are supported on the HP Insight CMU management node see “Operating system support”
(page 21)
The following rpms must be installed on the HP Insight CMU management node. Any missing
rpms are flagged as dependencies when the HP Insight CMU rpm is installed and must be
installed to continue the installation.
a. expect
b. dhcp
c. tftp client
d. tftp server
e. Oracle Java Runtime Environment, update 33 or newer
f. tcl-8
g. OpenSSL
h. NFS
i. xterm
j. libX11
k. libXau
l. libXdmcp
m. perl-IO-Socket-SSL.
n. perl-Net-SSLeay
o. Samba (Required only if you intend to use HP Insight CMU Windows support.)
If you are using firewalls on the HP Insight CMU management node or GUI client workstation,
configure them to enable the following ports:
• On the HP Insight CMU management node:
External network interface◦
– RMI registry traffic (tcp ports 1099, 49150)
– Webserver port (tcp 80)
– ssh server (tcp 22)
◦ Internal (Admin/Compute) network interface
– – Allow all incoming and outgoing traffic. Admin NIC should be a trusted
interface or “Internal Zone”.
• On the GUI client workstation:
◦ – X Window export (tcp ports 6000 to 6063)
2. Download and install a supported version of Oracle Java. HP Insight CMU depends on Oracle
Java version 1.6 update 33 or later. Only the Java Runtime Environment (JRE) is required. To
download a supported JRE, go to: http://www.oracle.com/technetwork/java/index.html.
3. Install HP Insight CMU.
a. Install the HP Insight CMU rpm key:
# rpm --import /mnt/cmuteam-rpm-key.asc
NOTE: If you do not import the cmuteam-rpm-key a warning message similar to the
following is displayed when you install the HP Insight CMU rmp:
warning: REPOSITORY/cmu-v7.2-1.x86_64.rpm: Header V4 DSA/SHA1 Signature, key ID b59742b4: NOKEY
b. Install the HP Insight CMU rpm:
# rpm -ivh REPOSITORY/cmu-v7.2-1.x86_64.rpm
2.3 Installation procedures 23
Page 24

Preparing... ########################################### [100%]
1:cmu ########################################### [100%]
post-installation...
post-installation of x86_64 tree.......done...
detailed log is /opt/cmu/log/cmu_install-Thu_Nov__7_12:21:59_EST_2013
********************************************************************************
* *
* optional next steps: *
* *
* - install additional cmu payload packages (ex: cmu-windows-moonshot-addon) *
* *
* - restore a cluster configuration with /opt/cmu/tools/restoreConfig *
* - complete the cmu management node setup: /opt/cmu/bin/cmu_mgt_config -c *
* - setup CMU HA (more than one mgt node): /opt/cmu/tools/cmu_ha_postinstall *
* *
* after setup is finished, unset audit mode and start cmu : *
* *
* /etc/init.d/cmu unset_audit *
* *
* /etc/init.d/cmu start *
* *
********************************************************************************
NOTE: HP Insight CMU has dependencies on other rpms (for example, dhcp). If any
missing dependencies are reported, install the required rpms and repeat this step.
c. Install the HP Insight CMU Windows Moonshot add-on rpm:
HP Insight CMU v7.2 supports autoinstall, backup, and cloning of select Windows images
for supported HP Moonshot cartridges. For more details see, “Preinstallation limitations”
(page 20). If you intend to use HP Insight CMU Windows support, install
cmu-windows-moonshot-addon-7.2.1-1.noarch.rpm.
# rpm -ivh cmu-windows-moonshot-addon-7.2.1-1.noarch.rpm
Preparing... ########################################### [100%]
1:cmu-windows-moonshot-ad########################################### [100%]
post-installation microsoft windows payload...
4. Install your HP Insight CMU license.
HP Insight CMU v7.2 requires a valid node license key for each rack/Blade/SL server registered
in the cluster. A separate chassis license key is required for each HP ProLiant Moonshot chassis
regardless of the number of cartridges inside a single chassis.
IMPORTANT: Customers upgrading from previous versions of HP Insight CMU to v7.2 must
obtain new license keys. Keys for previous versions do not work with HP Insight CMU v7.2.
The procedure to obtain license keys is provided with the Entitlement Certificate. For more
details, contact HP support.
Copy the content of all license key files to /opt/cmu/etc/cmu.lic.
Example v7.2 node license key:
FEATURE CMU-NODES HPQ 7.2 permanent uncounted 0123456789AB \
HOSTID=ANY NOTICE="EON 01234567890ABCDEF Qty 1000 \
PRODUCT DEMONODE#02 HP Insight CMU V7.2 25-Oct-2013 \
02:24:07" SIGN="00D7 E9EC 74A3 1624 333F 572C 24EB 4F00 2AC2 \
2B20 C837 E98E 52A1 98A7 E38A"
Example v7.2 Moonshot chassis license key:
FEATURE CMU-CHASSIS HPQ 7.2 permanent uncounted 0123456789AB \
HOSTID=ANY NOTICE="EON 01234567890ABCDEF Qty 100 \
PRODUCT DEMOCHASSIS#02 HP Insight CMU Moonshot V7.2 \
25-Oct-2013 02:27:02" SIGN="0041 1D25 CE0B D4DE F9B2 4B45 9BB6 \
22004 A175 702F 5015 A294 5A3D 4CC6"
5. Configure HP Insight CMU
To configure HP Insight CMU, run /opt/cmu/bin/cmu_mgt_config -c.
24 Installing and upgrading HP Insight CMU
Page 25

The following is an example of executing the command on a management node running Red
Hat Linux. In this example, the management node has the HP Insight CMU compute nodes
connected to eth0 and has a second network on eth1 as a connection outside the cluster.
# /opt/cmu/bin/cmu_mgt_config -c
Checking that SELinux is not enforcing... [ OK ]
Checking for required RPMs... [ OK ]
Checking existence of root ssh key... [ OK ]
Checking if firewall is down/disabled... [ OK ]
Checking tftp for required configuration... [ UNCONFIGURED ]
Making required changes to tftp... [ OK ]
Starting/restarting xinetd services...
Stopping xinetd: [ OK ]
Starting xinetd: [ OK ]
Checking that NFS is running... [ STOPPED ]
Configuring NFS to start on boot and starting NFS...
Starting NFS services: [ OK ]
Starting NFS quotas: [ OK ]
Starting NFS mountd: [ OK ]
Stopping RPC idmapd: [ OK ]
Starting RPC idmapd: [ OK ]
Starting NFS daemon: [ OK ]
Checking number of NFS threads >= 256... [ WARNING ]
The management node is currently running 8 NFS threads.
HP Insight CMU recommends a minimum of 256 NFS threads
on the management node regardless of cluster size.
How many NFS threads would you like me to configure? [256]
Configuring the number of NFS threads to 256 ... [ OK ]
Setting CMU_MIN_NFSD_THREADS in cmuserver.conf to 256 ... [ OK ]
Restarting NFS
Shutting down NFS daemon: [ OK ]
Shutting down NFS mountd: [ OK ]
Shutting down NFS quotas: [ OK ]
Shutting down NFS services: [ OK ]
Starting NFS services: [ OK ]
Starting NFS quotas: [ OK ]
Starting NFS mountd: [ OK ]
Stopping RPC idmapd: [ OK ]
Starting RPC idmapd: [ OK ]
Starting NFS daemon: [ OK ]
Checking dhcp for required configuration
Locating dhcp file... [ OK ]
Which eth should CMU use to access the compute node network?
0) eth0 10.117.20.78
1) eth1 16.117.234.140
:0
Checking if dhcpd interface is configured for "eth0"... [ UNCONFIGURED ]
Configuring dhcpd interface for "eth0"... [ OK ]
Setting dhcpd to start on (re)boot...
Checking if CMU is configured to use 10.117.21.37 [ OK ]
Checking for required sshd configuration... [ UNCONFIGURED ]
Making required changes to sshd... [ OK ]
Restarting sshd
Stopping sshd: [ OK ]
Starting sshd: [ OK ]
Checking if CMU supports the default java version... [ OK ]
Checking for valid CMU license... [ OK ]
The following files were modified by cmu_mgt_config
modified file: /etc/xinetd.d/tftp
backup copy: /etc/xinetd.d/cmu_tftp_before_cmu_mgt_config
modified file: /etc/sysconfig/nfs
backup copy: /etc/sysconfig/cmu_nfs_before_cmu_mgt_config
modified file: /opt/cmu/etc/cmuserver.conf
backup copy: /opt/cmu/etc/cmuserver.conf_before_cmu_mgt_config
modified file: /etc/sysconfig/dhcpd
backup copy: /etc/sysconfig/cmu_dhcpd_before_cmu_mgt_config
modified file: /etc/ssh/sshd_config
backup copy: /etc/ssh/cmu_sshd_config_before_cmu_mgt_config
#
2.3 Installation procedures 25
Page 26

This command can be rerun at any time to change your configuration without adversely
affecting previously configured steps. You can also verify your current configuration by running
/opt/cmu/bin/cmu_mgt_config -ti.
For additional options and details on this command, run /opt/cmu/bin/cmu_mgt_config
-h.
6. Start HP Insight CMU.
After the initial rpm installation, HP Insight CMU is configured in audit mode. To run HP Insight
CMU, unset audit mode and start the HP Insight CMU service.
# /etc/init.d/cmu unset_audit
cmu service needs (re)start
# /etc/init.d/cmu start
starting tftp server check ... done
cmu:core(standard) configured
cmu:java running (*:1099)
cmu:cmustatus running
cmu:monitoring not running
cmu:dynamic user groups unconfigured (cf ${CMU_PATH}/etc/cmuserver.conf
CMU_DYNAMIC_UG_INPUT_SCRIPTS)
cmu:web service running (port 80)
cmu:nfs server running
cmu:dhcpd.conf configured ( subnet X.X.X.X netmask Y.Y.Y.Y {})
cmu:high-availability unconfigured
Where X.X.X.X is the subnet IP address, and YYYY is the netmask of the subnet served by the
dhcp server.
The output lists all the daemons started by the service and their status. Verify that the daemons
are in their expected state.
core
Indicates whether the core components of HP Insight CMU are configured.
java
Indicates whether java is running and the interface used by the java to receive commands
from GUI clients and to send status back to them.
cmustatus
Indicates the status of the utility that checks the state of all the compute nodes.
Monitoring
Indicates the status of the monitoring daemon that gathers the information reported by the
small monitoring agent installed on the compute nodes.
NOTE: Because compute nodes are not installed on the cluster at this time, the monitoring
agent is not started after the installation. This behavior is normal. The cluster must be
configured for monitoring to start.
dynamic user groups
Indicates the configuration status of dynamic user groups.
web service
Indicates the status of the web service on the HP Insight CMU management node. By
default, the web service listens on port 80. The HP Insight CMU GUI can be launched
from a web browser that is pointed to the home page provided by the web service.
nfs server
Indicates the status of the NFS server.
dhcpd.conf
Indicates the status of the DHCPD configuration.
26 Installing and upgrading HP Insight CMU
Page 27

high-availability
Indicates whether the HP Insight CMU management node has been configured for high
availability.
7. Configure HP Insight CMU to start automatically.
IMPORTANT: This installation depends on the operating system installed and might have to
be adapted to your specific installation.
NOTE: The /etc/init.d/cmu file is available as a result of the HP Insight CMU installation.
a. Choose one of the following options:
• If your distribution supports chkconfig:
# chkconfig --add cmu
• If your distribution does not support chkconfig, add start and kill links in the rc.d
directory:
# ln -s /etc/init.d/cmu /etc/rc.d/rc5.d/S99cmu
# ln -s /etc/init.d/cmu /etc/rc.d/rc5.d/K01cmu
# ln -s /etc/init.d/cmu /etc/rc.d/rc3.d/S99cmu
# ln -s /etc/init.d/cmu /etc/rc.d/rc3.d/K01cmu
b. After system reboot, verify that the /var/log/cmuservice_hostname.log file does
not contain errors.
8. Install HP Insight CMU on the GUI client workstation.
2.4 Installing HP Insight CMU with high availability
If you are not using HP Insight CMU with high availability (HA), skip this section and go to the
instructions on configuring the cluster in “Defining a cluster with HP Insight CMU” (page 44).
A ”classic” HP Insight CMU cluster has a single management server. If that server fails, although
the HP Insight CMU cluster continues to work for customer applications, you lose management
functions such as backup, cloning, booting a compute node, and ssh through the HP Insight CMU
GUI. If the HP Insight CMU cluster uses a private network for management, you also lose connection
to the site network. Installing and configuring HP Insight CMU under the control of HA software
provides redundancy to avoid this HP Insight CMU service degradation. The following figure
describes a “classic” HP Insight CMU cluster connected to two networks: the site network and a
private cluster network where compute nodes are connected. The HP Insight CMU management
server is known by its IP0 address on the site network, and by the IP1 address on the cluster network.
The next figure shows the corresponding configuration where two servers can run HP Insight CMU
software in active or standby mode under control of HA software. Mgt server1 and mgt server 2
are connected to form an HP Insight CMU management cluster. The IP addresses IP0 and IP1 are
2.4 Installing HP Insight CMU with high availability 27
Page 28
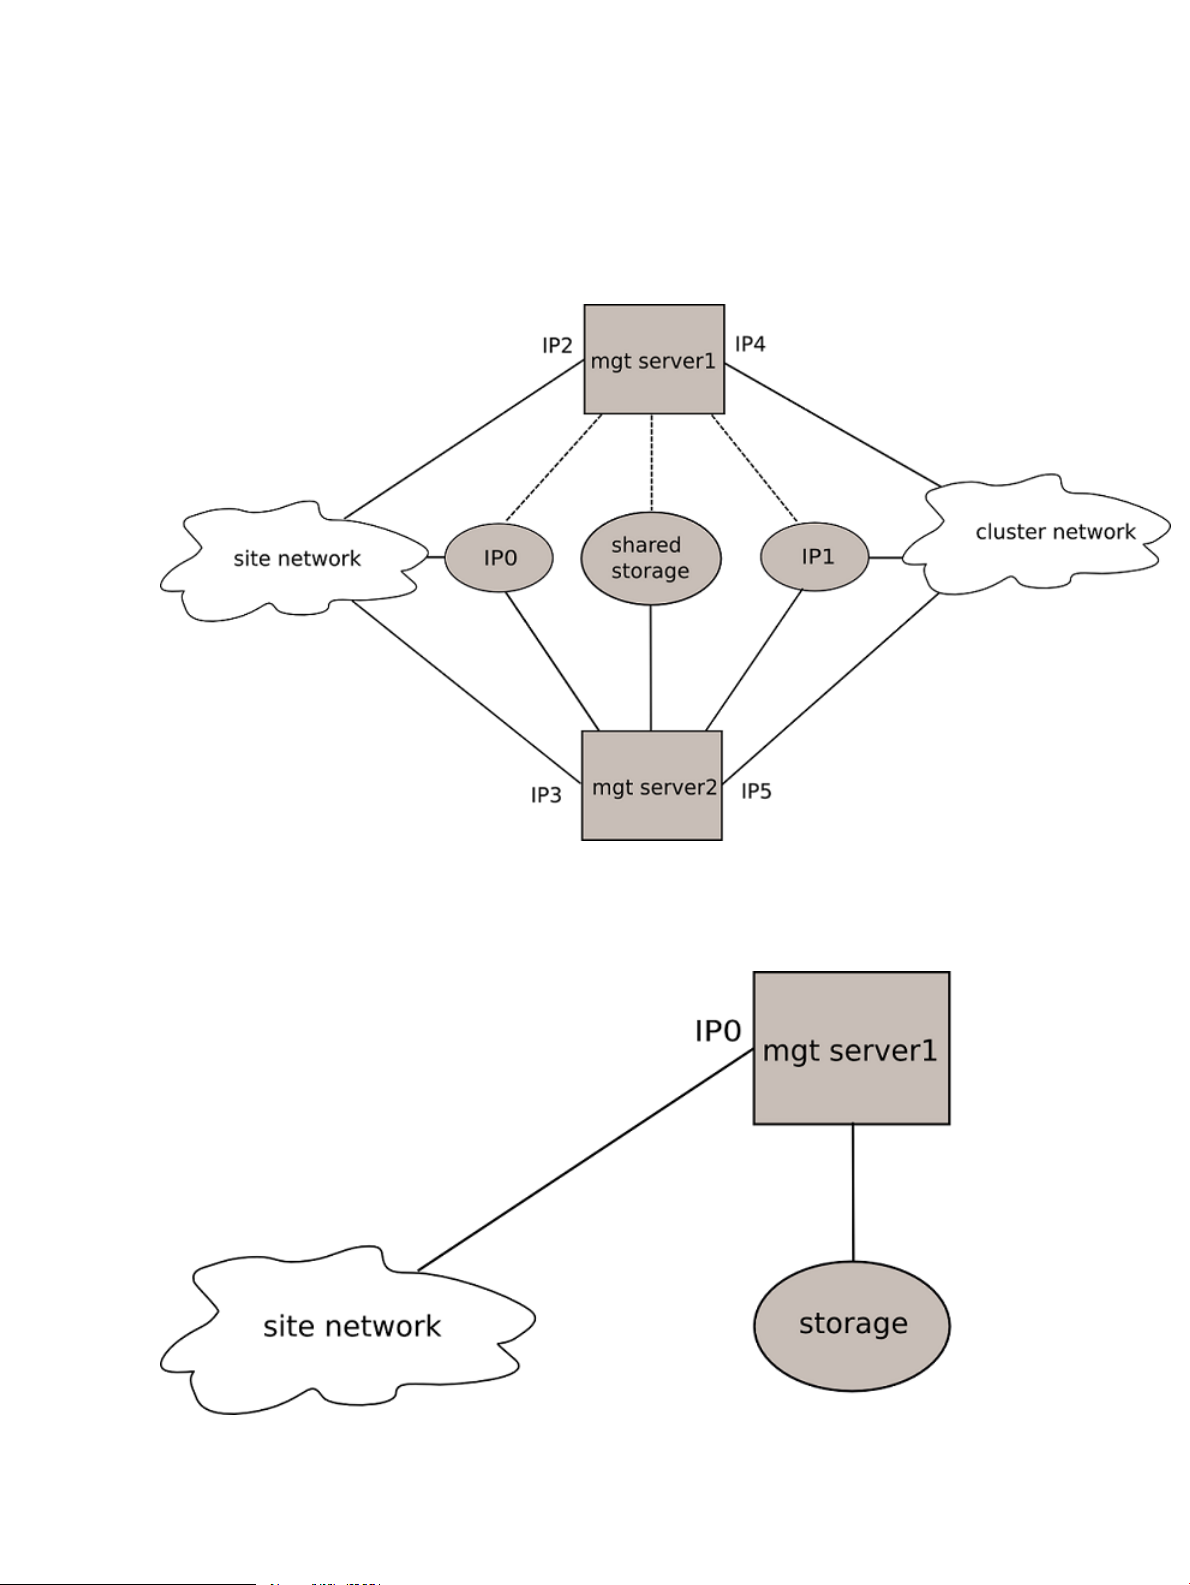
attached to the HP Insight CMU management server that is running the HP Insight CMU software
at a given time. The HP Insight CMU management cluster is known on the site network by the
address IP0, and on the compute network by the address IP1. IP0 and IP1 are the only addresses
HP Insight CMU recognizes. If that server fails, then IP0 and IP1 migrate to the other server. The
two servers each have one IP address per network (IP2, IP3, IP4, IP5). The two servers are connected
to shared storage which hosts the HP Insight CMU directory. This configuration is perceived as a
“classic” HP Insight CMU configuration with a single management server by the compute nodes,
and from the user's point of view.
The next figure shows a “classic” HP Insight CMU cluster with one HP Insight CMU management
server and compute nodes connected directly to the site network. A unique IP address IP0 is used
for compute node management and site network access.
The next figure shows the corresponding configuration with two HP Insight CMU management
servers running HP Insight CMU software in active or standby mode under control of HA software.
28 Installing and upgrading HP Insight CMU
Page 29
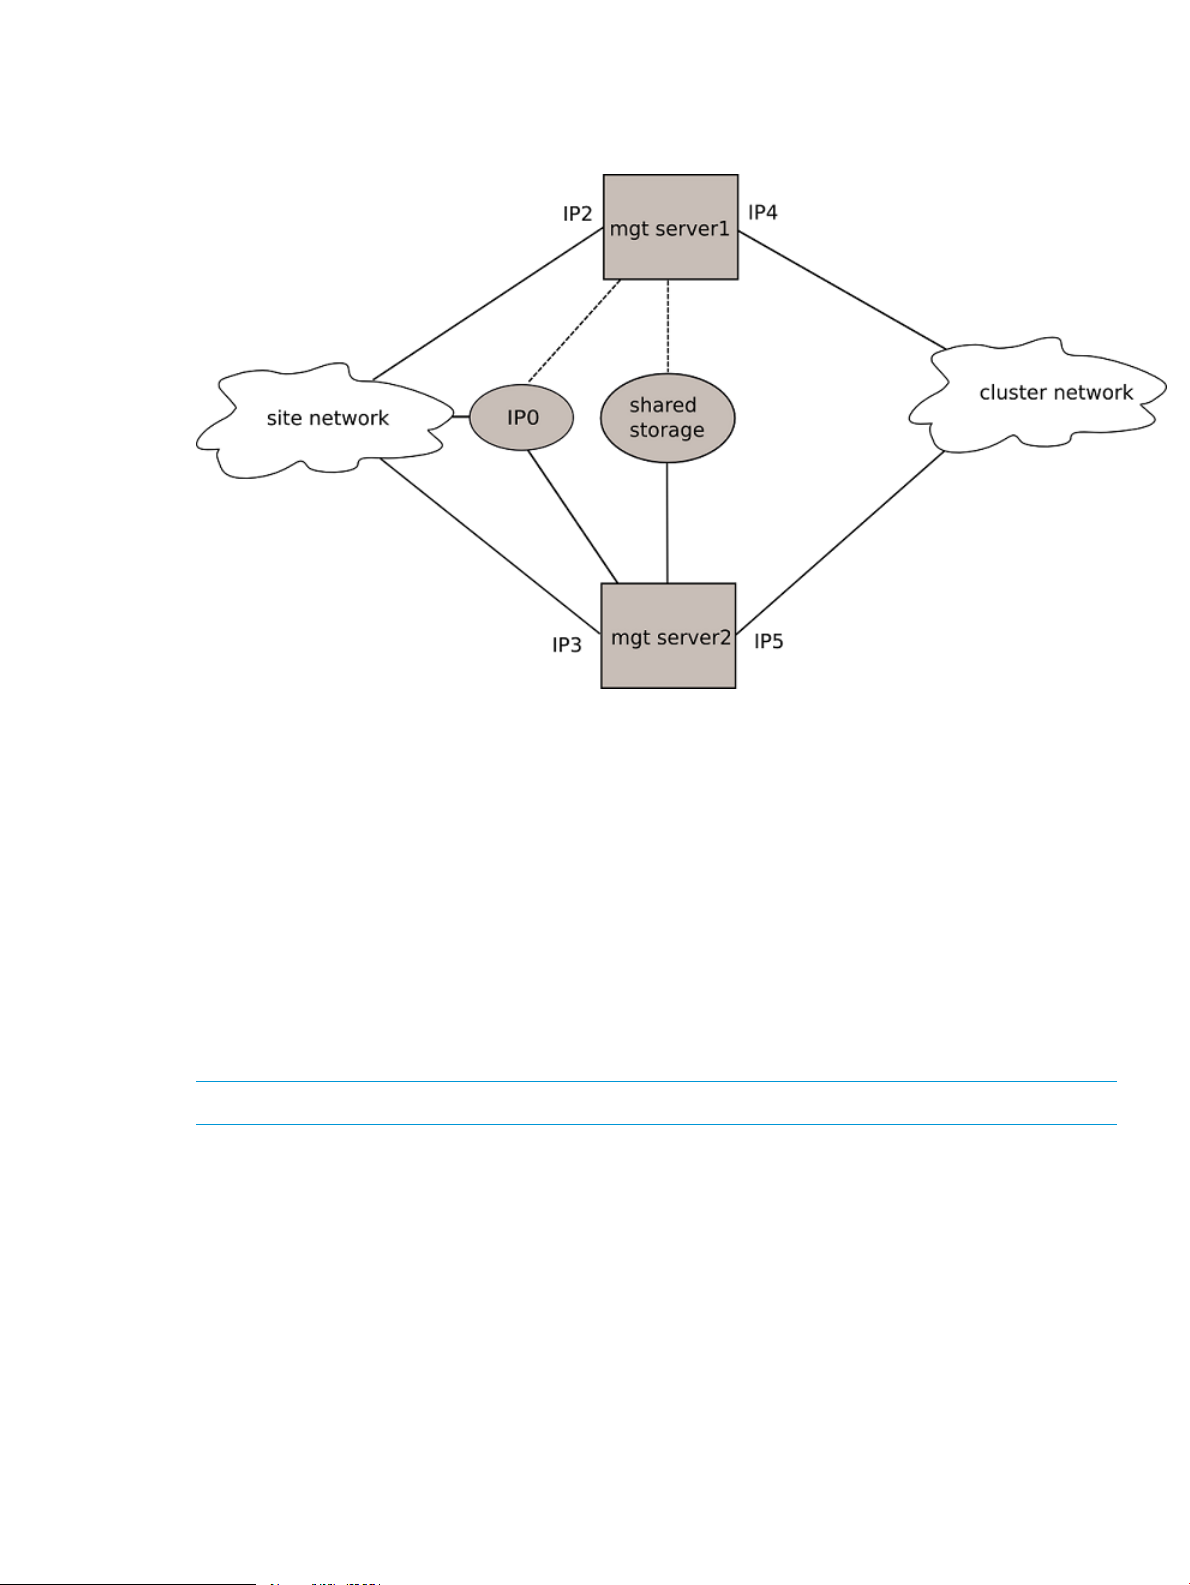
The address IP0 is attached to the server running the HP Insight CMU software. This is the unique
address HP Insight CMU recognizes. Each HP Insight CMU management server has its own IP
address on the site network, IP2 and IP 3 respectively, unknown to HP Insight CMU.
2.4.1 HA hardware requirements
The hardware requirements for HP Insight CMU under HA control are:
• Two or more management servers.
• One shared storage accessed by both servers.
2.4.2 Software prerequisites
In addition to the prerequisites described in “Preparing for installation” (page 20), you must install
and configure the HA software of your choice.
2.4.3 Installing HP Insight CMU under HA
2.4.3.1 Overview
NOTE: To avoid confusion in this section, review the glossary definitions in “Glossary” (page 219).
When installing HP Insight CMU as an HA cluster service, HP recommends completing a normal
HP Insight CMU installation on one management server, as described in “Preparing for installation”
(page 20) and “Installation procedures” (page 22). During this phase, HP Insight CMU can be
used as a normal standalone installation. Compute nodes can be installed, backed up, and cloned.
In the second phase of installation, you must install and configure the HA software of your choice.
This software controls the HP Insight CMU HA service.
After testing the configuration, enable the HP Insight CMU HA service by running the /opt/cmu/
tools/cmu_ha_postinstall script. This operation moves some /opt/cmu directories to a
unique shared file system. This shared file system must be configured as a resource of the HP Insight
CMU HA service.
After this procedure is completed on the first HP Insight CMU management server, a second server
can be installed with HP Insight CMU and added to the management cluster. This procedure is
repeated for additional servers connected to the shared storage.
2.4 Installing HP Insight CMU with high availability 29
Page 30

2.4.3.2 HP Insight CMU HA service requirements
When you configure the HA software layer, configure the HP Insight CMU HA service with the
following resources:
• A shared file system. The mount point of this file system must be /opt/cmu-store and must
be created on all HP Insight CMU management servers.
• A shared IP address.
• If your HP Insight CMU cluster uses separate site and compute networks, an additional IP
address resource must be configured and assigned to your HP Insight CMU HA service.
• The HP Insight CMU HA service must be able to invoke the /etc/init.d/cmu script with
start and stop parameters:
# /etc/init.d/cmu start
# /etc/init.d/cmu stop
2.4.3.3 Installing and testing
1. Install the HP Insight CMU rpm as described in “Installation procedures” (page 22). Be sure
all prerequisites are fulfilled.
2. To test HP Insight CMU on the first cluster member, run the HP Insight CMU software. Verify
that the HP Insight CMU software performs correctly.
2.4.4 Configuring HA control of HP Insight CMU
IMPORTANT: During the following procedure, results of the /etc/init.d/cmu script are saved
to /var/log/cmuservice_hostname.log where hostname is the host name of the HP Insight
CMU management cluster member. Refer to these log files for troubleshooting.
1. If HP Insight CMU is running, set audit mode before you stop HP Insight CMU:
cmuadmin1# /etc/init.d/cmu set_audit
cmuadmin1# /etc/init.d/cmu stop
2. In /opt/cmu/etc/cmuserver.conf, the CMU_CLUSTER_IP variable defines the IP address
used by compute nodes to reach the management cluster. This variable must be set with the
same IP address defined as the shared IP address resource for the compute network on the
HP Insight CMU HA service:
CMU_CLUSTER_IP=X.X.X.X
Where X.X.X.X is the address known by compute nodes to reach the management node.
3. Start the HP Insight CMU cluster HA service. Use the appropriate command for your HA
software to start the service on the first management cluster member. As a result of starting
the service, the following resources must be available:
• The shared file system mounted on /opt/cmu-store
• The cluster IP address
4. Run cmu_ha_postinstall:
cmuadlmin1# /opt/cmu/tools/cmu_ha_postinstall
*** starting setup procedure to operate CMU in HA (Highly Available) environment
*** note: this only affects the management nodes of the HPC cluster
**********************************************************************
requirements to building an Highly Available cluster of cmu mgt nodes:
**********************************************************************
* *
* 1] a shared filesystem mounted at /opt/cmu-store *
* *
* it must support locking via flock() *
* it must be mounted only by one (active) cmu mgt node at a time *
30 Installing and upgrading HP Insight CMU
Page 31

* it must be NFS exportable (for kickstart/diskless/backup/cloning) *
* *
* 2] (at least) one alias IP address: *
* *
* this is the address used by the compute nodes to contact the mgt *
* service, set CMU_CLUSTER_IP into /opt/cmu/etc/cmuserver.conf *
* this address should follow the active cmu management machine *
* *
* [ optionally: a site alias IP address ] *
* *
* 3] a third-party HA software: *
* *
* this software is responsible for: *
* *
* - mounting/unmounting the /opt/cmu-store filesystem *
* - activating/removing the alias IP address(es) *
* - using /etc/init.d/cmu start|stop|status ( NOT /opt/cmu/cmuserver)*
* *
**********************************************************************
(y/N)
y
setting cmu in audit mode
*** CMU is currently in 'audit' mode on cmuadmin1
*** use: '/etc/init.d/cmu unset_audit' to unset audit mode
cmu_ha: saving local cmu config in:/opt/cmu-store/etc/savedConfig/cmuconf0-XXXX.sav
cmu_ha: nothing to backup from the cmu HA share
merging cmuserver.conf files
`reconf.sh' -> `/opt/cmu-store/etc/reconf.sh'
`pre_reconf.sh' -> `/opt/cmu-store/etc/pre_reconf.sh'
`reconf-diskless-image.sh' -> `/opt/cmu-store/etc/reconf-diskless-image.sh'
`reconf-diskless-snapshot.sh' -> `/opt/cmu-store/etc/reconf-diskless-snapshot.sh'
/opt/cmu/tmp/GUI/config.txt was rewritten
cmu_ha: all existing cmu data has been saved
cmu_ha: if required, restore it with:
/opt/cmu/tools/restoreConfig -f /opt/cmu/etc/savedConfig/<your_cmuconf>
*** successfully configured CMU for HA operation
*** install CMU similarly on the other management node(s) of the cluster
management node(s) configured so far:
cmuadmin1
5. Start cmuserver:
# /etc/init.d/cmuserver start
Because HP Insight CMU is still in audit mode, it is not started but it will detect possible
configuration errors. For example:
cmuadmin1# /etc/init.d/cmu start
cmu:core(highavailability) configured (audit mode)
*** error : /usr/java/jre1.6.0_31/bin not found
*** adjust CMU_JAVA_BIN into /opt/cmu/etc/cmuserver.conf
cmu:core(standard) failed configuring (audit mode)
cmu:java not running (audit mode)
cmu:cmustatus not running (audit mode)
cmu:monitoring not running (audit mode)
cmu:web service not running (audit mode)
cmu:nfs server not running (audit mode)
cmu:dhcpd.conf configured ( subnet 16.16.184.0 netmask 255.255.248.0 { } )
cmu:cmu_ha_postinstall done (audit mode)
cmu:/opt/cmu-store mounted (audit mode)
note: use '/opt/cmu/cmuserver unset_audit' to unset cmu 'audit mode'
6. Correct possible errors and unset audit mode:
cmuadmin1# /etc/init.d/cmu unset_audit
cmu ha:cmu service needs (re)start
2.4 Installing HP Insight CMU with high availability 31
Page 32

This command does not actually start HP Insight CMU. It only clears the audit mode to enable
HP Insight CMU to be started by the HA tool.
7. Run the appropriate command for your HA software to start HP Insight CMU.
8. To verify that HP Insight CMU is still running correctly, review the
/var/log/cmuservice_hostname.log file for errors.
9. Install and configure HP Insight CMU on additional management cluster members. Installing
new cluster members is basically the same as for configuring the first member. Because new
members inherit the HP Insight CMU configuration of the first member, you do not have to set
parameters such as the cluster IP address and the Java path.
a. Using the same procedure as for the first member of the cluster, install the HP Insight CMU
rpm.
b. If you started HP Insight CMU in standalone mode on the HP Insight CMU management
server currently operating, you must put HP Insight CMU in audit mode and stop it before
migrating the HA service:
# /etc/init.d/cmu set_audit
# /etc/init.d/cmu stop
c. Migrate the HA service to the server that will perform the post installation procedure.
d. Run the post installation procedure:
cmuadmin2# /opt/cmu/tools/cmu_ha_postinstall
*** starting setup procedure to operate CMU in HA (Highly Available) environment
*** note: this only affects the management nodes of the HPC cluster
**********************************************************************
requirements to building an Highly Available cluster of cmu mgt nodes:
**********************************************************************
* *
* 1] a shared filesystem mounted at /opt/cmu-store *
* *
* it must support locking via flock() *
* it must be mounted only by one (active) cmu mgt node at a time *
* it must be NFS exportable (for kickstart/diskless/backup/cloning) *
* *
* 2] (at least) one alias IP address: *
* *
* this is the address used by the compute nodes to contact the mgt *
* service, set CMU_CLUSTER_IP into /opt/cmu/etc/cmuserver.conf *
* this address should follow the active cmu management machine *
* *
* [ optionally: a site alias IP address ] *
* *
* 3] a third-party HA software: *
* *
* this software is responsible for: *
* *
* - mounting/unmounting the /opt/cmu-store filesystem *
* - activating/removing the alias IP address(es) *
* - using /etc/init.d/cmu start|stop|status ( NOT /opt/cmu/cmuserver)*
* *
**********************************************************************
do you want to continue (at this stage only /opt/cmu-store is necessary) ?(y/N)y
setting cmu in audit mode
*** CMU is currently in 'audit' mode on cmuadmin2
*** use: '/etc/init.d/cmu unset_audit' to unset audit mode
cmu_ha: saving local cmu config in:/opt/cmu-store/etc/savedConfig/cmuconf1-yyyy.sav
cmu_ha: saving clusterwide cmu config in:/opt/cmu-store/etc/savedConfig/cmuconf2-zzzz.sav
cmu_ha: all existing cmu data has been saved
cmu_ha: if required, restore it with:
/opt/cmu/tools/restoreConfig -f /opt/cmu/etc/savedConfig/<your_cmuconf>
*** successfully configured CMU for HA operation
*** install CMU similarly on the other management node(s) of the cluster
management node(s) configured so far:
cmuadmin1
cmuadmin2
32 Installing and upgrading HP Insight CMU
Page 33

e. Unset the audit mode on the new member:
# /etc/init.d/cmu unset_audit
cmu ha:cmu service needs (re)start
f. Start HP Insight CMU under HA control.
g. Use your HA tool to migrate the HP Insight CMU HA service on the new member.
2.4.5 HP Insight CMU configuration considerations
The HA installation procedures described in “Installing HP Insight CMU under HA” (page 29) and
“Configuring HA control of HP Insight CMU” (page 30) convert a standalone HP Insight CMU
administration node into an HP Insight CMU HA administration cluster. During this procedure, the
cmu_ha_postinstall script behaves as follows with respect to HP Insight CMU configurations:
• The cmu_ha_postinstall script saves the local HP Insight CMU configuration of individual
servers. For the configuration example in “Configuring HA control of HP Insight CMU”
(page 30), cmuconf0-xxxx.sav is the local configuration file for the first server, and
cmuconf1-yyyy.sav is the local configuration file for the second server. The local
configuration is restored to the shared filesystem /opt/cmu-store on the first server that
runs cmu_ha_postinstall. This HP Insight CMU configuration is made available to other
HP Insight CMU management servers.
• When cmu_ha_postinstall runs on the first HP Insight CMU management server,
cmu_ha_postinstall does not save any cluster-wide configuration. The following message
appears:
cmu_ha: nothing to backup from the cmu HA share
• When cmu_ha_postinstall runs on the second HP Insight CMU management server,
cmu_ha_postinstall saves a cluster-wide configuration. For the configuration example
in “Configuring HA control of HP Insight CMU” (page 30), this configuration file is
cmuconf2-zzzz.sav.
Using this example, you do not have to manually restore any configuration. All necessary save
and restore operations are performed by the cmu_ha_postinstall script. Other scenarios
might require a manual intervention. For example, using different members of a future HP Insight
CMU administration cluster in standalone mode might result in different configurations on each HP
Insight CMU management server. The resulting cluster-wide configuration will reflect only one of
these configurations. These different configurations cannot automatically merge.
2.4.6 Upgrading HP Insight CMU HA service
To upgrade an HP Insight CMU management cluster under control of an HA software layer:
1. Set audit mode on server 1, which is the server currently running the HP Insight CMU HA
service.
2. Remove the previous HP Insight CMU rpm on server 1.
3. Install the new HP Insight CMU rpm on server 1.
4. Relocate the HP Insight CMU HA service to server 2.
5. Set audit mode on server 2.
6. Remove the previous HP Insight CMU rpm on server 2.
7. Install the new HP Insight CMU rpm on server 2.
8. Run cmu_ha_postinstall on server 2.
9. Unset the audit mode on server 2.
10. Relocate the HP Insight CMU HA service to server 1.
11. Run cmu_ha_postinstall on server 1.
12. Restore the cluster-wide configuration on server 1.
2.4 Installing HP Insight CMU with high availability 33
Page 34

13. Unset the audit mode on server 1.
14. Using the appropriate command for your HA software, restart the HP Insight CMU HA service.
2.5 Upgrading HP Insight CMU
Complete the steps in this section if you are upgrading an existing HP Insight CMU system from a
previous HP Insight CMU version.
2.5.1 Upgrading to v7.2 important information
IMPORTANT: The HP Insight CMU v7.2 license key format is changed from previous versions.
Older license keys will not work with HP Insight CMU v7.2. For details, see “Installing your HP
Insight CMU license” (page 36).
IMPORTANT: You must install Samba on the management node to upgrade to HP Insight CMU
v7.2. The Samba server is used for Windows provisioning.
Install the Samba package from your distribution vendor. The cmuserver verifies that Samba service
is running on the management node.
NOTE: If you will not use autoinstall for Windows, the Samba server can be turned off. Cloning
for Windows is still available if the Samba server is off.
The following environment variables are now kit properties and will be overwritten at each HP
Insight CMU v7.2 kit reinstall:
• CMU_VALID_ARCHITECTURE_TYPES
• CMU_BIOS_SETTINGS_TOOL
• CMU_BIOS_SETTINGS_FILE
• CMU_WI_KERNEL
• CMU_WI_INITRD
• CMU_WI_KERNEL_PARMS
• CMU_VALID_HARDWARE_TYPES
After upgrading to HP Insight CMU v7.2, you must verify the cmuserver setup by running:
cmu_mgt_config -c
An upgrade to HP Insight CMU v7.2 supports new fields in the internal cmu database. To reinstall
a previous version of HP Insight CMU, you must restore the previous configuration from backup.
Previous versions of HP Insight CMU are unable to restore V7.2 backups.
2.5.2 Dependencies
2.5.2.1 64-bit versions on management node
As of V7.0, HP Insight CMU is an x86 64-bit kit only and can no longer run on x86 32-bit hardware.
Previous releases required libX11, libxdmcp, and libXau on the management node only. These
requirements are still valid, but only 64-bit versions must be used. That is, at upgrade time HP
Insight CMU V7.0 and later might require libX* packages again, in their 64-bit versions (x86_64
in the rpm names).
2.5.2.2 tftp client
As of V7.0, HP Insight CMU depends on /usr/bin/tftp on the management node because of
sanity check improvements.
34 Installing and upgrading HP Insight CMU
Page 35

2.5.2.3 Java version dependency
HP Insight CMU v7.2 depends on Oracle Java version 1.6 update 33 or later. HP strongly
recommends upgrading the Java JVMs on both the management node and the endstations running
the GUI to version 1.6u33 or later to avoid security problems with the remote file browser (used
by the cmu_pdcp and autoinstall GUI dialogs).
2.5.2.4 Monitoring clients
Upgrading the management node to HP Insight CMU v7.2 also requires upgrading the monitoring
clients to v7.2 on the compute nodes. Monitoring will fail with an HP Insight CMU v7.2 management
node and v7.0 or previous compute node clients.
2.5.3 Stopping the HP Insight CMU service
To stop the HP Insight CMU service on the management node:
# /etc/init.d/cmu stop
2.5.4 Upgrading Java Runtime Environment
If you are upgrading from HP Insight CMU v5.x or v7.0, Java Runtime Environment V1.6u33 or
later is required for HP Insight CMU v7.2.
2.5.5 Removing the previous HP Insight CMU package
To remove the previous HP Insight CMU package:
# rpm –e cmu
The following message appears:
configuration saved into /opt/cmu/etc/savedConfig/cmuconf##.sav
Save this information. After installation, use this information to restore the previous configuration.
# /opt/cmu/tools/restoreConfig -f /opt/cmu/etc/savedConfig/cmuconf##.sav
2.5.6 Installing the HP Insight CMU v7.2 package
Install HP Insight CMU.
1. Install the HP Insight CMU rpm key:
# rpm --import /mnt/cmuteam-rpm-key.asc
NOTE: If you do not import the cmuteam-rpm-key a warning message similar to the
following is displayed when you install the HP Insight CMU rpm:
warning: REPOSITORY/cmu-v7.2-1.x86_64.rpm: Header V4 DSA/SHA1 Signature, key ID b59742b4: NOKEY
2. Install the HP Insight CMU rpm:
# rpm -ivh REPOSITORY/cmu-v7.2-1.x86_64.rpm
Preparing... ########################################### [100%]
1:cmu ########################################### [100%]
post-installation...
post-installation of x86_64 tree.......done...
detailed log is /opt/cmu/log/cmu_install-Thu_Nov__7_12:21:59_EST_2013
********************************************************************************
* *
* optional next steps: *
* *
* - install additional cmu payload packages (ex: cmu-windows-moonshot-addon) *
* *
* - restore a cluster configuration with /opt/cmu/tools/restoreConfig *
* - complete the cmu management node setup: /opt/cmu/bin/cmu_mgt_config -c *
* - setup CMU HA (more than one mgt node): /opt/cmu/tools/cmu_ha_postinstall *
* *
* after setup is finished, unset audit mode and start cmu : *
* *
* /etc/init.d/cmu unset_audit *
* *
2.5 Upgrading HP Insight CMU 35
Page 36

* /etc/init.d/cmu start *
* *
********************************************************************************
NOTE: HP Insight CMU has dependencies on other rpms (for example, dhcp). If any missing
dependencies are reported, install the required rpms and repeat this step.
3. Install the HP Insight CMU Windows Moonshot add-on rpm:
HP Insight CMU v7.2 supports autoinstall, backup, and cloning of select Windows images
for supported HP Moonshot cartridges. For more details see, “Preinstallation limitations”
(page 20). If you intend to use HP Insight CMU Windows support, install
cmu-windows-moonshot-addon-7.2.1-1.noarch.rpm.
# rpm -ivh cmu-windows-moonshot-addon-7.2.1-1.noarch.rpm
Preparing... ########################################### [100%]
1:cmu-windows-moonshot-ad########################################### [100%]
post-installation microsoft windows payload...
2.5.7 Installing your HP Insight CMU license
Install your HP Insight CMU license.
HP Insight CMU v7.2 requires a valid node license key for each rack/Blade/SL server registered
in the cluster. A separate chassis license key is required for each HP ProLiant Moonshot chassis
regardless of the number of cartridges inside a single chassis.
IMPORTANT: Customers upgrading from previous versions of HP Insight CMU to v7.2 must obtain
new license keys. Keys for previous versions do not work with HP Insight CMU v7.2.
The procedure to obtain license keys is provided with the Entitlement Certificate. For more details,
contact HP support.
Copy the content of all license key files to /opt/cmu/etc/cmu.lic.
Example v7.2 node license key:
FEATURE CMU-NODES HPQ 7.2 permanent uncounted 0123456789AB \
HOSTID=ANY NOTICE="EON 01234567890ABCDEF Qty 1000 \
PRODUCT DEMONODE#02 HP Insight CMU V7.2 25-Oct-2013 \
02:24:07" SIGN="00D7 E9EC 74A3 1624 333F 572C 24EB 4F00 2AC2 \
2B20 C837 E98E 52A1 98A7 E38A"
Example v7.2 Moonshot chassis license key:
FEATURE CMU-CHASSIS HPQ 7.2 permanent uncounted 0123456789AB \
HOSTID=ANY NOTICE="EON 01234567890ABCDEF Qty 100 \
PRODUCT DEMOCHASSIS#02 HP Insight CMU Moonshot V7.2 \
25-Oct-2013 02:27:02" SIGN="0041 1D25 CE0B D4DE F9B2 4B45 9BB6 \
22004 A175 702F 5015 A294 5A3D 4CC6"
2.5.8 Restoring the previous HP Insight CMU configuration
If you have a pre-existing HP Insight CMU installation, you must restore your HP Insight CMU cluster
configuration:
# /opt/cmu/tools/restoreConfig -f /opt/cmu/etc/savedConfig/cmuconf##.sav
HP Insight CMU v7.2 provides new features in the monitoring file /opt/cmu/etc/
ActionAndAlertFile.txt. When you restore the HP Insight CMU configuration, the customized
ActionAndAlertsFile.txt is copied to /opt/cmu/etc, and the original file from the HP
Insight CMU v7.2 rpm is saved in /opt/cmu/etc/
ActionAndAlertsFile.txt_before_restore. No automatic merge is performed. If you
want to use the new features, you must merge the two files manually.
36 Installing and upgrading HP Insight CMU
Page 37

2.5.9 Configuring the updated UP Insight CMU
To configure HP Insight CMU, run /opt/cmu/bin/cmu_mgt_config -c.
The following is an example of executing the command on a management node running Red Hat
Linux. In this example, the management node has the HP Insight CMU compute nodes connected
to eth0 and has a second network on eth1 as a connection outside the cluster.
# /opt/cmu/bin/cmu_mgt_config -c
Checking that SELinux is not enforcing... [ OK ]
Checking for required RPMs... [ OK ]
Checking existence of root ssh key... [ OK ]
Checking if firewall is down/disabled... [ OK ]
Checking tftp for required configuration... [ UNCONFIGURED ]
Making required changes to tftp... [ OK ]
Starting/restarting xinetd services...
Stopping xinetd: [ OK ]
Starting xinetd: [ OK ]
Checking that NFS is running... [ STOPPED ]
Configuring NFS to start on boot and starting NFS...
Starting NFS services: [ OK ]
Starting NFS quotas: [ OK ]
Starting NFS mountd: [ OK ]
Stopping RPC idmapd: [ OK ]
Starting RPC idmapd: [ OK ]
Starting NFS daemon: [ OK ]
Checking number of NFS threads >= 256... [ WARNING ]
The management node is currently running 8 NFS threads.
HP Insight CMU recommends a minimum of 256 NFS threads
on the management node regardless of cluster size.
How many NFS threads would you like me to configure? [256]
Configuring the number of NFS threads to 256 ... [ OK ]
Setting CMU_MIN_NFSD_THREADS in cmuserver.conf to 256 ... [ OK ]
Restarting NFS
Shutting down NFS daemon: [ OK ]
Shutting down NFS mountd: [ OK ]
Shutting down NFS quotas: [ OK ]
Shutting down NFS services: [ OK ]
Starting NFS services: [ OK ]
Starting NFS quotas: [ OK ]
Starting NFS mountd: [ OK ]
Stopping RPC idmapd: [ OK ]
Starting RPC idmapd: [ OK ]
Starting NFS daemon: [ OK ]
Checking dhcp for required configuration
Locating dhcp file... [ OK ]
Which eth should CMU use to access the compute node network?
0) eth0 10.117.20.78
1) eth1 16.117.234.140
:0
Checking if dhcpd interface is configured for "eth0"... [ UNCONFIGURED ]
Configuring dhcpd interface for "eth0"... [ OK ]
Setting dhcpd to start on (re)boot...
Checking if CMU is configured to use 10.117.21.37 [ OK ]
Checking for required sshd configuration... [ UNCONFIGURED ]
Making required changes to sshd... [ OK ]
Restarting sshd
Stopping sshd: [ OK ]
Starting sshd: [ OK ]
Checking if CMU supports the default java version... [ OK ]
Checking for valid CMU license... [ OK ]
The following files were modified by cmu_mgt_config
modified file: /etc/xinetd.d/tftp
backup copy: /etc/xinetd.d/cmu_tftp_before_cmu_mgt_config
modified file: /etc/sysconfig/nfs
backup copy: /etc/sysconfig/cmu_nfs_before_cmu_mgt_config
modified file: /opt/cmu/etc/cmuserver.conf
backup copy: /opt/cmu/etc/cmuserver.conf_before_cmu_mgt_config
modified file: /etc/sysconfig/dhcpd
backup copy: /etc/sysconfig/cmu_dhcpd_before_cmu_mgt_config
modified file: /etc/ssh/sshd_config
2.5 Upgrading HP Insight CMU 37
Page 38

backup copy: /etc/ssh/cmu_sshd_config_before_cmu_mgt_config
#
This command can be rerun at any time to change your configuration without adversely affecting
previously configured steps. You can also verify your current configuration by running
/opt/cmu/bin/cmu_mgt_config -ti.
For additional options and details on this command, run /opt/cmu/bin/cmu_mgt_config
-h.
2.5.10 Starting HP Insight CMU
After the initial rpm installation, HP Insight CMU is configured in audit mode. To run HP Insight
CMU, unset audit mode and start the HP Insight CMU service.
# /etc/init.d/cmu unset_audit
cmu service needs (re)start
# /etc/init.d/cmu start
starting tftp server check ... done
cmu:core(standard) configured
cmu:java running (*:1099)
cmu:cmustatus running
cmu:monitoring not running
cmu:dynamic user groups unconfigured (cf ${CMU_PATH}/etc/cmuserver.conf
CMU_DYNAMIC_UG_INPUT_SCRIPTS)
cmu:web service running (port 80)
cmu:nfs server running
cmu:dhcpd.conf configured ( subnet X.X.X.X netmask Y.Y.Y.Y {})
cmu:high-availability unconfigured
Where X.X.X.X is the subnet IP address, and YYYY is the netmask of the subnet served by the dhcp
server.
The output lists all the daemons started by the service and their status. Verify that the daemons are
in their expected state.
core
Indicates whether the core components of HP Insight CMU are configured.
java
Indicates whether java is running and the interface used by the java to receive commands from
GUI clients and to send status back to them.
cmustatus
Indicates the status of the utility that checks the state of all the compute nodes.
Monitoring
Indicates the status of the monitoring daemon that gathers the information reported by the small
monitoring agent installed on the compute nodes.
NOTE: Because compute nodes are not installed on the cluster at this time, the monitoring
agent is not started after the installation. This behavior is normal. The cluster must be configured
for monitoring to start.
dynamic user groups
Indicates the configuration status of dynamic user groups.
web service
Indicates the status of the web service on the HP Insight CMU management node. By default,
the web service listens on port 80. The HP Insight CMU GUI can be launched from a web
browser that is pointed to the home page provided by the web service.
nfs server
Indicates the status of the NFS server.
38 Installing and upgrading HP Insight CMU
Page 39

dhcpd.conf
Indicates the status of the DHCPD configuration.
high-availability
Indicates whether the HP Insight CMU management node has been configured for high
availability.
2.5.11 Deploying the monitoring client
If you use HP Insight CMU monitoring, upgrade the monitoring client on your HP Insight CMU
client nodes. For more information about deploying the monitoring client, see “Deploying the
monitoring client” (page 85).
2.6 Saving the HP Insight CMU database
The saveConfig script saves the HP Insight CMU configuration. The script creates an archive
containing several files, for example /etc/hosts, /etc/dhcpd.conf, /etc/exports, and
the HP Insight CMU configuration files cmu.conf and reconf.sh. Save the database with the
following command:
# /opt/cmu/tools/saveConfig.tcl -p /my-path
Where my-path is the location where you want to save the configuration. The scripts creates the
archive there. The format of the archive file name is:
cmuconf#-XXXX.sav
Where # is an incremental number and XXXX is a checksum number.
NOTE: When you uninstall HP Insight CMU, the saveConfig script is automatically executed.
Configuration settings are saved in the /opt/cmu/etc/savedConfig/ path.
2.7 Restoring the HP Insight CMU database
The restoreConfig script restores an HP Insight CMU configuration. You must provide a
configuration archive file. The /etc/hosts and /etc/dhcpd.conf and the HP Insight CMU
configuration files cmu.conf and reconf.sh are replaced. Restore the database with the
following command:
# /opt/cmu/tools/restoreConfig -f /opt/cmu/etc/savedConfig/cmuconf8-XXXX.sav
Where /opt/cmu/etc/savedConfig/cmuconf8-XXXX.sav is a previously saved configuration
archive file.
2.6 Saving the HP Insight CMU database 39
Page 40

3 Launching the HP Insight CMU GUI
3.1 HP Insight CMU GUI
The HP Insight CMU GUI can be used from any workstation connected through the network to the
cluster management node. The HP Insight CMU GUI is composed of the following modules:
• A Java GUI running on the client Windows or Linux workstation
• A server module on the management node to run tasks on compute nodes
IMPORTANT: If the server module is not running on the management node, the client module
cannot perform any tasks.
TIP: To close an unwanted dialog window, use ESC.
3.2 HP Insight CMU main window
If not already done, start the HP Insight CMU GUI on your workstation. Depending on your selected
method of launching the GUI, the IP address of the management node might be requested. If your
workstation has more than one network interface, then the correct network interface to use for
communication with the management node might also be requested by the HP Insight CMU GUI.
The following figure represents the HP Insight CMU main window.
Figure 4 HP Insight CMU main window
Figure 4 (page 40) contains four main areas:
• The top bar allows you to perform configuration commands.
• The left frame lists resources such as Network Entities, Logical Groups, Nodes Definitions, etc.
The '+' expands a resource. If HP Insight CMU cluster configuration commands have not yet
been entered, most resources are empty.
• A filter allows you to show specific resources.
40 Launching the HP Insight CMU GUI
Page 41

• The central frame displays the global cluster view. In Figure 4 (page 40), the global cluster
view is empty because the cluster is not yet configured.
• The bottom frame shows log information.
3.3 Administrator mode
Click Options→Enter Admin Mode.
You must have administrator privileges to perform the cluster configuration tasks described in this
chapter.
If you do not have administrator privileges, then you can monitor the cluster status, but you cannot
perform all the tasks described in this chapter.
IMPORTANT: Cluster configuration tasks can be performed on only one instance of the GUI at
a time.
3.4 Quitting administrator mode
Click Options→Leave Admin Mode.
3.5 Changing X display address
To change the X display address:
1. Click Options→Administrator Mode.
2. Login as root, and then confirm that your X Window display address is correct.
3. Click Options→Change X-display address.
4. Verify that the IP is your GUI station address, and the Display Number field has content, such
as :n, where n is any number.
Figure 5 Change X display address dialog box
NOTE: If the Display Number field is empty, verify that you started your X server and that your
firewall allows X traffic.
3.6 Launching the HP Insight CMU GUI
The HP Insight CMU GUI runs on the HP Insight CMU client and can be launched two ways:
• Through the client web browser by connecting to the HP Insight CMU management server
• By copying the HP Insight CMU GUI Java file onto the client
3.6.1 Launching the HP Insight CMU GUI using a web browser
The HP Insight CMU GUI is a Java application that can be downloaded from the web server running
on the HP Insight CMU management node by using Webstart. Using the HP Insight CMU client
web browser, the HP Insight CMU GUI can be accessed remotely and launched automatically on
the client workstation. This capability enables access to the HP Insight CMU GUI from any
workstation.
3.3 Administrator mode 41
Page 42

HP Insight CMU automatically starts a minimal web server on port 80 of the management node
that serves only the HP Insight CMU website. If an HTTP service is already running on this port on
the management node, then the HP Insight CMU web service does not run. If you want to use a
different port number, then edit the environment variable CMU_THTTPD_PORT in the /opt/cmu/
etc/cmuserver.conf file.
To launch the HP Insight CMU GUI:
1. Start a web browser on the HP Insight CMU client and then enter:
http://cmu-management-node-ip-addr
2. From the main menu of the HP Insight CMU v7.2 website, click Launch Cluster Management
Utility GUI.
3.6.2 Launching the HP Insight CMU GUI from the Java file
• With Java:
Download required libraries:◦
– Copy cmugui.jar to a chosen folder (/tmp in this example):
scp root@cluster: /opt/cmu/bin/cmugui.jar /tmp
– Copy required jars to the same folder:
scp root@cluster: /opt/cmu/www/jnlp/jogl-2.0-2/jar/*.jar /tmp
scp root@cluster: /opt/cmu/www/jnlp/jediterm/*.jar /tmp
◦ Launch HP Insight CMU:
java -cp "*" _GEN2.GUI.View.SplashScreen
◦ Enter the IP address of your cluster when prompted.
3.6.3 Configuring the GUI client on Linux workstations
On Linux workstations, you can use a secure ssh tunnel or an X Window server to communicate
between the workstation running the HP Insight CMU GUI and the HP Insight CMU management
server.
Using an ssh tunnel
1. To open the ssh tunnel, the following settings are required on the HP Insight CMU management
server.
• Put Xauth in the PATH. Xauth is typically at:
/usr/bin/xauth on Red Hat◦
◦ /usr/bin/X11/xauth on SUSE
Install the following:
◦ On Red Hat: xorg-x11-xauth rpm
◦ On SUSE: xorg-x11-libs rpm
◦ On Debian: xbase-clients.X.X.deb
NOTE: If you did not select the X11 package during your Linux installation, then you
must manually install it.
• sshd_config
42 Launching the HP Insight CMU GUI
Page 43

Edit /etc/ssh/sshd_config as follows:
1.
X11Forwarding yes
PasswordAuthentication yes
2. Restart sshd.
# /etc/init.d/sshd restart
Stopping sshd: [ OK ]
Starting sshd: [ OK ]
• Localhost must be resolved and pingable.
2. Verify the ssh tunnel is working correctly.
a. From the GUI workstation, open an ssh connection to the HP Insight CMU management
server.
# ssh x.x.x.x -l root
Where x.x.x.x is the IP address of the HP Insight CMU management server.
b. Open an x terminal from the HP Insight CMU management server and the GUI workstation.
# echo $DISPLAY
localhost:11.0
xterm
Using an X Window server
If you do not want to use the ssh tunnel, you must have an X Window Server installed and properly
configured. On a Linux workstation, the system must be configured so that it displays an x term.
The configuration might vary depending on the security requirements. For example:
• The X Window system must be listening to the TCP connection. This function is disabled by
default. Edit the window manager configuration file to remove this flag. If your display manager
is GDM, change the DisallowTCP line in the GDM configuration file (typically /etc/X11/
gdm/gdm.conf for RHEL3 and 4, or /etc/gdm/custom.conf for RHEL5) to false. Next,
restart the X Window server.
• The server access control must allow access. To authorize access, use the xhost + command.
• Allow rmi connection and X display export in your firewall configuration.
3.6.4 Launching the HP Insight CMU Time View GUI
• Select a group (in Network Entity, Logical Group, or User Group).
• In the right panel, click the third tab labeled Time View.
Each selected metric is represented by a tube filled with rings. Each ring represents a snapshot
of the metric value at a given time. A ring is composed of petals Each petal represents a value
for a given metric, at a given time, for a given node.
Some Time View functions are inherited from 2D flowers. All node interaction is preserved from
2D to 3D. To interact with a node, right-click on it or just hover over a 3D petal with your mouse
to make a tooltip appear. The tooltip displays detailed values for the petal.
3.6 Launching the HP Insight CMU GUI 43
Page 44

4 Defining a cluster with HP Insight CMU
4.1 HP Insight CMU service status
Obtain the status of all HP Insight CMU service components with the following command on the
management node:
# /etc/init.d/cmu status
HP Insight CMU must be properly configured before using the GUI. Ensure that the core and java
services report configured.
4.2 High-level checklist for building an HP Insight CMU cluster
After HP Insight CMU is installed and running on the management node, the rest of the cluster can
be configured as follows:
1. Start HP Insight CMU on the management node.
2. Start the GUI client on the GUI workstation.
3. Scan the compute nodes.
4. Create the network entities. For details, see “Network entity management” (page 49).
5. Perform a full Linux installation on the first compute node. This is referred to as the "golden
node".
6. Create the logical groups.
7. Backup the golden node in its logical group. This operation creates the "golden image" from
which other compute nodes are cloned. You can have several golden images, each in its own
logical group.
8. Clone the compute nodes.
9. Deploy the management agent on the compute nodes.
a. Install the expect package.
b. Install the monitoring rpm.
c. Ping all nodes from the management node.
4.3 Cluster administration
Figure 6 Cluster administration menu
44 Defining a cluster with HP Insight CMU
Page 45

4.3.1 Node management
Figure 7 Node management window
In Figure 7 (page 45), the node list of the cluster will appear as the node database is populated
by adding, scanning, or importing nodes. Each node is represented by a line containing the
following attributes:
• Node name
• Node IP address
• Netmask of the node
• MAC address of the node
• Logical group that cloned the node
• IP address of the management card of the node, or none if unused
• The type of management card on the node which can be iLO, LO100i, ILOCM, or none
• The architecture of the compute node (x86_64 is the default)
The Node Management window enables you to perform the following tasks:
• Add nodes to the HP Insight CMU database
• Delete nodes from the HP Insight CMU database
• Modify node attributes in the HP Insight CMU database
• Scan nodes to automatically add them to the HP Insight CMU database
• Import nodes
• Export nodes
IMPORTANT: Compute node numerical part names must contain zeroes as placeholders for the
highest node number in the cluster. For example, if the highest node number is 100, nodes must
be called cn001...cn100. If the highest node number is 1000, nodes must be called
cn0001...cn1000. Otherwise, some HP Insight CMU commands will parse nodes out of numerical
order.
4.3 Cluster administration 45
Page 46
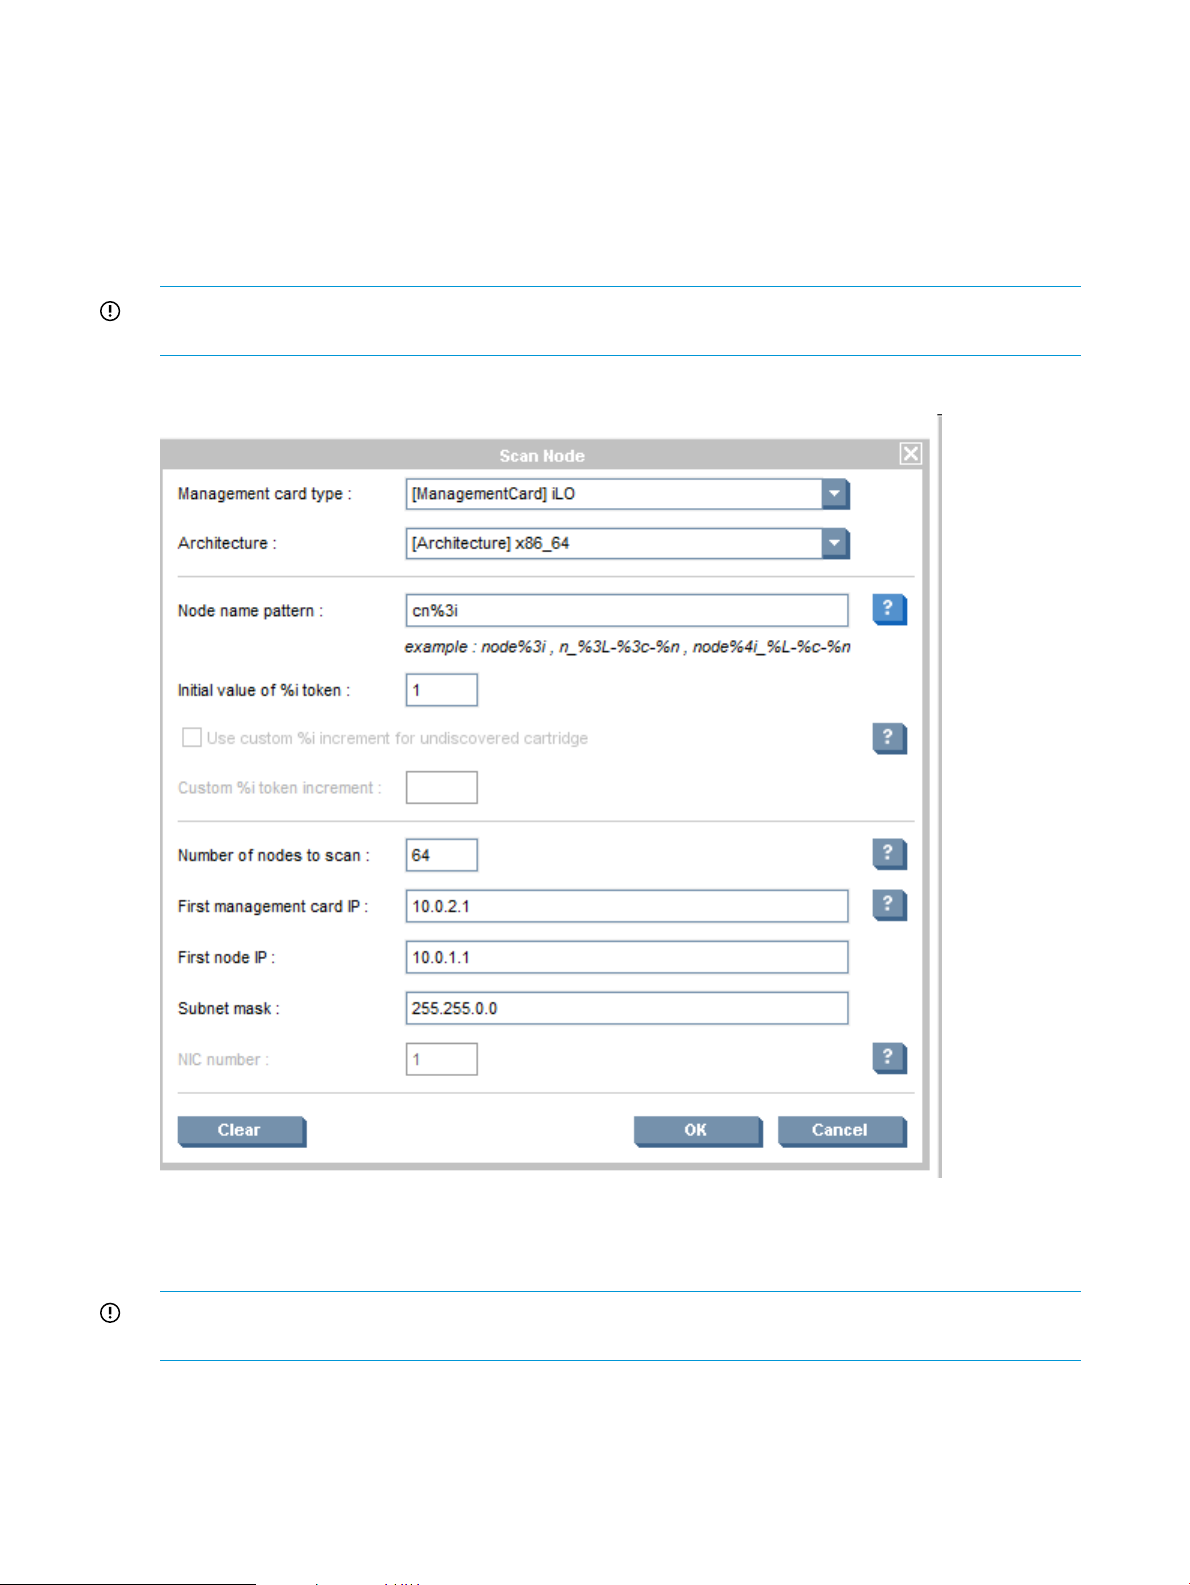
4.3.1.1 Scanning nodes
Cluster Administration→Node Management→Scan Node
The HP Insight CMU Node Management component provides the capability to scan new nodes
into the HP Insight CMU database. You can also manually add node information.
Use this interface to scan nodes in the HP Insight CMU database to retrieve hardware addresses
and configure IP addresses. The HP Insight CMU database is updated with the new nodes. Enter
parameters in the initial Scan Node dialog box.
IMPORTANT: On compute nodes with LO100i management cards, scanning does not work if
PXE is not activated on the BIOS. Only the hardware address of the PXE-enabled NIC is retrieved.
Figure 8 Scan node dialog
The Figure 8 (page 46), node dialog example will discover 64 nodes. Node names will range
from cn001 to cn064. This is specified by the Node name pattern parameter and the Initial value
of %i token parameter. For help on each parameter, click the ?.
IMPORTANT: Make sure you choose the correct management card type for your compute nodes
(LO100i/iLO).
To launch the scan node process:
1. Click OK.
2. In the confirmation window, click OK.
3. Enter the user name and password for the management card.
46 Defining a cluster with HP Insight CMU
Page 47
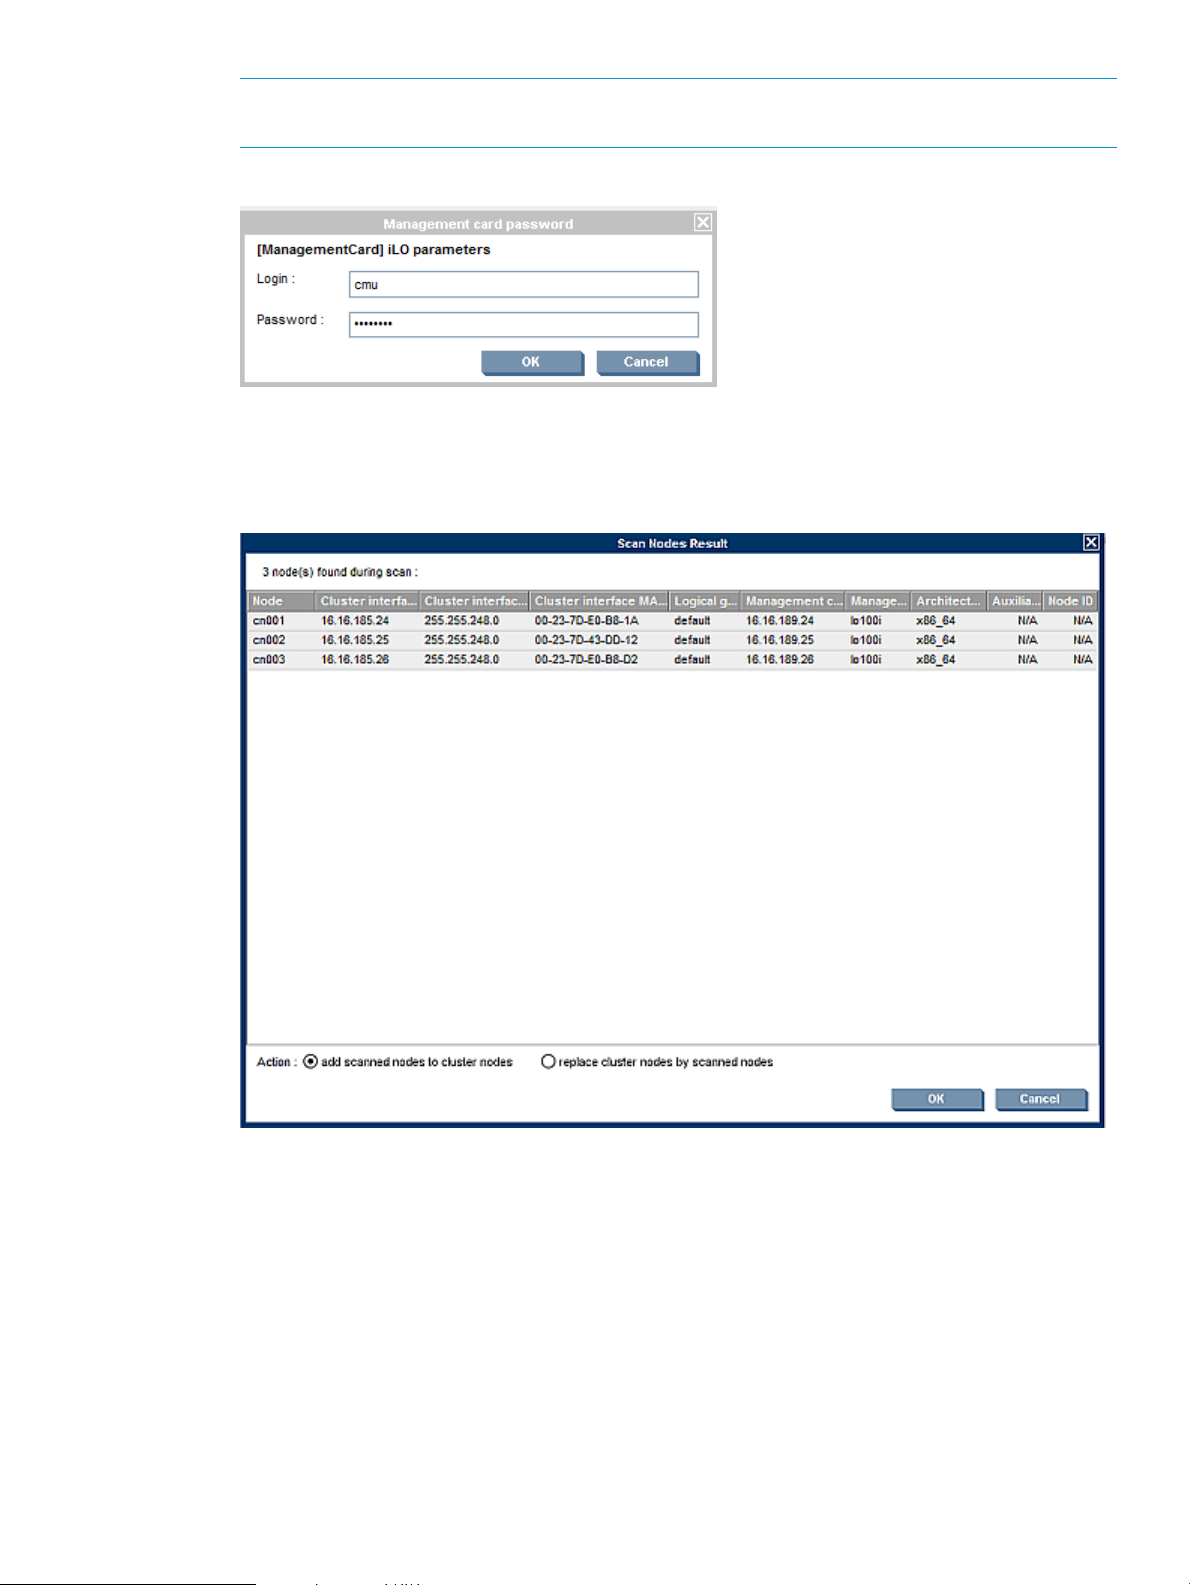
NOTE: This is necessary only for the first scan operation. For subsequent scans, the
Management card password window will not be displayed.
Figure 9 Management card password window
4. The Scan Node Result window appears. Figure 10 (page 47)
5. Select to either add or replace scanned nodes.
Figure 10 Scan node result
4.3.1.2 Adding nodes
Cluster Administration→Node Management→Add Node
Use this interface to add a new node to the HP Insight CMU database.
4.3 Cluster administration 47
Page 48

Figure 11 Add node dialog
At the Node Dialog box:
1. Click OK. A dialog box displays the successful addition of a node completion.
2. Click OK. A dialog box asks if you want to add another node.
NOTE: When you add a node, include it in a network entity using the Network Entity Management
utility.
The newly added nodes appear in the node list.
Figure 12 Populated database node management window
4.3.1.3 Modifying nodes
Cluster Administration→Node Management
48 Defining a cluster with HP Insight CMU
Page 49

To modify the attributes of a node, select the node in the Node Management list, and then select
Modify Node. The same interface as Add Node appears.
NOTE: The node name cannot be changed.
4.3.1.4 Importing nodes
Cluster Administration→Node Management→Import Node
To import nodes from a flat text file, select an existing text file and then click Open to import all
the nodes from this file into the HP Insight CMU database. The following is a sample import/export
file:
cn001 16.16.184.40 255.255.248.0 1C-C1-DE-6E-24-AE default 16.16.188.40 lo100i
cn002 16.16.184.41 255.255.248.0 1C-C1-DE-EA-49-74 default 16.16.188.41 lo100i
cn003 16.16.184.42 255.255.248.0 1C-C1-DE-EA-28-F6 default 16.16.188.42 lo100i
cn004 16.16.184.43 255.255.248.0 1C-C1-DE-E8-ED-2C default 16.16.188.43 lo100i
cn005 16.16.184.118 255.255.248.0 78-E7-D1-FA-8A-C0 default 16.16.188.118 ILO
NOTE: This file can be manually created and edited, but incorrect formatting can break the
operation.
All the imported nodes belong to the default logical group.
4.3.1.5 Deleting nodes
Use this interface to delete a node from the HP Insight CMU database. Select any number of nodes
in the nodes list, and then click Delete Node.
IMPORTANT: After deleting a node, you cannot recover its attributes.
4.3.1.6 Exporting nodes
To export node attributes to a flat text file, select one or several nodes in the Node Management
window, click Export Node and then save the file.
4.3.1.7 Contextual menu
Select one or several nodes in the Node Management window. To display a contextual menu
window, right-click the selected node or nodes.
The contextual menu options are:
• Delete Nodes invokes the delete node procedure for the selected nodes. This feature is
equivalent to selecting the Delete Node option from the Node Management menu.
• Change Active Group changes the active group of all selected nodes. The node appears in
the new group in the Monitoring by Logical Group window.
• Modify Node invokes the modify node procedure for the selected node. This feature is equivalent
to selecting the Modify Node option from the Node Management menu. This menu item is
only active when one node is selected from the list.
• Add Node invokes the add node procedure. This is equivalent to selecting the Add Node
option from the Node Management menu.
4.3.2 Network entity management
A network entity in HP Insight CMU corresponds to a single network switch that connects to a
group of nodes. Large clusters have more than one network switch. The cloning process attempts
to maximize the available network bandwidth within each of the Ethernet switches used in the
cluster. To accomplish this, a unique network entity must be created for each group of nodes
connected to a single Ethernet switch used within the cluster.
IMPORTANT: Cloning will not work for nodes that do not belong to a network entity.
4.3 Cluster administration 49
Page 50

You can use the Network Entity Management window to add and delete network entities. To
perform tasks by using the Network Entity Management option, click Cluster Administration and
then select Network Entity Management.
4.3.2.1 Adding network entities
NOTE: The cloning process does not clone nodes that are not assigned to a network entity.
Figure 13 Network entity management
1. Specify the name of the network entity to create. The length is limited to 15 characters. Each
network entity can contain up to 129 nodes.
NOTE: To minimize the cloning time, each network entity must correspond to each Ethernet
switch. A switch in the cluster must physically represent a network entity and the associated
nodes must be connected to that switch.
2. Select any number of nodes from the “Nodes not in any Network Entity” option on the left
and use the arrows to move the nodes to the “Nodes in Network Entity” option on the right.
4.3.2.2 Deleting network entities
To delete a network entity, select it from the network entities list in the Network Entity Management
window, and then click Remove NE.
IMPORTANT: A network entity cannot be recovered after it is deleted.
50 Defining a cluster with HP Insight CMU
Page 51

5 Provisioning a cluster with HP Insight CMU
5.1 Logical group management
A logical group in HP Insight CMU represents a disk image that has been captured (backed up).
Each logical group is associated with a single backup image. The logical group must contain the
nodes with good hardware configurations that can be cloned with this image.
The Logical Group Management window is used to add, modify, delete, or rename logical groups.
After the HP Insight CMU rpm is initially installed, only the default logical group exists. You cannot
perform backup operations in the default logical group. A new logical group must be created.
In the Logical Group Management window:
1. Click Cluster Administration→Logical Group Management→Create a Logical Group
Figure 14 Create a logical group
2. The following window appears.
Figure 15 Add logical group
3. Enter the group name. In the associated devices field, enter the disk type of the node to be
backed up:
• For the first SCSI drive, use sda.
5.1 Logical group management 51
Page 52
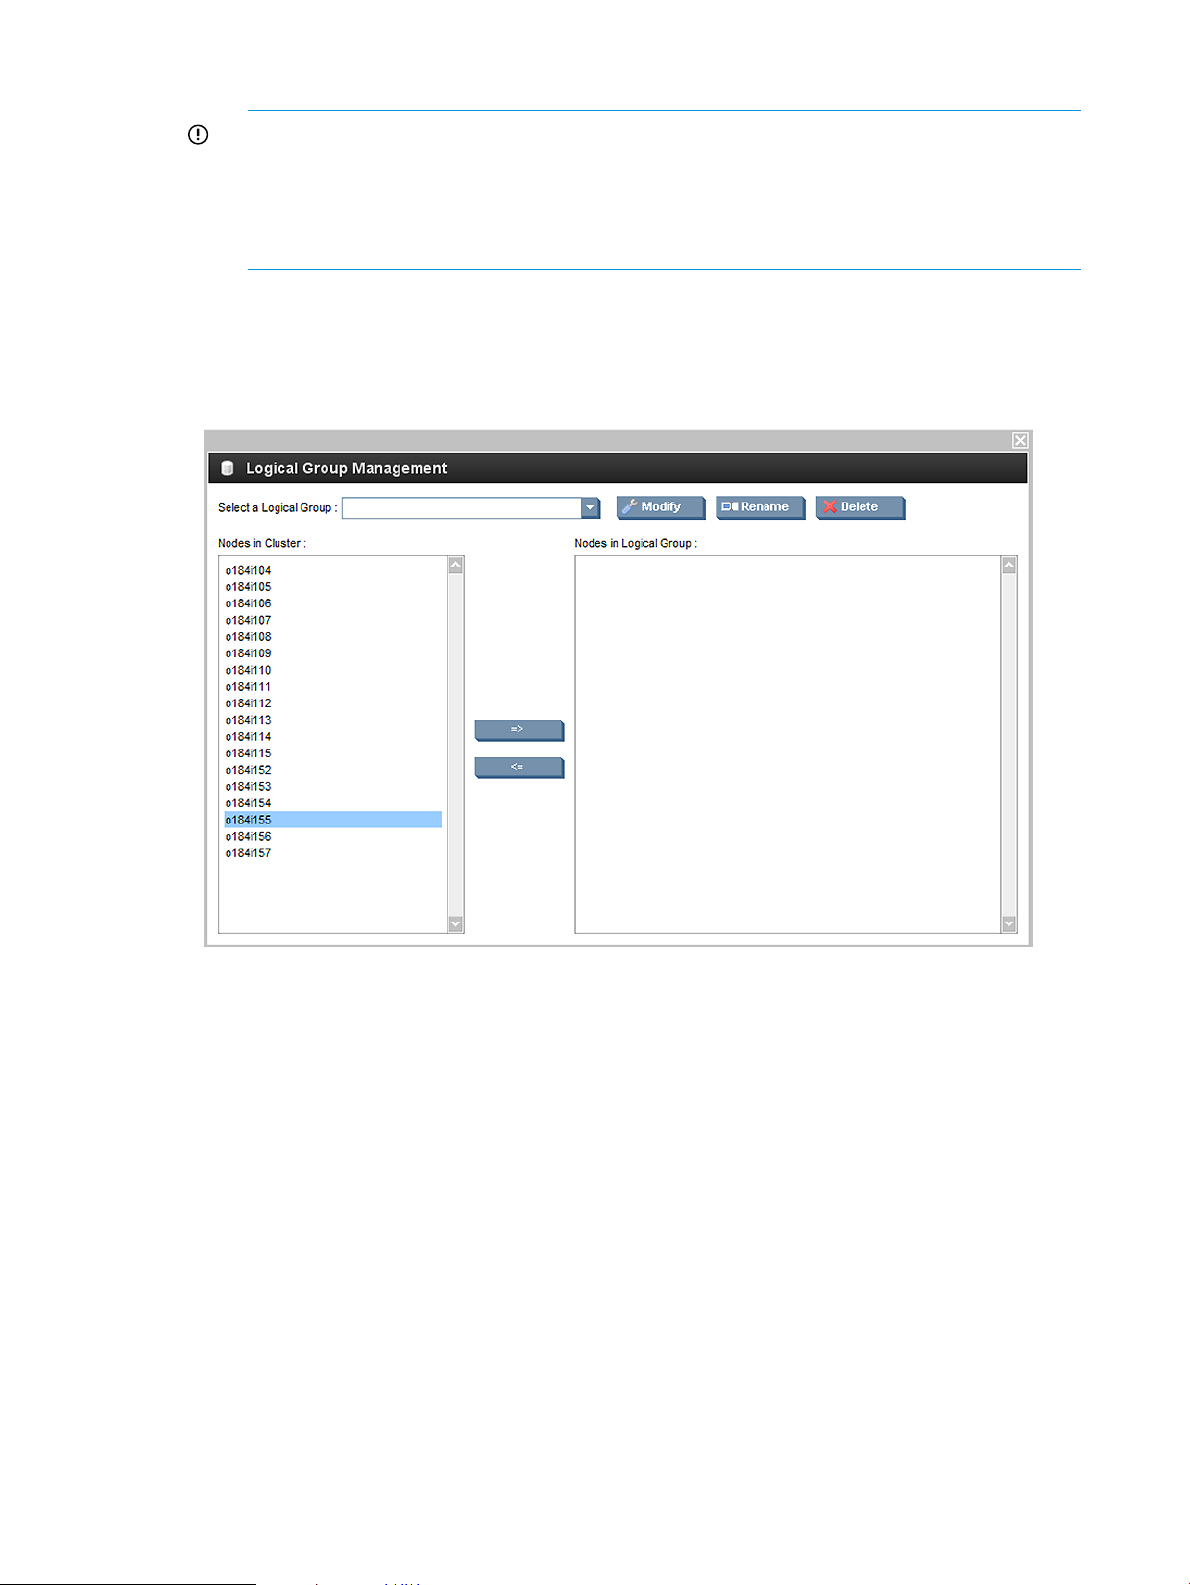
• For the first smart array logical drive on ProLiant servers, use cciss/c0d0.
IMPORTANT: For RHEL6, the smart array device name depends on the smart array
controller. For additional information, see “HP Smart Array warning with RHEL6 and
future Linux releases” (page 21).
IMPORTANT: For Windows logical groups (supported only on specific Moonshot
cartridges), use sda in the Associated devices field.
4. Click OK.
5. To add nodes to the logical group, on the top bar click Cluster Administration→Logical Group
Management→Manage logical group. The following window appears.
Figure 16 Logical group management
6. Select any number of nodes from the Nodes in Cluster list on the left and use the arrows to
move the nodes to the Nodes in the Logical Group list on the right. The nodes appear in the
Nodes in the Logical Group with a "not active" notation. This indicates that the nodes have
not yet been cloned, but are considered candidates for cloning. The notation will change to
"active" after cloning is complete.
5.1.1 Modifying logical groups
To modify the attributes and associated backup of an existing logical group, select the group from
the list in the Logical Group Management window and then click Modify. This function does not
allow you to change the name of the logical group. The dialog box is identical to Add Logical
Group.
5.1.2 Deleting logical groups
To delete a logical group and its associated backup, select the group from the list in the Logical
Group Management window and then click select Delete.
5.1.3 Renaming logical groups
To rename a logical group, select the group from the list in the Logical Group Management window
and then click Rename.
52 Provisioning a cluster with HP Insight CMU
Page 53

5.2 Autoinstall
HP Insight CMU provides automated compute node installation from software distribution repositories
available on the HP Insight CMU management node. The following distributions are supported:
• RHEL5
• RHEL6
• SLES11
• Ubuntu 12.x, 13.x
• Windows 7 Enterprise (on specific Moonshot cartridges only)
• Windows 2012 Server Standard (on specific Moonshot cartridges only)
• Windows 2012 R2 server Standard (on specific Moonshot cartridges only)
5.2.1 Autoinstall requirements
• Autoinstall repository—The operating system distribution repository must be copied to the HP
Insight CMU management node.
IMPORTANT: For Windows autoinstall only, HP insight CMU uses Samba for exporting the
repository. However, configuring Samba for Windows autoinstall is done automatically and
does not require any intervention from HP Insight CMU users.
• Autoinstall template file—The HP Insight CMU autoinstall utility requires an HP Insight CMU
autoinstall template file. The layout of the autoinstall template file depends on the software
being installed.
◦ Red Hat—A classic Red Hat kickstart file
◦ SLES—An autoyast xml file
◦ Debian—A preseed file
◦ Ubuntu—A preseed file
◦ Windows—A Windows unattended installation xml file
IMPORTANT: To autoinstall Windows systems, the rpm
cmu-windows-moonshot-addon-7.2.1-1.noarch must be installed. This rpm is
available on the HP Insight CMU CD.
Examples of autoinstall template files are available in the /opt/cmu/templates/
autoinstall directory.
• Autoinstall logical group—After the autoinstall repository and the autoinstall template file are
available, you must create an autoinstall logical group before autoinstalling a compute node.
5.2.2 Autoinstall templates
HP Insight CMU provides the following autoinstall templates in the directory /opt/cmu/
templates/autoinstall:
• autoinst_rh6.templ
• autoinst_sles11.templ
• autoinst_ubuntu_cd.templ
• autoinst_ubuntu_mini.templ
5.2 Autoinstall 53
Page 54

• autoinst_windows.templ
The template autoinst_windows.templ is delivered with the rpm
cmu-windows-moonshot-addon-7.2.1-1.noarch. This rpm is available on the HP
Insight CMU CD. This template is supported on specific Moonshot cartridges only.
In the templates provided by HP Insight CMU, special CMU keywords are automatically substituted
by the autoinstall process. All HP Insight CMU keywords begin with CMU_. HP Insight CMU locates
the correct values for these variables and makes the substitutions.
The following example is from the autoinst_rh6.templ template:
nfs --server=CMU_MGT_IP --dir=CMU_REPOSITORY_PATH
will be substituted as:
nfs --server=10.0.0.1 --dir=/data/repositories/rh6u4_x86_64
In the example above, HP Insight CMU retrieves the IP address of the management node to substitute
for CMU_MGT_IP. CMU_REPOSITORY_PATH is replaced with the value provided when the autoinstall
logical group is created.
Some keywords are customizable. For details, see the autoinstall section of /opt/cmu/etc/
cmuserver.conf.
In addition, any customer provided template file is supported, provided that:
• It is compatible with the software release being autoinstalled.
• The NFS server and repository information is correctly configured.
5.2.3 Autoinstall calling methods
Autoinstall commands for creating an autoinstall logical group and autoinstalling a compute node
are available from the GUI window and from the CLI interface. You can choose to autoinstall any
number of nodes registered in HP Insight CMU.
The number of nodes that can be autoinstalled simultaneously is determined by the variable
CMU_AUTOINST_PIPELINE_SIZE in /opt/cmu/etc/cmuserver.conf. The default value is
16. However, this value can be modified by the user.
5.2.4 Using autoinstall from GUI
5.2.4.1 Creating an autoinstall logical group
1. Log in to administrator mode.
2. Select Cluster Administration→Logical Group Management→Create an Auto Install Logical
Group from the top bar.
Figure 17 Logical group management autoinstall
3. Enter the required information in the popup window:
• Group name—The name of the autoinstall logical group. This name becomes a directory
in /opt/cmu/image.
• Autoinstall repository—The directory path where you copied the software distribution.
54 Provisioning a cluster with HP Insight CMU
Page 55

IMPORTANT: When creating a Windows logical group, HP insight CMU uses Samba
for exporting the repository. However, this is done automatically and does not require
any intervention from HP Insight CMU users. Exporting via NFS is useless in this case.
• Autoinstall template file—The path to a Red Hat kickstart file, SLES autoyast file, Ubuntu
preseed file or Windows unattended installation xml file. Information can be entered in
the text box, or browsed by clicking on the right side of the text box.
After the autoinstall logical group is created, the HP Insight CMU image directory contains a new
directory with the name of the logical group. This directory contains:
• autoinst.tmpl.orig—An exact copy of the autoinstall file.
• repository—A logical link to the autoinstall repository.
For example:
# ls /opt/cmu/image/rh6u4_autoinstall/
total 4
autoinst.tmpl-orig
repository -> /data/repositories/rh6u4_x86_64
Figure 18 New autoinstall logical group
5.2.4.2 Registering compute nodes
To enable autoinstall, a compute node must be registered in the autoinstall logical group. Registration
is the same as registering a normal HP Insight CMU logical group.
5.2.4.3 Autoinstall compute nodes
When you start autoinstall on a compute node, the following files are created:
• autoinst.tmpl-cmu—A copy of your autoinstall file with additional directives required by
HP Insight CMU.
• autoinst-[compute_node_hostname]—The autoinstall template with hard-coded
node-specific information.
• pxelinux_template—The pxelinux boot parameter file template for this logical group.
• pxelinux-[ compute_node_hostname]—The pxelinux boot parameter file for a specific
node.
For example:
5.2 Autoinstall 55
Page 56

# ls -l /opt/cmu/image/rh5u5_autoinstall/
total 24
-rw-r--r-- 1 root root 2881 Oct 11 15:38 autoinst-node1
-rw-r--r-- 1 root root 2861 Oct 11 15:38 autoinst.tmpl-cmu
-rw-r--r-- 1 root root 1313 Oct 11 15:35 autoinst.tmpl-orig
-rw-r--r-- 1 root root 13 Oct 11 15:38 node1.log
-rw-r--r-- 1 root root 832 Oct 11 15:38 pxelinux-node1
-rw-r--r-- 1 root root 830 Oct 11 15:38 pxelinux_template
lrwxrwxrwx 1 root root 31 Oct 11 15:35 repository -> /data/repositories/rh5u5_x86_64
After creating the files previously described, HP Insight CMU network boots the requested compute
node(s) and then autoinstall proceeds as with a normal Red Hat kickstart, SLES autoyast, Debian
preseed operation, or an unattended Windows installation. During the operation, the autoinstall
log is displayed on the terminal.
Figure 19 Autoinstall log
5.2.5 Using autoinstall from CLI
5.2.5.1 Registering an autoinstall logical group
To register an autoinstall logical group with the CLI, run the cmucli utility, and then enter the
logical group name, the repository path, and the autoinstall file directory path:
# /opt/cmu/cmucli
cmu> add_ai_logical_group rh5u5_autoinst "/data/repositories/rh5u5_x86_64" "/data/repositories/rh5_x86_64.cfg"
repository registration tool
registration in progress...
--> creating image directory
--> copying config file
--> creating link to repository in CMU image directory
--> exporting CMU image directory via NFS
--> registering the cmu image in cmu.conf
==> registration finished
***
*** add nodes to this group
*** before using cmu_autoinstall_node...
*** press enter to exit
5.2.5.2 Adding nodes to autoinstall logical group
To add nodes to the autoinstall logical group enter the following command at the cmucli prompt:
56 Provisioning a cluster with HP Insight CMU
Page 57

cmu> add_to_logical_group node to logical_group_name
For example:
cmu> add_to_logical_group node1 to rh5u5_autoinst
selected nodes: node1
processing 1 node ...
cmu>
Or:
# /opt/cmu/bin/cmu_add_to_logical_group_candidates -t rh5u5_ autoinstall node1 node2
processing 2 nodes...
5.2.5.3 Autoinstall compute nodes
To autoinstall a node, enter the following command at the cmucli prompt:
cmu> autoinstall "image" node1
For example:
cmu> autoinstall "rh6u4_autoinst" node1
or
/opt/cmu/bin/cmu_autoinstall_node -1 rh6u4_autoinst -f nodes.txt
Where nodes.txt is the list of nodes to autoinstall.
5.2.6 Customization
The configuration file /opt/cmu/etc/cmuserver.conf file includes an autoinstall section with
two sets of variables:
• Variables which affect the autoinstall process behavior:
CMU_AUTOINST_INSTALL_TIMEOUT◦
◦ CMU_AUTOINST_PIPELINE_SIZE
For example, use CMU_AUTOINST_INSTALL_TIMEOUT if autoinstallation times out due to
a long disk formatting time increase.
• Variables for keyword substitution into autoinstall templates:
CMU_CN_OS_LANG◦
◦ CMU_CN_OS_TIMEZONE
◦ CMU_CN_OS_CRYPT_PWD
For example, when setting the cmuserver.conf variable:
CMU_CN_OS_LANG=en_US
on the template file /opt/cmu/templates/autoinstall/autoinstall_rh6.template,
the following line:
lang CMU_CN_OS_LANG
becomes:
lang en_US
For a full list of customizable parameters, see the autoinstall section in /opt/cmu/etc/
cmuserver.conf.
5.2 Autoinstall 57
Page 58

5.2.6.1 RHEL autoinstall customization for nodes configured with Dynamic Smart Array RAID (B120i, B320i RAID mode)
To autoinstall RHEL6 on nodes with Dynamic Smart Array RAID configured, the following additional
steps are required to enable the hpvsa driver diskette:
• Download the appropriate hpvsa driver diskette image for the corresponding RHEL OS version.
• Uncompress the driver diskette image and copy it to the RHEL repository directory, which is
NFS exported.
• Add a driverdisk line to RHEL autoinstall template file before creating the logical group.
Specify the uncompressed driver diskette image name. For example:
driverdisk --source=nfs:CMU_MGT_IP:CMU_REPOSITORY_PATH/hpvsa-1.2.6-27.rhel6u4.x86_64.dd
NOTE: CMU_MGT_IP and CMU_REPOSITORY_PATH are automatically substituted with
correct values during autoinstall. Optionally, these values can be hardcoded in the template
file.
• For B120i based Dynamic Smart Array RAID, append blacklist=ahci to
CMU_KS_KERNEL_PARMS in /opt/cmu/etc/cmuserver.conf. For example:
CMU_KS_KERNEL_PARMS="lang=CMU_CN_OS_LANG devfs=nomount ramdisk_size=10240 console=CMU_CN_SERIAL_PORT
ksdevice=CMU_CN_MAC_COLON initrd=autoinst-initrd-CMU_IMAGE_NAME blacklist=ahci
5.2.7 Restrictions
This implementation contains the following restrictions:
• The repository must be on the local storage of the management node.
• The repository must be exported by NFS only. Do not use HTTP, or FTP.
IMPORTANT: For Windows autoinstall only, the repository is exported through Samba.
However, this is automatically done by HP Insight CMU and does not require intervention by
the user.
• Updates must be applied through autoinstall post installation scripts.
• Only qualified distributions and updates are supported by HP.
5.3 Backing up
The backup operation saves an image of the entire operating system and stores it on the local disk
of the HP Insight CMU administration node. This image can be used to clone other nodes of the
cluster. Each physical backup image is associated with a logical group. This functionality is available
only for the administrator.
Prior to performing a backup, ensure that the backup source-node contains all the desired services,
such as NTP for synchronizing time across the cluster. Install any additional applications or libraries.
5.3.1 Backing up a disk from a compute node in a logical group
The backup action is only available when one node is selected.
IMPORTANT: Before backing up a Windows golden node (supported only on specific Moonshot
cartridges), the golden node must be manually shut down gracefully.
To perform a backup:
1. Expand the node list in the left-side frame.
2. Select a node.
3. Right-click the selected node. The contextual menu appears.
4. Select the backup option.
58 Provisioning a cluster with HP Insight CMU
Page 59

Figure 20 Backup dialog box
IMPORTANT: When backing up a Windows golden node (supported only on specific
Moonshot cartridges):
• The backup image size (the total size of the compressed part-archi*.tar.bz2 files)
must be <85% of RAM size on the nodes to be cloned. For example, on nodes with 8GB
RAM, the maximum image size available for cloning is approximately 7GB.
• Ensure that the root partition number is correct. Root partition is the partition containing
the Windows system folder. Verify by running the diskpart command at the Windows
command prompt:
c:\>diskpart
Microsoft DiskPart version 6.1.7601
Copyright (C) 1999-2008 Microsoft Corporation.
On computer: SMITH1
DISKPART> list disk
Disk ### Status Size Free Dyn Gpt
-------- ------------- ------- ------- --- -- Disk 0 Online 465 GB 0 B
DISKPART> select disk 0
Disk 0 is now the selected disk.
DISKPART> list partition
Partition ### Type Size Offset
------------- ---------------- ------- ------ Partition 1 Primary 465 GB 1024 KB
A window displays the existing logical groups and the proposes a list of root directory
partitions. The OK button is enabled after a logical group and a root partition are selected
from the respective lists.
5. Click OK to launch the backup of the selected node with the chosen options.
IMPORTANT: HP Insight CMU only supports Ext2, Ext3, Ext4, FAT, XFS, and Reiserfs file systems
on the Linux partitions for backup.
After you click OK, the backup process starts. If the node to be backed up is linked to a management
card, you will be prompted to enter the management card login and password.
5.3 Backing up 59
Page 60

IMPORTANT: If partitions to be backed up are less than 50% empty, you must configure HP
Insight CMU to use the tmpfs file system for cloning partitions. To make this functionality work,
two conditions must be satisfied:
• The size of the largest partition to back up and clone must be smaller or equal to the compute
node memory size.
• Cloning must be enabled using tmpfs by setting CMU_CLONING_USE_TMPFS to yes in
/opt/cmu/etc/cmuserver.conf and then restart HP Insight CMU.
If these conditions are not satisfied, subsequent cloning operations will fail.
A window displays the backup status.
Figure 21 Backup status window
While the backup is processing, you cannot use the compute node but you can perform other tasks
with the HP Insight CMU GUI interface. When the backup is successfully executed, a message box
appears.
After a successful backup, the /opt/cmu/image/logicalgroupname directory on the management
node contains the image backup files. For example:
# /opt/cmu/image/logicalgroupname
total 422984
-rw-r--r-- 1 root root 745 Mar 31 09:39 fstab-device.txt
-rw-r--r-- 1 root root 834 Mar 31 09:39 fstab-orig.txt
-rw-r--r-- 1 root root 204 Mar 31 09:40 header.txt
-rw-r--r-- 1 root root 22440298 Mar 31 09:40 partarchi-sda1.tar.bz2
-rw-r--r-- 1 root root 410659470 Mar 31 09:40 partarchi-sda3.tar.bz2
-rw-r--r-- 1 root root 1024 Mar 31 09:39 parttbl-sda.raw
-rw-r--r-- 1 root root 364 Mar 31 09:39 parttbl-sda.txt
-rwx------ 1 root root 503 Mar 31 09:39 pre_reconf.sh
-rwx------ 1 root root 866 Mar 31 09:39 reconf.sh
60 Provisioning a cluster with HP Insight CMU
Page 61

5.4 Cloning
The HP Insight CMU cloning operation copies the complete contents of the golden image to other
nodes. The copied image is the same except for two changes:
• HP Insight CMU updates the host name of the node.
• HP Insight CMU updates the IP address of the network used for cloning.
All other configurations remain the same. Node-specific configuration changes can be made with
the HP Insight CMU reconf.sh script.
Before performing a cloning operation, you must satisfy the following prerequisites:
• Create a valid logical group.
• Perform a backup into the logical group.
• The nodes to be cloned must belong to the logical group.
• The nodes to be cloned must belong to a network entity.
• The logical group must have an image that is compatible with the node hardware.
• Nodes must be ready to be powered on by the management card.
To perform the cloning operation:
1. Select the compute nodes to be cloned from the left panel tree.
2. Right-click the selected nodes.
3. Select the logical group associated with the correct backup image.
4. Select Start Cloning.
Figure 22 Cloning procedure
When cloning is in progress, the following terminal window is launched.
5.4 Cloning 61
Page 62

Figure 23 Cloning status
When cloning is complete, a popup window displays the results.
The correctly cloned compute nodes appear in the chosen logical group. The compute nodes that
failed remain in the default logical group.
The cloning feature duplicates the software installation configuration from an installed Linux system
to systems with similar hardware configurations. This function eliminates the time-consuming task
of system installation and configuration for each node in the cluster.
The cloning procedure has the following limitations:
• The cloning procedure does not clone the HP Smart Array hard drive configuration. This type
of cloning must be done manually before the cloning.
• The cloning procedure does not setup the BIOS parameters as PXE-enabled and Wake-On-LAN
enabled. This configuration must be done by the system administrator during cluster integration.
For more information about cloning mechanisms, see “Cloning mechanisms” (page 148).
Use the following conditions to determine if cloning was successful:
• Successfully cloned nodes are added to the logical group containing the image. The remaining
nodes are added to the default logical group.
• In the logical group that contains the image, if the node name is preceded by an I (Inactive),
then the cloning process failed on the node. If the node name is preceded by an A (Active),
then the cloning process is successful on the node.
• The list of successfully cloned nodes is in the /opt/cmu/log/cmucerbere.log file.
5.4.1 Preconfiguration
You can customize the actions to perform on each compute node before starting the cloning process.
During cloning, after the node netboots and downloads the cloning image header files, an automatic
preconfiguration script is launched on each node. This pre_reconf.sh script is unique for each
image.
When a new backup image is created, a default reconfiguration file is copied from /opt/cmu/
etc/pre_reconf.sh to /opt/cmu/image/myimage/pre_reconf.sh. You can customize
this template by editing the /opt/cmu/image/myimage/pre_reconf.sh file.
The script is executed before hard drive partitioning and formatting begins on each of the nodes.
The pre_reconf.sh script can be used, for example, to flash the hard drive firmware and enable
write cache with hdparm.
62 Provisioning a cluster with HP Insight CMU
Page 63

The default content of pre_reconf.sh is:
#!/bin/bash
#keep this version tag here
CMU_PRE_RECONF_VERSION=1
#starting from cmu version 4.2 this script is dedicated to custom code
#it is running at cloning time after netboot is done and before the
#filesystems or even the partitioning is created.
exit 0
5.4.2 Reconfiguration
During cloning, automatic reconfiguration is performed on each node. The first network interface
on the node is reconfigured using the IP address and the subnet mask available in the HP Insight
CMU database. If a node has other network interface cards to reconfigure, then these interfaces
must be reconfigured with the shell script reconf.sh. This shell script is dedicated to user
customization.
To perform reconfiguration of network interfaces other than the first network interface, you must
insert the appropriate instructions into the reconf.sh script.
The reconf.sh script is unique for each image. When a new backup image is created, a default
reconfiguration file is copied from /opt/cmu/etc/reconf.sh to /opt/cmu/image/myimage/
reconf.sh.
IMPORTANT: The script must end with a return code equal to 0, otherwise cloning fails.
The reconf.sh script expects the following parameters:
• CMU_RCFG_PATH contains the path where the "/" partition of the node being cloned is
mounted on the network booted system during the cloning operation.
• CMU_RCFG_HOSTNAME contains the host name of the node.
• CMU_RCFG_DOMAIN contains the domain name of the node.
• CMU_RCFG_IP contains the IP address of the node.
• CMU_RCFG_NTMSK contains the netmask of the node.
IMPORTANT: “Execute” permission must be set for the reconf.sh file for users.
The default reconf.sh script is stored in the /opt/cmu/etc directory. If no reconf.sh script
is associated with an image, then the script in the /opt/cmu/etc/reconf.sh file is copied into
the image directory during backup. The default content of the reconf.sh file is:
#!/bin/bash
#keep this version tag here
CMU_RECONF_VERSION=1
# starting with cmu version 4.2
# this script is now dedicated to custom code and is invoked by:
#
# /opt/cmu/ntbt/rp/opt/cmu/tools/cmu_post_cloning
#
# all code below is therefore executed as the last step of the cloning process
# into the netboot environnement. This will allow seamless upgrade to cmuv7.2+
# and will avoid support issues.
#
# environment variables available:
#
# CMU_RCFG_PATH = path where the root filesystem is currently mounted
# CMU_RCFG_HOSTNAME = hostname of the compute node
# CMU_RCFG_DOMAIN = dns domainname of the compute node
5.4 Cloning 63
Page 64

# CMU_RCFG_IP = mgt network ip of this compute node
# CMU_RCFG_NTMSK = net mask
exit 0
5.4.3 Cloning Windows images
IMPORTANT: Windows is only available on HP ProLiant m300 and HP ProLiant m700 Server
cartridges.
Limitations for cloning Windows images:
• The golden image size (the total size of compressed part-archi*.tar.bz2 files) must be
less than 85% of RAM size on the nodes to be cloned. For example, on nodes with 8GB RAM,
the maximum image size available for cloning is approximately 7GB. A simple Windows
install image is usually approximately 3GB when compressed.
NOTE: Windows unattended autoinstall does not have this limitation.
# du -sh /opt/cmu/image/win2012_r2/partarchi-*.tar.bz2
3.1G /opt/cmu/image/win2012_r2/partarchi-sda1.tar.bz2
• Windows dynamic disks are not supported. Only Windows basic disks are supported.
• HP Insight CMU can clone only one disk per compute node.
• When multiple primary and logical partitions are present in a Windows backup image, drive
letters (e.g. D:, E:) assigned to primary partitions on the cloned nodes are not consistent with
the golden node. For more details, see http://support.microsoft.com/kb/93373.
The following partitioning schemes are not affected by drive letter re-ordering:
◦ Only 1 primary partition (for OS) and multiple logical partitions in the golden image.
◦ Only 4 primary partitions in the golden image.
• Local “Administrator” user account password and desktop folder are reset on cloned nodes.
Any content placed in the “Administrator” desktop folder is lost after cloning. Other local user
accounts are not affected. Always configure additional local user accounts with administrator
privileges on the golden node.
The default HP Insight CMU autoinstall template for golden nodes adds a “CMU” user account
with administrator privileges.
• Cloned nodes reboot twice after first disk-boot for host specific customizations.
• GPT partition tables are not supported.
5.5 Node static info
NOTE: Collecting node static info is not enabled on nodes running Windows OS.
To collect static information such as system model, BIOS version, CPU model, speed, and memory
size, from the contextual menu click Update→Get Node Static Info. Upon completion, static info is
available by clicking on the Details tab.
64 Provisioning a cluster with HP Insight CMU
Page 65

Figure 24 Node static info
5.6 Rescan MAC
Use this command only if you must replace a failing node. This command enables retrieving the
new MAC address of the node after node replacement. Right-click on a node in the node tree. On
the contextual menu, select Update. A submenu is displayed. Select Rescan MAC on the submenu.
NOTE: The Rescan MAC option is only active when a single node is selected in the node tree.
5.6 Rescan MAC 65
Page 66

Figure 25 Rescan MAC
5.7 HP Insight CMU image editor
An existing HP Insight CMU cloning image can be modified directly on the HP Insight CMU
management node, without making the modifications on a golden node and backing up the system.
Image editing involves three steps:
1. Use the cmu_image_open command to expand the image.
2. Make changes.
3. Use the cmu_image_commit command to save the image.
5.7.1 Expanding an image
An HP Insight CMU cloning image is stored in /opt/cmu/image. The image is composed of
several archives, one per partition. The cmu_image_open command analyzes the image directory
content and expands all the archives into the image directory. Depending on the cloning image
size, this script can take several minutes to complete. For example:
# /opt/cmu/bin/cmu_image_open -i rh5u4_x86_64
image <rh5uh_x86_64> untared into </opt/cmu/image/rh5u4_x86_64/image_mountpoint>
After editing the image, commit changes:
# cmu_image_commit -i rh5u4_x86_64
After this command is complete, the subdirectory image_mountpoint in the image directory
contains the expanded image:
# ls /opt/cmu/image/rh5u4_x86_64/image_mountpoint/
.autorelabel bin data etc lib lost+found misc opt proc sbin srv tftpboot usr
.open_image_finished boot dev home lib64 media mnt poweroff root selinux sys tmp var
66 Provisioning a cluster with HP Insight CMU
Page 67

5.7.2 Modifying an image
Modifications can consist of simple manual commands such as adding, removing, or modifying
files. However, complex operations using chroot commands on the expanded image directory
are also possible, such as installing a new rpm.
IMPORTANT: When using chroot, HP recommends performing chroot mount /proc or
chroot mount /sys in the image directory before executing other chroot commands.
For example:
# chroot /opt/cmu/image/rh5u4_x86_64/image_mountpoint/ mount /sys
# chroot /opt/cmu/image/rh5u4_x86_64/image_mountpoint/ mount /proc
# cp /data/repositories/rh5u4_x86_64/Server/dhcp-3.0.5-21.el5.x86_64.rpm
/opt/cmu/image/rh5u4_x86_64/image_mountpoint/tmp
# chroot /opt/cmu/image/rh5u4_x86_64/image_mountpoint rpm -ivh /tmp/dhcp-3.0.5-21.el5.x86_64.rpm
warning: /tmp/dhcp-3.0.5-21.el5.x86_64.rpm:
Header V3 DSA signature:
NOKEY, key ID 37017186
Preparing...
########################################### [100%]
1:dhcp
########################################### [100%]
# chroot /opt/cmu/image/rh5u4_x86_64/image_mountpoint/ umount /sys
# chroot /opt/cmu/image/rh5u4_x86_64/image_mountpoint/ umount /proc
IMPORTANT: When using chroot, some commands can alter the management node system:
• mount -a—Mounts the partitions of the management node in the image. Any further
modifications to the subdirectories modifies the management node tree and not the cloning
image.
• grub-install—Replaces the boot loader of the management node.
5.7.3 Saving a modified cloning image
After modifications are complete, run the cmu_image_commit command to save the content of
an expanded image into an HP Insight CMU cloning image. Depending on the cloning image
size, this script can take several minutes to complete. The modified image can either replace the
image itself or be saved as new cloning image.
To update cloning image rh5u4_x86_64 with the modifications:
# /opt/cmu/bin/cmu_image_commit -i rh5u4_x86_64
The original archive files are renamed in the image directory and the new image content is
compacted into one archive file per partition. The new image content replaces each original archive
file.
To save the modifications to cloning image rh5u4_x86_64 to a new cloning image rh5u4_mod:
# /opt/cmu/bin/cmu_image_commit -i rh5u4_x86_64 -n rh5u4_mod
NOTE: The -n option registers a new logical group to the HP Insight CMU database. No nodes
are added into this new group.
5.7 HP Insight CMU image editor 67
Page 68

5.8 HP Insight CMU diskless environments
5.8.1 Overview
HP Insight CMU provides two methods of provisioning a diskless OS with NFS:
• The legacy method in HP Insight CMU, called system-config-netboot.
• A new method based on the open-source oneSIS software package.
Both methods configure a central read-only root file system on an NFS server.
The system-config-netboot method also configures per-node read-write file systems on the
NFS server. Each diskless client mounts the read-only root file system, and then mounts their unique
per-node read-write files and directories over the read-only root file system. The result is that all
diskless clients share the read-only root file system, but write to their own per-node file system on
the NFS server.
68 Provisioning a cluster with HP Insight CMU
Page 69

The oneSIS method also configures a central read-only root file system on the NFS server. But
instead of writing back to the NFS server, the oneSIS software configures a local read-writable
tmpfs file system on each diskless client, copies the read-writable files into that file system, and
makes the appropriate soft links from the read-only root file system into this read-writable tmpfs file
system. The result is that all file reads are done from the NFS server, but the file write activity occurs
in local memory.
The advantage of the system-config-netboot method is that all node write activity is preserved
on the NFS server. All node write activity on the oneSIS method occurs in local memory by default,
and can be lost if the node is rebooted. If the user implements the oneSIS method and has write
activity that they would like to preserve, then they must configure a separate NFS location to store
this write activity.
The advantage of the oneSIS method is improved performance of any write activity (because it
goes to local memory rather than over the network to the NFS server) and less network traffic to
the NFS server. Also, because the diskless clients do not store any state on the NFS server, NFS
server failover can be accomplished by simply failing over one NFS server to another. With the
system-config-netboot method, a high-availability NFS server solution requires shared
storage between the primary and backup NFS server so that the node state is preserved through
an NFS server failover scenario.
Another advantage of the oneSIS method is that there is no requirement for the HP Insight CMU
management node and the golden node to run the same OS version. This is a requirement for the
system-config-netboot method. With the oneSIS method, you can deploy different diskless
OS versions from a single HP Insight CMU management node.
The system-config-netboot method is described in “The system-config-netboot diskless
method”. The oneSIS method is described in “The HP Insight CMU oneSIS diskless method”. Scaling
out either diskless method across multiple NFS serves is discussed in “Scaling out an HP Insight
CMU diskless solution with multiple NFS servers”
5.8.1.1 Enabling diskless support in HP Insight CMU
Regardless of which diskless method you choose to use, you must enable diskless support in HP
Insight CMU first.
1. Edit /opt/cmu/etc/cmuserver.conf to activate CMU_DISKLESS:
#cmu diskless feature true/false
CMU_DISKLESS=true
5.8 HP Insight CMU diskless environments 69
Page 70

2. Save and exit the file.
3. Restart the HP Insight CMU server:
# /etc/init.d/cmu restart
Also restart the HP Insight CMU GUI.
5.8.2 The system-config-netboot diskless method
The HP Insight CMU system-config-netboot diskless method implements a diskless feature
to build diskless clusters derived from Red Hat.
In the HP Insight CMU system-config-netboot implementation, the compute nodes share a
common operating system from the NFS server, which by default is the HP Insight CMU management
node. Each compute node has its own read-write directory hosted on the NFS server. Each time
a compute node starts, it mounts most of the operating system through NFS as read-only and its
own directory through NFS as read-write. Each client has its own read-write directory so that one
client cannot affect another. The exported operating system is copied from a third node, the golden
node, which must be installed with the same Linux OS version as the management node. After the
installation is complete, the golden node can also be started from the network as a compute node.
HP recommends that you backup the golden node image, so that it can be restored later if necessary.
5.8.2.1 Operating systems supported
The system-config-netboot method in HP Insight CMU v7.2 supports the diskless functionality
on Red Hat Enterprise Linux (RHEL)5.2, RHEL5.3, RHEL5.4, RHEL6.x; and SUSE Linux Enterprise
Server (SLES)11.
5.8.2.2 Installing the operating system on the management node and the golden node
IMPORTANT: The cluster must be homogeneous. Use the same distribution to install the HP Insight
CMU management node and the golden node.
Install the operating system on the management node and on the golden node. In addition to the
prerequisites described in “Installation procedures” (page 22), the following prerequisites must be
met:
On the management node
Install the rpm file system-config-netboot-cmd-cmu-0.1.45.1_X-Y.noarch.rpm.
IMPORTANT: This package is delivered in the HP Insight CMU CD. Do not use any other
system-config-netboot package from the OS distribution.
On the golden node
Install the following prerequisites on the golden node:
NOTE: Package names may vary depending on the OS distribution.
• busybox
• busybox-anaconda (RHEL5 only)
• dhclient (dhcp-client on SLES)
• bind-utils (not required on SLES)
5.8.2.3 Modifying the TFTP server configuration
1. Install TFTP on the head node.
2. Start TFTP on the head node.
3. Modify /etc/xinetd.d/tftp as follows:
70 Provisioning a cluster with HP Insight CMU
Page 71

# default: off
# description: The tftp server serves files using the trivial file transfer \
# protocol. The tftp protocol is often used to boot diskless \
# workstations, download configuration files to network-aware printers, \
# and to start the installation process for some operating systems.
service tftp
{
disable = no
socket_type = dgram
protocol = udp
wait = yes
user = root
server = /usr/sbin/in.tftpd
server_args = /tftpboot /opt/cmu/ntbt/tftp -v
per_source = 11
cps = 100 2
flags = IPv4
}
4. Restart xinetd to reload the TFTP configuration.
# /etc/init.d/xinetd restart
5.8.2.4 Populating the HP Insight CMU database
IMPORTANT: If your cluster contains more than 256 diskless nodes, then HP recommends that
you configure additional NFS servers before proceeding to this section. To configure additional
NFS servers, follow the instructions in “Scaling out an HP Insight CMU diskless solution with multiple
NFS servers” (page 82), then return to this section.
Register nodes into the HP Insight CMU database using the scan-node process, as described in
“Scanning nodes” (page 46).
5.8.2.5 Creating a diskless image
1. Verify the golden node is running.
2. Verify you have enough space on your head node in /opt/cmu/image to contain a copy
of all local file systems currently mounted on your golden node.
3. To configure ssh passwordless between your head node and your compute node for the root
user, add the content of /root/.ssh/id_rsa.pub on the administration server into the
/root/.ssh/authorizedKeys file on the golden node.
# /opt/cmu/tools/copy_ssh_keys.exp ip_golden_node
Enter the root password (not echoed).
4. If you want to use monitoring, you must install the compute node monitoring rpm on the golden
node before creating the diskless logical group.
5. To avoid collectl disk I/O operation, if you want to use the collectl option for
monitoring, verify that collectl is configured to not log to the disk. For details, see “Installing
and starting collectl on compute nodes” (page 100).
5.8.2.6 Creating a diskless logical group
From the GUI
1. In the Logical Group Management window, click the Add button.
2. Enter the new logical group name.
5.8 HP Insight CMU diskless environments 71
Page 72

Figure 26 Naming a logical group
3. Select the Diskless option to the right of the group name.
NOTE: If you cannot see the Diskless option, the diskless feature is not activated properly.
To correct the error, see “Enabling diskless support in HP Insight CMU” (page 69).
4. Enter the IP address of the golden node.
5. Click Get Kernel List. This will retrieve the list of available kernels from the golden node.
6. Select one of these kernels as the kernel to boot diskless, and then click OK. This will launch
the diskless image building process. This operation can last several minutes while the golden
node file system is copied to the HP Insight CMU management node to become the basis of
the diskless image.
From the CLI
1. Start the HP Insight CMU CLI:
# /opt/cmu/cmucli
2. To create the diskless group, you must know the IP address and the kernel name of the golden
node used by the diskless nodes. To get the kernel name, use the probe_kernel command:
cmu> probe_kernel 16.16.185.192
2.6.9-42.EL
2.6.9-42.ELsmp
kabi-4.0-0
kabi-4.0-0smp
cmu> add_logical_group <myTestImage> 16.16.185.192 "2.6.9-42.ELsmp"
5.8.2.7 Adding nodes into the logical group
From the GUI
1. Select nodes to add to the diskless image logical group.
2. Click Add.
This creates the read/write directory for each node and the corresponding diskless image.
The more nodes you add, the longer this operation takes.
72 Provisioning a cluster with HP Insight CMU
Page 73

Figure 27 Adding nodes to logical groups
From the CLI
Add the node into the logical group as follows:
cmu> add_to_logical_group node1 – noden to <myTestImage>
5.8.2.8 Booting the compute nodes
From the GUI
1. Select the compute nodes you added to the diskless logical group.
2. Right-click to launch a boot command on these nodes.
3. Select network. The list of all the diskless images registered in HP Insight CMU appears. The
cmu network image is also listed. The HP Insight CMU classic network boot image is used for
cloning and backup.
Figure 28 Booting the compute nodes
4. In the list box, select your diskless image name, and then click OK. The compute nodes start
on your diskless image.
From the CLI
Start the nodes as follows:
cmu> boot net "<myTestImage>" node1 - noden
5.8 HP Insight CMU diskless environments 73
Page 74

5.8.2.9 Understanding the structure of a diskless image
Like every HP Insight CMU image, all directories and files related to an HP Insight CMU diskless
image are stored in /opt/cmu/image/<imageName>.
A diskless image is composed of the following directories:
• root—Contains the root directory of the golden node and is mounted in read-only mode by
the diskless compute nodes and used as '/'.
• snapshot—Contains one subdirectory per node. Each subdirectory is created when you
register a node or a set of nodes into the diskless logical group and contains the files mounted
in read/write mode for each compute node. Snapshot directories are populated as defined
in the following files:
◦ files—The list of files to be put in the per node snapshot directories. This list is
provided by the diskless feature of HP Insight CMU. Do not modify this.
◦ files.custom—Add to this file the list of custom files that you want to put in the per
node snapshot directory.
When starting a node with a diskless image, HP Insight CMU modifies the dhcptab to network
boot the nodes on the diskless image.
5.8.2.10 Customizing your diskless image
5.8.2.10.1 files.custom
As described in “Understanding the structure of a diskless image” (page 74), add to files.custom
the list of custom files you want to put in the per node snapshot directories.
5.8.2.10.2 Using reconf-diskless-image.sh
The reconf-diskless-image.sh script is executed at the end of the image building process.
This script contains any modifications to be applied in the read-only part of the image mounted
by the nodes.
To this script, add all the commands that you want to execute before the creation of the snapshot
directories, such as the personalized read/write directory for each compute node. For example,
you can customize the list of files to be copied into the snapshot directory.
The reconf-diskless-image.sh content provided by HP Insight CMU is:
#!/bin/bash
#cmu_begin_interface
#do not change anything in this section
#add custom code after this section
CMU_RECONF_DISKLESS_IMAGE_VERSION=1
# starting with cmu version 4.2
# this script is now dedicated to custom code
# this code is executed as the last step of the creation of
# a diskless image
#
# this script is invoked by /opt/cmu/tools/cmu_dl_post_image
#
# environment variables available:
#
# CMU_RCFG_PATH = path where the root filesystem is currently mounted
# CMU_RCFG_HOSTNAME = hostname of the compute node
# CMU_RCFG_DOMAIN = dns domainname of the compute node
# CMU_RCFG_IP = mgt network ip of this compute node
# CMU_RCFG_NTMSK = net mask
74 Provisioning a cluster with HP Insight CMU
Page 75

#cmu_end_interface
#-- custom code starts here --
exit 0
This script is invoked at the end of the image creation process, when
/opt/cmu/image/<imageName>/root is populated.
The script is invoked with the following input parameters:
• CMU_RCFG_PATH—The path to the root directory of the
image. /opt/cmu/image/<imageName>/root
• CMU_RCFG_OSTYPE—The type of operating system detected by HP Insight CMU.
• CMU_RCFG_IMAGENAME—The name of the HP Insight CMU image.
• CMU_PATH—The path to the HP Insight CMU directory. The default is /opt/cmu.
5.8.2.10.3 Using reconf-diskless-snapshot.sh
The reconf-diskless-snapshot.sh script is invoked at the end of each node registration,
when the snapshot directory of a compute node has been created. All node-specific changes
are made in this script. For example, if you have a network card that needs a static IP address,
add the commands to create the ifcfg- file in this file.
IMPORTANT: If you need a customization file in the snapshot directory, you must also put the
name in the file /opt/cmu/image/my_diskless_image/snapshot/files.custom.
The content of the reconf-diskless-snapshot.sh script provided by HP Insight CMU is:
#!/bin/bash
#cmu_begin_interface
#do not change anything in this section
#add custom code after this section
CMU_RECONF_DISKLESS_SNAPSHOT_VERSION=1
# starting with cmu version 4.2
# this script is now dedicated to custom code
# this code is executed as the last step of the creation
# of snapshot directories
#
# this script is invoked by /opt/cmu/tools/cmu_dl_post_snapshot
#
# environment variables available:
#
# CMU_RCFG_PATH = path where the root filesystem is located
# CMU_RCFG_HOSTNAME = hostname of the compute node
# CMU_RCFG_IP = mgt network ip of this compute node
# CMU_RCFG_IMAGENAME = name of this image in cmu
#cmu_end_interface
#-- custom code starts here --
exit 0
The script is invoked with the following four input parameters:
• CMU_RCFG_PATH—The path to the snapshot directory of the
node. /opt/cmu/image/<imageName>/snapshot/<nodeName>
• CMU_RCFG_HOSTNAME—The name of the node.
5.8 HP Insight CMU diskless environments 75
Page 76

• CMU_RCFG_IP—The IP address of the node.
• CMU_IMAGENAME—The name of the diskless image.
5.8.2.10.4 Templates and image file
If the changes are valid for one image only, keep the modifications only in the reconfiguration files
for the specific /opt/cmu/image/<imageName> directory. If instead, the changes defined in
the reconf files are valid for all the diskless images, copy them to the templates files /opt/cmu/
etc/reconf-diskless-image.sh and /opt/cmu/etc/reconf-diskless-snapshot.sh.
Future images will be created with the updated reconfiguration files templates.
IMPORTANT: The reconfiguration files of the previously created images are not updated.
5.8.2.11 Best practices for diskless clusters
• Do not update the /opt/cmu/image/<imageName>/root directory.
IMPORTANT: HP strongly recommends not updating the
/opt/cmu/image/<imageName>/root directory.
Reasons for not updating this directory are:
◦ The /opt/cmu/image/<imageName>/root directory does not contain the exact copy
of the golden node root directory. Some files in this directory are modified during the
diskless image building process to clean the image and transform it into a
diskless-compatible image. When modifying the root directory directly, you might change
one of these modified files and break the diskless image.
◦ The snapshot directories are not synchronized. The registration process copies the listed
files into files and files.custom in the snapshot directory of each node. When
modifying the root directory directly, you might change one of these files. Because the
snapshot directory is not updated, the change does not affect the compute nodes.
◦ The golden node is not updated. If you rebuild the diskless image properly after the
complete image creation process, then you will lose all changes made directly in the
root directory.
• You can make several diskless images.
To modify your diskless image, create a new diskless image in HP Insight CMU. The image
building process and the node registration process do not require the diskless cluster to be
stopped, so you can still work with the previous image. When your new diskless image is
ready for production, reboot the nodes. If you want to make additional changes, then reboot
the nodes again on the previous image.
This process is safer than an online modification directly in the root directory, which might
break the production diskless image.
• You can use the golden node as a diskless compute node.
If the boot order of the golden node is properly set up to PXE boot before the local hard drive
boot, then you can choose to boot the golden node on the diskless image and use it as a
diskless compute node. To refresh your diskless image, choose the normal option in the HP
Insight CMU boot menu. This option removes the golden node from the dhcptab and restarts
on the local hard drive.
5.8.3 The HP Insight CMU oneSIS diskless method
The HP Insight CMU oneSIS diskless method is based on the open-source oneSIS software available
at http://onesis.org. The primary difference between the oneSIS implementation documented on
76 Provisioning a cluster with HP Insight CMU
Page 77

the website and the oneSIS implementation included with HP Insight CMU is that the HP Insight
CMU implementation does not require you to rebuild your kernel with NFS support. Instead HP
Insight CMU allows you use the existing kernel from the golden node, and it rebuilds an initrd
image containing the appropriate driver support plus NFS support for mounting the read-only root
file system. Everything else is the same.
The HP Insight CMU support for oneSIS includes scripts that adapt the oneSIS process to the HP
Insight CMU diskless process. When you create a oneSIS diskless logical group in HP Insight CMU,
the oneSIS copy-rootfs command is run to copy the golden node image to the HP Insight CMU
management node. HP Insight CMU also configures the writable files and directories specified in
the given files and files.custom files in the oneSIS sysimage.conf file in the golden
image, and the oneSIS mk-sysimage command is run to update the golden image. HP Insight
CMU also prepares the golden image for diskless operation by cleaning up log directories and
configuring an appropriate diskless fstab file.
5.8.3.1 Operating systems supported
HP Insight CMU has qualified the oneSIS diskless support with RHEL 6.X and SLES 11 Linux
distributions.
5.8.3.2 Enabling oneSIS support
To enable oneSIS diskless support in HP Insight CMU:
1. Edit /opt/cmu/etc/cmuserver.conf to add oneSIS to the list of valid diskless toolkits.
CMU_VALID_DISKLESS_TOOLKITS=system-config-netboot:oneSIS
2. Verify that CMU_DISKLESS=true in cmuserver.conf.
3. Save and exit the cmuserver.conf file.
4. Restart the HP Insight CMU GUI.
5.8.3.3 Preparing the HP Insight CMU management node
1. Install the oneSIS rpm on the HP Insight CMU management node. The oneSIS rpm qualified
with HP Insight CMU is available on the HP Insight CMU ISO image in the Tools/oneSIS/
directory.
2. Configure the tftp server arguments in /etc/xinetd.d/tftp with the /opt/cmu/image
location:
server_args = /opt/cmu/image /opt/cmu/ntbt/tftp -v
If you are also deploying system-config-netboot diskless images, the server_args
setting will also include /tftpboot.
3. Save and exit the /etc/xinetd.d/tftp file.
4. Restart the xinetd service.
# /etc/init.d/xinetd restart
5. Verify that the diskless compute nodes are properly configured in the HP Insight CMU database.
6. If the number of diskless compute nodes is greater than 250, then you must configure additional
NFS servers before proceeding. For more details, see Scaling out an HP Insight CMU diskless
solution with multiple NFS servers (page 82).
5.8.3.4 Preparing the golden node
1. Install the following prerequisites on the golden node:
NOTE: Package names may vary depending on the OS distribution.
• busybox (RHEL and SLES)
• dhclient (RHEL) / dhcp-client (SLES)
5.8 HP Insight CMU diskless environments 77
Page 78

• bind-utils (RHEL)
2. Install the oneSIS rpm on the golden node. Install the same oneSIS rpm that was installed on
the HP Insight CMU management node.
3. Configure the DISTRO setting for oneSIS. The /etc/sysimage.conf file is present after
the oneSIS rpm is installed on the golden node. This is the main oneSIS configuration file for
this image. For now, the only configuration setting that must be made is the DISTRO setting.
This setting tells oneSIS which Linux distribution is running on this node, so that the oneSIS
golden image capture process can apply the appropriate oneSIS Linux distribution patch.
OneSIS comes with distribution-specific patches for many Linux distributions. This patch converts
a disk-based golden image into a oneSIS diskless image.
The oneSIS Linux distribution patches are in /usr/share/oneSIS/distro-patches/.
Find the patch that matches the Linux distribution on the golden node, and configure it as the
DISTRO setting in /etc/sysimage.conf. In some cases, you can use a patch that is close
to a match. For example, if your golden node Linux distribution is Centos 6.3, you can configure
DISTRO: Redhat EL-6.2 in /etc/sysimage.conf. Verify that the syntax of the Linux
distribution matches the name of the corresponding oneSIS Linux distribution patch.
5.8.3.5 Capturing and customizing a oneSIS diskless image
After the above preparations are complete and the software on the golden node is ready to be
deployed in a diskless image, capture a oneSIS diskless golden image. If this is your first time
building a diskless image with HP Insight CMU, we recommend creating the diskless logical group.
Later, you might want to script some customizations to the image that will require re-creating the
image. This is supported by HP Insight CMU. You can create the image, add scripted changes to
the image creation process, and then delete the image and recreate the image to confirm that your
scripted changes work.
When you create the diskless logical group, the oneSIS image creation process is initiated.
• The golden image is copied from the golden node to the /opt/cmu/image/
<logical_group_name>/onesis directory on the HP Insight CMU management node.
• The initial ramdisk image is created for diskless booting.
• All writable files and directories in the files and files.custom files are properly
configured.
• The diskless fstab file is installed in the golden image.
1. Create the HP Insight CMU diskless logical group directory in /opt/cmu/image/.
2. Copy the /opt/cmu/diskless/oneSIS/reconf-onesis-image.sh file into the /opt/
cmu/image/ directory.
3. Add any image customizations to that script before you create the group.
4. Copy the /opt/cmu/diskless/oneSIS/files.custom file to the logical group directory.
5. Add any additional files and directories to be configured as writable in the golden image.
6. Create your image.
To perform any user-defined image customizations, run the
/opt/cmu/image/<logical_group_name>/reconf-onesis-image.sh.
NOTE: If this is the first time that this logical group image directory is created, then this script is
installed as a blank template file.
For details on customizing the diskless golden image, see “Customizing an HP Insight CMU oneSIS
diskless image” (page 80).
5.8.3.5.1 Creating an HP Insight CMU oneSIS diskless image
To create a oneSIS diskless logical group using the HP Insight CMU GUI:
78 Provisioning a cluster with HP Insight CMU
Page 79

1. Log in with Administrator privileges.
2. Select Cluster Administration→Logical Group Management→Create a Logical Group.
3. In the New Logical Group window, enter a name for this diskless logical group.
4. Check the diskless box.
NOTE: If the diskless box is not available, then add CMU_DISKLESS=true to /opt/cmu/
etc/cmuserver.conf and restart the GUI.
5. In the Diskless toolkit drop-down box, select oneSIS.
NOTE: If oneSIS is not available, then add oneSIS to the
CMU_VALID_DISKLESS_TOOLKITS variable in /opt/cmu/etc/cmuserver.conf and
restart the GUI.
6. Enter the Golden node host name.
7. Click Get Kernel List to retrieve the list of existing kernels on the golden node.
8. Select the desired kernel version string for PXE-booting the diskless image.
9. Click OK.
A terminal window displays the status of HP Insight CMU extracting the golden image from
the golden node and preparing the image for diskless bootup.
To create the same oneSIS diskless logical group using the HP Insight CMU command line:
# /opt/cmu/bin/cmu_add_logical_group –n <logical group name> -d diskless-oneSIS –k <kernel version> -I <golden
node>
The -k option parameter must be the kernel version of the kernel that exists on the golden node
and the one you want to boot diskless (for example, the output of uname –r on the golden node).
5.8 HP Insight CMU diskless environments 79
Page 80

If you want to select the current running kernel as the kernel to boot diskless, then provide the
CURRENT keyword (for example, –k CURRENT ).
If any errors occur during the creation of the golden image, the logical group will not be created
in HP Insight CMU. Correct the errors and recreate the diskless logical group.
5.8.3.5.2 Customizing an HP Insight CMU oneSIS diskless image
An HP Insight CMU oneSIS diskless image can be managed in two ways: manually and
automatically. The system administrator can manually make changes to the golden image. This is
a quick way to get a diskless image ready for deployment. The downside is that these changes
are not preserved.
The other way to manage an HP Insight CMU oneSIS diskless image is to script changes to occur
automatically when the image is created. Scripting these changes allows the system administrator
to update the software on the golden node and extract new diskless golden images without manually
repeating the previous customizations. The HP Insight CMU oneSIS diskless image creation process
provides support for scripting any customizations to the golden image.
Before making any manual customizations to this golden image, HP strongly recommends that you
read and become familiar with the "oneSIS-HOWTO" documentation section on the http://
onesis.org website. This documentation explains the file system layout of the read-only oneSIS
golden image and how to configure oneSIS to manage per-node file changes in this golden image.
You must not change any settings that specifically support the oneSIS diskless environment.
When an HP Insight CMU oneSIS diskless logical group is created for the first time, the contents
of the /opt/cmu/image/<logical_group_name>/ directory are populated with the
appropriate support infrastructure. After creating an HP Insight CMU oneSIS diskless image for
the first time, familiarize yourself with the HP Insight CMU oneSIS diskless image support:
[root@cmumaster ~]# cd /opt/cmu/image/centos63-onesis
[root@cmumaster centos63-onesis]# ls -l
total 28
-rw-r--r-- 1 root root 692 Sep 18 09:04 files
-rw-r--r-- 1 root root 250 Sep 18 09:04 files.customd
rwxr-xr-x 2 root root 4096 Sep 18 09:05 onesis
drwxr-xr-x 3 root root 4096 Sep 18 09:05 onesis_pxeboot
-rw-r--r-- 1 root root 268 Sep 18 09:04 onesis_pxeboot_template
-rwxr-xr-x 1 root root 2570 Sep 18 09:04 reconf-onesis-image.sh
-rwxr-xr-x 1 root root 2115 Sep 18 09:04 reconf-onesis-snapshot.sh
[root@cmumaster centos63-onesis]#
The files file contains the list of files and directories identified by HP Insight CMU as writable
by default for all Linux distributions. This file may be updated with HP Insight CMU patches or
updates. It is overwritten automatically each time the diskless logical group is re-created, so this
file should not be modified. These files and directories are automatically configured in the onesis/
etc/sysimage.conf file and when the mk-sysimage
/opt/cmu/image/<logical_group_name>/onesis command is run during the diskless
image creation process (when you add the logical group to HP Insight CMU).
An additional list of files and directories can be configured in the files.custom file to be writable
whenever the diskless logical group is created. You can also add files and directories directly to
the oneSIS image by manually modifying the onesis/etc/sysimage.conf file and then running
the mk-sysimage /opt/cmu/image/<logical_group_name>/onesis command, but the
files.custom file is recommended to enable repeatability.
The onesis directory contains the root file system for the golden image. This directory is
automatically configured to be exported as read-only through NFS during the image creation
process. You can update the contents of this directory but you must respect the alterations made
by the oneSIS process. These alterations are discussed in detail in the "oneSIS-HOWTO"
documentation section of http://onesis.org website. The alterations consist of soft links in place of
files and directories renamed to support the in-memory writable file system created at bootup.
80 Provisioning a cluster with HP Insight CMU
Page 81

The onesis_pxeboot directory contains
• The vmlinuz kernel.
• The initrd.img initial ramdisk.
• The pxelinux.0 PXE-boot loader.
• The pxelinux.cfg/ directory where the PXE-boot files for each node will be installed.
These components are used during the PXE-boot process to boot the compute nodes into a diskless
environment.
The onesis_pxeboot_template file is the PXE-boot template file. It contains keywords that are
replaced by node-specific information to create the PXE-boot file for that compute node. This occurs
when a node is added to this HP Insight CMU diskless logical group. To make changes to the
kernel arguments, for example to change the PXE-boot network from eth0 to eth1, edit this file.
However, this template file functions properly as is.
The reconf-onesis-image.sh file is run after the image creation process completes. System
administrators can automate any desired customizations to the image with this file; for example,
to add mountpoints to the etc/fstab file in the golden image so that all of the diskless compute
nodes will mount a shared file system on bootup. That customization can be performed manually,
or it can be done with this script. Another common customization example is configuring a second
network on the diskless compute nodes, such as an InfiniBand network. This example is documented
in the comments of this file and in the reconf-onesis-snapshot.sh file.
The reconf-onesis-snapshot.sh file is run after a node is added to this HP Insight CMU
oneSIS diskless logical group. System administrators can script any node-specific customizations
to the golden image with this file.
Be aware that some node-specific customizations require scripting in both the
reconf-onesis-image.sh script and in the reconf-onesis-snapshot.sh file. An example
of this is configuring TCP IP addresses over InfiniBand, which is documented in both files. The
reconf-onesis-image.sh script handles configuring the ifcfg-ib0 as a writable file in
oneSIS and creating the template file, while the reconf-onesis-snapshot.sh script handles
the per-node IP address configuration for each node.
5.8.3.6 Manage the writeable memory usage by the oneSIS diskless clients
OneSIS allows you to configure the amount of memory allocated for use by the oneSIS writable
file system that is created on bootup. The RAMSIZE setting in the onesis/etc/sysimage.conf
file controls the amount of memory allocated for oneSIS. By default, HP Insight CMU configures
this setting to 500m which is 500 MB of memory. Change this setting as appropriate.
5.8.3.7 Adding nodes and booting the diskless compute nodes
After the oneSIS diskless golden image is ready and the per-node configurations are set:
1. Add nodes to this HP Insight CMU diskless logical group.
2. Boot the nodes over the network.
3. Select this logical group name.
When the nodes boot up, the kernel and the initrd:
• Mount the read-only root file system.
• Configure the oneSIS/ram tmpfs file system.
• Copy the appropriate read-writable files into that file system.
• Proceed with the configured bootup sequence.
5.8 HP Insight CMU diskless environments 81
Page 82

5.8.4 Scaling out an HP Insight CMU diskless solution with multiple NFS servers
By default, the HP Insight CMU diskless support configures the HP Insight CMU management node
as the NFS server that will serve the diskless image, regardless of the diskless implementation
method. HP recommends that a single NFS server can support up to ~200 diskless clients over a
1Gb ethernet management network, and an NFS server with a 10Gb ethernet management network
can support up to ~400 diskless clients. These are recommendations based on bootup tests. Users
should factor in their expected usage of the diskless solution and adjust these numbers accordingly.
In any case, to scale beyond these numbers means that you need more NFS servers to serve the
additional diskless clients and distribute the network traffic among multiple network switches.
HP Insight CMU diskless support includes support for configuring additional NFS servers and
assigning groups of compute nodes to these NFS servers.
To build a large-scale diskless cluster with HP Insight CMU:
1. Determine the number of nodes per NFS server and identify the NFS server nodes. HP
recommends:
• Not more than 200 nodes per NFS server over a 1 Gb network and not more than 400
over a 10 Gb netowrk.
• 4GB of (non-SATA) storage per compute node on each NFS server
These recommendations are sufficient for booting and serving the OS. Also, these
recommendations are for a cluster that includes a high-performance cluster-wide file system
and/or a local scratch disk for the user workload.
When choosing the NFS server nodes, factor in the network topology of the cluster. Make
sure that the compute nodes have uncongested access to the NFS server. Ideally, each NFS
server is on the same switch as all of the compute nodes it serves.
2. Install the NFS server nodes with the selected Linux distribution, and verify that the NFS server
package is installed and configured to start at bootup.
On Red Hat
# chkconfig nfs on
On SLES
# chkconfig nfsserver on
3. Ensure that enough NFS daemons and threads are configured to handle the anticipated volume
of NFS traffic.
On Red Hat
Set RPCNFSDCOUNT in the /etc/sysconfig/nfs file to the requested number of NFS
daemons. By default, RPCNFSDCOUNT=8.
On SLES
Set USE_KERNEL_NFSD_NUMBER in the /etc/sysconfig/nfs file, which defaults to 4.
HP recommends that the setting be at least half of the maximum number of compute nodes
served by each NFS server, and is typically a multiple of the total number of CPUs on the NFS
server. For more information and tips on tuning NFS, see NFS documentation.
4. HP recommends that you install one of these nodes, use HP Insight CMU to take a backup of
the node, and then clone this image to all of the NFS servers, including the node that was
initially installed. This approach ensures that all of the NFS servers are consistent with the
same /etc/ hosts file and with passwordless ssh configured for the root account. This is
required for the rest of the setup to succeed.
5. Scalable diskless support in HP Insight CMU is based on the presence of a single configuration
file: /opt/cmu/etc/cmu_diskless_nfs_servers. The existence and content of this file
82 Provisioning a cluster with HP Insight CMU
Page 83

enables the scalable diskless support in HP Insight CMU. Edit this file and insert the NFS
topology of the cluster. The syntax of this file supports HP Insight CMU node names and
network entities. Remember that HP Insight CMU network entities represent groups of nodes
on a common network switch. The acceptable formats of this file are:
<NFS server A IP address> <nodeA1> <nodeA2> <nodeA3> ... <nodeAN>
<NFS server B IP address> <NEB1> <NEB2> ... <NEBN>
<NFS server C IP address> <nodeC1> <NEC2> <nodeC3> ... <NECN>
Sample file:
[root@head ~]# cat /opt/cmu/etc/cmu_diskless_nfs_servers
172.20.0.5 n06 n07 rack1
172.20.0.50 encl3 encl4
[root@head ~]#
In this sample, node n06, node n07, and all of the nodes in the 'rack1' network entity obtain
the NFS-root file system from node n05 which has IP address 172.20.0.5. All nodes in the
'encl3' and 'encl4' network entities obtain the NFS-root file system from node n50, which has
IP address 172.20.0.50. Any diskless compute nodes that are not assigned to an NFS server
in this file obtain the NFS-root file system from the HP Insight CMU management node.
6. Proceed with the diskless installation procedure in “Populating the HP Insight CMU database”
(page 71). If the /opt/cmu/etc/cmu_diskless_nfs_servers file is detected, the
following additional actions occur:
When a diskless logical group is created
• Each additional NFS server gets a copy of the root file system from /opt/cmu/image/
<logical_group_name> on the HP Insight CMU management node.
• Each additional NFS server is configured to export the root/ and snapshot/
subdirectories from /opt/cmu/image/<logical_group_name>
• For the system-config-netboot diskless method, additional TFTP subdirectories are
created on the HP Insight CMU management node to host the kernel and memory image
booted by each additional NFS server.
• For the system-config-netboot diskless method, an additional PXE-boot OS
description is configured on the HP Insight CMU management node for each additional
NFS server.
When a node is added to the diskless logical group
• For the system-config-netboot diskless method, a copy of the snapshot directory
for this node is sent to the NFS server that will be serving this node. For the oneSIS diskless
method, the onesis golden image directory on the HP Insight CMU management node
is synchronized (using rsync) with the other NFS servers to propagate any per-node
changes that were made.
• A PXE-boot file is created in the TFTP pxelinux.cfg directory that instructs the kernel
to obtain its root file system from the assigned NFS server.
IMPORTANT:
When booting the computes nodes in a large-scale diskless cluster, only one DHCP and TFTP server
are available for the cluster. HP recommends booting no more than 256 nodes at a time to avoid
DHCP and TFTP timeouts.
NOTE: For the system-config-netboot diskless method, any data written from the compute
nodes is stored on the respective NFS server for each node. HP Insight CMU does not aggregate
this data back to the HP Insight CMU management node.
5.8 HP Insight CMU diskless environments 83
Page 84

5.8.4.1 Comments on High Availability (HA)
Configuring an HA solution for the additional NFS servers is beyond the scope of the procedure
described in “Scaling out an HP Insight CMU diskless solution with multiple NFS servers” (page 82).
If HA NFS servers are needed, then configure the HA solution on the NFS servers during step #2
in“Scaling out an HP Insight CMU diskless solution with multiple NFS servers” (page 82) so the
servers are ready for use by step #6. When configuring the NFS server IP addresses in step #5 of
“Scaling out an HP Insight CMU diskless solution with multiple NFS servers” (page 82), use the
alias IP address for the NFS server that is managed by the HA solution.
84 Provisioning a cluster with HP Insight CMU
Page 85

6 Monitoring a cluster with HP Insight CMU
NOTE: Monitoring support is not available for Windows cartridges. However, users can gather
metrics for Windows cartridges from external sources and scripts, then use HP Insight CMU extended
metrics features to feed those metrics to the HP Insight CMU monitoring engine and GUI display.
6.1 Installing the HP Insight CMU monitoring client
You must install the HP Insight CMU monitoring client to properly monitor your cluster.
1. Select the compute nodes that need the rpm installation, and right-click to access the contextual
menu.
2. Select Update. This displays a submenu.
3. On the submenu, click Install CMU monitoring client.
4. An X Window appears with the status of the installation. A summary of the installation is
provided.
5. When the installation is complete, press Enter to close the window.
Figure 29 Monitoring client installation
6.2 Deploying the monitoring client
If you intend to use HP Insight CMU monitoring, you must install it on the golden node before
performing a backup.
The expect package is mandatory and must be installed on the compute nodes.
After a golden image node is created, the HP Insight CMU monitoring client can be deployed.
Ensure that the required expect package is installed on the golden image node and install the
monitoring agent as follows, using the HP Insight CMU GUI client:
1. Enable Administrator mode Options→Administrator Mode.
2. In the left panel tree of the HP Insight CMU GUI client, right-click the node holding the golden
image.
3. Click Update.
4. Select Install CMU monitoring client.
The status of the rpm installation appears in an x term window. A dialog box notifies you when
the installation is complete.
6.1 Installing the HP Insight CMU monitoring client 85
Page 86

NOTE: If you are upgrading from an older version of HP Insight CMU, then you must reinstall
the new HP Insight CMU monitoring agents from the HP Insight CMU v7.2 rpm or HP Insight CMU
monitoring will not start.
6.3 Monitoring the cluster
Launch the HP Insight CMU GUI.
Figure 30 Main window
In Figure 30 (page 86), the left frame lists the resources, such as Network Entities, Logical Groups,
Nodes Definitions, etc. The '+' sign expands a resource. Compute nodes can be displayed:
• By network entity
• By logical group
• By user group
• By nodes definition
For example, to see nodes belonging to a logical group, expand the Logical Group resource list,
then expand the desired logical group. Figure 30 (page 86) displays nodes belonging to the
logical group "lustre-21".
NOTE: When viewing by logical group, nodes are listed in the active logical group where nodes
have been successfully cloned.
To change the classification, select a group from the drop-down menu.
NOTE: If no network entity is defined, or if a node is not included in any network entity, a default
network entity group is created that contains unclassified nodes.
An icon represents the status of each node in the tree.
86 Monitoring a cluster with HP Insight CMU
Page 87

Figure 31 Node status
The status of this node is okay. Node values are correctly reported to the main monitoring daemon.
The node is pinging properly, and the monitoring is working properly, but an alert is currently
reported for this node. One of the thresholds defined by you has been exceeded. Click the node
in the tree to view the detail of this alert.
The status of this node is "No Ping". This node is not pinging at all. User action is required to
identify the problem.
The status of this node is unknown. The daemon of this node is not monitored because it failed or
is late. This state changes when HP Insight CMU monitoring selects a new monitoring server for
this node. No user action is required.
6.3.1 Node and group status
For logical groups, network entities, and user groups, a status bar represents the proportion of
nodes in "OK" state (green) and "no ping" state (red). In Figure 31 (page 87), the red/green
status bar at the top shows the node status.
• Green represents the portion of nodes in an okay status.
• Grey represents the portion of nodes in an unknown state.
• Red represents the portion of nodes in “no ping” or “monitoring error” state.
6.3.2 Selecting the central frame display
Information in the central frame appears according to the elements selected in the tree.
• When CMU Cluster is selected, the central frame displays the Global Cluster View.
• When a group is selected, the central frame displays the Group View. When a node is selected,
the central frame displays the Node View.
6.3 Monitoring the cluster 87
Page 88

In the central frame, the following tabs are available:
• Instant View
• Table View
• Time View
• Details
• Alerts
For a single node view, the following tabs are available:
• Monitoring
• Details
• Alerts
6.3.3 Global cluster view in the central frame
By default, the central frame displays the monitoring values of the whole cluster. You can return to
this view at any time by clicking CMU Cluster at the root of the node tree. The global cluster view
displays one or more pies representing the cluster monitoring sensor value. To choose the sensors
monitored, right-click an item in the central frame. A metrics window appears, see Figure 32
(page 88). Select the desired metric and click OK.
Figure 32 Monitoring window
Pausing the mouse on a portion of the pie displays the name of the corresponding node, the status,
and the value of the sensor displayed.
For a given metric, the internal circle of a pie represents zero and the external circle represents
the maximum value. By default, the current value of the metric appears in blue. Default color can
be changed by clicking Option→Properties in the top bar, then selecting the monitor options. Color
for a specific petal can also be changed on the fly by clicking on the petal. A grey colored pie
means no activity on the node or a metric is not correctly updated.
88 Monitoring a cluster with HP Insight CMU
Page 89

6.3.4 Resource view in the central frame
Monitoring values can be visualized by:
• Global cluster
• A specific logical group
• A specific network entity
• A specific user group
Click the desired resource in the left-frame tree and the title of the central frame displays the name
of the selected resource.
NOTE: Resource or node specific monitoring metrics and alerts can be displayed in CLI mode
using /opt/cmu/bin/cmu_monstat. For details, see the cmu_monstat manpage.
6.3.4.1 Resource view overview
To see pies representing the monitored values, in the resource view, click the Instant View tab.
To change pies, right-click on the central frame and select the desired metric(s) and click OK.
Figure 33 Resource view overview
To view alerts raised for nodes in this group, select the Alerts tab in the central frame.
NOTE: You can define reactions to alerts in the /opt/cmu/etc/ActionAndAlertsFile.txt
file. For more information, see “Customizing HP Insight CMU monitoring, alerting, and reactions”
(page 96).
6.3 Monitoring the cluster 89
Page 90

Figure 34 Alert messages
6.3.4.2 Detail mode in resource view
To display a table with sensor values, select the Instant View tab in the central frame.
• The cell is green when the value is below 33% of the maximum value.
• The cell is orange when the value is between 33% and 66% of the maximum value.
• The cell is red when the value is above 66% of the maximum value.
Figure 35 Resource view details
6.3.5 Gauge widget
The middle of the pie shows average values for a sensor. Click in the middle of a pie to toggle the
widget on/off.
90 Monitoring a cluster with HP Insight CMU
Page 91

Figure 36 Memory used summary
The widget also displays marks for average, maximum, and minimum values during the last two
minutes for a given metric.
6.3.6 Node view in the central frame
To display the details of a node, select that node in the tree. The following tabs are available in
the central frame:
• Monitoring — Shows monitoring metric values for that node.
• Details — Shows static data for the node. Some of the values are filled during the initial node
discovery (scan node). Other values are filled by right-clicking on the node in the tree to get
the contextual menu. Then select Update→Get Node Static Info.
• Alerts — Contains the alerts currently raised for this node.
6.3 Monitoring the cluster 91
Page 92

Figure 37 Node details
The central frame title displays the name of the node. The title is colored according to the state of
the node.
The following tables appear:
• The Node Properties table contains the static information from HP Insight CMU monitoring
(contained in the /opt/cmu/etc/cmu.conf.complementary file).
• The Information Retrieved table contains the current values of the sensors retrieved for this
node.
• The Alerts Raised table contains the alerts currently raised for this node.
6.3.7 Using Time View
HP Insight CMU v7.2 can be used to visualize the activity of your HP Insight CMU cluster in time
and in a scalable manner.
Assuming the GUI client has enough memory and OpenGL capabilities, Time View extends the
2D flowers visualization to provide an evaluative 3D view of your cluster with the Z-axis representing
the time. For system requirements, see “Technical dependencies” (page 94).
Time View visualizes the last 2 minutes at the finest 5 seconds resolution and visualizes the previous
40 minutes at a 30 seconds per ring resolution. For more information, see “Adaptive stacking”
(page 93). Detailed values are still available for the entire 42 minutes with the use of tooltip
functionality.
The long standing 2D flowers are still available in the Instant View panel.
6.3.7.1 Tagging nodes
Nodes can be labeled with a color. This allows chosen nodes to be easily tracked through different
views or partitions. This functionality is available from the Instant View and Time View tabs. Iterate
through a predefined set of four colors by clicking on a node. Colored nodes are shared between
Instant View and Time View, which allows them to be efficiently located regardless of the chosen
visualization.
92 Monitoring a cluster with HP Insight CMU
Page 93

6.3.7.2 Adaptive stacking
Adaptive stacking is an efficient way to monitor your cluster over a long period of time. Adaptive
stacking provides 42 minutes of data, without sacrificing the finest 5 second granularity provided
by the monitoring engine. The first 24 rings (representing 2 minutes of data, with a 5 second
granularity) progressively slide and consolidate into an intermediate ring, making room for newest
data. The intermediate ring is full when six rings are stacked in it, representing 30 seconds. Then
stacked rings slide and a new intermediate ring is created. The entire 42 minutes of history is
displayed as 24 rings of 5 seconds (representing 2 minutes of data), and 80 rings of 30 seconds
(representing 40 minutes of data). Stacked rings are displayed darker than single rings to
differentiate them.
The following figure shows Time View with 32 nodes displayed, including two color labeled nodes.
Stacked rings are visible at the end of the tube.
Figure 38 Time view
6.3.7.3 Bindings and options
6.3.7.3.1 Mouse control
• Left-click on a node – Mark the node from a set of four predefined colors
• Right-click on a node – Open the interactive menu for this node
• Right-click elsewhere – Open the metrics selection menu
NOTE:
Time View cannot display more than 10 metrics. For details, see “Technical dependencies”
(page 94).
• Navigating within the 3D scene
Left-click and drag – Translate the scene◦
◦ Right-click and drag – Rotate the scene
◦ Rotate the mousewheel – Rotate tubes on themselves
6.3 Monitoring the cluster 93
Page 94

◦ Press the mousewheel and drag – Zoom
6.3.7.3.2 Keyboard control
Keyboard shortcuts are available for some Time View options. All of the following shortcuts are
also available in Options→Properties.
• K, k – Increase or decrease space between the tube and petals (Radial offset option)
• L, l – Increase or decrease space between rings (Z offset option)
• M, m – Increase or decrease space between petals (Angular offset option)
• +, - – Increase or decrease petal outline width (Petal outline width option)
6.3.7.3.3 Custom cameras
To save a custom camera position, press Ctrl+1 to 5. Restore it later by pressing 1 to 5. (Custom
camera position 1 ... 5 options.)
• e – Set perspective view
• z – Set history view
• s – Set front view
6.3.7.3.4 Options
The following options are also available in Options→Properties:
• Anti-aliasing level – Set the smoothness of the line rendering. Higher levels are best, but not
all graphic cards can support it, and it can reduce performance.
• Petal pop-out speed – The petal inflate speed for a new petal. When set to the maximum,
petals directly appear fully inflated.
• Activate ring sliding – Enable or disable ring slide along the tube. Deactivating this option
can improve low performance conditions.
• Draw petal outline – Set to display the black outline surrounding each petal. Improves the
readability in most cases.
• Display metrics skeleton/name/cylinder – Set to display the tube skeleton, name, or cylinder.
6.3.7.4 Technical dependencies
Time View is a live history tool, meaning that the GUI stores the history data (42 minutes of data
in a circular buffer fashion) from the time it is started. The memory requirements of Time View on
the end station running the HP Insight CMU GUI depend on the cluster size. A typical 500 node
cluster can require 2GB to 3GB of RAM. Memory consumption does not impact the management
node. For larger clusters, the memory consumption can exceed 4GB requiring a 64-bit JVM on the
GUI client side.
Because of the high memory and CPU/GPU consumption, Time View is limited to displaying 10
metrics at a time.
HP recommends the use of OpenGL hardware acceleration for a higher quality experience such
as improved graphics and faster activation of anti-aliasing.
Time View has been tested using Oracle JVM in many environments including Linux, Windows 7,
and Windows Vista. OpenGL problems can occur with Windows Vista. For details, see
“Troubleshooting” (page 95).
94 Monitoring a cluster with HP Insight CMU
Page 95

6.3.7.5 Troubleshooting
Problems can occur with Time View running on Windows Vista. To disable Time View from the
GUI, click the second link on the cluster webstart page which launches HP Insight CMU without
Time View. In the CLI, set –Detrunk=false argument.
If Time View prints an "OutOfMemory [...]" error, try increasing the maximum HEAP memory usage
of the GUI. To specify the memory consumption allowed for the JVM, set the –Xmx JVM argument
when starting the CLI. In the GUI, edit CMU_GUI_MB (specified in MB) in cmuserver.conf.
IMPORTANT:
Setting this value too high may create "Unable to start JVM" messages on hosts with insufficient
memory or on hosts running a 32-bit JVM. HP recommends a 64-bit JVM, and requires it for large
clusters.
If Time View stops running, a restart button appears below the Time View panel.
Some GPUs may not support anti-aliasing levels set to 8. Symptoms are black strips on the left and
right of Time View, or cylinders above the rings making the visualization inoperable. If this occurs,
set anti-aliasing to a lower value such as 4.
6.3.8 Archiving user groups
Monitoring data for deleted user groups can be archived and visualized later as “history data”.
To archive monitoring data for deleted user groups:
1. Delete a user group
2. Answer Yes to Do you want to archive this User Group?
See Figure 39 (page 95).
Figure 39 Archiving deleted user groups
After the delete operation is complete, then the user group displays in the list of Archived User
Groups in the left-frame tree. See Figure 40 (page 96)
6.3 Monitoring the cluster 95
Page 96

Figure 40 Archived user groups
NOTE: User groups can also be archived using a the cmu_del_user_group command. For
details, see the cmu_del_user_group manpage.
6.3.8.1 Visualizing history data
When selecting an archived user group in the left-frame tree, a static Time View picture displays
in the central frame. The picture shows the activity view of the user group during its existence. All
options available with Time View are also available when visualizing archived user groups.
6.3.8.2 Limitations
To display an archived user group, the following conditions must be satisfied:
• Time must not exceed 24 hours.
• The number of nodes must not exceed 4096.
• The number of metrics must not exceed 100.
• The product of the three parameters above must not exceed 409600.
Table 2 (page 96) displays examples of valid combinations of these three parameters.
Table 2 Valid archived user group parameters
IMPORTANT: If the above criteria is not met, display fails with a warning message.
6.4 Stopping HP Insight CMU monitoring
To stop the HP Insight CMU Monitoring GUI, click the X in the upper right corner of the main HP
Insight CMU Monitoring window.
When the Monitoring GUI is stopped, the monitoring engine is not automatically stopped. To stop
the monitoring engine on the cluster, on the toolbar, click the Monitoring tab, and then select Stop
Monitoring Engine.
Nodes*Metrics*HoursHoursMetricsNodes
40960010104096
4096002054096
40960011004096
30720012100256
3932162482048
39321624161024
6.5 Customizing HP Insight CMU monitoring, alerting, and reactions
6.5.1 Action and alert files
Sensors, alerts, and alert reactions are described in the /opt/cmu/etc/
ActionAndAlertsFile.txt file.
Following is an example of the contents of the file:
96 Monitoring a cluster with HP Insight CMU
Page 97

#This is a CMU action and alerts description file
#=============================================================
#
#
ACTIONS
#
#
#
#-------------KERNEL VERSION, RELEASE, BIOS VERSIONS---------#
kernel_version "kernel version" 9999999 string Instantaneous release uname -r
#-------------CPU--------------------------------------------#
#
#- Native
cpuload "% cpu load (raw)" 1 numerical MeanOverTime 100 % awk '/cpu /
{printf"%d\n",$2+$3+$4}' /proc/stat
#- Collectl
#cpuload "% cpu load (normalized)" 1 numerical Instantaneous 100 % COLLECTL (cputotals.user) + (cputotals.nice)
+ (cputotals.sys)
#cpuload "% cpu load (normalized)" 1 numerical Instantaneous 100 % COLLECTL 100 - (cputotals.idle)
#
#-------------MEMORY-----------------------------------------#
#
#- Native
#memory_used "% memory used" 1 numerical Instantaneous 100 % free | awk '
BEGIN { freemem=0; totalmemory=0; } /cache:/ { freemem=$4; } /Mem:/ { totalmemory=$2; } END { printf "%d\n",
(((totalmemory-freemem)*100)/totalmemory); }'
#
#
#
ALERTS
#
#
#cpu_freq_alert "CPU frequency is not nominal" 1 24 100 < % sh -c "b=`cat
/sys/devices/system/cpu/cpu0/cpufreq/scaling_cur_freq`;a=`cat
/sys/devices/system/cpu/cpu0/cpufreq/cpuinfo_max_freq`;echo 100 \* \$b / \$a |bc"
login_alert "Someone is connected" 3 24 0 > login(s) w -h | wc -l
root_fs_used "The / filesystem is above 90% full" 4 24 90 > % df / | awk '{
if ($6=="/") print $5}' | cut -f 1 -d % #reboot_alert "Node rebooted" 4 24 5 < rebooted awk '{printf "%.1f\n",$1/60}' /proc/uptime
# The line below allows to report MCE errors; be careful for possible false positives
#mce_alert "The kernel has logged MCE errors; please check /var/log/mcelog" 5 60 1 > lines wc -l
/var/log/mcelog |cut -f 1 -d ' '
#
#
ALERT_REACTIONS
#
#
#login_alert "Sending mail to root" ReactOnRaise echo -e "Alert 'CMU_ALERT_NAME' raised on node(s)
CMU_ALERT_NODES. \n\nDetails:\n`/opt/cmu/bin/pdsh -w CMU_ALERT_NODES 'w -h'`" | mailx -s "CMU: Alert
'CMU_ALERT_NAME' raised." root
#
#root_fs_used "Sending mail to root" ReactOnRaise echo -e "Alert 'CMU_ALERT_NAME' raised on node(s)
CMU_ALERT_NODES. \n\nDetails:\n`/opt/cmu/bin/pdsh -w CMU_ALERT_NODES 'df /'`" | mailx -s "CMU: Alert
'CMU_ALERT_NAME' raised!" root
#
#reboot_alert "Sending mail to root" ReactOnRaise echo -e "Alert 'CMU_ALERT_NAME' raised on node(s)
CMU_ALERT_NODES. \n\nDetails:\n`/opt/cmu/bin/pdsh -w CMU_ALERT_NODES 'uptime'`" | mailx -s "CMU: Alert
'CMU_ALERT_NAME' raised." root
#
Lines prefixed with # are ignored. Lines cannot begin with a leading white space. Each line
corresponds to a sensor, alert, or an alert reaction. Sensors are placed at the beginning of the
file, between the ACTIONS and ALERTS tags. Each alert is in the middle of the file between the
ALERTS and ALERT_REACTIONS tags, and each alert reaction is at the end of the file below the
ALERT_REACTIONS tag.
Most sensors have both a “native” line and a commented “collectl” line. To use collectl for
collecting monitoring data, enable it by removing the comment from the corresponding sensor line.
NOTE: Using collectl requires additional steps described in “Using collectl for gathering
monitoring data” (page 100).
6.5.2 Actions
Each action contains the following fields:
Name
The name of the sensor as it appears in the Java GUI. It must consist of letters only.
6.5 Customizing HP Insight CMU monitoring, alerting, and reactions 97
Page 98

Description
A quote-contained string to describe in a few words what the sensor is. This appears in the
GUI.
Time multiple
An integer value that determines when the sensors are monitored. If the monitoring has a default
timer of 5 seconds:
• A time multiple of 1 means the value is monitored every 5 seconds.
• A time multiple of 2 means the value is monitored every 10 seconds.
Data type
This can be numerical or a string. A string sensor cannot be displayed in the pies by the
interface.
Measurement method
This can be either Instantaneous or MeanOverTime.
• Instantaneous returns the sensor value immediately.
• MeanOverTime returns the difference between the current value and the previous value
divided by the time interval.
For example, if the sensors return 1, 100, 50, 100 at 4 continuous time steps of 5 seconds:
• HP Insight CMU Monitoring with the Instantaneous option returns 1, 100, 50, 100.
• HP Insight CMU Monitoring with the MeanOverTime option returns N/A, 19.8, -10, 10.
Max value
Used by the interface to create the pies at the beginning. If a greater value is return by a sensor,
the maximum value is automatically updated in the interface.
Unit
The unit of the sensor. The GUI uses this measurement.
Command
The command to be executed by the script. This can be an executable or a shell command.
The executable and the shell command must be available on compute nodes.
6.5.3 Alerts
Each alert contains the following fields:
Name
The name of the sensor as it appears in the Java GUI. It must consist of letters only.
Description
A quote-contained string to describe in a few words what the sensor is. This appears in the
GUI.
Severity
An integer from 1 to 5. A fatal alert is 5 stands. A minor alert is 1. This appears by the interface.
Time multiple
An integer value that determines when the sensors are monitored. If the monitoring has a default
timer of 5 seconds:
• A time multiple of 1 means the value is monitored every 5 seconds.
• A time multiple of 2 means the value is monitored every 10 seconds.
Threshold
The threshold that must not be overcome by the sensor.
98 Monitoring a cluster with HP Insight CMU
Page 99

Operator
The comparison operator between the sensor and the threshold. Only > is available.
Unit
The unit of the sensor. The GUI uses this measurement.
Command
The command to be executed by the script. This can be an executable or a shell command.
The executable and the shell command must be available on compute nodes.
6.5.4 Alert reactions
Each alert reaction contains the following fields:
Name(s)
The names of one or more alerts from the ALERTS section. The reaction is associated with each
of the alerts. If an alert is specified in more than one reaction, then only the first reaction is
taken. The list of alert Names is white-space separated.
Description
A quote-contained brief description of the reaction.
Condition
The reaction is performed under this condition.
• ReactOnRaise — Execute the reaction whenever the alert shows as raised and the previous
state of the alert was lowered.
• ReactAlways — Execute the reaction whenever the alert shows as raised, subject to the
alert’s time multiple. For example, if the monitoring has a default timer of 5 seconds and
the alert’s time multiple is 6, the reaction will trigger every 5x6=30 seconds as long as
the alert is raised.
Command
The command to be executed. This can be a single-line shell command, a shell script, or an
executable file. Scripts and executable files must be available on the management node.
The following keywords are supported within the “Command”. Each keyword is substituted
globally (throughout the command line) using the defined values:
CMU_ALERT_NAME
The name of the alert that caused the reaction.
CMU_ALERT_LEVEL
The level of the alert.
CMU_REACT_MESSAGE
The text of the “Description” for this reaction.
CMU_ALERT_NODES
The list of names of all the nodes that raised the alert during the current monitoring pass.
The list is condensed in the form provided by cmu_condense_nodes.
CMU_ALERT_NODES_EXPANDED
The same as CMU_ALERT_NODES only the list is expanded, ordered, and separated by
commas.
CMU_ALERT_VALUES
The list of alert values. This list is comma separated and ordered like the names of
CMU_ALERT_NODES_EXPANDED.
CMU_ALERT_TIMES
The time the alert was triggered on each node. This list is comma separated and ordered
like the names of CMU_ALERT_NODES_EXPANDED.
6.5 Customizing HP Insight CMU monitoring, alerting, and reactions 99
Page 100

CMU_ALERT_SEQUENCE_FILE
The path of the HP Insight CMU “sequence” file containing the alerts and alert values from
the monitoring pass that triggered the reaction. Analyze this file with the
/opt/cmu/bin/cmu_monstat command.
NOTE: To protect the management node from large numbers of concurrent reactions, a
reaction will only launch on behalf of compute nodes that do not have previous instances of
the reaction still running. Limit the command runtime of a reaction if the reaction is expected
to be triggered frequently.
6.5.5 Modifying the sensors, alerts, and alert reactions monitored by HP Insight CMU
Several optional sensors, alerts, and alert reactions are commented out in the
ActionAndAlertsFile.txt file.
• Comment a sensor, alert, or alert reaction to stop monitoring it.
• Uncomment a sensor, alert, or alert reaction to start monitoring it.
• Modify a sensor, alert, or alert reaction line to change its parameters.
• Add your own sensors, alerts, or alert reactions by adding a line to the ACTIONS, ALERTS,
or ALERT_REACTIONS section.
Modifications in the ActionAndAlertsFile.txt file are only taken into consideration when
the monitoring daemons are restarted.
To restart the monitoring daemons:
1. Change the ActionAndAlertsFile.txt file on the management node.
2. Stop the Java GUI.
3. Stop the daemons.
# /etc/init.d/cmu stop
4. Restart the daemons.
# /etc/init.d/cmu restart
5. Start the Java interface.
6.5.6 Using collectl for gathering monitoring data
The default method for specifying commands to collect monitoring data is described in “Actions”
(page 97). This default method is referred to as native mode in this section.
HP Insight CMU provides an alternative method which uses the collectl tool for gathering
monitoring data. Data appears using the same HP Insight CMU interface as native mode.
6.5.6.1 Installing and starting collectl on compute nodes
1. On compute nodes, install the package from the HP Insight CMU CDROM:
# mount /dev/cdrom /mnt
# cd /mnt/tools/collectl
# rpm -ivh collectl-3.x.x-x.noarch.rpm
Preparing... ########################################### [100%]
1:collectl ########################################### [100%]
2. If you have not already done it, install the monitoring rpm on compute nodes as described in
“Installing the HP Insight CMU monitoring client” (page 85).
3. Edit the /etc/collectl.conf file as follows:
DaemonCommands = -s+dcmnNE --import misc --export lexpr -A server -i5
100 Monitoring a cluster with HP Insight CMU
 Loading...