

Page 1

quick help
hp deskjet 845c/825c series
table of contents
learn about the printer . . . . . . . . . . . . . . . . . . . . . . . . . . 1
introducing the hp deskjet 845c/825c series printer . . . . . . . . . . . . 2
terms and conventions . . . . . . . . . . . . . . . . . . . . . . . . . . . . . . . . . 3
notices and acknowledgments . . . . . . . . . . . . . . . . . . . . . . . . . . . 5
learning about printer features. . . . . . . . . . . . . . . . . . . . . . . . . . . . 6
using paper trays. . . . . . . . . . . . . . . . . . . . . . . . . . . . . . . . . . . . . 8
printing with the hp deskjet 845c/825c printer . . . . . . . . . . . . . . . 10
setting custom printing margins . . . . . . . . . . . . . . . . . . . . . . . . . . 12
using the taskbar icon . . . . . . . . . . . . . . . . . . . . . . . . . . . . . . . . 13
printing on paper and other media . . . . . . . . . . . . . . . . 15
envelopes . . . . . . . . . . . . . . . . . . . . . . . . . . . . . . . . . . . . . . . . 16
transparencies . . . . . . . . . . . . . . . . . . . . . . . . . . . . . . . . . . . . . 21
labels . . . . . . . . . . . . . . . . . . . . . . . . . . . . . . . . . . . . . . . . . . . 23
business cards, index cards, and other small media . . . . . . . . . . . 26
photographs . . . . . . . . . . . . . . . . . . . . . . . . . . . . . . . . . . . . . . 29
greeting cards . . . . . . . . . . . . . . . . . . . . . . . . . . . . . . . . . . . . . 32
posters . . . . . . . . . . . . . . . . . . . . . . . . . . . . . . . . . . . . . . . . . . 35
banners . . . . . . . . . . . . . . . . . . . . . . . . . . . . . . . . . . . . . . . . . . 37
iron-on transfers . . . . . . . . . . . . . . . . . . . . . . . . . . . . . . . . . . . . 40
manual two-sided printing . . . . . . . . . . . . . . . . . . . . . . . . . . . . . 43
special features . . . . . . . . . . . . . . . . . . . . . . . . . . . . . . 46
dual-cartridge printing . . . . . . . . . . . . . . . . . . . . . . . . . . . . . . . . 47
single-cartridge printing . . . . . . . . . . . . . . . . . . . . . . . . . . . . . . . 48
Page 2

product maintenance . . . . . . . . . . . . . . . . . . . . . . . . . . 49
print cartridge status light . . . . . . . . . . . . . . . . . . . . . . . . . . . . . . 50
replacing a print cartridge . . . . . . . . . . . . . . . . . . . . . . . . . . . . . 51
aligning print cartridges . . . . . . . . . . . . . . . . . . . . . . . . . . . . . . 54
automatically cleaning print cartridges . . . . . . . . . . . . . . . . . . . . . 55
manually cleaning print cartridges and the print cradle . . . . . . . . . 56
cleaning the printer case . . . . . . . . . . . . . . . . . . . . . . . . . . . . . . 60
refilling print cartridges. . . . . . . . . . . . . . . . . . . . . . . . . . . . . . . . 61
maintaining print cartridges . . . . . . . . . . . . . . . . . . . . . . . . . . . . 62
print cartridge part numbers . . . . . . . . . . . . . . . . . . . . . . . . . . . . 63
the hp deskjet toolbox . . . . . . . . . . . . . . . . . . . . . . . . . . . . . . . . 64
solve a problem . . . . . . . . . . . . . . . . . . . . . . . . . . . . . . 65
printer lights are flashing . . . . . . . . . . . . . . . . . . . . . . . . . . . . . . 66
printer is not printing . . . . . . . . . . . . . . . . . . . . . . . . . . . . . . . . . 68
printer is too slow . . . . . . . . . . . . . . . . . . . . . . . . . . . . . . . . . . . 71
problems with printouts . . . . . . . . . . . . . . . . . . . . . . . . . . . . . . . 73
product specifications. . . . . . . . . . . . . . . . . . . . . . . . . . 78
product specifications for the hp deskjet 845c/825c series printer. . 79
minimum printing margins . . . . . . . . . . . . . . . . . . . . . . . . . . . . . 84
system requirements . . . . . . . . . . . . . . . . . . . . . . . . . . . . . . . . . . 86
index. . . . . . . . . . . . . . . . . . . . . . . . . . . . . . . . . . . . . . 87
Page 3

learn about the printer
• introducing the hp deskjet 845c/825c series printer
• terms and conventions
• notices and acknowledgments
• learning about printer features
• using paper trays
• printing with the hp deskjet 845c/825c printer
• setting custom printing margins
• using the taskbar icon
1
Page 4

introducing the hp deskjet 845c/825c series printer
Congratulations! You have purchased an HP Deskjet 845c/825c series
printer which is equipped with the following features:
• Dual-cartridge printing for the highest print quality
• Single-cartridge printing that allows the printer to operate with only
the tri-color print cartridge installed
HP printers are designed to help you get the best results for your printing
needs. Read about these and other features in the following sections.
2
Page 5

terms and conventions
The following terms and word conventions are used in quick help.
terms
The HP Deskjet 845c/825c series printers are referred to as
HP Deskjet 845c/825c or HP Deskjet.
symbols
The > symbol guides you through a series of software steps.
For example:
Click Start > Programs > hp deskjet 845c/825c series > hp deskjet 845c/
825c series Toolbox
cautions and warnings
A Caution indicates the possible chance of damage to the HP Deskjet printer
or to other equipment. For example:
Caution! Do not touch the print cartridge ink nozzles or copper
contacts. Touching these parts will result in clogs, ink failure, and bad
electrical connections.
to open the HP Deskjet Toolbox.
A Warning indicates the possible chance of harm to yourself or to others.
For example:
Warning! Keep print cartridges out of the reach of children.
3
Page 6

icons
A Note icon indicates that additional information is provided. For example:
For best results use HP products.
Mouse icon indicates that additional information is available through the
A
What’s This? help feature.
To find more information about options on each tab screen, point to an
option and click the right mouse button to display the
box. Click What’s This? to view more information about the selected
option.
What’s This dialog
4
Page 7

notices and acknowledgments
hewlett-packard company notices
The information contained in this document is subject to change without
notice.
Hewlett-Packard (HP) makes no warranty of any kind with regard to this
material including, but not limited to, the implied warranties of
merchantability and fitness for a particular purpose.
Hewlett-Packard shall not be liable for any errors or for incidental or
consequential damages in connection with the furnishing, performance, or
use of this material.
All rights reserved. Reproduction, adaptation, or translation of this material
is prohibited without prior written permission of Hewlett-Packard, except as
allowed under copyright laws.
acknowledgments
Microsoft, MS, and Windows are registered trademarks of Microsoft
Corporation.
Pentium is a U.S. registered trademark of Intel Corporation.
TrueType is a U.S. trademark of Apple Computer, Inc.
Adobe and Acrobat are trademarks of Adobe Systems Incorporated.
Copyright 2001 Hewlett-Packard Company
5
Page 8

learning about printer features
buttons and lights
The printer buttons let you turn the printer on and off or resume printing. The
lights give you visual cues about the state of the printer.
1. power button and light 2. resume button and light
3. print cartridge status symbol and light
print cartridge status symbol and light
The light next to the Print Cartridge Status symbol flashes when you need to
check the status of a print cartridge.
6
Page 9

resume button and light
The light on the
Resume button flashes when an action is required such as
loading paper or clearing a paper jam. When the problem is fixed, press the
Resume button to continue printing.
power button and light
Power button turns the printer on and off. The green light on the Power
The
button flashes when printing is in progress.
Caution! Always use the Power button on the front of the printer to turn
the printer on and off. Using a power strip, surge protector, or a wallmounted switch to turn the printer on and off may cause premature
printer failure.
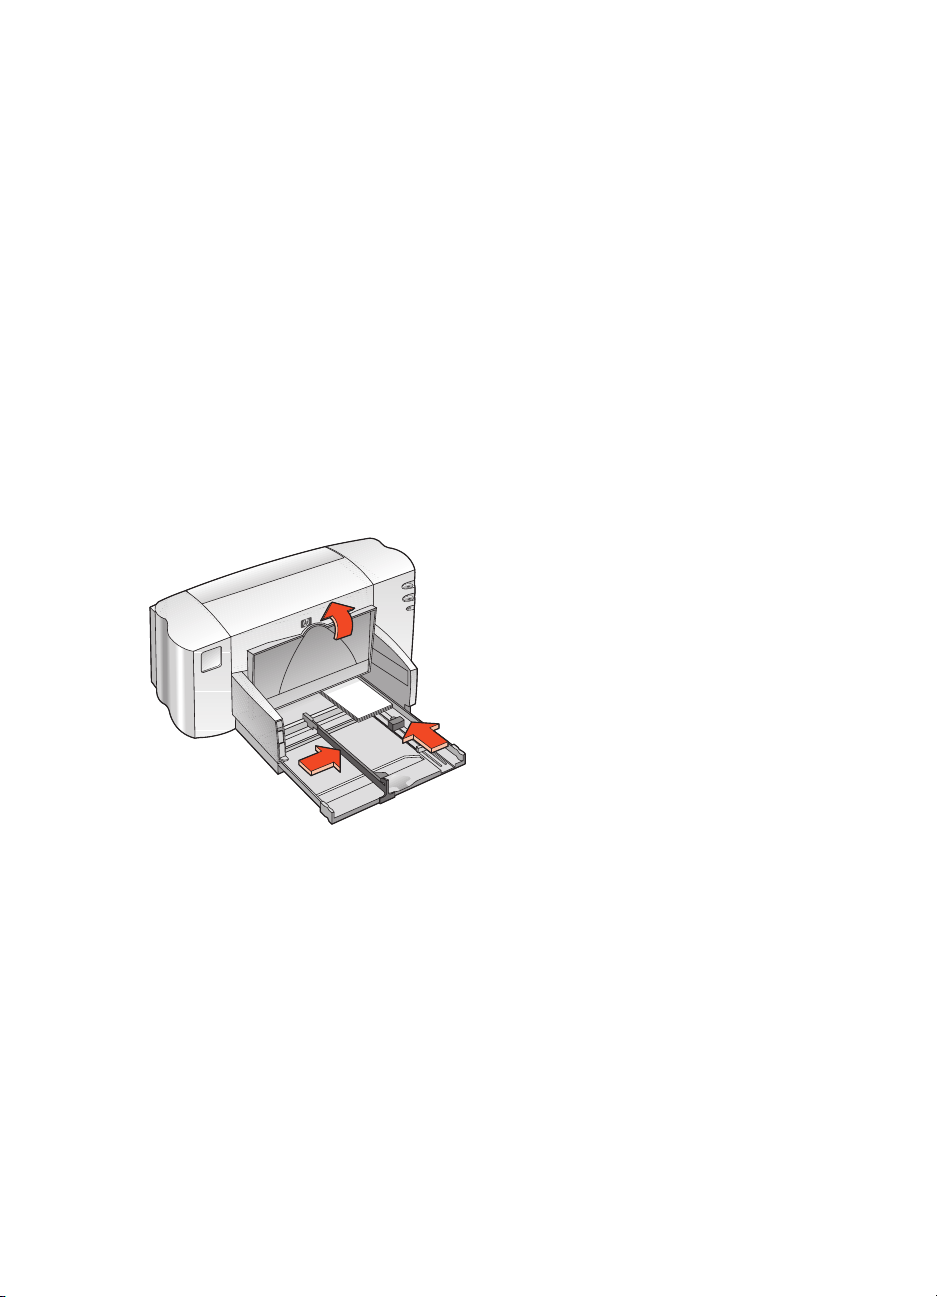
paper trays
The printer has an In tray and an Out tray. Place paper or other media in the
In tray for printing. Printed pages are deposited in the Out tray.
7
Page 10

using paper trays
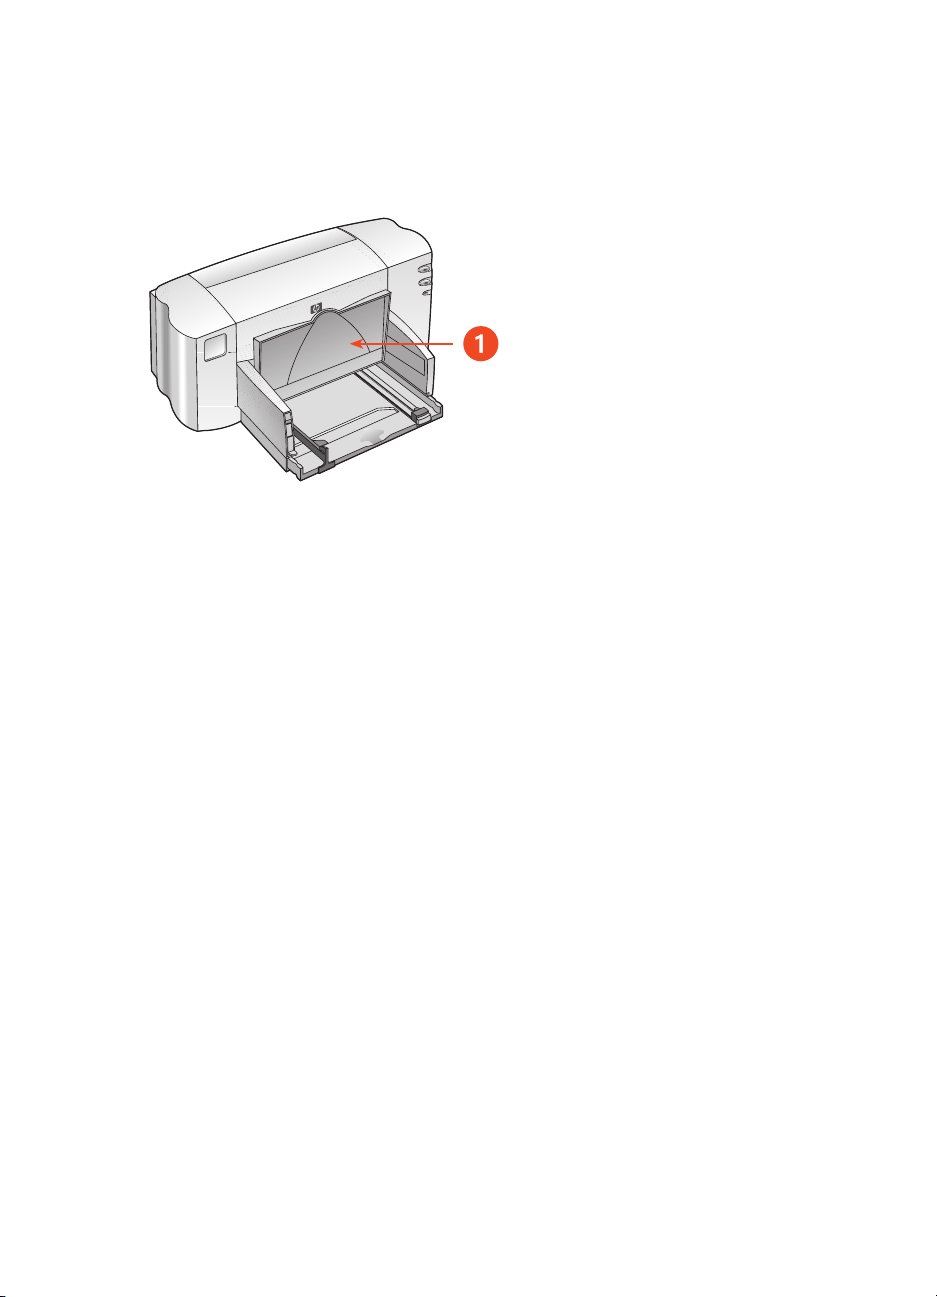
in tray
The In tray holds paper or other media to be printed.
1. In tray pulled out 2. paper length guide 3. paper width guide
1. Out tray 2. In tray pushed in
8
Page 11
out tray
Change the position of the Out tray for different printing tasks.
1. Out tray up
Out tray up - Raise the tray with the banner switch to properly load banner
paper. It must remain in the up position to print banners.
Out tray down - Leave the tray in the down position for most types of printing
and single envelope printing.
9
Page 12

printing with the hp deskjet 845c/825c printer
The printer is controlled by software installed on the computer. The printer
software, also called a printer driver, provides dialog boxes to communicate
print requests to the printer.
printing in Windows 98, Me, and 2000
Follow these instructions to print in Windows 98, Me, and 2000:
1. Open the file you want to print.
2. Use one of the following methods to display the hp deskjet 845c/825c
series
screen:
•Click
•Click
•Click
The hp deskjet 845c/825c series screen appears.
The option selected varies depending on the software program you are
using.
File > Print, then select Properties.
File > Print Setup, then select Properties.
File > Print > Setup, then select Properties.
The hp deskjet 845c/825c series screen displays three tab options:
Setup, Features, and Advanced.
3. Select the Setup tab to choose print quality options, paper type, paper
size, and photo paper printing.
4. Select the Features tab to choose page orientation, two-sided printing,
multiple pages per sheet, and poster printing.
10
Page 13

5.
Select the Advanced tab to choose color options for text, ink volume,
print speed (Low Memory Mode), and to make color and contrast
adjustments.
6. Click OK to return to the Print or Print Setup screen.
7. Click OK to print.
To find more information about options on each tab screen, point to an
option and click the right mouse button to display the
box. Click
option.
What’s This? to view more information about the selected
What’s This dialog
11
Page 14

setting custom printing margins
Follow these instructions to set printing margins:
1. Open the file you want to print.
2. Use one of the following methods to display the hp deskjet 845c/825c
series screen:
•Click
•Click
•Click
The hp deskjet 845c/825c series screen appears.
The option selected varies depending on the software program being
used.
The hp deskjet 845c/825c series screen displays three tab options:
Setup, Features, and Advanced.
3. Select the Setup tab, then select User Defined Paper Size in the Paper Size
option.
The User Defined Paper Size dialog box appears.
4. Select the appropriate width and length settings.
Paper width must be between 77 and 215 mm (3 x 8.5 in) and paper
length must be between 127 and 356 mm (5 x 14 in).
File > Print, then select Properties.
File > Print Setup, then select Properties.
File > Print > Setup, then select Properties.
5. Click OK to return to the Setup screen.
6. Click Apply, then click OK to accept the new settings.
7. Click OK to print.
12
Page 15

using the taskbar icon
The Printer Settings taskbar icon allows you to change default print settings.
1. Printer Settings taskbar icon
opening the printer properties dialog box
1. Double-click the Printer Settings taskbar icon.
The hp deskjet 845c/825c series dialog box appears.
2. Select the available print options in the hp deskjet 845c/825c series
screen.
3. Click OK.
13
Page 16

changing print options in the default print settings dialog box
1. Click the Printer Settings taskbar icon.
The Default Print Settings
dialog box appears. It allows you to change
the default print quality.
2. Select the following options:
•
Print Quality: Draft, Normal, or Best
3. Click outside of the dialog box.
A dialog box appears saying that the selections made determine what
print settings the printer will use when printing. If you don’t want to see
this dialog box again, select
4. Click OK.
Don’t show me this message again.
using printer settings taskbar icon shortcuts
1. Right-click the Printer Settings taskbar icon.
A shortcut menu appears displaying the names of installed printers. A
check mark appears next to the selected printer. You can select another
printer from the menu to change the default printer.
2. Choose one of these options:
•
Change Default Print Settings to open the hp deskjet 845c/825c
series dialog box.
•Click Open Toolbox to open the HP Deskjet Toolbox.
•Click
Exit to turn off the Printer Settings taskbar icon.
See also:
the hp deskjet toolbox
14
Page 17

printing on paper and other media
•envelopes
• transparencies
• labels
• business cards, index cards, and other small media
• photographs
• greeting cards
• posters
• banners
•iron-on transfers
• manual two-sided printing
15
Page 18

envelopes
Print a single envelope using the envelope slot, or print multiple envelopes
using the In tray.
printing a single envelope
preparing to print
1. Place the envelope–with the flap side on the left and facing up–into
the single envelope slot.
2. Push the envelope forward until it stops.
printing the envelope
If your software program includes an envelope-printing feature, do not follow
these instructions. Follow the instructions provided by the software program.
1. Open the file you want to print.
16
Page 19

2.
Use one of the following methods to display the hp deskjet 845c/825c
series screen:
•Click
•Click
•Click
File > Print, then select Properties.
File > Print Setup, then select Properties.
File > Print > Setup, then select Properties.
The hp deskjet 845c/825c series screen appears.
The option selected varies depending on the software program being
used.
The hp deskjet 845c/825c series screen displays three tab options:
Setup, Features, and Advanced.
3. Select the Setup tab, then choose the following:
Print Quality: Normal
•
•
Paper Type: Plain Paper
• Paper Size: Appropriate envelope size
4. Select the Features tab, then choose the following:
Orientation: Appropriate envelope orientation
•
•
Two-Sided Printing: Unchecked
5. Click OK to return to the Print or Print Setup screen.
6. Click OK to print.
printing guidelines
• Verify that the Out tray is in the down position.
• Avoid using envelopes that have clasps or windows.
• Avoid using envelopes that are shiny or embossed, envelopes with
thick, irregular, or curled edges, or envelopes that are wrinkled, torn,
or otherwise damaged.
17
Page 20

printing multiple envelopes
preparing to print
1. Pull out the In tray.
2. Slide out both paper guides and remove all paper from the tray.
3. Place no more than 15 envelopes–with the flap side on the left and
facing up–in the tray.
4. Push the envelopes forward until they stop.
5. Slide the paper guides snugly against the edges of the envelopes. Slide
the tray forward until it stops.
printing the envelopes
If your software program includes an envelope-printing feature, do not follow
these instructions. Follow the instructions provided by the software program.
1. Open the file you want to print.
18
Page 21

2.
Use one of the following methods to display the hp deskjet 845c/825c
series screen:
•Click
•Click
•Click
File > Print, then select Properties.
File > Print Setup, then select Properties.
File > Print > Setup, then select Properties.
The hp deskjet 845c/825c series screen appears.
The option selected varies depending on the software program you are
using.
The hp deskjet 845c/825c series screen displays three tab options:
Setup, Features, and Advanced.
3. Select the Setup tab, then choose the following:
Print Quality: Normal
•
• Paper Type: Plain Paper
• Paper Size: Appropriate envelope size
4. Select the Features tab, then choose the following:
Orientation: Appropriate envelope orientation
•
•
Two-Sided Printing: Unchecked
5. Click OK to return to the Print or Print Setup screen.
6. Click OK to print.
19
Page 22
printing guidelines
• Never place more than 15 envelopes in the In tray at one time.
• Align the envelope edges before inserting them.
• Avoid using envelopes that have clasps or windows.
• Avoid using envelopes that are shiny or embossed, envelopes with
thick, irregular, or curled edges, or envelopes that are wrinkled, torn,
or otherwise damaged.
For best results use HP products.
20
Page 23

transparencies
preparing to print
1. Pull out the In tray and raise the Out tray.
2. Slide out both paper guides and remove all paper from the tray.
3. Fan the edges of the transparency sheets to separate them, then align
the edges.
4. Place no more than 25 transparency sheets in the tray with the rough
side down and the adhesive strip toward the printer.
5. Push the transparencies forward until they stop.
6. Slide the paper guides snugly against the transparency paper, then slide
the tray forward until it stops.
7. Lower the Out tray.
21
Page 24

printing transparencies
1. Open the file you want to print.
2. Use one of the following methods to display the hp deskjet 845c/825c
series screen:
•Click
•Click
•Click
The hp deskjet 845c/825c series screen appears.
The option selected varies depending on the software program you are
using.
The hp deskjet 845c/825c series screen displays three tab options:
Setup, Features, and Advanced.
3. Select the Setup tab, then choose the following:
•
• Paper Type: Appropriate transparency paper
•
4. Select the Features tab, then choose the following:
•
•
File > Print, then select Properties.
File > Print Setup, then select Properties.
File > Print > Setup, then select Properties.
Print Quality: Draft, Normal, or Best
Paper Size: Appropriate size
Orientation: Appropriate orientation
Two-Sided Printing: Unchecked
5. Click OK to return to the Print or Print Setup screen.
6. Click OK to print.
printing guidelines
For best results use hp premium inkjet transparency film.
22
Page 25

labels
preparing to print
1. Pull out the In tray.
2. Slide out both paper guides and remove all paper from the tray.
3. Fan the edges of the label sheets to separate them, then align the label
edges.
4. Load no more than 20 label sheets–label side down–in the tray.
5. Slide the paper guides snugly against the sheets, then push in the tray.
23
Page 26

printing labels
1. Open the file you want to print.
2. Use one of the following methods to display the hp deskjet 845c/825c
series
screen:
•Click
•Click
•Click
The hp deskjet 845c/825c series screen appears.
The option selected varies depending on the software program you are
using.
The hp deskjet 845c/825c series screen displays three tab options:
Setup, Features, and Advanced.
3. Select the Setup tab, then choose the following:
•
• Paper Type: The appropriate paper type
•
4. Select the Features tab, then choose the following:
•
•
File > Print, then select Properties.
File > Print Setup, then select Properties.
File > Print > Setup, then select Properties.
Print Quality: Normal
Paper Size: Choose A4 or Letter (8.5 x 11 in)
Orientation: Appropriate orientation
Two-Sided Printing: Unchecked
5. Click OK to return to the Print or Print Setup screen.
6. Click OK to print.
24
Page 27

printing guidelines
• Use only paper labels that are designed specifically for inkjet
printers.
• Never place more than 20 sheets of labels in the In tray at one time.
• Use only full sheets of labels.
• Verify that the labels are not sticky, wrinkled, or pulling away from
the protective backing.
• Do not use plastic or clear labels. The ink will not dry on plastic or
clear labels.
For best results use HP products.
25
Page 28
business cards, index cards, and other small media
preparing to print
1. Pull out the In tray, then raise the Out tray.
2. Slide out both paper guides and remove all paper from the tray.
3. Align the media edges.
4. Place no more than 30 cards or other small media in the tray.
5. Push the cards or media forward until they stop, then lower the Out tray.
6. Slide the paper length guides snugly against the edges of the media.
7. Slide the colored fine length guide snugly against the media.
8. Slide the paper width guides snugly against the media.
9. Push in the In tray.
26
Page 29

printing business cards, index cards, and other small media
1. Open the file you want to print.
2. Use one of the following methods to display the hp deskjet 845c/825c
series screen:
•Click
•Click
•Click
The hp deskjet 845c/825c series screen appears.
The option selected varies depending on the software program you are
using.
The hp deskjet 845c/825c series screen displays three tab options:
Setup, Features, and Advanced.
3. Select the Setup tab, then choose the following:
•
• Paper Type: The appropriate paper type
•
4. Select the Features tab, then choose the following:
•
•
File > Print, then select Properties.
File > Print Setup, then select Properties.
File > Print > Setup, then select Properties.
Print Quality: Draft, Normal, or Best
Paper Size: Appropriate size
Orientation: Appropriate orientation
Two-Sided Printing: Unchecked
5. Click OK to return to the Print or Print Setup screen.
6. Click OK to print.
27
Page 30

printing guidelines
If an out of paper message appears, verify that the media is positioned
properly in the In tray.
For best results use HP products.
28
Page 31

photographs
preparing to print
1. Pull out the In tray and raise the Out tray.
2. Slide out both paper guides and remove all paper from the tray.
3. Fan the edges of the photo paper to separate them, then align the photo
paper edges.
4. Place the stack of photo paper–up to 3/8 in. (10mm) in thickness–
print side down in the tray.
5. Slide the paper guides snugly against the edges of the photo paper,
then slide in the tray.
6. Lower the Out tray.
29
Page 32

printing photographs
1. Open the file you want to print.
2. Use one of the following methods to display the hp deskjet 845c/825c
series
screen:
•Click
•Click
•Click
The hp deskjet 845c/825c series screen appears.
The option selected varies depending on the software program you are
using.
The hp deskjet 845c/825c series screen displays three tab options:
Setup, Features, and Advanced.
3. Select the Setup tab, then choose the following:
•
• Paper Type: The appropriate photo paper type
•
•
File > Print, then select Properties.
File > Print Setup, then select Properties.
File > Print > Setup, then select Properties.
Print Quality: Normal or Best
Photo Paper Printing:
PhotoREt for best print speed and quality, or
-
600 x 1200 dpi for maximum resolution
-
Paper Size: Appropriate paper size
4. Select the Features tab, then choose the following:
•
Orientation: Appropriate orientation
Two-Sided Printing: Unchecked
•
5. Click OK to return to the Print or Print Setup screen.
6. Click OK to print.
30
Page 33

printing guidelines
• Take a digital picture, scan a photo, or obtain an electronic file of the
photo from your local camera shop. The photo must be in an
electronic format (digital) before it can be printed.
• Use PhotoREt for most photo paper printing.
• Select the paper type, then select the appropriate paper size from the
drop-down menu.
For best results use hp premium plus photo paper or hp premium photo
paper
.
See also:
problems with printouts
31
Page 34

greeting cards
preparing to print
1. Pull out the In tray, then raise the Out tray.
2. Slide out both paper guides and remove all paper from the tray.
3. Fan the edges of the greeting cards to separate them.
4. Align the edges of the cards, then place no more than 30 cards in the
tray.
5. Push the cards forward until they stop, then lower the Out tray.
6. Slide the paper guides snugly against the edges of the cards, then slide
in the tray.
32
Page 35

printing greeting cards
1. Open the file you want to print.
2. Use one of the following methods to display the hp deskjet 845c/825c
series
screen:
•Click
•Click
•Click
The hp deskjet 845c/825c series screen appears.
The option selected varies depending on the software program you are
using.
The hp deskjet 845c/825c series screen displays three tab options:
Setup, Features, and Advanced.
3. Select the Setup tab, then choose the following:
•
• Paper Type: The appropriate greeting card type
•
4. Select the Features tab, then choose the following:
•
•
File > Print, then select Properties.
File > Print Setup, then select Properties.
File > Print > Setup, then select Properties.
Print Quality: Normal or Best
Paper Size: Appropriate card size
Orientation: Appropriate orientation
Two-Sided Printing: If appropriate
5. Click OK to return to the Print or Print Setup screen.
6. Click OK to print.
33
Page 36

printing guidelines
• Unfold pre-folded cards, then place them in the In tray.
•If an
See also:
manual two-sided printing
out of paper message appears, verify that the media is
positioned properly in the In tray.
For best results use HP products.
34
Page 37

posters
preparing to print
1. Pull out the In tray.
2. Slide out both paper guides and remove all paper from the tray.
3. Fan the edges of the sheets to separate them, then align the edges.
4. Place the paper in the tray.
5. Slide the paper guides snugly against the paper, then slide in the tray.
printing posters
1. Open the file you want to print.
2. Use one of the following methods to display the hp deskjet 845c/825c
series screen:
•Click
•Click
•Click
The hp deskjet 845c/825c series screen appears.
File > Print, then select Properties.
File > Print Setup, then select Properties.
File > Print > Setup, then select Properties.
The option selected varies depending on the software program you are
using.
The hp deskjet 845c/825c series screen displays three tab options:
Setup, Features, and Advanced.
35
Page 38

3.
Select the Setup tab, then choose the following:
•
Paper Type: Plain Paper
• Print Quality: Normal
Paper Size: Appropriate size
•
4. Select the Features tab, then choose the following:
Orientation: Appropriate orientation
•
•
Poster Printing: Select this option then select 2x2, 3x3, or 4x4
• Two-Sided Printing: Unchecked
5. Click OK to return to the Print or Print Setup screen.
6. Click OK to print.
printing guidelines
Trim the edges on the sheets, then tape the sheets together after printing.
For best results use HP products.
36
Page 39

banners
preparing to print
1. Pull out the In tray.
2. Slide out both paper guides and remove all paper from the tray.
3. Raise the banner switch to raise the Out tray, then slide the paper guides
snugly against the paper. Leave the Out tray raised.
4. Select up to 20 sheets of banner paper (but not less than 5 sheets).
Remove and discard any perforated strips.
5. Place the banner paper in the In tray with the unattached edge of the
paper facing the printer.
6. Push in the In tray.
37
Page 40

printing banners
1. Open the file you want to print.
2. Use one of the following methods to display the hp deskjet 845c/825c
series
screen:
•Click
•Click
•Click
The hp deskjet 845c/825c series screen appears.
The option selected varies depending on the software program you are
using.
The hp deskjet 845c/825c series screen displays three tab options:
Setup, Features, and Advanced.
3. Select the Setup tab, then choose the following:
•
•
• Print Quality: Normal
• Paper Size: Banner [A4 (210 x 297 mm)] or Banner [Letter (8.5 x 11 in)]
4. Select the Features tab, then choose the following:
•
•
File > Print, then select Properties.
File > Print Setup, then select Properties.
File > Print > Setup, then select Properties.
Banner Printing: Select this box
Paper Type: hp banner paper
Orientation: Appropriate orientation
Two-Sided Printing: Unchecked
5. Click OK to return to the Print or Print Setup screen.
6. Click OK to print.
The Banner prints.
7. If the Resume light blinks after the banner prints, press the Resume button
as many times as needed until all the banner paper is out of the printer.
38
Page 41

printing guidelines
• See the HP Deskjet 845c/825c Series Printer release notes for
specific printing information.
For best results use hp banner paper.
39
Page 42

iron-on transfers
preparing to print
1. Pull out the In tray.
2. Slide out both paper guides and remove all paper from the tray.
3. Fan the edges of the iron-on transfer paper to separate them, then align
the edges.
4. Place the iron-on transfer paper in the tray with the printable side down.
5. Slide the paper guides snugly against the transfer paper, then push in
the tray.
40
Page 43

printing iron-on transfers
1. Open the file you want to print.
2. Use one of the following methods to display the hp deskjet 845c/825c
series screen:
•Click
•Click
•Click
The hp deskjet 845c/825c series screen appears.
The option selected varies depending on the software program you are
using.
The hp deskjet 845c/825c series screen displays three tab options:
Setup, Features, and Advanced.
3. Select the Setup tab, then choose the following:
•
• Print Quality: Normal or Best
• Paper Size: A4 (210 x 297 mm) or Letter (8.5 x 11 in.)
4. Select the Features tab, then choose the following:
•
•
•
File > Print, then select Properties.
File > Print Setup, then select Properties.
File > Print > Setup, then select Properties.
Paper type: hp iron-on t-shirt transfers
Orientation: Appropriate orientation
Mirror Image: Check this box
Two-Sided Printing: Leave this box unchecked
5. Click OK to return to the Print or Print Setup screen.
6. Click OK to print.
41
Page 44

printing guidelines
• When you print a transfer with a mirror-image, the text and pictures
are horizontally reversed from what appears on the computer screen.
For best results use hp iron-on t-shirt transfer paper.
42
Page 45

manual two-sided printing
preparing to print
1. Pull out the In tray.
2. Remove all paper from the Out tray.
3. Place paper in the In tray.
4. Slide the paper guides snugly against the edges of the paper.
5. Push in the tray.
printing manually
1. Open the file you want to print.
2. Use one of the following methods to display the hp deskjet 845c/825c
series screen:
•Click
•Click
•Click
The hp deskjet 845c/825c series screen appears.
File > Print, then select Properties.
File > Print Setup, then select Properties.
File > Print > Setup, then select Properties.
The option selected varies depending on the software program you are
using.
The hp deskjet 845c/825c series screen displays three tab options:
Setup, Features, and Advanced.
3. Select the Setup tab, then choose the following:
Print Quality: Appropriate print quality
•
Paper Type: Appropriate paper type
•
•
Paper Size: Appropriate size
43
Page 46

4.
Select the Features tab, then choose the following:
•
Orientation: Appropriate orientation
Two-Sided Printing: Check this box
•
Book or Tablet: Select the appropriate option
•
5. Click OK to return to the Print or Print Setup screen.
6. Click OK to print.
The odd-numbered pages print. Follow the instructions displayed on
your screen to reload the paper and print the even-numbered pages.
book binding
tablet binding
7. Click Continue when the paper is properly reloaded.
44
Page 47

printing guidelines
• The printer automatically prints odd-numbered pages first. Once the
odd-numbered pages are printed, a message appears prompting you
to reload the paper so that the even-numbered pages can be printed.
For best results use HP products.
45
Page 48

special features
• dual-cartridge printing
• single-cartridge printing
46
Page 49

dual-cartridge printing
The dual-cartridge printing option allows your printer to provide the highest
quality printouts. To print with both cartridges:
1. Install both the black and the tri-color print cartridges.
2. Open the HP Deskjet Toolbox.
3. Click the Configuration tab and select the following option:
•
Configure Print Cartridges: Two Print Cartridges.
4. Click Apply.
The Changing Printer Configuration box appears.
5. Click OK.
6. Print according to the instructions for your document.
Caution! Remove empty print cartridges from the print cradle
immediately. Do not leave an empty print cartridge in the cradle, then
configure the printer for single-cartridge printing. Doing so can damage
the printer.
See also:
print cartridge part numbers
replacing a print cartridge
47
Page 50

single-cartridge printing
The printer can print with only the tri-color print cartridge installed. Color-only
printing allows the printer to print in a full range of colors, including black.
Caution! Never configure the printer for one-cartridge printing with both
the black and the tri-color print cartridges installed. Doing so affects
print quality.
color cartridge printing
1. Install the tri-color print cartridge.
2. Open the HP Deskjet Toolbox.
3. Click the Configuration tab and select the following option:
Configure Print Cartridges: One Color Print Cartridge.
•
4. Click Apply.
The Changing Printer Configuration box appears.
5. Click OK.
6. Print according to the instructions for your document.
See also:
print cartridge part numbers
replacing a print cartridge
48
Page 51

product maintenance
• print cartridge status light
• replacing a print cartridge
• aligning print cartridges
• automatically cleaning print cartridges
• manually cleaning print cartridges and the print cradle
• cleaning the printer case
• refilling print cartridges
• maintaining print cartridges
• print cartridge part numbers
• the hp deskjet toolbox
49
Page 52

print cartridge status light
understanding the print cartridge status light
The Print Cartridge Status light flashes when:
• A print cartridge is improperly installed or malfunctioning
• The wrong print cartridge type is used
• The top cover is open
1. print cartridge status light
If the Print Cartridge Status light flashes, open the printer cover. The Print
Cartridge Cradle moves to the center of the printer.
See also:
print cartridge part numbers
50
Page 53

replacing a print cartridge
Before buying replacement print cartridges, verify the correct part numbers.
Warning! Keep both new and used print cartridges
out of the reach of children.
To replace a print cartridge:
1. Verify that the Out tray is down.
2. Press the Power button to turn on the printer.
3. Open the top cover.
The cradle moves to the center of the printer.
4. Raise the cradle latch.
5. Lift the print cartridge out of the print cartridge cradle and discard it.
1. Out tray (in down position) 2. press power button 3. open top cover
4. raise cradle latch 5. lift out cartridge
51
Page 54

6.
Remove the packaging from the replacement print cartridge and
carefully remove the protective vinyl tape.
Caution! Do not touch the print cartridge ink nozzles or copper
contacts. Touching these parts will result in clogs, ink failure, and bad
electrical connections. Do not remove the copper strips. They are
required electrical contacts.
1. black cartridge 2. tri-color cartridge 3. ink nozzles 4. copper contacts–do not touch or
remove the copper contacts 5. protective vinyl tape–remove only the protective vinyl
tape
52
Page 55

7.
Holding the print cartridge vertically with the copper contacts toward
the rear of the printer, push the print cartridge down into the cradle.
8. Secure the cradle latch.
You hear a click when the latch is fully secured.
9. Close the top cover.
If the Print Cartridge Status light continues to blink after installing a new print
cartridge, check the part number on the cartridge to confirm that the correct
cartridge is installed.
After installing a new print cartridge, align the printer cartridges to ensure
the best print quality.
See also:
aligning print cartridges
print cartridge part numbers
53
Page 56

aligning print cartridges
After installing a print cartridge, align the print cartridges to ensure the best
print quality.
Aligning the print cartridges takes about two minutes to complete and
requires you to examine two test pages.
To align print cartridges:
1. Open the HP Deskjet Toolbox.
2. Click the Align the Print Cartridges button.
3. Click Align.
The first test page prints.
4. Examine the test page and follow the onscreen instructions to complete
the Align Print Cartridges dialog box.
5. After you have completed the Align Print Cartridges dialog box, click
Continue.
The second test page prints.
6. Compare the second test page to the onscreen example and follow the
onscreen instructions to complete the alignment process.
54
Page 57

automatically cleaning print cartridges
If your printed pages are missing lines or dots, or they contain ink streaks,
the print cartridges may need to be cleaned.
Print cartridges are cleaned automatically using the following procedure:
1. Open the HP Deskjet Toolbox.
2. Select Clean the Print Cartridges and follow the on-screen directions.
If you have questions about the cleaning feature, point to the Clean the
Print Cartridge option and click the right mouse button to display the
What’s This? dialog box. Click What’s This? for more information.
If the print quality improves, but is still not acceptable, repeat the above
procedure.
If your printouts are still missing lines or dots after cleaning, the ink level may
be low in one or both of the print cartridges. If so, a print cartridge may need
to be replaced.
If ink streaks still appear on your printouts after cleaning, the print cartridges
and print cartridge cradle may need to be cleaned manually.
Only clean print cartridges when it is necessary. Unnecessary cleaning
wastes ink and shortens the life of the cartridge.
See also:
the hp deskjet toolbox
manually cleaning print cartridges and the print cradle
replacing a print cartridge
cleaning the printer case
55
Page 58

manually cleaning print cartridges and the print cradle
If the printer is used in a dusty environment, a small amount of debris may
accumulate inside the case. This debris can include dust, hair, carpet, or
clothing fibers. When it gets on the print cartridges and cradle, it can cause
ink streaks and smudges on printed pages. Ink streaking is easily corrected
by manually cleaning the cartridges and cradle.
gathering cleaning supplies
You will need the following items to clean the print cartridges and cradle:
• Distilled, filtered, or bottled water. Tap water contains contaminants
that damage print cartridges.
• Cotton swabs or other soft, lint-free material that will not stick to the
cartridges.
• Scrap paper or a paper towel on which to set the print cartridges
while you are working.
Be careful not to get ink on your hands or clothing as you clean.
preparing to clean
Remove the print cartridges from the printer before cleaning.
1. Press the Power button to turn on the printer, then raise the top cover.
The print cradle moves to the center of the printer.
2. Disconnect the power cord from the back of the printer.
56
Page 59

3.
Remove the print cartridge(s) and place it on a piece of paper with the
ink nozzle plate facing up.
See the illustration in “cleaning print cartridges” for the location of the
ink nozzle plate.
Do not leave the cartridges outside the printer for more than 30 minutes.
Caution! Do not touch the print cartridge ink nozzles or copper
contacts. Do not remove the copper strips.
cleaning print cartridges
1. Dip the end of a clean cotton swab into the distilled water and remove
any excess water.
2. Clean the face and edges of the print cartridge with the swab, as shown
in the following illustration.
Do not wipe the nozzle plate.
1. nozzle plate 2. clean these areas
3. Inspect the face and edges of the print cartridge for fibers.
Repeat steps 1 and 2 above if fibers are still present.
57
Page 60

cleaning the print cradle
If you use the dual-cartridge printing option after printing with only one
cartridge, you may need to clean the back plate of the unused compartment.
To clean the print cradle:
1. Dip the end of a clean cotton swab into the distilled water and remove
any excess water.
2. Wipe the compartment’s back plate.
Repeat this process until no ink residue appears on a clean swab.
3. Wipe the underside of the print cartridge cradle walls.
Repeat this process until no ink residue appears on a clean swab.
1. print cartridge cradle 2. right compartment back plate 3. cradle wall
58
Page 61

after cleaning
1. Reinsert the print cartridges and close the printer’s top cover.
2. Reconnect the power cord to the back of the printer, then press the
Power button to turn on the printer.
3. Print a test page from the HP Deskjet Toolbox by selecting Print a Test
.
Page
4. Repeat the cleaning procedure if smeared ink still appears on the
printouts.
See also:
aligning print cartridges
the hp deskjet toolbox
59
Page 62

cleaning the printer case
The printer ejects ink onto paper in a fine mist, and small amounts of ink may
be deposited on the printer case over time. Follow these guidelines when
cleaning the outside of the printer:
• Use a soft damp cloth to remove dust, smudges, stains, and spilled
ink from the printer case exterior. Use water only. Do not use
household cleaners or detergents.
• Do not lubricate the rod on which the print cartridge cradle moves. It
is normal to hear noise as the cradle moves back and forth on the
rod when the printer is new. The noise decreases with use.
The printer should be handled and stored in an upright, level position
for maximum performance and reliability.
60
Page 63

refilling print cartridges
Do not refill HP print cartridges. Refilling print cartridges causes the electronic
and mechanical components of the print cartridge to exceed their normal life
cycle. It also creates many potential problems, such as:
Poor print quality. Non-HP inks can contain elements that clog the
•
cartridge nozzles and cause inconsistent print quality. Non-HP inks
can also contain elements that corrode the cartridges’ electrical
components, resulting in poor printouts.
Potential damage. Ink from a refilled cartridge can leak onto the
•
electrical components in the printer. This can cause severe printer
damage, resulting in downtime and repair costs.
Caution! Damage that results from modifying or refilling HP print
cartridges is specifically excluded from HP printer’s warranty coverage.
To get the best performance from your printer, use only genuine, factory-filled
HP print cartridges.
See also:
print cartridge part numbers
61
Page 64

maintaining print cartridges
The following tips will help maintain HP print cartridges and ensure consistent
print quality:
• Keep all print cartridges in their sealed packages until they are
needed. Print cartridges should be stored at room temperature
(60—78 degrees F or 15.6—26.6 degrees C).
• If print cartridges have been removed from their sealed packages
and not used, store the cartridges in an airtight, plastic container.
Store print cartridges with the nozzle-side up. Do not allow anything
to touch the nozzles.
• If the vinyl tape has been removed from the print cartridge, do not
attempt to reattach it. Reattaching the tape will damage the print
cartridge.
• Once print cartridges are installed in the printer, leave them in the
print cartridge cradle unless they are being manually cleaned. This
prevents ink from evaporating or clogging the print cartridges.
Caution! Do not unplug the printer until printing is complete, the print
cartridge cradle returns to the home position on the right side of the
printer, and the printer has been turned off. Print cartridges dry out if not
stored in the home position.
62
Page 65

print cartridge part numbers
When replacing print cartridges for your HP Deskjet 845c/825c series
printer, buy print cartridges with the following part numbers:
•
Black: HP No. 15 (C6615D Series)
Tri-color: HP No. 17 (C6625A Series)
•
63
Page 66

the hp deskjet toolbox
Windows 98, Me, and 2000
The HP Deskjet Toolbox contains a number of useful tools to calibrate the
printer, clean the print cartridges, print a test page, and print a diagnostics
page.
To open the HP Deskjet Toolbox:
•Click
OR
• Right-click the Printer Settings Taskbar icon and select
Start > Programs > hp deskjet 845c/825c series > hp deskjet
845c/825c series Toolbox
To find out more about HP Deskjet Toolbox utilities, open the Toolbox,
point to an option, and click the right mouse button to display the What’s
This?
dialog box. Click What’s This? for information about the tool
selected.
.
Open Toolbox.
64
Page 67

solve a problem
• printer lights are flashing
• printer is not printing
• printer is too slow
• problems with printouts
65
Page 68

printer lights are flashing
Flashing lights indicate the printer status.
power light is flashing
The printer may be receiving data and preparing to print. The light stops
flashing when the printer has finished receiving data.
resume light is flashing
printer may be out of paper
1. Place paper in the In tray.
2. Press the Resume button on the front of the printer.
a paper jam may have occurred
1. Remove the paper from the In and Out trays.
2. Press the Resume button.
If you are printing labels, verify that a label did not get stuck while
going through the printer.
3. Print the document if the paper jam is cleared.
If the paper jam did not clear, proceed to step 4.
4. Open and remove the Rear Access Door by turning the latch to the left.
5. Remove the paper jam from the printer.
6. Replace and close the Rear Access Door.
7. Press the Resume button.
66
Page 69

print cartridge light is flashing
• The top cover is open. Close the top cover.
• There may be a problem with one of the print cartridges. Remove
and reinstall the print cartridge(s).
• Confirm that the correct print cartridge numbers are installed.
all lights are flashing
The printer may need to be restarted.
1. Press the Power button to turn off the printer.
2. Press the Power button to turn on the printer.
Proceed to step 3 if the lights continue to flash.
3. Press the Power button to turn off the printer.
4. Disconnect the printer from the power source.
5. Reconnect the printer to the power source.
6. Press the Power button to turn on the printer.
See also:
print cartridge status light
If you continue to have problems, contact HP Customer Care.
67
Page 70

printer is not printing
paper does not come out of the printer
Follow these instructions to correct the problem.
check the printer
Verify the following:
1. The printer is connected to the power source.
2. The cable connections are secure.
3. The printer is turned on.
4. The media is correctly placed in the In tray.
5. The printer’s top cover is closed.
6. The Rear Access Door is attached.
check the printer lights
1. If the Print Cartridge Status light is blinking, lift the printer cover to verify
that the print cartridges are properly installed.
2. If the Power light is blinking, the printer is in the process of printing.
3. If the Resume light is blinking, press the Resume button.
reinstall the printer software
See the quick start setup poster for more information.
68
Page 71

error messages appear when using a USB connection
the error message “there was an error writing to <name of usb port>”
appears
The printer may not be receiving correct data from the other USB device or
hub. Connect the printer directly to the USB port on the computer.
paper jams near the rear access door
1. Remove the paper from the In and Out trays.
2. Press the Resume button on the front of the printer.
3. If you are printing labels, verify that a label did not become detached
from the label sheet while passing through the printer.
4. Print the document if the paper jam is cleared.
Proceed to step 5 if the paper jam is not cleared.
5. Open the Rear Access Door by turning the latch counter-clockwise, then
remove the door.
6. Remove the paper jam, then replace the Rear Access Door.
7. Print the document.
69
Page 72

printer does not turn on
The printer may have drawn too much power.
1. Disconnect the power cord from the printer.
2. Wait approximately 10 seconds.
3. Reconnect the power cord to the printer.
4. Press the Power button to turn on the printer.
See also:
printing with the hp deskjet 845c/825c printer
If you continue to have problems, contact HP Customer Care.
70
Page 73

printer is too slow
The print speed and overall performance of the printer can be affected by
several variables.
computer does not meet system requirements
1. Verify the computer’s RAM and processor speed.
See Product Specifications for more information.
2. Close all unnecessary software programs.
Too many software programs may be running at the same time.
3. Increase space on the hard drive.
If your computer has less than 100 MB available on the hard drive, the
printer processing time will be longer. See the manual that came with
your computer regarding how to manage space on the computer’s hard
drive.
printer software is outdated
1. Verify the printer driver being used.
2. Log onto HP’s Website to download the most recent software updates for
your printer. See the quick reference guide for Website information.
71
Page 74

complex documents, graphics, or photographs are printing
You are printing a complex document. Documents containing graphics or
photographs print more slowly than text documents. To print faster, try the
following options:
• Select the
then select the
• Select the
600 x 1200.
Advanced tab on the hp deskjet 845c/825c series screen,
Low Memory Mode option.
Setup tab, then select the PhotoREt option instead of
conflicting USB cable connections
A printing conflict may occur when the printer and several USB devices are
attached to a hub. Use one of the following methods to solve the problem:
• Attach the printer’s USB cable directly to the computer instead of a
hub.
• When the printer is attached to a hub, do not use other USB devices
also attached to the hub while printing.
See also:
printing with the hp deskjet 845c/825c printer
the hp deskjet toolbox
product specifications for the hp deskjet 845c/825c series printer
If you continue to have problems, contact HP Customer Care.
72
Page 75

problems with printouts
blank pages print
The printer may process pages containing no text or images if:
• One or both print cartridges is empty.
• The vinyl tape is not removed from a print cartridge.
• A fax is being printed.
• The printer is configured for the wrong print cartridge.
• The print job was prematurely cancelled. Turn the printer off and then
on again.
check the print cartridges
1. Replace the print cartridge if it is empty.
2. Remove the protective piece of vinyl tape if it is still attached to the print
cartridge.
save a facsimile (fax) file in graphic format
1. Save the fax in a graphic format with a .tiff file name extension.
2. Copy and insert the graphic into a word processing document.
3. Save the document.
4. Print the document in the word processing program.
73
Page 76

check the print cartridge configuration
1. Open the printer and verify if the tri-color cartridge is installed alone or
if both cartridges are installed.
2. Open the HP Deskjet toolbox.
3. Click the Configuration tab and select the following option:
Configure Print Cartridge: Select the appropriate option.
•
4. Click Apply.
The Changing Printer Configuration box appears.
5. Click OK.
6. Close the printer.
document is printed off-center or at an angle
1. Verify that the paper is correctly placed in the In tray.
2. Verify that the paper guides fit snugly against the paper.
3. Reprint the document.
74
Page 77

parts of the document are missing or printed in the wrong place
Follow these instructions to reset paper orientation, page size, print margins,
and other options:
1. Use one of the following methods to display the hp deskjet 845c/825c
series
screen:
•Click
•Click
•Click
The hp deskjet 845c/825c series screen appears.
The option selected varies depending on the software program you are
using.
The hp deskjet 845c/825c series screen displays three tab options:
Setup, Features, and Advanced.
2. Select the Features tab then choose the following options:
•
•
3. Select the Setup tab, then verify that the appropriate paper size is
selected.
File > Print, then select Properties.
File > Print Setup, then select Properties.
File > Print > Setup, then select Properties.
Orientation: Appropriate orientation
Poster Printing: Deselect Poster Printing if appropriate
4. Verify that the margins are set within the printable area.
5. Select Scale to Fit on the Setup tab screen to verify that the text and
graphics are correctly scaled.
75
Page 78

printout does not reflect new print settings
The printer’s default settings may differ from the software application’s print
settings. Select the appropriate print settings within the application.
color documents are printing in grayscale
Color documents may print in grayscale because the printer is set for
grayscale printing instead of color printing.
setting the printer to print in color
1. Use one of the following methods to display the hp deskjet 845c/825c
screen:
series
•Click
•Click
•Click
The hp deskjet 845c/825c series screen appears.
The option selected varies depending on the software program you are
using.
The hp deskjet 845c/825c series screen displays three tab options:
Setup, Features, and Advanced.
File > Print, then select Properties.
File > Print Setup, then select Properties.
File > Print > Setup, then select Properties.
2. Select the Advanced tab, then select the following option:
Print in Grayscale: Deselect this box.
•
3. Click Apply.
4. Click OK.
color and black text/graphics are not aligned on the document
Align the print cartridges. For instructions, see aligning print cartridges.
76
Page 79

photos are not printing correctly
1. Verify that the photo media is placed in the In tray with the print side
down.
2. Slide the paper forward until it stops.
3. Slide the paper guides snugly against the paper, then push in the tray.
4. Use one of the following methods to display the hp deskjet 845c/825c
series screen:
•Click
•Click
•Click
The hp deskjet 845c/825c series screen appears.
The option selected varies depending on the software program you are
using.
The hp deskjet 845c/825c series screen displays three tab options:
Setup, Features, and Advanced.
5. Select the Setup tab, then select the following options:
•
•
•
File > Print, then select Properties.
File > Print Setup, then select Properties.
File > Print > Setup, then select Properties.
Paper Type: an hp photo paper
Paper Size: Appropriate size
Print Quality: Best
6. Click Apply > OK to return to the Print or Print Setup screen.
7. Click OK to reprint the photo.
See also:
replacing a print cartridge
minimum printing margins
If you continue to have problems, contact HP Customer Care.
77
Page 80

product specifications
• product specifications for the hp deskjet 845c/825c series printer
• minimum printing margins
• system requirements
78
Page 81

product specifications for the hp deskjet 845c/825c series printer
hp deskjet 845c model no. C8934A, C8934B
hp deskjet 825c model no. C6506A
black text print speed
HP Deskjet 825c:
Draft: Up to 6.5 pages per minute
HP Deskjet 845c:
Draft: Up to 8 pages per minute
mixed text with color graphics print speed
HP Deskjet 825c:
Draft: Up to 4.5 pages per minute
HP Deskjet 845c:
Draft: Up to 5 pages per minute
black truetype text resolution
(depending on paper type)
, C6506B
Draft: 300 x 300 dpi
Normal: 600 x 300 dpi
Best: 600 x 600 dpi
color resolution
(depending on paper type)
Draft: 300 x 300 dpi
Normal: 600 x 300 dpi + PhotoREt
Best: 600 x 600 dpi + PhotoREt
photo paper printing resolution
PhotoREt
600 x 1200 dpi
print technology
Drop-on-Demand thermal inkjet printing
79
Page 82

software compatibility
MS Windows compatible (98, Me, and 2000)
duty cycle
3,000 pages per month
memory
2 MB built-in RAM
buttons/lights
Print Cartridge Status light
Resume button and light
Power button and light
i/o interface
Universal Serial Bus (USB) compatible
dimensions
446 mm wide x 185 mm high x 355 mm deep
17. 56 in wide x 7.2 in high x 13.8 in deep
weight
5.5 kg (12 lb) without power supply and pens
operating environment
Maximum operating conditions:
Temperature: 41 to 104 degree F, 5 to 40 degrees C
Humidity: 15 to 80 percent RH non-condensing
Recommended operating conditions for best print quality:
Temperature: 59 to 95 degrees F or 15 to 35 degrees C
Humidity: 20 to 80 percent RH non-condensing
Storage conditions:
Temperature: -40 to 140 degrees F, -40 to 60 degrees C
80
Page 83

power consumption
5 watts maximum when off
5 watts average non-printing
20—30 watts average when printing
power requirements
Input Voltage: 100 to 240 Vac (±10%)
Input Frequency: 50/60 Hz (±3 Hz)
Accommodates the worldwide range of AC line voltages and frequencies.
declared noise emissions in accordance with ISO 9296
Sound power level, LwAd (1B=10 dB):
5.5 B in normal mode
Sound pressure level, LpAm (bystander positions):
42 dB in normal mode
alignment
Skew:
± .52 mm/mm (.006 in/in) on plain paper
± .254 mm/mm (.010 in/in) on hp transparency films
media weight
Paper:
U.S. Letter 60 to 90 g/m
2
Legal 75 to 90 g/m
Envelopes: 75 to 90 g/m
Cards: Up to 200 g/m
(20 to 24 lb)
2
(20 to 24 lb)
2
(110 lb index max)
Banner paper: 60 to 90 g/m
2
(16 to 24 lb)
2
(16 to 24 lb)
81
Page 84

media handling
Sheets: up to 100
Banners: up to 20 sheets
Envelopes: up to 15
Cards: up to 30 cards
Greeting cards: up to 30 cards
Transparencies: up to 25
Labels: up to 20 sheets of labels (use only U.S. Letter or A4—sized sheets)
Photo paper: a stack measuring up to 10mm (3/8 in) thick
Out tray capacity: up to 50 sheets
media size
Paper:
U.S. Letter 216 x 279 mm (8.5 x 11 in)
Legal 216 x 356 mm (8.5 x 14 in)
Executive 184 x 279 mm (7.25 x 10.5 in)
A4 210 x 297 mm
A5 148 x 210 mm
B5-JIS 182 x 257 mm
User Defined:
Width 127 to 216 mm (5.0 to 8.5 in)
Length 148 to 356 mm (5.83 to 14 in)
Banner:
U.S. Letter 216 x 279 mm (8.5 x 11 in)
A4 210 x 297 mm
Envelopes:
U.S. No. 10 105 x 241 mm (4.13 x 9.5 in)
Invitation A2 111 x 146 mm (4.37 x 5.75 in)
DL 220 x 110 mm
C6 114 x 162 mm
82
Page 85

Index/Greeting Cards:
76 x 127 mm (3 x 5 in)
102 x 152 mm (4 x 6 in)
127 x 203 mm (5 x 8 in)
A6: 105 x 148.5 mm
Hagaki: 100 x 148 mm
Labels:
U.S. Letter 216 x 279 mm (8.5 x 11 in)
A4 210 x 297 mm
Transparencies:
U.S. Letter 216 x 279 mm (8.5 x 11 in)
A4 210 x 297 mm
Photo (with tear-off tab) 102 x 152 mm (4 x 6 in)
print cartridges
See also:
print cartridge part numbers
83
Page 86

minimum printing margins
The printer cannot print outside a designated area of the page so your
document content must be contained within the printable area.
A4 paper
Left and Right Margins: 3.2 mm (0.13 in)
Top Margin: 1.0 mm (0.04 in)
Bottom Margin: 11.7 mm (0.46 in)
letter, legal, and executive paper
Left and Right Margins: 6.4 mm (0.25 in)
Top Margin: 1.0 mm (0.04 in)
Bottom Margin: 11.7 mm (0.46 in)
A5, B5, and user defined paper
Left and Right Margins: 3.2 mm (0.125 in)
Top Margin: 1.0 mm (0.04 in)
Bottom Margin: 11.7 mm (0.46 in)
cards (3 x 5, 4 x 6, 5 x 8, and A6)
Left and Right Margins: 3.2 mm (0.125 in)
Top Margin: 1.0 mm (0.04 in)
Bottom Margin: 11.7 mm (0.46 in)
Hagaki postcards
Left and Right Margins: 3.2 mm (0.125 in)
Top Margin: 1.0 mm (0.04 in)
Bottom Margin: 11.7 mm (0.46 in)
envelopes
Left Margin: 1.0 mm (0.125 in)
Right Margin: 11.7 mm (0.46 in)
Top Margin: 3.2 mm (0.13 in)
Bottom Margin: 3.2 mm (0.13 in)
84
Page 87

banners - A4 (210 x 297 mm [8.27 x 11.7 in])
Left and Right Margins: 3.2 mm (0.13 in)
Top Margin: 0.0 mm (0.00 in)
Bottom Margin: 0.0 mm (0.00 in)
banners - letter (216 x 279 mm [8.5 x 11 in])
Left and Right Margins: 3.2 mm (0.125 in)
Top Margin: 0.0 mm (0.00 in)
Bottom Margin: 0.0 mm (0.00 in)
85
Page 88

system requirements
Your computer should meet the following requirements:
Microsoft Windows 2000
Minimum Processor Speed: Pentium 133 MHz
Required RAM: 64 MB
Required Free Hard Disk Space: 40 MB
Microsoft Windows 98 and Me
Minimum Processor Speed: Pentium 66 MHz
Required RAM: 32 MB
Required Free Hard Disk Space: 40 MB
86
Page 89

index
a
alignment 81
b
banner paper 38, 39
banner printing 9
banners
printing
binding
book
tablet 44
blank pages printing 73
book binding 44
built-in memory 80
business card printing 26
buttons 80
Power 7
Resume 7
38
44
c
calibrating printer 64
cleaning print cartridge 64
automatic 55
manual 56
cleaning printer case 60
color
adjustments
color documents are printing in grayscale
76
color graphics 79
11
d
damage to printer 52, 61
diagnostics page 64
digital photos 31
dimensions 80
dual-cartridge printing 47
duty cycle 80
e
envelope printing 9
guidelines 20
single 16
stack 18
error writing to USB port 69
f
flashing lights 66, 68
all lights flashing 67
Power light 66
Print Cartridge light 67
Resume light 66
g
greeting card printing 32
greeting cards
printing
guidelines
34
h
HP Deskjet printer features 2
HP Deskjet Toolbox 64
opening 64
utilities 64
Windows 98, Me, 2000 64
HP photo paper 30, 31
i
In tray 7, 8
index card printing 26
ink streaks 55, 56
iron-on transfer printing 40
guidelines 42
87
Page 90

l
label printing 23
guidelines 25
lights 80
flashing 66, 68
Power 7
Print Cartridge Status 6, 50, 53
Resume 7
Low Memory Mode 11, 72
m
manual two-sided printing 43
guidelines 45
margins 12, 84
banners 85
cards 84
envelopes 84
paper 84
postcards 84
setting 12
media sizes 82
media weight 81
memory 80
minimum printing margins 12, 84
mirror image 42
missing lines or dots 55
mouse icon 4
n
noise emissions 81
note icon 4
o
operating environment 80
Out tray 7, 9
p
page orientation 10
paper alignment 81
paper capacity 82
paper does not come out of printer 68
paper jams 66, 69
clearing 66
in Rear Access Door 69
paper sizes 82
paper trays 7, 8
In tray 8
Out tray 9
paper types 81
part of document missing 75
photo paper 30
photo paper printing resolution 79
photograph printing 29
guidelines 31
PhotoREt 30, 31, 72, 79
photos printing incorrectly 77
poster printing 35
guidelines 36
power consumption 81
print cartridge
aligning
cleaning 64
cleaning debris 56
copper contacts 52
ink nozzle plate 57
ink nozzles 52
maintaining 62
part numbers 63
refilling 61
removing debris 57
replacing 51, 73
storing 62
when to clean 55
print cartridge cradle 51
cleaning 58
Print Cartridge Status light 50, 53
print properties 10
print quality 14
print settings 14
default 14
54
automatic 55
manual 56
warranty exclusion 61
88
Page 91

print speed 71, 79
black text 79
mixed text with color graphics 79
print technology 79
printable area 12, 84
printer
cleaning cartridges
56
cleaning case 60
damage to 61
dimensions 80
I/O interface 80
media sizes 82
media types 81
media weight 81
minimum printing margins 12, 84
noise emissions 81
operating conditions 80
operating environment 80
paper alignment 81
paper capacity 82
paper sizes 82
power consumption 81
print cartridge cradle noise 60
voltage 81
weight 80
printer does not turn on 70
printer driver 10
printer features 6
printer maintenance
HP Deskjet Toolbox
64
printer memory 80
printer not printing 68
Printer Properties
Advanced tab
Windows 98, Me, 2000
Features tab
Windows 98, Me, 2000
Setup tab
Windows 98, Me, 2000,
Printer Settings taskbar icon 13
printer software 10
11
10
10
printer specifications 79
printer status
flashing lights
66
printer too slow 71
printing
banners
38
guidelines 39
business cards 26
guidelines 28
envelopes
guidelines
20
single 16
stack 18
greeting cards 32
guidelines 34
index cards 26
guidelines 28
iron-on transfers 40, 41
guidelines 42
labels 23
guidelines 23, 25
manual two-sided 43
guidelines 45
mirror image 42
photographs 29
guidelines 31
posters 35
guidelines 36
small media 26
guidelines 28
transparencies 21
guidelines 22
Windows 95, 98, ME, 2000, NT4 10
printing margins 12, 84
minimum 84
setting 12, 84
printing speed
increasing
31
printing test page 59
printout problems 73
89
Page 92

r
Rear Access Door 66
refilling print cartridge 61
restarting printer
when to restart
67
s
Setup tab 10
shortcuts
taskbar icon
single-cartridge printing 48
with color cartridge 48
small media printing 26
software compatibility 80
specifications 79
minimum printing margins 84
print cartridges 83
system requirements 86
stack of envelopes 18
surge protector 7
symbols 3
system requirements 86
Windows 2000 86
Windows 98 & Me requirements 86
14
t
tablet binding 44
taskbar icon 13
shortcuts 14
text resolution 79
Toolbox 64
opening 64
utilities 64
Windows 98, Me, 2000 64
transparency printing 21
guidelines 22
troubleshooting
blank pages printing
color documents are printing in gray-
76
scale
complex documents 72
document printing at angle 74
error writing to USB port 69
flashing lights 66, 68
73
new print setting not shown 76
paper does not come out of printer 68
paper jams 66, 69
part of document missing 75
photos printing incorrectly 77
print cartridges 73
printer does not turn on 70
printer not printing 68
printer too slow 71
printout problems 73
USB connection problems 69, 72
two-sided printing 10
manual 43
u
USB connection problems 69, 72
w
warning messages 3
warnings icon 3
What’s This? help feature 4
90
 Loading...