


 Loading...
hp LaserJet 1010  1012
1012  1015
1015
series printer
service

hp LaserJet 1010 series printer
Service Manual
Copyright Information
© 2003 Copyright Hewlett-Packard
Development Company, LP
Reproduction, adaptations, or translation without prior written permission is prohibited except as allowed under copyright laws.
The information contained in this document is subject to change without notice.
The only warranties for HP products and services are set forth in the express warranty statements accompanying such products and services. Nothing herein should be construed as constituting an additional warranty. HP shall not be liable for technical or editorial errors or omissions contained herein.
Part number Q2460-90928
Edition 1, 8/2003
Information regarding FCC Class B, Parts 15 and 68 requirements can be found in the user guide.
NOTICE TO U.S. GOVERNMENT USERS: RESTRICTED RIGHTS COMMERCIAL COMPUTER SOFTWARE: “Use, duplication, or disclosure by the Government is subject to restrictions as set forth in subparagraph (c) (1)(ii) of the Rights in Technical Data Clause at DFARS 52.2277013.”
Trademark Credits
Microsoft, Windows, and MS-DOS are U.S. registered trademarks of Microsoft Corporation.
TrueType is a U.S. trademark of Apple Computer, Inc.
All other products mentioned herein may be trademarks of their respective companies.
Safety Information
WARNING!
Potential Shock Hazard
Always follow basic safety precautions when using this product to reduce risk of injury from fire or electric shock.
Read and understand all instructions in the user guide.
Observe all warnings and instructions marked on the product.
Use only a grounded electrical outlet when connecting the HP LaserJet 1010 series printer to a power source. If you don’t know whether the outlet is grounded, check with a qualified electrician.
Do not touch the contacts on the end of any of the sockets on the HP LaserJet 1010 series printer. Replace damaged cords immediately.
Unplug this product from wall outlets before cleaning.
Do not install or use this product near water or when you are wet.
Install the product securely on a stable surface.
Install the product in a protected location where no one can step on or trip over the power cord and the power cord will not be damaged.
If the product does not operate normally, see the online user guide.
Refer all servicing questions to qualified personnel.
Table of contents
1 Product Information |
|
HP LaserJet 1010 series has three product configurations...................................................... |
2 |
The HP LaserJet 1010, 1012, and 1015............................................................................. |
2 |
Introduction............................................................................................................................... |
3 |
Overview of product.................................................................................................................. |
4 |
Model and serial numbers.................................................................................................. |
4 |
Hardware description.......................................................................................................... |
5 |
Firmware description ......................................................................................................... |
6 |
Product Specifications.............................................................................................................. |
7 |
HEWLETT-PACKARD LIMITED WARRANTY STATEMENT .................................................. |
9 |
Extended warranty.................................................................................................................. |
10 |
Print cartridge information ...................................................................................................... |
11 |
Refilled print cartridges ................................................................................................... |
11 |
Recycling print cartridges ................................................................................................ |
11 |
Declaration of Conformity....................................................................................................... |
12 |
For Regulatory Topics ONLY, contact:................................................................................... |
13 |
Laser safety statement..................................................................................................... |
13 |
Canadian DOC regulations............................................................................................... |
13 |
Korean EMI statement...................................................................................................... |
13 |
Laser statement for Finland.............................................................................................. |
14 |
2 Installation and Operation |
|
Operating environment .......................................................................................................... |
16 |
Identifying the control panel components............................................................................... |
17 |
Product media specifications.................................................................................................. |
18 |
Supported media sizes (printer)....................................................................................... |
18 |
Guidelines for using media..................................................................................................... |
19 |
Paper and Transparencies .............................................................................................. |
19 |
Common media problems table ....................................................................................... |
19 |
Labels .............................................................................................................................. |
19 |
Envelopes ........................................................................................................................ |
20 |
Card stock and heavy media ........................................................................................... |
20 |
Loading media ....................................................................................................................... |
22 |
Loading media to print...................................................................................................... |
22 |
3 Maintenance |
|
Life expectancies of parts that wear ...................................................................................... |
24 |
Cleaning the product............................................................................................................... |
25 |
Cleaning the print path..................................................................................................... |
25 |
Cleaning the print cartridge area...................................................................................... |
26 |
Cleaning the printer pickup roller ..................................................................................... |
27 |
User-replaceable parts ........................................................................................................... |
29 |
Replacing the printer pickup roller ................................................................................... |
29 |
Replacing the printer separation pad................................................................................ |
31 |
ENWW |
iii |
Replacing the main input tray (paper pickup tray assembly)............................................ |
33 |
Replacing the output tray extension (delivery tray assembly).......................................... |
34 |
4 Operational overview |
|
Basic functions........................................................................................................................ |
36 |
Formatter system.................................................................................................................... |
37 |
Central processing unit .................................................................................................... |
37 |
RAM.................................................................................................................................. |
37 |
Universal Serial Bus interface.......................................................................................... |
37 |
Parallel interface (HP LaserJet 1015 only)....................................................................... |
37 |
Control panel.................................................................................................................... |
37 |
Draft mode ....................................................................................................................... |
38 |
MEt................................................................................................................................... |
38 |
Enhanced I/O ................................................................................................................... |
38 |
PJL overview ................................................................................................................... |
38 |
Printer functions...................................................................................................................... |
39 |
Engine control system (engine control unit and power assembly)................................... |
39 |
Image formation system................................................................................................... |
43 |
Printer paper feed system................................................................................................ |
44 |
Jam detection .................................................................................................................. |
46 |
Solenoid, sensors, and switches...................................................................................... |
46 |
Basic sequence of operation (formatter-to-printer)........................................................... |
47 |
5 Removal and replacement |
|
Removal and replacement strategy........................................................................................ |
52 |
Required tools ................................................................................................................. |
52 |
Before performing service................................................................................................ |
52 |
Print cartridge .................................................................................................................. |
52 |
Differences between the series models............................................................................ |
53 |
Part removal order ........................................................................................................... |
53 |
User-replaceable parts ........................................................................................................... |
55 |
Replacing the printer pickup roller ................................................................................... |
55 |
Replacing the printer separation pad................................................................................ |
57 |
Replacing the main input tray (paper pick-up tray assembly)........................................... |
59 |
Replacing the output tray extension (delivery tray assembly).......................................... |
60 |
Covers..................................................................................................................................... |
61 |
Right side cover................................................................................................................ |
62 |
Left side cover.................................................................................................................. |
65 |
Print cartridge access door, fuser cover, and rear panel.................................................. |
65 |
Front cover....................................................................................................................... |
68 |
Internal assemblies................................................................................................................. |
70 |
Transfer roller assembly................................................................................................... |
70 |
Engine power assembly................................................................................................... |
72 |
Fuser (fixing) assembly.................................................................................................... |
73 |
Paper pickup assembly.................................................................................................... |
75 |
Engine control unit assembly............................................................................................ |
76 |
Laser scanner assembly................................................................................................... |
78 |
6 Troubleshooting |
|
Basic troubleshooting.............................................................................................................. |
82 |
Control panel power-on functions........................................................................................... |
84 |
Power-on Functions: Time Ranges.................................................................................. |
84 |
Control Panel Pages............................................................................................................... |
86 |
Control Panel Pages: Time Ranges................................................................................. |
86 |
iv |
ENWW |
Control Panel Lights................................................................................................................ |
87 |
Control Panel Light Patterns............................................................................................. |
87 |
Fatal Errors....................................................................................................................... |
91 |
Image troubleshooting............................................................................................................ |
92 |
Print cartridge problems................................................................................................... |
92 |
Solving image-quality problems ....................................................................................... |
92 |
Solving paper-feed problems.................................................................................................. |
99 |
Solving print paper-feed problems.................................................................................... |
99 |
Functional checks................................................................................................................. |
103 |
Half self-test functional check......................................................................................... |
103 |
Drum rotation functional check ...................................................................................... |
105 |
High-voltage contacts check........................................................................................... |
105 |
Troubleshooting tools ........................................................................................................... |
107 |
Repetitive image defect ruler.......................................................................................... |
107 |
Circuit diagram .............................................................................................................. |
108 |
Solenoid, sensors, and switches........................................................................................... |
109 |
7 Parts and diagrams |
|
Ordering parts and supplies ................................................................................................. |
112 |
Parts .............................................................................................................................. |
112 |
Related documentation and software ............................................................................ |
112 |
Parts that wear ............................................................................................................. |
112 |
Accessories and consumables ............................................................................................ |
113 |
Common hardware ........................................................................................................ |
114 |
How to use the parts lists and diagrams ........................................................................ |
114 |
Field-replaceable units ......................................................................................................... |
115 |
Alphabetical parts list............................................................................................................ |
118 |
Numerical parts list............................................................................................................... |
119 |
Index |
|
ENWW |
v |
vi |
ENWW |
List of tables
Table 1-1. Physical specifications............................................................................................. |
7 |
|
Table 1-2. Environmental specifications .................................................................................. |
7 |
|
Table 1-3. Performance of HP LaserJet 1010.......................................................................... |
7 |
|
Table 1-4. Performance of HP LaserJet 1012 and 1015.......................................................... |
7 |
|
Table 1-5. Electrical specifications............................................................................................ |
7 |
|
Table 2-1. Media types........................................................................................................... |
18 |
|
Table 3-1. Life expectancies of parts that wear...................................................................... |
24 |
|
Table 4-1. Basic sequence of operation................................................................................. |
47 |
|
Table 6-1. Basic troubleshooting .......................................................................................... |
82 |
|
Table 6-2. Solving print image-quality problems..................................................................... |
93 |
|
Table 6-3. Solving print paper-feed problems......................................................................... |
99 |
|
Table 7-1. Technical support websites ................................................................................ |
112 |
|
Table 7-2. |
Accessories ........................................................................................................ |
113 |
Table 7-3. |
Replaceable Assemblies .................................................................................... |
116 |
Table 7-4. |
Alphabetical parts list........................................................................................... |
118 |
Table 7-5. |
Numerical parts list.............................................................................................. |
119 |
ENWW |
vii |
viii |
ENWW |
List of figures
Figure 1-1. Model and serial number labels.............................................................................. |
4 |
Figure 1-2. Front and side view................................................................................................ |
4 |
Figure 1-3. Back and side view................................................................................................. |
5 |
Figure 2-1. Dimensions of product.......................................................................................... |
16 |
Figure 2-2. Control panel lights and buttons........................................................................... |
17 |
Figure 4-1. Basic configuration............................................................................................... |
36 |
Figure 4-2. Printer functional block diagram........................................................................... |
39 |
Figure 4-3. Laser/scanner operation....................................................................................... |
41 |
Figure 4-4. High-voltage power supply circuit......................................................................... |
42 |
Figure 4-5. Image formation block diagram............................................................................ |
43 |
Figure 4-6. Printer paper path ................................................................................................ |
45 |
Figure 4-7. Solenoid, photosensors, and switches................................................................. |
47 |
Figure 4-8. Printer timing diagram ........................................................................................ |
49 |
Figure 5-1. Removing the print cartridge................................................................................ |
53 |
Figure 5-2. HP LaserJet 1015 parallel port............................................................................. |
53 |
Figure 5-3. Product teardown tree.......................................................................................... |
54 |
Figure 5-4. Removing the right side cover (1 of 5).................................................................. |
62 |
Figure 5-5. Removing the right side cover (2 of 5).................................................................. |
62 |
Figure 5-6. Removing the right side cover (3 of 5).................................................................. |
63 |
Figure 5-7. Removing the right side cover (4 of 5).................................................................. |
64 |
Figure 5-8. Removing the right side cover (5 of 5).................................................................. |
64 |
Figure 5-9. Removing the rear panel (1 of 5).......................................................................... |
65 |
Figure 5-10. Removing the rear panel (2 of 5)........................................................................ |
66 |
Figure 5-11. Removing the rear panel (3 of 5)........................................................................ |
66 |
Figure 5-12. Removing the rear panel (4 of 5)........................................................................ |
67 |
Figure 5-13. Removing the rear panel (5 of 5)........................................................................ |
67 |
Figure 5-14. Removing the front cover (1 of 3)....................................................................... |
68 |
Figure 5-15. Removing the front cover (2 of 3)....................................................................... |
68 |
Figure 5-16. Removing the front cover (3 of 3)....................................................................... |
69 |
Figure 5-17. Removing the transfer roller (1 of 3)................................................................... |
70 |
Figure 5-18. Removing the transfer roller (2 of 3)................................................................... |
71 |
Figure 5-19. Removing the transfer roller (3 of 3)................................................................... |
72 |
Figure 5-20. Removing the engine power assembly (1 of 2).................................................. |
73 |
Figure 5-21. Removing the engine power assembly (2 of 2).................................................. |
73 |
Figure 5-22. Removing the fuser (fixing) assembly................................................................ |
74 |
Figure 5-23. Fragile tab on fuser assembly............................................................................ |
75 |
Figure 5-24. Removing the paper pickup assembly................................................................ |
75 |
Figure 5-25. Removing the ECU assembly (1 of 5)................................................................ |
76 |
Figure 5-26. Removing the ECU assembly (2 of 5)................................................................ |
76 |
Figure 5-27. Removing the ECU assembly (3 of 5)................................................................ |
77 |
Figure 5-28. Removing the ECU assembly (4 of 5)................................................................ |
77 |
Figure 5-29. Removing the ECU assembly (5 of 5)................................................................ |
78 |
Figure 5-30. Removing the laser scanner assembly............................................................... |
79 |
Figure 6-1. Control panel lights legend................................................................................... |
87 |
Figure 6-2. Check the fuser connections.............................................................................. |
104 |
Figure 6-3. Check the fuser connections.............................................................................. |
104 |
ENWW |
ix |
Figure 6-4. Print cartridge high-voltage contacts.................................................................. |
106 |
|
Figure 6-5. Printer high-voltage contacts.............................................................................. |
106 |
|
Figure 6-6. Repetitive image defect ruler.............................................................................. |
107 |
|
Figure 6-7. |
Circuit diagram................................................................................................... |
108 |
Figure 6-8. |
Solenoid, photosensors, and switches............................................................... |
109 |
Figure 7-1. |
All Models .......................................................................................................... |
115 |
Figure 7-2. |
Exploded View: Field Replaceable Units ........................................................... |
116 |
x |
ENWW |

Product Information
This chapter provides general product information for HP LaserJet 1010 series printers. |
|
HP LaserJet 1010 series has three product configurations...................................................... |
2 |
The HP LaserJet 1010, 1012, and 1015............................................................................. |
2 |
Introduction............................................................................................................................... |
3 |
Overview of product.................................................................................................................. |
4 |
Model and serial numbers.................................................................................................. |
4 |
Hardware description.......................................................................................................... |
5 |
Firmware description ......................................................................................................... |
6 |
Product Specifications.............................................................................................................. |
7 |
HEWLETT-PACKARD LIMITED WARRANTY STATEMENT .................................................. |
9 |
Extended warranty.................................................................................................................. |
10 |
Print cartridge information ...................................................................................................... |
11 |
Refilled print cartridges ................................................................................................... |
11 |
Recycling print cartridges ................................................................................................ |
11 |
Declaration of Conformity....................................................................................................... |
12 |
For Regulatory Topics ONLY, contact:................................................................................... |
13 |
Laser safety statement..................................................................................................... |
13 |
Canadian DOC regulations............................................................................................... |
13 |
Korean EMI statement...................................................................................................... |
13 |
Laser statement for Finland.............................................................................................. |
14 |
ENWW |
1 |
HP LaserJet 1010 series has three product configurations
The HP LaserJet 1010, 1012, and 1015
The HP LaserJet 1010 is the base model of the series. It offers the following:
●Prints up to 12 pages per minute.
●8 seconds to first page out.
●600 x 600 dpi.
●150 sheet paper capacity (20 lb).
●A priority input tray.
●A horizontal paper feed path.
●8 MB of RAM (not expandable).
●A host-based driver.
●A USB port
The HP LaserJet 1012 is the mid-range model of the series. It offers all the features of the HP LaserJet 1010, plus the following:
●Prints up to 14 pages per minute A4 (15 letter).
●1200 x 1200 dpi effective output quality [600 x 600 x 2 dpi with HP Resolution Enhancement (REt) technology.
●Networking support through HP Jetdirect devices
The HP LaserJet 1015 is the top model of the series. It offers all the features of the HP LaserJet 1012, plus the following:
●16 MB of RAM (not expandable).
●A host-based driver and HP's PCL 5e driver.
●A USB port and a parallel port
2 Chapter 1 Product Information |
ENWW |
Introduction
The HP LaserJet 1010 series is designed to print documents easily with the laser quality you have come to expect from an HP LaserJet product.
ENWW |
Introduction 3 |

Overview of product
Model and serial numbers
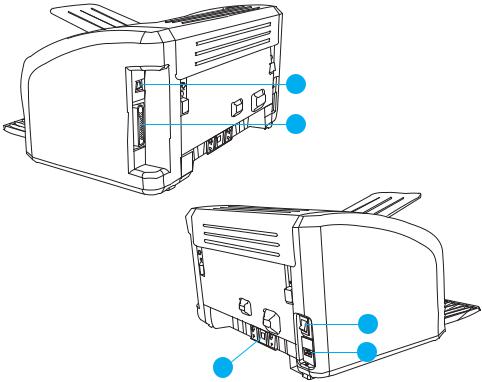
The model number and serial number are listed on an identification label located on the back of the product.
The serial number contains information about the country/region of origin, revision level, production code, and production number of the product.
The label also contains power rating and regulatory information.
Figure 1-1. Model and serial number labels
1
10 |
2 |
|
|
||
|
3 |
|
9 |
4 |
|
5 |
||
8 |
||
|
7 6
Figure 1-2. Front and side view
1Attention light
2Ready light
3Go light
4Go button
5Cancel job button
6Print cartridge door
7Priority feed slot
8Main input tray
9Tray cover (only with HP LaserJet 1012 printer and HP LaserJet 1015 printer in some countries/ regions)
10Output bin
4 Chapter 1 Product Information |
ENWW |
11
12
13
14
|
|
15 |
Figure 1-3. |
Back and side view |
|
|
11 |
USB port |
|
12 |
Parallel port (HP LaserJet 1015 printer only) |
|
13 |
On/off switch |
|
14 |
Power receptacle |
|
15 |
Separation pad |
Hardware description
The HP LaserJet 1010 product provides 600 x 600 dpi printing. The HP LaserJet 1012, and 1015 offer 600 x 600 x 2 dpi printing (effectively 1200 dot per inch (dpi) using HP REt technology).
The product prints at 12 pages per minute (HP LaserJet 1010) or 15 ppm for letter-size paper and 14 ppm for A4-size paper (HP LaserJet 1012 and HP LaserJet 1015). With 600 dpi printing for the HP LaserJet 1010 printer and an effective 1200 dpi printing resolution for the other models, the product has exceptional text and graphics print quality. The simple control panel and improved paper handling make this product very easy to use.
The main input tray has a 150-sheet (20 lb paper) capacity for continuous, multiple-page printing. The priority input tray is used for manual feeding single sheets of most recommended media and will hold up to ten sheets of 20 lb paper. Both trays are centerjustified for all supported paper sizes. The output bin holds up to 125 sheets of 20 lb paper.
The product has a very fast first-page-out, at less than eight seconds. The base memory contains 8 MB of RAM, and an embedded 133 MHz processor.
The print engine has an average duty cycle of 1,000 pages per month (7,000 peak). The standard toner life is 2,000 pages with 5 percent toner coverage.
ENWW |
Overview of product 5 |
Firmware description
The firmware in the product includes:
●Host based printing
●PCL Level 5e (HP LaserJet 1015 printer)
●EconoMode functionality
The 1012 and 1015 firmware has Resolution Enhancement technology (REt).
6 Chapter 1 Product Information |
ENWW |

Product Specifications
Table 1-1. Physical specifications
Product |
Height |
Depth |
Width |
Weight |
physical |
208 mm |
230 mm |
370 mm |
5.9 kg |
dimensions |
(8.2 in) |
(9.1 in) |
(14.6 in) |
(13 lbs) |
Table 1-2. Environmental specifications
 Category
Operating environment (unit plugged into an AC outlet)
 Specification
●Temperature: 10° to 32.5° C (50° to 90.5° F)
●Humidity: 20 to 80 percent relative humidity (no condensation)
Storage environment (unit not plugged into an AC outlet)
●Temperature: 0° to 40° C (32° to 104° F)
●Humidity: 10 to 80 percent relative humidity (no condensation)
Table 1-3. Performance of HP LaserJet 1010
Item |
Value |
Print resolution |
|
Normal black and white |
600 by 600 dpi |
Print speed |
|
A4, black and white |
12 ppm |
Table 1-4. Performance of HP LaserJet 1012 and 1015
 Item
Item  Value
Value
Print resolution
Normal black and white 600 by 600 x 2 (effective 1200 dpi resolution using HP REt technology) dpi
Print speed |
|
A4, black and white |
14 ppm |
Table 1-5. Electrical specifications
Item |
110-volt models |
220-volt models |
Power supply |
110 to 127 V (+/- 10 %) |
220 to 240 V (+/- 10 %) |
|
50 to 60 Hz (+/- 2 Hz) |
50 to 60 Hz (+/- 2 Hz) |
ENWW |
Product Specifications 7 |

Note
WARNING!
Note
Item |
|
110-volt models |
|
220-volt models |
Power consumption (typical) |
|
|
|
|
During printing |
|
250 W (average) |
|
250 W (average) |
|
|
|||
During standby |
|
2 W (average) |
|
2 W (average) |
|
|
|||
Power Save mode |
|
2 W (average) |
|
2 W (average) |
Off mode |
|
0 W (average) |
|
0 W (average) |
|
|
|||
Heat output |
|
|
|
|
During printing |
|
X BTU/hr |
|
X BTU/hr |
Minimum recommended circuit |
|
4.5 A |
|
2.3 A |
capacity |
|
|
|
|
Values subject to change. See http://www.hp.com/support/lj1010 for current information.
Power sources are not interchangeable.
Activity level |
Operator (<1m) |
Bystander (1m) |
Sound power |
Active |
LpAm56 dB (A) |
LpAm48 dB (A) |
LWAd6.1 Bels (A) |
Idle |
LpAmN/A dB (A) |
LpAmN/A dB (A) |
LWAdN/A Bels (A) |
|
(inaudible) |
(inaudible) |
(inaudible) |
Values subject to change. See http://www.hp.com/support/lj1010 for current information. During other operations, acoustic emissions may vary.
8 Chapter 1 Product Information |
ENWW |
HEWLETT-PACKARD LIMITED WARRANTY STATEMENT
HP PRODUCT |
DURATION OF LIMITED WARRANTY |
HP LaserJet 1010 series (1010, 1012, 1015) |
One year from date of purchase. |
HP warrants to you, the end-user customer, that HP hardware and accessories will be free from defects in materials and workmanship after the date of purchase, for the period specified above. If HP receives notice of such defects during the warranty period, HP will, at its option, either repair or replace products which prove to be defective. Replacement products may be either new or equivalent in performance to new.
HP warrants to you that HP software will not fail to execute its programming instructions after the date of purchase, for the period specified above, due to defects in material and workmanship when properly installed and used. If HP receives notice of such defects during the warranty period, HP will replace software which does not execute its programming instructions due to such defects.
HP does not warrant that the operation of HP products will be uninterrupted or error free. If HP is unable, within a reasonable time, to repair or replace any product to a condition as warranted, you will be entitled to a refund of the purchase price upon prompt return of the product.
HP products may contain remanufactured parts equivalent to new in performance or may have been subject to incidental use.
Warranty does not apply to defects resulting from (a) improper or inadequate maintenance or calibration, (b) software, interfacing, parts or supplies not supplied by HP, (c) unauthorized modification or misuse, (d) operation outside of the published environmental specifications for the product, or (e) improper site preparation or maintenance.
TO THE EXTENT ALLOWED BY LOCAL LAW, THE ABOVE WARRANTIES ARE EXCLUSIVE AND NO OTHER WARRANTY OR CONDITION, WHETHER WRITTEN OR ORAL, IS EXPRESSED OR IMPLIED AND HP SPECIFICALLY DISCLAIMS ANY IMPLIED WARRANTIES OR CONDITIONS OF MERCHANTABILITY, SATISFACTORY QUALITY, AND FITNESS FOR A PARTICULAR PURPOSE. Some countries/regions, states or provinces do not allow limitations on the duration of an implied warranty, so the above limitation or exclusion might not apply to you. This warranty gives you specific legal rights and you might also have other rights that vary from country/region to country/region, state to state, or province to province. HP's limited warranty is valid in any country/region or locality where HP has a support presence for this product and where HP has marketed this product. The level of warranty service you receive may vary according to local standards. HP will not alter form, fit, or function of the product to make it operate in a country/region for which it was never intended to function for legal or regulatory reasons.
TO THE EXTENT ALLOWED BY LOCAL LAW, THE REMEDIES IN THIS WARRANTY STATEMENT ARE YOUR SOLE AND EXCLUSIVE REMEDIES. EXCEPT AS INDICATED ABOVE, IN NO EVENT WILL HP OR ITS SUPPLIERS BE LIABLE FOR LOSS OF DATA OR FOR DIRECT, SPECIAL, INCIDENTAL, CONSEQUENTIAL (INCLUDING LOST PROFIT OR DATA), OR OTHER DAMAGE, WHETHER BASED IN CONTRACT, TORT, OR OTHERWISE. Some countries/regions, states or provinces do not allow the exclusion or limitation of incidental or consequential damages, so the above limitation or exclusion may not apply to you.
THE WARRANTY TERMS CONTAINED IN THIS STATEMENT, EXCEPT TO THE EXTENT LAWFULLY PERMITTED, DO NOT EXCLUDE, RESTRICT OR MODIFY AND ARE IN ADDITION TO THE MANDATORY STATUTORY RIGHTS APPLICABLE TO THE SALE OF THIS PRODUCT TO YOU.
ENWW |
HEWLETT-PACKARD LIMITED WARRANTY STATEMENT |
9 |
Extended warranty
In most countries/regions, HP Care Pack provides additional coverage, beyond standard warranty for the HP device and for all HP-supplied internal components. This hardware maintenance can uplift the standard warranty, for example, from next-day to same-day service, and/or extend it up to 5 years. The HP Care Pack can provide Express Exchange or onsite service. For more information, see the support flyer that came with your device for the appropriate phone numbers and information.
10 Chapter 1 Product Information |
ENWW |
Print cartridge information
The print cartridge is designed to simplify replacement of the major consumable parts. The print cartridge contains the printing mechanism and a supply of toner.
At 5 percent page coverage, a standard print cartridge will print approximately 2,000 pages. However, a cartridge should print more pages if it regularly prints pages with less coverage, such as short memos. The cartridge might print fewer pages if heavy or bold print is used.
For best results, always use a print cartridge before the expiration date stamped on the cartridge box.
Refilled print cartridges
While Hewlett-Packard does not prohibit the use of refilled print cartridges during the warranty period or while the product is under a maintenance contract, it is not recommended for the following reasons:
●Repairs resulting from the use of refilled cartridges are not covered under HewlettPackard warranty or maintenance contracts.
●Hewlett-Packard has no control or process to ensure that a refilled cartridge functions at the high level of reliability of a new HP LaserJet toner cartridge. Hewlett-Packard also cannot predict the long-term reliability effect on the product from using different toner formulations found in refilled cartridges.
●The print quality of HP LaserJet print cartridges influences the customer’s perception of the product. Hewlett-Packard has no control over the actual print quality of a refilled cartridge.
●Parts that are critical to print quality may not be replaced when the cartridge is refilled with toner.
Recycling print cartridges
In order to reduce waste, Hewlett-Packard offers a recycling program. Cartridge components that do not wear out are recycled. Plastics and other materials are recycled. Hewlett-Packard pays the shipping costs from the user to the recycling plant (within the United States). To join this recycling effort, follow the instructions inside the print cartridge box. Refer to http://www.hp.com/recycle for more information.
ENWW |
Print cartridge information 11 |
Declaration of Conformity
Declaration of Conformity
according to ISO/IEC Guide 22 and EN 45014
Manufacturer Name: |
|
Hewlett-Packard Company |
Manufacturer Address: |
11311 Chinden Boulevard |
|
|
|
Boise, , Idaho 83714-1021, USA |
declares that the product |
|
|
Product Name: |
|
HP LaserJet 1010 Series Printer |
Product Number: |
|
Q2460A, Q2461A, Q2462A, (Regulatory Model Number: BOISB-0207-00) |
Product Options: |
|
ALL |
conforms to the following Product Specifications: |
|
|
Safety: |
IEC 60950:1999 / EN 60950:2000 |
|
|
IEC 60825-1:1993 +A1/ EN 60825-1:1994+A11 (Class 1 Laser/LED Product) |
|
|
GB4943:1995 |
|
EMC: |
CISPR 22:1997/ EN 55022:1998 Class B1 |
|
|
EN 61000-3-2:1995/A14 |
|
EN 61000-3-3:1995
EN 55024:1998
FCC Title 47 CFR, Part 15 Class B2) / ICES-003, Issue 3
AS / NZS 3548:1995 +A1 +A2 / GB9254:1998
Supplementary Information
The product herewith complies with the requirements of the following EMC Directive 89/336/EEC and the Low Voltage Directive 73/23/EEC, and carries the CE-marking accordingly.
1)The product was tested in a typical configuration with Hewlett-Packard Personal Computer Systems.
2)This Device complies with Part 15 of the FCC Rules. Operation is subject to the following two conditions: (1) this device may not cause harmful interference, and (2) this device must accept any interference received, including interference that may cause undesired operation.
3)For regulatory purposes, this product is assigned a Regulatory model number. This number should not be confused with the marketing name (HP LaserJet 1010) or the product numbers (Q2460A, Q2461A, Q2462A).
|
Product Regulations Manager |
|
PO Box 15 Mail Stop 160 |
|
Boise, Idaho 83707-0015, USA |
|
(208-396-6000) |
|
April 1, 2003 |
For regulatory topics only, contact: |
|
Australia Contact |
Product Regulations Manager, Hewlett-Packard Australia, Ltd. 31-41 Joseph Street, Blackburn, Victoria 3130, |
|
Australia. |
European Contact |
Your Local Hewlett-Packard Sales and Service Office or Hewlett-Packard Gmbh, Department HQ-TRE / Standards |
|
Europe, Herrenberger Strasse 140, Böblingen, D-71034, (+49-7031-14-3143) |
U.S.A. Contact |
Product Relations Manager, Hewlett-Packard Company PO Box 15, Mail Stop 160 Boise, ID 83707-0015, U.S.A. |
|
(208-396-6000) |
12 Chapter 1 Product Information |
ENWW |
For Regulatory Topics ONLY, contact:
Laser safety statement
The Center for Devices and Radiological Health (CDRH) of the U.S. Food and Drug Administration has implemented regulations for laser products manufactured since August 1, 1976. Compliance is mandatory for products marketed in the United States. The printer is certified as a “Class 1” laser product under the U.S. Department of Health and Human Services (DHHS) Radiation Performance Standard according to the Radiation Control for Health and Safety Act of 1968.
Since radiation emitted inside the printer is completely confined within protective housings and external covers, the laser beam cannot escape during any phase of normal user operation.
WARNING! Using controls, making adjustments, or performing procedures other than those specified in this user guide could result in exposure to hazardous radiation.
Canadian DOC regulations
Complies with Canadian EMC Class B requirements.
«Conforme á la classe B des normes canadiennes de compatibilité électromagnétiques. «CEM».»
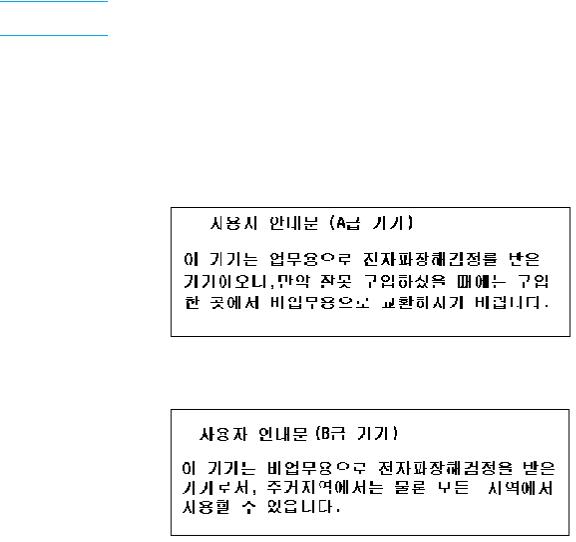
Korean EMI statement
ENWW |
For Regulatory Topics ONLY, contact: 13 |
Laser statement for Finland
LASERTURVALLISUUS
LUOKAN 1 LASERLAITE
LASERLAITE KLASS 1 LASER APPARAT
HP LaserJet 1010 -laserkirjoitin on käyttäjän kannalta turvallinen luokan 1 laserlaite. Normaalissa käytössä kirjoittimen suojakotelointi estää lasersäteen pääsyn laitteen ulkopuolelle. Laitteen turvallisuusluokka on määritetty standardin EN 60825-1 (1993) mukaisesti.
VAROITUS!
Laitteen käyttäminen muulla kuin käyttöohjeessa mainitulla tavalla saattaa altistaa käyttäjän turvallisuusluokan 1 ylittävälle näkymättömälle lasersäteilylle.
VARNING!
Om apparaten används på annat sätt än i bruksanvisning specificerats, kan användaren utsättas för osynlig laserstrålning, som överskrider gränsen för laserklass 1.
HUOLTO
HP LaserJet 1010 -kirjoittimen sisällä ei ole käyttäjän huollettavissa olevia kohteita. Laitteen saa avata ja huoltaa ainoastaan sen huoltamiseen koulutettu henkilö. Tällaiseksi huoltotoimenpiteeksi ei katsota väriainekasetin vaihtamista, paperiradan puhdistusta tai muita käyttäjän käsikirjassa lueteltuja, käyttäjän tehtäväksi tarkoitettuja ylläpitotoimia, jotka voidaan suorittaa ilman erikoistyökaluja.
VARO!
Mikäli kirjoittimen suojakotelo avataan, olet alttiina näkymättömälle lasersäteilylle laitteen ollessa toiminnassa. Älä katso säteeseen.
VARNING!
Om laserprinterns skyddshölje öppnas då apparaten är i funktion, utsättas användaren för osynlig laserstrålning. Betrakta ej strålen.
Tiedot laitteessa käytettävän laserdiodin säteilyominaisuuksista:
1)Aallonpituus 770-795 nm
2)Teho 5 mW
3)Luokan 3B laser
14 Chapter 1 Product Information |
ENWW |

Installation and Operation
This chapter provides an overview of the appropriate operating environment, describes the control panel, and describes media requirements and loading media to print.
Operating environment .......................................................................................................... |
16 |
Identifying the control panel components............................................................................... |
17 |
Product media specifications.................................................................................................. |
18 |
Supported media sizes (printer)....................................................................................... |
18 |
Guidelines for using media..................................................................................................... |
19 |
Paper and Transparencies .............................................................................................. |
19 |
Common media problems table ....................................................................................... |
19 |
Labels .............................................................................................................................. |
19 |
Envelopes ........................................................................................................................ |
20 |
Card stock and heavy media ........................................................................................... |
20 |
Loading media ....................................................................................................................... |
22 |
Loading media to print...................................................................................................... |
22 |
ENWW |
15 |

Operating environment
Place the product on a sturdy, level surface in a well-ventilated area that meets the following environmental requirements:
●Temperature: 10° to 32.5° C (50° to 90.5° F)
●Humidity: 20 to 80 percent relative humidity (no condensation)
●Away from direct sunlight, open flames, and ammonia fumes
●Sufficient space around the product to allow for proper access and ventilation
370mm (14.6 inches)
208mm (8.2 inches)
|
inches) |
.1 |
|
(9 |
|
230mm |
|
Figure 2-1. Dimensions of product
16 Chapter 2 Installation and Operation |
ENWW |
Identifying the control panel components
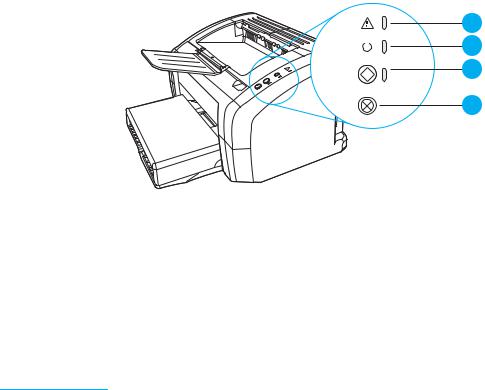
The printer control panel has three lights and two buttons. These lights produce patterns that identify your printer’ s status.
1
2
3
4
Figure 2-2. Control panel lights and buttons
1Attention light: Indicates printer media input tray is empty, print cartridge door is open, print cartridge is missing, and other errors.
2Ready light: Indicates that the printer is ready to print.
3Go button and light: To print a demo page, or to continue printing while in manual feed mode, press and release the Go button. To print a configuration page, press and hold the Go button between 5 and 10 seconds until the attention and ready lights flash. To run a cycle to clean the paper path (using a transparency), press and hold the Go button for at least 10 seconds until the attention and ready lights stay on.
4Cancel Job button: When the printer is processing data, press the Cancel Job button to cancel the print job.
Note |
The two printer buttons, Go and Cancel are mechanically linked and activate the same switch |
|
on the formatter. The formatter switch performs the correct function, based on the state of the |
|
printer when either button is pressed. Ease-of-use studies during product design resulted in |
|
offering the user a Go and a Cancel button rather than just a single button. |
ENWW |
Identifying the control panel components |
17 |

Product media specifications
|
The product accepts a variety of media. Properties such as weight, grain, and moisture |
|
content are important factors affecting printer performance and output quality. Media should |
|
conform to the guidelines in the User Guide located on the product CD. Media that does not |
|
meet HP guidelines might cause poor print quality, increased media jams, or premature wear |
|
on the product. This may require repair. |
|
Damage caused by media that does not meet HP’s specifications is not covered by the HP |
CAUTION |
|
|
warranty or service agreements. |
Note
Supported media sizes (printer)
The printer supports media within these sizes:
●Minimum: 76 x 127 mm (3 x 5 in)
●Maximum: 216 x 356 mm (8.5 x 14 in)
Table 2-1. Media types
Paper type |
Metric |
English |
Letter |
216 x 279 mm |
8.5 x 11 in |
Legal |
216 x 356 mm |
8.5 x 14 in |
Executive |
184 x 267 mm |
7.25 x 10.5 in |
A4 |
210 x 297 mm |
8.25 x 11.75 in |
COM10 Envelopes |
105 x 241 mm |
4.13 x 9.5 in |
DL Envelopes |
110 x 220 mm |
4.33 x 8.67 in |
C5 Envelopes |
162 x 229 mm |
(6.4 x 9 in) |
B5 Envelopes |
176 x 250 mm |
(6.9 x 9.85 in) |
Monarch Envelopes |
98.5 x 191 mm |
(3.88 x 7.5 in) |
Custom size media |
custom |
custom |
Narrow and heavy media can cause the printer to print slower.
18 Chapter 2 Installation and Operation |
ENWW |
Loading...