

Honeywell Hcm6012i, Hcm6012, Hcm6011ww, Hcm6011, Hcm6013i Owner's Manual
...
OWNER’S MANUAL
Console Humidifiers with Air Washing Technology
11 US GALLONS (40.6 LITERS)
OUTPUT PER DAY
CONSOLE HUMIDIFIERS
MODELS:
HCM-6011i
HCM-6012i
HCM-6013i
HCM-6011WW
The Honeywell trademark is used by Kaz, Inc. under license from Honeywell Intellectual Properties, Inc.

IMPORTANT SAFETY
INSTRUCTIONS
READ AND SAVE THESE SAFETY INSTRUCTIONS
BEFORE USING THIS HUMIDIFIER
When using electrical appliances, basic precautions should always be
followed to reduce the risk of fire, electric shock, and injury to persons,
including the following:
1. Always place this humidifier on a firm, flat and level surface. This humidifier may not work properly
on an uneven surface.
2. Place this humidifier in an area where it is not accessible to children.
3. Do not place the humidifier near any heat sources such as stoves, radiators, and heaters.
4. Do not use the humidifier outdoors.
5. Before using the humidifier, check the power cord for any signs of damage. If the cord is found to be
damaged, DO NOT USE and return the humidifier to the manufacturer under the warranty agreement
for repair.
6. This appliance has a polarized plug (one blade is wider than the other). To reduce the risk of shock,
this plug is intended to fit only one way in a polarized outlet. If the plug does not fit securely in the
outlet, reverse the plug. If it still does not fit, contact a qualified electrician. DO NOT attempt to
defeat this safety feature.
7. To disconnect the humidifier, first turn controls to the OFF position, then grip the plug and pull it from
the wall outlet. Never pull by the cord.
8. A loose fit between the AC outlet (receptacle) and plug may cause overheating and a distortion of the
plug. Contact a qualified electrician to replace loose or worn outlet.
9. The humidifier should always be unplugged and emptied when not in operation or while being
serviced or cleaned.
10. Never tilt or attempt to move the humidifier while it is operating or filled with water. UNPLUG the
humidifier before moving.
11. This humidifier requires regular cleaning. Refer to the CLEANING instructions provided. Never
clean the humidifier in any manner other than as instructed in this manual.
12. Do not direct moisture flow directly at individuals, walls or furniture.
13. When a humidifier is used in a closed room or small rooms, check periodically for proper ventilation,
as excessive humidity can cause condensation stains on walls.
14. Turn the humidifier OFF if you notice moisture on the inside of your windows. For proper humidity
reading use a hygrometer, which is available in many hardware and department stores, or by
ordering one from the manufacturer.
2

Introduction
HOW DOES IT WORK?
COOL MOISTURE SYSTEM:
Dry air is pulled through the humidifier and the QuietCare™fan blows out invisible, moisture-balanced air.
Unwanted minerals and bacteria from the water are trapped inside the Filter. When the unit is running you
will not see or feel a “mist”. You will know your humidifier is putting moisture into the air as you watch the
water level in your tank decrease throughout the day.
AIR WASHING TECHNOLOGY:
Your new console humidifier comes with a unique Air Washing system which helps “wash the air as it
humidifies”. The unique pre-filter in combination with an ionizer helps capture dust, dirt and pollen while
freshening the air.
Ionizer: Your console humidifier has an independently controlled ionizer, which, when turned on, releases
negative ions into outgoing humidified air. Negative ions attach themselves to very small airborne particles
in the room. These particles take on a negative charge and may join with positively charged particles, such
as dust, pollen, smoke and pet dander to form larger particles that are then more readily captured by the
filter system. They may also be attracted to positively charged surfaces like floors or walls.
You may sometimes notice after extended use, that dust may have collected around the grilles of your
humidifier. This is from the ionization effect caused by the negative ions existing from the air outlet. This
is additional evidence of the air cleaning effectiveness of negative ions. The dust can be easily removed
with a clean, damp cloth or soft brush.
Pre-filter: The Filter in your humidifier also includes a specially formulated “pre-filter” which helps capture
some dust, dirt, pollen and other small particles. The addition of this pre-filter layer in conjunction with the
ionizer helps capture some of the unwanted particles that move through your household air.
COMPLETE
Your new QuietCare™console humidifier has double Protec™Product Protection with the exclusive Protec
Cleaning Cartridge and Protec™treated Filter.
Protec™Cleaning Cartridge: Your humidifier has been designed with the Protec™Cleaning Cartridge which
helps your unit to stay cleaner longer. This unique cartridge features an advanced patented media which
continually inhibits the growth of odor-causing bacteria and mold in the cartridge as well as prevents the
buildup of slime in your humidifier. In addition, the Protec
is fresh and clean.
Protec™Antimicrobial Treated Filter: Your Filter has been treated with Protec™antimicrobial which helps
prevent surface growth and migration of mold, fungus and bacteria in the Filter for it’s life – approximately
one season. Keep in mind, depending on your water quality, mineral deposits can still clog or discolor the
Filter, affecting its life and that of the humidifier.
PROTECTION
™
™
cartridge provides peace of mind that the mist
3
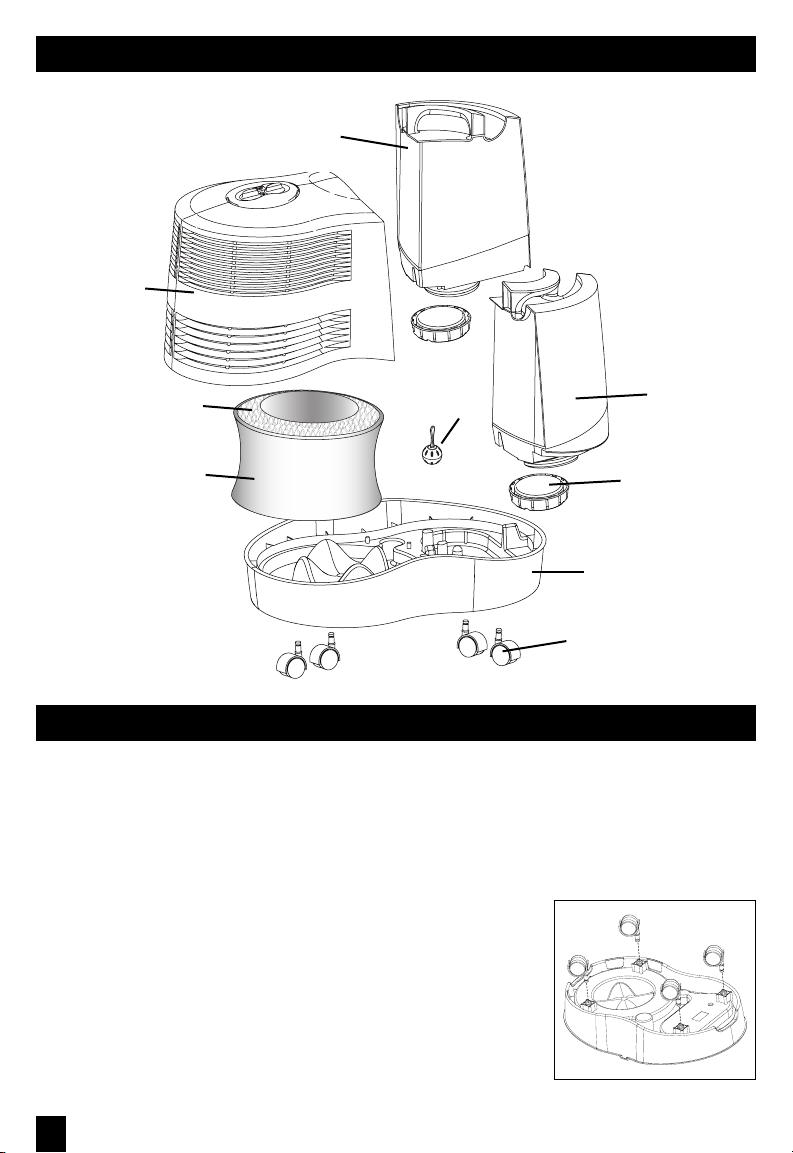
Your Humidifier
Motor
Housing
Filter
Water Tank
™
Protec
Cleaning
Cartridge
Water Tank
Pre-Filter
Tank Cap
Base
Casters
Set-Up
NOTE: We recommend that the humidifier be disinfected prior to first use.
Please see CLEANING INSTRUCTIONS.
Select a firm, level, flat location - at least six inches (15 cm) from any wall for proper air flow. Place the
humidifier on a water-resistant surface, as water can damage furniture and some flooring.
Kaz will not accept responsibility for property damage caused by water spillage.
Install Casters:
• Make sure the humidifier is unplugged and in the OFF position.
• Turn the Base of the humidifier upside down.
• Push the wheels into each wheel base pin until you hear them snap into
position (Fig.1).
NOTE: Save your box for end of season storage (See End of Season Care
and Storage Section).
Fig. 1
4
Filling
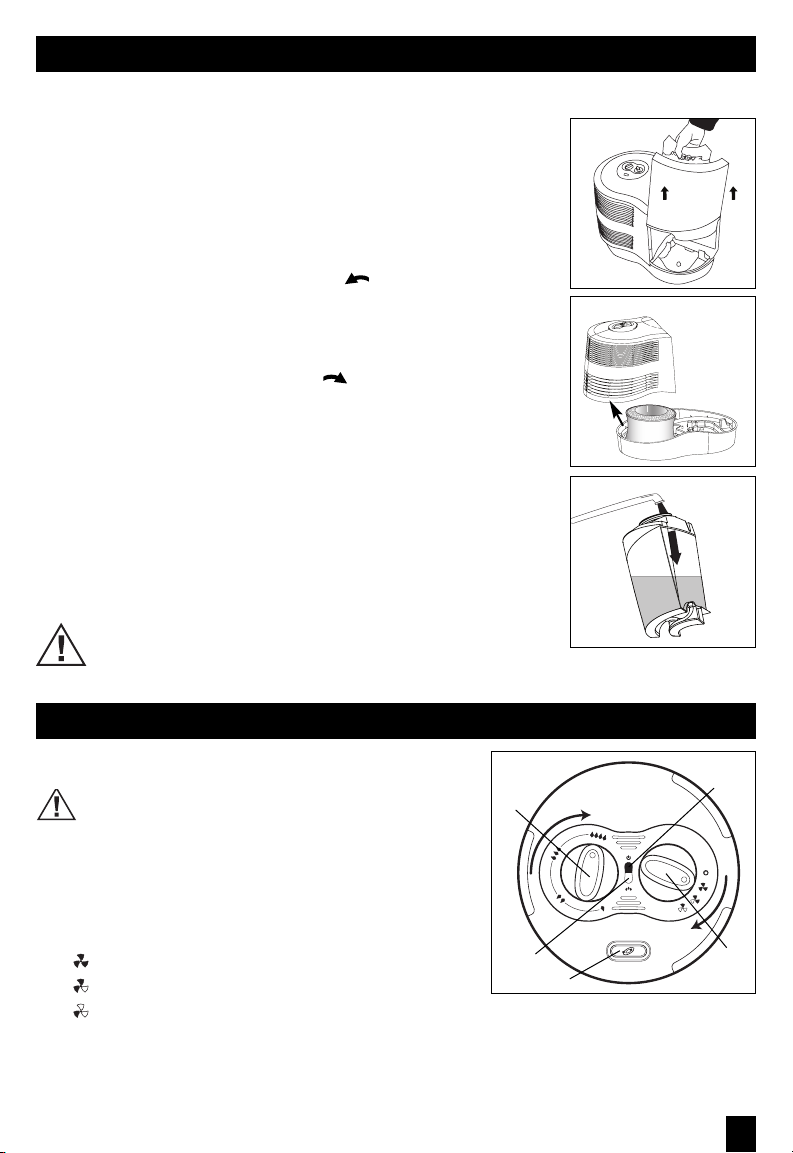
• Remove the Water Tanks by grasping the handle and pulling straight up. Set aside (Fig. 2).
• Lift up on the Motor Housing to remove and set aside (Fig. 3). Remove the
Filter from the Base before filling the unit with water. Soak the Filter in a
sink full of cool water to help reduce mineral buildup and place back in the
humidifier while wet. DO NOT SQUEEZE OR WRING OUT THE FILTER. To
help extend the life of your Filter, repeat this step each time you fill your
humidifier.
• Turn the Water Tank upside down so that the Fill Cap is facing up; unscrew
the Fill Cap by turning it counter-clockwise and set aside.
• Fill each Water Tank with COOL tap water (Fig. 4). Distilled water is not necessary
as the water is filtered by the Filter. DO NOT USE HOT WATER. Doing so may
damage the humidifier.
• Replace the Fill Cap by turning it clockwise . DO NOT OVER-TIGHTEN.
Turn the Water Tank right-side up.
NOTE: When carrying the filled Water Tank please use the handle and place
your other hand under the tank for additional support. Carry only one at a time.
• Place the Motor Housing back into the Base.
• Position each Water Tank in the humidifier and push into place. Some water will
empty into the Base. Note: The tanks do not drain simultaneously, one tank
will drain before the other.
• Once the filled tanks have been positioned, do not attempt to move the humidifier.
If it has to be moved, unplug the humidifier and remove the Water Tanks first.
CAUTION: DO NOT POUR WATER INTO THE GRILLE IN THE FRONT OF
THE HUMIDIFIER. DOING SO MAY DAMAGE THE HUMIDIFIER OR CAUSE
PERSONAL INJURY.
Fig. 2
Fig. 3
Fig. 4
Manual Control Operation (Models HCM-6011i & HCM-6011WW)
POWER
CAUTION: DO NOT PLUG IN THE HUMIDIFIER WITH WET
HANDS AS AN ELECTRICAL SHOCK COULD OCCUR.
• With the power switch in the OFF position, plug the filled
humidifier into a polarized 120V outlet. DO NOT FORCE THE
POLARIZED PLUG INTO THE OUTLET; it will only fit one way.
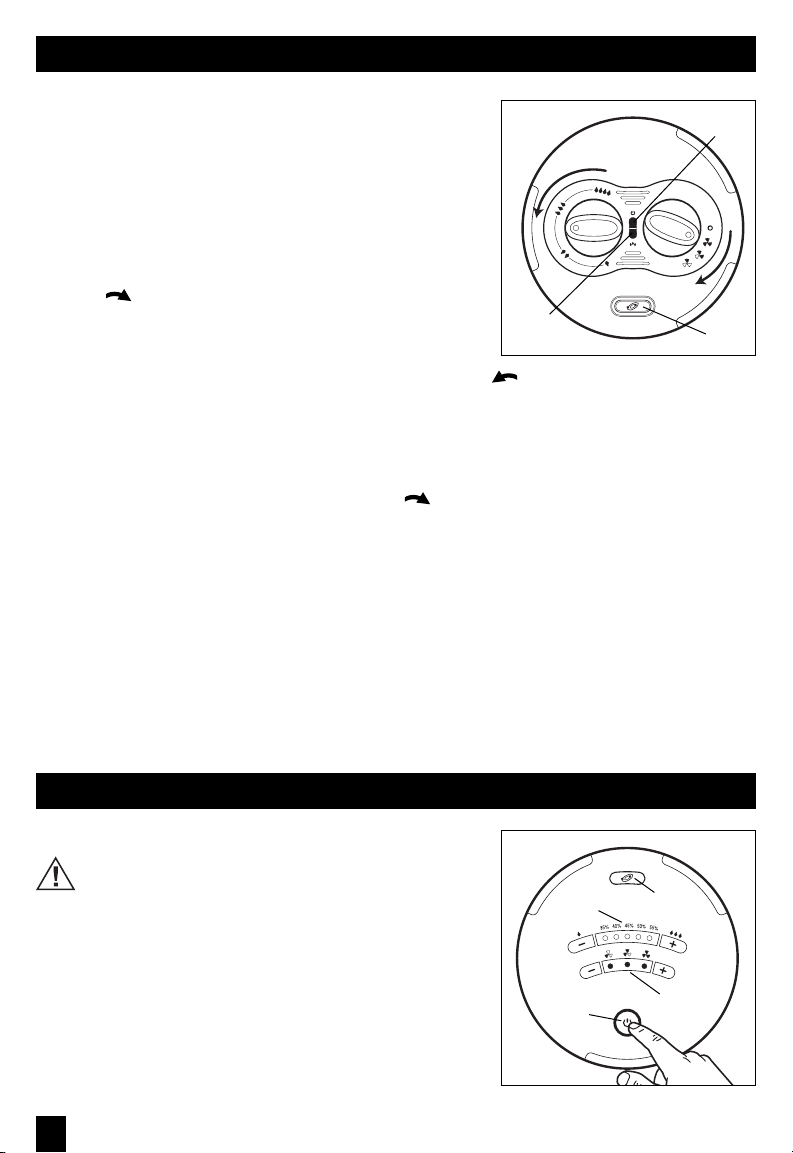
Fig. 5
Humidistat
Knob
Power Light
(Illuminated)
OUTPUT / FAN SPEED CONTROL
Set the fan speed to the desired position (Fig. 5).
HIGH: For fast humidifying
MED: For everyday moisture control
LOW: For minimum operation (ideal for nighttime use, or when silent operation is needed)
Continuous Mode: If you want your unit to run continuously, select a fan speed level. (Do not set
your humidistat.) It will run at your selected speed until you shut it off or it runs out of water.
NOTE: Turn the humidifier off if the humidity level feels too moist or you notice condensation
forming on the walls.
Desired
Humidity
Light
Ionizer
Button
Fan Speed
Knob
5
Manual Control Operation (Models HCM-6011i & HCM-6011WW) (Continued)
ADVANCED MIST
The Advanced Mist™Humidistat allows you to adjust and select the
™
HUMIDISTAT
Fig. 6
Power Light
(Illuminated)
humidity level to your personal preference. Your humidifier will turn
on and off throughout the day and night to maintain the desired
humidity level you have selected.
HOW TO SET THE HUMIDISTAT
First, turn the humidifier on and select your output/speed level.
Set the Advanced Mist
clockwise to the end (Fig. 5).
• Let the humidifier run on high for a least one hour or until your
room has reached a comfortable humidity level.
• At this point, slowly turn your Humidistat knob counter-clockwise until the humidifier shuts off and
the Desired Humidity light illuminates (Fig. 6).
• Now that your Humidistat knob is set, the humidifier will automatically turn back on when your room
drops below your comfort setting and will automatically turn off again when the setting is reached.
NOTE: If the humidifier fan will not start or restart when you select a fan speed, the Advanced Mist
Humidistat may be set too low. Turn the dial clockwise to the end (Fig. 5). The Desired Humidity light
will turn Off when the unit is producing moisture. When the Desired Humidity light turns ON, you have
reached optimal humidity.
™
Humidistat on High by turning the knob
Desired
Humidity Light
(Illuminated)
Ionizer
Button
™
IONIZER FEATURE
The ionizer helps freshen the air.
• Press the Ionizer button once to start; the Ionizer light will illuminate. Note: The unit must be turned on
for the Ionizer to function.
• To turn off the ionizer, simply press the ionizer button again; the ionizer light will turn off.
NOTE: The ionizer automatically turns off when the desired humidity is reached (your desired humidity
light will be illuminated, see Fig. 6). It will turn back on again when your humidifier restarts.
EasySet™Control Operation (Model HCM-6013i)
POWER
CAUTION: DO NOT PLUG IN THE HUMIDIFIER WITH WET
HANDS AS AN ELECTRICAL SHOCK COULD OCCUR.
• With the power OFF, plug the filled humidifier into a polarized
120V outlet. DO NOT FORCE THE POLARIZED PLUG INTO THE
OUTLET; it will only fit one way.
STEP 1: POWER
• Press the Power button to start the humidifier.Your humidifier will
automatically start on High power, Continuous Mode (Fig. 7).
• To turn your humidifier OFF simply press the Power button again.
6
Fig. 7
Humidistat
Control
Power
Button
Ionizer
Button
Fan Speed
Control
EasySet™Control Operation (Model HCM-6013i) (Continued)
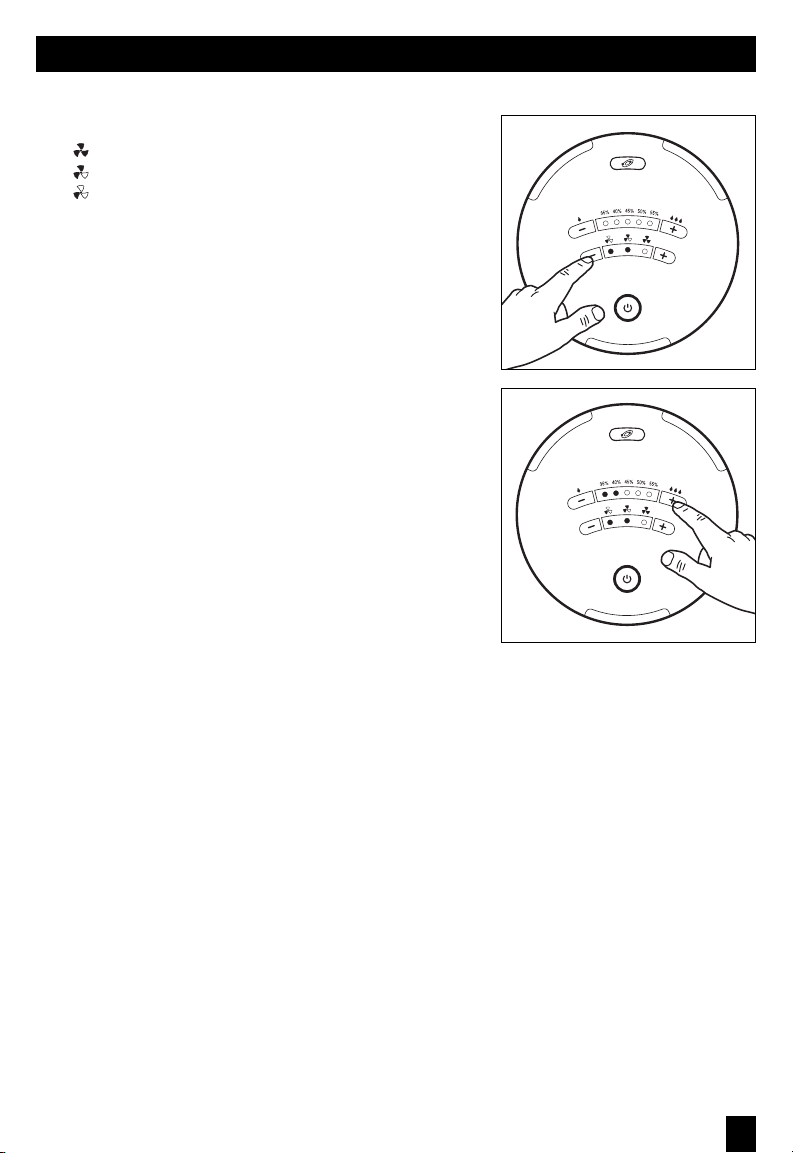
STEP 2: OUTPUT / FAN SPEED CONTROL
Your unit has three output levels/fan speeds:
HIGH: For fast humidifying
MED: For everyday moisture control
LOW: For minimum operation (ideal for nighttime use)
• Push the up button (+) to increase output level and push the
down button (–) to decrease output level. The LED's will
illuminate to reflect which speed you have selected (Fig. 8).
Continuous Mode: If you want your unit to run continuously,
select a fan speed level. (Do not set your humidistat.) It will
run at your selected speed until you shut it off or it runs out
of water.
NOTE: Turn the humidifier off if the humidity level feels too
moist or you notice condensation forming on the walls.
Fig. 8
Fig. 9
STEP 3: SET HUMIDITY
• Set your desired humidity anywhere between 35% and 55%.
• Push the up button (+) to increase desired humidity and push the
down button (–) to decrease desired humidity. The LED's will
illuminate to reflect which desired humidity level you have
selected (Fig. 9).
For example: If you set your humidity at 40%, the 35% and 40%
LED’s will be illuminated.
• Once you have set your desired humidity, the unit will operate
under this setting until the unit is turned off or your selected
humidity is reached.
• When the desired room humidity has been reached the fan will automatically shut off. (The humidity
LED's will remain illuminated)
• The fan will turn back on when your room decreases beyond your set level.
NOTE: Your room humidity can often fluctuate. It is normal for your unit to turn itself on and off
throughout the day as it is monitoring your changing environment.
To go back to Continuous Mode, turn your unit off and then back on and select your desired output setting
(see Step 2).
IONIZER FEATURE
The ionizer helps freshen the air.
• Press the Ionizer button once to start; the Ionizer light will illuminate. Note: The unit must be turned on
for the Ionizer to function.
• To turn off the ionizer, simply press the ionizer button again; the ionizer light will turn off.
NOTE: The ionizer automatically turns off when the desired humidity is reached (your desired humidity
light will be illuminated, see Fig. 7). It will turn back on again when your humidifier restarts.
7
Digital EasySet™Control Operation (Model HCM-6012i)
POWER
CAUTION: DO NOT PLUG IN THE HUMIDIFIER WITH WET
HANDS AS AN ELECTRICAL SHOCK COULD OCCUR.
• With the power OFF, plug the filled humidifier into a polarized 120V
outlet. DO NOT FORCE THE POLARIZED PLUG INTO THE OUTLET; it
will only fit one way.
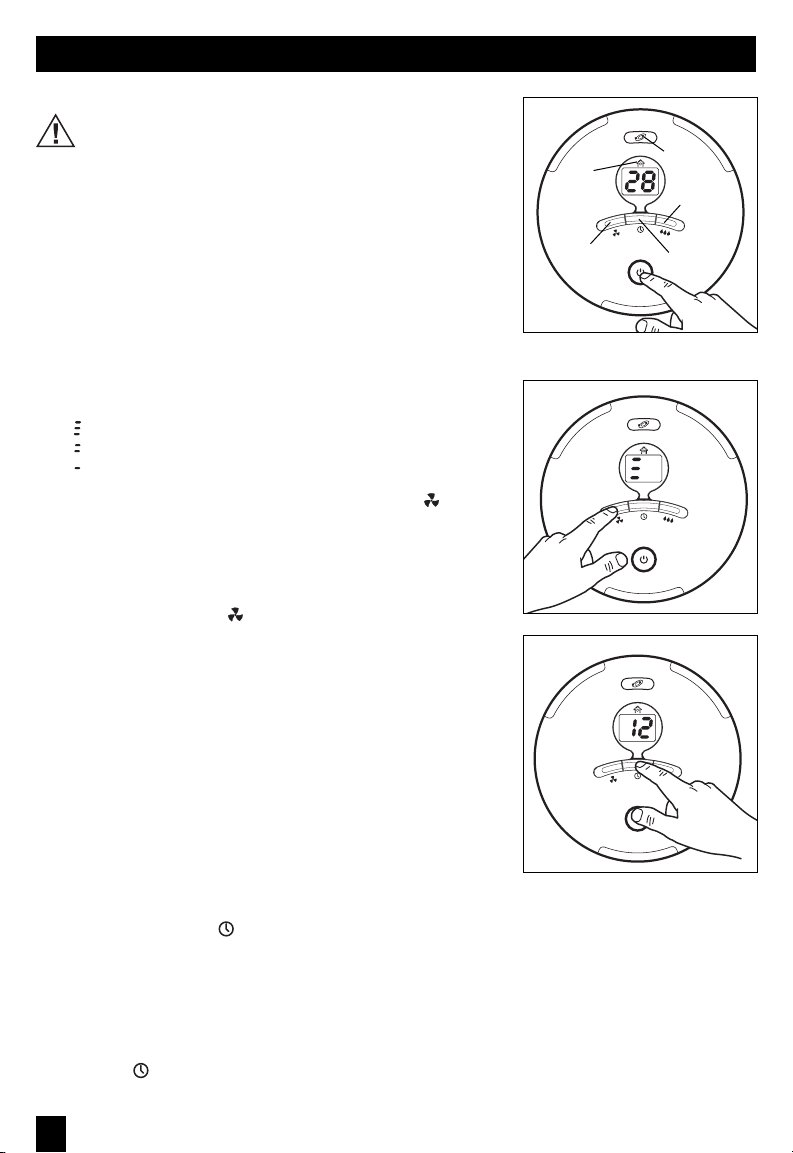
STEP 1: POWER
• Press the Power button to start the humidifier.Your humidifier will
automatically start on High power, Continuous Mode. The display will
be illuminated and will reflect the current room humidity (Fig. 10).
• To turn your humidifier OFF simply press the Power button again.
STEP 2: OUTPUT / FAN SPEED CONTROL
Your unit has three output levels/fan speeds:
HIGH: For fast humidifying
MED: For everyday moisture control
LOW: For minimum operation (ideal for nighttime use)
• To change your fan speed press the fan speed button ( ) up or
down (Fig. 11).
• Once you have selected your desired speed the display will go back
to showing the current room humidity after 3 seconds.
NOTE: If you wish to change or check your output/speed setting simply
press the fan speed button ( ) once and it will show you your setting.
If you would like to change it, continue to push the button up or down
until you have reached your desired setting. Again, after 3 seconds the
display will revert to showing the current room humidity.
Continuous Mode: If you want your unit to run continuously, select
a fan speed level. (Do not set your humidistat.) It will run at your
selected speed until you shut it off or it runs out of water.
NOTE: Turn the humidifier off if the humidity level feels too moist
or you notice condensation forming on the walls.
Fig. 10
Desired
Humidity
Light
Fan Speed
Control
Fig. 11
Fig. 12
Ionizer
Button
Humidistat
Control
Timer
Control
STEP 3: TIMER CONTROL
• You can set your timer for up to 18 hours.This function should only
be used if you desire that the humidifier be automatically shut off
after a certain period of time.
• Press the Timer button ( ) up or down to set how many hours you would like the humidifier to run
(Fig. 12).
• When the display indicates your desired time, wait 3 seconds.
• After 3 seconds, your desired time is set and the display will revert back to showing the current room
humidity.
NOTE: If you wish to change your timer setting or check to see how much time is left, simply press the
Timer button ( ) once and it will show you the time left. If you want to change the time remaining,
continue to push the button up or down until you have reached your desired time. Again, after 3 seconds
8
Digital EasySet™Control Operation (Model HCM-6012i) (Continued)
the display will revert to showing the current room humidity. If you set a timer but no longer wish to have
it set, turn the unit off and then repeat steps 1 and 2.
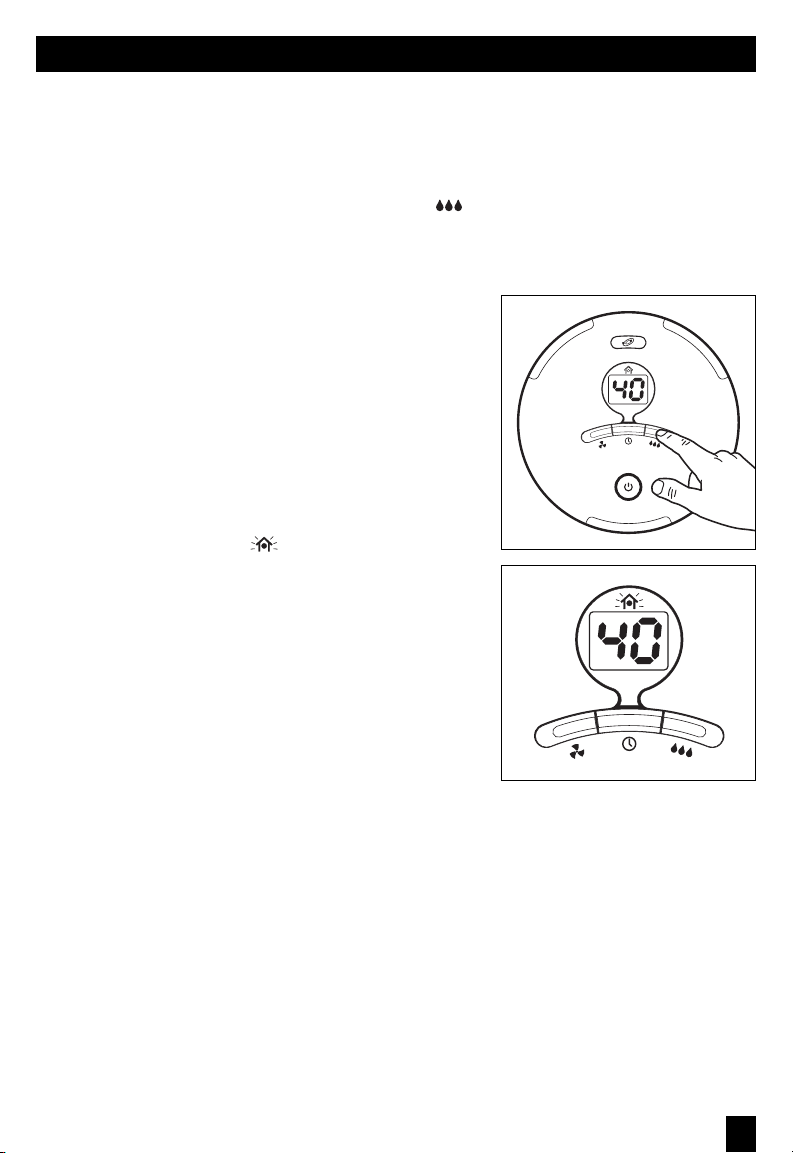
STEP 4: SET HUMIDITY
• You can set your desired humidity in 1% increments anywhere from 25% to 65%.
• To set your desired humidity, press the humidity button ( ) up or down (Fig. 13).
• When the display indicates your desired humidity setting wait 3 seconds.
• After 3 seconds your desired humidity is set and the display will revert back to showing the current
room humidity.
NOTE: If you wish to change your humidity setting or check to see
what you set, simply press the humidity button once and it will
show you the set humidity. If you want to change it, continue to
push the button up or down until you have reached your new
desired humidity.Again, after 3 seconds the display will revert to
showing the current room humidity.
• Once you have set your humidity the unit will operate under this
setting until the unit is turned off or your selected humidity is
reached.
• When your desired room humidity has been reached the fan will
shut off and the house icon ( ) on the top of your display will
illuminate (Fig. 14). It will stay illuminated until your desired
humidity decreases at which time the fan will turn back on.
NOTE: Your room humidity can often fluctuate. It is normal for
your unit to turn itself on and off throughout the day as it is
monitoring your changing environment.
To go back to continuous mode, turn your unit off and then
back on and select your desired output setting (see step 2).
Fig. 13
Fig. 14
IONIZER FEATURE
The ionizer helps freshen the air.
• Press the Ionizer button once to start; the Ionizer light will illuminate. Note: The unit must be turned on
for the Ionizer to function.
• To turn off the ionizer, simply press the ionizer button again; the ionizer light will turn off.
NOTE: The ionizer automatically turns off when the desired humidity is reached (your desired humidity
light will be illuminated, see Fig. 7). It will turn back on again when your humidifier restarts.
9
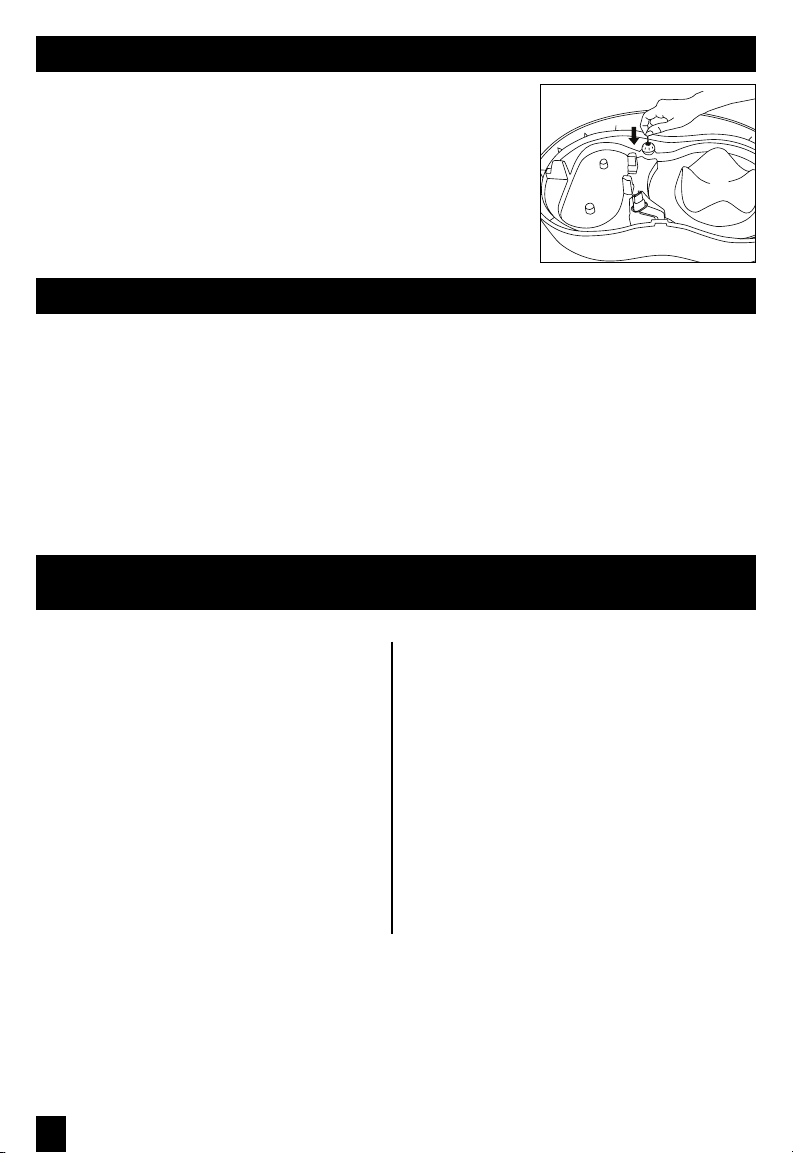
Protec™Cleaning Cartridge
The Protec™Cleaning Cartridge will last 30 days or longer, depending on
Fig. 15
your usage. To install or replace your cartridge, simply remove it from its
special inlet located in the base of the unit (Fig. 15).
Cleaning
™
Your Protec
Cleaning Cartridge helps your humidifier stay cleaner longer and will help extend the life of
your Filter. However, you should still continue to clean your humidifier regularly as needed.
Cleaning involves two steps, SCALE REMOVAL and DISINFECTING.
Be sure to perform these in the proper order to avoid harmful chemical interactions.
• First, turn off and unplug the humidifier.
• Remove the Water Tanks and Motor Housing.
• Remove the Filter from the Base.
• Empty any water from the Base.
NOTE: REMOVE FILTER AND PROTEC™CLEANING CARTRIDGE BEFORE CLEANING.
Failure to remove Filter during cleaning will destroy the Filter.
STEP ONE:
SCALE REMOVAL
BASE
1. Fill the Base with:
• 1 cup (8 ozs.) of undiluted white vinegar
2. Let solution stand for 20 minutes.
3. With the vinegar in the Base, clean all interior
surfaces with a soft cloth or brush to help
remove scales.
4. Rinse the Base thoroughly with water to remove
scale and cleaning solution.
WATER TANK/BASE
1. Fill the Water Tank with:
• 1 teaspoon of household bleach
• 1 gallon of water
Pour some of this solution into the Base.
2. Let solution stand for 20 minutes.
3. Rinse with water until the smell of bleach is
gone.
STEP TWO:
DISINFECTING
and
NOTES:
• The use of other water treatment products and chemicals may cause deterioration of the Filter or
damage the humidifier, thereby hindering the humidifier's effectiveness.
• If you are experiencing more buildup than when you first purchased your humidifier, you may
need to replace your Protec
™
Cleaning Cartridge. Changing your cartridge every 30 days will
provide continuous protection.
10

Prolonging the Life of the Filter and Maintaining a Clean Humidifier
NOTE: DO NOT ATTEMPT TO CLEAN THE FILTER WITH ANY CHEMICAL SOLUTIONS, DOING SO WILL
DAMAGE THE FILTER.
• Protec™antimicrobial prevents the surface growth and migration of mold, fungus, algae, and bacteria. It
is normal for a filter to discolor from mineral build-up. This will vary depending on water quality.
• DO NOT clean the filter using any chemical solution.
• If your filter appears to be clogged by hard water or mineral deposits, soak it in a sink full of cool water
for 10 minutes. DO NOT SQUEEZE OR WRING OUT THE FILTER. Always place filter back in the
humidifier wet.
• Always purchase Honeywell Brand filters (model number HC-14) as the fan motor of this humidifier and
the filter are designed to function efficiently as a set. Using any other filter could damage the motor or
reduce the humidifier’s performance.
• Be sure to empty water from the Water Tank and Base when not in use.
End-of-Season Care and Storage
• Follow the CLEANING instructions when the humidifier will not be used for at least one week or more,
or at the end of the season.
• At the end of the season, remove and throw away the Filter and Protec™Cleaning Cartridge; do not
store with a used Filter.
• Dry the humidifier completely before storing. DO NOT store with water inside the Base or Water Tank.
• Pack the unit in its original carton and store in a cool, dry location.
™
• Before next use, remember to clean your humidifier, install a new Filter and new Protec
Cartridge.
Cleaning
Consumer Relations
Mail questions or comments to:
Kaz, Incorporated
Consumer Relations Dept.
250 Turnpike Road
Southborough, MA 01772
Purchase replacement Filter model number HC-14 and Protec™Cleaning Cartridge part number
PC-1 (1 pack) or PC-2 (2 pack)
NOTE: IF YOU EXPERIENCE A PROBLEM, PLEASE RETURN THE HUMIDIFIER TO THE ORIGINAL PLACE
OF PURCHASE OR SEE YOUR WARRANTY. DO NOT ATTEMPT TO OPEN THE MOTOR HOUSING
YOURSELF. DOING SO MAY VOID YOUR WARRANTY AND CAUSE DAMAGE TO THE HUMIDIFIER OR
PERSONAL INJURY.
Call us toll-free at: 1-800-332-1110
E-mail: consumerrelations@kaz.com
Or visit our website at: www.kaz.com
Please be sure to specify a model number.
Electrical Ratings
The Honeywell QuietCare™Series models are rated at 120V, 60 Hz.
11

Troubleshooting
PROBLEM POSSIBLE CAUSE CORRECTIVE ACTION
The unit is on (the lights are
illuminated) but I don't see
any moisture
Cool Moisture humidifiers produce
invisible mist. You will not see the
moisture but you will feel cool air coming
from the unit.
Unit is out of water Refill and reinstall water tank
Humidity level is set too low Reset humidity to a higher level. If you
Monitor the water level in your tank/base.
If you notice a decrease in the water tank
over a 24hr. Period your unit is running
normally.
have a manual humidistat/knob (Models
HCM-6011i/HCM-6011WW) turn the knob
clockwise to the end.
The unit is not running; no
lights are illuminated
Humidity level was set but
unit does not start
Humidity level was set but
the unit does not shut off
Unit is not on level surface Place the unit on a firm, flat, and level
There is too much moisture inside the
unit
Filter has not absorbed water Wait 15 minutes so the filter gets fully
Mineral buildup in water tray See Cleaning instructions. Regular
Filter needs to be replaced If your filter is discolored, clogged or torn
Not plugged in properly Check the polarized plug to ensure it is
Airflow obstruction Check airflow. Are there any obstructions
Unit is off due to timer Press Power button (HCM-6012i only)
Power unit is not installed properly Reinstall the power unit
Humidity level is set too low Reset humidity to a higher level. If you
Humidity level is set too high Reset humidity to a lower level.
surface
Turn off the power and completely dry out
the unit
absorbed or soak your filter in water. (Do
not squeeze or wring out the filter) See
filling instructions for more information.
cleaning is recommended to keep the unit
functioning properly.
replace your filter (Model HC-14). Visit the
retailer where you purchased your unit or
call 1-800-332-1110.
fully inserted in the wall
preventing airflow?
have a manual humidistat/knob (Models
HCM-6011i/HCM-6011WW) turn the knob
clockwise to the end.
1212

Troubleshooting (Continued)
PROBLEM POSSIBLE CAUSE CORRECTIVE ACTION
Humidity display is too high
(Models HCM-6012i, HCM6013i)
Moisture/condensation accumulated
in the humidity sensor
Unit is overfilled with water Drain the excess water from the base and
Turn off the unit and completely dry out the unit
completely dry out the unit
Filter turns brown Filter may need to be replaced If you filter is light brown or rust colored after a
Condensation forming on
the windows and/or walls
Humidifier has strange odor
or unit does not seem to be
as clean as when I
purchased it
The humidifier cycles on/off The humidifier is responding to
Humidity level is set too high Reset humidity to a lower level and/or reduce
Unit is placed too close to the wall
and/or windows
Need to replace Protec™ Cleaning
Cartridge
Unit needs to be cleaned Clean your unit as directed in the Cleaning
your room humidity based on the
humidistat setting. This is normal.
short amount of time it's probably from mineral
deposits. Soak filter in a sink full of cool water
to help break up the deposits. The
discoloration may remain but it should not
affect the humidifier's performance. If you
notice a performance decrease or live in a hard
water area you may have to replace your filter
more regularly. Replace your filter (Model HC-
14). Visit the retailer you purchased your unit
from or call 1-800-332-1110.
the output level.
Relocate the unit
If you have been using your humidifier for over
30 days chances are you need to replace the
Protec™ cartridge. (Models: PC-1 or PC-2).
Visit the retailer you purchased your unit from
or call 1-800-331-1110.
section. Regular cleaning is recommended to
keep the unit functioning properly.
Set the humidistat to a higher or lower desired
setting. If you do not want your unit to cycle
on/off periodically run your unit on "Continuous
Mode". See operating instructions.
Water leaks from tank Rubber tank ring is missing or
improperly placed
Tank cap not tight enough Tighten the cap
Tank cap is too tight Tank cap over tightened Lightly lubricate the cap gasket with petroleum
Remove tank cap then replace or reposition the
ring. Make sure the cap spring valve operates
freely.
jelly to ease opening.
13

5 Year Limited Warranty
You should first read all instructions before
attempting to use this product.
A. This 5 year limited warranty applies to repair
or replacement of product found to be
defective in material or workmanship. This
warranty does not apply to damage resulting
from commercial, abusive, unreasonable use
or supplemental damage. Defects that are the
result of normal wear and tear will not be
considered manufacturing defects under this
warranty.
KAZ IS NOT LIABLE FOR INCIDENTAL OR
CONSEQUENTIAL DAMAGES OF ANY NATURE.
ANY IMPLIED WARRANTY OF
MERCHANTABILITY OR FITNESS FOR A
PARTICULAR PURPOSE ON THIS PRODUCT IS
LIMITED IN DURATION TO THE DURATION OF
THIS WARRANTY.
Some jurisdictions do not allow the exclusion
or limitation of incidental or consequential
damages or limitations on how long an implied
warranty lasts, so the above limitations or
exclusions may not apply to you. This
warranty gives you specific legal rights, and
you also may have other rights which vary
from jurisdiction to jurisdiction. This warranty
applies only to the original purchaser of this
product from the original date of purchase.
B. At its option, Kaz will repair or replace this
product if it is found to be defective in material
or workmanship. Defective product should be
returned to the place of purchase in
accordance with store policy. Thereafter, while
within the warranty period defective product
may be returned to Kaz.
C. This warranty does not cover damage resulting
from any unauthorized attempts to repair or
from any use not in accordance with the
instruction manual.
D. Return defective product to Kaz, Incorporated
with a brief description of the problem. Include
proof of purchase and a $10 US/$15.50 CAN
check or money order for handling, return
packing and shipping charges. Please include
your name, address and a daytime phone
number. You must prepay shipping charges.
Send to:
In U.S.A.:
Kaz, Incorporated
Attn: Returns Department
4755 Southpoint Drive
Memphis, TN 38118
USA
In Canada:
Kaz, Incorporated
Attn: Returns Department
510 Bronte Street South
Milton, ON L9T 2X6
Canada
14

MANUEL DE L'UTILISATEUR
Humidificateurs consoles avec technologie de purification d'air
RENDEMENT DE
40,6 LITRES (11 GALLONS US)
PAR JOUR HUMIDIFICATEURS CONSOLES
MODÈLES :
HCM-6011i
HCM-6012i
HCM-6013i
HCM-6011WW
La marque de commerce Honeywell est utilisée par Kaz, Inc. avec l'autorisation de Honeywell Intellectual Properties, Inc.
 Loading...