

Page 1

CV31
Data Collection Computer
Model CV31A
User Manual
Page 2

Disclaimer
Honeywell International Inc. (“HII”) reserves the right to make changes in specifications and other
information contained in this document without prior notice, and the reader should in all cases
consult HII to determine whether any such changes have been made. The information in this
publication does not represent a commitment on the part of HII.
HII shall not be liable for technical or editorial errors or omissions contained herein; nor for
incidental or consequential damages resulting from the furnishing, performance, or use of this
material.
This document contains proprietary information that is protected by copyright. All rights are
reserved. No part of this document may be photocopied, reproduced, or translated into another
language without the prior written consent of HII.
Trademarks
The word Intermec, the Intermec logo, Ready-to-Work, SmartSystems, and Thor are either
trademarks or registered trademarks of Honeywell.
Wi-Fi is a registered certification mark of the Wi-Fi Alliance.
Microsoft, Windows, and the Windows logo are registered trademarks of Microsoft Corporation
in the United States and/or other countries.
Bluetooth is a trademark of Bluetooth SIG, Inc., U.S.A.
This product includes software developed by the OpenSSL Project for use in the OpenSSL Toolkit
(www.openssl.org).
This product includes cryptographic software written by Eric Young (EAY@cryptsoft.com).
Regex++ library © Copyright 1998-2001 by Dr. John Maddock
Permission to use, copy, modify, distribute and sell this software and its documentation for any
purpose is hereby granted without fee, provided that the above copyright notice appear in all
copies and that both that copyright notice and this permission notice appear in supporting
documentation. Dr John Maddock makes no representations about the suitability of this software
for any purpose. It is provided “as is” without express or implied warranty.
Patents
For patent information, please refer to www.hsmpats.com.
© 2014 Honeywell International Inc. All rights reserved.
ii CV31 Data Collection Computer User Manual
Page 3

Contents
About the Computer Features . . . . . . . . . . . . . . . . . . . . . . . . . . . . . . 1
1
About the CV31. . . . . . . . . . . . . . . . . . . . . . . . . . . . . . . . . . . . . . . . . . . . . . . . . . . . . . . . . . . . . . . . . . . 2
About the CV31 Buttons . . . . . . . . . . . . . . . . . . . . . . . . . . . . . . . . . . . . . . . . . . . . . . . . . . 3
About the Power Button. . . . . . . . . . . . . . . . . . . . . . . . . . . . . . . . . . . . . . . . . . . 4
About the Power Options. . . . . . . . . . . . . . . . . . . . . . . . . . . . . . . . . . . . . . . . . . 4
About the CV31 Ports and Connectors. . . . . . . . . . . . . . . . . . . . . . . . . . . . . . 5
About the Status LEDs . . . . . . . . . . . . . . . . . . . . . . . . . . . . . . . . . . . . . . . . . . . . 7
How to Supply Power to the CV31. . . . . . . . . . . . . . . . . . . . . . . . . . . . . . . . . . . . . . . . . . . . . . . . . . 8
About the Backup Battery . . . . . . . . . . . . . . . . . . . . . . . . . . . . . . . . . . . . . . . . . . . . . . . . . 9
Check the Status of the Backup Battery . . . . . . . . . . . . . . . . . . . . . . . . . . . . . . . . . . . . 10
How to Mount the CV31 . . . . . . . . . . . . . . . . . . . . . . . . . . . . . . . . . . . . . . . . . . . . . . . . . . . . . . . . .10
How to Connect a Headset. . . . . . . . . . . . . . . . . . . . . . . . . . . . . . . . . . . . . . . . . . . . . . . . . . . . . . . . 10
How to Change the Volume. . . . . . . . . . . . . . . . . . . . . . . . . . . . . . . . . . . . . . . . . . . . . . . . . . . . . . . 11
Contents
Connect an External Keyboard . . . . . . . . . . . . . . . . . . . . . . . . . . . . . . . . . . . . . . . . . . . . . . . . . . . .12
About the Bar Code Slot Reader . . . . . . . . . . . . . . . . . . . . . . . . . . . . . . . . . . . . . . . . . . . . . . . . . . . 12
Configure the Bar Code Slot Reader . . . . . . . . . . . . . . . . . . . . . . . . . . . . . . . . . . . . . . . . . . . . . . .13
Install an SD Card . . . . . . . . . . . . . . . . . . . . . . . . . . . . . . . . . . . . . . . . . . . . . . . . . . . . . . . . . . . . . . . 13
CV31 Accessories. . . . . . . . . . . . . . . . . . . . . . . . . . . . . . . . . . . . . . . . . . . . . . . . . . . . . . . . . . . . . . . . .14
About the User Interface and Installed Applications . . . . . . . . . . .17
2
About the User Interface. . . . . . . . . . . . . . . . . . . . . . . . . . . . . . . . . . . . . . . . . . . . . . . . . . . . . . . . . . 18
About the Touch Screen . . . . . . . . . . . . . . . . . . . . . . . . . . . . . . . . . . . . . . . . . . . . . . . . . . . . . . . . . .18
About Screen Gestures . . . . . . . . . . . . . . . . . . . . . . . . . . . . . . . . . . . . . . . . . . . . . . . . . . . 19
Calibrate the Touch Screen . . . . . . . . . . . . . . . . . . . . . . . . . . . . . . . . . . . . . . . . . . . . . . . 19
Turn on the Heated Touch Screen . . . . . . . . . . . . . . . . . . . . . . . . . . . . . . . . . . . . . . . . . 19
Use the Computer in Cold Temperature Environments. . . . . . . . . . . . . . . . . . . . . .20
Applications Installed on the Computer . . . . . . . . . . . . . . . . . . . . . . . . . . . . . . . . . . . . . . . . . . . 20
CV31 Data Collection Computer User Manual iii
Page 4

Contents
Specifications. . . . . . . . . . . . . . . . . . . . . . . . . . . . . . . . . . . . . . . . . . 23
A
Physical and Environmental Specifications . . . . . . . . . . . . . . . . . . . . . . . . . . . . . . . . . . . . . . . . . 24
Screen Specifications . . . . . . . . . . . . . . . . . . . . . . . . . . . . . . . . . . . . . . . . . . . . . . . . . . . . . 25
Keyboard Options . . . . . . . . . . . . . . . . . . . . . . . . . . . . . . . . . . . . . . . . . . . . . . . . . . . . . . . 25
Bar Code Symbologies. . . . . . . . . . . . . . . . . . . . . . . . . . . . . . . . . . . . . . . . . . . . . . . . . . . . 25
iv CV31 Data Collection Computer User Manual
Page 5

1
About the Computer Features
This chapter introduces the CV31 Data Collection Computer
with Microsoft® Windows® Embedded Compact 7 (CE 7). Use
this chapter to learn about basic features and functions of the
computer, as well as the available accessories.
1
Page 6
Chapter 1 — About the Computer Features
About the CV31
The CV31 is a data collection computer that is rugged, versatile and
built on the Microsoft® Windows® Embedded Compact 7 (CE 7.0)
operating system.
The CV31 Data Collection Computer with a Texas Instruments
WL1273 802.11a/b/g/n radio installed is Wi-Fi® certified for
interoperability with other 802.11a/b/g/n wireless LAN devices.
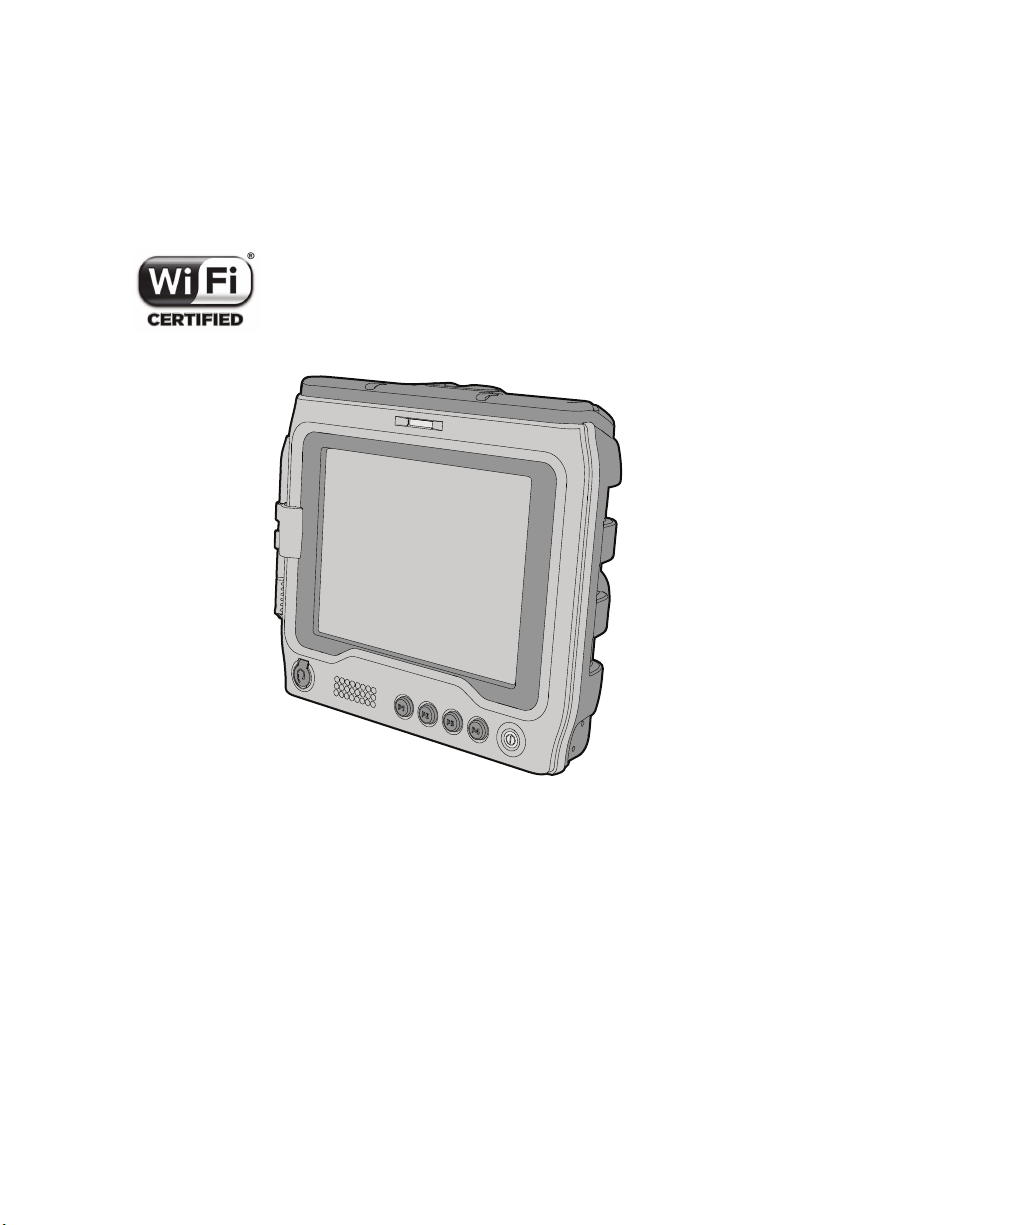
CV31 Data Collection Computer
2 CV31 Data Collection Computer User Manual
Page 7
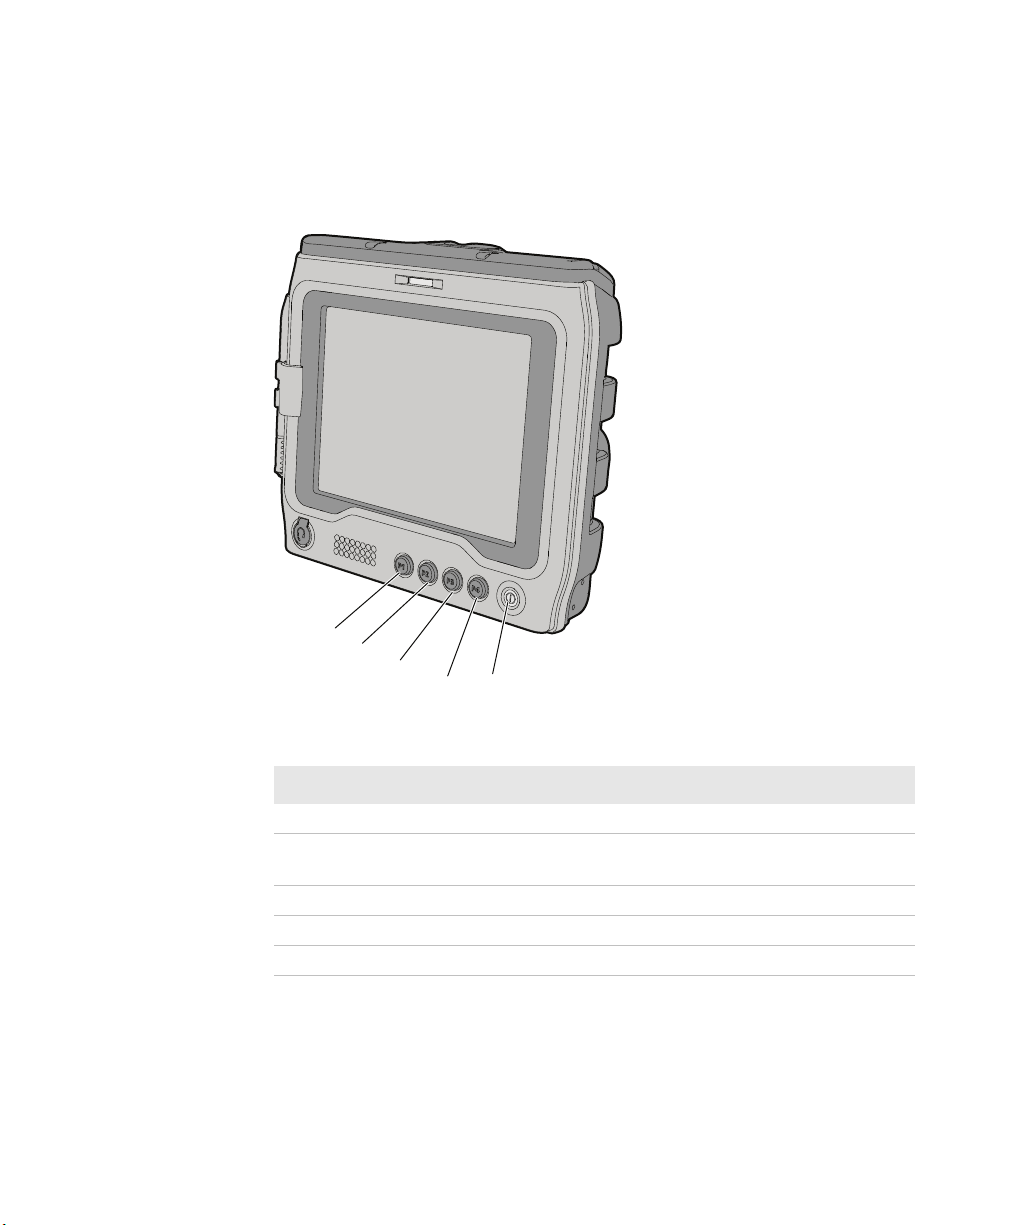
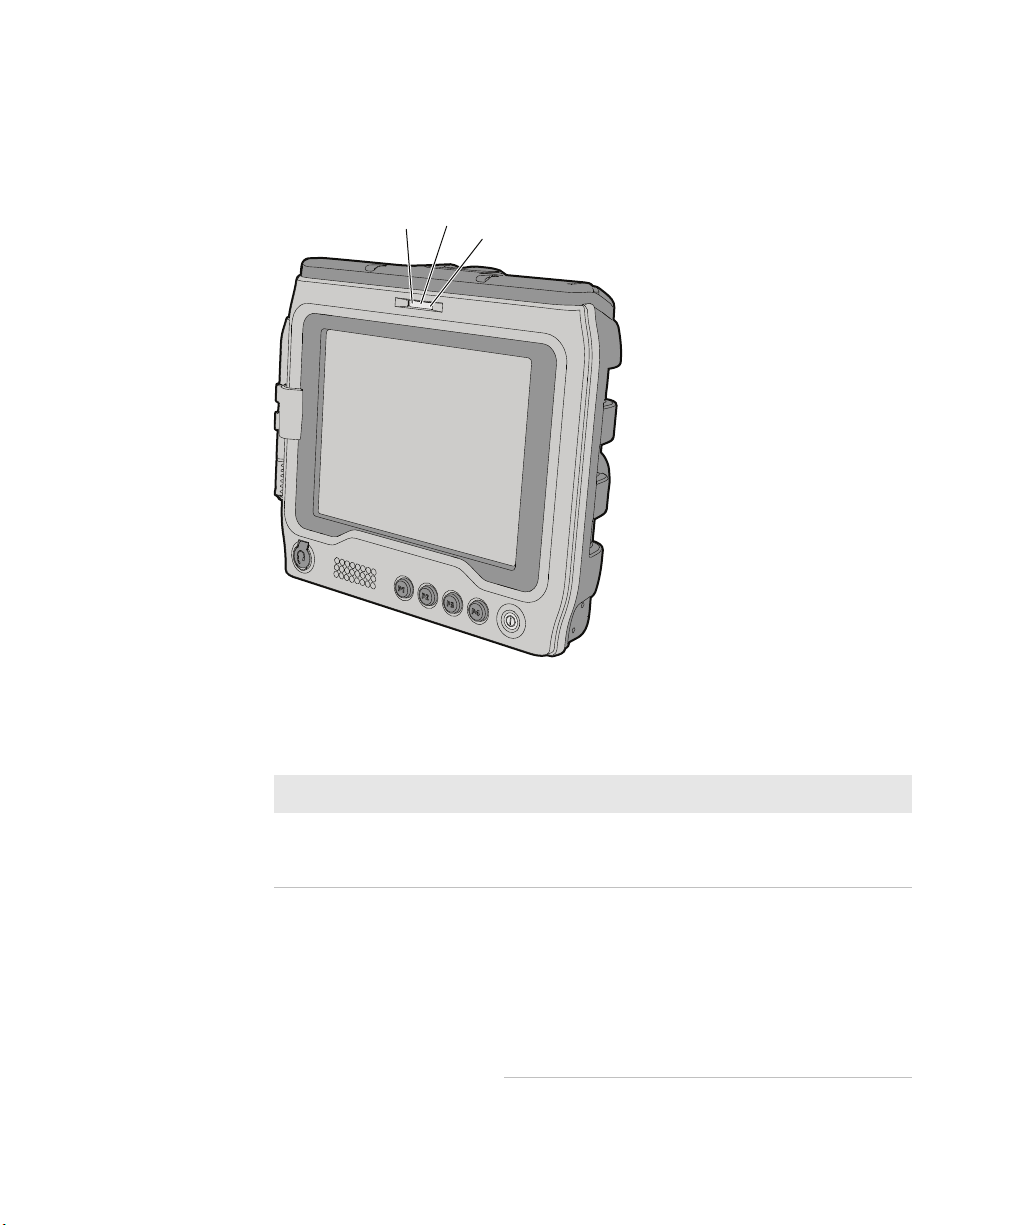
About the CV31 Buttons
5
1
2
3
4
The buttons on the front of the computer provide easy access to power,
volume, brightness, and device health. You can also program buttons
P1 to P4 to access different system functions.
Chapter 1 — About the Computer Features
CV31 Buttons
Callout Button Description
1 P1 Opens the Device Health Dashboard.
2 P2 Press and release to cycle through the five backlight
levels.
3 P3 Decreases the volume.
4 P4 Increases the volume.
5 Power Controls the power state of the computer.
CV31 Data Collection Computer User Manual 3
Page 8

Chapter 1 — About the Computer Features
About the Power Button
The Power button controls the power state of the computer. You can
use Intermec Settings to configure the behavior of the Power button.
Power Button Actions
Computer State Power Button Action
On Press and release to open the Power Options menu.
Press and hold for more than 8 seconds to turn off the
computer.
Suspend Press to wake up the computer.
Off Press to turn on the computer.
About the Power Options
The power options for the computer are available from the Power
Options menu. When the computer is on, press the Power button to
open the Power Options menu. The timeout bar at the bottom of the
screen indicates how much time is left to make a selection. If you do
not select a power option, the selected action (outlined in bold) occurs
after the timeout.
Power Options Menu
Option Description
Suspend The computer powers off all radios and internal devices not
involved in saving the system state. You can wake the
computer by pressing the Power button or scheduling an
event such as an alarm.
Shutdown The computer turns off.
Reboot The computer does not save the current system state, but
the registry and file systems are saved. The computer shuts
down all running processes and restarts.
Cancel Closes the Power Options menu.
If you are using WPA or 802.1x security, the computer may need to
reauthenticate before it resumes your application. The Real Time
Clock (RTC) will persist through all of the power options as long as it
receives power from the Real Time Clock battery.
4 CV31 Data Collection Computer User Manual
Page 9
Chapter 1 — About the Computer Features
The Power Options menu is customizable. You can use Intermec
Settings to determine which options are available to end users, the
timeout until the default choice is selected, the default action if no
option is selected, or to disable the Power Options Screen.
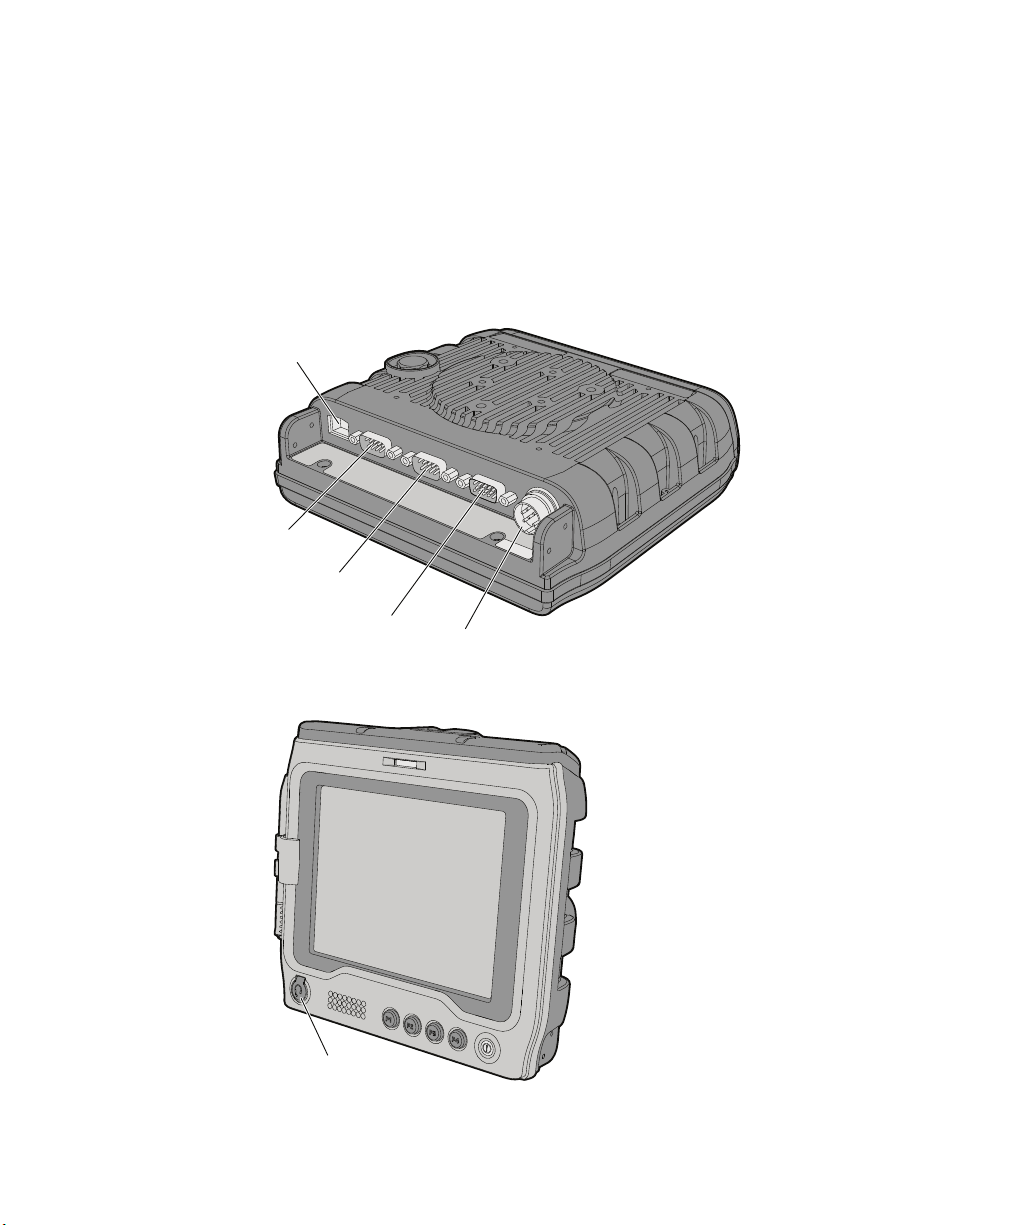
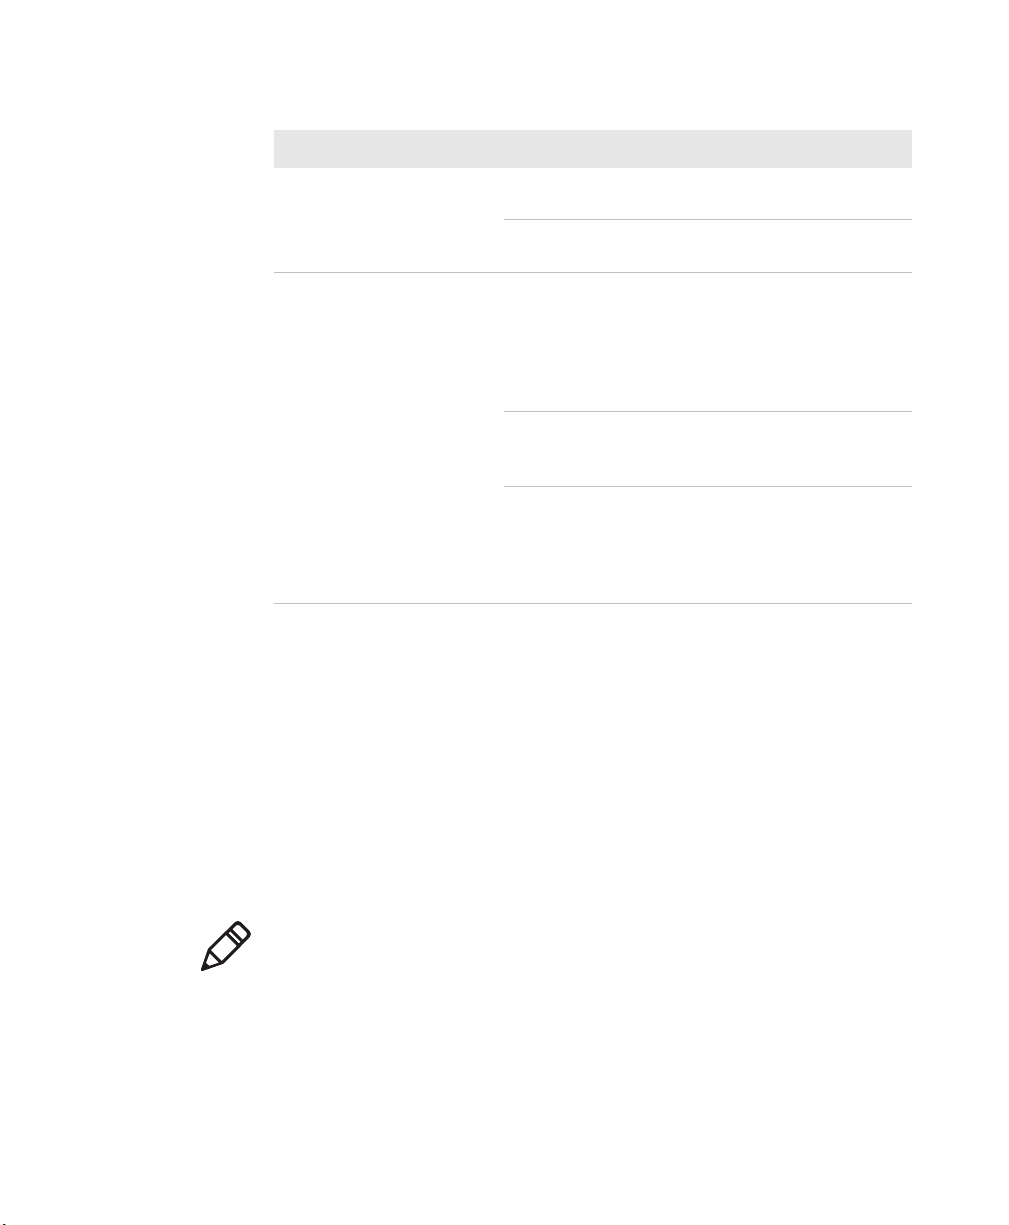
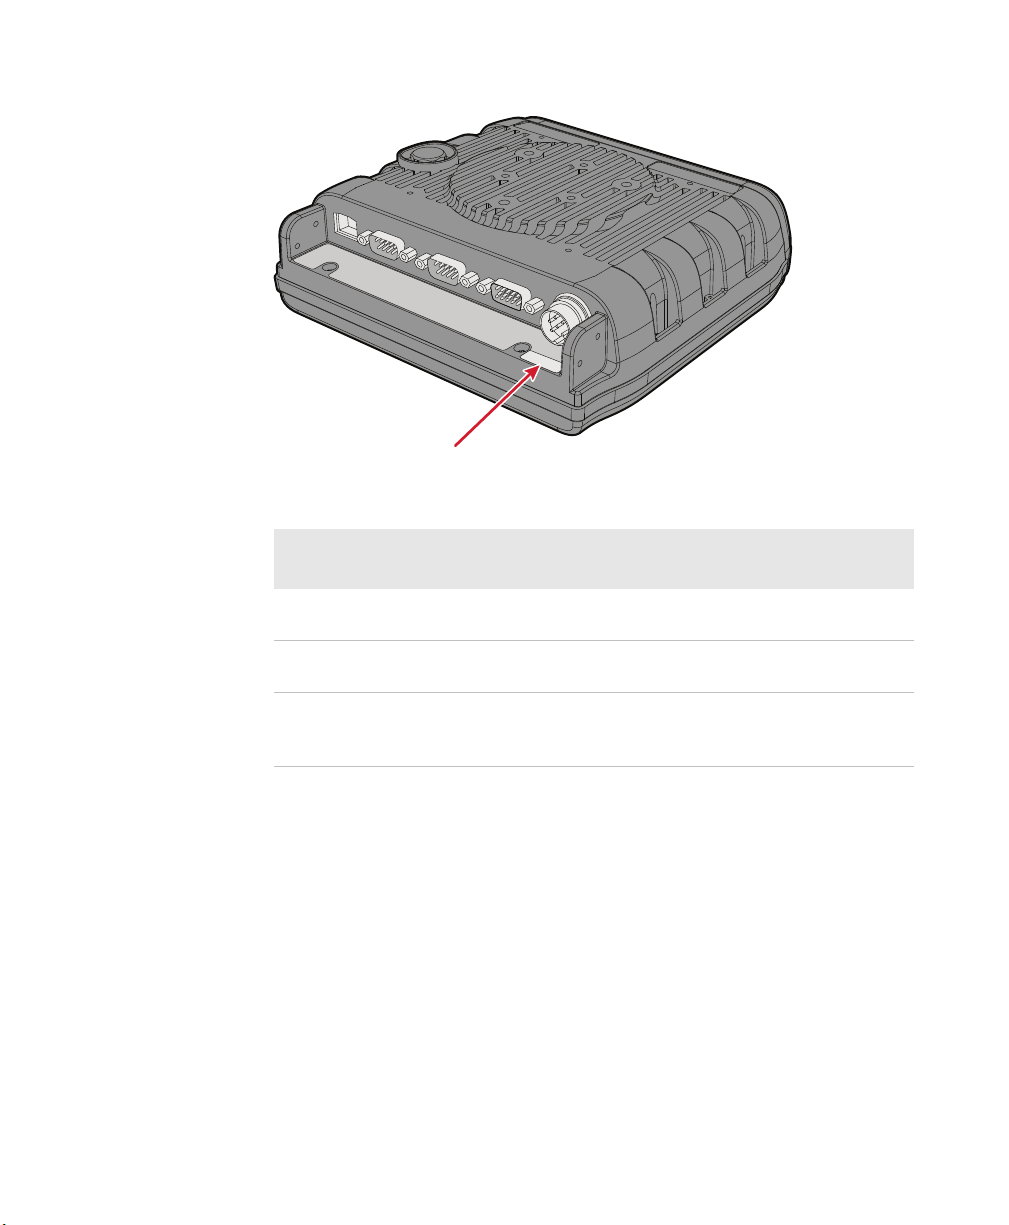
About the CV31 Ports and Connectors
The connectors provide access to power, external devices, and
communications.
1
2
3
4
Back View of the CV31
6
Headset Jack on the Front of the CV31
CV31 Data Collection Computer User Manual 5
5
Page 10
Chapter 1 — About the Computer Features
7
Antenna Connector on the Top of the CV31
CV31 Ports and Connectors
Callout Connector Description
1 Ethernet Supports 10BaseT/100BaseT full duplex
2 COM1 Connects the CV31 to RS-232 devices,
3 COM3 Connects the CV31 to RS-232 devices,
4 AUX Connects USB devices to the CV31. You
5 Power Connects the CV31 to an AC/DC or
6 Headset Jack Connects headphones to the CV31.
7 Antenna Connects an external antenna to the CV31.
standard Ethernet interfaces.
such as PCs or printers.
such as PCs or printers.
can connect a single or double USB cable
to the AUX connector to turn it into one or
two USB host connectors. You can also
connect a developer USB cable to turn the
port into a USB 1.1 Client connection.
DC/DC power supply.
6 CV31 Data Collection Computer User Manual
Page 11
About the Status LEDs
1
2
3
The status LEDs turn on, turn off, or blink to indicate a specific
activity on your computer.
Chapter 1 — About the Computer Features
CV31 Status LEDs
Status LEDs
CV31 Data Collection Computer User Manual 7
Callout LED Color Description
1 Good Read Green Both sides of the LED turn green to
indicate that the CV31 successfully
read a bar code.
2 Ready-to-Work™
indicator
Blue If Intermec Terminal Emulator (ITE)
is installed, the application is
running and is connected to the
host.
If you do not have ITE, you can
configure the Ready-to-Work
indicator to turn on or off to
indicate a healthy state.
Page 12
Chapter 1 — About the Computer Features
Status LEDs (Continued)
Callout LED Color Description
3 Battery Status Steady
Blinking
blue
Off ITE is not installed or not running.
orange
Blinking
orange
Blinking
red
ITE is running but not connected to
the host. The computer is unhealthy.
The computer is healthy.
The battery is outside the allowable
charging temperature range of 0 °C
to 40 °C (32 °F to 104 °F). Charging
will resume when the battery
temperature returns to within the
acceptable range.
There is a battery error. The battery
is not charging because it is missing,
faulty, or there is a bad connection.
The CV31 is not connected to
external power, and the battery is
very low. The computer will go into
Suspend mode soon. Charge or
replace the battery.
How to Supply Power to the CV31
The accessories you use to supply power to the CV31 depend on
whether you want to replace a CV30 and keep your existing wiring or
perform a new installation:
• To replace a CV30 and keep your existing wiring, you need to
purchase an adapter cable (P/N VE027-8024-C0).
• To perform a new installation, you need to know the electrical
rating of your CV31 and the vehicle you are installing it on to
determine which power supply to use.
Note: The AC power supply for the CV31 has a different input
connector than the AC power supply for the CV30. You cannot use the
CV31 power supply with a CV30.
8 CV31 Data Collection Computer User Manual
Page 13
Chapter 1 — About the Computer Features
Location of the CV31 Electrical Rating (12V or 9-36V)
CV31 Power Supply Options for a New Installation
Installation Electrical
Requirement
100-240 VAC,
50-60 Hz
Vehicle: 9-36 VDC 9-36 VDC CV31/CV61 Direct Wiring Kit
Vehicle: Over 36 VDC,
up to 96 VDC
About the Backup Battery
If the CV31 is disconnected from external power, the backup battery
can keep the CV31 running in a network connected state for up to 30
minutes. When power is restored, the CV31 continues normal
operation.
An internal charger automatically charges the backup battery (within
8 hours) when the CV31 is connected to external power.
CV31 Electrical
Rating
12 VDC or
9-36 VDC
12 VDC or
9-36 VDC
Use This Power Supply
AC Power Supply (P/N 203-955-001)
(P/N 203-950-001)
Universal Vehicle Power Supply Kit
(P/N 203-950-002) with cable
P/N VE027-8024-CO)
CV31 Data Collection Computer User Manual 9
Page 14

Chapter 1 — About the Computer Features
Check the Status of the Backup Battery
Check the status of the backup battery to make sure that it is
functioning properly.
1 Tap Start > Settings > Control Panel.
2 Double tap Power.
The battery status appears on the Battery tab.
How to Mount the CV31
Use a Honeywell approved mounting accessory to mount the CV31:
• Desktop Mounting Kit (P/N 805-815-001)
• Vehicle Mounting Kit with a 1.5-inch (C-size) (P/N 805-813-001) or
2.25-inch (D-size) (P/N 805-814-001) RAM ball
• Wall Mounting Kit (P/N VE011-2006)
• Mounting Screw Kit (P/N xxx-xxx-xxx) to mount the CV31 to an
existing 1.5-inch (C-size) or 2.25-inch (D-size) RAM ball
How to Connect a Headset
Use one of these methods to connect a headset:
• Plug a headset into the headset jack on the front of the CV31.
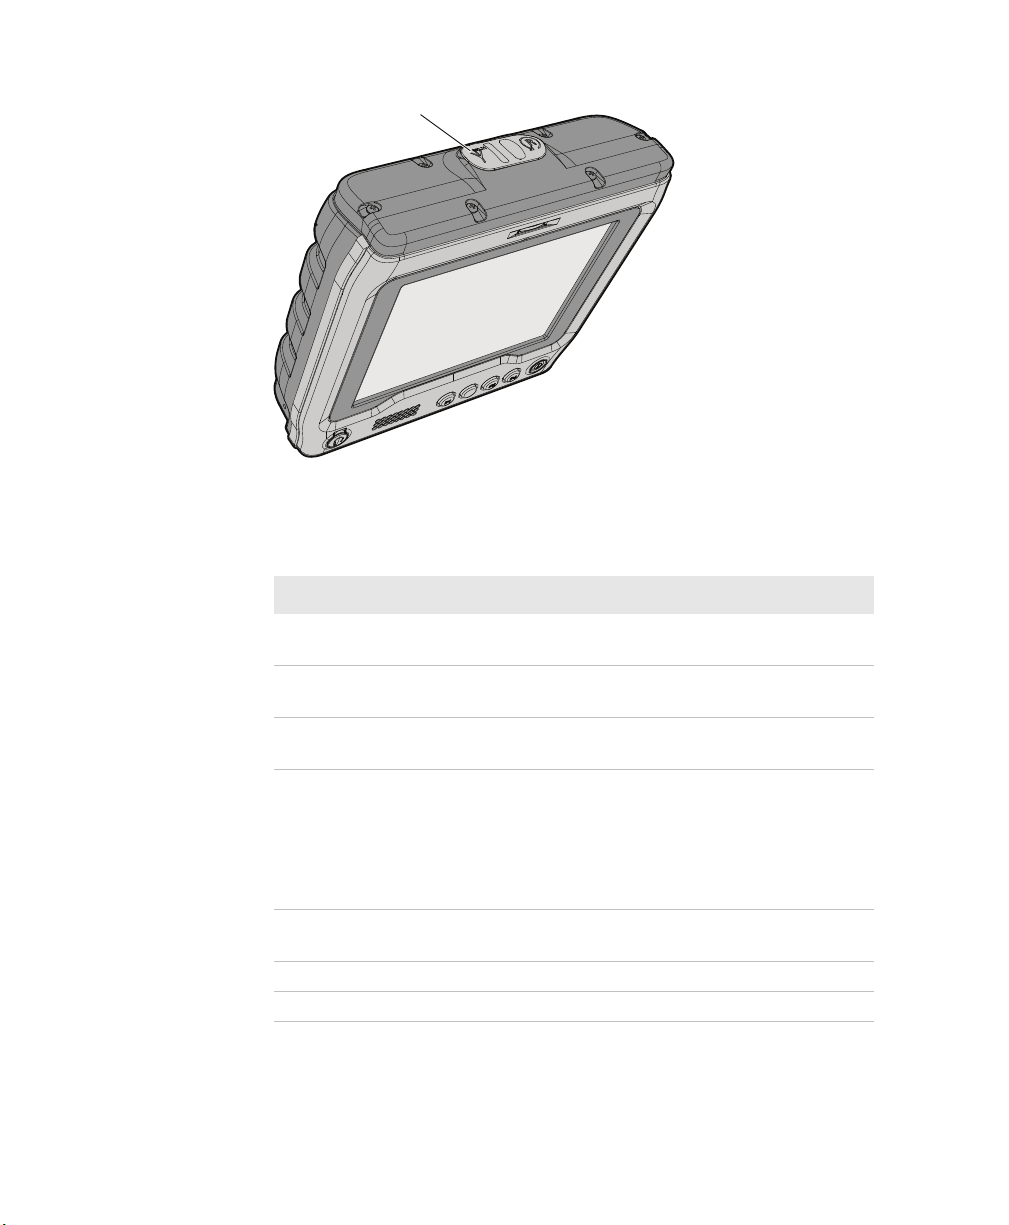
• Pair a Vocollect Bluetooth headset with the near-field
communication (NFC) radio on the top of the CV31.
10 CV31 Data Collection Computer User Manual
Page 15
How to Change the Volume
The computer volume controls the sounds you hear when you tap the
screen or scan bar codes with an external scanner.
Chapter 1 — About the Computer Features
NFC
Methods to Change the Volume
Method Description
Front panel buttons Use the volume up and volume down buttons on the
front panel.
Control panel Tap Start > Settings > Control Panel, and then
double-tap Volume & Sounds.
Intermec Settings Start Intermec Settings and go to Device Settings >
Volume.
CV31 Data Collection Computer User Manual 11
Page 16

Chapter 1 — About the Computer Features
Connect an External Keyboard
You can attach a compact or large external keyboard to make data
entry easier.
1 Mount the keyboard. For help, see the installation instructions
that ship with the mounting kit.
2 Connect the keyboard to the CV31 with a USB cable.
About the Bar Code Slot Reader
Install a visible light (P/N 858-098-001) or infrared light (P/N
858-098-002) bar code slot reader (Model AR3) to scan and enter bar
code data. The CV31 decodes the bar code and enters the data or
command.
After you install the bar code slot reader, you need to enable and
configure it. By default, these symbologies are enabled: Code 39, Code
128, UPC A, UPC E, EAN 8, and EAN 13. You should only enable the
symbologies that you plan to read.
When you scan a bar code, the Good Read LED turns green to indicate
a successful scan.
12 CV31 Data Collection Computer User Manual
Page 17

Chapter 1 — About the Computer Features
Configure the Bar Code Slot Reader
If you installed the bar code slot reader (Model AR3) accessory, you
need to enable and configure it before you can use it.
1 Tap Start > Settings > Control Panel > Intermec Settings.
2 Tap Data Collection > Tethered Scanner (COM3) > Scanner
Settings.
3 Tap Scanner Model.
4 From the list, select ID Tech Slot Scanner.
5 Select Enable Scanner Port.
6 Tap OK.
7 Tap Data Collection > Tethered Scanner (COM3) >
Symbologies.
8 Only enable the symbologies that you plan to read.
Install an SD Card
Use an SD card to increase file storage or install software. The
computer resets when you install or remove an SD card.
1 Press and hold the Power button for more than 8 seconds to turn
off the computer.
2 Disconnect the power cord from the computer.
3 Use a Phillips screwdriver to remove the six screws that secure the
radome cover.
CV31 Data Collection Computer User Manual 13
Page 18

Chapter 1 — About the Computer Features
(x6)
4 Carefully lift the radome cover.
5 Insert the SD card into the SD card slot.
6 Close the radome cover and replace the six screws.
7 Connect the power cord and turn on the computer. The computer
resets and turns on.
CV31 Accessories
The CV31 ships with a backup battery. All other accessories are sold
and ordered separately. For help, contact your local sales
representative.
CV31 Accessories
Accessory Description
AC Power Supply Use the AC power supply (P/N 203-955-001)
to power the CV31 (rated 12 VDC).
CV31/CV41/CV61 Direct
Wiring Kit
14 CV31 Data Collection Computer User Manual
Use the direct wiring kit (P/N 203-950-001)
to install the CV31 (rated 9-36 VDC) on a
vehicle rated 9-36 VDC.
Page 19

Chapter 1 — About the Computer Features
CV31 Accessories (Continued)
Accessory Description
Universal Vehicle Power
Supply
Replacement Battery The CV31 ships with a backup battery, but
Mounting Kits Use one of these mounting accessories to
Use the Universal Vehicle Power Supply
(P/N 203-950-002) with adapter cable
P/N VE027-8024-CO to install the CV31
(rated 9-36 VDC) on a vehicle rated from
36 VDC up to 96 VDC.
you can order and install a replacement
battery (P/N xxx-xxx-xxx), if necessary.
securely mount the CV31:
• Desktop Mounting Kit
(P/N 805-815-001)
• Vehicle Mounting Kit with a 1.5-inch
(C-size) (P/N 805-813-001) or 2.25-inch
(D-size) (P/N 805-814-001) RAM ball
• Wall Mounting Kit (P/N VE011-2006)
• Adapter Plate (P/N VE011-2011) to
mount the CV31 to an existing 2455
installation
• Mounting Screw Kit (P/N xxx-xxx-xxx) to
mount the CV31 to an existing 1.5-inch
(C-size) or 2.25-inch (D-size) RAM ball
• Wall Mount Cable Protector
AR3 Bar Code Reader Install a visible light (P/N 858-098-001) or
infrared light (P/N 858-098-002) bar code
slot reader to scan and enter bar code data.
Tethered Stylus Install the tethered stylus (P/N VE011-2004)
on the right or left side of the CV31 and use
the stylus to interact with the touch screen.
USB Cables Use one of these USB cables to connect a USB
device to the CV31:
• Single USB host cable (P/N VE011-2016)
• Dual USB cable (P/N VE011-2017)
• High density DB15 USB cable
(P/N VE011-2021)
Developer USB Cable Use the developer USB cable
(P/N VE011-2018) to connect the CV31
to your desktop PC.
CV31 Data Collection Computer User Manual 15
Page 20

Chapter 1 — About the Computer Features
CV31 Accessories (Continued)
Accessory Description
Screen Blanking Box Use the screen blanking box
Ignition Sensing Cable Install the ignition sensing cable
Compact Keyboards and
Overlays
Large external QWERTY
Keyboards
Screen Protector Install the screen protector to reduce damage
(P/N CV4151PWRSPLY) to help
improve operator safety and reduce driver
distractions by turning off the computer
display when the vehicle is in motion.
(P/N xxx-xxx-xxx) to allow the CV31 to
monitor the vehicle ignition switch.
Install the AK4 compact keyboard
(P/N VE011-2022 or P/N VE011-2030) and
keyboard mounting kit (P/N VE011-2003) to
make data entry easier.
Connect one of these large external
QWERTY keyboards to the CV31 to make
data entry easier:
• 3270 Backlit QWERTY Keyboard
(P/N 850-809-001)
• 3270 DE-15S Backlit QWERTY Keyboard
(P/N 340-054-001)
• 5250 Backlit QWERTY Keyboard
(P/N 850-809-002)
• 5250 DE-15S Backlit QWERTY Keyboard
(P/N 340-054-002)
• 5250 Extreme Temp QWERTY Keyboard
(P/N 340-054-102)
• Windows Backlit QWERTY Keyboard
(P/N 850-809-003)
• Windows DE-15S Backlit QWERTY
Keyboard (P/N 340-054-003)
• VT-220 Backlit QWERTY Keyboard
(P/N 850-809-004)
• VT-220 DE-15S Backlit QWERTY
Keyboard (P/N 340-054-004)
to the screen due to scratches.
16 CV31 Data Collection Computer User Manual
Page 21

2
About the User Interface and Installed
Applications
Use this chapter to learn about the Microsoft® Windows®
Embedded Compact 7 (CE 7) user interface and how to interact
with the screen. You can also use this chapter to learn about the
applications installed on your computer, as well as additional
applications you can download.
17
Page 22

Chapter 2 — About the User Interface and Installed Applications
About the User Interface
The Microsoft® Windows® Embedded Compact 7 (CE 7.0) operating
system provides a touch-friendly and easy to navigate user interface.
CV31 Main Screen
About the Touch Screen
The CV31 has a 6.4-inch color VGA (640 x 480 pixels) touch screen
display. The display also has an optional defroster to reduce
condensation on the external surface when moving between
sub-freezing and normal temperatures.
If you plan to use the CV31 in extreme cold conditions for an extended
period of time, turn on the power in a room temperature environment
(25
°C, 77 °F) and let the CV31 “warm up” for at least 15 minutes. This
process helps preserve the display lighting.
18 CV31 Data Collection Computer User Manual
Page 23

Chapter 2 — About the User Interface and Installed Applications
About Screen Gestures
The Windows CE7 interface supports the use of gestures with the
finger or stylus to move around the screen.
Screen Gestures
Gesture Description
Tap Represents the left click of a mouse.
Double-tap Represents the left double-click of a mouse.
Hold Represents the right click of a mouse when you press and
hold on the screen and a context menu appears.
Flick Initiates scrolling in the direction (horizontal or vertical) the
finger or stylus moves across the screen.
Pan Press and hold on the screen and then drag in any direction.
Calibrate the Touch Screen
If the touch screen does not respond when you tap it, you may need to
calibrate the touch screen.
1 Tap Start > Settings > Control Panel.
2 Double-tap Stylus.
3 Tap the Calibration tab.
4 Tap Recalibrate and follow the instructions.
Turn on the Heated Touch Screen
Turn on the optional defroster to reduce condensation on the external
surface of the touch screen when moving between sub-freezing and
normal temperatures.
1 Tap Start > Settings > Control Panel > Intermec Settings.
2 Tap Device Settings > Heater.
3 Under Heater, select Enabled.
4 Tap OK to save your settings.
CV31 Data Collection Computer User Manual 19
Page 24

Chapter 2 — About the User Interface and Installed Applications
Use the Computer in Cold Temperature Environments
To use the computer in cold temperature environments, you need to
connect the computer to external power, turn on the optional heated
touch screen, and follow the cold temperature usage model.
1 Turn on the computer in a room temperature (25 °C, 77 °F)
environment.
2 Let the computer run for 15 minutes.
3 Set the Backlight Level to High.
4 Enter the cold temperature (-30 °C, 77 °F) environment. You can
use the computer normally for up to 4 hours.
5 After 4 hours, return the computer to a room temperature
environment.
6 Let the computer run for 15 minutes.
7 Return to the cold temperature environment. You can use the
computer normally for up to another 4 hours.
Applications Installed on the Computer
Applications installed on the computer help you configure,
troubleshoot, and connect your computer to other devices and
networks.
Applications Installed on the Computer
Icon Application Description
Bluetooth Audio Use the Bluetooth Audio application to connect
to a Bluetooth headset or hands-free device.
CloneNGo Use CloneNGo to configure basic device settings
on multiple client computers from one master
computer.
20 CV31 Data Collection Computer User Manual
Page 25

Chapter 2 — About the User Interface and Installed Applications
Applications Installed on the Computer (Continued)
Icon Application Description
Intermec Settings Use Intermec Settings to configure your
computer. You can use Intermec Settings to
individually configure a computer or you can
use it through SmartSystems to configure all of
your computers.
ISpyWiFi Use ISpyWiFi to check your 802.11 status and
diagnose issues with the connection.
Profile Settings Use Profile Settings to easily configure the
computer for a specific use. You can choose
predefined values for the Power and Scanning.
Wireless Printing Use the Wireless Printing application to connect
to a Bluetooth printer.
Wireless Readers Use the Wireless Readers application to connect
the computer to the IV7D RFID reader.
Wireless
Scanning
CV31 Data Collection Computer User Manual 21
Use the Wireless Scanning application to
connect to a Bluetooth scanner.
Page 26

Chapter 2 — About the User Interface and Installed Applications
22 CV31 Data Collection Computer User Manual
Page 27

A
Specifications
This appendix lists the CV31 hardware and software
specifications.
23
Page 28

Appendix A — Specifications
Physical and Environmental Specifications
This section lists the physical and environmental specifications for the
CV31.
Physical Dimensions
Specification Measure
Height 17.65 cm (6.95 in)
Width 18.92 cm (7.45 in)
Depth 5.46 cm (2.15 in)
Weight 1.6 kg (3.5 lb)
Power and Electrical Specifications
Specification Measure
Electrical rating 12 VDC ±1.5 V input voltage range
9-36 VDC input voltage range
Backup battery Rechargeable lithium-ion battery
Temperature and Humidity Specifications
Specification Measure
Operating temperature -20 °C to 60 °C (-4 °F to 140 °F)
Operating temperature with optional
heater on
Backup battery charging temperature 0 °C to 40 °C (32 °F to 104 °F)
Storage temperature for up to 1 month -30 °C to 70 °C (-22 °F to 158 °F)
Storage temperature for up to 1 year -20 °C to 20 °C (-4 °F to 68 °F)
Relative humidity 5% to 95% non-condensing
24 CV31 Data Collection Computer User Manual
-30 °C to 50 °C (-22 °F to 122 °F)
Page 29

Screen Specifications
• 163 mm (6.4 in) color VGA
• 640 x 480 pixels, supports 16 bpp color depth (65,536 colors)
• LCD capable of both portrait and landscape operation
• LED backlight
Keyboard Options
• 3270 Backlit QWERTY Keyboard (P/N 850-809-001)
• 3270 DE-15S Backlit QWERTY Keyboard (P/N 340-054-001)
• 5250 Backlit QWERTY Keyboard (P/N 850-809-002)
• 5250 DE-15S Backlit QWERTY Keyboard (P/N 340-054-002)
• 5250 Extreme Temp QWERTY Keyboard (P/N 340-054-102)
• Windows Backlit QWERTY Keyboard (P/N 850-809-003)
• Windows DE-15S Backlit QWERTY Keyboard (P/N 340-054-003)
• VT-220 Backlit QWERTY Keyboard (P/N 850-809-004)
• VT-220 DE-15S Backlit QWERTY Keyboard (P/N 340-054-004)
Bar Code Symbologies
Appendix A — Specifications
The available bar code symbologies depend on the scanner connected
to the computer:
• Australia Post*
• Aztec*
• BPO (British Post 4-state)*
• Canada Post
• Codabar
• Codablock A
• Codablock F
• Code 11
• Code 39
• Code 93
• Code 128/GS1-128
• DataMatrix*
• Dutch Post*
CV31 Data Collection Computer User Manual 25
Page 30

Appendix A — Specifications
• EAN/UPC
• GS1 Composite*
• GS1 DataBar Expanded
• GS1 DataBar Limited
• GS1 DataBar Omni-Directional
• HanXin
• Infomail
• Intelligent Mail
• Interleaved 2 of 5
• JapanPost*
• Matrix 2 of 5
• Maxicode*
• Micro PDF417
• MSI
• PDF417*
• Planet*
• Plessey
• Postnet*
• QR Code*
• Standard 2 of 5
• SwedenPost
• Telepen
• TLC 39
* These symbologies are only available if your CV31 is connected to an
extended range area imager or a near-far area imager.
26 CV31 Data Collection Computer User Manual
Page 31

Page 32

Honeywell Scanning & Mobility
9680 Old Bailes Road
Fort Mill, SC 29707
www.honeywellaidc.com
CV31 Data Collection Computer User Manual
*935-081-001*
P/N 935-081-001
Page 33

CV31 Compliance Insert
Model CV31A
Complies with
IDA Standards
DA 102905
For Users in English-Speaking Regions (en)
Caution: This marking indicates that the user should read all included documentation before use. Retain this supplement for
future reference.
Users of this product are cautioned to use accessories and peripherals approved by Intermec Technologies Corporation. The use of
accessories other than those recommended, or changes to this product that are not approved by Intermec Technologies Corporation,
may void the compliance of this product and may result in the loss of the user’s authority to operate the equipment.
Caution: For vehicle installations observe all warnings and cautions contained in the installation instructions. CV31A
installations that use a DC/DC converter should only be performed by qualified Intermec-trained Service Technicians.
Caution: For use with Intermec battery pack Model 1021AB01 only. See battery instructions. For power supply, use Intermec
Models 9006AE01, 9004AE03, or 9007AX01. No user-serviceable parts.
Caution: For continued protection against risk of fire, replace only with same type and rating of fuse.
Battery Information
Caution: The battery pack used with this product may ignite, create a chemical burn hazard, explode, or release toxic
materials if mistreated. Do not incinerate, disassemble, or heat above 100 °C (212 °F). Do not short circuit; may cause burns.
Keep away from children. Promptly dispose of used battery pack according to the instructions.
Battery Recycling Information
This product contains or uses a lithium-ion (Li-ion) main battery. When the battery reaches the end of its useful life, the
spent battery should be disposed of by a qualified recycler or hazardous materials handler. Do not mix this battery with
the solid waste stream. Contact your Intermec Technologies Service Center for recycling or disposal information.
Li-ionLi-ion
802.11 Radio Precaution Statement
Caution: Users are responsible for configuring the channels of operation that comply with their country regulatory standards.
A Wireless Network Administrator should review the operating restrictions detailed within the Access Point installation
manual.
Radiation Exposure Statement
Warning: This equipment complies with International Commission on Non-Ionizing Radiation Protection (ICNIRP), IEEE
C95.1, Federal Communications Commission Office of Engineering and Technology (OET) Bulletin 65, Canada RSS-102,
and European Committee for Electrotechnical Standardization (CENELEC) limits for exposure to radio frequency (RF)
radiation.
Use of antennas and accessories not authorized may void the compliance of this product and may result in RF exposures beyond the
limits established for this equipment.
When installing and using this product, a 20 cm (7.87 in) passing distance must be maintained from the body or head of the user or
nearby persons and the antenna. The antenna must not be touched during transmitter operation.
For Users in the U.S.A. and Canada
U.S.A. Digital Emissions Compliance
This device complies with part 15 of the FCC Rules. Operation is subject to the following two conditions: (1) This device may not cause
harmful interference, and (2) This device must accept any interference received, including interference that can cause undesired
operation.
This equipment has been tested and found to comply with the limits for a Class A digital device, pursuant to Part 15 of the FCC Rules.
These limits are designed to provide reasonable protection against harmful interference when the equipment is operated in a
commercial environment. This equipment generates, uses, and can radiate radio frequency energy and, if not installed and used in
accordance with the instruction manual, may cause harmful interference to radio communications. Operation of this equipment in a
residential area is likely to casue harful interference in which case the user wil be required to the correct the interference at their own
expense.
1
Page 34

Canadian Digital Apparatus Compliance
This device complies with Industry Canada license-exempt RSS standards. Operation is subject to the following two conditions: (1)
This device may not cause harmful interference, and (2) This device must accept any interference received, including interference that
can cause undesired operation.
CAN ICES-3 (A)/NMB-3 (A)
802.11a Radio Precaution Statement
• 802.11a wireless LAN 5150 to 5250 MHz (5.15 to 5.25 GHz) (5 GHZ radio channels 34 - 48) is restricted to indoor operations to
reduce harmful interference to co-channel Mobile Satellite System (MSS) operations.
• The maximum antenna gain permitted for devices in the bands 5250-5350 MHz and 5470-5725 MHz shall comply with the e.i.r.p.
limit.
• The maximum antenna gain permitted for devices in the band 5725-5825 MHz shall comply with the e.i.r.p. limits specified for pointto-point and non point-to-point operation as appropriate.
• Be advised that high-power radars are allocated as primary users (i.e. priority users) of the bands 5250-5350 MHz and
5650-5850 MHz and that these radars could cause interference and/or damage to LE-LAN devices.
Under Industry Canada regulations, this radio transmitter may only operate using an antenna of a type and maximum (or lesser) gain
approved for the transmitter by Industry Canada. To reduce potential radio interference to other users, the antenna type and its gain
should be so chosen that the equivalent isotropically radiated power (e.i.r.p.) is not more than that necessary for successful
communication.
This radio transmitter IC: 1693B-CV31A1 has been approved by Industry Canada to operate with the antenna types listed below with
the maximum permissible gain and required antenna impedance for each antenna type indicated. Antenna types not included in this
list, having a gain greater than the maximum gain indicated for that type, are strictly prohibited for use with this device.
Description 2.4 GHz Gain (dBi) 5.0 GHz Gain (dBi) Impedance (Ohms)
Dual-Band Omnidirectional 3.0 5.0 50
Patch 3.0 50
For Users in Europe
EN 55022/CISPR 22 Compliance
Warning: This is a Class A product. In a domestic environment this product may cause radio interference in which case the
user may be required to take adequate measures.
Caution: 802.11a wireless LAN 5150 to 5350 MHz (5.15 to 5.35 GHz) is limited to indoor use only.
Note: Dynamic Frequency Selection and Transmit Power Control are required in the 5250 to 5350 MHz and 5470 to 5725 MHz
frequency range.
EU - R&TTE Declaration
Intermec Technologies Corporation declares that this device is in compliance with the essential requirements and other relevant
provisions of R&TTE Directive (1999/5/EC). To find the EU Declaration of Conformity, go to www.intermec.com > Products >
Computers > Fixed Vehicle Computers > CV31 > Manuals tab and then scroll down to Regulatory Information.
This product is marked with this logo and uses radio frequency bands that are harmonized throughout the
European Community.
This equipment may be operated in the following countries without restriction:
AT BE BG CH CY CZ DE DK EE ES FI FR GB GR HR HU IE
IS IT LI LT LU LV MK MT NL PL PT RO SE SI SK TR
Restrictions (Revision ERC/REC 70-03 E 2012-07, Annex 3 Band A)
NO This subsection does not apply for the geographical area within a radius of 20 km from the center of Ny-Ålesund.
Für Anwender in Deutschland (de)
Vorsicht: Diese Kennzeichnung weist darauf hin, dass der Benutzer vor dem Gebrauch alle mitgelieferten Unterlagen lesen
soll. Diese Ergänzung muss zur zukünftigen Bezugnahme aufgehoben werden.
Die Benutzer dieses Produkts werden darauf hingewiesen, nur Zubehörteile und Peripheriegeräte zu verwenden, die von Intermec
Technologies Corporation genehmigt sind. Falls nicht empfohlene Zubehörteile verwendet oder an diesem Produkt Änderungen
vorgenommen werden, die nicht von Intermec Technologies Corporation genehmigt sind, kann dadurch die behördliche Konformität
des Produkts verletzt werden und der Benutzer die Berechtigung zur Verwendung des Geräts verlieren.
Vorsicht: Bei Fahrzeuganwendungen sind sämtliche Warnungen und Vorsichtshinweise der Installationsanleitung zu
beachten. CV31A installations that use a DC/DC converter should only be performed by qualified Intermec-trained Service
Technicians.
2
Page 35

Vorsicht: Nur zum Gebrauch mit Intermec Akkusatz Modell 1021AB01. Siehe Batterieanweisungen. Als Netzteil IntermecModell 9006AE01, 9004AE03, oder 9007AX01 verwenden. Enthält keine Teile, die vom Benutzer gewartet werden können.
Vorsicht: Für fortwährenden Schutz gegen Brand nur durch eine Sicherung gleichen Typs und Nennwertes ersetzen
Informationen zu Akku
Vorsicht: Der in diesem Gerät verwendete Akkusatz kann sich bei Missbrauch entzünden, chemische Verätzungen
verursachen, expoldieren oder toxische Substanzen freisetzen. Nicht verbrennen, zerlegen oder über 100 °C erwärmen. Ne
pas court-circuiter; cela pourrait causer des brûlures. Garder hors de la portée des enfants. Den verbrauchten Akkusatz
sofort gemäß Anweisungen entsorgen.
Informationen zum Recycling von Batterien
Dieses Produkt enthält oder verwendet einen Lithiumionen-Hauptakku. Wenn die Batterie ausgedient hat, sollte sie
durch einen qualifizierten Recycler oder durch den Sondermüll entsorgt werden. Werfen Sie die Batterie nicht in den
Abfall. Setzen Sie sich mit Ihrem Intermec Technologies Service-Zentrum in Verbindung, um weitere Informationen
Li-ionLi-ion
zum Recycling oder Entsorgen zu erhalten.
Vorsichtsmaßnahmen für 802.11 Funk
Vorsicht: Benutzer sind dafür verantwortlich, die Betriebskanäle zu konfigurieren, die mit den behördlichen Normen ihres
Landes konform sind. Ein Verwalter des Drahtlosnetzwerks muss die Betriebsbeschränkungen prüfen, die im ZugriffsstellenInstallationshandbuch beschrieben sind.
Angabe zur Strahlenbelastung
Achtung: Dieses Gerät entspricht der Internationalen Kommission für den Schutz vor nicht ionisierender Strahlung (ICNIRP),
IEEE C95.1, dem Bulletin 65 des OET (Federal Communications Commission Office of Engineering and Technology), RSS102 (Kanada) und den Grenzwerten des European Committee for Electrotechnical Standardization (CENELEC) für die
Exposition mit Hochfrequenzstrahlung.
Der Gebrauch von nicht zugelassenen Antennen und Zubehörteilen kann die Konformität dieses Produktes aufheben und zu HFAussetzung in größerem Ausmaß führen, als für dieses Gerät zulässig ist.
Beim Befestigen und Gebrauch dieses Produkts, muss zwischen dem Körper bzw. Kopf des Benutzers oder nahestehender Personen
und der Antenne ein Abstand von 20 cm eingehalten werden. Die Antenne darf während des Betriebs des Senders nicht berührt
werden.
Konformität mit EN 55022/CISPR 22
Achtung: Das ist ein Produkt der Klasse A. In einer Wohngegend kann dieses Produkt Störungen beim Radioempfang
verursachen; in einem solchen Fall muss der Benutzer eventuell ausreichende Abhilfemaßnahmen treffen.
Vorsicht: 802.11a Wireless LAN 5150 bis 5350 MHz (5,15 bis 5,35 GHz) ist auf die Verwendung in Innenräumen beschränkt.
Hinweis: Dynamische Frequenzauswahl und Sendeleistungssteuerung sind im Frequenzbereich zwischen 5250 und 5350 MHz sowie
zwischen 5470 und 5725 MHz erforderlich.
EU – R&TTE-Erklärung
Intermec Technologies Corporation erklärt hiermit, dass dieses Gerät die wesentlichen Anforderungen und anderen relevanten
Bestimmungen der R&TTE-Direktive (1995/5/EC) erfüllt. Eine Kopie der Konformitätserklärung erhalten Sie unter www.intermec.com
> Products > Computers > Fixed Vehicle Computers > CV31 > Registerkarte Manuals. Scrollen Sie nach unten zu den Regulatory
Information.
Dieses Produkt wird mit diesem Logo vertrieben und verwendet Funkfrequenzbänder, die in der Europäischen
Gemeinschaft und in anderen Ländern (s. unten aufgeführte Tabelle) harmonisiert sind.
Dieses Gerät darf in den folgenden Ländern ohne Einschränkungen betrieben werden:
AT BE BG CH CY CZ DE DK EE ES FI FR GB GR HR HU IE
IS IT LI LT LU LV MK MT NL PL PT RO SE SI SK TR
Para usuarios en México, Centroamérica y Sudamérica - Excepto Brasil
(es)
Precaución: Esta marca indica que el usuario debe leer toda la documentación incluida antes del uso. Retenga este
suplemento para referencia futura.
3
Page 36

Se advierte a los usuarios de este producto que usen accesorios y periféricos aprobados por Intermec Technologies Corporation. El
uso de accesorios aparte de los recomendados, o los cambios a este producto que no estén aprobados por Intermec Technologies
Corporation, pueden anular el cumplimiento de este producto y ocasionar la pérdida de la autorización del usuario para operar el
equipo.
Precaución: Para instalaciones en vehículos, observe todas las advertencias y precauciones presentadas en las
instrucciones de instalación. CV31A installations that use a DC/DC converter should only be performed by qualified
Intermec-trained Service Technicians.
Precaución: Para usarse solamente con el paquete de batería Intermec modelo 1021AB01. Vea las instrucciones de la
batería. Para la fuente de alimentación, utilice los modelos Intermec 9006AE01, 9004AE03, o 9007AX01. No hay piezas a
las cuales pueda dar servicio el usuario.
Precaución: Para asegurar la protección continua contra el riesgo de incendios, reemplace únicamente con un fusible del
mismo tipo y capacidad.
Información de la batería
Precaución: El paquete de batería usado con este producto puede inflamarse, crear un riesgo de quemadura química,
explotar o emitir materiales tóxicos si se trata indebidamente. No incinere, desarme ni caliente sobre 100 °C. No haga
cortocircuitos, puede causar quemaduras. Mantenga alejado de los niños. Descarte rápidamente los paquetes de batería
usados conforme a las instrucciones.
Información de reciclaje de las baterías
Este producto contiene o utiliza una batería principal de iones de litio (Li-ion). Cuando la batería llegue al final de su
vida útil, la batería usada deberá desecharse por medio de un reciclador o un manejador de materiales peligrosos
calificado. No combine esta batería con el flujo de desechos sólidos. Comuníquese con el Centro de Servicio de
Li-ionLi-ion
Intermec Technologies para obtener información sobre el reciclaje o desecho.
Declaración de precaución de radio 802.11
Precaución: Los usuarios son responsables de configurar los canales de operación para cumplir con los estándares
reglamentarios de su país. Un Administrador de la red inalámbrica debe revisar las restricciones operativas detalladas dentro
del manual de instalación de Access Point.
Declaración de exposición a la radiación
Advertencia: Este equipo cumple con los límites de exposición a la radiación por radiofrecuencia (RF) establecidos por la
Comisión Internacional sobre Protección Frente a Radiaciones No Ionizantes (International Commission on Non-Ionizing
Radiation Protection, ICNIRP), IEEE C95.1, Oficina de Ingeniería y Tecnología (OET) de la Comisión Federal de
Comunicaciones (FCC), Boletín 65, Canadá RSS-102 y el Comité Europeo de Normalización Electrotécnica (CENELEC).
El uso no autorizado de antenas y accesorios puede anular el cumplimiento de este producto y puede causar exposiciones a RF que
superen los límites establecidos para este equipo.
Cuando instale y use este producto, se debe mantener una distancia de 20 cm entre el cuerpo o la cabeza del usuario o las personas
cercanas y la antena. No debe tocarse la antena durante la operación del transmisor.
Cumplimiento de las emisiones digitales
La operación de este equipo está sujeta a las siguientes dos condiciones: (1) es posible que este equipo o dispositivo no cause
interferencia perjudicial y (2) este equipo o dispositivo debe aceptar cualquier interferencia, incluyendo la que pueda causar su
operación no deseada.
Advertencia: Este es un producto Clase A. En un ambiente doméstico, este producto puede causar interferencia de radio, en
cuyo caso el usuario puede tener que tomar medidas adecuadas.
Precaución: La red inalámbrica 802.11a de 5150 a 5350 MHz (5.15 a 5.35 GHz) está limitada exclusivamente a uso bajo
techo.
Nota: La selección dinámica de la frecuencia y el control de la energía de transmisión son obligatorios para el rango de frecuencia de
5250 a 5350 y de 5470 a 5725 MHz.
Para usuarios en México
Este equipo ha sido diseñado para operar con las antenas que enseguida se enlistan y para una ganancia máxima de antena de 5 dB.
El uso con este equipo de antenas no incluidas en esta lista o que tengan una ganancia mayor que 5 dB quedan prohibidas La
impedancia requerida de la antena es de 50 ohms.
Descripción 2.4 GHz ganancia (dBi) 5.0 GHz ganancia (dBi) impedancia (Ohms)
omnidireccional de doble banda 3.0 5.0 50
Antena de parche 3.0 50
Para usuarios en Chile
Precaución: El uso de la red inalámbrica 802.11b/g de 2,40 a 2,4835 GHz (radiocanales de 2,4 GHz 1 a 13) en Chile está
restringido a operaciones en interiores.
4
Page 37

El uso de la red inalámbrica 802.11a de 5.15 a 5.35 GHz (radiocanales de 5 GHz 34 a 64) a 5.725 a 5.85 GHz (radiocanales
de 5 GHz 149 a 165) en Chile está restringido a operaciones en interiores.
Pour les utilisateurs canadiens et français (fr)
Mise en garde : Ce marquage indique que l’usager doit, avant l’utilisation, lire toute la documentation incluse. Conservez ce
supplément pour référence future.
Utilisateurs de ce produit sont avisés d’utiliser des accessoires et des périphériques approuvés par Intermec Technologies
Corporation. L’utilisation d’accessoires autres que ceux recommandés ou des changements à ce produit qui ne sont pas approuvés
par Intermec Technologies Corporation peuvent annuler la conformité de ce produit et mettre fin au droit qu’a l’usager d’utiliser
l’équipement.
Mise en garde : Pour les applications automobiles, observez les avertissements et les mises en garde de la notice
d'installation. CV31A installations that use a DC/DC converter should only be performed by qualified Intermec-trained
Service Technicians.
Mise en garde : Pour le bloc d’alimentation, utilisez le modèle 1021AB01. Voir les instructions pour la batterie. Pour
l’alimentation, utilisez le modèle 9006AE01, 9004AE03, ou modèle 9007AX01. Elle ne contient aucune pièce réparable par
l’utilisateur.
Mise en garde : Remplacez uniquement par des fusibles de mêmes type et calibre pour garantir une protection continue
contre le risque d’incendie.
Informations pour la pile
Mise en garde : Il est possible que le bloc-piles utilisé dans cet appareil présente un risque d’incendie ou de brûlure en cas
de manipulation impropre. Ne pas jeter au feu, démonter ni cha uffer à plus de 100 °C. Ne pas court-circuiter sous peine de
brûlures. Garder hors de por tée des enfants. Mettre rapidement au rebut tout bloc-piles usé, conformément aux instructions.
Informations sur le recyclage de la batterie
Ce produit contient des piles au lithium-ion. Lorsque la pile atteint la fin de sa vie utile, elle devrait être mise au rebut
par une entreprise qualifiée de recyclage ou de traitement des déchets dangereux. Ne pas jeter cette batterie dans les
ordures ménagères. Pour des informations sur le recyclage ou la mise au rebut, contacter le centre de réparation
Li-ionLi-ion
Intermec Technologies le plus proche.
802.11 Énoncé de mise en garde radio
Mise en garde : Il incombe aux utilisateurs de configurer les canaux de fonctionnement de manière à ce qu’ils se conforment
aux normes réglementaires de leur pays. L’administrateur d’un réseau sans fil doit revoir les restrictions de fonctionnement
indiquées en détail au manuel d’installation du point d’accès.
Énoncé sur l’exposition aux radiations
Avertissement : Cet équipement est conforme à la Commission internationale de protection contre les rayonnements non
ionisants (ICNIRP), à la norme IEEE C95.1, au bulletin 65 de l’OET (Federal Communications Commission Office of
Engineering and Technology), à la norme Canada RSS-102 et aux limites Comité Européen de Normalisation
Électrotechnique (CENELEC) d’exposition à des rayonnements radioélectriques.
L’utilisation d’antennes et d’accessoires non homologués peut annuler la conformité de ce produit et entraîner des expositions RF audelà des limites fixées pour cet appareil.
Lors de l’installation et de l’utilisation de ce produit, il est impératif de maintenir une distance de passage de 20 cm entre le corps ou la
tête de l’utilisateur ou des personnes à proximité et l’antenne. Il ne faut pas toucher à l’antenne pendant le fonctionnement de
l’émetteur.
Pour les utilisateurs canadiens
Conformité aux normes canadiennes sur les appareils numériques
Ce périphérique est conforme aux normes RSS exemptes de licence d’Industrie Canada. L’utilisation est assujettie aux deux
conditions suivantes : (1) Ce dispositif ne doit pas causer d’interférence dommageable et (2) Ce dispositif doit tolérer toute
interférence, incluant l’interférence pouvant causer un fonctionnement indésirable.
CAN ICES-3 (A)/NMB-3 (A)
802.11a Énoncé de mise en garde radio
• L’utilisation du LAN 802.11a sans fil 5150 à 5250 MHz (5,15 à 5,25 GHz) [canaux radio 5 GHz 34 à 48) est limitée à l’intérieur afin
de réduire les interférences nuisibles au fonctionnement des systèmes mobiles par satellite (SMS) partageant les mêmes canaux.
• Le gain d’antenne maximum autorisé pour les appareils utilisant les bandes de 5250 à 5350 MHz et 5470 à 5725 MHz doit
respecter la limite de puissance isotrope rayonnée équivalente.
• Le gain d’antenne maximum autorisé pour les appareils utilisant la bande de 5725 à 5825 MHz doit respecter la limite de puissance
isotrope rayonnée équivalente spécifiée pour un fonctionnement point-à-point et non-point-à-point, selon le cas.
• Veuillez prendre note que les radars à grande puissance sont traités à titre d’utilisateurs principaux (utilisateurs prioritaires) des
bandes de 5250 à 5350 MHz et 5650 à 5850 MHz et que ces radars peuvent nuire au fonctionnement et/ou endommager les
appareils LAN-EL (réseaux locaux sans fil exempts de licence).
Conformément aux réglementations d’Industrie Canada, cet émetteur radio peut uniquement fonctionner avec une antenne dont le
type et le gain maximal (ou d’une valeur moindre) sont approuvés par Industrie Canada pour cet émetteur. Pour réduire les risques
d’interférence radio envers d’autres utilisateurs, il faut également que le type et le gain de l’antenne soient tels que la puissance
isotrope rayonnée équivalente ne soit pas supérieure à ce qui est nécessaire pour de bonnes communications.
5
Page 38

Ces émetteurs radio IC: 1223A-CV31A ont été approuvés par Industrie Canada pour une utilisation avec les types d’antenne indiqués
(he) לארשיב םישמתשמ רובע
.דיתעב ןויעל הז חפסנ רומש .שומישה ינפל ףרוצמה דועיתה לכ תא אורקל שמתשמה לעש ןייצמ הז ןומיס :הארתה
םירחא םירזיבאב שומישה. Intermec Technologies Corporation ידי-לע םירשואמה יפקיה דויצו םירזיבאב שמתשהל םירהזומ הז רצומ ישמתשמ
ה הז רצומ לש תומיאתה תא לטבל םילולע ,Intermec Technologies Corporation ידי-לע םירשואמ םניאש הז רצומב םייוניש וא םיצלמומה הלאמ
.דויצה תא ליעפהל שמתשמה תאשרה תא לולשל םילולעו
. הנקתהה תוארוהב םיעיפומה תוריהזה יללכו תורהזאה לכב ןייע בכרב הנקתהל :תוריהז
CV31A installations that use a DC/DC converter should only be performed by qualified Intermec-trained Service Technicians.
Intermec ימגדב שמתשה למשח תקפסאל .הללוסה תוארוהב ןייע .דבלב 1021AB01 םגדמ Intermec תוללוס תכרע םע שומישל :תוריהז
.שמתשמה ידי-לע ןוקיתל םידעוימש םיקלח ןיא .9007AX01 וא 9004AE03 ,9006AE01
.גורידו גוס ותואמ ךיתנב קרו ךא ףילחהל שי ,הפירש תנכס ינפמ העובק הנגהל :תוריהז
למשח תקפסאו הללוס לע עדימ
םילפטמ םא םיליער םירמוח ררחשל וא ץצופתהל ,תימיכ היווכ תנכסל םורגל ,חקלתהל םילולע הז רצומב שומישבש תוללוסה יזראמ :הארתה
.םידלימ קיחרהל שי .תויווכל םורגל לולע רבדה .רצקל רוסא .'צ ° 100 לעמ הרוטרפמטל םמחל וא ,קרפל ,ףורשל ןיא .הכלהכ אלש םהב
םויתיל גוסמ תישאר הללוסב שמתשמ וא ליכמ הז רצומ- ןוי)Li-ion(.םיישומישה הייח ףוסל העיגמ הללוסה רשאכ ,
תשמושמה
הללוסה
לע ךלשות-לע וא תכמסומ רוזחימ תרבח ידי- לופיטל הרבח ידיםינכוסמ םירמוחב.
הליגר הקצומ
הפשא םע וז הללוס בברעל ןיא
.הכלשה וא רוזחימ לע עדימ תלבקל , לש תורישה זכרמ לא הנפIntermec Technologies.
Li-ionLi-ion
802.11 וידרל תוריהז יעצמא תרהצה
תולבגהב ןייעל ךירצ תיטוחלא תשר להנמ .םצראב תונקתב םידמועש הלעפהה יצורע לש הרוצתה תא עובקל םישמתשמה תוירחאב :הארתה
.השיגה תדוקנ לש הנקתהה ךירדמב תוטרופמש הלעפהה
ci-dessous avec le gain maximum autorisé et l’impédance d’antenne requise pour chaque type d’antenne. Il est strictement interdit
d’utiliser avec cet appareil un type d’antenne ne figurant pas dans cette liste ou ayant un gain supérieur au gain maximum indiqué pour
ce type.
Description 2.4 GHz Gain (dBi) 5.0 GHz Gain (dBi) Impédance (Ohms)
Omnidirectionnelle double bande 3.0 5.0 50
Antenne à plaque 3.0 50
Pour les utilisateurs français
Avertissement : Ceci est un appareil de classe A. Dans un environnement domestique, cet appareil peut créer des
interférences radio.
Mise en garde : Cet appareil de réseau local sans fil 802.11a utilisant la bande de 5150 à 5350 MHz (5,15 à 5,35 GHz) ne
peut être utilisé qu’à l’intérieur.
Remarque: La sélection de la fréquence dynamique et le contrôle de la puissance émise sont requis sur la bande de fréquence de
5250 à 5350 MHz et 5470 à 5725 MHz.
Déclaration ETRT de l’UE
Intermec Technologies Corporation déclare ce dispositif conforme aux exigences essentielles et autres dispositions pertinentes de la
Directive R&TTE (1999/5/EC). Pour consulter la Déclaration de conformité de l’UE, visitez www.intermec.com > Products >
Computers > Fixed Vehicle Computers > CV31 > onglet Manuals, puis faire défiler le curseur de la page jusqu’à Regulatory
Information.
Ce produit porte ce logo et utilise des bandes de fréquence radio harmonisés pour l’ensemble de la
Communauté européenne et d’autres pays, comme indiqué au tableau ci-dessous.
Cet équipement peut être utilisé dans les pays suivants sans aucune restriction :
AT BE BG CH CY CZ DE DK EE ES FI FR GB GR HR HU IE
IS IT LI LT LU LV MK MT NL PL PT RO SE SI SK TR
הללוס רוזחימ לע עדימ
6
Page 39

한국 사용자용 (ko)
לש הנירקל הפישח תרהצה
International Commission on Non-Ionizing Radiation Protection (ICNIRP) תולבגמל םאות הז דויצ :הרהזא
,Federal Communications Commission Office of Engineering and Technology (OET) Bulletin 65 ,IEEE C95.1
.(RF) וידר רדת תנירקל הפישחל CENELEC - ו ,Canada RSS-102
רובע רתומהמ רתוי ההובגה המרב RF ילגל הפישחל ליבוהלו תונקתל הז רצומ לש ותומיאת תא לטבל לולע םישרומ יתלב םירזיבאבו תונטנאב שומישה
.
הז דויצ
.םיכומס םדא-ינב לש וא שמתשמה לש ושאר וא ופוג ןיבל הנטנאה ןיב תוחפל מ"ס 20 לש רבעמ קחרמ לע רומשל שי ,וב שומישו הז רצומ תנקתה תעב
.רדשמה תלועפ ןמזב הנטנאב תעגל ןיא
םינעטמ::
ע לועפל שי"םינעטמב שומיש תעב םיאבה תוחיטבה יללכ פ:
עקתהו למשחה לבכ תוניקתו תומלש אדו.
תובוטר םיידיב למשחה תשרמ עקתה תא איצוהל וא סינכהל ןיא.
ןעטמה תא חותפל ןיא ,יהשלכ היעב לש הרקמב ,נפל שיהבורקה תורישה תדבעמל תו.
םילזונמ ןעטמה תא קיחרהל שי.
רזומ חיר לש הרקמב ,ןעטמב םרוקמש םישער , תונפלו למשחה תשרמ תידיימ וקתנל שי
ךותחל ןיא ,רובשל ,למשחה לבכ תא םקעלו.
הדימה לע רתי םמחתהל ול חינהל וא למשחה לבכ לע םיצפח חינהל ןיא ,קזנל םורגל לולע רבדה ןכש ,תולמשחתה וא הקילד.
למשחה תשרמ וקתנל שי ןעטמה יוקינ ינפל.
הרהזא:
םיירוקמ אל םיפילחתב הניזה לבכ תא ףילחהל ןיא ,שמתשמה תולמשחתהל םורגל לולע יוקל רוביח.
לבכבש הקראה ךילומ תוניקת אדוול שי ךיראמ לבכ לע שומישב.
.
.
.
.
.
.
.
.
.
.
.דבלב רוגס םוקמב שומישל תלבגומ 5.35 GHz דע 5.15 לש תיטוחלא a LAN 802.11 תשר :הארתה
.MHz 5350 דע 5250 םירדתה חווטב Transmit Power Control-ו Dynamic Frequency Selection :הרעה
주의 : 이 표시는 제품 사용 전에 모든 설명서 내용을 읽어야 한다는 것을 나타냅니다 . 향후 참고를 위해 본 자료를 보관하십
시오 .
Intermec Technologies Corporation 에서 승인한 부속품 및 주변 기기를 사용하는 본 제품의 사용자는 주의를 기울여야 합니다 . 권
장 되지 않은 부속품을 사용하거나 Intermec Technologies Corporation 의 승인 없이 본 제품을 변경할 경우 , 본 제품의 보증이 무효
화되 거나 장비 조작에 대한 사용자의 권한이 박탈될 수 있습니다 .
주의 : 차량에 사용할 경우 , 설치 지침에 명시된 모든 경고 및 주의 정보를 따르십시오 . CV31A installations th at use a DC/
DC converter should only be performed by qualified Intermec-trained Service Technicians.
주의 : Intermec 배터리 팩 모델 1021AB01 만 사용하십시오 . 배터리 안내서를 참조하십시오 . 전원 공급은 Intermec
9006AE01, 9004AE03, 또는 9007AX01 모델을 사용하십시오 . 사용자 서비스 가능한 부품이 없습니다.
주의 : 화재의 위험으로부터 향후 지속적으로 예방하려면 동일한 유형 및 정격의 퓨즈로만 교체하십시오 .
배터리 , 충전기 , 파워 서플라이 정보
주의 : 배터리를 불 에 태우거나 분해하거나 100 °C 이상의 열을 가하지 마십시오 . 배터리를 단락시키지 마십시오 . 화재가
발생할 수 있습니다 . 어린이 손 이 닿지 않는 곳에 보관하십시오 .
배터리 재활용 정보
이 제품은 리튬 이온 배터리를 내장 또는 사용하고 있습니다 . 배터리의 수명이 다한 경우 , 다 쓴 배터리는 반드시 공
인된 폐기 업체나 위험 물질 처리 작업장을 통해 안전하게 폐기하십시오 . 이 배터리는 다른 쓰레기와 함께 처리할 수
없습니다 . 재활용이나 폐기에 대한 기타 자세한 사항은 Intermec 기술 서비스 센터에 문의하십시오 .
Li-ionLi-ion
7
Page 40

802.11 라디오 주의 사항
주의 : 사용자는 해당 국가의 규정 기준을 준수하는 작동 채널 구성에 대한 책임이 있습니다. 무선 네크워크 관리자는 액세스
포인트 설치 매뉴얼 내에 상세히 기술된 작동 제한 규정을 검토해야 합니다 .
방사선 노출 성명서
경고 : 본 장비는 무선 주파수 (RF) 방사선 노출과 관련하여 국제 비전리방사선 보호위원회 (ICNIRP: International
Commission on Non-Ionizing Radiation Protection), IEEE C95.1, 미국연방통신위원회의 OET (Office of Engineering
and Technology) 회보 65, 캐나다 RSS-102 및 유럽전기표준화위원회 (CENELEC: European Committee for
Electrotechnical Standardization) 제한을 준수합니다 .
공인되지 않은 안테나 및 부속품을 사용하면 본 제품의 규정 준수 여부를 무효화시키고 본 장비에 대해 수립된 한도를 벗어나는 RF 노
출을 유발할 수 있습니다 .
이 제품을 설치하고 사용할 때 , 사용자 또는 주위 사람의 신체 부위 또는 머리 및 안테나로부터 20 cm 의 거리를 반드시 유지해야 합
니다 . 송신기 작동 중에 안테나를 만지면 안 됩니다 .
KN 22 규정 준수
이 기기는 업무용 (A 급 ) 으로 전자파 적합 등록을 한 기기 이오니 판매자 또는 사용자는 이 점을 주의하시길 바라며 , 가정 외의 지역
에서 사용하는것을목적으로합니다 .
주의 : 해당무선설비기기는 운용 중 전파혼신가능성이 있으므로 인명안전과 관련된 서비스는 할 수 없습니다 .
주의 : 802.11a 무선 LAN LAN 5150 - 5350 MHz (5.15 - 5.35 GHz) 는 실내 사용으로만 제한됩니다 .
참고 : 5250-5350 MHz 주파수 범위에서 동적 주파수 선택 (DFS: Dynamic Frequency Selection) 및 송신출력제어 (TPC: Transmit
Power Control) 가 필요합니다 .
For brukere i Norge (no)
EU - R&TTE-direktivet
Intermec Technologies Corporation erklærer at denne enheten oppfyller de vesentlige kravene og andre relevante bestemmelser i
R&TTE-direktivet (1999/5/EC). For å lese EUs samsvarserklæring, gå til www.intermec.com > Products > Computers > Fixed
Vehicle Computers > CV31 > Manuals > Manuals og bla nedover til Regulatory Information.
Dette produktet er merket med denne logoen og bruker radiofrekvensbånd som er harmonisert i EU.
Dette utstyret kan brukes uten restriksjoner i følgende land:
AT BE BG CH CY CZ DE DK EE ES FI FR GB GR HR HU IE
IS IT LI LT LU LV MK MT NL PL PT RO SE SI SK TR
802.11b/g eller Bluetooth restriksjoner (Revisjon ERC/REC 70-03 E 2012-07, Tillegg 3 Bandet A):
NO Dette punktet gjelder ikke for det geografiske området innenfor en radius av 20 km fra sentrum av Ny-Ålesund.
Para Usuários do Brasil (pt)
Cuidado: Esta identificação indica que o usuário deve ler toda a documentação fornecida antes de usar o produto. Guarde
esse suplemento para referências futuras.
Os usuários deste produto devem usar acessórios e periféricos aprovados pela Intermec Technologies Corporation. Usar acessórios
não recomendados, ou fazer alterações neste produto não aprovadas pela Intermec Technologies Corporation, poderá anular a
conformidade deste produto e resultar na perda da permissão do usuário de utilizar o equipamento.
Cuidado: Para aplicações em veículos, observe os avisos de cuidado e de atenção contidos nas instruções de instalação.
CV31A installations that use a DC/DC converter should only be performed by qualified Intermec-trained Service Technicians.
Cuidado: Para uso apenas com a bateria modelo 1021AB01 da Intermec. Veja as instruções de bateria. Usar fontes de
alimentação Intermec Modelo 9006AE01, 9004AE03, ou 9007AX01. Não há nenhuma peça que possa ser substituída ou
consertada pelo usuário.
Cuidado: Para desfrutar de proteção contínua contra risco de incêndio, trocar apenas por fusível do mesmo tipo e mesmas
especificações elétricas.
Informações sobre a bateria
Cuidado: O pacote de bateria usado com esse produto pode pegar fogo, criar perigo de queimadura química, explodir ou
liberar material tóxico, se não tratado adequadamente. Não incinerar, desmontar nem aquecer a bateria a mais de 100°C.
Não provocar curto-circuito, pois pode causar queimaduras. Manter afastada de crianças. Descartar imediatamente as
baterias usadas segundo as instruções fornecidas
8
Page 41

Informações para reciclagem da bateria
Este produto contém ou usa uma bateria principal de íon de lítio (Li-ion). Quando chega ao final de sua vida útil, a
bateria esgotada deve ser descartada por pessoal especializado em reciclagem ou na manipulação de materiais
perigosos. Não misture a bateria com lixo sólido. Entre em contato com o Centro de Atendimento da Intermec
Technologies para obter informações sobre reciclagem ou descarte.
Li-ionLi-ion
Declaração de precaução de rádio 802.11
Cuidado: Os usuários são responsáveis pela configuração dos canais de funcionamento que atendem aos padrões
regulatórios dos seus países. O administrador de rede sem fio deve analisar as restrições operacionais detalhadas no
manual de instalação do ponto de acesso.
Declaração de exposição à radiação
Advertencia: Este equipamento atende aos limites de exposição a radiação de radiofrequência (RF) do International
Commission on Non-Ionizing Radiation Protection (ICNIRP), IEEE C95.1, Federal Communications Commission Office of
Engineering and Technology (OET) Boletim 65, Canada RSS-102 e European Committee for Electrotechnical
Standardization (CENELEC).
O uso de antenas e acessórios não autorizados pode anular a conformidade deste produto e pode resultar em exposição a RF além
dos limites estabelecidos para este equipamento.
Ao instalar e utilizar este produto, deixe uma distância de 20 cm entre a cabeça ou o corpo do usuário ou das pessoas próximas e a
antena.
EN 55022/CISPR 22 Compliance
Advertencia: Este é um produto Classe A. Em um ambiente doméstico, este produto pode provocar interferência de rádio.
Neste caso, o usuário pode precisar tomar medidas adequadas.
Cuidado: A LAN wireless 802.11a de 5150 a 5350 MHz (5,15 a 5,35 GHz) está limitada apenas ao uso interno.
Nota: O uso nas faixas de frequência de 5250 a 5350 MHz e 5470 a 5725 MHz exige Seleção Dinâmica de Frequência.
Este equipamento opera em caráter secundário, isto é, não tem direito a proteção contra interferência prejudicial, mesmo de estações
do mesmo tipo, e não pode causar interferência a sistemas operando em caráter primário.
Для пользователей в России (ru)
Осторожно: Эта пометка означает, что пользователь должен прочитать всю прилагаемую документацию, прежде чем
начинать работу. Сохраните это дополнение для последующих справок.
Пользователи этого продукта предупреждаются, что они должны использовать принадлежности и периферийные устройства,
утвержденные Intermec Technologies Corporation. Использование принадлежностей, не являющихся рекомендованными, или
внесение в этот продукт изменений, не утвержденных Intermec Technologies Corporation, может сделать продукт не
соответствующим требованиям и привести к утрате пользователем права работать с данным оборудованием.
Caution: For vehicle installations observe all warnings and cautions contained in the installation instructions. CV31A
installations that use a DC/DC converter should only be performed by qualified Intermec-trained Service Technicians.
Осторожно: Тол ьк о для использования с батарейным источником питания Intermec 1021AB01. См. инструкции к
батарейкам. В качестве источника питания используйте Intermec 9006AE01, 9004AE03, или 9007AX01. Детали,
обслуживаемые пользователем, отсутствуют.
Caution: For continued protection against risk of fire, replace only with same type and rating of fuse.
Информация о батарее
Осторожно: При неправильном обращении батарейный источник питания, используемый в этом устройстве, может
воспламениться, создать опасность химического ожога, взорваться или выделять ядовитые материалы. Не сжигайте,
не разбирайте, не допускайте нагрева выше 100 °C. Не замыкайте контакты накоротко – это может причинить ожог.
Прячьте от детей.
Информация по утилизации батареек
В данном изделии содержится или используется литиево-ионная (Li-ion) батарейка. Ликвидацию
использованной батарейки, исчерпавшей свой ресурс, должно осуществлять специализированное
предприятие по утилизации или обращению с опасными материалами. Эта батарейка ни в коем случае не
Li-ionLi-ion
должна попасть в обычные твердые отходы. По вопросам утилизации или ликвидации обращайтесь в
соответствующий сервис-центр компании Intermec Technologies.
9
Page 42

Заявление о радиобезопасности согласно спецификации 802.11
Осторожно: Пользователи должны сконфигурировать рабочие каналы в соответствии с регулятивными стандартами
своей страны. Администратор беспроводной сети должен учесть эксплуатационные ограничения, содержащиеся в
руководстве по установке узла доступа.
Заявление о соответствии требованиям в отношении ВЧ излучения
Предостережение: Настоящее оборудование соответствует пределам воздействия высокочастотного (ВЧ) облучения,
установленным Международной комиссией по защите от неионизирующего излучения (ICNIRP), IEEE C95.1,
Бюллетенем 65 технического управления (OET) Федеральной комиссии США по связи, стандартом RSS-102 (Канада)
и CENELEC.
Использование не разрешенных антенн и принадлежностей может нарушить соответствие этого продукта и привести к ВЧ
облучению, выходящему за пределы, установленные для этого оборудования.
При установке и использовании устройства между антенной и любой частью тела или головой пользователя и находящихся
поблизости людей должно поддерживаться безопасное расстояние 20 см. Во время работы передатчика прикасаться к
антенне нельзя.
Соответствие EN 55022/CISPR 22
Предупреждение: Это изделие класса A. В условиях вашей страны это изделие может создавать радиопомехи, и в
этом случае от пользователя может потребоваться принятие соответствующих мер.
Осторожно: беспроводная связь в локальной сети по стандарту 802.11a в диапазоне 5150–5350 МГц (5,15–5,35 ГГц)
ограничена для использования только в помещениях.
Примечание. В диапазонах частот 5250 и 5350 МГц и 5470 - 5725 МГц требуются динамический выбор частоты и контроль
мощности излучения передатчика
Директива ЕС о радио- и телекоммуникационном оборудовании
Intermec Technologies Corporation заявляет, что данное устройство отвечает основным требованиям и другим существенным
положениям Директивы ЕС о радио- и телекоммуникационном оборудовании (1999/5/EC). Чтобы ознакомиться с Декларацией
ЕС о соответствии, откройте www.intermec.com > Products > Computers > Fixed Vehicle Computers > CV31 > Manuals и
пролистайте до раздела Regulatory Information.
Этот продукт маркирован данным логотипом и использует диапазоны радиочастот, гармонизированные
на территории Европейского Сообщества.
Эксплуатация данного оборудования без ограничений разрешена в следующих странах:
AT BE BG CH CY CZ DE DK EE ES FI FR GB GR HR HU IE
IS IT LI LT LU LV MK MT NL PL PT RO SE SI SK TR
Ограничения (Редакци я ERC/REC 70-03 E 2012-07, Приложение 3 диапазоны A):
RU 1. SRD с модуляцией с расширением спектра со скачкообразным переключением частоты (FHSS).
1.1. Макс. 2,5 мВт (эквивалентная мощность изотропного излучения).
1.2. Макс. 100 мВт (эквивалентная мощность изотропного излучения) SRD допускается использовать на улице без
ограничений по высоте установки только для целей сбора телеметрической информации для автоматизированных
систем мониторинга и учета ресурсов. Для других целей SRD допускается использовать на улице, только если
высота установки не превышает 10 м над поверхностью земли.
1.3. Макс. 100 мВт (эквивалентная мощность изотропного излучения)
2. SRD с DSSS и широкополосной модуляцией, кроме FHSS.
2.1. Макс. средняя удельная эквивалентная мощность изотропного излучения составляет 2 мВт/МГц Макс. 100 мВт
(эквивалентная мощность изотропного излучения).
2.2. Макс. средняя удельная эквивалентная мощность изотропного излучения составляет 20 мВт/МГц Макс. 100 мВт
(эквивалентная мощность изотропного излучения) SRD допускается использовать на улице без ограничений по
высоте установки только для целей сбора телеметрической информации для автоматизированных систем
мониторинга и учета ресурсов, а также систем безопасности.
2.3. Макс. средняя удельная эквивалентная мощность изотропного излучения составляет 10 мВт/МГц Макс. 100 мВт
(эквивалентная мощность изотропного излучения) Применение в помещениях.
изготовления указана на маркировке оборудования.
Дата
Dofin Ltd.
Boiarkino, Ozersky area, Moscow region, 140573 Russia
Применение в помещениях.
Türkiye'deki Kullanıcılar İçin (tr)
Dikkat: Bu işaret, kullanıcının dahil edilen tüm dökümantasyonları kullanım öncesinde okuması gerektiğini göstermektedir. Bu
eki daha sonra başvurmak üzere muhafaza edin.
10
Page 43

Bu ürünün kullanıcıları, Intermec Technologies Corporation tarafından onaylanmış aksesuarları ve yan donanımları kullanma
konusunda uyarılmaktadırlar. Önerilenin dışında aksesuar kullanımı ya da bu üründe Intermec Technologies Corporation'ın
onaylamadığı şekilde yapılacak değişiklikler, ürünün şartlarını geçersiz kılabilir ve kullanıcının donanımı çalıştırma yetkisinin kaybına
sebep olabilir.
Dikkat: Araç uygulamaları için, montaj talimatlarındaki tüm uyarı ve ikazlara uyun. CV31A installations that use a DC/DC
converter should only be performed by qualified Intermec-trained Service Technicians.
Dikkat: Sadece Intermec 1021AB01 Model pil paketiyle kullanım içindir.Pil talimatlarına bakın. Güç kaynağı için, Intermec
9006AE01, 9004AE03 veya 9007AX01 Modelini kullanın. Kullanıcı tarafından bakımı yapılamayan parçalar.
Dikkat: Yangın tehlikesine karşı devamlı koruma için yalnızca aynı tür ve bilgilere sahip sigortayla değiştirin.
Pil, Şarj Cihazı ve Güç Kaynağı Bilgileri
Dikkat: Bu ürünle kullanılan pil paketleri tutuşabilir, kimyasal yanık tehlikesi oluşturabilir, patlayabilir ya da yanlış
kullanıldığında toksik maddeler salgılayabilir. Yakmayın, parçalarına ayırmayın ya da 100 °C'nin üzerinde ısıtmayın. Kısa
devre yaptırmayın, yanmalara sebep olabilir. Çocuklardan uzak tutun.
Pil Geri Dönüşümü Bilgileri
Bu ürün, lityum iyon (Li-ion) pil kullanır veya içerir. Pil kullanım ömrünün sonuna geldiğinde, kullanılmış pil kalifiye bir
geri dönüşümcü ya da tehlikeli madde işleyicisi tarafından elden çıkarılmalıdır. Pili katı atık yığınıyla karıştırmayın. Geri
dönüşüm ya da elden çıkarma bilgileri için, Intermec Technologies Servis Merkeziyle iletişime geçin.
Li-ionLi-ion
802.11 Radyo Tedbir Bildirimi
Dikkat: Ülkelerinin yönetmeliklerle belirlenmiş standartları na uygun olan işletim kanallarının ayarlanmasından kullanıcılar
sorumludur. Bir Kablosuz Şebeke Yöneticisi Access Point kurulum manuelinde detaylarıyla anlatılan çalıştırma kısıtlamalarını
incelemelidir.
Radyo Frekansı Radyasyonuna Maruz Kalma Bildirimi
Uyarı: Bu cihaz Uluslararası İyonlaşmayan Radyasyondan Korunma Komisyonu (ICNIRP), IEEE C95.1, Federal İletişim
Komisyonu Mühendislik ve Teknoloji Dairesi (OET) Bülteni 65, Kanada RSS-102, ve CENELEC radyo frekansı (RF)
radyasyonuna maruz kalma sınırlarına uygundur.
Onaylanmamış antenlerin ve aksesuarların kullanımı bu ürünün uyumluluğunu geçersiz kılabilir ve bu ekipman için belirlenmiş RF
maruziyetinin aşılmasına neden olabilir.
Bu ürünü monte ederken ve kullanırken kullanıcının ve yakındaki kişilerin vücutlarından veya başlarından 20 cm geçiş mesafesi
korunmalıdır. Verici çalışırken antene dokunulmamalıdır.
EN 55022/CISPR 22 ile Uyumluluk
Uyarı: Bu A Sınıfı bir üründür. Bu ürün, iç mekanda kullanıcının uygun tedbirleri almasını gerektirebilecek radyo parazitine
neden olabilir.
Dikkat: 802.11a kablosuz LAN 5150 ila 5350 MHz (5.15 ila 5.35 GHz) yalnızca kapalı alanda kullanılacak şekilde
sınırlandırılmıştır.
Not: Dinamik Frekans Seçimi ve Verici Gücü Kontrolü 5250 ila 5350 MHz frekans aralığında olmalıdır.
EU - R&TTE Deklarasyonu
Intermec Technologies Corporation bu cihazın 1999/5/EC sayılı R&TTE Direktifi'nin temel gerekleri ve diğer ilgili hükümlerine
uygundur. AB Uygunluk Beyanı için bkz. www.intermec.com > Products > Computers > Fixed Vehicle Computers > CV31 >
Manuals sekmesine ve ardından Regulatory Information bölümüne gidin.
Ürün, bu amblem ile işaretlenmiştir ve Avrupa Topluluğu genelinde uyumlu hale getirilmiş olan ve aşağıdaki
tabloda belirtilmiş olan radyo frekans bantlarını kullanmaktadır.
Bu ekipman aşağıdaki ülkelerde kısıtlama olmadan kullanılabilir:
AT BE BG CH CY CZ DE DK EE ES FI FR GB GR HR HU IE
IS IT LI LT LU LV MK MT NL PL PT RO SE SI SK TR
适用于中国用户 (zh-cn)
警告 : 该标志表明,用户应在使用前通读所有随附的文档。请保留这份补充材料,以备日后参考。
11
Page 44

敬告本产品的用户,请务必使用 Intermec Technologies Corporation 许可的附件和外围设备。如果使用推荐附件之外的其它附件,
或 未经 Intermec Technologies Corporation 许可而擅自改装本产品,都可能会使本产品的符合性无效,并可能会导致用户失去操作
本设 备的权利。
注意 : 对于车辆应用,应遵守安装说明所述的所有警告和注意事项。 CV31A installations that use a DC/DC converter
should only be performed by qualified Intermec-trained Service Technicians.
注意:仅限与 Intermec 1021AB01 型电池配套使用。 请参阅电池说明。 使用 Intermec 9006AE01, 9004AE03, 或 9007AX01
型电源。所有部件无需用户动手安装。
注意:为长期防止火灾的发生,请仅使用相同类型和额定值的保险丝进行更换。
仅适用于海拔 2000 m 以下地区安全使用。
仅适用于非热带气候条件下安全使用。
电池、充电器和电源信息
注意:本设备所使用的电池如果处理不当,则可能会着火、造成化学烧伤、爆炸,或释放有毒物质。 切勿焚烧、拆解电池,
或使其温度超过 100 °C。 切勿短路,否则可能导致烧伤。 切勿让儿童接触。
電池回收資訊
本产品包含或使用一块锂离子主电池。 电池达到使用寿命后,请交由合格的回收者或危险材料处理者进行处理。 请勿
将使用后的电池混同其他固体废弃物处理。 请联系 Intermec 技术服务中心了解有关回收或处理的信息。
Li-ionLi-ion
802.11 無線電安全措施聲明
注意:用户用户负责根据所在国家 / 地区的法规标准配置操作信道。无线网络管理员必须仔细阅读 《接入点安装手册》中有
关操作限制的详细信息。
辐射暴露声明
警告:本裝置符合國際非電離輻射保護委員會 (ICNIRP)、IEEE C95.1、美國聯邦通信委員會工程技術署 (OET) Bulletin
65、加拿 大 RSS-102 和 CENELEC 規定的無綫電頻率 (RF) 輻射暴露限制。
未经许可而使用天线及其附件 , 可能会导致本产品的符合性无效 , 同时还可能会导致 RF 暴露超出对本设备作出的限制。
安裝及使用本產品時 , 必須與使用者或附近人員的身體或頭部以及天線保持 20 厘米的距離 操作發射器期間 , 請勿接觸天綫。
數位放射相容性
警告 : 此为 A 级产品,在生活环境中,该产品可能会造成无线电干扰。在这种情况下,可能需要用户对其干扰采取切实可行
的措施。
注意 : 802.11a 無線 LAN 5150 至 5350 MHz (5.15 至 5.35 GHz) 僅限室內使用。
注意 : 在 5250 至 5350 MHz 频率范围内,要求使用动态频率选择和传输功率控制。
適用於臺灣使用者 (zh-tw)
注意:此標誌表示使用者應在使用前先閱讀所有隨附的文件。 請保留這份補充材料,以備日後參考。
本產品的使用者必須小心使用 Intermec Technologies Corporation 許可的配件與週邊設備。使用非上述建議的配件,或是在未經 Intermec
Technologies Corporation 許可的情況下變更本產品可能會使得本產品的相容性失效,並且使得使用者喪失操作設備的權力。
Caution: For vehicle installations, observe all warnings and cautions contained in the installation instructions. CV31A installations that use a DC/
DC converter should only be performed by qualified Intermec-trained Service Technicians.
12
Page 45

注意:僅能使用 Intermec 1021AB01 型電池。請參閱電池指示。 請使用 Intermec 型 9006AE01, 9004AE03, 或 9007AX01 電源。 無使
Li-ionLi-ion
用者可自行維修之零件。
Caution: For continued protection against risk of fire, replace only with same type and rating of fuse.
電池、充電器和電源供應器資訊
注意: 此裝置中所用的電池必須小心處理 , 否則可能會燃燒 , 造成化學灼傷 , 爆炸或釋放出有毒物質。 請勿焚燒 , 拆卸或使其溫
度超過 100 °C。 請勿短路 , 否則可能會導致灼傷。 請放在兒童拿不到的地方。
電池回收資訊
本產品包含或使用鋰 ( 鋰離子 ) 主電池。 當電池已達其使用壽命 , 應將其置於合格的回收筒或危險物質的處理
裝置中。 請勿將此電池與固體廢棄物混在一起。 如需暸解電池的回收或棄置資訊 , 請聯絡 Intermec
廢電池請回收
Technologies 客服中心。
802.11 無線電安全措施聲明
注意:使用者負責根據所在國家 / 地區的法規標準配置操作通道。 無線網路管理員必須檢閱 《接入點安裝手冊》內有關操作限
制的詳細資訊。
輻射暴露聲明
警告:本設備符合國際非電離輻射保護委員會 (ICNIRP), IEEE C95.1, 美國聯邦傳播委員會工程技術部 (OET) Bulletin 65, 加拿大
RSS-102 和歐洲電工標準化委員會 (CENELEC) 規定的無線電頻率 (RF) 輻射暴露限制。
Use of antennas and accessories not authorized may void the compliance of this product and may result in RF exposures beyond the limits established for
this equipment.
When installing and using this product, a 20 cm passing distance must be maintained from the body or head of the user or nearby persons and the antenna.
The antenna must not be touched during transmitter operation.
Digital Emissions Compliance
注意: 這是甲類的資訊産品 , 在居住的環境中使用時 , 可能會造成射頻干擾 , 在這種情況下 , 使用者會被要求採取某些適當的對
策。
注意: 經型式認證合格之低功率射頻電機 , 非經許可 , 公司 , 商號或使用者均不得擅自變更頻率 , 加大功率或變更原設計之特性
及功能。
低功率射頻電機之使用不得影響飛航安全及干擾合法通信;經發現有干擾現象時 , 應改善至無干擾時方得繼續使用。
前項合法通信 , 指依電信法規定作業之無線電通信。
低功率射頻電機須忍受合法通信或工業 , 科學及醫療用電波輻射性電機設備之干擾。
如要降低 RF 影響 , 請依正確方法使用
注意: 在 5.25-5.35 秭赫頻帶內操作之無線資訊傳輸設備 , 限於室內使用。
13
Page 46

14
Page 47

15
Page 48

CV31 Compliance Insert
Honeywell Scanning & Mobility
9680 Old Bailes Road
Fort Mill, SC 29707
www.honeywellaidc.com
*933-326-001*
P/N 933-326-001, Revision A
 Loading...